
Хорошее руководство по эксплуатации
Законодательство обязывает продавца передать покупателю, вместе с товаром, руководство по эксплуатации Ford 6000 CD RDS EON. Отсутствие инструкции либо неправильная информация, переданная потребителю, составляют основание для рекламации в связи с несоответствием устройства с договором. В законодательстве допускается предоставлении руководства в другой, чем бумажная форме, что, в последнее время, часто используется, предоставляя графическую или электронную форму инструкции Ford 6000 CD RDS EON или обучающее видео для пользователей. Условием остается четкая и понятная форма.
Что такое руководство?
Слово происходит от латинского «instructio», тоесть привести в порядок. Следовательно в инструкции Ford 6000 CD RDS EON можно найти описание этапов поведения. Цель инструкции заключается в облегчении запуска, использования оборудования либо выполнения определенной деятельности. Инструкция является набором информации о предмете/услуге, подсказкой.
К сожалению немного пользователей находит время для чтения инструкций Ford 6000 CD RDS EON, и хорошая инструкция позволяет не только узнать ряд дополнительных функций приобретенного устройства, но и позволяет избежать возникновения большинства поломок.
Из чего должно состоять идеальное руководство по эксплуатации?
Прежде всего в инструкции Ford 6000 CD RDS EON должна находится:
— информация относительно технических данных устройства Ford 6000 CD RDS EON
— название производителя и год производства оборудования Ford 6000 CD RDS EON
— правила обслуживания, настройки и ухода за оборудованием Ford 6000 CD RDS EON
— знаки безопасности и сертификаты, подтверждающие соответствие стандартам
Почему мы не читаем инструкций?
Как правило из-за нехватки времени и уверенности в отдельных функциональностях приобретенных устройств. К сожалению само подсоединение и запуск Ford 6000 CD RDS EON это слишком мало. Инструкция заключает ряд отдельных указаний, касающихся функциональности, принципов безопасности, способов ухода (даже то, какие средства стоит использовать), возможных поломок Ford 6000 CD RDS EON и способов решения проблем, возникающих во время использования. И наконец то, в инструкции можно найти адресные данные сайта Ford, в случае отсутствия эффективности предлагаемых решений. Сейчас очень большой популярностью пользуются инструкции в форме интересных анимаций или видео материалов, которое лучше, чем брошюра воспринимаются пользователем. Такой вид инструкции позволяет пользователю просмотреть весь фильм, не пропуская спецификацию и сложные технические описания Ford 6000 CD RDS EON, как это часто бывает в случае бумажной версии.
Почему стоит читать инструкции?
Прежде всего здесь мы найдем ответы касательно конструкции, возможностей устройства Ford 6000 CD RDS EON, использования отдельных аксессуаров и ряд информации, позволяющей вполне использовать все функции и упрощения.
После удачной покупки оборудования/устройства стоит посвятить несколько минут для ознакомления с каждой частью инструкции Ford 6000 CD RDS EON. Сейчас их старательно готовят или переводят, чтобы они были не только понятными для пользователя, но и чтобы выполняли свою основную информационно-поддерживающую функцию.

Owner’s handbook
Audio system
100% Ford. 100% Entertainment.

The information contained in this publication was correct at the time of going to print. In the
interest of development the right is reserved to change specifications, design or equipment
at any time without notice and without incurring any obligations. This publication, or part
thereof, may not be reproduced nor translated without our approval. Errors and omissions
excepted.
© Ford Motor Company 2006
All rights reserved.
Order Code: 6S5J-19C104-DA (CG3508en) 01/2006 20060120121755

Audio introduction……..3
Important audio information…………3
Radio reception……………………………4
Audio unit overview……5
Audio system
security………………….7
Removable front panel…………………7
Security code……………………………….7
Lost security code………………………..7
Entering a security code………………7
Incorrect security code………………..8
Vehicle identification (VID)…………….8
Audio unit clock and
date displays…………10
Setting the clock and date on the
audio unit…………………………………10
Audio unit operation…12
On/off control……………………………..12
Volume control……………………………12
Bass/treble control……………………..12
Balance/fade control…………………..12
Phone mute control……………………13
Audio menu control…………………….13
Station preset buttons………………..15
Audio control………………………………15
Waveband button……………………….16
Sound button……………………………..16
Autostore control………………………..16
Stereo indicator control………………17
Traffic information (TA) control…….17
Station tuning control………………….19
Loudness control……………………….20
Audio unit menus……..21
Automatic volume control
(AVC)……………………………………….21
Audio distortion reduction
(CLIP)……………………………………….21
Digital signal processing (DSP)……21
Rear seat controls (RICP)……………21
Preset scan tuning……………………..22
Alternative frequencies………………22
Music/speech…………………………….23
Radio data system (RDS)…………..23
Enhanced other network
(RDS-EON)……………………………..23
News broadcasts………………………23
Priority programme type (PTY)…..24
Cassette tape
player…………………..27
Cassette tape playback……………..27
Fast forward……………………………….27
Fast rewind…………………………………27
Auto reverse………………………………28
Ending playback…………………………28
Cassette tape pause………………….28
Cassette tape side selection……..29
Automatic music search
(AMS)………………………………………29
Ejecting a cassette tape…………….29
Compact disc
player…………………..30
Loading compact discs……………..30
Loading the compact disc
changer…………………………………..31
1
Table of Contents

Track selection……………………………31
Compact disc playback……………..32
Compact disc selection……………..33
Fast forward/reverse…………………34
Shuffle/random………………………….34
Compact disc track
compression…………………………..35
Compact disc track scanning…….35
Ejecting compact discs………………36
Unloading the compact disc
changer…………………………………..37
MP3 file playback……………………….37
MP3 display options……………………41
Repeat compact disc tracks………42
Ending compact disc
playback………………………………….43
Ejecting multiple compact discs
………………………………………………..43
Auxiliary input (AUX IN)
socket………………….45
Rear passenger
controls……………….46
Rear seat controls……………………..46
Control panel buttons………………..46
Control mode……………………………..47
One hour mode………………………….48
Headphones………………………………48
Headphone sockets…………………..48
Rear passenger control display
screen…………………………………….49
Audio system care…..50
Audio unit…………………………………..50
Audio
troubleshooting……..51
2
Table of Contents
IMPORTANT AUDIO
INFORMATION
WARNINGS
Copyright laws vary from
country to country; please
check the laws in your country if you
want to record from copyright source
material.
Due to technical incompatibility,
recordable (CD-R) and
rewritable (CD-RW) discs may not
function correctly.
These CD radio units will play
compact discs that conform to
the International Red Book standard
audio specification. Copy protected
CDs from some manufacturers do
not conform to this standard and
playback cannot be guaranteed.
Dual format, dual sided discs
(DVD Plus, CD-DVD format),
now being adopted by the music
industry, are thicker than normal CDs
and consequently playback cannot
be guaranteed in Ford and Sony CD
audio units, and jamming could
occur.
Warranty claims, where this type
of disc is found to be inside an
audio unit returned for repair, will not
be accepted.
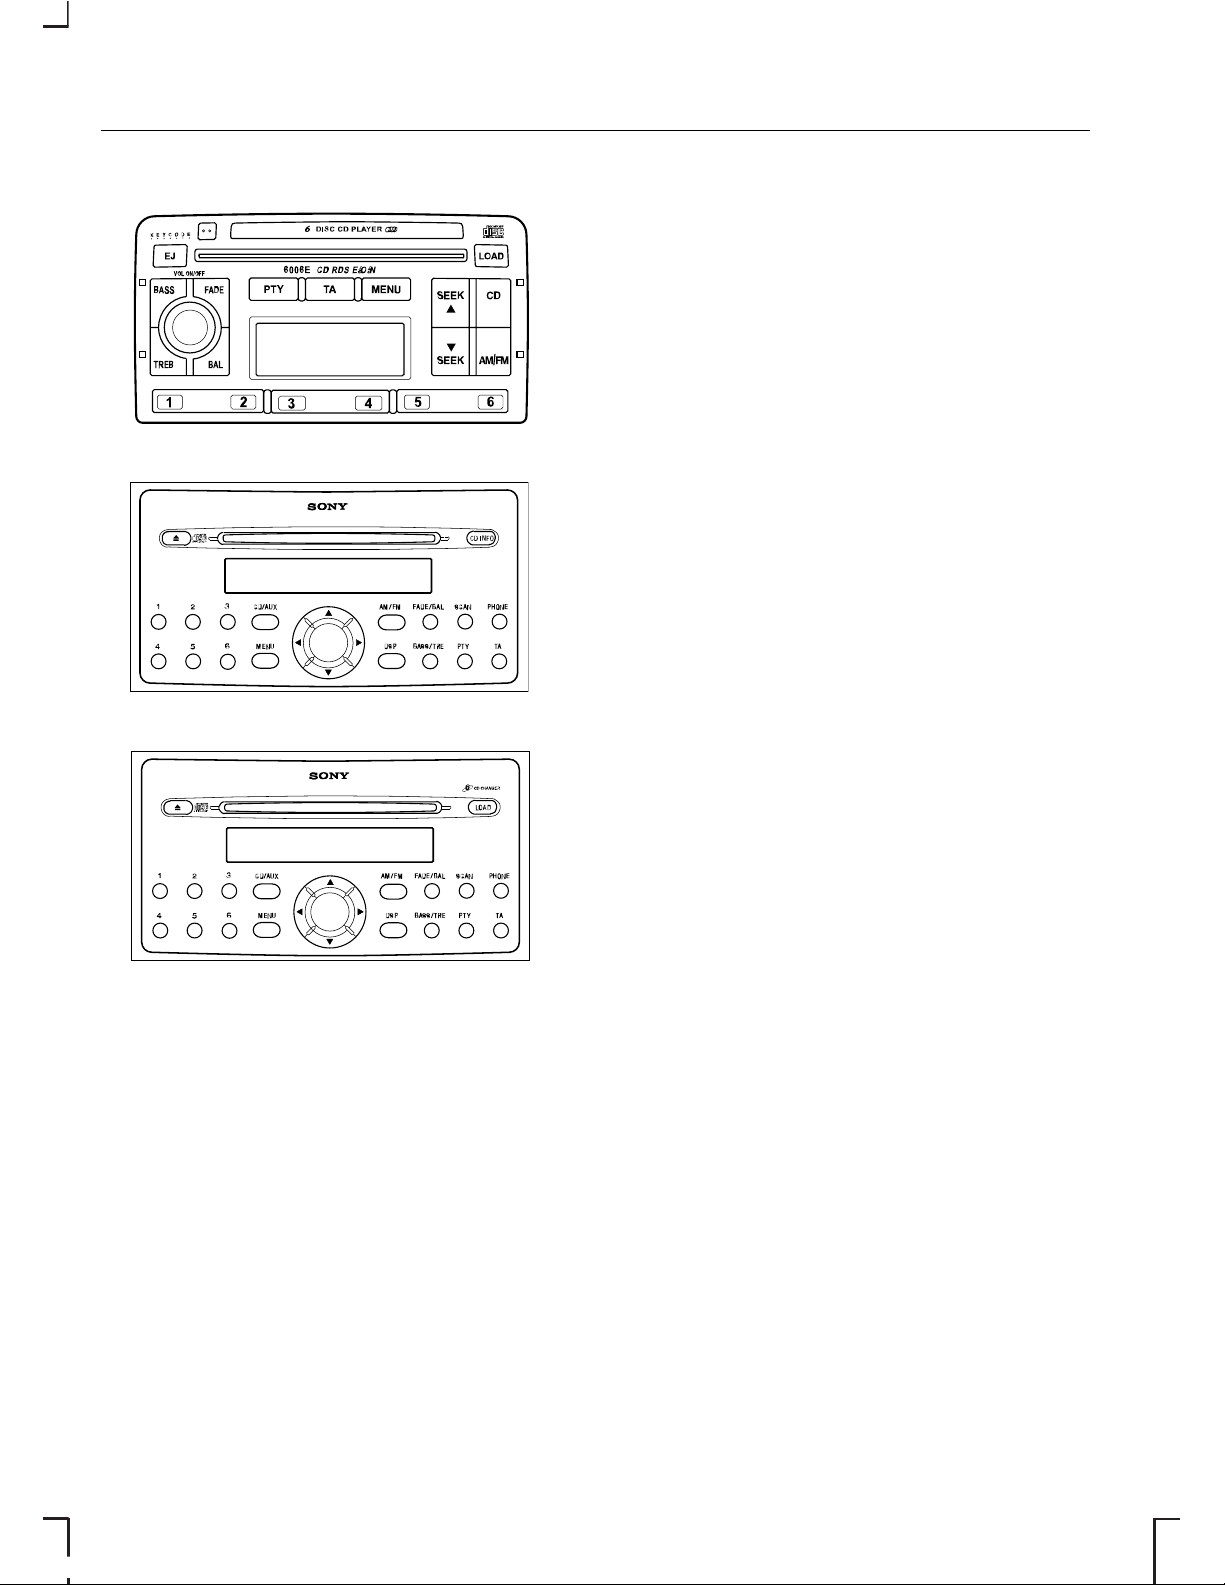
Apart from the 6000MP3
model, CD units are designed
to play commercially pressed 12 cm
audio compact discs only.
The Sony CD unit (but not the
6CD) will play 8 cm discs with a
Sony approved adaptor fitted
(CSA-8).
Irregular shaped CDs and CDs
with a scratch protection film or
self adhesive labels attached should
not be used.
The audio unit may be damaged
if unsuitable items like credit
cards or coins are pushed inside the
CD aperture.
Please contact your Dealer for
further information.
Sony CD/6CD
This label is located on the top of the
Sony CD/6CD chassis.
This label is located on the Sony
CD/6CD drive unit’s internal chassis.
These units are designed to play
discs that conform to the Compact
Disc (CD) standard.
Recently, some record companies
have marketed various music discs
encoded with copyright protection.
Please be aware that among those
discs, there are some that do not
conform to the CD standard and may
not be playable by this product.
3
Audio introduction
• You cannot play a CD-R/CD-RW
that is not finalised. (This process
is necessary for a recorded
CD-R/CD-RW disc to be played
on the audio CD player.)
• With the Sony CD unit, you can
play MP3 files recorded on
CDROMs, CD-Rs, and CDRWs.
• A CD-R/CD-RW to which a
session can be added can be
played.
Disc labels
Audio CD
RADIO RECEPTION
Advanced digital filter
adjustment (ADFA)
Sony CD/6CD
Note: Consult your dealer before
switching off the filter.
Under certain exceptional
conditions, radio reception may be
adversely affected by very strong
competing signals. This function
allows you to switch off the digital
filter to overcome this condition.
4
Audio introduction
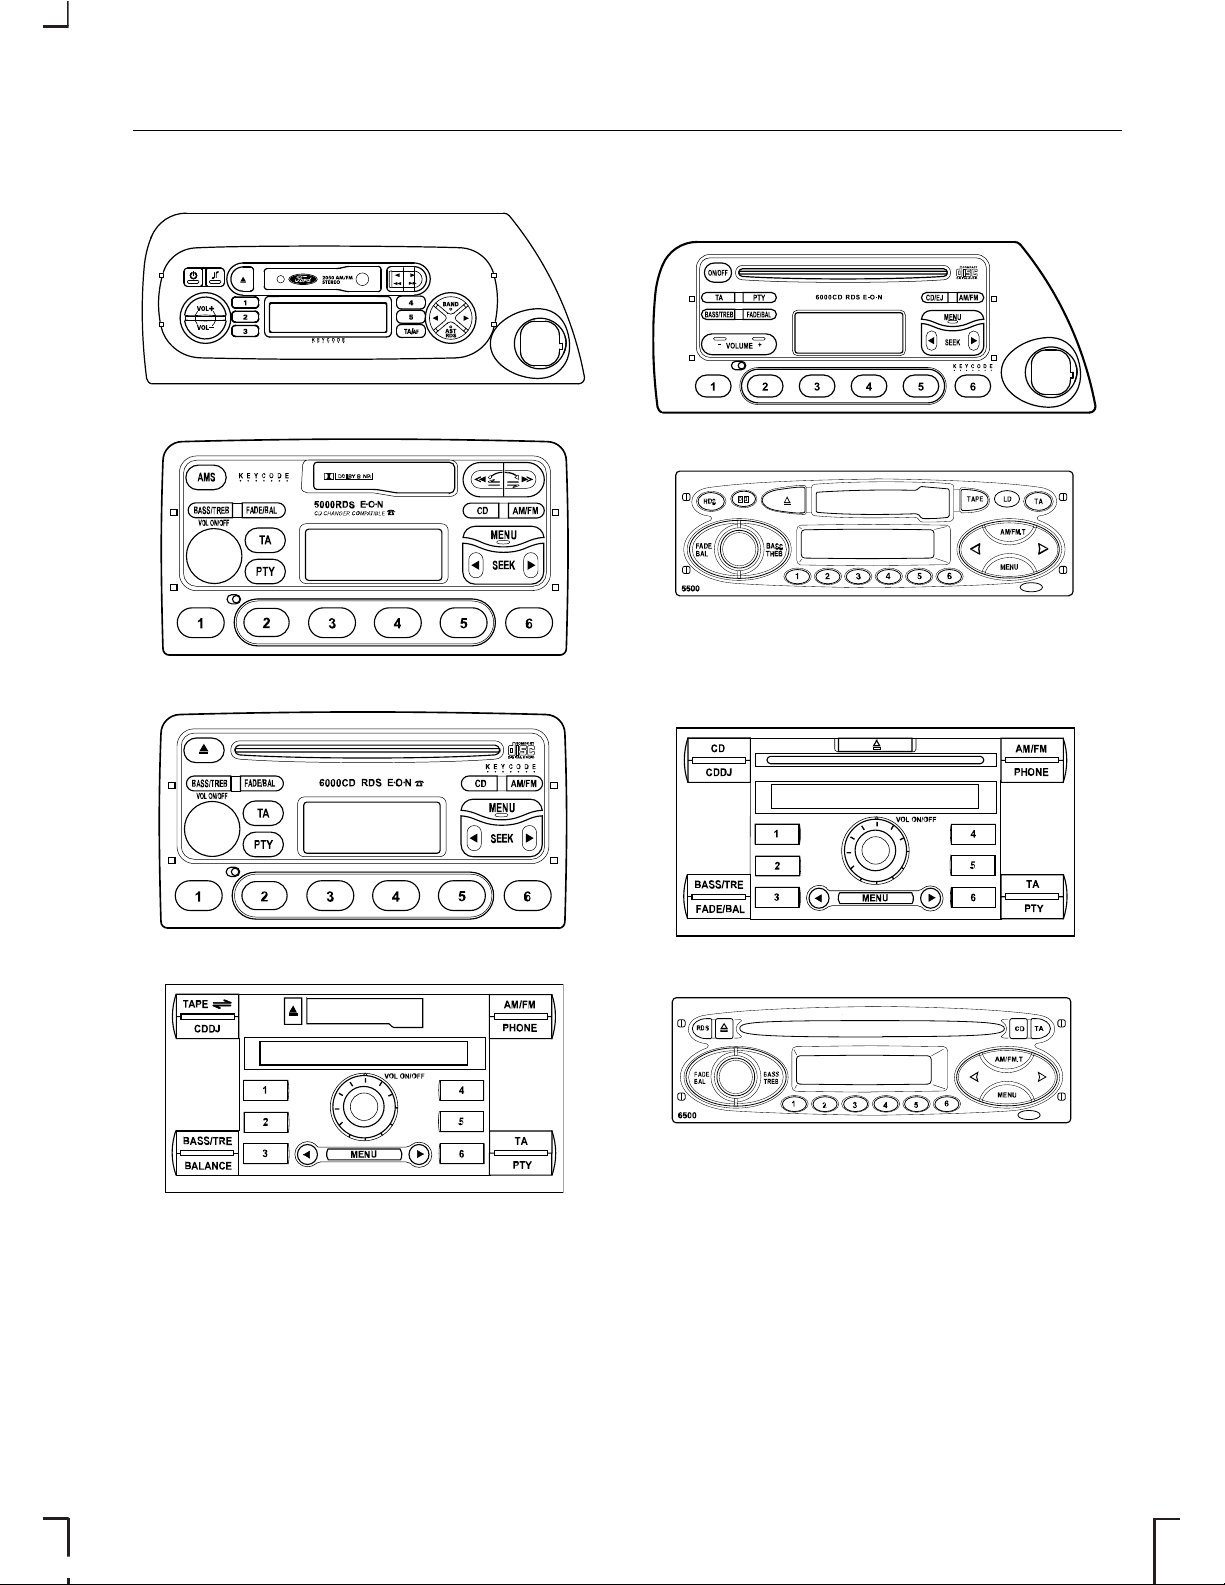
6000CD Series (with rocker
volume control)
6000CD (with centrally
located On/off and volume
control)

REMOVABLE FRONT
PANEL
Note: During removal, avoid
touching the contacts on the back of
the panel and do not use excessive
force to refit it.
• Where available slide the panel
release button to the left (on
6006E units press the panel
release button) and remove the
panel.
• To replace the panel, insert the
right-hand edge first, and then
push home the left-hand side until
the retaining latch is engaged.
SECURITY CODE
Most units incorporate a unique
Keycode security number that must
be entered before the unit will
operate. Normally, the Ford Dealer
does this during the predelivery
inspection.
If the battery is disconnected for any
reason, or the audio unit is removed
from the vehicle, the Keycode must
be re-entered before the unit will
work again.
LOST SECURITY CODE
If you lose the Keycode, contact your
dealer and supply details of your
audio unit along with some proof of
identity. Your Dealer will then obtain
the correct code from Ford Motor
Company.
ENTERING A SECURITY
CODE
If ‘CODE — — — —’ or ‘CODE 0000’
appears in the display for more than
5 seconds when you switch on the
audio unit, you must enter the
Keycode.
On all units except 2050
1. Press button 1 repeatedly until the
first digit of your Keycode is
shown in the display.
2. Press preset buttons 2, 3 and 4
in the same way for remaining
three digits.
3. Ensure the complete Keycode is
correct before pressing preset
button 5 to confirm it.
2050
1. Press button 1, use the arrow left
or right arrow buttons until the first
digit of your Keycode is shown in
the display.
2. Repeat step 1 for the remaining 3
digits.
3. Ensure the complete Keycode is
correct before pressing button 1
to confirm.
If the correct code was entered, the
radio will beep and then will function
normally.
7
Audio system security

INCORRECT SECURITY
CODE
On all units except 2050
Up to TEN Keycode entry attempts
are allowed with various
consequences if you get it wrong.
The number of attempts is shown in
the display.
• If the display reverts to ‘CODE’
another entry attempt may be
made immediately.
• If the display shows ‘WAIT 30’, the
unit will be locked for 30 minutes.
Wait until the timer counts down
to zero. When ‘CODE’ is
displayed, enter the Keycode
again.
• After ten incorrect attempts the
unit will be permanently
inoperative and ‘LOCK 10’ or
‘LOCKED’ will be displayed.
Contact your local Ford Dealer for
help.
2050
If an incorrect code was entered, the
radio beeps and «WAIT» appears in
the display. This indicates that a
waiting period has started.
Note: Do not switch off the radio
when the display shows «WAIT».
Turning off the radio will cause the
waiting period to start all over again.
• You must wait until the display
changes to «CODE» this indicates
that the waiting period has
finished and the correct code can
be entered.
• The waiting period doubles each
time an incorrect code is entered.
(1 minute, 2 minutes, 4 minutes,
etc)
VEHICLE IDENTIFICATION
(VID)
Note: For the location of the vehicle
identification number on your vehicle,
please refer to your Owner’s
handbook.
On all units except 2050
1. Press and hold the MENU button,
then press it repeatedly to select
a VID display. On Sony units, press
and hold the MENU button.
2. The current vehicle identification
number will be displayed or, if a
number has yet to be entered,
‘NO VID’, ‘VID 00000’ or ‘CODE
—-’ appears.
3. Enter your Keycode.
4. The audio unit will mute and the
display will show either a
previously entered vehicle
identification number or a flashing
cursor or a display of zeros.
8
Audio system security

5. Use the left/right arrow buttons to
move across the display, and use
the volume control or the
up/down arrow buttons on Sony
CD/6CD, to select or change the
individual characters. A total of 15
or 16 characters can be stored.
6. When all the characters have
been selected, press MENU to
store the number. The unit then
returns to normal operation.
On some units, the number appears
in the display whenever power is
restored. To check the vehicle
identification number, repeat steps 1
and 2 then press the MENU button.
9
Audio system security

SETTING THE CLOCK
AND DATE ON THE
AUDIO UNIT
All units, except the 2050, the
5000C, the 6000CD with centrally
located on/off and volume control,
and Sony CD/6CD, have a built in
facility that will receive RDS data for
a current time and date display.
When first switched on, a series of
bars may be displayed until the signal
is received.
In all cases, the time derived from the
signal is exact and in most units it
cannot be altered. Some units,
however, do allow you to set the time
manually.
On certain models, where possible,
adjustments are made as follows:
• Press and hold the MENU button
for approximately two seconds
until the display changes.
• Press the MENU button
repeatedly until a ‘CLK-MAN’ or
‘RDS TIME OFF’ display appears.
• Use the SEEK buttons to select
‘CLK-AUTO’ or ‘RDS TIME ON’.
Note: With ‘CLK-AUTO’ or ‘RDS
TIME ON’ selected, the time will be
set automatically via the RDS function
if an RDS signal is available. In this
case you will not find a time display
to set the time manually.
If you observe after setting ‘RDS
TIME’ to ‘ON’, that the clock is not set
properly, then the radio station
selected does not support RDS clock
setting.
In this case, either select another
radio station which transmits a time
signal or set the clock manually.
Note: If any of these features are
not available in your unit, the relevant
menu options will not be displayed.
2050
The clock is located on the
instrument panel please refer to your
Owner’s handbook for instructions.
5000C and 6000CD with
centrally located on/off and
volume control
Changing the date and time
• Press the CLOCK button to
display the date and time.
Note: If you do not press another
button within 30 seconds of pressing
the CLOCK button, the display will
return to its previous setting.
• Use the SEEK buttons to select
the date or time value that you
wish to change. The selected
value will flash in the display.
• Turn the volume control to
change the selected date or time
value.
• Use the SEEK buttons to select
additional date or time values that
you wish to change.
• Turn the volume control to
change the selected date or time
value.
• Press the CLOCK button to exit
and save the new date and time.
10
Audio unit clock and date displays

Note: If you do not press the CLOCK
button within 30 seconds of changing
a date or time value, the display will
exit and save the new values
automatically.
Tip: Press and hold the CLOCK
button for more than two seconds
to automatically select the hour value
for winter or summer time
adjustment.
12/24 hour format
• Press the MENU button
repeatedly until a 12/24 hour clock
display appears.
• Use the SEEK button to select the
setting required.
• Press the MENU button again to
confirm the selection.
Sony CD/6CD
Changing the date
• Press the MENU button and use
the up/down arrow buttons until
a date setting display appears.
• Use the left/right arrow buttons to
select days which flash in the
display.
• Use the up/down arrow buttons
to make an adjustment, then
press the left/right arrow buttons
to select months/years and adjust
accordingly.
• Press the MENU button to confirm
the date.
Changing the time
• Press the MENU button and use
the up/down arrow buttons until
a clock display appears.
• Use the left/right arrow buttons to
select hours which will flash in the
display.
• Use the up/down arrows to make
an adjustment, then press the
left/right arrow buttons to select
minutes and adjust accordingly.
• Press the MENU button to confirm
the time.
12/24 hour format
• Press the MENU button and use
the up/down arrow buttons until
a 12/24 hour clock display
appears.
• Use the left/right arrow buttons to
select the setting required.
• Press the MENU button to confirm
your selection.
11
Audio unit clock and date displays

ON/OFF CONTROL
• Press the on/off control to turn
your unit on or off. This will also
operate the unit for up to one
hour with the ignition turned off.
The radio will switch off
automatically after one hour.
2050
Note: CODE will briefly flash in the
display when the unit is turned on.
This is a normal system function the
security code is not required to be
entered.
VOLUME CONTROL
Use this control to raise or lower the
volume of the current audio source
at any time. When you make an
adjustment, the display indicates the
selected volume level.
On some audio units, the volume
control is also used in conjunction
with certain menu functions to make
other adjustments.
BASS/TREBLE CONTROL
All units, except the 2050, to adjust
the amount of bass or treble
response from any audio source. On
2050 See Sound button (page 16).
• Where the adjustment is featured
on a single button, press the
button once for bass or twice for
treble.
• Where there are separate
buttons, press the required button
once.
• Use the volume control or, on
Sony CD/6CD, the up/down
arrow buttons to make the
necessary adjustment.
The display indicates the level
selected.
Default audio settings
On 5500/6500 units, press and hold
BASS/TREB until the default audio
display appears. With the function
switched on, all the audio setting
return to the manufacturer’s original
preset levels.
BALANCE/FADE
CONTROL
All units, except the 2050, the
BALANCE control is used to adjust
the sound coming from the left and
right speakers. On 2050 See Sound
button (page 16).
All units, except the 2050, the FADE
control is used to adjust the sound
distribution from front to rear in
vehicles equipped with rear
speakers. When 6006E is fitted in
vehicles without rear speakers, ‘No
Rear’ is displayed if the FADE button
is pressed.
12
Audio unit operation

• Where the adjustment is featured
on a single button, press the
button once for fade or twice for
balance.
• Where there are separate
buttons, press the required button
once.
• Use the volume control to make
the necessary adjustment.
• Or, on Sony CD/6CD, use the
up/down arrow buttons for fade
adjustment, and left/right arrow
for balance adjustment.
The display indicates the level
selected.
PHONE MUTE CONTROL
• Where available, press the
PHONE button to mute your audio
unit.
• Press PHONE again to unmute.
AUDIO MENU CONTROL
Where available use the MENU
button to access features that
cannot be selected directly via one
of the button controls. Press the
MENU button for ‘first level’ features,
or press and hold the MENU button
for different ‘second level’ functions.
Features that are not available do not
appear in the display.
13
Audio unit operation

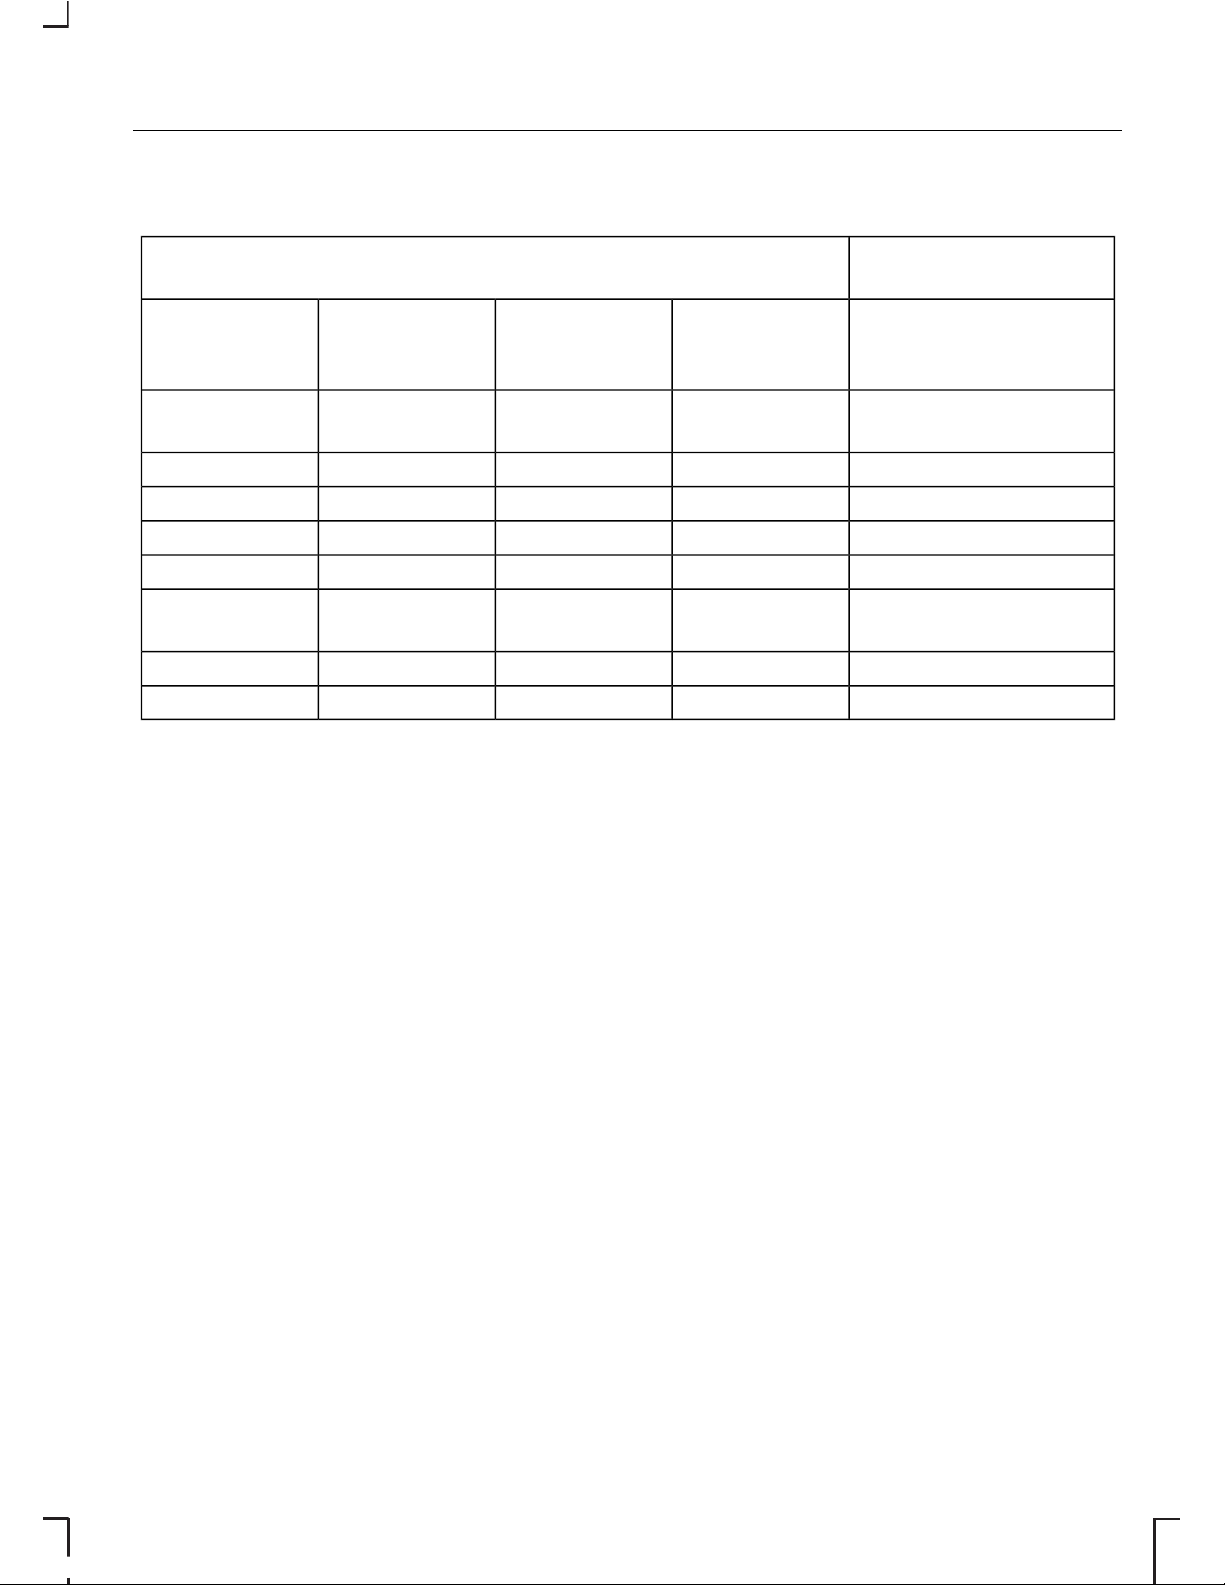
Sony CD/6CD
Second level func-
tions
Menu features — First level features
During all functionsDuring CD
changer
playback
During CD
playback
During tape
playback
During radio
reception
VIDRSE*RSE*RSE*
CLIP ON/OFFClockClockClock
Aux ON/OFFDateDateDate
News ON/OFF12/24 hour12/24 hour12/24 hour
Bluetooth enable/
disable
AVCScrollAVC
ADFA ON/OFFRepeatAVCTraffic local or
distant
CompRepeatAF
ShuffleComp
Shuffle
Note: The sequence in which features appear may vary for different audio
units and vehicles.
* Only when fitted.
14
Audio unit operation
5000C/6000CD
Second level func-
tions
Menu features — First level features
During all functionsDuring CD
changer
playback
During CD
playback
During tape
playback
During radio
reception
Traffic local or distantScanScanTrack
number
Manual
tuning
AFShuffleShuffleClockScan tuning
VIDRepeatRepeatDateClock
CLIPCompComp12/24 hourDate
NewsClockClockAVC12/24 hour
Bluetooth enable/
disable
DateDateAVC
12/24 hour12/24 hour
AVCAVC
Note: The sequence in which features appear may vary for different audio
units and vehicles.
* Only when fitted.
STATION PRESET
BUTTONS
This feature allows you to store your
favourite stations so that they can be
recalled by selecting the appropriate
waveband and pressing one of the
preset buttons.
• Select a waveband.
• Tune to the station required.
• Press and hold one of the preset
buttons. The audio unit will mute.
When sound returns or, on certain
units, a bleep sounds, the station
has been stored.
This can be repeated on each
waveband and for each preset
button.
Note: When you drive to another
part of the country, FM stations that
broadcast on alternate frequencies,
and are stored on preset buttons,
may be updated with the correct
frequency for that area.
AUDIO CONTROL
Where available, this control
combines all the sound adjustment
features – bass, treble, balance and
fade – in one button.
15
Audio unit operation
• Press AUDIO repeatedly to select
the required item.
• Use the volume control to make
the necessary adjustment. The
display indicates the level
selected.
WAVEBAND BUTTON
This control allows you to switch
between the LW, MW and AM
waveband, where available and the
FM waveband.
If you press the button repeatedly
during radio reception, you can select
from the wavebands available. The
display indicates the selection made.
On some units the selector can also
be used to return to radio reception
when you have been listening to a
tape cassette or CD.
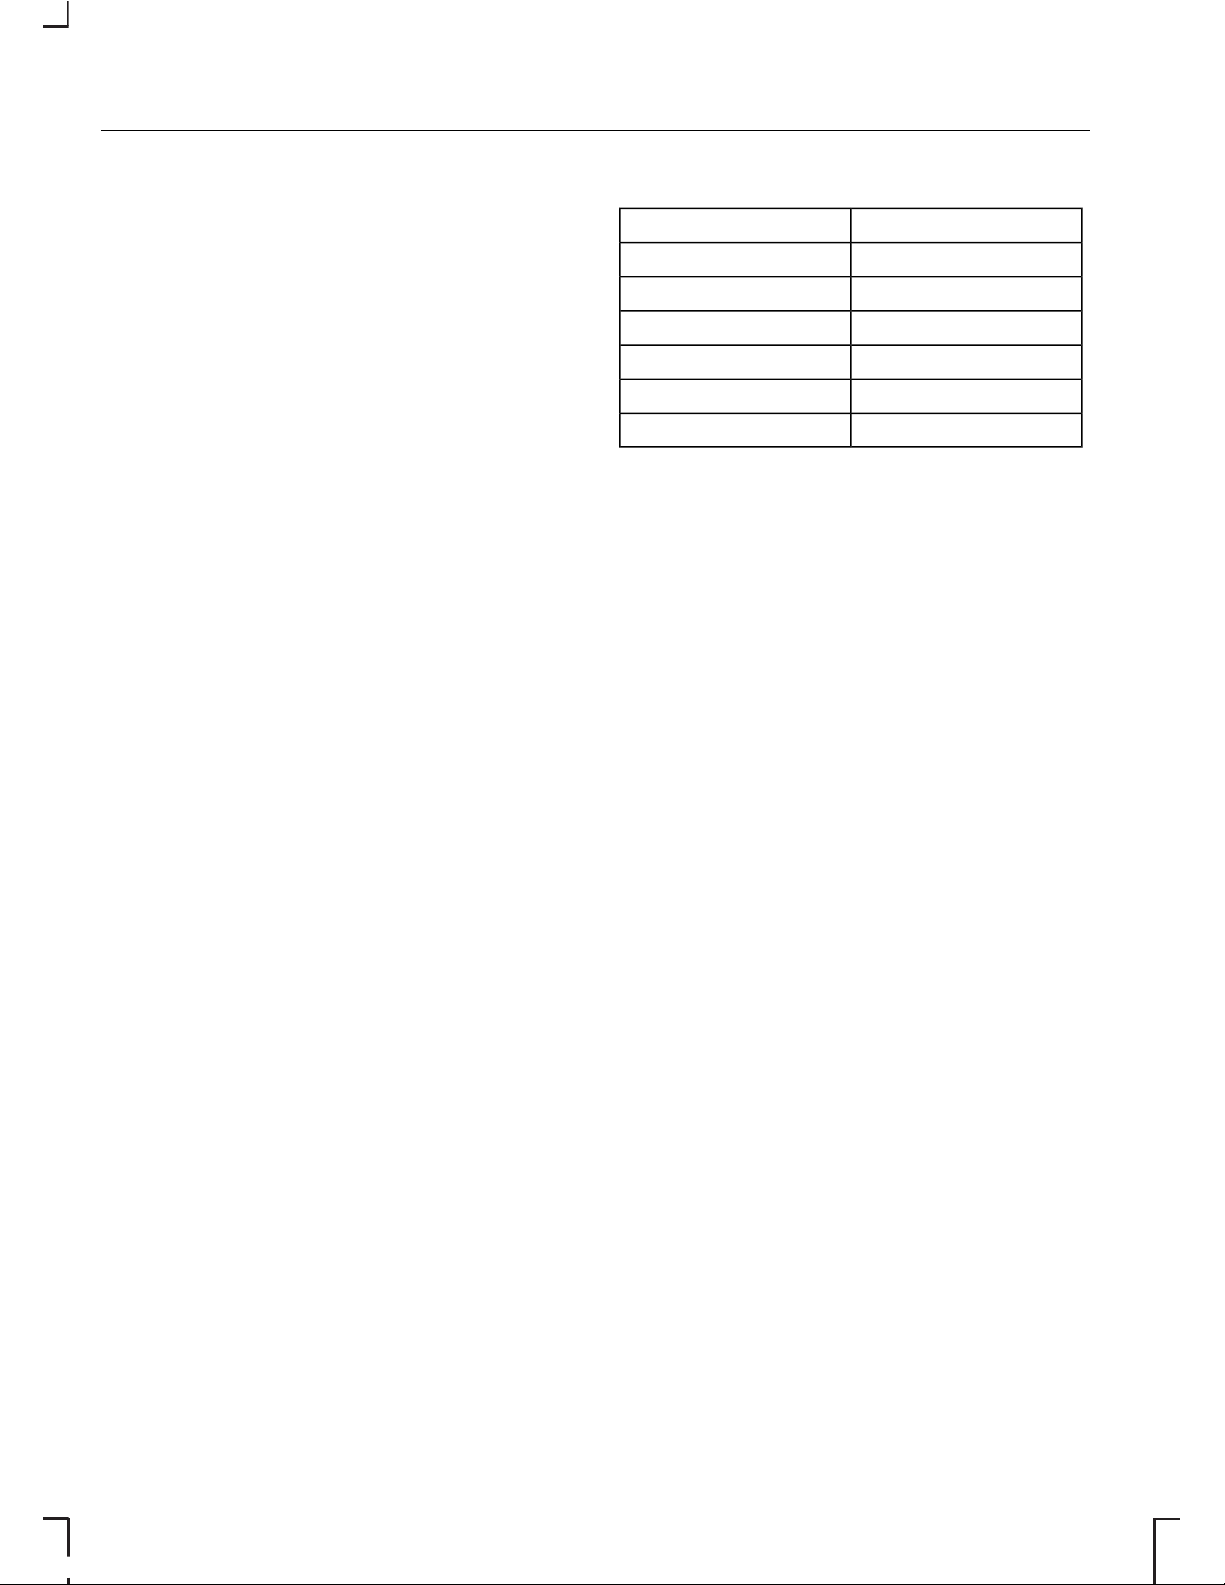
SOUND BUTTON
2050 only
Note: The sound button can be
identified by the two music note
symbols.
Sound style
• Press sound once to reach music
settings, to scroll through the
settings use the volume up/down
buttons.
Sound styleSetting
Original.FLAT
Jazz music.JAZZ
Speech.VOCAL
Pop music.POP
Classical music.CLASSIC
Rock music.ROCK
Bass/treble/balance and
loudness
• Press SOUND twice to select bass
adjust the settings with the
volume up/down buttons.
• Press SOUND three times to
select treble adjust the settings
with the volume up/down buttons.
• Press SOUND four times to select
balance adjust the settings with
the volume up/down buttons.
• Press SOUND five times to select
loudness adjust the settings with
the volume up/down buttons.
After 5 seconds the display goes
back to the last mode of operation.
AUTOSTORE CONTROL
Where available, AutoStore can be
used to store the up to six stations
on some units, with the strongest
signals receivable, either from the FM
waveband or from LW, MW, AM and
FM (where available).
16
Audio unit operation
Loading…
Report abuse
Libble takes abuse of its services very seriously. We’re committed to dealing with such abuse according to the laws in your country of residence. When you submit a report, we’ll investigate it and take the appropriate action. We’ll get back to you only if we require additional details or have more information to share.
Product:
Get your user manual by e-mail
Enter your email address to receive the manual of Ford 6000 CD RDS EON in the language / languages: Dutch as an attachment in your email.
The manual is 0,07 mb in size.
You will receive the manual in your email within minutes. If you have not received an email, then probably have entered the wrong email address or your mailbox is too full. In addition, it may be that your ISP may have a maximum size for emails to receive.
The manual is sent by email. Check your email
If you have not received an email with the manual within fifteen minutes, it may be that you have a entered a wrong email address or that your ISP has set a maximum size to receive email that is smaller than the size of the manual.
/Ford /Ford 6000 CD RDS EON
Are you looking for the manual for Ford 6000 CD RDS EON? You are in the right place. Below the document viewer for Ford 6000 CD RDS EON manual in PDF format. To save your time, we say that the most common problems with Ford 6000 CD RDS EON can be found in the manual in the «Troubleshooting» section. Check the appropriate page number in the table of contents, and then enter it in the page number box on the right side of the document viewer for Ford 6000 CD RDS EON.
If you have questions about the Ford 6000 CD RDS EON device, use the form at the bottom of the page and ask our community a question.
Remember! Reading the Ford 6000 CD RDS EON user manual and adhering to the rules of using the device provided there, greatly help in its effective use. It is important to correctly configure Ford 6000 CD RDS EON, it will save resources needed to use it. In case of problems, you will also find recommended companies that can properly fix Ford 6000 CD RDS EON. One of the most important reasons why you should read the Ford 6000 CD RDS EON user manual is that to take advantage of the warranty provided on Ford 6000 CD RDS EON — the device must be used in accordance with the manufacturer’s recommendations presented in user manual.
If you want to download Ford 6000 CD RDS EON manual, use the «Download» button below. You can easily view the downloaded version and print selected manual pages Ford 6000 CD RDS EON. All manuals on our website are available in PDF format, which is the most universal format that is as easy to use as possible on all operating systems.
Русский
- Bedienungsanleitung Ford 6000 CD RDS EON
- Ford 6000 CD RDS EON User Manual
- Manual Usuario Ford 6000 CD RDS EON
- Mode d’emploi Ford 6000 CD RDS EON
- Istruzioni Ford 6000 CD RDS EON
- инструкция Ford 6000 CD RDS EON
- Ford 6000 CD RDS EONの取扱説明書
- Handleiding Ford 6000 CD RDS EON
- Manual de uso Ford 6000 CD RDS EON
Вам нужна инструкция? Мы поможем Вам ее найти и сэкономить Ваше время.
- 66 stron
- 2.22 mb
Изделие Ford 6000 CD RDS EON, а также другие, которыми Вы пользуетесь ежедневно, наверняка вы получили в комплекте с инструкцией обслуживания. Из опыта наших пользователей мы знаем, что большинство из Вас не уделили этому особого внимания. Большая часть инструкций, сразу же после покупки попадает в корзину для мусора вместе с коробкой — это ошибка. Ознакомьтесь с информацией, касающейся инструкции Ford 6000 CD RDS EON, которая поможет Вам в будущем сэкономить нервы и избежать головной боли.
Важная подсказка — не забывайте хотя бы раз прочитать инструкцию Ford 6000 CD RDS EON
Если вы не хотите каждый раз читать информационные брошюры, касающиеся, тех или Ford 6000 CD RDS EON иных изделий, достаточно, прочитать их раз — сразу же после покупки устройства. Вы получите основное знания, касающиеся поддержания изделия Ford 6000 CD RDS EON в хорошем эксплуатационном состоянии, так, чтобы без проблем достигнуть его планируемого цикла работы. Затем инструкцию можно отложить на полку и вернуться к ней только в случае, если вы не уверены, правильно ли проводится техобслуживание изделия. Правильный уход является необходимым элементом Вашего удовольствия Ford 6000 CD RDS EON.
Раз в году пересмотрите шкафчик, в котором держите инструкции для всех устройств, — выбросите те, которыми вы уже не пользуетесься. Это поможет Вам сохранять порядок в своей домашней базе инструкций обслуживания.
Summary of Contents for Ford 6000 CD RDS EON
Что находится в инструкции Ford 6000 CD RDS EON? Почему стоит ее прочитать?
- Гарантия и подробности, касающиеся техобслуживания изделия
Хорошей идеей будет прикрепить чек к странице инструкции. Если что-то плохое случится во время использования Ford 6000 CD RDS EON, у вас будет комплект документов, необходимый для гарантийного ремонта. В этой части инструкции вы найдете информацию об авторизованных сервисных центрахFord 6000 CD RDS EON а также, как самостоятельно правильно ухаживать за оборудованием — так, чтобы не потерять гарантийных прав. - Указания по монтажу и Setup
Не терять нервов и времени на самостоятельную попытку установки и первого запуска изделия. Воспользуйтесь рекомендациями производителя Ford 6000 CD RDS EON чтобы правильно запустить изделие, без лишнего риска повреждения оборудования. - Информация, касающаяся дополнительных запчастей (входящих в комплект а также являющихся опцией)
Пересматривая эту часть документа вы сможете проверить, доставлен ли ваш Ford 6000 CD RDS EON с полним комплектом аксессуаров. Вы также сможете узнать, какие дополнительные запчасти или аксессуары для Ford 6000 CD RDS EON Вы сможете найти и докупить к своему устройству. - Troubleshooting
Самые частые проблемы, касающиеся Ford 6000 CD RDS EON и методы их решения. Это очень полезная часть руководства по обслуживанию — она позволит Вам сэкономить много времени на поиск решений. 90% проблем с Ford 6000 CD RDS EON повторяется у многих пользователей. - Требования, касающиеся питания и энергетический класс
Информация, касающаяся количества потребляемой энергии, а также рекомендации, касающиеся установки и питания Ford 6000 CD RDS EON. Прочитайте, чтобы оптимально пользоваться Ford 6000 CD RDS EON и не использовать большего количества ресурсов, нежели это необходимо для правильной работы изделия. - Специальные функции Ford 6000 CD RDS EON
Здесь вы можешь узнать, как персонализировать изделие Ford 6000 CD RDS EON. Вы узнаете, какие дополнительные функции могут помочь Вам удобно использовать продукт Ford 6000 CD RDS EON а также, какие функции Вашего устройства оптимальны для выполнения конкретной деятельности.
Как видите в инструкции вы найдете информацию, которая реально поможет Вам в использовании Вашего изделия. Стоит с ней ознакомиться, чтобы избежать разочарований, возникающих из более короткого, нежели предусматривалось, периода исправности изделия Ford 6000 CD RDS EON. Если все же вы не хотите копить инструкции в своем доме, наш сайт поможет Вам в этом — вы должны найти у нас руководство по обслуживанию большинства из своих устройств, а также Ford 6000 CD RDS EON.