
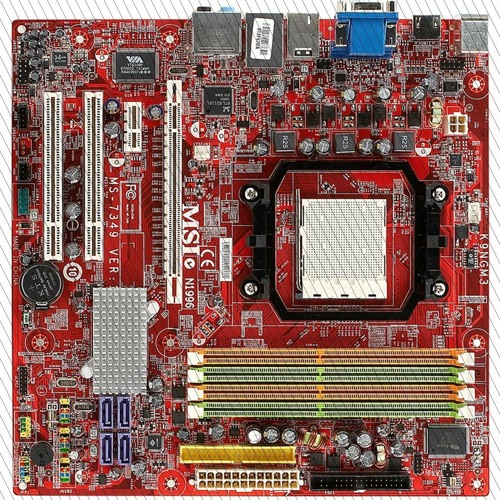
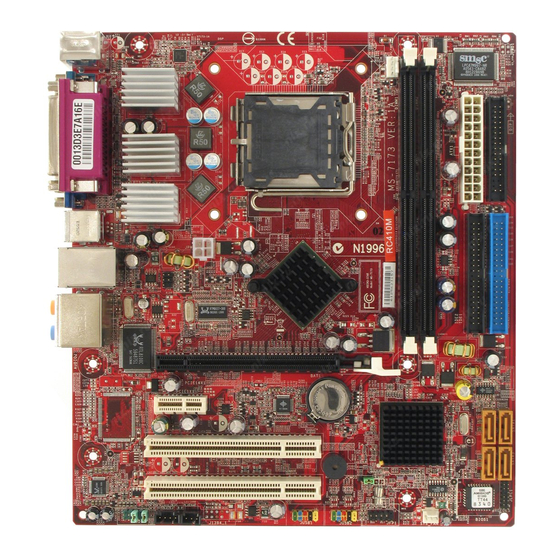
N1996 — материнская плата компании MSI для компьютерной платформы LGA775, которая сочетала в себе отличные технические характеристики и поддержку всех существующих для этого процессорного разъема моделей чипов. При этом стоимость данного решения вполне демократичная. Все это в сумме делало N1996 отличной основой для сборки системных блоков различных классов.

Сокет и набор микросхем системной логики
Как было уже отмечено ранее, процессорным разъемом LGA775 оснащалась материнская плата MSI N1996. Технические характеристики этого сокета указывали на наличие 775 контактов и возможность установки процессорных решений, которые включали 1, 2 или даже 4 вычислительных ядер. Промежуточного варианта с 3 блоками обработки кода у компании «Интел», в отличие от АМД, никогда не было. Также необходимо отметить что этот процессорный разъем иногда обозначался как «Сокет Т». Набор микросхем системной логики в данном случае включал 2 элемента: «северный мост» 945CG и «южный мост» ICH7. Данный чипсет официально был представлен в 2007 году. Его полупроводниковая часть изготавливались по нормам техпроцесса 45 нм. Рекомендуемые значения частоты системной шины в этом случае могли быть установлены на значениях 533 МГц или 800 МГц.

Список процессоров
Характеристика материнской платы N1996 с позиции поддерживаемых моделей центральных процессоров, как было отмечено ранее, указывала на то, что можно было установить любой чип для сокета LGA775 в нее. В этот список входили:
-
Для сборки офисных систем с минимальным быстродействием и минимальной стоимостью «Интел» рекомендовала использовать ЦПУ линейки Celeron D. Для работы в «Ворде», «Экселе» или «Пауэрпоинте» возможностей этого полупроводникового кристалла вполне достаточно. Также он без проблем мог справиться с просмотром веб-сайтов, воспроизведением видео и прослушиванием музыки.
-
Бюджетные компьютеры в рамках этой платформы могли базироваться на ЦПУ линейки Pentium DualCore, Pentium 4 или Pentium D. Улучшенная архитектура и возросшие тактовые частоты позволяли этим ЦПУ уже демонстрировать приличные результаты в игровых тестах.
-
Еще более скоростными и при этом и энергоэффективными процессорными решениями являлись чипы серии Core 2Duo. Более продвинутая архитектура полупроводникового кристалла, еще более увеличенные частоты и больший размер кеша были теми факторами, которые позволяли эти процессорам приблизиться по производительности и быстродействию вплотную к флагманским решениям данной платформы.
-
Премиум-сегмент ЦПУ в этом случае занимали решения Core 2Quad. Эти кремниевые решения уже имели 4 вычислительных блока. Также были улучшены и все остальные характеристики в этом семействе ЦПУ.
Как было отмечено ранее, любая из ранее приведенных моделей процессорных устройств могла быть установлена в данную модификацию N1996. Материнская плата была действительно универсальной и позволяла собирать ПК любого уровня.
Слоты для установки внутренних контроллеров, порты для периферийных устройств. Оперативная память
Характеристика материнской платы MSI N1996 в данном случае указывала на наличие таких слотов для установки контроллеров расширения внутри корпуса ПК:
-
1 слот в исполнении PCI – Express версии 16Х для установки дискретной графической системы.
-
3 слота расширения формата PCI. В этом случае могли быть установлены различные варианты контроллеров: сетевая плата, звуковая плата или, например, ТВ-тюнер.
Набор же периферийных портов в этом случае состоял из:
-
LPT & COM порты — по 1 штуке.
-
PS/2 порты в количестве 2 штук.
-
4 универсальных порта USB в исполнении 2.0.
-
1 сетевой RJ-45 разъем для подключения к ЛВС.
-
3 привычных аудиопорта формата 3,5-мм аудиоджек.
Под использование ОЗУ стандарта DDR2 была заточена N1996. Материнская плата могла адресовать максимум 2 Гб оперативной памяти и имела всего лишь 2 слота для установки таких модулей. То есть в один слот можно было установить планку с объемом в 1 Гб.

Резюме
Уже не один год успешно работают персональные компьютеры на базе данного компьютерного аксессуара, и это действительно наилучшая его характеристика. Материнская плата MSI N1996, отзывы это лишь только подтверждают, все еще позволяет создавать актуальные компьютерные системы по той причине, что в ее процессорный разъем может быть установлен 4-ядерный чип, который без проблем может справиться с любой задачей, в том числе и с наиболее свежими и самыми требовательными игрушками. Отдельно также необходимо отметить то, что в нескольких вариантах исполнения была выпущена N1996. Материнская плата могла быть оснащена, кроме рассматриваемого в этом материале LGA775, сокетами 478 или АМ2. Но наиболее производительным среди них является именно первый, который и рассмотрен в этой статье.
N1996 Motherboard Manual: A Comprehensive Guide
The N1996 motherboard is a classic piece of hardware, known for its reliability and performance. It’s likely that many users still have this motherboard in their possession, perhaps for nostalgia or as part of a retro gaming setup. This article will serve as a comprehensive guide to the N1996 motherboard manual, covering its key features, specifications, and how to find the right manual for your specific needs.
Understanding the N1996 Motherboard
The N1996 motherboard is a product of a specific manufacturer, and it’s vital to identify the exact model before delving into the manual. While the «N1996» designation might be common, there could be variations within this model line. To identify your specific motherboard, look for additional model numbers or specific branding on the board itself.
Key Features of the N1996 Motherboard
The N1996 motherboard, depending on the specific model, likely boasts a range of features that were cutting-edge in its era. These could include:
* Intel Pentium Processor Support: This motherboard was designed to support the powerful Intel Pentium processors, a major advancement in computing power.
* Expansion Slots: The N1996 motherboard likely featured various expansion slots, including PCI slots for adding sound cards, network cards, or other peripherals.
* Onboard Graphics: Some N1996 models might have featured onboard graphics capabilities, allowing for basic video output without the need for a dedicated graphics card.
* Integrated Sound and Networking: Certain models might have included onboard sound and networking capabilities, providing a streamlined experience for basic multimedia and internet access.
Finding the N1996 Motherboard Manual
Obtaining the correct manual for your N1996 motherboard is crucial for understanding its capabilities and troubleshooting any issues. Here are some ways to find the manual:
* Manufacturer Website: The first and most reliable source is the original manufacturer’s website. Look for a support section or a download area where you can search for specific motherboard models.
* Online Forums and Communities: Online forums dedicated to vintage computers or specific motherboard manufacturers are excellent resources for finding manuals. Members often share downloadable files or links to helpful resources.
* eBay or Similar Marketplaces: Sometimes, you might find complete documentation sets, including manuals, bundled with vintage hardware sold on eBay or similar online marketplaces.
* Archive Websites: Dedicated websites that archive old computer manuals, such as the Internet Archive, could offer a treasure trove of resources, including N1996 motherboard manuals.
Understanding the Contents of the N1996 Motherboard Manual
The N1996 motherboard manual is a valuable document that provides detailed information about the board’s features, specifications, and troubleshooting steps. Here are some common sections you can expect to find:
* Introduction: This section typically provides a brief overview of the motherboard, its key features, and intended use.
* Specifications: This section delves into the technical specifications of the motherboard, including supported processors, memory types, expansion slots, and other relevant details.
* Installation Guide: This section provides step-by-step instructions on how to install the motherboard, including connecting power, components, and setting up the BIOS.
* Troubleshooting Guide: This section offers solutions to common problems encountered with the N1996 motherboard, covering issues with boot-up, hardware compatibility, and other technical difficulties.
* System Configuration: This section provides detailed information about configuring the system using the BIOS, including setting boot order, adjusting system settings, and enabling specific hardware features.
* Glossary: The manual might include a glossary of terms relevant to the N1996 motherboard, explaining technical jargon and helping users understand the terminology used throughout the documentation.
FAQ: N1996 Motherboard Manual
Q: What if I can’t find the manual for my specific N1996 motherboard model?
A: If you can’t find the exact manual for your model, look for manuals from similar N1996 motherboards from the same manufacturer. Often, the basic functionalities and troubleshooting steps are similar across models.
Q: Can I use a generic motherboard manual for my N1996 board?
A: While generic manuals might offer some basic information, they won’t provide specific details about your N1996 model’s features, specifications, or troubleshooting solutions. It’s essential to use the manual tailored to your specific motherboard for accurate information.
Q: What should I do if I encounter problems with my N1996 motherboard?
A: If you face issues with your N1996 motherboard, consult the troubleshooting section in your manual. This section provides solutions to common problems, including hardware compatibility, boot-up errors, and other technical difficulties.
Q: Is the N1996 motherboard compatible with modern components?
A: The N1996 motherboard is designed for older components and might not be compatible with modern hardware. It’s crucial to consult the manual or research online for compatibility information before attempting to upgrade or replace components.
Q: What is the legacy value of the N1996 motherboard?
A: The N1996 motherboard holds significant legacy value for vintage computing enthusiasts and retro gamers. Its reliability and compatibility with classic hardware make it ideal for recreating a nostalgic computing experience or running older games.
Stream Msi N1996 Motherboard Manual Pdf by Lezhadgamj | Listen online for free on SoundCloud
Stream Msi N1996 Motherboard Manual Pdf from Rielusador1985 | Listen online for free on SoundCloud
MSI Global — The Leading Brand in High-end Gaming & Professional Creation

Manual placa madre msi n1996 by Edward — Issuu
MSI P6NGM-FIH — MOTHERBOARD — MICRO ATX USER MANUAL Pdf Download | ManualsLib
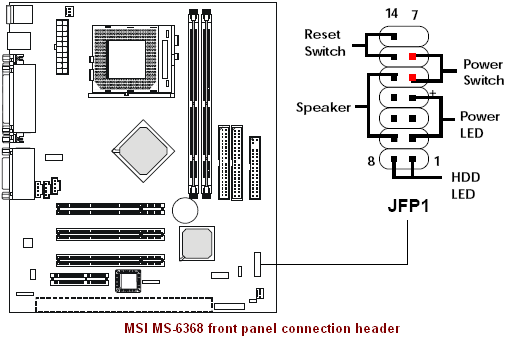
Solved: help with front panel connectors — HP Support Community — 6420912
Centroid PC Motherboards
Stream Msi N1996 Motherboard Manual Pdf by Comrodalars1985 | Listen online for free on SoundCloud
MSI MS-7173 USER MANUAL Pdf Download | ManualsLib
MSI Global — The Leading Brand in High-end Gaming & Professional Creation

MSI MS-7236 MANUAL Pdf Download | ManualsLib
%2001-800x800.jpg)
Moederbord HP MS-7613 v1.1 Socket 1156 MicroATX 24-pins DDR3 PCI-E

Acer Motherboard for Aspire M3641 M5641, MSI N1996 LGA775 With BP Motherboards
acer n1996 motherboard manual download
LINK 1 ENTER SITE >>> Download PDF
LINK 2 ENTER SITE >>> Download PDF
File Name:acer n1996 motherboard manual download.pdf
Size: 3455 KB
Type: PDF, ePub, eBook
Category: Book
Uploaded: 28 May 2019, 22:57 PM
Rating: 4.6/5 from 645 votes.
Status: AVAILABLE
Last checked: 2 Minutes ago!
In order to read or download acer n1996 motherboard manual download ebook, you need to create a FREE account.
Download Now!
eBook includes PDF, ePub and Kindle version
✔ Register a free 1 month Trial Account.
✔ Download as many books as you like (Personal use)
✔ Cancel the membership at any time if not satisfied.
✔ Join Over 80000 Happy Readers
acer n1996 motherboard manual downloadAnycast Touch instantly makes live production accessible to anyone who requires live broadcasting or webcasting. The portable system is designed to be incredibly easy to use. With no previous live production experience required, it is suitable for a wide range of customers, such as educational and government institutions, corporate organizations and event management companies. And as you can expect from Sony, Anycast Touch offers incredible clear and detailed pictures for live production. Multi-functional all-in-one solution Anycast Touch eliminates the need for any of the hardware typically required for professional live streaming. It includes a video switcher, streaming media encoder, recorder, audio mixer, titler, remote camera controller and supports multiple monitors. The Anycast Touch allows for seamless video mixing between a number of video sources in a variety of formats. You can record up to ten hours of video and audio on the internal SSD, create and add graphics elements to the image, control connected remote PTZ (pan, tilt, and zoom) cameras, perform multiple effects and wipes to enhance the production and instant streaming of media over a WAN or the Internet. Additionally, a fully functioned six channel audio mixer is provided for a separate audio mix. Intuitive double touch-screen operation The Anycast Touch enables intuitive, easy operation, and eliminates the cumbersome setup and signal adjustment process typically required when connecting various devices. Users can also store the setup information of all attached video sources, such as the camera input, title data, and transition effects. Additionally, scene lists can be prepared beforehand, allowing users to simply switch scenes during an event with just a single tap. Features Intuitive double touch-screen operation The AWS-750 Anycast Touch has a very simple and easy-to-use operational style with an intuitive double touch-screen interface that requires no technical background to operate.http://www.pphu-joanna.pl/fckpliki/ecler-nuo-5-manual.xml
- Tags:
- msi n1996 motherboard manual pdf download free, msi n1996 motherboard manual download, msi n1996 motherboard drivers download, msi n1996 motherboard drivers xp download, acer n1996 motherboard manual download, acer n1996 motherboard manual download windows 7, acer n1996 motherboard manual download free, acer n1996 motherboard manual download pdf, acer n1996 motherboard manual download windows 10.
Stylish and ultra portable design The Anycast Touch is stylish, compactand ultra-portable. Taking it from one location to the other is easy. Just pack up and go. The all-in-one style system displays sources for input and streaming, for simple operation. All-in-one solution Anycast Touch eliminates the need for any of the hardware typically required for professional live streaming. It includes a video switcher, streaming media encoder, video recorder, audio mixer, clip player, remote camera controller and titler that supports ten languages. It features 6 stereo audio inputs and 3 stereo audio outputs. Instant streaming function The system allows stable real time streaming over the Internet, LAN, and other dedicated lines. Auto Tracking function with selected Sony PTZ robotic cameras You can automatically track an object or person within a frame in a live production setting with a Sony PTZ robotic camera controlled through the AWS-750. Auto Tracking supports the following Sony HD PTZ robotics cameras:BRC-X1000, BRC-H800, BRC-H900, SRG-300H, SRG-300SE and SRG-120DH. Remote camera support The AWS-750 enables a large number of Sony PTZ robotic cameras to be manually controlled. Internal recorder The system records PGM output in the built-in 192 GB capacity solid state drive with up to 10 hours capacity. Recorded files can be exported and edited by various types of non-linear editor. Tally support Tally indicators in the GUI to make it easier to keep visual control of camera feeds and inputs. The option is selectable within the GUI menu. Tally support is possible via VISCA and GPI interfaces for both input and output indicators to and from cameras. These include 16:9 Wide Zoom input resize (for both normal SD and squeezed SD images) and Squeeze or Edge Crop output resize. Import title as template and text overlay You can create flexible titles graphics and overlay them on your content, as well as turn those titles into a template for storage and use on other content.http://xn—-0tbbbfo0f.xn--p1ai/userfiles/ecler-nuo-5-service-manual.xml It is possible to save up to 999 titles. Output impedance: 150. MIX Out Phono jack (x2). Reference level: -10 dBu (10 k? load). Output impedance: 470. Max. power: 70 mW (x2). Impedance: 47 ? Other Interfaces LAN RJ-45 (x2), 100BASE-TX, 1000BASE-T USB3.0 USB (Type A) (x4), USB 3.0 equivalent Panel (i)15.6-inch. Find out more. Simple, scaleable and single-operator live production solutions Discover our powerful solutions for single-person live productions and live streaming. All rights reserved.Tracking function You can now automatically track a specified object (e.g.,. Serial number: 11001 or later Timecode output function Timecodes are now embedded in HD SDI outputs. Version Update History. Video switching and audio mixing Logo 2 Title 2 can be performed via simple operations. The recorded files can be edited using various nonlinear editors. Two-channel output (AUX) In addition to PGM, another video output (AUX) is available on this unit. For details on When headphones are connected to the operations, see “Using the Touchscreens” (page 21). HEADPHONES jack, output from the internal speakers is disabled.Doing so may cause internal overheating, resulting in fire or damage to the unit. When moving the unit after use, allow the unit to cool down sufficiently beforehand.Connect USB storage devices, keyboards, and other external devices here.Connect the supplied AC adapter here. Note Use a Sony HDMI cable. Recommended cable example: HIGH SPEED HDMI CABLE DLC-HJ20 (2 m (6.6 feet)) Parts Identification. Main Display Opening the Main Display Lift the front portion of the panel cover to unlock it. The magnet locks will lock the display into place. Open the panel cover. The magnet locks will release. Anti-glare films are supplied with this unit to protect the touchscreen displays. Center the film so that the surrounding uncovered Verify that all specks of dust have been removed from edges of the display are even.http://dev.pb-adcon.de/node/15165Anti-glare film Place the anti-glare film back on the main display. Use the screen-cleaning solution and cleaning cloth to wipe the anti-glare film. You can perform touchscreen gestures on the main display and sub display with your fingers in place of Applying the film to the sub display keyboard and mouse operations. Drag Slide your finger while holding it on the screen. This performs the same operation as dragging on a mouse. If you have already connected the devices, proceed to “Step 2: Turning the Unit On” (page 25). Connection example Remote camera (page 93) Projector Computer Condenser microphones Camera with HD SDI output Headphones AC adapter. Do not perform operations with the main display closed. Turning the unit on Turning the unit off Press the 1 switch on the left side of the unit. Connect the DC output plug of the supplied AC A confirmation message appears. Step 3: Initial Settings Specify the video signal format that will be handled by the unit and the date and time. If necessary, you can also adjust the brightness of the display. If you have already configured these settings, proceed to “Step 4: Video Switching”. Video switching is performed in the main screen.Direct mode can also be used for switching operations Tap this area. Using Transition Effects You can select from the following transitions for video switching on this unit. Audio operations are performed in the sub screen. This section describes how to adjust the audio for each microphone and mix multiple audio channels. The results of adjustments and settings are applied immediately in the main screen. Depending on the adjustments and settings, perform them while viewing the Using the Screens main screen. To enable or disable options (protect) icon Tap the following area of the button to enable or Indicates that the current title or logo is protected. Displays a list of content for the option.Sub Screen You can perform adjustments, configure settings, and enter text in the sub screen. Tapping each tab displays its respective operation screen. Allows you to adjust the logo position. For details, see “To adjust the position”. Lists are created using the context menu that appears when you tap and hold an area within the respective list. The operations that can be performed and the materials that can be added will differ depending on the list. Lists (Delete) Dragging an area other than the move handle will not move the button.When the virtual keyboard appears, you can enter up to 20 alphanumeric characters.Using the Camera Tally Connect the GPI connector on the unit to the TALLY Function connector on the CCU. For details on pin assignments on the GPI connector, see “GPI connector” (page 113) in the “Connector You can have the tallies on cameras light via the VISCA Pin Assignments”. Depending on the functions you are using, the keyboard that is displayed may differ. The keyboard that is displayed will differ depending on the input language.You can use up to two overlay videos. Selecting Composite Patterns Inserted image (overlay video) Overlay video 2 Chroma keying is a compositing technique that involves specifying regions of a single color in the overlay video (green in the following example), and inserting the. If you want to use still images for the overlay image, use the Media Player. For details on adding the Media Player, see “Adding the Media Player to the Lists (Add Media Player)” (page 41). Adjusting Overlay Video 2 Titles and logos are not composited, making it easier to perform manual adjustments.Using the tracking function allows you to perform the For details on saving scenes, see “Creating Scenes” following controls. In addition to PGM, another video composite output (AUX) is available on this unit.This is useful for minimizing noise.For further details, contact your dealer or local Sony representative.Program video can be encoded on the unit and streamed live using an external server or saved to the unit’s internal storage. In addition, the throughput indicator turn off. The virtual keyboard that allows you to enter text appears in the sub screen.It will not be used as the background of the title.You can manage the following types of files stored on the unit’s internal storage using the File Manager. The virtual keyboard closes, and the file is renamed. You can select multiple files. Saving and Loading Settings You can save the current setting configurations to the internal storage as files (up to 99). These files are referred to as “projects.” Some conditions, such as tab selection states, are not If the external drive is portioned, each partition will saved. The project file is loaded onto the unit.For details configuring address numbers, refer to the instruction manual for the remote camera.The currently installed version and the version of the update package are displayed.Problems and Solutions Check the following before requesting repairs. If the problem persists, contact your local Sony representative. Symptom Possible cause Solution. The connected device is not turned Restart the device. The cables are not connected Connect the cables properly. properly. The video input signals are not Assign the video input signals properly.I want to restore the factory default Contact your local Sony representative. conditions. Configured date and time settings Incorrect date and time displays Contact your local Sony representative. Specifications Main Unit 415 mm (16 in.) General Power requirements 19.5 V DC, 9.2 A AC adapter Operating Voltage: 100-240 V AC, 2.5A, 50-60 Hz Power consumption 160 W Operating temperature. In addition, if even one of the following conditions is met, the other transitions may also be affected. Condition 1 A transition is executed within the same title. Encoding Black burst signal Data rate conversion that uses A reference signal used to achieve compression technology and is A new picture is mixed into an old external synchronization (GenLock). Anycast Touch is a video switcher, video recorder, streaming encoder, audio mixer, clip player, remote camera controller, and titler that supports ten languages. An all-in-one machine with six video and five audio inputs, it accepts professional, consumer, and PTZ cameras, Blu-ray and DVD players, computers, microphones, and other devices on input, and it broadcasts live to streaming servers, projectors, HDTVs, computers, smartphones, and tablets. Connections include SDI, HDMI, Composite, XLR, and RJ-45. The audio mixer features limiting, compression, EQ, and delay adjustments. Any transition effects and other settings that you assign to an input source can be stored and recalled and applied at anytime you connect that source again. Up to 99 scene lists, with titles, logos, transitions, and different sources, can be prepared in advance and later toggled throughout at the tap of the control surface. Multiple graphics, effects, and wipes can be used simultaneously at any point in a production. One or more PTZ cameras at remote locations can be controlled directly from Anycast Touch for use in live productions. Anycast Touch features a 192GB fixed internal SSD that you can record ten hours of video and audio to. It is also quite common that customers throw outUser manuals are alsoTry Google Search! Please send manual — CHAUVET COLORdash Par Quad-7 COLORDASHPARQUAD7 Posted by: Denis Pelli 2021-06-19 23:15:21 I need the manual for the Chauvet color dash per quad 7. User manual — Lowel Fluo-Tec 650 Fluorescent Softlight, Dimmable FLS-650DM230 Posted by: Tony Osborn 2021-06-19 01:47:17 I need the User manual for the Lowel Fluo-Tec 650 Fluorescent Softlight, Dimmable FLS-650DM230. Battery loose — Impossible Flash Bar 2 by MiNT for Polaroid SX-70-Type 2997 Posted by: Travis 2021-06-18 16:37:26 It seems as if theres room within the battery housing even with the batteries in it. The unit wont turn on. If you plug your dongle and find out the barcode on the home menu doesn’t link to EZMira, then it means that your dongle does not yet support EZMira. Users can easily cast videos or games from a device screen to a big screen without switching mirroring modes. AnyCast supports multi-OS mirroring which including Windows, macOS, Android, and iOS. Free firmware is provided to compatible with up-to-date devices. Please follow the user guide below to complete the setup. If everything works fine, you may see the main AnyCast setup screen. Tap “EZMira App” and select “Scan QR code to connect wifi”. The wifi setup page will pop out automatically. Tap “EZMira App” and select “Scan QR code to connect wifi”. This user manual guides users to quickly and easily complete all setups of K4 setting step by step. Anycast Touch instantly makes live production accessible to anyone who requires live broadcasting or webcasting. The portable system is designed to be incredibly easy to use. With no previous live production experience required, it is ideal for a wide range of users, such as houses of worship, educational and government institutions, corporate organizations and event management companies. And as you can expect from Sony, Anycast Touch offers clear and detailed pictures for live production. It includes a video switcher, streaming encoder, video recorder, audio mixer, clip player, remote camera controller and titler that supports ten languages. The Anycast Touch allows for seamless video mixing between a number of video sources in a variety of formats. You can record ten hours of video and audio on the internal SSD, create and add graphics elements to the image, control connected remote BRC cameras (pan, tilt and zoom), perform multiple effects and wipes to enhance the production and instantly stream the output over a WAN or the Internet. Additionally, a fully functioned five-channel audio mixer is provided for a separate audio mix. Users can also store the setup information of all attached video sources, such as the camera input, title data, and transition effects. Additionally, scene lists can be prepared beforehand, allowing users to simply switch scenes during an event with just a single tap. Please complete the informationYou may unsubscribe via the link. Explore now Support Hi My Sony Sign in Favourites Newsletter Subscriptions Community Favourites Sign out Favourites Search Sony Sony Sites Search Sony To get the full experience on Sony.co.uk, please change your settings to allow JavaScript. NOTE: To check if your devices are compatible with the Screen mirroring function, or alternative screen sharing methods, refer to the 2. Compatible devices and alternative methods section in the How to use the Screen mirroring function on my BRAVIA TV article. Make sure that the input of the TV is set to Screen mirroring, and setup of your mobile device is completed. NOTES: Make sure there are no other wireless devices connected to the mobile device before setting up the Screen mirroring feature of the TV. NOTE: The following is an example of operation using an Xperia phone. For specific operational details, refer to the instruction manual of your mobile device.Tap Turn off. Press and hold the Power button again for few seconds to turn on the device. For other TVs: Wait approximately 2 minutes, plug the power cord (mains lead) back into the outlet, and then turn on the TV. Scroll down to Settings and press the Select button. Select Bluetooth settings and press the Select button. Select Bluetooth On and press the Select button. Highlight Off and press the Select button. This feature does not require entering a password. If in case, it asks for a password, turn off the Wi-Fi Direct mode of the mobile device if there is any. Select BRAVIA TVs and Xperia mobile devices are compliant with the Screen mirroring function using the Miracast technology. The Screen mirroring function using mobile device from other manufacturers is not guaranteed to work. The TV picture quality is unstable or intermittently blurs when using one-touch mirroring or screen mirroring. BRAVIA does not appear on the screen of a Screen mirroring or Wi-Fi Direct compatible device. Find information and receive instant notifications about your product. Nase databaze obsahuje vice nez 1 milion prirucek ve formatu PDF pro vice nez 10 000 znacek. Kazdy den pridavame nejnovejsi prirucky, takze vzdy najdete produkt, ktery hledate. Je to velmi jednoduche: staci zadat znacku a typ produktu do vyhledavaciho pole a muzete si okamzite prohlednout prirucku vaseho vyberu online a zdarma. And by having access to our ebooks online or by storing it on your computer, you have convenient answers with Viewcontent Php3Farticle3Dsony Anycast Manual26context3Dlibpubs. To get started finding Viewcontent Php3Farticle3Dsony Anycast Manual26context3Dlibpubs, you are right to find our website which has a comprehensive collection of manuals listed. Our library is the biggest of these that have literally hundreds of thousands of different products represented. I get my most wanted eBook Many thanks If there is a survey it only takes 5 minutes, try any survey which works for you. Einstellen der Kamerasteuerung.Speichern und Laden verschiedener Einstellungen.243 Speicherbare Daten.Im Lieferzustand ist in Schacht 2 des 8 Serielles digitales HD- AWS-G500 ein SD-Video-Schnittstellenmodul installiert. Schnittstellenmodul (optional) Bezeichnung und Funktion der Teile. Lautsprecher stummgeschaltet. Wiedergabeposition Dies zeigt die Wiedergabeposition in der Datei an. Wenn sich die Wiedergabeposition am Anfang oder Ende befindet, leuchtet z der jeweiligen 2 Symbol ON LINE Position. Wiedergabeposition Dies zeigt die Wiedergabeposition in der Datei an. Wenn sich die Wiedergabeposition am Anfang Startpunkt Endpunkt Symbol oder Ende befindet, leuchtet z der jeweiligen Position. Die Datei wird gleichzeitig in der Hauptsoftware 2 Pipetten-Funktion Anycast Station gespeichert, und der Dateiname. Textobjekt mittig ausgerichtet (Seite 147).Diese Registerkarte ist in die weiteren Registerkarten Farbe, Kante und Schatten unterteilt. 0 Optionsfelder zur Linienauswahl qa Breite qs Optionsfelder zur Auswahl der Linienfarbe Diese Funktionen gleichen jenen von 2 bis 9 der Registerkarte. In diesem Fall ist es zur Spannungsversorgung der Tastatur erforderlich, zwei Standardbatterien (CR2032) einzusetzen. Ausbauen der Tastatur Verwenden Sie die Aussparung an der rechten Seite der Tastaturaufnahme, um die Tastatur herauszuheben. Der Startbildschirm wird angezeigt. Freigeben des Timers Die Timer-Anzeige wird ausgeblendet.Einstellen der Bildschirmhelligkeit Stellen Sie die Helligkeit des Bildschirms ein, auf dem der Betriebsbildschirm angezeigt wird. Hinweis Wird ein Videosignal in einem anderen Format als dem hier eingestellten eingespeist, kann es trotzdem angezeigt werden (z. Die folgende Abbildung zeigt ein Beispiel einer Systemkonfiguration und des Signalverlaufs.Verlegen Sie die Kabel lose, um starkes Knicken der Kabel zu verhindern.Ziehen Sie das Schnittstellenmodul heraus. Schieben Sie das optionale Modul in den Steckplatz. Ziehen Sie die Schrauben an.Den Auswahltasten Videoeingangssignale zuweisen Weisen Sie den Auswahltasten 1-6 Videosignale zu (Auswahltasten PGM und NEXT).Weisen Sie das Eingangssignal von der Kamera einer Auswahltaste zu.Vorsicht Falls Sie DV-, SDI- oder HD SDI-Signale zuweisen, werden die Regler zu Stereoreglern. Dies ist die grundlegendste Form des Umschaltens.Taste MIX AUTO TRANS. Taste EFFECT AUTO TRANS Die Taste EFFECT leuchtet gelb, und die Effektanzeige zeigt den aktuellen Effektzustand.Die aktuellen Einstellungen erscheinen in der Effektanzeige.In diesem Fall leuchtet die Taste DSK gelb.Importieren Sie ein Logo. Das Logo wird angezeigt.Lassen Sie das Logo anzeigen.Wenn die PVW-Anzeige Vorrang hat und die Funktion Autom.Schriftart 2Erstellen Sie ein Objekt. Bearbeiten Sie das Objekt, um einen Titel zu erstellen. Gleichzeitig gespeichert 3Speichern Sie die Datei.Vorsicht Wenn gerade eine Datei erstellt wird, wird das Programm beendet, ohne dass die Datei gespeichert wird. Cursor Taste Funktion T, t Horizontales Bewegen des Cursors um jeweils eine Position.Klicken Sie auf ein Objekt, oder legen Sie durch Ziehen einen Objektbereich fest.Vorsicht Der Dateiname darf bis zu 20 alphanumerische Zeichen enthalten.Daraufhin erscheint die folgende Meldung.Erstellen eines Textobjekts Klicken Sie auf das Text-Tool.Die Pulldown-Liste wird angezeigt.Ein orangefarbener Rahmen wird um das Textobjekt angezeigt.Ein orangefarbener Rahmen wird um das Textobjekt angezeigt.Durch Eingeben einer negativen Zahl wird der Abstand kleiner. Ein orangefarbener Rahmen wird um das Textobjekt angezeigt.Zeigen Sie mit dem Mauszeiger auf ein Ende der Linie. Der Mauszeiger wechselt zu Klicken und ziehen Sie mit der Maus. Klicken Sie auf das Pipetten-Tool. Der Mauszeiger wird zu einer Pipette.Hinweis In diesem Abschnitt wird das Beispiel einer Textobjekt-Farbe beschrieben.Hintergrund A wird in den Hintergrund verschoben.Vertikale Zentrierung Das Objekt wird innerhalb des Rahmens vertikal zentriert. Horizontale Zentrierung Das Objekt wird innerhalb des Rahmens horizontal zentriert.Leeres Blatt erstellen: Erstellen einer neuen, leeren Seite.Innerhalb der inneren gepunkteten Linie befindet sich die sichere Zone. Orientieren Sie sich beim Herstellen der Verbindungen am folgenden Schaltbild.PGM-Aufzeichnung B Aus Quellaufzeichnung HDD1 SCHACHT1-1 HDD1 SCHACHT1-2 Streaming HDD2 SCHACHT2-1. Der Frame der Datei erscheint als Standbild in der Quellenanzeige und der PVW-Anzeige. Taste PLAY SHIFT Die Datei wird in der Quellenanzeige und der PVW-Anzeige wiedergegeben. Der Vorlaufpunkt wird zugewiesen, und der Zeitcode der Vorlaufposition wird angezeigt. Das Videosignal am Vorlaufpunkt wird angezeigt, und die Anzeige stoppt. Daraufhin erscheint die folgende Meldung. Die Wiederherstellung wird gestartet. Nach der Beendigung der Wiederherstellung wird die folgende Meldung angezeigt.Mit jeder Auswahl wechseln Sie die Einstellung zwischen Ein und Aus. PGM OUT-Pegel DV OUT RGB OUT. Taste PLAY SHIFT Die Datei wird in der Quellenanzeige und der PVW-Anzeige wiedergegeben.Mit jeder Auswahl wechseln Sie die Einstellung zwischen Ein und Aus.Audio-Monitor OSC-Freq. OUT-Pegel -20dBFS s AUX1 OSC OUT s AUX2 s MIX Hinweis. Die Meldung wird ausgeblendet und die Speicherung abgeschlossen.B Aus PGM-Aufzeichnung Quellaufzeichnung Name der Datei XXXXXXXXXX Streaming. Die Erstellung der EDL wird beendet.Beim Zugriff von einem Computer aus auf die externe Festplatte wird der in der Dateiinformationsanzeige ersichtliche Name (physischer Name) angezeigt. Die Formatierung beginnt. Nach der Beendigung der Formatierung wird die folgende Meldung angezeigt.Der obere USB-Anschluss ist Nummer 1, der untere Anschluss ist Nummer FACTORY USE REMOTE NETWORK RESET. Formatieren eines USB-Flash-Speichermediums. Zuschauer greifen auf den Streaming- Streaming- Server zu und rufen die Inhalte ab. Servers Dienstanbieter begrenzte Anzahl. Anwenden XXXXXXXXXX Hostname IP-Einstellung DHCP DNS-Einstellung DHCP MAC-Adresse Maximal 15 Zeichen Das erste Zeichen muss ein Buchstabe sein.Geben Sie 3 bis 63 alphanumerische Zeichen ein. Das erste Zeichen muss ein Buchstabe sein. START Name der Livedatei XXXXXXXXXX STOP Pfad. Dies ist nicht erforderlich, falls Sie lediglich Einstellungen in den Schritten 7, 8, 9 oder 10 vorgenommen haben. Der folgende Bildschirm wird angezeigt.UHRZEIT Benutzervoreinst.Nummer Meldungstext Deutsch 0001 Daten wurden ins Verzeichnis xx: xx exportiert. EDL data has been divided into some files. Es ist erneut ein Fehler aufgetreten. Das Problem besteht weiterhin. An error occurred again. Would you like to cancel Ausgang aufzeichnen.Wird die PGM-Aufzeichnung zugewiesen, so wird die Aufzeichnung von When the PGM Recording is assigned, recording 1067. Schreibschutz bitte “Memory Stick” is Write Protected. Please 2016 deaktivieren und erneut einsetzen.Schreibschutz bitte This USB Flash Memory is write protected. 2059 deaktivieren und erneut einsetzen. Please remove Write Protection and re-insert. Schreibschutz bitte This “Memory Stick” is write protected. Please 2060 deaktivieren und erneut einsetzen. An error occurred during formatting. 4002 Beim Laden der Datei ist ein Fehler aufgetreten. An error occurred when loading file. 4003 Beim Lesen der Datei ist ein Fehler aufgetreten. Cannot start recording xx.Der Real Player wird gestoppt.Sony Corporation bekannt. Bereich. Diese Funktion wird zum Hervorheben oder GPI (General Purpose Indexbild Interface) Absenken bestimmter. Registrieren Sie sich jetzt. Download an official Sony user manual in which you will find instructions on how to install, use, maintain and service your product.The sides, bottom, and rear of the case are heavily padded to provide extra protection to the input and output connectors and the interior of the case is lined with additional foam. The lid of the case is made out of custom-molded EVA foam which protects the main touch panel of the Anycast Touch. The interior of the case also has 2 straps used to secure the Anycast Touch while in transport within the case. A heavy-duty nylon shoulder-strap is also included. Custom-molded EVA foam for extra protection Nylon shoulder strap included In the Box Sony Carrying Case for AWS-750 Live Content Producer Nylon Shoulder Strap Limited 1-Year Warranty Table of Contents Please send it to us and help us expand our library of instruction manuals. Add your rating and experience with the product. Let us know and we will try to add the missing manual:Porta Brace ATV-F4 Audio Tactical Vest for Zoom F4 Portable RecorderPor lo demas, es muy buen aparato y tambien veloz en gravar. Tengo DVD peliculas, puedo cargarlo en su memoria de mi lap top y gr. Our instructions database is constantly updated and supplemented with new products. Looking for instruction manuals? Ask us. If you continue browsing the site, you agree to the use of cookies on this website. See our User Agreement and Privacy Policy.If you continue browsing the site, you agree to the use of cookies on this website. See our Privacy Policy and User Agreement for details.You can change your ad preferences anytime. Cancel anytime. Straight from the AWS-G500E, the user can feedprograms to a TV transmitter for live broadcast, record onto tape, feed the switched program output directly to largevenue displays, store input sources and a PGM output to external hard disk drives, and stream the program on the webon a live or on-demand basis.The AWS-G500E also includes beneficial Text Typing Tool software as standard, which allows operators to easily generatestill text for superimposition on the program output.With all these unique features, plus a logical design for ultimate ease of use, the AWS-G500E combined with a widerange of optional modules is a powerful tool that can be used by anyone, anytime, and anywhere — for remote televisionbroadcast operations, church productions, product promotions, event and live staging, music clip creation, conferences,seminars, and distance learning. Internet Projector Streaming Camera 3 Live Content Producer Camera 2 Camera 1 Input Source Recording Presentation Materials 3 On the large LCD screen, there are two windowsaudio mixer, an LCD display, and camera control functions, for monitoring the program and preview outputs, togetherall packed into a compact attache.
Тема: Материнская плата n1996 (Прочитано 43066 раз)
0 Пользователей и 1 Гость просматривают эту тему.
Вобщем притарабанили мне древнющмй ящик, проблема — не запускается при нажатии на кнопку питания, как выяснилось в процессе распросов за коим то лядом им понадобилось повыдёргивать все разёмы с платы, а далее повтыкать их обратно, но само собой как придётся и если с IDE и питанием хрен чего намутиш, то как подключить разёмы корпуса, х.з. Тем более распиновка не написана. Вобщем тыкал я их несколькими вариантами, но запустить не вышло. Гуглил в сети выходит что плата как бы MSI n1996 но ни по внешнему виду ни по маркировке она не соответствует. Вобщем может есть у кого сей древняк подскажите куда воткнуть кнопку питания.
З.Ы. Если мать вообще рабочая.
« Последнее редактирование: 12 Май 2011, 19:37:22 от Photon9 »
N1996 не имеет никакого отношения к модели платы. Это какой-то стандарт или типа того. Ищи другую маркировку. Она может быть очень мелкой, не обязательно на самой плате, может на наклейке
а между pci слотами не написано?
Да в том то и дело что нигде ничего, только обычные обозначения конденсатор, сопротивление и т.д. могу предположить что на радиаторе была бумажка которая со временем отклеилась и слетела.
А что на южнике написано? И под какой камень вообще мать? =)
а проц какой интел, амд?
южник VIA походу.
такой радиатор на севернике у msi плат вроде был.
А наклейка со штрих-кодом на разъёме? Ещё бывают наклейки на боковой поверхности слота.
Проц Sempron , наклейка с серийником или чем то вроде есть вверху возле процессора, она и единственная из имеющихся, ни на слотах ни на радиаторах никакой другой нет
Разьемы питания на кнопки и лампочки там идут цельным штекером (2 фотка) (штекер идет из родного блока питания.блок питания там на 230v по идее)
Все остальное как в современной материнке.
Плата очень похожа на мою из компа PC-300 от IBM 98года.
Вобще мат.платы тогда шли прямо с компом,прямо в корпусе.Отдельно официально не продавались.
Короче от БП должен идти такой-же широкий штекер на разъем как на 2 фотке.
На второй фотке отчетливо видна некая надпись JRMS1. Гугл выдаёт пару ссылок на мануалы, в которых говорится, что это и есть два контакта для кнопки включения.
дата: 01.03.2024 15:44
Материнская плата — это основа любого компьютера, которая объединяет все его компоненты в единое целое. От ее качества и характеристик зависит производительность системы и стабильность работы.
- Процессор: Acer N1996 поддерживает процессоры Intel Pentium III и Celeron.
- Чипсет: Чипсет Intel 815E обеспечивает высокую производительность и надежность.
- Память: Плата имеет два слота для оперативной памяти DDR SDRAM объемом до 256 Мб.
- Видеокарта: Acer N1996 оснащена интегрированной видеокартой Intel Extreme Graphics II, которая обеспечивает высокое качество графики.
- Интерфейсы: На плате присутствуют различные интерфейсы, такие как USB, PS/2, COM, LPT, VGA и другие.
- Блок питания: Acer N1996 использует блок питания мощностью 300 Вт.
- Размеры: Размеры материнской платы составляют 305 x 244 мм.
В целом, материнская плата Acer N1996 обладает хорошими характеристиками и может быть рекомендована для использования в домашних или офисных компьютерах.