
View the manual for the Alesis DM LITE here, for free. This user manual comes under the category drum computers and has been rated by 23 people with an average of a 8.1. This manual is available in the following languages: English. Do you have a question about the Alesis DM LITE?
Ask your question here
Alesis DM LITE specifications
Below you will find the product specifications and the manual specifications of the Alesis DM LITE.
The Alesis DM LITE is a drum kit that offers a budget-friendly option for beginners and intermediate drummers. With its compact size, it can easily fit into most living spaces, making it ideal for home use. The kit features LED lights that can help players learn to play by color coding the pads, making it easier to recognize which pad to hit. The DM LITE includes four drum pads, three cymbal pads, and a hi-hat controller pedal, providing players with a realistic drumming experience. Additionally, it comes equipped with a built-in sequencer that allows players to record and save their creations. The drum kit has a headphone jack, enabling players to practice without disturbing others. It also includes a USB-MIDI output that can connect to a computer or other devices for recording or to expand the kit if desired. The DM LITE comes with ten preset kits that can be customized to suit individual playing styles. Overall, the Alesis DM LITE is a reliable and functional drum kit that accommodates beginner and intermediate drummers’ musical aspirations.
General
Frequently asked questions
Can’t find the answer to your question in the manual? You may find the answer to your question in the FAQs about the Alesis DM LITE below.
Is the manual of the Alesis DM LITE available in English?
Yes, the manual of the Alesis DM LITE is available in English .
Is your question not listed? Ask your question here

DRUM MODULE
User Guide
English ( 3 – 10 )
Guía del usuario
Español ( 11 – 18 )
Guide d’utilisation
Français ( 19 – 26 )
Guida per l’uso
Italiano ( 27 – 34 )
Benutzerhandbuch
Deutsch ( 35 – 42 )
Appendix
English ( 43 – 47 )

User Guide (English)
Support
For complete system requirements, compatibility information, and product registration, visit the
Alesis website: alesis.com.
For the latest information about this product, visit alesis.com/dmlitekit.
For additional product support, visit alesis.com/support.
Quick Start
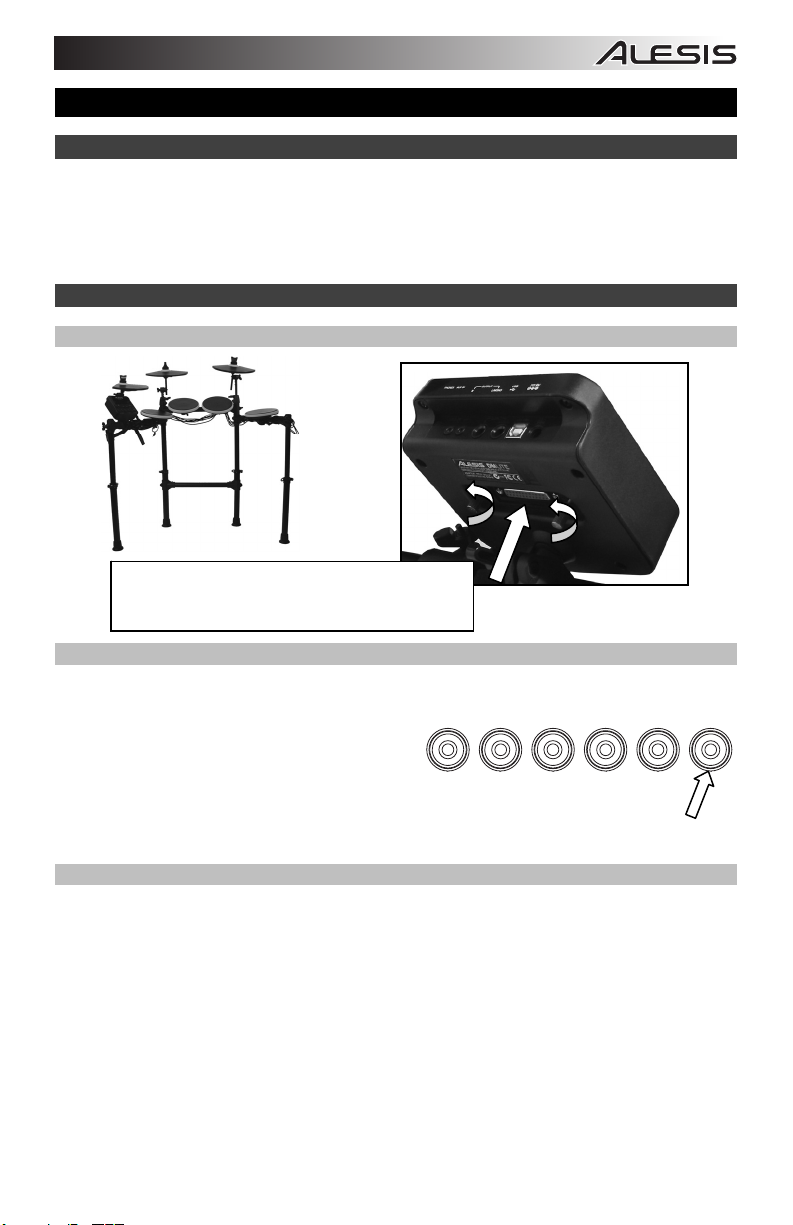
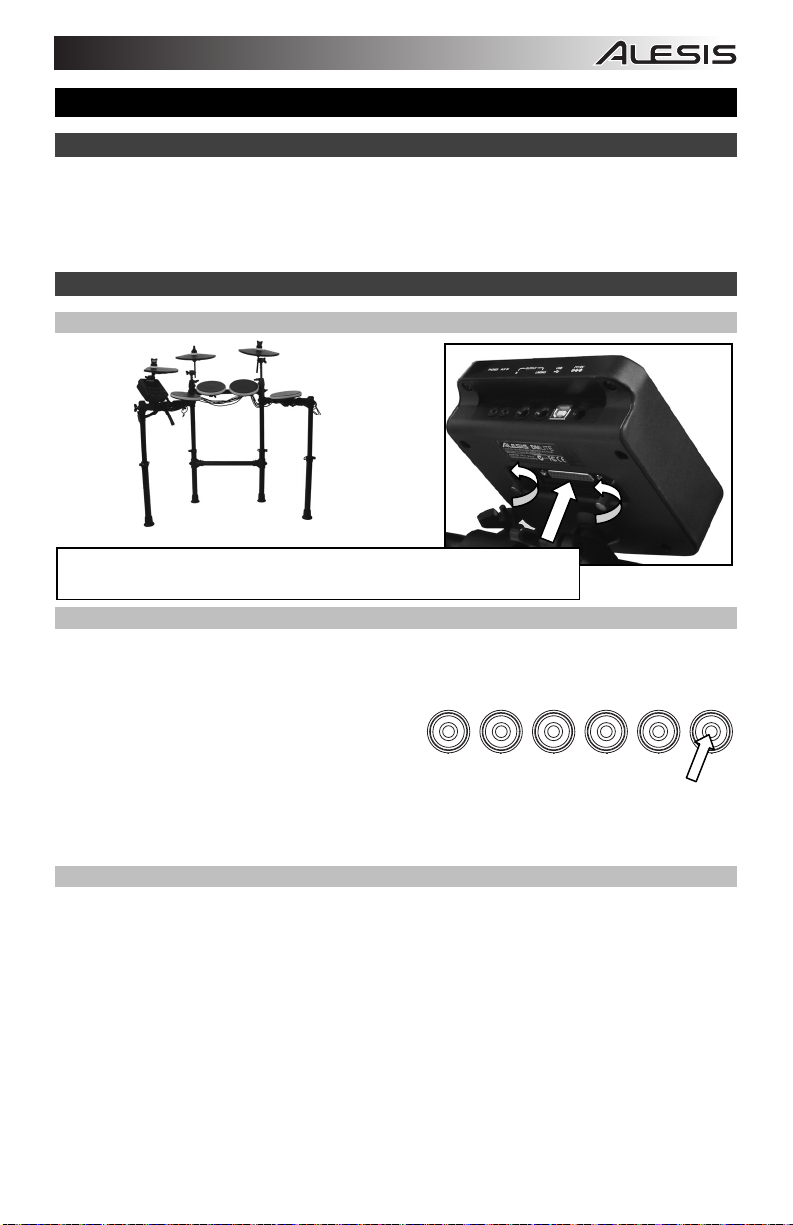
Connecting the Drum Module
Selecting a Kit
To select one of the module’s 10 preset Kits, do one of the following:
The Kit number will appear in the display. Once you have selected a Kit, you can select others
by repeating one of the steps above or by using the – and + Buttons.
Playing the Pads
If your electronic drum kit has velocity-sensitive pads, this drum module will play sounds of
varying timbres depending on how hard you hit the pads. Try hitting the pads with different
amounts of force to experiment with the different sounds produced by the module!
Note: The hi-hat sound will vary based on the position of the hi-hat controller pedal:
Learn more about using the drum module in the Using the Module section of this manual.
3
Connect the cable snake here (using the two
screws to secure it), and then connect the 1/4″
ends of the cables to their res
• Press the Variation Button so it is lit red,
and then press the 1, 2, 3, 4, or 5 Button to
select Kit 1, 2, 3, 4, or 5 (respectively).
• Press the Variation Button so it is lit green,
and then press the 1, 2, 3, 4, or 5 Button to select Kit 6, 7, 8, 9, or 10 (respectively).
• Open hi-hat: With your foot off of the pedal, hit the hi-hat pad.
• Closed hi-hat: With your foot pressing the pedal all the way down, hit the hi-hat pad.
• Pedal close: Press the hi-hat pedal all the way down without hitting the hi-hat pad.
• Splash: Quickly press the hi-hat pedal all the way down, and then release it
immediately.
ective pads.
12345
VARIATION
Features
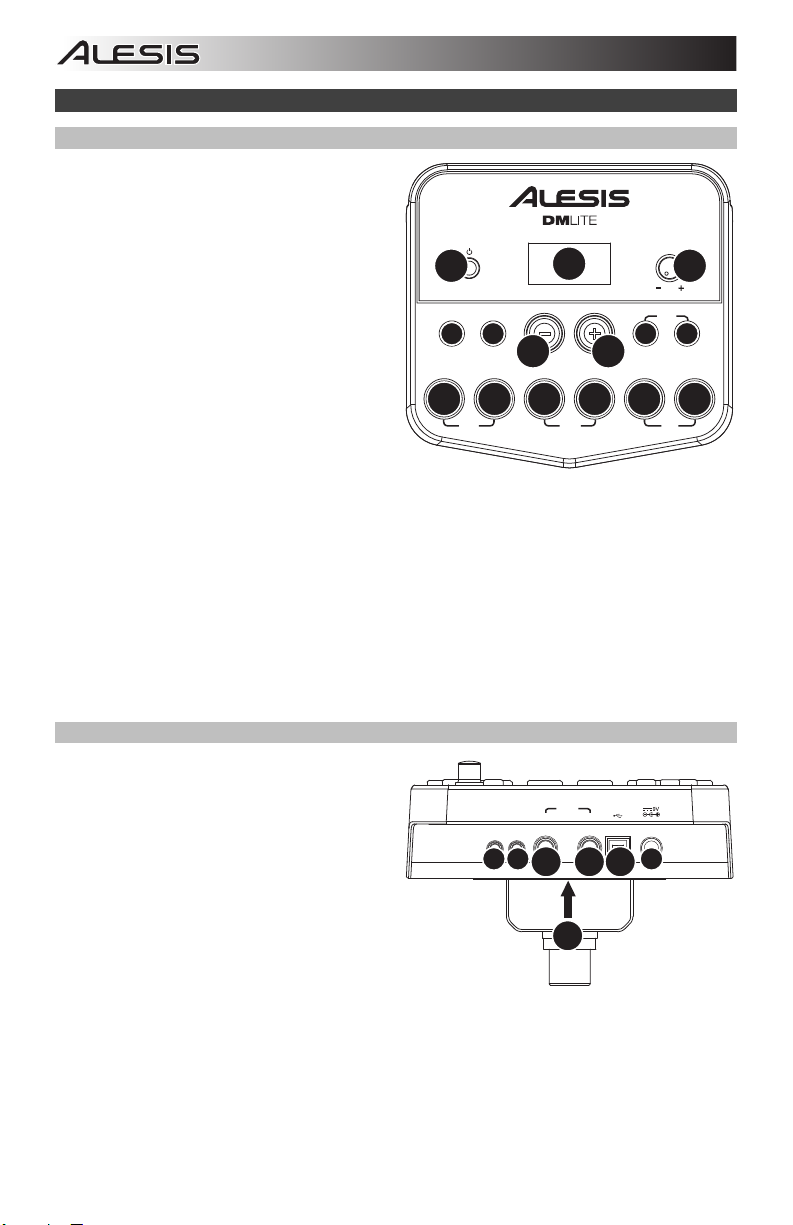
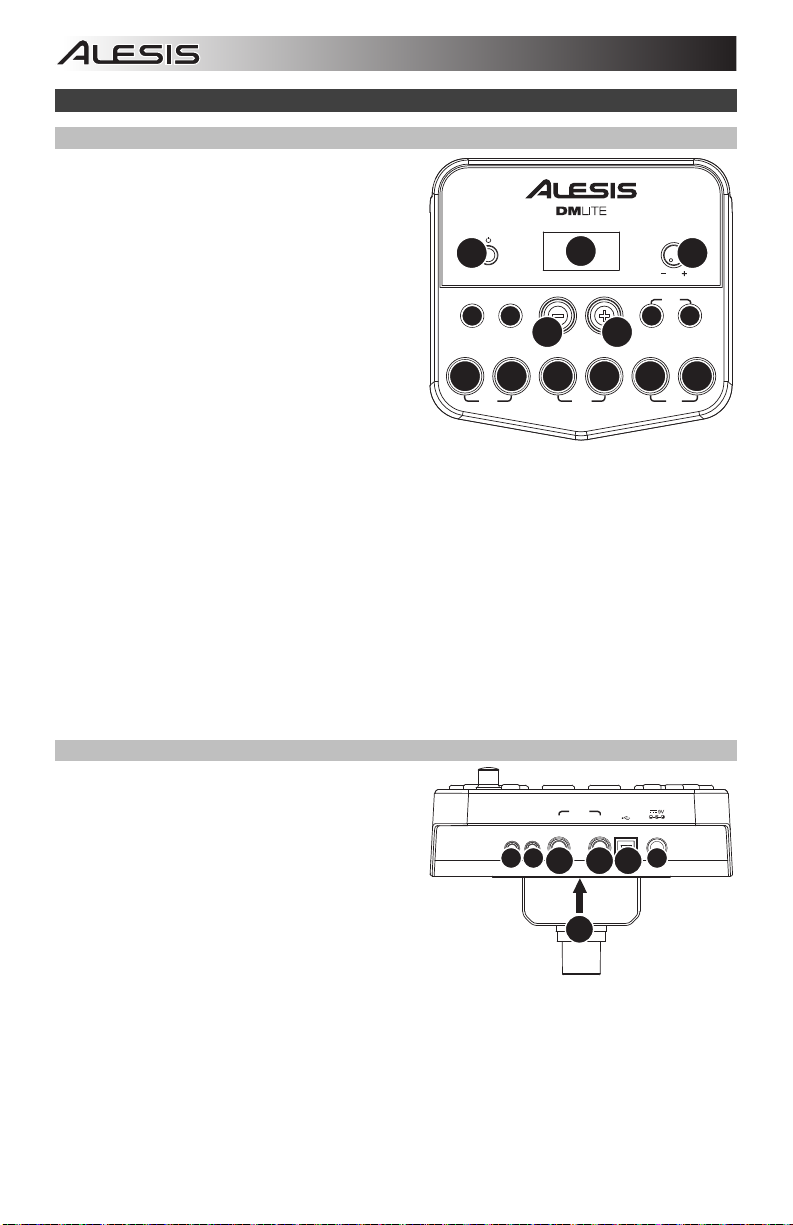
Front Panel
1. Power Button: Press this button to turn the
drum module on. Press and hold it for 2
seconds to turn the drum module off.
2. Display: This area shows values and text
relevant to the drum module’s functions and
operation.
3. Volume Knob: Turn this knob to adjust the
volume of the Main Outputs and Phones
Output.
4. – / + : Press either of these buttons to
decrease or increase the value shown in the
display.
5. Click Button: Press this button to turn the
metronome («click») on or off. See the
Using the Metronome (Click) section for
1
CLICK
5
12345
999999
SLOW
more information.
6. Start/Stop Button: Press this button to
start or stop playback of a Pattern. See the Playing Along With Patterns section for more
information.
7. Pattern Button: Press this button to enter Pattern Mode. Press both this button and the Tempo
Button simultaneously to use the Built-In Drum Coach. See the Playing Along With Patterns
and Using the Built-In Drum Coach sections for more information.
8. Tempo: Press this button to enter Tempo Mode, and use the – and + buttons to adjust the
tempo. Press both this button and the Pattern Button simultaneously to use the Built-In Drum
Coach. See the Using the Metronome (Click) and Using the Built-In Drum Coach sections
for more information.
9. 1-5/Variation Buttons: Press any one of these buttons to enter Kit Mode and select a Kit. When
using the Built-In Drum Coach, you can use these buttons to select an exercise. See the Using
Kits and Using the Built-In Drum Coach sections for more information.
Rear Panel
1. Power Jack: Use a power adapter
(included, 9 V, 500 mA, center pin-positive)
to connect this jack to your power outlet.
2. Cable Snake Connector: Connect your
cable snake (included) here, and connect
the cable snake’s cables to your kit’s
triggers (drum pads, cymbal pads, and
pedals).
3. Main Outputs: Use standard 1/4″ mono
cables (not included) to connect these
outputs to your monitor, amplifier, or PA
system. Adjust the volume with the Volume
Knob on the top panel.
4. Phones Output: Connect standard 1/8″ stereo headphones (not included) to this output. Adjust
the volume with the Volume Knob on the top panel.
5. Aux In: Use a 1/8″ stereo cable (not included) to connect an external audio device (smartphone,
CD player, etc.) to this input.
6. USB Port: Use a standard USB cable (not included) to connect your computer to this port,
allowing you to send and receive MIDI messages to and from your computer. See the Using
MIDI section for more information.
4
START
/STOP
6
PHONES
AUX IN
4
3
DRUM MODULE
2
GOOD
OUTPUT
R
2
4
USB
L/MONO
36
7
PATTERN
VOLUME
3
COACH
8
TEMPO
VARIATION
FAST
145
Using the Module
Using Kits
Selecting a Kit
To select one of the module’s 10 preset Kits, do one of the following:
• With the Variation Button lit red, press the 1,
2, 3, 4, or 5 Button to select Kit 1, 2, 3, 4, or
5 (respectively).
• With the Variation Button lit green, press the
1, 2, 3, 4, or 5 Button to select Kit 6, 7, 8, 9,
or 10 (respectively).
The Kit number will appear in the display. Once you have selected a Kit, you can select others
by repeating one of the steps above or by using the – and + Buttons.
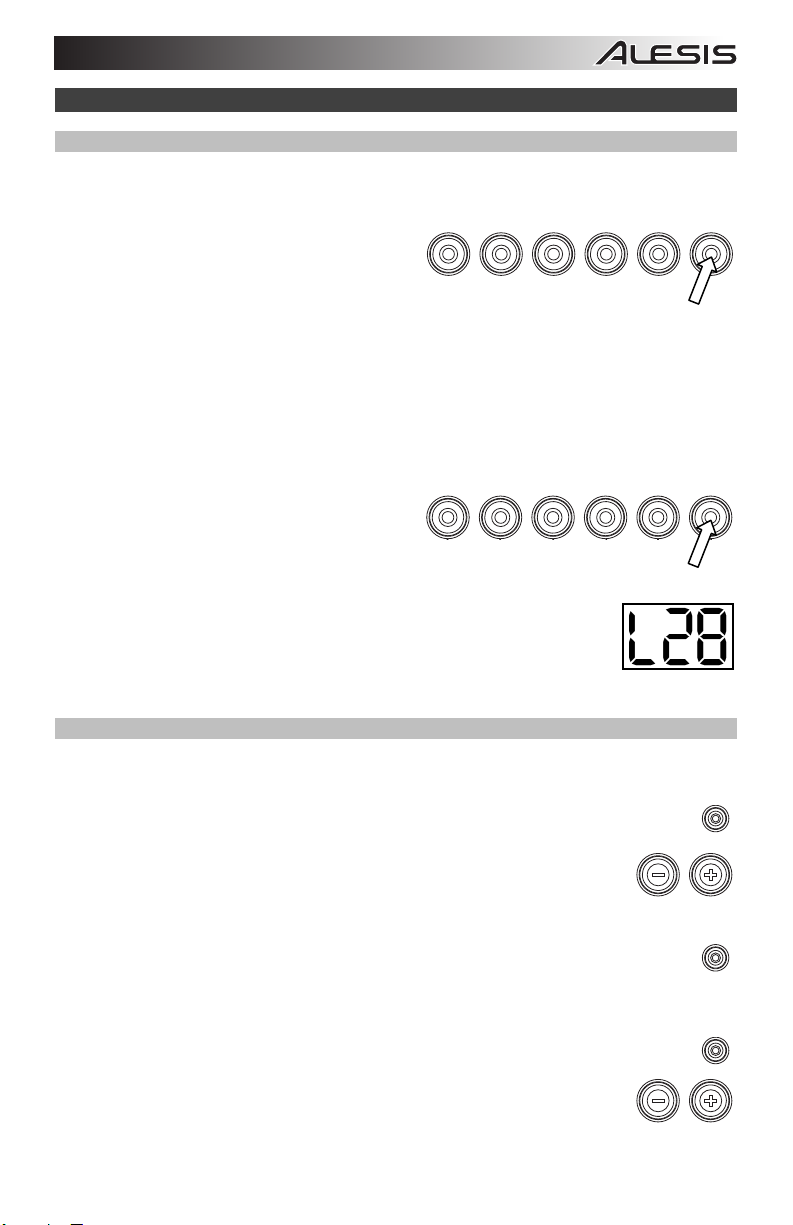
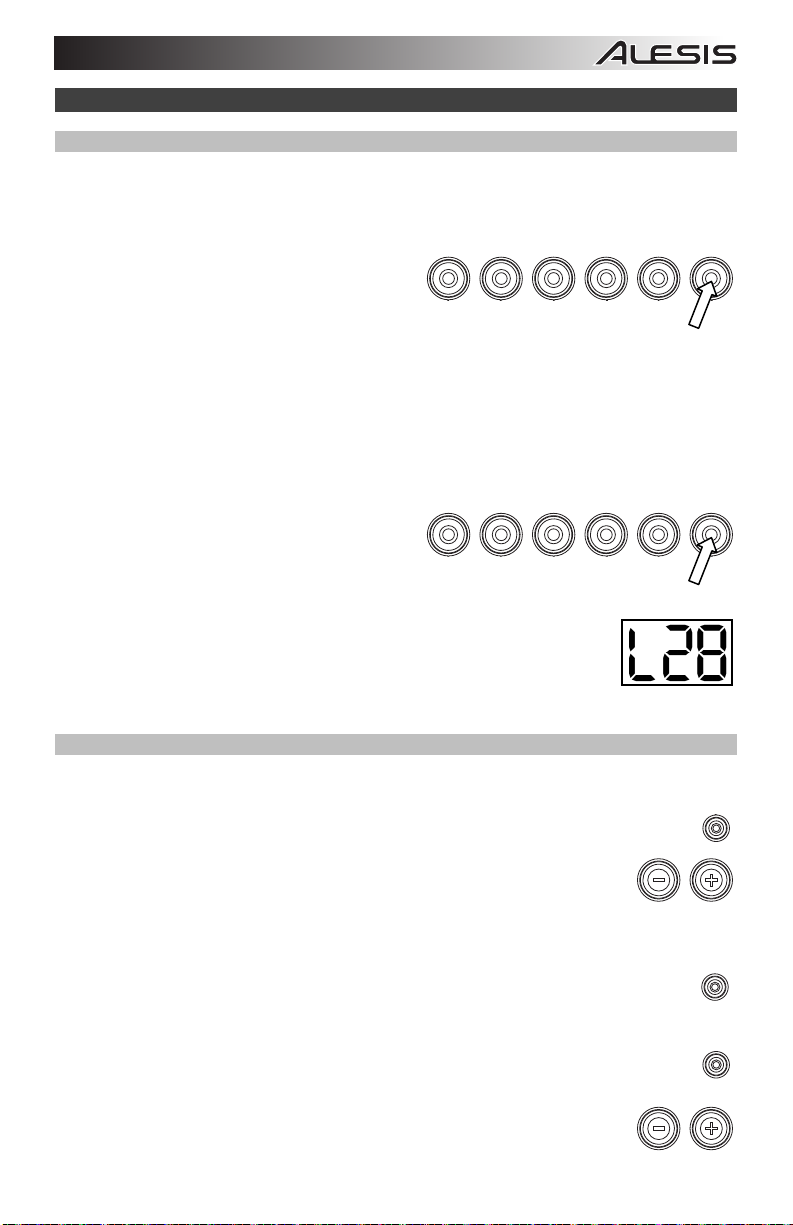
Adjusting Kit Volumes
To adjust the volume of each separate Kit:
1. Do one of the following:
• With the Variation Button lit red,
double-press the 1, 2, 3, 4, or 5 Button
to select Kit 1, 2, 3, 4, or 5
(respectively).
• With the Variation Button lit green,
double-press the 1, 2, 3, 4, or 5 Button to select Kit 6, 7, 8, 9, or 10 (respectively).
2. The display will show an L («level») and the volume level (00 – 32). Use
the – or + Buttons to set the Kit’s volume level. (The default volume
level is 28.)
3. Wait for 4 seconds. The drum module will automatically save the new
setting.
Playing Along With Patterns
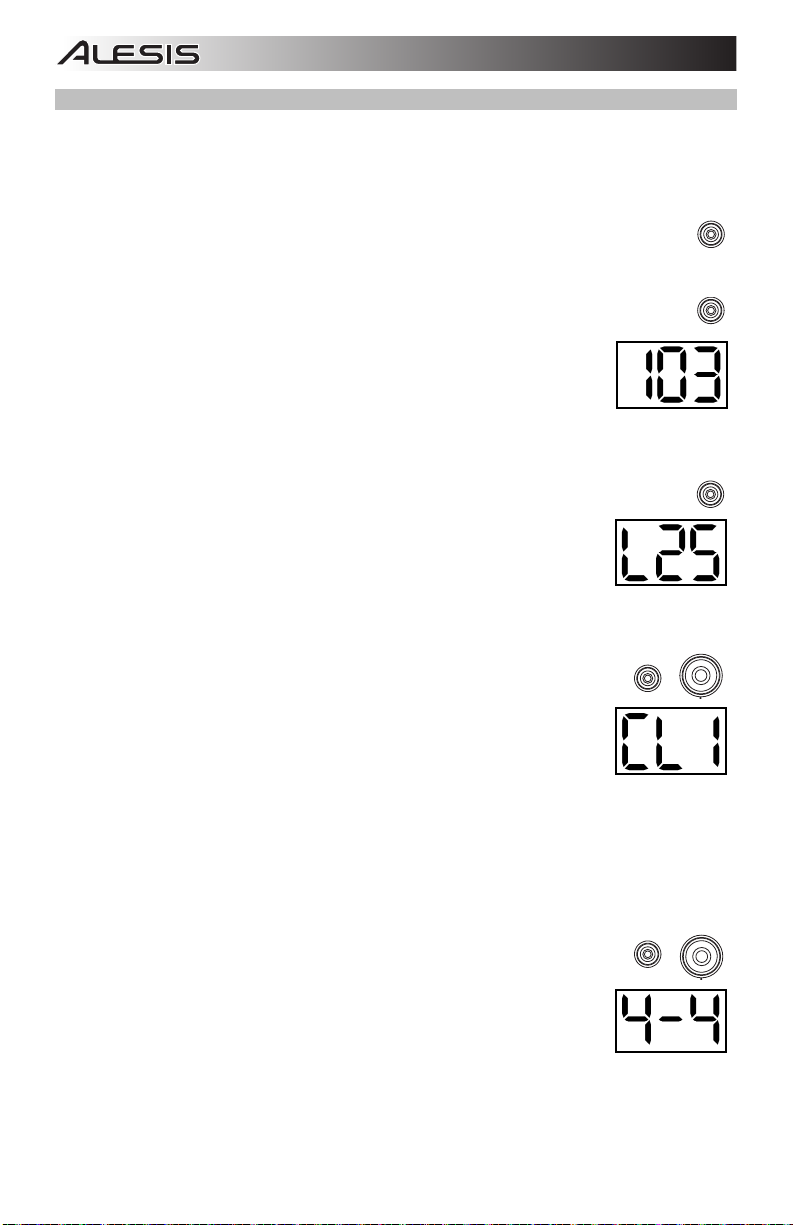
Selecting and Playing a Pattern
To select one of the 30 preset Patterns:
1. Press the Pattern Button to enter Pattern Mode. The button’s LED will light up, and
the display will show the current Pattern’s number.
2. Use the – or + buttons to select a Pattern. (You can hold down the – or +
buttons to scan quickly through the list.)
3. Press the Start/Stop Button to start the Pattern’s playback.
4. Play along to the Pattern!
5. Press the Start/Stop Button to stop the Pattern’s playback.
Adjusting the Pattern Volume
To adjust the volume of each separate Pattern:
1. Double-press the Pattern Button.
2. The display will show the volume level (00 – 32). Use the – or + Buttons
to set the Pattern’s volume level. (The default volume level is 25.)
12345
12345
VARIATION
VARIATION
PATTERN
START
/STOP
PATTERN
5

Using the Metronome (Click)
You can use the built-in metronome («click») to help you keep time while practicing with the
Built-In Drum Coach or with Patterns. You can change the metronome’s tempo (speed),
volume, sound, and time signature.
Turning the Metronome On or Off
To turn the metronome on or off, press the Click button.
Adjusting the Metronome Tempo
To adjust the metronome’s tempo (speed):
1. Press the Tempo Button.
2. The display will show the current tempo (30 – 280) in BPM («beats per
minute»). Use the – or + Buttons to set the new tempo.
3. Wait for 4 seconds. The drum module will automatically save the new
setting.
Adjusting the Metronome Volume
To adjust the metronome’s volume:
1. Double-press the Click Button.
2. The display will show an L («level») and the volume level (00 – 32). Use
the – or + Buttons to set the metronome’s volume level. (The default
volume level is 25.)
3. Wait for 4 seconds. The drum module will automatically save the new
setting.
Changing the Metronome Sound
To change the metronome’s «click» sound:
1. Press the Click Button and 1 Button simultaneously.
2. The display will show CL («click») and the number of the sound (CL1 –
CL5). Use the – or + Buttons to set the metronome sound:
• CL1: Chime and click (default)
• CL2: Clave
• CL3: Side-stick
• CL4: Cowbell
• CL5: Vocal
3. Wait for 4 seconds. The drum module will automatically save the new setting.
Changing the Metronome Time Signature
To change the metronome’s time signature:
1. Press the Click Button and 2 Button simultaneously.
2. The display will show the current time signature. Use the – or + Buttons
to select a time signature: 1/2, 2/2, 3/4, 4/4, or 6/8.
3. Wait for 4 sec
onds. The drum module will automatically save the new
setting.
CLICK
CLICK
CLICK
TEMPO
CLICK
1
2
6
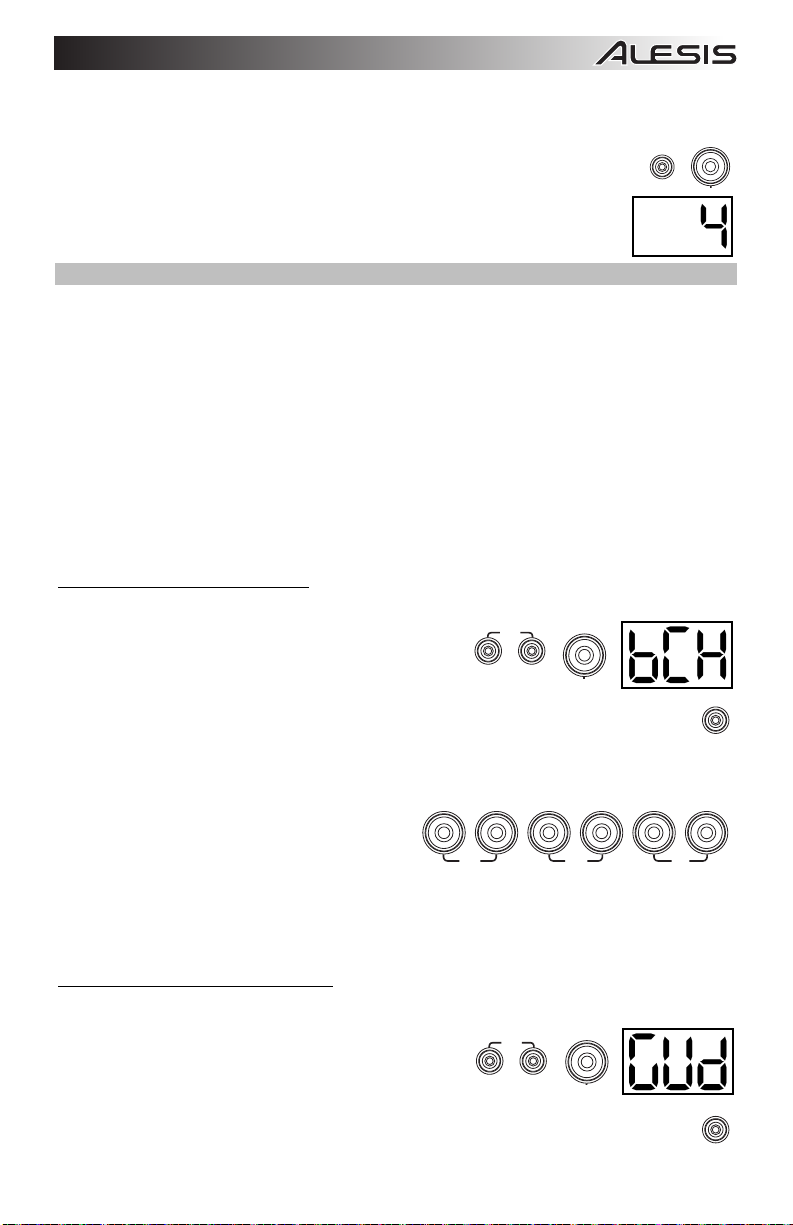
Changing the Metronome Interval
To change the metronome’s note division (the note value it measures with each click):
1. Press the Click Button and 3 Button simultaneously.
3
CLICK
2. The display will show the current interval. Use the – or + Buttons to
select a new interval: 2 (half note), 3 (triplet), 4 (quarter note), 6
(sextuplet), 8 (eighth note), or 16 (sixteenth note). (The default is 4.)
3. Wait for 4 seconds. The drum module will automatically save the new
setting.
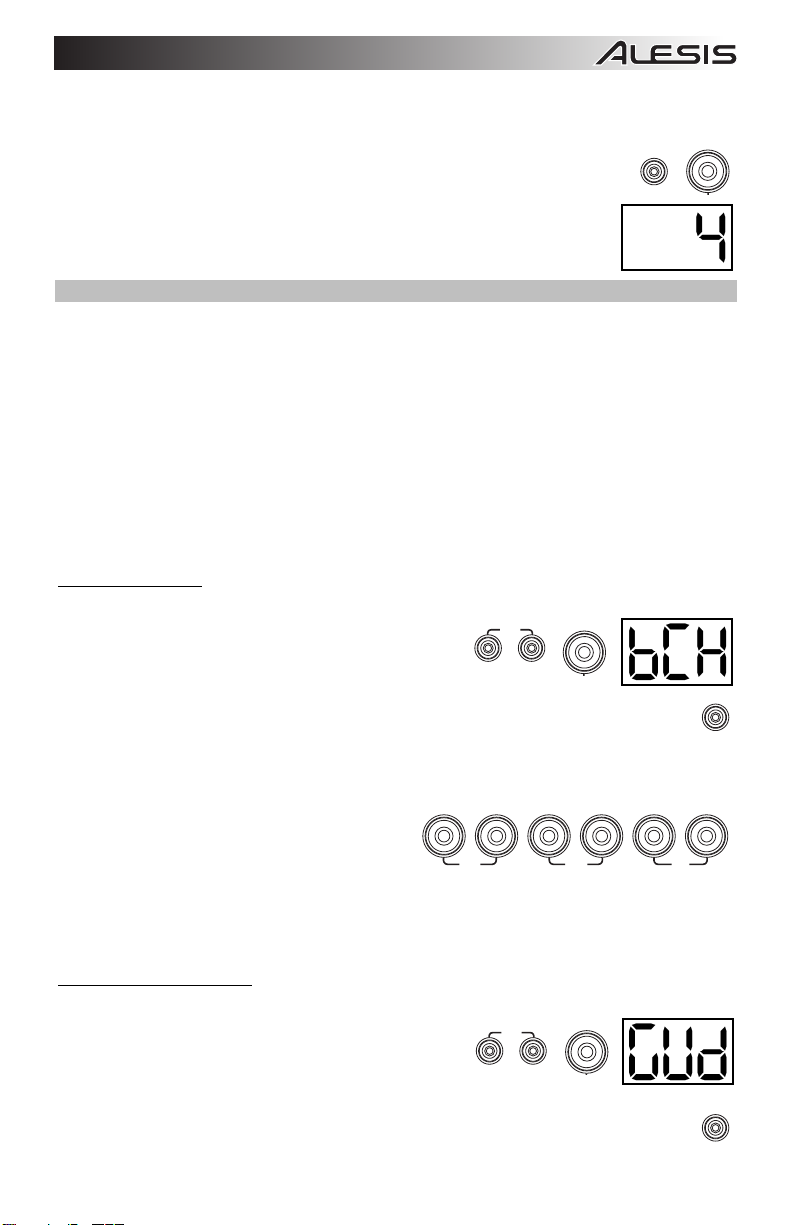
Using the Built-In Drum Coach
The Built-In Drum Coach contains five different exercises to help you develop and improve a sense of
tempo, accuracy, or stamina: Beat Check, Gradual Up/Down, Rhythm Change Up, Follow Me, and
Drum Mute.
To use the Built-In Drum Coach, press the Pattern Button and Tempo Button at the same time.
Then, press the 1, 2, 3, 4, or 5 Button that corresponds to the exercise you want to do. The display
will show which exercise you have selected.
1. Beat Check (bCH)
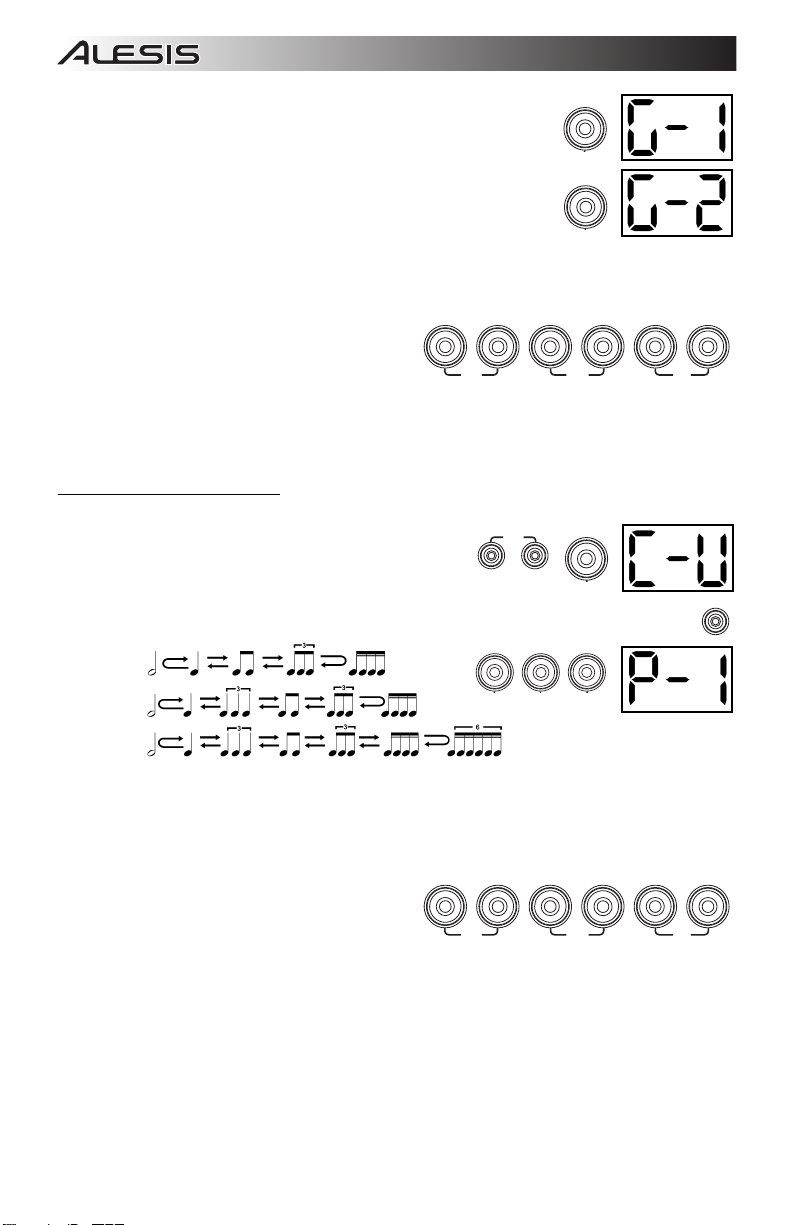
2. Gradual Up/Down (GUd)
3. Rhythm Change Up (C-U)
4. Follow Me (FLo)
5. Drum Mute (d-U)
Using Beat Check
This exercise evaluates your sense of time and how accurately you play along with the metronome.
To use Beat Check:
1
1. Press the Pattern Button and Tempo Button at the
same time, and then press the 1 Button.
2. Set the metronome’s time signature and interval
(described in the Using the Metronome (Click) section).
START
/STOP
3. Press the Start/Stop Button to begin.
4. Hit the pads in time with the metronome. The six LEDs of the 1-5/Variation Buttons indicate how
accurate (how «on time») you are.
• When you are right on the beat, the 3
and 4 Button light up.
12345VARIATION
• When you are slightly off the beat, the 2
or 5 Button will light up.
• When you are off the beat, the 1 or
SLOW
GOOD
FAST
Variation Button will light up.
• When you are completely off the beat,
no buttons will light up.
5. Press the Start/Stop Button to stop.
Using Gradual Up/Down
Gradual Up/Down evaluates how quickly you can play while still maintaining accurate time.
To use Gradual Up/Down:
1. Press the Pattern Button and Tempo Button at the
same time, and then press the 2 Button.
2. Set the metronome’s time signature and interval
(described in the Using the Metronome (Click) section).
3. Press the Start/Stop Button.
2
START
/STOP
7
4. Do one of the following:
1
• Press the 1 Button to select G-1 Mode. In this mode, the
tempo automatically decreases or increases by 5 BPM every
4 measures, depending on your accuracy.
• Press the 2 Button to select G-2 Mode. In this mode, the
2
tempo automatically decreases or increases by 1 BPM each
measure. (The starting tempo is your metronome’s current
setting.)
5. Hit the pads in time with the metronome. The six LEDs of the 1-5/Variation Buttons indicate how
accurate (how «on time») you are.
• When you are right on the beat, the 3
and 4 Button light up.
• When you are slightly off the beat, the 2
12345
VARIATION
or 5 Button will light up.
• When you are off the beat, the 1 or
Variation Button will light up.
SLOW
GOOD
FAST
• When you are completely off the beat,
no buttons will light up.
6. Press the Start/Stop Button to stop.
Using Rhythm Change Up
Rhythm Change Up helps you practice changing rhythms while still maintaining accurate time.
To use Rhythm Change Up:
1. Press the Pattern Button and Tempo Button at the
same time, and then press the 3 Button.
2. Press the Start/Stop Button.
3. Press the 1, 2, or 3 Button, or use the – and + Buttons to select a rhythmic progression,
shown below:
P-1:
123
3
START
/STOP
P-2:
P-3:
4. Press the Start/Stop Button to begin.
5. Hit the pads in the rhythm you selected (above) and in time with the metronome (the starting
tempo is your metronome’s current setting). The six LEDs of the 1-5/Variation Buttons indicate
how accurate (how «on time») you are:
• When you are right on the beat, the 3
and 4 Button light up.
• When you are slightly off the beat, the 2
12345
or 5 Button will light up.
• When you are off the beat, the 1 or
Variation Button will light up.
SLOW
GOOD
• When you are completely off the beat,
no buttons will light up.
The display will show your score:
• 0 – 29: OK
• 30 – 59: Good
• 60 – 79: Very Good
• 80 – 100: Excellent
8
VARIATION
FAST
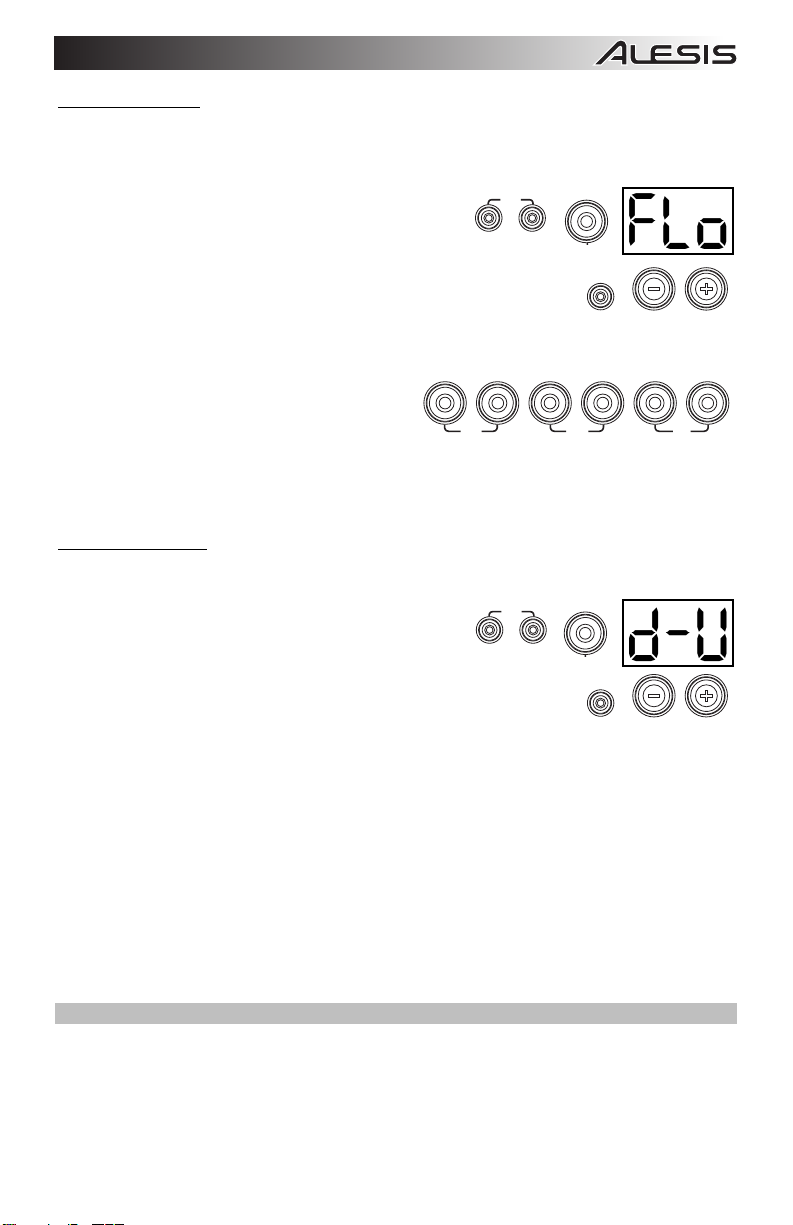
Using Follow Me
Follow Me helps you practice identifying different drums by their sound and memorizing drum
rhythms that use the entire drum kit. In this exercise, a drum loop will repeat, alternating
between (1) the drum pattern itself and (2) a metronome track of the same length during which
you play the drum pattern yourself.
To use Follow Me:
4
1. Press the Pattern Button and Tempo Button at the
same time, and then press the 4 Button.
2. Press the Start/Stop Button.
3. Use the – and + Buttons to select the drum pattern you want to
START
/STOP
play to.
4. Press the Start/Stop Button to begin.
5. When you hear the drum pattern, try to
learn which pads are being played and
when. During the metronome track that
12345
follows, play the same drum pattern in time
with the metronome. For reference, the
display will show the current beat. The six
SLOW
GOOD
LEDs of the 1-5/Variation Buttons indicate
how accurate you are.
6. Press the Start/Stop Button to stop.
Using Drum Mute
Drum Mute lets you silence certain parts of various drum patterns, allowing you to play freely
and create your own parts over the rest of the drum pattern.
To use Drum Mute:
5
1. Press the Pattern Button and Tempo Button at the
same time, and then press the 5 Button.
2. Press the Start/Stop Button.
3. Use the – and + Buttons to select the drum pattern you want to
START
/STOP
play to.
4. Press one or several of the 1-5/Variation Buttons to select the sound or sounds you want
to mute:
• 1: Kick drum
• 2: Snare drum
• 3: Hi-hat
• 4: Toms
• 5: Crash and ride cymbals
• Variation: Percussion
5. Press the Start/Stop Button to begin.
6. Play freely along with the drum pattern you hear. The drum pattern will not include any
sounds you muted in Step 4, allowing you to create your own part.
7. Press the Start/Stop Button to stop.
Automatic Power-Off
To save energy, the drum module will power off automatically after 30 minutes of no activity. If
you do not need this feature, disable it by powering off the drum module, and then pressing and
holding the Start/Stop Button while powering it back on. PoF will appear on the display to
confirm the feature is off.
Note: After powering off, this feature will be re-enabled. Repeat the procedure above to disable
it each time you power on the module.
9
VARIATION
FAST
Using MIDI
About MIDI
MIDI (Musical Instrument Digital Interface) is a standard way in which certain electronic musical devices can
communicate with each other. When two MIDI devices are connected, they can send/receive MIDI
«messages,» «data,» or «information» over either a 5-pin MIDI cable or a standard USB cable (depending on
the available ports on the devices).
In the case of the DM Lite module, you can connect its USB port to a USB port on your computer with a
standard USB cable (sold separately). All MIDI messages will travel to and from your computer over this
connection. This allows you to do one of two things:
• Use an electronic drum kit connected to the drum module to trigger sounds on an external MIDI device
(e.g., a sequencer, your computer if you use software that can receive MIDI notes, etc.). See
Triggering Sounds on an External MIDI Device later in this section.
• Use an external MIDI device to play sounds in the drum module. See Using the Drum Module as the
Sound Module later in this section.
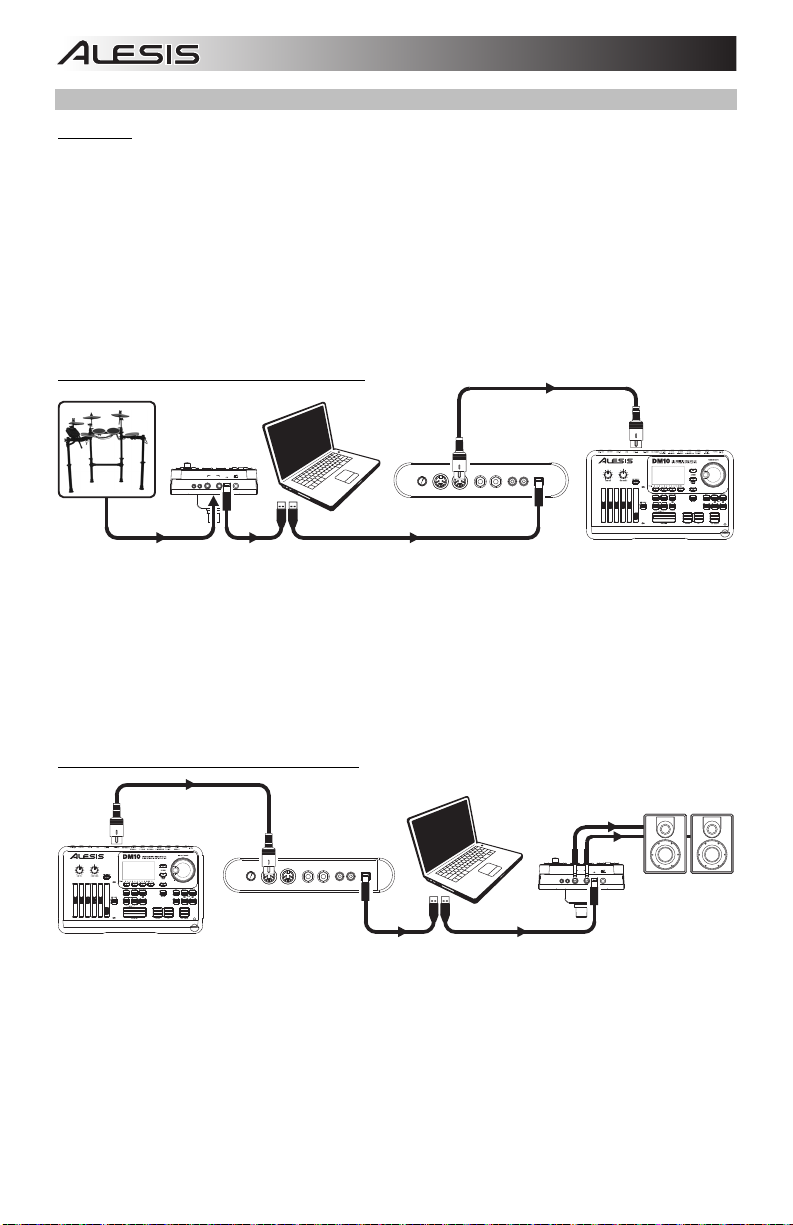
Triggering Sounds on an External MIDI Device
OUTPUT
PHONES
AUX IN
USB
L/MONO
R
1. Using a standard USB cable (not included), connect the drum module’s USB port to a USB port on your
MIDI INVOL MIDI OUT R L R L USB
computer.
2. If you are triggering sounds in software, skip to the next step.
If you are triggering sounds in an external MIDI device, make sure that device is connected to your
computer (either directly via USB or through a USB-MIDI interface).
3. Set the active track of your MIDI software, sequencer, etc. to Channel 10, and start recording.
4. Play your electronic drum kit. The MIDI information will be sent to your computer, sequencer, etc. See
the Trigger MIDI Notes section of this manual’s Appendix for a list of the MIDI notes sent out by each
trigger.
5. Stop recording.
Using the Drum Module as the Sound Module
MIDI INVOL MIDI OUT R L R L USB
1. Using a standard USB cable (not included), connect the drum module’s USB port to a USB port on your
OUTPUT
PHONES
AUX IN
USB
L/MONO
R
computer.
2. If you are using software to play the drum module’s sounds, skip to the next step.
If you are using an external MIDI device to play the drum module’s sounds, make sure that device
is connected to your computer (either directly via USB or through a USB-MIDI interface).
3. Set the the active track of your MIDI software, sequencer, etc. to the desired channel (1-16).
Note: Channel 10 of the drum module is reserved for drum sounds.
4. Play your sequencer or other external device to hear the drum module’s internal sounds.
5. See the Presets and General MIDI (GM) sections of this manual’s Appendix for lists of the available
sounds.
10
Guía del usuario (Español)
Soporte
Para obtener información completa sobre requisitos del sistema, compatibilidad y registro del
producto, visite el sitio web de Alesis: alesis.com.
Para obtener la información más completa acerca de este producto, visite alesis.com/dmlitekit.
Para soporte adicional del producto, visite alesis.com/support.
Inicio rápido
Conexión del módulo de batería
Conecte aquí el multicable (usando los dos tornillos para fijarlo) y luego
conecte los extremos de 1/4 pulg. de los cables a sus pads respectivos.
Cómo seleccionar un kit
Para seleccionar uno de los 10 kits preprogramados del módulo, realice uno de los siguientes
procedimientos:
• Pulse el botón Variation de modo que se
ilumine verde y luego pulse el botón 1, 2, 3, 4 o
5 para seleccionar el kit 1, 2, 3, 4 o 5
(respectivamente).
• Pulse el botón Variation de modo que se
ilumine rojo y luego pulse el botón 1, 2, 3, 4 o 5
para seleccionar el kit 6, 7, 8, 9 o 10 (respectivamente).
El número del kit aparece en la pantalla. Una vez que haya seleccionado un kit, puede seleccionar
otros repitiendo uno de los pasos precedentes o usando los botones – y +.
Cómo tocar los pads
Si su kit de batería electrónica tiene pads sensibles a la velocidad, este módulo de batería
reproducirá sonidos de timbres variables que dependen de la fuerza con que golpee los pads. ¡Trate
de golpear los pads con fuerzas diferentes para experimentar los distintos sonidos que produce el
módulo!
Nota: El sonido del hi-hat varía en función de la posición del pedal controlador de hi-hat:
• Hi-hat abierto: Con su pie levantado del pedal, golpee el pad del hi-hat.
• Hi-hat cerrado: Con su pie presionando el pedal a fondo, golpee el pad del hi-hat.
• Cierre de pedal: Presione el pedal del hi-hat a fondo sin golpear el pad del hi-hat.
• Salpicado: Presione rápidamente el pedal del hi-hat a fondo y luego suéltelo
inmediatamente.
Aprenda más acerca del uso del módulo de batería en la sección Cómo usar el módulo de este
manual.
11
12345
VARIATION
Características
Panel frontal
1. Botón de encendido: Pulse este botón para
encender el módulo de batería. Manténgalo
pulsado 2 segundos para apagar el módulo de
batería.
2. Pantalla: Esta área muestra valores y texto
relevantes de las funciones y la operación del
módulo de batería.
3. Perilla de volumen: Gire esta perilla para
ajustar el volumen de las salidas Main
(Principal) y Phones (Auriculares).
4. – / + : Pulse alguno de estos botones para
aumentar o disminuir el valor que se muestra
en la pantalla.
1
CLICK
5
12345
999999
SLOW
5. Botón de clic: Pulse este botón para activar o
desactivar el metrónomo («clics»). Para más
información, consulte la sección Cómo usar el metrónomo (clic).
6. Botón de inicio/parada: Pulse este botón para iniciar o detener la reproducción de un patrón.
Para más información, consulte la sección Cómo tocar con acompañamiento de patrones.
7. Botón de patrón: Pulse este botón para entrar al modo de patrón. Pulse simultáneamente este
botón y el botón Tempo para usar el instructor de batería integrado. Para más información,
consulte las secciones Cómo tocar con acompañamiento de patrones y Cómo usar el
instructor de batería integrado.
8. Tempo: Pulse este botón para entrar al modo Tempo y use los botones – y + para ajustar el
tempo. Pulse simultáneamente este botón y el botón Pattern para usar el instructor de batería
integraado. Para más información, consulte las secciones Cómo usar el metrónomo (clic) y
Cómo usar el instructor de batería integrado.
9. Botones de 1-5/variación: Pulse cualquiera de estos botones para entrar al modo de kit y
seleccione un kit. Cuando usa el instructor de batería integrado, puede usar estos botones para
seleccionar un ejercicio. Para más información, consulte las secciones Cómo usar los kits y
Cómo usar el instructor de batería integrado.
Panel trasero
1. Conector hembra de alimentación: Use un
adaptador de alimentación (incluido, de 9 V,
500 mA, pin central positivo) para conectar este
conector hembra al tomacorriente.
2. Conector del multicable: Conecte aquí su
multicable (incluido) y conecte los cables del
multicable a los disparadores de su kit (pads de
tambor, pads de platillos y pedales).
3. Salidas principales: Use cables mono
estándar de 1/4 pulg. (no incluidos) para
conectar estas salidas a su monitor,
amplificador o sistema de megafonía. Ajuste el volumen con la perilla Volume del panel
superior.
4. Salida para auriculares: Conecte a esta salida auriculares estéreo estándar de 1/8 pulg. (no
incluidos). Ajuste el volumen con la perilla Volume del panel superior.
5. Entrada auxiliar: Use un cable estéreo de 1/8 pulg. (no incluido) para conectar a esta entrada
un dispositivo de audio externo (teléfono inteligente, reproductor de CD, etc.).
6. Puerto USB: Use un cable USB estándar (no incluido) para conectar su computadora este
puerto, permitiéndole enviar y recibir mensajes MIDI hacia y desde la misma. Para más
información, consulte la sección Cómo usar MIDI.
12
START
/STOP
6
PHONES
AUX IN
4
3
DRUM MODULE
2
GOOD
OUTPUT
R
2
4
USB
L/MONO
36
7
PATTERN
VOLUME
3
COACH
8
TEMPO
VARIATION
FAST
145
Cómo usar el módulo
Cómo usar los kits
Cómo seleccionar un kit
Para seleccionar uno de los 10 kits preprogramados del módulo, realice uno de los siguientes
procedimientos:
• Con el botón Variation de encendido en
12345
rojo, pulse el botón 1, 2, 3, 4 o 5 para
seleccionar el kit 1, 2, 3, 4 o 5
(respectivamente).
• Con el botón Variation de encendido en
verde, pulse el botón 1, 2, 3, 4 o 5 para seleccionar el kit 6, 7, 8, 9 o 10 (respectivamente).
El número del kit aparece en la pantalla. Una vez que haya seleccionado un kit, puede
seleccionar otros repitiendo uno de los pasos precedentes o usando los botones – y +.
Cómo ajustar los volúmenes de los kits
Para ajustar el volumen de cada kit por separado:
1. Seleccione una de los siguientes procedimientos:
• Con el botón Variation de encendido
12345
en rojo, pulse dos veces el botón 1, 2,
3, 4 o 5 para seleccionar el kit 1, 2, 3,
4 o 5 (respectivamente).
• Con el botón Variation de encendido
en verde, pulse dos veces el botón 1, 2, 3, 4 o 5 para seleccionar el kit 6, 7, 8, 9 o 10
(respectivamente).
2. La pantalla muestra una L («nivel») y el nivel de volumen (00 – 32). Use
los botones – o + para ajustar el volumen del kit. (El nivel de volumen
predeterminado es 28).
3. Espere 4 segundos. El módulo de batería guarda automáticamente el nuevo ajuste.
Cómo tocar con acompañamiento de patrones
Cómo seleccionar y tocar un patrón
Para seleccionar uno de los 30 patrones preprogramados:
1. Pulse el botón Pattern para entrar al modo de patrón. Se enciende el LED del
botón y aparece en la pantalla el número del patrón actual.
2. Use los botones – o + para seleccionar un patrón. (Puede mantener
pulsados los botones – o + para recorrer rápidamente la lista).
3. Pulse el botón Start/Stop para iniciar inmediatamente la reproducción del patrón.
4. ¡Toque con el acompañamiento del patrón!
5. Pulse el botón Start/Stop para detener inmediatamente la reproducción del
patrón.
Cómo ajustar el volumen del patrón
Para ajustar el volumen de cada patrón por separado:
1. Pulse dos veces el botón Pattern.
2. Aparece en la pantalla el nivel de volumen (00 – 32). Use los botones – o
+ para ajustar el nivel de volumen del patrón. (El nivel de volumen
predeterminado es 25).
13
VARIATION
VARIATION
PATTERN
START
/STOP
PATTERN
Cómo usar el metrónomo (clic)
Puede usar el metrónomo integrado («clic») para ayudarle a mantener el tiempo cuando
practica con el instructor de batería integrado o con patrones. Puede cambiar el tempo
(velocidad), el volumen, el sonido y la firma de tiempo del metrónomo.
Cómo activar y desactivar el metrónomo
Para activar o desactivar el metrónomo, pulse el botón Click.
Cómo ajustar el tempo del metrónomo
Para ajustar el tempo (velocidad) del metrónomo:
1. Pulse el botón Tempo.
2. Aparece en la pantalla el tempo actual (30 – 280) en BPM («beats por
minuto»). Use los botones – o + para ajustar el nuevo tempo.
3. Espere 4 segundos. El módulo de batería guarda automáticamente el
nuevo ajuste.
Cómo ajustar el volumen del metrónomo
Para ajustar el volumen del metrónomo:
1. Pulse dos veces el botón Click.
2. La pantalla muestra una L («nivel») y el nivel de volumen (00 – 32).
Use los botones – o + para ajustar el volumen del metrónomo. (El
nivel de volumen predeterminado es 25).
3. Espere 4 segundos. El módulo de batería guarda automáticamente el
nuevo ajuste.
Cómo cambiar el sonido del metrónomo
Para cambiar el sonido «clic» del metrónomo:
CLICK
1. Pulse simultáneamente los botones Click y 1.
2. Aparece en la pantalla CL («clic») y el número del sonido (CL1 – CL5).
Use los botones – o + para ajustar el sonido del metrónomo.
• CL1: Carrillón y clic (predeterminado)
• CL2: Clave
• CL3: Baqueta lateral
• CL4: Cencerro
• CL5: Vocal
3. Espere 4 segundos. El módulo de batería guarda automáticamente el nuevo ajuste.
Cómo cambiar la firma de tiempo del metrónomo
Para cambiar la firma de tiempo del metrónomo:
CLICK
1. Pulse simultáneamente los botones Click y 2.
2. Aparece en la pantalla la firma de tiempo actual. Use los botones – o +
para seleccionar una firma de tiempo. 1/2, 2/2, 3/4, 4/4 o 6/8.
3. Espere
4 segundos. El módulo de batería guarda automáticamente el
nuevo ajuste.
CLICK
TEMPO
CLICK
1
2
14
Cómo cambiar el intervalo del metrónomo
Para cambiar la división de notas (el valor de la nota que mide con cada clic) del metrónomo:
1. Pulse simultáneamente los botones Click y 3.
2. Aparece en la pantalla el intervalo actual. Use los botones – o + para
CLICK
seleccionar un nuevo intervalo. 2 (blanca), 3 (tresillo), 4 (negra), 6 (seisillo), 8
(corchea), or 16 (semicorchea). (El valor predeterminado es 4).
3. Espere 4 segundos. El módulo de batería guarda automáticamente el nuevo
ajuste.
Cómo usar el instructor de batería integrado
El instructor de batería integrado contiene cinco ejercicios diferentes para ayudarle a desarrollar y
mejorar el sentido de tiempo, precisión o fibra: Beat Check (Chequeo del beat), Gradual Up/Down
(Arriba/abajo gradual), Rhythm Change Up (Cambio de ritmo ascendente), Follow Me (Sígame) y
Drum Mute (Silencio de batería).
Para usar el instructor de batería integrado, pulse simultáneamente los botones Pattern y Tempo.
Luego, pulse el botón 1, 2, 3, 4 o 5 que corresponde al ejercicio que desea realizar. Aparece en la
pantalla el ejercicio que seleccionó.
1. Chequeo del beat (bCH)
2. Arriba/abajo gradual (GUd)
3. Cambio ascendente de ritmo (C-U)
4. Sígame (FLo)
5. Silencio de batería (d-U)
Cómo usar el chequeo del beat
Este ejercicio permite evaluar su sentido del tiempo y con qué precisión toca acompañado por el
metrónomo.
1
Para usar el chequeo del beat:
1. Pulse simultáneamente los botones Pattern y Tempo
y luego pulse el botón 1.
2. Ajuste la firma de tiempo y el intervalo del metrónomo (según se explica en la sección
Cómo usar el metrónomo (clic)).
3. Pulse el botón Start/Stop para comenzar.
4. Golpee los pads al ritmo del metrónomo. Los seis LED de los botones 1-5/Variation indican
cuán preciso («a tiempo») va usted.
• Cuando está bien en el beat, se
12345VARIATION
encienden los botones 3 y 4.
• Cuando está ligeramente fuera del beat,
se encienden los botones 2 o 5.
SLOW
GOOD
• Cuando está fuera del beat, se
enciende el botón 1 o Variation.
• Cuanto está completamente fuera del beat, no se enciende ningún botón.
5. Pulse el botón Start/Stop para parar.
Cómo usar el arriba/abajo gradual
El ejercicio arriba/abajo gradual permite evaluar cuán rápidamente puede tocar mientras mantiene un
tiempo preciso.
Para usar el arriba/abajo gradual:
1. Pulse simultáneamente los botones Pattern y Tempo
y luego pulse el botón 2.
2. Ajuste la firma de tiempo y el intervalo del metrónomo
(según se explica en la sección Cómo usar el metrónomo (clic)).
3. Pulse el botón Start/Stop.
15
2
3
START
/STOP
FAST
START
/STOP
Loading…
Электронные ударные ALESIS DM LITE KIT руководство по сборке(soundmain.ru).pdf
-
245
Количество просмотров
-
Vocal Remover
Преобразуйте музыкальные треки: изолируйте вокал, создавайте инструментальные композиции с помощью и
- SoundMain
- Обновлено:
-
Пошаговое создание Future House трека с нуля в FL Studio 20 (2019)
Ты возьмешь на вооружение ВСЕ ФИШКИ И ПРИНЦИПЫ в создании первого по популярности танцевального жанр
- SoundMain
- Обновлено:
-
PDF Насретдинов А. Физика и анатомия музыки
Первая часть книги рассказывает о физических характеристиках звука. Что такое обертоны, гармоники…
- SoundMain
- Обновлено:
-
PDF Пономарёв Валерий. На обратной стороне звука
Джазовые легенды Москвы 60-х… Джазовые легенды Америки 70-х…
- SoundMain
- Обновлено:
-
Pop Music Made in Småland
Music Production and Entrepreneurship in Sweden (Pop Music, Culture and Identity)
- SoundMain
- Обновлено:
Box Contents
Contenido de la caja
Contenu de la boîte
Contenuti della confezione
Lieferumfang
A
C
(Kick
Pedal)
B
D
(Hi-Hat
Pedal)
Connection Diagram
Schéma de connexion
Anschlussübersicht
B
IMPORTANT:
• Connect the cable snake to the rear of the module (using the two screws to secure it), and then connect the 1/4″ ends of the cables to their respective pads. Use the included
power adapter (B) to connect the module to a power outlet.
• Turn on your speaker system or connect your headphones last (and with the volumes at «zero»), after you have made all necessary cable connections and turned on the
drum module.
• To learn how to use the DM Lite drum module with your kit, please see the included User Guide.
IMPORTANTE:
• Conecte el multicable a la parte trasera del módulo (usando los dos tornillos para fijarlo) y luego conecte los extremos de 1/4 pulg. de los cables a sus pads respectivos. Use
el adaptador de alimentación incluido (B) para conectar la unidad a un tomacorriente.
• Encienda el sistema de altavoces o conecte sus auriculares en último término (y con los volúmenes en «cero»), después de que haya hecho todas las conexiones de cables
necesarias y encendido el módulo de batería.
• Para saber cómo usar el módulo de batería DM Lite con su kit, consulte la Guía del usuario incluida.
IMPORTANT :
• Branchez le câble multipaire à l’arrière du module (en utilisant les deux vis pour le fixer), puis branchez les extrémités 6,35 mm (¼ po) des câbles à leurs pads respectifs.
Utilisez le câble d’alimentation inclus (B) pour brancher le module dans une prise d’alimentation.
• Ne mettre le système de sonorisation ou le casque d’écoute sous tension qu’en dernier (et assurez-vous que les niveaux sont à « zéro ») et uniquement après avoir fait tous
les raccordements de connexion et après avoir mis sous tension le module de percussion.
• Pour savoir comment utiliser le module de percussion DM Lite avec votre ensemble de batterie, veuillez consulter le Guide d’utilisation inclus.
IMPORTANTE:
• Collegare il fascio di cavi alla parte posteriore del modulo (servendosi delle due viti per fissarlo), quindi collegare i capi da 1/4″ dei cavi ai rispettivi pad. Servirsi dell’adattatore
di alimentazione (B) in dotazione per collegare il modulo ad una presa elettrica funzionante.
• Accendere il sistema di altoparlanti o collegare le cuffie per ultimi (e con il volume su «zero»), dopo aver effettuato tutti i necessari collegamenti dei cavi e aver acceso il
modulo di batteria.
• Per imparare a utilizzare il modulo batteria DM Lite con il kit, si veda la Guida per l’uso inclusa.
WICHTIG:
• Verbinden Sie die Kabelschlange mit der Rückseite des Moduls (verwenden Sie die beiden Schrauben zur Fixierung). Verbinden Sie anschließend die 1/4″-Enden der Kabel
mit den jeweiligen Pads. Verwenden Sie den mitgelieferten Adapter (B), um das Modul mit einer Steckdose zu verbinden.
• Zum Schluss schalten Sie Ihr Lautsprechersystem oder Ihre Kopfhörer ein (bei Lautstärke «Null») -und zwar erst nachdem Sie alle notwendigen Kabelverbindungen
hergestellt und das Drum-Modul eingeschaltet haben.
• Um zu erfahren, wie das DM Lite Drum-Modul mit Ihrem Kit zu verwenden ist, lesen Sie bitte das mitgelieferte Handbuch.
Diagrama de conexión
Schema dei collegamenti
ride
crash
hi-hat
tom 1
tom 2
snare
hi-hat
kick
control
alesis.com
Manual Version 1.1
tom 3
1
A
Remove the kit from the box and stand it upright.
Extraiga el kit de la caja y colóquelo en posición vertical.
Retirez l’ensemble de la boîte et positionnez-le de façon à ce
qu’il tienne debout.
Rimuovere il set dalla confezione e collocarlo in posizione
eretta.
Entfernen Sie das Kit aus der Box und stellen es senkrecht hin.
4
Assembly Guide
Guida di montaggio
2
Loosen the wingnuts on the three cymbal «boom» arms, raise the
cymbal arms, and tighten the wingnuts to secure them in place.
Afloje las tuercas mariposa de los tres brazos de platillos, levante
los brazos y apriete las tuercas mariposa para fijarlos en su
posición.
Dévissez les écrous à oreilles sur les trois tiges de cymbale,
relevez les tiges, puis resserrez les écrous afin de bien les fixer en
place.
Allentare i dadi a farfalla a livello dei tre bracci a giraffa dei piatti,
sollevare i bracci stessi e stringere i dadi a farfalla per fissarli in
posizione.
Lösen Sie die Flügelmuttern an den drei Becken-Schwenkarmen,
heben Sie die Beckenarme an und ziehen die Flügelmuttern fest,
um sie zu fixieren.
Loosen the wingnuts securing the four drum pads to the rack, turn the drum pads so they face upward, and
tighten the wingnuts again to secure them in place.
Afloje las tuercas de mariposa que fijan los cuatro pads de tambor al bastidor, gire los pads de forma que
miren hacia arriba y apriete nuevamente las tuercas de mariposa para fijarlos en su sitio.
Desserrer les écrous à oreilles qui retiennent les quatre pads sur le support, tournez les pads afin qu’ils
soient face vers le haut et resserrez les écrous à oreilles pour les fixer en place.
Allentare i dadi a farfalla che fissano i quattro pad batteria al rack, girare i pad in modo che siano rivolti
verso l’alto e stringere nuovamente i dadi per fissarli in posizione.
Lösen Sie die Flügelmuttern, mit denen die vier Drum-Pads am Rack fixiert sind. Drehen Sie die Drum-
Pads, so dass sie nach oben zeigen und ziehen die Flügelmuttern wieder an, um sie zu befestigen.
Guía de armado
Guide de montage
Montageanleitung
3
5
Open the four clamps near the tops of the rack legs, raise the upper part of the rack to an appropriate height, and close the clamps again to secure the
rack in place. Make any other adjustments to the rack, drum pads, or cymbal pads/arms so all of the pads are within reach. See the Connection
Diagram on the opposite page to connect the pads to the module.
Abra las cuatro abrazaderas que están cerca de las partes superiores de las patas del bastidor, levante la parte superior del bastidor hasta una altura
apropiada y cierre nuevamente las abrazaderas para fijar el bastidor en su sitio. Realice todos los demás ajustes del bastidor, los pads de tambor o los
pads/brazos de platillos, de modo que todos los pads queden a su alcance. Consulte el Diagrama de conexión de la página opuesta para conectar los
pads al módulo.
Ouvrez les quatre bagues près du sommet des pieds du support, soulevez la partie supérieure à la hauteur appropriée et refermez les bagues pour fixer
le support en place. Effectuez tous les autres ajustements nécessaires au support, aux pads de batterie, pads ou tiges de cymbale afin que tous les pads
soient à portée de main. Consultez le Schéma de connexion sur la page opposée pour raccorder les pads au module.
Aprire i quattro morsetti accanto alle parti superiori delle gambe del rack, alzare la parte superiore del rack all’altezza adeguata e chiudere nuovamente i
morsetti per fissarlo in posizione. Effettuare tutte le regolazioni necessarie a livello di rack, pad batteria o pad piatti/bracci, in modo che tutti i pad siano a
portata. Si veda lo Schema dei collegamenti nella pagina accanto per collegare i pad al modulo.
Öffnen Sie die oberen vier Klemmen der Rack-Beine, heben Sie den oberen Teil des Racks auf eine geeignete Höhe und schließen die Klemmen erneut,
um das Rack zu fixieren. Verstellen Sie das Rack, die Drum-Pads oder Becken-Pads/Arme so, dass alle Pads in Reichweite sind. Werfen Sie einen Blick
auf das Anschlussdiagramm auf der gegenüberliegenden Seite, um die Pads an das Modul anzuschließen.
alesis.com
Cut the zip-ties and unfold the rack (loosening the wingnuts of the clamps, if necessary, then
tightening them to secure the rack legs). Remove the plastic wrapping from all of the kit’s parts,
and remove the drum sticks from the outermost rack legs.
Corte los precintos y despliegue el bastidor (aflojando las tuercas mariposa de las abrazaderas,
si fuera necesario, y apretándolas luego para fijar las patas del bastidor). Extraiga la envoltura
plástica de todas las piezas del kit y retire las baquetas de las patas más exteriores del
bastidor.
Couper les attaches et dépliez le support (desserrer les écrous à oreilles des bagues, si
nécessaire, puis resserrez-les pour fixer les pieds du support). Retirez l’emballage en plastique
de toutes les pièces de l’ensemble et retirez les baguettes des pieds arrière du support.
Tagliare i lacci in plastica e aprire il rack (allentando i dadi a farfalla dei morsetti, se necessario,
quindi stringendoli nuovamente per fissare le gambe del rack). Rimuovere la plastica che
avvolge tutti i componenti del set e rimuovere le bacchette dalle gambe esterne del rack.
Schneiden Sie die Kabelbinder durch und klappen das Rack auf (lösen Sie bei Bedarf die
Flügelmuttern und ziehen Sie sie an, um die Standbeine zu fixieren). Nehmen Sie alle Teile des
Kits aus den Plastikverpackungen. Entfernen Sie die Drum-Sticks von den äußersten Rack-
Standbeinen.
ALESIS DM LITE KIT является барабанной установкой, имеющей светодиодную подсветку пэдов, которая придется по вкусу всем барабанщикам – как продвинутым, так и начинающим музыкантам. Все тарелки и барабаны крепятся на предварительно собранную и регулируемую по высоте раму, имеющую четыре секции, что позволит собрать данную установку за несколько минут. Дополнением к двум сотням звуков в модуле модели ALESIS DM LITE KIT стали упражнения и различные тренировочные шаблоны для улучшения исполнительских навыков пользователя. Наличие стерео 1/4″ выхода позволит вам легко и быстро подключить акустическую систему или усилитель, а выход 1/8″ для наушников поможет осуществлять репетицию, не тревожа окружающих. Выход 1/8″ aux позволит загрузить пользовательские настройки из подключаемых внешних аудиоисточников. Помимо этого, установка может подключаться к персональному компьютеру, позволяя загрузить виртуальные инструменты и программное обеспечение.
Мгновенная установка.
Модель ALESIS DM LITE KIT содержит все необходимые тарелки и барабаны, которые имеют возможность быстрого крепления на раму с четырьмя специальными перекладинами. Для этого пользователю необходимо просто развернуть перекладины, установить все тарелки и барабаны, отрегулировать высоту в соответствии с собственным ростом, подключить все педали и пэды к модулю, включить модуль и взять палочки в руки. Что может быть проще!
Профессиональное исполнение с превосходным звучанием.
Модуль модели ALESIS DM LITE KIT наделен двумя сотнями качественных звуков перкуссии и барабанов, доступных с ваших источников MIDI. Все эти звуки составляют десять комплектов готовых к игре, которые отобраны по различным музыкальным жанрам. Звуки являются лишь началом! Встроенный модуль предоставит вам огромное количество полезных дополнений. Тридцать музыкальных треков, встроенные тренировочные функции и метроном поспособствуют вашим репетициям и помогут повысить ваш исполнительский уровень, усовершенствовать ваше мастерство. Помимо этого, модуль наделен 1/8″ aux стерео входом, позволяющим вам сохранять любимые треки на персональный компьютер и многие другие устройства. 1/4″ стерео выход и USB MIDI разъем предназначаются для загрузки различного программного обеспечения и виртуальных инструментов из персонального компьютера, а также для подключения усилителей и акустических систем.
Пэды, имеющие светодиодную подсветку.
Комплектация ALESIS DM LITE KIT включает в себя четыре барабанных пэда, один из которых — пэд малого барабана, а остальные – три тома. Имеются также и пэды тарелок – ride, crash и hi-hat. Во время вашего исполнения, каждый удар по тарелке или пэду активирует подсветку голубого цвета, которая добавляет мини лайт-шоу вашей игре. Пэды могут загораться и во время работы обучающих программ и уроков.
Полный набор ALESIS DM LITE KIT завершают две педали. Первая педаль – открытый/закрытый хай-хэт с мгновенным управлением. Вторая является педалью бас барабана, чувствительной к силе нажатия. В отличие от стандартных педалей, данное устройство переводит силу исполнителя в громкость, делающую исполнение более реалистичным.
Технические характеристики:
Комплектация:
• необходимые кабели;
• комплект барабанных палочек;
• рама и все необходимые крепления;
• триггер педаль (бас барабан) с чувствительностью к силе нажатия, а также с внутренним пьезо-сенсором;
• педаль Hi-Hat (мгновенное открытое/закрытое действие);
• 10″ треугольный пэд тарелки х 3;
• 7.5″ круглый пэд, имеющий голубую подсветку х 4;
• барабанный модуль DM Lite;
• блок питания.