
MidiVerb 4. Руководство пользователя
Программируемый 18-битный сигнальный процессор
Введение
Спасибо за то, что вы приобрели мультиэффекторный процессор MidiVerb 4 фирмы Alesis. Для того, чтобы использовать всю
функциональную мощность MidiVerb 4 и продлить срок службы прибора, пожалуйста внимательно изучите это руководство.
Правила пользования руководством
Руководство состоит из нескольких глав, описывающих различные режимы работы MidiVerb 4. Мы рекомендуем начинать
изучение руководства с самого начала, однако опытные пользователи могут воспользоваться содержанием для ознакомления с
правилами управления тем или иным режимом.
Глава 1: Начало работы с MidiVerb 4. Даются основные рекомендации по распаковке и запуску прибора, прослушиванию
заводских программ, регулировке уровней, сравнению и запоминанию отредактированных программ.
Глава 2: Коммутация. Приводятся сведения, необходимые для коммутации прибора с другими компонентами аудио-систем
(инструменты, микшерные пульты, коммутаторы (patchbay) и многодорожечные магнитофоны).
Глава 3: Эффекты. Детально рассматриваются функции сигнальной обработки процессора MidiVerb 4 и концепция
мультиэффекторного программирования.
Глава 4: Редактирование программ. Рассматриваются вопросы программирования простых и мультиэффекторных программ.
Глава 5: Органы управления. Описываются все органы управления прибором (кнопки, разъемы и параметры).
Глава 6: Применение MIDI. Приводятся основные правила работы с MIDI-функциями, такими как вызов программ, модуляция
параметров в режиме реального времени, передача данных SysEx.
Глава 7: Устранение неполадок. Описываются неполадки, возможные причины и способы их устранения, правила ухода за
прибором, карта MIDI-функций (MIDI Implementation Chart).
Используемые обозначения
Название кнопок, ручек и разъемов задней панели заключаются в квадратные скобки и записываются заглавными буквами.
Например, кнопка [PROG], колесо [VALUE]. Выдержки с экрана дисплея заключаются в фигурные скобки, например, от {00} до
{127}, {DELAY->REVERB} и т.д.
Особо важная информация выделена подчеркнутым курсивом.
1

Начало работы с MidiVerb 4 . . . . . . . . . . . . . . . . . . . . . . . . . . . . . . . . . . . . . . . . . . . . . . .2
Распаковка и проверка. Основные соединения. Включение питания. Регулировка уровня. Автоматический режим
регулировки уровня входного сигнала. Дисплей. Программы. Переключение между пресетным и пользовательским
банками. Программа Bypass/ Пресет 00. Редактирование параметров эффекта. Режим подсказки. Управление
миксом прямого и обработанного сигналов. Отключение прямого сигнала (Dry Defeat). Сравнение
отредактированной программы и оригинала. Возврат от отредактированной программы к оригиналу. Сохранение
отредактированных программ. Режим Bypass.
Коммутация . . . . . . . . . . . . . . . . . . . . . . . . . . . . . . . . . . . . . . . . . . . . . . . . . . . . . . . . . . . .7
Подключение питания. Устройства защиты от сбоев в сети питания. Аудио-коммутация. Стандартное
использование аудио-входов/выходов. Распайка входного разъема. Коммутация с инструментами. Коммутация с
пультом. Использование дополнительных посылов. Использование разрывов. Подключение к основному выходу.
“Земляные” петли. MIDI. Ножной переключатель.
Эффекты . . . . . . . . . . . . . . . . . . . . . . . . . . . . . . . . . . . . . . . . . . . . . . . . . . . . . . . . . . . . . .11
Архитектура MidiVerb 4. Понятие конфигурации. Простая конфигурация (Single). Двойная конфигурация (Double).
Конфигурация Двойная Моно (Dual Mono). Многозвенная конфигурация (Multi Chain).Эффекты реверберации.
Concert Hall. Real Room. Realroom и Room. Ambience. Plate Reverb. Nonlinear. Параметры эффектов реверберации.
Длина хвоста (Decay). Обрезной фильтр высоких частот. Предварительная задержка (Pre-delay). Микс сигнала
предварительной задержки (Pre-delay Mix). Плотность (Density). Диффузия (Diffusion). Низко и высокочастотное
дэмпфирование (Low и High). Swirl. Гейтирование (Gating). Эффекты задержки. Монофоническая задержка (Mono
Delay). Стереофоническая задержка (Stereo Delay). Задержка типа “пинг-понг” (Ping Pong). Многоотборная
задержка (MultiTap Delay). Монофоническая задержка BPM (BPM Mono Delay). Синхронизация по MIDI Clock.
Delay и Dly. Установка времени задержки с помощью Tap Tempo. Эффекты подстройки высоты тона (Pitch).
Стерофонический хорус (Stereo Chorus). Квадратичный хорус (Quad Chorus). Хорус (Chorus). Стереофонический
флэнжер (Stereo Flanger). Флэнжер (Flanger). Лесли (Lezlie). Стереофонический сдвиг частоты (Stereo Pitch Shifter).
Сдвиг частоты (Pitch).
Редактирование программ . . . . . . . . . . . . . . . . . . . . . . . . . . . . . . . . . . . . . . . . . . . . . . . .16
Выбор конфигурации. Редактирование параметров эффекта. Переключение страниц. Кнопки A/B/C/D. Частные
случаи. Наименование программ.
Органы управления . . . . . . . . . . . . . . . . . . . . . . . . . . . . . . . . . . . . . . . . . . . . . . . . . . . . .17
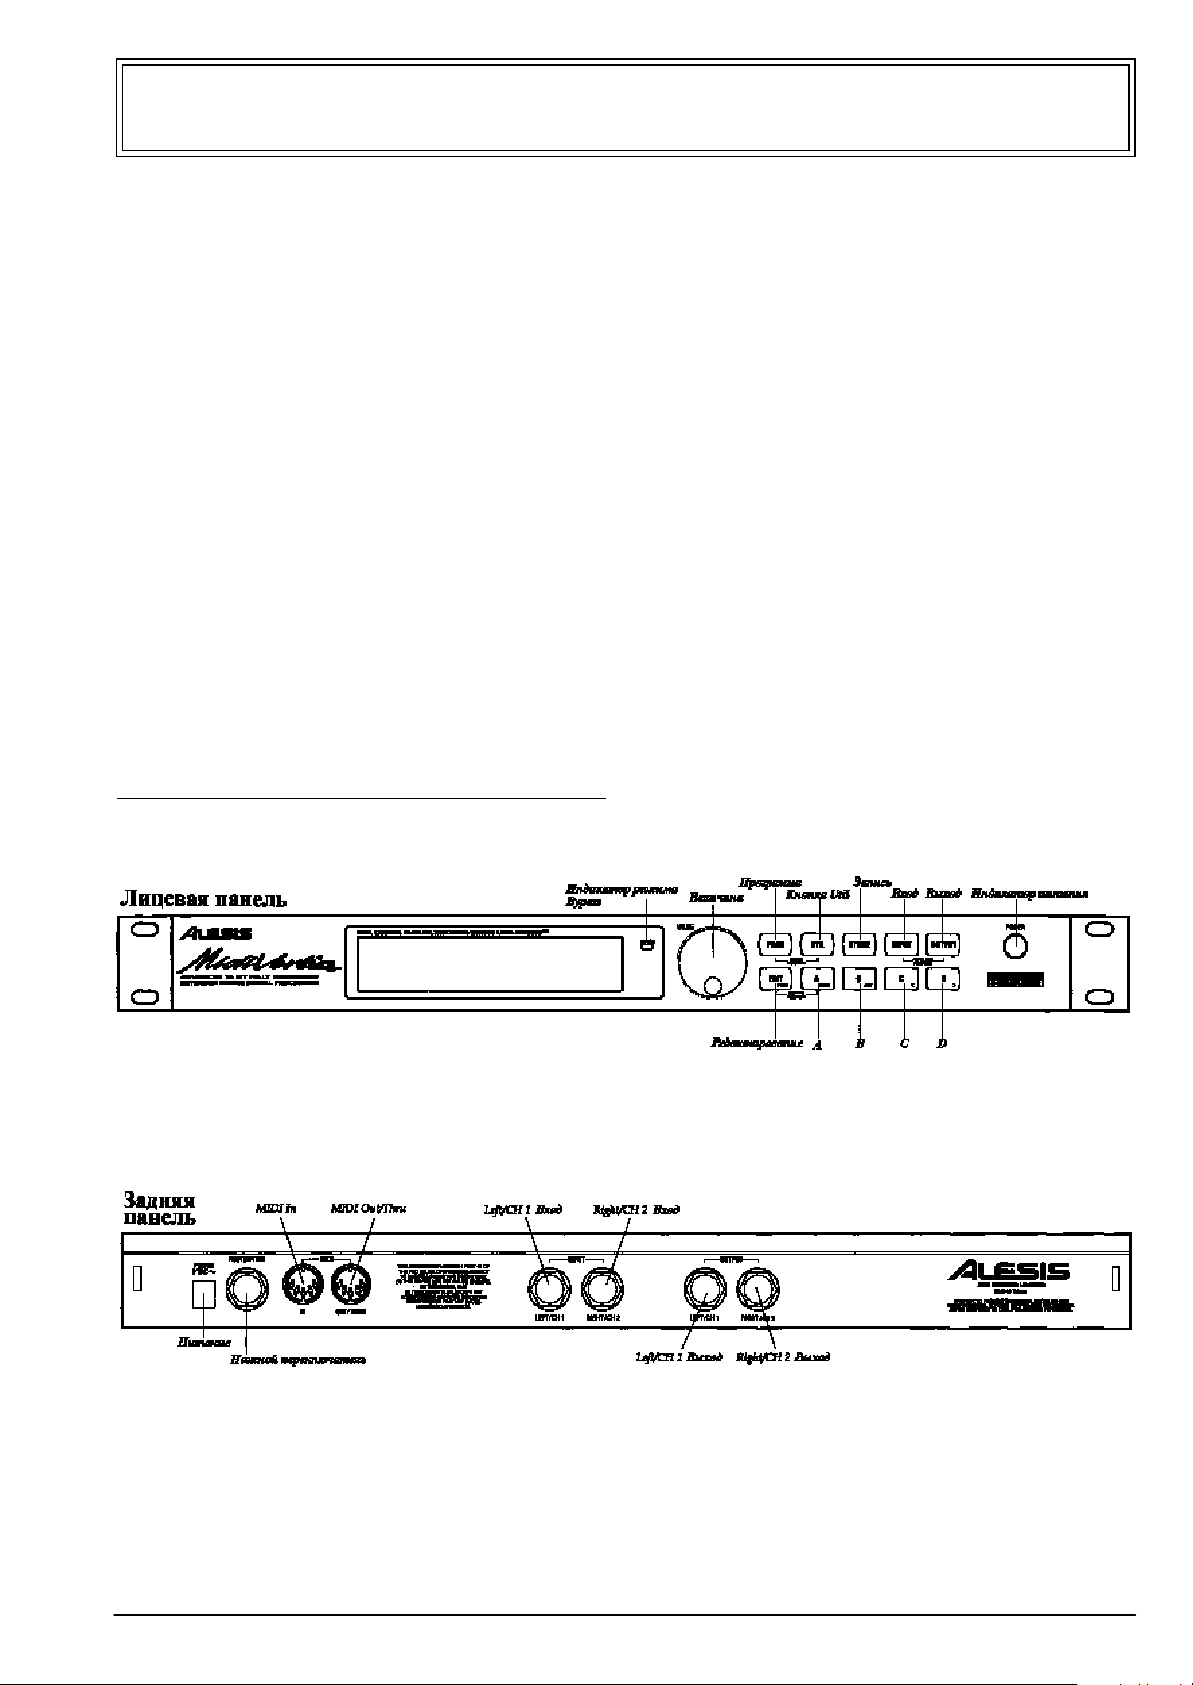
Лицевая панель. Жидкокристаллический дисплей. Светодиодный индикатор BYPASS. Колесо VALUE. Кнопка PROG.
Кнопка EDIT/PAGE. Кнопки A/B/C/D (NAME/ESC/</>). Кнопка UTIL. Кнопка STORE. Кнопки INPUT и OUTPUT.
Автоматическая регулировка уровня (Auto Level). Переключатель POWER. Задняя панель. POWER (питание).
Педальный разъем BYPASS/ADVANCE. MIDI IN. MIDI OUT/THRU. Вход (Left/Ch.1 и Right/Ch.2). Выход (Left/Ch.1 и
Right/Ch.2). Параметры эффекта
Применение MIDI . . . . . . . . . . . . . . . . . . . . . . . . . . . . . . . . . . . . . . . . . . . . . . . . . . . . . . .22
Функции MIDI. Канал MIDI. MIDI Thru. Прием команд Program Change. Таблица переадресации Program Change
Table. Запись SysEx. Модуляция в реальном времени. Определение источников модуляции. Таблица параметров
модуляции. Установка глубины модуляции. Установка времени задержки по MIDI clock.
Устранение неполадок . . . . . . . . . . . . . . . . . . . . . . . . . . . . . . . . . . . . . . . . . . . . . . . . . . .25
Список возможных неисправностей. Перезапуск. Проверка версии программного обеспечения. Обслуживание.
Уход. Ремонт.
Карта MIDI-функций . . . . . . . . . . . . . . . . . . . . . . . . . . . . . . . . . . . . . . . . . . . . . . . . . . . . .26
Характеристики . . . . . . . . . . . . . . . . . . . . . . . . . . . . . . . . . . . . . . . . . . . . . . . . . . . . . . . .26
Глава 1
Начало работы с MidiVerb 4
Распаковка и проверка
Фабричная упаковка MidiVerb 4 предохраняет прибор от повреждения во время транспортировки. Пожалуйста сохраняйте
упаковочные коробки на случай, если у вас возникнет необходимость выслать прибор на сервисное обслуживание.
Упаковочная коробка содержит:
• Руководство пользователя
• Прибор Alesis MidiVerb 4 с тем же номером, что и на упаковочной коробке
• Блок питания
• Гарантийный талон фирмы Alesis
Необходимо зарегистрировать вашу покупку. Заполните гарантийный талон и отошлите его на фирму Alesis,
Основные соединения
MidiVerb 4 можно использовать в самых различных аудио-системах. Его можно коммутировать как непосредственно с
инструментом, так и с микшерной консолью. Приведенная ниже информация позволит вам быстро скоммутировать прибор и
приступить к работе. Более подробная информация о способах коммутации прибора приводится в главе 2.
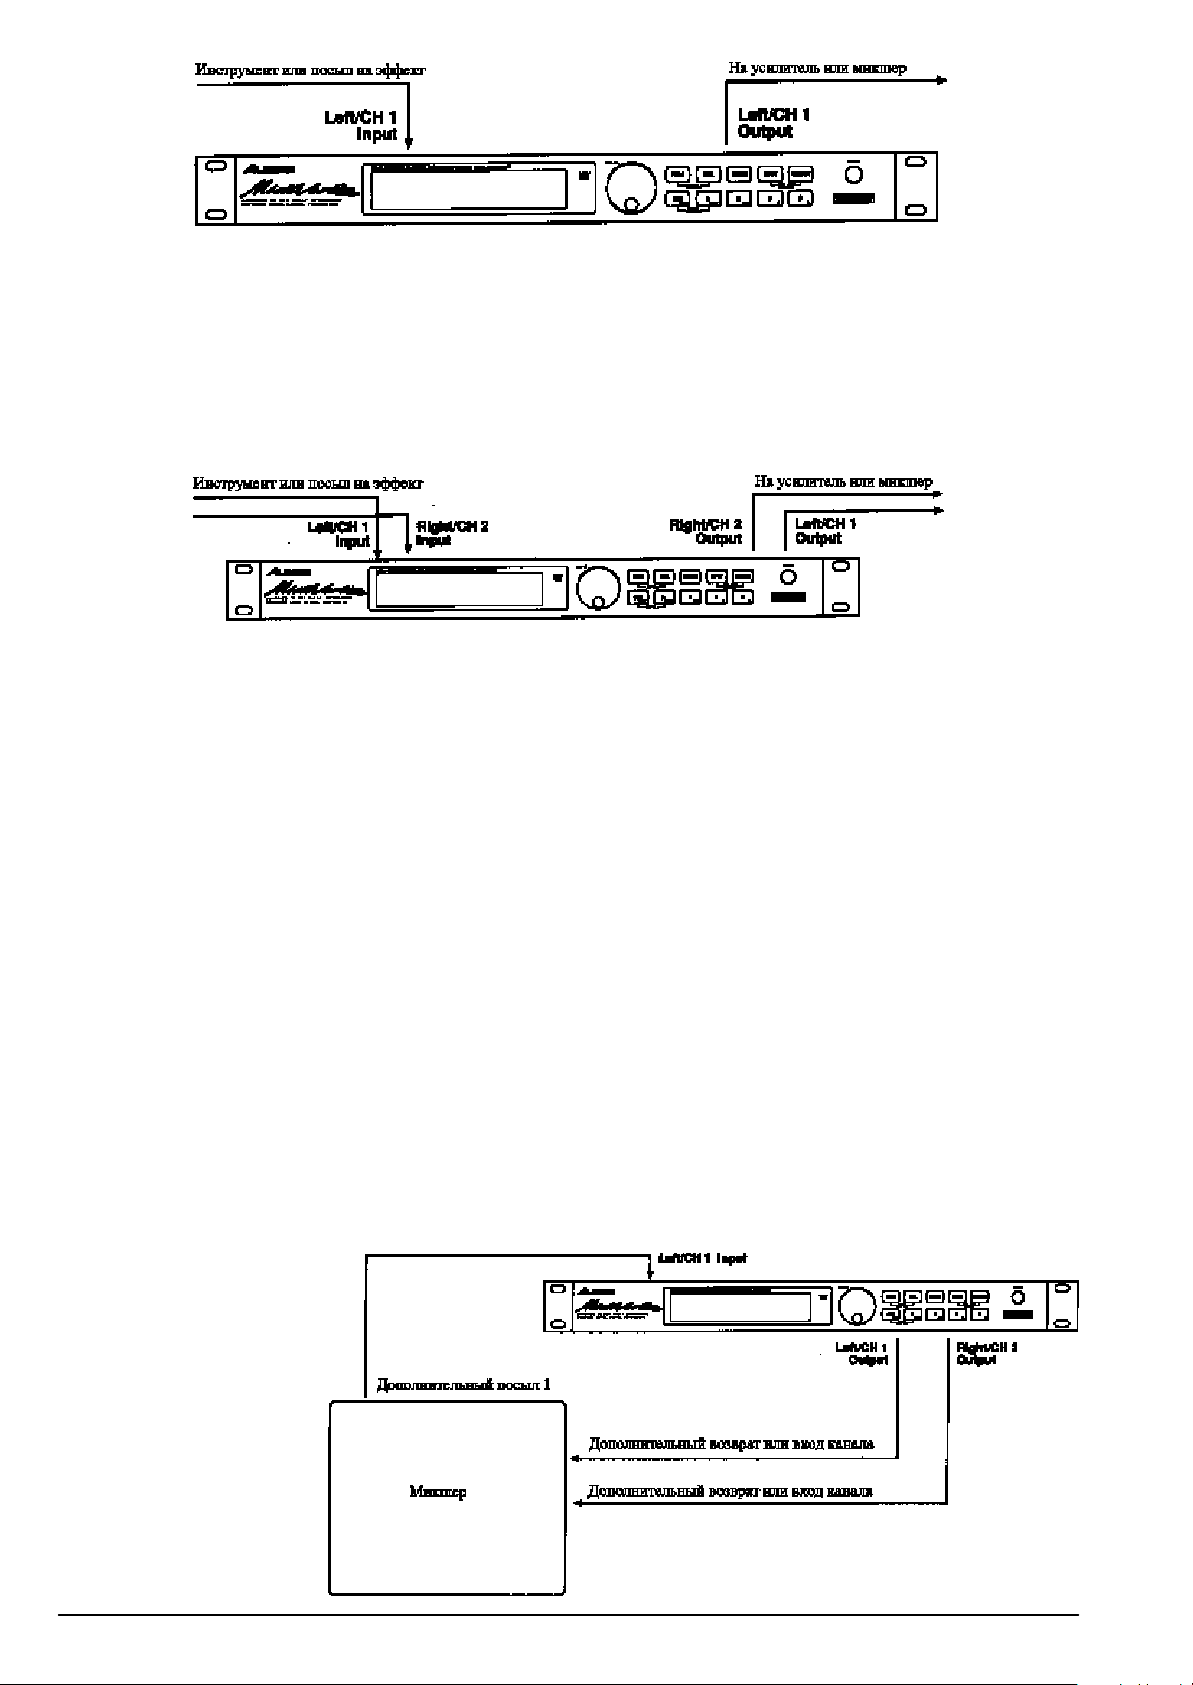
• Монофонический вход, моно или стерео выход. Соедините источник моно сигнала монофоническим проводом с входом
[LEFT/CH.1 INPUT] MidiVerb 4. Левый вход [LEFT/CH.1 INPUT] нормализован по отношению к правому [RIGHT/CH.2 INPUT]).
Скоммутируйте с помощью монофонического провода выход прибора [LEFT/CH.1 OUTPUT] с звукоусиливающей системой или
2 MicroVerb 4. Руководство пользователя
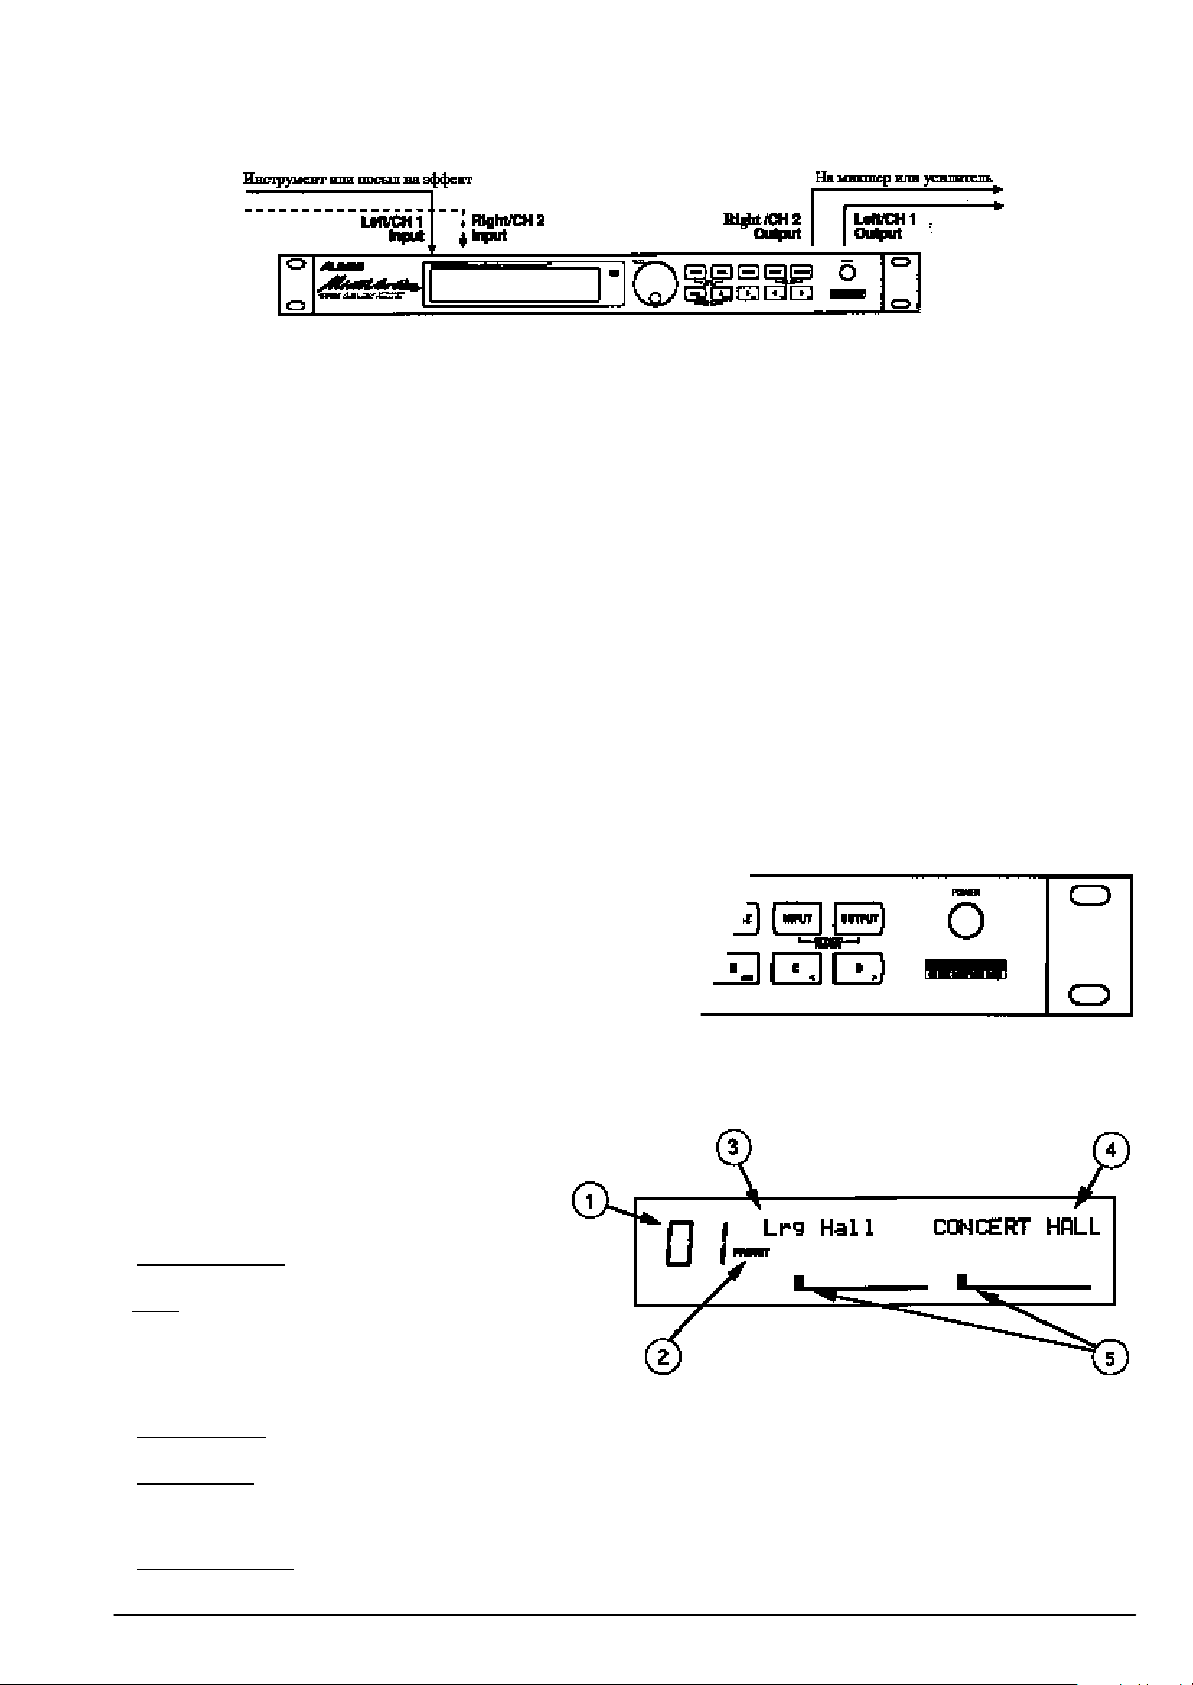
с микшерным пультом. Кроме того, вы можете снимать сигнал с правого выхода [RIGHT/CH.2 OUTPUT] и использовать его в
стереофонической системе звукоусиления или подавать на второй канал микшера.
• Стерео. Соедините двумя монофоническими проводами входы [LEFT/CH.1 INPUT] и [RIGHT/CH.2 INPUT] MidiVerb 4 с
источником стерео сигнала. С помощью еще двух монофонических проводов соедините выходы MidiVerb 4 с системой
стереофонического усиления или двумя каналами микшерной консоли.
При коммутации MidiVerb 4 с дополнительными посылами/возвратами микшерной консоли, вам может потребоваться установить
выходной сигнал на максимум эффекта (в выходном миксе прибора присутствует только обработанный сигнал). Это делается с
помощью соответствующей глобальной опции, устанавливающей этот режим одновременно для всех программ (см. раздел
Управление миксом прямого и обработанного сигналов).
Включение питания
После завершения процесса коммутации можно включить питание прибора. При этом необходимо придерживаться следующей
последовательности:
1) Перед включением питания MidiVerb 4 проверьте:
• Правильность коммутации.
• Выведены ли на минимум ручки управления уровнем сигнала на усилителе или микшере.
2) Нажмите на кнопку [POWER], расположенную на лицевой панели прибора.
При включении питания на дисплей выводится строка {ALESIS MIDIVERB 4}, по истечении некоторого времени дисплей высветит
номер последней выбранной программы (00 — 127) из пресетного или пользовательского банков и загорится кнопка [PROG].
3) Включите питание усилителя/микшера и отрегулируйте уровень.
Регулировка уровня
Правильная установка входного и выходного уровней способствует увеличению соотношения сигнал/шум. Лучше устанавливать
регуляторы на 3/4 (75 % от максимального уровня). Это снижает вероятность возникновения перегрузок и искажений, а также
минимизирует уровень фонового шума.
Автоматический режим регулировки уровня входного сигнала
MidiVerb 4 имеет уникальную возможность автоматической регулировки уровня входного сигнала. Вам достаточно лишь
установить прибор в этот режим работы и подать на него сигнал (с гитары, синтезатора, магнитофона и т.д.). Все остальное
MidiVerb 4 сделает сам.
Автоматическая регулировка уровня входного сигнала:
1) Скоммутируйте MidiVerb 4 с источником аудио-сигнала (см. главу 2).
2) Нажмите одновременно кнопки [INPUT] и [OUTPUT].
3) Подайте на вход MidiVerb 4 сигнал.
Функция автоматической регулировки в течение примерно 5 секунд
анализирует входной сигнал и устанавливает уровень входа по обоим
каналам.
Замечание. При необходимости вы можете увеличить время анализа входного сигнала (практически до бесконечности). Для этого
подключите к разъему [FOOTSWITCH], расположенному на задней панели, любой ножной переключатель мгновенного действия и
держите его нажатым во время работы режима автоматической регулировки входного уровня (Auto Input). Для получения более
подробной информации см. главу 2.
Дисплей
После первого включения питания дисплей MidiVerb 4
выглядит следующим образом:
Дисплей MidiVerb 4 разбит на 5 секций.
1) Номер программы.
{00} по {127}. В данном случае выбрана программа {01}.
2) Банк.
пользовательский), в каждом из которых размещено по
128 программ. В зависимости от того, какой банк активен
в настоящий момент, дисплей высвечивает либо “PRESET” (пресетный банк), либо “USER” (банк
пользовательских программ). В этом примере выбран пресетный банк.
3) Имя программы.
пресетных, пользовательские программы можно переименовывать.
4) Конфигурация.
конфигурации (Stereo или Dual конфигурация). Более подробное описание различных типов конфигураций приведено в главе 3. В
приведенном выше примере конфигурация называется {CONCERT HALL}. Если в программу были внесены изменения, то
впоследствии конфигурации будет высвечиваться на дисплее прописными буквами.
5) Индикаторы уровня.
индикаторами уровня обычного магнитофона. Отображенное на рисунке состояние индикаторов говорит о том, что входной
MidiVerb 4 имеет два банка (пресетный и
Программы MidiVerb 4 нумеруют с
Каждая программа имеет уникальное 8-символьное имя. В нашем примере это — {Lrg Hall}. В отличие от
Описывает используемый программой эффект, пути прохождения через него входного сигнала, определяет тип
Индикаторы пикового типа отображают уровень необработанного входного сигнала и во многом схожи с
MicroVerb 4. Руководство пользователя 3
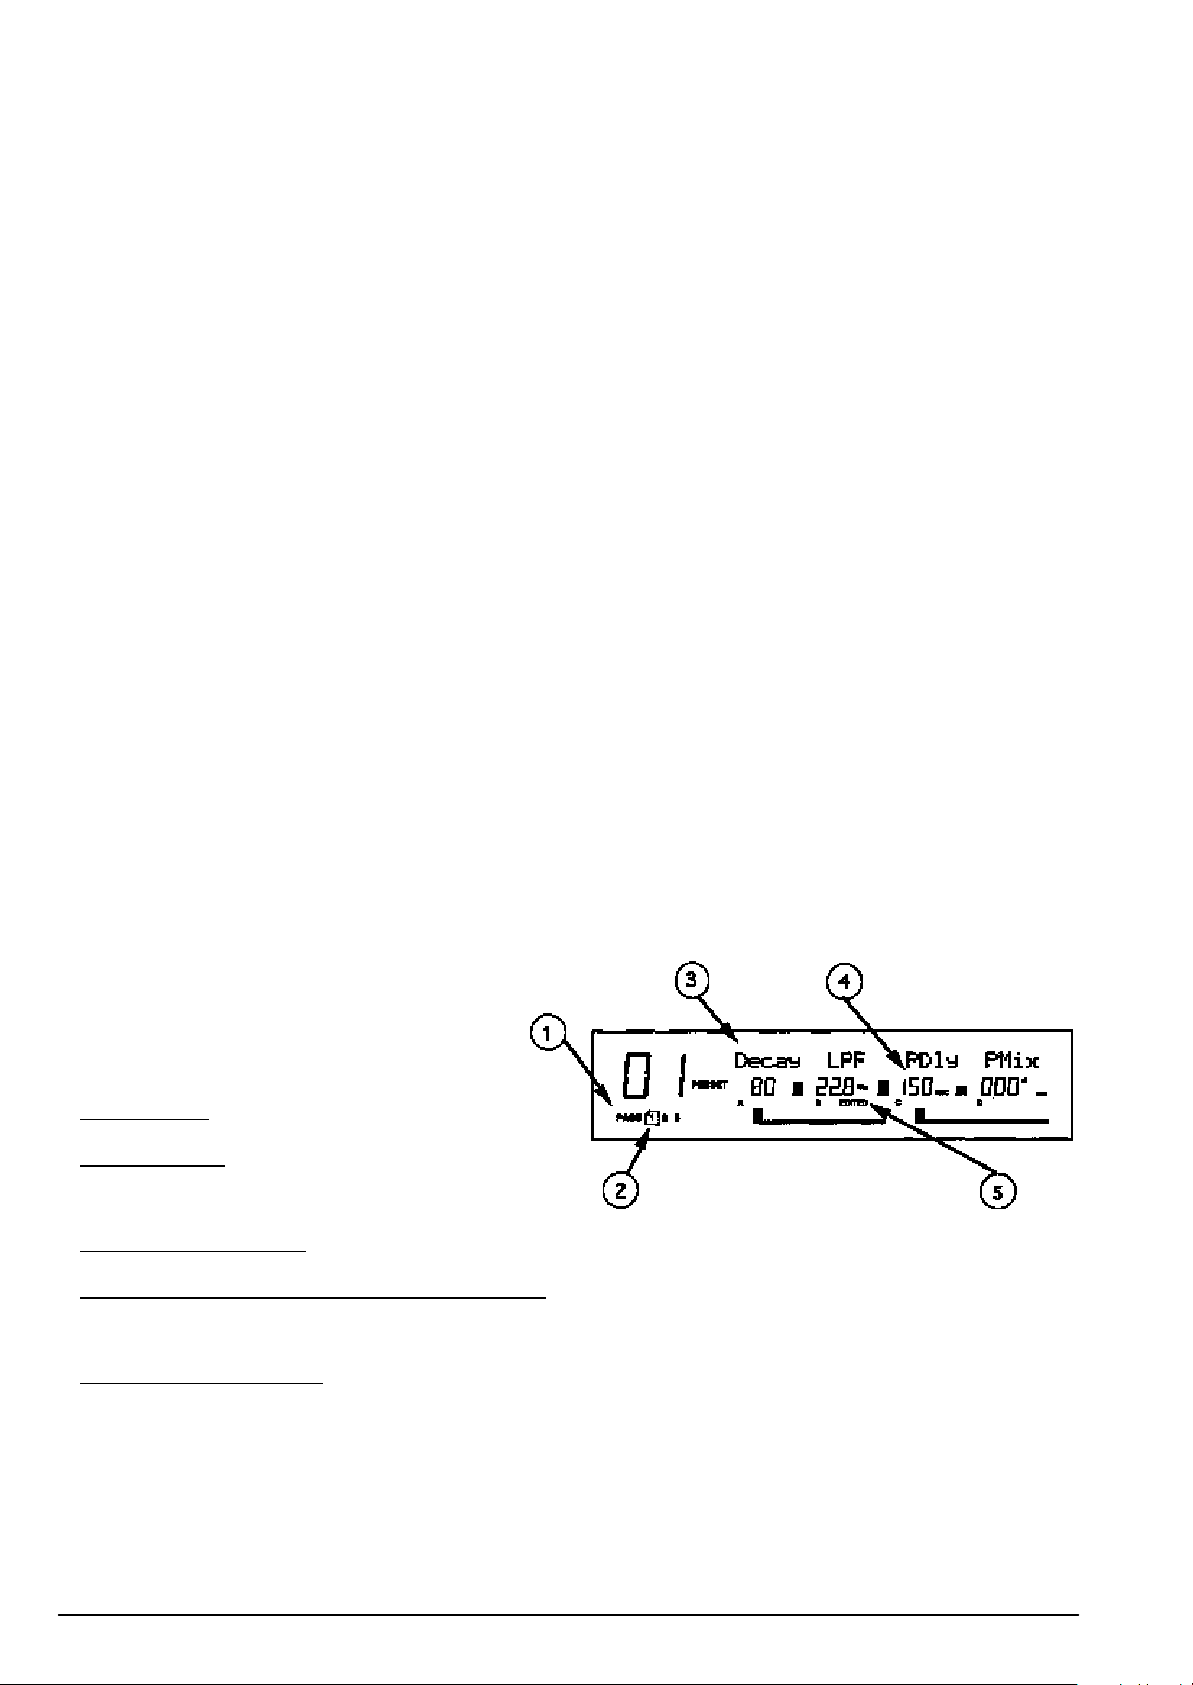
сигнал отсутствует. Обычно индикаторы помечены символами “L” и “R”. Однако, если программа использует конфигурацию типа
Dual (два моно эффекта), индикаторы помечаются символами “CH1” и “CH2”. Более подробная информация о конфигурации типа
Dual приведена в главе 3.
Программы
MidiVerb 4 имеет 128 пресетных программ, расположенных в банке пресетов и 128 пользовательских, хранящихся в
пользовательском банке. Эти программы позволяют использовать MidiVerb 4 в самых разнообразных областях.
Прослушивание программ.
1) Нажмите кнопку [PROG].
При этом загорится подсветка кнопки [PROG].
2) Выбирайте различные программы из пресетного и пользовательского банков с помощью колеса [VALUE].
Переключение между пресетным и пользовательским банками
Для мгновенного переключения между банком пресетов и банком пользовательских программ используется кнопка [PROG].
Каждое нажатие на эту кнопку приводит к переключению с одного банка на другой. На дисплее смена банков отображается
появлением соответствующей надписи “PRESET” или “USER”.
Перейти из одного банка в другой можно также с помощью колеса [VALUE]. При вращении [VALUE] по часовой стрелке после
выбора пресетной программ с номером {127} произойдет переключение на пользовательский банк, и на дисплее высветится
номер первой программы из этого банка — {00}. И наоборот, при вращении колеса [VALUE] против часовой стрелки после
программы с номером {00} (первой из банка пользовательских программ), произойдет переход к пресетному банку и на дисплее
появится номер пресетной программы {127}.
Однако, если вы будете вращать колесо [VALUE] дальше и достигнете программы с номером {00} из пресетного банка, то
переключение на пользовательскую программу с номером {127} не произойдет. Дисплей будет отображать номер первой
программы из банка пресетов — {00} (программа “Bypass”). Таким образом вам не надо беспокоиться о том, что вы пропустите
эту программу, вращая против часовой стрелки колесо [VALUE] — MidiVerb 4 сам остановится на ней при достижении программы
с номером {00}.
Программа Bypass/ Пресет 00
Пресетная программа с номером {00} называется “Bypass Program”. Если выбрана эта программа, то входной сигнал не
обрабатывается никакими эффектами и передается в чистом виде со входа на выход MidiVerb 4. Не следует путать эту программу
с режимом Bypass, работа которого будет описана чуть позже.
Пресетную программу {00} можно выбрать также с помощью педали, подключенной к разъему [FOOTSWITCH] (если установлен
режим прокрутки “Advance” для [FOOTSWITCH]) или с помощью посылки MIDI-команды Program Change с управляющего прибора,
подключенного к разъему [MIDI IN] MidiVerb 4. Для детального ознакомления с функциональным назначении разъемов
[FOOTSWITCH] и [MIDI IN] см. главу 2. Более подробная информация о MIDI-данных типа Program Change приведена в главе 6.
Редактирование параметров эффекта
При вызове программы соответствующая ей конфигурация отображается в правой части имени.
{RoomVerb Real Room}
Программы с простой конфигурацией включают в себя только один эффект (как в приведенном выше примере), программы со
сложной конфигурацией являются комбинацией двух или трех эффектов (например, Reverb+Delay или Chorus->Delay->Reverb).
Информация о входящих в программу эффектах облегчает поиск необходимых параметров.
Прежде чем приступить к корректировке параметров
эффектов, необходимо войти в режим редактирования.
Для того, чтобы это сделать, надо при горящей кнопке
[PROG] нажать кнопку [PAGE] или одну из кнопок [A], [B],
[C]. (Замечание: функциональное назначение этих кнопок
зависит от режима). Дисплей в режиме редактирования
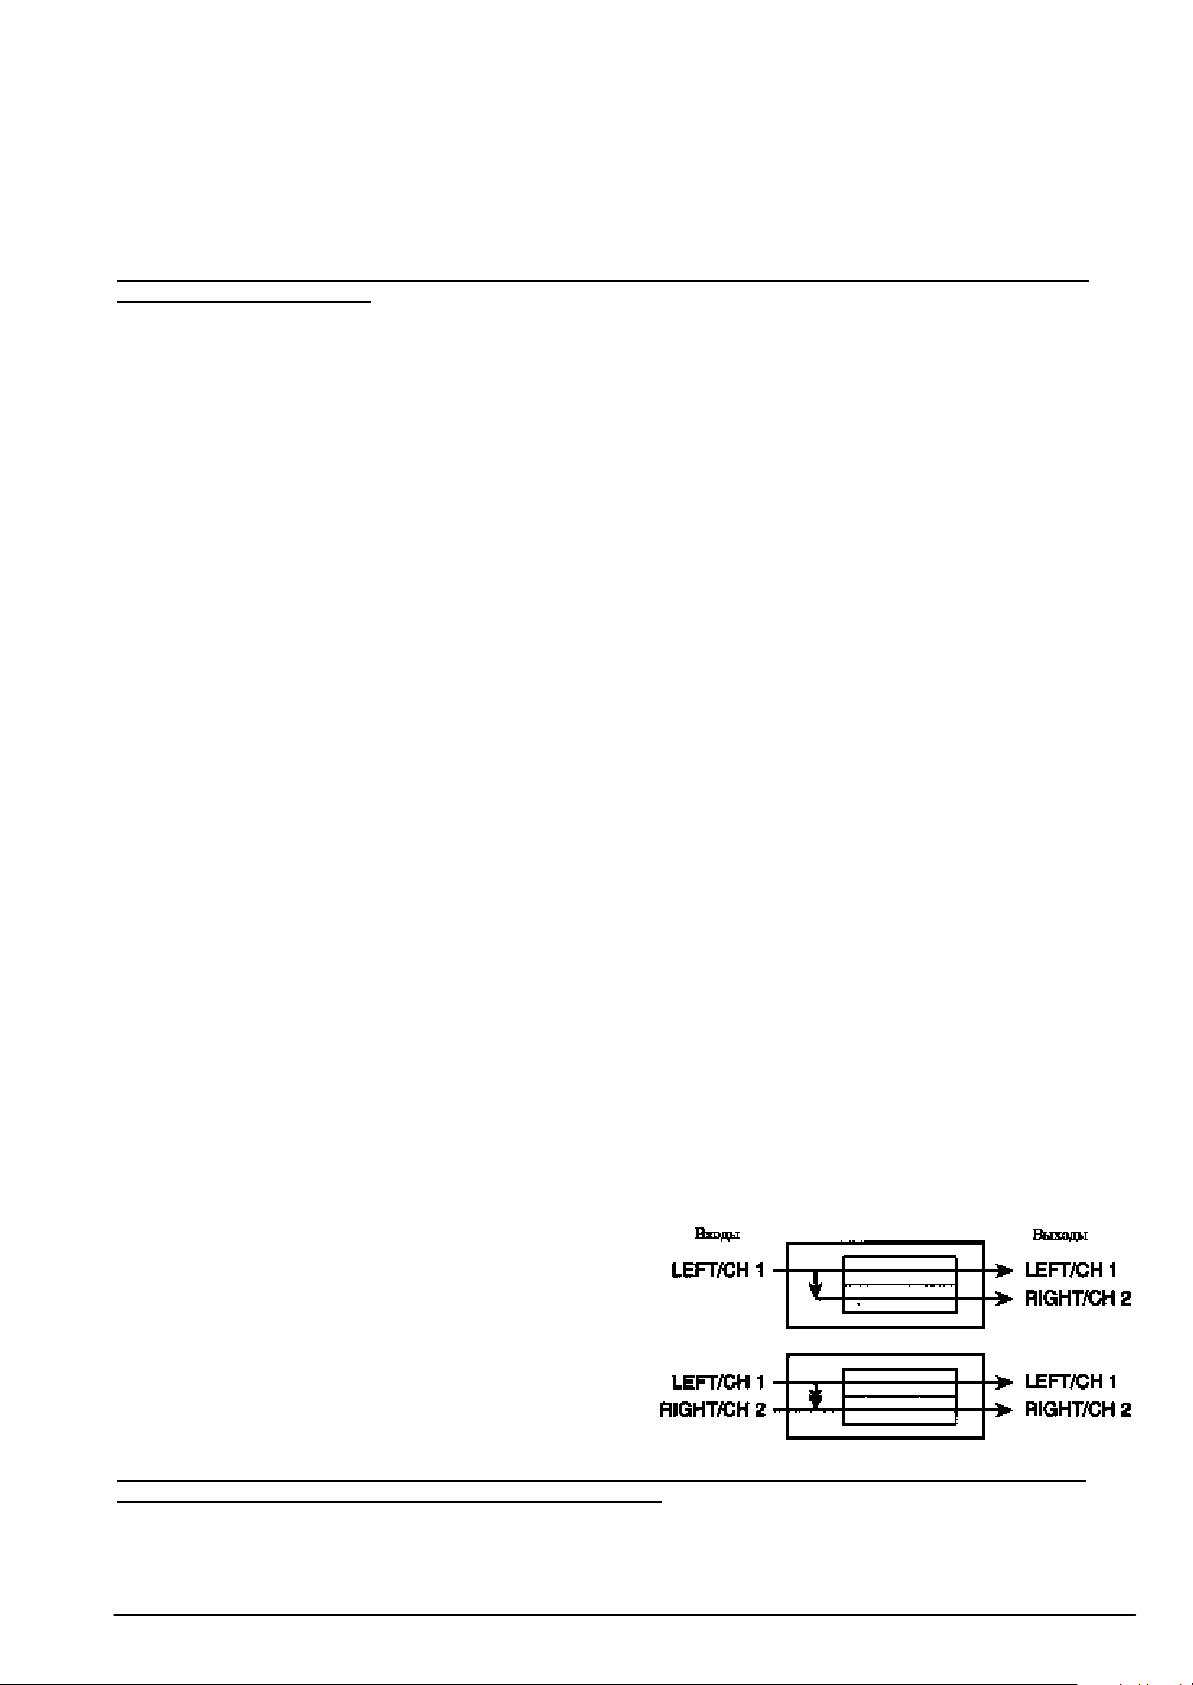
выглядит приблизительно следующим образом:
1) Номер страницы
программа может состоять максимум из 4 страниц.
2) Активная страница
в прямоугольник. В приведенном выше примере активной
является первая страница. Для того, чтобы перейти к
следующей странице, необходимо нажать кнопку [PAGE].
3) Строка названий параметров
отображаются в верхней строке дисплея над соответствующими величинами.
4) Цифровое и графическое отображение значения параметра
редактирования, отображается в цифровом и графическом видах. При редактировании параметра (для этого используется колесо
[VALUE]) изменяются оба представления. Рядом с цифровым представлением параметра указываются единицы его измерения.
(dB, ms, kHz и т.д.).
5) Индикаторы A, B, C, D и EDITED
какую из кнопок необходимо нажать ([A], [B], [C] или [D]) для редактирования соответствующего параметра. При изменении
значения параметра, под ним загорается сообщение “EDITED” (отредактирован).
Редактирование параметров.
1) Нажмите кнопку [PROG].
Кнопка [PROG] загорится.
2) Для входа в режим редактирования нажмите кнопку [PAGE].
Если программа редактируется в первый раз, то активной становится первая страница параметров эффектов. В зависимости от
конфигурации, программа может состоять из двух или более страниц. Точное количество страниц отображается цифрами в
левом нижнем углу дисплея. Активная страница заключена в прямоугольник. Для перехода между страницами используйте кнопку
. В зависимости от конфигурации,
. Номер активной страницы заключен
. В режиме редактирования каждая из страниц может содержать до 4 параметров. Их названия
. Каждый из параметров, представленных на странице
. Каждый параметр активной страницы помечен одной из букв (A, B, C или D), показывающих
4 MicroVerb 4. Руководство пользователя

[PAGE]. На каждой странице размещено до 4 параметров. Расположенная над параметрами аббревиатура описывает
функциональное назначение каждого из них.
3) Выбор параметра для редактирования осуществляется нажатием на кнопку [A], [B], [C] или [D].
Выбранный параметр будет мигать.
4) Установите требуемое значение выбранного параметра с помощью колеса [VALUE].
При изменении параметра под ним появляется сообщение “EDITED”. Если вернуть параметру его прежнее значение, но надпись
“EDITED” исчезнет.
Все изменения, внесенные в программу, остаются временными до тех пор, пока они не будут сохранены. Если редактировалась
пресетная программа, то ее необходимо записать в банк пользовательских программ. При вызове другой программы результаты
редактирования пропадают (если вы, конечно, не успели их сохранить). Более подробно об этом рассказывается ниже в разделе
“Запоминание отредактированных программ”. Детальное описание процесса редактирования параметров эффектов приведено в
главе 4.
Режим подсказки
MidiVerb 4 имеет встроенную функцию, представляющую справочную информацию о том или ином параметре непосредственно
на экране дисплея. Войдя в режим редактирования (см. предыдущий раздел), нажатием на одну из кнопок ([A], [B], [C] или [D]) вы
можете выбрать любой из четырех параметров. Однако, если удерживать кнопку более одной секунды, то в верхней части дисплея
высветится подсказка с более детальным описанием выбранного параметра.
Например, если при редактировании программы {01} (см. предыдущий пример), удерживать нажатой кнопку [B] более одной
секунды, то на дисплее появится расшифрованное название параметра “B”:
{INPUT LOWPASS FILTER}
Если отпустить кнопку [B], то дисплей вернется в нормальное состояние.
Кроме того, если в режиме редактирования удерживать нажатой кнопку [EDIT/PAGE], то на дисплее отобразится страница и/или
набор параметров, с которыми вы работаете. Например, если редактируемая программа использует подстройку (Pitch: Delay
Configuration), то удерживая нажатой кнопку [EDIT/PAGE], вы увидите на экране следующее сообщение:
{CH 1 PITCH PARAMETR}
Управление миксом прямого и обработанного сигналов
Независимо от числа включенных в программу эффектов, вы можете регулировать микс каждого из них, добиваясь желаемого
баланса прямого (необработанного) сигнала и эффекта. Параметр Mix (или “wet/dry mix”) можно корректировать наряду с другими
параметрами в режиме редактирования. Для удобства пользования, этот параметр размещается всегда в правой части экрана
дисплея (следовательно ему соответствует кнопка [D]) на последней странице эффекта. Поскольку количество страниц в
различных эффектах неодинаково, то параметр Mix может появляться в разных программах на разных страницах. Имейте в виду,
что если программа состоит из нескольких эффектов, то каждый из них имеет свой параметр Mix.
1) Нажмите кнопку [PROG].
Кнопка [PROG] загорится.
2) Для входа в режим редактирования нажмите кнопку [PAGE].
Поищите в правой части дисплея слово {MIX} (или некоторую его вариацию, отражающую принадлежность этого параметра к
тому или иному эффекту, например, {CMIX}=Chorus Mix, {RMIX}=Reverb Mix и т.д.). Если вы не обнаружили похожего слова, то
переключитесь на следующую страницу, нажав кнопку [PAGE], и т.д. Для того, чтобы быть полностью уверенным, что
обнаруженный параметр Mix именно тот, который вам нужен, прибегните к помощи экранной подсказки (см. предыдущий
раздел). Для этого более одной секунды удерживайте нажатой кнопку [D].
3) Для выбора параметра Mix нажмите кнопку [D].
Мерцание параметра говорит о том, что он выбран для редактирования.
4) Для изменения значения параметра используйте колесо [VALUE].
Параметр Mix изменяется в диапазоне от {000} до {100%}.
Отключение прямого сигнала (Dry Defeat)
При коммутации MidiVerb 4 с дополнительными посылами и возвратами, обычно требуется вывести прямой сигнал из выходного
микса эффекта, чтобы с выхода прибора снимался только обработанный сигнал. Прямой и снятый с возврата эффекта сигналы
можно впоследствии объединить на пульте. Функция отключения прямого сигнала (Dry Defeat) блокирует прохождение прямого
сигнала через MidiVerb 4 одновременно для всех программ.
1) Нажмите [UTIL].
Кнопка [UTIL] загорится.
2) Жмите [EDIT] до тех пор, пока не будет выбрана страница 1.
На дисплее появится надпись:
{Footswitch Dry Defeat}
3) Для переключения параметра Dry Defeat между значениями ON (включен) и OFF (выключен), используйте кнопку [D].
При включенной функции Dry Defeat в поле параметра Mix всех эффектов высвечивается “—”. Это сигнализирует о том, что
параметр не редактируется (он зафиксирован на 100%). Исключение: в конфигурации RealRoom->Flange для ревербератора
параметр Mix будет фиксирован (100%), однако у флэнжера он остается доступным для редактирования.
Сравнение отредактированной программы и оригинала
Номер текущей программы отображается в левой части дисплея. Если нажать на кнопку [PROG] еще один раз, то в верхней части
дисплея появится и имя программы, и название конфигурации.
Если программа была отредактирована, то название конфигурации будет записано прописными буквами. Если в
мультиэффекторной конфигурации (конфигурация, состоящая из более чем одного эффекта) был отредактирован только один
эффект, то только его название будет записано прописными буквами. Например: если вы выбрали конфигурацию
{DELAY>REVERB} и отредактировали только параметры задержки, то при нажатии на кнопку [PROG], на дисплее появится строка
MicroVerb 4. Руководство пользователя 5

{delay>REVERB}. Это говорит о том, что был изменен один или несколько параметров задержки, в то время как параметры
ревербератора остались прежними.
Нажимая одновременно кнопки [PAGE] и [A], вы получаете временный доступ к оригинальной версии программы, т.е. к последней
сохраненной с этим номером программе. Это позволяет оценить на слух качество внесенных в программу изменений.
В режиме сравнения на дисплее появляется мерцающее сообщение {COMPARING EDITS}. Для выхода из этого режима
достаточно нажать любую из кнопок, и MidiVerb 4 вернется к редактируемой версии программы. Вы можете входить и выходить из
режима сравнения только в том случае, если в программу были внесены какие-либо изменения (если в программу не было
внесено изменений, то сравнивать в общем-то не с чем).
Возврат от отредактированной программы к оригиналу
Для отмены внесенных в программу изменений и возврата к оригиналу необходимо сделать следующее:
1) Нажмите [PROG].
MidiVerb 4 выйдет из режима редактирования.
2) С помощью колеса [VALUE] выберите другую программу, а затем вернитесь к той, которую редактировали.
Таким образом вы вызовете оригинальную версию программы и название конфигурации будет записано заглавными буквами.
Все изменения, внесенные в программу до манипуляции с колесом [VALUE], будут потеряны. Сказанное выше верно, если вы
сначала не сохранили программу.
Сохранение отредактированных программ
Если вы удовлетворены изменениями внесенными в программу или создали “с нуля” новую, то ее необходимо сохранить.
MidiVerb4 хранит текущую программу в памяти, которая не сбрасывается при отключении питания. Поэтому, если вы даже не
сохранили внесенные в программу изменения, то при отключении питания они не пропадут. Однако, если вы выберете другую
программу до того, как сохранили отредактированную, все изменения будут безвозвратно утеряны.
Хотя MidiVerb 4 имеет два банка (пресетный и пользовательский), вы можете сохранять программу только в пользовательском.
Сохранение отредактированной программы:
1) Нажмите [STORE].
Кнопка [STORE] начнет мигать и на дисплее появится сообщение:
{Store as XXX (nnnnnnnn)?}
XXX — номер программы (00 — 127), nnnnnnnn — имя программы.
2) С помощью колеса [VALUE] задайте номер программы (00 — 127), в которую вы хотите сохранить отредактированную.
Программы можно сохранять только в пользовательский банк. Поэтому, если вы выбрали программу из пресетного банка и
решили ее сохранить, то она автоматически сохранится в пользовательском под заданным вами номером.
3) При необходимости измените имя программы, нажав [A/NAME].
При этом курсор из цифрового поля номера программы переместится в первую позицию символьного поля имени программы.
Для изменения символов используется колесо [VALUE], для перемещения курсора внутри символьного поля имени программы —
кнопки [C/<] и [D/>]. Для возврата курсора в цифровое поле номера программы нажмите [B/ESC].
Замечание:для отмены операции сохранения программы, нажмите любую кнопку, за исключением кнопки [STORE].
4) Нажмите еще раз [STORE].
Кнопка [STORE] начнет быстро мигать, а на дисплее появится сообщение:
{Program nnnnnnnn Stored!}
nnnnnnnn — имя программы. Затем кнопка [STORE] погаснет и дисплей вернется в состояние, в котором он находился до первого
нажатия на эту кнопку.
Режим Bypass
В любой момент вы можете отключить эффекты, позволяя, тем не менее, входному сигналу проходить через MidiVerb 4 без
изменения. Этого можно достичь двумя способами:
• одновременно нажать расположенные на лицевой панели кнопки [PROG] и [UTIL];
• соединить педаль с гнездом [FOOTSWITCH] и нажать на нее. Для этого необходимо запрограммировать гнездо [FOOTSWITCH]
на работу в режиме Bypass.
При каждом одновременном нажатии на кнопки [PROG] и [UTIL], или нажатии на педаль, подключенную к разъему [FOOTSWITCH],
происходит переключение режима Bypass из пассивного состояния в активное и наоборот. Активное состояние режима Bypass
отображается горящим светодиодным индикатором [BYPASS], расположенным на лицевой панели прибора.
Программирование разъема [FOOTSWITCH] на работу в режиме Bypass:
1) Нажмите [UTIL].
Кнопка [UTIL] загорится.
2) Нажимайте на [EDIT/PAGE] до тех пор, пока не будет выбрана страница 1.
На дисплее появится сообщение:
{Footswitch Dry Defeat}
3) Для выбора параметра Footswitch нажмите [B].
4) С помощью колеса [VALUE] установите параметр Footswitch на работу в режиме Bypass ({bYP}).
6 MicroVerb 4. Руководство пользователя
Глава 2
Коммутация
Подключение питания
MidiVerb 4 поставляется вместе с блоком питания. Характеристики адаптера меняются в зависимости от электрических
стандартов стран, в которых данный прибор продается (110 или 220 V, 50 или 60 Hz).
В выключенный MidiVerb 4 вставьте маленький разъем (гнездо [POWER]), другой — в сеть. Не рекомендуется включать MidiVerb 4
до тех пор, пока не будут скоммутированы все остальные кабели системы.
Фирма Alesis не несет ответственности за поломку прибора, связанную с неправильной коммутацией питания MidiVerb 4 или
связанного с ним оборудования.
Устройства защиты от сбоев в сети питания
MidiVerb 4 может работать даже в условиях нестабильного питания. Однако, происходящие в сети время от времени скачки
напряжения и переходные процессы могут привести к сбоям в работе вашего оборудования или даже вывести его из строя. Эта
проблема может быть разрешена тремя различными путями, отличающимися сложностью и необходимыми капиталовложениями:
• Устройства защиты линии от пиковых и продолжительных перегрузок. Это относительно недорогие, устройства, работающие
по принципу обыкновенных предохранителей — они сгорают при возникновении в сети больших импульсов.
• Сетевые фильтры. Эти устройства обычно являются комбинацией устройств защиты линии от перегрузок и собственно
фильтров, позволяющих понизить уровень сетевого шума (диммерный шум, переходные процессы, вызванные работой
другого оборудования и т.д.)
• Устройства бесперебойного питания (UPS). Это наиболее сложный путь. UPS обеспечивает питание даже в случае полного
падения напряжения в сети. Разработанные первоначально для компьютеров (UPS позволяют корректно заканчивать работу
при отключении питания), устройства минимизируют все виды интерференции — пиковое повышение напряжения, шум и т.д.
Аудио-коммутация
Для коммутации MidiVerb 4 с другим оборудованием вашей студии рекомендуется использовать низкоемкостные экранированные
кабели с витым (а не одножильным) проводником и экраном с низким сопротивлением. Применение более дорогих кабелей
способствует улучшению качества звука системы. При прокладке кабелей к MidiVerb 4 руководствуйтесь следующими правилами:
• Не прокладывайте аудио-кабели в непосредственной близости от шнуров питания.
• Избегайте расположения аудио-кабелей в непосредственной близости от источников электромагнитного излучения,
например трансформаторов, мониторов, компьютеров и т.д.
• Не выдергивайте вилку из розетки за провод. Придерживайте розетку и аккуратно вынимайте из нее вилку.
• Не размещайте кабели в легкодоступных местах. Хождение по кабелю не вызывает непосредственного его разрушения,
однако, может ухудшить изоляцию между центральным проводником и экраном, снижая тем самым качество передаваемого
по нему сигнала и сокращая срок его службы.
• Не допускайте, чтобы кабель терся об острые углы и поверхности.
Стандартное использование аудио-входов/выходов
Аналоговые аудио-входы и выходы обычно коммутируются по трем схемам:
• вход с одного или двух выходов эффекта/дополнительного посыла микшера, выход направляется на входы возвратов с
эффектов микшера;
• вход с инструмента линейного уровня (например гитара или синтезатор с моно/стерео выходом), выходной сигнал
направляется на усилитель или вход микшера;
• вход с выходной стереошины микшера, выход направляется на магнитофон или усилитель.
При использовании монофонического источника сигнала MidiVerb 4 размещается между ним и микшером/усилителем. Несмотря
на то, что источник сигнала монофонический, левый и правый выходы MidiVerb 4 ([LEFT/CH.1] и [RIGHT/CH./2]) можно
скоммутировать с двумя входами микшера/усилителя, добиваясь таким образом стереофонической картины эффекта.
В качестве альтернативного варианта, для подключения MidiVerb 4 можно использовать разрывы пульта. В этом случае сигнал
направляется только на левый или правый канал прибора. Подключение через дополнительные посылы микшера позволяет
направлять на вход MidiVerb 4 сигнал с любого канала пульта, регулируя уровень посыла по каждому из них.
Подробнее различные способы коммутации MidiVerb 4 будут рассмотрены чуть позже.
Распайка входного разъема
Входной разъем MidiVerb 4 [LEFT/CH.1 INPUT] нормализован с
[RIGHT/CH.2 INPUT]. Это означает, что если только один вход, а
именно [LEFT/CH.1 INPUT], скоммутирован с источником сигнала
монофоническим кабелем, то сигнал также передается и на
правый вход [RIGHT/CH.2 INPUT]. При коммутации второго входа
([RIGHT/CH.2 INPUT]) эта связь разрывается и сигнал поступает на
внутренние контуры прибора раздельно по двум каналам.
Необходимо заметить, что правый вход [RIGHT/CH.2 INPUT] не
нормализован по отношению к левому входу [LEFT/CH.1 INPUT].
Коммутация с инструментами
При коммутации аудио-кабелей и/или включении/отключении питания прибора убедитесь, что все остальное оборудование
системы выключено, и регуляторы громкости вывернуты на минимум.
MidiVerb 4 имеет два 1/4” несбалансированных входа и два 1/4” несбалансированных выхода. Такая схема позволяет
коммутировать прибор четырьмя различными способами:
• Ìîíî. Соедините источник сигнала монофоническим кабелем с левым входом MidiVerb 4 ([LEFT/CH.1 INPUT]). Другим
монофоническим кабелем скоммутируйте левый выход MidiVerb 4 с системой звукоусиления или входом микшера.
MicroVerb 4. Руководство пользователя 7
• Моно вход, стерео выход. В этом случае используется один монофонический вход, как и в предыдущем примере. Однако,
выход снимается с двух (левого и правого) разъемов MidiVerb 4 — [LEFT/CH.1 OUTPUT] и [RIGHT/CH.2 OUTPUT] — и
направляется на стереофоническую систему звукоусиления или на два канала микшерной консоли.
• Двойное моно. Соедините двумя монофоническими кабелями два источника моно сигнала с левым и правым входами
MidiVerb 4 ([LEFT/CH.1 INPUT] и [RIGHT/CH.2 INPUT]). Левый и правый выходы прибора ([LEFT/CH.2 OUTPUT] и [RIGHT/CH.2
OUTPUT]) направьте на систему стереофонического звукоусиления или на два канала микшера. Такая схема подключения
обеспечивает независимую обработку двух источников монофонического сигнала.
• Стерео.Соедините монофоническими кабелями левый и правый входы MidiVerb 4 ([LEFT/CH.1 INPUT] и [RIGHT/CH.2 INPUT]) с
источником стереосигнала. Левый и правый выходы ([LEFT/CH.1 OUTPUT] и [RIGHT/CH.2 OUTPUT]) скоммутируйте
монофоническими кабелями с системой стереофонического усиления или двумя входными каналами микшерной консоли.
Коммутация с пультом
MidiVerb 4 работает с моно/стерео посылами любых уровней. Прибор выдерживает сигнал уровня +4 dBu (+20 dBu на пиках) и в то же
время имеет достаточное входное усиление для работы с сигналами низких уровней (-10 dBV) недорогих звукозаписывающих систем.
MidiVerb 4 может коммутироваться с микшерным пультом по трем различным схемам. Для обработки нескольких инструментов
прибор необходимо скоммутировать с дополнительными посылом и возвратом консоли. При необходимости обработать эффектом отдельный инструмент, MidiVerb 4 коммутируется в разрыв пульта. Для обработки общего микса прибор подключается к
основному мастер-выходу консоли.
Использование дополнительных посылов
Дополнительные посылы бывают двух типов: префейдерные (обычно используются для организации мониторного микса) и постфейдерные. Постфейдерные посылы используются для подключения приборов обработки звука, например таких как MidiVerb 4.
Использование дополнительных посылов для подключения эффектов имеет неоспоримое преимущество: вы можете регулировать
уровень посыла на эффект независимо по каждому из каналов (общий для всех каналов уровень эффекта можно регулировать на
MidiVerb 4). Кроме того, большинство консолей имеют возможность регулировки уровня дополнительного возврата, с помощью
которого можно управлять уровнем возврата с эффекта.
Возврат сигнала из MidiVerb 4 в микшер можно организовать двумя различными способами:
• коммутация выходов прибора с соответствующим гнездом возврата;
• коммутация выходов прибора с входными каналами микшера.
Если ваш микшер не имеет соответствующих гнезд возврата с эффектов или уже не осталось свободных, то можно скоммутировать выход MidiVerb 4 с входными каналами консоли. Такой подход имеет еще один плюс — вы имеете дополнительные возможности по панорамированию и эквалайзерной обработке эффекта.
Независимо от схемы подключения MidiVerb 4, вы имеете возможность регулировать баланс прямого и обработанного сигналов
(прямой сигнал подается на дополнительный посыл и общий микс). Возврат с эффекта обычно не должен содержать прямого
сигнала, поскольку баланс прямого и обработанного сигналов регулируется в самом микшере.
Для того, чтобы с выходов MidiVerb 4 снимался только обработанный сигнал:
• Установите параметр [MIX] на 100% (с выхода прибора снимается только обработанный сигнал). Или
• Активизируйте функцию Dry Defeat.
Более подробно функция Dry
Defeat описана в главах 1 и 5.
Моно вход — Стерео выход.
Если вы хотите обрабатывать с
помощью MidiVerb 4 моносигнал,
но хотите иметь два возврата с
эффекта, вам потребуется три
монофонических кабеля с 1/4”
джеками. Один монофонический
кабель соединяет пультовой
посыл на эффект с левым входом
([LEFT/CH.1 INPUT]) MidiVerb 4.
Левый выход MidiVerb 4
([LEFT/CH.1 OUTPUT])
коммутируется монофоническим
8 MicroVerb 4. Руководство пользователя

проводом с одним гнездом возврата с эффекта, а правый выход ([RIGHT/CH.2 OUTPUT]) — с другим (или с входным каналом
микшера).
Стерео вход — Стерео выход.
Схема подключения аналогична
описанной выше. Однако, в
этом случае используется
дополнительный кабель для
коммутации второго посыла.
Теперь на входы MidiVerb 4
будет поступать
стереофонический сигнал.
Например, можно соединить
пультовые посылы 3 и 4
стереофонического
инструмента (например,
синтезатора), подключенного к
двум каналам пульта, с левым и
правым входами ([LEFT/CH.1
INPUT] и [RIGHT/CH.2 INPUT])
(панорама одного из каналов
вывернута до упора влево, а
другого — вправо). Таким образом, левый канал будет сниматься с посыла 3, а правый — с посыла 4.
Двойное моно. Аналогично вы можете использовать два независимых посыла на эффект и обрабатывать их раздельно с
помощью эффектов двойной моно конфигурации (Dual Mono Configuration) (см. главу 3). Для этого скоммутируйте
монофоническими кабелями два дополнительных посыла микшера с левым ([LEFT/CH.1 INPUT]) и правым [RIGHT/CH.2 INPUT])
входами MidiVerb 4, а левый и правый выходы прибора ([LEFT/CH.1 OUTPUT] и [RIGHT/CH.2 OUTPUT]) — с двумя входами
микшера. Эта схема позволяет организовать независимую обработку двух каналов, поскольку каждый из них обрабатывается
своим эффектом.
Использование разрывов
Канальные разрывы пульта позволяют обработать с помощью MidiVerb 4 один или два канала консоли. Разрывы позволяют
включать в звуковой тракт внешние приборы обработки звука. Обычно они расположены в линейке пульта после усилительного
входного контура и до фейдера. По существу это аналогично подключению источников сигнала (инструмента или микрофона)
непосредственно к MidiVerb 4 перед входным каналом микшера. Однако, в некоторых пультах разрывы находятся после
эквалайзерной секции. В этом случае вы будете иметь возможность регулировать тональный баланс сигнала перед его посылом
на эффект. Если в гнездо разрыва не подключен ни один из приборов, то сигнал просто поступает на последующие контуры
канала пульта.
Обычно коммутация с разрывом осуществляется с помощью стереофонического кабеля, имеющего два монофонических джека на
одном из концов (стереофонический джек обеспечивает посыл/возврат, а два монофонических коммутируются со
входом/выходом прибора обработки звука). Это так называемое TRS-соединение (“конец”-”кольцо”-”корпус”). “Конец”
стереофонического джека — посыл, “кольцо” — возврат, “корпус” — общая земля обоих сигналов.
Ìîíî. Коммутация MidiVerb 4 через разрыв пульта осуществляется с
помощью кабеля, на одном конце которого находится 1/4” стереофонический джек TRS, а на другом — два 1/4” монофонических джека. В
разрыв вставляется стереофонический джек, а монофонические
коммутируются с левым входом ([LEFT/CH.1 INPUT]) и левым выходом
([LEFT/CH.2 OUTPUT]) MidiVerb 4. Если после включения прибора в
разрыв пропал звук, поменяйте местами моноджеки. Обычно посыл
маркируется красным цветом (коммутируется со входом MidiVerb 4), а
возврат — черным (коммутируется с выходом прибора).
Двойное моно
Аналогично вы можете обрабатывать два канальных разрыва, коммутируя их с левым и правым входами MidiVerb 4 и выбирая эффект с двойной конфигурацией (Daul Configuration) (см. главу 3). Соедините 1/4”
TRS Y-кабелем разрыв пульта одного канала (стереофонический джек)
с левым входом ([LEFT/CH.1 INPUT]) и выходом ([LEFT/CH.2 OUTPUT])
(монофонические джеки) MidiVerb 4. С помощью другого
1/4” TRS Y-кабеля скоммутируйте разрыв пульта другого
канала (стереофонический джек) с правым входом
([RIGHT/CH.1 INPUT]) и выходом ([RIGHT/CH.2 OUTPUT])
(монофонические джеки) MidiVerb 4. Такая схема
позволяет организовать независимую обработку двух
каналов, поскольку каждый из них обрабатывается своим
эффектом.
Стерео.
Схема подключения аналогична двойному моно (см. рисунок), только в качестве источника сигнала используется
стереофонический инструмент (например, синтезатор или
сэмплер).
MicroVerb 4. Руководство пользователя 9
Loading…
Просмотр
Доступно к просмотру 27 страниц. Рекомендуем вам скачать файл инструкции, поскольку онлайн просмотр документа может сильно отличаться от оригинала.
-
MidiVerb 4. ?oeiaianoai iieuciaaoaey I?ia?aiie?oaiue 18-aeoiue neaiaeuiue i?ioanni? Введение Nianeai ca oi, ?oi au i?eia?aee ioeuoeyooaeoi?iue i?ioanni? MidiVerb 4 oe?iu Alesis. Aey oiai, ?oiau eniieuciaaou an? ooieoeiiaeuio? iiuiinou MidiVerb 4 e i?iaeeou n?ie neo?au i?eai?a, ii?aeoenoa aieiaoaeuii eco?eoa yoi ?oeiaianoai. Правила пользования руководством ?oeiaianoai ninoieo ec ianeieueeo aeaa, iienuaa?ueo ?acee?iua ?a?eiu ?aaiou MidiVerb 4. Iu ?aeiiaiaoai ia?eiaou eco?aiea ?oeiaianoaa n naiiai ia?aea, iaiaei iiuoiua iieuciaaoaee iiaoo ainiieuciaaouny niaa??aieai aey iciaeiieaiey n i?aaeeaie oi?aaeaiey oai eee eiui ?a?eiii. Aeaaa 1: Ia?aei ?aaiou n MidiVerb 4. Aa?ony iniiaiua ?aeiiaiaaoee ii ?aniaeiaea e caioneo i?eai?a, i?ineooeaaie? caaianeeo i?ia?aii, ?aaoee?iaea o?iaiae, n?aaiaie? e caiiieiaie? io?aaaeoe?iaaiiuo i?ia?aii. Aeaaa 2: Eiiiooaoey. I?eaiayony naaaaiey, iaiaoiaeiua aey eiiiooaoee i?eai?a n a?oaeie eiiiiiaioaie aoaei-nenoai (eino?oiaiou, ieeoa?iua ioeuou, eiiiooaoi?u (patchbay) e iiiaiai?i?a?iua iaaieoioiiu). Aeaaa 3: Yooaeou. Aaoaeuii ?anniao?eaa?ony ooieoee neaiaeuiie ia?aaioee i?ioanni?a MidiVerb 4 e eiioaioey ioeuoeyooaeoi?iiai i?ia?aiie?iaaiey. Aeaaa 4: ?aaaeoe?iaaiea i?ia?aii. ?anniao?eaa?ony aii?inu i?ia?aiie?iaaiey i?inouo e ioeuoeyooaeoi?iuo i?ia?aii. Aeaaa 5: I?aaiu oi?aaeaiey. Iienuaa?ony ana i?aaiu oi?aaeaiey i?eai?ii (eiiiee, ?acuaiu e ia?aiao?u). Aeaaa 6: I?eiaiaiea MIDI. I?eaiayony iniiaiua i?aaeea ?aaiou n MIDI-ooieoeyie, oaeeie eae aucia i?ia?aii, iiaoeyoey ia?aiao?ia a ?a?eia ?aaeuiiai a?aiaie, ia?aaa?a aaiiuo SysEx. Aeaaa 7: Ono?aiaiea iaiieaaie. Iienuaa?ony iaiieaaee, aicii?iua i?e?eiu e niiniau eo ono?aiaiey, i?aaeea ooiaa ca i?eai?ii, ea?oa MIDI-ooieoee (MIDI Implementation Chart). Используемые обозначения Iacaaiea eiiiie, ?o?ae e ?acuaiia caaiae iaiaee caee??a?ony a eaaa?aoiua neiaee e caienuaa?ony caaeaaiuie aoeaaie. Iai?eia?, eiiiea [PROG], eieani [VALUE]. Auaa??ee n ye?aia aenieay caee??a?ony a oeao?iua neiaee, iai?eia?, io {00} ai {127}, {DELAY->REVERB} e o.a. Iniai aa?iay eioi?iaoey auaaeaia iia?a?eiooui eo?neaii. 1 -
Начало работы с MidiVerb 4  . . . . . . . . . . . . . . . . . . . . . . . . . . . . . . . . . . . . . . . . . . . . . . .2
?aniaeiaea e i?iaa?ea. Iniiaiua niaaeiaiey. Aee??aiea ieoaiey. ?aaoee?iaea o?iaiy. Aaoiiaoe?aneee ?a?ei
?aaoee?iaee o?iaiy aoiaiiai neaiaea.  Aenieae. I?ia?aiiu. Ia?aee??aiea ia?ao i?anaoiui e iieuciaaoaeuneei
aaieaie. I?ia?aiia Bypass/ I?anao 00. ?aaaeoe?iaaiea ia?aiao?ia yooaeoa. ?a?ei iianeacee. Oi?aaeaiea
ieenii i?yiiai e ia?aaioaiiiai neaiaeia. Ioee??aiea i?yiiai neaiaea (Dry Defeat). N?aaiaiea
io?aaaeoe?iaaiiie i?ia?aiiu e i?eaeiaea. Aica?ao io io?aaaeoe?iaaiiie i?ia?aiiu e i?eaeiaeo. Nio?aiaiea
io?aaaeoe?iaaiiuo i?ia?aii. ?a?ei Bypass.
Коммутация  . . . . . . . . . . . . . . . . . . . . . . . . . . . . . . . . . . . . . . . . . . . . . . . . . . . . . . . . . . . .7
Iiaee??aiea ieoaiey. Ono?ienoaa caueou io naiaa a naoe ieoaiey. Aoaei-eiiiooaoey. Noaiaa?oiia
eniieuciaaiea aoaei-aoiaia/auoiaia. ?aniaeea aoiaiiai ?acuaia. Eiiiooaoey n eino?oiaioaie. Eiiiooaoey n
ioeuoii. Eniieuciaaiea aiiieieoaeuiuo iinueia. Eniieuciaaiea ?ac?uaia. Iiaee??aiea e iniiaiiio auoiao.
“Caieyiua” iaoee. MIDI. Ii?iie ia?aee??aoaeu.
Эффекты  . . . . . . . . . . . . . . . . . . . . . . . . . . . . . . . . . . . . . . . . . . . . . . . . . . . . . . . . . . . . . .11
A?oeoaeoo?a MidiVerb 4. Iiiyoea eiioeao?aoee.  I?inoay eiioeao?aoey (Single). Aaieiay eiioeao?aoey (Double).
Eiioeao?aoey Aaieiay Iiii (Dual Mono). Iiiaicaaiiay eiioeao?aoey (Multi Chain). Yooaeou ?aaa?aa?aoee.
Concert Hall. Real Room. Realroom e Room. Ambience. Plate Reverb. Nonlinear. Ia?aiao?u yooaeoia ?aaa?aa?aoee.
Aeeia oainoa (Decay). Ia?aciie oeeuo? aunieeo ?anoio. I?aaaa?eoaeuiay caaa??ea (Pre-delay). Ieen neaiaea
i?aaaa?eoaeuiie caaa??ee (Pre-delay Mix). Ieioiinou (Density). Aeooocey (Diffusion). Iecei e auniei?anoioiia
ayiioe?iaaiea (Low e High). Swirl. Aaeoe?iaaiea (Gating). Yooaeou caaa??ee. Iiiioiie?aneay caaa??ea (Mono
Delay). Noa?aioiie?aneay caaa??ea (Stereo Delay). Caaa??ea oeia “ieia-iiia” (Ping Pong). Iiiaiioai?iay
caaa??ea (MultiTap Delay). Iiiioiie?aneay caaa??ea BPM (BPM Mono Delay). Neio?iiecaoey ii MIDI Clock.
Delay e Dly. Onoaiiaea a?aiaie caaa??ee n iiiiuu? Tap Tempo. Yooaeou iiano?ieee auniou oiia (Pitch).
Noa?ioiie?aneee oi?on (Stereo Chorus). Eaaa?aoe?iue oi?on (Quad Chorus). Oi?on (Chorus). Noa?aioiie?aneee
oeyi?a? (Stereo Flanger). Oeyi?a? (Flanger). Eanee (Lezlie). Noa?aioiie?aneee naaea ?anoiou (Stereo Pitch Shifter).
Naaea ?anoiou (Pitch).
Редактирование программ . . . . . . . . . . . . . . . . . . . . . . . . . . . . . . . . . . . . . . . . . . . . . . . .16
Auai? eiioeao?aoee. ?aaaeoe?iaaiea ia?aiao?ia yooaeoa. Ia?aee??aiea no?aieo. Eiiiee A/B/C/D. ?anoiua
neo?ae. Iaeiaiiaaiea i?ia?aii.
Органы управления  . . . . . . . . . . . . . . . . . . . . . . . . . . . . . . . . . . . . . . . . . . . . . . . . . . . . .17
Eeoaaay iaiaeu. ?eaeie?enoaeee?aneee aenieae. Naaoiaeiaiue eiaeeaoi? BYPASS. Eieani VALUE. Eiiiea PROG.
Eiiiea EDIT/PAGE. Eiiiee A/B/C/D (NAME/ESC/). Eiiiea UTIL.  Eiiiea STORE. Eiiiee INPUT e OUTPUT.
Aaoiiaoe?aneay ?aaoee?iaea o?iaiy (Auto Level). Ia?aee??aoaeu POWER. Caaiyy iaiaeu. POWER (ieoaiea).
Iaaaeuiue ?acuai BYPASS/ADVANCE.  MIDI IN. MIDI OUT/THRU. Aoia (Left/Ch.1 e Right/Ch.2). Auoia (Left/Ch.1 e
Right/Ch.2). Ia?aiao?u yooaeoa
Применение MIDI  . . . . . . . . . . . . . . . . . . . . . . . . . . . . . . . . . . . . . . . . . . . . . . . . . . . . . . .22
Ooieoee MIDI. Eaiae MIDI. MIDI Thru. I?eai eiiaia Program Change. Oaaeeoa ia?aaa?anaoee Program Change
Table. Caienu SysEx. Iiaoeyoey a ?aaeuiii a?aiaie. Ii?aaaeaiea enoi?ieeia iiaoeyoee. Oaaeeoa ia?aiao?ia
iiaoeyoee. Onoaiiaea aeoaeiu iiaoeyoee. Onoaiiaea a?aiaie caaa??ee ii MIDI clock.
Устранение неполадок  . . . . . . . . . . . . . . . . . . . . . . . . . . . . . . . . . . . . . . . . . . . . . . . . . . .25
Nienie aicii?iuo iaeni?aaiinoae. Ia?acaione. I?iaa?ea aa?nee i?ia?aiiiiai iaania?aiey. Ianeo?eaaiea.
Ooia. ?aiiio.
Карта MIDI-функций . . . . . . . . . . . . . . . . . . . . . . . . . . . . . . . . . . . . . . . . . . . . . . . . . . . . .26
Характеристики  . . . . . . . . . . . . . . . . . . . . . . . . . . . . . . . . . . . . . . . . . . . . . . . . . . . . . . . .26
Глава 1
Начало работы с MidiVerb 4
Распаковка и проверка
Oaa?e?iay oiaeiaea MidiVerb 4 i?aaio?aiyao i?eai? io iia?a?aaiey ai a?aiy o?ainii?oe?iaee. Ii?aeoenoa nio?aiyeoa
oiaeiai?iua ei?iaee ia neo?ae, anee o aan aicieeiao iaiaoiaeiinou auneaou i?eai? ia na?aeniia ianeo?eaaiea.
Oiaeiai?iay ei?iaea niaa??eo:
•     ?oeiaianoai iieuciaaoaey
•     I?eai? Alesis MidiVerb 4 n oai ?a iiia?ii, ?oi e ia oiaeiai?iie ei?iaea
•     Aeie ieoaiey
•     Aa?aioeeiue oaeii oe?iu Alesis
Iaiaoiaeii ca?aaeno?e?iaaou aaoo iieoieo. Caiieieoa aa?aioeeiue oaeii e ioioeeoa aai ia oe?io Alesis,
Основные соединения
MidiVerb 4 ii?ii eniieuciaaou a naiuo ?acee?iuo aoaei-nenoaiao. Aai ii?ii eiiiooe?iaaou eae iaiin?aanoaaiii n
eino?oiaioii, oae e n ieeoa?iie eiinieu?. I?eaaaaiiay ie?a eioi?iaoey iicaieeo aai auno?i neiiiooe?iaaou i?eai? e
i?enooieou e ?aaioa. Aieaa iia?iaiay eioi?iaoey i niiniaao eiiiooaoee i?eai?a i?eaiaeony a aeaaa 2.
•    Iiiioiie?aneee aoia, iiii eee noa?ai auoia.  Niaaeieoa enoi?iee iiii neaiaea iiiioiie?aneei i?iaiaii n aoiaii
[LEFT/CH.1 INPUT] MidiVerb 4. Eaaue aoia [LEFT/CH.1 INPUT] ii?iaeeciaai ii ioiioaie? e i?aaiio [RIGHT/CH.2 INPUT]).
Neiiiooe?oeoa n iiiiuu? iiiioiie?aneiai i?iaiaa auoia i?eai?a [LEFT/CH.1 OUTPUT] n caoeioneeeaa?uae nenoaiie eee
2                                                                   MicroVerb 4. ?oeiaianoai iieuciaaoaey
-
n ieeoa?iui ioeuoii. E?iia oiai, au ii?aoa nieiaou neaiae n i?aaiai auoiaa [RIGHT/CH.2 OUTPUT] e eniieuciaaou aai a
noa?aioiie?aneie nenoaia caoeioneeaiey eee iiaaaaou ia aoi?ie eaiae ieeoa?a.
•    Noa?ai.  Niaaeieoa aaoiy iiiioiie?aneeie i?iaiaaie aoiau [LEFT/CH.1 INPUT] e [RIGHT/CH.2 INPUT] MidiVerb 4 n
enoi?ieeii noa?ai neaiaea. N iiiiuu? aua aaoo iiiioiie?aneeo i?iaiaia niaaeieoa auoiau MidiVerb 4 n nenoaiie
noa?aioiie?aneiai oneeaiey eee aaoiy eaiaeaie ieeoa?iie eiiniee.
I?e eiiiooaoee MidiVerb 4 n aiiieieoaeuiuie iinueaie/aica?aoaie ieeoa?iie eiiniee, aai ii?ao iio?aaiaaouny onoaiiaeou
auoiaiie neaiae ia iaeneioi yooaeoa (a auoiaiii ieena i?eai?a i?enoonoaoao oieuei ia?aaioaiiue neaiae). Yoi aaeaaony n
iiiiuu? niioaaonoao?uae aeiaaeuiie iioee, onoaiaaeeaa?uae yoio ?a?ei iaiia?aiaiii aey anao i?ia?aii (ni. ?acaae
Oi?aaeaiea ieenii i?yiiai e ia?aaioaiiiai neaiaeia).
Включение питания
Iinea caaa?oaiey i?ioanna eiiiooaoee ii?ii aee??eou ieoaiea i?eai?a. I?e yoii iaiaoiaeii i?eaa??eaaouny neaao?uae
iineaaiaaoaeuiinoe:
1) Ia?aa aee??aieai ieoaiey MidiVerb 4 i?iaa?uoa:
•     I?aaeeuiinou eiiiooaoee.
•     Auaaaaiu ee ia ieieioi ?o?ee oi?aaeaiey o?iaiai neaiaea ia oneeeoaea eee ieeoa?a.
2) Ia?ieoa ia eiiieo [POWER], ?aniiei?aiio? ia eeoaaie iaiaee i?eai?a.
I?e aee??aiee ieoaiey ia aenieae auaiaeony no?iea {ALESIS MIDIVERB 4}, ii enoa?aiee iaeioi?iai a?aiaie aenieae aunaaoeo
iiia? iineaaiae aua?aiiie i?ia?aiiu (00 — 127) ec i?anaoiiai eee iieuciaaoaeuneiai aaieia e caai?eony eiiiea [PROG].
3) Aee??eoa ieoaiea oneeeoaey/ieeoa?a e io?aaoee?oeoa o?iaaiu.
Регулировка уровня
I?aaeeuiay onoaiiaea aoiaiiai e auoiaiiai o?iaiae niinianoaoao oaaee?aie? niioiioaiey neaiae/ooi. Eo?oa onoaiaaeeaaou
?aaoeyoi?u ia 3/4 (75 % io iaeneiaeuiiai o?iaiy). Yoi nie?aao aa?iyoiinou aicieeiiaaiey ia?aa?ocie e enea?aiee, a oae?a
ieieiece?oao o?iaaiu oiiiaiai ooia.
Автоматический режим регулировки уровня входного сигнала
MidiVerb 4 eiaao oieeaeuio? aicii?iinou aaoiiaoe?aneie ?aaoee?iaee o?iaiy aoiaiiai neaiaea. Aai ainoaoi?ii eeou
onoaiiaeou i?eai? a yoio ?a?ei ?aaiou e iiaaou ia iaai neaiae (n aeoa?u, neioacaoi?a, iaaieoioiia e o.a.). Ana inoaeuiia
MidiVerb 4 naaeaao nai.
Aaoiiaoe?aneay ?aaoee?iaea o?iaiy aoiaiiai neaiaea:
1) Neiiiooe?oeoa MidiVerb 4 n enoi?ieeii aoaei-neaiaea (ni. aeaao 2).
2) Ia?ieoa iaiia?aiaiii eiiiee [INPUT] e [OUTPUT].
3) Iiaaeoa ia aoia MidiVerb 4 neaiae.
Ooieoey aaoiiaoe?aneie ?aaoee?iaee a oa?aiea i?eia?ii 5 naeoia
aiaeece?oao aoiaiie neaiae e onoaiaaeeaaao o?iaaiu aoiaa ii iaiei
eaiaeai.
Caia?aiea. I?e iaiaoiaeiinoe au ii?aoa oaaee?eou a?aiy aiaeeca aoiaiiai neaiaea (i?aeoe?anee ai aaneiia?iinoe). Aey yoiai
iiaee??eoa e ?acuaio [FOOTSWITCH], ?aniiei?aiiiio ia caaiae iaiaee, e?aie ii?iie ia?aee??aoaeu iaiiaaiiiai aaenoaey e
aa??eoa aai ia?aoui ai a?aiy ?aaiou ?a?eia aaoiiaoe?aneie ?aaoee?iaee aoiaiiai o?iaiy (Auto Input). Aey iieo?aiey aieaa
iia?iaiie eioi?iaoee ni. aeaao 2.
Дисплей
Iinea ia?aiai aee??aiey ieoaiey aenieae MidiVerb 4
auaeyaeo neaao?uei ia?acii:
Aenieae MidiVerb 4 ?acaeo ia 5 naeoee.
1) Iiia? i?ia?aiiu. I?ia?aiiu MidiVerb 4 ioia?o?o n
{00} ii {127}. A aaiiii neo?aa aua?aia i?ia?aiia {01}.
2) Aaie. MidiVerb 4 eiaao aaa aaiea (i?anaoiue e
iieuciaaoaeuneee), a ea?aii ec eioi?uo ?aciauaii ii
128 i?ia?aii. A caaeneiinoe io oiai, eaeie aaie aeoeaai
a ianoiyuee iiiaio, aenieae aunaa?eaaao eeai “PRE-
SET” (i?anaoiue aaie), eeai “USER” (aaie
iieuciaaoaeuneeo i?ia?aii). A yoii i?eia?a aua?ai i?anaoiue aaie.
3) Eiy i?ia?aiiu. Ea?aay i?ia?aiia eiaao oieeaeuiia 8-neiaieuiia eiy. A iaoai i?eia?a yoi — {Lrg Hall}. A ioee?ea io
i?anaoiuo, iieuciaaoaeuneea i?ia?aiiu ii?ii ia?aeiaiiauaaou.
4) Eiioeao?aoey. Iienuaaao eniieucoaiue i?ia?aiiie yooaeo, iooe i?ioi?aaiey ?a?ac iaai aoiaiiai neaiaea, ii?aaaeyao oei
eiioeao?aoee (Stereo eee Dual eiioeao?aoey). Aieaa iia?iaiia iienaiea ?acee?iuo oeiia eiioeao?aoee i?eaaaaii a aeaaa 3. A
i?eaaaaiiii auoa i?eia?a eiioeao?aoey iacuaaaony {CONCERT HALL}. Anee a i?ia?aiio auee aianaiu eciaiaiey, oi
aiineaanoaee eiioeao?aoee aoaao aunaa?eaaouny ia aenieaa i?iieniuie aoeaaie.
5) Eiaeeaoi?u o?iaiy. Eiaeeaoi?u ieeiaiai oeia ioia?a?a?o o?iaaiu iaia?aaioaiiiai aoiaiiai neaiaea e ai iiiaii noi?e n
eiaeeaoi?aie o?iaiy iau?iiai iaaieoioiia. Ioia?a?aiiia ia ?enoiea ninoiyiea eiaeeaoi?ia aiai?eo i oii, ?oi aoiaiie
MicroVerb 4. ?oeiaianoai iieuciaaoaey                                                                3
- 1
- 2
- 3
- 4
- 27
-
Страница 1
A L ES I S MidiVerb 4 Reference M a nu a l[…]
-
Страница 2
MidiVerb 4 Reference Manual 1 Introduction Thank you for purchasing the Alesis MidiVerb 4 Multi Effects Processor. To take full advantage of the MidiVerb 4’s functions, and to enjoy long and trouble-free use, please read this user’s manual carefully. How To Use This Manual This manual is divided into the following sections describing the variou[…]
-
Страница 3
2 MidiVerb 4 Reference Manual[…]
-
Страница 4
Contents MidiVerb 4 Reference Manual 3 C ONTENTS Your First Session with the MidiVerb 4 ……………………………….. 7 Unpacking and Inspection ……………………………………………………………………………7 Basic Connections ……………………………………………………………………………..[…]
-
Страница 5
Contents 4 MidiVerb 4 Reference Manual Low Pass Filter ………………………………………………………………………………. 31 Pre-delay ………………………………………………………………………………………. 31 Pre-delay Mix ………………………………………………………………[…]
-
Страница 6
Contents MidiVerb 4 Reference Manual 5 MIDI Out/Thru ……………………………………………………………………………… 49 Input (Left/Ch.1 & Right/Ch.2) …………………………………………………………. 50 Output (Left/Ch.1 & Right/Ch.2) …………………………………………………….[…]
-
Страница 7
Contents 6 MidiVerb 4 Reference Manual VALUE BYPASS ADV ANCED 18 BIT FULL Y INTEGRATED EXTENDED RANGE SIGNAL PROCESSING FRONT P ANEL REAR P ANEL Power Footswitch Left/CH 1 Output Right/CH 2 Output Bypass Value Program Utilities Store Input Output Power Edit A B CD MIDI In MIDI Out/Thru Left/CH 1 Input Right/CH 2 Input[…]
-
Страница 8
Your First Session with the MIDIVerb 4 – Chapter 1 MidiVerb 4 Reference Manual 7 C HAPTER 1 Y OUR F IRST S ESSION WITH THE M IDI V ERB 4 Unpacking and Inspection Your MidiVerb 4 was packed carefully at the factory, and the shipping carton was designed to protect the unit during shipping. Please retain this container in the highly unlikely event t[…]
-
Страница 9
Chapter 1 – Your First Session with the MIDIVerb 4 8 MidiVerb 4 Reference Manual After making your connections, turn on the system’s power using this procedure: ➀ Before turning on the MidiVerb 4’s power, check the following items: • Have all connections been made correctly? • Are the volume controls of the amplifier or mixer turned dow[…]
-
Страница 10
Your First Session with the MIDIVerb 4 – Chapter 1 MidiVerb 4 Reference Manual 9 What’s in the Display? When the MidiVerb 4 is first turned on, the display will look something like this: L R PRESET 0 1 L r g H a l l C O N C E R T H A L L 4 5 1 3 2 The MidiVerb 4’s display is divided into 5 sections: ➀ Program Number . MidiVerb 4 Programs ar[…]
-
Страница 11
Chapter 1 – Your First Session with the MIDIVerb 4 10 MidiVerb 4 Reference Manual Auditioning Internal Programs The MidiVerb 4 comes with 128 Programs in a Preset bank, plus another 128 Programs in the User bank. These Programs represent the wide range of applications for which the MidiVerb 4 is suited. To audition the internal effect Programs: ?[…]
-
Страница 12
Your First Session with the MIDIVerb 4 – Chapter 1 MidiVerb 4 Reference Manual 11 Changing Effect Settings When you dial up a Program, its Configuration is shown in the display to the right of the Program’s name. RoomVerb REAL ROOM The Configuration will either be a single reverb type effect (as in the example above), or a combination of two or[…]
-
Страница 13
Chapter 1 – Your First Session with the MIDIVerb 4 12 MidiVerb 4 Reference Manual To edit effect parameters: ➀ Press the [ PROG ] button. The [ PROG ] button will light. ➁ Press the [ PAGE ] button to enter Edit mode. This selects the first page of effect parameters, if you are editing the Program for the first time. There are usually two or […]
-
Страница 14
Your First Session with the MIDIVerb 4 – Chapter 1 MidiVerb 4 Reference Manual 13 Adjusting Effects Mix Levels Whether a Program contains a single effect or two or three effects, you can adjust each effect’s mix to obtain a desirable balance between the original, uneffected signal and each effect’s output. The Mix parameter (or “wet/dry mix[…]
-
Страница 15
Chapter 1 – Your First Session with the MIDIVerb 4 14 MidiVerb 4 Reference Manual Comparing an Edited Program to its Original Settings The left side of the display always indicates the currently selected Program. If the [ PROG ] button is pressed once, the currently selected Program’s name and the Configuration being used both appear in the upp[…]
-
Страница 16
Your First Session with the MIDIVerb 4 – Chapter 1 MidiVerb 4 Reference Manual 15 Storing Edited Programs Once you are satisfied with the changes you have made to an edited Program, or are creating a new Program from scratch, you will need to store your edited Program back into memory. The MidiVerb 4 will store the currently selected Program in n[…]
-
Страница 17
Chapter 1 – Your First Session with the MIDIVerb 4 16 MidiVerb 4 Reference Manual Bypassing Effects At any time you can bypass the effects, thereby allowing the direct signal to pass through the MidiVerb 4 unchanged. This can be done in two ways: • by simultaneously pressing both the [ PROG ] and [ UTIL ] buttons on the front panel; or, • by […]
-
Страница 18
Connections – Chapter 2 MidiVerb 4 Reference Manual 17 C HAPTER 2 C ONNECTIONS AC Power Hookup The MidiVerb 4 comes with a power adapter suitable for the voltage of the country it is shipped to (either 110 or 220V, 50 or 60 Hz). With the MidiVerb 4 off, plug the small end of the power adapter cord into MidiVerb 4’s [ POWER ] socket and the male[…]
-
Страница 19
Chapter 2 – Connections 18 MidiVerb 4 Reference Manual • Do not place cables where they can be stepped on. Stepping on a cable may not cause immediate damage, but it can compress the insulation between the center conductor and shield (degrading performance), or reduce the cable’s reliability. • Avoid twisting the cable or having it make sha[…]
-
Страница 20
Connections – Chapter 2 MidiVerb 4 Reference Manual 19 When connecting audio cables and/or turning power on and off, make sure that all devices in your system are turned off and the volume controls are turned down. The MidiVerb 4 has two 1/4” unbalanced inputs and two 1/4” unbalanced outputs. These provide three different (analog) audio hooku[…]
-
Страница 21
Chapter 2 – Connections 20 MidiVerb 4 Reference Manual Interfacing to a Mixing Console The MidiVerb 4 handles mono or stereo sends at all system levels. The input circuitry of the MidiVerb 4 can easily handle +4 dBu levels (+20 dBu peaks), while having enough input and output gain to interface with the low -10 dBV signal levels of budget recordin[…]
-
Страница 22
Connections – Chapter 2 MidiVerb 4 Reference Manual 21 Mono In — Stereo Out. If you only want to feed the MidiVerb 4 a mono input, but wish to connect both of its outputs back to the mixer, you will need three 1/4″ audio cables. Connect a mono cord from an effect send to the [ LEFT/CH.1 ] input of the MidiVerb 4, another mono cord from the [[…]
-
Страница 23
Chapter 2 – Connections 22 MidiVerb 4 Reference Manual Using Inserts By using individual channel inserts, you can dedicate the MidiVerb 4 to a specific channel (or pair of channels) on the mixer. The Insert connections on the back of the mixer provide a way of “inserting” external processing equipment into the signal path. The insert occurs a[…]
-
Страница 24
Connections – Chapter 2 MidiVerb 4 Reference Manual 23 Stereo. In the case where a stereo instrument (such as a keyboard or sampler) is con- nected to two separate channels of a mixing console, you will need two 1/4″ TRS cables, one for each channel. The connection is made in a similar fashion as described above. Using Main Outputs When you […]
-
Страница 25
Chapter 2 – Connections 24 MidiVerb 4 Reference Manual Avoiding Ground Loops In today’s studio, where it seems every piece of equipment has its own computer chip inside, there are many opportunities for ground loop problems to occur. These show up as hums, buzzes or sometimes radio reception and can occur if a piece of equipment “sees” two […]
-
Страница 26
Connections – Chapter 2 MidiVerb 4 Reference Manual 25 MIDI MIDI (Musical Instrument Digital Interface) is an internationally-accepted protocol that allows musical-related data to be conveyed from one device to another. The MIDI connections on the MidiVerb 4 provide four different functions: • To recall Programs using MIDI program change messag[…]
-
Страница 27
Chapter 2 – Connections 26 MidiVerb 4 Reference Manual Any momentary single-pole/single-throw footswitch, normally open or normally closed, will work for the three footswitch functions. This should be plugged in prior to power-up so that the MidiVerb 4 can configure itself for the type of footswitch being used. Advance. When the footswitch mode i[…]
-
Страница 28
Overview of Effects – Chapter 3 MidiVerb 4 Reference Manual 27 C HAPTER 3 O VERVIEW OF E FFECTS The Architecture of the MidiVerb 4 What is a Configuration? A Configuration is an arrangement of one or more effects. Each of the 256 internal Programs in the MidiVerb 4 use one Configuration. There are 32 different Configurations available, each of wh[…]
-
Страница 29
Chapter 3 – Overview of Effects 28 MidiVerb 4 Reference Manual Double Double Configurations consist of two “side-by-side” mono-in/stereo-out effects. These Configurations are identified by the presence of a “+” in their name. In each case, the Left/Ch. 1 input is routed to one effect, while the Right/Ch. 2 input is routed to the other. Th[…]
-
Страница 30
Overview of Effects – Chapter 3 MidiVerb 4 Reference Manual 29 Multi Chain The Multi Chain Configurations provide two or three stereo effects, which are connected in series; i.e. one feeding the next in the chain. These Configurations are identified by the presence of one or two “->” symbols in their name ( Example: “Chorus->Real Room[…]
-
Страница 31
Chapter 3 – Overview of Effects 30 MidiVerb 4 Reference Manual Reverb Effects Reverb is made up of a large number of distinct echoes, called reflections. In a natural acoustic space, each reflection’s amplitude and brightness decays over time. This decaying action is influenced by the room size, the location of the sound source in the room, the[…]
-
Страница 32
Overview of Effects – Chapter 3 MidiVerb 4 Reference Manual 31 Reverb Parameters Most of the reverb effects in the MidiVerb 4 operate under the same set of control parameters, which are listed and described in this section. However, reverbs which use more processing power (i.e. the Single Configuration reverbs) provide more parameters which take […]
-
Страница 33
Chapter 3 – Overview of Effects 32 MidiVerb 4 Reference Manual Note: The illustration above reflects a Density setting of 0. Frequency Damping – Low & High These two parameters allow you to control the equalization of the reverb’s decay separately for both the low and high frequencies. This means that you have control over the tonal shape[…]
-
Страница 34
Overview of Effects – Chapter 3 MidiVerb 4 Reference Manual 33 Delay Effects Delay provides a discrete repetition of a signal. By adding feedback within the effect, the delayed signal can repeat many times, with each successive decay softer than its predecessor. Each of the Delay types allow you to adjust their delay time in milliseconds, however[…]
-
Страница 35
Chapter 3 – Overview of Effects 34 MidiVerb 4 Reference Manual Synchronizing to MIDI Clock It is possible to control the delay time of the BPM Mono Delay effect from an external MIDI clock source, such as a MIDI sequencer or drum machine. Any device which can output MIDI clock can be used to control this Configuration’s delay time. If the “Te[…]
-
Страница 36
Overview of Effects – Chapter 3 MidiVerb 4 Reference Manual 35 Pitch Effects The Pitch effects alter the pitch of a signal in various ways to produce “layered” timbres that are more complex than the original signal. Although some of these effects can sound similar to one another depending on the parameter settings, each is achieved differentl[…]
-
Страница 37
Chapter 3 – Overview of Effects 36 MidiVerb 4 Reference Manual Stereo Flange First used in the 1960s, “flanging” was achieved by the use of two tape recorders that would record and play back the same program in synchronization. By slowing down one tape machine, and then letting it catch up with the other, different phase cancellations would o[…]
-
Страница 38
Overview of Effects – Chapter 3 MidiVerb 4 Reference Manual 37 Flange This is a mono, less processor intensive version of the Stereo Flange, used in the Multi Chain Configurations Flange->Realroom, Realroom->Flange and Flange->Dly- >Room; the Double Configuration Realroom+Flange; and the Dual Mono Configurations Flange:Flange and Flan[…]
-
Страница 39
Chapter 3 – Overview of Effects 38 MidiVerb 4 Reference Manual The Direction parameter determines which direction the panning will start in when triggered (this has no effect if the Trigger parameter is turned off). You can adjust the attack threshold of this audio triggering function, and adjust the hold time (how long the Auto Pan will wait bef[…]
-
Страница 40
E diting Programs – Chapter 4 MidiVerb 4 Reference Manual 39 C HAPTER 4 E DITING P ROGRAMS Selecting A Configuration A Configuration is made up of one or more effects. Each of the internal Programs of the MidiVerb 4 use one Configuration. When you want to create your own Program, the first thing you must decide is which Configuration you wish to […]
-
Страница 41
Chapter 4 – Editing Programs 40 MidiVerb 4 Reference Manual Editing Effect Parameters Editing Programs is only possible while in Program mode. This means that the [ PROG ] button must be lit. If the [ PROG ] button is not lit, press it now. From Program mode, you can edit the currently selected Program by pressing either [ EDIT/PAGE ] or any of t[…]
-
Страница 42
E diting Programs – Chapter 4 MidiVerb 4 Reference Manual 41 Moving Through Pages Once in Edit mode, there will usually be multiple pages available. The total number of pages depends on the Configuration that the selected Program uses, and will be indicated by the numbers appearing in the lower left corner of the display. The [ EDIT/PAGE ] button[…]
-
Страница 43
Chapter 4 – Editing Programs MidiVerb 4 Reference Manual 43 Naming A Program The process of naming a Program is integrated into the Store function. Whenever you store a Program, you have the opportunity to change its name. This is done by using the [ A ], [ B ], [ C ] and [ D ] buttons while in Store mode. To change a Program’s name: ➀ Press […]
-
Страница 44
Description of Controls – Chapter 5 MidiVerb 4 Reference Manual 43 C HAPTER 5 D ESCRIPTION OF C ONTROLS Front Panel LCD Display When the MidiVerb 4 is first turned on, the display will look something like this: L R PRESET 0 1 L r g H a l l C O N C E R T H A L L 4 5 1 3 2 The MidiVerb 4’s display is divided into 5 sections: ➀ Program Number . […]
-
Страница 45
Chapter 5 – Description of Controls 44 MidiVerb 4 Reference Manual way as the level meters on a standard tape recorder. The meters shown in this example are idle, indicating that there is no input signal activity. Normally, these are labeled as “ L ” and “ R ”. However, when the selected Program uses a Dual type Configuration (two mono ef[…]
-
Страница 46
Description of Controls – Chapter 5 MidiVerb 4 Reference Manual 45 BYPASS LED Indicator The [ BYPASS ] LED will be lit whenever Bypass mode is enabled. Bypass mode can be toggled on and off by simultaneously pressing the [ PROG ] and [ UTIL ] buttons, or by pressing a footswitch connected to the [ FOOTSWITCH ] jack (if the footswitch is switched […]
-
Страница 47
Chapter 5 – Description of Controls 46 MidiVerb 4 Reference Manual character of the Program’s name. The [ C/< ] and [ D/> ] buttons move the cursor left and right, respectively, through the eight character fields of the Program’s name. To move the cursor back to the Program location number, press [ B/ESC ]. UTILity Button When the [ UTI[…]
-
Страница 48
Description of Controls – Chapter 5 MidiVerb 4 Reference Manual 47 Page 4: Modulators. This is where you select the two MIDI modulation sources which will be used for all Programs to control their parameters. The parameters these control depend on the selected Program’s Configuration. For example, in all Reverb Configurations, Modulator X contr[…]
-
Страница 49
Chapter 5 – Description of Controls 48 MidiVerb 4 Reference Manual To store an edited Program: ➀ Press [ STORE ]. The [ STORE ] button will flash, and the display will read: Store as X XX (nnnnnnnn)? …whereas XXX is a Program location number from 00—127 in the User bank, and nnnnnnnn is the Program’s name. ➁ Use the [ VALUE ] knob to se[…]
-
Страница 50
Chapter 5 – Description of Controls MidiVerb 4 Reference Manual 49 Rear Panel Power This is a plug for connecting the +9VAC power supply (supplied). The power supply is then connected to an AC outlet delivering a nominal 120VAC. The correct power supply must be used AT ALL TIMES. Any other power supply might create a fire risk and/or permanently […]
-
Страница 51
Description of Controls – Chapter 5 50 MidiVerb 4 Reference Manual These are 1/4″ phone jacks which connect to sources such as the effects sends of mixing consoles. They may be used with nominal input levels from -10dBV (guitar level) to +4dBu. For mono applications, use the [ LEFT/CH.1 ] input. The [ LEFT/CH.1 ] input jack is normalled to t[…]
-
Страница 52
Chapter 5 – Description of Controls MidiVerb 4 Reference Manual 51 PLATE REVERB 1 Decay !59-6!2˙ LPF 059ƒ-3^2 ∂ , OFF PDly 000-75© PMx 000-100å 2 Dens 000-100å Diff 000-100å LDamp OFF , 059ƒ — 3^2 ∂ HDamp 059ƒ-3^2 ∂ , OFF 3 Gate OFF , 001-100å Hold 000-500© Rel 000-500© 4 Swirl 00-99 Mix 000-100å NONLINEAR 1 Time 100-600© LPF 0[…]
-
Страница 53
Description of Controls – Chapter 5 52 MidiVerb 4 Reference Manual MULTI TAP DELAY 1 Time 1 000-250 © Lvl 1 00-99 Pan 1 -50-50 Fdbk 1 00-99å 2 Time 2 000-250 © Lvl 2 00-99 Pan 2 -50-50 Fdbk 2 00-99å 3 Time 3 000-250 © Lvl 3 00-99 Pan 3 -50-50 Fdbk 3 00-99å 4 MFdbk 000-100å LoCut OFF , 059ƒ-3^2 ∂ HiCut 059ƒ-3^2 ∂ , OFF Mix 000-100å B[…]
-
Страница 54
Chapter 5 – Description of Controls MidiVerb 4 Reference Manual 53 STEREO FLANGE 1 Rate )0ƒ-(9ƒ Depth 000-250 Fdbk -99-99å Thru0 OFF , On 2 Trig 0fffffffFF , L , r , Lr Attck 000-255 Rel 000-255 Mix 000-100å FLANGE: FLANGE 1 Rate )0ƒ-(9ƒ Depth 000-250 Fdbk -99-99å Wave Sin , tri 2 Trig 0fffffffFF , L , r , Lr Attck 000-255 Thru0 OFF , On M[…]
-
Страница 55
Description of Controls – Chapter 5 54 MidiVerb 4 Reference Manual DELAY} REALROOM 1 Tap — 100ms 0-7 10ms 0-9 1ms 0-9 2 Fdbk 00-99å HiCut 059ƒ-3^2 ∂ , OFF DMix 000-100å 3 Decay !0-7%8˙ LPF 059ƒ-3^2 ∂ , OFF Dens 000-100å Diff 000-100å 4 Gate OFF , 001-100å Hold 000-500© Rel 000-500© RMix 000-100å CHORUS} REALROOM 1 Rate )0ƒ-(9ƒ […]
-
Страница 56
Chapter 5 – Description of Controls MidiVerb 4 Reference Manual 55 CHORUS}DLY} ROOM 1 Rate )0ƒ-(9ƒ Depth 000-255 Fdbk 00-99å CMix 000-100å 2 Time 000-500 © Fdbk 00-99å HiCut 059ƒ-3^2 ∂ , OFF DMix 000-100å 3 Decay !0-7%8˙ LPF 059ƒ-3^2 ∂ , OFF Dens 000-100å Diff 000-100å 4 Gate OFF , 001-100å Hold 000-500© Rel 000-500© RMix 000-1[…]
-
Страница 57
Description of Controls – Chapter 5 56 MidiVerb 4 Reference Manual REALROOM+ FLANGE 1 Decay !0-7%8˙ LPF 059ƒ-3^2 ∂ , OFF PDly 000-250© PMix 000-100å 2 Dens 000-100å Diff 000-100å Gate OFF , 000-500© RMix 000-100å 3 Rate )0ƒ-(9ƒ Depth 000-250 Fdbk -99-99å Wave Sin , tri 4 Trig 0fffffffFF , L , r , Lr Attck 000-255 Rel 000-255 FMix 000[…]
-
Страница 58
Advanced Applications – Chapter 6 MidiVerb 4 Reference Manual 57 C HAPTER 6 MIDI A PPLICATIONS MIDI Functions The MidiVerb 4 provides many MIDI functions, including being able to respond to program changes, sending and receiving Program information via Sysex (System Exclusive) dumps, and realtime control over effect parameters via MIDI controller[…]
-
Страница 59
Chapter 6 – Advanced Applications 58 MidiVerb 4 Reference Manual Receiving Program Changes In order to recall programs on the MidiVerb 4 from a MIDI control device (keyboard, drum pad, guitar or bass controller, sequencer, etc.): ➀ Connect the control device’s MIDI OUT to the MidiVerb 4’s [ MIDI IN ]. ➁ Press [ UTIL ], then press the [ ED[…]
-
Страница 60
Advanced Applications – Chapter 6 MidiVerb 4 Reference Manual 59 ➂ Turn the [ VALUE ] knob to select a MIDI program change number from 000–127 to be remapped. ➃ Press the [ D ] button to select the Program field. The Program field will flash to indicate it is selected for editing. ➄ Turn the [ VALUE ] knob to select a MidiVerb 4 Program f[…]
-
Страница 61
Chapter 6 – Advanced Applications 60 MidiVerb 4 Reference Manual Realtime Modulation Functions You can use various MIDI messages (such as note number, velocity, aftertouch, or pitch-bend, etc.) to simultaneously control up to two parameters in the MidiVerb 4, such as delay time, room size, etc. Modulation functions are “hard-wired” in each Co[…]
-
Страница 62
Advanced Applications – Chapter 6 MidiVerb 4 Reference Manual 61 The following is a chart describing which parameters of each Configuration are controlled by Modulators X and Y. Use this chart to determine what control possibilities exist for each Program. Configuration Mod X Mod Y CONCERT HALL Decay Wet/Dry Mix REAL ROOM Decay Wet/Dry Mix AMBIEN[…]
-
Страница 63
Chapter 6 – Advanced Applications 62 MidiVerb 4 Reference Manual Let’s say you want your keyboard’s modulation wheel (controller #1) to control how much reverb is heard. Since Mod Y is wired to the Wet/Dry Mix, you would first assign Mod Y to be 001 . Next, you set the amplitude for how much of the Mix parameter’s range you wish to be able […]
-
Страница 64
Troubleshooting – Chapter 7 MidiVerb 4 Reference Manual 63 C HAPTER 7 T ROUBLESHOOTING Trouble-Shooting Index If you are experience problems while operating the MidiVerb 4, please use the following table to locate possible causes and solutions before contacting Alesis customer service for assistance. Symptom Cause Solution The display does not li[…]
-
Страница 65
Chapter 7 – Troubleshooting 64 MidiVerb 4 Reference Manual The current software version may be determined by holding [ PROG ] and pressing [ EDIT ]. The display will briefly indicate the currently installed software version. Maintenance/Service Cleaning Disconnect the AC cord, then use a damp cloth to clean the MidiVerb 4’s metal and plastic su[…]
-
Страница 66
Troubleshooting – Chapter 7 MidiVerb 4 Reference Manual 65 Los Angeles, CA 90016 Customers outside the USA: Contact your local Alesis dealer for warranty assistance. Do not return products to the factory unless you have been given specific instructions to do so. Note that the warranty is valid only in the country of origin.[…]
-
Страница 67
MIDI Implementation Chart 66 MidiVerb 4 Reference Manual MIDI I MPLEMENTATION C HART Function Transmitted Recognized Remarks Basic Channel Default Changed X * * * * * * * * 1 — 16 Mode Default Messages Altered X X * * * * * * * * Mode 3 X Note Number True Voice 0 — 127 * * * * * * * * 0 — 127 0 — 127 Velocity Note On Note Off X X O O After […]
-
Страница 68
Specifications MidiVerb 4 Reference Manual 67 S PECIFICATIONS Electrical Frequency Response: ±1dB from 20Hz to 20 kHz Dynamic Range: >90dB «A» wtg., 20 Hz-22kHz Distortion: <0.009% @ 1kHz, nominal level (-12 dBfs) <0.005% @ peak level Crosstalk: <90dB below full scale Input Number of Channels: 2 Format: 1/4″ unbalanced N[…]
-
Страница 69
Specifications 68 MidiVerb 4 Reference Manual Rear Panel Input (Left/CH 1, Right/CH 2) 1/4″ 2-conductor Output (Left/CH 1, Right/CH 2) 1/4″ 2-conductor FOOTSWITCH 1/4″ (accepts normally open or normally closed momentary footswitch, such as the Alesis PD) MIDI (In, Out/Thru) 5 pin DIN Power 9 Volt Power Transformer Processing and Memo[…]
-
Page 1: Alesis MidiVerb 4
A L ES I S MidiVerb 4 Reference M a nu a l[…]
-
Page 2: Alesis MidiVerb 4
MidiVerb 4 Reference Manual 1 Introduction Thank you for purchasing the Alesis MidiVerb 4 Multi Effects Processor. To take full advantage of the MidiVerb 4’s functions, and to enjoy long and trouble-free use, please read this user’s manual carefully. How To Use This Manual This manual is divided into the following sections describing the variou[…]
-
Page 3: Alesis MidiVerb 4
2 MidiVerb 4 Reference Manual[…]
-
Page 4: Alesis MidiVerb 4
Contents MidiVerb 4 Reference Manual 3 C ONTENTS Your First Session with the MidiVerb 4 ……………………………….. 7 Unpacking and Inspection ……………………………………………………………………………7 Basic Connections ……………………………………………………………………………..[…]
-
Page 5: Alesis MidiVerb 4
Contents 4 MidiVerb 4 Reference Manual Low Pass Filter ………………………………………………………………………………. 31 Pre-delay ………………………………………………………………………………………. 31 Pre-delay Mix ………………………………………………………………[…]
-
Page 6: Alesis MidiVerb 4
Contents MidiVerb 4 Reference Manual 5 MIDI Out/Thru ……………………………………………………………………………… 49 Input (Left/Ch.1 & Right/Ch.2) …………………………………………………………. 50 Output (Left/Ch.1 & Right/Ch.2) …………………………………………………….[…]
-
Page 7: Alesis MidiVerb 4
Contents 6 MidiVerb 4 Reference Manual VALUE BYPASS ADV ANCED 18 BIT FULL Y INTEGRATED EXTENDED RANGE SIGNAL PROCESSING FRONT P ANEL REAR P ANEL Power Footswitch Left/CH 1 Output Right/CH 2 Output Bypass Value Program Utilities Store Input Output Power Edit A B CD MIDI In MIDI Out/Thru Left/CH 1 Input Right/CH 2 Input[…]
-
Page 8: Alesis MidiVerb 4
Your First Session with the MIDIVerb 4 – Chapter 1 MidiVerb 4 Reference Manual 7 C HAPTER 1 Y OUR F IRST S ESSION WITH THE M IDI V ERB 4 Unpacking and Inspection Your MidiVerb 4 was packed carefully at the factory, and the shipping carton was designed to protect the unit during shipping. Please retain this container in the highly unlikely event t[…]
-
Page 9: Alesis MidiVerb 4
Chapter 1 – Your First Session with the MIDIVerb 4 8 MidiVerb 4 Reference Manual After making your connections, turn on the system’s power using this procedure: ➀ Before turning on the MidiVerb 4’s power, check the following items: • Have all connections been made correctly? • Are the volume controls of the amplifier or mixer turned dow[…]
-
Page 10: Alesis MidiVerb 4
Your First Session with the MIDIVerb 4 – Chapter 1 MidiVerb 4 Reference Manual 9 What’s in the Display? When the MidiVerb 4 is first turned on, the display will look something like this: L R PRESET 0 1 L r g H a l l C O N C E R T H A L L 4 5 1 3 2 The MidiVerb 4’s display is divided into 5 sections: ➀ Program Number . MidiVerb 4 Programs ar[…]
-
Page 11: Alesis MidiVerb 4
Chapter 1 – Your First Session with the MIDIVerb 4 10 MidiVerb 4 Reference Manual Auditioning Internal Programs The MidiVerb 4 comes with 128 Programs in a Preset bank, plus another 128 Programs in the User bank. These Programs represent the wide range of applications for which the MidiVerb 4 is suited. To audition the internal effect Programs: ?[…]
-
Page 12: Alesis MidiVerb 4
Your First Session with the MIDIVerb 4 – Chapter 1 MidiVerb 4 Reference Manual 11 Changing Effect Settings When you dial up a Program, its Configuration is shown in the display to the right of the Program’s name. RoomVerb REAL ROOM The Configuration will either be a single reverb type effect (as in the example above), or a combination of two or[…]
-
Page 13: Alesis MidiVerb 4
Chapter 1 – Your First Session with the MIDIVerb 4 12 MidiVerb 4 Reference Manual To edit effect parameters: ➀ Press the [ PROG ] button. The [ PROG ] button will light. ➁ Press the [ PAGE ] button to enter Edit mode. This selects the first page of effect parameters, if you are editing the Program for the first time. There are usually two or […]
-
Page 14: Alesis MidiVerb 4
Your First Session with the MIDIVerb 4 – Chapter 1 MidiVerb 4 Reference Manual 13 Adjusting Effects Mix Levels Whether a Program contains a single effect or two or three effects, you can adjust each effect’s mix to obtain a desirable balance between the original, uneffected signal and each effect’s output. The Mix parameter (or “wet/dry mix[…]
-
Page 15: Alesis MidiVerb 4
Chapter 1 – Your First Session with the MIDIVerb 4 14 MidiVerb 4 Reference Manual Comparing an Edited Program to its Original Settings The left side of the display always indicates the currently selected Program. If the [ PROG ] button is pressed once, the currently selected Program’s name and the Configuration being used both appear in the upp[…]
-
Page 16: Alesis MidiVerb 4
Your First Session with the MIDIVerb 4 – Chapter 1 MidiVerb 4 Reference Manual 15 Storing Edited Programs Once you are satisfied with the changes you have made to an edited Program, or are creating a new Program from scratch, you will need to store your edited Program back into memory. The MidiVerb 4 will store the currently selected Program in n[…]
-
Page 17: Alesis MidiVerb 4
Chapter 1 – Your First Session with the MIDIVerb 4 16 MidiVerb 4 Reference Manual Bypassing Effects At any time you can bypass the effects, thereby allowing the direct signal to pass through the MidiVerb 4 unchanged. This can be done in two ways: • by simultaneously pressing both the [ PROG ] and [ UTIL ] buttons on the front panel; or, • by […]
-
Page 18: Alesis MidiVerb 4
Connections – Chapter 2 MidiVerb 4 Reference Manual 17 C HAPTER 2 C ONNECTIONS AC Power Hookup The MidiVerb 4 comes with a power adapter suitable for the voltage of the country it is shipped to (either 110 or 220V, 50 or 60 Hz). With the MidiVerb 4 off, plug the small end of the power adapter cord into MidiVerb 4’s [ POWER ] socket and the male[…]
-
Page 19: Alesis MidiVerb 4
Chapter 2 – Connections 18 MidiVerb 4 Reference Manual • Do not place cables where they can be stepped on. Stepping on a cable may not cause immediate damage, but it can compress the insulation between the center conductor and shield (degrading performance), or reduce the cable’s reliability. • Avoid twisting the cable or having it make sha[…]
-
Page 20: Alesis MidiVerb 4
Connections – Chapter 2 MidiVerb 4 Reference Manual 19 When connecting audio cables and/or turning power on and off, make sure that all devices in your system are turned off and the volume controls are turned down. The MidiVerb 4 has two 1/4” unbalanced inputs and two 1/4” unbalanced outputs. These provide three different (analog) audio hooku[…]
-
Page 21: Alesis MidiVerb 4
Chapter 2 – Connections 20 MidiVerb 4 Reference Manual Interfacing to a Mixing Console The MidiVerb 4 handles mono or stereo sends at all system levels. The input circuitry of the MidiVerb 4 can easily handle +4 dBu levels (+20 dBu peaks), while having enough input and output gain to interface with the low -10 dBV signal levels of budget recordin[…]
-
Page 22: Alesis MidiVerb 4
Connections – Chapter 2 MidiVerb 4 Reference Manual 21 Mono In — Stereo Out. If you only want to feed the MidiVerb 4 a mono input, but wish to connect both of its outputs back to the mixer, you will need three 1/4″ audio cables. Connect a mono cord from an effect send to the [ LEFT/CH.1 ] input of the MidiVerb 4, another mono cord from the [[…]
-
Page 23: Alesis MidiVerb 4
Chapter 2 – Connections 22 MidiVerb 4 Reference Manual Using Inserts By using individual channel inserts, you can dedicate the MidiVerb 4 to a specific channel (or pair of channels) on the mixer. The Insert connections on the back of the mixer provide a way of “inserting” external processing equipment into the signal path. The insert occurs a[…]
-
Page 24: Alesis MidiVerb 4
Connections – Chapter 2 MidiVerb 4 Reference Manual 23 Stereo. In the case where a stereo instrument (such as a keyboard or sampler) is con- nected to two separate channels of a mixing console, you will need two 1/4″ TRS cables, one for each channel. The connection is made in a similar fashion as described above. Using Main Outputs When you […]
-
Page 25: Alesis MidiVerb 4
Chapter 2 – Connections 24 MidiVerb 4 Reference Manual Avoiding Ground Loops In today’s studio, where it seems every piece of equipment has its own computer chip inside, there are many opportunities for ground loop problems to occur. These show up as hums, buzzes or sometimes radio reception and can occur if a piece of equipment “sees” two […]
-
Page 26: Alesis MidiVerb 4
Connections – Chapter 2 MidiVerb 4 Reference Manual 25 MIDI MIDI (Musical Instrument Digital Interface) is an internationally-accepted protocol that allows musical-related data to be conveyed from one device to another. The MIDI connections on the MidiVerb 4 provide four different functions: • To recall Programs using MIDI program change messag[…]
-
Page 27: Alesis MidiVerb 4
Chapter 2 – Connections 26 MidiVerb 4 Reference Manual Any momentary single-pole/single-throw footswitch, normally open or normally closed, will work for the three footswitch functions. This should be plugged in prior to power-up so that the MidiVerb 4 can configure itself for the type of footswitch being used. Advance. When the footswitch mode i[…]
-
Page 28: Alesis MidiVerb 4
Overview of Effects – Chapter 3 MidiVerb 4 Reference Manual 27 C HAPTER 3 O VERVIEW OF E FFECTS The Architecture of the MidiVerb 4 What is a Configuration? A Configuration is an arrangement of one or more effects. Each of the 256 internal Programs in the MidiVerb 4 use one Configuration. There are 32 different Configurations available, each of wh[…]
-
Page 29: Alesis MidiVerb 4
Chapter 3 – Overview of Effects 28 MidiVerb 4 Reference Manual Double Double Configurations consist of two “side-by-side” mono-in/stereo-out effects. These Configurations are identified by the presence of a “+” in their name. In each case, the Left/Ch. 1 input is routed to one effect, while the Right/Ch. 2 input is routed to the other. Th[…]
-
Page 30: Alesis MidiVerb 4
Overview of Effects – Chapter 3 MidiVerb 4 Reference Manual 29 Multi Chain The Multi Chain Configurations provide two or three stereo effects, which are connected in series; i.e. one feeding the next in the chain. These Configurations are identified by the presence of one or two “->” symbols in their name ( Example: “Chorus->Real Room[…]
-
Page 31: Alesis MidiVerb 4
Chapter 3 – Overview of Effects 30 MidiVerb 4 Reference Manual Reverb Effects Reverb is made up of a large number of distinct echoes, called reflections. In a natural acoustic space, each reflection’s amplitude and brightness decays over time. This decaying action is influenced by the room size, the location of the sound source in the room, the[…]
-
Page 32: Alesis MidiVerb 4
Overview of Effects – Chapter 3 MidiVerb 4 Reference Manual 31 Reverb Parameters Most of the reverb effects in the MidiVerb 4 operate under the same set of control parameters, which are listed and described in this section. However, reverbs which use more processing power (i.e. the Single Configuration reverbs) provide more parameters which take […]
-
Page 33: Alesis MidiVerb 4
Chapter 3 – Overview of Effects 32 MidiVerb 4 Reference Manual Note: The illustration above reflects a Density setting of 0. Frequency Damping – Low & High These two parameters allow you to control the equalization of the reverb’s decay separately for both the low and high frequencies. This means that you have control over the tonal shape[…]
-
Page 34: Alesis MidiVerb 4
Overview of Effects – Chapter 3 MidiVerb 4 Reference Manual 33 Delay Effects Delay provides a discrete repetition of a signal. By adding feedback within the effect, the delayed signal can repeat many times, with each successive decay softer than its predecessor. Each of the Delay types allow you to adjust their delay time in milliseconds, however[…]
-
Page 35: Alesis MidiVerb 4
Chapter 3 – Overview of Effects 34 MidiVerb 4 Reference Manual Synchronizing to MIDI Clock It is possible to control the delay time of the BPM Mono Delay effect from an external MIDI clock source, such as a MIDI sequencer or drum machine. Any device which can output MIDI clock can be used to control this Configuration’s delay time. If the “Te[…]
-
Page 36: Alesis MidiVerb 4
Overview of Effects – Chapter 3 MidiVerb 4 Reference Manual 35 Pitch Effects The Pitch effects alter the pitch of a signal in various ways to produce “layered” timbres that are more complex than the original signal. Although some of these effects can sound similar to one another depending on the parameter settings, each is achieved differentl[…]
-
Page 37: Alesis MidiVerb 4
Chapter 3 – Overview of Effects 36 MidiVerb 4 Reference Manual Stereo Flange First used in the 1960s, “flanging” was achieved by the use of two tape recorders that would record and play back the same program in synchronization. By slowing down one tape machine, and then letting it catch up with the other, different phase cancellations would o[…]
-
Page 38: Alesis MidiVerb 4
Overview of Effects – Chapter 3 MidiVerb 4 Reference Manual 37 Flange This is a mono, less processor intensive version of the Stereo Flange, used in the Multi Chain Configurations Flange->Realroom, Realroom->Flange and Flange->Dly- >Room; the Double Configuration Realroom+Flange; and the Dual Mono Configurations Flange:Flange and Flan[…]
-
Page 39: Alesis MidiVerb 4
Chapter 3 – Overview of Effects 38 MidiVerb 4 Reference Manual The Direction parameter determines which direction the panning will start in when triggered (this has no effect if the Trigger parameter is turned off). You can adjust the attack threshold of this audio triggering function, and adjust the hold time (how long the Auto Pan will wait bef[…]
-
Page 40: Alesis MidiVerb 4
E diting Programs – Chapter 4 MidiVerb 4 Reference Manual 39 C HAPTER 4 E DITING P ROGRAMS Selecting A Configuration A Configuration is made up of one or more effects. Each of the internal Programs of the MidiVerb 4 use one Configuration. When you want to create your own Program, the first thing you must decide is which Configuration you wish to […]
-
Page 41: Alesis MidiVerb 4
Chapter 4 – Editing Programs 40 MidiVerb 4 Reference Manual Editing Effect Parameters Editing Programs is only possible while in Program mode. This means that the [ PROG ] button must be lit. If the [ PROG ] button is not lit, press it now. From Program mode, you can edit the currently selected Program by pressing either [ EDIT/PAGE ] or any of t[…]
-
Page 42: Alesis MidiVerb 4
E diting Programs – Chapter 4 MidiVerb 4 Reference Manual 41 Moving Through Pages Once in Edit mode, there will usually be multiple pages available. The total number of pages depends on the Configuration that the selected Program uses, and will be indicated by the numbers appearing in the lower left corner of the display. The [ EDIT/PAGE ] button[…]
-
Page 43: Alesis MidiVerb 4
Chapter 4 – Editing Programs MidiVerb 4 Reference Manual 43 Naming A Program The process of naming a Program is integrated into the Store function. Whenever you store a Program, you have the opportunity to change its name. This is done by using the [ A ], [ B ], [ C ] and [ D ] buttons while in Store mode. To change a Program’s name: ➀ Press […]
-
Page 44: Alesis MidiVerb 4
Description of Controls – Chapter 5 MidiVerb 4 Reference Manual 43 C HAPTER 5 D ESCRIPTION OF C ONTROLS Front Panel LCD Display When the MidiVerb 4 is first turned on, the display will look something like this: L R PRESET 0 1 L r g H a l l C O N C E R T H A L L 4 5 1 3 2 The MidiVerb 4’s display is divided into 5 sections: ➀ Program Number . […]
-
Page 45: Alesis MidiVerb 4
Chapter 5 – Description of Controls 44 MidiVerb 4 Reference Manual way as the level meters on a standard tape recorder. The meters shown in this example are idle, indicating that there is no input signal activity. Normally, these are labeled as “ L ” and “ R ”. However, when the selected Program uses a Dual type Configuration (two mono ef[…]
-
Page 46: Alesis MidiVerb 4
Description of Controls – Chapter 5 MidiVerb 4 Reference Manual 45 BYPASS LED Indicator The [ BYPASS ] LED will be lit whenever Bypass mode is enabled. Bypass mode can be toggled on and off by simultaneously pressing the [ PROG ] and [ UTIL ] buttons, or by pressing a footswitch connected to the [ FOOTSWITCH ] jack (if the footswitch is switched […]
-
Page 47: Alesis MidiVerb 4
Chapter 5 – Description of Controls 46 MidiVerb 4 Reference Manual character of the Program’s name. The [ C/< ] and [ D/> ] buttons move the cursor left and right, respectively, through the eight character fields of the Program’s name. To move the cursor back to the Program location number, press [ B/ESC ]. UTILity Button When the [ UTI[…]
-
Page 48: Alesis MidiVerb 4
Description of Controls – Chapter 5 MidiVerb 4 Reference Manual 47 Page 4: Modulators. This is where you select the two MIDI modulation sources which will be used for all Programs to control their parameters. The parameters these control depend on the selected Program’s Configuration. For example, in all Reverb Configurations, Modulator X contr[…]
-
Page 49: Alesis MidiVerb 4
Chapter 5 – Description of Controls 48 MidiVerb 4 Reference Manual To store an edited Program: ➀ Press [ STORE ]. The [ STORE ] button will flash, and the display will read: Store as X XX (nnnnnnnn)? …whereas XXX is a Program location number from 00—127 in the User bank, and nnnnnnnn is the Program’s name. ➁ Use the [ VALUE ] knob to se[…]
-
Page 50: Alesis MidiVerb 4
Chapter 5 – Description of Controls MidiVerb 4 Reference Manual 49 Rear Panel Power This is a plug for connecting the +9VAC power supply (supplied). The power supply is then connected to an AC outlet delivering a nominal 120VAC. The correct power supply must be used AT ALL TIMES. Any other power supply might create a fire risk and/or permanently […]
-
Page 51: Alesis MidiVerb 4
Description of Controls – Chapter 5 50 MidiVerb 4 Reference Manual These are 1/4″ phone jacks which connect to sources such as the effects sends of mixing consoles. They may be used with nominal input levels from -10dBV (guitar level) to +4dBu. For mono applications, use the [ LEFT/CH.1 ] input. The [ LEFT/CH.1 ] input jack is normalled to t[…]
-
Page 52: Alesis MidiVerb 4
Chapter 5 – Description of Controls MidiVerb 4 Reference Manual 51 PLATE REVERB 1 Decay !59-6!2˙ LPF 059ƒ-3^2 ∂ , OFF PDly 000-75© PMx 000-100å 2 Dens 000-100å Diff 000-100å LDamp OFF , 059ƒ — 3^2 ∂ HDamp 059ƒ-3^2 ∂ , OFF 3 Gate OFF , 001-100å Hold 000-500© Rel 000-500© 4 Swirl 00-99 Mix 000-100å NONLINEAR 1 Time 100-600© LPF 0[…]
-
Page 53: Alesis MidiVerb 4
Description of Controls – Chapter 5 52 MidiVerb 4 Reference Manual MULTI TAP DELAY 1 Time 1 000-250 © Lvl 1 00-99 Pan 1 -50-50 Fdbk 1 00-99å 2 Time 2 000-250 © Lvl 2 00-99 Pan 2 -50-50 Fdbk 2 00-99å 3 Time 3 000-250 © Lvl 3 00-99 Pan 3 -50-50 Fdbk 3 00-99å 4 MFdbk 000-100å LoCut OFF , 059ƒ-3^2 ∂ HiCut 059ƒ-3^2 ∂ , OFF Mix 000-100å B[…]
-
Page 54: Alesis MidiVerb 4
Chapter 5 – Description of Controls MidiVerb 4 Reference Manual 53 STEREO FLANGE 1 Rate )0ƒ-(9ƒ Depth 000-250 Fdbk -99-99å Thru0 OFF , On 2 Trig 0fffffffFF , L , r , Lr Attck 000-255 Rel 000-255 Mix 000-100å FLANGE: FLANGE 1 Rate )0ƒ-(9ƒ Depth 000-250 Fdbk -99-99å Wave Sin , tri 2 Trig 0fffffffFF , L , r , Lr Attck 000-255 Thru0 OFF , On M[…]
-
Page 55: Alesis MidiVerb 4
Description of Controls – Chapter 5 54 MidiVerb 4 Reference Manual DELAY} REALROOM 1 Tap — 100ms 0-7 10ms 0-9 1ms 0-9 2 Fdbk 00-99å HiCut 059ƒ-3^2 ∂ , OFF DMix 000-100å 3 Decay !0-7%8˙ LPF 059ƒ-3^2 ∂ , OFF Dens 000-100å Diff 000-100å 4 Gate OFF , 001-100å Hold 000-500© Rel 000-500© RMix 000-100å CHORUS} REALROOM 1 Rate )0ƒ-(9ƒ […]
-
Page 56: Alesis MidiVerb 4
Chapter 5 – Description of Controls MidiVerb 4 Reference Manual 55 CHORUS}DLY} ROOM 1 Rate )0ƒ-(9ƒ Depth 000-255 Fdbk 00-99å CMix 000-100å 2 Time 000-500 © Fdbk 00-99å HiCut 059ƒ-3^2 ∂ , OFF DMix 000-100å 3 Decay !0-7%8˙ LPF 059ƒ-3^2 ∂ , OFF Dens 000-100å Diff 000-100å 4 Gate OFF , 001-100å Hold 000-500© Rel 000-500© RMix 000-1[…]
-
Page 57: Alesis MidiVerb 4
Description of Controls – Chapter 5 56 MidiVerb 4 Reference Manual REALROOM+ FLANGE 1 Decay !0-7%8˙ LPF 059ƒ-3^2 ∂ , OFF PDly 000-250© PMix 000-100å 2 Dens 000-100å Diff 000-100å Gate OFF , 000-500© RMix 000-100å 3 Rate )0ƒ-(9ƒ Depth 000-250 Fdbk -99-99å Wave Sin , tri 4 Trig 0fffffffFF , L , r , Lr Attck 000-255 Rel 000-255 FMix 000[…]
-
Page 58: Alesis MidiVerb 4
Advanced Applications – Chapter 6 MidiVerb 4 Reference Manual 57 C HAPTER 6 MIDI A PPLICATIONS MIDI Functions The MidiVerb 4 provides many MIDI functions, including being able to respond to program changes, sending and receiving Program information via Sysex (System Exclusive) dumps, and realtime control over effect parameters via MIDI controller[…]
-
Page 59: Alesis MidiVerb 4
Chapter 6 – Advanced Applications 58 MidiVerb 4 Reference Manual Receiving Program Changes In order to recall programs on the MidiVerb 4 from a MIDI control device (keyboard, drum pad, guitar or bass controller, sequencer, etc.): ➀ Connect the control device’s MIDI OUT to the MidiVerb 4’s [ MIDI IN ]. ➁ Press [ UTIL ], then press the [ ED[…]
-
Page 60: Alesis MidiVerb 4
Advanced Applications – Chapter 6 MidiVerb 4 Reference Manual 59 ➂ Turn the [ VALUE ] knob to select a MIDI program change number from 000–127 to be remapped. ➃ Press the [ D ] button to select the Program field. The Program field will flash to indicate it is selected for editing. ➄ Turn the [ VALUE ] knob to select a MidiVerb 4 Program f[…]
-
Page 61: Alesis MidiVerb 4
Chapter 6 – Advanced Applications 60 MidiVerb 4 Reference Manual Realtime Modulation Functions You can use various MIDI messages (such as note number, velocity, aftertouch, or pitch-bend, etc.) to simultaneously control up to two parameters in the MidiVerb 4, such as delay time, room size, etc. Modulation functions are “hard-wired” in each Co[…]
-
Page 62: Alesis MidiVerb 4
Advanced Applications – Chapter 6 MidiVerb 4 Reference Manual 61 The following is a chart describing which parameters of each Configuration are controlled by Modulators X and Y. Use this chart to determine what control possibilities exist for each Program. Configuration Mod X Mod Y CONCERT HALL Decay Wet/Dry Mix REAL ROOM Decay Wet/Dry Mix AMBIEN[…]
-
Page 63: Alesis MidiVerb 4
Chapter 6 – Advanced Applications 62 MidiVerb 4 Reference Manual Let’s say you want your keyboard’s modulation wheel (controller #1) to control how much reverb is heard. Since Mod Y is wired to the Wet/Dry Mix, you would first assign Mod Y to be 001 . Next, you set the amplitude for how much of the Mix parameter’s range you wish to be able […]
-
Page 64: Alesis MidiVerb 4
Troubleshooting – Chapter 7 MidiVerb 4 Reference Manual 63 C HAPTER 7 T ROUBLESHOOTING Trouble-Shooting Index If you are experience problems while operating the MidiVerb 4, please use the following table to locate possible causes and solutions before contacting Alesis customer service for assistance. Symptom Cause Solution The display does not li[…]
-
Page 65: Alesis MidiVerb 4
Chapter 7 – Troubleshooting 64 MidiVerb 4 Reference Manual The current software version may be determined by holding [ PROG ] and pressing [ EDIT ]. The display will briefly indicate the currently installed software version. Maintenance/Service Cleaning Disconnect the AC cord, then use a damp cloth to clean the MidiVerb 4’s metal and plastic su[…]
-
Page 66: Alesis MidiVerb 4
Troubleshooting – Chapter 7 MidiVerb 4 Reference Manual 65 Los Angeles, CA 90016 Customers outside the USA: Contact your local Alesis dealer for warranty assistance. Do not return products to the factory unless you have been given specific instructions to do so. Note that the warranty is valid only in the country of origin.[…]
-
Page 67: Alesis MidiVerb 4
MIDI Implementation Chart 66 MidiVerb 4 Reference Manual MIDI I MPLEMENTATION C HART Function Transmitted Recognized Remarks Basic Channel Default Changed X * * * * * * * * 1 — 16 Mode Default Messages Altered X X * * * * * * * * Mode 3 X Note Number True Voice 0 — 127 * * * * * * * * 0 — 127 0 — 127 Velocity Note On Note Off X X O O After […]
-
Page 68: Alesis MidiVerb 4
Specifications MidiVerb 4 Reference Manual 67 S PECIFICATIONS Electrical Frequency Response: ±1dB from 20Hz to 20 kHz Dynamic Range: >90dB «A» wtg., 20 Hz-22kHz Distortion: <0.009% @ 1kHz, nominal level (-12 dBfs) <0.005% @ peak level Crosstalk: <90dB below full scale Input Number of Channels: 2 Format: 1/4″ unbalanced N[…]
-
Page 69: Alesis MidiVerb 4
Specifications 68 MidiVerb 4 Reference Manual Rear Panel Input (Left/CH 1, Right/CH 2) 1/4″ 2-conductor Output (Left/CH 1, Right/CH 2) 1/4″ 2-conductor FOOTSWITCH 1/4″ (accepts normally open or normally closed momentary footswitch, such as the Alesis PD) MIDI (In, Out/Thru) 5 pin DIN Power 9 Volt Power Transformer Processing and Memo[…]
-
Page 1
ALESIS MidiVerb 4 Reference Manual… -
Page 2
Introduction Thank you for purchasing the Alesis MidiVerb 4 Multi Effects Processor. To take full advantage of the MidiVerb 4’s functions, and to enjoy long and trouble-free use, please read this user’s manual carefully. How To Use This Manual This manual is divided into the following sections describing the various modes of the MidiVerb 4. -
Page 3
MidiVerb 4 Reference Manual… -
Page 4: Table Of Contents
Your First Session with the MidiVerb 4… 7 Unpacking and Inspection…7 Basic Connections…7 Powering Up…8 Setting Levels …8 Automatic Input Level Settings…8 What’s in the Display? …9 Auditioning Internal Programs…10 Switching Between Preset and User Banks…10 Bypass Program/Preset 00 …10 Changing Effect Settings …11…
-
Page 5
BYPASS LED Indicator…44 VALUE Knob …44 PROGram Button…45 EDIT/PAGE Button…45 A/B/C/D (NAME/ESC/</>) Buttons…45 UTILity Button …45 STORE Button …47 INPUT and OUTPUT Buttons…48 Auto Level …48 POWER Switch…48 Rear Panel…49 Power …49 Bypass/Advance Footswitch…49 MIDI In…49 MidiVerb 4 Reference Manual… -
Page 6
Modulation Parameters Index…61 Setting Modulation Amplitude …61 Controlling Delay Time via MIDI Clock …62 Troubleshooting … 63 Trouble-Shooting Index…63 Re-initializing…63 Checking the Software Version…64 Maintenance/Service …64 Cleaning …64 Obtaining Repair Service…64 MIDI Implementation Chart… 66 Specifications…67 MidiVerb 4 Reference Manual Contents… -
Page 7
Contents MidiVerb 4 Reference Manual… -
Page 8: Your First Session With The Midiverb 4
Stereo. Connect two mono cords to the [LEFT/CH.1] & [RIGHT/CH.2] INPUTS of the MidiVerb 4 from a stereo source , and two mono cords from the OUTPUTS of the MidiVerb 4 to a stereo amplification system or two mixer inputs.
-
Page 9: Setting Levels
As a good rule of thumb, it is always best to set both input and output level controls at 3/4 or 75% of full. This will decrease the possibility of overload distortion and keep the amount of background noise to a minimum.
-
Page 10: What’s In The Display
Your First Session with the MIDIVerb 4 – Chapter 1 What’s in the Display? When the MidiVerb 4 is first turned on, the display will look something like this: The MidiVerb 4’s display is divided into 5 sections: Program Number . MidiVerb 4 Programs are numbered from 00 to 127.
-
Page 11: Auditioning Internal Programs
To instantly switch between the Preset and User banks, press the [PROG] button. Each time you press the [PROG] button, the MidiVerb 4 will toggle back and forth between the Preset and User banks. The display will indicate this by reading either “PRESET”…
-
Page 12: Changing Effect Settings
Your First Session with the MIDIVerb 4 – Chapter 1 Changing Effect Settings When you dial up a Program, its Configuration is shown in the display to the right of the Program’s name. RoomVerb REAL ROOM The Configuration will either be a single reverb type effect (as in the example above), or a combination of two or three effects (like Reverb+Delay, or Chorus>Delay>…
-
Page 13: Using Online Help
For more about editing effects parameters, see Chapter 4. Using Online Help The MidiVerb 4 has built-in online help to assist you in identifying parameter functions from the display, without having to look things up in this manual. Once…
-
Page 14: Adjusting Effects Mix Levels
The Mix parameter’s range is 000-100å. Dry Defeat When connecting the MidiVerb 4 to a mixing console’s aux sends and returns, it is generally desirable to remove the direct (dry) signal from the outputs of the MidiVerb 4 so that its output signal contains only the effected (wet) signal. The dry signal may then be combined at the mixing console with the returning wet signal.
-
Page 15: Comparing An Edited Program To Its Original Settings
Chapter 1 – Your First Session with the MIDIVerb 4 Comparing an Edited Program to its Original Settings The left side of the display always indicates the currently selected Program. If the [PROG] button is pressed once, the currently selected Program’s name and the Configuration being used both appear in the upper part of the display.
-
Page 16: Storing Edited Programs
Program from memory before storing the edited Program, your changes will be lost forever. Although the MidiVerb 4 has two banks (Preset and User), you can only store Programs in the User bank. To store an edited Program: Press [STORE].
-
Page 17: Bypassing Effects
Bypassing Effects At any time you can bypass the effects, thereby allowing the direct signal to pass through the MidiVerb 4 unchanged. This can be done in two ways: • by simultaneously pressing both the [PROG] and [UTIL] buttons on the front panel;…
-
Page 18: Connections
ONNECTIONS AC Power Hookup The MidiVerb 4 comes with a power adapter suitable for the voltage of the country it is shipped to (either 110 or 220V, 50 or 60 Hz). With the MidiVerb 4 off, plug the small end of the power adapter cord into MidiVerb 4’s [POWER] socket and the male (plug) end into a source of AC power.
-
Page 19: Typical Applications
Alternatively, you could use the inserts on your mixer to “patch in” only the left or right channel of the MidiVerb 4. If using the effect sends of a mixer, you have the advantage of sending any of the mixer’s input channels to the MidiVerb 4’s input(s), and have control over the level of each channel being sent.
-
Page 20
• Stereo. Connect two mono cords to the [LEFT/CH.1] and [RIGHT/CH.2] INPUTS of the MidiVerb 4 from a stereo source , and two other mono cords from the [LEFT/CH.1] and [RIGHT/CH.2] OUTPUTS of the MidiVerb 4 to a stereo amplification system or two mixer inputs. -
Page 21: Using The Aux Sends
(headphone) mix, and individual, post-fader effect sends. Typically, if a mixer has more than two sends per channel (4, 6 or 8, perhaps), the first two sends are reserved for the cue sends, while the remaining sends are used to feed effects, such as the MidiVerb 4.
-
Page 22
Connections – Chapter 2 Mono In — Stereo Out. If you only want to feed the MidiVerb 4 a mono input, but wish to connect both of its outputs back to the mixer, you will need three 1/4″ audio cables. Connect a mono cord from an effect send to the [LEFT/CH.1] input of the MidiVerb 4, another mono cord from the [LEFT/CH.1] output of the MidiVerb 4 to an… -
Page 23: Using Inserts
If you do not hear any audio after making these connections, swap the input and output cables at the MidiVerb 4, as these may be wired backwards. If the cable is color-coded, usually the red jack represents the send (which connects to the MidiVerb 4’s input) and black is the return (which connects to the output).
-
Page 24: Using Main Outputs
Stereo. In the case where a stereo instrument (such as a keyboard or sampler) is con- nected to two separate channels of a mixing console, you will need two 1/4″ TRS cables, one for each channel. The connection is made in a similar fashion as described above.
-
Page 25: Avoiding Ground Loops
In some cases, a “star grounding” scheme must be used, with the mixer at the center of the star providing the shield ground on telescoping shields, which do NOT connect to the chassis ground of other equipment in the system. MidiVerb 4 Reference Manual…
-
Page 26: Midi
Note: It is not necessary to follow step 2 if you intend to only send information to the MidiVerb 4, and do not need to receive information back from it. Example: If you only want to be able to recall Programs using MIDI program change messages, there is no need to connect a cable to the MidiVerb 4’s [OUT/THRU] connector.
-
Page 27
Any momentary single-pole/single-throw footswitch, normally open or normally closed, will work for the three footswitch functions. This should be plugged in prior to power-up so that the MidiVerb 4 can configure itself for the type of footswitch being used. Advance. When the footswitch mode is set to the Advance function, each time the footswitch is pressed the MidiVerb 4 will advance to the next Program number. -
Page 28: Overview Of Effects
A Configuration is an arrangement of one or more effects. Each of the 256 internal Programs in the MidiVerb 4 use one Configuration. There are 32 different Configurations available, each of which fall into one of four categories. The four types of Configurations are: Single, Double, Dual Mono and Multi Chain.
-
Page 29: Double
Note: If Cascade mode is turned on, the [RIGHT/CH. 2] input will be disabled for all Dual Mono Configurations. This is because the channel 2 effect is being fed the output of the channel 1 effect. MidiVerb 4 Reference Manual…
-
Page 30: Multi Chain
Mix parameter to 000% (this means none of its output can be heard nor is sent to the second effect in the chain). MidiVerb 4 Reference Manual…
-
Page 31: Reverb Effects
Plate Reverb This is a simulation of a classic echo plate, a 4′ by 8′ suspended sheet of metal with transducers at either end used to produce reverb. Popular in the 1970’s, it still prized for its transparent sound, particularly on vocals and guitars. This algorithm uses the most processing available for a truly realistic reverb plate simulation.
-
Page 32: Reverb Parameters
Overview of Effects – Chapter 3 Reverb Parameters Most of the reverb effects in the MidiVerb 4 operate under the same set of control parameters, which are listed and described in this section. However, reverbs which use more processing power (i.e. the Single Configuration reverbs) provide more parameters which take advantage of their extra processing power;…
-
Page 33: Frequency Damping — Low & High
Gate. This can be set between 10 and 500 ms, and controls both the hold and release times of the gate effect. Alternatively, the Gate parameter can be set to “OFF” when you do not wish to use the gating effect. MidiVerb 4 Reference Manual…
-
Page 34: Delay Effects
An additional parameter, called Note, is used to determine what beat value your tempo represents. For example, if you set the note to 4, then you can set the tempo using quarter-note beats to establish delay time. If instead you set the Note to 4t, the same delay tempo setting will play faster because it is simulating quarter-note triplets in relation to the selected tempo.
-
Page 35: Synchronizing To Midi Clock
The Note parameter determines what note value the MidiVerb 4 should synchronize to. For example, if you set the Note value to 4, then you can synchronize to the quarter-note beats of the incoming MIDI clock. If instead you set the Note value to 8t, you can synchronize to eighth-note triplets relative to the incoming MIDI clock signal.
-
Page 36: Pitch Effects
“rhythm” of the phasing. Chorus This is a mono, less processor-intensive version of the Stereo Chorus effect, used in the Multi Chain Configurations Chorus->Realroom and Chorus->Dly->Room, the Double Configuration Realroom+Chorus, and the Dual Mono Configurations Chorus:Chorus and Chorus:Delay. MidiVerb 4 Reference Manual…
-
Page 37: Stereo Flange
The “Thru0” parameter found in the MidiVerb 4’s flanging effects lets you create the appearance of the effected signal passing through the zero point. It does this by actually delaying the uneffected signal by as mush as 12 milliseconds (an amount virtually undetectable to the human ear).
-
Page 38: Flange
The Auto Pan effect alternates the loudness of the signal in opposite channels at a definable rate. Low and high frequency cutting is available, and (like the flange effects) can be triggered by the input signal (either the left or right input, or both). MidiVerb 4 Reference Manual…
-
Page 39
(how long the Auto Pan will wait before it can be retriggered). The Direction parameter can be set to alternate; that is, the Auto Pan will change its start direction with each succesive trigger. MidiVerb 4 Reference Manual… -
Page 40: Editing Programs
A Configuration is made up of one or more effects. Each of the internal Programs of the MidiVerb 4 use one Configuration. When you want to create your own Program, the first thing you must decide is which Configuration you wish to use. Then you need to locate a Program that already uses this Configuration.
-
Page 41: Editing Effect Parameters
Chapter 4 – Editing Programs Editing Effect Parameters Editing Programs is only possible while in Program mode. This means that the [PROG] button must be lit. If the [PROG] button is not lit, press it now. From Program mode, you can edit the currently selected Program by pressing either [EDIT/PAGE] or any of the [A], [B], [C] or [D] buttons.
-
Page 42: Moving Through Pages
Using Online Help The MidiVerb 4 has built-in online help to assist you in identifying parameter functions from the display, without having to look things up in this manual. Once you have accessed Edit mode (see previous section), you can select any of the parameters shown in the display by pressing the corresponding button ([A], [B], [C] or [D]).
-
Page 43: Naming A Program
[STORE] was pressed for the first time. Here is a chart of available characters: » # $ % & ’ 4 5 6 7 8 9 J K L M N O P Q R S T U V W X Y Z [ ¥ ]…
-
Page 44: Description Of Controls
ESCRIPTION OF Front Panel LCD Display When the MidiVerb 4 is first turned on, the display will look something like this: The MidiVerb 4’s display is divided into 5 sections: Program Number . MidiVerb 4 Programs are numbered from 00 to 127.
-
Page 45
[D]) should be pressed to select the desired parameter for editing. Once a parameter has been edited, the word “EDITED” will appear below it. Decay LPF PDly PMix 395 § 2@8 PRESET ¶ 150© ¢ 000å¡ EDITED MidiVerb 4 Reference Manual… -
Page 46: Bypass Led Indicator
This is the MidiVerb 4’s built-in online help system. If there is no corresponding parameter for one or more of the [A], [B], [C] and [D] buttons in a particular page, it will be indicated in the display when the button is pushed.
-
Page 47: Utility Button
4 ignores program change messages. When set to on, incoming MIDI program change messages received on the same channel the MidiVerb 4 is set to will recall the same numbered User Program. When set to table, the MidiVerb 4 will use the Program Change Table (see below) to remap incoming program change messages.
-
Page 48: Store Button
There are 128 different possible MIDI program change messages (000 – 127). However, the MidiVerb 4 has 256 Programs to choose from. Therefore, the Program Table allows us to choose which of the 256 Programs will be recalled when certain program change numbers are received.
-
Page 49: Input And Output Buttons
The Auto Level function listens for a period of five seconds. During this time, you should feed signal to the MidiVerb 4’s inputs (i.e. play your guitar or keyboard, or playback tape). •…
-
Page 50: Rear Panel
Bypass/Advance Footswitch This is a 1/4″ phone jack which connects to a footswitch, either normally-open or normally-closed. This footswitch can perform either one of two functions: Bypass or Advance. The function is selected from the UTILity mode.
-
Page 51: Output (Left/Ch.1 & Right/Ch.2)
[LEFT/CH.1] input is routed to the [RIGHT/CH.2] as well. Output (Left/Ch.1 & Right/Ch.2) These are 1/4″ phone jacks which connect to devices such as the effects returns on a mixing console. For mono applications, use the [LEFT/CH.1] output. When Cascade mode is on (routing the output of Ch. 1 to the input of Ch. 2 of Dual Configurations only), the [LEFT/CH.1] output will only supply the signal coming from the…
-
Page 52
Time 100-600© For, rEv MONO DELAY Fdbk 00-99å STEREO DELAY L: Tap R: Tap PING PONG DELAY Fdbk 00-99å MidiVerb 4 Reference Manual PDly 059ƒ-3^2 , OFF 000-75© Diff LDamp 000-100å OFF, 059ƒ-3^2 Gate Hold OFF, 001-100å 000-500© Swirl 00-99 PDly 059ƒ-3^2 , OFF… -
Page 53
PDly 3 000-255© 000-255© Depth Fdbk 000-255 00-99å Wave Sin, tri Depth Fdbk 000-255 00-99å Wave Sin, tri MidiVerb 4 Reference Manual Fdbk 1 00-99å Fdbk 2 00-99å Fdbk 3 00-99å 000-100å Fdbk 00-99å 000-100å 000-100å 000-100å Fdbk 00-99å 000-100å… -
Page 54
SemiL -12-12 PDlyL 000-250© LvlL 00-99 PITCH:PITCH Semi -12-12 Semi -12-12 AUTO PAN Rate )0ƒ-2%5ƒ Trig 0fffffffFF, L, r, MidiVerb 4 Reference Manual Depth Fdbk 000-250 -99-99å Attck 000-255 000-255 Depth Fdbk 000-250 -99-99å Attck Thru0 000-255 OFF, On Depth… -
Page 55
000-100å OFF, 010-500© PDly 059ƒ-3^2 , OFF 000-250© Diff Gate 000-100å OFF, 010-500© Depth Fdbk 000-250 -99-99å Attck 000-255 000-255 MidiVerb 4 Reference Manual DMix 000-100å Diff 000-100å RMix 000-100å CDly 000-255© CMix 000-100å PMix 000-100å RMix 000-100å Wave Sin, tri FMix 000-100å… -
Page 56
REALROOM+ Decay DELAY !0-7%8˙ Gate OFF, 001-100å Fdbk 00-99å REALROOM+ Decay CHORUS !0-7%8˙ Dens 000-100å Rate )0ƒ-(9ƒ MidiVerb 4 Reference Manual Depth Fdbk 000-255 00-99å Fdbk HiCut 059ƒ-3^2 , OFF 00-99å Dens 059ƒ-3^2 , OFF 000-100å Hold 000-500© 000-500© Depth… -
Page 57
OFF, 059ƒ-3^2 Fine PDly -50-50 000-250© LoCut HiCut 059ƒ-3^2 , OFF OFF, 059ƒ-3^2 100ms 10ms LoCut HiCut 059ƒ-3^2 , OFF OFF, 059ƒ-3^2 MidiVerb 4 Reference Manual PMix 000-100å RMix 000-100å Wave Sin, tri FMix 000-100å PDly 000-250© 000-100å 000-100å Fdbk -99-99å… -
Page 58: Midi Applications
Omni mode (receives on all 16 channels simultaneously). MIDI Thru In order to pass on MIDI information from a control device thru the MidiVerb 4 to another MIDI device: Connect the control device’s MIDI OUT to the MidiVerb 4’s [MIDI IN]. Then connect the MidiVerb 4’s [MIDI OUT] to the MIDI IN of the other device you…
-
Page 59: Receiving Program Changes
Program Table, you can have any incoming MIDI program change message recall any of the 256 Programs in the MidiVerb 4. Example: If you programmed the Table so that program message 101 was mapped to Preset 33, sending a MIDI program change message of 101 to the MidiVerb 4 would recall Program Preset 33.
-
Page 60: Sysex Storage
The [UTIL] button will briefly flash rapidly and the display will read: Transmitting Sysex… When you send a Sysex dump back to the MidiVerb 4, it will automatically go into receive mode (you do not have to do anything special). When this occurs, the display will momentarily read: RECEIVING MIDI DATA…
-
Page 61: Realtime Modulation Functions
Configuration, and therefore cannot be changed. However, you can select which two types of MIDI messages will act as the modulation sources, and you can adjust how much they will affect the MidiVerb 4’s parameters by either a positive or negative amount.
-
Page 62: Modulation Parameters Index
Modulators is -99 to +99. If you chose an amplitude of +99, the Modulator will have full positive control over the parameter it is modulating. But what does this mean to you? Let’s take a look at some examples. MidiVerb 4 Reference Manual Advanced Applications – Chapter 6 Mod X…
-
Page 63: Controlling Delay Time Via Midi Clock
MIDI clock signal received at the [MIDI IN] port coming from an external source. If the MIDI clock’s tempo changes, the MidiVerb 4 will chase it. If the MIDI clock signal is discontinued, the delay time will remain set to the last tempo which the MIDI clock had been running at.
-
Page 64: Troubleshooting
Unit does not respond to front panel controls. Re-initializing To re-initialize the MidiVerb 4, hold down both [PROG] and [D] while turning on the power. This will reset all Utility parameters to their default settings, and will recall Preset 01.
-
Page 65: Checking The Software Version
Maintenance/Service Cleaning Disconnect the AC cord, then use a damp cloth to clean the MidiVerb 4’s metal and plastic surfaces. For heavy dirt, use a non-abrasive household cleaner such as Formula 409 or Fantastik. DO NOT SPRAY THE CLEANER DIRECTLY ONTO THE FRONT OF THE UNIT AS IT MAY DESTROY THE LUBRICANTS USED IN THE SWITCHES AND CONTROLS! Spray onto a cloth, then use cloth to clean the unit.
-
Page 66
Troubleshooting – Chapter 7 Los Angeles, CA 90016 Customers outside the USA: Contact your local Alesis dealer for warranty assistance. Do not return products to the factory unless you have been given specific instructions to do so. Note that the warranty is valid only in the country of origin. -
Page 67: Midi Implementation Chart
All Notes Off Active Sense Reset Notes Mode 1: OMNI ON, POLY Mode 3: OMNI OFF, POLY Mode 2: OMNI ON, MONO Mode 4: OMNI OFF, MONO Transmitted Recognized 1 — 16 Mode 3 0 — 127 0 — 127 O 0 —…
-
Page 68: Specifications
Nominal Level Output Impedance: Front Panel Controls Buttons Switches Indicator MidiVerb 4 Reference Manual Specifications ±1dB from 20Hz to 20 kHz >90dB «A» wtg., 20 Hz-22kHz <0.009% @ 1kHz, nominal level (-12 dBfs) <0.005% @ peak level <90dB below full scale 1/4″…
-
Page 69
Delay effects: Pitch effects: Special effects: Multiple effect configurations: 1/4″ 2-conductor 1/4″ 2-conductor 1/4″ (accepts normally open or normally closed momentary footswitch, such as the Alesis PD) 5 pin DIN 9 Volt Power Transformer 24 bit accumulator 1299 milliseconds Concert Hall, Real Room, Ambience, Plate…