
USER GUIDE
Publication AP7265
Allen & Heath XONE:4D User Guide
Limited One Year Warranty
This product is warranted to be free from defects in materials or
workmanship for period of one year from the date of purchase by the
original owner.
To ensure a high level of performance and reliability for which this
equipment has been designed and manufactured, read this User Guide
before operating. In the event of a failure, notify and return the
defective unit to ALLEN & HEATH Limited or its authorised agent as
soon as possible for repair under warranty subject to the following
conditions
Conditions Of Warranty
The equipment has been installed and operated in accordance with the
instructions in this User Guide.
The equipment has not been subject to misuse either intended or
accidental, neglect, or alteration other than as described in the User
Guide or Service Manual, or approved by ALLEN & HEATH.
Any necessary adjustment, alteration or repair has been carried out by
ALLEN & HEATH or its authorised agent.
This warranty does not cover fader wear and tear.
The defective unit is to be returned carriage prepaid to ALLEN &
HEATH or its authorised agent with proof of purchase.
Units returned should be packed to avoid transit damage.
In certain territories the terms may vary. Check with your ALLEN &
HEATH agent for any additional warranty which may apply.
This product complies with the European Electro magnetic
Compatibility directives 89/336/EEC & 92/31/EEC and the
European Low Voltage Directives 73/23/EEC & 93/68/EEC.
This product has been tested to EN55103 Parts 1 & 2 1996 for use in
Environments E1, E2, E3, and E4 to demonstrate compliance with the
protection requirements in the European EMC directive 89/336/EEC.
During some tests the specified performance figures of the product were
affected. This is considered permissible and the product has been passed as
acceptable for its intended use. Allen & Heath has a strict policy of
ensuring all products are tested to the latest safety and EMC standards.
Customers requiring more information about EMC and safety issues can
contact Allen & Heath.
XONE:4D User Guide AP7265
Copyright © 2008 Allen & Heath Limited. All rights reserved
Allen & Heath Limited
Kernick Industrial Estate, Penryn, Cornwall, TR10 9LU, UK
http://www.allen-heath.com http://www.xone.co.uk
Allen & Heath 2 XONE:4D User Guide

CONTENTS
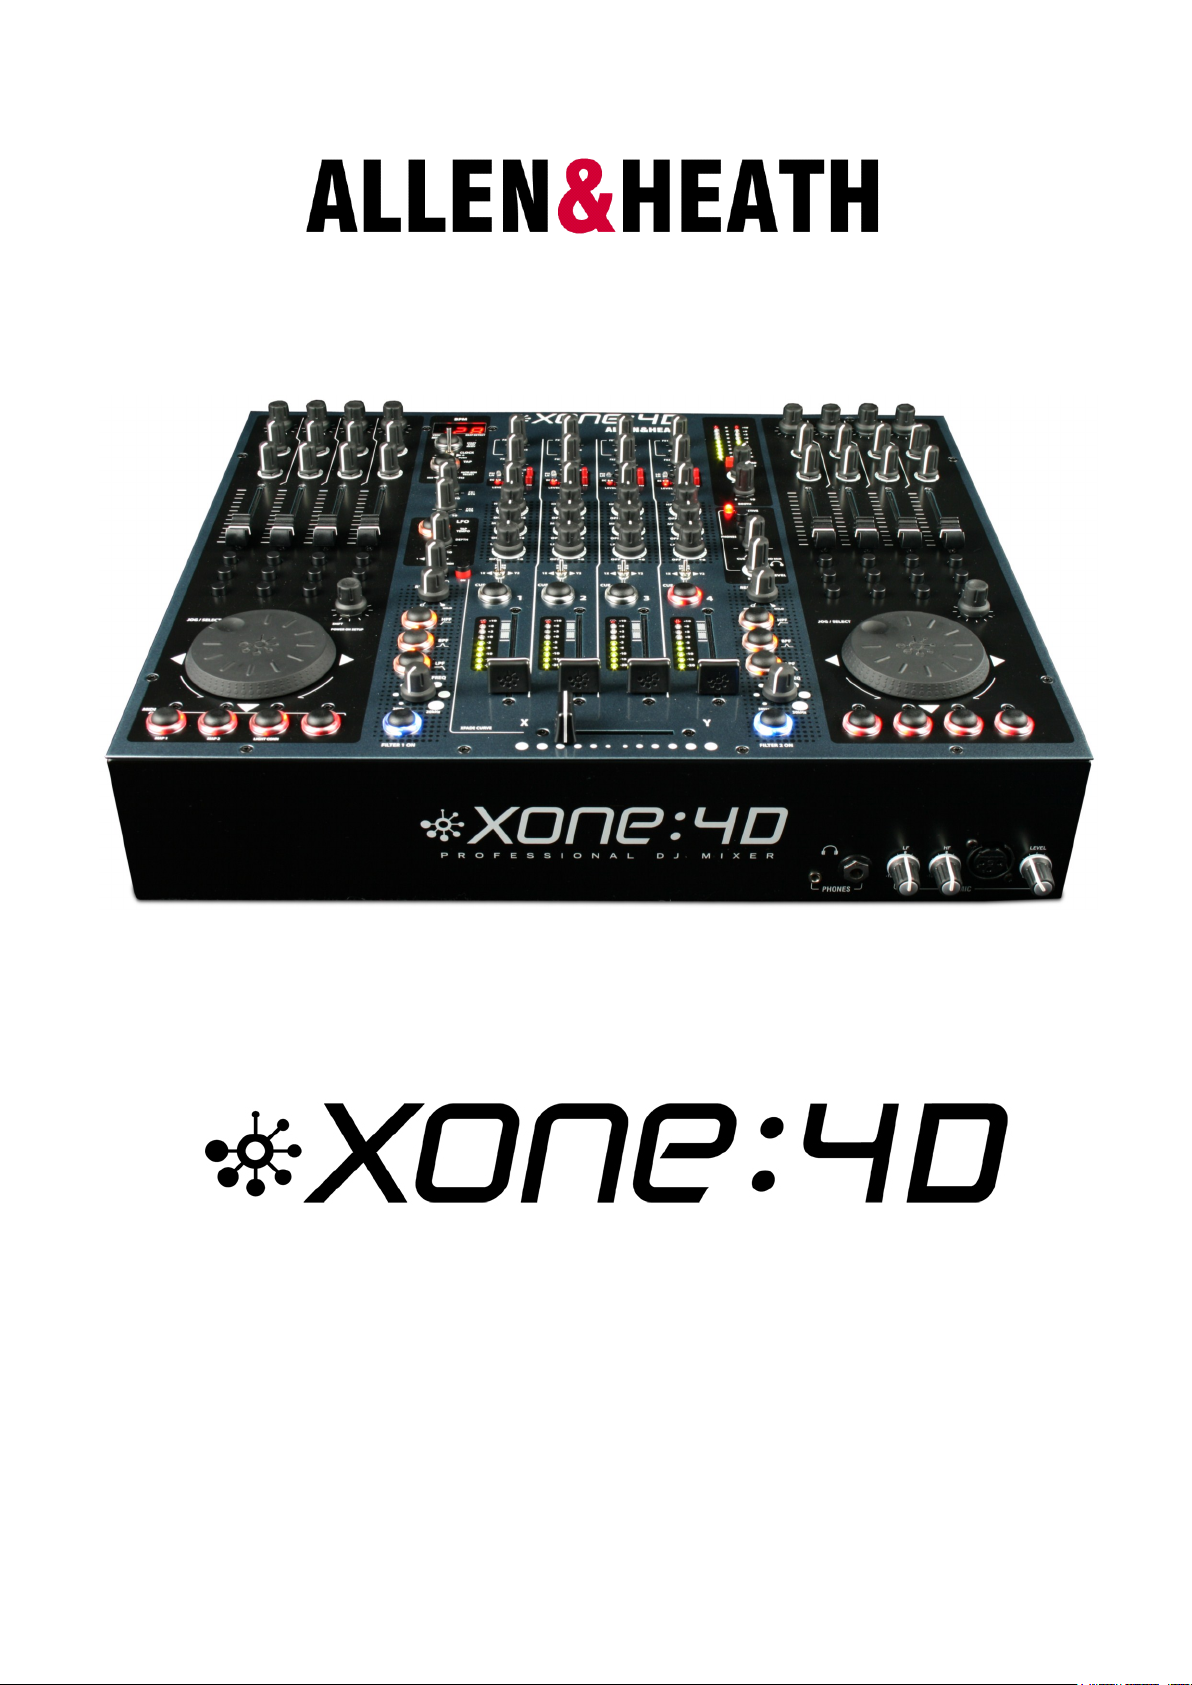
Congratulations on purchasing the Allen & Heath Xone:4D performance
DJ mixer. To ensure that you get the maximum benefit from the unit
please spare a few minutes familiarising yourself with the controls and
setup procedures outlined in this user guide. For further information
please refer to the additional information available on our web site, or
contact our technical support team.
http://www.xone.co.uk
Warranty ……………………………………… 2
Packed Items ……………………………….. 4
Software Installation PC………………. 5
Checking the Windows Driver
Installation ……………………………………. 7
Software Installation MAC ………….. 8
Checking the Mac Driver
Installation ……………………………………. 10
MIDI Channel Setup ……………………. 11
MIDI Map and Light Pipe Setup …… 12
Soundcard Architecture ………………. 13
Soundcard Software Description … 14
Ableton Setup ……………………………… 15
Traktor Setup ………………………………. 16
Panel Drawings ……………………………. 17
Introduction ………………………………… 18
Description ………………………………….. 19
MIDI Implementation Chart ………… 40
MIDI Note Chart …………………………. 41
Filter Reference …………………………… 42
Operating Levels ………………………….. 43
Earthing ………………………………………… 44
Cables And Connectors ………………. 45
User Options ……………………………….. 46
Specifications ……………………………….. 47
Product Registration ……………………. 48
Soundcard Input Block Diagram …. 21
Soundcard Output / MIDI
Block Diagram …………………………….. 22
Channel Input ………………………………. 23
Mix and Monitor ………………………….. 26
Filters and LFO ……………………………. 28
FX Returns and Crossfader ………… 29
Front Controls and Connectors …. 30
Rear Connectors …………………………. 31
BPM Counter ………………………………. 34
LFO ……………………………………………… 36
The LFO Editor …………………………… 37
MIDI Control Section ………………….. 38
Allen & Heath 3 XONE:4D User Guide
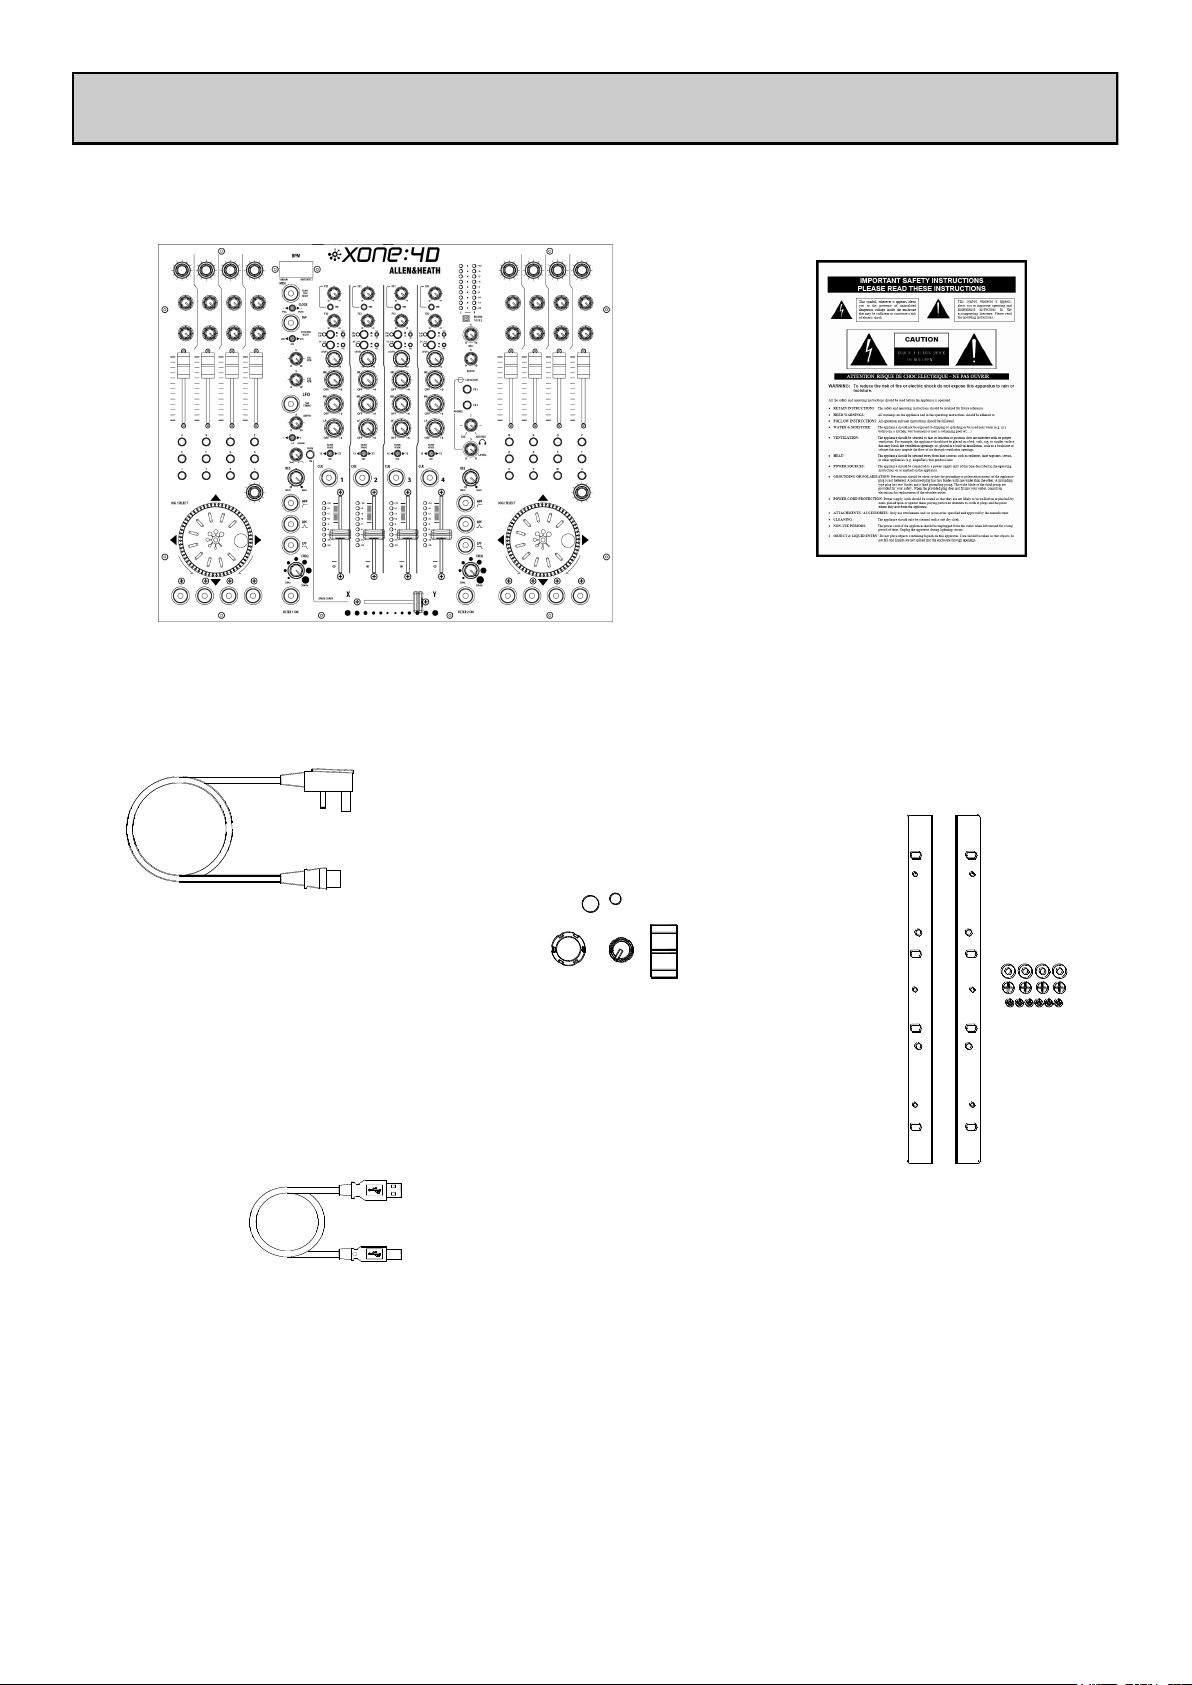
PACKED ITEMS
Check that you have received the following:
Xone:4D mixer
Check that the rear panel optical in/out blank plugs are fitted.
Safety Sheet
Important ! Read this sheet
before starting.
Retain for future reference.
Mains Lead
Check that the correct
mains plug is fitted.
Type A-B USB Lead
To connect the Xone:4D
to your computer.
Spare knobs
and buttons
Rack Ears + fixings.
For mounting the 4D
in a 19” rack.
6x M4x10mm screws
Allen & Heath 4 XONE:4D User Guide
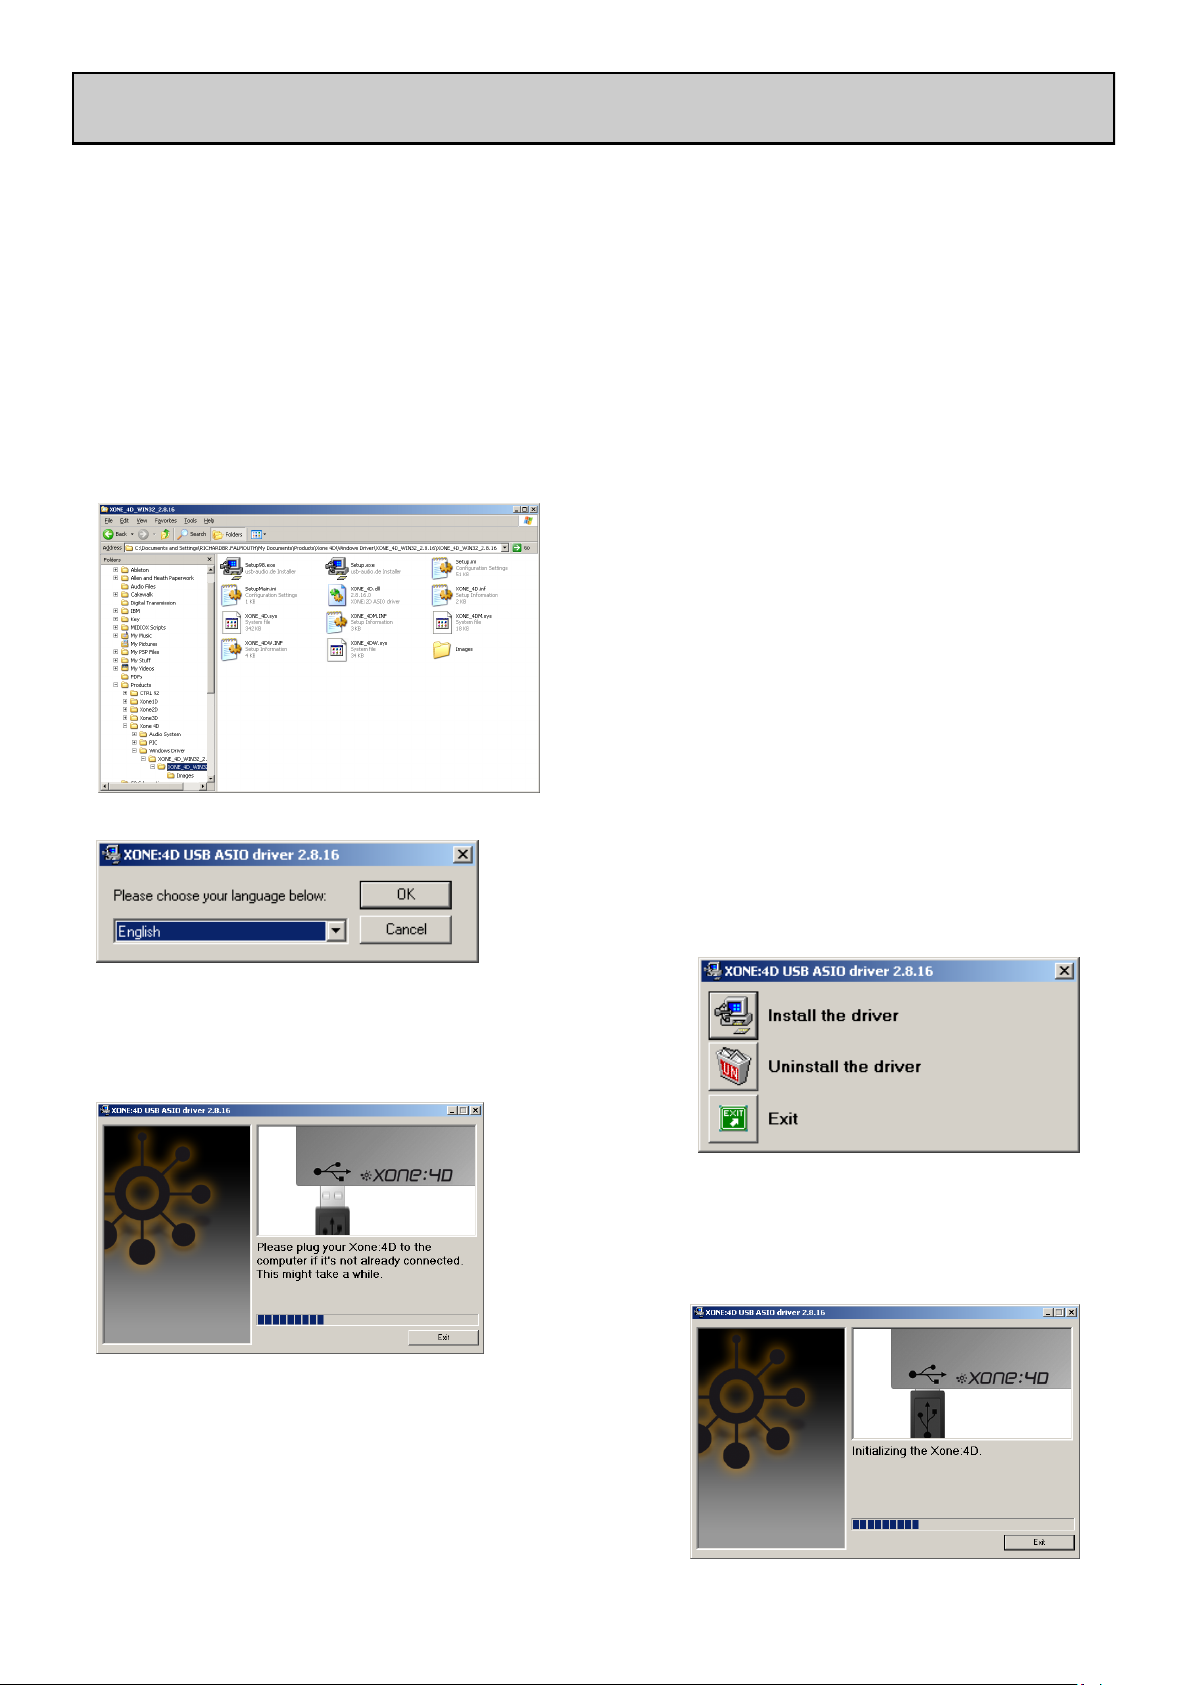
SOFTWARE INSTALLATION PC
STOP!
BEFORE YOU DO ANYTHING WITH YOUR XONE:4D, PLEASE READ THE
FOLLOWING CAREFULLY TO ENSURE YOUR PC IS CORRECTLY SET UP TO
BE USED WITH THE DEVICE. PLEASE DOWNLOAD THE LATEST DRIVERS
FROM:
www.xone.co.uk/4d
Software Installation (Windows 2000, XP and Vista)
Follow the procedure described below to install the USB audio and MIDI drivers:
1— Using the provided power supply, connect the
Xone:4D to your mains electricity supply.
Do not connect the 4D to the PC at this time.
2— Open the Drivers folder and run Setup.exe for
Windows XP and Vista or Setup98.exe for Windows 98.
3— Select your preferred language
4— Select Install the driver
5— When prompted, connect the 4D to
the PC with the USB lead.
The Xone:4D will now initialise.
Allen & Heath 5 XONE:4D User Guide
SOFTWARE INSTALLATION PC
6— You will now be asked to unplug your Xone:4D
7— You will now be asked to plug in your Xone:4D again.
The USB drivers will now initialise.
8— Once the driver installation is complete you will be
prompted to reboot your computer.
Note: Always use the same USB port with your Xone:4D. When installing on a MS
Windows system, the drivers will be associated with the USB port that you are currently plugged
into. If you attempt to use the 4D with another USB port, or without installing the drivers at all,
the system may work but with degraded performance (XP, Vista), or may not work at all (2000).
Allen & Heath 6 XONE:4D User Guide
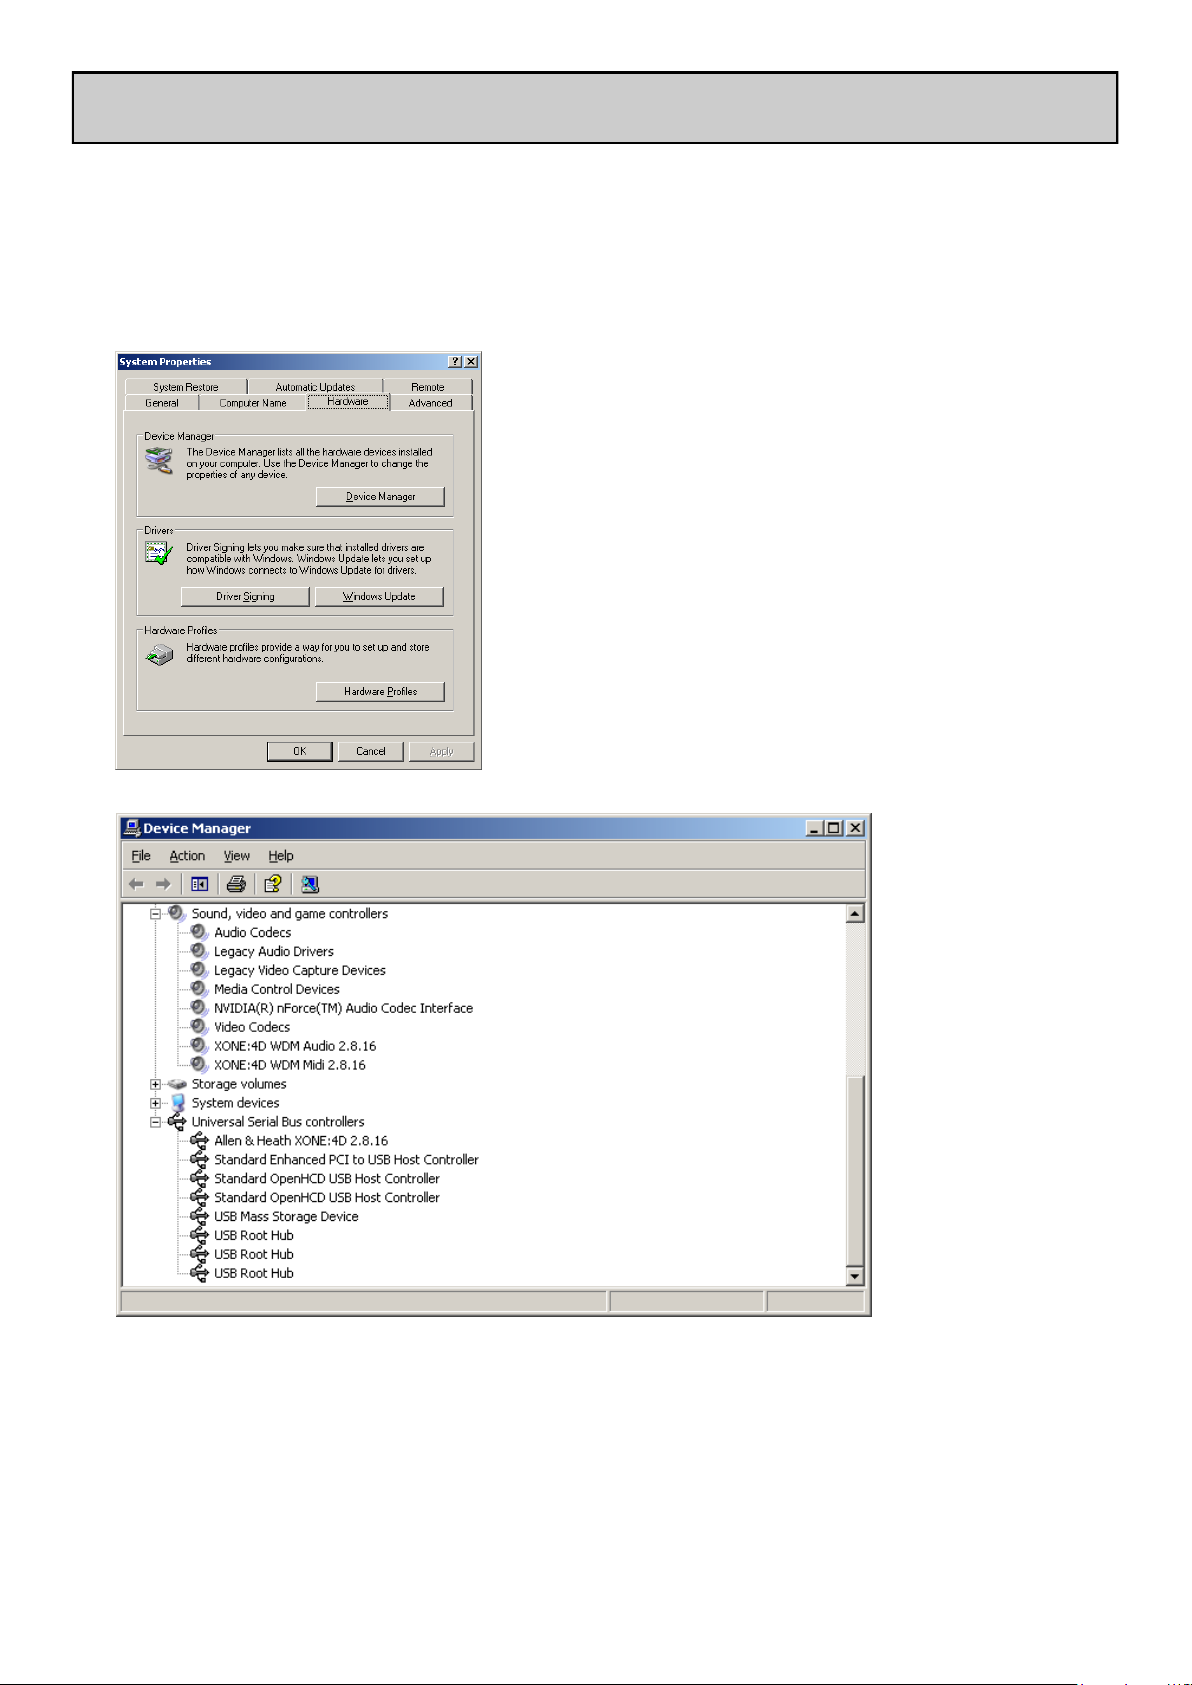
CHECKING THE DRIVER INSTALLATION—WINDOWS
Checking the Driver Installation
Once the driver installation is complete, you will need to check that the Xone:4D is being recognised. To do this, connect the Xone:4D to your PC/laptop and then right click on My Comput-
er to open the System Properties window.
Select the Hardware tab then click on Device
Manager
Expand the Sound, Video and Game Controllers section to reveal the WDM audio and MIDI
drivers for the Xone:4D.
Expand the Universal Serial Bus Controllers section to reveal the Xone:4D ASIO driver and
its release (version) number —in this case V2.8.16.
Allen & Heath 7 XONE:4D User Guide
SOFTWARE INSTALLATION—APPLE MAC
STOP!
BEFORE YOU DO ANYTHING WITH YOUR XONE:4D, PLEASE READ THE
FOLLOWING CAREFULLY TO ENSURE YOUR PC IS CORRECTLY SET UP TO
BE USED WITH THE MIXER.
Mac OSX
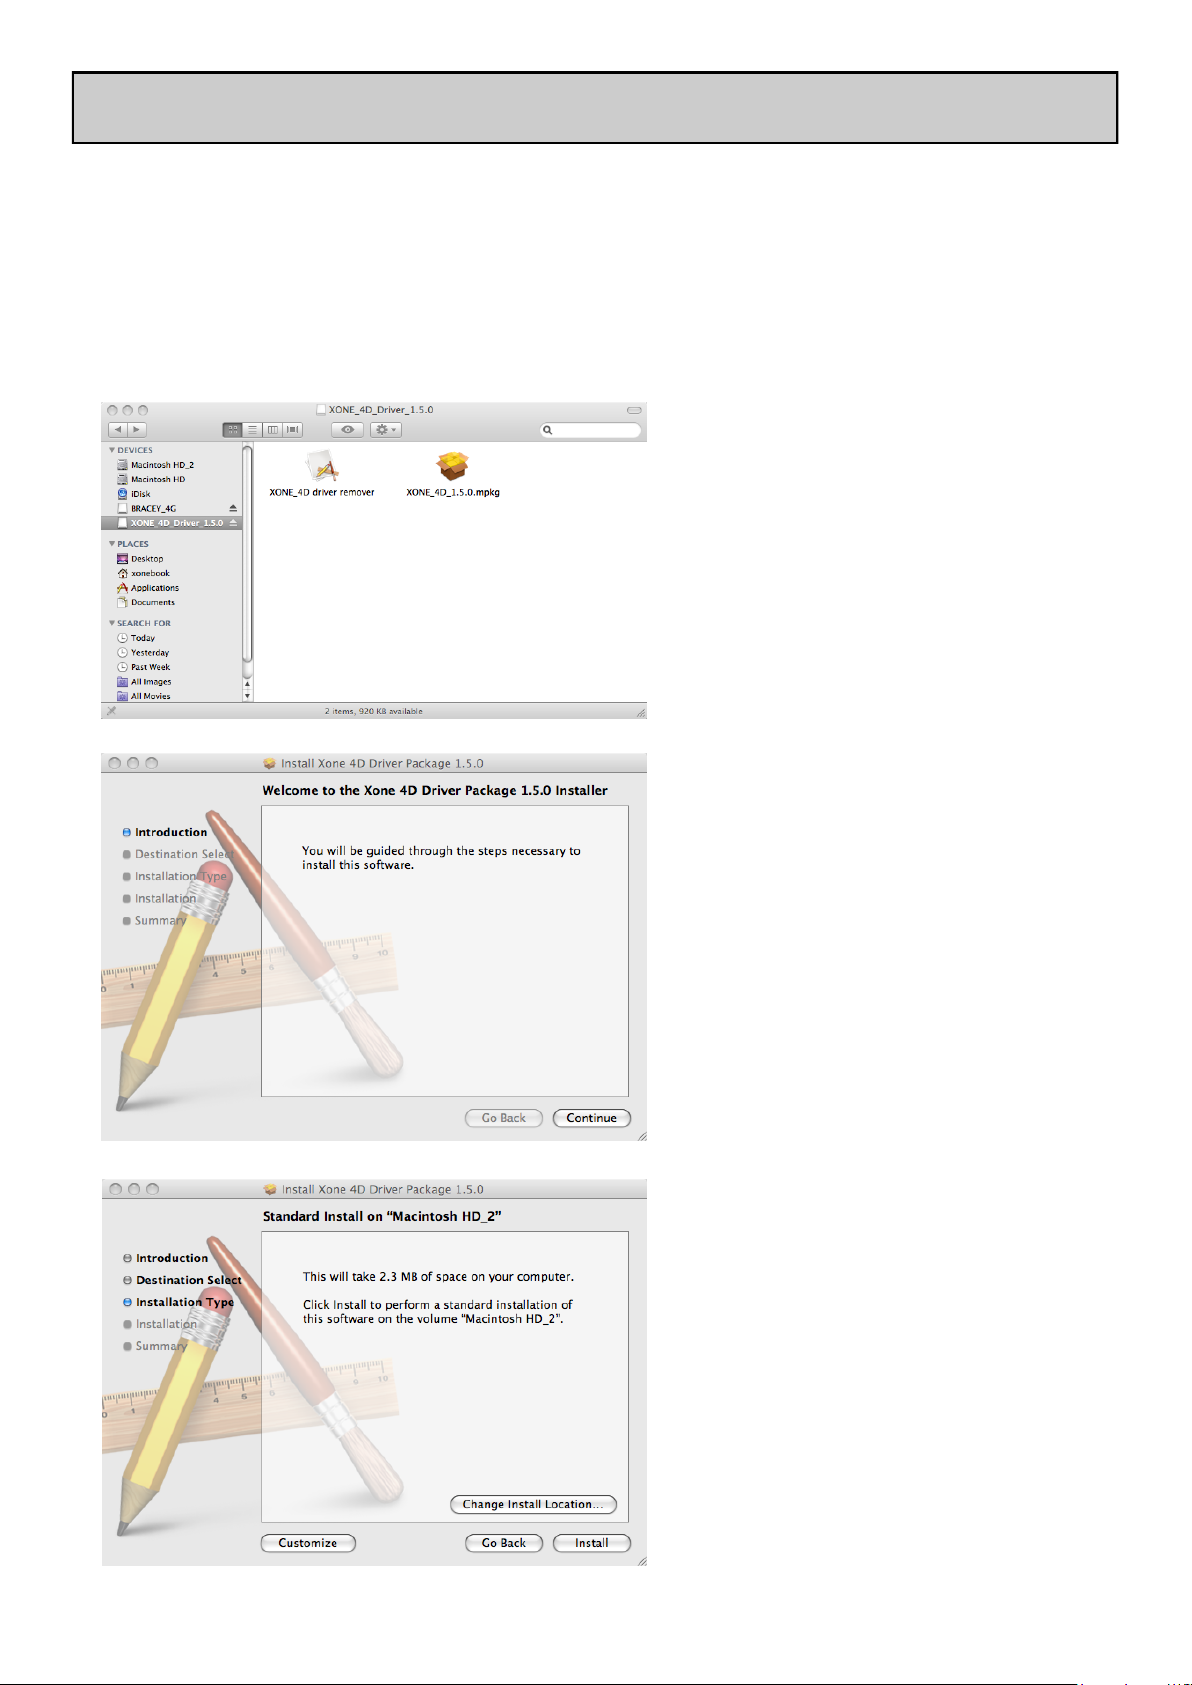
Open the Xone_4D_Driver_x.x.x.dmg to reveal the window shown.
Click on the Xone:4D mpkg file to
launch the driver installation.
Click on “Continue”.
Select install location and then
click “Install”.
Allen & Heath 8 XONE:4D User Guide
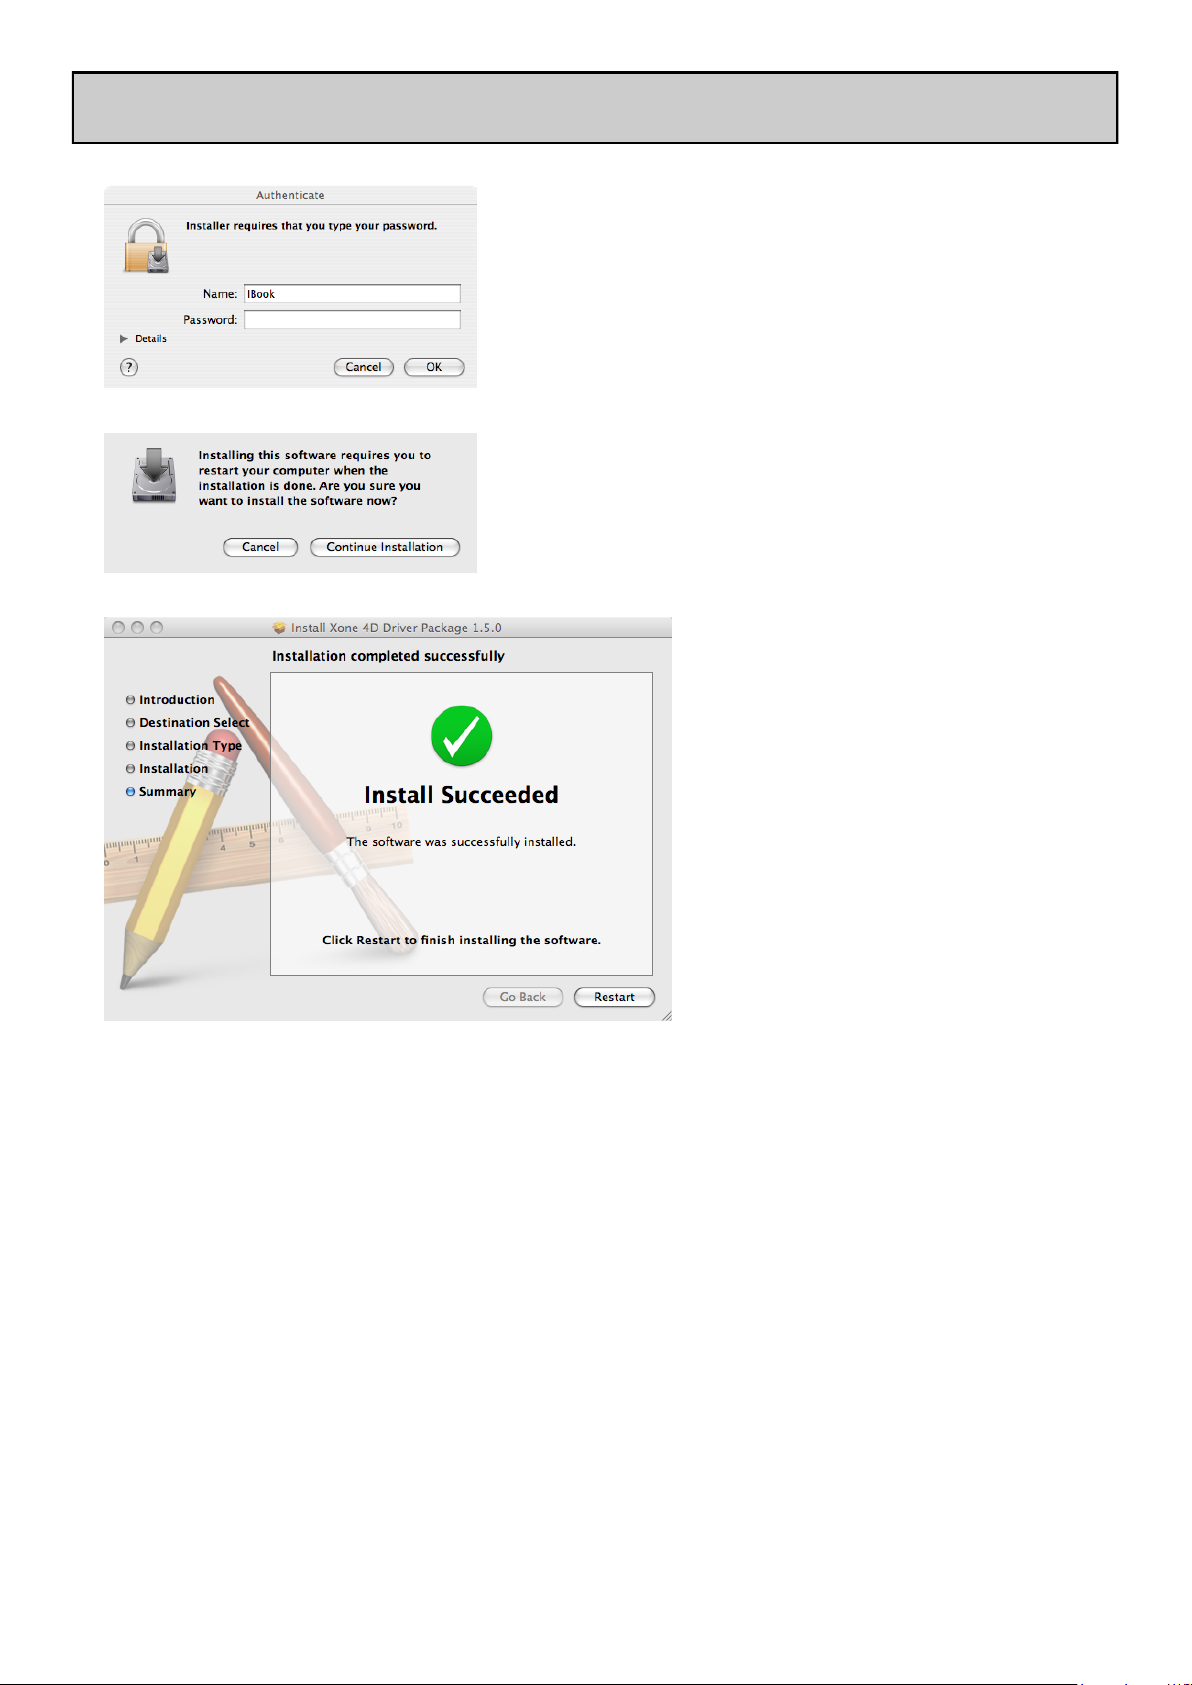
SOFTWARE INSTALLATION—APPLE MAC
Enter your system password.
Click on “Continue Installation”.
Restart your Mac.
Allen & Heath 9 XONE:4D User Guide
CHECKING THE DRIVER INSTALLATION—APPLE MAC
Checking the Driver Installation
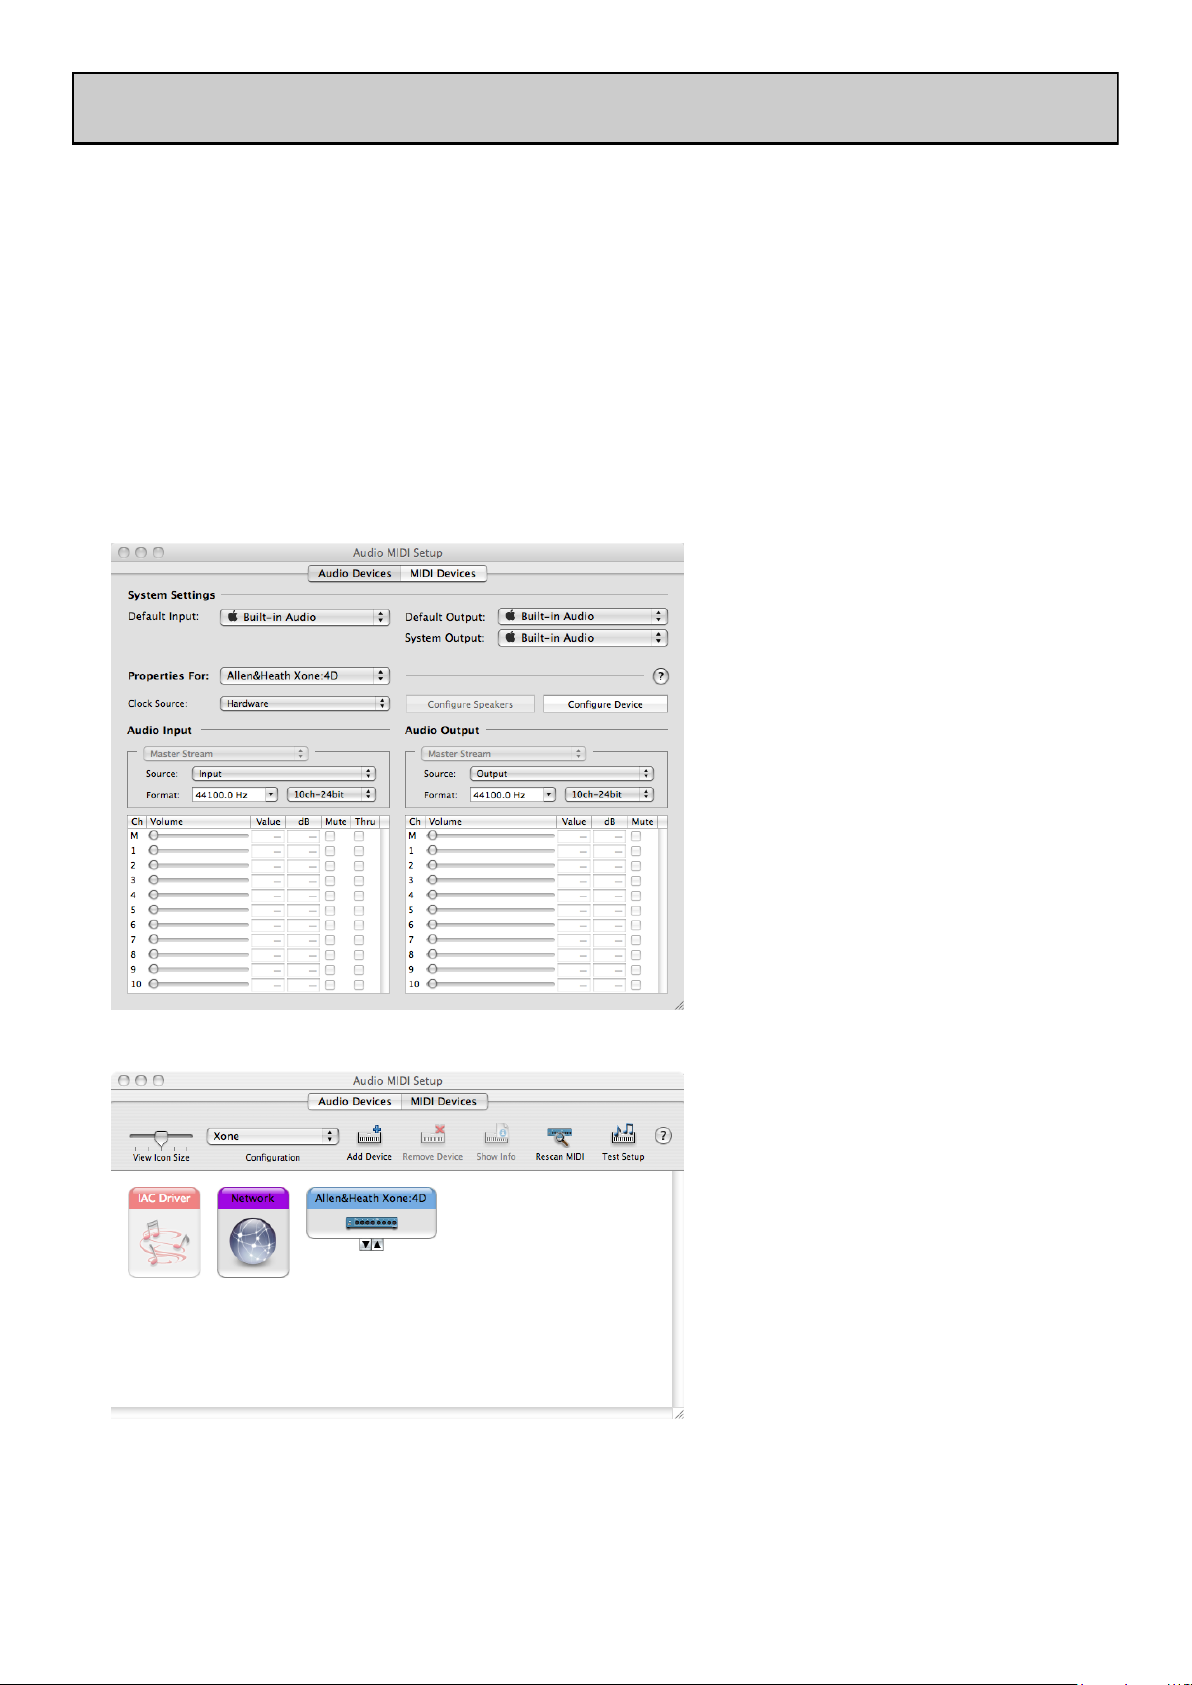
Once the driver installation is complete, you will need to check that the Xone:4D is being recognised. To do this, connect the Xone:4D to your Mac and then select:
Mackintosh HD Applications Utilities Audio MIDI Setup
Now select the Audio tab and in the “Properties For” dropdown box select Allen & Heath
Xone:4D.
In the Audio Input section, the
number of channels should be seen
as 10, running at 24 bit.
In the Audio Output section, the
number of channels should be seen
as 10, running at 24 bit.
The sample rate is selectable from
44.1 to 96kHz.
Now select the MIDI Devices tab
and make sure that the Xone:4D is
seen as a MIDI device as shown.
Allen & Heath 10 XONE:4D User Guide
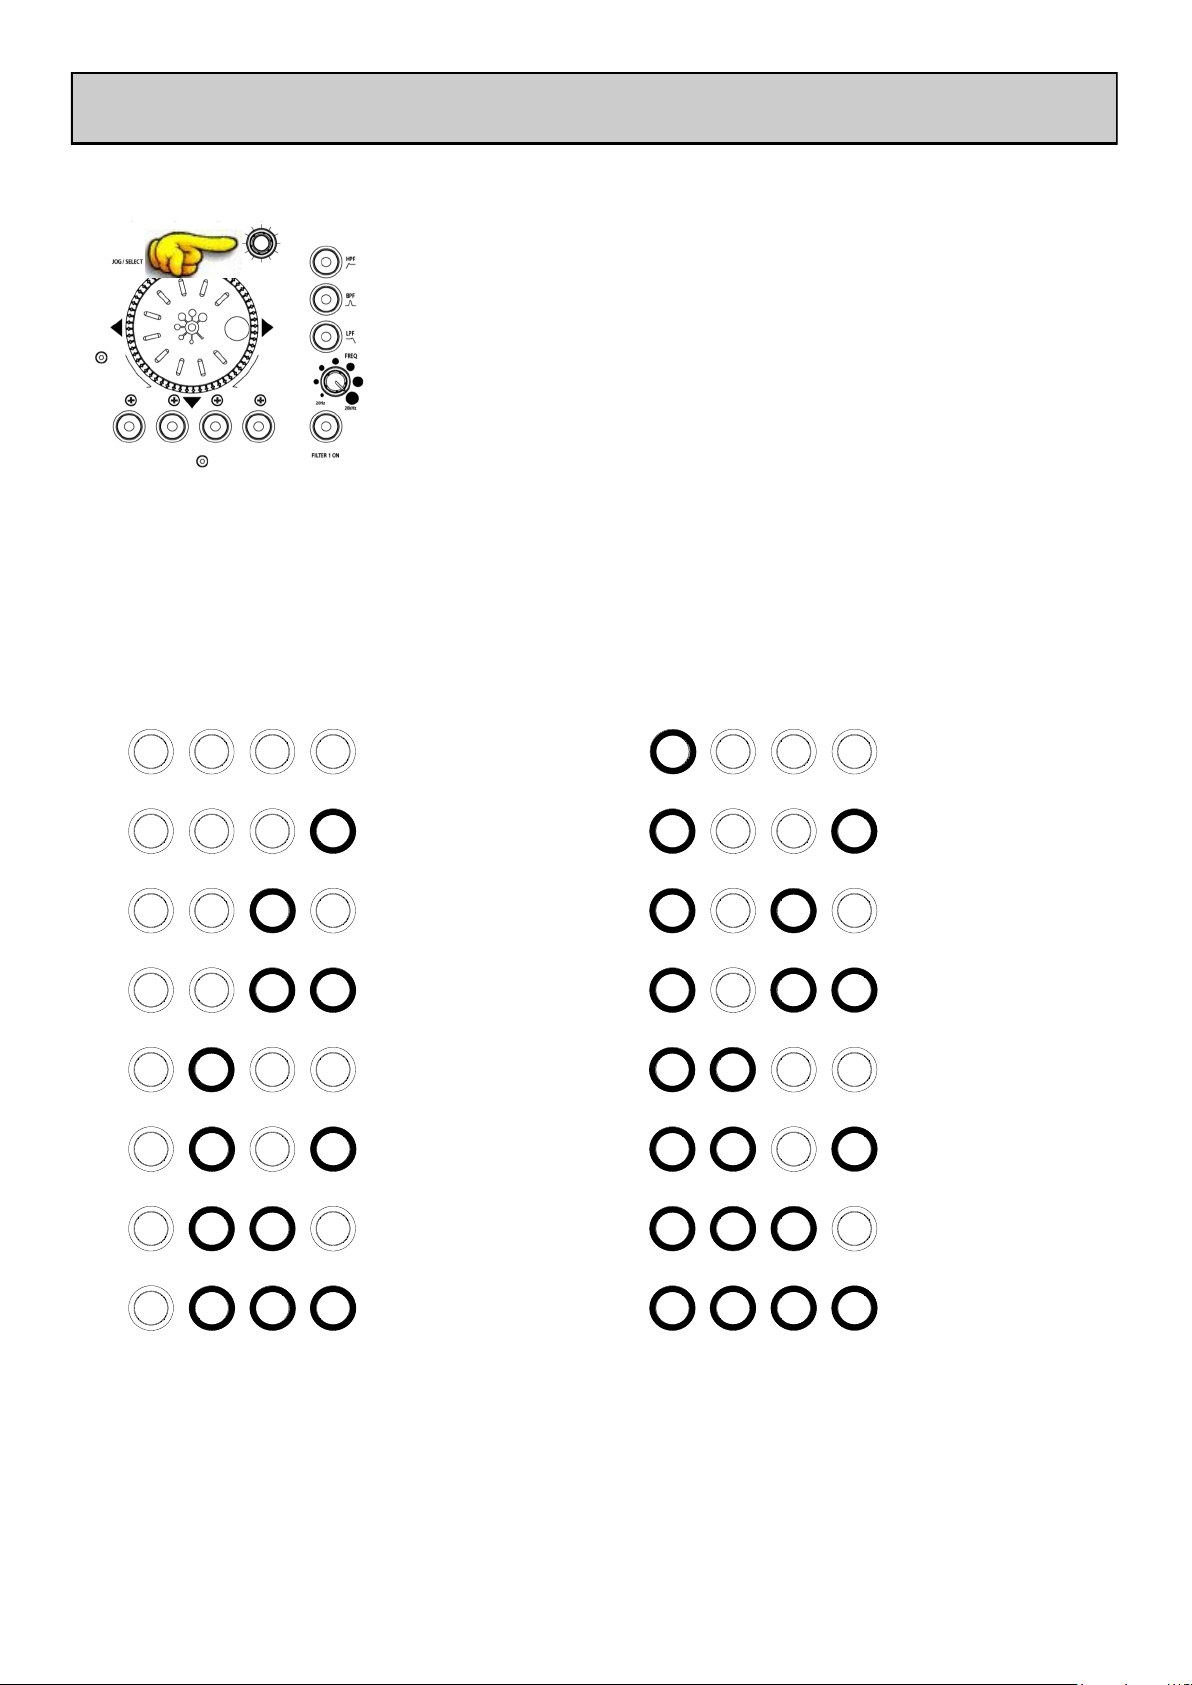
MIDI CHANNEL SETUP
MIDI Channel Number
The MIDI channel number will default to channel 16, but can be
changed to any channel between 1 and 16.
To change the MIDI channel number and MIDI map:
1. Hold down the switch on the encoder shown in the diagram
2. Turn on the Xone:4D
3. At the end of the start up sequence, when the illuminated
switches have flashed three times, release the switch on the
encoder.
The illuminated switches on the Xone:4D will display the current
MIDI channel number in binary format as shown below.
Hot Setup
You may also enter setup mode by holding down the encoder shown above and then pressing
the same encoder on the right hand MIDI pod. This allows the MIDI channel and Map to be
changed if the mixer is in a fixed installation.
Channel 1
Channel 2
Channel 3
Channel 4
Channel 5
Channel 6
Channel 7
Channel 8
Channel 9
Channel 10
Channel 11
Channel 12
Channel 13
Channel 14
Channel 15
Channel 16
To change the channel number that the MIDI is transmitted on, rotate the encoder above
the jog wheel.
Once the desired channel has been selected, press and then release the switch on the
encoder above the jog wheel. The illuminated switches will flash once indicating that the
channel number has been set.
Allen & Heath 11 XONE:4D User Guide
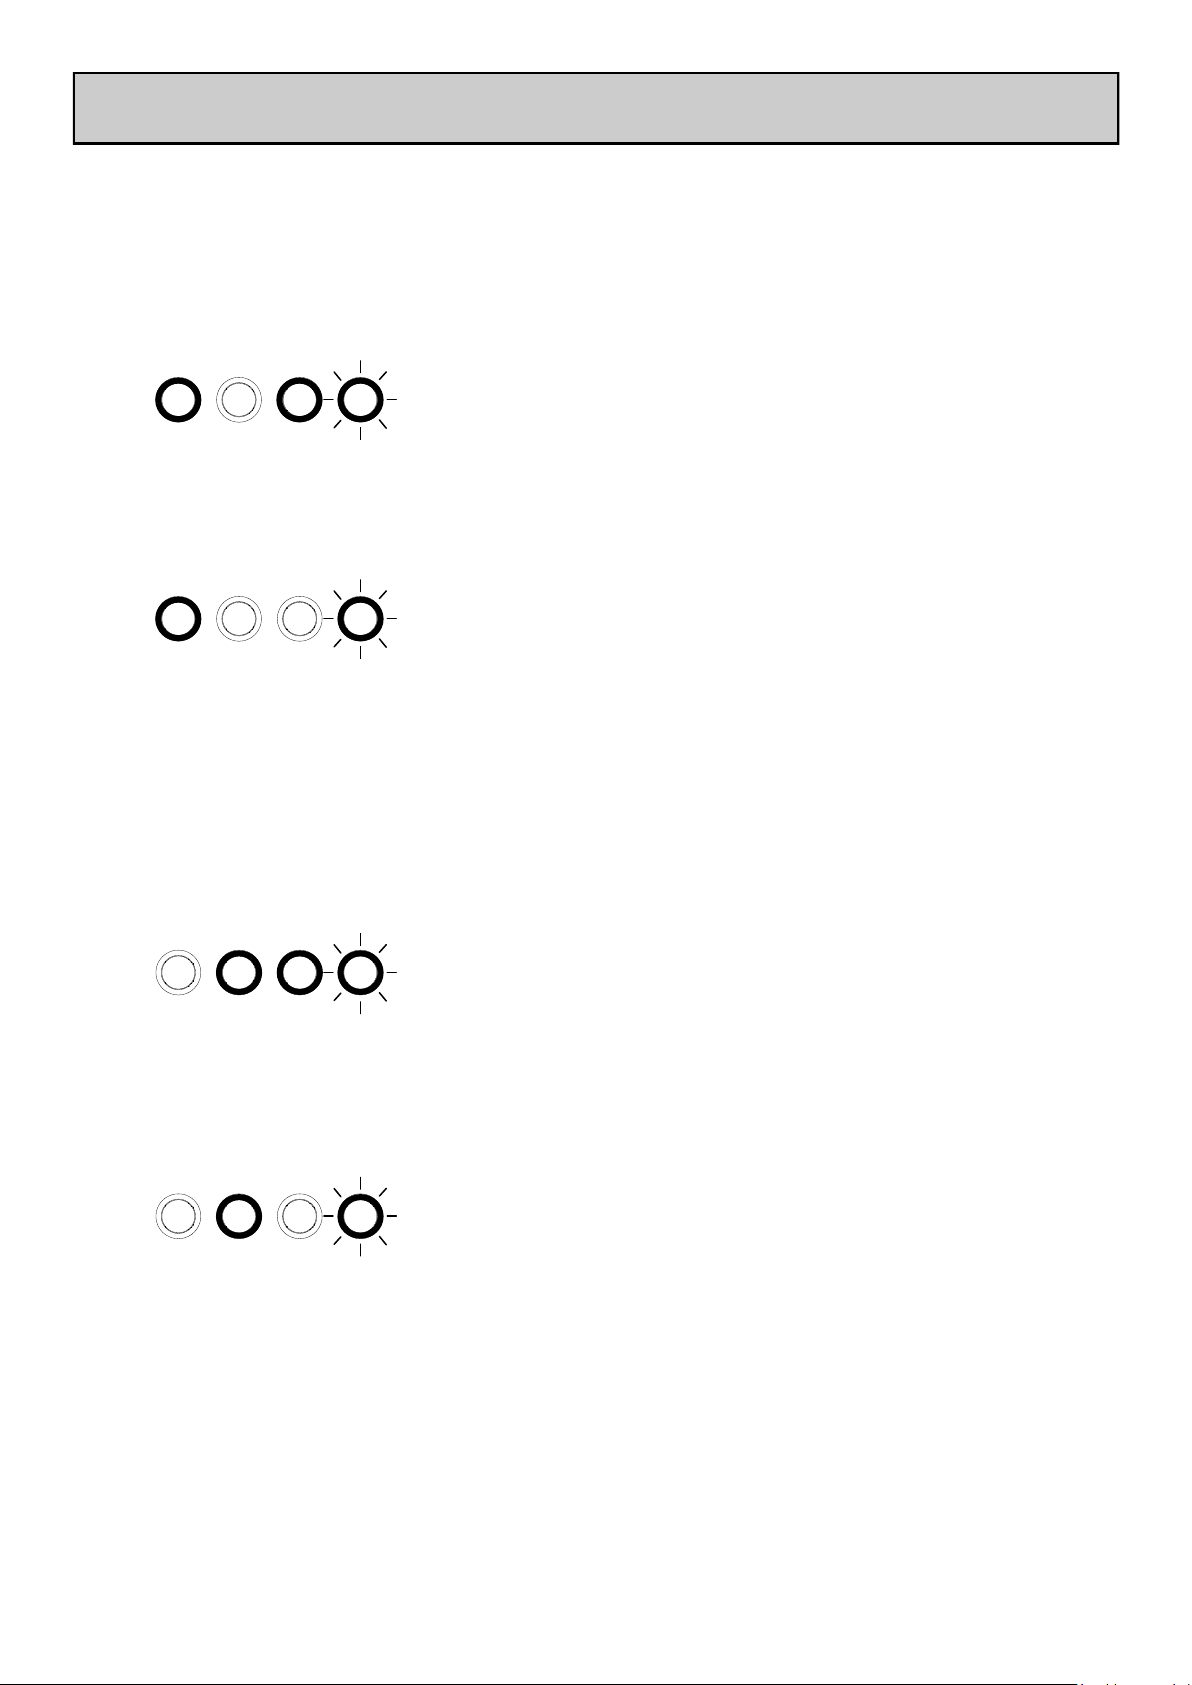
MIDI MAP AND LIGHT PIPE SETUP
Changing the MIDI Map
Once the MIDI channel number has been stored, the illuminated switch to the far right of
the unit will flash indicating that the MIDI map may now be selected. The following
examples are in relation to the left-hand MIDI pod on the Xone:4D.
Map 1 (Traktor default)
The first switch (far left) is used to select MIDI Map 1. In
this map the top row of encoders send ‘Note On’ messag-
es upon rotation (see MIDI Control Section p39).
The third button (centre right) is used to determine the status of the light rings. If the
third light ring is illuminated, then during normal operation all four light rings will stay
illuminated at all times.
If the third light ring is not illuminated then each light ring will toggle on and off on re-
ceipt of a specific MIDI ‘Note On’ message. The ‘Note On’ message that the light ring
responds to is the same ‘Note On’ message that is sent by the corresponding switch.
Therefore, referencing the MIDI Control Section, the first (far left) light pipe will toggle on and off when it receives a ‘Note On’ message of D1.
Map 2 (Ableton default)
The second switch (centre left) is used to select MIDI Map
2. In this map the top row of encoders send ‘Control
Change’ messages upon rotation (see MIDI Control Sec-
tion p39).
The third button (centre right) is used to determine the status of the light rings. If the
third light ring is illuminated, then during normal operation all four light rings will toggle
on and off when their respective switch is pressed.
If the third light ring is not illuminated then each light ring will toggle on and off on re-
ceipt of a specific MIDI ‘Note On’ message. The ‘Note On’ message that the light ring
responds to is the same ‘Note On’ message that is sent by the corresponding switch.
Therefore, referencing the MIDI Control Section, the second (middle left) light pipe
will toggle on and off when it receives a ‘Note On’ message of B-1.
When the desired MIDI map has been selected, press and release the switch on the
encoder above the jog wheel. The illuminated switches will flash three times indicating
that the MIDI map has been stored and that the unit is now in its normal operating mode.
Allen & Heath 12 XONE:4D User Guide

SOUNDCARD ARCHITECTURE
ANALOGUE INPUTS:
The analogue inputs are sourced from the input channels on the Xone:4D as
follows:
Channel Soundcard Input Selectable From
1 1/2 Mic or Channel 1 (Pre or Post Fader)
2 3/4 FX2 or Channel 2 (Pre or Post Fader)
3 5/6 FX1 or Channel 3 (Pre or Post Fader)
4 7/8 Mix or Channel 4 (Pre or Post Fader)
DIGITAL INPUTS:
The SPDIF digital inputs are sourced directly from the digital input sockets on the
rear of the Xone:4D. The soundcard will internally switch between the COAX
and Optical inputs, with the COAX connection being the default. The digital
inputs are sent directly to the soundcard on inputs 9/10.
ANALOGUE OUTPUTS:
The analogue outputs are sent to the mixer from the PC/Mac and can be sourced
as follows:
Channel Soundcard Output Routing
1 1/2 Channel SC1-2 switch and rear panel
RCA connectors
2 3/4 Channel SC3-4 switch and rear panel
RCA connectors
3 5/6 Channel SC5-6 switch and rear panel
RCA connectors
4 7/8 Channel SC7-8 switch
DIGITAL OUTPUTS:
The SPDIF digital outputs are sent directly to the digital output sockets on the
rear of the Xone:4D. The digital output will be present on both the COAX and
Optical output connectors simultaneously. The digital outputs are sent directly
from software on soundcard outputs 9/10.
SPDIF DIGITAL INPUTS AND OUTPUTS
SPDIF is a popular digital audio interfacing standard for connecting two channel
(stereo) audio using a single COAX (RCA phono socket) or optical fibre (Toslink
socket) cable.
The SPDIF inputs and outputs are available only when your computer is
connected via the USB port. The computer provides the clocks needed for the
soundcard to function.
Sample rates of up to 96kHz are supported.
Allen & Heath 13 XONE:4D User Guide

SOUNDCARD SOFTWARE DESCRIPTION
SOFTWARE DESCRIPTION
The inputs and outputs of the soundcard have a description within the software being
used. Below are the descriptions used in Ableton and Traktor.
Soundcard Input Ableton Descriptor Traktor Descriptor
1-2 1/2 (Stereo) IN 0-Allen&Heath Xone:4D
1 (Mono) & 2 (Mono) IN 1-Allen&Heath Xone:4D
3-4 3/4 (Stereo) IN 2-Allen&Heath Xone:4D
3 (Mono) & 4 (Mono) IN 3-Allen&Heath Xone:4D
5-6 5/6 (Stereo) IN 4-Allen&Heath Xone:4D
5 (Mono) & 6 (Mono) IN 5-Allen&Heath Xone:4D
7-8 7/8 (Stereo) IN 6-Allen&Heath Xone:4D
7 (Mono) & 8 (Mono) IN 7-Allen&Heath Xone:4D
9-10 (Digital in 1-2) 9/10 (Stereo) IN 8-Allen&Heath Xone:4D
9 (Mono) & 10(Mono) IN 9-Allen&Heath Xone:4D
Soundcard Output Ableton Descriptor Traktor Descriptor
1-2 1/2 (Stereo) OUT 0-Allen&Heath Xone:4D
1 (Mono) & 2 (Mono) OUT 1-Allen&Heath Xone:4D
3-4 3/4 (Stereo) OUT 2-Allen&Heath Xone:4D
3 (Mono) & 4 (Mono) OUT 3-Allen&Heath Xone:4D
5-6 5/6 (Stereo) OUT 4-Allen&Heath Xone:4D
5 (Mono) & 6 (Mono) OUT 5-Allen&Heath Xone:4D
7-8 7/8 (Stereo) OUT 6-Allen&Heath Xone:4D
7 (Mono) & 8 (Mono) OUT 7-Allen&Heath Xone:4D
9-10 (Digital Out 3-4) 9/10 (Stereo) OUT 8-Allen&Heath Xone:4D
9 (Mono) & 10 (Mono) OUT 9-Allen&Heath Xone:4D
Supported Buffer Sizes
The Xone:4D supports the following buffer sizes:
64, 96, 128, 192, 256, 384, 512, 768, 1024 etc.
Allen & Heath 14 XONE:4D User Guide
ABLETON SET UP
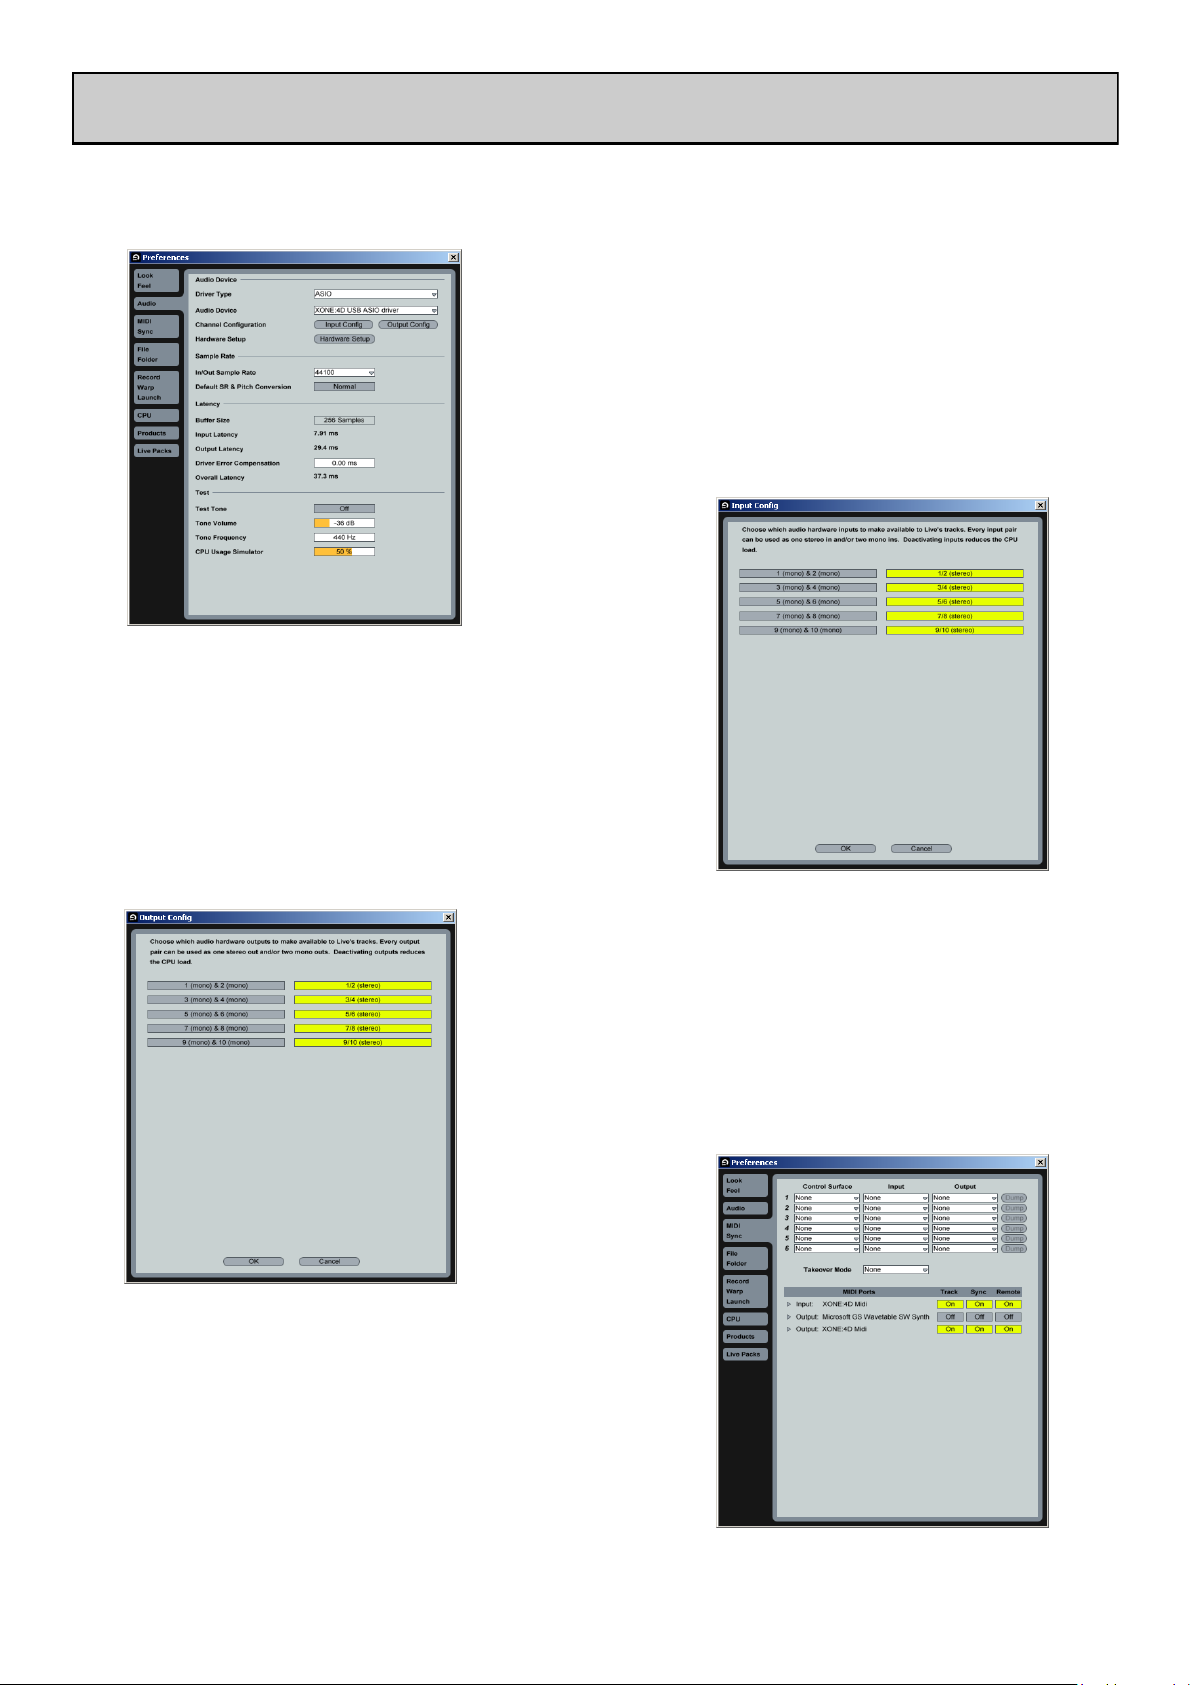
Turn on your Xone:4D, launch your Ableton software and open the Preferences window.
1— In the Preferences window select the Audio
tab. Change the driver type to ASIO and set the Audio Device to Xone:4D USB ASIO driver
In the Settings section click on the Input Config button.
2— Select the Stereo options and de-select the Mono
options. You must click OK for the changes to take
effect.
Now, in the Settings section of the Audio tab, click on
the Output Config button.
3—Select the Stereo options and de-select the Mono
options. You must click OK for the changes to take
effect.
Now select the MIDI Sync tab of the Preferences
window.
4— Set the Track, Sync and Remote to On for the
Xone:4D MIDI Input and Output.
Allen & Heath 15 XONE:4D User Guide
Loading…
Allen & Heath XONE:4D User Guide
USER GUIDE
Publication AP7265
Allen & Heath 2 XONE:4D User Guide
Limited One Year Warranty
This product is warranted to be free from defects in materials or workmanship for period of one year from the date of purchase by the original owner.
To ensure a high level of performance and reliability for which this equipment has been designed and manufactured, read this User Guide before operating. In the event of a failure, notify and return the defective unit to ALLEN & HEATH Limited or its authorised agent as soon as possible for repair under warranty subject to the following conditions
Conditions Of Warranty
The equipment has been installed and operated in accordance with the instructions in this User Guide.
The equipment has not been subject to misuse either intended or accidental, neglect, or alteration other than as described in the User Guide or Service Manual, or approved by ALLEN & HEATH.
Any necessary adjustment, alteration or repair has been carried out by ALLEN & HEATH or its authorised agent.
This warranty does not cover fader wear and tear.
The defective unit is to be returned carriage prepaid to ALLEN & HEATH or its authorised agent with proof of purchase.
Units returned should be packed to avoid transit damage.
In certain territories the terms may vary. Check with your ALLEN & HEATH agent for any additional warranty which may apply.
This product complies with the European Electro magnetic Compatibility directives 89/336/EEC & 92/31/EEC and the European Low Voltage Directives 73/23/EEC & 93/68/EEC.
This product has been tested to EN55103 Parts 1 & 2 1996 for use in Environments E1, E2, E3, and E4 to demonstrate compliance with the protection requirements in the European EMC directive 89/336/EEC. During some tests the specified performance figures of the product were affected. This is considered permissible and the product has been passed as acceptable for its intended use. Allen & Heath has a strict policy of ensuring all products are tested to the latest safety and EMC standards. Customers requiring more information about EMC and safety issues can contact Allen & Heath.
XONE:4D User Guide AP7265
Copyright 2008 Allen & Heath Limited. All rights reserved
Allen & Heath Limited
Kernick Industrial Estate, Penryn, Cornwall, TR10 9LU, UK
http://www.allen-heath.com http://www.xone.co.uk
Allen & Heath 3 XONE:4D User Guide
Warranty ……………………………………… 2
Packed Items ……………………………….. 4
Software Installation PC………………. 5
Checking the Windows Driver
Installation ……………………………………. 7
Software Installation MAC ………….. 8
Checking the Mac Driver
Installation ……………………………………. 10
MIDI Channel Setup ……………………. 11
MIDI Map and Light Pipe Setup …… 12
Soundcard Architecture ………………. 13
Soundcard Software Description … 14
Ableton Setup ……………………………… 15
Traktor Setup ………………………………. 16
Panel Drawings ……………………………. 17
Introduction ………………………………… 18
Description ………………………………….. 19
Soundcard Input Block Diagram …. 21
Soundcard Output / MIDI
Block Diagram …………………………….. 22
Channel Input ………………………………. 23
Mix and Monitor ………………………….. 26
Filters and LFO ……………………………. 28
FX Returns and Crossfader ………… 29
Front Controls and Connectors …. 30
Rear Connectors …………………………. 31
BPM Counter ………………………………. 34
LFO ……………………………………………… 36
The LFO Editor …………………………… 37
MIDI Control Section ………………….. 38
CONTENTS
Congratulations on purchasing the Allen & Heath Xone:4D performance DJ mixer. To ensure that you get the maximum benefit from the unit please spare a few minutes familiarising yourself with the controls and setup procedures outlined in this user guide. For further information please refer to the additional information available on our web site, or contact our technical support team.
http://www.xone.co.uk
MIDI Implementation Chart ………… 40
MIDI Note Chart …………………………. 41
Filter Reference …………………………… 42
Operating Levels ………………………….. 43
Earthing ………………………………………… 44
Cables And Connectors ………………. 45
User Options ……………………………….. 46
Specifications ……………………………….. 47
Product Registration ……………………. 48
Allen & Heath 4 XONE:4D User Guide
PACKED ITEMS
Check that you have received the following:
Safety Sheet
Important ! Read this sheet before starting.
Retain for future reference.
Type A-B USB Lead
To connect the Xone:4D to your computer.
Mains Lead
Check that the correct mains plug is fitted.
Xone:4D mixer
Check that the rear panel optical in/out blank plugs are fitted.
Rack Ears + fixings.
For mounting the 4D in a 19 rack.
6x M4x10mm screws
Spare knobs and buttons
Allen & Heath 5 XONE:4D User Guide
SOFTWARE INSTALLATION PC
STOP!
BEFORE YOU DO ANYTHING WITH YOUR XONE:4D, PLEASE READ THE FOLLOWING CAREFULLY TO ENSURE YOUR PC IS CORRECTLY SET UP TO BE USED WITH THE DEVICE. PLEASE DOWNLOAD THE LATEST DRIVERS FROM:
www.xone.co.uk/4d
Software Installation (Windows 2000, XP and Vista)
Follow the procedure described below to install the USB audio and MIDI drivers:
1 Using the provided power supply, connect the Xone:4D to your mains electricity supply.
Do not connect the 4D to the PC at this time.
2 Open the Drivers folder and run Setup.exe for Windows XP and Vista or Setup98.exe for Windows 98.
3 Select your preferred language
4 Select Install the driver
5 When prompted, connect the 4D to the PC with the USB lead.
The Xone:4D will now initialise.
Allen & Heath 6 XONE:4D User Guide
6 You will now be asked to unplug your Xone:4D
Note: Always use the same USB port with your Xone:4D. When installing on a MS Windows system, the drivers will be associated with the USB port that you are currently plugged into. If you attempt to use the 4D with another USB port, or without installing the drivers at all, the system may work but with degraded performance (XP, Vista), or may not work at all (2000).
8 Once the driver installation is complete you will be prompted to reboot your computer.
SOFTWARE INSTALLATION PC
7 You will now be asked to plug in your Xone:4D again.
The USB drivers will now initialise.
Allen & Heath 7 XONE:4D User Guide
CHECKING THE DRIVER INSTALLATIONWINDOWS
Checking the Driver Installation
Once the driver installation is complete, you will need to check that the Xone:4D is being recog-
nised. To do this, connect the Xone:4D to your PC/laptop and then right click on My Comput-
er to open the System Properties window.
Select the Hardware tab then click on Device
Manager
Expand the Sound, Video and Game Controllers section to reveal the WDM audio and MIDI
drivers for the Xone:4D.
Expand the Universal Serial Bus Controllers section to reveal the Xone:4D ASIO driver and
its release (version) number in this case V2.8.16.
Allen & Heath 8 XONE:4D User Guide
STOP!
BEFORE YOU DO ANYTHING WITH YOUR XONE:4D, PLEASE READ THE FOLLOWING CAREFULLY TO ENSURE YOUR PC IS CORRECTLY SET UP TO BE USED WITH THE MIXER.
Mac OSX
Open the Xone_4D_Driver_x.x.x.dmg to reveal the window shown.
SOFTWARE INSTALLATIONAPPLE MAC
Click on the Xone:4D mpkg file to
launch the driver installation.
Click on Continue.
Select install location and then
click Install.
Allen & Heath 9 XONE:4D User Guide
SOFTWARE INSTALLATIONAPPLE MAC
Enter your system password.
Click on Continue Installation.
Restart your Mac.
Allen & Heath 10 XONE:4D User Guide
CHECKING THE DRIVER INSTALLATIONAPPLE MAC
Checking the Driver Installation
Once the driver installation is complete, you will need to check that the Xone:4D is being recog-
nised. To do this, connect the Xone:4D to your Mac and then select:
Mackintosh HD Applications Utilities Audio MIDI Setup
Now select the Audio tab and in the Properties For dropdown box select Allen & Heath
Xone:4D.
In the Audio Input section, the
number of channels should be seen
as 10, running at 24 bit.
In the Audio Output section, the
number of channels should be seen
as 10, running at 24 bit.
The sample rate is selectable from
44.1 to 96kHz.
Now select the MIDI Devices tab
and make sure that the Xone:4D is
seen as a MIDI device as shown.
Allen & Heath 11 XONE:4D User Guide
MIDI CHANNEL SETUP
MIDI Channel Number
The MIDI channel number will default to channel 16, but can be changed to any channel between 1 and 16.
To change the MIDI channel number and MIDI map:
1. Hold down the switch on the encoder shown in the diagram
2. Turn on the Xone:4D
3. At the end of the start up sequence, when the illuminated switches have flashed three times, release the switch on the encoder.
The illuminated switches on the Xone:4D will display the current MIDI channel number in binary format as shown below.
Channel 1
Channel 2
Channel 3
Channel 4
Channel 5
Channel 6
Channel 7
Channel 8
Channel 9
Channel 10
Channel 11
Channel 12
Channel 13
Channel 14
Channel 15
Channel 16
To change the channel number that the MIDI is transmitted on, rotate the encoder above the jog wheel.
Once the desired channel has been selected, press and then release the switch on the encoder above the jog wheel. The illuminated switches will flash once indicating that the channel number has been set.
Hot Setup
You may also enter setup mode by holding down the encoder shown above and then pressing the same encoder on the right hand MIDI pod. This allows the MIDI channel and Map to be changed if the mixer is in a fixed installation.
Allen & Heath 12 XONE:4D User Guide
Changing the MIDI Map
Once the MIDI channel number has been stored, the illuminated switch to the far right of the unit will flash indicating that the MIDI map may now be selected. The following examples are in relation to the left-hand MIDI pod on the Xone:4D.
Map 1 (Traktor default)
When the desired MIDI map has been selected, press and release the switch on the encoder above the jog wheel. The illuminated switches will flash three times indicating that the MIDI map has been stored and that the unit is now in its normal operating mode.
MIDI MAP AND LIGHT PIPE SETUP
The first switch (far left) is used to select MIDI Map 1. In
this map the top row of encoders send Note On messag-
es upon rotation (see MIDI Control Section p39).
The third button (centre right) is used to determine the status of the light rings. If the
third light ring is illuminated, then during normal operation all four light rings will stay
illuminated at all times.
If the third light ring is not illuminated then each light ring will toggle on and off on re-
ceipt of a specific MIDI Note On message. The Note On message that the light ring
responds to is the same Note On message that is sent by the corresponding switch.
Therefore, referencing the MIDI Control Section, the first (far left) light pipe will tog-
gle on and off when it receives a Note On message of D1.
Map 2 (Ableton default)
The second switch (centre left) is used to select MIDI Map
2. In this map the top row of encoders send Control
Change messages upon rotation (see MIDI Control Sec-
tion p39).
The third button (centre right) is used to determine the status of the light rings. If the
third light ring is illuminated, then during normal operation all four light rings will toggle
on and off when their respective switch is pressed.
If the third light ring is not illuminated then each light ring will toggle on and off on re-
ceipt of a specific MIDI Note On message. The Note On message that the light ring
responds to is the same Note On message that is sent by the corresponding switch.
Therefore, referencing the MIDI Control Section, the second (middle left) light pipe
will toggle on and off when it receives a Note On message of B-1.
Allen & Heath 13 XONE:4D User Guide
SOUNDCARD ARCHITECTURE
ANALOGUE INPUTS:
The analogue inputs are sourced from the input channels on the Xone:4D as follows:
Channel Soundcard Input Selectable From
1 1/2 Mic or Channel 1 (Pre or Post Fader)
2 3/4 FX2 or Channel 2 (Pre or Post Fader)
3 5/6FX1 or Channel 3 (Pre or Post Fader)
4 7/8 Mix or Channel 4 (Pre or Post Fader)
DIGITAL INPUTS:
The SPDIF digital inputs are sourced directly from the digital input sockets on the rear of the Xone:4D. The soundcard will internally switch between the COAX and Optical inputs, with the COAX connection being the default. The digital inputs are sent directly to the soundcard on inputs 9/10.
ANALOGUE OUTPUTS:
The analogue outputs are sent to the mixer from the PC/Mac and can be sourced as follows:
Channel Soundcard Output Routing
1 1/2 Channel SC1-2 switch and rear panel RCA connectors
2 3/4 Channel SC3-4 switch and rear panel RCA connectors
3 5/6Channel SC5-6 switch and rear panel RCA connectors
4 7/8 Channel SC7-8 switch
DIGITAL OUTPUTS:
The SPDIF digital outputs are sent directly to the digital output sockets on the rear of the Xone:4D. The digital output will be present on both the COAX and Optical output connectors simultaneously. The digital outputs are sent directly from software on soundcard outputs 9/10.
SPDIF DIGITAL INPUTS AND OUTPUTS
SPDIF is a popular digital audio interfacing standard for connecting two channel (stereo) audio using a single COAX (RCA phono socket) or optical fibre (Toslink socket) cable.
The SPDIF inputs and outputs are available only when your computer is connected via the USB port. The computer provides the clocks needed for the soundcard to function.
Sample rates of up to 96kHz are supported.
Allen & Heath 14 XONE:4D User Guide
SOUNDCARD SOFTWARE DESCRIPTION
SOFTWARE DESCRIPTION
The inputs and outputs of the soundcard have a description within the software being used. Below are the descriptions used in Ableton and Traktor.
Soundcard Input Ableton Descriptor Traktor Descriptor
1-2 1/2 (Stereo) IN 0-Allen&Heath Xone:4D
1 (Mono) & 2 (Mono) IN 1-Allen&Heath Xone:4D
3-4 3/4 (Stereo) IN 2-Allen&Heath Xone:4D
3 (Mono) & 4 (Mono) IN 3-Allen&Heath Xone:4D
5-6 5/6 (Stereo) IN 4-Allen&Heath Xone:4D
5 (Mono) & 6 (Mono) IN 5-Allen&Heath Xone:4D
7-8 7/8 (Stereo) IN 6-Allen&Heath Xone:4D
7 (Mono) & 8 (Mono) IN 7-Allen&Heath Xone:4D
9-10 (Digital in 1-2) 9/10 (Stereo) IN 8-Allen&Heath Xone:4D
9 (Mono) & 10(Mono) IN 9-Allen&Heath Xone:4D
Soundcard Output Ableton Descriptor Traktor Descriptor
1-2 1/2 (Stereo) OUT 0-Allen&Heath Xone:4D
1 (Mono) & 2 (Mono) OUT 1-Allen&Heath Xone:4D
3-4 3/4 (Stereo) OUT 2-Allen&Heath Xone:4D
3 (Mono) & 4 (Mono) OUT 3-Allen&Heath Xone:4D
5-6 5/6 (Stereo) OUT 4-Allen&Heath Xone:4D
5 (Mono) & 6 (Mono) OUT 5-Allen&Heath Xone:4D
7-8 7/8 (Stereo) OUT 6-Allen&Heath Xone:4D
7 (Mono) & 8 (Mono) OUT 7-Allen&Heath Xone:4D
9-10 (Digital Out 3-4) 9/10 (Stereo) OUT 8-Allen&Heath Xone:4D
9 (Mono) & 10 (Mono) OUT 9-Allen&Heath Xone:4D
Supported Buffer Sizes
The Xone:4D supports the following buffer sizes:
64, 96, 128, 192, 256, 384, 512, 768, 1024 etc.
Allen & Heath 15 XONE:4D User Guide
Turn on your Xone:4D, launch your Ableton software and open the Preferences window.
ABLETON SET UP
1 In the Preferences window select the Audio
tab. Change the driver type to ASIO and set the Au-
dio Device to Xone:4D USB ASIO driver
In the Settings section click on the Input Config but-
ton.
2 Select the Stereo options and de-select the Mono
options. You must click OK for the changes to take
effect.
Now, in the Settings section of the Audio tab, click on
the Output Config button.
3Select the Stereo options and de-select the Mono
options. You must click OK for the changes to take
effect.
Now select the MIDI Sync tab of the Preferences
window.
4 Set the Track, Sync and Remote to On for the
Xone:4D MIDI Input and Output.
Allen & Heath 16 XONE:4D User Guide
TRAKTOR SET UP
Turn on your Xone:4D, launch your Traktor software and open the Preferences window.
1 In the Preferences window, expand the
Audio Setup section and select Soundcard. Set
the Audio Device to Xone:4D USB ASIO driv-
er
Now select Input Routing.
2 In the Input Routing section, assign the
Xone:4D analogue or digital inputs to the re-
quired deck.
Now select Output Routing.
3 In the Output Routing section, first make
sure that the Mixer Mode is set to External.
Now assign the Xone:4D analogue or digital out-
puts to the required deck.
4 In the Preferences window expand the
Hotkey & MIDI Setup section, select
MIDI Interfaces, double click the Active
box next the Xone:4D MIDI and an X will
appear. This will activate the MIDI from the
Xone:4D.
Allen & Heath 17 XONE:4D User Guide
PANEL DRAWINGS
OUTIN
FX2 SEND
WARNING: FOR CONTINUED PROTECTION AGAINST RISK OF FIRE REPLACE FUSE WITH SAME TYPE AND RATING.
STRICTEMENT IDENTIQUE EN VALEURS. ATTENTION: REMPLACER PAR UN FUSIBLE
DO NOT EXPOSE APPARATUS TO RAIN OR MOISTURE.
TO REDUCE THE RISK OF FIRE OR ELECTRIC SHOCK
WARNING: THIS APPARATUS MUST BE EARTHED.
CAUTION
100 — 240V~
47-63Hz ~ 30W MAX MADE IN THE UK BY ALLEN & HEATH LIMITED
FUSE
T500mAL 250V 20mm MIX OUT
LEFT RIGHT I
0
ON OFF
SERIAL No:
AC MAINS IN ~
TO PC
USB
GAME/MIDI
FOOT SWITCH
FX RETURNS
MIDI
L R
L R LINE
L RPHONO
L R LINE
L RPHONO
L R
L R
L R FX2
L RFX1
L R
INPUT 1INPUT 2INPUT 3INPUT 4
CH1
SOUNDCARD OUTPUTS
R
L
FX1 SEND
R
L
MONITOR
R
L
SPDIF
OUT
IN
L
CH2 R
CH3 L
CH4 R
CH5 L
CH6 R
IN OUT
DIGITAL AUDIO
OPTICAL
(REC OUT)
LINE
LINE
B
A
LINE
PHONO
MICPHONES
Allen & Heath 18 XONE:4D User Guide
INTRODUCTION TO THE XONE:4D
Welcome to the Allen & Heath Xone:4D digital DJ workstation. This system has been designed with the help of some of the worlds most cutting edge DJs to provide a seamless integration of traditional and computer-based audio replay systems. The Xone:4D comprises three main sections:
MIXER The mixer is based on the award-winning Allen & Heath Xone:92. It lets you mix a combination of vinyl, CD and other sources through 4 stereo channels to its main mix and monitor outputs. It provides 2 effects send/return loops, 3-band EQ isolators, 2 analogue VCF filters with LFO, VCA crossfader and channel faders, DJ mic and cue monitoring system. A BPM counter can be set for tap tempo or automatic beat detection.
MIDI CONTROLLER Two dedicated control strips provide a total of 105 MIDI messages from a combination of switches, rotary and fader controls, multi- function jog wheels, foot pedal and game controllers. A MIDI shift mode allows all of the controls to be mapped for a second time, giving the MIDI surface a second page. A fader pick-up algorithm has been incorporated into the mixer allowing seamless integration of the pages. In addition, several mixer functions generate and respond to MIDI, and the BPM counter provides MIDI start/stop and clock. The Xone:4D provides full control of external MIDI devices including the most sophisticated DJ performance computer environments. Overlays are available to identify the control function for popular software applications.
SOUNDCARD A high performance 20-channel USB2.0 soundcard is built into the mixer. The soundcard features 4 analogue stereo inputs and four analogue stereo outputs, transmitting audio at 96kHz with 24 bit resolution. It uses USB to interface the mixer audio and MIDI to a PC where the sound may be manipulated in real time using one of the several exciting new DJ performance applications. The soundcard also produces SPDIF COAX and optical digital inputs and outputs. A low latency ASIO driver is provided for audio streaming between mixer and PC.
BPM MIXERMIDI MIDI
SOUNDCARD
FILTER 1 FILTER 2
CROSSFADER
MICPHONES
CUE
FX1
FX2
EQ
CH1 CH2 CH3 CH4
LFO
MONITOR
MASTER
Allen & Heath 19 XONE:4D User Guide
DESCRIPTION
MIXER
Each of the 4 channels can select one of 3 sources: phono, line or soundcard audio as shown. RIAA phono preamps are available on channels 1, 2 and 3. These may be changed to line input by resetting an internal jumper link if required. Level may be adjusted over a +/- 10dB range if the signal reads too high or low on the channel meters. The 3-band EQ provides a safe amount of boost but full cut (kill) for dramatic effect. A mic input with level and 2-band EQ routes direct to the main mix. The DJ cues the mix using headphones. The mix may be added to the cued channel signal to help the DJ synchronise the beat.
FILTERS
The channel signal may be routed direct to the LR mix or through either of the two analogue filters. These provide the characteristic Allen & Heath analogue filter sound with combinations of 3 switched bands, swept frequency, resonance and tap tempo LFO control. The VCA crossfader affects the filter path when switched in.
FX LOOPS
Two FX sends are provided. FX1 may be switched pre or post fader, while FX2 is pre fader. The send is typically connected to an effects device or sampler, then routed back to the mix via one of the two FX return inputs.
OUTPUTS
The balanced XLR mix output feeds the house sound system. The monitor output follows the main mix and can provide a booth monitor, alternative zone or recording feed.
BPM COUNTER
Displays the BPM (beats per minute) of a music track entered manually by tapping a button in time to the music, or automatically by analysing the signal routed to it. The signal may be routed from the main mix or from an individual channel via the pre-fade FX2 mix so that the beat may be calculated and checked before the track is routed to the mix.
The BPM counter outputs MIDI clock so that a slave device such as a hardware or software sequencer can be synchronized to the timing of a track playing through the Xone:4D. To aid synchronization the MIDI clock can be momentarily speeded up or slowed down by operating the PUSH/PULL lever.
UV REACTIVE PAINT
The white artwork on the front panel of the Xone:4D uses a UV reactive layer and will therefore glow under UV light to improve visibility in low level light conditions.
Allen & Heath 20 XONE:4D User Guide
MIDI CONTROL
MIDI (musical instrument digital interface) is a standardised protocol for communication between electronic music devices as well as between those devices and computers. Two identical banks of MIDI controls are provided on either side of the mixer section. These bring control of remote performance equipment such as computer-based sound manipulation and sequencing, samplers, effects and even lighting right to the mixer control surface. The function of the controls may be identified using overlay sheets, samples of which are supplied with the Xone:4D.
The control banks comprise both linear and rotary faders, rotary encoders with integrated switches, push button switches with and without light ring indicators, and large dedicated jog wheels with four position switches. A footswitch socket and the 15-pin Game port provide control voltage input, which produce further MIDI output from foot pedal, joystick and custom-wired controllers. Operation of these controls does not affect any audio signals directly, but is automatically translated into MIDI messages according to a pre-configured MIDI map. The MIDI channel number, map and other functions are selected during the start-up configuration procedure. Two MIDI maps are available to suit the various performance software applications currently available. Further details are provided later in this guide.
In addition to the dedicated MIDI controls, some of the DJ mixer functions also output MIDI messages when operated. These include all switches with light rings, the filter frequency controls, the crossfader, and BPM start/stop and clock. The MIDI data is sent out of the mixer via the rear panel MIDI out and Game port sockets, and is simultaneously transferred to a connected computer via the USB interface. The MIDI surface has two pages, allowing all of the MIDI controls (with the exception of the crossfader), to be mapped twice.
SOUNDCARD
The 20-channel USB2.0 soundcard is built into the mixer to ensure the highest performance and lowest noise. 24-bit converters are used at a maximum sampling rate of 96kHz, together with low latency ASIO drivers supplied by Allen & Heath.
There are 4 stereo (8 mono) analogue and 1 stereo (2 mono) digital inputs to the PC/Mac from the Xone:4D, and 4 stereo (8 mono) analogue and 1 stereo (2 mono) digital outputs from the PC/Mac to the Xone:4D.
The soundcard input block diagram is shown overleaf.
DESCRIPTION
Allen & Heath 21 XONE:4D User Guide
SOUNDCARD INPUT BLOCK DIAGRAM
MIC
-12 + 12 -12 + 12 0
LEVEL
10
PHONES
HFLF
ADC ADC ADC ADC
IN 1/2
IN 3/4
IN 5/6
IN 7/8 Auto-Sense
SOUNDCARD
USB2.0
F X
2 S
e n
d
F X
1 S
e n
d
M a in
M ix
M ic
ro p
h o
n e I
n p
u t
Post-Fade Channel Send
IN 9/10
C h
2 P
re F
a d
e
C h
1 P
re F
a d
e
Ch3 Pre Fade
Ch4 Pre Fade
Note:
The pre-fade channel send
is sourced after the phono/
line input switch. From
this, the soundcard input
can only be routed back to
software when the pre/
post switch is set to post.
Allen & Heath 22 XONE:4D User Guide
SOUNDCARD OUTPUT / MIDI BLOCK DIAGRAM
DAC DAC DAC DAC
OUT 1/2
OUT 3/4
OUT 5/6
OUT 7/8
SOUNDCARD
USB2.0
OUT 9/10
Line Input Line Input Line Input Line Input
Line Input Phono Input Phono Input Phono Input
Xone:4D
Channel 1
Xone:4D
Channel 2
Xone:4D
Channel 3
Xone:4D
Channel 4
SOUNDCARD
MIDI
LEFT BANK
RIGHT BANK
MIXER
MIDI IN
FOOTSWITCH
RIAA
LINE
LINE
PHONO
LINE
SC 1-2
FX1FX2
FX2 MIX
OFF
CH1
GAME/MIDI
BPM
DAC
1
2
DAC
3
4
DAC
5
6
ADC
PHONO
LINE
PHONO
LINE
SC 3-4 SC 5-6
RIAA
CH2 CH3 CH4
COAXOPTICAL IN
OPTICAL
MIX
1 2 3 4
FX1
CH2 PHONO
COAX
COAXOPTICAL OUT SPDIF
ADC
MIX
FX1
CH3 PHONO
SC 1-2
SOUNDCARD OUT
SOUNDCARD IN
DIGITAL OUT
RETURN
SOUNDCARD
USB
MIXER
MIDI OUT
CV IN
MIDI OUT
MIDI CLOCK
MIDI OUT
MIDI IN
CV IN
MAP1
MAP2
MAPPING
MIDI CONTROL
SOURCE SELECT
MIDI TO USB
AUDIO IN/OUT
MIDI CONTROL
COMPUTER
1 STEREO IN / 3 STEREO OUT
CONFIGURATION
MODE 1
1
2
3
4
5
6
COAXOPTICAL IN
COAXOPTICAL OUT SPDIFSOUNDCARD OUT
TO CH1 and 4
LEFT BANK
RIGHT BANK
MIXER
MIDI IN
FOOTSWITCH
RIAA
LINE
LINE
PHONO
LINE
SC 1-2
MIC INPHONES
FX1FX2
FX2 MIX
OFF
CH1
GAME/MIDI
BPM FX1 SEND
DAC
1
2
DAC
3
4
DAC
5
6
ADC
PHONO
LINE
PHONO
LINE
SC 3-4 SC 5-6 SC 1-2
RIAA RIAA
CH2 CH3 CH4
COAXOPTICAL IN
OPTICAL
MIX
1 2 3 4
FX1
CH2 PHONO
COAX
COAXOPTICAL OUT SPDIF
ADC
MIX
FX1
CH3 PHONO
SC 1-2
SOUNDCARD OUT
SOUNDCARD IN
DIGITAL OUT
RETURN
SOUNDCARD
USB
MIXER
MIDI OUT
CV IN
MIDI OUT
MIDI CLOCK
MIDI OUT
MIDI IN
CV IN
MAP1
MAP2
MAPPING
MIDI CONTROL
FX2 SEND
SOURCE SELECT
MIDI TO USB
AUDIO IN/OUT
MIDI CONTROL
COMPUTER
EFFECTS LOOP
HEATHALLEN&
1 STEREO IN / 3 STEREO OUT
CONFIGURATION
MODE 1
MIX OUT
MONITOR OUT
LEFT BANK
RIGHT BANK
MIXER
MIDI IN
FOOTSWITCH
RIAA
LINE
LINE
PHONO
LINE
SC 1-2
FX1FX2
FX2 MIX
OFF
CH1
GAME/MIDI
BPM
DAC
1
2
DAC
3
4
DAC
5
6
ADC
PHONO
LINE
PHONO
LINE
SC 3-4 SC 5-6
RIAA
CH2 CH3 CH4
COAXOPTICAL IN
OPTICAL
MIX
1 2 3 4
FX1
CH2 PHONO
COAX
COAXOPTICAL OUT SPDIF
ADC
MIX
FX1
CH3 PHONO
SC 1-2
SOUNDCARD OUT
SOUNDCARD IN
DIGITAL OUT
RETURN
SOUNDCARD
USB
MIXER
MIDI OUT
CV IN
MIDI OUT
MIDI CLOCK
MIDI OUT
MIDI IN
CV IN
MAP1
MAP2
MAPPING
MIDI CONTROL
SOURCE SELECT
MIDI TO USB
AUDIO IN/OUT
MIDI CONTROL
COMPUTER
1 STEREO IN / 3 STEREO OUT
CONFIGURATION
MODE 1
1
2
3
4
5
6
COAXOPTICAL IN
COAXOPTICAL OUT SPDIFSOUNDCARD OUT
TO CH1 and 4
LEFT BANK
RIGHT BANK
MIXER
MIDI IN
FOOTSWITCH
RIAA
LINE
LINE
PHONO
LINE
SC 1-2
MIC INPHONES
FX1FX2
FX2 MIX
OFF
CH1
GAME/MIDI
BPM FX1 SEND
DAC
1
2
DAC
3
4
DAC
5
6
ADC
PHONO
LINE
PHONO
LINE
SC 3-4 SC 5-6 SC 1-2
RIAA RIAA
CH2 CH3 CH4
COAXOPTICAL IN
OPTICAL
MIX
1 2 3 4
FX1
CH2 PHONO
COAX
COAXOPTICAL OUT SPDIF
ADC
MIX
FX1
CH3 PHONO
SC 1-2
SOUNDCARD OUT
SOUNDCARD IN
DIGITAL OUT
RETURN
SOUNDC RD
USB
MIXER
MIDI OUT
CV IN
MIDI OUT
MIDI CLOCK
MIDI OUT
MIDI IN
CV IN
MAP1
MAP2
MAPPING
MIDI CONTROL
FX2 SEND
SOURCE SELECT
MIDI TO USB
AUDIO IN/O T
MIDI CONTROL
COMPUTER
EFFECTS LOOP
HEATHALLEN&
1 STEREO IN / 3 STEREO OUT
CONFIGURATION
MODE 1
MIX OUT
MONITOR OUT
Allen & Heath 23 XONE:4D User Guide
MIXER SECTION CHANNEL INPUT
1
2 3
FX 1-2 send controls
These controls adjust the signal level that is sent from each channel to the two FX mix busses. These signals will appear at the RCA sockets on the rear of the unit.
FX1 PRE switch determines whether the FX1 send signal is affected by the channel fader. When pressed the signal is pre- fader, when released post-fader.
FX1 can also be sent to the input of the soundcard for processing or recording by the PC (see Soundcard Mode for details).
FX2 is pre-fader (this can be changed internally — see User Options). FX2 can also be selected as the audio source for the Auto Beat detector (See BPM Detector).
1
Input Selection
Two switches select one of three possible stereo audio sources; Line A (RIAA phono on CH 1-3), Line B, or output from the computer via the internal soundcard (SC1- 6). Switch 2 (SC) overrides switch 1 (phono/line). The LED indicator displays which source is active:
CH1 CH2 CH3 CH4
Switch1 gn LineA Phono Phono Phono
Switch1 red LineB LineB LineB LineB
Switch2 red SC1-2 SC3-4 SC5-6 SC1-2
2
Soundcard Input Selection Switches
Two switches select one of three possible soundcard input sources. All channels have the option of pre or post channel fader sends as well as the microphone input, FX1 bus, FX2 bus and main mix. The selector switches are set up as follows:
Ch Switch 1 Switch 2
1 Mic / Channel Pre / Post fader
2 FX2 / Channel Pre / Post fader
3 FX1 / Channel Pre / Post fader
4 Mix / Channel Pre / Post fader
3
Allen & Heath 24 XONE:4D User Guide
Channel Level Control
This control has a range of +/- 10dB either side of the 0dB centre position. Use it to adjust the signal level of an audio source to give a nominal 0dB reading on the channel meter, with the peak level at or below +6dB. Turn LEVEL down if the +10 peak meter starts flashing.
3
Channel Equalizer/Isolator
The Xone:4D is equipped with a very powerful 3 band EQ stage providing a controlled +6dB of boost when fully clockwise but full isolation (cut) of each band for dramatic effect when fully anti- clockwise. Centre frequencies are set at:
HF = 10kHz (high frequency, treble)
MF = 1.2kHz (mid frequency)
LF = 120Hz (low frequency, bass)
4
MIXER SECTION CHANNEL INPUT
5
6
Filter/Crossfade Assignment
The channel signal can be routed directly to the main mix or via either of the two filter/crossfade paths. Note that the crossfade affects the filter path only.
Set the 3-position switch to its mid position to route the signal direct to the mix, or to its left or right positions to route the signal to filter-1/crossfade-X or filter-2/crossfade-Y respectively.
To enable the crossfader check that the XFADE ON switch above the filter1 controls is pressed.
5
Cue Switch
Press the cue switch to listen to the channel pre-fade signal in the headphones and see its level on the main meters. The LED indicator ring around the switch lights up when selected. The big red CUE ACTIVE indicator also lights to warn that you are monitoring the channel signal rather than the main mix.
Press the switch to deselect cue. The switches are interlocked; pressing another one turns off the previous selection.
6
3
4
Allen & Heath 25 XONE:4D User Guide
7
8
Channel Meter
Displays the channel signal level. It is post- EQ and pre-fader. This means it is not affected by the EQ or fader position.
The channel level control should be set so that the meter averages around 0 with loudest peaks no higher than +6. Turn down the level control if the +10 peak indicator lights.
7
Channel Fader
A high quality, smooth travel dual-rail fader adjusts the channel signal level from fully off to fully on.
8
MIXER SECTION CHANNEL INPUT
Allen & Heath 26 XONE:4D User Guide
MIXER SECTION MIX AND MONITOR
1
3
4
5
6
7
8
Mix / Monitor Meters
The main meters follow the selected monitor source. The meter reads 0 for an XLR output of +4dBu. The mixer should be operated with these meters averaging around 0 with loudest peaks no higher than +6.
1
Mix Master Level Control
A rotary master control adjusts the level of the main mix XLR outputs feeding the house sound system. This does not affect the mon- itor output or the meter reading.
3
Monitor Master Level Control
Adjusts the level of the signal to the stereo monitor RCA output. This does not affect the headphones. The monitor output could be used for a booth monitor, recording or an additional zone feed.
4
Cue Active LED
A large red LED indicator lights when a channel CUE is active. This indicates that the selected channel CUE signal is heard in the headphones and displayed on the monitor meters.
5
Monitor Select Switches
In the normal up position the headphones and meters monitor the pre-level main mix. Press these switches to select either of the stereo FX mixes as the headphones and meter source. Note that this does not affect the main mix or monitor outputs.
6
2
Record to FX2 Switch
Selecting this switch will send the pre-fade mix output to the FX2 Send RCA sockets on the rear of the mixer.
The mix signal is switched after the internal FX2 buss, allowing the FX2 Send controls to still be used for software effect loops and a source for the BPM counter.
2
Allen & Heath 27 XONE:4D User Guide
Cue / Add Mix Control
Allows the main mix output to be added to the CUE signal. Turned fully anti-clockwise, only the active CUE signal is heard through the headphones when selected. Gradually turning clockwise introduces the main mix output to the headphones, adding to the ac- tive CUE. This does not affect the meters.
7
Headphones Level Control
Adjusts the level of the headphones signal. 8
! Warning ! To avoid damage to your hearing do not operate the headphones or sound system at excessively high volume. Continued exposure to high volume sound can cause frequency selective or wide range hearing loss.
MIXER SECTION MIX AND MONITOR
-
Страница 1
Allen & Heath XONE:4D User Guide USER GUIDE Publication AP7265[…]
-
Страница 2
Allen & Heath 2 XONE:4D User Guide Limited One Y ear W arranty This product is warranted to be free from defects in materials or workmanship for period of one year from the date of purchase by the original owner. To ensure a high level of performance and reliability for which this equipment has been designed and manufactured, read this User Gui[…]
-
Страница 3
Allen & Heath 3 XONE:4D User Guide W arranty ………………………………………. 2 Pack ed Items …………………………………. 4 Softwar e Installation PC ……………….. 5 Checking the Windows Driv er Installation …………………………………….. 7 Softwar e Installation MA C ……………. 8 Checking t[…]
-
Страница 4
Allen & Heath 4 XONE:4D User Guide P A CKED ITEMS Check that you have received the f ollowing: Safety Sheet Important ! R e a d t h i s s h e e t before starting. Retain for future reference. Type A-B USB Lead To connect the Xone:4D to your computer. Mains Lead Check that the correct mains plug is fitted. Xone:4D mixer Check that the rear panel[…]
-
Страница 5
Allen & Heath 5 XONE:4D User Guide SOFTW ARE INST ALLA TION PC STOP! BEFORE YOU DO ANYTHING WITH YOUR XONE:4D, PLEASE READ THE FOLLOWING CAREFULLY TO ENSURE YO UR PC IS CORRECTLY SET UP TO BE USED WITH THE DEVICE. PLEASE DOWNLOAD THE LATEST DRIVERS FROM: www.xone.co.uk/4d Software Installation (Windows 2000, XP and Vista) Follow the procedure d[…]
-
Страница 6
Allen & Heath 6 XONE:4D User Guide 6— You will now be asked to unplug your Xone:4D Note: Always use the same US B port with your Xone:4D . When installing on a MS Windows system, the drivers will be associated with the USB port that you are cur rently plugged into. If you attempt to use the 4D with another USB port, or without installing the […]
-
Страница 7
Allen & Heath 7 XONE:4D User Guide CHECKING THE DRIVER INST ALLA TION—WINDO WS Checking the Driver Installation Once the driver installation is complete, you will need to check that the Xone:4D is being recog- nised. To do this, conne ct the Xone:4D to your PC/lap top and then right click o n My Com- puter to open the System Properties window[…]
-
Страница 8
Allen & Heath 8 XONE:4D User Guide STOP! BEFORE YOU DO ANYTHING WITH YOUR XONE:4D, PLEASE READ THE FOLLOWING CAREFULLY TO ENSURE YO UR PC IS CORRECTLY SET UP TO BE USED WITH THE MIXER. Mac OSX Open the Xone_4D_Driver_x.x.x.dmg to reveal the window shown. SOFTW ARE INST ALLA TION—APPLE MA C Click on the Xone:4D mpkg file to launch the driver i[…]
-
Страница 9
Allen & Heath 9 XONE:4D User Guide SOFTW ARE INST ALLA TION—APPLE MA C Enter your system password. Click on “Continue Installation”. Restart your Mac.[…]
-
Страница 10
Allen & Heath 10 XONE:4D User Guide CHECKING THE DRIVER INST ALLA TION—APPLE MA C Checking the Driver Installation Once the driver installation is complete, you wi ll need to ch eck that the Xone:4D is being recog- nised. To do this, connect the Xone :4D to your Mac and then sele ct: Mackintosh HD App lications Utilities Audio MIDI Setup Now […]
-
Страница 11
Allen & Heath 11 XONE:4D User Guide MIDI CHANNEL SETUP MIDI Channel Number The MIDI channel number will defa ult to channel 16, but can be changed to any channel between 1 and 16. To change the MIDI channel number and MIDI map: 1. Hold down the switch on th e encoder shown in the diagram 2. Turn on the Xone:4D 3. At the end of the start up sequ[…]
-
Страница 12
Allen & Heath 12 XONE:4D User Guide Changing the MIDI Map Once the MIDI channel number has been stored, the illuminated switch to the far right of the unit will flash indicating that the M IDI map may now be selected. The fo llowing examples are in relation to the left-hand MIDI pod on the Xone:4D. Map 1 (Traktor default) When the desired MIDI […]
-
Страница 13
Allen & Heath 13 XONE:4D User Guide SOUNDCARD ARCHITECTURE ANALOGUE INPUTS: The analogue inputs are sourced from the input channels on the Xone:4D as follows: Channel Soundcard Input Selectable From 1 1/2 Mic or Channel 1 (Pre or Post Fader ) 2 3/4 FX2 or Channel 2 (Pre or Post Fader) 3 5/6 FX1 or Channel 3 (Pre or Post Fader) 4 7/8 Mix or Chan[…]
-
Страница 14
Allen & Heath 14 XONE:4D User Guide SOUNDCARD SOFTW ARE DESCRIPTION SOFTWARE DESCRIPTION The inputs and outputs of the soundcard have a description within the software being used. Below are the descriptions used in Ableton and Traktor. Soundcard Input Ableton Descriptor Traktor Descriptor 1-2 1/2 (Stereo) IN 0-Allen&Heath Xone:4D 1 (Mono) &[…]
-
Страница 15
Allen & Heath 15 XONE:4D User Guide Turn on your Xone:4D, launch your Ableton software and open the Preferences window. ABLET ON SET UP 1— In the Preferences window select the Audio tab. Change the driver type to ASIO and set the Au- dio Device to Xone:4D USB ASIO driver In the Settings sect ion click on th e Input Config but- ton. 2— Selec[…]
-
Страница 16
Allen & Heath 16 XONE:4D User Guide TRAKT OR SET UP Turn on your Xone:4D, launch your Traktor software and open the Preferences window. 1— In the Preferences window, expand the Audio Setup section and select Soundca rd. Set the Audio Device to Xone:4D USB A SIO driver ’ Now select Input Routing . 2— In the Input Routing section, assign th[…]
-
Страница 17
Allen & Heath 17 XONE:4D User Guide P ANEL DRA WINGS OUT IN FX2 SEND WARNING: FOR CONTINUED PROTECTION AG AINST RISK OF FIRE REPLACE FUSE WITH SAME TYPE A ND RATING. STRICTEMEN T IDENTIQUE EN VALE URS. ATTENTION: REMPLACER PAR UN FUSIBLE DO NOT EX POSE APPARATUS TO RAIN OR MOISTURE. TO REDUCE THE RISK OF FIRE OR ELE CTRIC SHOCK WARNING: THIS AP[…]
-
Страница 18
Allen & Heath 18 XONE:4D User Guide INTR ODUCTION T O THE XONE:4D Welcome to the Allen & Heath Xone:4D digi ta l DJ workstation. This system has been designed with the help of some of the world’s most cutting edge DJs to provide a seamless integration of tradit ional and computer-based audio replay systems. The Xone:4D comprises three mai[…]
-
Страница 19
Allen & Heath 19 XONE:4D User Guide DESCRIPTION MIXER Each of the 4 channels can sele ct one of 3 sources: phono, line or soundcard audio as shown. RIAA phono preamps are available on channels 1, 2 and 3. These may be changed to line input by resetti ng an internal jumper link if required. Level may be adjusted over a +/- 10 dB rang e if the si[…]
-
Страница 20
Allen & Heath 20 XONE:4D User Guide MIDI CONTROL MIDI (musical instrument digital interface) is a standardised protocol for communication between electronic music devices as well as between those devices and computers. Two identical ba nks of MIDI controls are provided on either side of the mixer section. Thes e bring control of remote performa[…]
-
Страница 21
Allen & Heath 21 XONE:4D User Guide SOUNDCARD INPUT BLOCK DIA GRAM MIC -12 +12 -12 +12 0 LEVEL 10 PHONES HF LF ADC ADC ADC ADC IN 1/2 IN 3/4 IN 5/6 IN 7/8 Auto-Sense SOUNDCARD USB2.0 FX2 Send FX1 Send Main Mix Microphone Input Post-Fade Channel Se nd IN 9/10 Ch2 Pre Fade Ch1 Pre Fade Ch3 Pre Fade Ch4 Pre Fade Note: The pre-fade channel send is […]
-
Страница 22
Allen & Heath 22 XONE:4D User Guide SOUNDCARD OUTPUT / MIDI BLOCK DIA GRAM DAC DAC DAC DAC OUT 1/2 OUT 3/4 OUT 5/6 OUT 7/8 SOUNDCARD USB2.0 OUT 9/10 Line Input Line Input Line Input Line Input Line Input Phono Input Phono Input Phono Input Xone:4D Channel 1 Xone:4D Channel 2 Xone:4D Channel 3 Xone:4D Channel 4 SOUNDCARD MIDI LEFT BANK RIGHT BAN[…]
-
Страница 23
Allen & Heath 23 XONE:4D User Guide MIXER SECTION — CHANNEL INPUT 1 2 3 FX 1-2 send controls These controls adjust the signal level that is sent from each channel to the two FX mix busses. These signals will appear at the RCA sockets on the rear of the unit. FX1 PRE switch determines whether the FX1 send signal is a ffected by the channel fad[…]
-
Страница 24
Allen & Heath 24 XONE:4D User Guide Channel Level Control This control has a range of +/- 10dB either side of the 0dB centre position. Use it to adjust the signal level of an audio source to give a nominal 0dB reading on the channel meter, with the peak level at or below +6dB. Turn LEVEL down if the +10 peak meter starts flashing. 3 Channel Equ[…]
-
Страница 25
Allen & Heath 25 XONE:4D User Guide 7 8 Channel Meter Displays the channel signal level. It is pre-EQ and pre-fader. This means it is not affected by the EQ or fader position. The channel level control should be set so that the meter averages around ‘0’ with loudest peaks no higher than ‘+6’. Turn down the level control if the +10 peak […]
-
Страница 26
Allen & Heath 26 XONE:4D User Guide MIXER SECTION — MIX AND MONIT OR 1 3 4 5 6 7 8 Mix / Monitor Meters The main meters follow the selected monitor source. The meter reads ‘0’ for an XLR output of +4dBu. The mixer should be operated with these meters averaging around ‘0’ with loudest peaks no higher than ‘+6’. 1 Mix Master Level C[…]
-
Страница 27
Allen & Heath 27 XONE:4D User Guide Cue / Add Mix Control Allows the main mix output to be added to the CUE signal. Turned fully anti-clockwise, only the active CUE signal is heard through the headphones when selected. Gradually turning clockwise introduces the main mix output to the headphones, adding to the ac- tive CUE. This does not affect […]
-
Страница 28
Allen & Heath 28 XONE:4D User Guide MIXER SECTION — FIL TERS and LFO 1 3 5 LFO Tap Tempo button Tap the tap tempo button in time with the beat to set the frequency of the LFO. 1 LFO Depth control When assigned, the LFO modulates the filter with a cyclic frequency sweep effect in time to the beat set using the tap tempo button. The depth contr[…]
-
Страница 29
Allen & Heath 29 XONE:4D User Guide FILTER / X FADE SEL ECT 12 OFF DC FILTER 1 M IX BUS FILTER 2 M IX BUS MAIN LR MI X BUS FILTE R 1 MI X FILTE R 2 MI X XY CROSSFADER X FILTER 1 FILTER 2 Y XFADE CURVE XFADE ON VCA VCA LFO DEPTH TAP TEMPO FROM IN PUT CHANNEL MIXER SECTION — FX R TN & CROSSF ADER 1 4 FX Return Controls These controls route […]
-
Страница 30
Allen & Heath 30 XONE:4D User Guide MIC -12 +12 -12 +12 0 LEVEL 10 PHONES HF LF FR ONT CONTR OLS & CONNECT ORS Headphones Outputs Stereo 1/4” TRS jack and 3. 5mm mini-jack. Plug in good quality stereo headphones intended for DJ monitoring. Use closed-ear headphones that provide maximum acoustic isolation when cueing your sources. We recom[…]
-
Страница 31
Allen & Heath 31 XONE:4D User Guide REAR CONNECT ORS 1 2 4 5 3 CH1-4 Stereo Line Input RCA phono. Connect stereo line level music sources such as CD, MD, DAT, drum machines, keyboards or other instruments. Do not connect turntables which require RIAA equalisation. Alternatively, you can connect to jack sources using a cable with RCA to jack ada[…]
-
Страница 32
Allen & Heath 32 XONE:4D User Guide OUT IN FX2 SEND WARNING: FOR CONTINUED PROTECTION AGAINST RISK OF FIRE REPLACE FUSE WITH SAME TYPE AND RATING. STRICT EMENT IDENT IQUE EN VALEURS. ATT ENTION: REMPLAC ER PAR UN FUSI BLE DO NOT EX POSE APPARA TUS TO RAIN OR MOISTURE. TO REDUCE THE RISK OF FIRE OR ELEC TRIC SHOCK WARNI NG: TH IS APPA RATUS MU S[…]
-
Страница 33
Allen & Heath 33 XONE:4D User Guide REAR CONNECT ORS 11 12 13 14 MIDI Input / Output 5 pin DIN socket. Connect to either a MIDI interface or directly to MIDI compatible equipment using a standard 5 pin DIN (MIDI) lead. The MIDI output socket data duplicates what is sent via the USB connection to the PC, and to the gameport. MIDI in can be used […]
-
Страница 34
Allen & Heath 34 XONE:4D User Guide MIXER SECTION — BPM COUNTER 1 3 BPM Display Displays the tempo of an anal ysed piece of music, rounded up to the nearest whole number. On power-up, and when t he detector is reset, the dis play will show a line of three dashes. When an audio source is routed to the auto beat detector, a dot in the bottom ri[…]
-
Страница 35
Allen & Heath 35 XONE:4D User Guide MIXER SECTION — BPM COUNTER 4 5 BPM Tap Tempo Button This control is used to tap in a beat manually at any speed between 70 and 400 BPM. The taps are averaged, so the greater number of taps the more accurate the result. The tap button can also be used as a guide for the auto beat detector on complex rhythms[…]
-
Страница 36
Allen & Heath 36 XONE:4D User Guide MIXER SECTION — LFO LFO Tap Tempo button Tapping this button will set the spe ed of the LFO (low frequency oscillator) within the range of 0.25Hz — 3.33Hz (15 — 200 BPM) The LFO speed can be displayed on the BPM meter by pressing and holding this button until dots appear after all of the digits—the BPM di[…]
-
Страница 37
Allen & Heath 37 XONE:4D User Guide MIXER SECTION — THE LFO EDIT OR The LFO Editor allows real-time mani pulation of the LFO waveform using the linear faders on the left and right MIDI pods of the Xone:4D. The LFO tempo can be set using the LFO Tap Tem po button or by synchronising the LFO tempo to the displayed BPM (see page 36). Enter LFO E[…]
-
Страница 38
Allen & Heath 38 XONE:4D User Guide MIDI CONTR OL SECTION 1 3 Rotary Encoders Turning an encoder produces MIDI CC (continuous controller) messages with a unique controller number i n two’s complement binary encoding. Refer to the MIDI mapping diagram for the differences between Map 1 and 2 for these controls. These encoders feature a built in[…]
-
Страница 39
Allen & Heath 39 XONE:4D User Guide MIDI CONTR OL SECTION MIDI Messages The diagram below shows which controls are a ssociated with MIDI CC (c ontinuous controller) and note on/off messages. These controls send the MIDI messages shown when operated. The switch light ring indicators (except for start/st op and tap tempo) may be turned on or off […]
-
Страница 40
Allen & Heath 40 XONE:4D User Guide MIDI IMPLEMENT A TION CHAR T Function Transmitted Received Remarks Basis Channel Default Option 16 1-16 16 1-16 Selectable with Configuration Utility Mode Default Messages Altered X X X X X X Note Number O O Refer to Diagram. MIDI note messages received as well as transmitted for all push buttons with light r[…]
-
Страница 41
Allen & Heath 41 XONE:4D User Guide MIDI NO TE CHAR T Note No. (Hex) Note No. (Decimal) Note Name Note No. (Hex) Note No. (Decimal) Note Name 00 0 C-2 36 54 F#2 01 1 C#-2 37 55 G2 02 2 D-2 38 56 G#2 03 3 D#-2 39 57 A2 04 4 E-2 3A 58 A#2 05 5 F-2 3B 59 B2 06 6 F#-2 3C 60 C3 07 7 G-2 3D 61 C#3 08 8 G#-2 3E 62 D3 09 9 A-2 3F 63 D#3 0A 10 A#-2 40 6[…]
-
Страница 42
Allen & Heath 42 XONE:4D User Guide FIL TER REFERENCE The VCF Filters A voltage controlled filter is an audio filter where the cut-off frequency is altered by a DC control voltage rather than a variable resistor. This produces a much wider operating range and more control over the filter response to create unlimited combinations of tonal effect[…]
-
Страница 43
Allen & Heath 43 XONE:4D User Guide It is most important that the s ystem level se ttings are corr ectly set. It is well known that many DJs push the level to maximum wit h meters peaking hard in the belief that they are getting the best from the system. THIS IS NOT THE CASE ! The best can only be achieved if the system leve ls are set within t[…]
-
Страница 44
Allen & Heath 44 XONE:4D User Guide The connection to earth (ground) in an audio system is important for two reasons: SAFETY — To protect the operator from high voltage electric shock, and AUDIO PERFORMANCE — To minimise the effect of earth (ground) loops which result in audible hum and buzz, and to shield the audio signals from interference. F[…]
-
Страница 45
Allen & Heath 45 XONE:4D User Guide CABLES AND CONNECTIONS USB TYPE A USB TYPE B MAX 2M SPDIF RCA — 75 ohm coax MIDI — 5-pin DIN SPDIF OPTICA L — TOSLINK 1=ground 2=hot (+) 3=cold (-) BALANCED XLR FEMALE RCA phono jacks XLR MALE 2=hot (+) 1=ground 3=cold (-) CABLE D CABLE E CABLE A CABLE G Sleeve=ground Ring=cold (-) Tip=hot (+) BALANCED 1=grou[…]
-
Страница 46
Allen & Heath 46 XONE:4D User Guide USER OPTIONS Internal Link Options The Xone:4D offers several internal option settings: • FX1 and FX2 Return Routing — The FX1 and FX2 Retur ns ar e set, b y default, to route to the main LR Mix. Link options allow the return to be routed through either Filter 1 or Filter 2. • Disabling / Enabling RIAA […]
-
Страница 47
Allen & Heath 47 XONE:4D User Guide SPECIFICA TIONS Dimensions and Weights The console is fitted with rubber feet for desktop operation. A scre w on rack ear kit is included for 19” rack or plinth mounting. Width Height Depth Weight Desktop 432 mm (17”) 88 mm (3.5 ”) 358 mm (14”) 5kg (11 lbs) Rack ears fitted 483 mm (19”) 88 mm (3.5?[…]
-
Страница 48
Allen & Heath 48 XONE:4D User Guide PR ODUCT REGISTRA TION Registering your product Please go to www.allen-heath.com/register.asp and register your product’s serial number and your details. By registering with us and becomin g an official Reg istered User, you will ensure that any warranty claim you might make is actioned quickly an d with th[…]
-
Page 1: Allen & Heath XONE:4D
Allen & Heath XONE:4D User Guide USER GUIDE Publication AP7265[…]
-
Page 2: Allen & Heath XONE:4D
Allen & Heath 2 XONE:4D User Guide Limited One Y ear W arranty This product is warranted to be free from defects in materials or workmanship for period of one year from the date of purchase by the original owner. To ensure a high level of performance and reliability for which this equipment has been designed and manufactured, read this User Gui[…]
-
Page 3: Allen & Heath XONE:4D
Allen & Heath 3 XONE:4D User Guide W arranty ………………………………………. 2 Pack ed Items …………………………………. 4 Softwar e Installation PC ……………….. 5 Checking the Windows Driv er Installation …………………………………….. 7 Softwar e Installation MA C ……………. 8 Checking t[…]
-
Page 4: Allen & Heath XONE:4D
Allen & Heath 4 XONE:4D User Guide P A CKED ITEMS Check that you have received the f ollowing: Safety Sheet Important ! R e a d t h i s s h e e t before starting. Retain for future reference. Type A-B USB Lead To connect the Xone:4D to your computer. Mains Lead Check that the correct mains plug is fitted. Xone:4D mixer Check that the rear panel[…]
-
Page 5: Allen & Heath XONE:4D
Allen & Heath 5 XONE:4D User Guide SOFTW ARE INST ALLA TION PC STOP! BEFORE YOU DO ANYTHING WITH YOUR XONE:4D, PLEASE READ THE FOLLOWING CAREFULLY TO ENSURE YO UR PC IS CORRECTLY SET UP TO BE USED WITH THE DEVICE. PLEASE DOWNLOAD THE LATEST DRIVERS FROM: www.xone.co.uk/4d Software Installation (Windows 2000, XP and Vista) Follow the procedure d[…]
-
Page 6: Allen & Heath XONE:4D
Allen & Heath 6 XONE:4D User Guide 6— You will now be asked to unplug your Xone:4D Note: Always use the same US B port with your Xone:4D . When installing on a MS Windows system, the drivers will be associated with the USB port that you are cur rently plugged into. If you attempt to use the 4D with another USB port, or without installing the […]
-
Page 7: Allen & Heath XONE:4D
Allen & Heath 7 XONE:4D User Guide CHECKING THE DRIVER INST ALLA TION—WINDO WS Checking the Driver Installation Once the driver installation is complete, you will need to check that the Xone:4D is being recog- nised. To do this, conne ct the Xone:4D to your PC/lap top and then right click o n My Com- puter to open the System Properties window[…]
-
Page 8: Allen & Heath XONE:4D
Allen & Heath 8 XONE:4D User Guide STOP! BEFORE YOU DO ANYTHING WITH YOUR XONE:4D, PLEASE READ THE FOLLOWING CAREFULLY TO ENSURE YO UR PC IS CORRECTLY SET UP TO BE USED WITH THE MIXER. Mac OSX Open the Xone_4D_Driver_x.x.x.dmg to reveal the window shown. SOFTW ARE INST ALLA TION—APPLE MA C Click on the Xone:4D mpkg file to launch the driver i[…]
-
Page 9: Allen & Heath XONE:4D
Allen & Heath 9 XONE:4D User Guide SOFTW ARE INST ALLA TION—APPLE MA C Enter your system password. Click on “Continue Installation”. Restart your Mac.[…]
-
Page 10: Allen & Heath XONE:4D
Allen & Heath 10 XONE:4D User Guide CHECKING THE DRIVER INST ALLA TION—APPLE MA C Checking the Driver Installation Once the driver installation is complete, you wi ll need to ch eck that the Xone:4D is being recog- nised. To do this, connect the Xone :4D to your Mac and then sele ct: Mackintosh HD App lications Utilities Audio MIDI Setup Now […]
-
Page 11: Allen & Heath XONE:4D
Allen & Heath 11 XONE:4D User Guide MIDI CHANNEL SETUP MIDI Channel Number The MIDI channel number will defa ult to channel 16, but can be changed to any channel between 1 and 16. To change the MIDI channel number and MIDI map: 1. Hold down the switch on th e encoder shown in the diagram 2. Turn on the Xone:4D 3. At the end of the start up sequ[…]
-
Page 12: Allen & Heath XONE:4D
Allen & Heath 12 XONE:4D User Guide Changing the MIDI Map Once the MIDI channel number has been stored, the illuminated switch to the far right of the unit will flash indicating that the M IDI map may now be selected. The fo llowing examples are in relation to the left-hand MIDI pod on the Xone:4D. Map 1 (Traktor default) When the desired MIDI […]
-
Page 13: Allen & Heath XONE:4D
Allen & Heath 13 XONE:4D User Guide SOUNDCARD ARCHITECTURE ANALOGUE INPUTS: The analogue inputs are sourced from the input channels on the Xone:4D as follows: Channel Soundcard Input Selectable From 1 1/2 Mic or Channel 1 (Pre or Post Fader ) 2 3/4 FX2 or Channel 2 (Pre or Post Fader) 3 5/6 FX1 or Channel 3 (Pre or Post Fader) 4 7/8 Mix or Chan[…]
-
Page 14: Allen & Heath XONE:4D
Allen & Heath 14 XONE:4D User Guide SOUNDCARD SOFTW ARE DESCRIPTION SOFTWARE DESCRIPTION The inputs and outputs of the soundcard have a description within the software being used. Below are the descriptions used in Ableton and Traktor. Soundcard Input Ableton Descriptor Traktor Descriptor 1-2 1/2 (Stereo) IN 0-Allen&Heath Xone:4D 1 (Mono) &[…]
-
Page 15: Allen & Heath XONE:4D
Allen & Heath 15 XONE:4D User Guide Turn on your Xone:4D, launch your Ableton software and open the Preferences window. ABLET ON SET UP 1— In the Preferences window select the Audio tab. Change the driver type to ASIO and set the Au- dio Device to Xone:4D USB ASIO driver In the Settings sect ion click on th e Input Config but- ton. 2— Selec[…]
-
Page 16: Allen & Heath XONE:4D
Allen & Heath 16 XONE:4D User Guide TRAKT OR SET UP Turn on your Xone:4D, launch your Traktor software and open the Preferences window. 1— In the Preferences window, expand the Audio Setup section and select Soundca rd. Set the Audio Device to Xone:4D USB A SIO driver ’ Now select Input Routing . 2— In the Input Routing section, assign th[…]
-
Page 17: Allen & Heath XONE:4D
Allen & Heath 17 XONE:4D User Guide P ANEL DRA WINGS OUT IN FX2 SEND WARNING: FOR CONTINUED PROTECTION AG AINST RISK OF FIRE REPLACE FUSE WITH SAME TYPE A ND RATING. STRICTEMEN T IDENTIQUE EN VALE URS. ATTENTION: REMPLACER PAR UN FUSIBLE DO NOT EX POSE APPARATUS TO RAIN OR MOISTURE. TO REDUCE THE RISK OF FIRE OR ELE CTRIC SHOCK WARNING: THIS AP[…]
-
Page 18: Allen & Heath XONE:4D
Allen & Heath 18 XONE:4D User Guide INTR ODUCTION T O THE XONE:4D Welcome to the Allen & Heath Xone:4D digi ta l DJ workstation. This system has been designed with the help of some of the world’s most cutting edge DJs to provide a seamless integration of tradit ional and computer-based audio replay systems. The Xone:4D comprises three mai[…]
-
Page 19: Allen & Heath XONE:4D
Allen & Heath 19 XONE:4D User Guide DESCRIPTION MIXER Each of the 4 channels can sele ct one of 3 sources: phono, line or soundcard audio as shown. RIAA phono preamps are available on channels 1, 2 and 3. These may be changed to line input by resetti ng an internal jumper link if required. Level may be adjusted over a +/- 10 dB rang e if the si[…]
-
Page 20: Allen & Heath XONE:4D
Allen & Heath 20 XONE:4D User Guide MIDI CONTROL MIDI (musical instrument digital interface) is a standardised protocol for communication between electronic music devices as well as between those devices and computers. Two identical ba nks of MIDI controls are provided on either side of the mixer section. Thes e bring control of remote performa[…]
-
Page 21: Allen & Heath XONE:4D
Allen & Heath 21 XONE:4D User Guide SOUNDCARD INPUT BLOCK DIA GRAM MIC -12 +12 -12 +12 0 LEVEL 10 PHONES HF LF ADC ADC ADC ADC IN 1/2 IN 3/4 IN 5/6 IN 7/8 Auto-Sense SOUNDCARD USB2.0 FX2 Send FX1 Send Main Mix Microphone Input Post-Fade Channel Se nd IN 9/10 Ch2 Pre Fade Ch1 Pre Fade Ch3 Pre Fade Ch4 Pre Fade Note: The pre-fade channel send is […]
-
Page 22: Allen & Heath XONE:4D
Allen & Heath 22 XONE:4D User Guide SOUNDCARD OUTPUT / MIDI BLOCK DIA GRAM DAC DAC DAC DAC OUT 1/2 OUT 3/4 OUT 5/6 OUT 7/8 SOUNDCARD USB2.0 OUT 9/10 Line Input Line Input Line Input Line Input Line Input Phono Input Phono Input Phono Input Xone:4D Channel 1 Xone:4D Channel 2 Xone:4D Channel 3 Xone:4D Channel 4 SOUNDCARD MIDI LEFT BANK RIGHT BAN[…]
-
Page 23: Allen & Heath XONE:4D
Allen & Heath 23 XONE:4D User Guide MIXER SECTION — CHANNEL INPUT 1 2 3 FX 1-2 send controls These controls adjust the signal level that is sent from each channel to the two FX mix busses. These signals will appear at the RCA sockets on the rear of the unit. FX1 PRE switch determines whether the FX1 send signal is a ffected by the channel fad[…]
-
Page 24: Allen & Heath XONE:4D
Allen & Heath 24 XONE:4D User Guide Channel Level Control This control has a range of +/- 10dB either side of the 0dB centre position. Use it to adjust the signal level of an audio source to give a nominal 0dB reading on the channel meter, with the peak level at or below +6dB. Turn LEVEL down if the +10 peak meter starts flashing. 3 Channel Equ[…]
-
Page 25: Allen & Heath XONE:4D
Allen & Heath 25 XONE:4D User Guide 7 8 Channel Meter Displays the channel signal level. It is pre-EQ and pre-fader. This means it is not affected by the EQ or fader position. The channel level control should be set so that the meter averages around ‘0’ with loudest peaks no higher than ‘+6’. Turn down the level control if the +10 peak […]
-
Page 26: Allen & Heath XONE:4D
Allen & Heath 26 XONE:4D User Guide MIXER SECTION — MIX AND MONIT OR 1 3 4 5 6 7 8 Mix / Monitor Meters The main meters follow the selected monitor source. The meter reads ‘0’ for an XLR output of +4dBu. The mixer should be operated with these meters averaging around ‘0’ with loudest peaks no higher than ‘+6’. 1 Mix Master Level C[…]
-
Page 27: Allen & Heath XONE:4D
Allen & Heath 27 XONE:4D User Guide Cue / Add Mix Control Allows the main mix output to be added to the CUE signal. Turned fully anti-clockwise, only the active CUE signal is heard through the headphones when selected. Gradually turning clockwise introduces the main mix output to the headphones, adding to the ac- tive CUE. This does not affect […]
-
Page 28: Allen & Heath XONE:4D
Allen & Heath 28 XONE:4D User Guide MIXER SECTION — FIL TERS and LFO 1 3 5 LFO Tap Tempo button Tap the tap tempo button in time with the beat to set the frequency of the LFO. 1 LFO Depth control When assigned, the LFO modulates the filter with a cyclic frequency sweep effect in time to the beat set using the tap tempo button. The depth contr[…]
-
Page 29: Allen & Heath XONE:4D
Allen & Heath 29 XONE:4D User Guide FILTER / X FADE SEL ECT 12 OFF DC FILTER 1 M IX BUS FILTER 2 M IX BUS MAIN LR MI X BUS FILTE R 1 MI X FILTE R 2 MI X XY CROSSFADER X FILTER 1 FILTER 2 Y XFADE CURVE XFADE ON VCA VCA LFO DEPTH TAP TEMPO FROM IN PUT CHANNEL MIXER SECTION — FX R TN & CROSSF ADER 1 4 FX Return Controls These controls route […]
-
Page 30: Allen & Heath XONE:4D
Allen & Heath 30 XONE:4D User Guide MIC -12 +12 -12 +12 0 LEVEL 10 PHONES HF LF FR ONT CONTR OLS & CONNECT ORS Headphones Outputs Stereo 1/4” TRS jack and 3. 5mm mini-jack. Plug in good quality stereo headphones intended for DJ monitoring. Use closed-ear headphones that provide maximum acoustic isolation when cueing your sources. We recom[…]
-
Page 31: Allen & Heath XONE:4D
Allen & Heath 31 XONE:4D User Guide REAR CONNECT ORS 1 2 4 5 3 CH1-4 Stereo Line Input RCA phono. Connect stereo line level music sources such as CD, MD, DAT, drum machines, keyboards or other instruments. Do not connect turntables which require RIAA equalisation. Alternatively, you can connect to jack sources using a cable with RCA to jack ada[…]
-
Page 32: Allen & Heath XONE:4D
Allen & Heath 32 XONE:4D User Guide OUT IN FX2 SEND WARNING: FOR CONTINUED PROTECTION AGAINST RISK OF FIRE REPLACE FUSE WITH SAME TYPE AND RATING. STRICT EMENT IDENT IQUE EN VALEURS. ATT ENTION: REMPLAC ER PAR UN FUSI BLE DO NOT EX POSE APPARA TUS TO RAIN OR MOISTURE. TO REDUCE THE RISK OF FIRE OR ELEC TRIC SHOCK WARNI NG: TH IS APPA RATUS MU S[…]
-
Page 33: Allen & Heath XONE:4D
Allen & Heath 33 XONE:4D User Guide REAR CONNECT ORS 11 12 13 14 MIDI Input / Output 5 pin DIN socket. Connect to either a MIDI interface or directly to MIDI compatible equipment using a standard 5 pin DIN (MIDI) lead. The MIDI output socket data duplicates what is sent via the USB connection to the PC, and to the gameport. MIDI in can be used […]
-
Page 34: Allen & Heath XONE:4D
Allen & Heath 34 XONE:4D User Guide MIXER SECTION — BPM COUNTER 1 3 BPM Display Displays the tempo of an anal ysed piece of music, rounded up to the nearest whole number. On power-up, and when t he detector is reset, the dis play will show a line of three dashes. When an audio source is routed to the auto beat detector, a dot in the bottom ri[…]
-
Page 35: Allen & Heath XONE:4D
Allen & Heath 35 XONE:4D User Guide MIXER SECTION — BPM COUNTER 4 5 BPM Tap Tempo Button This control is used to tap in a beat manually at any speed between 70 and 400 BPM. The taps are averaged, so the greater number of taps the more accurate the result. The tap button can also be used as a guide for the auto beat detector on complex rhythms[…]
-
Page 36: Allen & Heath XONE:4D
Allen & Heath 36 XONE:4D User Guide MIXER SECTION — LFO LFO Tap Tempo button Tapping this button will set the spe ed of the LFO (low frequency oscillator) within the range of 0.25Hz — 3.33Hz (15 — 200 BPM) The LFO speed can be displayed on the BPM meter by pressing and holding this button until dots appear after all of the digits—the BPM di[…]
-
Page 37: Allen & Heath XONE:4D
Allen & Heath 37 XONE:4D User Guide MIXER SECTION — THE LFO EDIT OR The LFO Editor allows real-time mani pulation of the LFO waveform using the linear faders on the left and right MIDI pods of the Xone:4D. The LFO tempo can be set using the LFO Tap Tem po button or by synchronising the LFO tempo to the displayed BPM (see page 36). Enter LFO E[…]
-
Page 38: Allen & Heath XONE:4D
Allen & Heath 38 XONE:4D User Guide MIDI CONTR OL SECTION 1 3 Rotary Encoders Turning an encoder produces MIDI CC (continuous controller) messages with a unique controller number i n two’s complement binary encoding. Refer to the MIDI mapping diagram for the differences between Map 1 and 2 for these controls. These encoders feature a built in[…]
-
Page 39: Allen & Heath XONE:4D
Allen & Heath 39 XONE:4D User Guide MIDI CONTR OL SECTION MIDI Messages The diagram below shows which controls are a ssociated with MIDI CC (c ontinuous controller) and note on/off messages. These controls send the MIDI messages shown when operated. The switch light ring indicators (except for start/st op and tap tempo) may be turned on or off […]
-
Page 40: Allen & Heath XONE:4D
Allen & Heath 40 XONE:4D User Guide MIDI IMPLEMENT A TION CHAR T Function Transmitted Received Remarks Basis Channel Default Option 16 1-16 16 1-16 Selectable with Configuration Utility Mode Default Messages Altered X X X X X X Note Number O O Refer to Diagram. MIDI note messages received as well as transmitted for all push buttons with light r[…]
-
Page 41: Allen & Heath XONE:4D
Allen & Heath 41 XONE:4D User Guide MIDI NO TE CHAR T Note No. (Hex) Note No. (Decimal) Note Name Note No. (Hex) Note No. (Decimal) Note Name 00 0 C-2 36 54 F#2 01 1 C#-2 37 55 G2 02 2 D-2 38 56 G#2 03 3 D#-2 39 57 A2 04 4 E-2 3A 58 A#2 05 5 F-2 3B 59 B2 06 6 F#-2 3C 60 C3 07 7 G-2 3D 61 C#3 08 8 G#-2 3E 62 D3 09 9 A-2 3F 63 D#3 0A 10 A#-2 40 6[…]
-
Page 42: Allen & Heath XONE:4D
Allen & Heath 42 XONE:4D User Guide FIL TER REFERENCE The VCF Filters A voltage controlled filter is an audio filter where the cut-off frequency is altered by a DC control voltage rather than a variable resistor. This produces a much wider operating range and more control over the filter response to create unlimited combinations of tonal effect[…]
-
Page 43: Allen & Heath XONE:4D
Allen & Heath 43 XONE:4D User Guide It is most important that the s ystem level se ttings are corr ectly set. It is well known that many DJs push the level to maximum wit h meters peaking hard in the belief that they are getting the best from the system. THIS IS NOT THE CASE ! The best can only be achieved if the system leve ls are set within t[…]
-
Page 44: Allen & Heath XONE:4D
Allen & Heath 44 XONE:4D User Guide The connection to earth (ground) in an audio system is important for two reasons: SAFETY — To protect the operator from high voltage electric shock, and AUDIO PERFORMANCE — To minimise the effect of earth (ground) loops which result in audible hum and buzz, and to shield the audio signals from interference. F[…]
-
Page 45: Allen & Heath XONE:4D
Allen & Heath 45 XONE:4D User Guide CABLES AND CONNECTIONS USB TYPE A USB TYPE B MAX 2M SPDIF RCA — 75 ohm coax MIDI — 5-pin DIN SPDIF OPTICA L — TOSLINK 1=ground 2=hot (+) 3=cold (-) BALANCED XLR FEMALE RCA phono jacks XLR MALE 2=hot (+) 1=ground 3=cold (-) CABLE D CABLE E CABLE A CABLE G Sleeve=ground Ring=cold (-) Tip=hot (+) BALANCED 1=grou[…]
-
Page 46: Allen & Heath XONE:4D
Allen & Heath 46 XONE:4D User Guide USER OPTIONS Internal Link Options The Xone:4D offers several internal option settings: • FX1 and FX2 Return Routing — The FX1 and FX2 Retur ns ar e set, b y default, to route to the main LR Mix. Link options allow the return to be routed through either Filter 1 or Filter 2. • Disabling / Enabling RIAA […]
-
Page 47: Allen & Heath XONE:4D
Allen & Heath 47 XONE:4D User Guide SPECIFICA TIONS Dimensions and Weights The console is fitted with rubber feet for desktop operation. A scre w on rack ear kit is included for 19” rack or plinth mounting. Width Height Depth Weight Desktop 432 mm (17”) 88 mm (3.5 ”) 358 mm (14”) 5kg (11 lbs) Rack ears fitted 483 mm (19”) 88 mm (3.5?[…]
-
Page 48: Allen & Heath XONE:4D
Allen & Heath 48 XONE:4D User Guide PR ODUCT REGISTRA TION Registering your product Please go to www.allen-heath.com/register.asp and register your product’s serial number and your details. By registering with us and becomin g an official Reg istered User, you will ensure that any warranty claim you might make is actioned quickly an d with th[…]