
FOR CAR USE ONLY
EN
Advanced Navi Station
INE-S900R
OWNER’S MANUAL
Please read before using this equipment.

Operating Instructions
If there is anything in the manual about the operation of
the navigation system which you are uncertain about,
PRECAUTIONS
please contact your local Alpine authorized navigation
dealer before using the navigation system.
IMPORTANT INFORMATION, PLEASE
READ CAREFULLY BEFORE USING THIS
PRODUCT.
This product is intended to safely provide turn-by-turn
instructions to get you to a desired destination. Please read the
following precautions to ensure that you use this navigation
system correctly.
• This product is not a substitute for your personal judgment. Any
route suggestions made by this navigation system should never
supersede any local traffic regulations or your personal judgment
and/or knowledge of safe driving practices. Do not follow route
suggestions if the navigation system instructs you to perform an
unsafe or illegal manoeuvre, places you in an unsafe situation, or
routes you into an area which you consider unsafe.
• Glance at the screen only when necessary and safe to do so. If
prolonged viewing of the screen is necessary, stop in a safe and legal
manner and location.
• Do not input destinations, change settings, or access any functions
requiring a prolonged view of the monitor while you are driving. Stop
in a safe and legal manner and location before attempting to access
the system.
• When using the navigation system to find/route to an emergency
service, please contact the facility to validate and verify availability,
prior to driving to it. Not all locations of emergency service providers
such as police and fire stations, hospitals, and clinics are contained
in the database. Please use your own judgment and your ability to
ask for directions in these situations.
• The map database contained within the media (SD memory card) in
which it is stored is the most recent map data available at the time of
production. Because of changes in streets and neighborhoods, there
may be situations where the navigation system may not be able to
route you to your desired destination. In these cases, use your own
personal judgment.
• The map database is designed to provide you with route suggestions,
it does not take account of the relative safety of a suggested route, or
of factors which may affect the time required to reach your
destination. The system does not reflect road closures or
construction, road characteristics (i.e. type of road surface, slope or
grade, weight or height restrictions, etc.), traffic congestion, weather
conditions, or any other factors which may affect the safety or timing
of your driving experience. Use your personal judgment if the
navigation system is unable to provide you with an alternate route.
• There may be situations where the navigation system may display the
vehicle’s location erroneously. Use your own driving judgment in
this situation, taking into account current driving conditions. Please
be aware that in this situation, the navigation system should correct
the vehicle’s position automatically; however, there may be times
where you may have to correct the position yourself. If this is the
case, stop in a safe and legal manner and location before attempting
operation.
• Make certain that the volume level of the unit is set to a level which
still allows you to hear outside traffic and emergency vehicles.
Driving while unable to hear outside sounds could cause an
accident.
• Please make certain that any other person who intends on using this
navigation system reads these precautions and the following
instructions carefully.
Points to Observe for Safe Usage
• Read this manual carefully before using this disc and the system
components. They contain instructions on how to use this product in
a safe and effective manner. Alpine cannot be responsible for
problems resulting from failure to observe the instructions in this
manual.
• This manual uses various pictorial displays to show you how to use
this product safely and to alert you to potential dangers resulting
from improper connections and operation. Following are the
meanings of these pictorial displays. It is important to fully
understand the meanings of these pictorial displays in order to use
this manual and the system properly.
WARNING
• Operation of the system while driving is dangerous. Users
should stop vehicle before operating the software.
• Road conditions and regulations take precedence over
information contained on the map display: observe actual
traffic restrictions and circumstances while driving.
• This software is designed for use exclusively in the INES900R. It cannot and may not be used in conjunction with
other hardware.
WARNING
This symbol means important instructions.
Failure to heed them can result in serious injury
or death.
DO NOT OPERATE ANY FUNCTION THAT TAKES YOUR
ATTENTION AWAY FROM SAFELY DRIVING YOUR VEHICLE.
Any function that requires your prolonged attention should only be
performed after coming to a complete stop. Always stop the vehicle
in a safe location before performing these functions.
Failure to do so may result in an accident.
KEEP SMALL OBJECTS SUCH AS SCREWS OUT OF THE
REACH OF CHILDREN.
Swallowing them may result in serious injury. If swallowed,
consult a physician immediately.
MINIMIZE DISPLAY VIEWING WHILE DRIVING.
Viewing the display may distract the driver from looking ahead of
the vehicle and cause an accident.
1-EN

DO NOT FOLLOW ROUTE SUGGESTIONS IF THE
NAVIGATION SYSTEM INSTRUCTS YOU TO PERFORM AN
UNSAFE OR ILLEGAL MANOEUVRE, OR PLACES YOU IN AN
UNSAFE SITUATION OR AREA.
This product is not a substitute for your personal judgment. Any
route suggestions by this system should never supersede any local
traffic regulations or your personal judgment or knowledge of safe
driving practice.
KEEP THE VOLUME AT A LEVEL WHERE YOU CAN STILL
HEAR OUTSIDE NOISES WHILE DRIVING.
Excessive volume levels that obscure sounds such as emergency
vehicle sirens or road warning signals (train crossings, etc.) can be
dangerous and may result in an accident. LISTENING AT LOUD
VOLUME LEVELS IN A CAR MAY ALSO CAUSE HEARING
DAMAGE.
DO NOT DISASSEMBLE OR ALTER.
Doing so may result in an accident, fire or electric shock.
USE ONLY IN CARS WITH A 12 VOLT NEGATIVE GROUND.
(Check with your dealer if you are not sure.) Failure to do so may
result in fire, etc.
USE THE CORRECT AMPERE RATING WHEN REPLACING
FUSES.
Failure to do so may result in fire or electric shock.
CAUTION
This symbol means important instructions.
Failure to heed them can result in injury or
material property damage.
HALT USE IMMEDIATELY IF A PROBLEM APPEARS.
Failure to do so may cause personal injury or damage to the
product. Return it to your authorized Alpine dealer or the nearest
Alpine Service Centre for repairing.
DO NOT BLOCK VENTS OR RADIATOR PANELS.
Doing so may cause heat to build up inside and may result in fire.
USE THIS PRODUCT FOR MOBILE 12V APPLICATIONS.
Use for other than its designed application may result in fire,
electric shock or other injury.
DO NOT PLACE HANDS, FINGERS OR FOREIGN OBJECTS IN
INSERTION SLOTS OR GAPS.
Doing so may result in personal injury or damage to the product.
2-EN
PRECAUTIONS
Product Cleaning
Use a soft dry cloth for periodic cleaning of the product. For more
severe stains, please dampen the cloth with water only. Anything
else has the chance of dissolving the paint or damaging the plastic.
Temperature
Be sure the temperature inside the vehicle is between +45°C
(+113°F) and 0°C (+32°F) before turning your unit on.
Moisture Condensation
You may notice the disc playback sound wavering due to
condensation. If this happens, remove the disc from the player and
wait about an hour for the moisture to evaporate.
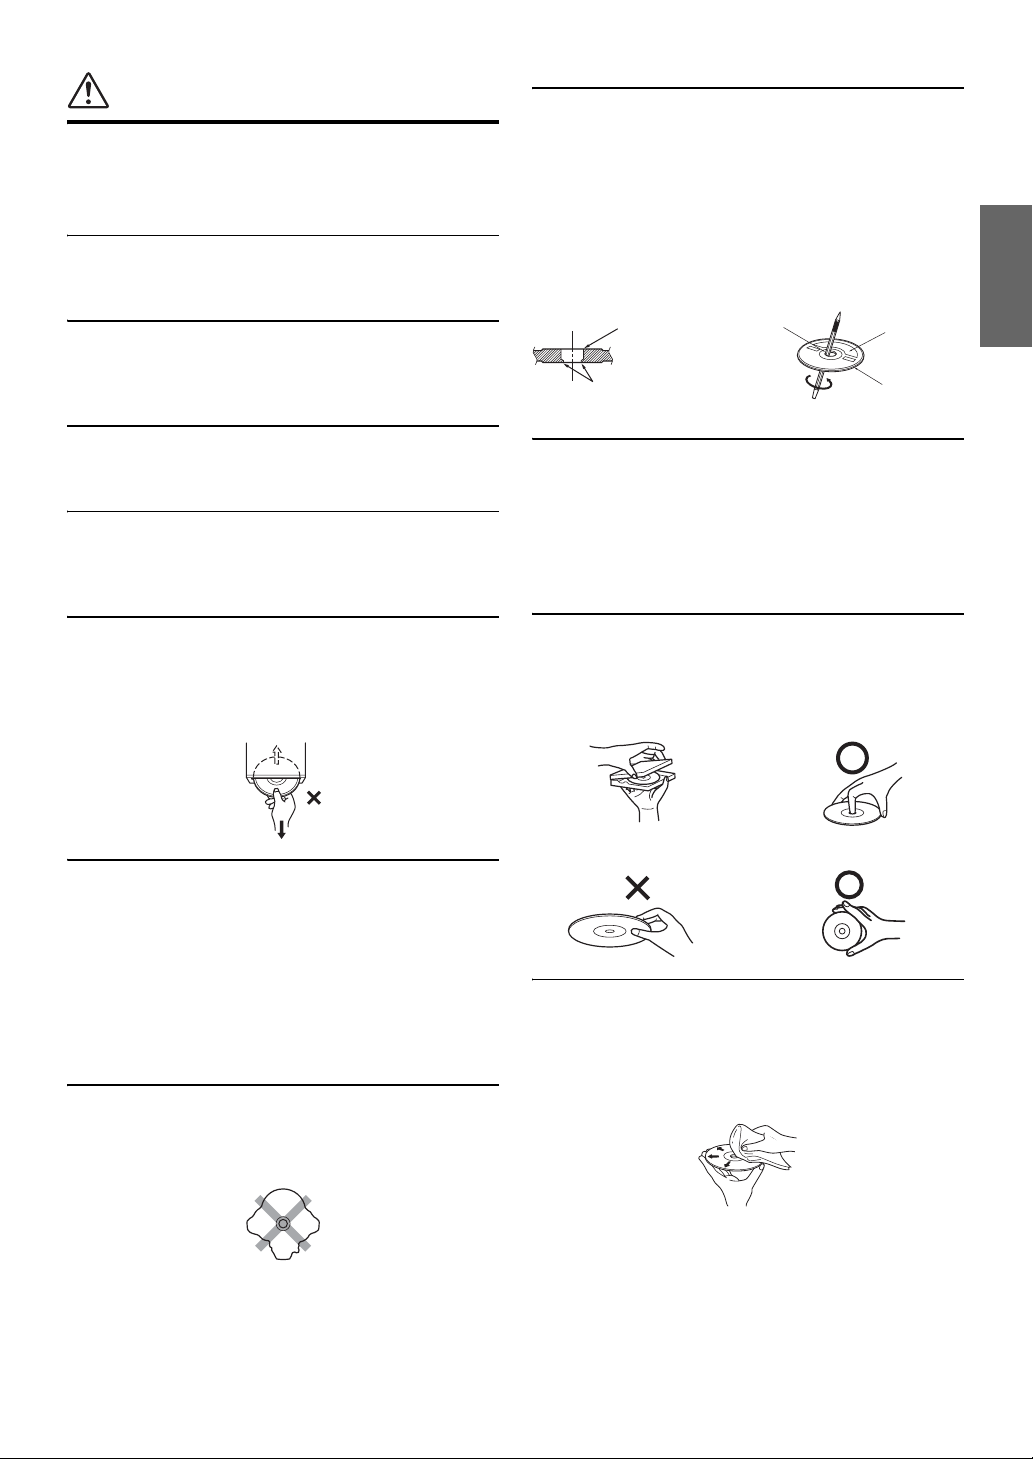
New Discs
To prevent the CD from jamming, “Unable to read Disc.” is
displayed if discs with irregular surfaces are inserted or if discs are
inserted incorrectly. When a new disc is ejected immediately after
initial loading, use your finger to feel around the inside of the
centre hole and outside edge of the disc. If you feel any small
bumps or irregularities, this could inhibit proper loading of the disc.
To remove the bumps, rub the inside edge of the hole and outside
edge of the disc with a ballpoint pen or other such instrument, then
insert the disc again.
Centre Hole
Bumps
Centre Hole
New Disc
Outside
(Bumps)
Damaged Disc
Do not attempt to play cracked, warped, or damaged discs. Playing
a bad disc could severely damage the playback mechanism.
Maintenance
If you have problems, do not attempt to repair the unit yourself.
Return it to your Alpine dealer or the nearest Alpine Service
Station for servicing.
Never Attempt the Following
Do not grip or pull out the disc while it is being pulled back into the
player by the automatic reloading mechanism.
Do not attempt to insert a disc into the unit when the unit power is
off.
Inserting Discs
Your player accepts only one disc at a time for playback. Do not
attempt to load more than one disc.
Make sure the label side is facing up when you insert the disc.
“Unable to read Disc.” will be displayed on your player if you
insert a disc incorrectly. If “Unable to read Disc.” continues to be
displayed even though the disc has been inserted correctly, push the
RESET switch with a pointed object such as a ballpoint pen.
Playing a disc while driving on a very bumpy road may result in
skips, but this will not scratch the disc or damage the player.
Irregular Shaped Discs
Be sure to use round shaped discs only for this unit and never use
any special shaped discs.
Use of special shaped discs may cause damage to the mechanism.
Installation Location
Make sure the INE-S900R will not be installed in a location
subjected to:
• Direct sun and heat
• High humidity and water
• Excessive dust
• Excessive vibrations
Correct Handling
Do not drop the disc while handling. Hold the disc so you will not
leave fingerprints on the surface. Do not affix tape, paper, or
gummed labels to the disc. Do not write on the disc.
INCORRECT CORRECT
Disc Cleaning
Fingerprints, dust, or soil on the surface of the disc could cause the
DVD player to skip. For routine cleaning, wipe the playing surface
with a clean, soft cloth from the centre of the disc to the outer edge.
If the surface is heavily soiled, dampen a clean, soft cloth in a
solution of mild neutral detergent before cleaning the disc.
3-EN

Disc Accessories
There are various accessories available on the market for protecting
the disc surface and improving sound quality. However, most of
them will influence the thickness and/or diameter of the disc. Using
such accessories can cause operational problems. We recommend
not using these accessories on discs played in INE-S900R.
Transparent Sheet Disc Stabilizer
• After turning the system off, a slight ghost of the image will
remain temporarily. This is an effect peculiar to LCD technology
and is normal.
• In cold temperature conditions, the screen may lose contrast
temporarily. After a short warm-up period, it will return to
normal.
Discs Playable on This Unit
Playable Discs
The discs listed below can be played on this unit.
Mark (logo) Recorded Content Disc size
DVD Video Audio + Video 12 cm*
Music CD Audio 12 cm
Operation of some of the functions of this unit is very complex.
Because of this, it was deemed necessary to place these functions
into a special screen. This will restrict operation of these functions
to times when the vehicle is parked. This ensures the focus of the
driver’s attention will be on the road and not on the INE-S900R.
This has been done for the safety of the driver and passengers.
The car must be parked and the parking brake must be engaged for
the procedure described in the Owner’s Manual to be valid. The
warning “No operation while driving — for your safety” will be
displayed if any attempts are made to perform these operations
while driving.
• The INE-S900R draws minimal current even when its power switch is
turned off. If the switched power (ignition) lead of the INE-S900R is
connected directly to the positive (+) post of the vehicle’s battery, the
battery may be discharged.
An SPST (Single-Pole, Single-Throw) switch (sold separately) can be
added to simplify this procedure. Then, you can simply place it in the
OFF position when you leave the vehicle. Turn the SPST switch back
ON before using the INE-S900R. For connecting the SPST switch,
refer to the “Connection Diagram of SPST Switch (Sold Separately)”
(page 139). If the power (ignition) lead is unswitched, it must be
disconnected from the battery post should the vehicle be left unused
for an extended period of time.
®
DivX
* Two-layer DVD disc compatible
The formatted discs listed below can be played on this unit.
CD-R/
CD-RW
CD
Format
MP3 Format
(“mp3”)
WMA Format
(“wma”)
AAC Format
(“m4a”)
DVD Video
Format
DivX Format
(“avi”, “divx”)
ASF Format
(“asf”)
• Discs that are not finalised cannot be played back.
Audio + Video 12 cm
DVD-R/
DVD-RW
DVD+R/
DVD+RW
4-EN

Discs that cannot be played
DVD-RAMs, CD-ROMs (excluding MP3/WMA/AAC files), Video
CD, photo CDs, etc.
DualDisc
This unit is not compatible with DualDisc.
Using a DualDisc may cause unit malfunction, and may cause disc
damage when the disc is inserted/ejected.
Double-sided DVD
This unit is not compatible with double-sided DVD.
Using a double-sided DVD may cause unit malfunction, and may
cause disc damage when the disc is inserted/ejected.
DVD region number (playable region number)
This DVD player will play back any disc whose region number is 2
(or All). DVDs with a region number other than those listed below,
cannot be played on this DVD player.
Using compact discs (CD/CD-R/CD-RW)
If you use unspecified compact discs, correct performance cannot
be guaranteed.
You can play CD-Rs (CD-Recordables)/CD-RWs (CDReWritables) which have been recorded only on audio devices.
You can also play CD-Rs/CD-RWs containing MP3/WMA/AAC
formatted audio files.
• Some of the following discs may not play on this unit:
Flawed discs, discs with fingerprints, discs exposed to extreme
temperatures or sunlight (e.g., left in the car or this unit), discs
recorded under unstable conditions, discs on which a recording
failed or a re-recording was attempted, copy-protected CDs
which do not conform to the audio CD industry standard.
• Use discs with MP3/WMA/AAC files written in a format
compliant with this unit. For details, see pages 63 and 64.
To customers using CD-R/CD-RW
• If a CD-R/CD-RW cannot be played back, make sure the last
recording session was closed (finalised).
• Finalise the CD-R/CD-RW if necessary, and attempt playback
again.
Tips for making your own CDs
The INE-S900R plays DVD Video, Audio CD, DivX® and has a
built in MP3/WMA/AAC decoder.
The following information is designed to help you create your own
music CDs (either Audio CD or MP3/WMA/AAC encoded CD-R/
RW files).
What is the difference between an Audio and MP3/WMA/AAC
CD?
An Audio CD is the same format as the commercial CDs you buy
in the store (also known as CD-DA). MP3 (MPEG-1 Audio Layer
3)/WMA (Windows Media Audio)/AAC (Advanced Audio
Coding) is a data file that uses a compression scheme to reduce the
size of the music file*.
Multisession CD-R/CD-RW:
Once a recording has been stopped, this is considered one session.
If the disc is not closed (finalised), additional data may be added.
Once this additional data has been recorded, this becomes a
“multisession” CD. Only the last session of a multisession DATA
formatted disc can be played, depending on the writing software
that is used to format the disc.
Properly formatted MP3/WMA/AAC Discs:
Use ISO9660 formatting to insure proper playback. You may use
standard ISO naming Level 1 (8.3 DOS standard), Level 2 (32
characters) or Joliet (Windows long filenames) file naming
conventions*.
* Please consult the Owner’s manual for additional information.
On handling compact discs (CD/CD-R/CD-RW)
• Do not touch the surface.
• Do not expose the disc to direct sunlight.
• Do not affix stickers or labels.
• Clean the disc when it is dusty.
• Make sure that the disc is smooth and flat.
• Do not use commercially available disc accessories.
Do not leave the disc in the car or the unit for a long time.
Never expose the disc to direct sunlight.
Heat and humidity may damage the disc and you may not be
able to play it again.
5-EN

Using DVD-Rs/DVD-RWs/DVD+Rs/DVD+RWs
• This unit is compatible with discs recorded in the standard
DVD-Video formats.
• Note that discs not finalised (processed to enable to play on
playback-only DVD players) cannot be played on this DVD
player.
• Some discs may not play back, depending on the recording
device and disc format.
• Discs or files utilizing copy protection, may not be playable.
Some recording systems may not properly format copied files to
enable proper playback.
• In the following cases, the disc may not play on this unit:
discs recorded by certain DVD recorders, certain irregular discs,
flawed discs, dirty discs, when the pickup lens of this DVD
player is dirty, or when moisture condensation has occurred
inside the unit.
• Be sure to follow all cautions included with your DVD-Rs/
DVD-RWs/DVD+Rs/DVD+RWs discs.
• Do not put stickers, seals, or tape on the label side of DVD-Rs/
DVD-RWs/DVD+Rs/DVD+RWs.
• Compared to the regular discs, DVD-Rs/DVD-RWs/DVD+Rs/
DVD+RWs are more affected by heat, moisture, and direct
sunlight. If left in a car, etc., damage may occur and it might not
play on this unit.
• The operable temperature range for disc playback is as follows:
DVD-R/DVD-RW: -25 ~ +70°C
DVD+R/DVD+RW: +5 ~ +55°C
Disc terminology
Title
If titles are programmed for the DVD, these are the largest units of
division of the information recorded on the disc.
Chapter
Each Title may also be divided into smaller divisions, called
chapters. These can be specific scenes or musical selections.
Protecting the USB connector
• Only an iPod/iPhone or USB memory can be connected to the
USB connector on this unit. Correct performance using other
USB products cannot be guaranteed.
• If the USB connector is used, be sure to use only the supplied
connector cable with the unit. A USB hub is not supported.
• A USB memory with write protection switched on may not work
correctly.
• Depending on the connected USB memory device, the unit may
not function or some functions may not be performed.
• The audio file format that can be played back on the unit is
MP3/WMA/AAC.
• Artist/song name, etc., can be displayed, however characters
may not be correctly displayed.
CAUTION
Alpine accepts no responsibility for lost data, etc., lost as a result of
using this product.
On Handling USB Memory
• This unit can control a memory storage device that supports the
USB Mass Storage Class (MSC) protocol. Playable audio file
formats are MP3, WMA and AAC.
• USB memory function is not guaranteed. Use USB memory
according to the terms of agreement. Read the USB memory
Owner’s Manual thoroughly.
• Avoid usage or storage in the following locations:
Anywhere in the car exposed to direct sunlight or high
temperatures.
Anywhere the possibility of high humidity or corrosive
substances are present.
• Fix the USB memory in a location where driver operation will
not be hindered.
• USB memory may not function correctly at high or low
temperature.
• Use only certified USB memory. Note that even certified USB
memory, may not function correctly depending on its type or
state.
• Depending on the settings of the USB memory type, memory
state or encoding software, the unit may not play back or display
properly.
• Files protected by DRM (Digital Rights Management), cannot
be played back on this unit. These include AAC formatted files
purchased from the iTunes Store and WMA or other files with
some form of copyright protection.
• USB memory may take time to start playback. If there is a
particular file other than audio in the USB memory, it may take
considerable time before the file is played back or searched.
• The unit can play back “mp3”, “wma” or “m4a” file extensions.
• Do not add the above extensions to a file other than audio data.
This non-audio data will not be recognized. The resulting
playback may contain noise that can damage speakers and/or
amplifiers.
• It is recommended to back up important data on a personal
computer.
• Do not remove the USB device while playback is in progress.
Change SOURCE to something other than USB, then remove the
USB device to prevent possible damage to its memory.
6-EN

Contents
Operating Instructions
PRECAUTIONS
IMPORTANT INFORMATION, PLEASE READ
CAREFULLY BEFORE USING THIS
PRODUCT. …………………………………………….1
Points to Observe for Safe Usage ………………… 1
WARNING …………………………………………. 1
CAUTION ………………………………………….. 2
PRECAUTIONS …………………………………. 3
Discs Playable on This Unit ………………………..4
Getting Started
Preface
Navigation systems …………………………………..13
GPS (Global Positioning System) …………… 13
Gyroscope/ Speed sensor ……………………….13
Navigation Terminology …………………………… 14
Features …………………………………………………..15
Before Using The System
About This Navigation System ………………….. 16
Location of Controls ………………………………… 16
Turning the System On ……………………………..17
Initial System Start-Up ……………………………..17
Basic Operation
Turning Power On or Off …………………………..18
Inserting/Ejecting a Disc ………………………….. 18
Inserting the Disc ………………………………….18
Removing the Disc ……………………………….. 18
Using the Front AUX Input Terminal …………. 18
Adjusting the Volume ………………………………. 18
Adjusting the volume of the Audio/Visual
mode …………………………………………………18
Adjusting the volume of the Navi
Guidance ………………………………………….. 18
Adjusting the volume of the Sound (Beep)
Guide ………………………………………………..19
Lowering Volume Quickly ………………………… 19
Changing between the NAVIGATION menu
and the AUDIO/VISUAL menu ………………19
Touch operation ………………………………………. 19
Window operations ………………………………….. 19
Appearance of the NAVIGATION
Window ……………………………………………. 19
Appearance of the AUDIO/VISUAL
Window ……………………………………………. 20
Changing to the Info. Window ……………….. 20
Resize the Window ……………………………….. 20
Selecting an Item in a List ………………………… 21
Using the On-Screen Keyboard …………………. 21
Entering characters ……………………………….. 21
Entering number ……………………………………21
Turn off the Screen ………………………………….. 22
Setting the Clock Display …………………………. 22
Navigation
Basic Operations
How to View a Navigation Screen ………………23
Current Vehicle Position Map
(without route) ………………………………….. 23
Point Display ……………………………………….. 24
Displaying a Desired Place ……………………….. 24
Scrolling the Map ………………………………….24
Displaying the Current Vehicle Position
Map ………………………………………………….24
Changing the Map Scale ……………………………25
Changing the Map Orientation ………………….. 25
Changing the Map Mode ………………………….. 26
About the Manoeuvre List Screen ……………26
Display the POI Icon ………………………………..27
About Congestion Areas ……………………………27
About Dynamic Route Guidance ……………….. 28
If the Dynamic route guidance is set to
Manual …………………………………………….. 28
If the Dynamic Route Guidance is set to
Auto …………………………………………………28
Finding Your Destination
Searching for a Destination/Route ………………29
Displaying the Destination Menu Screen ……. 30
Displaying from the Map screen …………….. 30
Displaying from the Navigation Menu
screen ……………………………………………….30
Country selection operation ……………………30
Finding by Address …………………………………..31
7-EN

Finding a Point of Interest (POI) ……………….. 32
Finding a Place by Intersection ………………….33
Finding the Nearest Points of Interest
(POI) ……………………………………………………34
Finding by Postcode …………………………………35
Finding by Coordinates ……………………………. 35
Finding a Destination Using the Address
Book ……………………………………………………36
Finding a Place from the Destination
History …………………………………………………36
Finding a Destination by Home …………………. 37
Finding a Destination by Scrolling Displayed
Map …………………………………………………….37
Finding facilities in the vicinity of the specified
location by Scrolling the Displayed Map …. 38
Finding a Destination by POI icon …………….. 38
Confirm Destination
Change Method ……………………………………….. 39
Set as Current Position …………………………….. 40
Save as Address Book ……………………………… 41
Save as Home …………………………………………. 41
Add a Waypoint ……………………………………….42
Route Guidance
Guidance Display ……………………………………. 43
Intersection/junction guidance ……………….. 43
Motorway entrance/exit ramp guidance …… 43
Border guidance …………………………………… 44
Direction line display ……………………………. 44
Voice Guidance ……………………………………….. 44
Examples for voice guidance to the
destination ………………………………………… 44
Examples for voice guidance on arrival at the
destination/waypoint/ferry port/car train
terminal …………………………………………….44
Confirming the voice guidance ………………. 44
Personal POI guidance ……………………………… 45
Edit Route
Displaying the Edit Route Screen ………………. 46
Delete Waypoint ……………………………………… 46
Arrange Waypoints automatically ………………46
Arranges Waypoints manually …………………… 47
See Route Summary ………………………………… 47
Change Method ……………………………………….. 47
Start Demo ……………………………………………… 47
Detour …………………………………………………….48
Reroute ……………………………………………………48
Cancel Route …………………………………………… 48
Navigation Edit Function
Displaying the Edit Address Screen …………… 49
Editing the Address Book ………………………….49
Delete Address Book Entry …………………….50
Delete All Address Book Entry ……………….50
Name Change ……………………………………….50
Icon Change …………………………………………51
Icon Display Setting ………………………………51
Location Change ………………………………….. 51
Phone Number Change …………………………. 51
Editing the Home ……………………………………..52
Deleting the Last Destination ……………………. 52
Delete All of the Destination History ………. 52
TMC Operation
About the TMC Information ………………………53
Displaying the Traffic Event Information …….54
Audio/Visual
Basic Operation
Selecting the Source …………………………………56
Displaying the Audio/Visual Source Main
Screen ………………………………………………….56
Turning off the Audio/Visual Source ………….. 56
Radio
Listening to the Radio ………………………………. 57
Presetting Stations Manually …………………….. 57
Presetting Stations Automatically ……………… 57
Tuning to Preset Stations …………………………..57
RDS Operation
Turning AF (Alternative Frequencies) On or
Off ……………………………………………………… 58
Receiving Traffic Information
Automatically ………………………………………. 58
Receiving Traffic Information Manually …….. 58
PTY (Programme Type) Tuning ………………… 59
Priority News ………………………………………….. 59
Displaying Radio Text ……………………………… 59
8-EN

CD/MP3/WMA/AAC
Playback ………………………………………………….61
Repeat Play ……………………………………………..61
Random Play (M.I.X.) ………………………………61
Random Play (Shuffle Songs) (M.I.X. All) …. 62
Selecting Folders (concerning MP3/WMA/
AAC) ………………………………………………….. 62
Searching from CD Text …………………………… 62
File/Folder Name Search (Concerning MP3/
WMA/AAC) ………………………………………… 62
About MP3/WMA/AAC ……………………………63
DVD
Playing a Disc …………………………………………. 65
If a menu screen appears ………………………..66
Numeric Keypad Input Operations ………….. 67
Displaying the Top Menu Screen …………….67
Displaying the Menu Screen ………………….. 67
Displaying the Menu Operation Mode
Screen ……………………………………………….67
Stopping Playback (Pre Stop) ……………………. 67
Stopping Playback …………………………………… 67
Fast-forwarding/Fast-reversing ………………….. 67
Finding the Beginnings of Chapters/Files …… 68
Playing Still Frames (Pausing) ………………….. 68
Forward/reverse frame-by-frame Playback …. 68
Slow Motion Playback ………………………………68
Selecting Folders ……………………………………..68
Repeat Playback ……………………………………… 68
Searching by Title Number ……………………….. 69
Searching Directly by Chapter Number ………69
Searching for a Desired Video File …………….. 69
Switching the Angle …………………………………70
Switching the Audio Tracks ……………………… 70
Switching the Subtitles
(Subtitle Language) ……………………………….70
Switching from the disc menu ……………………70
Switching Display Modes ………………………….71
About DivX
About ASF ……………………………………………… 71
®
………………………………………….. 71
iPod/iPhone (Optional)
Playback ………………………………………………….73
Searching for a desired Music File ……………..74
Searching by artist name ……………………….. 74
Searching for a desired Video File …………….. 75
Up/Down Function ………………………………….. 75
Repeat Play …………………………………………….. 76
Random Play (Shuffle) …………………………….. 76
Random Play (Shuffle All) ………………………..76
USB Memory
Playback ………………………………………………….77
Auxiliary Device (Optional)
Operating Auxiliary Devices …………………….. 77
Operating an External DVD Changer …………. 78
Change to the External DVD Changer
mode ………………………………………………..78
About the DVD changer operation
screen ……………………………………………….78
Operating Mobile Digital TV Receiver
(DVB-T) ……………………………………………… 79
Changing to the Mobile Digital TV Receiver
(DVB-T) mode ………………………………….. 79
About the DVB-T operation screen …………. 79
Other Useful Features
Hands-Free Phone Control
About the Hands-Free Phone …………………….. 80
How to connect to a BLUETOOTH compatible
device (Pairing) …………………………………….80
Connecting the mobile phone from this
unit …………………………………………………..80
Using the mobile phone ………………………… 81
Connecting a BLUETOOTH compatible
device ………………………………………………….81
Disconnecting the BLUETOOTH
Connection …………………………………………..81
Updating the device information about
BLUETOOTH ……………………………………… 82
Deleteing the registered BLUETOOTH
device ………………………………………………….82
Clearing one device information …………….. 82
Clear all device information …………………… 82
Answering a Call …………………………………….. 82
Adjusting the volume ……………………………….. 83
Hanging up the Telephone …………………………83
Calling ……………………………………………………83
Dialling a Number In Call History ………….. 83
Entering a phone number to make a call ….. 83
Dialling a Number In The Phone Book …….84
Using one-touch dialling to make a call …… 84
9-EN

Redial Function …………………………………….84
Calling from the Confirmation screen ……… 84
Operations During a Conversation …………….. 84
Changing the voice output ……………………… 84
Adjusting the speech volume …………………. 85
Tone dialling function …………………………… 85
Phone Book Function ………………………………. 85
Transferring the phone book ………………….. 85
Synchronising the phone book ………………..85
Changing the character code of the phone
book …………………………………………………85
Deleting the phone book entries ………………86
Assigning as the one-touch dialling
number ……………………………………………..86
Alphabet Searching Function …………………. 86
Call History Function ……………………………….87
Making a call using the Call history ……….. 87
Deleting the Call history ………………………..87
User setup ………………………………………………. 87
User Setup Operation ……………………………. 87
Setting to Receive Calls automatically …….. 88
Setting the Caller’s name display …………….88
Setting the Secret data display ……………….. 88
Setting the passcode for displaying Secret
data …………………………………………………..88
Setting the Auto Storing Call History ………88
Rear Camera Operation (Optional)
Turning the Rear Camera On and Off …………. 89
Setup
General Setup
General Setup Operation ………………………….. 91
Dimmer Setup ………………………………………….92
Setting the Illumination Brightness …………. 92
Adjusting the Level of Backlight ……………. 92
Adjusting the Level of Keylight ……………… 92
Display Setup ………………………………………….. 92
Setting the Scroll …………………………………..92
Setting the Wallpaper colour ………………….. 92
Setting the Menu colour ………………………… 92
Volume Setup ………………………………………….. 92
Sound (Beep) Guide Function …………………92
Navi Guidance Volume Adjustment ………… 92
Guidance volume confirmation ………………. 92
Auto volume Adjustment ………………………. 93
Rear view camera Setup …………………………… 93
Setting the Rear Camera …………………………93
Rear camera guide line display setting ……..93
Adjusting the Rear Camera Guide line …….93
Adjusting the picture quality of the Rear
Camera screen ……………………………………93
System Setup ………………………………………….. 94
Setting the Language …………………………….. 94
Setting the Keypad ………………………………..94
Setting the Units (km/m or mile/yard) ……..94
Setting of Calendar Display Pattern
Switching …………………………………………. 94
Clock Setup ……………………………………………..94
Setting the Clock Display ……………………….94
Setting Daylight Saving Time …………………94
Setting Time Zone ………………………………… 94
Installation Setup ……………………………………..95
Installation check ………………………………….95
Setting Security code …………………………….. 95
Adjusting the Touch Panel ……………………..96
Adjusting the Vehicle position
calibration ………………………………………… 96
Setting Speed pulse type ……………………….. 97
Formatting the SD memory card …………….. 97
Initializing the System ……………………………98
Restore default setting ……………………………… 98
Navigation Setup
Navigation Setup Operation ………………………99
Map Setup ……………………………………………..100
Setting the Map Colour Display ……………. 100
Setting the Night/Day Display ………………100
Adjusting the 3D view angle ………………… 100
Setting the Next street Name Display …….100
Setting the Direction line Display …………. 101
Setting the Tracking point Display ………… 101
Setting the Motorway mode …………………. 101
Setting the Vehicle Position Mark …………. 101
Points of Interest Setup …………………………… 101
Setting the POI Icon Display …………………101
Setting the POI Icons Display Category … 102
Setting the Address book icon Display ….. 102
Guidance Setup ……………………………………… 102
Setting the Border Guidance ………………… 102
The estimated Arrival Time Display
Setting ……………………………………………. 102
Setting the Arrival Time ………………………. 102
Setting the Intersection Guidance …………. 102
Setting the Average Speed …………………….103
The Interrupt Display to the Audio/Visual
Screen setting ………………………………….. 103
Route Setup …………………………………………… 103
Setting the Dynamic Route Guidance ……. 103
RDS-TMC Setup …………………………………… 103
Traffic Event Arrow display setting ………. 103
10-EN

TMC icon display setting …………………….. 103
Country Setting …………………………………..104
Station Setting …………………………………….104
Performing the pay TMC Activation ………104
Storing Region Selection ………………………… 105
Personal POI Setup …………………………………105
Updating POI warning data …………………..105
Deleting POI warning data …………………… 106
POI warning data icon display setting …….106
POI warning data guidance setting …………106
Updating custom POI data …………………… 106
Editing custom POI data ………………………107
Deleting custom POI data …………………….107
Custom POI data Icon display setting ……. 107
Storing custom POI data on a USB
memory …………………………………………..108
Storing tracking points to a USB
memory …………………………………………..108
Navi information ……………………………………. 108
Displaying GPS status …………………………. 108
Displaying Version information …………….108
Audio Setup
Audio Setup Operation …………………………… 109
AUX Setup …………………………………………….110
Setting the Rear AUX Primary ……………… 110
Adjusting the Rear AUX Audio Level …… 110
Setting the AUX Secondary …………………. 110
Setting the Front AUX …………………………110
Adjusting the Front AUX Audio Level ….. 110
Radio Setup ……………………………………………110
Adjusting Source Signal Levels ……………. 110
PI SEEK Setting ………………………………….110
Receiving RDS Regional (Local)
Stations …………………………………………… 110
Setting PTY31 (Emergency Broadcast)
Reception ……………………………………….. 110
DVD Setup …………………………………………….111
Changing the language setting ……………… 111
Setting of the Menu Language ……………… 111
Setting of the Audio Language …………….. 111
Setting of the Subtitle Language …………… 111
Changing the Country Code Setting ……… 111
Setting the Rating Level
(Parental Lock) ……………………………….. 112
Changing the Passcode …………………………112
Setting the Menu skip function ……………..112
Displaying DivX
Setting the TV Screen Mode ………………… 113
Setting the Downmix Mode ………………….113
Resets DVD setup ………………………………. 113
®
Disc Information ……… 112
Phone Setup
Phone Setup Operation …………………………… 114
Changing the Device information …………….. 115
Editing device name ……………………………. 115
Editing device passcode ………………………. 115
BLUETOOTH Setup ……………………………… 115
Setting the Search Mode ……………………… 115
Sound Setup
Sound Setup Operation …………………………… 116
Adjusting Balance/Fader ………………………116
Adjusting Bass Level …………………………..116
Adjusting Treble Level ………………………… 116
Adjusting the Subwoofer Level …………….. 116
Setting the Loudness …………………………… 116
Turning Defeat ON or OFF ………………….. 116
Visual Setup
Visual EQ Setup Operation ……………………… 117
Storing and recalling the picture quality
adjustment values …………………………….. 118
Information
Fluctuation of the Current Position or
Tracks ……………………………………………….. 119
Fluctuation by GPS Positioning not
Acceptable ……………………………………… 119
Fluctuation by GPS Satellites ……………….. 119
Other Fluctuations ……………………………….119
About DVDs ………………………………………….120
List of Language Codes ………………………….. 121
List of Country Codes …………………………….. 122
In Case of Difficulty ………………………………. 124
If this Message Appears …………………………. 127
Specifications ………………………………………… 130
END USER LICENSE AGREEMENT
(Microsoft) ………………………………………… 132
END USER LICENSE AGREEMENT
(NAVTEQ) ………………………………………… 133
THE MARKS OF COMPANIES …………….. 134
11-EN

Installation and
Connections
Warning ………………………………………… 135
Caution …………………………………………. 135
Precautions …………………………………… 135
Installation …………………………………………….136
Connections …………………………………………..140
System Example …………………………………….142
12-EN
Getting Started
Preface
Two dimension positioning
When GPS satellite reception is less than optimal positioning is
performed in two dimensions: latitude/longitude. In the latter case, since
altitude cannot be determined, minor positioning discrepancies can
occur three dimension positioning.
Navigation systems
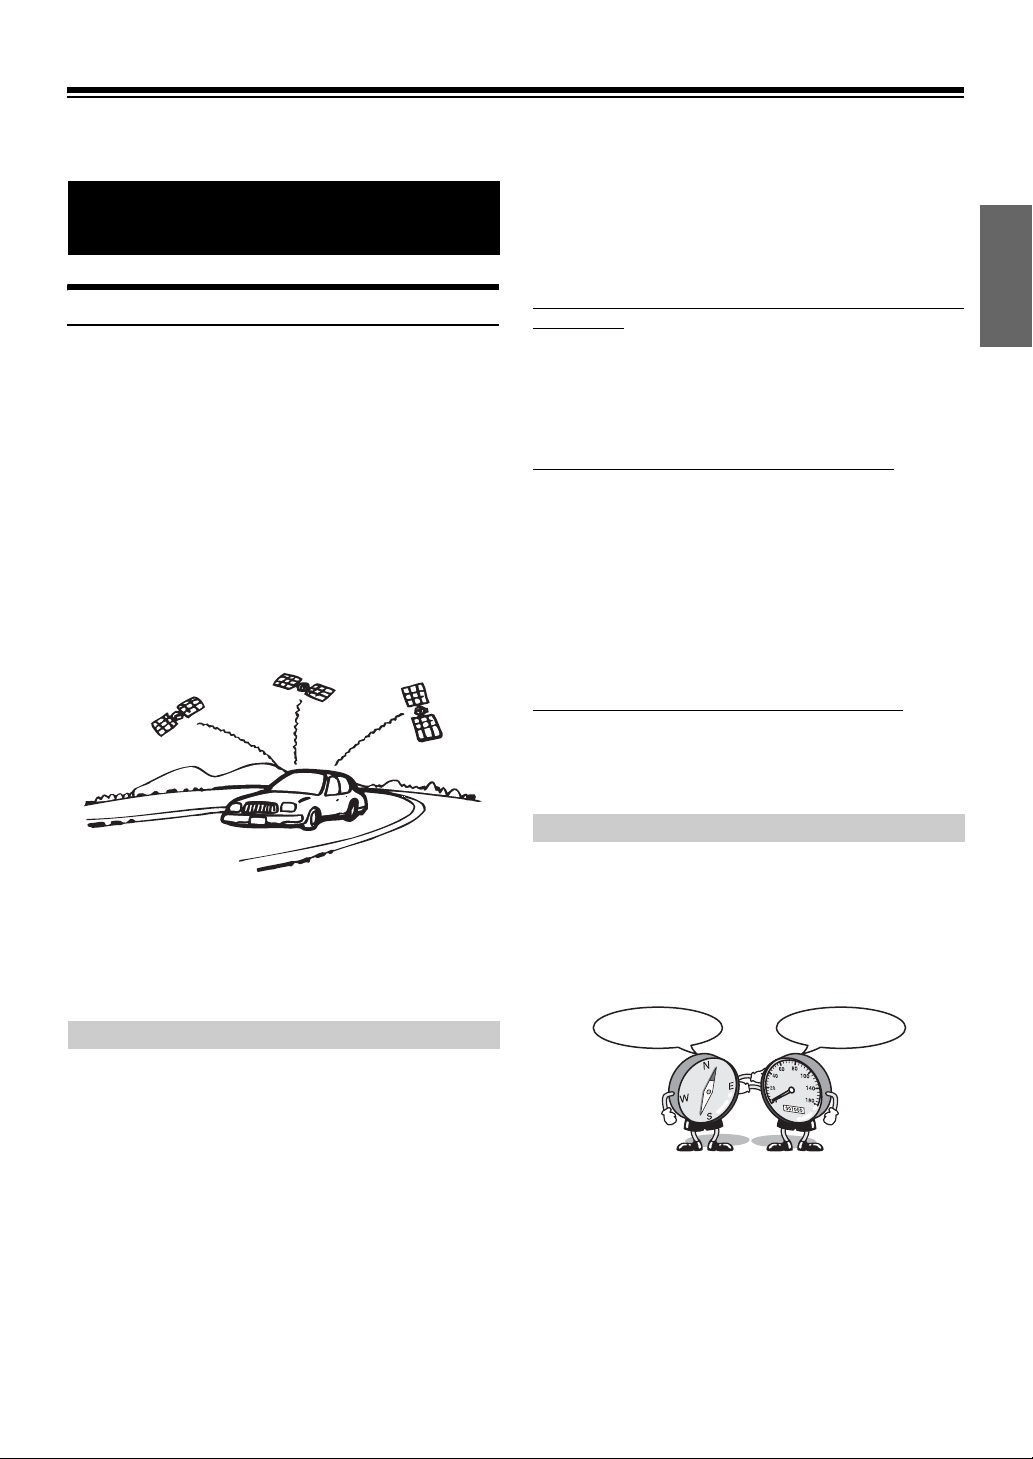
This navigation system uses three different sensing devices to determine
the present location and to track the progress of the vehicle. These three
devices are: a GPS (Global Positioning System) receiver which receives
digital signals from GPS satellites to determine the current position of
the vehicle, a gyroscope which determines which direction the vehicle
turns, and a speedometer pulse sensor which determine how far the
vehicle has travelled. Because this system incorporates a gyroscope and
a speed sensor, the system will be able to display the vehicle’s position
and track the vehicle’s progress even in areas where the GPS signal may
be blocked.
All map data is contained on a removable SD memory card. This system
integrates this unique map database with the sensing devices to
automatically plot out a route when a destination is entered. While
driving, the navigation system guides you along the route with pictorial
displays and verbal prompts.
• Altitude display accuracy can vary widely since the system uses only
GPS signals for determining altitude approximations. Unlike altitude
measurement, map matching accuracy is much more precise due to
calculation methods that utilize three inputs: 1) GPS signals, 2)
vehicle speed signals, and 3) the system’s built-in electronic gyro
signals.
There may be a delay before the actual vehicle’s position
is displayed
Determination of the present vehicle’s position starts when the ignition
key is turned to the ACC or ON position, and ends when the key is
turned OFF. When the key is first turned to the ACC or ON position
delay of approximately one to two minutes is typical before the present
vehicle’s position can be displayed.
The error from the actual position of the vehicle
When GPS signals can be received from 4 or more satellites, 3
dimensional positioning (altitude, latitude, and longitude) of the vehicle
can be determined. In this case, error is in the range of 30 to 200 meters.
When GPS signals can only be received from 3 satellites, only two
dimensional positioning (latitude and longitude) can be determined,
resulting in a slight increase in error. When GPS signals can only be
received from less than three satellites, positioning of the vehicle
through GPS is not possible. In addition to the inherent GPS error
margin, the error rate may also increase if the United States Department
of Defense deliberately changes its accuracy.
Locations where GPS signals are received easily
The optimum locations for receiving GPS signals are locations that
command a good view where there are no tall buildings, trees, or other
objects to obstruct the signals.
Gyroscope/ Speed sensor
The gyroscope is a sensor that accurately measures the angle by which
the direction of a vehicle or other moving body changes.
Gyroscopes are used in inertial navigation systems for airliners and
ships. In this navigation system, the gyroscope is used together with the
speed sensor, making it possible to display the position of the vehicle
even in locations where GPS signals may be blocked.
GPS (Global Positioning System)
This system receives signals from 3 or more GPS satellites (operated by
the United States Department of Defense) orbiting at an altitude of
21,000 kilometers and measures the present car position using the same
principles as triangulation. If the system receives signals from more
than three GPS satellites, positioning becomes possible.
The GPS positioning system uses both three dimensional and two
dimensional positioning.
Three dimension positioning
If GPS satellite reception is good, the positioning can be performed in
three dimensions: latitude/longitude/altitude.
Direction Mileage
13-EN

About car positional accuracy on initial use
Accurate Gyroscope/Speed sensor performance is not possible first
without accumulating driving some data.
The car position may not be correctly displayed after initial installation
of the system without inputting information about any previous changes
(exchanging the tire, etc.).
The error margin between sensor information and GPS data (as
calculated from the vehicle position) is continuously analyzed/revised,
resulting in a gradual increase in system accuracy.
A measurement is constant even if GPS signals cannot be received
avoiding the “filling of the gap” that occurs in running only the Gyro
sensor.
Address book
Locations you go to frequently can be stored into address book and
marked on the map. The system can store up to 200 points. You can add
icons at the marking locations so that the system also displays the icons
on the map.
Navigation Terminology
Navigation
The navigation system displays and tracks the vehicle’s position and
movement on a moving map display. When a destination is input, the
navigation system quickly calculates a route and guides you along the
route with pictorial displays and voice prompts.
Present Vehicle Position
The present vehicle position is indicated by an arrowhead within a circle
Present vehicle position
Map matching
Since GPS navigation has an error window of about 30 m — 200 m, the
position of your vehicle may be calculated in such a way that it is
displayed incorrectly off the road. Map matching automatically corrects
this error so that the position is displayed on the road.
Destination
The point on the map that is your destination is specified and displayed
with the destination icon.
You can set up a destination and 4 waypoints for the same journey.
Mark
Motorway-preference selection
When searching for routes with the navigation system, you can switch
between searching for routes that give priority to motorways and those
that give priority to ordinary roads. When you specify motorway
preference, the navigation system automatically searches for a route that
gives priority to motorways and guides you along that route.
Route
When a destination is input, the navigation system automatically
calculates a route and displays it in blue on the map
Route (Blue)
Destination icon
14-EN

Features
Large Touch-screen Monitor
This device is equipped with touch screen. Just touch the screen to
operate this unit. You can also operate it using the remote control (sold
separately).
18 Languages Selectable
You can choose one of the 18 languages for using this unit.
Built-in RDS-TMC Receiver
Real time traffic information from the Traffic Message Channel (TMC)
will be automatically received. In the event of a traffic jam or traffic
restriction, etc., you will be informed by voice and visual guidance.
TMC traffic information is already broadcast in Austria, Andorra,
Belgium, Switzerland, Czech, Germany, Denmark, Spain, France,
Liechtenstein, Great Britain, Italy, Luxembourg, Monaco, Norway,
Netherlands, San Marino and Vatican City.
• RDS-TMC information may not be received depending on FM radio
reception and TMC service conditions.
Automatic Route Calculation
Just select the destination and your navigation system does the rest,
automatically searching for the route you need.
Real Time Voice Guide
A voice guide informs you of the distance and direction until your
course changes, giving advice timed to match road conditions.
<NAV> button lets you repeat the last voice guide when needed by just
pushing the button.
The voice guidance may not be given if the vehicle’s present position is
too near the destination.
Map Zooming
You can change the map display in 12 magnification scales.
3-Dimensional Map Display
A bird’s eye view, 3-dimensional map can also be displayed.
Multiple-Destination Setting
You can set up to a destination and 4 waypoints in any order you like for
the same journey.
Intersection Zoom (Auto Zoom Map)
As you near intersections and cross points, the map display
automatically zooms in to show a more detailed view that you will need.
This means there is no need to press the zoom buttons.
Direct Input of Name of Place of Interest
Input only the name of a place of interest (without inputting the city
name) to search for the route to the place of interest.
Enjoying DVD with clear pictures
DVD-Video stored in high definition and high-quality sound format can
be played. DivX
®
mode and ASF mode are supported.
Enjoying MP3/WMA/AAC player
CD-R/CD-RW/DVD-R/DVD-RW/DVD+R/DVD+RW or USB memory
is playable.
iPod/iPhone Connection
You can connect iPod/iPhone using an optional cable (sold separately)
and play back songs and video in iPod/iPhone.
Safety Camera Warning
This feature allows you to receive a warning when approaching a Road
Safety Camera. You must ensure on your own liability that using this
feature is legal in the country where you intend to use.
Dynamic Route Guidance Function
While following the route you have set, this function continuously
searches for alternative routes to optimize travel time. The dynamic
route guidance is performed based on TMC restriction events (accident,
traffic congestion, etc.).
A message will be displayed to inform you that a route search to avoid a
restriction district for a particular day, week, time and the detour point is
made automatically.
Detour of Congestion Area
Areas in London, for example, where a congestion tax has been
introduced, are shown in a different colour (scale less than 2 km). You
can also search for a detour around a congested area.
Built-in Gyroscope and Speed Sensors
The gyroscope for sensing direction and the speed pulse sensor for
detecting distance provide data which allows the vehicle position and
direction to be displayed even in locations where the GPS signals
cannot be received, such as between high buildings or in tunnels.
15-EN
Before Using The
System
About This Navigation System
This system is shipped with an SD memory card that is already inserted
into the system. The SD memory card contains the necessary data such
as map data.
• Usually, you do not need to remove the SD memory card.
• If the SD memory card is malfunctioning for any reason, consult your
nearest Alpine dealer.
• Do not insert the SD memory card into another device such as a
computer. Doing so may cause data corruption.
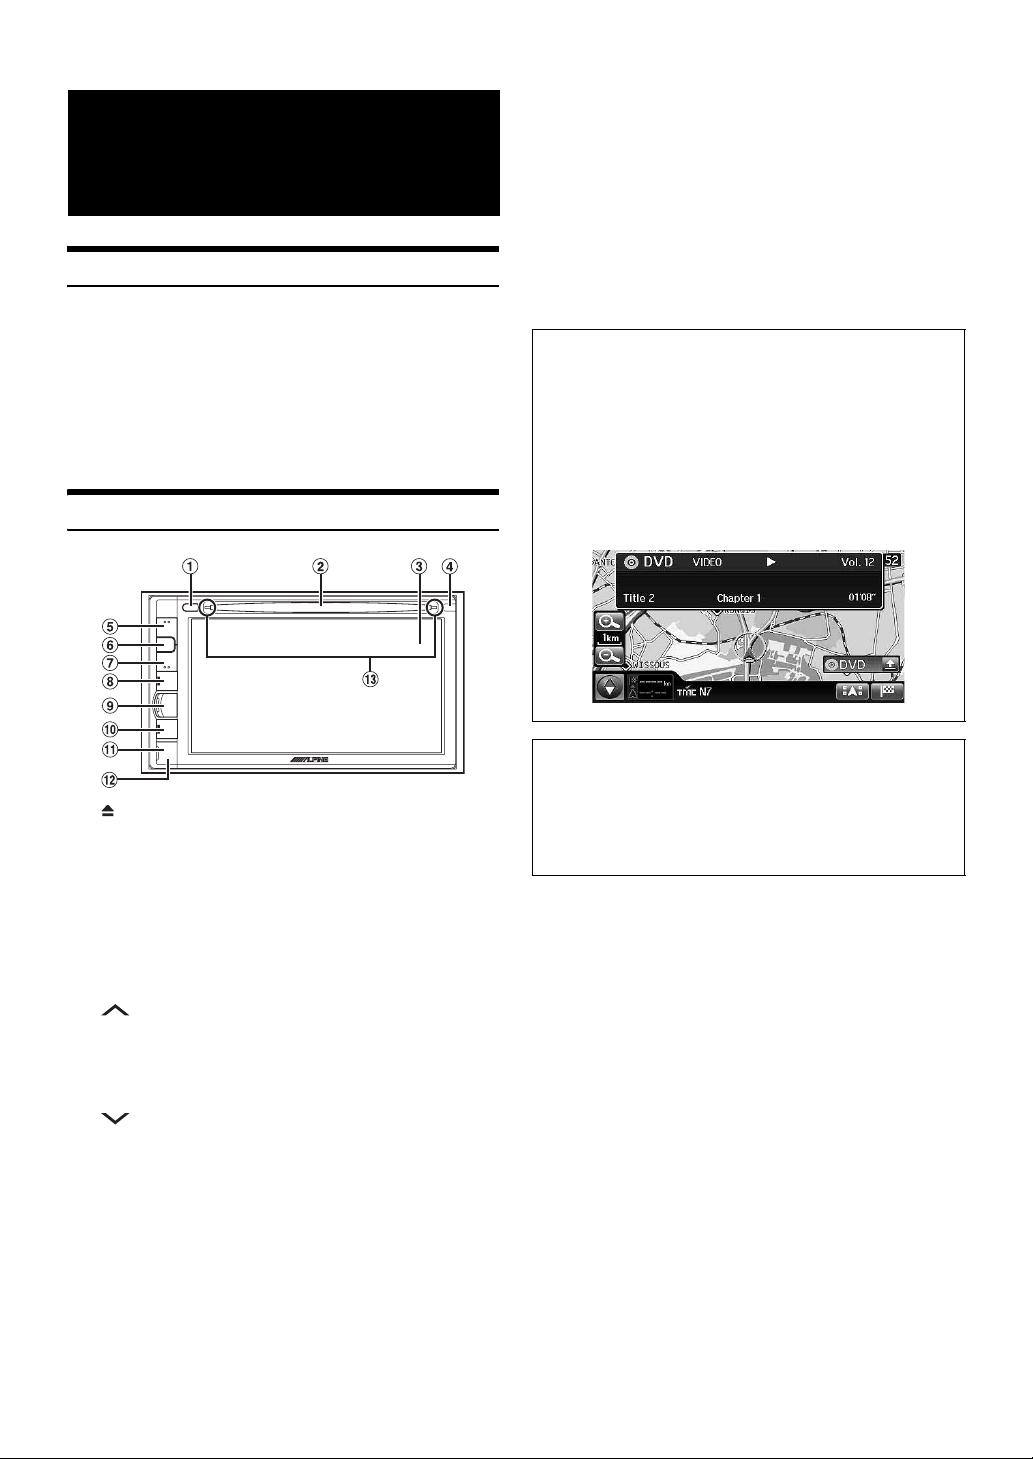
Location of Controls
0 NAV
Displays the current position screen. While the system is
performing route guidance, pressing the <NAV> button will
repeat voice guidance.
! RESET switch
The system of this unit is reset.
@ Front AUX Input Terminal
Connects a portable music player, etc., to the system. For
details, see “Using the Front AUX Input Terminal” (page 18).
# Disc indicator
The light will turn off when a disc is inserted.
Optional Remote Control Interface Box
This unit is operable using the vehicle’s secondary radio
controls. An Alpine Remote Control Interface Box (optional) is
required. For details, contact your Alpine dealer.
Controllable with Remote Control
This unit can be controlled with an optional Alpine remote
control (RUE-4202). Some operations are possible in Audio/
Visual mode. For details, consult your Alpine dealer.
Point the optional remote control transmitter at the remote
control sensor.
1 button
Ejects a disc.
2 Disc Slot
3 Monitor
4 Remote sensor / Dimmer sensor
• Point the optional remote control transmitter (RUE-4202)
towards the remote sensor within a range of 2 meters.
Some operations are possible in Audio/Visual mode.
• Senses the brightness of the car interior.
5 (VOL.)
Turns up the volume of the audio/visual mode.
6 MUTE
Activating this function will instantly lower the volume level
by 20 dB.
7 (VOL.)
Turns down the volume of the audio/visual mode.
8 SOURCE / PWR
Displays the Audio/Visual screen. If the Audio/Visual screen
is already displayed, changes the source. The unit turns off
when you press the button for more than 3 seconds.
9 MENU
Displays the Menu screen. When the system is in the
navigation mode, displays the NAVIGATION screen. When
the system is in the audio/visual mode, displays the AUDIO/
VISUAL screen.
About the button descriptions used in this Owner’s
Manual
This Owner’s Manual uses square brackets to present a
touch switch name (e.g. [Destination]), and uses angle
brackets to present a button name on the body (e.g.
<MENU>).
16-EN
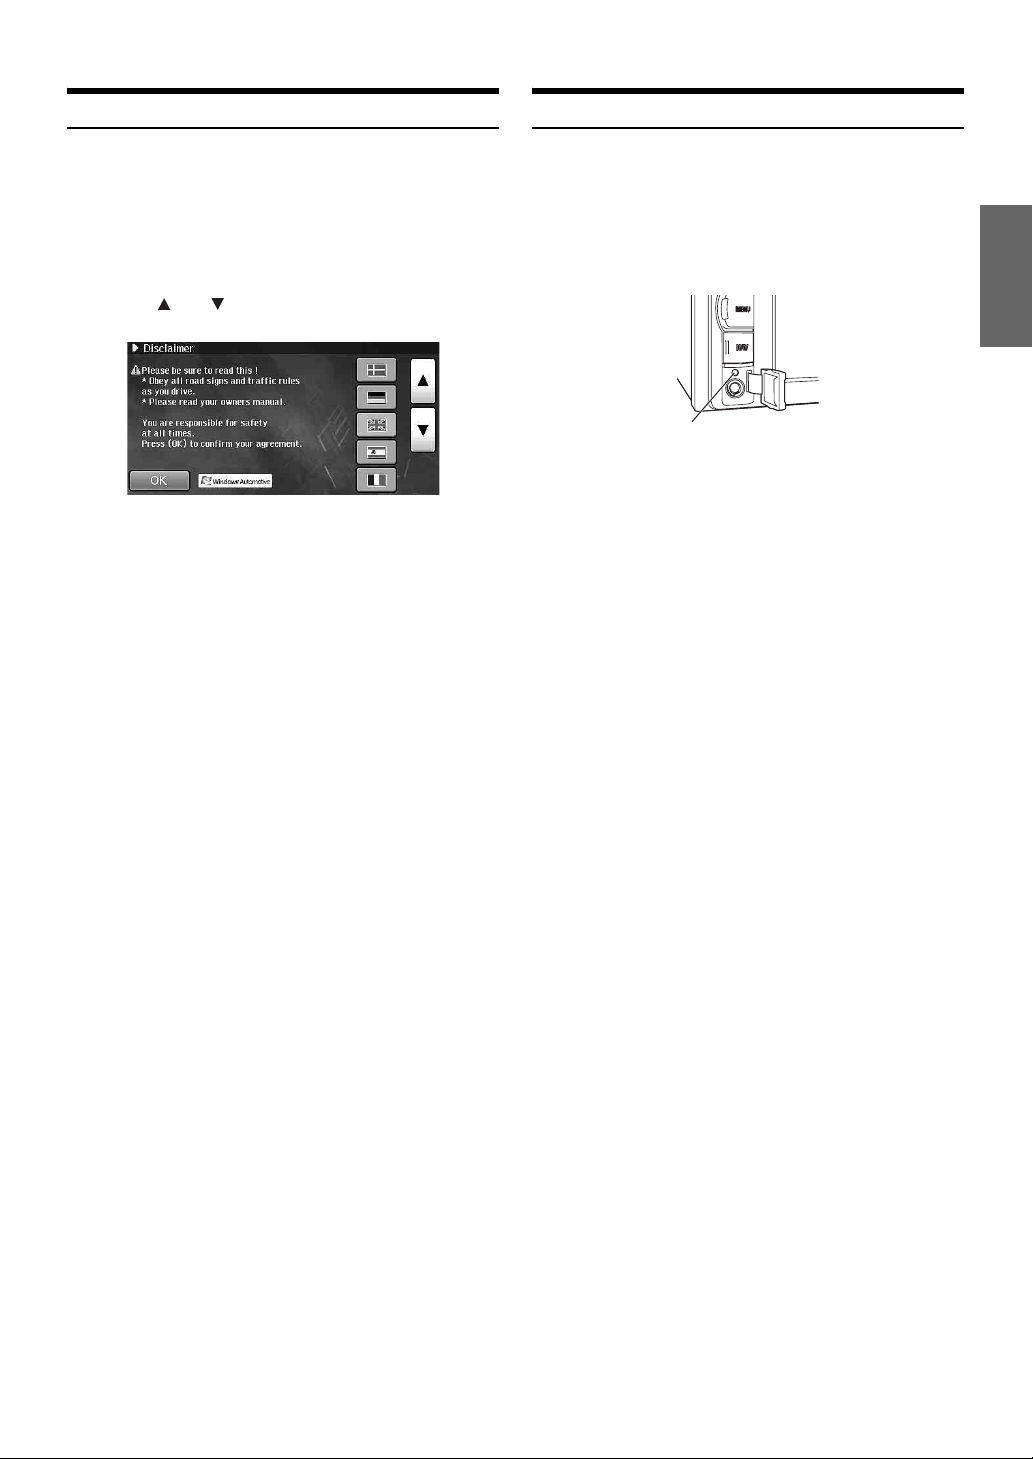
Turning the System On
Initial System Start-Up
With the Alpine navigation system, when the ignition key is turned to
ACC or ON, the opening screen will be automatically displayed.
1
When the system is used for the first time, both the
language selection menu and important information
saying “Disclaimer” are displayed on the same
screen. There are 18 languages to choose from.
Touch [ ] or [ ] to scroll the list, and then touch
the desired language.
After the language has been selected, important
information is displayed in each language. Be sure to read
the important information.
2
After you have read this important information,
touch [OK].
The radio screen is displayed.
• Some of this unit’s functions cannot be performed while the vehicle is
in motion. Be sure to stop your vehicle in a safe location and apply
the parking brake before attempting these operations.
Be sure to press the RESET switch when using the unit for the first
time, after changing the car battery, etc.
1
Turn off the unit power.
2
Remove the cover.
RESET switch
3
Press RESET switch with a ballpoint pen or similar
pointed object.
17-EN
Basic Operation
Turning Power On or Off
1
Turn the ignition key to the ACC or ON position.
The system is automatically turning on. After turned on, the
opening screen appears first and then the mode screen
(map screen, radio screen, etc.) appears.
• When turned on, the system displays the last mode
screen that was displayed before the ignition key was
turned off. For example, when the navigation mode
screen is displayed, if you turn off the ignition key and
then turn it on, the system displays the navigation mode
screen again.
2
To turn off the system, press and hold the
<SOURCE/PWR> button for more than 3 seconds.
The system is turned off.
• The unit can be turned on by pressing any button on the unit, except
(Eject).
Inserting/Ejecting a Disc
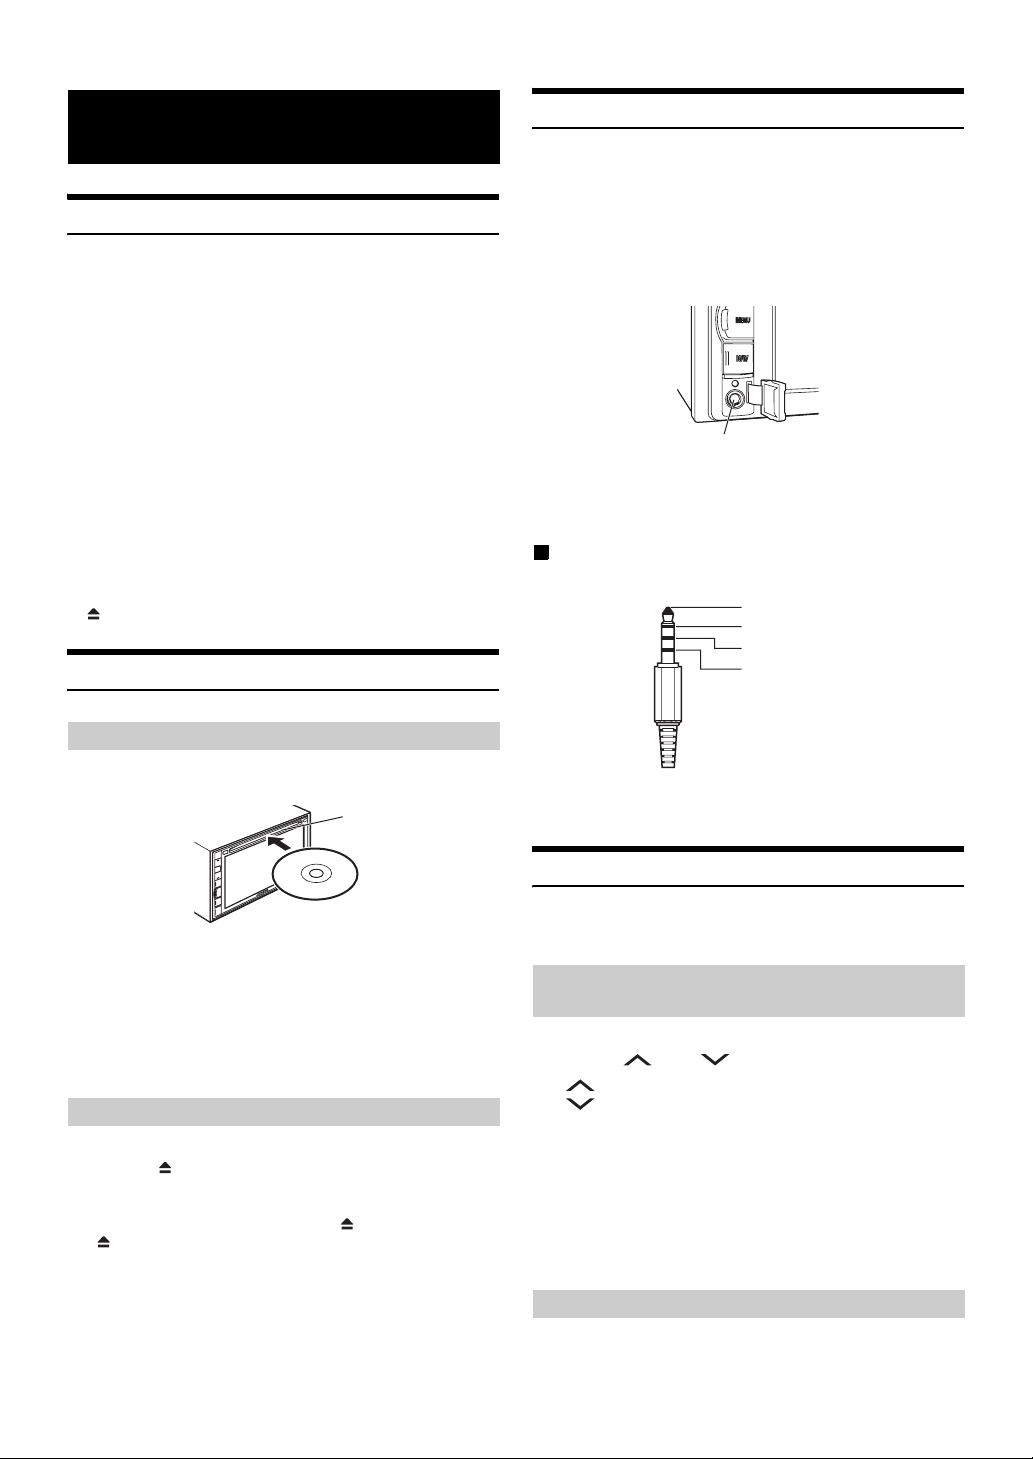
Using the Front AUX Input Terminal
Connect a portable music player, etc., by simply connecting it to the
input on the front panel. An optional adapter cable is required (standard
RCA to 3.5ø mini-phono plug or 3.5ø to 3.5ø mini phono plug).
You can also play back video connecting with an optional AV cable (4pole mini AV plug to 3-RCA).
1
Remove the cover from the Front AUX Input Terminal.
Front AUX Input terminal
2
Connect a portable music player, etc., by using an
optional adapter cable.
Usable 4-pole mini AV plug
The unit accepts the following 4-pole mini AV plug pin-out:
Audio L (White)
Audio R (Red )
Ground
Video (Yellow)
Inserting the Disc
1
Insert the disc with the label side facing up.
Disc Slot
When you insert the disc up to certain point, it is
automatically pulled into the unit. The unit starts to play the
disc.
• Do not touch the surface of the disc directly with your fingers.
• Before inserting or removing the disc, always turn the ignition key to
ACC or ON. You cannot remove or insert the disc with the ignition
key turned to OFF.
Removing the Disc
1
Press < >.
When the disc has been ejected part way, take it out.
• If the disc cannot be ejected by pressing < >, press and hold
< > again for at least 10 seconds.
• Please check pin-out carefully before use of this product. Depending
on the cable, there may be no picture and/or sound.
Adjusting the Volume
You can adjust the volume by the button on the body or the Setup
screen.
Adjusting the volume of the Audio/Visual
mode
1
Press < > or < >.
: Turns up the volume.
: Turns down the volume.
• Navi MIX Level: The audio volume during the navigation guide can
be set by adjusting the audio volume while the navigation guide
continues. When the navigation guide finishes, the previous audio
volume and the previous screen are restored. For example, if
navigation cuts in when the volume is lower than the setting level, the
volume during the navigation guide will be reset to the current
listening volume. (When the navigation guide cuts in, the audio
volume does not increase.)
Adjusting the volume of the Navi Guidance
18-EN
Adjust on the Setup screen.
For details, see “Navi Guidance Volume Adjustment” (page 92).
Adjusting the volume of the Sound (Beep)
Guide
Adjust on the Setup screen.
For details, see “Sound (Beep) Guide Function” (page 92).
• In this Owner’s Manual, the navigation instructions assume that the
NAVIGATION menu screen appears when the <MENU> button is
pressed. Also, the audio/visual instructions assume that the AUDIO/
VISUAL menu screen appears when the <MENU> button is pressed.
Touch operation
Lowering Volume Quickly
Activating the Audio Mute function will instantly lower the volume
level by 20 dB.
1
Press <MUTE> to activate the MUTE mode.
The audio level will decrease by about 20 dB and “Mute”
flashes.
2
Pressing <MUTE> again will bring the audio back to
its previous level.
Changing between the NAVIGATION
menu and the AUDIO/VISUAL menu
1
Press <MENU>.
The NAVIGATION menu screen or the AUDIO/VISUAL menu
screen appears.
In the navigation mode, the NAVIGATION menu screen
appears. In the audio/visual mode, the AUDIO/VISUAL
menu screen appears.
2
To change to the NAVIGATION menu screen, touch
the [NAVIGATION] tab.
To change to the AUDIO/VISUAL menu screen, touch
the [AUDIO/VISUAL] tab.
You can operate the system by using the touch panel on the screen.
• Be sure to touch the switch lightly with the pad of your finger on the
display to protect the display.
• If you touch a switch and there is no reaction, remove your finger
from the display once, and try again.
• Touch switches that cannot be operated appear dull in colour.
Common touch switches
: Returns to the previous screen. Depending on the
function, this switch may cancel the operations
performed on the screen.
: Closes the window.
Window operations
This system uses window displays on the map screen and the AUDIO/
VISUAL main screen.
In the NAVIGATION mode, the AUDIO/VISUAL Window is
displayed, which allows you to perform simple operations in the
AUDIO/VISUAL mode. In AUDIO/VISUAL mode, the current
position screen is displayed.
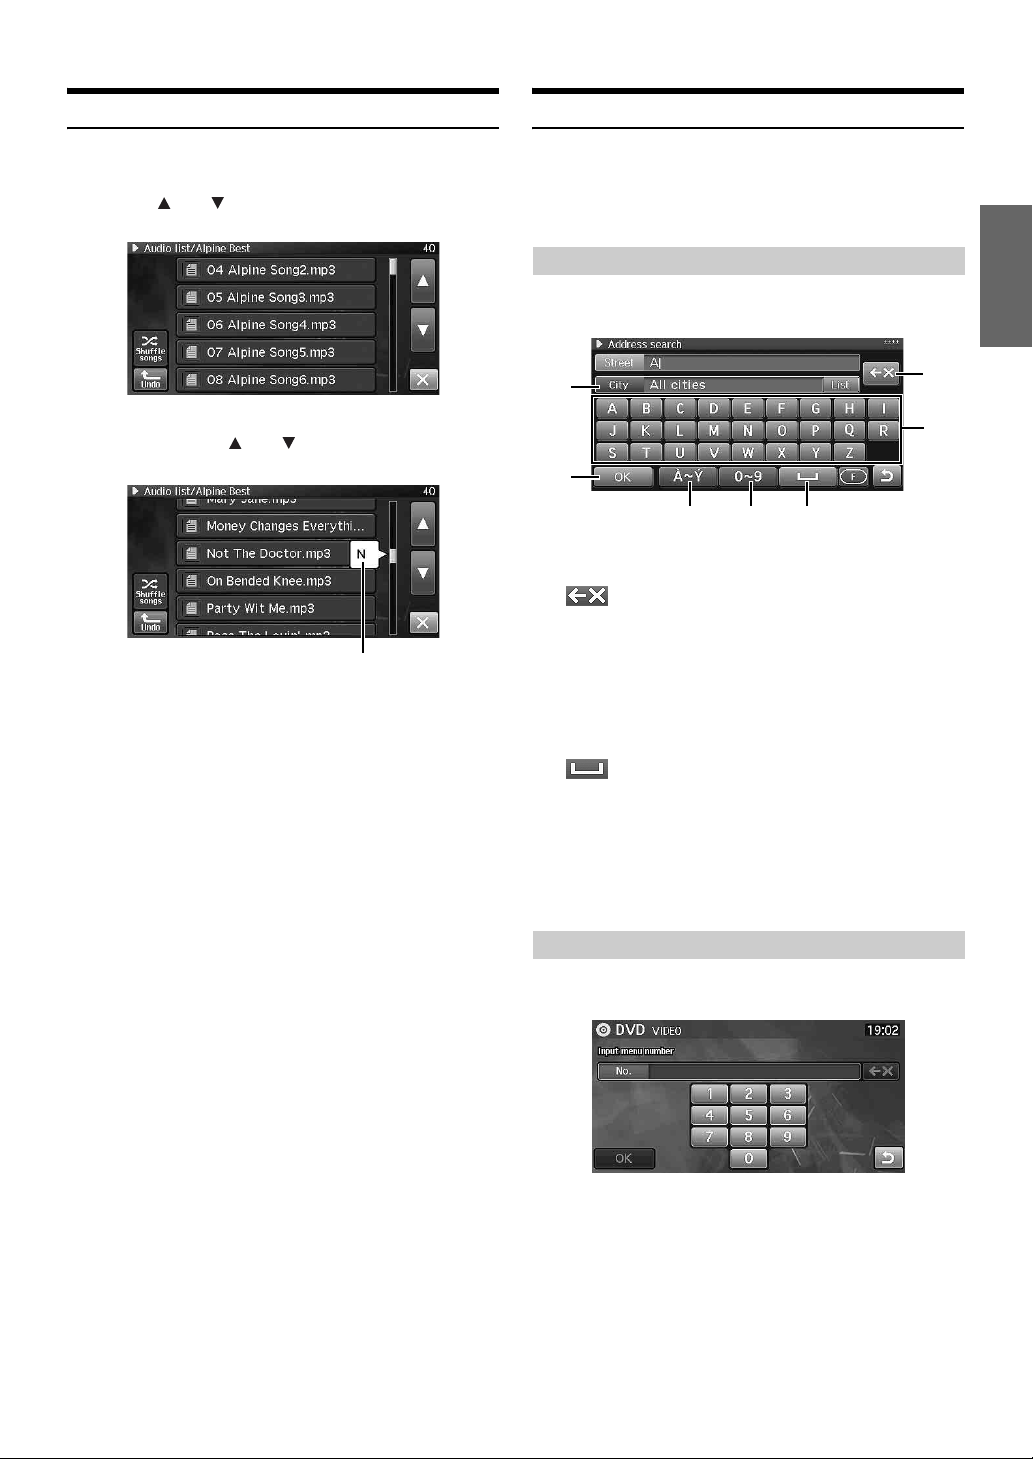
Furthermore, you can change to the Info. Window to display the clock/
calendar.
Appearance of the NAVIGATION Window
1
2
3
Touch the
[N AVI GAT IO N]
tab.
If you press <MENU> on the MENU screen, the
NAVIGATION menu screen and AUDIO/VISUAL menu
screen are switched alternately.
Touch the
[AUDIO/VISUAL]
tab.
456
1 The clock display
2 The next guidance point name*
3 The current position icon
4 The direction
5 The distance to the next guidance point*
6 The turn direction at the next guidance point*
* Appears only when the system is providing route guidance.
• If a 3D map is displayed on the map screen, it changes to the 2D
Heading Up display automatically.
19-EN
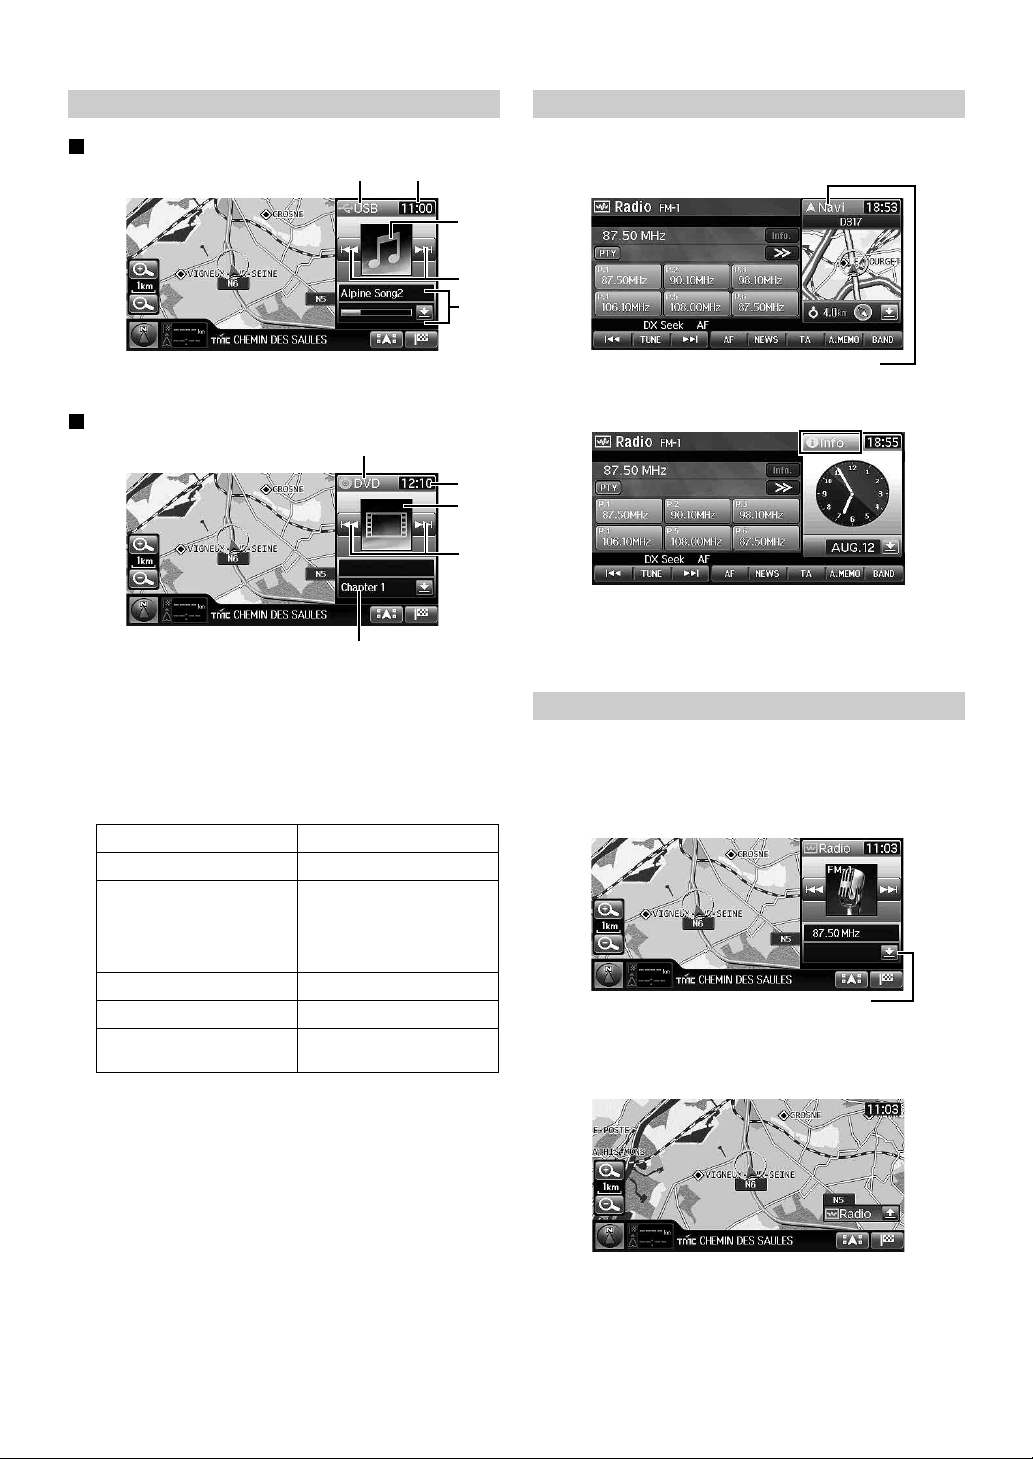
Appearance of the AUDIO/VISUAL Window
Changing to the Info. Window
Audio mode view
12
Visual mode view
1
5
1 [(mode name)] switch (The source display)
2 The clock display
3 The artwork/image display
4 The UP/DOWN switch
The appearance and function of the UP/DOWN switch
varies depending on the source.
Source Function
DVD/CD/USB/iPod Changing Track/File/Chapter
Radio/RDS • Distance mode/Local mode:
AUX –
EXT.DVD Changer Changing Track
DVB-T Changing Channel number /
5 The information display
DVD: Chapter no.
iPod/MP3/WMA/AAC: Song Title/The playback elapsed time
indicator
CD: Track name, Current song no./Total song no./
The playback elapsed time indicator
Radio: Frequency, PS (Programme Service) Name
Automatic tuning
• Manual mode: Changing the
channel
• RDS mode: TA skip
Favorite channel number
3
4
5
2
3
4
1
Touch the [(mode name)] switch on the Window.
[(mode name)] switch
The Window changes to the Info. Window. The current time
and the calendar are displayed.
2
Touch [Info.].
The window returns to the previous screen.
Resize the Window
You can change the Window size to mini size.
1
Touch the resize switch.
The window changes to mini size.
Resize switch
2
To restore the Window size, touch the resize switch
once more.
20-EN
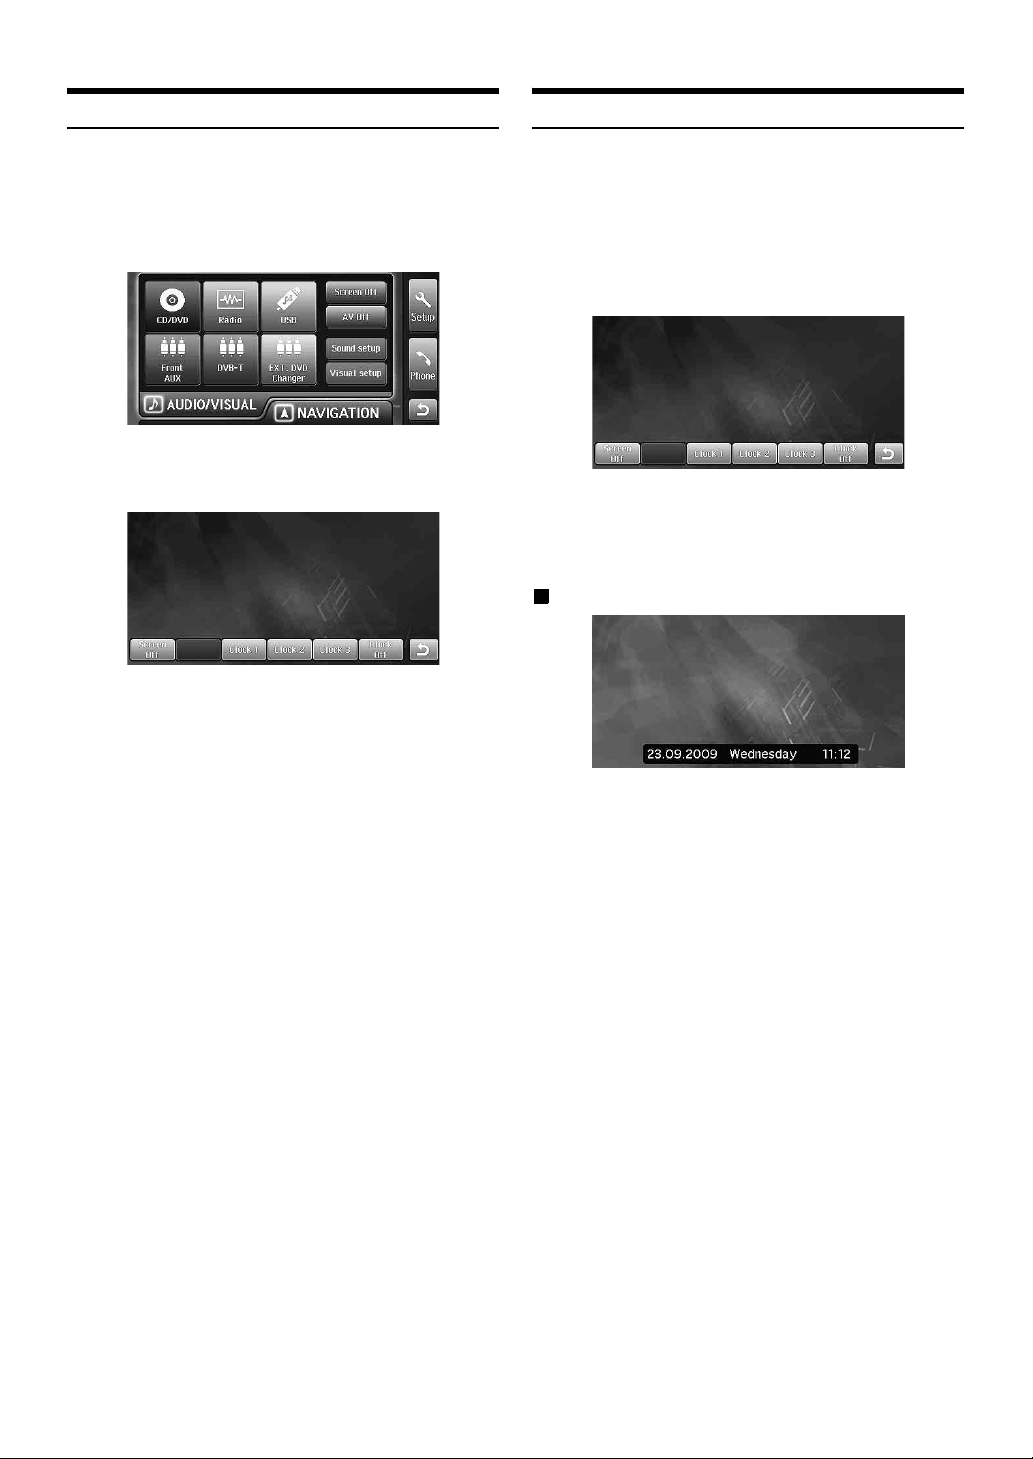
Selecting an Item in a List
Using the On-Screen Keyboard
To scroll through a list, perform the following operations.
1
Touch [ ] or [ ] to scroll items one by one up or
down.
2
Touch and hold [ ] or [ ] to scroll quickly through
the list.
1*
There are 3 progressive levels of scroll speed.
At first, when you touch and hold, the list scrolls 4 lines per
second. After holding for a while, the list scrolls 8 lines per
second. After holding even further, the list scrolls 40 lines
per second.
1 When the list is arranged in alphabetical order, an
initial letter appears while scrolling at the highest
speed.
* This feature may not be available for some lists.
When you are required to input a character on the screen using the
keyboard, the display changes to the keyboard. Use the displayed
characters to input information. The following procedure explains how
to select characters.
Entering characters
1
Touch the desired character.
1
4
5
76
1 Text window
Displays the selected characters/numerals.
2 (Delete)
Returns to the previous character and erases it.
Touching here for more than 2 seconds will erase all input
characters.
3 Character keypad
4 OK
The selected character is set. The available characters,
depending on the item, are shown in the list.
5 (Space)
6 Special character selector switch
Changes the character keypad to display additional
characters.
7 Number/symbol selector switch
Changes the character keypad to display numbers and
symbols.
2
3
Entering number
1
Touch the desired number.
21-EN
Turn off the Screen
You can turn off the screen.
1
Press <MENU>.
2
Touch [Screen Off].
3
Touch the screen to display the operation switch,
then touch [Screen Off].
The screen display is turned off.
• To cancel turning off the screen, touch the screen once
more.
Setting the Clock Display
1
Press <MENU>.
2
Touch [Screen Off].
3
Touch the screen to display the operation switch,
then touch any of [Clock1] ~ [Clock3] or [Clock Off].
Clock1/Clock2/Clock3: Display the clock on the wallpaper.
Clock Off: Do not display the clock on the wallpaper.
• Repeat steps 3 to change the clock display when the
clock is displayed (or the screen is off).
Clock display example
22-EN
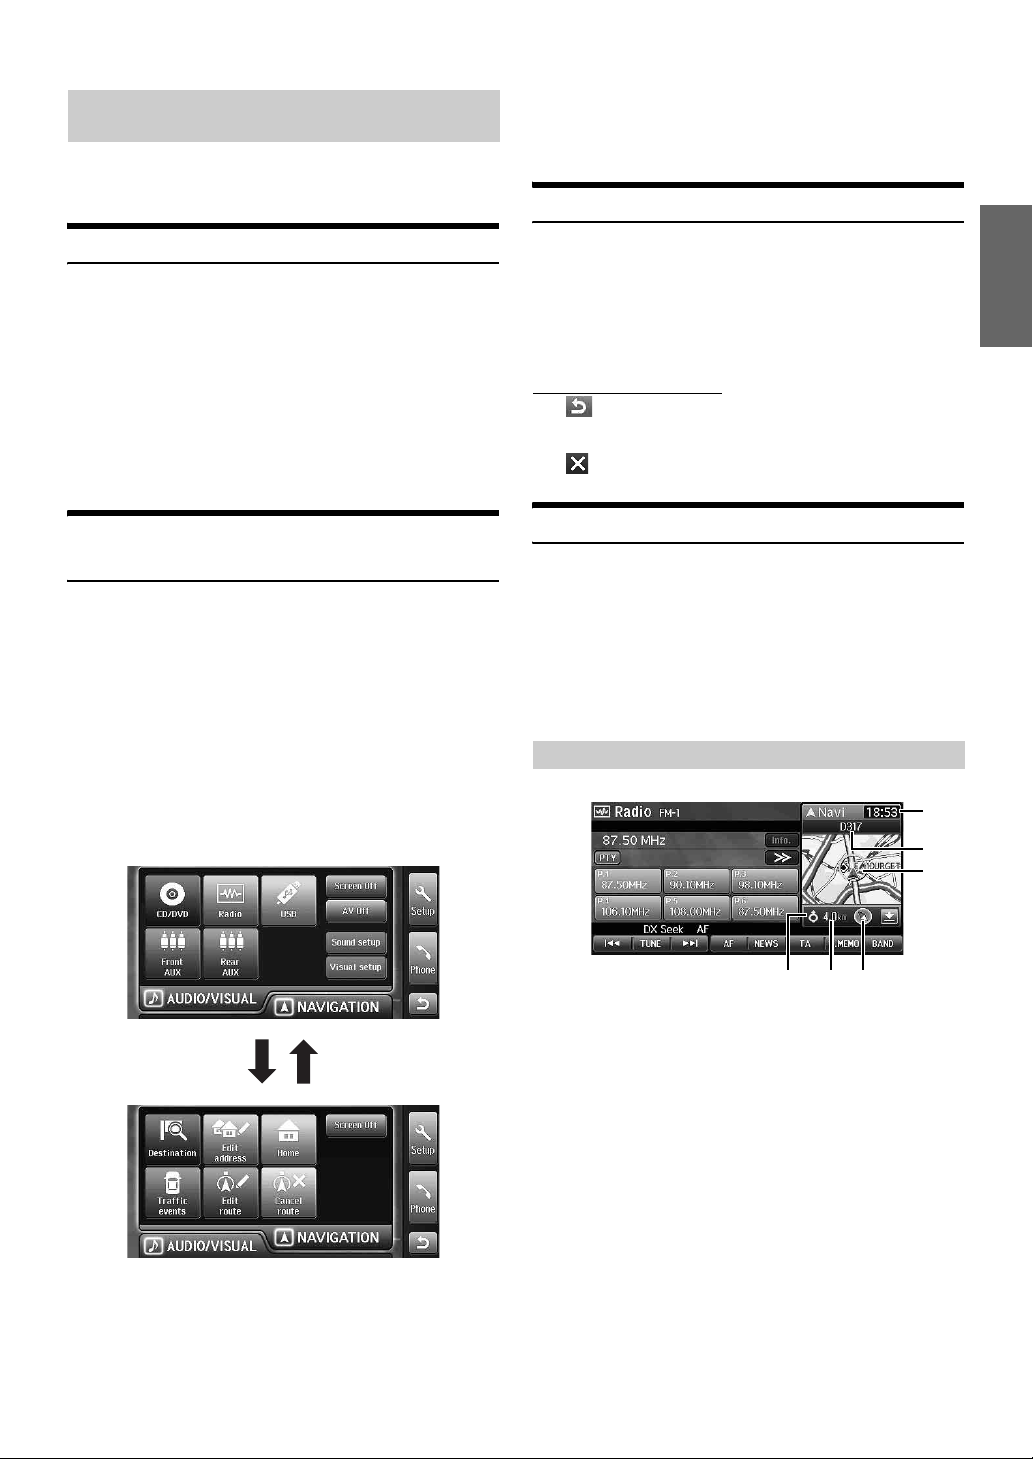
Navigation
Basic Operations
How to View a Navigation Screen
The map screen that shows the position of the vehicle is called the
navigation screen. Normally, the vehicle is displayed at the centre of the
map screen and the map is automatically scrolled according to the
movement of the vehicle.
Current Vehicle Position Map (without
route)
0 switch
Displays/hides the POI Icons. For details, see page 27.
! switch
Displays the Destination screen. You cannot touch the
switch while you are driving. For details, see page 30.
@ AUDIO/VISUAL window
For details, see page 19 and 20.
# Vehicle position icon
: This indicates the current position of the vehicle.
: This indicates the direction in which the vehicle is
moving.
$ Clock display
Current time received from GPS is displayed. See “Clock
Setup” (page 94).
• Building outline is displayed on the 50 m (50 yards) scale map.
1
2
3
4
5
6
098
!7
1 POI Icons
The POI icons can be displayed on the map when map
scale is 200 m (200 yards) or less.
2 Address book Icons
The address book icons can be displayed at the entered
locations on the map when map scale is 10 km (6 miles) or
less.
3 (Zoom in)
Enlarges the map scale.
4 Map scale
5 (Zoom out)
Reduces the map scale.
6 Compass Icon
This indicates the orientation of the map. When you set the
direction in which the vehicle is moving to up, the red
triangle points north.
The icon’s color circle also indicates whether the current
GPS position is available or not.
: The current GPS position is available.
: The current GPS position is not available.
7 Destination information switch
When setting the route, you can change to the manoeuvre
list screen by touching this switch. For details, see page 26.
8 TMC indicator
For details, see page 53.
9 Street name
$
#
@
23-EN
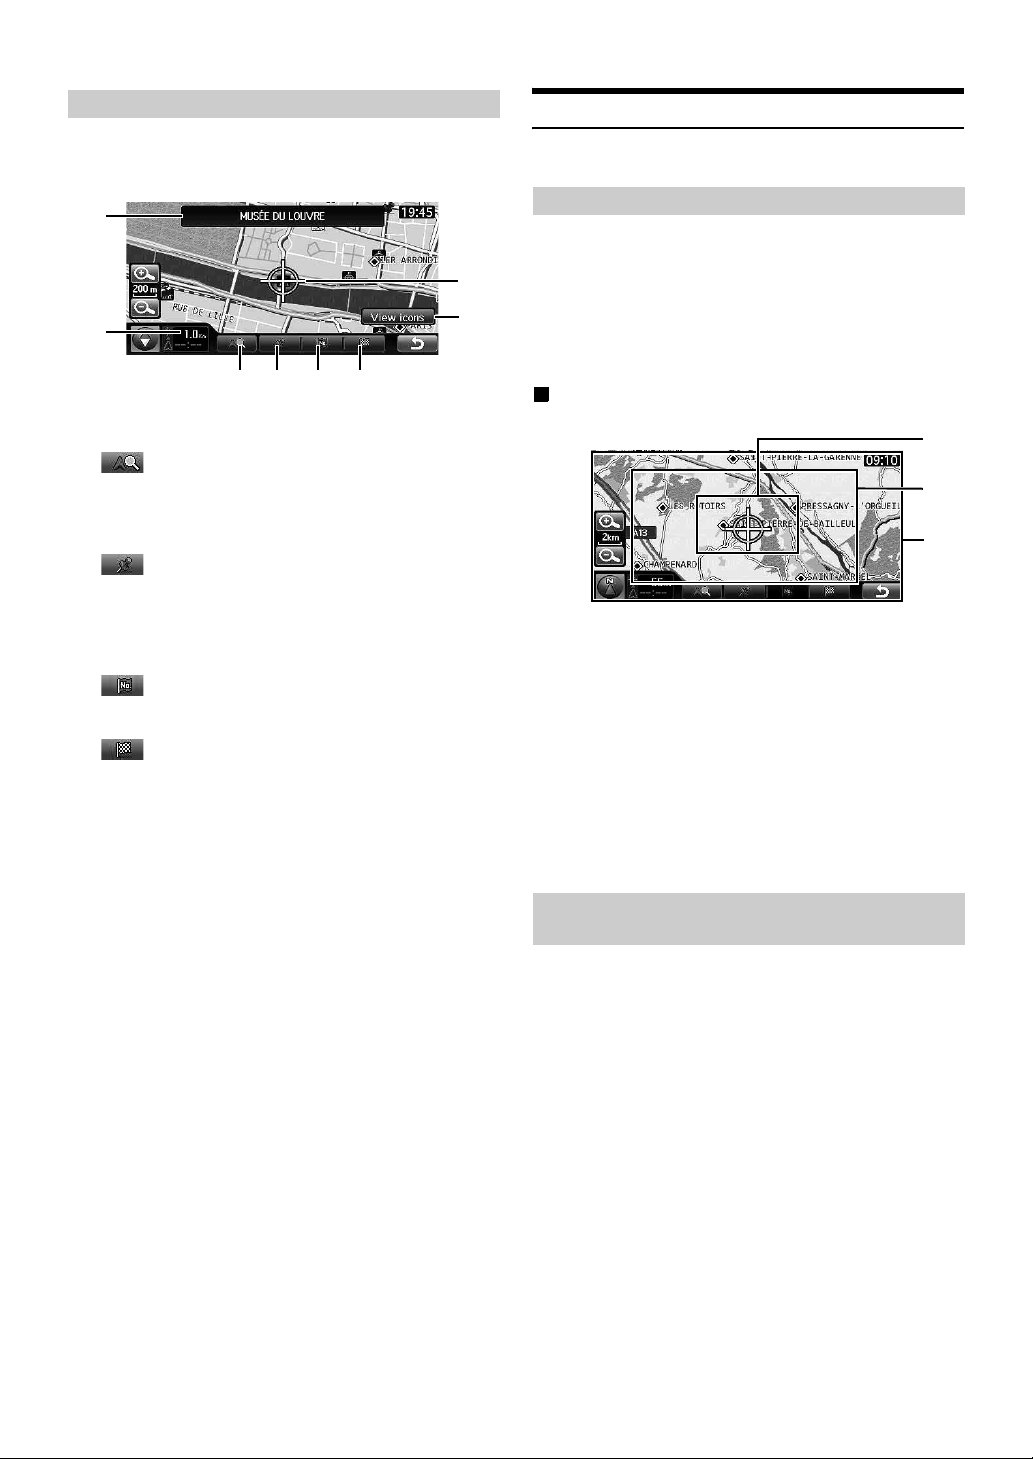
Point Display
The point display appears on the screen after you have scrolled the map.
For how to find a destination by scrolling the displayed map, see
“Finding a Destination by Scrolling Displayed Map” on page 37.
8
7
1
4
5
32
1 Distance from the current vehicle position
Distance in a straight line from the current vehicle position.
2 switch
You can search for facilities in the vicinity of the crosshair
icon on the map. For details, see “Finding facilities in the
vicinity of the specified location by Scrolling the Displayed
Map” (page 38).
3 switch
Save the cross hair icon’s position as Home, enters the
position into the address book, or sets the position as the
current position. For details, see “Save as Home” (page 41),
“Save as Address Book” (page 41) or “Set as Current
Position” (page 40).
4 switch
Adds the cross hair icon’s position as a waypoint. For how to
add a waypoint, see “Add a Waypoint” (page 42).
5 switch
Sets the cross hair icon’s position as the destination. For
how to set the destination, see “Finding a Destination by
Scrolling Displayed Map” (page 37).
6 [View icons] switch
Appears only when the cross hair icon lays on a POI icon.
You can touch the switch to display. See “Finding a
Destination by POI icon” (page 38).
7 Crosshair icon
Align the crosshair icon over the place to be searched by
scrolling the map.
8 Details on the crosshair icon
Street names, addresses and POIs (Point of interest) are
displayed.
• The selected street’s colour changes (scale less than 1 km/800 yards).
6
Displaying a Desired Place
You can search a map for a desired place by scrolling it.
Scrolling the Map
1
Touch the Map Display.
The map continues to scroll while you touch the map
display.
When you release the display, the screen becomes the
scroll screen in which the straight distance from the current
position is displayed.
Scroll speed changes depending on the screen area
you are touching.
1
2
3
1 Area 1
Scrolls slow.
2 Area 2
Increases the scroll speed in three stages in accordance
with how long you touch the screen.
3 Area 3
Scrolls quickly.
• You can not scroll continuously while driving for your safety.
• Scrolling a 3D map changes it to a 2D map. See “Changing the Map
Orientation” (page 25).
• The <NAV> button returns you to the current car position map.
• Scrolling is not available in the manoeuvre list screen.
Displaying the Current Vehicle Position
Map
The screen returns to the present peripheral map after when the map is
scrolled, other maps are displayed for searching destination, and the
menu screen is displayed.
1
Press <NAV>.
The current car position screen is displayed.
24-EN
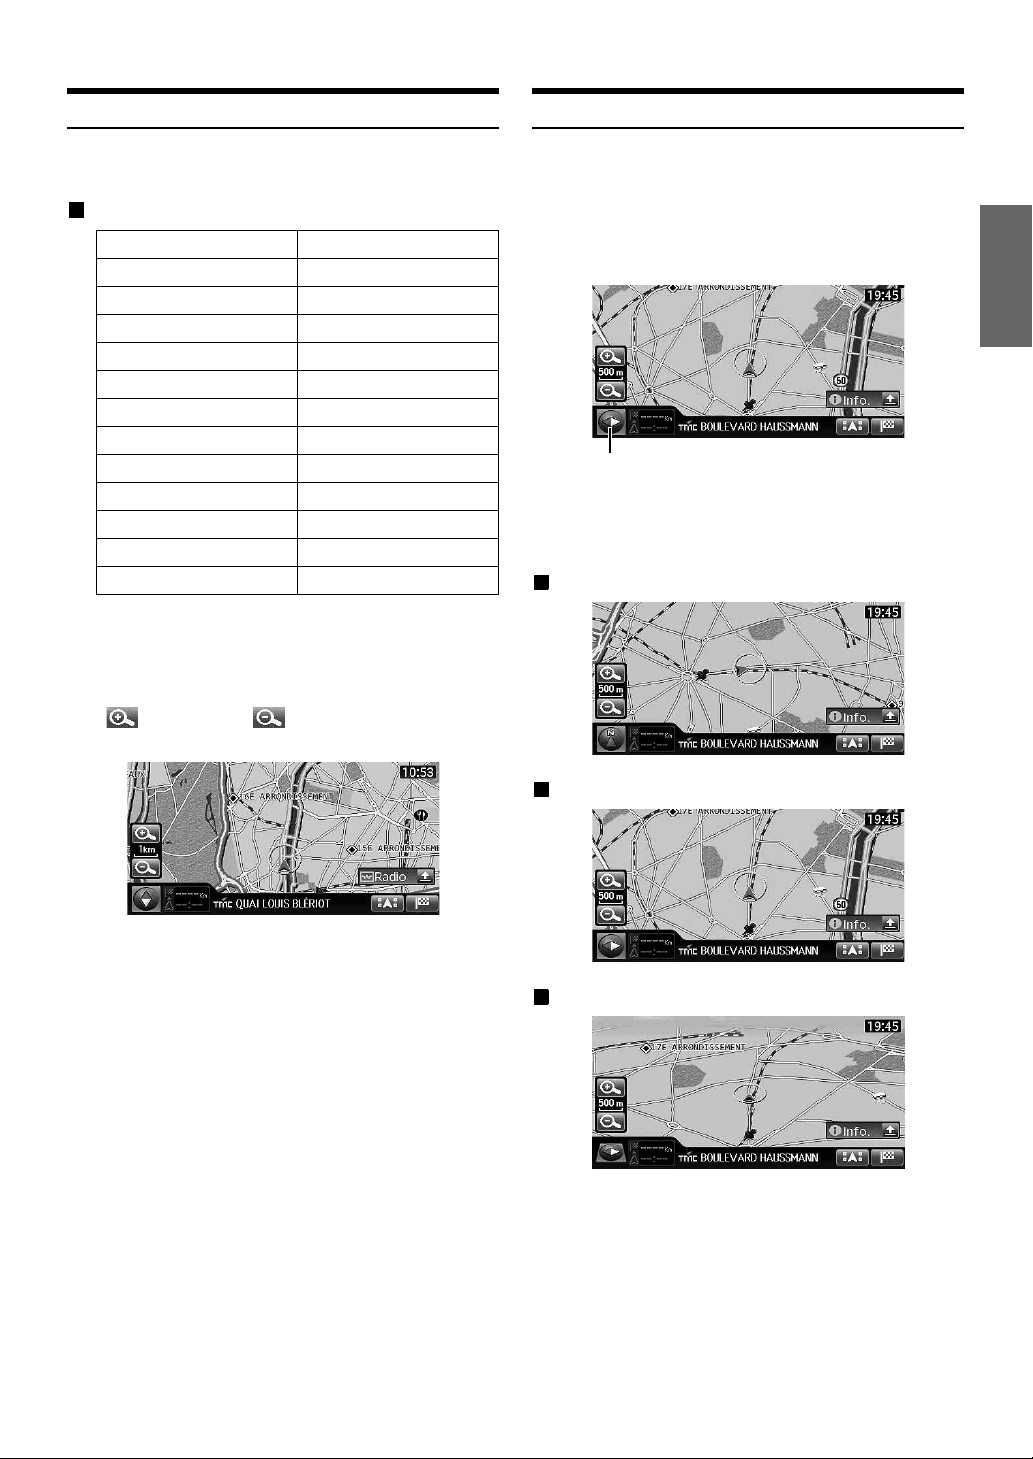
Changing the Map Scale
Changing the Map Orientation
The map scale can be adjusted from 50 m (50 yards) to 200 km (120
miles).
Map scale
Metric (km/m) Imperial (mile/yard)
200 km 120 miles
100 km 60 miles
50 km 30 miles
20 km 12 miles
10 km 6 miles
5 km 3 miles
2 km 1 miles
1 km 1/2 miles (800 yards)
500 m 500 yards
200 m 200 yards
100 m 100 yards
50 m 50 yards
• For some locations, the map scale is automatically adjusted
according to the map data.
• You can change between kilometers or miles in setup, see page 94.
1
Change the map magnification ratio by touching
[ ] (zoom in) or [ ] (zoom out).
This changes rapidly by touching and holding either switch.
The map orientation can be set for either north up, or your current
direction heading up. A 3-dimensional map can also be displayed.
The icon in the lower left of the screen above the map scale icon
indicates the current orientation.
1
Touch the Compass icon.
Compass Icon
Each time you touch the Compass icon, the direction of the
map changes.
North up ➝ Heading up ➝ 3D map ➝ North up
North up map
• The building outlines can be displayed on the map when map scale is
50 m (50 yards) or less.
• The POI icons can be displayed when map scale is 200 m (200 yards)
or less.
• POI Warning icons can be displayed on the map when map scale is
500 m (500 yards) or less.
• Custom POI icons can be displayed on the map when map scale is
200 m (200 yards) or less.
• The 3D map will automatically be switched to heading up.
Heading up map
3D map
• The viewing angle for the 3D map can be adjusted. See “Adjusting
the 3D view angle” (page 100).
• When the 3D map is scrolled, it changes automatically to 2D map
(heading up).
25-EN
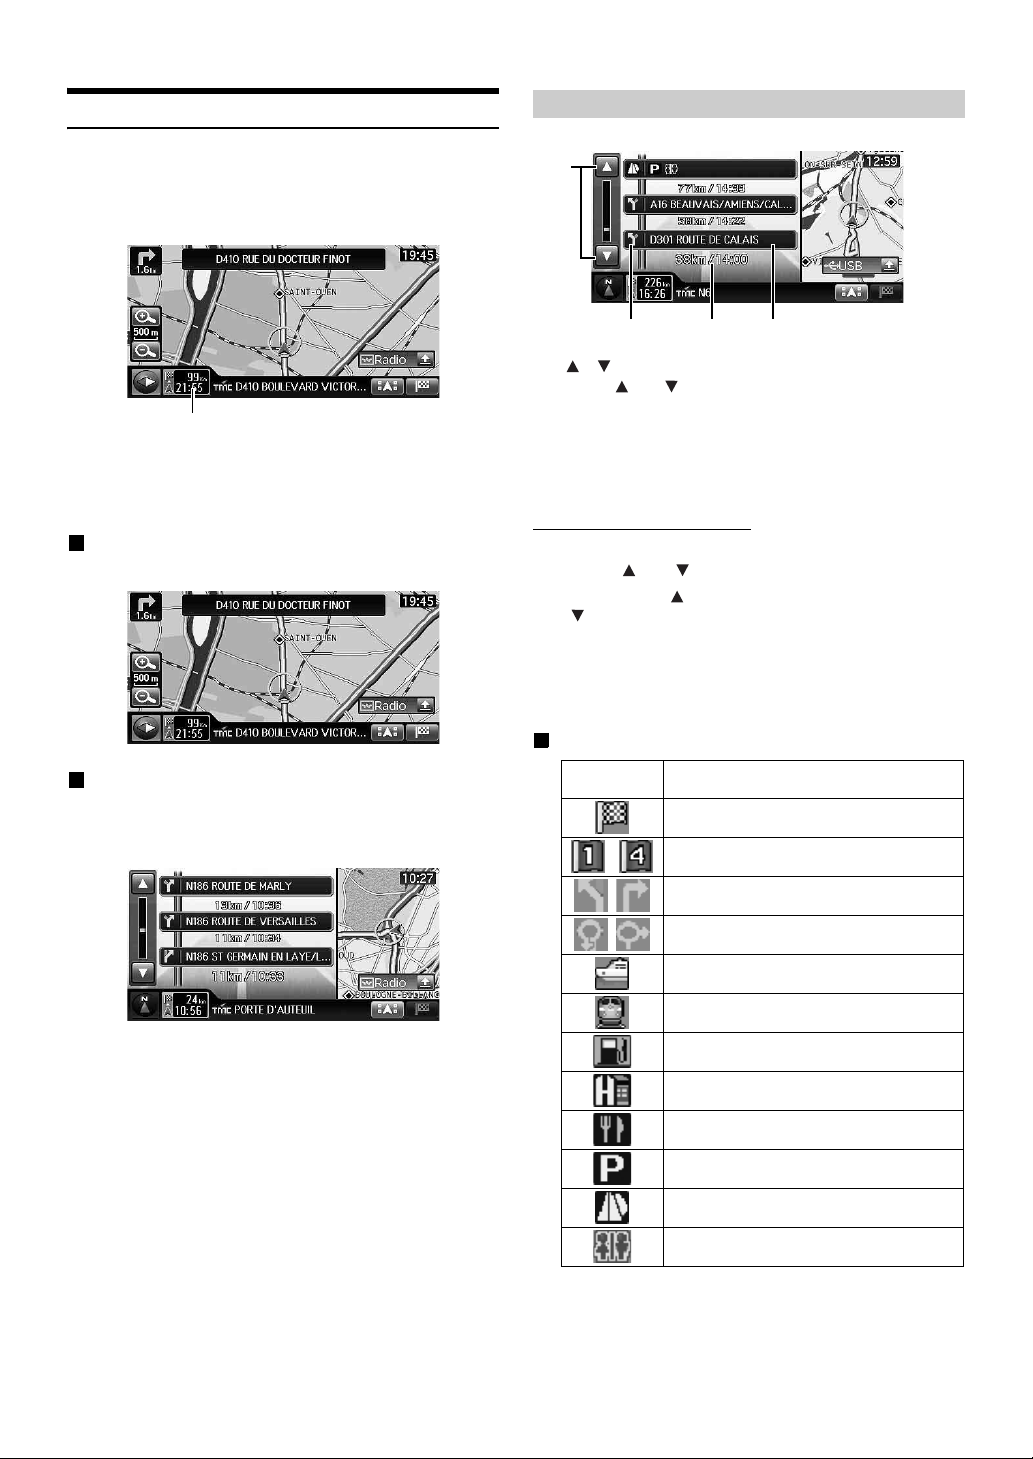
Changing the Map Mode
About the Manoeuvre List Screen
The map mode can be changed according to the situation.
1
When the route is set, touch the Destination
information switch.
Destination information switch
Each time you touch the Destination information switch, the
map mode changes.
Map screen ➝ Manoeuvre list screen ➝ Map screen
Map screen
The regular map is displayed.
a
cb
a /
Touch [ ] or [ ] to scroll the manoeuvre list.
b Turn direction at the guidance point.
c Distance to the next guidance point / the required
time
d Name of guidance point
Scrolling the Manoeuvre List
1
Touch [ ] or [ ].
You can touch [ ] to display the next manoeuvre list, and
[ ] to display the previous manoeuvre list. You can also
touch and hold to scroll the manoeuvre list continuously.
2
To return from the manoeuvre list to the present
location, press <NAV>.
d
Manoeuvre list screen
During the route guide, the distance between the guide point ahead and
the current position is displayed on the left. The map is displayed on the
right.
• The right map always shows the vehicle position (it cannot be
scrolled).
• The Manoeuvre list screen cannot be displayed if the destination is
not set.
• Roundabouts are also displayed in the Manoeuvre list screen. When
the destination or a waypoint is set on a roundabout, the roundabout
is displayed ahead of the destination/waypoint.
• The map display on the right side of the screen switches the head up
display when the screen displays the 3D map.
Information shown about a rest area, etc.
Symbol Legend
Destination
~ Waypoint
Intersection with guidance
Roundabout with guidance
Ferr y terminal
Train station
Petrol station
Hotel
Restaurant
Car park
Rest area
Toilet
26-EN
Display the POI Icon
About Congestion Areas
You can display the POI Icon on the map. You can also display the POI
Icon in the Setup screen.
Refer to “Setting the POI Icon Display” (page 101) on Setup.
1
Touch [ ] on the present location screen.
The POI selection screen is displayed.
2
Touch the desired POI icon.
• Touch [More] to select the POI Icon in all categories. After
this operation, refer to step 2-4 of “Setting the POI Icons
Display Category” (page 102).
3
Touch [OK].
The selected POI Icon is displayed on the map.
• Touch [Hide] in step 2 to hide the POI Icon. The [Hide]
switch changes [Show]. Touch [Show] to display the POI
Icon again.
• The POI icons can be displayed on the detailed map with 200 m (200
yards) or less of scale.
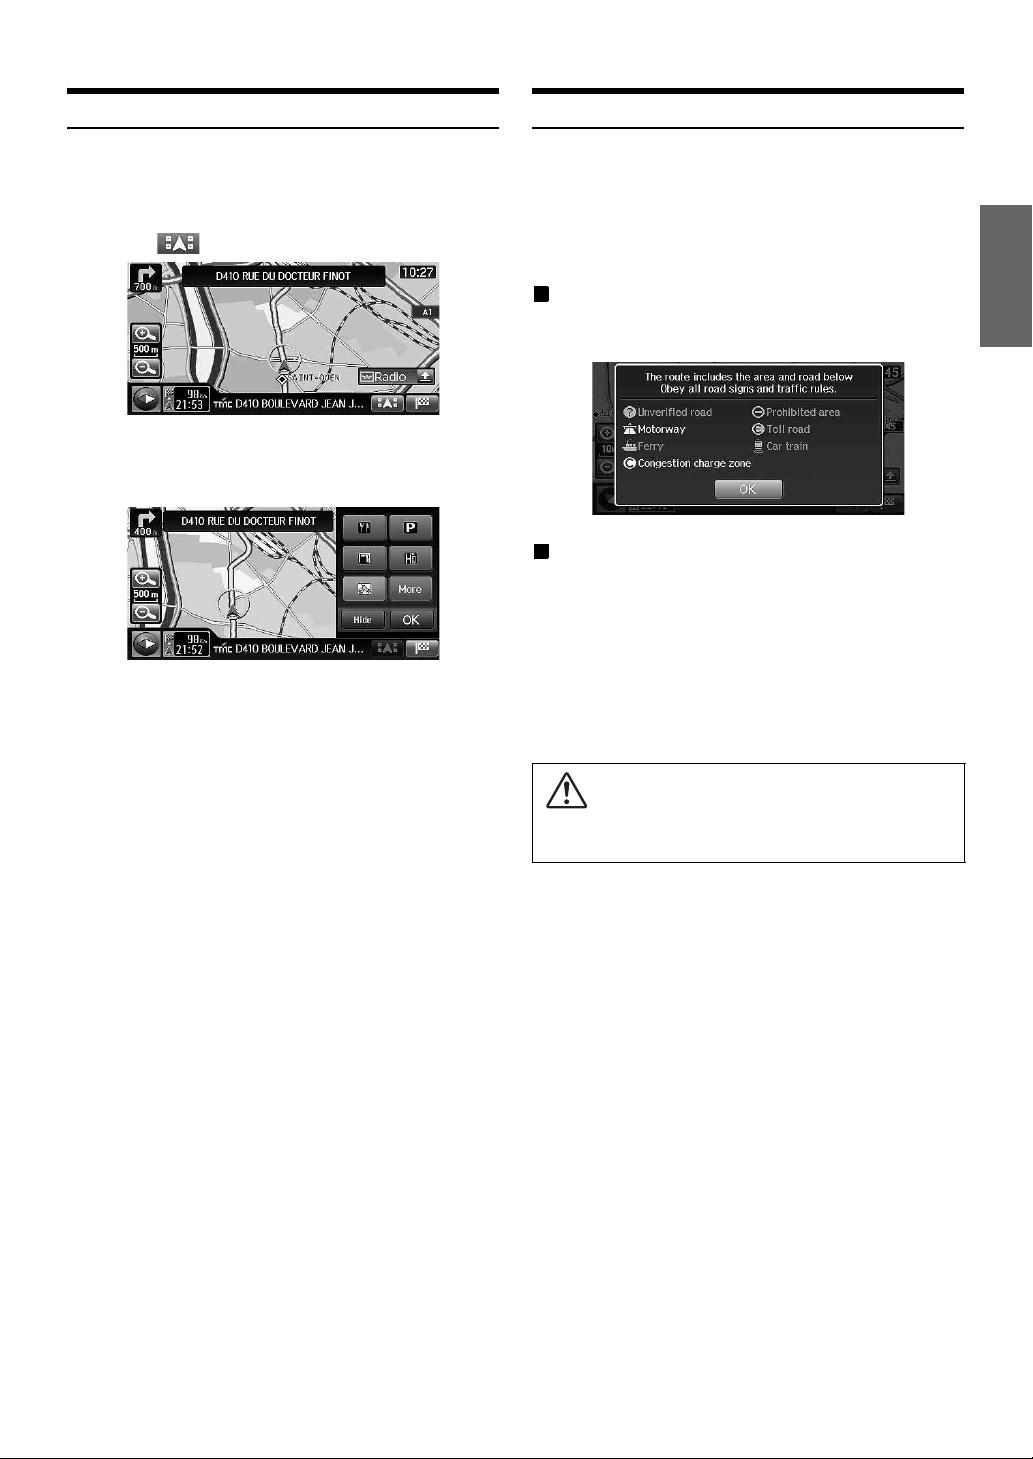
Areas in London, for example, where a congestion tax has been
introduced, display streets in a different colour on the map (scale 2 km/1
mile or less). You can also search for a detour of a congested area.
• To automatically find a congestion area detour during a search, set
“Congestion charge zone” to Off in the road preference setting. For
details, see page 39.
If “Congestion charge zone” is set to Off
If the destination is set in a congestion area and a route is searched, a
confirmation message is shown.
If “Congestion charge zone” is set to On
Even if the destination is set in a congestion area, the route is searched
as usual.
• When the current vehicle position is in a congestion area, a route is
searched, regardless of the congestion area setting.
• If “Congestion charge zone” is set to Off after the destination has
been set for a congested area, an alternate route through the
congested area will be searched. If you want to avoid the congested
area, do another search, setting the destination outside the congested
area.
Caution
If “Congestion charge zone” is set to Off, in searching for a route
through a congested area, decide your own detour route.
27-EN
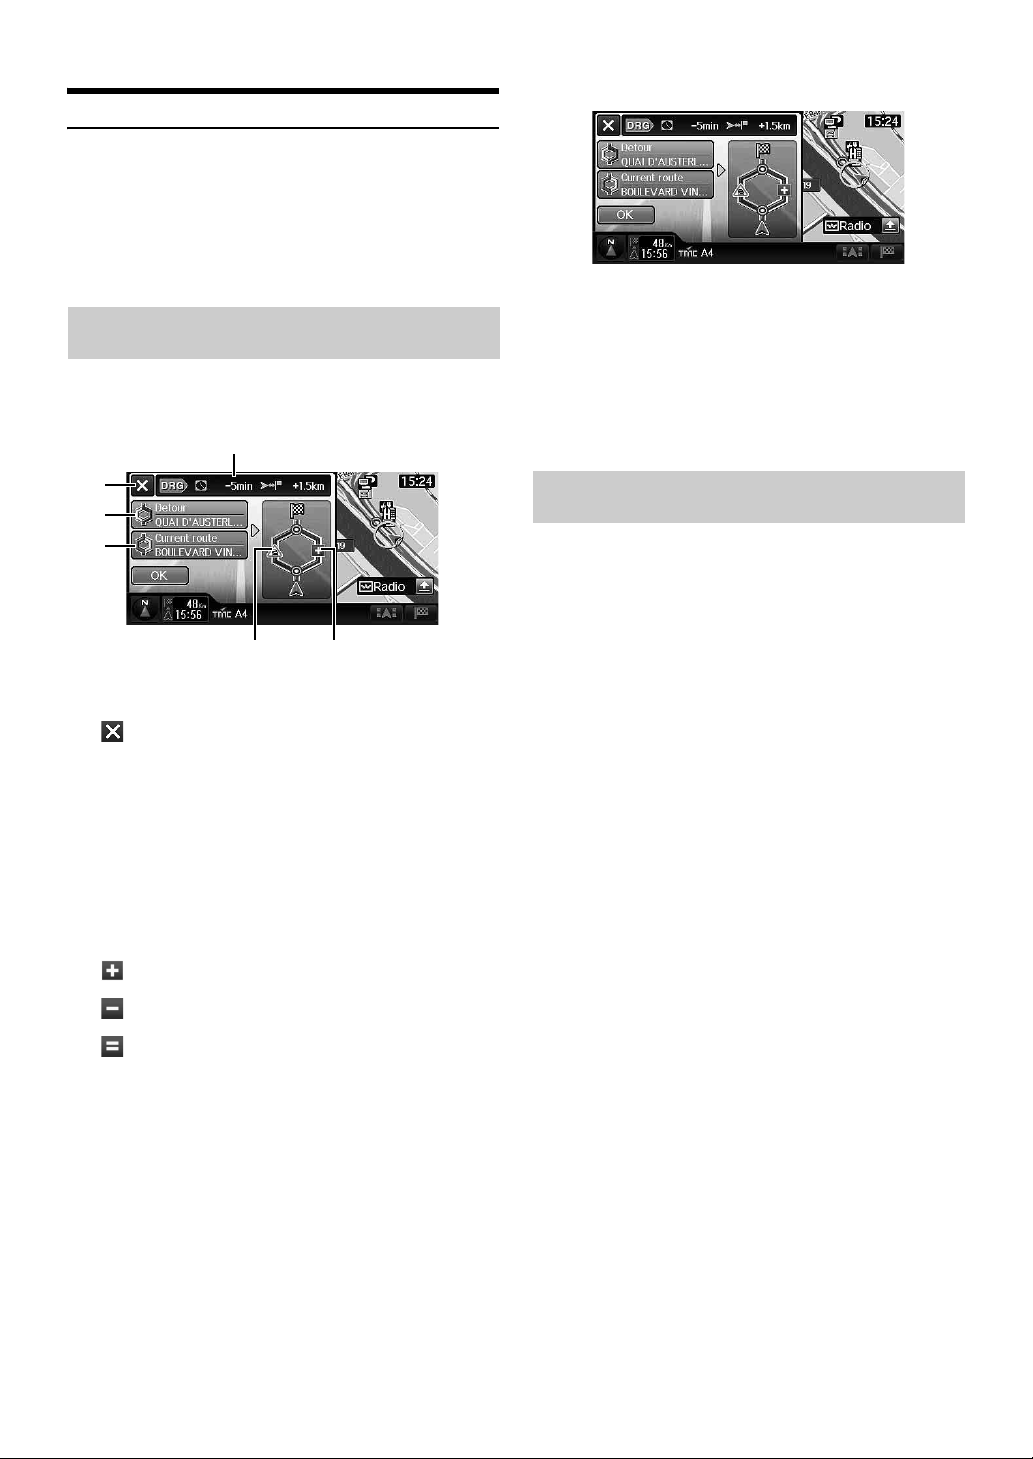
About Dynamic Route Guidance
The DRG (dynamic route guidance) updates traffic changes from
moment to moment, providing you with a more accurate anticipated
arrival time.
The dynamic route guidance is performed based on TMC restriction
event (accident, traffic congestion, etc.). When an optimal route is
found, the message is shown in the display and automatically changes
the route (when the DRG is set to Auto). For details, refer to page 103.
If the Dynamic route guidance is set to
Manual
If an optimal route is found using the dynamic route guidance function,
the DRG screen appears. You can select a Detour route or the Current
route.
1
1
Touch [Detour] or [Current route].
2
Touch [OK].
The route is changed or remains on the current route, and
the guidance starts.
• If there is no operation for 30 seconds, the current route is selected.
• While the DRG screen is displayed, if you drive along the detour
route, the detour route is selected. If you drive along the current
route, the current route is selected.
2
3
4
65
1 DRG information display
The time reduction and distance reduction/increase appear.
2 switch
Close the DRG screen display and continue the guidance
along the current route.
3 Detour route selection switch
The street name is displayed.
4 Current route selection switch
The street name is displayed.
5 Current route information display
The TMC event icon that causes the detour is displayed.
6 Detour route information display
The distance reduction/increase indication icons
: The distance will be increased compared with the
current route distance.
: The distance will be reduced compared with the
current route distance.
: The distance will be equal to the current route
distance.
If the Dynamic Route Guidance is set to
Auto
If an optimal route is found using the Dynamic Route Guidance
function, the route will be automatically changed to a new route.
• The distance for a newly searched route may be longer than the
current one.
28-EN
Loading…
Manual
View the manual for the Alpine INE-S900R here, for free. This manual comes under the category navigators and has been rated by 3 people with an average of a 7.3.
This manual is available in the following languages: English. Do you have a question about the Alpine INE-S900R or do you need help?
Ask your question here
Alpine INE-S900R specifications
Below you will find the product specifications and the manual specifications of the Alpine INE-S900R.
The navigator Alpine INE-S900R features a 6.1-inch LCD display with a resolution of 480 x 234 pixels, providing a clear and detailed view. Users can easily navigate through the various functions using the touchscreen interface. The unit is equipped with Bluetooth technology, allowing for hands-free calling and audio streaming from compatible devices.
With dimensions of 178 millimeters in width, 100 millimeters in depth, and 160 millimeters in height, the navigator is compact and can be installed easily in most vehicles. Weighing 2300 grams, it is relatively lightweight and portable.
The Alpine INE-S900R supports a variety of audio formats including AAC, MP3, and WMA, giving users flexibility in playing their favorite music. While it does not have specific features for marine, sport, or outdoor activities, it excels in providing a comprehensive navigation experience for drivers.
The standout feature of the Alpine INE-S900R is the innovative ONE LOOK NAVI interface, which allows users to customize their display with navigation maps, music sources, phone functions, and more. The ability to shift between main and side screens offers convenience and versatility to suit different driving scenarios.
Overall, the Alpine INE-S900R is a versatile and user-friendly navigator that enhances the driving experience with its advanced features and customizable interface.
Display resolution
480 x 234 pixels
Audio formats supported
AAC, MP3, WMA
Operating temperature (T-T)
-20 — 60 °C
General
| Brand | Alpine |
| Model | INE-S900R | INE-S900R |
| Product | navigator |
| EAN | 4958043523931 |
| Language | English |
| Filetype | User manual (PDF) |
Display
| Display resolution | 480 x 234 pixels |
| Display | LCD |
| Touchscreen | Yes |
| Display diagonal | 6.1 « |
| Widescreen | — |
Network
Weight & dimensions
| Width | 178 mm |
| Depth | 100 mm |
| Height | 160 mm |
| Weight | 2300 g |
Design
| Product color | Black |
| Form factor | Fixed |
Performance
| Audio formats supported | AAC, MP3, WMA |
| Text-to-speech message reader | — |
| DVD player | Yes |
| CD player | Yes |
| Built-in speaker(s) | — |
| Built-in camera | No |
Operational conditions
| Operating temperature (T-T) | -20 — 60 °C |
GPS type
| Marine (chartplotters, sounders) | No |
| Sport (fitness, running) | No |
| Outdoor (hiking, trekking) | No |
| Geocaching (GPS stash hunt) | No |
| Auto | Yes |
| Aviation | No |
| No | |
| Truck | No |
| Camper/Caravan | No |
| Bicycle | No |
| Golf | No |
Navigation
| Traffic Message Channel (TMC) | Yes |
| Live service | — |
| Live Traffic Message Channel (TMC) | — |
| Languages support | — |
Map
| Maps included | Yes |
| Map coverage | All Europe |
Memory
| Storage media type | — |
| Compatible memory cards | — |
Radio
| Supported radio bands | Not supported |
Power
| Power source type | DC |
| Battery technology | — |
show more
Frequently Asked Questions
Can’t find the answer to your question in the manual? You may find the answer to your question in the FAQs about the Alpine INE-S900R below.
Does the Alpine INE-S900R have a touchscreen display?
Yes, the Alpine INE-S900R has a touchscreen display. This means that users can easily navigate through menus and access different features by simply touching the screen.
What is the resolution of the display on the Alpine INE-S900R?
The display resolution of the Alpine INE-S900R is 480 x 234 pixels. This resolution ensures clear and sharp visuals for the user, making it easier to view maps and other information.
Can the Alpine INE-S900R play audio files in different formats?
Yes, the Alpine INE-S900R supports various audio formats such as AAC, MP3, and WMA. This provides users with flexibility in playing their favorite music or audio files while on the go.
Is the Alpine INE-S900R suitable for marine activities or chartplotters?
No, the Alpine INE-S900R is not designed for marine activities or chartplotters. It is primarily designed for use in automotive applications, providing navigation and entertainment features for car owners.
Does the Alpine INE-S900R cater to specific vehicle types like trucks or campers?
No, the Alpine INE-S900R is not specifically designed for trucks or campers. It is primarily intended for use in regular automobiles. So, users with trucks or campers may need to consider other options that better cater to their specific needs.
How do I access the SD memory card that comes with the Alpine INE-S900R navigator?
To access the SD memory card that comes with the Alpine INE-S900R navigator, follow these steps:
1. Remove the cover of the SD memory card slot located on the left side of the system.
2. Press the SD memory card that is inserted into the slot.
3. The SD memory card will then come out of the slot.
Please note the following precautions:
— Do not insert the SD memory card into another device, such as a computer, as it may cause data corruption.
— Do not remove the SD memory card while the INE-S900R is in operation.
These steps will allow you to access the SD memory card in the Alpine INE-S900R navigator.
What should I do if I cannot find a specific control button on the Alpine INE-S900R navigator?
If you cannot find a specific control button on the Alpine INE-S900R navigator, follow these steps:
1. Check the location of the control buttons mentioned in the manual. Refer to the section «Locatie van de bedieningselementen» (Location of the controls) for a detailed description of the buttons and their positions on the navigator.
2. Make sure you are looking for the correct button based on its function. The manual provides information on the purpose of each button, so refer to the relevant sections to understand the intended use of the button you are searching for.
3. If you still cannot locate the specific control button, try using the menu button or touchscreen interface to access the desired function. The manual provides instructions on navigating the menu and using the touchscreen, so refer to the appropriate sections for guidance.
4. If all else fails, consult the troubleshooting section of the manual for further assistance. The troubleshooting section may provide solutions for common issues related to control buttons or offer alternative methods to access certain functions.
By following these steps, you should be able to address the issue of not finding a specific control button on the Alpine INE-S900R navigator.
How do I pair and use the optional remote control (RUE-4202) with the Alpine INE-S900R navigator?
To pair and use the optional remote control (RUE-4202) with the Alpine INE-S900R navigator, follow these steps:
1. Locate the AUX INPUT on the back of the INE-S900R navigator. It is a set of video/audio input connectors.
2. Connect the RCA extension cable (sold separately) to the AUX INPUT connectors. The extension cable will allow you to connect the remote control.
3. Connect the remote control cable to the extension cable. The remote control cable carries the control signals from the remote control to the navigator.
4. Make sure the remote control is set to the «ON» position. This is usually indicated by a switch or button on the remote control itself.
5. Test the remote control by pressing the buttons and verifying that the navigator responds accordingly. You should be able to control various functions of the INE-S900R using the remote control.
By following these steps, you should be able to pair and use the optional remote control (RUE-4202) with the Alpine INE-S900R navigator.
What should I do if the optional interface box for the remote control is not working with the Alpine INE-S900R navigator?
If the optional interface box for the remote control is not working with the Alpine INE-S900R navigator, follow these steps:
1. Check if the optional interface box is properly connected to the INE-S900R navigator. Ensure that all cables are securely plugged into their respective ports.
2. Verify that the optional interface box is compatible with the INE-S900R navigator. Refer to the product specifications or consult the manufacturer’s website to confirm compatibility.
3. Make sure the optional interface box is receiving power. Check if the power indicator light on the interface box is illuminated. If not, check the power connection and ensure that the power source is functioning correctly.
4. Reset the optional interface box by disconnecting it from the power source for a few seconds, then reconnecting it. This can help resolve any temporary issues or glitches.
5. If the issue persists, consider contacting Alpine customer support for further assistance. They can provide specific troubleshooting steps or recommend any necessary repairs or replacements.
By following these steps, you should be able to address the issue of the optional interface box not working with the Alpine INE-S900R navigator.
How do I use the touch buttons (e.g., [Destination]) and the buttons on the housing (e.g., <MENU>) of the Alpine INE-S900R navigator?
To use the touch buttons (e.g., [Destination]) and the buttons on the housing (e.g., <MENU>) of the Alpine INE-S900R navigator, follow these steps:
1. Power on the INE-S900R navigator by turning the vehicle’s ignition key to the ACC or ON position. The system will automatically turn on and display the home screen or the last mode screen.
2. To access specific functions or settings, use the touch buttons on the screen. For example, to set a destination, touch the [Destination] button on the screen and follow the on-screen prompts.
3. To navigate through menus and options, use the buttons on the housing. Press the <MENU> button to access the main menu. Use the arrow buttons (< >) to navigate through the menu options. Press the <ENTER> button to select an option.
4. When using the touch buttons, lightly touch the screen with the soft part of your finger to avoid damaging the screen. If there is no response to your touch, remove your finger and try again.
5. Common touch buttons include the [Return] button, which takes you back to the previous screen, and the [Close] button, which closes a window or dialog box.
By following these steps, you should be able to effectively use the touch buttons and buttons on the housing of the Alpine INE-S900R navigator.
What is the weight of the Alpine INE-S900R?
The Alpine INE-S900R has a weight of 2300 g.
What is the height of the Alpine INE-S900R?
The Alpine INE-S900R has a height of 160 mm.
What is the width of the Alpine INE-S900R?
The Alpine INE-S900R has a width of 178 mm.
What is the depth of the Alpine INE-S900R?
The Alpine INE-S900R has a depth of 100 mm.
What is the screen size of the Alpine INE-S900R?
The screen size of the Alpine INE-S900R is 6.1 «.
What is the screen resolution of the display of the Alpine INE-S900R?
The screen resolution of the Alpine INE-S900R is 480 x 234 pixels.
Do I need internet for GPS?
No, no internet is required to receive GPS.
Can I update the maps of my navigation system?
With most navigation systems it is possible to update maps. Most brands periodically update the maps.
What is GPS?
GPS is a system that can be used all over the globe to determine your location by means of satellites.
What does the abbreviation GPS stand for?
The abbreviation GPS stands for ‘Global Positioning System’.
Is the manual of the Alpine INE-S900R available in English?
Yes, the manual of the Alpine INE-S900R is available in English .
Is your question not listed? Ask your question here
Скачать
R
EN
FOR CAR USE ONLY
Advanced Navi Station
INE-S900R
OWNER’S MANUAL
Please read before using this equipment.
A good user manual
The rules should oblige the seller to give the purchaser an operating instrucion of Alpine INE-S900R, along with an item. The lack of an instruction or false information given to customer shall constitute grounds to apply for a complaint because of nonconformity of goods with the contract. In accordance with the law, a customer can receive an instruction in non-paper form; lately graphic and electronic forms of the manuals, as well as instructional videos have been majorly used. A necessary precondition for this is the unmistakable, legible character of an instruction.
What is an instruction?
The term originates from the Latin word „instructio”, which means organizing. Therefore, in an instruction of Alpine INE-S900R one could find a process description. An instruction’s purpose is to teach, to ease the start-up and an item’s use or performance of certain activities. An instruction is a compilation of information about an item/a service, it is a clue.
Unfortunately, only a few customers devote their time to read an instruction of Alpine INE-S900R. A good user manual introduces us to a number of additional functionalities of the purchased item, and also helps us to avoid the formation of most of the defects.
What should a perfect user manual contain?
First and foremost, an user manual of Alpine INE-S900R should contain:
— informations concerning technical data of Alpine INE-S900R
— name of the manufacturer and a year of construction of the Alpine INE-S900R item
— rules of operation, control and maintenance of the Alpine INE-S900R item
— safety signs and mark certificates which confirm compatibility with appropriate standards
Why don’t we read the manuals?
Usually it results from the lack of time and certainty about functionalities of purchased items. Unfortunately, networking and start-up of Alpine INE-S900R alone are not enough. An instruction contains a number of clues concerning respective functionalities, safety rules, maintenance methods (what means should be used), eventual defects of Alpine INE-S900R, and methods of problem resolution. Eventually, when one still can’t find the answer to his problems, he will be directed to the Alpine service. Lately animated manuals and instructional videos are quite popular among customers. These kinds of user manuals are effective; they assure that a customer will familiarize himself with the whole material, and won’t skip complicated, technical information of Alpine INE-S900R.
Why one should read the manuals?
It is mostly in the manuals where we will find the details concerning construction and possibility of the Alpine INE-S900R item, and its use of respective accessory, as well as information concerning all the functions and facilities.
After a successful purchase of an item one should find a moment and get to know with every part of an instruction. Currently the manuals are carefully prearranged and translated, so they could be fully understood by its users. The manuals will serve as an informational aid.
Русский
- Bedienungsanleitung Alpine INE-S900R
- Alpine INE-S900R User Manual
- Manual Usuario Alpine INE-S900R
- Mode d’emploi Alpine INE-S900R
- Istruzioni Alpine INE-S900R
- инструкция Alpine INE-S900R
- Alpine INE-S900Rの取扱説明書
- Handleiding Alpine INE-S900R
- Manual de uso Alpine INE-S900R
Вам нужна инструкция? Мы поможем Вам ее найти и сэкономить Ваше время.
- 151 stron
- 0 mb
Изделие Alpine INE-S900R, а также другие, которыми Вы пользуетесь ежедневно, наверняка вы получили в комплекте с инструкцией обслуживания. Из опыта наших пользователей мы знаем, что большинство из Вас не уделили этому особого внимания. Большая часть инструкций, сразу же после покупки попадает в корзину для мусора вместе с коробкой — это ошибка. Ознакомьтесь с информацией, касающейся инструкции Alpine INE-S900R, которая поможет Вам в будущем сэкономить нервы и избежать головной боли.
Важная подсказка — не забывайте хотя бы раз прочитать инструкцию Alpine INE-S900R
Если вы не хотите каждый раз читать информационные брошюры, касающиеся, тех или Alpine INE-S900R иных изделий, достаточно, прочитать их раз — сразу же после покупки устройства. Вы получите основное знания, касающиеся поддержания изделия Alpine INE-S900R в хорошем эксплуатационном состоянии, так, чтобы без проблем достигнуть его планируемого цикла работы. Затем инструкцию можно отложить на полку и вернуться к ней только в случае, если вы не уверены, правильно ли проводится техобслуживание изделия. Правильный уход является необходимым элементом Вашего удовольствия Alpine INE-S900R.
Раз в году пересмотрите шкафчик, в котором держите инструкции для всех устройств, — выбросите те, которыми вы уже не пользуетесься. Это поможет Вам сохранять порядок в своей домашней базе инструкций обслуживания.
Summary of Contents for Alpine INE-S900R
Что находится в инструкции Alpine INE-S900R? Почему стоит ее прочитать?
- Гарантия и подробности, касающиеся техобслуживания изделия
Хорошей идеей будет прикрепить чек к странице инструкции. Если что-то плохое случится во время использования Alpine INE-S900R, у вас будет комплект документов, необходимый для гарантийного ремонта. В этой части инструкции вы найдете информацию об авторизованных сервисных центрахAlpine INE-S900R а также, как самостоятельно правильно ухаживать за оборудованием — так, чтобы не потерять гарантийных прав. - Указания по монтажу и Setup
Не терять нервов и времени на самостоятельную попытку установки и первого запуска изделия. Воспользуйтесь рекомендациями производителя Alpine INE-S900R чтобы правильно запустить изделие, без лишнего риска повреждения оборудования. - Информация, касающаяся дополнительных запчастей (входящих в комплект а также являющихся опцией)
Пересматривая эту часть документа вы сможете проверить, доставлен ли ваш Alpine INE-S900R с полним комплектом аксессуаров. Вы также сможете узнать, какие дополнительные запчасти или аксессуары для Alpine INE-S900R Вы сможете найти и докупить к своему устройству. - Troubleshooting
Самые частые проблемы, касающиеся Alpine INE-S900R и методы их решения. Это очень полезная часть руководства по обслуживанию — она позволит Вам сэкономить много времени на поиск решений. 90% проблем с Alpine INE-S900R повторяется у многих пользователей. - Требования, касающиеся питания и энергетический класс
Информация, касающаяся количества потребляемой энергии, а также рекомендации, касающиеся установки и питания Alpine INE-S900R. Прочитайте, чтобы оптимально пользоваться Alpine INE-S900R и не использовать большего количества ресурсов, нежели это необходимо для правильной работы изделия. - Специальные функции Alpine INE-S900R
Здесь вы можешь узнать, как персонализировать изделие Alpine INE-S900R. Вы узнаете, какие дополнительные функции могут помочь Вам удобно использовать продукт Alpine INE-S900R а также, какие функции Вашего устройства оптимальны для выполнения конкретной деятельности.
Как видите в инструкции вы найдете информацию, которая реально поможет Вам в использовании Вашего изделия. Стоит с ней ознакомиться, чтобы избежать разочарований, возникающих из более короткого, нежели предусматривалось, периода исправности изделия Alpine INE-S900R. Если все же вы не хотите копить инструкции в своем доме, наш сайт поможет Вам в этом — вы должны найти у нас руководство по обслуживанию большинства из своих устройств, а также Alpine INE-S900R.