
Описание
Модель AR-Mini является типичным представителем сканирующих приемников предназначенных для начинающих пользователей еще не уверенных в том что они с головой уйдут в радиомониторинг, но все же желающие приобрести пусть и простой, но надежный приемник.
Краткие технические характеристики широкополосного приемника AOR AR-Mini:
Диапазон частот на прием: 100 кГц-1299 МГц
Тип приемника: супергетеродин с тройным преобразованием
Скорость сканирования, каналов / сек: 8
Виды модуляции: AM FM NFM WFM
Шаг подстройки частоты, кГц: 5 6.25 8.33* 9* 10 12.5 15 20 25 30 50 100
Антенный разъем на приемнике: SMA-мама
Диапазон рабочих температур, °С: -10…+50
Особенности AOR AR-Mini:
- Наблюдение за приоритетным каналом
- 2 ГПД
- Перенос настроек (с прибора на прибор или посредством ПК)
- Память на каналы пропуска
- Аттенюатор приёма
- Возможно использование кабеля наушников в качестве антенны
- Встроенная ферритовая антенна для AM-передач (10 кГц – 5 МГц)
- Функция энергосбережения, таймер автоматического выключения
- Шаг настройки: автоматический с возможностью выбора вручную
- Индикатор уровня сигнала
- Индикатор низкого заряда батарей
|
Технические характеристики сканирующего приемника AOR AR-Mini |
|||
|
Рабочий диапазон |
100 кГц — 1299,995 МГц *) |
||
|
Тип приёмника |
AM, FM: супер-гетеродин с тройным преобразованием частоты |
||
|
WFM: супер-гетеродин с двойным преобразованием частоты |
|||
|
Режимы приёма |
AM, WFM, NFM |
||
|
Ширина ПЧ |
AM/NFM: 15 кГц; WFM: 220 кГц |
||
|
Каналов памяти |
1000 (10 банков по 100 каналов) |
||
|
Скорость сканирования |
8 шагов в секунду |
||
|
Избранные каналы сканирования |
100 |
||
|
Кол-во приоритетных каналов |
1 |
||
|
Кол-во пропускаемых частот |
100 |
||
|
Номинальная чувствительность |
AM |
0,2 — 5 МГц |
1,3 мкВ |
|
5 — 160 МГц |
0,6 мкВ |
||
|
160 — 370 МГц |
0,6 мкВ |
||
|
370 — 520 МГц |
0,6 мкВ |
||
|
520 — 1300 МГц |
0,7 мкВ |
||
|
FM |
5 — 160 МГц |
0,2 мкВ |
|
|
160 — 370 МГц |
0,2 мкВ |
||
|
370 — 520 МГц |
0,28 мкВ |
||
|
520 — 1300 МГц |
0,35 мкВ |
||
|
WFM |
5 — 160 МГц |
0,9 мкВ |
|
|
160 — 370 МГц |
0,8 мкВ |
||
|
370 — 520 МГц |
1 мкВ |
||
|
520 — 1300 МГц |
1 мкВ |
||
|
Промежуточные частоты |
243,95 МГц, 21,7 МГц, 450 кГц |
||
|
Шаги настройки |
5, 6,25, 8,33 *, 9 *, 10, 12,5, 15, 20, 25, 30, 50, 100 кГц ( * — в зависимости от диапазона) |
||
|
Избирательность |
AM/FM: более 15 кГц при -6 дБ |
||
|
WFM: более 110 кГц при -6 дБ |
|||
|
Общее паразитное излучение |
Менее 54 дБм 3) |
||
|
Стабильность частоты |
+/- 2,5 ppm 2) |
||
|
Мощность УМЗЧ |
100 мВт при кни=10% и нагрузке в 8 Ом |
||
|
Разъём внешнего громкоговорителя |
Двухконтактный TRS 3,5 мм |
||
|
Антенный разъём |
SMA (50 Ом) |
||
|
Элементы питания |
Два элемента типоразмера АА (LR6), щелочные батареи или NiMH-аккумуляторы |
||
|
Время работы от батарей |
Около 22 часов в режиме нормального прослушивания |
||
|
Внешнее питание |
6 В пост., 500 мА |
||
|
Ток потребления |
100 мА (приём, 50 мВт на аудиовыходе) |
||
|
20 мА (простой, функция энергосбережения установлена на 1:4) |
|||
|
65 мА (простой, функция энергосбережения выключена) |
|||
|
Рабочая температура |
от -10 до +50 °C |
||
|
Габариты, мм |
ширина 50 х высота 95 х глубина 24 |
||
|
Вес |
210 г (с антенной и элементами питания) |
Комплект поставки портативного приемника AOR AR-Mini:
- Приемник AOR AR-Mini
- Антенна широкополосная
- AA-Mini Сетевой адаптер вешнего питания, зарядное устройство
- Аккумуляторы Ni-MH, АА-типа (LR06), 2шт
- Клипса ременного крепления
- Кистевой ремешок
- Инструкция по эксплуатации AOR AR-Mini
- Оригинальные аксессуары для сканера AOR ARMini:
- AA-Mini Сетевой адаптер внешнего питания, зарядное устройство
- DC-Mini Автомобильное зарядное устройство / источник внешнего питаня
- SC-Mini Чехол кожаный
- CO-Mini кабель для клонирования настроек приемника AOR AR-Mini
- PC-Mini Кабель для программирования, USB
- AD-92SMA высокочастотный SMA-BNC переходник на внешнюю антенну
Назад в раздел
Оставить запрос о цене и наличии
Ранее просмотренные товары
| Виды модуляции | AM FM NFM WFM |
| Диапазон частот на прием | 100 кГц-1299 МГц |
| Скорость сканирования, каналов / сек | 8 |
Краткие технические характеристики широкополосного приемника AOR AR-Mini:
Диапазон частот на прием: 100 кГц-1299 МГц
Тип приемника: супергетеродин с тройным преобразованием
Скорость сканирования, каналов / сек: 8
Виды модуляции: AM FM NFM WFM
Шаг подстройки частоты, кГц: 5 6.25 8.33* 9* 10 12.5 15 20 25 30 50 100
Антенный разъем на приемнике: SMA-мама
Диапазон рабочих температур, °С: -10…+50
Комплект поставки портативного приемника AOR AR-Mini:
Приемник AOR AR-Mini
Антенна широкополосная
AA-Mini Сетевой адаптер вешнего питания, зарядное устройство
Аккумуляторы Ni-MH, АА-типа (LR06), 2шт
Клипса ременного крепления
Кистевой ремешок
Инструкция по эксплуатации AOR AR-Mini
Оригинальные аксессуары для сканера AOR ARMini:
AA-Mini Сетевой адаптер внешнего питания, зарядное устройство
DC-Mini Автомобильное зарядное устройство / источник внешнего питания
SC-Mini Чехол кожаный
CO-Mini кабель для клонирования настроек приемника AOR AR-Mini
PC-Mini Кабель для программирования, USB
AD-92SMA высокочастотный SMA-BNC переходник на внешнюю антенну
COMMUNICATIONS RECEIVER
100 kHz – 1299.995 MHz
COMMUNICATIONS RECEIVER AR-mini
ATT
SEL
V/M SCAN MODE
SKIP TSQ
L.SRCH TONEMW
DW
PW
PWR
V.1.1
Dec.18, 2008
OPERATING MANUAL
FCC WARNING
Changes or modifications not expressly approved by the party responsible for
compliance could void the user’s authority to operate the equipment.
■ Part15 class B
NOTICE:
This equipment has been tested and found to comply with the limits for a Class
B digital device, pursuant to part 15 of the FCC Rules. These limits are designed
to provide reasonable protection against harmful interference in a residential
installation.
This equipment generates, uses and can radiate radio frequency energy and, if
not installed and used in accordance with the instructions, may cause harmful
interference to radio communications. However, there is no guarantee that
interference will not occur in a particular installation. If this equipment does cause
harmful interference to radio or television reception, which can be determined
by turning the equipment off and on, the user is encouraged to try to correct the
interference by one or more of the following measures:
●
Reorient or relocate the receiving antenna
●
Increase the separation between the equipment and receiver.
●
Connect the equipment into an outlet on a circuit different from that to which the
receiver is connected.
●
Consult the dealer or an experienced radio/TV technician for help.
■ Part15 Class C
This device complies with Part 15 of the FCC Rules. Operation is subject to the
following two conditions: (1) this device may not cause harmful interference, and (2)
this device must accept any interference received, including interference that may
cause undesired operation.
2

CONTENTS
FOR SAFETY ………………………………….5
INTRODU CTION …………………………….8
Contents list ……………………………………8
Part names and functions …………………9
Description of LCD (Liquid Crystal
Display) …………………………………….. 12
PREPARATION AND
BASIC USAGE ………………………………13
Connect the antenna ……………………..13
Attach the belt clip …………………………14
Tie the hand strap ………………………….14
Install the supplied Ni-MH batteries or
AA batteries ……………………………….15
Charge the supplied Ni-MH
batteri es ……………………………………. 16
Basic usage…………………………………..18
Quick guide: Scan frequencies
previously saved in a memory bank
Storing a frequency in memory bank …20
Scanning the memory bank ……………..20
Options list ……………………………………21
Using the DC-mini DC adapter ……….21
Using the CO-mini clone cable ……….22
Using the PC-mini programing
cable …………………………………………22
Preparati ons ………………………………….. 22
Connecting PC-mini ………………………..23
Connecting with the AR-mini …………….23
Running the PC-mini program …………..24
BASIC OPERATION ………………………25
Switching on …………………………………25
Adjusting the volume ……………………..26
Adjusting the frequency ………………….27
Adjusting the squelch …………………….28
Changing the mode ……………………….29
Monitorin g …………………………………….29
Setting the AR-mini ………………………..30
ADVANCED OPERATION ………………31
Finding the desired frequency …………31
Priority watch ………………………………..31
2VFO watch …………………………………..32
2VFO watch with 2VFO watch
reception memory ………………………33
……20
Changing the 2VFO watch reception
memor y …………………………………….. 33
VFO search ………………………………….34
Skipping the desired frequency in a
search ………………………………………. 34
Limit search ………………………………….35
Changing the search type ………………36
Changing the search band
memory …………………………………….36
Limit link search ……………………………37
Memor y ………………………………………..38
Storing a frequency in memory ……….39
Recalling memory ………………………….39
Returning to VFO with displaying
memory frequency ……………………..40
Erasing memory …………………………….40
Erasing all memories from the memory
bank …………………………………………. 41
Naming memory ……………………………42
Memory scanning ………………………….42
Setting skipped memory when
scanning ……………………………………43
Scanning the memory bank …………….43
Scanning a linked memory bank ……..44
Using broadcast facility ………………….45
Using preset ………………………………….45
Using tone squelch (CTCSS) …………..46
Searching tone frequency……………….46
Reversed tone squelch function ……… 47
Using DCS …………………………………….47
Using the voice inverter ………………….48
Using the attenuator ………………………48
Using key lock ……………………………….48
Searching bug frequencies ……………..49
Using the bug detector function ………49
Resetting system (system reset) ……..50
Resetting all contents (all reset) ………50
CHANGING SETTINGS …………………51
Changing steps …………………………….. 51
Changing fast steps ………………………. 51
Setting the lamp function ……………….52
Setting the timer ……………………………52
Setting the S-meter sensitivity ………..53
Setting the S-meter buzzer ……………..54
Setting the resumption time ……………54
3

CONTENTS
Setting the search ………………………….55
Setting the memory scan ……………….56
Setting the limit link search …………….57
Setting the memory for a memory
bank link scan …………………………….58
Confirming limit search frequencies …59
Erasing all memory from a memory
bank ………………………………………….59
Erasing VFO skip memory ………………60
Erasing the memory channel’s skip
mark …………………………………………. 61
Cancelling muting during a scan ……..61
Antenna selection ………………………….62
Using the earphone as an antenna …..62
Automatically increasing the volume in
FM …………………………………………….63
Setting tone frequency …………………..63
Selecting reversed tone frequency …..64
Selecting voice inverter carriers ………64
Automatically switching the display
informati on …………………………………6 5
Setting DCS codes ……………………….65
Setting the DCS code phases …………66
Turning the beep off ……………………….66
Changing the battery saving time …….67
Displaying battery voltage ……………… 67
Charging the Ni-MH battery ……………68
Revising step frequency …………………69
Shifting the microprocessor’s clock
freque ncy …………………………………..69
APPEND IX ……………………………………70
Broadcast facility frequencies …………70
Bug frequencies …………………………….70
Preset memory frequencies ……………71
Shortwave broadcast station list ……..72
Tone frequency list ( CTCSS)……………73
DCS code list ………………………………..73
Search band memory list ……………….. 74
2VFO watch memory list ………………… 74
Setting number list …………………………75
Troubleshooting ……………………………. 78
Specifications ……………………………….79
4
FOR SAFETY
To ensure proper use of the receiver,
carefully read the “For Safety” section
prior to use.
After you have read it, keep this
operating manual and the warranty
handy in case you need them in the
future.
Icon Labels
A variety of icon labels are used in
this operating manual to ensure safe
use of the product, to prevent injury
to yourself and others, and to prevent
property damage. Make sure you fully
understand the meanings of the icon
labels after reading this operating
manual.
This label is used in cases
WARNING
CAUTION
Icon label examples
A ▲ is used in cases where caution (danger,
warning) is urged. Inside the triangle, the
specific type of caution is indicated (in
Electric
the example shown here, the caution is an
shock
caution
electric shock caution).
A ● with a line through it is used in cases
where a particular action is not allowed.
Inside the circle, or near it, the specific type
of action which is not allowed is indicated
Disassembly
not allowed
(in the example shown here, disassembly is
not allowed).
A ● (black circle) is used to indicate an
action to be performed by the user. In the
example shown on the left, the action shown
Remove
is removal of the AC adapter power plug
plug from
outlet
from the wall outlet.
where there may be the
possibility of death or serious
injury.
This label is used in cases where
there may be the possibility of
serious or minor injury.
WARNING
• Do not insert anything metallic or
flammable into the equipment. Doing
so may result in fire or damage to the
equipment.
• Do not place any container filled with
Prohibition
plug from
Disassembly
not allowed
water or other liquids, or small pieces of
metal, on top of or near the AR-mini. In
such cases, fire may result if the liquid
is spilt on the AR-mini or if metal enters
the unit.
• Fire, electric shock, or damage to the
equipment may result if the charger is
used under abnormal conditions (e.g.,
if it is emitting smoke, or strange odors
or noises). In such cases, immediately
remove the AC adapter power plug
from the outlet. Make sure the charger
stops emitting smoke, then contact
your dealer to have it repaired. Never
try to repair the equipment yourself: it is
dangerous to do so.
• If water enters the AR mini or AC
adapter, remove the AC adapter
power plug from the power outlet and
contact your dealer. Using the charger
under such conditions may result in
fire, electric shock, or damage to the
Remove
equipment.
outlet
• If a foreign object enters the AR mini
or AC adapter, remove the AC adapter
power plug from the power outlet and
contact your dealer. Using the charger
under such conditions may result in
fire, electric shock, or damage to the
equipment.
• If you drop or damage the A R mini or
AC adapter, be sure to remove the AC
adapter power plug from the power
outlet and contact your dealer. Using
the charger under such conditions may
result in fire, electric shock, or damage
to the equipment.
• Do not disassemble or modify the
AR-mini and AC adapter. Doing so
may result in a fire, electric shock, or
damage to the equipment.
5
FOR SAFETY
WARNING
• Do not disassemble the battery. Doing
Disassembly
not allowed
Prohibition
Prohibition
Prohibition
Prohibition
so may cause the battery to leak, heat
up, or burst.
• Do not throw used batteries into a
fire. Batteries thrown into a fire may
explode, resulting in uncontrollable fire
or burns.
• Do not short-circuit the battery
Caution
terminals. Doing so may result in burns
due to heat buildup. A battery could be
shortcircuited if you carry it by itself.
• Do not use the AC adapter at voltages
other than 100–240 V with an AC
power supply. Doing so may result in
fire, electric shock, or damage to the
equipment.
• Do not use a power strip. Doing so may
result in fire or overheating.
• Only use the AC adapter that is designed
for use with the AR-mini. Using different
equipment may result in fire, electric
shock, or damage to the equipment.
• Do not modify, excessively bend, twist,
or pull on the AC adapter or DC output
cord. Doing so may result in fire or
electric shock.
• If the AC adapter or DC output cord is
damaged, have the cord replaced by the
dealer. Failure to do so may result in fire
or electric shock.
• Do not short-circuit the DC plug with
metal. Doing so may result in fire or
damage to the equipment.
• Do not charge the AR-mini if there are
any water droplets on the DC plug.
Doing so may result in fire or damage to
the equipment.
• If lightning occurs near the equipment,
remove the AC adapter power plug from
the power outlet. Lightning may cause
fire, electric shock, or damage to the
equipment.
WARNING
• Do not use the AC adapter as a power
supply for other equipment. Doing so
may result in fire, electric shock, or
damage to the equipment.
• Do not place any heavy object on the
power cord, and do not place the cord
Prohibition
beneath such equipment. Doing so may
damage the cord, resulting in fire or
electric shock. Note: If the cord is placed
under a carpet or the like, someone may
fail to notice the cord and inadvertently
place something heavy on top of it.
• Do not remove or insert the AC adapter
power plug with wet hands. Doing so
No wet
may result in electric shock.
hands
CAUTION
• If you are not going to be using the
AR-mini or AC adapter for an extended
length of time (e.g., if you are taking
a vacation ), be sure to remove the AC
adapter power plug from the outlet as a
safety precaution.
• Do not use the AR-mini or AC adapter in
humid or dusty locations. Doing so may
result in fire, electric shock, or damage
to the equipment.
• Use and store the AR-mini and AC
adapter in a location that is inaccessible
to small children.
• Do not use the AR-mini or AC adapter
on unstable surfaces. The units may
Remove
plug from
fall or be tipped over if installed in such
outlet
locations, resulting in injury or damage
to the equipment.
• Do not use the AR-mini or AC adapter
in locations subject to significant
vibrations or mechanical shocks.
The units may fall or be tipped over if
installed in such locations, resulting in
injury or damage to the equipment.
• Do not place the DC cord of the AC
adapter near a heater. In such cases,
the cord sheathing may melt, resulting
in fire or electric shock.
6

FOR SAFETY
CAUTION
• When removing the AC adapter power
plug, be sure to hold the plug as you
remove it. If you pull on the DC cord,
you may damage the cord, resulting in
fire or electric shock.
• Do not wipe the exterior with benzene
or paint thinner based liquid, and do not
Remove
plug from
Prohibition
apply insecticide near the AR-mini or
outlet
the AC adapter.
• Doing so may damage the sur face of the
units. To clean them properly, always
wipe the units with a soft, dry cloth.
• Do not use the AC adapter if it
affects nearby televisions, electronic
equipment, medical equipment, or the
like.
• Before moving the unit for charging,
remove the AC adapter power plug from
the outlet and confirm that it has been
disconnected. If this is not done, the
cord may be damaged, resulting in fire
or electric shock.
IMPORTANT
• Remove the AC adapter after approximately 20
hours have passed from the start of charging.
Failure to do so may result in over-charging of
the batteries.
• The AR-mini and AC adapter become warm
during the charging operation and immediately
after charging. This is normal.
• After the charging operation ends, do not
repeatedly charge the Ni-MH batteries. Doing
so may overcharge the Ni-MH batteries, causing
their performance to decline and shortening their
service life.
• Be sure to charge the batter y before using it
for the first time, and after not using it for an
extended length of time.
IMPORTANT
• When you charge the Ni-MH bat teries after not
using them for an ex tended length of time, the
charging operation will end before achieving
full charge, resulting in insufficient charge. This
happens because extended storage of the Ni-MH
battery makes it dif ficult to charge. In such
cases, if you charge and then discharge (use
until the bat tery has no more charge) the battery
two or three times in a row, the battery will again
charge properly.
• Fully use up the Ni-MH batteries’ charge before
recharging them. If the batteries are recharged
without first being fully depleted, they may not
charge properly even if the charging operation
is performed for a sufficient length of time. In
order to prevent such problems, we recommend
fully using up the batteries’ charge and then
recharging them at least once a month.
• The Ni-MH batteries’ service life under normal
use is approximately one year. If the batteries’
charge depletes quickly under normal use, even
when fully charged, they may be close to the
end of their ser vice life. In such cases, quickly
replace the batteries with new ones.
• If the charging terminals on the Ni-MH batteries
are dirty, it may not be possible to charge the
battery properly. Always clean the charging
terminals before charging the bat teries. If the
terminals become dir ty, wipe them with a dry
cloth.
7
INTRODUCTION
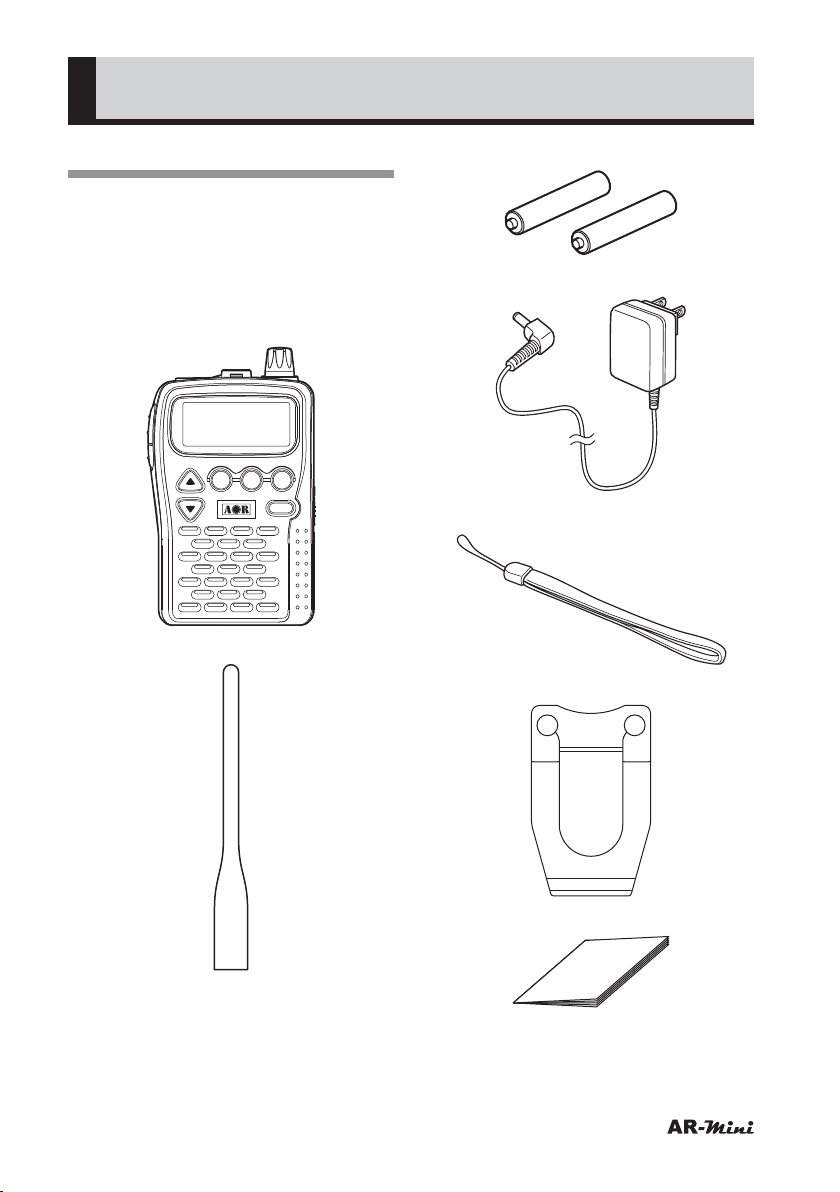
Contents List
When unpacking the AR-mini, please
check that the box contains the
following items.
If you find any item(s) to be missing,
please contact your dealer.
●
AR-mini Receiver
COMMUNICATIONS RECEIVER AR-mini
ATT
SEL
V/M SCAN MODE
L.SRCH TONEMW
SKIP TSQ
PWR
●
Antenna
DW
PW
●
Ni-MH Batteries
●
AC Adapter (AA-mini)
●
Hand Strap
●
Belt Clip (hook) with screws
●
Operating Manual
8
INTRODUCTION
V/M
SCAN
MODE
PWR
ATT
DW
SKIP TSQ
COMMUNICATIONS RECEIVER AR-mini
SEL
PW
L.SRCH
TONEMW
:
8
2
>
B
=
@
.
;
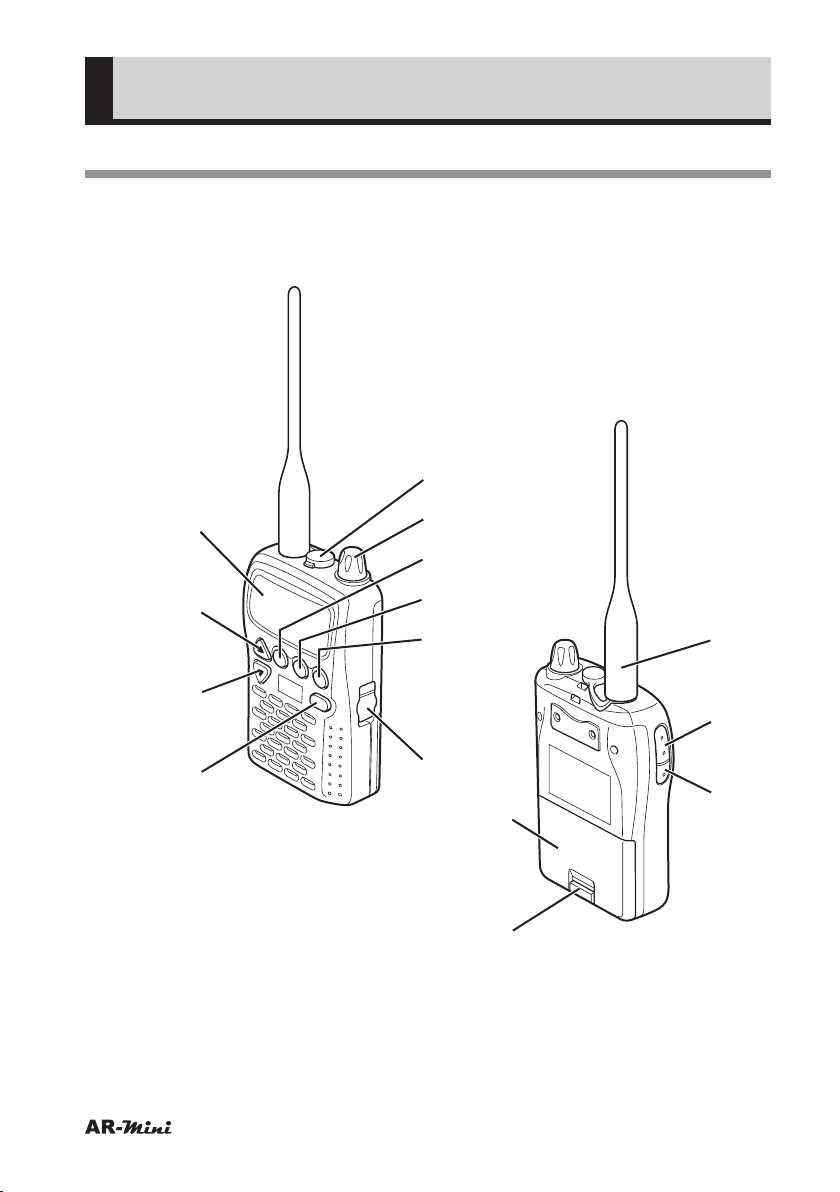
Part Names and Functions
9

INTRODUCTION
: Display
@ c (Up) key
●
Press this key to increase the setting
value.
●
Hold down this key to set the
attenuator.
●
Press this key while holding down the
FUNC key to set the VFO, Broadcast
Facility or PRESET.
●
Hold down this key together with the
FUNC key to store a priority channel
for PRIORITY SCAN.
. v (Down) key
●
Press this key to decrease the setting
value.
●
Hold down this key to start the 2VFO
watch.
●
Press this key while holding down the
FUNC key to start the Priority Scan.
●
Hold down this key together with the
FUNC key to store a channel for the
2VFO watch.
; PWR key
●
Press and hold this key to turn the
power on or off.
= External DC jack
●
Remove the external DC jack cover
and insert the DC output plug of an
AA-mini or DC mini for power supply
or charging.
B MODE key
●
Press this key to switch between FM,
Wide FM, AM and auto modes.
●
Press this key while holding down the
FUNC key to select a tone type.
> SCAN key
●
Press this key to start a search in
VFO, or to begin a scan in MEMORY.
●
Hold down this key to search for a
bug frequency.
●
Press this key while holding down the
FUNC key to store frequencies in the
limit search operation.
●
Hold down this key together with the
FUNC key to change the band in the
limit search operation.
2 V/M key
●
Press this key to switch between VFO
and MEMORY.
●
Hold down this key to assign a skip
channel for search or scan.
●
Press this key while holding down the
FUNC key to memorize a frequency
and then name the memorised
frequency.
●
Hold down this key together with
the FUNC key to erase a memory
channel.
10

INTRODUCTION
8 Dial knob
●
Turn this knob to change the
frequency or memorised channel.
●
Press this knob to switch the volume
or squelch settings.
●
Turn this knob while holding down the
FUNC key to change the frequency
more quickly.
●
Hold down this key together with the
FUNC key to change the settings.
Earphone jack
●
Remove the earphone jack cover and
connect the earphones.
Battery case
●
Remove the battery case lid, and
install the supplied Ni-MH battery or
AA battery.
Battery case lock
●
Unlock this to remove the battery
case lid.
MONI key
●
Hold down this key to open the
squelch and monitor.
●
Press this key while holding down the
FUNC key to lock keys other than the
PWR, FUNC and MONI keys.
FUNC key
●
Press this key together with another
key or dial knob to use the function
operation.
Antenna connector
●
Fix the supplied antenna.
11

INTRODUCTION
Description of LCD (Liquid Crystal Display)
Main Display: Frequency, memory name, setting number or the other various
conditions are displayed.
1: This segment appears when
the frequency in VFO is 1000
MHz or higher.
.: Decimal point
75 50 25: This segment appears when
a 6.25 and 12.5 kHz step are
set.
WFM, FM, AM
ATT: This segment appears when
: This segment appears when
B: This segment appears when
S: This segment is appears
: FM, Wide FM, AM or AUTO
appears in VFO.
: Signal meter
the attenuator is set.
a battery save is set.
: This segment appears when
the key lock is set.
: Low battery indicator.
the Busy scan is active.
when Set Number is
selected to change the
settings.
PW: This segment appears when
the Priority watch is active.
DW: This segment appears when
the 2VFO watch is active.
DCS: This segment appears when
Digital Code squelch is set.
—: Repeater minus
TSQ: This segment appears when
Tone Squelch is set.
: This segment appears when
the Scrambler function is
set. (Not available for the US
domestic version.)
: This segment appears when
the off timer or alarm is set.
: This segment appears when
the skipped frequency is set
to Search.
12
PREPARATION AND BASIC USAGE
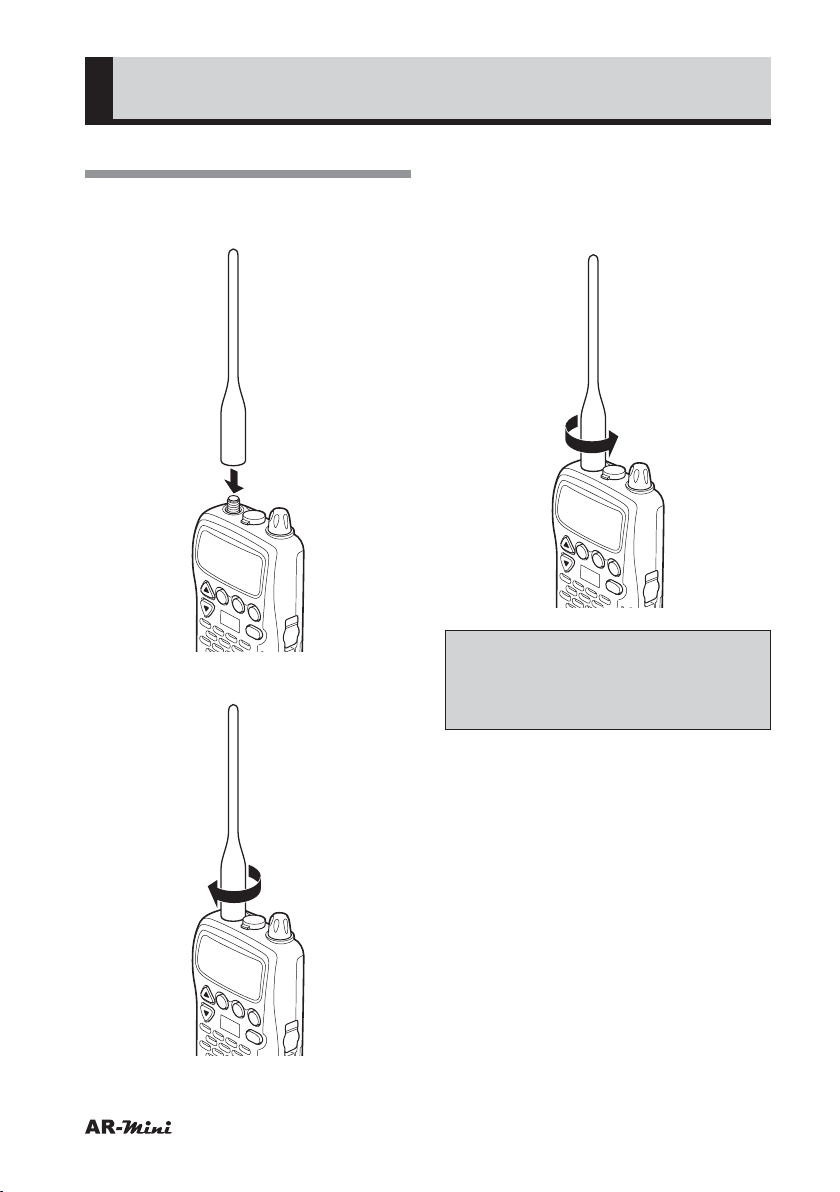
Connect the Antenna
Press the antenna firmly onto the
1
antenna connector.
COMMUNICATIONS RECEI
ATT
SEL
VER AR-mini
V/M
SCAN
SKIP
MW
DW
PW
L.SRCH
MODE
TONE
PWR
Twist the antenna clockwise.
2
Confirm that the antenna is fixed to
3
the AR-mini.
To remove the antenna, twist the
4
antenna counterclockwise.
COMMUNICATIONS RECEIVER AR-mini
ATT
SEL
V/M
SCAN
SKIP
MW
DW
PW
L.SRCH
MODE
TONE
PWR
Note:
AR-mini has a SMA antenna
connector. Never connect any other
type antenna.
COMMUNICATIONS RECEI
ATT
SEL
V/M
SKIP
MW
DW
PW
VER AR-mini
SCAN
L.SRCH
PWR
MODE
TONE
13

PREPARATION AND BASIC USAGE
Attach the Belt Clip
Insert the supplied screws through
1
the screw holes of the belt clip.
Fix the belt clip with the supplied
2
screws.
Tie the Hand Strap
Push the end of the hand strap
1
through the hand strap holder.
Loop the other end through the
2
end that has just been pushed
through.
Note:
Do not use screws other than those
supplied, as the inside of the ARmini may be damaged or the unit
could easily be dropped.
14
Tie the hand strap.
3
PREPARATION AND BASIC USAGE
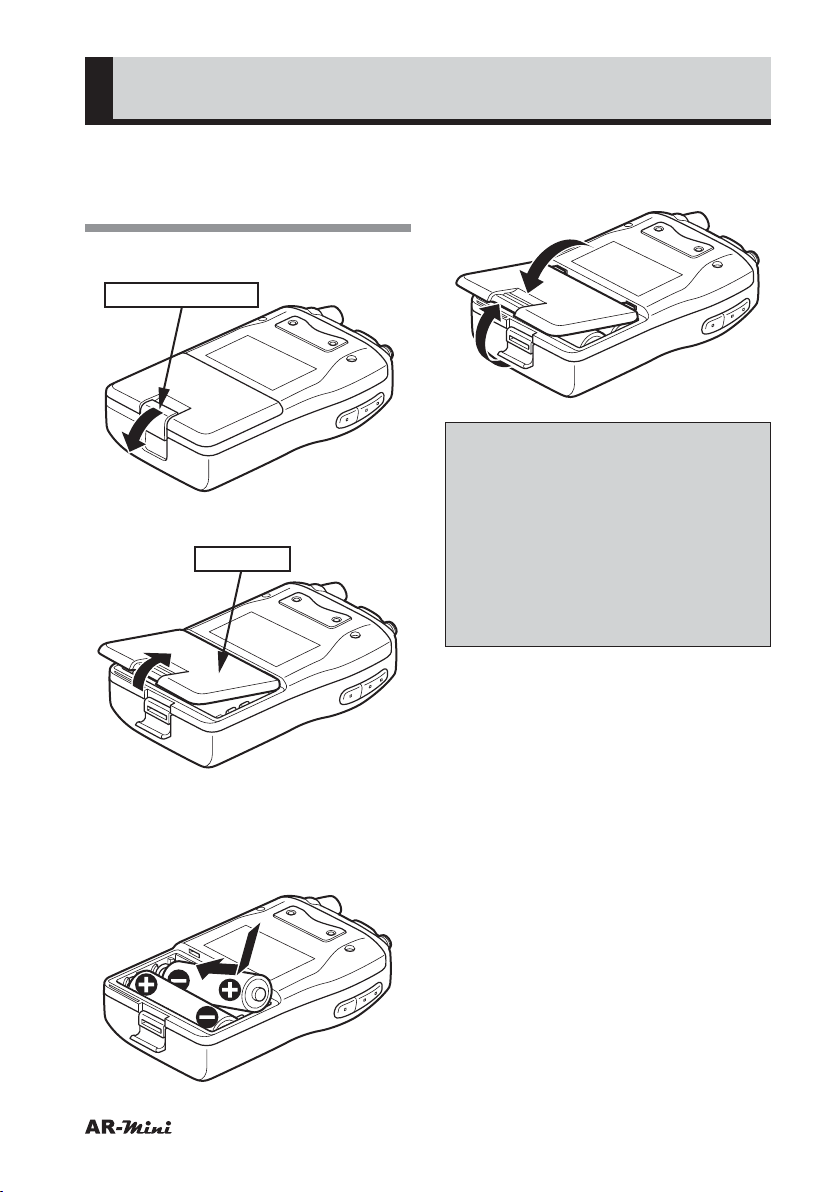
Install the Supplied
Ni-MH Batteries or AA
Batteries
Unlock the battery case lock.
1
Battery case lock
Remove the battery lid.
2
Battery lid
Attach the battery lid.
5
Lock the battery case lock.
6
Note:
• Never use old batteries together
with new batteries.
• Never use different types of
battery together.
• When disposing of old batteries,
be sure to distinguish them from
other waste products and observe
any local rules regarding correct
disposal.
Confirm the positive and negative
3
points of the battery.
Correctly install the batter y in the
4
batter y case.
15
PREPARATION AND BASIC USAGE
Charge the Supplied
Ni-MH Batteries
Caution:
Never charge any other type of
battery.
Attempting to charge other types
(e.g. manganese or alkaline), may
result in fire or explosion.
The supplied Ni-MH batteries are
charged via the AA-mini AC adapter.
Turn the AR-mini off.
1
Make sure the AR-mini contains
2
the supplied Ni-MH batteries.
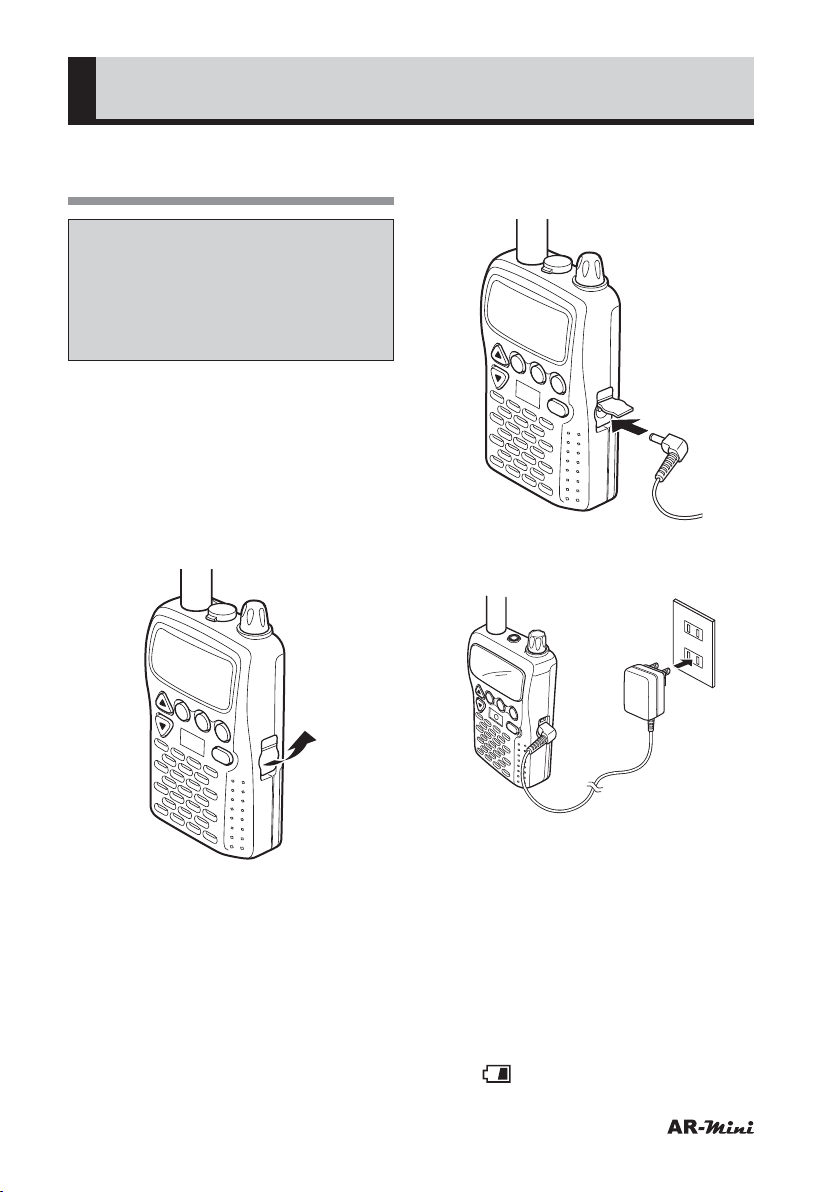
Remove the external DC jack
3
cover.
COMMUNICATIONS RECEIVER AR-mini
ATT
SEL
V/M
SCAN
SKIP
MW
DW
PW
L.SRCH
MODE
TONE
PWR
Insert the DC output plug into the
4
external DC jack on the right side
of the AR-mini.
COMMUNICATIONS RECEIVER AR-mini
ATT
SEL
V/M
SCAN
SKIP
MW
DW
PW
L.SRCH
MODE
TONE
PWR
Insert the AC adapter power plug
5
into an AC outlet (100 V–240 V).
COMMUNICATIONS RECEIVER
ATT
SEL
V/M
AR-mini
SKIP
SCAN
DW
MW
PW
L.SR
MODE
CH
TONE
PWR
16
Press the PWR key to turn the
6
power on.
Press the dial knob while holding
7
down the FUNC key to change the
setting.
Turn the dial knob to select setting
8
number 30.
Hold down the FUNC key and turn
9
the dial knob to set “CHARG”.
) will blink.
• (

PREPARATION AND BASIC USAGE
Press the dial knob to return to
10
VFO.
Approximately 20 hours later,
11
disconnect the AC adapter from
the AC outlet and then remove the
DC-out plug from the AR-mini.
Tips:
• The charging function is
cancelled when the AC adapter is
disconnected.
• The charging function will be
cancelled automatically after
24 hours have passed. When
recharging, repeat from step 7.
• The charging function continues
even if the power is turned off.
17
PREPARATION AND BASIC USAGE
Basic Usage
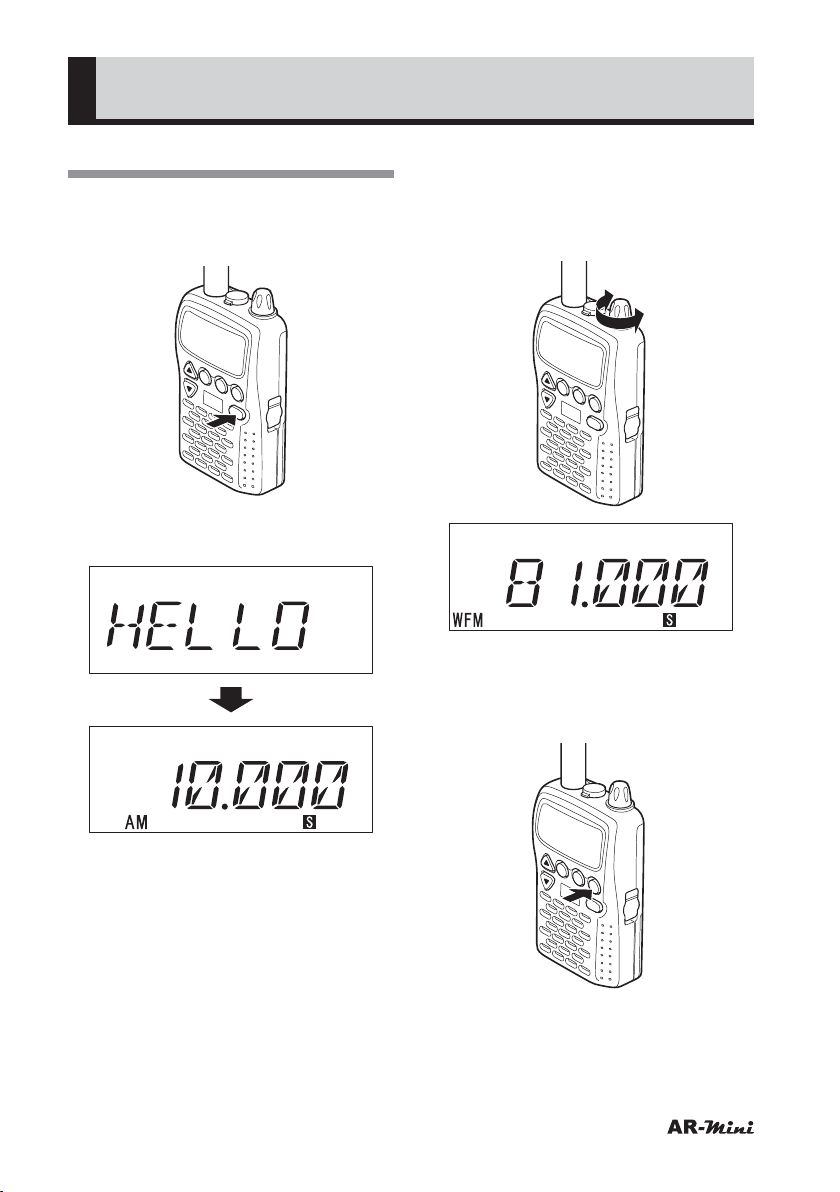
Press and hold the PWR key for 2
1
seconds or longer to turn the ARmini on.
COMMUNICATIONS RECEIVER AR-mini
ATT
SEL
V/M
SCAN
SKIP
MW
DW
PW
L.SRCH
MODE
PWR
Confirm that VFO has appeared in
2
the display.
Turn the dial knob to match the
3
desired frequency.
• Turn the dial knob while holding
down the FUNC key; the frequency
will change in 1 MHz steps.
COMMUNICATIONS RECEIVER AR-mini
ATT
SEL
V/M
SCAN
SKIP
MW
DW
PW
L.SRCH
MODE
TONE
PWR
If the reception mode is different,
4
press the MODE key until the
desired reception mode is
displayed.
(VFO)
* 10 MHz (AM mode) is displayed
initially.
• If MEMORY appears, press the V/M
key to switch to VFO.
18
COMMUNICATIONS RECEIVER AR-mini
ATT
SEL
V/M
SCAN
SKIP
MW
DW
PW
L.SRCH
MODE
PWR
• The reception mode will be
changed with each press of the
MODE key, as follows:
AUTO ➝ FM ➝ WFM ➝ AM ➝
AUTO ➝ ·····
PREPARATION AND BASIC USAGE
Note:
The AR-mini is by default initially
set to Auto step and Auto reception
mode functions. These functions
change the frequency step and
reception mode automatically
depending on the band. They can be
cancelled and reset manually.
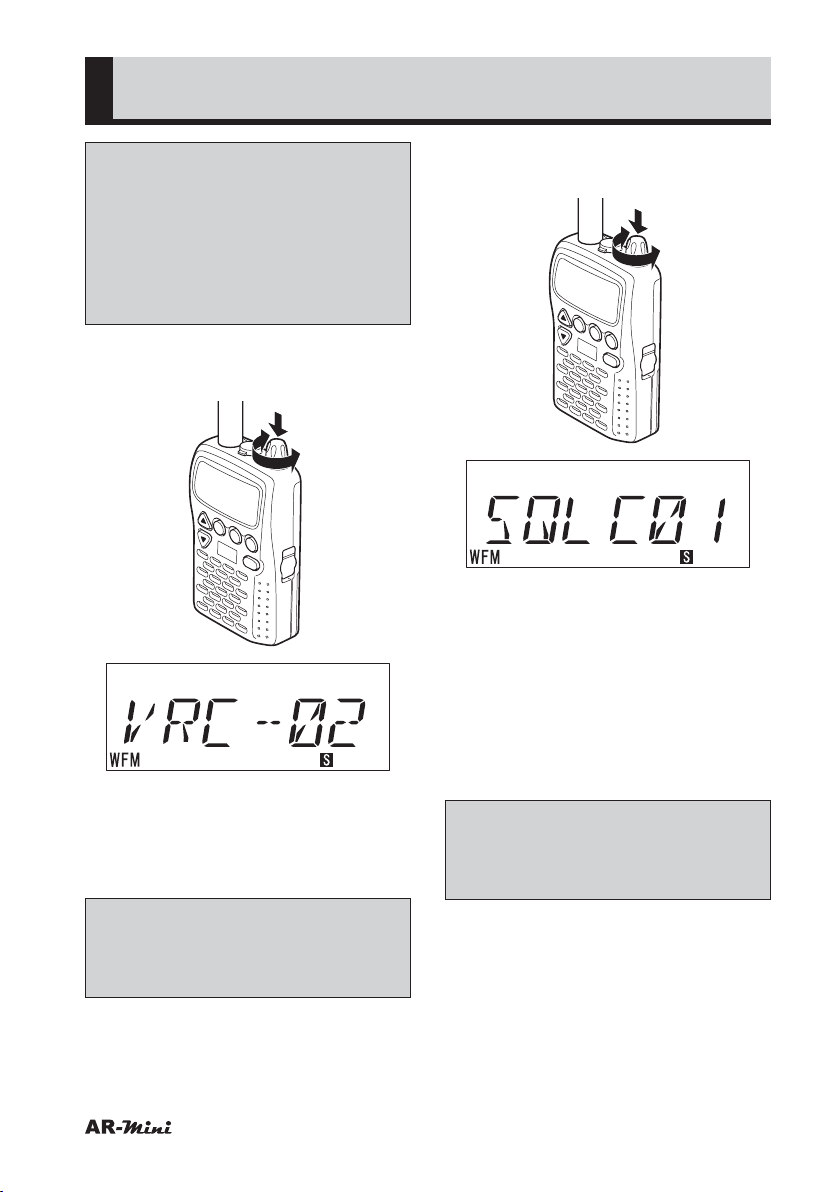
Press and turn the dial knob to
5
adjust the volume.
COMMUNICATIONS R
ATT
SEL
ECEIVER AR-mini
V/M
SCAN
SKIP
MW
DW
PW
L.SRCH
MODE
TONE
PWR
• Volume can be changed by turning
the dial knob as follows:
00 ➝ 01 ➝ (01) ➝ (01) ➝ 02 ➝ (02)
➝ (02) ➝ 03 ➝ (03) ➝ (03) ➝ 04
➝ (04) ➝ (04) ➝ 05 ➝ ····· ➝ 10
Press the dial knob again, and the
6
turn it to adjust the squelch.
COMMUNICATIONS R
ATT
SEL
ECEIVER AR-mini
V/M
SCAN
SKIP
MW
DW
PW
L.SRCH
MODE
TONE
PWR
• The squelch level can be changed
by turning the dial knob as follows:
• Increase direction (clockwise)
00 ➝ 01 ➝ (01) ➝ 02 ➝ (02) ➝ 03
➝ (03) ➝ 04 ➝ (04) ➝ 05 ➝ (05)
➝ 06 ➝ 07 ➝ 08 ➝ 09 ➝ 10
Decrease direction (anticlockwise)
•
10 ➝ 09 ➝ 08 ➝ 07 ➝ 06 ➝ 05 ➝
(05) ➝ 04 ➝ (04) ➝ 03 ➝ (03) ➝
02 ➝ (02) ➝ 01 ➝ (01) ➝ 00
Note:
Some displayed squelch values will
not be changed, but in reality the
squelch level has changed.
Note:
The displayed volume value will not
be changed for every 2 steps, but in
reality the volume has changed.
19
PREPARATION AND BASIC USAGE
Quick Guide:
Scan Frequencies Previously
Saved in a Memory Bank
Storing a frequency in
memory bank
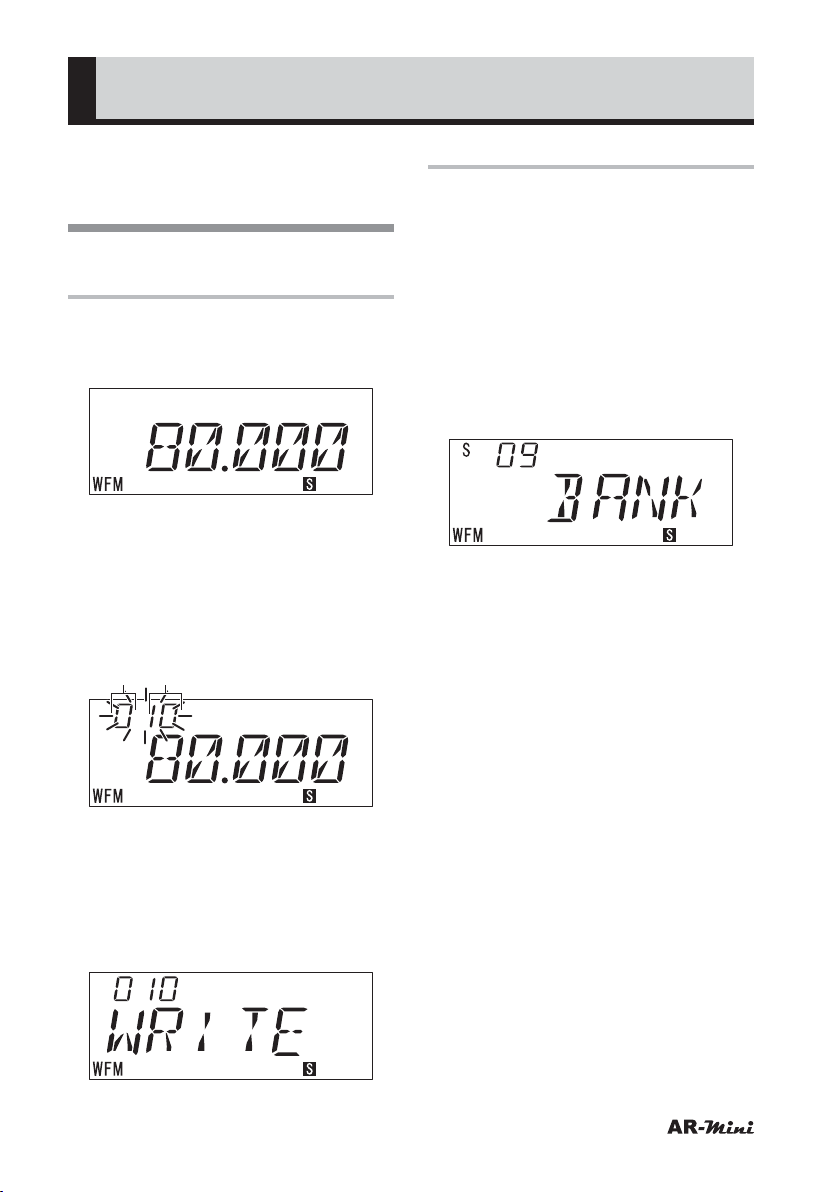
Confirm that VFO is set.
1
Turn the dial knob to set the
2
frequency to be stored in memory.
Hold down the FUNC key and
3
press the V/M key.
• The memory bank and number will
blink.
Press the c or v key to change
4
the memory bank.
Memory
Turn the dial knob to change the
5
memory number.
• Skip this step if there is no need to
To store, hold down the FUNC key
6
and press the V/M key.
Memory
bank
number
change the memory number.
Scanning the memory bank
Scanning can be performed within a
specified memory bank.
Confirm that VFO is set.
1
Hold down the FUNC key and
2
press the dial knob to change the
setting.
Turn the dial knob to select setting
3
number 09.
Hold down the FUNC key and turn
4
the dial knob to select BANK.
Press the dial knob or V/M key to
5
return to VFO.
To return to MEMORY, press the
6
V/M key.
Press the c or v key to select the
7
desired memory bank.
Press the SCAN key.
8
• Scanning will start in the memory
bank.
To change the memory bank, hold
9
down the FUNC key and turn the
dial knob.
Press the V/M key to return to
10
MEMORY.
20
PREPARATION AND BASIC USAGE
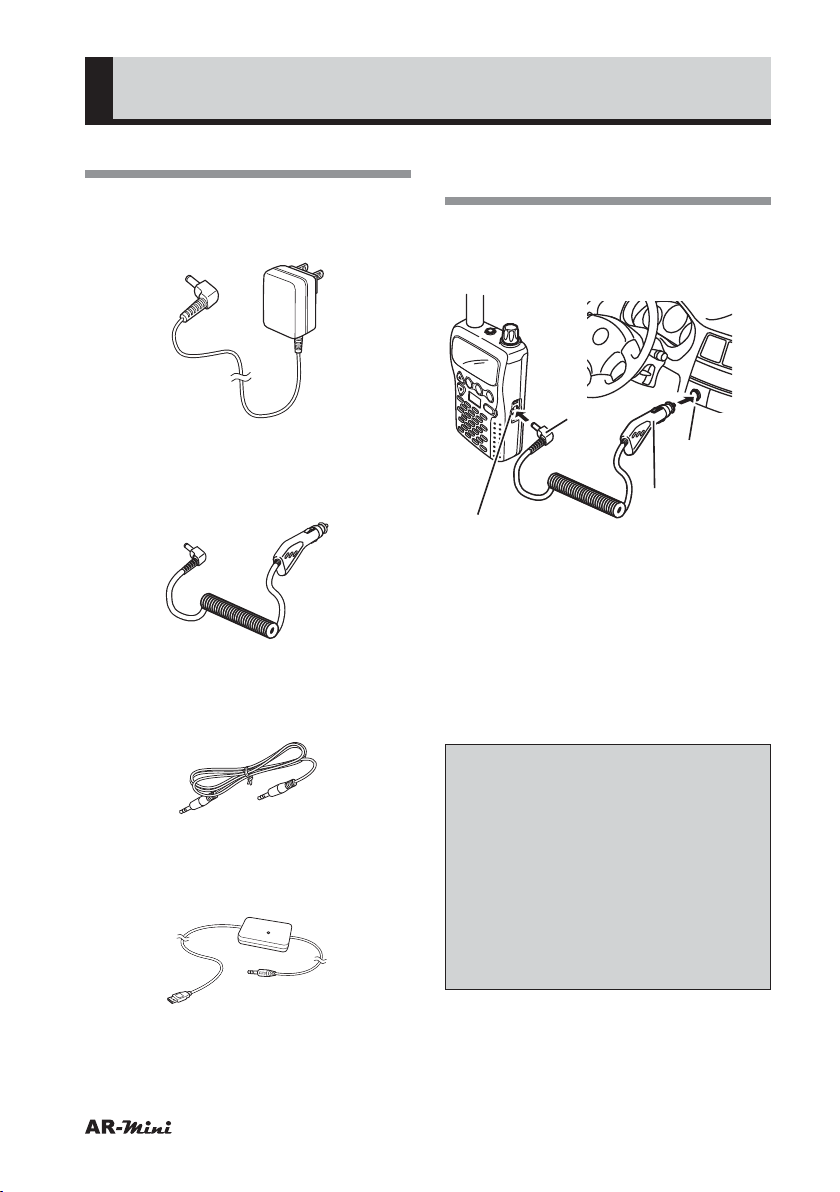
Options List
●
AA-mini
“A” plug type replacement AC adapter
(6 VDC, 500mA for 100 – 240 VAC)
●
DC-mini
DC cable with cigar-lighter plug
(6 VDC, 500 mA for 12/24V socket)
●
CO-mini
Data cloning cable
(AR-mini to AR-mini)
Using the DC-mini DC
Adapter
Insert the cigar lighter plug into the
1
cigar lighter receptacle (12 or 24
VDC) of the vehicle.
COMMUNICATIONS RECEIVER AR-mini
ATT
SEL
V/M
SKIP
SCAN
DW
MW
PW
L.SRCH
MODE
TONE
PWR
EXT DC jack
Remove the AR-mini EXT DC jack
2
cap.
Insert the DC-mini plug into the
3
EXT DC jack.
To charge the supplied Ni-MH
4
battery, AR-mini’s settings have to
be changed.
Plug
Cigar lighter
receptacle
Cigar lighter
plug (DC-mini)
●
PC-mini
PC cable
(USB only)
Note:
• Do not remove the plug by
tugging at the cable. The cable
may become disconnected and
thereafter malfunction.
• Never use this unit with wet hands.
Doing so may result in an electric
shock.
• Noise that results from AR-mini
being operated with this unit is not
necessarily a sign of malfunction.
21

PREPARATION AND BASIC USAGE
Using the CO-mini Clone
Cable
Turn the AR-mini off.
1
Plug
Earphone
jack
COMMUNICATIO
ATT
SEL
NS RECEIVER AR-m
V/M
SKIP
ini
SCAN
DW
MW
PW
L.SRCH
MODE
TONE
PWR
Remove the AR-mini earphone
2
jack cap.
Turn the power on while holding
3
down FUNC and c key.
• “RX-TX” will be displayed.
Press the receiver’s SCAN key.
4
(“R” will be displayed.)
Press the transmitter’s MODE key.
5
(“T” will be displayed.)
Confirm “PASS” is displayed when
6
the cloning is completed.
• If “NPASS” is displayed, the cloning
has failed. Repeat the procedure
from step 3.
Note:
• Do not remove the plug by
tugging at the cable. The cable
may become disconnected and
thereafter malfunction.
• Turn the power off before
connecting or removing the cable.
ATT
SEL
DW
COMMUNICATIONS
PW
RECEIVER AR
V/M
-mini
SKIP
SCAN
MW
L.SRCH
MODE
TONE
PWR
Using the PC-mini
Programing Cable
Preparations
◆ Installing special software
: Access the download page on our
web site and download the software
according to the explanation
provided there.
URL: http://www.aorja.com/ar-mini/
@ Run the downloaded file and perform
setup.
Caution:
Although this software is provided
free of charge, do not make any
illegal copies.
◆ Installing the USB driver
PC-mini requires a special USB driver.
Before connecting PC-mini to the PC,
ensure that you have installed the USB
driver.
This USB driver can be downloaded
from the following URL.
URL: http://www.aorja.com/ar-mini/
CP210x_VCP_Win2K_XP_S2K3.
exe
or
URL: http://www.silabs.com/
* Download the VCP Driver kit.
22
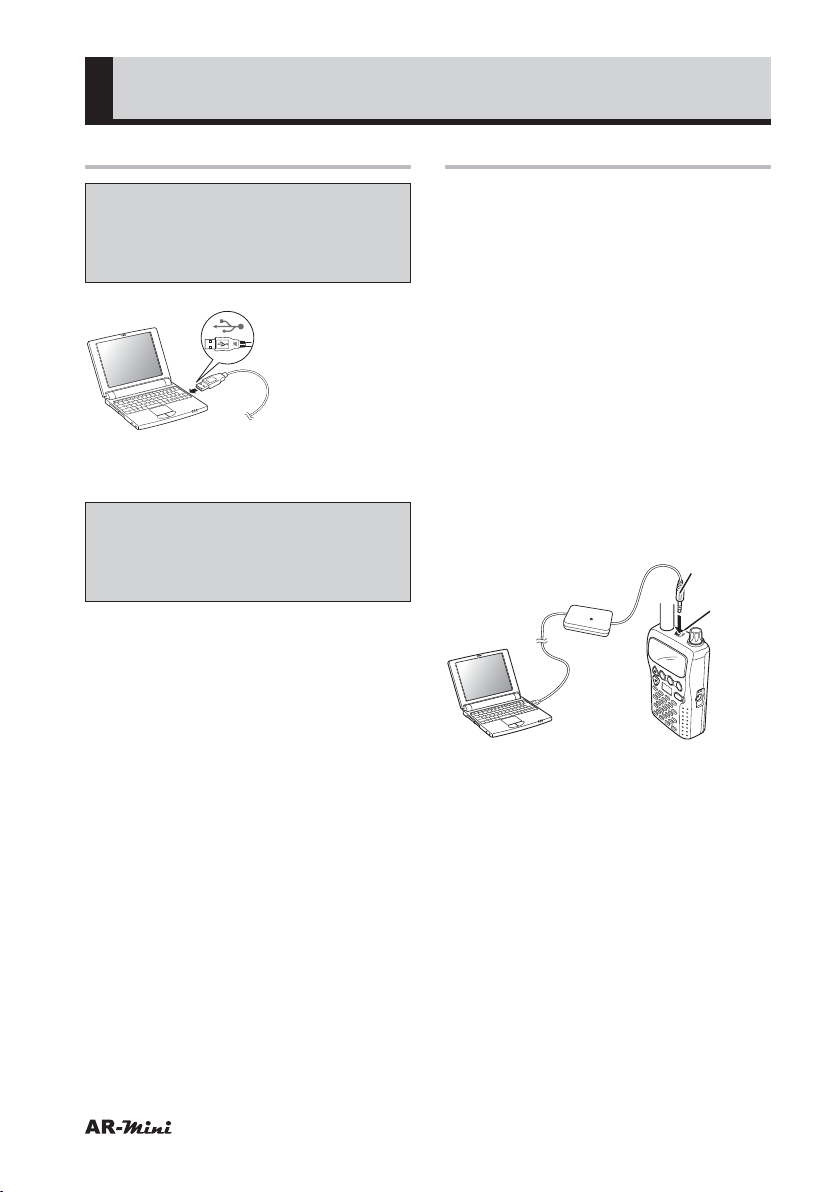
PREPARATION AND BASIC USAGE
Connecting PC-mini
Caution:
Check that the USB driver is
properly installed before connecting
PC-mini to the PC.
Connect PCmini to the
USB terminal
of the PC.
Connect PC-mini’s USB plug to the
USB terminal of the PC.
Note:
Ensure that the USB plug is properly
and firmly connected to the USB
terminal of the PC.
Connecting with the AR-mini
Hold down the PWR key of the AR-
1
mini for at least 2 seconds to turn
the power off.
Hold down the PWR switch for
2
at least 2 seconds while holding
down the FUNC, v and the dial
knob to turn the power on.
Confirm that “PRG-M” is
3
displayed.
• If “PRG-M” does not appear, repeat
the procedure from step 1.
Remove the AR-mini earphone
4
cap.
Firmly insert the PC-mini 3.5 ø
5
plug into the AR-mini jack.
3.5 ø Plug
Jack
COMMUNICATIONS
ATT
SEL
RECEIVER AR-mini
V/M
SKIP
SCAN
DW
MW
PW
L.SRC
MODE
H
TONE
PWR
23

PREPARATION AND BASIC USAGE
ATT
COMMUNICATIONS RECEIVER AR-mini
V/M SCAN MODE
SEL
Running the PC-mini program
Click and run AR-mini.exe that you have
downloaded from the AOR web site.
Tips:
It is recommended that you create a
shortcut on your PC. This will enable
you to run the program quickly on
subsequent occasions.
Refer to the program software manual
for instructions on using the PC-mini
program software.
Display when reading data
PRG-R
Display when writing data
PRG-W
When operation is complete
END
24
Loading…
| Виды модуляции | AM FM NFM WFM |
| Диапазон частот на прием | 100 кГц-1299 МГц |
| Скорость сканирования, каналов / сек | 8 |
Краткие технические характеристики широкополосного приемника AOR AR-Mini:
Диапазон частот на прием: 100 кГц-1299 МГц
Тип приемника: супергетеродин с тройным преобразованием
Скорость сканирования, каналов / сек: 8
Виды модуляции: AM FM NFM WFM
Шаг подстройки частоты, кГц: 5 6.25 8.33* 9* 10 12.5 15 20 25 30 50 100
Антенный разъем на приемнике: SMA-мама
Диапазон рабочих температур, °С: -10…+50
Комплект поставки портативного приемника AOR AR-Mini:
Приемник AOR AR-Mini
Антенна широкополосная
AA-Mini Сетевой адаптер вешнего питания, зарядное устройство
Аккумуляторы Ni-MH, АА-типа (LR06), 2шт
Клипса ременного крепления
Кистевой ремешок
Инструкция по эксплуатации AOR AR-Mini
Оригинальные аксессуары для сканера AOR ARMini:
AA-Mini Сетевой адаптер внешнего питания, зарядное устройство
DC-Mini Автомобильное зарядное устройство / источник внешнего питания
SC-Mini Чехол кожаный
CO-Mini кабель для клонирования настроек приемника AOR AR-Mini
PC-Mini Кабель для программирования, USB
AD-92SMA высокочастотный SMA-BNC переходник на внешнюю антенну
100kHz — 1300MHz, AM, WFM, NFM
1000 каналов памяти
CTCSS & DCS декодер
Голосовой инвертер (дискремблер)
Долгая работа от батареек (22 часа)
Два VFOs
Встроенная ферритовая антенна (100-5000 kHz)
Защита от влаги
Феноменальная экономичность для современных девайсов (ток потребления 110 mA в режиме приёма и 65 mA в дежурном режиме при активированной функции сохранения энергии источника питания. Ставишь комплект аккумов в сканер и слушаешь, слушаешь, слушаешь… Потом даже забываешь, когда их последний раз заряжал. К примеру — даже малыш IC-R5 по сравнению с ним в этом отношении сильно проигрывает AR-Mini.
Адекватный инверсионный дескремблер с возможностью подстройки (3200…3500 Hz). Сигналы с инверсией спектра раскрывает, очень неплохо для аппарата таких размеров.
Наличие актуальных для современных аппаратов функций работа с DCS, CTCSS, функция поиска жучков.
Отменное исполнение корпуса. Когда берёшь девайс в руку, ощущаешь всю мощь и толщину ударопрочной пластмассы. Корпус сделан не хуже, чем у VR-120D, а уж IC-R5 в своей игрушечной коробочке и рядом не лежал. Размер корпуса оптимален для ношения в кармане и использования всегда и везде.
Звучание аппарата в режиме АМ для приёмника такого класса очень приличное (в этом плане не уступает даже старичку-коллеге AR-8000) — приятно слушать ДСВ/КВ-вещалки и АВИА. Собственные шумы приёмного тракта при приёме в «амплитуде» очень невелики, что повышает комфортность прослушивания.
Приёмник имеет встроенную магнитную антенну для приёма вещательных станций в диапазонах ДВ, СВ и КВ. По паспорту эта антенна принимает до 5 MHz, на самом деле — до 30.
Аппарат имеет возможность работы с шагом 6,25 kHz и 8,33 kHz, что весьма актуально для работы с PMR-радиостанциями и в АВИАдиапазоне.
Вердикт — по качеству звучания AR-Mini превосходит всех: VR-120, VR-500 (суховатые средние и низкие), IC-R5. Разве что с AX-400 (там поменьше собственных шумов), но по качеству воспроизведения высоких звуковых частот AR-Mini уделывает всех.
На свою внутреннюю антенну по приёму СВ-вещалок он в пух и прах уделывает VR-120, IC-R5 и даже AR-8000. УКВ/FM очень хорошо — самый лучший звук из вышеозвученных карманных радиосканеров. По чутью тоже очень хорош.