
Раздел: Бытовая, кухонная техника, электроника и оборудование
Тип: Стиральная Машина
Характеристики, спецификации
Дополнительное полоскание:
Да
Отложенный старт:
2/ 4/ 6/ 9 ч
»Ручная стирка» шерсти:
Да
Тип управления:
электронный
Защита от протечек:
доп. опция
Наим. защиты от протечек:
Menalux
Габаритные размеры (В*Ш*Г):
90*40*60 см
Максимальная загрузка:
5 кг
Макс. скорость отжима:
1000 об/мин
Энергопотребление за цикл:
0.85 кВтч
Класс энергоэффективности:
A
Потребляемая мощность:
1850 Вт
Тип загрузки:
вертикальная
Инструкция к Стиральной Машине Hotpoint-Ariston AVTL 109

Instructions for use
WASHING MACHINE
Contents
GB
GB
Installation, 2-3
GB
ES
PL
CIS
Unpacking and levelling, 2
Electric and water connections, 2-3
English, 1
Polski, 13
ÐÓÑÑÊÈÉ, 25
The first wash cycle, 3
Technical details, 3
Washing machine description, 4-5
ES
CZ
HU
Control panel, 4
How to open and shut the drum, 5
Español, 37
Èeský, 49
Magyar, 61
Leds, 5
Starting and Programmes, 6
Briefly: how to start a programme, 6
Programme table, 6
Personalisations, 7
Setting the temperature, 7
Setting the spin cycle, 7
Functions, 7
Detergents and laundry, 8
Detergent dispenser, 8
Bleach cycle, 8
Preparing your laundry, 8
AVTL 109
Special items, 8
Woolmark Platinum Care, 8
Precautions and advice, 9
General safety, 9
Disposal, 9
Saving energy and respecting the environment, 9
Care and maintenance, 10
Cutting off the water or electricity supply, 10
Cleaning your appliance, 10
Caring for your appliance door and drum, 10
Cleaning the pump, 10
Checking the water inlet hose, 10
Cleaning the detergent dispenser, 10
Troubleshooting, 11
Service, 12
Before calling for Assistance, 12
1
Installation
Keep this instruction manual in a safe place for
loosening the adjustable front feet (see figure); the
GB
future reference. Should the appliance be sold,
angle of inclination, measured according to the
transferred or moved, make sure the instruction
worktop, must not exceed 2°.
Levelling your appliance correctly will provide it with
manual accompanies the washing machine to inform
stability and avoid any vibrations, noise and shifting
the new owner as to its operation and features.
during operation. If it is placed on a fitted or loose
carpet, adjust the feet in such a way as to allow
Read these instructions carefully: they contain vital
enough room for ventilation beneath the washing
information on installation, use and safety.
machine.
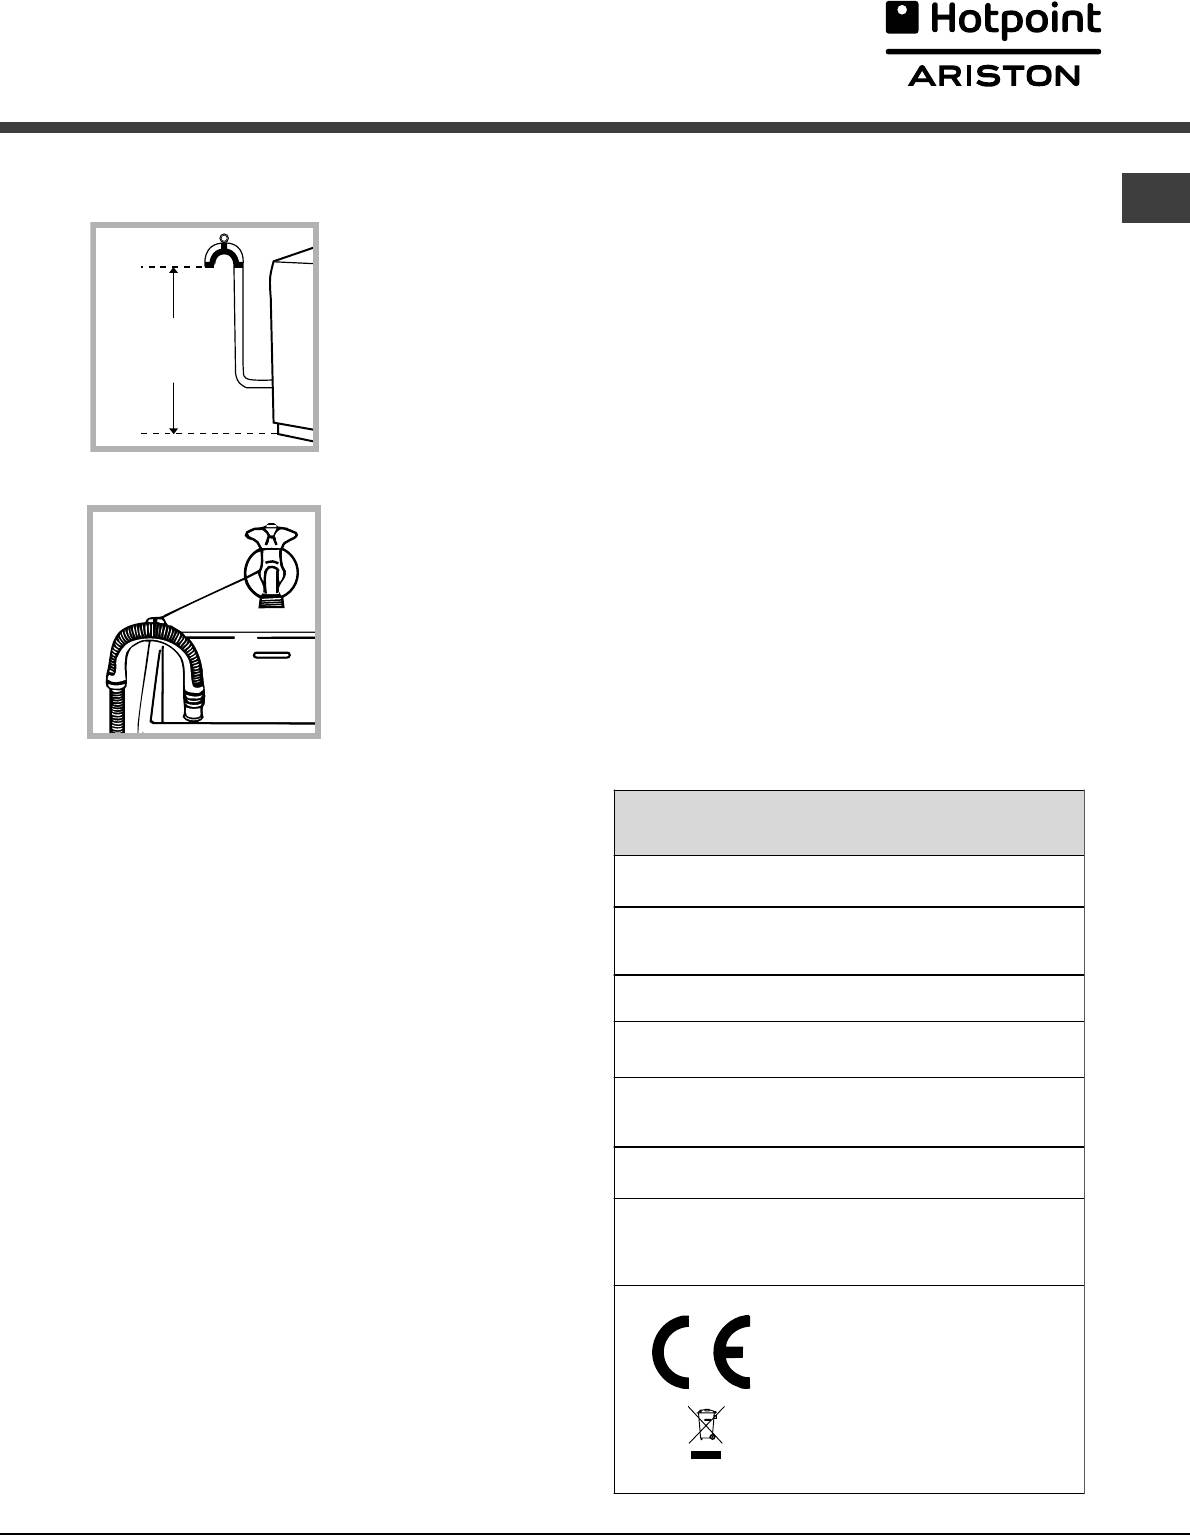
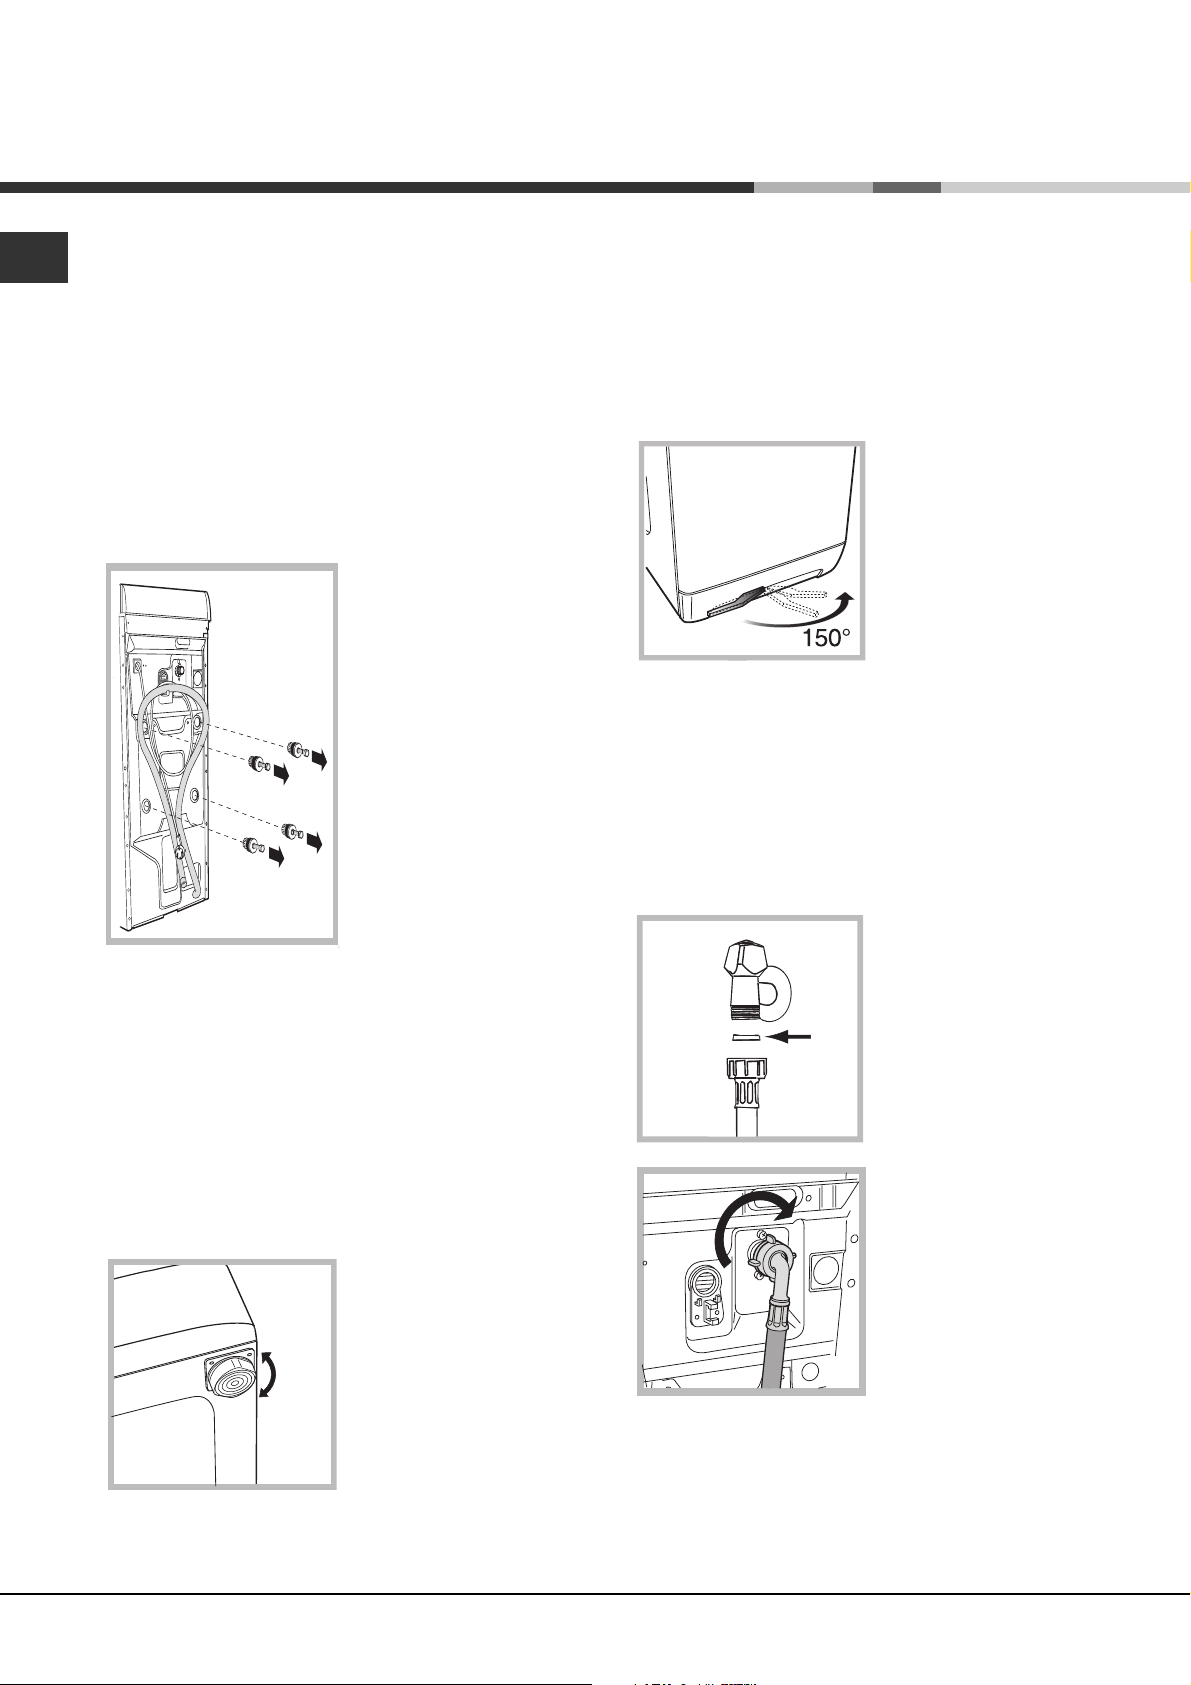
Unpacking and levelling
Putting your appliance in place and moving it.
If your washing machine
Unpacking
is equipped with a
special set of retractable
1. Unpack the washing
wheels you can easy
machine.
move it. To lower the
wheels and thus move
2. Check whether the
the appliance effortlessly,
washing machine has
just pull the lever,
been damaged during
situated on the left-hand
transport. If this is the
side beneath the base.
case, do not install it
Once the appliance is in
and contact your
the required position, put
the lever back in place. The washing machine is now
retailer.
firmly in place (see figure).
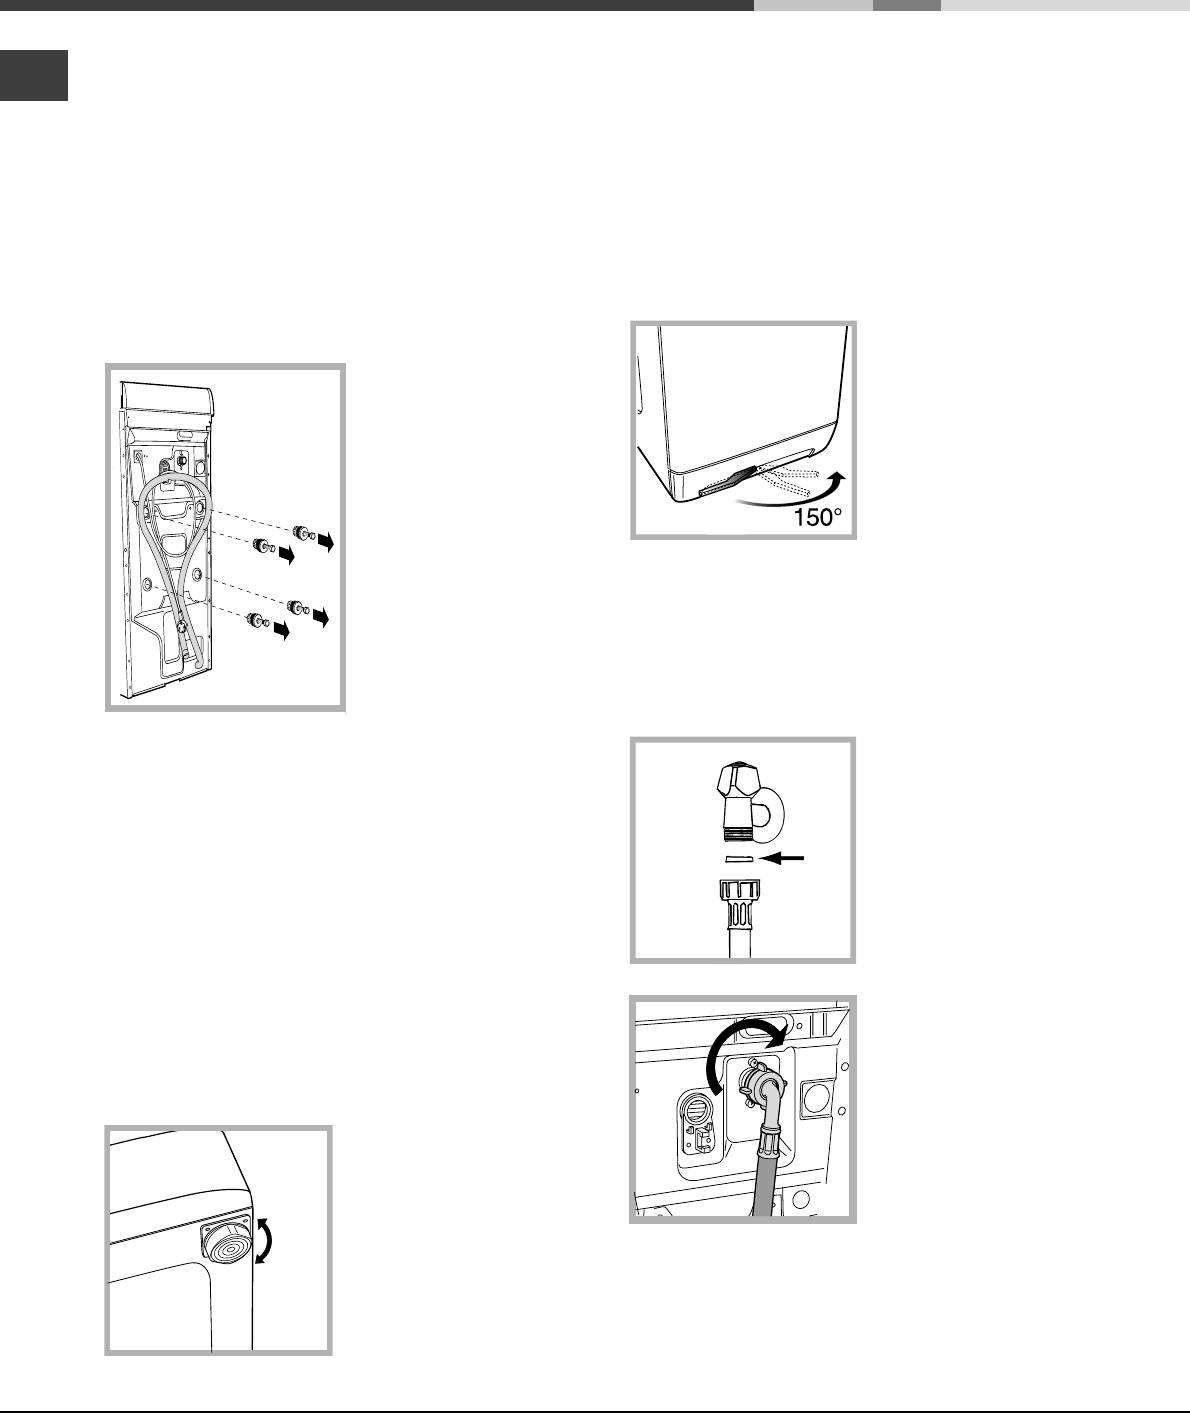
3. Remove the four
protective screws and
the rubber washer with
Electric and water connections
the respective spacer,
situated on the rear of
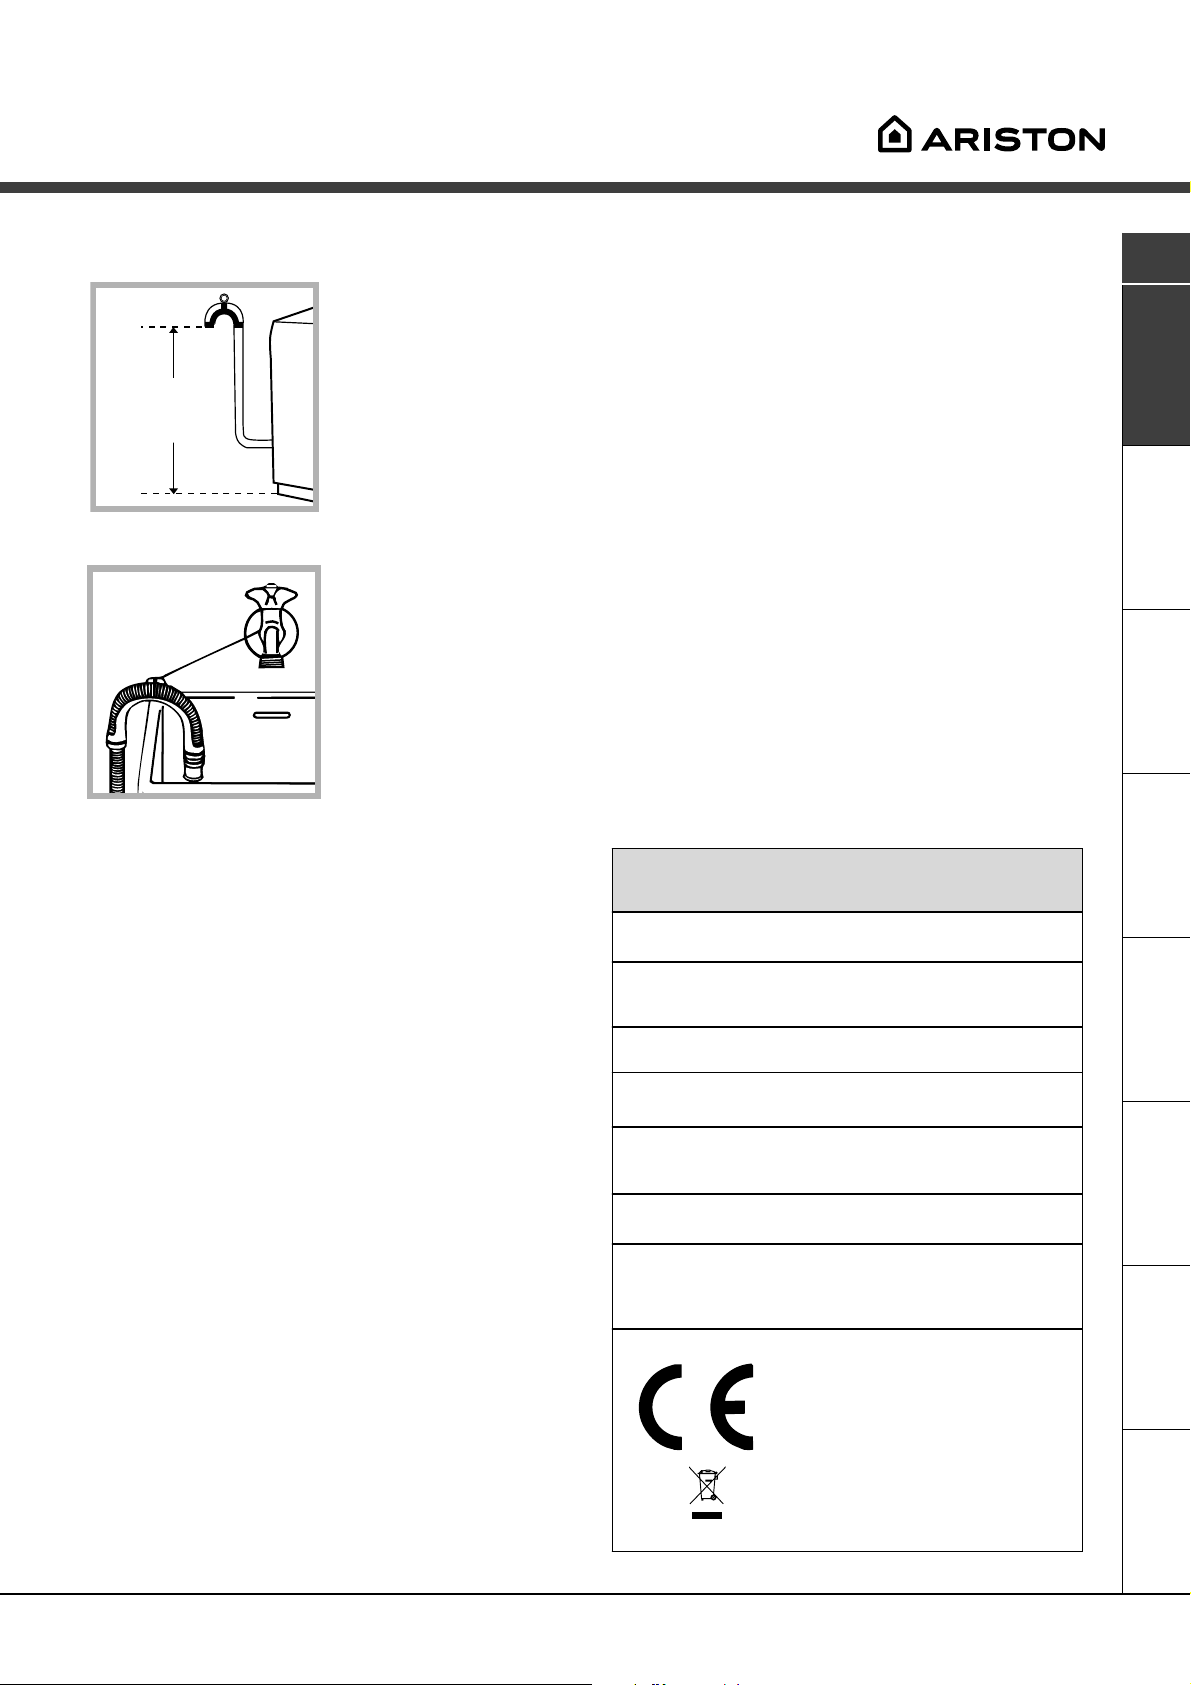
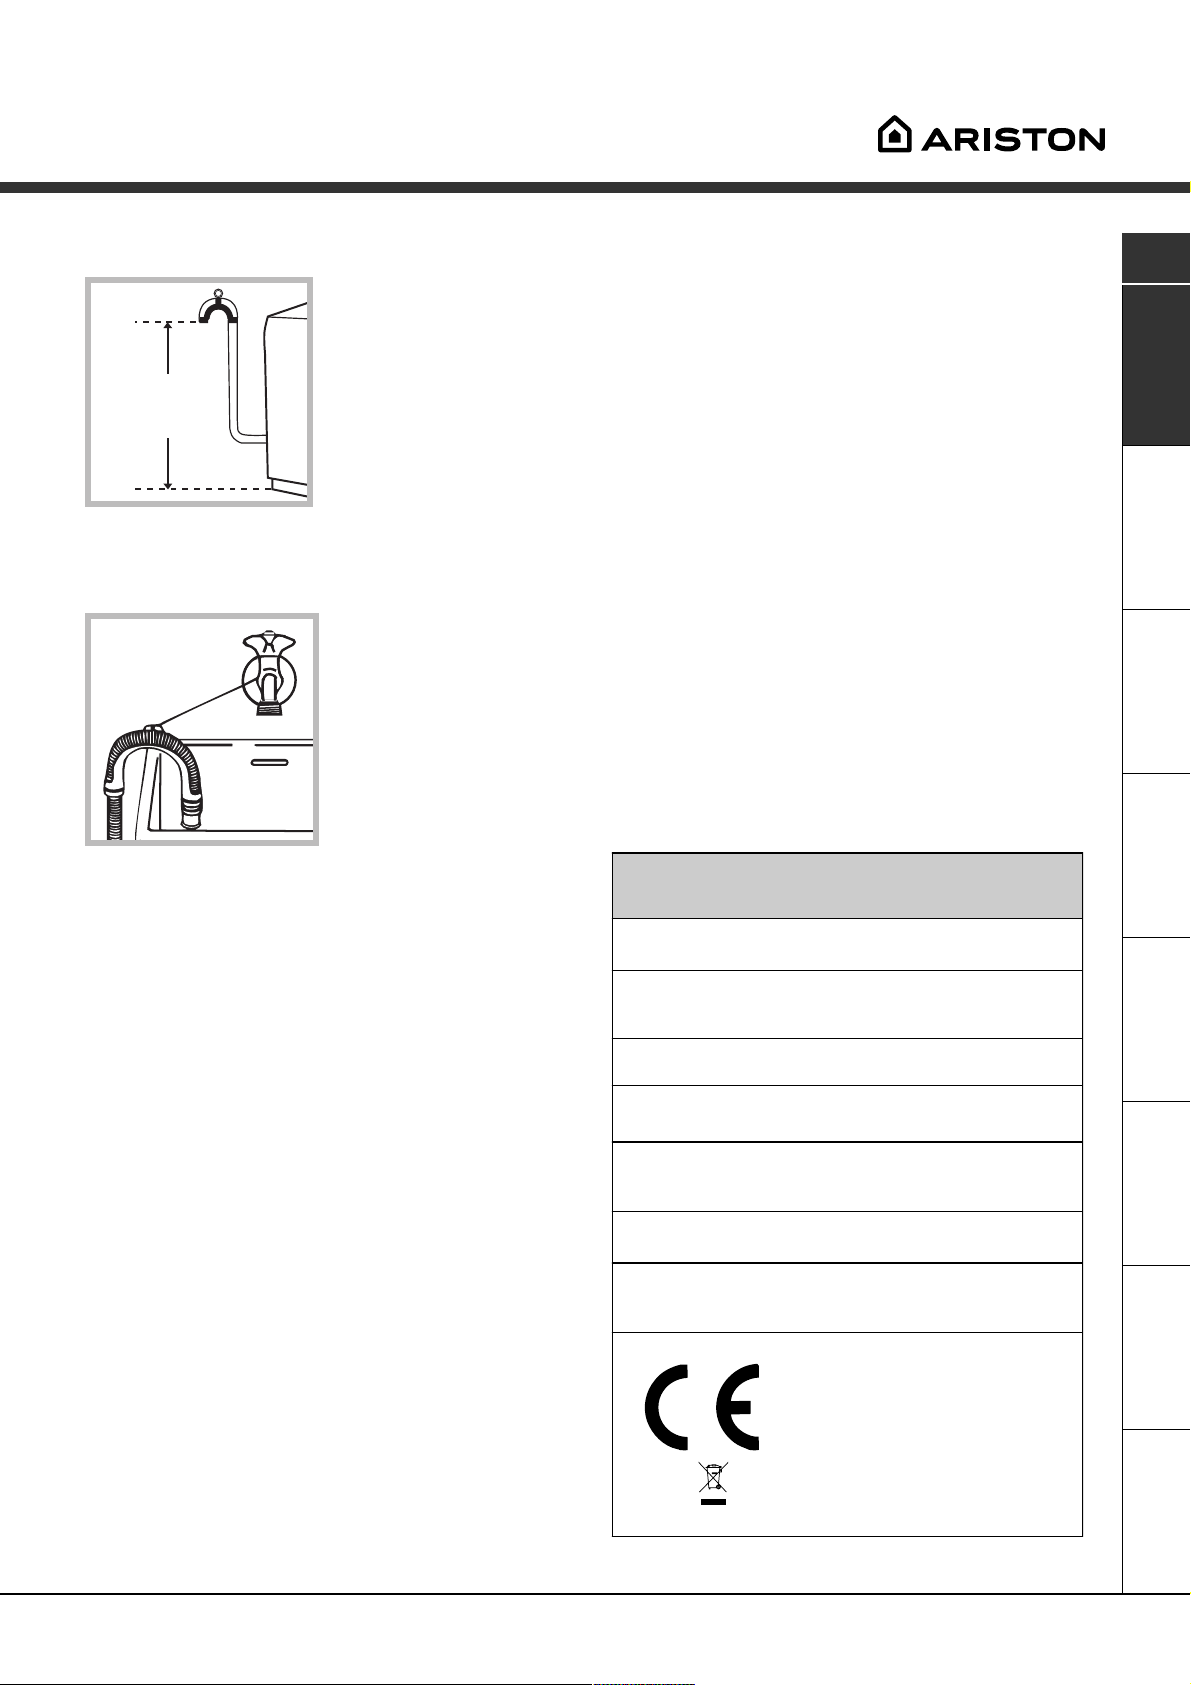
Connecting the water inlet hose
the appliance (see
figure).
1. Insert seal A into the
end of the inlet hose and
4. Seal the gaps using the plastic plugs provided.
screw the latter onto a
5. Keep all the parts: you will need them again if the
cold water tap with a 3/4
gas threaded mouth (see
washing machine needs to be moved to another
figure).
location.
A
Before making the
connection, allow the
Warning: should the screws be re-used, make sure
water to run freely until it
you fasten the shorter ones at the top.
is perfectly clear.
Packaging materials are not children’s toys.
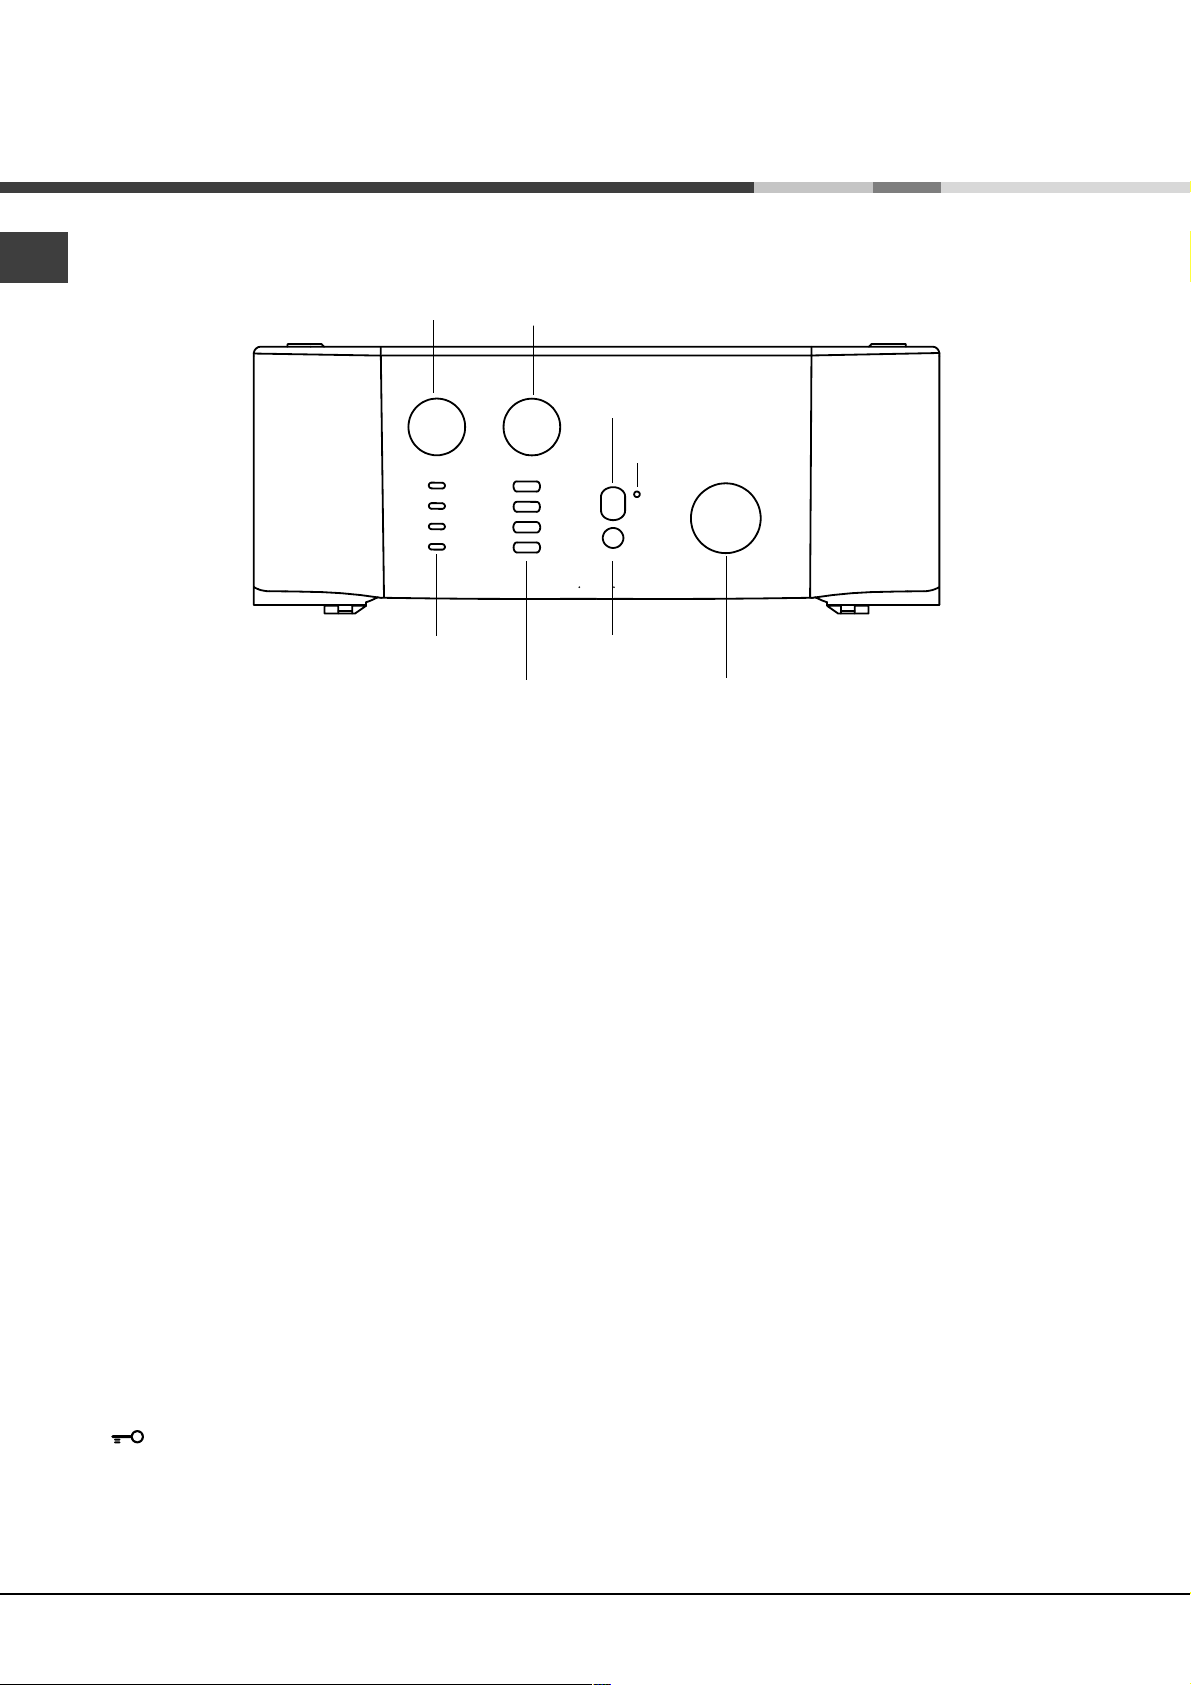
2. Connect the other end
of the water inlet hose to
the washing machine,
Levelling
screwing it onto the
Your machine may make a considerable amount of
appliance’s cold water
inlet, situated on the top
noise if the two front feet have not been adjusted
right-hand side on the rear
correctly
of the appliance
1. Install the washing
(see figure).
machine on a flat sturdy
3. Make sure there are
floor, without resting it
no kinks or bends in the
up against walls,
hose.
furniture cabinets or
other.
The water pressure at the tap must be within the
2. If the floor is not
values indicated in the Technical details table
perfectly level, compen-
(on the next page).
sate for any unevenness
If the water inlet hose is not long enough, contact
by tightening or
a specialist store or an authorised serviceman.
2
Connecting the drain hose
GB
Connect the drain hose,
When the washing machine is installed, the main
without bending it, to a
socket must be within easy reach.
draining duct or a wall
drain situated between
Do not use extensions or multiple sockets.
65 and 100 cm from
65 — 100 cm
the floor;
The power supply cable must never be bent or
dangerously compressed.
The power supply cable must only be replaced by
an authorised serviceman.
Warning! The company denies all liability if and when
alternatively, place it
these norms are not respected.
over the edge of a
basin, sink or tub,
The first wash cycle
fastening the duct
supplied to the tap (see
Once the appliance has been installed, and before
figure). The free end of
you use it for the first time, run a wash cycle with
the hose should not be
detergent and no laundry, setting the 90°C
underwater.
programme without a pre-wash cycle.
We advise against the use of hose extensions; in
case of absolute need, the extension must have the
same diameter as the original hose and must not
Technical details
exceed 150 cm in length.
Model
AVTL 109
40 cm wide
Electric connection
Dimensions
85 cm high
60 cm deep
Before plugging the appliance into the mains socket,
Capacity
from 1 to 5 kg
make sure that:
the socket is earthed and in compliance with the
Electric
Please refer to the technical data plate
applicable law;
connections
fixed to the machine.
maximum pressure 1 MPa (10 bar)
Water
the socket is able to sustain the appliance’s
minimum pressure 0.05 MPa (0.5 bar)
connections
maximum power load indicated in the Technical
drum capacity 42 litres
details table (on the right);
Spin speed
up to 1000 rpm
the supply voltage is included within the values i
Control
ndicated on the Technical details table
programmes
programme 3; temperature 60°C;
(on the right);
according to EN
run with a load of 5 kg.
60456 directive
the socket is compatible with the washing
machine’s plug. If this is not the case, replace the
This appliance is compliant with the
following European Community
socket or the plug.
Directives:
— 89/336/CEE of 03/05/89
The washing machine should not be installed in an
(Electromagnetic Compatibility) and
outdoor environment, not even when the area is
subsequent amendments
— 2006/95/CE (Low Voltage)
sheltered, because it may be very dangerous to
— 2002/96/CE
leave it exposed to rain and thunderstorms.
3
Аннотация для Стиральной Машиной Hotpoint-Ariston AVTL 109 в формате PDF
Топ 10 инструкций
Другие инструкции
Страницы и текст этой инструкции
Инструкция стиральной машины Ariston AVTL 109
Информация отображена на картинке
Информация отображена на картинке
Информация отображена на картинке
Информация отображена на картинке
Как использовать наш сайт инструкций OnlineManuals.ru
Наша цель состоит в том, чтобы предоставить вам быстрый доступ к содержанию инструкции для стиральной машины Ariston AVTL 109.
С помощью онлайн просмотра, Вы можете быстро просмотреть содержимое инструкции и найти решение проблемы с стиральной машины Ariston AVTL 109.
Для Вашего удобства
Если листать руководство пользователя стиральной машины Ariston AVTL 109 прямо на сайте, не очень удобно для Вас, есть два возможных решения:
• Просмотр в полноэкранном режиме — легко просмотреть руководство пользователя (без загрузки его на свой компьютер), Вы можете использовать режим полноэкранного просмотра.
Для просмотра инструкции пользователя стиральной машины Ariston AVTL 109 на полном экране, используйте кнопку «Открыть в Pdf-viewer».
• Загрузка на компьютер — Вы можете также скачать Инструкция стиральной машины Ariston AVTL 109 на свой компьютер и сохранить его в файлах.
Многие люди предпочитают читать документы не на экране, а в печатной версии.
Возможность печати руководства пользователя также была предусмотрена на нашем сайте,
и вы можете использовать ее, нажав на иконку «печать» в Pdf-viewer.
Нет необходимости печатать все руководство стиральной машины Ariston AVTL 109, можно выбрать только нужные страницы инструкции.
Характеристики стиральной машины hotpoint-ariston avtl-109
| Характеристики модели | |
| Установка | отдельно стоящая |
| Тип загрузки | вертикальная |
| Габариты (ШxГxВ) | — |
| Максимальная загрузка белья | 5 кг |
| Управление | электронное (интеллектуальное) |
| Тип сушки | — |
| Дисплей | — |
| Цвет | белый |
| Вес | — |
| Пузырьковая стирка | — |
| Прямой привод | — |
| Класс энергопотребления | A |
| Защита от протечек воды | частичная (корпус) |
| Материал бака | пластик |
+7(927)510-50-06
Перейти к контенту
Стиральные машины Ariston
- Размер инструкции: 1.93 Мб
- Формат файла: pdf
Если вы потеряли инструкцию от стиральной машины Ariston AVTL 109, можете скачать файл для просмотра на компьютере или печати.
Инструкция для стиральной машины Ariston AVTL 109 на русском языке. В руководстве описаны возможности и полезные функции, а также правила эксплуатации. Перед использованием внимательно ознакомьтесь с инструкцией.
Чтобы не читать всю инструкцию вы можете выполнить поиск по содержимому внутри инструкции и быстро найти необходимую информацию. Рекомендации по использованию помогут увеличить срок службы стиральной машины Ariston AVTL 109. Если у вас появилась проблема, то найдите раздел с описанием неисправностей и способами их решения. В нем указаны типичные поломки и способы их решения.

Instructions for use
WASHING MACHINE
GB
English, 1
ES
Español, 37
AVTL 109
PL
ES
Polski, 13
CZ
Èeský, 49
CIS
РУССКИЙ, 25
HU
Magyar, 61
Contents
GB
Installation, 2-3
Unpacking and levelling, 2
Electric and water connections, 2-3
The first wash cycle, 3
Technical details, 3
Washing machine description, 4-5
Control panel, 4
How to open and shut the drum, 5
Leds, 5
Starting and Programmes, 6
Briefly: how to start a programme, 6
Programme table, 6
Personalisations, 7
Setting the temperature, 7
Setting the spin cycle, 7
Functions, 7
Detergents and laundry, 8
Detergent dispenser, 8
Bleach cycle, 8
Preparing your laundry, 8
Special items, 8
Woolmark Platinum Care, 8
Precautions and advice, 9
General safety, 9
Disposal, 9
Saving energy and respecting the environment, 9
Care and maintenance, 10
Cutting off the water or electricity supply, 10
Cleaning your appliance, 10
Caring for your appliance door and drum, 10
Cleaning the pump, 10
Checking the water inlet hose, 10
Cleaning the detergent dispenser, 10
Troubleshooting, 11
Service, 12
Before calling for Assistance, 12
1

Installation
GB
Keep this instruction manual in a safe place for
future reference. Should the appliance be sold,
transferred or moved, make sure the instruction
manual accompanies the washing machine to inform
the new owner as to its operation and features.
Read these instructions carefully: they contain vital
information on installation, use and safety.
Unpacking and levelling
Unpacking
1. Unpack the washing
machine.
2. Check whether the
washing machine has
been damaged during
transport. If this is the
case, do not install it
and contact your
retailer.
3. Remove the four
protective screws and
the rubber washer with
the respective spacer,
situated on the rear of
the appliance (see
figure).
4. Seal the gaps using the plastic plugs provided.
5. Keep all the parts: you will need them again if the
washing machine needs to be moved to another
location.
Warning: should the screws be re-used, make sure
you fasten the shorter ones at the top.
Packaging materials are not children’s toys.
Levelling
Your machine may make a considerable amount of
noise if the two front feet have not been adjusted
correctly
1. Install the washing
machine on a flat sturdy
floor, without resting it
up against walls,
furniture cabinets or
other.
2. If the floor is not
perfectly level, compensate for any unevenness
by tightening or
loosening the adjustable front feet (see figure); the
angle of inclination, measured according to the
worktop, must not exceed 2°.
Levelling your appliance correctly will provide it with
stability and avoid any vibrations, noise and shifting
during operation. If it is placed on a fitted or loose
carpet, adjust the feet in such a way as to allow
enough room for ventilation beneath the washing
machine.
Putting your appliance in place and moving it.
If your washing machine
is equipped with a
special set of retractable
wheels you can easy
move it. To lower the
wheels and thus move
the appliance effortlessly,
just pull the lever,
situated on the left-hand
side beneath the base.
Once the appliance is in
the required position, put
the lever back in place. The washing machine is now
firmly in place (see figure).
Electric and water connections
Connecting the water inlet hose
1. Insert seal A into the
end of the inlet hose and
screw the latter onto a
cold water tap with a 3/4
gas threaded mouth (see
A
The water pressure at the tap must be within the
values indicated in the Technical details table
(on the next page).
If the water inlet hose is not long enough, contact
a specialist store or an authorised serviceman.
figure).
Before making the
connection, allow the
water to run freely until it
is perfectly clear.
2. Connect the other end
of the water inlet hose to
the washing machine,
screwing it onto the
appliance’s cold water
inlet, situated on the top
right-hand side on the rear
of the appliance
(see figure).
3. Make sure there are
no kinks or bends in the
hose.
2
Connecting the drain hose
65 — 100 cm
Connect the drain hose,
without bending it, to a
draining duct or a wall
drain situated between
65 and 100 cm from
the floor;
GB
When the washing machine is installed, the main
socket must be within easy reach.
Do not use extensions or multiple sockets.
The power supply cable must never be bent or
dangerously compressed.
The power supply cable must only be replaced by
an authorised serviceman.
alternatively, place it
over the edge of a
basin, sink or tub,
fastening the duct
supplied to the tap (see
figure). The free end of
the hose should not be
underwater.
We advise against the use of hose extensions; in
case of absolute need, the extension must have the
same diameter as the original hose and must not
exceed 150 cm in length.
Electric connection
Before plugging the appliance into the mains socket,
make sure that:
the socket is earthed and in compliance with the
applicable law;
the socket is able to sustain the appliance’s
maximum power load indicated in the Technical
details table (on the right);
Warning! The company denies all liability if and when
these norms are not respected.
The first wash cycle
Once the appliance has been installed, and before
you use it for the first time, run a wash cycle with
detergent and no laundry, setting the 90°C
programme without a pre-wash cycle.
Technical details
Model
Dimensions
Capacity
Electric
connections
Wate r
connections
Spin speed
AVTL 109
40 cm wide
85 cm high
60 cm deep
from 1 to 5 kg
voltage 220/230 Volts 50 Hz
maximum absorbed power 1850 W
maximum pressure 1 MPa (10 bar)
minimum press ure 0.05 MPa (0.5 bar)
drum capacity 4 2 litres
up to 1000 rpm
the supply voltage is included within the values i
ndicated on the Technical details table
(on the right);
the socket is compatible with the washing
machine’s plug. If this is not the case, replace the
socket or the plug.
The washing machine should not be installed in an
outdoor environment, not even when the area is
sheltered, because it may be very dangerous to
leave it exposed to rain and thunderstorms.
Control
programmes
according to
IEC456 directive
programm e 3; temperature 60°C;
run with a load of 5 kg.
This appliance is compliant with the
followin g European Commu nity
Directives:
— 73/23/CEE of 19/02/73 (Low
Voltage) an d subs equent am endments
— 89/336/CEE of 03/05/89
(Electromagnetic Compatibility) and
subsequent amendments
— 2002/96/CE
ServiceTroubleshootingPrecautions CareProgrammes DetergentsInstallation Description
3
Washing machine description
GB
Control panel
SPIN SPEED
knob
LEDs
TEMPERATURE
knob
START/RESET
key
FUNCTION
keys
ON/OFF
key
LID LOCKED
LED
PROGRAMME
knob
Detergent dispenser to add detergent and fabric
softener (see page 8).
LEDs to find out which wash cycle phase is under way.
If the Delay Timer function has been set, the time left
until the programme starts will be indicated (see page
5).
SPIN SPEED knob to set the spin speed or exclude
the spin cycle completely (see page 7).
FUNCTION keys to select the functions available. The
button corresponding to the function selected will
remain on.
TEMPERATURE knob to set the temperature or the
cold wash cycle (see page 7).
ON/OFF key to turn the washing machine on and
off.
START/RESET key to start the programmes or
cancel incorrect settings.
ON-OFF/LID LOCK led ,to find out whether the
washing machine is on (flashing) and if the lid may be
opened (see page 5).
PROGRAMME knob to set the programmes
(see page 6).
The knob stays still during the cycle.
ON-OFF/LID LOCK led:
If this LED is on, the appliance Lid is locked to prevent it from being opened accidentally; to avoid any damages,
you must wait for the lamp to flash before you open the Lid.
.
The rapid flashing of the ON-OFF/LID LOCK Led together with the flashing of at least one other LED indicates
there is an abnormality, see page 7.
4
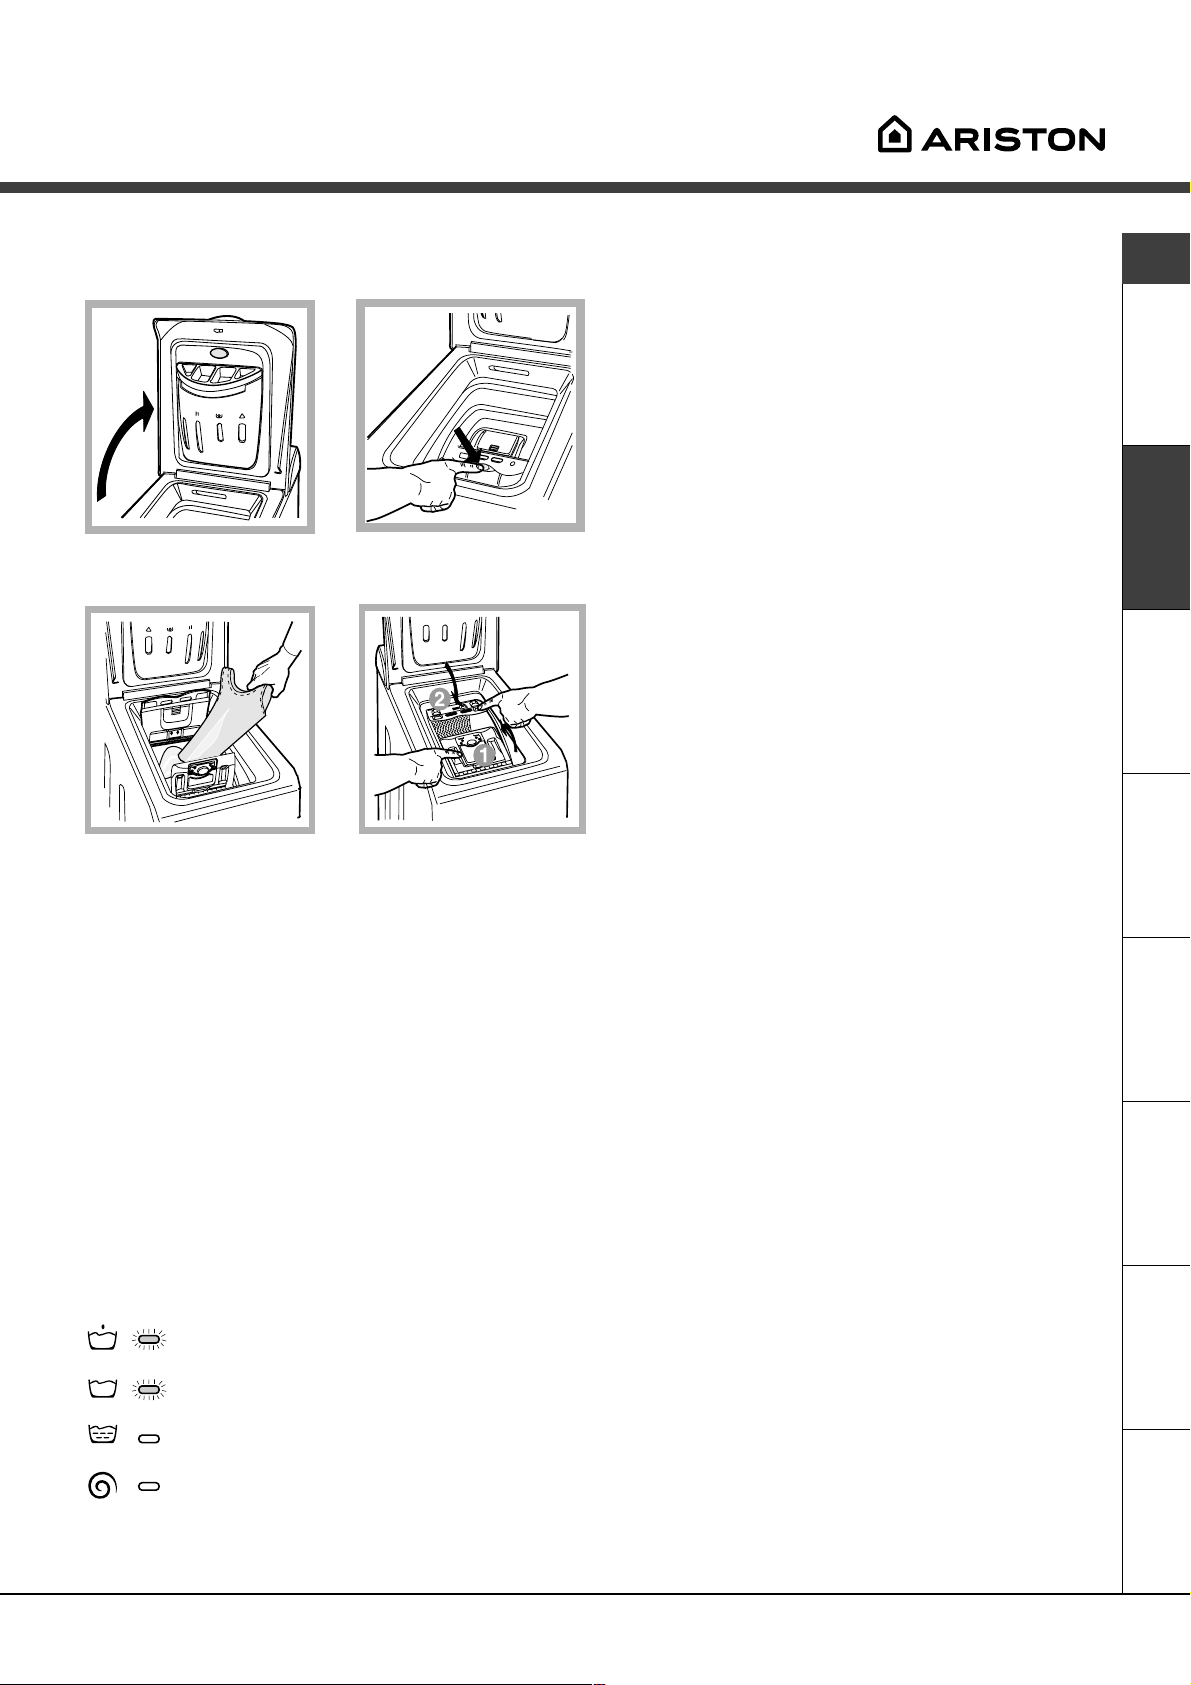
How to open and to close the drum
GB
A) Opening (Fig. 1).
Lift the external lid and open it completely.
B) Opening the drum (Soft opening):
With one finger, push the button indicated in fig. 2
and the drum will open delicately.
Fig. 1
Fig. 3
Fig. 2
Fig. 4
C) Loading the washing machine. (Fig. 3).
D) Shutting (Fig. 4).
— close the drum fully by first shutting the front door
followed by the rear one;
— then ensure the hooks on the front door are perfectly
housed within the seat of the rear door;
— after the hooks have clicked into position, press both
doors lightly downwards to make sure they do not
come loose;
— finally shut the external lid.
Leds
The LEDS provide important information.
This is what they can tell you:
Cycle phase under way:
During the wash cycle, the LEDs gradually illuminate
on to indicate the cycle phase under way:
Prewash
Wash
Rinse
Spin cycle
Note: during draining, the LED corresponding to the
Spin cycle phase will be turned on.
Function keys
The FUNCTION KEYS also act like LEDS.
When a function is selected, the corresponding button
is illuminated.
If the function selected is incompatible with the
programme set, the button will flash and the function
will not be enabled.
If you set a function that is incompatible with another
function you selected previously, only the last one
selected will be enabled.
ServiceTroubleshootingPrecautions CareProgrammes DetergentsInstallation Description
5

Starting and Programmes
GB
Briefly: starting a programme
1. Switch the washing machine on by pressing button .
All the LEDS will light up for a few seconds and
the ON-OFF/DOOR LOCK Led will begin to flash.
2. Load your laundry into the washing machine, add
the detergent and any fabric softener (see page 
and shut the appliance door.
3. Set the PROGRAMME knob to the programme
required.
4. Set the wash temperature (see page 7).
5. Set the spin speed (see page 7).
6. Start he programme by pressing the START/RESET
button.
To cancel it, keep the START/RESET button pressed
for at least 2 seconds.
7. When the programme is finished, the ON-OFF/
DOOR LOCK Led will flash to indicate that the
appliance door can be opened. Take out your
laundry and leave the appliance door ajar to allow
the drum to dry thoroughly. Turn the washing
Programme table
Type of fabric and degree
of soil
Programmes
Was h
temperat.
Detergent
Pre-
Wash
wash
machine off by pressing button
Fabr ic
softener
Bleaching
/option
Bleach
Cycle
length
(minutes)
Description of wash c ycle
Cotton
Extremely soil ed whites
(sheets, tablecloths, etc.)
Extremely soil ed whites
(sheets, tablecloths, etc.)
Heavily soi led whites and
fast colours
Heavily soi led whites and
fast colours
Slightly soiled whites and
delicate colours (shirts,
jumpers, etc.)
1
2
3
4
5
90°C 137
90°C
60°C
40°C
30°C
Delicate/
Traditio nal
Delicate/
Traditio nal
Delicate/
Traditio nal
Delicate/
Traditio nal
Pre-wash, wash cycle, rinse
cycles, intermediate and final
spin cycles
Wash c ycle, r inse cycles,
129
intermediate and final spin
cycles
Wash c ycle, r inse cycles,
144
intermediate and final spin
cycles
Wash c ycle, r inse cycles,
8
7
intermediate and final spin
cycles
Wash c ycle, r inse cycles,
70
intermediate and final spin
cycles
Synthetics
Heavily soi led fast colours
(baby linen, etc.)
Heavily soi led fast colours
(baby linen, etc.)
Delicate colours (all types
of slightly soiled
garments)
Delicate colours (all types
of slightly soiled
garments)
6
7
8
9
60°C
50°C
40°C
30°C 32
Delicate
Delicate
Delicate
Wash cycle, rin se cycles, ant i-
79
crease or delicate spin cycle
Wash cycle, rin se cycles, ant i-
75
crease or delicate spin cycle
Wash cycle, rin se cycles, ant i-
65
crease or delicate spin cycle
Wash cycle, rinse cycles and
delicate spin cycl
Delicate
Wool
Very delicate fabrics
(curtains, silk, viscose,
etc.)
PARTIAL PROGRAMMES
Rinse Rinse cycles and spin cycle
Delicate rinse cycle
Spin cycle
Delicate spin cycle
Drainin g Drainin g
10
11
40°C
30°C
Delicate
Wash cycle, rinse cycles and
45
delicate spin cycle
Wash cycle, rin se cycles, ant i-
5
2
crease or draining cycle
Rinse cycles, ant i-crease or
draining
Draining and heavy duty spin
cycle
Drain ing and delicat e spin
cycle
.
Notes:
For the anti-crease function: see Easy iron, opposite page. The information contained in the table is purely indicative.
At the end of the wash cycle, before opening the appliance, wait 3 minutes for the doors of the drum to face upwards.
Special programme
Daily 30′ (programme 9 for Synthetics) is designed to wash lightly soiled garments in a short amount of time: it only lasts
30 minutes and allows you to save on both time and energy. By setting this programme (9 at 30°C), you can wash
different fabrics together (except for woollen and silk items), with a maximum load of 3 kg. We recommend the use of
liquid detergent.
6
Personalisations
Setting the temperature
Turn the TEMPERATURE knob to set the wash temperature (see Programme table on page 6).
The temperature can be lowered, or even set to a cold wash (
).
Setting the spin speed
Turn the SPIN SPEED knob to set the spin speed for the programme selected.
The maximum spin speeds for each programme are as follows:
Programmes Maximum spin speed
Cottone 1000 rpm
Synthetics 800 rpm
Wool 600 rpm
Silk no
The spin speed can be lowered, or the spin cycle can be excluded altogether by selecting symbol
The washing machine will automatically prevent you from selecting a spin speed higher than the maximum speed for
each programme.
.
To avoid excessive vibrations, before every spin cycle the machine distributes the load in a uniform manner by
continuously rotating the drum at a speed which is slightly faster than the normal washing speed.
When, despite repeated attempts, the load is still not evenly distributed, the machine spins at a lower speed than
the set frequency.
If the load is excessively unbalanced, the machine attempts to distribute it instead of spinning.
The balancing attempts may extend the total duration of the cycle, up to a maximum of 10 minutes.
Functions
To enable a function:
1. press the button corresponding to the desired function, according to the table below;
2. the function is enabled when the corresponding button is illuminated.
GB
Note: The rapid flashing of the button indicates that the corresponding function cannot be selected for the
programme set.
Function Effect Comments Enabled with
S u pe r
Was h
E a s y i r on This option
R a pi d Cuts the
E x t r a
R i ns e
Allows for an
impeccable
wash, visibly
whiter than a
standard
Class A
reduces the
amount of
creasing on
fabrics,
making them
easier to iron.
duration of
the wash
cycle by 30%.
Increases the
efficiency of
the rinse.
wash.
This function is incompatible with the RAPID function.
When this function is set, programmes 6, 7, 8, 11 and
Delicate rinse will end with the laundry left to soak
(Anti-crease) and the Rinse cycle phase LED will
flash.
— to conclude the cycle, press the START/RESET
button;
— to run the draining cycle alone, set the knob to the
relative symbol and press the START/RESET
button.
This function is incompatible with the SUPER WASH
function.
Recommended when the appliance has a full load or
with large quantities of detergent.
programmes:
1, 2, 3, 4,
5, 6, 7, 8
All
programmes
except for
1, 2, 9, 10
and
Draining.
1, 2, 3, 4,
5, 6, 7, 8
Rinses
1, 2, 3, 4, 5,
6, 7, 8, and
Rinse
cycles.
ServiceTroubleshootingPrecautions CareProgrammes DetergentsInstallation Description
7

Detergents and laundry
GB
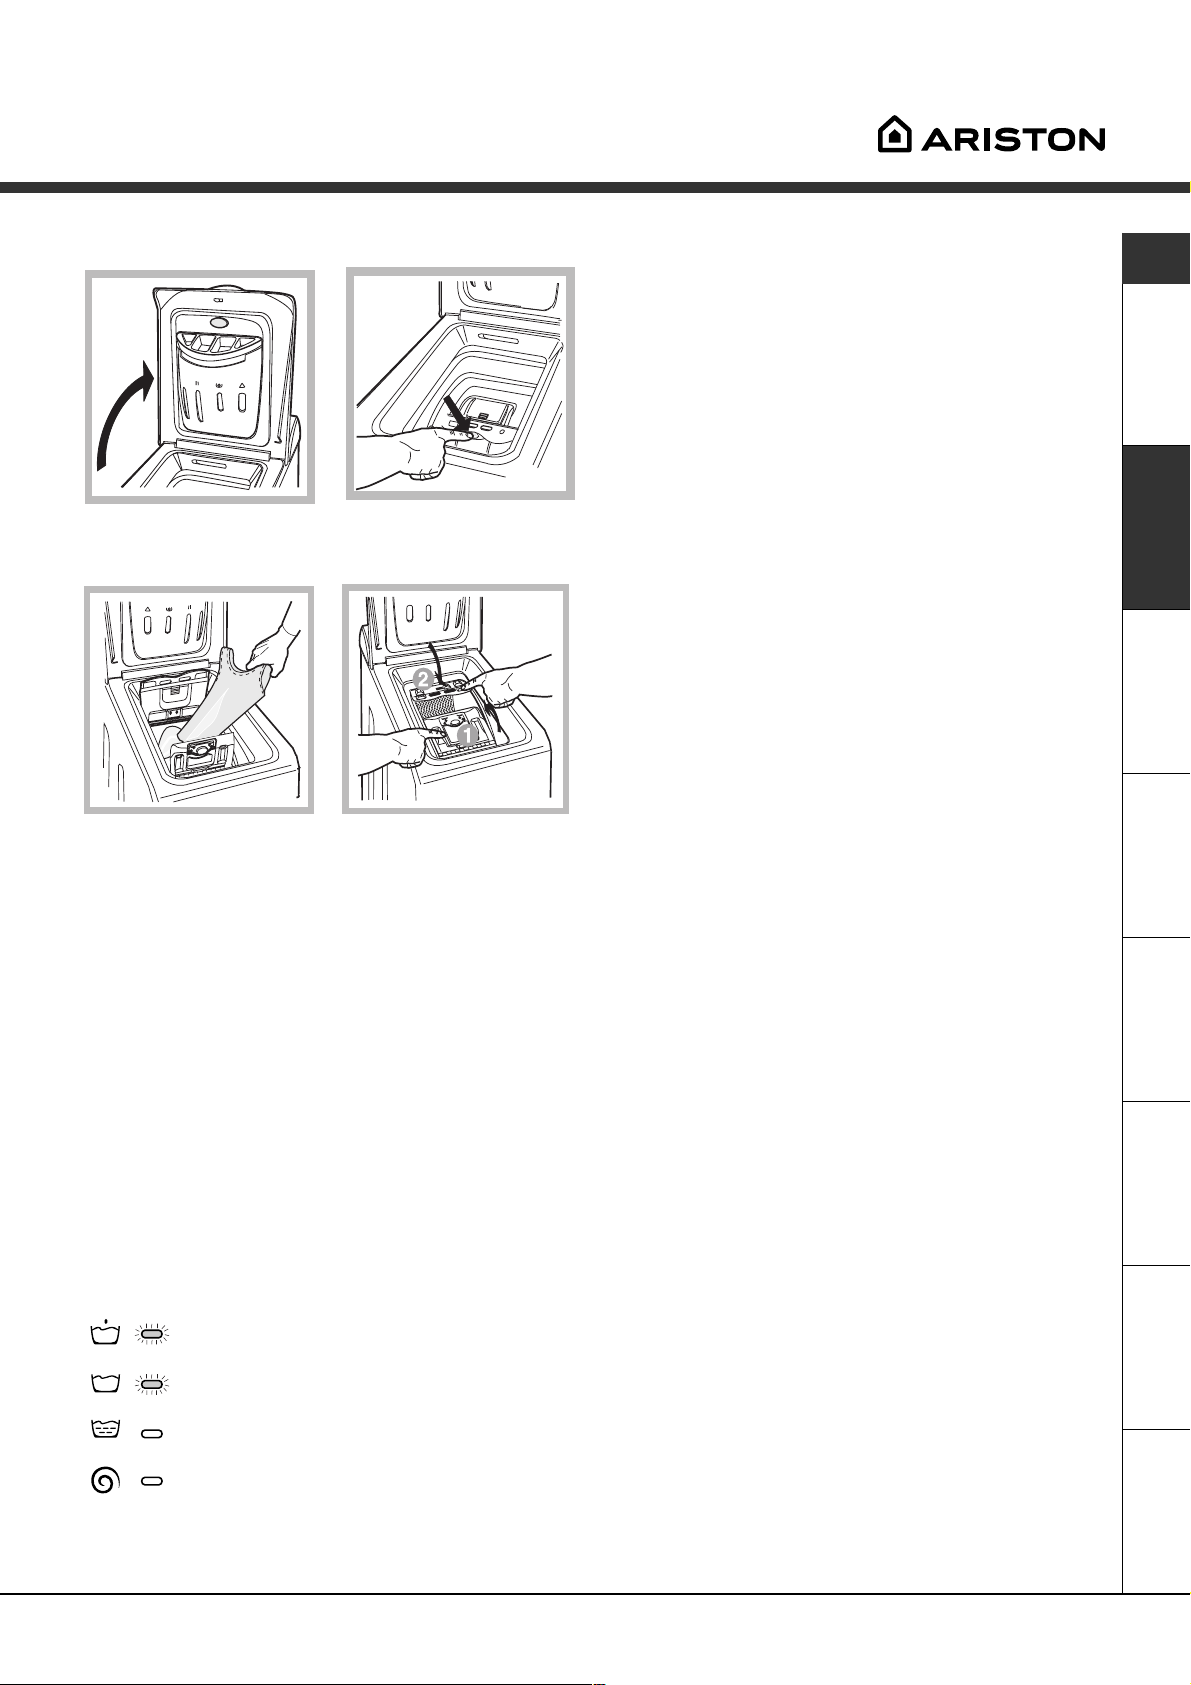
Detergent dispenser
Good washing results also depend on the correct
dose of detergent: adding too much detergent won’t
necessarily make for a more efficient wash, and may
in fact cause build up
on the interior of your
appliance and even
pollute the
environment.
Open up the
detergent dispenser
and pour in the
detergent and fabric
softener, as follows.
compartment 1: Detergent for pre-wash
compartment 2: Detergent for the wash cycle
(powder or liquid)
It is recommended that you place liquid detergent
directly into the compartment using the appropriate
dosing cup.
compartment 3: Additives (softener, etc.)
When pouring the softener in compartment 3, avoid
exceeding the «max» level indicated.
The softener is added automatically into the machine
during the last wash. At the end of the wash
programme, some water will be left in compartment
3. This is used for the inlet of denser fabric softeners
into the machine, i.e. to dilute the more
concentrated softeners. Should more than a normal
amount of water remain in compartment 3, this
means the emptying device is blocked. For cleaning
instructions, see page 10.
Preparing your laundry
Divide your laundry according to:
— the type of fabric/the symbol on the label.
— the colours: separate coloured garments from
whites.
Empty all pockets and check for loose buttons.
Do not exceed the weight limits stated below,
which refer to the weight when dry:
Sturdy fabrics: max 5 kg
Synthetic fabrics: max 2.5 kg
Delicate fabrics: max 2 kg
Wool: max 1 kg
How much does your laundry weigh?
1 sheet 400-500 g
1 pillow case 150-200 g
1 tablecloth 400-500 g
1 bathrobe 900-1,200 g
1 towel 150-250 g
Special items
Curtains: fold curtains and place them in a pillow
case or mesh bag. Wash them separately without
exceeding half the appliance load. Use programme
11 which excludes the spin cycle automatically.
Quilted coats and windbreakers: if they are
padded with goose or duck down, they can be
machine-washed. Turn the garments inside out and
load a maximum of 2-3 kg, repeating the rinse cycle
once or twice and using the delicate spin cycle.
Trainers: remove any mud. They can be washed
together with jeans and other tough garments, but
not with whites.
Wool: for best results, use a specific detergent,
taking care not to exceed a load of 1 kg.
compartment 4: Bleach
Do not use hand wash detergent because it may
form too much foam.
Bleach cycle
Traditional bleach should be used on sturdy white
fabrics, and delicate bleach for coloured fabrics,
synthetics and for wool.
When pouring in the bleach, be careful not to exceed
the «max» level indicated on compartment 4 .
To run the bleach cycle alone, pour the bleach into
compartment 4 and set the Extra Rinse function
8
Woolmark Platinum Care
As gentle as a hand wash.
Ariston sets a new standard of superior
performance that has been endorsed by
The Woolmark Company with the
prestigious Woolmark Platinum Care brand.
Look for the Woolmark Platinum Care logo on the
washing machine to ensure you can safely and
effectively wash wool garments labelled as «hand
wash» (M.0303):
Set programme 10 for all «Hand wash»
.
using the appropriate detergent (max load 1 kg).
garments,

Precautions and advice
The washing machine was designed and built in
compliance with the applicable international safety
regulations. The following information is provided for
your safety and should consequently be read carefully.
General safety
This appliance has been designed for nonprofessional, household use and its functions must
not be changed.
This washing machine should only be used by
adults and in accordance with the instructions
provided in this manual.
Never touch the washing machine when barefoot
or with wet or damp hands or feet.
Do not pull on the power supply cable to unplug
the appliance from the electricity socket. Pull the
plug out yourself.
Do not open the detergent dispenser while the
appliance is in operation.
Do not touch the drain water as it could reach
very high temperatures.
Never force the washing machine door: this could
damage the safety lock mechanism designed to
prevent any accidental openings.
In the event of a malfunction, do not under any
circumstances touch internal parts in order to
attempt repairs.
Always keep children well away from the
appliance while in operation.
The appliance door tends to get quite hot during
the wash cycle.
Should it have to be moved, proceed with the
help of two or three people and handle it with the
utmost care. Never try to do this alone, because
the appliance is very heavy.
Before loading your laundry into the washing
machine, make sure the drum is empty.
Disposal
Disposing of the packaging material: observe local
regulations, so the packaging can be re-used.
Disposal of old electrical appliances
The European Directive 2002/96/EC on Waste
Electrical and Electronic Equipment (WEEE), requires
that old household electrical appliances must not be
disposed of in the normal unsorted municipal waste
stream. Old appliances must be collected separately
in order to optimise the recovery and recycling of
the materials they contain and reduce the impact on
human health and the environment.
The crossed out «wheeled bin» symbol on the
product reminds you of your obligation, that when
you dispose of the appliance it must be separately
collected.
Consumers should contact their local authority or
retailer for information concerning the correct
disposal of their old appliance.
Disposing of an old washing machine:
before scrapping your appliance, cut the power
supply cable and remove the appliance door.
Saving energy and respecting the
environment
Environmentally-friendly technology
If you only see a little water through your appliance
door, this is because thanks to the latest technology,
your washing machine only needs less than half the
amount of water to get the best results: an objective
reached to respect the environment.
Saving on detergent, water,
energy and time
To avoid wasting resources, the washing machine
should be used with a full load. A full load instead
of two half loads allows you to save up to 50% on
energy.
The pre-wash cycle is only necessary on
extremely soiled garments. Avoiding it will save on
detergent, time, water and between 5 and 15%
energy.
Treating stains with a stain remover or leaving
them to soak before washing will cut down the
need to wash them at high temperatures. A
programme at 60°C instead of 90°C or one at
40°C instead of 60°C will save up to 50% on
energy.
Use the correct quantity of detergent depending
on the water hardness, how soiled the garments
are and the amount of laundry you have, to avoid
wastage and to protect the environment: despite
being biodegradable, detergents do contain
ingredients that alter the natural balance of the
environment. In addition, avoid using fabric
softener as much as possible.
If you use your washing machine from late in the
afternoon until the early hours of the morning, you
will help reduce the electricity board’s peak load.
The Delay Timer option (see page 7) helps to
organise your wash cycles accordingly.
If your laundry has to be dried in a tumble dryer,
select a high spin speed. Having the least water
possible in your laundry will save you time and
energy in the drying process.
GB
ServiceTroubleshootingPrecautions CareProgrammes DetergentsInstallation Description
9
Care and maintenance
GB
Cutting off the water or electricity
supply
Turn off the water tap after every wash. This will
limit the wear of your appliance’s water system
and also prevent leaks.
Unplug your appliance when cleaning it and
during all maintenance operations.
Cleaning your appliance
The exterior and rubber parts of your appliance can
be cleaned with a soft cloth soaked in lukewarm
soapy water. Do not use solvents or abrasives.
Cleaning the detergent dispenser
Remove the dispenser by raising it and pulling it out
(see figure).
Wash it under running water; this operation should
be repeated
frequently.
Caring for your appliance door and
drum
Always leave the appliance door ajar to prevent
unpleasant odours from forming.
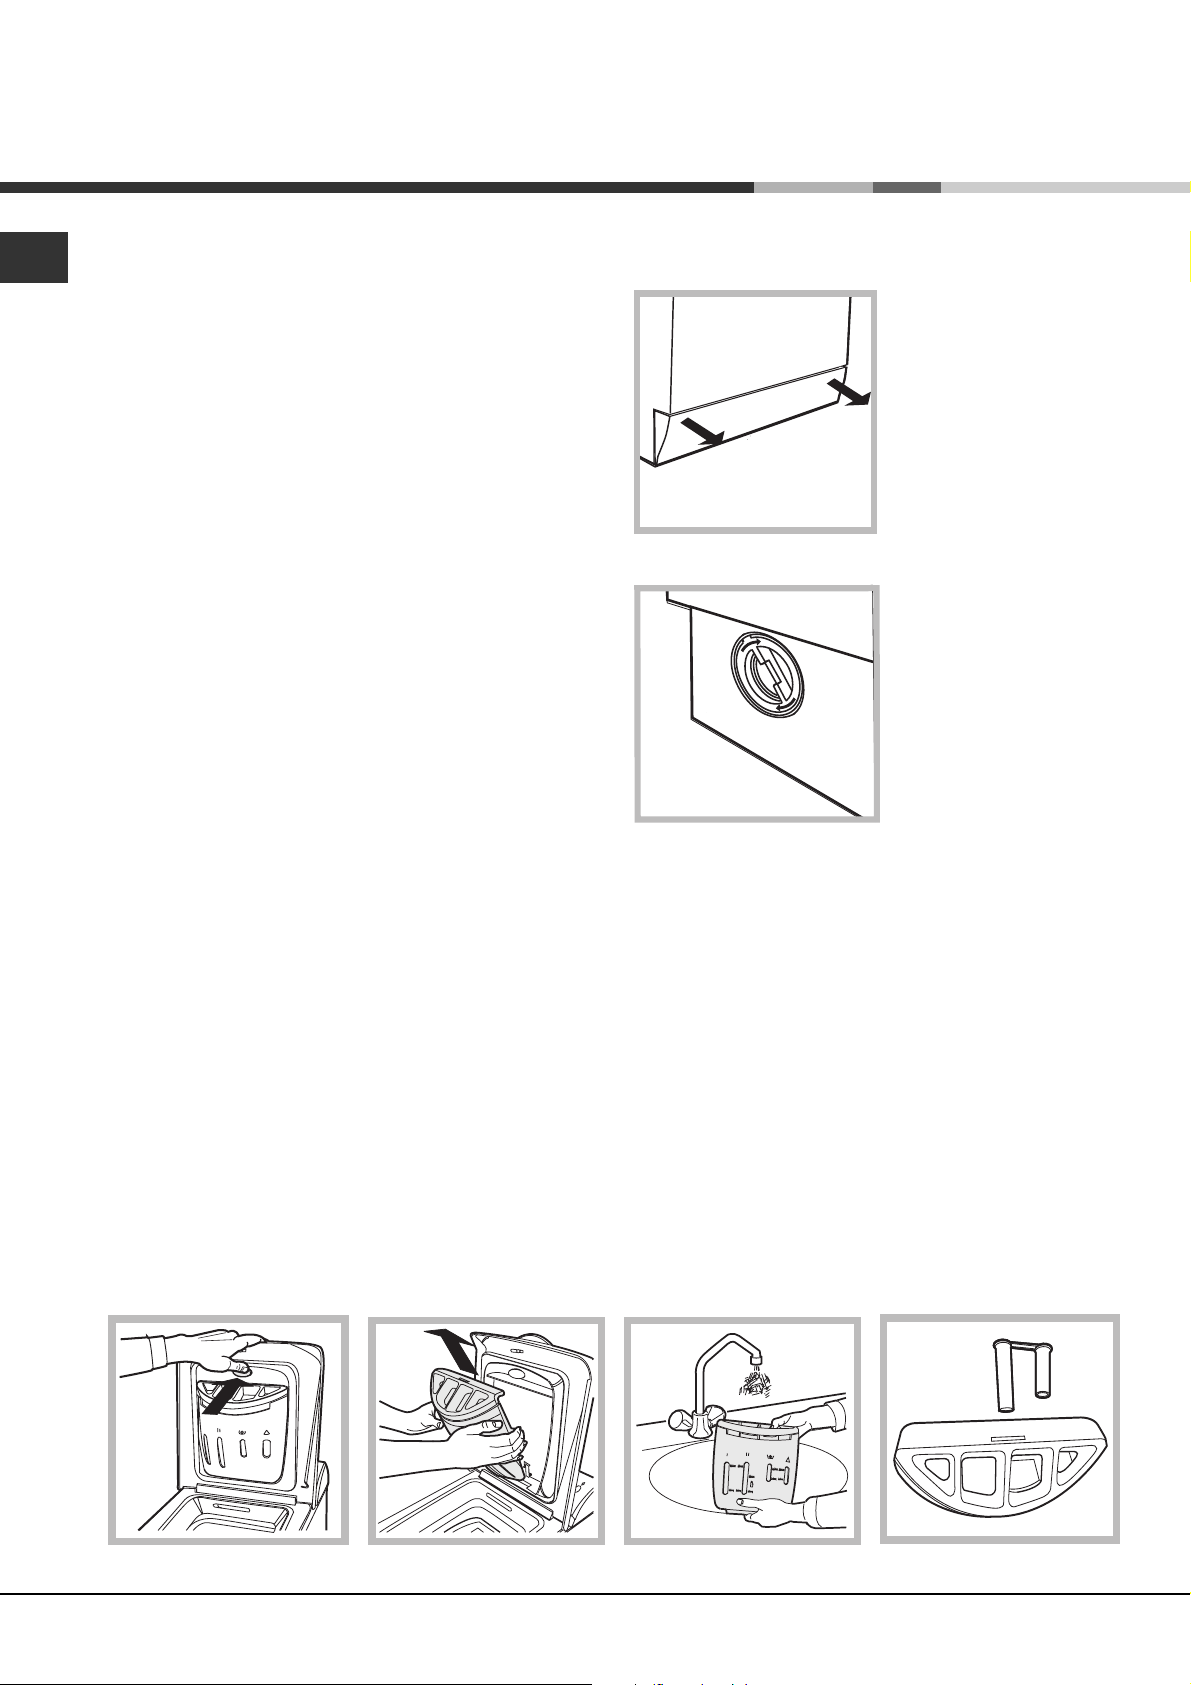
Cleaning the pump
The washing machine is fitted with a self-cleaning
pump that does not require any maintenance.
Sometimes, small items (such as coins or buttons)
may fall into the pre-chamber that protects the
pump, situated in the lower part of the same.
Make sure the wash cycle has ended and unplug
the appliance.
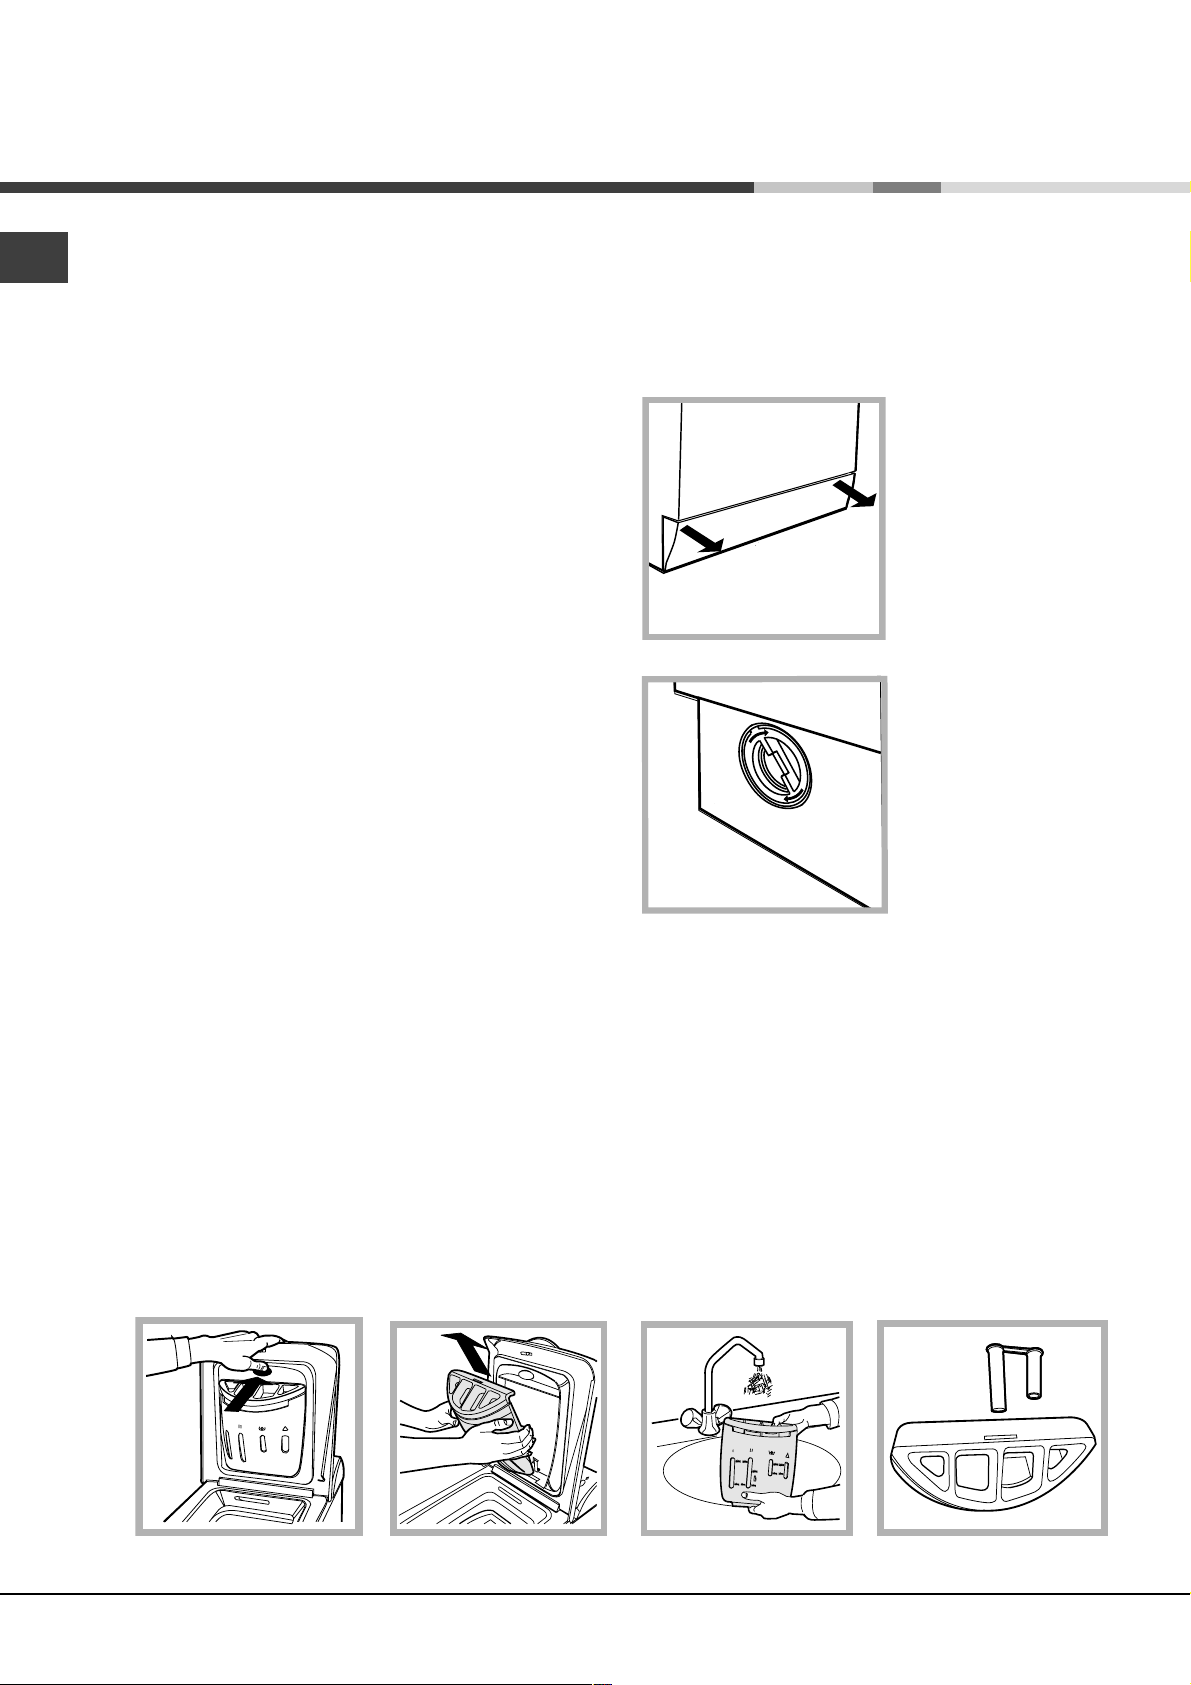
To recover any objects that have fallen into the prechamber:
1. remove the plinth at
the bottom on the
front side of the
washing machine by
pulling from the side
with your hands (see
figure);
2. unscrew the lid
rotating it anticlockwise (see figure): a
little water may trickle
out. This is perfectly
normal;
3. clean the interior
thoroughly;
4. screw the lid back
on;
5. reposition the
panel, making sure the
hooks are securely in
place before you push
it onto the appliance.
Checking the water inlet hose
Check the water inlet hose at least once a year. If
you see any cracks, replace it immediately: during
the wash cycles, water pressure is very strong and
a cracked hose could easily split open.
Never use hoses that have already been used.
Disassembly:
Press lightly on the large
button on the front of the
detergent dispenser and pull
it upwards (fig. 1).
Fig. 1 Fig. 2
10
How to clean the detergent dispenser
Cleaning:
Then clean the dispenser under a tap (fig. 3) using an old
toothbrush and, once the pair of siphons inserted in the
top of compartments 1 and 2 (fig. 4) have been pulled
out, check whether the same are not clogged and then
rinse them.
Fig. 3
Reassembly:
Do not forget to reinsert the
pair of siphons into the
special housings and then to
replace the dispenser into its
seat, clicking it into place
(fig. 4, 2 and 1).
Fig. 4

Troubleshooting
Your washing machine could fail to work. Before calling for Assistance (see page 12), make sure the problem
can’t easily be solved by consulting the following list.
Problem
The washing machine won’t
start.
The wash cycle won’t start.
The washing machine fails to
load water.
The washing machine
continuously loads and unloads
water.
Possible causes/Solution:
The appliance is not plugged into the socket, or not enough to
make contact.
There has been a power failure.
The appliance Lid is not shut properly. The Lid locked Led flashes.
The
The START/RESET button has not been pressed.
The water tap is not turned on.
The water inlet hose is not connected to the tap.
The hose is bent.
The water tap is not turned on.
There is a water shortage.
The water pressure is insufficient.
The START/RESET button has not been pressed.
The drain hose is not fitted between 65 and 100 cm from the floor
The free end of the hose is underwater (see page 3).
The wall drainage system doesn’t have a breather pipe.
If the problem persists even after these checks, turn off the water tap,
switch the appliance off and call for Assistance. If the dwelling is on one of
the upper floors of a building, there may be drain trap problems causing the
washing machine to load and unload water continuously. In order to avoid
such an inconvenience, special anti-drain trap valves are available in shops.
button has not been pressed.
(see page 3).
GB
The washing machine does not
drain or spin.
The washing machine vibrates
too much during the spin cycle.
The washing machine leaks.
The ON-OFF/DOOR LOCK Led
flashes rapidly at the same time
as at least one other LED.
There is too much foam.
The programme does not foresee the draining: some programmes
require enabling the draining manually (see page 6).
The Easy iron option is enabled: to complete the programme, press
the START/RESET button (see page 7).
The drain hose is bent (see page 3).
The drain duct is clogged.
When the machine is installed, the locking screws for the oscillating
assembly are still in place. Remove the screws (see page 2).
The washing machine is not level (see page 2).
The washing machine is closed in between furniture cabinets and
the wall (see page 2).
The water inlet hose is not screwed on correctly (see page 2).
The detergent dispenser is obstructed (to clean it, see page 10).
The drain hose is not secured properly (see page 3).
Switch off the machine and unplug the appliance; wait for
approximately 1 minute then switch it on again.
If the problem persists, contact Assistance.
The detergent is not suitable for machine washing (it should bear
the definition «for washing machines» or «hand and machine wash»,
or the like).
You used too much detergent.
ServiceTroubleshootingPrecautions CareProgrammes DetergentsInstallation Description
11

Service
GB
Before calling for Assistance:
Check whether you can solve the problem on your own (see page 11);
Restart the programme to check whether the problem has been solved;
If this is not the case, contact an authorised Technical Service Centre on the telephone number
provided on the guarantee certificate.
If the machine has been installed or used incorrectly, you may be charged for the maintenance callout
service.
Always request the assistance of authorised servicemen.
Notify the operator of:
the type of problem;
the appliance model (Mod.);
the serial number (S/N);
This information can be found on the data plate situated on the rear of the washing machine.
Service
12

Instrukcja obs³ugi
PRALKA
PL
Polski
AVTL 109
Spis treci
PL
Instalacja, 14-15
Rozpakowanie i wypoziomowanie, 14
Pod³¹czenie do sieci wodnej i elektrycznej, 14-15
Pierwszy cykl prania, 15
Dane techniczne, 15
Opis pralki, 16-17
Panel kontrolny, 16
Jak otwieraæ i zamykac kosz, 17
wiate³ka sygnalizuj¹ce, 17
Uruchomienie i Programy, 18
Krótko mówi¹c: jak nastawiæ program, 18
Tabela programów, 18
Potrzeby indywidualne, 19
Nastawienie temperatury, 19
Nastawienie wirowania, 19
Funkcje, 19
rodki pior¹ce i bielizna, 20
Szufladka na rodki pior¹ce, 20
Cykl wybielania, 20
Przygotowanie bielizny, 20
Tkaniny wymagaj¹ce szczególnej dba³oci, 20
Woolmark Platinum Care, 20
Zalecenia i rodki ostro¿noci, 21
Ogólne zasady bezpieczeñstwa, 21
Usuwanie odpadów, 21
Oszczêdnoæ i ochrona rodowiska, 21
Konserwacja, 22
Wy³¹czenie wody i pr¹du elektrycznego, 22
Czyszczenie pralki, 22
Czyszczenie szufladki na rodki pior¹ce, 22
Czyszczenie drzwiczek i bêbna, 22
Czyszczenie pompy, 22
Kontrola rury doprowadzania wody, 22
Jak czyciæ szufladkê rodków pior¹cych, 22
Anomalie i rodki zaradcze, 23
Serwis Techniczny, 24
Przed zwróceniem siê do Serwisu Technicznego, 24
13
Instalacja
PL
Nale¿y zachowaæ niniejsz¹ ksi¹¿eczkê instrukcji dla
przysz³ych konsultacji. W razie sprzeda¿y, oddania,
czy przeniesienia pralki w inne miejsce nale¿y
upewniæ siê, by przekazana zosta³a ona razem z
instrukcj¹, aby nowy w³aciciel zapoznaæ siê móg³ z
dzia³aniem urz¹dzenia i odpowiednimi informacjami.
Nale¿y uwa¿nie przeczytaæ instrukcjê obs³ugi, gdy¿
zawiera ona wa¿ne informacje dotycz¹ce instalacji
oraz w³aciwego i bezpiecznego u¿ytkowania pralki.
Rozpakowanie i wypoziomowanie
Rozpakowanie
1. Rozpakowaæ pralkê.
2. Sprawdziæ, czy nie
dozna³a ona
uszkodzeñ w czasie
transportu. Jeli by³aby
ona uszkodzona, nie
pod³¹czaæ jej i
powiadomiæ
sprzedawcê.
3. Odkrêciæ cztery ruby
ochronne, zamocowane
na czas transportu, oraz
zdj¹æ gumow¹
podk³adkê z
odpowiedni¹ rozpórk¹,
znajduj¹ce siê w tylnej
cianie i (zobacz
rysunek).
4. Zatkaæ otwory przy pomocy za³¹czonych do pralki
plastykowych zalepkek.
5. Zachowaæ wszystkie te czêci: gdyby okaza³o siê
konieczne przewiezienie pralki w inne miejsce,
powinny one zostaæ ponownie zamontowane.
Uwaga: w razie ponownego uzycia kròtsze srubki
powinny byc przymocowane u gòry.
Czêci opakowania nie nadaj¹ siê do zabawy dla
dzieci
Wypoziomowanie
1. Ustawiæ pralkê na
p³askiej i twardej
pod³odze; nie opieraæ
jej o ciany, meble itp.
2. Jeli pod³oga nie jest
dok³adnie pozioma,
nale¿y wypoziomowaæ
pralkê, dokrêcaj¹c lub
odkrêcaj¹c przednie
nó¿ki (zobacz rysunek)
K¹t nachylenia,
zmierzony na górnym
blacie pralki, nie powinien przekraczaæ 2°.
Staranne wypoziomowanie pralki zapewnia jej
stabilnoæ i zapobiega wibrowaniu, ha³asom i
przesuwaniu siê urz¹dzenia w czasie pracy.
W razie ustawienia na dywanie lub wyk³adzinie
dywanowej nale¿y tak wyregulowaæ nó¿ki, aby pod
pralk¹ pozostawa³a wolna przestrzeñ niezbêdna dla
wentylacji.
Ustawienie, przeniesienie.
Jeli twój model pralki
wyposa¿ony jest w
specjalne wysuwalne
kó³ka, ³atwo jest j¹
przesuwaæ. Aby
wysun¹æ kó³ka i móc
dziêki temu ³atwo
przesun¹æ pralkê,
nale¿y poci¹gn¹æ
dwigniê, znajduj¹c¹ siê
na dole z lewej strony
pod coko³em. Po
przesuniêciu pralki nale¿y z powrotem ustawiæ
dwigniê w pierwotnej pozycji. Urz¹dzenie stoi
teraz pewnie na pod³odze. (Zobacz rysunekodnosi siê tylko do niektórych modeli).
.
Pod³¹czenie do sieci wodnej i elektrycznej
Pod³¹czenie rury pobierania wody
1. Wsun¹æ uszczelkê A do
koñcówki rury pobierania
wody i przykrêciæ j¹ do
kurka zimnej wody o
gwintowanym otworze
A
Cinienie hydrauliczne kurka powinno mieciæ siê w
.
przedziale podanym w tabeli Danych technicznych
(zobacz na s¹siedniej stronie).
Jeli rura doprowadzania wody okaza³aby siê za
krótka, nale¿y zwróciæ siê do wyspecjalizowanego
sklepu lub do upowa¿nionego fachowca.
3/4» (zobacz rysunek).
Przed pod³¹czeniem
upuciæ wodê, a¿ bêdzie
zupe³nie czysta i
przeroczysta.
2. Pod³¹czyæ rurê
pobierania wody do pralki,
przykrêcaj¹c j¹ do
odpowiedniego otworu
pobierania wody,
znajduj¹cego siê w tylnej
cianie pralki, z prawej
strony u góry (zobacz
rysunek).
3. Zwróciæ uwagê, by na
rurze nie by³o zgiêæ ani
ciniêæ.
14
Pod³¹czenie rury usuwania wody
Pod³¹czyæ rurê
usuwania wody, bez
zginania jej, do
przewodu ciekowego
lub do cieku w cianie,
65 — 100 cm
które powinny
znajdowaæ siê na
wysokoci od 65 do 100
cm od pod³ogi;
lub oprzeæ j¹ na brzegu
zlewu lub wanny,
przymocowuj¹c do
kranu za³¹czony do
pralki prowadnik
(zobacz rysunek).
Wolny koniec rury
usuwania wody nie
powinien pozostawaæ
zanurzony w wodzie.
Po zainstalowaniu pralki gniazdko elektryczne
powinno byæ ³atwo dostêpne.
Nie u¿ywaæ przed³u¿aczy ani wtyczek
wielokrotnych.
Kabel nie powinien mieæ zgiêæ ani nie powinien byæ
zgnieciony.
Kabel zasilania elektrycznego mo¿e byæ wymieniony
wy³¹cznie przez upowa¿nionego technika specialistê.
Uwaga! Producent uchyla siê od wszelkiej
odpowiedzialnoci, jeli nie przestrzega siê powy¿szych
zasad.
Pierwszy cykl prania
Po zainstalowaniu, zanim zacznie siê u¿ywaæ pralki,
nale¿y wykonaæ jeden cykl prania ze rodkiem pior¹cym,
lecz bez bielizny, nastawiaj¹c program na 90°C bez
prania wstêpnego.
PL
Odradza siê u¿ywanie rur-przed³u¿aczy; jeli
przed³u¿acz jest jednak konieczny, powinien mieæ
on ten sam przekrój, co rura oryginalna, i nie
powinien przekraczaæ 150 cm d³ugoci.
Pod³¹czenia elektryczne
Przed wprowadzeniem wtyczki do gniazdka nale¿y
upewniæ siê, czy:
gniazdko ma odpowiednie uziemnienie i czy
odpowiada obowi¹zuj¹cym przepisom;
gniazdko jest w stanie wytrzymaæ obci¹¿enie
maksymalnej mocy urz¹dzenia, podanej w tabeli
Danych Technicznych (zobacz obok);
napiêcie pr¹du elektrycznego w sieci zgodne jest
z danymi podanymi w tabeli Danych Technicznych
(zobacz obok);
gniazdko odpowiada wtyczce pralki. W
przeciwnym razie nale¿y wymieniæ gniazdko lub
wtyczkê.
Nie nale¿y instalowaæ pralki na otwartym
powietrzu, nawet jeli miejsce to jest chronione
daszkiem, gdy¿ wystawienie urz¹dzenia na dzia³anie
deszczu i burz, jest bardzo niebezpieczne.
Dane techniczne
Model
Wymiary
Pojemnoæ
Dane pr¹du
elektrycznego
Dane sieci
wodoci¹gowej
Szybkoæ wirowania
Programy kontrolne
zgodnie z przepisami
IEC456
AVTL 109
szerokoæ cm 40
wysokoæ cm 85
g³êbokoæ cm 60
od 1 do 5 kg
Napiêcie 220/230 Volt 50 Hz
maksymalna moc pobierana 1850 W
Maksymalne cinienie 1 MPa (10 barów)
cinienie minimalne 0,05 MPa (0,5 barów)
pojemnoæ bêb na 42 litrów
do 1000 obrotów na minutê
program 3; temperatura 60°C;
wykonane przy 5 kg za³adowanej bielizny.
Urz¹dzenie to zosta³o wyprodukowane
zgodnie z nastêpuj¹cymi przepisami EWG :
— 73/23/CEE z dn. 19/02/73 (o Niskim
Napiêciu) w raz z kolejnymi zmianami
— 89/336/CEE z dn. 03/05/89
(o Kompatybilnoci Elektromagnety
cznej) wraz z kolejnymi zmianami
-2002/96/CE
ostro¿noci
Zasady
KonserwacjaProgramy rodki pior¹ceInstalacja Opis
Nieprawid³owoci
w dzia³aniu
techniczny
Serwis
15

Opis pralki
PL
Panel kontrolny
Pokrêt³o
WIROWANIA
wiate³ka
sygnalizuj¹ce
Pokrêt³o
TEMPERATURY
Przycisk
W£¥CZENIE/
WY£¥CZENIE
Przycisk
START/RESET
Przyciski
FUNKCYJNE
wiate³ko sygnalizuj¹ce
POKRYWA
ZABLOKOWANA
Pokrêt³o
PROGRAMÓW
Szufladka na rodki pior¹ce s³u¿y do wsypania
rodków pior¹cych i dodatków (zobacz str. 20).
Lampki sygnalizuj¹ce umo¿liwiaj¹ ledzenie
stanu postêpowania programu prania.
Jeli nastawiona zosta³a funkcja Delay Timer,
wska¿¹ one czas pozostaj¹cy do uruchomienia siê
programu (zobacz str. 17).
Pokrêt³o WIROWANIE s³u¿y do nastawienia lub
wykluczenia wirowania (zobacz str. 19).
Przyciski FUNKCJA s³u¿¹ do wybrania
po¿¹danych funkcji. Przycisk odnosz¹cy siê do
wybranej funkcji zawieci siê po jej nastawieniu.
wiate³ko sygnalizuj¹ce ZAPALENIE/ZABLOKOWANE DRZWICZKI:
To wiate³ko sygnalizacyjne zapalone wskazuje, ¿e drzwiczki pralki s¹ zablokowane, aby zapobiec
przypadkowemu ich otwarciu; aby unikn¹æ szkód nale¿y odczekaæ do momentu, w którym wiate³ko zacznie
pulsowaæ, po czym mo¿na otworzyæ drzwiczki.
Pokrêt³o TEMPERATURA s³u¿y do ustawienia
temperatury prania lub nastawienia prania w zimnej
wodzie (zobacz str. 19).
Przycisk W£¥CZANIE/WY£¥CZANIE s³u¿y do
w³¹czania i wy³¹czania pralki.
Przycisk START/RESET s³u¿y do uruchamiania
programów lub do anulowania b³êdnie nastawionych.
wiate³ko sygnalizuj¹ce W£¥CZENIE/POKRYWA
ZABLOKOWANA s³u¿y do zrozumienia, czy pralka
jest w³¹czona (lampka pulsuj¹ca) i czy mo¿na
otworzyæ pokrywê (wiat³o sta³e) (patrz str. 17).
Pokrêt³o PROGRAMY do nastawiania programów
(patrz str. 18).
W czasie trwania programu pokrêt³o pozostaje
nieruchome.
! Szybkie pulsowanie wiate³ka ZAPALENIE/ZABLOKOWANE DRZWICZKI przy jednoczesnym pulsowaniu
przynajmniej jeszcze jednego innego wiate³ka sygnalizacyjnego wskazuje nieprawid³owe dzia³anie pralki. W
tym wypadku nale¿y wezwaæ Serwis Techniczny.
16
Jak otwieraæ i zamykac kosz
A) OTWIERANIE. (Rys.1). Podnieæ zewnêtrzn¹
PL
pokrywê i ca³kowicie j¹ otworzyæ.
B Otwieranie kosza (Soft opening):
Nacisn¹æ palcem przycisk wskazany na rys. 2 i
koszyk delikatnie siê otworzy.
Fig. 1
Fig. 3
Fig. 2
Fig. 4
wiate³ka sygnalizuj¹ce
C) WK£ADANIE BIELIZNY. (Rys.3)
D) ZAMKNIÊCIE. (Rys.4)
— dobrze zamkn¹æ drzwiczki, opuszczaj¹c
najpierw drzwiczki przednie i opieraj¹c na nich
drzwiczki tylne;
— upewniæ siê, czy zaczepy przednich drzwiczek
dobrze wesz³y na swoje miejsce w tylnych
drzwiczkach;
— po us³yszeniu charakterystycznego clac, co
wiadczy o zaskoczeniu zaczepów, lekko
docisn¹æ oboje drzwiczek, które nie powinny siê
rozczepiæ.;
— na zakoñczenie zamkn¹æ klapê zewnêtrzn¹.
ostro¿noci
Zasady
wiate³ka sygnalizuj¹ce dostarczaj¹ wa¿nych
informacji.
Informuj¹ one, co nastêpuje:
Aktualna faza prania:
W trakcie cyklu prania poszczególne wiate³ka
bêd¹ siê zapalaæ, wskazuj¹c stan zaawansowania
prania w toku:
Pranie wstêpne
Pranie
P³ukanie
Odwirowanie
Uwaga: w fazie usuwania wody zapali siê wiate³ko
odpowiadaj¹ce fazie Wirowania.
Przyciski funkcyjne
PRZYCISKI FUNKCYJNE s³u¿¹ równie¿ jako
wiate³ka sygnalizuj¹ce.
Po wybraniu danej funkcji zawieci siê odpowiedni
przycisk.
Jeli wybrana funkcja nie mo¿e byæ nastawiona
razem z wybranym programem, przycisk funkcji
bêdzie migota³, a funkcja nie zostanie uruchomiona.
Jeli nastawiona zostanie funkcja sprzeczna z
uprzednio wybran¹ inn¹ funkcj¹, tylko jeden wybór
bêdzie przyjêty.
17
KonserwacjaProgramy rodki pior¹ceInstalacja Opis
Nieprawid³owoci
w dzia³aniu
techniczny
Serwis

Uruchomienie i Programy
PL
Krótko mówi¹c: jak nastawiæ program
1. W³¹czyæ pralkê, przyciskaj¹c przycisk .
Wszystkie wiate³ka sygnalizacyjne zapal¹ siê na
kilka sekund, a nastêpnie zgasn¹, po czym zacznie
migotaæ wiate³ko sygnalizacyjne W£¥CZENIE/
ZABLOKOWANE DRZWICZKI.
2. W³o¿æ bielinê do pralki, wsypaæ proszek i dodatki
(patrz str. 20) i zamnkn¹æ pokrzwkê.
3. Nastawiæ po¿¹dany program przy pomocy pokrêt³a
PROGRAMÓW.
4. Nastawiæ temperaturê prania (zobacz str. 19).
5. Nastawiæ szybkoæ wirowania (zobacz str. 19).
6. Uruchomiæ program, przyciskaj¹c przycisk START/RESET.
Aby anulowaæ program, nale¿y trzymaæ przyciniêty przycisk
START/RESET przez conajmniej 2 sekundy.
7. Po zakoñczeniu programu wiate³o sygnalizacyjne
W£¥CZENIE/ZABLOKOWANE DRZWICZKI zacznie
migotaæ, co wskazuje, ¿e mo¿na otworzyæ drzwiczki.
Wyj¹æ bieliznê i pozostawiæ drzwiczki pralki uchylone,
aby bêben móg³ wyschn¹æ. Wy³¹czyæ pralkê,
przyciskaj¹c przycisk
.
Tabela programów
Czas
trwania
cyklu
(minuty)
137
129
14
78
7
6
30
4
5
Opis cyklu prania
Pranie wstêpne, pranie w³aciwe,
p³ukania, odwirowania porednie i
koñcowe
Pranie, p³ukania, odwirowania
porednie i koñcowe
Pranie, p³ukania, odwirowania
4
porednie i koñcowe
Pranie, p³ukania, odwirowania
porednie i koñcowe
Pranie, p³ukania, odwirowania
0
porednie i koñcowe
Pranie, p³ukania, funkcja
przeciw g nieceniu lub delikatne
odwirowanie
Pranie, p³ukania, funkcja
przeciw g nieceniu lub delikatne
odwirowanie
Pranie, p³ukania, funkcja
5
przeciw g nieceniu lub delikatne
odwirowanie
Pranie, p³ukania i delikatne
odwirowanie
Pranie, p³ukania i delikatne
5
odwirowanie
Pranie, p³ukania, funkcja
2
przeciw gnieceniu lub
opró¿nienie z wody
P³ukania i odwirowanie
P³ukania, funkcja przeciw
gnieceniu lub opró¿nienie z wody
Opró¿nienie z wody i
energiczne odwirowanie
Opró¿nienie z wody i delikatne
odwirowanie
°
C
C
°
°
C
°
C
C
°
°
C
°
C
°
C
°
C
C
°
°
C
rodek pior¹cy
Pranie
wstêpne
Pranie
ciwe
w³a
rodek
zmiêkczaj¹cy
Rodzaj tkaniny oraz stopieñ
zabrudzenia
Bawe³na
Bielizna bia³a silnie zabrudzona
(pociel, obrusy itp.)
Bielizna bia³a silnie zabrudzona
(pociel, obrusy itp.)
Bielizna bia³a i kolorowa,
wytrzyma³a, mocno zabrudzona
Bielizna bia³a, s³abo zabrudzona
oraz kolorowa delikatna
(koszule, bluzki itp.)
Tkaniny kolorowe, delikatne,
ma³o zabrudzone
Tkaniny syntetyczne
Tkaniny syntetyczne o wytrzyma³ych
kolorach, silnie zabrud zone (b ielizna
dla niemowl¹t itp.)
Tkaniny syntetyczne o wytrzyma³ych
kolorach, silnie zabrud zone (b ielizna
dla niemowl¹t itp.)
Tkaniny syntetyczne o delikatnych
kolorach (w szystkie rodzaje
bielizny, lekko zabrudzonej)
Tkaniny syntetyczne o delikatnych
kolorach (w szystkie rodzaje
bielizny, lekko zabrudzonej)
Tkaniny delikatne
We³na
Ubrania i tkaniny wyj¹tkowo
delikatne (firanki, jedwab,
wiskoza itp.)
PROGRAMY CZÊ CIOWE
P³ukanie
P³ukanie delikatne
Odwirowanie
Odwirowanie delikatne
Opró¿nienie z wody Opró¿nienie z wody
Programy
10
11
1
2
3
4
5
6
7
8
9
Temperatury
90
90
60
40
30
60
50
40
30
40
30
Opcja
Wybielanie/
Wybielacz
Delikatne /
Tradycyjny
Delikatne /
Tradycyjny
Delikatne /
Tradycyjny
Delikatne /
Tradycyjny
Delikatne 79
Delikatne 75
Delikatne
Delikatne
Uwagi.
Opis funkcji przeciw gnieceniu siê tkanin, zobacz £atwiejsze prasowanie, na nastêpnej stronie. Podane w
tabeli dane maj¹ charakter przybli¿ony.
Po zakoñczeniu cyklu prania, przed otwarciem pralki, poczekaæ 3 minuty do momentu, kiedy drzwiczki
bêbna ustawi¹ siê w pozycji w kierunku do góry.
Program specjalny.
Dzienny 30′ (program 9 dla tkanin syntetycznych) przeznaczony jest do prania bielizny ma³o zabrudzonej w krótkim
czasie: trwa tylko 30 minut i pozwala dziêki temu na zaoszczêdzenie energii i czasu.
Nastawiaj¹c program (9 o temperaturze 30°C) mo¿na razem wypraæ ró¿nego rodzaju tkaniny (z wyj¹tkiem we³ny i
jedwabiu), przy maksymalnym za³adunku do 3kg. Zalecamy stosowanie p³ynnego rodka pior¹cego.
18
Potrzeby indywidualne
Nastawienie temperatury
Temperaturê prania nastawia siê, obracaj¹c pokrêt³o TEMPERATURY (zobacz Tabelê programów na str. 18).
Temperaturê mo¿na zredukowaæ, a¿ do prania w zimnej wodzie (
Nastawienie wirowania
Obracaj¹c pokrêt³o WIROWANIE, mo¿na nastawiæ szybkoæ odwirowywania dla wybranego programu.
Maksymalne szybkoci przewidziane dla wybranych programów s¹ nastêpuj¹ce:
Programy Maksymalna szybkoæ
Bawe³na 1000
Tkaniny syntetyczne 800 obrotów na minutê
We³na 600 obrotów na minutê
Jedwab bez wirowania
Szybkoæ wirowania mo¿e zostaæ zmniejszona lub mo¿na wirowanie zupe³nie wykluczyæ przez
przyciniêcie przycisku
Pralka zapobiegnie automatycznie wykonaniu wirowania szybszego, ni¿ maksymalne wirowanie przewidziane dla
wybranego programu.
W celu unikniecia nadmiernych wibracji przed kazdym odwirowaniem pralka rozklada ciezar wsadu w sposób
jednolity, nastepuje to poprzez wykonywanie stalych obrotów kosza z predkoscia nieco wyzsza od obrotów
podczas prania.Kiedy jednak, niezaleznie od powtarzanych prób, wsad nie zostanie rozlozony równomiernie,
maszyna wykona wirowanie z predkoscia nizsza od zaprogramowanej.
W przypadku pojawienia sie nadmiernego niezrównowazenia maszyna bedzie próbowala rozlozyc wsad zamiast
odwirowywac.
Ewentualne próby zrównowazenia wsadu moga wydluzyc laczny czas trwania cyklu o maksimum 10 minut.
obrotów na minutê
.
).
PL
Funkcje
Ró¿ne funkcje, w jakie wyposa¿ona jest pralka, pozwalaj¹ na osi¹gniêcie po¿¹danych rezultatów prania. Aby
uaktywniæ poszczególne funkcje, nale¿y postêpowaæ w nastêpuj¹cy sposób:
1. przycisn¹æ odpowiadaj¹cy po¿¹danej funkcji przycisk, zgodnie z poni¿sz¹ tabel¹;
2. zawiecenie siê odpowiedniego przycisku oznacza, ¿e funkcja jest aktywna.
Uwaga: Szybkie migotanie przycisku oznacza, ¿e danej funkcji nie mo¿na nastawiæ przy wybranym programie.
Funkcje Efekt Uwagi dotycz¹ce u¿ycia Opcja aktywna
Super Wash
£atwiejsze
prasowanie
Pozwala na
doskona³e wypranie
bielizny; bielizna
jest zdecydowanie
bielsza, ni¿ przy
standardowym
praniu w klasie
enegetycznej A.
Zmnie jsza
gniecenie siê
tkanin, u³atwiaj¹c
prasowanie.
Funkcji tej nie mo¿na nastawiæ razem z funkcj¹ PRANIE
B£YSKAWICZNE.
Po nastawieniu tej funkcji programy 6, 7, 8, 11 oraz
Delikatne p³ukanie zatrzymaj¹ siê z bielizn¹ namoczon¹ w
wodzie (Funkcja zapobiegaj¹ca gnieceniu), a zacznie
migotaæ wiate³ko sygnalizacyjne fazy P³ukania .
— aby zakoñczyæ cykl prania, nale¿y przycisn¹æ
przycisk START/RESET;
— aby wykonaæ tylko opró¿nienie z wody, ustawiæ
pokrêt³o na odpowiednim symbolu i
przycisn¹æ przycisk START/RESET.
przy
programach:
1, 2, 3, 4,
5, 6, 7, 8
Wszystkie poza
1, 2, 9, 10,
Opró¿nianie z
wody.
ostro¿noci
Zasady
KonserwacjaProgramy rodki pior¹ceInstalacja Opis
Nieprawid³owoci
w dzia³aniu
Pranie
b³yskawiczne
P³ukanie
dodatkowe
Zmniejsza o oko³o
30% czas trwania
cyklu prania.
Zwiêksza skuteczno
æ p³ukania.
Funkcji tej nie mo¿na nastawiæ razem z funkcj¹ SUPER
WASH.
Zaleca siê stosowanie tej opcji przy pralce za³adowanej do
pe³na lub przy du¿ej iloci u¿ytego rodka pior¹cego.
1, 2, 3, 4,
5, 6, 7, 8
P³ukanie
techniczny
Serwis
1, 2, 3, 4,
5, 6, 7, 8,
P³ukania.
19

rodki pior¹ce i bielizna
PL
Szufladka na rodki pior¹ce
Dobre rezultaty prania zale¿¹ równie¿ od
w³aciwego dozowania rodka pior¹cego: wsypuj¹c
go za du¿o, wcale nie poprawia siê wydajnoci
prania, lecz
przyczynia siê do
odk³adania siê
nalotów na
wewnêtrznych
czeciach pralki i do
zanieczyszczania
rodowiska.
Wysun¹æ szufladkê i
wsypaæ do niej rodki
pior¹ce i dodatkowe w
nastêpuj¹cy sposób
przegródka 1: rodek pior¹cy do prania
wstêpnego (w proszku)
przegródka 2: rodek pior¹cy
(w proszku lub w p³ynie)
rodek pior¹cy w p³ynie nale¿y w³o¿yæ
bezporednio do bêbna z zastosowaniem
odpowiedniej kulki dozuj¹cej.
przegródka 3: rodki dodatkowe
(zmiêkczaj¹ce, itp.)
Kiedy wlewa siê rodek zmiêkczaj¹cy do
przegródki 3, to nale¿y zwróciæ uwagê, aby nie
przekroczyæ oznaczonego poziomu «max».
rodek zmiêkczaj¹cy jest automatycznie
dodawany do wody podczas ostatniego p³ukania.
Na zakoñczenie tego programu prania w
przegródce 3 pozostaje reszta wody. S³u¿y ona dla
skoncentrowanych rodków zmiêkczaj¹cych, to
znaczy do ich rozprowadzenia z wod¹. Jeliby w
przegródce 3 pozosta³o wiêcej wody ni¿ zwykle,
oznacza to, ¿e urz¹dzenie dozuj¹ce jest zatkane.
Jak je wyczyciæ patrz strona 22.
przegródka 4: Wybielacz
Nie u¿ywaæ rodków do prania rêcznego,
poniewa¿ tworz¹ za du¿o piany.
Cykl wybielania
Tradycyjnego wybielacza u¿ywa siê do bia³ych
tkanin wytrzyma³ych, delikatnego — do tkanin
kolorowych, syntetycznych i do we³ny.
Przy wlewaniu wybielacza nie nale¿y przekroczyæ
poziomu max» wskazanego na rodkowej oce
(zobacz rysunek).
Aby przeprowadziæ tylko samo wybielanie, nale¿y
wlaæ wybielacz do pojemniczka dodatkowego 4 i
nastawiæ funkje P³ukanie dodatkowe
.
Przygotowanie bielizny
Podzieliæ bieliznê do prania wed³ug:
— rodzaju tkaniny / symbolu na etykietce.
— kolorów: oddzieliæ bieliznê kolorow¹ od bia³ej.
Opró¿niæ kieszenie i sprawdziæ guziki.
Nie przekraczaæ wskazanego ciê¿aru bielizny
suchej:
Tkaniny wytrzyma³e: max 5 kg
Tkaniny syntetyczne: max 2,5 kg
Tkaniny delikatne: max 2 kg
We³na: max 1 kg
Ile wa¿y bielizna?
1 przecierad³o 400-500 gr.
1 pow³oczka na poduszkê 150-200 gr.
1 obrus 400-500 gr.
1 szlafrok 900-1.200 gr.
1 rêcznik 150-250 gr.
Tkaniny wymagaj¹ce szczególnej dba³oci
Firanki: w³o¿yæ je z³o¿one do poszewki lub do
siatkowatego worka. Praæ same, nie przekraczaj¹c
po³owy za³adunku. Stosowaæ program 11, który
automatycznie wyklucza wirowanie.
Poduszki i kurtki: Jeli wype³nione s¹ one pierzem
gêsim lub kaczym, mo¿na je praæ w pralce.
Wywróciæ na lew¹ stronê i za³adowaæ nie wiêcej ni¿
2-3 kg; powtórzyæ p³ukania jeden lub dwa razy i
stosowaæ delikatne odwirowanie.
Tenisówki: oczyciæ z b³ota. Mo¿na je praæ razem
z d¿insami i bielizn¹ wytrzyma³¹, lecz nie bia³¹.
We³na: Aby uzyskaæ dobre rezultaty prania, nale¿y
stosowaæ specjalny rodek pior¹cy i nie
przekraczaæ 1 kg za³adunku.
Woolmark Platinum Care
Program delikatny jak pranie rêczne.
Ariston wprowadzi³ nowy standard prania o
doskona³ych rezultatach, który zdoby³ sobie
uznanie Stowarzyszenia Czystej ¯ywej We³ny (The
Woolmak Company) przez przyznanie presti¿owej marki
Woolmark Platinum Care. Jeli na Waszej pralce znajduje siê
znak firmowy Woolmark Platinum Care, mo¿na w niej praæ,
uzyskuj¹c doskona³e rezultaty, ubrania we³niane z etykietk¹
Praæ rêcznie (M.0303):
Nastawiæ program 10 dla wszyskich ubrañ nosz¹cych
etykietkê Praæ rêcznie
pior¹ce (max 1 kg).
, stosuj¹c specjalne rodki
20

Zalecenia i rodki ostro¿noci
Pralka zosta³a zaprojektowana i wyprodukowana
zgodnie z miêdzynarodowymi przepisami
bezpieczeñstwa. Podajemy Wam poni¿sze zalecenia,
maj¹c na wzglêdzie Wasze bezpieczeñstwo, i
powinniecie je uwa¿nie przeczytaæ.
Ogólne zasady bezpieczeñstwa
Pralki powinny u¿ywaæ wy³¹cznie osoby doros³e i w
sposób zgodny z podanymi w niniejszej ksi¹¿eczce
instrukcjami.
Nie dotykaæ pralki, stoj¹c przy niej boso lub maj¹c
rêce czy stopy mokre lub wilgotne.
Nie wyjmowaæ wtyczki z gniazdka, ci¹gn¹c za kabel,
lecz trzymaj¹c za wtyczkê.
Nie otwieraæ szufladki na rodki pior¹ce w trakcie
prania.
Nie dotykaæ usuwanej wody, gdy¿ mo¿e byæ ona
bardzo gor¹ca.
W ¿adnym wypadku nie otwieraæ drzwiczek pralki
na si³ê: móg³by bowiem ulec uszkodzeniu
mechanizm zabezpieczaj¹cy drzwiczki przed
przypadkowym otworzeniem.
W razie usterek nie nale¿y w ¿adnym wypadku
próbowaæ dostaæ siê do wewnêtrznych czêci pralki,
próbuj¹c samemu j¹ naprawiaæ.
Skontrolowaæ zawsze, by dzieci nie zbli¿a³y siê do
pracuj¹cej pralki.
W czasie prania okr¹g³e drzwiczki pralki rozgrzewaj¹ siê.
Jeli trzeba przenieæ pralkê w inne miejsce, nale¿y
to robiæ bardzo ostro¿nie w kilka osób. Nigdy nie
nale¿y tego robiæ samemu, gdy¿ pralka jest bardzo
ciê¿ka.
Przed w³o¿eniem bielizny sprawdziæ, czy bêben jest
pusty.
Usuwanie odpadów
Pozbycie siê materia³ów opakowania:
stosowaæ siê do lokalnych przepisów; w ten sposób
opakowanie bêdzie mog³o zostaæ ponownie
wykorzystane.
Pozbywanie sie starych urzadzen elektrycznych.
Europejska Dyrektywa 2002/96/EC dotyczaca
Zuzytych Elektrycznych i Elektronicznych Urzadzen
(WEEE) zaklada zakaz pozbywania sie starych
urzadzen domowego uzytku jako nieposortowanych
smieci komunalnych. Zuzyte urzadzenia musza byc
osobno zbierane i sortowane w celu
zoptymalizowania odzyskania oraz ponownego
przetworzenia pewnych komponentów i materialów.
Pozwala to ograniczyc zanieczyszczenie
srodowiska i pozytywnie wplywa na ludzkie zdrowie.
Przekreslony symbol kosza umieszczony na
produkcie przypomina klientowi o obowiazku
specjalnego sortowania.
Konsumenci powinni kontaktowaæ siê z w³adzami
lokalnymi lub sprzedawc¹ w celu uzyskania
informacji dotycz¹cych postêpowania z ich zu¿ytymi
urz¹dzeniami gospodarstwa domowego.
Pozbycie siê starej pralki:
przed oddaniem jej na z³om nale¿y j¹ uniezdatniæ do
u¿ytku odcinaj¹c kabel elektryczny i wyjmuj¹c
drzwiczki.
Oszczêdnoæ i ochrona rodowiska
Technologia w s³u¿bie rodowiska
Jeli przez okr¹g³e drzwiczki pralki widaæ w czasie prania
ma³o wody, to dlatego, ¿e przy nowej technologii Ariston
wystarcza mniej ni¿ po³owa wody do uzyskania
maksymalnych rezultatów prania: zosta³ w ten sposób
osi¹gniêty jeden z celów ochrony rodowiska.
Oszczêdnoæ rodka pior¹cego, wody, energii i
czasu
Aby nie trwoniæ zasobów, nale¿y u¿ywaæ pralki
za³adowanej do pe³na. Jedno za³adowane do pe³na
pranie, zamiast dwóch za³adowanych do po³owy,
pozwala na zaoszczêdzenie a¿ do 50% energii.
Pranie wstêpne konieczne jest tylko w przypadku
bielizny bardo brudnej. Unikanie prania wstêpnego
pozwala na zaoszczêdzenie rodka pior¹cego;
czasu, wody oraz od 5 do 15% energii.
Wywabiaj¹c plamy odplamiaczem i pozostawiaj¹c
bieliznê namoczon¹ w wodzie przed praniem, mo¿na
zredukowaæ temperaturê prania. Stosuj¹c program
60°C zamiast 90°C lub program 40°C zamiast 60°C,
mo¿na zaoszczêdziæ a¿ do 50% energii.
Dok³adne dozowanie rodka pior¹cego w zale¿noci
od twardoci wody, stopnia zabrudzenia i iloci
bielizny pozwala unikn¹æ jego trwonienia i wychodzi na
korzyæ rodowisku: rodki pior¹ce, mimo ¿e ulegaj¹
biodegradacji, zawsze zawieraj¹ jednak sk³adniki,
które zak³ócaj¹ rodowisko naturalne. Nale¿y równie¿
unikaæ, gdy jest to mo¿liwe, rodka zmiêkczaj¹cego.
Dokonuj¹c prania pónym popo³udniem i wieczorem, a¿
do wczesnych godzin rannych, przyczynia siê do
zmniejszenia obci¹¿enia energetycznego elektrowni.
Jeli bielizna ma byæ wyszuszona w suszarce,
nale¿y wybraæ wysok¹ szybkoæ odwirowania.
Dobrze odwirowana z wody bielizna pozwala na
zaoszczêdzenie czasu i energii przy suszeniu.
PL
ostro¿noci
Zasady
KonserwacjaProgramy rodki pior¹ceInstalacja Opis
Nieprawid³owoci
w dzia³aniu
techniczny
Serwis
21
Konserwacja
PL
Wy³¹czenie wody i pr¹du elektrycznego
Zamkn¹æ kurek dop³ywu wody po ka¿dym praniu.
Zmniejsza siê w ten sposób zu¿ycie instalacji
hydraulicznej pralki oraz niebezpieczeñstwo
przecieków.
Wyj¹æ wtyczkê z kontaktu przed przyst¹pieniem do
czyszczenia pralki oraz czynnoci
konserwacyjnych.
Czyszczenie pralki
Obudowê zewnêtrzn¹ i gumowe czêci pralki nale¿y
myæ wilgotn¹ ciereczk¹ zmoczon¹ w wodzie z
myd³em. Nie stosowaæ rozpuszczalników ani ostrych i
ciernych rodków czyszcz¹cych.
Czyszczenie szufladki na rodki pior¹ce
Wysun¹æ szufladkê, unosz¹c j¹ lekko ku górze i
wyci¹gaj¹c na zewn¹trz (zobacz rysunek).
Wyp³ukaæ j¹ pod bie¿¹c¹ wod¹. Czynnoæ tê nale¿y
powtarzaæ stosunkowo czêsto.
Czyszczenie drzwiczek i bêbna
Nale¿y zawsze pozostawiaæ uchylone drzwiczki
pralki, aby zapobiec tworzeniu siê przykrych
zapachów.
Czyszczenie pompy
Pralka wyposa¿ona jest w pompê samooczyszczaj¹c¹,
która nie wymaga zabiegów konserwacyjnych. Mo¿e siê
jednak zdarzyæ, ¿e ma³e przedmioty (monety, guziki)
wpadn¹ do przedsionka ochronnego pompy,
znajduj¹cego siê w jej dolnej czêci.
Upewniæ siê, by cykl prania by³ zakoñczony i by
wtyczka by³a wyjêta z gniazdka.
Aby odzyskaæ ewentualne przedmioty, które upad³y
do wstêpnej komory:
1. Odczepiæ dolny cokó³
w przedniej czêci
pralki poci¹gaj¹c
rêkoma jej boczne
koñce (patrz rysunek);
2. odkrêciæ przykrywkê,
obracaj¹c j¹ w kierunku
przeciwnym do ruchu
wskazówek zegara
:
(zobacz rysunek)
¿e wyp³ynie trochê
wody, jest zjawiskiem
normalnym;
3. dok³adnie wyczyciæ
wnêtrze;
4. ponownie przykrêciæ
przykrywkê;
5. ponownie
przymocowaæ panel,
pamiêtaj¹c o wsuniêciu
zaczepów w
odpowiednie otwory
przed dopchniêciem go do urz¹dzenia.
fakt,
Kontrola rury doprowadzania wody
Przynajmniej raz do roku nale¿y skontrolowaæ rurê
doprowadzania wody. Jeli widoczne s¹ na niej rysy
i pêkniêcia, nale¿y j¹ wymieniæ: w trakcie prania
du¿e cinienie mo¿e bowiem spowodowaæ jej nag³e
rozerwanie siê.
Nigdy nie instalowaæ rur u¿ywanych.
Wymontowanie:
Lekko przycisn¹æ du¿y
przycisk w przedniej
czêci szufladki rodków
pior¹cych i poci¹gn¹æ j¹
do góry (Rys.1).
Ris. 1
22
Jak czyciæ szufladkê rodków pior¹cych
Czyszczenie:
Wymyæ. szufladkê pod bie¿¹c¹ wod¹ (Rys.3),
pomagaj¹c sobie star¹ szczoteczk¹ do zêbów i po
wyjêciu pary syfonków znajduj¹cych siê w górnej
czêci przegródek 1 i 2 (Rys.4), sprawdziæ, czy nie
s¹ one zatkane i wyp³ukaæ je.
Ris. 2
Ris. 3
Ponowne
zamontowanie:
Po w³o¿eniu pary syfonków, wstaw szufladkê na
swoje miejsce, zaczepia
j¹c j¹ (Rys. 4, 2, 1).
Ris. 4
Loading…