
Arturia MiniFuse 2 White — 2-канальный USB-аудиоинтерфейс с 2 микрофонными / инструментальными предусилителями, хабом с портом USB-A и разнообразным пакетом комплектного софта.
MiniFuse 2 принадлежит отмеченной наградами линейке студийных аудиоинтерфейсов Arturia AudioFuse. Он идеально впишется в вашу студию благодаря простому набору входов и выходов. Записывайте 2 инструмента или микрофона одновременно с помощью двух комбинированных входов, синхронизируйте и записывайте свои MIDI-устройства с помощью 5-контактных разъемов DIN и подключайте дополнительные устройства с помощью хаба с портом USB-A.

Просто лучший звук
На бумаге MiniFuse 2 дает вам динамический диапазон 110 дБ и эквивалентный входной шум -129 дБ. Проще говоря, это означает отличный звук, который может конкурировать даже с хорошими студиями. Наслаждайтесь динамикой, чистым сигналом без шума и действительно ощутимым качеством.
Прочная портативная конструкция
Возьмите свою студию в дорогу. MiniFuse 2 компактен и легок, а его прочный алюминиевый корпус может выдержать образ жизни мобильного продюсера.
Полная работоспособность
Независимо от того, используете ли вы ноутбук или настольный компьютер, MiniFuse 2 будет работать для вас. Более того, с помощью приложения MiniFuse Control Center вы можете управлять его входами, выходами, настройками и обновлениями прошивки.
Домашнее вдохновение
Сохраните творческий потенциал и вдохновение с помощью пошаговых руководств по созданию музыки, советов по микшированию и шаблонов проектов Ableton, разработанных художниками, продюсерами и битмейкерами, с использованием программного обеспечения, входящего в комплект MiniFuse 2. Частое обновление, не требуется подписка и бесплатно для MiniFuse.
MiniFuse 2 поставляется с эксклюзивным набором программ, предлагающих все необходимое, чтобы придать вашему звуку профессиональные качества.
В комплектном пакете софта вы найдете: 4 премиальных FX-плагина (Pre 1973, Rev PLATE-140, Delay TAPE-201, Chorus JUN-6), Ableton Live Lite, эмуляция винтажных синтезаторов Analog Lab Intro, 3-месячная бесплатная подписка на Auto-Tune Unlimited, подборка усилителей, кабинетов, педалей эффектов и компрессоров GUITAR RIG 6 LE, а также 3-месячная бесплатная подписка на сервис Splice с сэмплами, пресетами плагинов и лупами.
5-летняя гарантия
Каждый MiniFuse изготовлен из самых прочных и надежных компонентов и проходит более 200 тестов на надежность. Arturia настолько уверена в долговечности MiniFuse, что предлагает 5-летнюю гарантию на каждое проданное устройство.
Основные характеристики:
- 2 микрофонных/инструментальных предусилителя
- Элементы управления с подсветкой с индикацией перегрузки входных каналов
- Переключение между линейным и инструментальным входом
- Подключение к компьютеру с помощью универсального порта USB-C
- Подключите любое стандартное USB-устройство к MiniFuse 2 через порт USB-A
- Контроль уровня микширования: смешивание входного сигнала и сигнала с компьютера
- Переключатель моно: суммирование входов в один моно сигнал
- Пакет программного обеспечения включает: Ableton Live Lite, Analog Lag Intro, 4 x Arturia FX, 3-месячную подписку Auto-Tune, GUITAR RIG 6 LE, 3-месячную подписку Splice и многое другое
- Эксклюзивный контент — советы, уловки и приемы экспертов
- Виртуальный стереоканал Loopback
- Питание от порта USB-С
- 5-летняя гарантия
- Прочный алюминиевый корпус
Интерфейс подключения
Интерфейс — способ или метод одновременного действия двух и более информационных систем, устройств или программ, определяемый их характеристиками, а также характеристиками соединения, сигналов обмена и т. п.
Другими словами, средство подключения и обмена информацией между устройствами (картой и компьютером).
:
- USB
Форм-фактор
Форм-фактор — стандарт технического изделия, описывающий совокупность его технических параметров.
В данном случае — способ установки, использования или транспортировки.
Внешний — автономное устройство.
Внутренний — устанавливается в системный блок компьютера.
Рэковый — устанавливается в рэк.
:
Линейные входы аудиоинтерфейса:
2
Микрофонные входы аудиоинтерфейса
Микрофонный вход – вход, разработанный для принятия сигнала микрофонного уровня. Микрофонный вход обычно балансный, обладает низким импедансом и реализован на разъёме XLR.
:
2
Пар выходов на мониторы:
1
Питание от USB
Аудиоинтерфейс способен работать только от USB-порта без необходимости внешнего питания.
:
Фонокорректор
Электронный усилитель, восстанавливающий исходную АЧХ звукового сигнала на пластинке и усиливающий выходное напряжение головки звукоснимателя до линейного уровня.
:
Динамический диапазон
Динамический диапазон – отношение между самым громким звуком и самым тихим, измеряемое в децибелах.
Пример: оркестр может иметь динамический диапазон в 90 дБ. Это означает, что самый тихий пассаж на 90 дБ менее мощный, чем самый громкий.
:
110 дБ
Количество аудио входов
Вход – подключение для направления аудиосигнала на устройство или схему.
:
2
Максимальная частота дискретизации
Частота дискретизации — частота, с которой записывающим устройством фиксируются отсчеты входного сигнала. При записи звука в цифровом виде фактически записываются отдельные отсчеты или, иными словами, значения интенсивности звука в отдельные моменты времени.
Частота дискретизации для записывающих устройств имеет обычно следующие стандартные значения: 44,1 кГц; 48 кГц и 96 кГц. Чем большая величина частоты дискретизации, тем большее количество отсчетов делается за 1 секунду и тем лучше качество цифрового звука мы имеем в результате.
:
Тип аудио входов:
2 x Combo (Mic/Line/Hi-Z)
Тип аудио выходов
Выход – основное подключение для направления на устройство или схему.
:
2 x TRS
Аналоговые выходы:
2 x 1/4″ TRS
Фантомное питание
Фантомное питание – напряжение тока, обычно 48 Вольт, применяемое для питания микрофонов и активных ди-боксов. Наиболее распространенный «потребитель» фантомного питания – конденсаторный микрофон.
:
48 В
Индикаторы уровня сигнала:
Есть
Вход MIDI
Вход MIDI – тип подключения, которое принимает MIDI данные с внешнего устройства.
MIDI – аббревиатура Musical Instrument Digital Interface (цифровой интерфейс музыкального инструмента).
Разработан в начале 1980-х, как стандартизированный протокол связи между электронными музыкальными инструментами и периферийными устройствами. Он позволяет передавать и получать практически каждый аспект исполнения посредством сообщений (данных).
:
1
Выход MIDI
Выход MIDI – тип MIDI подключения, которое отправляет MIDI данные, сгенерированные устройством.
MIDI – аббревиатура Musical Instrument Digital Interface (цифровой интерфейс музыкального инструмента).
Разработан в начале 1980-х, как стандартизированный протокол связи между электронными музыкальными инструментами и периферийными устройствами. Он позволяет передавать и получать практически каждый аспект исполнения посредством сообщений (данных).
:
1
AES/EBU порты
AES/EBU — стандарт передачи цифровых звуковых сигналов между аудиоустройствами, также известен под названием AES3. Протокол данных включает до двух каналов до 24-битного звука с частотой дискретизации до 96 кГц.
:
Loopback
Loopback объединяет входной аудиосигнал со звуком, который воспроизводится на компьютере, и отправляет результат в ПО для стриминга. Эта функция, например, упрощает добавление фоновой музыки в стрим.
:
Производитель товара:
Arturia FR, 11B chemin de la Dhuy, 38240 Meylan, France
Импортер:
ООО «Аудио Бразерс», 220029, Минск, пр-кт Машерова, 15/4
Сервисный центр:
ООО «Аудио Бразерс», 220029, Минск, пр-кт Машерова, 15/4
По мнению
2 пользователей
отличная звуковая карта, для домашней студии самое то
Ковалёв Сергей
08/14/2023, 15:55
1
Хорошая карта, с мощным предусилителем на наушники (с запасом раскачивает 250 Ом).
Не хватает цифрового микшера управления громкостями.
MiniFuse
Tutorials
Follow these step by step overview videos to get to grips with how MiniFuse works.
MiniFuse 2 — Overview
Introducing MiniFuse 2. In this tutorial, Lena gives you a guided tour of our evolved 2 in / 2 out interface, exploring its smart design, useful creative features, and guiding your first steps towards making your sound happen.
MiniFuse 1 — Overview
Introducing MiniFuse 1. In this tutorial video, Lena explores this compact audio interface right out the box, giving you a guided tour of its design, its useful creative features, and your first steps towards making your sound happen.
MiniFuse 4 — Overview
In this MiniFuse 4 overview tutorial Lena gives you a guided tour of our biggest MiniFuse series interface, exploring its expanded inputs and outputs, useful monitoring section and additional software bundle.
Tutorial | MiniFuse 1&2 Loopback Update
MiniFuse 1&2 — Virtual Mixers
MiniFuse
How to’s
Tips, hacks, and useful info from the pros on how to make MiniFuse work for your creative process.
How to connect your studio
How to record a synthesizer
Other
videos
Arturia Rendez-vous | MiniFuse 4 presentation
with Martin Dutasta
Join Director of Product Management Martin for a closer look at MiniFuse 4, the 4-in/4-out audio & MIDI interface that completes the Fuse family of compact, accessible interfaces.
MiniFuse
Manuals & Installers
Firmware
Manuals
MiniFuse 2
Firmware
Manuals
MiniFuse 4
Firmware
Manuals
MiniFuse Control Center
Software

USER MANUAL
_MINIFUSE 2

Special Thanks
DIRECTION
Frédéric BRUN Kevin MOLCARD
DEVELOPMENT
Jérôme LAURENT
Daire O’NEILL
Timothée BEHETY
DESIGN
Martin DUTASTA Morgan PERRIER Axel HARTMANN
TESTING
Thomas BARBIER Matthieu BOSSHARDT Emilie JACUSZIN
BETA TESTING
Paolo NEGRI
Marco CORREIA
Bernd WALDSTÄDT
Khutornoy Maksim
JUREVICH
Erik VAN DE VOSSENBERG
Aurore BAUD
Benjamin REYNIER
Arthur RÖNISCH
Luca LEFÈVRE
David BIRDWELL
Navi RETLAV
Gert BRAAKMAN
Pierre GACHET
Charles CAPSIS IV
Lionel FERRAGUT
Nadine LANTHEAUME
Jérôme BLANC
Andrew HENDERSON
Chuck ZWICKY
George WARE
Tony FLYING SQUIRREL
Terence MARSDEN
Kirke GODFREY
Adán SÁNCHEZ DE PEDRO
CRESPO
Are LEISTAD
Luis RODRIGUEZ
MANUAL
Stephan VANKOV
Jimmy MICHON
© ARTURIA SA – 2021 – All rights reserved.
26 avenue Jean Kuntzmann
38330 Montbonnot-Saint-Martin
FRANCE
www.arturia.com
Information contained in this manual is subject to change without notice and does not
represent a commitment on the part of Arturia. The software described in this manual is
provided under the terms of a license agreement or non-disclosure agreement. The software
license agreement specifies the terms and conditions for its lawful use. No part of this
manual may be reproduced or transmitted in any form or by any purpose other than
purchaser’s personal use, without the express written permission of ARTURIA S.A.
All other products, logos or company names quoted in this manual are trademarks or
registered trademarks of their respective owners.
Product version: 1.0.0
Revision date: 28 September 2021
Holger STEINBRINK
Minoru KOIKE
Gala KHALIFE
Justin TROMBLEY

Thank you for purchasing the Arturia MiniFuse
2!
This manual covers the features and operation of Arturia’s MiniFuse 2. MiniFuse 2 is a
professional-grade audio interface that empowers the recording and production of music
and audio content. Whether in the studio, on the road, or at home, we are confident that the
MiniFuse 2 will become an indispensable tool in your kit.
Be sure to register your MiniFuse 2 as soon as possible! There is a sticker on the bottom
panel that contains the serial number of your unit and an unlock code. These are required
during the online registration process at www.arturia.com. You may want to record these
elsewhere or take a photo of the sticker in case it becomes damaged.
Registering your MiniFuse 2 provides the following benefits:
• Access to the latest version of the Arturia Software Center and MiniFuse Control
Center applications
• Special offers restricted to MiniFuse owners
As a registered owner, you also have access to an exclusive software bundle that includes:
• Arturia’s Pre 1973, Rev PLATE-140, Delay TAPE-201, Chorus JUN-6 audio effects
• Arturia’s Analog Lab Intro containing thousands of ready-to-use instruments and
sounds
• Ableton Live Lite
• NI Guitar Rig 6 LE
• 3-month complimentary subscription to Splice
• 3-month complimentary subscription to Auto-Tune Unlimited
• Exclusive Ableton Live Lite sessions curated by producers around the globe
MiniFuse 2 is easy to use, so you’ll probably start experimenting with it right out of the box.
However, please be sure to read this manual even if you are an experienced user, as we
describe many useful tips that will help you get the most out of your purchase. We’re sure
you will find MiniFuse 2 a powerful tool in your setup and we hope you’ll use it to its fullest
potential.
Happy music making!
The Arturia team

Special Message Section
Specifications Subject to Change:
The information contained in this manual is believed to be correct at the time of printing.
However, Arturia reserves the right to change or modify any of the specifications without
notice or obligation to update the hardware that has been purchased.
IMPORTANT:
The product and its software, when used in combination with an amplifier, headphones or
speakers, may be able to produce sound levels that could cause permanent hearing loss.
DO NOT operate for long periods of time at a high level or at a level that is uncomfortable.
If you encounter any hearing loss or ringing in the ears, you should consult an audiologist.
NOTICE:
Service charges incurred due to a lack of knowledge relating to how a function or feature
works (when the product is operating as designed) are not covered by the manufacturer’s
warranty, and are therefore the owner’s responsibility. Please study this manual carefully
and consult your dealer before requesting service.
Precautions include, but are not limited to, the following:
1. Read and understand all the instructions.
2. Always follow the instructions on the device.
3. Before cleaning the device, always remove the USB cable. When cleaning, use a
soft and dry cloth. Do not use gasoline, alcohol, acetone, turpentine or any other
organic solutions; do not use a liquid cleaner, spray or cloth that is too wet.
4. Do not use the device near water or moisture, such as a bathtub, sink, swimming
pool or similar place.
5. Do not place the device in an unstable position where it might accidentally fall
over.
6. Do not place heavy objects on the device. Do not block openings or vents of the
device; these locations are used for air circulation to prevent the device from
overheating. Do not place the device near a heat vent at any location with poor
air circulation.
7. Do not open or insert anything into the device that may cause a fire or electrical
shock.
8. Do not spill any kind of liquid onto the device.
9. Always take the device to a qualified service center. You will invalidate your
warranty if you open and remove the cover, and improper assembly may cause
electrical shock or other malfunctions.
10. Do not use the device with thunder and lightning present; otherwise it may cause
long distance electrical shock.
11. Do not expose the device to hot sunlight.
12. Do not use the device when there is a gas leak nearby.
13. Arturia is not responsible for any damage or data loss caused by improper
operation of the device.

Table Of Contents
1. INTRODUCTION…………………………………………………………………………………………………………………………………………. 2
1.1. WHAT IS AN AUDIO INTERFACE AND WHY DO I NEED ONE? ………………………………………………………… 2
1.2. MINIFUSE 2 FEATURES OVERVIEW…………………………………………………………………………………………………………… 2
2. CONNECTION DIAGRAM……………………………………………………………………………………………………………………….. 3
3. FRONT PANEL FEATURES………………………………………………………………………………………………………………………. 4
4. REAR PANEL FEATURES …………………………………………………………………………………………………………………………. 6
5. SETUP…………………………………………………………………………………………………………………………………………………………….. 7
5.1. Changing default system audio input and output ……………………………………………………………………………… 8
5.1.1. MacOS……………………………………………………………………………………………………………………………………………………………………………………………………….. 8
5.1.2. Windows………………………………………………………………………………………………………………………………………………………………………………………………. 10
5.2. Using the MiniFuse 2 as an audio device with your DAW …………………………………………………………….. 11
5.2.1. Configuring audio in Ableton Live………………………………………………………………………………………………………………………………………………. 12
5.2.2. Configuring audio in FL Studio …………………………………………………………………………………………………………………………………………………… 13
5.2.3. Configuring audio in Analog Lab ………………………………………………………………………………………………………………………………………………. 14
5.3. Recording audio into your DAW………………………………………………………………………………………………………………. 15
5.4. Using the MiniFuse 2 as a MIDI device with your DAW ……………………………………………………………….. 16
5.4.1. Configuring MIDI in Ableton Live ……………………………………………………………………………………………………………………………………………….. 16
5.4.2. Configuring MIDI in FL Studio……………………………………………………………………………………………………………………………………………………… 17
5.4.3. Configuring MIDI in Analog Lab………………………………………………………………………………………………………………………………………………… 18
5.5. Recording MIDI from the MiniFuse 2 into your DAW……………………………………………………………………… 19
6. MINIFUSE CONTROL CENTER ………………………………………………………………………………………………………….. 20
6.1. Top Toolbar ………………………………………………………………………………………………………………………………………………………. 20
6.2. Device Controls………………………………………………………………………………………………………………………………………………. 22
7. LOOPBACK RECORDING FEATURE………………………………………………………………………………………………….. 24
7.1. Routing computer audio to the Loopback output/input …………………………………………………………………. 24
7.1.1. Recording all computer audio………………………………………………………………………………………………………………………………………………………. 24
7.1.2. Record audio from specific applications ………………………………………………………………………………………………………………………………… 28
7.1.3. Recording into your DAW……………………………………………………………………………………………………………………………………………………………… 30
8. A QUICK PRIMER ON DIGITAL AUDIO………………………………………………………………………………………….. 32
8.1. What is latency?…………………………………………………………………………………………………………………………………………….. 32
8.2. Sample Rate…………………………………………………………………………………………………………………………………………………….. 33
8.3. Buffer Size………………………………………………………………………………………………………………………………………………………… 34
8.4. A red herring……………………………………………………………………………………………………………………………………………………. 34
8.5. How to deal with latency……………………………………………………………………………………………………………………………. 35
8.5.1. Recording live audio………………………………………………………………………………………………………………………………………………………………………… 35
8.5.2. Recording a MIDI part…………………………………………………………………………………………………………………………………………………………………… 35
8.5.3. Mixing and mastering ……………………………………………………………………………………………………………………………………………………………………. 35
9. SPECIFICATIONS……………………………………………………………………………………………………………………………………. 36
9.1. Box Contents…………………………………………………………………………………………………………………………………………………….. 36
9.2. Hardware Specifications ……………………………………………………………………………………………………………………………. 37
10. Declaration of Conformity……………………………………………………………………………………………………………….. 39
11. Software License Agreement………………………………………………………………………………………………………….. 40

1. INTRODUCTION
Thank you for purchasing our compact audio interface, the MiniFuse 2. We at Arturia are
committed to delivering excellent products that satisfy the needs of modern musicians
and producers — we are confident that the MiniFuse 2 will be a perfect companion to any
computer-based music production and recording setup.
1.1. WHAT IS AN AUDIO INTERFACE AND WHY DO I NEED ONE?
An audio interface is an outboard device that handles processing of audio input and
output. While all laptop and desktop computers these days come equipped with integrated
soundcards, in practice these are only meant for casual use and are, in most cases,
insufficient for the demanding tasks of audio production and recording. Our MiniFuse 2
is an affordable, professional-grade dedicated audio interface that offers the following
advantages over a typical onboard soundcard:
• Optimized for low-latency performance
• Microphone preamp(s) for crisp, present recording of vocals and instruments
• High-impedance input(s) to directly record your guitar or bass.
• Headphone and speaker system outputs for flexible monitoring
• Loopback recording for recording computer audio without any messy hardware
or software configurations.
• Direct Monitoring for monitoring your performance without any processing
latency.
1.2. MINIFUSE 2 FEATURES OVERVIEW
• 2 x combo Mic/Inst/Line XLR inputs with optional 48V phantom power
• 2 x 1/4″ TRS balanced line outputs
• 1 x 1/4″ stereo headphone output
• 1 x 5-pin MIDI input
• 1 x 5-pin MIDI output
• 1 x USB2 type A hub (low power)
• USB-C interface compatible with PC, Mac, fully USB 2.0 compatible
• Bus-powered
• Up to 192kHZ / 24bits
• Loopback stereo input (at all sample rates)
2 Arturia — User Manual MiniFuse 2 — INTRODUCTION
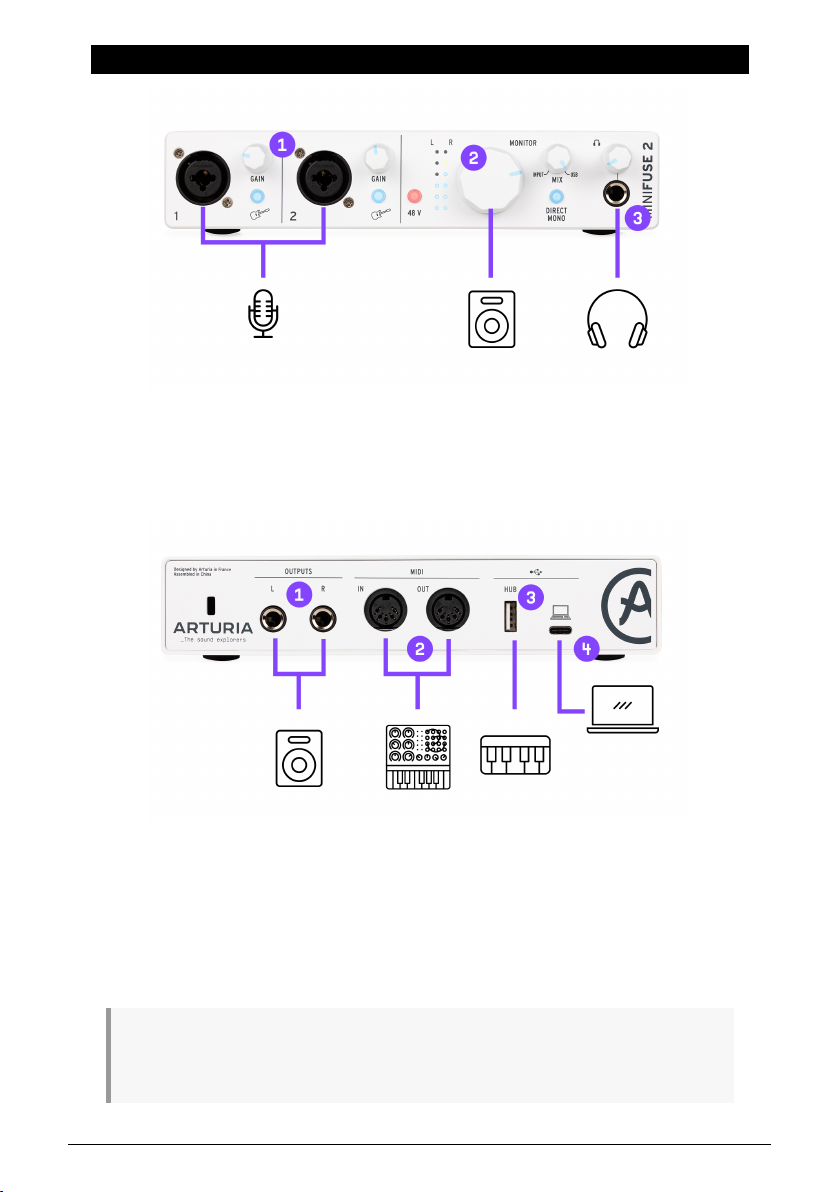
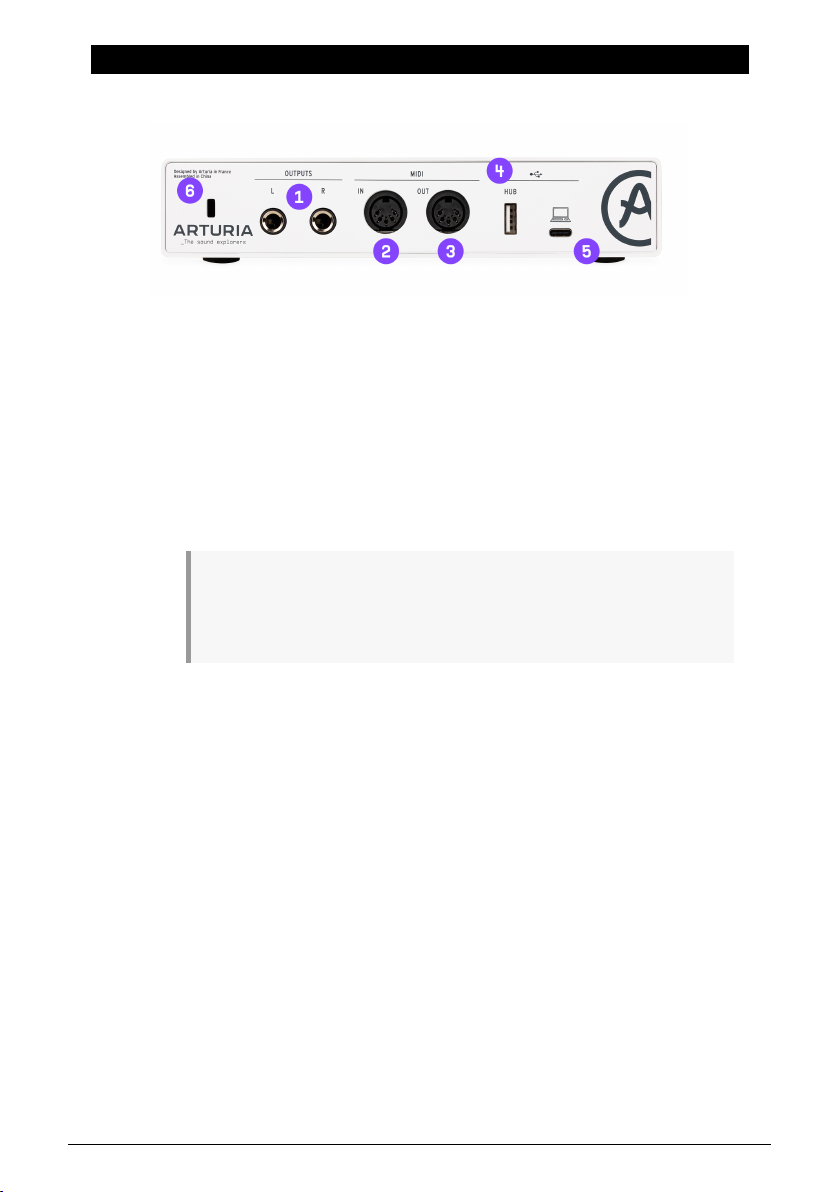
2. CONNECTION DIAGRAM
1 : XLR/TRS combo inputs for microphones, guitars/basses or other instruments
2 : Monitor Volume knob
3 : Headphones output
1 : TRS outputs to connect powered speakers or mixers/amplifiers
2 : MIDI input/output to control a synthesizer, drum machine or some other Midi device
3 : USB hub port allowing connection of thumb drives, controllers or other USB devices
requiring less than 250mA
4 : Connection to the computer
Note: We strongly recommend using the included cable with your interface when connecting your
device to a computer to avoid any connectivity issues. The included USB cable has been specially
designed for the Arturia MiniFuse 2.
Arturia — User Manual MiniFuse 2 — CONNECTION DIAGRAM 3

3. FRONT PANEL FEATURES
The front panel of the MiniFuse 2 provides access to most of the essential features on the
unit.
1. The combo jack(s) accept two different kinds of input — XLR and TRS — allowing you to
connect a variety of microphones and instruments into the MiniFuse. The type of input is
determined by the Guitar and 48V switches next to the input.
2. The Inst switch toggles the high-impedance circuit for the corresponding input.
When recording instruments with pickups, like guitar and bass, using the high-impedance setting
adjusts the internal circuit so that you can plug the instrument directly into the in put without having
to first plug into an amp or a direct box. When using other types of inputs, like synthesizers or
microphones, leave this switch in the inactive position.
3. 48V switch turns on phantom power for the in put(s). Phantom power delivers a power
current to a connected microphone and may be required to get a good signal out of certain
types of microphones. Please read the following recommendations regarding when and
how to use phantom power:
Only certain types of microphones, like condenser microphones, require phantom power to function
properly. Please check your microphone’s user manual to determine which type it is. Phantom power
may damage some equipment, like certain ribbon microphones. Ensure that you are only using
phantom power with microphones that require it. Do not connect or disconnect microphones while
phantom power is turned on. Turn off phantom power first, then connect or disconnect the microphone.
4. The Gain knob controls the gain of the input preamp. Use it to adjust the volume of the
input to ensure that you are capturing a good signal without overloading. The knob also
features a LED indicator to help with setting in put gain. When an instrument or microphone
source is detected, the LED will illuminate blue. If the input signal overloads, the LED will
illuminate red. If this happens, turn down the Gain knob.
High-resolution input metering is available through the MiniFuse Control Center [p.20] application.
4 Arturia — User Manual MiniFuse 2 — FRONT PANEL FEATURES

5. Monitor Volume knob controls the volume of the signal sent to the speakers (outputs L &
R on the rear panel).
6. Monitor Mix knob controls the mix of direct input signal (Direct Monitoring) and computer
audio playback. Its default position is Fully Clockwise. At minimum position, you will only
hear signal from the interface input(s). As you turn up the knob, you will gradually crossfade
to computer playback. At maximum position, you will only hear computer playback.
Recording live instruments on a computer can sometimes present challenges, depending on your
computer configuration and CPU load. Since your computer processes incoming and outgoing audio
in buffer “chunks”, this can result in delayed playback of the input signal, which can create distracting
echoes that could throw off a performance. Instead of monitoring the input signal through software, the
MiniFuse 2 gives you the option of using Direct Monitoring. Direct Monitoring sends the input signal(s)
directly to the outputs, allowing you to listen to the input(s) directly without any latency introduced by
computer processing. To read more about latency and how to best deal with it, please see the A Quick
Primer On Digital Audio [p.32] section of this manual.
7. Direct Mono switch controls how the input signals are distributed across the stereo
output when using Direct Monitoring. In the inactive position, input 1 is sent to the left channel
(output 1) while input 2 is sent to the right channel (output 2). In the active position, inputs
1 and 2 are turned into mono signals that are sent to both channels; effectively this means
that both inputs will play back centered in the stereo image instead of panned to one
speaker or the other.
The Direct Mono switch only impacts how signal from the inputs is routed to the speakers and
headphones. It does not have any effect on the stereo image of computer playback.
8. The 1/4” stereo headphone output can be used for connecting headphones. The
headphone output mirrors the Monitor Output but has its own independent volume control.
9. Headphone Volume adjusts the volume of the headphone output.
Listening to loud music for prolonged durations of time through headphones can have a negative
impact on your hearing. When using headphones, we recommend taking frequent breaks to give your
ears a rest and avoiding high volumes for prolonged durations.
Arturia — User Manual MiniFuse 2 — FRONT PANEL FEATURES 5
4. REAR PANEL FEATURES
The rear panel of the MiniFuse 2 provides access to audio and MIDI connections.
1. Outputs — these 1/4” balanced stereo outputs can be connected directly to active
studio speakers or other devices such as amplifiers and mixers.
2. MIDI In — connect MIDI devices to this jack using a standard 5-pin MIDI cable.
Devices connected to this in put can be used to trigger and control software
instruments and effects.
3. MIDI Out — this output allows you to output MIDI data from your computer to
control other MIDI-compatible hardware devices.
4. Hub — this convenient USB port allows you to plug in other USB devices, like
thumb drives or MIDI controllers.
While the Hub port is sufficient for powering most controllers and portable drives
up to 250mA, it may not provide enough power for some devices that require higher
power draw. In these situations, we recommend plugging these devices directly into your
computer, or into a separate powered USB hub.
5. USB — connect the interface to your computer by plugging the supplied USB cable
into this port and your computer. This connection provides power to the interface
and enables communication between the interface and your computer.
6. Kensington lock — this optional security slot can be used for securing the interface
using a Kensington lock cable.
6 Arturia — User Manual MiniFuse 2 — REAR PANEL FEATURES
5. SETUP
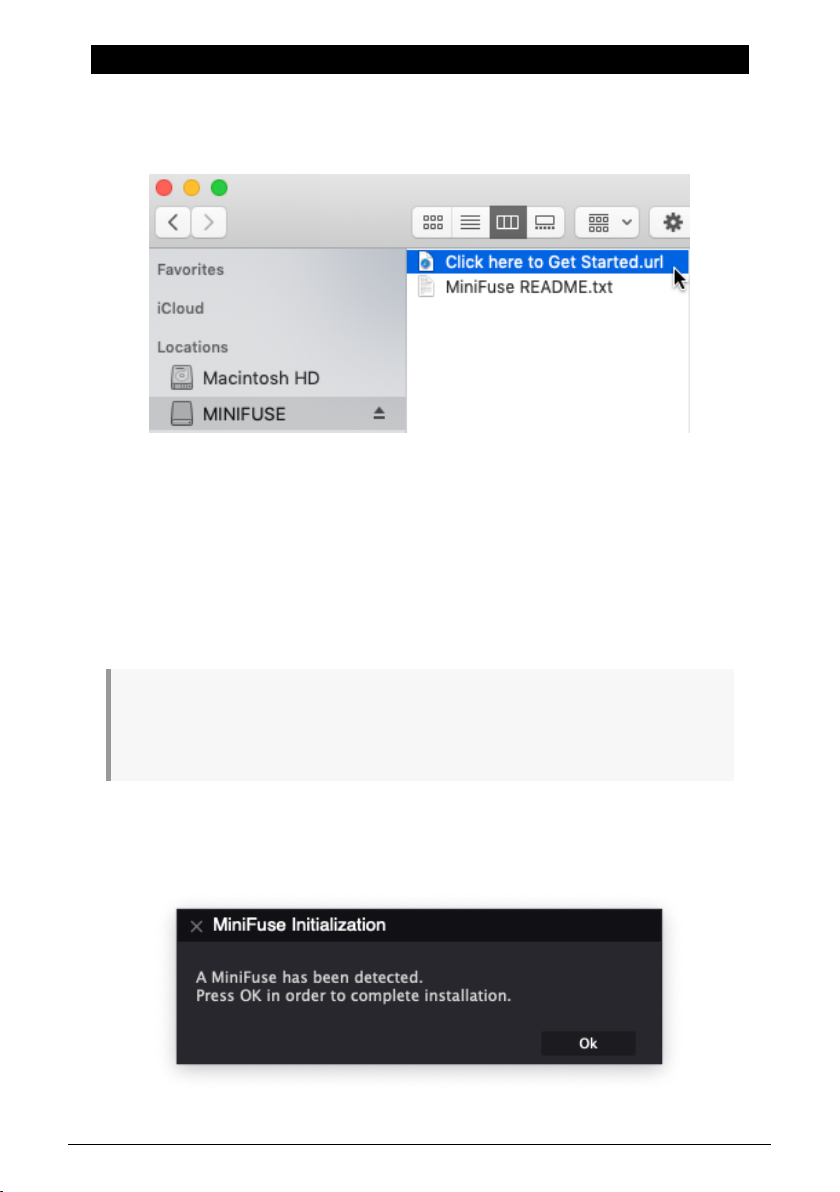
The first time you connect the MiniFuse 2 to your computer, it will appear as an external disk
drive.
Open the drive to access its contents, and double-click the Click here to Get Started link.
This link will open the MiniFuse registration page in your web browser. Follow the
instructions there to register your unit and download the MiniFuse Control Center
application.
Benefits of registering:
• Free exclusive effects and instruments from Arturia, Ableton, and many more
• Access to tutorials, sound banks, and helpful content to get you started
• Regular free firmware updates
• Exclusive discounts on Arturia products as a registered user
While it is possible to use the MiniFuse 2 immediately without the MiniFuse Control Center
application, we highly recommend following the steps outlined in this section to initialize your MiniFuse
2 so that you can take advantage of all of its features. The MiniFuse Control Center installer includes the
MiniFuse ASIO driver for Windows, enabling the best performances from your MiniFuse.
Once you have downloaded and installed the MiniFuse Control Center application, doubleclick to start it.
You will see the following pop-up window. Press Ok to complete the installation.
Arturia — User Manual MiniFuse 2 — SETUP 7
Congratulations, your MiniFuse 2 is now ready to use! For more information and support
online, you may visit www.arturia.com/support.
For more information on the features available in the MiniFuse Control Center application,
see the MiniFuse Control Center [p.20] section of this manual.
5.1. Changing default system audio input and output
If you would like to use the MiniFuse 2 as your computer’s default audio playback and
recording device, please follow the instructions below.
Most pro audio applications have their own audio preferences where you can select the MiniFuse 2
as the active audio device. If you intend to only use the MiniFuse for playback and recording with these
applications, it is not necessary to change the default system audio input and output.
5.1.1. MacOS
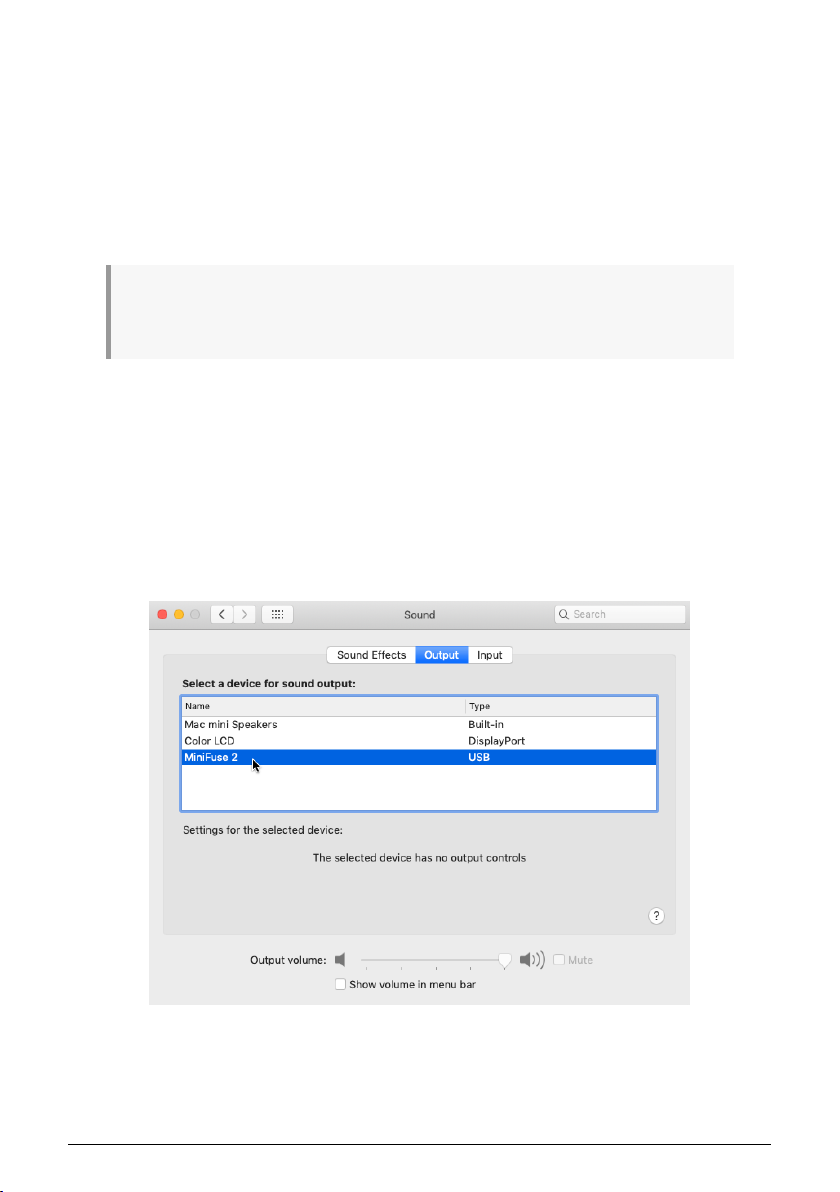
1. Navigate to your Applications folder.
2. Double-click System Preferences.
3. Click the Sound icon.
4. If you would like all computer audio — such as audio from browsers and movie players
— to be played back through the MiniFuse 2, click the Output tab and select the MiniFuse as
the default output device.
8 Arturia — User Manual MiniFuse 2 — SETUP
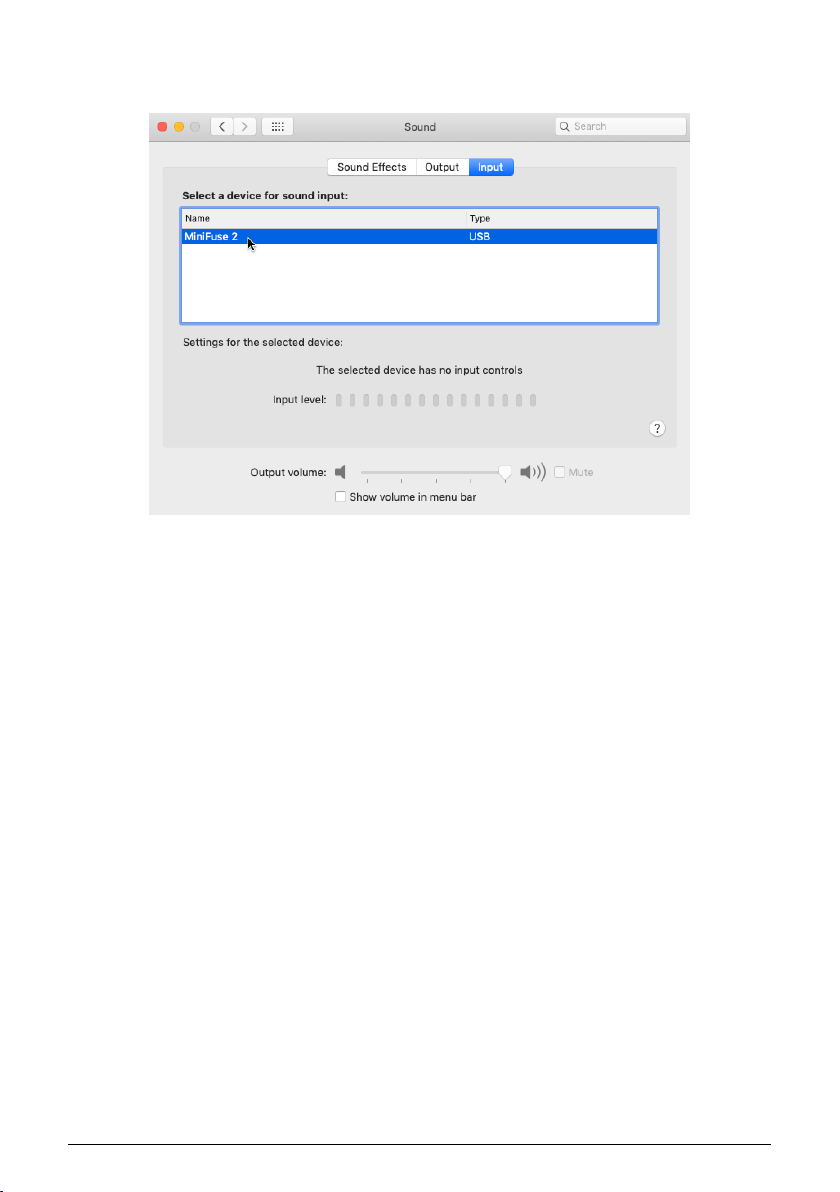
5. If you would like to use a microphone connected to the MiniFuse 2 as the default sound
input into your computer, click the Input tab and select the MiniFuse as the default input
device.
Arturia — User Manual MiniFuse 2 — SETUP 9
5.1.2. Windows
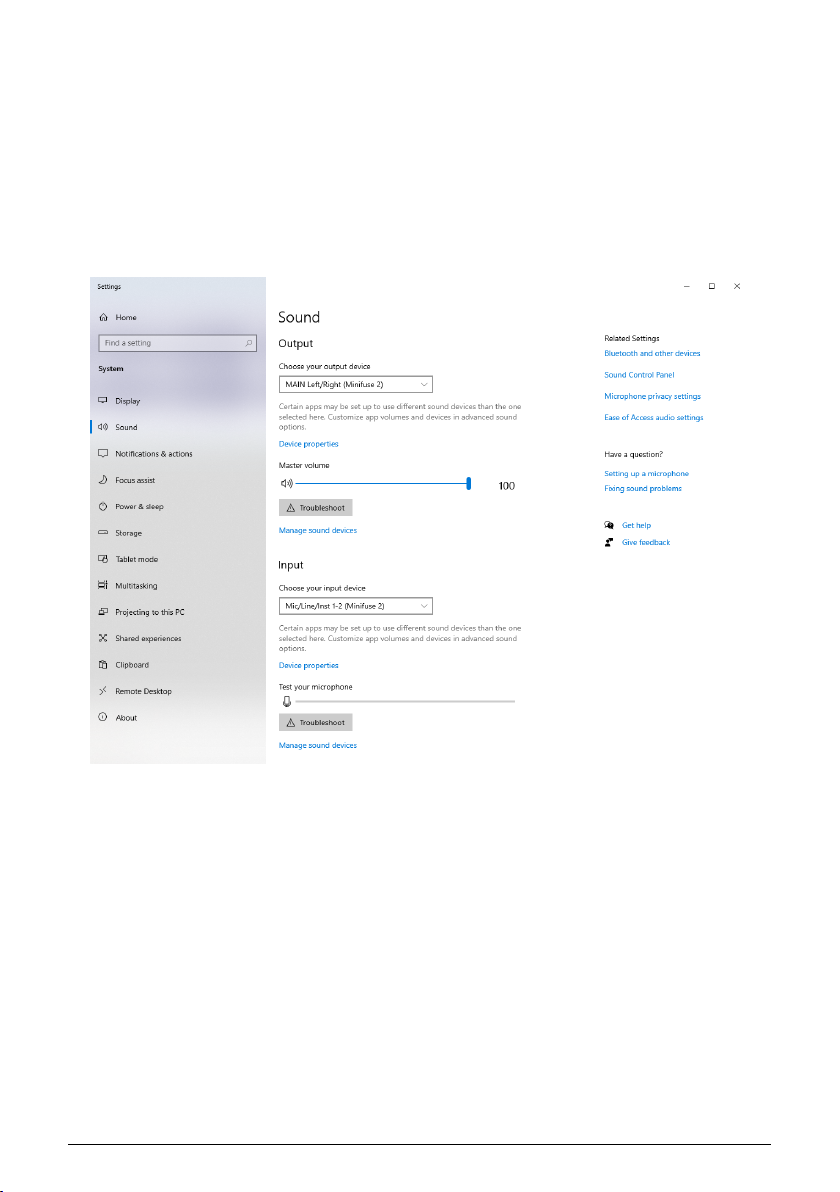
1. Navigate to Settings.
2. Click the Sound tab.
3. If you would like all computer audio — such as audio from browsers and movie
players — to be played back through the MiniFuse 2, choose «MAIN Left/Right
(MiniFuse 2) from the Output menu.
4. If you would like to use a microphone connected to the MiniFuse 2 as the default
sound input into your computer, choose the input channel from the Input menu.
10 Arturia — User Manual MiniFuse 2 — SETUP
Loading…
Портативный USB аудиоинтерфейс Arturia MiniFuse 2 — это компактный 2-канальный USB-C аудиоинтерфейс. Комбинированные входы позволяет легко подключать кабели с разъемами XLR или 1/4 дюйма. Подключите к компьютеру с помощью быстрой и компактной совместимости с USB-C. Версия MiniFuse 2 иммет на своем борту MIDI вход/выход, к дополнительному разъему USB-концентратора можно подключить различные устройства. MiniFuse может похвастаться динамическим диапазоном 110 дБ и лучшим в своем классе эквивалентным входным шумом -129 дБ. Каждая ваша запись будет звучать невероятно, с богатой динамикой, чистым бесшумным сигналом и студийным качеством. MiniFuse работает с ПК и Mac.
С помощью приложения MiniFuse Control Center вы можете отслеживать его входы, выходы, настройки и обновления прошивки в одном месте. Интерфейс работает от шины USB-C. Интерфейс имеет виртуальный канал обратной связи, который отлично подходит для записи телефонных звонков или игрового звука. В комплекте также поставляется пакет ПО, включающий Ableton Live Lite, Arturia Analog Lab Intro, Arturia FX, Native Instruments Guitar Rig 6 LE и бесплатную трехмесячную подписку на Auto-Tune Unlimited и Splice.
Особенности
- Два комбинированных входа XLR-1/4” (микрофонный / линейный / инструментальный) с фантомным питанием +48 В;
- Преобразователи 24-бит / 192 кГц;
- Два симметричных линейных выхода 1/4“ TRS с регулятором громкости;
- Стереовыход для наушников с регулятором громкости;
- Переключатель прямого монитора;
- Управление миксом мониторинга между сигналами входящим и с компьютера;
- Встроенный концентратор USB тип A (макс. 250 мА);
- Один виртуальный стереоканал loopback;
- Интерфейс USB-C, совместимый с ПК и Mac с питанием от шины USB.
Технические характеристики
- Частота дискретизации: 44,1 / 48 / 88,2 / 96 / 176,4 / 192 кГц;
- Разрядность: 24-бит;
- Вход аудио: 2 x XLR-1/4” TRS (Line, Inst, Mic);
- Выходы аудио: 2 x 1/4” TRS (Speakers), 1 x 1/4” TRS (Phones);
- Входное сопротивление: 16 кОм (Line), 1 МОм (Inst), 2,5 кОм (Mic);
- Макс. входной уровень: +22 дБн (Line), +11,5 дБн (Inst), + 9 дБн (Mic);
- Диапазон усиления: 56 дБ (Line, Inst, Mic);
- Эквивалентный входной шум (EIN): -129 дБ типично (A-взвешенный) (Mic);
- Частотная характеристика: 20 Гц — 20 кГ (+/- 0,05 дБ) (Line), 20 Гц — 20 кГц (+/- 0,06 дБ) (Inst, Mic);
- Динамический диапазон: 110 дБ (по шкале А) (Line, Inst, Mic);
- THD + N при 1 кГц: -100 дБ (Line, Mic), -91 дБ (Inst);
- Выходное сопротивление: 94 Ом (Speakers), 10 Ом (Phones);
- Макс. выходной уровень: + 12 дБн (Speakers), +11,4 дБн (Phones);
- Частотная характеристика: 20 Гц — 20 кГц (+/- 0,09 дБ) (Speakers, Phones);
- Динамический диапазон: 107,5 дБ (A-взвешенный) (Speakers), 104 дБ (A-взвешенный) (Phones);
- THD + N при 1 кГц: -101 дБ (невзвешенный) (Speakers);
- Мощность:: 137 мВт при 33 Ом (Phones);
- Фантомное питание: +48 В;
- MIDI: 5-контактный вход, выход;
- USB: 1 x USB тип C, USB тип A;
- ПО в комплекте: Arturia Analog Lab Intro, Native Instruments Guitar Rig 6 LE, Arturia Delay Tape-201, Arturia Chorus JUN-6, Arturia Pre 1973, Arturia Rev Plate-140;
- Цвет: белый;
- Размеры: 210 х 99 х 41 мм;
- Вес: 0,5 кг.
Нашли ошибку в тексте? выделите ее, и нажмите CTRL+ENTER
Гарантия производителя
12 месяцев
Количество микрофонных входов
2 (два)
Частотная характеристика, Гц
20 — 20000
Комплектация
Звуковая карта, USB-кабель, инструкция пользователя.
Поддаржка фантомного питания +48 В
Есть
Уровень усиления микрофона, дБ
56
Индикация клиппирования
Есть
Уровень усиления линейного сигнала, дБ
56
Частота дискретизации, кГц
192
Количество входных каналов
2
Количество выходных каналов
2
Входы
Mic/Inst (Combo XLR) x2, MIDI
Выходы
Line (Jack 6,3) x2, наушники (Jack 6,3), MIDI
Наличие инструментального входа
Есть
Динамический диапазон, дБ
110
Входное сопротивление (микрофон), кОм
2.5
Входное сопротивление (лин. вход), кОм
10
Максимальный уровень входного сигнала, дБв
22
ПО в комплекте
Arturia Analog Lab Intro, Native Instruments Guitar Rig 6 LE, Arturia Delay Tape-201, Arturia Chorus JUN-6, Arturia Pre 1973, Arturia Rev Plate-140
Выходная мощность на наушники, мВт (Max)
137
Видео скоро будет опубликовано.
Инструкции на стадии заполнения.