
Manuals.eu
- Manuals.eu
- ASUS
- Computers & Peripherals
- Eee Pad
- ASUS MeMO Pads
- MeMO Pad FHD 10
- Russian User manual
×
1
2
3
4
5
6
7
8
9
10
11
12
13
14
15
16
17
18
19
20
21
22
23
24
25
26
27
28
29
30
31
32
33
34
35
36
37
38
39
40
41
42
43
44
45
46
47
48
49
50
51
52
53
54
55
56
57
58
59
60
61
62
63
64
65
66
67
68
69
70
71
72
73
74
75
76
77
78
79
80
81
82
83
84
85
86
87
88
89
90
91
92
93
94
95
96
⟨
⟩
Copyright © Manuals.eu
Agreement
Privacy Policy
Contact us
K005
11
Глава 1:
Настройка оборудования
Глава 1: Настройка оборудования
Электронное руководство для планшета
12
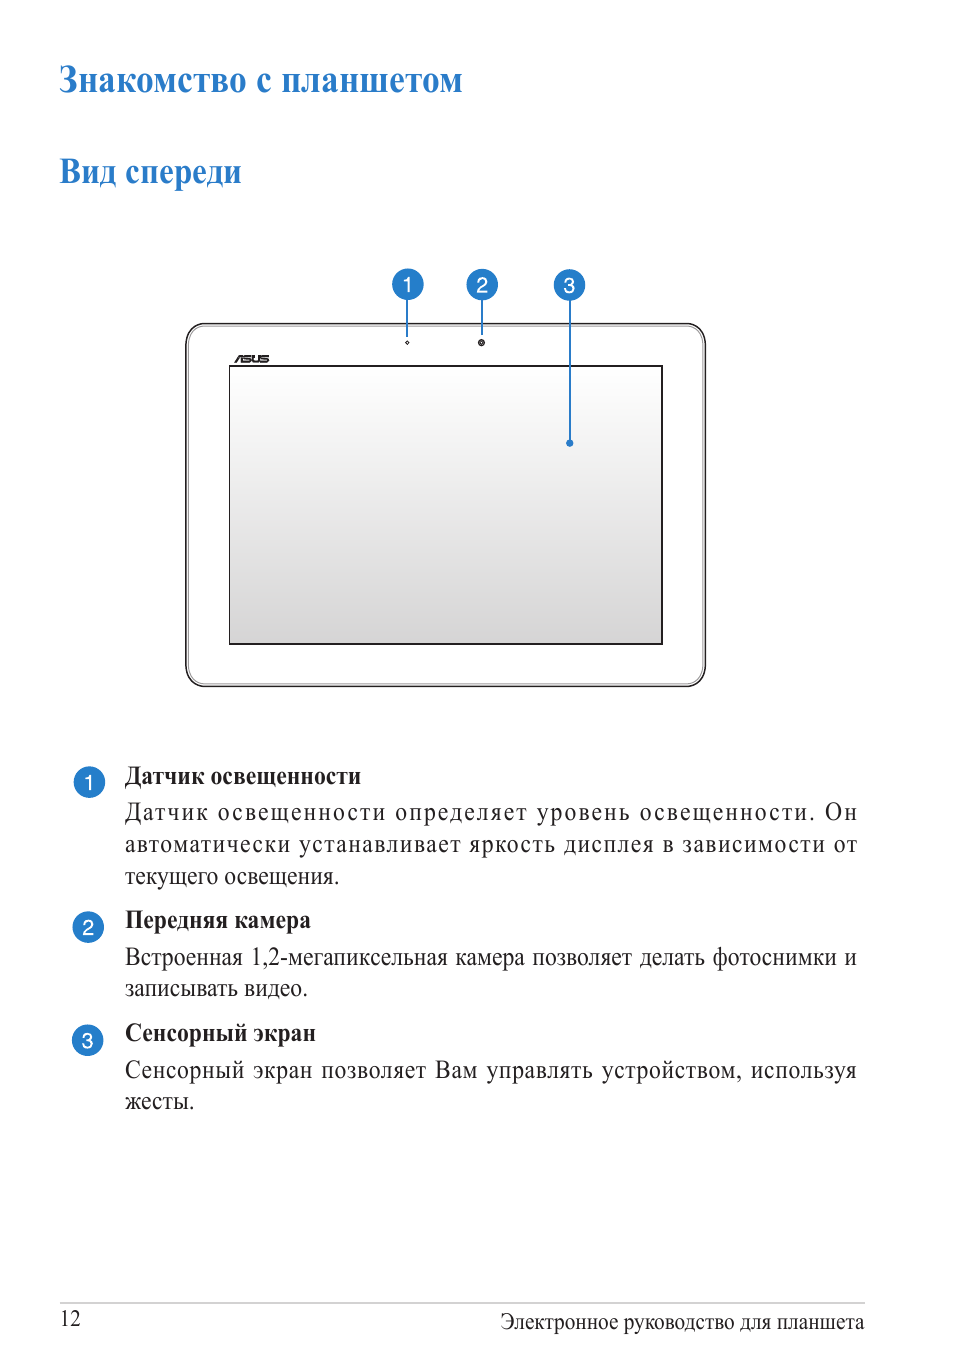
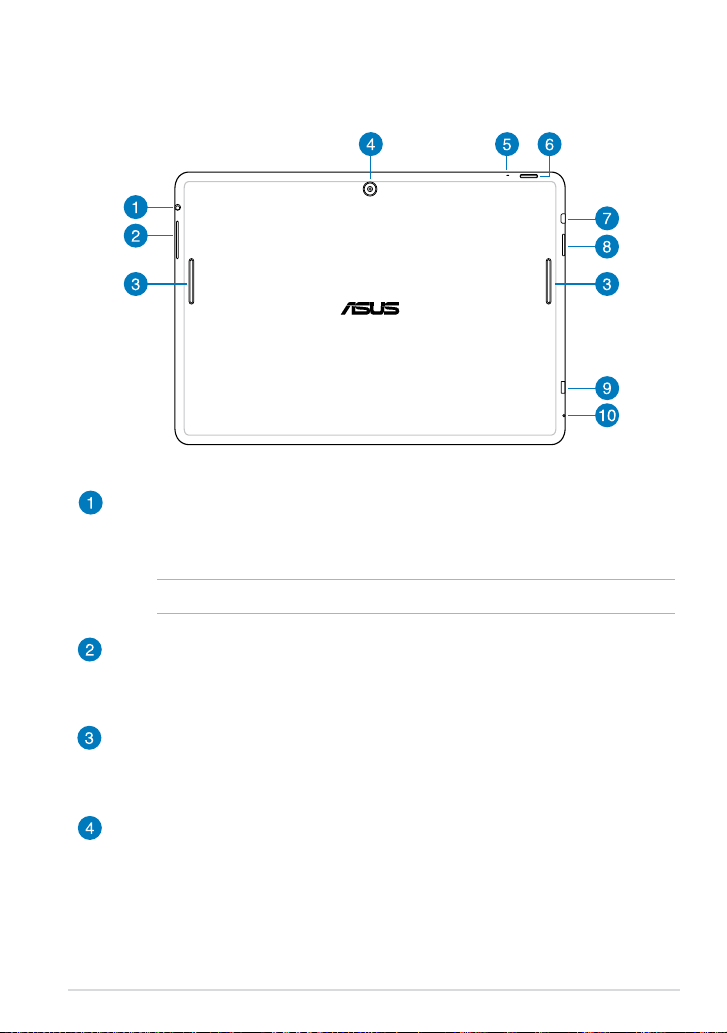
Датчик освещенности
Датчик освещенности определяет уровень освещенности. Он
автоматически устанавливает яркость дисплея в зависимости от
текущего освещения.
Передняя камера
Встроенная 1,2-мегапикcельная камера позволяет делать фотоснимки и
записывать видео.
Сенсорный экран
Сенсорный экран позволяет Вам управлять устройством, используя
жесты.
Знакомство с планшетом
Вид спереди
K005
13
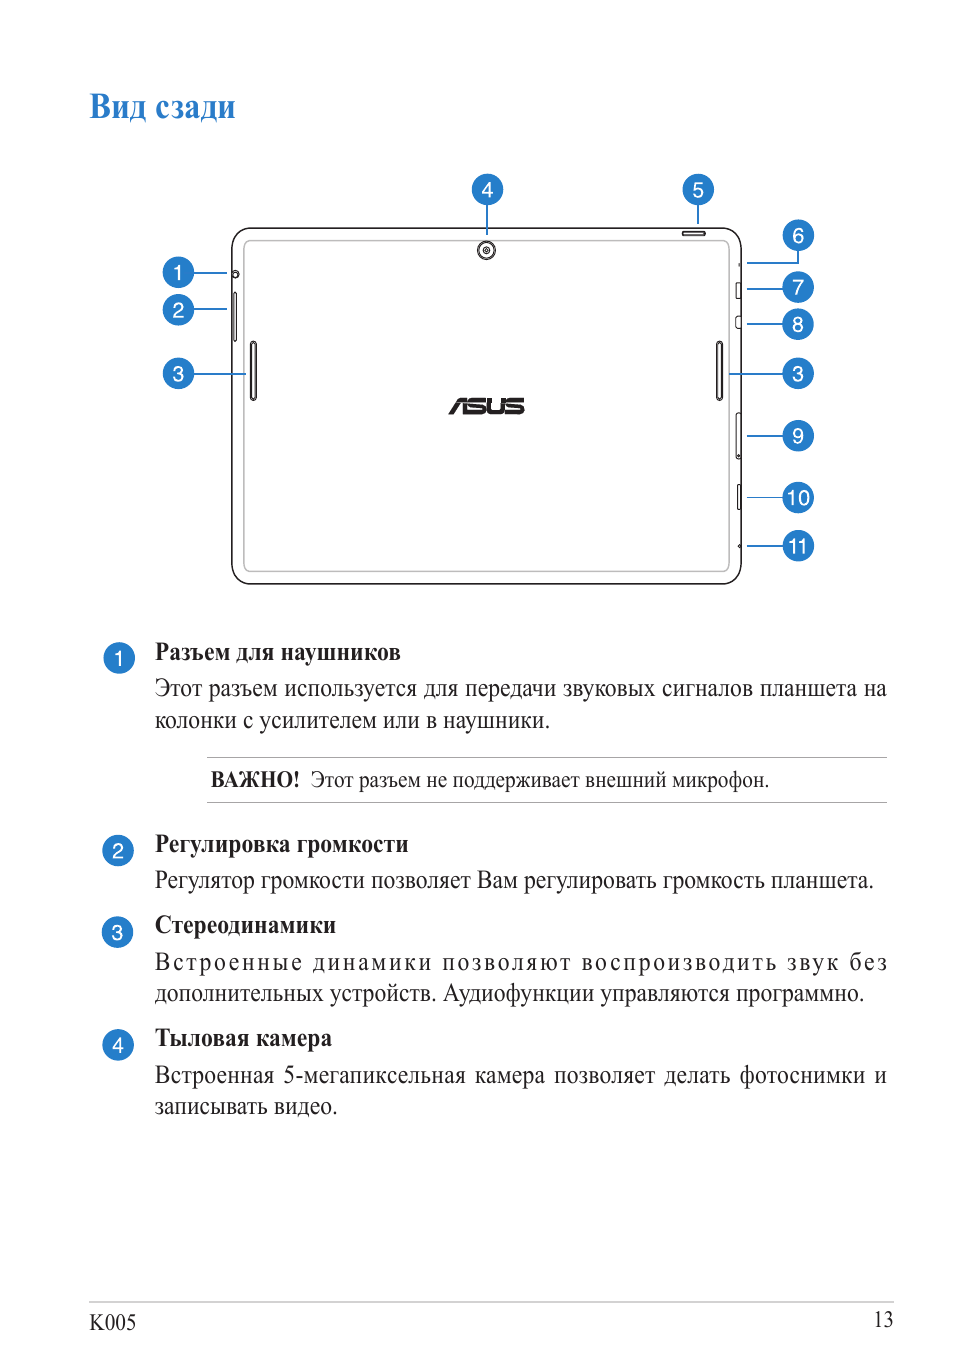
Вид сзади
Разъем для наушников
Этот разъем используется для передачи звуковых сигналов планшета на
колонки с усилителем или в наушники.
ВАЖНО! Этот разъем не поддерживает внешний микрофон.
Регулировка громкости
Регулятор громкости позволяет Вам регулировать громкость планшета.
Стереодинамики
Встроенные динамики позволяют воспроизводить звук без
дополнительных устройств. Аудиофункции управляются программно.
Тыловая камера
Встроенная 5-мегапикcельная камера позволяет делать фотоснимки и
записывать видео.
Электронное руководство для планшета
14
Кнопка питания
Нажмите и удерживайте кнопку питания в течение двух (2) секунд для
включения планшета или вывода его из спящего режима.
Для выключения планшета нажмите и удерживайте кнопку питания
в течение двух (2) секунд до появления запроса, затем выберите
Выключить и нажмите OK.
Для блокировки планшета или перевода его в режим ожидания нажмите
и сразу отпустите кнопку питания.
Если планшет перестает отвечать на запросы, нажмите и удерживайте
кнопку питания в течение 10 секунд.
ВАЖНО!
•
Если планшет не используется в течение минуты, он автоматически
переходит в режим ожидания.
• Принудительная перезагрузка системы может привести к потере
данных. Настоятельно рекомендуется регулярно создавать резервные
копии важных данных.
Микрофон
Встроенный микрофон может использоваться для видеоконференций,
записи голоса или наложения звука.
Порт микро-USB 2.0
Порт микро-USB (Universal Serial Bus) предназначен для питания
планшета и зарядки аккумулятора. Этот порт также можно использовать
для обмена данными между компьютером и планшетом.
ПРИМЕЧАНИЕ: При подключении планшета к разъему USB
компьютера, планшет будет заряжаться только если он выключен или
находится в спящем режиме (экран выключен).
Разъем micro-HDMI
Этот порт предназначен для подключения к HDMI-монитору, что
позволяет воспроизводить содержимое HD DVD и Blu-Ray.
K005
15
Слот карты micro-SIM
Планшет оснащен лотком карты micro-SIM, которая поддерживает сети
GSM, WCDMA и LTE.
ПРИМЕЧАНИЕ: Подробную информацию смотрите в разделе
Установка карты micro-SIM.
Слот для карт памяти MicroSD
Планшет оснащен встроенным кардридером, поддерживающим карты
памяти microSD и microSDHC.
Отверстие для сброса
Если система перестает отвечать на запросы, используйте
выпрямленную скрепку для принудительной перезагрузки устройства.
ВАЖНО! Принудительная перезагрузка системы может привести
к потере данных. Настоятельно рекомендуется регулярно создавать
резервные копии важных данных.

Электронное руководство для планшета
16
K005
17
Глава 2: Использование планшета
Глава 2:
Использование планшета
Электронное руководство для планшета
18
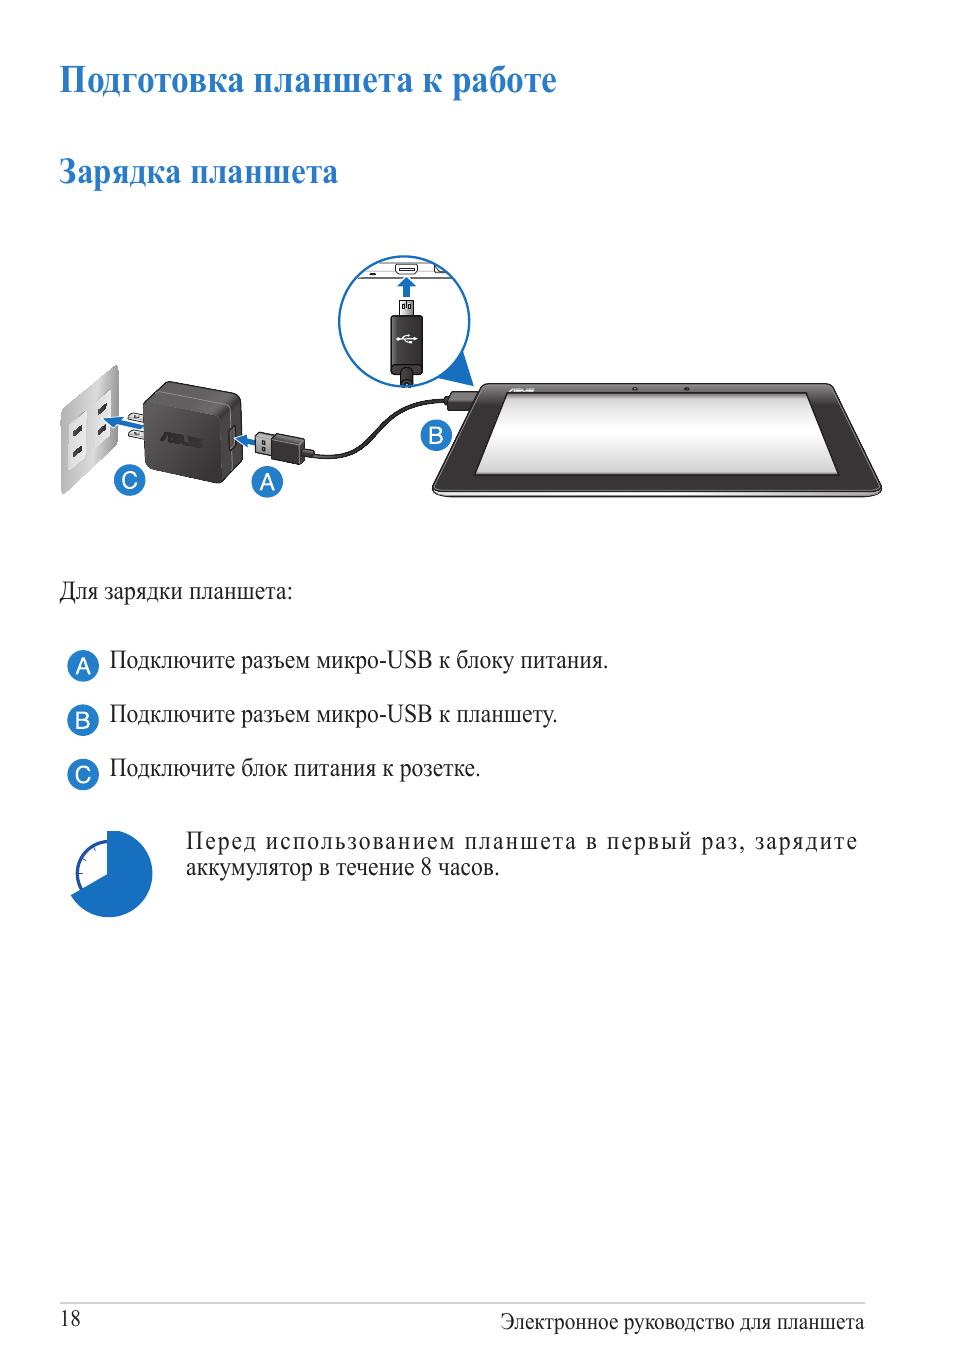
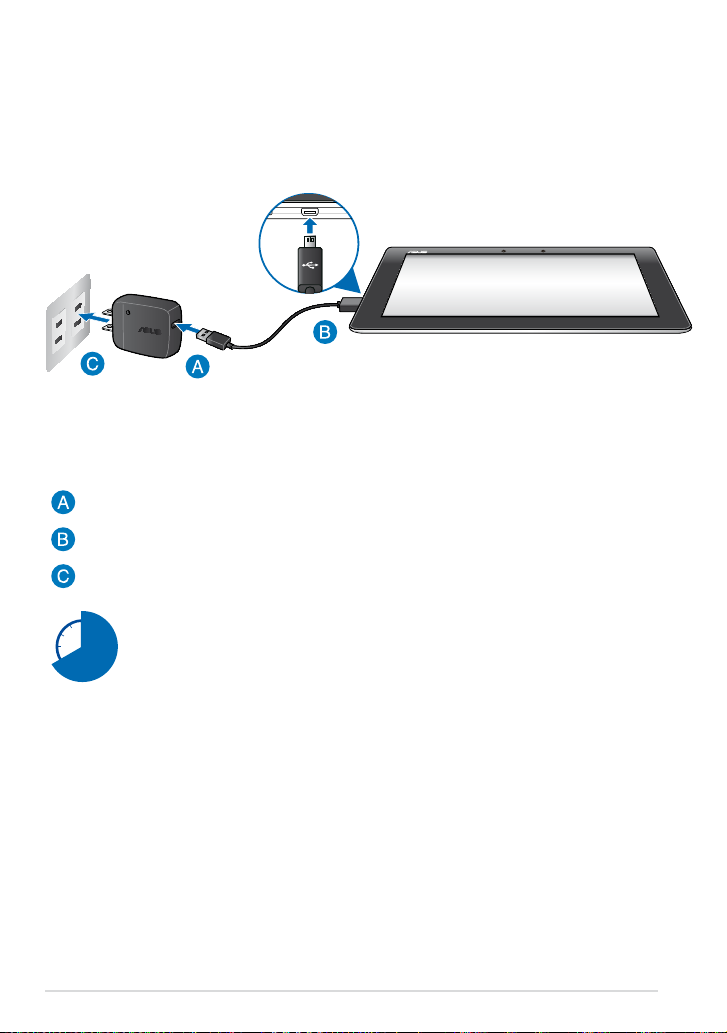
Подготовка планшета к работе
Зарядка планшета
Перед использованием планшета в первый раз, зарядите
аккумулятор в течение 8 часов.
Подключите разъем микро-USB к блоку питания.
Подключите разъем микро-USB к планшету.
Подключите блок питания к розетке.
Для зарядки планшета:
K005
19
ПРИМЕЧАНИЯ:
• При подключении планшета к разъему USB компьютера, планшет будет
заряжаться только если он выключен или находится в спящем режиме (экран
выключен).
• Зарядка от USB-порта займет больше времени.
• Если компьютер не обеспечивает достаточную мощность для зарядки планшета,
используйте для подзарядки блок питания.
ВАЖНО!
• Для подзарядки планшета используйте поставляемый блок питания и USB-
кабель. При использовании других блоков питания устройство может быть
повреждено.
• Перед зарядкой устройства снимите защитную пленку с блока питания и кабеля
микро-USB.
• Убедитесь, что напряжение в электросети соответствует входному для блока
питания. Выходное напряжение этого блока питания 5В, 2A пост. тока.
• Не оставляйте планшет подключенным к источнику питания, когда он
полностью заряжен. Планшет не предназначен для подключения к источнику
питания в течение длительного периода времени.
• При питании планшета от сети розетка должна быть расположена рядом с
устройством и быть легко доступной.
Электронное руководство для планшета
20
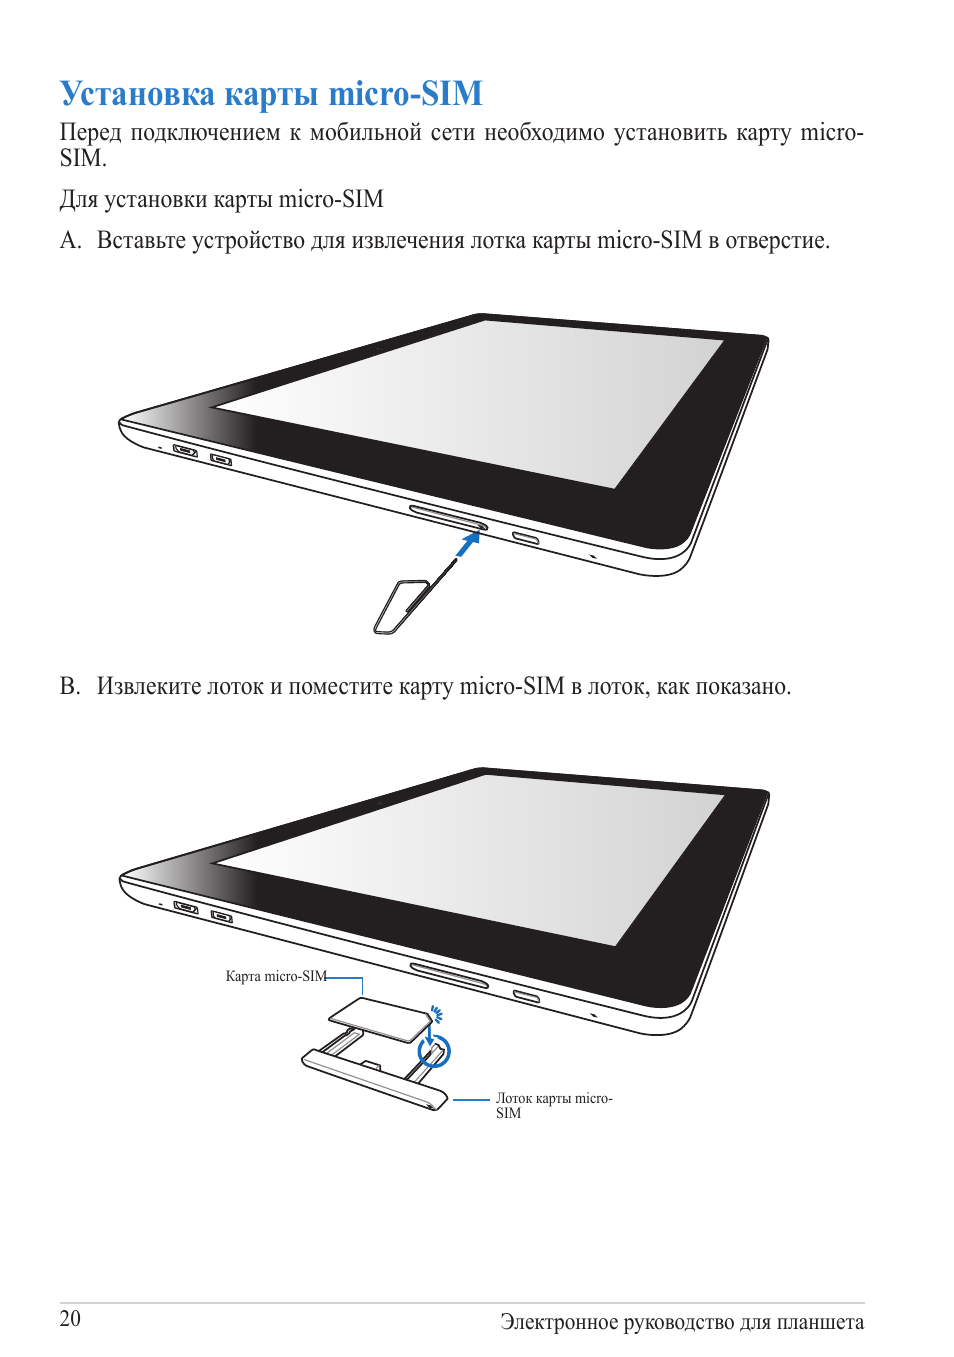
Установка карты micro-SIM
Перед подключением к мобильной сети необходимо установить карту micro-
SIM.
Для установки карты micro-SIM
A. Вставьте устройство для извлечения лотка карты micro-SIM в отверстие.
B. Извлеките лоток и поместите карту micro-SIM в лоток, как показано.
Лоток карты micro-
SIM
Карта micro-SIM
05:05
Asus Memo Pad FHD 10: обзор планшета
07:28
Обновился до Android 8.1 OREO. Обзор и мнение (Asus Memo Pad FHD 10 LTE)
06:42
Прошивка Asus MeMO Pad FHD 10 ME302C
18:45
Asus MEMO Pad FHD 10 LTE Обзор
05:08
Asus Memo Pad FHD 10 (ME302C) — Обзор Планшета от Keddr.com
08:47
ASUS MeMO Pad FHD 10 ME302KL 32Gb LTE распаковка
10:02
Обзор Asus Memo Pad FHD 10 LTE или ME302KL (детский)
Нажмите на кнопку для помощи
-
Инструкции по эксплуатации
22
Языки:
ASUS MeMO Pad FHD 10 (ME302KL) инструкция по эксплуатации
(98 страниц)
- Языки:Молдавский, Русский
-
Тип:
PDF -
Размер:
26.71 MB -
Описание:
ASUS MeMO Pad FHD 10 LTE Russian User manual
The screenshot pictures in this manual may be different between different firmware versions.
Просмотр
ASUS MeMO Pad FHD 10 (ME302KL) инструкция по эксплуатации
(98 страниц)
- Языки:Английский, Молдавский
-
Тип:
PDF -
Размер:
4.49 MB -
Описание:
ASUS MeMO Pad FHD 10 LTE English User manual
The screenshot pictures in this manual may be different between different firmware versions.
Просмотр
ASUS MeMO Pad FHD 10 (ME302KL) инструкция по эксплуатации
(100 страниц)
- Языки:Китайский, Молдавский
-
Тип:
PDF -
Размер:
20.14 MB -
Описание:
ASUS MeMO Pad FHD 10 LTE Simple Chinese User manual
The screenshot pictures in this manual may be different between different firmware versions.
Просмотр
ASUS MeMO Pad FHD 10 (ME302KL) инструкция по эксплуатации
(96 страниц)
- Языки:Молдавский, Немецкий
-
Тип:
PDF -
Размер:
43.99 MB -
Описание:
ASUS MeMO Pad FHD 10 LTE German User manual
The screenshot pictures in this manual may be different between different firmware versions.
Просмотр
ASUS MeMO Pad FHD 10 (ME302KL) инструкция по эксплуатации
(98 страниц)
- Языки:Итальянский, Молдавский
-
Тип:
PDF -
Размер:
22.77 MB -
Описание:
ASUS MeMO Pad FHD 10 LTE Italian User manual
The screenshot pictures in this manual may be different between different firmware versions.
Просмотр
ASUS MeMO Pad FHD 10 (ME302KL) инструкция по эксплуатации
(98 страниц)
- Языки:Молдавский, Французский
-
Тип:
PDF -
Размер:
12.53 MB -
Описание:
ASUS MeMO Pad FHD 10 LTE French User manual
The screenshot pictures in this manual may be different between different firmware versions.
Просмотр
ASUS MeMO Pad FHD 10 (ME302KL) инструкция по эксплуатации
(98 страниц)
- Языки:Молдавский, Японский
-
Тип:
PDF -
Размер:
14.46 MB -
Описание:
ASUS MeMO Pad FHD 10 LTE Japanese User manual
The screenshot pictures in this manual may be different between different firmware versions.
Просмотр
ASUS MeMO Pad FHD 10 (ME302KL) инструкция по эксплуатации
(96 страниц)
- Языки:Молдавский, Эстонский
-
Тип:
PDF -
Размер:
39.93 MB -
Описание:
ASUS MeMO Pad FHD 10 LTE Estonian User manual
The screenshot pictures in this manual may be different between different firmware versions.
Просмотр
ASUS MeMO Pad FHD 10 (ME302KL) инструкция по эксплуатации
(96 страниц)
- Языки:Литовский, Молдавский
-
Тип:
PDF -
Размер:
50.65 MB -
Описание:
ASUS MeMO Pad FHD 10 LTE Lithuanian User manual
The screenshot pictures in this manual may be different between different firmware versions.
Просмотр
ASUS MeMO Pad FHD 10 (ME302KL) инструкция по эксплуатации
(96 страниц)
- Языки:Латышский, Молдавский
-
Тип:
PDF -
Размер:
47.16 MB -
Описание:
ASUS MeMO Pad FHD 10 LTE Latvian User manual
The screenshot pictures in this manual may be different between different firmware versions.
Просмотр
ASUS MeMO Pad FHD 10 (ME302KL) инструкция по эксплуатации
(96 страниц)
- Языки:Молдавский, Тайский
-
Тип:
PDF -
Размер:
47.95 MB -
Описание:
ASUS MeMO Pad FHD 10 LTE Thai User manual
The screenshot pictures in this manual may be different between different firmware versions.
Просмотр
ASUS MeMO Pad FHD 10 (ME302KL) инструкция по эксплуатации
(96 страниц)
- Языки:Молдавский, Польский
-
Тип:
PDF -
Размер:
52.91 MB -
Описание:
ASUS MeMO Pad FHD 10 LTE Polish User manual
The screenshot pictures in this manual may be different between different firmware versions.
Просмотр
ASUS MeMO Pad FHD 10 (ME302KL) инструкция по эксплуатации
(96 страниц)
- Языки:Молдавский, Хорватский
-
Тип:
PDF -
Размер:
24.61 MB -
Описание:
ASUS MeMO Pad FHD 10 LTE Croatian User manual
The screenshot pictures in this manual may be different between different firmware versions.
Просмотр
ASUS MeMO Pad FHD 10 (ME302KL) инструкция по эксплуатации
(96 страниц)
- Языки:Молдавский, Чешский
-
Тип:
PDF -
Размер:
32.25 MB -
Описание:
ASUS MeMO Pad FHD 10 LTE Czech User manual
The screenshot pictures in this manual may be different between different firmware versions.
Просмотр
ASUS MeMO Pad FHD 10 (ME302KL) инструкция по эксплуатации
(96 страниц)
- Языки:Молдавский, Нидерландский
-
Тип:
PDF -
Размер:
27.4 MB -
Описание:
ASUS MeMO Pad FHD 10 LTE Dutch User manual
The screenshot pictures in this manual may be different between different firmware versions.
Просмотр
ASUS MeMO Pad FHD 10 (ME302KL) инструкция по эксплуатации
(96 страниц)
- Языки:Венгерский, Молдавский
-
Тип:
PDF -
Размер:
49.82 MB -
Описание:
ASUS MeMO Pad FHD 10 LTE Hungarian User manual
The screenshot pictures in this manual may be different between different firmware versions.
Просмотр
ASUS MeMO Pad FHD 10 (ME302KL) инструкция по эксплуатации
(96 страниц)
- Языки:Индонезийский, Молдавский
-
Тип:
PDF -
Размер:
14.86 MB -
Описание:
ASUS MeMO Pad FHD 10 LTE Indonesian User manual
The screenshot pictures in this manual may be different between different firmware versions.
Просмотр
ASUS MeMO Pad FHD 10 (ME302KL) инструкция по эксплуатации
(96 страниц)
- Языки:Испанский, Молдавский
-
Тип:
PDF -
Размер:
15 MB -
Описание:
ASUS MeMO Pad FHD 10 LTE Spanish User manual
The screenshot pictures in this manual may be different between different firmware versions.
Просмотр
ASUS MeMO Pad FHD 10 (ME302KL) инструкция по эксплуатации
(96 страниц)
- Языки:Молдавский, Словацкий
-
Тип:
PDF -
Размер:
32.46 MB -
Описание:
ASUS MeMO Pad FHD 10 LTE Slovak User manual
The screenshot pictures in this manual may be different between different firmware versions.
Просмотр
ASUS MeMO Pad FHD 10 (ME302KL) инструкция по эксплуатации
(96 страниц)
- Языки:Молдавский, Словенский
-
Тип:
PDF -
Размер:
31.84 MB -
Описание:
ASUS MeMO Pad FHD 10 LTE Slovenian User manual
The screenshot pictures in this manual may be different between different firmware versions.
Просмотр
ASUS MeMO Pad FHD 10 (ME302KL) инструкция по эксплуатации
(98 страниц)
- Языки:Молдавский, Турецкий
-
Тип:
PDF -
Размер:
26.61 MB -
Описание:
ASUS MeMO Pad FHD 10 LTE Turkish User manual
The screenshot pictures in this manual may be different between different firmware versions.
Просмотр
ASUS MeMO Pad FHD 10 (ME302KL) инструкция по эксплуатации
(102 страницы)
- Языки:Китайский, Молдавский
-
Тип:
PDF -
Размер:
20.38 MB -
Описание:
ASUS MeMo Pad FHD 10 LTE E-Manual (Tranditional-Chinese)
The screenshot pictures in this manual may be different between different firmware versions.
Просмотр
На NoDevice можно скачать инструкцию по эксплуатации для ASUS MeMO Pad FHD 10 (ME302KL). Руководство пользователя необходимо для ознакомления с правилами установки и эксплуатации ASUS MeMO Pad FHD 10 (ME302KL). Инструкции по использованию помогут правильно настроить ASUS MeMO Pad FHD 10 (ME302KL), исправить ошибки и выявить неполадки.


E8319
First Edition
July 2013
COPYRIGHT INFORMATION
No part of this manual, including the products and software described in it, may be reproduced,
transmitted, transcribed, stored in a retrieval system, or translated into any language in any form
or by any means, except documentation kept by the purchaser for backup purposes, without the
express written permission of ASUSTeK COMPUTER INC. (“ASUS”).
ASUS PROVIDES THIS MANUAL “AS IS” WITHOUT WARRANTY OF ANY KIND, EITHER EXPRESS
OR IMPLIED, INCLUDING BUT NOT LIMITED TO THE IMPLIED WARRANTIES OR CONDITIONS
OF MERCHANTABILITY OR FITNESS FOR A PARTICULAR PURPOSE. IN NO EVENT SHALL ASUS,
ITS DIRECTORS, OFFICERS, EMPLOYEES OR AGENTS BE LIABLE FOR ANY INDIRECT, SPECIAL,
INCIDENTAL, OR CONSEQUENTIAL DAMAGES (INCLUDING DAMAGES FOR LOSS OF PROFITS, LOSS
OF BUSINESS, LOSS OF USE OR DATA, INTERRUPTION OF BUSINESS AND THE LIKE), EVEN IF ASUS
HAS BEEN ADVISED OF THE POSSIBILITY OF SUCH DAMAGES ARISING FROM ANY DEFECT OR
ERROR IN THIS MANUAL OR PRODUCT.
Products and corporate names appearing in this manual may or may not be registered
trademarks or copyrights of their respective companies, and are used only for identication or
explanation and to the owners’ benet, without intent to infringe.
SPECIFICATIONS AND INFORMATION CONTAINED IN THIS MANUAL ARE FURNISHED FOR
INFORMATIONAL USE ONLY, AND ARE SUBJECT TO CHANGE AT ANY TIME WITHOUT NOTICE, AND
SHOULD NOT BE CONSTRUED AS A COMMITMENT BY ASUS. ASUS ASSUMES NO RESPONSIBILITY
OR LIABILITY FOR ANY ERRORS OR INACCURACIES THAT MAY APPEAR IN THIS MANUAL,
INCLUDING THE PRODUCTS AND SOFTWARE DESCRIBED IN IT.
Copyright © 2013 ASUSTeK COMPUTER INC. All Rights Reserved.
LIMITATION OF LIABILITY
Circumstances may arise where because of a default on ASUS’ part or other liability, you are
entitled to recover damages from ASUS. In each such instance, regardless of the basis on which
you are entitled to claim damages from ASUS, ASUS is liable for no more than damages for bodily
injury (including death) and damage to real property and tangible personal property; or any
other actual and direct damages resulted from omission or failure of performing legal duties
under this Warranty Statement, up to the listed contract price of each product.
ASUS will only be responsible for or indemnify you for loss, damages or claims based in contract,
tort or infringement under this Warranty Statement.
This limit also applies to ASUS’ suppliers and its reseller. It is the maximum for which ASUS, its
suppliers, and your reseller are collectively responsible.
UNDER NO CIRCUMSTANCES IS ASUS LIABLE FOR ANY OF THE FOLLOWING: (1) THIRD-PARTY
CLAIMS AGAINST YOU FOR DAMAGES; (2) LOSS OF, OR DAMAGE TO, YOUR RECORDS OR DATA;
OR (3) SPECIAL, INCIDENTAL, OR INDIRECT DAMAGES OR FOR ANY ECONOMIC CONSEQUENTIAL
DAMAGES (INCLUDING LOST PROFITS OR SAVINGS), EVEN IF ASUS, ITS SUPPLIERS OR YOUR
RESELLER IS INFORMED OF THEIR POSSIBILITY.
SERVICE AND SUPPORT
Visit our multi-language web site at http://support.asus.com
2
ASUS Tablet E-Manual

Contents
About this manual ……………………………………………………………………………………………..6
Conventions used in this manual ……………………………………………………………………7
Typography ……………………………………………………………………………………………………….. 7
Safety Precautions ……………………………………………………………………………………………..8
Charging your device ……………………………………………………………………………………….. 8
Using your ASUS Tablet ……………………………………………………………………………………. 8
Airplane Precautions ………………………………………………………………………………………… 8
Package contents ……………………………………………………………………………………………….9
Chapter 1: Hardware Setup
Getting to know your ASUS Tablet ………………………………………………………………..12
Front view …………………………………………………………………………………………………………12
Rear view ………………………………………………………………………………………………………….
Chapter 2: Using your ASUS Tablet
Setting up your ASUS Tablet …………………………………………………………………………..18
Charging your ASUS Tablet …………………………………………………………………………….18
Gestures for the ASUS Tablet ………………………………………………………………………….20
Connecting an HDMI-compliant display ………………………………………………………23
Chapter 3: Working with Android®
Starting up for the rst time …………………………………………………………………………..26
Android® lock screen ………………………………………………………………………………………..27
Unlocking your device …………………………………………………………………………………….27
Adding a wallpaper on the lock screen ………………………………………………………..28
Adding a widget on the lock screen ……………………………………………………………..28
Entering Google Now ……………………………………………………………………………………..29
Home Screen …………………………………………………………………………………………………….30
Screen views ……………………………………………………………………………………………………..31
Locking the screen orientation ……………………………………………………………………..32
13
K00A
3

Connecting to the world …………………………………………………………………………………32
Connecting to Wi-Fi networks ……………………………………………………………………….32
Using Bluetooth ……………………………………………………………………………………………….33
Managing Apps ………………………………………………………………………………………………..35
Creating app shortcuts ……………………………………………………………………………………35
Removing an app from the Home Screen ……………………………………………………35
Viewing app info ………………………………………………………………………………………………36
Creating app folder ………………………………………………………………………………………….37
Viewing apps under the Recents screen ………………………………………………………38
Task Manager …………………………………………………………………………………………………..40
File Manager …………………………………………………………………………………………………….41
Accessing the internal storage ………………………………………………………………………41
Accessing the external storage device …………………………………………………………41
Settings ………………………………………………………………………………………………………….
43
Turning your ASUS Tablet o ………………………………………………………………………….45
Putting your ASUS Tablet to sleep …………………………………………………………………45
Chapter 4: Pre-installed Apps
Featured pre-installed apps ……………………………………………………………………………48
Play Music………………………………………………………………………………………………………….48
Camera ………………………………………………………………………………………………………….
Gallery ………………………………………………………………………………………………………….
Email ………………………………………………………………………………………………………….
Gmail ………………………………………………………………………………………………………….
Play Store ………………………………………………………………………………………………………….
Maps ………………………………………………………………………………………………………….
MyLibrary ………………………………………………………………………………………………………….
SuperNote Lite………………………………………………………………………………………………….68
ASUS Studio ………………………………………………………………………………………………………72
BuddyBuzz ………………………………………………………………………………………………………..75
AudioWizard ……………………………………………………………………………………………………..76
49
51
58
60
61
62
63
4
ASUS Tablet E-Manual

ASUS Artist ………………………………………………………………………………………………………..77
App Locker ………………………………………………………………………………………………………..80
Widgets ………………………………………………………………………………………………………….
ASUS Battery …………………………………………………………………………………………………….84
Appendices
Federal Communications Commission Statement …………………………………….86
RF Exposure Information (SAR) ……………………………………………………………………..87
Canada, Industry Canada (IC) Notices …………………………………………………………..87
Canada, avis d’Industrie Canada (IC) …………………………………………………………….88
IC Warning Statement ……………………………………………………………………………………..88
EC Declaration of Conformity ………………………………………………………………………..89
Prevention of Hearing Loss …………………………………………………………………………….89
CE Mark Warning ……………………………………………………………………………………………..90
RF Exposure information (SAR) — CE ………………………………………………………………91
Power Safety Requirement …………………………………………………………………………….91
ASUS Recycling/Takeback Services ……………………………………………………………….91
Coating notice ………………………………………………………………………………………………….91
Green ASUS notice …………………………………………………………………………………………..92
Regional notice for Singapore ……………………………………………………………………….92
Proper disposal …………………………………………………………………………………………………93
83
K00A
5

About this manual
This manual provides information about the hardware and software features of
your ASUS Tablet, organized through the following chapters:
Chapter 1: Hardware Setup
This chapter details the hardware components of your ASUS Tablet.
Chapter 2: Using your ASUS Tablet
This chapter shows you how to use the dierent parts of your ASUS Tablet.
Chapter 3: Working with Android®
This chapter provides an overview of using Android® in your ASUS Tablet.
Chapter 4: Pre-installed apps
This chapter features the pre-installed applications included with your ASUS
Tablet.
Appendices
This section includes notices and safety statements for your ASUS Tablet.
6
ASUS Tablet E-Manual

Conventions used in this manual
To highlight key information in this manual, some texts are presented as follows:
IMPORTANT! This message contains vital information that must be followed to
complete a task.
NOTE: This message contains additional information and tips that can help
complete tasks.
WARNING! This message contains important information that must be followed
to keep you safe while performing tasks and prevent damage to your ASUS Tablet’s
data and components.
Typography
Bold = This indicates a menu or an item that must be selected.
Italic = This indicates sections that you can refer to in this manual.
K00A
7

Safety Precautions
Charging your device
Ensure to fully charge your ASUS Tablet before using it in battery mode for
extended periods. Remember that the power adapter charges the your ASUS
Tablet as long as it is plugged into an AC power source. Be aware that it takes
much longer to charge your ASUS Tablet when it is in use.
IMPORTANT! Do not leave the ASUS Tablet connected to the power supply once it is
fully charged. ASUS Tablet is not designed to be left connected to the power supply
for extended periods of time.
Using your ASUS Tablet
This ASUS Tablet should only be used in enviroments with ambient temperatures
between 0°C (32°F) and 35°C (95°F).
Long time exposure to extremely high or low temperature may quickly deplete
and shorten the battery life. To ensure the battery’s optimal performance, ensure
that it is exposed within the recommended environment temperature.
Airplane Precautions
Contact your airline provider to learn about related inight services that can be
used and restrictions that must be followed when using your ASUS Tablet in-ight.
IMPORTANT! You can send your ASUS Tablet through x-ray machines (used on items
placed on conveyor belts), but do not expose them from magnetic detectors and
wands.
8
ASUS Tablet E-Manual
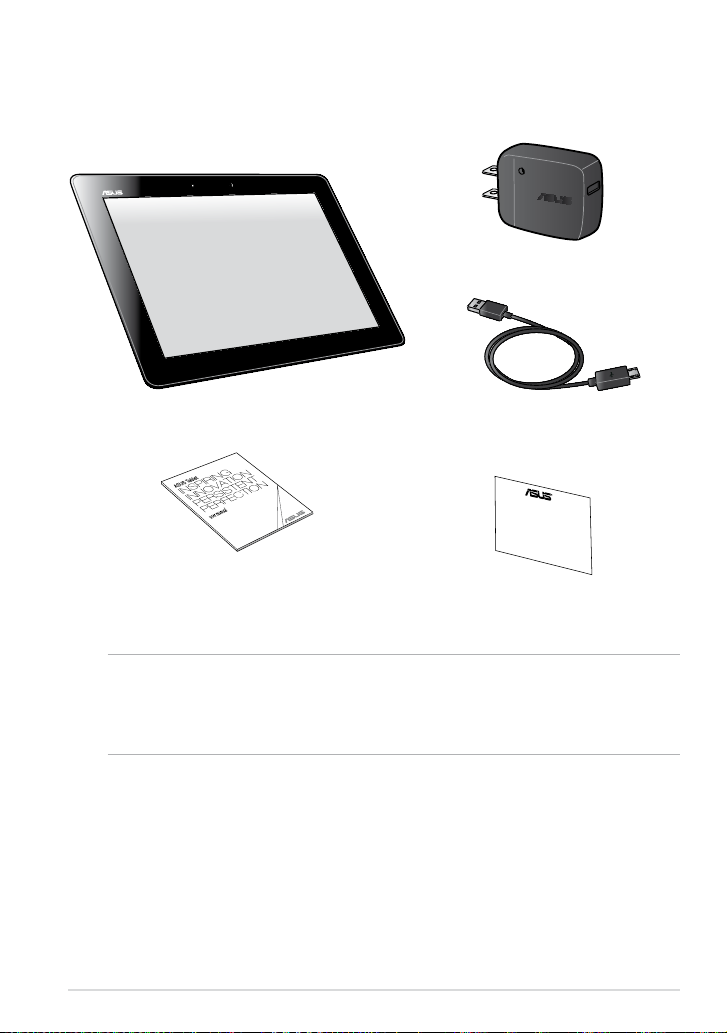
Package contents
ASUS Tablet Micro USB cable
User manual Warranty card
Power adapter
NOTES:
• If any of the items is damaged or missing, contact your retailer.
• The bundled power adapter varies with country or region.
K00A
9
10
ASUS Tablet E-Manual

Chapter 1: Hardware Setup
Chapter 1:
Hardware Setup
K00A
11
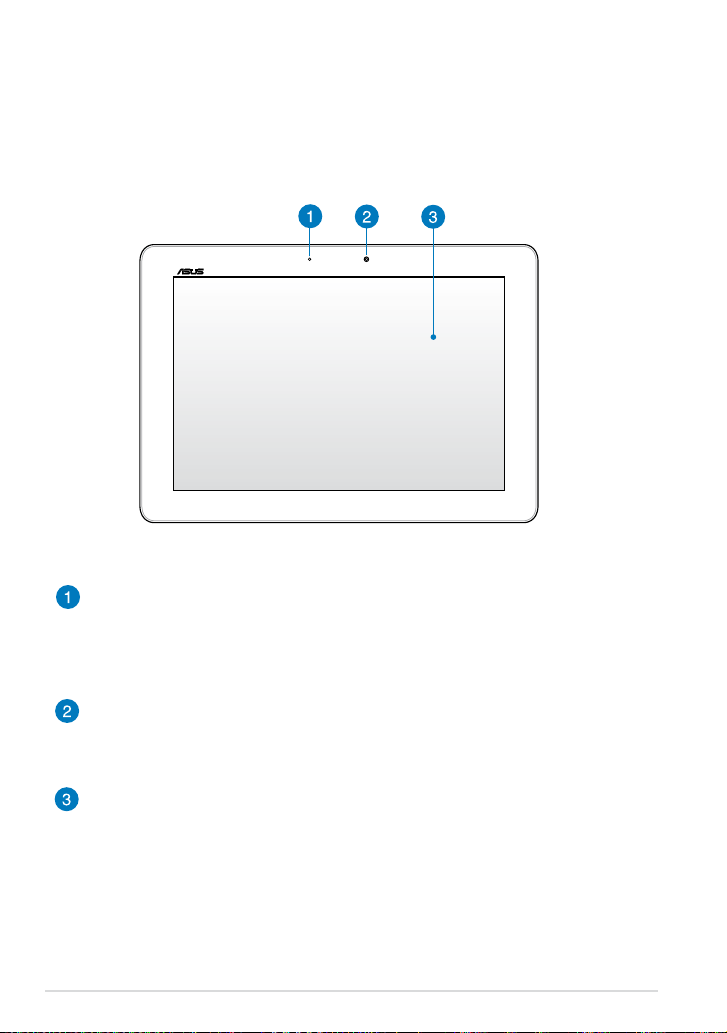
Getting to know your ASUS Tablet
Front view
Ambient light sensor
The ambient light sensor detects the amount of light in your environment.
It allows the system to automatically adjust the brightness of the display
depending on the ambient light condition.
Front camera
This built-in 1.2-megapixel camera allows you to take pictures or record
videos using your ASUS Tablet.
Touch screen panel
The touch screen panel allows you to operate your ASUS Tablet using
touch gestures.
12
ASUS Tablet E-Manual
Rear view
Speaker/Headset port
This port allows you to connect your ASUS Tablet to amplied speakers or
a headset.
IMPORTANT! This port does not support an external microphone.
Volume button
The volume button allows you to increase or decrease the volume level of
your ASUS Tablet.
Audio speakers
The built-in audio speakers allow you to hear audios straight from your
ASUS Tablet. Audio features are software controlled.
Rear camera
This built-in 5-megapixel camera allows you to take high-denition
pictures or record high-denition videos using your ASUS Tablet.
K00A
13
Microphone
The built-in microphone can be used for video conferencing, voice
narrations or simple audio recordings.
Power button
Press the power button for about two (2) seconds to turn your ASUS Tablet
on or wake it up from standby mode.
To turn your ASUS Tablet o, press the power button for about (2) seconds
and when prompted, tap Power O then tap OK.
To lock your ASUS Tablet or put it to standby mode, press and quickly
release the power button.
In the event that your ASUS Tablet becomes unresponsive, press and hold
the power button for about seven (7) seconds to force it to shut down.
IMPORTANT!
• When your ASUS Tablet is inactive for fteen (15) seconds, it will
automatically go to standby mode.
• Forcing the system to restart may result to data loss. We strongly
recommend that you back up your data regularly.
Micro HDMI port
This port is for a micro HDMI (High-Denition Multimedia Interface)
connector and is HDCP compliant for HD DVD, Blu-ray and other protected
content playback.
MicroSD card slot
The ASUS Tablet comes with a built-in memory card reader slot that
supports microSD and microSDHC card formats.
14
ASUS Tablet E-Manual
Micro USB 2.0 port
Use the micro USB (Universal Serial Bus) 2.0 to charge the battery pack
or supply power to your ASUS Tablet. This port also allows you to transfer
data from your computer to your ASUS Tablet and vice versa.
NOTE: When you connect your ASUS Tablet to the USB port on your
computer, your ASUS Tablet will be charged only when it is in sleep mode
(screen o) or turned o.
Manual reset hole
If your system becomes unresponsive, push inside the manual reset hole
for ten (10) seconds using a straightened paper clip to force-restart your
ASUS Tablet.
IMPORTANT! Forcing the system to restart may result to data loss. We
strongly recommend that you back up your data regularly.
K00A
15

16
ASUS Tablet E-Manual

Chapter 2: Using your ASUS Tablet
Chapter 2:
Using your ASUS Tablet
K00A
17
Setting up your ASUS Tablet
Charging your ASUS Tablet
To charge your ASUS Tablet:
Connect the micro USB cable to the power adapter.
Plug the micro USB connector into your ASUS Tablet.
Plug the power adapter into a grounded power outlet.
Charge your ASUS Tablet for eight (8) hours before using it in battery
mode for the rst time.
18
ASUS Tablet E-Manual

IMPORTANT!
• Use only the bundled power adapter and micro USB cable to charge your ASUS
Tablet. Using a dierent power adapter may damage your ASUS Tablet.
• Peel the protective lm o from the power adapter and micro USB cable before
charging the ASUS Tablet to prevent risk or injury.
• Ensure that you plug the power adapter to the correct power outlet with the
correct input rating. The output voltage of this adapter is DC 5V, 2A.
• Do not leave the ASUS Tablet connected to the power supply once it is fully
charged. ASUS Tablet is not designed to be left connected to the power supply for
extended periods of time.
• When using your ASUS Tablet while plugged-in to a power outlet, the grounded
power outlet must be near to the unit and easily accessible.
NOTES:
• Your ASUS Tablet can be charged via the USB port on the computer only when it is
in sleep mode (screen o) or turned o.
• Charging through your computer’s USB port may take a longer time to complete.
• If your computer does not provide enough power for charging your ASUS Tablet,
charge your ASUS Tablet via the grounded power outlet instead.
K00A
19
Gestures for the ASUS Tablet
Using the touch screen panel, the following gestures can be done to navigate,
interact with, and launch the exclusive features included with your ASUS Tablet.
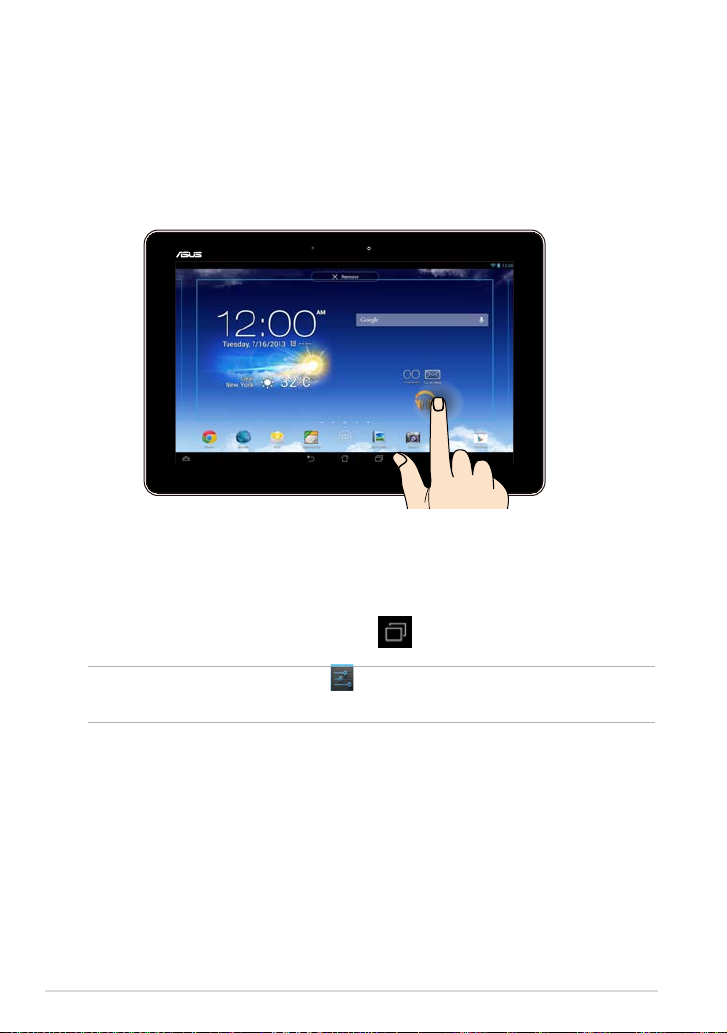
Drag/Tap and hold/Long press
To move an app, tap and hold the app and drag it to a new location.
❏
To delete an app from the main screen, tap and hold the app and drag it up
❏
to the top side of the screen.
To capture a screen image, tap and hold .
❏
NOTE: To enable this setting, go to
Capture screenshots by holding the Recent Apps Key.
20
> ASUS Customized Setting then tick
ASUS Tablet E-Manual
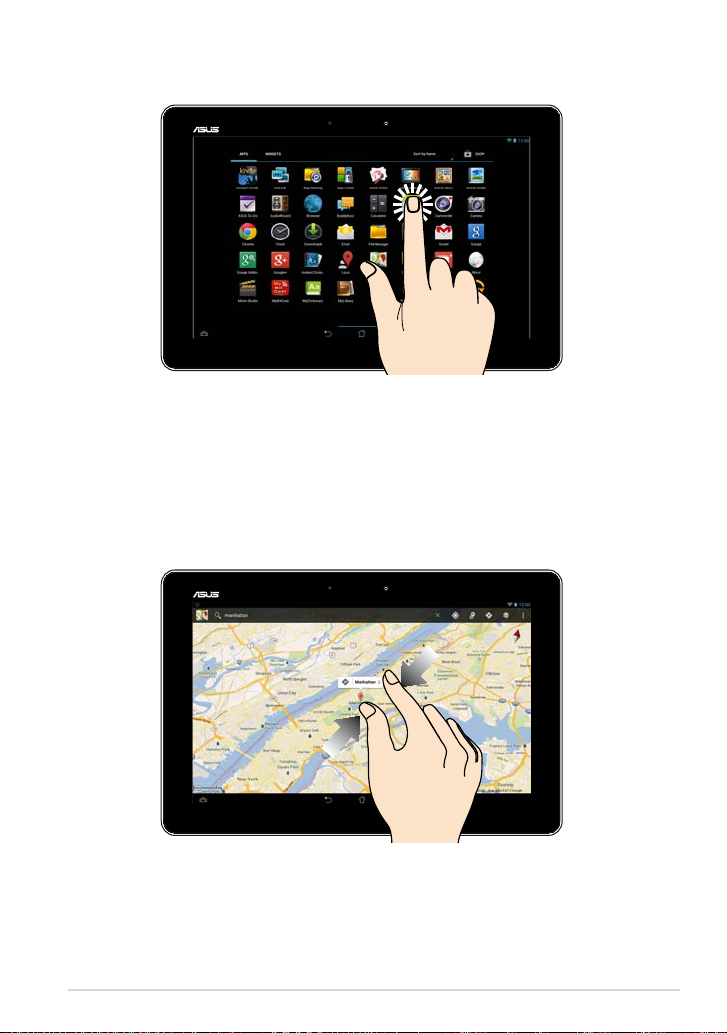
Tap/touch
Tap an app to launch it.
❏
In the File Manager app, tap to select and open a le.
❏
Zoom out
Bring together your two ngers on the touch panel to zoom out an image in
Gallery, Maps or Places.
K00A
21
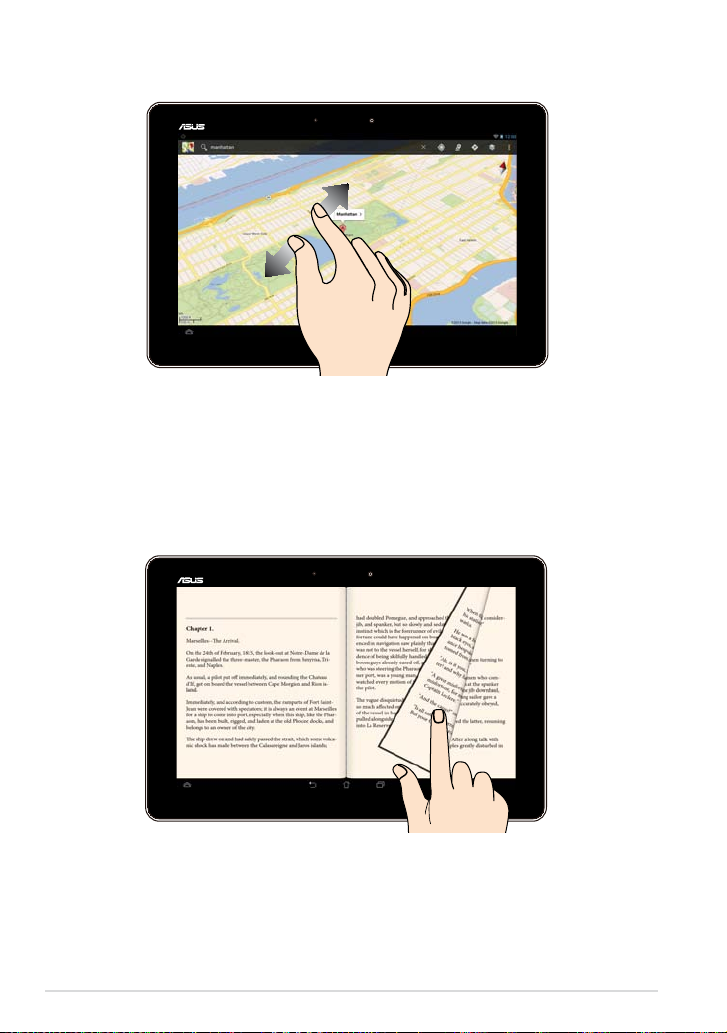
Zoom in
Spread apart your two ngers on the touch panel to zoom in an image in Gallery,
Maps or Places.
Swipe
Swipe your nger to the left or to the right on the touch panel display to switch
between screens or to ip through the pages of an e-book or a gallery of images.
22
ASUS Tablet E-Manual
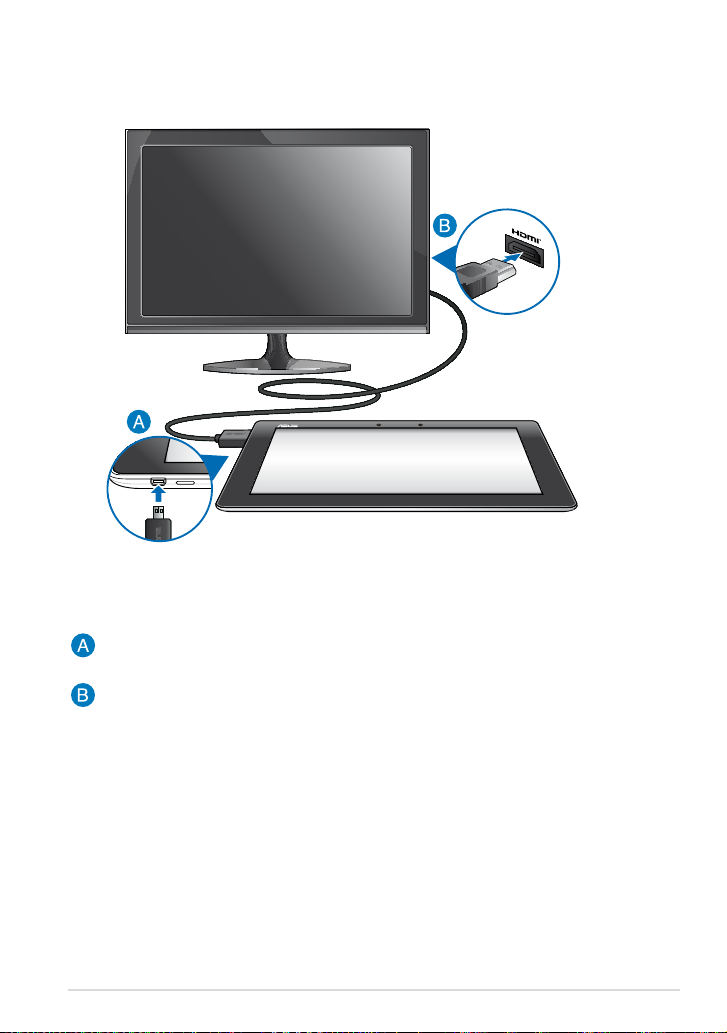
Connecting an HDMI-compliant display
To connect an HDMI-compliant display:
Connect the micro HDMI connector to the micro HDMI port of your ASUS
Tablet.
Plug the HDMI cable to the HDMI port of an HDMI-compliant display.
K00A
23
24
ASUS Tablet E-Manual

Chapter 3: Working with Android®
Chapter 3:
Working with Android®
K00A
25
Starting up for the rst time
When you turn on your ASUS Tablet for the rst time, a series of steps appear to
guide you in conguring the basic settings of your Android® operating system.
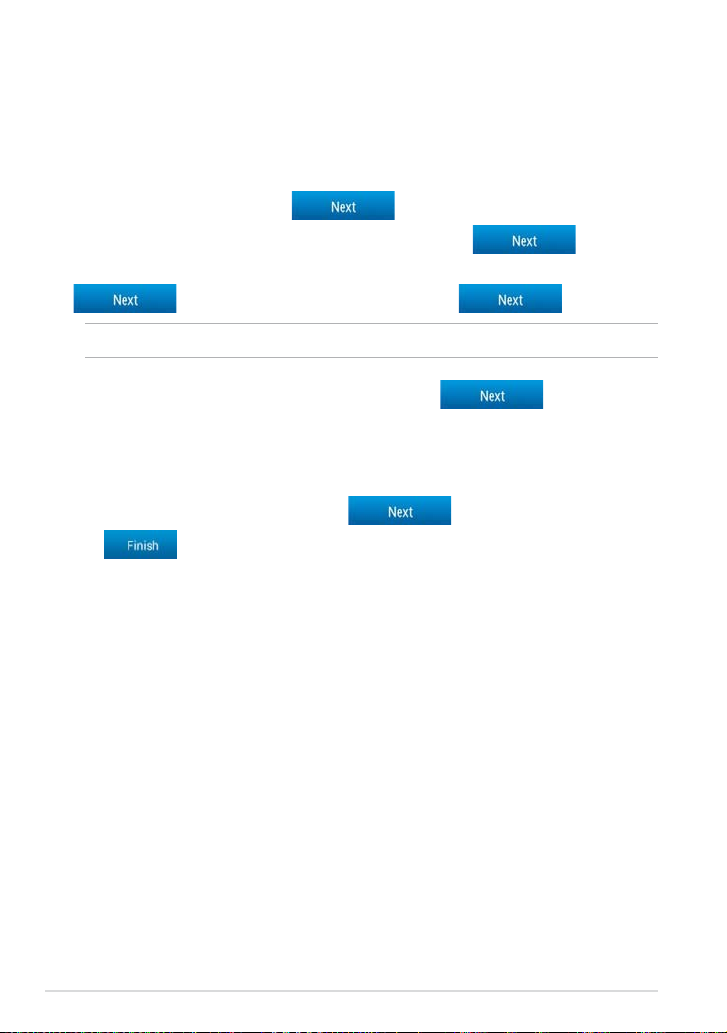
To start your ASUS Tablet for the rst time:
1. Turn your ASUS Tablet on.
2. Choose a language, then tap
.
3. Select an input method or keyboard format, then tap
4. From the list of available Wi-Fi networks, tap a network name then tap
. To skip connecting to a network, tap .
NOTE: Some Wi-Fi networks may prompt you to key in a passcode.
5. Select the type of data synchronization, then tap .
6. Follow the onscreen instructions to congure the following items:
q Google Account
q Google location and services
7. Set the local date and time, then tap
8. Tap
9. On the Home Screen, tap
to enter Home screen.
OK to start navigating your ASUS Tablet.
.
.
26
ASUS Tablet E-Manual
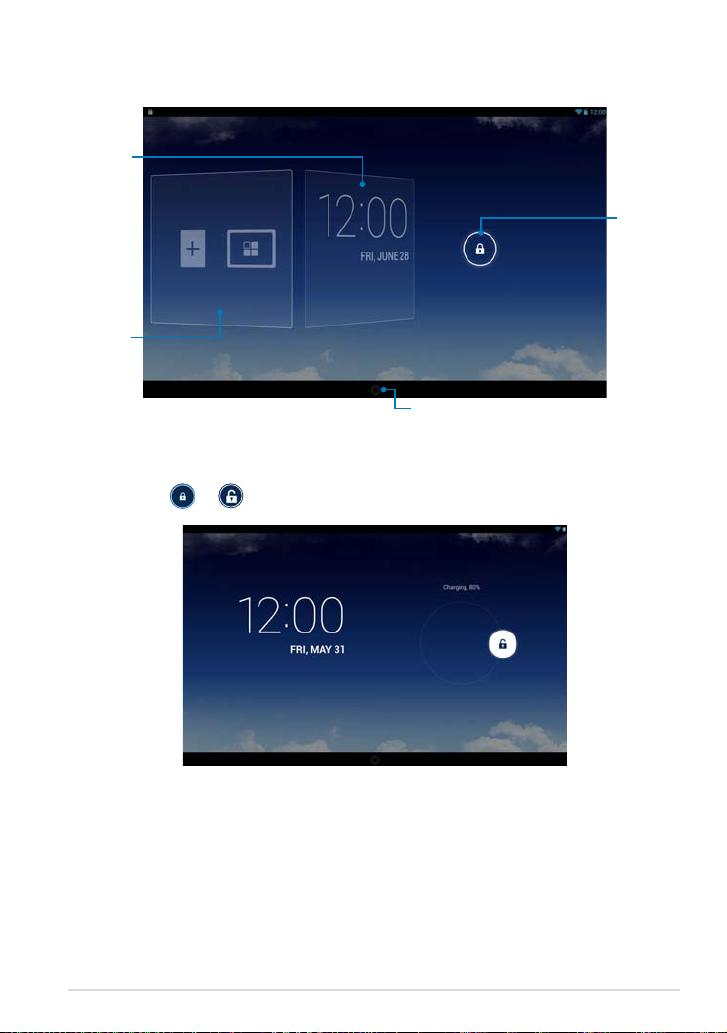
Android® lock screen
Time and
date panel
Wallpaper
and widget
panel
Unlocking your device
Tap and drag to .
Lock icon
Google Now launcher
K00A
27
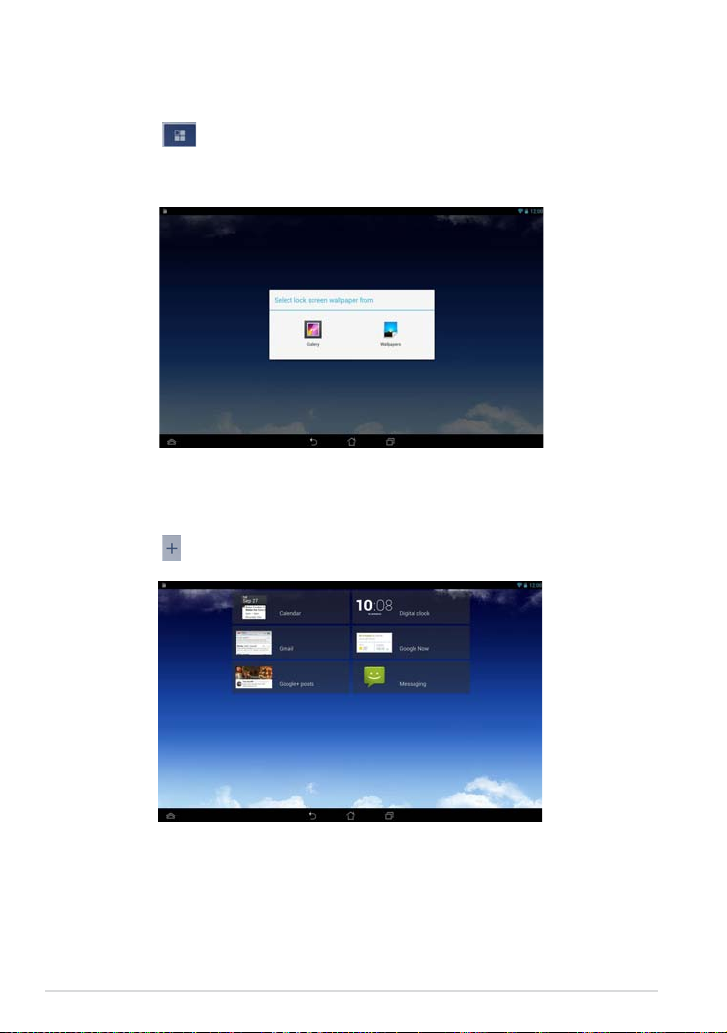
Adding a wallpaper on the lock screen
Swipe the time and date panel to the right to view the wallpaper and widget
panel, then tap and select a wallpaper from Gallery or Wallpapers.
Adding a widget on the lock screen
Swipe the time and date panel to the right to view the wallpaper and widget
panel, then tap and select a widget.
28
ASUS Tablet E-Manual
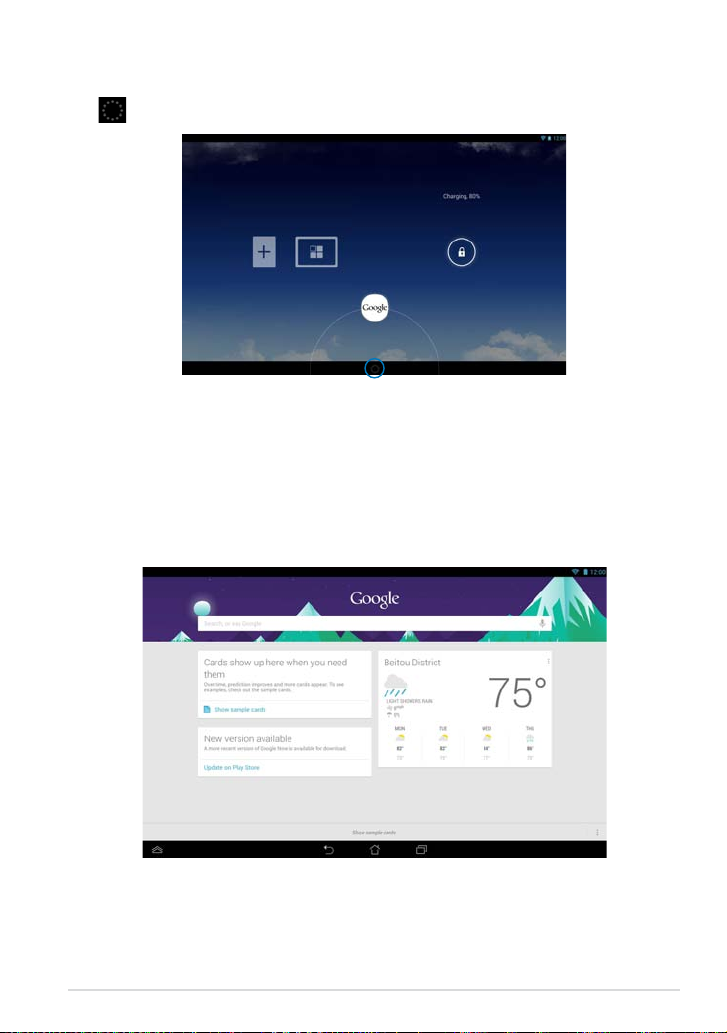
Entering Google Now
Tap on the system bar then drag it to Google icon.
Google Now
Google Now is your ASUS Tablet’s personal assistant, giving you instant
updates on weather conditions, nearby restaurants, ight schedules, scheduled
appointments, and other related information based from your web history,
synced calendars and reminders.
K00A
29
Loading…
- Инструкции и руководства
- Бренды
- ASUS
- ASUS MeMO Pad FHD 10 (ME302KL)
- Справочник Пользователя