
Manual
View the manual for the Audison bit One here, for free. This user manual comes under the category hi-fi systems and has been rated by 2 people with an average of a 8.9. This manual is available in the following languages: English. Do you have a question about the Audison bit One?
Ask your question here
Frequently asked questions
Can’t find the answer to your question in the manual? You may find the answer to your question in the FAQs about the Audison bit One below.
Can bluetooth devices of different brands be connected to each other?
Yes, bluetooth is a universal method that allows different devices equipped with bluetooth to connect to each other.
What is bluetooth?
Bluetooth is a way of exchanging data wirelessly between electronic devices via radio waves. The distance between the two devices that exchange data can in most cases be no more than ten metres.
What is HDMI?
HDMI stands for High-Definition Multimedia Interface. An HDMI cable is used to transport audio and video signals between devices.
When is my volume too loud?
A volume above 80 decibels can be harmful to hearing. When the volume exceeds 120 decibels, direct damage can even occur. The chance of hearing damage depends on the listening frequency and duration.
How can I best clean my hi-fi system?
A slightly damp cleaning cloth or soft, dust-free cloth works best to remove fingerprints. Dust in hard-to-reach places is best removed with compressed air.
Wat is Dolby Atmos?
Dolby Atmos is a technology that ensures that the sound is reflected from the ceiling to where you are listening. This makes it possible to create a 5.1 effect with only 1 speaker.
Is the manual of the Audison bit One available in English?
Yes, the manual of the Audison bit One is available in English .
Is your question not listed? Ask your question here

Updates for Bit Ones already finalized: Software and Firmware
To be used on Bit Ones (with Firmware V. 1.0.7.1 or older version installed) where settings have already been saved.
Starting from Firmware V. 1.5.0.0 or higher version the update can be performed following the standard procedure
Contents:
• PC Software update
• Bit One Firmware update
IMPORTANT REMARKS:
1) The different steps of this update must be performed strictly following the sequence
hereafter, exactly as per the chronological order indicated in this document.
2) First you need to update the Bit One PC software, then proceed with updating the Bit One
firmware.
3) These updates require good skills in general PC management.
4) The firmware update should be attentively performed, following the warnings listed in the Bit
One firmware update section of this document, to avoid damaging the product.
5) All the previously stored settings will be lost once the software and firmware updates are
completed.
6) If the PC used for the update is not the PC where the previous software version has been
installed, before proceeding you first need to install the software and drivers you can find in
the CD supplied with the Bit One product (following the document
“Driver_Software_Installation_Guide_ENG.pdf”, available on http://update.audison.eu
you will have to uninstall the software following the procedure hereafter.
(see the Bit One Advanced Manual)
). Then
PC Software Update
1. Write down ALL the settings selected in the Bit One (Eqs, Delays, Filters, Output levels, Input
configuration, Output configuration) or save them selecting «Save Setup» from the «File» menu. By
saving the settings of your Bit One through the «Save Setup» function you can view the settings in
Offline mode: this software version does not allow you to automatically resume the settings you
previously set.
2. Uninstall the old version of the Bit One software: click “Start”, “Control Panel”, “Add or Remove
Programs”. Browse the listed installed programs and look for “bit one”, select it and then click on
“Remove”.
REMARK: In order to install the program on Windows 2000 / XP / Vista operating systems, the user
profile must have Local Administrator privileges. If the user profile does not have these privileges,
uninstalling the old software version and installing the new one will not be possible.
3. Create a new folder (named for example: bitone 1.5.0.0) on the Desktop or wherever you prefer.
4. Download the zipped folder “Bit_One_Update_PCsoftware_V1-5_Firmware_V1-5-0-0.zip“from
http://update.audison.eu
5. Open the zipped folder “Bit_One_ Update_PCsoftware_V1-5_Firmware_V1-5-0-0.zip” using the
specific software (for example Winzip or “Compressed folders” Windows utility if available in your
PC), and save the files you can find inside the zipped folder (“bit one.msi”, “setup.exe” and
“bitone.1.5.0.0.bin”).
6. Install the new Bit One software version by double-clicking the “setup.exe» file. Please follow the
Install Wizard: it is exactly the same procedure as the one used to install the older version.
rev. 02 1/4
and save it in the folder you have just created.
Firmware Update
REMARK: The firmware update procedure requires particular attention. So, it must be performed under the
best possible conditions: if the firmware update is launched but prematurely interrupted (for example
because the PC locks up or the USB accidentally disconnects during the firmware update), you need to
contact our Customer Service for further support as memory programming may be necessary.
Attention
The first action to be taken is to create a new folder (named for example: bitone 1.5.0.0) and save it on your
desktop or wherever you prefer. Open the zipped folder “Bit_One_ Update_PCsoftware_V1-
5_Firmware_V1-5-0-0.zip” using the specific software (for example Winzip or “Compressed folders”
Windows utility if available in your PC), and save the files you can find inside the zipped folder you have just
created.
Recommended precautions:
a. If the update is being performed using a laptop, you have to connect it to the PC through the
mains supply and not through the laptop battery.
b. Close any currently running program before launching the firmware update procedure.
c. Disconnect all the audio inputs and all the audio outputs.
d. Make sure that the Bit One is supplied in a continuous and stable way, at least during firmware
update: check if the power supply and the remote in connections are correctly working, and if
power is suppled in a continuous and stable way.
e. Connect the Bit One to the PC using the USB cable supplied with the product.
f. Turn on the Bit One by using one of the Remote In contacts.
g. Make sure you save the Bit One settings by either writing them down or saving them selecting
“Save Setup” from the “File” menu.
UPDATE:
1. After double-checking that the above instructions have been followed, connect the Bit One to the
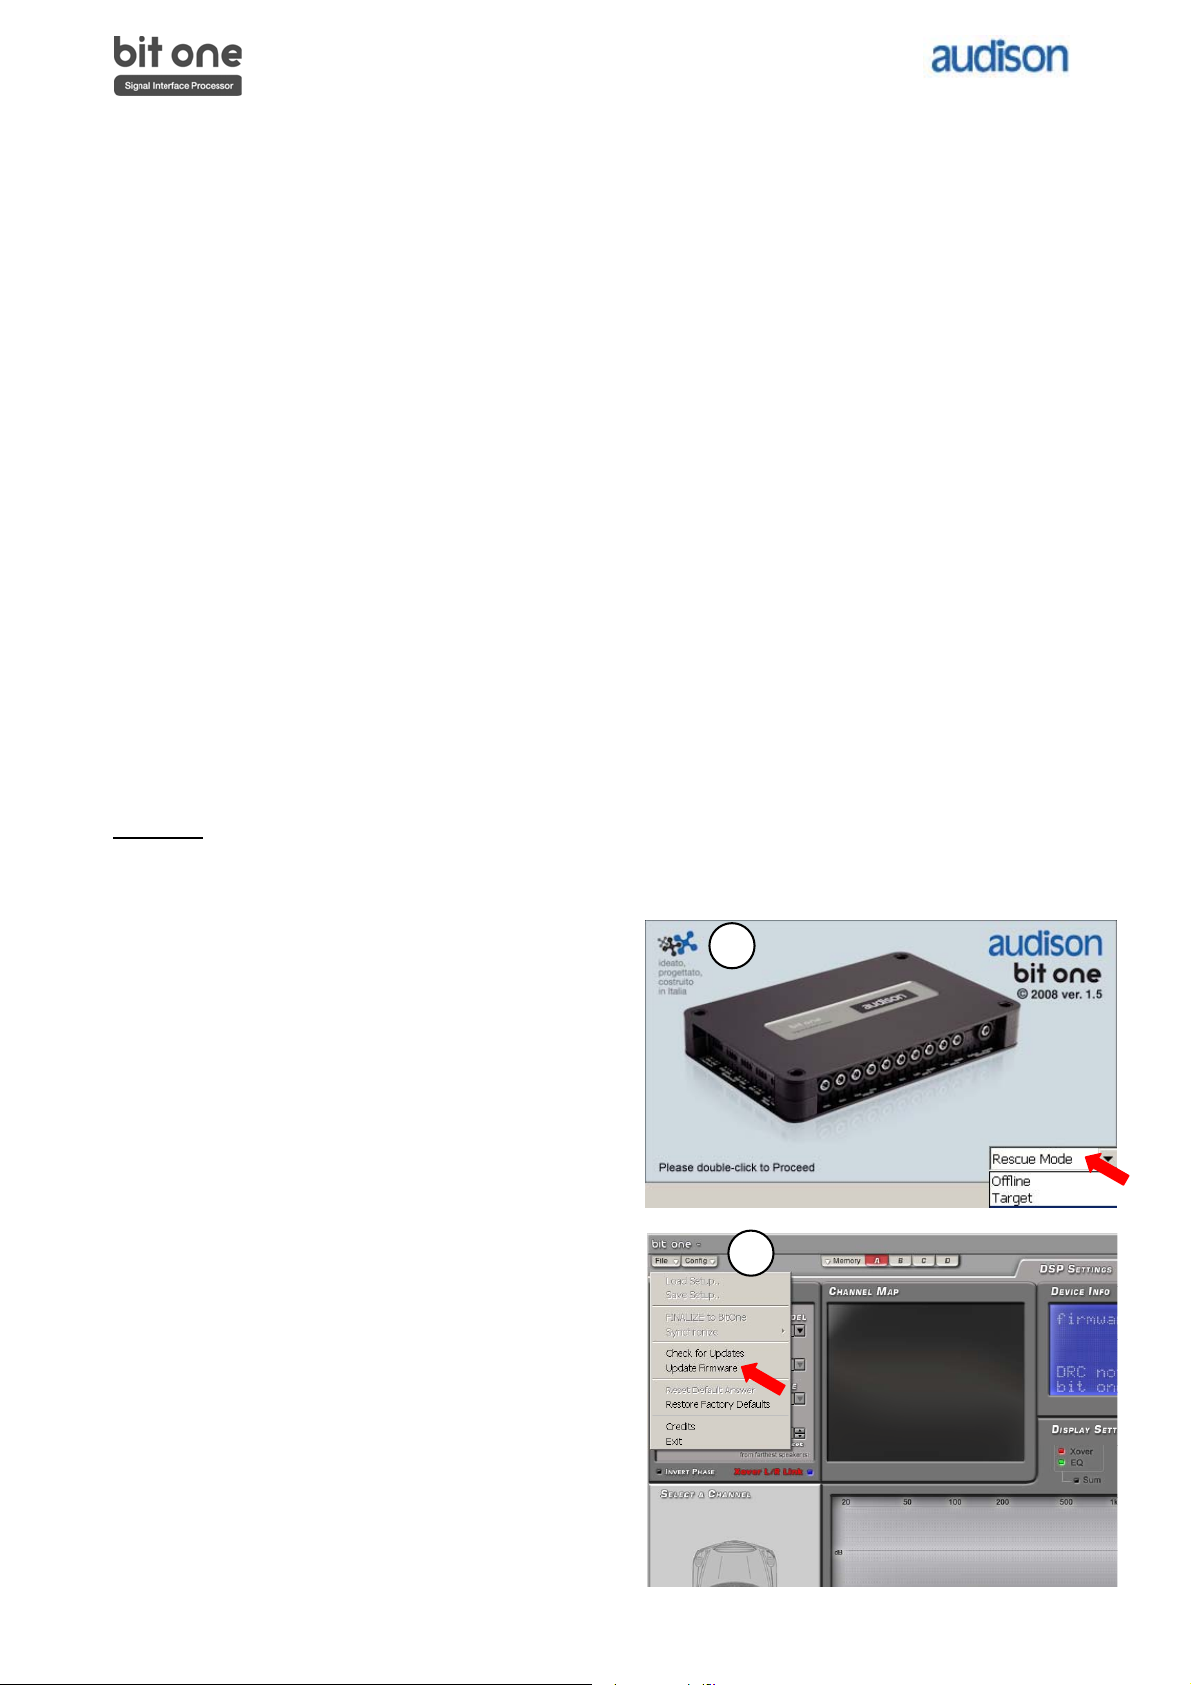
2. Launch the “Bit One V. 1.5” PC software.
3. Select “Rescue Mode” and double click on the
4. Select “Update Firmware” from the “File”
drop-down menu.
PC. Then turn the Bit One on.
Bit One image.
3
4
rev. 02 2/4
USERS MANUAL rev. 1.5 e
Update for:
bit One.1 Pc Software 1.5 bit One Firmware 1.5.0.0 DRC Firmware 1.50 Accessories: SFC / DRC cable extension Kit Instruction for Windows XP, Vista, 7, 8, 8.1, 10 installation
2
USERS MANUAL bit One /
Index 1. PRODUCT DESCRIPTION ……………………………………………………………………………………………………………………………3 2. PACKAGING CONTENTS …………………………………………………………………………………………………………………………….3 3. BIT ONE and DRC INSTALLATION ……………………………………………………………………………………………………………..4 4. CONNECTION PANELS — DESCRIPTION …………………………………………………………………………………………………….5 4.1 Input Signals ……………………………………………………………………………………………………………………………………….5 4.2 Output Signal ………………………………………………………………………………………………………………………………………6 4.3 Inputs — remote control outputs and power supply ……………………………………………………………………………6 5. CONNECTIONS ……………………………………………………………………………………………………………………………………………7 5.1 Power supply and remote turn on ………………………………………………………………………………………………………7 5.2 How to turn on/off the bit One ……………………………………………………………………………………………………………7 5.3 Personal computer and Digital Remote Control (DRC) ………………………………………………………………………7 5.4 Low Level and Digital input signals …………………………………………………………………………………………………….8 5.5 High Level input signals ……………………………………………………………………………………………………………………..9 5.6 Output Signals …………………………………………………………………………………………………………………………………..10 6. BIT ONE SOFTWARE AND DRIVERS — INSTALLATION GUIDE ………………………………………………………………..11 6.1 Software installation guide ……………………………………………………………………………………………………………….11 6.2 Ac-Link drivers installation on Windows XP, Vista, 7 ……………………………………………………………………….13 6.3 Ac-Link drivers installation on Windows 8, 8.1, 10 …………………………………………………………………………..17 6.4 Troubleshooting section for software installation ……………………………………………………………………………24 7. BIT ONE SOFTWARE AND DRIVERS UNINSTALLATION GUIDE………………………………………………………………25 7.1 bit One software uninstall …………………………………………………………………………………………………………………25 7.2 How to uninstall the Ac-Link drivers with Windows XP ……………………………………………………………………25 7.3 How to uninstall the Ac-Link drivers with Windows Vista ………………………………………………………………..26 7.4 How to uninstall the Ac-Link drivers with Windows 7 ………………………………………………………………………27 7.5 How to uninstall the Ac-Link drivers with Windows 8, 8.1, 10 ………………………………………………………….28 8. HOW TO CONNECT THE BIT ONE TO THE PC ………………………………………………………………………………………….29 8.1 OFFLINE mode ………………………………………………………………………………………………………………………………….29 8.2 Starting up the bit One software in TARGET mode — warnings ………………………………………………………..30 8.3 TARGET mode …………………………………………………………………………………………………………………………………..30 8.4 Selecting the MASTER mode Low Level inputs ……………………………………………………………………………….31 8.5 Selecting the MASTER mode High Level inputs ……………………………………………………………………………….35 9. HOW TO SETUP THE BIT ONE WITH THE PC …………………………………………………………………………………………..38 9.1 Features …………………………………………………………………………………………………………………………………………….38 9.2 Main menu File ………………………………………………………………………………………………………………………………….39 9.3 Main menu Config …………………………………………………………………………………………………………………………….40 9.4 Channel Map ……………………………………………………………………………………………………………………………………..41 9.5 Select a Channel ……………………………………………………………………………………………………………………………….42 9.6 Filter Settings …………………………………………………………………………………………………………………………………….43 9.7 Display and Settings …………………………………………………………………………………………………………………………45 9.8 Selected Input …………………………………………………………………………………………………………………………………..45 9.9 Ext. Source EQ …………………………………………………………………………………………………………………………………..46 9.10 Set Distance and Delay ……………………………………………………………………………………………………………………..48 9.11 Output Level ………………………………………………………………………………………………………………………………………50 9.12 Grafic Equalizer …………………………………………………………………………………………………………………………………51 9.13 Dynamic Equalization Wizard ……………………………………………………………………………………………………………52 9.14 Memory ……………………………………………………………………………………………………………………………………………..54 10. TROUBLESHOOTING …………………………………………………………………………………………………………………………………55 10.1 Synchronization with the PC …………………………………………………………………………………………………………….55 10.2 Background noise ……………………………………………………………………………………………………………………………..55 10.3 Firmware upgrade — Rescue Mode ……………………………………………………………………………………………………55 11. STARTING UP THE BIT ONE SOFTWARE IN TARGET MODE IN FINALIZED BIT ONES …………………………..59 12. DRC — DIGITAL REMOTE CONTROL ………………………………………………………………………………………………………….60 12.1 Phone Call …………………………………………………………………………………………………………………………………………61 12.2 SEL button — function ………………………………………………………………………………………………………………………..61 12.3 Bypassing the DRC ……………………………………………………………………………………………………………………………62 12.4 Upgrade Firmware DRC …………………………………………………………………………………………………………………….62 13. ACCESSORIES …………………………………………………………………………………………………………………………………………..65 13.1 SFC…………………………………………………………………………………………………………………………………………………….65 13.2 DRC cable extension kit …………………………………………………………………………………………………………………….66 14. TECHNICAL SPECIFICATIONS ………………………………………………………………………………………………………………….67
3
USERS MANUAL bit One /
— bit One — Signal Interface Processor
— DRC (Digital Remote Control) Control Panel
— Printed Quick Start Guide
— 5.0 m / 196,85 AC Link (RJ-12) cable
— 5.0 m / 196,85 AD Link (LAN class 5S — RJ45) cable
— 3.0 m / 118,11 USB cable
-N.44.2x38mmself-tapping,crossheadfixingscrews
— 4.5 m / 177,16 DRC / ACLink cable
-N.2fixingbracketswith2.9×6.5mm self-tapping, cross head screws
— CD ROM with: bit One Software USB-ACNet drivers This Advanced Manual (.pdf format) Test tracks
— DVD comprising: Test tracks encoded with Dolby Digital 5.1
1. PRODUCT DESCRIPTION bit One is a signal digital processor essential to maximize the acoustic performance of your Car Audio system. It consists of a 32 bit DSP processor and 24 bit AD and DA converters. It can be interfaced with any factory system, even in vehicles featuring an integrated audio processor, since, thanks to the de-equalization function, the bit One will send back a linearized signal. The bit One features 21 signal inputs; 8 Hi-Level, 1 Phone, 6 Low-Level, 4 Aux, 1 Optical Digital, 1 Coax Digital. It provides 8 PRE OUT analog or digital outputs. Each output channel has a 32 band equalizer available. It also features a 66 frequency steps electronic crossover aswellasBUTTERWORTHorLINKWITZfilterswith6-48dBslopes;adigitaltimedelaylinealongwithanequalizer on each auxiliary input are also available. The user can select adjustments that will allow him to interract with the bit One trough the remote controll device called DRC.
WARNING: a PC provided with Windows XP, Vista, 7, 8, 8.1 or 10 operating system, 1.5 GHz minimum processor speed and 1 GB RAM minimum memory, are required to install the software and setup the bit One.
2. PACKAGING CONTENTS
SETUP CD 1.1
TEST SIGNALS Track_01. sine sweep (10 min) Track_02. white noise (15 min) Track_03. pink noise (10 min) Track_04. sine wave 50 Hz — 0 dB (2 min) Track_05. sine wave 1 kHz — 0 dB (2 min) CD ROM Bit One Software 1.1 USB-ACNet Drivers 1.0 Product manual
audison is part of elettromedia — 62018 Potenza Picena (M C
) Italy — w w
w .elettrom
edia.it — A ll R
ights R eserved
— A ll product nam
es are registered tradem arks of their respective holders
TEST SIGNAL DVD
SURROUND TEST SIGNALS 5.1 Track_01. sine sweep (10 min) Track_02. white noise (15 min) Track_03. pink noise (10 min) Track_04. sine wave 50 Hz — 0 dB (2 min) Track_05. sine wave 1 kHz — 0 dB (2 min)
audison is part of elettromedia — 62018 Potenza Picena (M C
) Italy — w w
w .elettrom
edia.it — A ll R
ights R eserved
— A ll product nam
es are registered tradem arks of their respective holders
1/2
4
USERS MANUAL bit One /
3. BIT ONE AND DRC INSTALLATION
External dimensions
How to install the DRC
Mounting dimensions
(provided)
BIT ONE:
DRC:
WARNING: do not use aggressive cleaning agents or abrasive cloth to clean the display. Simply use a soft cotton cloth lightly damped with water.
225 mm / 8,85
15 0
m m
/ 5,
90
201 mm / 7,91
12 6
m m
/ 4,
96
4.2 x 38 mm
32 .3
m m
1, 27
68 m
m /
2. 68
90 mm / 3.54
35 mm / 1.38 2 mm / 1/8
50 m
m /
2
16 mm / 0.63
17 mm / 0.67
12 .5
m m
/ 0.
49
43 .5
m m
/ 1.
71
13.5 mm / 0.53
3.5 mm / 0.14
6 mm / 0.23
3
5
USERS MANUAL bit One /
1. PRE IN low-level MASTER inputs (see section 5.4.1-2) Ch1 — Ch2 — Ch3 — Ch4 — Ch5 — Ch6 Connect here the RCA cables coming from the main analog signal source. If these inputs are used, the MASTER SPEAKER IN inputs can not be used.
2. AUX1 AUX2 auxiliary low-level STEREO inputs (see section 5.4.3-4) Connect here the RCA cables coming from additional analog signal sources.
3. DIGITAL IN S/PDIF digital inputs (see section 5.4.5-6) The applicable signal must be a 48 kHz/24bit max. STEREO signal. COAXIAL. Connect a 75 ohm shielded cable. OPTICAL. ConnectanopticalfibrecablewithTOSLINKconnector.
4. SPEAKERS IN hi-level MASTER input(see section 5.5.1-2) Ch1 — Ch2 — Ch3 — Ch4 — Ch5 — Ch6 — Ch7 — Ch8 Connectherethespecificcablescomingfromthepoweroutputofthemainsignalsource. If these inputs are used, the MASTER PRE IN inputs can not be used. Ch1 features AUTO TURN ON (ART), providing the ability to automatically turn on/off the bit One through the connection with the source speaker outputs. In the bit One.1 version (check label on the bottom of the product) this feature can be disabled (see section 5.5.1).
5. PHONE input for phone hands-free kits (see section 5.5.3) SIGNAL. Connect the audio output cables coming from the hands-free kit system in use. MUTE. Connect the hands-free kit remote control (MUTE/PHONE MUTE).
4. CONNECTION PANELS — DESCRIPTION
negative pole (ground) positive pole
Remark: Ch1 Auto Turn ON can be excluded in the bit One.1 version.
4.1 INPUT SIGNALS
4 5
3
4
6
USERS MANUAL bit One /
1. PRE OUT low-level analog signal (see section 5.6.2-3) Ch1 — Ch2 — Ch3 — Ch4 — Ch5 — Ch6 — Ch7 — Ch8 ConnectheretheRCAcablesgoingtothesystemsamplifiers.
2. AD Link — OUT digital signal (see section 5.6.1-3) S/PDIFstandarddigitalsignal(Ch1Ch8)toconnectamplifiersprovidedwithappropriateADLinkinput.
3. AC Link 1 — 2 Remote Controls DRC: Connection plug for the remote control panel of the processor functions and the devices connected to the AMPS bus (see section 5.3). AMPS:ConnectionbustocontroltheamplifiersprovidedwithACLinkconnection(see section 5.6.1-3).
1. REMOTE IN-OUT (see section 5.1) IN: for the processor remote turn-on through one or multiple signal sources, featuring Rem Out control. OUT:outputfortheremoteturn-onoftheotherdevices/amplifiersconnectedtotheprocessor. The REMOTE OUT output current capability is 20 mA. From the REMOTE-IN signal, the processor only takes 7 seconds to supply the signal to the REMOTE OUT output.
WARNING:thebitOnemustbeswitchedonbeforetheamplifiersconnectededitareturnedon.Itsnecessaryto connect the sources Remote Out to the bit One Remote In and then the bit One Remote Out to the Remote In of theotherdevices/amplifiersconnectedtothebitOne(section 5.1).
2. KEY SWITCH ignition key connection (see section 5.2.3-4) MEM: it stores the processor status when it is turned off. ON — OFF: it turns the processor on and off when the vehicle turn on/off ignition key is turned.
WARNING: make sure the connection polarity is as indicated on the terminals. A mis-connection may result in damage to the bit One. After applying a 12V power, wait at least 20 seconds before turning the bit One on.
3. POWER power supply connection (section 5.1) — 12V + : Positive and negative connection terminal for car 12 V power supply.
IMPORTANT REMARK: current capability of the bit One.1 version (check the label on the bottom of your bit One to know its version) is 130 mA; it can also drive an automotive relay (make sure its absorption is not higher than 130 mA).
4. USB (section 5.3) USB (B) connection plug, to connect the processor to a PC and manage its functions through the bit One software. The connection standard is USB 1.1/2.0 compatible.
4.3 INPUTS — REMOTE CONTROL OUTPUTS AND POWER SUPPLY
4.2 OUTPUT SIGNALS
3 421
AMPSDRC 1 — AC Link — 2
123
4
7
USERS MANUAL bit One /
5. CONNECTIONS
1. Push the DRC main control switch (to turn on). Keep the DRC main control knob pressed (to shut down). In this case no other connections Remote In / KEY SWITCH are required, but they can coexist (see section 12). 2. Connecting one of the Remote In plugs using a Remote signal coming from one source, the KEY SWITCH connection is not required, but it can coexist. 3. Through the KEY SWITCH ON OFF. Every time you turn on / off the car ignition key, the bit One will turn on / off. If this control is used, KEY SWITCH MEM can not be used. 4. Through the KEY SWITCH MEM. If the bit One was turned off through the KEY SWITCH MEM connection, it will automatically turn on again by turning the KEY SWITCH MEM itself. If it was turned off through a different method (ex. through the Remote or the DRC) while the KEY SWITCH MEM was still active, the bit One will not turn on again through the KEY SWITCH MEM; you will have to turn it on through either the DRC or the Remote. If you use the KEY SWITCH MEM, the KEY SWITCH ON OFF can not be used.
5. ThroughtheSPEAKERINCH1.TheAUTOTURNON(ART)activatesbyconnectingtheamplifiedhead unit output to the SPEAKER IN CH1 input channel, the ART can be disabled on the bit One.1 (check the label on the bottom of your bit One to know its version) by opening the product and removing the jumper as shown in the picture (see section 5.5.1). 6. Automatically through the hands-free phone kit (see section 5.5.3), with the bit One mute control turned off.
Remark: The bit One is internally protected by a fuse-resistor soldered on its printed circuit board. To replace it, contact a service centre. The application of an external fuse is recommended, though it is not indispensable.
REMOTE TURN ON
The bit One is on when the Audison logo lights up in blue. After receiving the turn-on input the bit One takes 9 seconds to become operative. It can be turned on / off in the following ways:
5.3 PERSONAL COMPUTER and DIGITAL REMOTE CONTROL (DRC)
5.2 HOW TO TURN ON/OFF THE BIT ONE
5.1 POWER SUPPLY AND REMOTE TURN-ON
ATTENTION: to power the bit One, use 1 mm2 (16 AWG) min. cables. POWER SUPPLY
Fuse Holder Not provided
suggested fuse T1A-DelayedGround Battery
12V
Ground
L: 7 mm (5/16)
3 (section 5.2)
(section 5.2)
4
L: 7 mm (5/16)
or other
2(section 5.2)
1 (section 5.2)
A M P L I F I E R S
DRC IN
USB cable (provided)
DRC / ACLink cable (4,5 m / 177,16 in provided see section 13.2)
TO THE SYSTEMS AMPLIFIER ACLink PROVIDED
DRC/ACLink cable (provied)
NO SI
5
8
USERS MANUAL bit One /
3. AUX 1 — Left/Right — analog STEREO signal
5. DIGITAL IN OPTICAL Digital S/PDIF STEREO signal
6. DIGITAL IN COAXIAL Digital S/PDIF STEREO signal
2. PRE IN — Ch1/Ch 6 — analog Audio Car Theatre
4. AUX 2- Left/Right analog STEREO signal
1. PRE IN — Ch1/Ch6 analog STEREO signal (select 2 signals from Ch1 and Ch6)
DIGITAL IN — WARNING: the digital inputs accepts up to 48 kHz / 24 bit stereo PCM signals. So DOLBY DIGITAL (AC3) multi-channel signals coming from audio/video sources (such as theaudioofafilminDVD)orDTScannotbe reproduced. The output of these devices will therefore be set in STEREO mode for the signal to be reproduced. If digital signals at frequency higher than 48 kHz (96 — 192 kHz) are supplied, the bit One locks up. In that case, turn the bit One off, supply the adequate signal and turn it on again.
5.4 LOW-LEVEL AND DIGITAL INPUT SIGNALS
Pre Out
Source (MAX 6 PRE OUT)
L R
Multi Channel Source Analog Preamplified Signal
S U B
C E N T E R
REAR FRONT
Auxiliary Stereo Preamplifier Source
Auxiliary Stereo Preamplifier
Source
Signal: STEREO Max 48 kHz / 24 bit
Stereo Source Digital Signal
75 ohm coax cable
Signal: STEREO Max 48 kHz / 24 bit
bit One Bottom Side
TOSLINK connector
Optical fiber
5
9
USERS MANUAL bit One /
1. SPEAKER IN Hi-Level STEREO Front + Rear
2. SPEAKER IN Hi-Level MULTICHANNEL
3. CONNECTION WITH HANDS-FREE PHONE KIT
(see section 5.2.5)
(see section 5.2.5)
Signal: input compatible with the hands-free kit headphones or speaker output. Sensitivity adjustable via the bit One PC software from 0.6V to 10V RMS.
Mute: bit One on. It gives priority to the phone conversation, allowing to resume the audio reproduction when the phone call is finished.
Mute: bit One off. It turns the bit One on. When a phone call is received, the phone ringing tone is audible after around 9 seconds.Oncethephonecallisfinished,thebitOneturnsoff.
5.5 HIGH-LEVEL INPUT SIGNALS
bit One.1 To deactivate the ART function on Ch1 take out the Jumper as indicated in the picture.
MAX: 8 amplified channels
Original amplified source
CH1: Auto Turn On System (ART)
CH1: Auto Turn On System (ART)
Front Rear
Amplified Source
Signal
mute
bit One Left Side
5
10
USERS MANUAL bit One /
1. OUTPUT TO AN AMPLIFIERS SYSTEM PROVIDED WITH ADLINK AND ACLINK CONNECTION (THESIS TH) (see section 8.4.7)
2. OUTPUT TO A PRE PROVIDED AMPLIFIERS SYSTEM (see section 8.4.7)
3. OUTPUT TO AN AMPLIFIERS SYSTEM PROVIDED WITH AD LINK CONNECTIONS (THESIS TH) AMPLIFIERS SYSTEM PROVIDED WITH PRE INPUT (see section 8.4.7)
Remark: in total, 8 output channels are available. The sum of the analog and digital outputs (ADLink) must not exceed the total available channels.
ADLINK-OUT / ACLINK 2 — AMPS
5.6 OUTPUT SIGNALS
Remark: the output channels are 8 in total. The sum of the channels of theamplifiersconnectedmustnot exceed 8. To increase the number of channels, however, the same function (AMP ID) can be assigned tomorethanoneamplifier
AMPSDRC 1 — AC Link — 2
DRC ACLink Function Control
ADLink Digital Signal
Other TH amplifier TH
amplifier TH
amplifier TH
amplifier
AMPSDRC 1 — AC Link — 2
Other amplifier
DRC
bit One Top Side
DRC ACLink Function Control
TH amplifier
TH amplifier
Other TH amplifier
ADLink
5
11
USERS MANUAL bit One /
1. Insert the bit One Setup 1.5 CD into the CD-Player of the PC you are going to use.
6. BIT ONE SOFTWARE AND DRIVERS — INSTALLATION GUIDE
6.1 SOFTWARE INSTALLATION GUIDE
2. Windows XP: select My Computer from the Windows START menu; Windows Vista: select Computer from the Windows START menu; Windows 7: select Computer from the Windows START menu; Windows 8, 8.1: click on the DESKTOP icon; Windows 10: select My Computer from the DESKTOP.
3. Windows XP: right-click your mouse on the bit One v.1.5 CD icon and click on Explore; Windows Vista: right-click your mouse on the bit One v.1.5 CD icon and click on Explore; Windows 7: right-click your mouse on the bit One v.1.5 CD icon and click on Open; Windows 8, 8.1: double click on the Computer icon. Windows 10: right-click your mouse on the bit One v.1.5 CD icon and click on Open
4. Windows XP: double click on the setup icon; Windows Vista: double click on the setup icon; Windows 7: double click on the setup icon; Windows 8, 8.1: select the CD ROM drive an double click on setup icon; Windows 10: double click on the setup icon
Windows XP Windows Vista Windows 7 Windows 8, 8.1 Windows 10
Windows XP Windows Vista Windows 7 Windows 8, 8.1 Windows 10
Windows XP Windows Vista Windows 7
Windows 8, 8.1 Windows 10
6
12
USERS MANUAL bit One /
5. Windows XP, Windows Vista, Windows 7, Windows 8, 8.1, Windows 10: select NEXT to go on with the installation, CANCEL to interrupt it;
6. Windows XP, Windows Vista, Windows 7, Windows 8, 8.1, Windows 10: select I Agree and then NEXT;
7. Windows XP, Windows Vista, Windows 7, Windows 8, 8.1, Windows 10: select — Everyone if you have the system administrator privileges, so, once installed, the program can be used by anyone who uses that PC; — Just me if you want that, once installed, the program can only be used by yourself as single system user. Then click on NEXT;
8. Windows XP, Windows Vista, Windows 7, Windows 8, 8.1, Windows 10: go on and complete the installation procedure, then click on CLOSE to exit the installation;
9.The bit One PC software is now installed in your system. Leave the bit One Setup 1.5 CD in the CD-Player and proceed with the installation of the Drivers as detailed out in the following chapter 6.2.
6
13
USERS MANUAL bit One /
1. Turn the bit One on.
2. Connect the USB cable located on the appropriate connector on the bit One to the USB available on the PC.
WARNING: When connecting a PC laptop via a USB cable to the bit One being the device turned on, the laptop has to work with its own battery, keeping it disconnected from the mains adapter (external power supply). Once the connection between the PC laptop and the bit One is established, you can immediately connect the computer, if necessary, through the mains adapter.
6.2 AC-LINK DRIVERS INSTALLATION ON WINDOWS XP, Vista, 7
3. Windows XP: The PC will recognise the bit One interface and will ask you to install the driver; Windows Vista: Click on Locate and install driver software (recommended); Windows 7: The PC will recognise the bit One interface and will ask you to install the driver;
4. Windows XP: select No, not this time and click on Next; Windows Vista: click on Dont search online; Windows 7: select START => Control Panel => Device Manager, right click your mouse on the AC-Link interface and select Update driver software=> Browse my computer for driver software;
Windows XP Windows Vista Windows 7
Windows XP Windows Vista Windows 7
6
14
USERS MANUAL bit One /
5. Check if the bit One Setup CD is inside the CD-ROM drive Windows XP: select Install software automatically then click on Next; Windows Vista: click on Next; Windows 7: click the Browse button to locate the setup CD, select the CD bit One V_15, click on OK, then on Next;
6. Thefollowingwindowregardingthedrivercertificationwarningwillshowup. Windows XP: click on Continue Anyway; Windows Vista: click on Install this driver software anyway; Windows 7: click on Install this driver software anyway;
7. The system will install the ACLink interface drivers:
Windows XP Windows Vista Windows 7
Windows XP Windows Vista Windows 7
Windows XP Windows Vista Windows 7
6
15
USERS MANUAL bit One /
8. If the procedure was successfully completed, the system will notify you that the driver installation has been completed. Windows XP: click on Finish; Windows Vista: click on Close; Windows 7: click on Close;
9. Windows XP:The system will now recognise the virtual serial port connected to the bit One and will ask you to install the driver; Windows Vista: Click on Locate and install driver software (recommended); Windows 7: The system will now recognise the virtual serial port connected to the bit One and will ask you to install the driver;
10. Windows XP: select No, not this time and click on Next; Windows Vista: click on Dont search online; Windows 7: select START => Control Panel => Device Manager, right click your mouse on the USB Serial port and select Update driver software=> Browse my computer for driver software;
Check if the bit One Setup CD is inside the CD-ROM drive. Windows XP: select Install software automatically then click on Next; Windows Vista: click on Next; Windows 7: click the Browse button to locate the setup CD, select the CD bit One V_15, click on OK, then on Next;
Windows XP Windows Vista Windows 7
Windows XP Windows Vista Windows 7
Windows XP
Windows XP
Windows Vista
Windows Vista
Windows 7
Windows 7
6
16
USERS MANUAL bit One /
13. The system will install the ACLink drivers:
12. Thefollowingwindowregardingthedrivercertificationwarningwillshowup. Windows XP: click on Continue Anyway; Windows Vista: click on Install this driver software anyway; Windows 7: click on Install this driver software anyway;
14. If the procedure was successfully completed, the system will notify you that the driver installation has been completed. Windows XP: click on Finish; Windows Vista: click on Close; Windows 7: click on Close;
15. The installation of the bit One software and driver is now completed (see section 8).
Windows XP Windows Vista Windows 7
Windows XP Windows Vista Windows 7
Windows XP Windows Vista Windows 7
6
17
USERS MANUAL bit One /
1. Check if the bit One Setup CD is inside the CD-ROM drive
2. Press and keep pressed down the Windows key on the keyboard (it is located at the bottom left side, look for the symbol). Then, press the R key.
6.3 AC-LINK DRIVERS INSTALLATION ON WINDOWS 8, 8.1, 10
Remark: The following procedure will temporary disable Windows driver signature enforcement, to allow the AC-Link drivers installation. The driver signature enforcement will be enabled again with the next reboot. The procedure has to be performed only once: after the AC-Link driver installation is completed, it is NOT necessary to repeat this procedure again every time you want to connect and use the bit One.
3. The following dialogue window will appear:
4. Type shutdown.exe /r /o /f /t 00intheOpenfieldandclickonOK:
5. The following screen will be shown. Click on Troubleshoot:
6. The following screen will be shown. Click on Advanced options:
6
18
USERS MANUAL bit One /
7. The following screen will be shown. Click on Startup Settings:
8. The following screen will be shown. Click on Restart.
9. The PC will reboot. The following screen will be shown during reboot. Press 7 (Disable driver signature enforcement) and wait for complete Windows startup.
6
19
USERS MANUAL bit One /
10. Windows 8, 8.1: Right-click on the Windows Start screen. All apps key will show on the bottom right angle of the screen. Click it: Windows 10: Click on the Windows Start screen. Locate Settings and click on it:
12. Windows 8, 8.1: The Control Panel will show up. Click on Hardware and Sound: Windows 10: The Device menu will show up. Click on Connected devices:
11. Windows 8, 8.1: The screen will show all the icons. Locate the Control Panel icon and click on it: Windows 10: Locate the Devices icon and click on it:
Windows 8, 8.1 Windows 10
Windows 8, 8.1 Windows 10
Windows 8, 8.1 Windows 10
6
20
USERS MANUAL bit One /
13. Windows 8, 8.1: Click on Device Manager: Windows 10: Click on Device Manager:
15. The Control Panel will show the AC-Link interface with an exclamation mark. Double click on AC-Link interface:
16. The following dialogue window will be shown. Click on Update Driver
14. Power on the bit One processor and connect the USB to the PC.
Windows 8, 8.1 Windows 10
6
21
USERS MANUAL bit One /
17. Click on Browse my computer for driver software:
18. Browse for the AC-Link Driver v1_1 previously copied as per step nr. 2 of this guide, and click on OK:
19. Click on Next:
20. The following warning will show up, this is normal. Click on Install this driver software anyway:
6
22
USERS MANUAL bit One /
21. The AC-Link interface driver is now installed. The AC-Link Port still has to be installed. Click on Close to close the dialogue windows:
22. ThesystemwillnowfindtheAC-Linkport, named USB Serial Port as shown in the following screen. Double-click on USB Serial Port:
23. Click on Update driver:
6
23
USERS MANUAL bit One /
24. Click on Browse my computer for driver software:
25. The system will propose the previously used AC-Link Drivers v1_1 folder: if so, click on Next. Otherwise, click on Browse..: locate the AC-Link Drivers v1_1 folder and then click on Next:
26. The following warning will show up, this is normal. Click on Install this driver software anyway:
27. The AC-Link port driver is now installed, and the driver installation procedure is complete. Click on Close to close the dialogue windows:
26. The installation of the bit One software and driver is now completed (see section  .
.
6
24
USERS MANUAL bit One /
— If you receive error messages when installing the software or the drivers, check if the user account you are using on your PC has admin privileges.
— If the PC that is connected to the bit One shows an error message regarding the connection with the bit One (for example bit One device not found), check the following points:
If the DRC display shows the message audison: vol bal fad sub: There should be a fault in the PC, for instance due to a wrong installation of the software or the drivers, or due to undetectable problems, on an operating system or hardware level. If the DRC display shows the message PC control — DRC is disabled: In this case the PC is correctly initializing the ACLink bus but the fault is in the bit One. Exit the program on the PC, turn the bit One off then on again, then try reconnecting.
If after turning on the bit One again one of the above messages appears, you may need to perform again the ACLink drivers installation. You may be required to uninstall and reinstall the drivers also if other applications overwriting, even partly, the USB-ACLink drivers have been installed (see section 7).
6.4 TROUBLESHOOTING SECTION FOR SOFTWARE INSTALLATION
6
25
USERS MANUAL bit One /
Automatic procedure (available only on the 1.5 Software version) To uninstall the bit One PC software you can use the link listed on the menu: Start / All Programs / bit one 1.5 / uninstall.
Manual procedure (available only on the 1.5 Software version) To uninstall the bit One PC software you can also follow the standard procedure: Start / Control Panel / Applications Installation / bit one 1.5 / uninstall (in 1.5 software version). Start / Control Panel / Applications Installation / bit one / uninstall (in older software versions).
5. Click on OK when you are asked to confirmthedeviceuninstall;
8. Disconnect the USB plug, turn off the bit One then turn it on again and connect again the USB plug and one available plug to the PC;
9. Repeat the installation procedure, (see section 6).
6. Select USB Controllers (Universal Serial Bus controllers) then right-click on Audison ACLink Interface and select Uninstall;
7. ClickonOKwhenyouareaskedtoconfirmthedeviceuninstall;
7. BIT ONE SOFTWARE AND DRIVERS UNINSTALLATION GUIDE
1. DO NOT turn the bit One off and DO NOT disconnect the USB plug; 2. Open Control Panel and click on System Properties; 3. Select the Hardware folder and click on Device Manager; 4. Select Ports (COM & LPT), then right-click on Audison AC Link Port (COM X) and select Uninstall;
7.1 BIT ONE SOFTWARE UNINSTALL
7.2 HOW TO UNINSTALL THE AC-LINK DRIVERS WITH WINDOWS XP
7
26
USERS MANUAL bit One /
8. Disconnect the USB plug, turn off the bit One then turn it on again and connect again the USB plug and one available plug to the PC;
9.Repeat the installation procedure, (see section 6).
6. Select USB Controllers (Universal Serial Bus controllers) then right-click on Audison AC Link Interface and select Uninstall;
7. Awindowaskingyoutoconfirmthedeviceuninstall will appear; select Delete the driver software for this device and click on OK;
3. Click on Device Manager;
5. Awindowaskingyoutoconfirmthedeviceuninstallwillappear; select Delete the driver software for this device and click on OK;
4. Select Ports (COM & LPT), then right-click on Audison ACLink Port (COM X) and select Uninstall;
2. Open Control Panel and click on Hardware and Sound;
7.3 HOW TO UNINSTALL THE AC-LINK DRIVERS WITH WINDOWS VISTA
1. DO NOT turn the bit One off and DO NOT disconnect the USB plug;
7
27
USERS MANUAL bit One /
1. DO NOT turn the bit One off and DO NOT disconnect the USB plug;
8. Repeat the installation procedure (see section 6).
4.ClickonOKwhenyouareaskedtoconfirmthedeviceuninstall;
6.ClickonOKwhenyouareaskedtoconfirmthedeviceuninstall;
5. Select USB controllers (Universal Serial Bus controllers), right-click on Audison AC-Link Interface and select Uninstall;
2. Open the Control Panel and click on Device Manager;
3. Select Ports (COM and LPT), then right-click on Audison AC-Link Port (COMX), and select Uninstall;
7.4 HOW TO UNINSTALL THE AC-LINK DRIVERS WITH WINDOWS 7
7. Disconnect the USB plug, turn the bit One off, then turn it on again and connect back the USB plug.
7
28
USERS MANUAL bit One /
1. DO NOT turn the bit One off and DO NOT disconnect the USB plug;
9. Repeat the installation procedure, (see section 6).
4. Select Ports (COM & LPT),then right-click on Audison ACLink Port (COM X) and select Uninstall;
6. Select USB Controllers (Universal Serial Bus controllers) then right-click on Audison AC Link Interface and select Uninstall;
7.Awindowaskingyoutoconfirmthedeviceuninstallwillappear;select Delete the driver software for this device and click on OK;
5.Awindowaskingyoutoconfirmthedeviceuninstallwillappear; select Delete the driver software for this device and click on OK;
2. Windows 8, 8.1: The Control Panel will show up. Click on Hardware and Sound; Windows 10: The Device menu will show up. Click on Connected devices;
3. Click on Device Manager;
7.5 HOW TO UNINSTALL THE AC-LINK DRIVERS WITH WINDOWS 8, 8.1, 10
8. Disconnect the USB plug, turn off the bit One then turn it on again and connect again the USB plug and one available plug to the PC;
7
29
USERS MANUAL bit One /
8. HOW TO CONNECT THE BIT ONE TO THE PC To adjust the bit One functions the software is required. The processor needs to be connected to the PC and turned on. After installing the software, start it by clicking on the icon shown on your desktop.
To select the start mode select the corresponding entry on the drop down menu, then press ENTER or double click on the bit One image.
In this case even if the bit One processor is connected to the PC, it does not interact with the software. The OFFLINE mode can be used to work on the software without connecting the bit One to the PC to get familiar with the processor multiple functions. For more information on the specific functions see section 8.3 for the TARGET mode. Thesoftwareispre-settostartwitha3-way+stereoSubactivemulti-amplifiedsystem. To set a new virtual system, and so to change the inputs and select the outputs, you need to select the function I/O ConfigurationWizardintheConfigwindowofthesoftwaremainmenu. (Follow same instructions as those for the TARGET mode — see section 8.3.1)
Here is how the bit One software appears when it is started up in OFFLINE mode.
Thefirstscreenshotshowingupisthestartuppagewhereyouneedtochooseamong: — OFFLINE mode, bit One not connected; — TARGET mode, bit One connected; — RESCUE mode, bit One connected for Update/Rescue (see section 10.1).
8.1 OFFLINE MODE
2 click
8
30
USERS MANUAL bit One /
In this case the bit One processor has to be connected to the PC and turned on, otherwise the software wont even show the TARGET entry as selectable on the start up window.
At this point you need to have in mind the system you want to realize beforehand, since from this moment if you want to change any of the settings you will have to go through the guided procedure all over again.
Morespecificallytheguidedprocedurewillaskfor: — Which main inputs you want to use (high or low level). Once you select your choice, auxiliary low level or digital sources can anyway be added. The guided procedure changes according to the selected choice. — Which auxiliary inputs will be used (ex.: AUX1 or DIGITAL IN or PHONE etc. ). — Which kind of signals will be allocated to the different inputs (ex.: Front Left or Center or Subwoofer etc. ). — Which speakers you are using for your system (ex.: 3-way Front or stereo Sub or 2-way Rear etc. ). — If the system features passive crossovers managing speaker groups (ex.: 3-way system with active mid-low). — If the system features any speaker connected through the ACLink.
2.If you are using a c
Audison bit one Signal Processors PDF User Guides and Manuals for Free Download: Found (4) Manuals for Audison bit one Device Model (Advanced Manual, Frequent Asked Questions)
The Audison bit one is a groundbreaking product that has redefined the realm of automotive audio processing. It combines sophistication with user-friendly features, making it a go-to solution for both enthusiasts and professionals. The versatility of the bit one is truly a standout aspect, capable of serving various audio systems, ensuring that every listener experiences premium sound quality.
One of the key features of the bit one is its advanced digital signal processing (DSP) capabilities. The onboard DSP allows for precise tuning, enabling users to customize their audio experience to perfection. With 31-band parametric equalization for each channel, the bit one empowers users to manipulate the sound to their liking. The result is an audio landscape that’s rich, clear, and personalized.
Another notable advantage is the bit one’s compatibility with a wide range of audio components. Whether you’re integrating factory head units or utilizing aftermarket options, this product seamlessly fits within any audio ecosystem. Here are some of the integrations you can expect:
- Amplifiers
- Subwoofers
- Custom speaker setups
- OEM audio systems
Installing the bit one can be handled easily, thanks to its intuitive connection layout. Its comprehensive user manual guides you through the wiring and setup process, while the Audison software interface further enhances usability. Users can connect to the bit one using a USB interface, enabling access to a wide array of configuration options right from their computers.
An essential feature of the bit one is its ability to perform time alignment. This function minimizes the difference in sound arrival time between various speakers, resulting in a cohesive audio stage. The bit one allows users to fine-tune this aspect meticulously, ensuring an optimal listening experience in any vehicle.
Moreover, the bit one is designed with flexibility in mind. Users can easily set up multiple zones, making it possible to cater to various listening preferences within the same vehicle. Whether you’re driving solo, entertaining friends, or streaming music during a family road trip, the bit one adapts to meet every audio requirement.
When it comes to build quality, the Audison bit one does not disappoint. The compact design and robust construction ensure durability, making it a reliable choice for years to come. Its sleek appearance also adds a level of sophistication that enhances any car’s interior.
In summary, the Audison bit one stands out as an exemplary product in the automotive audio world. Its advanced DSP features, impressive compatibility, ease of installation, and exceptional sound tailoring capabilities place it among the leaders in the market. For anyone serious about enhancing their in-car audio experience, the bit one is undoubtedly worth considering, providing unparalleled performance and versatility.
Audison bit one user guide recommended for: MM 208, AX100G, ME02R96, IF-2D3D1, bit One HD Virtuoso.
The Audison bit one Processor manual (Audison Advanced manual, 17 pages) is completely safe to download (last scan date: 07/03/2025). You can rest assured of your safety when interacting with Audison bit one document.
1
MELSEC Q Series
242
217
44
2
ENCORE/MDX G4 DUET
Operation & user’s manual Sonnet Processor Operation & user’s manual (File: sonnet-encore-mdx-g4-duet-processor-14, 16th Mar 2025)
14
343
79
5
976
Faq User Manual: Outlaw 976 (QB115P, Upd.Fri 01.2025)
3
1379
318
7
230
Quick setup manual PDF User Manual (@4Y2U47), Aphex 230 Computer Hardware (19th Mar 2025)
1
721
145
8
TMS320C6000
Manual PDF Guide (@6Y8R5L), Texas Instruments TMS320C6000 Processor (21.11.2024)
18
1308
314
9
DDP
Manual #9EW8L9: DDP Musical Instrument Manual
2
704
127
10
Audibox USB-I/O
Owner’s manual ARX Audibox USB-I/O User Guide (Owner’s manual), @4SCA93
2
1422
285