

Owner’s Manual
Bedienungsanleitung
Manuel D’Utilisation
Manuale Di Istruzioni
Manual De Instrucciones

Figure A
•
Loudspeaker
•
Lautsprecher
•
Haut-parleur
•
Altoparlante
•
Altavoz
•
Direction Lights
•
Richtungsanzeige
•
Achage de la Direction
•
Spie Luminose di Direzione
•
Luces Direccionales
•
Distance Indicator/Battery Power Display
•
Distanzanzeige/Batterieladeanzeige
•
Indicateur de Distance/Témoin de Batterie
•
Indicatore di Distanza/Display del Livello Batteria
•
Indicator de Distancia/Estado de Bateria
•
Multiple Burial Indicator
•
Mehrfachverschüttetenanzeige
•
Indicateur Multi Victimes
•
Led Indicatore di
Seppellimento Multiplo
•
Luz Indicadora de Entierros
Múltiples
•
Options Button
•
Optionstaste
•
Bouton Options
•
Pulsante Opzioni
•
Botón de opciones
•
Transmit Light
•
Sendekontrolllampe
•
Témoin d’Émission
•
Spia Luminosa di Trasmissione
•
Indicador de Transmisión
•
Dial Switch
•
Drehschalter
•
Commutateur
•
Selettore di modalità
•
Interruptor
•
Battery Door
•
Batteriefach
•
Logement des Piles
•
Sportello Batterie
•
Compartmento de Bateria
•
Sliding Lock
•
Schiebeverriegelung
•
Curseur de Verrouillage
•
Blocco Scorrimento
•
Pestaña Deslizante de
Bloqueo
•
USB Port
•
Dial Switch
•
Drehschalter
•
Commutateur
•
Selettore di modalità
•
Interruptor
32
N
S
E
W
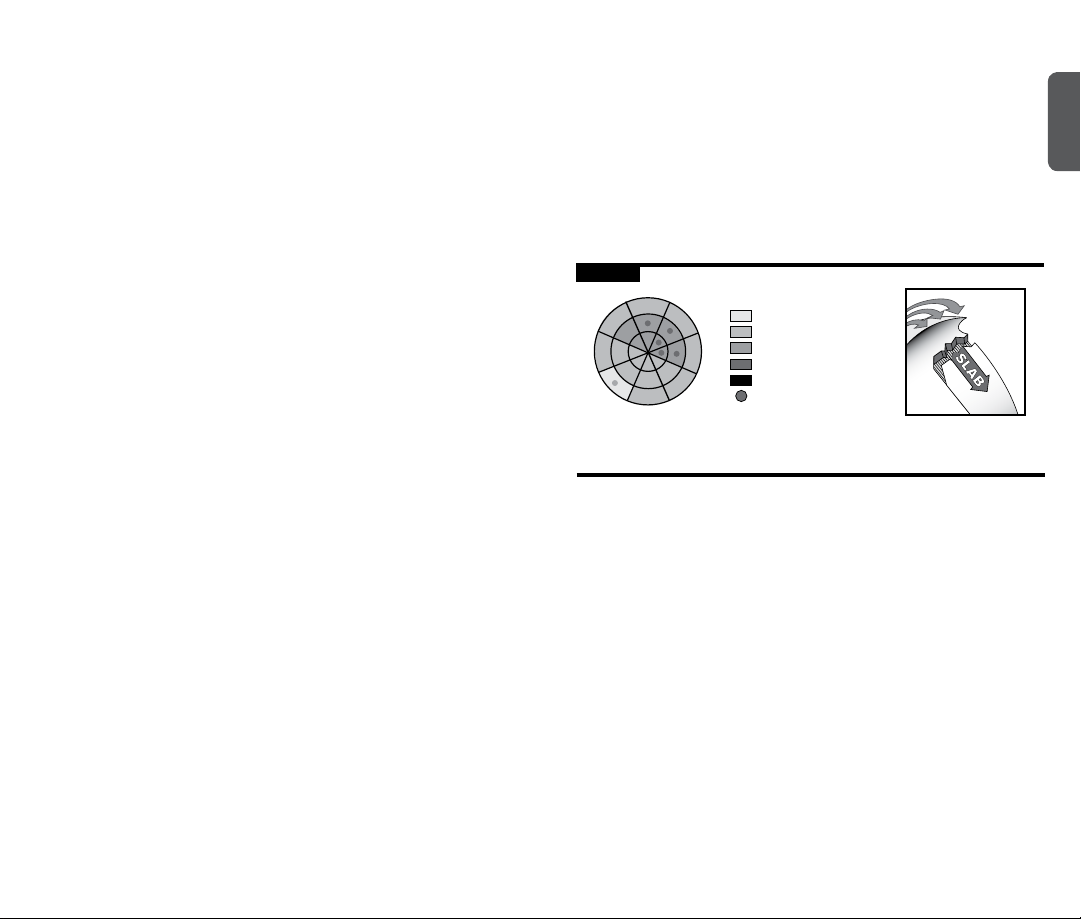
Low
Moderate
Considerable
High
Extreme
Disclaimer
Avalanche Awareness
No avalanche transceiver can help save lives without a fully trained user.
Practice frequently with your Tracker3 before going into the backcountry.
Learn and understand the inherent dangers of backcountry travel. Become
educated in avalanche hazard evaluation, route selection, and self-rescue.
In addition to your transceiver, always carry a probe and shovel—and
always travel with a partner. We also recommend the use of avalanche
airbags and group communication devices, such as two-way radios.
Make sure all rescue equipment is functioning properly before venturing
into the backcountry. Perform a transceiver trailhead test every time
you use your Tracker3. Check that all transceivers transmit and receive
properly—and that all receive a signal at a minimum distance of 20 meters
(65 feet).
Do not place cellular phones, communication radios, GPS devices, digital
cameras, or any other electronic equipment within 50 cm (20 inches) of
Tracker3 while performing a transceiver search. In receive mode, irregular
readings, decreased range and multiple burial indications can be caused
by these and other sources of electrical interference, such as power lines,
electrical storms, and electrical generating equipment. In transmit mode,
keep Tracker3 at least 20 cm (8 inches) from other electronic equipment
or large metal objects. Use only alkaline batteries of identical age and
brand. Do not use rechargeable, lithium, Oxyride, PowerPix, or any
other non-alkaline battery.
This owner’s manual covers the basic techniques required to use
Tracker3 effectively. To increase your efficiency, refer to our website:
www.backcountryaccess.com. Here you will also find important
resources for obtaining avalanche education and updates on regional
avalanche conditions.
To ensure warranty protection and to be notied of software updates,
please complete an online warranty registration at:
www.backcountryaccess.com/warranty.
Conforms to the R&TTE harmonized version of the EN 300 718 and meets
or exceeds the requirements of Articles 3.1, 3.2, and 3.3.
This is a basic introduction to avalanche safety and awareness.
We encourage you to read this manual thoroughly. We strongly
suggest taking an avalanche course in your area before venturing
into the backcountry.
Before leaving, call your local avalanche forecast center and determine
the danger level in the area you intend to visit.
U.S. www.avalanche.org
Canada www.avalanche.ca
Europe www.lawinen.org
Figure B
Avalanche Forecasts
Low
Moderate
Considerable
High
Extreme
Pockets of next danger level
Bulletins from your local avalanche forecast center will enable you to
identify the avalanche problems to avoid when planning your route.
Avalanche Awareness
At the trailhead, check that each person has a working transceiver,
probe, and shovel—and knows how to use them. We also recommend
the use of avalanche airbags and two-way radios.
Learn to recognize avalanche terrain:
• Does this slope have a history of sliding?
• What is the angle and aspect of the slope?
• Will recent weather impact snow stability?
Learn to avoid avalanche terrain:
• Is there any evidence of recent avalanche activity?
• Is the slope angle between 30 and 45 degrees?
• Does the slope you plan to use have dangerous terrain traps
(rocks, trees, gullies, clis, etc.)?
ENGLISH
54

Avalanche Awareness
Familiarization
Travel with considerate partners:
• Cross potentially dangerous terrain one at a time.
• Identify and practice stopping in safe zones.
• Have an escape route in mind if the slope does avalanche.
• Communicate with your partners before moving on to the slope.
When traveling in a group, be aware of the errors groups
typically make:
• Recreating at an area that’s been visited without incident before
and feeling condent in its stability.
• Not speaking out or communicating concerns about a path
or slope, fearing conict.
• Being overcondent in the groups’ abilities.
• Determination to reach a destination without re-evaluating terrain
and conditions.
If in doubt, it is always best to avoid questionable terrain and return
when the snow is stable.
If you are caught in an avalanche:
• Yell “avalanche” and wave your arms to alert your group.
• Deploy your avalanche airbag if you have one.
• Try to escape the slide by grabbing trees or rocks or “swimming”
to the side.
• Try to keep your airway clear of snow.
• When you feel the slide slowing, thrust a hand upward in hopes
of it being seen.
• Place your other hand in front of your face to increase the
air space.
• Remain calm, breathe slowly and conserve your air.
Searching for victims:
• Do not go for help! You are the victim’s only chance of survival!
• Establish a last seen point.
• Conrm you are not in danger of a second avalanche occurring.
• Look for visual clues to the victim’s location.
• Begin your signal search for the victim using your avalanche
transceiver.
Thank you for choosing Tracker3, featuring Tracker2’s famous
ease-of-use in a smaller, lighter package.
Remember, transceiver searches are only part of the avalanche rescue
process. It is equally important to practice the probing and shoveling
techniques found later in this section. For training videos on transceiver
searching, probing, and strategic shoveling techniques, please visit
www.backcountryaccess.com/education.
Transmit mode: From the ‘O’ position, pull the sliding lock
direction of the arrow and turn the dial switch
the transmit (“TR”) position (see Figure C).
Figure C
Top view of
Tracker3.
The battery life is then shown in the distance/battery power display
in Figure A.
After displaying battery power, Tracker3 ashes “TR” and enters transmit
mode. The transmit light
This light will not ash if the battery power is below 20 percent.
In addition to being displayed at startup, the battery power level can also
be checked in transmit mode by pressing the Options button
Note: the battery percentage is approximate. Replace batteries
reaching 40 percent.
When in transmit mode, the Tracker3 cannot be turned to o or search
without pulling back the sliding lock.
Search mode: Pull the sliding lock
switch to the search (“SE”) position. In search mode, the
display will periodically ash “SE” until a signal is detected.
Upon detecting a transmitting signal, Tracker3 will begin to
display distance and directional readings. At distances of less
than two meters, the directional lights are no longer shown.
Return to transmit: When in search mode, the sliding lock does not need
to be moved in order to return to transmit mode. Simply rotate the switch
back to the transmit position. The Tracker will beep and ash “TR” before
it begins to transmit.
ashes with every transmit pulse.
l
on top of Tracker3 to
j
n and rotate the dial
n in the
k
.
o
before
m
ENGLISH
76

Familiarization
Familiarization
After 30 minutes in search mode, Tracker3 will beep every two minutes.
After 12 hours in transmit mode, it will beep every two minutes. These beeps
are reminders that there has been no user input and Tracker3 is still on.
Auto Revert Mode: Auto revert mode will make your Tracker3
automatically revert to TR (transmit) mode if the device does
not move for one minute–or if there is movement, but the
searcher remains in search mode for more than ve minutes.
An alarm will sound 30 seconds before the unit returns to
transmit mode. This can be avoided by pressing the Options
button or turning the dial switch before the 30-second
warning period has elapsed.
Auto revert mode is activated by holding down the Options button
while turning on the device, in either transmit or search mode. You must
continue to hold down the Options button until “Ar” is shown on the
display.
Before “Ar” is shown, other diagnostics will be displayed, including “T3,”
“r.c.” (with software version number) and battery power percentage.
If choosing to use auto revert, it must be activated every time the unit
is turned on. Otherwise, the unit can only be switched from search to
transmit mode manually.
Muting the Sound: The sound in Search mode can be muted
by pressing the Options button while switching from transmit
to search mode. “LO” will appear in the display and all sounds
assisting the search function are muted.
Downloading Tracker3 software: Using BCA software, you can update
the Tracker3’s programming. Currently this is only possible with a PC (not
Mac). To update:
1. Go to www.backcountryaccess.com/downloads;
2. Download T3 Utility program;
3. Install and start the program;
4. Connect the Tracker3 to your computer with a standard USB cable;
5. Follow the T3 Utility instructions.
Low battery warning: At 40 percent battery power, the
audible sounds at startup will no longer be heard. At 20
percent, no sounds will be heard in search mode.
When the battery power becomes too low to operate, the
transceiver will display the “Lb” sign. When you see this,
replace the batteries before further use. When batteries are too low to do
startup routines, a simple “0” will blink on the display.
Mismatched batteries can act unpredictably at various temperatures
and low batteries can die unexpectedly fast. Therefore, we strongly
recommend changing batteries once the battery power indicator reaches
40 percent.
NOTE: never mix new and used batteries in your transceiver–or batteries
of mixed brands. Never use lithium or rechargeable batteries. These may
all lead to an inaccurate battery power indication.
Signal Suppression: Signal Suppression mode suppresses the
strongest signal and shows the searcher the second strongest
signal, including directional arrows. Always stay in standard
search mode when searching for the rst transmitter. Once the
rst victim has been located and your ne search is complete,
you are ready to use Signal Suppression.
Signal Suppression mode is activated by pressing the Options button until
“SS” is shown on the display. To enter suppression mode, the Options
button must be released before “BP” is displayed. The multiple victim icon
will ash alternately while in SS mode.
Suppression of the strongest signal will last for one minute, giving the
searcher time to move away from the suppressed signal and lock on to the
next transmitter. The Tracker3 will automatically default from suppression
mode to standard search mode after one minute. This can also be done
manually, by pressing the Options button until “SE” is displayed. When
returning to search mode, the multiple victim icon will stop ashing and
the Tracker3 will isolate the strongest signal.
NOTE: Signal suppression can be unreliable when attempting to suppress
older analog transceivers.
Big Picture: Big Picture mode is the closest thing to an
analog transceiver in the digital world. It displays distances
and directions of all the transceivers that are transmitting
within range. With Big Picture mode, you can estimate how
many transceivers are in the search area along with their
approximate direction. You can also perform a search in BP
mode, but always remember to return to normal search mode
during the ne search when you’re getting close to the victim.
Big Picture mode is activated by holding down the Options button
until “BP” ashes in the display. You must continue to hold down the
Options button to stay in BP mode. Once the mode button is released,
the Tracker3 will automatically return to search mode and isolate the
strongest signal.
ENGLISH
98
Familiarization
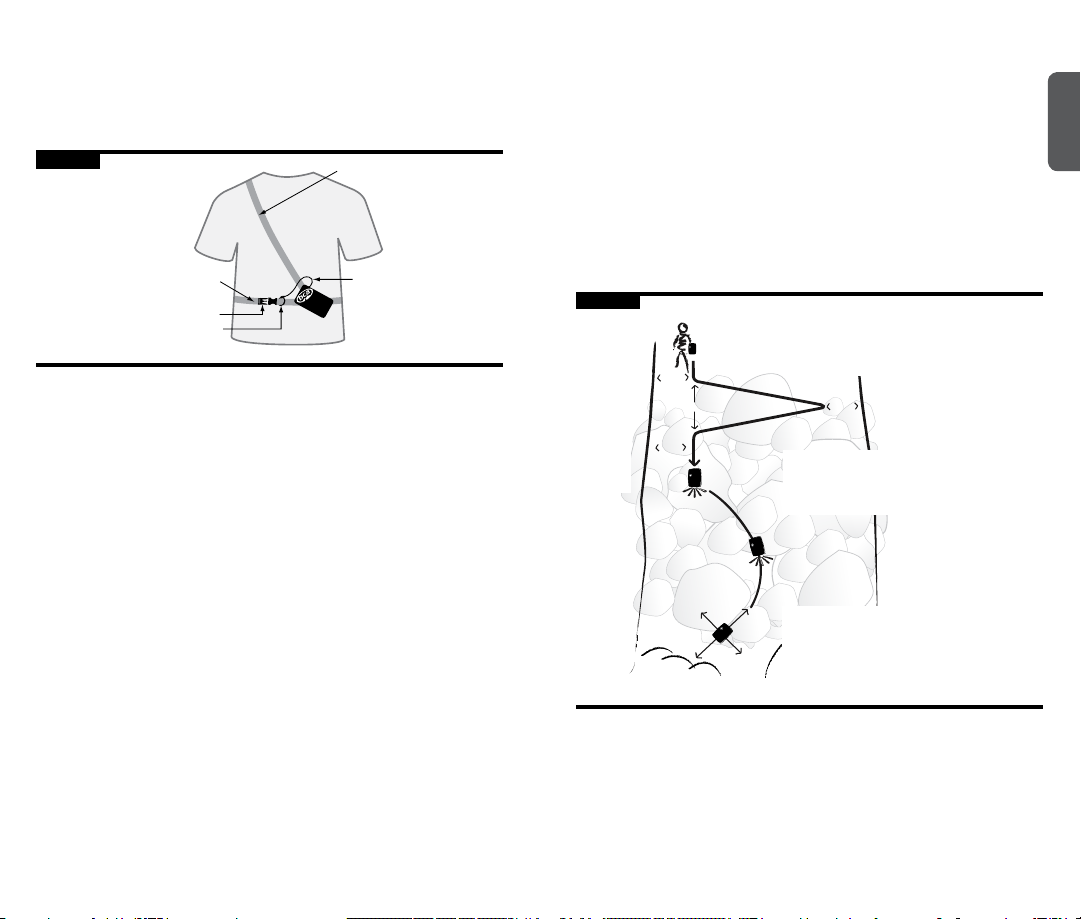
Shoulder Strap
Waist Attachment Buckle
Waist Strap
Lanyard
Lanyard Attachment Loop
Operating Instructions
Adjustment/Fitting
Tracker3 can be worn with or without its harness. When used with a
harness, Tracker3 should be worn underneath your outer garments,
as shown in Figure D.
Figure D
Distance/directional display should be against your body and transmit light
should be exposed and visible.
To search, remove Tracker3 from its pouch, but keep the harness on and
lanyard attached. If using without a harness, keep Tracker3 in a secure
pocket, preferably in your pants or other garment that won’t be removed
while traveling in the backcountry. Attach the lanyard clip to a zipper or
other solid xture. If the lanyard is removed from harness or clothing for
searching, keep it attached to your wrist with the loop provided.
Power Supply
Tracker3 operates with three AAA alkaline batteries. Use only high-quality
alkaline batteries of identical age and brand. Do not use rechargeable,
lithium, Oxyride, PowerPix or any other non-alkaline battery. Replace with
fresh batteries at the beginning of every season.
If Tracker3 is exposed to excessive moisture, open the battery door
to help allow the unit to dry. To prevent corrosion of contacts, remove
m
batteries during extended periods of inactivity. The manufacturer does not
warranty damage caused by battery corrosion.
Trailhead Test
To ensure proper transmit and search functions, always perform a
trailhead test before starting your tour. One person should walk 20 meters
away and make sure his or her signal is detected by the others. Then the
rest of the group switches to transmit mode and walks toward the leader,
who should conrm their signals can each be detected from 20 meters
away. The leader should always switch back to transmit mode after the
test is completed.
Searching
Tracker3 operates using the 457 kHz international standard frequency.
ENGLISH
It is fully compatible with all avalanche transceivers adhering to
this standard. Do not use with 457 kHz transceivers designed for
firefighter rescue.
When searching, keep Tracker3 at least 20” (50 cm) away from
electrical equipment, including cell phones and video cameras.
Turn all non-essential electrical equipment o if possible.
The search process includes four phases: the signal search, the coarse
search, the ne search, and the pinpointing/probing phase (See Figure E).
Figure E
SIGNAL
SEARCH
> 40 m
COARSE
SEARCH
3–40 m
FINE
SEARCH
< 3 m
20 m
40m
avalanche path
20 m
Objective: Locate signal
• If no «last seen area,» search entire path
• Rotate Tracker horizontally and vertically
• Max 40 m between searchers or switchbacks
20 m
Objective: Move quickly to 10m, slowly to 3 m
• Follow general direction of center 3 lights
• Make sure distance readings are decreasing
• Slow down at 10 m
Objective: Locate smallest distance reading
(strongest signal)
• Use Tracker3 close to snow surface
• Confirm lowest distance reading by “bracketing”
• Begin probing at lowest distance
Signal Search: The signal search refers to the process of establishing a
search pattern and looking for a signal. The search pattern will be dened
by the victim’s last seen area, the size of the slide, and the number of
searchers. Refer to Figure F to establish a signal search pattern. If the slide
is less than 40 meters wide, the signal search path will be directly up or
down the center. If the victim’s last seen area is well dened, the signal
search will follow a direct path along the fall line (up or down) from this point.
1110

Operating Instructions
Operating Instructions
Figure F
Signal search path with one searcher
(slide wider than 40 meters).
20 m
avalanche path
40m
20 m
40m
20 m
Signal search path with multiple searchers
(slide wider than 40 meters).
20 m
40m
20 m
40 m40 m
20 m20 m
If the slide is wider than 40 meters and there is no last seen point, cover
the entire slide area by using switchbacks in the search pattern (Figure F).
If multiple rescuers are available, establish a search pattern where the
space between searchers is no more than 40 meters and the distance to
the edges is no more than 20 meters.
Prior to the signal search, be sure that all transceivers are turned to search
mode. Rotate Tracker3 slowly in all directions (Figure G) while moving
along your signal search pattern. While searching, be aware of other
physical clues, such as equipment or extremities protruding from the
snow surface. When no signal is detected, “SE” will ash in the distance
indicator. Once a signal is detected consistently, mark this spot and begin
the coarse search.
Figure G
Slowly rotate the Tracker horizontally and
vertically in your hand, but move rapidly
during the signal search. Do not abandon
your search path until you have captured
a strong, steady signal. Ignore irregular
signals, which can sometimes be caused
by electrical interference.
Coarse Search: The coarse search is the portion of the search from where
you have detected a steady signal to where you are close to the victim.
Once the signal is consistently detected, rotate Tracker3 slowly on a
horizontal plane until the center direction light
is blinking.
p
Tracker3 is now pointed in the direction of the strongest signal. The four
lights on either side of center tell you which way to rotate Tracker3 to
engage the center light. The distance indicator
meters, how far you must travel (1 meter = 1.1 yards or 3.3 feet). If the
tells you, in approximate
k
number on the distance indicator is increasing, you are on the same axis
as the victim’s signal, but moving in the opposite direction. Turn 180
degrees, engage the center search light again, and continue your search
in the direction Tracker3 is pointing. If you are stationary, but the distance
is signicantly changing, you are probably detecting the signal of another
rescuer. Make sure all rescuers are in search mode before continuing.
You may nd that, while following the directional lights, your route follows
an arc. This is because Tracker3 follows the shape of the electromagnetic
signal coming from the transmitting transceiver’s antenna. The distance
displayed is the distance to be traveled along that signal, not the straightline distance from you to the victim.
ENGLISH
1312

Operating InstructionsOperating Instructions
Fine Search: The ne
search is the nal part of
the transceiver search,
which is performed on
foot with the transceiver
positioned at or near
the snow surface. The
objective of the ne
search is to locate where
the signal is strongest
(distance reading is
lowest) and to reduce
the area to be probed.
Move Tracker3 slowly
Figure H
Bracketing: Make sure
you go well past the
low reading to conrm
it is the lowest. When
bracketing, ignore the
directional lights, which
no longer illuminate at
less than two meters.
Do not rotate the
transceiver during
this process, as it can
change the distance
readings.
3.0
2.0
1.0
1.6
1.6
2.0
in a straight line along
the surface of the snow
during the nal three
meters of the ne search.
3.0
The directional lights do
not illuminate in the nal
two meters, so only pay
attention to the distance
readings. From the point where you have located the smallest reading,
“bracket” at 90-degree angles to the left and then to the right in search of
a lower reading (Figure H). Repeat if necessary along both axes. Begin
probing at the lowest distance reading.
Pinpointing/Probing
At your lowest distance reading, probe in concentric circles, with each
probe hole about 10 inches (25 cm) apart (Figure I). Your probe should
enter the snow perpendicular to the slope. Once you have conrmed the
victim’s location, leave the probe in the snow.
Figure I
10”
25 cm
90°
10” 10”
25 cm 25 cm
Shoveling
Shoveling is dicult and consumes the majority of time during an avalanche
rescue. For best results, start shoveling just downhill of the probe (Figure J).
Make sure your hole is at least one “wingspan” wide. In burials deeper than
one meter, excavate downhill about 1.5 times the burial depth.
Figure J
1.5 x
burial depth
Multiple Burials
When more than one transmitting victim is within the receiving range
of Tracker3, the multiple burial icon
(Note: this icon can occasionally illuminate irregularly in the presence
of electromagnetic noise or when detecting older analog transceivers).
If there are more than two transmitting victims within range, then the
“+” icon will illuminate.
If the multiple burial icon is illuminated and/or Tracker3 displays more than
one distance and direction, then there are probably several victims within
range. Stay in search mode and focus on the closest distance reading,
attempting to engage that signal in the center search light.
Once you are signicantly closer to one signal than the other, Tracker3
will “lock” onto that signal and mask out the others. Once this signal
is isolated, Tracker3 will behave very similar to how it does in a single
transceiver search. Once you have located and excavated the rst victim,
turn his or her transceiver o if you determine the conditions are safe.
If you have a clear signal, then begin searching for the next victim.
If it is not possible to turn o the rst victim’s transceiver—and you have
enough people to begin shoveling—then we recommend isolating the
next signal using Signal Suppression.
will illuminate and stay solid.
q
ENGLISH
1514

Operating Instructions
Operating Instructions
Isolating multiple victims: Complex multiple burials are rare in
recreational settings and usually can be treated as a series of single burials
performed in normal search mode. The only time multiple burials can
become truly complex is when it’s not possible to turn o the rst victim’s
transceiver, when the victims are in close proximity (≤10 m) to each other,
or if there are three or more victims.
The following icons help to determine how many buried victims are within
range of the rescuer and whether they are in close proximity to each other:
More than
one signal
within range.
If it’s not possible to turn o a victim’s transceiver, use Signal Suppression
to nd the next closest victim. Press and immediately release the
Options button (6). “SS” will be shown in the display and the icons in the
multiple burial indicator will ash back and forth. Follow the distance and
direction to the next victim. Remember that the rst victim’s signal will be
suppressed for one minute, at which time the icons in the multiple burial
indicator will stop ashing. To go back to normal search mode before one
minute has elapsed, simply press the Options button.
It is important to note that Signal Suppression, marking, and other
forms of signal isolation are not 100 percent reliable, especially when
searching for older analog transceivers. This is due to the possibility
of overlapping signals, especially when more than two transmit signals
are within range. Due to their imprecise transmit signals, analog
transceivers can sometimes trigger multiple burial indications. For these
reasons, it’s important to learn some of the backup techniques described
at www.backcountryaccess.com/tracker-resources.
Two victims both
within six meters
of the searcher.
More than
two signals
within range.
More than two sig-
nals within range
and at least two
within six meters.
Using Big Picture Mode: Big Picture mode is a valuable feature that can
be used to gain an overview of the scenario and optimize the eciency
of your search. It can be used at the beginning of a scenario to assign
rescuers to each displayed signal. It is also valuable in situations involving
more than two signals within range.
Remember, Tracker3 suppresses only one signal at a time. When you
suppress a second signal, it will then show you the next closest signal–
even if that victim’s signal was suppressed earlier. If victim #3 is closer
to victim #2 than victim #1 (scenario A, below), then suppressing victim
#2’s signal will take you to victim #3 automatically. However, if victim #1 is
closer than victim #3, (scenario B), Tracker3 will bring you back to victim
#1. If this is the case, use Big Picture mode to nd the general direction to
the third signal. After moving closer to the third signal, release the Options
button and Tracker3 will automatically isolate that third signal.
Figure K
Tracker3 suppresses one signal at a time. When suppressing victim #2’s
signal, if victim #3 is further away from victim #2 than #1 (scenario B), then
use Big Picture mode to move toward #3.
Scenario A
#1
Scenario B
#1
#2
#2
#3
#3
ENGLISH
1716

Haftungsbeschränkung
Lawinenkunde
Kein Verschüttetensuchgerät (VS-Gerät) kann Leben retten ohne einen
gut ausgebildeten Anwender. Üben Sie regelmäßig mit Ihrem Tracker3,
bevor Sie ins freie Skigelände gehen. Lernen Sie die typischen Gefahren
der Natur kennen und verstehen. Besuchen Sie einen Ausbildungskurs zur
Einschätzung von Lawinengefahr, Routenplanung und Kameradenrettung.
Führen Sie immer zusätzlich eine Sonde und eine Schaufel mit – und
gehen Sie nie allein auf Tour. Wir empfehlen zudem die Verwendung
eines Lawinenairbags und Gruppenfunkgeräte, zum Beispiel Zwei-WegeFunkgeräte.
Vergewissern Sie sich, dass die Notfallausrüstung funktionstüchtig ist,
bevor Sie auf Tour gehen. Führen Sie jedes Mal einen VS-Geräte-Check
durch, wenn Sie Ihren Tracker3 benutzen. Überprüfen Sie, ob alle VSGeräte richtig senden und empfangen. Die Empfangsreichweite muss
mindestens 20 Meter (65’) betragen.
Wenn Sie Mobiltelefone, Funkgeräte, GPS-Geräte, Digitalkameras, oder
andere elektrische Geräte mitführen, müssen diese einen Mindestabstand
von 50 cm zum Tracker3 haben, wenn Sie eine Suche durchführen.
Im Suchmodus können sonst irreführende Anzeigen, eine geringere
Reichweite oder fälschlicherweise Mehrfachverschüttete angezeigt
werden. Störungen können durch Hochspannungsleitungen, bei Gewittern
oder durch elektrische Geräte verursacht werden, die elektromagnetische
Felder aussenden. Im Sendemodus müssen andere elektrische Geräte
oder große Metallobjekte mindestens einen Abstand von 20 Zentimetern
zum Tracker3 haben. Verwenden Sie nur Alkalibatterien gleichen
Alters und gleicher Marke. Verwenden Sie keine wiederauadbaren,
Lithium-, Oxyride-, PowerPix- oder andere nicht alkalische Batterien.
Diese Bedienungsanleitung beinhaltet das Basiswissen zur eektiven
Anwendung des Tracker3. Auf unserer Homepage
www.backcountryaccess.com nden Sie zudem wichtige Hinweise zu
Anbietern, die Lawinenkunde vermitteln sowie aktuelle Informationen über
regionale Verhältnisse bezüglich der aktuellen Lawinengefahr.
Für Leistungen im Garantiefall füllen Sie bitte eine Garantieregistrierung
online auf: www.backcountryaccess.com/warranty aus.
Der Tracker3 erfüllt die harmonisierte R&TTE-Version der Norm EN 300
718 und entspricht oder übertrit die Anforderungen der Abschnitte 3.1,
3.2 und 3.3.
Wir freuen uns, dass Sie sich für den Kauf eines BCA Tracker3 entschieden
haben. Der Tracker3 ist das schnellste digitale 3-Antennen-LVS-Gerät auf
dem Markt und steht für einfachste Bedienung bei der Kameradenrettung.
Der folgende Abschnitt vermittelt Basiswissen zur Lawinengefahr und
Lawinenkunde.
Bitte lesen Sie diese Anleitung sorgfältig durch. Wir empfehlen Ihnen, einen
Lawinenkurs zu belegen, bevor Sie sich ins freie Skigelände begeben.
Rufen Sie den Lawinenlagebericht ab und informieren Sie sich über die
regionale Lawinengefahrenstufe, bevor Sie aufbrechen.
USA www.avalanche.org
Kanada www.avalanche.ca
Europa www.lawinen.org
Bild B
NW
W
SW
Lawinenlagebericht
N
NO
O
SO
5
4
3
2
1
Der Lawinenlagebericht gibt Informationen zur aktuellen
Gefahrensituation und dient somit als Grundlage jeder
Tourenplanung.
Lawinenkunde
Prüfen Sie, ob jede Person ein funktionstüchtiges VS-Gerät, eine Sonde
und eine Schaufel mit sich führt und mit der Ausrüstung umgehen kann.
Wir empfehlen zudem die Verwendung eines Lawinenairbags und Zwei-
Wege-Funkgeräte.
Lernen Sie, lawinengefährliches Gelände zu erkennen
• Gibt das Gelände Hinweise früherer Lawinenabgänge?
• Welche Neigung und welche Ausrichtung hat der Hang?
• Wie beeinusst das Wetter die Schneestabilität?
Lernen Sie, lawinengefährliches Gelände zu vermeiden
• Gibt es Anzeichen jüngster Lawinenaktivität?
• Beträgt die Steilheit des Hanges zwischen 30° und 45°?
• Hat der Hang, den Sie betreten wollen, gefährliche Geländefallen
(Steine, Bäume, Löcher, Felsen, usw.)?
DEUTSCH
1918

Lawinenkunde
Einführung
Gehen Sie mit aufmerksamen Partnern auf Tour
• Überqueren Sie potentiell gefährliches Gelände einzeln.
• Halten Sie an sicheren Geländepunkten.
• Merken Sie sich im Voraus einen Fluchtweg, falls tatsächlich eine
Lawine abgeht.
• Besprechen Sie sich mit Ihren Partnern, bevor Sie in einen Hang einfahren.
Falls Sie in einer Gruppe unterwegs sind, denken Sie an die typischen
Fehler, die Gruppen machen:
• Falls eine Route schon einmal ohne Vorfall begangen wurde, fühlt sich
die Gruppe dort sicher bezüglich der Schneedeckenstabilität.
• Vorbehalte gegenüber einer Route oder eines Hanges werden aus
Angst vor Konikten nicht ausgesprochen oder diskutiert.
• Das Wissen und die Fähigkeiten der Gruppe werden überschätzt.
• Der Entschluss das Ziel zu erreichen, wird bezüglich des Geländes
und der Verhältnisse nicht überdacht.
Im Zweifel ist es immer besser, fragwürdiges Gelände zu vermeiden.
Versuchen Sie die Tour zu einem anderen Zeitpunkt wenn die
Bedingungen stabil sind.
Falls Sie von einer Lawine erfasst werden:
• Rufen Sie „Lawine“ und geben Sie Zeichen, um die Gruppe zu alarmieren.
• Falls Sie einen Lawinen Airbag tragen lösen Sie diesen sofort aus.
• Versuchen Sie, sich an Bäumen oder Felsen festzuhalten, um nicht
mitgerissen zu werden. Oder versuchen Sie, seitlich aus der Lawine
zu „schwimmen“.
• Versuchen Sie, Ihre Atemwege frei zu halten.
• Wenn Sie fühlen, dass die Lawine langsamer wird, stoßen Sie einen
Arm nach oben. Eventuell werden Sie dann besser gesehen.
• Halten Sie sich die andere Hand vor den Mund, um eine Atemhöhle
zu bilden.
• Bleiben Sie ruhig und atmen Sie langsam, das spart Luft.
Suche nach Verschütteten:
• Versuchen Sie zunächst nicht, Hilfe von außen zu holen! Sie sind
die einzige Überlebenschance des Verschütteten!!
• Markieren Sie den Punkt, an dem Sie das Opfer zuletzt gesehen haben.
• Vergewissern Sie sich, dass Sie nicht durch eine zweite Lawine
gefährdet sind.
• Suchen Sie das Lawinenfeld mit den Augen nach Hinweisen auf den
Verschütteten ab.
• Suchen Sie mit Ihrem VS-Gerät nach dem Signal des Verschütteten.
Einführung
Bitte machen Sie sich bewusst, dass die Suche mit dem VS-Gerät nur
ein Teil der Kameradenrettung ist. Es ist genauso wichtig, das Sondieren
und Graben zu üben! Weitere Informationen nden Sie weiter hinten in
diesem Kapitel. Trainingsvideos zur Verschüttetensuche, zum Sondieren
und strategischen Schaufeln nden Sie auf unserer Website unter
www.backcountryaccess.com/education.
Sendemodus: Ziehen Sie die Schiebeverriegelung
Position in Pfeilrichtung und drehen Sie den Wahlschalter
Oberseite des Tracker3 in Sendeposition („TR“) (siehe Bild C). Die
Batteriekapazität wird im Distanz-/Batterieladedisplay
angezeigt (siehe Bild A).
Bild C
Ansicht
von oben
auf den
Tracker3
Nach der Anzeige der Batteriekapazität erscheint “tr” für “transmit”
im Display und der Tracker3 schaltet in den Sendemodus. Die
Sendekontrolllampe l blinkt bei jedem zweiten Sendeimpuls. Die
Sendekontrolllampe blinkt nicht, falls die Batteriekapazität weniger als
20 Prozent beträgt.
Hinweis: Es wird nur die ungefähre Batteriekapazität angezeigt.
Tauschen Sie die Batterien frühzeitig aus, bevor eine Restkapazität
von 40 Prozent unterschritten wird.
Der Tracker3 kann im Sendemodus nur ausgeschaltet oder auf
Suchmodus umgeschaltet werden, wenn die Schiebeverriegelung
zurückgezogen wird.
Suchmodus: Ziehen Sie die Schiebeverriegelung n zurück
und drehen Sie den Wahlschalter in Suchposition („SE“). Im
Suchmodus blinkt im Display die Anzeige „SE“, bis ein Signal
gefunden wird. Empfängt der Tracker3 ein Signal, werden
Distanz und Richtung im Display angezeigt. Benden Sie sich
im Nahbereich des Verschütteten, werden unter einer Distanz
von 2 Metern keine Richtungspfeile mehr angezeigt.
Rückkehr zum Sendemodus: Im Suchmodus muss die
Schiebeverriegelung zum Umschalten in den Sendemodus nicht
betätigt werden. Drehen Sie stattdessen einfach den Wahlschalter in
Sendeposition. Im Tracker-Display blinkt „TR“ und es ertönt ein Warnton,
bevor das Gerät wieder sendet.
Bendet sich der Tracker3 mehr als 30 Minuten im Suchmodus, ertönt
alle 2 Minuten ein Warnton. Ist er länger als 12 Stunden im Sendemodus,
ertönt ebenfalls alle 2 Minuten ein Warnton. Die Warnungen dienen als
Erinnerung, dass das Gerät nicht umgeschaltet oder ausgeschaltet wurde.
n von der „O“-
auf der
j
in Prozent
k
DEUTSCH
2120

Einführung
Einführung
Automatischer Umschaltmodus : Im automatischen
Umschaltmodus schaltet der Tracker3 automatisch zurück in
den Sendemodus (TR), wenn das Gerät eine Minute lang nicht
bewegt wird, oder wenn sich der Suchende bewegt, aber länger
als fünf Minuten im Suchmodus (SE) bleibt. 30 Sekunden bevor
das Gerät in den Sendemodus zurückschaltet, ertönt ein Warnsignal. Sie
können das Umschalten vermeiden, indem Sie die Optionstaste drücken
bzw. den Wahlschalter vor Ablauf der 30-Sekunden-Warnung betätigen.
Der automatische Umschaltmodus wird aktiviert, wenn Sie das Gerät in
den Sende- oder Suchmodus bei gedrückter Optionstaste einschalten.
Halten Sie die Optionstaste so lange gedrückt, bis „Ar“ im Display erscheint.
Weitere Gerätewerte werden angezeigt, z. B. „T3“, „r.c.“, bevor „Ar“
im Display erscheint (einschließlich der Softwareversion) und der
Batterieladeanzeige.
Wenn Sie den automatischen Umschaltmodus verwenden möchten,
müssen Sie ihn bei jedem Einschalten des Geräts aktivieren, andernfalls
kann das Gerät nur manuell von Suchmodus auf Sendemodus
umgeschaltet werden.
Stummschalten des Tons: Sie können den Ton im Suchmodus
stumm schalten. Drücken Sie hierzu beim Umschalten vom
Sendemodus in den Suchmodus die Optionstaste. „LO“
erscheint im Display, wenn der Ton für die Suchfunktion stumm
geschaltet ist.
Herunterladen der Tracker3-Software: Sie können den Tracker3 mit
BCA-Software aktualisieren. Zurzeit ist dies nur über einen PC möglich
(nicht mit einem Mac). So aktualisieren Sie die Software:
1. Gehen Sie zu www.backcountryaccess.com/downloads.
2. Laden Sie die T3 Utility Software herunter.
3. Installieren und starten Sie die Software.
4. Schließen Sie den Tracker3 mit einem Standard-USB-Kabel an Ihren
Computer an. Die USB-Schnittstelle nden Sie im Batteriefach.
5. Folgen Sie den T3 Utility Anweisungen.
Batteriewarnanzeige: Bei einer Restkapazität von 40 Prozent
ertönt beim Starten des Geräts kein Ton mehr. Bei 20 Prozent
werden im Suchmodus keine Töne mehr ausgegeben.
Ist die Batteriekapazität für den Betrieb des Geräts zu gering,
erscheint „Lb“ im Display. Tauschen Sie die Batterien vor der weiteren
Verwendung aus, sobald diese Warnung erscheint. Sind die Batterien
zum Einschalten des Geräts zu schwach, blinkt eine „0“ im Display. Nicht
zusammenpassende Batterien können bei unterschiedlichen Temperaturen
unvorhersehbar reagieren und schwache Batterien sind oft unerwartet
schnell leer. Das Auswechseln der Batterien wird daher ausdrücklich
empfohlen, sobald die Batterieladeanzeige 40 Prozent erreicht.
HINWEIS: Verwenden Sie nie alte Batterien zusammen mit neuen oder
Batterien unterschiedlicher Marken in Ihrem VS-Gerät. Verwenden Sie nie
wiederauadbare oder Lithium-Batterien. Bei der Verwendung solcher
Batterien ist die Batterieladeanzeige unter Umständen ungenau.
Signalunterdrückungsmodus: Der Signalunterdrückungsmodus
(SS) unterdrückt bei einer Mehrfachverschüttung das stärkste
Signal und zeigt dem Suchenden das zweitstärkste Signal nebst
Richtungspfeilen an. Bleiben Sie bei der Suche nach dem ersten
Verschütteten immer im Standardsuchmodus. Sobald der erste
Verschüttete gefunden wurde und die Feinsuche abgeschlossen ist, können
Sie den Signalunterdrückungsmodus verwenden.
Drücken Sie zum Aktivieren des Signalunterdrückungsmodus die
Optionstaste bis „SS“ im Display erscheint. Zum Umschalten in den
Signalunterdrückungsmodus müssen Sie die Optionstaste loslassen,
bevor „BP“ angezeigt wird. Im Signalunterdrückungsmodus blinkt das
Mehrfachverschüttetensymbol.
Das stärkste Signal wird für etwa eine Minute unterdrückt, damit
sich der Suchende von diesem Signal entfernen und nach dem
nächsten VS-Gerät suchen kann. Der Tracker3 schaltet nach einer
Minute vom Signalunterdrückungsmodus automatisch wieder in
den Standardsuchmodus. Dies kann auch manuell ausgeführt
werden, indem die Optionstaste so lange gedrückt wird, bis “SE”
im Display angezeigt wird. Wenn Sie in den normalen Suchmodus
zurück kehren, zeigt der Tracker3 wieder das stärkste Signal und die
Mehrfachverschüttetenanzeige hört auf zu blinken.
ACHTUNG: Die Signalunterdrückungsfunktion kann bei älteren analogen
VS-Geräten Probleme verursachen. Sollten Personen in Ihrer Gruppe
solche Geräte verwenden, weisen Sie sie auf die veraltete Technologie
ihrer Geräte hin.
Übersichtsmodus: Im Übersichtsmodus (BP) zeigt der
Tracker3 die Entfernungen und Richtungen aller sendenden
VS-Geräte an, die sich innerhalb der Reichweite benden.
So gibt der Übersichtsmodus rasch einen Überblick über
die Anzahl, Richtung und Distanz aller Verschütteten. Um
den Übersichtsmodus zu aktivieren und mit ihm zu Suchen, halten Sie
die Optionstaste ständig gedrückt. Der Übersichtsmodus ist, wie alle
Funktionen des Tracker3, eine Echtzeitfunktion und das Display wird
fortlaufend aktualisiert, während Sie sich bewegen. Wird die Optionstaste
im BP losgelassen, kehrt der Tracker3 in den normalen Suchmodus
zurück. Lassen Sie die gedrückte Optionstaste im Nahbereich eines
neu gefundenen Signals immer los, um im normalen Suchmodus die
Fokussierung des stärksten Signals automatisch zu erhalten.
2322
DEUTSCH

Einführung
Shoulder Strap
Waist Attachment Buckle
Waist Strap
Lanyard
Lanyard Attachment Loop
Bedienungsanleitung
Anlegen des Tragesystems
Der Tracker3 kann mit oder ohne Tragesystem verwendet werden. Bei
Verwendung des Tragesystems sollte der Tracker3 unter der äußersten
Kleidungsschicht getragen werden (Bild D). Das Gerät sollte so getragen
werden, dass die Distanz-/Richtungsanzeige auf den Körper gerichtet ist
und die Sende-LED nicht verdeckt und sichtbar ist.
Bild D
Bauchgurt
Schnalle für den Bauchgurt
Sicherheitsschnur
befestigungsschlaufe
Schultergurt
Sicherheitsschnur
Bei der Suche wird der Tracker3 aus dem Holster genommen. Tragesystem
und Sicherheitsschnur bleiben am Körper befestigt. Falls Sie den Tracker3
ohne Tragesystem verwenden, tragen Sie ihn in einer sicheren Tasche, zum
Beispiel in einer Hosentasche mit Reißverschluss oder in einem anderen
Kleidungsstück, das Sie nicht ausziehen, während Sie unterwegs sind. Den
Klipp der Sicherheitsschnur xieren Sie dann an einem Reißverschluss oder an
einem anderen soliden Punkt ihrer Kleidung. Wenn Sie die Sicherheitsschnur
zur Suche vom Tragesystem oder von der Bekleidung lösen, sichern Sie das
Gerät mit der vorgesehenen Schlaufe an Ihrem Handgelenk.
Stromversorgung
Der Tracker3 arbeitet mit drei AAA-Alkalibatterien. Verwenden Sie nur
qualitativ hochwertige Alkalibatterien gleichen Alters und gleicher Marke.
Verwenden Sie keine wiederauadbaren, Lithium-, Oxyride-, PowerPix-
oder andere nicht alkalische Batterien. Ersetzen Sie die Batterien am
Beginn einer neuen Saison.
Wird der Tracker3 feucht oder gar nass, dann önen Sie das Batteriefach
, um ihn trocknen zu lassen. Entfernen Sie die Batterien, falls das
m
Gerät über längere Zeit nicht eingesetzt wird, um eine Korrosion an den
Batteriekontakten zu vermeiden. Der Hersteller ersetzt im Garantiezeitraum
keine Geräte, die durch Batteriekorrosion beschädigt wurden.
Test vor Tourbeginn
Um sicher zu gehen, dass Sende- und Suchfunktion richtig funktionieren,
sollten Sie jeweils vor Tourbeginn einen Test am Ausgangspunkt durchführen.
Hierfür geht eine Person 20 Meter voraus und prüft, ob ihr Signal vom Rest
der Gruppe empfangen werden kann. Daraufhin schalten die restlichen
Gruppenmitglieder auf Sendemodus um und bewegen sich auf den Anführer
zu, der ihnen dann jeweils bestätigt, ob der Empfang ihres Signals aus 20
Metern Entfernung möglich ist. Nach Abschluss dieses Tests sollte der
Anführer grundsätzlich wieder auf Sendemodus umschalten.
Suchen
Der Tracker3 sendet auf der internationalen 457-kHz-Standardfrequenz.
Er ist vollständig kompatibel mit allen Verschüttetensuchgeräten, die
der Norm EN 300 718 entsprechen. Verwenden Sie keine FeuerwehrSuchgeräte mit der Frequenz 457kHz.
Während einer Suche muss der Tracker3 einen Mindestabstand
von 50 cm zu elektronischen Geräten, inkl. Mobiltelefonen, haben.
Wenn möglich sollten alle nicht benötigten elektronischen Geräte
ausgeschaltet werden.
Die Suche gliedert sich in vier Phasen: Signalsuche, Grobsuche,
Feinsuche und Punktortung.
Bild E
Signalsuche
> 40 m
20 m
40m
avalanche path
Grobsuche
40 – 3 m
Feinsuche
< 3 m
20 m
Signalsuche: Bei der Signalsuche wird die Lawine anhand eines
Suchmusters nach einem ersten Signal abgesucht. Das Suchmuster hängt
vom Verschwindepunkt des Opfers, von der Größe des Lawinenkegels und
der Anzahl der Suchenden ab. Bild F veranschaulicht die Suchmuster. Ist
die Lawine schmaler als 40 Meter, wird auf gerader Linie in der Mitte der
Lawine abwärts gesucht. Falls der Verschwindepunkt des Opfers sicher
bekannt ist, wird die Signalsuche von diesem Punkt aus auf einer Geraden
hangabwärts durchgeführt.
Ziel: Suche nach einem Signal
• Wenn kein „Verschwindepunkt” vorhanden,
Lawinenkegel absuchen
• Schwenken Sie den Tracker3 vertikal und horizontal
• 40m Abstand zwischen den suchenden Personen
oder 40m Schleifenabstand bei Einpersonensuche
20 m
Ziel: Gehen Sie schnell bis zum 10m Bereich,
langsamer bis zum 3m Bereich
• Halten Sie die Richtungsanzeige im Bereich der drei
mittleren Anzeigen
• Gehen Sie zügig in die angezeigte Richtung
• Vergewissern Sie sich, dass die Entfernungsanzeige
abnimmt
Ziel: Stellen Sie den Punkt mit der kleinsten
Entfernungsanzeige fest (stärkstes Signal)
• Bewegen Sie den Tracker nahe an der
Schneeoberfläche
• Bestätigen Sie die kürzeste Distanzanzeige
durch „Einkreuzen“.
• Beginnen Sie am Punkt der kleinsten Anzeige
zu sondieren
2524
DEUTSCH

Bedienungsanleitung
Bedienungsanleitung
Bild F
Ein Retter bei einer Lawinenbreite
von mehr als 40 Metern.
20 m
avalanche path
40m
20 m
40m
20 m
Mehrere Retter bei einer Lawinenbreite
von mehr als 40 Metern.
20 m
40m
20 m
40 m40 m
20 m20 m
Ist die Lawine breiter als 40 Meter und ist der Verschwindepunkt des Opfers
nicht bekannt, gehen Sie in Suchschleifen über die gesamte Lawine (Bild F).
Falls mehrere Sucher zur Verfügung stehen, folgen Sie einem Suchmuster,
bei dem der Abstand der Suchenden nicht mehr als 40 Meter beträgt und
maximal 20 Meter Abstand zum Rand der Lawine eingehalten werden
Vor Beginn der Signalsuche müssen alle VS-Geräte in den Suchmodus
geschaltet werden. Schwenken Sie Ihren Tracker3 langsam vertikal und
horizontal (Bild G), während Sie das Suchmuster verfolgen. Während der
Signalsuche achten Sie auf weitere Hinweise wie z. B. Extremitäten oder
Ausrüstung, die aus der Schneeoberäche ragen. Solange kein Signal
empfangen wird, blinkt im Display die Anzeige „SE“. Sobald Sie ein
regelmäßiges Signal empfangen, markieren Sie diesen Punkt mit einem
Gegenstand (Skistock o.Ä.) und beginnen Sie mit der Grobsuche.
Figure G
Schwenken Sie Ihren Tracker3 langsam
vertikal und horizontal, während Sie
schnell das Suchmuster verfolgen.
Brechen Sie die Signalsuche nicht ab,
bevor Sie ein starkes und regelmäßiges
Signal empfangen. Ignorieren Sie
einzelne, unregelmäßige Signale, welche
manchmal durch elektromagnetische
Störungen erzeugt werden.
Grobsuche: Die Grobsuche beginnt, nachdem Sie ein starkes,
regelmäßiges Signal erfasst haben und endet im Nahbereich des Opfers.
Wenn ein regelmäßiges Signal angezeigt wird, drehen Sie den Tracker3
langsam in der Waagrechten so, dass die mittlere Richtungs-LED
aueuchtet.
p
Der Tracker3 zeigt jetzt in Richtung des stärksten Signals. Die vier weiteren
Richtungs-LEDs zeigen an, in welche Richtung die Suche fortgeführt
werden muss, um die Richtung des stärksten Signals beizubehalten. Die
Distanzanzeige
Verschütteten zurückgelegt werden muss. Falls die Distanz kontinuierlich
zeigt in etwa den Abstand in Metern an, der bis zum
k
zunimmt, haben Sie zwar das Signal erfasst, müssen sich aber um
180° drehen und in die entgegengesetzte Richtung gehen. Drehen Sie
den Tracker3 nach der Richtungsänderung wieder so, dass die mittlere
Richtungs-LED leuchtet und führen Sie die Suche in dieser Richtung
fort. Falls Sie still stehen und die Distanzanzeige ändert sich erheblich,
empfangen Sie wahrscheinlich das Signal eines weiteren Retters, welcher
nicht im Suchmodus ist. Stellen Sie sicher, dass alle Suchenden im
Suchmodus sind, bevor Sie die Suche fortsetzen.
Während Sie der Richtungsanzeige folgen, stellen Sie eventuell fest, dass
Ihr Suchweg in einem Bogen verläuft. Das liegt daran, dass der Tracker3
der gekrümmten elektromagnetischen Feldlinie des Senders folgt. Die
angezeigte Distanz ist hierbei nicht die direkte Entfernung, sondern die
bogenförmige Distanz zum Opfer.
DEUTSCH
2726
Loading…
Document Download |
‹
›
bca Tracker3 Manual Online:
4,
2319
votes
bca Tracker3 User Manual
bca Tracker3 User Guide
bca Tracker3 Online Manual
Text of bca Tracker3 User Guide:
More Instructions:
|
bca Tracker3 Owner’s manual
|
DOWNLOAD | |
|
bca Tracker3 Owner’s manual
|
DOWNLOAD |
Related Products and Documents (Transceiver):
-
Humminbird 858c Transceiver Installation and operation manual
858c
humminbird/858c.pdf, 160 -
Subaru Forester Transceiver Manual
Forester
subaru/forester.pdf, 397 -
bca TRACKER2 Transceiver Operation & user’s manual
TRACKER2
bca/tracker2.pdf, 5 -
Alinco DR-M03SX Transceiver Service manual
DR-M03SX
alinco/dr-m03sx.pdf, 42 -
bca TRACKER2 Transceiver Owner’s manual
TRACKER2
bca/tracker2.pdf, 26 -
Snooper Syrius Pro Transceiver Operation & user’s manual
Syrius Pro
snooper/syrius-pro.pdf, 83 -
Delta Electronics SPBD-1250A4Q1RT Transceiver Specification
SPBD-1250A4Q1RT
delta-electronics/spbd-1250a4q1rt.pdf, 10 -
Ascend Group GTLT2 Transceiver Operation & user’s manual
GTLT2
ascend-group/gtlt2.pdf, 21
Comparable Devices:
| # | Manufacturer | Model | Document Type | File | Updated | Pages | Size |
|---|---|---|---|---|---|---|---|
| 1 | Dell | Inspiron 1000 | Setup manual | dell/inspiron-1000-2S7.pdf | 22 Dec 2024 | 2 | 0.46 Mb |
| 2 | Motorola | GPS-100M | Operation & user’s manual | motorola/gps-100m-I5E.pdf | 08 Dec 2024 | 8 | |
| 3 | Electro-Voice | FRX+ 660 | Technical specifications | electro-voice/frx-660-GXX.pdf | 04 Dec 2023 | 4 | 0.41 Mb |
| 4 | Audiovox | FR-314 | Owner’s manual | audiovox/fr-314-K28.pdf | 21 Jan 2024 | 30 | 1.26 Mb |
| 5 | Samsung | SHR-5162 | Product specifications | samsung/shr-5162-CUM.pdf | 21 Dec 2024 | 1 | 0.3 Mb |
| 6 | Audio Pro | Black Diamond V.2 | Datasheet | audio-pro/black-diamond-v-2-8GC.pdf | 29 May 2024 | 1 | 0.07 Mb |
Similar Resources:
Transceiver Instructions:
-
Shindaiwa Trimmer X7502862900
Shindaiwa X7502862900 User Guide (Doc Type: Trimmer Owner’s/operator’s manual)
X7502862900, 24
-
OWI Speaker System T502
PDF User Guide (@AS527A), OWI T502 Speaker System (24th Mar 2025)
T502, 1
-
Aiwa Stereo System XR-M77
Stereo System PDF Operating instructions manual
XR-M77, 19
-
Volkswagen Automobile 2014 Beetle
User Guide: Volkswagen 2014 Beetle (3Q5LMW, Upd.10/01/2025)
2014 Beetle, 17
-
Drill Master Power Tool Heat gun
Manual: Drill Master Heat gun (28FJ87, Upd.02/03/2025)
Heat gun, 14
-
Philips Coffee Maker HD7567
Philips HD7567 Coffee Maker Operation & user’s manual
HD7567, 108
-
Daewoo Stereo Receiver DRP-121
Stereo Receiver Instruction manual (Daewoo DRP-121)
DRP-121, 22
-
SENAO Wireless Access Point IAP8250AG
Guide: SENAO IAP8250AG (JQ14WR, Upd.Tuesday 26-11-2024)
IAP8250AG, 6
-
Tennant Carpet Dryers 200
Manual: Tennant 200 (NOY9PI, Upd.04.02.2025)
200, 12
-
Blaze King Wood stove PF-202
#3NLWAI PF-202: Blaze King Wood stove Owner Documentation
PF-202, 15
-
Morphy Richards Toaster PRISM
PRISM (Toaster ePDF User Guide, #W85547)
PRISM, 8
-
JVC Car Stereo System 1297MNMMDWJES
#55S65J: 1297MNMMDWJES Car Stereo System Installation & connection manual
1297MNMMDWJES, 4
Comments, Questions and Opinions:
View the manual for the BCA Tracker 3 here, for free. This user manual comes under the category not categorized and has been rated by 1 people with an average of a 8.2. This manual is available in the following languages: English. Do you have a question about the BCA Tracker 3?
Ask your question here
BCA Tracker 3 specifications
Below you will find the product specifications and the manual specifications of the BCA Tracker 3.
The BCA Tracker 3 is a device that is widely used for backcountry skiing and snowboarding in New Zealand. It is a transceiver that aids in locating individuals who have been buried in avalanches. This device is designed to be lightweight and compact, making it easy to carry and use while on the mountain.
One of the standout features of the BCA Tracker 3 is its simple and intuitive interface. It has a user-friendly design that allows for quick and efficient rescue operations. The device has multiple burial indicator lights, which helps rescuers determine the number of buried victims in an avalanche.
The BCA Tracker 3 also boasts a fast and accurate signal detection system. It uses multiple antennas to ensure a strong and reliable signal, even in challenging terrain. With its rapid processor, it can quickly and accurately pinpoint the exact location of buried victims.
In terms of durability, the BCA Tracker 3 is constructed with rugged materials that can withstand harsh mountain conditions. It is also designed to be water-resistant, ensuring reliable performance even in wet and snowy environments.
Overall, the BCA Tracker 3 is a reliable and essential tool for backcountry enthusiasts in New Zealand. With its user-friendly design, fast signal detection, and durable construction, it is a valuable device for avalanche rescue missions.
General
Frequently asked questions
Can’t find the answer to your question in the manual? You may find the answer to your question in the FAQs about the BCA Tracker 3 below.
Is the manual of the BCA Tracker 3 available in English?
Yes, the manual of the BCA Tracker 3 is available in English .
Is your question not listed? Ask your question here
FAQ: Types of Manuals and Their Contents
bca TRACKER 3 Manuals come in various types, each serving a specific purpose to help users effectively operate and maintain their devices. Here are the common types of bca TRACKER 3 User Guides and the information they typically include:
- User Manuals: Provide comprehensive instructions on how to use the device, including setup, features, and operation. They often include troubleshooting tips, safety information, and maintenance guidelines.
- Service Instructions: Designed for technicians and repair professionals, these manuals offer detailed information on diagnosing and repairing issues with the device. They include schematics, parts lists, and step-by-step repair procedures.
- Installation Guides: Focus on the installation process of the device, providing detailed instructions and diagrams for proper setup. They are essential for ensuring the device is installed correctly and safely.
- Maintenance Manuals: Provide guidance on routine maintenance tasks to keep the device in optimal condition. They cover cleaning procedures, part replacements, and regular servicing tips.
- Quick Start Guides: Offer a concise overview of the essential steps needed to get the device up and running quickly. They are ideal for users who need immediate assistance with basic setup and operation.
Each type of bca TRACKER 3 instruction is designed to address specific needs, ensuring users have the necessary information to use, maintain, and repair their devices effectively.
Related Instructions for bca TRACKER 3:
3
TRACKER DTS
Operation & user’s manual bca GPS Operation & user’s manual (File: bca-tracker-dts-operation-user-s-manual-10, 15.01.2025)
10
374
60
4
BC Link 2.0
Owner’s manual bca BC Link 2.0 User Manual (Owner’s manual), @Y3EA2U
11
1350
270
6
TRACKER2
Owner’s manual bca TRACKER2 User Manual (Owner’s manual), @FNLLZ1
47
1378
290
8
Tracker3
Owner’s manual User Manual: bca Tracker3 (7A74I7, Upd.Fri 12.2024)
16
1202
265
9
TRACKER 3
Owner’s manual TRACKER 3 (Transceiver ePDF User Manual, #3Q259N)
32
1225
221
10
BC Link
Owner’s manual bca Radio Owner’s manual (File: bca-bc-link-owner-s-manual-11, Tue 11.2024)
11
275
47
Transceiver Devices by Other Brands:
|
Kenwood TK-860HG Service Manual TK-860HG (Transceiver ePDF User Guide, #KU7W95) Document Copyrights 02 Jan 2025 | 44 |
|
|
Icom M802 Operation & User’s Manual Icom M802 User Guide (Operation & user’s manual), @I99GS2 1 17 Apr 2025 | 18 |
|
|
Standard Horizon GX1270S Owner’s Manual GX1270S (Transceiver ePDF User Manual, #AUB99R) Owner’s Manual 02 Nov 2024 | 70 |
|
|
Alinco DJ49l Specifications Alinco DJ49l User Manual (Specifications), @KO9774 DJ49l/DJ-491 30 Oct 2024 | 2 |
Categories:
Radio
Kitchen Appliances
GPS
Transceiver
Diving Instrument
Two-Way Radio
bca Tracker3 GPS PDF User Guides and Manuals for Free Download: Found (3) Manuals for bca Tracker3 Device Model (Owner’s Manual)
The BCA Tracker3 is a cutting-edge avalanche transceiver that combines advanced technology with user-friendly design, making it an essential tool for backcountry enthusiasts. As the backcountry skiing and riding community continue to grow, safety becomes paramount, and the Tracker3 has been engineered specifically with this in mind. This review aims to cover various aspects of the product, from its functionality to usability, to help potential buyers make informed decisions.
First and foremost, the Tracker3 excels in its ease of use. The device features a simple interface with a large display that makes navigation a breeze. Users can immediately switch between search and transmit modes, which is crucial in emergency situations. With its intuitive design, even beginners can quickly learn how to operate the Tracker3 effectively without extensive training.
One of the standout features of the BCA Tracker3 is its enhanced tracking capability. It employs a sophisticated digital signal processing system that provides accurate and reliable results, minimizing the chances of user error during critical moments. The device can track multiple buried victims, making it a great tool for group outings. It also boasts a range of up to 60 meters, ensuring that you can locate your companions from a significant distance.
Another impressive aspect is the battery life. The Tracker3 is equipped with an efficient power management system that allows for long-lasting usage. With a battery life of up to 200 hours in transmit mode, users can feel confident that their device will last throughout their adventures. This reliability is crucial as it eliminates the frequent need for recharging, allowing for more time enjoying the backcountry.
- Durability: Designed to withstand the rigors of outdoor activities, the Tracker3 is built with robust materials that can handle harsh environments.
- Weight: Weighing in at just 7.6 ounces (including batteries), the Tracker3 is lightweight and easy to carry, making it an excellent option for backcountry skiers and snowboarders.
- Visual Indicator: The device’s visual indicator helps users quickly identify the direction of a signal, enhancing the search process dramatically.
- Rescue Features: In addition to traditional searching capabilities, the Tracker3 offers advanced features like the «flagging» function, which lets users mark signals of interest, streamlining the search process.
If you are concerned about performance in extreme conditions, the BCA Tracker3 rises to the occasion. It functions effectively even in cold temperatures and has been designed to work in all weather conditions. Users can rely on this device, knowing it won’t fail them when they need it the most.
However, no product is perfect. Some users have reported that the manual could be clearer, particularly for those who are new to avalanche safety equipment. While the learning curve is not steep, a more detailed manual could potentially ease the transition for beginners into the world of avalanche safety.
In summary, the BCA Tracker3 is a reliable, efficient, and user-friendly avalanche transceiver that checks all the right boxes for safety-conscious adventurers. Its combination of advanced tracking abilities, long battery life, and durable design make it an essential addition to any backcountry skier’s gear collection. While there is room for improvement in the manual, the overall performance and reliability of the Tracker3 make it a product that any backcountry enthusiast should consider.