
ЗВУКОВАЯ КОНСОЛЬ
SOUNDTOUCH® 300
РУКОВОДСТВО ПОЛЬЗОВАТЕЛЯ

ВАЖНЫЕ УКАЗАНИЯ ПО ТЕХНИКЕ БЕЗОПАСНОСТИ
Прочтите и сохраните эти инструкции.
Важные указания по технике безопасности
1. Внимательно прочтите настоящее руководство.
2. Руководствуйтесь указанными инструкциями.
3. Учтите все предупреждения.
4. Следуйте всем инструкциям.
5. Не используйте устройство вблизи воды.
6. Протирайте только сухой тканью.
7. Не блокируйте вентиляционные отверстия. Установите устройство в соответствии с инструкциями производителя.
8. Не размещайте устройство рядом с такими источниками тепла, как радиаторы, печи или
другие (включая усилители), которые нагреваются при работе.
9. Берегите кабель питания. Не наступайте на кабель и следите за его целостностью, особенно у вилки и в месте, где он выходит из устройства.
10. Используйте только рекомендуемые производителем аксессуары.
11. Отключайте устройство от сети во время грозы или, когда оно не используется долгое время.
12. Сервисное обслуживание устройства выполняется квалифицированным персоналом.
Сервисное обслуживание требуется, если устройство повреждено, например, поврежден
кабель или вилка питания, пролита жидкость или внутрь пропали посторонние предметы, устройство побывало под дождем или в условиях повышенной влажности, устройство
уронили, и оно не функционирует нормально.
2

ВАЖНЫЕ УКАЗАНИЯ ПО ТЕХНИКЕ БЕЗОПАСНОСТИ
ПРЕДУПРЕЖДЕНИЯ И ПРЕДОСТЕРЕЖЕНИЯ
Этот символ предназначен для предупреждения пользователя о присутствии в корпусе продукта неизолированного «опасного напряжения», которое может вызвать опасный электрический удар.
Это символ предназначен для предупреждения пользователя о наличии важных инструкций
по установке.
Поверхность данного модуля выполнена из закаленного стекла. Будьте предельно аккуратны
при перемещении. В случае повреждения стекла тщательно соберите все осколки.
Изделие содержит мелкие детали, которые могут представлять опасность при попадании в
дыхательные пути. Не использовать детям до 3 лет.
Данное изделие содержит магнит. Обратитесь, пожалуйста, к терапевту, если у вас есть вопросы о влиянии магнита на работу используемых вами или имплантированных медицинских устройств.
• Для уменьшения риска удара электрическим током не оставляйте устройство под воздействием
дождя или влаги.
• Устройство не должно находиться в местах доступа капель или брызг, а также не оставляйте на
устройстве/ возле устройства сосуды с жидкостью, например, вазы.
• Устанавливайте устройство вдали от любых обогревательных приборов или источников открытого огня. Не располагайте на устройстве или вблизи его источники открытого огня, такие как свечи.
• НЕ разбирайте наушники.
• Не используйте силовые инверторы с данной акустической системой.
• Не используйте в транспорте или на яхтах.
Рекомендуется использовать устройство на высоте не более 2000 м над уровнем моря.
• Комплект для настенного монтажа WB-300 предназначен для использования только со звуковой
консолью SoundTouch® 300.
• Используйте только входящие в комплект кронштейны.
• Не устанавливайте монтажные кронштейны на непрочную поверхность или на стены, скрывающие
электропроводку или водопроводную систему. Если вы не уверены в правильности монтажа кронштейна, проконсультируйтесь с профессиональным мастером. Убедитесь, что кронштейн установлен в соответствии с местными строительными нормами.
• В соответствии с требованиями вентиляции компания Bose не рекомендует располагать системы в
закрытом пространстве, например, в стенной нише или в закрытом шкафу.
• Не размещайте кронштейн или усилитель рядом с такими источниками тепла, как радиаторы, печи
или другие (включая усилители), которые нагреваются при работе.
• Ярлык изделия расположен на задней панели звуковой консоли.
3

НОРМАТИВНАЯ ИНФОРМАЦИЯ
Примечание: Это оборудование было протестировано и установлено в соответствии с ограничениями для цифровых
устройств Класса В согласно Части 15 Правил FCC. Данные ограничения призваны обеспечить соответствующую защиту
от вредоносных помех в жилой обстановке. Данное оборудование генерирует, использует и может излучать высокочастотную энергию и, не будучи установлено в соответствии с инструкциями и при отклонении от инструкций при эксплуатации,
может создавать вредоносные помехи для радиокоммуникаций. Однако нет гарантии, что помехи не возникнут в частных
случаях установки. Если данное оборудование вызывает вредоносные помехи для радио- и телевизионного приема, которые определяются по включению и выключению оборудования, пользователь должен попытаться устранить помехи следующим способом:
• Переориентируйте или переместите приемную антенну.
• Увеличьте расстояние между оборудованием и приемником.
• Оборудование и приемник должны использовать разные штепсельные розетки.
• Проконсультируйтесь с дилером или опытным техническим специалистом по радиосвязи/телевидению.
Изменения или доработка данного устройства не разрешены компанией Bose и могут стать причиной аннулирования вашего права на использование устройства.
Это устройство подчиняется Части 15 Правил FCC и отвечает требованиям промышленных RSS стандартов Канады. Его работа допускает следующие условия:
1) Это устройство не должно создавать вредного излучения, и (2) Это устройство должно выдерживать воздействие любого
излучения, в том числе излучения, способного вызывать сбои в работе.
Устройство соответствует нормам FCC и ограничениям по радиационному излучению промышленных стандартов Канады.
Расстояние не менее 20 см должно отделять данное устройство от всех пользователей.
Запрещено использовать или устанавливать данное устройство и его антенну вблизи других антенн или передатчиков.
Устройство, работающее на частоте 5150–5250 МГц, предназначено для внутреннего использования только для сокращения
потенциальных помех, возникающих при использовании мобильных спутниковых систем.
Устройство предназначено для использования только внутри помещений.
Регламент для маломощных радиочастотных устройств
Статья XII
В соответствии с «Положением о маломощных радиочастотных устройствах», ни одна компания, предприятие или пользователь не может менять частоту, наращивать мощность передачи или изменять первоначальную характеристику сигнала, а также производительность утвержденного устройства без разрешения, выданного NCC.
Статья XIV
Радиочастотные маломощные устройства не должны влиять на безопасность воздушных судов и не должны создавать помехи законным средствам связи. В противном случае пользователь должен немедленно отключить устройство. Законные средства связи представляют собой устройства, работающие в соответствии с Законом о Телекоммуникациям.
Все радиочастотные устройства малой мощности чувствительны к помехам законных радио устройств или устройств ISM.
Корпорация Bose заявляет о соответствии данного продукта основным требованиям и другим условиям директивы 1999/5/EC и другим применимым директивам. Полную версию декларации о соответствии вы можете найти на
веб-сайте: www.Bose.com/compliance
Этот символ означает, что данный продукт необходимо предоставить в центры утилизации электрического и электронного оборудования. Соответствующая утилизация позволит исключить нанесение вреда человеческому здоровью или окружающей среде. Более подробную информацию об утилизации данного продукта вы можете получить
в местных органах управления, в службе утилизации или по месту приобретения продукта.
4
НОРМАТИВНАЯ ИНФОРМАЦИЯ
Названия токсичных или вредных веществ и элементов
Токсичные и вредные вещества и элементы
Название детали
Свинец
Блок управления x o o o o o
Металлические детали x o o o o o
Пластиковые детали o o o o o o
Акустические системы x o o o o o
Кабели x o o o o o
Данная таблица составлена в соответствии с нормативами SJ/T 11364.
O: Означает, что токсические и вредные вещества, содержащиеся во всех материалах дан-
ной детали, не превышают ограничения требований GB/T 26572.
X: Означает, что токсические и вредные вещества, содержащиеся хоть в одном материале
данной детали, превышают ограничения требований GB/T 26572.
Дата производства: Восьмизначный серийный номер указывает год производства, где «6» означает 2006 или 2016.
Amazon, Kindle и Fire и все соответствующие логотипы являются торговыми марками Amazon Inc. или его дочерних компаний.
Apple и логотип Apple – это торговые марки компании Apple, Inc., зарегистрированной в США и других странах. App Store является зарегистрированной торговой маркой Apple Inc.
Android, Google Play и логотип Google Play являются торговыми марками Google Inc.
Термин Bluetooth» и логотип являются торговыми марками Bluetooth SIG, Inc. и любое использование указанных знаков
должно производится с разрешения Bose Corporation.
Dolby, Dolby Audio и символ двойного D являются торговыми марками Dolby Laboratories.
HDMI, логотип HDMI и High-Denition Multimedia Interface являются торговыми марками или заре-
гистрированными торговыми марками HDMI Licensing LLC в США и других странах.
Данный продукт оснащен iHeartRadio. iHeartRadio является зарегистрированной торговой маркой iHeartMedia, Inc.
Этот продукт защищает некоторые права интеллектуальной собственности Microsoft. Использование или распространение
подобной технологии вне этого продукта запрещено без лицензии от Microsoft.
N-Mark является торговой маркой или зарегистрированной торговой маркой компании NFC Forum, Inc. в США и других странах.
SoundTouch и беспроводной дизайн являются зарегистрированными торговыми марками корпорации Bose в США и дру-
гих странах.
Данный продукт использует программное обеспечение Spotify; лицензии сторонних компаний вы можете найти на веб-сайте:
www.spotify.com/connect/third-party-licenses
Spotify является зарегистрированной торговой маркой Spotify AB.
Разработано с технологией UEI Technology*. Создано по лицензии Universal Electronics, Inc. © UEI 2000-2016 Wi-Fi является
зарегистрированной торговой маркой Wi-Fi Alliance.
©2016 Корпорация Bose. Строго запрещается воспроизводить, изменять, распространять или использовать каким-либо дру-
гим способом весь документ или его часть без письменного разрешения.
(Pb)
Ртуть
(Hg)
Кадмий
(Cd)
Шестивалентный
(CR(VI))
Полибромдифенил
(PBB)
Полибромированные
дифенол-эфиры (PBDE)
5

СОДЕРЖАНИЕ
Начало работы
Создание системы домашнего кинотеатра ……………………………………………………………10
Извлечение устройства из упаковки ……………………………………………………………………….10
Руководство по расположению громкоговорителей ……………………………………………11
Монтаж звуковой консоли …………………………………………………………………………………..12
Настройка звуковой консоли
Варианты кабелей ……………………………………………………………………………………………………….13
Подключение звуковой консоли к телевизору ………………………………………………………14
Вариант 1: HDMI™ ARC (рекомендуется) ………………………………………………………….14
Вариант 2: Optical ………………………………………………………………………………………………….15
Подключение к сети ……………………………………………………………………………………………………16
Установка батареек в пульт ДУ ………………………………………………………………………………….17
Включение питания звуковой консоли ……………………………………………………………………17
Сопряжение звуковой консоли с бас-модулем
или акустическими системами (опция) ……………………………………………………………………18
Завершающая настройка звуковой консоли
Отключение внутренних динамиков телевизора ………………………………………………….19
Проверка звука …………………………………………………………………………………………………………….19
Информация о настройках калибровки звука ADAPTiQ® …………………………………..20
Запуск калибровки звука ADAPTiQ® …………………………………………………………………20
6

СОДЕРЖАНИЕ
Настройка универсального пульта ДУ
Кнопки универсального пульта ДУ …………………………………………………………………………..22
Программирование универсального пульта ДУ …………………………………………………….23
Настройка кнопки питания ………………………………………………………………………………….24
Повторная синхронизация источника сигнала и телевизора ………………………24
Программирование пульта ДУ не фирмы Bose ……………………………………………………..24
Настройка SoundTouch®
Добавление звуковой консоли к Wi-Fi® сети ………………………………………………………..25
Загрузите и установите приложение SoundTouch®. ……………………………………………..26
Добавление звуковой консоли к Wi-Fi® сети ………………………………………………….26
Добавление звуковой консоли в вашу учетную запись SoundTouch® ……………..27
Подключение звуковой консоли к новой сети ………………………………………………………27
Использование приложения SoundTouch®
Как работают пресеты …………………………………………………………………………………………………28
Это следует знать …………………………………………………………………………………………………..28
Настройка пресета ……………………………………………………………………………………………………….28
Воспроизведение пресета ………………………………………………………………………………………….29
Помощь …………………………………………………………………………………………………………………………..30
Интерактивные советы ……………………………………………………………………………………………….30
Управление звуковой консолью с другого смартфона,
планшета или компьютера …………………………………………………………………………………………30
7
СОДЕРЖАНИЕ
Использование звуковой консоли
Выбор источника сигнала …………………………………………………………………………………………..31
Регулировка уровня громкости …………………………………………………………………………………31
Настройка басов …………………………………………………………………………………………………………..32
Сброс настроек басов …………………………………………………………………………………………..32
Функциональные кнопки ……………………………………………………………………………………………33
Режим диалога ……………………………………………………………………………………………………………..33
Функция Auto-wake (автоматического включения) ………………………………………………33
Беспроводная технология Bluetooth®
Выбор способа сопряжения ………………………………………………………………………………..34
Сопряжение с мобильным устройством ………………………………………………………………….35
Сопряжение мобильного устройства с NFC ……………………………………………………………36
Подключение сопряженного устройства ……………………………………………………………….. 37
Если вам не удается воспроизвести потоковый аудиосигнал
ссопряженного устройства …………………………………………………………………………………37
Отключение мобильного устройства ……………………………………………………………………….37
Повторное подключение к мобильному устройству …………………………………………….38
Очистка списка сопряженных устройств звуковой консоли ……………………………….38
Получение информации о системе
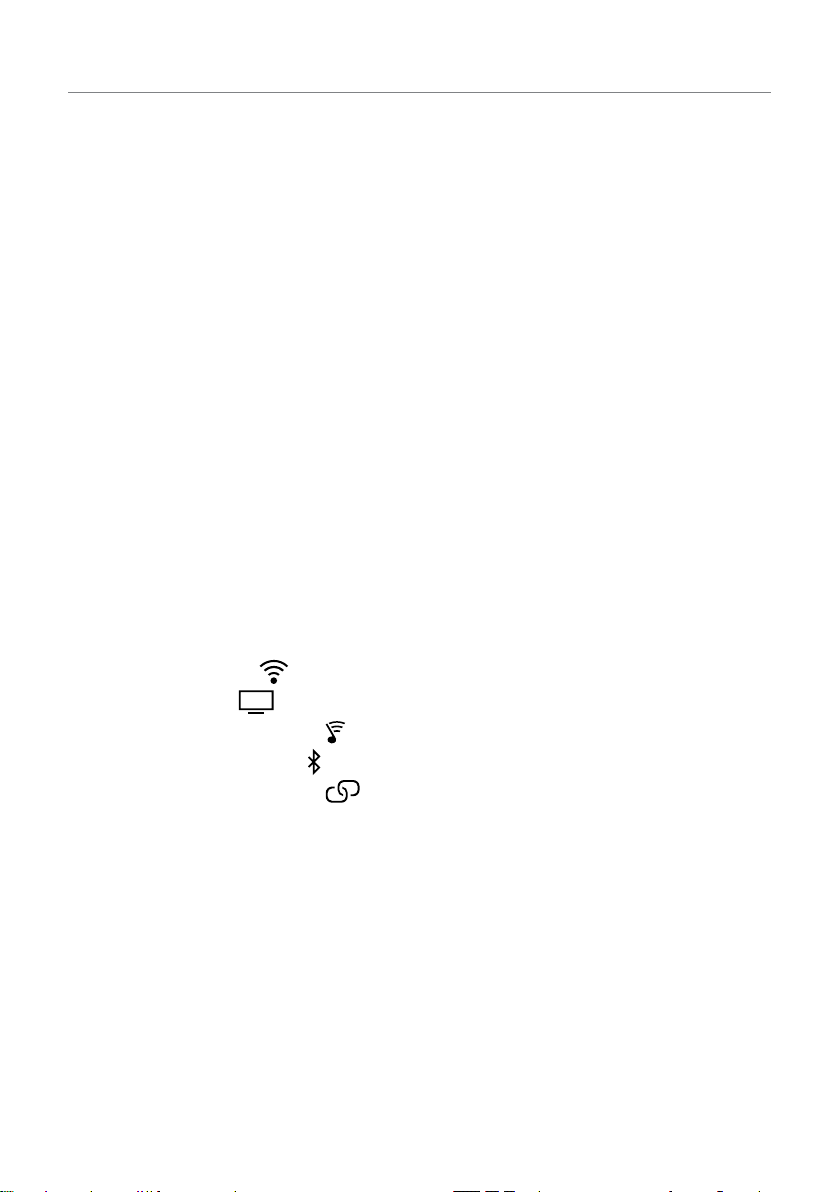
Индикаторы состояния системы ……………………………………………………………………………….39
Индикатор Wi-Fi
Индикатор TV
Индикатор SoundTouch®
Индикатор Bluetooth®
Индикатор подключения
…………………………………………………………………………………………….39
……………………………………………………………………………………………….39
………………………………………………………………………………..40
……………………………………………………………………………………..40
…………………………………………………………………………….40
8

СОДЕРЖАНИЕ
Дополнительные функции
Обновление программного обеспечения системы ……………………………………………….41
Отключение функции Wi-Fi® …………………………………………………………………………………….42
Повторное включение функции Wi-Fi® ………………………………………………………………….42
Сброс настроек звуковой консоли……………………………………………………………………………43
Альтернативная настройка
Альтернативные методы настройки …………………………………………………………………………44
Подключение источника сигнала к звуковой консоли ………………………………….44
Воспроизведение аудиосигнала подключенного
к звуковой консоли источника сигнала …………………………………………………………….45
Настройка звуковой консоли с помощью компьютера ………………………………………..46
Уход и обслуживание
Очистка ………………………………………………………………………………………………………………………….. 47
Служба работы с клиентами ……………………………………………………………………………………… 47
Ограниченная гарантия ………………………………………………………………………………………………47
Технические характеристики ……………………………………………………………………………………. 47
Неполадки и способы их устранения
Общие решения ……………………………………………………………………………………………………………48
Сообщения об ошибках аудио калибровки ADAPTiQ® ………………………………………..52
9
НАЧАЛО РАБОТЫ
СОЗДАНИЕ СИСТЕМЫ ДОМАШНЕГО КИНОТЕАТРА
(домашней мультимедийной системы развлечений)
Беспроводной модуль Acoustimass® 300 является частью домашней мультимедийной
системы развлечений (домашнего кинотеатра). Он совместим со звуковой консолью
SoundTouch® 300 и беспроводной акустической системой Virtually Invisible® 300 (не
входит в комплект). Вы можете в любое время подключиться к басовому модулю и акустическим системам окружающего звука для создания более богатого звучания.
Для приобретения бас-модуля или акустических систем свяжитесь с дилером Bose® или
посетите веб-сайт www.bose.com.
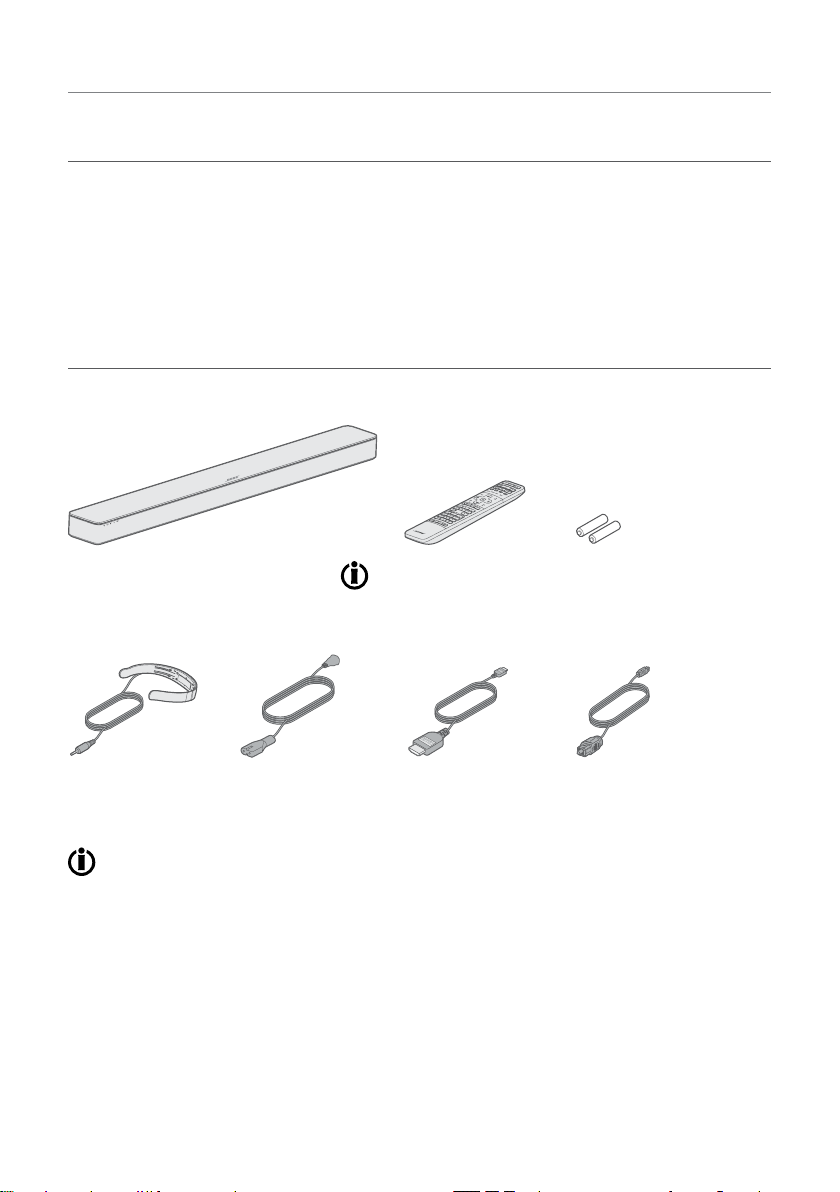
ИЗВЛЕЧЕНИЕ УСТРОЙСТВА ИЗ УПАКОВКИ
Аккуратно распакуйте упаковку и убедитесь, что в комплект входят следующие элементы:
Звуковая консоль SoundTouch®
300 (1)
Головные телефоны
ADAPTiQ® (1)
Универсальный
пульт ДУ (1)
Кабель HDMI™ (1)Кабель питания (1)
Батареи размера AAA (2)
Оптический кабель (1)
В комплект может входить несколько кабелей питания. Используйте только кабель
соответствующий розеткам вашего региона.
Примечание: Если вы видите, что одна из деталей повреждена или разбито стекло, не ис-
пользуйте устройство. Свяжитесь с уполномоченным дилером Bose или позвоните в отдел работы с клиентами Bose. Контактные данные указаны в
адресном листке из упаковки.
10
НАЧАЛО РАБОТЫ
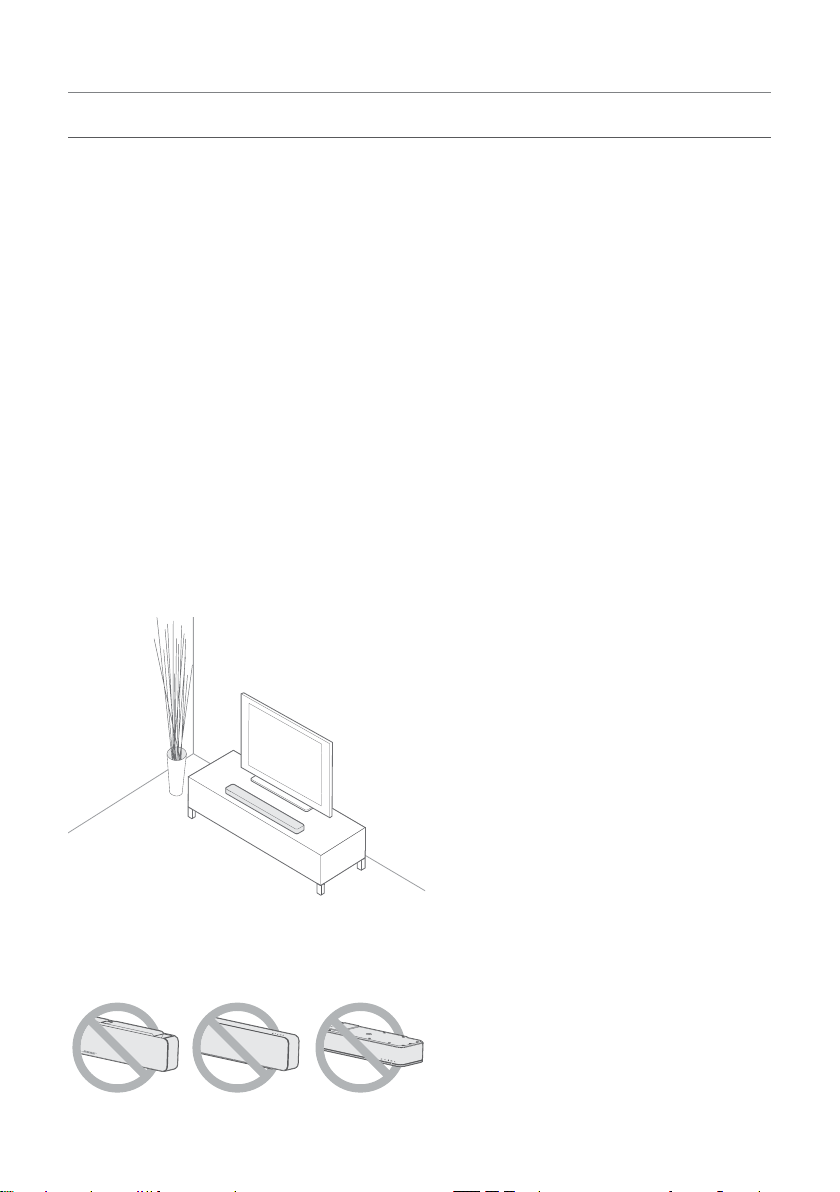
РУКОВОДСТВО ПО РАСПОЛОЖЕНИЮ ГРОМКОГОВОРИТЕЛЕЙ
Во избежание возникновения помех установите любое беспроводное оборудование на
расстоянии не менее 0,3–0,9 м от системы. Расположите систему подальше от металлических предметов, другого аудио/видео оборудования и источников нагрева.
• Расположите звуковую консоль на устойчивой поверхности над или под телевизором,
направив панель с решеткой в сторону комнаты.
• Расположите звуковую консоль на резиновых ножках на ровной устойчивой поверхности. Для наилучшей устойчивости обе ножки должны располагаться на одной поверхности. Если звуковая консоль была установлена на гладкой поверхности, типа мрамора, стекла или полированного дерева, то вибрация во время звучания может сдвинуть
ее с места.
• Задняя панель звуковой консоли должна располагаться на расстоянии не менее 1 см от
других поверхностей. Блокирование боковых отверстий корпуса существенно изменит
качество звучания.
• Не ставьте никакие предметы на верхнюю поверхность звуковой консоли.
• Убедитесь, что недалеко от выбранного местоположения находится розетка.
• Для оптимального качества звучания не располагайте звуковую консоль в закрытом
шкафу или в углу комнаты.
• При желании расположить звуковую консоль в книжном шкафу или на полке, установите ее максимально близко к внешнему краю, для сохранения оптимальных характеристик воспроизведения.
Предостережение: Не устанавливайте звуковую консоль на переднюю, заднюю или верх-
нюю панели.
11

НАЧАЛО РАБОТЫ
Монтаж звуковой консоли
При необходимости вы можете выполнить монтаж звуковой консоли на стену. Для приобретения кронштейнов для монтажа WB-300 свяжитесь с дилером Bose® или посетите
веб-сайт www.Bose.com.
Предостережение: Не используйте другие кронштейны для монтажа звуковой консоли.
12
НАСТРОЙКА ЗВУКОВОЙ КОНСОЛИ
ВАРИАНТЫ КАБЕЛЕЙ
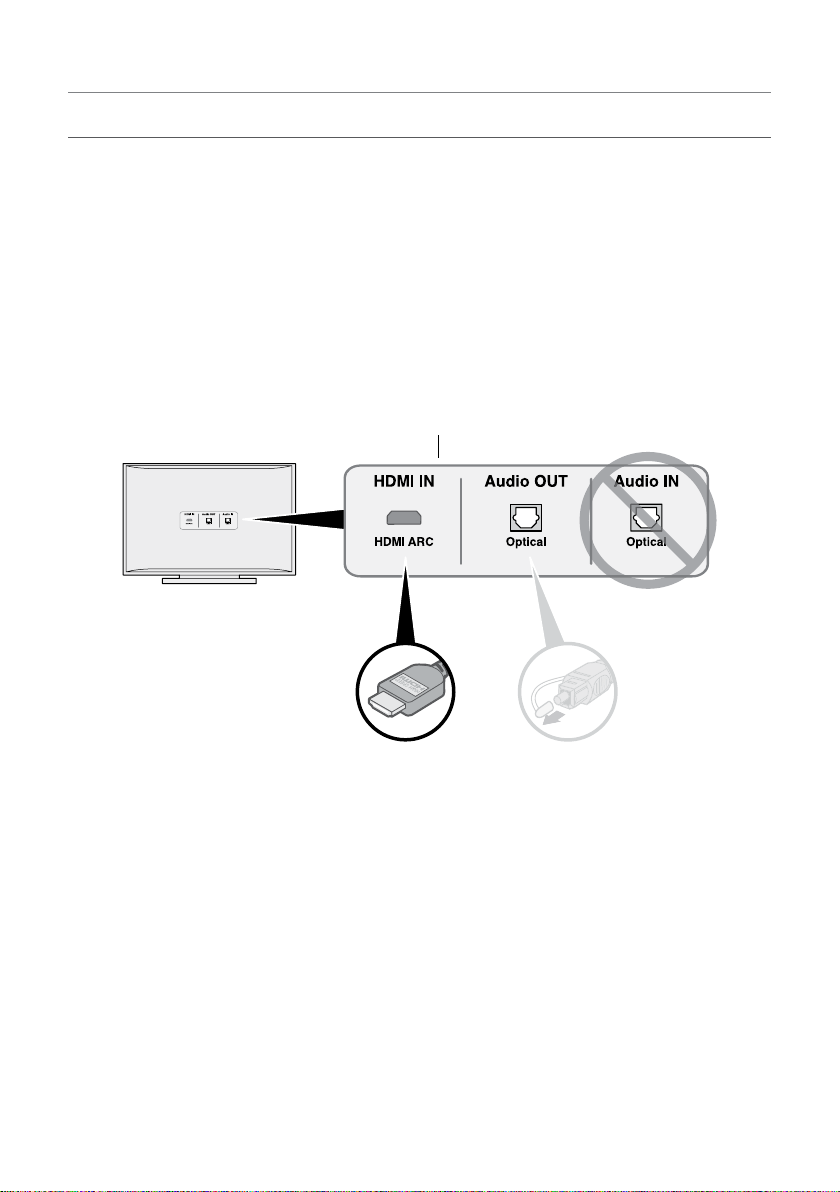
Подключите звуковую консоль к телевизору с помощью одного из двух вариантов кабелей:
• Вариант 1: HDMI™ ARC (рекомендуется)
• Вариант 2: Optical
Примечание: Подключите HDMI кабель к звуковой консоли в разъем телевизора HDMIARC
или Audio Return Channel.
1. На задней панели телевизора расположена панель подключений Audio OUT (цифровой
разъем) и выход HDMI IN.
Панель подключений вашего телевизора может
отличаться от показанной на рисунке. Определите
форму разъема.
Вариант 1: HDMI™ ARC
(рекомендуется)
Используйте HDMI
кабель для выполнения
подключения.
Вариант 2: Opcal
Если используемый вами телевизор
не оснащен разъемом HDMI ARC,
воспользуйтесь оптическим кабелем
для выполнения этого подключения.
2. Выберите аудио кабель.
Примечание: Если же ваш телевизор не оснащен разъемом HDMI ARC или оптическим
разъемом, то прочтите раздел «Неполадки и способы их устранения» на
стр. 48.
13
НАСТРОЙКА ЗВУКОВОЙ КОНСОЛИ
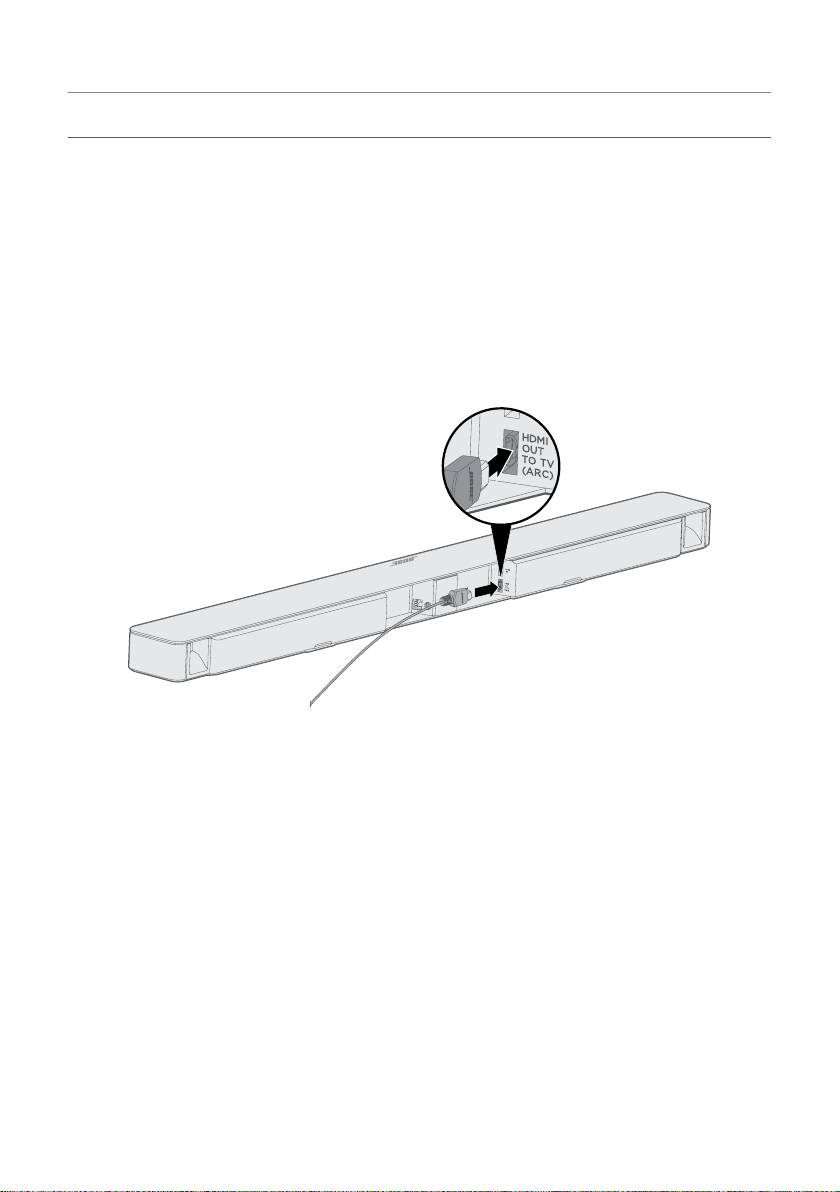
ПОДКЛЮЧЕНИЕ ЗВУКОВОЙ КОНСОЛИ К ТЕЛЕВИЗОРУ
После выбора кабеля подключите звуковую консоль к телевизору.
Вариант 1: HDMI™ ARC (рекомендуется)
1. Подключите один конец кабеля HDMI к разъему HDMI ARC вашего телевизора.
Примечание: Если вы не подключите разъемы HDMI ARC или Audio Return Channel теле—
визора, то не услышите воспроизведение звуковой консоли. Если же ваш
телевизор не оснащен разъемом HDMI ARC, то прочтите раздел «Вариант 2:
Optical» на стр. 15.
2. Подключите другой конец кабеля к разъему HDMI OUT TO TV (ARC) на звуковой кон-
соли.
14
НАСТРОЙКА ЗВУКОВОЙ КОНСОЛИ
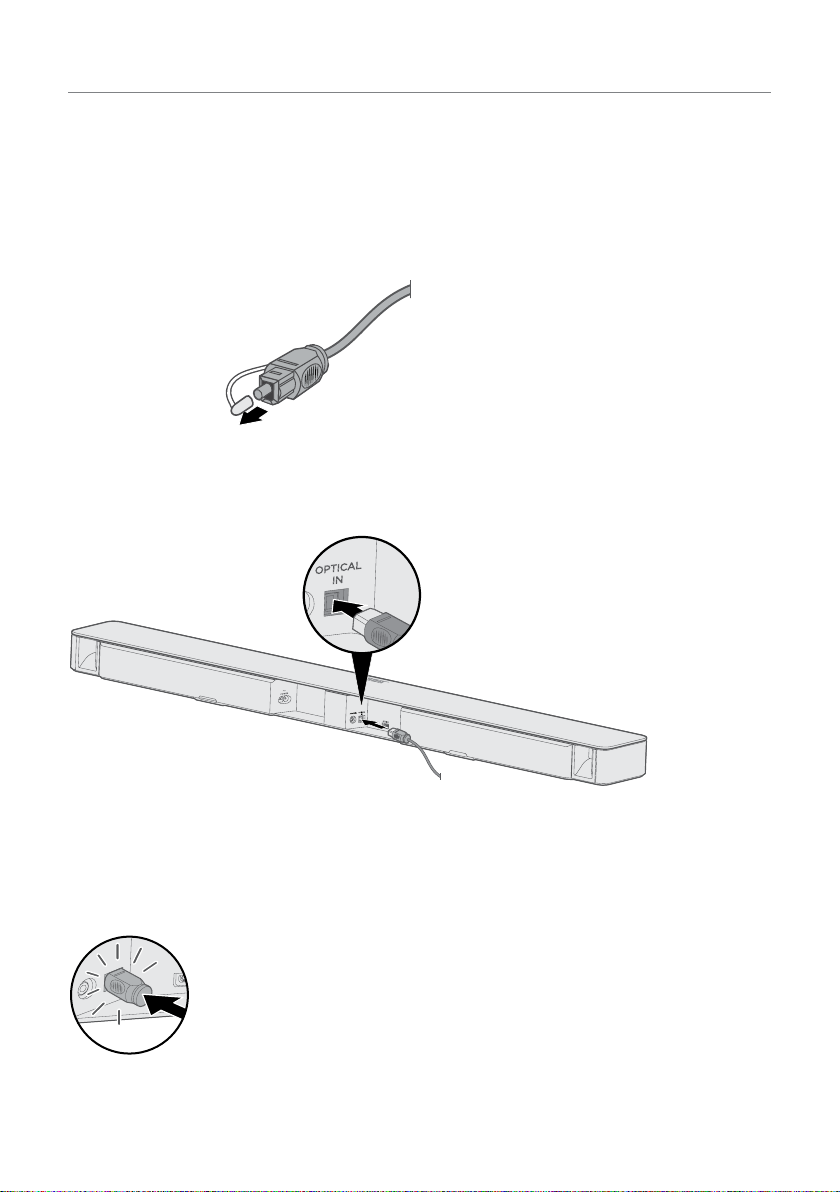
Вариант 2: Optical
Если ваш телевизор не оснащен разъемом HDMI™ ARC, то подключите звуковую консоль
к телевизору с помощью оптического кабеля.
Предостережение: Снимите защитные колпачки с двух концов оптического кабеля. Не-
верная установка штекера может привести к повреждению разъема
и/или штекера.
1. Подключите другой конец оптического кабеля к разъему Optical OUT вашего телеви-
зора.
2. Держите штекер оптического кабеля, расположив логотип Bose® вверх.
3. Аккуратно вставьте штекер оптического кабеля в разъем OPTICAL IN звуковой консоли.
Примечание: Оптический разъем акустической системы оборудован навесной крышкой,
которая открывается при установке штекера.
4. Плавно вставьте штекер в разъем до щелчка.
15
НАСТРОЙКА ЗВУКОВОЙ КОНСОЛИ
ПОДКЛЮЧЕНИЕ К СЕТИ
1. Подключите один конец кабеля электропитания в разъем питания
консоли.
2. Подключите второй конец кабеля электропитания к розетке электросети.
на звуковой
16
Loading…
Bose SOUNDTOUCH 300 universal remote control
SETUP GUIDE • INSTALLATIONSVEJLEDNING • SETUP-ANLEITUNG • INSTALLATIEHANDLEIDING
GUÍA DE CONFIGURACIÓN • ASENNUSOPAS • GUIDE D’INSTALLATION
GUIDA ALL’INSTALLAZIONE • TELEPÍTÉSI ÚTMUTATÓ • OPPSETTVEILEDNING
PRZEWODNIK KONFIGURACJI • GUIA DE CONFIGURAÇÃO • INSTALLATIONSGUIDE
®
300
universal remote control
Manual
View the manual for the Bose SOUNDTOUCH 300 universal remote control here, for free. This manual comes under the category speakers and has been rated by 2 people with an average of a 9.2.
This manual is available in the following languages: English. Do you have a question about the Bose SOUNDTOUCH 300 universal remote control or do you need help?
Ask your question here
Index
- Setup Guide
- Installationsvejledning
- Setup-Anleitung
- Installatiehandleiding
- Guía de configuración
- Asennusopas
- Guide d’installation
- Guida all’installazione
- Telepítési útmutató
- Oppsettveiledning
- Przewodnik konfiguracji
- Guia de configuração
- Installationsguide
Product Images (1)
Bose SOUNDTOUCH 300 universal remote control specifications
Below you will find the product specifications and the manual specifications of the Bose SOUNDTOUCH 300 universal remote control.
The Bose SOUNDTOUCH 300 universal remote control is a speaker accessory that allows for seamless control of audio settings and playback. The remote is designed to work with the Bose SOUNDTOUCH 300 soundbar, providing users with a convenient and intuitive way to manage their listening experience.
With its sleek and compact design, the remote is easy to handle and operate. It features a range of buttons that enable users to adjust volume levels, switch between different audio sources, and control playback functions. The universal remote can also be programmed to control other audio and video devices, providing a unified control solution for the entire home entertainment system.
The remote utilizes wireless technology, allowing for seamless communication with the soundbar. This eliminates the need for line-of-sight operation and enables users to control their audio settings from anywhere in the room. Additionally, the remote comes with a built-in display, providing real-time feedback on the current audio settings and playback status.
Constructed with high-quality materials, the Bose SOUNDTOUCH 300 remote is designed to be durable and reliable. It is built to withstand regular use and offers a long lifespan, ensuring that users can enjoy their audio experience for years to come.
Overall, the Bose SOUNDTOUCH 300 universal remote control is a practical and reliable accessory that enhances the user’s ability to control and personalize their audio experience. Its intuitive design and range of features make it an ideal choice for anyone seeking a convenient and efficient way to manage their soundbar.
General
| Brand | Bose |
| Model | SOUNDTOUCH 300 universal remote control |
| Product | speaker |
| Language | English |
| Filetype | User manual (PDF) |
Frequently Asked Questions
Can’t find the answer to your question in the manual? You may find the answer to your question in the FAQs about the Bose SOUNDTOUCH 300 universal remote control below.
How do I connect my Bose SOUNDTOUCH 300 universal remote control to my speaker?
To connect the remote control to your speaker, simply press and hold the «TV» button on the remote until the light at the top stays on. Then, follow the on-screen instructions on your TV to complete the connection process.
How can I adjust the volume using the universal remote control?
To adjust the volume on your speaker, use the volume up and down buttons located on the side of the remote. Press the «Volume Up» button to increase the volume, or the «Volume Down» button to decrease it.
Can I program the universal remote control to work with other devices?
Yes, you can program the remote control to operate other devices such as your TV or cable box. Simply press and hold the «Setup» button until the light at the top flashes twice, then follow the on-screen instructions to program it for a specific device.
How do I switch between different audio inputs on my speaker using the universal remote control?
To switch between different audio inputs, press the «Source» button on the remote control. This will cycle through the available audio inputs, allowing you to select the desired source for your speaker.
Is there a way to customize the settings of my speaker using the universal remote control?
Yes, you can access the settings menu of your speaker using the universal remote control. Press the «Settings» button to enter the settings menu, where you can adjust various parameters such as bass, treble, or room size to optimize the audio output according to your preferences.
Can bluetooth devices of different brands be connected to each other?
Yes, bluetooth is a universal method that allows different devices equipped with bluetooth to connect to each other.
What is bluetooth?
Bluetooth is a way of exchanging data wirelessly between electronic devices via radio waves. The distance between the two devices that exchange data can in most cases be no more than ten metres.
When is my volume too loud?
A volume above 80 decibels can be harmful to hearing. When the volume exceeds 120 decibels, direct damage can even occur. The chance of hearing damage depends on the listening frequency and duration.
Wat is Dolby Atmos?
Dolby Atmos is a technology that ensures that the sound is reflected from the ceiling to where you are listening. This makes it possible to create a 5.1 effect with only 1 speaker.
Is the manual of the Bose SOUNDTOUCH 300 universal remote control available in English?
Yes, the manual of the Bose SOUNDTOUCH 300 universal remote control is available in English .
Is your question not listed? Ask your question here
Bose SoundTouch 300 SoundBar Manual
IMPORTANT SAFETY INSTRUCTIONS
Please read and keep all safety and use instructions.
Important Safety Instructions
- Read these instructions.
- Keep these instructions.
- Heed all warnings.
- Follow all instructions.
- Do not use this apparatus near water.
- Clean only with a dry cloth.
- Do not block any ventilation openings. Install in accordance with the manufacturer’s instructions.
- Do not install near any heat sources such as radiators, heat registers, stoves, or other apparatus (including amplifiers) that produce heat.
- Protect the power cord from being walked on or pinched particularly at plugs, convenience receptacles, and the point where they exit from the apparatus.
- Only use attachments/accessories specified by the manufacturer.
- Unplug this apparatus during lightning storms or when unused for long periods of time.
- Refer all servicing to qualified personnel. Servicing is required when the apparatus has been damaged in any way, such as power-supply cord or plug is damaged, liquid has been spilled or objects have fallen into the apparatus, the apparatus has been exposed to rain or moisture, does not operate normally, or has been dropped.
WARNINGS/CAUTIONS
This symbol on the product means there is uninsulated, dangerous voltage within the product enclosure that may present a risk of electrical shock.
This symbol on the product means there are important operating and maintenance instructions in this guide.
This product contains a tempered glass surface. Use caution to avoid impact. In the event of breakage, use care in handling broken glass.
Contains small parts which may be a choking hazard. Not suitable for children under age 3.
This product contains magnetic material. Consult your physician on whether this might affect your implantable medical device.
- To reduce the risk of fire or electrical shock, do NOT expose this product to rain, liquids or moisture.
- Do NOT expose this product to dripping or splashing, and do not place objects filled with liquids, such as vases, on or near the product.
- Keep the product away from fire and heat sources. Do NOT place naked flame sources, such as lighted candles, on or near the product.
- Do NOT make unauthorized alterations to this product.
- Do NOT use a power inverter with this product.
- Do NOT use in vehicles or boats.
- Where the mains plug or an appliance coupler is used as the disconnect device, the disconnect device shall remain readily operable.
Use at altitude less than 2000 meters only. - The WB-300 wall bracket is only for use with the SoundTouch® 300 soundbar.
- Only use the mounting hardware supplied with this product.
- Do not mount on surfaces that are not sturdy, or that have hazards concealed behind them, such as electrical wiring or plumbing. If you are not sure about installing the bracket, contact a qualified professional installer. Ensure the bracket is installed according to local building codes.
- Due to ventilation requirements, Bose does not recommend placing the product in a confined space such as in a wall cavity or in an enclosed cabinet.
- Do not place or install the bracket or product near any heat sources, such as fireplaces, radiators, heat registers or other apparatus (including amplifiers) that produce heat.
- The product label is located on the back of the soundbar.
REGULATORY INFORMATION
NOTE: This equipment has been tested and found to comply with the limits for a Class B digital device, pursuant to Part 15 of the FCC Rules. These limits are designed to provide reasonable protection against harmful interference in a residential installation. This equipment generates, uses, and can radiate radio frequency energy and, if not installed and used in accordance with the instructions, may cause harmful interference to radio communications. However, there is no guarantee that interference will not occur in a particular installation. If this equipment does cause harmful interference to radio or television reception, which can be determined by turning the equipment off and on, the user is encouraged to try to correct the interference by one or more of the following measures:
- Reorient or relocate the receiving antenna.
- Increase the separation between the equipment and receiver.
- Connect the equipment into an outlet on a circuit different from that to which the receiver is connected.
- Consult the dealer or an experienced radio/TV technician for help.
Changes or modifications not expressly approved by Bose Corporation could void the user’s authority to operate this equipment.
This device complies with part 15 of the FCC Rules with Industry Canada license-exempt RSS standard(s). Operation is subject to the following two conditions:
- This device may not cause harmful interference, and
- this device must accept any interference received, including interference that may cause undesired operation
This device complies with FCC and Industry Canada radiation exposure limits set forth for general population.
This equipment should be installed and operated with a minimum distance of 20 cm between radiator and your body. This transmitter must not be co-located or operating in conjunction with any other antenna or transmitter.
This device for operation in the 5150 – 5250 MHz is for indoor use only to reduce the potential for harmful interference to co-channel mobile satellite systems. W52/W53 Indoor Only
Management Regulation for Low-power Radio-frequency Devices
Article XII
According to «Management Regulation for Low-power Radio-frequency Devices» without permission granted by the NCC, any company, enterprise, or user is not allowed to change frequency, enhance transmitting power or alter original characteristic as well as performance to an approved low power radio-frequency devices.
Article XIV
The low power radio-frequency devices shall not influence aircraft security and interfere legal communications; If found, the user shall cease operating immediately until no interference is achieved. The said legal communications means radio communications operated in compliance with the Telecommunications Act.
The low power radio-frequency devices must be susceptible with the interference from legal communications or ISM radio wave radiated devices.
Bose Corporation hereby declares that this product is in compliance with the essential requirements and other relevant provisions of Directive 1999/5/EC and all other EU directive requirements. The complete declaration of conformity can be found at: www.Bose.com/compliance
This symbol means the product must not be discarded as household waste, and should be delivered to an appropriate collection facility for recycling. Proper disposal and recycling helps protect natural resources, human health and the environment. For more information on disposal and recycling of this product, contact your local municipality, disposal service, or the shop where you bought this product.
| Names and Contents of Toxic or Hazardous Substances or Elements | ||||||
| Toxic or Hazardous Substances and Elements | ||||||
| Part Name | Lead (Pb) | Mercury (Hg) | Cadmium (Cd) | Hexavalent (CR(VI)) | Polybrominated Biphenyl (PBB) |
Polybrominated diphenylether (PBDE) |
| PCBs | X | O | O | O | O | O |
| Metal Parts | X | O | O | O | O | O |
| Plastic Parts | O | O | O | O | O | O |
| Speakers | X | O | O | O | O | O |
| Cables | X | O | O | O | O | O |
|
This table is prepared in accordance with the provisions of SJ/T 11364. O: Indicates that this toxic or hazardous substance contained in all of the homogeneous materials for this part is below the limit requirement of GB/T 26572. |
||||||
| X: Indicates that this toxic or hazardous substance contained in at least one of the homogeneous materials used for this part is above the limit requirement of GB/T 26572. |
Date of Manufacture: The eighth digit in the serial number indicates the year of manufacture; «6» is 2006 or 2016.
Amazon, Kindle, Fire and all related logos are trademarks of Amazon, Inc. or its affiliates.
Apple and the Apple logo are trademarks of Apple Inc., registered in the U.S. and other countries. App Store is a service mark of Apple Inc.
Android, Google Play, and the Google Play logo are trademarks of Google Inc.
The Bluetooth® word mark and logos are registered trademarks owned by Bluetooth SIG, Inc. and any use of such marks by Bose Corporation is under license.
Dolby, Dolby Audio and the double-D symbol are trademarks of Dolby Laboratories.
For DTS patents, see http://patents.dts.com. Manufactured under license from DTS, Inc. DTS, the Symbol, DTS in combination with the Symbol, and DTS Digital Surround are registered trademarks or trademarks of DTS, Inc. in the United States and/or other countries. ©DTS, Inc. All Rights Reserved.
The terms HDMI and HDMI High-Definition Multimedia Interface, and the HDMI logo are trademarks or registered trademarks of HDMI Licensing LLC in the United States and other countries.
This product contains the iHeartRadio service. iHeartRadio is a registered trademark of iHeartMedia, Inc.
This product is protected by certain intellectual property rights of Microsoft. Use or distribution of such technology outside of this product is prohibited without a license from Microsoft.
The N-Mark is a trademark or registered trademark of NFC Forum, Inc. in the United States and in other countries.
SoundTouch and the wireless note design are registered trademarks of Bose Corporation in the U.S. and other countries.
This product incorporates Spotify software which is subject to 3rd party licenses found here: www.spotify.com/connect/third-party-licenses
Spotify is a registered trademark of Spotify AB.
Designed with UEI Technology™. Under License from Universal Electronics, Inc. © UEI 2000-2016
Wi-Fi is a registered trademark of Wi-Fi Alliance®.
©2016 Bose Corporation. No part of this work may be reproduced, modified, distributed or otherwise used without prior written permission.
GETTING STARTED
Building your entertainment system
The SoundTouch® 300 soundbar is part of a modular home entertainment system, and is compatible with the optional Acoustimass® 300 wireless bass module and Virtually Invisible® 300 wireless surround speakers (not provided). You can wirelessly pair the bass module and surround speakers to the soundbar at any time for even richer, more immersive sound.
To purchase the bass module or surround speakers, contact your local Bose® dealer or visit www.Bose.com
Unpacking
Carefully unpack the carton and confirm that the following parts are included:
SoundTouch® 300 soundbar
Universal remote control
AAA Battery (2)
ADAPTiQ® headset
Power cord*
HDMI™ cable
Optical cable
*May ship with multiple power cords. Use the power cord for your region.
Note: If any part is damaged or if the glass on your soundbar is broken, do not use it. Contact your authorized Bose dealer or Bose customer service.
Placement guidelines
To avoid wireless interference, keep other wireless equipment 1 – 3 ft. (0.3 – 0.9 m) away from the system. Place the system outside and away from metal cabinets, other audio/video components and direct heat sources.
- Place the soundbar directly below (preferred) or above your TV with the speaker grille facing into the room.
- Place the soundbar on its rubber feet on a stable and level surface. For proper support, both feet must be resting on the surface. Vibration can cause the soundbar to move, particularly on smooth surfaces like marble, glass or highly polished wood.
- Keep the back side of the soundbar at least 0.4 in. (1 cm) from any other surface. Blocking the ports on this side affects acoustic performance.
- Do NOT place any objects on top of the soundbar.
- Make sure there is an AC (mains) outlet nearby.
- For best sound quality, do not place the soundbar in an enclosed cabinet or diagonally in a corner.
- If placing the soundbar in an enclosed cabinet or on a shelf or TV stand, position the front of the soundbar as close as possible to the front edge of the shelf for optimal acoustic performance.
Do not place the soundbar on its front, back or top when in use.

Mounting the soundbar
You can mount the soundbar on a wall. To purchase the WB-300 wall bracket, contact your local Bose® dealer or visit www.Bose.com
Do not use any other hardware to mount the soundbar.
SETTING UP THE SOUNDBAR
Cable options
Connect the soundbar to your TV using one of two cable options:
- Option 1: HDMI™ ARC (preferred)
- Option 2: Optical
Note: The preferred option is to connect the soundbar to your TV’s HDMI ARC or Audio Return Channel connector using the HDMI cable.
- On the back of your TV, locate the HDMI IN and Audio OUT (digital) connector panels.
Your TV’s connector panel may not appear as shown. Look for the shape of the connector.
Option 1: HDMI™ ARC (preferred)
Use the HDMI cable for this connection.
Option 2: Optical
If your TV doesn’t have an HDMI ARC connector, use the optical cable for this connection. - Choose an audio cable.
Note: If your TV does not have an HDMI ARC or optical connector, see «Troubleshooting».

Connecting the soundbar to your TV
After choosing an audio cable, connect the soundbar to your TV.
Option 1: HDMI™ ARC (preferred)
- Insert one end of the HDMI™ cable into your TV’s HDMI ARC connector.
Note: If you don’t connect to your TV’s HDMI ARC or Audio Return Channel connector, you won’t hear audio from the soundbar. If your TV does not have an HDMI ARC connector, see «Option 2: Optical». - Insert the other end of the cable into the HDMI OUT TO TV (ARC) connector on the soundbar.
")
Option 2: Optical
If your TV doesn’t have an HDMI™ ARC connector, use the optical cable to connect the soundbar to your TV.
Make sure you have removed the protective cap from both ends of the optical cable. Inserting the plug in the wrong orientation can damage the plug and/or the connector.
- Insert one end of the optical cable into your TV’s Optical OUT connector.
- Hold the plug at the other end of the optical cable with the Bose® logo facing down.
- Align the plug with the soundbar’s OPTICAL IN connector and insert the plug carefully.
Note: The connector has a hinged door that swings inward when inserting the plug.
- Firmly push the plug into the connector until you hear or feel a click.

Connecting to power
- Plug one end of the power cord into the connector on the back of the soundbar.
- Plug the other end of the power cord into a live AC (mains) outlet.

Installing the remote control’s batteries
- Slide open the battery compartment cover on the back of the remote control.
- Insert the two provided AAA (IEC-LR3) 1.5V batteries. Match the + and – symbols on the batteries with the + and – markings inside the compartment.
- Slide the battery compartment cover back into place.

Powering on the soundbar
On the remote control, press to power on the soundbar.
The soundbar powers on.
Note: The soundbar defaults to TV the first time it’s powered on. Otherwise, the soundbar defaults to your last used source.
Pairing the soundbar with a bass module or surround speakers (optional)
If you’ve purchased the optional Acoustimass® 300 wireless bass module or Virtually Invisible® 300 wireless surround speakers, you can wirelessly pair them with the soundbar now or later.
Notes:
- Pairing now instead of later prevents you from having to repeat certain steps, such as running ADAPTiQ® audio calibration.
- You’ll need to pair the bass module and surround speakers separately.
- Connect either the bass module or surround speakers to power. Refer to the Acoustimass® 300 or Virtually Invisible® 300 quick start guide or owner’s guide.
- On the remote control, press the SoundTouch® button .
- Press and hold 7 until the connectivity indicator on the soundbar blinks white.
Once paired, the bass module or surround speakers emit a tone and on the soundbar glows white.
- Repeat steps 1 – 3 until all bass modules and surround speakers are paired.
Note: If the soundbar doesn’t pair with the bass module or surround speakers, see «Troubleshooting».

FINISHING SOUNDBAR SETUP
Turning off your TV speakers
To avoid hearing distorted audio, turn off your TV speakers.
Refer to your TV owner’s guide for more information.
Checking for sound
- Power on your TV.
- If you are using a cable/satellite box or other secondary source:
- Power on this source.
- If your secondary source is connected to your TV, select the appropriate TV input. If you have not programmed the remote control, you may need to use a different remote.
- Power on the soundbar. You should hear sound coming from the soundbar.
- Press on the remote control. You should not hear sound coming from the TV speakers or soundbar.
Note: If you don’t hear sound coming from the soundbar or do hear sound coming from your TV speakers, see «Troubleshooting».
About ADAPTiQ® audio calibration
After setting up your soundbar and pairing the optional bass module or surround speakers, run ADAPTiQ® audio calibration for best acoustic performance. ADAPTiQ audio calibration customizes the sound of the soundbar to the acoustics of your listening area by taking five audio measurements. To run an audio calibration, you need 10 minutes when the room is quiet.
During ADAPTiQ audio calibration, a microphone on the top of the provided ADAPTiQ headset measures the sound characteristics of your room to determine optimal sound quality.
Running ADAPTiQ® audio calibration
- Insert the ADAPTiQ headset cable into the ADAPTiQ connector on the back of the soundbar.
- Put the ADAPTiQ headset on your head.
- On the remote control, press the SoundTouch® button .
- Press and hold 8 until the TV indicator and the Bluetooth indicator on the soundbar glow green.
The ADAPTiQ® process begins.
Note: If you don’t hear your language, press and on the navigation pad to cycle through languages. To reset the language, press and hold 8 for 10 seconds. - Follow the voice prompts until the ADAPTiQ process is complete. If you hear an error message and are unable to complete ADAPTiQ audio calibration, see «ADAPTiQ® audio calibration error messages».
- Unplug the ADAPTiQ headset from the soundbar and store it in a safe place. If you later pair the optional bass module or surround speakers, move or mount the soundbar or move any furniture, run ADAPTiQ audio calibration again to ensure optimal sound quality.


SETTING UP THE UNIVERSAL REMOTE CONTROL
Universal remote control buttons
Use the remote control to control sources connected to your TV or soundbar, adjust the volume and bass, change channels, use dialogue mode, use playback functions and enable cable/satellite box functions.

Programming the universal remote control
The universal remote control has four programmable source buttons ( , AUX, and ). You can program these buttons to control your TV, cable/satellite box, DVD or Blu-ray Disc™ player, game system, DVR or other auxiliary source by entering the code for your source’s brand. There may be several codes for your source. You may need to perform this procedure multiple times to locate the correct code.
Locate the code
- Power on your source.
- Locate the code for your source’s brand in the Universal Remote Control Setup Guide (provided).
Enter the code
- On the remote control, press and hold the appropriate source button (, AUX, and ) until all six source buttons glow, then release. For example, to program your TV, press and hold until all six source buttons glow, then release. The appropriate source button continues to glow.
- On the number keypad, enter the code for your source’s brand and press .
Test the code
- Test the source for basic functions by following the instructions for your source:
- Based on your source’s response to basic functions:
Note: Your source may not be compatible with universal remote controls or may not accept IR (infrared) signals. Refer to your source owner’s guide for more information.
Customizing the power button
You can customize the power button on your remote control to power on/off your soundbar, TV and another source simultaneously.
- Program your remote control to control your TV and source.
- Press and hold and the appropriate source button simultaneously for 10 seconds until both buttons flash three times.
Resyncing your source and TV
After customizing the power button, your source and TV may become out of sync and not power on/off simultaneously. Use the following steps to resync the system.
- Press the source button for the source that is out of sync.
- Press to power on/off the source.
- Press .
Your sources power on/off simultaneously.
Programming a non-Bose remote control
You can program a non-Bose remote control, such as your cable/satellite box remote, to control the soundbar. Refer to your non-Bose remote control owner’s guide or cable/ satellite website for instructions.
Once programmed, the non-Bose remote controls basic functions such as power on/off and volume.
Note: The non-Bose remote must be able to send IR (infrared) signals to control the soundbar.
SETTING UP SOUNDTOUCH®
The SoundTouch® app lets you set up and control SoundTouch® from your smartphone, tablet or computer. Using the app, your smart device acts as a remote for the soundbar.
From the app, you can manage your SoundTouch® settings, add music services, explore local and global Internet radio stations, set and change presets and stream music. New features are added periodically.
Note: If you have already set up SoundTouch® for another speaker, see «Add the soundbar to an existing account».
Download and install the SoundTouch® app
On your smartphone or tablet, download the Bose® SoundTouch® app.
SoundTouch® app
Follow the instructions in the app to complete setup, including adding the soundbar to your Wi-Fi network, creating a SoundTouch® account, adding a music library and using music services.
Once you set up the soundbar on your home Wi-Fi network, you can control it from any smartphone or tablet on the same network.
Note: For instructions on using a computer for setup, see instructions below.
Tip: Once you set up the soundbar on your home Wi-Fi network, you can control it from any smartphone or tablet on the same network. Download the SoundTouch® app on the smart device. You must use the same SoundTouch® account for all devices connected to your soundbar.
SoundTouch® Owner’s Center
global.Bose.com/Support/ST300
This website provides access to the owner support center, which includes: owner’s manuals, articles, tips, tutorials, a video library, and the owner community where you can post questions and answers.
Add the soundbar to an existing account
If you have already set up SoundTouch® on another speaker, you do not need to download the SoundTouch® app again.
From within the app, select > Settings > Add or Reconnect Speaker.
The app guides you through setup.
Connect the soundbar to a new network
If your network information changes, add your soundbar to your new network. You can do this by putting your soundbar into setup mode.
- From within the app, select > Settings > Speaker Settings and select your soundbar.
- Select CONNECT SPEAKER. The app guides you through setup.
USING THE SOUNDTOUCH® APP
You can personalize six presets to your favorite streaming music services, stations, playlists, artists, albums or songs from your music library. You can access your music, at any time, with a simple touch of a button using the SoundTouch® app.
Before using presets, note the following:
- You can set presets from the app and the remote control.
- If the preset source is your music library, make sure the computer storing your music library is on and connected to the same network as the soundbar.
- You cannot set presets to a Bluetooth stream.
Setting a preset
- Stream music to the soundbar using the app.
- On the remote control, press the SoundTouch® button .
- While the music is playing, press and hold a preset (1 – 6) on the remote control until the soundbar emits a tone.
Note: For information on using the SoundTouch® app to set and change your presets, visit global. Bose.com/Support/ST300
Playing a preset
Once you personalize your presets, press a preset on the remote control to play music.
- On the remote control, press the SoundTouch® button .
- Press a preset (1 – 6) on the remote control to play that preset.
Note: If you don’t hear music and the SoundTouch® indicator on the soundbar double blinks amber, see «Setting a preset».
USING THE SOUNDBAR
Source selection
You can switch between sources by selecting different inputs on your TV using the remote control. For information on connecting to a device paired via Bluetooth.
Notes:
- Press the button for the source you want to control. The source button glows.
- Press . The source powers on.
- If the source is connected to your TV, press and select the correct input on your TV.
Adjusting the volume
On the remote control:
Adjusting the bass setting
You can adjust the soundbar’s bass setting using the SoundTouch® app or the remote control.
- On the remote control, press .
The indicators on the soundbar glow to show the current bass setting, as shown below.
| Bass setting | Indicator activity |
| +4 | |
| +3 | |
| +2 | |
| +1 | |
| 0 (default) | |
| -1 | |
| -2 | |
| -3 | |
| -4 |
- On the remote control:
- Press . The soundbar saves your settings.
Note: For optimal sound quality for dialogue-only programs, such as news and talk shows, see «Dialogue mode».
Resetting the bass setting
On the remote control, press and hold until the SoundTouch® indicator on the soundbar blinks twice.
The bass setting resets to original factory settings.
Function buttons
The red, green, yellow and blue buttons on the remote control correspond with the color-coded function buttons on your cable/satellite box or teletext functions.
- Cable/satellite box functions: refer to your cable/satellite box owner’s guide.
- Teletext functions: correspond with color-coded page numbers, headings or shortcuts on a teletext display.
Dialogue mode
Dialogue mode improves the clarity of dialogue and vocals in movies, TV programs and podcasts by adjusting the tonal balance of the system.
On the remote control, press the dialogue mode button to toggle between dialogue mode and your default audio settings.
The status indicator for the current source glows green when dialogue mode is enabled.
Note: Turning off the soundbar disables dialogue mode.
Persistent dialogue mode
You can set the system so that turning off the soundbar doesn’t disable dialogue mode.
To enable or disable persistent dialogue mode, on the remote control, press and hold until the status indicator for the current source double blinks green (see «System status indicators»).
Auto-wake
You can set the soundbar to power on whenever a sound signal is received. This is most useful when connecting to the TV using the optical cable, as most HDMI™ ARC connections enable this feature by default.
To toggle between auto-wake and default power settings, on the remote control, press and hold until the soundbar emits a tone. A rising tone means that auto-wake is enabled, and a falling tone means that auto-wake is disabled.
Bluetooth® TECHNOLOGY
Bluetooth wireless technology lets you stream music from mobile devices such as smartphones, tablets and laptop computers. Before you can stream music from a mobile device, you must pair the mobile device with the soundbar.
Choosing your pairing method
You can pair your mobile device with the soundbar using Bluetooth wireless technology or Near Field Communication (NFC).
What is NFC?
NFC uses Bluetooth technology to let two devices establish wireless communication with each other by simply tapping the devices together. Refer to your mobile device owner’s guide to see if your model supports NFC.
| If your mobile device does not support Bluetooth pairing via NFC or if you are unsure: | Follow the instructions for «Pairing your mobile device». |
| If your mobile device supports Bluetooth pairing using NFC: | Follow the instructions for «Pairing your mobile device with NFC». |
Note: If your device supports Bluetooth pairing via NFC, you can use either pairing method.
Pairing your mobile device
- On the remote control, press and hold the Bluetooth button until the Bluetooth indicator on the soundbar blinks blue.
- On your mobile device, turn on the Bluetooth feature.
Tip: The Bluetooth feature is usually found in the Settings menu. - Select your SoundTouch® soundbar from the device list.
Once paired, on the soundbar glows solid white, the soundbar emits a tone and the system’s name appears connected in the device list.

Pairing your mobile device with NFC
- With the soundbar powered on, unlock your mobile device and turn on the Bluetooth and NFC features. Refer to your mobile device owner’s guide to learn more about these features.
- Gently tap the NFC touchpoint on your mobile device to the top of the soundbar behind the Bose® logo.
Your mobile device may prompt you to accept pairing.
Once paired, the Bluetooth indicator on the soundbar glows solid white and the soundbar emits a tone.

Connecting to a paired device
You can stream audio from a mobile device to the soundbar.
Note: If there are multiple mobile devices stored in the soundbar’s pairing list, it may take a minute or two for the paired device to connect. The soundbar’s Bluetooth indicator shows connection status.
- On the remote control, press the Bluetooth button . The soundbar connects to the last mobile device that streamed to the soundbar.
- On the mobile device, play music.
If you can’t stream audio from a paired device
The soundbar may have lost the connection to the mobile device. Check the soundbar’s Bluetooth indicator. If the paired device is out of range of the soundbar, move the device within range.
Disconnecting a mobile device
- Turn off the Bluetooth feature on your mobile device.
- If your mobile device supports NFC, tap the NFC touchpoint on your mobile device to the top of the soundbar behind the Bose® logo.
Reconnecting a mobile device
- When powered on, the soundbar tries to reconnect with the most recently-connected mobile device.
Note: The mobile device must be within range and powered on. - If your mobile device supports NFC, tap the NFC touchpoint on your mobile device to the top of the soundbar behind the Bose® logo.
Clearing the soundbar’s pairing list
You can store up to eight paired mobile devices in the soundbar’s pairing list.
- On the remote control, press and hold the Bluetooth button for 10 seconds until the Bluetooth indicator on the soundbar double blinks white. The soundbar emits a tone.
- Delete your SoundTouch® 300 soundbar from the Bluetooth list on your mobile device.
All mobile devices are cleared and the soundbar is ready to pair a new mobile device.
GETTING SYSTEM INFORMATION
System status indicators
The front of the soundbar has a series of indicators that show system status.

Wi-Fi® indicator
Shows the Wi-Fi connection status of the system.
| Indicator activity | System state |
| Blinking white | Connecting to Wi-Fi network |
| Solid white (dim) | Power saving mode and connected to Wi-Fi network |
| Solid white (bright) | System is on and connected to Wi-Fi network |
| Amber | System is in setup mode |
TV indicator
Shows the connection status of the TV source and all sources connected to your TV or the soundbar.
SoundTouch® indicator
| Indicator activity | System state |
| Blinking white | Connecting to a SoundTouch® source |
| Solid white | System is playing a SoundTouch® source |
| Solid amber | • Station or library not found • Invalid account • General error • Station or service unavailable |
| Double blink amber | • Preset empty • Skip limit reached |
| Solid green | SoundTouch® is selected as the current source and dialogue mode is enabled |
| Double blink green | SoundTouch® is selected as the current source and persistent dialogue mode is enabled. |
Bluetooth indicator
Shows the connection status for mobile devices paired via Bluetooth.
| Indicator activity | System state |
| Blinking blue | Ready to connect |
| Blinking white | Connecting |
| Double blink white | Pairing list cleared |
| Solid white | Connected |
| Solid green | Connected and dialogue mode is enabled |
| Double blink green | Connected and persistent dialogue mode is enabled. |
Connectivity indicator
Shows the connection status between the soundbar and the optional Acoustimass® 300 wireless bass module or Virtually Invisible® 300 wireless surround speakers.
| Indicator activity | System state |
| Blinking white | Connecting |
| Solid white | Connected to the bass module, surround speakers or both |
| Solid amber | Disconnected from the bass module, surround speakers or both |
| Blinking amber | Both surround speakers are set to the same channel, such as L (left) or R (right) |
ADVANCED FEATURES
Updating system software
The SoundTouch® app alerts you when a software update is available for the soundbar. You can update the system software using the app or the remote control.
- On the remote control, press the SoundTouch® button .
- Press and hold the Closed Captioning button until the Wi-Fi indicator , TV indicator , SoundTouch® indicator and Bluetooth indicator on the soundbar blink white.
The soundbar restarts when the update is complete.
Note: The update may take up to several minutes.

Disabling Wi-Fi capability
Disabling Wi-Fi also disables the Bluetooth feature.
- On the remote control, press the SoundTouch® button .
- Press and hold O until the Wi-Fi indicator , TV indicator , SoundTouch® indicator and Bluetooth indicator on the soundbar blink white.
When Wi-Fi is disabled, on the soundbar turns off.

Re-enabling Wi-Fi capability
Re-enabling Wi-Fi also re-enables the Bluetooth feature.
- On the remote control, press the SoundTouch® button .
- Press and hold O until , , and on the soundbar blink white.
Resetting the soundbar
Factory reset clears all source, volume, network and ADAPTiQ® audio calibration settings from the soundbar and returns it to original factory settings.
- On the remote control, press the SoundTouch® button .
- Press and hold the TeleText button for 10 seconds until the Wi-Fi indicator , TV indicator , SoundTouch® indicator and Bluetooth indicator on the soundbar blink white.
The soundbar restarts and on the soundbar glows amber (setup mode) when the reset is complete.
- To restore the soundbar’s network and audio settings:
- Launch the SoundTouch® app on your smartphone or tablet and add the system to your network.
- Run ADAPTiQ audio calibration.

ALTERNATE SETUP
Alternate setup methods
You may need to use an alternate setup method to resolve the following problems:
| Symptom | Solution |
| No available HDMI™ inputs on your TV for sources | Follow the instructions for «Connecting a source to the soundbar». |
| No sound or poor sound quality from a source connected to your TV | Follow the instructions for «Playing audio directly from a source connected to the soundbar». |
| Can’t set up the SoundTouch® app on a smartphone or tablet | Follow the instructions for «Setting up your soundbar using a computer». |
Connecting a source to the soundbar
Some TVs have too few HDMI inputs for all of your sources.
If the soundbar is connected to your TV’s HDMI ARC connector, you can resolve this problem by connecting one source to the soundbar’s HDMI IN connector with a s econd HDMI cable (not provided).
Note: Make sure that the soundbar is connected to your TV’s HDMI ARC connector before connecting a source to the soundbar. If the soundbar is connected to your TV’s optical connector only, you won’t see video from the source.
- Insert one end of an HDMI cable into your source’s HDMI (OUT) connector.
- Insert the other end of the HDMI cable into the HDMI IN connector on the back of the soundbar.
- Program the universal remote control to control your source.
- Select your source using the remote control.
Note: You must select the TV input to which the soundbar is connected.

Playing audio directly from a source connected to the soundbar
Some TVs don’t deliver audio from connected sources to the soundbar. Other TVs reduce the quality of surround sound audio from connected sources before delivering it to the soundbar.
This can cause you to hear no sound or poor sound quality from a source connected to your TV.
To resolve these problems, you can connect the source to the soundbar’s HDMI IN connector and select the appropriates ettings in the SoundTouch® app to play surround sound audio directly from the source.
- Connect a source to the soundbar (see «Connecting a source to the soundbar»).
- Select the appropriate system settings in the SoundTouch® app to play surround sound audio directly from the source. For more information, visit global. Bose.com/Support/ST300
Setting up your soundbar using a computer
You can set up your soundbar using a computer rather than a smartphone or tablet.
Before you begin
- Position your soundbar next to your computer.
- Make sure your computer is on your Wi-Fi network.
- Obtain a USB A to USB Micro B cable (not provided).
Notes:
- A USB A to USB Micro B cable is commonly used for charging mobile devices. You can also purchase this part at your local electronics store.
- The USB connector on the back of your soundbar is for computer setup only. The USB connector is not designed to charge smartphones, tablets, similar devices or the soundbar itself.
Computer Setup
During setup, the app prompts you to temporarily connect the USB cable from the computer to your soundbar. Do not connect the USB cable until the app instructs you to do so.
- Plug the power cord into an AC (mains) power outlet.
- On your computer, open a browser and go to:
global. Bose.com/Support/ST300
Tip: Use the computer where your music library is stored. - Download and run the SoundTouch® app. The app guides you through setup.
- After setup is complete, disconnect the USB cable from your computer and from your soundbar. Move your soundbar to its permanent location.
CARE AND MAINTENANCE
Cleaning
Do not allow liquids to spill onto the system or into any openings.
- Clean the exterior of the system with the provided cleaning cloth or another soft, dry cloth.
- Do not use any sprays near the system.
- Do not use any solvents, chemicals or cleaning solutions containing alcohol, ammonia or abrasives.
- Do not allow objects to drop into any openings.
Customer service
For additional help using the system:
- Visit global.Bose.com/Support/ST300
- Contact Bose customer service.
Limited warranty
Your system is covered by a limited warranty. Details of the limited warranty are provided on the product registration card that is in the carton. Please refer to the card for instructions on how to register. Failure to register will not affect your limited warranty rights.
The warranty information provided with this product does not apply in Australia and New Zealand. See our website at www.Bose.com.au/warranty or www.Bose.co.nz/warranty for details of the Australia and New Zealand warranty.
Technical information
Input power rating:
100-240V 50/60 Hz, 65W
TROUBLESHOOTING
If you experience problems with your soundbar:
- Connect the soundbar and optional bass module or surround speakers to AC (mains) power.
- Secure all cables.
- Verify the state of the system status indicators.
- Move the soundbar and optional bass module or surround speakers away from possible interference (wireless routers, cordless phones, televisions, microwaves, etc.).
- Move the soundbar within the recommended range of your wireless router or mobile device for proper operation.
- Place the soundbar according to the placement guidelines.
If you could not resolve your issue, see the table below to identify symptoms and solutions to common problems. If you are unable to resolve your issue, contact Bose customer service.
Common solutions
The following table lists symptoms and possible solutions to common problems.
| Symptom | Solution |
| No HDMI™ ARC or optical connector on your TV |
|
| No power |
|
| Remote control is inconsistent or does not work |
|
| Soundbar doesn’t pair with Acoustimass® 300 wireless bass module or Virtually Invisible® 300 wireless surround speakers |
|
| Intermittent or no audio |
|
| Sound is coming from your TV speaker |
|
| Poor or distorted sound |
|
| Bass is too heavy or low |
|
| No available HDMI™ inputs on your TV for sources |
|
| Soundbar doesn’t play audio from the correct source or selects the incorrect source after a delay |
|
| No video from a source connected to the soundbar’s HDMI IN connector |
• Select the TV input to which the soundbar is connected. • Make sure that the soundbar’s HDMI cable is inserted into a connector on your TV labeled ARC or Audio Return Channel. Do not plug a source into the soundbar’s HDMI IN connector when connecting to your TV using the optical cable. • Unplug the power cords for the soundbar and your source, wait 15 seconds and plug them firmly into a live AC (mains) outlet. |
| Can’t complete network setup |
|
| Can’t connect to network |
|
| Soundbar doesn’t pair with mobile device |
|
| Soundbar doesn’t pair with NFC- enabled device |
|
ADAPTiQ® audio calibration error messages
Listen to the voice prompts for the following error messages:
| Error message | Problem | What to do |
| 1 | The microphone on the ADAPTiQ® headset cannot detect sound |
|
| 2 | The room is too loud |
|
| 3 | The ADAPTiQ headset is too close to the speakers |
|
| 4 | The listening locations are too similar |
|
| 5 | The ADAPTiQ headset cannot take measurements due to movement |
|
After correcting your problem, you must restart ADAPTiQ audio calibration.
If you hear a different error message, contact Bose® customer service.
Videos
Bose SoundTouch 300 Soundbar — REVIEW VIDEO
Documents / Resources
References
Download manual
Here you can download full pdf version of manual, it may contain additional safety instructions, warranty information, FCC rules, etc.
Download Bose SoundTouch 300 SoundBar Manual
Bose SOUNDTOUCH 300 Manuals come in various types, each serving a specific purpose to help users effectively operate and maintain their devices. Here are the common types of Bose SOUNDTOUCH 300 User Guides and the information they typically include:
- User Manuals: Provide comprehensive instructions on how to use the device, including setup, features, and operation. They often include troubleshooting tips, safety information, and maintenance guidelines.
- Service Instructions: Designed for technicians and repair professionals, these manuals offer detailed information on diagnosing and repairing issues with the device. They include schematics, parts lists, and step-by-step repair procedures.
- Installation Guides: Focus on the installation process of the device, providing detailed instructions and diagrams for proper setup. They are essential for ensuring the device is installed correctly and safely.
- Maintenance Manuals: Provide guidance on routine maintenance tasks to keep the device in optimal condition. They cover cleaning procedures, part replacements, and regular servicing tips.
- Quick Start Guides: Offer a concise overview of the essential steps needed to get the device up and running quickly. They are ideal for users who need immediate assistance with basic setup and operation.
Each type of Bose SOUNDTOUCH 300 instruction is designed to address specific needs, ensuring users have the necessary information to use, maintain, and repair their devices effectively.