
Перейти к контенту
Швейные машинки Brother
- Размер инструкции: 1.36 Мб
- Формат файла: pdf
Если вы потеряли инструкцию от швейной машинки Brother LS-1520, можете скачать файл для просмотра на компьютере или печати.
Инструкция для швейной машинки Brother LS-1520 на русском языке. В руководстве описаны возможности и полезные функции, а также правила эксплуатации. Перед использованием внимательно ознакомьтесь с инструкцией.
Чтобы не читать всю инструкцию вы можете выполнить поиск по содержимому внутри инструкции и быстро найти необходимую информацию. Рекомендации по использованию помогут увеличить срок службы швейной машинки Brother LS-1520. Если у вас появилась проблема, то найдите раздел с описанием неисправностей и способами их решения. В нем указаны типичные поломки и способы их решения.
Раздел: Швейное Оборудование
Тип: Швейная Машина
Характеристики, спецификации
Тип управления:
электромеханическое
Отключение механизма подачи ткани:
есть
Система измерения размера пуговиц:
есть
Количество швейных операций:
14
Выполнение петли:
полуавтомат
Строчки:
потайная, эластичная, эластичная потайная
Максимальная длина стежка:
4 мм
Максимальная ширина стежка:
5 мм
Лапки:
для вшивания молнии
Автоматическая вставка нити:
есть
Отсек для аксессуаров:
есть
Переключатель положения иглы (верх/низ):
есть
Инструкция к Швейной Машиной Brother LS 1520
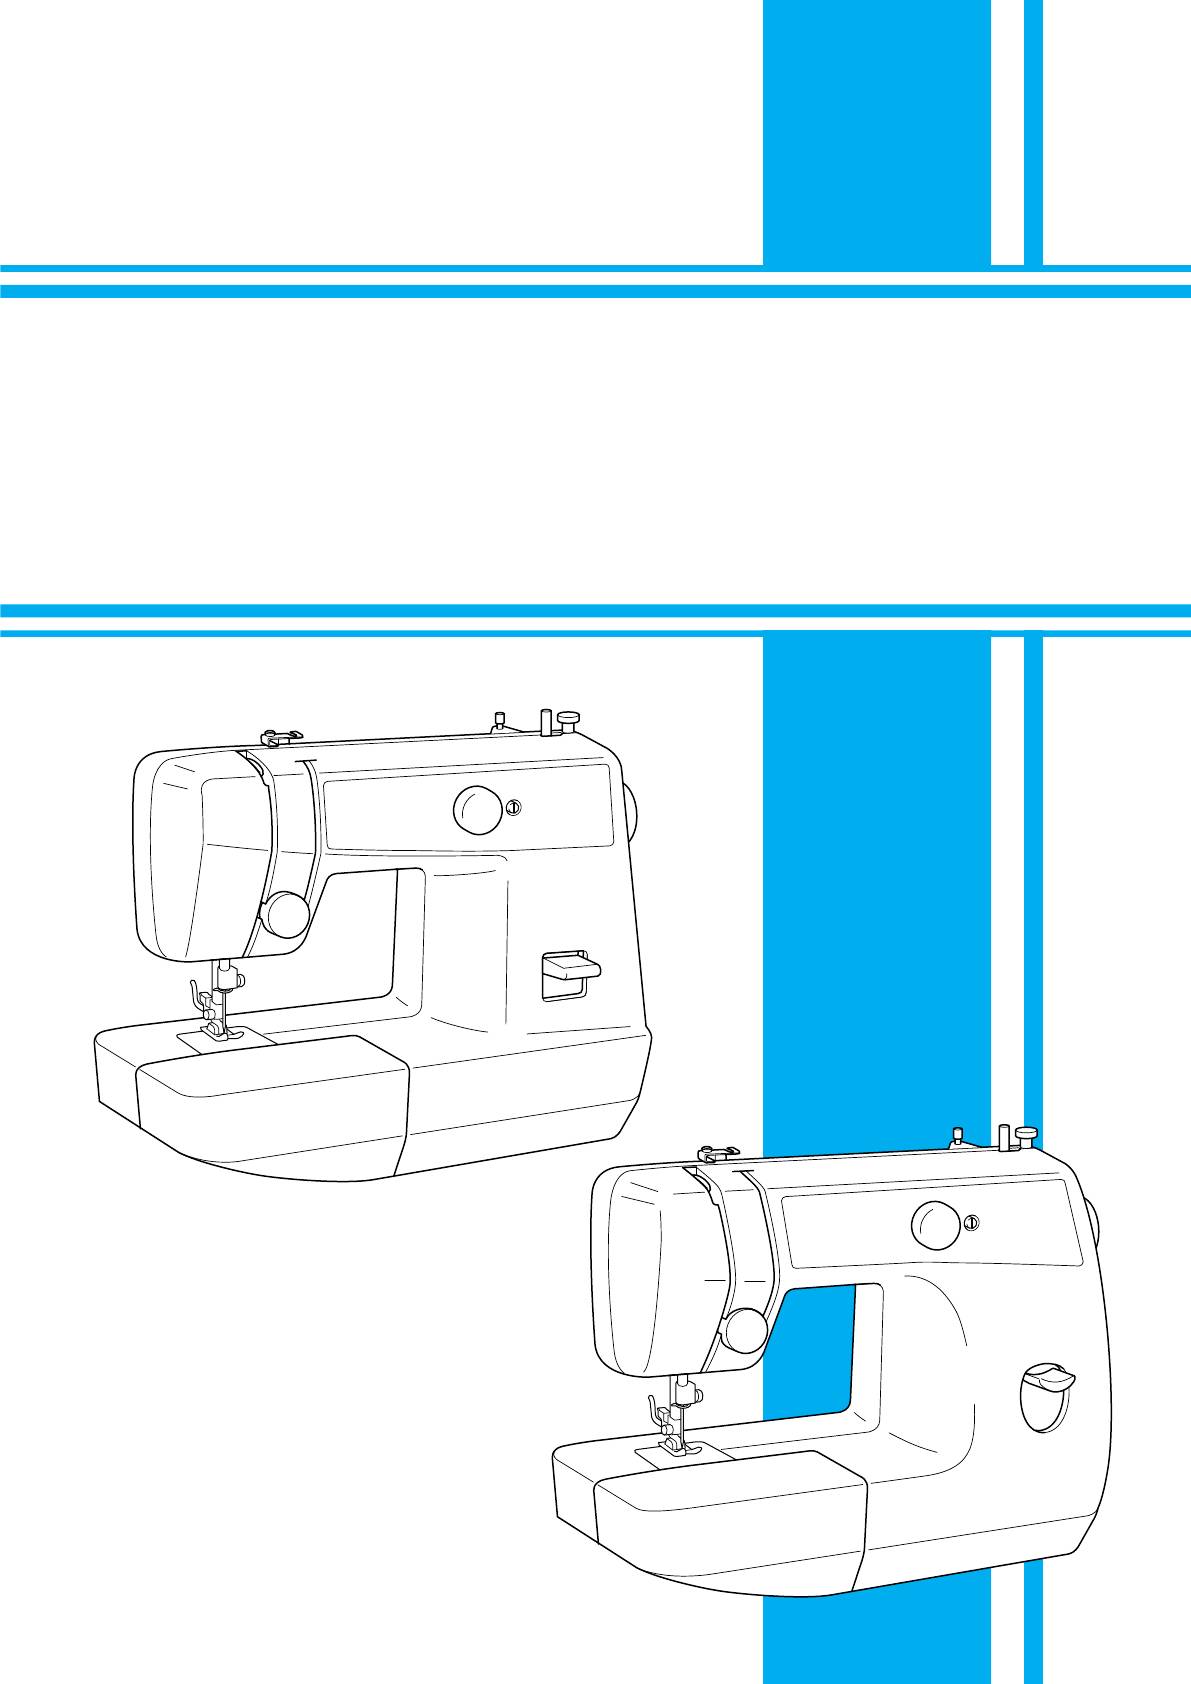
Black
PMS8363
Instruction Manual
Manuel d’instructions
Manual de instrucciones
Инструкция по эксплуатации
«IMPORTANT SAFETY INSTRUCTIONS»
When using the sewing machine, basic safety precautions should always be followed,
including the following:
«Read all instructions before using.»
DANGER – To reduce the risk of electric shock:
1. The sewing machine should never be left unattended when plugged in. Always unplug this sewing machine from the electrical
outlet immediately after using and before cleaning.
2. Always unplug before changing the light bulb. Replace bulb with same type rated 15 watts.
WARNING – To reduce the risk of burns, fire, electric shock, or injury to persons:
1. Do not allow this machine to be used as a toy. Close attention is necessary when the sewing machine is used by or near children.
2. Use this sewing machine only for its intended use as described in this manual. Use only accessories recommended by the
manufacturer as contained in this manual.
3. Never operate this sewing machine if it has a damaged cord or plug, if it is not working properly, if it has been dropped or damaged,
or dropped into water. Return the sewing machine to the nearest authorized dealer or service center for examination, repair,
electrical or mechanical adjustment.
4. Never operate the sewing machine with any of the air openings blocked. Keep the ventilation openings of the sewing machine and
foot controller free from the accumulation of lint, dust and loose cloth.
5. Never drop or insert any object into any openings.
6. Do not use this machine outdoors.
7. Do not operate this machine where aerosol (spray) products are being used or where oxygen is being administered.
8. To disconnect, turn the main switch to the symbol “O” position which represents off, then remove plug from outlet.
9. Do not unplug by pulling on the cord. To unplug, grasp the plug and pull, not the cord.
10. Keep fingers away from all moving parts. Special care is required around the sewing machine needle.
11. Always use the proper needle plate. The wrong plate can cause the needle to break.
12. Do not use a bent needle.
13. Do not pull or push the fabric while stitching. It may deflect the needle causing it to break.
14. Switch the sewing machine to the off, symbol “O” position when making any adjustments in the needle area, such as threading the
needle, changing the needle, threading the bobbin, or changing the presser foot.
15. Always unplug the sewing machine from the electrical outlet when removing covers, lubricating, or when making any other user
service adjustments mentioned in this instruction manual.
16. This sewing machine is not intended for use by young children or impaired persons without supervision.
17. Young children should be supervised to ensure that they do not play with this sewing machine.
«SAVE THESE INSTRUCTIONS»
«This sewing machine is intended for household use.»
“IMPORTANTES CONSIGNES DE SECURITE”
Lors de l’utilisation de la machine à coudre, il convient de toujours suivre les consignes de sécurité essentielles et de prendre
notamment les précautions suivantes:
“Lire toutes les instructions avant d’utiliser la machine.”
DANGER — Pour réduire le risque de décharge électrique:
1. Ne jamais laisser la machine sans surveillance lorsqu’elle est branchée. Toujours débrancher la machine à coudre après son
utilisation et avant de procéder au nettoyage.
2. Toujours débrancher la machine avant de changer l’ampoule de la lampe. Remplacer l’ampoule par une du même type, de 15
watts.
AVERTISSEMENT — Pour réduire le risque de brûlures, d’incendie, de choc électrique ou de blessures:
1. Ne pas utiliser cette machine comme un jouet. Il convient de faire particulièrement attention lorsqu’elle est utilisée par des enfants
ou dans leur entourage.
2. Ne jamais utiliser cette machine à d’autres fins que celles pour lesquelles elle a été conçue, telles que décrites dans le présent
manuel. Utiliser uniquement les accessoires recommandés par le fabricant tels que repris dans le manuel.
3. Ne jamais faire fonctionner la machine si le cordon d’alimentation ou la fiche ont été endommagés, s’il y a un problème de
fonctionnement, si elle est tombée ou a été abîmée, ou si elle a été plongée dans du liquide. Retourner la machine à coudre
auprès du revendeur autorisé ou du service technique le plus proche afin qu’il puisse l’examiner, la réparer ou effectuer certains
réglages électriques ou mécaniques.
4. Ne jamais faire fonctionner la machine si l’un des orifices de ventilation est obstrué. Veiller à ce que ces orifices et la commande
au pied ne soient jamais encombrés de peluches, poussières et morceaux de tissus.
5. Ne jamais laisser tomber ou insérer des objets dans ces ouvertures.
6. Ne pas utiliser la machine à l’extérieur.
7. Ne pas faire fonctionner la machine en cas d’utilisation de produits aérosols (vaporisateurs) ou d’administration d’oxygène.
8. Pour l’éteindre, mettre l’interrupteur principal sur le symbole “O” pour “Off”, puis retirer la fiche de la prise.
9. Ne jamais débrancher en tirant sur le cordon d’alimentation. Pour débrancher, saisir la fiche (et non le cordon) et tirer.
10. Tenir ses doigts à l’écart de toute pièce mobile. Faire tout spécialement attention a proximité de l’aiguille.
11. Toujours utiliser la plaque à aiguille adéquate. Une mauvaise plaque peut casser l’aiguille.
12. Ne jamais utiliser une aiguille tordue.
13. Ne pas tirer ou pousser le tissu en cousant. Cela peut entraver le fonctionnement de l’aiguille et causer sa rupture.
14. Eteindre la machine (mettre sur “O”) lors des réglages dans la zone de l’aiguille, tels que l’enfilage, le changement d’aiguille, la
mise en place de la canette ou le changement de pied-de-biche.
15. Toujours débrancher la machine à coudre avant de retirer les plaques de protection, de la graisser ou avant d’effectuer toute
modification accessible à l’utilisateur telles qu’elles sont reprises dans le présent manuel d’utilisation.
16. Cette machine à coudre n’est pas prévue pour être utilisée sans surveillance par de jeunes enfants ou des personnes
handicapées.
17. Surveillez les jeunes enfants, afin de vous assurer qu’ils ne jouent pas avec cette machine.
“CONSERVER CES INSTRUCTIONS”
“Cette machine à coudre est prévue pour un usage
domestique.”
“IMPORTANTES INSTRUCCIONES DE
SEGURIDAD”
Cuando se usa una máquina de coser, debe seguirse unas precauciones básicas y que se detallan a continuación.
“Leer todas las instrucciones antes de usarla”
PELIGRO — Para reducir el riesgo de una descarga eléctrica.
1. La máquina no debe dejarse nunca desatendida mientras esté conectada. Desconectar la máquina de la red cuando se termine
de usar y antes de limpiarla.
2. Desconectar la máquina de la red antes de cambiar la bombilla. Colocar una bombilla del mismo tipo con una potencia de 15
vatios.
CUIDADO — Para reducir el riesgo de quemaduras, fuego, descargas eléctricas o causar daño a las personas.
1. No usar la máquina como un juguete.
Hay que prestar atención si la máquina la usan los niños o se trabaja cerca de ellos.
2. Usar la máquina de coser solamente como se describe en este manual.
Usar únicamente los accesorios recomendados por el fabricante y que vienen especificados en este manual.
3. Nunca haga funcionar la máquina de coser si el cordón de alimentación o la clavija están deteriorados, si no funciona
correctamente, si se ha caído o si se ha mojada. Entregar la máquina de coser al centro de servicio autorizado más cercano para
que la examinen, la reparen o hagan los ajustes eléctricos o mecánicos que correspondan.
4. No usar la máquina con los orificios de ventilación bloqueados. Mantener los orificios de ventilación de la máquina de coser y el
pedal sin acumulacíon de polvo. Suciedad y restos de tejido.
5. No introducir ni insertar objetos en los orificios de ventilación.
6. No usar al, aire libre.
7. No trabajar con la máquina si se estén utilizando productos aerosoles (spray) o en lugares donde se esté administrando oxígeno.
8. Para desconectar, girar el interruptor hasta la posición del símbolo “O” que representa off, luego desconectar el enchufe de la red.
9. No desconectar el enchufe tirando del cable. Para desconectar, tirar de la clavija, no del cable.
10. Mantener los dedos alejados de todas las partes movibles de la máquina. Tener un cuidado especial con la aguja.
11. Usar siempre la placa de agujas apropiada. Una placa de agujas impropia puede producir la rotura de la aguja.
12. No usar agujas despuntadas.
13. No presionar ni tirar del tejido mientras se está cosiendo. Esto podría doblar la aguja y romperla.
14. Situar el interruptor principal de la máquina en posición “O” cuando se realice algún ajuste en el área de la aguja como
enhebrara, cambiar la aguja, cambiar la canilla, cambiar la pata prensatelas y similares.
15. Desconectar siempre la máquina de la red eléctrica cuando se retiren las tapas, para lubricar, o cuando se realice algún otro tipo
de ajuste mecánico mencionado en el manual de instrucciones.
16. Esta máquina de coser no ha sido pensada para que la usen sin supervisión niños pequeños o personas con minusvalías.
17. Evítese que los niños pequeños jueguen con la máquina.
“CONSERVE ESTE MANUAL DE
INSTRUCCIONES”
“Esta máquina de coser es para uso
doméstico”
ИНСТРУКЦИИ ПО ТЕХНИКЕ БЕЗОПАСНОСТИ
При эксплуатации швейной машины следует всегда соблюдать перечисленные ниже основные меры безопасности.
Прочтите все инструкции перед использованием
ВНИМАНИЕ! Для предотвращения возможности поражения электрическим током:
1. Никогда не оставляйте швейную машину без присмотра при вставленной в розетку вилке сетевого шнура. Сразу же
после использования швейной машины или перед ее чисткой всегда вынимайте вилку сетевого шнура из розетки.
2.
Всегда отключайте сетевой шнур перед заменой лампы подсветки. Заменяйте лампы на однотипные, мощностью 15 Вт
ПРЕДУПРЕЖДЕНИЕ! Для снижения возможности получения ожогов, возгорания, поражения
электрическим током или травм:
1. Не допускайте использования машины в качестве игрушки. Необходимо быть особенно внимательным, когда машина
используется детьми или когда во время работы на машине рядом находятся дети.
2. Используйте машину только по ее прямому назначению, как описано в настоящем руководстве. Используйте только те
принадлежности, которые рекомендованы изготовителем и указаны в данном руководстве.
3. Никогда не используйте швейную машину, если у нее поврежден сетевой шнур или вилка, если машина плохо
работает, если ее уронили или повредили, если в машину попала вода. В этих случаях машину следует отправить
официальному дилеру компании BROTHER вашего региона или в уполномоченный сервисный центр для проверки,
ремонта и наладки ее электрической или механической части.
4. Никогда не работайте на машине при закрытых вентиляционных отверстиях. Содержите вентиляционные отверстия
машины и педаль в чистоте, своевременно очищайте их от пыли, грязи, обрывков ткани и ворса.
5. Не роняйте в отверстия машины и не вставляйте в них никаких посторонних предметов.
6. Не используйте машину для работы вне помещения.
7. Не используйте машину в помещениях, в которых распыляют те или иные аэрозоли или применяют чистый кислород.
8. Для отключения машины от электрической сети установите сетевой выключатель в положение, обозначенное
символом «О», соответствующее выключению, а затем выньте вилку сетевого шнура из розетки.
9. При отключении машины от сети не вытягивайте вилку за шнур. Возьмитесь за вилку и выньте ее из электрической
розетки.
10. Держите пальцы вдали от движущихся частей машины. Особенная осторожность требуется в непосредственной
близости к игле машины.
11. Применяйте только соответствующую игольную пластину. Использование неподходящей игольной пластины может
привести к поломке иглы.
12. Не пользуйтесь погнутыми иглами.
13. Не тяните и не подталкивайте ткань во время шитья. Это может привести к отклонению иглы и ее поломке.
14. При выполнении любых операций в районе иглы, например при заправке нити в иглу, замене иглы или шпульки или
смене прижимной лапки и т. п., выключите машину, установив сетевой выключатель в положение, обозначенное
символом «О».
15. При снятии крышек, смазке или выполнении любых других регулировок, разрешенных пользователю и описанных в
данном руководстве, всегда отключайте машину от электрической сети.
16. Малолетним детям, а также физически или умственно неполноценным людям пользоваться швейной машиной без
присмотра не разрешается.
17. Следите за детьми. Не допускайте, чтобы они играли со швейной машиной.
СОХРАНИТЕ ЭТО РУКОВОДСТВО
Эта машина предназначена только для бытового
применения

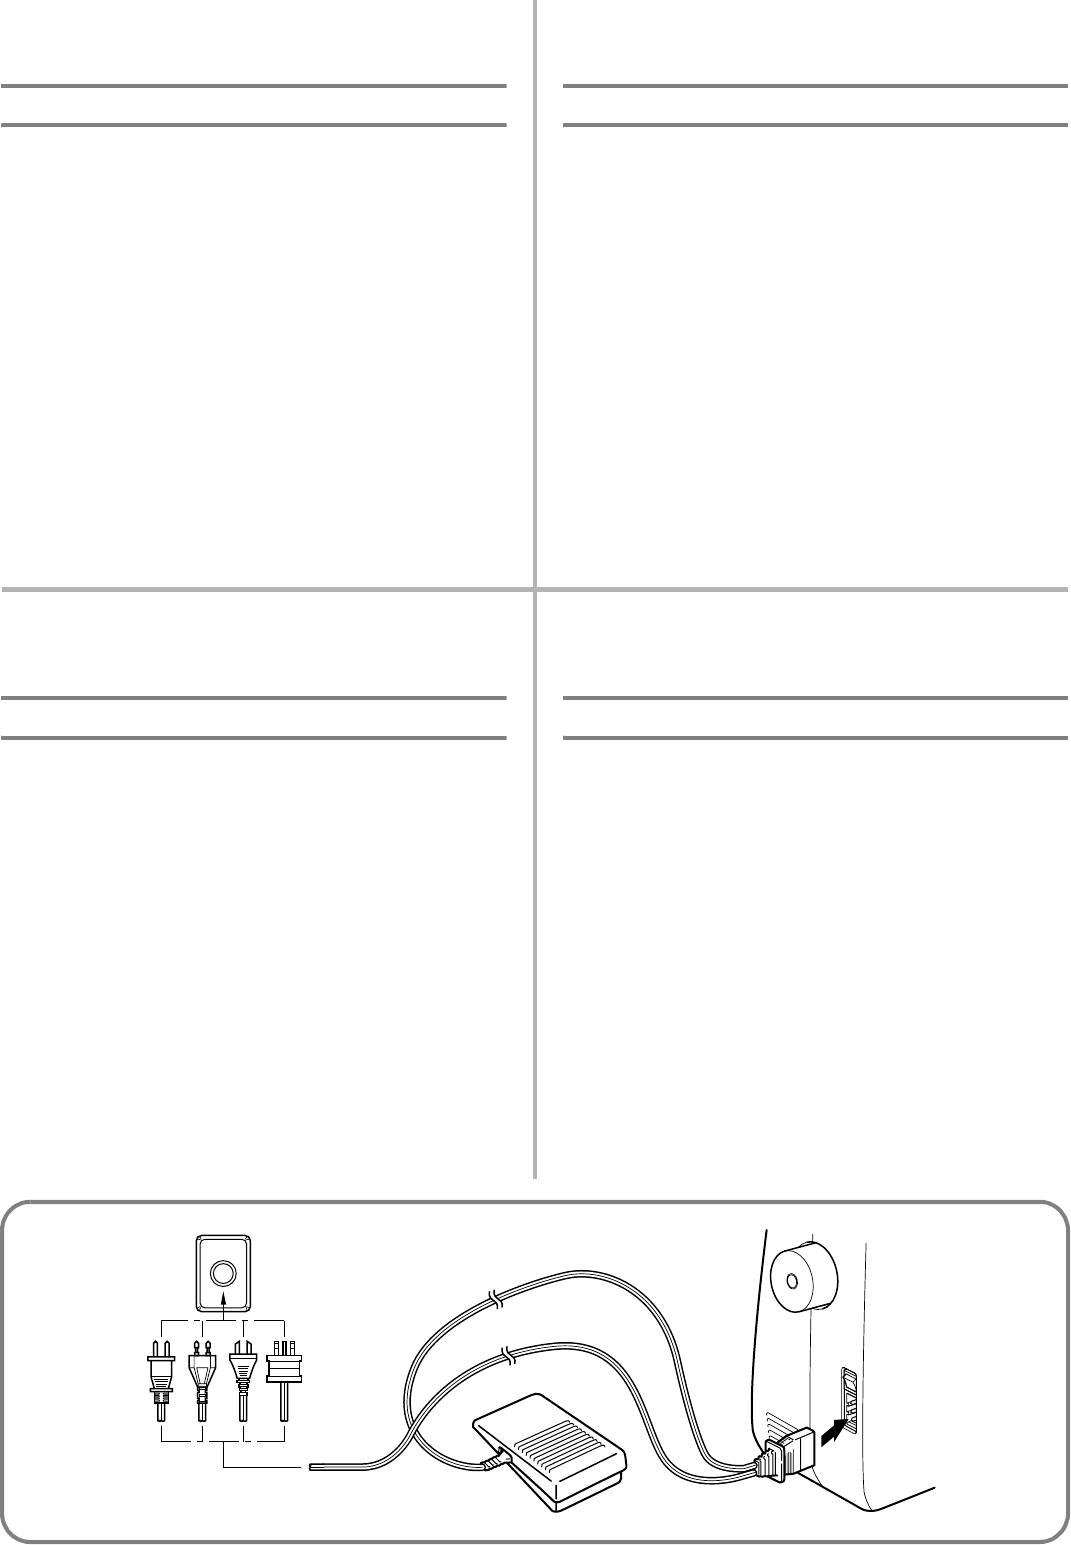
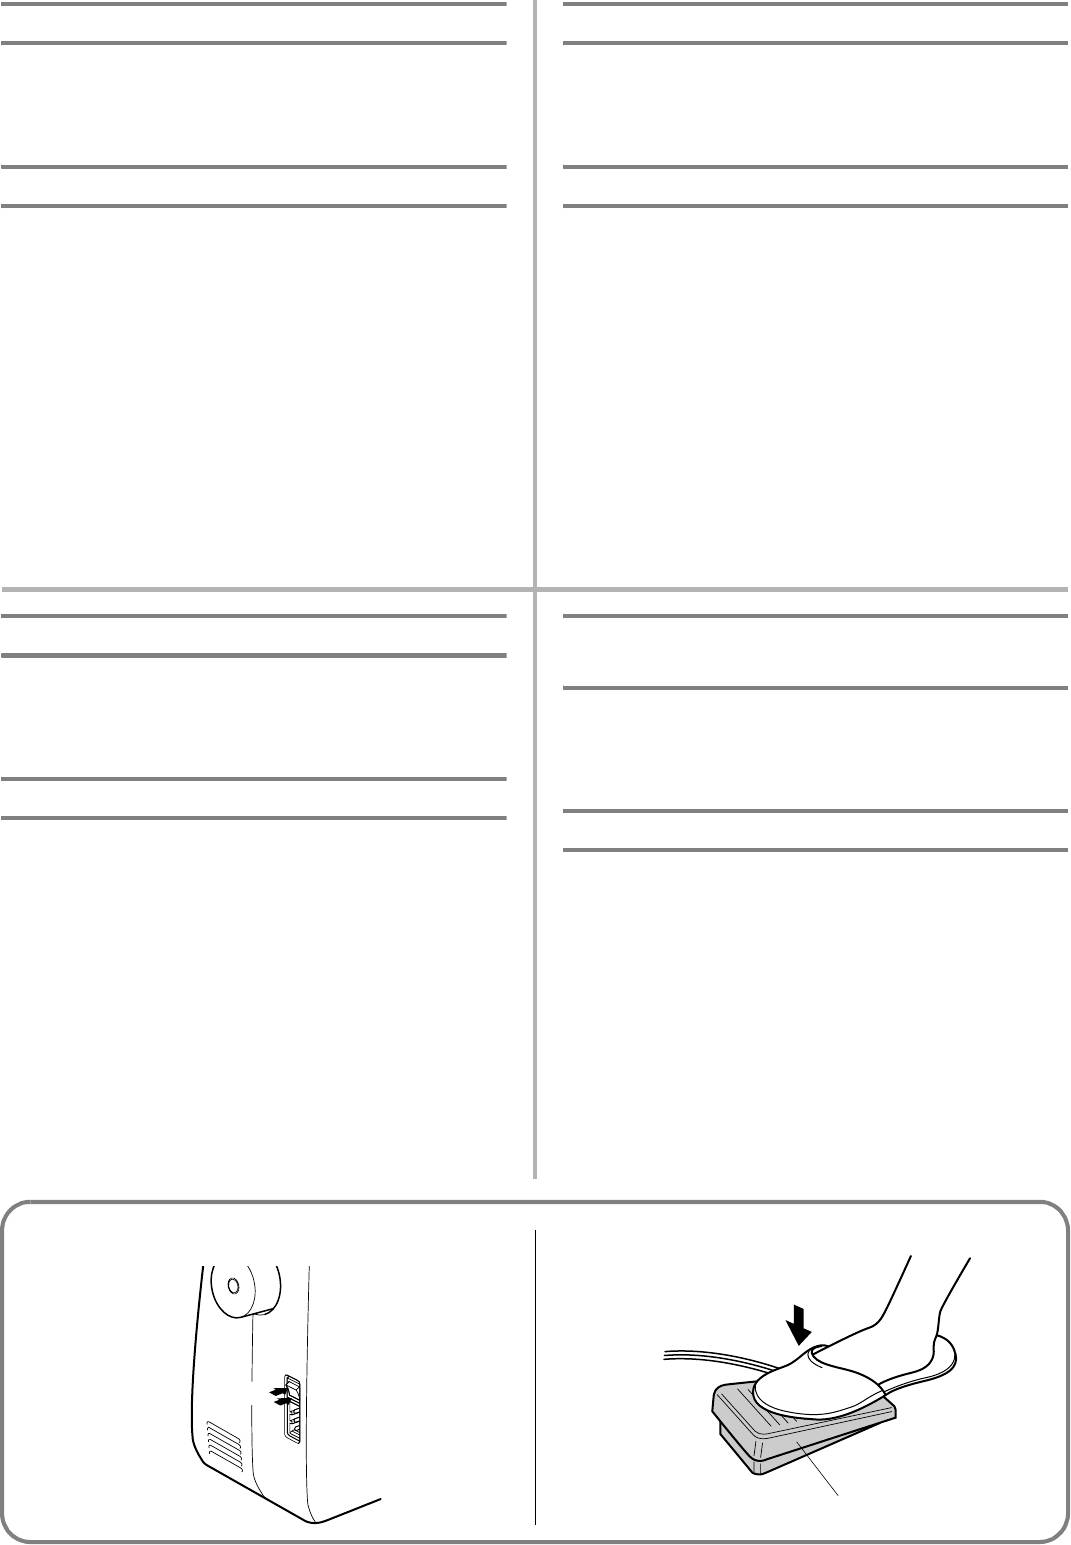
Подключение соединителей и выключатель питания/
лампочки подсветки
1
2
1. Вставьте трехконтактный разъем сетевого шнура в
Переключатель для включения или выключения сетевого
гнездо на машине.
питания и лампочки подсветки.
2. Вставьте вилку сетевого шнура в настенную розетку.
1 Включение
— Перед тем как оставить машину без присмотра,
2 Выключение
выключите ее сетевым выключателем или выньте
— При выполнении технического обслуживания
вилку сетевого шнура из настенной розетки.
швейной машины, снятии крышек и замене лампочки,
машина должна быть обесточена отключением
сетевого шнура от розетки.
CONTENTS
TABLE DES MATIÉRES
Page
Page
PRINCIPAL PARTS………………….…………….……………..…………. 1
PIECES PRINCIPALES ………………….……………..…………………….1
PRINCIPAL PARTS………………….…………….……………..…………. 2
PIÉCES PRINCIPALES ………………….……………..…………………….2
ACCESSORIES ………..……………..…………….………………………... 3
ACCESSOIRES……………..…………….……………..……………..……..3
OPERATING YOUR SEWING
FONCTIONNEMENT DE LA
MACHINE ……………..……………..…………….……………..…………. 4
MACHINE A COUDRE………………..……………..……………..……..4
Connecting Plugs …………..…………….………………………... 4
Raccordement……..…………….……………..……………..……..4
Main Power and Sewing Light Switches ………….…………. 5
Interrupteur principal et de la lampe …….……………..……..5
Foot Controller ………………………..……………..……………... 5
Pédale…………..……………..……………..…………….…………..5
Inserting the Needle …………………………………….…………. 6
Pour mettre l’aiguille en place……………………….…………..6
Checking the Needle………………..……………..……………... 6
Vérification de l’aiguille……………………………….…………..6
Changing the Presser Foot ……………..……………..…………. 7
Changement de pied-de-biche ………..…………….…………..7
Converting to Free-Arm Style……………….……………..……. 8
Modèle bras libre……………….……………..……………..……..8
Steadying the Machine ……………..……………..……………... 8
Pour stabiliser la machine………………………..……………....8
VARIOUS CONTROLS ………………………….……………..…………. 9
DESCRIPTIF DES DIFFERENTES COMMANDES…………………...9
Pattern Selection Dial………….……………..……………..……. 9
Sélecteur de modèle de point………….…………….…………..9
PATTERNS AND STITCH NAMES………………………………..….. 10
MOTIFS ET NOMS DES POINTS………………….……………..……10
Reverse Sewing Lever……..…………….……………..……….. 12
Levier de couture en marche arrière…………..……………..12
THREADING THE MACHINE …………….……………………….….. 12
ENFILAGE DE LA MACHINE……………………….……………..……12
Winding the Bobbin ………………………………………….….. 12
Remplissage de la canette………………………..……………..12
Lower (bobbin) Threading ………………………..……………. 14
Mise en place du fil inférieur (canette) ………………………14
Upper (Needle) Threading…………………..…………………. 15
Mise en place du fil supérieur
(fil de l’aiguille)………………….……………..……………..……15
Drawing Up Lower (bobbin) Thread……..……………..….. 17
Remontée du fil inférieur (canette) ……………………………17
Twin-Needle Sewing …………..……………………….……….. 18
Couture avec l’aiguille jumelée…………………………..……18
Thread Tension …..……………..……………..…………………. 20
Tension des fils ……………………….……………………….……20
RELATIVE CHART OF SEWING FABRICS,
NEEDLES AND THREADS COMBINATIONS…………………….. 22
TABLEAU DES COMBINAISONS TISSU/AIGUILLE/FIL ……….22
Straight Stitching ..……………………….………………………. 24
Point droit……………….……………..……………..……………..24
Zigzag Stitching………………….……………..……………..….. 26
Points zigzag……………………..……………………….…………26
Blind Hem Stitching ……….…………….……………..……….. 27
Point élastique invisible ……………………………….…………27
Elastic Stitching ……………..…………….………………………. 28
Point élastique ……………………………..…………….…………28
Shell Tuck Stitching…..……………..……………..……………. 29
Point picot ……………………………..……………..……………..29
Making a Buttonhole …………………….……………..……….. 30
Création d’une boutonnière ……………………………….……30
Buttonhole Fine Adjustment ……………………..……………. 34
Equilibrage des boutonnières ………….…………….…………34
Button Sewing ……………….…………….……………..……….. 35
Pour coudre un bouton …..……………..…………….…………35
Zipper Insertion………..……………..……………..……………. 36
Insertion de fermeture à glissière……………….……………..36
Gathering……………………………….……………………….….. 37
Pour froncer un tissu ………………..……………..……………..37
Darning.…………….……………..……………..……………..….. 38
Reprisage ………………………….……………..……………..……38
Appliques………………..……………..……………………….….. 39
Appliques ..……………..……………..……………………….……39
Monogramming and Embroidering ..……………..……….. 40
Monogrammes et broderies…………….…………….…………40
Changing the Bulb………….…………….……………..……….. 42
Remplacement de l’ampoule……..……………..……………..42
Oiling………………..……………..……………..……………..….. 43
Graissage ………………..……………..……………………….……43
Cleaning………………….……………..……………..……………. 43
Nettoyage …………..…………….……………………….…………43
Performance Checklist…………………..………………………. 45
Liste de vérification en cas de défaillances…………………45
PERFORMANCE CHECK LIST……………………………..….. 46
LISTE DE VERIFICATION EN CAS DE DEFAILLANCES…48
Repacking the Machine…………….……………..……………. 54
Emballage de la machine ..……………..…………….…………54
INDEX………..………..……….………..………..………..………..………..……. 55
INDEX..………..………..………..……….………..………..………..………..…..56
INDICE
СОДЕРЖАНИЕ
Página
Стр.
ELEMENTOS PRINCIPALES……..………..………..………..………..….. 1
ОСНОВНЫЕ ЧАСТИ…………………………………………..……… 1
ELEMENTOS PRINCIPALES……..………..………..………..………..….. 2
ОСНОВНЫЕ ЧАСТИ…………………………………………..……… 2
ACCESORIOS………….………..………..………..………..………..………..….. 3
ПРИНАДЛЕЖНОСТИ…………………………..……………………. 3
FUNCIONAMIENTO DE LA MÁQUINA DE COSER ………….…..4
РАБОТА НА ШВЕЙНОЙ МАШИНЕ …………………………….. 4
Conexión de los enchufes .………..………..……….………..……….... 4
Подключение электропитания ……….……………….……… 4
Interruptor principal y de luz …..………..……….………..……….... 5
Выключатель питания и лампочки подсветки …..……… 5
Pedal………..………..………..………..………..……….………..……….... 5
Педаль .…………………….……………….……….………….……… 5
Inserción de la aguja ………..………..………..………..………..………6
Установка иглы .…….…………………….………………………... 6
Comprobación de la aguja ..………..………..………..………..………6
Проверка иглы ………….……………….…………………….……. 6
Cambio del prensatelas ………..………..………..………..………..….. 7
Замена прижимной лапки …..………..……….………..……… 7
Conversión en modalidad de brazo libre…………..………..………8
Переоборудование машины для работы с функцией
Para estabilizar la máquina ……..………..……….………..……….... 8
«свободный рукав»……………………….………………………… 8
DISTINTOS MANDOS ………….………..…………..……………………….... 9
Обеспечение устойчивости машины ..….……….…..….…. 8
Selector de puntadas ………..………..………..………..………..………9
ОРГАНЫ УПРАВЛЕНИЯ…………………………………………….. 9
DIBUJO Y NOMBRE DE LOS PUNTOS …………….………..………..11
Ручка выбора вида строчки …………….……………….……… 9
Palanca de retroceso ……………………..………..………..………..… 12
НАИМЕНОВАНИЯ СТРОЧЕК И СООТВЕТСТВУЮЩИЕ
ИМ ПОЗИЦИИ ПЕРЕКЛЮЧАТЕЛЯ ……………..…………… 10
ENHEBRADO DE LA MÁQUINA………………..………..………..…….13
Клавиша шитья в обратном направлении …….…….….. 12
Bobinado de la canilla .………..………..………..………..…………..13
ЗАПРАВКА НИТИ В МАШИНУ…………………….…………… 12
Enhebrado inferior (de la canilla) ……………….………..………..14
Enhebrado superior (de la aguja) ……….……….……………….… 15
Намотка шпульки ….…………………….…………………….… 14
Para sacar el hilo de la canilla ……………..………..………..…….17
Заправка нижней нити (шпульки) …….……………….….. 14
Costura con aguja doble …………….……………………..………..… 19
Заправка верхней нити (в иглу)……..…………………….… 15
Tensión de los hilos ………….………..………..………..………..…….20
Вытягивание нижней (шпульной) нити ….………..……. 17
Шитье двойной иглой …..……………….……………….……. 18
TABLA DE RELACIÓN ENTRE TEJIDOS, HILOS Y AGUJAS 23
Натяжение нитей……………………….…………………….….. 20
Puntada recta ….………..………..………..………..………..………..… 24
ТАБЛИЦА РЕКОМЕНДУЕМЫХ КОМБИНАЦИЙ
Puntadas zigzag…………………..………..………..………..………..… 26
ТКАНЕЙ, ИГЛ И НИТЕЙ……………………………..…………… 22
Puntadas invisibles…………..………..………..………..………..…….27
Прямая строчка…..…….……………….…………………….….. 24
Puntada elástica….………..………..………..……….………..………..28
Строчка «зигзаг» ……………………….…………………….….. 26
Puntada ondas…….………..………..………..……….………..………..29
Подрубка …..……….…….……………….…………………….….. 27
Para coser ojales …………..………..………..……….………..………..30
Эластичная строчка ……………………….……………….……. 28
Ajuste fino de los ojales………..………..………..………..…………..34
Строчка-ракушка………..……….…….…………………….….. 29
Coser botones………..………..………..………..………..………………35
Выметывание петель….……….………….……….……………. 30
Poner de cremalleras……………………..………..………..………..… 36
Точная настройка при выметывании петель …………… 34
Fruncido .………..………..………..………..………..………..………..… 37
Пришивание пуговиц …………………….……………….……. 35
Zurcido …………..………..………..………..………..………..………..…38
Вшивание застежки «молния» …….…………………….….. 36
Aplicaciones ……………..………..………..………..………..………..… 39
Выполнение сборок…..…………….………..……….………... 37
Monogramas y bordados………….………..……….………..………..40
Штопка…………………..…………………….…………………..… 38
Cambio de la bombilla …………………..………..………..………..… 42
Аппликация ….………….……………….…………………….….. 39
Engrasado ………………..………..………..………………………………43
Выстрачивание монограмм и вышивание.………….….. 40
Limpieza …………………..………..………..………..………..………..… 44
Замена лампочки подсветки..………….……………….……. 42
Listado de posibles incidencias…………..…………..………..…….45
Смазка……………….…….……………….…………………….….. 43
LISTADO DE POSIBLES INCIDENCIAS……..………..………..50
Чистка …..……………….…………………….…………….…….… 43
Embalaje de la máquina……….………..………..………..…………..54
Порядок проверки машины при возникновении
INDICE …………………..………..………..………..………..………..………..…57
проблем …….………….…………………….…………………….… 45
ПОРЯДОК ПРОВЕРКИ МАШИНЫ ПРИ
ВОЗНИКНОВЕНИИ ПРОБЛЕМ ……………………….… 46
Повторная упаковка машины ……….…………………….… 54
УАЗАТЕЛЬ……………………….…………………..………………….. 55
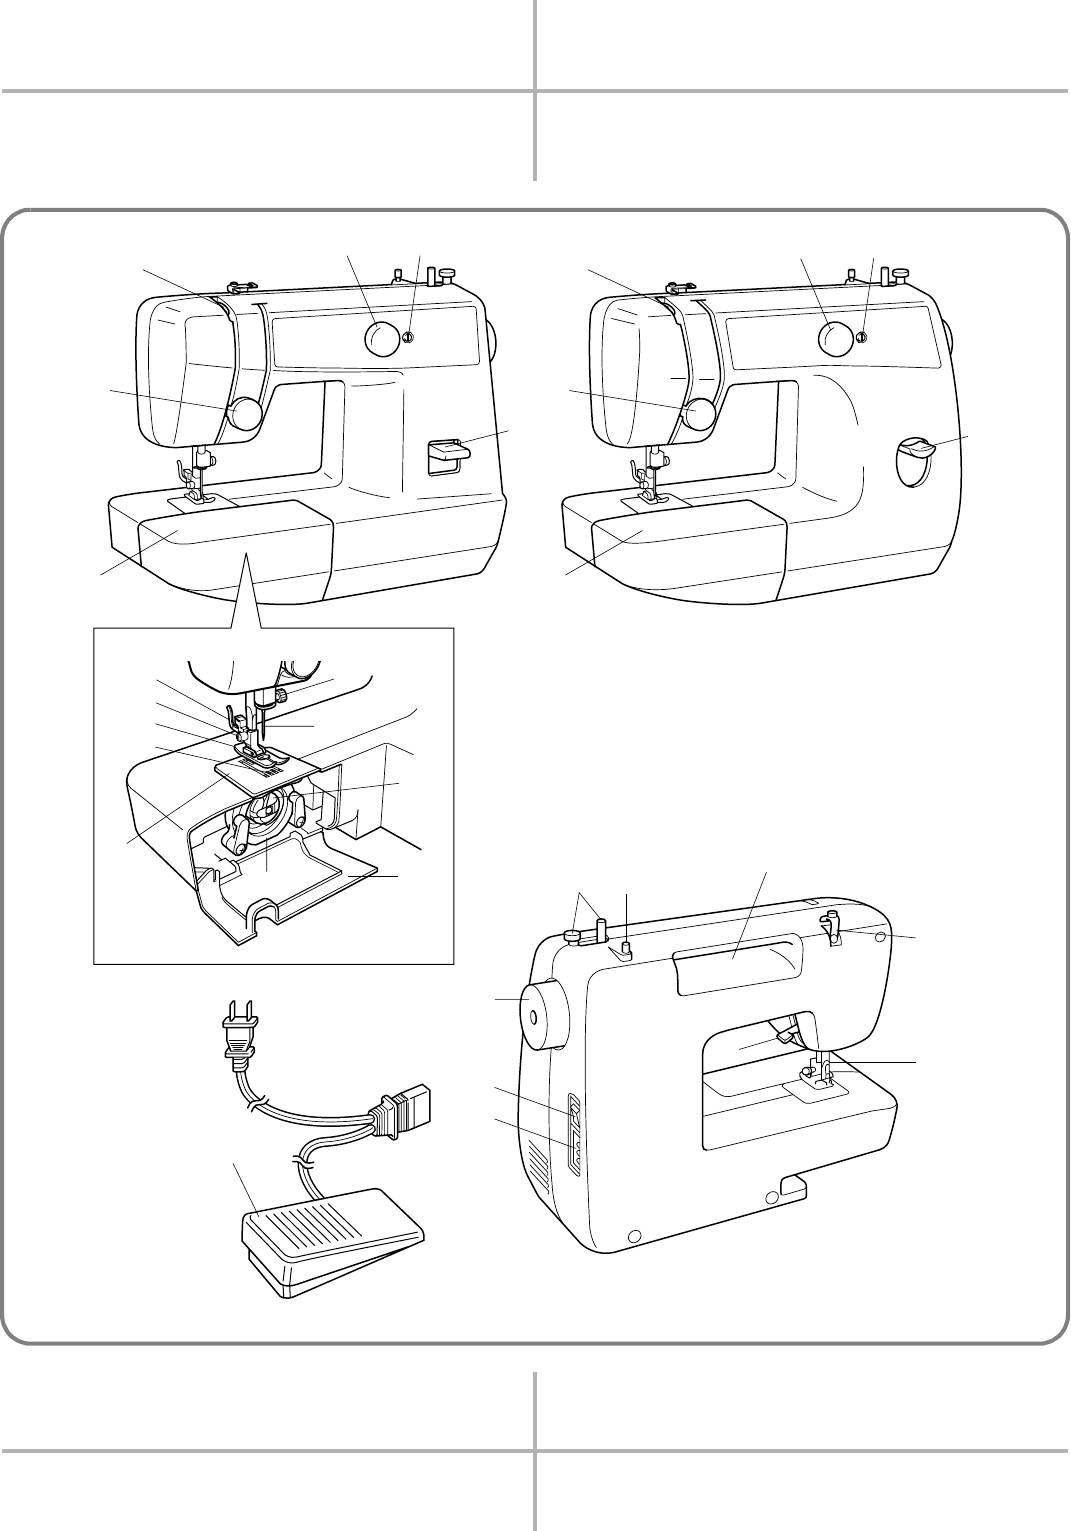
PRINCIPAL PARTS
PIECES PRINCIPALES
ELEMENTOS PRINCIPALES
ОСНОВНЫЕ ЧАСТИ
1
2
1
2
3
3
5
5
6
6
4
4
8
F
9
0
E
D
C
A
N
B
G
I
H
O
J
L
7
M
K
P
* The illustrations of the sewing machine on the following pages may
* Les illustrations représentées aux pages suivantes peuvent différer
differ slightly from your machine.
légèrement de votre machine à coudre.
* Las ilustraciones de la máquina de coser, representadas en las siguientes
* Изображения швейной машины на последующих страницах могут
páginas, pueden variar un poco con respecto del modelo adquirido.
незначительно отличаться от Вашей машины.
1

PRINCIPAL PARTS
PIÉCES PRINCIPALES
a Pattern selection dial
a Sélecteur de modèle de point
b Buttonhole fine-adjusting screw
b Vis d’équilibrage des boutonnières
c Thread take-up lever
c Levier releveur de fil
d Extension table with accessory storage
d Table d’extension avec tiroir à accessoires
e Upper tension control dial
e Sélecteur de tension supérieure
f Reverse sewing lever
f Levier de couture en marche arrière
g Thread cutter
g Coupe-fils
h Presser foot holder assembly
h Support du pied-de-biche
i Presser foot screw
i Vis du pied-de-biche
j Presser foot (Zigzag)
j Pied-de-biche (zigzag)
k Needle plate (Zigzag)
k Plaque à aiguille (zigzag)
l Shuttle hook
l Crochet de la navette
m Bobbin case
m Boîtier de la canette
n Feed dogs
n Griffes d’entraînement
o Needle
o Aiguille
p Needle clamp screw
p Vis de fixation de l’aiguille
q Shuttle cover
q Shytttle cuver
r Spool pin
r Porte-bobine
s Bobbin winder
s Dévidoir
t Balance wheel
t Volant à main
u Foot controller jack
u Prise de la pédale
v Presser foot lever
v Levier du pied-de-biche
w Main power/sewing light switch
w Interrupteur principal/de la lampe
x Built-in handle
x Poignée intégrée
y Thread guide/bobbin winding tension disc
y Guide-fils/Disque de tension du dévidoir
z Foot controller
z Pédale
ELEMENTOS PRINCIPALES
ОСНОВНЫЕ ЧАСТИ
a Selector de puntadas
a Ручка выбора вида строчки
b Tornillo de ajuste fino de los ojales
b Винт точной настройки выметывания петель
c Palanca tirahilos
c Рычаг нитепритягивателя
d Soporte de accesorios
d
Съемный столик с отделением для хранения принадлежностей
e Disco de control de la tensión superior
e Дисковый регулятор натяжения верхней нити
f Pulsador de retroceso
f Клавиша шитья в обратном направлении
g Cortador de hilo
g Приспособление для обрезки нити
h Conjunto del soporte del prensatelas
h Узел адаптера прижимной лапки
i Tornillo del prensatelas
i Винт крепления адаптера прижимной лапки
j Prensatelas (zigzag)
j Прижимная лапка (для строчки «зигзаг»)
k Placa de agujas (zigzag)
k Игольная пластина (для строчки «зигзаг»)
l Garfio de la lanzadera
l Челночный узел
m Portacanillas
m Шпульный колпачок
n Alimentadores
n Гребенки транспортера ткани
o Aguja
o Игла
p Tornillo de sujeción de la aguja
p Винт иглодержателя
q Cubierta exterior del garfio
q Крышка челночного устройства
r Portacarretes
r Стержень для установки катушки
s Conjunto de bobinado de la canilla
s Устройс тво намотк и шп ул ек
t Ruedecilla
t Маховик
u Enchufe del pedal
u Гнездо подключения педали
v Palanca del prensatelas
v Рычаг прижимной лапки
w Interruptor principal y de luz
w Выключатель питания и лампочки подсветки
x Asa incorporada
x Встроенная ручка для переноски
y Guía hilos/Disco de tensión para bobinado
y Направляющая нити/регулятор натяжения нити при намотке
z Pedal
на шпульку
z Педаль
2
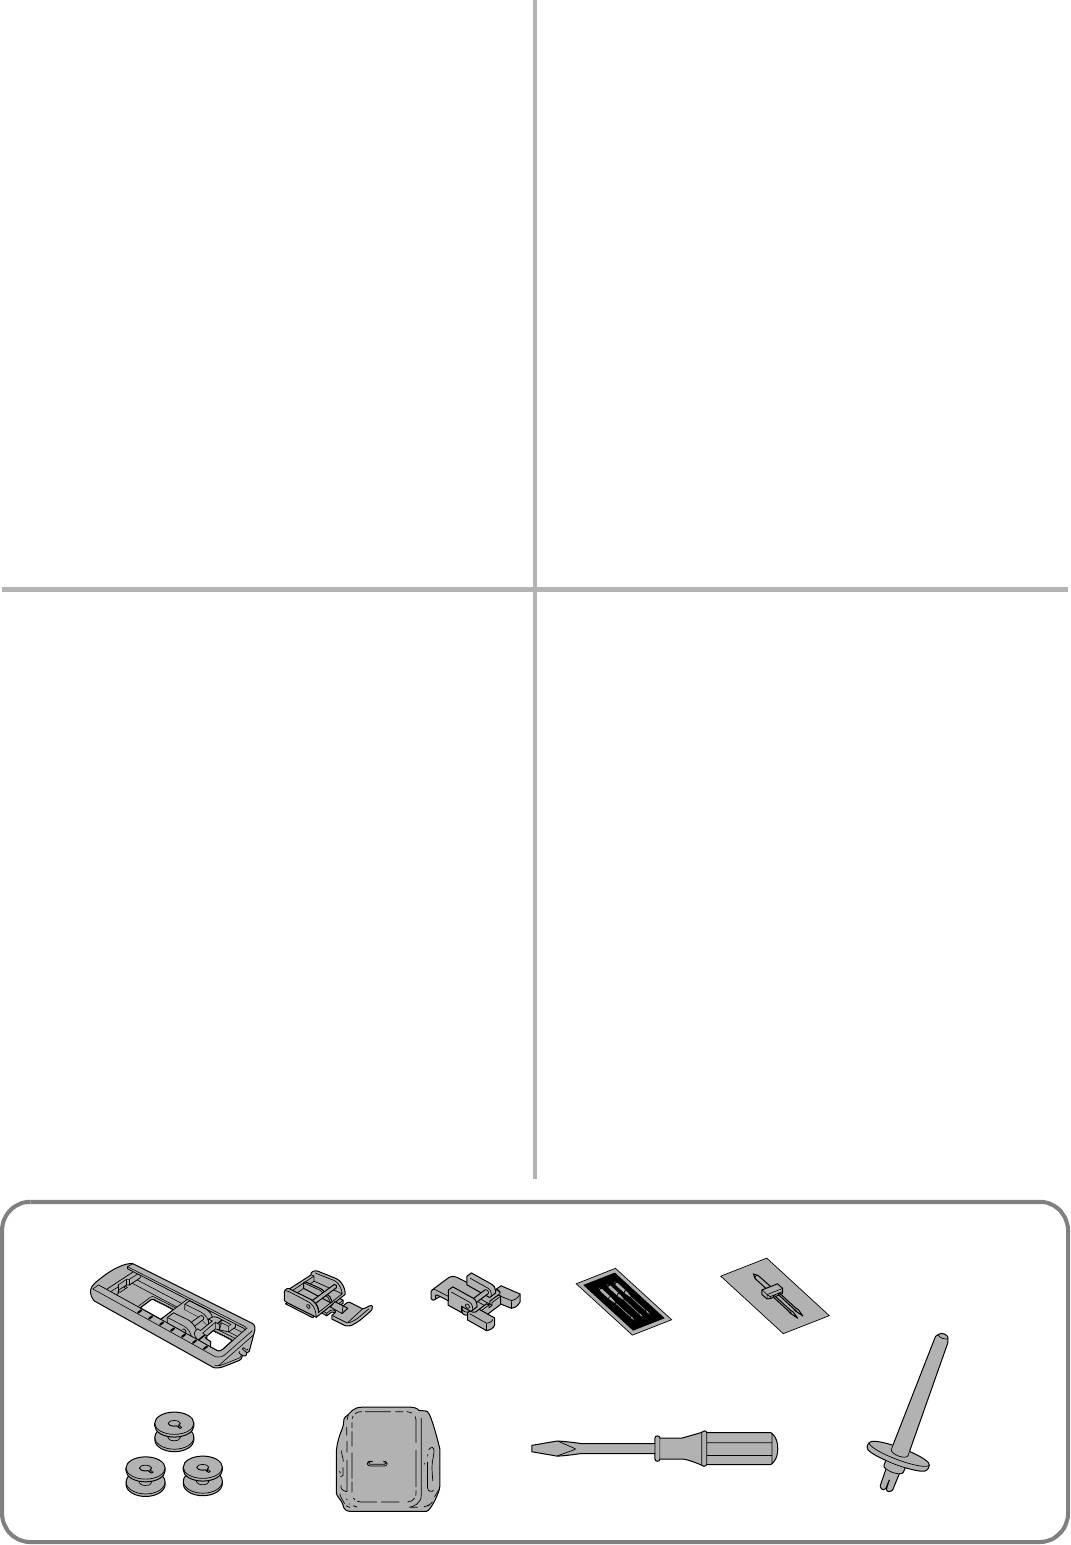
ACCESSORIES
ACCESSOIRES
a Buttonhole foot (1 pc.)
a Pied pour boutonnières (1 pc.)
b Zipper foot (1 pc.)
b Pied pour fermetures à glissière (1 pc.)
c Button sewing Foot (1 pc.)
c Pied pour boutons (1 pc.)
d Needle set (regular single needle No. 14) (3 pcs.)
d Jeu d’aiguilles (aiguille normale No. 14) (3 pcs.)
e Twin needle (1 pc.)
e Aiguille jumelée (1 pc.)
f Bobbins (3 pcs.)
f Canettes (3 pcs.)
g Darning plate (1 pc.)
g Plaque à repriser (1 pc.)
h Screwdriver (1 pc.)
h Tournevi (1 pc.)
i Extra spool pin (1 pc.)
i Porte-bobine supplémentaire (1 pc.)
Parts code for zigzag presser foot: 138135-051
Code des éléments pour le pied Zigzag: 138135-051
Foot controller: X57319-051 (110/120V Area)
Pédale du rhéostat:X57319-051 (Zones 110/120V)
XA6422-021 (220/240V Area)
XA6422-021 (Zones 220/240V)
XA6412-021 (U.K.)
XA6412-021 (R.U.)
XA6414-021 (Australia, New Zealand)
XA6414-021 (Australie, Nouvelle Zélande)
The above accessories are stored in the accessory bag inside the
Les accessoires mentionnés ci-dessus se trouvent dans un sac, à
extension table. These accessories have been designed to help
l’intérieur de la table d’extension. Ils ont été conçus pour vous
complete most sewing tasks.
permettre de réaliser la plupart des tâches de couture. Pour de
plus amples renseignements les concernant, veuillez vous
reporter aux pages indiquées.
ACCESORIOS
ПРИНАДЛЕЖНОСТИ
a Prensatelas para ojales (1 pza)
a Лапка для выметывания петель (1 шт.)
b Pata de cremalleras (1 pza)
b Лапка для вшивания застежки «молния» (1 шт.)
c Prensatelas para la costura de botones (1 pza)
c Лапка для пришивания пуговиц (1 шт.)
d Paquete de agujas (agujas simples normales No 14) (3 pzas)
d Набор игл (обычная одиночная игла № 14) (3 шт.)
e Aguja doble (1 pza)
e Двойная игла (1 шт.)
f Canillas (3 pzas)
f Шпульки (3 шт.)
g Placa de zurcir (1 pza)
g Штопальная пластина (1 шт.)
h Destornilladore (1 pza)
h Отвертка (1 шт.)
i Portacarretes extra (1 pza)
i Дополнительный стержень для катушки (1 шт.)
Código del prensatelas para la puntada zigzag: 138135-051
Код изделия для прижимной лапки для строчки «зигзаг»:
Pedal: X57319-051 (zona con 110/120V)
138135*051
XA6422-021 (zona con 220/240V)
Педаль: XA6422*021
XA6412-021 (Reino Unido)
XA6414-021 (Australia, Nueva zelanda)
Перечисленные выше принадлежности хранятся в
специально предназначенном для них футляре внутри
Los accesorios mencionados arriba se encuentran en la bolsa de
столика*приставки. Эти принадлежности предназначены для
accesorios, dentro del soporte de accesorios. Han sido concebidos
облегчения выполнения большинства швейных задач.
para poder realizar la mayoría de las operaciones de costura.
1 X59369-251 2 X59370-051
3 X59375-051
4 129583-001 5 X57521-001
9 130920-051
6 X52800-150 8 X55467-051
7 XA3442-151
3
OPERATING YOUR SEWING
FONCTIONNEMENT DE LA
MACHINE
MACHINE A COUDRE
Connecting Plugs
Raccordement
1. Insert the foot controller plug, located between the foot
1. Brancher la fiche qui se trouve sur le cordon d’alimentation
controller and the power supply plug on the cord, into the
entre la pédale et la fiche d’alimentation dans la machine.
jack on the machine.
2. Brancher la fiche d’alimentation à une prise secteur.
2. Insert the power supply plug into an electrical outlet.
PRECAUTION:
CAUTION:
1. Lors du remplacement de l’ampoule, de la canette, de
1. When changing the light bulb or when the sewing machine is
l’aiguille ou lorsque la machine n’est pas utilisée, il est
not in use, the power supply plug must be disconnected from
recommandé de la débrancher de la prise secteur pour éviter
the wall socket to avoid electrical hazards.
toute décharge électrique.
2. For U.S.A. only
2. Uniquement pour les Etats-Unis
This appliance has a polarized plug (one blade wider than the
Pour certains pays, cette machine est équipée d’une fiche polarisée
other). To reduce the risk of electric shock, this plug is
pour courant alternatif, c’est-à-dire d’une fiche qui possède une
intended to fit in a polarized outlet only one way.
lame plus grande que l’autre pour les zones où le voltage est de
If the plug does not fit completely in the outlet, reverse the
120V. Par mesure de sécurité, il existe une seule manière
plug.
d’introduire la fiche dans une prise de courant. Si l’on ne parvient
If it still does not fit, contact a qualified electrician to install
pas à insérer la fiche à fond dans la prise, essayer dans l’autre sens.
the proper outlet.
Si malgré cela, il est toujours impossible de la brancher, veuillez
Do not modify the plug in any way.
contacter un électricien pour qu’il vienne remplacer la prise. Ne
jamais passer outre cette mesure de sécurité des fiches polarisées.
FUNCIONAMIENTO DE LA
РАБОТА НА ШВЕЙНОЙ
MÁQUINA DE COSER
МАШИНЕ
Conexión de los enchufes
Подключение электропитания
1. Conecte el enchufe a la máquina, el cordón, se encuentra situado
1. Подключите педаль, вставив разъем, расположенный на
entre el pedal y el enchufe destinado a la alimentación de corriente.
сетевом шнуре между педалью и сетевой вилкой, в гнездо
2. Conecte el enchufe de alimentación a una toma de corriente.
на машине.
2. Вставьте вилку сетевого шнура в электрическую розетку.
ATENCIÓN:
1. Cuando se cambia una aguja, la canilla o la bombilla de luz, o
ВНИМАНИЕ!
cuando se deja la máquina sin funcionar, se recomienda siempre
1. Во избежание поражения электрическим током во время
retirar el enchufe de la toma de corriente para evitar choques
замены лампы подсветки, или когда швейная машина не
eléctricos.
используется, сетевой шнур должен быть отсоединён от
2. Sólo para EE.UU.
электрической розетки.
Esta máquina está provista de un enchufe polarizado para
corriente alterna (un enchufe con un borne mas ancho que el
otro) para las zonas con corriente eléctrica de 120V. Como medida
de seguridad, existe una sola manera de adaptar ese enchufe a
una toma de corriente. Si no puede introducir la clavija a fondo en
el enchufe, intente cambiar la clavija de lado. Si la clavija no se
introduce aún, póngase en contacto con un electricista para que le
cambie el enchute, que debe ser antigua. No descuide nunca de
esta medida de seguridad del enchufe polarizado.
4
Main Power and Sewing Light Switches
Interrupteur principal et de la lampe
This switch turns the main power and sewing light on or off. (See
Cet interrupteur permet d’allumer et d’éteindre la machine ainsi
fig. A.)
que la lampe de couture. (Voir fig. A.)
a Turn on (toward the “I” mark)
a Allumer (pousser vers la marque “I”)
b Turn off (toward the “O” mark)
b Eteindre (pousser vers la marque “O”)
Foot Controller
Pédale
When the foot controller is depressed lightly, the machine will
Lorsque l’on appuie légèrement sur la pédale, la machine va
run at a low speed. When the pressure on the foot controller is
fonctionner à faible vitesse. Si l’on augmente la pression, la
increased, the machine’s speed will increase. When pressure on
vitesse de couture de la machine va augmenter également. La
the foot controller is released, the machine will stop. (See fig. B.)
machine s’arrête lorsque la pression sur la pédale est relâchée.
(Voir fig. B.)
NOTE:
1. Be sure that nothing is placed on the foot controller when the
REMARQUE:
machine is not being used.
1. S’assurer de ne rien placer sur la pédale lorsque la machine
2. A new sewing machine or one that has not been in use for a
n’est pas utilisée.
long period of time should be oiled as described on page 43.
2. Il est nécessaire d’huiler une nouvelle machine ou une
After oiling, be sure to wipe off any excess oil.
machine n’ayant pas été utilisée pendant une longue période
de temps selon les instructions page 43. Après l’avoir huilée,
Note (For U.S.A. only):
essuyer tout excédent d’huile.
This foot controller can be used for sewing machine model
a Pédale du rhéostat
LS-2220/2720.
a Foot controller: Model N
Interruptor principal y de luz
Выключатель питания и лампочки
подсветки
Este interruptor permite apagar y encender la máquina y la luz.
(Véase fig. A.)
Этот выключатель служит для включения и выключения
a Encender (hacia la marca “I”)
машины и лампочки подсветки. (См. рис. A.)
b Apagar (hacia la marca “O”)
a Включен (нажата сторона с символом «I»)
b Выключен (нажата сторона с символом «O»)
Pedal
Педаль
Al presionar ligeramente el pedal, la máquina funcionará a baja
velocidad. Al aumentar la presión, se incrementa también la velocidad
При слабом нажатии на педаль машина будет работать на
de la máquina. Al soltar el pedal, la máquina se para. (Véase fig. B.)
низкой скорости. При усилении нажима на педаль скорость
NOTA:
машины возрастёт. Если нажим на педаль прекратить,
1. Asegúrese siempre de no dejar ningún objeto sobre el pedal
машина остановится. (См. рис. B.)
cuando la máquina no está utilizada.
ПРИМЕЧАНИЕ:
2. Una nueva máquina de coser o que no haya sido utilizada por
1. Следите за тем, чтобы на педали не находились никакие
mucho tiempo debe ser lubricada tal como se indica en la página
предметы, когда машина не используется.
43. Después de la lubricación, asegúrese siempre de limpiar todo
2. Новую швейную машину или машину, которая не
el excedente de aceite.
использовалась в течение длительного времени,
a Pedal
необходимо смазать в соответствии с инструкциями на
стр.43. После смазки протрите машину для удаления
излишков масла.
a Педаль
A B
1
2
1
5
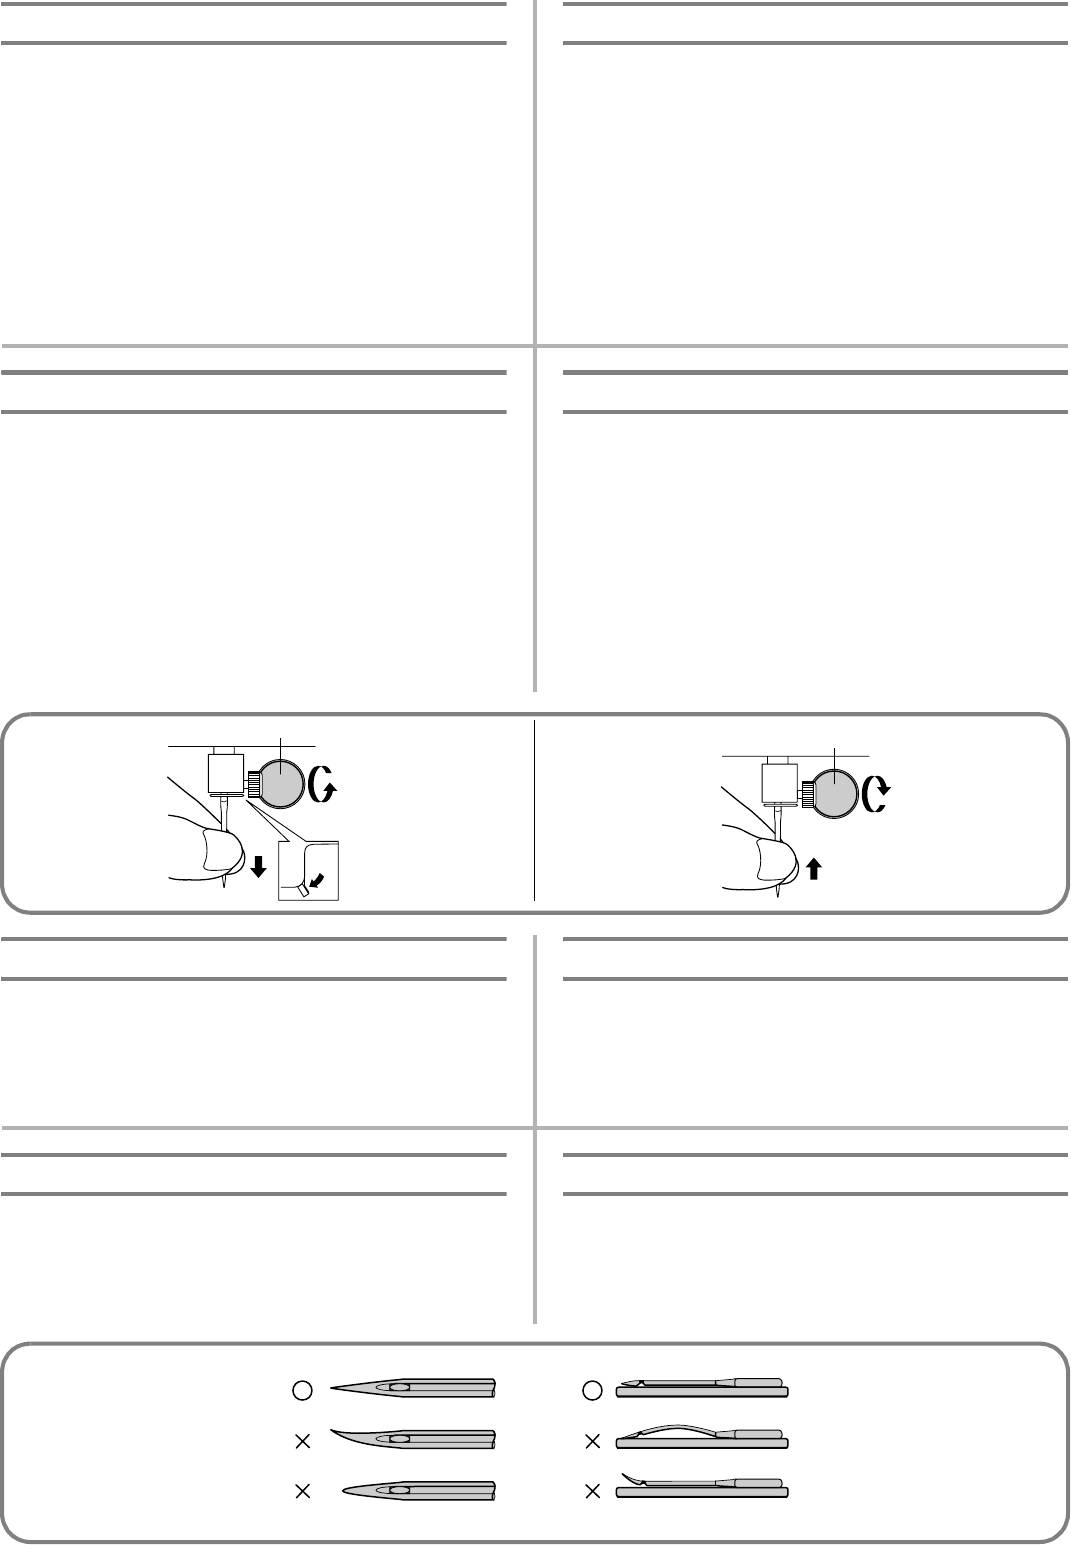
Inserting the Needle
Pour mettre l’aiguille en place
Turn power switch to “O”.
Mettre l’interrupteur d’alimentation sur “O”.
1. Remove the power supply plug from the electrical outlet.
1. Retirer la fiche de la prise de courant.
2. Raise the needle bar to its highest position.
2. Remonter complètement l’aiguille.
3. Lower the presser foot.
3. Abaisser le pied-de-biche.
4. If a needle is already installed, remove the needle by
4. Retirer l’aiguille éventuellement présente en dévissant la fixation
loosening the needle clamp with a coin and pulling the
avec une pièce de monnaie et en tirant l’aiguille vers le bas.
needle down.
5. Introduire une autre aiguille côté plat vers l’arrière, en
5. With the flat side toward the back, insert the new needle as far
l’enfonçant au maximum jusqu’à ce qu’elle vienne heurter le
as possible up against the needle stopper.
butoir.
6. Tighten the needle clamp.
6. Resserrer la fixation.
a Coin
a Pièce de monnaie
Inserción de la aguja
Установка иглы
Coloque el interruptor principal en “O”.
Переведите сетевой выключатель в положение «О»
1. Retire el enchufe de alimentación de la toma de corriente.
1. Выньте вилку сетевого шнура из электрической розетки.
2. Levante la barra de la aguja a su posición más alta.
2. Поднимите игловодитель в крайнее верхнее положение.
3. Baje el prensatelas.
3. Опустите прижимную лапку.
4. En caso de que ya esté una aguja instalada, retírela aflojando el
4. Если игла уже установлена, выньте ее, ослабив винт
tornillo con una moneda y tirándola hacia abajo.
иглодержателя монетой и потянув иглу вниз.
5. Introduzca otra aguja, con la parte redonda cara a usted. Hay que
5. Вставьте новую иглу, плоской стороной обращённую к
meterla lo más adentro posible hasta que toque arriba con el
задней части машины, задвигая её как можно выше до
pasador.
упора в стопор.
6. Vuelva a apretar el tornillo de la aguja.
6. Затяните винт иглодержателя.
a Moneda
a Монета
1
1
Checking the Needle
Vérification de l’aiguille
1. The sewing needle must always be straight and sharp for
1. L’aiguille doit toujours être droite et pointue pour piquer
smooth sewing.
correctement.
2. To check if the needle is bent, place the flat side of the needle
2. Pour vérifier si l’aiguille n’est pas tordue, placer le côté plat de
down as shown in the illustration.
l’aiguille vers le bas, comme le montre l’illustration.
3. Replace the needle if it is bent or dull.
3. Remplacer l’aiguille si elle est tordue ou usée.
Comprobación de la aguja
Проверка иглы
1. La aguja siempre ha de estar bien recta y afilada para un perfecto
1. Для ровного шитья швейная игла обязательно должна быть
cosido.
прямой и острой.
2. Para comprobar que la aguja no está doblada, coloque la parte
2. Для проверки прямизны иглы расположите её плоской стороной
plana de la aguja hacia abajo como se muestra en el dibujo.
вниз на ровной поверхности, как показано на рисунке.
3. Cambie la aguja si está doblada o gastada.
3. Если игла погнута или затупилась, замените ее.
6
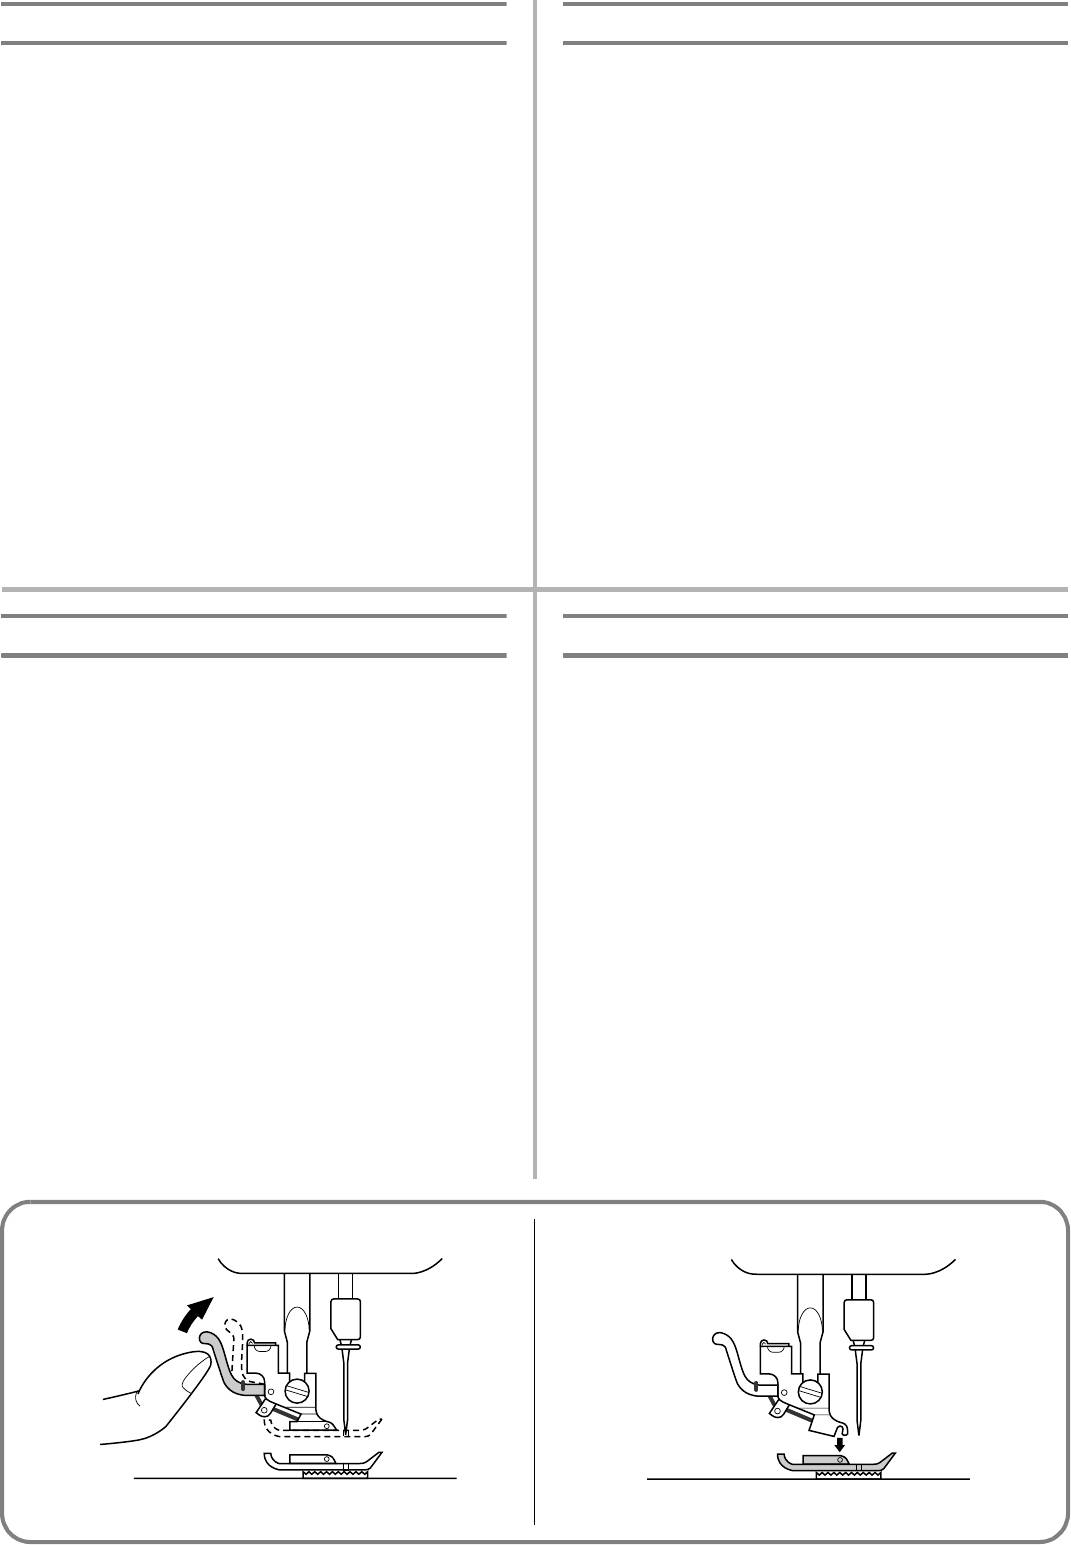
Changing the Presser Foot
Changement de pied-de-biche
It may be necessary to change the presser foot according to your
En fonction des besoins, il peut s’avérer nécessaire de changer le
sewing needs.
pied-de-biche.
SNAP-ON TYPE
MODELE A CLIQUET
Turn power switch to “O”.
Mettre l’interrupteur principal sur “O”.
1. Raise the needle to its highest position by turning the balance
1. Remonter complètement l’aiguille en tournant le volant vers
wheel toward you (counterclockwise), and raise the presser
soi (dans le sens opposé aux aiguilles d’une montre) et
foot lever.
remonter le levier du pied-de-biche.
2. Release the foot by raising the lever located at the back of the
2. Libérer le pied en levant le levier situé à l’arrière du support.
presser foot holder assembly.
3. Placer un pied différent sur la plaque à aiguille de telle
3. Place a different presser foot on the needle plate so that the
manière que la tige du pied-de-biche s’aligne avec la fente de
bar on the presser foot is in line with the slot on the shank.
la fixation.
4. Lower the presser foot lever and fix the presser foot onto the
4. Abaisser le levier du pied-de-biche et fixer le pied sur l’axe. Si
shank. If the presser foot is in the correct location, the bar
le pied-de-biche est mis correctement, la tige devrait se mettre
should snap in.
en place d’elle même avec un déclic.
Cambio del prensatelas
Замена прижимной лапки
Según sus necesidades de costura, puede ser necesario cambiar el
В зависимости от вида вашей работы, бывает нужно заменить
prensatelas.
прижимную лапку.
MODELO A PRESIÓN
ФИКСАЦИЯ ЛАПКИ ОСУЩЕСТВЛЯЕТСЯ ПУТЕМ
Coloque el interruptor principal en “O”.
ЗАЩЕЛКИВАНИЯ НА СТЕРЖНЕ
1. Levante la aguja a su posición más alta, girando la ruedecilla
Переведите сетевой выключатель в положение «О»
hacia usted (en el sentido contrario al de las manecillas de un
1. Поднимите иглу в крайнее верхнее положение, повернув
reloj) y levante la palanca del prensatelas.
маховик на себя (против часовой стрелки), затем
2. Suelte el prensatelas levantando la palanca que hay en la parte
поднимите рычаг прижимной лапки.
trasera del soporte.
2. Отсоедините прижимную лапку, подняв рычажок на
3. Coloque otro prensatelas en la placa de agujas de tal forma que la
задней стороне узла адаптера лапки.
barra del prensatelas quede alineada con la ranura del soporte.
3. Разместите другую прижимную лапку на игольной
4. Baje la palanca del prensatelas y fije el prensatelas en el soporte.
пластине таким образом, чтобы поперечный стерженёк
Si el prensatelas está bien colocado, la barra se entra a presión.
прижимной лапки находился прямо под пазом в нижней
части адаптера лапки.
4. Опустите рычаг прижимной лапки и зафиксируйте лапку в
адаптере. Если прижимная лапка находиться в правильном
положении, ее стерженек защелкнется в адаптере.
7
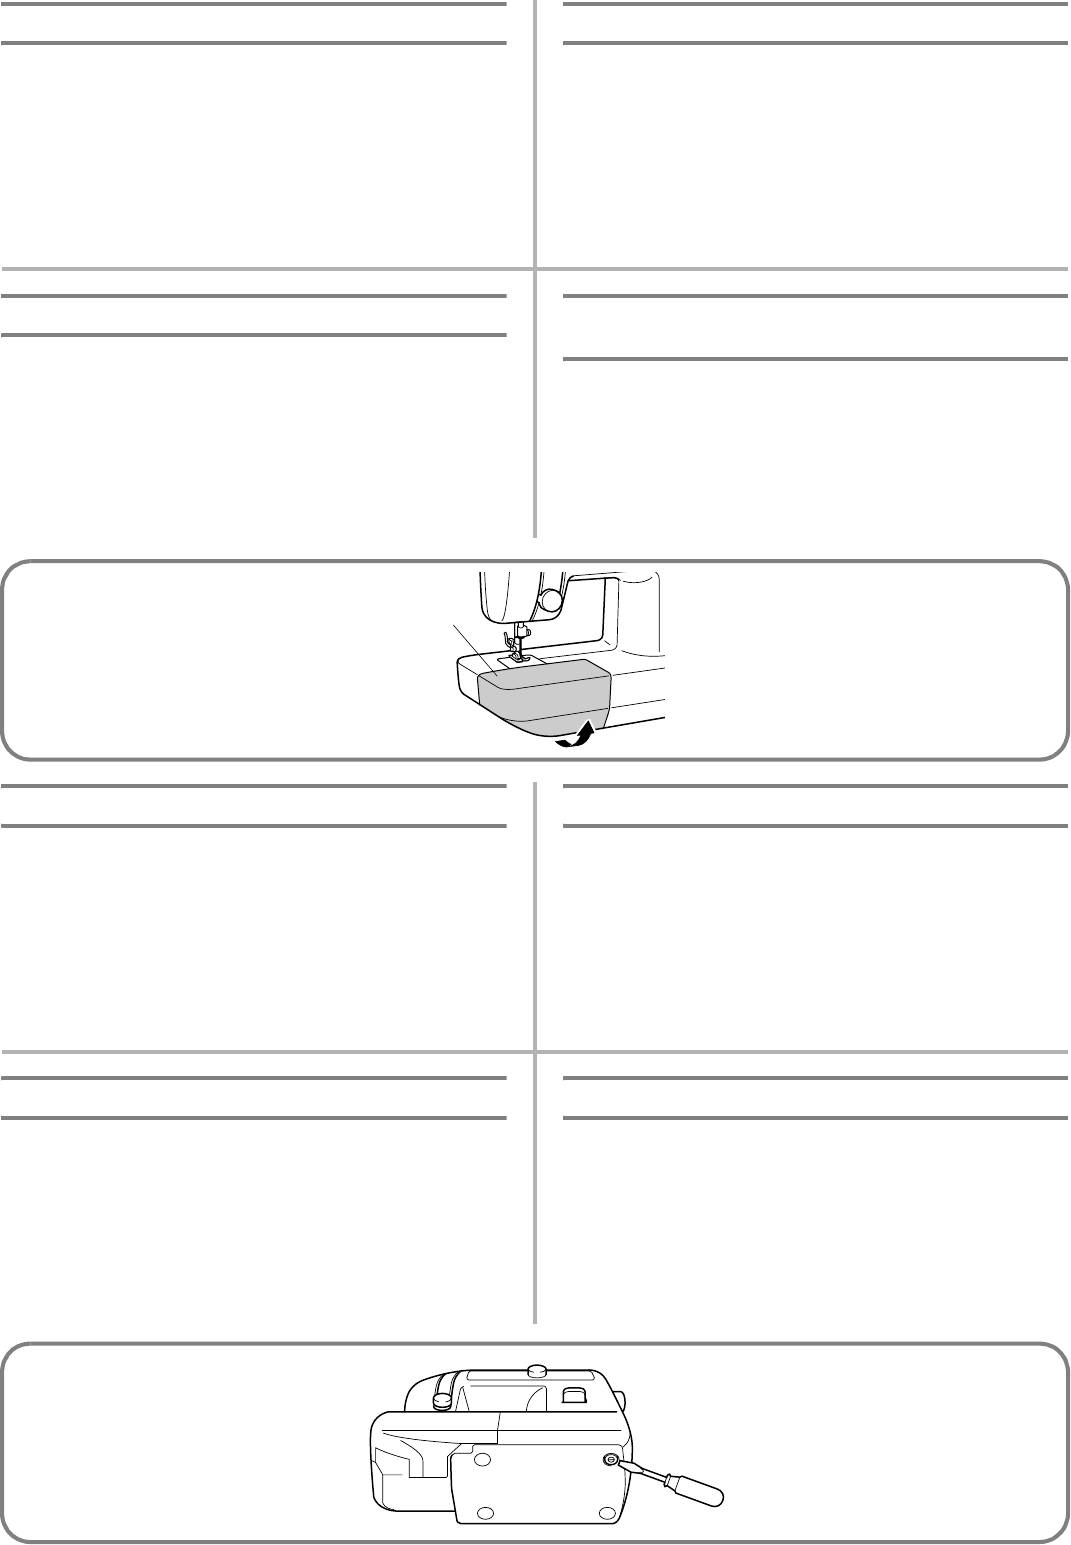
Converting to Free-Arm Style
Modèle bras libre
Free-Arm sewing is convenient for sewing tubular and hard-to-
La couture à bras libre s’impose pour des coutures tubulaires ou
reach areas on garments. To change your machine to the free-arm
pour des endroits difficiles à atteindre sur des vêtements. Pour
style, lift up on the extension table and pull it out.
obtenir la configuration à bras libre, il suffit de soulever et de
a Lift the bottom of the extension table up toward you.
retirer la table d’extension.
b Pull the extension table out to remove it.
a Soulever le bas de la table d’extension vers soi.
a Extension table
b Tirer la table d’extension vers l’extérieur pour l’enlever.
a Table d’extension
Conversión en modalidad de brazo libre
Переоборудование машины для работы с
функцией «свободный рукав»
La costura con brazo libre es práctica para coser en redondo y en
Функция «свободный рукав» удобна для обработки
partes del tejido de dificil acceso. Para transformar su máquina en
цилиндрических деталей одежды и шитья в труднодоступных
esa modalidad, sólo hace falta levantar el soporte de los accesorios y
частях изделия. ля переоборудования машины для работы с
sacarlo tirando de él.
функцией «свободный рукав» поднимите столик*приставку и
снимите его с машины
a Levante la parte inferior del soporte de accesorios hacia usted.
a Приподнимите нижнюю часть столика*приставки по
b Tíre hacia afuera para sacarlo.
направлению вверх и к себе.
a Soporte de accesorios
b Потяните столик*приставку и снимите его с машины.
a Столик*приставка
1
Steadying the Machine
Pour stabiliser la machine
When the sewing machine is placed on an uneven surface, turn
Lorsque la machine à coudre est installée sur une surface inégale,
the rubber cushion on the front right-hand side of the base plate
tourner le coussin en caoutchouc sur le côté avant droit de la
to adjust its height until the sewing machine is stable.
plaque de base pour régler sa hauteur jusqu’à ce que la machine
soit stable.
Para estabilizar la máquina
Обеспечение устойчивости машины
Si se instala la máquina de coser en una superficie desigual, puede
Если машина установлена на неровной поверхности, то
ajustar su altura girando el cojinete de goma que se encuentra en la
добейтесь ее устойчивого положения путем вращения
parte anterior derecha de la placa de base hasta que la máquina
резиновой ножки в правой передней части основания
quede estable.
машины.
8
VARIOUS CONTROLS
DESCRIPTIF DES DIFFERENTES
COMMANDES
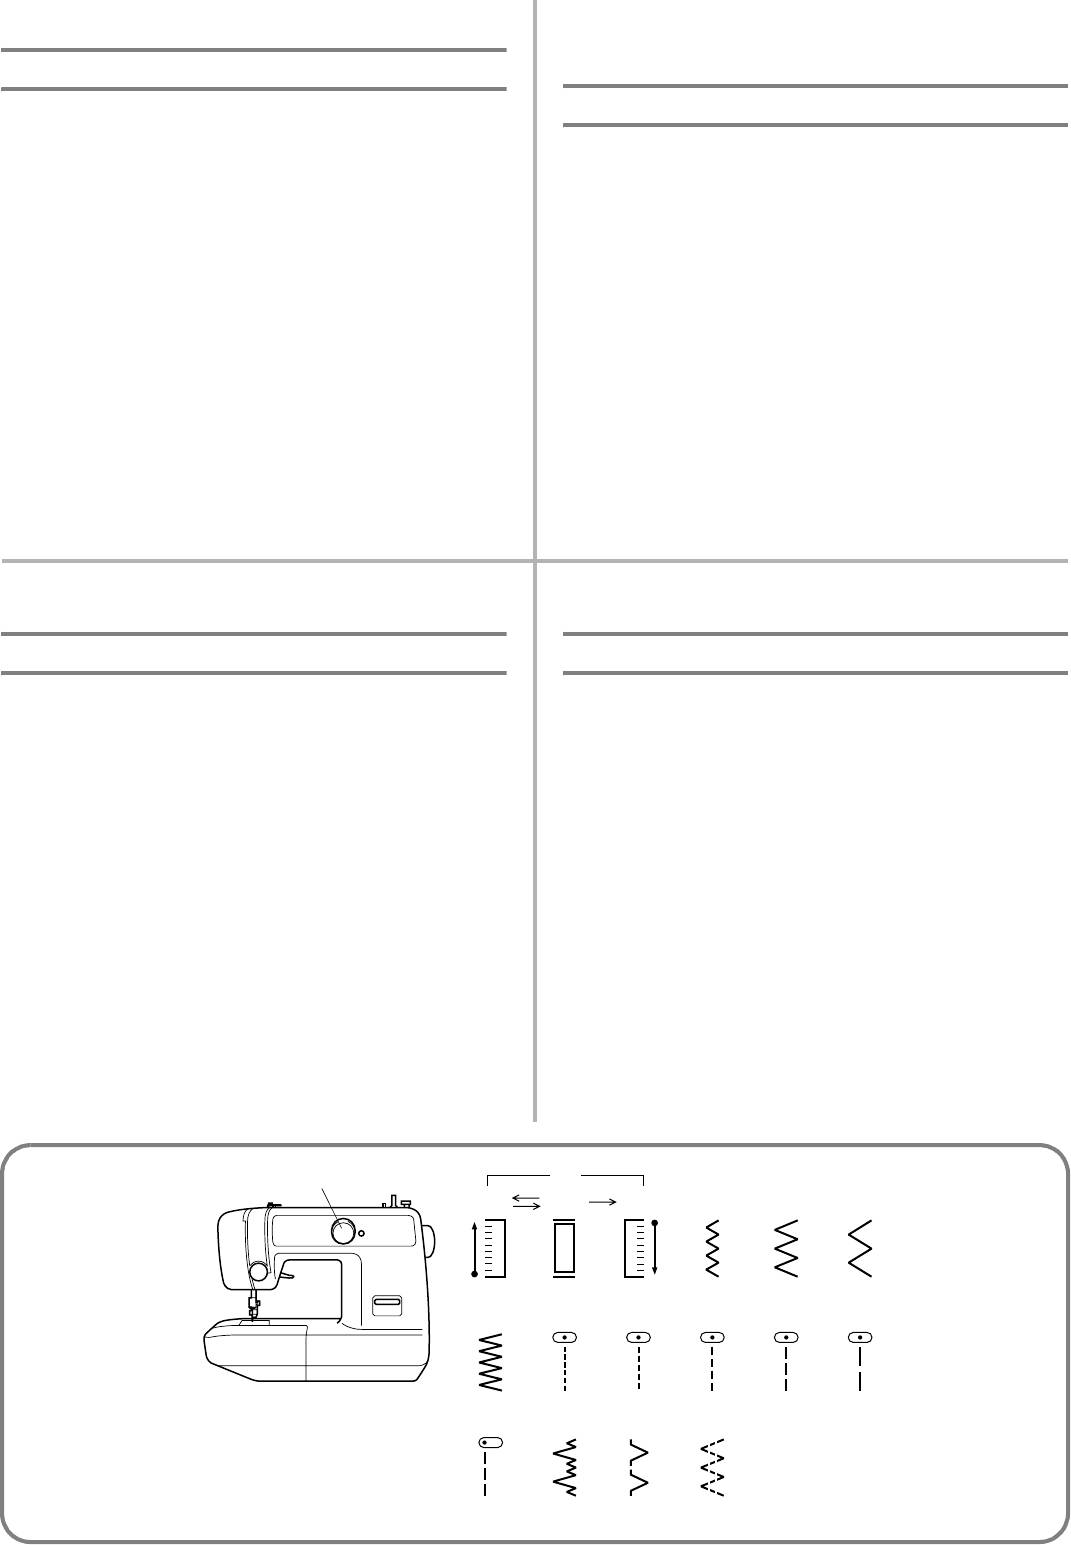
Pattern Selection Dial
Sélecteur de modèle de point
To select a stitch, simply turn the pattern selection dial in either
direction. Stitch widths and lengths are shown on the following
Pour sélectionner un modèle de point, tourner le sélecteur de
page.
modèle dans l’un ou l’autre sens. Sur la page suivante, vous
a Pattern selection dial
trouverez une liste avec les longueurs et les largeurs de points en
fonction du modèle choisi.
a Sélecteur de modèle de point
DISTINTOS MANDOS
ОРГАНЫ УПРАВЛЕНИЯ
Selector de puntadas
Ручка выбора вида строчки
Para seleccionar una puntada, sólo hace falta girar el disco en
Для выбора желаемой строчки просто поворачивайте ручку
cualquier dirección. En la siguiente página, encontrará los largos y
выбора вида строчки в том или ином направлении. Значения
anchos de puntadas.
ширины строчки и длины стежка приведены на следующей
a Selector de puntadas.
странице.
a Ручка выбора вида строчки
1
1
bac
d 2
3 4
c
a
5
678910
12 141311
9

PATTERNS AND STITCH NAMES
PAGE IN
PATTERN STITCH NAME
INSTRUCTIONS
1(a-b-c-d) 4-STEP AUTOMATIC BUTTONHOLE 30
2 ZIGZAG STITCH 26
3 ZIGZAG STITCH 26
4 ZIGZAG STITCH 26
5 ZIGZAG (SATIN) STITCH 26
6-10 STRAIGHT STITCH 24
11 STRAIGHT STITCH (Left needle position) 24
12 STRETCH BLIND STITCH 27
13 SHELL TUCK STITCH 29
14 ELASTIC STITCH 28
MOTIFS ET NOMS DES POINTS
PAGE DU
MODÈLE NOM DU POINT
MANUEL
1(a-b-c-d) BOUTONNIÈRE AUTOMATIQUE EN 4 TEMPS 30
2 POINT ZIGZAG 26
3 POINT ZIGZAG 26
4 POINT ZIGZAG 26
5 POINT ZIGZAG (POINT DE BOURDON) 26
6-10 POINT DROIT 24
11 POINT DROIT (aiguille placée à gauche) 24
12 POINT ÉLASTIQUE INVISIBLE 27
13 POINT PICOT 29
14 POINT ÉLASTIQUE 28
10

DIBUJO Y NOMBRE DE LOS PUNTOS
PÁGINA DEL
PUNTADA NOMBRE
manual
1(a-b-c-d) OJAL AUTOMÁTICO DE 4 PASOS 30
2 PUNTADA ZIGZAG 26
3 PUNTADA ZIGZAG 26
4 PUNTADA ZIGZAG 26
5 PUNTADA ZIGZAG (DE REALCE) 26
6-10 PUNTADA RECTA 24
11 PUNTADA RECTA (aguja a la izquierda) 24
12 PUNTADA INVISIBLE ELÁSTICA 27
13 PUNTADA ONDAS 29
14 PUNTADA ELÁSTICA 28
НАИМЕНОВАНИЯ СТРОЧЕК И СООТВЕТСТВУЮЩИЕ ИМ ПОЗИЦИИ
ПЕРЕКЛЮЧАТЕЛЯ
СТРАНИЦЫ С
ПОЗИЦИЯ НАИМЕНОВАНИЕ СТРОЧКИ
ИНСТРУКЦИ
ЯМИ
1(a*b*c*d) Автоматическое выметывание петель за четыре приема 30
2 Строчка «ЗИГЗАГ» 26
3 Строчка «ЗИГЗАГ» 26
4 Строчка «ЗИГЗАГ» 26
5 Строчка «ЗИГЗАГ» (атласная) 26
6*10 Прямая строчка 24
11 Прямая строчка (левое положение иглы) 24
12 Эластичная потайная строчка 27
13 Строчка*ракушка 29
14 Эластичная строчка 28
11
Аннотации для Швейной Машиной Brother LS 1520 в формате PDF
Топ 10 инструкций
Другие инструкции
Как использовать наш сайт инструкций OnlineManuals.ru
Наша цель состоит в том, чтобы предоставить вам быстрый доступ к содержанию инструкции для Руководство пользователя, руководство по эксплуатации швейной машинки Brother LS-1520_LS-2125_LS-2150.
С помощью онлайн просмотра, Вы можете быстро просмотреть содержимое инструкции и найти решение проблемы с Руководство пользователя, руководство по эксплуатации швейной машинки Brother LS-1520_LS-2125_LS-2150.
Для Вашего удобства
Если листать руководство пользователя Руководство пользователя, руководство по эксплуатации швейной машинки Brother LS-1520_LS-2125_LS-2150 прямо на сайте, не очень удобно для Вас, есть два возможных решения:
• Просмотр в полноэкранном режиме — легко просмотреть руководство пользователя (без загрузки его на свой компьютер), Вы можете использовать режим полноэкранного просмотра.
Для просмотра инструкции пользователя Руководство пользователя, руководство по эксплуатации швейной машинки Brother LS-1520_LS-2125_LS-2150 на полном экране, используйте кнопку «Открыть в Pdf-viewer».
• Загрузка на компьютер — Вы можете также скачать Руководство пользователя, руководство по эксплуатации швейной машинки Brother LS-1520_LS-2125_LS-2150 на свой компьютер и сохранить его в файлах.
Многие люди предпочитают читать документы не на экране, а в печатной версии.
Возможность печати руководства пользователя также была предусмотрена на нашем сайте,
и вы можете использовать ее, нажав на иконку «печать» в Pdf-viewer.
Нет необходимости печатать все руководство Руководство пользователя, руководство по эксплуатации швейной машинки Brother LS-1520_LS-2125_LS-2150, можно выбрать только нужные страницы инструкции.
-
Страница 1
Instruction Manual Manuel d’instructions Manual de instrucciones Manual de Instruções[…]
-
Страница 2
«IMPOR T ANT SAFETY INSTR UCTIONS» When using the se wing machine, basic safety precautions should alw ays be f ollo wed, including the follo wing: «Read all instructions before using.» D ANGER – T o reduce the risk of electric shock: 1. The sewing machine should ne v er be left unattended when plugged in. Alwa ys unplug this […]
-
Страница 3
“IMPOR T ANTES CONSIGNES DE SECURITE” Lors de l’utilisation de la machine à coudre, il con vient de toujours suivre les consignes de sécurité essentielles et de prendre notamment les précautions suivantes: “Lire toutes les instructions av ant d’utiliser la machine. ” D ANGER — P our réduire le risque de décharge électrique: 1. Ne[…]
-
Страница 4
“IMPOR T ANTES INSTR UCCIONES DE SEGURID AD” Cuando se usa una máquina de coser , debe seguirse unas precauciones básicas y que se detallan a continuación. “Leer todas las instrucciones antes de usar la” PELIGR O — P ara reducir el riesgo de una descarga eléctrica. 1. La máquina no debe dejarse nunca desatendida mientras esté conectad[…]
-
Страница 5
“INSTR UÇÕES IMPOR T ANTES P ARA SU A SEGURANÇA” Sempre que utilizar a máquina de costura, atente às precauções básicas de segur ança, nomeadamente as que se seguem: “Leia estas instruções antes de utilizar a máquina” PERIGO — P ara diminuir os riscos de choques eléctricos: 1. A máquina de costura nunca de ve ser abandonada se[…]
-
Страница 6
1 2 FOR USERS IN THE UK, EIRE, MAL T A AND CYPRUS ONL Y . If your se wing machine is fitted with a 3 pin non-rewireab le BS plug then please read the follo wing. Connecting Plugs and Main P ower / Se wing Light Switch IMPORT ANT If the a vailable soc ket outlet is not suitab le for the plug supplied with this equipment, it should be cut off and an […]
-
Страница 7
CONTENTS Page PRINCIP AL P ARTS …………………………………………………………. 1 PRINCIP AL PARTS …………………………………………………………. 2 ACCESSORIES ……………………………………………………………….. 3 OPERA TING YOUR SEWING MACHINE …………………………………..[…]
-
Страница 8
INDICE Página ELEMENTOS PRINCIP ALES ………………………………………………… 1 ELEMENTOS PRINCIP ALES ………………………………………………… 2 ACCESORIOS ……………………………………………………………………….. 3 FUNCIONAMIENTO DE LA MÁQUINA DE COSER ……………… 4 Conexión de[…]
-
Страница 9
1 PRINCIP AL P ARTS 1 3 4 5 6 2 L O H I J K M N P 7 8 9 0 A B C E F D G 1 3 4 5 6 2 * The illustrations of the sewing machine on the following pages may differ slightly from your machine. PIECES PRINCIP ALES * Les illustrations repr é sent é es aux pages suivantes peuvent diff é rer l é g è rement de votre machine à coudre. ELEMENT OS PRINCIP[…]
-
Страница 10
2 PRINCIP AL PARTS 1 Pattern selection dial 2 Buttonhole fine-adjusting screw 3 Thread take-up lever 4 Extension table with accessory storage 5 Upper tension control dial 6 Reverse sewing lever 7 Thread cutter 8 Presser foot holder assembly 9 Presser foot screw 0 Presser foot (Zigzag) A Needle plate (Zigzag) B Shuttle hook C Bobbin case D Feed dogs[…]
-
Страница 11
3 ACCESSORIES 1 Buttonhole foot (1 pc.) 2 Zipper foot (1 pc.) 3 Button sewing Foot (1 pc.) 4 Needle set (regular single needle No. 14) (3 pcs.) 5 T win needle (1 pc.) 6 Bobbins (3 pcs.) 7 Darning plate (1 pc.) 8 Screwdriver (1 pc.) 9 Extra spool pin (1 pc.) Parts code for zigzag presser foot: 138135-051 Foot controller: X57319-051 (1 10/120V Area) […]
-
Страница 12
4 OPERA TING YOUR SEWING MACHINE Connecting Plugs 1. Insert the foot controller plug, located between the foot con- troller and the power supply plug on the cord, into the jack on the machine. 2. Insert the power supply plug into an electrical outlet. CAUTION: 1. When changing the light bulb or when the sewing machine is not in use, the power suppl[…]
-
Страница 13
5 Main Power and Sewing Light Switches This switch turns the main power and sewing light on or off. (See fig. A .) 1 T urn on (toward the “ I ” mark) 2 T urn off (toward the “ O ” mark) Foot Controller When the foot controller is depressed lightly , the machine will run at a low speed. When the pressure on the foot controller is in- creased[…]
-
Страница 14
6 Inserting the Needle T urn power switch to “ O ” . 1. Remove the power supply plug from the electrical outlet. 2. Raise the needle bar to its highest position. 3. Lower the presser foot. 4. If a needle is already installed, remove the needle by loosening the needle clamp with a coin and pulling the needle down. 5. W ith the flat side toward t[…]
-
Страница 15
7 Changing the Presser Foot It may be necessary to change the presser foot according to your sewing needs. SNAP-ON TYPE T urn power switch to “ O ” . 1. Raise the needle to its highest position by turning the balance wheel toward you (counterclockwise), and raise the presser foot lever . 2. Release the foot by raising the lever located at the b[…]
-
Страница 16
8 Converting to Free-Arm Style Free-Arm sewing is convenient for sewing tubular and hard-to- reach areas on garments. T o change your machine to the free-arm style, lift up on the extension table and pull it out. 1 Lift the bottom of the extension table up toward you. 2 Pull the extension table out to remove it. 1 Extension table Mod è le bras lib[…]
-
Страница 17
9 V ARIOUS CONTROLS Pattern Selection Dial T o select a stitch, simply turn the pattern selection dial in either direction. Stitch widths and lengths are shown on the following page. 1 Pattern selection dial DESCRIPTIF DES DIFFERENTES COMMANDES S é lecteur de mod è le de point Pour s é lectionner un mod è le de point, tourner le s é lecteur de[…]
-
Страница 18
10 MOTIFS ET NOMS DES POINTS MOD È LE NOM DU POINT PAGE DU MANUEL 1(a-b-c-d) BOUT ONNI È RE AUT OMA TIQUE EN 4 TEMPS 30 2 POINT ZIGZAG 26 3 POINT ZIGZAG 26 4 POINT ZIGZAG 26 5 POINT ZIGZAG (POINT DE BOURDON) 26 6-10 POINT DROIT 24 1 1 POINT DROIT (aiguille plac é e à gauche) 24 12 POINT É LASTIQUE INVISIBLE 27 13 POINT PICOT 29 14 POINT É LAS[…]
-
Страница 19
11 DIBUJO Y NOMBRE DE LOS PUNTOS PONTO DESIGNA ÇÃ O DO PONT O INSTRU ÇÕ ES NA P Á GINA 1(a-b-c-d) CASEADO AUTOM Á TICO EM 4 F ASES 30 2 PONTO ZIGUEZAGUE 26 3 PONTO ZIGUEZAGUE 26 4 PONTO ZIGUEZAGUE 26 5 PONTO ZIGUEZAGUE (CHEIO) 26 6-10 PONTO A RETO 24 11 PONTO RETO (agulha à esquerda) 24 12 PONT O INVIS Í VEL EL Á STICO 27 13 PONTO CONCHA ([…]
-
Страница 20
12 Reverse Sewing Lever T o sew in reverse, press down the reverse sewing lever as far as possible and hold it in that position while lightly stepping on the foot controller . T o sew forward, release the reverse sewing lever . Reverse sewing is used for locking and reinforcing seams. Levier de couture en marche arri è re Pour coudre en arri è re[…]
-
Страница 21
13 ENHEBRADO DE LA M Á QUINA Bobinado de la canilla 1. Coloque un carr ete de hilo en el porta carretes y pase el hilo por el disco de tensi ó n de bobinado de la canilla 1 Disco de tensi ó n de bobinado de la canilla 2 Bobinado de la canilla 2. Pase el extr emo del hilo por el orificio de la canilla a partir del interior . 3. Coloque la canilla[…]
-
Страница 22
14 Lower (bobbin) Threading T urn power switch to “ O ” . 1. Raise the needle to its highest position by turning the balance wheel toward you (counterclockwise) and raise the presser foot lifter . 2. Open the shuttle cover behind the extension table on the front of the machine and remove the bobbin case by pulling its latch toward you and pulli[…]
-
Страница 23
15 1 2 A B-1 B-2 B-3 C 3 24 Upper (Needle) Threading Mise en place du fil sup é rieur (fil de l ’ aiguille) Enhebrado superior (de la aguja) Passagem da linha superior (agulha) 2 3 4 1[…]
-
Страница 24
16 1. Raise the presser foot using the presser foot lifter and turn the balance wheel toward you (counterclockwise) to raise the thread take-up lever to its highest position. 2. Pull up the spool pin and place a spool of thread on this pin. 3. Pass the thread through both thread guides: the rear one first, then the front one. ( fig. A ) 1 Spool pin[…]
-
Страница 25
17 3 1 DE AB C 1 2 3 4 5 6 8 1 2 7 7 Drawing Up Lower (bobbin) Thread 1. Raise the presser foot and the needle to their highest positions. 2. W ith your left hand, hold the end of the upper thread. W ith your right hand, turn the balance wheel toward you (counterclockwise) until the needle moves down and back up again to its highest position. 3. Th[…]
-
Страница 26
18 T win-Needle Sewing Y our sewing machine is designed for twin-needle sewing which allows you to sew using two upper threads. Y ou can use the same color or two different colors of thread for decorative stitches. T win- needle sewing works well with these stitches: the Straight Stitch (6-10)-and the Zigzag Stitch (2). Be sure that the two upper t[…]
-
Страница 27
19 Costura con aguja doble Su m á quina de coser ha sido concebida para poder utilizar una aguja doble y permitir la costura con dos hilos superior es. Puede usar el mismo color de hilo o dos hilos de color es distintos para puntadas decorativas. Las costuras con aguja doble dan muy buenos r esultados con las siguientes puntadas: la puntada r ecta[…]
-
Страница 28
20 Thread T ension Thread tension will affect the quality of your stitches. It may need to be adjusted when you change fabric or thread type. NOTE: It is recommended that a test sample be made on a fabric scrap before sewing on your project. The basic thread tension setting is “ 5 ” . Possible problems and how to correct them. A Upper tension i[…]
-
Страница 29
21 NOTE: The bobbin thread tension has already been adjusted at the fac- tory for general use. For most sewing applications, no adjustment is needed. When sewing with thin thread on thin fabrics, the thread tension may not be adjusted adequately with the upper tension control dial. Therefore, the thread tension must be adjusted according to the pro[…]
-
Страница 30
22 RELA TIVE CHART OF SEWING F ABRICS, NEEDLES AND THREADS COMBINA TIONS SEWING F ABRICS NEEDLE SIZES THREAD SIZES VER Y THIN LIGHTWEIGHT MEDIUM WEIGHT HEA VYWEIGHT KNITS Fine tricot, Fine lace, Thin linen, Silk, Organza, Chiffon V oile, T affeta, Synthetics, Silk, Batiste Cotton, Gingham, Poplin, Percale, Pique, Satin, V elvet, Lightweight wool, F[…]
-
Страница 31
23 MUY FINO LIGERO MEDIO PESADO PRENDAS DE PUNTO n ° 65/9 n ° 75/11 n ° 90/14 (Pr ovista con la m á quina) n ° 100/16 n ° 90/14 (Punta de bola) Algod ó n: 80 Sint é tico/ Fibra lar ga de poli é ster Algod ó n fino. Algod ó n: 60-80 Seda: “ A ” Sint é tico/ Fibra lar ga de poli é ster Mer cer í a 50. Algod ó n: 50-60 Seda “ A ?[…]
-
Страница 32
24 Straight Stitching Pattern 6-10 (Center needle position) 1 1 (Left needle position) The Straight Stitch (6-10 or 1 1) is used for top stitching and sewing lightweight fabrics. Starting Sewing (fig. A) 1. Set the pattern selection dial to the appropriate Straight Stitch (6-10 or 1 1) with the desired length. 2. Raise the needle to its highest pos[…]
-
Страница 33
25 1 CD Para empezar a coser (fig. A) 1. Colocar el selector de puntadas en la puntada der echa adecuada (6-10 ó 1 1), con el largo deseado. 2. Levante la aguja a su posici ó n m á s alta y suba la palanca del prensatelas. 3. Saque el hilo inferior girando la ruedecilla hacia usted (en el senti- do contrario al de las manecillas de un r eloj) y […]
-
Страница 34
26 Zigzag Stitching Pattern 2 (Zigzag Stitch) 3 (Zigzag Stitch) 4 (Zigzag Stitch) ZIGZAG STITCH Set the pattern selection dial to the appropriate Zigzag Stitch (2, 3 or 4) with the desired width. It is recommended to sew using the Straight Stitch at the beginning and end of the Zigzag Stitches. Pattern 5 (Zigzag (Satin) Stitch) ZIGZAG (SA TIN) STIT[…]
-
Страница 35
27 Blind Hem Stitching Pattern 12 (Stretch Blind Stitch) The Stretch Blind Stitch is used to finish the edge of projects made with stretch fabrics without the stitch showing. 1. Set the pattern selection dial to 12. 2. Both the threads should be the same color as the fabric. 3. Fold back the fabric to the desired location of the hem as shown in fig[…]
-
Страница 36
28 Elastic Stitching Pattern 14 (Elastic Stitch) The Elastic Stitch can be used in 3 ways: mending, sewing elastic or joining fabric. Each is explained below . Set the pattern selection dial to 14. MENDING 1. Place the reinforcement fabric under the tear to be mended. 2. Following the line of the tear , sew using the Elastic Stitch as illustrated i[…]
-
Страница 37
29 Shell T uck Stitching Pattern 13 (Shell T uck Stitch) The Shell T uck Stitch can be used to sew a picot (lace-like) edge on a lightweight fabric. 1. Set the pattern selection dial to 13. 2. Use a tighter thread tension than normal. 3. At a slow speed, sew the fabric on the bias, placing it under the presser foot so that the straight stitches are[…]
-
Страница 38
30 Making a Buttonhole Pattern Foot 1(b ac d) Buttonhole foot NOTE: 1. It is recommended to practice making a buttonhole on a scrap piece of fabric before attempting it on the actual garment. 2. When making buttonholes on soft fabrics, place stabilizer ma- terial on the underside of the fabric. Buttonhole-making is a simple process that provides re[…]
-
Страница 39
31 1. Mettre le s é lecteur de mod è le sur a. 2. Abaisser le pied-de-biche et coudre 5 ou 6 points. 3. Arr ê ter la machine lorsque l ’ aiguille se trouve à gauche des points et relever l ’ aiguille du tissu. 1. Mettre le s é lecteur de mod è le sur b. 2. Coudre la longueur de la ligne pr é -d é finie à la craie. 3. Arr ê ter la mach[…]
-
Страница 40
32 1. Coloque o seletor de pontos em a. 2. A Baixe o calcador e execute de 5 a 6 pontos. 3. Pare a m á quina quando a agulha estiver espetada do lado esquerdo dos pontos executa- dos e levante a agulha plforado tecido. 1. Gire o seletor de pontos para b. 2. Costure ao longo da linha marcada a giz correspondente ao comprimento pr é -definido. 3. P[…]
-
Страница 41
33 SECURING THE STITCHING AND CUTTING THE BUTTON- HOLE 1 . T o secure the stitching, turn the material 90 degrees counterclockwise, set the pattern selection dial to the Straight Stitch (6-10) with the desired length and sew to the edge of the front bar tack. 2. Remove the fabric from the machine. It is recommended that pins be placed across both e[…]
-
Страница 42
34 Buttonhole Fine Adjustment If the stitching on the two sides of the buttonhole do not appear uniform, the following adjustments can be made. 1. After sewing the left side of the buttonhole, stitch the right side and observe the feeding. 2. If the right side is too coarse or fine compared to the left side, adjust the buttonhole fine-adjusting scr[…]
-
Страница 43
35 Button Sewing Pattern Foot Other 2, 3 or 4 Button Sewing Foot Darning Plate 1. Measure the distance between the buttonholes and set the pat- tern selection dial to the Zigzag Stitch (2, 3 or 4) with the de- sired width. Distance between holes Pattern 1.6mm (1/16″) 2 3.2 mm (1/8″) 3 4.8 mm (3/16″) 4 2. Attach the button sewing foot[…]
-
Страница 44
36 Zipper Insertion Pattern 6-10 (Straight Stitch) The zipper foot is used to sew on various types of zippers and can easily be positioned to the right or left side of the needle. When sewing the right side of the zipper , attach the shank to the left pin of the zipper foot. When sewing the left side of the zipper , attach the shank to the right pi[…]
-
Страница 45
37 4 A 1 2 3 B 4 Gathering Pattern 6-10 (Straight Stitch) 1. Set the pattern selection dial to the Straight Stitch (6-10) with the desired length. 2. Loosen the tension of the upper thread (to about 2) so that the lower thread lies on the underside of the fabric. 3. Sew a single row or evenly-spaced multiple rows of Straight Stitches. 4. Pull the l[…]
-
Страница 46
38 Darning Pattern Foot Other 6-10 (Straight Stitch) None Darning Plate 1. Place the darning plate on the needle plate as shown in fig. A . 2. Set the pattern selection dial to the Straight Stitch (6-10) with the desired length. 3. Place the portion to be darned under the presser foot together with a fabric underlay for reinfor cement. 4. Either re[…]
-
Страница 47
39 Appliques Pattern 2, 3, 4, 5 (Zigzag Stitch) An applique is created by cutting a contrasting piece of fabric into a shape to be used as a decoration on a garment or project. 1. Baste the cut design to the fabric in the desired location where desired. 2. Carefully sew around the edge of the cutout design with the appropriate Zigzag Stitch (2, 3, […]
-
Страница 48
40 Monogramming and Embroidering Pattern Foot Other 2, 3, 4, 5 ( Zigzag Stitch ) None Darning Plate PREP ARING FOR MONOGRAMMING AND EMBROIDERING 1. Place the darning plate on the needle plate. 2. Set the pattern selection dial to the appropriate Zigzag Stitch (2, 3, 4 or 5). 3. Draw the lettering (for monogramming) or design (for embroi- dering) on[…]
-
Страница 49
41 MONOGRAMMING (fig. A) 1. Sew moving the hoop slowly along the lettering at a constant speed. 2. T o secure the stitching, set the pattern selection dial to the Straight Stitch (6-10) with the desired length and sew a few stitches at the end of the last letter . EMBROIDERING (fig. B) 1. Stitch the outline of the design by moving the embroidery ho[…]
-
Страница 50
42 Changing the Bulb 1. Remove the power supply plug from the electrical outlet. 2. Loosen the face plate screw as shown in fig. A . 3. Remove the face plate from the machine as illustrated in fig. B . 4. Replace the sewing light bulb. See fig. C . 1 Bulb 2 Loosen 3 T ighten 5. Reattach the face plate and fasten the screw as shown in fig. D . Rempl[…]
-
Страница 51
43 Oiling 1. Remove the power supply plug from the outlet. 2. Put 2 to 3 drops of oil at each of the points indicated in fig. A . 3. After oiling, run the machine at a fast speed without thread installed for a short time. 4. Be sure to wipe any excess oil off the machine. NOTE: The machine should be oiled once a week if it is used more than one hou[…]
-
Страница 52
44 NOTE: When the needle is lowered, the shuttle hook cannot be removed. Cleaning the Shuttle Race 1. Remove any accumulated lint and thread with a brush from the retaining ring, hook, driver and race body . 2. A cloth dampened with machine oil should be used to wipe the shuttle race clean of lint. 3. Clean the lint from the shuttle hook in the sam[…]
-
Страница 53
45 Cleaning the Feed Dogs 1. Remove the presser foot holder and the needle. 2. Remove the needle plate using a coin or screwdriver to take out the screws. 3. Clean the lint from the upper part of the feed dogs and shuttle race body with a brush. Nettoyage des griffes d ’ entra î nement 1. Retirer le support de pied-de-biche et l ’ aiguille. 2.[…]
-
Страница 54
46 PERFORMANCE CHECK LIST F ABRIC PUCKERS LOOP IN SEAM SKIPPED STITCHES LOWER (BOBBIN) THREAD BREAKS UPPER THREAD BREAKS Thread tension is too tight. Thread tension is incorrect. Needle is incorrectly inserted. Upper thread is not correctly installed. Lower (bobbin) thread is tangled. ▼ ▼ ▼ ▼ Page 17 ▼ Page 16 No No Pages 20-21 Page 6 No […]
-
Страница 55
47 PERFORMANCE CHECK LIST NEEDLE BREAKS Lint is clinging to the bottom of the needle plate. ▼ ▼ Page 6 No Pages 43-45 ▼ ▼ ▼ Page 6 No Page 43 Insufficient oiling. ▼ Page 22 No No ▼ ▼ ▼ ▼ ▼ ▼ No No ▼ ▼ Page 4 No ▼ ▼ Page 5 No ▼ ▼ Page 5 No ▼ Page 12 No ▼ F ABRIC DOES NOT FEED PROPERL Y MACHINE IS NOISY OR SLOW[…]
-
Страница 56
48 LISTE DE VERIFICA TION EN CAS DE DEFAILLANCES LE TISSU FRONCE DES POINTS SAUTENT RUPTURE DU FIL INFERIEUR Å (canette) RUPTURE DU FIL SUPERIEUR Le fil inf é rieur (canette) est emm ê l é . ▼ ▼ ▼ ▼ Page 17 ▼ Page 16 Non Non Page 20-21 Page 6 Non ▼ Page 20-21 Non ▼ ▼ ▼ Page 17 ▼ Page 16 Non Non Page 6 ▼ Page 12-17 Non Le f[…]
-
Страница 57
49 LISTE DE VERIFICA TION DES DEF AILLANCES L ’ AIGUILLE CASSE Des peluches sont accroch é es sous la plaque à aiguille. ▼ ▼ Page 6 Non Page 43-45 ▼ ▼ ▼ Page 6 Non Page 43 La machine manque d ’ huile. ▼ Page 22 Non Non ▼ ▼ ▼ ▼ ▼ ▼ Non Non ▼ ▼ Page 4 Non ▼ ▼ Page 5 Non ▼ ▼ Page 5 Non ▼ Page 12 Non ▼ L ?[…]
-
Страница 58
50 LIST ADO DE POSIBLES INCIDENCIAS ARRUGAS EN EL TEJIDO BAGAS EN LAS PUNT ADAS SALTO DE PUNT ADAS ROTURA DEL HILO INFERIOR (de la canilla) ROTURA DEL HILO SUPERIOR La tensi ó n de los hilos es demasiada fuerte La tensi ó n de los hilos no es correcta El hilo inferior (de la canilla) est á enredado ▼ ▼ ▼ ▼ P á gina 17 ▼ P á gina 16 N[…]
-
Страница 59
51 LIST ADO DE POSIBLES INCIDENCIAS ▼ ▼ P á gina 6 No ▼ ▼ ▼ P á gina 6 No P á gina 43 ▼ P á gina 23 No No ▼ ▼ ▼ ▼ ▼ ▼ No No ▼ ▼ P á gina 4 No ▼ ▼ P á gina 5 No ▼ ▼ P á gina 5 No ▼ P á gina 12 No ▼ No ▼ P á gina 6 No ▼ P á gina 12-17 No ▼ No La placa de zur cir est á instalada ▼ ▼ ▼ Se e[…]
-
Страница 60
52 LIST A DE CONTROLO DA EXECU ÇÃ O O TECIDO FRANZE LA Ç ADAS NAS COSTURAS PONTOS F ALSOS ROMPIMENTO DA LINHA INFERIOR (DA BOBINA) A LINHA SUPERIOR PA R T E A linha inferior est á emaranhada ▼ ▼ ▼ ▼ P á g. 17 ▼ P á g. 16 N ã o N ã o P á g. 20-21 P á g. 6 N ã o ▼ P á g. 20-21 N ã o ▼ ▼ ▼ P á g. 17 ▼ P á g. 16 N ã […]
-
Страница 61
53 LIST A DE CONTROLO DA EXECU ÇÃ O ▼ ▼ N ã o P á g. 43-45 ▼ ▼ ▼ N ã o P á g. 43 ▼ P á g. 23 N ã o N ã o ▼ ▼ ▼ ▼ ▼ ▼ N ã o N ã o ▼ ▼ P á g. 4 N ã o ▼ ▼ P á g. 5 N ã o ▼ ▼ P á g. 5 N ã o ▼ P á g. 12 N ã o ▼ P á g. 23 N ã o ▼ P á g. 6 N ã o ▼ P á g. 12-17 N ã o ▼ N ã o Est á ins[…]
-
Страница 62
54 Repacking the Machine Keep the carton and packing materials for future use. It may be- come necessary to reship the sewing machine. Improper packing or improper packing material could result in damage during ship- ping. Instructions for repacking the machine are illustrated below . Emballage de la machine Conserver le carton et les mat é riaux […]
-
Страница 63
55 Page A Accessories …………………………………………………………………… 3 Applique …………………………………………………………………….. 39 B Blind Hem Stitching ……………………………………………………… 27 Bobbin winding …………………………………………..[…]
-
Страница 64
56 INDEX Page A Accessoires …………………………………………………………………… 3 Aiguille Remplacement/Inspection ………………………………………. 6 Appliques ……………………………………………………………………. 39 B Boutonni è re ………………………………………….[…]
-
Страница 65
57 INDICE P á gina A Accesorios …………………………………………………………………………….. 3 Aguja Cambio/V erificaci ó n ………………………………………………………. 6 Ajuste fino de los ojales ………………………………………………………….. 34 Aplicaciones ……………..[…]
-
Страница 66
58 Í NDICE P á gina A Acess ó rios ……………………………………………………………………………… 3 Agulha Substitui çã o/Inspe çã o ……………………………………………………. 6 Agulha dupla ………………………………………………………………………….. 3 Ajuste do casead[…]
-
Страница 67
ENGLISH FRANÇAIS ESPAÑOL PORTUGUÊS 194404-011 Printed in China[…]
PMS8363 Black Instruction Manual Manuel d’instructions Manual de instrucciones Инструкция по эксплуатации
«IMPORTANT SAFETY INSTRUCTIONS» When using the sewing machine, basic safety precautions should always be followed, including the following: «Read all instructions before using.» DANGER – To reduce the risk of electric shock: 1. The sewing machine should never be left unattended when plugged in.
“IMPORTANTES CONSIGNES DE SECURITE” Lors de l’utilisation de la machine à coudre, il convient de toujours suivre les consignes de sécurité essentielles et de prendre notamment les précautions suivantes: “Lire toutes les instructions avant d’utiliser la machine.” DANGER — Pour réduire le risque de
“IMPORTANTES INSTRUCCIONES DE SEGURIDAD” Cuando se usa una máquina de coser, debe seguirse unas precauciones básicas y que se detallan a continuación. “Leer todas las instrucciones antes de usarla” PELIGRO — Para reducir el riesgo de una descarga eléctrica. 1. 2. La máquina no debe dejarse nunca
ИНСТРУКЦИИ ПО ТЕХНИКЕ БЕЗОПАСНОСТИ При эксплуатации швейной машины следует всегда соблюдать перечисленные ниже основные меры безопасности. Прочтите все инструкции перед использованием ВНИМАНИЕ! Для предотвращения возможности поражения электрическим током: 1. Никогда не оставляйте швейную машину без
Подключение соединителей и выключатель питания/ лампочки подсветки 1 2 1. 2. — Вставьте трехконтактный разъем сетевого шнура в гнездо на машине. Вставьте вилку сетевого шнура в настенную розетку. Перед тем как оставить машину без присмотра, выключите ее сетевым выключателем или выньте вилку
CONTENTS TABLE DES MATIÉRES Page PRINCIPAL PARTS………………………………………………………….. 1 PRINCIPAL PARTS………………………………………………………….. 2 ACCESSORIES ……………………………………………………………….. 3
INDICE СОДЕРЖАНИЕ Página ELEMENTOS PRINCIPALES ………………………………………………… 1 ELEMENTOS PRINCIPALES ………………………………………………… 2 ACCESORIOS………………………………………………………………………… 3
PRINCIPAL PARTS PIECES PRINCIPALES ELEMENTOS PRINCIPALES ОСНОВНЫЕ ЧАСТИ 1 3 2 1 3 5 2 5 6 4 6 4 8 9 0 D F E C A B N G I H O J L 7 M K P * The illustrations of the sewing machine on the following pages may differ slightly from your machine. * Les illustrations représentées aux pages suivantes
PRINCIPAL PARTS a b c d e f g h i j k l m n o p q r s t u v w x y z Pattern selection dial Buttonhole fine-adjusting screw Thread take-up lever Extension table with accessory storage Upper tension control dial Reverse sewing lever Thread cutter Presser foot holder assembly Presser foot screw
ACCESSORIES a b c d e f g h i ACCESSOIRES a b c d e f g h i Buttonhole foot (1 pc.) Zipper foot (1 pc.) Button sewing Foot (1 pc.) Needle set (regular single needle No. 14) (3 pcs.) Twin needle (1 pc.) Bobbins (3 pcs.) Darning plate (1 pc.) Screwdriver (1 pc.) Extra spool pin (1 pc.) Pied pour
OPERATING YOUR SEWING MACHINE FONCTIONNEMENT DE LA MACHINE A COUDRE Connecting Plugs Raccordement 1. Insert the foot controller plug, located between the foot controller and the power supply plug on the cord, into the jack on the machine. 2. Insert the power supply plug into an electrical outlet.
Main Power and Sewing Light Switches Interrupteur principal et de la lampe This switch turns the main power and sewing light on or off. (See fig. A.) Cet interrupteur permet d’allumer et d’éteindre la machine ainsi que la lampe de couture. (Voir fig. A.) a Turn on (toward the “I” mark) b Turn off
Inserting the Needle Pour mettre l’aiguille en place Turn power switch to “O”. 1. Remove the power supply plug from the electrical outlet. 2. Raise the needle bar to its highest position. 3. Lower the presser foot. 4. If a needle is already installed, remove the needle by loosening the needle clamp
Changing the Presser Foot Changement de pied-de-biche It may be necessary to change the presser foot according to your sewing needs. En fonction des besoins, il peut s’avérer nécessaire de changer le pied-de-biche. SNAP-ON TYPE Turn power switch to “O”. 1. Raise the needle to its highest position
Converting to Free-Arm Style Modèle bras libre Free-Arm sewing is convenient for sewing tubular and hard-toreach areas on garments. To change your machine to the free-arm style, lift up on the extension table and pull it out. a Lift the bottom of the extension table up toward you. b Pull the
VARIOUS CONTROLS DESCRIPTIF DES DIFFERENTES COMMANDES Pattern Selection Dial Sélecteur de modèle de point To select a stitch, simply turn the pattern selection dial in either direction. Stitch widths and lengths are shown on the following page. Pour sélectionner un modèle de point, tourner le
PATTERNS AND STITCH NAMES PATTERN STITCH NAME PAGE IN INSTRUCTIONS 1(a-b-c-d) 4-STEP AUTOMATIC BUTTONHOLE 30 2 ZIGZAG STITCH 26 3 ZIGZAG STITCH 26 4 ZIGZAG STITCH 26 5 ZIGZAG (SATIN) STITCH 26 6-10 STRAIGHT STITCH 24 11 STRAIGHT STITCH (Left needle position) 24 12 STRETCH BLIND STITCH 27 13 SHELL
DIBUJO Y NOMBRE DE LOS PUNTOS PUNTADA NOMBRE PÁGINA DEL manual 1(a-b-c-d) OJAL AUTOMÁTICO DE 4 PASOS 30 2 PUNTADA ZIGZAG 26 3 PUNTADA ZIGZAG 26 4 PUNTADA ZIGZAG 26 5 PUNTADA ZIGZAG (DE REALCE) 26 6-10 PUNTADA RECTA 24 11 PUNTADA RECTA (aguja a la izquierda) 24 12 PUNTADA INVISIBLE ELÁSTICA 27 13
Reverse Sewing Lever Levier de couture en marche arrière To sew in reverse, press down the reverse sewing lever as far as possible and hold it in that position while lightly stepping on the foot controller. To sew forward, release the reverse sewing lever. Reverse sewing is used for locking and
ENHEBRADO DE LA MÁQUINA ЗАПРАВКА НИТИ В МАШИНУ Bobinado de la canilla Намотка шпульки 1. Coloque un carrete de hilo en el porta carretes y pase el hilo por el disco de tensión de bobinado de la canilla 1. Установите катушку с нитью на предназначенный для нее стержень и проведите нить вокруг
Lower (bobbin) Threading Mise en place du fil inférieur (canette) Turn power switch to “O”. 1. Raise the needle to its highest position by turning the balance wheel toward you (counterclockwise) and raise the presser foot lifter. 2. Open the shuttle cover behind the extension table on the front of
A B-1 2 1 B-3 B-2 C 3 4 Upper (Needle) Threading Mise en place du fil supérieur (fil de l’aiguille) Enhebrado superior (de la aguja) Заправка верхней нити (в иглу) 2 3 4 15 2 1
1. Raise the presser foot using the presser foot lifter and turn the balance wheel toward you (counterclockwise) to raise the thread take-up lever to its highest position. 2. Pull up the spool pin and place a spool of thread on this pin. 3. Pass the thread through both thread guides: the rear one
A 1 2 B C 6 5 4 3 D 7 E 8 7 Drawing Up Lower (bobbin) Thread Remontée du fil inférieur (canette) 1. Raise the presser foot and the needle to their highest positions. 2. With your left hand, hold the end of the upper thread. With your right hand, turn the balance wheel toward you (counterclockwise)
Twin-Needle Sewing Couture avec l’aiguille jumelée Your sewing machine is designed for twin-needle sewing which allows you to sew using two upper threads. You can use the same color or two different colors of thread for decorative stitches. Twin-needle sewing works well with these stitches: the
Costura con aguja doble Шитье двойной иглой Su máquina de coser ha sido concebida para poder utilizar una aguja doble y permitir la costura con dos hilos superiores. Puede usar el mismo color de hilo o dos hilos de colores distintos para puntadas decorativas. Las costuras con aguja doble dan muy
Thread Tension Tension des fils Thread tension will affect the quality of your stitches. It may need to be adjusted when you change fabric or thread type. La tension des fils va affecter directement la qualité des points et il se peut qu’elle doive être réglée lors du changement de tissu ou de fil.
NOTE: The bobbin thread tension has already been adjusted at the factory for general use. For most sewing applications, no adjustment is needed. When sewing with thin thread on thin fabrics, the thread tension may not be adjusted adequately with the upper tension control dial. Therefore, the thread
RELATIVE CHART OF SEWING FABRICS, NEEDLES AND THREADS COMBINATIONS SEWING FABRICS VERY THIN Fine tricot, Fine lace, Thin linen, Silk, Organza, Chiffon NEEDLE SIZES THREAD SIZES #65/9 Cotton: 80 Synthetic/ Polyester Long Fiber Fine Mercerized Cotton #75/11 Cotton: 60-80 Silk: “A” Synthetic/
TABLA DE RELACIÓN ENTRE TEJIDOS, HILOS Y AGUJAS TEJIDOS MUY FINO Punto fino, Encaje fino, Lino fino, Seda, Tul, Gasa LIGERO Velo, Tafetán, Sintéticos, Seda, Batista MEDIO Algodón, Vichy, Popelin, Percal, Piqué, Satén, Terciopelo, Lana ligera, Pana fina, Forros, Lino, Muselina PESADO Tejano,
Straight Stitching Point droit Pattern Modèle 6-10 (Center needle position) 6-10 (Aiguille au centre) 11 (Left needle position) 11 (Aiguille à gauche) The Straight Stitch (6-10 or 11) is used for top stitching and sewing lightweight fabrics. Le point droit (modèle 6-10 ou 11) sert pour la “haute
Para empezar a coser (fig. A) 1. Colocar el selector de puntadas en la puntada derecha adecuada (6-10 ó 11), con el largo deseado. 2. Levante la aguja a su posición más alta y suba la palanca del prensatelas. 3. Saque el hilo inferior girando la ruedecilla hacia usted (en el sentido contrario al de
Zigzag Stitching Points zigzag Pattern Modèle 2 (Zigzag Stitch) 2 (Point zigzag) 3 (Zigzag Stitch) 3 (Point zigzag) 4 (Zigzag Stitch) 4 (Point zigzag) ZIGZAG STITCH Set the pattern selection dial to the appropriate Zigzag Stitch (2, 3 or 4) with the desired width. It is recommended to sew using the
Blind Hem Stitching Point élastique invisible Pattern 12 Modèle (Stretch Blind Stitch) 12 (Point élastique invisible) The Stretch Blind Stitch is used to finish the edge of projects made with stretch fabrics without the stitch showing. 1. Set the pattern selection dial to 12. 2. Both the threads
Elastic Stitching Point élastique Pattern 14 Modèle (Elastic Stitch) 14 The Elastic Stitch can be used in 3 ways: mending, sewing elastic or joining fabric. Each is explained below. Set the pattern selection dial to 14. MENDING 1. Place the reinforcement fabric under the tear to be mended. 2.
Shell Tuck Stitching Point picot Pattern 13 (Shell Tuck Stitch) Modèle 13 (Point picot) The Shell Tuck Stitch can be used to sew a picot (lace-like) edge on a lightweight fabric. 1. Set the pattern selection dial to 13. 2. Use a tighter thread tension than normal. 3. At a slow speed, sew the fabric
Making a Buttonhole Création d’une boutonnière Pattern Foot Modèle Pied-de-biche 1(b ac d) Buttonhole foot 1(b ac d) Pied pour boutonnières NOTE: 1. It is recommended to practice making a buttonhole on a scrap piece of fabric before attempting it on the actual garment. 2. When making buttonholes on
MAKING A BUTTONHOLE Step Sewn Portion Pattern ac Step a (Front end of buttonhole) a a b c ac c a d Step d (Right side) 1. Set the pattern selection dial to a. 2. Lower the presser foot and sew 5 to 6 stitches. 3. Stop the machine when the needle is at the left side of the stitches and raise the
COSIDO DE UN OJAL Pasos Zona de cosido Paso a (remate de la parte delantera del ojal) a Diseño Como coser ac 1. Ponga el selector de diseño en a. 2. Baje el prensatelas y cosa 5 ó 6 puntadas. 3. Pare la máquina cuando la aguja se encuentre a la izquierda de las puntadas y levante la aguja del
SECURING THE STITCHING AND CUTTING THE BUTTONHOLE 1. To secure the stitching, turn the material 90 degrees counterclockwise, set the pattern selection dial to the Straight Stitch (6-10) with the desired length and sew to the edge of the front bar tack. 2. Remove the fabric from the machine. It is
Buttonhole Fine Adjustment Equilibrage des boutonnières If the stitching on the two sides of the buttonhole do not appear uniform, the following adjustments can be made. 1. After sewing the left side of the buttonhole, stitch the right side and observe the feeding. 2. If the right side is too
Button Sewing Pour coudre un bouton Pattern Foot Other Modèle Pied-de-biche Autre 2, 3 or 4 Button Sewing Foot Darning Plate 2, 3 ou 4 Pied pour boutons Plaque à repriser 1. Measure the distance between the buttonholes and set the pattern selection dial to the Zigzag Stitch (2, 3 or 4) with the
Zipper Insertion Insertion de fermeture à glissière Pattern 6-10 (Straight Stitch) The zipper foot is used to sew on various types of zippers and can easily be positioned to the right or left side of the needle. When sewing the right side of the zipper, attach the shank to the left pin of the
B A 1 2 4 4 3 Gathering Pour froncer un tissu Pattern 6-10 (Straight Stitch) Modèle 6-10 (Point droit) 1. Set the pattern selection dial to the Straight Stitch (6-10) with the desired length. 2. Loosen the tension of the upper thread (to about 2) so that the lower thread lies on the underside of
Darning Reprisage Pattern Foot Other Modèle Pied-de-biche Autre 6-10 (Straight Stitch) None Darning Plate 6-10 (Point droit) Sans pied Plaque à repriser 1. Place the darning plate on the needle plate as shown in fig. A. 2. Set the pattern selection dial to the Straight Stitch (6-10) with the
Appliques Appliques Pattern 2, 3, 4, 5 (Zigzag Stitch) Modèle 2, 3, 4, 5 (Point zigzag) An applique is created by cutting a contrasting piece of fabric into a shape to be used as a decoration on a garment or project. 1. Baste the cut design to the fabric in the desired location where desired. 2.
Monogramming and Embroidering Monogrammes et broderies Pattern Foot Other Modèle Pied-de-biche Autre 2, 3, 4, 5 (Zigzag Stitch) None Darning Plate 2, 3, 4, 5 (Point zigzag) Sans pied Plaque à repriser PREPARING FOR MONOGRAMMING AND EMBROIDERING 1. Place the darning plate on the needle plate. 2. Set
MONOGRAMMING (fig. A) 1. Sew moving the hoop slowly along the lettering at a constant speed. 2. To secure the stitching, set the pattern selection dial to the Straight Stitch (6-10) with the desired length and sew a few stitches at the end of the last letter. MONOGRAMMES (fig. A) 1. Coudre à une
Changing the Bulb Remplacement de l’ampoule 1. Remove the power supply plug from the electrical outlet. 2. Loosen the face plate screw as shown in fig. A. 3. Remove the face plate from the machine as illustrated in fig. B. 4. Replace the sewing light bulb. See fig. C. 1. Retirer la fiche
Oiling Graissage 1. Remove the power supply plug from the outlet. 2. Put 2 to 3 drops of oil at each of the points indicated in fig. A. 3. After oiling, run the machine at a fast speed without thread installed for a short time. 4. Be sure to wipe any excess oil off the machine. 1. Retirer la fiche
NOTE: When the needle is lowered, the shuttle hook cannot be removed. REMARQUE: Il est impossible de retirer le crochet de la navette l’aiguille est abaissée. Cleaning the Shuttle Race 1. Remove any accumulated lint and thread with a brush from the retaining ring, hook, driver and race body. 2. A
Cleaning the Feed Dogs 1. Remove the presser foot holder and the needle. 2. Remove the needle plate using a coin or screwdriver to take out the screws. 3. Clean the lint from the upper part of the feed dogs and shuttle race body with a brush. Nettoyage des griffes d’entraînement 1. Retirer le
PERFORMANCE CHECK LIST UPPER THREAD BREAKS LOWER (BOBBIN) THREAD BREAKS SKIPPED STITCHES LOOP IN SEAM FABRIC PUCKERS Upper thread is not correctly installed. Lower (bobbin) thread is tangled. Needle is incorrectly inserted. Thread tension is incorrect. Thread tension is too tight. Page 16 No Upper
PERFORMANCE CHECK LIST FABRIC DOES NOT FEED PROPERLY NEEDLE BREAKS MACHINE IS NOISY OR SLOW MACHINE DOES NOT START The combination of needle size/ thread size/fabric is incorrect. Needle is not correctly inserted. Lint is clinging to the bottom of the needle plate. Power supply plug is removed from
LISTE DE VERIFICATION EN CAS DE DEFAILLANCES RUPTURE DU FIL SUPERIEUR RUPTURE DU FIL INFERIEURÅ (canette) DES POINTS SAUTENT LA COUTURE FAIT DES BOUCLES LE TISSU FRONCE Le fil supérieur n’est pas bien enfilé. Le fil inférieur (canette) est emmêlé. L’aiguille est mal installée. Mauvaise tension des
LISTE DE VERIFICATION EN CAS DE DEFAILLANCES L’ENTRAINEMENT DU TISSU N’EST PAS CORRECT L’AIGUILLE CASSE LA MACHINE EST BRUYANTE OU LENTE LA MACHINE NE DEMARRE PAS La combinaison aiguille/fil/tissu est incorrecte. L’aiguille est mal installée. Des peluches sont accrochées sous la plaque à aiguille.
LISTADO DE POSIBLES INCIDENCIAS ROTURA DEL HILO SUPERIOR ROTURA DEL HILO INFERIOR (de la canilla) SALTO DE PUNTADAS BAGAS EN LAS PUNTADAS ARRUGAS EN EL TEJIDO ROTURA DEL HILO SUPERIOR El hilo inferior (de la canilla) está enredado La aguja está mal colocada La tensión de los hilos no es correcta La
LISTADO DE POSIBLES INCIDENCIAS EL TEJIDO NO ARRASTRA BIEN LAAGUJA SE ROMPE LA MAQUINA ES RUIDOSA O FUNCIONA MUY DESPACIO LA MAQUINA NO ARRANCA La combinaison aiguille/fil/tissu est incorrecte. La aguja está mal colocada Hay polvo en la placa de agujas El enchufe de alimentación está desconectado
ТАБЛИЦА КОНТРОЛЬНЫХ ПРОВЕРОК ТЕХНИЧЕСКИХ ХАРАКТЕРИСТИК 52
ТАБЛИЦА КОНТРОЛЬНЫХ ПРОВЕРОК ТЕХНИЧЕСКИХ ХАРАКТЕРИСТИК 53
Repacking the Machine Keep the carton and packing become necessary to reship packing or improper packing during shipping. Instructions illustrated below. materials for future use. It may the sewing machine. Improper material could result in damage for repacking the machine are Emballage de la
INDEX Page Page A S Accessories ……………………………………………………………………. 3 Applique ……………………………………………………………………….. 9 B Satin
INDEX Page Page A N Accessoires ……………………………………………………………………. 3 Aiguille Remplacement/Inspection ……………………………………….. 6 Nettoyage…………………………………………………………………43-45 Nettoyage de
INDICE Página Página A M Accesorios ……………………………………………………………………………… 3 Aguja Cambio/Verificación ……………………………………………………….. 6 Modalidad brazo
УКАЗАТЕЛЬ Стр. Стр. А С Аппликация …………………………………………………………………… 9 Сетевой выключатель……………………………………………………… 5 Смазка…………………………………………………………………………. 43 В