
Язык
Руководство пользователя |
| Заголовок | Описание | Дата выпуска (Bерсия) |
файла (Размер) |
|---|---|---|---|
|
Руководство пользователя |
27.11.2006 (01) |
Загрузка (1.85MB) |
Загрузите и просмотрите документ в формате PDF. Для просмотра документов в формате PDF требуется программное обеспечение Adobe® Acrobat® Reader®. Если у вас нет данного программного обеспечения, вы можете загрузить его, щёлкнув по ссылке «Adobe® Acrobat® Reader®».
Характеристики, спецификации
размер машины::
стандартный
тип челнока::
вертикальный
выполнение петли::
автоматическое
регулировка баланса петли::
есть
максимальная длина стежка::
до 4 мм (плавная регулировка)
максимальная ширина строчки::
до 5 мм (фиксированная)
регулировка давления лапки на ткань::
нет
максимальная высота подъема лапки::
до 9мм
отключение нижнего транспортера::
нет
автостоп при намотке на шпульку::
есть
смещение иглы::
есть (ступенчатое)
шитье двойной иглой::
есть
горизонтальное положение катушки::
нет
быстрая смена лапки::
есть
материал корпуса::
пластик
потребляемая мощность (общая/лампа)::
85/15 Вт
XL5050us_cover
Руководство по эксплуатации
RUSSIAN
885-444/446/448
XD1162-021
Printed in China
XC6752-021 XL5050 (NA03J061) Bk

XL5050ru.book Page 1 Wednesday, August 24, 2005 5:52 PM
ИНСТРУКЦИИ ПО БЕЗОПАСНОСТИ
При эксплуатации швейной машины следует всегда соблюдать следующие основные меры
безопасности:
Перед началом эксплуатации внимательно прочтите все инструкции.
ВНИМАНИЕ! Для предотвращения возможности поражения
электрическим током:
1. Никогда не оставляйте швейную машину без присмотра при вставленной в розетку вилке
сетевого шнура. Сразу же после использования швейной машины или перед ее чисткой
всегда вынимайте вилку сетевого шнура из розетки.
2. Перед заменой лампочки подсветки всегда вынимайте вилку сетевого шнура из розетки.
Для замены используйте лампочку того же типа, имеющую мощность 15 Ватт.
ПРЕДУПРЕЖДЕНИЕ: Для уменьшения риска возгорания,
поражения электрическим током, получения ожогов или травм:
1. Не допускайте использования машины в качестве игрушки. Необходимо быть особенно
внимательным, когда машина используется детьми или когда во время работы на машине
рядом находятся дети.
2. Используйте машину только по ее прямому назначению, как описано в настоящем
руководстве. Используйте только те принадлежности, которые рекомендованы
изготовителем и указаны в данном руководстве.
3. Никогда не используйте швейную машину, если у нее поврежден сетевой шнур или вилка,
если машина плохо работает, если ее уронили или повредили, если в машину попала вода.
В этих случаях машину следует отправить официальному дилеру компании BROTHER
вашего региона или в уполномоченный сервисный центр для проверки, ремонта и наладки
ее электрической или механической части.
4. Никогда не работайте на машине при закрытых вентиляционных отверстиях. Содержите
вентиляционные отверстия машины и педаль в чистоте, своевременно очищайте их от
пыли, грязи, обрывков ткани и ворса.
5. Не роняйте в отверстия машины и не вставляйте в них никаких посторонних предметов.
6. Не используйте машину для работы вне помещения.
7. Не используйте машину в помещениях, в которых распыляют те или иные аэрозоли или
применяют чистый кислород.
8. Для отключения машины от электрической сети установите сетевой выключатель в
положение “{”, соответствующее выключению, а затем выньте вилку сетевого шнура из
розетки.
9. При отключении машины от сети не вытягивайте вилку за шнур. Возьмитесь за вилку и
выньте ее из электрической розетки.
10. Держите пальцы вдали от движущихся частей машины. Будьте особенно осторожны при
работе рядом с иглой.
11. Применяйте только соответствующую игольную пластину. Использование неподходящей
игольной пластины может привести к поломке иглы.
12. Не используйте погнутые иглы.
13. Не тяните и не подталкивайте ткань во время шитья. Это может привести к отклонению
иглы и ее поломке.
1
——————————————————————————————————————————————————————————————————————
—
XL5050ru.book Page 2 Wednesday, August 24, 2005 5:52 PM
14. При выполнении любых операций в районе иглы, например при заправке нити в иглу,
замене иглы или шпульки или смене прижимной лапки и т. п., выключите машину,
установив сетевой выключатель в положение, обозначенное символом “{”.
15. При снятии крышек, смазке или выполнении любых других регулировок, разрешенных
пользователю и описанных в данном руководстве, всегда отключайте машину от
электрической сети.
16. Малолетним детям или людям пожилого возраста пользоваться швейной машиной без
присмотра не разрешается.
17. Следите за детьми. Не допускайте, чтобы они играли со швейной машиной.
СОХРАНИТЕ ЭТО РУКОВОДСТВО
Эта машина предназначена только для бытового применения.
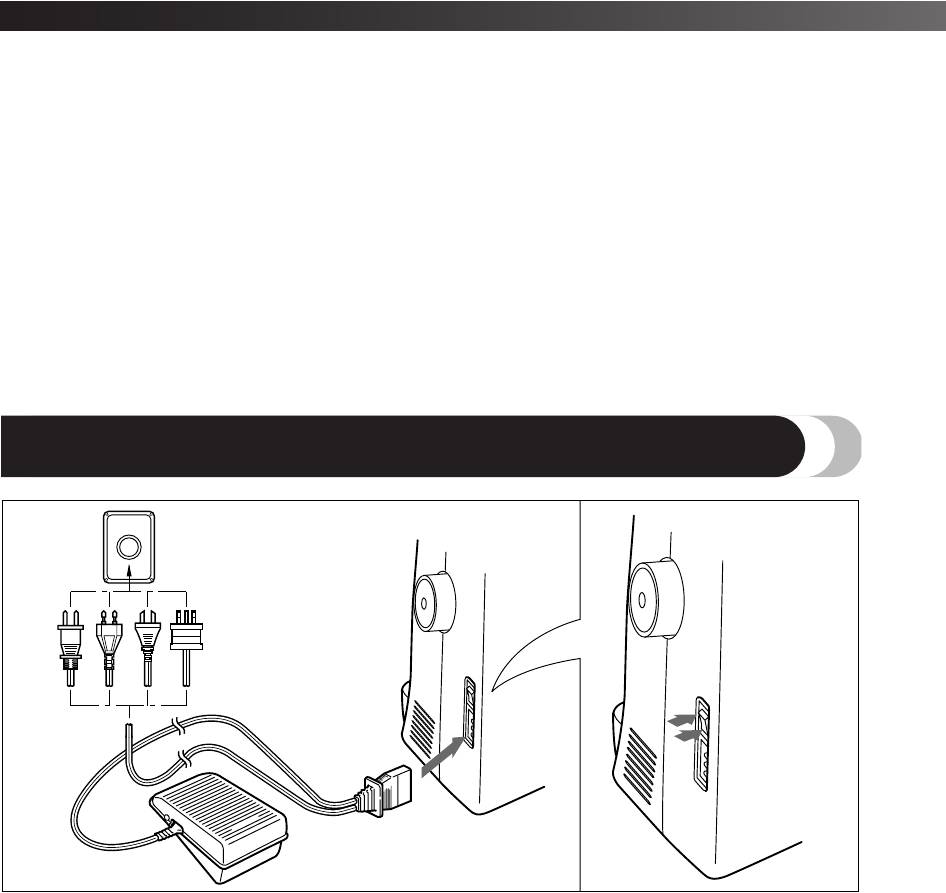
ПОДКЛЮЧЕНИЕ СОЕДИНИТЕЛЕЙ И ВЫКЛЮЧАТЕЛЬ ПИТАНИЯ/ЛАМПОЧКИ ПОДСВЕТКИ
1
2
1. Вставьте трехконтактный разъем сетевого шнура в
Выключатель питания/лампочки подсветки служит для
гнездо на машине.
включения и выключения электропитания машины и
2. Вставьте вилку сетевого шнура в настенную
лампочки подсветки.
розетку.
1 Включен
2 Выключен
• Перед тем как оставить машину без присмотра,
• При выполнении технического обслуживания
выключите ее сетевым выключателем и выньте
машины, снятии крышек и замене лампочки также
вилку сетевого шнура из настенной розетки.
необходимо вынуть вилку сетевого шнура из
розетки.
2
Перейти к контенту
Швейные машинки Brother
- Размер инструкции: 1.85 Мб
- Формат файла: pdf
Если вы потеряли инструкцию от швейной машинки Brother XL-5070, можете скачать файл для просмотра на компьютере или печати.
Инструкция для швейной машинки Brother XL-5070 на русском языке. В руководстве описаны возможности и полезные функции, а также правила эксплуатации. Перед использованием внимательно ознакомьтесь с инструкцией.
Чтобы не читать всю инструкцию вы можете выполнить поиск по содержимому внутри инструкции и быстро найти необходимую информацию. Рекомендации по использованию помогут увеличить срок службы швейной машинки Brother XL-5070. Если у вас появилась проблема, то найдите раздел с описанием неисправностей и способами их решения. В нем указаны типичные поломки и способы их решения.
Страницы и текст этой инструкции
Руководство пользователя швейной машинки Brother XL-5050_XL-5060_XL-5070
Информация отображена на картинке
Информация отображена на картинке
Информация отображена на картинке
Информация отображена на картинке
Как использовать наш сайт инструкций OnlineManuals.ru
Наша цель состоит в том, чтобы предоставить вам быстрый доступ к содержанию инструкции для швейной машинки Brother XL-5050_XL-5060_XL-5070.
С помощью онлайн просмотра, Вы можете быстро просмотреть содержимое инструкции и найти решение проблемы с швейной машинки Brother XL-5050_XL-5060_XL-5070.
Для Вашего удобства
Если листать руководство пользователя швейной машинки Brother XL-5050_XL-5060_XL-5070 прямо на сайте, не очень удобно для Вас, есть два возможных решения:
• Просмотр в полноэкранном режиме — легко просмотреть руководство пользователя (без загрузки его на свой компьютер), Вы можете использовать режим полноэкранного просмотра.
Для просмотра инструкции пользователя швейной машинки Brother XL-5050_XL-5060_XL-5070 на полном экране, используйте кнопку «Открыть в Pdf-viewer».
• Загрузка на компьютер — Вы можете также скачать Руководство пользователя швейной машинки Brother XL-5050_XL-5060_XL-5070 на свой компьютер и сохранить его в файлах.
Многие люди предпочитают читать документы не на экране, а в печатной версии.
Возможность печати руководства пользователя также была предусмотрена на нашем сайте,
и вы можете использовать ее, нажав на иконку «печать» в Pdf-viewer.
Нет необходимости печатать все руководство швейной машинки Brother XL-5050_XL-5060_XL-5070, можно выбрать только нужные страницы инструкции.
-
Page 1: Brother XL-5070
English 885-448 XC6752-021 Printed in China XL5050us_cov er Operation Manual XC6752-021 XL5050 (NA03J061) Bk[…]
-
Page 2: Brother XL-5070
1 IMPORTANT SAFETY INSTRUCTIONS When using this machine, basic safety p recautions, in cluding the following, should always b e taken: Read all instructions before use. DANGER — To reduce the risk of electric shock: 1. The machine sh ould never b e left unatte nded while plu gged in. A lways unplug the machine from the el ectrical outle t immediate[…]
-
Page 3: Brother XL-5070
——————————————————— ——————————————— ——————————————————— ————————— — 2 FOR USERS IN THE UK, EIRE, MALTA AND CYPRUS ONLY If this mach ine is fitted with a thre e-pin non-rew ireable BS plug t hen please read the followin g. IM[…]
-
Page 4: Brother XL-5070
3 CONTENTS IMPORTANT SAF ETY INSTRUCT IONS …………… ……………. …………. ……………. ……………. … 1 CONNECTING P LUGS AND MA IN POWER/SEWIN G LIGHT SW ITCH ……. ……………. …… 2 CONTENTS .. ……………. …………. ……………. ……………. …………. …………….. ………… ……..[…]
-
Page 5: Brother XL-5070
KNOWING YOUR SEWING MACHINE ————————————————— ——————————————— ————————————— — 4 PRINCIPAL PARTS 1 Bobbin-winding assembly (page 15) This winds the thread onto the bo bbin, which you use for the lower thread. 2 Spool pin (page 15 and 18) Holds the spool of th[…]
-
Page 6: Brother XL-5070
5 ACCESSORIES 1 Buttonhole foot (1 pc.) 2 Zipper foot (1 pc.) 3 Button sewing foot (1 pc.) 4 Needle pack (regular single needle HAX130) (3 pcs.) 5 Twin needle (1 pc.) 6 Bobbins (3 pcs.) 7 Screwdriver (1 pc.) 8 Extra spool pin (1 pc.) 9 Darning plate (1pc.) (When the machine is not equipped with a Drop Feed.) Parts code for zigzag presser foot: 1381[…]
-
Page 7: Brother XL-5070
KNOWING YOUR SEWING MACHINE ————————————————— ——————————————— ————————————— — 6 USING YOUR SEWING MACHINE Connecting Plugs 1 Connect the power cord plug to the machine. 2 Connect the power supply plug to a wall outlet. ● Use only regular household elect ri[…]
-
Page 8: Brother XL-5070
7 Note ● When leaving the machine unattended, the main switch of the machine should be switched off or the plug must be removed from the socket outlet. ● When servicing the machine, removing covers or changing bulbs, the machine must be unplugged. (For U.S.A. only) ● This appliance has a polarized plug (one blade wider than the other). To red[…]
-
Page 9: Brother XL-5070
KNOWING YOUR SEWING MACHINE ————————————————— ——————————————— ————————————— — 8 2 Raise the needle bar to its highest position. 3 Lower the presser foot. 4 If a needle is already installed, remove it by loosening the needle clamp with a screwdriver and pulli[…]
-
Page 10: Brother XL-5070
9 3 Put a different presser foot on the needle plate so that the bar on the presser foot is in line with the slot on the shank. 4 Lower the presser foot lever and fix the presser foot onto the shank. If the presser foot is in the correct place, the bar should snap in. Converting to Free-arm Style Free-arm sewing is convenient for sewing tubular and[…]
-
Page 11: Brother XL-5070
KNOWING YOUR SEWING MACHINE ————————————————— ——————————————— ————————————— — 10 THE CONTROLS Pattern Selection Dial To choose a stitch, simply turn the pattern selection dial in either direction. Stitch widths and lengths are shown on the following page. 1 […]
-
Page 12: Brother XL-5070
11 Recommended Widths and Lengths for Stitches ■ 21 Stitches (1-Step Automatic Buttonhole) Pattern Stitch Name Recommended Width [mm (inch)] Recommended Length [mm (inch)] Page in Instruction s 1 1-STEP AUTOMATIC BUTTONHOLE 5 (3/16) -1.5 (1/64-1/16) 30 2 STRAIGHT STITCH (CENTER) — 1-4 (1/16-3/16) 25, 34, 35 3 STRAIGHT STITCH (LEFT) — 1-4 (1/16-3/[…]
-
Page 13: Brother XL-5070
KNOWING YOUR SEWING MACHINE ————————————————— ——————————————— ————————————— — 12 ■ 17 Stitches (1-Step Automatic Buttonhole) Pattern Stitch Name Recommended Width [mm (inch)] Recommended Length [mm (inch)] Page in Instruction s 1-STEP AUTOMATIC BUTTONHOLE […]
-
Page 14: Brother XL-5070
13 ■ 17 Stitches (4-Step Buttonhole) Pattern Stitch Name Recommended Width [mm (inch)] Recommended Length [mm (inch)] Page in Instruction s 1 4-STEP BUTTONHOLE 5 (3/16) -1.5 (1/64-1/16) 31 2 ZIGZAG STITCH 1.7 (1/16) -4 (1/64-3/16) 26, 33, 36 3 ZIGZAG STITCH 3.5 (1/8) -4 (1/64-3/16) 26, 33, 36 4 ZIGZAG STITCH 5 (3/16) -4 (1/64-3/16) 26, 33, 36 5 S[…]
-
Page 15: Brother XL-5070
KNOWING YOUR SEWING MACHINE ————————————————— ——————————————— ————————————— — 14 Stitch Length Dial Depending on the selected stitch, you may need to adjust the stitch length for best results. The numbers marked on the stitch length dial represent the stitch[…]
-
Page 16: Brother XL-5070
15 THREADING THE MACHINE Winding the Bobbin 1 Put the spool of thread on the spool pin and pass the thread around the bobbin-winding tension disc. 1 Bobbin-winding tension disc 2 Bobbin-winding shaft 2 Pass the end of the thread through the hole on the bobbin from the inside of the bobbin. 3 Put the bobbin onto the bobbin-windin g shaft and slide t[…]
-
Page 17: Brother XL-5070
KNOWING YOUR SEWING MACHINE ————————————————— ——————————————— ————————————— — 16 Lower Threading 1 Raise the nee dle to its highest positio n by turning the balance wheel toward you (counterclockwise) and raise the presser foot lever. 2 Open the shuttle cove[…]
-
Page 18: Brother XL-5070
17 3 Unwind about 10 cm (4″) of thread from a full bobbin and insert the bobbin into the bobbin case. (See fig. A-1.) Pull the trailing thread into the slot, then down and to the left, as shown in fig. A-2, until it enters the delivery eye under the tension spring (fig. A-3) . 1 Tension spring 4 Holding the bobbin case by the latch, fully inse[…]
-
Page 19: Brother XL-5070
KNOWING YOUR SEWING MACHINE ————————————————— ——————————————— ————————————— — 18 Upper Threading 1 Spool pin 2 Thread guide 3 Tension discs 4 Thread take-up lever Set the main power switch to “O”. 1 Raise the presser foot lever and turn the balance wheel[…]
-
Page 20: Brother XL-5070
19 6 Bring the thread down and pass it behind the thread guide. 1 Thread guide 7 Thread the needle from front to back and pull out about 5 cm (2″) of thread. 1 5cm (2inch) Note ● If the thread take-up lever is lower ed, the upper thread cann ot be wrapped around th e thread take-up lever. Make sure you raise the presser foot lever and the th[…]
-
Page 21: Brother XL-5070
KNOWING YOUR SEWING MACHINE ————————————————— ——————————————— ————————————— — 20 5 While lightly holding the thread, turn the needle threader lever toward the front of the machine (toward you). The hook will pull the thread through the needle. 1 Hook 2 Threa[…]
-
Page 22: Brother XL-5070
21 Drawing up the lower thread 1 Raise the presser foot and the needle to their highest positi ons. 2 While lightly holding the end of the upper thread, slowly turn the balance wheel to the front (counterclockwis e) once by hand to lower, then raise the needle. 3 The upper thread should have caught the lower thread in a loop. Pull on the upper thre[…]
-
Page 23: Brother XL-5070
KNOWING YOUR SEWING MACHINE ————————————————— ——————————————— ————————————— — 22 ■ Twin Needle Threading You should thread each needle separately. 1 Threading the Right Needle Follow the same instructions for threading a single needle. See page 18 for more[…]
-
Page 24: Brother XL-5070
23 Correct tension Correct tension is im portant as too much or too little tension will weaken your seams or cause puckers on your fabric. 1 Reverse 2 Surface 2 1 2 1 XL5000us.book Page 23 Tu esday, November 11, 2003 9:25 AM[…]
-
Page 25: Brother XL-5070
KNOWING YOUR SEWING MACHINE ————————————————— ——————————————— ————————————— — 24 CHART OF SEWING FABRICS, N EEDLES AND THREAD COMBINATIONS Note ● Select the correct needle and thread size from the above chart. ● Use the same size thread for the upper (sp[…]
-
Page 26: Brother XL-5070
25 Please Read Before Sewing Straight Stitching ■ Starting Sewing 1 Turn the pattern selection dial to choose the Straight Stitch or Triple Stretch Stitch. 2 Raise the needle to its highest position and lift the presser foot lever. 3 Pull up the lower thread by turning the balance wheel towar d you (counterclockwise), and place both the upper and[…]
-
Page 27: Brother XL-5070
KNOWING YOUR SEWING MACHINE ————————————————— ——————————————— ————————————— — 26 2 Raise the presser foot and turn the fabric to its new direction using the needle as a turning point for the fabric. 3 Lower the presser foot and continue sewing in the new dir[…]
-
Page 28: Brother XL-5070
27 ■ SATIN STITCH Setting the Zigzag Stitch length in the “ ” range produces a satin stitch (close zigzag stitch). The satin stitch can be used for making buttonholes and decorative stitches. Set the pattern selection dial to the desired Zigzag Stitch, set the stitch length in the “ ” range. Blind Hem Stitching You can use the Blind Hem S[…]
-
Page 29: Brother XL-5070
KNOWING YOUR SEWING MACHINE ————————————————— ——————————————— ————————————— — 28 Elastic Stitching You can use the Elastic Stitch for mending, sewing elastic or joining fabric. Ea ch is explained be low. Set the pattern selection dial to the Elastic Stitch. […]
-
Page 30: Brother XL-5070
29 Overedge Stitching You can use these stitches to join together seams and finish them in one operation. The Overlock Stitches are also useful for sewing stretch materials while the Arrowhead Stitch is ideal for sewing the edge of a blanket. 1 Set the pattern selection dial to the Elastic Overlock, Stretch Overlock or Arrowhead. 2 Put the fabric u[…]
-
Page 31: Brother XL-5070
KNOWING YOUR SEWING MACHINE ————————————————— ——————————————— ————————————— — 30 Triple Zigzag Stretch Stitching This stitch can be used wherever a Zigzag Stitch would be used to sew heavyweight stre tch fabrics. The Triple Zigzag Stretch Stitch can also be […]
-
Page 32: Brother XL-5070
31 5 Lower the buttonhole lever and push it back slightly. 6 While gently holding the upper thread, start the machine. 7 The bar tacks of the buttonhole are sewn in the order shown. 8 Stop the machine when buttonhole stitching is finished. ■ Making a Buttonhole on Stretch Fabrics When sewing butto nholes on stretch fabric, the buttonhole stitchin[…]
-
Page 33: Brother XL-5070
KNOWING YOUR SEWING MACHINE ————————————————— ——————————————— ————————————— — 32 3 You need to sew the front bar tack first. Line the bar tack mark under the center of the presser foot and align it with the two lines on the pres ser foot. 1 Front of chalk ma[…]
-
Page 34: Brother XL-5070
33 Adjusting Buttonholes If the stitching on the two sides of the butt onhole is not the same, you can make the follow ing adjustments. 1 Set the stitch length dial to » » and sew the buttonhole on a scrap piece of fabric to observe how the material is fed. 2 If the right side of the buttonhole is too coarse or fine, adjust the feeding of[…]
-
Page 35: Brother XL-5070
KNOWING YOUR SEWING MACHINE ————————————————— ——————————————— ————————————— — 34 3 Place the darning plate on the needle plate. (On a machine equipped with a drop feed lever, lower the feed dogs by setting the drop feed lever to the up position.) 4 Put a but[…]
-
Page 36: Brother XL-5070
35 5 Sew from the bottom of the zipper toward the top on both sides. The needle should be positioned on the zipper side of the foot for best results. 6 To sew the opposite side of the zipper, release the foot by raising the lever located at the back of the presser foot, position the zipper foot on the other side of the zipper and continue sewing us[…]
-
Page 37: Brother XL-5070
KNOWING YOUR SEWING MACHINE ————————————————— ——————————————— ————————————— — 36 Appliqués You can create an applique by cutting a different piece of fabric into a shape and using it as a decoration. 1 Baste the cutout to the fabric at the desired location.[…]
-
Page 38: Brother XL-5070
37 6 Pull the lower thread up through the work at the starting position by turning the balan ce wheel, and then make a few holding stitches. 7 Grip the hoop with your thumbs and forefingers while pressing the fabric with your middle and third fingers and supporting the outside of the hoop with your little fingers. Note ● After sewing without feed[…]
-
Page 39: Brother XL-5070
KNOWING YOUR SEWING MACHINE ————————————————— ——————————————— ————————————— — 38 MAINTENANCE Changing the Light Bulb 1 Remove the power supply plug from the outlet. 2 Loosen the face plate screw. 3 Remove the face plate from the m achine as shown below. Note[…]
-
Page 40: Brother XL-5070
39 Cleaning ■ Removing the Shuttle Hook 1 Raise the needle to its highest position and unplug the machine. 2 Remove the extension table and open the shuttle cover on the front of the free arm. 3 Take the bobbin case out of the shuttle race by opening and pulling the latch. 4 Slide the latch levers away from the retaining ring to remove it. 1 Reta[…]
-
Page 41: Brother XL-5070
KNOWING YOUR SEWING MACHINE ————————————————— ——————————————— ————————————— — 40 Performance Checklist Whenever sewing difficulties are encountered, first review the manual section about th e operation that you are performing, to make sure you are using the […]
-
Page 42: Brother XL-5070
41 No No No No No No No No No No No No No F ABRIC DOES NOT FEED PROPERL Y MACHINE IS NOISY OR SLOW No NEEDLE BREAKS MACHINE DOES NOT ST ART Power supply plug is removed from outlet. Lint is clinging to the bottom of the needle plate. Stitch length dial is set at no feeding. Needle is not correctly inserted. The combination of needle size/ thread si[…]
-
Page 43: Brother XL-5070
KNOWING YOUR SEWING MACHINE ————————————————— ——————————————— ————————————— — 42 Repacking the Machine Keep the carton and packing materials for future use. You may have to take or send the machine to be re paired or wish to move the machine. If you do not p[…]
-
Page 44: Brother XL-5070
43 INDEX Numerics 1-Step Automatic Buttonhole …………….. 4 , 5 , 11 , 12 , 30 4-Step Buttonhole ……………………………………… 5 , 13 , 31 A Accessories …………………………………………………………… 5 Adjusting Buttonholes ……………………………………… …… 33 Appliqu é s …………[…]
-
Page 45: Brother XL-5070
——————————————————— ——————————————— ——————————————————— ————————— — 44 Sewing Light Switch …………………………………………… 2 , 7 Sewing with a Twin Needle …………………………………… 21 She[…]