
×
Join the club
Sign up for our newsletter to get the latest news on our products, firmware updates, exclusive competitions,
events, and blogs. Your ears will thank you later.
First Name *
Last Name *
Email Address *
Country *
I agree with the Privacy Policy. *
Evo 75
Evo
ALL IN ONE PLAYER
150

Contents
IMPORTANT SAFETY INSTRUCTIONS 3
REAR PANEL CONNECTIONS 6
FRONT PANEL CONTROLS 7
REMOTE CONTROL 8
REPLACEABLE SIDE PANELLING 8
OVERVIEW 9
GETTING CONNECTED 9
ADVANCED USB AUDIO 10
BALANCED AUDIO CONNECTIONS EVO 150 ONLY 10
USB AUDIO CONNECTION EVO 150 ONLY 10
GETTING CONNECTED 11
OPERATING INSTRUCTIONS 12
PRESETS 12
HOW TO USE RADIO 12
MUSIC LIBRARY 12
USB MEDIA 13
INPUTS 13
BLUETOOTH AUDIO STREAMING 13
SPOTIFY 13
AIRPLAY 13
CHROMECAST BUILTIN 13
SETTINGS 14
SETUP WIFI 14
ENTER THE NETWORK NAME 14
UPDATE FIRMWARE 15
AUDIO 15
USB AUDIO CLASS 15
AUDIO OUTPUT 15
BLUETOOTH AUDIO OUTPUT 15
STANDBY MODE 15
NETWORK STANDBY ON 15
AUTOMATIC POWER DOWN 15
LANGUAGE 16
DISPLAY BRIGHTNESS 16
FACTORY RESET 16
STREAMMAGIC APP 16
TECHNICAL SPECIFICATIONS 17
TROUBLESHOOTING 18
This guide is designed to make installing and using this product as easy
as possible. Information in this document has been carefully checked
for accuracy at the time of printing; however, Cambridge Audio’s policy
is one of continuous improvement, therefore design and specications
are subject to change without prior notice.
This document contains proprietary information protected by copyright.
All rights are reserved. No part of this manual may be reproduced by
any mechanical, electronic or other means, in any form, without prior
written permission of the manufacturer. All trademarks and registered
trademarks are the property of their respective owners.
The Bluetooth® word mark and logos are registered trademarks
owned by the Bluetooth SIG, Inc. and any use of such marks by Audio
Partnership Plc is under license. Other trademarks and trade names are
those of their respective owners.
Qualcomm is a trademark of Qualcomm Incorporated, registered in the
United States and other countries, used with permission.
aptX is a trademark of Qualcomm Technologies International,
Ltd., registered in the United States and other countries, used with
permission. Qualcomm aptX is a product of Qualcomm Technologies
International, Ltd
Stream Magic is a trademark of Audio Partnership Plc and is registered
in the European Community and other countries.
This product contains software licensed under version 2 of the GNU
Public License and version 2.1 of the GNU Lesser Public License. The
source code for this software is available from:
http://gpl.stream-magic.com/
This product includes technology owned by Microsoft Corporation and
under a licence from Microsoft Licensing GP. Use or distribution of such
technology outside of this product is prohibited without a license from
Microsoft Corporation and/or Microsoft Licensing, GP as applicable.
The Spotify software is subject to third party licenses found here:
www.spotify.com/connect/third-party-licenses.
This Evo 75/Evo 150 support AirPlay 2 and requires iOS 11.4 or later.
Apple and AirPlay are trademarks of Apple Inc., registered in the U.S.
and other countries.
Use of the Works with Apple badge means that an accessory has
been designed to work specically with the technology identied
in the badge and has been certied by the developer to meet Apple
performance standards.
Android, Google Play and the Chromecast built-in logo are trademarks
of Google Inc.
TIDAL and TIDAL logo are registered trademark of Aspiro AB in the
European Union and other countries.
© Copyright Cambridge Audio Ltd 2020.
Make sure you register your CA product:
WWW.CAMBRIDGEAUDIO.COM/REGISTER
For upcoming news on future products, software updates and exclusive
oers.
Support
If you have questions about your Cambridge Audio product visit
https://support.cambridgeaudio.com where you will nd FAQs and
guides to assist you.
2

Important safety instructions
For your own safety please read the following important safety instructions
carefully before attempting to connect this unit to the mains power supply.
They will also enable you to get the best performance from and prolong the
life of the unit:
1. Read these instructions.
2. Keep these instructions.
3. Heed all warnings.
4. Follow all instructions.
5. Do not use this apparatus near water.
6. Clean only with a dry cloth.
7. Do not block any ventilation openings. Install in accordance with the
manufacturer’s instructions.
8. Do not install near any heat sources such as radiators, heat registers,
stoves, or other apparatus (including ampliers) that produce heat.
9. Do not defeat the safety purpose of the polarized or grounding-type
plug. A polarized plug has two blades with one wider than the other.
A grounding-type plug has two blades and a third grounding prong.
The wide blade or the third prong are provided for your safety. If the
provided plug does not t into your outlet, consult an electrician for
replacement of the obsolete outlet.
10. Protect the power cord from being walked on or pinched, particularly
at plugs, convenience receptacles and the point where they exit from
the apparatus.
11. Only use attachments/accessories specied by the manufacturer.
12. Use with only the cart, stand, tripod, bracket, or table
specied by the manufacturer, or sold with the apparatus.
When a cart is used, use caution when moving the cart/
apparatus combination to avoid injury from tip-over.
13. Unplug this apparatus during lightning storms or when unused for
long periods of time.
14. Refer all servicing to qualied service personnel. Servicing is required
when the apparatus has been damaged in any way, such as the powersupply cord or plug having been damaged, liquid has been spilled or
objects have fallen into the apparatus, the apparatus has been exposed
to rain or moisture, does not operate normally, or has been dropped.
WARNING:
– Do not place the unit in an enclosed space; if you wish to place the unit on
a shelf, use the top shelf to allow maximum ventilation. Do not put any
objects on top of this unit. Do not situate it on a rug or other soft surface
and do not obstruct any air inlets or outlet grilles. Do not cover the
ventilation grilles with items such as newspapers, tablecloths, curtains,
etc.
– To reduce the risk of re or electric shock, do not expose this apparatus
to rain or moisture . This unit must not be used near water or exposed to
dripping or splashing water or other liquids. No objects lled with liquid,
such as vases, shall be placed on the unit.
– Danger of explosion if battery is incorrectly replaced. Replace only with
the same or equivalent type.
– The battery (battery pack or batteries installed) shall not be exposed to
excessive heat such as sunshine, re or the like.
– The unit must be installed in a manner that makes disconnection of
the mains plug from the mains socket outlet (or appliance connector
from the rear of the unit) possible. Where the mains plug is used as the
disconnect device, the disconnect device shall remain readily operable.
– Please refer to the information on the exterior rear panel for electrical
and safety information before installing or operating the apparatus.
– Only use the mains cord supplied with this unit.
Use of the apparatus in tropical climates — The equipment shall be used at
a maximum 45 degree C ambient temperature.
The unit is of Class 1 construction and must be connected to a mains
socket outlet with a protective earthing connection.
The lightning ash with the arrowhead symbol within an equilateral
triangle is intended to alert the user to the presence of un-insulated
‘dangerous voltage’ within the product’s enclosure that may be of
sucient magnitude to constitute a risk of electric shock to persons.
Warning: To reduce the risk of electric shock, do not remove cover (or
back) as there are no user-serviceable parts inside. Refer servicing to
qualied personnel. The exclamation point within an equilateral triangle
is intended to alert the user to the presence of important operating
and maintenance instructions in the service literature relevant to this
appliance
VENTILATION
Important! The unit will become hot when in use. Do not stack multiple
units on top of each other.
Ensure that small objects do not fall through any ventilation grille. If this
happens, switch o immediately, disconnect from the mains supply and
contact your dealer for advice.
POSITIONING
Choose the installation location carefully. Avoid placing it in direct
sunlight or close to a source of heat. No naked ame sources, such as
lighted candles, should be placed on the unit. Also avoid locations subject
to vibration and excessive dust, cold or moisture. The unit can be used in
a moderate climate.
This unit must be installed on a sturdy, level surface. Do not place in a
sealed area such as a bookcase or in a cabinet. Do not place the unit on
an unstable surface or shelf. The unit may fall, causing serious injury to a
child or adult as well as serious damage to the product. Do not place other
equipment on top of the unit.
Due to stray magnetic elds, turntables or CRT TVs
should not be located nearby due to possible interference.
Electronic audio components have a running in period of around a week (if
used several hours per day). This will allow the new components to settle
down and the sonic properties will improve over this time
POWER SOURCES
The unit should be operated only from the type of power source indicated
on the marking label. If you are not sure of the type of power-supply to
your home, consult your product dealer or local power company. If you do
not intend to use this unit for a long period of time, unplug it from the
mains socket.
OVERLOADING
Do not overload wall outlets or extension cords as this can result in a risk
of re or electric shock. Overloaded AC outlets, extension cords, frayed
power cords, damaged or cracked wire insulation and broken plugs are
dangerous. They may result in a shock or re hazard.
Be sure to insert each power cord securely. To prevent hum and noise, do
not bundle the interconnect leads with the power cord or speaker leads.
CLEANING
To clean the unit, wipe its case with a dry, lint-free cloth. Do not use any
cleaning uids containing alcohol, ammonia or abrasives. Do not spray an
aerosol at or near the unit.
SERVICING
These units are not user serviceable. Never attempt to repair, disassemble
or reconstruct the unit if there seems to be a problem. A serious electric
shock could result if this precautionary measure is ignored. In the event of
a problem or failure, please contact your dealer.
/
3
3

Wi-Fi information
BATTERY DISPOSAL
Batteries may contain substances harmful to the environment. Please
dispose of any discharged batteries with due consideration and in
accordance with local environmental/electronic recycling guidelines.
WEEE SYMBOL
The crossed-out wheeled bin is the European Union symbol
for indicating separate collection for electrical and electronic
equipment. This product contains electrical and electronic
and should not be disposed of with unsorted regular waste. Please return
the unit or contact the authorised dealer from whom you purchased this
product for more information.
equipment which should be reused, recycled or recovered
CE MARK
This product complies with European Low Voltage (2014/35/
Environmentally-friendly design of Energy-related Products (2009/125/
EC) Directives when used and installed according to this instruction
manual. For continued compliance only Cambridge Audio accessories
should be used with this product and servicing must be referred to
qualied service personnel.
ERAC and ACMA.
EU), Electromagnetic Compatibility (2014/30/EU) and
RCM (REGULATORY COMPLIANCE MARK)
This product meets Australia, New Zealand Safety,
EMC and Radio Communications requirements of the
FEDERAL COMMUNICATIONS COMMISSION
Supplier’s declaration of conformity (SDoC)
Equipment(s): All In One Player
Model(s): Evo 75, Evo 150
Trademark: Cambridge Audio
This device complies with Part 15 of the FCC Rules. Operation is subject
to the following two conditions: (1) this device may not cause harmful
interference, and (2) this device must accept any interference received,
including interference that may cause undesired operation.
The responsible party in US:
Company name: Audio Partnership LLC
Address: 1913 N Milwaukee Ave. Chicago, IL 60647
Phone: (312) 636-4817
Legal Representative Person: Gregg Chopper
Signature:
FEDERAL COMMUNICATIONS COMMISSION NOTICE:
This equipment has been tested and found to comply with the limits
for a Class B digital device, pursuant to Part 15 of the FCC Rules. These
limits are designed to provide reasonable protection against harmful
interference in a residential installation.
This equipment generates, uses, and can radiate radio frequency energy,
and if not installed and used in accordance with the instructions, may
cause harmful interference to radio communications. However, there is
no guarantee that interference will not occur in a particular installation.
If this equipment does cause harmful interference to radio or television
reception, which can be determined by turning the equipment o and on,
the user is encouraged to try and correct the interference by one or more
of the following measures:
• Reorient or relocate the receiving antenna.
• Increase the distance between the equipment and the receiver.
• Connect the equipment to an outlet on a circuit dierent from that to
which the receiver is connected.
• Consult the dealer or an experienced radio/TV technician for help.
FCC Caution: Any changes or modications not expressly approved by
the party responsible for compliance could void the user’s authority to
operate this equipment.
2.4 GHz Wi-Fi operation of this product in the USA is hardware limited to
channels 1 through 11.
5G channels are 36-48, 52-64, 100-140, 149-161.
FCC RADIATION EXPOSURE STATEMENT:
This equipment complies with FCC radiation exposure limits set forth for
an uncontrolled environment. This equipment should be installed and
operated with a minimum distance of 20cm between the radiator and
your body.
This transmitter must not be co-located or operating in conjunction with
any other antenna or transmitter.
MODIFICATIONS:
The FCC requires the user to be notied that any changes or
modications to this device that are not expressly approved by Cambridge
Audio, may void the user’s authority to operate the equipment.
4

Limited warranty
/
5
CANADA INDUSTRY CANADA IC
This radio transmitter has been approved by Industry Canada.
This device complies with Industry Canada License exempt RSS
standard(s). Operation is subject to the following two conditions.
(1) this device may not cause interference and (2) this device must accept
any interference, including interference that may cause undesired
operation of the device. This equipment should be installed and operated
with a minimum distance of 20cm between the radiator and your body.
The transmitter must not be co-located or operating in conjunction with
any other antenna or transmitter.
INDUSTRIE CANADA IC
Le présent appareil est conforme aux CNR d’Industrie Canada applicables
aux appareils radio exempts de licence. L’exploitation est autorisée aux
deux conditions suivantes :
(1) l’appareil ne doit pas produire de brouillage, et (2) l’utilisateur de
l’appareil doit accepter tout brouillage radioélectrique subi, même si le
brouillage est susceptible d’en compromettre le fonctionnement. Cet
équipement doit être installé et utilisé à une distance minimale de 20 cm
entre le radiateur et votre corps.
L’émetteur ne doit pas être co-placé ni fonctionner en conjonction avec
une autre antenne ou transmetteur.
EUROPEEUROPEAN UNION NOTICE
Hereby, Audio Partnership PLC declares that this product is in
compliance with Directive 2014/53/EU, the full text of the EU
declaration of conformity is available at the following internet address:
https://www.cambridgeaudio.com/DoC
WARNING: To reduce exposure to electromagnetic radiation, it is advised
that user is situated at least 20cm from the Wi-Fi Antenna during normal
operation.
FCC ID:YKBCA0999-038 IC:9095A-CA0999038
CAN ICES-3 (B)/NMB-3 (B)
Contains FCC ID:UAY-W8997-M1216 IC:6549A-W8997M1216
Bluetooth Radio frequency: 2.402GHz-2.48GHz, Max. transmit power:
10dBm.
EUROPE STANDARD:
Wi-Fi 2.4G Radio frequency: 2412-2472MHz, the Max. EIRP power 23dBm
Wi-Fi 5G Radio frequency: 5180-5825MHz, the Max. EIRP power 26dBm
Cambridge Audio warrants this product to be free from defects in materials
and workmanship (subject to the terms set forth below). Cambridge Audio
will repair or replace (at Cambridge Audio’s option) this product or any
defective parts in this product. Warranty periods may vary from country
to country. If in doubt consult your dealer and ensure that you retain proof
of purchase.
To obtain warranty service, please contact the Cambridge Audio authorised
dealer from which you purchased this product. If your dealer is not
equipped to perform the repair of your Cambridge Audio product, it can be
returned by your dealer to Cambridge Audio or an authorised Cambridge
Audio service agent. You will need to ship this product in either its original
packaging or packaging aording an equal degree of protection.
Proof of purchase in the form of a bill of sale or receipted invoice, which
is evidence that this product is within the warranty period, must be
presented to obtain warranty service.
This Warranty is invalid if (a) the factory-applied serial number has been
altered or removed from this product or (b) this product was not purchased
from a Cambridge Audio authorised dealer. You may call Cambridge
Audio or your local country Cambridge Audio distributor to conrm that
you have an unaltered serial number and/or you made a purchase from a
Cambridge Audio authorised dealer.
This Warranty does not cover cosmetic damage or damage due to acts of
God, accident, misuse, abuse, negligence, commercial use, or modication
of, or to any part of, the product. This Warranty does not cover damage due
to improper operation, maintenance or installation, or attempted repair
by anyone other than Cambridge Audio or a Cambridge Audio dealer,
or authorised service agent which is authorised to do Cambridge Audio
warranty work. Any unauthorised repairs will void this Warranty. This
Warranty does not cover products sold AS IS or WITH ALL FAULTS.
REPAIRS OR REPLACEMENTS AS PROVIDED UNDER THIS WARRANTY
ARE THE EXCLUSIVE REMEDY OF THE CONSUMER. CAMBRIDGE AUDIO
SHALL NOT BE LIABLE FOR ANY INCIDENTAL OR CONSEQUENTIAL
DAMAGES FOR BREACH OF ANY EXPRESS OR IMPLIED WARRANTY IN
THIS PRODUCT. EXCEPT TO THE EXTENT PROHIBITED BY LAW, THIS
WARRANTY IS EXCLUSIVE AND IN LIEU OF ALL OTHER EXPRESS AND
IMPLIED WARRANTIES WHATSOEVER INCLUDING, BUT NOT LIMITED
TO, THE WARRANTY OF MERCHANTABILITY AND FITNESS FOR A
PRACTICAL PURPOSE.
Some countries and US states do not allow the exclusion or limitation of
incidental or consequential damages or implied warranties so the above
exclusions may not apply to you. This Warranty gives you specic legal
rights, and you may have other statutory rights, which vary from state to
state or country to country.
For any service, in or out of warranty, please contact your dealer.
5
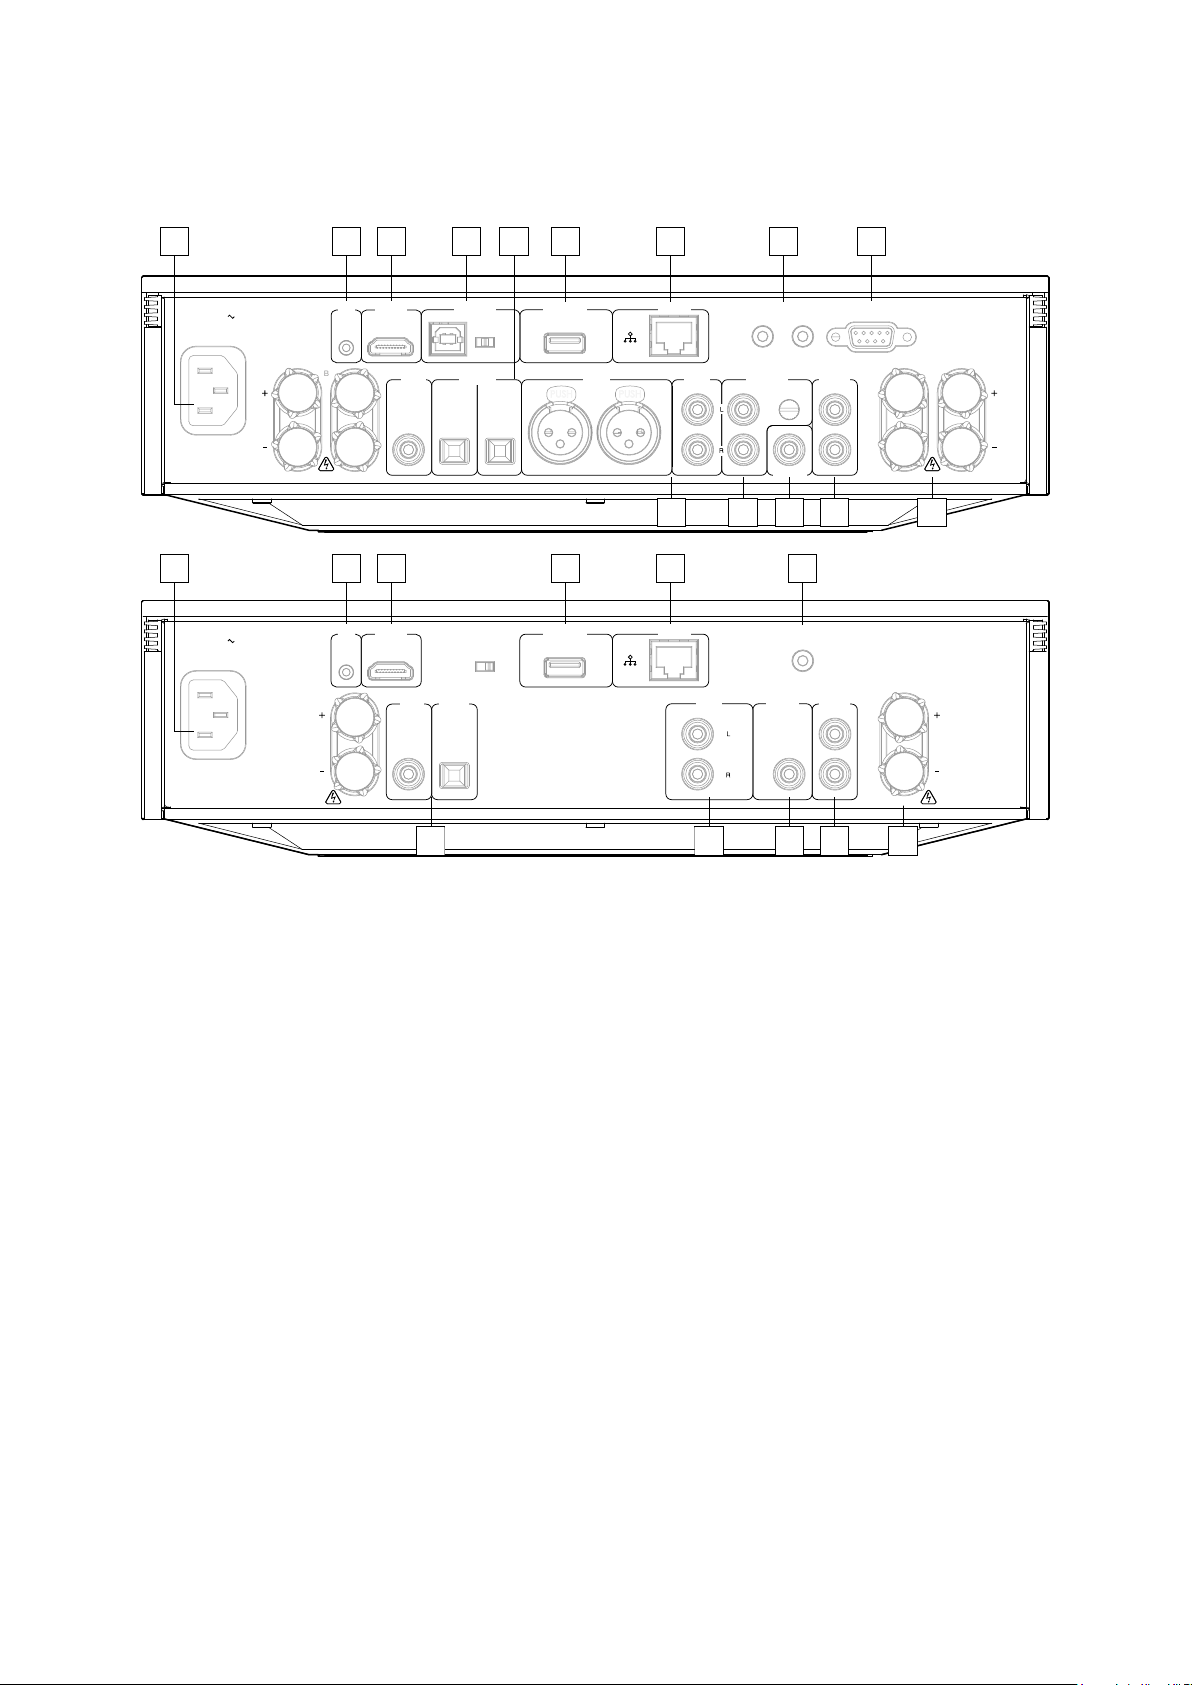
Rear panel connections
1
Max Power Consumption: 700W
Power AC
Power Rating:
100V-240V~50/60Hz
1
Max Power Consumption: 400W
Power AC
Power Rating:
100V-240V~50/60Hz
A
Right
Loudspeaker
Right
Loudspeaker
3
2
TV ARCCD USB Audio
Coax
In
4–8 Ω
3
2
TV ARCCD
Coax
In
4–8 Ω 4–8 Ω
Ground
Switch
1 2 3
Optical In XLR In Aux In MM Phono
1 2
Ground
Switch
1 2
Optical
In
6
54 8
USB Media
R L
7
Ethernet
Trigger
Out
1110 12
6
USB Media
7
Ethernet
Aux In
Sub-Out
Trigger In
Ground
Sub-Out
IR In
Pre-Out
13
8
IR In
Pre-Out
9
RS-232C
Serial no. fitted on underside
Left
Loudspeaker
B A
4–8 Ω
14
Left
Loudspeaker
Evo 150
Evo 75
1. AC POWER SOCKET
2. CD
allows for Evo CD using this control system and display from your Evo 75/
Evo 150
3. AUDIO RETURN CHANNEL ARC
Connec tion from a T V that supp orts ARC f unction
4. USB AUDIO IN EVO 150 ONLY
For connecting to PC/MAC computers.(Class 2 USB Audio only. windows
based PC’s require a Cambridge Audio USB drive to be installed before
connection)
GROUND SWITCH
1: The Ground Switch enables the USB interface earth and main board
earth to be disconnected from the Evo 75/Evo 150 chassis earth.
2: Disconnecting (lifting) the earth can be useful if electronic hum is heard
through the speakers. the switch should otherwise be left in the Ground
position.
3: The Ground Switch enables the USB interface earth and main board
earth connected from the Evo 150 chassis earth. (Evo 150 only)
5. DIGITAL INPUTS COAX IN, OPTICAL IN1/IN2
Note: Optical in 2 is available on the Evo 150 only.
6. USB MEDIA
For connecting local media storage. Note that the USB ports are not
intended for connection to Apple mobile devices; no functionality,
charging or otherwise is supported.
7. ETHERNET
Ethernet port for connecting to a 10/100BASE-T local area network (LAN).
Your unit will automatically default to an Ethernet connection if one is
made.
8. TRIGGER IN/OUT EVO 150 ONLY
The Evo 150 can be connected to the trigger control output of home
12105
13
automation equipment to control the power state of the Evo 150. The input
level should be 12V. The trigger out will go high while the Evo 150 is powered
on. This can be used to turn on other equipment that has a trigger in.
IR In: Allows modulated IR commands from an IR repeater or custom
install systems to be received by the amplier.
14
9. RS232C
Custom install control — a full protocol is available for the Evo 150 on our
website.
10. ANALOGUE INPUTS XRL IN, AUX IN
Note: Blanced (XLR in) is available on the Evo 150 only.
the balanced connection is the higher quality option and can reject noise
and interference in the cable when used with other equipment that
supports this function. An XLR connector is wired Pin 1 — Ground; Pin 2 Hot (in-phase); Pin 3 — Cold (phase-inverted).
Aux in is suitable for any ‘line level’ source equipment such as CD players,
DAB or FM/AM tuners etc.
Note: These inputs are for analogue audio signals only. They should not be
connected to the digital output of a CD player or any other digital device.
11. MM PHONO INPUT EVO 150 ONLY
This input has a built in phono stage. Record players tted with Phono
Cartridges of the Moving Magnet (MM) , the «ground» terminals on both
the reocrder player and the Evo 150 should be connected(where possible)
with a ground wire for lowest noise/hum pickup.
12. SUB OUT
Connect to the input on an active subwoofer if required.
13. PREOUT
For connection to the unbalanced inputs of a power amplier or active
subwoofer.
14. LOUDSPEAKER TERMINALS
Important Note: When using a banana plug, make sure the speaker
terminals are completely tightened before inserting the plug.
B SPEAKER (Evo 150 ONLY)
6
Loading…
Table of Contents
- Evo – All In One Player
- Front panel controls
- Evo display
- Evo 150 rear panel connections
- Evo 75 rear panel connections
- Remote control
- Replaceable side panel
- Getting connected
- Network connections
- StreamMagic app – Setup
- Google Home / Chromecast built-in
- Chromecast built-in
- Bluetooth source
- AirPlay
- Spotify Connect
- Bluetooth output
- MQA (Master Quality Authenticated)
- Settings
- Info screen
- Technical specifications
- Troubleshooting
- References
- Read User Manual Online (PDF format)
- Download This Manual (PDF format)
CAMBRIDGE AUDIO Evo Series Evo 150 All In One Player User Manual

Evo – All In One Player
Last updated: April 9, 2021 08:32. Revision #1455
evo all one player
This guide is designed to make installing and using this product as easy as
possible. Information in this document has been carefully checked for accuracy
at the time of publishing; however, Cambridge Audio’s policy is one of
continuous improvement, therefore design and specifications are subject to
change without prior notice.
This document contains proprietary information protected by copyright. All
rights are reserved. No part of this manual may be reproduced by any
mechanical, electronic or other means, in any form, without prior written
permission of the manufacturer. All trademarks and registered trademarks are
the property of their respective owners.
The Bluetooth® word mark and logos are registered trademarks owned by the
Bluetooth SIG, Inc. and any use of such marks by Audio Partnership Plc is
under license. Other trademarks and trade names are those of their respective
owners.
Qualcomm is a trademark of Qualcomm Incorporated, registered in the United
States and other countries, used with permission.
aptX is a trademark of Qualcomm Technologies International, Ltd., registered
in the United States and other countries, used with permission.
Qualcomm aptX is a product of Qualcomm Technologies International, Ltd.
StreamMagic is a trademark of Audio Partnership Plc and is registered in the
European Community and other countries.
This product contains software licensed under version 2 of the GNU Public
License and version 2.1 of the GNU Lesser Public License. The source code for
this software is available from: http://gpl.stream-magic.com/
This product includes technology owned by Microsoft Corporation and under a
licence from Microsoft Licensing GP. Use or distribution of such technology
outside of this product is prohibited without a license from Microsoft
Corporation and/or Microsoft Licensing, GP as applicable.
The Spotify software is subject to third party licenses found here:
www.spotify.com/connect/third-party-licenses.
This product support AirPlay 2 and requires iOS 11.4 or later.
Apple and AirPlay are trademarks of Apple Inc., registered in the U.S. and
other countries.
Use of the Works with Apple badge means that an accessory has been designed to
work specifically with the technology identified in the badge and has been
certified by the developer to meet Apple performance standards.
Android, Google Play and the Chromecast built-in logo are trademarks of Google
Inc.
TIDAL and TIDAL logo are registered trademark of Aspiro AB in the European
Union and other countries.
MQA and the Sound Wave Device are registered trade marks of MQA Limited ©
2016.
© Copyright Cambridge Audio Ltd
For upcoming news on future products, software updates and exclusive offers,
make sure you register your product at
http://www.cambridgeaudio.com/register
Front panel controls
Last updated: April 7, 2021 11:30. Revision #1436 evo all one player / front
panel controls

-
Display
-
Skip
-
Play/Pause
-
Speaker output
Press this button to choose a different speaker output from the menu. Use the
source selector knob to select the speaker output between speaker A, speaker
B, speaker A+B, headphone and Bluetooth devices.
Note: Speaker A, speaker B and speaker A+B are available on the Evo 150 only. -
Volume/Source selector
To change the volume, rotate the front part.
To select a source, rotate the back part. -
Info
During playback, pressing this button will cycle through ‘Now Playing’
screens. Press and hold to display the product info. -
IR sensor
-
Standby/On
-
Headphones
For suitable headphones – connection will automatically mute the speaker
output and the pre-out.
Evo display
Last updated: May 12, 2021 10:50. Revision #1574
evo all one player / evo display

-
Album/Source artwork
Displays the album artwork. Alternatively, if no albums are available this
will display the source input icon. -
Track title, artist and album
For Internet Radio, this will display the radio station name and the current
playback. -
Format info
Displays the streaming sample rate. For Internet Radio, this will display the
bitrate the station is streaming. -
Source input
Displays the currently selected source input. -
Progress bar
When available, this will display the current track progression during
playback. -
Track time
When available, this will display the elapsed track time during playback. -
Clock
-
Network connection
Displays the current network connection.
Wireless network connection
Wireless connection with no internet access
Wired network connection Wired connection with no internet access
No network connection -
Speaker output
Displays the currently selected speaker output. -
Mute volume
Displays when the network streamer is muted. -
Firmware update
This indicates when new firmware is available. Press the ‘Info’ button on the
front panel or use the StreamMagic app to update the network streamer’s
firmware. -
MQA indicator
See the MQA section for more details. -
Shuffle, Repeat and Repeat +1
Evo 150 rear panel connections
Last updated: April 26, 2021 09:15. Revision #1556
evo all one player / evo 150 rear panel connections

-
AC Power socket
-
Speaker terminals
B Speaker
For connecting a second pair of loudspeakers. -
Evo CD
A dedicated connection from an Evo CD player. -
Audio return channel (ARC)
A connection from a TV that supports ARC function. -
USB Audio In
For connecting to PC/Mac computers.
Note: For Class 2 USB audio, Windows-based PCs require a Cambridge Audio
USB driver to be installed before connection.
Ground Switch
Note: The ground switch position should be set to 1 as default. Use
another position if a humming noise occurs.
Position 1 – Normal/default position. The main unit audio ground is
lifted from chassis earth.
Position 2 – USB Audio ground is lifted from the main unit audio ground,
which is also lifted from chassis earth. This may be useful to reduce hum and
noise that can occur with some USB Audio setups.
Position 3 – Main unit audio ground is connected directly to chassis
ground and USB Audio ground. For some setups, this can reduce hum or noise
when certain TVs, Turntables, and other equipment are connected to the Evo
unit. -
USB Media
For connecting local media storage. Note that the USB ports are not intended
for connection to Apple mobile devices; no functionality, charging or
otherwise is supported. -
Ethernet
Use a wired connection for seamless playback of high-resolution 352.8kHz,
384kHz, and DSD 256. -
Trigger Out
Use a link wire between the Evo 150 and a product that has a trigger input.
This will synchronise the power state of both products when powering the Evo
150 on/standby. -
Trigger In/IR In
Trigger In – Use a link wire between a product that has a trigger output
and the Evo 150. This will synchronise the power state of the Evo 150 with the
controlling unit
IR In – Receives modulated IR commands from an IR repeater or custom
install systems. -
RS232C
Custom install control – a full protocol is available for the Evo 150 on
our website. -
Digital Inputs (Coax and Optical)
Note: If a digital input is connected to a TV you can enable TV mode in
the input settings of the StreamMagic app. This mode minimises lip-sync delays
on the audio path by bypassing MQA decoding and also reduces the chance of
dropouts and glitches from some TVs. -
Analogue Inputs (AUX/XLR)
-
MM Phono input
For connecting a turntable that uses a moving magnet cartridge.
Ground
If your turntable has a separate grounding lead, then connect here. -
Sub-Out
-
Pre-Out
Evo 75 rear panel connections
Last updated: April 28, 2021 09:51. Revision #1555
evo all one player / evo 75 rear panel connections

-
AC Power socket
-
Speaker terminals
-
Evo CD
A dedicated connection from an Evo CD player. -
Audio return channel (ARC)
A connection from a TV that supports ARC function. -
Ground Switch
Note: The ground switch position should be set to 1 as default. Use
another position if a humming noise occurs.
Position 1 – Normal/default position. The main unit audio ground is
lifted from chassis earth.
Position 2 – Main unit audio ground is connected directly to chassis
earth. For some setups, this can reduce hum or noise when certain TVs,
Turntables, and other equipment are connected to the Evo unit -
USB Media
For connecting local media storage. Note that the USB ports are not intended
for connection to Apple mobile devices; no functionality, charging or
otherwise is supported. -
Ethernet
Use a wired connection for seamless playback of high-resolution 352.8kHz,
384kHz, and DSD 256. -
IR In
Receives modulated IR commands from an IR repeater or custom install systems. -
Digital Inputs (Coax and Optical)
Note: If a digital input is connected to a TV you can enable TV mode in
the input settings of the StreamMagic app. This mode minimises lip-sync delays
on the audio path by bypassing MQA decoding and also reduces the chance of
dropouts and glitches from some TVs. -
Analogue Input
-
Sub-Out
-
Pre-Out
Remote control
Last updated: April 7, 2021 11:31. Revision #1437
evo all one player / remote control
-
Mute
-
Standby/On
-
Preset buttons
Press and hold to store the current source.
Note: Not available for media player queue, AirPlay or Chromecast
sources. -
Speaker output
Press to choose a different speaker output. Pressing this button will toggle
the speaker output between speaker A, speaker B, speaker A+B, headphone and
Bluetooth devices. -
Info
During playback, pressing this button will cycle through ‘Now Playing’
screens. Press and hold to display the product info. -
Brightness
Pressing this button will alter the brightness of the display backlight
between bright, dim and an option to switch off the backlight. -
Eject CD (Evo CD only)
Press to eject the CD from the slot. -
Stop (Evo CD only)
-
Play/Pause/Skip
-
Source selection
-
Volume
Replaceable side panel
Last updated: April 7, 2021 11:29. Revision #1431
evo all one player / replaceable side panel

When installing new magnetic side panels, please ensure that the groove cuts
are aligned with the direction of the front panel. Insert from the rear by
holding the rear of the panel.
Important note: The magnets can snap hard and pinch your fingers if not
done correctly.
Getting connected
Last updated: April 21, 2021 02:06. Revision #1554
evo all one player / getting connected
Basic connections
The diagram below shows the basic connection of your Evo to a pair of
loudspeakers

Speaker B connections (Evo 150 only)
The diagram below shows the connection for a second pair of loudspeakers.
Pressing the speaker output icon will scroll through the selection of
speakers, speaker A, speaker B, and speaker A and B together.

Preamp Out connections
The Preamp Out sockets are for connecting to a power amplifier or active
subwoofer.

Balanced audio connections (Evo 150 only)
The diagram below shows how to connect the Evo 150 using the Balanced Audio
inputs.

USB audio connection (Evo 150 only)
Important note: Before setting up your Evo 150 for the first time, please make
sure that the USB Audio connection is unplugged. USB Audio can be re-connected
once any firmware updates are applied.

Network connections
Connecting to a wired network

Connecting to a wireless network

Note: Your Evo will need to be in range of your wireless router.
StreamMagic app – Setup
Last updated: April 7, 2021 02:47. Revision #1419
evo all one player / streammagic app setup
Your player is network connected, not only can you listen to devices connected
to the inputs on the product but you can also stream music from many different
sources both on your home network and from the internet.
To set up your player, please first download the StreamMagic app from the
Apple app store or Google Play store.
Set up
- Switch on your player and follow the on screen instructions to select your preferred language.
- Open the StreamMagic app and follow the instructions provided to complete setting up your player on your network. This process will also apply any new updates that may be pending.
Note: During the set up process you will be asked to give your player a
name, please make sure this is unique to your player. This will make it easier
to find when using streaming and smart home services.
Once your player is connected to your home network you’ll have full control of
your sources, including internet radio, streaming services, network and USB
drives and more.
For more information on our StreamMagic app, please visit:
https://www.cambridgeaudio.com/streammagic
Google Home / Chromecast built-in
Last updated: April 7, 2021 12:45. Revision #1489
evo all one player / google home chromecast built
Your player is network connected, not only can you listen to devices connected
to the inputs on the product but you can also stream music from many different
sources both on your home network and from the internet.
Your player features Chromecast built-in and can be incorporated in to your
Google Home. To set up your player, download the Google Home app on your smart
phone or tablet.
With Chromecast built into your player, your phone becomes your remote.
Simply tap the Cast button from apps you already know and love to stream
music, podcasts and playlists from your phone, tablet or laptop to your
player.
Chromecast built-in
Your phone is your remote
- Simply tap the Cast button from apps you already know and love. No new logins or downloads required.
- Use your phone to search, play, pause and turn up the volume from anywhere in the home.
- While you’re streaming, you can keep using your phone for other things – scroll through social media, send a text, and even accept calls.
- Enjoy music throughout your house when you use multi-room casting with Chromecast-enabled speakers.
- Just say “Hey Google” to cast to your player
Unlimited entertainment, all on your schedule
- Works with hundreds of apps and new apps are being added all the time.
- Choose from millions of songs from popular music services like Pandora, Spotify, and Youtube Music.
Android, Google Play and the Chromecast built-in logo are trademarks of Google
Inc.
Bluetooth source
Last updated: July 7, 2021 11:26. Revision #1804
evo all one player / bluetooth source
The Bluetooth source allows your player to receive wireless Bluetooth audio
from most phones, tablets and laptops.
Pairing
To begin streaming high-quality music from your chosen media source it will
first need to be paired with your player

- Select the Bluetooth source on your player
- Open your mobile device or laptops Bluetooth settings
- Select your player from the list of available devices
- Your device should now connect to your player
Once paired you should be able to connect to your player at any time by
selecting the Bluetooth source on your player and then choosing your player
from the list of previously connected devices.
Notes:
- Your Bluetooth device can only be connected to your player while the Bluetooth source is selected.
- The Bluetooth source cannot be used if listening on Bluetooth headphones via the Output Select feature.
AirPlay
Last updated: April 7, 2021 11:30. Revision #1421
evo all one player / airplay
AirPlay is an Apple technology designed to control home audio systems and
speakers in any room — with a tap or by just asking Siri — right from iPhone,
iPad, HomePod, or Apple TV. Play a song in the living room and kitchen at the
same time or adjust the volume in any room, all in sync.
After installing your player, add it to the Apple Home app with a few simple
steps using your iPhone or iPad
How to use AirPlay from iPhone or iPad
- Ensure your player is connected to your network.
- Open the app that you want to AirPlay from.
- Tap or .
- Select your player as your AirPlay device.
How to use AirPlay from Control Center
To switch the audio on your device from Control Center: Swipe up from the
bottom edge of any screen on your device to open Control Center.
Touch and hold in the upper-right corner, then select your playe
This product supports AirPlay 2 and requires iOS 11.4 or later.
Apple and AirPlay are trademarks of Apple Inc., registered in the U.S. and
other countries.
Use of the Works with Apple badge means that an accessory has been designed to
work specifically with the technology identified in the badge and has been
certified by the developer to meet Apple performance standards.
Spotify Connect
Last updated: April 7, 2021 11:29. Revision #1422
evo all one player / spotify connect
Use your phone, tablet or computer as a remote control for Spotify.
Go to spotify.com/connect to learn how.
The Spotify Software is subject to third party licenses found here:
www.spotify.com/connect/third-party-licenses
Bluetooth output
Last updated: April 12, 2021 08:55. Revision #1490
evo all one player / bluetooth output
Your player supports Bluetooth output. This means you can send the audio from
your player, wirelessly to Bluetooth headphones or a Bluetooth speaker.
Pairing
If you haven’t connected your player to a Bluetooth device previously you’ll
need to use the StreamMagic app.
- Make sure your Bluetooth device is set to pairing mode (see your Bluetooth device instructions for how to do this).
- Open the StreamMagic app.
- Tap select output on the home page.
- Select Pair new Bluetooth device.
- Select your Bluetooth device from the list of available devices.
Your player will now switch its audio output to playback on your Bluetooth
device.
Once paired your Bluetooth device will be remembered by your player.
To switch audio output to a Bluetooth device
Make sure your Bluetooth device is switched on and ready to connect.
either:
- Open the StreamMagic app.
- Tap Select Output on the Home page.
- Choose your Bluetooth device.
or

- Press the Output select button on the remote or front panel.
- Choose your Bluetooth device from the list.
To switch audio away from the Bluetooth device
either:
- Switch off or disconnect your Bluetooth device.
or
- Choose a different output from either the StreamMagic app or by pressing the output select button on the remote or front panel.
Notes:
- Audio cannot be output to a Bluetooth device if the Bluetooth source is currently selected.
- Please use the volume controls on your Bluetooth headphones.
MQA (Master Quality Authenticated)
Last updated: April 8, 2021 09:09. Revision #1465
evo all one player / mqa master quality authenticated
The Cambridge Audio EVO includes MQA technology, which enables you to play
back MQA audio files and streams, delivering the sound of the original master
recording.

The front panel will display MQA green or blue to indicate that the unit is
decoding and playing an MQA stream or file, and denotes provenance to ensure
that the sound is identical to that of the source material. It displays MQA
blue to indicate it is playing an MQA Studio file, which has either been
approved in the studio by the artist/producer or has been verified by the
copyright owner.
Settings
Last updated: June 2, 2021 02:46. Revision #1687
evo all one player / settings
Device Name
This is how your player will appear in your StreamMagic app and on your home
network when using services like Spotify, Chromecast built-in and TIDAL
Connect.
Giving your player a unique name makes it easier to distinguish when using
streaming and smart home services.
AirPlay Name
This is how your player will appear when using AirPlay or the Apple Home app.
Standby Mode
This selects what type of standby mode your player will use.
Network Standby means your player will still be controllable by the
StreamMagic app and other network services.
If Eco mode is chosen your player will use even less power in standby but will
need to be switched on either by the front panel or the remote control.
Automatic Power Down
This sets how long your player will wait while inactive before switching in to
standby.
Display Brightness
This sets the brightness of your player’s display. If set to ‘Off’ the display
will show for a few seconds after any change and then switch off.
USB Audio Class
This sets the USB Audio Class for the USB Audio input.
USB Audio Class 1.0 (default) works with USB 1.1 ports and supports up to 24
bit/96kHz.
USB Audio Class 2.0 requires a USB 2.0 port and can support up to 32
bit/384kHz (asynchronous) and up to DSD-256. Depending on your PC or laptop
you may require an additional driver.
For more info about USB Audio see our online
guide.
**Tone Control***
We’ve tuned Evo to deliver Great British Sound, however we realise how
personal and subjective listening can be so we’ve added a digital tone control
to allow you to tailor the sound of Evo to your own preference.
If you’d rather leave your sound untouched, you can disable the tone control
completely and audio will bypass all processing, leaving Evo performing
exactly as we tuned it.
Note: Tone control will not affect DSD streams and will not be present on
Bluetooth output.
Volume Limit
This sets the maximum volume that other streaming services like AirPlay,
Spotify, TIDAL Connect and Chromecast built-in can set. The front panel,
remote control and StreamMagic app volume controls can override this setting.
Early Update
Setting this to ‘On’ will let you try out the latest firmware ahead of general
release.
For more information and to find out what’s new visit our FAQ.
Firmware
This will check for and apply any new firmware available for your player.
You can also check for new updates on the info screen.
When left in network standby overnight your player will check and apply any
new updates.
Factory Reset
This will return your player to its factory settings.
You can also do this from the info screen.
Note: Your network player must be connected to the internet to carry out
firmware updates. It is recommended that you keep your network player
connected to ensure optimal performance.
*Requires software version 124-a-018 or higher
Info screen
Last updated: April 12, 2021 08:55. Revision #1463
evo all one player / info screen
The info screen shows useful information about your player, it also allows you
to carry out some actions to help resolve problems with your player.
To access the info screen hold the button on the front panel for 2 seconds

Technical specifications
Last updated: August 31, 2021 11:32. Revision #1829
evo all one player / technical specifications
Evo 75
POWER OUTPUT
75W into 8 Ohms
AMPLIFICATION
Class-D
DAC
ESS Sabre ES9016K2M
FREQUENCY RESPONSE
20Hz –20kHz +/-3dB
ANALOGUE AUDIO INPUTS
1 x RCA
DIGITAL AUDIO INPUTS
1 x TOSLINK optical, 1 x S/PDIF coaxial, Bluetooth (integrated), 1 x TV ARC
Bluetooth: 4.2 A2DP/AVRCP supporting SBC, aptX and aptX HD codecs
COMPATIBILITY
TOSLINK optical: 16/24bit 44.1-96kHz PCM only
S/PDIF coaxial: 16/24bit 44.1-192kHz PCM only
ARC: 16/24bit 44.1-192kHz PCM only
UPnP, Local USB media, Airplay 2, Chromecast built-in, Internet Radio, Spotify
Connect, TIDAL, Qobuz, Amazon Music, RoonReady.
AUDIO FORMATS
ALAC, WAV, FLAC, AIFF, DSD (x256), WMA, MP3, AAC, HE AAC AAC+, OGG Vorbis
OUTPUTS
Speakers, 3.5mm headphone, Preamp Output, Subwoofer Output, Bluetooth
(integrated)
Bluetooth: 4.2 A2DP/AVRCP supporting up to aptX HD
ETHERNET
IEEE 802.3, 10 Base-T or 100 Base-T
WI-FI
Dual-Band 2.4/5GHz
MAX POWER CONSUMPTION
400W
STANDBY POWER CONSUMPTION
<0.5W
DIMENSIONS (W x H x D)
317 x 89 x 352 mm
WEIGHT
5Kg
Evo 150
POWER OUTPUT
150W into 8 Ohms
AMPLIFICATION
Class-D
DAC
ESS Sabre ES9018K2M
FREQUENCY RESPONSE
20Hz –20kHz +/-3dB
ANALOGUE AUDIO INPUTS
1 x RCA, 1 x Balanced XLR, 1 x MM Phono
DIGITAL AUDIO INPUTS
2 x TOSLINK optical, 1 x S/PDIF coaxial, Bluetooth (integrated), 1 x TV ARC,
USB Audio
USB Audio: USB Type B conforming to USB Audio Class 1 or USB Audio Class
2 (user selectable)
Bluetooth: 4.2 A2DP/AVRCP supporting SBC, aptX and aptX HD codecs
COMPATIBILITY
TOSLINK optical: 16/24bit 44.1-96kHz PCM only
S/PDIF coaxial: 16/24bit 44.1-192kHz PCM only
ARC: 16/24bit 44.1-192kHz PCM only
USB Audio Class 1: Up to 24-bit 96kHz (asynchronous)
USB Audio Class 2 : Up to 32 bit 384kHz (asynchronous) and up to DSD-256
UPnP, Local USB media, Airplay 2, Chromecast built-in, Internet Radio, Spotify
Connect, TIDAL, Qobuz, Amazon Music, RoonReady.
Note: USB media maximum current 1A
AUDIO FORMATS
ALAC, WAV, FLAC, AIFF, DSD (x256), WMA, MP3, AAC, HE AAC AAC+, OGG Vorbis
OUTPUTS
Speakers A+B, 3.5mm headphone, Preamp Output, Subwoofer Output, Bluetooth
(integrated)
Bluetooth: 4.2 A2DP/AVRCP supporting up to aptX HD
ETHERNET
IEEE 802.3, 10 Base-T or 100 Base-T
WI-FI
Dual-Band 2.4/5GHz
MAX POWER CONSUMPTION
700W
STANDBY POWER CONSUMPTION
<0.5W
DIMENSIONS (W x H x D)
317 x 89 x 352 mm
WEIGHT
5.3Kg
Troubleshooting
Last updated: April 26, 2021 09:33. Revision #1557
evo all one player / troubleshooting
If you experience any trouble with your Evo, visit the help section on our
webpage at http://techsupport.cambridgeaudio.com
If you have trouble connecting the Evo to your network, these steps may help
to resolve the problem:
- Confirm that a connected computer can access the Internet (i.e. can browse the web) using the same network.
- If you have an encrypted Wi-Fi network, check that you have entered the correct key or passphrase. Remember that text-format keys are casesensitive.
If your Evo can connect to the network successfully but is unable to play
particular Internet Radio stations, it may be due to one of the following
causes:
- The station is not broadcasting at this time of the day (remember it may be located in a different time zone).
- The station has reached the maximum allowed number of simultaneous listeners.
- The station is not broadcasting anymore.
- The Internet connection between the server (often located in a different country) and you is too slow.
If you have problems with UPnP playback check the following:
- Ensure your chosen UPnP server software is capable of serving the file type you are trying to access. Some servers do not serve FLAC for instance.
- Evo can only play non DRM files. Files that have DRM controls cannot be played by Evo. Some servers may be able to authorise and de-crypt Microsoft PlaysForSure before then serving the content to Evo, but this operation is not guaranteed as it is purely a function of the server.
- If attempting to play 24-bit WAV or FLAC content a wired Ethernet connection is normally required for reliable operation due to bandwidth considerations.
- Check Evo is capable of playing back the file type you are trying to access.
If you have problems with USB Media playback check the following:
- Check Evo is capable of playing back the file type you are trying to access.
- For USB Media Evo can only play non DRM files. Files that have DRM controls cannot be played.
- Check that your device does not require more than 1A if it is powered from the USB socket itself.
- Check your device format is supported by Evo.
- The way you organise your USB media affects how efficiently Evo can browse the content. A good practice is to create folders for Artists within which you should have subfolders for each Album which then contain the tracks for that Album. Libraries with thousands of tracks in one folder will progressively slow down Evo’s media browsing.
A TV connected to a digital input has dropouts, glitches or disrupted
audio.
- Some TVs have been found to have issues on digital inputs. Enabling TV mode in the StreamMagic app for the digital input connected to a TV should reduce the chance of audio issues from the TV.
MQA tracks do not display as MQA on the front panel.
- If you are using one of the digital inputs, check that TV Mode is disabled.
There is no power:
- Ensure the AC power cord is connected securely.
- Ensure the plug is fully inserted into the wall socket and is switched on.
- Check fuse in the mains plug or adaptor.
There is no sound:
- Make sure the unit is not in Standby mode.
- Check that the source component is properly connected.
- Check that your speakers are properly connected.
- Make sure Evo is not in mute mode.
There is no sound on one channel:
- Check speaker connections.
- Check interconnects.
There is a loud buzz or hum:
- Ensure no interconnects are loose or defective.
There is weak bass or diffused stereo imaging:
- Ensure that speakers are not wired out of phase.
The remote handset will not function:
- Check that the batteries have not expired.
- Ensure that nothing is blocking the remote sensor.
References
- gpl.stream-magic.com/
- Spotify — Connect
- Support Hub — | Cambridge Audio US
- Register your product | Cambridge Audio US
- Support Hub — | Cambridge Audio US
- Spotify — Connect
- Third Party Licenses | Spotify for Developers
- Support Hub — | Cambridge Audio US
- StreamMagic — | Cambridge Audio US
Read User Manual Online (PDF format)
Read User Manual Online (PDF format) >>
Download This Manual (PDF format)
Download this manual >>
Cambridge Audio Evo 150 Player Specification
The Cambridge Audio Evo 150 Player is a high-fidelity all-in-one streaming amplifier designed to deliver superior audio performance and versatile connectivity options. It features a robust digital amplification system that outputs 150 watts per channel, ensuring powerful and clear sound reproduction suitable for driving a wide range of speakers. The Evo 150 integrates Cambridge Audio’s renowned StreamMagic platform, offering seamless access to popular streaming services like Spotify, Tidal, and Qobuz, as well as internet radio and local network playback.
The device boasts comprehensive connectivity, including HDMI ARC, USB, coaxial, and optical digital inputs, alongside analog RCA and balanced XLR inputs, allowing compatibility with a variety of audio sources. Its aptX HD Bluetooth ensures high-quality wireless streaming from mobile devices, while the integrated Wi-Fi and Ethernet support provide stable network connections.
The Evo 150’s user interface is enhanced by a high-resolution color display, allowing intuitive control and album art visualization. It can be managed via the dedicated StreamMagic app, which offers remote control functionality and easy access to music libraries. The player supports high-resolution audio formats, including FLAC, WAV, and DSD, to ensure audiophile-grade sound quality.
The design of the Evo 150 is both elegant and minimalist, with premium materials and a customizable side panel that adapts to personal aesthetic preferences. It also includes a built-in moving magnet (MM) phono stage to connect turntables directly. This combination of advanced technology and design makes the Cambridge Audio Evo 150 Player a versatile and sophisticated choice for modern audiophiles seeking an integrated solution for high-quality music playback.
Cambridge Audio Evo 150 Player F.A.Q.
To connect the Evo 150 to your home network, use the network settings in the StreamMagic app or the device’s front panel menu. You can connect via Wi-Fi by selecting your network and entering the password, or use an Ethernet cable for a wired connection.
First, check the power cable connection and ensure the outlet is working. If the unit still doesn’t turn on, try resetting it by unplugging it for a few minutes. If the problem persists, contact Cambridge Audio support for further assistance.
To perform a factory reset, press the Settings button on the front panel, navigate to ‘System’, and select ‘Factory Reset’. Confirm the reset when prompted. This will erase all settings and return the device to its original state.
Yes, the Evo 150 supports Spotify Connect. Ensure your device is connected to the same network as your smartphone or tablet, open the Spotify app, and select the Evo 150 from the list of available devices.
The Evo 150 supports a wide range of formats including MP3, AAC, WMA, WAV, FLAC, ALAC, AIFF, DSD, and MQA, ensuring high-quality playback for various audio sources.
To update the firmware, connect the Evo 150 to the internet and navigate to ‘Settings’ > ‘Firmware Update’ on the device menu. Follow the prompts to download and install the latest firmware.
Ensure that the volume is turned up and not muted. Check speaker connections and make sure the correct input source is selected. Verify that the audio file or stream is playing correctly.
You can control the Evo 150 remotely using the StreamMagic app available for iOS and Android devices. Connect the app to your player via the same network, and you’ll have full control over playback and settings.
Yes, the Evo 150 is compatible with Apple AirPlay 2, allowing you to stream music directly from your Apple devices and integrate the player into your Apple-based smart home setup.
To clean the Evo 150, use a soft, dry cloth to wipe the exterior. Avoid using any liquids or abrasive materials. Regularly check and clean the speaker terminals to maintain optimal audio performance.