

LBP-810 Laser Printer
Getting Started Guide
IMPORTANT:
Read this manual carefully before using your printer.
Save this manual for future reference.

Copyright
Copyright ©2001 Canon Inc.
All information in this manual is copyrighted. No part of this publication
may be reproduced, transmitted, transcribed, stored in a retrieval system,
or translated into any language or computer language, in any form or by
any means, electronic, mechanical, magnetic, optical, chemical, manual,
or otherwise, without prior written consent from Canon.
Notice
Canon makes no guarantees of any kind with regard to this manual.
Canon shall not be held liable for errors contained herein or for
consequential or incidental damages incurred as a result of acting on
information contained in the manual.
Trademarks
LBP, Canon, and the Canon Logo are trademarks of Canon Inc.
Microsoft®, Windows®, and Windows NT® are either registered
trademarks or trademarks of Microsoft Corporation in the United States
and/or in other countries.
Other brand and product names are trademarks or registered trademarks
of their respective companies.
In this manual, Microsoft
Windows NT ® are referred to as Microsoft, Windows and Windows NT
respectively.
®
, Microsoft® Windows®, and Microsoft®
2

Contents
Using Your LBP-810 Documentation …………………………………… 4
Conventions …………………………………………………………………… 4
Using the Online Documentation ……………………………………… 5
Checking the Package Contents …………………………………………… 6
Identifying the Parts …………………………………………………………… 7
Front View …………………………………………………………………….. 7
Rear View ……………………………………………………………………… 7
Selecting the Printer Location ……………………………………………… 8
Carrying the Printer…………………………………………………………. 8
Installing the EP-22 Cartridge ……………………………………………… 9
Inserting/Removing the Paper Supports ………………………………… 13
Connecting the Printer to Your Computer ……………………………… 14
Parallel Cable ………………………………………………………………… 14
USB Cable …………………………………………………………………….. 15
Connecting to the Power Supply ………………………………………….. 17
Selecting Paper Delivery …………………………………………………….. 18
Face-down Delivery ……………………………………………………….. 18
Face-up Delivery ……………………………………………………………. 18
Loading Paper into the MP Tray ………………………………………….. 19
Installing the CAPT ……………………………………………………………. 21
Windows 95/98/Me CD-ROM Installation ………………………… 21
Canon CAPT Tools Group ………………………………………………. 26
Printing …………………………………………………………………………. 26
English
Contents
3

Using Your LBP-810 Documentation
Congratulations on your purchase of the Canon LBP-810 Laser Printer.
Your printer comes with the following documentation:
❏
❏
❏
❏
❏
Conventions
The LBP-810 Getting Started Guide
Describes how to set up the printer and install the printing software
(CAPT). Read this manual first before operating your printer. The
Getting Started Guide
The LBP-810 User’s Guide
Describes the printer’s features and its basic operation. The
Guide
is available online. Use this manual when you need a quick
reference help.
Help
Provides help for the CAPT (Canon Advanced Printing Technology).
Use Help to get more information while operating the printer.
CD-ROM Menu Help
Provides help for using the CD-ROM Menu.
Readme File
Contains last-minute information about the Canon LBP-810 printer.
is also available online (PDF).
(PDF)
(This Guide)
User’s
This guide uses the following conventions:
CAUTION:
Indicates precautions that must be observed to prevent possible injury.
Indicates that neglecting the suggested procedure or practice could result
in damage to the printer.
Indicates notes and memos containing useful tips or detailed information.
4
Using Your LBP-810 Documentation
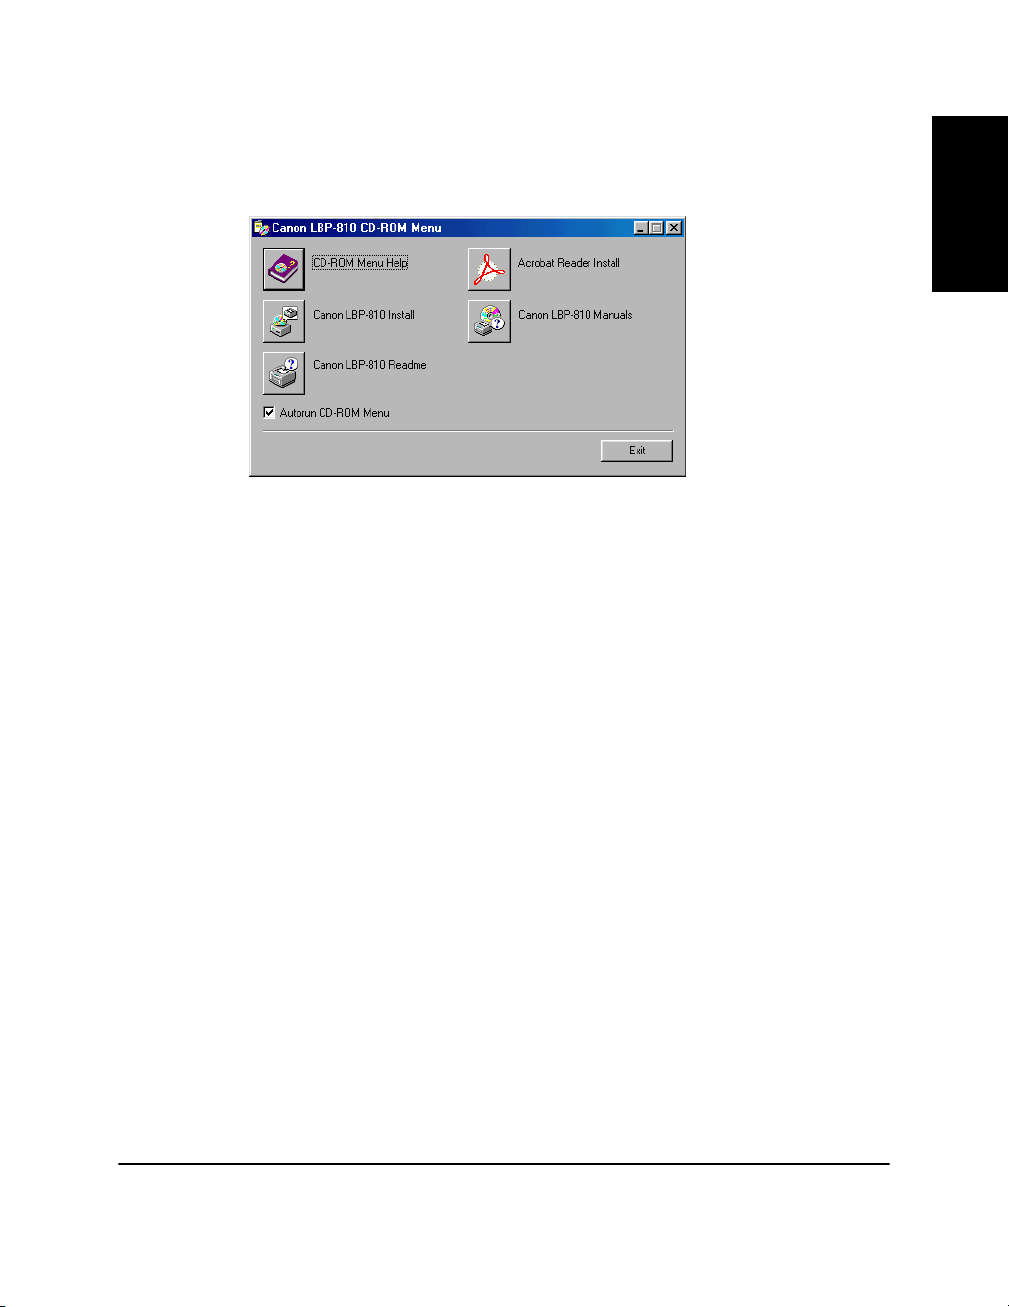
Using the Online Documentation
To read the PDF files, insert the compact disc in your CD-ROM drive.
The CD-ROM menu appears automatically.
English
To access the CD-ROM Menu Help
button.
To access the LBP-810 Documentation
Manuals button. To read the manual, you must have Adobe Acrobat
Reader installed.
To install Adobe Acrobat Reader
button, and select the language folder you want to install. Double-click
the .EXE file in that folder. Adobe Acrobat Reader will install in the
language you selected. For help using Acrobat Reader, select the
Guide
in the Acrobat Reader Help menu.
, click the CD-ROM Menu Help
, click the Canon LBP-810
, click the Acrobat Reader Install
Online
System Requirements
Before installing the LBP-810 Laser Printer’s printing software, make
sure your computer has the following minimum configuration:
❏
Pentium PC running Windows 95/98/Me or Windows NT 4.0/2000. A
Pentium 200 MMX processor or faster is recommended.
❏
16 MB of RAM (32 MB for Windows NT 4.0/2000) and 15 MB of
available disk space. 24 MB of RAM (48 MB for Windows NT 4.0,
128MB for Windows 2000) is recommended.
❏
Monitor with a resolution of 640 x 480, showing at least 16 colors.
❏
A standard USB or parallel port and a CD-ROM drive.
❏
Sound card (if you want to hear audio messages).
Using Your LBP-810 Documentation
5
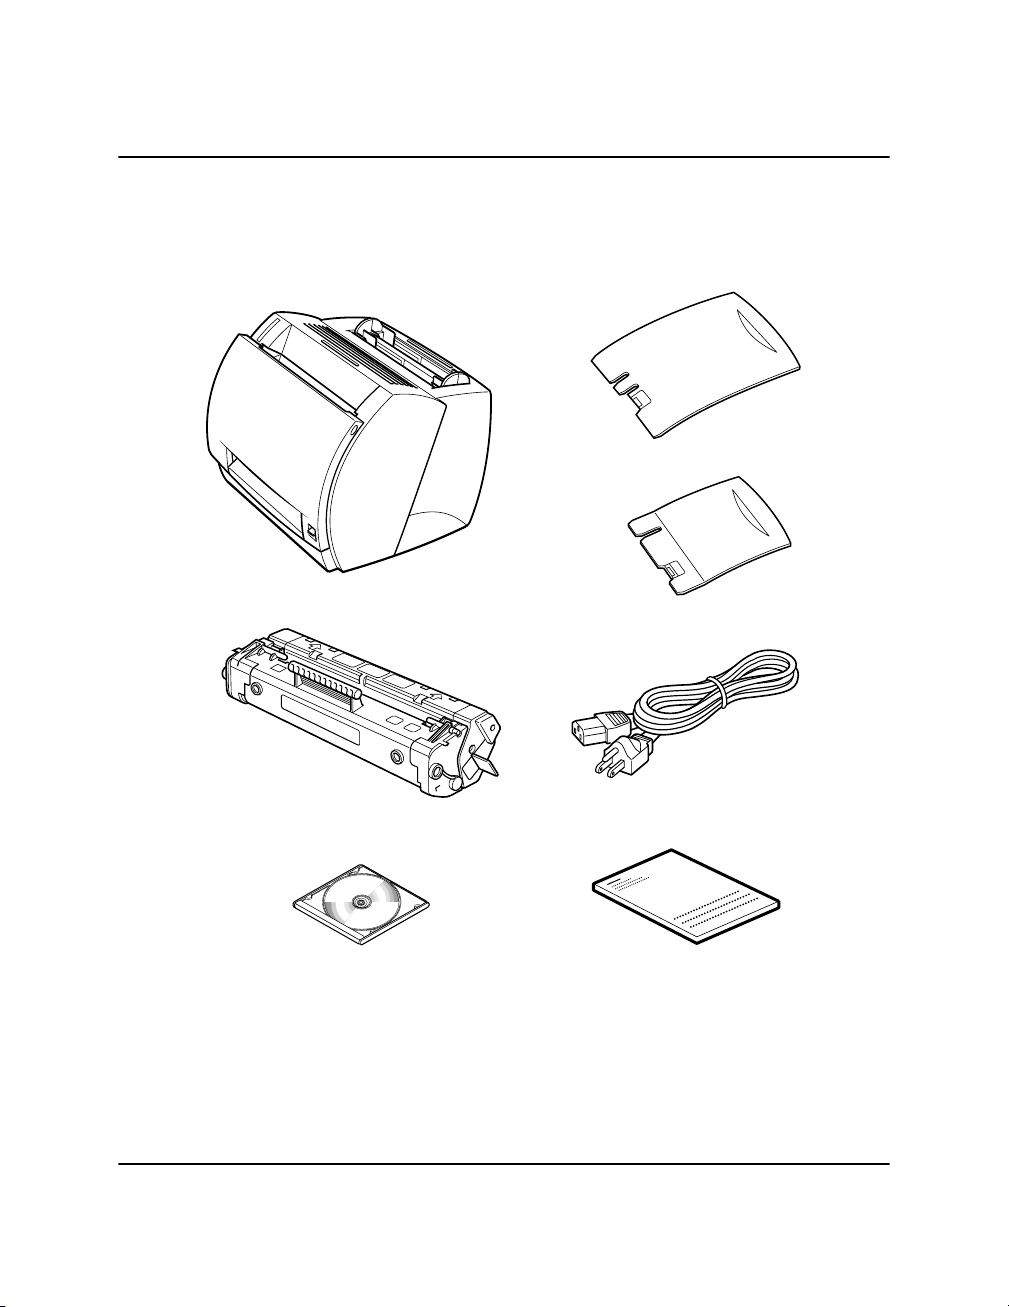
Checking the Package Contents
As you unpack the printer, save the carton and packing materials in case
you want to move or ship the printer in the future.
Input paper support
LBP-810 Printer
EP-22 cartridge
CD-ROM disc
Output paper support
Power cord
(Example: 120V Model)
Documentation
(Getting Started Guide)
6
Checking the Package Contents
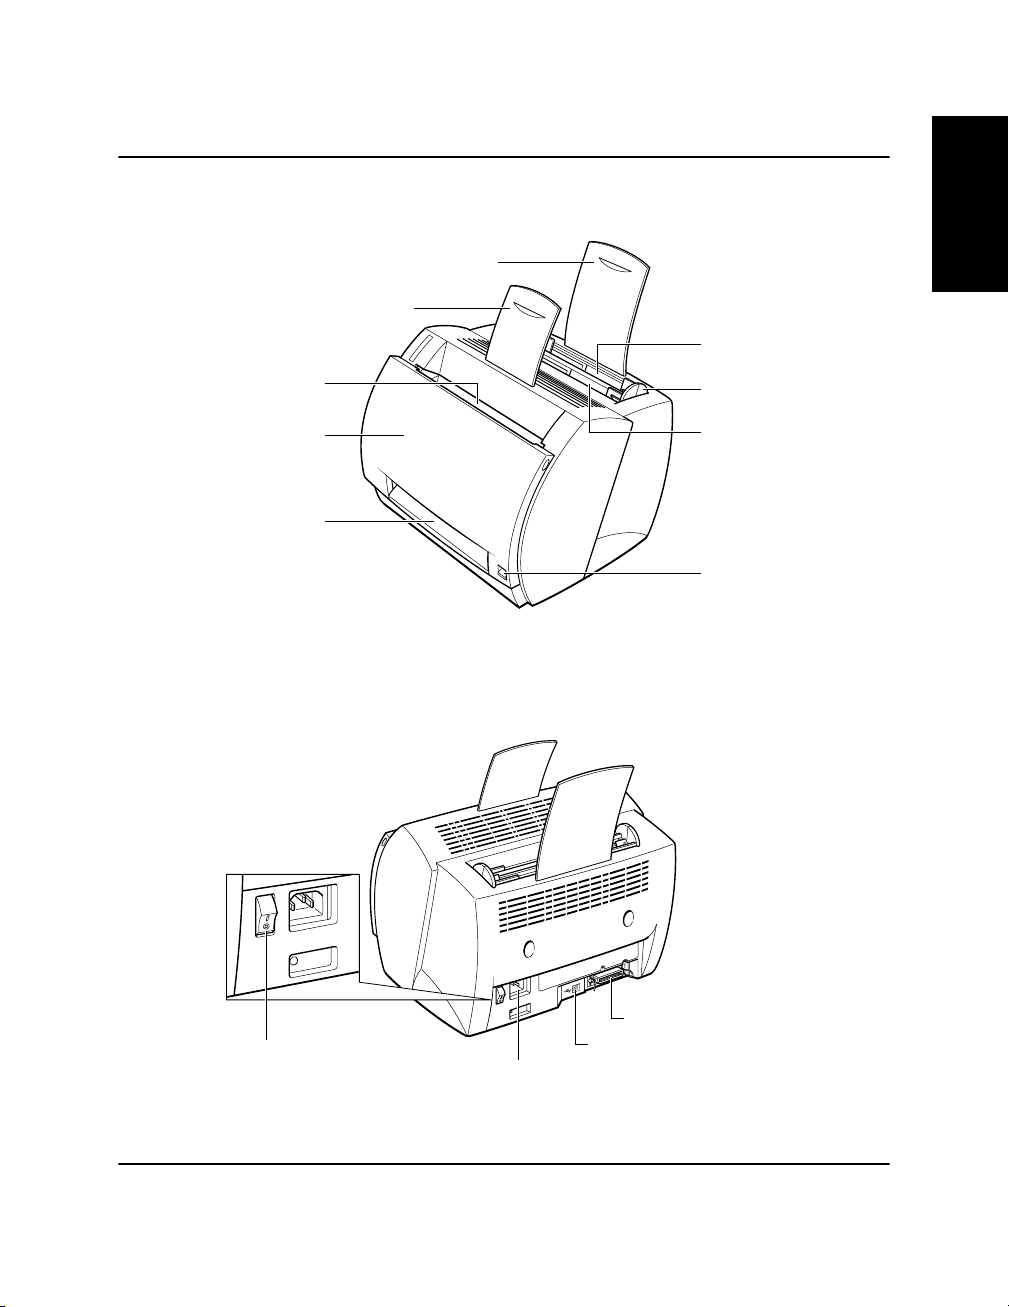
Identifying the Parts
Front View
Face-down
delivery slot
Front cover
Face-up
delivery slot
Rear View
Input paper support
Face-down output
paper support
English
Multi-purpose tray
(MP tray)
Paper guides
Manual feed slot
Paper delivery
selector
Power switch
Identifying the Parts
Power socket
Parallel port
interface connector
USB port
interface connector
7
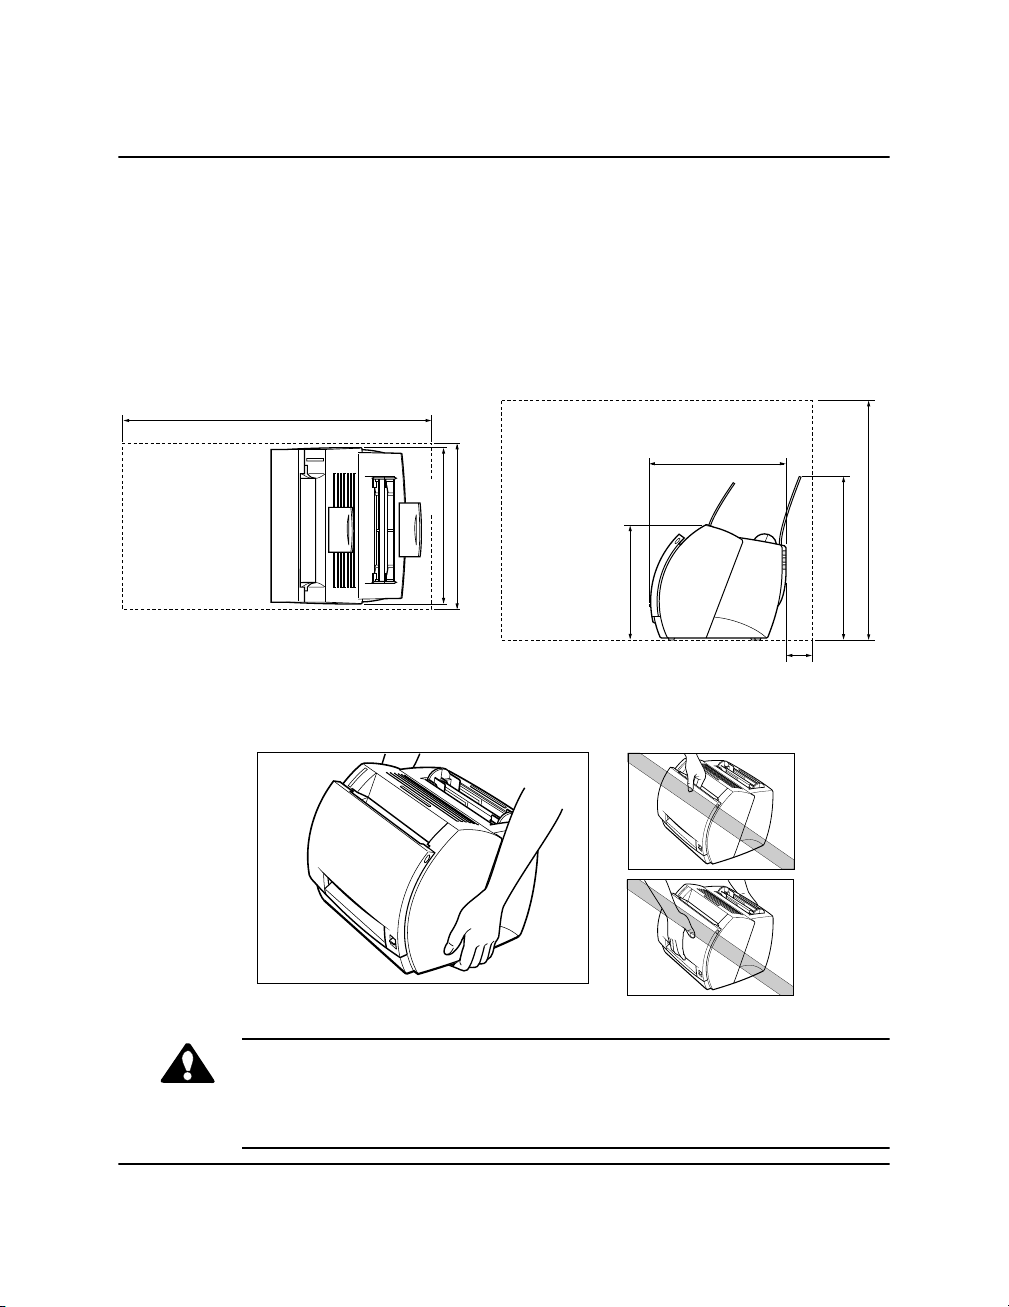
Selecting the Printer Location
When selecting a site for the printer, the location should provide ample
space for ventilation and easy servicing of the printer. Use the
dimensional diagrams below for space considerations.
(Dimensions are in millimeters.)
Top view Side view
768
345
405
312
550
Carrying the Printer
CAUTION:
Do not carry the printer by holding the front panel, the face-up delivery
slot, or by holding it at the front and rear. This could result in damage to
the printer or personal injury if the printer is dropped.
266
378
100
8
Selecting the Printer Location
Loading…
График работы поддержки:
Пн-Пт: с 9:00 до 18:00
Сб-Вс: Выходной
График отправки ключей
Adjustment program и Canon Service Tool:
Рабочие дни:
с 09:00 до 18:00 в течении 5 — 15 мин.
с 18:00 до 23:00 в течении 1 часа
с 23:00 до 09:00 отправка не производится
Выходные дни:
с 09:00 до 23:00 По свободному графику
Мы работаем по московскому времени!
Прошивки для принтеров Samsung, Xerox, HP, Pantum вы можете получить в автоматическом режиме, круглосуточно, моментально после оплаты, сделав заказ через магазин
Делайте покупки через свой аккаунт на нашем сайте и накапливайте постоянную скидку до 17%
-
Drivers
8
-
Repair manuals
2
Canon LBP-810 electrical circuit
(43 pages)
- Languages:English
-
Type:
PDF -
Size:
2.26 MB -
Description:
Revision 1
Preview
Canon LBP-810 service manual
(194 pages)
- Languages:English
-
Type:
PDF -
Size:
1.64 MB
Preview
Canon LBP-810 (Printers) service manuals in PDF format will help to find failures and errors and repair Canon LBP-810 and restore the device’s functionality.
Содержание
- Эх, яблочко! Выжмем все соки. Выбираем соковыжималку
- Какие бывают соковыжималки
- Соковыжималки для яблок – какую выбрать?
- Пять соковыжималок, которые я советую друзьям
- 1. Соковыжималки Аксион
- 2. Соковыжималки, или, как их называет производитель, соковыжиматели Bork
- 3. Центробежная соковыжималка Moulinex XXL JU655H
- 4. Шнековая соковыжималка Zigmund & Shtain ESJ 770
- 5. Шнековая соковыжималка Mirandi J-100
- Чем помогут сушилки
- СОКОВЫЖИМАЛКА. ЭЛЕКТРОСОКОВЫЖИМАЛКА СВСА-301. 1988 ГОД. РАБОЧАЯ.ЗВЕРЬ-МАШИНА.
- Выбираю отечественную соковыжималку
- Электросоковыжималка беломо свпп-301 повышенной производительности
- Содержание
- Как выбрать
- Виды соковыжималок
- Центробежные
- Шнековые
- Популярные модели
- Как выбрать соковыжималку белорусского производства?
- С чем сравнить
- Подробнее о некоторых моделях
- БелОМО СВШПП-302
- Журавинка
- Россошанка СВПР-201 — со знаком качества
- Преимущества и недостатки
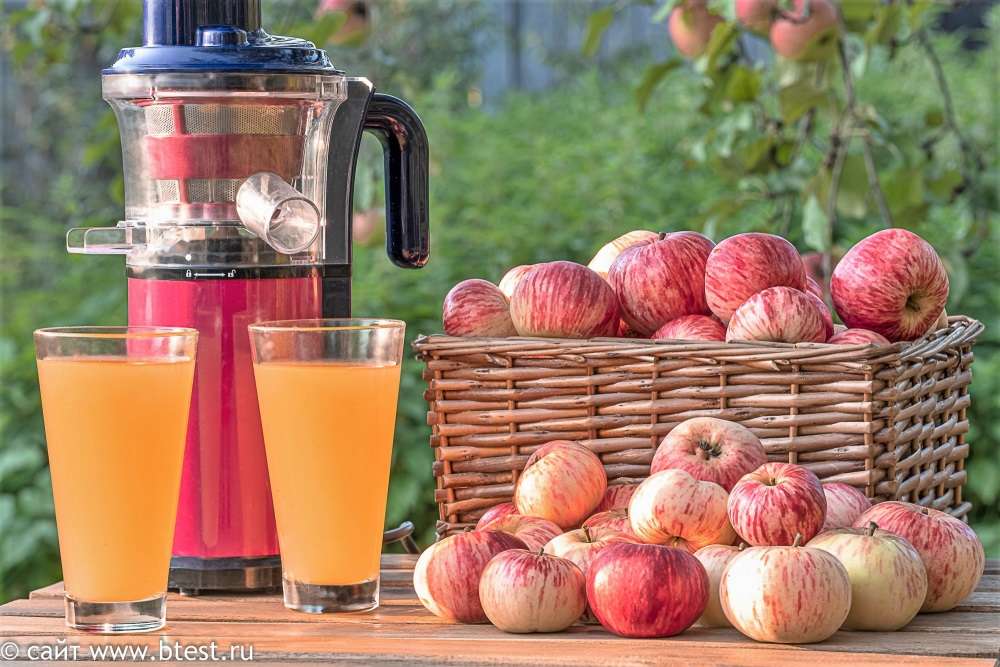
Эх, яблочко! Выжмем все соки. Выбираем соковыжималку
Сказать, что этот год яблочный – ничего не сказать. Он мега яблочный, супер яблочный, год, когда урожай превращается в стихийное бедствие.
Я даже не знала, что на моем дачном участке столько яблонь. Серьезно! До этого видела урожай на двух деревьях. В этом году оказалось, что яблонь не меньше пяти. Причем они усыпаны яблоками, одно дерево, практически, лежит на земле под тяжестью урожая. Но пока не до него: хватает яблок более ранних сортов.
Куда девать и как сохранить этот огромный урожай?
Я наварила варенья (хотя его особо никто не ест), намариновала, даже поставила киснуть яблочный уксус в 20 литровой бутылке (эксперимент). И хотя ранние яблоки рыхлые, поняла, что без сока никак не обойтись.

В недрах бабушкиного дома нашла старинную соковыжималку, аж 1987 года выпуска. Легендарная СВСА 301. Стоила 27 руб. Достаточно дорого, мне кажется, для того времени. Включила – работает. И весьма неплохо, не хуже многих современных образцов, коих я оттестировала за время работы в «Потребителе» пару десятков.
Меня удивило, что решетку нужно прикручивать к корпусу, и в комплекте есть специальная приспособа для ее откручивания. А так, обычная центробежная соковыжималка – сок льется в один стакан, жмых – в кувшин сзади. Яблоки, конечно же приходится резать – горловина соковыжималки рассчитана на четвертинки плодов.
По работе эта боевая старушка нареканий от меня не получила. Но как же ее тяжело отмывать! В те времена совсем не думали о тяжкой женской доле (посудомоек-то точно не было). У съемных частей куча узких выемок и желобков, куда забиваются кусочки измельченных яблок, и вытащить их чрезвычайно сложно.
А, вообще, надежная машина. Посмотрела, в сети полно объявлений о продаже рабочих соковыжималок СВСА 301. Конечно, наши мамы их берегли и не перетруждали, но все равно 30 лет – долгий срок, не вся современная техника способна служить так долго.
Давайте, посмотрим, что же предлагают производители в 2019 году, и чем современные соковыжималки могут порадовать своих владельцев.
Какие бывают соковыжималки
Совсем кратенько напомню теорию.
Соковыжималки бывают центробежные и шнековые.
В центробежных отжим сока происходит на огромной скорости (десять тысяч и более оборотов в минуту), они быстрые и производительные, в шнековых скорость на несколько порядков ниже (50-150 оборотов в минуту).
У центробежных решетка и сетка, яблоко трется как на скоростной терке, мельчайшие частицы прижимаются к сетке барабана, сок через сетку стекает в желобок, из которого отправляется в кувшин.

У шнековых – кусочек яблока проходит, как в мясорубке, между сеткой и керамическим шнеком, сок выдавливается из него вместе с мельчайшими кусочками мякоти и стекает в стакан.

У центробежных соковыжималок сок получается внизу, мякоть – сверху, у шнековых он более однороден.
Ну и часто шнековые соковыжималки называют соковыжималками «холодного» отжима, так как фрукты не нагреваются, а в центробежных на таких больших оборотах нагрев неизбежен.
Соковыжималки для яблок – какую выбрать?

- На первый взгляд, при борьбе с урожаем, если не хотите весь сентябрь просидеть, очищая яблоки, самые удобные центробежные соковыжималки с широким входным отверстием. Семь с половиной сантиметров может и не хватить, лучше восемь с половиной, и то, не все яблоки поместятся.
Но есть один минус: опускать целое яблоко можно, если вы уверены, что оно не червивое и нет нездоровых частей.
- К сожалению, большую часть яблок все равно придется нарезать. Поэтому соковыжималки с отверстием на половинки или четвертинки яблок так же не будут стоять без дела. Такие модели к тому же часто более компактны и могут использоваться не только осенью, но и весь год.
- Считается, что шнековые соковыжималки не рассчитаны на большой объем работы. Раньше так и было. Но модели этого года, и в этом я убедилась во время тестирования, могут пригодиться при заготовке сока впрок.
При выборе соковыжималок обращайте внимание на время работы без перерыва. Вы можете примерно прикинуть, сколько яблок вы превратите в сок за один цикл.
Важен даже не тип соковыжималки, а ее рабочие качества и ваши потребности: если вам нужна соковыжималка только для переработки яблок в яблочный год – это один расклад, если вы хотите, чтобы она использовалась в течение всего года – другой.
Пять соковыжималок, которые я советую друзьям
1. Соковыжималки Аксион
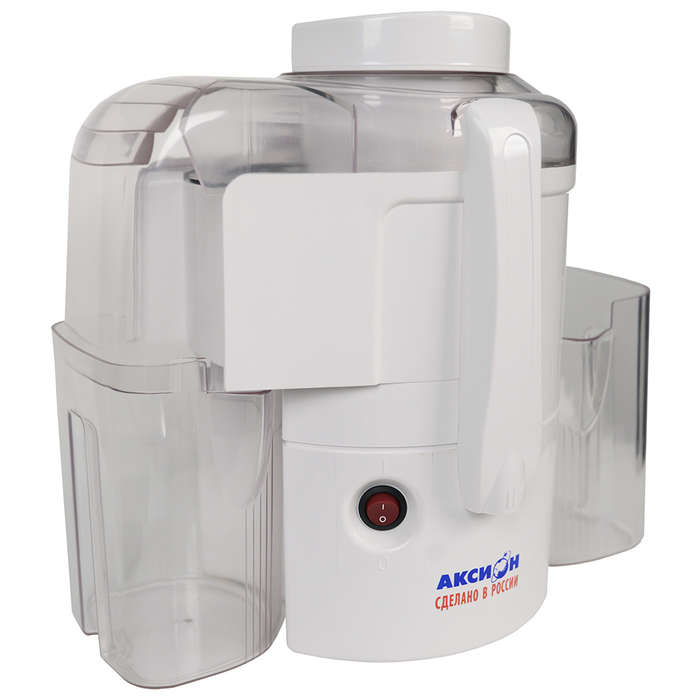
Если у вас много яблонь, и вы заняты заготовками сока и закатываете банки с овощными салатами, то обратите внимание на соковыжималки Аксион ижевского производства.
Это, как я понимаю, внучки моей дачной помощницы. Они знают толк в борьбе с урожаем. В комплекте некоторых моделей есть диски для нарезки овощей, что делает их многофункциональными устройствами.
Обещанная производительность – 30 л сока в час.
В характеристиках даже нет указания на продолжительность одного цикла работы. Но отключать соковыжималку придется, чтобы очистить от жмыха отверстия в крышке корпуса.
Высокая производительность, доступная цена.
Яблоки надо нарезать на половинки или четвертинки.
2. Соковыжималки, или, как их называет производитель, соковыжиматели Bork
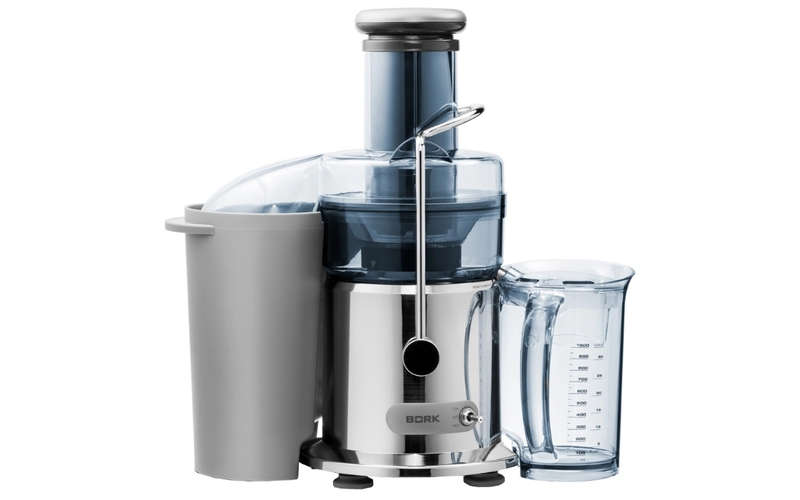
С диаметром входного отверстия 8,4 см.
Это совсем другая история, конечно. Соковыжималку Bork вы не будете прятать в коробку после окончания периода соковарения, наоборот, поставите на кухню на самое видное место, и даже будете показывать гостям, хвастаться.
При этом, соковыжималки Bork на самом деле хорошо отжимают сок и не только из яблок.
Высокая производительность, продуманная эргономика, стильный дизайн.
Не всем по карману.
3. Центробежная соковыжималка Moulinex XXL JU655H

Диаметр отверстия 8,5 см позволяет не тратить время на измельчение яблок.
Пользователи отмечают большую производительность соковыжималки и возможность работы без перерыва 15-20 минут.
В инструкции, кстати, есть более жесткие ограничения, написано, что при измельчении твердых плодов следует за один цикл ограничиваться 3 кг продуктов, и выключать устройство через пару минут.
Но яблоки нельзя назвать твердыми, и владельцы Moulinex XXL JU655H утверждают, что она работает минут 15 – 20 легко, и очень помогает при больших объемах продуктов.
А вот по качеству отжима мнения расходятся: кто-то доволен, кто-то жалуется, что жмых влажный. Некоторые даже из отжатого жмыха еще отжимали сок.
Многое зависит, конечно, от качества яблок. Рыхлые плоды дают мало сока, поэтому жмых будет очень влажным, для таких яблок лучше использовать другие устройства.
Широкая горловина, 2 скорости работы.
Не всегда сухой жмых.
4. Шнековая соковыжималка Zigmund & Shtain ESJ 770
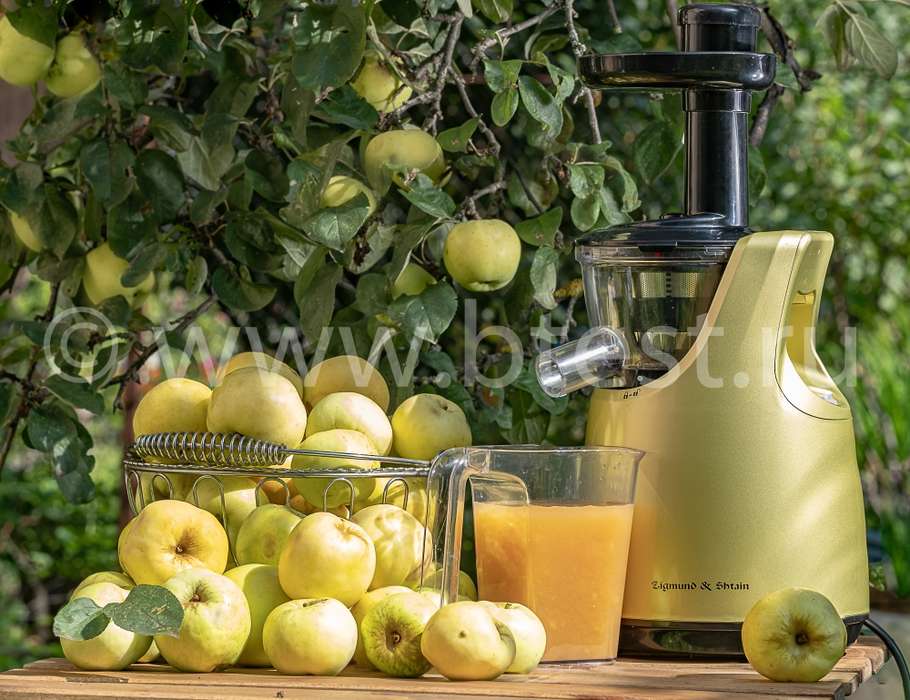
Может работать без перерыва 30 минут.
1 кг яблок она превращает в сок за 2 минуты 10 секунд. Значит, за полчаса можно выжать сок из 14 кг яблок. Согласитесь, совсем неплохо!
Кроме того, шнековые устройства подходят для переработки мягких яблок – они превращают мякоть с соком в нежное пюре, которое так же можно консервировать на зиму.
5. Шнековая соковыжималка Mirandi J-100
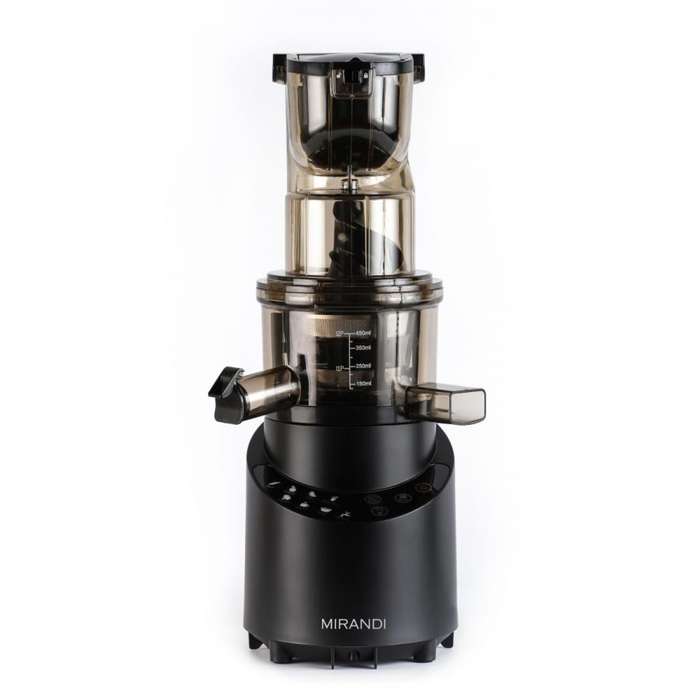
Это шнековая соковыжималка с широкой горловиной, как у некоторых центробежных моделей – 80 мм, поэтому некрупные яблоки не придется нарезать, что сэкономит время.
1 цикл непрерывной работы – 20 минут позволит переработать за раз большой объем яблок.
Для каждого вида продуктов подобрана своя скорость вращения шнека, во всяком случае, на сенсорной панели можно выбрать соответствующий режим. Ну и понятно, что весь год это устройство не будет скучать на антресолях, вы сможете готовить сок из любых любимых овощей и фруктов.
Широкий диаметр горловины, несколько режимов работы.
Стоит достаточно дорого.
Чем помогут сушилки
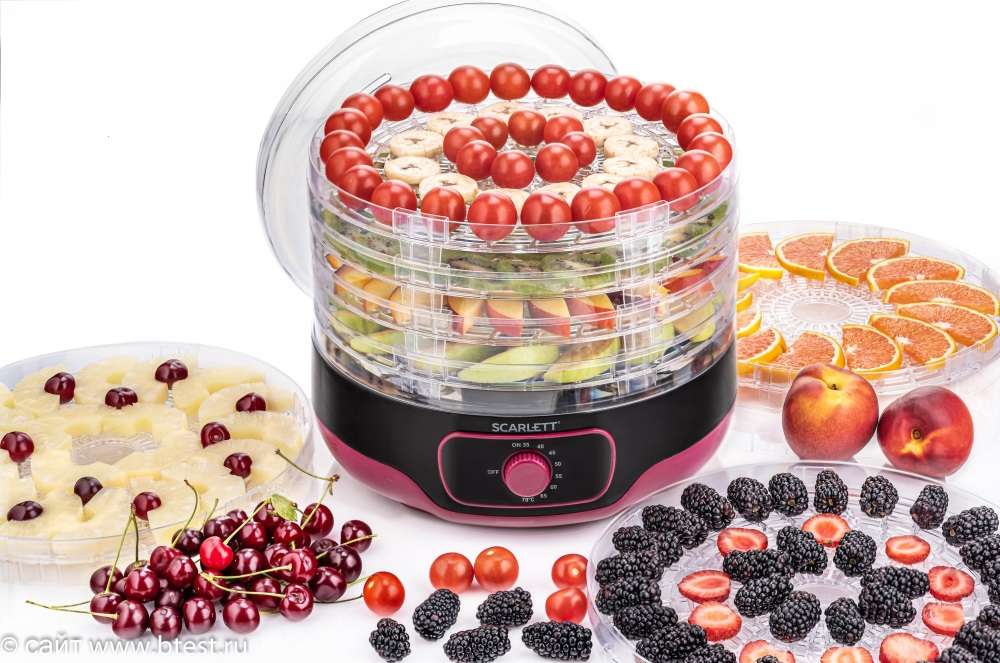
Используя электрическую сушилку можно не только запастись сухофруктами. Сушилки позволяют приготовить модные и любимые подрастающим поколением яблочные чипсы, мармелад, пастилу нескольких видов – тоненькую, только из измельченного яблока ( вот как раз влажный жмых от мягких яблок пойдет в дело), и с добавлением яичного белка – настоящую Белевскую. Моя сестра каждый год радует нас этим вкусным десертом.
Две электросушилки мы протестировали этим летом – смотрите, выбирайте: Scarlett SC-FD421012 или Zigmund & Shtain ZFD-400.
Яблочный год закончится, и следующим летом такого урожая не будет, яблони будут отдыхать. Но заготовленного сока, пюре, варенья может хватить и на две долгие зимы. Так что, не ленитесь. Тем более, что современные соковыжималки большую часть труда берут на себя!
Источник
СОКОВЫЖИМАЛКА. ЭЛЕКТРОСОКОВЫЖИМАЛКА СВСА-301. 1988 ГОД. РАБОЧАЯ.ЗВЕРЬ-МАШИНА.
Покупая несколько лотов продавца, Вы экономите на доставке.
Лоты доставляются одним отправлением.
Прошу выйти на связь в течение трех дней, внести оплату в течение пяти дней. Высылаю покупки после оплаты лота на карту СБ. Рассчитаю доставку точно — на сайте почты от своего города до Вашего по весу и тарифам почты, плюс упаковка (в основном упаковка моя). Трек сообщаю, сдачу возвращаю, фото квитанций присылаю.
СОКОВЫЖИМАЛКА. ЭЛЕКТРОСОКОВЫЖИМАЛКА СВСА-301. 1988 ГОД. РАБОЧАЯ. ЗВЕРЬ-МАШИНА. С автоматическим удалением выжимок. СССР. Завод «Знамя труда» г. Москва. Очень надёжная и качественная. Тех.данные: 220 в, 50 Гц, класс прибора II (двойная изоляция). Потребляемая мощность не более 200 вт, расход энергии — 0,1 квт/час. Эффективность отжима – НЕ МЕНЕЕ 50%. Вес около 3,5 кг. В комплекте толкатель, бачок, ключ. Выжималка мало б/у в хорошем рабочем состоянии. Для приготовления яблочного сока -примерно 3 литра за 5 минут.
Покупая несколько лотов продавца, Вы экономите на доставке.
Лоты доставляются одним отправлением.
Прошу выйти на связь в течение трех дней, внести оплату в течение пяти дней. Высылаю покупки после оплаты лота на карту СБ. Рассчитаю доставку точно — на сайте почты от своего города до Вашего по весу и тарифам почты, плюс упаковка (в основном упаковка моя). Трек сообщаю, сдачу возвращаю, фото квитанций присылаю.
Покупая несколько лотов продавца, Вы экономите на доставке.
Лоты доставляются одним отправлением.
Также вы можете посмотреть лоты на моем парном аккаунте: https://meshok.net/profile.php?what=sale
Доставка с обоих аккаунтов общая, что удобно и экономно.
Прошу выйти на связь в течение трех дней, внести оплату в течение пяти дней. Высылаю покупки после оплаты лота на карту СБ. Рассчитаю доставку точно — на сайте почты от своего города до Вашего по весу и тарифам почты, плюс упаковка (в основном упаковка моя). Трек сообщаю, сдачу возвращаю, фото квитанций присылаю.
КУРЬЕР: Есть курьер — 300 руб. внутри МКАД (в пригород тоже можно, но дороже). Курьеру на доставку передаю только после получения полной предоплаты по сделке.
ПЕРЕСЫЛКА: Все купленные лоты одной отправкой, если есть такая возможность. Гантели с елочными игрушками в одной коробке не пошлю. Коробки на почте не покупаю, а клею и нахожу сама бесплатные. Габаритные лоты пересылаю.
САМОВЫВОЗ: С покупателями в городе не пересекаюсь. Это нарушает мои планы. Но предложения и пожелания выслушаю.
Источник
Выбираю отечественную соковыжималку
Уважаемые, поделитесь пожалуйста впечатлениями по поводу соковыжималок. Интересует исключительно отечественная продукция: садовая, журавинка, ульбинка, россошанка и пр.
Хотелось бы узнать достоинства/недостатки конкретных моделей. В связи с урожаем яблок давить сок планируется в приличных масштабах
Имею Журавинку. Бяка. Забивается через пять минут, приходится разбирать и вычищать жмых.
Перешли на Мулинекс.
У самого есть журавинка 1976 г.в. Хотя вся в изоленте (потрескалась) работает «как зверь»
Качество изготовления что-ли ухудшилось?
2Ржавый зверь — это как — сколько сока дает, как часто забивается ?
2SergeyE Кол-во сока зависит от состояния сырья. Последние замеры: «белый налив» упавшие, почищенные ( без середины) — ведро с горкой (ведро
10л) на выходе дали чуть меньше 5 литров сока.
Забивается очень медленно, потому как ручной сброс жима. Что не сбросилось чистится
после 1.5 ведер сока. Количество яблок до ручного сброса обычно 1-2.
А БОРК кто-нибудь пробовал?
ТТХ у нее замечательные, а вот реальных владельцев я пока не видел
а что за ТТХ — не сказано — выброс жмыха автоматический или нет, какова чистота сока и т.д. — только киловатная мощность (наверняка завышена)
Так что, «из наших» ничего никто не посоветует?
бери Росошанку; автоматический выброс жмыха=растрочительство
2SergeyE Уж больно серьезен аппарат. 70кг/ч при собственном весе 13кг и соответствующих габаритах — это для меня перебор. Да и цена тоже выше в 2 раза.
тогда Philips HR1858
так по цене одно и тоже
1.5 раза (сравниваю с «Садовой»), кроме этого — автовыброс, а нужен ручной. И я совсем не уверен, что она потянет необходимый обьем без частых чисток.
С 2003 года пользуем СВПП Мичуринского завода. Ручной выброс жима, с ведра чищеных спелых (!) яблок выход сока порядка 4-х литров. Ситечко не забивается.
Thunder Спасибо. Я так понял, что речь идет о выжималке «Садовая»? Планирую купить «Садовую», но минского производства (хотя в некоторых магазинах говорят, что это одно и то же).
Ржавый Если точнее, то называется она СВПП-301. «Садовую» — увы, не пробовал.
так в Садовой для промывки забившийся сетки что надо сделать — только снять крышку как в импортных или еще открутить винт и снять терочный диск ?
Уважаемые. нужен диск от соковыжималки Журавинка.
Помогите! Отдали мне почти новую соковыжималку СВСА-301 (еще советских времен). Правда, без инструкции. Отжала сок, а помыть не могу. Кроме верхней крышки ничего не снимается. Боюсь повредить. Может у кого есть инструкция, как ее открывать и мыть. Помогите! Плиз!
соковыжималка садовая (оч высокая производительность) в комплекте 2 шинковки (оч удобно когда делаешь осенью заготовки). выброс жмыха ручной работает норм. за 15 минут можно выжать пару ведер яблок (удобная загрузка крупные яблоки достаточно разрезать пополам) ВНИМАНИЕ !! в магазине обязательно включайте собраную полностью (попадаются с неотбалансированой сеткой и потом жутко вибрируют) а вообще лучше ненайдете для сада для дачи для заготовок на зиму
Источник
Электросоковыжималка беломо свпп-301 повышенной производительности
Содержание
- Как выбрать
- Виды соковыжималок
- Центробежные
- Шнековые
- Популярные модели
- Как выбрать соковыжималку белорусского производства?
- С чем сравнить
- Подробнее о некоторых моделях
- БелОМО СВШПП-302
- Журавинка
- Россошанка СВПР-201 — со знаком качества
- Преимущества и недостатки
- Универсальная Дачница СВПР-201
- Нептун 332215.001 модель КАЖИ — супермощь и элегантность
Как выбрать
При выборе соковыжималки белорусского производства следует обратить внимание на следующие параметры:
Нюансов при выборе соковыжималки достаточно, главное, чтобы она оптимально справлялась со своим прямым назначением и соответствовала потребностям пользователя.
Виды соковыжималок
Один из вопросов, который надо решить потребителю – какой тип прибора выбрать. Существует два вида соковыжималок:
- центробежные;
- шнековые.
Каждая из разновидностей обладает своими особенностями, достоинствами и недостатками.
Центробежные
Модели такого типа работают по простому принципу: внутри располагается центрифуга – вращающиеся ножи с фильтрами, которые пропускают жидкость. Под действием высокой скорости продукт измельчается, затем в специальном барабане происходит отделение сока от жмыха. Далее они отправляются в раздельные контейнеры. В зависимости от скорости вращения дисков и диаметра отверстий фильтра, на выходе может получиться пюре или прозрачный сок.
В некоторых случаях после окончания процесса жмых получается влажным
Здесь необходимо обратить внимание на форму сепаратора. В электроприборах с цилиндрическим устройством нет режима автоматического выброса мякоти, поэтому на выходе получается более чистый сок (от 95%)
Конусный сепаратор обеспечивает автоматический выброс жмыха, избавляя от лишней работы. Но в итоге отходы более сочные, соответственно, увеличивается расход продуктов.
- высокая производительность;
- непрерывность работы;
- повышенная скорость;
- легкость очистки.
- на 10% меньше сока по сравнению со шнековыми моделями;
- нагревание напитка при выжимании;
- мутный цвет сока из-за окисления;
- потеря в нем ряда питательных веществ;
- высокий уровень шума.
Шнековые
Принцип функционирования шнековой соковыжималки напоминает работу обычной мясорубки. В приемное отверстие загружаются плоды, которые измельчаются, а затем продавливаются через сито при помощи винтового вала. Получаемые сок и жмых разделяются в специальные контейнеры.
Существует два вида шнековых соковыжималок – ручная, электрическая:
- первая модель работает точно так же, как советская ручная. Она оснащена длинной рукоятью, которую надо вращать самостоятельно, при этом другой рукой создавать давление в приборе. Большие объемы томатов удобно перерабатывать именно такими соковыжималками российского производства;
- электрическая шнековая модель может быть горизонтальной, вертикальной, двухшнековой. Эти разновидности отличаются расположением конструкций, типом работы, способностью перемалывать плоды.
В числе основных преимуществ шнековых моделей – возможность переработки большого количества продуктов. Есть и другие достоинства:
- 80-85% сока на выходе, что значительно выше по сравнению с центробежными устройствами;
- щадящий принцип измельчения;
- низкий уровень шума;
- сохранение большого количества питательных веществ;
- минимальный нагрев продуктов.
- затрата физических усилий в ручных моделях;
- не подходят для мягких плодов, потому что выжимают мало сока;
- узкий диаметр горловины.
Популярные модели
Беларусь, как и Россия, не отходит от своих традиций и выпускает соковыжималки с простым дизайном, но эффективной и долгосрочной производительностью. Пользователи выделяют 2 наиболее популярные модели белорусских производителей: «Журавинку» и «Садовую».
«Журавинка» – мощное центробежное устройство, которое способно в короткие сроки отжать сок из овощей и фруктов любой твердости. Электросоковыжималка, изготовленная на заводе Беларуси, выпускается еще с 1969 года и до сих пор не теряет своей актуальности. Все благодаря эффективной производительности – около 500 мл жидкости в минуту. Мощность устройства – 220 Вт. Кроме переработки плодов в виде сока и жмыха, присутствуют функции шинкования и резки продуктов, что дает повод обратить еще больше внимания на отечественные соковыжималки.
Несмотря на долгие годы существования «Журавинки», производители продолжают совершенствовать модель. Остаются неизменными высокое качество и гарантированный 12-летний срок работы. Данный электроприбор – универсальный помощник не только для любителей свежевыжатого сока, но и для владельцев больших садов, где идет круглогодичная заготовка.
«Журавинка» оснащена следующей комплектацией:
- Корпус из прочного пластика с боковыми креплениями для крышки, отсеком для сетевого шнура.
- 2 контейнера: для мякоти и сока.
- Толкатель для приемного отверстия.
- Фильтр с металлической теркой.
- Чаша для подачи сока.
- Насадки для резки и шинковки.
- Горловина для подачи продуктов и фиксирующая крышка.
- эффективная фильтрация;
- невысокая цена: около 2000 рублей;
- до 92% чистого сока;
- прорезиненные ножки;
- компактные размеры: 21*26*31 см;
- небольшой вес: 5 кг;
- автоматический сброс жмыха;
- ударопрочный пластик.
- высокий уровень шума, вибрация;
- окрашивание пластика после переработки сырья;
- относительно маленький диаметр горловины.
Пользователи отмечают, что устройство, произведенное на белорусском предприятии, является достаточно универсальным и позволяет в кратчайшие сроки изготовить большое количество сока высокого качества.
Официальное название электросоковыжималки «Садовой» – БелОМО. Отличается она повышенной производительностью и рассчитана на изготовление сока из плодово-ягодных культур в больших объемах. Идеально подходит соковыжималка белорусская для переработки целых яблок – благодаря высокой мощности двигателя устройство отлично справляется с фруктами средних размеров. Объем вырабатываемого сока – около 830 мл в минуту. Скорость переработки – не менее 50 кг фруктов или овощей в час. При этом чистота сока – 92-95%, что является высоким показателем.
Соковыжималка работает очень просто: к мотору прикреплена центрифуга, на ее дне находится дисковая терка, по бокам сетки-фильтры. При перетирании плодов мякоть придавливается к стенкам, из нее выдавливается сок. Плюсы:
- надежный асинхронный двигатель;
- простота сборки деталей;
- система плавного разгона барабана;
- эффективность отжима – не менее 50%;
- получение больших объемов сока в короткие сроки;
- долгий срок службы даже при самом активном использовании;
- специальные диски для шинкования и выжимания.
- отсутствие автоматического удаления жмыха;
- необходимость очистки и нарезки крупных плодов;
- вибрация, шумная работа;
- при мягкости плодов возможны брызги.
Перечисленные модели белорусских производителей отвечают всем требуемым нормам безопасности. Детали выполнены из качественного пластика и стали. Как и многие зарубежные электроприборы, соковыжималки отечественного производства оснащены несколькими скоростями отжима, которые регулируются в зависимости от вида сырья. Благодаря совершенствованию деталей и производительности, бытовые приборы остаются востребованными не только в Беларуси, но и во многих других странах СНГ.
Как выбрать соковыжималку белорусского производства?
Для соковыжималок производства Беларуси характерны:
- высокая производительность;
- большой выбор моделей;
- много функций;
- возможность получить несколько литров сока за несколько минут.
Среди основных моделей, пользующихся спросом у покупателей, стоит отметить такие, как БелОМО (СВШПП-302), которая выпускается торговой маркой «Садовая». Прибор характеризуется высокой мощностью, что позволяет выдавливать из яблок и груш много сока. За 1 час мощная соковыжималка способна переработать до 50 кг яблок, из которых получится 20-30 л яблочного сока отменного качества. В ее функции входят: выжимка сока из плодов, их нарезка и шинковка. Данная белорусская соковыжималка отлично справляется с твердыми и мягкими овощами, ягодами, фруктами.
Модель СВШПП-302 хорошо шинкует капусту. Только кочан надо брать небольшой, до 2,5 кг. Производители предусмотрели наличие особой функции, которая позволяет сбрасывать жмых в принудительном режиме. Не в каждой модели есть подобная опция, поэтому продукция БелОМО отлично подходит для использования на даче, в большом фермерском хозяйстве, кафе или ресторане.
«Журавинка» — портативная модель, которая отлично подходит для использования на кухне в квартире или частном доме. Заготавливать на такой соковыжималке промышленные объемы сока не получится, а готовить каждый день витаминные коктейли и соки можно. Модель перерабатывает овощи, томаты, ягоды, цитрусовые, делая из них несколько литров сока для ежедневного употребления. На рынке представлены модели Журавинка 301-М, Журавинка-2 и Журавинка СВПС-102.
Рассмотрим качество и преимущества белорусских соковыжималок. Техника из Белоруссии для получения сока отличается мощностью, экологическими материалами, которые соответствуют всем требованиям по работе с овощами и фруктами. Большая часть деталей изготавливается из нержавеющей стали.
К другим достоинствам относятся:
- Установка различных скоростей отжима, выбор которых зависит от используемого сырья.
- Оборудованы емкостями на 1 или 2 л.
- Есть пеноотсекатель, который позволяет получать сок разной консистенции, густоты, прозрачности.
- Длительная эксплуатация.
- Надежность.
- Наличие дополнительной функции шинковки, что делает белорусские соковыжималки универсальной техникой на кухне.
С чем сравнить
Белорусскую «Журавинку» можно сравнить с отечественным аналогом «Аксион СЦ 32.02 Джус». Соковыжималки компании «Аксион» признаны одними из лучших – это лидеры по качеству в России.
Данный электрический прибор центробежного вида позволяет получать из фруктов и овощей сок, а также нарезать их. На вашей кухне эта соковыжималка станет незаменимой помощницей, экономя ваше время и силы – очень быстро вы сможете получить как свежеотжатый сок плодов, так и красивую их нарезку.
Двигатель прибора защищён от таких неприятностей, как случайное включение и перегрузка. Соковыжималка компактна и отличается симпатичным дизайном.
Подробнее о некоторых моделях
БелОМО СВШПП-302
Данная соковыжималка выпускается известным белорусским производителем «БелОМО» и предназначена того, чтобы получать сок из плодов, а также шинковать их и нарезать. Чтобы получить десятки литров сока – фруктового ли, овощного ли, времени понадобится совсем немного, даже если фрукты или овощи будут очень твёрдыми. Такому прибору место, конечно, в просторном саду, но никак не тесном кухонном помещении. Эта соковыжималка работает от обычного напряжения в 220 В и способна в течение одного часа переработать сырья весом в 50 кг.
В устройстве СВШПП-302 сложного ничего нет, поэтому эксплуатировать его и обслуживать довольно легко. На данном электрическом устройстве вы сможете и отжимать сок, и шинковать или нарезать любые плоды.
На этом белорусском устройстве вполне возможно в течение одной минуты управиться с шинкованием головки капусты весом 2,5 кг. Потребители по достоинству оценили в данном приборе возможность принудительно сбрасывать жмых. Такой функцией может похвастаться далеко не каждая соковыжималка, но именно эта универсальная модель – это отличная помощница не только для садовода-любителя, но и для фермера, где продукции заготавливаются в очень больших объёмах.
Журавинка
Данная модель рассчитана именно на её эксплуатацию в стенах своей кухни, когда речь не идёт о больших заготовках, а просто время от времени вашим домочадцам, да и вам тоже хочется выпить тот или иной витаминный продукт.
Эта мясорубка может обрабатывать разные виды плодов, помидоры в том числе, но на слишком длительный период работы, данный прибор не рассчитан.
Перечисленные модели, также, впрочем, как и другие соковыжималки из Белоруссии, совершенствуются день ото дня. Производители всегда учитывают все отзывы о своих моделях и с учётом них вносят те или иные корректировки. Как результат – модели раскупаются ещё быстрее и становятся ещё популярнее.
Россошанка СВПР-201 — со знаком качества
Приспособление имеет простую конструкцию, поэтому им легко пользоваться. Обслуживание не занимает много времени, так как механизм включает минимум деталей. При этом модель характеризуется высокой производительностью и высокими оценками у пользователей.
При своевременном уходе за фильтром сок получается чистым, практически без примеси мякоти. Агрегат рассчитан на длительную эксплуатацию в течение дня.
- прочный пластиковый корпус;
- мощностной потенциал 200 Вт;
- работает в режиме прямой подачи;
- в час перерабатывает свыше 70 кг яблок;
- максимальная эффективность при переработке яблок осенне-зимних сортов;
- можно использовать нерезаные плоды с семечками;
- удобная функция динамического тормоза электромотора;
- длительный срок службы;
- стоимость около 6000 руб.
- в конструкции не предусмотрено автоматическое удаление мякоти;
- повышенная вибрация.
Преимущества и недостатки
Соковыжималки, изготовленные на белорусских предприятиях, отличаются следующими достоинствами:
- Производительность – в среднем устройство за минуту способно изготовить около 500 мл свежевыжатого напитка.
- Мощность – для моделей отечественного производства она играет значительную роль, потому что сок выдавливается не только из мягких плодов, но и из твердых. Средняя мощность моделей – от 160 до 350 Вт, количество потребляемой энергии при этом минимальное.
- Универсальность – приборы могут перерабатывать любые плоды: ягоды, овощи, фрукты. В некоторых моделях предусмотрена терка. Такая соковыжималка приобретает функцию кухонного комбайна, может нарезать на ломтики или шинковать.
- Надежность и длительность эксплуатации – белорусские моторы могут бесперебойно работать дольше часа, не нагреваясь при этом. Срок эксплуатации устройства – в среднем 12 лет.
- Высокое качество – корпус выполнен из прочного пластика, остальные детали – из металла, не поддающегося коррозии.
- Низкая цена – в сравнении с моделями зарубежных компаний соковыжималки белорусского и российского производства отличаются демократичной стоимостью.
- Удобство в использовании – конструкция устройства легко разбирается и очищается, предусмотрена автоматическая или полуавтоматическая система выброса жмыха.
- Безопасность в процессе эксплуатации при соблюдении рекомендаций, которые прописывают производители.
К недостаткам белорусских соковыжималок можно отнести:
- Сложности с очисткой сетки – после переработки овощей или фруктов остается жмых, который забивается в отверстия фильтра.
- Крупные плоды приходится разрезать на несколько частей из-за небольшого размера приемного отверстия.
- В одних случаях сок может получиться с примесями, в других – в виде пюре.
Источник
-
Page 1
LBP-810 Laser Printer User’s Guide IMPORTANT: Read this manual carefully. Use this manual when you need quick reference help. -
Page 2
Canon. Notice Canon makes no guarantees of any kind with regard to this manual. Canon is not liable for errors contained herein or for consequential or incidental damages incurred as a result of acting on information contained in the manual. -
Page 3: About This Guide
❏ Chapter 3: Using the Canon Advanced Printing Technology. Describes the Canon Advanced Printing Technology and how to install and use the software, as well as how to check on the status of a print job.
-
Page 4: Safety Information
Safety Information FCC Notice (100–127 V model) Laser Beam Printer, Model L10573A This device complies with Part 15 of the FCC Rules. Operation is subject to the following two conditions: (1) This device may not cause harmful interference, and (2) this device must accept any interference received, including interference that may cause undesired operation.
-
Page 5
• Use of shielded cable is necessary to comply with the technical requirements of EMC Directive. International E Office Equipment Program NERGY As an E partner, Canon Inc. has determined that this product NERGY meets the E guidelines for energy efficiency. NERGY The International E Office Equipment Program is an… -
Page 6
Laser Safety (100–127 V / 220–240 V models) Laser radiation could be hazardous to the human body. For this reason, laser radiation emitted inside this printer is hermetically sealed within the protective housing and external cover. In the normal operation of the product by the user, no radiation can leak from the machine. -
Page 7: Important Safety Instructions
Important Safety Instructions CAUTION: This printer is a high-precision electronic device. Before operation, be sure to read the following instructions to handle the printer properly. ❏ Read the manual carefully before operation. ❏ Do not dispose of these instructions. Save them for future reference. ❏…
-
Page 8
❏ 100–127 V model only: This product is equipped with a 3-wire grounding type plug, a plug that has a third (grounding) pin. As a safety feature, this plug fits only into a grounding-type power outlet. If you are unable to insert the plug into the outlet, contact an electrician to replace your obsolete outlet. -
Page 9
❏ The printer should never be placed near or over a radiator, heat register, or flame. It should not be placed in a built-in installation unless proper ventilation is provided. Ventilation slots ❏ Before connecting the printer to a power source, check the voltage rating label at the back of the printer to ensure that the printer voltage matches that of the power source. -
Page 10
• If the printer does not operate normally when the operating instructions are followed. Adjust only those controls that are covered by the operating instructions, since improper adjustment of other controls may damage the printer and may require extensive work by a qualified technician to restore the product to normal operation. -
Page 11: Operating Environment
Operating Environment When selecting a location for the printer, check the following guidelines: • Make sure the location is flat and sturdy. • When power is on (printer plugged into an AC outlet): Temperature: 10˚C-32.5˚C (50˚F-90.5˚F) Relative humidity: 20-80% RH with no condensation •…
-
Page 12: Carrying The Printer
Observe the following requirements when the power is off (printer unplugged from the AC outlet): • Temperature: 0˚C-35˚C (32˚F-95˚F). • Relative Humidity: 10-80% RH with no condensation. Carrying the Printer CAUTION: Do not carry the printer by holding the front panel, the face-up delivery slot, or by holding it at the front and rear.
-
Page 13: Table Of Contents
Windows NT 4.0 Add Printer Wizard……… 42 Windows 2000 Add Printer Wizard ……….46 Windows XP Add Printer Wizard ……….52 Connecting to the LBP-810 Already on Your Network….58 Printer Sharing………………62 Connecting the LBP-810 as a Network Printer ……62 The Canon CAPT Tools ……………
-
Page 14
Document Properties* …………..80 Checking the Status of a Print Job…………94 Opening the Status Window…………95 Using the LBP-810 Status Window ……….96 Network Printer Status ………….. 107 The Status Window Icon …………108 Closing the Status Window …………109 Messages ………………. -
Page 15: Chapter 1 Introduction
Chapter 1 Introduction Congratulations on your purchase of the Canon LBP-810 Laser Printer. This chapter introduces you to the printer and explains its features. Your new laser printer has many advanced features, including the CAPT (Canon Advanced Printing Technology). The CAPT gives you instant access to printer information.
-
Page 16: Printer Features
Printer Features The LBP-810 combines the following features to form a versatile printing system: Quick startup The printer is ready to print in less than 8 seconds after it is turned on (start-up time), and has a first print time of less than 18 seconds. This means that you can print documents quickly and efficiently.
-
Page 17
Delivery can be face down (for plain paper) or face up (for all paper types). Direct Network Connection With the optional network adapter, you can connect directly to the LBP-810 over a network, without having to go through a server. Chapter 1 Introduction… -
Page 18: Parts Of The Printer
Parts of the Printer Front View Input paper support Face-down output paper support Multi-purpose tray (MP tray) Face-down Paper guides delivery slot Manual feed slot Front cover Face-up delivery slot Paper delivery selector Rear View Parallel port interface connector Power switch USB port interface connector Power socket…
-
Page 19: Inside The Printer
Inside the Printer Transfer roller For more information about setting up the printer, see the Getting Started Guide. Chapter 1 Introduction…
-
Page 20
Introduction Chapter 1… -
Page 21: Chapter 2 Paper Handling
Chapter 2 Paper Handling This chapter describes how to select the different types of paper you can use with your printer and how to load them. It includes the following information: ❏ Paper Requirements ❏ Storing Paper ❏ Paper Path ❏…
-
Page 22: Paper Requirements
Paper Requirements Make sure that the paper you use meets the following requirements. Weight Loading Type Size Capacity Delivery (g/m MP Tray Plain paper Legal, Letter, A4, 64-135 Max height: Face-up Executive, B5. 12.5 mm Face- (Approx. 125 down (64- sheets of 75 g/m 105 g/m paper)
-
Page 23: Plain Paper
Weight Loading Type Size Capacity Delivery (g/m Manual Labels Letter, A4 1 sheet Face-up Envelopes 98 x 162 to 176 x 250 1 sheet Face-up mm (COM 10, Monarch, DL, B5, Postcards 100 x 147 mm 1 sheet Face-up Other Index cards: 3″…
-
Page 24: Labels
Labels Labels are paper with pressure-sensitive adhesive. Acceptable sizes are Letter and A4. Note the following conditions when choosing a label sheet: ❏ The label print face (top, or face sheet) must be made of ordinary, matte-finish paper similar to copy paper. ❏…
-
Page 25: Postcards
❏ Poorly manufactured envelopes are not recommended. Postcards Follow these guidelines when printing on postcards: ❏ Postcards should not be greater than 0.28 mm in thickness. ❏ Postcards should be free of glue, clips, and staples. ❏ Do not use postcards that are damaged or curled, or that have special coatings or an irregular shape.
-
Page 26: Storing Paper
Storing Paper Improper paper storage might cause a deterioration of print quality and paper performance. Therefore, note the following when storing paper: ❏ Store unused paper in its wrapping to protect against humidity. ❏ Do not store paper directly on the floor as the floor is usually humid. ❏…
-
Page 27: Paper Path
Paper Path Understanding how paper travels inside the printer helps you better handle paper loading and jams. A sheet of paper enters the printer from the MP tray or the manual feed slot. It travels to the image transfer area where the printer drum has been statically charged.
-
Page 28: Selecting Paper Delivery
Selecting Paper Delivery Use the paper delivery selector to choose face-up or face-down delivery. When the selector is in the lower position, face-up delivery is selected. When the selector is in the upper position, face-down delivery is selected. Face-down Face-up Face-down Delivery Use face-down delivery for plain paper only.
-
Page 29: Face-Up Delivery
Face-up Delivery Use face-up delivery for envelopes and transparencies, as well as other special paper, including non-standard sized plain paper. Printouts come out from the face-up delivery slot face up. This helps prevent paper curl. To select face-up delivery, push the paper delivery selector down. ❏…
-
Page 30: Loading Paper Into The Mp Tray
Loading Paper into the MP Tray The multi-purpose tray can hold up to approximately 125 sheets of 75 g/m paper for high-volume printing. Acceptable paper sizes are Legal, Letter, A4, Executive, and B5. It also accepts transparencies, envelopes, postcards, or special paper with a maximum height of 12.5 mm. Before loading paper on the MP tray, first select the paper delivery.
-
Page 31
Prepare a stack of paper and tap it on a flat surface to properly align the edges. ❏ Do not fan the paper, or printing problems might occur. ❏ When using transparencies, slightly fan the stack of transparencies before loading them in the MP tray to prevent feed failures. Align the stack of paper so that the side to be printed on faces the front of the printer. -
Page 32
Adjust the paper guides to the width of the paper stack. For A4-size or Letter/Legal-size paper, align the paper guides with the icons inside the MP tray. Adjust the paper guides so that there is no space between the paper guide and the edge of the stack of paper. -
Page 33: Loading Envelopes Into The Mp Tray
Loading Envelopes into the MP Tray Before Loading Envelopes Please be sure to follow these steps before loading envelopes: Place the envelopes on a flat surface and press the corners down in the direction shown to flatten the envelopes. Flex the envelope stack, including all four edges, to remove any stiffness.
-
Page 34: Loading Envelopes
Align the stack of envelopes by tapping them on a flat surface. Loading Envelopes Align the stack of envelopes so that the side to be printed on faces the front of the printer. Slide the stack in until it stops. Paper Handling Chapter 2…
-
Page 35
Adjust the paper guides to the width of the stack of envelopes. Most applications allow you to choose which way envelopes feed into the printer. Make sure your printer settings before you print. When using C5-size envelopes, remove any stiffness by lightly flexing both edges of the envelope. -
Page 36
Insert the envelopes one at a time into the MP tray, in the direction shown in the illustration. If the flap is along the long edge of the envelope, insert each envelope with the flap at the back and on the right. If the flap is along the short edge of the envelope, insert envelopes with the flap at the bottom and at the back. -
Page 37
Not Acceptable If the flap of any of the envelopes overlaps the edges of other envelopes in the stack, like those in the examples below, paper jams or misfeeds will occur. Flaps overlapping the envelopes underneath Flaps overlapping Top flap overlaps the envelopes underneath Chapter 2 Paper Handling… -
Page 38: Loading Paper Manually
Loading Paper Manually The manual feed slot allows you to load paper manually, one sheet at a time. You can load transparencies, labels, envelopes, postcards, or other special paper. You can also load plain paper, which is useful when you want to use paper that is a different size from the paper in the MP tray.
-
Page 39
❏ Do not force the paper into the printer or printing problems might result. ❏ For continuous manual feed, insert a new sheet only when the previous sheet has come out completely from the delivery slot. If a new sheet is inserted before the previous sheet has been delivered, a paper jam may occur. -
Page 40
Paper Handling Chapter 2… -
Page 41: Chapter 3 Using The Canon Advanced Printing Technology
Chapter 3 Using the Canon Advanced Printing Technology This chapter describes the CAPT (Canon Advanced Printing Technology). It includes the following information: ❏ Installing the CAPT ❏ Printing with the CAPT ❏ Checking the Status of a Print Job Chapter 3…
-
Page 42: Installing The Capt
“Connecting to the LBP-810 Already on Your Network” on pag e 58. If you want to install the LBP-810 as a network printer, follow the steps in “Connecting the LBP-810 as a Network Printer”…
-
Page 43
The following procedure only applies to the installation under Windows The first time you start Windows with the LBP-810 attached to your computer the New Hardware Found dialog box appears, then click Next >. When using parallel port, go Step 3. -
Page 44
For example, if your CD-ROM drive is drive D, browse to D:\English\WinMe and click OK. The installation of the USB class driver will complete. The Add New Hardware Wizard (Canon LBP-810) appears. Click Next>. Select Search for the best driver for you device (recommended) and click Next >. -
Page 45: Add Printer Wizard
Windows 95/98/Me Add Printer Wizard. Following is the installation procedures for “Using Parallel Port” under Windows 98. To install the LBP-810 printer driver to USB port, perform procedure as same as “CD-ROM Installation” or “Plug and Play”. Chapter 3…
-
Page 46
From the Start menu, select Settings, then Printers. The Printers folder appears. Double-click the Add Printer icon. The Add Printer Wizard dialog box appears. Click Next >. Select Local Printer and click Next >. Using the Canon Advanced Printing Technology Chapter 3… -
Page 47
OK. For example, if you are using the CD-ROM to install the software, and your CD-ROM drive is drive D:, the path name would be D:\English\Win9x. Chapter 3 Using the Canon Advanced Printing Technology… -
Page 48
Select the printer, and click Next >. Select the printer’s port, and then click Next >. Using the Canon Advanced Printing Technology Chapter 3… -
Page 49
Enter the name you wish to use, then click Finish. When the installation is complete, the following dialog box appears. To close the dialog box, click OK. Click Finish on the Add New Hardware Wizard. Chapter 3 Using the Canon Advanced Printing Technology… -
Page 50: Windows Nt 4.0/2000/Xp
Plug and Play is being carried out and the USB class driver, “USB Printing Support” is automatically detected and installed. Log on as member of Administrators. The full control access right for the printer is necessary for the installation of the CAPT. Using the Canon Advanced Printing Technology Chapter 3…
-
Page 51
Select Search for a suitable driver for my device (recommended) in the Found New Hardware Wizard and click Next >. “Unknown” may be displayed as the name of the device. Select Specify a location and click Next >. Chapter 3 Using the Canon Advanced Printing Technology… -
Page 52
Click Yes if the Digital Signature Not Found dialog box appears. When the installation is complete, the following dialog box appears. Click OK to close the dialog box. Click Finish on the Found New Hardware Wizard. Using the Canon Advanced Printing Technology Chapter 3… -
Page 53: Windows Xp Plug And Play
Plug and Play is being carried out and the USB class driver, “USB Printing Support” is automatically detected and installed. Log on as member of Administrators. The full control access right for the printer is necessary for the installation of the CAPT. Chapter 3 Using the Canon Advanced Printing Technology…
-
Page 54
The Found New Hardware Wizard dialog box appears. Select Install from a list or specific location (Advanced) and click Next >. “Unknown” may be displayed as the name of the device. Clear Search removable media (floppy, CD-ROM,…) check box. Using the Canon Advanced Printing Technology Chapter 3… -
Page 55
Click Continue Anyway if the Hardware Installation dialog box appears. When the installation is complete, the following dialog box appears. Click OK to close the dialog box. Click Finish on the Found New Hardware Wizard. Chapter 3 Using the Canon Advanced Printing Technology… -
Page 56: Windows Nt 4.0 Add Printer Wizard
Double-click the Add Printer icon. The Add Printer Wizard dialog box appears. Select My Computer, then click Next >. Select the printer port or ports you want to use, then click Next >. Using the Canon Advanced Printing Technology Chapter 3…
-
Page 57
CAPT, then click OK. For example, if you are using the CD-ROM to install the CAPT, and your CD-ROM drive is drive D:, the path name would be D:\ENGLISH\WINNT40. Chapter 3 Using the Canon Advanced Printing Technology… -
Page 58
Select your printer model from the list of printers displayed, then click Next >. Click Next > to accept the default printer name, or enter the name you wish to use, then click Next >. Using the Canon Advanced Printing Technology Chapter 3… -
Page 59
11. Click Yes if you want to print a test page, or No if you do not want to print a test page, then click Finish. Windows creates the Canon CAPT Tools icon on the Desktop, and the Canon LBP-810 icon is added to the Printers folder. -
Page 60: Windows 2000 Add Printer Wizard
Following is the installation procedure for “Using Parallel Port” under Windows 2000. To install the LBP-810 printer driver to USB port, perform procedure as same as “Plug and Play”. Log on as member of Administrators. The full control access right for the printer is necessary for the installation of the CAPT.
-
Page 61
Double-click the Add Printer icon. The Add Printer Wizard dialog box appears. Click Next >. Select Local printer, then click Next >. To check on “Automatically detect and install my Plug and Play Printer” is not recomended. Chapter 3 Using the Canon Advanced Printing Technology… -
Page 62
Select the printer port or ports you want to use, then click Next >. Click Have Disk… in the Manufacturers/Printers dialog box. Using the Canon Advanced Printing Technology Chapter 3… -
Page 63
For example, if you are using the CD-ROM to install the CAPT, and your CD-ROM drive is drive H:, the path name would be H:\ENGLISH\Win2000. Select your printer model from the list of printers displayed, then click Next >. Chapter 3 Using the Canon Advanced Printing Technology… -
Page 64
Click Next > to accept the default printer name, or enter the name you wish to use, then click Next >. 10. Select whether this printer is shared or not shared with other computers. Click Next >. Using the Canon Advanced Printing Technology Chapter 3… -
Page 65
12. Click Finish. Click Yes if the Digital Signature Not Found dialog box appears. Windows creates the Canon CAPT Tools icon on the Desktop, and the Canon LBP-810 icon is added to the Printers folder. 13. When the installation is complete, the following dialog box appears. -
Page 66: Windows Xp Add Printer Wizard
Following is the installation procedure for “Using Parallel Port” under Windows XP. To install the LBP-810 printer driver to USB port, perform procedure as same as “Plug and Play”. Log on as member of Administrators. The full control access right for the printer is necessary for the installation of the CAPT.
-
Page 67
Double-click the Add Printer icon. The Add Printer Wizard dialog box appears. Click Next >. Select Local printer attached to this computer, then click Next >. To check on “Automatically detect and install my Plug and Play printer” is not recomended. Chapter 3 Using the Canon Advanced Printing Technology… -
Page 68
Select the printer port or ports you want to use, then click Next >. Click Have Disk… in the Manufacturer/Printers dialog box. Using the Canon Advanced Printing Technology Chapter 3… -
Page 69
For example, if you are using the CD-ROM to install the CAPT, and your CD-ROM drive is drive H:, the path name would be H:\ENGLISH\WinXP. Select your printer model from the list of printers displayed, then click Next >. Chapter 3 Using the Canon Advanced Printing Technology… -
Page 70
Click Next > to accept the default printer name, or enter the name you wish to use, then click Next >. 10. Select whether this printer is shared or not shared with other computers. Click Next >. Using the Canon Advanced Printing Technology Chapter 3… -
Page 71
Click Continue Anyway if the Hardware Installation dialog box appears. Windows creates the Canon CAPT Tools icon on the Desk- top, and the Canon LBP-810 icon is added to the Printers and Faxes folder. 13. When the installation is complete, the following dialog box appears. -
Page 72: Connecting To The Lbp-810 Already On Your Network
OK. Connecting to the LBP-810 Already on Your Network If the LBP-810 is already on your network you can install it two different ways. The easiest way is using automatic network download. If network download is not available, you can use the Add Printer Wizard.
-
Page 73
OK. If the server is a Windows 95/98/Me computer, you can enter a name for the printer, or accept the default name and click Next >. Chapter 3 Using the Canon Advanced Printing Technology… -
Page 74
Double-click the Add Printer icon. The Add Printer Wizard dialog box appears. Click Next >. Select Network printer, then click Next >. Follow the directions on screen to complete installation. Using the Canon Advanced Printing Technology Chapter 3… -
Page 75
Next >. The Specify a Printer dialog appears. Click Next>, or enter the network path or print queue that you want connect to. Follow the directions on screen to complete installation. Chapter 3 Using the Canon Advanced Printing Technology… -
Page 76: Printer Sharing
Connecting the LBP-810 as a Network Printer If you plan to share the LBP-810 on a network, install the print server locally, then make the following settings. See your print server system documentation for more information.
-
Page 77
Click OK and then restart Windows. Printer Settings Share-level Access Control Open the Canon LBP-810 Properties window, then check “Shared As” in the Sharing tab. Enter the Share name, Comments, and Password as needed. Click OK. User-level Access Control Open the Canon LBP-810 Properties window, then check “Shared As”… -
Page 78
Select File and Printer Sharing for Microsoft Networks in the Network Services box, then click OK. Click Close. Printer Sharing Settings Open the Canon LBP-810 Properties window, then check “Shared” in the Sharing tab. Enter the Share Name as needed. Click OK. The printer icon changes to indicate sharing. -
Page 79: The Canon Capt Tools
The Canon CAPT Tools When you install the CAPT, the Canon CAPT Tools group is created. You can select the following from the Canon CAPT Tools group: ❏ Canon LBP-810 Help Selects the Canon LBP-810 Help file for the CAPT.
-
Page 80: Printing With The Capt
You must use a bi-directional cable for proper operation. Every time you print, the CAPT displays the Canon LBP-810 Status Window. This window shows you the paper moving through the printer, how long it will take to print the document, and how much of the document has printed.
-
Page 81: Windows 95/98/Me Printer Properties
Windows application. From the Print dialog box, usually accessed from an application’s File menu, you can select Properties to proceed to the Canon LBP-810 Properties dialog box and its printing options. ❏ You can open the Properties dialog box from the Printers folder. The number of tabs displayed in the Properties dialog box depends on how you have your system set up.
-
Page 82: General Tab
General Tab Lets you print a test page or define separator pages. Refer to your operating system documentation for more information. Using the Canon Advanced Printing Technology Chapter 3…
-
Page 83: Details Tab
Details Tab Specifies the printer port and time-out settings. Refer to your operating system documentation for more information. Spool Settings… The installer sets the following defaults. Chapter 3 Using the Canon Advanced Printing Technology…
-
Page 84: Sharing Tab
Sharing Tab Specifies the printer-sharing settings. This tab is available only when file and printer sharing is turned on. Refer to your operating system documentation for more information. Using the Canon Advanced Printing Technology Chapter 3…
-
Page 85: Page Setup Tab
Page Layout lets you select the number of pages per sheet (1, 2, 4, 8, 9). If you select more than 1, the image may be reduced to fit on the selected output size. When 2, 4, 8, or 9 pages per sheet is selected Manual Chapter 3 Using the Canon Advanced Printing Technology…
-
Page 86
Custom Paper Size on the Page Setup tab window allows you to define custom paper sizes (forms) for quick selection. You can specify the name, width, and height of each form. You can have up to 3 custom forms. Using the Canon Advanced Printing Technology Chapter 3… -
Page 87
Overlay on the Page Setup tab accesses the settings to specify how you want the overlay and print data printed, including the print position, size, and whether it is printed in the foreground (on top of) or background (under) the application data. Chapter 3 Using the Canon Advanced Printing Technology… -
Page 88
Size lets you set the size of the overlay. Units lets you select the units of measurement (Centimeters, Inches). Restore Defaults resets Left, Top, Width and Height to their default values. Using the Canon Advanced Printing Technology Chapter 3… -
Page 89
Add… on the Page Setup, Finishing, or Quality tab. Name lets you specify the profile name. Icon lets you select an icon to represent the new profile. View Settings >> shows or hides the profile’s settings. Chapter 3 Using the Canon Advanced Printing Technology… -
Page 90
To retrieve the profiles, rename the printer to its original name. ❏ Profiles are not erased even when the printer driver is uninstalled. ❏ Overlay history information is not stored in profiles. Using the Canon Advanced Printing Technology Chapter 3… -
Page 91: Finishing Tab
The check box lets you force pages to print, even when the paper size does not match. If this is not checked, you’ll be asked to change paper when a paper size mismatch is detected.By default the setting for this option is unchecked. Chapter 3 Using the Canon Advanced Printing Technology…
-
Page 92: Quality Tab
Decreasing contrast lightens the dark areas and darkens the light areas; increasing it darkens the dark areas and lightens the light areas. Contrast is expressed as a relative range from -80% to +80%. Using the Canon Advanced Printing Technology Chapter 3…
-
Page 93
Toner Saver prints only alternate data bits, so toner consumption is reduced. Automatic Image Refinement is a printer technology from Canon, with which the printer automatically senses and refines the jagged edges and ragged curves of characters and graphics. -
Page 94: Windows Nt 4.0/2000/Xp Printer Properties And Default Document Properties
Printer Properties To view the printer properties, select Properties from the File menu in the Printers folder, or click the right mouse button on the LBP-810 icon in the Printers folder and select Properties from the pop-up menu. Default Document Properties*…
-
Page 95
General Tab Specifies to print a test page and separator pages. Refer to your operating system documentation for more information. Chapter 3 Using the Canon Advanced Printing Technology… -
Page 96: Ports Tab
Ports Tab Lets you specify the port to which the printer is attached. Refer to your operating system documentation for more information. Using the Canon Advanced Printing Technology Chapter 3…
-
Page 97: Scheduling Tab
Lets you define print spooling settings. Refer to your operating system documentation for more information. “Spool print documents so program finishes printing faster” and “Start printing immediately” are set automatically when you install the printer driver. Chapter 3 Using the Canon Advanced Printing Technology…
-
Page 98
Sharing Tab Specifies the printer-sharing settings. Refer to your operating system documentation for more information. Using the Canon Advanced Printing Technology Chapter 3… -
Page 99: Security Tab
Security Tab Lets you specify security settings. Refer to your operating system documentation for more information. Chapter 3 Using the Canon Advanced Printing Technology…
-
Page 100: Select Forms Tab
OK, the form information is copied to the selected form in the Selected Forms list on the Select Forms tab. Using the Canon Advanced Printing Technology Chapter 3…
-
Page 101
If you select more than 1, the image may be reduced to fit on the selected output size. When 2, 4, 8, or 9 pages per sheet is selected Manual Scaling disappears and Page Order appears in its place. Chapter 3 Using the Canon Advanced Printing Technology… -
Page 102
Overlay on the Page Setup tab accesses the settings to specify how you want the overlay and print data printed, including the print position, size, and whether it is printed in the foreground (on top of) or background (under) the application data. Using the Canon Advanced Printing Technology Chapter 3… -
Page 103
Size lets you set the size of the overlay. Units lets you select the units of measurement (Centimeters, Inches). Restore Defaults resets Left, Top, Width and Height to their default values. Chapter 3 Using the Canon Advanced Printing Technology… -
Page 104
Add… on the Page Setup, Finishing, or Quality tab. Name lets you specify the profile name. Icon lets you select an icon to represent the new profile. View Settings >> shows or hides the profile’s settings. Using the Canon Advanced Printing Technology Chapter 3… -
Page 105
To retrieve the profiles, rename the printer to its original name. ❏ Profiles are not erased even when the printer driver is uninstalled. ❏ Overlay history information is not stored in profiles. Chapter 3 Using the Canon Advanced Printing Technology… -
Page 106
The second check box lets you turn EMF Spooling on. If this is not checked, EMF Spooling will be off. These settings are unchecked by default. Using the Canon Advanced Printing Technology Chapter 3… -
Page 107
Decreasing contrast lightens the dark areas and darkens the light areas; increasing it darkens the dark areas and lightens the light areas. Contrast is expressed as a relative range from -80% to +80%. Chapter 3 Using the Canon Advanced Printing Technology… -
Page 108: Checking The Status Of A Print Job
Toner Saver prints only alternate data bits, so toner consumption is reduced. Automatic Image Refinement is a printer technology from Canon, with which the printer automatically senses and refines the jagged edges and ragged curves of characters and graphics.
-
Page 109: Opening The Status Window
You can also open the Status Window by clicking on the Status Window icon in the Windows taskbar and selecting the LBP-810. Status Window icon If multiple LBP-810 printers are connected, select a printer from the list. The Status Window opens and displays information for the selected printer.
-
Page 110: Using The Lbp-810 Status Window
Using the LBP-810 Status Window The Status Window is a program used to display the status of jobs and perform printer operations. Menu bar Printer icon Printer status Animation area message area Error message area Progress bar Tool bar Tab window…
-
Page 111
Displays information related to print jobs. The type of information displayed changes with the selected tab. Status bar Displays the name of the printer port and describes menu options as you move your mouse over them. Chapter 3 Using the Canon Advanced Printing Technology… -
Page 112: Job Menu
Using the Menu Bar Job Menu You can select the Job menu from the menu bar of the LBP-810 Status Window: The Job menu includes the following options: ❏ Pause Job—This temporarily halts printing of the current document. After the current page completes printing, the printer pauses until you select Resume Job.
-
Page 113
Options Menu You can select the Options menu from the menu bar of the LBP-810 Status Window: The Options menu includes the following selections: ❏ Status Options—This opens the Status Options dialog box that lets you change the settings for the Status Window. -
Page 114
Status Options This dialog box lets you define when and how you want the LBP-810 Status Window to display. You can also set up sounds that play when there are errors. ❏ Status Window—lets you select when the Status Window displays. -
Page 115
❏ ECP with DMA—uses the parallel port as an ECP parallel port that uses DMA. Before you make any changes, check the manual that came with your computer to determine what type of port you have. Chapter 3 Using the Canon Advanced Printing Technology… -
Page 116
Using the Help Menu You can select the Help menu from the menu bar of the LBP-810 Status Window: ❏ Help Topics—Displays the search window for help topics. ❏ About—Displays Status Window version information. Using the Canon Advanced Printing Technology… -
Page 117
Settings from the Start menu, then select the Printers folder; Double-click the Canon LBP-810 icon to display the Canon LBP-810 dialog box. Select all of the jobs and delete them. When the Printed Job tab is selected, none of the buttons are displayed. -
Page 118
The following types of information are displayed: ❏ Document name ❏ User name ❏ Computer name ❏ Estimated time left ❏ Estimated finish time Some of this information may not be displayed, depending on the printer status. Using the Canon Advanced Printing Technology Chapter 3… -
Page 119
The job history displayed in the job information area can list a history of up to 100 jobs, beginning from the time the Status Window was started. The job history clears whenever you terminate the Status Window. Chapter 3 Using the Canon Advanced Printing Technology… -
Page 120
Waiting Jobs This tab shows information related to the jobs that have not yet started. ❏ Document name ❏ Status ❏ Owner ❏ Pages ❏ Started At Using the Canon Advanced Printing Technology Chapter 3… -
Page 121: Network Printer Status
If the print server’s Status Window is not running, you cannot perform job operations on the client. The client’s Status Window displays the message “Check Print Server.” Audio messages for jobs play on the client and on the print server. Chapter 3 Using the Canon Advanced Printing Technology…
-
Page 122: The Status Window Icon
You may have to contact an authorized service representative. Abnormal Condition Something is wrong with the printer or one of its connections. You will not be able to print until the problem is fixed. Using the Canon Advanced Printing Technology Chapter 3…
-
Page 123: Closing The Status Window
DL Envelope (110 x 220 mm) Env: C5 C5 Envelope (6.4 x 9 in.) Card: Index Index Card (3 x 5 in.) User defined Custom form: You defined the name. Current Unknown Paper Chapter 3 Using the Canon Advanced Printing Technology…
-
Page 124
Spoken message Event Filename Printing complete Last page finished zdone.wav Printing paused Pause button pressed zpaused.wav Printing resumed Printing resumed zresume.wav Printing started Printing started zstarted.wav Printing stopped Delete button pressed zstopped.wav Using the Canon Advanced Printing Technology Chapter 3… -
Page 125
Check toner cartridge No cartridge zsetcart.wav Printer busy Printer is processing zprtbusy.wav another job Port busy Selected printer port is zpotbusy.wav being used by another device Printing failed Printing could not zprtfail.wav complete Chapter 3 Using the Canon Advanced Printing Technology… -
Page 126
Using the Canon Advanced Printing Technology Chapter 3… -
Page 127: Chapter 4 Troubleshooting
Chapter 4 Troubleshooting This chapter includes information to help you solve printer problems. A problem might have one or a combination of causes, including a computer malfunction, software errors, the printer cable, or the printer. Many printing problems are related to how your software interacts with the printer.
-
Page 128
If you have a problem with your printer and you cannot resolve it by referring to the information in this chapter, contact a Canon authorized service representative. Before contacting Canon, make sure you have the following information: ❏ Product name (LBP-810) ❏… -
Page 129: Paper Jams
Paper Jams Locating Paper Jams Paper jams can occur in several locations along the print path. Refer to the diagram below to help you locate paper jams. Locate the area where the paper jam has occurred and follow the instructions for removing jams in that area.
-
Page 130: Before Removing Paper Jams Inside The Printer
Before Removing Paper Jams Inside the Printer When a paper jam occurs, follow the procedure below before removing the jammed paper from the affected area. Remove watches and any bracelets or rings when touching the inside of the printer. These items might be damaged if they come into contact with parts inside the printer.
-
Page 131
Remove the EP-22 cartridge by grasping the cartridge’s handle and lifting it out of the printer. Do not expose the cartridge to light for more than 5 minutes. If necessary, put the cartridge in its original protective bag or wrap it with a thick cloth to prevent exposure to light. -
Page 132
CAUTION: The face-up delivery area (shaded part) becomes hot when the printer is in use. Be careful not to touch this area, because personal injury might result. When removing the jammed paper, do not touch the transfer roller (shaded part) as its surface is very delicate and susceptible to finger oil and scratches, which may lead to print deterioration. -
Page 133
To avoid possible damage to the printer, do not touch the pins near the right end of the transfer roller. To avoid damaging the printer, check that the pressure release levers (black) were released when the front cover was opened. If the pressure release levers were not released, close the front cover and then open it again. -
Page 134: Removing Paper Jams
Removing Paper Jams Please use both hands to remove jammed paper from the printer. Paper Jam in the Paper Feed Area If only a small portion of the paper has moved into the printer Use both hands to carefully pull the jammed paper straight up and out from the MP tray.
-
Page 135
If the paper has moved completely into the printer Follow the steps described in “Before Removing Paper Jams Inside the Printer” on page 116 to remove the toner cartridge, then follow the procedure below. Remove any paper from the input area by gently pulling it forward. Roll the edge of the paper inwards so that the printed surface is on the inside of the roll, then gently pull the rolled up paper out of the printer. -
Page 136
Do not remove jammed paper at a sharp upwards angle; the toner on the paper will stain the printer and cause a permanent reduction in print quality. Replace the cartridge and close the front cover. The paper release levers automatically return to their original positions. Troubleshooting Chapter 4… -
Page 137
Paper Jams near the Imaging Area Please use both hands to remove jammed paper from the printer. Follow the steps described in “Before Removing Paper Jams Inside the Printer” on page 116 to remove the toner cartridge, then follow the procedure below. -
Page 138
If you cannot see the rear edge of the paper Carefully pull the jammed paper forwards and out of the printer. Paper Jam in the Face-down Delivery Area Please use both hands to remove jammed paper from the printer. Follow the steps described in “Before Removing Paper Jams Inside the Printer”… -
Page 139
Never pull the paper out of the printer by pulling it forwards if the paper is behind the face-down delivery rollers. This could result in damage to the face-down delivery rollers. Paper Jam in the Face-up Delivery Area Please use both hands to remove jammed paper from the printer. Follow the steps described in “Before Removing Paper Jams Inside the Printer”… -
Page 140
If you can see the front edge of the paper While holding the printer steady, carefully pull the jammed paper out straight and horizontally. If the jammed paper is badly folded, similar to the folds of an accordion, ease the jammed paper loose and then pull it out of the printer. Troubleshooting Chapter 4… -
Page 141
If you cannot see the front edge of the paper If the paper becomes wrapped around the roller inside the fixing assembly, neither the leading edge or the trailing edge of the paper may be easily accessible. If this occurs, follow the procedure below to remove the paper. -
Page 142
Gently pull the paper through the rollers. ❏ After you replace the cartridge and close the front cover, the printer should be ready for printing. If the printer returns to the ready state for printing, troubleshooting has been successful. If the printer does not return to the ready state for printing, paper may still be jammed in the printer. -
Page 143: Print Quality Problems
Cartridge” in the Getting Started Guide. When purchasing a replacement cartridge, make sure you get the right one for this printer: a Canon EP-22 cartridge. The EP-22 cartridge typically lasts for about 2,500 prints of Letter- or A4-size paper, assuming the printer is used for standard word processing documents printed at the default density, and at 4% dot ratio (equivalent to print coverage of approximately 5%).
-
Page 144: Printout Has Black Specks
Printout Has Black Specks If toner powder adheres to the pressure roller, black specks 1 mm in diameter or larger might appear on the front or back of the printed paper. Corrective action Use the Options menu in the Status Window to print the cleaning page on a blank sheet of paper.
-
Page 145: Printer Problems
Printer does not Paper might not be loaded. Make sure paper is loaded. print Print jobs might be stalled. Check the LBP-810 Status Window for stalled jobs. The cartridge might not be Check that the EP-22 cartridge is installed correctly.
-
Page 146
Check that you have selected the correct printer driver in Windows. The wrong printer is Make sure the LBP-810 is selected in the Printers selected in the Printers folder. folder. You might need to modify See your computer’s your BIOS setup. -
Page 147
Problem Cause Solution Printer locks up Your system setup might Verify that you have a high- system be a problem. quality shielded interface cable. The problem might be your BIOS. Verify that your BIOS setup is correct. (See your computer’s documentation for details.) Verify that your physical memory is working correctly. -
Page 148: Capt Problems
Solution CAPT is not working The CAPT for Specify the CAPT for the properly LBP-810 is not LBP-810 as the default driver. selected as the default printer driver. The software might Refer to “Using the Trouble not be installed Shooter” on page 139.
-
Page 149
Problem Cause Solution CD-ROM Menu Autorun CD- Start the CD-ROM menu manually, and doesn’t appear ROM Menu check the “Autorun CD-ROM Menu” automatically checkbox is checkbox. unchecked in the CD-ROM menu. The Auto insert From the Device Manager make sure that notification the “Auto insert notification”… -
Page 150
[Device Manager] button. 4) Delete ONLY the following USB class drivers under [Universal Serial Bus Controller]; For Windows 98, select [Canon LBP-810], For Windows Me, [Canon CAPT USB Printer], and click [Delete] button. For Windows 2000/XP, select [USB Printing Support] or [Canon CAPT USB Printer], and uninstall from the [Action] menu. -
Page 151: Capt Messages
You have two choices: ❏ Replace the paper so that it matches the specified paper size. ❏ Use the Resume Job menu option in the LBP-810 Status Window to start printing on the paper in the printer. Check Printer/Cable Your computer and printer are not communicating.
-
Page 152
2 Open the front cover and remove the EP-22 cartridge. 3 Reinsert the cartridge properly. Use both hands to close the front cover completely. 4 Plug in and turn on your printer. 5 If the error persists, contact your Canon authorized service representative. Troubleshooting Chapter 4… -
Page 153: Using The Trouble Shooter
The Trouble Shooter does not detect problems related to hardware, such as printer cable problems, parallel port failure, or ECP setting errors. To start the Trouble Shooter, select the Canon LBP-810 Trouble Shooter icon in the Canon CAPT Tools group. The Trouble Shooter checks the following and corrects any problems: ❏…
-
Page 154
Windows NT 4.0/2000/XP Trouble Shooter checks whether Spooler service has started and if not, displays a dialog box and does not run. When Trouble Shooter is done checking your files, it displays a dialog box similar to the one below. While Trouble Shooter is running, it saves a log file with the name tshooter.tmp in your system temp directory, such as \windows\temp or \temp. -
Page 155: Uninstalling The Capt
Follow the on-screen instructions. Windows 95/98/Me: Click OK and your system restarts. Windows NT 4.0/2000/XP: Click OK (recommended) to restart your system. In Windows NT 4.0/2000/XP, you cannot uninstall the Canon Advanced Printing Technology unless you have administrative privileges. Chapter 4 Troubleshooting…
-
Page 156
Troubleshooting Chapter 4… -
Page 157: Chapter 5 Maintenance
Chapter 5 Maintenance This chapter describes how to care for and maintain your printer. Regular care and maintenance helps keep your printer in good working order. This chapter includes the following information: ❏ Handling and Cleaning the Printer ❏ EP-22 Cartridge Handling and Cleaning the Printer Handling the Printer Note the following points when handling the printer:…
-
Page 158: Cleaning The Printer
Cleaning the Printer Clean the printer cabinet regularly to keep the printer in its best condition. To clean the printer, use a soft cloth slightly moistened with water or a mild detergent solution. Avoid using any other type of solvents, such as alcohol or benzine, which might damage the surface.
-
Page 159: Storage Guidelines
Storage Guidelines • Store the cartridge in its protective bag. Do not open the bag until you are ready to install the cartridge in the printer. • Do not store the cartridge where it will be exposed to direct sunlight. •…
-
Page 160: Handling Guidelines
Handling Guidelines • Do not expose the cartridge to direct sunlight. Do not expose it to bright light or to room light for more than 5 minutes. • Do not open the drum’s protective shutter on the cartridge. If the shutter is open and the drum is damaged, print quality might deteriorate.
-
Page 161: Replacing The Ep-22 Cartridge
CAUTION: Do not dispose of toner cartridges in fire. Toner powder is flammable. • Do not attempt to disassemble the cartridge. Replacing the EP-22 Cartridge The EP-22 cartridge typically lasts for about 2,500 prints of Letter or A4- size paper. This assumes that the printer is used for standard word processing documents printed at the default density, and at 4% dot ratio (equivalent to print coverage of approximately 5%).
-
Page 162
CAUTION: The shaded part of the face-up delivery area is hot when the printer is in use. Be careful not to touch this area, because personal injury might result. Grasp the EP-22 cartridge by its handle and lift it out of the printer. Install a new cartridge. -
Page 163: Cleaning
Cleaning Whenever you replace the EP-22 cartridge and the printing quality is poor, you may need to use the Cleaning function. Follow the instructions below. Place letter or A4-size paper in the MP tray. Click on the printer icon in the taskbar to open the Status Window. From the Options menu, click Cleaning.
-
Page 164
Maintenance Chapter 5… -
Page 165: Appendix A Printer Specifications
Appendix A Printer Specifications Model: Desktop page printer Printing method: Electrophotographic printing using laser beam scanning Resolution: 600 dpi Printing speed: 8 pages per minute (A4-size paper) Paper sizes: MP Tray 76.2×127 to 216×356 mm (3”x5” to 8-1/2”x14”) Plain paper (Legal, A4, Letter, Executive, B5) Maximum capacity: 12.5 mm (Approx.
-
Page 166
First print: Face-down delivery: Less than 18 seconds Face-up delivery: Less than 17 seconds For printing on A4-size paper using MP tray at 20˚ C (68˚ F) Toner cartridge: EP-22 cartridge Power requirements: 100-127V (±10%) 50/60Hz (±2Hz) 220-240V (-10%, +6%) 50Hz (±2Hz) Power consumption: 100-127V During printing:… -
Page 167: Appendix B Network Adapter: Axis 1610
Appendix B Network Adapter: AXIS 1610 The optional network adapter, AXIS 1610 is available to use the LBP-810 in a network. When the network adapter is connected to the parallel port of the LBP- 810, the printer can connect directly to a network. The network adapter and host have a peer-to-peer connection.
-
Page 168: Connecting Directly From Clients
Connecting Directly From Clients Centralized control of print jobs is not available because print queues are distributed among all clients. When multiple jobs compete, jobs print in the order of arrival at the network adapter. Jobs may not arrive in the order they were sent. For example, if client 1 enters jobs A and B, and then client 2 enters job C, the print order might be A, C, then B, if job B did not arrive at the network adapter until job A was completed.
-
Page 169: Connecting Through A Print Server
Connecting Through A Print Server Using a print server, you can control print jobs (for example, change printing order, cancel jobs, etc.) centrally. When multiple jobs compete, they print in the order in which the jobs are entered. The Print Monitor for the network adapter needs to be installed only on the printer server.
-
Page 170: Specifications
External AC adapter 2 MB Flash EPROM, 1 MB Flash method Safe flash Compatible MIB Some Canon MIBs, some printer MIBs, some TCP/IP MIBs, some host MIBs Compatible host NetSpot, NetPilot utilities Compatible printers Canon Advanced Printing Technology printers only…
-
Page 171: Glossary
Bi-directional communications Allows information to pass back and forth between the Canon Advanced Printing Technology software and a local printer. Bold A characteristic of a printed character that indicates wider, darker representation.
-
Page 172
Canon Advanced Printing Technology (CAPT) Software that extends the power of the Windows operating system to a printer to speed up and simplify printing. The Canon Advanced Printing Technology provides more printing control and bi-directional communication between the printer and a computer running a Windows application. -
Page 173
The printer driver supplies Windows with information such as descriptions of the fonts and features of the installed printer. When you print with the Canon Advanced Printing Technology, you are using its printer driver. Abbreviation for Extended Capabilities Port. A bi-directional communication mode that enables high-speed data transmission to printers and other devices. -
Page 174
Interface port The port through which the printer communicates with the computer. The LBP-810 have a USB port and a Centronics, 8-bit, parallel interface port, located on the back of the printer. See also Parallel or USB interface. Glossary… -
Page 175
Italic A font style distinguished by slanted characters (the upright strokes of the characters are at an angle to the vertical axis). A situation created when paper becomes caught along the paper path. You must remove jammed paper before you can continue printing. Kilobyte (KB) A unit of measurement, representing the binary number 1024, used to describe printer or computer memory size in thousand-byte units. -
Page 176: Network Adapter
NetPilot This utility is used to control network printers. Network A group of computers connected by cables or other means and using software that enables them to share equipment (such as printers) and exchange information. Network Adapter An optional device that allows you to connect your printer directly to a network.
-
Page 177
Parallel interface An interface that transmits multiple bits simultaneously (usually in one- byte segments). Your printer has a built-in, Centronics-type parallel interface. See also Centronics interface. Parallel interface cable A bi-directional cable, usually less than six feet long, that transfers multiple bits of information to the printer simultaneously, speeding the transfer. -
Page 178: Printer Driver
A program that controls how the computer and printer interact. The printer driver supplies Windows with information such as descriptions of fonts and features of the installed printer. When you print with the Canon Advanced Printing Technology, you are using its printer driver.
-
Page 179
Scaling Enlarging or reducing the printed image. SCoA ScoA is an original Canon print data compressor and forwarding technology, which utilizes the full potential of your computer to make CAPT high speed printing a reality. Further, as compression and forwarding are efficient, only a small amount of memory is used, and regardless of how much data you send, you do not need to increase RAM. -
Page 180: Status Window
Settings which determine when the Printer Status Window opens and whether sounds play with messages. Status Window A window that the Canon Advanced Printing Technology uses to display messages about the current print job, as well as to graphically show the print job’s progress from computer to printer.
-
Page 181
Title bar The horizontal bar that contains the title of a window or dialog box. On many windows, the title bar contains the Control menu box and Maximize and Minimize buttons. Toner A black, resin-coated powder contained in the EP-22 cartridge. The printer applies the toner to the surface of the photosensitive drum inside the printer via an electrophotographic mechanism. -
Page 182: Virtual Memory
Universal Serial Bus (USB) interface These are new serial interface standards. This bus automatically recognizes connections (Plug and Play) to allow plugging and unplugging connectors with the power still turned on to the PC or peripheral equipment. Virtual Memory Space on the hard disk that Windows uses for temporary data storage as if it were actually random access memory (RAM).
-
Page 183: Index
66–94 printing with 2, 151 600 dpi uninstalling 27–111 using 8, 16, 109, 129, 147, 151 A4 paper Canon Advanced Printing Technology Abnormal condition icon (CAPT) Canon Advanced Printing Tools Add Paper using Add Printer Wizard Canon CAPT 46–52 Windows 2000 Uninstaller 31–35…
-
Page 184
Envelopes Image 19–23 loading too dark Environments, specifications too light EP toner cartridge Index cards SeeToner cartridge Installing,Canon Advanced Printing 3, 8, 16, 109, 151 28–58 Executive paper Technology Insufficient Memory Interface Face-down delivery Interface cable Face-down delivery slot 4, 160… -
Page 185
8, 16, 151 Letter paper Lifting, printer Opening, Status Window Loading Operating environment 20–23 envelopes 99–101 Options menu, using 16–18 paper Orientation 28–58 Local printer Output paper support 73, 88, 162 Overlay 143–149 Maintaining, printer Manual feed Page setup tab continuous custom paper size 4, 13, 24… -
Page 186
80–94 Power switch Precautions Printer ready icon 143–144 printer Printer sharing settings toner cartridge Printing Preferences, Finishing tab Canon Advanced Printing Print job, status Technology Print Monitor speed Print monitor, installing Printing Failed 129–130 Print quality, problems Printing job tab… -
Page 187
Removing, Canon Advanced Printing icon Technology menu bar Replacing, toner cartridge opening 151, 165 Resolution printer animation Resume job button printer icon Resume printing progress bar status bar tool bar Scaling 96–111 using Scheduling tab, Windows NT 4.0/2000/ Storage environment Storing Security tab, Windows NT 4.0/2000/XP… -
Page 188
131–132 printer problems quality tab removing Canon Advanced Printing scheduling tab Technology (Uninstallation) security tab USB class driver is not properly select forms tab installed server settings sharing tab WYSIWYG Uninstallation 28, 36, 39 cable connector 4, 168 interface 4, 28, 36, 39…