
View the manual for the Canon Prima Zoom 90u here, for free. This user manual comes under the category not categorized and has been rated by 1 people with an average of a 7.6. This manual is available in the following languages: English. Do you have a question about the Canon Prima Zoom 90u?
Ask your question here
Frequently asked questions
Can’t find the answer to your question in the manual? You may find the answer to your question in the FAQs about the Canon Prima Zoom 90u below.
Is the manual of the Canon Prima Zoom 90u available in English?
Yes, the manual of the Canon Prima Zoom 90u is available in English .
Is your question not listed? Ask your question here
The self-timer function allows you to take a picture from a distance away
from the camera when it is attached to a tripod.
1
Set the camera to self-timer mode.
● Press the s button.
as appears on the LCD panel.
● If you then press the s button again,
s disappears and self-timer mode is
cancelled.
2
Compose the picture and press the shutter button.
aThe self-timer lamp blinks and the shutter is released approximately
10 seconds later.
● To cancel the self-timer, press the s button again.
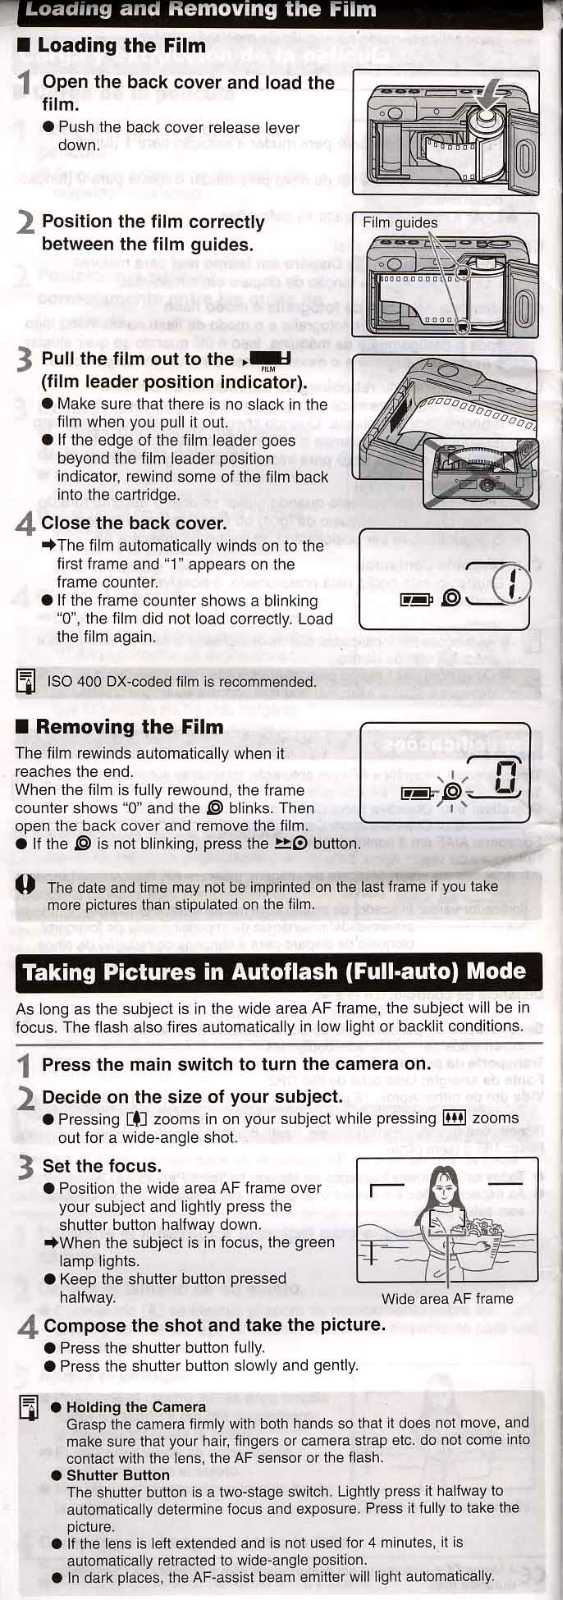
■ Loading the Film
1
Open the back cover and load the
film.
● Push the back cover release lever
down.
2
Position the film correctly
between the film guides.
3
Pull the film out to the
(film leader position indicator).
● Make sure that there is no slack in the
film when you pull it out.
● If the edge of the film leader goes
beyond the film leader position
indicator, rewind some of the film back
into the cartridge.
4
Close the back cover.
aThe film automatically winds on to the
first frame and “1” appears on the
frame counter.
● If the frame counter shows a blinking
“0”, the film did not load correctly. Load
the film again.
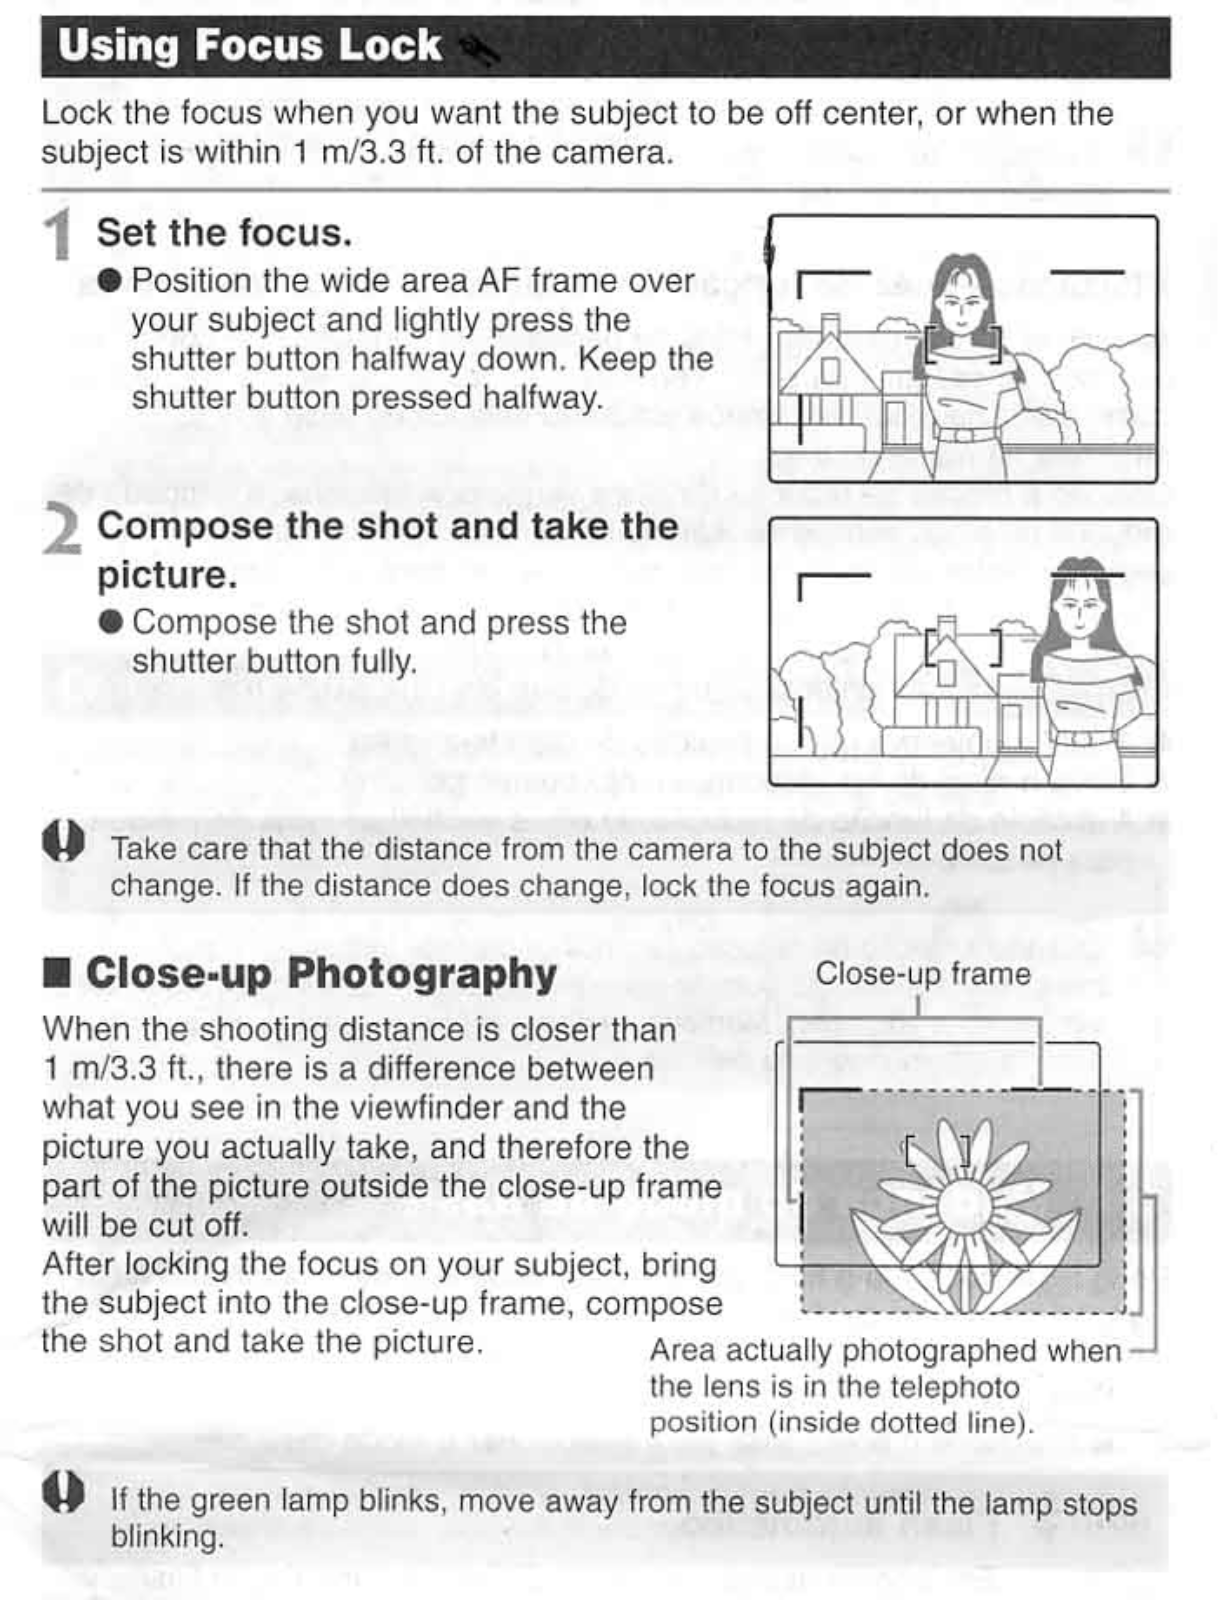
■ Close-up Photography
When the shooting distance is closer than
1 m/3.3 ft., there is a difference between
what you see in the viewfinder and the
picture you actually take, and therefore the
part of the picture outside the close-up frame
will be cut off.
After locking the focus on your subject, bring
the subject into the close-up frame, compose
the shot and take the picture.
■ Nomenclature
Front
q Shutter button
w w Zoom-in (telephoto)/
Set x button
e t Zoom-out (wide-angle)/
Selection x button
r Main switch
Pressing the main switch turns the camera on and
sets the lens to the wide-angle position. If you
press it again, the lens retracts, the lens cover
closes and the camera switches off. When you
switch the camera off, the display on the LCD
panel does not disappear.
t LCD panel
y s Self-timer button
u m Mode button
i h Flash mode button
o Back cover release lever
!0 Flash
!1 Viewfinder window
!2 AF sensor/metering window
Soiling on the AF sensor causes focusing
problems. Wipe off any dust or dirt before taking
pictures.
!3 Lens
Soiling on the lens causes focusing problems.
Wipe off any dust or dirt before taking pictures.
!4 Red-eye reduction/Self-timer lamp/
AF-assist beam emitter
Back
!5 Green lamp
!6 Viewfinder eyepiece
!7 Film check window
!8 Strap
!9 Strap mount
@0 Battery compartment cover
@1 o Mid-roll rewind button
Hold this button down until the film starts to
rewind.
@2 Tripod socket
Attaching the Strap
LCD Panel
(Normally, only necessary information displayed)
q Date x/
Custom Function number
w Manual exposure compensation
e Red-eye reduction mark
r Frame counter
t Film mark
y Real-time release
u Close-up
i Mode selection indicator
o Portrait
!0 Night portrait
!1 Action
!2 Battery level indicator
!3 Self-timer
!4 j Flash ON (Fires for all shots)
!5 i Flash OFF (Never fires)
!6 Autoflash
When “H” is displayed, remove the battery from the camera, wait until “H”
is no longer displayed and then reload the battery.
■ Loading the Battery
Applicable Battery: One lithium battery (CR2)
1
Open the battery cover.
2
Load a new battery.
● Align the + – terminals correctly and
insert the battery – end first.
aThe r appears on the LCD panel.
3
Close the battery cover.
● Push the cover closed until you hear a
clicking sound.
aThe date display “— — —” on the LCD
panel blinks. Set the date and time.
x
The camera will not operate if the + – terminals are aligned incorrectly.
■ Checking the Battery Level
Check that r appears on the LCD panel when you turn the power on.
Change the battery if is displayed.
r (lit) The battery level OK.
q (lit) Prepare a new battery.
(blinking) Load a new battery.
A new battery will generally provide enough charge to shoot approx.
16 rolls of 24-exposure film (based on Canon’s Standard Test Method at
normal temperature and with 50% flash use). At low temperatures (–10°C/
14°F), the battery life is approximately one third of the normal figure.
ISO 400 DX-coded film is recommended.
■ Removing the Film
The film rewinds automatically when it
reaches the end.
When the film is fully rewound, the frame
counter shows “0” and the f blinks. Then
open the back cover and remove the film.
● If the f is not blinking, press the o button.
As long as the subject is in the wide area AF frame, the subject will be in
focus. The flash also fires automatically in low light or backlit conditions.
1
Press the main switch to turn the camera on.
2
Decide on the size of your subject.
● Pressing w zooms in on your subject while pressing t zooms
out for a wide-angle shot.
3
Set the focus.
● Position the wide area AF frame over
your subject and lightly press the
shutter button halfway down.
aWhen the subject is in focus, the green
lamp lights.
● Keep the shutter button pressed
halfway.
4
Compose the shot and take the picture.
● Press the shutter button fully.
● Press the shutter button slowly and gently.
● Holding the Camera
Grasp the camera firmly with both hands so that it does not move, and
make sure that your hair, fingers or camera strap etc. do not come into
contact with the lens, the AF sensor or the flash.
● Shutter Button
The shutter button is a two-stage switch. Lightly press it halfway to
automatically determine focus and exposure. Press it fully to take the
picture.
● If the lens is left extended and is not used for 4 minutes, it is
automatically retracted to wide-angle position.
● In dark places, the AF-assist beam emitter will light automatically.
Wide area AF frame
Film guides
Subjects Difficult to Autofocus
The green lamp may blink 4 times per second for subjects with the
following characteristics that cannot be brought into focus.
In situations like this, focus on something roughly the same distance away
as your subject and lock the focus for the shot.
Main types of subjects where focusing is difficult:
● Subjects in scenes without much contrast, e.g. blue sky, or scenes of
mainly one color
● Subjects in very dark places
● Subjects in extreme backlit situations or subjects which are extremely
reflective, e.g. the body of a car which gives off a strong reflection
● Subjects in a photograph, some of which are close and some of which
are in the distance, e.g. animals in a cage
● Subjects with a repetitive pattern, e.g. continuous windows in a
building, etc.
Lock the focus when you want the subject to be off center, or when the
subject is within 1 m/3.3 ft. of the camera.
1
Set the focus.
● Position the wide area AF frame over
your subject and lightly press the
shutter button halfway down. Keep the
shutter button pressed halfway.
2
Compose the shot and take the
picture.
● Compose the shot and press the
shutter button fully.
Take care that the distance from the camera to the subject does not
change. If the distance does change, lock the focus again.
Close-up frame
Area actually photographed when
the lens is in the telephoto
position (inside dotted line).
● In low light or backlit conditions, the flash fires automatically.
● You may not be able to focus on subjects moving rapidly.
● The red-eye reduction function can not be set.
● The green lamp does not light.
● No camera shake warning is given.
● The camera continues to adjust the focus for 40 seconds while the
shutter button is held down halfway.
●
Even if set, the Real-time Release Custom Function (CF1) will not operate.
n Shooting against Dark Backgrounds
Use this mode when you are taking pictures of people against a sunset or
nighttime background.
The flash illuminates the subject and the slow shutter speed captures the
background, allowing you to take beautiful pictures.
● Follow the steps in autoflash mode to take a picture.
● The red-eye reduction function will operate.
● You cannot change the flash mode.
● No camera shake warning is given. Because of the slow shutter speeds
(up to 2 seconds), you must use a tripod to keep the camera steady.
You should also ensure that the subject does not move in the moment
after the flash fires.
p Shooting Portraits
Use this mode when you want to lessen the impact of the background and
highlight the subject.
The camera automatically zooms in, to a range of 1 to 2.2 m/3.3 to 7.2 ft.
for the 90u, and 1 to 2 m/3.3 to 6.6 ft. for the 80u, to frame from the waist
up of the subject and fires the flash for every shot to produce highlights in
the subject’s eyes.
● Follow the steps in autoflash mode to take a picture.
● The red-eye reduction function will operate.
The lens automatically zooms and locks into position.
You cannot operate the zoom.
y Shooting in Real Time
Press the shutter button down halfway to focus on the subject and then
press the button fully to take a picture in real time. This mode enables you
to take pictures at the best moment.
If you press the shutter button all the way down in a single movement,
realtime release does not operate.
Using Red-eye Reduction Function Effectively
When you use the flash to take photos of people in low light conditions,
their eyes sometimes glow red in the photograph. This is referred to as
the red-eye effect and is caused by the light of the flash being reflected off
the retina of the eye.
When the red-eye reduction operates, the red-eye reduction lamp lights
for approximately 1 second before the flash fires. This causes the
subject’s pupils to contract, minimizing the risk of red-eye.
qTake the picture from within 2 m/6.6 ft. of your subject.
wAttract the subject’s attention so that he or she looks at the camera.
● Set the lens to the wide-angle position.
● Raise the available light level as much as possible.
● The effectiveness of the red-eye reduction function varies from person
to person.
When the red-eye reduction function operates, a picture can not be taken
for approximately 1 second (the green lamp blinks 16 times). Hold down
the shutter button until you hear the sound of the film winding on.
You can cause the flash to fire for every shot or suppress flash operation
completely to suit the subject or location.
Select the flash mode.
● Press the h button to select the mode you want.
e Autoflash
In dark places and in backlit conditions, the flash fires
automatically.
Flash Distance Range (with color print film)
You can select whether the autoflash mode initially set when
you turn the power on is g or e. Set the camera to
the desired autoflash mode and then switch the camera off.
gAutoflash with Red-eye Reduction
In dark places, the flash automatically fires after the red-eye
reduction lamp has lit.
j Flash ON (Fires for all shots)
The flash fires when the picture is taken.
i Flash OFF (Never fires)
The flash does not fire.
k
Flash OFF with Manual Exposure Compensation
l
There is automatic exposure compensation in backlit
conditions but manual exposure compensation is also optional.
●
k Exposure Compensation
You can use this setting to prevent your subject being too
dark (underexposed) when the surroundings are extremely
bright, such as at a ski-resort or in backlit conditions.
●
l Exposure Compensation
You can use this setting to prevent your subject being too
bright (overexposed) when the surroundings are extremely
dark, such as on a spotlit stage.
Because of the slow shutter speeds in dark places in i,
k, and l modes, if the camera shake warning comes
on (the green lamp blinks 16 times per second), you must use
a tripod to keep the camera steady.
Model
Film speed
Wide-angle Telephoto
ISO 100 0.6–3.8 m (2–12.5 ft.) 0.6–2 m (2–6.6 ft.)
90u ISO 200 0.6–5.4 m (2–17.7 ft.) 0.6–2.8 m (2–9.2 ft.)
ISO 400 0.6–7.6 m (2–25 ft.) 0.6–4 m (2–13.1 ft.)
ISO 100 0.6–3.8 m (2–12.5 ft.) 0.6–2.2 m (2–7.2 ft.)
80u ISO 200 0.6–5.4 m (2–17.7 ft.) 0.6–3.1 m (2–10.2 ft.)
ISO 400 0.6–7.6 m (2–25 ft.) 0.6–4.4 m (2–14.4 ft.)
1
Select the Date mode.
● With the power off, press the m
button.
2
Select the date and time
combination.
● By pressing the w button, you can
select the date and time combination.
The display changes in the cycle
shown below.
● Press the m button and the power
switches off.
■ Setting the Date and Time
When you replace the battery or travel to the different time zone, use the
following procedure to set or adjust the date and time settings.
1
Select the Date mode.
2
Press the t button for more than
2 seconds for date/time set mode.
3
Press the t button to select the
setting position (numbers blinking).
● Setting position cycles through in the
order year-month-day-hour-minute-(:).
4
Press the w button to set the
number.
5
Repeat 3 and 4 above to set all
digits of the date and time.
● Pressing the w button while “:” is blinking
resets the seconds (:) setting to zero.
6
Finish setting the date and time.
● Press the t button and once “:” stops
blinking, date and time setting is
completed.
● Press the m button and the power
switches off.
Date/time etc. imprinted here.
<Year/Month/Day> <Month/Day/Year> <Day/Month/Year>
<No data imprinted> <Day/Hour/Minute>
Each time the w button is pressed, the number increases by one. If kept
pressed, the number increases continuously.
Setting the Date
Setting the Time
You can customize the functions listed below to suit your preferences or
the photography conditions.
1
Set the camera to Custom
Function setting mode.
● With the power off, hold down the s
button and press the h button.
a“CF 1-0” appears on the LCD panel.
2
Select a function.
● Each time you press the w button, the Custom Function number
changes in the cycle shown below.
3
Set the function.
● Press the h button to change the setting display to 1 (function
enabled).
Press the h button again to change the setting to 0 (function
disabled).
● Turning the power on completes the settings.
CF1: Real-time Release
Refer to y Shooting in Real Time for information on using the
Real-time Release function.
CF2: Shooting Mode and Flash Mode Memory
Stores the shooting mode and the flash mode in memory
immediately before the camera is switched off. Useful when you
always want to set the shooting mode and the flash mode to a
particular mode.
CF3: Disabling Automatic Film Rewind
Useful for situations where you do not want the sudden sound of the
film rewinding. When you reach the end of the roll, the number on
the frame counter and the f blink. Press the o button to start
film rewinding.
CF4: Center-point AF
A convenient function when you want to place your subject off center
(using focus lock) or focus on one particular subject.
The subject must be positioned in the center of the wide area AF
frame.
CF5: Continuous Shooting
While the shutter button is pressed, you can take continuous shots.
CANON INC.
30-2, Shimomaruko 3-chome, Ohta-ku, Tokyo
146-8501, Japan
U.S.A.
CANON U.S.A. INC.
For all inquiries concerning this camera,
call toll free in the U.S.
1-800-OK-CANON or write to:
Customer Relations, Canon U.S.A., Inc.
One Canon Plaza, Lake Success, N.Y.
11042-1198
CANADA
CANON CANADA INC. HEADQUARTERS
6390 Dixie Road, Mississauga, Ontario
L5T 1P7, Canada
CANON CANADA INC. MONTREAL
BRANCH
5990, Côte-de-Liesse, Montréal Québec
H4T 1V7, Canada
CANON CANADA INC. CALGARY OFFICE
2828, 16th Street, N.E. Calgary, Alberta
T2E 7K7, Canada
For all inquiries concerning this camera,
call toll free in Canada
1-800-OK-CANON
EUROPE, AFRICA & MIDDLE EAST
CANON EUROPA N.V.
Bovenkerkerweg 59-61, P.O. Box 2262,
1180 EG Amstelveen, The Netherlands
CANON COMMUNICATION & IMAGE
FRANCE S.A.
102, Avenue du Général de Gaulle 92257
La Garenne-Colombes Cedex, France
CANON UK LTD.
Woodhatch Reigate Surrey RH2 8BF,
United Kingdom
CANON DEUTSCHLAND GmbH
Europark Fichtenhain A10, 47807 Krefeld,
Germany
CANON ITALIA S.p.A.
Palazzo L, Strada 6, 20089 Rozzano,
Milanofiori, Milano, Italy
CANON Benelux N.V./S.A.
Bessenveldstraat 7, 1831 Diegem
(Machelen), Belgium
CANON Schweiz AG
Geschäftsbereich Wiederverkauf,
Industriestrasse 12, CH-8305 Dietlikon,
Switzerland
CANON G. m. b. H.
Oberlaaerstrasse 233, 4th floor, 1100 Wien,
Austria
CANON España, S. A.
C/Joaquín Costa, 41, 28002 Madrid, Spain
SEQUE Soc. Nac. de Equip., Lda.,
Praça da Alegria, 58, 2°, 1269-149 Lisboa,
Portugal
CENTRAL & SOUTH AMERICA
CANON LATIN AMERICA, INC.DEPTO DE
VENTAS
703 Waterford Way Suite 400 Miami, FL
33126 U.S.A.
CANON LATIN AMERICA, INC.CENTRO
DE SERVICIO Y REPARACION
Apartado 2019, Zona Libre de Colón,
República de Panamá
ASIA
CANON HONGKONG CO., LTD.
9/F, The Hong Kong Club Building,
3A Chater Road, Central, Hong Kong
CANON SINGAPORE PTE. LTD.
79 Anson Road #09-01/06 Singapore
079906
OCEANIA
CANON AUSTRALIA PTY.LTD.
1 Thomas Holt Drive, North Ryde, N.S.W.
2113, Australia
CANON NEW ZEALAND LTD.
Akoranga Business Park, Akoranga Drive,
Northcote, Auckland, New Zealand
JAPAN
CANON SALES CO., INC.
12-15 Mita, 3-Chome, Minato-ku, Tokyo
108-8011, Japan
● The Custom Functions were all set to zero (0) at the factory setting.
● The Custom Function settings are retained even when you switch the
camera off and on, replace the film, or replace the battery.
Type: Fully-automatic 35 mm lens-shutter AF camera
Image Size: 24
× 36 mm
Lens: 90u: Canon zoom lens 38-90 mm f/4.7-10.5
80u: Canon zoom lens 38-80 mm f/4.7-9.4
Focusing: Passive 3-point AIAF
Viewfinder Coverage: Approx. 84%
Viewfinder Information: Picture frame, Wide area AF frame, Close-up frame
Green lamp: Camera ready indicator/too-close warning/focusing-not-possible
warning/release lock while the red-eye reduction lamp is lit/
camera shake warning
Shooting Distance: 0.6 m (2.0 ft.)-infinity
Close-up: 0.45 m (1.5 ft.)-infinity
Film Speeds: DX-coded ISO 25-3200 set automatically in full-stop increments
Film Transport: Automatic, mid-roll rewind
Power Source: One CR2 lithium battery
Battery Life: Approx. 16 rolls (24-ex. • normal temperature with 50% flash use)
Dimensions (W × H × D): 107.2 × 58.7 × 42.8 mm/4.2 × 2.3 × 1.7 in.
Weight: 185 g/6.5 oz. (excluding battery)
● All the specifications above are based on Canon’s testing and measuring
standards.
● Specifications and physical appearance are subject to change without notice.
This device complies with Part 15 of the FCC Rules. Operation is subject to the
following two conditions: (1) This device may not cause harmful interference, and (2)
this device must accept any interference received, including interference that may
cause undesired operation.
Do not make any changes or modifications to the equipment unless otherwise
specified in the instructions. If such changes or modifications should be made, you
could be required to stop operation of the equipment.
This equipment has been tested and found to comply with the limits for a class B
digital device, pursuant to part 15 of the FCC Rules. These limits are designed to
provide reasonable protection against harmful interference in a residential installation.
This equipment generates, uses and can radiate radio frequency energy and, if not
installed and used in accordance with the instructions, may cause harmful interference
to radio communications.
However, there is no guarantee that interference will not occur in a particular
installation. If this equipment does cause harmful interference to radio or television
reception, which can be determined by turning the equipment off and on, the user is
encouraged to try to correct the interference by one or more of the following measures:
• Reorient or relocate the receiving antenna.
• Increase the separation between the equipment and receiver.
• Consult the dealer or an experienced radio/TV technician for help.
This digital apparatus does not exceed the Class B limits for radio noise emissions
from digital apparatus as set out in the interference-causing equipment standard
entitled “Digital Apparatus”, ICES-003 of the Industry Canada.
Cet appareil numérique respecte les limites de bruits radioélectriques applicables aux
appareils numériques de Classe B prescrites dans la norme sur le matériel brouilleur:
“Appareils Numériques”, NMB-003 édictée par l’Industrie Canada.
v
The v Mark is a Directive conformity mark of the European Community (EC)
When you take consecutive shots using the flash, the battery level may
drop off temporarily and prevent the LCD panel from displaying
information correctly.
b Shooting Moving Objects
This mode selects servo autofocus, which keeps moving objects in focus,
and the continuous shooting function.
b, p, c uses center-point AF to focus in the center of the wide area AF
frame.
Using Focus Lock
s
Shooting with Self-timer
Shooting with the Mode Button
Select the shooting mode.
● Press the m button, and align u with b, n, p, c, y.
c Shooting Close-up
Use this mode when you want to take close-up pictures of flowers and
insects.
You can get as close to 45 cm/1.5 ft. to the subject to take a picture. The
shooting distance range is between 0.45 m/1.5 ft. to infinity.
● Refer to Close-up Photography for the procedure to shoot in close-up.
Setting the Custom Functions
Major Specifications
Loading the Battery and Checking the Battery Level
Loading and Removing the Film
Taking Pictures in Autoflash (Full-auto) Mode
h
Changing the Flash Mode
Imprinting the Date and Time
x
The date and time may not be imprinted on the last frame if you take
more pictures than stipulated on the film.
If the green lamp blinks, move away from the subject until the lamp stops
blinking.
´ Instructions
1. Before taking pictures of important events, such as weddings and trips, check
to make sure the camera is working properly.
2. This camera is not resistant to water, and should not be used outdoors if it is raining
or snowing. Keep the camera out of salt spray and excessive humidity. If used at
the beach, clean it thoroughly afterward with a dry cloth.
3. Store the camera in a cool, dry, dust-free place. Be sure to keep the camera out of
direct sunlight, and away from “hot spots” such as the trunk or rear window shelf of a
car. Avoid places where mothballs are used, and use a desiccant in excessive humidity.
4. Do not attempt to disassemble the camera yourself, since there is high-voltage
circuitry inside.
5. The battery may explode or cause burns if disassembled, recharged, shorted,
exposed to high temperatures, or disposed of in a fire.
6. Use a blower brush to remove dust and sand from the lens and inside the camera.
Do not apply any fluids to the lens or body.
Convention
Warnings you should observe when using the camera.
Additional information on using the camera.
Please note that these instructions are for both the model with the date function and
model without date function. Information relevant only to the model with the date
function is marked with the x symbol.
Handling Precautions
CT1-7491-000 © CANON INC. 2002 PRINTED IN CHINA
IMPRIMÉ EN CHINE
■ Réglage de la date et de l’heure
Lorsque vous remplacez la pile ou que vous voyagez dans une région
située dans un fuseau horaire différent, utilisez la procédure suivante pour
régler la date et l’heure.
1
Sélectionnez le mode de date.
2
Appuyez sur la touche t pendant
plus de 2 secondes pour entrer en
mode de réglage de la date et de
l’heure.
3
Appuyez sur la touche t pour
sélectionner la position de réglage
(les chiffres clignotent).
● Les positions de réglage sont en cycle
dans l’ordre année-mois-jour-heure-
minute-(:).
4
Appuyez sur la touche w pour
régler le chiffre.
5
Répétez les étapes 3 et 4 ci-dessus
pour régler tous les chiffres de la
date et de l’heure.
● Le fait d’appuyer sur la touche w
lorsque “:” clignote remet les secondes à
zéro.
6
Fin du réglage de la date et de
l’heure.
● Appuyez sur la touche t et une fois que “:” s’arrête de clignoter, le
réglage de la date et de l’heure est terminé.
● Appuyez sur la touche m et l’appareil photo se met hors
tension.
■ Chargement du film
1
Ouvrez le dos de l’appareil et
mettez le film en place.
● Poussez le levier d’ouverture du dos
de l’appareil vers le bas.
2
Installez le film correctement
entre les guides de film.
3
Tirez l’amorce du film
(indicateur de position de
l’amorce).
● Vérifiez que le film est bien tendu
quand vous tirez l’amorce.
● Si le bord de l’amorce du film dépasse
l’indicateur de position, rembobinez un
peu le film dans la cartouche.
4
Refermez le dos.
aLe film s’enroule automatiquement
jusqu’à la première vue et “1” apparaît
sur le compteur de vues.
● Si le compteur de vues indique un “0”
clignotant, le film n’a pas été chargé
correctement. Rechargez le film de
nouveau.
■ Plan rapproché
Lorsque la distance de prise de vues est
inférieure à un mètre, il y a une différence
entre ce que vous voyez dans le viseur et
la photo que vous prenez en réalité. Pour
cette raison, la partie de l’image en dehors
du cadre de gros plan sera éliminée.
Après avoir mémorisé la mise au point sur
votre sujet, amenez le sujet dans le cadre
de gros plan, composez votre image et
prenez la photo.
Conventions
Avertissements que vous devez observer lorsque vous utilisez l’appareil.
Informations supplémentaires sur l’utilisation de l’appareil.
Veuillez noter que ce manuel d’instructions s’applique au modèle avec fonction
de date et au modèle sans fonction de date. Les informations concernant le
modèle avec fonction de date sont indiquées par le symbole x.
■ Nomenclature
Avant
q Déclencheur
w Touche zoom avant (téléobjectif) w/
SET x
e Touche zoom arrière (grand-angle) t/
SELECT x
r Interrupteur principal
Appuyez sur l’interrupteur principal pour mettre
l’appareil photo sous tension et régler l’objectif sur
la position grand-angle. Si vous appuyez de
nouveau sur l’interrupteur principal, l’objectif se
rétracte, le couvercle de l’objectif se referme et
l’appareil se met hors tension. L’affichage sur
l’écran LCD ne disparaît pas lorsque l’appareil est
mis hors tension.
t Écran LCD
y s Touche de Retardateur
u m Touche MODE
i h Touche de mode de flash
o Levier d’ouverture du dos de l’appareil
!0 Flash
!1 Fenêtre de viseur
!2 Capteur AF/fenêtre de mesure
Des problèmes de mise au point peuvent se
produire si le capteur AF est sale. Essuyez la
poussière ou la saleté avant de prendre des photos.
!3 Objectif
Des problèmes de mise au point peuvent se
produire si l’objectif est sale. Essuyez la poussière
ou la saleté avant de prendre des photos.
!4 Lampe d’atténuateur d’yeux rouges/
Retardateur/Emetteur d’éclair auxiliaire AF
Arrière
!5 Témoin vert
!6 Oculaire du viseur
!7 Fenêtre de vérification de film
!8 Dragonne
!9 Monture de dragonne
@0 Couvercle de logement de pile
@1 o Touche de rembobinage à mi-course
Maintenez cette touche enfoncée jusqu’à ce que
le film commence à se rembobiner.
@2 Fixation de pied
Fixation de la
dragonne
Écran LCD
(Normalement, seule l’information nécessaire est affichée)
q Date x/
n° de fonction personnalisée
w Compensation manuelle de
l’exposition
e Indicateur d’atténuateur d’yeux
rouges
r Compteur de vues
t Indicateur de film
y Déclenchement en temps réel
u MACRO
i Indicateur de sélection de mode
o Portrait
!0 Portrait de nuit
!1 SPORT
!2 Indicateur de pile
!3 Retardateur
!4 j Indicateur de flash activé
(flash forcé)
!5 i Indicateur de flash débrayé
(flash supprimé)
!6 Flash-auto
Lorsque “H” est affiché, retirez la pile de l’appareil photo, attendez que “H”
disparaisse de l’affichage et remettez ensuite la pile en place.
■ Installation de la pile
Pile utilisable: Une pile au lithium (CR2)
1
Ouvrez le couvercle de logement
de pile.
2
Mettez la pile neuve en place.
● Alignez correctement les polarités + et
– puis insérez la pile d’abord par le
côté –.
aLe pictogramme r apparaît sur
l’écran LCD.
3
Refermez le couvercle de
logement de pile.
● Poussez le couvercle pour le fermer
jusqu’à ce que vous entendiez un
déclic.
aL’affichage de la date “— — —” clignote
sur l’écran LCD. Réglez la date et
l’heure. x
L’appareil photo ne fonctionne pas si les bornes + et – ne sont pas
alignées correctement.
■ Vérification du niveau de la pile
Vérifiez que le pictogramme r apparaît sur l’écran LCD quand vous
mettez l’appareil sous tension. Remplacez la pile si est affiché.
r (allumé) La niveau de la pile est suffisant.
q (allumé)Préparez une pile neuve.
(clignotant) Chargez la pile neuve.
Une pile neuve fournissent une autonomie environ 16 rouleaux de
film de 24 vues (basé sur la Méthode de Test Standard de Canon à
températures normales et utilisation du flash à 50%). A températures
basses (–10°C), la durée des piles est d’environ un tiers de la durée
normale.
Il est recommandé d’utiliser des films codés DX et avec une sensibilité
ISO 400.
■ Retrait du film
Le film se rembobine automatiquement
quand il est fini.
Lorsque le film est entièrement rembobiné, le
compteur de vues indique “0” et le
pictogramme f clignote. Ouvrez alors le
dos de l’appareil et retirez le film.
● Si le le pictogramme f ne clignote pas,
appuyez sur la touche o.
La photo sera mise au point tant que le sujet reste à l’intérieur du cadre
AF élargi. Le flash fonctionne automatiquement dans les conditions de
faible éclairage ou de contre-jour.
1
Appuyez sur l’interrupteur principal pour mettre l’appareil
photo sous tension.
2
Décidez de la taille de votre sujet.
● Appuyez sur w pour faire un zoom avant sur le sujet et sur t
pour un zoom arrière et une prise de vue grand-angle.
3
Réglez la mise au point.
● Positionnez le cadre AF élargi sur votre
sujet et appuyez légèrement à mi-
course sur le déclencheur.
aQuand le sujet est mis au point, le
témoin vert s’allume.
● Laissez le déclencheur enfoncé à mi-
course.
4
Composez l’image et prenez la photo.
● Appuyez complètement sur le déclencheur.
● Appuyez lentement et doucement sur le déclencheur.
● Prise en main de l’appareil photo
Tenez fermement l’appareil photo à deux mains de façon à ce qu’il ne
bouge pas, et veillez à ce que vos cheveux, vos doigts ou la bandoulière
ne soient pas en contact avec l’objectif, le capteur AF ou le flash.
● Déclencheur
Le déclencheur est un interrupteur à deux temps. Une pression légère
à mi-course sur le déclencheur permet de déterminer automatiquement
la mise au point et l’exposition. Appuyez de nouveau à fond pour
prendre la photo.
● Si l’objectif est laissé déployé sans être utilisé pendant 4 minutes,
l’objectif revient automatiquement à la position grand-angle.
● Dans les endroits sombres, l’émetteur d’éclair auxiliaire AF s’allume
automatiquement.
Cadre AF élargi
Guides de film
Sujets difficiles pour l’autofocus
Le témoin vert clignote 4 fois par seconde dans le cas de sujets présentant
les caractéristiques suivantes qui ne conviennent pas à la mise au point.
Dans ce cas, effectuez la mise au point sur un sujet situé
approximativement à la même distance que le sujet à photographier et
mémorisez la mise au point pour la photo.
Principaux types de sujets difficiles à mettre au point :
● Sujets très faiblement contrastés, comme un ciel bleu, ou scènes ne
présentant qu’une seule couleur
● Sujets dans des endroits très sombres
● Sujets en contre-jour violent ou avec forte réflexion, comme la
carrosserie d’une voiture à fort pouvoir réfléchissant
● Sujets situés à des distances différentes sur l’image, comme des
animaux en cage
● Sujets avec des motifs en répétition, comme la rangée de fenêtres d’un
immeuble, etc.
Verrouillez la mise au point lorsque vous voulez décentrer le sujet, ou
lorsque le sujet est à 1 m ou moins de l’appareil photo.
1
Réglez la mise au point.
● Positionnez le cadre AF élargi sur votre
sujet et appuyez légèrement à mi-
course sur le déclencheur. Laissez le
déclencheur enfoncé à mi-course.
2
Composez l’image et prenez la
photo.
● Composez l’image et appuyez à fond
sur le déclencheur.
Faites attention de ne pas faire varier la distance entre le sujet et l’appareil
photo. Si la distance change, effectuez de nouveau la mise au point.
Cadre de gros plan
Zone réellement photographiée
(à l’intérieur de la ligne pointillée).
● Dans des conditions de faible éclairage ou de contre-jour, le flash
s’enclenche automatiquement.
● Vous risquez de ne pas pouvoir faire la mise au point sur des sujets se
déplaçant rapidement.
● La fonction d’atténuateur d’yeux rouges ne peut pas être réglée.
● Le témoin vert ne s’allume pas.
● Aucun avertissement de tremblement de l’appareil photo n’est donné.
● L’appareil continue à effectuer la mise au point pendant 40 secondes
pendant que le declencheur est maintenu à moitié enfoncé.
● Même si elle est réglée, la fonction personnalisée de déclenchement en
temps réel (CF1) ne peut pas opérer.
n Mode scène de nuit
Utilisez ce mode lorsque vous prenez des photos de personnes devant un
coucher de soleil ou un arrière-plan nocturne.
Le flash illumine le sujet et la vitesse lente de l’obturateur expose
correctement l’arrière-plan, ce qui vous permet de prendre de superbes
photos.
● Suivez les étapes du mode flash auto pour prendre la photo.
● La fonction d’atténuateur d’yeux rouges est opérationnelle.
● Vous ne pouvez pas changer le mode de flash.
● Aucun avertissement de tremblement de l’appareil photo n’est donné.
Vous devrez utiliser un trépied pour stabiliser l’appareil photo, en raison
des vitesses d’obturation peu élevées (jusqu’à 2 secondes). Vous
devrez également vous assurer que le sujet ne se déplace pas après le
déclenchement du flash.
p Portraits
Utilisez ce mode lorsque vous désirez réduire l’impact de l’arrière-plan et
accentuer votre sujet.
L’appareil photo effectue automatiquement un zoom avant, sur une
distance comprise entre 1 et 2,2 m pour le 90u, et 1 et 2 m pour le 80u,
pour cadrer la partie supérieure du corps du sujet et déclenche le flash
pour chaque photo afin de mettre un reflet dans les yeux du sujet.
● Suivez les étapes du mode flash auto pour prendre la photo.
● La fonction d’atténuateur d’yeux rouges est opérationnelle.
L’objectif effectue automatiquement un zoom et se bloque en place.
Vous ne pouvez pas actionner le zoom.
y Prise de vue en temps réel
Appuyez à mi-course sur le déclencheur pour faire la mise au point sur le
sujet et appuyez ensuite à fond pour prendre la photo en temps réel. Ce
mode vous permet de prendre des photos au meilleur moment.
Si vous enfoncez à fond le déclencheur du premier coup, la photographie
n’est pas prise en temps réel.
Utilisation efficace de la fonction d’atténuateur d’yeux rouges
Quand vous utilisez le flash pour prendre des photos de personnes dans
des conditions de faible éclairage, leurs yeux apparaissent souvent
rouges sur la photographie. Ceci est connu sous le nom d’effet d’yeux
rouges et est le résultat de la réflexion de la lumière sur le fond de la
rétine des yeux.
Lorsque l’atténuateur des yeux rouges est activé, la lampe d’atténuateur
d’yeux rouges s’allume environ 1 seconde avant déclenchement du flash.
Ceci force la pupille du sujet à se contracter, et minimise le risque d’effet
d’yeux rouges.
qPrenez la photo à moins de 2 m du sujet.
wAttirez l’attention du sujet pour le faire regarder vers l’appareil photo.
● Réglez l’objectif sur la position grand-angle.
● Augmentez autant que possible la lumière disponible.
● L’efficacité d’atténuateur d’yeux rouges varie de personne à personne.
Lorsque la fonction d’atténuateur d’yeux rouges est activée, il est
impossible de prendre une photo pendant environ 1 seconde (le témoin
vert clignote 16 fois). Maintenez le déclencheur enfoncé jusqu’à ce que
vous entendiez le bruit du film se rembobinant.
Vous pouvez forcer le flash à chaque photo ou supprimer le flash pour
vous adapter au sujet ou au lieu de prise de vue.
Sélectionnez le mode de flash.
● Appuyez sur la touche h pour sélectionner le mode que vous
désirez.
e Flash-auto
Dans les endroits sombres et les éclairages en contre-jour, le
flash se déclenche automatiquement.
Plage de distance du flash (avec film couleur)
Vous pouvez sélectionner si le mode flash auto est réglé
initialement sur g ou e lorsque vous mettez
l’appareil photo sous tension. Réglez l’appareil photo sur le
mode flash-auto souhaité et mettez ensuite l’appareil hors
tension.
gFlash-auto avec atténuateur d’yeux rouges
Dans les endroits sombres, le flash se déclenche
automatiquement après que la lampe d’atténuateur d’yeux
rouges se soit allumée.
j Flash activé (flash forcé)
Le flash se déclenche lorsque la photo est prise.
i Flash débrayé (flash supprimé)
Le flash ne se déclenche pas.
k Flash débrayé avec compensation manuelle de
l l’exposition
La compensation de l’exposition est automatique lorsque
l’éclairage est en contre-jour mais la compensation manuelle
de l’exposition est aussi optionnelle.
● Compensation de l’exposition
k
Vous pouvez utilisez ce réglage pour éviter que votre sujet
soit trop sombre (sous-exposé) quand l’environnement est
extrêmement lumineux, comme une piste de ski ou à contre-
jour.
● Compensation de l’exposition
l
Vous pouvez utiliser ce réglage pour éviter que votre sujet
soit trop clair (sur-exposé) quand l’environnement est
extrêmement sombre, comme sur une scène éclairée par
des projecteurs.
Comme des vitesses d’obturation lente sont utilisées dans
des endroits sombres en modes i, k et l, si un
avertissement de bougé de l’appareil photo apparaît (le
témoin vert clignote 16 fois par seconde), vous devrez utiliser
un trépied pour stabiliser l’appareil photo.
1
Sélectionnez le mode de date.
● Appuyez sur la touche m alors
que l’appareil photo est hors tension.
2
Sélectionnez une combinaison de
date et d’heure.
● Vous pouvez sélectionner la
combinaison de la date et de l’heure
en appuyant sur la touche w.
L’affichage change selon le cycle
indiqué ci-dessous.
● Appuyez sur la touche m et
l’appareil photo se met hors tension.
La date et l’heure sont imprimées ici.
<Année/Mois/Jour> <Mois/Jour/Année> <Jour/Mois/Année>
<Pas d’impression> <Jour/Heure/Minute>
A chaque fois que la touche w est enfoncée, le chiffre augmente d’une
unité. Si la touche est maintenue, les chiffres augmentent en succession
continue.
Réglage de la date
Réglage de l’heure
Vous pouvez personnaliser les fonctions présentées dans la liste ci-
dessous selon vos préférences ou les conditions de la photographie.
1
Mettez l’appareil photo en mode
de réglage de fonction
personnalisée.
● L’appareil photo étant hors tension,
maintenez la touche s enfoncée et
appuyez sur la touche h.
a“CF 1-0” apparaît sur l’écran LCD.
2
Sélectionnez une fonction.
● A chaque pression sur la touche w, le numéro de fonction
personnalisée change selon le cycle indiqué ci-dessous.
3
Réglez la fonction.
● Appuyez sur la touche h pour changer le réglage affiché sur 1
(fonction activée).
Appuyez à nouveau sur la touche h pour changer le réglage sur
0 (fonction désactivée).
● Mettez sous tension pour terminer les réglages.
CF1: Déclenchement en temps réel
Reportez-vous à y Prise de vues en temps réel pour les
informations sur l’utilisation de la fonction de déclenchement en
temps réel.
CF2: Mode de prise de vues et mémoire de mode de flash
Enregistre le mode de prise de vues et le mode de flash en mémoire
immédiatement avant que l’appareil photo soit mis hors tension. Utile
lorsque vous désirez toujours régler le mode de prises de vues et le
mode de flash dans un mode particulier.
CF3: Désactivation du rembobinage automatique du film
Utile dans les situations où le bruit de rembobinage du film est
gênant. Lorsque vous avez atteint la fin de la bobine, le chiffre du
compteur de vues clignote ainsi que le pictogramme f. Appuyez
sur la touche o pour initier le rembobinage du film.
CF4: AF sur point central
Fonction pratique lorsque vous désirez décentrer votre sujet (en
utilisant le verrouillage de mise au point) ou faire la mise au point sur
un sujet en particulier.
Celui-ci doit alors être placé au centre du cadre AF élargi.
CF5: Prise de vues en rafale
Vous pouvez prendre des photos en continu lorsque le déclencheur
est enfoncé.
● Les fonctions personnalisées sont toutes réglées sur zéro (0) au
moment de l’expédition.
● Les réglages de fonctions personnalisées sont retenus même quand
l’appareil est mis hors tension puis remis sous tension, quand vous
remplacez le film ou quand vous remplacez la pile.
Type: Appareil AF entièrement automatique 35 mm à objectif — obturateur
Format de l’image: 24 × 36 mm
Objectif: 90u: Canon 38-90 mm f/4,7-10,5
80u: Canon 38-80 mm f/4,7-9,4
Mise au point: AIAF passive en trois points
Couverture du viseur: environ 84%
Informations dans le viseur: Cadre d’image, cadre AF élargi, cadre de gros
plan
Témoin vert: Indicateur appareil photo prêt/avertissement de trop grand
rapprochement/avertissement de mise au point impossible/
libération du verrou de la lampe d’atténuateur d’yeux rouges
lorsqu’elle est allumée/d’avertissement de tremblement de
l’appareil
Distance de mise au point: 0,6 m à ∞
Gros plan: 0,45 m à ∞
Sensibilité du film: ISO 25 à 3200 avec marque DX, réglé automatiquement
par paliers d’une valeur
Avance du film: Automatique, rembobinage à mi-course
Souce d’alimentation: Une pile au lithium (CR2)
Durée de la pile: Environ 16 rouleaux de 24 vues (températures normales et
utilisation du flash à 50%)
Dimensions (L × H × P): 107,2 × 58,7 × 42,8 mm
Poids: 185 g (sans la pile)
● Toutes les données basées sur la Méthode de Test Standard de Canon.
● Sujet à changement sans préavis.
Cet appareil numérique respecte les limites de bruits radioélectriques applicables aux
appareils numériques de Classe B prescrites dans la norme sur le matériel brouilleur:
“Appareils Numériques”, NMB-003 édictée par l’Industrie Canada.
v
La marque v est une marque conforme aux directives de la Communauté
Européenne
Quand vous prenez des photos en continue avec le flash, il se peut que le
niveau des piles tombe temporairement et empêche l’écran LCD d’afficher
correctement les informations.
b Prise de vue en mode SPORT
Ce mode sélectionne la mise au point predictif, qui permet de maintenir
au point les sujets en mouvement, et la fonction prises de vue en continu.
b, p, c utilise l’autofocus en point central pour effectuer la mise au
point au centre du cadre AF élargi.
Précautions d’emploi
Utilisation du verrouillage de mise au point
s Utilisation du retardateur
Prise de vues avec la touche Mode
Sélectionnez le mode de prise de vue.
● Appuyez sur la touche m et alignez u avec b, n, p, c, y.
La fonction de retardateur vous permet de prendre une photo en
demeurant éloigné de l’appareil photo lorsqu’il est monté sur un trépied.
1
Réglez l’appareil sur le mode de
retardateur.
● Appuyez sur la touche s.
aLe pictogramme s apparaît sur l’écran
LCD.
● Si vous appuyez de nouveau sur la
touche s, le pictogramme s disparaît
et le mode de retardateur est annulé.
2
Composez l’image et appuyez sur le déclencheur.
aLa lampe du retardateur clignote et l’obturateur est déclenché 10
secondes plus tard environ.
● Pour annuler le retardateur, appuyez de nouveau sur la touche s.
c MACRO
Utilisez ce mode lorsque vous désirez prendre des photos en gros plan de
fleurs et d’insectes.
Vous pouvez vous rapprocher jusqu’à 45 cm du sujet pour prendre la
photo. Dans ce mode, la distance de prise de vue est comprise entre
0,45 m et ∞.
● Reportez-vous à Photographie en Plan rapproché pour la procédure
de prise de vues en gros plan.
Réglage des fonctions personnalisées
Fiche technique
Mise en place de la pile et contrôle de son niveau
Chargement et retrait du film
Prise de vue en mode Flash-auto (entièrement automatique)
h Changer le mode de flash
Impression de la date et de l’heure
x
Modèle Sensibilité du film Grand-angle Téléobjectif
ISO 100 0,6 à 3,8 m 0,6 à 2 m
90u ISO 200 0,6 à 5,4 m 0,6 à 2,8 m
ISO 400 0,6 à 7,6 m 0,6 à 4 m
ISO 100 0,6 à 3,8 m 0,6 à 2,2 m
80u ISO 200 0,6 à 5,4 m 0,6 à 3,1 m
ISO 400 0,6 à 7,6 m 0,6 à 4,4 m
La date et l’heure risquent de ne pas être imprimées sur la dernière photo
si vous prenez plus de photos que le nombre stipulé sur le film.
Si le témoin vert clignote, éloignez-vous du sujet jusqu’à ce que le témoin
s’arrête de clignoter.
1.
Avant de prendre des photos d’événements importants, comme celles d’un mariage
ou d’un voyage, assurez-vous que l’appareil photo fonctionne correctement.
2. Cet appareil n’est pas étanche, et ne doit pas être utilisé en extérieur lorsqu’il pleut
ou qu’il neige. Évitez d’exposer l’appareil aux embruns et à une humidité excessive.
Si l’appareil a été utilisé à la plage, nettoyez-le soigneusement à l’aide d’un chiffon
sec.
3. Rangez l’appareil dans un endroit frais, sec et à l’abri de la poussière. Ne le laissez
pas exposer au soleil et dans des “points chauds” comme la plage arrière ou le
coffre d’une voiture. Evitez les endroits où des boules de naphtaline sont utilisées, et
utilisez un sachet déshydratant en cas d’humidité excessive.
4. Ne pas tenter de démonter l’appareil car il possède un circuit haute tension.
5. La pile peut exploser ou causer des brûlures si elle est démontée, rechargée, court-
circuitée, exposée à des hautes températures, ou jetée au feu.
6. Utilisez une brosse soufflante pour retirer la poussière et le sable de l’objectif et de
l’intérieur de l’appareil. N’utilisez aucun produit liquide sur l’objectif ou le boîtier.
Ï Mode d’emploi
K180_7491_Euro 2002.11.28 16:22 Page 1
Canon
Loading…
S
- Stacker-C1
- Staple Finisher-AA1
- Staple Finisher-D1
- Staple Finisher-H1
- Staple Finisher-S1
- starter 1080
- starter 1400
- starter 1600
- STOREFRONT 220EP2
- Sts-E3
- Sts-h1
- Sts-J12
- Sts-K1
- Studio Solution10
- SUPER 120
- Super 130
- SUPER135
- SUPER 150U
- SUPER 150U DATE
- Super 150u QD
- Super 28N -Set
- Super 55
- Super 82
- Super 8 814
- Super 8 Auto Zoom 518
- Super 8 Auto Zoom 518 SV
- SUPER E20
- SUPER E47
- Super G32
- Super G3 Fax Board-AF1
- Super G3 FAX Board-AH1
- Super G3 FAX Board-AP1
- Super G3 Fax Board-J1
- Super G3 FAX Board-T13
- SUPER G3 FAX L900
- SUPERSHOT 130u Caption
- Sure Shot2
- Sure Shot 105
- Sure Shot 105 u date2
- Sure Shot 105 ZOOM S Date
- Sure Shot 115u Date2
- Sure Shot 130u
- Sure shot 130u caption2
- Sure Shot 150u3
- Sure Shot 150u Date2
- Sure Shot 60 Zoom
- SureShot 60 Zoom — SureShot 60 Zoom 35mm Camera
- Sure Shot 65 Zoom Date
- Sure Shot 76 Zoom
- Sure Shot 76 Zoom Date
- Sure shot 80 tele2
- Sure Shot 80u2
- Sure Shot 80u Date
- Sure Shot 85 Zoom
- Sure Shot 85 Zoom Date
- Sure Shot 90u2
- Sure Shot 90u Date
- Sure Shot A-12
- Sure Shot AF-10 Date
- Sure Shot AF-72
- Sure Shot BF
- Sure Shot BF-10
- Sure Shot BF Date
- Sure Shot Classic 120
- Sure Shot Classic 120 Caption
- Sure Shot Owl2
- Sure Shot PRIMA BF TWIN
- Sure Shot Quartz Date2
- Sure Shot Supreme2
- Sure Shot Supreme Quartz Date
- Sure Shot WP-12
- Sure Shot Z115
- Sure Shot Z135 Caption
- Sure Shot Z155 Caption2
- Sure Shot Z180u2
- Sure Shot Z180u Kit
- Sure shot Z70W
- Sure Shot Z85
- Sure Shot Z90W
- SureShot Z90W Caption
- SX100
- SX100 IS22
- SX100 IS Silver
- SX10 IS18
- SX110 IS18
- SX110 IS Black
- SX110IS — PowerShot IS Digital Camera
- SX1201S
- SX120 IS14
- SX130 IS17
- SX150 IS14
- SX160 IS11
- SX170
- SX170 IS2
- SX1 IS16
- SX20
- SX-200
- SX20 IS13
- SX 505
- SX-7302
Loading…
Loading…
Nothing found
Sure Shot 80u
Owner’s Manual
9 pgs1.75 Mb0
User Manual
9 pgs1.76 Mb0
Table of contents
Loading…
Canon Sure Shot 80u, Sure Shot 90u, Prima Zoom 80u, Prima Zoom 90u Owner’s Manual
…
Canon Owner’s Manual
Download
Specifications and Main Features
Frequently Asked Questions
User Manual

Loading…
+ 6 hidden pages
You need points to download manuals.
1 point = 1 manual.
You can buy points or you can get point for every manual you upload.
Buy points
Upload your manuals
Manuals Canon PRIMA ZOOM 90U Files size: 9201 KB, Language: English, Format: pdf, Platform: Windows/Linux, Date: 2017-02-27
On this page you can download the manuals Canon PRIMA ZOOM 90U. We suggest you familiarize yourself with the user management, service and repair instructions.
Here you will also find a list of ordering numbers for parts and components Canon PRIMA ZOOM 90U.
All files are provided exclusively for introductory purposes. And they are not a repair guide, but are only aimed at helping you to familiarize yourself with the principle of building a device in more detail.
The contents of the guidelines presented here require you to know the technical English language.
If you are going to download service management manual Canon PRIMA ZOOM 90U, In other words, the manual service, you are long to possess at least minimal knowledge in the field of electronics and understanding the basic principles of the operation of electromechanical devices.
To view the manuals, you will need Adobe Acrobat Reader version 9 and above or another program for viewing PDF files.
Due to the popularity of the information presented on the site and its free provision of the final user, a convincing request to use special software products for multi-threaded download downloads.
List of manuals for Canon PRIMA ZOOM 90U
- Guide to use (User manual)
- Guide to service (Service manual)
- Guide to repair (Repair manual)
- The list of parts and components (PartList)
Инструкция цифрового фотоаппарата Canon PRIMA ZOOM 90U Размер: 9181 KB, Язык: Английский, Расширение: .pdf, Платформа: Adobe Acrobat, Дата: 2018-02-06
Руководство пользователя содержит основные технические характеристики устройства.
Комплект поставки может отличаться от описанного в руководстве.
Отдельная глава руководства пользователя посвящена условиям эксплуатации устройства. Описаны всевозможные варианты монтажа и установки.
Подробно описаны функции и особенности органов управления устройством.
Инструкция Canon PRIMA ZOOM 90U предназначена для технически образованных людей и при детальном изучении гарантирует безопасную и долговременную работу устройства.
Руководство пользователя цифрового фотоаппарата Canon PRIMA ZOOM 90U содержит описание процедуры первоначальной настройки и подключения устройства и выполнение процедур сервисного обслуживания и подготовки расходных материалов.
Для изучения файла вам необходимо обладать хотя бы минимальным знанием английского языка, так как инструкция на русском для цифрового фотоаппарата Canon PRIMA ZOOM 90U пока еще не выпущена.
Описание специальных функций описано в отдельной главе инструкции.
Последняя глава руководства по эксплуатации содержит описание основных неисправностей цифрового фотоаппарата и перечень основных действий по их устранению.
Пожалуйста используйте специальное программное обеспечение для скачивания файлов и по возможности дождитесь окончания загрузки первого файла перед началом загрузки второго.
Перечень основных разделов руководства пользователя цифрового фотоаппарата Canon PRIMA ZOOM 90U
- Технические характеристики
- Варианты монтажа
- Безопасность
- Органы управления
- Настройка устройства
- Стандартные функции
- Основные неисправности цифрового фотоаппарата Canon PRIMA ZOOM 90U