
CASIO W-96/800 Модуль 2499 3092
Руководство пользователя
Прежде всего прочтите эту важную информацию
Батарея.
• В приобретенных вами часах батарея питания устанавливается на фабрике и
должна быть немедленно заменена при первых признаках недостаточности питания
(не включается подсветка, тусклый дисплей) у ближайшего к вам дилера или
дистрибьютора фирмы «CASIO».
Защита от воды.
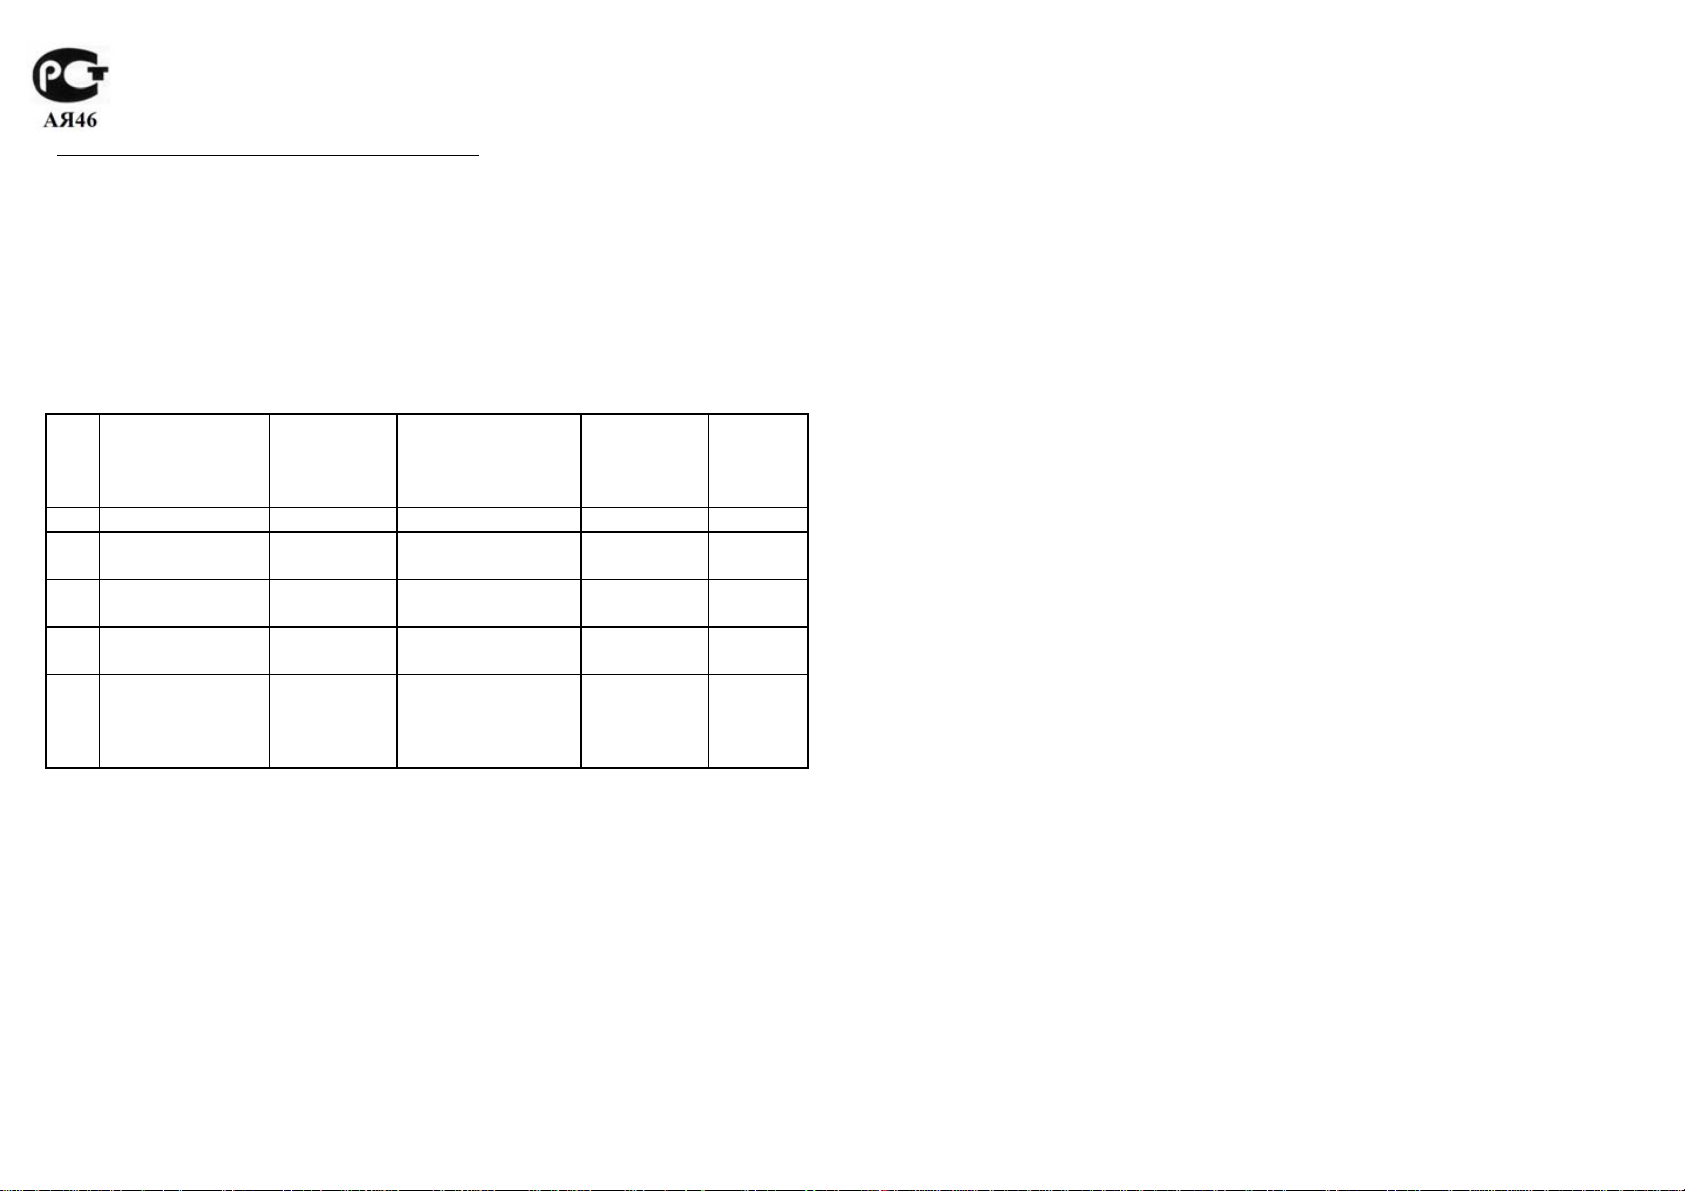
• Часы классифицируются по разрядам (с I по V) в соответствии со степенью их
защищенности от воды. Уточните разряд ваших часов с помощью приведенной
ниже таблицы, для правильной эксплуатации ваших часов.
Раз
Маркировка на
ряд
корпусе
I — Нет Нет Нет Нет
II WATER
RESISTANT
III 50M WATER
RESISTANT
IV 100M WATER
RESISTANT
V 200M WATER
RESISTANT
300M WATER
RESISTANT
Примечания для соответствующих разделов:
I. Часы не защищены от воды. Избегайте попадания любой влаги.
II. Не вытаскивайте коронку , если часы мокрые .
III. Не нажимайте кнопки часов под водой.
IV. Если часы подверглись воздействию соленой воды, то тщательно промойте их и
вытрите насухо.
V. Часы могут использоваться при погружении с аквалангом (за
глубин, при которых требуется гелиево—кислородная смесь).
• Особенностью некоторых защищенных от воды часов является наличие у них
кожаных ремешков. Не надевайте эти часы во время плавания или какой-либо
другой деятельности, при которой ремешок погружается в воду.
Уход за вашими часами
• Никогда не пытайтесь вскрывать корпус
Брызги,
дождь и т.п.
Да Нет Нет Нет
Да Да Нет Нет
Да Да Да Нет
Да Да Да Да
Плавание, мытье
машины и т.п.
и снимать заднюю крышку.
Подводное
плавание,
ныряние и
т.п.
исключением таких
Ныряние
с
акваланг
ом
• Замена резиновой прокладки, защищающей часы от попадания воды и пыли,
должна осуществляться через каждые 2-3 года.
• Если внутрь часов попадет влага, то немедленно проверьте их у ближайшего к вам
дилера или дистрибьютора фирмы CASIO.
• Не подвергайте часы воздействию предельных температур.
• Хотя часы рассчитаны на использование
должны избегать грубого обращения с ними и не допускать их падения.
• Не пристегивайте ремешок слишком сильно. Между вашим запястьем и ремешком
должен проходить палец.
• Для очистки часов и ремешка используйте сухую мягкую ткань, либо мягкую ткань,
смоченную в водном растворе
используйтесь легко испаряющимися средствами (например такими, как бензин,
растворители, распыляющиеся чистящие средства и т.п.).
• Когда вы не пользуетесь вашими часами, храните их в сухом месте.
• Избегайте попадания на часы бензина, чистящих растворителей, аэрозолей из
распылителей, клеящих веществ, краски и т.п. Химические
этими материалами, приводят к повреждению прокладок, корпуса и полировки
часов.
• Особенностью некоторых моделей часов является наличие на их ремешке
изображений, выполненных шелкографией. Будьте осторожны при чистке таких
ремешков, чтобы не испортить эти рисунки.
Для часов с пластмассовыми ремешками…
• Вы можете обнаружить белесое порошкообразное вещество на ремешке
вещество не вредно для вашей кожи или одежды и может быть легко удалено путем
простого протирания куском ткани.
• Попадание на пластмассовый ремешок пота или влаги, а также хранение его в
условиях высокой влажности может привести к повреждению, разрыву или
растрескиванию ремешка. Для того, чтобы обеспечить длительный срок службы
пластмассового ремешка, при первой возможности протирайте его от грязи и воды с
помощью мягкой ткани.
Для часов с флуоресцентными корпусами и ремешками…
• Длительное облучение прямыми солнечным светом может привести к
постепенному исчезновению флуоресцентной окраски.
• Длительный контакт с влагой может вызвать постепенное исчезновение
флуоресцентной окраски. В случае попадания на поверхность
как можно скорее сотрите ее.
• Длительный контакт с любой другой намоченной поверхностью может привести к
обесцвечиванию флуоресцентной окраски. Следите за отсутствием влаги на
флуоресцентной поверхности и избегайте ее контакта с другими поверхностями.
• Сильное трение поверхности, имеющей нанесенную флуоресцентную краску, о
другую поверхность может привести к
поверхность.
мягкого нейтрального моющего средства. Никогда не
их в обычных условиях, тем не менее вы
реакции, вызываемые
. Это
часов любой влаги,
переносу флуоресцентной краски на эту
Фирма «CASIO COMPUTER CO., LTD» не несет ответственности за какой бы то ни
было ущерб, который может возникнуть при использовании этих часов, и не
принимает никаких претензий со стороны третьих лиц.
ОБЩЕЕ ОПИСАНИЕ РЕЖИМОВ РАБОТЫ
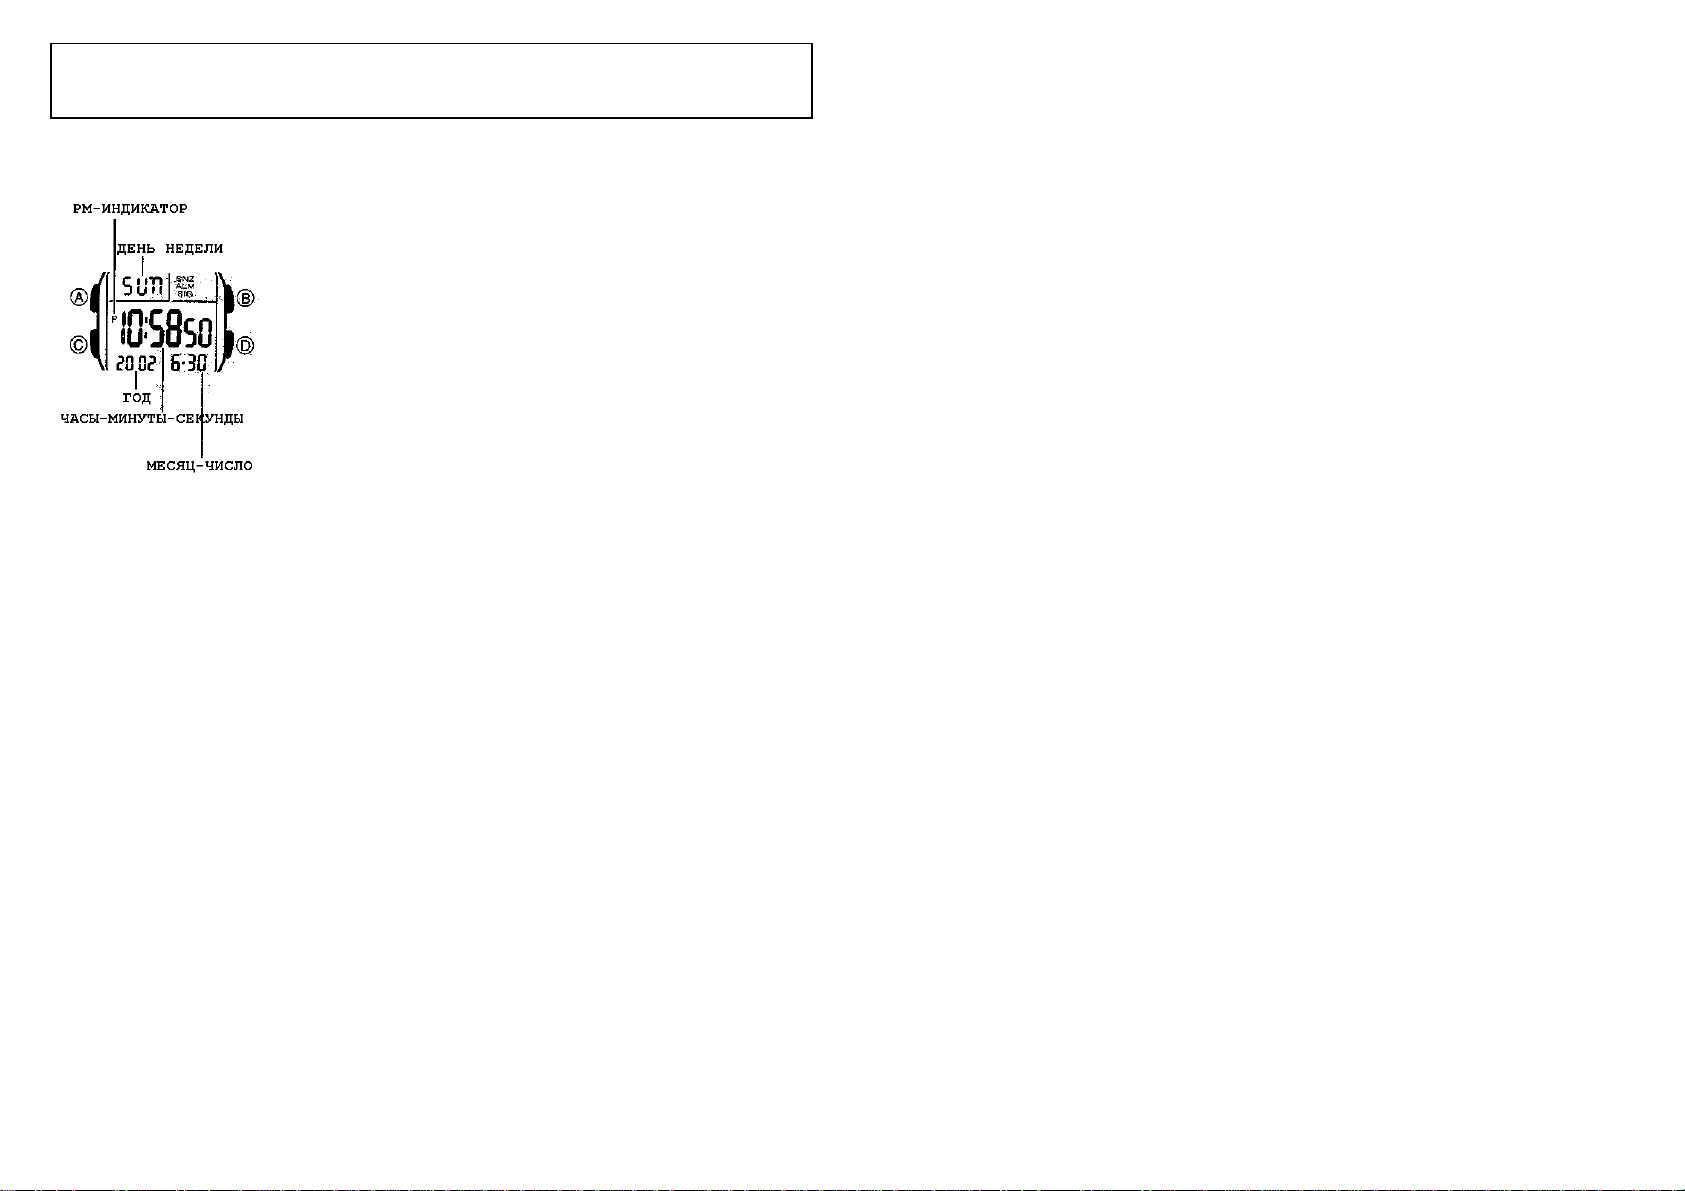
На рисунке изображен общий вид часов в Режиме Текущего
Времени. Нажмите кнопку “C” для перехода из режима в
режим в следующей последовательности:
Режим Текущего Времени – Режим Звукового Сигнала –
Режим Секундомера – Режим Двойного Времени – Режим
Текущего Времени.
В любом режиме нажмите кнопку “В” для подсветки
дисплея.
В Режимах
Звукового Сигнала, Секундомера и Двойного
Времени в нижней части дисплея часов представлено
значение текущего времени.
РЕЖИМ ТЕКУЩЕГО ВРЕМЕНИ
Для переключения внутри 12/24 часового формата нажмите кнопку “D”. При
включенном 12-ти часовом формате на дисплее появляется индикация “P” для
обозначения времени после полудня, для обозначения времени до полудня индикации
нет.
Установка времени и
даты
1. Нажмите кнопку “А” в Режиме Текущего времени. Значения секунд будут мигать.
2. Нажмите кнопку “С” для перехода из разряда в разряд в следующей
последовательности: Секунды – Часы – Минуты – Год – Месяц – Число –
Секунды.
3. В то время, когда цифры в разряде секунд будут находиться в мигающем
состоянии, нажмите кнопку “D”, для сброса
счетчика секунд в “00”. Если кнопка
“D” нажата в то время, когда значение секунд будет находиться в диапазоне от
“30” до “59“, то одновременно с переустановкой секунд в положение “00”, к
значению минут будет добавлена “1”. Если значение секунд в этот момент будет
находиться в диапазоне от “00” до “29”, то значение минут останется без
изменений.
4.
Для коррекции значений в других разрядах (за исключением секунд), используйте
кнопку “D” для изменений.
• Удерживание кнопок в нажатом состоянии позволяет изменять показания с более
высокой скоростью.
5. После окончания установок нажмите кнопку “А”, для возврата в Режим Текущего
Времени.
• День недели устанавливается автоматически в соответствии с датой.
• Дата
может быть установлена в пределах от 1 января 2000г. до 31 декабря 2099г.
• Если в течении нескольких минут ( во время мигания цифр выбранного вами
разряда) вы не нажмете ни одну из кнопок, то мигание прекратится, а часы
автоматически вернутся в исходный Режим Текущего Времени.
Подсветка
В любом режиме нажмите кнопку “В”
для освещения дисплея в течение трех
секунд.
• Подсветка этих часов выполнена на светодиодном (LED) элементе и световодной
панели, которые обеспечивают четкость изображения значений на дисплее часов при
темном свете.
• Подсветку трудно разглядеть, если на часы падают прямые солнечные лучи.
• Частое использование подсветки сокращает жизнь элемента питания .
• Подсветка автоматически
отключается при звучании сигнала.
РЕЖИМ ЗВУКОВОГО СИГНАЛА
Вы можете установить различные звуковые сигналы. В установленное время
звуковой сигнал включится на 20 секунд. Если включен режим индикации начала часа,
короткий звуковой сигнал будет подаваться в начале каждого часа.
Нажатие кнопки «D» переключает дисплей изображения установленного
времени звукового сигнала и дисплей установки сигнализации
начала часа («:00»).
Типы звуковых сигналов
Тип звукового сигнала зависит от информации, установленной на будильнике.
• Установка ежедневного будильника
Установите часы и минуты звукового сигнала. В разряде месяца установите значение
“- “ и в разряде даты “—”. Этот тип установки обеспечит звуковой сигнал ежедневно в
установленное время.
• Установка будильника с датой
Установите месяц
, дату, часы и минуты звукового сигнала. Этот тип будильника
обеспечивает звуковой сигнал в установленное время в определенный день.
• Установка будильника в течение месяца
Установите месяц, часы и минуты звукового сигнала. Выберите “- -“ в разряде даты.
Этот тип будильника обеспечивает звуковой сигнал в установленное время каждый
день в течение одного месяца.
• Установка ежемесячного будильника
Установите дату, часы и минуты звукового сигнала. В разряде месяца выберите “- “ .
Этот тип будильника обеспечивает звуковой сигнал каждый месяц в установленное
время в определенный день.
Установка времени звучания сигнала
1. В Режиме Звукового Сигнала нажмите кнопку «D» для перехода к дисплею
установки времени звукового сигнала.
2. Нажмите и удерживайте
кнопку “А”. Цифровое значение в разряде часов,
начинает мигать, так как оно выбрано для установки. В этот момент будильник
автоматически включается.
Перейти к контенту
Русские электронные инструкции по эксплуатации
Постоянно обновляемый большой каталог документации по эксплуатации и использованию современных устройств и оборудования на русском языке. Бесплатное скачивание файлов.
Поиск:
Главная
♥ В закладки
Просмотр инструкции в pdf
Инструкция по эксплуатации наручных часов Casio W-96H-1A.
Скачать инструкцию к наручным часам Casio W-96H-1A (260,98 КБ)
Инструкции наручных часов Casio
« Инструкция к наручным часам Casio MTP-1308PL-1A
» Инструкция к наручным часам Casio G-SHOCK GBA-800-1A
Вам также может быть интересно

Инструкция к наручным часам Casio G-SHOCK GMA-S120MF-7A1
Инструкция к наручным часам Casio G-SHOCK G-2900F-1V

Инструкция к наручным часам Casio BG-6903-7B

Инструкция к наручным часам Casio G-SHOCK GD-400MB-1E

Инструкция к наручным часам Casio G-SHOCK GPW-1000-1B
Инструкция к наручным часам Casio G-SHOCK DW-5600E-1V
Инструкция к наручным часам Casio B640WB-1A
Инструкция к наручным часам Casio MTP-1303PD-1A
Добавить комментарий
Имя *
Email *
Сайт
Комментарий
Сохранить моё имя, email и адрес сайта в этом браузере для последующих моих комментариев.
- Добавить инструкцию
- Заказать инструкцию
- Политика конфиденциальности
Casio W-96 / линейка Collection / модуль 2499 / год 2002
Инструкция к модулю Casio 2499
- Смотреть онлайн → (без скачивания, удобно на мобильных и планшетах);
- Скачать русскую инструкцию → (типичная «как у всех», не всегда понятные картинки);
- Скачать английскую инструкцию → (детальная, много фото, более понятная).
Сложно настроить? Спрашивай на форуме Casio →
Читайте новости о любимых часах W-96 на блоге
[display-posts tag=»W-96″ posts_per_page=»4″]
Все новости о W-96 →
Побывайте на заводе Casio, изучайте последние новинки часов на Casioblog.RU
Casio Collection W-96H-1AVES
1
Operation Guide 2499/3092
Alarm
The multi-function alarm lets you specify the hour,minutes, month, and day for the alarm. You can set up thealarm so it sounds once when the alarm time is reached,or for a snooze alarm that repeats up to seven times,every five minutes.You can also turn on an Hourly Time Signal that causesthe watch to beep twice every hour on the hour.
• Pressing D in the Alarm Mode toggles between the
alarm screen (Alarm time displayed) and the HourlyTime Signal screen (
:00
displayed).• An alarm setting (and an Hourly Time Signal setting) isavailable in the Alarm Mode, which you enter bypressing C.
Timekeeping
Use the Timekeeping Mode to set and view the currenttime and date.
To set the time and date
1. In the Timekeeping Mode, hold down A until theseconds start to flash, which indicates the settingscreen.2. Press C to move the flashing in the sequence shownbelow to select other settings.Seconds HourMinutesDay Month
Year
MA0702-EA
About This Manual
• The operational procedures for Modules 2499 and 3092 are identical. All of theillustrations in this manual show Module 2499.• Button operations are indicated using the letters shown in the illustration.• Each section of this manual provides you with the information you need to performoperations in each mode. Further details and technical information can be found inthe “Reference” section.Module 2499 Module 3092Timekeeping ModeAlarm Mode Stopwatch Mode Dual Time ModePress .
General Guide
• Press C to change from mode to mode.
• In any mode, press B to illuminate the display.
• In any mode, hold down C for about two seconds to return to the Timekeeping
Mode.• In the Alarm, Stopwatch and Dual Time modes, the watch always shows the currentTimekeeping Mode time in the lower display area.Hour : Minutes SecondsDay of weekPM indicator
year
Month – Da
3. When the setting you want to change is flashing, press D to change it as
described below.To change this settingSecondsHour, Minutes, Year, Month, DayPerform this button operationPress D to reset to 00.Press D to increase the setting.
• Pressing D while the seconds are in the range of 30 to 59 resets them to 00 and
adds 1 to the minutes. In the range of 00 to 29, the minutes are unchanged.4. Press A to exit the setting screen.• The day of the week is automatically displayed in accordance with the date (year,month, and day) settings.• The year can be set in the range of 2000 to 2099.
• The watch’s built-in full automatic calendar automatically makes allowances for
different month lengths and leap years. Once you set the date, there should be noreason to change it except after you have the watch’s battery replaced.
To toggle between 12-hour and 24-hour timekeeping
In the Timekeeping Mode, press D to toggle between 12-hour timekeeping and24-hour timekeeping.
• With the 12-hour format, the P (PM) indicator appears to the left of the hour digits for
times in the range of noon to 11:59 p.m. and no indicator appears to the left of thehour digits for times in the range of midnight to 11:59 a.m.• With the 24-hour format, times are displayed in the range of 0:00 to 23:59, withoutany indicator.• The 12-hour/24-hour timekeeping format you select in the Timekeeping Mode isapplied in all other modes.
Month – Day
Hour : Minutes
Alarm Types
The alarm type is determined by the settings you make, as described below.• Daily alarmSet the hour and minutes for the alarm time. This type of setting causes the alarm tosound everyday at the time you set.• Date alarmSet the month, day, hour and minutes for the alarm time. This type of setting causesthe alarm to sound at the specific time, on the specific date you set.• 1-Month alarmSet the month, hour and minutes for the alarm time. This type of setting causes thealarm to sound everyday at time you set, only during the month you set.• Monthly alarmSet the day, hour and minutes for the alarm time. This type of setting causes the alarmto sound every month at time you set, on the day you set.
To set an alarm time
1. In the Alarm Mode, press D to display the alarmscreen.2. Hold down A until the hour setting of the alarm timestarts to flash, which indicates the setting screen.• This operation automatically turns on the one-timealarm.3. Press C to move the flashing in the sequence shownbelow to select other settings.
Hour Minutes
Month Day
4. While a setting is flashing, press D to increase it.• To set an alarm that does not include a month (Daily alarm, Monthly alarm),
set x for the month. Press D until the x mark appears (between 12 and 1) while
month setting is flashing.• To set an alarm that does not include a day (Daily alarm, 1-Month alarm),
set xx for the day. Press D until the xx mark appears (between the end of the
month and 1) while the day setting is flashing.• When setting the alarm time using the 12-hour format, take care to set the timecorrectly as a.m. or p.m. (P indicator).5. Press A to exit the setting screen.
Alarm Operation
The alarm tone sounds at the preset time for about 10 seconds. In the case of thesnooze alarm, the alarm repeats up to seven times every five minutes.• Pressing any button stops the alarm tone operation.• The alarm and the Hourly Time Signal sound in all modes.
To select the alarm type
1. In the Alarm Mode, press D to display the alarmscreen.2. Press A to cycle through the available alarm settingsshown below.One-timealarm on
Alarm off
Snooze alarm on• The alarm on indicator and the snooze alarm onindicator are shown on the display in all modes whilethese functions are turned on.• The snooze alarm on indicator flashes during the5-minute intervals between alarms.• Displaying the Alarm Mode setting screen automaticallychanges the alarm type to one-time alarm.• Changing the Timekeeping Mode setting screen during a 5-minute interval betweensnooze alarms stops the current snooze alarm operation (but snooze alarm remainsas the alarm type setting).• If a snooze alarm time is reached while you are setting the current time in theTimekeeping Mode, the alarm sounds only once. Subsequent snooze alarmoperations are not performed.
Alarm on/off indicator
View the manual for the Casio Collection W-96H-1AVES here, for free. This manual comes under the category watches and has been rated by 1 people with an average of a 7.5. This manual is available in the following languages: English. Do you have a question about the Casio Collection W-96H-1AVES or do you need help?
Ask your question here
Index
- About This Manual
- General Guide
- Timekeeping
- Alarm
- Stopwatch
- Dual Time
- Reference
Product Images (1)
Casio Collection W-96H-1AVES specifications
Below you will find the product specifications and the manual specifications of the Casio Collection W-96H-1AVES.
The Casio Collection W-96H-1AVES is a wristwatch that offers a range of practical features. Designed with simplicity and functionality in mind, this watch is suitable for everyday wear.
Featuring a digital display, it allows for easy timekeeping and reading. The display shows the hour, minute, second, day, and date, providing all the necessary information at a glance.
The watch is equipped with an alarm function, allowing users to set multiple alarms for various purposes. Whether it’s a reminder for an important event or to wake up in the morning, this feature is designed to ensure punctuality and efficiency.
Additionally, it includes a chronograph function, which enables users to measure elapsed time accurately. This can be useful for timing various activities, such as workouts or sports events.
The Casio Collection W-96H-1AVES is water-resistant, making it suitable for various outdoor activities. While it is not designed for scuba diving or extensive water submersion, it can withstand splashes and brief immersion in water.
With its resin strap, the watch offers durability and comfort. The strap is adjustable, allowing users to find the perfect fit for their wrist.
Overall, the Casio Collection W-96H-1AVES is a reliable and practical watch with essential features. Its simple yet functional design makes it an ideal choice for those seeking a timepiece for everyday use.
General
| Brand | Casio |
| Model | Collection W-96H-1AVES |
| Product | watch |
| Language | English |
| Filetype | Manual (PDF) |
Frequently Asked Questions
Can’t find the answer to your question in the manual? You may find the answer to your question in the FAQs about the Casio Collection W-96H-1AVES below.
How do I reset the stopwatch on the Casio Collection W-96H-1AVES watch?
To reset the stopwatch on the Casio Collection W-96H-1AVES watch, follow these steps: Press the C button to enter the Stopwatch Mode. The stopwatch will start running automatically. To stop the stopwatch, press the C button again. To reset the stopwatch to zero, press and hold the D button until the stopwatch display shows ’00:00:00′. Release the D button to complete the reset. Now, the stopwatch on your Casio Collection W-96H-1AVES watch is reset and ready to be used again for measuring elapsed time, split times, and two finishes. Please note that these instructions are specific to the Casio Collection W-96H-1AVES watch and may not apply to other models.
How do I set the Dual Time feature on the Casio Collection W-96H-1AVES watch?
To set the Dual Time feature on the Casio Collection W-96H-1AVES watch, follow these steps: Press the C button to enter the Dual Time Mode. Hold down the A button until the hour setting starts to flash. Press the C button to change the selection to the desired hour. Press the D button to increase the hour setting. Press the A button to exit the setting screen. Now, the Dual Time feature on your Casio Collection W-96H-1AVES watch is set to the desired hour. You can use this feature to keep track of time in a different time zone. Please note that these instructions are specific to the Casio Collection W-96H-1AVES watch and may not apply to other models.
How do I stop the snooze alarm on the Casio Collection W-96H-1AVES watch?
To stop the snooze alarm on the Casio Collection W-96H-1AVES watch, follow these steps: 1. When the snooze alarm is sounding, press any button to stop the alarm tone operation. 2. The snooze alarm will repeat up to seven times, with a 5-minute interval between each alarm. 3. To completely turn off the snooze alarm, press the A button to exit the setting screen. By following these steps, you can stop the snooze alarm on your Casio Collection W-96H-1AVES watch. Please note that pressing any button will stop the alarm tone operation, and the snooze alarm will continue to repeat until it reaches the maximum number of times or is manually turned off.
How do I switch off the hourly time signal on the Casio Collection W-96H-1AVES watch?
To disable the Hourly Time Signal on the Casio Collection W-96H-1AVES watch, follow these steps: 1. Press the C button to access Alarm Mode. 2. Use the D button to cycle through alarm screens until you reach the Hourly Time Signal screen. 3. Press the B button to switch the Hourly Time Signal on or off. 4. Once turned off, the corresponding indicator will disappear from the display. 5. Press the A button to exit the setting screen. By following these instructions, you can disable the Hourly Time Signal on your Casio Collection W-96H-1AVES watch. Please remember that the Hourly Time Signal is an hourly alarm that can be enabled or disabled based on your preference.
What should I do if the backlight of the Casio Collection W-96H-1AVES watch is not working properly?
If the backlight of the Casio Collection W-96H-1AVES watch is not working properly, you can try the following steps to troubleshoot the issue: Check the battery: Ensure that the watch has sufficient battery power. If the battery is low, replace it with a new one. Activate the backlight: Press the B button to illuminate the display. If the backlight does not turn on, proceed to the next step. Check the settings: Make sure that the backlight is not set to the Off position. Press the B button to cycle through the backlight settings and select the desired brightness level. Reset the watch: If the backlight issue persists, try resetting the watch to its factory settings. Refer to the manual for instructions on how to perform a reset. Contact customer support: If none of the above steps resolve the issue, it is recommended to contact Casio customer support for further assistance and possible repair options. Please note that these troubleshooting steps are specific to the Casio Collection W-96H-1AVES watch and may not apply to other models.
A battery in my watch has started to corrode. Is the device still safe to use?
The product can still be used safely after proper cleaning. Remove the battery with gloves and clean the battery compartment with a toothbrush and vinegar. After drying, new batteries can be inserted into the device.
Is the manual of the Casio Collection W-96H-1AVES available in English?
Yes, the manual of the Casio Collection W-96H-1AVES is available in English .
Is your question not listed? Ask your question here
1
Operation Guide 2499/3092
Alarm
The multi-function alarm lets you specify the hour,
minutes, month, and day for the alarm. You can set up the
alarm so it sounds once when the alarm time is reached,
or for a snooze alarm that repeats up to seven times,
every five minutes.
You can also turn on an Hourly Time Signal that causes
the watch to beep twice every hour on the hour.
• Pressing D in the Alarm Mode toggles between the
alarm screen (Alarm time displayed) and the Hourly
Time Signal screen (
:00
displayed).
• An alarm setting (and an Hourly Time Signal setting) is
available in the Alarm Mode, which you enter by
pressing C.
Timekeeping
Use the Timekeeping Mode to set and view the current
time and date.
To set the time and date
1. In the Timekeeping Mode, hold down A until the
seconds start to flash, which indicates the setting
screen.
2. Press C to move the flashing in the sequence shown
below to select other settings.
Seconds Hour
Minutes
Day Month
Year
MA0702-EA
About This Manual
• The operational procedures for Modules 2499 and 3092 are identical. All of the
illustrations in this manual show Module 2499.
• Button operations are indicated using the letters shown in the illustration.
• Each section of this manual provides you with the information you need to perform
operations in each mode. Further details and technical information can be found in
the “Reference” section.
Module 2499 Module 3092
Timekeeping Mode
Alarm Mode Stopwatch Mode Dual Time Mode
Press .
General Guide
• Press C to change from mode to mode.
• In any mode, press B to illuminate the display.
• In any mode, hold down C for about two seconds to return to the Timekeeping
Mode.
• In the Alarm, Stopwatch and Dual Time modes, the watch always shows the current
Timekeeping Mode time in the lower display area.
Hour : Minutes Seconds
Day of week
PM indicator
year
Month – Da
3. When the setting you want to change is flashing, press D to change it as
described below.
To change this setting
Seconds
Hour, Minutes, Year, Month, Day
Perform this button operation
Press D to reset to 00.
Press D to increase the setting.
• Pressing D while the seconds are in the range of 30 to 59 resets them to 00 and
adds 1 to the minutes. In the range of 00 to 29, the minutes are unchanged.
4. Press A to exit the setting screen.
• The day of the week is automatically displayed in accordance with the date (year,
month, and day) settings.
• The year can be set in the range of 2000 to 2099.
• The watch’s built-in full automatic calendar automatically makes allowances for
different month lengths and leap years. Once you set the date, there should be no
reason to change it except after you have the watch’s battery replaced.
To toggle between 12-hour and 24-hour timekeeping
In the Timekeeping Mode, press D to toggle between 12-hour timekeeping and
24-hour timekeeping.
• With the 12-hour format, the P (PM) indicator appears to the left of the hour digits for
times in the range of noon to 11:59 p.m. and no indicator appears to the left of the
hour digits for times in the range of midnight to 11:59 a.m.
• With the 24-hour format, times are displayed in the range of 0:00 to 23:59, without
any indicator.
• The 12-hour/24-hour timekeeping format you select in the Timekeeping Mode is
applied in all other modes.
Month – Day
Hour : Minutes
Alarm Types
The alarm type is determined by the settings you make, as described below.
• Daily alarm
Set the hour and minutes for the alarm time. This type of setting causes the alarm to
sound everyday at the time you set.
• Date alarm
Set the month, day, hour and minutes for the alarm time. This type of setting causes
the alarm to sound at the specific time, on the specific date you set.
• 1-Month alarm
Set the month, hour and minutes for the alarm time. This type of setting causes the
alarm to sound everyday at time you set, only during the month you set.
• Monthly alarm
Set the day, hour and minutes for the alarm time. This type of setting causes the alarm
to sound every month at time you set, on the day you set.
To set an alarm time
1. In the Alarm Mode, press D to display the alarm
screen.
2. Hold down A until the hour setting of the alarm time
starts to flash, which indicates the setting screen.
• This operation automatically turns on the one-time
alarm.
3. Press C to move the flashing in the sequence shown
below to select other settings.
Hour Minutes
Month Day
4. While a setting is flashing, press D to increase it.
• To set an alarm that does not include a month (Daily alarm, Monthly alarm),
set x for the month. Press D until the x mark appears (between 12 and 1) while
month setting is flashing.
• To set an alarm that does not include a day (Daily alarm, 1-Month alarm),
set xx for the day. Press D until the xx mark appears (between the end of the
month and 1) while the day setting is flashing.
• When setting the alarm time using the 12-hour format, take care to set the time
correctly as a.m. or p.m. (P indicator).
5. Press A to exit the setting screen.
Alarm Operation
The alarm tone sounds at the preset time for about 10 seconds. In the case of the
snooze alarm, the alarm repeats up to seven times every five minutes.
• Pressing any button stops the alarm tone operation.
• The alarm and the Hourly Time Signal sound in all modes.
To select the alarm type
1. In the Alarm Mode, press D to display the alarm
screen.
2. Press A to cycle through the available alarm settings
shown below.
One-time
alarm on
Alarm off
Snooze
alarm on
• The alarm on indicator and the snooze alarm on
indicator are shown on the display in all modes while
these functions are turned on.
• The snooze alarm on indicator flashes during the
5-minute intervals between alarms.
• Displaying the Alarm Mode setting screen automatically
changes the alarm type to one-time alarm.
• Changing the Timekeeping Mode setting screen during a 5-minute interval between
snooze alarms stops the current snooze alarm operation (but snooze alarm remains
as the alarm type setting).
• If a snooze alarm time is reached while you are setting the current time in the
Timekeeping Mode, the alarm sounds only once. Subsequent snooze alarm
operations are not performed.
Alarm on/off indicator