
CASIO DB-E30 Модуль 2568
Руководство пользователя
Прежде всего прочтите эту важную информацию
Батарея
При первых признаках недостаточности питания (нечеткость изображения
или отсутствие подсветки) необходимо заменить батарею у ближайшего
дилера или дистрибьютора фирмы «CASIO». В приобретенных вами часах,
содержится батарея, установленная изготовителем для тестовых испытаний,
поэтому срок службы этой батареи по сравнению со стандартным, вероятно,
будет сокращен
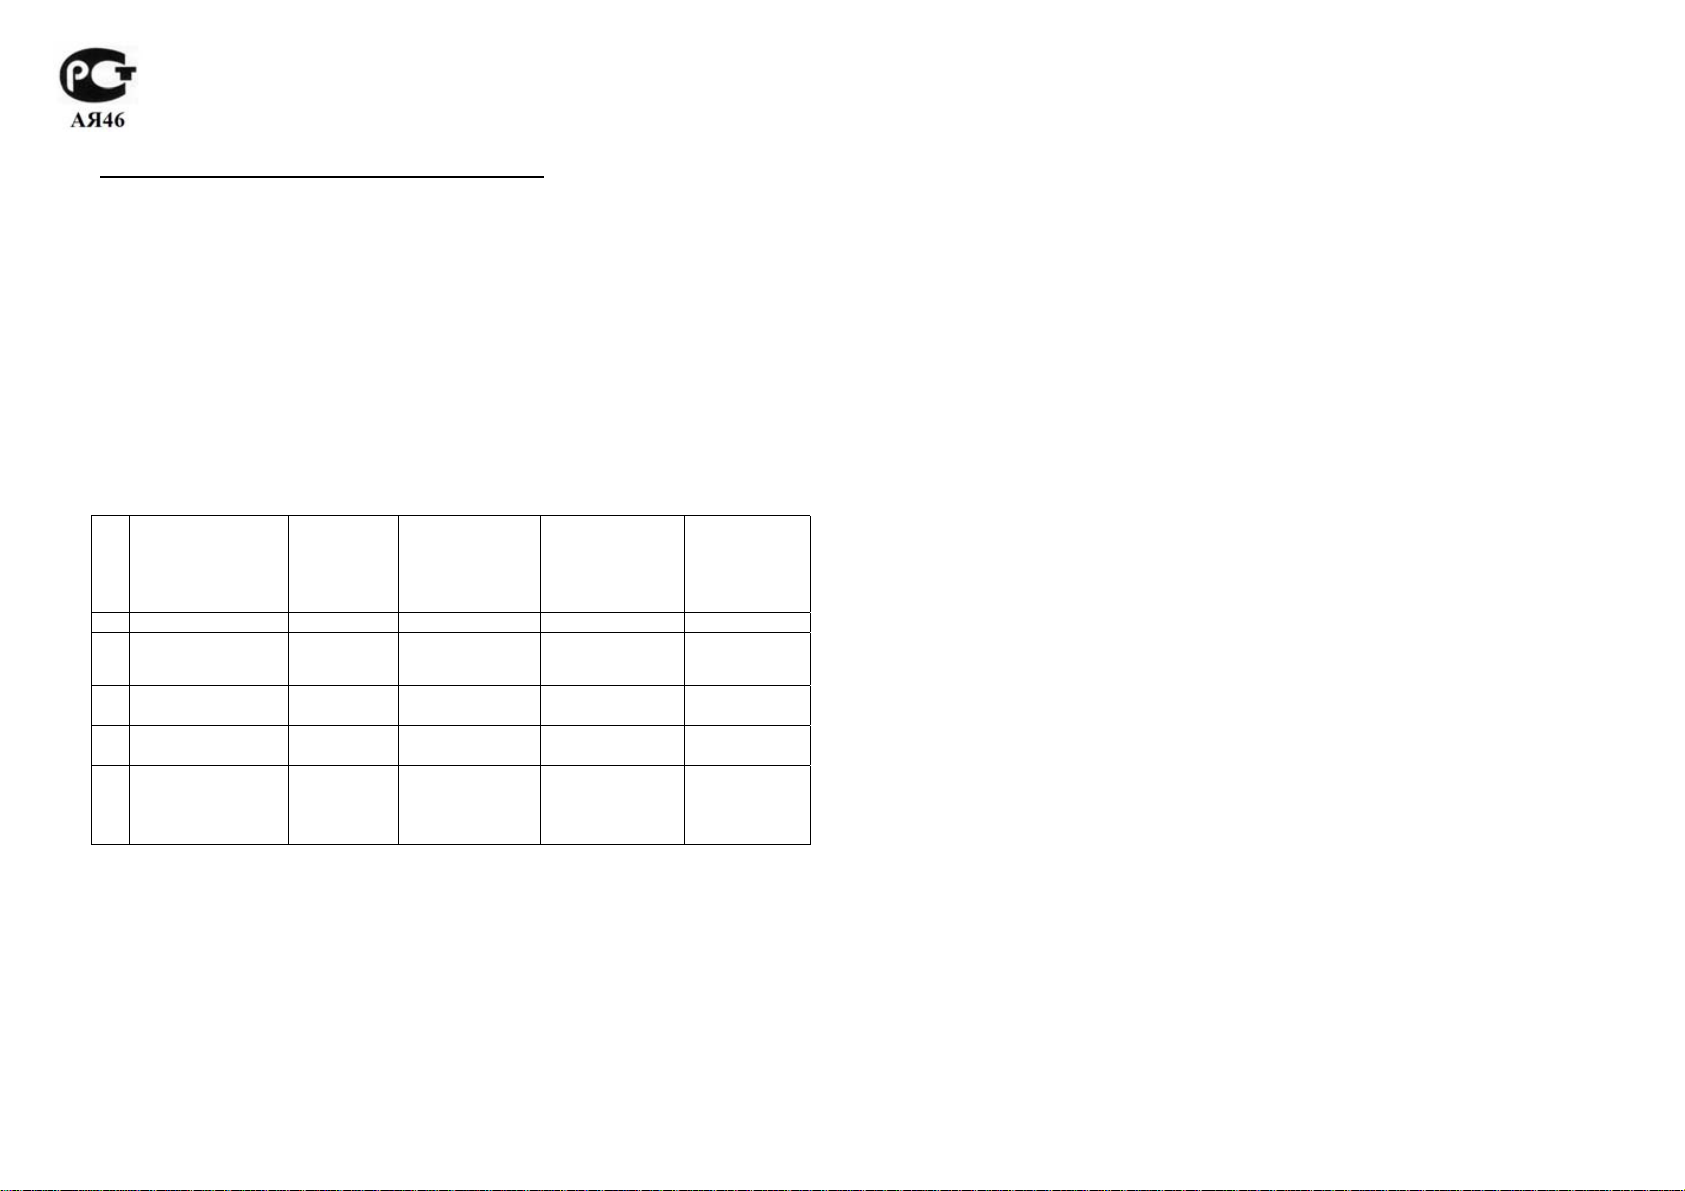
Защита от воды
Часы классифицируются
степенью их защищенности от воды. Уточните разряд ваших часов с
помощью приведенной ниже таблицы, чтобы определить правила их
использования.
Маркировка
на корпусе
I
II
III
IV
V
Примечания для соответствующих разделов.
I. Часы не защищены от воды. Избегайте попадания любой влаги.
III. Если часы подверглись воздействию соленой воды, то тщательно
промойте их и вытрите насухо.
IV. Если часы подверглись воздействию соленой воды, то тщательно
промойте их и вытрите насухо.
V. Часы могут использоваться при погружении с аквалангом (за
исключением таких глубин, при которых требуется гелиево-кислородная
смесь).
ВНИМАНИЕ!!!
Для всех категорий часов запрещается:
—
Нет Нет Нет Нет
WATER
RESISTANT
50M WATER
RESISTANT
100M WATER
RESISTANT
200M WATER
RESISTANT
300M WATER
RESISTANT
по разрядам (с I по V разряд) в соответствии со
Брызги,
дождь и
т.п.
Да Нет Нет Нет
Да Да Нет Нет
Да Да Да Нет
Да Да Да Да
Плавание,
мытье
машины и т.п.
Подводное
плавание,
ныряние и т.п.
Ныряние с
аквалангом
нажимать кнопки под водой
переводить стрелки под водой
отвинчивать переводную головку под водой
ВАЖНО!!!
Особенностью некоторых защищенных от воды часов является наличие у них
кожаных ремешков. Не надевайте эти часы во
либо другой деятельности, при которой ремешок погружается в воду.
Уход за вашими часами
Замена резиновой прокладки, защищающей часы от попадания воды и пыли,
должна осуществляться через каждые 2-3 года.
Если внутрь часов попадет влага, то немедленно проверьте их у ближайшего к
вам дилера или дистрибьютора
Не подвергайте часы воздействию слишком высоких или низких температур.
Хотя часы рассчитаны на использование их в обычных условиях, тем не менее,
вы должны избегать грубого обращения с ними и не допускать их падения.
Не застегивайте ремешок слишком туго. Между вашим запястьем и ремешком
должен проходить палец.
Для очистки часов и ремешка используйте сухую мягкую ткань, либо мягкую
ткань, смоченную в водном растворе мягкого нейтрального моющего средства.
Никогда не используйте легко испаряющимися средствами (например, такими,
как бензин, растворители, распыляющиеся чистящие средства и т.п.).
Когда вы не пользуетесь вашими часами, храните их в сухом месте.
Избегайте попадания на часы бензина, чистящих растворителей, аэрозолей из
распылителей, клеящих веществ, краски и т.п. Химические реакции,
вызываемые этими материалами, приводят к повреждению прокладок, корпуса
и полировки часов.
Особенностью некоторых моделей часов является наличие на их ремешке
изображений, выполненных шелкографией. Будьте осторожны при чистке
таких ремешков, чтобы не испортить
Для часов с полимерными ремешками…
Вы можете обнаружить белесое порошкообразное вещество на ремешке. Это
вещество не вредно для вашей кожи или одежды и может быть легко удалено
путем протирания мягкой тканью.
Попадание на полимерный ремешок пота или влаги, а также хранение его в
условиях высокой влажности
растрескиванию ремешка. Для того чтобы обеспечить длительный срок
службы полимерного ремешка, как можно чаще протирайте его от грязи и
воды мягкой тканью.
Для часов с флуоресцентными корпусами и ремешками…
Длительное облучение прямым солнечным светом может привести к
постепенному исчезновению флуоресцентной окраски.
фирмы CASIO.
эти рисунки.
может привести к повреждению, разрыву или
время плавания или какой—
Длительный контакт с влагой может вызвать постепенное исчезновение
флуоресцентной окраски. В случае попадания на поверхность часов любой
влаги, как можно скорее удалите ее.
Длительный контакт с влажной поверхностью может привести к
обесцвечиванию флуоресцентной окраски. Следите за отсутствием влаги на
флуоресцентной поверхности и избегайте ее контакта с другими
поверхностями.
Сильное трение поверхности, имеющей нанесенную флуоресцентную краску,
о другую поверхность может привести к переносу флуоресцентной краски на
эту поверхность.
Фирма «CASIO COMPUTER CO., LTD» не несет ответственности за какой бы то ни
было ущерб, который может возникнуть при использовании этих часов, и не
принимает никаких претензий со стороны третьих лиц.
ОБЩЕЕ ОПИСАНИЕ РЕЖИМОВ РАБОТЫ
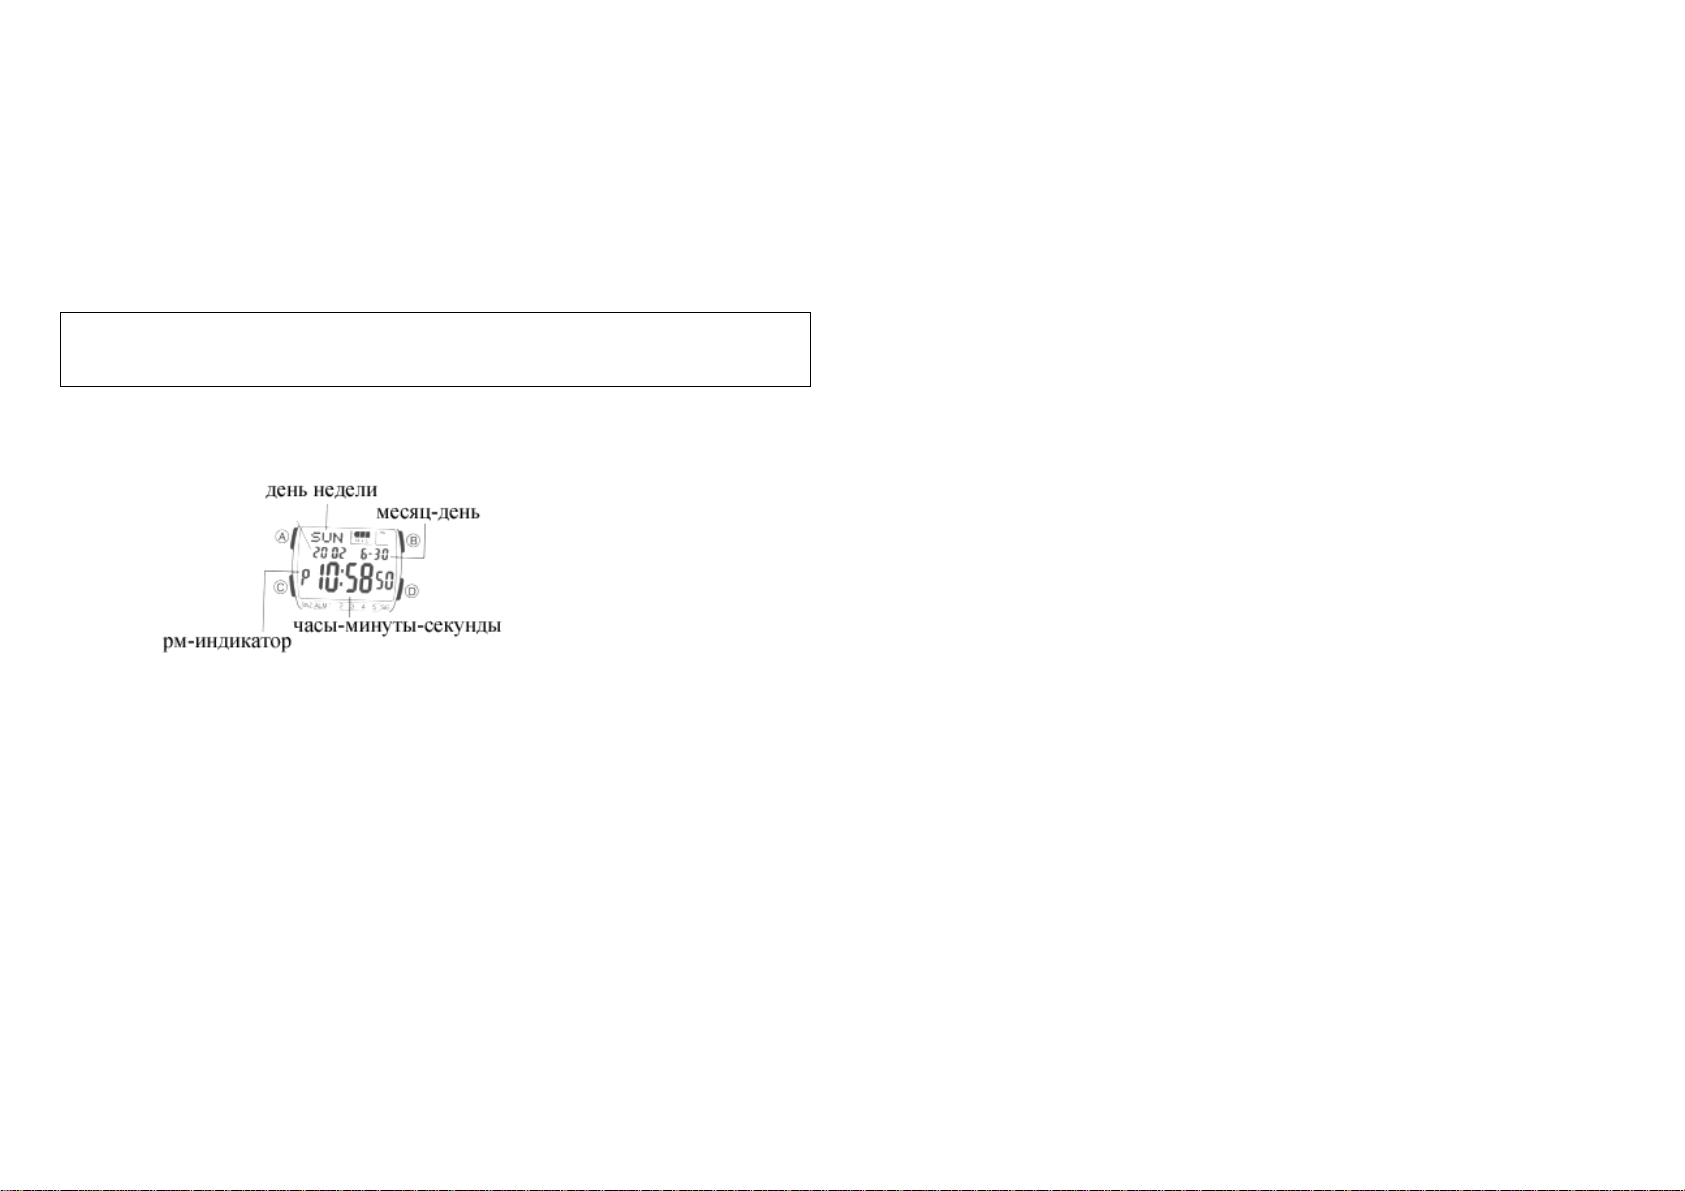
На рисунке изображен общий вид часов в Режиме Текущего Времени.
Нажмите кнопку “C” для перехода из разряда в разряд в следующей
последовательности:
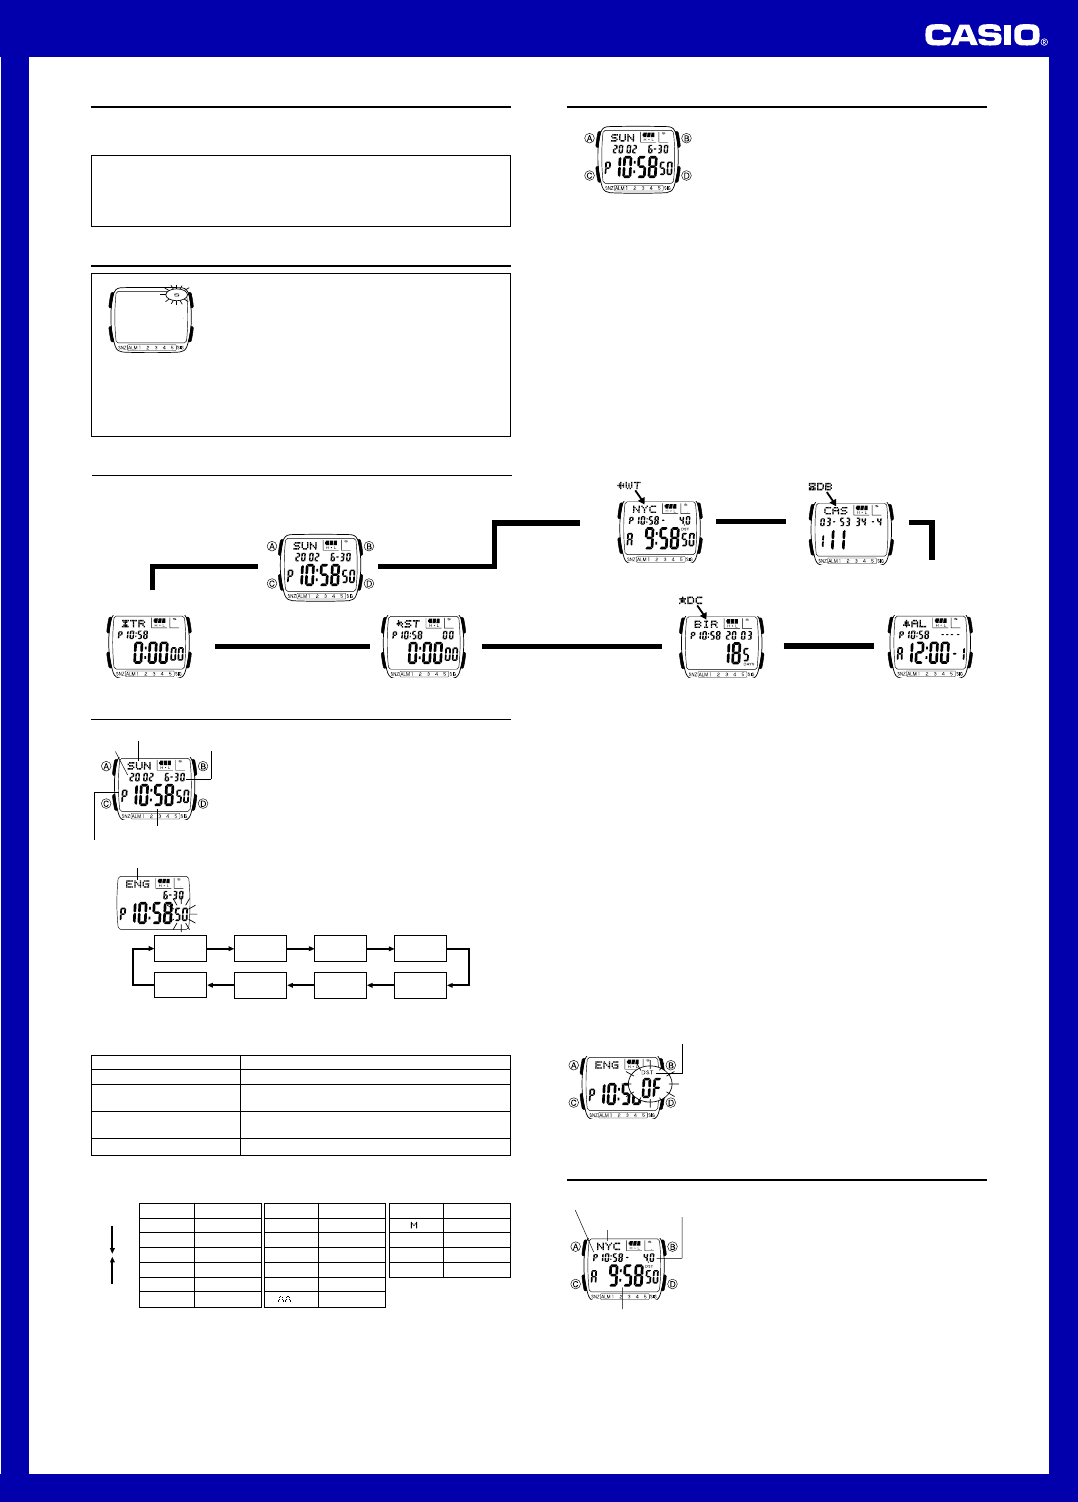
Режим Текущего Времени Режим Мирового Времени Режим Записной Книжки
Режим Звукового Сигнала Режим Отсчета Дней
Режим Секундомера
Режим Обратного Отсчета Режим Текущего Времени.
В любом режиме нажмите кнопку “B” для включения подсветки дисплея.
РЕЖИМ ТЕКУЩЕГО ВРЕМЕНИ
Установка времени и даты
1. Нажмите кнопку “А” в Режиме Текущего Времени. Изображение секунд начнет
мигать.
2. Нажмите кнопку “С” для перехода из разряда в разряд в следующей
последовательности: Секунды Режим Летнего Времени (DST) Часы
Минуты Год Месяц Число Язык Секунды.
3. Если вы выбрали для коррекции секунды (изображение секунд мигает), нажмите
кнопку “D” для сброса значения счетчика секунд в 00. Если вы нажмете кнопку
“D” при значении счетчика секунд между 30 и 59, то значение
счетчика
установится в 00 и 1 прибавится к счетчику минут, если значение счетчика секунд
будет между 00 и 29, то изменение счетчика минут не произойдет.
4. Для изменения значений минут и т.д., используйте кнопку “D” для увеличения и
кнопку “B” для уменьшения значений.
5. Для переключения 12/24 часового формата нажмите кнопку “D” в Режиме
Текущего Времени. При выбранном
12-ти часовом формате представления
времени индикация “P” обозначает значение времени после полудня, а индикация
“A” – значение времени до полудня.
6. Для выбора кода города нажимайте кнопку “D”.
7. Для выбора языка нажимайте кнопки “D” и “B”:
ENG – английский CES — чешский
POR — португальский SVE — шведский
ESP — испанский POL — польский
FRA — французский EЛЛ — греческий
NED — голландский ROM — румынский
DAN — датский TUR — турецкий
DEU — немецкий РУС —
русский
ITA — итальянский JPN — японский
8. Для включения/выключения летнего времени нажимайте кнопку “D”.
Удерживание кнопки в нажатом состоянии позволяет изменять значения с
большей скоростью.
День недели устанавливается автоматически в соответствии с датой.
9. После установки даты и времени, нажмите кнопку “А” для возврата в Режим
Текущего времени.
10. Если вы не
будете нажимать кнопки в течении некоторого времени, то часы
автоматически перейдут в режим Текущего времени.
Подсветка
В любом режиме нажмите кнопку “В” для включения подсветки.
Подсветка этих часов выполнена на электролюминесцентных (ЕL) элементах,
мощность которых падает после длительного срока использования.
Во время освещения дисплея часы испускают слышимый сигнал
. Это происходит
потому, что элементы подсветки вибрируют, это не является показателем
неисправности часов.
Подсветку трудно разглядеть, если на часы падают прямые солнечные лучи.
Частое использование подсветки сокращает жизнь элемента питания.
Автоподсветка
Вы можете включить или выключить функцию автоподсветки нажатием кнопки “B” в
течение 2-х секунд в Режиме Текущего Времени
.
Автоподсветка включается автоматически каждый раз, когда ваша рука расположена
под углом 40 градусов относительно земли.
Не используйте функцию автоподсветки, когда свет может повредить вам или отвлечь
ваше внимание. Например, при управлении мотоциклом или велосипедом.
РЕЖИМ МИРОВОГО ВРЕМЕНИ
Casio Watch Line: Collection
Module number: 2568
Manual in PDF: Watch 2568 Online → (without downloading, good for mobile);
English Instruction Manual in PDF: Download 2568 ZIP
Being a fan of CASIO watches since 2009, I strive to share my passion and knowledge with others. Through publishing short notes and curating all listings on this site, I hope to inspire fellow enthusiasts to explore the world of high-quality CASIO watches. A proud owner of GST-B200, GG-1000, GA-110. Remember: Fake Watches are for Fake People.
Страницы и текст этой инструкции
Руководство пользователя часов Casio DB-E30(2568)
Информация отображена на картинке
Информация отображена на картинке
Информация отображена на картинке
Информация отображена на картинке
Как использовать наш сайт инструкций OnlineManuals.ru
Наша цель состоит в том, чтобы предоставить вам быстрый доступ к содержанию инструкции для часов Casio DB-E30(2568).
С помощью онлайн просмотра, Вы можете быстро просмотреть содержимое инструкции и найти решение проблемы с часов Casio DB-E30(2568).
Для Вашего удобства
Если листать руководство пользователя часов Casio DB-E30(2568) прямо на сайте, не очень удобно для Вас, есть два возможных решения:
• Просмотр в полноэкранном режиме — легко просмотреть руководство пользователя (без загрузки его на свой компьютер), Вы можете использовать режим полноэкранного просмотра.
Для просмотра инструкции пользователя часов Casio DB-E30(2568) на полном экране, используйте кнопку «Открыть в Pdf-viewer».
• Загрузка на компьютер — Вы можете также скачать Руководство пользователя часов Casio DB-E30(2568) на свой компьютер и сохранить его в файлах.
Многие люди предпочитают читать документы не на экране, а в печатной версии.
Возможность печати руководства пользователя также была предусмотрена на нашем сайте,
и вы можете использовать ее, нажав на иконку «печать» в Pdf-viewer.
Нет необходимости печатать все руководство часов Casio DB-E30(2568), можно выбрать только нужные страницы инструкции.
USER’S GUIDE 2568
1
Getting Acquainted
Congratulations upon your selection of this CASIO watch. To get the most out of your
purchase, be sure to carefully read this manual and keep it on hand for later reference
when necessary.
Expose the watch to bright light to charge its battery before using it.
You can use this watch even as its battery is being charged by exposure to bright
light.
••
••
• Be sure to read “Battery” of this manual for important information you need
to know when exposing the watch to bright light.
If the display of the watch is blank…
If the Power Saving on (S) indicator flashes on the
display, it means that the display is blank because the
watch’s Power Saving function has turned off the
display to conserve power. Power Saving automatically
turns off the display and puts the watch into a sleep state
whenever your watch is left for a certain period where it
is dark.
• The initial factory default setting is Power Saving on.
• The watch recovers from the sleep state if you move it
to a well-lit area
*
, if you press any button, or if you
angle the watch towards your face for reading.
*
It can take up to five seconds for the display to turn on.
••
••
• See “Power Saving function” for more information.
About This Manual
• Button operations are indicated using the letters shown
in the illustration.
• Each section of this manual provides you with the
information you need to perform operations in each
mode. Further details and technical information can be
found in the “Reference” section.
General Guide
• Press C to change from mode to mode.
• In any mode (except when a setting screen is on the display), press B to illuminate
the display.
Data Bank Mode
Countdown
Timer Mode
World Time Mode
▲
▲
▲
Alarm Mode
Timekeeping Mode
▲
Press C.
▲
▲
▲
Stopwatch Mode
Day Counter Mode
Timekeeping
Use the Timekeeping Mode to set the time and date.
Note
This watch is capable of displaying text for the day of the
week in any one of 16 different languages (English,
Portuguese, Spanish, French, Dutch, Danish, German,
Italian, Czech, Swedish, Polish, Greek, Romanian,
Turkish, Russian, and Japanese).
To set the time and date
1. In the Timekeeping Mode, hold down A until the
seconds start to flash, which indicates the setting
screen.
2. Use C to move the flashing in the sequence shown
below to select other settings.
Day of week
Month – Day
Hour : Minutes Seconds
PM indicator
Year
Language indicator
• The currently selected language indicator flashes on the display while the
Language (setting) is selected in the above sequence.
3. When the setting you want to change is flashing, use B and D to change it as
described below.
Seconds DST on/off Hour Minutes
Day Month Year
Language
To change this setting
Seconds
DST on/off
Hour, Minutes, Year,
Month, Day
Language
Perform this button operation
Press D to reset to 00.
Press D to toggle between Daylight Saving Time
(ON displayed) and standard time (OF displayed).
Use D (+) and B (–) to change the setting.
Use B and D to change the language setting.
• While the language indicator is flashing on the display, use B and D to cycle
through the language indicators as shown below, until the one for the language
you want to select is displayed.
4. Press A to exit the setting screen.
• The day of the week is automatically displayed in accordance with the date (year,
month, and day) settings.
• See the “Day of the Week List” for information on abbreviations used.
Indicator Language
ENx English
POR Portuguese
ESP Spanish
FRA French
NED Dutch
DAN Danish
Press D.
Press B.
Indicator Language
DEU German
ITA Italian
CES Czech
SVE Swedish
POL Polish
E
Greek
Indicator Language
RO Romanian
T)R Turkish
PUC Russian
JPN Japanese
• In addition to the day of the week display, the language setting also affects the type
of characters you can input for the name in the Data Bank Mode and the text in the
Day Counter Mode.
• Holding down A in the Timekeeping Mode displays the indicator for the currently
selected language. Keeping A depressed for about two seconds changes to the
Timekeeping Mode setting screen (indicated by the seconds flashing). If you
accidentally display the setting screen, press A again to exit.
To toggle between 12-hour and 24-hour timekeeping
In the Timekeeping Mode, press D to toggle between 12-hour timekeeping (indicated
by A or P on the display), or 24-hour timekeeping.
• With the 12-hour format, the P (PM) indicator appears on the display for times in the
range of noon to 11:59 p.m. and the A (AM) indicator appears for times in the range
of midnight to 11:59 a.m.
• With the 24-hour format, times are displayed in the range of 0:00 to 23:59, without
any indicator.
• The 12-hour/24-hour timekeeping format you select in the Timekeeping Mode is
applied in all modes.
Daylight Saving Time (DST)
Daylight Saving Time (summer time) advances the time setting by one hour from
Standard Time. Remember that not all countries or even local areas use Daylight
Saving Time.
To toggle the Timekeeping Mode time between DST and Standard Time
1. In the Timekeeping Mode, hold down A until the
seconds start to flash, which indicates the setting
screen.
2. Press C to move the flashing to the DST on/off setting.
3. Press D to toggle between Daylight Saving Time (ON
displayed) and standard time (OF displayed).
4. Press A to exit the setting screen.
• The DST indicator appears on the display to indicate
that Daylight Saving Time is turned on in the
Timekeeping, Alarm, and Day Counter Mode.
DST indicator
World Time
The World Time shows the current time in 28 cities (29
time zones) around the world.
• The time settings of the Timekeeping Mode and the
World Time Mode are independent from each other, so
you must make separate settings for each.
• Whenever you change the time setting for any city in the
World Time Mode, the settings of all other cities are
changed accordingly.
• The UTC differential value indicates the number of hours
difference in time between the currently selected time
zone and UTC.
• All of the operations in this section are performed in the
World Time Mode, which you enter by pressing C.
UTC
differential
Current time in
the selected city
code
Timekeeping
mode time
City code
Getting Acquainted
Congratulations upon your selection of this CASIO watch. To get the most out of your
purchase, be sure to carefully read this manual and keep it on hand for later reference
when necessary.
Expose the watch to bright light to charge its battery before using it.
You can use this watch even as its battery is being charged by exposure to bright
light.
• • • • • Be sure to read «Battery» of this manual for important information you need
to know when exposing the watch to bright light.
If the display of the watch is blank…
If the Power Saving on (S) indicator flashes on the
display, it means that the display is blank because the
watch’s Power Saving function has turned off the
display to conserve power. Power Saving automatically
turns off the display and puts the watch into a sleep state
whenever your watch is left for a certain period where it
is dark.
• The initial factory default setting is Power Saving on.
• The watch recovers from the sleep state if you move it
to a well-lit area
angle the watch towards your face for reading.
*
It can take up to five seconds for the display to turn on.
• • • • • See «Power Saving function» for more information.
General Guide
• Press C to change from mode to mode.
• In any mode (except when a setting screen is on the display), press B to illuminate
the display.
Timekeeping Mode
Countdown
Timer Mode
Timekeeping
Use the Timekeeping Mode to set the time and date.
Day of week
Month – Day
Year
Note
This watch is capable of displaying text for the day of the
week in any one of 16 different languages (English,
Portuguese, Spanish, French, Dutch, Danish, German,
Italian, Czech, Swedish, Polish, Greek, Romanian,
Turkish, Russian, and Japanese).
Hour : Minutes Seconds
To set the time and date
1. In the Timekeeping Mode, hold down A until the
PM indicator
seconds start to flash, which indicates the setting
Language indicator
screen.
2. Use C to move the flashing in the sequence shown
below to select other settings.
Seconds
DST on/off
Language
Day
• The currently selected language indicator flashes on the display while the
Language (setting) is selected in the above sequence.
3. When the setting you want to change is flashing, use B and D to change it as
described below.
To change this setting
Perform this button operation
Press D to reset to 00.
Seconds
Press D to toggle between Daylight Saving Time
DST on/off
(ON displayed) and standard time (OF displayed).
Hour, Minutes, Year,
Use D (+) and B (–) to change the setting.
Month, Day
Use B and D to change the language setting.
Language
• While the language indicator is flashing on the display, use B and D to cycle
through the language indicators as shown below, until the one for the language
you want to select is displayed.
Press D.
Indicator Language
Indicator Language
ENx
DEU
English
POR
ITA
Portuguese
ESP
CES
Spanish
FRA
SVE
French
NED
POL
Dutch
DAN
E
Press B.
Danish
4. Press A to exit the setting screen.
• The day of the week is automatically displayed in accordance with the date (year,
month, and day) settings.
• See the «Day of the Week List» for information on abbreviations used.
USER’S GUIDE 2568
, if you press any button, or if you
*
Press C.
Stopwatch Mode
Hour
Minutes
Month
Year
Indicator Language
RO
German
Romanian
T)R
Italian
Turkish
PUC
Czech
Russian
JPN
Swedish
Japanese
Polish
Greek
About This Manual
• Button operations are indicated using the letters shown
in the illustration.
• Each section of this manual provides you with the
information you need to perform operations in each
mode. Further details and technical information can be
found in the «Reference» section.
World Time Mode
Day Counter Mode
• In addition to the day of the week display, the language setting also affects the type
of characters you can input for the name in the Data Bank Mode and the text in the
Day Counter Mode.
• Holding down A in the Timekeeping Mode displays the indicator for the currently
selected language. Keeping A depressed for about two seconds changes to the
Timekeeping Mode setting screen (indicated by the seconds flashing). If you
accidentally display the setting screen, press A again to exit.
To toggle between 12-hour and 24-hour timekeeping
In the Timekeeping Mode, press D to toggle between 12-hour timekeeping (indicated
by A or P on the display), or 24-hour timekeeping.
• With the 12-hour format, the P (PM) indicator appears on the display for times in the
range of noon to 11:59 p.m. and the A (AM) indicator appears for times in the range
of midnight to 11:59 a.m.
• With the 24-hour format, times are displayed in the range of 0:00 to 23:59, without
any indicator.
• The 12-hour/24-hour timekeeping format you select in the Timekeeping Mode is
applied in all modes.
Daylight Saving Time (DST)
Daylight Saving Time (summer time) advances the time setting by one hour from
Standard Time. Remember that not all countries or even local areas use Daylight
Saving Time.
To toggle the Timekeeping Mode time between DST and Standard Time
1. In the Timekeeping Mode, hold down A until the
DST indicator
seconds start to flash, which indicates the setting
screen.
2. Press C to move the flashing to the DST on/off setting.
3. Press D to toggle between Daylight Saving Time (ON
displayed) and standard time (OF displayed).
4. Press A to exit the setting screen.
• The DST indicator appears on the display to indicate
that Daylight Saving Time is turned on in the
Timekeeping, Alarm, and Day Counter Mode.
World Time
The World Time shows the current time in 28 cities (29
Timekeeping
UTC
time zones) around the world.
mode time
differential
• The time settings of the Timekeeping Mode and the
City code
World Time Mode are independent from each other, so
you must make separate settings for each.
• Whenever you change the time setting for any city in the
World Time Mode, the settings of all other cities are
changed accordingly.
• The UTC differential value indicates the number of hours
difference in time between the currently selected time
zone and UTC.
Current time in
• All of the operations in this section are performed in the
the selected city
World Time Mode, which you enter by pressing C.
code
Data Bank Mode
Alarm Mode
1