
When testing things in the homelab, I frequently work with older hardware.
This means that when you use ESXi, you might get the following warning:
This host is potentially vulnerable to issues described in CVE-2018-3646, please refer to https://kb.vmware.com/s/articles/55636 for details and VMware recommendations.
I typically chose to ignore the warning, as this is a lab anyway. And this is fine on a stand alone host, but it is pretty annoying when using vCenter.
So if you are in the same situation, here is how to disable the warning:
Open your host configuration, go to System, Advanced System Settings, click “Edit…”
The key you are looking for is:
UserVars.SuppressHyperthreadWarning
Set this to a value of 1, press “OK” and refresh the host. The warning should now disappear.
Please do keep in mind that the vulnerability is still present, you did not eliminate the risk, you only disabled the warning.
I reinstalled ESXi v7U3 on a new host in my home lab today and saw this notification below the summary information after adding it to my datacenter & cluster:

So, OK – I recognize this. The error/information warning is for the administrators notice to address CVE-2018-3646 (https://nvd.nist.gov/vuln/detail/CVE-2018-3646), which according to the CVE: “…may allow unauthorized disclosure of information residing in the L1 data cache to an attacker with local user access with guest OS privilege via a terminal page fault and a side-channel analysis”.
Makes sense. This is a moderate CVSS score (5.6), and needs to be mitigated. This is one of those mitigations that requires a change to the system settings.
Let’s go ahead and walk-through the process.
- Connect to vCenter Server
- Select your ESXi host in the inventory
- Click the Configure tab
- Look under System menu heading
- Click Advanced System Settings
- Click Edit (on the right side)

I found using the text filter to be the easiest to find the Key/Value I needed to change. So click the filter icon, and type in “vmkernel.boot.hyperthreadingMitigation”. Most of the time you’ll be able to pull up the Key needed just with a minimal amount of searching.

Find the “vmkernel.boot.hyperthreadingMitigation” Key, and where the Value is set to “false”…

Change the Value to “true”…

Click “Save” and reboot your host.
You can also do this via SSH:
- Connect to the host using SSH (I use puTTy or MTPuTTY)
- Check the current value of the “vmkernel.boot.hyperthreadingMitigation” setting by running:
esxcli system settings kernel list -o hyperthreadingMitigation
You will see this output:

- Enable “vmkernel.boot.hyperthreadingMitigation” by running:
esxcli system settings kernel set -s hyperthreadingMitigation -v TRUE
- Verify by running
esxcli system settings kernel list -o hyperthreadingMitigationagain…

- And then reboot the ESXi Host
And that’s it,
Check out the below links for reference – thanks and cheers!
https://www.vmware.com/security/advisories/VMSA-2018-0020.html
https://kb.vmware.com/s/article/55636
https://kb.vmware.com/s/article/55806
We came across the following warning in one of our clusters running ESXi 6.7.0, 17700523 (latest build)
After some searching, performing the following steps from kb article 55806 solved the issue for us.
Enabling the ESXi Side-Channel-Aware Scheduler Version 2 (SCAv2) using ESXi Embedded Host Client
- Connect to the ESXi host by opening a web browser to https://HOSTNAME.
- Click Manage under host navigator.
- Click the Advanced settings Tab.
- Use the search box to find VMkernel.Boot.hyperthreadingMitigation.
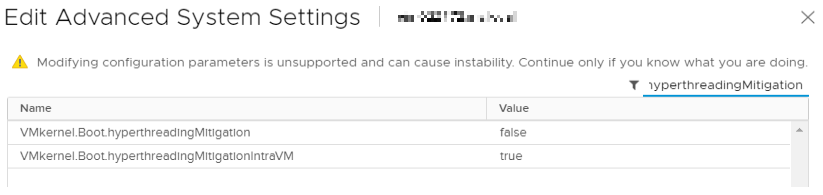
Here you can see that VMkernel.Boot.hyperthreadingMitigation is set to ‘false’
- Select the VMkernel.Boot.hyperthreadingMitigation setting and click the Edit Option.
- Change the configuration option to true (default: false).
- Click Save.

- Use the search box to find VMkernel.Boot.hyperthreadingMitigationIntraVM.
- Select the VMkernel.Boot.hyperthreadingMitigationIntraVM setting and click the Edit Option.
- Change the configuration option to false (default: true).
- Click Save.
- Reboot the ESXi host for the configuration change to go into effect.
As you could see in the ‘Edit Advanced System Settings’ screenshots, VMkernel.Boot.hyperthreadingMitigationIntraVM already had the correct status which is ‘true’.
1. Connect to vCenter Server 7.0.
Using a web browser, enter the fully qualified domain name of the vCenter Server 7.0 in the URL.
2. Privacy Notice.
If using the VMware self-signed certificate (the default), click Accept to proceed.
3. Launch vSphere Client (HTML5).
Click the Launch vSphere Client (HTML5) button.
4. Enter SSO credentials.
Enter the Administrator@vsphere.loca
5. Enable SSH and Console Shell.
Select and enable SSH Secure Shell and ESXi Console.
6. SSH Connection.
Using the Windows application PuTTY or another SSH client, connect to the IP address of the ESXi host server, and enter the following commands
7. Check current values.
esxcli system settings kernel list -o hyperthreadingMitigationOpen in new window
.
8. Check current values.
esxcli system settings kernel list -o hyperthreadingMitigationIntraVMOpen in new window
.
9. Enable ESXi Side-Channel-Aware Scheduler.
esxcli system settings kernel set -s hyperthreadingMitigation -v TRUEOpen in new window
esxcli system settings kernel set -s hyperthreadingMitigationIntraVM -v FALSEOpen in new window
.
10. Reboot the host.
Critical Vulnerability: How to patch & secure CVE-2018-3646 on ESXi?
#Critical #Vulnerability #patch #secure
“Omid Askari”
ESXI critical vulnerability CVE 2018 3646,To patch CVE-2018-3646 on your ESXi host …
source