

d

Table des matières
C
ONTENU DE LA BOITE
C
ONFIGURATION SYSTEME REQUISE
INTRODUCTION ………………………………………………………………………………………………………………………………………………………………………………….. 2
C
ARACTERISTIQUES
D
ESCRIPTION DU MATERIEL
Façade …………………………………………………………………………………………………………………………………………………………………………………………. 4
Panneau arrière …………………………………………………………………………………………………………………………………………………………………………….. 5
INSTALLATION DU MATERIEL …………………………………………………………………………………………………………………………………………………………….. 6
T
OUS LES DISQUES DURS INSTALLES DANS LE
UTILITAIRES DE CONFIGURATION………………………………………………………………………………………………………………………………………………………. 9
Click n’ Connect pour l’installation d’un nouveau disque dur …………………………………………………………………………………………………………………10
Utilitaire Easy Search ……………………………………………………………………………………………………………………………………………………………………..18
Connexion du disque réseau……………………………………………………………………………………………………………………………………………………………24
………………………………………………………………………………………………………………………………………………………………………….. 1
…………………………………………………………………………………………………………………………………………………………. 1
…………………………………………………………………………………………………………………………………………………………………………….. 3
……………………………………………………………………………………………………………………………………………………………………. 4
DNS-313
DOIVENT IMPERATIVEMENT ETRE FORMATES AVANT TOUT USAGE
. …………………………………………….. 8
CONFIGURER LE DNS-313 ………………………………………………………………………………………………………………………………………………………………….27
Configuration du réseau local…………………………………………………………………………………………………………………………………………………………..28
Périphérique ………………………………………………………………………………………………………………………………………………………………………………….29
Date et heure ………………………………………………………………………………………………………………………………………………………………………………..30
C
ONFIGURATION AVANCEE
……………………………………………………………………………………………………………………………………………………………………..31
Utilisateurs / Groupes ……………………………………………………………………………………………………………………………………………………………………..32
Accès au réseau ……………………………………………………………………………………………………………………………………………………………………………33
Serveur FTP ………………………………………………………………………………………………………………………………………………………………………………….34
Serveur UPnP AV …………………………………………………………………………………………………………………………………………………………………………..35
Serveur iTunes ………………………………………………………………………………………………………………………………………………………………………………36

Serveur DHCP ………………………………………………………………………………………………………………………………………………………………………………37
M
AINTENANCE
……………………………………………………………………………………………………………………………………………………………………………………38
Système ……………………………………………………………………………………………………………………………………………………………………………………….39
Mise à jour du microprogramme ……………………………………………………………………………………………………………………………………………………….40
Alertes électroniques ………………………………………………………………………………………………………………………………………………………………………41
Gestion de l’alimentation …………………………………………………………………………………………………………………………………………………………………42
Formatage …………………………………………………………………………………………………………………………………………………………………………………….43
Scan Disk ……………………………………………………………………………………………………………………………………………………………………………………..43
DNS dynamique …………………………………………………………………………………………………………………………………………………………………………….44
É
TAT
………………………………………………………………………………………………………………………………………………………………………………………………..45
TELECHARGEMENTS …………………………………………………………………………………………………………………………………………………………………………46
É
TAT DU TELECHARGEMENT
……………………………………………………………………………………………………………………………………………………………………48
FONCTION DIRECT ATTACHED STORAGE (STOCKAGE DIRECTEMENT CONNECTE) …………………………………………………………………………..49
CARACTERISTIQUES TECHNIQUES ……………………………………………………………………………………………………………………………………………………51
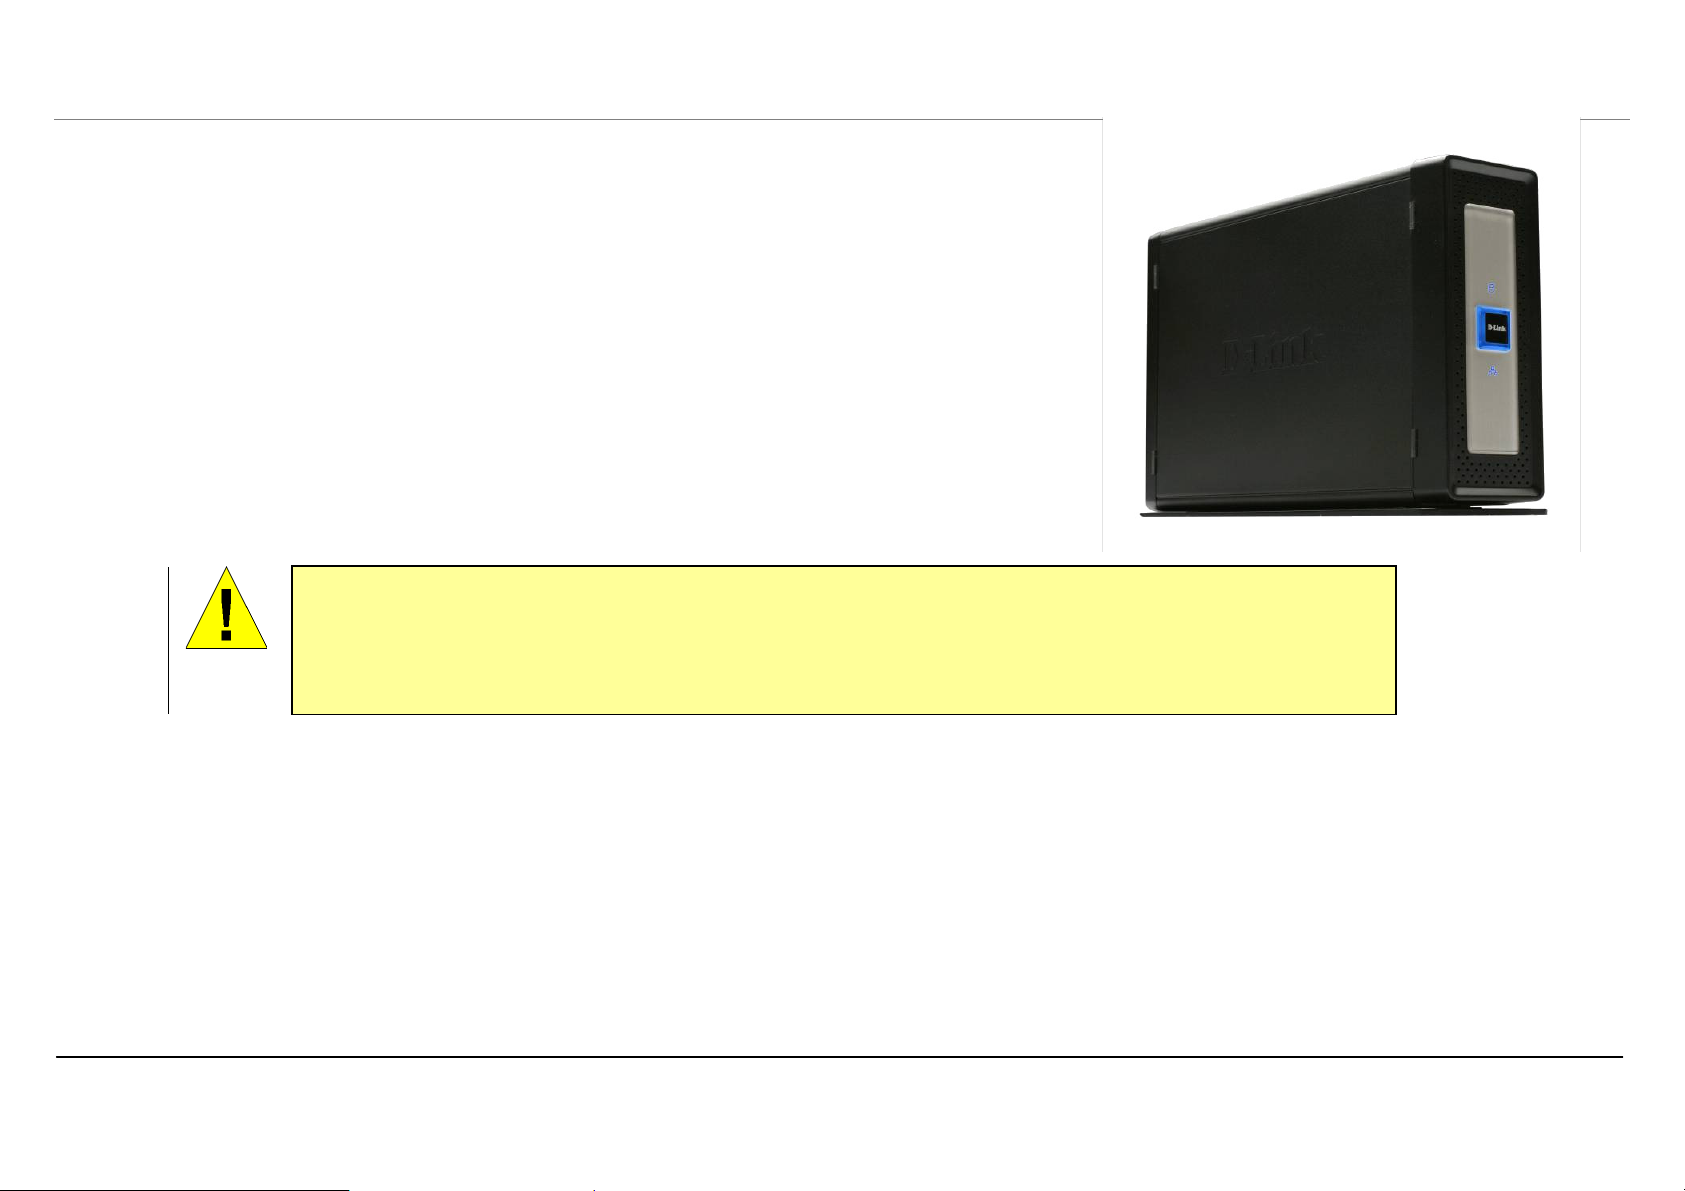
Vue d’ensemble du produit
•
Boîtier de stockage réseau DNS-313 D-Link
•
CD-ROM avec manuel et logiciel
•
Guide d’installation rapide
•
Adaptateur secteur (12 V ; 3 A)
•
Cordon d’alimentation
•
Pieds verticaux
•
Câble USB 2.0
•
Câble Ethernet cat. 5
L’utilisation d’une alimentation dont la tension diffère de celle du DNS-313 risque d’endommager le
produit et en annule la garantie.
MISE EN
GARDE
Contenu de la boîte
Configuration système requise
•
le DNS-313 requiert l’installation d’un disque dur avant toute utilisation. Il doit s’agir d’un disque dur SATA de 3,5 pouces et de n’importe quelle
capacité.
Pour obtenir des résultats optimaux, les exigences minimales suivantes sont recommandées sur tout système servant à configurer et utiliser le DNS-313 :
•
Ordinateur avec : processeur de 1 GHz / 512 MB de RAM / 200 Mo d’espace disque disponible / lecteur de CD-ROM
•
Internet Explorer 6.0 ou Mozilla Firefox 1.0 et versions ultérieures
•
Windows XP SP2, Windows 2000 SP6 ou Windows Vista
Manuel d’utilisation du DNS-313 D-Link

Vue d’ensemble du produit
Introduction
Le boîtier de stockage réseau à 1 baie DNS-313 D-Link vous permet de partager vos documents, photos, musiques et vidéos sur le réseau et Internet (via un serveur
FTP). Votre famille, vos amis, voire vos employés peuvent ainsi y accéder. Ce boîtier, qui peut contenir un disque dur SATA 3,05” de toute capacité, créé un point de
réseau central pour sauvegarder vos fichiers de valeur.
Le DNS-313 permet de partager des fichiers sur Internet, grâce au serveur FTP intégré. Des utilisateurs et des groupes peuvent être créés et attribués à des dossiers,
avec des permissions de lecture ou de lecture/écriture. De plus, le DNS-313 peut servir à diffuser des photos, de la musique et des vidéos sur des lecteurs multimédia
en réseau UPnP AV compatibles.
Le CD joint contient l’utilitaire Easy Search de D-Link. Suite à l’installation initiale et au premier formatage du disque dur, cet utilitaire vous permet de localiser le
DNS-313 sur le réseau et de connecter des disques à votre ordinateur. Le logiciel de sauvegarde se trouve également sur le CD. Il vous permet de sauvegarder les
fichiers de votre ordinateur sur le DNS-313 manuellement, via un calendrier ou en temps réel. Les sauvegardes en temps réel représentent un excellent moyen de se
prémunir contre les accidents entraînant une perte de fichiers importants.
Associant la simplicité d’utilisation avec des fonctions pratiques et très performantes, le DNS-313 est une solution organisée adaptée à tous les réseaux. Libérez de
l’espace disque sur vos ordinateurs et centralisez les données sur votre réseau grâce au boîtier de stockage réseau à 1 baies DNS-313.
1
Manuel d’utilisation du DNS-313 D-Link
Remar
que :
Veuillez relier votre routeur et le DNS-313 via un câble Ethernet, puis exécuter l’assistant d’installation se trouvant sur
le CD lorsque vous installez un nouveau disque dur dans le DNS-313. Lors de la première mise sous tension, au cours de
la séquence d’initialisation initiale, le DNS-313 attend qu’une adresse IP lui soit attribuée via le DHCP. Si aucune
adresse IP ne lui est attribuée par le DHCP, il démarre par défaut avec l’adresse IP 192.168.0.32 attribuée
automatiquement.

Vue d’ensemble du produit
Caractéristiques
Le boîtier de stockage réseau DNS-313 est une plate-forme de stockage de données simple à installer, servant à réaliser un accès distant via un réseau privé ou sur
Internet. Installez un disque dur SATA de n’importe quelle taille pour exploiter tous les avantages du DNS-313, y compris les fonctions du produit répertoriées ici :
•
Une baie de disques durs pour un disque dur SATA de 3,5” dont la capacité atteint 1 000 Go1
•
Procédure d’installation du disque dur simplifié ; aucun outil n’est requis
•
Connectivité Ethernet hautes performances en giga-octets
•
Serveur FTP intégré pour accéder aux fichiers depuis Internet2
•
Téléchargements planifiés sur des sites Web ou FTP
•
Sauvegardes totales ou incrémentales
•
Sauvegardes en temps réel avec logiciel de sauvegarde inclus
•
Des utilisateurs et des groupes peuvent être attribués à des dossiers ayant une permission de lecture ou lecture/écriture et des notifications
automatiques par courrier électronique
•
Gestion de l’alimentation pour conserver l’énergie et allonger la durée de vie du disque dur
•
Serveur UPnP AV pour diffuser de la musique, des photos et des vidéos sur les lecteurs multimédia compatibles3
•
Logiciel iTunes® permettant de rechercher et de lire automatiquement de la musique, directement sur le DNS-313.
•
Port USB 2.0 inclus, à utiliser comme disque dur portable4
•
Utilitaire Easy Search de D-Link
•
Utilitaire Click’n Connect D-Link
•
Configurable via un navigateur Web
1
Disque dur non inclus. Prend en charge un disque dur SATA atteignant 1 000 Go à partir de l’heure d’impression.
2 Notez que l’utilisation d’un serveur FTP pour accéder aux fichiers sur Internet n’implique pas que les transmissions sont sécurisées ou chiffrées.
3
D-Link ne peut pas garantir la compatibilité totale ou la lecture appropriée avec tous les codecs. La fonction de lecture dépend du support codec du lecteur multimédia UPnP™ AV.
4 Lorsque le DNS-313 sert de disque portable à port USB 2.0, la fonction de stockage réseau est désactivée. Pour réactiver la fonction de stockage réseau, veuillez éteindre le DNS-313 et débrancher le câble USB. Ensuite,
branchez le câble Ethernet et rallumez le DNS-313.
Manuel d’utilisation du DNS-313 D-Link

Vue d’ensemble du produit
Façade
Description du matériel
Voyant du disque
Le voyant est BLUE et fixe lorsque le disque est
connecté, mais inactif. Il clignote lorsqu’une personne
accède au disque, le formate ou le synchronise. Le voyant
est VERT fixe lorsque la capacité restante du disque est
inférieure à 5 %. Il est ROUGE en cas de panne du disque.
Bouton de mise sous tension
Appuyez dessus pour allumer le DNS-313. Les bords
du bouton sont rétroéclairés en BLEU lorsque le
périphérique est allumé. Appuyez de nouveau pour
l’éteindre. Un délai de quelques secondes sépare
l’allumage et l’arrêt.
Voyant d’activité
Le voyant d’activité est BLEU et fixe lorsqu’une
connexion Ethernet est établie. Il clignote pour indiquer
un trafic sur le réseau local.
Manuel d’utilisation du DNS-313 D-Link

Vue d’ensemble du produit
Panneau arrière
Réinitialisation
Utilisez-le pour réinitialiser le DNS-313
aux paramètres d’usine par défaut. Pour
le réinitialiser, insérer un stylo à bille et
maintenir le bouton enfoncé pendant
Levier d’éjection des disques
Utilisez le levier fourni pour éjecter le
disque dur après avoir retiré la façade.
Ventilateur du système
Le ventilateur du système sert à
refroidir le disque dur lorsqu’il est
enclenché par le capteur thermique.
Il reste inactif s’il n’est pas utile. Ne
Port USB
Pour USB destiné à la connexion à un
ordinateur fixe ou portable en tant que
disque portable USB 2.0.
Port Ethernet
Port Ethernet en gigabits connectant le
DNS-313 à un réseau local.
Fiche d’alimentation
Branchez l’alimentation 12 V 3 A ici.
Manuel d’utilisation du DNS-313 D-Link

Installation du matériel
Installation du matériel
Suivez les instructions suivantes pour installer un disque dur, le connecter au réseau et allumer le DNS-313. Ouvrez le carton d’expédition du DNS-313, puis retirez
et déballez soigneusement son contenu. Procédez comme suit pour installer le DNS-313. Si vous l’utilisez pour la première fois ou si un nouveau disque dur est
installé, utilisez l’utilitaire de configuration Click n’ Connect présent sur le CD d’installation, puis suivez les instructions d’installation, de configuration et de
formatage du nouveau disque dur.
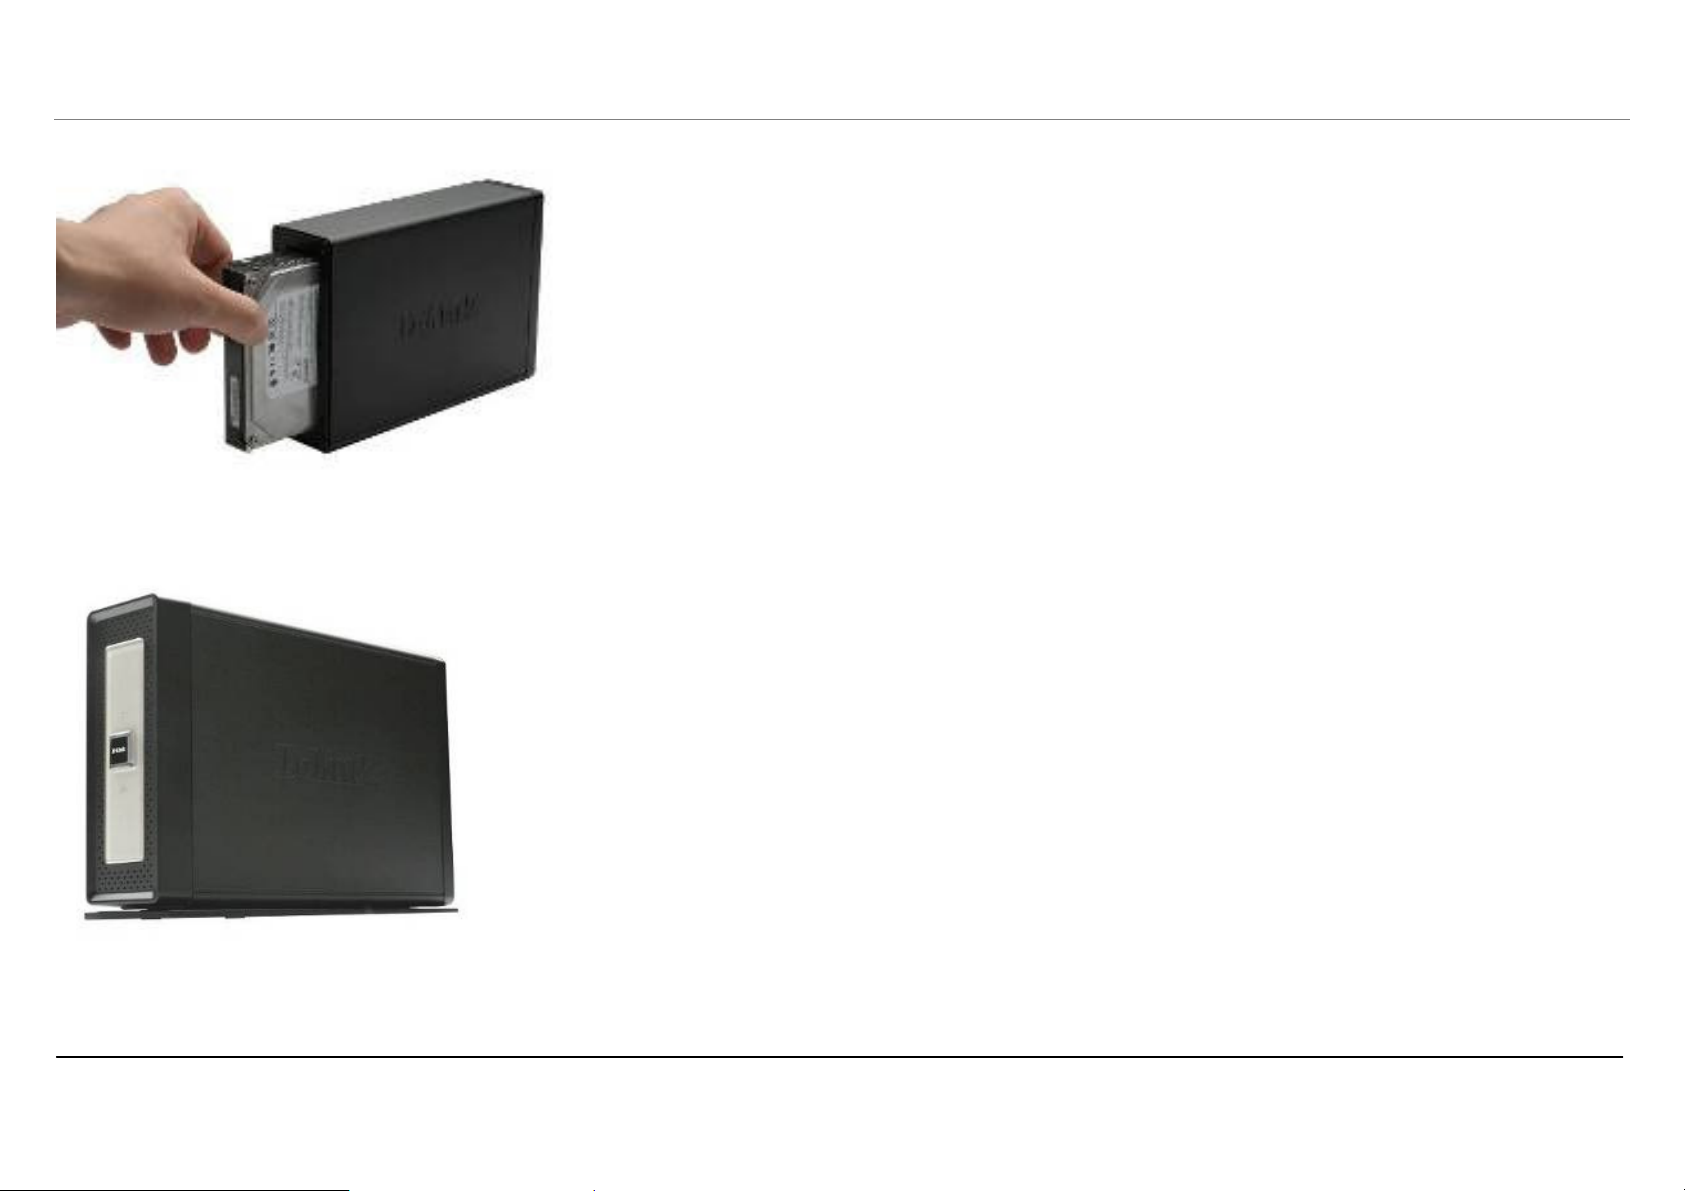
1. Accédez à la baie des disques en tirant la face avant vers vous jusqu’à ce qu’elle se décroche de l’appareil.
2. Une fois que la face avant est décrochée, retirez-la de l’appareil pour faire apparaître la baie.
Manuel d’utilisation du DNS-313 D-Link
Installation du matériel
3. Insérez un disque dur SATA de 3,5 pouces dans la baie. Veillez à bien aligner les connecteurs des disques avec les points de connexion du DNS-313.
Insérez délicatement les disques jusqu’à ce qu’ils se connectent.
4. Remontez la face avant sur l’appareil.
Manuel d’utilisation du DNS-313 D-Link
Installation du matériel
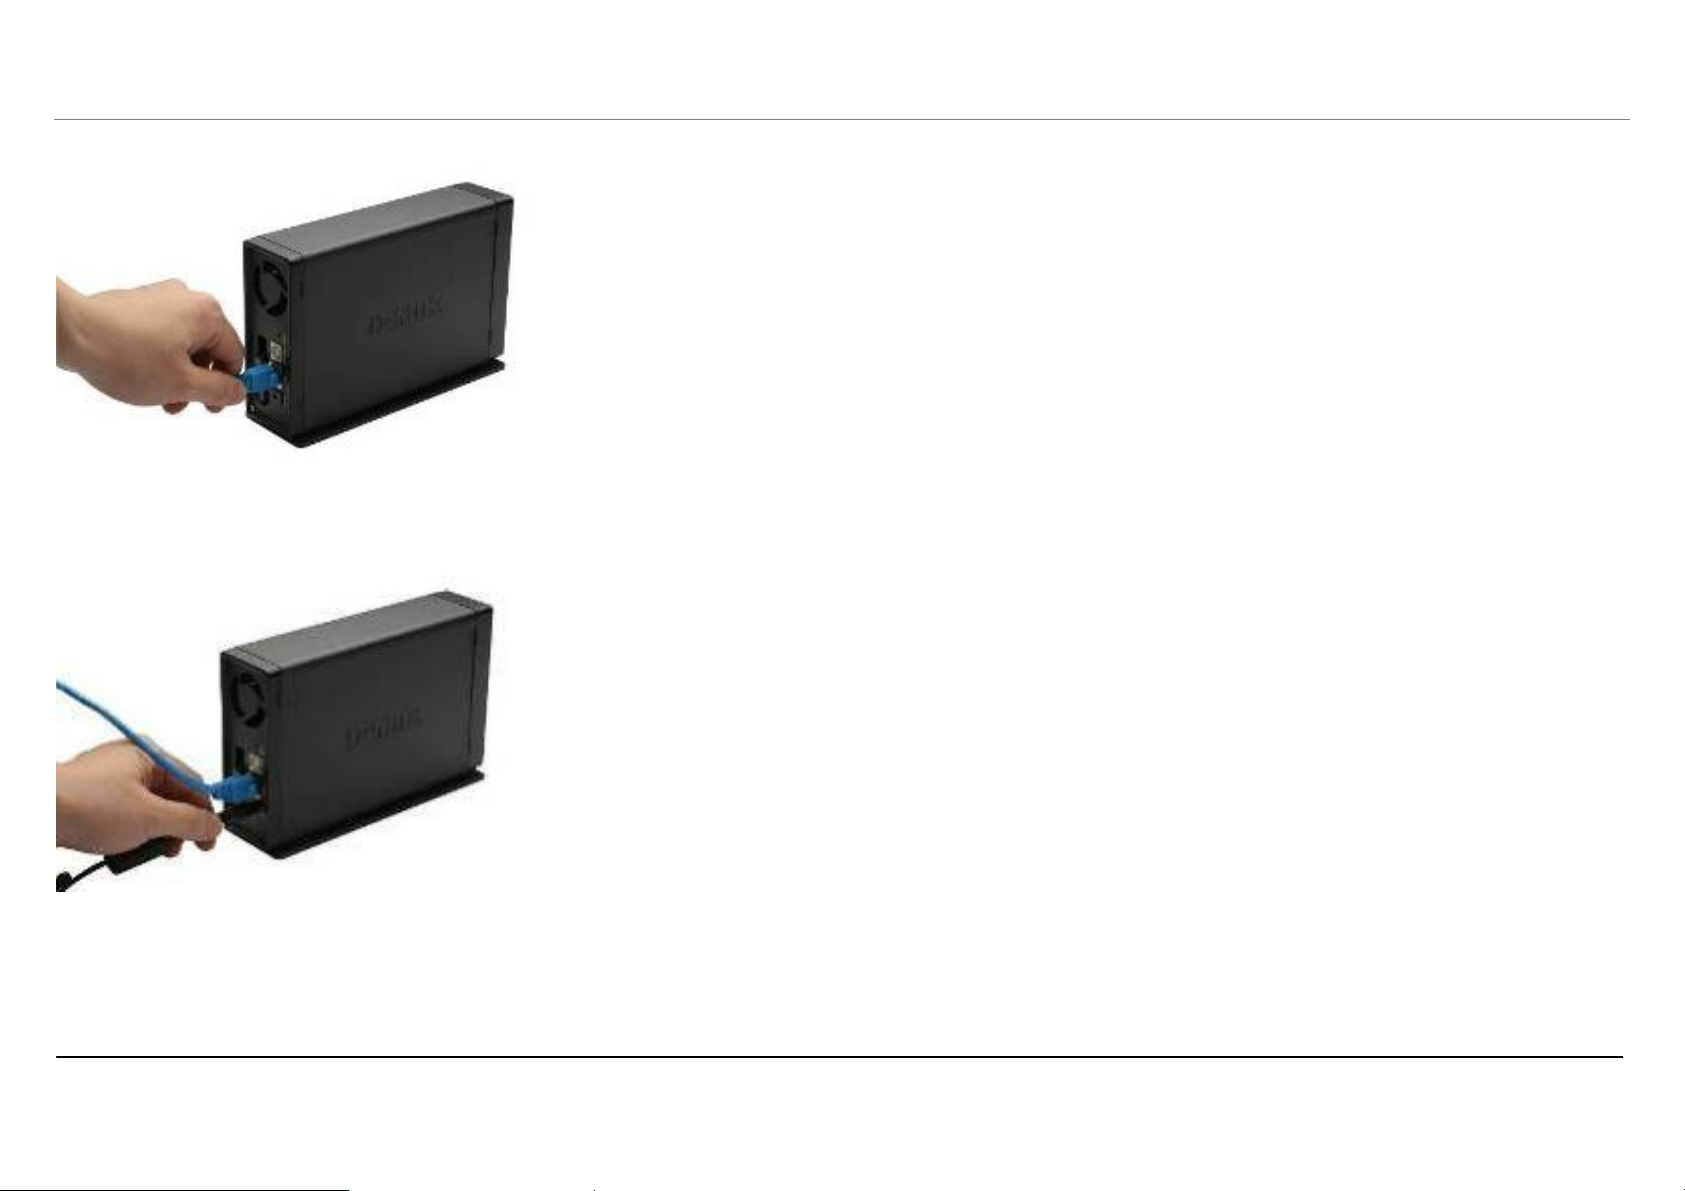
5. Branchez un câble Ethernet au port Ethernet disponible. Ce câble doit relier le DNS-313 à votre réseau local ou directement à un ordinateur pour sa
configuration.
Rema
rque :
Quand vous installez un disque dur, vous devez le formater pour pouvoir l’utiliser dans
le DNS-313. Insérez le CD d’installation dans le lecteur de CD-ROM ou de DVD-ROM
de votre ordinateur, puis suivez les instructions suivantes pour utiliser l’utilitaire Easy
Search et établir une liaison réseau avec le DNS-313. Ensuite, utilisez le logiciel de
gestion Web pour formater le nouveau disque dur.
Tous les disques durs installés dans le DNS-313 doivent impérativement être formatés
avant tout usage.
6. Enfin, branchez l’adaptateur secteur dans une prise de courant.
Quand vous installez un nouveau disque dur, vous devez le formater pour pouvoir l’utiliser dans le DNS-313. Insérez le CD d’installation dans le lecteur de CD/DVD
de votre ordinateur et suivez les instructions afin d’utiliser l’utilitaire Click’n Connect en vue de formater le nouveau disque dur.
Tous les disques durs installés dans le DNS-313 doivent impérativement être formatés avant tout usage.
Manuel d’utilisation du DNS-313 D-Link
Utilitaire d’installation
Utilitaires de configuration
L’utilitaire de configuration du CD d’installation sert à installer le DNS-313 pour la première fois ou, après avoir formaté le disque dur, à définir et configurer les
paramètres IP et connecter le disque à votre ordinateur Windows.
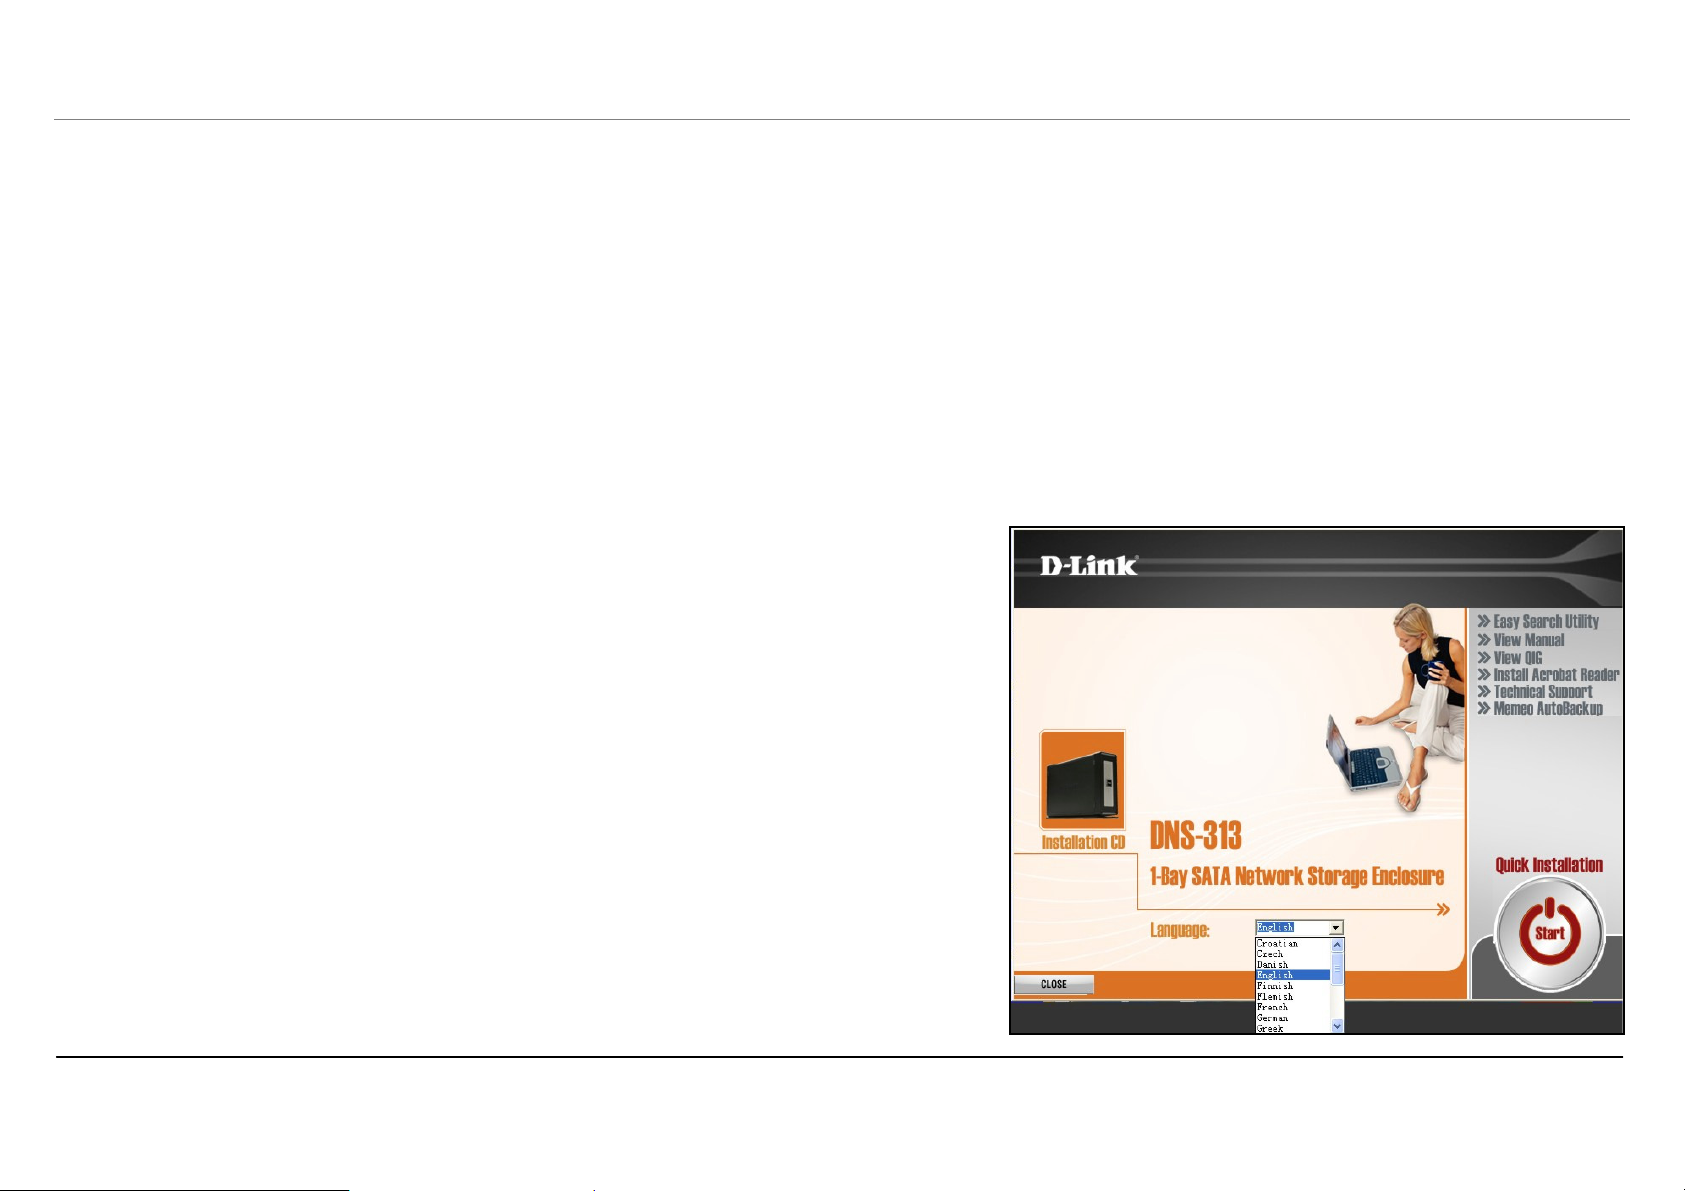
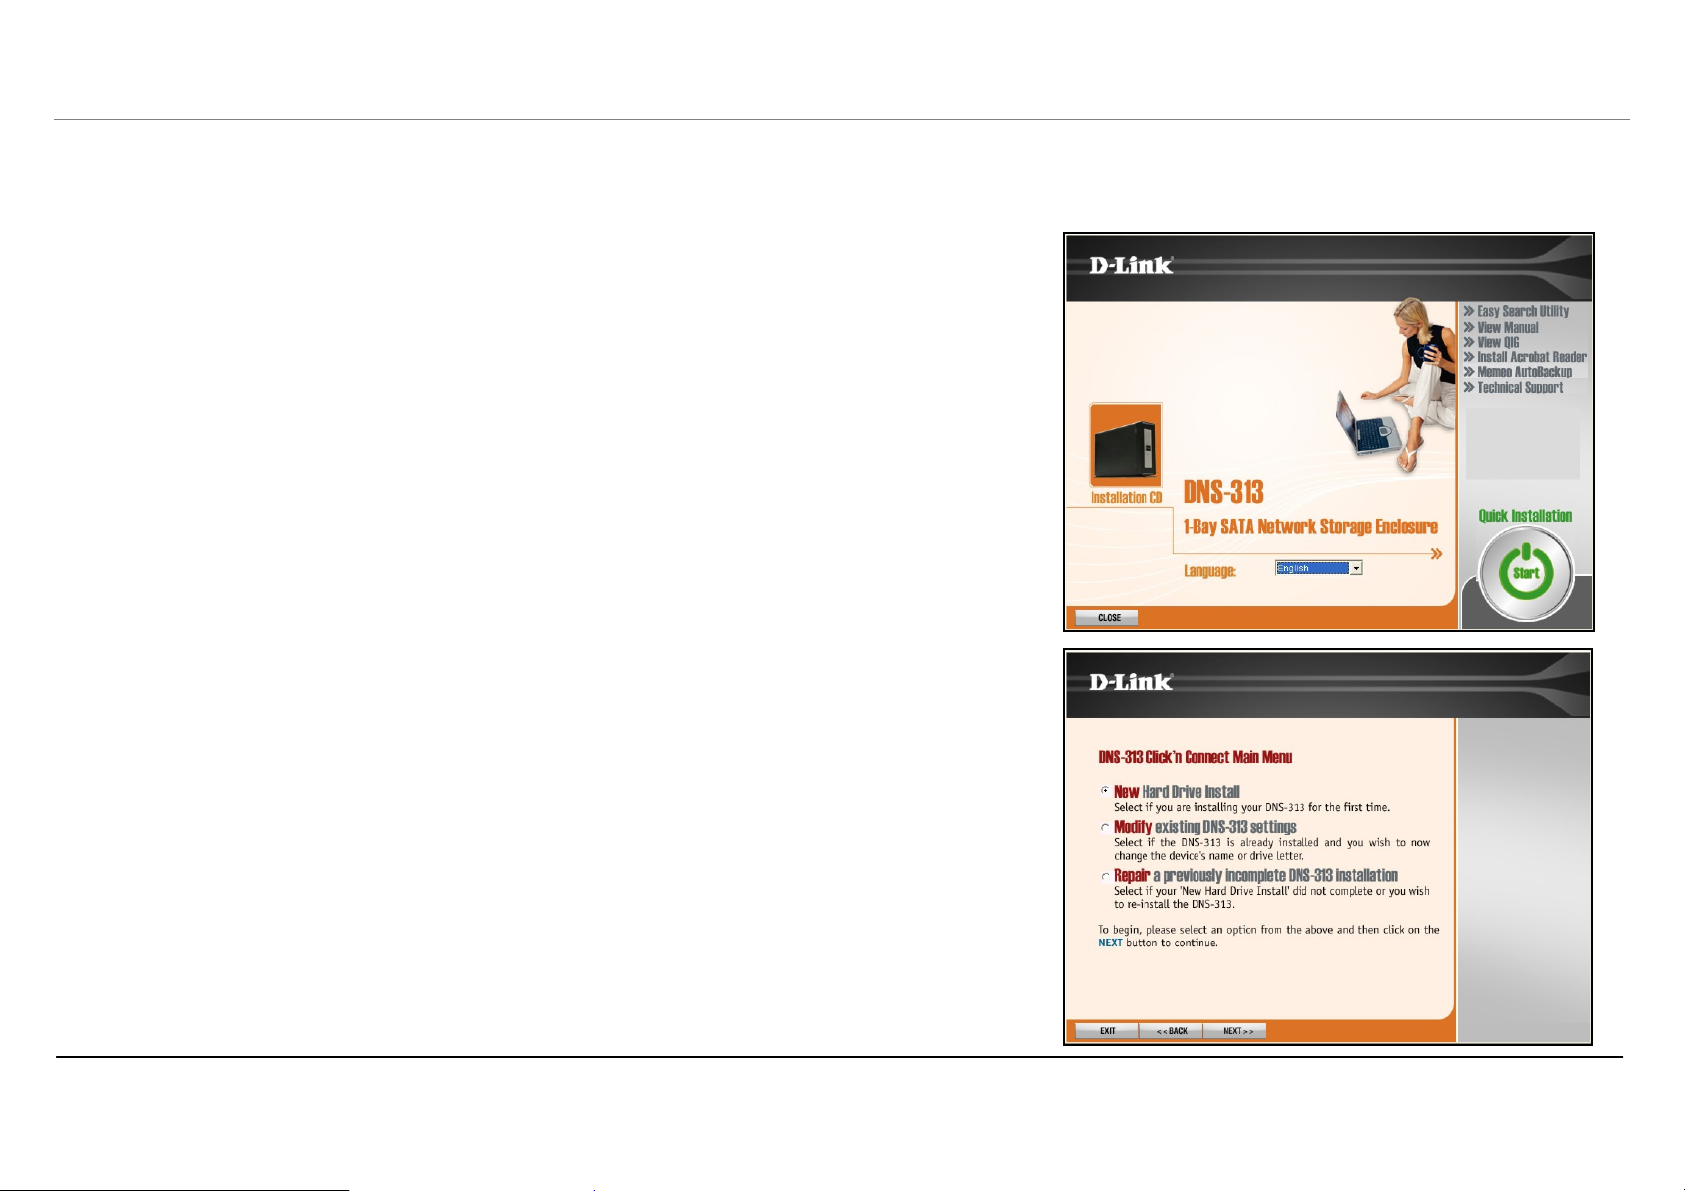
Pour utiliser l’utilitaire Click n’ Connect en vue de l’installation initiale, insérez le CD d’installation dans le lecteur de CD-ROM de votre ordinateur, puis suivez les
instructions de la section suivante. Après avoir inséré le CD, le menu suivant doit apparaître sur le bureau, après quelques secondes. Utilisez ce menu pour
l’installation rapide de Click n’ Connect, mais aussi pour lancer l’utilitaire Easy Search ou n’importe quelle option répertoriée dans la liste figurant dans le volet de
droite.
L’utilitaire Click n’ Connect réalise l’ensemble du processus d’installation, y compris l’insertion d’un disque dur SATA, le formatage du disque et la connexion du
disque à votre ordinateur. L’utilitaire Easy Search peut servir à définir les paramètres IP, puis à connecter le disque réseau à votre ordinateur. Il ne peut pas être utilisé
avec un disque dur non formaté. Vous devez donc utiliser Click n’ Connect pour la première installation, puis utiliser Easy Search sur n’importe quel ordinateur
utilisant le disque de stockage réseau.
Les utilitaires Click n’ Connect et Easy Search sont présentés ci-dessous, dans des sections
distinctes.
Manuel d’utilisation du DNS-313 D-Link
Utilitaire d’installation
Click n’ Connect pour l’installation d’un nouveau disque dur
Pour utiliser l’utilitaire Click n’ Connect de D-Link, sélectionnez la langue souhaitée, puis cliquez sur le
bouton Quick Installation — Start (Installation rapide – Démarrer) dans le menu. Le bouton devient
vert lorsque le curseur est placé dessus.
1. Les options d’installation de Click n’ Connect apparaissent dans un nouveau menu.
Choisissez celle qui vous convient.
• S’il s’agit d’un nouveau disque dur que vous installez, choisissez l’option New
Hard Drive Install (Installation d’un nouveau disque dur), puis cliquez sur le
bouton Next (Suivant).
• Si vous modifiez les paramètres d’un disque précédemment configuré, choisissez
Modify existing DNS-313 settings (Modifier les paramètres existants du
DNS-313), puis cliquez sur le bouton Next (Suivant).
• Si vous tentez de réaliser une installation incomplète ou si vous devez réinstaller
le DNS-313, choisissez l’option Repair (Réparer), puis cliquez sur le bouton
Next (Suivant).
Manuel d’utilisation du DNS-313 D-Link
10
Utilitaire d’installation
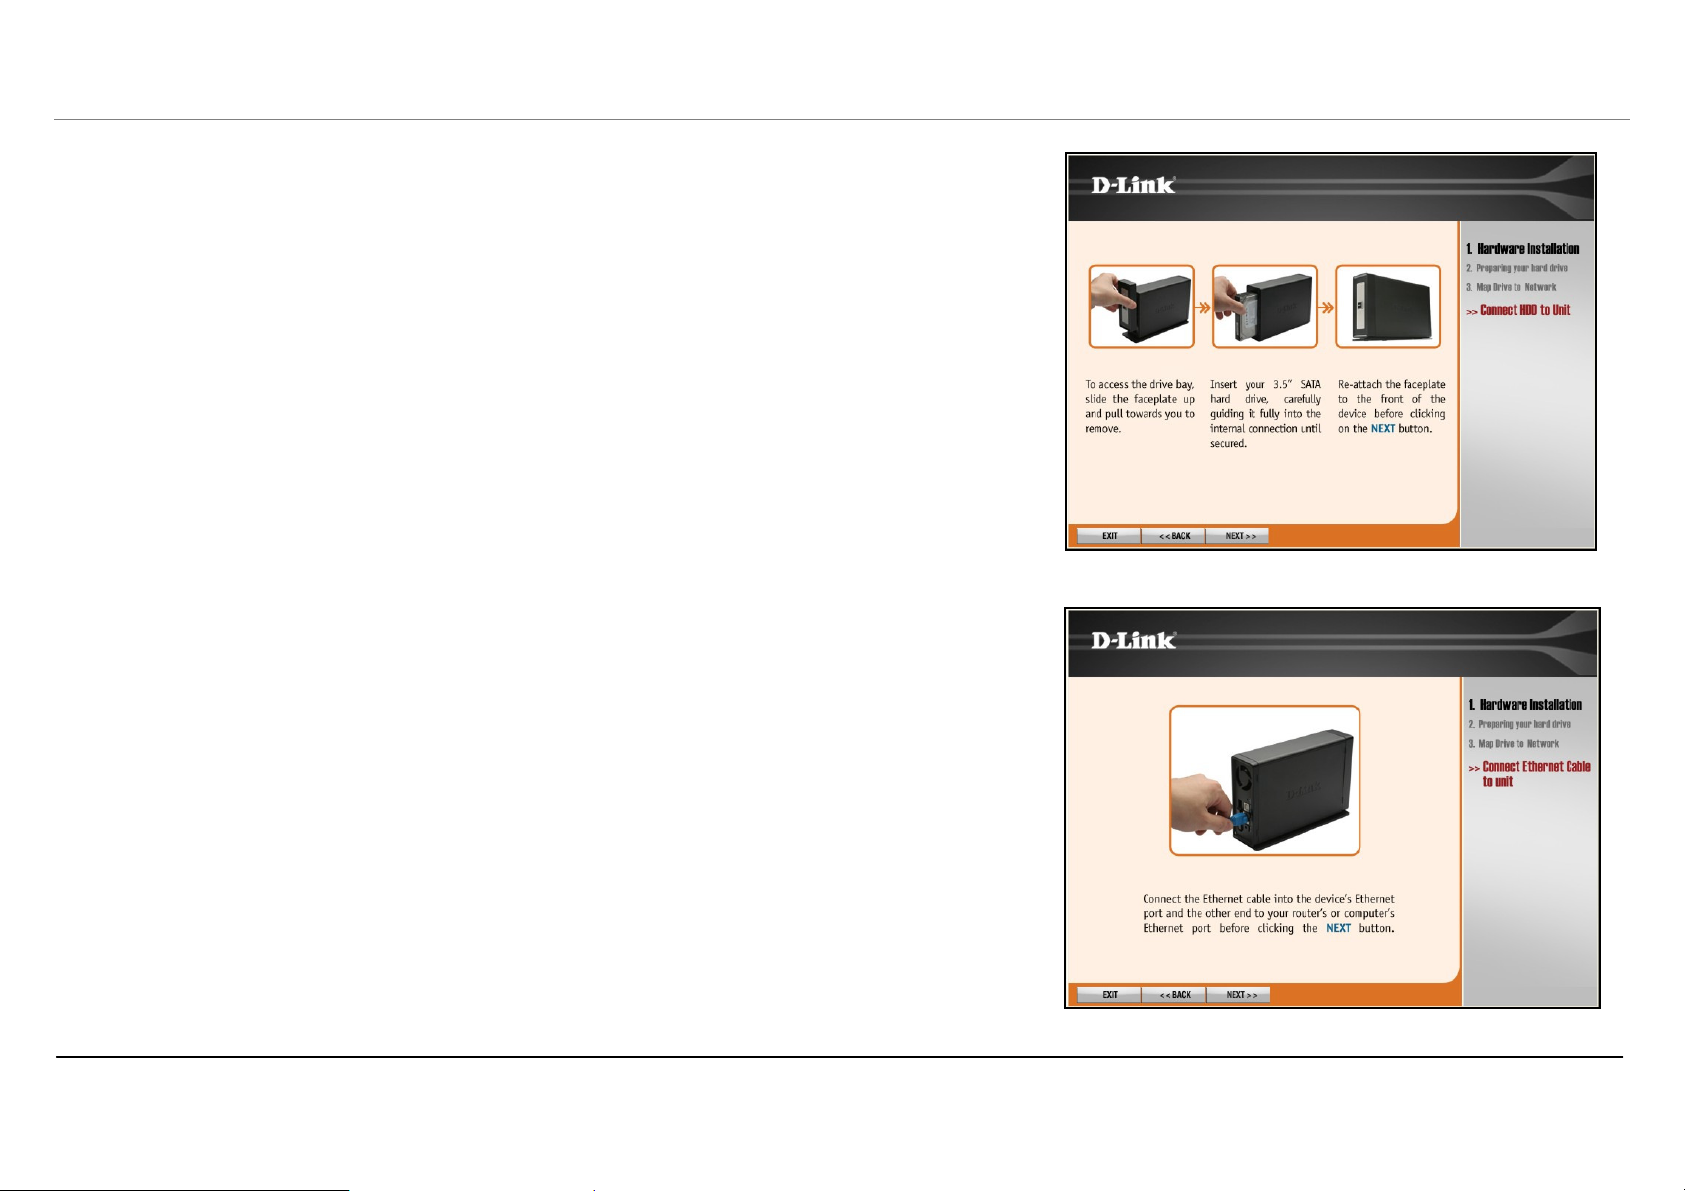
Pour l’installation d’un nouveau disque dur, le menu Click n’ Connect indique comment installer le
disque dur SATA. Si vous ne l’avez pas encore fait, installez le disque comme illustré. Si vous avez déjà
installé le disque dur, connecté et allumé le périphérique, ignorez les menus d’installation du matériel.
Cliquez sur le bouton Next (Suivant) pour continuer.
2. Connectez le DNS-313 au port Ethernet de votre ordinateur ou de votre routeur, puis
cliquez sur le bouton Next (Suivant) pour passer à la dernière illustration d’installation du
matériel.
Manuel d’utilisation du DNS-313 D-Link
11
Utilitaire d’installation
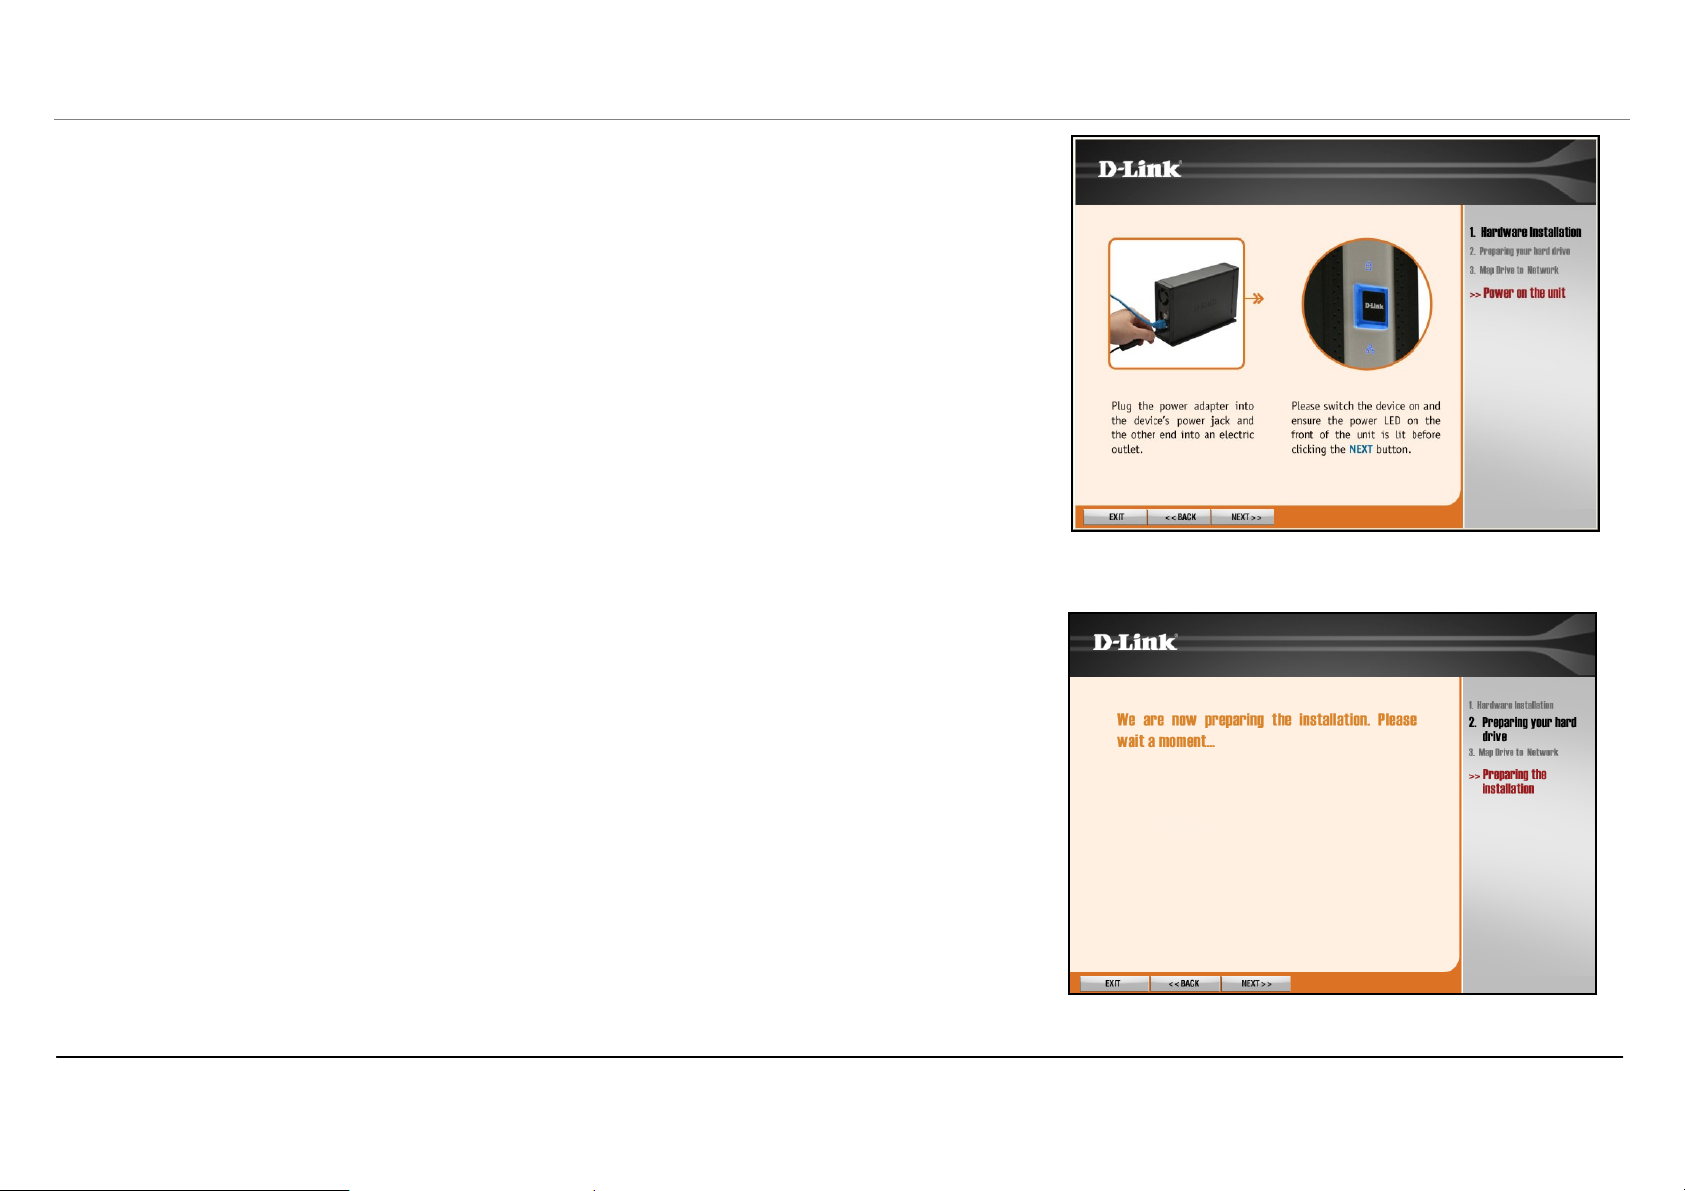
3. Connectez l’alimentation et allumez le DNS-313 comme illustré. Cliquez sur le bouton
Next (Suivant) pour commencer à rechercher le disque.
La détection du DNS-313 peut prendre quelques secondes selon l’état du réseau.
Remar
que :
À la première mise sous tension, pendant la séquence de démarrage
initiale, le DNS-313 attend de se voir attribuer une adresse IP via DHCP.
Si aucune adresse IP ne lui est attribuée par le DHCP, il démarre par
défaut avec l’adresse IP 192.168.0.32 attribuée automatiquement.
Une fois l’installation du DNS-313 non formaté détectée, un nouveau menu apparaît.
Manuel d’utilisation du DNS-313 D-Link
12

Utilitaire d’installation
4. Le disque dur est maintenant prêt à être formaté. Pour ce faire, cliquez sur le bouton Next
(Suivant). N’oubliez pas que les données du disque seront effacées au cours du
formatage.
Le formatage peut prendre quelques minutes si le disque est très grand.
Manuel d’utilisation du DNS-313 D-Link
13
Utilitaire d’installation
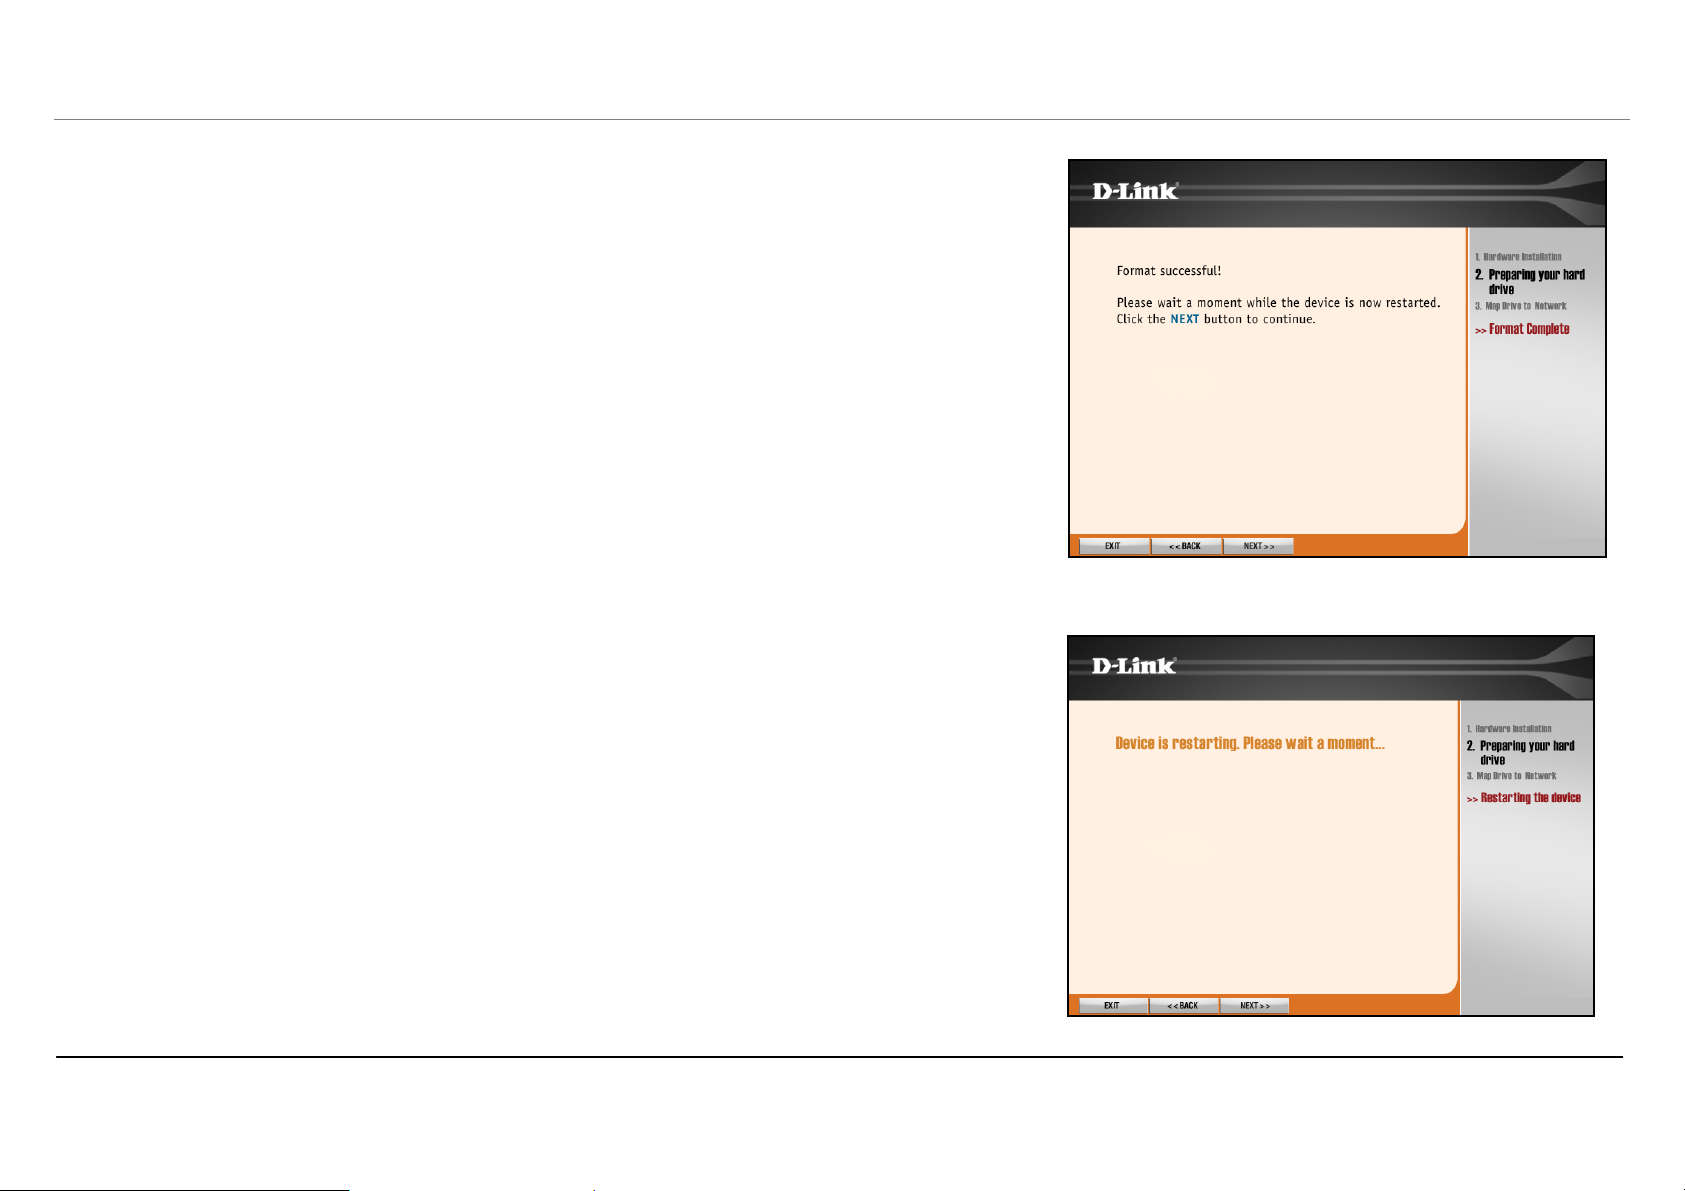
5. Une fois le nouveau disque correctement formaté, un message vous informe que le
processus est terminé. Cliquez sur Next (Suivant) pour redémarrer le DNS-313 et passer
à la phase suivante, la connexion du disque à votre ordinateur.
Le redémarrage prend environ deux minutes. Veuillez attendre que le disque soit détecté et répertorié
dans le menu.
Manuel d’utilisation du DNS-313 D-Link
14
Loading…
View the manual for the D-Link DNS-313 here, for free. This user manual comes under the category external hard drives and has been rated by 1 people with an average of a 7.4. This manual is available in the following languages: English. Do you have a question about the D-Link DNS-313?
Ask your question here
Frequently asked questions
Can’t find the answer to your question in the manual? You may find the answer to your question in the FAQs about the D-Link DNS-313 below.
What is the weight of the D-Link DNS-313?
The D-Link DNS-313 has a weight of 1290 g.
Is the manual of the D-Link DNS-313 available in English?
Yes, the manual of the D-Link DNS-313 is available in English .
Is your question not listed? Ask your question here
-
Страница 1
1[…]
-
Страница 2
2 Table of Contents Product Overview ………………………………………… 3 Package Contents……… ……………………… …………….3 System Requirements …………………………. ………………… 4 Introduction …………………………. ………………… ……………… 4 Features ……………..[…]
-
Страница 3
3 Product Overview Package Contents D-Link DNS-313 Network Enclosure CD-ROM with Manual and Software Quick Installation Guide Power Adapter (12V/ 3A) Power cord Vertical stands USB 2.0 Cable Cat 5 Ethernet Cable Note: Using a power supply with a diffe rent voltage than the one incl uded with the DNS-313 will ca use d[…]
-
Страница 4
4 System Requirements For best results, the following S ystem Requirements are recommended: Computer with: 1Ghz proce ssor / 512 MB RAM / 200 MB available space / CD-ROM drive Internet Explorer version 6.0 or Mozilla Firefox 1.0 and above 3.5” SATA Hard Drive Windows XP SP2, Windows 2000 SP6 or Windows Vista Introduction The D-Link DNS-313 1-Bay […]
-
Страница 5
5 Combining ease of use with pract ical, high performance features, t he DNS-313 is an organized solution for any network. Free up disk space on computers and cent ralize data on your network with the DNS-313 1-Bay Network Storage Enclosure! 1 Hard Drive not included. Supports up to 1000GB SA TA Hard drive as at time of print. 2 Note that use of an[…]
-
Страница 6
6 1 Hard Drive not included. Supports up to 1000GB SA TA Hard drive as at time of print. 2 Note that use of an FTP Server to access files over the Internet does not provide for se cure or encrypted transmissions. 3 D-Link cannot guarantee full compatibilit y or proper playback with all codecs. Playback capability depends on the codec suppo rt of th[…]
-
Страница 7
7 Hardware Overview Front View Power Button: Press once to power on the DNS-313. Press again to power off the DNS-313. Drive LED: The LED will be solid BLUE wh en drive is connected but inactive. The LED will blin k when the drive is being accessed, formatted or synchr onized. The LED will be solid GREEN when t he remaining capacity of the drive is[…]
-
Страница 8
8 Rear Panel (Connections) Power Receptacle: The 12V/ 3A power supply connects here. Ethernet Port: A Gigabit Ethernet port that connects the DNS-313 to the local network. USB Port: USB port for connecting to a desktop or notebook as a USB2.0 portable drive. Drive Eject Lever: Use the provided lever to eject the hard drive. T he front panel must be[…]
-
Страница 9
9 Installation Hardware Setup This section provides unpacki ng and installation information for the DNS-313. Open the shipping carton for the DNS-313 and carefully unpack its contents. To install the DNS-313 on your local network, refer to the steps below: 1. Access the drive bays by sliding the faceplate up until it unlatches from the device. 2. O[…]
-
Страница 10
10 4. Attach the faceplate to the front of the device. 5. Connect an Ethernet c able into the available Ethernet port. This cable should connect the DNS-313 to your loca l network or directly to a computer for configuration. Note: Should you need to install a new Hard Disk into the DNS -313, you will be required to inse rt the Ethernet cable betwee[…]
-
Страница 11
11 Configuration Getting Started Note: Please insert an Ethernet cable from your router to the DNS-313 and run the installation wizard included in the CD whenever you inst all a new Hard Drive to the DNS-313. When first powered on, during the initi al boot sequence, the DNS-313 will wait to be assigned an IP address via DHCP. If it does not receive[…]
-
Страница 12
12 Logging in the Web GUI The Web UI allows you to configure the DNS-313 with more advanced func tions. You may access the Web UI by many ways: 1. Connect from installation Wizard. 2. Connect from the Easy Search Utility. 3. Open the web browser and type the IP address. Once you connect to the Web UI, the Login screen will appear: Type admin for th[…]
-
Страница 13
13 Web UI The DNS-313 web UI defaults to the Setup page. The main categories for configuration are located in the menu tabs at the top of the page. These categories include: Setup — Contains the DNS-313 setup wizard, as well as the LAN configuration settings, Device settings and Time and Date settings. Advanced — Allows the DNS-313 administ[…]
-
Страница 14
14 Setup Wizard The DNS-313 has a setup Wizard that allows you to quickly configure some of the basic device settings. When running the DNS-313 setup wizar d, the welcome screen details the five steps of the wizard. Click ‘Next’ to continue. Section 3 — Configuration[…]
-
Страница 15
15 It is recommended you set an admin password here. Enter the new password and re-enter it for confirmation. Click ‘Next’ to continue. Set the appropriate Time Zone and click ‘Next’ to continue. Section 3 — Configuration[…]
-
Страница 16
16 Edit or change the DNS-313 LAN informa tion, or to keep the current setti ngs, click ‘Next’ to continue. Enter a workgroup, name, and description for the DNS-313, or leave the default values and click ‘Next’ to continue. Section 3 — Configuration[…]
-
Страница 17
17 When the wizard completes, click ‘Back’ to go back and make changes or click ‘Rest art’ to restart the DNS-313 and save the configuration. While the DNS-313 is restarting, a Loading message will appear. Section 3 — Configuration[…]
-
Страница 18
18 When the login prompt appears, login us ing the new administrator password. Section 3 — Configuration[…]
-
Страница 19
19 LAN Setup The Local Area Network settings for the DNS-313 are configured on the LAN page. DHCP Client Selecting DHCP Client will cause the DNS-313 to obt ain an IP address from the local DHCP serve r. Static IP Selecting Static IP requires the user to assign the IP information for the DNS-313 manually. Section 3 — Configuration[…]
-
Страница 20
20 Device Settings The device settings page allows you to assign a workgroup, name and descri ption to the DNS-313. Workgroup Assigns a workgroup name to the DNS-313. Name Assigns a name to the DNS-313. The name can be used to access t he device from a web browser instead of the IP address, for example, http://DNS-313. Description Assigns a unique […]
-
Страница 21
21 Time and Date The DNS-313’s Time and Date menu contains several different options for setting the de vice’s internal clock. It is important that the accurate time is set so that scheduled backups an d downloads will be accurate. Time Zone Settings This option allows you to set appropriate Time Zone. Section 3 — Configuration[…]
-
Страница 22
22 Click ‘Set Time’ to sync with the local computer. From My Computer This option will synchronize the DNS-313 clock wit h the computer being used to configure it. Click ‘Set Time’ to sync with the local computer. NTP Server Network Time Protocol (NTP) synchronizes the DNS-313 with an Internet time server. Enter the IP Address or domain nam[…]
-
Страница 23
23 Advanced Users/Groups The DNS-313 supports up to 64 uniq ue users and 10 unique groups. The users can be spec ified by groups, or created individually for ease of management, and to aid in organization when setting up access rules and quotas. The users are created to a llow access to specific folders on the DNS-313, via FTP or the local network.[…]
-
Страница 24
24 User and Group Creation This section contains required attributes for a new user, incl uding user name and passw ord or create a new Group by assigning a unique group name. User Name Set a unique name for the user. Password Set a unique password for the user. Confirm Password Confirm the assigned password for the user. Group settings Select a pr[…]
-
Страница 25
25 Network Access The Network Access settings a llow you to assign users and groups to spec ific folders or volumes. By default, all users are allowed Read/Write access to all volume s. Before specific user or group rules can be created, the default rules must be deleted. Network Access Settings Assign permissions for users and groups on the local […]
-
Страница 26
26 Category Determines whether the access rule will apply to a group or individual user. Group / User Select the group or user the access rule will apply to. Folder Browse to and select the folder or directory you are controlling access to. Permission Set the user or group permission to Read Only or Read/Write. Comment Enter a comment for reference[…]
-
Страница 27
27 FTP Server The DNS-313 is equipped with a built in FTP Server. The server is easy to configure and allows users access to important data whether they are on the local network or at a remote loca tion. The FTP server can be configured to allow user a ccess to specific directories, and will al low up to 10 users to access the DNS-313 at a time. FT[…]
-
Страница 28
28 FTP Server Status The current settings and status of the DNS-313 FTP Server are displayed here. FTP Server Settings Category Determines whether the FTP server rule will apply to a group or individual user. Section 3 — Configuration[…]
-
Страница 29
29 User /Group Select the user or group the FTP server rule will apply to. Folder Browse to and select the folder or dire ctory you are granting FTP access to. Select root to grant access to all volumes. Permission Set the user or group permission to Read Only or Read/Write. Max User Sets the maximum amount of users t hat can connect to the FTP ser[…]
-
Страница 30
30 Name Name the DNS-313 FTP server rule. IP Address Enter the IP address of the DNS-313. Public Port Enter the public FTP port. By default, the port is 21. Private Port Enter the private FTP port. By default, the port is 21. Traffic Type Set the traffic type to TCP. If you use an FTP port other than 21, then users accessing the FTP server using an[…]
-
Страница 31
31 UPnP AV Server The DNS-313 features a UPnP AV Server. This server provides t he ability to stream photos, music and videos to UPnP AV compatible netw ork media players. If the server is enabled, th e DNS-313 will be automatically detected by UPnP AV compat ible media players on your local network. UPnP AV Server Select Enable or Disable to enabl[…]
-
Страница 32
32 Auto Refresh Sets the duration of time to refresh t he media files list of the UPnP AV Server. Refresh Click ‘Refresh’ after adding new files to be used by UPnP AV compatible devices. Section 3 — Configuration[…]
-
Страница 33
33 iTunes Server The DNS-313 features an iTunes Server. This server provides the abil ity to share music and videos to computers on the local network running iTunes. If the server is enabled , the DNS-313 will be automatically detected in the iTunes program and t he music and videos contain ed in the specified direc tory will be available to stream[…]
-
Страница 34
34 ‘Browse’ to select a specific folder. Password Sets password for the iTunes server. Refresh Click ‘Refresh’ after adding new files to be used with iTunes. After enabling the iTunes server on the DNS-313, launch iTunes. When iTunes detects the DNS-313, select it and you will be prompted to enter the iTunes server password. Select the DNS-[…]
-
Страница 35
35 Media stored on the DNS-313 will then be available for use in iTunes. Section 3 — Configuration[…]
-
Страница 36
36 DHCP Server The DNS-313 can also be used as a DHCP Server. As a DHCP serv er, it can be used to serve IP addresses to devices on your lo cal network, however, this feature shou ld not be enabled if you already have a DHCP server, such as a router on your local network. DHCP Server Enables or Disables the DNS-313 DHCP Ser ver. Starting IP Address[…]
-
Страница 37
37 Ending IP Address Enter the ending IP address for the range of addresses a ssigned by the DHCP server. Lease Time Sets the duration of time that an IP address will remain assigned to a device. Section 3 — Configuration[…]
-
Страница 38
38 Maintenance Admin Password The Admin Password menu allows you to set a passwo rd for the admin account. It is recommended to set an admin account password when first configuring the DNS-313. User Name The administrator user name is admin, and this cannot be changed. Password Enter the current password. Section 3 — Configuration[…]
-
Страница 39
39 New Password Enter the new password. Confirm Password Enter the new password again for confirmation. Click ‘Save Settings’ to save the new password. Section 3 — Configuration[…]
-
Страница 40
40 System The DNS-313 System menu provides opt ions for system restarts, savi ng and loading configuration settings, and setting idle times. Restart Click ‘Restart’ to reboot the DNS-313. Section 3 — Configuration[…]
-
Страница 41
41 Defaults Click ‘Restore’ to reset the DNS-313 to its factory default se ttings. This will erase all previous configuration changes. Shutdown Click ‘Shutdown’ to pow er off the DNS-313. Configuration Settings Click ‘Save’ to save the current DNS-313 c onfiguration settings to a file on the local computer. If at a later time you need t[…]
-
Страница 42
42 Firmware Upgrade The DNS-313 Firmware Upgrade menu makes it simple to check for new firmware releases and upload them to the device. Firmware Upgrade This section provides a link to check for new firmware on the D-Link support website. If a new firmware is available, downlo ad the file to your local computer. Current Firmware Info This section p[…]
-
Страница 43
43 When upgrading the firmware, click ‘Brows e’ to select the new firmware f ile on your local computer. Click ‘Apply’ to begin the firmware upgrade process. Section 3 — Configuration[…]
-
Страница 44
44 E-Mail Alerts With the DNS-313 E-Mail Alerts, you ca n configure e-mails to be sent alerting you to certain operational conditions and drive status conditions. These alerts can prove helpful with the management and safeguarding of important data. Section 3 — Configuration[…]
-
Страница 45
45 E-Mail Alert Settings This section contains the configurat ion settings for the outgoing e-mail accoun t and the receiving e-mail account. Once configured, use the ‘Test E-Mail button’ to s end a test e-mail and confirm your settings are correct. Alert Types This section contains the alert opti ons and their configuration settings. E-Mail Al[…]
-
Страница 46
46 Sender E-Mail Enter the “from” e-mail address (e .g. alerts@dns313.com). This field does not require a valid e-mail address. However, if your e-ma il client is filtering spam, make sure you allow this address to be received. Receiver E-Mail Enter the e-mail address you want to send t he alerts to. This address mu st correspond with the SMTP […]
-
Страница 47
47 Alert Types Space Status Select an interval in hours and minutes to have a st atus of space remaini ng on the drives e-mailed. Volume is Full An alert will be sent when the hard drive is full. Hard Drive Has Failed An alert will be sent if a critic al error occurs on the drive. Administrator Password Change An alert will be sent if the admin pas[…]
-
Страница 48
48 Power Management The DNS-313 Power Management feature allows you to configure the drives to shut down while power remains constant to the device. The drive s will power up agai n when data is accessed. Power Management Enable or Disable Powe r Management on the DNS-313. Turn off Hard Drive Set the amount of time before idle drive will shut down.[…]
-
Страница 49
49 Dynamic DNS (DDNS) The DDNS feature allows you to host a server (Web, FTP, Game Server, etc…) us ing a domain name that you have purchased (www.whatevery ournameis.com) with your dynam ically assigned IP address. Most broadband Internet Service Providers assign dynamic (changing) IP addresses. Using a DDNS service provider, your friends can en[…]
-
Страница 50
50 Enable DDNS Click to enable the DDNS function. Server Address Choose your DDNS provider from the drop down menu.. Host name Enter the Host Name that you regist ered with your DDNS service provider. Username or Key Enter the Username for your DDNS account. Password or Key Enter the Password for your DDNS account. Timeout Enter a time (in hours). […]
-
Страница 51
51 Status Device Info LAN Info Displays the local network settings of the DNS-313. Section 3 — Configuration[…]
-
Страница 52
52 Device Info Displays the workgroup, name, description and system temperat ure of the DNS-313. Hard Drive Info Displays the hard drive information, including the total capacity, us ed and unused drive space. Section 3 — Configuration[…]
-
Страница 53
53 Help The DNS-313 Help page provides a menu of Help t opics explaining the features of the device. Section 3 — Configuration[…]
-
Страница 54
54 Easy Search Utility The Easy Search Utility included in the CD provides many useful functions help you to discover the device, assign the IP address, mapping a dri ve, and connect to the device GUI. To run the Easy Search Utility, ins ert the DNS-313 CD into your CD-ROM drive, and click Easy Search Utility. Section 3 — Configuration[…]
-
Страница 55
55 Network Storage Device The Easy Search Utility displays any DNS-313 devices it detects on the network here. Refresh Refreshes the device list. Configuration Click ‘Configuration’ to acce ss the Web UI of the DNS-313. LAN Configure the LAN Settings for the DNS-313 here. Apply Click ‘Apply’ to save changes to the LAN Settings. Drive Mappin[…]
-
Страница 56
56 Mapping a Drive You can use the D-Link Easy Search Utility to map drives to your comp uter. Insert the DNS-313 CD into your CD-ROM drive. Click the ‘Easy Search Utility’. T he Easy Search Utility will load and det ect any DNS-313 devices that are on the local network. If the DNS-313 you are working with does not show up in the device list, c[…]
-
Страница 57
57 Highlight an available DNS-313. Available volumes will be displayed under Drive M apping. Highlight the volu me you want to map. Select an available drive letter from the drop-down menu and click ‘Connect’. Once connected, your mapped dri ve(s) will appear in My Computer. Double-click the My Com puter icon on your desktop. Section 3 — Config[…]
-
Страница 58
58 Double-click on the mapped drive to access the files and folders. Section 3 — Configuration[…]
-
Страница 59
59 Downloads The DNS-313 Schedule Download feature allows you to set up scheduled folder or file downloads and backup sessions. Begin by accessing the co nfiguration of the DNS-313: Click ‘Easy Search Utility’. Highlight an available DNS-313 and click ‘Co n figuration’ to access the web-based utility. The DNS-313 logi n screen will appear: […]
-
Страница 60
60 Type admin for the username and l eave the password field blank. Click ‘Downloads’. The DNS-313 Schedule Downl oads configuration will appear. Section 3 — Configuration[…]
-
Страница 61
61 Scheduling Scheduling Settings Configure download and backup schedules here. Schedule List The Schedule List will display all completed, active, and pending scheduled downloads and backups. Section 3 — Configuration[…]
-
Страница 62
62 Scheduling Settings Login Method Select the appropriate login method to acce ss the files for download. If the site r equires login credentials, select Account an d enter a valid username and password. Type Select File or Folder, depending on w hat you want to download or backup. URL Enter the URL of the site or server you are initiating a trans[…]
-
Страница 63
63 E.g. ftp:// 123.456.789/Test ftp: //123.456.789/test.txt h t t p ://www.test.com/test.txt Test Click ‘Test’ to test the URL is valid and the user name and password are correct. Local Click ‘Local’ to set the source f ile or folder from one of the in ternal drive volumes. Browse to the file or folder, and click ‘Ok’ to accept the netw[…]
-
Страница 64
64 Status Schedule List The Schedule List will display all completed, active, and pending scheduled downloads and backups. Section 3 — Configuration[…]
-
Страница 65
65 Direct Attached Storage Function Note: Before using the Direct Attached Storage func tion, make sure your DNS-313 has been configured. (Please refer to “Installation”). The DAS function will not work without the system being installed. The DNS-313 features a built-in Direct Attached Storage function to allo w the DNS-313 to function as a USB[…]
-
Страница 66
66 Turn on the Power Button of the DNS-313, In Window s 2000, XP and Vista the DN S-313 will automatically install upon power-on. Open My Computer and the new drive will be present. By default it will use the firs t available drive letter. Note: When using the DNS-313 as a USB 2.0 port portable drive, the Network Storage functionality will be disab[…]
-
Страница 67
67 Trademarks: D-Link is a registered trademark of D-Link Corpor ati on/D-Link Systems, Inc. Ot her trademar ks or registered trademarks are the property of their respective owners. Copyright . Statement:No part of this publication or documentation accompanying this produc t may be reproduced in any form or by any means or used to make any derivati[…]
-
Page 1: D-Link DNS-313
1[…]
-
Page 2: D-Link DNS-313
2 Table of Contents Product Overview ………………………………………… 3 Package Contents……… ……………………… …………….3 System Requirements …………………………. ………………… 4 Introduction …………………………. ………………… ……………… 4 Features ……………..[…]
-
Page 3: D-Link DNS-313
3 Product Overview Package Contents D-Link DNS-313 Network Enclosure CD-ROM with Manual and Software Quick Installation Guide Power Adapter (12V/ 3A) Power cord Vertical stands USB 2.0 Cable Cat 5 Ethernet Cable Note: Using a power supply with a diffe rent voltage than the one incl uded with the DNS-313 will ca use d[…]
-
Page 4: D-Link DNS-313
4 System Requirements For best results, the following S ystem Requirements are recommended: Computer with: 1Ghz proce ssor / 512 MB RAM / 200 MB available space / CD-ROM drive Internet Explorer version 6.0 or Mozilla Firefox 1.0 and above 3.5” SATA Hard Drive Windows XP SP2, Windows 2000 SP6 or Windows Vista Introduction The D-Link DNS-313 1-Bay […]
-
Page 5: D-Link DNS-313
5 Combining ease of use with pract ical, high performance features, t he DNS-313 is an organized solution for any network. Free up disk space on computers and cent ralize data on your network with the DNS-313 1-Bay Network Storage Enclosure! 1 Hard Drive not included. Supports up to 1000GB SA TA Hard drive as at time of print. 2 Note that use of an[…]
-
Page 6: D-Link DNS-313
6 1 Hard Drive not included. Supports up to 1000GB SA TA Hard drive as at time of print. 2 Note that use of an FTP Server to access files over the Internet does not provide for se cure or encrypted transmissions. 3 D-Link cannot guarantee full compatibilit y or proper playback with all codecs. Playback capability depends on the codec suppo rt of th[…]
-
Page 7: D-Link DNS-313
7 Hardware Overview Front View Power Button: Press once to power on the DNS-313. Press again to power off the DNS-313. Drive LED: The LED will be solid BLUE wh en drive is connected but inactive. The LED will blin k when the drive is being accessed, formatted or synchr onized. The LED will be solid GREEN when t he remaining capacity of the drive is[…]
-
Page 8: D-Link DNS-313
8 Rear Panel (Connections) Power Receptacle: The 12V/ 3A power supply connects here. Ethernet Port: A Gigabit Ethernet port that connects the DNS-313 to the local network. USB Port: USB port for connecting to a desktop or notebook as a USB2.0 portable drive. Drive Eject Lever: Use the provided lever to eject the hard drive. T he front panel must be[…]
-
Page 9: D-Link DNS-313
9 Installation Hardware Setup This section provides unpacki ng and installation information for the DNS-313. Open the shipping carton for the DNS-313 and carefully unpack its contents. To install the DNS-313 on your local network, refer to the steps below: 1. Access the drive bays by sliding the faceplate up until it unlatches from the device. 2. O[…]
-
Page 10: D-Link DNS-313
10 4. Attach the faceplate to the front of the device. 5. Connect an Ethernet c able into the available Ethernet port. This cable should connect the DNS-313 to your loca l network or directly to a computer for configuration. Note: Should you need to install a new Hard Disk into the DNS -313, you will be required to inse rt the Ethernet cable betwee[…]
-
Page 11: D-Link DNS-313
11 Configuration Getting Started Note: Please insert an Ethernet cable from your router to the DNS-313 and run the installation wizard included in the CD whenever you inst all a new Hard Drive to the DNS-313. When first powered on, during the initi al boot sequence, the DNS-313 will wait to be assigned an IP address via DHCP. If it does not receive[…]
-
Page 12: D-Link DNS-313
12 Logging in the Web GUI The Web UI allows you to configure the DNS-313 with more advanced func tions. You may access the Web UI by many ways: 1. Connect from installation Wizard. 2. Connect from the Easy Search Utility. 3. Open the web browser and type the IP address. Once you connect to the Web UI, the Login screen will appear: Type admin for th[…]
-
Page 13: D-Link DNS-313
13 Web UI The DNS-313 web UI defaults to the Setup page. The main categories for configuration are located in the menu tabs at the top of the page. These categories include: Setup — Contains the DNS-313 setup wizard, as well as the LAN configuration settings, Device settings and Time and Date settings. Advanced — Allows the DNS-313 administ[…]
-
Page 14: D-Link DNS-313
14 Setup Wizard The DNS-313 has a setup Wizard that allows you to quickly configure some of the basic device settings. When running the DNS-313 setup wizar d, the welcome screen details the five steps of the wizard. Click ‘Next’ to continue. Section 3 — Configuration[…]
-
Page 15: D-Link DNS-313
15 It is recommended you set an admin password here. Enter the new password and re-enter it for confirmation. Click ‘Next’ to continue. Set the appropriate Time Zone and click ‘Next’ to continue. Section 3 — Configuration[…]
-
Page 16: D-Link DNS-313
16 Edit or change the DNS-313 LAN informa tion, or to keep the current setti ngs, click ‘Next’ to continue. Enter a workgroup, name, and description for the DNS-313, or leave the default values and click ‘Next’ to continue. Section 3 — Configuration[…]
-
Page 17: D-Link DNS-313
17 When the wizard completes, click ‘Back’ to go back and make changes or click ‘Rest art’ to restart the DNS-313 and save the configuration. While the DNS-313 is restarting, a Loading message will appear. Section 3 — Configuration[…]
-
Page 18: D-Link DNS-313
18 When the login prompt appears, login us ing the new administrator password. Section 3 — Configuration[…]
-
Page 19: D-Link DNS-313
19 LAN Setup The Local Area Network settings for the DNS-313 are configured on the LAN page. DHCP Client Selecting DHCP Client will cause the DNS-313 to obt ain an IP address from the local DHCP serve r. Static IP Selecting Static IP requires the user to assign the IP information for the DNS-313 manually. Section 3 — Configuration[…]
-
Page 20: D-Link DNS-313
20 Device Settings The device settings page allows you to assign a workgroup, name and descri ption to the DNS-313. Workgroup Assigns a workgroup name to the DNS-313. Name Assigns a name to the DNS-313. The name can be used to access t he device from a web browser instead of the IP address, for example, http://DNS-313. Description Assigns a unique […]
-
Page 21: D-Link DNS-313
21 Time and Date The DNS-313’s Time and Date menu contains several different options for setting the de vice’s internal clock. It is important that the accurate time is set so that scheduled backups an d downloads will be accurate. Time Zone Settings This option allows you to set appropriate Time Zone. Section 3 — Configuration[…]
-
Page 22: D-Link DNS-313
22 Click ‘Set Time’ to sync with the local computer. From My Computer This option will synchronize the DNS-313 clock wit h the computer being used to configure it. Click ‘Set Time’ to sync with the local computer. NTP Server Network Time Protocol (NTP) synchronizes the DNS-313 with an Internet time server. Enter the IP Address or domain nam[…]
-
Page 23: D-Link DNS-313
23 Advanced Users/Groups The DNS-313 supports up to 64 uniq ue users and 10 unique groups. The users can be spec ified by groups, or created individually for ease of management, and to aid in organization when setting up access rules and quotas. The users are created to a llow access to specific folders on the DNS-313, via FTP or the local network.[…]
-
Page 24: D-Link DNS-313
24 User and Group Creation This section contains required attributes for a new user, incl uding user name and passw ord or create a new Group by assigning a unique group name. User Name Set a unique name for the user. Password Set a unique password for the user. Confirm Password Confirm the assigned password for the user. Group settings Select a pr[…]
-
Page 25: D-Link DNS-313
25 Network Access The Network Access settings a llow you to assign users and groups to spec ific folders or volumes. By default, all users are allowed Read/Write access to all volume s. Before specific user or group rules can be created, the default rules must be deleted. Network Access Settings Assign permissions for users and groups on the local […]
-
Page 26: D-Link DNS-313
26 Category Determines whether the access rule will apply to a group or individual user. Group / User Select the group or user the access rule will apply to. Folder Browse to and select the folder or directory you are controlling access to. Permission Set the user or group permission to Read Only or Read/Write. Comment Enter a comment for reference[…]
-
Page 27: D-Link DNS-313
27 FTP Server The DNS-313 is equipped with a built in FTP Server. The server is easy to configure and allows users access to important data whether they are on the local network or at a remote loca tion. The FTP server can be configured to allow user a ccess to specific directories, and will al low up to 10 users to access the DNS-313 at a time. FT[…]
-
Page 28: D-Link DNS-313
28 FTP Server Status The current settings and status of the DNS-313 FTP Server are displayed here. FTP Server Settings Category Determines whether the FTP server rule will apply to a group or individual user. Section 3 — Configuration[…]
-
Page 29: D-Link DNS-313
29 User /Group Select the user or group the FTP server rule will apply to. Folder Browse to and select the folder or dire ctory you are granting FTP access to. Select root to grant access to all volumes. Permission Set the user or group permission to Read Only or Read/Write. Max User Sets the maximum amount of users t hat can connect to the FTP ser[…]
-
Page 30: D-Link DNS-313
30 Name Name the DNS-313 FTP server rule. IP Address Enter the IP address of the DNS-313. Public Port Enter the public FTP port. By default, the port is 21. Private Port Enter the private FTP port. By default, the port is 21. Traffic Type Set the traffic type to TCP. If you use an FTP port other than 21, then users accessing the FTP server using an[…]
-
Page 31: D-Link DNS-313
31 UPnP AV Server The DNS-313 features a UPnP AV Server. This server provides t he ability to stream photos, music and videos to UPnP AV compatible netw ork media players. If the server is enabled, th e DNS-313 will be automatically detected by UPnP AV compat ible media players on your local network. UPnP AV Server Select Enable or Disable to enabl[…]
-
Page 32: D-Link DNS-313
32 Auto Refresh Sets the duration of time to refresh t he media files list of the UPnP AV Server. Refresh Click ‘Refresh’ after adding new files to be used by UPnP AV compatible devices. Section 3 — Configuration[…]
-
Page 33: D-Link DNS-313
33 iTunes Server The DNS-313 features an iTunes Server. This server provides the abil ity to share music and videos to computers on the local network running iTunes. If the server is enabled , the DNS-313 will be automatically detected in the iTunes program and t he music and videos contain ed in the specified direc tory will be available to stream[…]
-
Page 34: D-Link DNS-313
34 ‘Browse’ to select a specific folder. Password Sets password for the iTunes server. Refresh Click ‘Refresh’ after adding new files to be used with iTunes. After enabling the iTunes server on the DNS-313, launch iTunes. When iTunes detects the DNS-313, select it and you will be prompted to enter the iTunes server password. Select the DNS-[…]
-
Page 35: D-Link DNS-313
35 Media stored on the DNS-313 will then be available for use in iTunes. Section 3 — Configuration[…]
-
Page 36: D-Link DNS-313
36 DHCP Server The DNS-313 can also be used as a DHCP Server. As a DHCP serv er, it can be used to serve IP addresses to devices on your lo cal network, however, this feature shou ld not be enabled if you already have a DHCP server, such as a router on your local network. DHCP Server Enables or Disables the DNS-313 DHCP Ser ver. Starting IP Address[…]
-
Page 37: D-Link DNS-313
37 Ending IP Address Enter the ending IP address for the range of addresses a ssigned by the DHCP server. Lease Time Sets the duration of time that an IP address will remain assigned to a device. Section 3 — Configuration[…]
-
Page 38: D-Link DNS-313
38 Maintenance Admin Password The Admin Password menu allows you to set a passwo rd for the admin account. It is recommended to set an admin account password when first configuring the DNS-313. User Name The administrator user name is admin, and this cannot be changed. Password Enter the current password. Section 3 — Configuration[…]
-
Page 39: D-Link DNS-313
39 New Password Enter the new password. Confirm Password Enter the new password again for confirmation. Click ‘Save Settings’ to save the new password. Section 3 — Configuration[…]
-
Page 40: D-Link DNS-313
40 System The DNS-313 System menu provides opt ions for system restarts, savi ng and loading configuration settings, and setting idle times. Restart Click ‘Restart’ to reboot the DNS-313. Section 3 — Configuration[…]
-
Page 41: D-Link DNS-313
41 Defaults Click ‘Restore’ to reset the DNS-313 to its factory default se ttings. This will erase all previous configuration changes. Shutdown Click ‘Shutdown’ to pow er off the DNS-313. Configuration Settings Click ‘Save’ to save the current DNS-313 c onfiguration settings to a file on the local computer. If at a later time you need t[…]
-
Page 42: D-Link DNS-313
42 Firmware Upgrade The DNS-313 Firmware Upgrade menu makes it simple to check for new firmware releases and upload them to the device. Firmware Upgrade This section provides a link to check for new firmware on the D-Link support website. If a new firmware is available, downlo ad the file to your local computer. Current Firmware Info This section p[…]
-
Page 43: D-Link DNS-313
43 When upgrading the firmware, click ‘Brows e’ to select the new firmware f ile on your local computer. Click ‘Apply’ to begin the firmware upgrade process. Section 3 — Configuration[…]
-
Page 44: D-Link DNS-313
44 E-Mail Alerts With the DNS-313 E-Mail Alerts, you ca n configure e-mails to be sent alerting you to certain operational conditions and drive status conditions. These alerts can prove helpful with the management and safeguarding of important data. Section 3 — Configuration[…]
-
Page 45: D-Link DNS-313
45 E-Mail Alert Settings This section contains the configurat ion settings for the outgoing e-mail accoun t and the receiving e-mail account. Once configured, use the ‘Test E-Mail button’ to s end a test e-mail and confirm your settings are correct. Alert Types This section contains the alert opti ons and their configuration settings. E-Mail Al[…]
-
Page 46: D-Link DNS-313
46 Sender E-Mail Enter the “from” e-mail address (e .g. alerts@dns313.com). This field does not require a valid e-mail address. However, if your e-ma il client is filtering spam, make sure you allow this address to be received. Receiver E-Mail Enter the e-mail address you want to send t he alerts to. This address mu st correspond with the SMTP […]
-
Page 47: D-Link DNS-313
47 Alert Types Space Status Select an interval in hours and minutes to have a st atus of space remaini ng on the drives e-mailed. Volume is Full An alert will be sent when the hard drive is full. Hard Drive Has Failed An alert will be sent if a critic al error occurs on the drive. Administrator Password Change An alert will be sent if the admin pas[…]
-
Page 48: D-Link DNS-313
48 Power Management The DNS-313 Power Management feature allows you to configure the drives to shut down while power remains constant to the device. The drive s will power up agai n when data is accessed. Power Management Enable or Disable Powe r Management on the DNS-313. Turn off Hard Drive Set the amount of time before idle drive will shut down.[…]
-
Page 49: D-Link DNS-313
49 Dynamic DNS (DDNS) The DDNS feature allows you to host a server (Web, FTP, Game Server, etc…) us ing a domain name that you have purchased (www.whatevery ournameis.com) with your dynam ically assigned IP address. Most broadband Internet Service Providers assign dynamic (changing) IP addresses. Using a DDNS service provider, your friends can en[…]
-
Page 50: D-Link DNS-313
50 Enable DDNS Click to enable the DDNS function. Server Address Choose your DDNS provider from the drop down menu.. Host name Enter the Host Name that you regist ered with your DDNS service provider. Username or Key Enter the Username for your DDNS account. Password or Key Enter the Password for your DDNS account. Timeout Enter a time (in hours). […]
-
Page 51: D-Link DNS-313
51 Status Device Info LAN Info Displays the local network settings of the DNS-313. Section 3 — Configuration[…]
-
Page 52: D-Link DNS-313
52 Device Info Displays the workgroup, name, description and system temperat ure of the DNS-313. Hard Drive Info Displays the hard drive information, including the total capacity, us ed and unused drive space. Section 3 — Configuration[…]
-
Page 53: D-Link DNS-313
53 Help The DNS-313 Help page provides a menu of Help t opics explaining the features of the device. Section 3 — Configuration[…]
-
Page 54: D-Link DNS-313
54 Easy Search Utility The Easy Search Utility included in the CD provides many useful functions help you to discover the device, assign the IP address, mapping a dri ve, and connect to the device GUI. To run the Easy Search Utility, ins ert the DNS-313 CD into your CD-ROM drive, and click Easy Search Utility. Section 3 — Configuration[…]
-
Page 55: D-Link DNS-313
55 Network Storage Device The Easy Search Utility displays any DNS-313 devices it detects on the network here. Refresh Refreshes the device list. Configuration Click ‘Configuration’ to acce ss the Web UI of the DNS-313. LAN Configure the LAN Settings for the DNS-313 here. Apply Click ‘Apply’ to save changes to the LAN Settings. Drive Mappin[…]
-
Page 56: D-Link DNS-313
56 Mapping a Drive You can use the D-Link Easy Search Utility to map drives to your comp uter. Insert the DNS-313 CD into your CD-ROM drive. Click the ‘Easy Search Utility’. T he Easy Search Utility will load and det ect any DNS-313 devices that are on the local network. If the DNS-313 you are working with does not show up in the device list, c[…]
-
Page 57: D-Link DNS-313
57 Highlight an available DNS-313. Available volumes will be displayed under Drive M apping. Highlight the volu me you want to map. Select an available drive letter from the drop-down menu and click ‘Connect’. Once connected, your mapped dri ve(s) will appear in My Computer. Double-click the My Com puter icon on your desktop. Section 3 — Config[…]
-
Page 58: D-Link DNS-313
58 Double-click on the mapped drive to access the files and folders. Section 3 — Configuration[…]
-
Page 59: D-Link DNS-313
59 Downloads The DNS-313 Schedule Download feature allows you to set up scheduled folder or file downloads and backup sessions. Begin by accessing the co nfiguration of the DNS-313: Click ‘Easy Search Utility’. Highlight an available DNS-313 and click ‘Co n figuration’ to access the web-based utility. The DNS-313 logi n screen will appear: […]
-
Page 60: D-Link DNS-313
60 Type admin for the username and l eave the password field blank. Click ‘Downloads’. The DNS-313 Schedule Downl oads configuration will appear. Section 3 — Configuration[…]
-
Page 61: D-Link DNS-313
61 Scheduling Scheduling Settings Configure download and backup schedules here. Schedule List The Schedule List will display all completed, active, and pending scheduled downloads and backups. Section 3 — Configuration[…]
-
Page 62: D-Link DNS-313
62 Scheduling Settings Login Method Select the appropriate login method to acce ss the files for download. If the site r equires login credentials, select Account an d enter a valid username and password. Type Select File or Folder, depending on w hat you want to download or backup. URL Enter the URL of the site or server you are initiating a trans[…]
-
Page 63: D-Link DNS-313
63 E.g. ftp:// 123.456.789/Test ftp: //123.456.789/test.txt h t t p ://www.test.com/test.txt Test Click ‘Test’ to test the URL is valid and the user name and password are correct. Local Click ‘Local’ to set the source f ile or folder from one of the in ternal drive volumes. Browse to the file or folder, and click ‘Ok’ to accept the netw[…]
-
Page 64: D-Link DNS-313
64 Status Schedule List The Schedule List will display all completed, active, and pending scheduled downloads and backups. Section 3 — Configuration[…]
-
Page 65: D-Link DNS-313
65 Direct Attached Storage Function Note: Before using the Direct Attached Storage func tion, make sure your DNS-313 has been configured. (Please refer to “Installation”). The DAS function will not work without the system being installed. The DNS-313 features a built-in Direct Attached Storage function to allo w the DNS-313 to function as a USB[…]
-
Page 66: D-Link DNS-313
66 Turn on the Power Button of the DNS-313, In Window s 2000, XP and Vista the DN S-313 will automatically install upon power-on. Open My Computer and the new drive will be present. By default it will use the firs t available drive letter. Note: When using the DNS-313 as a USB 2.0 port portable drive, the Network Storage functionality will be disab[…]
-
Page 67: D-Link DNS-313
67 Trademarks: D-Link is a registered trademark of D-Link Corpor ati on/D-Link Systems, Inc. Ot her trademar ks or registered trademarks are the property of their respective owners. Copyright . Statement:No part of this publication or documentation accompanying this produc t may be reproduced in any form or by any means or used to make any derivati[…]