
Тема: DAEWOO DHC-UX3500 (Прочитано 4613 раз)
теперь диск крутиться только нет звука в режиме МП3 но как я писал через 30 сек.останавливается
поменял головку и усилитель все ОК.
DVD DAEWOO вставляеш диск нажимаеш пуск, обратно выдает диск я в основном занимаюсь теликами в б.п. напруги все вроде есть, схемы такой нет в инете, мотор целый дайте направление.
Такая схема есть на сайте manualslib.com в поисковике наберите Daewoo RD-430
Такая схема есть на сайте manualslib.com в поисковике наберите Daewoo RD-430
Морды похожи и только. В остальном абсолютно разные аппараты. Не вводите в заблуждение. Схемы на DAEWOO DHC-UX3500 нет.
Блоки питания одинаковые. Майн плата судя по фото тоже похожа. У меня изменилось сопротивление R7 330 Ом. Был перекос напряжений на линии -12, +12 вольт.
Возможно проблема в прошивке. На данный момент у меня центр тоже не работает. На дисплее светятся все символы. Считал прошивку с ATMEL 24C04N. Дамп выложу можете сравнить, но гарантии нет. Там ещё есть EEPROM ES29LV800EB, но что бы её прочитать программатором TL866CS по моему нужен специальный адаптер. У меня нет.
Вот на всякий случай мануал. Попробую поменять процессор, на кварцах всё гуляет.
Заменил процессор дисплея PT6311-LQ , аппарат ожил! Появилось радио и звук. Привод диски не читает, но лоток открывает и закрывает. Греется сильно процессор SPHE8281D думаю проблема в нём буду менять.
Ура всё заработало!!! Заменил процессор SPHE8281D, нагрев в норме палец держит.На Ali Express стоит 85 рублей. МР3 работает, DVD крутит. Смущает диапазон радиостанций от 87,75- 92,85 MHz. В с STAND BY отключается только из радиоприёмника. Вентилятор крутится — обдув оконечника TDA. МР3 играет чисто. Звук регулируется небольшими шагами.

DHC-XD300 Series
DHC-XD350 Series
Digital Home Cinema System
PLAY
DIGITAL HOME CINEMA SYSTEM
VOL.
DOWN UP
OPEN/CLOSE PLAY/PAUSE STOP PREV
SKIP
NEXT FUNCTION
ON/OFF
POWER
PHONES
DIGITAL HOME CINEMA SYSTEM DHC-XD350
DHC-XD350 Series
DHC-XD300 Series

1. SAFETY PRECAUTIONS………………………………………………3/4
2. SPECIFICATIONS…………………………………………………………..5
3. LOCATION OF USERS CONTROLS………………………………6/8
FRONT PANEL.
REAR PANEL.
DISPLAY.
REMOTE CONTROLLER.
4. CONNECTING TO EQUIPMENT…………………………………..9/11
CONNECTING TO TV
CONNECTING TO AUDIO & VIDEO.
CONNECTING TO SPEAKER.
CONNECTING TO RECORDING EQUIPMENT.
5. TROUBLE SHOOTING GUIDE…………………………………..12/19
6. DVD PROGRAM DOWNLOAD METHOD…………………………20
7. WAVEFORMS OF MAJOR CHECK POINT………………….21/22
AUDIO OUT SIGNAL WAVEFORM.
DAC OUTPUT SIGNAL WAVEFORM.
OPTICAL OUTPUT AUDIO DATA SIGNALFORM.
L/R CLOCK DATA WAVEFORM DURING NORMAL PLAY.
SERIAL DATA OUTPUT WAVEFORM DURING NORMAL PLAY.
Cr OUTPUT DATA WAVEFORM IN COMPONENT OUTPUT.
Cb OUTPUT DATA WAVEFORM IN COMPONENT OUTPUT.
Y OUTPUT DATA WAVEFORM IN COMPONENT OUTPUT.
8. INTERNAL BLOCK DIAGRAM OF ICs……………………….23/31
9. BLOCK DIAGRAM……………………………………………………32/35
10. WIRING DIAGRAM………………………………………………………36
11. SCHEMATIC DIAGRAM…………………………………………..37/45
AMP SCHEMATIC DIAGRAM.
FRONT SCHEMATIC DIAGRAM.
DDX SCHEMATIC DIAGRAM.
I/O SCHEMATIC DIAGRAM.
DSP SCHEMATIC DIAGRAM.
MPEG DECODER SCHEMATIC DIAGRAM.
MPEG OUTPUT SCHEMATIC DIAGRAM.
REGULATOR SCHEMATIC DIAGRAM.
12. PRINTED CIRCUIT DIAGRAM………………………………….46/54
FRONT PCB.
I/O PCB.
MPEG PCB.
MAIN PCB.
REGULATOR PCB.
STANDBY PCB.
13. MECHANISM………………………………………………………………55
14. EXPLODED VIEW…………………………………………………..56/60
MECHANICAL EXPLODED VIEW
MECHANICAL PARTS LIST
15. ELECTRICAL PARTS LIST……………………………………..61/70
ELECTRICAL PARTS LIST
Contents
2
DIGITAL HOME CINEMA SYSTEM
DHC-XD 300/350
DHC-XD 300/350P (with Pro Logic II)
DHC-XD 300/350S (with Progressive Scan)
DHC-XD 300/350PS (with Pro Logic II, Progressive Scan)
WARNING
: TO PREVENT FIRE OR ELECTRIC SHOCK, DO NOT EXPOSE
THIS APPLIANCE TO RAIN OR MOISTURE.
CAUTION :
TO REDUCE THE RISK IF ELECTRIC SHOCK, DO NOT
REMOVE COVER (OR BACK). NO USER SERVICEABLE PARTS
INSIDE.
REFER SERVICING TO QUALIFIED SERVICE PERSONNEL.
THIS SYMBOL IS INTENDED TO ALERT THE USER TO THE
PRESENCE OF UNINSULTED «DANGEROUS VOLTAGE»
WITHIN THE PRODUCT’S ENCLOSURE THAT MAY BE
SUFFICIENT MAGNITUDE TO CONSTITUTE A RISK OF
ELECTRIC SHOCK TO PERSONS.
THIS SYMBOL IS INTENDED TO ALERT THE USER TO THE
PRESENCE OF IMPORTANT OPERATING AND MAINTENANCE
(SERVICING) INSTRUCTIONS IN THE LITERATURE
ACCOMPANYING THE APPLIANCE.
CAUTION
TO PREVENT ELECTRIC SHOCK, DO NOT USE THIS POLARIZED AC
PLUG WITH AN EXTENSION CORD, RECEPTACLE OR OTHER OUTLET
UNLESS THE BLADES CAN BE FULLY INSERTED TO PREVENT BLADE
EXPOSURE.
LASER SAFETY
THIS UNIT EMPLOYS A LASER. ONLY QUALIFIED SERVICE PERSONNEL
SHOULD REMOVE THE COVER OR ATTEMPT TO SERVICE THIS DEVICE
DUE TO POSSIBLE EYE INJURY.
CAUTION :
USE OF ANY CONTROLS, ADJUSTMENTS, OR PROCEDURES
OTHER THAN THOSE SPECIFIED HEREIN MAY RESULT IN HAZARDOUS
RADIATION EXPOSURE.
CAUTION :
TO PREVENT ELECTRIC SHOCK, MATCH WIDE BLADE OF
PLUG TO WIDE SLOT, FULLY INSERT.
ATTENTION :
POUR EVITER LES CHOCS ELECTRIQUES, INTRODUIRE
LA LAME LA PLUS LARGE DE LA FICHE DANS LA BORNE CORRESPONDANTE DE LA PRISE ET POUSSER JUSQU’AU FOND.
Important Safety Instructions
— All the safety and operating instructions should be read before
the appliance is operated.
— The safety and operating instructions should be retained for
future reference.
— All warnings on the appliance and in the operating instructions
should be adhered to.
— All operating and use instructions should be followed.
1. Water and Moisture — The appliance should not be used near
water — for example, near a bathtub, washbowl, kitchen sink,
laundry tub, in a wet basement, or near a swimming pool,
and the like.
2. Carts and Stands — The appliance
should be used only with a cart or
stand that is recommended by th
manufacturer.
3. An appliance and cart combination
should be moved with care. Quick
stops, excessive force, and uneven
surfaces may cause the appliance
and cart combination to overturn.
4. Wall or Ceiling Mounting — The appli-
ance should be mounted to a wall or
ceiling only as recommended by the manufacturer.
5. Ventilation — The appliance should be situated so that its
location or position does not interfere with its proper
ventilation. For example, the appliance should not be situated
on a bed, sofa, rug, or similar surface that may block the
ventilation openings; or, placed in a built-in installation, such
as a bookcase or cabinet that may impede the flow of air
through the ventilation openings.
6. Heat — The appliance should be situated away from heat
sources such as radiators, heat registers, stoves, or other
appliances (including amplifiers) that produce heat.
7. Power Sources — The appliance should be connected to a
power supply only of the type described in the operating
instructions or as marked on the appliance.
8. Grounding or Polarization — The precautions that should be
taken so that the grounding or polarization means of an
appliance is not defeated.
9. Power — Cord Protection — Power-supply cords should be
routed so that they are not likely to be walked on or pinched
by items placed upon or against them, paying particular
attention to cords at plugs, convenience receptacles, and the
point where they exit from the appliance.
10.Protective Attachment Plug — If the appliance is equipped with
an attachment plug having overload protection. This is a
safety feature. See Instruction Manual for replacement or
resetting of protective device. If replacement of the plug is
required, be sure the service technician has used a
replacement plug specified by the manufacturer that has the
same overload protection as the original plug.
11.Cleaning — The appliance should be cleaned only as
recommended by the manufacturer.
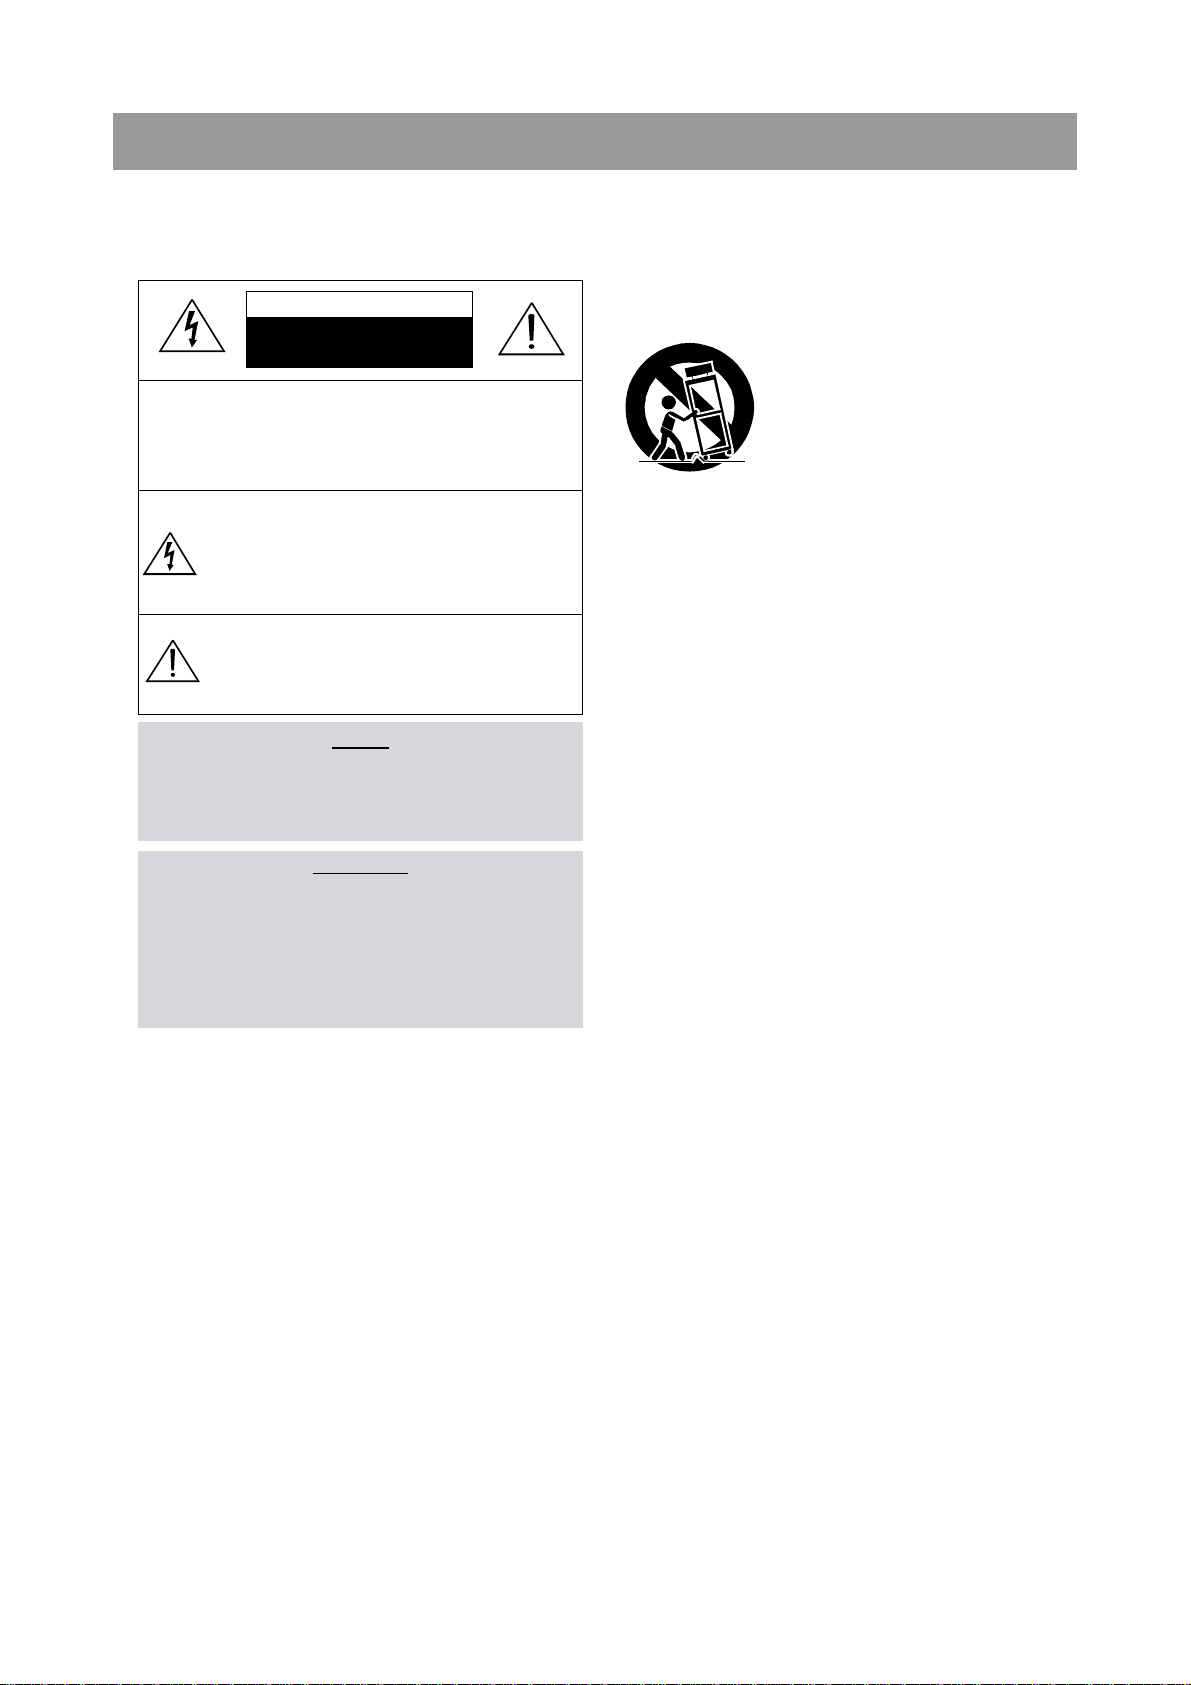
12.Power Lines — An outdoor antenna should be located away
from power lines.
CAUTION
RISK OF ELECTRIC SHOCKS
DO NOT OPEN
PORTABLE CART
Figure 2
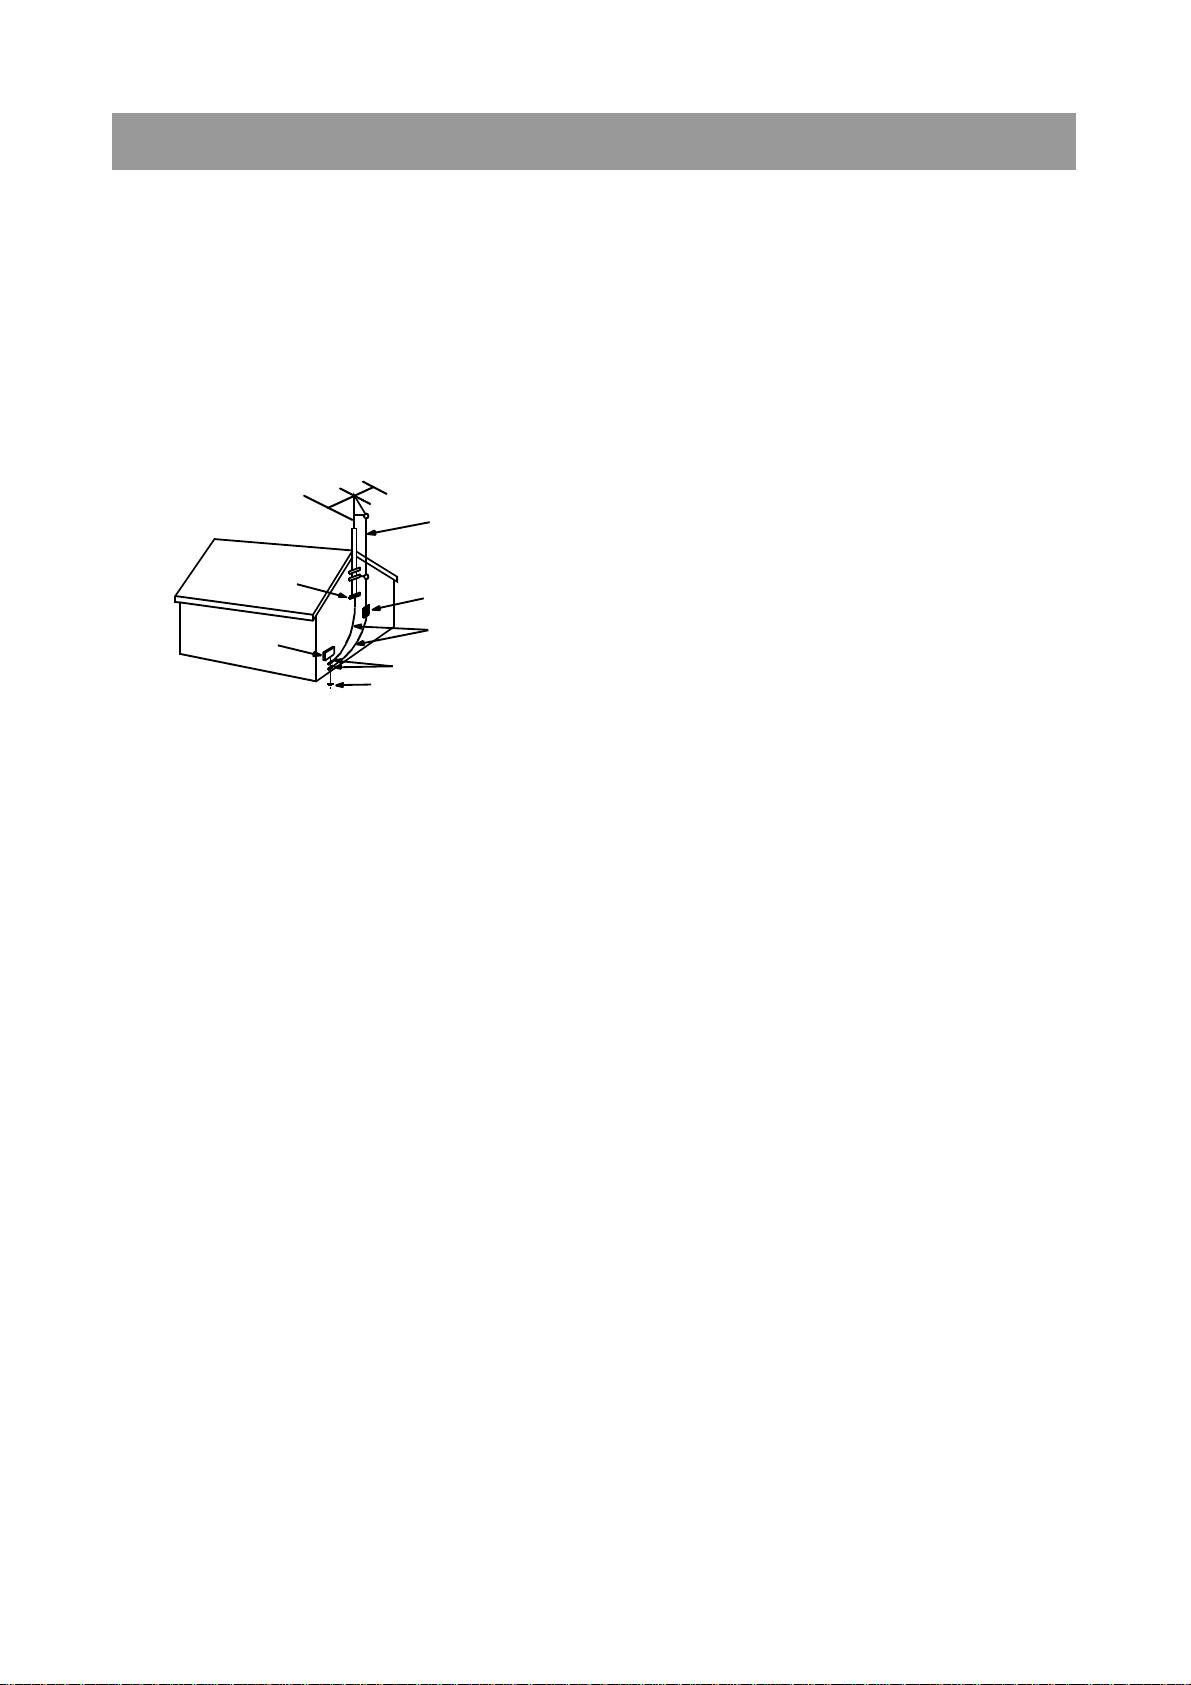
13.Outdoor Antenna Grounding — If an outside antenna is
connected to the receiver be sure the antenna system is
grounded so as to provide some protection against voltage
surges and built-up static charges. Article 810 of the National
Electrical Code, ANSI/NFPA 70, provides information with
regard to proper grounding of the mast and supporting
structure, grounding of the lead-in wire to an antenna-dis
charge unit, size of grounding conductors,location of antennadischarge unit, connection to grounding electrodes and
requirements for the grounding electrode. See Figure 1.
14.Non-use Periods — The power cord of the appliance should be
unplugged from the outlet when left unused for a long period
of time.
15.Object and Liquid Entry — Care should be taken so that objects
do not fall and liquids are not spilled into the enclosure through
openings.
16.Damage Requiring Service — The appliance should be
serviced by qualified service personnel when:
a) The power-supply cord or the plug has been damaged; or
b) Objects have fallen, or liquid has been spilled into the
appliance; or
c) The appliance has been exposed to rain; or
d) The appliance does not appear to operate normally or
exhibits a marked change in performance; or
e) The appliance has been dropped, or the enclosure
damaged.
17.Servicing — The user should not attempt to service the
appliance beyond that described in the operating instructions.
All other servicing should be referred to qualified service
personnel.
ANTENNA DISCHARGE UNIT
(NEC SECTION 810-20)
ANTENNA LEAD
IN WIRE
POWER SERVICE GROUNDING
ELECTRODE SYSTEM
(NEC ART 250 PART H)
GROUND CLAMP
ELECTRIC
SERVICE
EQUIPMENT
GROUNDING CONDUCTORS
(NEC SECTION 810-21)
GROUND CLAMPS
EXAMPLE OF ANTENNA
GROUNDING
NEC — NATIONAL ELECTRICAL CODE
POWER OUTPUT 1% THD(DIN)
TOTAL HARMONIC DISTORTION
S/N RATIO DOLBY
FREQUENCY RESPONSE
FM Tuner Section
(FM ANT Impedance : 75 ohms)
Power supply
Voltage ( Option )
AC 110V or 120V or 127V or
220V or 230V or 240V (50/60Hz)
Power consumption Standby 2Watt
Operating 80Watt
Dimensions (W x D x H) / Weight
360 x 380 x 70mm/ 6.7 kg
POWER OUTPUT at 1% THD(DIN)
THD(Total Harmonic Distortion)
Input Sen. / Impedance @ 1KHz, 47K ohms
Output Level/Impedance @ 1KHz
Frequency Response(Analogue)
S/N Ratio IHF-A Weighted
Subwoofer Turnover Frequency
Channel Separation
Crosstalk
At 1KHz, 8 ohms
At 1KHz, 1W
VIDEO, TV/AUX
Video Rec
at 1W : TV/AUX -3dB
TV/AUX
TV/AUX:1KHz
VIDEO —>TV/AUX
TV/AUX—> VIDEO
30W
0.1%
200mV±30mV/47K
200mV±30mV/2.2K
20Hz~20KHz
70dB
≤
120Hz
65dB
65dB
65dB
Front Amp. Section
Rear Amp Section
Center Amp Section
Video Section
Input Sen./Impedance
Output Level/Impedance
Frequency Response
Crosstalk
S/N Ratio
Composite Video(Video)
Composite 75 ohm
S-Video(Y/C) 75 ohm(DVD only)
Component Out(Y/ Cb/ Cr):Option
Ref 500KHz
@1MHz
DVD
1Vp-p/75 ohm
1Vp-p/75 ohm
1Vp-p/ 0.286Vp-p
1Vp-p/0.7Vp-p/0.7Vp-p
45dB
60dB
±
0.5 dB
±
0.5 dB
±
0.5 dB
±
0.5 dB
5Hz~5.7MHz
40dB
POWER OUTPUT at 1% THD(DIN)
TOTAL HARMONIC DISTORTION
S/N RATIO, IHF-A FILTER
FREQUENCY RESPONSE
At 1KHz, 8 ohms
At 1KHz, 1W
10W
1W
30W
0.1%
70dB
135Hz~18KHz
At 1KHz, 8 ohms
At 1KHz, 1W
10W
1W
30W
0.1%
70dB
135Hz~18KHz
Tuning Range
Scanning
Frequency Interval
Usable Sensitivity,
75 ohms
S/N Ratio @1mV
IHF-A FILTER
USA Version
Europe Version
USA Version
Europe Version
S/N=30dB,USA Version
S/N=26dB,Europe Version
Mono USA Version
Mono Europe Version
Stereo USA Version
Stereo Europe Version
87.5~108.0MHz
87.5~108.0MHz
100KHz
50KHz
2uV(17.2dBf)
3uV(20.8dBf)
70dB
70dB
65dB
63dB
Subwoofer Section
POWER OUTPUT at 10% THD
FREQUENCY RESPONSE
S/N RATIO, IHF-A Weight
At 100Hz, 8 ohms
1W
30W
20Hz~150Hz
60dB
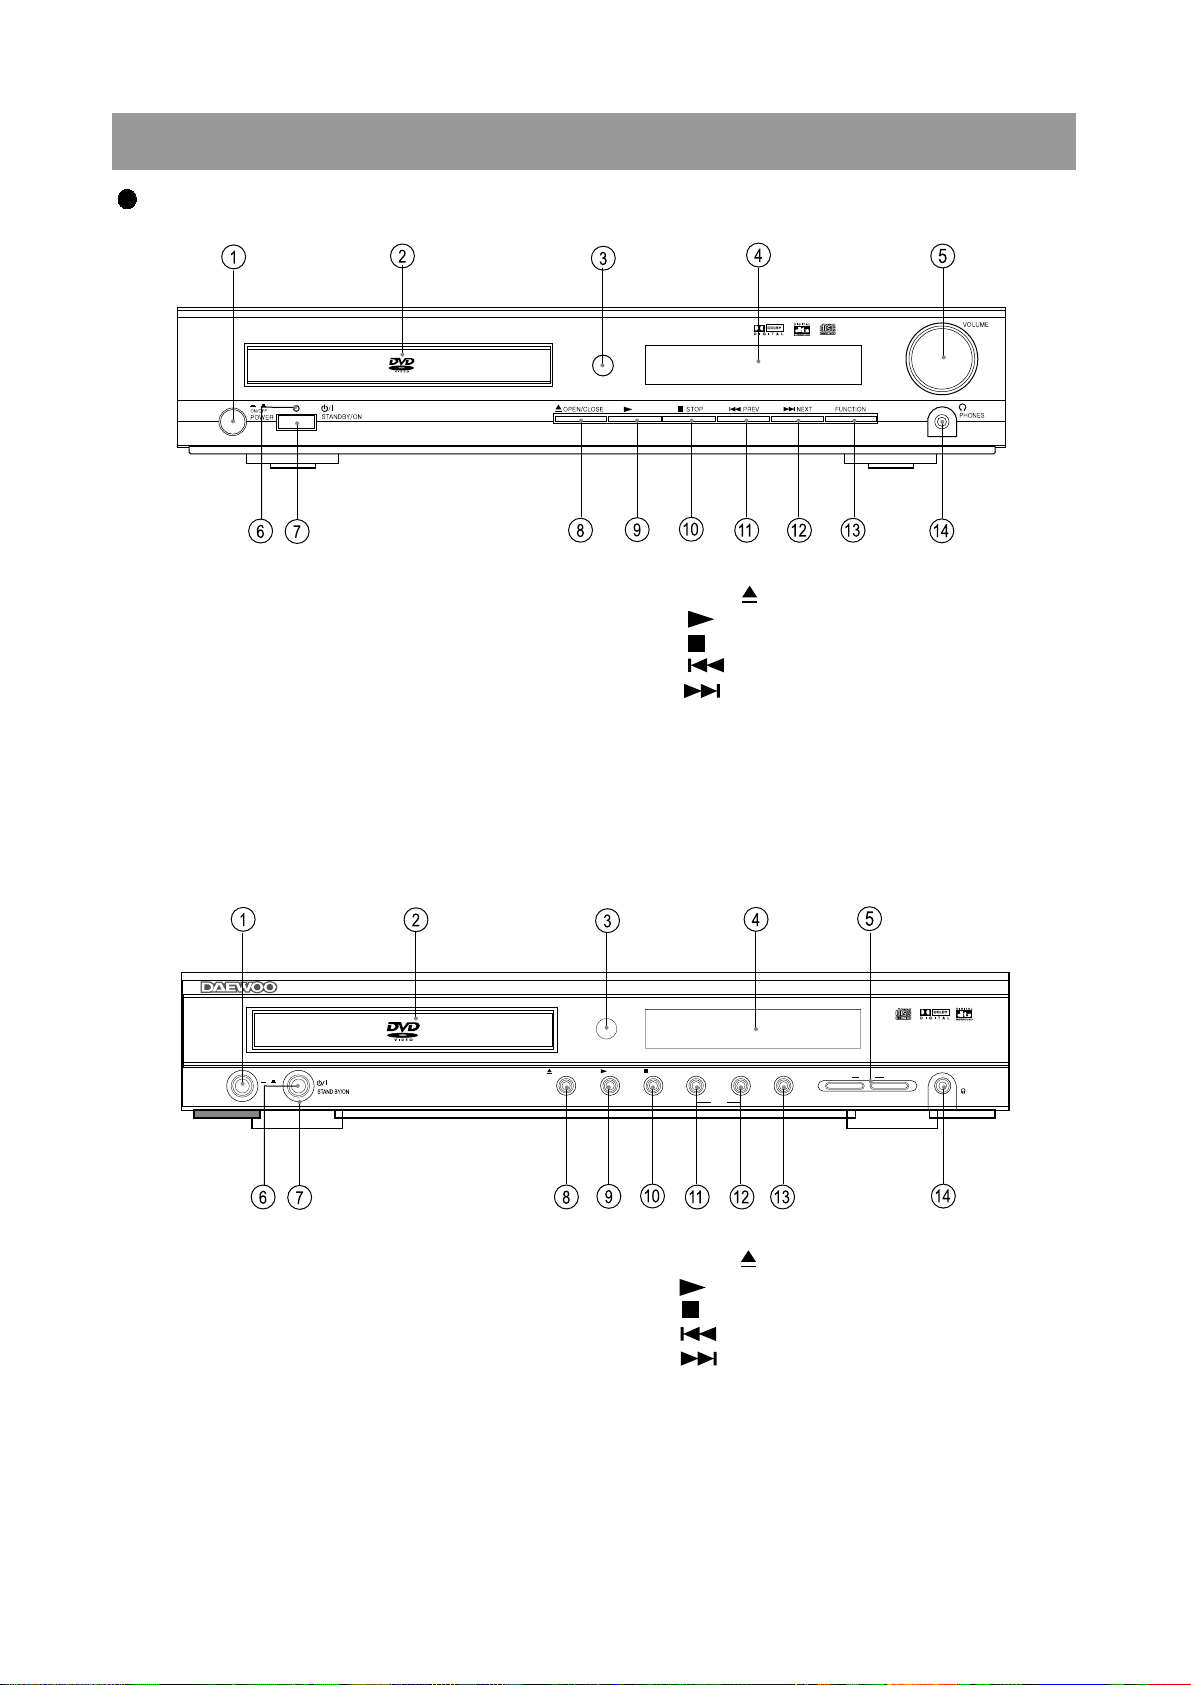
3. Location of Users Controls
PLAY
DIGITAL HOME CINEMA SYSTEM
Front Panel
1) DHC-XD300 Series
6
2) DHC-XD350 Series
DIGITAL HOME CINEMA SYSTEM DHC-XD350
VOL.
DOWN UP
OPEN/CLOSE PLAY STOP PREV
SKIP
NEXT FUNCTION
ON/OFF
POWER
PHONES
1. POWER ON/OFF switch
2. DVD/VIDEO CD/MP3 CD/audio CD disc tray
3. Remote Control Sensor
4. Display
5. MASTER VOLUME control
6. STANDBY indicator
7. STANDBY/ON button
8. OPEN/CLOSE ( ) button
9. PLAY ( ) button
10. STOP ( ) button
11. PREV ( ) button
12. NEXT ( ) button
13. FUNCTION button
14. PHONES jack
3. Location of Users Controls
Rear Panel
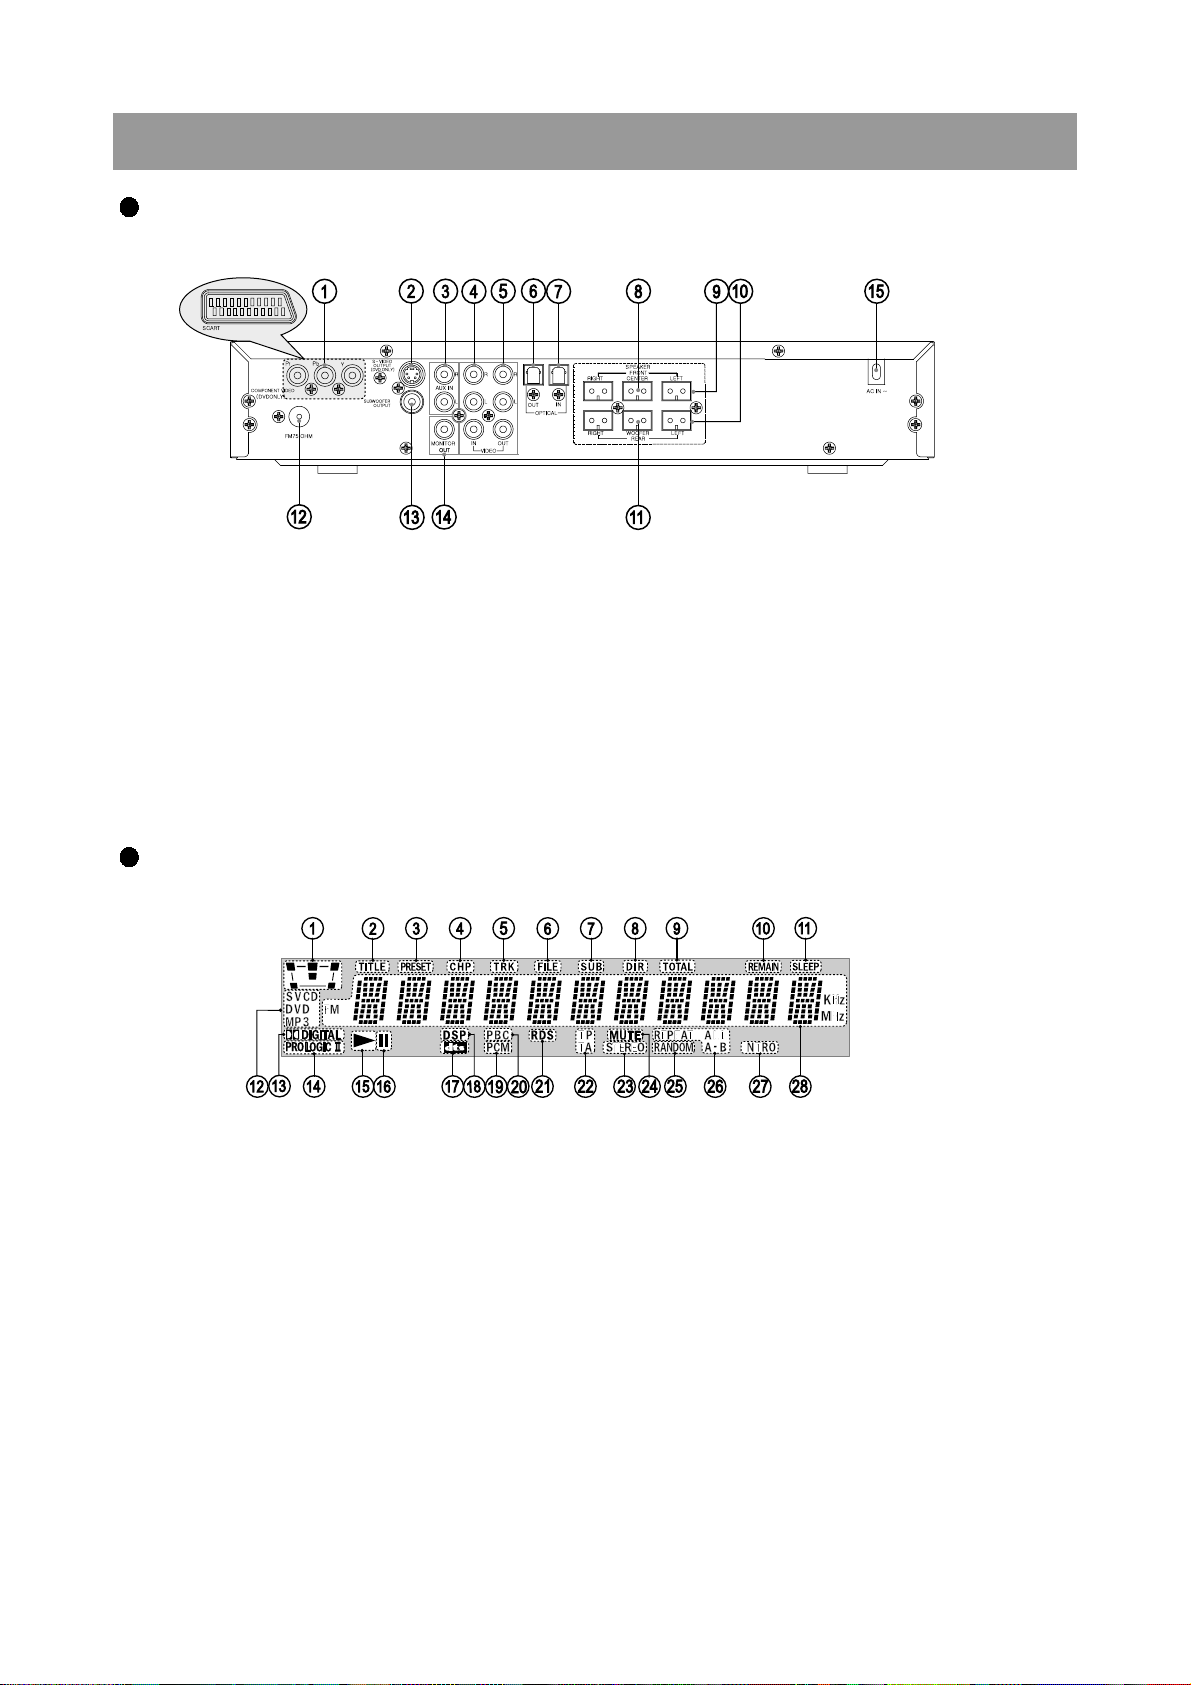
Display
1. SPEAKER CONFIGURATION indicator
2. TITLE indicator
3. PRESET indicator
4. CHAPTER indicator
5. TRACK indicator
6. FILE indicator
7. SUB indicator
8. DIR indicator
9. TOTAL indicator
10. REMAIN indicator
11. SLEEP indicator
12. SOURCE indicator
13. DOLBY DIGITAL indicator
14. PROLOGIC / PROLOGIC II indicator
15. PLAY indicator
16. PAUSE indicator
17. DTS indicator
18. DSP indicator
19. PCM indicator
20. PBC(Playback Control) indicator
21. RDS indicator
22. TA/TP indicator
23. STEREO indicator
24. MUTE indicator
25. RANDOM indicator
26. REPEAT indicator
27. INTRO indicator
28. Playing Information display
7
1. COMPONENT VIDEO OUTPUT Y/Pb/Pr jacks
or SCART jack(Optional)
2. S VIDEO MONITOR OUT jack
3. AUX IN jacks
4. VIDEO (IN) jack
5. VIDEO (OUT) jack
6. DIGITAL OUTPUT jack
7. DIGITAL IN jack : DHC-XD300P/PS, 350P/PS only
8. CENTER SPEAKER connector
9. FRONT SPEAKER connector
10. REAR SPEAKER connector
11. WOOFER SPEAKER connector
12. FM ANTENNA connector
13. SUBWOOFER output jack
14. MONITOR OUT jack
15. Power cord
8
3. Location of Users Controls
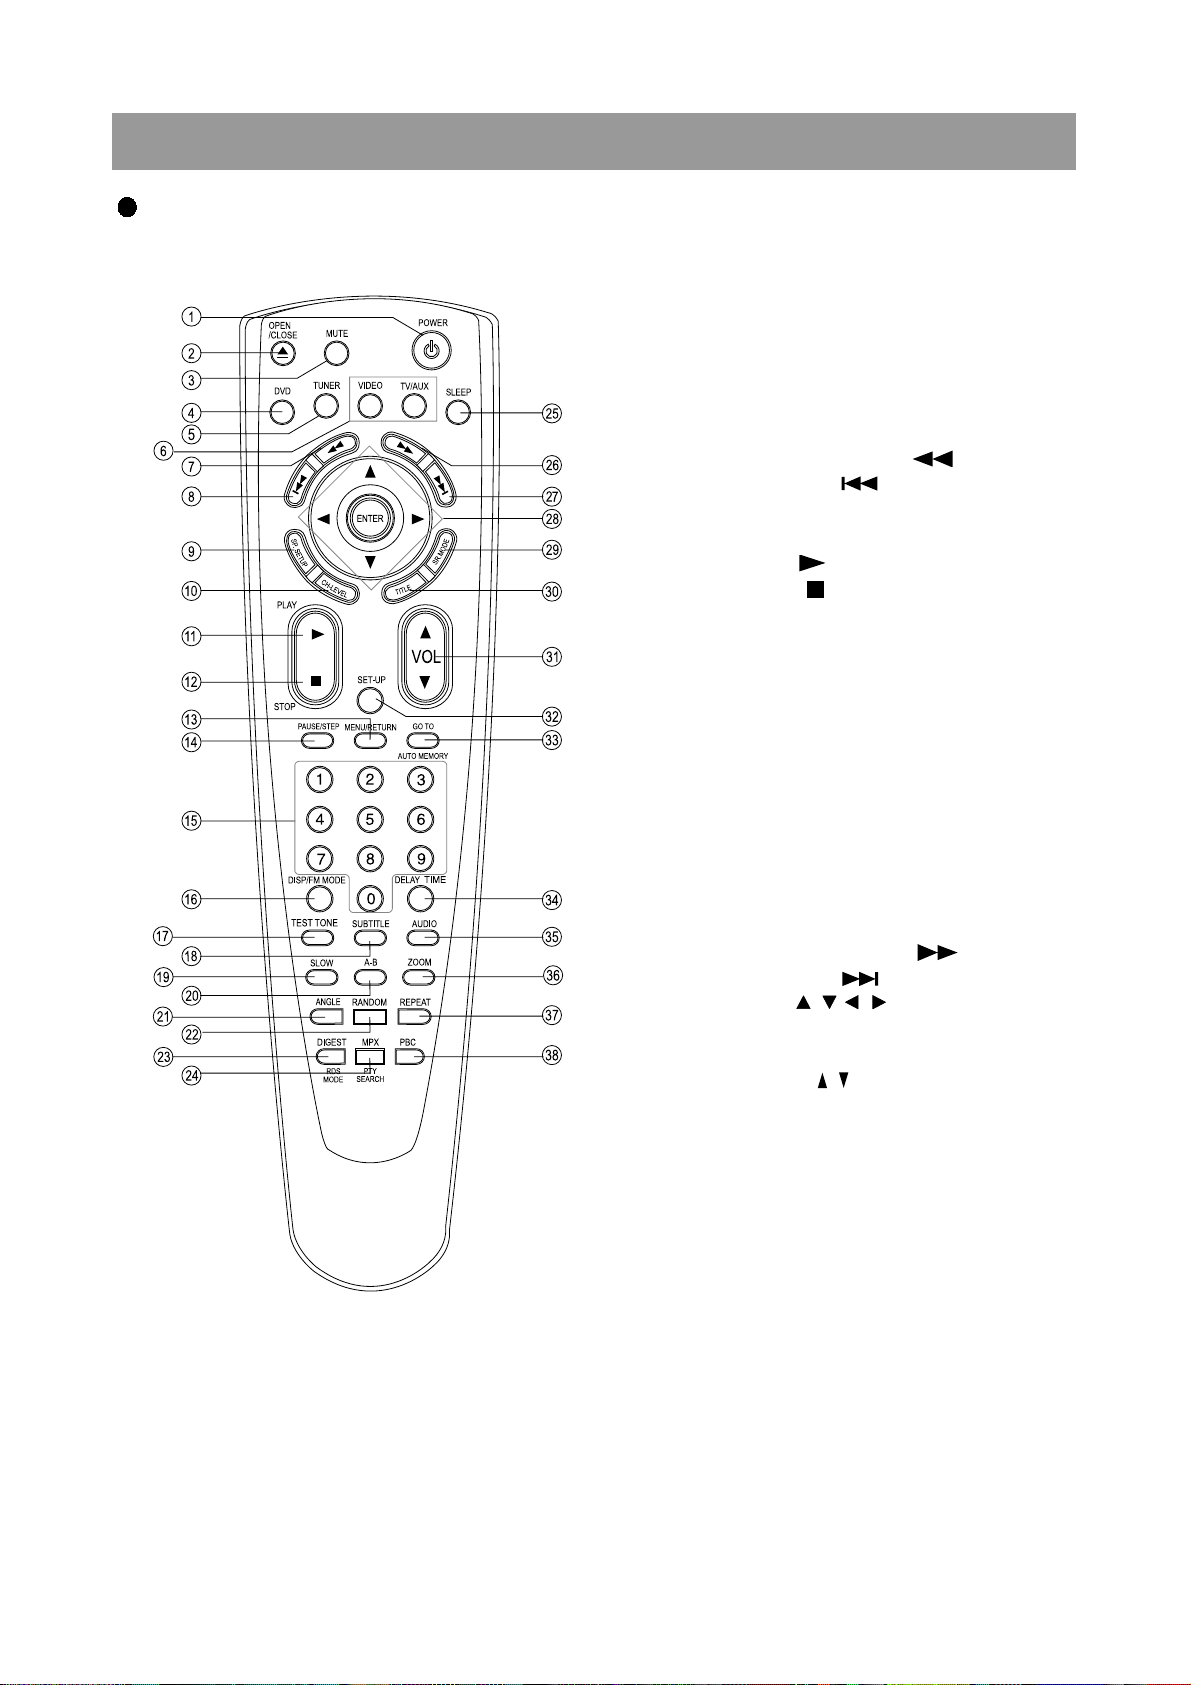
Remote Controller
1. STANDBY/ON(POWER) button
2. OPEN/CLOSE button
3. MUTE button
4. Input Selector : DVD button
5. Input Selector : TUNER button
6. Input Selector : VIDEO, TV/AUX button
7. FAST REVERSE(FR) ( ) button
8. SKIP PREV ( ) button
9. SPEAKER SETUP button
10. CH LEVEL button
11. PLAY ( ) button
12. STOP( ) button
13. MENU/RETURN button
14. PAUSE/STEP button
15. Number buttons
16. DISPLAY/FM MODE button
17. TEST TONE button
18. SUBTITLE button
19. SLOW button
20. A-B Repeat button
21. ANGLE button
22. RANDOM button
23. DIGEST/RDS MODE button
24. MPX/PTY SEARCH button
25. SLEEP button
26. FAST FORWARD(FF) ( ) button
27. SKIP NEXT ( ) button
28. MOVE /ENTER buttons
29. SURROUND MODE button
30. TITLE button
31. VOLUME buttons
32. SET-UP button
33. GO TO/AUTO MEMORY button
34. DELAY TIME button
35. AUDIO button
36. ZOOM button
37. REPEAT button
38. PBC button
4. Connecting to Equipment
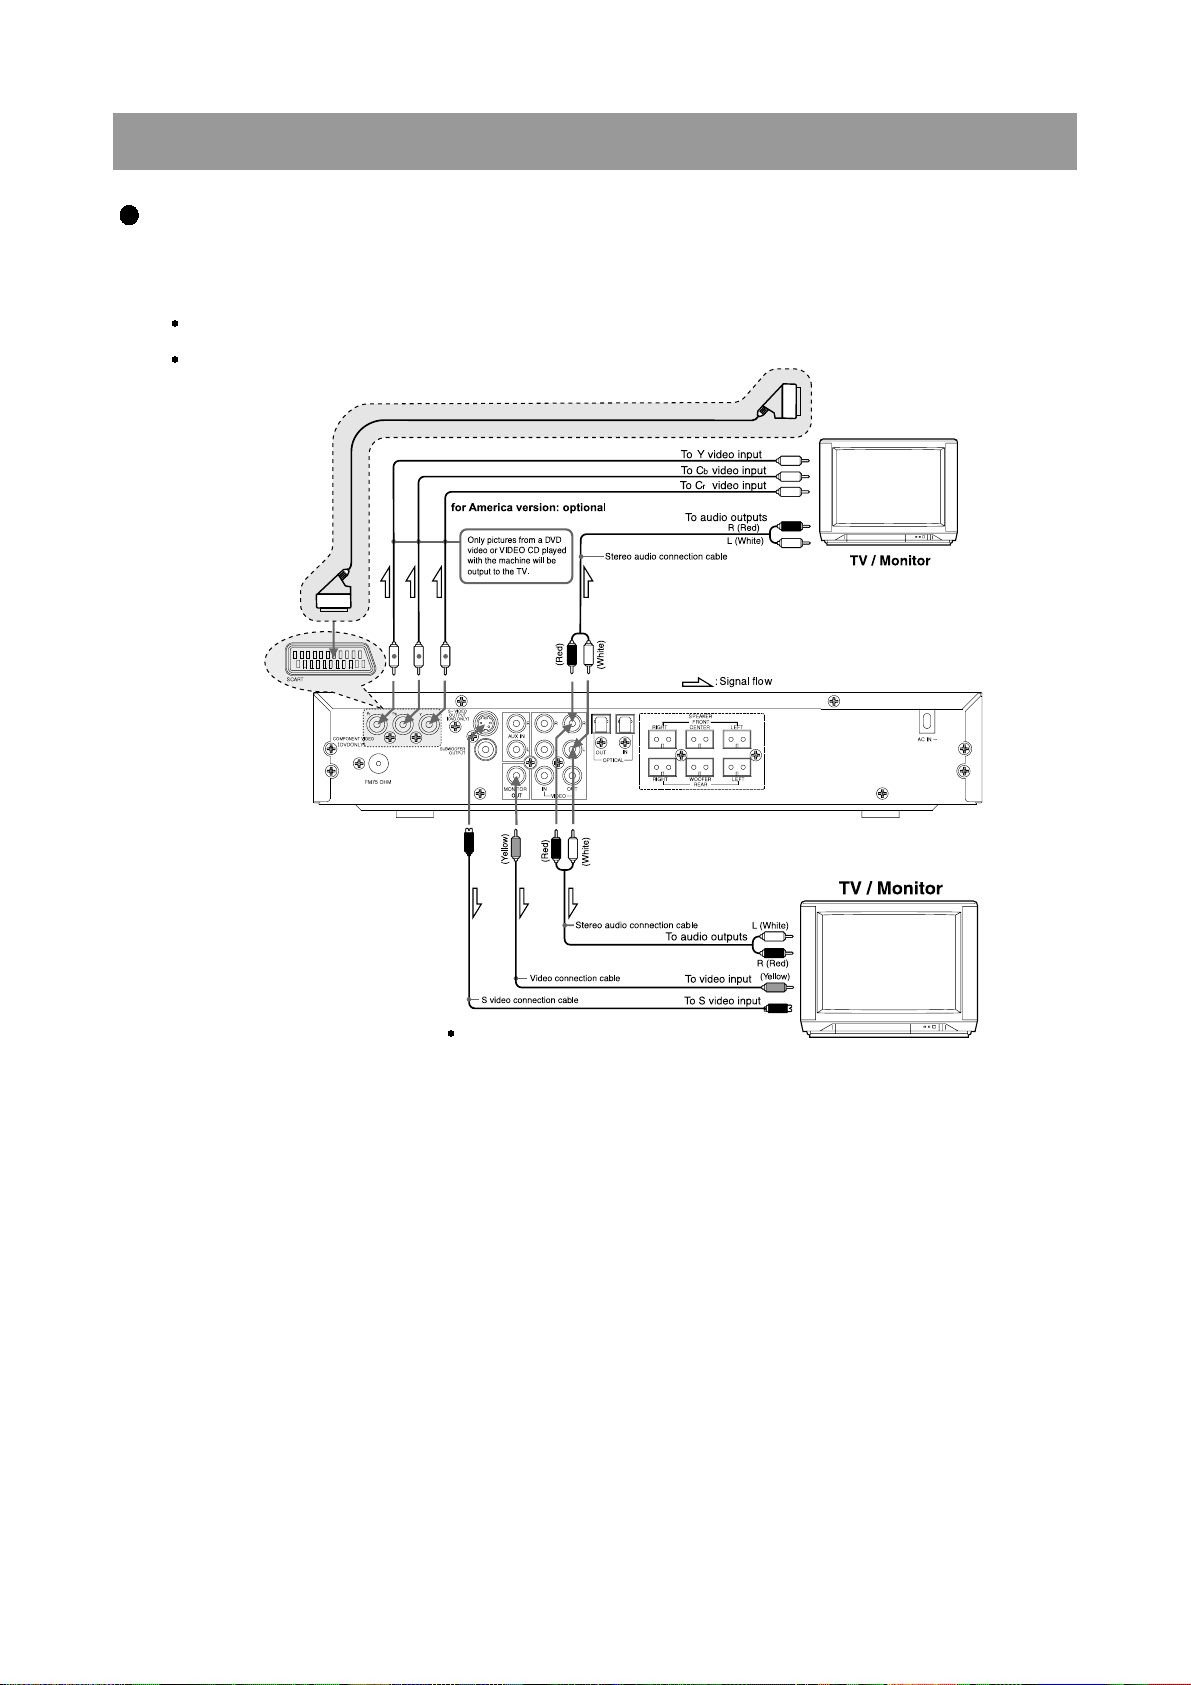
Connecting to TV
9
If the TV or monitor is equipped with an S video input,
make the S video connection in addition to the normal
video connection. The S video connection will provide
higher quality picture playback.
21-Pin SCART Cable(not included) to 21-pin SCART input terminal on TV
SCART Specification : Composite and Component Video output(DVD,
Video) Audio L/R Output(DVD only)
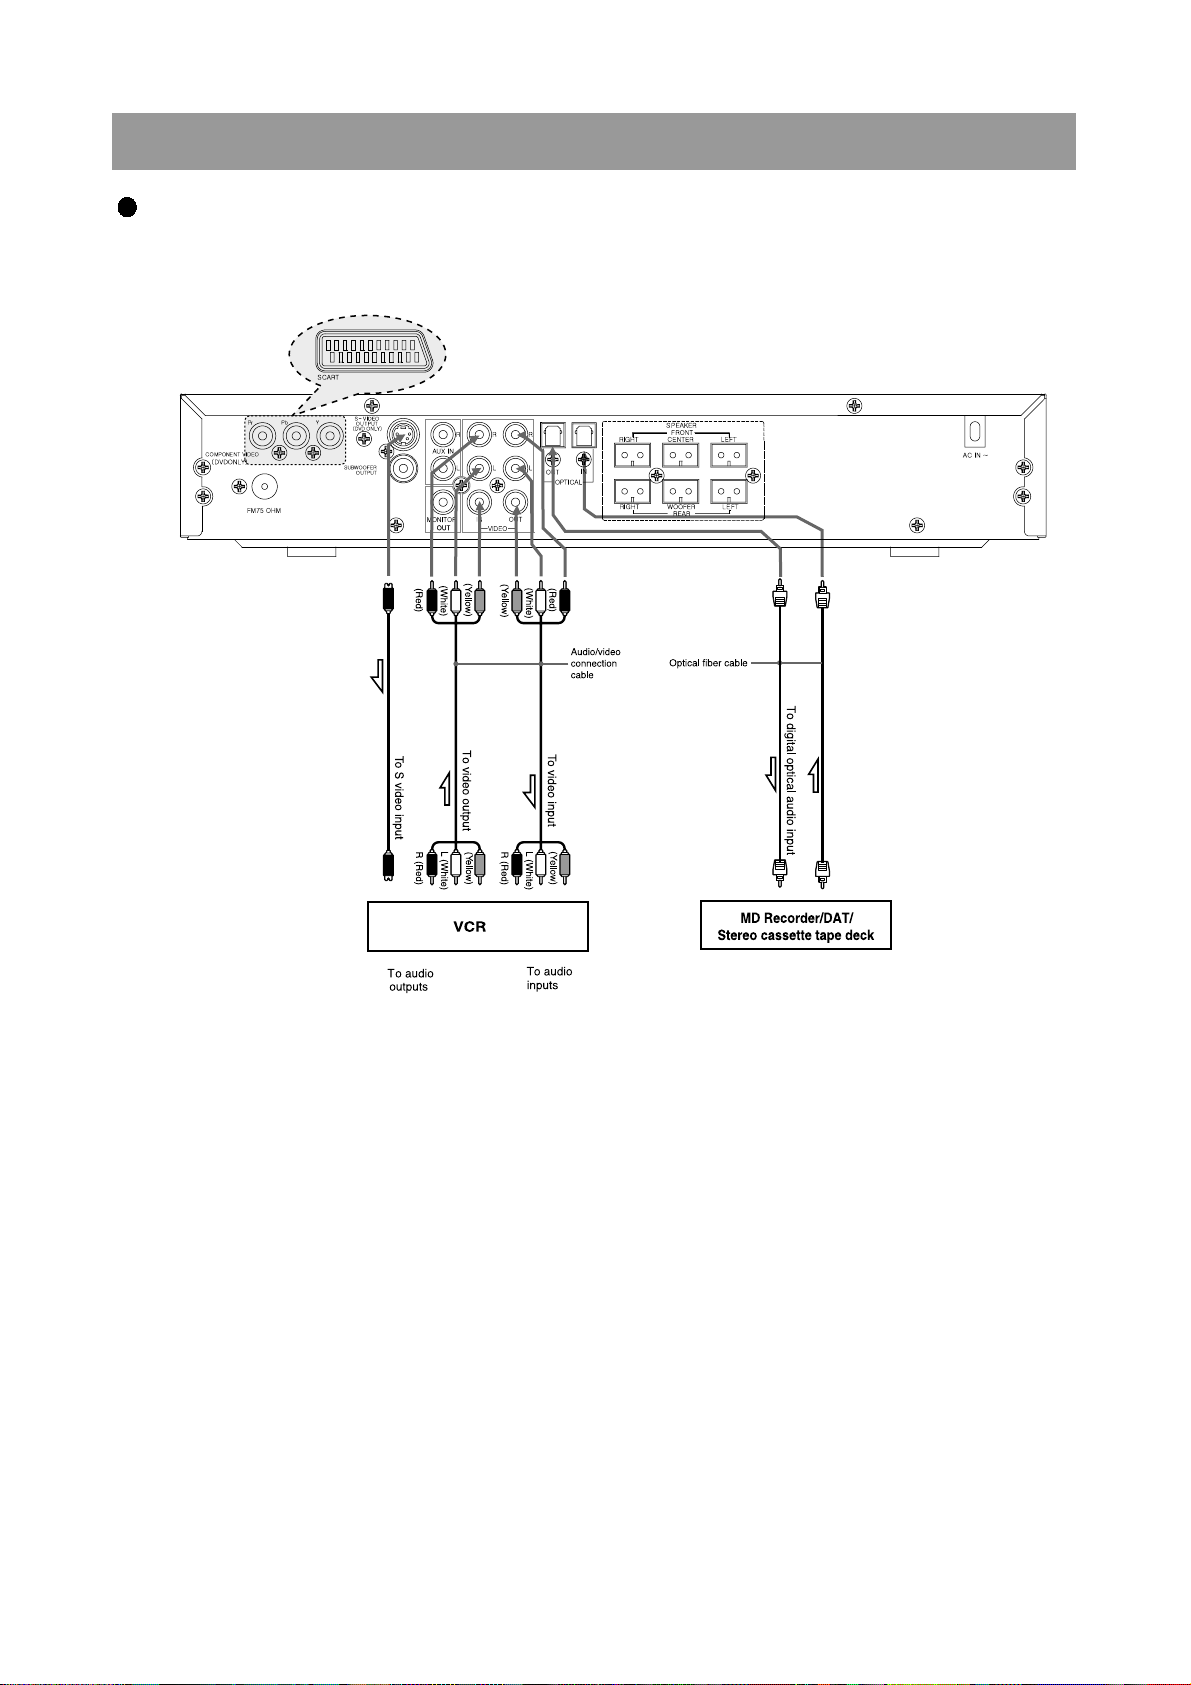
4. Connecting to Equipment
Connecting to AUDIO & VIDEO
10
(DHC-XD300P/300PS/350P/350PS Only)
To digital optical audio output
4. Connecting to Equipment
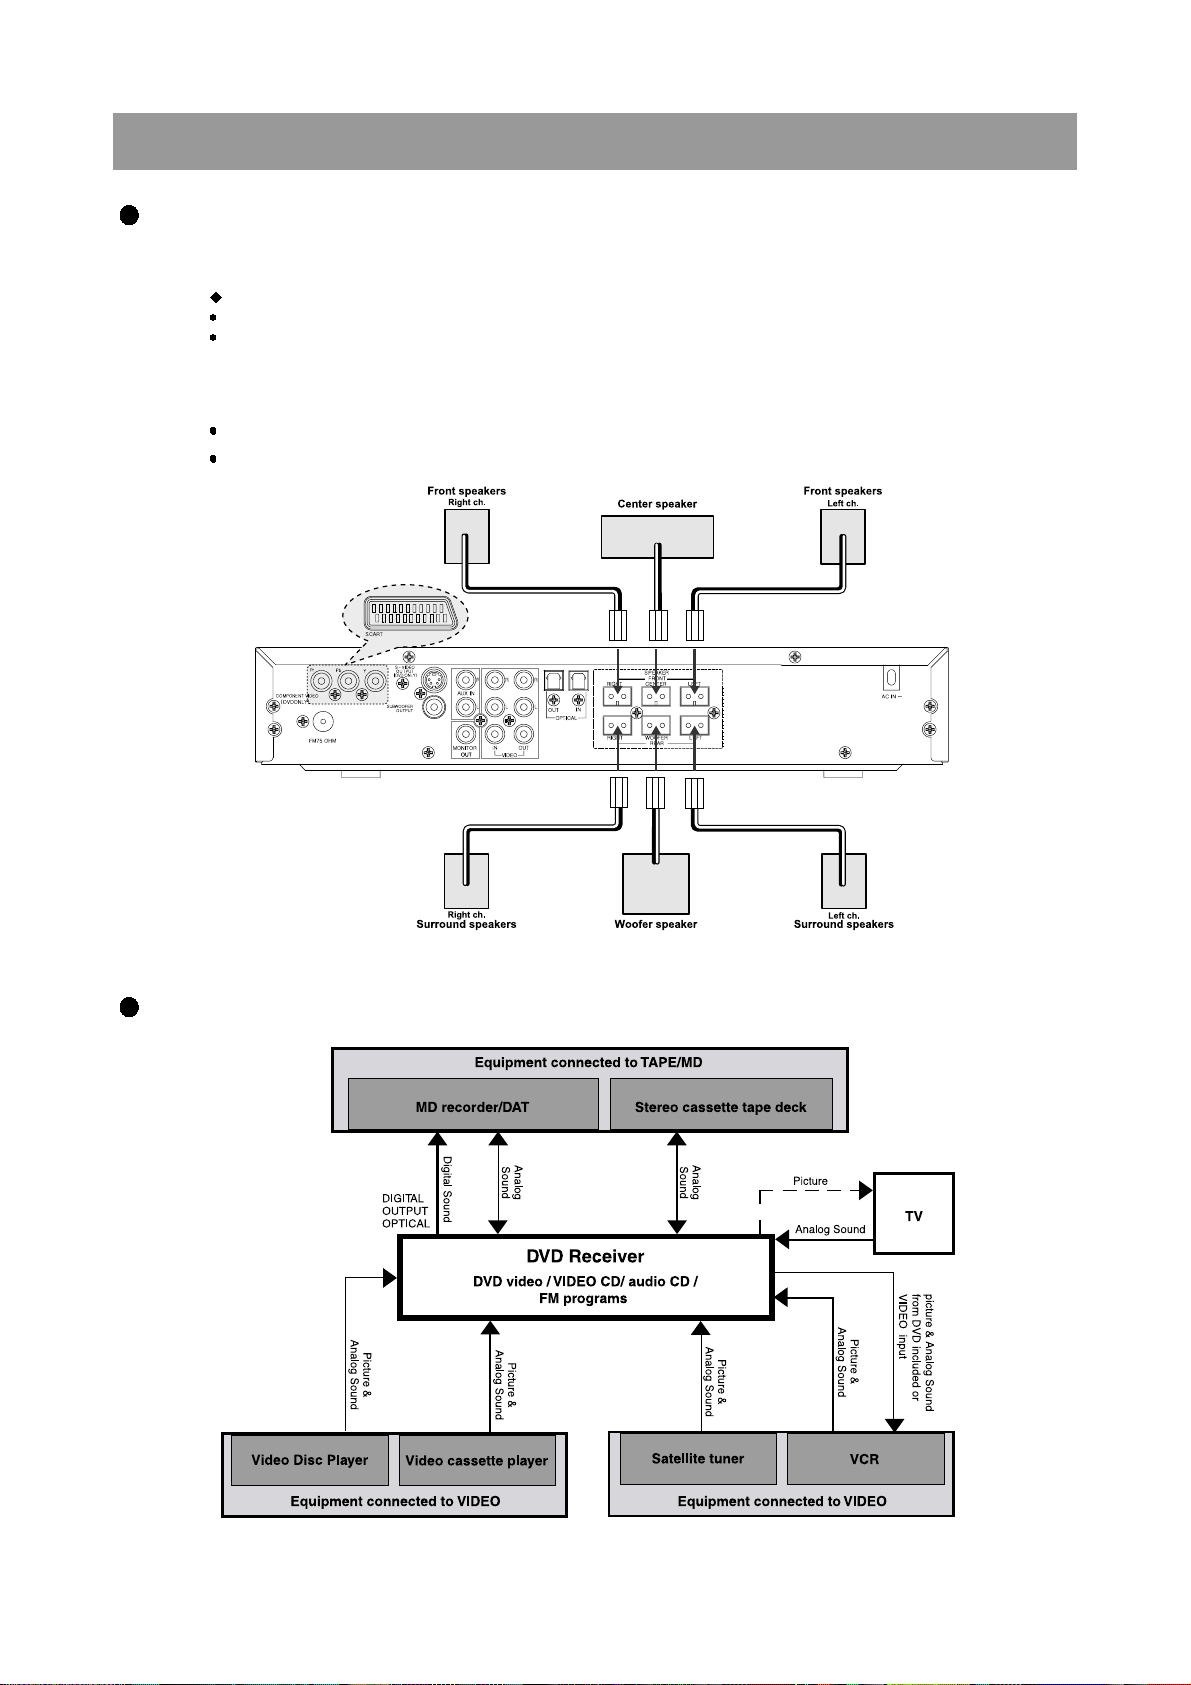
Connecting to Speaker
s
Connectiong to Recording Equipments
11
Before connecting
Refer also to the instruction manuals of the speakers.
This machine is designed to reproduce optimum sound quality when speakers with the specified impedance below are
connected.Please check the following information and choose speakers with appropriate impedance for the connections.
Front speakers / Center speaker / Surround Speakers : 8 ohms min. per speaker
Subwoofer speaker : 8 ohm min
To prevent damage to circuits, never short-circuit the positive (+) and negative (-) speaker wires.
Do not connect the speaker cable to the L and R connectors at the same time and do not connect more than one speaker to the
same speaker connectors.
RED
BLUE
GREEN
GRAY
ORANGE
BROWN

5. Trouble Shooting Guide
12
1. Basic Operating
Is STANDBY LED on?
Push power on.
Is POWER on?
Does initial read work
Turn Power on.
Does it play?
Does it output audio?
OK
Yes
Yes
Yes
Yes
Yes
Yes
Check AUDIO circuit.
No
Check tracking SERVO
circuit.
No
Check LASER circuit.
Check focus circuit.
Check disc.
Check protect circuit.
No
Check power supply circuit.
No
Check POWER SUPPLY
circuit.
Check connection
CN703, WC700.
No
2. Front Micom Circuit
Replace IC703
Yes
Check if IC703
Pin24, 98
is High(+5.0V) ?
Check +5.0V line.
Check if IC703
Pin18
is High ?
Check Power down line.
Check if IC703
Pin6, 7, 8
is High ?
Yes
Check Protection circuit.
No
No
No
Yes
Yes
1
Does DVD appear
at VFD ?
Push power on.
Does loading appear
at VFD ?
Yes
Does no DISC or
time appear at VFD ?
Yes
Check if DVD an Audio
Micom Interface is OK.
Yes
Check from Micom
to DVD Interface
Check Power
Check Loader.
Check MPEG PCB
Yes
Check Power Supply circuit
No
No
No
Check power
supply circuit
of Regulator PCB
Yes
Refer to Power Supply
Circuit.
Check Oscillator of
XC700
Yes
Replace XC700
Check if IC703 Pin5
is work ?
Yes
Check DVD Reset control
Check if
Connector CW704 Pin1
to 6 are work ?
Yes
No
No
No
No
No
1
Check connector
WC701 if it normaly?
Check MPEG PCB
Yes
No
Recheck it
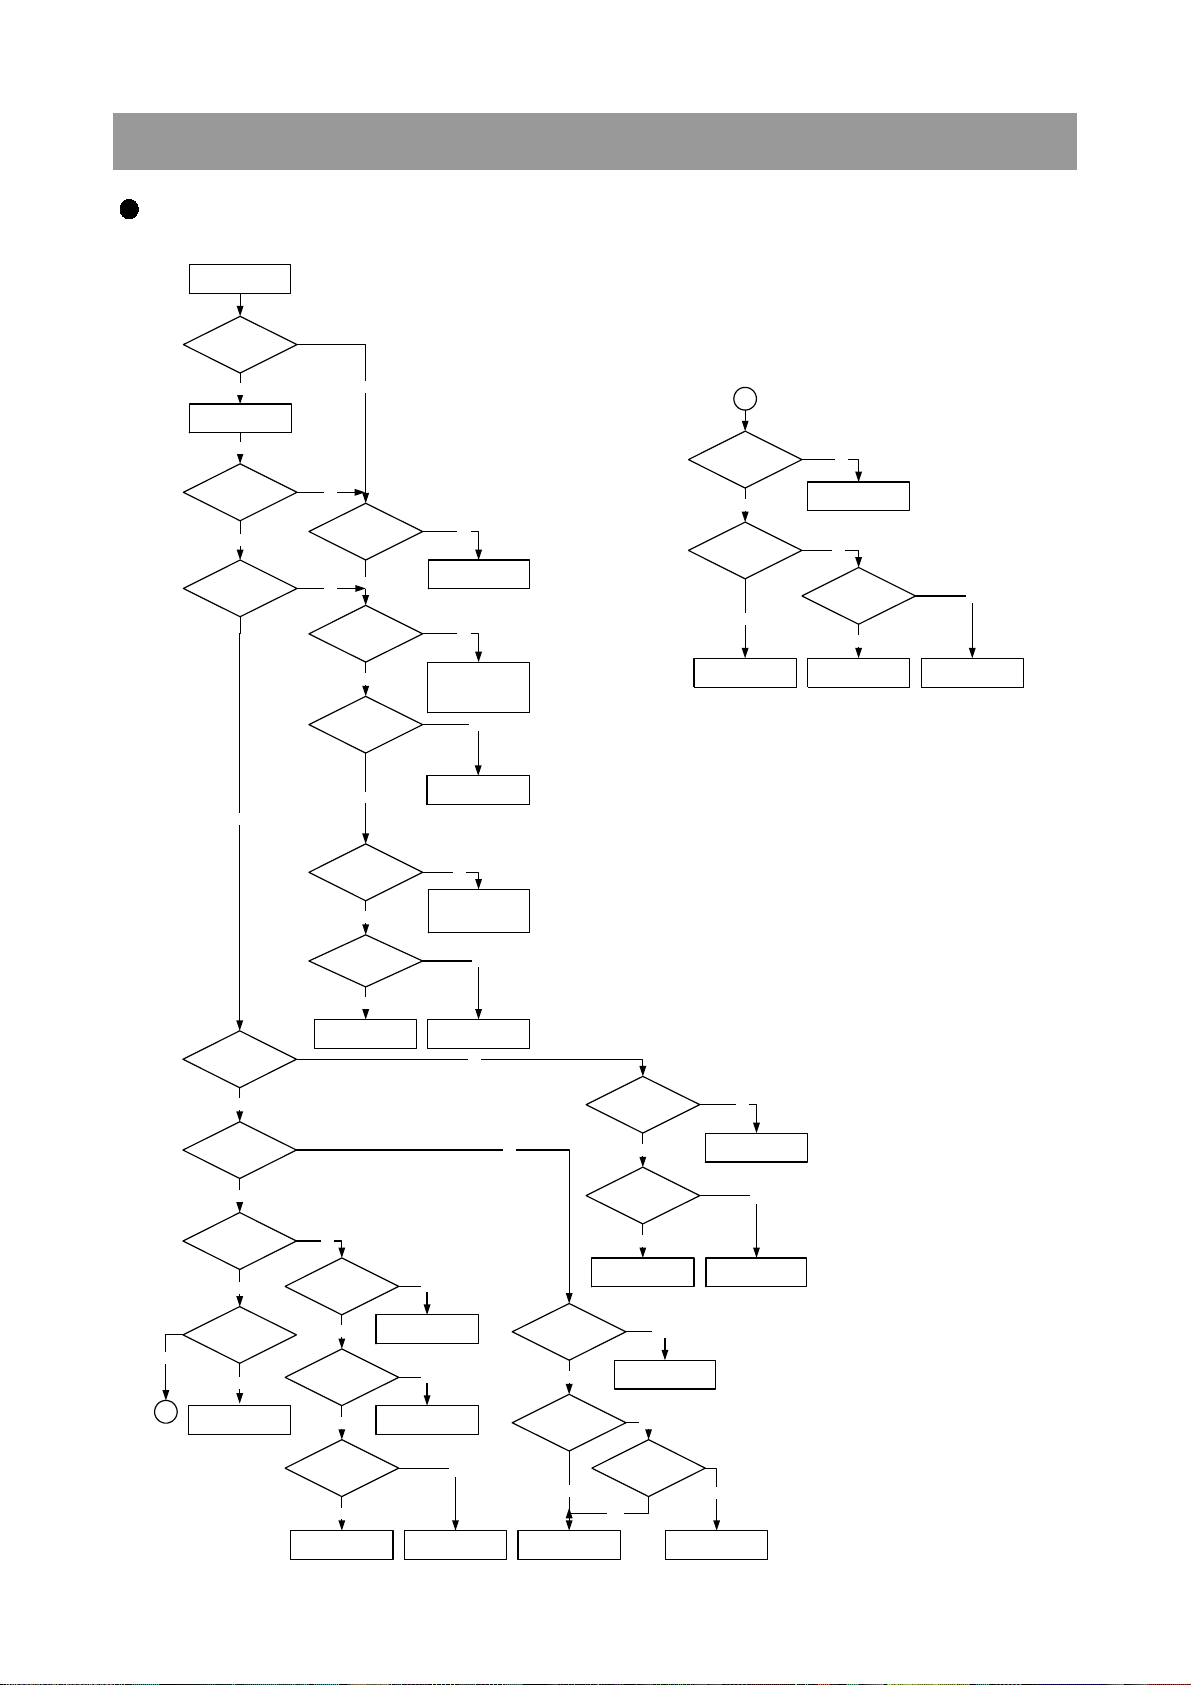
13
5. Trouble Shooting Guide
Check if the
POWER PART of the
FRONT is OK.
Check if the
REMOCON waveform of
the IC703 PIN(31).
Refer to MICOM circuit.
Refer to POWER SUPPLY
circuit.
Check if the IC702
PIN(1) is OK.
Replace IC702. Check RMC circuit.
Yes
Yes
No
No
No
Yes
1
LED ON
Push power on.
Yes
LED OFF
Yes
Yes
Check if ALL
BUTTONS are OK.
Check if the
FRONT POWER is OK.
Yes
Check if the IC703
OSC PIN(22) waveform is OK.
Yes
Check if the IC703
PIN (24) (98) is OK.
Check if POWER PART
of the FRONT is OK.
Replace XD700.
Check if the
VOLUME
is OK.
Check if the
HEADPHONE is OK?
Check if the
REMOCON is OK.
Yes
Yes
Yes
Yes
Yes
Check if the CN703
is OK.
Check if the FL700 PINS
are OK.
Yes
STANDBY ON
No
Yes
Re connect it.
Refer to POWER SW PCB
Refer to POWER SUPPLY
circuit.
CN703 PIN3: +5.6V
PIN8: -30V
Refer to POWER
SUPPLY circuit.
Refer POWER SUPPLY
circuit.
Check IC703
PIN(98) (99) (100) OK.
Refer to MICOM circuit.
Refer to KEY-IN line.
Check PATTERN and
RESOLDING.
No
No
No
No
No
Yes
Yes
No
No
Yes
No
Check if the POWER
is OK.
Check if the J700
PIN(4) is High.
Check if
HEADPHONE JACK is
OK.
Check MAIN PCB.
Check J700 circuit.
Replace H/P JACK.
Refer to Power Supply
circuit.
No
No
No
No
Yes
Yes
Yes
Check if POWER PART
of the FRONT is OK.
Check if IC703
PIN(29) (30) waveform
OK.
Refer to MICOM circuit.
Refer to Power Supply
circuit.
Check
VR700, HR718, HR719
OK.
Replace
VR700, HR718, HR719.
No
No
No
Yes
Yes
No
Refer to MICOM circuit.
Yes
No
No
1
Does Initial work? No
Front PCB OK
Loading…
Читайте подробный и интересный текстовый обзор, в котором описаны преимущества товара, его недостатки, полезные свойства и различные области применения.
В среднем, кратко
Великолепный представитель категории . Товар представляет из себя отличный образец инженерного искусства, в его разработке применялись самые передовые на момент выпуска технологии. Люди, которые изобретали дизайн, писали тексты для других специалистов старались донести до будущего клиента самые смелые идеи.
Что интересно, в процессе разработки был использован передовой опыт специалистов различных стран с различных континентов, ведь при помощи сети Интернет можно общаться из любой точки мира, а значит все накопленные знания легко доступны инженерам в любом уголке нашей планеты.
На данном этапе советуем Вам, как пользователю, купить девайс, попробовать товар в деле и, если вам он понравится, написать свой обзор, изложить свои впечатления от использования, написать все плюсы и минусы, может быть показать процесс распаковки и подключения, а значит поделиться с другими людьми своими мыслями.
Мы приветствуем любые обзоры от наших пользователей, негативные или положительные, если Вам есть, что сказать, присылайте нам на email: komplektmarketru@yandex.ru и мы обязательно разместим Ваш текст в этом разделе.
Если потратить минут 15 на написание, пусть даже краткого обзора и прислать его нам, то этот текст может кому-то кардинально помочь в выборе, в принятии решения о покупке.
Добавить свой обзор товара
Ещё интересные товары
4 069 ₽
>>>>>
Конструктор LEGO Super Mario 71386
тип конструктора: классический, серия: Super Mario, возраст: от 6 лет, пол: для девочек, для мальчиков, унисекс, материал: пластик
790 ₽
>>>>>
96 507 ₽
>>>>>
Биде напольное Timo Kulo ТК-402
тип: биде, установка: напольная, выпуск: горизонтальный, цвет: белый, материал корпуса: санфаянс, особенности: антигрязевое…
16 560 ₽
>>>>>
Барный стул Sun 6402160
назначение: барный, материал каркаса: металл, обивка: искусственная кожа, особенности: мягкое сиденье, поворотный, подставка…
4 271 ₽
>>>>>
26 450 ₽
>>>>>
Не тратьте время на поиск нужной запчасти, оформите заявку на заказ товара и наш менеджер свяжется с вами и согласует заказ.
Модель
Просьба указывать серийный номер техники, для ускорения
обработки заказа.
Запчасть
Если у вас есть Артикул (P/N) необходимой запчасти — укажите её.
Email используется для отправки уведомлений о ценах и наличии
Наша компания продает запчасти к бытовой технике уже много лет. Мы реализуем запчасти для музыкальных центров Daewoo в розницу и оптом в различные регионы России и Украины. С повсеместным распространением всемирной паутины все больше людей стали делать выбор в пользу интернет-магазинов, понимая, что торговля через интернет позволяет продавцу избежать затрат связанных с арендой помещения, содержания огромного штата продавцов и т.п. Поэтому, мы предлагаем покупателям запчасти для музыкальных центров по более низким ценам, нежели в обычных магазинах. Мы постоянно расширяем ассортимент запчастей, заключая договора напрямую с заводами-изготовителями.
Воспользовавшись услугами наших менеджеров, можно оперативно уточнить характеристики деталей для музыкальных центров Daewoo, получить консультацию по применению, взаимозаменяемости запчасти и другую дополнительную информацию.
Для оплаты заказа предусмотрены различные возможности, удобные как частным лицам, так и организациям. Доставка возможна несколькими способами: товар может доставить наш курьер, можно воспользоваться услугами транспортных компаний, либо осуществить пересылку почтой не только в такие крупные города как Москва, Санкт-Петербург, Нижний Новгород, Екатеринбург, Казань, Самара, Новосибирск, Киев, Днепропетровск, Донецк, Харьков, Запорожье, Одесса, Львов, а и в любой уголок России и Украины.
Битый архив !!! Архив поврежден !!! Архив открывается с ошибкой !!! Не спешите винить в этом сам закачанный файл !!!
Главное условие нормального открытия архивов — версия WinRar должна быть не ниже 5. Скачать можно здесь — по ссылке,
так же смотрите и сравнивайте размер скачанного файла с размером в описании. Участник , который жалуется на поврежденный архив, получит предупреждение или бан, если окажется, что с архивом все хорошо, а у него просто архиватор не последней версии.
Не нужно в комментариях писать только слово Спасибо участнику, который выложил файл, для этого есть специальная кнопка , так же не нужно писать если файл не качается,
для этого есть специальная тема.
Пишите только по делу: схема подходит еще к каким-то моделям, можете описывать неисправности по данной модели и что было причиной и т.д, короче, ту информацию, которая будет полезна участникам форума.