
Войти
+7 (495) 589-67-37
Отправляем по всей России
г. Москва, ул. Барклая, д. 8
Пн — Пт, с 10:00 до 19:00
zakaz@videooko.ru
Каталог
0
0
0Корзина
Домофоны
Комплекты: видеодомофон и вызывная панель
Комплекты видеодомофонов с замком
Комплекты HD видеодомофонов
Комплекты IP-видеодомофонов
IP-домофоны
IP-домофоны Fox
IP-домофоны Dahua Technology
IP-домофоны Hikvision
IP-домофоны Keno
Видеодомофоны
Видеодомофоны с интернет
Видеодомофоны для координатных подъездных домофонов
Видеодомофоны для цифровых подъездных домофонов
Видеодомофоны с записью
Блоки сопряжения, трубки, контроллеры
Вызывные панели
Антивандальные видеопанели
Видеопанели на 2, 3, 4 и более абонентов
Дизайнерские видеопанели
Уголки, кронштейны
Видеоглазки с монитором
Видеоглазки WiFi
Беспроводные видеодомофоны
Аудиодомофоны и переговорные устройства
Индивидуальные аудиодомофоны
Абонентские трубки для подъездных домофонов
Переговорные устройства «клиент-кассир»
Селекторная связь
Видеонаблюдение
Комплекты видеонаблюдения для дома, дачи, офиса
Комплекты видеонаблюдения на 1 камеру
Комплекты видеонаблюдения на 2 камеры
Комплекты видеонаблюдения на 4 камеры
Комплекты видеонаблюдения на 8 камер
Комплекты видеонаблюдения на 16 камер
Комплекты видеонаблюдения для дома и дачи
Смотреть все
Аналоговое HD видеонаблюдение
HD видеокамеры
HD видеорегистраторы
Усилители, разветвители, передатчики по витой паре
IP видеонаблюдение
Камеры IP видеонаблюдения
IP видеорегистраторы NVR
IP-видеосерверы
Коммутаторы, роутеры, оборудование PoE
Муляжи видеокамер и предупреждающие наклейки
Муляжи видеокамер
Предупреждающие наклейки
Беспроводные видеоняни
Видеоняни с монитором
Видеоняни Wi-Fi
Жесткие диски и карты памяти
Объективы, кожухи, корпуса, микрофоны, пульты, кронштейны
Кронштейны и монтажные коробки
Объективы
Кожухи и корпуса
Микрофоны
Пульты управления
Контроль доступа
Комплекты систем контроля доступа
Замки и защелки
Электромеханические замки
Миниатюрные электромеханические замки Шериф
Электромагнитные замки
Электромеханические защелки
Соленоидные (электроригельные) замки
Контроллеры и кодонаборные (кодовые) панели
Автономные контроллеры
Кодонаборные панели
Сетевые контроллеры
Биометрические контроллеры
Считыватели электронных ключей
Электронные ключи
Кнопки выхода и радиоуправление
Доводчики
Системы охраны
Беспроводная система охранной сигнализации HikVision AX PRO
Датчики AX PRO
Комплекты охранной и пожарной сигнализации
Пульты сигнализации ППКОП
Проводные устройства
Проводные датчики (извещатели)
Проводные сирены (оповещатели)
GSM сигнализация ИПРо
Беспроводные датчики для сигнализации ИПРо
Беспроводная охранная сигнализация Ajax
Беспроводная сигнализация Atis
Беспроводная сигнализация Sapsan GSM
Сигнализация Сибирский Арсенал серии Express GSM
Умный дом
Умный дом Fox Smart
Умный дом Rubetek
Готовые наборы умного дома Rubetek
Устройства и датчики Rubetek
Умный дом Sonoff
GSM-розетки
Источники питания, кабель, разъемы
Источники питания
Источники питания 12 В
Блоки бесперебойного питания 12 В
Источники питания 24 В
Источники бесперебойного питания 220 В
Аккумуляторы
Кабель
Готовые кабели
Разъемы
Популярные бренды
Все бренды
D
Dahua Technology
H
HiWatch
I
IMOU
C
CTV
T
Tantos
A
Atis Security
Amatek
F
Fox CCTV
K
Keno
E
EZVIZ
i
iVideon
C
Commax
S
Slinex
A
Atix
I
IronLogic
A
AccordTec
Y
YLI Electronic
A
Activision
K
KadrON
C
Cubris
Каталог
+7 (495) 589-67-37
Заказать звонок
0
0
0
Главная
Видеонаблюдение
Аналоговое HD видеонаблюдение
HD видеорегистраторы
Видеорегистратор Dahua DHI-XVR4104C
Инструкции и ПО
Инструкции и ПО
ОбзорОтзывыИнструкции и ПО
Основная инструкция по настройке (.pdf)
Программное обеспечение для видеорегистратора Dahua DHI-XVR4104C
ПО CMS SmartPSS v.1.11.1 для Windows (.zip)
Приложение iDMSS Lite для iPhone
Приложение iDMSS HD Lite для iPad
Приложение gDMSS Lite для смартфонов Android
Приложение gDMSS HD Lite для планшетов Android
Видеорегистратор DVR (аналоговый) Dahua DH-XVR4104C-X1
Нет в наличии
Последний раз товар был 25 ноября
- Тип видеорегистратора: DVR (аналоговый)
- Каналов записи: 4
- Поддержка форматов: AHD, HD-CVI, HD-TVI
- Слотов для HDD: 1
Появились вопросы о товаре?
- Тип видеорегистратора: DVR (аналоговый)
- Каналов записи: 4
- Поддержка форматов: AHD, HD-CVI, HD-TVI
- Слотов для HDD: 1
Появились вопросы о товаре?
Нет в наличии
Последний раз товар был 25 ноября
Нет в наличии
Последний раз товар был 25 ноября
Мы используем файлы cookie. Подробнее
Мы используем файлы cookie для вашего удобства. Продолжая пользоваться сайтом, вы соглашаетесь с политикой использования cookie. Подробнее
Доставка в пункты выдачи
Бесплатная доставка при заказе на сумму от 8 000 руб. осуществляется до пунктов выдачи в выбранном вами городе по всей территории РФ
Если сумма заказа менее 8 000 руб., стоимость доставки до пункта выдачи в выбранном вами городе составит 500 руб.
Курьерская доставка в руки
Доставка курьером по городу до дверей обойдется в 350 руб. для заказов на сумму более 8000 рублей.
При заказе на сумму менее 8000 руб. стоимость доставки до дверей составит 850 руб. (Сумма 500р. до пункта самовывоза вашего города + 350р. доставка до дверей).
Полезный лайфхак: стоимость доставки и варианты рассчитываются автоматически в корзине, в зависимости от суммы заказа
Отдаленные города, поселки, деревни
Если в выбранном вами населенном пункте отсутствует терминал ТК, доставка осуществляется до терминала ТК в ближайшем к вам городе.
При этом доставка в ваш населенный пункт оплачивается отдельно по тарифам ТК.
Наложенный платеж
Доставка наложенным платежом с оплатой заказа при получении возможна по согласованию с менеджером.
Отгрузки
Отгрузка оплаченного и согласованного заказа производится на следующий или 2-й рабочий день с момента зачисления денег на наш счет.
При отгрузке продукции в регионы срок доставки может составлять от 2 до 3 дней в зависимости от удаленности Вашего населенного пункта.
Работаем с физическими и юридическими лицами
Гарантия возврата денежных средств
Для юридических лиц
Для юридических лиц, оптовых покупателей и Дилеров оплата производится по безналичному расчету.
При этом покупатель может выбрать вариант как с учетом, так и без учета НДС.
Для физических лиц
Физические лица могут произвести оплату одним из следующих способов:
-
Оплата с банковских карт Мир, Visa, Mastercard, Юmoney, Яндекс кошелек, SberPay, Рассрочкой в Сплит, Кредит от СберБанка при оформлении заказа в корзине;
-
Наличными курьеру или в терминале ТК при получении товара наложенным платежом.
Важно! Оплата производится без комиссии во всех способах кроме наложенного платежа
Безналичный расчет для юридических лиц
Если покупка совершается от юридического лица, оплата производится по счету, который выставляет менеджер
интернет-магазина.
Важно! Срок оплаты счета – до 3 дней. Возможно продление периода оплаты счета. Для этого необходимо
связаться с персональным менеджером.
Отгрузка оплаченного и согласованного заказа производится на следующий или 2-й рабочий день с момента зачисления денег на наш счет (исключение составляют случаи оформления товаров в статусе «Под заказ»).. При отгрузке продукции в регионы срок доставки может составлять от 1 до 5 дней в зависимости от удаленности Вашего населенного пункта.
Кредит и Рассрочка без переплаты
В интернет-магазине Dahua.market есть возможность приобрести товары в кредит от Сбербанка или в рассрочку используя Яндекс Сплит
Максимально выгодные для клиентов условия сделки, быстрые сроки оформления, качественное обслуживание – мы
делаем все, чтобы наши покупатели остались довольны.
Срок гарантийного обслуживания оборудования составляет от 1 до 3 лет. Точный срок гарантийного обслуживания конкретного оборудования вы можете уточнить у специалиста отдела продаж!
При отправке оборудования в ремонт клиент должен приложить к оборудованию копию документа о реализации (товарная накладная, товарный чек) или заполненный гарантийный талон (серийные номера на талоне и устройства идентичны), полностью заполненную РЕКЛАМАЦИЮ формы №1 отдельно на каждую единицу оборудования и заполненный Акт приемки оборудования.
Неисправное оборудование клиент доставляет на наш склад своими силами и за свой счет. Все остальные расходы, связанные с перемещением оборудования в сервисный центр производителя, несет продавец.
Срок гарантийного ремонта определяется производителем оборудования, при этом срок ремонта не включает в себя время доставки оборудования до сервиса производителя и обратно.
Гарантия не распространяется и гарантийный ремонт не производится в случаях:
- Наличия механических повреждений или следов попыток вскрытия изделий, нарушении пломб, перепаек, сорванных шлицов на крепежных винтах и т.п.
- Серийный номер изменен или удален.
- Нарушения правил эксплуатации и несоответствия внешних воздействий классу защиты оборудования.
- Повреждений, вызванных молнией, пожаром или другими природными явлениями, чрезмерной влажностью или запыленностью.
- Повреждений, вызванных несоответствием Государственным стандартам параметров питающих, коммуникационных, кабельных сетей и иных аналогичных внешних факторов.
- Повреждений, вызванных инсталляцией или эксплуатацией с нарушением технических условий и требований безопасности.
- Транспортировки оборудования не в штатной таре (не в таре производителя).
Замене не подлежит оборудование, потерявшее товарный вид, без штатных блоков питания, без комплекта принадлежностей, без программного обеспечения и эксплуатационной документации.
Содержание
- DH-XVR4104C-X1 XVR-видеорегистратор Dahua
- Хиты продаж
- Новинки
- DH-XVR4104C-X1 DAHUA 4-канальный гибридный видеорегистратор
- Описание DH-XVR4104C-X1 DAHUA:
- Подробное описание
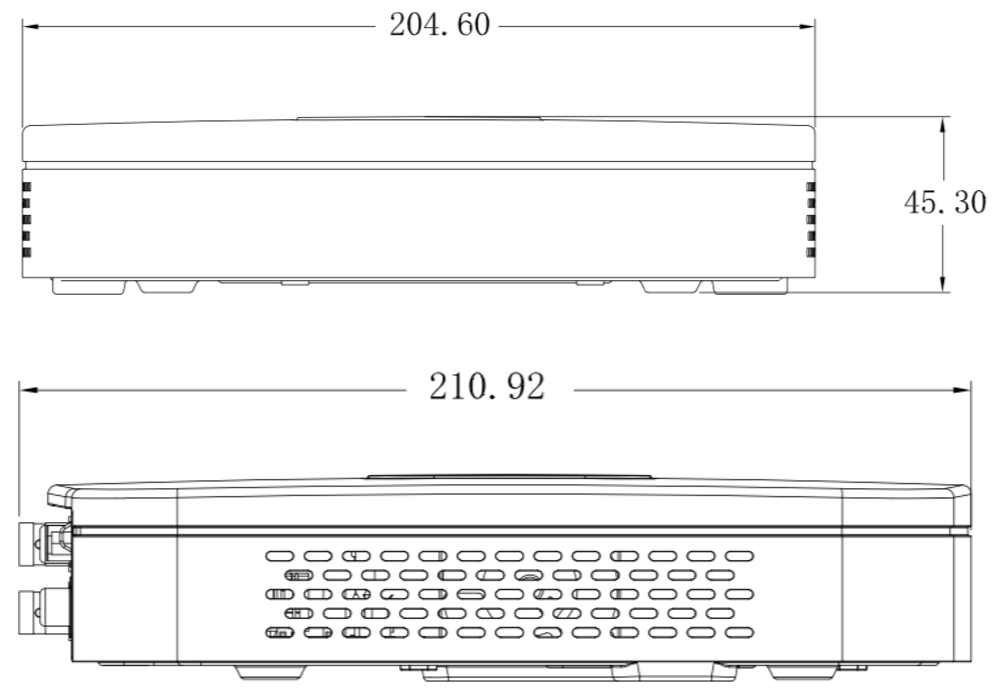
- Габаритные размеры DAHUA DH-XVR4104C-X1
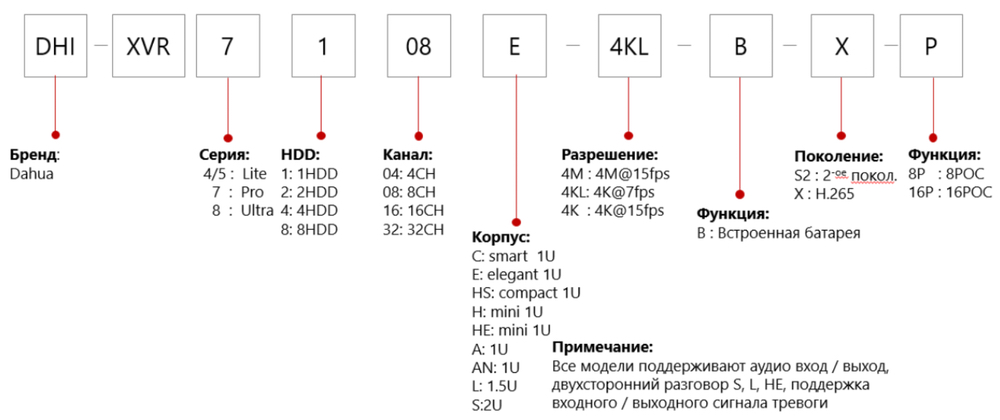
- Расшифровка маркировки модельного ряда видеорегистраторов DAHUA
- HDCVI видеорегистратор DH-XVR4104C-X1
- Описание
- Доставка
- Оплата
- Гарантия
- Отзывы (0)
- Доставка в пункты выдачи
- Курьерская доставка в руки
- Отдаленные города, поселки, деревни
- Наложенный платеж
- Отгрузки
- nano-zoom.ru
DH-XVR4104C-X1
XVR-видеорегистратор
Dahua
| Тип регистратора | XVR |
|---|---|
| AHD видеовходы | 1080P@25/30, 720P@25/30fps |
| TVI видеовходы | 1080P@25/30, 720P@25/30fps |
| HDCVI видеовходы | 1080P@25/30fps, 720P@25/30fps |
| CVBS видеовходы | PAL/NTSC |
| IP видеовходы | 4+1 до 2MP |
| Аналоговые видеовходы | 4 |
| Видеовыходы | 1 HDMI ,1 VGA |
| Аудио входы/выходы | 1/1 |
| Скорость записи | 1080N/720P/960H/D1/CIF 30к/с |
| OSD меню | имя камеры, время, потеря видеосигнала, блокировка камеры, обнаружение движения, запись |
| Формат сжатия | H.265+/H.265/H.264+/H.264 |
| Разрешение | 1080N, 720P, 960H, D1, CIF |
| Режим записи | ручной, по расписанию: непрерывная, по движению, по тревоге |
| Интервал записи | 1 |
60 мин (по умолчанию: 60 мин), предварительная запись: 1
30 сек, после записи: 10
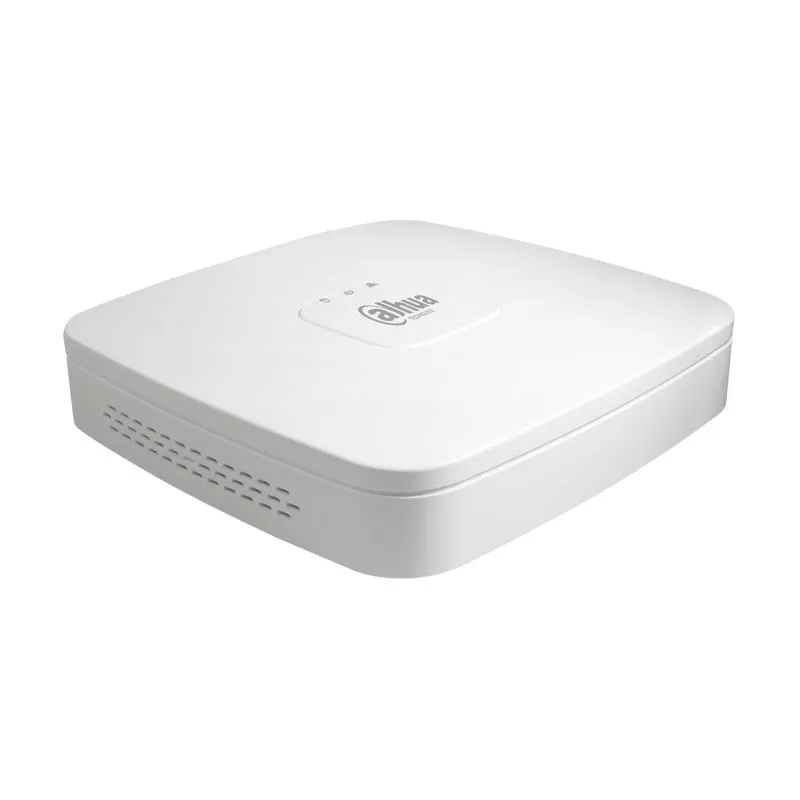
Хиты продаж

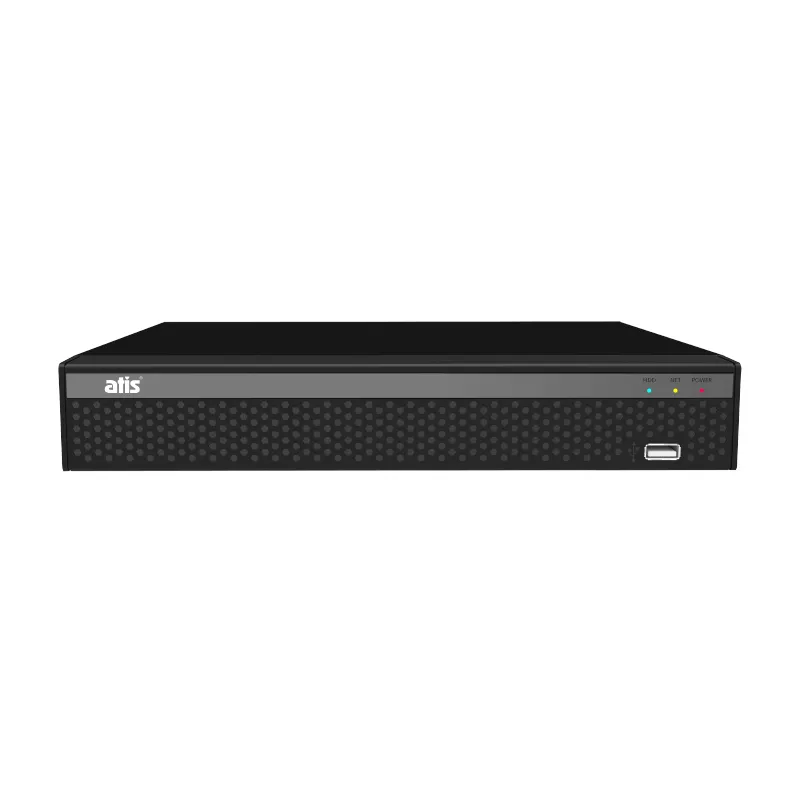
ATIS XVR 4104NA
XVR видеорегистратор
ATIS L
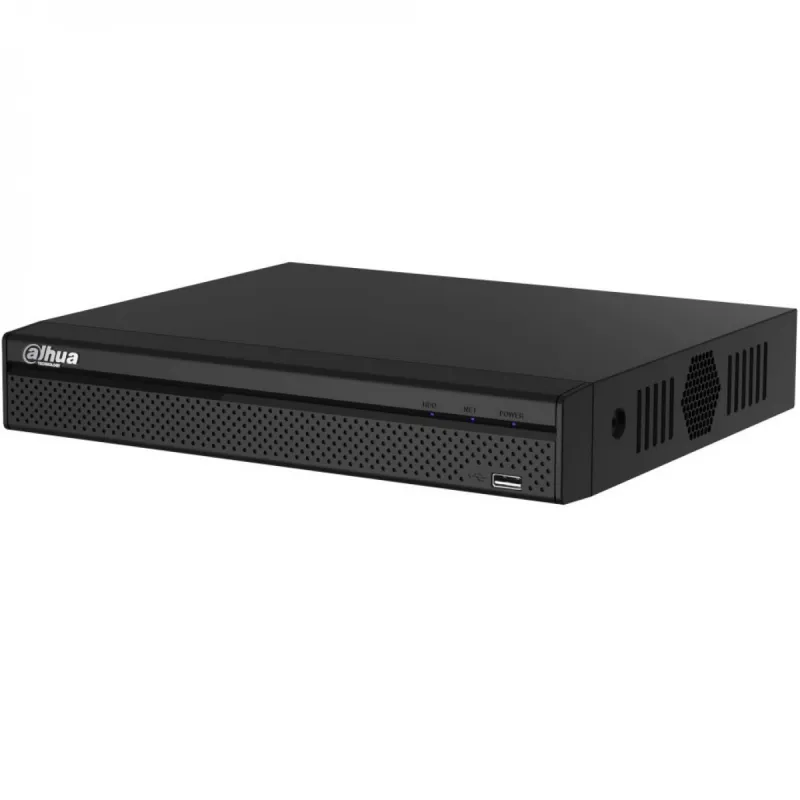
ATIS XVR 4108NA
XVR видеорегистратор
ATIS L
XVR 4108RA
XVR видеорегистратор
ATIS L
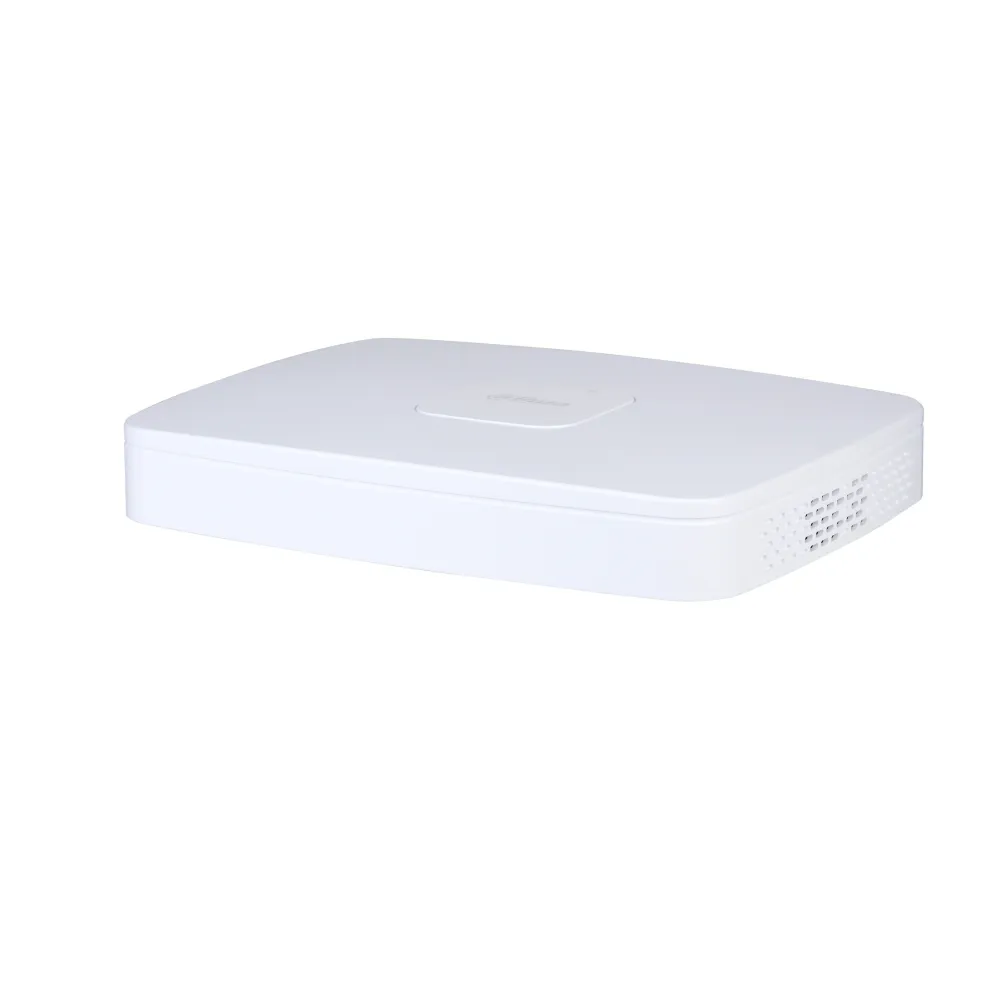
DH-XVR5104C-X1
XVR-видеорегистратор
Dahua
DH-XVR5116HS-X
XVR-видеорегистратор
Dahua
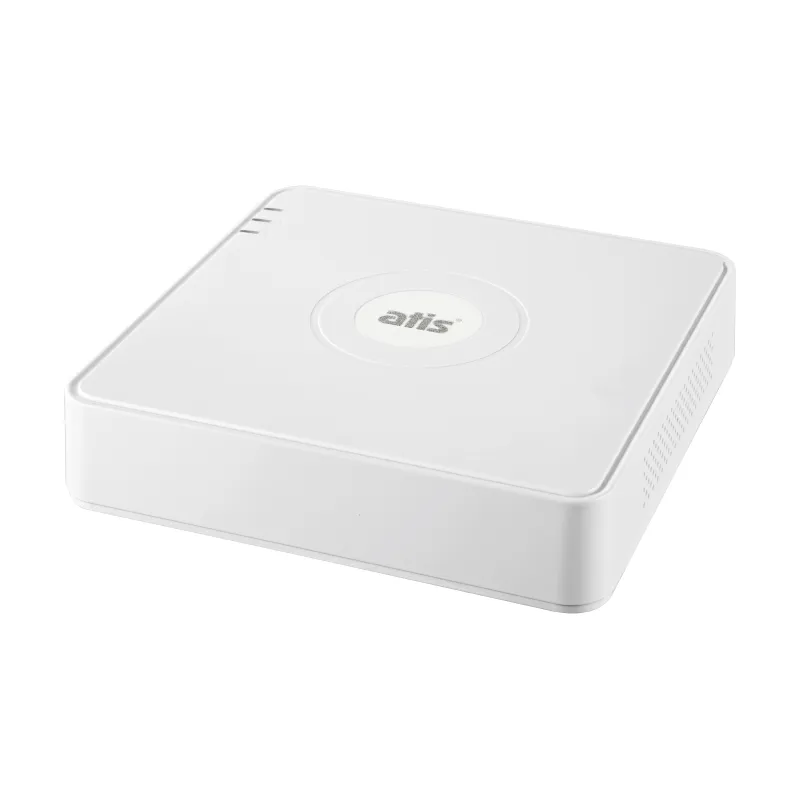
AH-NVR7104
IP-видеорегистратор
ATIS H
DHI-NVR4216-4KS2
IP-видеорегистратор
Dahua
DHI-NVR5432-4KS2
IP-видеорегистратор
Dahua
AH-NVR7108P
IP-видеорегистратор
ATIS H
DHI-NVR5864-4KS2
IP-видеорегистратор
Dahua
Новинки

DH-XVR4116HS-I
XVR-видеорегистратор
Dahua
DH-XVR5108HE-I3
XVR-видеорегистратор
Dahua
DH-XVR5108HS-I3
XVR-видеорегистратор
Dahua
XVR5104C-4KL-I3
XVR-видеорегистратор
Dahua
DH-XVR4108C-I
XVR-видеорегистратор
Dahua
DH-XVR4104C-I
XVR-видеорегистратор
Dahua
DH-XVR5208AN-4KL-I2
XVR-видеорегистратор
Dahua
AL-NVR5225
IP-видеорегистратор
ATIS L
AL-XVR3116
XVR-видеорегистратор
ATIS L
AL-XVR3108 RA
XVR-видеорегистратор
ATIS L
ООО «Торус» — молодая компания, основанная в 2014 году в Москве. Основной род деятельности компании — поставки оборудования, оптовые продажи, послепродажное обслуживание и сервис, проектирование комплексных инженерно-технических решений на базе интегрированных систем безопасности, включающих охранное видеонаблюдение, системы контроля доступа, домофонию и охранную сигнализацию. В компании, кроме отдела продаж, создан сервисный центр, служба технической поддержки и проектный отдел. Компания имеет широкую сеть филиалов с офисами в Санкт-Петербурге, Екатеринбурге, Ростове-на-Дону, Самаре, Новосибирске, Уфе и Краснодаре. В штате компании работают ведущие в сфере безопасности топ-менеджеры и инженеры. Инженерно-технический состав регулярно повышает квалификацию и проходит сертификацию в центрах обучения ведущих мировых компаний-производителей систем видеонаблюдения.
127254 Россия, Москва,
ул. Руставели, 14, стр.6
Источник
DH-XVR4104C-X1 DAHUA 4-канальный гибридный видеорегистратор
Производитель: DAHUA
Купить DH-XVR4104C-X1 DAHUA по выгодным ценам в магазине СЕКТОР-СБ:
Доставка: по всей России (со склада в Москве или Санкт-Петербурге)
Задайте вопросы менеджеру:
Москва: (495) 150-15-47
СПб: (812) 677-85-80
Описание DH-XVR4104C-X1 DAHUA:
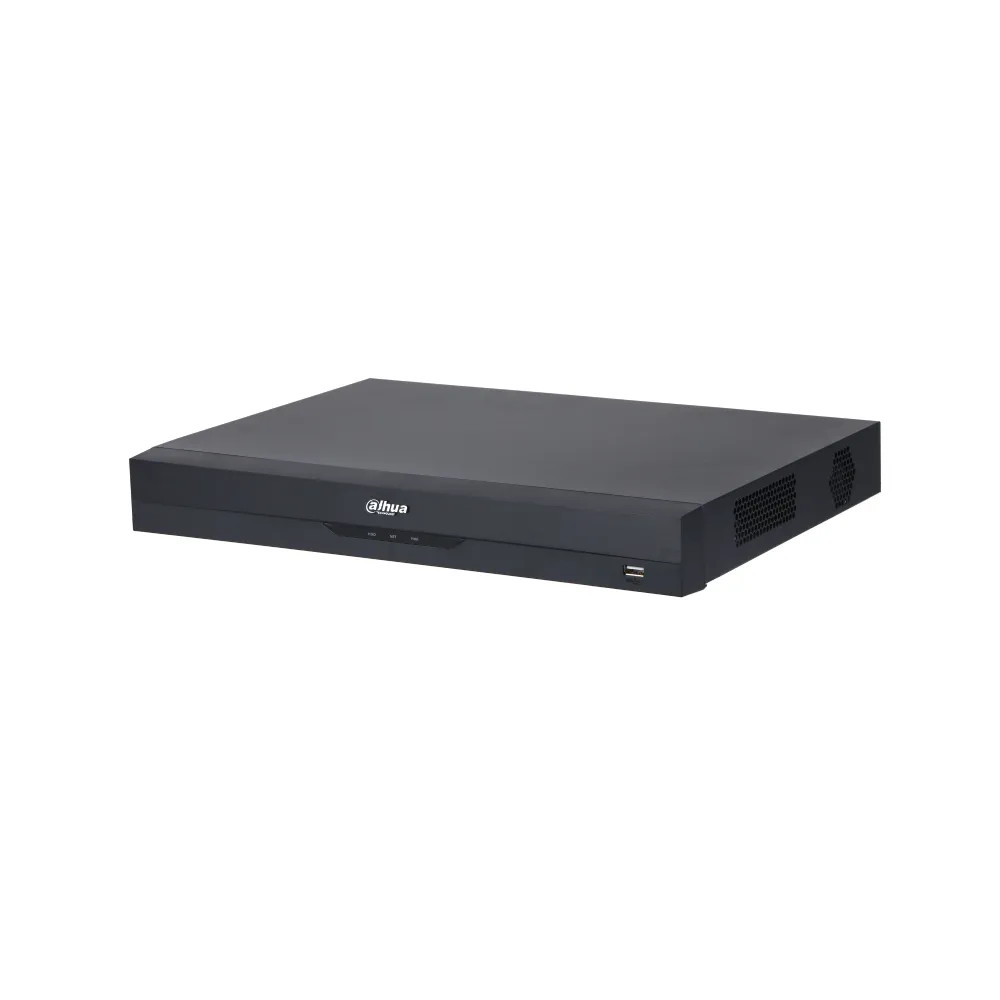
DH-XVR4104C-X1 — представляет собой 4-канальный гибридный видеорегистратор от компании DAHUA, предназначенный для организации систем видеонаблюдения.
Данный регистратор основан на высокопроизводительном процессоре и работает на операционной системе LINUX. Он имеет 4 BNC-видеовхода, а также оснащен HDMI и VGA портами. Для работы со звуком в нем предусмотрены аудио вход и выход стандарта RCA. Сетевое подключение производится посредством стандартного порта RJ45. Плюс ко всему имеется 2 USB порта 2.0. Питание регистратора осуществляется от сетевого адаптера +12 В, который входит в комплект поставки.
Для хранения записанного материала в данной модели предусмотрено подключение 1 жесткого диска с максимально допустимым объемом памяти 6 ТБ (в комплект не входит). Для экономия места на HDD, устройство имеет поддержку интеллектуальных Smart-кодеков, которые в свою очередь существенным образом уменьшают размер записанного материала без потери качества.
Сам же видеорегистратор выполнен в портативном пластиковом корпусе и имеет широкий диапазон рабочих температур. Комплект поставки включает в себя: сетевой адаптер, USB мишь, комплект кабелей для подключения HDD, комплект винтов для крепления HDD и руководство по эксплуатации.
Краткая характеристика:
Подробное описание
Габаритные размеры DAHUA DH-XVR4104C-X1
Расшифровка маркировки модельного ряда видеорегистраторов DAHUA
4 канала BNC; поддержка камер с разрешением до 5 Мп; компрессия H.264+ / H.264; интерфейсы 1 × HDMI / 1 × VGA; порт для HDD 1 × SATA до 8 Тб; 2 × USB 2.0; сетевой порт RJ45; аудио вход / выход RCA; ОС LINUX; питание +12 В / 2 А / Розница: 9 390 руб.
Опт: 9 390 руб.
Для дилеров: Звоните!
8 каналов BNC; поддержка камер с разрешением до 2 Мп; компрессия H.264; интерфейсы 1 × HDMI / 1 × VGA; порт для HDD 1 × SATA до 8 Тб; 2 × USB 2.0; сетевой порт RJ45; аудио вход / выход RCA; ОС LINUX; питание +12 В / 2 А / Розница: 7 690 руб.
Опт: 7 690 руб.
Для дилеров: Звоните!
8 каналов BNC; поддержка камер с разрешением до 4 Мп; компрессия H.264+ / H.264; интерфейсы 1 × HDMI / 1 × VGA; порт для HDD 1 × SATA до 8 Тб; 2 × USB 2.0; сетевой порт RJ45; аудио вход / выход RCA; ОС LINUX; питание +12 В / 2 А / Розница: 12 090 руб.
Опт: 12 090 руб.
Для дилеров: Звоните!
4 канала BNC; поддержка камер с разрешением до 4 Мп; компрессия H.264+ / H.264; интерфейсы 1 × HDMI / 1 × VGA; порт для HDD 1 × SATA до 8 Тб; 2 × USB 2.0; сетевой порт RJ45; аудио вход / выход RCA; ОС LINUX; питание +12 В / 2 А / Розница: 7 990 руб.
Опт: 7 990 руб.
Для дилеров: Звоните!
4 канала BNC; поддержка камер с разрешением до 2 Мп; компрессия H.264; интерфейсы 1 × HDMI / 1 × VGA; порт для HDD 1 × SATA до 8 Тб; 2 × USB 2.0; сетевой порт RJ45; аудио вход / выход RCA; ОС LINUX; питание +12 В / 2 А / Розница: 6 090 руб.
Опт: 6 090 руб.
Для дилеров: Звоните!
4 канала BNC; поддержка камер с разрешением до 4K Мп; компрессия H.265+ / H.265 / H.264+ / H.264; интерфейсы 1 HDMI / 1 VGA; порт для HDD 1 SATA до 10 Тб; 2 × USB 2.0; сетевой порт RJ45; аудио вход / выход RCA; ОС LINUX; питание +12 В / 2 А / Розница: 10 890 руб.
Опт: 10 890 руб.
Для дилеров: Звоните!
8 каналов BNC; поддержка камер с разрешением до 2 Мп; компрессия H.265+ / H.265 / H.264+ / H.264; интерфейсы 1 HDMI / 1 VGA; порт для HDD 1 SATA до 6 Тб; 2 × USB 2.0; сетевой порт RJ45; аудио вход / выход RCA; ОС LINUX; питание +12 В / 1.5 А / Розница: 8 190 руб.
Опт: 8 190 руб.
Для дилеров: Звоните!
8 каналов BNC; поддержка камер с разрешением до 5 Мп; компрессия H.265+ / H.265 / H.264+ / H.264; интерфейсы 1 HDMI / 1 VGA; порт для HDD 1 SATA до 10 Тб; 2 × USB 2.0; сетевой порт RJ45; аудио вход / выход RCA; ОС LINUX; питание +12 В / 2 А / Розница: 12 490 руб.
Опт: 12 490 руб.
Для дилеров: Звоните!
4 канала BNC; поддержка камер с разрешением до 5 Мп; компрессия H.265+ / H.265 / H.264+ / H.264; интерфейсы 1 HDMI / 1 VGA; порт для HDD 1 SATA до 6 Тб; 2 × USB 2.0; сетевой порт RJ45; аудио вход / выход RCA; ОС LINUX; питание +12 В / 1.5 А / Розница: 8 390 руб.
Опт: 8 390 руб.
Для дилеров: Звоните!
Источник
HDCVI видеорегистратор DH-XVR4104C-X1
5 490 ₽ Указана стоимость товара рекомендованная производителем!
Заказать товар по оптовой цене со скидкой 20% вы можете в личном кабинете после регистрации на сайте (* для корпоративных клиентов в соответствии с ценовой политикой Dahua Technology)
Описание
Доставка
Оплата
Гарантия
Отзывы (0)

- Видеорегистратор HDCVI 4-х канальный мультиформатный 720P;
- Поддержкка передачи звука через коаксиальный кабель;
- Поддержка форматов HDCVI, AHD, TVI, IP, CVBS;
- Разрешение и скорость записи: 1080N/720Р -25к/с на канал;
- H.265+/H.265/H.264+/H.264;
- Поддержка IP камер: 5 каналов до 2Мп;
- HDD: 1 SATA3 до 6Тб;
- Видеовыходы: 1 HDMI, 1 VGA;
- Сеть: 1 порт 100Mb;
- USB 2.0 — 2 порта;
- Аудио вх. вых 1/1;
- Поддержка: iOS, Android
Доставка в пункты выдачи
Если сумма заказа менее 8 000 руб. , стоимость доставки до пункта выдачи в выбранном вами городе составит 500 руб.
Курьерская доставка в руки
Отдаленные города, поселки, деревни
Если в выбранном вами населенном пункте отсутствует терминал ТК, доставка осуществляется до терминала ТК в ближайшем к вам городе.
При этом доставка в ваш населенный пункт оплачивается отдельно по тарифам ТК.
Наложенный платеж
Доставка наложенным платежом с оплатой заказа при получении возможна по согласованию с менеджером.
Отгрузки
Отгрузка оплаченного и согласованного заказа производится на следующий или 2-й рабочий день с момента зачисления денег на наш счет.
При отгрузке продукции в регионы срок доставки может составлять от 2 до 3 дней в зависимости от удаленности Вашего населенного пункта.
Для юридических лиц, оптовых покупателей и Дилеров оплата производится по безналичному расчету.
При этом покупатель может выбрать вариант как с учетом, так и без учета НДС.
Физические лица могут произвести оплату одним из следующих способов:
Оплата с банковских карт VISA, MasterCard, МИР при оформлении заказа в корзине;

Безналичный перевод на карту СберБанка при согласовании заказа и условий перевода с сотрудником;
Наличными курьеру или в терминале ТК при получении товара наложенным платежом.
Отгрузка оплаченного и согласованного заказа производится на следующий или 2-й рабочий день с момента зачисления денег на наш счет (исключение составляют случаи оформления товаров в статусе «Под заказ»).. При отгрузке продукции в регионы срок доставки может составлять от 1 до 5 дней в зависимости от удаленности Вашего населенного пункта.
В интернет-магазине Dahua.market есть возможность приобрести товары в кредит!
Максимально выгодные для клиентов условия сделки, быстрые сроки оформления, качественное обслуживание – мы делаем все, чтобы наши покупатели остались довольны.
Срок гарантийного обслуживания оборудования составляет от 3 до 5 лет. Точный срок гарантийного обслуживания конкретного оборудования вы можете уточнить у специалиста отдела продаж!
При отправке оборудования в ремонт клиент должен приложить к оборудованию копию документа о реализации (товарная накладная, товарный чек) или заполненный гарантийный талон (серийные номера на талоне и устройства идентичны), полностью заполненную РЕКЛАМАЦИЮ формы №1 отдельно на каждую единицу оборудования и заполненный Акт приемки оборудования.
Неисправное оборудование клиент доставляет на наш склад своими силами и за свой счет. Все остальные расходы, связанные с перемещением оборудования в сервисный центр производителя, несет продавец.
Срок гарантийного ремонта определяется производителем оборудования, при этом срок ремонта не включает в себя время доставки оборудования до сервиса производителя и обратно.
Гарантия не распространяется и гарантийный ремонт не производится в случаях:
- Наличия механических повреждений или следов попыток вскрытия изделий, нарушении пломб, перепаек, сорванных шлицов на крепежных винтах и т.п.
- Серийный номер изменен или удален.
- Нарушения правил эксплуатации и несоответствия внешних воздействий классу защиты оборудования.
- Повреждений, вызванных молнией, пожаром или другими природными явлениями, чрезмерной влажностью или запыленностью.
- Повреждений, вызванных несоответствием Государственным стандартам параметров питающих, коммуникационных, кабельных сетей и иных аналогичных внешних факторов.
- Повреждений, вызванных инсталляцией или эксплуатацией с нарушением технических условий и требований безопасности.
- Транспортировки оборудования не в штатной таре (не в таре производителя).
Замене не подлежит оборудование, потерявшее товарный вид, без штатных блоков питания, без комплекта принадлежностей, без программного обеспечения и эксплуатационной документации.
Источник
nano-zoom.ru
Описание HDCVI видеорегистратора Dahua DH-XVR4104C-X1
Отличный выбор для применения на различных объектах: офисы, частные дома, коттеджи, школы, магазины.
Мультиформатный HDCVI видеорегистратор с поддержкой форматов: HDCVI, AHD, TVI, IP, CVBS, имеет 4 канала. Разрешение записи: 1080N/720Р. Скорость 25 кадров в секунду на канал. Информация на монитор телевизора или ПК выводится через HDMI и VGA видеовыходы. Поддерживает передачу звука через коаксиальный кабель. Запись может производиться, как на жесткий диск объемом до 6 Тб, так и на наружные устройства через USB порта. Сеть: 1 порт 100Mb. USB 2.0 — 2 порта. Процессор поддерживает сжатия: H.265+/H.265/H.264+/H.264. Поддержка IP камер: 5 каналов до 2Мп. Аудио вх. вых 1/1. Поддержка: iOS, Android.
Система
- Главный процессор Встроенный процессор;
- Операционная система Встроенная ОС LINUX.
Видео и аудио
- Вход аналоговой видеокамеры 4 канала, BNC;
- HDCVI-видеокамера 1080P 25/30к/с, 720P 25/30к/с;
- AHD-видеокамера 1080P 25/30к/с, 720P 25/30к/с;
- TVI-видеокамера 1080P 25/30к/с, 720P 25/30к/с;
- CVBS-видеокамера PAL/NTSC;
- Вход IP-видеокамеры 4+1, каждый канал до 2 Мп;
- Аудио вход/выход 1/1, RCA;
- Двусторонняя связь Повторно используемый аудио вход/выход, RCA.
Запись
- Сжатие видео H.265+/H.265/H.264+/H.264;
- Разрешение 1080N, 720P, 960H, D1, CIF;
- Скорость записи Основной поток: 1080N/720P/960H/D1/CIF (1
25/30к/с) Дополнительный поток: CIF (1
15к/с);
Видео битрейт 32 Кбит/с4096 Кбит/с на канал;
- Режим записи Ручной, расписание (общий, непрерывный), MD (видеодетекция: детекция движения, потеря видео, вмешательство), тревога, стоп;
- Интервал записи 1
60 мин (по умолчанию: 60 мин), предварительная запись: 1
30 сек, после записи: 10
300 сек;
- Сжатие аудио AAC (только для 1-го канала), G.711A, G.711U, PCM;
- Частота дискретизации аудио 8КГц, 16 бит на канал;
- Аудио битрейт 64 Кбит/с на канал.
Дисплей
- Интерфейс 1 HDMI ,1 VGA;
- Разрешение 1920×1080, 1280×1024, 1280×720;
- Многоэкранный дисплей Если режим расширения IP не включен: 1/4 Если режим расширения IP включен: 1/4/6;
- OSD меню Название камеры, время, потеря видео, блокировка камеры, детекция движения, запись.
Сеть
- Интерфейс 1 порт RJ-45 (100M);
- Сетевые функции HTTP, HTTPS, TCP/IP, IPv4/IPv6, 3G/4G, UPnP, RTSP, UDP, SMTP, NTP, DHCP, DNS, IP-фильтр, PPPoE,DDNS, FTP, сервер сигнализации, P2P, поиск по IP (поддержка IP-видеокамеры Dahua, DVR, NVS и т.д.);
- Макс. число пользователей 128 пользователей;
- Смартфон iPhone, iPad, Android;
- Взаимодействие ONVIF 16.12, CGI.
Видеодетекция и тревога
- Активация при срабатывании Запись, PTZ, обход, Video Push, Email, FTP, снимок, зуммер и посказки на экране;
- Видеодетекция Детекция движения, зоны: 396 (22 x 18), потеря видео, вмешательство и диагностика;
- Тревожные входы нет;
- Релейные выходы нет;
- Воспроизведение и резервное копирование Воспроизведение 1/4;
- Режим поиска Время/дата, тревога, детекция.
Источник

ZHEJIANG DAHUA VISION TECHNOLOGY CO., LTD.

Cybersecurity Recommendations
Mandatory actions to be taken towards cybersecurity
1. Change Passwords and Use Strong Passwords:
The number one reason systems get “hacked” is due to having weak or default passwords. It is
recommended to change default passwords immediately and choose a strong password whenever
possible. A strong password should be made up of at least 8 characters and a combination of special
characters, numbers, and upper and lower case letters.
2. Update Firmware
As is standard procedure in the tech-industry, we recommend keeping NVR, DVR, and IP camera
firmware up-to-date to ensure the system is current with the latest security patches and fixes.
“Nice to have” recommendations to improve your network security
1. Change Passwords Regularly
Regularly change the credentials to your devices to help ensure that only authorized users are able to
access the system.
2. Change Default HTTP and TCP Ports:
● Change default HTTP and TCP ports for systems. These are the two ports used to communicate and
to view video feeds remotely.
● These ports can be changed to any set of numbers between 1025-65535. Avoiding the default ports
reduces the risk of outsiders being able to guess which ports you are using.
3. Enable HTTPS/SSL:
Set up an SSL Certificate to enable HTTPS. This will encrypt all communication between your devices
and recorder.
4. Enable IP Filter:
Enabling your IP filter will prevent everyone, except those with specified IP addresses, from accessing
the system.
5. Change ONVIF Password:
On older IP Camera firmware, the ONVIF password does not change when you change the system’s
credentials. You will need to either update the camera’s firmware to the latest revision or manually
change the ONVIF password.
6. Forward Only Ports You Need:
● Only forward the HTTP and TCP ports that you need to use. Do not forward a huge range of numbers
to the device. Do not DMZ the device’s IP address.
● You do not need to forward any ports for individual cameras if they are all connected to a recorder on
site; just the NVR is needed.
7. Disable Auto-Login on SmartPSS:
Those using SmartPSS to view their system and on a computer that is used by multiple people should
disable auto-login. This adds a layer of security to prevent users without the appropriate credentials from
accessing the system.
8. Use a Different Username and Password for SmartPSS:
Cybersecurity Recommendations I

In the event that your social media, bank, email, etc. account is compromised, you would not want
someone collecting those passwords and trying them out on your video surveillance system. Using a
different username and password for your security system will make it more difficult for someone to
guess their way into your system.
9. Limit Features of Guest Accounts:
If your system is set up for multiple users, ensure that each user only has rights to features and functions
they need to use to perform their job.
10. UPnP:
● UPnP will automatically try to forward ports in your router or modem. Normally this would be a good
thing. However, if your system automatically forwards the ports and you leave the credentials defaulted,
you may end up with unwanted visitors.
● If you manually forwarded the HTTP and TCP ports in your router/modem, this feature should be
turned off regardless. Disabling UPnP is recommended when the function is not used in real
applications.
11. SNMP:
Disable SNMP if you are not using it. If you are using SNMP, you should do so only temporarily, for
tracing and testing purposes only.
12. Multicast:
Multicast is used to share video streams between two recorders. Currently there are no known issues
involving Multicast, but if you are not using this feature, deactivation can enhance your network security.
13. Check the Log:
If you suspect that someone has gained unauthorized access to your system, you can check the system
log. The system log will show you which IP addresses were used to login to your system and what was
accessed.
14. Physically Lock Down the Device:
Ideally, you want to prevent any unauthorized physical access to your system. The best way to achieve
this is to install the recorder in a lockbox, locking server rack, or in a room that is behind a lock and key.
Cybersecurity Recommendations II
General
DH-XVR4104C-X/DH-XVR4108C-X/DH-XVR4116HS-X/DH-XVR4104HS-X/
DH-XVR4108HS-X/DH-XVR4216AN-X/DH-XVR4232AN-X
DH-XVR5108C-X/DH-XVR5104C-4KL-X/DH-XVR5104C-X/DH-XVR5108H-X/
DH-XVR5116H-X/DH-XVR5104H-4KL-X/DH-XVR5108H-4KL-X/
DH-XVR5116H-4KL-X/DH-XVR5108HE-X/DH-XVR5116HE-X/
DH-XVR5108HS-X/DH-XVR5116HS-X/DH-XVR5104HS-4KL-X/
DH-XVR5108HS-4KL-X/DH-XVR5104HS-X/DH-XVR5104H-X/
DH-XVR5104HE-X/DH-XVR5216AN-X/DH-XVR5232AN-X/
DH-XVR5208AN-4KL-X/DH-XVR5216AN-4KL-X/DH-XVR5216A-X/
DH-XVR5432L-X/DH-XVR5832S-X/DH-5208AN-4KL-X-8/
DH-5216AN-4KL-X-16P/DH-XVR5108H-4KL-X-8P
DH-XVR7104E-4KL-X/DH-XVR7108E-4KL-X/DH-XVR7104E-4KL-B-X/
DH-XVR7108E-4KL-B-X/DH-XVR7104HE-4KL-X/
DH-XVR7108HE-4KL-X/DH-XVR7116HE-4KL-X/DH-XVR7108HE-4K-X/
DH-XVR7208A-4KL-X/DH-XVR7216A-4KL-X/DH-XVR7208A-4K-X/
DH-XVR7416L-4KL-X/ DH-XVR7816S-4KL-X
Indicates a high potential hazard which, if not avoided, will result
in death or serious injury.
Indicates a medium or low potential hazard which, if not avoided,
could result in slight or moderate injury.
Indicates a potential risk which, if not avoided, could result in
property damage, data loss, lower performance, or unpredictable
result.
Provides methods to help you solve a problem or save you time.
This user’s manual (hereinafter referred to be «the Manual») introduces the functions and
operations of the DVR devices (hereinafter referred to be «the Device»).
Models
Foreword
Safety Instructions
The following categorized signal words with defined meaning might appear in the Manual.
Foreword III

Provides additional information as the emphasis and supplement
to the text.
Revision History
1. Add four models.
2. Add following sections:
Privacy Protection Notice
Using Reset Button on the
Mainboard
Configuring White Light
Configuring Siren
Viewing PoC Information
3. Update following sections:
About the Manual
Important Safeguards and
Warnings
Configuring IVS Function
Configuring Face
Detection
Privacy Protection Notice
As the device user or data controller, you might collect personal data of others’ such as face,
fingerprints, car plate number, Email address, phone number, GPS and so on. You need to be
in compliance with the local privacy protection laws and regulations to protect the legitimate
rights and interests of other people by implementing measures include but not limited to:
providing clear and visible identification to inform data subject the existence of surveillance
area and providing related contact.
About the Manual
The Manual is for reference only. If there is inconsistency between the Manual and the
actual product, the actual product shall prevail.
We are not liable for any loss caused by the operations that do not comply with the Manual.
The Manual would be updated according to the latest laws and regulations of related
regions. For detailed information, see the paper User’s Manual, CD-ROM, QR code or our
official website. If there is inconsistency between paper User’s Manual and the electronic
version, the electronic version shall prevail.
All the designs and software are subject to change without prior written notice. The product
updates might cause some differences between the actual product and the Manual. Please
Foreword IV

contact the customer service for the latest program and supplementary documentation.
There still might be deviation in technical data, functions and operations description, or
errors in print. If there is any doubt or dispute, please refer to our final explanation.
Upgrade the reader software or try other mainstream reader software if the Guide (in PDF
format) cannot be opened.
All trademarks, registered trademarks and the company names in the Manual are the
properties of their respective owners.
Please visit our website, contact the supplier or customer service if there is any problem
occurred when using the device.
If there is any uncertainty or controversy, please refer to our final explanation.
Foreword V

Important Safeguards and Warnings
This Chapter describes the contents covering proper handling of the Device, hazard prevention,
and prevention of property damage. Read these contents carefully before using the Device,
comply with them when using, and keep it well for future reference.
Operation Requirement
Do not place or install the Device in a place exposed to sunlight or near the heat source.
Keep the Device away from dampness, dust or soot.
Keep the Device installed horizontally on the stable place to prevent it from falling.
Do not drop or splash liquid onto the Device, and make sure there is no object filled with
liquid on the Device to prevent liquid from flowing into the Device.
Install the Device in a well-ventilated place, and do not block the ventilation of the Device.
Operate the device within the rated range of power input and output.
Do not dissemble the Device.
Transport, use and store the Device under the allowed humidity and temperature
conditions.
Electrical Safety
Improper battery use might result in fire, explosion, or inflammation.
When replacing battery, make sure the same model is used.
Use the recommended power cables in the region and conform to the rated power
specification.
Use the power adapter provided with the Device; otherwise, it might result in people injury
and device damage.
The power source shall conform to the requirement of the Safety Extra Low Voltage (SELV)
standard, and supply power with rated voltage which conforms to Limited power Source
requirement according to IEC60950-1. Please note that the power supply requirement is
subject to the device label.
Connect the device (I-type structure) to the power socket with protective earthing.
The appliance coupler is a disconnection device. When using the coupler, keep the angle
for easy operation.
Important Safeguards and Warnings VI

Table of Contents
Cybersecurity Recommendations …………………………………………………………………………………………….. I
Foreword ……………………………………………………………………………………………………………………………….. III
Important Safeguards and Warnings ………………………………………………………………………………………. VI
1 Introduction ………………………………………………………………………………………………………………………….. 1
1.1 Overview ……………………………………………………………………………………………………………………… 1
1.2 Functions ……………………………………………………………………………………………………………………… 1
2 Getting Started …………………………………………………………………………………………………………………….. 3
2.1 Checking the Components……………………………………………………………………………………………… 3
2.2 Installing HDD ………………………………………………………………………………………………………………. 3
2.2.1 DH-XVR5108C-X/DH-XVR5104C-4KL-X/DH-XVR5104C-X/
DH-XVR4104C-X/DH-XVR4108C-X……………………………………………………………………………….. 4
2.2.2 DH-XVR7104E-4KL-X/DH-XVR7108E-4KL-X/DH-XVR7104E-4KL-B-X/
DH-XVR7108E-4KL-B-X ……………………………………………………………………………………………….. 5
2.2.3 DH-XVR4116HS-X/DH-XVR5108HS-X/DH-XVR5116HS-X/DH-XVR5104HS-4KL-X/
DH-XVR5108HS-4KL-X/
DH-XVR5108H-X/DH-XVR5116H-X/DH-XVR5104H-4KL-X/DH-XVR5108H-4KL-X/DH-XVR511
6H-4KL-X/DH-XVR5108HE-X/DH-XVR5116HE-X/DH-XVR7104HE-4KL-X/DH-XVR7108HE-4K
L-X/DH-XVR7116HE-4KL-X/DH-XVR7108HE-4K-X/DH-XVR5104HS-X/
DH-XVR4104HS-X/DH-XVR5104H-X/DH-XVR5104HE-X/DH-XVR4108HS-X ……………………. 6
2.2.4 DH-XVR4216AN-X/DH-XVR4232AN-X/DH-XVR5216AN-X/DH-XVR5232AN-X/
DH-XVR5208AN-4KL-X/DH-XVR5216AN-4KL-X/DH-XVR5216A-X/DH-XVR7208A-4KL-X/DH-
XVR7216A-4KL-X/DH-XVR7208A-4K-X …………………………………………………………………………. 7
2.2.5 DH-XVR7416L-4KL-X/DH-XVR5432L-X …………………………………………………………………. 7
2.2.6 DH-XVR7816S-4KL-X/DH-XVR5832S-X ………………………………………………………………… 8
2.3 Installing Device into Rack ……………………………………………………………………………………………… 8
3 The Grand Tour …………………………………………………………………………………………………………………… 10
3.1 Front Panel …………………………………………………………………………………………………………………. 10
3.1.1 DH-XVR5108C-X/DH-XVR5104C-4KL-X/DH-XVR5104C-X/
DH-XVR4104C-X/DH-XVR4108C-X……………………………………………………………………………… 10
3.1.2 DH-XVR7104E-4KL-X/DH-XVR7108E-4KL-X/DH-XVR7104E-4KL-B-X/
DH-XVR7108E-4KL-B-X ………………………………………………………………………………………………. 11
3.1.3 DH-XVR5108H-X/DH-XVR5116H-X/DH-XVR5104H-4KL-X/DH-XVR5108H-4KL-X/
DH-XVR5116H-4KL-X/DH-XVR5108HE-X/DH-XVR5116HE-X/DH-XVR4116HS-X/DH-XVR510
8HS-X/DH-XVR5116HS-X/DH-XVR5104HS-4KL-X/DH-XVR5108HS-4KL-X/
DH-XVR5104HS-X/DH-XVR4104HS-X/DH-XVR4108HS-X/DH-XVR5104H-X/
DH-XVR5104HE-X …………………………………………………………………………………………………….. 12
3.1.4 DH-XVR7104HE-4KL-X/DH-XVR7108HE-4KL-X/DH-XVR7116HE-4KL-X/
DH-XVR7108HE-4K-X ………………………………………………………………………………………………… 12
3.1.5 DH-XVR4216AN-X/DH-XVR4232AN-X/DH-XVR5216AN-X/DH-XVR5232AN-X/
DH-XVR5208AN-4KL-X/DH-XVR5216AN-4KL-X/DH-XVR5216A-X …………………………………. 13
3.1.6 DH-XVR7208A-4KL-X/DH-XVR7216A-4KL-X/DH-XVR7208A-4K-X …………………………. 13
Table of Contents VII

3.1.7 DH-XVR7416L-4KL-X …………………………………………………………………………………………. 14
3.1.8 DH-XVR7816S-4KL-X ………………………………………………………………………………………… 14
3.1.9 DH-XVR5432L-X ……………………………………………………………………………………………….. 14
3.1.10 DH-XVR5832S-X ……………………………………………………………………………………………… 15
3.2 Rear Panel …………………………………………………………………………………………………………………. 16
3.2.1 DH-XVR5108C-X/DH-XVR5104C-4KL-X/DH-XVR5104C-X/
DH-XVR4104C-X/DH-XVR4108C-X……………………………………………………………………………… 16
3.2.2 DH-XVR7104E-4KL-X/DH-XVR7108E-4KL-X/DH-XVR7104E-4KL-B-X/
DH-XVR7108E-4KL-B-X ……………………………………………………………………………………………… 17
3.2.3 DH-XVR4116HS-X/DH-XVR5108HS-X/DH-XVR5116HS-X/DH-XVR5104HS-4KL-X/
DH-XVR5108HS-4KL-X/DH-XVR5104HS-X/ DH-XVR4104HS-X/DH-XVR4108HS-X ………… 18
3.2.4 DH-XVR5108H-X/DH-XVR5116H-X/DH-XVR5104H-4KL-X/DH-XVR5108H-4KL-X/
DH-XVR5116H-4KL-X/DH-XVR5108HE-X/DH-XVR5116HE-X/DH-XVR7104HE-4KL-X/DH-XV
R7108HE-4KL-X/DH-XVR7116HE-4KL-X/DH-XVR7108HE-4K-X/DH-XVR5104H-X/DH-XVR51
04HE-X/DH-XVR5108H-4KL-X-8P ……………………………………………………………………………….. 19
3.2.5 DH-XVR4216AN-X/DH-XVR4232AN-X/DH-XVR5216AN-X/DH-XVR5232AN-X/
DH-XVR5208AN-4KL-X/DH-XVR5216AN-4KL-X/DH-XVR5216A-X/DH-XVR7208A-4KL-X/DH-
XVR7216A-4KL-X/DH-XVR7208A-4K-X/DH-5208AN-4KL-X-8/DH-5216AN-4KL-X-16P …….. 20
3.2.6 DH-XVR7416L-4KL-X/DH-XVR5432L-X ……………………………………………………………….. 22
3.2.7 DH-XVR7816S-4KL-X/DH-XVR5832S-X ………………………………………………………………. 23
3.3 Remote Control Operations ………………………………………………………………………………………….. 25
3.4 Mouse Operations ……………………………………………………………………………………………………….. 27
4 Connecting Basics ……………………………………………………………………………………………………………… 29
4.1 Typical Connection Diagram …………………………………………………………………………………………. 29
4.2 Connecting to Video and Audio Input and Output ……………………………………………………………. 31
4.2.1 Video Input ………………………………………………………………………………………………………… 31
4.2.2 Video Output ……………………………………………………………………………………………………… 31
4.2.3 Audio Input ………………………………………………………………………………………………………… 32
4.2.4 Audio Output ……………………………………………………………………………………………………… 32
4.3 Connecting to Alarm Input and Output …………………………………………………………………………… 32
4.3.1 Introducing Alarm Port ………………………………………………………………………………………… 33
4.3.2 Alarm Input ………………………………………………………………………………………………………… 33
4.3.3 Alarm Output ……………………………………………………………………………………………………… 34
4.3.4 Alarm Output Relay Parameters …………………………………………………………………………… 34
4.4 Connecting to RS485 Port ……………………………………………………………………………………………. 35
5 Local Configurations ………………………………………………………………………………………………………….. 36
5.1 Initial Settings ……………………………………………………………………………………………………………… 36
5.1.1 Booting up …………………………………………………………………………………………………………. 36
5.1.2 Initializing the Device ………………………………………………………………………………………….. 36
5.1.3 Resetting Password ……………………………………………………………………………………………. 39
5.1.4 Setting Up with the Startup Wizard ………………………………………………………………………. 46
5.2 Live View ……………………………………………………………………………………………………………………. 63
5.2.1 Live View Screen ……………………………………………………………………………………………….. 64
5.2.2 Live View Control bar ………………………………………………………………………………………….. 65
5.2.3 Navigation Bar …………………………………………………………………………………………………… 68
5.2.4 Shortcut Menu …………………………………………………………………………………………………… 69
5.2.5 Color Setting ……………………………………………………………………………………………………… 71
Table of Contents VIII

5.2.6 Live View Display ……………………………………………………………………………………………….. 73
5.2.7 Configuring Tour Settings ……………………………………………………………………………………. 78
5.3 Entering Main Menu …………………………………………………………………………………………………….. 81
5.4 Controlling PTZ Cameras …………………………………………………………………………………………….. 84
5.4.1 Configuring PTZ Connection Settings …………………………………………………………………… 84
5.4.2 Working with PTZ Control Panel ………………………………………………………………………….. 86
5.4.3 Configuring PTZ Functions ………………………………………………………………………………….. 88
5.4.4 Calling PTZ Functions ………………………………………………………………………………………… 90
5.4.5 Calling OSD Menu ……………………………………………………………………………………………… 91
5.5 Configuring Camera Settings ………………………………………………………………………………………… 92
5.5.1 Configuring Image Settings …………………………………………………………………………………. 92
5.5.2 Configuring Encode Settings ……………………………………………………………………………….. 95
5.5.3 Configuring Snapshot Settings …………………………………………………………………………….. 97
5.5.4 Configuring Overlay Settings ……………………………………………………………………………….. 98
5.5.5 Configuring Covered Area Settings ………………………………………………………………………. 99
5.5.6 Configuring Channel Type …………………………………………………………………………………. 100
5.5.7 Upgrading Coaxial Camera ……………………………………………………………………………….. 101
5.6 Configuring Remote Devices ………………………………………………………………………………………. 102
5.6.1 Adding Remote Devices ……………………………………………………………………………………. 102
5.6.2 Managing Remote Devices …………………………………………………………………………………114
5.7 Configuring Record Settings …………………………………………………………………………………………117
5.7.1 Enabling Record Control …………………………………………………………………………………….118
5.7.2 Configuring Recorded Video Storage Schedule …………………………………………………….119
5.8 Configuring Snapshot Settings ……………………………………………………………………………………..119
5.8.1 Configuring Snapshot Trigger ………………………………………………………………………………119
5.8.2 Configuring Snapshot Storage Schedule …………………………………………………………….. 124
5.8.3 Backing up Snapshots to FTP ……………………………………………………………………………. 124
5.9 Playing Back Video ……………………………………………………………………………………………………. 125
5.9.1 Enabling Record Control …………………………………………………………………………………… 125
5.9.2 Instant Playback ………………………………………………………………………………………………. 126
5.9.3 Main Interface of Video Playback ……………………………………………………………………….. 126
5.9.4 Smart Search …………………………………………………………………………………………………… 131
5.9.5 Marking and Playing Back Video ………………………………………………………………………… 132
5.9.6 Playing Back Snapshots ……………………………………………………………………………………. 134
5.9.7 Playing Back Splices ………………………………………………………………………………………… 134
5.9.8 Using the File List …………………………………………………………………………………………….. 135
5.10 Alarm Events Settings ………………………………………………………………………………………………. 137
5.10.1 Alarm Information ……………………………………………………………………………………………. 137
5.10.2 Alarm Input Settings ……………………………………………………………………………………….. 138
5.10.3 Alarm Output Settings ……………………………………………………………………………………… 145
5.10.4 Video Detection ……………………………………………………………………………………………… 148
5.10.5 System Events ……………………………………………………………………………………………….. 157
5.11 Configuring IVS Function ………………………………………………………………………………………….. 162
5.11.1 Configuring Intelligent Settings …………………………………………………………………………. 162
5.11.2 Enabling the Intelligent Settings for IP Camera …………………………………………………… 177
5.11.3 Using Smart Search ………………………………………………………………………………………… 180
5.12 Configuring Face Detection ………………………………………………………………………………………. 183
Table of Contents IX

5.12.1 Configuring Face Detection Settings …………………………………………………………………. 183
5.12.2 Searching for Detected Faces ………………………………………………………………………….. 186
5.12.3 Playing the Detected Faces……………………………………………………………………………… 188
5.13 IoT Function ……………………………………………………………………………………………………………. 188
5.13.1 Configuring Sensor Settings …………………………………………………………………………….. 188
5.13.2 Configuring Temperature and Humidity Camera …………………………………………………. 196
5.13.3 Configuring Wireless Siren ………………………………………………………………………………. 208
5.14 Configuring POS Settings …………………………………………………………………………………………. 209
5.14.1 Searching the Transaction Records ………………………………………………………………….. 209
5.14.2 Configuring POS Settings ………………………………………………………………………………… 210
5.15 Configuring Backup Settings ………………………………………………………………………………………211
5.15.1 Finding USB Device …………………………………………………………………………………………211
5.15.2 Backing up Files …………………………………………………………………………………………….. 212
5.16 Network Management ………………………………………………………………………………………………. 213
5.16.1 Configuring Network Settings …………………………………………………………………………… 213
5.16.2 Configuring Network Testing Settings ……………………………………………………………….. 230
5.17 Configuring Account Settings …………………………………………………………………………………….. 235
5.17.1 Configuring User Account ………………………………………………………………………………… 235
5.17.2 Configuring Group Account ……………………………………………………………………………… 241
5.17.3 Configuring Onvif Users ………………………………………………………………………………….. 245
5.18 Audio Management ………………………………………………………………………………………………….. 246
5.18.1 Configuring Audio Files ……………………………………………………………………………………. 246
5.18.2 Configuring Playing Schedule for Audio Files …………………………………………………….. 248
5.19 Storage Management ………………………………………………………………………………………………. 250
5.19.1 Configuring Basic Settings ………………………………………………………………………………. 250
5.19.2 Configuring the Recording and Snapshot Schedule ……………………………………………. 251
5.19.3 Configuring HDD Manager ………………………………………………………………………………. 251
5.19.4 Configuring HDD Detecting Settings …………………………………………………………………. 252
5.19.5 Configuring Record Estimate …………………………………………………………………………… 255
5.19.6 Configuring FTP Storage Settings …………………………………………………………………….. 257
5.20 Configuring System Settings …………………………………………………………………………………….. 259
5.20.1 Configuring General System Settings ……………………………………………………………….. 259
5.20.2 Configuring Security Settings …………………………………………………………………………… 261
5.20.3 Configuring System Maintenance Settings ………………………………………………………… 263
5.20.4 Exporting and Importing System Settings ………………………………………………………….. 264
5.20.5 Restoring Default Settings ……………………………………………………………………………….. 266
5.20.6 Upgrading the Device ……………………………………………………………………………………… 267
5.21 Viewing Information …………………………………………………………………………………………………. 270
5.21.1 Viewing Version Details …………………………………………………………………………………… 270
5.21.2 Viewing Log Information ………………………………………………………………………………….. 271
5.21.3 Viewing Event Information ……………………………………………………………………………….. 273
5.21.4 Viewing Network Information ……………………………………………………………………………. 274
5.21.5 Viewing HDD Information ………………………………………………………………………………… 276
5.21.6 Viewing Channel Information ……………………………………………………………………………. 277
5.21.7 Viewing Data Stream Information ……………………………………………………………………… 278
5.21.8 Viewing PoC Information …………………………………………………………………………………. 279
5.22 Logout the Device ……………………………………………………………………………………………………. 280
Table of Contents X

6 Web Operations ………………………………………………………………………………………………………………… 281
6.1 Connecting to Network ……………………………………………………………………………………………….. 281
6.2 Logging in the Web ……………………………………………………………………………………………………. 281
6.3 Resetting Password …………………………………………………………………………………………………… 282
6.4 Introducing Web Main Menu ……………………………………………………………………………………….. 286
7 FAQ ………………………………………………………………………………………………………………………………….. 288
Glossary ……………………………………………………………………………………………………………. 294 Appendix 1
HDD Capacity Calculation …………………………………………………………………………………. 296 Appendix 2
Compatible Backup Devices ……………………………………………………………………………… 298 Appendix 3
Appendix 3.1 Compatible USB list …………………………………………………………………………………….. 298
Appendix 3.2 Compatible SD Card list ………………………………………………………………………………. 299
Appendix 3.3 Compatible Portable HDD list ……………………………………………………………………….. 299
Appendix 3.4 Compatible USB DVD List ……………………………………………………………………………. 299
Appendix 3.5 Compatible SATA DVD List …………………………………………………………………………… 299
Appendix 3.6 Compatible SATA HDD List ………………………………………………………………………….. 300
Compatible CD/DVD Burner List ………………………………………………………………………… 305 Appendix 4
Compatible Displayer List …………………………………………………………………………………. 306 Appendix 5
Compatible Switcher …………………………………………………………………………………………. 307 Appendix 6
Earthing ……………………………………………………………………………………………………………. 308 Appendix 7
Appendix 7.1 What Is the Surge ……………………………………………………………………………………….. 308
Appendix 7.2 The Earthing Modes ……………………………………………………………………………………. 309
Appendix 7.3 Thunder Proof Ground Method in the Monitor System …………………………………….. 310
Appendix 7.4 The Shortcut Way to Check the Electric System by Digital Multimeter …………………311
RJ45-RS232 Connection Cable Definition ………………………………………………………….. 314 Appendix 8
Table of Contents XI

1.1 Overview
The Device is an excellent digital monitor product for security industry. The embedded LINUX
OS assures the stable operation. The H.265 and G.711 technologies assure the high quality
image and low bit stream. The frame-by-frame play function displays more details for analysis,
and provides the functions such as record, playback, and monitor and assures the
synchronization for audio and video. The Device also adopts the advanced control technology
and great network data transmission capability.
The Device adopts embedded design to achieve high security and reliability. It can work in the
local end and, with strong networking capability it can get connected to the professional
surveillance software (Smart PSS) to form a security network to show its powerful remote
monitoring function.
The Device is applicable to the areas such as bank, telecom, electricity, traffic, intelligent
residential district, factory, warehouse, resources, and water conservancy facilities.
1 Introduction
1.2 Functions
The functions might be different depending on the software and hardware version of the model
you purchased.
Real-time Surveillance
Support VGA port and HDMI port to realize the surveillance through monitors.
Support HDMI, VGA, and TV output at the same time.
IoT Management
Provide specific management module for IoT features including humidity and temperature data
reports and alarms linkage.
Sensor Integration
Integrate coaxial cameras with diverse array of sensors such as temperature, humidity and
wireless alarm devices.
Storage Management
Special data format to guarantee data security and avoid the risk of modifying data
viciously.
Support digital watermark.
Compression Format
Introduction 1

Support multiple-channel audio and video signal. An independent hardware decodes the audio
and video signal from each channel to maintain video and audio synchronization.
Backup Function
Support backup operation through USB port (such as USB storage disk, portable HDD,
and burner).
Client-end user can download the file from local HDD through network to backup.
Record & Playback
Support each channel real-time record independently, and simultaneously support the
functions such as search, backward play, network monitor, record search, and download.
Support various playback modes: slow play, fast play, backward play and frame by frame
play.
Support time title overlay so that you can view event accurate occurred time.
Support zooming in the selected area in the live view.
Network Operation
Support network remote real-time monitor, remote record search and remote PTZ control.
Alarm Activation
Several relay alarm outputs to realize alarm activation and on-site light control.
The alarm input port and output port have the protection circuit to guarantee the Device
safety.
Communication Port
RS485 port can realize alarm input and PTZ control.
RS232 port can connect to keyboard, COM port of PC or the matrix control.
Standard Ethernet port can realize network remote access function.
The dual-network port has the multi-address, fault tolerance, load balance setup mode.
PTZ Control
Support PTZ decoder through RS485 port.
Intelligent Operation
Support mouse operation function.
Support «copy and paste» function for the same settings.
UPnP (Universal Plug and Play)
Establish mapping connection between LAN and WAN through UPnP protocol.
Camera Self-adaptive
Auto-recognize and work with the PAL or NTSC camera and HD camera.
Introduction 2
2.1 Checking the Components
No broken or distorted positions that
could be caused by hit.
Not torn up.
Do not tear up or throw away the
labels; otherwise the warranty
services are not ensured. You need
to provide the serial number of the
product when you call the after-sales
service.
Data cables, power
cables, fan cables,
mainboard
When you receive the Device, please check against the following checking list. If any of the
items are missing or damaged, contact the local retailer or after-sales engineer immediately.
2 Getting Started
2.2 Installing HDD
Please check if the HDD is already installed in the Device when you first time using the Device.
It is suggested to use the HDD recommended officially. Do not use the PC HDD.
Shut down the device and then unplug the power cable before you open the case to replace the
HDD.
Getting Started 3
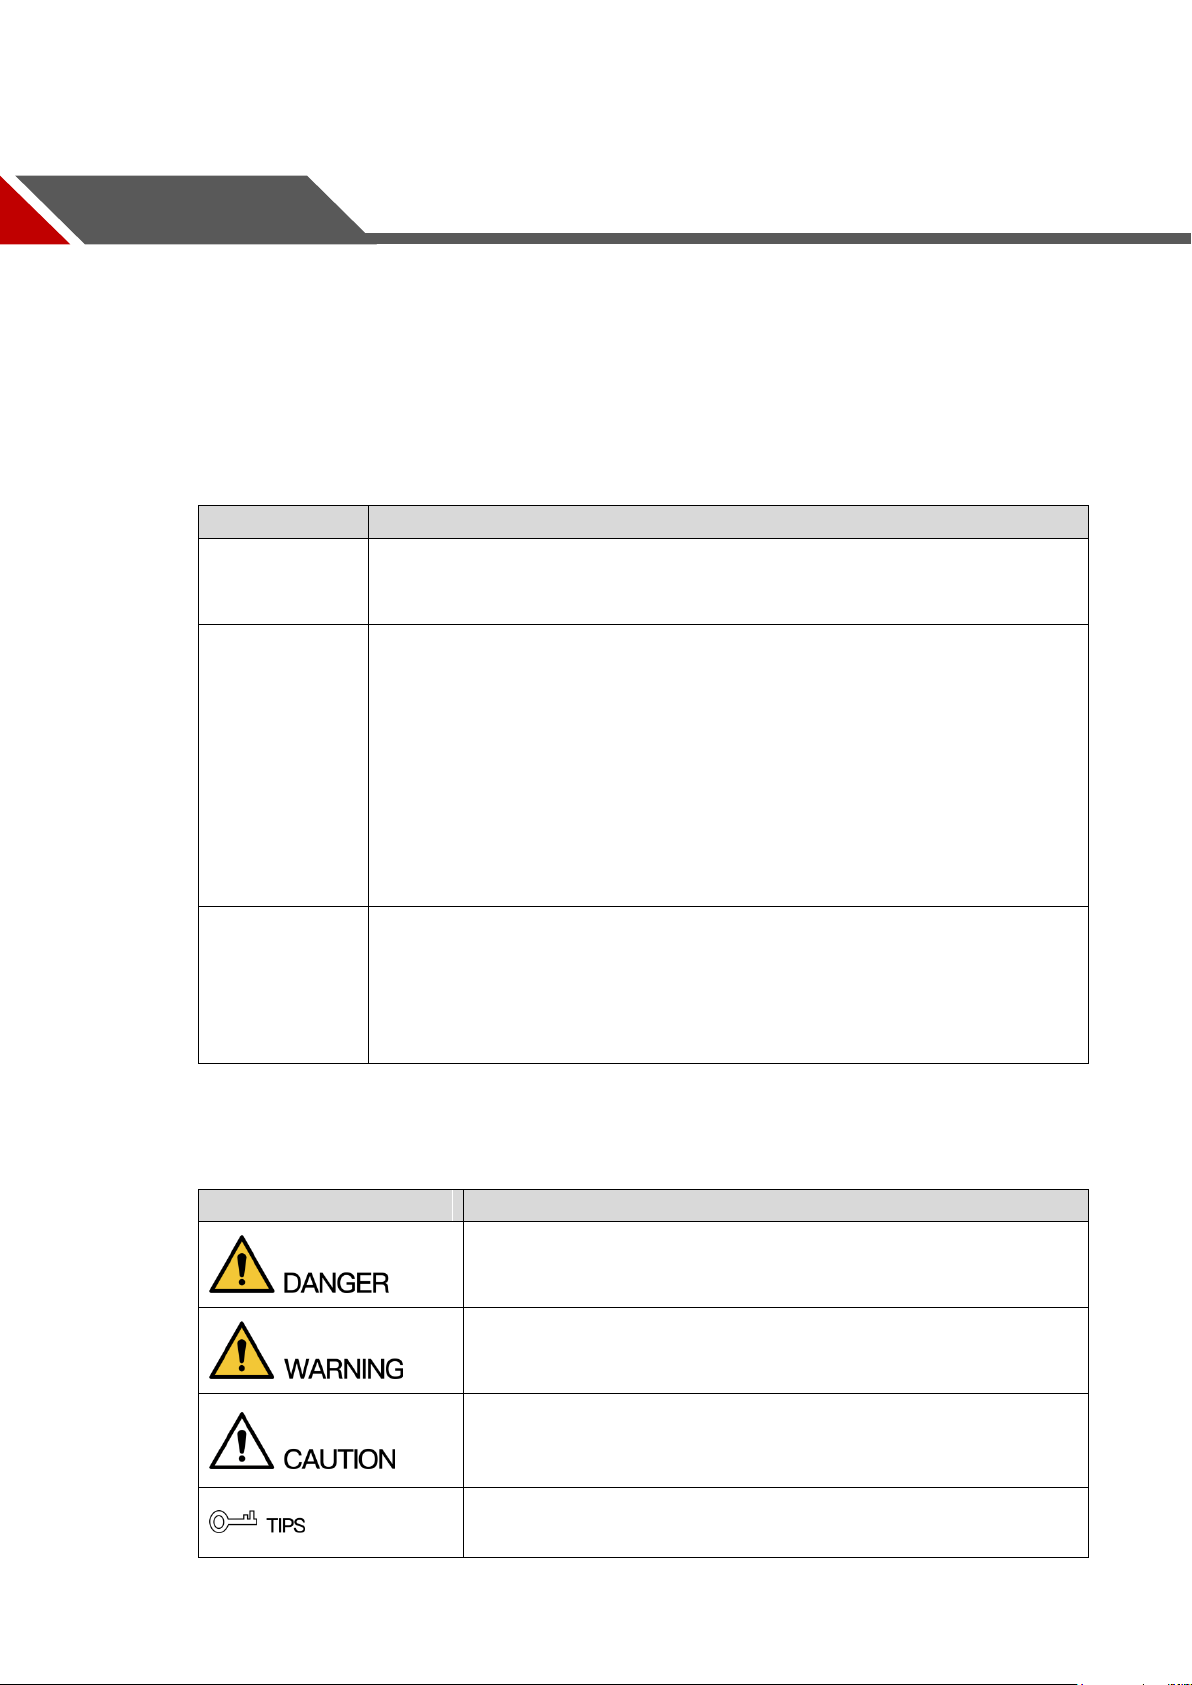
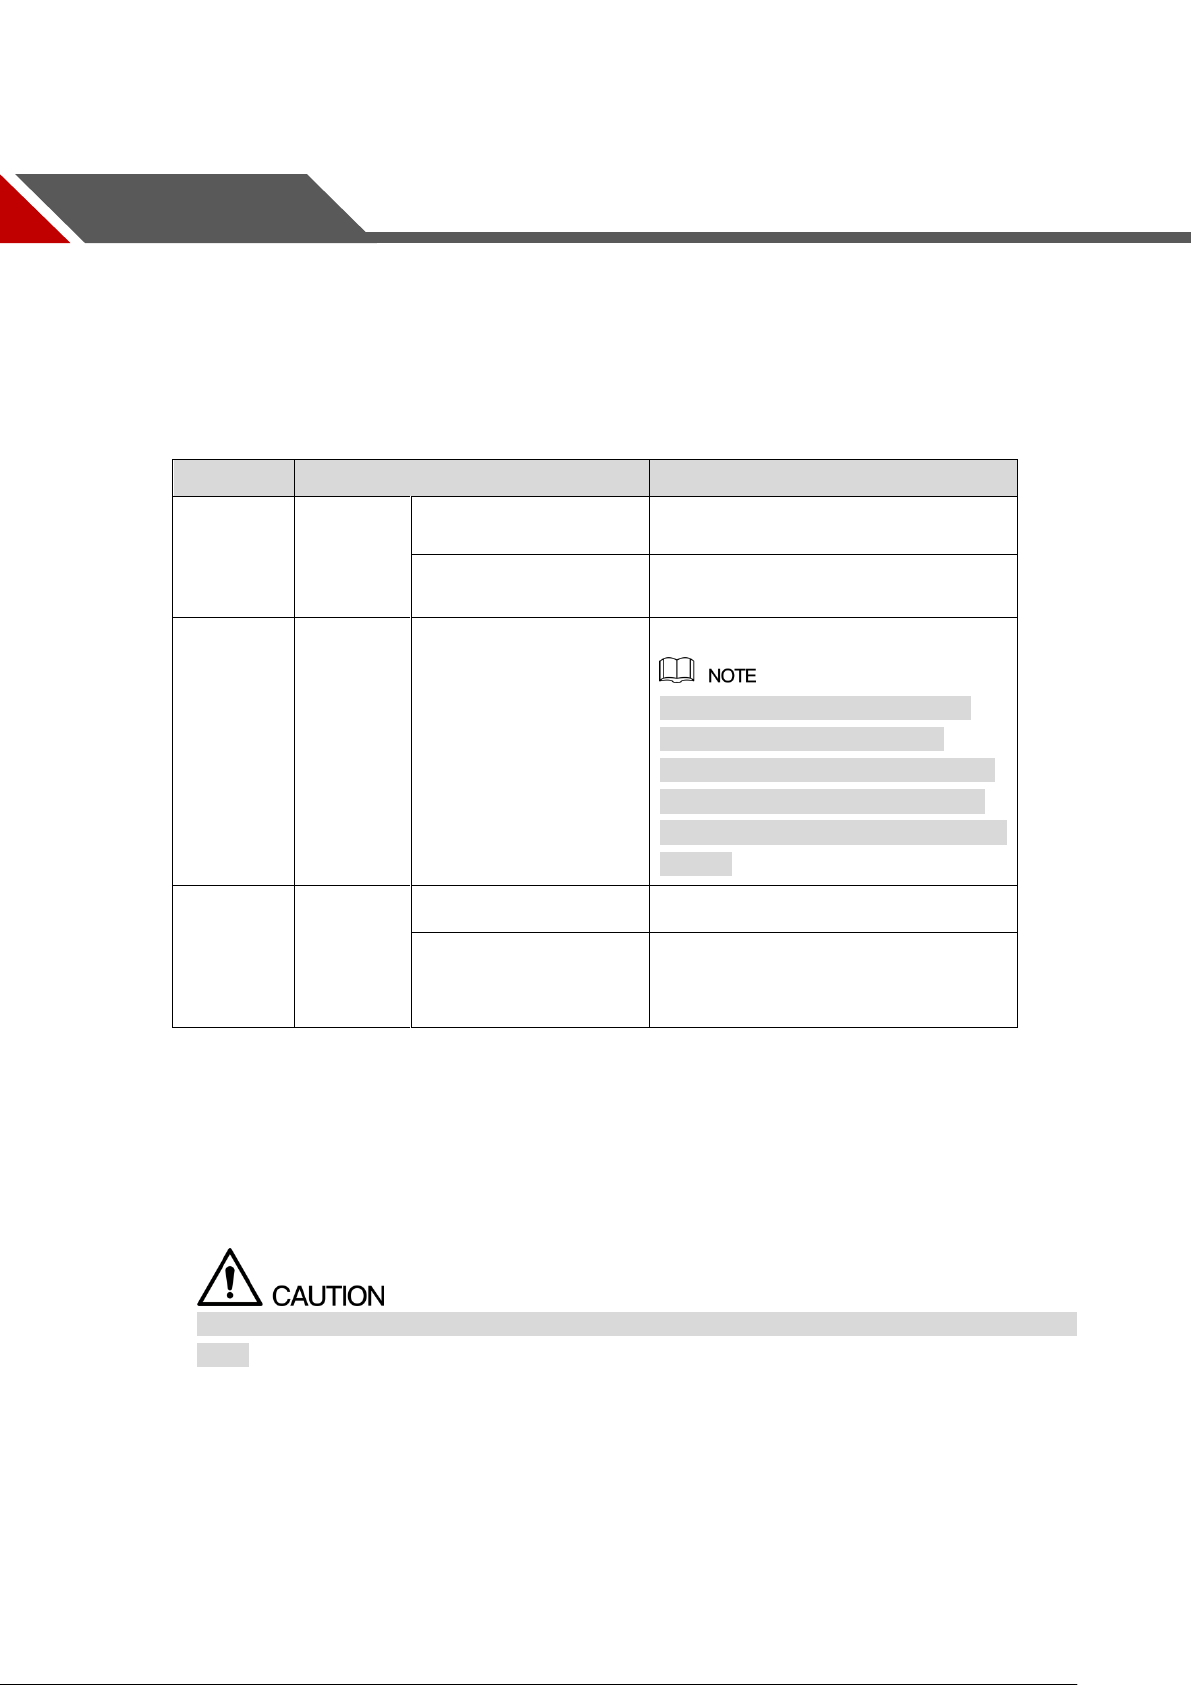
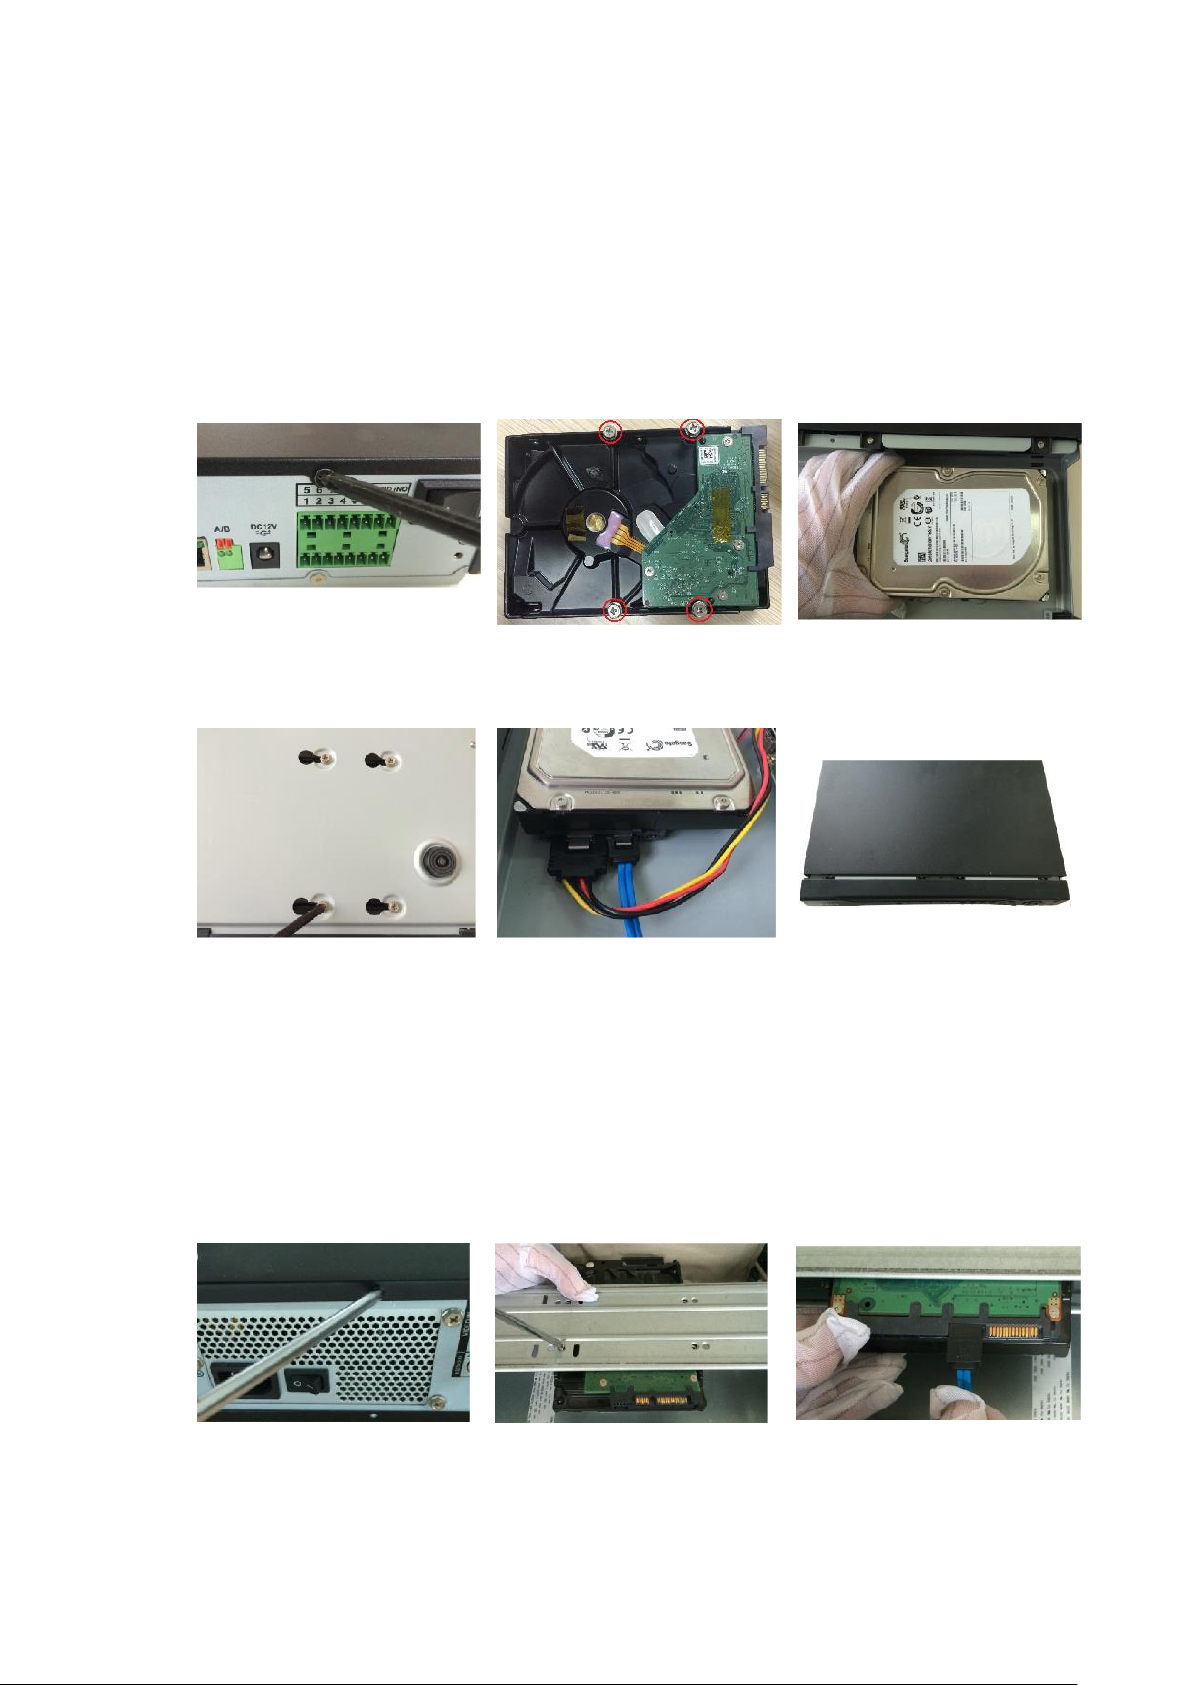
2.2.1 DH-XVR5108C-X/DH-XVR5104C-4KL-X/DH-XVR5104C-X/
1. Remove the screws to take
off the cover.
2. Fix the screws on the HDD
but do not fasten them.
3. Match the screws with
the holes on the DVR to
place the HDD.
4. Turn the DVR upside down
to see the screws and then
fasten them.
5. Use the HDD cable and
power cable to connect HDD
and mainboard.
6. Put back the cover and
fasten the screws.
DH-XVR4104C-X/DH-XVR4108C-X
Getting Started 4

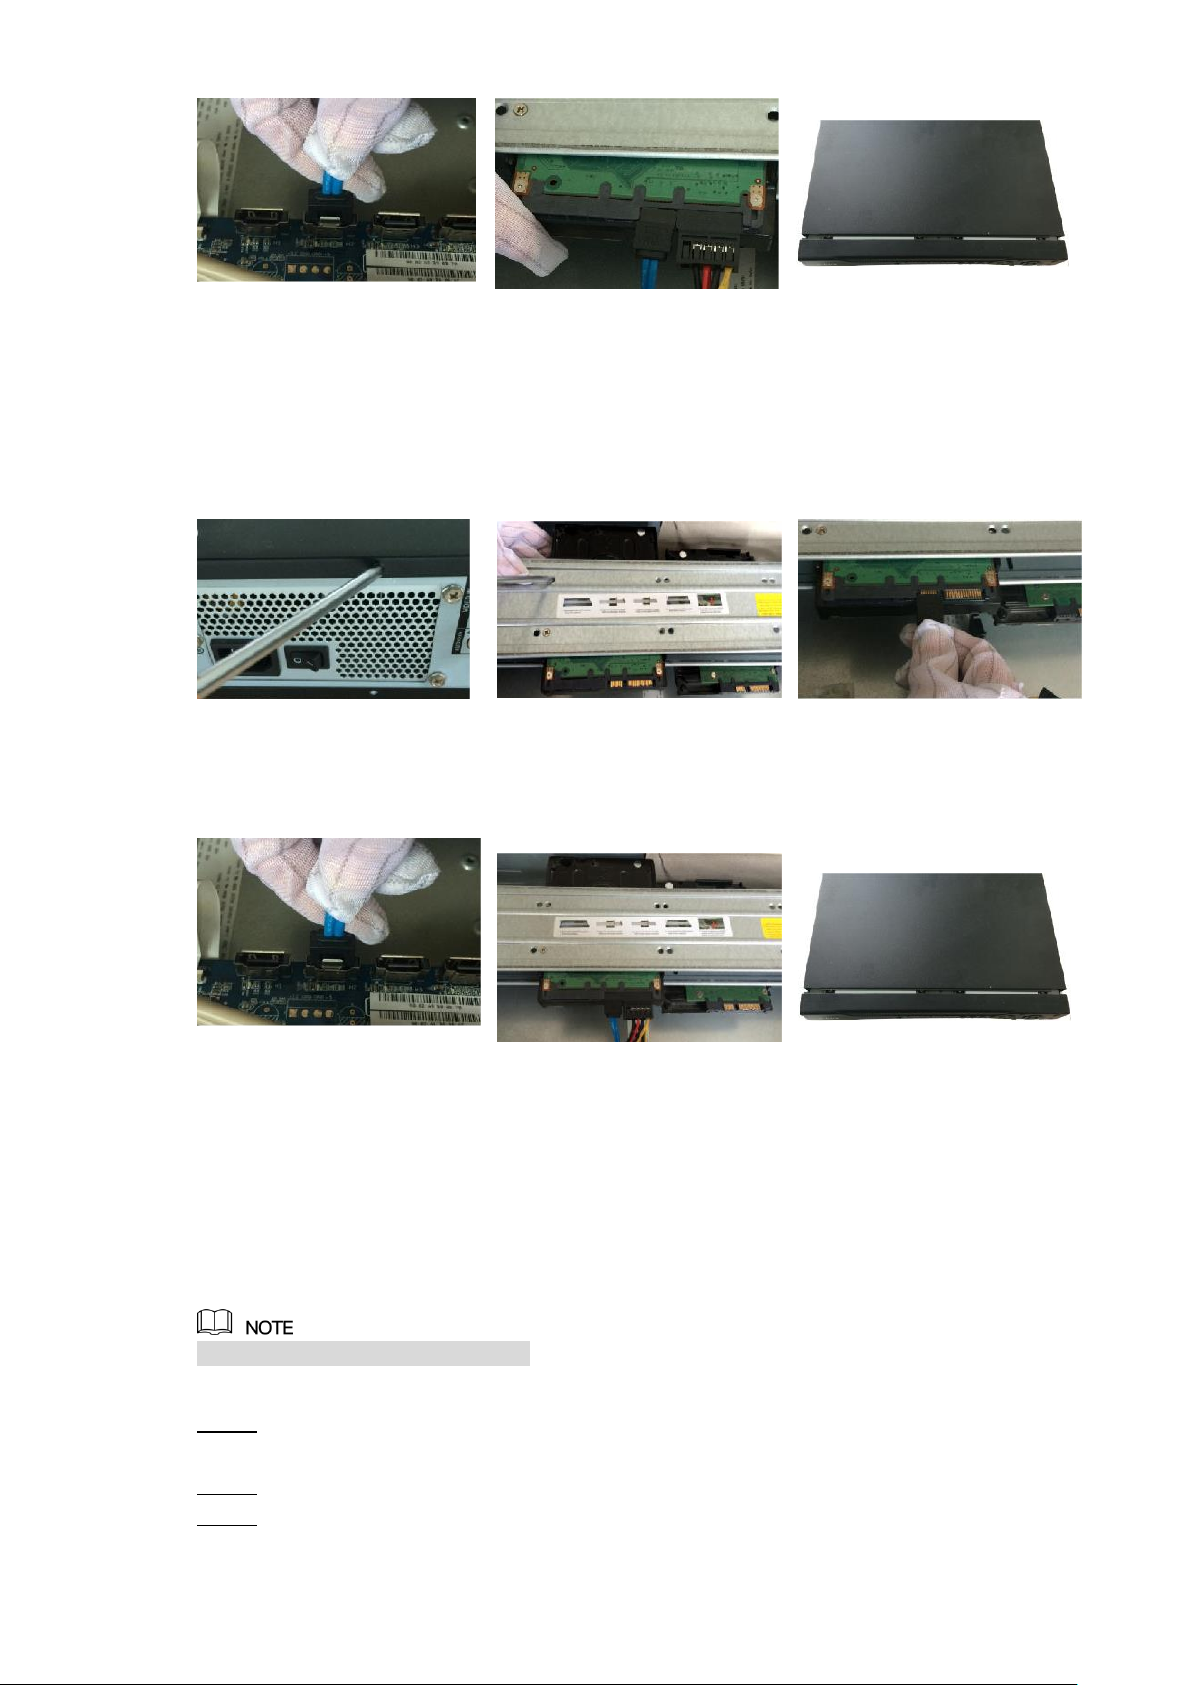
2.2.2 DH-XVR7104E-4KL-X/DH-XVR7108E-4KL-X/DH-XVR7104E-
1. Put the battery cable through the hole.
2. Connect to the cable into the port.
1. Remove the screws to take
off the cover.
2. Remove the screws to take
off the bracket.
3. Put the HDD onto the
bracket.
4. Match the holes on the
bracket with the screw
holes on HDD.
5. Use screws to fix the HDD
onto the bracket.
6. (Optional) Put the
battery cable through
the hole to connect into
the cable port.
4KL-B-X/ DH-XVR7108E-4KL-B-X
2.2.2.1 Installing Battery
The battery is only provided with some models.
2.2.2.2 Installing HDD
Skip step 6 if the battery is not equipped with the model you purchased.
Getting Started 5
7. Use the HDD cable and
power cable to connect
HDD and mainboard.
8. Install the bracket back and
then fasten the screws.
9. Put back the cover and
fasten the screws.
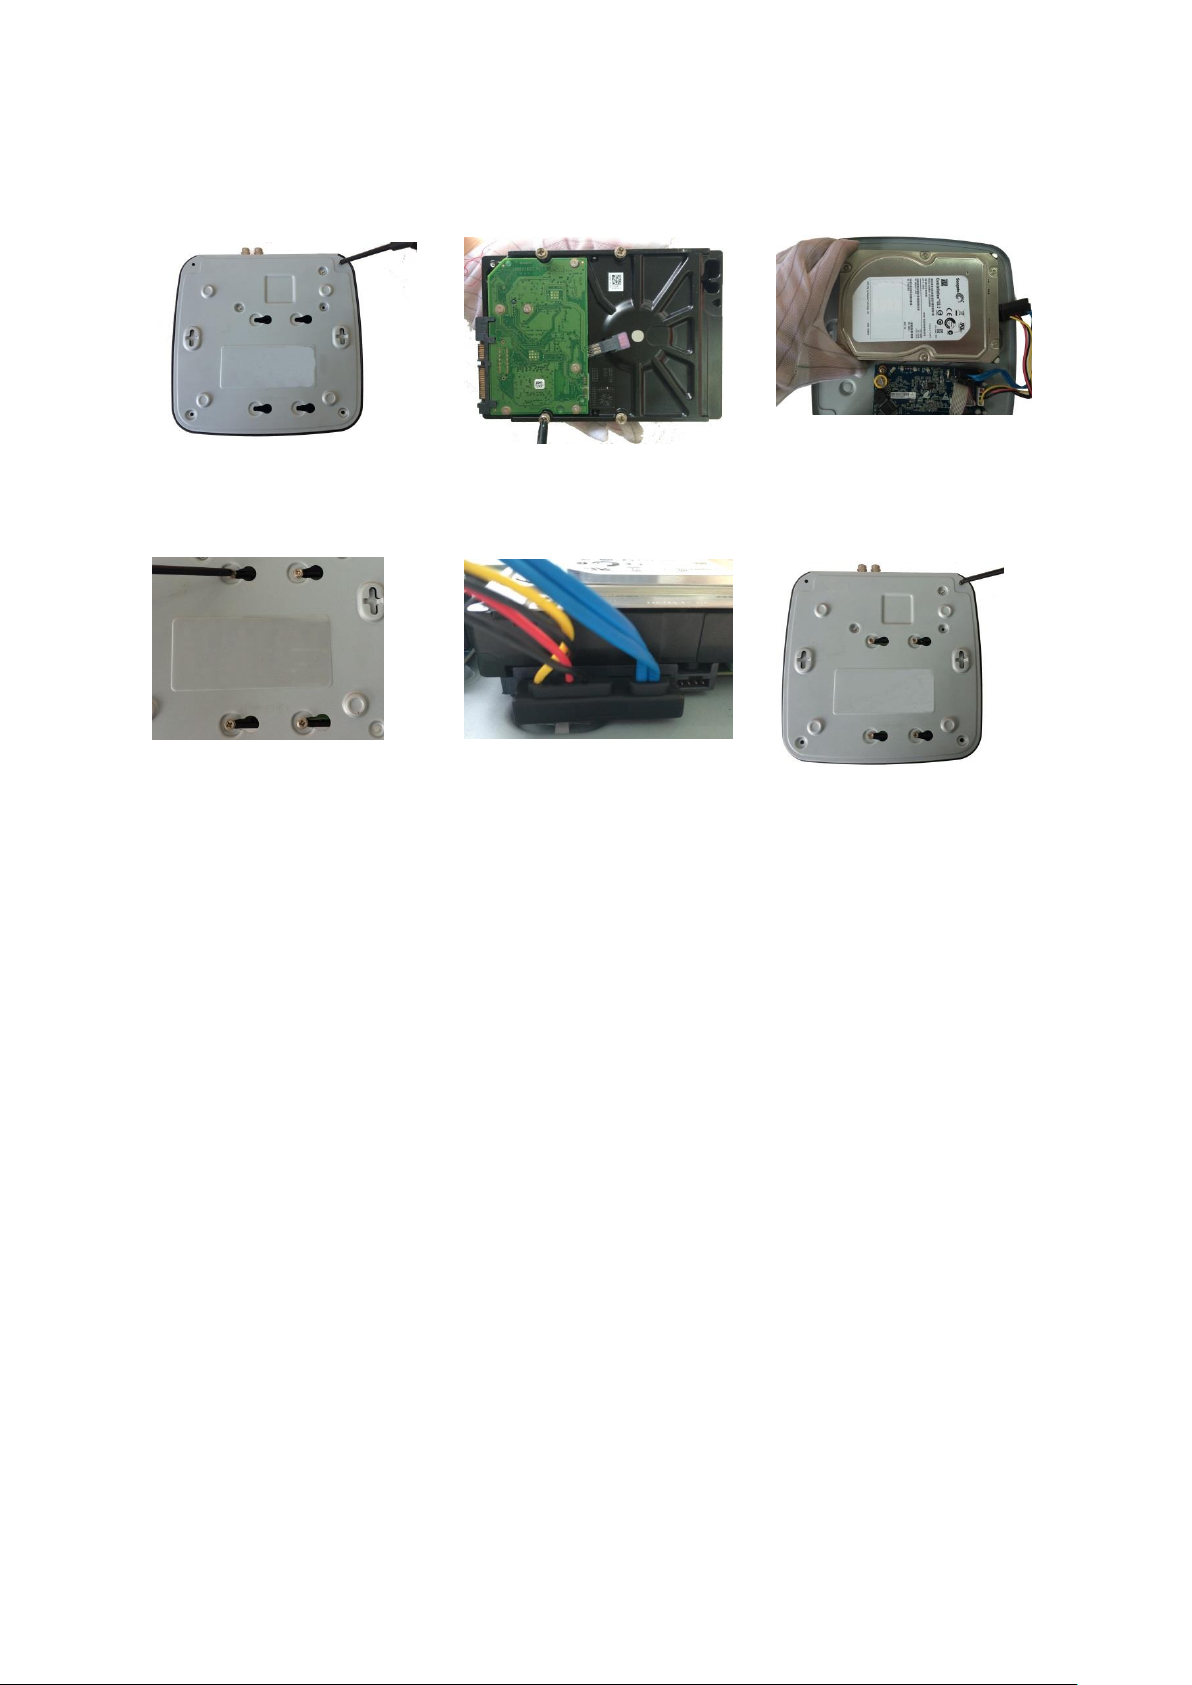
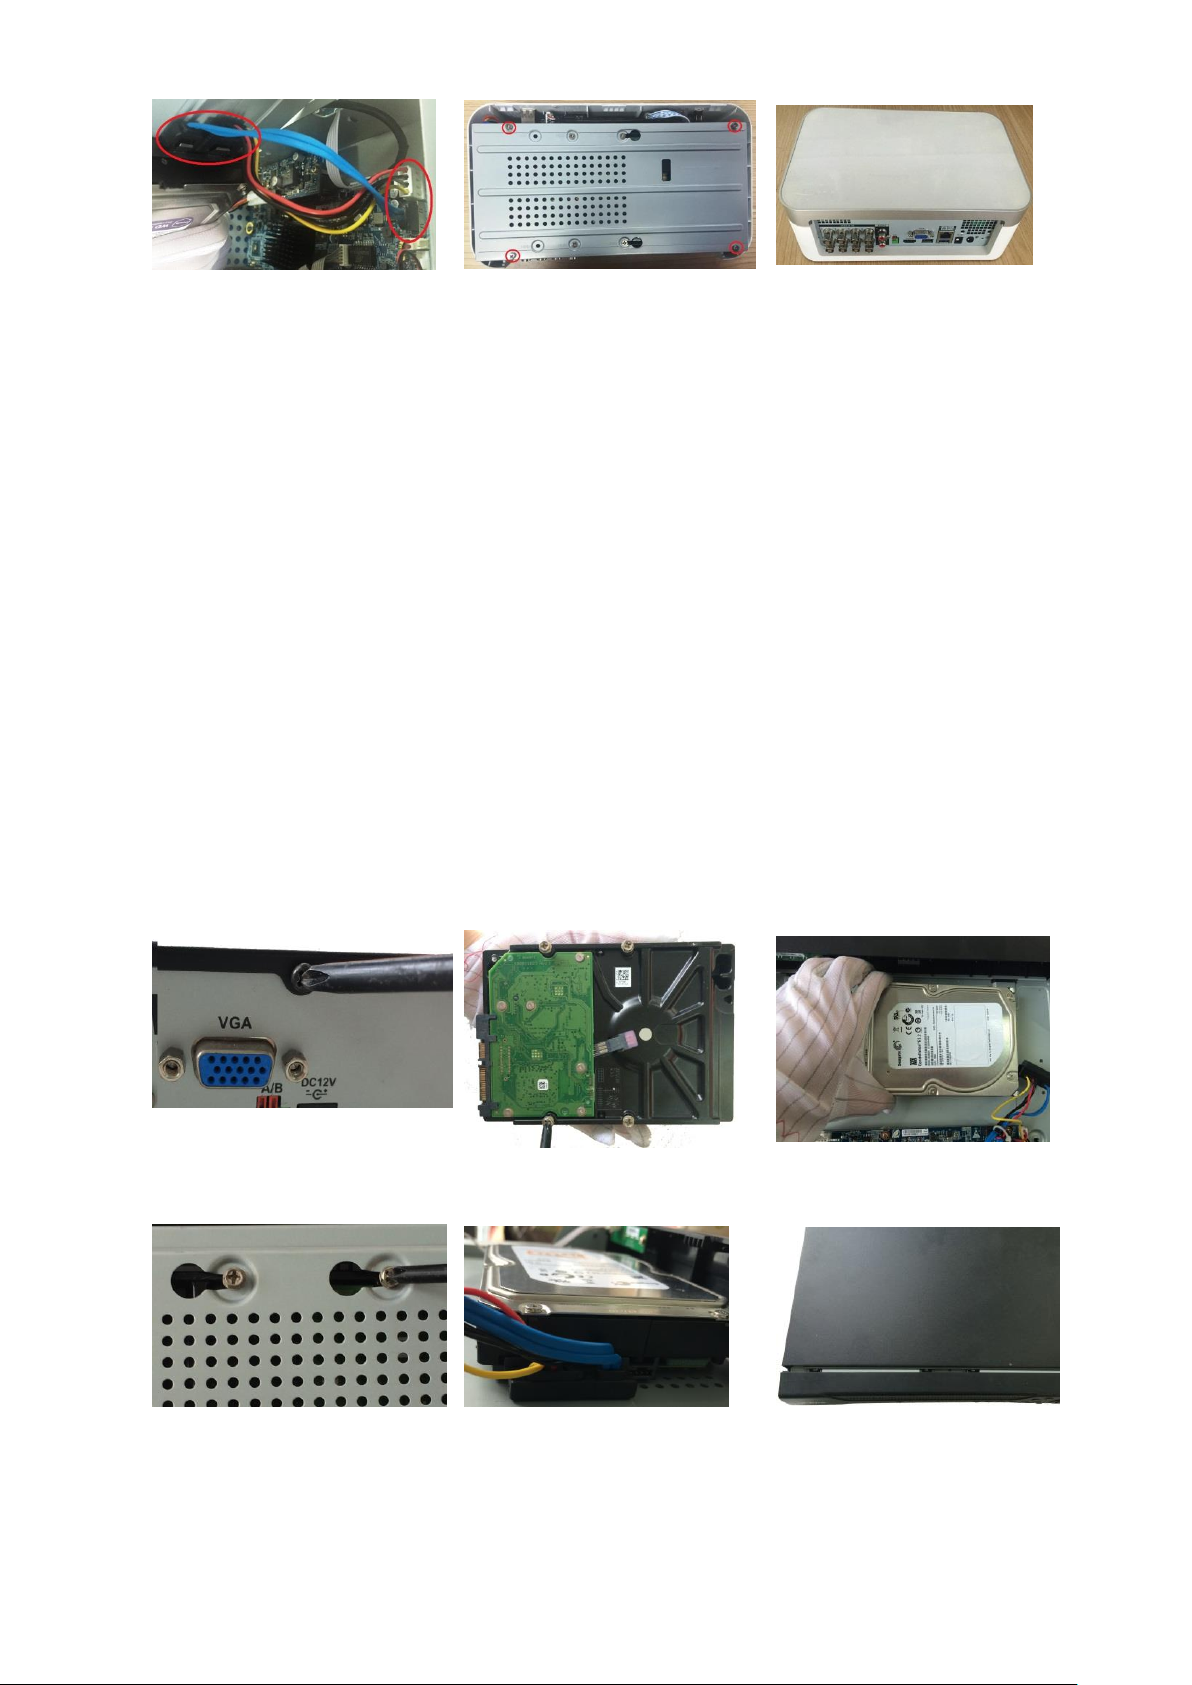
2.2.3 DH-XVR4116HS-X/DH-XVR5108HS-X/DH-XVR5116HS-X/DH
1. Remove the screws on the
rear panel.
2. Fix the screws on the HDD
but do not be fastened.
3. Place the HDD onto the
Device.
4. Turn the device to see the
back side of it. Aim the
screws of the HDD at the
holes on the back of the
5. Use the HDD cable and
power cable to connect
HDD and mainboard.
6. Put back the cover and
fix the screws.
-XVR5104HS-4KL-X/DH-XVR5108HS-4KL-X/
DH-XVR5108H-X/DH-XVR5116H-X/DH-XVR5104H-4KL-X/DH-XVR
5108H-4KL-X/DH-XVR5116H-4KL-X/DH-XVR5108HE-X/DH-XVR51
16HE-X/DH-XVR7104HE-4KL-X/DH-XVR7108HE-4KL-X/DH-XVR7
116HE-4KL-X/DH-XVR7108HE-4K-X/DH-XVR5104HS-X/
DH-XVR4104HS-X/DH-XVR5104H-X/DH-XVR5104HE-X/DH-XVR4
108HS-X
Getting Started 6
device and fix the screws.
2.2.4 DH-XVR4216AN-X/DH-XVR4232AN-X/DH-XVR5216AN-X/D
1. Remove the screws on the
cover.
2. Fix the screws onto the
HDD, but do not be
fastened.
3. Put the HDD into the
Device.
4. Turn the device to see the
back side of it. Aim the
screws of the HDD at the
holes on the back of the
device, and then fix the
screws.
5. Use the HDD cable and
power cable to connect
HDD and mainboard.
6. Put back the cover and fix
the screws.
1. Remove the screws on
cover.
2. Use the screws to fix the
HDD onto the bracket.
3. Connect one end of HDD
cable to the HDD.
H-XVR5232AN-X/DH-XVR5208AN-4KL-X/DH-XVR5216AN-4KL-X/
DH-XVR5216A-X/DH-XVR7208A-4KL-X/DH-XVR7216A-4KL-X/DHXVR7208A-4K-X
2.2.5 DH-XVR7416L-4KL-X/DH-XVR5432L-X
Getting Started 7
4. Connect the other end of
HDD cable to the
mainboard.
5. Use the power cable to
connect HDD and
mainboard.
6. Put back the cover and fix
the screws.
2.2.6 DH-XVR7816S-4KL-X/DH-XVR5832S-X
1. Loose the screws on the
panel and remove the
cover.
2. Fix the HDD(s) onto the
bracket. Remove the top
bracket if you want to install
HDD to the bottom bracket.
3. Connect one end of HDD
cable to the HDD.
4. Connect the other end of
HDD cable to the
mainboard
5. Use the power cable to
connect HDD and
mainboard.
6. Put back the cover and fix
the screws.
2.3 Installing Device into Rack
Not all models support this function.
To install the DVR into Rack, do the following:
Check if the in-house temperature is lower than 35℃(95℉) and make sure the 15cm Step 1
(6in.) spacing around the Device for ventilation.
Use six screws to fix the DVR on each side. Step 2
Install from the bottom up. Step 3
Getting Started 8

If you want to install more accessories to the rack, take preventive measures to avoid power
socket overload.
Install more accessories to the rack if needed.Step 4
Getting Started 9
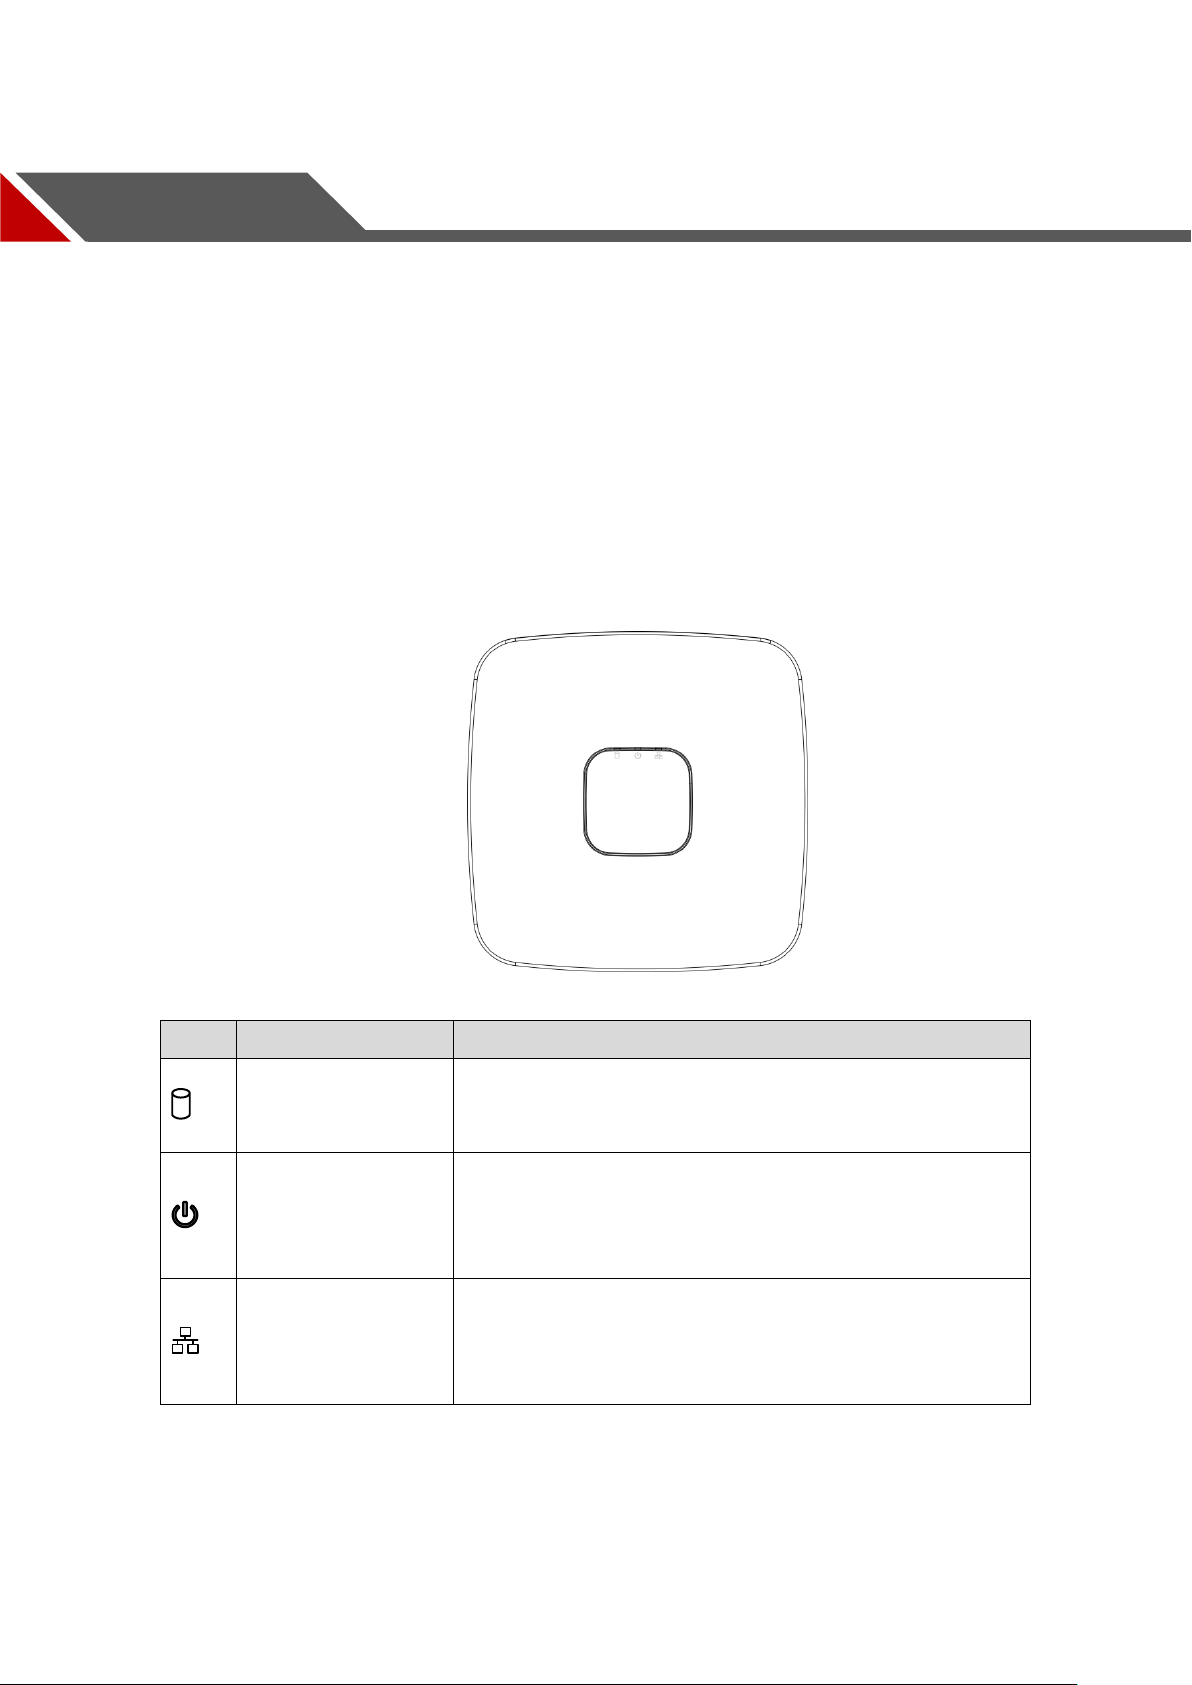
3 The Grand Tour
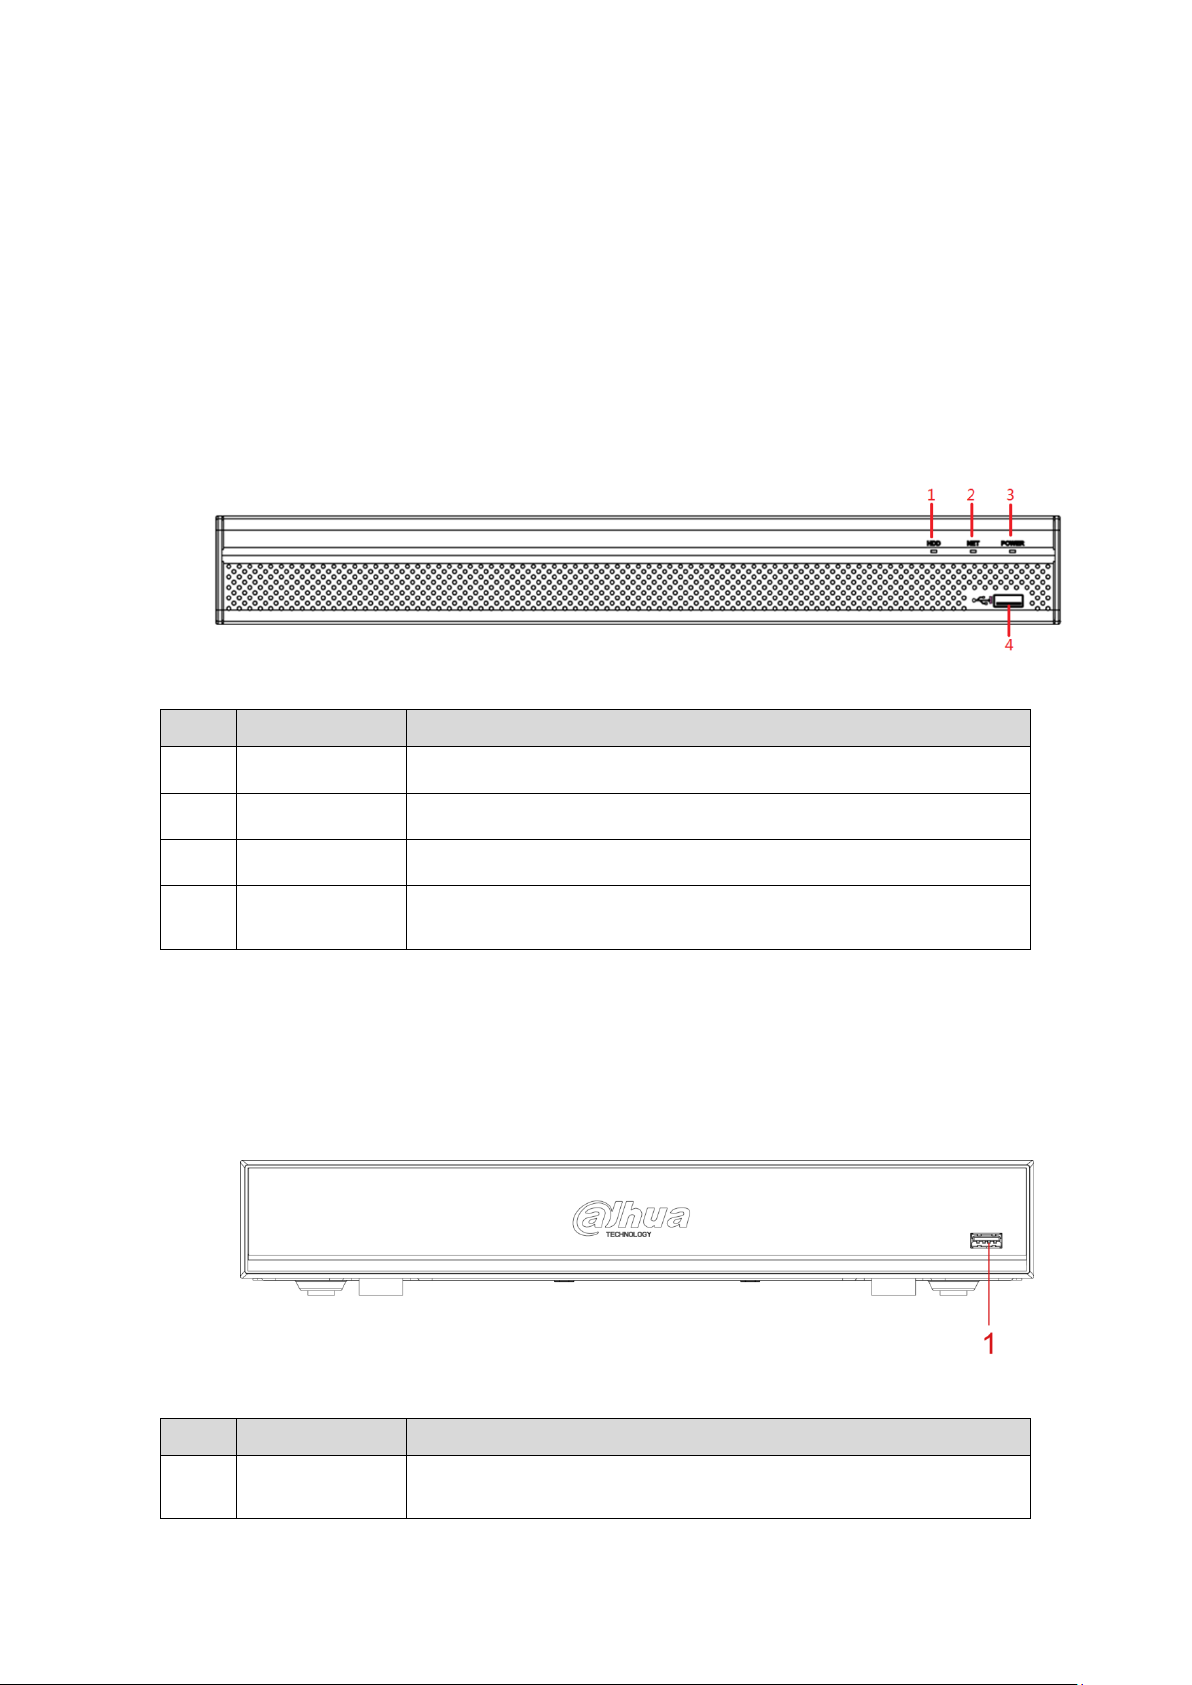
The indicator is off when the HDD is running normally.
The indicator glows blue when the HDD is in
The indicator is off when the power is connected
abnormally.
The indicator glows blue when the power is connected
The indicator is off when the network connection is
correct.
The indicator glows blue when the network connection
This chapter introduces various components of the Device, remote control and mouse
operations.
3.1 Front Panel
3.1.1 DH-XVR5108C-X/DH-XVR5104C-4KL-X/DH-XVR5104C-X/
DH-XVR4104C-X/DH-XVR4108C-X
Figure 3-1
Table 3-1
The Grand Tour 10
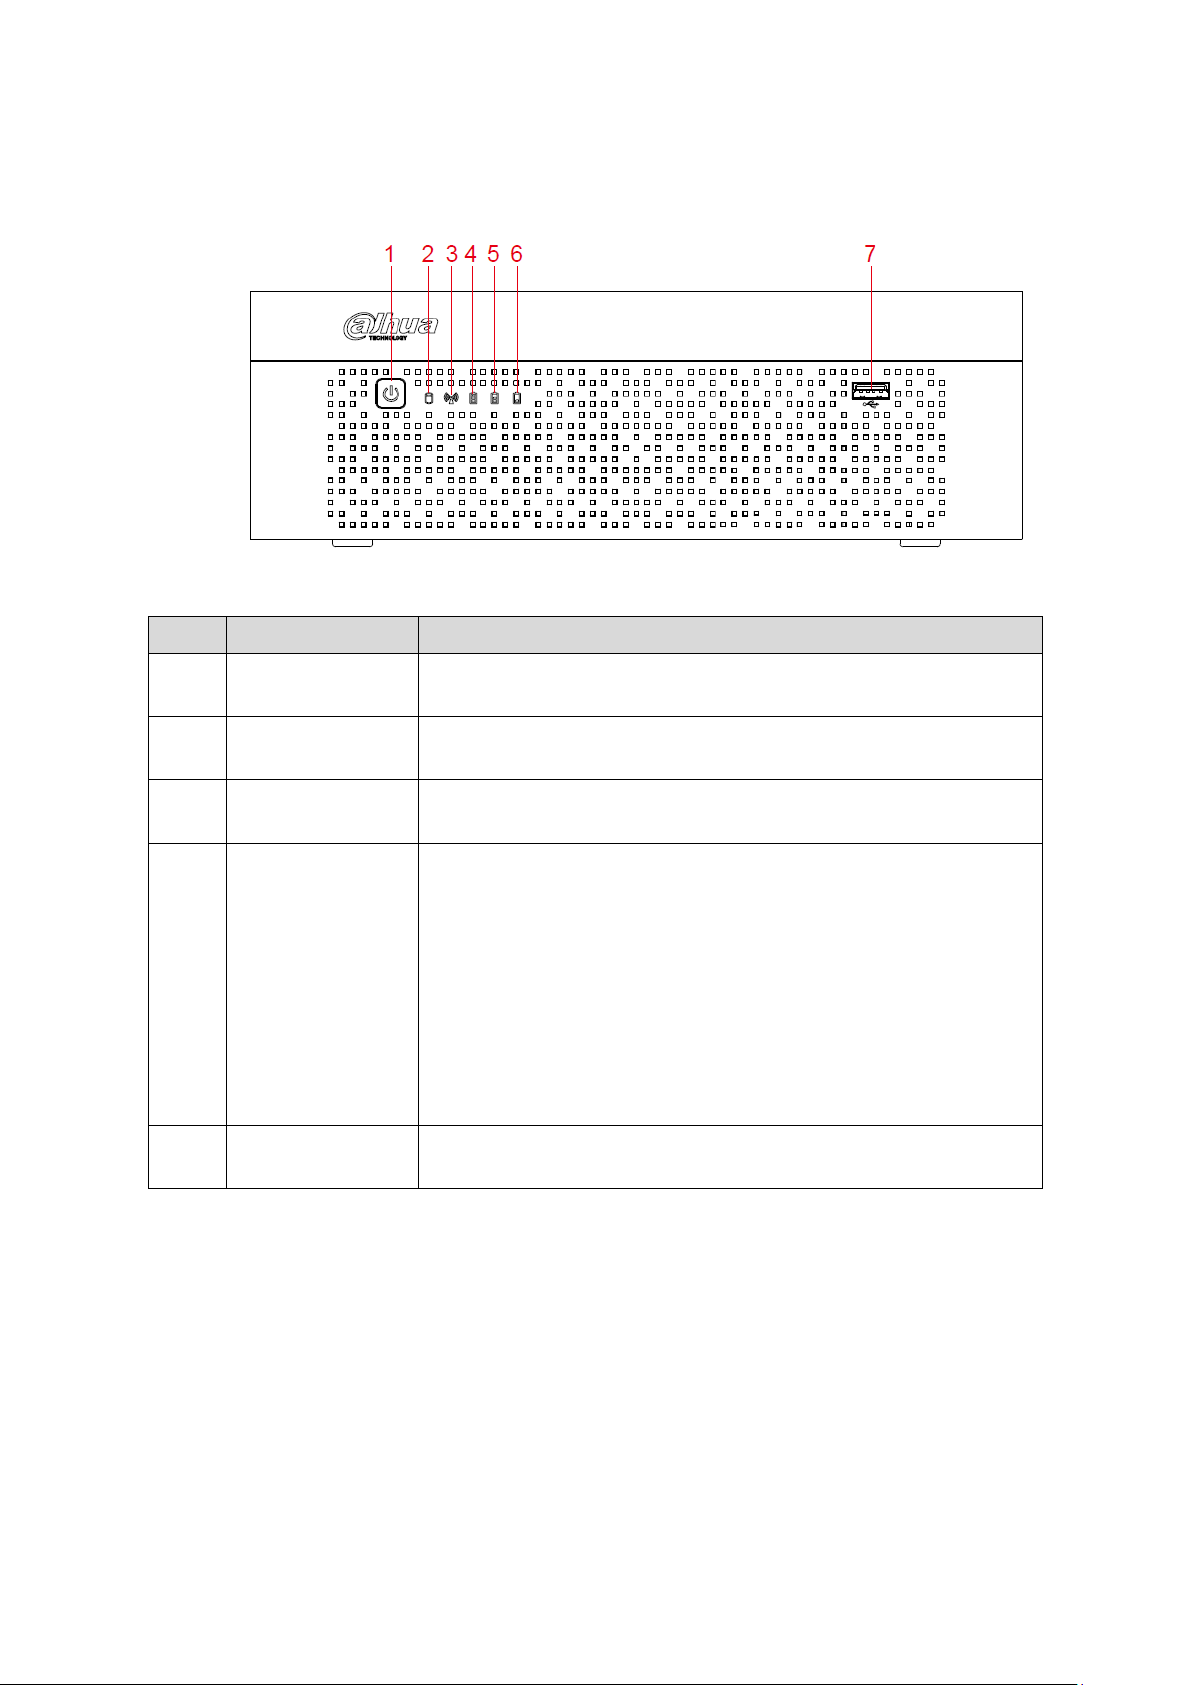
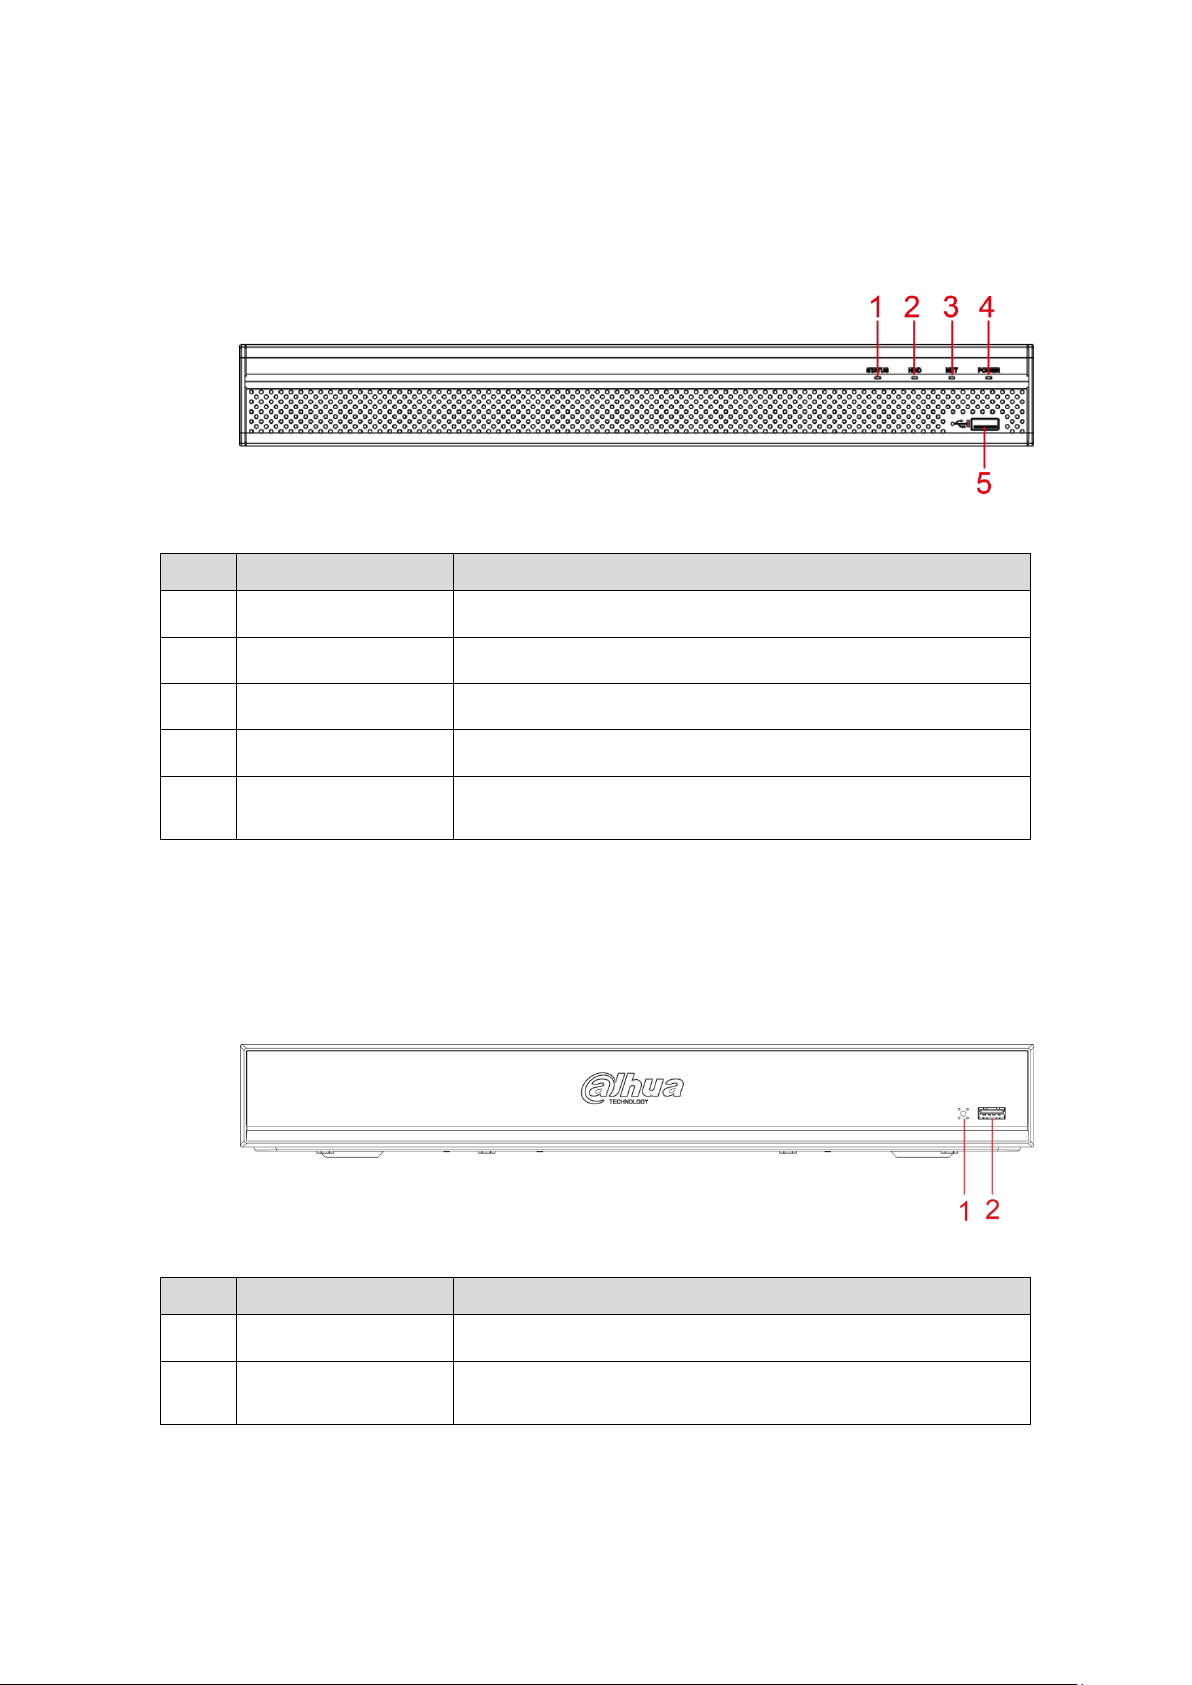
3.1.2 DH-XVR7104E-4KL-X/DH-XVR7108E-4KL-X/DH-XVR7104E-
Turns on/off the DVR. The indicator glows blue when the DVR is
turned on.
The indicator glows blue when the HDD is in malfunction.
The indicator glows blue when the network connection is
abnormal.
When the battery remains full or no less than sixty percent,
the No.4 indicator is on, and the No.5 and No.6 are out.
When the battery remains between thirty percent and sixty
percent, the No.5 indicator is on and the others are out.
When the battery remains between one percent and thirty
percent, the No.6 indicator is on and the others are out.
When the battery is exhausted, the DVR is turned off, or
there is no battery attached to the DVR, all the three
indicators are out.
Connects to external devices such as USB storage device,
keyboard and mouse.
4KL-B-X/ DH-XVR7108E-4KL-B-X
Figure 3-2
Table 3-2
The Grand Tour 11
3.1.3 DH-XVR5108H-X/DH-XVR5116H-X/DH-XVR5104H-4KL-X/D
Glows blue when HDD status is abnormal.
Glows blue when network status is abnormal.
Glows blue when the power is connected properly.
Connects to peripheral devices such as USB storage device,
keyboard and mouse.
Connects to peripheral devices such as USB storage device,
keyboard and mouse.
H-XVR5108H-4KL-X/DH-XVR5116H-4KL-X/DH-XVR5108HE-X/DHXVR5116HE-X/DH-XVR4116HS-X/DH-XVR5108HS-X/DH-XVR511
6HS-X/DH-XVR5104HS-4KL-X/DH-XVR5108HS-4KL-X/
DH-XVR5104HS-X/DH-XVR4104HS-X/DH-XVR4108HS-X/DH-XVR
5104H-X/DH-XVR5104HE-X
Figure 3-3
Table 3-3
3.1.4 DH-XVR7104HE-4KL-X/DH-XVR7108HE-4KL-X/DH-XVR711
6HE-4KL-X/DH-XVR7108HE-4K-X
Figure 3-4
Table 3-4
The Grand Tour 12
3.1.5 DH-XVR4216AN-X/DH-XVR4232AN-X/DH-XVR5216AN-X/D
Glows blue when the device is working properly.
Glows blue when HDD status is abnormal.
Glows blue when network status is abnormal.
Glows blue when the power is connected properly.
Connects to the external devices such as keyboard, mouse,
and USB storage device.
Glows blue when the device is working properly.
Connects to the external devices such as keyboard, mouse,
and USB storage device.
H-XVR5232AN-X/DH-XVR5208AN-4KL-X/DH-XVR5216AN-4KL-X/
DH-XVR5216A-X
Figure 3-5
Table 3-5
3.1.6 DH-XVR7208A-4KL-X/DH-XVR7216A-4KL-X/DH-XVR7208A4K-X
Figure 3-6
Table 3-6
The Grand Tour 13
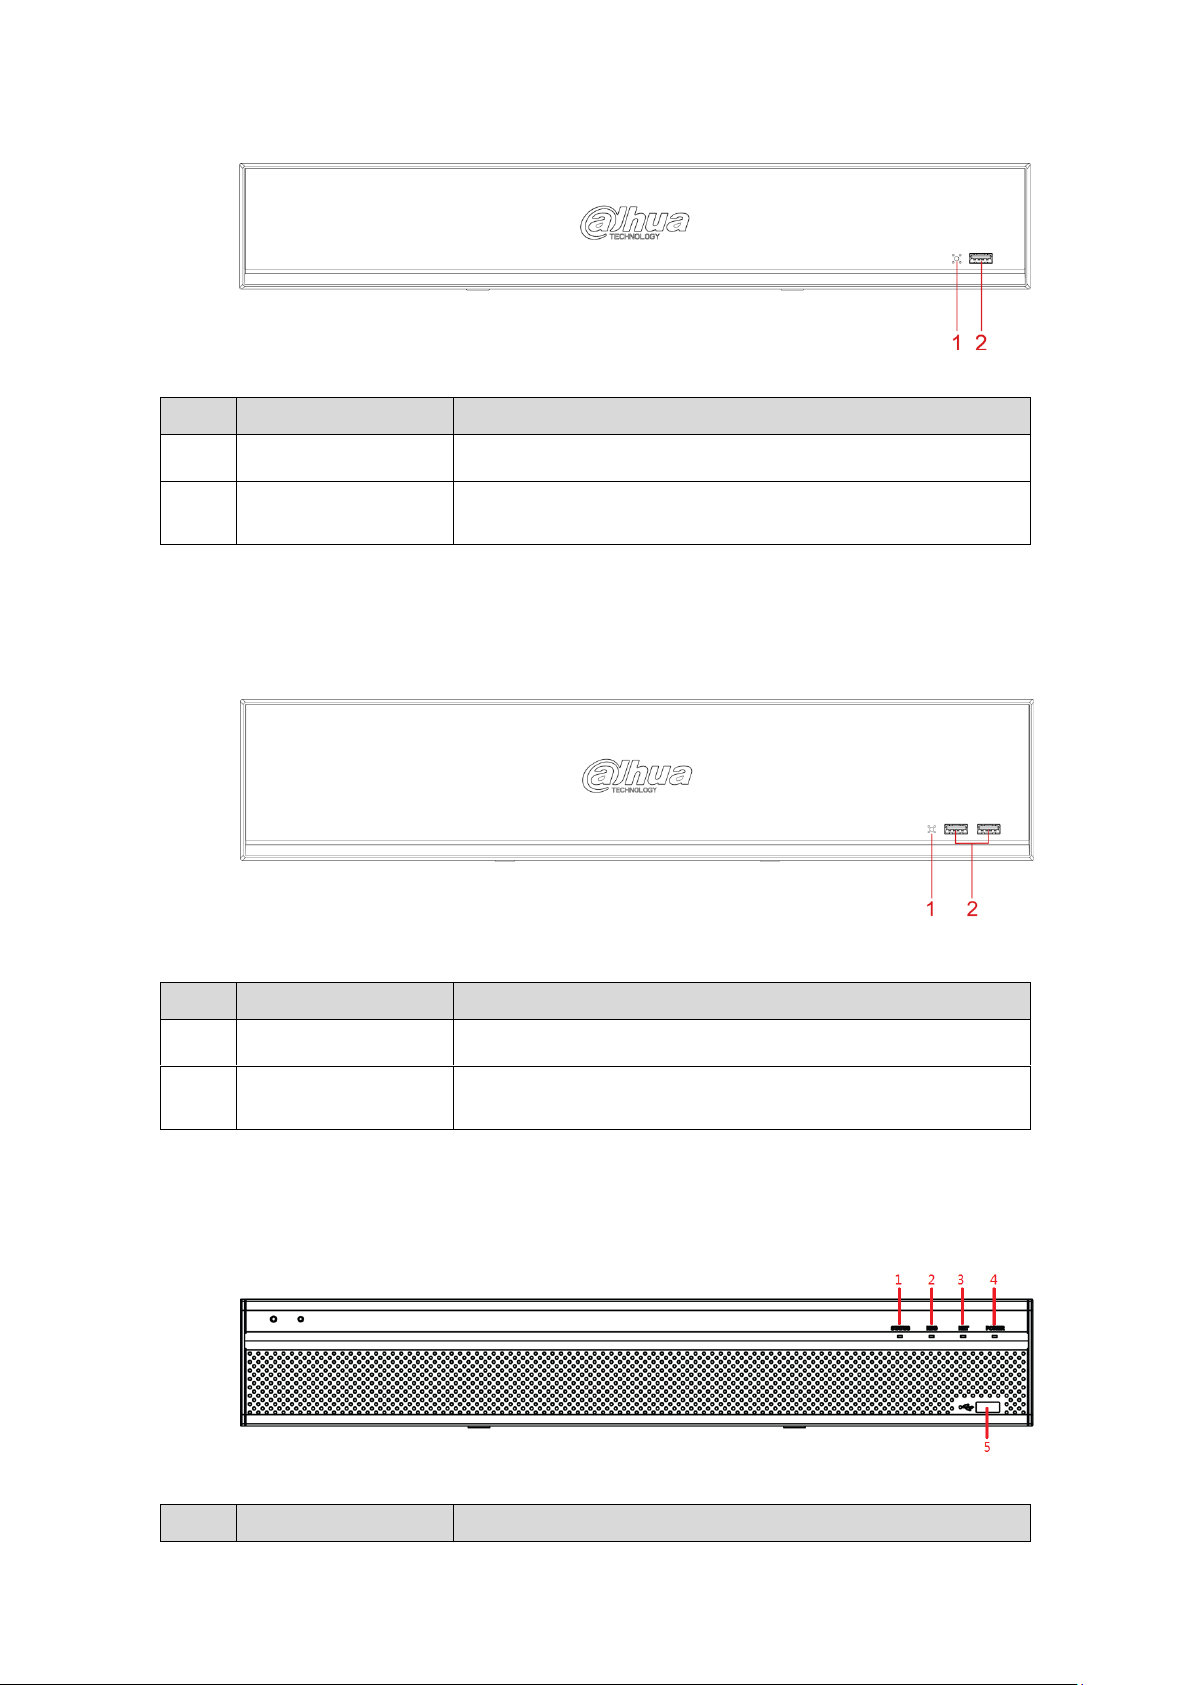
3.1.7 DH-XVR7416L-4KL-X
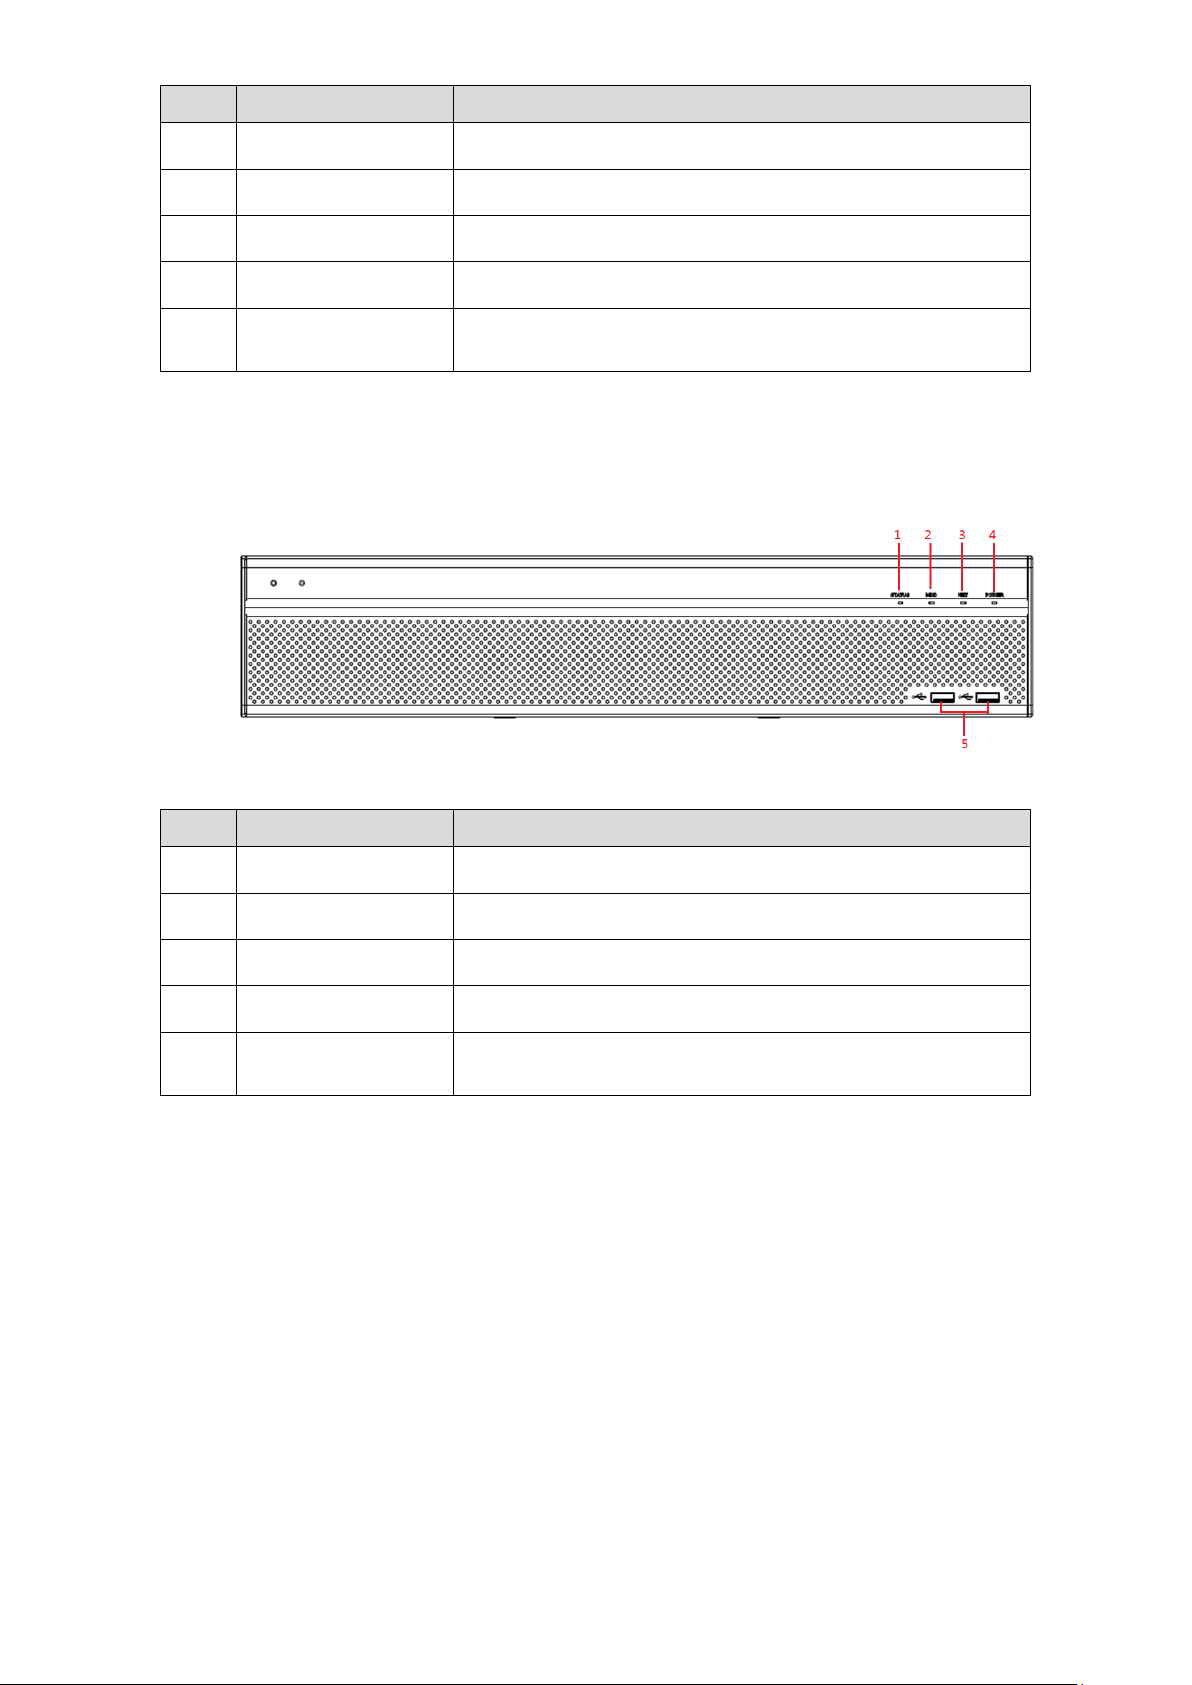
Receives infrared signal from remote control.
Connects to peripheral devices such as USB storage
device, keyboard and mouse.
Receives infrared signal from remote control.
Connects to peripheral devices such as USB storage
device, keyboard and mouse.
3.1.8 DH-XVR7816S-4KL-X
Figure 3-7
Table 3-7
3.1.9 DH-XVR5432L-X
Figure 3-8
Table 3-8
Figure 3-9
The Grand Tour 14
Glows blue when the device is working properly.
Glows blue when HDD status is abnormal.
Glows blue when network status is abnormal.
Glows blue when the power is connected properly.
Connects to peripheral devices such as USB storage
device, keyboard and mouse.
3.1.10 DH-XVR5832S-X
Glows blue when the device is working properly.
Glows blue when HDD status is abnormal.
Glows blue when network status is abnormal.
Glows blue when the power is connected properly.
Connects to peripheral devices such as USB storage
device, keyboard and mouse.
Table 3-9
Figure 3-10
Table 3-10
The Grand Tour 15
3.2 Rear Panel
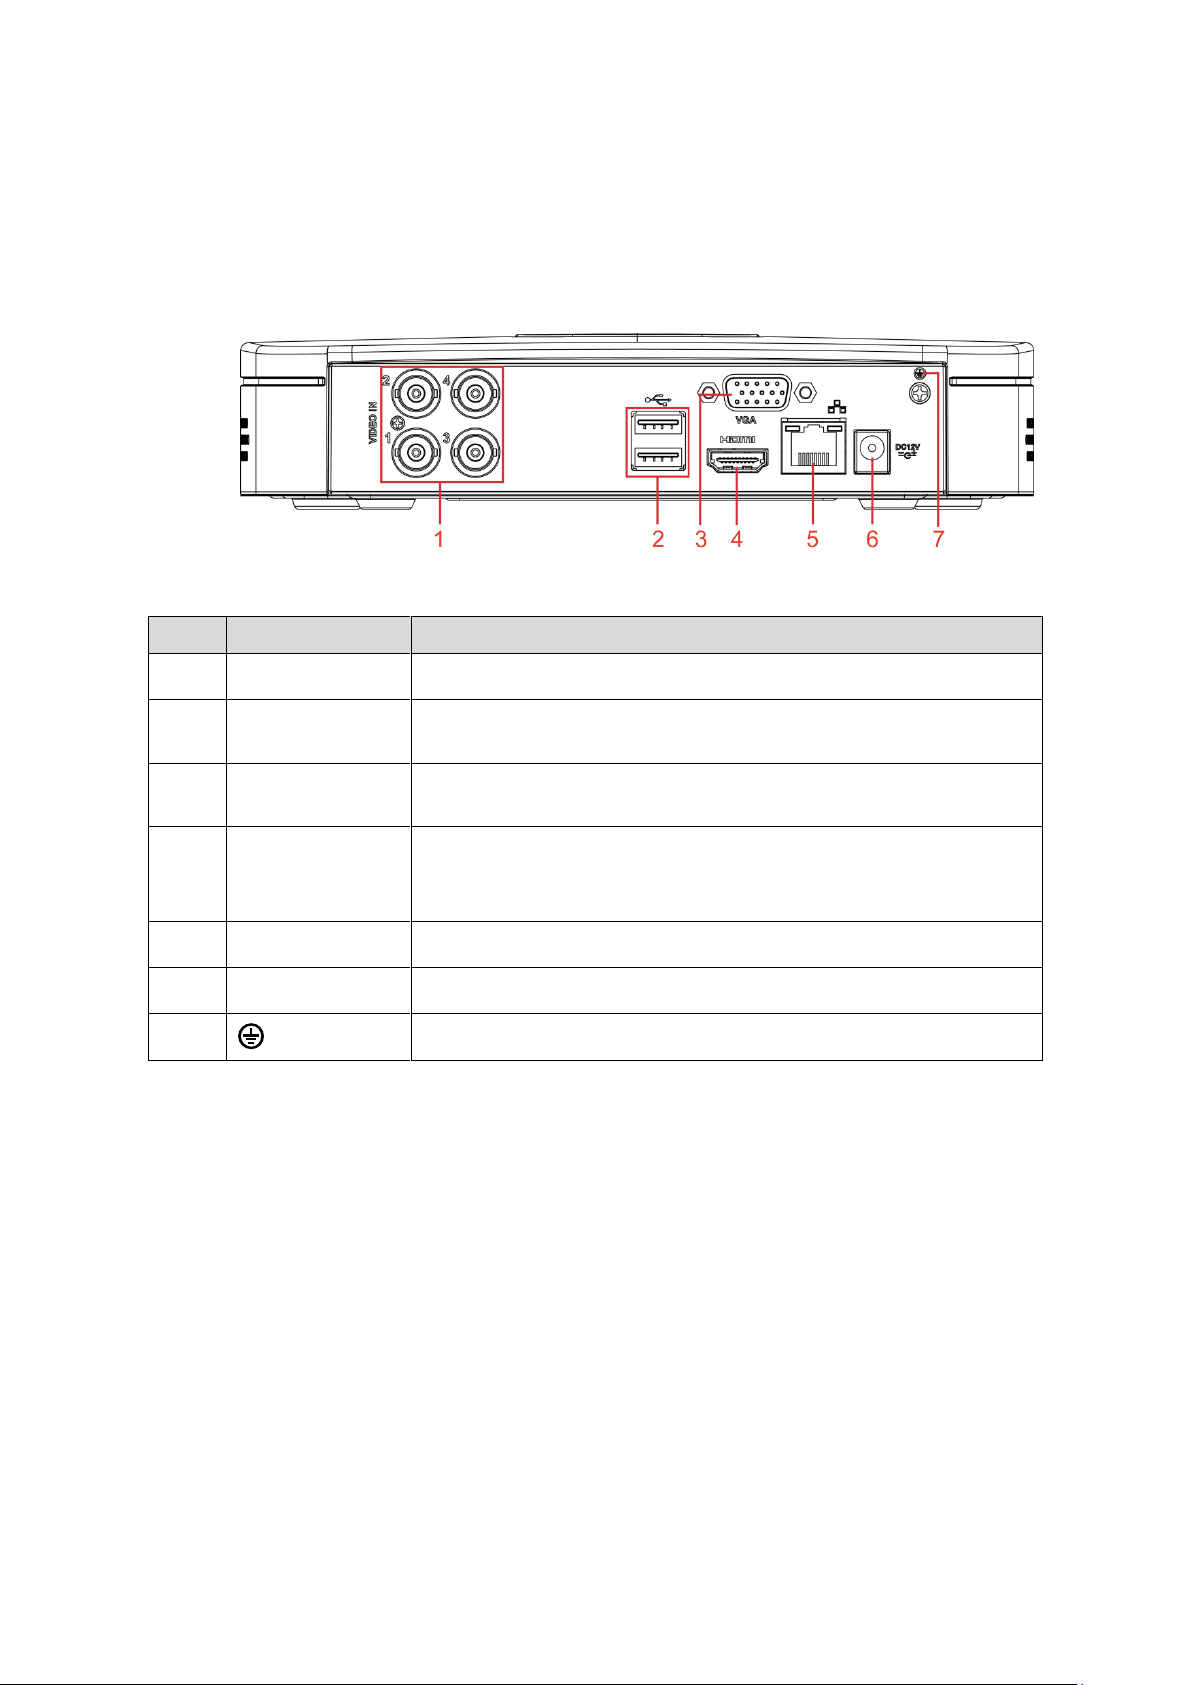
Connects to analog camera to input video signal.
Connects to external devices such as USB storage device,
keyboard and mouse.
Outputs analog video data to the connected display with VGA
port.
High definition audio and video signal output port.
The port outputs the uncompressed high definition video and
multi-channel audio data to the connected display with HDMI port.
Connects to Ethernet port.
3.2.1 DH-XVR5108C-X/DH-XVR5104C-4KL-X/DH-XVR5104C-X/
DH-XVR4104C-X/DH-XVR4108C-X
Figure 3-11
Table 3-11
The Grand Tour 16
3.2.2 DH-XVR7104E-4KL-X/DH-XVR7108E-4KL-X/DH-XVR7104E-
Connects to analog camera to input video signal.
Receives audio signal output from the devices such as
microphone.
Outputs audio signal to the devices such as the sound box.
Connects to the control devices such as speed dome PTZ.
RS485_A port is connected by the cable A and RS485_B is
connected to the cable B.
High definition audio and video signal output port.
The port outputs the uncompressed high definition video and
multi-channel audio data to the connected display with HDMI
port.
Outputs analog video data to the connected display with VGA
port.
Connects to external devices such as USB storage device,
keyboard and mouse.
Connects to Ethernet port.
4KL-B-X/ DH-XVR7108E-4KL-B-X
Figure 3-12
Figure 3-13
The Grand Tour 17
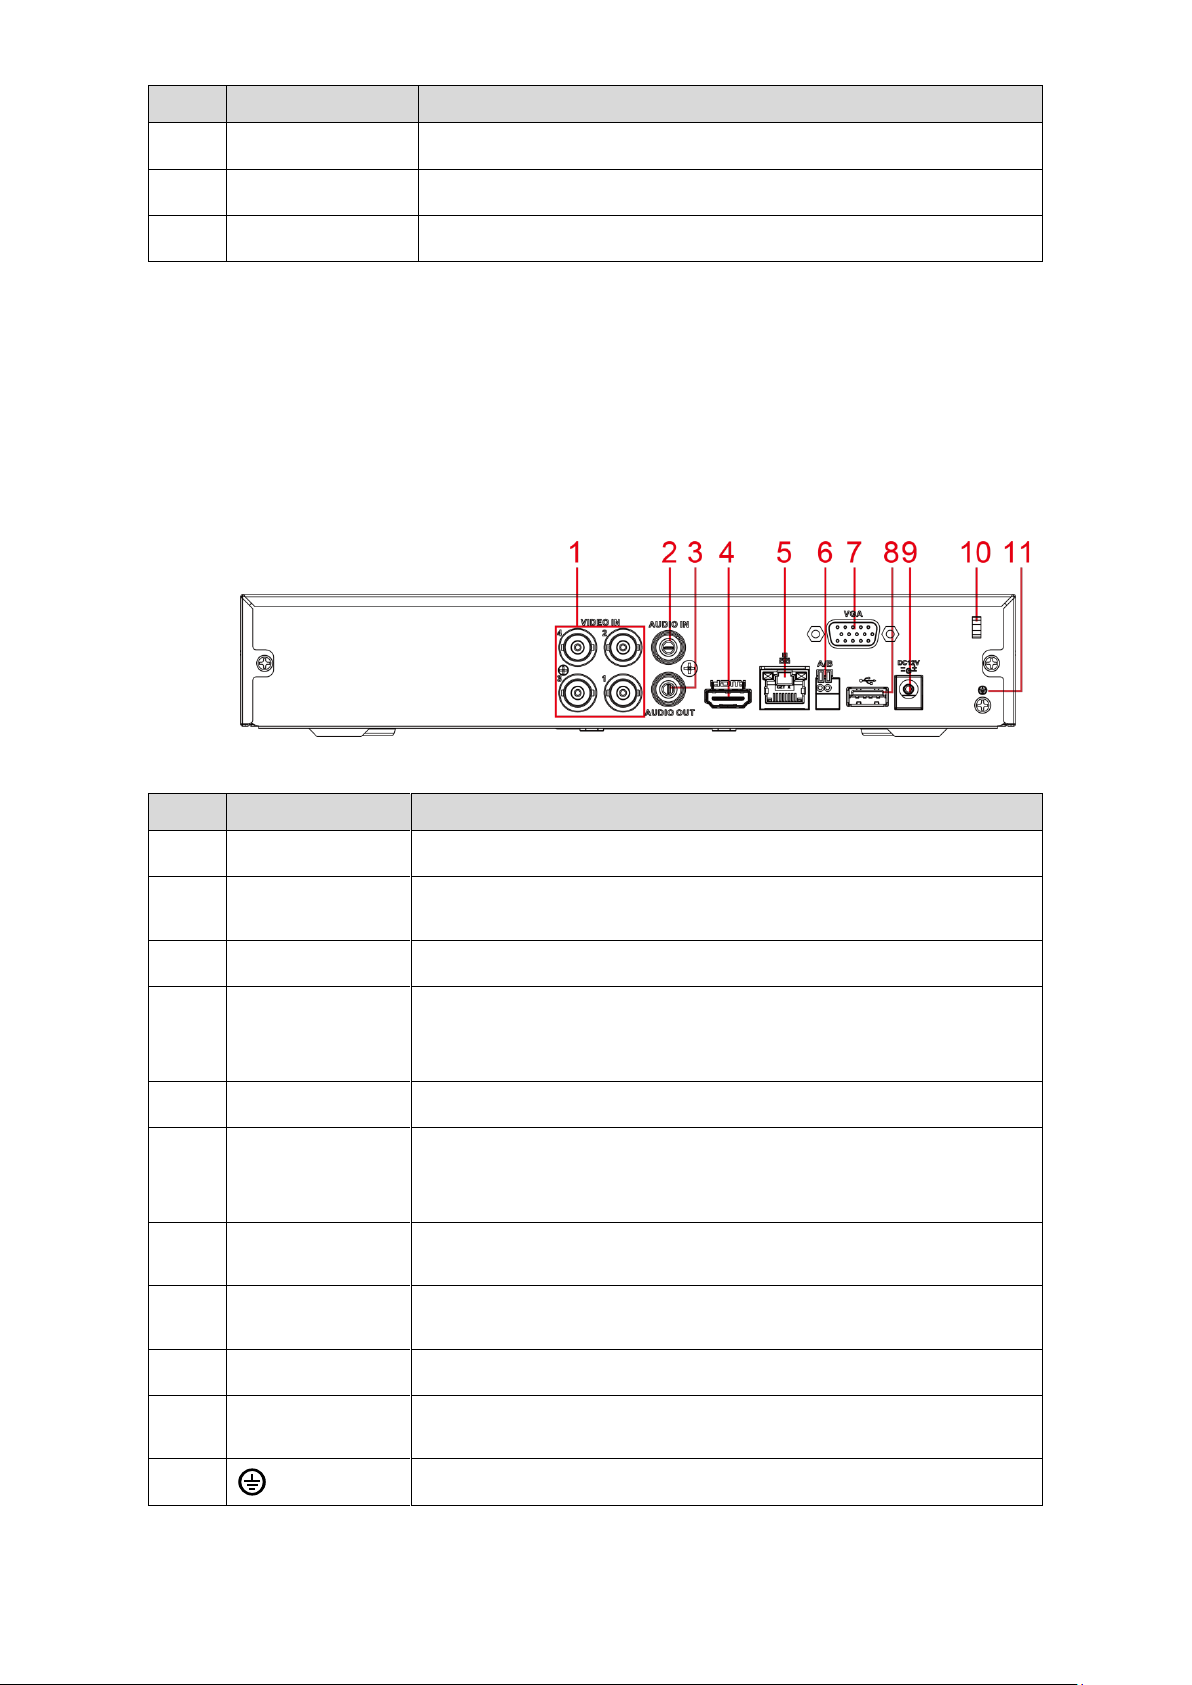
Table 3-12
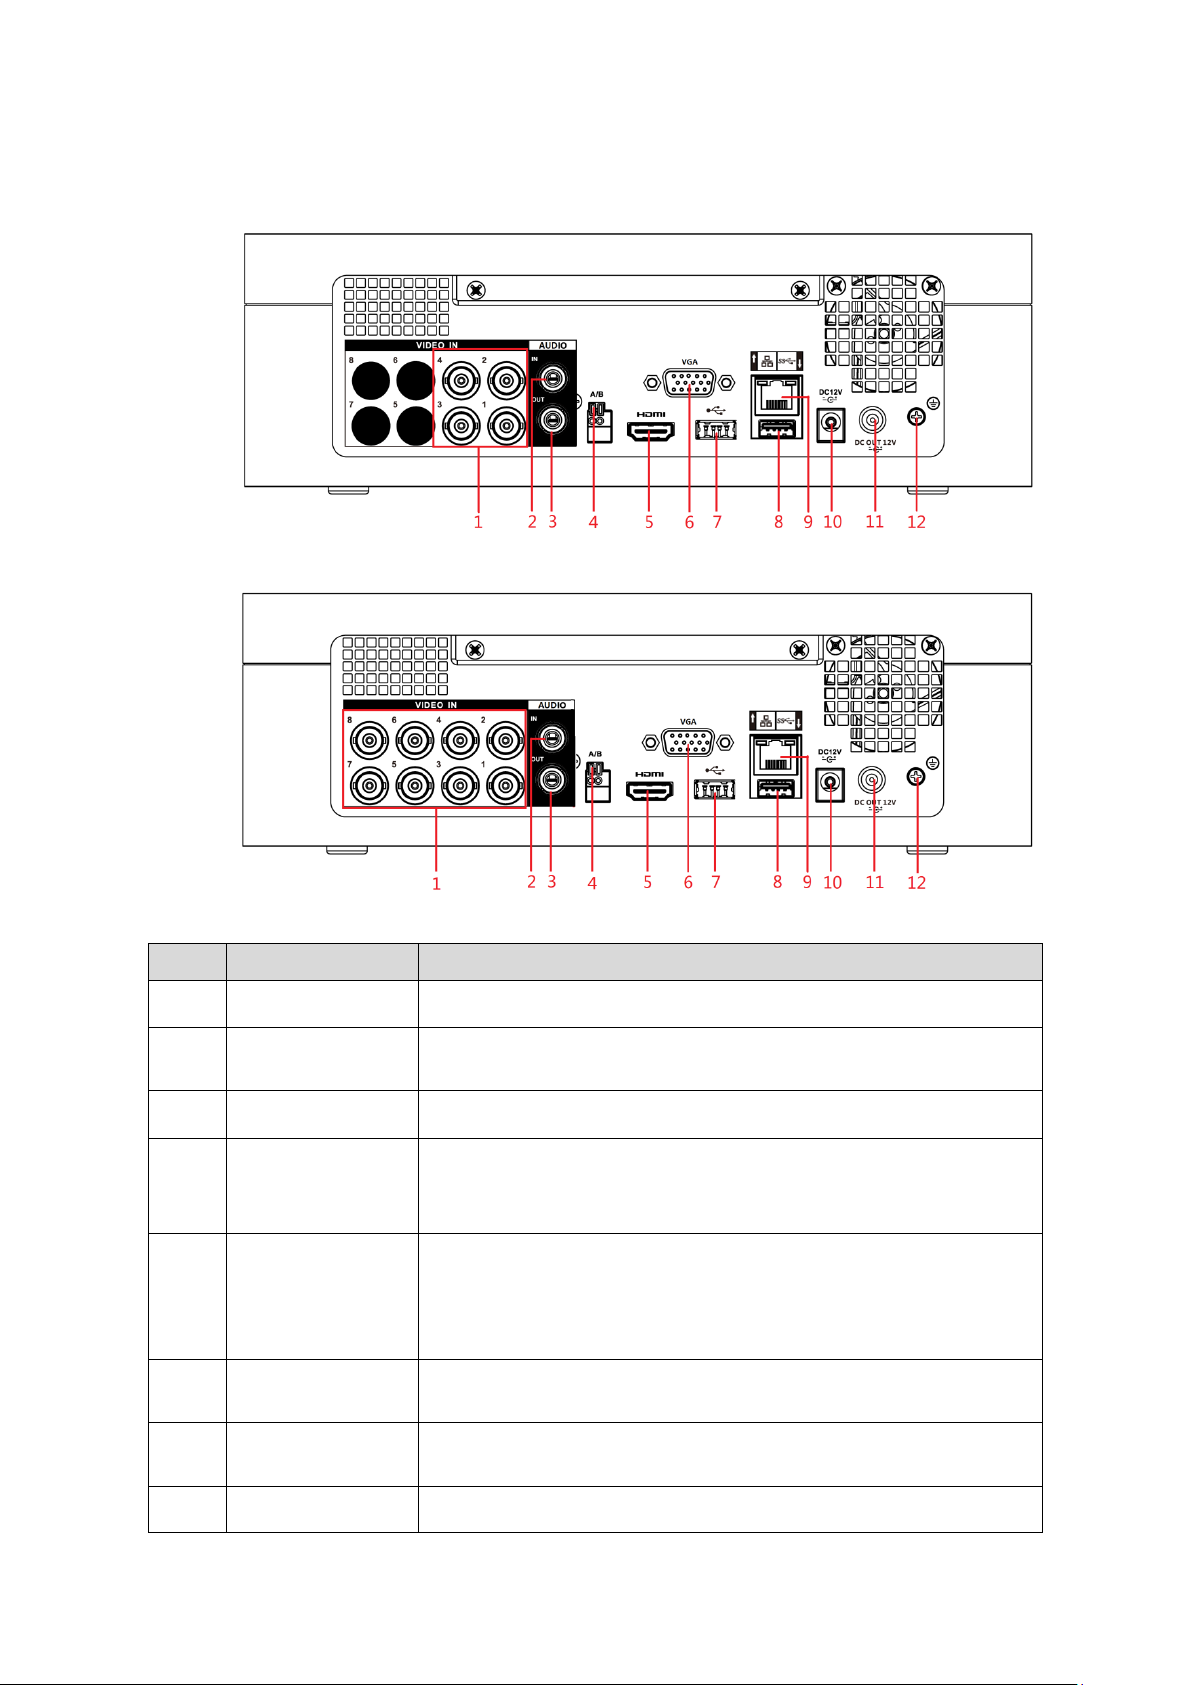
Connects to analog camera to input video signal.
Receives audio signal output from the devices such as
microphone.
Outputs audio signal to the devices such as the sound box.
High definition audio and video signal output port.
The port outputs the uncompressed high definition video and
multi-channel audio data to the connected display with HDMI port.
Connects to Ethernet port.
Connects to the control devices such as speed dome PTZ.
RS485_A port is connected by the cable A and RS485_B is
connected to the cable B.
Outputs analog video data to the connected display with VGA
port.
Connects to external devices such as USB storage device,
keyboard and mouse.
Use clamp to secure the power cable on the DVR in case there is
any loss.
3.2.3 DH-XVR4116HS-X/DH-XVR5108HS-X/DH-XVR5116HS-X/DH
-XVR5104HS-4KL-X/DH-XVR5108HS-4KL-X/DH-XVR5104HS-X/
DH-XVR4104HS-X/DH-XVR4108HS-X
Figure 3-14
Table 3-13
The Grand Tour 18
Loading…