
Пройдите тест, узнайте какой профессии подходите
Работать самостоятельно и не зависеть от других
Работать в команде и рассчитывать на помощь коллег
Организовывать и контролировать процесс работы
Введение: Что такое DaVinci Resolve и зачем его использовать
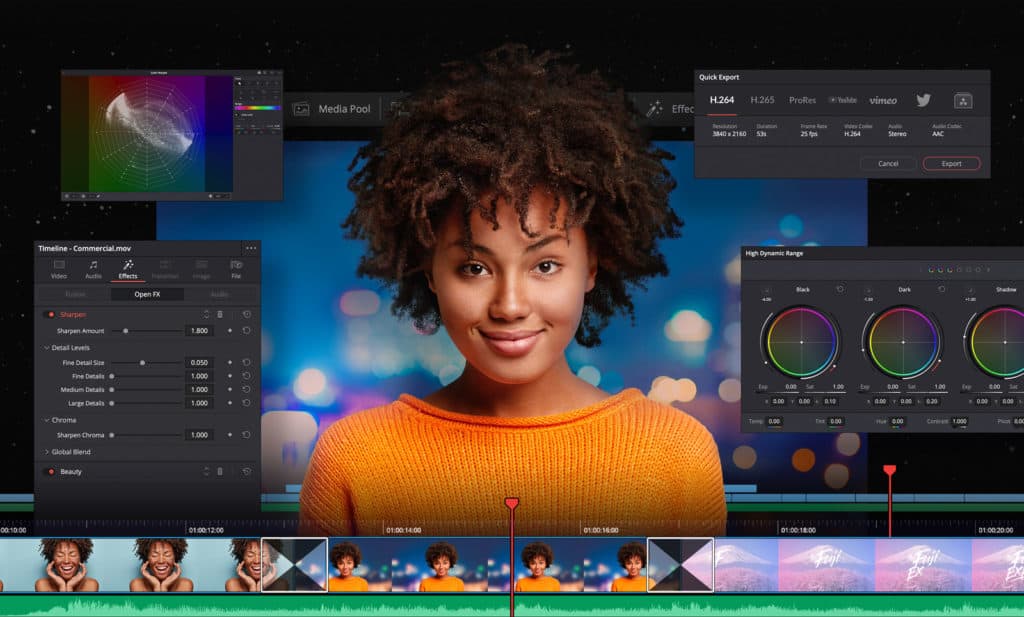
DaVinci Resolve — это мощный инструмент для видеомонтажа, цветокоррекции и пост-продакшн, который используется как профессионалами, так и любителями. Программа предлагает широкий спектр возможностей, от базового монтажа до сложных эффектов и цветокоррекции. Основное преимущество DaVinci Resolve — это его бесплатная версия, которая предоставляет доступ к большинству функций, необходимых для качественного видеомонтажа. 🎥
Программа DaVinci Resolve имеет множество преимуществ, которые делают её популярной среди видеомонтажеров. Во-первых, это интуитивно понятный интерфейс, который позволяет быстро освоить основные функции. Во-вторых, программа поддерживает работу с высококачественными видеофайлами, что особенно важно для профессионалов. В-третьих, DaVinci Resolve имеет мощные инструменты для цветокоррекции, которые позволяют добиться кинематографического качества изображения.
Кроме того, DaVinci Resolve поддерживает работу с различными форматами видео и аудио, что делает её универсальным инструментом для видеомонтажа. Программа также имеет встроенные инструменты для создания визуальных эффектов и работы со звуком, что позволяет выполнять все этапы пост-продакшн в одном приложении. Это значительно упрощает процесс работы и экономит время.

Установка и настройка DaVinci Resolve
Шаг 1: Скачивание и установка
- Перейдите на официальный сайт DaVinci Resolve.
- Выберите версию для вашей операционной системы (Windows, macOS, Linux).
- Заполните форму регистрации и скачайте установочный файл.
- Запустите установочный файл и следуйте инструкциям на экране.
Перед установкой DaVinci Resolve убедитесь, что ваш компьютер соответствует минимальным системным требованиям. Это важно для стабильной работы программы и предотвращения возможных сбоев. Также рекомендуется освободить достаточное количество места на жестком диске для установки программы и хранения проектов.
Шаг 2: Первоначальная настройка
- После установки откройте DaVinci Resolve.
- При первом запуске программа предложит настроить основные параметры, такие как язык интерфейса и путь для сохранения проектов.
- Настройте параметры в соответствии с вашими предпочтениями и нажмите «Продолжить».
После первоначальной настройки рекомендуется ознакомиться с интерфейсом программы. Это поможет вам быстрее освоить основные функции и начать работу над проектами. Обратите внимание на расположение основных панелей и инструментов, чтобы в дальнейшем не тратить время на их поиск.
Основы интерфейса и основные инструменты
Основные панели интерфейса
- Media Pool: Здесь вы можете импортировать и организовывать все ваши медиафайлы.
- Cut Page: Быстрая и удобная страница для базового монтажа.
- Edit Page: Более продвинутый интерфейс для детального монтажа.
- Fusion Page: Используется для создания визуальных эффектов.
- Color Page: Панель для цветокоррекции и градации.
- Fairlight Page: Панель для работы со звуком.
- Deliver Page: Панель для экспорта готового проекта.
Каждая из этих панелей имеет свои уникальные функции и предназначена для выполнения определённых задач. Например, Media Pool позволяет вам импортировать и организовывать медиафайлы, что упрощает процесс работы над проектом. Cut Page и Edit Page предназначены для монтажа видео, но имеют разные уровни сложности и функциональности.
Основные инструменты
- Selection Tool: Основной инструмент для выбора и перемещения клипов.
- Blade Tool: Инструмент для разрезания клипов.
- Trim Tool: Инструмент для подрезки начала и конца клипов.
- Zoom Tool: Инструмент для увеличения и уменьшения масштаба таймлайна.
Эти инструменты являются основными для работы с видео на таймлайне. Selection Tool позволяет выбирать и перемещать клипы, что упрощает процесс монтажа. Blade Tool используется для разрезания клипов на части, что позволяет создавать более сложные монтажные решения. Trim Tool и Zoom Tool помогают точно подрезать и масштабировать клипы для достижения желаемого результата.
Импорт и организация медиафайлов
Шаг 1: Импорт медиафайлов
- Перейдите на вкладку Media Pool.
- Нажмите на кнопку «Import Media» или просто перетащите файлы в окно Media Pool.
- Выберите файлы, которые хотите импортировать, и нажмите «Open».
Импорт медиафайлов — это первый шаг в создании любого видеопроекта. Важно правильно организовать файлы, чтобы в дальнейшем не тратить время на их поиск. Вы можете импортировать видео, аудио и изображения, которые будут использоваться в вашем проекте.
Шаг 2: Организация медиафайлов
- Создайте папки для различных типов медиа (видео, аудио, изображения) для удобства.
- Переименуйте файлы и папки, чтобы легко находить нужные элементы.
- Используйте метки и маркеры для дополнительной организации.
Организация медиафайлов — это важный этап, который поможет вам сэкономить время и упростить процесс работы над проектом. Создавайте папки для различных типов медиа, чтобы легко находить нужные файлы. Переименовывайте файлы и папки, чтобы они имели понятные названия. Используйте метки и маркеры для дополнительной организации и быстрого доступа к нужным элементам.
Основы монтажа: создание и редактирование проекта
Шаг 1: Создание нового проекта
- Перейдите на вкладку Project Manager.
- Нажмите «New Project» и введите название проекта.
- Нажмите «Create» для создания нового проекта.
Создание нового проекта — это первый шаг в работе над любым видеопроектом. Важно правильно настроить проект с самого начала, чтобы избежать возможных проблем в будущем. Введите название проекта и выберите нужные настройки, такие как формат видео и частота кадров.
Шаг 2: Добавление клипов на таймлайн
- Перейдите на вкладку Edit Page.
- Перетащите клипы из Media Pool на таймлайн.
- Используйте инструменты Selection Tool и Blade Tool для редактирования клипов.
Добавление клипов на таймлайн — это основной этап монтажа видео. Перетащите клипы из Media Pool на таймлайн и используйте инструменты для их редактирования. Вы можете разрезать клипы на части, перемещать их и подрезать, чтобы создать желаемый монтаж.
Шаг 3: Применение переходов и эффектов
- Перейдите на вкладку Effects Library.
- Выберите нужный переход или эффект и перетащите его на таймлайн.
- Настройте параметры перехода или эффекта в Inspector.
Переходы и эффекты помогают сделать видео более динамичным и интересным. Выберите нужный переход или эффект из библиотеки и перетащите его на таймлайн. Настройте параметры в Inspector, чтобы добиться желаемого результата.
Шаг 4: Цветокоррекция и градация
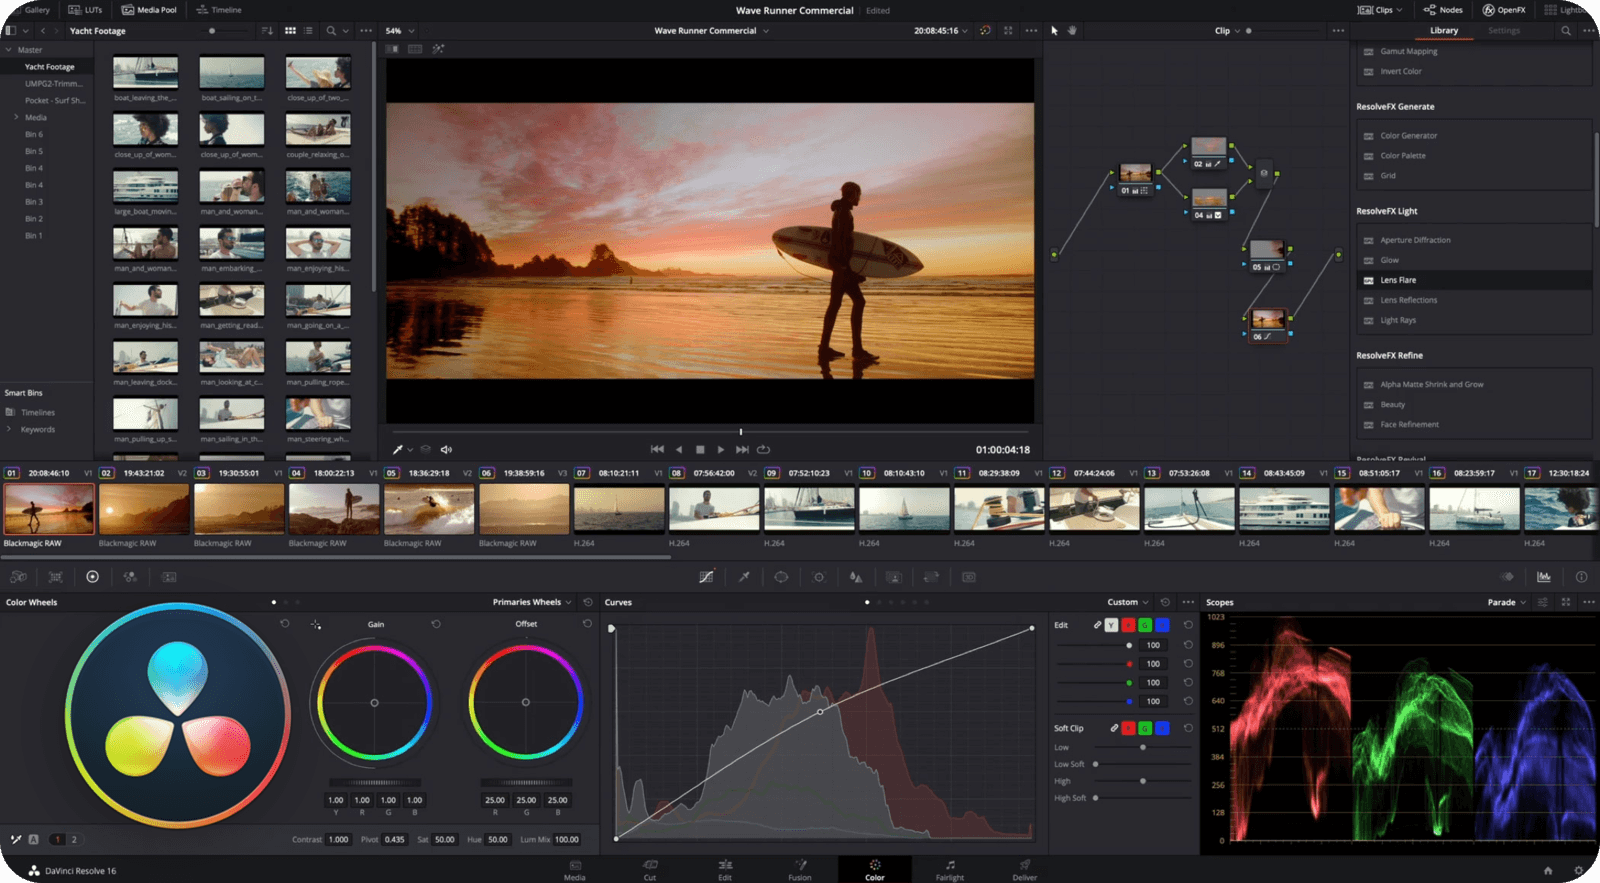
- Перейдите на вкладку Color Page.
- Используйте инструменты для цветокоррекции (Primary Wheels, Curves, Qualifiers).
- Примените LUTs (Look-Up Tables) для быстрого изменения цветовой гаммы.
Цветокоррекция — это важный этап пост-продакшн, который помогает улучшить качество изображения и создать нужную атмосферу. Используйте инструменты для цветокоррекции, чтобы настроить яркость, контраст и цветовую гамму. Примените LUTs для быстрого изменения цветовой гаммы и достижения кинематографического качества.
Шаг 5: Работа со звуком
- Перейдите на вкладку Fairlight Page.
- Импортируйте аудиофайлы и добавьте их на таймлайн.
- Используйте инструменты для редактирования звука (Equalizer, Dynamics, Reverb).
Работа со звуком — это неотъемлемая часть видеомонтажа. Импортируйте аудиофайлы и добавьте их на таймлайн. Используйте инструменты для редактирования звука, чтобы настроить громкость, эквализацию и добавить эффекты. Это поможет создать качественный звуковой ряд и улучшить общее восприятие видео.
Шаг 6: Экспорт проекта
- Перейдите на вкладку Deliver Page.
- Выберите формат и настройки экспорта.
- Нажмите «Add to Render Queue» и затем «Start Render».
Экспорт проекта — это финальный этап работы над видео. Выберите формат и настройки экспорта в зависимости от ваших потребностей. Нажмите «Add to Render Queue» и затем «Start Render» для начала процесса экспорта. После завершения экспорта вы получите готовое видео, которое можно использовать для публикации или дальнейшего редактирования.
Теперь вы знаете основные шаги для работы с DaVinci Resolve! 🎬
Читайте также
This tutorial for beginners will explain how to edit video and audio with the free program “DaVinci Resolve 17“. We’ll cover things such as how to add background music, use multi camera angles (multicam), add text, transitions, effects and much more.
As I did for the guide on How To Set Up OBS, I put together this OBS Beginner’s Guide transcribing the excellent YouTube tutorials done by Kevin Stratvert (see playlist).
For more complete tutorials, guides and training check out DaVinci Resolve’s official website.
DaVinci Resolve is an all-in-one software made by Blackmagic Design, for video editing, color correction, visual effects, motion graphics and audio post production for Mac, Windows and Linux. The software comes in a free version (DaVinci Resolve 17) and in a paid version (DaVinci Resolve Studio 17) that includes everything in the free version plus DaVinci Neural Engine, stereoscopic 3D tools, dozens of extra Resolve FX filters and Fairlight FX audio plugins plus advanced HDR grading and HDR scopes.
TABLE OF CONTENTS
- Introduction
- How To Get DaVinci Resolve
- Start Page
- Main Edit Interface
- Import Videos, Photos & Audio To Media Pool
- Visualize Media In Media Pool
- Source Viewer
- Bring Media Onto Timeline
- Change Timeline View Options
- Timeline Toolbar
- Selection Mode
- Trim Edit Mode, Including Trim, Roll, Slip & Slide Edits
- Dynamic Trim Mode
- Blade Edit Mode
- Editing Keyboard Shortcut Keys
- Making Edits
- Snapping Tool
- Linked Selection Tool
- Position Lock Tool
- Flag & Marker Tools
- Timeline Zoom Levels
- Delete Selected & Ripple Delete
- Change Clip Brightness
- Change Clip Speed
- Audio & Auto Track Selector
- Fade Audio In & Out
- Lock Track
- Fade Video In & Out
- Adjust Audio Volume
- Copy & Paste Clip Attributes
- Review & Set Shortcut Keys
- Insert Transitions
- Insert Text
- Zoom In & Out Using Keyframes
- Customize User Interface
- Render & Export Video
- View Final Video Output
- Wrap Up
Introduction
This tutorial will show you how you can both get and use DaVinci Resolve 17, which is the latest version.
What is DaVinci Resolve? It is a super powerful and versatile video editor. In fact, it’s such a good video editor that many movie studios and also TV studios rely on it for their editing needs. The great thing is that it’s a freemium product, meaning that you can get started with it entirely for free. In fact, the free version has more functionality than many paid video editors provide.
DaVinci Resolve is an extremely comprehensive piece of software, and so we’re going to break it down for you and show you step by step how you can use it. Because it is so comprehensive, we’re not going to cover everything. Instead, we will focus on editing. First we’re going to import and organize media, then we’ll edit and trim video clips, and then we’ll add some transitions, titles, and effects and at the very end we’ll render it.
Kevin has even included some sample video files here if you want to follow along. Alright, let’s jump on the PC and first off, let’s look at how we can get DaVinci Resolve.
To get DaVinci Resolve 17, head to this url. Once you land on the homepage, scroll down a little bit, and you’ll see a “Download Now” link: click on that. This opens up a prompt with four different options in the top left hand corner we have DaVinci Resolve 17, this is the free version of DaVinci Resolve.
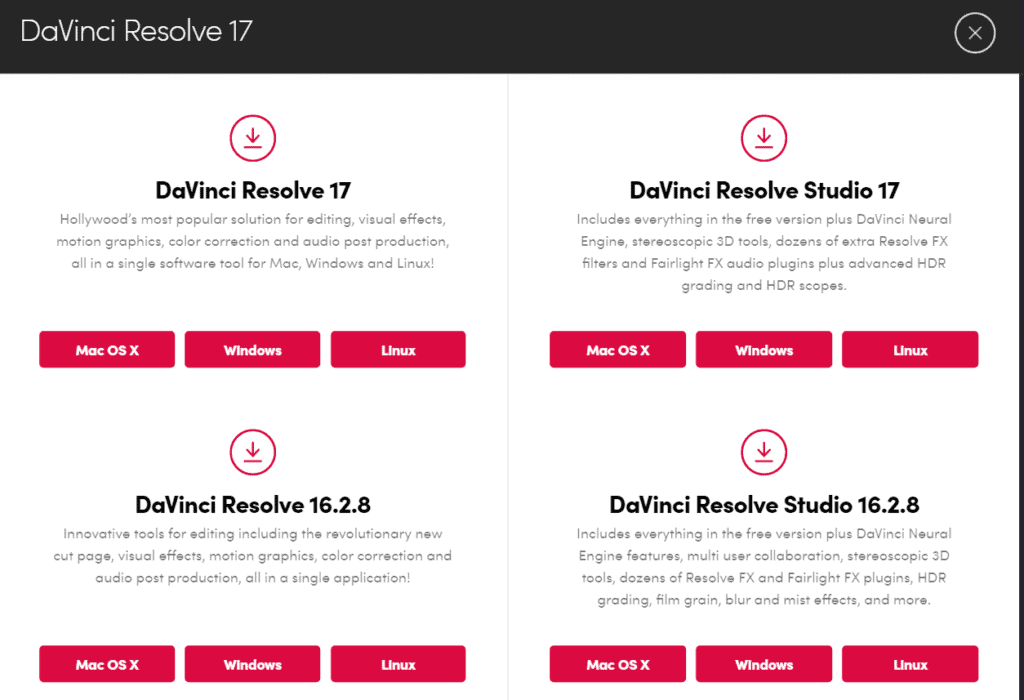
Over on the right hand side you have the Studio version, and this is the premium version of DaVinci Resolve and it runs for $295. With a premium version you get a few additional things. It has a few more effects, it has some 3D tools, but all in all the free version is a great place to start and it’ll give you most of what you need.
Down below you have DaVinci Resolve 16, and there’s also the premium version of 16. If you like being on the latest and greatest we’d recommend going with 17. Choose your operating system down below and click on it and run through the download and install process.
Start Page
Once you’ve finished downloading and installing DaVinci Resolve 17, launch the app. This will launch the start page, and up here we can kick off a new project. If you have any existing projects you can also get back to them right here.
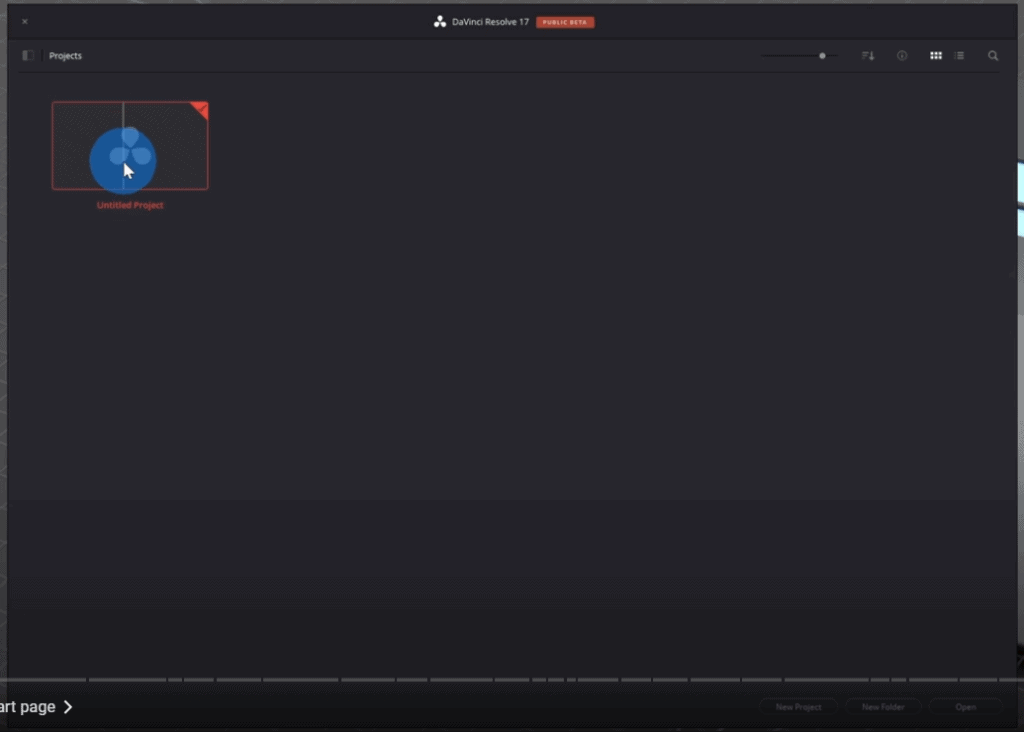
Down in the bottom right hand corner we can also create a new project, we can create folders to organize all of our projects, or we can also open projects.
Up in the top right hand corner you have different tools that’ll change how we visualize all of our projects. Today we want to start with a blank new project, so let’s click on new project down below. Next, it’ll ask you to title your project. We’re going to call this the Kevin cookie company official commercial. Once again, if you want to follow along, Kevin has included a link to files in the video description.
Main Edit Interface
This drops us into a blank project and we can start creating an amazing commercial for the Kevin cookie company. Before we get started though, let’s focus our attention on the bottom tabs. You have a number of tabs and, like we said in the introduction, DaVinci Resolve is very comprehensive. Today we are going to spend most of our time in the editing view down here.
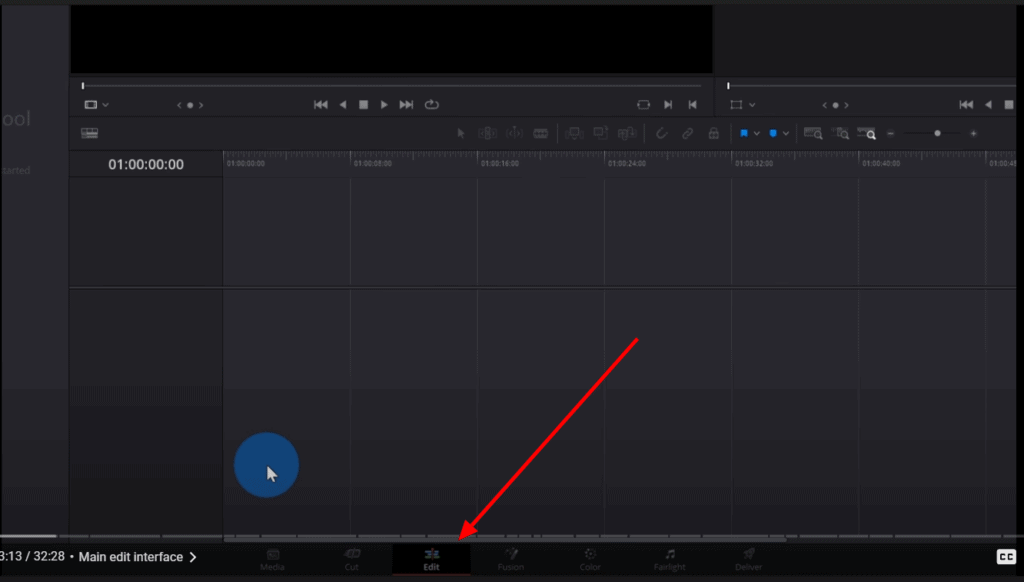
To get started with our project we need to import some media.
Media can include things like videos, audio, or photos. To import media we are going to use the Media Pool over on the left hand side.
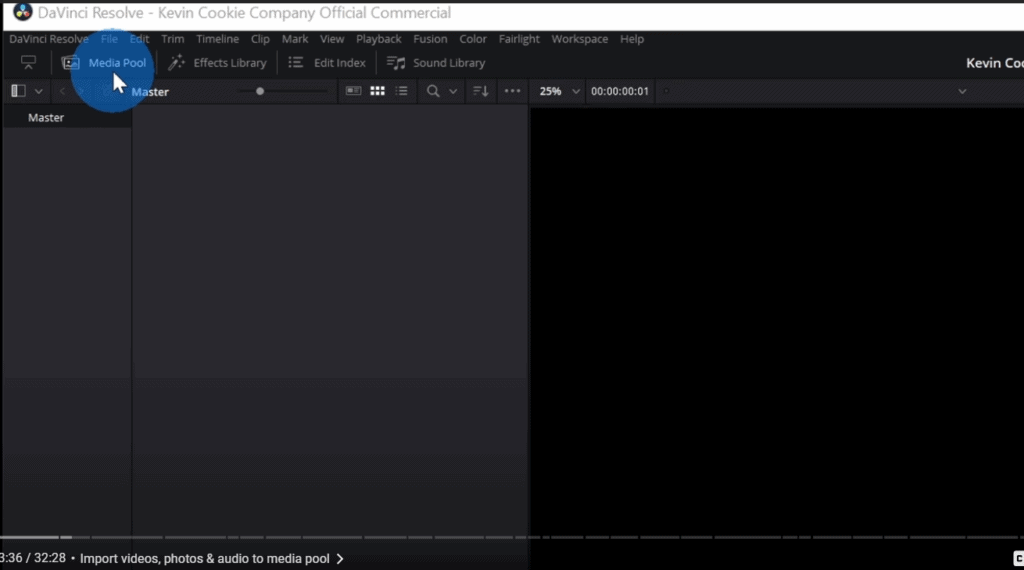
The Media Pool is where we can view and also organize all of our media. Up in the top left hand corner you have a button for media pool. When you click on this it hides the media pool and when you click on it again, it’ll show the media pool.
To import media we can simply right click and then there’s the option to import media.
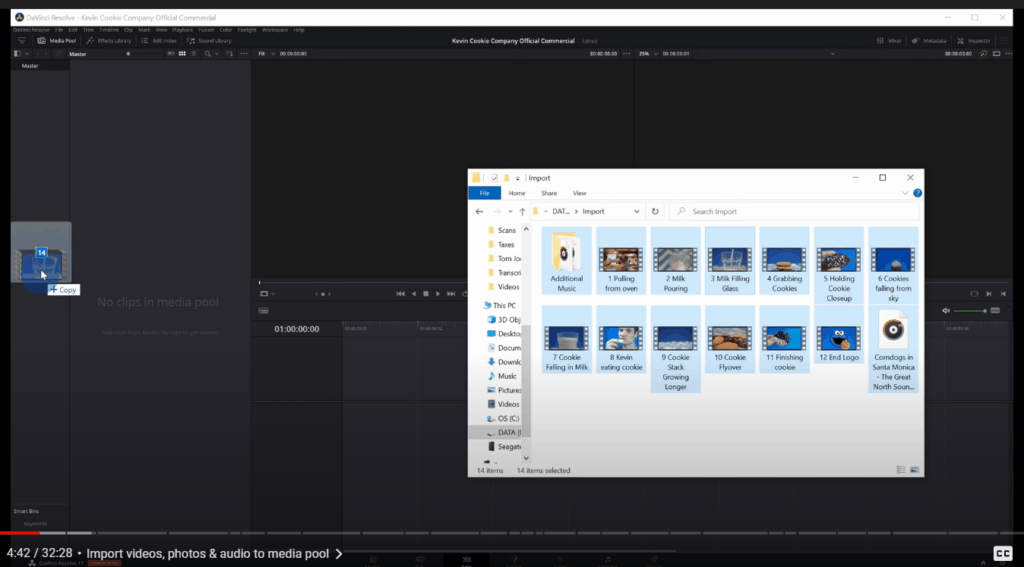
Alternatively, you could simply drag and drop the files from File Explorer. With File Explorer open, simply highlight all the files that you want to bring in and then you can drag and drop it over into the media pool. When you drag it over, you’ll get a prompt from DaVinci Resolve asking if you want to change the project frame rate. This is a really helpful prompt. DaVinci Resolve will look at your video clips and it’ll adjust the project frame rate to match your clips. Let’s click on “Change”. This will now import all of the video and audio files into DaVinci Resolve.
One of the things that you’ll notice though, is it didn’t maintain the folder structure, it simply placed all of the files directly in this master folder. If instead we wanted to maintain the folder structure, instead of just dropping it all directly into the media pool, we can go back to File Explorer and we can drag and drop all of the files into the left “Master” column, and you’ll see now that it maintains the folder structure.
One of the great things about DaVinci Resolve is you have a lot of control over what the experience looks like. Right now the media pool is taking up quite a bit of space, along with a folder structure.
If you want to hide the folder structure on the left hand side, you can click on the icon up in the top left hand corner, and that’ll hide it, you could click on it again if you want to show it again.
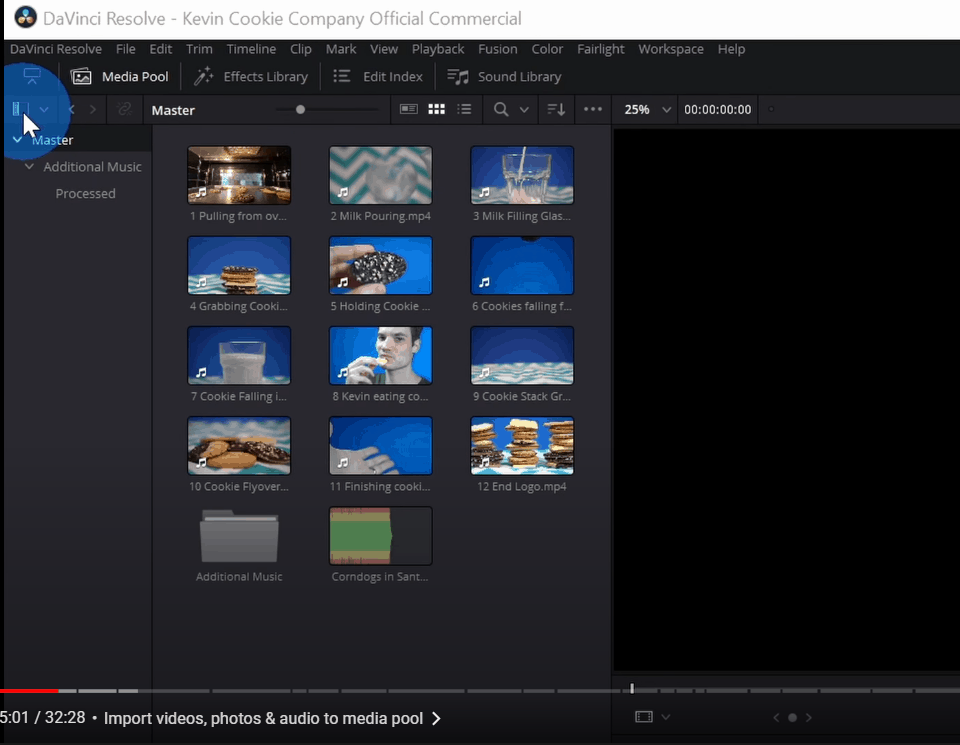
Now, right now the media pool is taking up quite a bit of the screen, but we don’t actually have that many files. If we click on the icon in the top left hand corner, it’ll shrink the size of the media pool. We can expand it again but, once again, since we don’t have that many files we’ll keep it in the smaller view so we have more space down below for the timeline.
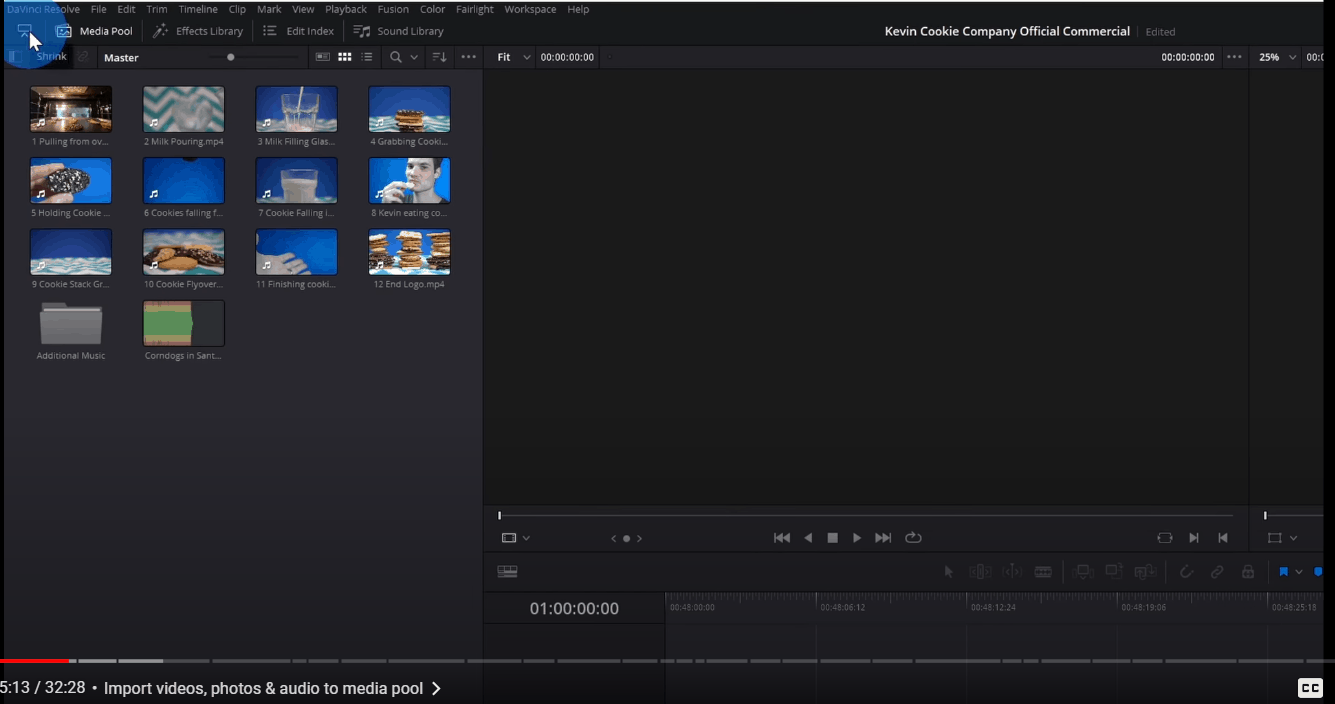
Along with being able to set the size of the media pool, we can also adjust how we visualize all of the files with the slider up top. We can adjust how big or how small, all of the thumbnails appear.
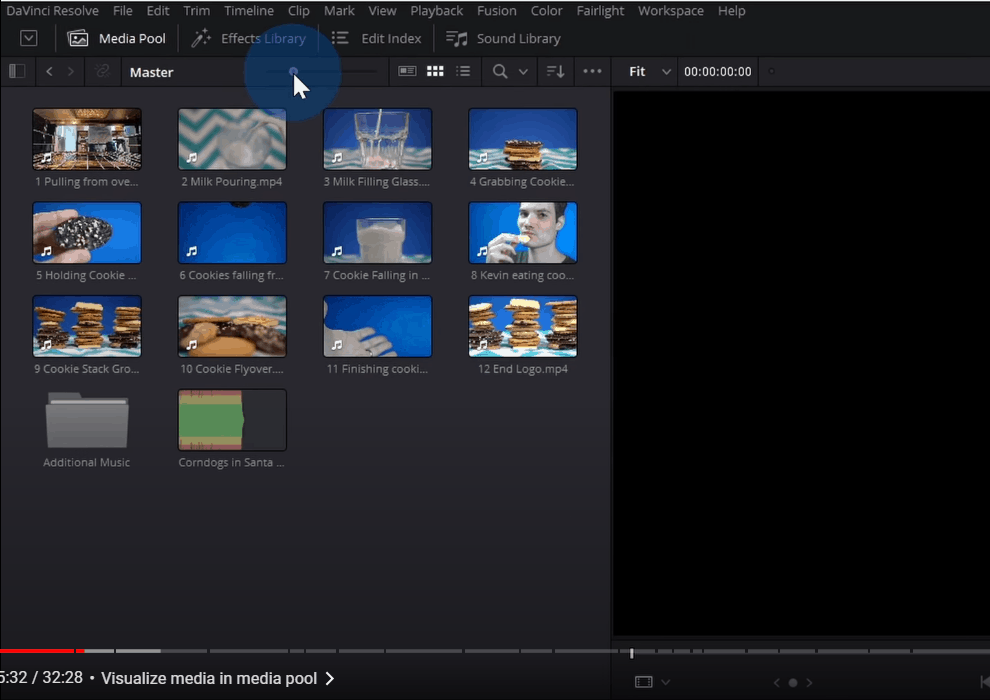
Next to the slider, to the right, we have 3 more options that allow us to also use a “metadata view”, a “thumbnail view” or a “list view”. So, whatever your preference is.
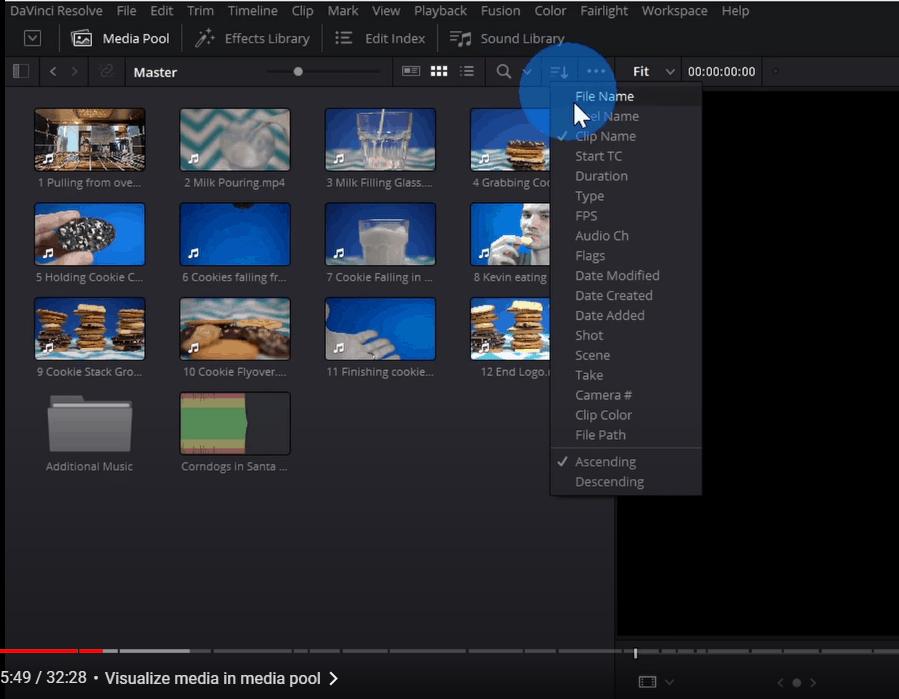
Also, over on the right hand side we could also decide how we want to sort this list.
If you want to organize your files, when you right click, you can also add additional folders (“Bins“).
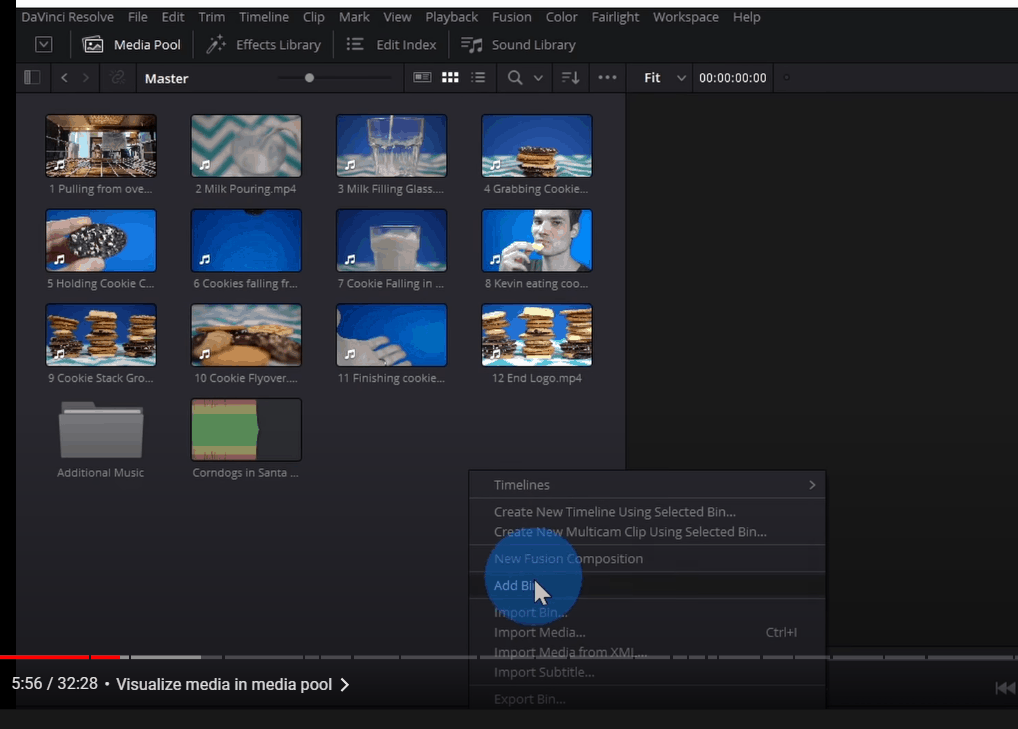
So let’s say you have certain clips that relate to the beginning, or maybe the end, you can drop all of those files in that folder to help organize your media.
Source Viewer
Now that we’ve imported all of our media let’s focus over on the right hand side where we have two media players.
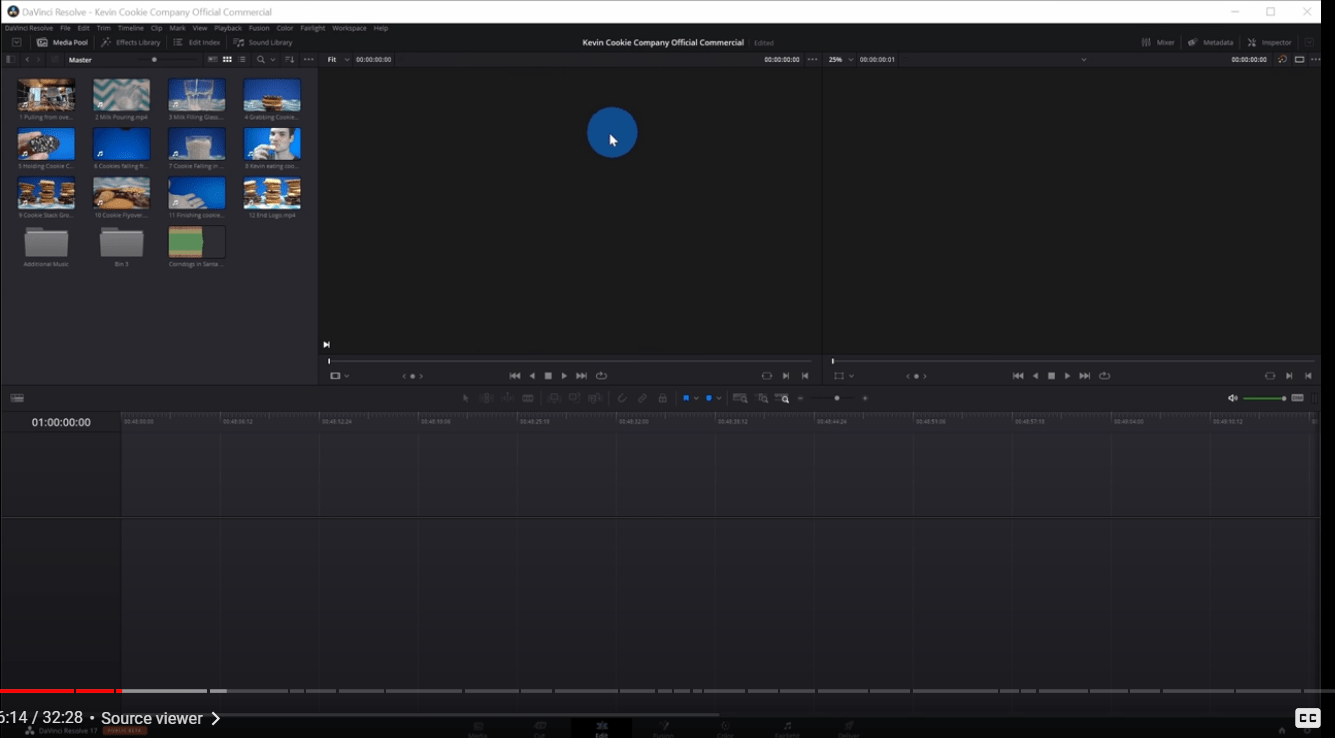
The one on the left hand side is for viewing your source content. So, if you click on a clip, it’ll start playing it in the source viewer. Over on the right hand side, this is a viewer for the timeline, once you start organizing your content down on the timeline, you’ll be able to preview it up there in that viewer. You can use the source viewer to start editing and trimming your video.
Go back to the media pool and click on the first file. Double click on it so it shows up within the source viewer. Move the playhead to the beginning, and if you press the spacebar key it’ll start playing it. Then, if you press the spacebar again, that’ll pause it.
You could also use the controls down under the Source Viewer. Move the playhead to the beginning and maybe go a little forward and set the endpoints. Down in the bottom right hand corner of the source viewer set the Mark In point.
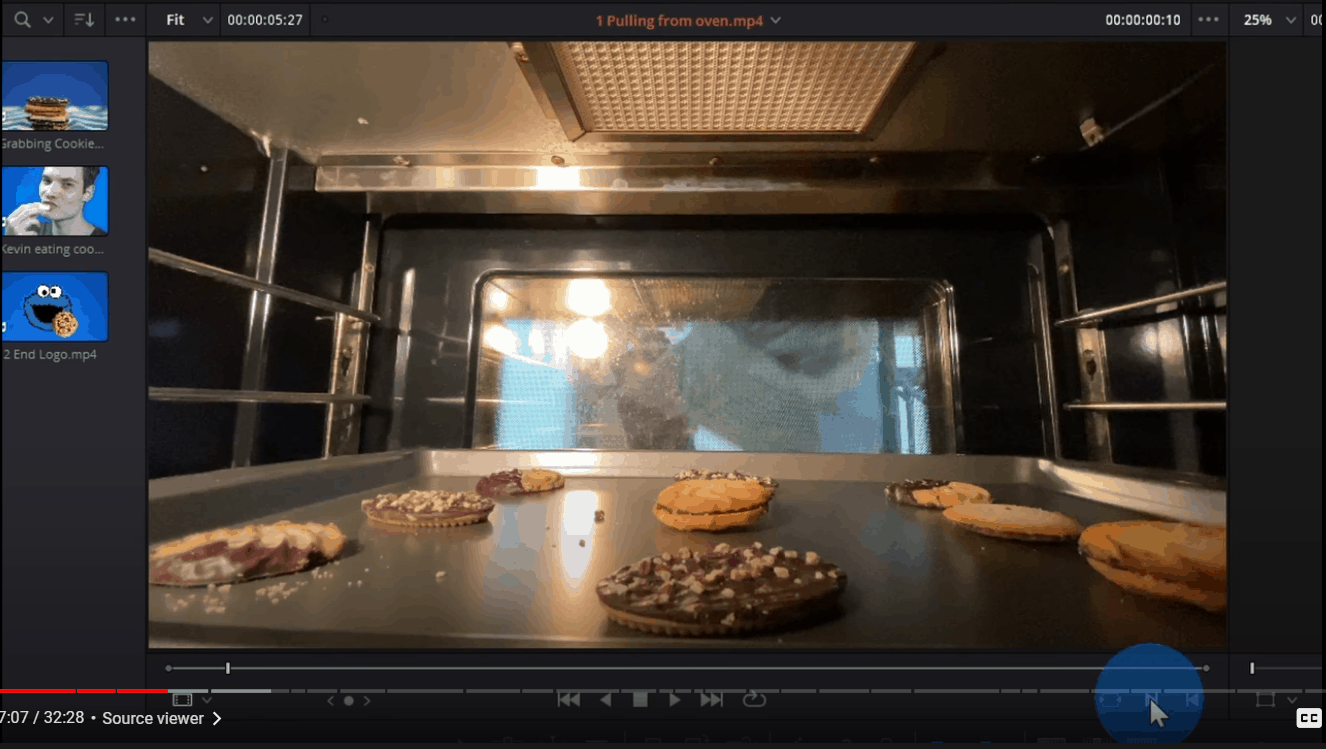
When you click on it, it will define when the video clip starts. You can then go ahead and play it and when you want to mark the out points of this video clip you can tap on the Mark Out icon. That’ll set the mark out points.
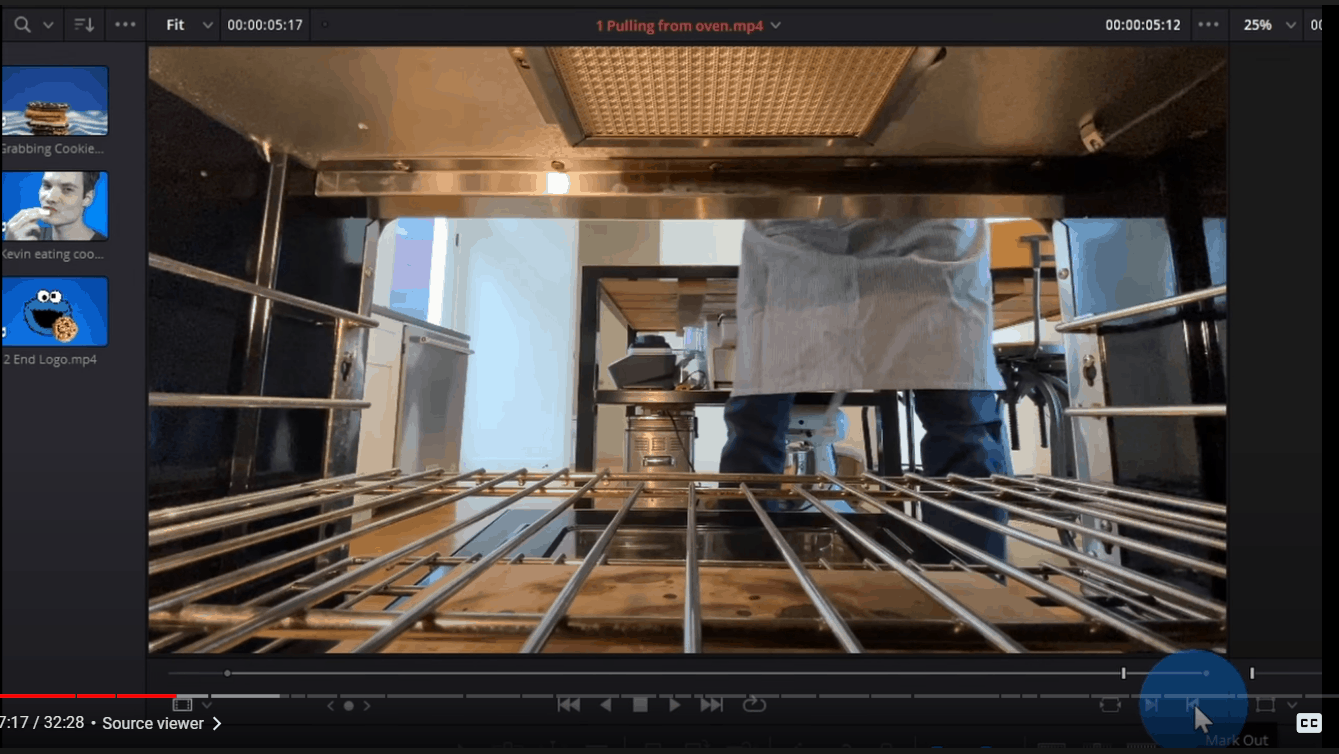
Instead of clicking on these icons, because it’s a little bit of work to move your mouse down to click on them, you can also rely on shortcut keys. You can press the “i key” (i for in), then you can play it and wherever you want to place the outs point you can press the “o key” for out, and that’ll mark the end point.
Now that we’ve finished defining what the in point is and the out point is, to bring it onto the timeline we can simply click on the video clip, and we can drag it right down onto the timeline. You’ll notice that it automatically creates a new video track and a new audio track for us.
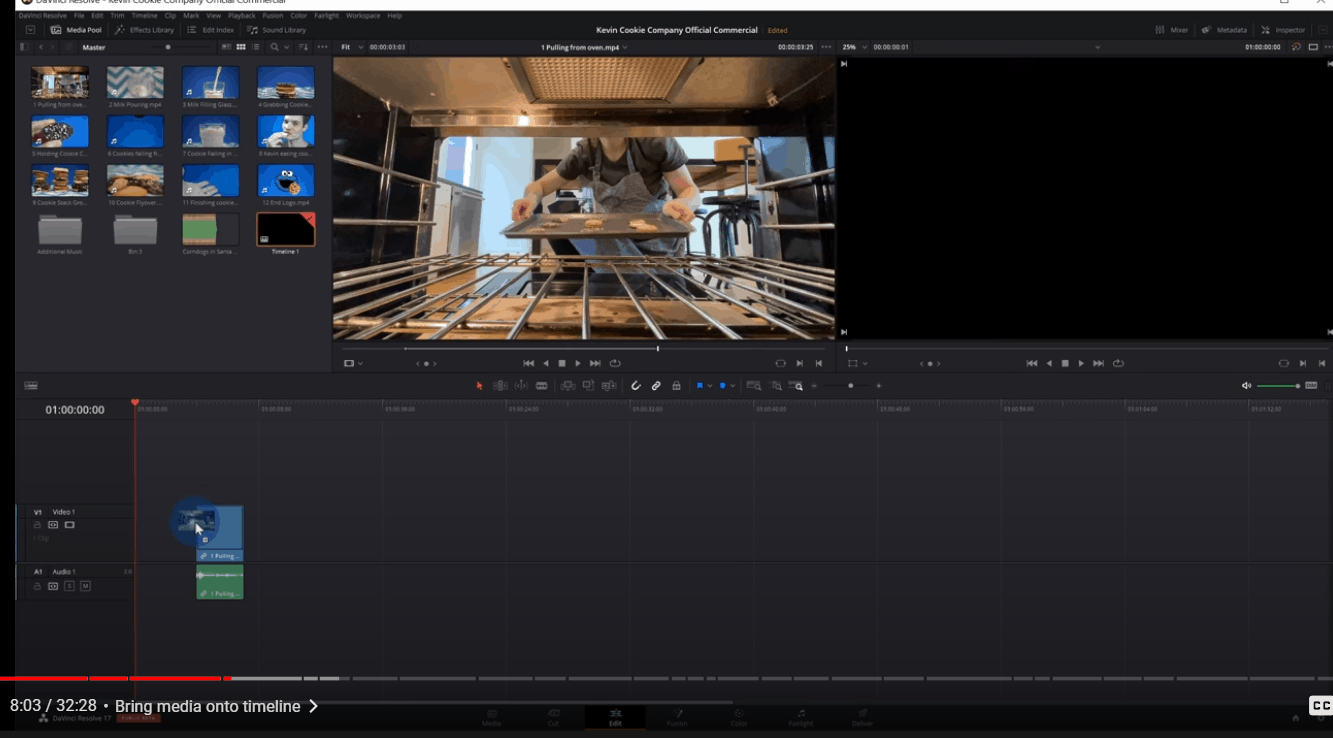
Alternatively, we can also go up to the video file within the media pool and we can drag it down from there and that’ll maintain the same in and out point that we defined in the source viewer.
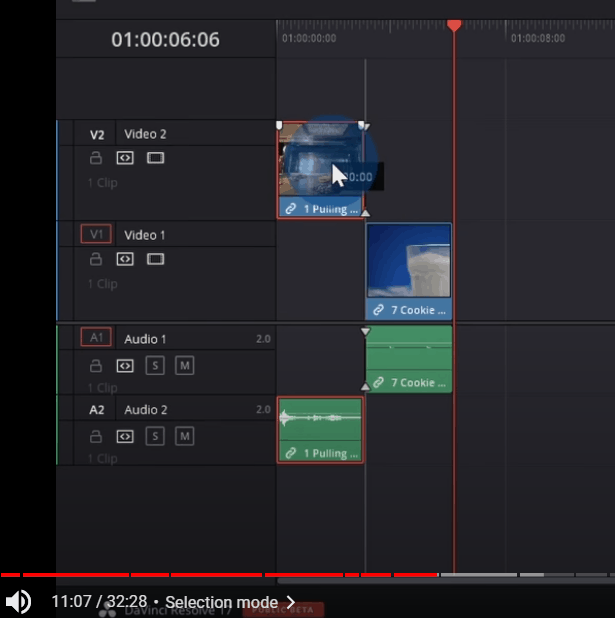
I now want to show you some additional ways that you can get your different media files down onto your timeline. I’m going to double click on the clip where it shows a cookie falling into a glass of milk. As I hover over the clip, you’ll see these two icons (a video and an audio icons) appear at the bottom of the clip.
If I click on the video icon, I can drag it down and this will only bring in the video file and not the audio. Alternatively if I hover over again and click on the audio icon, I can only pull in the audio and not the video file.
Down below on the toolbar, I have three additional options for getting media onto my timeline.
I can insert at the current playhead. I can also overwrite or I can replace. There’s no shortage of ways for getting your media onto the timeline.
I can also take the clip and then drag it over to the far right hand side, and I’ll see a few additional options.
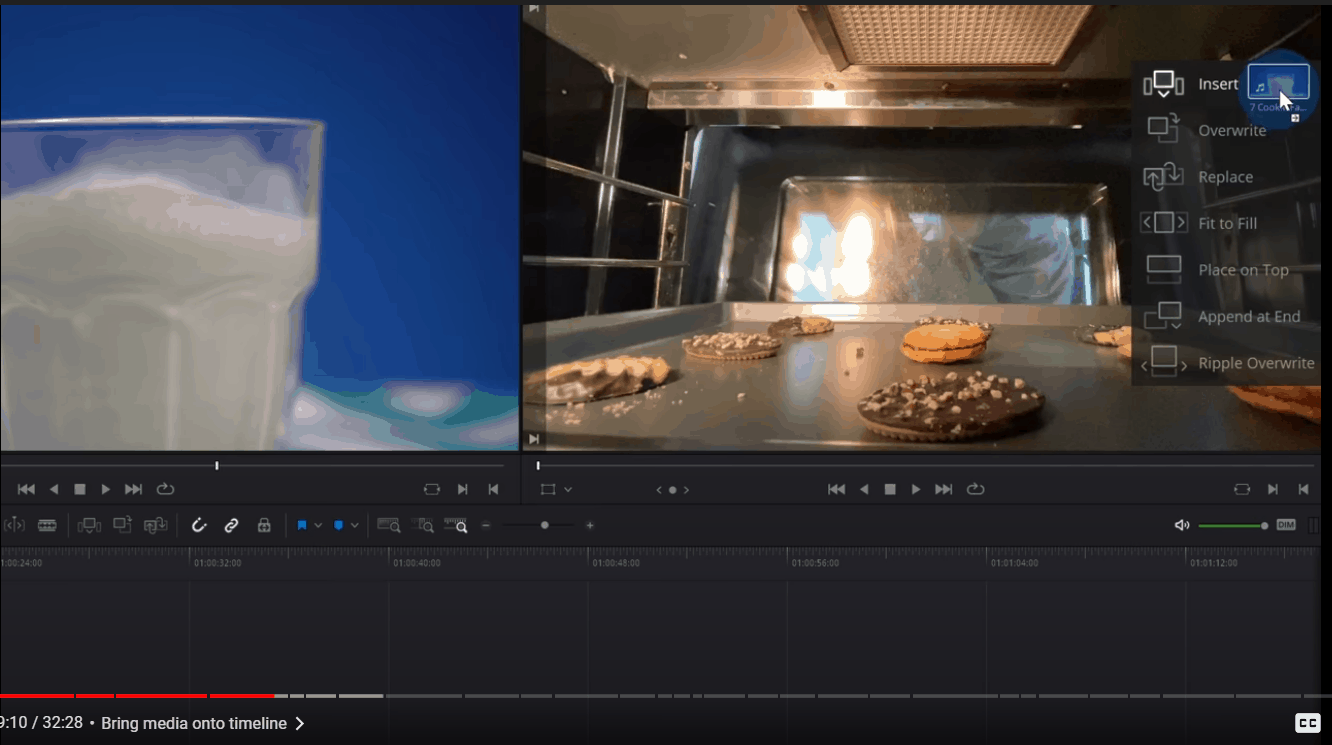
The first three options are also on the toolbar down below, but we have some additional ones. We can “fit to fill”, “place on top”, “append at the end” or “Ripple overwrite”. For now, we want to append this at the end. There’s no shortage of ways of getting your media onto the timeline.
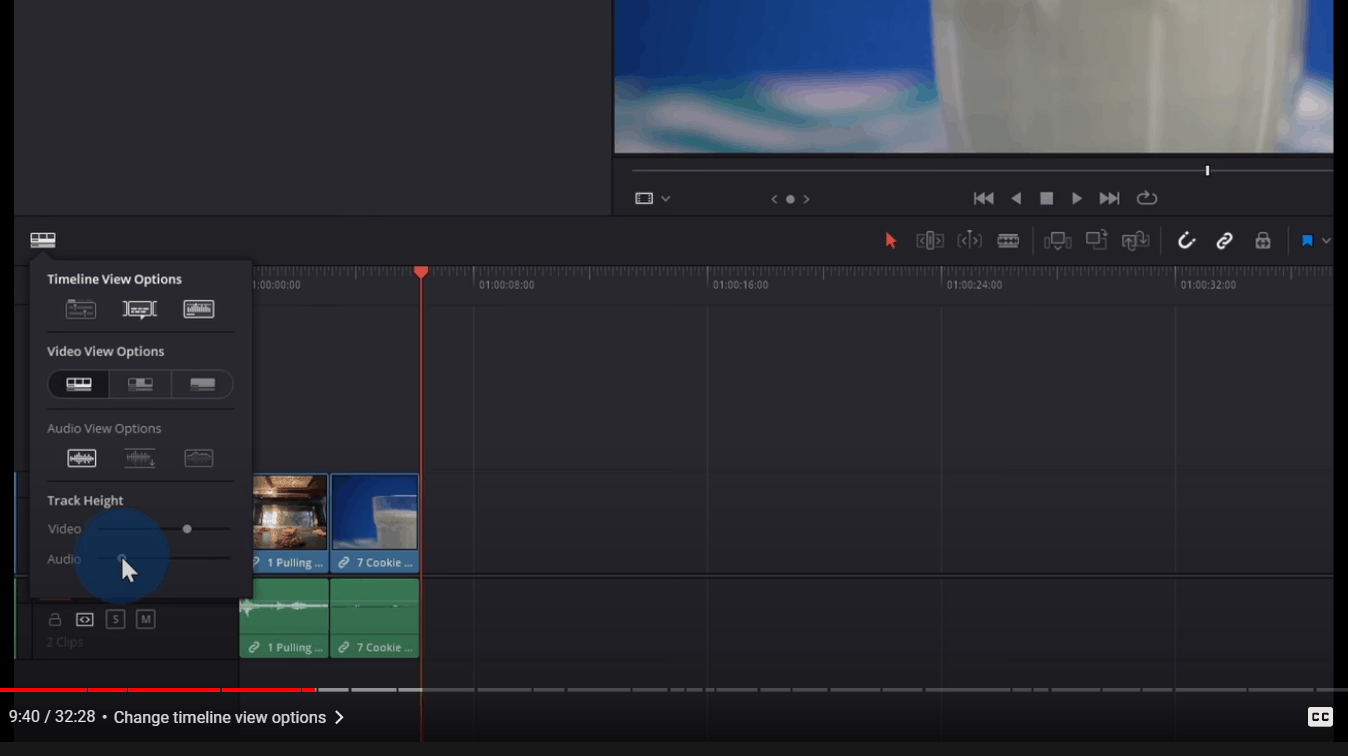
Change Timeline View Options
We now have some media on the timeline. Let’s shift our focus down to the timeline at the bottom. First in the top left hand corner of the timeline, we can adjust how we visualize the timeline. You can adjust the video height and you could also adjust the audio track height.
Right above the timeline, in the middle, we have all of our different editing tools:
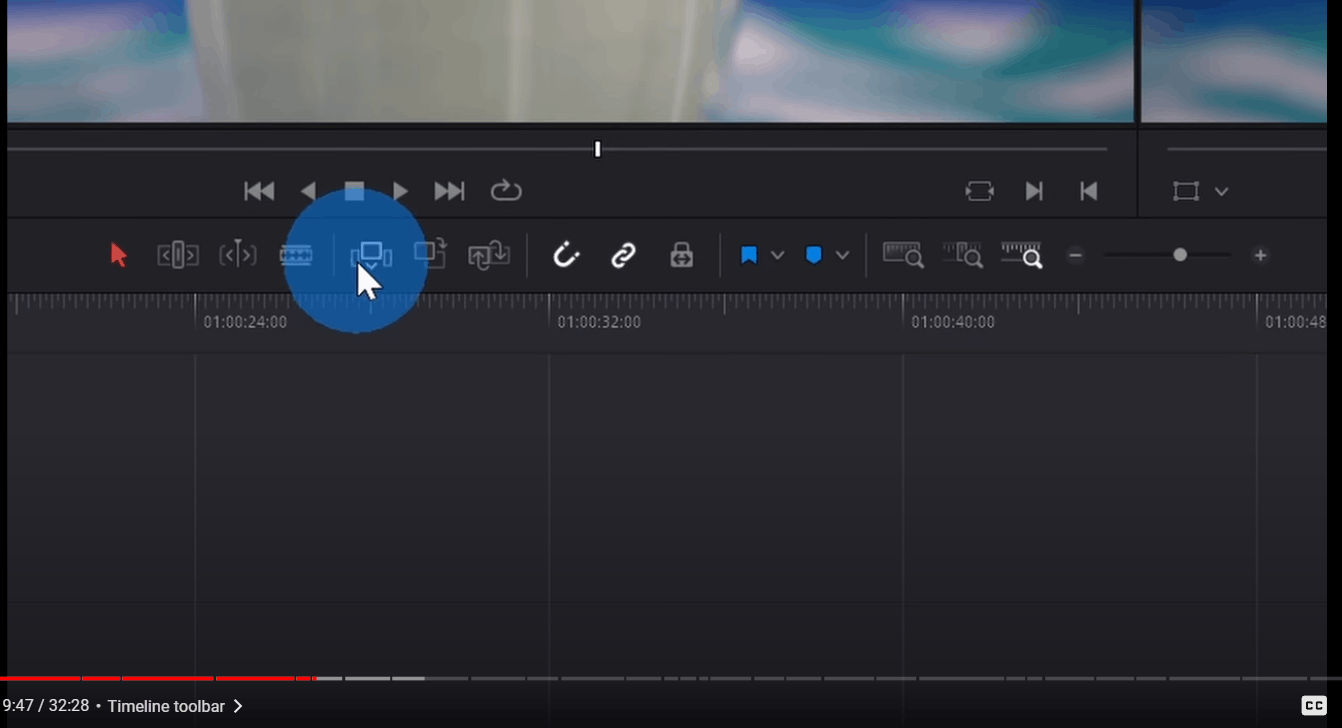
We’ve already looked at three of them for how you get more media onto your timeline, and we’ll go through one by one, to see what all of these different icons do.
You’ll see on the left hand side that one of them is highlighted in red. This indicates that it’s the currently active tool. Here I can click on another one to make that the active tool.
When I hover over the different icons you’ll see a tooltip appear with a shortcut key. So as you start using DaVinci Resolve more and more, you can rely on tooltips, instead of having to click on each individual icon.
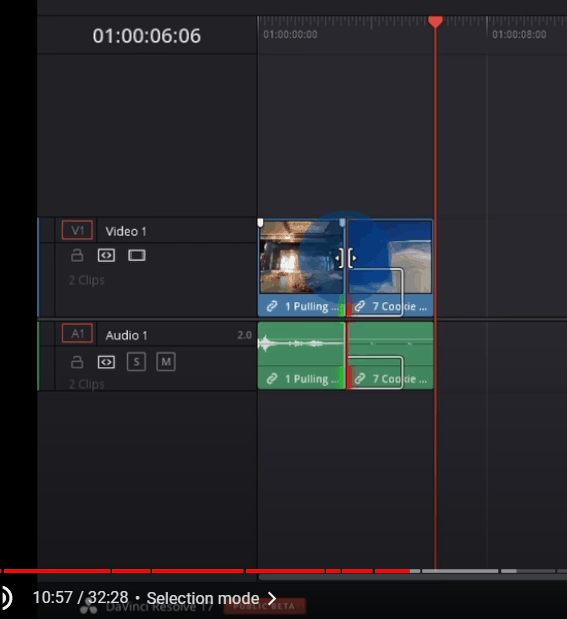
Selection Mode
Let’s first focus our attention on the selection mode to see what we can do with this. With the selection mode active I can click on a clip on my timeline and I can move it to a new position.
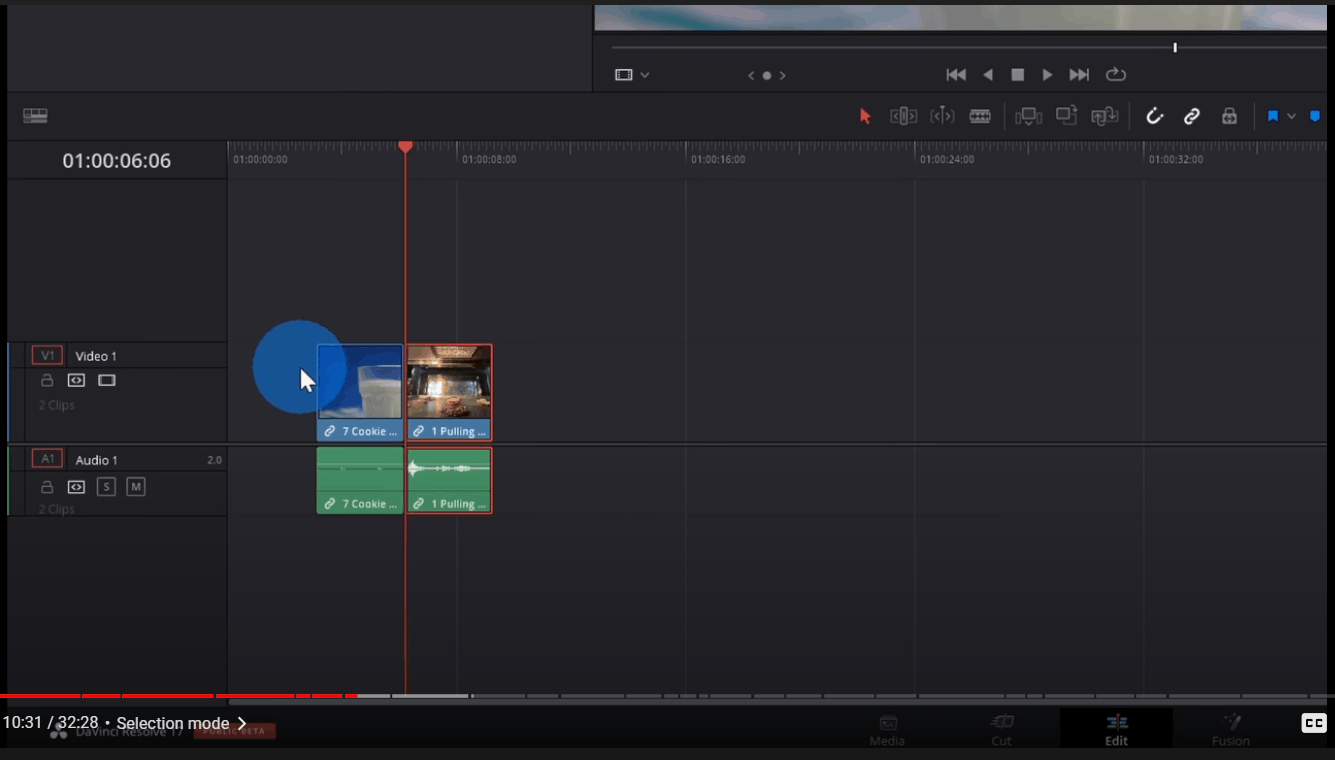
So here I move the clip to the end. You’ll notice that it leaves a gap here though, if I also press the Ctrl and Shift key and then I move this will do a ripple move where it fills in the gap.
With the selection mode tool I can also hover over the front or the end of the clip if I want to adjust the start point, or if I want to adjust the end point.
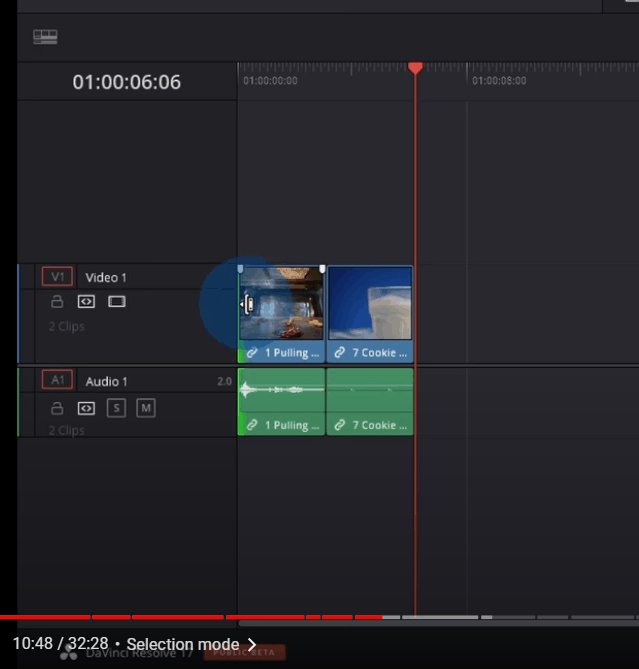
If I hover over between two clips I have the roll tool and here I can adjust the ending of one clip and the beginning of the other clip.
Along with being able to edit the clips and trim them I can also click on one of my clips, and I could drag it up, which will create a new video and audio track.
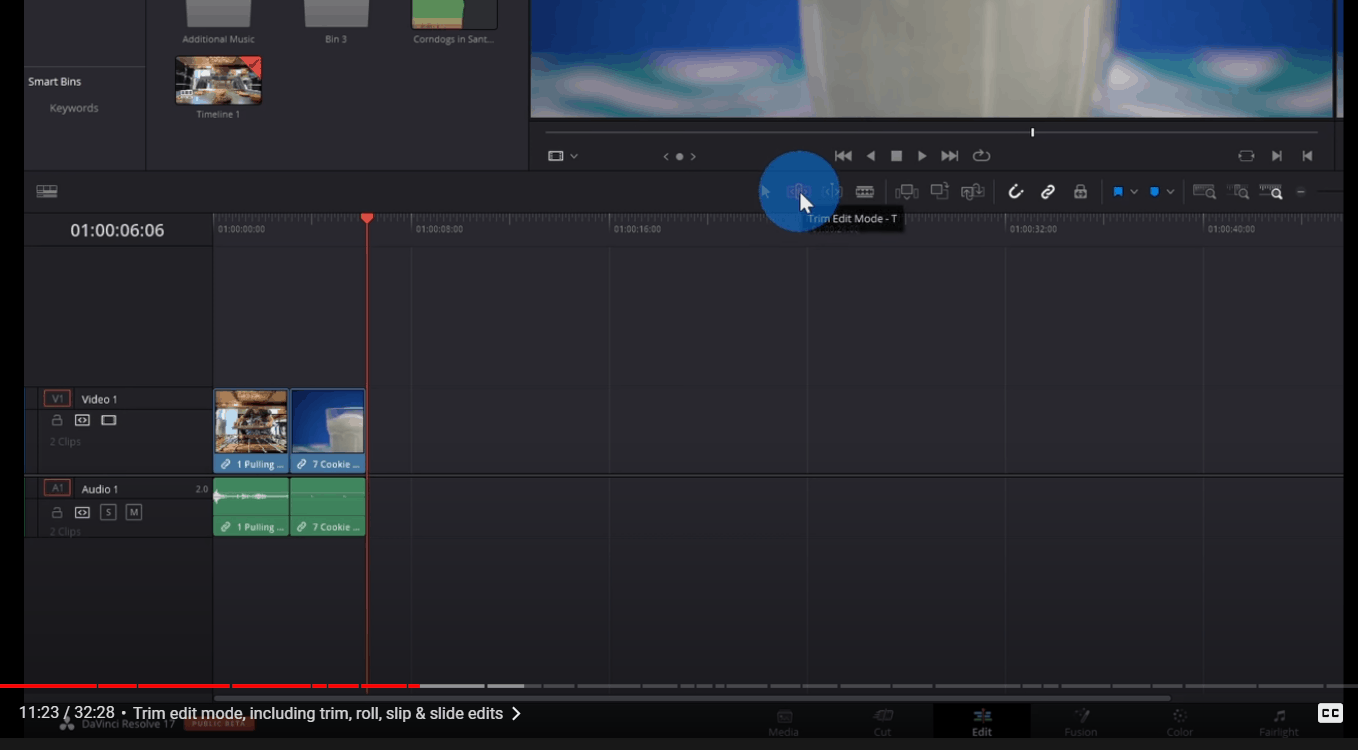
Trim Edit Mode, Including Trim, Roll, Slip & Slide Edits
Now that we’ve looked at the Selection mode tool, let’s shift our focus to the Trim Edit Mode tool. I’ll click on that to activate it and this tool does a lot. It can do trims, rolls, slips and slides, and if you don’t quite know what all of that means don’t worry we’re gonna step through each one.
Once again I’ll go down to my timeline with this tool selected, and just like before I can trim a clip by hovering over the edges and then I can drag it in to adjust the out points or, hovering over the left edge, I could adjust the start points.
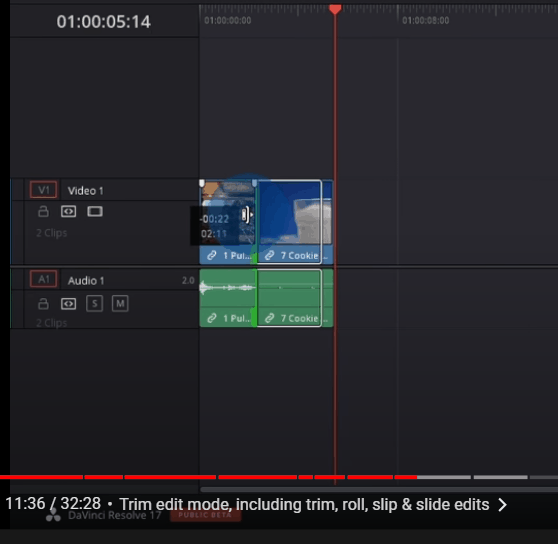
One of the differences between this and the selection mode tool is it automatically fills in the gaps while with the selection mode tool, it left a gap there.
Next I can also do a Roll Edit just like with the Selection tool. Here I can adjust the start point and the end point for adjacent clips.
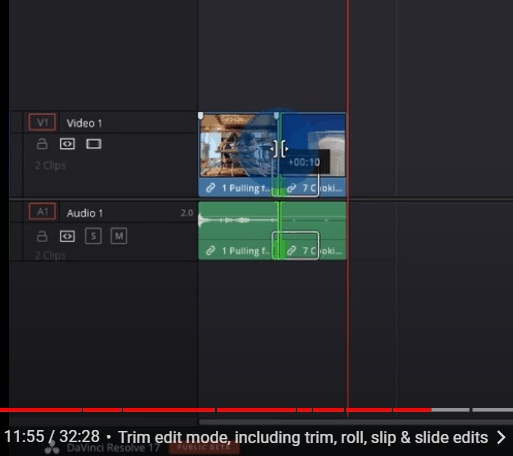
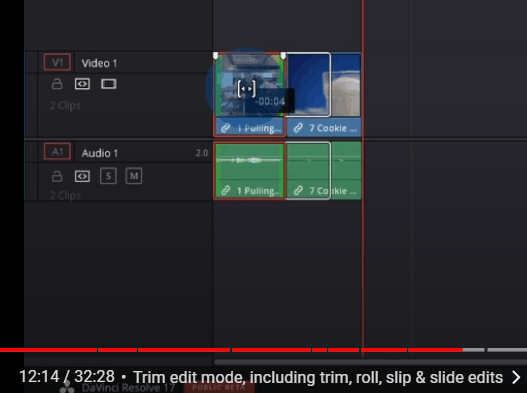
Next we can also make a Slip Edit. When I hover over the middle of the clip, you’ll see the slip icon appears. When I click on the clip, I can maintain the clip’s length, but, adjust the start point and the end point.
To help me with this in the top right hand corner you’ll see some preview images that show me when the clip will start and when the clip will end.
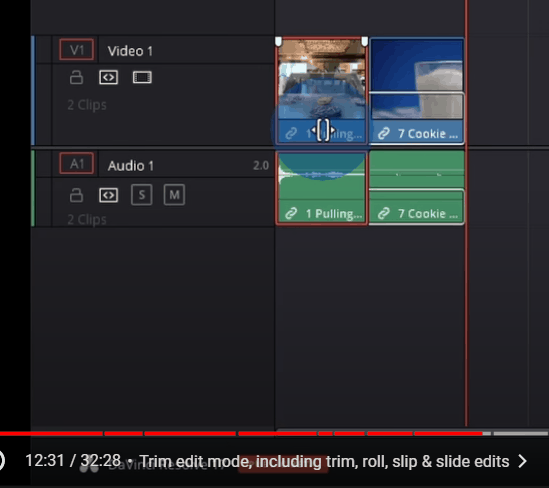
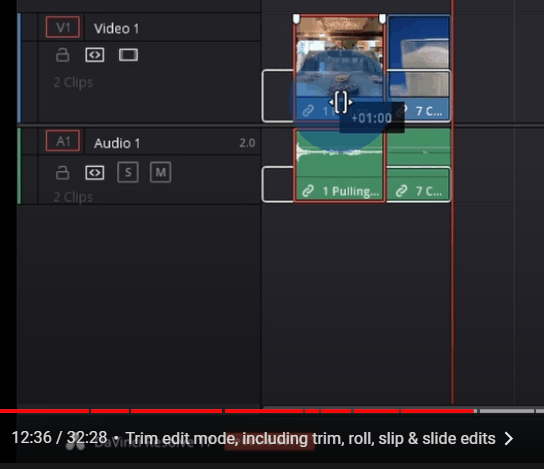
Last I want to show you how you can make a Slide Edit. When I hover over the base of the clip, you see the slide icon appear. When I click on this, I can adjust the position of my clip. It’ll maintain the length, but here I could adjust where it appears in relation to the adjacent clips.
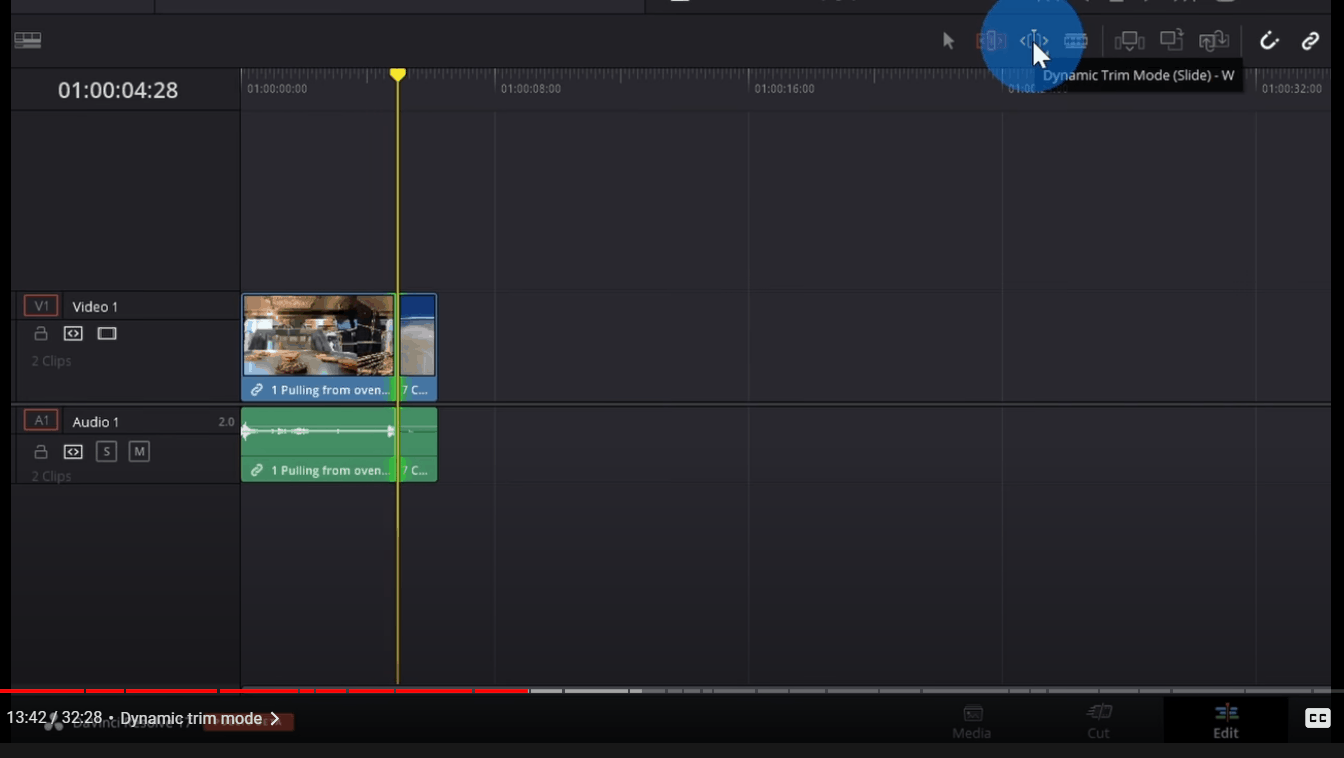
Dynamic Trim Mode
Next, let’s look at how we can use the Dynamic Trim Mode tool.
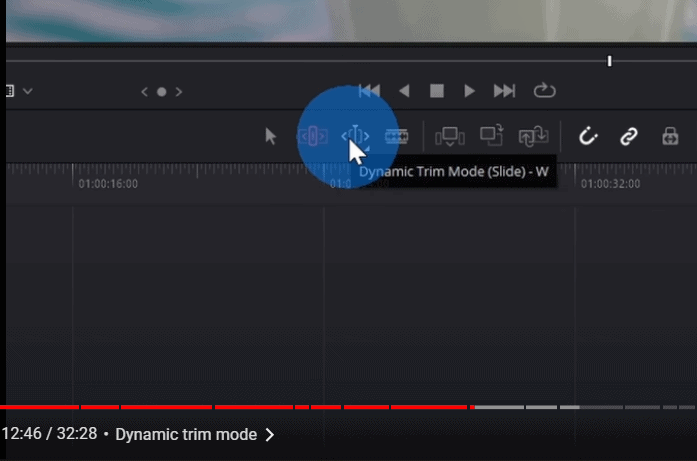
Before we do that, I want to show a few different ways you can both play and reverse your video in the timeline viewer. This will be helpful when we use the dynamic trim tool.
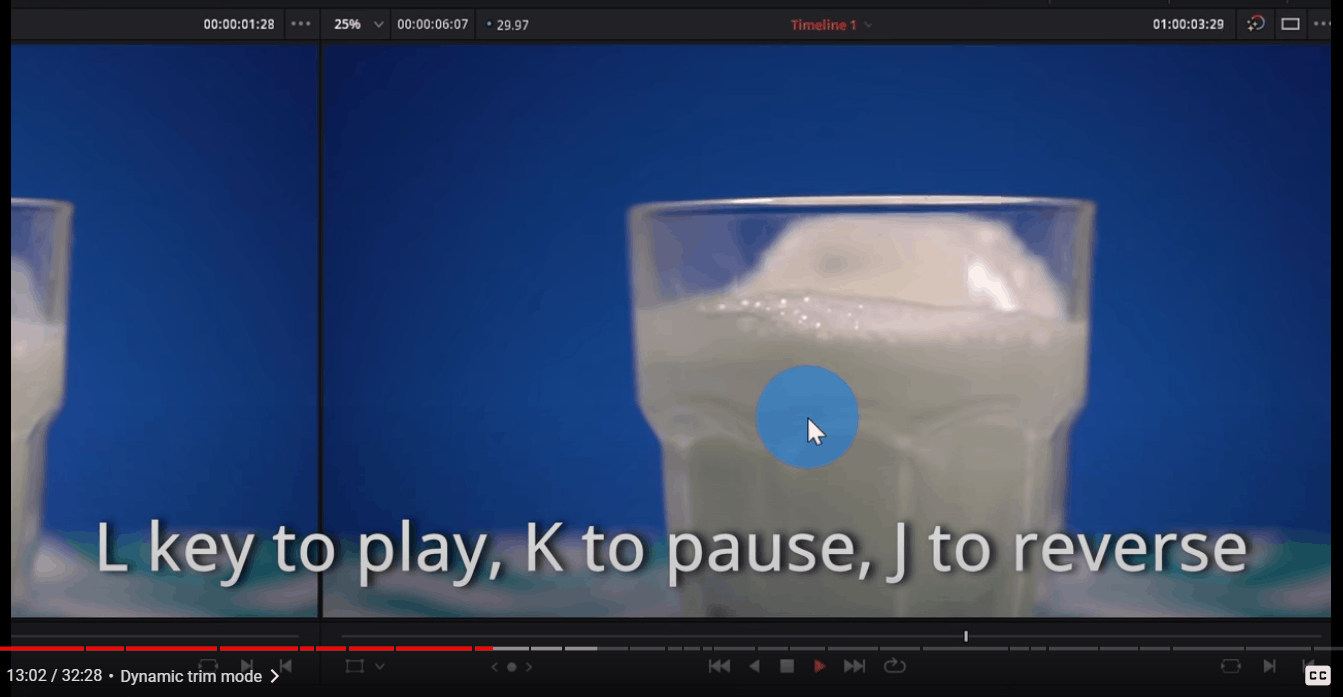
First, with the timeline viewer and focus up here in the top right hand corner, you can press the L key to play, and you could press the K key to pause or the J key to reverse. All these keys, sit together on the keyboard you have J K and L. So once again, J to go backwards, K to pause and L to go forwards. One of the neat tricks is if you press L twice or J, twice, it’ll increase the speed so here if I press L twice, it’ll go even faster. We’re going to use these keys when we use the dynamic trim mode.
Now, I place my playhead over the second clip on my timeline, and I’m going to select the dynamic trim mode. Right now I can press the L key and it’ll increase the length of the first clip. Alternatively, I could press the J key and it’ll reduce the length of the first clip.
Blade Edit Mode
The last tool in this group is the blade edit mode. When I selected this, it lives up to its name, I can go over one of the clips on my timeline and you’ll see a blade appear.
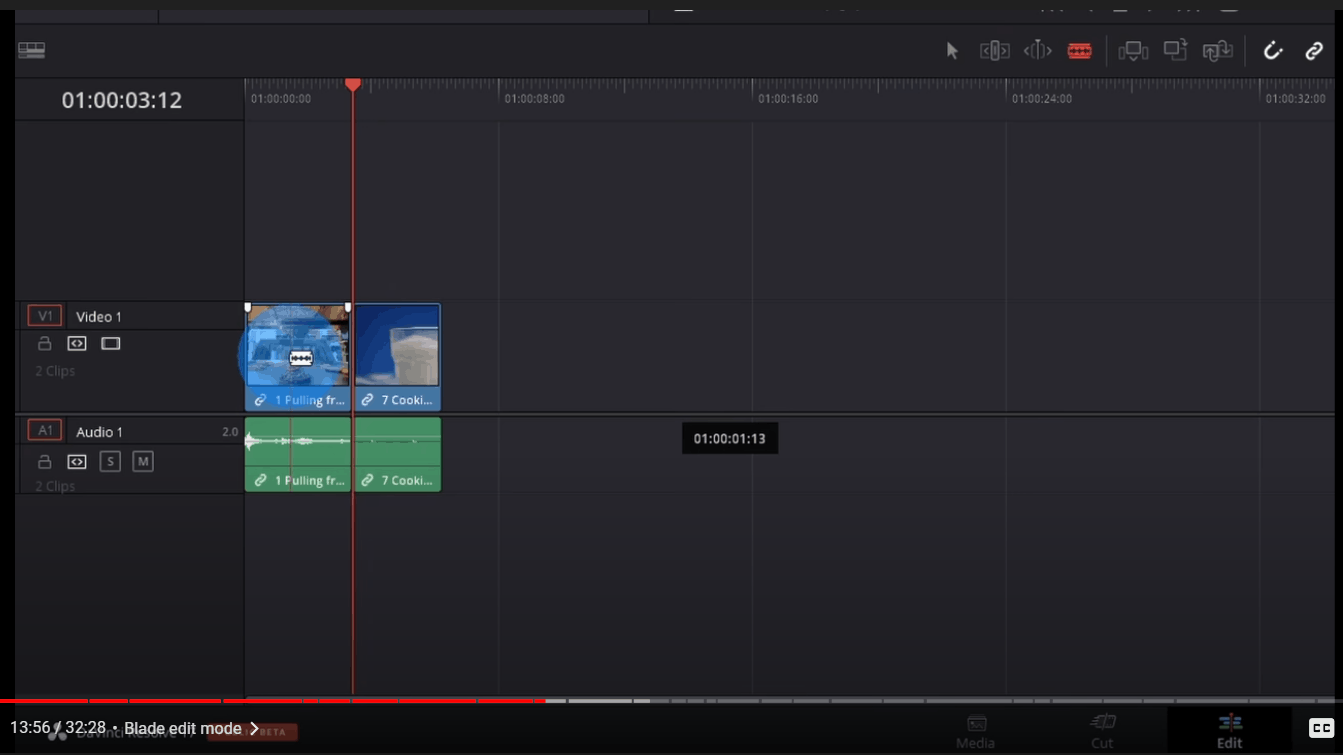
When I click, this will slice the clip where I click.
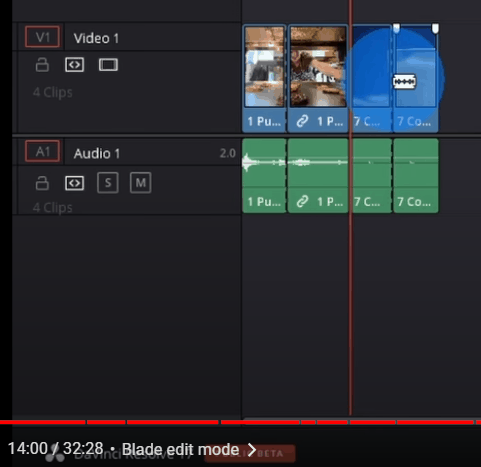
So this is yet one more way that you could edit your video clips.
Now that we know the basics of trimming and editing clips on our timeline, let’s bring in the rest of our clips from the media pool. I’m going to go up to the top and I’ll simply select clips, 2 through 12 and I’ll drag and drop them onto my timeline. I’m going to override clip number seven because I already have it in this set of clips.
Editing Keyboard Shortcut Keys
With all of the clips on the timeline now, I want to show you how you can use keyboard shortcuts to also edit and trim your video clips.
I’ll select right in front and we see the milk glass filling up. I want to wait until it’s right about at the midway point and I want to set this as the endpoint. I could use these four tools that we just walked through to set the endpoints, or I’ll use keyboard shortcut keys. Now, if I want this to be the In point I could press the shift key, together with the open bracket key – “Shift + [” – and that will set the in point.
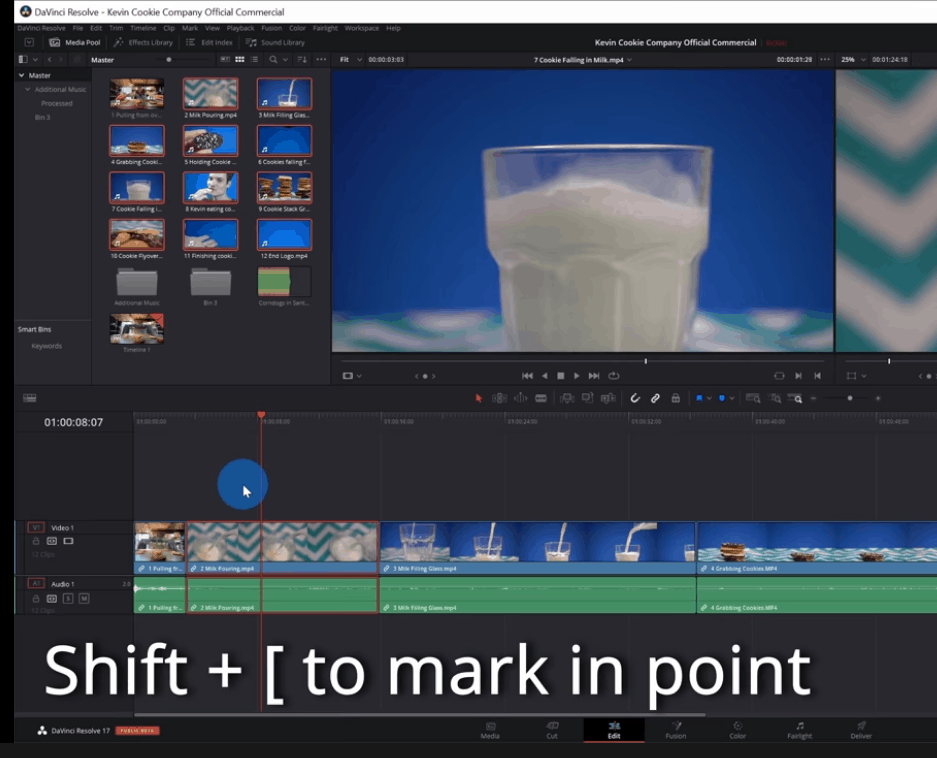
Here you’ll see that it leaves a gap in front and the reason is that I currently have the Selection Tool selected. I can undo that. If instead I go with the trim edit mode and I press Shift bracket, it’ll close that gap.
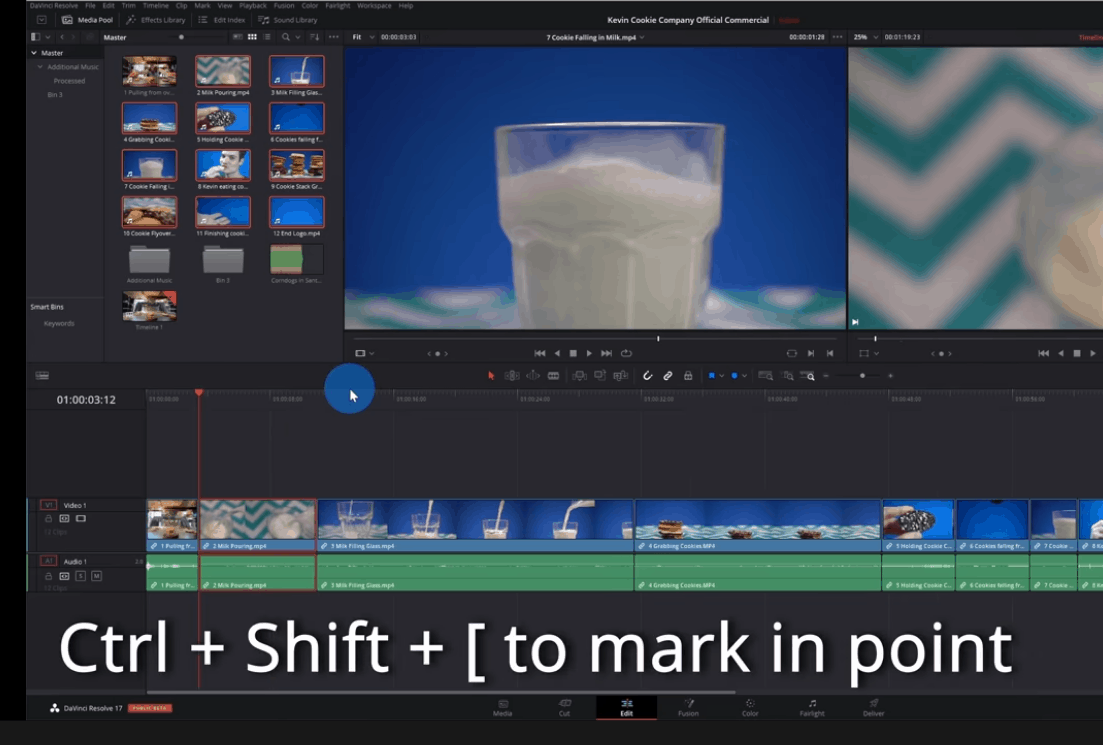
If I don’t want to have to worry about toggling back and forth between these two tools and I want to remove the gap. I can press the Ctrl Shift and open bracket key – “Ctrl + Shift + [“. And that’ll remove the gap as well.
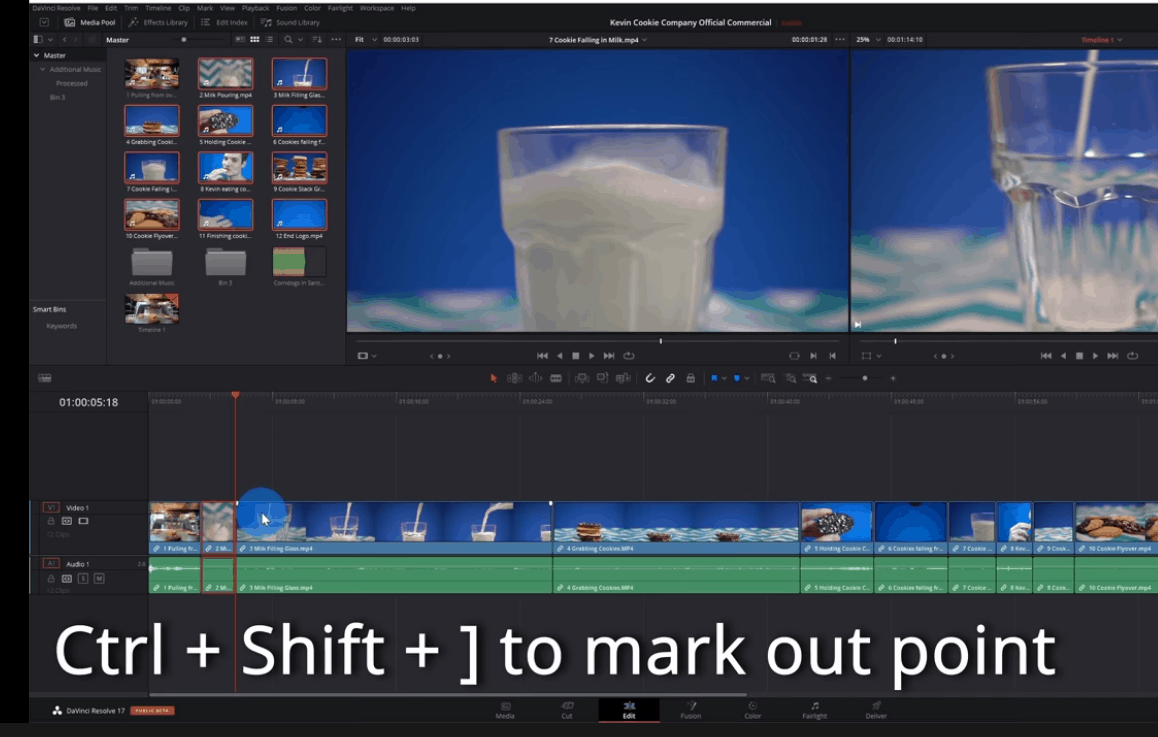
So just a few different ways you can use your keyboard to set the endpoint. Now here I’m going to play the clip for a little bit longer and it fills up just a little bit and I want this to be the out point, I can press the Ctrl Shift and close bracket key – “Ctrl + Shift + ]“. And that’ll set the end of the clip, and it’ll also apply a ripple edit, so it won’t leave any gaps in place.
Making Edits
Now that we know all of the different tools and the shortcut keys, let’s go through and make a few edits.
I’ll select the next clip, and then hit the Play icon, and right when the glass is about halfway full I want this to be the in-point. So once again, I’ll press Ctrl Shift open bracket, and we’ll play for just a moment and then that’ll be the out point, so I’ll press control shift and close bracket.
I can now go through, I’ll select my next video clip, and right when the hand comes in to grab the cookie, we’ll set that as the endpoint. I’ll play for a moment, once it disappears, then that’ll be the end point.
I can now go through and I’ll edit all of my different clips, just so they’re a little bit shorter.
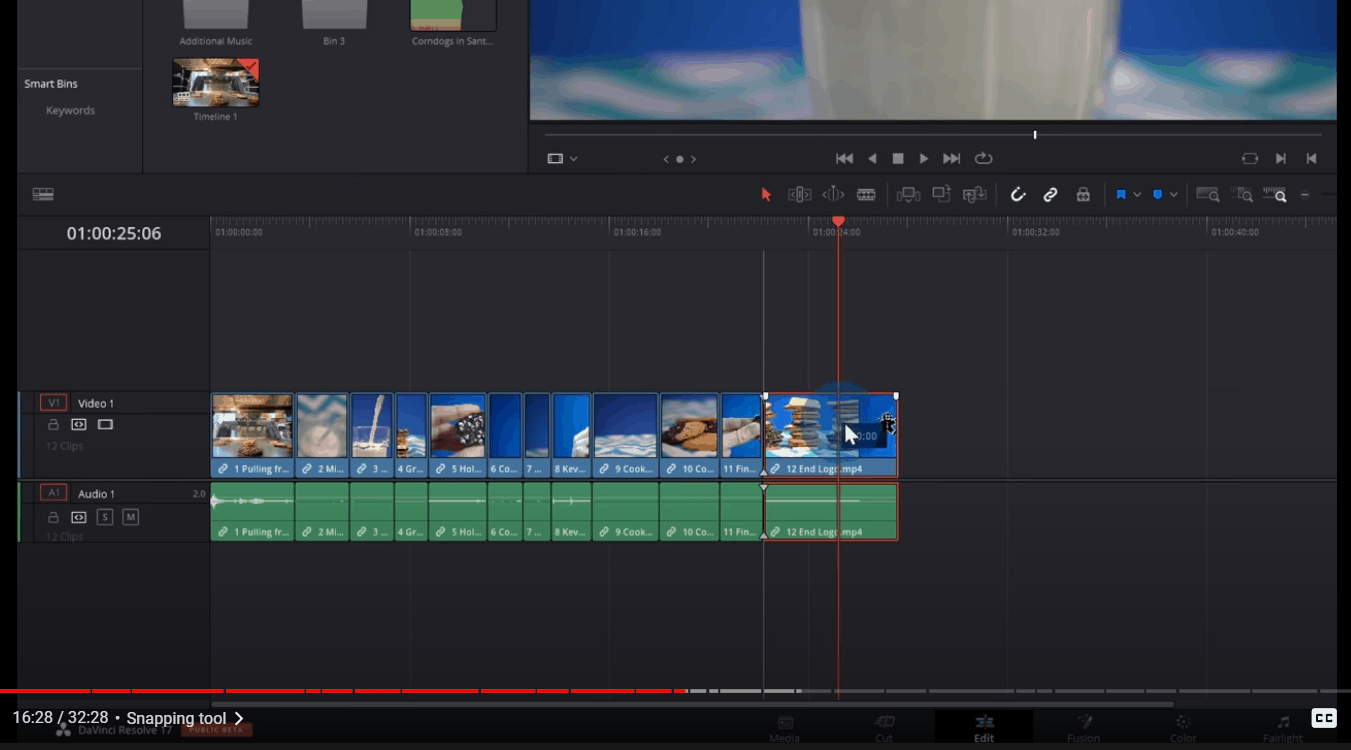
Now that I’ve made a whole bunch of edits, let’s see what other tools that we have on our toolbar. The next one here is the Snapping Tool.
If I click on one of the clips on my timeline and I bring it to an adjacent clip, you’ll notice that it snaps. If I turn this off, I no longer get that snapping.
To the right of that I have the Linked Selection tool.
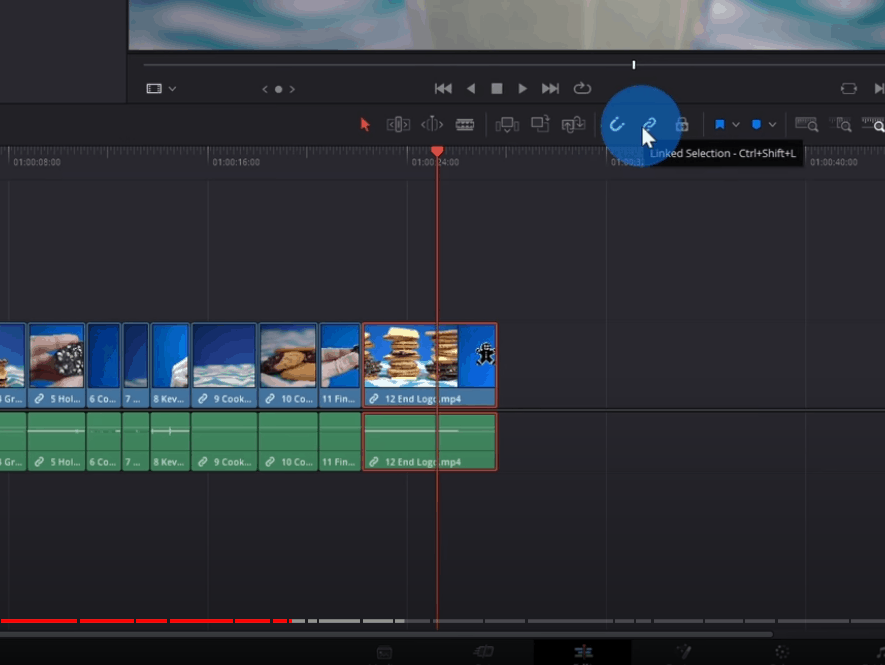
When link selection is turned on, let’s say I click on this video clip, it’ll tie together the audio and I could move both files together. If however I turn off link selection, I can click on the video file and you’ll notice that it does not pull the audio file along with it.
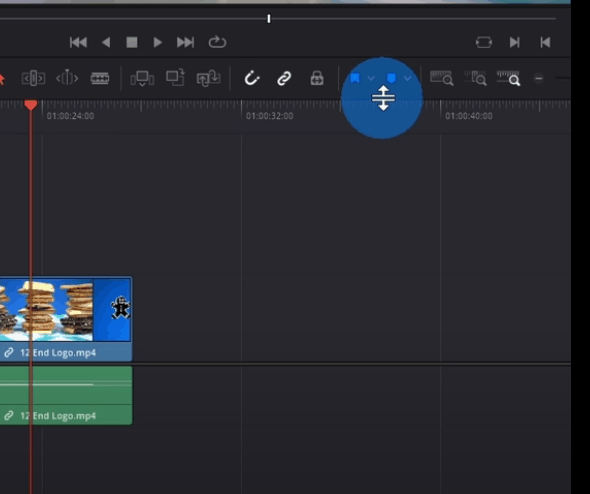
The last tool in this group is the Position Lock. When I turn this on, it’ll lock the position of all of the video clips on this track, so here I can no longer move these different items.
To the right of this group we have the Flag and the Marker tool. This way you can put down reminders on your timeline or on clips, so maybe you remember to do something.
Here for example I’ll selected this clip and next, I’ll click on the flag tool. Here you’ll see that it inserts a flag on the clip. If I double click on the flag, I can leave a note. I can even adjust the color of the flag. I can click on the marker tool and this will insert a marker on my timeline. We see the marker icon in here too. I can double click on it and I can leave a note. I can even click into a clip, and then click on the marker tool and this will leave a marker, within the clip.
So these are just tools that you can use to help you remember to go back to a certain point. Maybe you needed to edit something, maybe you wanted to adjust something, this will help you remember where that was.
Timeline Zoom Levels
Now I want to show the last few icons that we have on the toolbar. These affects how we view our timeline and what our zoom level is.
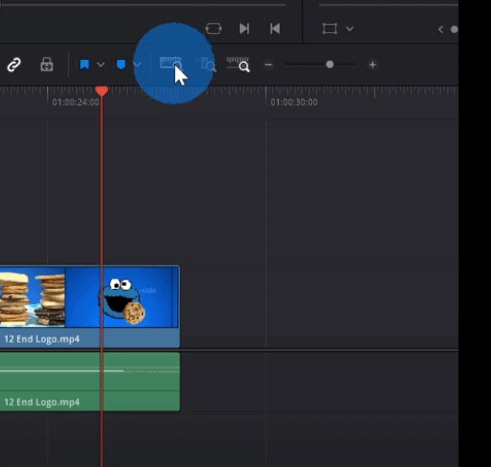
The first icon takes all the clips and it fits it within the available space.
Next, if I click on the next one, it’ll zoom in and show me a detailed view.
The last one jumps to a custom zoom level and I could adjust what that custom zoom level is.
Now one very handy shortcut key that you could use is “Shift + Z“. That’ll toggle between showing all of your clips in the available view and going to the custom view and I can toggle back and forth between those two.
Delete Selected & Ripple Delete
The last thing I want to show you related to editing is how you can delete a clip. If you no longer want it on your timeline. To delete a clip, simply select it and then you could right click on the clip and you could Delete the Selected, or you could Ripple Delete.
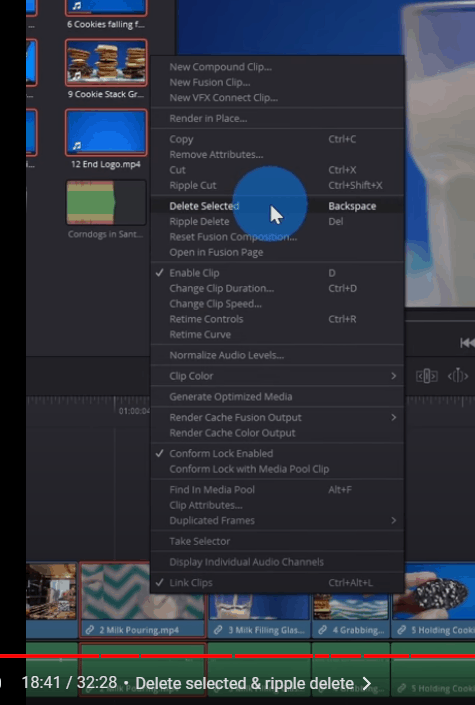
Remember Ripple Delete removes the gap. This is a handy shortcut key to know: to simply delete the selected item and leave the gap, you can press Backspace or you can ripple delete by clicking on Delete.
Let’s try this out to see how it works. I’ll click on the clip and here I’ll hit backspace and there you see it leaves the gap. I’m going to undo that. Now, if I press the delete key, it’ll remove it, plus it fills in that gap.
Change Clip Brightness
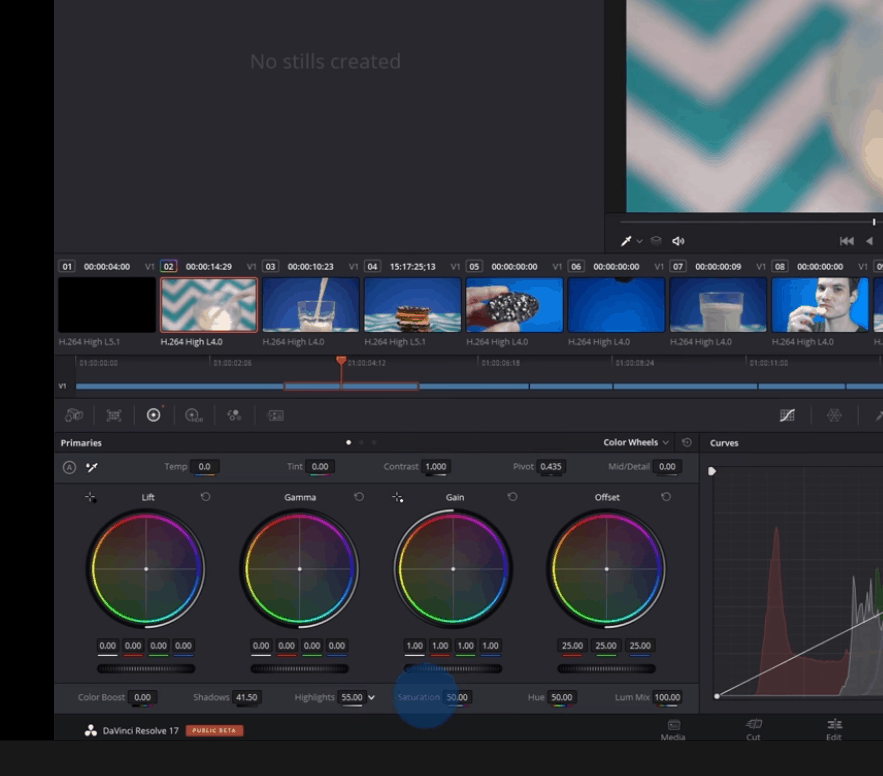
We need to make a few tweaks now. When I go to my second clip, you’ll notice that it’s a little dark and dim especially when I compare it to this shot of the milk. I want to brighten this up a little bit. To brighten up a clip, I’ll simply select it and then we’ll click on Color on the bottom.
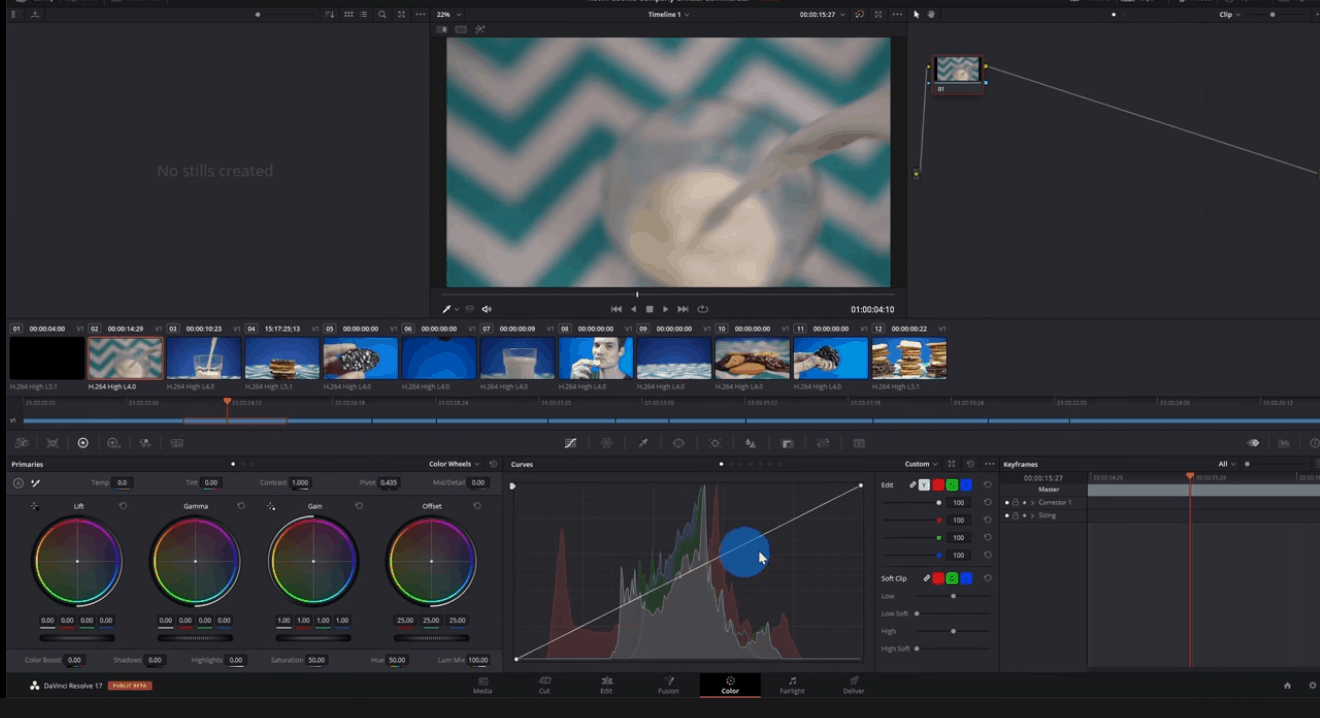
When we click on Color this drops us within the color view and I see that my second clip is currently selected. Down below, I can adjust the color of this clip. Click over shadows, I can adjust the shadows a little bit so I’ll make it a little bit lighter. Additionally, I’ll click into highlights and I can brighten this up as well.
This is just a very quick preview of how you could adjust the brightness of a clip. Next let’s click back into edit.
Change Clip Speed
The next edit I want to make is right up here with clip number seven, where the cookie falls in the milk. The clip goes by a little quick and I want to slow it down a little bit.
To adjust the speed of a clip, let’s right click on the clip, and within the menu that appears, let’s click on “Change Clip Speed“. A dialog appears and I’ll simply slide it over so maybe we’re at about 75%.
Next, because the clip will be longer because I slowed it down, I want to ripple the sequence, so it moves everything out, to fit the longer clip.
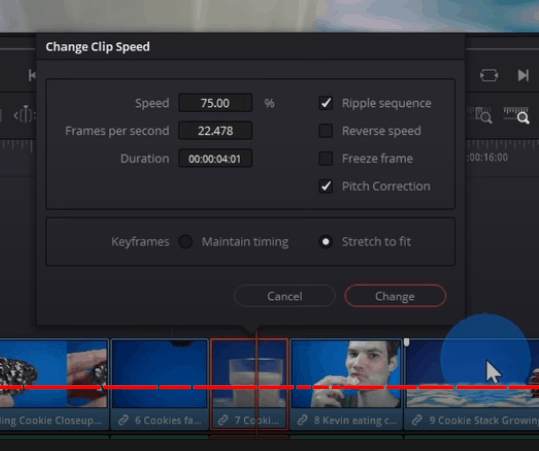
Next let’s click on change. I now see the clip is slightly longer and if I play it we see that it goes a little bit slower.
Audio & Auto Track Selector
The video is starting to take shape but it wouldn’t really be a commercial without music. I have some music, up here in my media pool and I want to pull it down onto my timeline here I’ll select the music clip and I’ll drag it down. When I drag it down, you’ll see that once again, it adds a new audio track.

I’ll drop it right there and now I have my audio.
With the audio now on my timeline, you’ll see that it doesn’t start immediately. I want the music to kick in right at the beginning of my video. Also, if I go forward a little bit, you’ll see that the drum doesn’t kick in until a little bit later. I want my clip to start maybe right about here.
Now I can use all of the same editing tools with audio that I use with my video tracks. I can press “Control + Shift + [” and that’ll set the in point for my audio.
The one thing you’ll notice though is when I set the in point, it also adjusted the in point for my other tracks. I didn’t want that, so I’ll undo it. If I want to make edits to let’s say this track, but I don’t want it to affect the other tracks, I can use the Auto Track Selector.
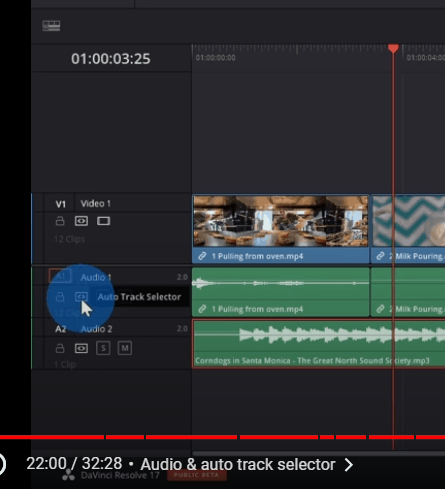
When I go over to the track here I can turn off the auto track selector for video one and audio one.
When I do that, I’ll go back down to my audio clip. And here I’ll set the in-point using “Ctrl + Shift + [“.
Now you’ll see that the Edit applies to my audio track, but it left my other two tracks alone.
Next I want to go to the end of my audio clip, and I want to set the end-points. Here, I’ll zoom in just a little bit more. Now, just like before I can click on the audio track and here I’ll press “Ctrl + Shift + ]” and that’ll set the out points.
Fade Audio In & Out
You’ll notice that right at the end of the video, the audio is still going at full power. I want that to fade out. When I hover over the clip you’ll see an icon appear at the very top. When I click on that icon, I can drag it over and this will apply a fade to the audio.

Lock Track
Now that I’m done making edits to my audio track, over on the left hand side – where I have all of my tracks – I can lock this track.

In this way, I won’t be able to make any additional edits. Especially if you have a complex project, you might want to lock something just so you don’t mess with it and so it stays exactly how you have it.
Fade Video In & Out
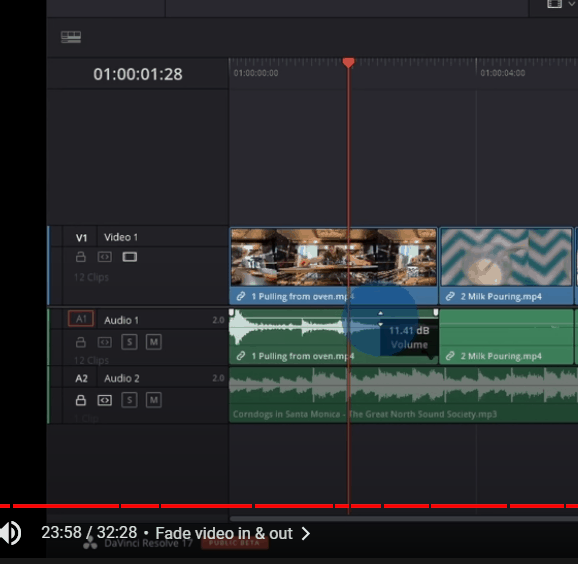
Just like we can set a fade out on the audio we can also fade out on video. Here too when I hover over a video track, I see the same icon and I can fade out that track. So now both the video will fade out and the audio will fade out.
You’ll notice that there are some sound effects of the oven opening and then I pull the tray out. I’d like that to be a little bit louder, so you really hear those sound effects.
Now I can hover over the audio file, and you’ll see that there’s a line here. When I click on that line I can increase the volume or I can also decrease the volume or increase it just a tiny bit so you hear it a little bit more.
Adjust Audio Volume
let’s say that I wanted to take that same volume adjustment and I want to apply it to other clips, I can right click on this and all go to copy. I can also press Ctrl C. Let’s say I want to apply this sound effect here where I’m eating the cookie so you can really hear that I can right click and then I can go to paste attributes. When I click on that I could paste all sorts of different types of attributes, I could paste video attributes and also audio attributes also like to audio because I only want the audio attribute to take effect on this new clip. Next, I’ll click on Apply. You’ll now see that the audio is slightly louder and let’s play that to see what it sounds like. Oh, you can hear me biting on that cookie that sounds good,
Copy & Paste Clip Attributes
Let’s say that I wanted to take that same volume adjustment and I wanted to apply it to other clips. I can right-click on the audio track and select “copy”. I can also press “Ctrl + c”. Let’s say I wanted to apply this sound effect to another clip. I can right-click and then go to “Paste Attributes“.
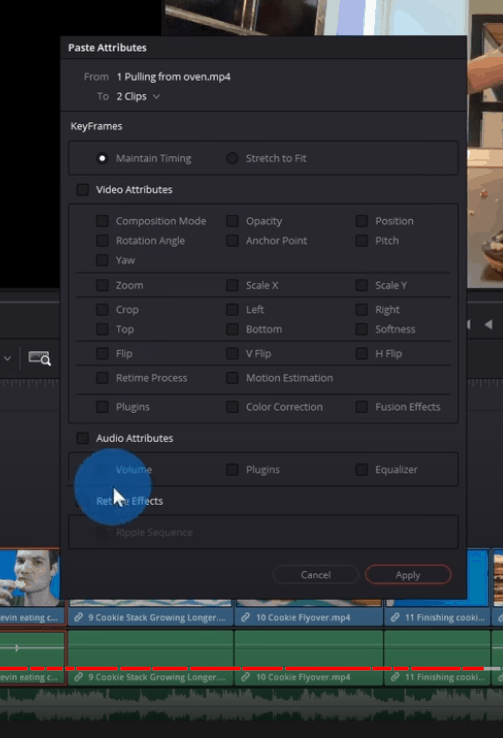
When I click on that, I could paste all sorts of different types of attributes. I could paste video attributes and also audio attributes. I’ll select audio because I only want the audio attribute to take effect on this new clip.
Next, I’ll click on “Apply”. You’ll now see that the audio is slightly louder.
Review & Set Shortcut Keys
As we’ve been going through this, we’ve been using lots of different shortcut keys. If you don’t remember shortcut keys or you want a quick reminder of what they are, you can simply go to the menus on top.
So, for instance, click on “Edit” and you can see all of the different editing tools and you can see the associated shortcut keys.
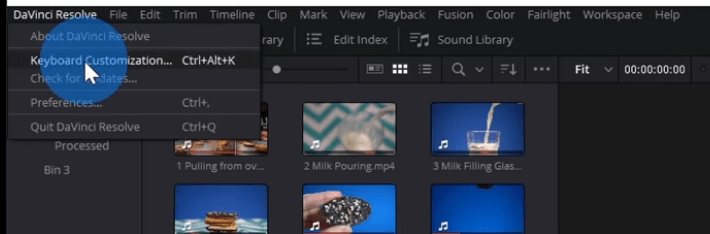
Now let’s say that maybe you don’t like these shortcut keys or you’d rather have a different shortcut key. You can also go up to this top menu for “DaVinci Resolve”, and there’s an option for Keyboard Customization. When I click on this you can go through and you can modify the shortcut keys to whatever you like.
Insert Transitions
I want to make a few more tweaks. Here’s the video of me eating that cookie and then you see this stack of cookies appear. I want to insert a transition between those two clips versus having just a hard cut.
To insert a transition, let’s go to the top-left hand corner, and I’m going to toggle off the media pool. I already have all of my video and audio files on the timeline, so I don’t need to see this anymore. Next let’s click on the effects library.
This opens up the effects library and I see video transitions, audio transitions, titles effects… There’s a lot of richness here.

Now I want to insert a Cross Dissolve from me eating the cookie to the stack of cookies.
To insert this transition, I’ll simply click on it and I can drag and drop it onto the timeline. Next I’ll go back and play to see how this transition looks.
Let’s say I want to make a few edits to the transition, I can double click on the transition, and that opens up the Inspector on the right hand-side.
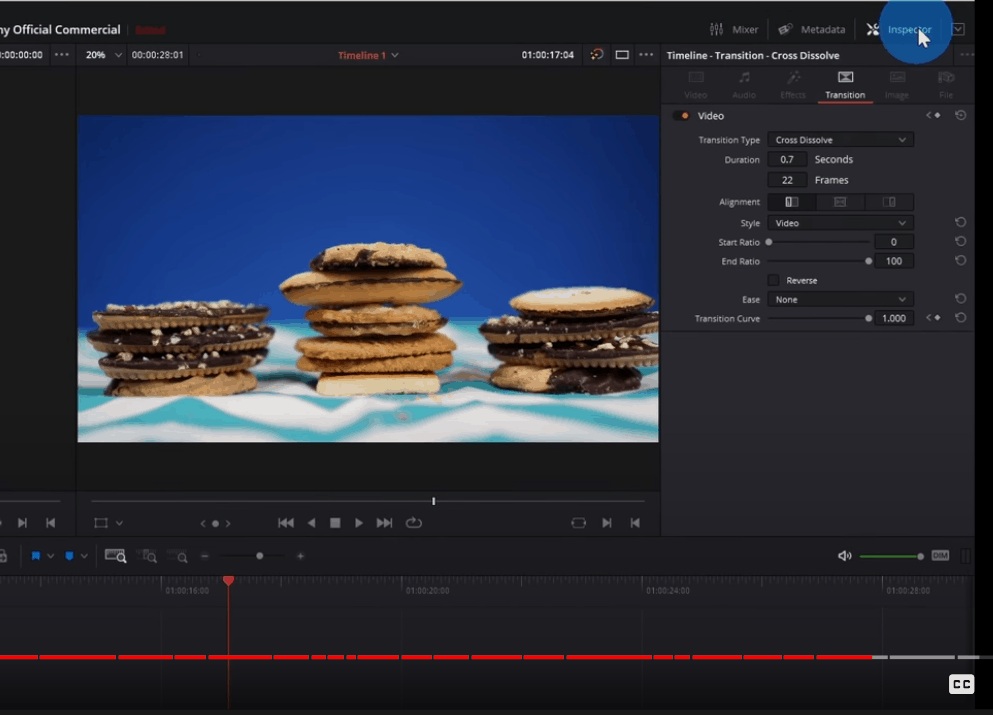
I can click on inspector to hide it or inspector to show it again. Here I’m in the details of the transition and I can set things like the duration, the frames, the alignment. So, there are lots of different ways I can customize what this transition looks like.
Insert Text
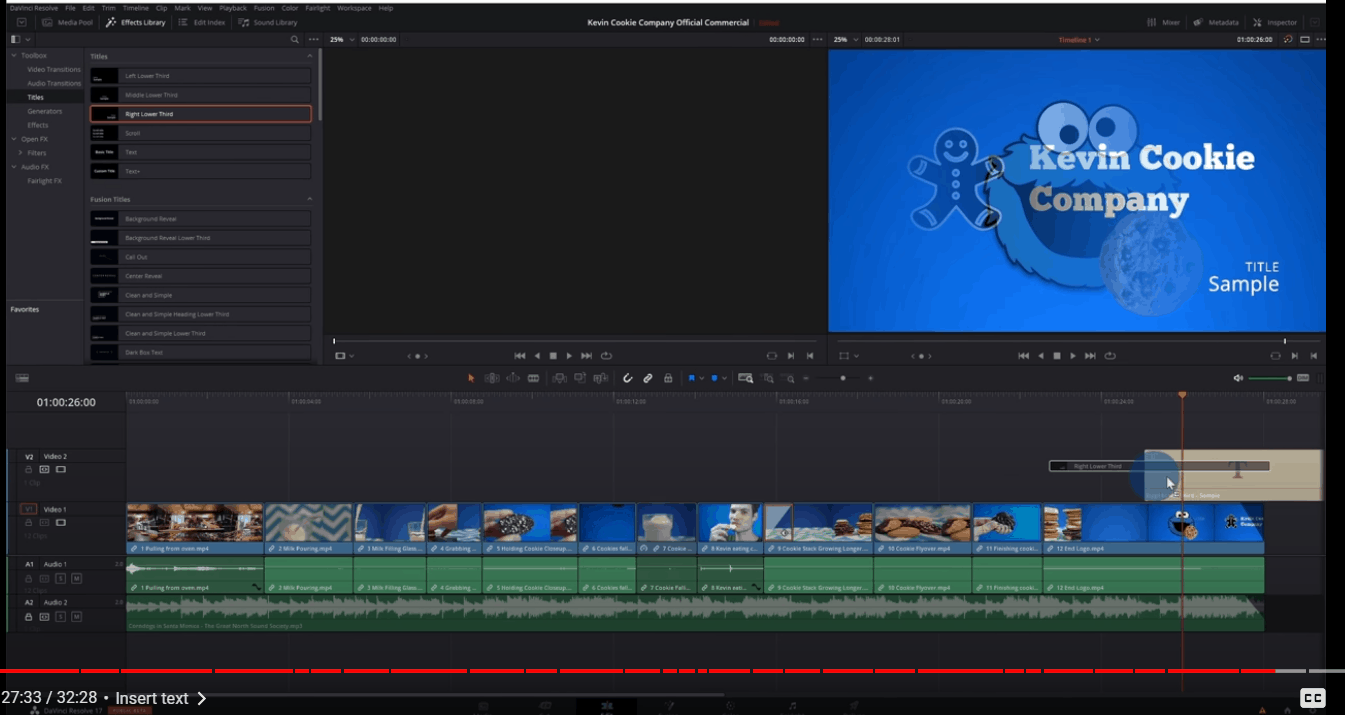
Let’s say at the very end of my video, where we show the company logo, I also want to insert the website. How do I get the text in? Well, here again we are going to use the effects library.
Just like we dragged a transition in, I can click on “Titles” and I can pull text into my video.
There are all sorts of different types of text I can insert you have titles, lower thirds, fusion titles which have animations. So, there’s all sorts of things I could insert into my video. I want to keep this simple for now, so I’ll use a “Right Lower Third“. And then I could simply drag and drop that onto another track in my video.
I’ll position it so it appears right at the end and I’ll trim it so it ends when the video ends.
If I double click on it, this will open up the Inspector where I could enter the details of it, and I’ll type in the website URL.
Now, along with typing in the text, I could edit all of the attributes of this text. I could change the color, the size, the positioning, the font, whatever I want.
Zoom In & Out Using Keyframes
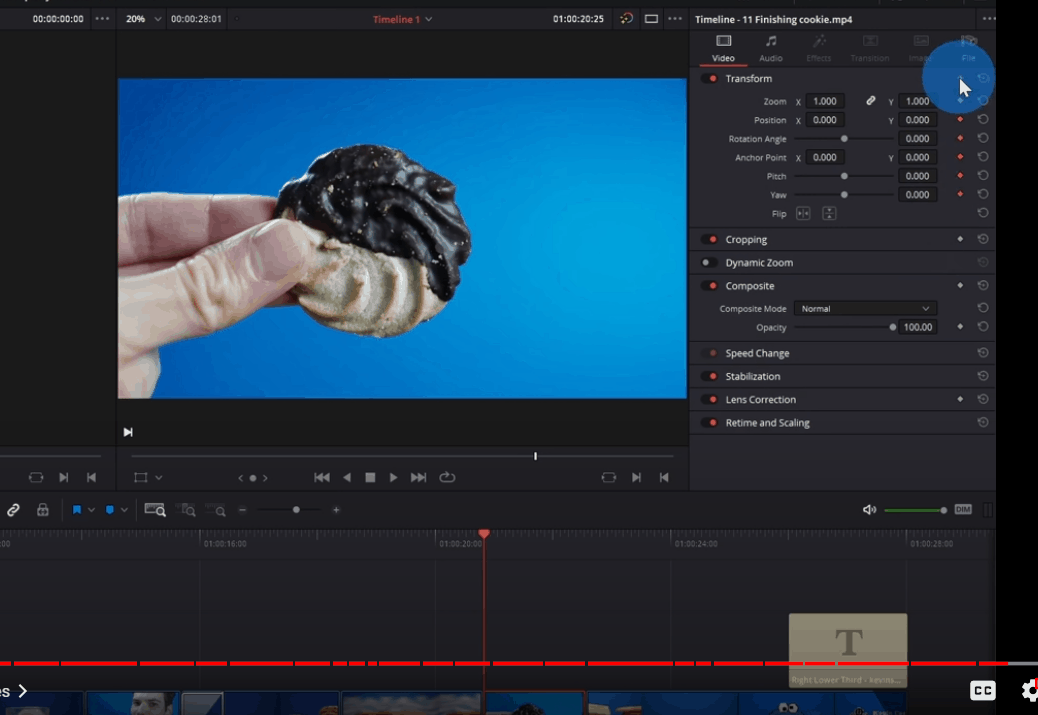
I now want to make one additional tweak to my video. In this clip where I show the cookie and it’s disappearing, I want it to zoom in throughout this clip.
So, how do we do a zoom in?
I’ll move the playhead to the very beginning of the clip and I’ll have the clip selected. Next, let’s go to the top right hand corner and click on the Inspector. Once again, just like we’ve seen, the Inspector shows all the details of that clip. I have it selected on “Video” and within the Transform section we can insert keyframes. I’m going to click on this icon and that’ll insert a keyframe.
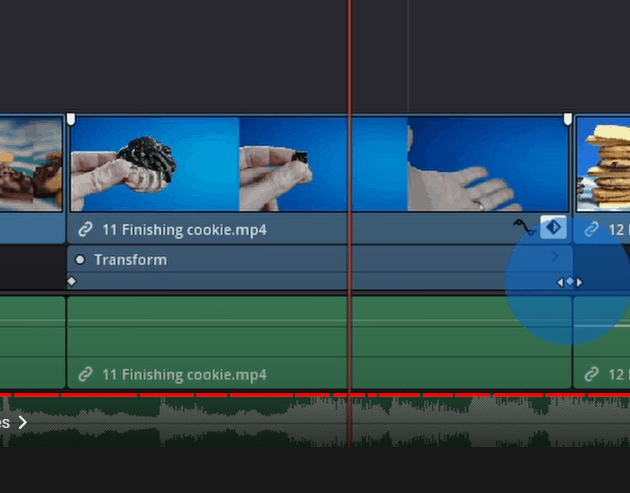
If I go down to the clip below, I can view all of my keyframes by clicking on this icon.
A keyframe allows me to define the attributes of the clip at this point in time. At the beginning of the clip I want it to be at this zoom level. I’ll go to the very end of the clip and I’ll insert another keyframe right here, and I want this zoom to be a little bit greater so I’ll zoom in just a little bit.
Now if we play it, you’ll see the zoom effect. If I zoom in a little bit down here here you’ll see these dots which represent each of the keyframes on the timeline.
Using keyframes, you could define what the video state looks like at this point in time, and you could define what it looks like at another point in time and in-between it’ll shift from whatever the state is at the beginning to whatever the state is at the end.
Customize User Interface
We’re getting close to wrapping up. One last thing I wanted to show you is how you can change this interface to match your needs. Let’s say you want more or less space for the timeline, you can simply hover over and you can drag it so it’s smaller or it’s larger. Once again, you could close and show these various panes.
Let’s say you make a whole bunch of changes to the experience and maybe you want to go back to what it looked like when you first started. Up on the top menu, you can click on “Workspace“, and then there’s an option to “Reset the UI Layout“.
Render & Export Video
To render the video, down below let’s click on the option that says “Deliver“. This opens up the delivery screen, and I usually make my videos for YouTube. So, over here on the left hand side, I could select the YouTube service. Down here I could select my resolution, and I’ll go with Ultra HD, I’ll go with the highest quality level.
You can customize all of the different settings related to the video for the format I’ll set it to mp4. I can then give it a name, and you can also select a location where you want to save the file. I’ll save it to my desktop. Once I’m all done making my various selections, I can go to the bottom and “add it to my render queue“. When I click on “Add to Render Queue”, you’ll see it appear as job one. I don’t have any other jobs going on. If I want to kick off the rendering, I’ll click on “Render All“. here now I see that rendering is in progress and it’s pulling together my video.
View Final Video Output
I’ve now finished rendering my video and I see it here on my desktop, let’s click into it to see how it turned out.
Wrap Up
All right, well that’s how you can get started editing using DaVinci Resolve 17. Like I said, it’s a pretty comprehensive video editor, but it has a lot of nice shortcuts to make your editing even more efficient.
Note: the transcription of the original YouTube tutorial was done using Otter.
Сегодня у нас туториал вселенского масштаба, который должен был увидеть свет!
Женя Тен проведёт вас в мир DaVinci Resolve 17 — самой нелагающей и мощной монтажки 2021 года, которая очень быстро набирает популярность благодаря постоянной оптимизации от разработчиков и user-friendly интерфейсу.
Мы самым подробнейшим образом разобрали интерфейс и функционал всех вкладок и инструментов Давинчи, которые потребуются тебе при переходе на эту монтажную программу.
Начиная с создания датабазы и проекта, добавления файлов и создания таймлайна, и заканчивая монтажом, эффектами, созданием прокси, настройками звука и финальным экспортом видоса.
У тебя просто НЕТ варианта НЕ НАУЧИТЬСЯ монтировать в DaVinci Resolve Studio 17 после просмотра этого тутора.
Поэтому скорее заваривай кофе, открывай монтажку и учись новому!

DaVinci Resolve 17 для НОВИЧКОВ. Полный гайд по МОНТАЖУ с НУЛЯ до ПРОФИ. ЭФФЕКТЫ ЗВУК ПРОКСИ ЭКСПОРТ
2
Если вы никогда не работали в программе DaVinci Resolve и не знаете, с чего начать — всё необходимое для новичков вы найдёте в этой статье.
Скачайте DaVinci Resolve
Начните с загрузки и установки бесплатной DaVinci Resolve по этой ссылке: https://www.blackmagicdesign.com/ru/products/davinciresolve/training
Там же найдёте официальные обучающие видео на английском языке и ссылки на исходники для прохождения их курса.
Можете использовать их исходники для прохождения уроков или мини-курсов из этой статьи.
DaVinci Resolve: обучение за час
Познакомьтесь с DaVinci Resolve
Скачайте исходные клипы для прохождения этого урока: https://disk.yandex.ru/d/xaKt8RaOYRNtzA
В этом вводном уроке автор за 45 минут познакомит вас с программой. Вы узнаете, как пользоваться DaVinci Resolve, базовыми инструментами и командами.
Лучший старт для новичка:
Для чего нужна DaVinci Resolve?
Эта программа по праву считается лучшей программой для цветокоррекции видео.
DaVinci Resolve использовалась при создании таких фильмов как «Мстители. Война бесконечности», «Чудо-женщина», «Хан Соло», «Лунный свет» и многих других.
Помимо цветокоррекции в DaVinci Resolve вы также можете монтировать свои проекты, добавлять анимацию и графику, работать со звуком и музыкой.
Взгляните, как оживает скучный материал после грейдинга в DaVinci Resolve:
Уроки DaVinci Resolve на русском
Обучающего материала по DaVinci Resolve на русском языке достаточно, в этой статье я привёл самые полезные каналы и плейлисты. Они помогут вам самостоятельно изучить DaVinci Resolve с нуля.
Отдельно также приведу пару англоязычных каналов по другим полезным фишкам программы.
Канал MediaKeller
Отличный русскоязычный канал с уроками по Resolve, автор объяснит всё, — от цветокора до анимации и монтажа. Плюс поделится ценными профессиональными советами в уроках.
Курс Roman Bolharov
Плейлист с уроками по DaVinci Resolve на русском. Автор последовательно обучит вас монтажу, цветокору и созданию переходов. Также даст немало дельных советов по работе в программе.
Всего 10 уроков по 10-20 минут, отличный вариант для начинающих:.
Канал Vasily Kostomarov
Уроки в этом плейлисте расположены в порядке возрастающей сложности.
Вместе с автором вы изучите вкладки программы, базовые инструменты. Затем перейдёте к монтажу и цветокору, например, настройке тона кожи и многому другому.
Плейлист закрывается уроками по крутым эффектам и покраске профессиональных футажей, автор даёт немало полезных советов по грейдингу в DaVinci Resolve.
Серия уроков «Красим видео вместе»
Крутая серия 7 обучающих видео по грейдингу в DaVinci Resolve.
В этих уроках автор учит вас создавать, так называемый, «look» ваших видео, повторяя палитру и стилистику популярных блокбастеров, вроде Мстителей.
Уроки DaVinci Resolve на английском
Уроки JayAreTV по Fusion
Интересует не только монтаж и грейдинг в DaVinci Resolve?
С помощью вкладки Fusion вы можете создавать анимации и накладывать эффекты на видео. Раньше Fusion был отдельной программой, а теперь он — часть Resolve.
В этом плейлисте найдёте кучу уроков по созданию титров, анимаций, различных плашек и эффектов с помощью Fusion.
Плейлист уроков Casey Faris
Уроки в этом плейлисте помогут вам получше разобраться с инструментами монтажа в DaVinci Resolve. Также вы немало узнаете о работе с различными эффектами для ваших видео.
Всего 75 роликов по 5 минут в среднем, автор хорошо раскрывает отдельные темы. Также есть уроки и по Fusion, полезный ресурс для начинающих.