
Addenda to the Nikon Guide to Digital Photography with the COOLPIX5000
En
Please note the following changes to the Nikon Guide to Digital Photography with the COOLPIX5000 with the release of version 1.7 of the
camera fi rmware:
Nikon View (pp. 179–188)
After completing the fi rmware update, you will need to upgrade to Nikon View 5 version 5.1.2 or later, which is available for download
from the following web sites:
• For users in the U.S.A.: http://www.nikontechusa.com/
• For users in Europe: http://www.nikon-euro.com/
• For users in Asia, Oceania, the Middle East, and Africa: http://www.nikon-asia.com/
Please note that the Windows version of Nikon View 5 is only supported under pre-installed versions of Windows 98 Second Edition (SE) or
later, including Windows XP Home Edition, Windows XP Professional, Windows 2000 Professional, and Windows Millennium Edition (Me).
It is not supported under Windows 98. The Macintosh version is supported under Mac OS 9.0, 9.1, and 9.2 and under Mac OS X version
10.1.2 or later. It is not supported under Mac OS 8.
Support for RAW (NEF) Image Quality (pp. 72–73)
When image size is set to FULL, you can now select an image quality of RAW by pressing the button until RAW is displayed in the moni-
tor and the HI icon in the control panel fl ashes. At this setting, data from the CCD are stored on the memory card without modifi cation
or compression, producing photographs that show a level image quality comparable to HI while requiring only about half as much memory
to store. RAW images can only be viewed or printed in Nikon Capture 3 (available separately) or Nikon View 5. In both these applications,
RAW images can be modifi ed and saved to disk without reducing image quality. Nikon View 5 supports limited white balance adjustment,
while Nikon Capture 3 can be used for more extensive editing.
An image quality setting of RAW is not available when Black&White is selected for SATURATION CONTROL (see pg. 115 of the Nikon
Guide to Digital Photography with the COOLPIX5000). Black&White is not available when image quality is set to RAW.
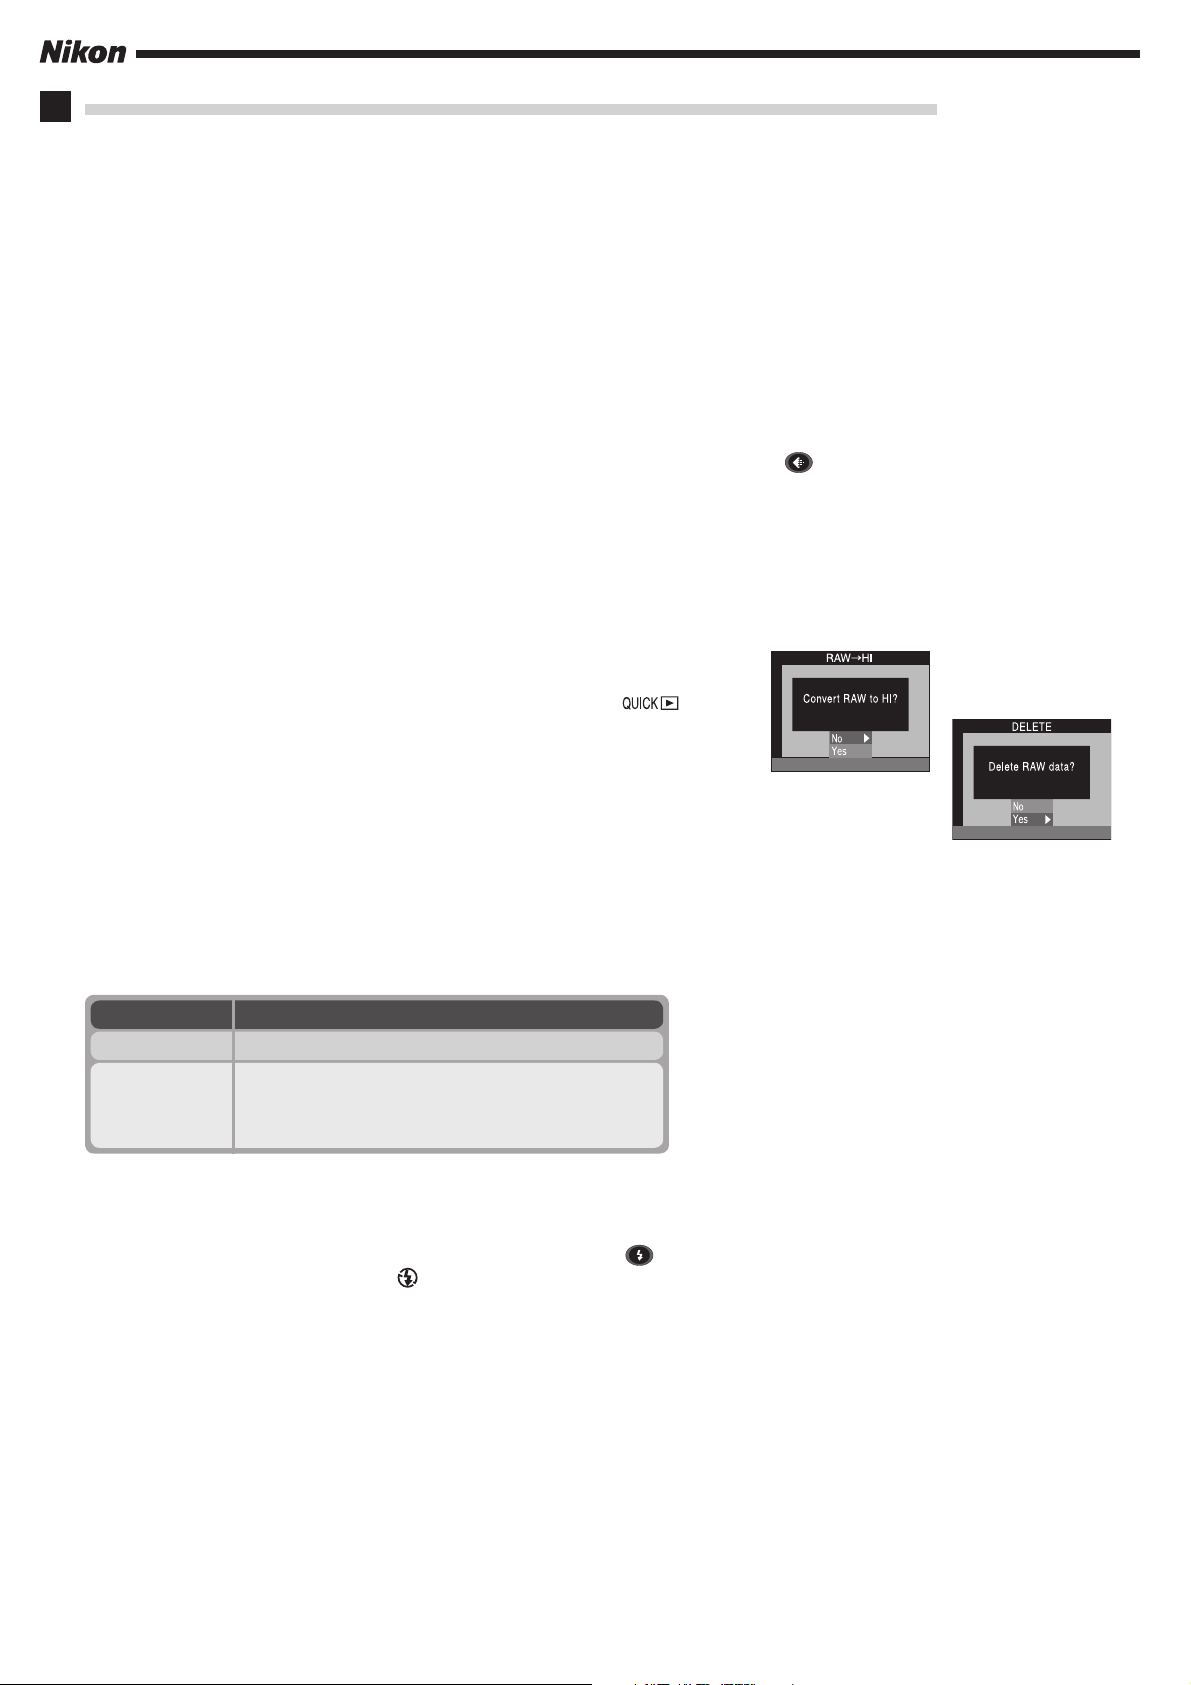
To convert a RAW image to TIFF (HI-quality) format so that it can be opened in applications that do not support RAW, display the picture in single-image playback (pp.
158–159). CONVERT will be displayed in the monitor next to the
Pressing this button will display the confi rmation dialog shown at right; choose YES to
create a copy of the image in TIFF format. You will then be given the option of deleting
the original RAW image. Choose YES to delete the original RAW image and keep only
the high-quality copy, or NO to keep both the copy and the original. The copy will be
stored on the memory card under a new name assigned automatically by the camera
and ending in the extension “.TIF”. Note that you will require at least 15MB of free
space on the camera memory card to create a copy in TIFF format.
A minimum of 128MB of computer memory (RAM) is recommended when displaying RAW images in Nikon View 5 (pg. 204).
button.
Shutter Release Speed (pp. 28, 146–147)
The Monitor Options item in the setup menu now contains a Shutter Release Speed setting that controls the speed of shutter response
when the view through the lens is displayed in the monitor. The following options are available:
Option Description
Normal
Quick Response
Priority given to quality of preview displayed in monitor.
Reduces lag between pressing shutter-release button all
the way down and shutter being released to take picture.* Horizontal lines may appear when view through
lens is previewed in monitor.
* If the shutter-release button is pressed all the way
down to take a picture during picture review (pg. 55),
the focus and exposure settings used in the previous
shot will apply to the new photo. To ensure a quick
response, the built-in Speedlight will not fi re.
Options for External Speedlights (pp. 29, 152)
The Speedlight Cntrl menu (pg. 152) now contains an Int Flash Off option that allows you to turn the built-in Speedlight off entirely.
Optional grip-type fl ash accessories such as the SB-11 and SB-14 can be used when connected via the optional AS-15 accessory shoe
adapter. The fl ash mode for the fl ash accessory is set by pressing the
panel and monitor. The monitor shows
the photograph.
in all modes to indicate that light from the built-in Speedlight will not affect the outcome of
button (pg. 82), and the fl ash mode is displayed in the control
Support for Exif 2.2 (pp. 174–175)
The COOLPIX5000 now supports Exif (Exchangeable Image File Format for Digital Still Cameras) version 2.2, a standard that allows information stored with photographs to be used for optimal color reproduction when images are output on Exif-compliant printers. PRINT
Image Matching (PIM) is no longer supported.
Support for Picture Transfer Protocol (pp. 29, 136, 182–186)
In User Sets 1, 2, and 3, the setup menu (pp. 29, 136) now offers an Interface option containing Video Mode and USB settings. The for-
mer is identical to the existing Video Mode option (pg. 155) that allows you to choose the video mode used when connecting the camera
to a television (pg. 178). The USB option specifi es the USB protocol used when the camera is connected to a computer (pp. 182–186).
Two protocols are available: Mass Storage and PTP (Picture Transfer Protocol). Choose Mass Storage when connecting the camera to a
computer running Windows 2000 Professional, Windows Millennium Edition (Me), Windows 98 Second Edition (SE), or Mac OS 9.0. 9.1,
or 9.2. When connecting the camera to a computer running Windows XP Home Edition, Windows XP Professional, or Mac OS X (version
10.1.2 or later), you can choose either Mass Storage or PTP.
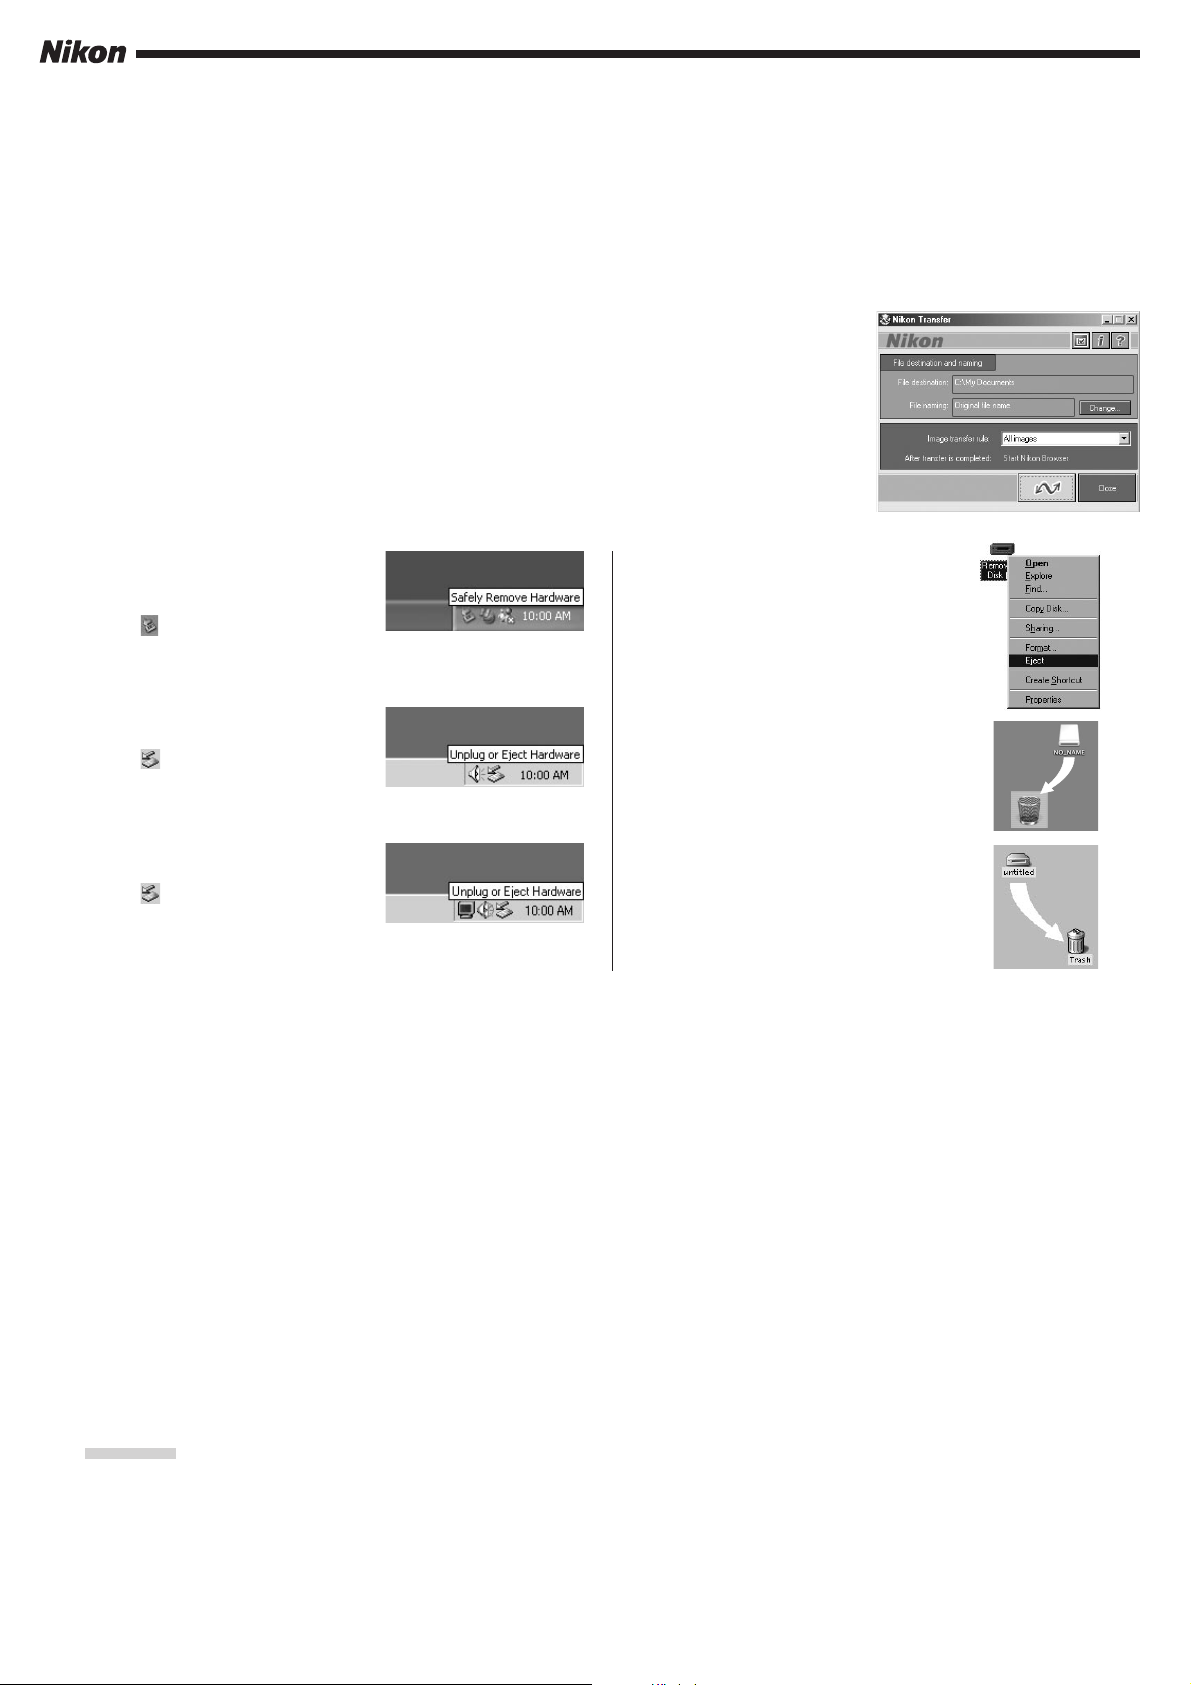
Transferring Pictures Using Nikon View 5 (pp. 182–186)
When you connect the camera to a computer using the UC-E1 USB cable and turn the camera on,
Nikon View 5 will start automatically and the Nikon Transfer window will be displayed in the computer monitor. When transfer is complete, the transferred images will be displayed in Nikon Browser.
If PTP is selected in the Interface > USB menu, you can now turn the camera off and disconnect the
cable after verifying that image transfer is complete. If USB is set to Mass Storage (the default option), you must remove the camera from the system as described below before turning the camera
off or disconnecting the USB cable.
Windows XP Home Edition/
Windows XP Professional
Click the “Safely Remove Hardware”
icon ( ) in the taskbar and select
Safely remove USB Mass Storage
Device from the menu that appears.
Windows 2000 Professional
Click the “Unplug or Eject Hardware”
icon ( ) in the taskbar and select
Stop USB Mass Storage Device
from the menu that appears.
Windows Millennium Edition (Me)
Click the “Unplug or Eject Hardware”
icon ( ) in the taskbar and select
Stop USB Disk from the menu that
appears.
Windows 98 Second Edition (SE)
In My Computer, click with the right
mouse button on the removable disk
corresponding to the camera and
select Eject from the menu that appears.
Mac OS X
Drag the “NO_NAME” camera volume into the Trash.
Mac OS 9
Drag the “untitled” camera volume
into the Trash.
Do not select PTP when connecting the COOLPIX5000 to a computer running Windows 2000 Professional, Windows Millennium Edition
(Me), Windows 98 Second Edition (SE), or Mac OS 9 (there is no need to change the USB setting when using the camera for the fi rst time,
as Mass Storage is selected at shipment).
If you have already selected PTP, be sure to select Mass Storage before connecting the camera to your computer. If you have connected
the camera to a computer running one of the above operating systems with USB set to PTP, disconnect the camera as described below.
Be sure to select Mass Storage before reconnecting the camera.
Windows 2000 Professional
A dialog will be displayed welcoming you to the “Found New Hardware Wizard.” Click Cancel to close the dialog, and then disconnect the
camera.
Windows Millennium Edition (Me)
After displaying a message stating that the hardware information database is being updated, the computer will start the “Add New Hardware
Wizard.” Click Cancel to exit the wizard, and then disconnect the camera.
Windows 98 Second Edition (SE)
The “Add New Hardware Wizard” will be displayed. Click Cancel to exit the wizard, and then disconnect the camera.
Mac OS 9
A dialog will be displayed stating that the computer is unable to use the driver needed for the “Nikon Digital Camera E5000_PTP” device. Click
Cancel to close the dialog, and then disconnect the camera.
Erratum
The note “Faster Shutter Speeds” on page 92 of the Nikon Guide to Digital Photography with the COOLPIX5000 states that “the largest
aperture setting (smallest f/-number)” should be selected for faster shutter speeds. This is incorrect. To achieve a shutter speed of
choose aperture-priority auto exposure mode, zoom the camera all the way out, and select an aperture of f/8.0. Choosing a larger aperture
(smaller f/-number) will result in slower shutter speeds.
1
/
4000
S2I01 (11)
6MAA4411—
s,
Руководство пользователя
ЦИФРОВАЯ ФОТОКАМЕРА
Ru

Содержание этого руководства
Ниже приведен список разделов этого руководства.
O
Оглавление
Î
a
Bvi–vii
Этот раздел позволяет находить информацию по названию
функции или пункта меню.
O
Вопросы и ответы
Î
a
Bviii–ix
Если название функции неизвестно, можно найти необходимую
информацию в списке вопросов и ответов.
O
Предметный указатель
Î
a
B111–114
Поиск статей по ключевому слову.
O
Сообщения об ошибках
Î
a
B97–99
Если в видоискателе или на мониторе отображается
предупреждение, решение проблемы можно найти в этом
разделе.
O
Устранение неисправностей
Î
a
B100–103
Фотокамера работает не так, как ожидалось? Ответ можно найти
в этом разделе.
Справка
Воспользуйтесь встроенной справочной системой фотокамеры для получения
информации о пунктах меню и на другие темы. Подробные сведения см. на стр. 7.
Сведения о товарных знаках
Macintosh, Mac OS и QuickTime являются зарегистрированными товарными
знаками корпорации Apple Computer. Microsoft и Windows являются
зарегистрированными товарными знаками корпорации Microsoft. Логотип SD
является товарным знаком ассоциации SD Card Association. Adobe и Acrobat
являются зарегистрированными товарными знаками корпорации Adobe Systems
Inc. PictBridge является товарным знаком. Технология D-Lighting предоставлена
компанией B Apical Limited. Все другие торговые наименования, приводимые в
настоящем руководстве и в другой документации, которая поставляется вместе с
изделиями
компании Nikon, являются
товарными
знаками
или
зарегистрированными товарными знаками своих владельцев.
i
Символы и обозначения
Для облегчения поиска необходимой
информации используются следующие
символы и обозначения.
D
Этим символом обозначены
предупреждения, с которыми
необходимо ознакомиться во
избежание повреждения
фотокамеры.
A
Этим символом обозначены
примечания, с которыми
необходимо ознакомиться перед
использованием фотокамеры.
C
Этим символом обозначены
полезные советы по работе
с фотокамерой.
B
Этот символ указывает на то, что
в другом месте данного руководства
или в Кратком руководстве
содержится дополнительная
информация.
Введение
Первые шаги
Съемка и просмотр
снимков
Сюжетный режим
Режимы P и T
Режимы P, S, A и M
Дополнительные
сведения о просмотре
Видеоролики
Записи голоса
Подключение к телевизору,
компьютеру или принтеру
Структура меню
Технические
примечания
ii
Меры безопасности
Перед началом работы с устройством внимательно изучите следующие
меры безопасности во избежание получения травм и повреждения
изделия. Всем лицам, использующим данное изделие, следует
ознакомиться с инструкциями по безопасности.
Возможные последствия нарушения указанных мер безопасности
обозначены следующим символом.
ПРЕДУПРЕЖДЕНИЯ
В случае неисправности выключите
фотокамеру
Если вы заметили дым или ощущаете
необычный запах, исходящий от
фотокамеры
или сетевого блока
питания, отсоедините адаптер и/ или
немедленно
извлеките
батарею.
Действуйте осторожно, чтобы не
получить
ожогов.
Дальнейшая
эксплуатация может привести к травме.
После удаления или отсоединения
источника
питания
отвезите
оборудование
в
авторизованный
сервисный центр компании Nikon для
осмотра.
Не разбирайте фотокамеру
Прикосновение к внутренним частям
фотокамеры или сетевого блока
питания может привести к получению
травм. Ремонт должен производиться
только
квалифицированными
специалистами. В случае повреждения
корпуса фотокамеры или сетевого
блока питания в результате падения или
другого
происшествия
отключите
сетевой блок питания, извлеките
батарею и доставьте изделие для
проверки в ближайший официальный
сервисный центр компании Nikon.
Не
пользуйтесь
фотокамерой,
зарядным устройством и сетевым
блоком питания при наличии в воздухе
легковоспламеняющихся газов
Не
работайте
с
электронным
оборудованием и с фотокамерой при
наличии
в
воздухе
легковоспламеняющихся газов: это
может привести к взрыву или пожару.
Меры
предосторожности
при
обращении с ремнем фотокамеры
Запрещается надевать ремень фотокамеры
на шею младенца или ребенка.
Храните в недоступном для детей месте
Примите
особые
меры
предосторожности
во
избежание
попадания
батарей
и
других
небольших предметов детям в рот.
Соблюдайте меры предосторожности
при обращении с батареями
Неправильное обращение с батареями
может привести к их протеканию или
взрыву. Соблюдайте следующие меры
предосторожности при использовании
батарей с данным изделием.
• Перед заменой батареи выключите
фотокамеру.
Если
используется
сетевой блок питания, убедитесь, что
он отключен от сети.
• Используйте только аккумуляторные
литий-ионные батареи EN-EL5 компании
Nikon (входят в комплект поставки). Для
зарядки этих батарей используйте
зарядное устройство MH-61.
• При установке батареи в фотокамеру
соблюдайте полярность.
• Не замыкайте контакты батареи
накоротко и не разбирайте батарею.
• Не подвергайте батареи сильному
нагреву или воздействию открытого огня.
Данным символом отмечены предупреждения и сведения, с которыми
необходимо ознакомиться до начала работы с изделием Nikon во
избежание травм.
A
A
A
A
A
A
A
iii
• Не погружайте батареи в воду и не
допускайте попадания на них воды.
• При
транспортировке
батареи
закрывайте ее контакты защитной
крышкой.
Не
храните
и
не
транспортируйте батареи вместе с
металлическими предметами, например
шпильками или украшениями.
• Из полностью разряженных батарей
может вытекать жидкость. Во избежание
повреждения изделия извлекайте из него
разряженные батареи.
• Немедленно прекратите использовать
батарею, если вы заметили в ней какие-
либо изменения, например изменение
окраски или деформацию.
• В случае попадания жидкости, вытекшей
из поврежденных батарей, на одежду
или кожу немедленно тщательно
промойте пораженные участки водой.
Соблюдайте
следующие
меры
предосторожности
во
время
эксплуатации зарядного устройства
• Используйте только зарядные устройства,
специально предназначенные для работы с
данным изделием.
• Не допускайте попадания воды на
устройство.
Несоблюдение
этого
требования может привести к возгоранию
или поражению электрическим током.
• Пыль на металлических частях сетевой
вилки или вокруг них необходимо
удалять с помощью сухой ткани.
Продолжение работы с устройством
может привести к возгоранию.
• Не прикасайтесь к сетевому шнуру и не
находитесь рядом с блоком питания во
время грозы. Несоблюдение этого
требования
может
привести
к
поражению электрическим током.
• Берегите
шнур
питания
от
повреждений, не вносите в него
конструктивные
изменения,
не
перегибайте его и не тяните за него с
усилием, не ставьте на него тяжелые
предметы,
не
подвергайте
его
воздействию открытого огня или
высоких
температур.
В
случае
повреждения изоляции шнура питания
и оголения проводов доставьте его для
проверки в официальный сервисный
центр компании Nikon. Несоблюдение
этих требований может привести к
поражению электрическим током.
Не смотрите на солнце через
видоискатель
Взгляд на солнце или другой яркий
источник света через видоискатель может
вызвать необратимое ухудшение зрения.
Используйте соответствующие кабели
При подключении кабелей к входным и
выходным
разъемам
и
гнездам
фотокамеры
используйте
только
специальные
кабели Nikon,
поставляемые вместе с фотокамерой
или продаваемые отдельно.
Соблюдайте
осторожность
при
обращении с подвижными частями
фотокамеры
Будьте внимательны. Следите за тем,
чтобы ваши пальцы и другие предметы
не были зажаты объективом или другими
подвижными частями фотокамеры.
Компакт-диски
Запрещается воспроизводить компакт-
диски, прилагаемые к изделию, в
аудиопроигрывателях компакт-дисков.
Воспроизведение компакт-дисков с
данными в аудиопроигрывателе может
привести к нарушениям слуха или
повреждению оборудования.
Соблюдайте
осторожность
при
использовании вспышки
Использование вспышки на близком
расстоянии от глаз объекта съемки может
вызвать временное ухудшение зрения.
Особенную
осторожность
следует
соблюдать при фотографировании детей:
в этом случае вспышка должна
находиться на расстоянии не менее
одного метра от объекта съемки.
Не включайте вспышку, когда человек
или объект соприкасаются с ней
Срабатывание
вспышки
может
привести к ожогу или возгоранию
одежды из-за нагрева вспышки.
Избегайте контакта
с жидкокристаллическим веществом
Если монитор разбился, необходимо
предпринять
срочные
меры
во
избежание травм из-за осколков стекла
и
предупредить
попадание
жидкокристаллического вещества на
кожу, в глаза и в рот.
A
A
A
A
A
A
A
A
iv
Уведомления
• Никакая часть руководств, включенных
в комплект поставки данного продукта, не
может быть воспроизведена, передана,
сохранена
в
системе
резервного
копирования или переведена на любой
язык в любой форме любыми средствами
без
предварительного
письменного
разрешения компании Nikon.
• Компания Nikon сохраняет за собой право
изменять
любые
характеристики
аппаратного
и
программного
обеспечения, описанного в данных
руководствах, в любое время и без
предварительного уведомления.
• Компания Nikon не несет ответственности
за какой бы то ни было ущерб, вызванный
применением данного изделия.
• Были приложены все усилия для того,
чтобы обеспечить точность и полноту
приведенной
в
руководствах
информации. Компания Nikon будет
благодарна за любую информацию
о замеченных ошибках и упущениях,
переданную
в
ближайшее
представительство компании (адрес
сообщается отдельно).
Символ для раздельной утилизации, применяемый в европейских странах
Данный символ означает, что изделие должно утилизироваться отдельно.
Следующие замечания касаются только пользователей в европейских
странах.
• Данное изделие предназначено для раздельной утилизации в
соответствующих пунктах утилизации. Не выбрасывайте изделие вместе с
бытовым мусором.
• Подробные сведения можно получить у продавца или в местной организации,
ответственной за вторичную переработку отходов.
v
Уведомление о запрещении копирования или воспроизведения
Необходимо помнить, что даже простое обладание материалом, скопированным или
воспроизведенным цифровым способом с помощью сканера, цифровой фотокамеры или
другого устройства, может преследоваться по закону.
• Материалы,
копирование
или
воспроизведение которых запрещено
законом
Не копируйте и не воспроизводите
денежные банкноты, монеты, ценные
бумаги, государственные ценные бумаги
и ценные бумаги органов местного
самоуправления, даже если такие копии и
репродукции
отмечены
штампом
«образец».
Запрещено
копирование
и
воспроизведение денежных банкнот,
монет и ценных бумаг других государств.
Запрещено
копирование
и
воспроизведение негашеных почтовых
марок и почтовых открыток, выпущенных
государством,
без
письменного
разрешения государственных органов.
Запрещено
копирование
и
воспроизведение
печатей
государственных
учреждений
и
документов, заверенных в соответствии с
законодательством.
• Предупреждения на копиях и
репродукциях
Копии и репродукции ценных бумаг,
выпущенных
частными
компаниями
(акции, векселя, чеки, подарочные
сертификаты и т. д.), сезонных билетов
или
купонов
помечаются
предупреждениями
согласно
требованиям государственных органов
(исключая минимальное
количество
копий, необходимых для использования
компанией в деловых целях). Не
копируйте
и
не
воспроизводите
государственные паспорта; лицензии,
выпущенные
государственными
учреждениями и частными компаниями;
удостоверения
личности
и
такие
документы, как пропуска или талоны на
питание.
• Уведомления
о
соблюдении
авторских прав
Копирование или воспроизведение книг,
музыкальных
произведений,
произведений
живописи,
гравюр,
печатной продукции, географических
карт, чертежей, фильмов и фотографий с
зарегистрированным авторским правом
охраняется
государственным
и
международным законодательством об
авторском
праве.
Не
используйте
изделие для изготовления незаконных
копий, нарушающих законодательство об
авторском праве.
Утилизация устройств хранения данных
Обратите внимание, что при удалении изображений или форматировании устройств
хранения данных, таких как карточки памяти или внутренняя память фотокамеры,
исходные данные изображений уничтожаются не полностью. В некоторых случаях
файлы, удаленные с отслуживших свой срок устройств хранения данных, можно
восстановить с помощью имеющихся в продаже программных средств. Информацией
личного характера могут воспользоваться злоумышленники. Ответственность за
обеспечение конфиденциальности личной информации лежит исключительно на
пользователе.
Прежде чем избавиться от неиспользуемых устройств хранения данных или передать
право собственности на них другому лицу, следует стереть всю информацию с помощью
имеющегося в продаже специального программного обеспечения или отформатировать
устройство, а затем заполнить его изображениями, не содержащими личной информации
(например, видами ясного неба). Не забудьте также заменить изображения, выбранные в
качестве заставки приветствия (B 84). При физическом уничтожении устройств хранения
данных соблюдайте меры предосторожности, чтобы не нанести ущерба здоровью.
vi
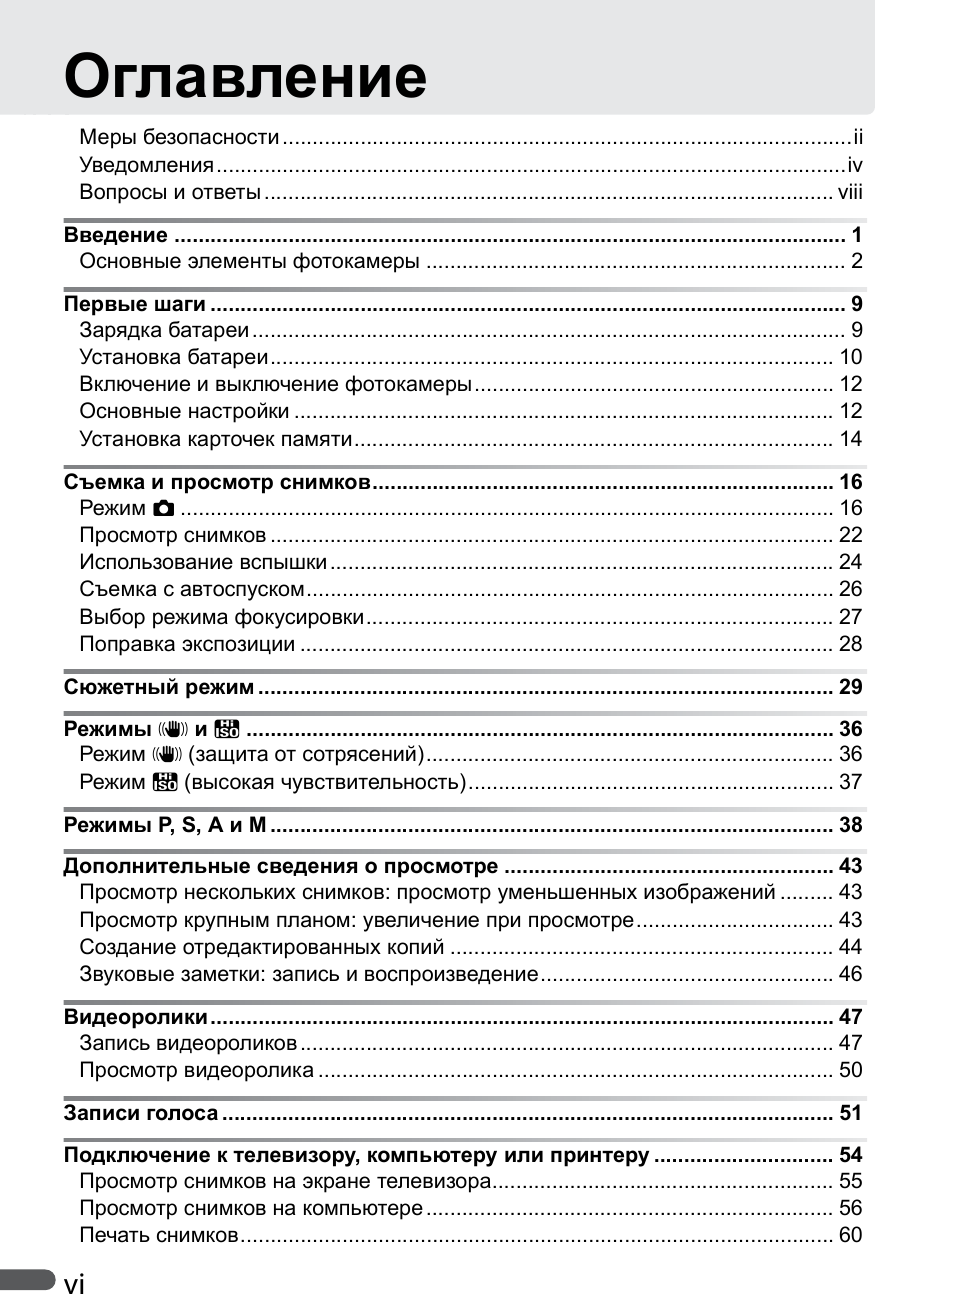
Оглавление
Меры безопасности …………………………………………………………………………………..ii
Уведомления……………………………………………………………………………………………iv
Вопросы и ответы ………………………………………………………………………………….. viii
Введение …………………………………………………………………………………………………. 1
Основные элементы фотокамеры ……………………………………………………………. 2
Первые шаги ……………………………………………………………………………………………. 9
Зарядка батареи ……………………………………………………………………………………… 9
Установка батареи…………………………………………………………………………………. 10
Включение и выключение фотокамеры…………………………………………………… 12
Основные настройки ……………………………………………………………………………… 12
Установка карточек памяти…………………………………………………………………….. 14
Съемка и просмотр снимков………………………………………………………………….. 16
Режим U ………………………………………………………………………………………………. 16
Просмотр снимков …………………………………………………………………………………. 22
Использование вспышки ………………………………………………………………………… 24
Съемка с автоспуском……………………………………………………………………………. 26
Выбор режима фокусировки…………………………………………………………………… 27
Поправка экспозиции …………………………………………………………………………….. 28
Сюжетный режим …………………………………………………………………………………… 29
Режимы P и T …………………………………………………………………………………….. 36
Режим P (защита от сотрясений)………………………………………………………….. 36
Режим T (высокая чувствительность)……………………………………………………. 37
Режимы P, S, A и M …………………………………………………………………………………. 38
Дополнительные сведения о просмотре ………………………………………………. 43
Просмотр нескольких снимков: просмотр уменьшенных изображений ……… 43
Просмотр крупным планом: увеличение при просмотре…………………………… 43
Создание отредактированных копий ………………………………………………………. 44
Звуковые заметки: запись и воспроизведение…………………………………………. 46
Видеоролики………………………………………………………………………………………….. 47
Запись видеороликов …………………………………………………………………………….. 47
Просмотр видеоролика ………………………………………………………………………….. 50
Записи голоса ………………………………………………………………………………………… 51
Подключение к телевизору, компьютеру или принтеру ………………………… 54
Просмотр снимков на экране телевизора………………………………………………… 55
Просмотр снимков на компьютере ………………………………………………………….. 56
Печать снимков……………………………………………………………………………………… 60
vii
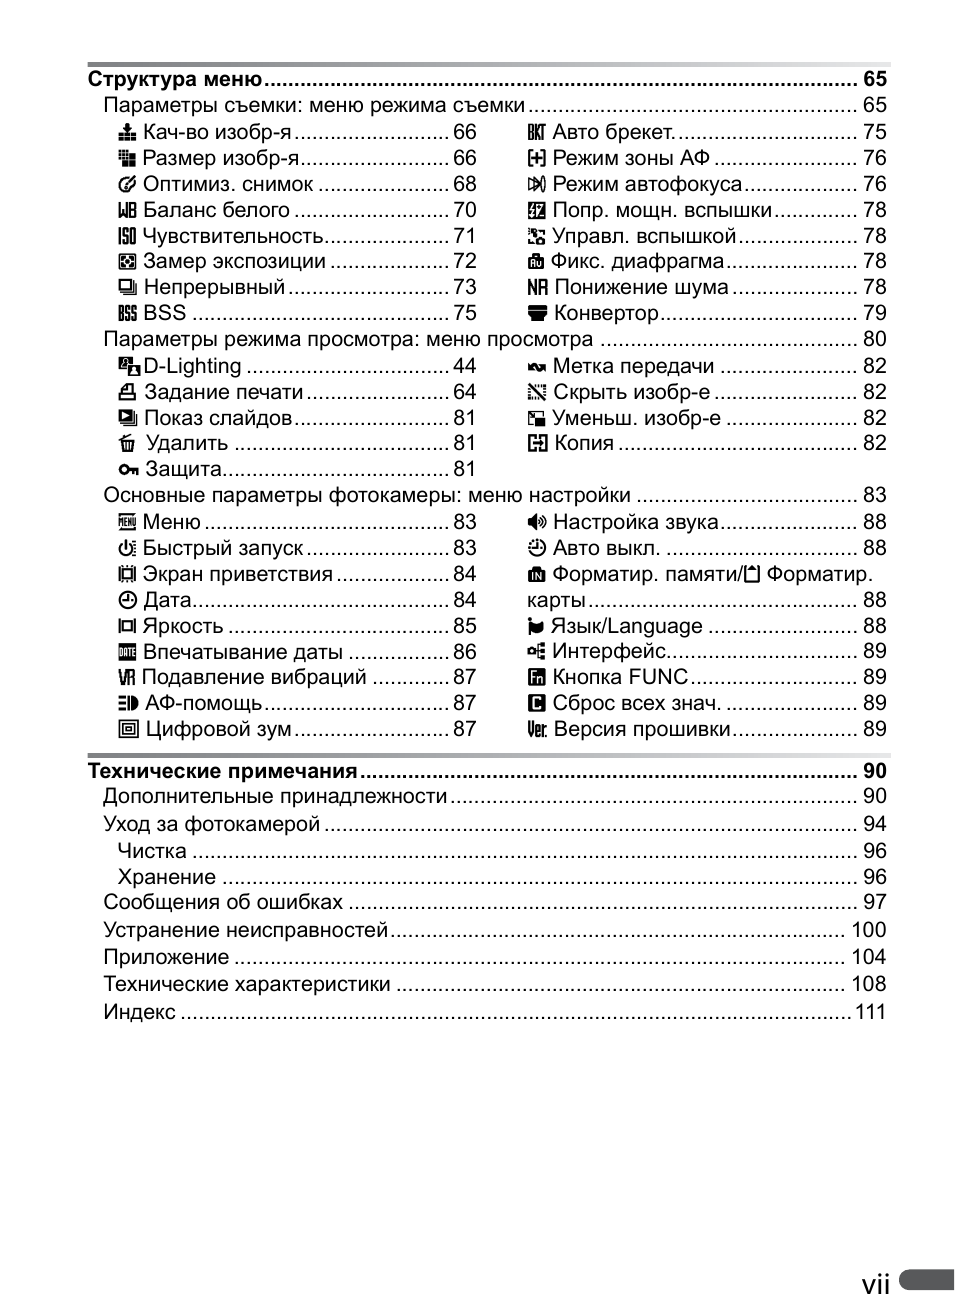
Структура меню……………………………………………………………………………………… 65
Параметры съемки: меню режима съемки ………………………………………………. 65
j Кач-во изобр-я …………………….. 66
n Размер изобр-я……………………. 66
C
Оптимиз. снимок …………………. 68
k
Баланс белого …………………….. 70
n
Чувствительность………………… 71
p Замер экспозиции ……………….. 72
a
Непрерывный ……………………… 73
L
BSS ……………………………………. 75
a Авто брекет…………………………. 75
G
Режим зоны АФ …………………… 76
E
Режим автофокуса………………. 76
t Попр. мощн. вспышки………….. 78
o Управл. вспышкой……………….. 78
d Фикс. диафрагма…………………. 78
h Понижение шума ………………… 78
e Конвертор…………………………… 79
Параметры режима просмотра: меню просмотра ……………………………………. 80
J
D-Lighting ……………………………. 44
M
Задание печати …………………… 64
d
Показ слайдов…………………….. 81
j
Удалить ……………………………… 81
O
Защита……………………………….. 81
X
Метка передачи ………………….. 82
Z
Скрыть изобр-е …………………… 82
w
Уменьш. изобр-е …………………. 82
f
Копия …………………………………. 82
Основные параметры фотокамеры: меню настройки ………………………………. 83
a
Меню ………………………………….. 83
P
Быстрый запуск …………………… 83
s
Экран приветствия ………………. 84
W
Дата……………………………………. 84
r
Яркость ………………………………. 85
h
Впечатывание даты …………….. 86
K
Подавление вибраций …………. 87
B
АФ-помощь…………………………. 87
0
Цифровой зум…………………….. 87
e
Настройка звука………………….. 88
L
Авто выкл. ………………………….. 88
q
Форматир. памяти/Q Форматир.
карты……………………………………… 88
o
Язык/Language ……………………. 88
m
Интерфейс………………………….. 89
N
Кнопка FUNC………………………. 89
V
Сброс всех знач. …………………. 89
f
Версия прошивки………………… 89
Технические примечания……………………………………………………………………….. 90
Дополнительные принадлежности………………………………………………………….. 90
Уход за фотокамерой …………………………………………………………………………….. 94
Чистка ………………………………………………………………………………………………… 96
Хранение ……………………………………………………………………………………………. 96
Сообщения об ошибках …………………………………………………………………………. 97
Устранение неисправностей…………………………………………………………………. 100
Приложение ………………………………………………………………………………………… 104
Технические характеристики ………………………………………………………………… 108
Индекс ………………………………………………………………………………………………….111
viii
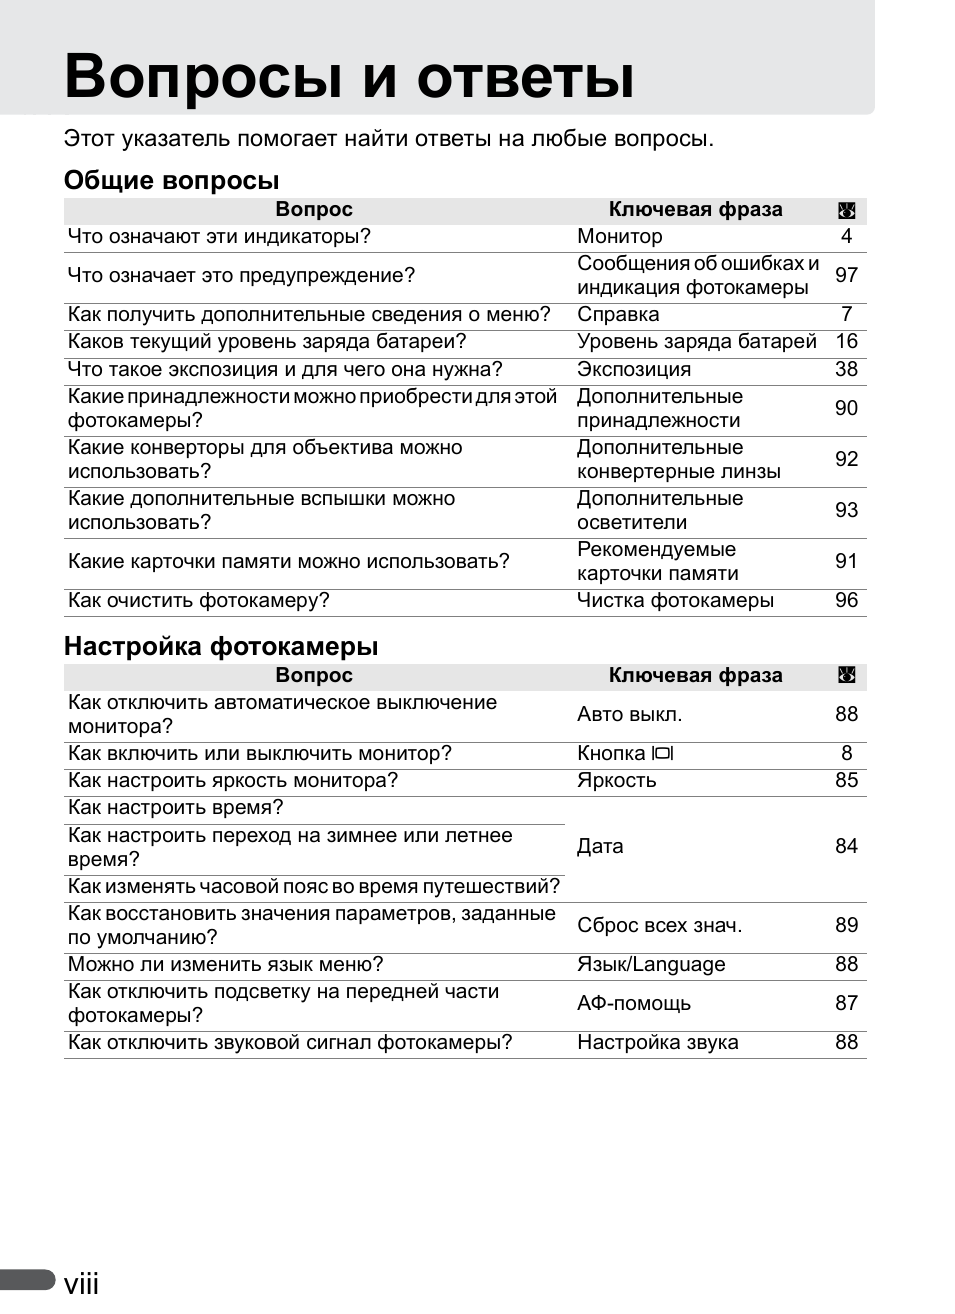
Вопросы и ответы
Этот указатель помогает найти ответы на любые вопросы.
Общие вопросы
Настройка фотокамеры
Вопрос
Ключевая фраза
B
Что означают эти индикаторы?
Монитор
4
Что означает это предупреждение?
Сообщения об ошибках и
индикация фотокамеры
97
Как получить дополнительные сведения о меню?
Справка
7
Каков текущий уровень заряда батареи?
Уровень заряда батарей 16
Что такое экспозиция и для чего она нужна?
Экспозиция
38
Какие принадлежности можно приобрести для этой
фотокамеры?
Дополнительные
принадлежности
90
Какие конверторы для объектива можно
использовать?
Дополнительные
конвертерные линзы
92
Какие дополнительные вспышки можно
использовать?
Дополнительные
осветители
93
Какие карточки памяти можно использовать?
Рекомендуемые
карточки памяти
91
Как очистить фотокамеру?
Чистка фотокамеры
96
Вопрос
Ключевая фраза
B
Как отключить автоматическое выключение
монитора?
Авто выкл.
88
Как включить или выключить монитор?
Кнопка Q
8
Как настроить яркость монитора?
Яркость
85
Как настроить время?
Дата
84
Как настроить переход на зимнее или летнее
время?
Как изменять часовой пояс во время путешествий?
Как восстановить значения параметров, заданные
по умолчанию?
Сброс всех знач.
89
Можно ли изменить язык меню?
Язык/Language
88
Как отключить подсветку на передней части
фотокамеры?
АФ-помощь
87
Как отключить звуковой сигнал фотокамеры?
Настройка звука
88
07:59
Nikon Coolpix P1000 обзор от Фотосклад.ру
03:20
Cameras.co.uk Guide to the Nikon Coolpix P5000
02:15
Nikon Coolpix P5000 — demonstration video
06:47
Nikon Coolpix P5000 [2] Fisheye / SpeedLight / Wideangle
01:03
Filmagem da Lua. Câmera Nikon Coolpix P5000 36X de Zoom
01:03
Nikon — Coolpix P5000
03:08
Nikon P900 Captures ISS Lunar Transit
Нажмите на кнопку для помощи
Nikon Coolpix 5000
i
The documentation for this product includes the manuals listed below. Please
be sure to read all instructions thoroughly to get the most from your camera.
Quick-Start Guide
The Quick-Start Guide takes you through the process of unpacking and set-
ting up your Nikon digital camera, taking your first photographs, and trans-
ferring them to your computer.
Guide to Digital Photography
The Guide to Digital Photography (this manual) provides complete operat-
ing instructions for your camera.
Nikon View 4 Reference Manual
The Nikon View 4 Reference Manual can be found in electronic format on
the reference CD provided with your camera. For information on viewing
the Reference Manual, see “Connections” in this manual.
Product Documentation
View the manual for the Nikon Coolpix 5000 here, for free. This manual comes under the category photo cameras and has been rated by 3 people with an average of a 8.8.
This manual is available in the following languages: English. Do you have a question about the Nikon Coolpix 5000 or do you need help?
Ask your question here
Product Images (1)
Nikon Coolpix 5000 specifications
Below you will find the product specifications and the manual specifications of the Nikon Coolpix 5000.
The Nikon Coolpix 5000 is a digital camera that was released in 2002. It features a 5-megapixel sensor and a 3x optical zoom lens. The camera has a sleek, compact design and is lightweight, making it easy to carry around and use.
The Coolpix 5000 offers a range of shooting modes, including auto, manual, and scene modes, allowing users to capture images in various situations. It also has a built-in flash for low-light photography. The camera’s LCD screen can be tilted, providing flexibility for capturing images from different angles.
In terms of connectivity, the Coolpix 5000 offers USB and video output ports, allowing users to transfer images to their computer or view them on a TV. It also has a memory card slot for storing images.
The camera supports various file formats, including JPEG and TIFF, and has a burst mode for continuous shooting. It also features white balance and exposure compensation options for achieving accurate colors and brightness in photos.
The Coolpix 5000 comes with a rechargeable battery and is compatible with Nikon’s range of accessories, including lenses and flashes. It has a sturdy build quality and is designed to withstand regular use.
Overall, the Nikon Coolpix 5000 is a reliable and versatile digital camera that offers good image quality and a range of features for both amateur and professional photographers.
General
| Brand | Nikon |
| Model | Coolpix 5000 |
| Product | photo camera |
| Language | English |
| Filetype | User manual (PDF) |
Frequently Asked Questions
Can’t find the answer to your question in the manual? You may find the answer to your question in the FAQs about the Nikon Coolpix 5000 below.
How do I turn on the Nikon Coolpix 5000 camera?
To turn on the Nikon Coolpix 5000 camera, follow these steps:
1. Locate the power switch on the camera. It is usually located on the top or side of the camera body.
2. Slide the power switch to the «On» position. This will activate the camera and power it up.
3. Once the camera is turned on, you will see indicators and information displayed on the control panel or LCD screen.
4. To ensure proper focus, press the shutter-release button halfway down. This will activate the autofocus system and the green lamp next to the viewfinder will light up when the camera has focused on the subject.
5. To take a picture, press the shutter-release button all the way down. This will capture the image.
Note: Make sure you have a fully charged battery or the camera is connected to a power source before turning it on. Also, refer to the camera’s manual for more detailed instructions and additional features.
Please let me know if you need further assistance.
Why is the zoom function not working on my Nikon Coolpix 5000 camera?
There could be several reasons why the zoom function is not working on your Nikon Coolpix 5000 camera. Here are some possible solutions:
1. Check if the camera is in digital zoom mode: Press and hold the zoom button for more than two seconds at the maximum optical zoom position. The green lamp should blink slowly to indicate that digital zoom is activated. If the digital zoom mode is not enabled, the zoom function may not work.
2. Ensure that the monitor is turned on: Digital zoom can only be used when the monitor is on. If the monitor is off, the digital zoom function will not be available.
3. Verify the camera settings: Make sure that the image quality is not set to «HI» and that «Black&White» is not selected in the saturation control sub-menu. Also, check if «Multi-Shot 16» or «Ultra HS» is selected in the continuous sub-menu. These settings may restrict the use of digital zoom.
4. Check the zoom options: Access the zoom options sub-menu in the camera setup menu. Make sure that the «Digital Tele» option is set to «On» to enable digital zoom. If it is set to «Off,» pressing the zoom button at the maximum optical zoom position will have no effect.
5. Consider the aperture settings: In some cases, the camera may maintain the selected aperture as you zoom in or out. Check the «Fixed Aperture» option in the zoom options sub-menu. If it is set to «On,» the aperture will remain fixed at the selected f/-number as you zoom. However, note that the selected f/-number may exceed the camera’s exposure range at the new zoom position.
Please note that these troubleshooting steps are based on the information available and may not cover all possible scenarios. If the issue persists, it is recommended to consult the camera’s manual or contact Nikon customer support for further assistance.
Can I use a different battery pack with the Nikon Coolpix 5000 camera?
Yes, you can use a different battery pack with the Nikon Coolpix 5000 camera. The camera is compatible with the rechargeable Nikon EN-EL1 lithium-ion battery, which is included with the camera. However, if you prefer to use a different battery pack, you have a few options:
1. Non-rechargeable 2CR5 (DL245) lithium batteries: These batteries are available at various retail outlets and can be used with the Coolpix 5000. However, it is recommended to use the rechargeable Nikon EN-EL1 battery for optimal performance.
2. MB-E5000 battery pack: This battery pack, available separately, can be used to power the camera for extended periods. It takes six ordinary LR-6 (AA) batteries and is equipped with its own shutter release and zoom buttons for taking photographs in portrait orientation.
Please note that using a different battery pack may affect the camera’s performance and battery life. It is recommended to use the recommended battery pack or consult the camera’s manual for more information on compatible battery options.
If you have any further questions, feel free to ask.
How can I improve the image quality of my photos taken with the Nikon Coolpix 5000 camera?
To improve the image quality of your photos taken with the Nikon Coolpix 5000 camera, you can follow these steps:
1. Adjust the image quality setting: Press the button repeatedly until the desired image quality setting is displayed in the control panel or monitor. The available options are BASIC and NORMAL. Choosing NORMAL will result in higher image quality compared to BASIC.
2. Consider the image size: The camera offers different image size options, such as VGA (640×480 pixels) and XGA (1024×768 pixels). Selecting a larger image size, such as XGA, can improve the overall detail and resolution of your photos.
3. Be mindful of compression: The camera uses JPEG compression to reduce the file size of the images. However, higher compression levels can result in a loss of detail and visible block patterns. It is recommended to find a balance between file size and image quality by selecting an appropriate compression level.
4. Optimize for electronic distribution: If you plan to share your photos electronically, such as via email or on the web, choose a lower image quality setting (BASIC or NORMAL) and a smaller image size (VGA). This will reduce file size and make it easier to upload and download the images.
By adjusting the image quality settings, image size, and considering compression levels, you can enhance the image quality of your photos taken with the Nikon Coolpix 5000 camera.
If you have any further questions, feel free to ask.
Why is the video playback not working on the monitor of my Nikon Coolpix 5000 camera?
There could be several reasons why the video playback is not working on the monitor of your Nikon Coolpix 5000 camera. Here are some possible solutions:
1. Check the video cable connection: Ensure that the video cable is correctly connected to both the camera and the television. Make sure the plugs are securely inserted into the A/V OUT connector on the camera and the video-in jack on the television.
2. Verify the television settings: Make sure the television is tuned to the correct video channel. Refer to the television’s manual for instructions on how to select the appropriate video input.
3. Check the Video Mode setting: Ensure that the Video Mode setting on the camera matches the video standard of the television. The options are NTSC and PAL. Select the standard that matches your television’s system.
4. Consider using an AC adapter: If the display on the television turns off when the camera enters sleep mode, connect the camera to an EH-21 AC adapter/battery charger (available separately). This will prevent the display from turning off during video playback.
Please note that these troubleshooting steps are based on the information available and may not cover all possible scenarios. If the issue persists, it is recommended to consult the camera’s manual or contact Nikon customer support for further assistance.
How do I turn on the Nikon Coolpix 5000 camera?
To turn on the Nikon Coolpix 5000 camera, follow these steps:
1. Locate the power switch on the camera. It is usually located on the top or side of the camera body.
2. Slide the power switch to the «On» position. This will activate the camera and power it up.
3. Once the camera is turned on, you will see indicators and information displayed on the control panel or LCD screen.
4. The camera is now ready to use. You can start taking photos or accessing different shooting modes by using the mode selector.
5. To turn off the camera, simply slide the power switch to the «Off» position.
Please note that the exact location of the power switch may vary slightly depending on the camera model, but it is typically labeled and easily identifiable.
Why is the zoom function not working on my Nikon Coolpix 5000 camera?
If the zoom function is not working on your Nikon Coolpix 5000 camera, there could be a few possible reasons. Here are some troubleshooting steps you can try:
1. Check if the camera is in digital zoom mode. Press and hold the zoom button for more than two seconds at the maximum optical zoom position to activate digital zoom. If the camera is not in digital zoom mode, the zoom function may not work.
2. Ensure that the monitor is turned on. Digital zoom can only be used when the monitor is on. If the monitor is off, the digital zoom function will not be available.
3. Verify the image quality settings. Digital zoom may be restricted when the image quality is set to HI (high). Try changing the image quality setting to a different option and see if the zoom function becomes active.
4. Check the zoom options in the camera setup menu. Access the zoom options sub-menu and make sure that digital zoom is enabled. If it is set to Off, pressing the zoom button at the maximum optical zoom position will have no effect.
5. If none of the above steps resolve the issue, it is recommended to refer to the camera’s manual or contact Nikon customer support for further assistance.
Please note that these troubleshooting steps are based on the information available for the Nikon Coolpix 5000 camera and may vary slightly depending on the specific model or firmware version.
Can I use a different battery pack with the Nikon Coolpix 5000 camera?
Yes, you can use a different battery pack with the Nikon Coolpix 5000 camera. The camera is compatible with the rechargeable Nikon EN-EL1 lithium-ion battery, which is included with the camera. However, there are also alternative power sources that you can use.
One option is the six-volt 2CR5 (DL245) lithium battery, which is available separately. This non-rechargeable battery can be used with the Coolpix 5000 camera.
Another option is the MB-E5000 battery pack, which is also available separately. This battery pack can be used to power the camera for extended periods. It takes six ordinary LR-6 (AA) batteries and is equipped with its own shutter release and zoom buttons for taking photographs in portrait orientation.
It is important to note that while using a different battery pack is possible, it is recommended to use the rechargeable Nikon EN-EL1 lithium-ion battery included with the camera for optimal performance and convenience.
How do I adjust the shutter speed on the Nikon Coolpix 5000 camera?
To adjust the shutter speed on the Nikon Coolpix 5000 camera, follow these steps:
1. Set the camera to the «Shutter-Priority Auto» mode. This mode allows you to manually adjust the shutter speed while the camera automatically selects the appropriate aperture value.
2. Rotate the command dial to adjust the shutter speed. The available options range from 8 seconds to 1/2000th of a second, in increments equivalent to 1 EV (exposure value) or 1 step.
3. As you rotate the command dial, the selected shutter speed will be displayed in the control panel and monitor of the camera.
4. If the selected shutter speed would result in an underexposed or overexposed photograph, the shutter speed displayed in the control panel and monitor will flash when you press the shutter-release button halfway. In such cases, choose another shutter speed and try again.
5. It is important to note that at shutter speeds of 1/4th of a second or slower, the shutter-speed indicator in the monitor may turn yellow to indicate that mottling or noise may appear in the final photograph. In such situations, it is recommended to either choose a faster shutter speed or enable noise reduction.
Please keep in mind that the camera has certain limitations on shutter speeds in continuous shooting modes and that faster shutter speeds can be achieved by using the aperture-priority auto mode, selecting the largest aperture setting, and zooming the camera all the way out.
For long time-exposures, such as bulb exposures of up to five minutes, you can set the camera to manual exposure mode and select the BULB shutter speed. This allows the shutter to remain open as long as the shutter-release button is pressed, up to a maximum of 60 seconds. It is recommended to use a tripod and a remote shutter release for such long exposures.
Please note that the above steps are based on the information available for the Nikon Coolpix 5000 camera and may vary slightly depending on the specific model or firmware version.
Why are my photos on the Nikon Coolpix 5000 camera appearing noisy?
Noisy photos on the Nikon Coolpix 5000 camera can occur due to various factors, including high sensitivity (ISO) settings and slow shutter speeds. To reduce noise and improve image quality, follow these steps:
1. Check the ISO settings: When using high ISO settings above ISO 100 equivalent, noise in the form of randomly-spaced brightly-colored pixels may appear, especially in shadows. Try using lower ISO settings to minimize noise.
2. Adjust the shutter speed: Noise can also be more noticeable in photos taken with slower shutter speeds, particularly in long time-exposures. Consider using faster shutter speeds to reduce noise.
3. Enable noise reduction: The camera offers noise reduction options to minimize noise in photos. The «On» option reduces noise in long time-exposures, while the «Clear Image Mode» option minimizes noise and improves color gradation in photos of certain sizes.
4. Use appropriate image sizes: Some image sizes, such as FULL, UXGA, and 3:2, may not be available when using the «Clear Image Mode» noise reduction setting. Choose image sizes that are suitable for your intended print or electronic distribution.
By adjusting ISO settings, shutter speed, and utilizing noise reduction options, you can reduce noise and improve the overall quality of your photos taken with the Nikon Coolpix 5000 camera.
Is the manual of the Nikon Coolpix 5000 available in English?
Yes, the manual of the Nikon Coolpix 5000 is available in English .
Is your question not listed? Ask your question here
- Topics
- manualsbase, manuals,
- Collection
- manuals_nikon; manuals; additional_collections
- Language
- English
- Item Size
- 10.7M
- Addeddate
- 2020-06-07 00:02:23
- Identifier
- manualsbase-id-29761
- Identifier-ark
- ark:/13960/t3wt7hf52
- Ocr
- ABBYY FineReader 11.0 (Extended OCR)
- Ppi
- 600
- Scanner
- Internet Archive Python library 1.9.3
plus-circle Add Review
plus-circle Add Review
comment
Reviews
There are no reviews yet. Be the first one to
write a review.
99
Views
DOWNLOAD OPTIONS
download 1 file
ABBYY GZ download
Temporarily Unavailable
DAISY
For users with print-disabilities
Temporarily Unavailable
EPUB
download 1 file
FULL TEXT download
download 1 file
ITEM TILE download
download 1 file
PAGE NUMBERS JSON download
download 1 file
PDF download
download 1 file
SINGLE PAGE PROCESSED JP2 ZIP download
download 1 file
TORRENT download
download 12 Files
download 6 Original
SHOW ALL
IN COLLECTIONS
Manuals: Nikon
The Manual Library
Additional Collections
Uploaded by
chris85
on

NIKON CORPORATION
FUJI BLDG., 2-3, MARUNOUCHI 3-CHOME, CHIYODA-KU, TOKYO 100-8331, JAPAN
www.nikon-image.com/eng/
Printed in Japan Code No. 6CE41183 (0203-53.610)K
COOLPIX 5000
EXTRAORDINARY DIGITAL
5.0
Effective Megapixels
Superhigh-precision
28-85mm
Zoom-Nikkor Lens
(35mm [135] equiv.)
1/4,000 sec.
Top Shutter Speed
3 Frames
Per Second
at Full Image Size
Durable
Magnesium
Alloy Body
Nikon Digital Camera COOLPIX 5000 Specifications
Type of camera
Digital camera E5000
Effective pixels
5.0 million
CCD
2/3-inch-type CCD (total pixels: 5.24 million)
Image size
2,560 x 1,920 pixels,
UXGA-size (1,600 x 1,200), SXGA-size (1,280 x 960),
XGA-size (1,024 x 768), VGA-size (640 x 480),
3:2 (2,560 x 1,704) selectable
Lens
3x Zoom-Nikkor; f=7.1~21.4mm [35mm (135) format equivalent
to 28~85mm] /F2.8~4.8 with macro;
9 elements in 7 groups; all elements are made of environmentally
friendly glass; Nikon Super Integrated Coating (SIC) applied; three
glass molded aspherical lens elements included
Digital zoom
Up to 4x
Autofocus
Contrast-detect TTL AF;
7,514-step autofocus control including macro range;
5-Area Multi AF or Spot AF selectable
Focus modes
1) Continuous AF mode (when using LCD monitor),
2) Single AF mode (when not using LCD monitor and/or
selectable from shooting menu), 3) Manual (50 steps from 2cm
[0.8 in.] to infinity (
∞
) with Focus Confirmation Indication)
Focus range
50cm (19.7 in.) to infinity (
∞
);
2cm (0.8 in.) to infinity (
∞
) in Macro mode
Optical viewfinder
Real-image zoom viewfinder; diopter adjustment: -2 ~ +1m
-1
LCD monitor
1.8-in., 110,000-dot, low-temp. polysilicon TFT LCD (white LED
backlight);
brightness/hue adjustment; frame coverage: approx. 97%
Storage
System: EXIF 2.1 file (uncompressed TIFF or compressed JPEG)
Design rule for Camera File system (DCF), Digital Print Order
Format (DPOF), QuickTime Motion JPEG (Movie)
Media: CF Card Type I/II, 512MB/1GB Microdrive™ Card
Number of frames with 32MB CF Card (approx.)
Image size
FULL
3:2
UXGA
SXGA
XGA
VGA
Image quality
HI
2
2
—
—
—
—
FINE
13
14
32
50
75
173
NORMAL
26
28
62
95
139
289
BASIC
51
55
118
173
243 459
User setting
1) Automatic mode (default); Custom mode (three combinations of
mode setting can be memorized in #1-#3), 2) White Balance,
3) (Exposure) Metering, 4) Continuous (Shooting), 5) Best-Shot
Selector (BSS), 6) Image Adjustment (Auto/Normal/More Contrast/
Less Contrast/Lighten/Darken), 7) Saturation Control (-2 ~ +1/
Black & White),  Lens, 9) Exposure Options (AE Lock, Maximum
bulb duration 1 min./5 min.), 10) Focus Options, 11) Image
Sharpening, 12) Auto Bracketing, 13) Noise Reduction, Clear Image
Capture modes
1) Single,
2) Continuous H (3 fps; up to 3 frames),
3) Continuous L (1.5 fps),
4) Multi-Shot 16 (consecutive 16 frames at 3 fps),
5) High-speed Continuous (SXGA, XGA, VGA-size images; 3 fps),
6) Ultra High-speed Continuous (QVGA-size images; 30 fps;
number of frames selectable, up to 100 frames),
7) Movie with audio (QVGA-size images; 15 fps; up to 60 sec.)
Shutter
Mechanical and charge-coupled electronic shutter;
1/4,000 (with minimum aperture) to 1 sec. in AUTO mode and
Programmed Auto; 1/4,000 to 8 sec. in Aperture-Priority
Auto; 1/2,000 to 8 sec. in Shutter-Priority Auto and Manual; Bulb
time limit (up to 5 minutes)
Aperture
7-blade iris diaphragm; 10 steps in 1/3 EV increments
Exposure control
1) Programmed Auto with Flexible Program [P],
2) Shutter-Priority Auto [S], 3) Aperture-Priority Auto [A],
4) Manual [M]; Exposure Compensation (±2 EV in 1/3 EV steps);
Auto Exposure Bracketing (3 or 5 frames within ±2 EV)
Exposure metering
4-mode TTL metering; 1) 256-segment Matrix [ ],
2) Center-Weighted [ ], 3) Spot [ ], 4) Spot AF Area [ ]
Exposure range
EV -2.0 ~ +18.0 (W), EV -0.5 ~ +17.0 (T) (ISO 100 equivalent)
Sensitivity (approx.)
ISO 100 equivalent; 100, 200, 400, 800, and Auto
(can be controlled in any exposure mode)
White balance
1) Matrix Auto White Balance with TTL control, 2) 5-mode
Manual with fine tuning (Fine/Incandescent/Fluorescent/Cloudy/
Speedlight), 3) Preset, 4) White Balance Bracketing
Self-timer
10 sec. or 3 sec. duration
Built-in Speedlight
Guide number: 10 (when sensitivity is at ISO 100 equivalent)
Flash control: Sensor flash system
Flash modes: 1) Auto Flash, 2) Flash Cancel, 3) Anytime Flash,
4) Slow Sync, 5) Red-Eye Reduction
Accessory shoe
Standard ISO 518; lock pin provided prevents Nikon Speedlight from
slipping off
External Speedlight
Hotshoe connects to external Nikon Speedlight
SB-80DX/28DX/50DX/28/27/26/25/24/23/22s/30;
built-in Speedlight can be canceled when using external
Speedlight(s)
Playback menu options
1) 1 frame, 2) Thumbnail (4/9 segments), 3) Slide show,
4) Movie with audio, 5) Enlarged playback (up to 6x);
Shooting information; Histogram indication and highlight
point display; Hide and protect attributes can be set to
each image; Focus confirmation indication
Interface
USB 1.1
I/O terminal
Power input, Audio/Video output (NTSC or PAL selectable),
Digital terminal (USB 1.1/Remote Cord)
Power requirements
One Rechargeable Li-ion Battery EN-EL1 (included),
One 6V 2CR5/DL245 lithium battery (optional),
Six 1.5V LR6 (AA-size alkaline) batteries* with Battery Pack
MB-E5000 (optional), AC adapter (optional)
*1.5V Lithium, 1.2V NiMH, or 1.2V NiCd batteries can also be used.
Battery life
Approx. 100 min. when using LCD monitor and
EN-EL1 battery at normal temperature (20ºC [68ºF])
Dimensions (W x H x D)
Approx. 101.5 x 81.5 x 67.5mm (4.0 x 3.2 x 2.7 in.)
Weight (without battery)
Approx. 360g (12.6 oz.)
Accessories included*
Lens cap, Camera strap, AV cable, CompactFlash™ Card,
USB cable UC-E1, Rechargeable Li-ion Battery EN-EL1,
Battery Charger, Nikon View 4 CD-ROM
Optional accessories
Fisheye Converter FC-E8, Wideangle Converter WC-E68, Telephoto
Converter TC-E2, Telephoto Converter TC-E3ED**, Slide Copy
Adapter ES-E28***, Step Down Ring Lens Adapter UR-E5 and
UR-E6, Lens Hood HN-E5000, LCD Hood HL-E5000, Battery Pack
MB-E5000, Remote Cord MC-EU1
* Standard accessories may differ by country or area.
** Recommended for use with 1.2x digital zoom or higher
(vignetting occurs otherwise)
***Recommended for use with 1.4x digital zoom or higher
Driver Software Nikon View 4 System Requirements
Macintosh
OS
Mac
®
OS8.6 ~ 9.2
Models
iMac™, iBook™, Power Macintosh
®
G3 (Blue/White), Power Mac™ G4
or later, PowerBook
®
G3 (only built-in USB ports supported) or later
RAM
32Mbyte (64Mbyte or more recommended)
Hard disk
15MB required for installation, with additional amount equivalent to twice the
capacity of the camera memory card required when Nikon View 4 is running
Display
640 x 480 with 16-bit color (800 x 600 or greater, full color recommended)
Others
CD-ROM drive, USB interface (only built-in USB ports supported),
Mac
®
OS8.6 needs USB driver (ver. 1.3.5) on Apple’s website
Windows
OS/Models
Windows
®
98/98SE, Windows
®
2000 Professional, Windows
®
Me pre-installed
model
CPU
MMX
®
Pentium
®
or later
RAM
64Mbyte (128Mbyte or more recommended)
Hard disk
15MB required for installation, with additional amount equivalent to twice the
capacity of the camera memory card required when Nikon View 4 is running
Display
640 x 480 with 16-bit color (800 x 600 or greater, full color
recommended)
Others
CD-ROM drive, USB interface (only built-in USB ports supported)
●
Windows
®
is either a registered trademark or trademark of Microsoft Corporation in the United States and/or other countries.
●
Macintosh
®
is either a registered trademark or trademark of Apple Computer Inc. in the United States and/or other
countries.
●
CompactFlash™ is a trademark of SanDisk Corporation.
●
Products and brand names are trademarks or registered trademarks of their respective companies.
●
Images on LCDs and monitors shown in this brochure are simulated.
Specifications and equipment are subject to change without any notice or obligation on the part of the manufacturer. March 2002
©2001-2002 NIKON CORPORATION
www.nikon-coolpix.com
En