
DMF 10 Zoom
PROFESSIONAL
Bedienungsanleitung
Operating instructions
Instructions d’emploi
Instrucciones de servicio
Manual de instruções
Istruzioni d’uso
Gebruiksaanwijzing
Betjeningsvejledning
Bruksanvisning
Brukerveiledningen
Käyttöohje
Οδηγία χειρισμού
Kullanım kılavuzu
取扱説明書
操作指南
Instrukcja obsługi
Návod k obsluze
Návod na používanie
Használati utasítás
Руководство по
эксплуатации
Інструкція з експлуатації
Instrucţiuni de folosire
Ръководство за
експлоатация
Uputstvo za opsluživanje
Navodilo za uporabo
Upute za uporabu
Kasutusjuhend
Lietošanas pamācība
Naudojimo instrukcija
10
11
12
8
9
8
1 609 929 P99 • 8.1.08
a
bc d
k
j
e
i
h
f
g
1
2
1 609 929 P99 • 8.1.08
3
4
5
6
7

Funktionsbeschreibung
Optimales Arbeiten mit dem Messwerkzeug ist
nur möglich, wenn Sie die Bedienungsanleitung
und die Arbeitshinweise vollständig lesen und die
darin enthaltenen Anweisungen strikt befolgen.
BEWAHREN SIE DIESE ANWEISUNGEN GUT AUF.
Bitte klappen Sie die Ausklappseite mit der Darstellung des Messwerkzeugs auf, und lassen Sie diese Seite aufgeklappt, während Sie die
Bedienungsanleitung lesen.
Bestimmungsgemäßer Gebrauch
Das Messwerkzeug ist bestimmt zur Suche nach Metallen (Eisen- und
Nichteisenmetalle, z.B. Armierungseisen), Holzbalken sowie spannungsführenden Leitungen in Wänden, Decken und Fußböden.
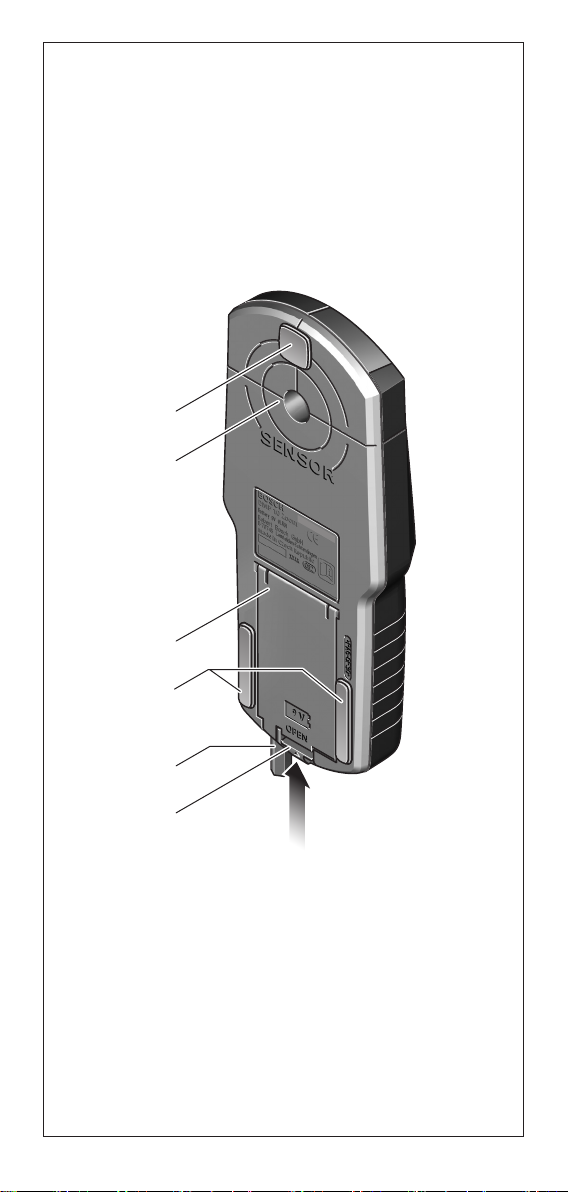
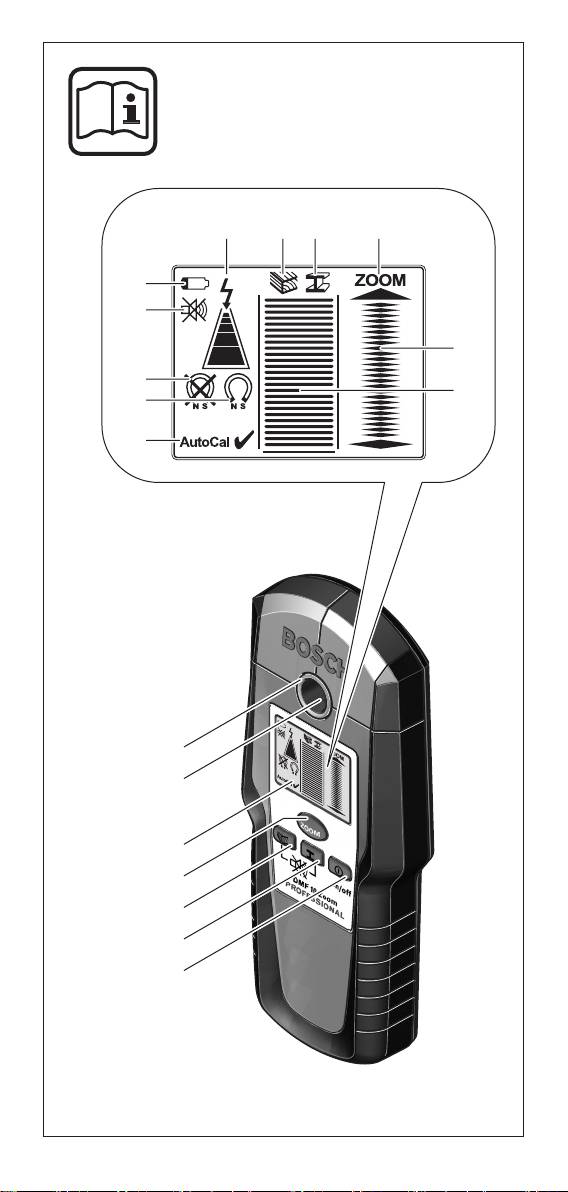
Abgebildete Komponenten
Die Nummerierung der abgebildeten Komponenten bezieht sich auf die
Darstellung des Messwerkzeuges auf der Grafikseite.
1 Leuchtring
2 Markierungsöffnung
3 Display
4 Taste „ZOOM“
5 Taste für Holzsuche
6 Taste für Metallsuche
7 Ein-Aus-Taste „on/off“
8 Filzgleiter
9 Sensorbereich
10 Batteriefachdeckel
11 Bleistift zum Markieren (herausnehmbar)
12 Arretierung des Batteriefachdeckels
Anzeigenelemente
a Anzeige von spannungsführenden Leitungen
b Anzeige der Funktion Holzsuche
c Anzeige der Funktion Metallsuche
d Anzeige der Funktion „ZOOM“
e Messanzeige „ZOOM“
f Messanzeige
g Kalibrierungsanzeige „AutoCal“
h Anzeige magnetischer Metalle
i Anzeige nichtmagnetischer Metalle
j Anzeige für abgeschalteten Signalton
k Batterie-Anzeige
1 609 929 P99 • 8.1.08
Deutsch– 1

Technische Daten
Digitales Ortungsgerät DMF 10 Zoom
Sachnummer 3 601 K10 0..
max. Erfassungstiefe*:
Eisenmetalle 100 mm
Nichteisenmetalle (Kupfer) 80 mm
Kupferleitungen (spannungsführend)** 50 mm
Holz 20 mm
Abschaltautomatik nach ca. 5 min
Betriebstemperatur –10 °C … +50 °C
Lagertemperatur –20 °C … +70 °C
Batterie 1 x 9 V 6LR61
Akku 1 x 9 V 6F22
Betriebsdauer (Alkali-Mangan-Batterie) ca. 6 h
Gewicht entsprechend
EPTA-Procedure 01/2003
* abhängig von Material und Größe der Objekte sowie Material und Zustand des
Untergrundes
** geringere Erfassungstiefe bei nicht spannungsführenden Leitungen
Bitte beachten Sie die Sachnummer auf dem Typenschild Ihres Messwerkzeugs,
die Handelsbezeichnungen einzelner Messwerkzeuge können variieren.
PROFESSIONAL
0,24 kg
Betrieb
Batterien einsetzen/wechseln
Verwenden Sie ausschließlich Alkali-Mangan-Batterien oder Akkus.
Zum Öffnen des Batteriefachdeckels 10 drücken Sie die Arretierung 12
in Pfeilrichtung und klappen den Batteriefachdeckel hoch. Setzen Sie
die mitgelieferte Batterie ein. Achten Sie dabei auf die richtige Polung
entsprechend der Darstellung auf der Innenseite des Batteriefachs.
Leuchtet die Batterie-Anzeige k im Display auf, dann können Sie bei Verwendung von Alkali-Mangan-Batterien noch ca. 1 Stunde messen (bei
Akkus kürzere Standzeit). Blinkt die Anzeige k, dann sind noch ca.
10 min Messung möglich. Blinken die Batterie-Anzeige k und der
Leuchtring 1 (rot), dann ist keine Messung mehr möglich und Sie müssen die Batterie bzw. den Akku wechseln.
B Nehmen Sie die Batterie aus dem Messwerkzeug, wenn Sie
es längere Zeit nicht benutzen. Die Batterie kann bei längerer
Lagerung korrodieren oder sich selbst entladen.
Inbetriebnahme
Schützen Sie das Messwerkzeug vor Nässe und direkter Sonneneinstrahlung.
Ein-/Ausschalten
B Stellen Sie vor dem Einschalten des Messwerkzeugs sicher,
dass der Sensorbereich 9 nicht feucht ist. Reiben Sie das Mess-
werkzeug gegebenenfalls mit einem Tuch trocken.
1 609 929 P99 • 8.1.08
Deutsch– 2
B War das Messwerkzeug einem starken Temperaturwechsel
ausgesetzt, dann lassen Sie es vor dem Einschalten austemperieren.
Zum Einschalten des Messwerkzeugs drücken Sie eine beliebige
Taste.
Wenn Sie das Messwerkzeug mit der Taste für Holzsuche 5 oder mit der
Taste für Metallsuche 6 einschalten, dann befindet es sich sofort in der
entsprechenden Suchfunktion.
Wenn Sie das Messwerkzeug mit der Ein-Aus-Taste 7 oder der Taste
„ZOOM“ 4 einschalten, dann befindet es sich in der Suchfunktion, in
der es zuletzt verwendet wurde.
Nach einem kurzen Selbsttest ist das Messwerkzeug betriebsbereit.
Befindet sich das Messwerkzeug in der Funktion Metallsuche, dann wird
die Betriebsbereitschaft durch einen Haken hinter der Kalibrierungsanzeige „AutoCal“ g angezeigt.
Zum Ausschalten des Messwerkzeugs drücken Sie die Ein-Aus-Taste 7.
Wird ca. 5 min lang keine Taste am Messwerkzeug gedrückt, dann
schaltet sich das Messwerkzeug zur Schonung der Batterie automatisch
ab.
Betriebsarten
Das Messwerkzeug detektiert Objekte unterhalb des Sensorbereiches 9.
Metallobjekte suchen
Drücken Sie für die Suche nach Metallobjekten die Taste für Metallsuche 6. Im Display wird das Symbol c für Metallsuche angezeigt, der Ring
1 leuchtet grün.
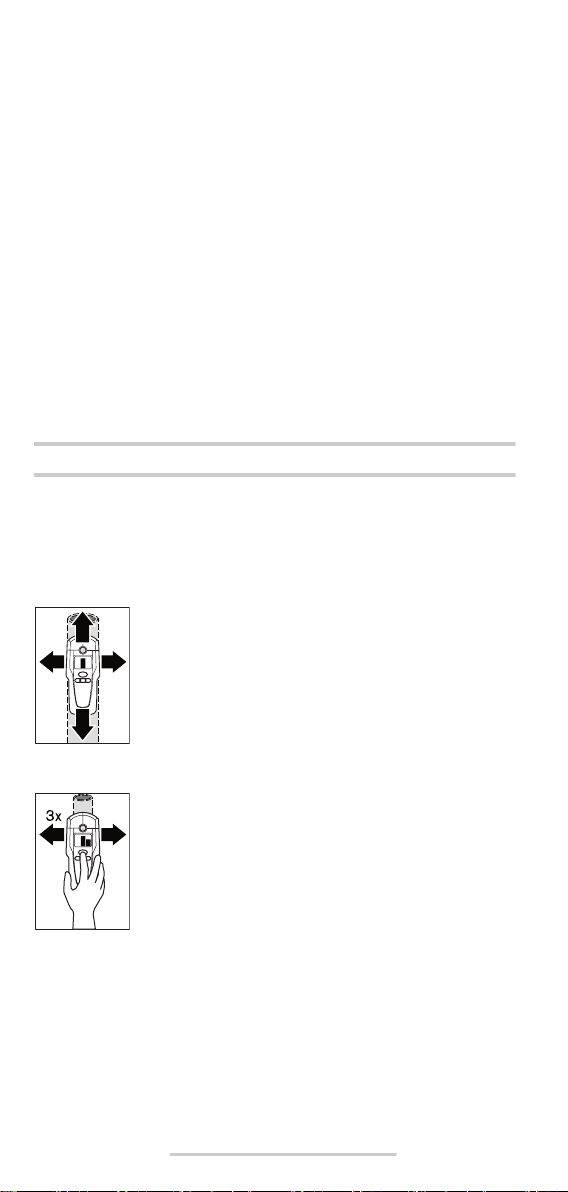
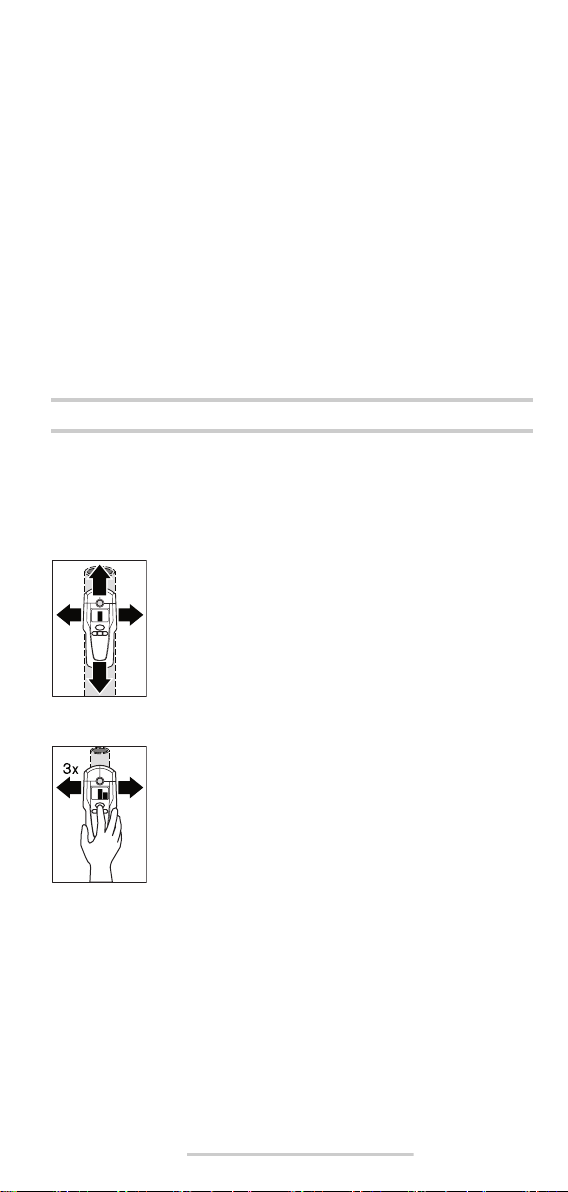
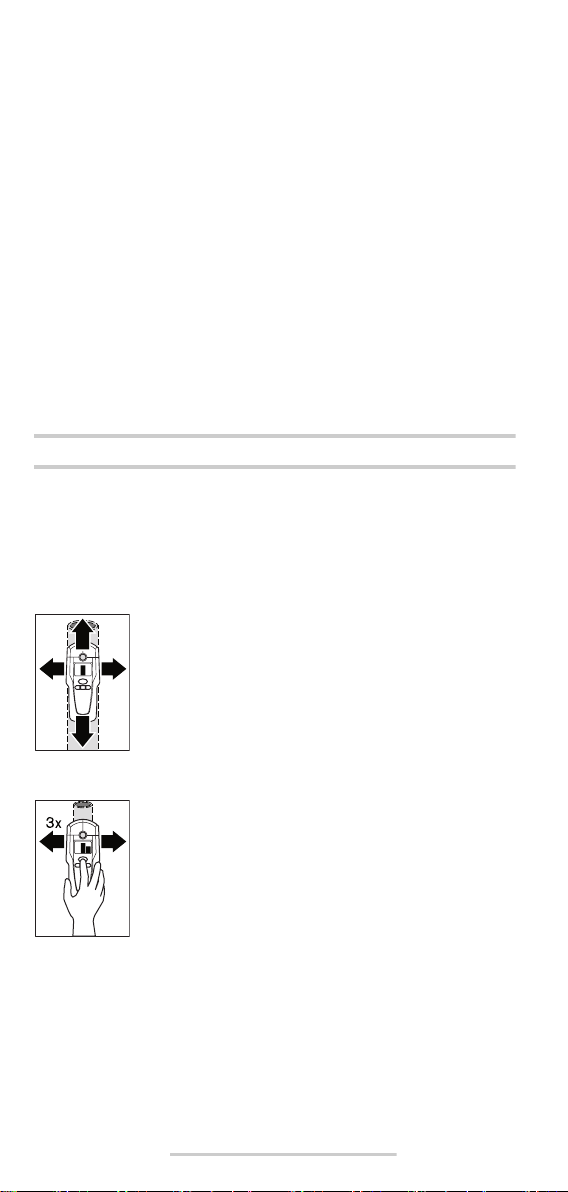
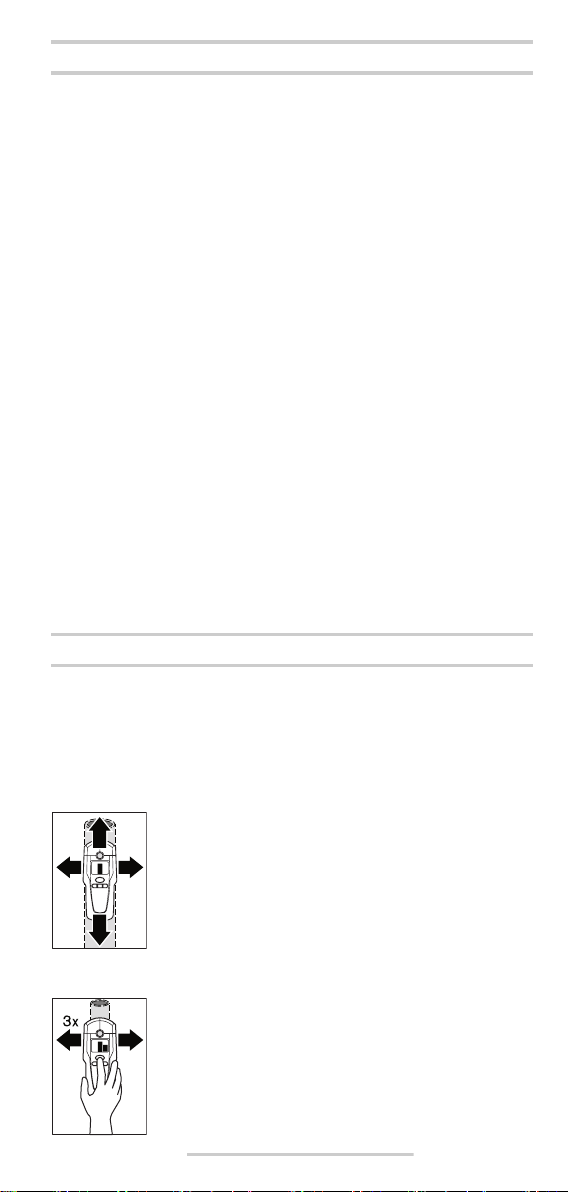
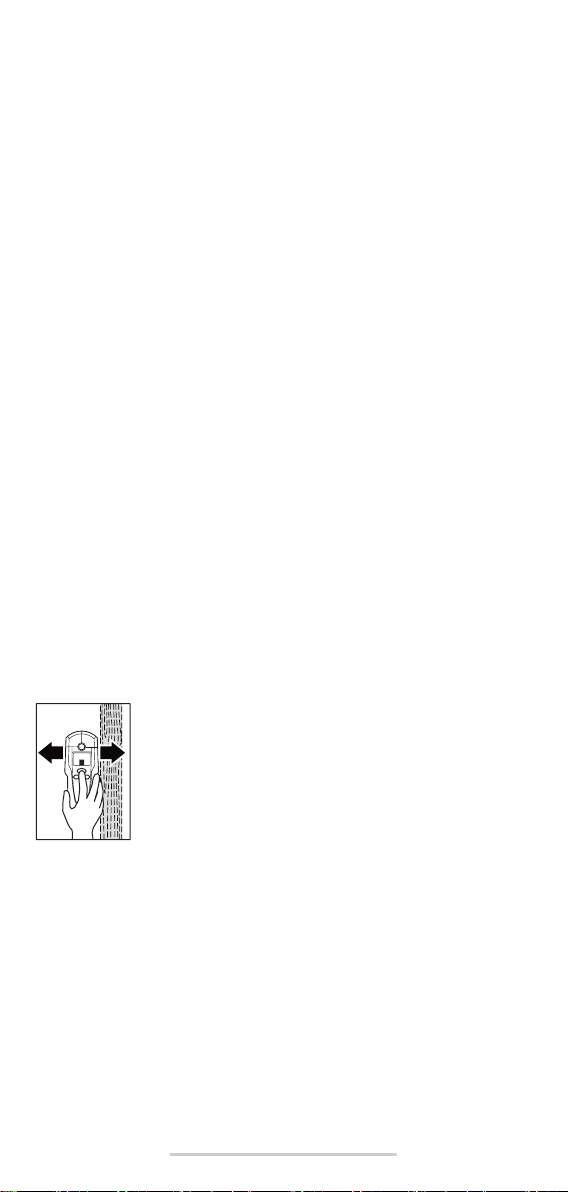
Setzen Sie das Messwerkzeug auf die zu untersuchende Oberfläche und bewegen Sie es seitlich. Nähert
sich das Messwerkzeug einem Metallobjekt, dann nimmt
der Ausschlag in der Messanzeige f zu, entfernt es sich
von dem Objekt, dann nimmt der Ausschlag ab. An der
Position des maximalen Ausschlages befindet sich das
Metallobjekt unterhalb der Sensormitte (unterhalb der
Markierungsöffnung 2). Solange sich das Messwerkzeug über dem Metallobjekt befindet, leuchtet der Ring
1 rot und es ertönt ein Dauerton.
Drücken Sie für eine genaue Lokalisierung des Objektes
die Taste „ZOOM“ 4 und halten Sie sie gedrückt, wäh-
rend Sie das Messwerkzeug wiederholt (3x) über das
Objekt bewegen. Im Display erscheint die Anzeige der
Zoom-Funktion d. Über der Mitte des Metallobjektes hat
die Zoom-Messanzeige e den größten Ausschlag.
Werden sehr kleine oder tief liegende Metallobjekte
drücken Sie die Taste „ZOOM“ 4 und halten Sie sie gedrückt, während
Sie den Bereich weiter überfahren. Beachten Sie für die Suche nur die
Zoom-Messanzeige e.
Befinden sich im zu untersuchenden Material metallische Einschlüsse,
dann wird in der Messanzeige f ein Dauersignal angezeigt. Drücken Sie
dann die Taste „ZOOM“ 4 und halten Sie sie gedrückt, während Sie
den Bereich weiter überfahren. Beachten Sie für die Suche nur die
Zoom-Messanzeige e.
gesucht und die Messanzeige f schlägt nicht aus, dann
1 609 929 P99 • 8.1.08
Deutsch– 3

Handelt es sich bei dem gefundenen metallischen Objekt um ein magnetisches Metall (z.B. Eisen), so wird im Display das Symbol h angezeigt. Bei nichtmagnetischen Metallen wird das Symbol i angezeigt. Für
die Unterscheidung zwischen den Metallarten muss sich das Messwerkzeug über dem gefundenen Metallobjekt befinden (Ring 1 leuchtet rot).
Bei schwachen Signalen ist die Anzeige der Metallart nicht möglich.
Bei Baustahlmatten und Armierungen im untersuchten Untergrund wird
über der gesamten Fläche ein Ausschlag in der Messanzeige f angezeigt. Verwenden Sie in diesem Fall immer die Zoom-Funktion für die
Suche. Typischerweise wird bei Baustahlmatten direkt über den Eisenstäben im Display das Symbol h für magnetische Metalle angezeigt, zwischen den Eisenstäben erscheint das Symbol i für nichtmagnetische
Metalle.
Holzobjekte suchen
Drücken Sie für die Suche nach Holzobjekten die Taste für Holzsuche 5.
Im Display werden das Symbol b für Holzsuche und die Anzeige der
Zoom-Funktion d angezeigt, der Pfeil unterhalb der Zoom-Anzeige d
blinkt. Die Kalibrierungsanzeige „AutoCal“ g und der Ring 1 erlöschen.
Setzen Sie das Messwerkzeug auf die zu untersuchende Fläche auf.
Drücken Sie erst dann die Taste „ZOOM“ 4 und halten Sie sie gedrückt.
Der Leuchtring 1 leuchtet nun grün, die Kalibrierungsanzeige
„AutoCal“ g wird wieder angezeigt, die Anzeige der Zoom-Funktion d
sowie der Pfeil darunter erlöschen.
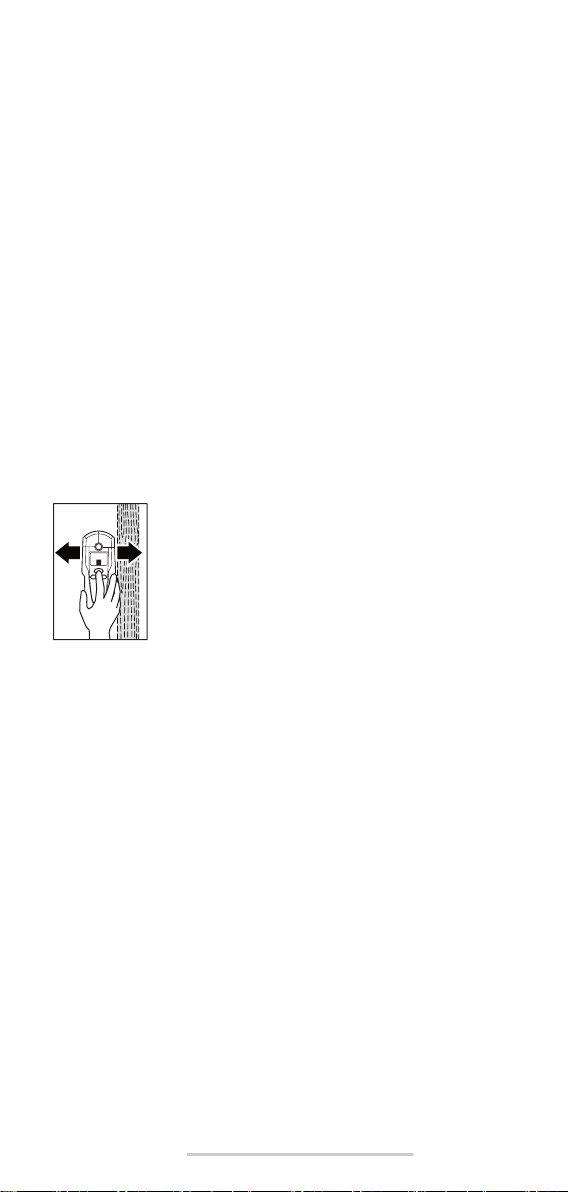
Bewegen Sie das Messwerkzeug mit gedrückter Taste
„ZOOM“ 4 gleichmäßig über den Untergrund, ohne es
abzuheben oder den Anpressdruck zu verändern. Während der Messung müssen die Filzgleiter 8 immer Kontakt zum Untergrund haben.
Wird ein Holzobjekt gefunden, schlägt die Messanzeige
f aus. Bewegen Sie das Messwerkzeug wiederholt über
die Fläche, um das Holzobjekt genauer zu lokalisieren.
Nach mehrmaligem Überfahren des gleichen Bereiches kann das Holzobjekt sehr genau angezeigt werden: Solange sich das Messwerkzeug
über dem Holzobjekt befindet, leuchtet der Ring 1 rot und es ertönt ein
Dauerton. Über der Mitte des Holzobjektes hat die Messanzeige f den
größten Ausschlag. Die Zoom-Messanzeige e ist bei der Suche nach
Holzobjekten nicht aktiv.
Achtung: Wenn Sie das Messwerkzeug zufällig über einem Holzobjekt
auf die zu untersuchende Fläche aufgesetzt und über die Fläche bewegt
haben, dann blinken die Messanzeige f sowie der Pfeil unter der ZoomAnzeige d, und der Leuchtring 1 blinkt rot. Beginnen Sie in diesem Fall
die Messung neu, indem Sie das Messwerkzeug etwas versetzt wieder
auf den Untergrund setzen und die Taste „ZOOM“ 4 erneut drücken.
Bei der Suche nach Holzobjekten werden teilweise auch Metallobjekte
in einer Tiefe von 20–50 mm als gefundene Objekte angezeigt. Zur
Unterscheidung zwischen Holz- und Metallobjekten wechseln Sie in die
Funktion Metallsuche (siehe „Metallobjekte suchen“). Wird in dieser
Funktion an der gleichen Stelle ein Objekt angezeigt, dann ist es eindeutig ein Metall-, kein Holzobjekt. Wechseln Sie zur weiteren Suche nach
Holzobjekten zurück in die Funktion Holzsuche.
1 609 929 P99 • 8.1.08
Deutsch– 4

Spannungsführende Leitungen suchen
Das Messwerkzeug kann spannungsführende Leitungen mit 50 bzw.
60 Hz Wechselstrom anzeigen. Andere Leitungen können nur als Metallobjekte angezeigt werden.
Spannungsführende Leitungen werden sowohl während einer Metallsuche als auch während einer Holzsuche angezeigt. Wird eine spannungsführende Leitung gefunden, dann erscheint im Display die Anzeige a.
Bewegen Sie das Messwerkzeug wiederholt über die Fläche, um die
spannungsführende Leitung genauer zu lokalisieren. Nach mehrmaligem
Überfahren kann die spannungsführende Leitung sehr genau angezeigt
werden. Ist das Messwerkzeug sehr nahe an der Leitung (vier bzw. fünf
Balken in der Anzeige a), dann blinkt der Leuchtring 1 rot und der Signalton ertönt mit schneller Tonfolge.
Spannungsführende Leitungen können leichter gefunden werden, wenn
Stromverbraucher (z.B. Leuchten, Geräte) an der gesuchten Leitung
angeschlossen und eingeschaltet werden. Leitungen mit 110 V, 240 V
und 380 V (Drehstrom) werden mit ungefähr derselben Suchleistung
gefunden.
Unter bestimmten Bedingungen (wie z.B. hinter Metalloberflächen oder
hinter Oberflächen mit hohem Wassergehalt) können spannungsführende Leitungen nicht sicher gefunden werden. Sie erkennen diese
Bereiche in der Funktion Metallsuche. Wird über einem größeren
Bereich überall ein Messwert f angezeigt, dann schirmt das Material
elektrisch ab und die Suche nach spannungsführenden Leitungen ist
nicht zuverlässig.
Nicht spannungsführende Leitungen können Sie als Metallobjekte mit
der Funktion Metallsuche finden. Litzenkabel werden dabei nicht angezeigt (im Gegensatz zu Vollmaterialkabeln).
Arbeitshinweise
B Die Messergebnisse können prinzipbedingt durch bestimm-
te Umgebungsbedingungen beeinträchtigt werden. Dazu gehören z.B. die Nähe von Geräten, die starke magnetische
oder elektromagnetische Felder erzeugen, Nässe, metallhaltige Baumaterialien, alukaschierte Dämmstoffe oder leitfähige Tapeten. Beachten Sie deshalb vor dem Bohren, Sägen oder
Fräsen in Wände, Decken oder Böden auch andere Informationsquellen (z.B. Baupläne).
Signalton abschalten
Sie können den Signalton ab- und anschalten. Drücken Sie dazu die
Tasten für Metallsuche 6 und für Holzsuche 5 gleichzeitig. Bei abgeschaltetem Signalton erscheint im Display die Anzeige j.
Die Einstellung des Signaltons bleibt beim Aus- und Einschalten des
Messwerkzeugs erhalten.
Objekte markieren
Sie können gefundene Objekte bei Bedarf markieren. Nehmen Sie dazu
den Bleistift 11 aus dem Messwerkzeug und messen Sie wie gewohnt.
Haben Sie die Grenzen oder die Mitte eines Objektes gefunden, dann
markieren Sie die gesuchte Stelle durch die Markierungsöffnung 2.
Anzeige „AutoCal“
Blinkt der Haken hinter der Kalibrierungsanzeige „AutoCal“ g über län-
gere Zeit oder wird er nicht mehr angezeigt, kann nicht mehr zuverlässig
gemessen werden. Senden Sie das Messwerkzeug in diesem Fall an
eine autorisierte Bosch-Kundendienststelle. Ausnahme: In der Funktion
Holzsuche erlischt die Kalibrierungsanzeige „AutoCal“ g, solange die
Taste „ZOOM“ 4 nicht gedrückt wird.
1 609 929 P99 • 8.1.08
Deutsch– 5

Wartung und Service
Wartung und Reinigung
Schlägt die Messanzeige f dauerhaft aus, obwohl sich kein Objekt aus
Metall in der Nähe des Messwerkzeugs befindet, kann das Messwerkzeug manuell kalibriert werden. Entfernen Sie dazu alle Objekte aus der
Nähe des Messwerkzeugs (auch Armbanduhr oder Ring aus Metall) und
halten Sie das Messwerkzeug in die Luft. Drücken Sie bei ausgeschaltetem Messwerkzeug die Ein-Aus-Taste 7 und die Taste für Holzsuche 5
so lange gleichzeitig, bis der Leuchtring 1 gleichzeitig rot und grün
leuchtet. Lassen Sie dann beide Tasten los. Verlief die Kalibrierung
erfolgreich, dann startet das Messwerkzeug nach einigen Sekunden neu
und ist wieder betriebsbereit.
Wischen Sie Verschmutzungen mit einem trockenen, weichen Tuch ab.
Verwenden Sie keine Reinigungs- oder Lösemittel.
Um die Messfunktion nicht zu beeinflussen, dürfen im Sensorbereich 9
auf der Vorder- und Rückseite des Messwerkzeugs keine Aufkleber oder
Schilder, insbesondere keine Schilder aus Metall, angebracht werden.
Entfernen Sie die Filzgleiter 8 auf der Rückseite des Messwerkzeugs
nicht. Ersetzen Sie die Filzgleiter, wenn sie beschädigt oder abgenutzt
sind. Entfernen Sie dazu die beschädigten Filzgleiter vollständig und kleben Sie die neuen Filzgleiter auf der gleichen Stelle auf.
Lagern und transportieren Sie das Messwerkzeug nur in der mitgelieferten Schutztasche.
Sollte das Messwerkzeug trotz sorgfältiger Herstellungs- und Prüfverfahren einmal ausfallen, ist die Reparatur von einer autorisierten Kundendienststelle für Bosch-Elektrowerkzeuge ausführen zu lassen.
Geben Sie bei allen Rückfragen und Ersatzteilbestellungen bitte unbedingt die 10-stellige Sachnummer laut Typenschild des Messwerkzeugs
an.
Ersatzteile
Schutztasche. . . . . . . . . . . . . . . . . . . . . . . . . . . . . . . . . . . 1 609 203 P19
Batteriefachdeckel 10 . . . . . . . . . . . . . . . . . . . . . . . . . . . 1 609 203 P20
Filzgleiter 8 . . . . . . . . . . . . . . . . . . . . . . . . . . . . . . . . . . . . 1 609 203 P21
Service und Kundenberater
Explosionszeichnungen und Informationen zu Ersatzteilen finden Sie unter:
www.bosch-pt.com
www.powertool-portal.de, das Internetportal für Handwerker und
Heimwerker.
www.ewbc.de, der Informations-Pool für Handwerk und Ausbildung.
Deutschland
Robert Bosch GmbH
Servicezentrum Elektrowerkzeuge
Zur Luhne 2
37589 Kalefeld
✆ Service: . . . . . . . . . . . . . . . . . . . . . . . . . . . . . . . . . . .01 80/3 35 54 99
Fax:. . . . . . . . . . . . . . . . . . . . . . . . . . . . . . . . . . . +49 (0) 55 53/20 22 37
✆ Kundenberater: . . . . . . . . . . . . . . . . . . . . . . . . . . . . .01 80/3 33 57 99
1 609 929 P99 • 8.1.08
Deutsch– 6

Österreich
ABE Service GmbH
Jochen-Rindt-Straße 1
1232 Wien
✆ Service: . . . . . . . . . . . . . . . . . . . . . . . . . . . . . . . . . .+43 (0)1/61 03 80
Fax: . . . . . . . . . . . . . . . . . . . . . . . . . . . . . . . . . . . . . +43 (0)1/61 03 84 91
✆ Kundenberater: . . . . . . . . . . . . . . . . . . . . . . . +43 (0)1/7 97 22 30 66
E-Mail: abe@abe-service.co.at
Schweiz
✆ Service: . . . . . . . . . . . . . . . . . . . . . . . . . . . . . . . . +41 (0)1/ 8 47 16 16
Fax: . . . . . . . . . . . . . . . . . . . . . . . . . . . . . . . . . . . . . . +41 (0)1/8 47 16 57
✆ Kundenberater: . . . . . . . . . . . . . . . . . . . . . . . . . . . . . . .0 800 55 11 55
Luxemburg
✆ . . . . . . . . . . . . . . . . . . . . . . . . . . . . . . . . . . . . . . . .+32 (0)70/22 55 65
Fax: . . . . . . . . . . . . . . . . . . . . . . . . . . . . . . . . . . . . . . .+32 (0)70/22 55 75
E-Mail: outillage.gereedschap@be.bosch.com
Entsorgung
Messwerkzeuge, Zubehör und Verpackungen sollen einer umweltgerechten Wiederverwertung zugeführt werden.
Nur für EU-Länder:
Werfen Sie Messwerkzeuge nicht in den Hausmüll!
Gemäß der Europäischen Richtlinie 2002/96/EG über
Elektro- und Elektronik-Altgeräte und ihrer Umsetzung in
nationales Recht müssen nicht mehr gebrauchsfähige
Messwerkzeuge getrennt gesammelt und einer umweltgerechten Wiederverwertung zugeführt werden.
Akkus/Batterien:
Werfen Sie Akkus/Batterien nicht in den Hausmüll, ins Feuer oder ins
Wasser. Akkus/Batterien sollen gesammelt, recycelt oder auf umweltfreundliche Weise entsorgt werden.
Nur für EU-Länder:
Gemäß der Richtlinie 91/157/EWG müssen defekte oder verbrauchte
Akkus/Batterien recycelt werden.
Nicht mehr gebrauchsfähige Akkus/Batterien können direkt abgegeben
werden bei:
Deutschland
Recyclingzentrum Elektrowerkzeuge
Osteroder Landstraße 3
37589 Kalefeld
Schweiz
Batrec AG
3752 Wimmis BE
Änderungen vorbehalten.
1 609 929 P99 • 8.1.08
Deutsch– 7

Functional Description
Optimal working with the measuring tool is possible only when the operating instructions and
information are read completely, and the instructions contained therein are strictly followed.
SAVE THESE INSTRUCTIONS.
Please unfold the fold-out page with the representation of the measuring
tool and leave it unfolded while reading the operating instructions.
Intended Use
The measuring tool is intended for the detection of metals (ferrous and
non-ferrous metals, e.g., rebar), joists and “live” wires/conductors in
walls, ceilings and floors.
Product Features
The numbering of the product features shown refers to the illustration of
the measuring tool on the graphic page.
1 Illuminated ring
2 Marking hole
3 Display
4 “ZOOM” button
5 Wood-detection button
6 Metal-detection button
7“on/off” button
8 Felt pads
9 Sensor area
10 Battery lid
11 Pencil for marking (removable)
12 Latch of battery lid
Display Elements
a “Live” wire indicator
b Wood detection indicator
c Metal detection indicator
d “ZOOM” function indicator
e “ZOOM” measuring indicator
f Measuring indicator
g“AutoCal” calibration indicator
h Indicator for magnetic metals
i Indicator for non-magnetic metals
j Switched-off audio signal indicator
k Battery indication
1 609 929 P99 • 8.1.08
English– 1

Technical Data
Digital Detector DMF 10 Zoom
Article number 3 601 K10 0..
Maximum scanning depth*:
Ferrous metals 100 mm
Non-ferrous metals (copper) 80 mm
Copper conductors (live)** 50 mm
Wood 20 mm
Automatic switch-off after approx. 5 min
Operating temperature –10 °C … +50 °C
Storage temperature –20 °C … +70 °C
Battery 1 x 9 V 6LR61
Rechargeable battery 1 x 9 V 6F22
Operating lifetime (alkali-manganese
batteries) approx. 6 h
Weight according to
EPTA-Procedure 01/2003
* depends on material and size of objects as well as material and condition of
structure
** less scanning depth for wires/conductors that are not “live”
Please observe the article number on the type plate of your measuring tool. The
trade names of the individual measuring tools may vary.
PROFESSIONAL
0.24 kg
Operation
Inserting/Replacing the Battery
Use only alkali-manganese or rechargeable batteries.
To open the battery lid 10, press the latch 12 in the direction of the arrow
and fold up the battery lid. Insert the supplied battery. Pay attention that
the polarity is correct, according to the representation on the inside of
the battery lid.
When the battery indication k in the display lights up, measuring is possible for approx. 1 h when using alkali-manganese batteries (service life
is shorter with rechargeable batteries). When the battery indication k
flashes, measuring is still possible for approx. 10 minutes. When the battery indication k and the illuminated ring 1 (red) are flashing, measuring
is no longer possible and the battery or the rechargeable battery respectively, must be replaced.
B If the measuring tool is not used for a long period of time, the
battery must be removed. The battery can corrode or discharge
itself over long periods.
Initial Operation
Protect the measuring tool against moisture and direct sun irradiation.
Switching On and Off
B Before switching the measuring tool on, make sure that the
sensor area 9 is not moist. If required, wipe the measuring tool dry
using a cloth.
1 609 929 P99 • 8.1.08
English– 2
B If the measuring tool was subject to an extreme temperature
change, allow it to adjust to the ambient temperature before
switching on.
To switch on switch on the measuring tool on, press any button.
When switching the measuring tool on with the wood-detection button
5 or with the metal-detection button 6, it will automatically be in the
respective detection function.
When switching the measuring tool on with the “on/off” button 7 or with
the “ZOOM” button 4, it will be in the detection function last used.
After a brief self-check, the measuring tool is ready for operation. When
the measuring tool is in the metal-detection function, the service readiness is indicated through a check mark behind the “AutoCal” calibration indicator g.
To switch the measuring tool off, press the “on/off” button 7.
If none of the measuring tool buttons are pressed for approx. 5 minutes,
the measuring tool switches off automatically in order to extend the service life of the battery.
Operating Modes
The measuring tool detects objects below the sensor area 9.
Detecting Metal Objects
When scanning for metal objects, press the metal-detection button 6.
The metal detection indicator symbol c is indicated in the display and the
illuminated ring 1 lights up green.
Position the measuring tool onto the surface to be
scanned and move it sidewards. When the measuring
tool comes close to a metal object, then the amplitude
of the measuring indicator f increases; when it moves
away from the object, the amplitude decreases. At the
position of maximum amplitude, the metal object is
located below the centre of the sensor (below the marking opening 2). As long as the measuring tool is above
the metal object, the illuminated ring 1 lights up red and
a steady tone sounds.
To localise the object precisely, press the “ZOOM” button 4 and keep it pressed while repeatedly (3x) moving
the measuring tool over the object. The “Zoom” function
indicator d appears in the display. The “Zoom” measuring indicator e has the greatest amplitude over the centre of the metal object.
When very small or deeply embedded metal objects are
react, press the “ZOOM” button 4 and keep it pressed while continuing
to move the measuring tool over the area. Observe only the zoom measuring indicator e for the scan.
If there are any metal inclusions in the material being scanned, then a
continuous signal is indicated in the measuring indicator f. In this case,
press the “ZOOM” button 4 and keep it pressed while continuing to
move the measuring tool over the area. Observe only the “Zoom” measuring indicator e for the scan.
being detected and the measuring indicator f does not
1 609 929 P99 • 8.1.08
English– 3

If the metal object found is a magnetic (e.g. iron), then the indicator for
magnetic metals h is displayed. For non-magnetic metals, the indicator
for non-magnetic metals i is displayed. In order for the measuring tool to
differentiate between the metal types, it must be positioned above the
detected metal object (the illuminated ring 1 lights up red). For weak signals, the indication of the metal type is not possible.
For steel wire mesh and reinforcements in the scanned structural material, an amplitude of the measuring indicator f is displayed over the complete surface. In this case, always use the “Zoom” function for the scan.
For steel wire mesh, it is typical that the indicator for magnetic metals h
is displayed directly above the rebar; the indicator for non-magnetic metals i is displayed between the rebars.
Detecting Wooden Objects
When scanning for wooden objects, press the wood-detection button 5.
The wood detection indicator symbol b and the “Zoom” function indicator d are indicated in the display and the arrow below the “Zoom” function indicator d flashes. The “AutoCal” calibration indicator g and the
illuminated ring 1 go out.
Position the measuring tool onto the surface being scanned. Then press
the “ZOOM” button 4 and keep it pressed. Now the illuminated ring 1
lights up green, the “AutoCal” calibration indicator g is displayed again,
the “Zoom” function indicator d as well as the arrow below it go out.
With the “ZOOM” button 4 pressed, move the measuring tool uniformly above the structure without lifting it off
or changing the applied pressure. During the scan, the
felt pads 8 must always have contact with the structure.
When a wooden object is detected, an amplitude is displayed in the measuring indicator f. Move the measuring
tool over the surface repeatedly to localise the wooden
object more precisely. After moving over the same area
several times, the wooden object can be indicated quite accurately: The
illuminated ring 1 lights up red and a steady tone sounds as long as the
measuring tool is over the wooden object. The measuring indicator f has
the greatest amplitude over the centre of the wooden object. The
“Zoom” measuring indicator e is inactive when scanning for wooden
objects.
Caution: When having placed the measuring tool onto the surface to
be scanned under which a wooden object is coincidentally located, and
having moved it over the surface, the measuring indicator f, the arrow
below the “Zoom” function indicator d and the illuminated ring 1 flash
red. In this case, start the scan again by repositioning the measuring tool
somewhat offset onto the structure and pressing the “ZOOM” button 4
again.
When scanning for wooden objects, metal objects are sometimes also
indicated as objects found at depths between 20–50 mm. To distinguish between wooden and metal objects, switch to the detecting-metal
function (see “Detecting Metal Objects”). When an object is indicated
at the same location in this function, then it is clearly a metal object and
not a wooden object. To continue searching for wooden objects, switch
back to the detecting-wood function.
1 609 929 P99 • 8.1.08
English– 4

Scanning for “Live” Wires
The measuring tool can indicate “live” wires/conductors with 50 or 60 Hz
of AC. Other wires/conductors can only be indicated as metal objects.
“Live” wires/conductors are indicated both during a metal scan as well
as during a wood scan. When a “live” wire/conductor is detected, the
indicator a appears in the display. Move the measuring tool over the surface repeatedly in order to localise the “live” wire/conductor more precisely. After moving the measuring tool over the surface several times,
the “live” wire/conductor can be indicated quite precisely. If the measuring tool is very close to the wire/conductor (four or five bars in indicator
a), the illuminated ring 1 flashes red and the signal tone sounds with a
rapid tone sequence.
“Live” wires/conductors can be detected easier when power consumers
(e.g., lamps, appliances) are connected to the wire/conductor being
sought and switched on. Wires/conductors with 110 V, 240 V and
380 V (three-phase current) are detected with about the same scan
capacity.
Under certain conditions (such as when behind metal surfaces or behind
surfaces with high water content), “live” wires/conductors cannot be
detected with certainty. These ranges can be recognised in the metal
detection function. When a measuring value is indicated all over a larger
range of the measuring indicator f, then the material is screening off
electrically and the scan for “live” wires/conductors is not reliable.
Wires that are not “live” can be found as metal objects with the detecting-metal function. However, stranded cables are not indicated (contrary
to solid copper conductors).
Operating Instructions
B On condition of the principle, the measuring values can be
impaired through certain ambient conditions. These include,
e.g., the proximity of other equipment that produce strong
magnetic or electromagnetic fields, moisture, metallic building materials, foil-laminated insulation materials or conductive wallpaper. Therefore, please also observe other information
sources (e.g. construction plans) before drilling, sawing or routing
into walls, ceilings or floors.
Switching Off the Signal Tone
The signal tone can be switched on and off. For this, press the metaldetection button 6 and the wood-detection button 5 at the same time.
When the signal tone is switched off, the switched-off audio signal indicator j appears on the display.
The signal tone setting is maintained after switching the measuring tool
off and on again.
Marking Objects
Detected objects can be marked as required. For this, remove the pencil
11 from the measuring tool and carry out the scan as usual. Once you
have found the limits or the centre of an object, simply mark the sought
after location through the marking opening 2.
“AutoCal” Calibration Indicator
When the check mark behind the “AutoCal” calibration indicator g
flashes over a longer period or if it is not displayed anymore, reliable
scanning is no longer possible. In this case, send in the measuring tool
to an authorised Bosch after-sales service agent. Exception: In the
detecting wooden objects’ function, the “AutoCal” calibration indicator
g goes out as long as the “ZOOM” button 4 is not pressed.
1 609 929 P99 • 8.1.08
English– 5

Maintenance and Service
Maintenance and Cleaning
When the measuring indicator f continuously shows an amplitude even
though there is no metal object in the vicinity of the measuring tool, the
measuring tool can be calibrated manually. For this, remove all objects
in the vicinity of the measuring tool (including wrist watches or rings of
metal) and hold the measuring tool up in the air. With the measuring tool
switched off, press both the “on/off” button 7 and the wood-detection
button 5 until the illuminated ring 1 lights up red and green at the same
time. Then release both buttons. When the calibration process was successful, the measuring tool will start over after a few seconds and is then
ready for operation.
Wipe away debris or contamination with a dry, soft cloth. Do not use
cleaning agents or solvents.
In order not to affect the measuring function, decals/stickers or name
plates, especially metal ones, may not be attached in the sensor area 9
on the front or back side of the measuring tool.
Do not remove the felt pads 8 on the back side of the measuring tool.
Replace the felt pads when they are damaged or used. For this, completely remove the felt pads and glue the new felt pads onto the same
spots.
Store and transport the measuring tool only in the supplied protective
case.
If the measuring tool should fail despite the care taken in manufacturing
and testing procedures, repair should be carried out by an authorized
after-sales service centre for Bosch power tools.
In all correspondence and spare parts orders, please always include the
10-digit article number given on the type plate of the measuring tool.
Spare Parts
Protective case . . . . . . . . . . . . . . . . . . . . . . . . . . . . . . . . . 1 609 203 P19
Battery lid 10 . . . . . . . . . . . . . . . . . . . . . . . . . . . . . . . . . . 1 609 203 P20
Felt pads 8 . . . . . . . . . . . . . . . . . . . . . . . . . . . . . . . . . . . . 1 609 203 P21
Service and Customer Assistance
Exploded views and information on spare parts can be found under:
www.bosch-pt.com
Great Britain
Robert Bosch Ltd. (B.S.C.)
P.O. Box 98
Broadwater Park
North Orbital Road
Denham-Uxbridge
Middlesex UB 9 5HJ
✆ Service: . . . . . . . . . . . . . . . . . . . . . . . . . . . . .+44 (0)18 95 / 83 87 82
✆ Advice line: . . . . . . . . . . . . . . . . . . . . . . . . . .+44 (0) 18 95 / 83 87 91
Fax: . . . . . . . . . . . . . . . . . . . . . . . . . . . . . . . . . . .+44 (0) 18 95 / 83 87 89
1 609 929 P99 • 8.1.08
English– 6

Ireland
Beaver Distribution Ltd.
Greenhills Road
Tallaght-Dublin 24
✆ Service: . . . . . . . . . . . . . . . . . . . . . . . . . . . . . . +353 (0)1 / 4 14 94 00
Fax:. . . . . . . . . . . . . . . . . . . . . . . . . . . . . . . . . . . . +353 (0)1 / 4 59 80 30
Australia and New Zealand
Robert Bosch Australia Pty. Ltd.
RBAU/ SPT
1555 Centre Road
P.O. Box 66
3168 Clayton/ Victoria
✆ . . . . . . . . . . . . . . . . . . . . . . . . . . . . . . . . . . . +61 (0)1 / 3 00 30 70 44
Fax:. . . . . . . . . . . . . . . . . . . . . . . . . . . . . . . . . . +61 (0)1 / 3 00 30 70 45
www.bosch.com.au
Disposal
Measuring tools, accessories and packaging should be sorted for environmental-friendly recycling.
Only for EC countries:
Do not dispose of measuring tools into household waste!
According the European Guideline 2002/96/EC for
Waste Electrical and Electronic Equipment and its implementation into national right, measuring tools that are no
longer usable must be collected separately and disposed of in an environmentally correct manner.
Battery packs/batteries:
Do not dispose of battery packs/batteries into household waste, fire or
water. Battery packs/batteries should be collected, recycled or disposed of in an environmental-friendly manner.
Only for EC countries:
Defective or dead out battery packs/batteries must be recycled according the guideline 91/157/EEC.
Batteries no longer suitable for use can be directly returned at:
Great Britain
Robert Bosch Ltd. (B.S.C.)
P.O. Box 98
Broadwater Park
North Orbital Road
Denham-Uxbridge
Middlesex UB 9 5HJ
✆ Service: . . . . . . . . . . . . . . . . . . . . . . . . . . . . .+44 (0)18 95 / 83 87 82
✆ Advice line: . . . . . . . . . . . . . . . . . . . . . . . . . . +44 (0) 18 95 / 83 87 91
Fax:. . . . . . . . . . . . . . . . . . . . . . . . . . . . . . . . . . .+44 (0) 18 95 / 83 87 89
Subject to change without notice.
1 609 929 P99 • 8.1.08
English– 7

Description du fonctionnement
Un travail optimal avec cet appareil de mesure
n’est possible que si vous lisez complètement les
instructions d’utilisation et les instructions de travail et que vous respectiez strictement les indications qui y sont mentionnées. GARDER PRECIEUSEMENT CES INSTRUCTIONS DE SECURITE.
Dépliez le volet sur lequel l’appareil de mesure est représenté de
manière graphique. Laissez le volet déplié pendant la lecture de la présente notice d’utilisation.
Utilisation conforme
L’appareil de mesure est conçu pour détecter les métaux (métaux ferreux et non-ferreux, tels que les fers d’armature), les poutres en bois ainsi
que les conduites sous tension dans les murs, plafonds et sols.
Eléments de l’appareil
La numérotation des éléments de l’appareil se réfère à la représentation
de l’appareil de mesure sur la page graphique.
1 Anneau luminescent
2 Ouverture de marquage
3 Afficheur
4 Touche « ZOOM »
5 Touche de détection des bois
6 Touche de détection des métaux
7 Interrupteur Marche/Arrêt « on/off »
8 Glisseur en feutre
9 Zone de détection
10 Couvercle du compartiment à piles
11 Crayon pour le marquage (amovible)
12 Blocage du couvercle du compartiment à piles
Eléments d’affichage
a Affichage de conduites électriques sous tension
b Affichage de la fonction Détection de bois
c Affichage de la fonction Détection de métaux
d Affichage de la fonction « ZOOM »
e Affichage de mesure « ZOOM »
f Affichage de mesure
g Affichage de calibrage « AutoCal »
h Affichage de métaux métalliques
i Affichage de métaux non métalliques
j Affichage signal acoustique éteint
k Indicateur de charge de la pile
1 609 929 P99 • 8.1.08
Français– 1

Caractéristiques techniques
Détecteur numérique DMF 10 Zoom
N° d’article 3 601 K10 0..
Profondeur max. de détection*:
Métaux ferreux 100 mm
Métaux non-ferreux (cuivre) 80 mm
Conduites en cuivre (sous tension)** 50 mm
Bois 20 mm
Coupure automatique après env. 5 min
Température de service –10 °C … +50 °C
Température de stockage –20 °C … +70 °C
Pile 1 x 9 V 6LR61
Accu 1 x 9 V 6F22
Durée de fonctionnement
(avec pile alcaline au manganèse) env. 6 h
Poids suivant EPTA-Procédure 01/2003 0,24 kg
* selon le matériau et la taille des objets ainsi que du matériau et de l’état du support
** profondeur plus faible de détection pour les conduites sans tension
Faire attention au numéro d’article se trouvant sur la plaque signalétique de
l’appareil de mesure. Les désignations commerciales des différents appareils
peuvent varier.
PROFESSIONAL
Fonctionnement
Mise en place/changement des piles
N’utiliser que des piles ou accus alcalines au manganèse.
Pour ouvrir le couvercle du compartiment à piles 10, appuyer sur le blo-
cage 12 dans le sens de la flèche et relever le couvercle du compartiment à piles. Introduire la pile fournie. Veiller à la bonne position des
pôles qui doit correspondre à la figure se trouvant à l’intérieur du compartiment à piles.
Si l’affichage de piles k s’allume sur l’afficheur, vous disposez encore
d’environ 1 heure pour effectuer des mesurages, si vous utilisez des
piles alcalines au manganèse (les accus ont une durée d’utilisation plus
courte). Si l’affichage k clignote, vous disposez encore d’environ
10 min. pour effectuer des mesurages. Si l’affichage des piles k et
l’anneau luminescent 1 clignotent (rouge), aucun mesurage ne peut être
effectué et la pile ou l’accu doit être remplacé.
B Sortir les piles de l’appareil de mesure au cas où l’appareil ne
serait pas utilisé pendant un certain temps. En cas de stockage
long, la pile peut être corrodée ou se décharger.
Mise en service
Protéger l’appareil de mesure contre l’humidité, ne pas l’exposer aux rayons directs du soleil.
Mise en Marche/Arrêt
B Avant de mettre en service l’appareil de mesure, s’assurer
que la zone de détection 9 n’est pas humide. Si nécessaire,
sécher l’appareil de mesure à l’aide d’un chiffon.
1 609 929 P99 • 8.1.08
Français– 2
B Au cas où l’appareil de mesure aurait été exposé à une forte
différence de température, le laisser équilibrer sa température avant de le mettre en service.
Pour mettre en service l’appareil de mesure, appuyer sur une touche
quelconque.
Si vous mettez en service l’appareil de mesure à l’aide de la touche de
détection de bois 5 ou à l’aide de la touche de détection de métaux 6,
l’appareil se trouve immédiatement dans la fonction de détection correspondante.
Si vous mettez en service l’appareil de mesure à l’aide de la touche Marche/Arrêt 7 ou la touche « ZOOM » 4, l’appareil se trouve dans la fonction de détection dans laquelle il a été utilisé la dernière fois.
Après un bref test automatique, l’appareil de mesure est prêt à fonctionner. Si l’appareil de mesure se trouve dans la fonction détection de
métaux, un crochet derrière l’affichage de calibrage « AutoCal » g indique que l’appareil est prêt à fonctionner.
Pour arrêter l’appareil de mesure, appuyer sur la touche Marche/ Arrêt 7.
Si l’on n’appuie sur aucune touche sur l’appareil de mesure pendant env.
5 min, l’appareil s’arrête automatiquement afin de ménager la pile.
Mode opératoire
L’appareil de mesure détecte des objets au-dessous de la zone de
détection 9.
Détection d’objets en métal
Pour détecter des objets en métal, appuyer sur la touche de détection
de métal 6. Le symbole c pour détection de métal est affiché, l’anneau 1
s’allume vert.
Placer l’appareil de mesure sur la surface à examiner et
le déplacer transversalement. Si l’appareil de mesure
s’approche d’un objet métallique, l’oscillation sur l’afficheur f augmente, si l’appareil s’éloigne d’un objet,
l’oscillation diminue. L’objet en métal se trouve au-dessous du centre du capteur (en dessous de l’ouverture
de marquage 2) à l’endroit où l’oscillation est à son maximu m. Tant que l’a pparei l de mesure se tro uve au-dessus
de l’objet en métal, l’anneau 1 est allumé rouge et un
signal acoustique permanent se fait entendre.
Pour une localisation précise de l’objet, appuyer sur la
touche « ZOOM » 4 et la maintenir appuyée tout en
déplaçant l’appareil de mesure plusieurs fois (3 fois) sur
l’objet. La fonction Zoom d est affichée. L’oscillation de
l’affichage de mesure Zoom e est à son maximum sur le
centre de l’objet en métal.
Si des objets métalliques très petits ou profondément
n’oscille pas, appuyer sur la touche « ZOOM » 4 et la maintenir appuyée
tout en continuant à déplacer l’appareil sur cet endroit. Ne prendre en
compte que l’affichage de mesure Zoom e pour la détection.
Au cas où il y aurait des inclusions métalliques dans le matériau à examiner, l’affichage de mesures f affiche un signal permanent. Appuyer
ensuite sur la touche « ZOOM » 4 et la maintenir appuyée tout en continuant à déplacer l’appareil sur cet endroit. Ne prendre en compte que
l’affichage de mesure Zoom e pour la détection.
enfoncés sont cherchés et que l’affichage de mesure f
1 609 929 P99 • 8.1.08
Français– 3
Si l’objet en métal détecté est un métal magnétique (par ex. fer), le symbole h est affiché. Pour les métaux non magnétiques, le symbole i est
affiché. Pour différencier entre les deux types de métaux, l’appareil de
mesure doit se trouver au-dessus de l’objet métallique détecté (l’anneau
1 s’allume rouge). Pour les faibles signaux l’affichage du type de métaux
n’est pas possible.
Si des treillis soudés ou des armatures se trouvent derrière la surface
examinée, des oscillations sont affichées sur l’ensemble de la surface de
l’affichage de mesure f. Dans un tel cas, toujours utiliser la fonction
Zoom pour la détection. Généralement, lors de la détection de treillis
soudés, le symbole h pour métaux magnétiques apparaît sur l’affichage
directement au dessus des barres de fer alors que le symbole i s’affiche
entre les barres de fer en cas de détection de métaux non magnétiques.
Détection d’objets en bois
Pour détecter des objets en bois, appuyer sur la touche de détection de
bois 5. Le symbole b pour détection de bois et la fonction Zoom d sont
affichés, la flèche en-dessous de l’affichage Zoom d clignote. L’affichage de calibrage « AutoCal » g et l’anneau 1 s’éteignent.
Poser l’appareil de mesure sur la surface à examiner. Appuyer maintenant sur la touche « ZOOM » 4 et la maintenir appuyée. L’anneau luminescent 1 s’allume alors vert, l’affichage de calibrage «AutoCal» g est
affiché de nouveau, l’affichage de la fonction Zoom d et la flèche se trouvant en-dessous s’éteignent.
Déplacer alors l’appareil de mesure, la touche
«ZOOM» 4 étant appuyée, de manière uniforme sur la
surface sans soulever l’appareil et sans modifier la pression appliquée. Les glisseurs en feutre 8 doivent toujours être en contact avec la surface pendant l’opération
de mesure.
Si un objet en bois est détecté, l’affichage de mesure f
oscille. Déplacer l’appareil de mesure plusieurs fois sur
la surface pour localiser avec précision l’objet en bois. Après avoir passé
plusieurs fois sur le même endroit, l’objet en bois peut être précisément
affiché : Tant que l’appareil de mesure se trouve au-dessus de l’objet en
bois, l’anneau 1 est allumé rouge et un signal acoustique permanent se
fait entendre. L’oscillation de l’affichage de mesure f est à son maximum
quand l’appareil se trouve sur le centre de l’objet en bois. L’affichage de
mesure Zoom e n’est pas actif lors de la détection d’objets en bois.
Attention : Si l’appareil de mesure a été posé et déplacé par mégarde
sur la surface à examiner, l’affichage de mesure f ainsi que la flèche se
trouvant au-dessous de l’affichage Zoom d clignotent, et l’anneau luminescent 1 clignote rouge. Dans un tel cas, recommencer le mesurage en
replaçant l’appareil de mesure un peu décalé sur la surface et en
appuyant de nouveau sur la touche « ZOOM » 4.
Lors de la détection d’objets en bois, quelquefois des objets métalliques
dans une profondeur de 20– 50 mm sont indiqués comme des objets
détectés. Pour distinguer entre les objets en bois et les objets en métal,
passez dans la fonction détection d’objets métalliques (cf. « Détection
d’objets en métal »). Si un objet est indiqué au même endroit dans cette
fonction, c’est qu’il s’agit précisément d’un objet en métal, pas d’un
objet en bois. Pour détecter d’autres objets en bois, passez de nouveau
dans la fonction détection d’objets en bois.
1 609 929 P99 • 8.1.08
Français– 4

Détecter des conduites sous tension
L’appareil de mesure peut indiquer des conduites sous tension de 50 ou
60 Hz courant alternatif. D’autres conduites ne peuvent être indiquées
que comme objets métalliques.
Les conduites sous tension sont indiquées aussi bien pendant une
détection de métaux que pendant une détection de bois. Si une conduite sous tension est détectée, l’indication a est affichée. Déplacer
l’appareil de mesure plusieurs fois sur la surface pour précisément localiser la conduite sous tension. Après avoir passé plusieurs fois, la conduite sous tension peut être précisément affichée. Si l’appareil de
mesure est très proche d’une conduite (quatre ou cinq barres dans l’affichage a), l’anneau luminescent clignote 1 rouge et le signal sonore
retentit avec une suite rapide de sons.
Les conduites sous tension peuvent être détectées plus facilement, si
les consommateurs de courant (par ex. lampes, appareils) sont connectés à la conduite et mis en service. Les conduites à 110 V, 240 V et
380 V (courant triphasé) sont détectées avec approximativement la
même capacité de détection.
Dans certaines conditions (par ex. derrières les surfaces métalliques ou
les surfaces contenant beaucoup d’eau), il n’est pas toujours possibles
de détecter les conduites sous tension. On reconnaît ces zones dans la
fonction détection de métaux. Si lors de la mise en service de l’appareil
sur une surface relativement grande, seule la valeur de mesure f est affichée, cela signifie que le matériau fait écran et que la détection de conduites sous tension n’est plus fiable.
Il est possible de détecter les conduites qui ne sont pas sous tension
avec la fonction détection d’objets en métal. Les torons conducteurs ne
seront alors pas indiqués (contrairement aux câbles pleins).
Instructions d’utilisation
B De par la conception de l’appareil, les résultats de mesure
peuvent être entravés par certaines conditions environnementales, tels que par ex. la proximité d’appareils qui génèrent de forts champs magnétiques ou électromagnétiques,
l’humidité, les matériaux de construction contenant des
métaux, les matériaux isolants métallisés ou les papiers
peints conducteurs. Avant le perçage, le sciage ou le fraisage dans
les murs, plafonds ou sols, respecter également d’autres sources
d’information (par ex. plans de construction).
Arrêter le signal sonore
Vos pouvez mettre en fonction ou arrêter le signal sonore. Pour ce faire,
appuyer simultanément sur les touches « détection de métaux » 6 et
« détection de bois » 5. Lorsque le signal sonore est mis en fonction, le
symbole j est affiché.
Le réglage du signal sonore est maintenu quand l’appareil de mesure est
mis en ou hors fonctionnement.
Marquage d’objets
Si nécessaire, les objets détectés peuvent être marqués. Pour ce faire,
sortir le crayon 11 de l’appareil de mesure et effectuer un mesurage
comme habituellement. Si vous avez détecté les limites ou le centre d’un
objet, marquer l’endroit cherché à travers l’ouverture de marquage 2.
1 609 929 P99 • 8.1.08
Français– 5

Affichage « AutoCal »
Si le crochet derrière l’affichage de calibrage « AutoCal » g clignote
pendant une période assez longue ou quand il n’est plus affiché, il n’est
plus possible d’effectuer des mesures fiables. Dans un tel cas, envoyer
l’appareil de mesure à une station de service après-vente agréé pour
outillage Bosch. Exception : Dans la fonction détection de bois, l’affichage de calibrage « AutoCal » g s’éteint, tant que l’on n’appuie pas sur
la touche « ZOOM » 4.
Entretien et service après-vente
Nettoyage et entretien
Si l’affichage de mesure f oscille de façon permanente, bien qu’aucun
objet ne se trouve à proximité de l’appareil de mesure, il est possible de
calibrer l’appareil de mesure manuellement. Pour ce faire, enlever tous
les objets à proximité de l’appareil de mesure (également montres ou
anneaux en métal) et maintenir l’appareil de mesure en l’air. L’appareil de
mesure étant arrêté, appuyer sur la touche Marche/Arrêt 7 et la touche
de détection de bois 5 simultanément jusqu’à ce que l’anneau luminescent 1 s’allume simultanément rouge et vert. Puis relâcher les deux touches. Si le calibrage est réussi, l’appareil de mesure redémarre au bout
de quelques secondes et est de nouveau prêt à fonctionner.
Nettoyer l’appareil à l’aide d’un torchon doux et sec. Ne pas utiliser de
détergents ou de solvants.
Afin de ne pas altérer la fonction de mesure, n’appliquer pas de plaquettes, en particulier de plaquettes en métal sur la zone de détection 9 se
trouvant au dos ou sur la face avant de l’appareil de mesure.
Ne pas enlever les glisseurs en feutre 8 se trouvant sur le dos de l’appareil de mesure. Remplacer les glisseurs en feutre lorsque ceux-ci sont
endommagés ou usés. Pour ce faire, enlever complètement les glisseurs
en feutre endommagés et coller les nouveaux glisseurs en feutre sur le
même endroit.
Ne transporter et ranger l’appareil de mesure que dans son étui de protection fourni avec l’appareil.
Si, malgré tous les soins apportés à la fabrication et au contrôle de
l’appareil de mesure, celui-ci devait avoir un défaut, la réparation ne doit
être confiée qu’à une station de service après-vente agréée pour
outillage Bosch.
Pour toute demande de renseignement ou commande de pièces de
rechange, nous préciser impérativement le numéro d’article à dix chiffres
de l’appareil de mesure indiqué sur la plaque signalétique.
Pièces de rechange
Etui de protection . . . . . . . . . . . . . . . . . . . . . . . . . . . . . . . 1 609 203 P19
Couvercle du compartiment à piles 10. . . . . . . . . . . . . . 1 609 203 P20
Glisseur en feutre 8 . . . . . . . . . . . . . . . . . . . . . . . . . . . . . 1 609 203 P21
1 609 929 P99 • 8.1.08
Français– 6

Service après-vente
Vous trouverez des vues éclatées ainsi que des informations concernant
les pièces de rechange sous :
www.bosch-pt.com
France
Robert Bosch France S.A.S.
Service Après-vente/Outillage
126, rue de Stalingrad
93700 Drancy
✆ Centre d’appels SAV :. . . . . . . . . . . . . . . . . . . . . . . . 01 43 11 90 06
✆ N° vert Conseiller Bosch :. . . . . . . . . . . . . . . . . . . . . 0 800 05 50 51
Belgique, Luxembourg
✆ . . . . . . . . . . . . . . . . . . . . . . . . . . . . . . . . . . . . . . . .+32 (0)70/22 55 65
Fax . . . . . . . . . . . . . . . . . . . . . . . . . . . . . . . . . . . . . . .+32 (0)70/22 55 75
E-Mail : Outillage.Gereedschap@be.bosch.com
Suisse
✆ . . . . . . . . . . . . . . . . . . . . . . . . . . . . . . . . . . . . . . . +41 (0)1/ 8 47 16 16
Fax . . . . . . . . . . . . . . . . . . . . . . . . . . . . . . . . . . . . . . +41 (0)1/8 47 16 57
✆ Service conseil client : . . . . . . . . . . . . . . . . . . . . . . . .0 800 55 11 55
Elimination des déchets
Les appareils de mesure ainsi que leurs accessoires et emballages, doivent pouvoir suivre chacun une voie de recyclage appropriée.
Seulement pour les pays de l’Union Européenne :
Ne pas jeter votre appareil de mesure avec les ordures
ménagères !
Conformément à la directive européenne 2002/96/CE
relative aux déchets d’équipements électriques et électroniques et sa réalisation dans les lois nationales, les appareils de mesure dont on ne peut plu s se servir doivent être
séparés et suivre une voie de recyclage appropriée.
Accus/piles :
Ne pas jeter les accu/piles dans les ordures ménagères, ni dans les
flammes ou l’eau. Les accus/piles doivent être collectés, recyclés ou éliminés en conformité avec les réglementations se rapportant à l’environnement.
Seulement pour les pays de l’Union Européenne :
Les accus/piles usés ou défectueux doivent être recyclés conformément
à la directive 91/157/CEE.
Les accus/ piles dont on ne peut plus se servir peuvent être déposés
directement auprès de :
Suisse
Batrec AG
3752 Wimmis BE
Sous réserve de modifications.
1 609 929 P99 • 8.1.08
Français– 7

Descripción del funcionamiento
Solamente podrá trabajar de forma óptima con el
aparato de medición si lee íntegramente las instrucciones de manejo y de operación, ateniéndose estrictamente a las instrucciones allí comprendidas. GUARDE ESTAS INSTRUCCIONES EN
UN LUGAR SEGURO.
Despliegue y mantenga abierta la solapa con la imagen del aparato de
medida mientras lee las instrucciones de manejo.
Utilización reglamentaria
Este aparato de medida ha sido diseñado para detectar metales (no
férricos y férricos, p.ej. acero para armar), vigas de madera, así como
conductores portadores de tensión en paredes, techos y suelos.
Componentes principales
La numeración de los componentes está referida a la imagen del aparato
de medición en la página ilustrada.
1 Anillo luminoso
2 Orificio para marcado
3 Display
4 Tecla “ZOOM”
5 Tecla para detección de madera
6 Tecla para detección de metal
7 Tecla de conexión/desconexión “on/off”
8 Protección de fieltro
9 Área del sensor
10 Tapa del alojamiento de la pila
11 Lápiz para marcar (extraíble)
12 Enclavamiento de la tapa del alojamiento de la pila
Elementos de indicación
a Indicador de conductores portadores de tensión
b Indicador de la función para detección de madera
c Indicador de la función para detección de metal
d Indicador de la función “ZOOM”
e Indicador de medida “ZOOM”
f Indicador de medida
g Indicador de calibrado “AutoCal”
h Indicador de metales magnéticos
i Indicador de metales no magnéticos
j Indicador para señal acústica inactiva
k Símbolo de estado de carga
1 609 929 P99 • 8.1.08
Español– 1

Datos técnicos
Detector Digital DMF 10 Zoom
Nº de artículo 3 601 K10 0..
Profundidad de detección máx.*:
Metales férricos 100 mm
Metales no férricos (cobre) 80 mm
Conductores de cobre
(portadores de tensión)**
Madera 20 mm
Desconexión automática después de aprox. 5 min
Temperatura de operación –10 °C … +50 °C
Temperatura de almacenamiento –20 °C … +70 °C
Pila 1 x 9 V 6LR61
Acumulador 1 x 9 V 6F22
Autonomía (pilas alcalinas-manganeso), aprox. 6 h
Peso según EPTA-Procedure 01/2003 0,24 kg
* Dependiente del tipo de material y tamaño de los objetos, así como del tipo de
material y estado de la base de apoyo
** La profundidad de detección es menor en conductores que no sean portadores de tensión
Preste atención al nº de artículo que figura en la placa de características de su
aparato de medida, ya que pueden variar las denominaciones comerciales en
ciertos aparatos de medida.
PROFESSIONAL
50 mm
Operación
Inserción y cambio de la pila
Utilice exclusivamente pilas alcalinas-manganeso o acumuladores.
Para abrir la tapa del alojamiento de la pila 10 presionar el enclavamiento
12 en dirección de la flecha y abatir hacia arriba la tapa del alojamiento
de la pila. Inserte la pila suministrada. Respete la polaridad correcta de
acuerdo a la representación en la parte interior del alojamiento de las
pilas.
Si el símbolo de estado de carga k del display se ilumina, y se están
empleando pilas alcalinas-manganeso, puede seguirse midiendo
durante aprox. 1 hora (este tiempo se reduce al usar acumuladores). Si
el símbolo k parpadea, solamente puede seguirse midiendo durante
10 min. Si parpadean el símbolo de estado de carga k y el anillo luminoso 1 (rojo), no es posible realizar entonces ninguna medición y deberá
sustituirse la pila o el acumulador.
B Saque la pila del aparato de medida si pretende no utilizarlo
durante largo tiempo. Si el tiempo de almacenaje es prolongado,
la pila se puede llegar a corroer o autodescargar.
1 609 929 P99 • 8.1.08
Español– 2
Puesta en marcha
Proteja el aparato de medida de la humedad y de la exposición
directa al sol.
Conexión/desconexión
B Antes de conectar el aparato de medida cerciorarse de que
no esté humedecida el área del sensor 9. Si fuera éste el caso
secar el aparato de medida con un paño seco.
B Si el aparato de medida ha sido sometido a un cambio
brusco de temperatura, deje que éste se atempere primero
antes de conectarlo.
Para conectar el aparato de medida pulsar una tecla cualquiera.
Al conectar el aparato de medida con la tecla para detección de madera
5 o con la tecla para detección de metal 6 se selecciona directamente
también la función de exploración respectiva.
Si el aparato de medida es conectado con la tecla de conexión/desconexión 7 o con la tecla “ZOOM” 4, se activa la función de exploración
utilizada la última vez.
Una vez concluida la breve rutina de autocontrol del aparato de medida,
éste se encuentra en disposición de funcionamiento. Si el aparato de
medida se encuentra en la función para detección de metales, la disponibilidad de funcionamiento se indica representándose un ganchito al
lado del indicador de calibrado “AutoCal” g.
Para desconectar el aparato de medida pulsar la tecla de conexión/
desconexión 7.
En caso de no activarse ninguna tecla del aparato de medida durante
aprox. 5 min, el aparato de medida se desconecta automáticamente
para evitar una descarga innecesaria de la pila.
Modos de operación
El aparato de medida detecta los objetos situados debajo del área del
sensor 9.
Detección de objetos metálicos
Si desea localizar objetos metálicos, pulse la tecla para detección de
metales 6. En el display se representa el símbolo c para la detección de
metales, además de iluminarse de color verde el anillo 1.
Deposite el aparato de medida sobre la superficie a
explorar y desplácelo lateralmente. Al aproximarse el aparato de medida a un objeto metálico, aumenta la amplitud
en el indicador de medida f, y vuelve a decrecer al separarse del objeto. En la posición correspondiente a la
amplitud máxima se encuentra el objeto metálico debajo
del centro del sensor (debajo del orificio para marcado
2). Siempre que el aparato de medida se encuentre sobre
el objeto metálico se enciende el anillo 1 de color rojo y
se emite una señal acústica permanente.
Para localizar exactamente el objeto, pulse la tecla
“ZOOM” 4 y manténgala pulsada hasta haber pasado
3 veces con el aparato de medición por encima del
objeto. En el display aparece el indicador de la función
zoom d. En la posición correspondiente al centro del
objeto metálico se obtiene la deflexión máxima en el indicador de medida zoom e.
1 609 929 P99 • 8.1.08
Español– 3
Si desea detectar objetos metálicos muy pequeños o profundos y no se
obtiene una señal en el indicador de medida f, pulse entonces, y mantenga en esa posición, la tecla “ZOOM” 4 al sobrepasar el área. Al realizar la exploración solamente centre su atención en el indicador de
medida zoom e.
Si el material que está explorando albergase inclusiones metálicas, en el
indicador de medida f se representa entonces continuamente una señal.
Pulse entonces la tecla “ZOOM” 4 y manténgala presionada a sobrepasar el área. Al realizar la exploración solamente centre su atención en
el indicador de medida zoom e.
Si el objeto metálico detectado fuese un metal magnético (p.ej. hierro),
se muestra entonces el símbolo h en el display. En metales no magnéticos se representa el símbolo i. Para discernir entre los diversos tipos de
metal deberá situarse el aparato de medida sobre el objeto metálico
detectado (el anillo 1 se enciende de color rojo). Si la señal es demasiado débil no es posible determinar el tipo de metal detectado.
Si el material de base explorado contiene en su interior malla o varilla de
acero se obtiene continuamente una señal en el indicador de medida f.
En estos casos emplee siempre la función zoom. Al explorar áreas que
contengan malla de acero se suele observar en el display el símbolo h
para metales magnéticos al encontrarse el aparato directamente sobre
la varilla de acero, y el símbolo para metales no magnéticos i al estar
situado entre las varillas.
Detección de objetos de madera
Para localizar objetos de madera pulse la tecla para detección de
madera 5. En el display se muestra el símbolo b para detección de
madera y el indicador de la función zoom d, además de parpadear la flecha situada debajo del indicador de la función zoom d. El indicador de
calibrado “AutoCal” g y el anillo 1 se apagan.
Deposite el aparato de medida sobre la superficie a explorar. Pulse
entonces la tecla “ZOOM” 4 y manténgala pulsada. El anillo luminoso 1
se enciende entonces de color verde, se vuelve a representar el indicador de calibrado “AutoCal” g, y se apagan el indicador de la función
zoom d y la flecha situada debajo.
Mantenga pulsada la tecla “ZOOM” 4 y desplace uniformemente sobre el material de base el aparato de
medida, sin separarlo y sin variar la presión de aplicación. Durante la medición deberán mantenerse siempre
los fieltros de protección 8 en contacto con el material
de base.
En caso de detectar un objeto de madera se obtiene
una señal en el indicador de medida f. Desplace repetidamente el aparato de medida sobre la superficie para localizar con
mayor exactitud el objeto de madera. Sobrepasando varias veces el
mismo área puede localizarse el objeto de madera con gran exactitud.
Siempre que el aparato de medida se encuentre encima del objeto de
madera se enciende el anillo 1 de color rojo y se emite una señal acústica permanente. La amplitud máxima en el indicador de medida f se
alcanza en el centro del objeto de madera. El indicador de medida zoom
e no se activa al detectar objetos de madera.
Atención: si casualmente deposita el aparato de medida en un punto
debajo del cual se encuentre un objeto de madera y desplaza el aparato
sobre la superficie que pretende explorar, entonces parpadea el indicador de medida f y la flecha debajo del indicador zoom d, y el anillo luminoso 1 parpadea en color rojo. En este caso realice la medición de
nuevo, colocando el aparato de medida en una posición desfasada de
la anterior y pulse nuevamente la tecla “ZOOM” 4.
1 609 929 P99 • 8.1.08
Español– 4

Al tratar de localizar objetos de madera puede ocurrir que los objetos
detectados sean en realidad objetos metálicos situados a una profundidad entre 20–50 mm. Para saber si los objetos encontrados son de
madera o metal, seleccionar la función para detección de metales (ver
“Detección de objetos metálicos”). Si con esta función se detecta un
objeto en el mismo punto, ello indica que el objeto localizado es de metal
y no de madera. Para continuar buscando objetos de madera seleccione
nuevamente la función para detección de madera.
Detección de conductores portadores de tensión
El aparato de medida puede detectar conductores portadores de tensión alterna a 50 ó 60 Hz. Los demás conductores solamente pueden
detectarse por su condición como objeto metálico.
Los conductores portadores de tensión que pudieran existir se muestran tanto en la función de búsqueda de metales como en la función de
búsqueda de madera. En caso de detectarse un conductor portador de
tensión se representa entonces en el display el indicador a. Desplace
repetidamente el aparato de medida sobre la superficie para poder
detectar con mayor exactitud el conductor eléctrico. Después de haber
sobrepasado reiteradamente por encima del conductor portador de tensión, la localización de éste puede realizarse de forma muy exacta. Si el
aparato de medida se encuentra muy próximo al conductor (amplitud de
cuatro o cinco escalones en el indicador a), comienza a parpadear en
color rojo el anillo luminoso 1 y la señal acústica se emite muy seguidamente.
Los conductores portadores de tensión pueden detectarse más fácilmente si se conecta a ellos, y se deja funcionar, algún consumidor (p.ej.
una lámpara o aparato). Los conductores con tensiones de 110 V,
240 V y 380 V (corriente trifásica) se detectan sin apreciarse gran diferencia entre ellos.
Bajo ciertas condiciones (p.ej. detrás de superficies metálicas o de
aquellas con mucha humedad) puede que no se detecten con fiabilidad
los conductores portadores de tensión. Para identificar estas áreas
puede recurrirse a la función para detección de metal. Si dentro de un
área relativamente amplia se obtiene una señal f en cada punto, ello
indica que el material apantalla las señales eléctricas, lo que no permite
detectar con fiabilidad conductores portadores de tensión.
Los cables que no sean portadores de tensión pueden detectarse como
objeto metálico con la función para detección de metales. Sin embargo,
no son detectados los cables flexibles con alma de hilos múltiples (a
diferencia de los cables rígidos de alma maciza).
Instrucciones para la operación
B Condicionado por el principio de funcionamiento, los resul-
tados de medición pueden verse afectados por ciertas condiciones del entorno. Éstas pueden ser p.ej. la proximidad de
aparatos que generen unos fuertes campos magnéticos o
electromagnéticos, la humedad, materiales de construcción
que contengan metal, y materiales aislantes revestidos con
lámina de aluminio o papeles pintados conductores. Por ello,
antes de taladrar, serrar o fresar en paredes, techos o suelos, recomendamos consultar otras fuentes de información (p.ej. planos de
construcción).
1 609 929 P99 • 8.1.08
Español– 5

Desconexión de la señal acústica
Ud. puede activar y desactivar la señal acústica. Para ello pulse simultáneamente las teclas para detección de metal 6 y madera 5. Si se ha desactivado la señal acústica se representa en el display el símbolo j.
La modalidad elegida para la señal acústica se mantiene también tras la
desconexión del aparato de medida.
Marcado de los objetos
Si lo desea puede marcar también la posición de los objetos detectados.
Para ello retire el lápiz 11 del aparato de medida y efectúe la medida en la
manera acostumbrada. Una vez localizados los límites o el centro del
objeto, marque el punto correspondiente por el orificio de marcado 2.
Indicador “AutoCal”
Si el ganchito al margen del indicador de calibrado “AutoCal” g no fuese
perceptible durante largo tiempo o desapareciese del todo, no es posible
entonces realizar mediciones fiables. En estos casos entregue el aparato
de medida a un servicio técnico autorizado Bosch. Excepción: en la función para detección de madera desaparece el indicador de autocalibrado
“AutoCal” g, siempre que no se pulse la tecla “ZOOM” 4.
Mantenimiento y servicio
Mantenimiento y limpieza
Si el indicador de medida f muestra permanentemente un valor, a pesar
de no encontrarse cerca del aparato de medida ningún objeto de metal,
es posible recalibrar manualmente el aparato de medida. Retirar para
ello todos los objetos que se encuentren cerca del aparato de medida
(también un reloj de pulsera o anillo de metal) y sujete el aparato de
medida en el aire. Estando desconectado el aparato de medida, pulse al
mismo tiempo la tecla de conexión/desconexión 7 y la tecla para detección de madera 5 hasta que el anillo luminoso 1. Suelte entonces ambas
teclas. Si el calibrado fue correcto, pasados algunos segundos, se
conecta nuevamente el aparato de medida que queda así en disposición
de funcionamiento.
Limpie el aparato con un paño seco y suave. No utilice agentes de limpieza ni disolvente.
Para no falsear la medición no deberán fijarse en el área del sensor 9
tanto en el frente como al dorso del aparato de medida ni etiquetas ni
placas, especialmente si éstas fuesen de metal.
No desprenda las protecciones de fieltro 8 al dorso del aparato de
medida. Sustituya las protecciones de fieltro si estuviesen dañadas o
desgastadas. Desprenda completamente las protecciones de fieltro y
pegue las protecciones nuevas en el mismo lugar.
Solamente guarde y transporte el aparato de medida en el estuche de
protección adjunto.
Si a pesar de los esmerados procesos de fabricación y control, el aparato de medida llegase a averiarse, la reparación deberá encargarse a
un taller de servicio autorizado para herramientas eléctricas Bosch.
Al realizar consultas o solicitar piezas de repuesto, es imprescindible
indicar siempre el nº de artículo de 10 dígitos que figura en la placa de
características del aparato de medida.
1 609 929 P99 • 8.1.08
Español– 6
Loading…
ID товара: 10152


Детекторы проводки, Для измерения
Сравнить
Детектор Bosch DMF 10 Zoom Professional
Состояние НОВОГО инструмента
Комплектация:
1. Детектор Bosch DMF 10 Zoom
2. Коробка
3. Инструкция по эксплуатации.
4,200.00 ₽
Количество
-
Спецификация
| Брэнды |
Bosch |
|---|
Похожие товары
-
Для измерения, Лазерные уровни
Лазерный уровень Kapro 873 (Новый)
Для измерения, Лазерные уровни
Лазерный уровень Kapro 873 (Новый)
0 из 5
(0)
Лазерный уровень KAPRO 873 (НОВЫЙ)
Год выпуска 2018
Производство Израиль.Комплектация:
1.Лазерный уровень.
2.Переходник на 5/8″.
3.Сумка.
4.Коробка.
5.Инструкция.SKU: n/a
8,000.00 ₽
В корзину
Сравнить
-
Для измерения, Лазерные уровни
Лазерный уровень Kapro 875 (Новый)
Для измерения, Лазерные уровни
Лазерный уровень Kapro 875 (Новый)
0 из 5
(0)
Лазерный уровень KAPRO 875
НОВЫЙ, НА ГАРАНТИИ
Год выпуска 2018гКомплектация:
1. Лазерный уровень
2. Мишень
3. Очки
4. Зарядное устройство
5. Противоударная сумка
6. Инструкция по эксплуатации
7. Гарантийный талонSKU: n/a
13,500.00 ₽
В корзину
Сравнить
-
Для измерения, Лазерные уровни
Лазерный уровень Hilti PM 4-M в Кейсе (Новый)
Для измерения, Лазерные уровни
Лазерный уровень Hilti PM 4-M в Кейсе (Новый)
0 из 5
(0)
Лазерный уровень HILTI PM 4-M
НОВЫЙ
Год выпуска 10.2017гКомплектация:
1.Мультилинейный лазерный нивелир PM 4-M.
2.Элемент питания AA (2) алкалиновый1×4шт.
3. Адаптер для штатива PMW 301.
4.ЧемоданSKU: n/a
22,500.00 ₽
В корзину
Сравнить
-
Для измерения, Лазерные дальномеры (рулетки)
Дальномер Bosch PLR 50 C (Новый)
Для измерения, Лазерные дальномеры (рулетки)
Дальномер Bosch PLR 50 C (Новый)
0 из 5
(0)
Дальномер Bosch PLR 50 C
Новые, НА ГАРАНТИИ
Производство МАЛАЙЗИЯSKU: n/a
7,500.00 ₽
В корзину
Сравнить
-
Продано
Для измерения, Лазерные уровни, Нивелиры
Лазерный уровень Bosch 2-80 P + BM1 (Кейс)
Для измерения, Лазерные уровни, Нивелиры
Лазерный уровень Bosch 2-80 P + BM1 (Кейс)
0 из 5
(0)
Состояние НОВОГО инструмента
Комплектация:
1. Нивелир Bosch 2-80 P
2. Универсальный держатель Bosch BM1
3. Мишень.
4. Очки
5. Кейс
6. Инструкция по эксплуатации
7. Гарантийный талонSKU: n/a
21,500.00 ₽
Подробнее
Сравнить
FAQ: Types of Manuals and Their Contents
Bosch DMF 10 Zoom Manuals come in various types, each serving a specific purpose to help users effectively operate and maintain their devices. Here are the common types of Bosch DMF 10 Zoom User Guides and the information they typically include:
- User Manuals: Provide comprehensive instructions on how to use the device, including setup, features, and operation. They often include troubleshooting tips, safety information, and maintenance guidelines.
- Service Instructions: Designed for technicians and repair professionals, these manuals offer detailed information on diagnosing and repairing issues with the device. They include schematics, parts lists, and step-by-step repair procedures.
- Installation Guides: Focus on the installation process of the device, providing detailed instructions and diagrams for proper setup. They are essential for ensuring the device is installed correctly and safely.
- Maintenance Manuals: Provide guidance on routine maintenance tasks to keep the device in optimal condition. They cover cleaning procedures, part replacements, and regular servicing tips.
- Quick Start Guides: Offer a concise overview of the essential steps needed to get the device up and running quickly. They are ideal for users who need immediate assistance with basic setup and operation.
Each type of Bosch DMF 10 Zoom instruction is designed to address specific needs, ensuring users have the necessary information to use, maintain, and repair their devices effectively.
Related Instructions for Bosch DMF 10 Zoom:
2
NGP745UC — 30″4 Burner Cooktop NGP Series…
Installation manual PDF Manual (@X896Y7), Bosch NGP745UC — 30″4 Burner Cooktop NGP Series… Cooktop (Sunday 15-12-2024)
32
1232
247
3
GSA 1100 E Professional
36
715
151
4
AUTODOME IP starlight 5100i IR
54
1261
278
5
ISN?SM?80
Installation manual Bosch Security Sensors Installation manual (File: bosch-isnsm80-installation-manual-8, 04th Mar 2025)
8
1277
205
6
MMB1000UC — 600 Watt Blender
31
1112
223
9
Rexroth ctrlX CORE
Manual PDF User Manual (@EMVU2V), Bosch Rexroth ctrlX CORE Control Unit (Fri 01.2025)
40
725
131
Security Sensors Devices by Other Brands:
|
DualLite SEWL Series Installation, Operation And Maintainance Instructions DualLite Security Sensors Installation, operation and maintainance instructions (File: duallite-sewl-series-installation-operation-and-maintainance-instructions-2, 20th Nov 2024) Wet Location/NEMA 4X Die-Cast Aluminum LED Exit Sign 20 Nov 2024 | 2 |
|
|
PHYWE Cobra4 Operating Instructions Cobra4 Operating instructions — 54HER4 1 01 Feb 2025 | 3 |
|
|
EVERSPRING ST812 Operating Manual ST812 Operating manual — 71IO51 1 27 Dec 2024 | 5 |
|
|
Eaton Crouse-hinds series Operating Instructions Manual Crouse-hinds series (Outdoor Light ePDF Manual, #1EMLY6) Explosionsgeschützte Notleuchten 25 Nov 2024 | 36 |
Categories:
Headsets
Juice extractor
Ice Maker
Cooktops
Radar
Microwave

249 ₽
Инструкция (руководство пользователя) на Цифровой измеритель Bosch DMF-10 Zoom
Артикул: bosch-dmf-10-zoom
Категория: BOSCH
-
Описание
-
Детали
Описание
Инструкцию по эксплуатации Bosch DMF-10 Zoom на русском языке можно будет скачать в личном кабинете после оформления и оплаты заказа.
Детали
| Формат файла |
|
|---|---|
| Размер инструкции в кб |
725 |
Технические данные
Цифровой детектор
Предметный №
Глубина обнаружения, макс.*:
черные металлы
цветные металлы (медь)
медные кабели (под напряжением)**
древесина
Автоматическое выключение прибл. через
Рабочая температура
Температура хранения
Батарея
Аккумулятор
Продолжительность работы
(щелочных батарей) ок.
Вес согласно EPTA-Procedure 01/2003
* в зависимости от материала и размеров объектов и также материала
и состояния поверхности
** меньшая глубина обнаружения электрокабеля без напряжения
Учитывайте предметный номер на типовой табличке Вашего измери-
тельного инструмента, торговые обозначения отдельных инструментов
могут изменяться.
Работа с инструментом
Установка/смена батареи
Применяйте исключительно щелочные аккумуляторы или
батареи.
Для открытия батарейного отсека 10 нажмите на фиксатор 12
в направление стрелки и откиньте крышку отсека наверх.
Вложите поставленные с инструментом батареи. Следите при
этом за правильным расположением полюсов в соответствии с
изображением на внутренней стенке отсека.
Если на дисплее загорается индикатор батареи k, то при при-
менении щелочных батарей Вы можете вести измерения еще
ок. 1 часа (рабочее время аккумуляторов короче). Если инди-
катор начнет мигать k, то измерение возможно еще ок. 10 мин.
При мигании индикатора батарей k и святящегося кольца 1
(красный свет) измерения больше невозможны и Вы должны
заменить батареи или аккумулятор.
B Если Вы продолжительное время не пользуйтесь
измерительным инструментом, то батарея должна быть
вынута из инструмента. При продолжительном хранении
инструмента батарея может окислиться и разрядиться.
1 609 929 P99 • 8.1.08
Русский–2
DMF 10 Zoom
PROFESSIONAL
3 601 K10 0..
100 мм
80 мм
50 мм
20 мм
5 мин
–10 °C … +50 °C
–20 °C … +70 °C
1 x 9 В 6LR61
1 x 9 В 6F22
0,24 кг
6 ч
Позвольте внести свой «целковый» как человеку, имеющему некоторый опыт эксплуатации подобных девайсов.
Небольшая предыстория.
Эту тему я пытался поднимать пару раз на старом форуме:
Кому лень читать былое, вкратце:
Ваш покорный слуга несколько лет занимается монтажом плазменных и ЖК панелей на стены и потолки различных типов. Без подобных детекторов в такой работе не обойтись.
Началось с трехсотрублевого китайского индукционного приборчика (1-е фото). При всем, что говорено-переговорено про «желтый» ширпотреб везде, и на этом форуме, в частности (и с чем я согласен ), этот прибор, вобщем, свои деньги отработал, не раз окупившись. Но и, вобщем, изжил себя. Определяет только металл (дерево, пластик – нет), сканирует неглубоко, периодически глючит, довольно быстро разряжает батарейки.
Потом был ультразвуковой детектор (2-е фото), реагирующий на неоднородности. Он может определять дерево, пластик, металл, выделяя их границы как некие островки неоднородности в общей однородной массе стены или другой поверхности. Немного бОльшая цена (30$), немного бОльшие возможности. В целом свое тоже отработал и, отрабатывая, подталкивал своего хозяина к следующему, более серьезному шагу.
Им стала покупка американского Zirkon’а (3-е фото). Кстати, на стадии выбора-то в поле зрения и попадал Bosch. Только модель была DMO 10 (названная Vladis-lav’ом DMF 10 ZOOM появилась позже). По характеристикам среди аппаратов такого класса Zirkon практически непревзойденный:
- глубина сканирования 150 (!) мм,
- многофункциональный дисплей,
-
определение точного местоположения и глубины залегания мет.предмета.
Денег он стоил, конечно, других (на момент покупки – 240$). Но и — вещь. Сейчас без него не выезжаю ни на один заказ.Логическим завершением и венцом может стать Bosch D Tect 100 (4-е фото).
Вот это В-Е-Щ-Ь. Почти молюсь на него, так хочу. У нас в Питере он 27…32 тыс.руб., в столице 21…24 ! Эх,москвичи!.. Завидки берут.Теперь по существу высказанного Vladis-lav’ом.
Если совсем коротко — у любой вещи есть ГРАНИЦЫ ПРИМЕНИМОСТИ.
Моя «детекторная эволюция» подсказывает это мне еще со времени самого первого китайского приборчика. Отчасти это указано, кстати, и в инструкциях по применению.
Несколько моментов.С приближением к предельной глубине сканирования разрешающая способность прибора падает. Вблизи этой глубины (для моего Zirkon Metalliscanner 6.0 — 150мм, для Bosch DMF 10 ZOOM — 50) два находящихся даже на достаточном расстоянии (несколько см) друг от друга мет.предмета могут быть опознаны как один или не определены вовсе.
Второе.
Максимальную эффективность подобные приборы проявляют в ситуациях, когда однородные, однотипные предметы залегают на примерно одинаковой глубине с достаточным шагом, соизмеримым с глубиной сканирования детектора (бОльшим или ненамного меньшим). Например, арматурные прутки в железобетоне с шагом 10…20 см.При нахождении рядом двух сильно отличающихся, например, по массе, диаметру (для проволоки, прутков, болтов) мет.предметов меньший из них может быть не опознан, а локализация бОльшего – искажена (прибор «усредняет»). То есть, минимально эффективны такие детекторы в ситуациях, противоположных первой.
С повышением класса прибора все эти издержки постепенно уменьшаются. И в продвинутых топовых моделях типа Bosch D Tect 100, Hilti Ferroscan PS200 близки, наверное, к нулю.
Вобщем, профессиональный инструмент был и останется недешевой высокотехнологичной продукцией. Как и должно быть.Извините, если кому надоел длинным повествованием.
DMF 10 Zoom Professional — это измерительный инструмент от компании Bosch, который позволяет пользователям точно измерять расстояния и глубины с помощью лазера. Если вы только что приобрели этот инструмент, можете использовать следующие шаги, чтобы начать его использование:
1. Убедитесь, что вам доступна инструкция для DMF 10 Zoom Professional. Она может быть включена в коробку с устройством, либо вы можете найти ее на сайте производителя.
2. Подготовьте инструмент, вставив батареи и убедившись, что он в рабочем состоянии.
3. Выберите режим измерения, который соответствует вашим потребностям. Вы можете выбрать режим точного измерения расстояния, измерения расстояния с функцией сложения и вычитания, измерения глубины и т.д.
4. Наведите лазерную точку на объект, который вы хотите измерить, и нажмите на соответствующую кнопку на инструменте, чтобы выполнить измерение.

Bosch DMF 10 Zoom Test u0026 Review
BOSCH GMS 120 Детектор скрытых объектов
ПЕРМЬ Металлодетектор BOSCH DMF 10 Zoom в качестве пинпоинтера
Bosch DMF10 Tutorial
Детектор скрытой проводки DMF 10 Zoom
Bosch DMF 10 Zoom
Детектор BOSCH DMF 10 Zoom
Детектор Bosch DMF 10 zoom
как работать детектором металла Bosch DMF 10 Zoom
Bosch DMF10
Также читайте:
- Как удалить zoom аккаунт
- Почему не видно демонстрацию экрана в зуме
- Как поставить в zoom фото
- Как в зуме комментировать
- Как писать комментарии в зуме с телефона
- Как включить таймер в зуме
- Как выйти из аккаунта зум на компьютере
- Как запустить zoom на компьютере без установки
- Как разобрать налобный фонарик с зумом
- Куда сохраняется запись зум на телефоне
- Сколько обрабатывается видео в зуме
- Какой зум у айфона 12
Содержание
- 1 Файлы для скачивания:
- 2 Магазины, в которых можно купить этот товар и его аналоги
- 3 Видео обзоры Bosch DMF 10 Zoom
- 4 Характеристики Bosch DMF 10 Zoom
- 5 Плюсы и минусы Bosch DMF 10 Zoom
- 6 Отзывы о Bosch DMF 10 Zoom
Файлы для скачивания:
| Прайс-лист «Детекторы проводки» |
Формат:
Дата формирования прайс-листа: 25.11.2019.
Справочные документы и прайсы в разделе для скачивания подготовлены в формате PDF. Все инструкции по эксплуатации, руководства пользователя, мануалы и другие документы на данном сайте принадлежат ЗАО «Вива-Телеком». Скачивание файлов «Прайс Детекторы проводки», а также других документов на сайте бесплатно, но в коммерческих целях разрешено только с письменного согласия владельцев.
Вся документация в разделе «Файлы для скачивания» (1459 шт.)
- Инструкции и руководства пользователя по радиостанциям и измерительным приборам (733 шт.)
- Рекламные проспекты (609 шт.)
- Сертификаты и декларации соответствия на поставляемую аппаратуру (117 шт.)
Магазин и информационный ресурс по продажам и обслуживанию детекторов скрытой проводки Bosch. Цена на товар в наличии всегда актуальна. Всю предлагаемую технику можно купить с доставкой из городов Краснодар, Омск и Москва в любой регион России и страны таможенного союза. Приобретайте оборудование только у проверенных и надежных поставщиков.
2009—2019 © ЗАО «Вива-Телеком». ОГРН 1085543064947. Радиостанции и измерительные приборы.
Стоимость с учетом скидок
Залог : 1 000 руб.
Комплектация :
Цифровой детектор
чехол ( ткань )
карандаш
Технические характеристики :
Глубина обнаружения , макс .:
Черные металлы – 100 мм
Цветные металлы – 80 мм
Медные кабели (под напряжением ) – 50 мм
Древесина – 20 мм
Вес: 0,24 кг .
- Дерево : Есть
- Пластик : Нет
- Черные металлы : Есть
- Цветные металлы : Есть
- Электропроводка : Есть
- Древесины : 20 мм
- Меди : 80 мм
- Проводов под напряжением : 50 мм
- Стали : 100 мм
- Автоматика отключения : Есть
Купить
Здесь вы можете посмотреть видео обзор Bosch DMF 10 Zoom. Узнать характеристики, прочитать отзывы о Bosch DMF 10 Zoom.
Магазины, в которых можно купить этот товар и его аналоги
- Все 23
- Обзоры 1
- Ремонт 1
- как работать детектором металла Bosch DMF 10 Zoom
Характеристики Bosch DMF 10 Zoom
* Точные характеристики уточняйте у продавца.
Обнаруживаемые материалы
| Дерево | Есть |
| Пластик | Нет |
| Черные металлы | Есть |
| Цветные металлы | Есть |
| Электропроводка | Есть |
Максимальная глубина обнаружения
| Древесины | 20 мм |
| Меди | 80 мм |
| Проводов под напряжением | 50 мм |
| Стали | 100 мм |
Дополнительно
| Автоматика отключения | Есть |
Размеры и вес
| Вес | 240 г |
| Толщина | 30 мм |
| Ширина | 83 мм |
| Высота | 204 мм |
* Точные характеристики уточняйте у продавца.
Плюсы и минусы Bosch DMF 10 Zoom
Отзывы о Bosch DMF 10 Zoom
Спасибо, ваш отзыв скоро появится на сайте.
Позвольте внести свой «целковый» как человеку, имеющему некоторый опыт эксплуатации подобных девайсов.
Небольшая предыстория.
Эту тему я пытался поднимать пару раз на старом форуме:
Кому лень читать былое, вкратце:
Ваш покорный слуга несколько лет занимается монтажом плазменных и ЖК панелей на стены и потолки различных типов. Без подобных детекторов в такой работе не обойтись.
Началось с трехсотрублевого китайского индукционного приборчика (1-е фото). При всем, что говорено-переговорено про «желтый» ширпотреб везде, и на этом форуме, в частности (и с чем я согласен ), этот прибор, вобщем, свои деньги отработал, не раз окупившись. Но и, вобщем, изжил себя. Определяет только металл (дерево, пластик – нет), сканирует неглубоко, периодически глючит, довольно быстро разряжает батарейки.
Потом был ультразвуковой детектор (2-е фото), реагирующий на неоднородности. Он может определять дерево, пластик, металл, выделяя их границы как некие островки неоднородности в общей однородной массе стены или другой поверхности. Немного бОльшая цена (30$), немного бОльшие возможности. В целом свое тоже отработал и, отрабатывая, подталкивал своего хозяина к следующему, более серьезному шагу.
Им стала покупка американского Zirkon’а (3-е фото). Кстати, на стадии выбора-то в поле зрения и попадал Bosch. Только модель была DMO 10 (названная Vladis-lav’ом DMF 10 ZOOM появилась позже). По характеристикам среди аппаратов такого класса Zirkon практически непревзойденный:
- глубина сканирования 150 (!) мм,
- многофункциональный дисплей,
-
определение точного местоположения и глубины залегания мет.предмета.
Денег он стоил, конечно, других (на момент покупки – 240$). Но и — вещь. Сейчас без него не выезжаю ни на один заказ.Логическим завершением и венцом может стать Bosch D Tect 100 (4-е фото).
Вот это В-Е-Щ-Ь. Почти молюсь на него, так хочу. У нас в Питере он 27…32 тыс.руб., в столице 21…24 ! Эх,москвичи!.. Завидки берут.Теперь по существу высказанного Vladis-lav’ом.
Если совсем коротко — у любой вещи есть ГРАНИЦЫ ПРИМЕНИМОСТИ.
Моя «детекторная эволюция» подсказывает это мне еще со времени самого первого китайского приборчика. Отчасти это указано, кстати, и в инструкциях по применению.
Несколько моментов.С приближением к предельной глубине сканирования разрешающая способность прибора падает. Вблизи этой глубины (для моего Zirkon Metalliscanner 6.0 — 150мм, для Bosch DMF 10 ZOOM — 50) два находящихся даже на достаточном расстоянии (несколько см) друг от друга мет.предмета могут быть опознаны как один или не определены вовсе.
Второе.
Максимальную эффективность подобные приборы проявляют в ситуациях, когда однородные, однотипные предметы залегают на примерно одинаковой глубине с достаточным шагом, соизмеримым с глубиной сканирования детектора (бОльшим или ненамного меньшим). Например, арматурные прутки в железобетоне с шагом 10…20 см.При нахождении рядом двух сильно отличающихся, например, по массе, диаметру (для проволоки, прутков, болтов) мет.предметов меньший из них может быть не опознан, а локализация бОльшего – искажена (прибор «усредняет»). То есть, минимально эффективны такие детекторы в ситуациях, противоположных первой.
С повышением класса прибора все эти издержки постепенно уменьшаются. И в продвинутых топовых моделях типа Bosch D Tect 100, Hilti Ferroscan PS200 близки, наверное, к нулю.
Вобщем, профессиональный инструмент был и останется недешевой высокотехнологичной продукцией. Как и должно быть.Извините, если кому надоел длинным повествованием.
249 ₽
Инструкция (руководство пользователя) на Цифровой измеритель Bosch DMF-10 Zoom
Артикул: bosch-dmf-10-zoom
Категория: BOSCH
-
Описание
-
Детали
Описание
Инструкцию по эксплуатации Bosch DMF-10 Zoom на русском языке можно будет скачать в личном кабинете после оформления и оплаты заказа.
Детали
| Формат файла |
|
|---|---|
| Размер инструкции в кб |
725 |
Технические данные
Цифровой детектор
Предметный №
Глубина обнаружения, макс.*:
черные металлы
цветные металлы (медь)
медные кабели (под напряжением)**
древесина
Автоматическое выключение прибл. через
Рабочая температура
Температура хранения
Батарея
Аккумулятор
Продолжительность работы
(щелочных батарей) ок.
Вес согласно EPTA-Procedure 01/2003
* в зависимости от материала и размеров объектов и также материала
и состояния поверхности
** меньшая глубина обнаружения электрокабеля без напряжения
Учитывайте предметный номер на типовой табличке Вашего измери-
тельного инструмента, торговые обозначения отдельных инструментов
могут изменяться.
Работа с инструментом
Установка/смена батареи
Применяйте исключительно щелочные аккумуляторы или
батареи.
Для открытия батарейного отсека 10 нажмите на фиксатор 12
в направление стрелки и откиньте крышку отсека наверх.
Вложите поставленные с инструментом батареи. Следите при
этом за правильным расположением полюсов в соответствии с
изображением на внутренней стенке отсека.
Если на дисплее загорается индикатор батареи k, то при при-
менении щелочных батарей Вы можете вести измерения еще
ок. 1 часа (рабочее время аккумуляторов короче). Если инди-
катор начнет мигать k, то измерение возможно еще ок. 10 мин.
При мигании индикатора батарей k и святящегося кольца 1
(красный свет) измерения больше невозможны и Вы должны
заменить батареи или аккумулятор.
B Если Вы продолжительное время не пользуйтесь
измерительным инструментом, то батарея должна быть
вынута из инструмента. При продолжительном хранении
инструмента батарея может окислиться и разрядиться.
1 609 929 P99 • 8.1.08
Русский–2
DMF 10 Zoom
PROFESSIONAL
3 601 K10 0..
100 мм
80 мм
50 мм
20 мм
5 мин
–10 °C … +50 °C
–20 °C … +70 °C
1 x 9 В 6LR61
1 x 9 В 6F22
0,24 кг
6 ч
Новое и полезное: