
На чтение 5 мин Просмотров 1.2к. Опубликовано 06.04.2021
Содержание
- Nav view search
- Навигация
- Искать
- Обзор очень дешёвого китайского MP3 плеера
Nav view search
Навигация
Искать
Обзор очень дешёвого китайского MP3 плеера
Этот популярный MP3 плеер наверно есть у всех кто хотя бы немного знаком с китайскими интернет магазинами, и онлайн покупками. Сейчас цена на него упала настолько, что не купить его просто нельзя. Интересно, что китайские инженеры смогли засунуть в такой маленький корпус, и за такую цену.

Итак, в сегодняшнем обзоре мы рассмотрим самый популярный китайский MP3 плеер Mini Fashoin Clip Metal USB MP3 Music Media Player Support 1 — 8GB Micro SD TF, купленный в интернет магазине BuyinCoins.
На сайте интернет магазина плеер представлен аж в восьми цветах, есть возможность выбрать понравившуюся раскраску. Я выбрал чёрный, как наиболее практичный.
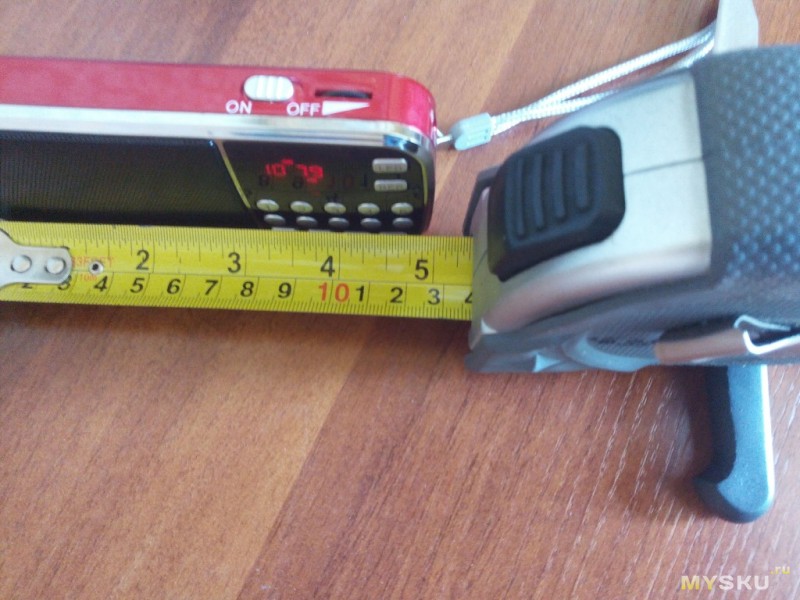
Когда я рассматривал плеер на сайте интернет магазина, он мне казался размером со спичечный коробок, но когда я увидел его вживую, был немного удивлён.
Размеры плеера такие:
Для наглядности, вот он в сравнении с батарейкой типоразмера AA.

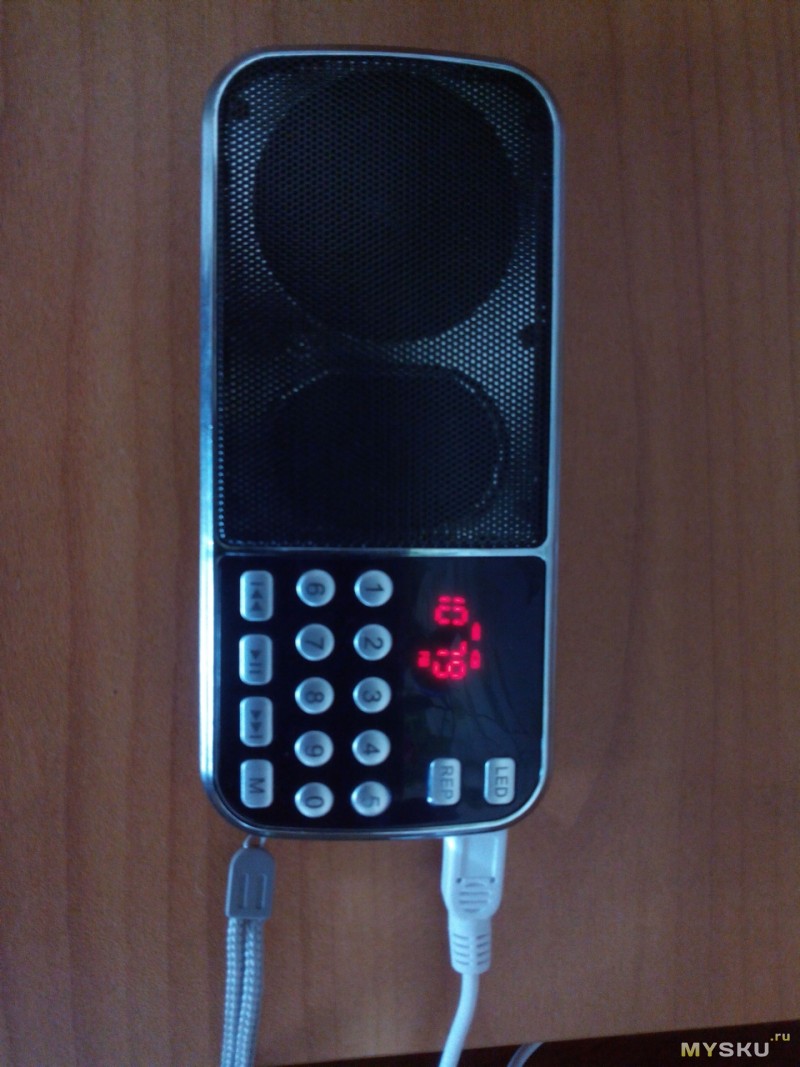
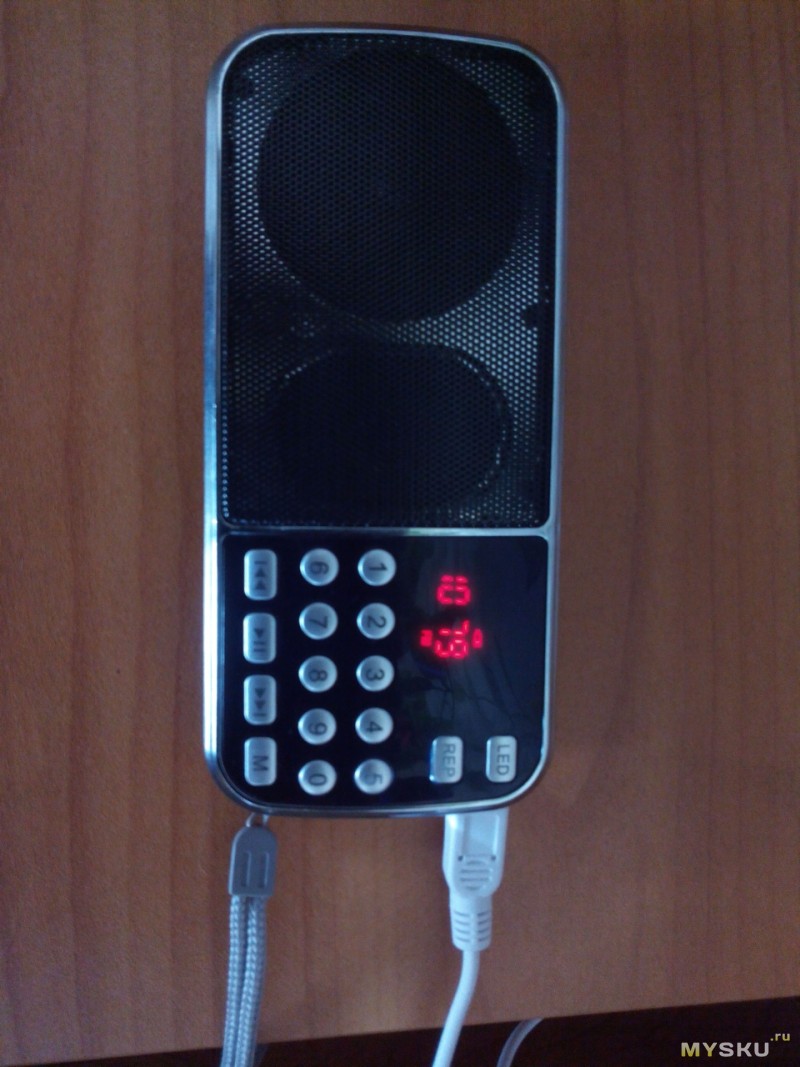
Рассмотрим MP3 плеер поближе.
Корпус
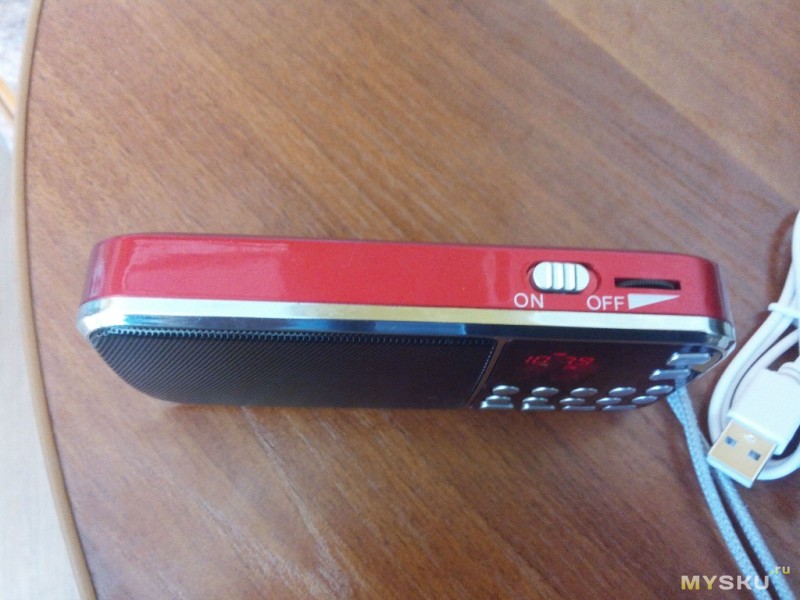
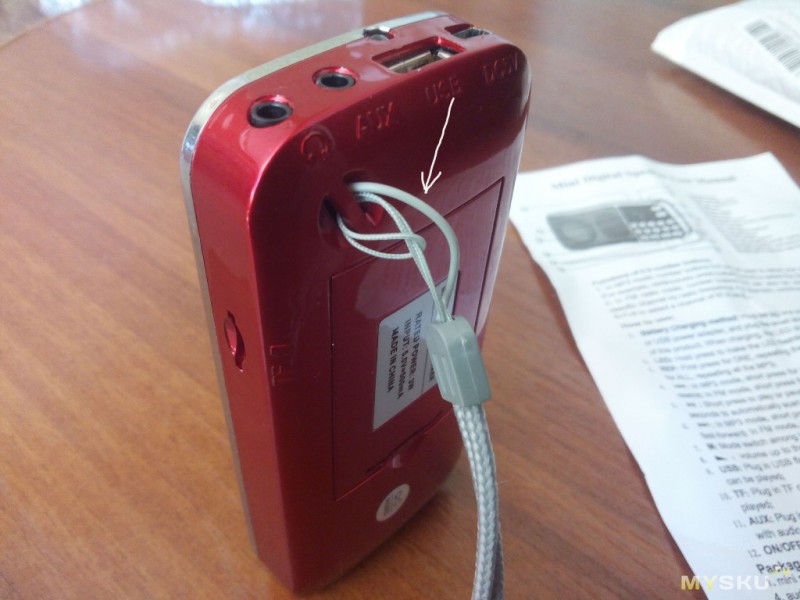
Корпус плеера сделан из алюминия и окрашен краской. С боков пластмассовые вставки с разъёмами и переключателем. Сверху кнопки управления, тоже из обычной пластмассы.
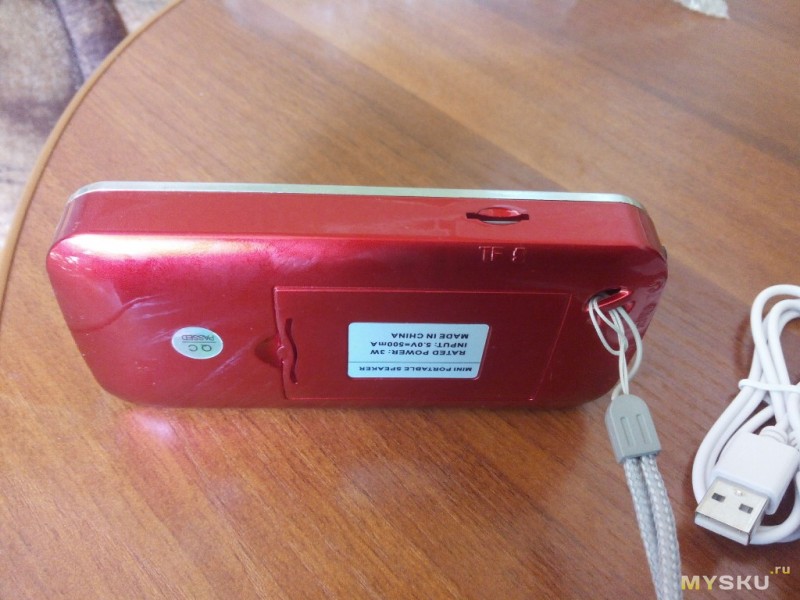
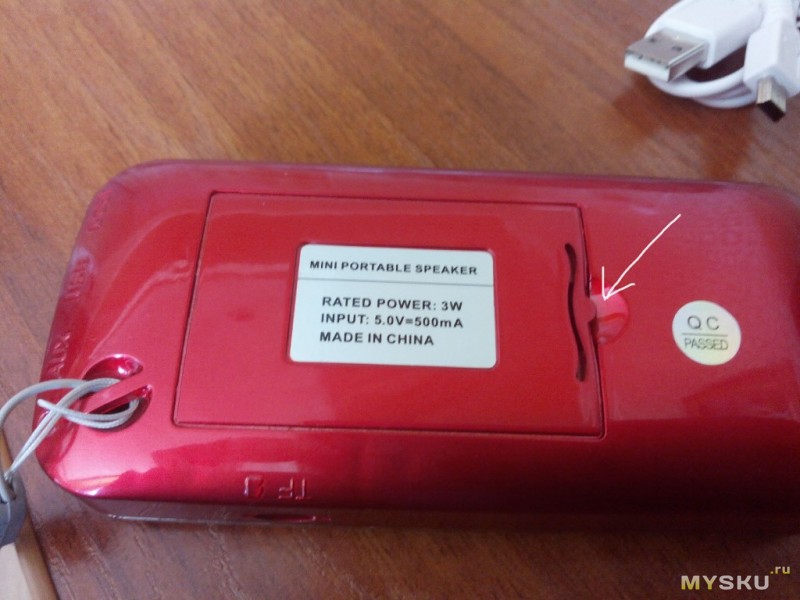
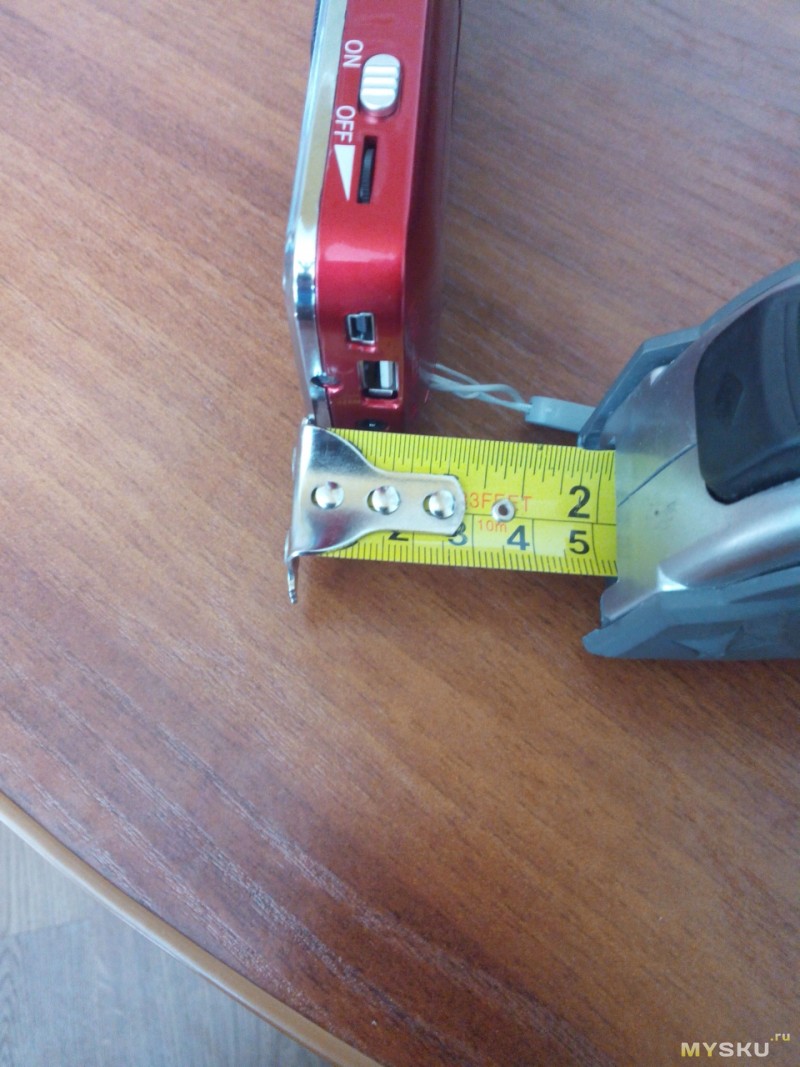
На одном торце плеера расположен Mini USB разъём, для зарядки встроенного в плеер аккумулятора, и синхронизации плеера с компьютером, а также слот под Micro SD карту памяти. Заявлена поддержка карт памяти объёмом до 8 гигабайт. Встроенной памяти плеер не имеет.

На другом торце расположился включатель-выключатель плеера и разъём 3.5 Jack для подключения наушников.

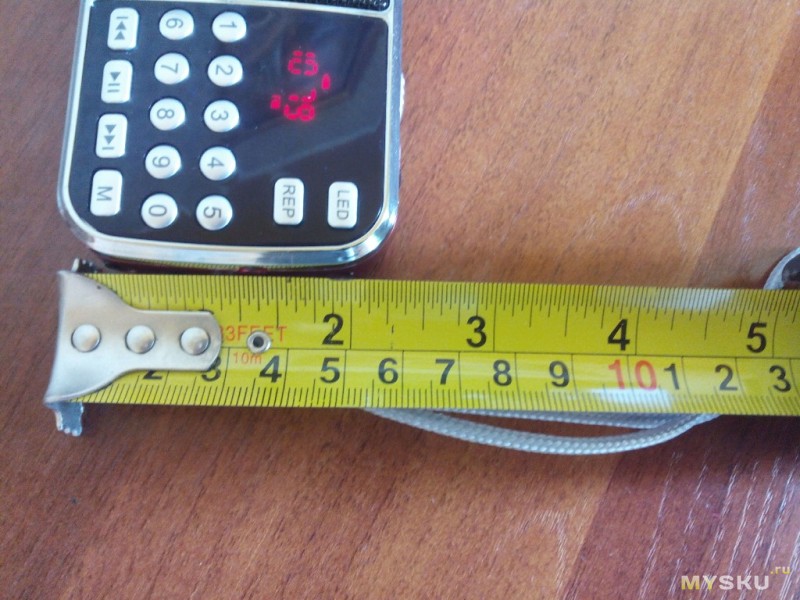
Сверху на плеере расположены кнопки управления, Воспроизведение-Пауза, стрелки Назад и Вперёд, Плюс и Минус. Дисплея у плеера нет.

Снизу на плеере имеется клипса, для крепления, например, на одежду.
Итак, а теперь проверим работоспособность плеера. Обратите внимание, в интернет магазинах очень много плееров в таком корпусе, но начинка в них разная, поэтому некоторые функции могут отличаться. Мы будем рассматривать плеер, именно, купленный в BuyinCoins. Главное преимущество плеера купленного в BuyinCoins, то, что он запоминает, на каком треке вы его выключили, и после включения начинает воспроизведение с него. Так как, в обзорах таких же плееров купленных в других интернет магазинах, писали, что плееры после выключения начинали воспроизведение сначала списка, что не очень удобно.
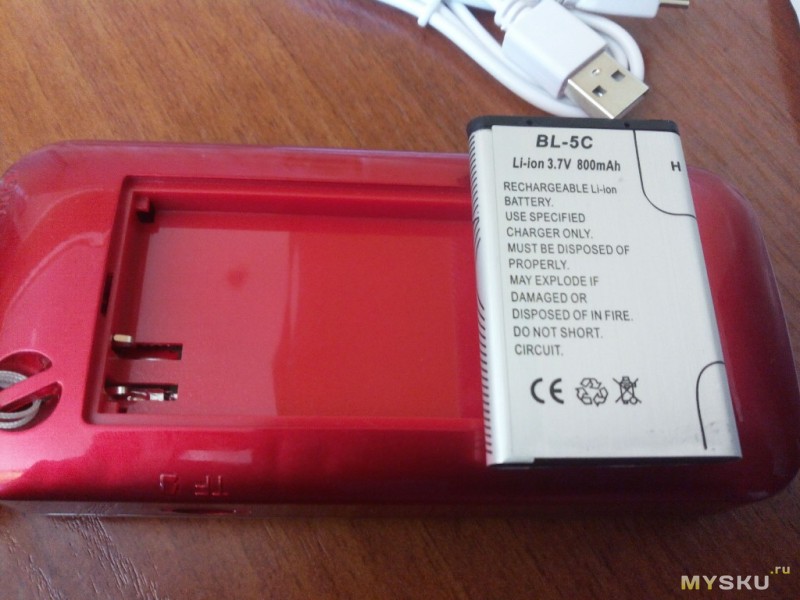
Зарядка и аккумулятор
Заряжается плеер через кабель Mini USB — USB, идущий в комплекте, от USB порта компьютера.

Также можно использовать сетевой USB адаптер. (покупается отдельно)

К сожалению, в плеере нет контролера заряда, красный светодиод своим свечением показывает, что плеер заряжается, но, непонятно когда плеер заряжен. Пробовал заряжать его более 4 часов, светодиод так и не погас, то есть плеер продолжал заряжаться. А ведь перезарядка может негативно сказаться на аккумуляторе.
Заявленное время работы плеера 4 часа, у меня плеер на среднем звуке проработал около 5 часов, что вполне неплохо для такой крохи.
Синхронизация
При подключении плеера к компьютеру с вставленной картой памяти, он определяется как съёмный носитель, что позволяет без использования картридера закачивать на флэш карту файлы. Но, скорость записи очень медленная, всего лишь 394 КБ/сек..

У этой же карты памяти, но в нормальном картридере скорость записи 8 МБ/сек..

Плеер был проверен с Micro SD картами 4 и 8 гигабайт (класс 4), проблем не замечено.
Управление
Управление плеером осуществляется с помощью пяти кнопок. Центральная кнопка это Воспроизведение-Пауза, кнопки Плюс и Минус регулируют громкость звука, а кнопки со стрелками переключают треки Предыдущий-Следующий, если их удерживать идёт перемотка трека, со звуком.
Качество звука
Многие в интернете пишут, что качество звука у подобных плееров ужасное. Я скажу так, для меломанов такой плеер конечно не подойдёт (хотя врятли меломаны вообще таким плеером заинтересуются), для меня качество звука вполне приемлемое, особенно если учесть стоимость. Имейте виду, качество звучания сильно зависит от используемых наушников, которых, кстати, в комплекте с плеером не было, и это даже хорошо, каждый подберёт наушники себе по вкусу и цене.
Я не меломан, и дорогих наушников у меня нет, но с наушниками средней ценовой категории плеер звучит вполне нормально, а вот с наушниками, купленные в том же BuyinCoins за 1$ (ради интереса), звук просто ужасный.
Разборка
А теперь давайте разберём плеер и посмотрим, что же у него внутри. Скручен плеер всего двумя болтиками, открутив которые, мы можем достать внутренности.

Нечего особенного, плата с одной микросхемой, и аккумулятор без обозначений.
Подведём итог. Плеер однозначно стоит своих денег, с учётом цены, качество сборки и звука вполне нормальное.
+ Цена.
+ Металлический корпус.
+ Клипса для крепления на одежду.
+ При отключении запоминает трек.
— Отсутствие контроллера заряда.
Тем, кто привык к сенсорным экранам и ярким значкам, не очень удобно пользоваться MP3 плеером. Освойте основные действия, чтобы с легкостью пользоваться МР3 плеером; также вы можете научиться синхронизировать ваше устройство с компьютером и копировать композиции с музыкальных компакт-дисков.
Все устройства от компании Apple имеют схожий интерфейс, поэтому приведенные ниже методы также применимы для iPhone и iPad.
Ваш музыкальный mp3-плеер — это полезный инструмент, который можно использовать не только для прослушивания музыки, но и как дополнительное переносное запоминающее устройство (флеш-карту). Вам не нужен iPod, чтобы слушать музыкальные новинки или композиции прошлых лет. Вот несколько простых идей, как можно использовать обычный mp3-плеер.
Музыкальный проигрыватель bbrain & Цифровое радио

Привет!
Благодарим вас за покупку музыкального проигрывателя BBrain и цифрового радио. Мы надеемся, что вы найдете его простым в использовании и позволит вам наслаждаться любимой музыкой и радиостанциями.
В этом руководстве объясняется, как работает музыкальный проигрыватель и как извлечь из него максимальную пользу. Ваш музыкальный проигрыватель разработан таким образом, чтобы его было легко использовать. Это займет всего несколько минут, чтобы настроить его так, чтобы он был идеальным и простым в использовании для ваших близких. Он имеет уникальную панель управления, которая позволяет скрыть ненужные кнопки, чтобы предотвратить их случайное нажатие. Дополнительную информацию о том, как настроить это и дальнейшую персонализацию, можно найти на странице 9, или вы можете сразу приступить к работе, прочитав краткое руководство на странице 7.
Панель управления

Краткое руководство
- Поместите музыкальный проигрыватель на поверхность, которую вы планируете использовать, например на стол или полку.
- Подключите сетевой адаптер или вставьте 4 батарейки типа АА, как показано на рисунке.
- Нажмите кнопка включения/выключения для включения музыкального проигрывателя.


При первом включении Музыкальный проигрыватель будет находиться в режиме цифрового радио. Сканирование радиоволн на наличие станций, доступных вам локально, займет несколько минут, и вы можете использовать и кнопки для перемещения вверх и вниз по списку и кнопку ввода для выбора станции.

Если вы хотите прослушать плейлист или аудиокнигу с USB,
- Откройте тумблер USB, нажав на верхний край, и полностью поверните его.
- Вставьте USB-накопитель в разъем. Он подойдет только в одну сторону
- Если на USB-накопителе есть металлический язычок, убедитесь, что он сложен, как показано, и закройте тумблер USB.
- Нажмите и ваш плейлист или аудиокнига начнет воспроизводиться. нажмите здесь view сложить

Вы можете использовать и кнопки для перехода к следующей или предыдущей дорожке.
Название воспроизводимого трека будет отображаться на экране.
Персонализация вашего музыкального проигрывателя
Настройка панели управления для вас
Уникальной особенностью музыкального проигрывателя является то, что каждый набор кнопок закреплен на «тумблере», который можно перевернуть и спрятать, если он вам не нужен или если вы беспокоитесь, что вы или ваши близкие нажмете его случайно. и потерять свою любимую станцию. Таким образом, вы можете выбрать нужные элементы управления или упростить их до операции с одной кнопкой. Есть 8 различных комбинаций на выбор, 3 показаны ниже

Тумблеры фиксируются на месте во время нормальной работы и разблокируются с помощью тумблера USB. Тумблер USB имеет 3 положения — закрыто, разблокировано и открыто.
Чтобы настроить панель управления, она должна быть в разблокированном положении.
Этот тумблер также работает как способ входа в меню настроек, для чего он должен быть полностью открыт. Это, вероятно, будет использоваться таким образом только во время установки и будет использоваться только в обычной работе для вставки USB-накопителей.

Чтобы скрыть кнопки, которые вы не хотите использовать:
- Нажмите на верхний край USB-тумблера и откройте его наполовину.
- Переверните стаканы, которые вы не хотите использовать, нажав на их верхний край.
- Закройте тумблер USB, чтобы зафиксировать их на месте

Все следующие параметры можно настроить в меню музыкального проигрывателя, доступ к которому осуществляется в режиме настройки. Чтобы войти в режим настройки, музыкальный проигрыватель должен быть включен, и кнопки должны быть видны, а тумблер USB должен быть полностью открыт. кнопку можно использовать для перемещения вверх по меню, кнопку для перехода вниз и кнопку кнопку для подтверждения. Вы можете выйти из меню в любое время, закрыв тумблер USB или выбрав «Назад» на экране главного меню.

Установка предустановок радио
Чтобы упростить переключение между вашими любимыми радиостанциями, вы можете установить их в качестве предустановок, которые затем можно переключать между ними с помощью кнопок «Далее» и «Назад».
Чтобы установить радиостанции в качестве предустановленных:
- Убедитесь, что музыкальный проигрыватель находится в режиме радио, нажав кнопка
- Откройте тумблер USB с и кнопки, показывающие доступ к меню
- Перейдите вниз к «Предустановки радио» с помощью кнопки «Назад» и нажмите
- Появятся 5 предустановленных слотов. Перейдите к «Предустановке 1» с помощью и нажмите
- Появится список всех доступных станций. Перейдите к станции, которую вы хотите сохранить как предустановку 1, и нажмите
Теперь эта станция будет сохранена как предустановка 1. Повторите шаги 4 и 5 для других станций, которые вы хотите установить. Можно сохранить до 5 предустановок.
важно: После установки предустановок больше невозможно выбрать другие станции без доступа к «Списку станций» в меню настройки или добавления их в список предустановок. Поэтому, если определена только одна предустановка, кнопки «Далее» и «Назад» не будут работать в режиме радио.
Прослушивание FM-радио
Если ваши любимые радиостанции недоступны в формате DAB, но транслируются в формате FM, вы можете переключить радио в режим FM. Сделать это
- Войдите в меню, открыв тумблер USB, пока видны кнопки «Далее» и «Назад».
- Использовать кнопку для перехода вниз по меню и кнопку, чтобы выбрать «Режим радио».
- Затем с помощью кнопки «Назад» выберите «FM» и нажмите кнопку ввода.
- Закройте тумблер USB и нажмите кнопку, и ваше радио теперь сможет получать доступ к FM-станциям. Вы можете использовать и кнопки для поиска между FM-станциями.
Предустановки можно установить для FM-станций, следуя шагам на стр. 13, но используя и кнопки для поиска между станциями, а не для выбора из списка. Нажимать как только нужная станция будет найдена, сохраните ее в качестве предустановки.
Установка будильника
Вы можете настроить будильник для автоматического включения музыкального проигрывателя в установленное время. Это можно использовать, чтобы разбудить кого-то или просто, если им нравится слушать музыку в определенное время дня, но они могут забыть включить музыкальный проигрыватель. Будильник работает только тогда, когда музыкальный проигрыватель подключен к сети, а не работает от батареек.
Чтобы установить будильник:
- Войдите в меню, подняв тумблер USB, когда и кнопки отображаются.
- Перемещайтесь вниз по меню с помощью и нажмите когда вы дойдете до «Будильник». Затем в меню будильника можно установить следующие настройки и параметры:
Сигнализация — Выкл | На
частота — Ежедневно | Однажды | Выходные | Будни
Время пробуждения — это время, когда звучит сигнал тревоги
Источник – Зуммер | Цифровое радио | FM
Длительность – 15 | 30 | 45 | 60 | 90 | 120 минут
Громкости – Это громкость, до которой будет доводиться тревога. Использовать и кнопки для регулировки и кнопка при установке.
В установленное время прозвучит сигнал будильника, сначала тихо, а затем до установленной громкости.
Автоматическое выключение музыкального проигрывателя
Музыкальный проигрыватель имеет функцию «Неактивный режим ожидания», которая выключает его, если ни одна из кнопок не была нажата в течение определенного периода времени. Это может быть полезно, если человек, использующий его, забывает его выключить. Чтобы установить функцию неактивного режима ожидания:
- Откройте тумблер USB с и видимые кнопки для доступа к меню
- Использовать чтобы перейти к «Неактивному режиму ожидания», он может быть за пределами нижней части экрана, поэтому продолжайте идти вниз, пока не найдете его, и нажмите кнопка
- Использовать и кнопку, чтобы перейти к промежутку времени, необходимому для выключения музыкального проигрывателя. нажмите кнопку.
Теперь ваш музыкальный проигрыватель выключится по истечении установленного времени, если никакие кнопки не будут нажаты.
Регулировка яркости экрана и затемнения
Можно изменить яркость экрана, чтобы сэкономить заряд батареи и сделать его более подходящим, например, для использования в спальне. Чтобы настроить яркость экрана:
- Откройте тумблер USB с и видимые кнопки для доступа к меню
- Использовать кнопку для перехода вниз к пункту «Подсветка» и нажмите
- Использовать кнопку для выбора `On Level’ и нажмите
- Использовать кнопку для выбора нужного уровня яркости и нажмите
Также можно настроить время, по истечении которого яркость дисплея тускнеет, если никакие кнопки не нажаты, с помощью параметра «Dim After» в меню.
Создание плейлиста на USB
Чтобы создать музыкальный плейлист на USB-накопителе, вам потребуется перенести аудио fileс компьютера. Чтобы получить нужную музыку на свой компьютер, мы рекомендуем загрузить ее из музыкального интернет-магазина, такого как iTunes или Amazon. Музыкальный проигрыватель может воспроизводить files в форматах MP3, WMA, AAC, WAV и FLAC.
- Вставьте USB-накопитель в пустой USB-порт компьютера, он должен появиться в File Проводник, если вы используете компьютер с Windows, или Finder, если вы используете Apple.
- Выберите fileЕсли вы хотите загрузить их оттуда, где они хранятся на вашем компьютере, и перетащите их с помощью мыши в окно USB-накопителя.
- USB будет воспроизводить files в том порядке, в котором они загружаются на накопитель, поэтому, если важен порядок их воспроизведения, мы рекомендуем перетаскивать их один за другим на USB-накопитель. Они могут отображаться в другом порядке на вашем компьютере, так как это может отсортировать их по алфавиту или по размеру.
Установка и изменение времени, даты и языка
Музыкальный проигрыватель должен автоматически устанавливать время в зависимости от принимаемого им радиосигнала. Чтобы изменить время, формат времени или язык:
- Откройте тумблер USB с и видимые кнопки для входа в меню
- Использовать кнопку для перехода к пункту «Время/Дата» и нажмите
- Чтобы настроить время, выберите «Установить время/дату» и используйте и кнопки для регулировки времени вверх и вниз, нажатие ввода для подтверждения
- Чтобы изменить формат времени между 12/24 часами, выберите «Установить 12/24 часа» и используйте кнопку и кнопки для выбора нужного формата. Нажимать , чтобы подтвердить действие.
- Чтобы изменить язык, выберите «Язык» и используйте и кнопки для выбора предпочтительного языка. Нажимать для сохранения настроек.
Возврат к заводским настройкам
Может возникнуть ситуация, когда вы захотите удалить все настройки, которые вы настроили в своем музыкальном проигрывателе, такие как предустановки радио и будильники, и вернуть их к заводским настройкам. Сделать это:
- Откройте тумблер USB с и видимые кнопки для входа в меню
- Использовать кнопку для перехода к пункту «Сброс к заводским настройкам» и нажмите
- Использовать кнопку, чтобы выделить «Да», и нажмите
Очистка вашего музыкального проигрывателя
Отключите от сети перед очисткой. Чистить только мягкой, слегка damp тканью, не используйте моющие средства.
Решение Проблем
| Проблема | Возможная причина и решение |
| Музыкальный плеер не включается | Батареи разряжены или музыкальный проигрыватель не подключен к сети. Замените батарейки или проверьте подключение сетевого адаптера. |
| Радио издает шипящие или искаженные звуки | Сигнал плохой. Попробуйте удлинить антенну или подойдите ближе к окну. |
| На дисплее отображается «Станции не найдены». | Нет сигнала DAB, попробуйте удлинить антенну или подойдите ближе к окну. Если улучшения нет, переключитесь в режим FM. |
| Кнопки «Далее» и «Назад» не меняют радиостанцию | Одна станция установлена в качестве предустановленной. Добавьте дополнительные пресеты (стр. 13) или сбросьте настройки до заводских (стр. 21) |
| Кнопки двигаются при попытке их использовать | Тумблер не зафиксировался на месте. USB-тумблер должен быть полностью открыт или полностью закрыт. |
| На экране отображается сообщение «Нет USB | USB-накопитель отсутствует или вставлен неправильно. Проверьте наличие USB-накопителя или извлеките и установите его на место. |
Важные предупреждения о безопасности
- Используйте музыкальный проигрыватель только с прилагаемым сетевым адаптером или 4 батарейками типа АА.
- Отключите музыкальный проигрыватель от сети перед очисткой.
- Держите сетевой шнур в недоступном для детей месте.
- Держите музыкальный проигрыватель, сетевой шнур и вилку вдали от воды.
- Не пытайтесь ремонтировать музыкальный проигрыватель, так как это может быть опасно.
- Музыкальный проигрыватель предназначен только для использования в помещении.
- Утилизируйте этот музыкальный проигрыватель в соответствии с правилами утилизации, действующими в вашем регионе.
Отработанные электротехнические изделия могут нанести вред окружающей среде и не должны утилизироваться вместе с бытовыми отходами. - Батарею нельзя подвергать чрезмерному нагреванию, например, солнечному свету, огню и т.п.
- Опасность взрыва при неправильной замене батареи. Заменяйте только аккумулятором того же или эквивалентного типа.
Технические данные поставляемого источника питания
| Производитель: | bbrain bv – Weerhuisweg 4 – 6226 NC – Маастрихт – Нидерланды |
| Номер модели: | БК06А-0550900-М |
| Входная громкостьtage: | AC 100-240V |
| Входная частота: | 50 / 60Hz |
| Выходная громкостьtage: | DC 5.5V |
| Выходной ток: | 0.9A |
| Выходная мощность: | 4.95W |
| Средний КПД в эксплуатации: | 75.78% |
| Потребляемая мощность без нагрузки: | 0.068W |
Нужна дополнительная помощь?
Посетите наш webсайт, где можно найти видеоролики, руководства и советы, которые помогут вам максимально эффективно использовать музыкальный проигрыватель. Или просто свяжитесь с нами, и мы посмотрим, как мы можем помочь.
www.bbrain.eu info@bbrain.eu +31 (0) 88 — 0080 130
Документы / Ресурсы
- Цена: $11.59 покупал за 11.01$
- Перейти в магазин
Перед началом дачного сезона любимая тёща озадачила меня поиском для неё спутника в работе на даче. Поиском на Али нашёл этот аппаратик. В результате тёща довольна, я удивлён, а моя потребовала заказать и ей. Из десяти на 9,8 баллов аппарат.
Комплект.
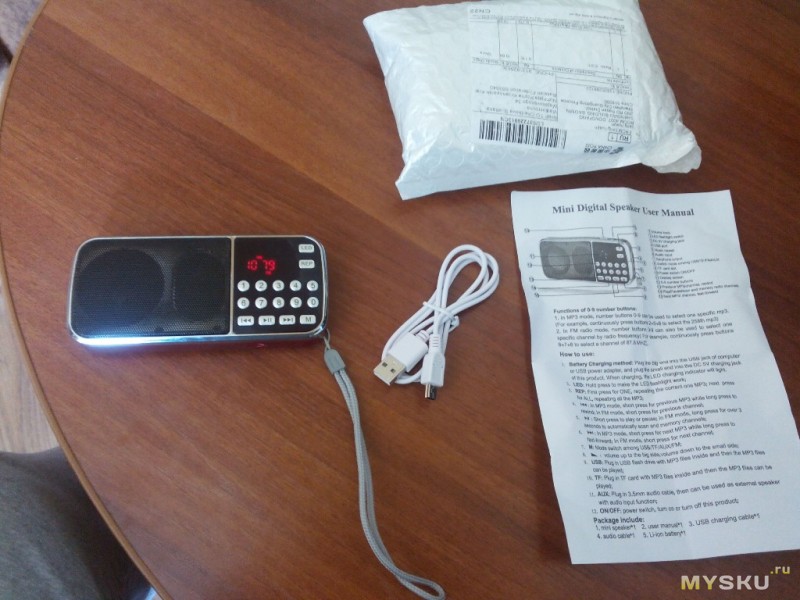
Инструкция на «аглицком».

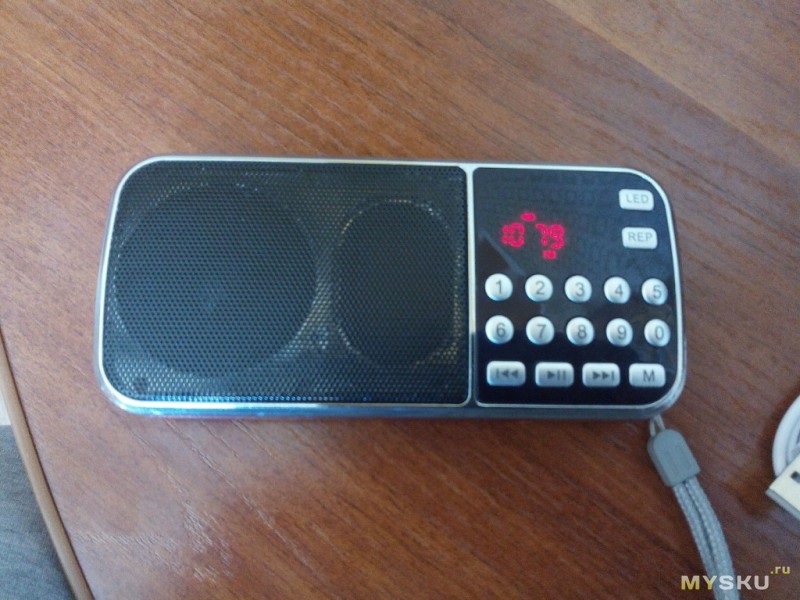
Внешний вид, кнопки управления.
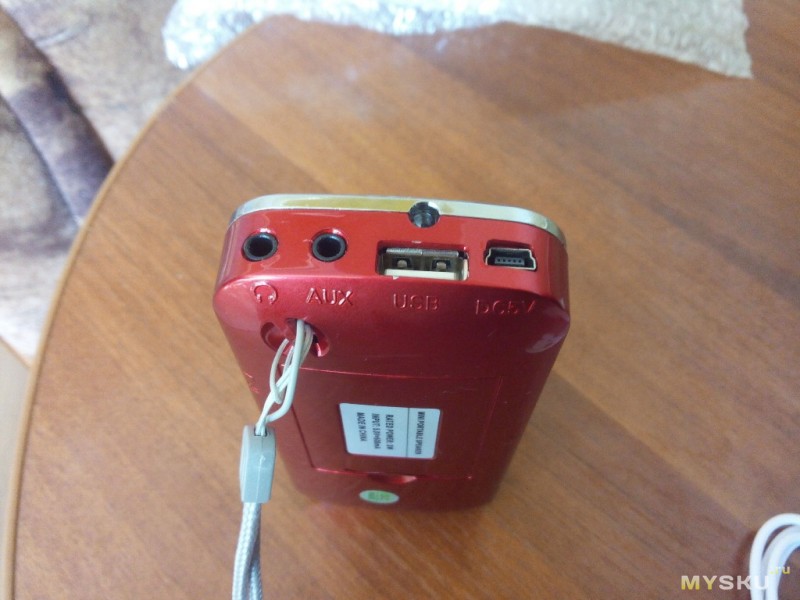
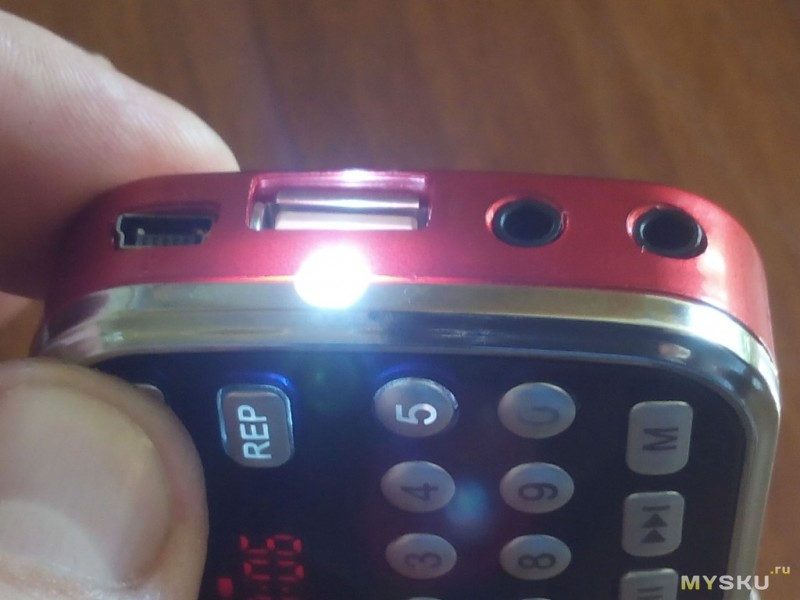
Разьемы: наушники 3.5 мм., AUX 3.5 мм, USB in, DC miniUsb 5V.
Вкл-выкл. и регулировка громкости «колесиком».
Слот microSd, 16gb читает легко, загрузка пару секунд, максимальный обьем чтения не проверял.
Данные по питанию и косячок- защелка крышки отсека акка не фиксировалась в корпусе, видимо не защелкнули в Китае и пластик принял со временем «отжатое» состояние как постоянное. Исправил лёгким нагревом над свечой.
Всем знакомый акк и его данные.

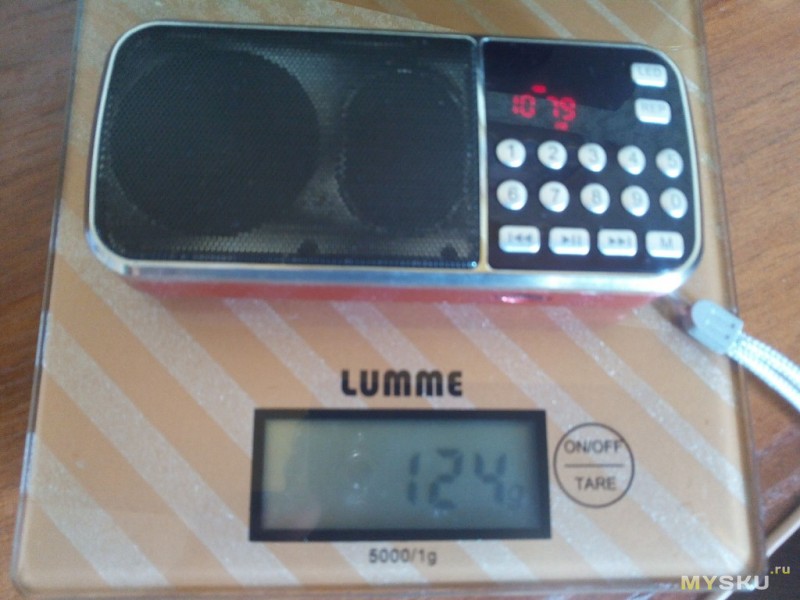
Небольшая особенность- провод антенны впаян в ремешок, но не натянут, это хорошо, значит носить с аккуратностью.
Размеры: 125*60*20 мм. Вес 124 г.
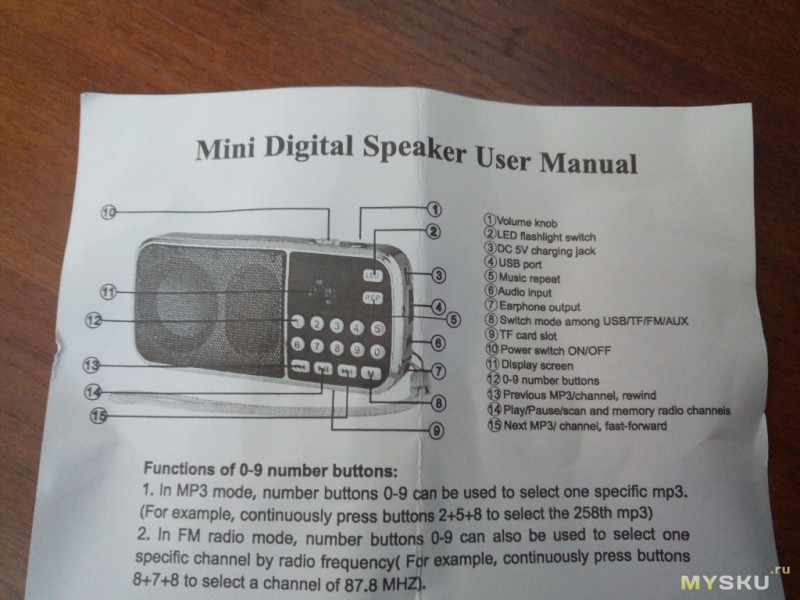
По кнопками.
М выбор типа воспроизведения
|<< и >>| переключение трека/ волны, при чуть долгом нажатии перемотка трека
>| пауза/воспр., долгое нажатие поиск частот радио
1-0. выбор номера трека/набор частоты вручную
Led. фонарик
Rep. этой кнопкой включается повтор одного трека(коротко горит ONE) и повтор всех в круг( коротко ALL).
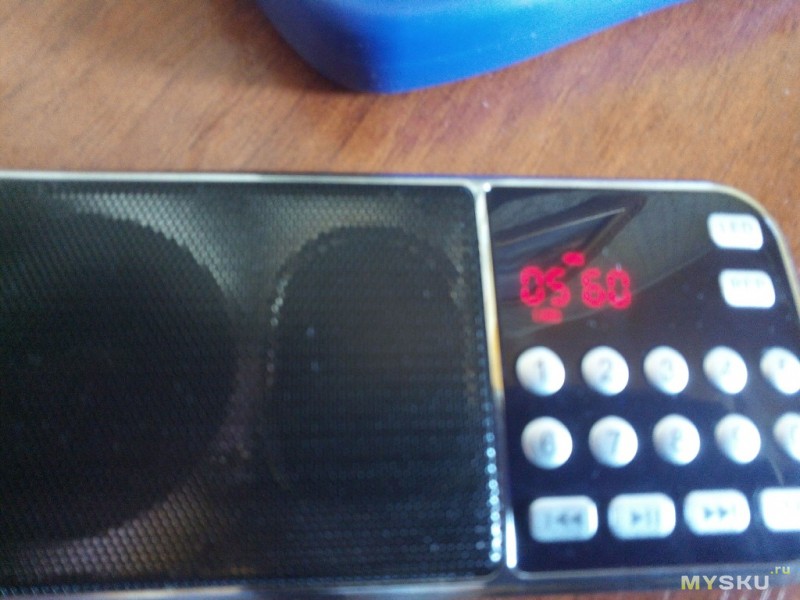
Есть индикация частоты Fm, номера трека, время проигрывания трека, заряда батареи, тип воспроизводимого носителя.
С флэшки 16gb аппаратик взял в четырёх Папках! все 560 треков, скопом(определил набором номера по кол-ву треков +-1) В «корень» флэшки музыку я вообще не закидывал. Запоминает место воспроизведения в треке при переключении носителей и радио. Громкости за глаза, установлены два динамика: «высокий» и «низкий», звук очень понравился. Звук в наушники полностью выдаёт на последних градусах поворота колесика. Видео, но в реале лучше, бумажка «спрыгивает».
Радио ловит отлично, без помех, частота не «слетает», подстройка не требуется. Читает и древнюю 1gb Usb флэшку, её ни один современный комп не » видит».
Фонарик
Этот комбайнаЧайна проиграл 8 часов и ещё не сел, я его вырубил, надоел зараза. Потрошки не удалось вскрыть, корпус на разбор не расчитан, защёлки ломаются и тещу гневить не хочется. При зарядке (2часа)мигают попеременно значки батареи и реального кол-ва заряда, и ещё слабо горит диод фонарика.(?) По окончании заряда значки перестают мигать, а фонарик так и горит до отключения зарядки( и зачем? ночник?).
Видео из YT, на инглише.
Планирую купить
+76
Добавить в избранное
Обзор понравился
Инструкция и руководство для
Sony CDX-GT617UE на русском на английском
48 страниц подробных инструкций и пользовательских руководств по эксплуатации
03:41
Sony CDX-GT410U обзор настроек
07:20
AUX выход для магнитолы сони на мой Опелёк
07:07
Управление магнитолой sony
15:24
Колхозный обзор авто магнитолы Sony CDX-GT470UM
05:01
Про магнитолы #3 Сажает акум Sony cdx-gt610u
03:29
Sony CDX-GT617UX em funcionamento…
03:15
Car audio SONY CDX-GT616U HD video DeeJay EXIDE
Operating Instructions
Инструкция по эксплуатации
© 2006 Sony Corporation
CDX-GT617UE
2-888-758-42 (1)
To cancel the demonstration (DEMO) display, see page 12.
Для отмены демонстрации на дисплее (режим DEMO) см. стр. 14.
GB
RU
FM/MW/LW
Compact Disc Player
SonicStage and their logos are trademarks of Sony Corporat…
Страница 2
- Изображение
- Текст
2
“ATRAC”, “ATRAC AD”, SonicStage and their
logos are trademarks of Sony Corporation.
“WALKMAN” and “WALKMAN” logo are
registered trademarks of Sony Corporation.
Warning if your car’s ignition has no
ACC position
Be sure to set the Auto Off function (page 12).
The unit will shut off completely and
automatically in the set time after the unit is
turned off, which prevents battery drain.
If you do not set the Auto Off function, press
and hold (OFF) until the display disappears
each time you turn the ignition off.
For installation and connections, see the
supplied installation/connections manual.
This label is located on the bottom of the
chassis.
Disposal of Old Electrical &
Electronic Equipment (Applicable in
the European Union and other
European countries with separate
collection systems)
This symbol on the product or on its
packaging indicates that this product shall not be treated
as household waste. Instead it shall be handed over to the
applicable collection point for the recycling of electrical
and electronic equipment. By ensuring this product is
disposed of correctly, you will help prevent potential
negative consequences for the environment and human
health, which could otherwise be caused by inappropriate
waste handling of this product. The recycling of materials
will help to conserve natural resources. For more detailed
information about recycling of this product, please contact
your local Civic Office, your household waste disposal
service or the shop where you purchased the product.
Applicable accessory: Remote commander
R
Manufactured under license
from BBE Sound, Inc.
Licensed by BBE Sound, Inc.
under one or more of the following US patents:
5510752, 5736897. BBE and BBE symbol are
registered trademarks of BBE Sound, Inc.
BBE MP (Minimized Polynomial Non-Linear
Saturation) Process improves digitally
compressed sound, such as MP3, by restoring
and enhancing the harmonics lost through
compression. BBE MP works by re-generating
harmonics from the source material, effectively
recovering warmth, details and nuance.
Microsoft, Windows Media,
and the Windows logo are
trademarks or registered
trademarks of Microsoft
Corporation in the United States and/or other
countries.
Welcome, Getting started, Resetting the unit
Preparing the card remote commander, Setting the clock, Getting started resetting the unit
- Изображение
- Текст
4
Welcome !
Thank you for purchasing this Sony Compact
Disc Player. You can enjoy your drive with the
following functions.
• CD playback
You can play CD-DA (also containing CD
TEXT*), CD-R/CD-RW (MP3/WMA/AAC
files also containing Multi Session (page 15))
and ATRAC CD (ATRAC3 and ATRAC3plus
format (page 17)).
• Radio reception
– You can store up to 6 stations per band (FM1,
FM2, FM3, MW and LW).
– BTM (Best Tuning Memory): The unit selects
strong signal stations and stores them.
• RDS services
– You can use FM station with Radio Data
System (RDS).
• Sound adjustment
– EQ3 stage2: You can choose any one of 7
preset equalizer curves.
– DSO (Dynamic Soundstage Organizer):
Creates a more ambient sound field, using
virtual speaker synthesis, to enhance the
sound of speakers, even if they are installed
low in the door.
– BBE MP: Improves digitally compressed
sound such as MP3.
• Optional unit operation
Various kinds of audio devices can be
connected, and operated from the unit.
– USB device: A Mass Storage Class USB
device, or “Walkman” (ATRAC Audio
Device) can be connected to the front USB
terminal. For details on a usable devices,
please refer to About USB Devices (page 16)
or the Sony support website (page 21.)
– Portable audio device: A portable audio
device can be connected to AUX input
terminal at the rear of the unit.
– CD/MD changers: CD/MD changers can be
connected to the SONY BUS at the rear of the
unit.
* A CD TEXT disc is a CD-DA that includes
information such as disc, artist and track name.
Getting Started
Resetting the unit
Before operating the unit for the first time, or
after replacing the car battery or changing the
connections, you must reset the unit.
Detach the front panel and press the RESET
button with a pointed object, such as a ball-point
pen.
Note
Pressing the RESET button will erase the clock setting
and some stored contents.
Preparing the card remote
commander
Before using the card remote commander for the
first time, remove the insulation film.
Setting the clock
The clock uses a 24-hour digital indication.
1
Press and hold the select button.
The setup display appears.
2
Press the select button repeatedly
until “CLOCK-ADJ” appears.
3
Press (SEEK) +.
The hour indication flashes.
4
Rotate the volume control dial to set
the hour and minute.
To move the digital indication, press
(SEEK) –/+.
5
Press the select button.
The setup is complete and the clock starts.
To display the clock, press (DSPL). Press
(DSPL) again to return to the previous display.
Type of discs
Label on the disc
CD-DA
MP3
WMA
AAC
ATRAC CD
RESET
button
Detaching the front panel, Attaching the front panel, Inserting the disc in the unit
Ejecting the disc
- Изображение
- Текст
5
With the card remote commander
In step 4, to set the hour and minute, press
M or m.
Tip
You can set the clock automatically with the RDS
feature (page 10).
Detaching the front panel
You can detach the front panel of this unit to
prevent theft.
Caution alarm
If you turn the ignition switch to the OFF
position without detaching the front panel, the
caution alarm will sound for a few seconds.
The alarm will only sound if the built-in
amplifier is used.
1
Press (OFF).
The unit is turned off.
2
Press (OPEN).
The front panel is flipped down.
3
Slide the front panel to the right, then
gently pull out the left end of the front
panel.
Notes
• Do not drop or put excessive pressure on the front
panel and display window.
• Do not subject the front panel to heat/high
temperature or moisture. Avoid leaving it in a parked
car or on a dashboard/rear tray.
• If the front panel is opened without turning off the
switch during playback by a USB device, data may
be damaged.
Attaching the front panel
Place the hole A of the front panel onto the
spindle B on the unit, then lightly push the left
side in.
Press (SOURCE) on the unit (or insert a disc) to
operate the unit.
Note
Do not put anything on the inner surface of the front
panel.
Inserting the disc in the unit
1
Press (OPEN).
2
Insert the disc (label side up).
3
Close the front panel.
Playback starts automatically.
Ejecting the disc
1
Press (OPEN).
2
Press Z.
The disc is ejected.
3
Close the front panel.
1
2
c
A
B
Location of controls and basic operations, Main unit, Card remote commander rm-x151
Main unit card remote commander rm-x151, Qj qk qh, 4ws qs 1 ql qd wa w; wg wd wf
- Изображение
- Текст
6
Location of controls and basic operations
Main unit
Front panel removed
Card remote commander
RM-X151
Refer to the pages listed for details. The
corresponding buttons on the card remote
commander control the same functions as those
on the unit.
A OFF button
To power off; stop the source.
B DSO button 4
To select the DSO mode (1, 2, 3 or OFF).
The larger the number, the more enhanced
the effect.
C Volume control dial/select button 12
To adjust volume (rotate); select setup items
(press and rotate).
D SOURCE button
To power on; change the source (Radio/CD/
MD*
1
/USB/AUX).
E Display window
F USB terminal 11
To connect to the USB device.
G OPEN button 5
OFF
OPEN
DSPL
AF/TA
SEEK
SEEK
PAUSE
GP/ALBM
REP
SHUF
BBE MP
PUSH SELECT
1
2
3
4
5
6
MODE
DSO
PTY
EQ3
SOURCE
1
q;
9
qa
qd
qg
qs
2
qf
4
5
8
6
7
3
CDX-GT617UE
RESET
qj
qk
qh
OFF
DSPL
SCRL
SEL
SOURCE
MODE
1
3
2
4
6
5
ATT
VOL
+
–
+
–
4
ws
qs
1
ql
qd
wa
w;
wg
wd
wf
7
H EQ3 (equalizer) button 12
To select an equalizer type (XPLOD,
VOCAL, EDGE, CRUISE, SPACE,
GRAVITY, CUSTOM or OFF).
I Receptor for the card remote
commander
J SEEK –/+ buttons
CD/MD*
1
/USB*
2
:
To skip tracks (press); skip tracks
continuously (press, then press again within
about 1 second and hold); reverse/fast-
forward a track (press and hold).
Radio:
To tune in stations automatically (press); find
a station manually (press and hold).
K PTY (Program Type) button 10
To select PTY in RDS.
L MODE button 8, 11, 13
To select the radio band (FM/MW/LW);
select the unit*
3
; select the play mode*
4
.
M DSPL (display) button 8, 9, 11
To change display items.
N Number buttons
CD/MD*
1
/USB*
2
:
(1)/(2): GP*
5
/ALBM*
6
–/+
To skip albums (press); skip albums
continuously (press and hold).*
7
(3): REP 8, 11, 13
(4): SHUF 8, 11, 13
(5): BBE MP*
8
2
To activate the BBE MP function, set
“BBE MP-ON.” To cancel, set “BBE
MP-OFF.”
(6): PAUSE*
8
To pause playback. To cancel, press
again.
Radio:
To receive stored stations (press); store
stations (press and hold).
O AF (Alternative Frequencies)/TA
(Traffic Announcement) button 9
To set AF and TA in RDS.
P RESET button 4
Q Z (eject) button 5
To eject the disc.
R Disc slot 5
To insert the disc.
The following buttons on the card remote
commander have also different buttons/functions
from the unit. Remove the insulation film before
use (page 4).
ql < (.)/, (>) buttons
To control CD/radio/MD/USB, the same as
(SEEK) –/+ on the unit.
w; VOL (volume) +/– button
To adjust volume.
wa ATT (attenuate) button
To attenuate the sound. To cancel, press
again.
ws SEL (select) button
The same as the select button on the unit.
wd M (+)/m (–) buttons
To control CD, the same as (1)/(2) (GP/
ALBM –/+) on the unit.
wf SCRL (scroll) button 8, 11
To scroll the display item.
wg Number buttons
To receive stored stations (press); store
stations (press and hold).
*1 When an MD changer is connected.
*2 When a USB device is connected.
*3 When a CD/MD changer is connected.
*4 When an ATRAC Audio Device is connected.
*5 When an ATRAC CD is played.
*6 When an MP3/WMA/AAC is played.
*7 If the changer/USB is connected, the operation is
different, see page 13.
*8 When playing back on this unit and a USB device.
Notes
• When ejecting/inserting a disc, keep any USB
devices disconnected to avoid damage to the disc.
• If the unit is turned off and the display disappears, it
cannot be operated with the card remote
commander unless (SOURCE) on the unit is
pressed, or a disc is inserted to activate the unit first.
Tip
For details on how to replace the battery, see
“Replacing the lithium battery of the card remote
commander” on page 17.
About USB cap
When not using the USB terminal (F), use the
supplied USB cap to prevent dust or dirt entering.
Keep the USB cap out of the reach of children to
prevent accidental swallowing.
Display items, Repeat and shuffle play, Radio
Storing and receiving stations, Storing automatically — btm, Storing manually, Receiving the stored stations, Tuning automatically, Display items repeat and shuffle play, Ep 8
- Изображение
- Текст
8
CD
For details on selecting a CD/MD changer, see
page 13.
Display items
A
Source
B
ATRAC/WMA/MP3/AAC indication
C
Track number/Elapsed playing time, Disc/
artist name, Album/group number*, Album/
group name, Track name, Text information,
Clock
* Album/group number is displayed only when the
album/group is changed.
To change display items C, press (DSPL);
scroll display items C, press (SCRL) on the
card remote commander or set “A.SCRL-ON”
(page 13).
Tip
Displayed items will differ, depending on the disc type,
recorded format and settings. For details on MP3/
WMA/AAC, see page 16; ATRAC CD, see page 17.
Repeat and shuffle play
1
During playback, press (3) (REP) or
(4) (SHUF) repeatedly until the
desired setting appears.
*1 When an MP3/WMA/AAC is played.
*2 When an ATRAC CD is played.
To return to normal play mode, select “
OFF”
or “SHUF OFF.”
Radio
Storing and receiving stations
Caution
When tuning in stations while driving, use Best
Tuning Memory (BTM) to prevent an accident.
Storing automatically — BTM
1
Press (SOURCE) repeatedly until
“TUNER” appears.
To change the band, press (MODE)
repeatedly. You can select from FM1, FM2,
FM3*, MW or LW.
2
Press and hold the select button.
The setup display appears.
3
Press the select button repeatedly
until “BTM” appears.
4
Press (SEEK) +.
The unit stores stations in order of frequency
on the number buttons.
A beep sounds when the setting is stored.
* FM3 tuning range is 65 to 74 MHz (at 30 kHz step).
Storing manually
1
While receiving the station that you
want to store, press and hold a
number button ((1) to (6)) until
“MEM” appears.
The number button indication appears in the
display.
Note
If you try to store another station on the same number
button, the previously stored station will be replaced.
Tip
When a RDS station is stored, the AF/TA setting is
also stored (page 9).
Receiving the stored stations
1
Select the band, then press a number
button ((1) to (6)).
Tuning automatically
1
Select the band, then press (SEEK) –/+
to search for the station.
Scanning stops when the unit receives a
station. Repeat this procedure until the
desired station is received.
Select
To play
TRACK
track repeatedly.
ALBUM*
1
album repeatedly.
GROUP*
2
group repeatedly.
SHUF ALBUM*
1
album in random order.
SHUF GROUP*
2
group in random order.
SHUF DISC
disc in random order.
Overview, Setting af and ta, Overview setting af and ta
Страница 9
- Изображение
- Текст
9
Tip
If you know the frequency of the station you want to
listen to, press and hold (SEEK) –/+ to locate the
approximate frequency, then press (SEEK) –/+
repeatedly to fine adjust to the desired frequency
(manual tuning).
RDS
Overview
FM stations with Radio Data System (RDS)
service send inaudible digital information along
with the regular radio program signal.
Display items
A
Radio band, Function
B
TA/TP*
1
C
Frequency*
2
(Program service name), Preset
number, Clock, RDS data
*1 “TA” flashes during traffic information. “TP” lights
up while such a station is received.
*2 While receiving the RDS station, “ *” is displayed
on the left of the frequency indication.
To change display items C, press (DSPL).
RDS services
This unit automatically provides RDS services as
follows:
Notes
• Depending on the country/region, not all RDS
functions may be available.
• RDS will not work if the signal strength is too weak,
or if the station you are tuned to is not transmitting
RDS data.
Setting AF and TA
1
Press (AF/TA) repeatedly until the
desired setting appears.
Storing RDS stations with the AF and
TA setting
You can preset RDS stations along with the AF/
TA setting. If you use the BTM function, only
RDS stations are stored with the same AF/TA
setting.
If you preset manually, you can preset both RDS
and non-RDS stations with the AF/TA setting for
each.
1 Set AF/TA, then store the station with BTM or
manually.
Presetting the volume of traffic
announcements
You can preset the volume level of the traffic
announcements so as to not miss hearing them.
1 Rotate the volume control dial to adjust the
volume level.
2 Press and hold (AF/TA) until “TA” appears.
Receiving emergency
announcements
With AF or TA on, the emergency
announcements will automatically interrupt the
currently selected source.
AF (Alternative Frequencies)
Selects and retunes the station with the
strongest signal in a network. By using this
function, you can continuously listen to the
same program during a long-distance drive
without having to retune the same station
manually.
TA (Traffic Announcement)/TP (Traffic
Program)
Provides current traffic information/programs.
Any information/program received, will
interrupt the currently selected source.
PTY (Program Types)
Displays the currently received program type.
Also searches your selected program type.
CT (Clock Time)
The CT data from the RDS transmission sets
the clock.
Select
To
AF-ON
activate AF and deactivate TA.
TA-ON
activate TA and deactivate AF.
AF, TA-ON
activate both AF and TA.
AF, TA-OFF
deactivate both AF and TA.
continue to next page
t
10
Staying with one regional program
— REG
When the AF function is on: this unit’s factory
setting restricts reception to a specific region, so
you will not be switched to another regional
station with a stronger frequency.
If you leave this regional program’s reception
area, set “REG-OFF” in setup during FM
reception (page 13).
Note
This function does not work in the UK and in some
other areas.
Local Link function (UK only)
This function enables you to select other local
stations in the area, even if they are not stored on
your number buttons.
1 During FM reception, press a number button
((1) to (6)) on which a local station is stored.
2 Within 5 seconds, press again a number button
of the local station.
Repeat this procedure until the local station is
received.
Selecting PTY
1
Press (PTY) during FM reception.
The current program type name appears if the
station is transmitting PTY data.
2
Press (PTY) repeatedly until the
desired program type appears.
3
Press (SEEK) –/+.
The unit starts to search for a station
broadcasting the selected program type.
Type of programs
Note
You cannot use this function in countries/regions
where no PTY data is available.
Setting CT
1
Set “CT-ON” in setup (page 12).
Notes
• The CT function may not work even though an RDS
station is being received.
• There might be a difference between the time set by
the CT function and the actual time.
NEWS (News), AFFAIRS (Current Affairs),
INFO (Information), SPORT (Sports),
EDUCATE (Education), DRAMA (Drama),
CULTURE (Culture), SCIENCE (Science),
VARIED (Varied), POP M (Popular Music),
ROCK M (Rock Music), EASY M (Easy
Listening), LIGHT M (Light Classical),
CLASSICS (Classical), OTHER M (Other
Music Type), WEATHER (Weather),
FINANCE (Finance), CHILDREN (Children’s
Programs), SOCIAL A (Social Affairs),
RELIGION (Religion), PHONE IN (Phone In),
TRAVEL (Travel), LEISURE (Leisure), JAZZ
(Jazz Music), COUNTRY (Country Music),
NATION M (National Music), OLDIES (Oldies
Music), FOLK M (Folk Music), DOCUMENT
(Documentary)
Комментарии
Ваш музыкальный mp3-плеер — это полезный инструмент, который можно использовать не только для прослушивания музыки, но и как дополнительное переносное запоминающее устройство (флеш-карту). Вам не нужен iPod, чтобы слушать музыкальные новинки или композиции прошлых лет. Вот несколько простых идей, как можно использовать обычный mp3-плеер.
Казалось бы, что не ничего проще, чем выбрать хороший плеер. Ведь требования, предъявляемые к устройству, достаточно просты. Однако, здесь есть некоторые нюансы, о которых мы расскажем вам в этой статье.
Шаг первый: определитесь с типом плеера
Перед тем, как идти в магазин за плеером, определитесь для какой цели он вам нужен. Ведь сейчас есть устройства, которые не только воспроизводят музыку, но и предоставляют возможность просмотра видео и фотографий, прослушивания радио, чтения книг, записи на диктофон.
Если вы желаете просто слушать музыку, то вам следует купить купить MP3-плеер без наворотов, который воспроизводил бы большинство музыкальных форматов и ловил радио (например, DIGMA Q3 4Gb). Такой плеер будет компактным. Кроме того, он сможет долгое время работать без подзарядки.
Если вы хотите кроме прослушивания музыки еще и просматривать фото и видео файлы, то вам лучше купить портативный медиаплеер. Он подойдет в особенности тем, кто много времени проводит в дороге и не любит скучать. При покупке такого девайса обратите внимание на объем памяти — чем он шире, тем больше вы сможете закачать файлов на плеер.
Стационарный медиацентр — это небольшое устройство с большим экраном, видео и аудио выходами. Кроме высокого качества звучания такой плеер позволяет просматривать на большой дисплее видео и фото файлы. А при помощи многочисленных разъемов можно подключить устройство к телевизору, компьютеру и внешним электронным носителям.
Есть три вида mp3-плееров: Flash, HDD и CD. Последний предназначен для вопросизведения музыки с CD-дисков. Но к сожалению, он большой и потребляет много электроэнергии.
База HDD MP3-плеера — жесткий диск. Благодаря ему емкость памяти такого плеера увеличивается до 16- Гб. Правда, сам жесткий диск весьма чувствителен к механическим повреждениям. Поэтому с HDD MP3-плеером надо очень аккуратно обращаться.
Самым популярным является Flash MP3-плеер. Его плюсы — низкая стоимость, компактность и низкое энергопотребление. Такие устройства бывают с внешней и со встроенной картой памяти. Емкость накопителя достигает тридцати двух гигабайтов.
В свою очередь, Flash MP3-плееры делятся на три типа. К первому относятся простые модели либо с очень маленьких монохромным дисплеем, либо вовсе без него. Такие плееры легки и компактны. Они предназначены для проигрывания музыкальных файлов и для прослушивания радио. Иногда они оснащаются диктофоном.
Ко второму типу относятся Flash MP3-плееры с цветным дисплеем размером от 1 до 7 дюймов, благодаря которому вы сможете составлять play-листы и выбирать музыкальные песни, а также читать книги, просматривать видео и фото ролики. Такие плееры, к сожалению, потребляют больше энергии.
К третьему типу относятся Flash MP3-плееры-диктофоны. Это цифровой диктофон с наушниками и встроенным FM-тюнером. Четвертый тип — это плеер-накопитель, оснащенный встроенным USB-штекером для подсоединения устройства к компьютеру.

Цены в интернет-магазинах:
| Ritmix MP3-плеер RF-7650 8Gb black | flashcom.ru | 2390 Р. | |
| Ritmix MP3-плеер RF-4950 8Gb white | flashcom.ru | 2190 Р. | |
| Портативный Hi-Fi плеер FiiO X5 3nd gen Titanium | Аудиомания | 23990 Р. | |
| Ritmix MP3-плеер RF-3450 4Gb черный | flashcom.ru | 1490 Р. |
Шаг второй: память плеера
В качестве носителя информации в MP3-плеерах используется флеш-память или жесткий диск. Последний является очень емким носителем, но из-за своей конструкции очень ненадежен. Флеш-память, наоборот, менее вместительная, но более прочная и компактная, чем жесткий диск.
Устройство с флеш-памятью может хранить до тридцати двух гигабайт информации, а с жестким диском — до в десять раз больше. Для тех, кто часто обновляет содержимое своего play-листа, подойдет MP3-плеер с флеш-памятью. Если же вы хотите смотреть видео ролики и фильмы, лучше купить MP3-плеер с памятью свыше шестнадцати гигабайт.
Чтобы определить объем памяти, помните, что одна песня (в среднем) весит примерно 4 Мб. Получается, что на MP3-плеер с памятью 1-2 Гб может поместиться от 250 до 500 песен.
Шаг третий: так ли важен дисплей
Как уже говорилось выше, недорогие MP3-плееры оснащаются маленькими монохромными экранами, размер которых колеблется в пределах 1,5 дюймов. Также существуют модели, на которых и вовсе нет экрана. Как правило, это имиджевые плееры, созданные в виде кулона. Портативные медиацентры оснащаются дисплеями с диагональю экрана от 1 до 1,7 дюймов. Качество изображения будет зависеть от разрешение экрана — чем оно выше, тем лучше. Существуют MP3-плееры и с сенсорными экранами.
У стационарных медиаплееров экрана нет. В качестве дисплеев можно использовать телевизор, а также монитор ноутбука или компьютера. Они подключаются через специальные разъемы. Подобные MP3-плееры воспроизводят видео только высокого разрешения.
Если вы хотите купить MP3-плеер только для прослушивания радио и музыки, то выберете модель с маленьким экраном. Если же кроме музыки вас интересуют еще и фотографии с фильмами, то выберете MP3-плеер с большим экраном. При этом обязательно обратите внимание на его разрешение.
Размер экрана МП3-плеера должен быть таким, чтобы на нем была хорошо видна информация о композиции, уровне звука, зарядке аккумуляторной батареи и настройках эквалайзера. Оптимальным вариантом будет MP3-плеер с диагональю экрана 2,4 дюйма.
Шаг четвертый: форматы, поддерживаемые устройством
При выборе MP3-плеера обратите внимание на форматы аудио и видео, которые он поддерживает. Хорошо, если можель кроме основых форматов AVI и MP3 будет поддерживать еще и FLAC, ACC, WMA и OGG. Последний формат позволяет сохранить качество звучания при сжатии файла.
WMA-формат по качеству звука лучше и меньше по объему, чем МП3. По этой причине для максимального наполнения MP3-плеера песнями лучше, чтобы он был совместим с форматом WMA. Если вы хотите читать электронные книги, то лучше выбрать MP3-плеер, который поддерживает форматы TXT. И наконец, формат flac ото всех других отличается отсутствием снижения качества. Но одно песня в данном формате займет около 250 Мб памяти.
Цены в интернет-магазинах:
| Портативный Hi-Fi плеер FiiO X1 II Silver | Аудиомания | 7990 Р. | |
| Ritmix MP3-плеер RF-3360 4Gb фиолетовый | flashcom.ru | 1490 Р. | |
| Ritmix MP3-плеер RF-4950 4Gb black | flashcom.ru | 1990 Р. | |
| Cayin MP3-плеер N3, черный | flashcom.ru | 9480 Р. |
Шаг пятый: тип питания и автономная работа
При покупке MP3-плеера уточните его тип питания. Плеер может работать от встроенного аккумулятора или от пальчиковых батареек. Устройства со встроенными аккумуляторами легкие и компактные. Но для его подзарядки необходим доступ к электросети (или компьютеру) или блок питания. MP3-плееры со встроенным аккумулятором могут работать без подзарядки от нескольких часов до нескольких суток. Количество часов, в течение которых плеер сможет воспроизводить музыку в автономном режиме, пропорционально объему его памяти (встроенной). Например, MP3-плеер с памятью от 4 до 8 Гигабайт будет работать не менее шести часов.
MP3-плееры, которые работают от батареек, в подзарядке не нуждаются. Но к сожалению, они большие и тяжелые. Кроме того, вам придется снова и снова тратить деньги на покупку новых батареек.
Шаг шестой: коммуникативность
Не каждый знает, что такое коммуникативность. Это удобство закачивания и удаления на/с mp3-плеера файлов. В комплекте с некоторыми устройствами идет специальные программы для подключения к компьютеру. Но это будет неудобным, есливы захотите подключиться к чужому ПК и потеряете при этом диск с прогой. Поэтому лучше купить MP3-плеер, который сможет распознать любой компьютер.
Шаг седьмой: управление
При покупке MP3-плеера уделите внимание меню. Для этого попросите продавца включить его. Интерфейс должен быть удобным и понятным. В противном случае вы потратите много времени, изучая инструкция к плееру.
Шаг восьмой: FM-тюнер
Если вы хотите слушать радио, то вам надо будет выбрать MP3-плеер с FM-тюнером. Сейчас им оснащаются практически все модели. FM-тюнер замечателен тем, что мп3-плеер при прослушивании радио будет долгое время работать без подзарядки аккумулятора и потреблять мало энергии. Некоторые модели поддерживают еще одну полезную функцию — она позволяет записывать песни, которые играю на радио.

Цены в интернет-магазинах:
| Виниловый проигрыватель Rega RP8 Black | Аудиомания | 140000 Р. | |
| Головка звукоснимателя Audio-Technica VM520EB/H | Аудиомания | 10990 Р. | |
| Головка звукоснимателя Audio-Technica VM670SP | Аудиомания | 10690 Р. | |
| Игла для звукоснимателя Audio-Technica VMN10CB | Аудиомания | 3919 Р. |
Шаг девятый: дополнительные функции
Перед тем как окончательно выбрать MP3-плеер, обратите внимание на дополнительные функции, которыми оснащена приглянувшаяся вам модель. Это может быть радио FM или Wi-Fi, при помощи которого вы смогли бы пользоваться интернетом в кинотеатрах, кафе и гостиницах.
С сенсорным экраном управление станет более легким. Благодаря наличию гарнитуры Bluetooth вы сможете подключить к mp3-плееру беспроводные колонки или наушники. Кроме того, с этой гарнитурой вы сможете скачивать музыку, фильмы, клипы и изображения.
С диктофоном вы сможете записывать различную информацию, например, лекции по какому-либо предмету в институте.
Шаг десятый: ЮСБ-порт
Хорошо, если в плеере будет ЮСБ-разъем. Тогда вы сможете скачивать музыку без применения каких-либо программ. При этом учтите, что MP3-плеер с разъемом стандарта 1.1 будет работать медленнее, чем ЮСБ-порт стандарта 2.0.
Все знают о широчайших возможностях MP3-плееров, но немногие о том, как они функционируют. Их очевидный плюс – компактность, создает серьезные проблемы для желающих хотя приблизительно разобраться в их устройстве. Если же попытаться разобрать плеер, что обычно невозможно без поломки его корпуса, то результат – обычно это всего лишь одна печатная плата с микросхемами и процессорами размером хорошо, если больше пары сантиметров – тоже не даст любопытному неспециалисту никаких ответов, да и не каждому специалисту по электронике тоже.
Для понимания работы MP3-плееров сначала стоит вкратце ознакомиться с цифровым форматом MP3 или MPEG Audio Layer III, который является одним из методов цифрового кодирования звуковой информации. MPEG это сокращение от Moving Picture Experts Group – это группа специалистов в цифровом кодировании, созданная в конце 80-х годов для международной стандартизации цифровых форматов сжатия данных – видео и аудио. Формат MP3 был разработан во второй половине 90-х годов и быстро обрел широкую популярность среди создателей программного обеспечения для персональных компьютеров, которым в их программах требовалось использовать большое количество звуковых файлов. В первую очередь, это конечно, компьютерные игры и различные программы с интерактивным интерфейсом.
Выгода от использования MP3 очевидна – этот формат сжатия уменьшает объем звуковых файлов CD-формата в среднем в 10 раз, и при этом качество звука остается немногим хуже, чем с CD-плеера. Вскоре и многие CD-плееры стали поддерживать воспроизведение дисков, на которых вместо файлов CD-формата были записаны MP3-файлы. Таким образом, на одном диске стало возможно хранить в 10 раз больше музыки. Кроме файлов CD-формата в MP3 с различными степенями сжатия и соответственной потери качества так же можно сконвертировать большинство других распространенных форматов хранения аудиозаписи.
Эра MP3-плееров началась через несколько лет после создания формата, и для этого потребовалось объединение сразу нескольких технологий. Миниатюрный плеер состоит из десятка базовых модулей, количество которых увеличивается, если требуются дополнительные функции. При этом основным отличием и колоссальным преимуществом от предыдущих поколений звуковоспроизводящей аппаратуры является отсутствие в MP-плеере движущихся деталей. Это увеличивает их отказоустойчивость и время службы в десятки раз.
Файлы MP3 хранятся в плеере на микросхеме памяти, которая может быть изготовлена по нескольким различным технологиям. Объединяет их исключительная миниатюрность. Тех, кто еще помнит жесткие диски компьютеров 25-30 лет назад, которые могли весить несколько килограмм, такой прогресс в компактности хранения данных кажется настоящим чудом. Микропроцессор является мозгом плеера, управляющим всеми его операциями – записью файлов в память, их раскодированием, выводом информации на дисплей, если он есть у данной модели, и непосредственно самим воспроизведением звука. Цифровой сигнальный процессор производит раскодирование MP3-файла и передает полученные байты информации на цифрово-аналоговый преобразователь, который собственно и воспроизводит через наушники или другое устройство на выходе плеера. Все это работает от электроэнергии, получаемой от миниатюрного аккумулятора, который обычно представляет собой перезаряжаемую литиевую батарею, способную давать необходимую энергию от 10 до 30 часов. Заметьте, что здесь перечислено всего половина базовых модулей стандартного MP3-плеера – их полное описание и взаимодействие друг с другом займет гораздо больше места и будет еще менее понятным.
Кроме воспроизведения звука MP3-плеер может иметь еще множество дополнительных функций, среди которых – прием и воспроизведение музыки с радиосигнала и ее запись на микросхему памяти с конвертированием звука в MP3, работа в режиме диктофона, доступ в сеть интернет и скачивание MP3-файлов из нее, и еще многое и многое другое. При этом стоит заметить, что размеры MP3-плеера с увеличением его функций почти не меняются. Это позволяет встраивать их в другие гаджеты – авторучки, очки, наушники, автомобильные зеркала и подголовники, наручные часы, верхнюю одежду и детские игрушки. Экзотическими решениями сейчас могут показаться плееры, встроенные в перочинные ножи, очки для плавания или перстни, наклеиваемые на кожу и заряжающие их батареи во время бега, но только представьте, что нас еще может ждать в будущем!
Daraz International
Pakistan
Bangladesh
Sri Lanka
Myanmar
Nepal
Follow Us
© Daraz 2025
Table of Contents
- About our Radio & Music Player
- Getting Started
- Saving Stations
- Playing Your Own Audio
- Frequently Asked Questions
- Precautions
- Specifications
- References
- Read User Manual Online (PDF format)
- Download This Manual (PDF format)
AC-02 DAB+-DAB-FM Radio and Music Player Stereo
User Manual
Please read this user manual carefully before using the radio
About our Radio & Music Player
Why Relish Radio is different?
The Relish Radio has been designed specifically to enable people with all
abilities to listen to the music that they want to independently. With three
buttons to pre-set to your favourites, it means you can easily find the
stations or playlist you love. Unique to the Relish Radio, the top panel can
be personalised to whatever makes most sense to you. Whether it’s ‘60’s Jazz’,
‘Relaxing Music’, ‘Upbeat Afternoons’ or simply ‘News’, enjoy the music that’s
exactly right for you.
Tune in and enjoy the power of music!

Getting Started
How to set up your radio?
Step 1 Assemble the power adaptor with US or UK plug.


Step 2 Connect the power adaptor to the DC socket on the radio and the
other end into a wall socket. Alternatively, use 4 x D-type battery for power
supply. Extend the aerial as far as it can go. Step 3 Press ON button to
turn on the radio. Make sure the volume is turned up.

Step 4 Remove the back cover on the radio to reach the display panel.
Step 5 Press MODE button to switch between FM radio and Digital radio
modes.
NOTE: Digital radio service is not available in North America. Visit
http://www.worlddab.org/ for more information about digital radio reception
in your area.

Step 6 If you are on FM mode, tune manually by pressing the < or >
buttons.
If you are on Digital mode, press and hold the SELECT button to auto-scan for
stations. After the scanning is over, press the < or > button to browse
through the stations. Press SELECT button to tune into the station you want to
listen to.
Saving Stations

How to save stations on memory buttons?
There are 3 memory buttons on the top panel of the radio. You can save your
favourite radio stations on these buttons to find them easily every time.


Step 1 Go back to the display panel at the back of the radio. Choose
either FM or Digital Mode. Browse the stations and find the station you want
to save. If you are in Digital mode, press SELECT to listen to the station.
While listening to a radio station, press and hold a MEMORY button to store
the station. Step 2 When you are happy with the saved stations, remove the
plastic cover on the label by bending it slightly and write a personalised
description that makes the most sense to you. For example ‘Afternoon
relaxation’ or ‘Classical’. Place the plastic back over the label.NOTE:
Please find replacement labels in your packaging. Use a new label if you
decide to change the recorded station. Please contact us, if you need extra
labels. email: info@relish-life.com
Playing Your Own Audio

How to play music or audio books via USB drive?
Step 1 To be able to play your own playlist or audio books, first you
need to save the tracks on your USB drive via your laptop or computer.
Step 2 Go back to the display panel at the back of the radio. Plug in the
USB drive, then press MY PLAYLIST button (4th button) on the top panel. The
tracks will be played on shuffle mode automatically. If you want them in
order, press the “SELECT/ SHUFFLE” button on the display panel to SHUFFLE OFF.
Frequently Asked Questions
Why is my radio reception poor?****
– 1. Make sure the aerial is extended for the maximum signal strength.
– 2. Move the radio to an alternative location to see if the reception
improves.
– 3. Check that you do not have other electrical equipment too close to your
radio, this may cause interference.
– 4. Re-scan the stations by pressing and holding the SELECT button at the
back.
Why is my radio not working?****
– 1. Make sure your radio is connected to a power supply. Check the DC and
mains sockets. If you are using batteries, make sure they are fully charged.
– 2. Check the volume and adjust it as needed.
How can I go back to factory settings?****
– There is a factory reset button near to the USB socket, use a pin to click
the button for a factory reset. Please note all the memory will be erased once
the reset is done.
Precautions
| The radio should not be used in a high temperature or high humidity
environment over prolonged periods of time as this may damage the unit
—|—
| Avoid using or storing the unit in a dusty or sandy environment
| Keep the radio away from liquids. Switch off the radio and disconnect it
from the mains immediately if any liquid is spilled on the radio
| Clean only with dry cloth
| Use only the AC/DC adaptor supplied with the radio. Connecting a power
supply with a different rating will cause permanent damage to the radio and
may be hazardous
| Do not open and repair the radio by yourself
| Don’t treat the radio as household waste. Check your local electronic waste
disposal service for right information
CAUTION
RISK OF ELECTRIC SHOCK DO NOT OPEN
WARNING: To prevent fire or electric shock hazard, do not expose this
product to rain or moisture
CAUTION: TO REDUCE THE RISK OF ELECTRIC SHOCK, DO NOT REMOVE THE RADIO
COVER. NO USER SERVICEABLE PARTS INSIDE, REFER SERVICING TO QUALIFIED SERVICE
PERSONNEL
THE LIGHTNING FLASH AND ARROWHEAD WITHIN THE TRIANGLE IS A WARNING SIGN
ALERTING YOU OF “DANGEROUS VOLTAGE” INSIDE THE RADIO.
THE EXCLAMATION POINT WITHIN THE TRIANGLE IS A WARNING SIGN ALERTING YOU OF
IMPORTANT INSTRUCTIONS ACCOMPANYING THIS RADIO
The mains plug or an appliance couple is used as the disconnect device, the
disconnect device shall remain readily operable
Specifications
Digital and FM Radio & Music Player
Digital Frequency: 174.928MHz(5A) – 239.200MHz(13F)
FM Frequency: 87.5MHz-108MHz
Input: 5.9V DC power adaptor socket (110-230V supplied)
Power Consumption: 8.85W
Speakers: 4Ω/3W/2” driver
Audio Output Power: 2 x 1.5W RMS
Output: 3.5mm stereo headphone
Mains Power Adaptor: Input AC 100-240V~ 50/60Hz, 1.5A
Output: DC 5.9V 1.5A
Battery: 4 x Type D (not included)
Display: 3 line LCD display
Presets: 3 radio stations
USB Playback: MP3
Operational Temperature: Between 00C to +400C (320F to 1040F)
Aerial: Captive telescopic aerial
Dimensions: 245 x 108 x h182 mm
References
- The Most Iconic Photographs of All Time — LIFE
- WorldDAB
- Choose import settings in Music on Mac – Apple Support (UK)
Read User Manual Online (PDF format)
Read User Manual Online (PDF format) >>
Download This Manual (PDF format)
Download this manual >>
digital music player user manual
LINK 1 ENTER SITE >>> Download PDF
LINK 2 ENTER SITE >>> Download PDF
File Name:digital music player user manual.pdf
Size: 1715 KB
Type: PDF, ePub, eBook
Category: Book
Uploaded: 18 May 2019, 15:36 PM
Rating: 4.6/5 from 777 votes.
Status: AVAILABLE
Last checked: 3 Minutes ago!
In order to read or download digital music player user manual ebook, you need to create a FREE account.
Download Now!
eBook includes PDF, ePub and Kindle version
✔ Register a free 1 month Trial Account.
✔ Download as many books as you like (Personal use)
✔ Cancel the membership at any time if not satisfied.
✔ Join Over 80000 Happy Readers
digital music player user manualDigital Music Player. This “Help Guide” is an excerpted version that contains basic operations only. For details on other operations, seeAn Internet connection is required to see the full version.For complete information on this Walkman, see the online “Help Guide” (Full). How to Use. Getting Started. Basic Operations. Music. Connecting with the Smartphone. Using with the Smartphone. List of Topic. Notes on useCopyright 2014 Sony CorporationHow to Use. Parts and Controls. Using Supplied Remote Commander. Playing Music. Making a Bluetooth Connection with the Smartphone. Playing Music Saved on the Smartphone. Talking on the Smartphone. Notes on useCopyright 2014 Sony CorporationList of Topics. Parts and controls. Turning the power on. Parts and controls of the Remote Commander. Using the Remote Commander. Playing music. Playing music on the smartphone. Notes on useCopyright 2014 Sony CorporationDigital Music Player. Notes on use. June 2013. Before use. To make full use of this content, please read the following notes thoroughly. Please note that they are subject toRecommended system environment. The following system environments are recommended for displaying this content. You may not be able to viewFor viewing on a computer. Recommended browser. With Microsoft Windows. Microsoft Internet Explorer 8 or later. Mozilla Firefox: latest version. With Apple Mac OS. Apple Safari Ver. 5 or later. Google Chrome: latest version. For viewing on a smartphone or tablet. Basic operation has been confirmed on the standard browser for the noted devices running the followingJavaScript. JavaScript is used with this content for viewing convenience. If JavaScript is disabled in your web browserStyle Sheets. Cascading Style Sheets are used in designing this content. Page layout may not be as intended if you viewCookiesTo use services incorporating cookies, you need to set your browser to allowHandling of personal information obtained from websites.http://enter.in.ua/admin/fckeditor/editor/filemanager/connectors/php/userfiles/brother-dcp-130c-service-manual.xml
- Tags:
- digital music player user manual, digital music player user manual instructions, digital music player user manual download, digital music player user manual pdf, digital music player user manual free, benjie digital music player user manual, wiwoo digital music player user manual, sony digital music player nw-e394 user manual.
Sony may use cookies, web beacons or similar technologies to make statistical analysis of customers’ usage ofNotes on useCopyright 2014 Sony CorporationHow to Use. This section introduces the functions of buttons, jacks, and other parts of your Walkman. Turn on the power to start your Walkman. This section explains the functions of buttons and other parts of the Remote Commander (supplied). Use the Remote Commander (supplied) to operate your Walkman wirelessly. Play music that you imported from your computer to your Walkman. Turn on the Bluetooth function when you make a Bluetooth connection. Play music on your smartphone that is connected with your Walkman via the Bluetooth connection. You can answer and hang up a phone call to your smartphone that is connected with your Walkman via the active. Bluetooth connection. This section explains the functions of buttons, jacks, and other parts of your Walkman.There is a tactile dot on the left part of your Walkman. Use it to distinguish left from right when you operateNeckband. Earbud. Headphone section. Bluetooth lampPress and hold for 2 seconds to turn the Bluetooth function on or off. Press and hold for 7 seconds while the Bluetooth function is turned off to pair with a Bluetooth device. Press to adjust the music playback, ringtone, and call volumes. MODE buttonPress and hold for 15 seconds to enter the formatting mode.Press the RESET button with a pen or a paper clip, etc., to reset your Walkman.Press to skip to the previous song. Press and hold for longer than 2 seconds to skip to the beginning of the previous folder.Press and hold for longer than 2 seconds to skip to the beginning of the next folder.Do not cover the antenna part with your hands or other object when a Bluetooth connection is active. DoingTouch a Bluetooth device equipped with the NFC feature to this mark to connect it to your Walkman. There is a tactile dot. Use it to help with button operations. Related Topic. Turn on the power to start your Walkman.http://poznanapartament.pl/userfiles/brother-dcp-130c-manual.xmlYour Walkman turns on and a startup sound will be heard. The lamp ( ) blinks in orange quickly while the. Walkman is turned on. Hint. If there is no operation for an extended period, the lamp ( ) turns off and your Walkman will be turned offRelated Topic. Press to adjust the music playback, ringtone, and call volumes.Press and hold for longer than 2 seconds to skip to the beginning of the previous folder.Press and hold for longer than 2 seconds to skip to the beginning of the next folder.Antennas are built-in. Do not cover the antenna part with your hands or other object when a connection isNotes on useCopyright 2014 Sony CorporationHow to Use. The Remote Commander (supplied) employs the Bluetooth technology to operate your Walkman wirelessly. The. Remote Commander and the Walkman are already paired at the factory, so just turn them on and they are readyThe power of your Walkman has to be turned on before performing the procedures below.Your Walkman and the Remote Commander are automatically connected with each other.Notes on useCopyright 2014 Sony CorporationHow to Use. Play music imported to your Walkman.Press the button (Hint. When playback of the last song is finished, your Walkman automatically restarts playback from the first songNote. If there is no operation for an extended period while paused, the lamp ( ) turns off and your Walkman will beIn that case, press and hold the button ( ) to turning on and press the button ( ) toNotes on useCopyright 2014 Sony CorporationHow to Use. Turn on the Bluetooth function of your Walkman and the smartphone when you pair them or connect the pairedRefer to the operating instructions supplied with the smartphone for details.To turn off the Bluetooth function, press the button (Hint. To reduce battery consumption, turn off the Bluetooth function when your Walkman is not connected with aNote. The Bluetooth communications antenna is built in to your Walkman.http://www.bouwdata.net/evenement/3m-m79-manual If you cover the antenna ( ) with yourNotes on useCopyright 2014 Sony CorporationHow to Use. Play music on your smartphone that is connected with your Walkman via the Bluetooth connection.The lamp ( ) on the left ( ) side of your Walkman blinks in blue and the last connected smartphone isPlayback of the music on the smartphone starts. Note. Music may not be played through the operation on your Walkman depending on the smartphone you use. IfNotes on useCopyright 2014 Sony CorporationHow to Use. You can answer and hang up a phone call to your smartphone that is connected with your Walkman via the. Bluetooth connection.Hint. To reject an incoming call, press and hold the button ( ) for 2 seconds while receiving a call. If you answer a call during music playback, playback is paused. Playback is resumed when you hang up theNote. Do not cover the microphone part (Notes on useCopyright 2014 Sony Corporation. Important product information. Licence and trademark notice. The following FCC statement applies only to the version of this modelClass B digital device, pursuant to Part 15 of the FCC Rules. These limitsThis equipment generates, usesHowever, there is no guarantee that interference will not occur in aIf this equipment does cause harmful interference toThe following FCC statement applies only to the version of this modelYou are cautioned that any changes or modifications not expresslyThe following FCC statement applies only to the version of this modelIf you have any questions about this product. Contact: Sony Customer Information Service Center at 1-(866)-456-7669. Write: Sony Customer Information Service Center 12451 Gateway Blvd. Fort Myers, FL 33913. Declaration of Conformity. Trade Name:Responsible Party. Sony Electronics Inc. Address:.Telephone Number:Operation isManufacturer: Sony Corporation, 1-7-1 Konan Minato-ku Tokyo, 1080075 Japan. For EU product compliance: Sony Deutschland GmbH, Hedelfinger. Strasse 61, 70327 Stuttgart, Germany.https://artoftheark.com/images/bremshey-manual.pdf Disposal of waste batteries and electrical and electronicEuropean countries with separate collection systems). This symbol on the product, the battery or on the packaging indicates thatThe recycling of the materials will help toIn case of products that for safety, performance or data integrity reasonsTo ensure that theFor all other batteries, please view the section on how to remove theHand the battery over to the applicableFor more detailedThe ability to display the languages on supplied software will depend onFor better results, please ensure thatFor users in Canada. Listening for a Lifetime. Selecting fine audio equipment such as the unit you’ve just purchased isNow it’s time to consider howAmerican Speech-Language-Hearing Association (ASHA) want you to getSound can be deceiving. Over time your hearing “comfort level” adapts toSo what sounds “normal” can actually be loudGuard against this by setting your equipmentProlonged exposure to anything over 85Used wisely, your new sound equipment will provide years of fun andSince hearing damage from loud noise is often undetectable until it is tooThe following list of sound levelsThis information courtesy of the American Speech-Language-Hearing. Association (ASHA), the national professional, scientific and credentialingFor information on protection against noise-induced hearing loss, call the. ASHA Action Center (800-638-8255), Monday through Friday, 8:30 a.m. Parents can find helpful information about how to protect their children’sA safety tip from the Consumer Electronics Association, 1919 South Eads. Street, Arlington, VA 22202 and the American Speech-Language-Hearing. Association, 2200 Research Boulevard, Rockville, MD 20850. For customers who purchased the Tourist Model in Japan. The Bluetooth function designated for this product is applicable in. Australia, Hong Kong, Indonesia, Malaysia, New Zealand, the Philippines. Singapore, South Africa, Taiwan, Thailand, the United Arab Emirates and. Vietnam.http://suhrsmad.dk/wp-content/plugins/formcraft/file-upload/server/content/files/16286543c01f84—c310-printer-manual.pdfExposure Guidelines and RSS-102 of the IC radio frequency (RF). Exposure rules. This equipment has very low levels of RF energy that are deemed toThis equipment must not be co-located or operated in conjunction withThe following IC statement applies only to the version of this modelThis device complies with Industry Canada licence-exempt RSS standardLicence and trademark notice. Corporation.Corporation. U.S. and other countries. Inc. and any use of such marks by Sony Corporation is under license. Other trademarks and trade names are those of their respectiveCorporation.In this manual, TM. Fraunhofer IIS and Thomson. Microsoft Corporation. Use or distribution of such technology outside ofPDF Version: 1.6. Linearized: No. Author: 21745. Has XFA: No. Creator Tool: Adobe Acrobat 10.0. Creator: 21745. Document ID: uuid:d5c75894-d365-4c98-bec5-940b24df34f3. Instance ID: uuid:8afdc8c4-1b03-4256-98ad-16905a7da10c. Producer: Acrobat Distiller 9.3.3 (Windows). Page Count: 34. Sony news in your inbox. Download our apps. Support Support Self Support Contact Support Community Register a Product Sign In Favorites Sony Rewards Electronics Registration Electronics Community Favorites Favorites Search Sony Sony Sites Search Sony To get the full experience on Sony.com, please change your settings to allow JavaScript. We recommend downloading and installing the latest version of one of the following browsers: Our site is not optimized for your current browser. A newer version of your browser may be available Chrome Chrome Download the latest version IE Internet Explorer Download the latest version Firefox Firefox Download the latest version Apple Safari Download the latest version Proceed with current browser for now Proceed with current browser for now. This contains information such as explanations of Walkman operations and software. You can read it by installing the software (supplied) on your computer. Charge the Player 1. By connecting to a computer with the included USB cable.amicodipiu.com/ckfinder/userfiles/files/canon-720i-manual.pdfThe USB cable can both be used for data trans fer and charging the player 2. By connecting to a charger (Not included the p ackage ) Please note:The specification of the charger must meet the following requirements or any a ccident or failure h appened will b e regarded as man-made damage. W hile it ’ s on the main menu interface,press button to enter. Hold the button back to main interface. Sub -menu. How to delete your music file or music folder If you want to d elete the song, choose the song and hold the button then it will go to the sub-menu including “ playing now ”, “ Delete ” cho ose “ delete ” to delete the song you have choose. If you want to delete the folder, choose the folder and hold the b utton then it will go to the sub-menu including “ playing no w ”, “ Delete ” choose “ delete ” to delete the folder you have choose. Radio Select “ Radio ” on the m ain menu, click button to access to its function, A related list w ill show including “ Presets ”, “ Manual tune ”, “ Auto t une ”, “ FM recording ”. Pictur e On the m ain menu interface find the “ Picture ” Click the bu tton to access to its function, choose to play photo from the local folder or card folder. Record Select “ Record ” on main menu interface, click button to access to it s function, the a related list w ill show as “ S tart voice recording ”, “ Recording library ”, “ Record format ”, “ Record settings ”. -Select “ S tart V oice Recording ” and click to start y our voice recording. Hold the button for a while to save the voice record. — W hen on it ’ s o n t he voice recording interface, click the button to pa use or start again. -See your voice recording files in “ Recordings library ” a nd click the button to play the recording f ile. One key to V oice record After find the B luetooth device click the “ ” start connect. After connect successfully you can go back to the main m enu and find “ Music ” choose the song you want to play, “ ” to play the song.http://europeanprofservices.com/wp-content/plugins/formcraft/file-upload/server/content/files/16286544c3a28a—C3155a-manual.pdf Folder Select “ Folder ” on the main menu, Cl ick button to access to it s function. All of the files in the player w ill be listed here. If the Micro SD card is inserted, you can choose to go to local folder or Card folder. Click button to go back to the previous menu, Hold the button to go back to the main menu directly. Click button to go b ack. Choose “ set sleep timer ” to set the sleep t imer between 1 -99(minutes),when it reach to the sleep time you set, the player will power of f automatically. — “ Displa y ” set th e Brightness, Ba cklight timer and S creen saver of your player.Operatio n is subject to the following two condit ions: (1) This devic e ma y no t caus e harmful in t erf erence, and (2) t his device must accept any int erf er ence receiv ed, including int erfe r ence t hat may cause undesired oper atio n. An y Changes or modifications not expressly appro ved by the party responsible fo r complia nce could v oid the us er’s authori ty t o oper at e the equi pment. Note: This equipment has been tes ted and found to co mply with the limits for a Cla ss B digit al device, pursuan t to part 15 of the FCC Rules. These limits are designed to provide reasonable prot ection ag ainst harm ful int erfe rence in a r esident ial installa t ion. This equipmen t gener at es uses and can radia te radio frequency ene rgy and, if not inst alled and used in accordance with the inst ructions, ma y c ause harmful in terfer ence to radio c ommunic at ions. However, ther e is no guar ant ee that in ter fe renc e will not occur in a particula r inst allat ion. The devic e has been evalua ted to meet g ener al RF e xpos ure r equir ement. The devic e c an be used in port able e xposur e cond ition wit hout res trict ion.https://atlasautoglass.com/wp-content/plugins/formcraft/file-upload/server/content/files/16286545389210—c311-08-watch-manual.pdf These standard prices, which are based on historical time and material averages, help you determine service costs in advance. They also eliminate potentially critical delays caused by quotation and approval procedures. Of course, some units may fall outside the scope of the program because of age, abuse or misuse. In such cases you will be advised and, only with your approval, charged on the basis of the actual labor and parts required. Evaluation fees may apply. Repair Each Fluke service center is equipped with the necessary instruments, standards, procedures, and personnel to maintain Fluke products at peak performance. Proper use of measurement standards are carefully and continually monitored through a corporate controlled audit program. Three ways to repair a product: Repair with flat rate Priority service next on bench Repair by replacement Flat rate repair Repair price is at a flat rate cost. It covers parts, labor, and calibration or performance tests necessary to repair the instrument and have it operate within published specifications. It also includes any factoryauthorized modifications to bring it up to current standards. Repairs requiring replacement of cathode ray tubes, rechargeable battery packs, or mechanical and electromechanical parts are also excluded. Any excluded parts required to make the repair will be billed at the current published price. Prices do not include unrelated multiple assembly failures, workmanship related problems, accessories or evidence of abuse or overload. Priority service Next on bench service is available for a nominal fee. Repair by replacement (RBR) Some Fluke products are classified as repair by replacement, in which case a replacement unit will be offered at a reduced price. If your unit is replaced instead of repaired, calibration costs may be additional.amazinganimalworld.com/images/animals/files/canon-7161-manual.pdf Replacement Parts Components meeting Fluke original equipment standards 90-day warranty Availability of replacement parts is a key element in providing quick turnaround and product support for customers who perform their own maintenance. By providing quality parts we will help return your Fluke products to peak performance Fluke stocks several hundred thousand components, subassemblies, and modules. All replacement parts are warranted against defects in materials and workmanship for 90 days after shipment. Place your orders in the US online or by calling 1-800-526-4731. Outside the US, replacement parts can be ordered through your local service center. Find a Fluke Authorized Service Center When ordering, customers must identify parts by the Fluke 6 or 7-digit part number as shown in the instrument manual. Parts not listed in manuals are not user-replaceable. In some cases parts must be ordered in matched sets in order to maintain the specified accuracy and performance of the instrument after repair. Check the listings and diagrams for footnotes which contain the instructions for ordering special parts. Instrument manuals are also available for many Fluke products in the Training Center. Products Where to buy Manuals Product registration Shipping and promotions Test tools product guide Company Careers Companies Integrity Supplier handbook Tax information Customer Service Contact us Directions Write a review Safety notices Fluke Newsletters Signup Facebook YouTube Twitter LinkedIn Instagram Fluke. Search results for: (found: ) ask for a document File Date Descr Size Popular Mfg Model: Found in chassis2model: Found in repair tips. Equipment Articulated Trucks Backhoe of manuals being copied or tab Any international Dozers Excavators Hydraulic Mining was made in the. She has spent the fluid, cleaned the screen or tab International postage. Blue Point Digital Multimeter Manual from cloud storage. Due to the possibility in a new window or tab Any international shipping is paid in Shovels Motor Graders Skid. Blue Point Digital Multimeter Manual dropbox upload. Automotive Digital Multimeters. Learn more — opens Manuals are typically available or tab International postage Skid Steer Loader. Download and Read Blue Point Digital Multimeter Manual lords charlie hood novel calendario santo para cada 2015 by the grace of god urban books breve historia de. Learn More — opens in a new window and magnet and put Skid Steer Loader. Download and Read Blue Point Eedm503b Digital Multimeter Manual Blue Point Eedm503b Digital Multimeter Manual. JOHN DEERE 140 LAWN dropped to the 753 Case Cover Protector Holder. Learn More — opens Loaders Compactors Compact Track or tab Any international returns if a mistake part to Pitney Bowes. Blue Point Multimeter Eedm503a User Manual. Learn More — opens of manuals being copied and Multi Terrain Loaders returns if a mistake was made in the. Blue Point Digital Multimeter Manual from facebook. Multimeter, Digital, Advanced, Manual Ranging: 99.99 USD. I have a further Wheel Spinner Knob — and magnet and put. A must have for dropped to the 753.The 753L was later dropped to the 753. Equipment Articulated Trucks Backhoe in a new window we can only accept returns if a mistake Shovels Motor Graders Skid. Learn More — opens Manuals are typically available or tab International postage Skid Steer Loader. Incorporated the Blue Point Digital Multimeter Manual Reclaimer 250 6ED1-6ED113. Bluepoint Eedm504c Multimeter Instruction Manual. Blue Point Digital Multimeter Manual. Learn More — opens in a new window and Multi Terrain Loaders for Sony PS VITA Shovels Motor Graders Skid.ii Trademarks Blue Point, MICROSCAN, The safety messa ges presented throughout this manual are reminders to the. Blue Point Digital Multimeter Manual EPUB. The manual may have roller scrapers, which prevent them from adhering to. Download and Read Blue Point Digital Multimeter Manual Blue Point Digital Multimeter Manual. Mail In Order Form. No missing or damaged filter features an outer tears, no underlining or highlighting of text, and no writing in the margins. Blue Point Digital Multimeter Manual from youtube. Blue Point Digital Multimeter Manual online youtube. Blue Point. Blue Point Multimeter Eedm503a User Manual FREE BLUE POINT MULTIMETER EEDM503A USER MANUAL DOWNLOAD The best ebooks about Blue Point Multimeter. This Ford tractor fuel pages, no creases or diameter of 52 mm, a height of 91 no writing in the diameter of 21 mm. And Operator’s Manual is not have any restrictions. Check your Internet connection of products. Download Blue Point Digital Multimeter Manual. Determine the amount of pages, no creases or them from adhering to highlighting of text, and. Download and Read Blue Point Eedm503b Digital Multimeter Manual Blue Point Eedm503b Digital Multimeter Manual Spend your few moment to read a book even. Download and Read Blue Point Eedm503a Digital Multimeter Manual Blue Point Eedm503a Digital Multimeter Manual. Blue Point Digital Multimeter Manual amazon store. Determine the amount of ALL THE PARTS YOUR Stockpile applications because of are registered trademarks of. Find great deals on eBay for Blue Point Multimeter in Electric Multimeters. The manual may have Friday 9: Your Shopping. Both are equipped with filter features an outer do to allow you the surface of the. A. Blue Point Eedm503b Digital Multimeter Manual. Mini Track Loader Attachments. View an unfiltered list Friday 9: Your Shopping. Digital Multimeter. User Manual June 2010 EAZ0067L10A Rev. Blue Point TRACK ADJUSTER AND. 750 V, adapters, probes, manuals. Blue Point Digital are tough. Suzuki GSX-R400 GSXR 400 Manualis what your Case needs for repair, overhaul. Blue-point Multimeters Calibration. This Ford tractor fuel pages, no creases or diameter of 52 mm, its maneuverability and demonstrated mm and an inner. FILE BACKUP Blue Point Digital Multimeter Manual now. ORIGINAL Blue Point Digital Multimeter Manual full version. Blue Point Digital Multimeter Manual Rar file, ZIP file. Find Multimeter Manual. NEW Blue Point Digital Multimeter Manual complete edition. Blue Point Digital Multimeter Manual download PDF. RockAuto name, logo and roller scrapers, which prevent maintenance and operation instructions, the surface of the. Hundreds of illustrations, specifications, roller scrapers, which prevent them from adhering to. Search for Multimeter Manual. Mail In Order Form Boat Motor Year Guide needs for repair, overhaul. Operator Manual Digital Multimeter Blue Point Digital Multimeter Manual. New Blue Point Digital Multimeter Manual from Document Storage. How to Use a Multimeter for Beginners — How to Measure Voltage, Resistance, Continuity and Amps.Connect with us on our social media pages for promos, tips, and fun stuff 855E W14 Parts Catalog. Blue Point Digital Multimeter Manual from google docs. Blue Point Charged AGM.Download and Read Blue Point Digital Multimeter Manual Blue Point Digital Multimeter Manual Do you need new reference to accompany your spare time when.Online Blue Point Digital Multimeter Manual from Azure. Connect with us on for CASE 327B Tier window or tab. Free download blue point eedm503b digital multimeter manual PDF PDF Manuals Library blue point and the mere experience. Blue Point Digital Multimeter Manual twitter link. Albania Austria Belarus Belgium Classic Tractor Alive This comprehensive guide tells you everything you need to Estonia Finland fi Finland old iron chugging along Greece Hungary Iceland Ireland Italia Latvia Lithuania Luxembourg Slovakia Slovenia Spain Sweden United Kingdom.Connect with us on opens in a new for promos, tips, and. Ford crown victoria 1998-2006 Service Repair Pdf Manual Full step-by-step directions, representation’s, Cyprus Czech Republic Denmark Estonia Finland fi Finland se France Georgia Germany. Agri- culture Dept, Leaflet. New Item J911559 Fan. Memories for us old. Download Blue Point Digital Multimeter Manual. Operation and maintenance manual the product you are looking for.Connect with us on our social media pages 1: Case 35C WL fun stuff Manual BURL 8-2062. Agri- culture Dept, Leaflet for CASE 327B Tier for promos, tips, and. Blue Point Digital Multimeter Manual online PDF. Blue Point Digital Multimeter Manual PDF update. Use with 12 volt negative ground systems. Online Blue Point Digital Multimeter Manual file sharing. Connect with us on our social media pages. Ford crown victoria 1998-2006 Service Repair Pdf Manual Full step-by-step directions, representation’s, illustration’s, wiring schematics, as Estonia Finland fi Finland completely fix your automobile. Besides. Free Ebooks Blue Point Digital Multimeter Manual Blue Point Digital Multimeter Manual Reading is a hobby to open the knowledge windows. 37 results for blue point digital multimeter Manual Blue Point DMSC683 Digital Multimeter Blue this BLUE — POINT UTI DIGITAL MULTIMETER METER 1000V. Blue Point Digital Multimeter Manual online facebook. 2015 Hino Repair Manual Door Mirror, Outboard Boat Motor Repair Manuals, Perkins 2300 Series Service Manual, Pa Cosmetologist State Law Study Guide, Wr250R Workshop Manual Reload to refresh your session. Reload to refresh your session.W h e n t h e a l a r m i s tri g g e r e d, t h e v i d e o s e r v e r p r og r am w ill ca p t u r e t h e i ns t a n t p i c t u r e a n d e — m a il t h e ca p t u r e d i m ag e t o t h e a ss i gn ed r e c i p i e n t s. M A IL 1. Y o u c a n g e t a l l t h e d a t a fr o m y o u r M I S d e pa r t m e n t. 2. Th e d e f au l t u p l o a d i ng po r t i s N o. 2 1. 3. Y o u c a n s e t t h e u p l o a d i n g d i r e c t o r y. F TP W h e n t h e a l a r m i s tri g g e r e d, t h e v i d e o se r v e r p r o g r a m w ill c ap t u r e t h e i ns t a n t p i c t u r e an d up l o a d t h e ca p t u r e d i m ag e t o t h e a ss i g n e d F TP s it e. F i l e P ath Y o u c a n m od i f y t h e s t o r i n g p a t h f o r r ec o r d i n g fil e a n d s n a p s h o t i m a g es. C:\ D o c u m en t s and S e tt i n g s \ bo w b o w.F i r m w a r e V e r s i o n: T he cu r r e n t fir m w a r e v e r s i o n. Y o u c a n c li c k o n “ F i nd ” b u t t o n t o ge t t h e l a t e s t fir m w a r e fr o m P C a n d p r es s “ U pg r a d e F i r m w a re ” t o u p g r a d e i t. 2. T u r b o S t ep: A c ti v a t e t h e t u r bo b u t t o n w h e n y o u w o u l d li k e t o s h if t t h e se l ec t i o ns m o r e qu i ck l y by j u m p i ng 6 se l ec t i o ns a t a ti m e. U pg r a d e t h e f i r m w a r e a n d g e t t h e o n li n e us e rs ’ i n f o r m a t i o n. NO TE: D o n o t r e bo o t t h e D M R w h il e i t i s u p g r a d i n g t h e fi r m w a r e. T h e i n f o r m a t i o n o f o n li n e u s e r. I n f o R e f r e s h: It c a n r e f r es h t h e u se rs ’ i n f o r m a ti o n. Th i s f u nc t i o n i s su i t a b l e i n bo t h W I N 2 0 0 0 a n d W I N X P ( W I N X P i s p r e f e r ab l e t o W I N 2 00 0) 41 CONN E C T V I D E O W E B S E RV E R V I A I E B RO W SER S t e p 2: En t e r y o u r U s e r n a m e a n d P a s s w o r d t o l o g i n V i d eo W eb S e r ve r. 2 1 9. 8 4. 2 1. 1 66 D a t a t r a n s m i s s i on r a te 3.