
Служба поддержки онлайн (Английский)
Пн-Пт с: 9:00 до 17:00 (UTC+1)
Обслуживание по почте
Нужна помощь? Мы всегда готовы помочь!
Характеристики
Notes
DJI Goggles RE
Weight (Typical)DJI Goggles RE Body: 502 g;
Headband: 500 g
Dimensions DJI Goggles RE Body: 195 × 155 × 110 mm;
Headband (folded):255 × 205 × 92 mm
Screen Size5-inch × 2
Screen Resolution3840 × 1080 (single screen: 1920 × 1080)
Transmitter Power (EIRP)2.4 GHz:
25.5 dBm (FCC); 18.5 dBm (CE); 19 dBm (SRRC)
5.8 GHz:
25.5 dBm (FCC); 12.5 dBm (CE); 18.5 dBm (SRRC)
Live View Modes1080p30, 720p60, 720p30
Video FormatMP4 (H.264)
Supported Video Play FormatMP4, MOV, MKV
(Video format: H264; Audio format: AAC-LC, AAC-HE, AC-3, DTS, MP3)
Battery Capacity:9440 mAh
Operating Temperature Range32° to 104° F (0° to 40° C)
Charger Input100-240 VAC, 50 / 60 Hz, 0.5 A
Output5 V 3 A / 9V 2A / 12 V 1.5 A
FAQ
Function
1. What are the main differences between DJI Goggles RacingEdition (RE) and DJI Goggles?
DJI Goggles RE feature a redesigned facial pad and headband, making them even more comfortable to wear. In addition to all the functions of DJI Googles, DJI Goggles RE also support Sphere pano photo viewing and local video playback. DJI Goggles RE also work with the DJI OcuSync Air Unit and can receive analog video signal.
2. Which DJI drones are compatible with DJI Goggles RE?
DJI Goggles RE work with all the DJI drones compatible with the original DJI Goggles, including the Spark, Mavic Pro, Phantom 4 Series, and Inspire 2.
3. What’s the SMA port on the body of the Goggles RE for?
In addition to the four antennas built into the original DJI Goggles, DJI Goggles RE are also compatible with external antennas, which work with the built-in ones to support 5.8 GHz video transmission. The external antennas connect to the SMA port on the Goggles’ body.
4. What video formats do DJI Goggles RE support?
5. Do DJI Goggles RE support any third-party flight controllers or remote controllers?
Yes. Supported flight controllers: KISS, F3, F4, and Naze Supported remote controllers: X9D (FrSky), DEVO 10 (Walkera), T8FG (Futaba), T14SG (Futaba), WTF09sll (WFLY), and AT9S (RadioLink)
6. How can I view Sphere pano photos with DJI Goggles RE?
1. Sphere panos on SkyPixel can be downloaded to an SD card and viewed with Goggles in the Local Storage interface.
2. If Sphere panos are saved to a DJI aircraft, you can download the photos to Goggles RE from Aircraft Storage then view them in the Local Storage interface.
3. To view Sphere photos from a PC directly, go to http://www.skypixel.com and download them via DJI Assistant. Then you can view the photos in the Local Storage interface.
Air System
1. What is the SD card slot for?
Videos recorded by the DJI OcuSync Air Unit will be stored on the SD card inserted into the Air Unit’s SD card slot. Videos rendered from the live view will also save to the Goggles’ SD card slot. Please note that these SD slots do not support hot swapping.
2. Can I connect the Air Unit with any non-DJI camera?
3. Does the OcuSync Air System support non-DJI antennas?
Yes. However, we strongly recommend you do not use non-DJI antennas as compatibility problems may arise.
4. What batteries does the Air Unit support?
5. How do I update the video transmission module of the Air Unit?
Connect the video transmission module to a PC with a USB cable. Open DJI Assistant 2 and choose the firmware version you need. Proceed with the firmware update.
6. Can I remove the metal shell from the video transmission module to reduce weight?
No. The metal shell is used for cooling and fixing the device. It should not be removed.
7. Can I connect the camera to other devices other than the DJI OcuSync Air Unit?
8. Can I use the camera of the OcuSync Air Unit to take photos?
No. But you can take screenshot by pressing the touch pad on the Goggles RE with two fingers and hold.
Antenna
1. What are the differences between the three compatible antennas?
DJI Goggles RE come with a set of three compatible antennas for different scenarios:
• Pagoda: This circularly polarized antenna performs best at 5.8 GHz.
• Cylindrical: Also circularly polarized, this antenna operates at 2.4 and 5.8 GHz for fully integrated performance.
• Dipole: Linearly polarized, this antenna operates at 2.4 and 5.8 GHz and is lightweight, allowing for a clear video feed at close distances.
2. Can I bend two antennas to make them cross each other?
No. Bending the antennas may permanently affect their service life and performance.
3. Can I remove the silicone cover from a Dipole antenna?
It is recommended you do not remove the silicone cover.
4. When using Goggles RE to receive analog video transmission, can I use antennas other than the official DJI Pagoda Antenna?
No. In many countries, local laws and regulations do not allow unofficial antennas to be used.
Связаться с нами
DJI Goggles Racing Edition
DJI GOGGLES
Racing Edition
User Manual V1.6
2019.04
Searching for Keywords
Search for keywords such as “battery” and “install” to find a topic. If you
are using Adobe Acrobat Reader to read this document, press Ctrl+F on Windows
or Command+F on Mac to begin a search.
Navigating to a Topic
View a complete list of topics in the table of contents. Click on a topic to
navigate to that section.
Printing this Document
This document supports high resolution printing.
Using This Manual
Legends
Warning
Important
Hints and Tips
Reference
Read Before First Usage
Please read the following documents before using the DJITM Goggles Racing
Edition: 1. DJI Goggles Racing Edition In the Box 2. DJI Goggles Series
Disclaimer and Safety Guidelines 3. DJI Goggles Racing Edition Quick Start
Guide 4. DJI Goggles Racing Edition User Manual
We recommend you check that you have all of the included parts listed in In
the Box. Please watch all the tutorial videos on the official DJI website and
read the disclaimer to understand your legal rights and responsibilities.
Prepare for your first usage by reviewing the Quick Start Guide and refer to
the User Manual for more details. If you have any questions or problems during
the installation, maintenance or use of this product, please contact DJI or a
DJI authorized dealer.
Video Tutorials
Please watch the tutorial videos in the link below, which demonstrate how to
use the DJI Goggles RE safely: http://www.dji.com/dji-goggles-re/info#video
Download the DJI Assistant 2
Download DJI ASSISTANTTM 2 at http://www.dji.com/dji-goggles-re/info#downloads
DJI Assistant 2 supports Windows 7 (or later) or OS X 10.11 (or later).
2 © 2019 DJI All Rights Reserved.
Contents
Using This Manual
2
Legends
2
Read Before First Usage
2
Video Tutorials
2
Download the DJI Assistant 2
2
Product Profile
4
Introduction
4
At a Glance
4
Installation and Wearing
6
Usage
7
Operating Control
7
Connection
8
Screen
16
Controlling the Aircraft
19
Viewing Photos and Videos
20
Charging the Goggles RE
22
Upgrading Firmware
24
DJI Assistant 2
24
DJI GO 4 App
24
Cleaning and Maintenance
25
Cleaning the Goggles RE
25
Maintenance of Lenses
25
Specifications
26
3 © 2019 DJI All Rights Reserved.
Product Profile
Introduction
DJI Goggles Racing Edition (abbreviated as “Goggles RE”) are equipped with
high-performance displays and an ultra-low latency video downlink for use with
DJI aircraft, giving you a real-time aerial FPV (First Person View)
experience. Goggles RE can also be used to play HD videos, bringing you an
immersive high-definition viewing experience. Precisely engineered for racing,
Goggles RE are compatible with DJI’s advanced OCUSYNCTM video transmission
module, supporting both analog and 2.4/5.8 GHz dual-band digital video signal
with up to 7 km transmission distance and latency as low as 50 ms.* Goggles RE
comes with a set of three compatible antennas for different scenarios. The DJI
OcuSync Air System comes equipped with an array of powerful features, such as
1280×960 HD transmission, automatic Frequency-Hopping Spread Spectrum (FHSS)
transmission, and access to up to 19 selectable transmission channels. This
module is compatible with a variety of multi-rotor and fixed-wing aircrafts.
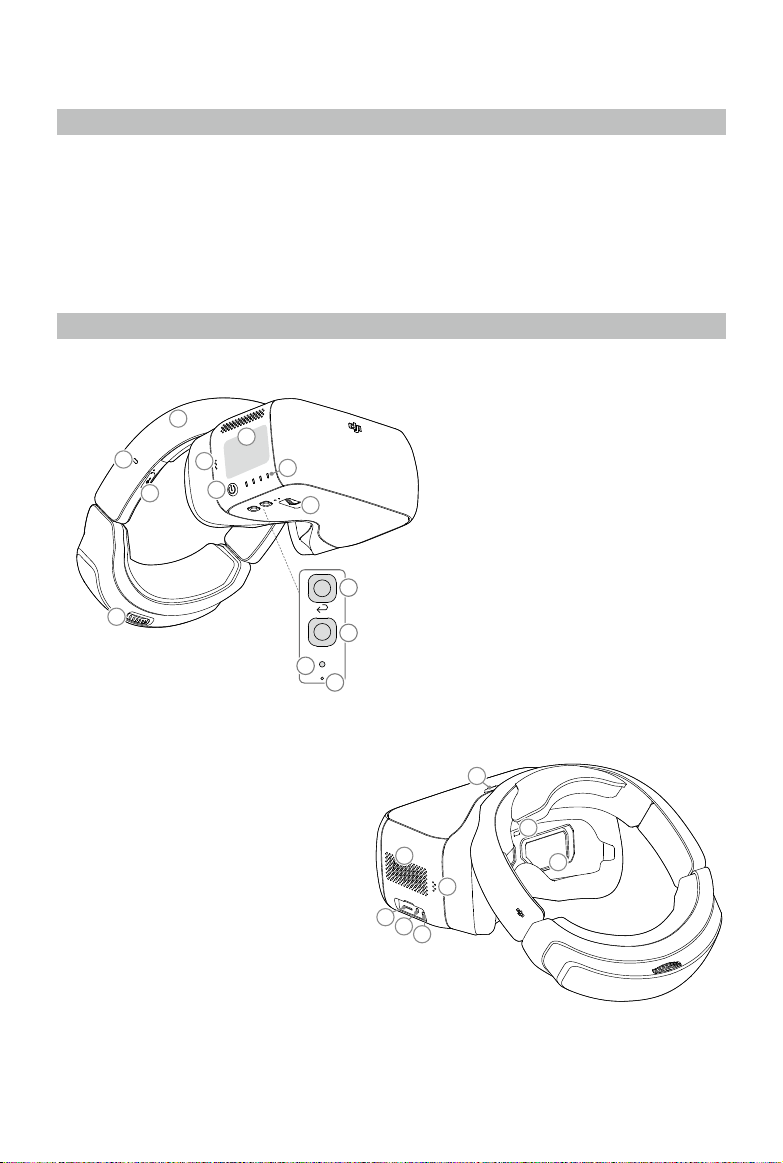
At a Glance
DJI Goggles Racing Edition
2 1
3
6
4
7
8 13
9
5 10
Fn
11 12
1. Touch Panel 2. Headband 3. Charging Status Indicator 4. Micro USB Port 5.
Headband Knob 6. Speaker 7. Power Button 8. Battery Level Indicators 9. Back
Button 10. Function Button 11. Link Button 12. Linking Status Indicator 13.
IPD (Interpupillary Distance) Knob
14. Lens 15. Proximity Sensor 16. Headband Buckle 17. Heat Vent 18. Micro SD
Card Slot 19. 3.5 mm Audio Port 20. HDMI Type-D Port 21. Speaker 22. SMA
Antenna Port
16 22
17 21
18 19 20
15 14
- The Goggles RE can reach their maximum transmission distance (2.4 GHz, FCC) in a wide open area with no EMI (electromagnetic interference), achieving minimum latency in 480p50 live view mode.
4 © 2019 DJI All Rights Reserved.
DJI OcuSync Air Unit
3 1
2
DJI Goggles Racing Edition User Manual
1. Camera Port* Connects to the DJI OcuSync Camera.
2. S.Bus Port Connects with the 3-in-1 Cable (Power, S.Bus, UART), and
connects to the power, flight controller, and OSD port based on the
information below. RED: Power BLACK: Power GND WHITE: UART RX (Connects to OSD
TX) GRAY: UART TX (Connects to OSD RX) BROWN: Signal GND YELLOW: S.Bus
(Connects to Flight Controller RX)
3. Micro SD Card Slot Insert the Micro SD card to store the recorded video.
- Note that both this port and the camera connector plug are customized Type-C interfaces, and they are not compatible with third-party equipment.
4. Antenna Ports (MMCX)
Used to attach the Air Unit antennas.
5. Micro USB Port
Connects to your PC for firmware updates
through DJI Assistant 2.
(When the Air Unit is powered on)
6. PPM Port
Connects to external devices that can handle
PPM signals via the PPM Cable. Set the
corresponding channel in DJI Goggles RE
to control the device remotely with head
movements. (coming soon)
RED: Power
BLACK: Signal GND
4
WHITE: PPM signal
7. Link Button
Press this button to link the OcuSync Air Unit
with the Goggles RE.
8. Linking Status Indicator
Indicates the linking status of the DJI
OcuSync Air Unit and the Goggles RE.
57 8 6
5 © 2019 DJI All Rights Reserved.
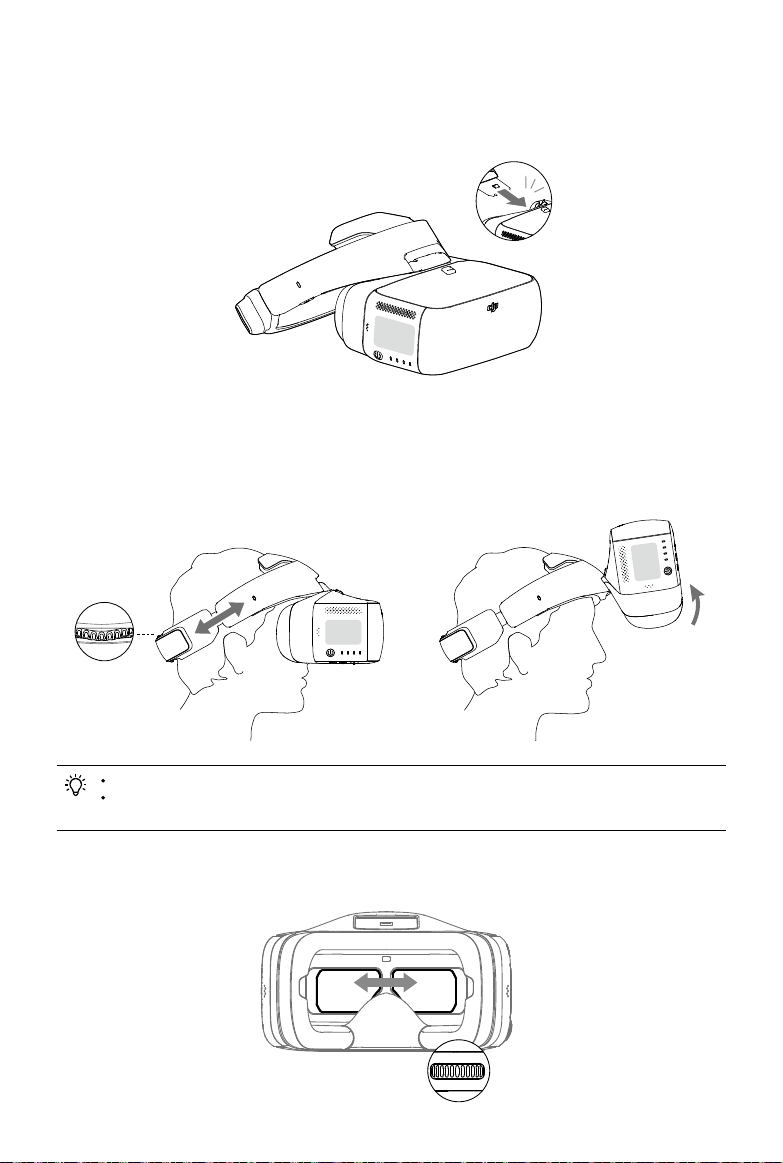
Installation and Wearing
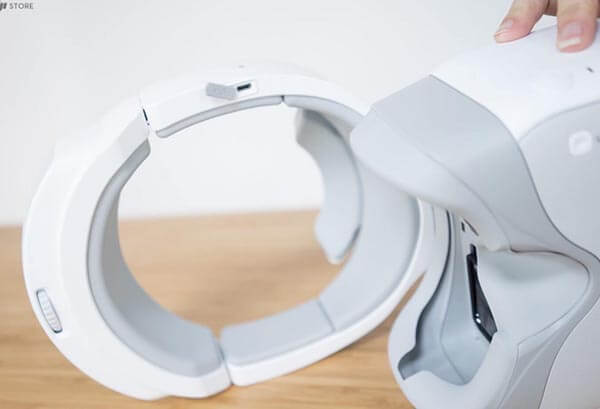
1. Insert the Headband into the slot above the Goggles RE body until you hear
a click. Now check that it has been securely fastened. Click
Press the Headband Buckle and move it in the opposite direction to release the
Headband. 2. Align the lenses over your eyes and pull the Headband down.
Adjust the Headband Knob until
the Goggles RE fit snugly and comfortably on your face and head.
Goggles RE can be worn over glasses. When putting the Goggles RE on, you can
flip the Goggles RE body to see the world outside. 3. Turn the IPD Knob to
adjust the distance between the lenses until the images are properly aligned.
6 © 2019 DJI All Rights Reserved.
Usage
Operating Control
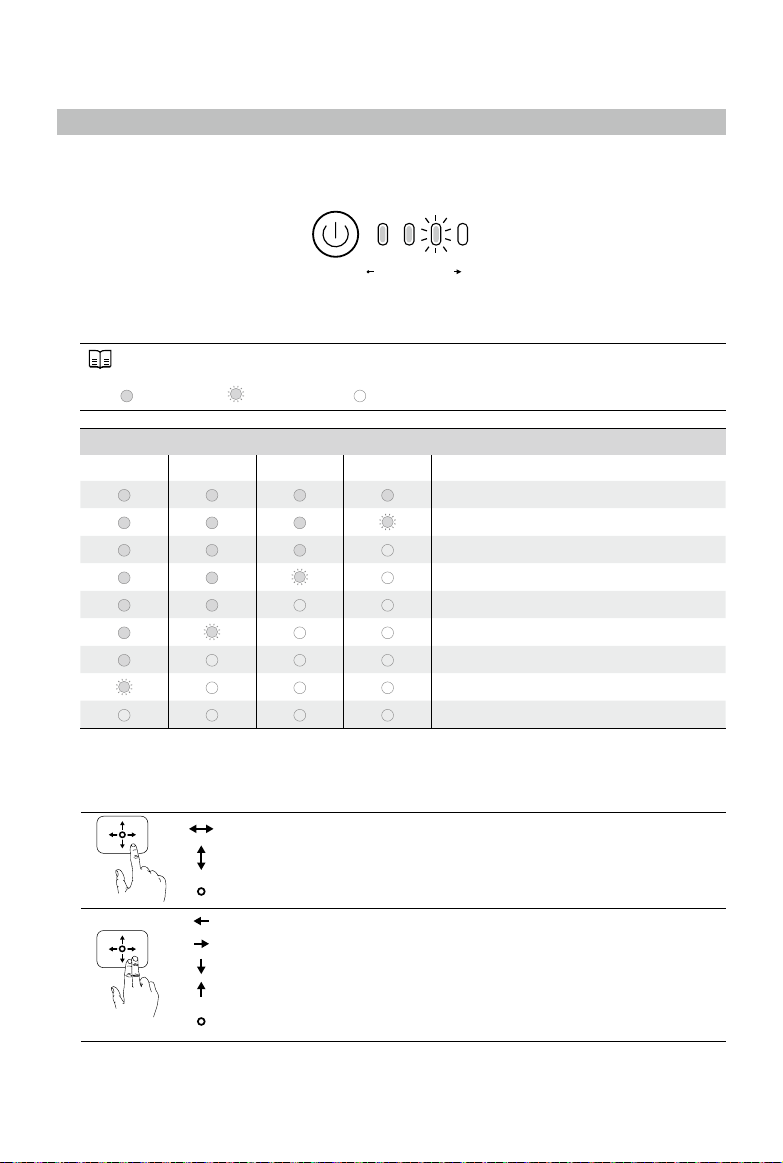
[1] Power Button Press the power button once, then press it again and hold to
turn the Goggles RE on/off. Battery level indicators will display the current
battery level.
Low Battery Level High
[2] Battery Level Indicators When the battery is powered off, press the power
button once to light up the battery level indicators to display the current
battery level.
The battery level indicators will also show the current battery level during
charging and
discharging. The indicators are defined below:
LED on
LED flashing
LED off
Battery Level Indicators
LED1
LED2
LED3
LED4
Battery Level 87.5%~100% 75%~87.5% 62.5%~75% 50%~62.5% 37.5%~50% 25%~37.5%
12.5%~25%
0%~12.5% =0%
[3] Touch Panel Use the touch panel with your right hand to control on-screen
operations.
Browse the menu and swipe right/left
Browse the menu and swipe up/down
Tap to confirm Lock the touch panel to make it non-functional Unlock the touch
panel Enter shortcut menu Exit shortcut menu Tap and hold to screenshot, and
the image will be saved in the Micro SD card of the Goggles RE.*
- Please ensure the Micro SD card is inserted into the Goggles RE.
7 © 2019 DJI All Rights Reserved.
DJI Goggles Racing Edition User Manual
[4] Charging Status Indicator This indicates the current charging status. The
LED will be solid red, yellow or green to reflect low, medium, and high power
levels respectively.
Blinking Red
Solid Red
Solid Yellow
Solid Green
Headband abnormal
0~29%
30~89%
90~100%
[5] Back Button Press this to return to the previous menu, or exit the current
Intelligent Flight Mode.
[6] Function Button For DJI aircraft that support focus (e.g. MAVICTM Pro,
PHANTOMTM 4 Pro), press this to show the focus cursor on the display screen
and swipe forward and backward on the touch panel with one finger to zoom in
or out. Move your head then tap the touch panel to define the focus point. For
other third-party devices when using digital video transmission, press to
start or stop video recording.
The Goggles RE support up to 4x zoom on the Mavic Pro.
Back Button
Function Button
Fn
[7] Link Button When connected with the aircraft by OCUSYNCTM, press the link
button with an appropriate tool to start linking.
[8] Linking Status Indicator Indicates the linking status of the Goggles RE
and the aircraft. The indicator will be solid red while linking and will go
solid green when linked.
Connection
Goggles RE support the DJI OcuSync Air System, third-party analog video
transmitters, and a wide range of DJI aircrafts for different uses. Please
follow the steps below for connecting with these devices.
Analog Video Transmitter The analog frequency band is 5.650 GHz – 5.925 GHz.
This range supports various third-party analog transmission devices and can be
used in scenarios such as racing drones and controlling model aircraft, ship,
and other vehicles.
Linking Method 1. Install the Pagoda antenna (SMA interface) to Goggles
RE’s SMA port.
8 © 2019 DJI All Rights Reserved.
DJI Goggles Racing Edition User Manual
2. Power on the Goggles RE, swipe downward with two fingers on the touch
panel to enter the shortcut menu and select “Racing Drone (Analog)> Frequency
Scanning” to search for the frequency you need.
The analog frequency band is 5.650 GHz – 5.925 GHz, of which 5.725 GHz – 5.850
GHz are ISM frequency bands. You may use these frequencies without permission
but please be sure to have the relevant license and follow local regulatory
procedures when using the other frequency bands. The Pagoda antenna is an
omnidirectional left hand circularly polarized (LHCP) antenna design. It is
recommended to use the Pagoda antenna or other left hand circularly polarized
antennas for analog transmitters to achieve the best transmission performance.
In a multi-aircraft flying environment, the adjacent frequency interval should
be higher than 25 MHz to avoid nearby frequencies affecting the live view of
your Goggles RE.
DJI OcuSync Air System The Goggles RE’s built-in DJI OcuSync dual-band
wireless receiver is compatible with a DJI OcuSync Air System, which you can
install on a third-party device to transmit digital video signals. Digital
video transmission supports 1280 × 960p50, 1280 × 720p60 and 640 × 480p50, as
well as automatic Frequency-Hopping Spread Spectrum (FHSS) transmission.
Digital video transmission can also access to up to 19 selectable transmission
channels, which can be used for racing drones, model aircraft, ship, and other
vehicles, as well as for industrial use.
Basic Linking 1. Install the Pagoda antenna (SMA interface) to Goggles RE’s
SMA port.
2. Install the DJI OcuSync Air System on a third-party device to link with
the Goggles RE. Please refer to the illustration below to mount and connect
the components onto your device.
Devices that support PPM signals (e.g. actuator)
DJI OcuSync Camera
PPM Cable
RED: Power (5 V) BLACK: Signal GND WHITE: PPM signal (0-5 V)
Antennas
3-in-1 Cable (Power, S.Bus, UART)
RED: Power (9-16.8 V) BLACK: Power GND BROWN: Signal GND
WHITE: UART RX (Connects to OSD TX, 0-3.3 V) GRAY: UART TX (Connects to OSD
RX, 0-3.3 V) YELLOW: S.Bus (Connects to Flight Controller RX, 0-3.3 V)
9 © 2019 DJI All Rights Reserved.
DJI Goggles Racing Edition User Manual
The S.Bus port and PPM port on the Air Unit are only used when transmitting
remote control signals. These ports don’t need to be connected if only using
video downlink. There are up to 19 channels (5.8 GHz: 12 channels; 2.4 GHz: 7
channels) for digital video transmission, and each bandwidth is 10 MHz. You
can manually select the transmission channel to avoid interference from other
devices.
Please be aware that the Air Unit may become very hot during or after
operation. DO NOT touch the Air Unit before it has sufficiently cooled down.
Please avoid using the Air Unit for an extended period of time when there is
no external cooling equipment present, as this may cause the Air unit to enter
Overheat Protection mode. Wait for the module to cool down and then you can
restart it. It is recommended to have an external fan installed to dissipate
heat. Place the two antennas on the Air Unit vertically and parallel to each
other at least 30 mm apart. Please note that you should avoid placing the
antennas level with any electrically conducive material. Also, make sure to
keep the bottom of the antenna at least 25 mm away from potential conductors
such as cables, carbon fiber frames, batteries, and metals. If you are only
using the Air Unit to transmit downstream video signals, DO NOT use the same
frequency band as the upstream control signal to avoid interference.
Antenna Pagoda Antenna Cylindrical Antenna Dipole Antenna
Description
5.8 GHz single frequency circular polarization omnidirectional, small size,
recommended for racing. Do not use this antenna when using the 2.4 GHz
frequency band.
Dual-frequency circular polarization omnidirectional, providing smooth long-
range video transmission.
Dual-frequency linear polarization omnidirectional, suitable for close-up
flight.
3. Power on the DJI OcuSync Air Unit and press the link button on the Air
Unit with an appropriate tool when the linking status indicator is solid
green. The indicator will turn solid red when the air unit is waiting for
linking.
4. Power on the Goggles RE, then press the link button with an appropriate
tool in the main menu, or just swipe down on the touch panel with two fingers
to enter the shortcut menu and select “Racing Drone (Digital) > Linking
Settings > Quick Linking”.
5. Make sure the distance between Goggles RE and the Air Unit is within 2 m.
Both linking status indicators will turn solid green when successfully linked,
and the video will display normally.
Multi-Device Linking The DJI OcuSync Air System supports linking two devices
to receive video transmission at the same time. Below are two specific
scenarios.
Two Goggles RE: 1. Follow the steps 1 and 2 of “Basic Linking” above to
complete the linking of Goggles RE and DJI
OcuSync Air System respectively.
10 © 2019 DJI All Rights Reserved.
DJI Goggles Racing Edition User Manual
2. Power on the DJI OcuSync Air Unit and press the link button on the Air
Unit with an appropriate tool when the linking status indicator is solid
green. The indicator will turn solid red when the Air Unit is waiting for
linking.
3. Power on the Goggles RE and swipe down on the touch panel with two fingers
to enter the shortcut menu, then select “Racing Drone (Digital) > Linking
Settings > Advanced Linking > Connect two sets of Goggles RE > Primary” and
confirm. This Primary Goggles RE will be linked with the DJI OcuSync Air
System in a few seconds.
4. Press the link button on the Air Unit again. The indicator will turn solid
red when the Air Unit is waiting for linking.
5. Power on the other Goggles RE and swipe downward with two fingers on the
touch panel to enter the shortcut menu, select “Racing Drone (Digital) >
Linking Settings > Advanced Linking > Connect two sets of Goggles RE >
Secondary” and confirm. This Secondary Goggles RE will be linked with the DJI
OcuSync Air System in a few seconds.
Goggles RE + Mavic Pro Remote Controller 1. Follow the steps 1 and 2 of “Basic
Linking” above to complete the linking of Goggles RE and DJI
OcuSync Air System respectively. 2. Power on the Goggles RE and swipe down on
the touch panel with two fingers to enter the
shortcut menu, select “Racing Drone (Digital) > Wireless Settings > Auto”, and
set 2.4 GHz as the operating frequency, since this is the only frequency that
the Mavic Pro Remote Controller supports. 3. Power on the DJI OcuSync Air Unit
and press the link button on the Air Unit with an appropriate tool when the
linking status indicator is solid green. The indicator will turn solid red
when the Air Unit is waiting for linking. 4. Put on Goggles RE, select “Racing
Drone (Digital) > Linking Settings > Advanced Linking > Connect two sets of
Goggles RE > Primary” and confirm. This Primary Goggles RE will be linked with
the DJI OcuSync Air System in a few seconds. 5. Press the link button on the
Air Unit again. The indicator will turn solid red when the Air Unit is waiting
for linking. 6. Connect your mobile device to the Mavic Pro Remote Controller,
launch the DJI GOTM 4 app and enter the camera view. Press , then select
“Remote Controller Linking > Secondary Remote Controller”. The Remote
Controller will be linked with the DJI OcuSync Air System in a few seconds.
You can only view video transmission on the mobile device linked to the Mavic
Pro Remote Controller. Upstream control signal transmission is not supported.
After familiarizing yourself with digital video transmission, you can connect
the trainer port on a third-party remote controller and the audio port on the
Goggles RE with a trainer cable to transmit the control signal to a racing
drone. In addition, the PPM port of the DJI OcuSync Air Unit can be connected
to the gimbal actuator, enabling gimbal control through your head movements.
11 © 2019 DJI All Rights Reserved.
DJI Goggles Racing Edition User Manual
DJI Aircraft using OcuSync With OcuSync, the Goggles RE can be connected to
the Mavic 2 series, Mavic Pro or the Phantom 4 Pro/Pro+ V2.0 wirelessly.
Toggle the control mode switch of the Mavic Pro to RC mode before linking.
Ensure that the DJI GO 4 app is updated to the latest version. Mavic 2 series
and Phantom 4 Pro/Pro+ V2.0 currently only supports linking with Goggles RE by
Standard Mode.
Standard Mode Standard Mode is suitable for both single and dual operator
aircraft control. In this mode, the pilot using the remote controller can
focus on flight, while the Goggles RE operator can view the environment in
real-time FPV for more intuitive control. By moving their head, the Goggles RE
wearer can control aircraft orientation or gimbal movement.
Remote Controller DJI GO 4 App Live View Intelligent Flight Mode
Goggles RE
Live View Head Tracking Intelligent Flight Mode
If the remote controller and Goggles RE are operated by the same user, a
spotter who is able to give instructions and warnings is required to ensure
safe flying. In Head Tracking Flight, aircraft yaw can be controlled by both
the Goggles RE and the remote controller. With Head Tracking Gimbal, the
gimbal will only move with the movement of the Goggles RE.
Linking Method 1. Ensure both the aircraft and the remote controller are
powered on and linked. 2. Put on the Goggles RE and power on. 3. Press the
link button on Goggles RE or use the touch panel to enter “Tools > Settings >
Linking
Settings”, select “Quick Linking” and confirm. The Goggles RE linking status
indicator will go solid red on standby for linking. 4. Press the link button
on the aircraft. Once linked, the Goggles RE linking status indicator will
turn solid green.
12 © 2019 DJI All Rights Reserved.
DJI Goggles Racing Edition User Manual
Coach Mode Coach Mode is suitable for dual operator aircraft control. In this
mode, the pilot using the remote controller can focus on flight, while the
Goggles RE operator with a secondary remote controller can view the
environment in real-time FPV for more intuitive control. By moving their head,
the Goggles RE wearer can control aircraft orientation or gimbal movement.
They can also control the aircraft with the auxiliary secondary remote
controller that is inferior to the priority control of the primary remote
controller. Please note that only the DJI GO 4 app connected with the primary
remote controller and the Goggles RE can display the live view.
Remote Controller (primary) DJI GO 4 App Live View Intelligent Flight Mode
Goggles RE (secondary) Live View Head Tracking Intelligent Flight Mode
Remote Controller (auxiliary secondary ) +2 s Can’t switch flight modes. No
live view, only support settings.
Only the primary remote controller can switch flight modes. If two operators
control the aircraft simultaneously, the commands from the primary remote
controller takes priority of aircraft movements (control sticks and gimbal
dial). The auxiliary secondary remote controller only works if the primary
remote controller is not being operated for more than two seconds, whereas the
primary remote controller can always override it to regain control. The two
remote controllers follow the same priority for other commands. If the Goggles
RE are powered off or disconnected from the aircraft for more than 30 seconds
during flight, the Goggles RE’s corresponding secondary remote controller will
replace it to control the aircraft. Note that there is still no live view on
the DJI GO 4 app connected to the secondary remote controller.
Linking Method 1. Please ensure that both the aircraft and the primary remote
controller are powered on and linked
together. 2. Put on the Goggles RE and power on. 3. Use the touch panel to
enter “Tools > Settings > Linking Settings”. 4. Select “Advanced Linking >
Connect one set of Goggles RE” and confirm. The Goggles RE
linking status indicator will go solid red to wait for linking.
13 © 2019 DJI All Rights Reserved.
DJI Goggles Racing Edition User Manual
5. Press the Link button on the aircraft. Once linked, the linking status
indicator will turn solid green. 6. Select “Connect Remote Controller” and
confirm in Goggles RE. 7. Power on the auxiliary secondary remote controller
and connect it with the mobile device. 8. Launch the DJI GO 4 app and enter
the camera view. Press , then select “Remote Controller
Linking > Secondary Remote Controller,” for successful linking in a few
seconds.
Multiuser Mode Multiuser Mode is suitable for dual (or more) aircraft operator
control. In this mode, the Goggles RE operators with a secondary remote
controller can view the environment in real-time FPV for more intuitive
control. Please note that only the Goggles RE will display live view and that
the primary Goggles RE only support head tracking.
Remote Controller (main secondary)
No live view, only support settings.
Goggles RE (primary)
Live View Head Tracking Intelligent Flight
Mode
Goggles RE (secondary) Live View Intelligent Flight Mode × Head Tracking
Remote Controller
(auxiliary secondary)
+2 s
Can’t switch flight modes. No live view, only support settings.
If the remote controller and Goggles RE are operated by one person but for two
users, a spotter who is able to instruct and give warning is required for safe
flying. Only the primary remote controller can switch flight modes. Secondary
Goggles RE do not support head tracking. If two operators control the aircraft
simultaneously, the commands from the main secondary remote controller takes
priority of aircraft movements (control sticks and gimbal dial). The auxiliary
secondary remote controller only works if the main secondary remote controller
is not being operated for more than two seconds, whereas the main secondary
remote controller can always override it to regain control. The two remote
controllers follow the same priority for other commands. If the Goggles RE are
powered off or disconnected from the aircraft for more than 30 seconds during
flight, the Goggles RE’s corresponding secondary remote controller will
replace it to control the aircraft. Note that there is still no live view on
the DJI GO 4 app connected to the secondary remote controller.
14 © 2019 DJI All Rights Reserved.
DJI Goggles Racing Edition User Manual
Linking Method 1. Put on the Primary Goggles RE and power on. 2. Use the touch
panel to enter “Tools > Settings > Linking Settings”. 3. Select “Advanced
Linking > Connect two sets of Goggles RE > Primary/Remote Controller” and
confirm. The linking status indicator will go solid red to wait for linking.
4. Press the Link button on the aircraft. Once linked, the linking status
indicator will turn solid green. 5. Select whether to connect with the remote
controller in the Goggles RE. Next, power on the
main secondary remote controller and connect it with a mobile device, if
required. 6. Launch the DJI GO 4 app and enter the camera view. Press , then
select “Remote Controller
Linking > Primary Remote Controller”. They will link after a few seconds. 7.
Repeat the above steps for the secondary pair of Goggles RE and the secondary
remote controller.
Please note that you must select “Advanced Linking > Connect two sets of
Goggles RE > Secondary/Remote Controller” in the Goggles RE, and then select
“Remote Controller Linking > Secondary Remote Controller” on the mobile
device.
Other DJI Aircraft The Goggles RE can also support other DJI aircraft. Ensure
that the aircraft is linked with the remote controller and then connect the
Goggles RE to the Micro USB port or the HDMI port of the remote controller.
INSPIRETM 2 PHANTOM 4 Series* MAVIC AIR SPARKTM **
Micro USB cable
Support Head Tracking, Intelligent Flight Modes, and Live view.
INSPIRE Series PHANTOM 4 PRO+ PHANTOM 4 ADVANCED+
HDMI cable Support only Live view. Aircraft operation is not supported.
When using an HDMI cable, you can secure the wire clip to the left side of the
Goggles RE headband, which allows the HDMI cable to pass through the clip
recess down your back.
- Please note that the Phantom 4 Pro+/Advanced+ remote controller must have the latest firmware update. ** Connect an OTG cable to the Micro USB port on the remote controller, then connect to the Goggles RE with a Micro USB
cable.
15 © 2019 DJI All Rights Reserved.
DJI Goggles Racing Edition User Manual
Screen
Main Screen The main screen of the Goggles RE and functions are described as
follows:
12
3 4 5 6 7 8 9 10
IN-FlIGHT (GPS)
12
FLIGHT MODE GPS
02:36 100% 60%
Vibrations Detected in Gimbal Pitch Axis
11
17
10°
VPS 2.5 m VS 2.5 m s HS 10 m s D 200 M H 300 m
ISO AUTO S F 2.8 EV 0.0 LIVEVIEW 720P60
12 13 14
16
15
1. Aircraft Status Indicates aircraft flight status.
2. Flight Mode Indicates current flight mode.
3. Obstacle Detection Status Red bars are displayed when obstacles are close
to the aircraft. Orange bars are displayed when obstacles are in detection
range.
4. GPS Status Indicates GPS signal strength.
5. Remote Controller Signal Strength Indicates the strength of the remote
controller signal.
6. Connection Status Indicates the connection status of the aircraft and
Goggles RE. Green indicates a healthy signal connection, yellow indicates a
weak or unstable signal connection, and red indicates a disconnection. The
Goggles RE will automatically attempt to reconnect if disconnected.
7. Touch Panel Lock Status Indicates the lock status of the touch panel. A
locked touch panel will be unresponsive to touch to avoid accidental control.
Swipe forward with two fingers to unlock it.
8. Flight Time Shows the flight time of the aircraft.
9. Aircraft Battery Level Shows the current battery level of the Intelligent
Flight Battery.
10. Goggles RE Battery Level Shows the current battery level of the Goggles
RE.
16 © 2019 DJI All Rights Reserved.
DJI Goggles Racing Edition User Manual
11. Prompt Message Shows warning messages. Swipe up or down to select and tap
to delete prompts.
12. Intelligent Flight Modes Tap to select TapFly, ActiveTrack, Terrain
Follow, Tripod, and other intelligent flight modes.
13. Tools Tap to set the settings of the Goggles RE and select Auto
Takeoff/Landing, HDMI video playback, or flight photos/videos playback. The
Settings menu also includes video tutorials, linking settings, language
settings, volume settings, gimbal modes, AR auxiliary settings, and more.
Gimbal Mode FPV Mode: The gimbal synchronizes with aircraft movement for a
first-person flying experience. Follow Mode: The gimbal keeps the camera
steady, allowing for a stable and horizonal view. AR Auxiliary Settings Fixed-
Wing Mode AR: Displays the aircraft’s flight path in Fixed-Wing mode. Head
Tracking Gimbal AR Assist: Indicates the central position of the gimbal (front
direction of the aircraft). Head Tracking Flight AR Assist: Indicates the
aircraft’s yaw and throttle gain values.
14. Camera Settings/Shoot/Record Button Tap to set the ISO, shutter,
aperture, and auto exposure values of the camera. Swipe left or right to
switch between Shoot and Record mode. Tap to shoot photos or start/stop
recording video.
15. Camera Parameters and Live View Mode* Shows the setting parameters of the
camera and Live View Mode.
16. Flight Attitude The triangle indicates the direction the aircraft is
facing. The horizontal level indicates aircraft roll angle. The scale
indicates the tilt angle of the gimbal. The arc beside the triangle indicates
the yaw angle of the gimbal when Head Tracking Gimbal is enabled.
17. Flight Telemetry Flight Telemetry is the horizontal/vertical distance
between the aircraft and the Home Point as well as the movement speed across
the horizontal/vertical distance of the aircraft. When the aircraft is close
to the ground, the altitude will be displayed.
- Live View Mode of the Goggles RE interacts with the aircraft’s video recording. When Live View Mode is in HD mode, video recording automatically switches to 1080p30. When in smooth mode, video recording automatically switches to 1080p60. If you change the video recording mode of the aircraft, the live view of Goggles RE will preferentially synchronize with the matching format (1080p30 HD or 720p60 smooth mode). Otherwise, it will adjust Live View Mode to 720p30.
17 © 2019 DJI All Rights Reserved.
DJI Goggles Racing Edition User Manual
Digital Transmission Screen
1
2 34
2.4V 1080P
8JSFMFTT4FUUJOHT
-JOLJOH4FUUJOHT
3FNPUF$POUSPMMFS$IBOOFM
$BNFSB7JFX4FUUJOHT
6
;PPN4DBMF4FUUJOHT
SJHIUOFTT
0OTDSFFO%JTQMBZ
$BNFSB3PUBUJPO
7JEFP4UPSBHF4FUUJOHT
&YJU
5
1. Aircraft Voltage Shows the aircraft voltage read by the flight controller.
2. Live View Mode Shows the current live view resolution.
3. Video Downlink Signal Strength Indicates the strength of the video
downlink between the Goggles RE and the DJI OcuSync Air System.
4. Remote Controller Connection Indicates that the audio port of the Goggles
RE is connected to the trainer port of a third-party remote controller through
a trainer cable.
5. Flight Attitude Indicates the aircraft’s roll and tilt angle during
flight. Ensure that the UART input of the S.Bus port of the DJI OcuSync Air
Unit is properly connected with the OSD output of the third-party flight
controller.
6. Menu Bar Tap the touch panel to call up the menu bar. a) Wireless Settings
Manual mode bandwidth is 10 MHz, which is suitable for high-interference
environments, such as one that contains many wireless devices. The
interference intensity of different channels will be displayed, and it is
recommended to use a green channel, which indicates lower interference. Auto
mode bandwidth is 20 MHz, which is suitable for low-interference environments,
providing an enhanced quality for the live view. Please refer to the
specifications to select appropriate frequency. (2.4 GHz / 5.8 GHz) b) Linking
Settings Links Goggles RE or a remote controller with the DJI OcuSync Air
System wirelessly. A variety of connection modes are supported. c) Remote
Controller Channel Displays up to 8 channels of the remote controller output
for debugging. Ensure that the S.Bus port of the DJI OcuSync Air Unit is
properly connected with the OSD output of thirdparty flight controller, and
that the Goggles RE’s audio port is connected to the trainer port of a third-
party remote controller.
18 © 2019 DJI All Rights Reserved.
DJI Goggles Racing Edition User Manual
d) Camera View Settings Supports 1280×960, 1280×720, and 640×480 live view
modes.
e) On-screen Display Enables/disables the Image Transmission signal, Image
Transmission Resolution, and Flight Attitude on-screen displays separately.
f) Camera Rotation Rotates the live view and recorded video by 180° to suit
special installation or shooting needs.
g) Video Storage Settings Enables/disables saving recorded video to the Micro
SD card on the DJI OcuSync Air Unit or Goggles RE separately. Tap the Function
Button on Goggles RE to start/stop video recording. Video saved on the Micro
SD card of the DJI OcuSync Air Unit can be connected to a computer for
browsing, but cannot be viewed in “Aircraft Storage”. Videos saved on the
Goggles RE can be played in “Local Storage”.
Controlling the Aircraft
The functional support list of the Goggles RE when connected with different
aircraft is shown below.*
Mavic 2 Series**
Mavic Pro
Phantom 4 Pro/Pro+ V2.0
Mavic Air
Spark
Phantom 4 Pro/ Advanced Series
Phantom 4
Inspire 2
Head Tracking Flight
Head Tracking Gimbal
Focus
×
×
Auto Takeoff / Return-to-Home
TapFly
×
×
×
ActiveTrack
Terrain Follow
×
×
×
Tripod
×
×
Cinematic
×
×
×
×
Fixed-Wing
×
×
×
×
×
×
×
×
×
×
×
×
×
Inspire 1 Series
× × ×
×
× × × × × ×
- Some functions will be supported later, please pay attention to future updates. ** Mavic 2 Enterprise and Mavic 2 Enterprise Dual are not included.
When linked to the Mavic 2 series or Mavic Pro, the remote controller can be
used to control the Goggles RE. 5D button = Touch Panel; C1 button = Function
button; C2 button = Back button. Press the C1 and C2 buttons together to enter
the shortcut menu, and press the C2 button to exit. These remote controller
buttons will be used to control the Goggles RE and their original function
will be disabled. Please fly with caution.
Intelligent Flight Modes Goggles RE support DJI Intelligent Flight Modes such
as TapFly, ActiveTrack, Terrain Follow, Tripod, Fixed-Wing and more. Please
refer to the aircraft user manual for further details. Use the touch panel to
enter “Intelligent Flight Mode” and select the corresponding button to enable
the desired mode. Enable TapFly, ActiveTrack or Fixed-Wing in the Goggles RE
as follows:
1. TapFly a) Use the touch panel to enter “Intelligent Flight Mode > TapFly”.
b) Move your head to control the cursor in the Goggles RE and then tap the
touch panel to
19 © 2019 DJI All Rights Reserved.
DJI Goggles Racing Edition User Manual
confirm the target direction and wait for the icon to appear. c) Tap again to
confirm the selection and the aircraft will fly in that direction. d) Press
the back button on the Goggles RE to exit the current target direction or
TapFly.
2. ActiveTrack a) Use the touch panel to enter “Intelligent Flight Mode >
ActiveTrack”. b) Move your head to control the cursor in the Goggles RE and
then tap the touch panel to select the target subject. If the subject is not
automatically recognized, move your head from the upper left corner to the
lower right corner to drag a box around it. The box will turn green when
tracking is in progress. If the box turns red, the object could not be
identified and you should try again. c) Tap again to confirm the selection and
the aircraft will track the target subject. d) Press the back button on the
Goggles RE to exit the current target subject or ActiveTrack.
3. Fixed-Wing a) Use the touch panel to enter “Intelligent Flight Mode >
Fixed-Wing”. b) When the forward speed of the aircraft is more than 3 m/s, you
can select to enter a FixedWing cruise option. Press the function button or
tap the touch panel on the Goggles RE to enter Fixed-Wing Mode. c) Press the
back button on the Goggles RE to exit Fixed-Wing Mode.
Shortcut Menu Swipe downward with two fingers on the touch panel to enter the
shortcut menu. Move the cursor and tap the touch panel to turn functions
on/off. The Goggles RE support head tracking, which allows the aircraft to
follow head movements: 1. Head Tracking Flight
Move your head to control the aircraft and the gimbal. Turn left and right to
control the yaw of the aircraft, and turn up and down to control the pitch of
the gimbal (-90° to 30°). 2. Head Tracking Gimbal Move your head to control
the gimbal. Turn left and right to control the yaw of the gimbal (-30° to
30°), and turn up and down to control the pitch of the gimbal (-90° to 30°).
3. Reset Motion Control Set the gimbal to the center position or simulate the
yaw stick in the mid-point of the remote controller. Head tracking will center
on this point.
You can set the head tracking sensitivity in Tools setting.
When Head Tracking is enabled (especially Head Tracking Flight), the aircraft
yaw or gimbal movement will be affected. Please fly with caution and pay
attention to control with the remote controller. It is recommended you use a
720p60 high frame rate format to ensure a smooth live view during fast
movements. The functions in the shortcut menu are disabled when using TapFly
and ActiveTrack. Only Head Tracking Flight can be enabled when using Fixed-
Wing Mode. This head tracking function should be enabled before entering the
Fixed-Wing cruise option and your head is best kept stable at that time.
Viewing Photos and Videos
Review your flight videos and photos, use your head and body movement to view
panoramas, and watch HD video content through the Goggles RE for an immersive
viewing experience.
20 © 2019 DJI All Rights Reserved.
DJI Goggles Racing Edition User Manual
Flight Photos and Videos Select “Tools > Playback” to enter the playback page
for flight photos and videos (shot by DJI aircraft only), or demo videos.
IN-FlIGHT (GPS)
FLIGHT MODE GPS
Local Storage
12
Aircraft Storage
Demo Videos
02:36 100% 60%
VPS 2.5 m VS 2.5 m s HS 10 m s D 200 M H 300 m
ISO AUTO S 30 F 2.8 EV 0.0 LIVEVIEW 720P60
Local Storage Remove the Micro SD card from the aircraft and insert it into
the Micro SD Card slot on the Goggles RE and then select “Local Storage”.
Aircraft Storage Select “Aircraft Storage” to preview images stored on the
aircraft. When you are browsing photos or videos, you can swipe up/down with
one finger to download or delete them.
Panorama Goggles RE support panorama picture-browsing with up to 6000×3000
resolution (only sphere panorama is currently supported). You can move your
head and body to view all parts of the 360° panoramic view. To browse
panoramas: 1. Local Storage — Insert the Micro SD card with the containing
panorama into the Micro SD card
slot of Goggles RE, then preview it in “Local Storage”. 2. Download from the
Aircraft Storage — In the DJI GO 4 main screen, enter “Playback > Photo”
and select a panorama, tap to synchronize it to the aircraft. When
synchronization is complete, you will see a thumbnail of the panorama in the
“Aircraft Storage” on Goggles RE. Make sure that Goggles RE is connected with
the remote controller, download the panorama to Goggles RE, and then you can
browse it in “Local Storage”. When you select the panorama from the Playback
page on Goggles RE, you will first access a thumbnail. Tap the touch panel
again to enter the full 360° view.
Only 720p and 1080p videos recorded by the aircraft can be played from Local
Storage or Aircraft Storage. Playback is only supported by Mavic series, Spark
and Phantom 4 Pro/Advanced series aircrafts. Please ensure the Micro SD card
is inserted into the Goggles RE when downloading photos/videos. After that,
you can browse them in “Local Storage”. When browsing the photos and videos in
“Local Storage”, store the files in the Micro SD card according to the
directory below: Videos: DJI_VIDEO in the root or root directory Photos:
DJI_PHOTO in root or root directory Panoramas: DJI_PANO in the root directory
21 © 2019 DJI All Rights Reserved.
DJI Goggles Racing Edition User Manual
Ensure to use the Panorama feature when the aircraft’s motors are turned off.
When using the Goggles RE with the Mavic Pro, if a user plays the video from
aircraft storage instead of having a live view, then this video will be
displayed on all devices synchronously. DO NOT play aircraft storage videos
during flight to ensure safety.
Video Play Goggles RE support both Micro SD card and HDMI connection to view
HD video. For HD video playback: 1. Micro SD Card — Insert the Micro SD card
with the containing HD video into the Micro SD card
slot of Goggles RE, then select “Tools > Playback > Local Storage”. 2. HDMI —
Connect the video source to Goggles RE with an HDMI cable and select “Tools >
HDMI
Input”.
During video playback, swipe up/down on the touch panel with one finger to
adjust volume. Swipe left/right with two fingers for high-speed scrubbing
through the video, and with one finger for fine scrubbing. Micro SD card video
playback is compatible with MP4, MOV, and MKV formats. Please refer to
“Specifications” for details.
Charging the Goggles RE
1. Connect the battery charger to a power outlet (100-240 V, 50/60 Hz). 2.
With the Goggles RE powered off, connect the charging port on the headband to
the charger
with the Micro USB cable included.
3. The charging status indicator will go solid red, yellow, and green in that
order when charging. The battery level indicators will blink green, indicating
current battery levels.
4. The battery is fully charged when the charging status indicator or battery
level indicators turn off. Disconnect the Goggles RE from the charger.
Battery Level Indicators While Charging
LED1
LED2
LED3
LED4
Battery Level 0%~25% 25%~50% 50%~75%
75%~100% Fully Charged
22 © 2019 DJI All Rights Reserved.
DJI Goggles Racing Edition User Manual DO NOT charge the Goggles RE when it is
powered on to ensure safety. When using a non-standard charger, the maximum
output voltage must not exceed 12 V. The Goggles RE battery is located in the
headband. You can connect the headband individually to the charger for
charging. The battery is fully charged when the charging status indicator
turns off. A standard charger is recommended for charging. It takes
approximately four hours to fully charge the battery. Other chargers may take
longer. The Goggles RE and the standard charger featuring the Qualcomm Quick
ChargeTM 3.0 technology.
23 © 2019 DJI All Rights Reserved.
Upgrading Firmware
DJI Assistant 2 Use DJI Assistant 2 to upgrade the Goggles RE. 1. Power on the
Goggles RE and connect them to a computer with a Micro USB cable. 2. Launch
DJI Assistant 2 and login with a registered DJI account. 3. Select “Goggles
RE” and click “Firmware Upgrade” on the left-hand side. 4. Select the firmware
version required. 5. DJI Assistant 2 will download and upgrade the firmware
automatically. 6. Restart the Goggles RE after the firmware upgrade is
complete.
Use DJI Assistant 2 to upgrade the aircraft and remote controller of the Mavic
Pro and the Goggles RE simultaneously (only supports connection topology for
Standard Mode). 1. Ensure all devices are powered on and that the aircraft is
linked with the remote controller. 2. Connect the remote controller to a
computer with a Micro USB cable. 3. Launch DJI Assistant 2 and login with a
registered DJI account. 4. Select “RC for Mavic Pro” and click “Firmware
Upgrade” on the left-hand side. 5. Select the required firmware version. 6.
DJI Assistant 2 will download and upgrade the firmware automatically. 7.
Restart all devices when the firmware upgrade is complete.
Use DJI Assistant 2 to upgrade the DJI OcuSync Air Unit. 1. When the DJI
OcuSync Air Unit is powered on, connects it to a computer with a Micro USB
cable. 2. Launch DJI Assistant 2 and login with a registered DJI account. 3.
Select “DJI OcuSync Air Unit” and click “Firmware Upgrade” on the left-hand
side. 4. Select the firmware version required. 5. DJI Assistant 2 will
download and upgrade the firmware automatically. 6. Restart the Air Unit after
the firmware upgrade is complete.
DJI GO 4 App Use the DJI GO 4 app to upgrade the aircraft and remote
controller of the Mavic Pro and the Goggles RE simultaneously (only supports
connection topology for Standard Mode). 1. Ensure all devices are powered on
and that the aircraft is linked with the remote controller. 2. Connect the
remote controller with the DJI GO 4 app. A prompt will appear if a new
firmware
upgrade is available. To start upgrading, connect a mobile device to the
Internet and follow the on-screen instructions. 3. Restart all devices when
the firmware upgrade is complete.
24 © 2019 DJI All Rights Reserved.
Cleaning and Maintenance
Be sure to unplug the charger from the power outlet before cleaning and ensure
that there are no cables connected. Cleaning the Goggles RE Wipe and clean the
surface of the Goggles RE with a soft clean cloth. To clean the facial pad,
first drag it from the left or right side to the inside, then detach the other
parts. Run water over the facial pad, then wipe it with a soft, dry cloth
until it is completely dry. Align the protruding part of the facial pad with
the holes on the Goggles RE body, then press them together so they are
securely attached.
Maintenance of Lenses Use the cleaning cloth included to wipe the lenses
gently. 1. Moisten the cleaning cloth with alcohol or a lens cleaner. 2. Wipe
in a circular motion from the center to the outer edges of the lenses.
DO NOT clean the headband padding with alcohol. The lenses are delicate,
please clean them gently. DO NOT scratch them as this will damage the overall
viewing experience. Store the Goggles RE in a dry room at room temperature to
avoid damage to the lenses from high temperature and humid environments.
25 © 2019 DJI All Rights Reserved.
DJI Goggles RE Weight (Typical) Dimensions Screen Size Screen Resolution
Refresh Rate FOV Interpupillary Distance Range Communication Frequency
Transmitter Power (EIRP) Max. Transmission Distance Live View Modes
Min. Video Downlink Latency
Video Format Supported Video Play Format
I/O Interface HDMI Supported Sensors Operating Temperature Range Battery
Capacity Battery Energy Max. Operating Time Charger
Goggles RE Body: 502 g Headband: 500 g
Goggles RE Body: 195×155×110 mm Headband (folded): 255×205×92 mm
5 inch×2
3840×1080 (single screen: 1920×1080)
60 Hz
85° (single screen)
58 70 mm
2.4 GHz / 5.8 GHz
2.4 GHz: 25.5 dBm (FCC); 18.5 dBm (CE); 19 dBm (SRRC) 5.8 GHz: 25.5 dBm (FCC);
12.5 dBm (CE); 18.5 dBm (SRRC)
Same as the aircraft connected
1080p30, 720p60, 720p30
140 ms (Mavic 2 Series, 720p30, video format: 1080p60) 110 ms (Mavic Pro,
720p60, video format: 720p120) 180 ms (Mavic Air, 720p30, video format:
720p120) 150 ms (Spark, 720p30, video format: 1080p30) 110 ms (Phantom 4
Pro/Pro+ V2.0, 720p60, video format: 720p120) 150 ms (Phantom 4 Pro/Advanced
Series, 720p60, video format: 720p60/720p120) 167 ms (Phantom 4, 720p30, video
format: 720p60) 140 ms (Inspire 2+X5S, 720p60, video format: 1080p120) 190 ms
(Inspire 2+X4S, 720p60, video format: 1080p60)
MP4 (H.264)
MP4, MOV, MKV, AVI, FLV, 3GP, MPG, TS (Video format: H264, H263, MPEG4, MPEG2,
MPEG1; Audio format: AAC, AC-3, EAC3, DTS, MP3, MP2, Vorbis, PCM)
SMA port, Micro USB port, 3.5 mm Audio port, HDMI Type-D port, Micro SD Card
slot
HDMI 1.4b, HDCP 1.4
Gyroscope, Accelerometer, Proximity Sensor
32° to 104° F (0° to 40° C)
9440 mAh
35.44 Wh
6 hrs
Input: 100-240 VAC, 50/60 Hz, 0.5 A Output: 5 V 3 A / 9V 2A / 12 V 1.5 A
26 © 2019 DJI All Rights Reserved.
DJI Goggles Racing Edition User Manual
DJI OcuSync Air System
Weight
Air Unit: 43.7 g; Camera (cable included): 18.2 g Pagoda Antenna: 9.4 g;
Cylindrical Antenna: 9.4 g; Dipole Antenna: 4.2 g
Dimensions
Air Unit: 72 × 33 × 14 mm Camera: 29.4 × 28.2 × 22.6 mm
Communication Frequency
2.4 GHz / 5.8 GHz
Transmitter Power (EIRP)
2.4 GHz: 22.5 dBm (FCC); 18.5 dBm (CE); 19 dBm (SRRC) 5.8 GHz: 25.5 dBm (FCC);
12.5 dBm (CE); 25.5 dBm (SRRC)
Live View Modes and Min. Latency
960p50: 70 ms; 720p60: 60 ms; 480p50: 50 ms
Max. Transmission Distance
2.4 GHz: 7 km (FCC); 4 km (CE); 4 km (SRRC) 5.8 GHz: 4 km (FCC); 0.7 km (CE);
4 km (SRRC)
Recommended Frequency Band FCC: 5.8 GHz; CE: 2.4 GHz; SRRC: 5.8 GHz
Video Format
MP4 (MPEG4)
I/O Interface
S.Bus, Micro USB, PPM, UART, MMCX, Micro SD card slot
Supported Flight Control System F3, F4, KISS, NAZE
Supported Remote Controller
X9D (Frsky), DEVO 10 (Walkera), T8FG (Futaba), T14SG (Futaba), WTF09sll
(WFLY), AT9S (RadioLink)
Operating Temperature Range 32° to 104° F (0° to 40° C)
Input Power
9-16.8 V (3S-4S)
Camera
Sensor: 1/3” CMOS; Effective pixels: 1.2M Lens: 2.65 mm, f/2.0 Lens Group: 6G
- IR Shutter: Global shutter ISO: 100 – 3200 FOV: 148° (D); 111° (H); 79.5°
(V)
DJI incorporates HDMITM technology. The terms HDMI and HDMI High-Definition
Multimedia Interface, and the HDMI Logo are trademarks or registered
trademarks of HDMI Licensing LLC in the United States and other countries.
Qualcomm Quick Charge is a product of Qualcomm Technologies, Inc. Qualcomm is
a trademark of Qualcomm Incorporated, registered in the United States and
other countries. Quick Charge is a trademark of Qualcomm Incorporated. All
Qualcomm Incorporated trademarks are used with permission.
27 © 2019 DJI All Rights Reserved.
DJI Support http://www.dji.com/support
This content is subject to change. Download the latest version from
www.dji.com/dji-goggles-re
If you have any questions about this document, please contact DJI by sending
an email to DocSupport@dji.com. DJI is a trademark of DJI. Copyright © 2019
DJI All Rights Reserved.
Read User Manual Online (PDF format)
Read User Manual Online (PDF format) >>
Download This Manual (PDF format)
Download this manual >>
Хорошее руководство по эксплуатации
Законодательство обязывает продавца передать покупателю, вместе с товаром, руководство по эксплуатации DJI Goggles Racing Edition V1.4 — 2018. Отсутствие инструкции либо неправильная информация, переданная потребителю, составляют основание для рекламации в связи с несоответствием устройства с договором. В законодательстве допускается предоставлении руководства в другой, чем бумажная форме, что, в последнее время, часто используется, предоставляя графическую или электронную форму инструкции DJI Goggles Racing Edition V1.4 — 2018 или обучающее видео для пользователей. Условием остается четкая и понятная форма.
Что такое руководство?
Слово происходит от латинского «instructio», тоесть привести в порядок. Следовательно в инструкции DJI Goggles Racing Edition V1.4 — 2018 можно найти описание этапов поведения. Цель инструкции заключается в облегчении запуска, использования оборудования либо выполнения определенной деятельности. Инструкция является набором информации о предмете/услуге, подсказкой.
К сожалению немного пользователей находит время для чтения инструкций DJI Goggles Racing Edition V1.4 — 2018, и хорошая инструкция позволяет не только узнать ряд дополнительных функций приобретенного устройства, но и позволяет избежать возникновения большинства поломок.
Из чего должно состоять идеальное руководство по эксплуатации?
Прежде всего в инструкции DJI Goggles Racing Edition V1.4 — 2018 должна находится:
— информация относительно технических данных устройства DJI Goggles Racing Edition V1.4 — 2018
— название производителя и год производства оборудования DJI Goggles Racing Edition V1.4 — 2018
— правила обслуживания, настройки и ухода за оборудованием DJI Goggles Racing Edition V1.4 — 2018
— знаки безопасности и сертификаты, подтверждающие соответствие стандартам
Почему мы не читаем инструкций?
Как правило из-за нехватки времени и уверенности в отдельных функциональностях приобретенных устройств. К сожалению само подсоединение и запуск DJI Goggles Racing Edition V1.4 — 2018 это слишком мало. Инструкция заключает ряд отдельных указаний, касающихся функциональности, принципов безопасности, способов ухода (даже то, какие средства стоит использовать), возможных поломок DJI Goggles Racing Edition V1.4 — 2018 и способов решения проблем, возникающих во время использования. И наконец то, в инструкции можно найти адресные данные сайта DJI, в случае отсутствия эффективности предлагаемых решений. Сейчас очень большой популярностью пользуются инструкции в форме интересных анимаций или видео материалов, которое лучше, чем брошюра воспринимаются пользователем. Такой вид инструкции позволяет пользователю просмотреть весь фильм, не пропуская спецификацию и сложные технические описания DJI Goggles Racing Edition V1.4 — 2018, как это часто бывает в случае бумажной версии.
Почему стоит читать инструкции?
Прежде всего здесь мы найдем ответы касательно конструкции, возможностей устройства DJI Goggles Racing Edition V1.4 — 2018, использования отдельных аксессуаров и ряд информации, позволяющей вполне использовать все функции и упрощения.
После удачной покупки оборудования/устройства стоит посвятить несколько минут для ознакомления с каждой частью инструкции DJI Goggles Racing Edition V1.4 — 2018. Сейчас их старательно готовят или переводят, чтобы они были не только понятными для пользователя, но и чтобы выполняли свою основную информационно-поддерживающую функцию.
Stichwortsuche
Suchen Sie nach Stichwörtern wie „Akku“ und „Montage“, um das entsprechende Thema zu nden.
Wenn Sie dieses Dokument mithilfe von Adobe Acrobat Reader geöffnet haben, drücken Sie die
Tastenkombination Strg+F bei Windows oder Command+F bei Mac, um eine Suche zu starten.
Themensuche
Das Inhaltsverzeichnis bietet eine Liste mit allen verfügbaren Themen. Klicken Sie auf ein Thema, um
diesen Abschnitt aufzurufen.
Ausdrucken dieses Dokuments
Dieser Dokument unterstützt Drucken in hoher Auösung
Hinweise zu dieser Anleitung
Erläuterung der Symbole
Warnung
Wichtig Tipps und Hinweise Querverweis
Vor dem ersten Gebrauch lesen
Lesen Sie sich vor dem Gebrauch der DJITM Goggles die folgenden Dokumente durch:
1. DJI Goggles – Lieferumfang
2. DJI Goggles – Haftungsausschluss und Sicherheitsvorschriften
3. DJI Goggles – Kurzanleitung
4. DJI Goggles – Bedienungsanleitung
Wir empfehlen Ihnen zu überprüfen, ob Sie alle der im Lieferumfang angegebenen Gegenstände
erhalten haben. Sehen Sie sich alle Tutorial-Videos auf der ofziellen DJI-Website an, und lesen Sie den
Haftungsausschluss, um Ihre gesetzlichen Rechte und Pichten zu verstehen. Bereiten Sie sich auf die
erste Verwendung vor: Lesen Sie die Kurzanleitung. Genauere Informationen sind der Bedienungsanleitung
zu entnehmen. Wenn bei Montage, Pege oder Betrieb des Produkts Fragen oder Probleme auftreten,
wenden Sie sich bitte an DJI oder einen DJI-Vertragshändler.
Tutorial-Videos
Schauen Sie sich die Tutorial-Videos unter dem folgenden Link an. Dort erhalten Sie Informationen zum
sicheren Gebrauch der DJI Goggles:
http://www.dji.com/dji-goggles/info#video
DJI Assistant 2 herunterladen
Laden Sie DJI ASSISTANTTM 2 unter der folgenden Adresse herunter:
http://www.dji.com/dji-goggles/info#downloads
DJI Assistant 2 unterstützt Windows 7 (oder höher) und Mac OS X 10.11 (oder höher).
2017 DJI Alle Rechte vorbehalten.
2
©

Inhalt
Hinweise zu dieser Anleitung
Erläuterung der Symbole 2
Vor dem ersten Gebrauch lesen 2
Tutorial-Videos 2
DJI Assistant 2 herunterladen 2
Inhalt
Produktbeschreibung
Einleitung 4
Überblick 4
Montage und Anwendung
Verwendung
Betriebssteuerung 6
Anschließen 7
Hauptbildschirm 11
Fluggerät bedienen 13
Videowiedergabe 14
Laden der Goggles 15
Firmware aktualisieren
DJI Assistant 2 17
„DJI GO 4“-App 17
2
3
4
5
6
17
Reinigung und Wartung
Reinigen der Goggles 18
Wartung der Objektive 18
Technische Daten
2017 DJI Alle Rechte vorbehalten.
©
18
19
3
Produktbeschreibung
Einleitung
Die DJI Goggles (abgekürzt „Goggles“) sind für die Verwendung mit DJI-Fluggeräten mit Hochleistungs-
Displays und einem Videolink mit sehr geringer Latenz ausgestattet und ermöglichen so in Echtzeit
Luftaufnahmen in der Ich-Perspektive (First Person View, FPV). Mit den DJI Goggles können auch HD-
Videos abgespielt und so ein beeindruckendes Bilderlebnis in HD geschaffen werden.
Dank ihres intuitiven und funktionalen Designs lassen sie sich einfach nur mit der rechten Hand bedienen.
Die DJI Goggles unterstützen Head-Tracking, wodurch das Steuern des Fluggeräts und des Gimbals per
Kopfbewegungen ermöglicht wird. Mit den intelligenten Flugmodi von DJI wird eine völlig neue Art des
Fliegens eingeführt.
Überblick
2
1
3
6
4
7
5
14. Objektiv
15. Abstandssensor
16. Kopfband-Verschluss
17. Luftauslass
18. Micro-SD-Karteneingang
19. Audio-Anschluss 3,5 mm
20. HDMI-D-Anschluss
21. Lautsprecher
1. Bedienfeld
2. Kopfband
3. Ladestatusanzeige
8
13
9
4. Micro-USB-Anschluss
5. Kopfband-Regler
6. Lautsprecher
7. Ein/Aus-Taste
8. Akkuladezustandsanzeige
9. Zurück-Taste
10. Funktions-Taste
11. Koppeltaste
12. Koppelstatusanzeige
13. Augenabstands-Regler
10
Fn
11
12
16
15
17
14
21
18
19
20
2017 DJI Alle Rechte vorbehalten.
4
©
Montage und Anwendung
1. Führen Sie das Kopfband in den Schlitz über dem Goggles-Gehäuse so weit ein, bis Sie ein Klicken
hören. Prüfen Sie jetzt, ob es sicher befestigt ist.
Klick!
Drücken Sie den Kopfband-Verschluss, und bewegen Sie ihn in die entgegengesetzte Richtung, um
das Kopfband zu lösen.
2. Richten Sie die Objektive über Ihren Augen aus, und ziehen Sie das Kopfband nach unten. Stellen Sie
den Kopfband-Regler ein, bis die Goggles fest und komfortabel an Ihrem Kopf und Gesicht anliegen.
Die Goggles können über einer Brille getragen werden.
Wenn Sie die Goggles aufsetzen, können Sie das Visier der Goggles aufklappen, um die
Außenwelt zu sehen.
3. Drehen Sie den IPD-Regler, um den Abstand zwischen den Objektiven einzustellen, bis die Bilder
richtig ausgerichtet sind.
2017 DJI Alle Rechte vorbehalten.
©
5
Verwendung
Betriebssteuerung
[1] Einschalttaste
Drücken Sie die Einschalttaste einmal, drücken Sie sie dann erneut, und halten Sie sie gedrückt, um die
Goggles ein-/auszuschalten. Die Akkuladezustandsanzeige zeigt den aktuellen Akkuladezustand an.
Akkuladezustand
[2] Akkuladezustandsanzeige
Drücken Sie im ausgeschalteten Zustand einmal die Einschalttaste. Die Akkuladezustandsanzeige
leuchtet auf und zeigt den aktuellen Akkuladezustand an.
Auch beim Laden und Entladen zeigt die Akkuladezustandsanzeige den aktuellen
Akkuladezustand an. Legende zu den Leuchten:
LED ein LED blinkt LED aus
Akkuladezustandsanzeige
LED1 LED2 LED3 LED4 Akkuladezustand
[3] Bedienfeld
Betätigen Sie das Bedienfeld mit der rechten Hand, um die Vorgänge auf dem Bildschirm zu steuern.
Durchsuchen des Menüs und Wischen nach rechts/links
Durchsuchen des Menüs und Wischen nach oben/unten
Tippen, um zu bestätigen
Sperren des Bedienfelds, damit es nicht mehr betätigt werden kann
Entsperren des Bedienfelds
Öffnen des Kontextmenüs
Verlassen des Kontextmenüs
Tippen Sie auf den Screenshot und halten Sie den Finger auf dem Bild, um
dieses auf der Micro-SD-Karte der Goggles zu speichern.*
HochNiedrig
87,5…100 %
75…87,5 %
62,5…75 %
50…62,5 %
37,5…50 %
25…37,5 %
12,5…25 %
0…12,5 %
= 0 %
* Vergewissern Sie sich, dass die Micro-SD-Karte in den Goggles steckt.
2017 DJI Alle Rechte vorbehalten.
6
©
Содержание
- Обзор очков DJI Goggles Racing Edition
- Что нового?
- Внешний вид
- Функциональные улучшения
- Какую версию DJI Goggles выбрать?
- Часто задаваемые вопросы
- DJI Goggles Racing Edition: скорость и полная свобода
- Релиз
- Особенности
- О новинке
- Аксессуары
- Комплектация
- Внешний вид
- Детали
- Dji goggles racing edition инструкция
- DJI Goggles обзор
- Зачем мне нужны очки DJI Goggles
- Первое впечатление от DJI Goggles
- Ощущение от DJI Goggles
Обзор очков DJI Goggles Racing Edition
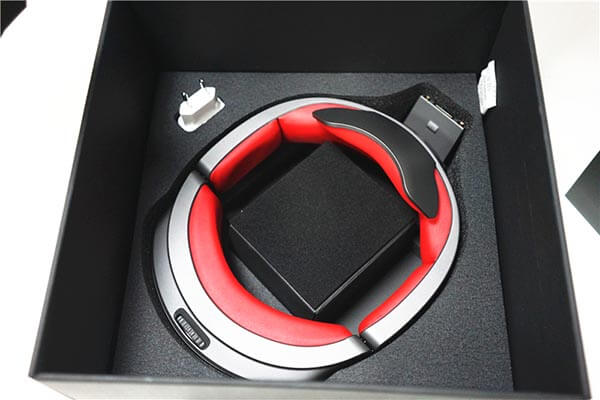
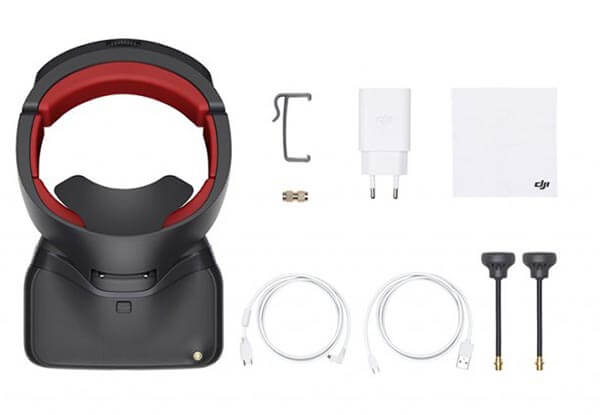
Наконец-то вышли очки виртуальной реальности DJI Goggles Racing Edition (RE), но стоило ли их ждать? Давайте изучим эти новые, более красивые и удобные очки от DJI подробнее.
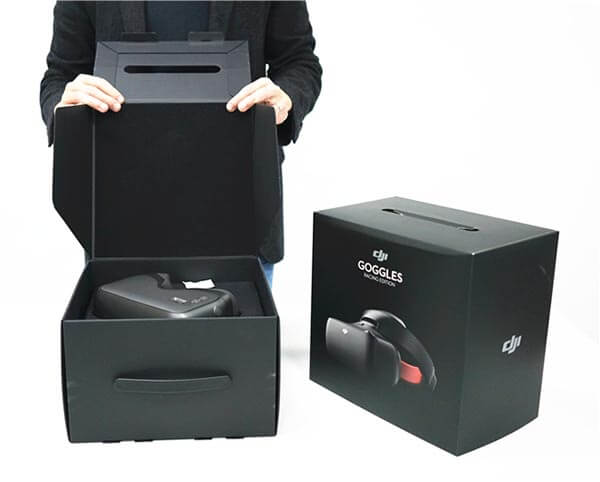
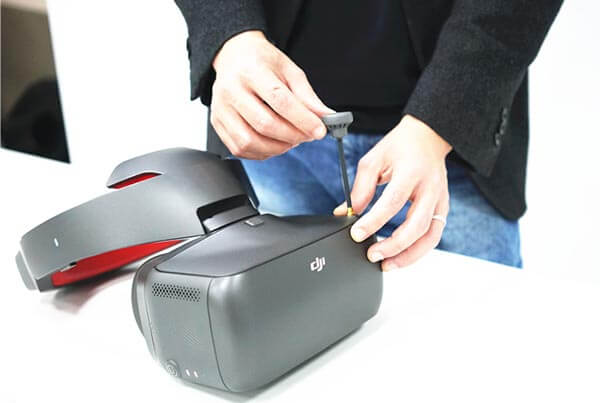
Открыв коробку, видим сами очки, головную дужку и зарядное устройство, тип которого зависит от региона.
В середине коробки на дне лежит коробочка поменьше, а в ней кабель Micro USB, кабель HDMI, зажим для крепления проводов, соединитель SMA с измененным полом (папа мама) и антенна Pagoda (интерфейс SMA).
Что нового?
Внешний вид
DJI Goggles RE отличаются цветом – теперь это матовый металлик, а также дизайном визора и головной дужки.
Входящая в комплект поставки антенна Pandora имеет два режима передачи сигнала – цифровой и аналоговый, так что она подойдет для множества приложений и сценариев гонок от первого лица.
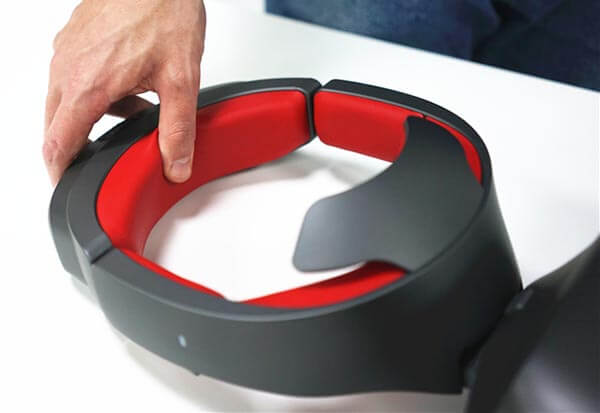
Красная кожа
Еще одно впечатляющее отличие состоит в том, что внутренняя часть головной дужки отделана высококачественной кожей красного цвета. Первоначальная версия очков DJI Goggles была удобна, но теперь удобство вышло на новый уровень.
Функциональные улучшения
DJI Goggles RE сохраняют все функции своего предшественника и совместимы со всеми дронами от DJI для полетов от первого лица с погружением. Они также хороши для просмотра фильмов и игр. Но в первую очередь они были разработаны для гонок на коптерах от первого лица.
Очки совместимы с модулем передачи видео OcuSync и высококачественной камерой. Работая в тандеме, они передают цифровой видеосигнал с расстояния до 7 км и с очень незначительным запаздыванием в 50 миллисекунд.
Они также совместимы с двумя другими антеннами. Цилиндрическая антенна выдает более сфокусированный сигнал, что хорошо при больших расстояниях. Двухполюсная антенна идеальна для разнонаправленного полета, она обеспечивает более контрастный вид от первого лица на открытых пространствах. Обе придется прикупить отдельно.
Какую версию DJI Goggles выбрать?
Все зависит от того, с какой целью вы покупаете очки. Первоначальной версии вполне достаточно, если вам требуется стандартный функционал качественных очков виртуальной реальности. К тому же они на $50 дешевле. А почему бы и не взять девайс поновее? Конечно, новый цвет и красная кожа привлекают, к тому же вы получаете возможность погонять на дронах с отличной картинкой от первого лица. Взвесьте все и сделайте выбор.
Часто задаваемые вопросы
Каковы основные различия между очками?
DJI Goggles RE имеют улучшенный дизайн лицевой части и головной дужки, очки сидят просто идеально. Кроме всех функций классической модели, новая версия также поддерживают функции просмотра фото в виде круговой панораме и проигрывания сохраненного видео. И работают с модулем DJI OcuSync Air Unit, который принимает аналоговый сигнал.
Какие дроны от DJI совместимы с очками?
Работают со всеми дронами от DJI, совместимыми с предшественником, включая Spark, Mavic Pro, серию Phantom 4 и Inspire 2.
Зачем на корпусе расположен порт SMA?
В дополнение к четырем антеннам, встроенным в DJI Goggles, новые очки могут работать и со внешними антеннами. Они поддерживают передачу видео с частотой 5.8 ГГц. Внешние антенны подключаются к порту SMA на корпусе очков.
Видео каких форматов поддерживают?
MP4, MOV, MKV
Поддерживают ли очки полетные контроллеры и пульты управления сторонних производителей?
Да.
Поддерживаемые полетные контроллеры: KISS, F3, F4 и Naze
Поддерживаемые пульты управления: X9D (FrSky), DEVO 10 (Walkera), T8FG (Futaba), T14SG (Futaba), WTF09sll (WFLY) и AT9S (RadioLink)
Как можно через DJI Goggles RE посмотреть фото в виде круговой панорамы?
- Круговые панорамы на SkyPixel можно скачать на карту SD и просматривать в очках в интерфейсе локального запоминающего устройства.
- Если круговые панорамы сохранены на запоминающее устройство коптера DJI, можно перенести фото и смотреть их в интерфейсе локального запоминающего устройства.
- Чтобы смотреть круговые панорамы на компьютере, заходим на сайт SkyPixel и скачиваем их через ассистент DJI. Смотрим в интерфейсе локального запоминающего устройства.
Источник
DJI Goggles Racing Edition: скорость и полная свобода
Релиз
22 ноября на официальном пресс-релизе DJI Innovations была представлена гоночная версия FPV очков Goggles — DJI Goggles Racing Edition. Goggles RE помимо брутального черного металлизированного цвета и красной кожаной обивки, получили ряд весомых доработок о которых подумывал каждый пилот БЛА, когда впервые узнал о DJI Goggles.
Особенности
*нововведения для модели DJI Goggles Racing Edition.
- Технология передачи данных OcuSync
- Двухдиапазонная передача видеосигнала 2.4 и 5.8ГГц
- Поддерживает технологию автоматической смены несущей частоты FHSS
- Передача цифрового видеосигнала с задержкой до 50мс
- Встроенный видеоприёмник работающий на аналоговой частоте 5.8ГГц
- 12 выбираемых FPV каналов
- Расстояние удаления до 7км
- Поддержка видеоформатов MP4, MOV и MKV
- Поддерживает режим Sphere (просмотр панорам 360°)
- FPV камера DJI OcuSync для расширения возможностей использования очков (для комплекта Combo)
- DJI OcuSync Air Unit внешний видеопередатчик для расширения возможностей использования очков (для комплекта Combo)
- 2 × экрана ультравысокого качества
- Поддержка интеллектуальных режимов полета
- Управление движением головы
О новинке
DJI Goggles RE ориентированы прежде всего на пилотов БЛА которые требовательны к качеству передаваемого FPV сигнала. Теперь помимо приема цифрового видеосигнала посредством технологии OcuSync, благодаря встроенному видеоприёмнику, очки поддерживают и аналоговый в диапазоне частот 5.8ГГц. Это означает, что Goggles RE совместимы с любым гоночным дроном из вашего беспилотного парка.
Аксессуары
DJI Goggles Racing Edition можно использовать не только при пилотировании БЛА, но и при управлении автомобилями на радиоуправлении, роботами и т.п. Такая возможность появилась благодаря союзу двух доп.аксессуаров, которые входят в комплектацию Combo:
- FPV камера DJI OcuSync
- Внешний видеопередатчик Ocusync Air Unit
Комплектация
*Комплект DJI Goggles Racing Edition.
Разработчик предлагает три варианта комплектации:
- DJI Goggles Racing Edition
- DJI Goggles Racing Edition & Carry More Backpack
- DJI Goggles Racing Combo
Внешний вид
Детали
Стоит понимать, что передача FHD FPV картинки в режиме реального времени на расстояние до 7км с задержкой 50м/с пока недосягаемый результат для бытовых устройств такого типа. На деле FHD трансляция будет возможна на ограниченных в скорости режимах полета. Дистанция в 7км будет досягаема на особых условиях (например в Европе так далеко летать точно не получится). И наконец для получения минимальной задержки в 50м/с картинка должна будет приходить в разрешении 480p при 50fps. Чтобы получить максимально полное представление о новой версии очков, предлагаем ознакомиться с основными вопросами и ответами ниже.
В: В чем различия между DJI Goggles и DJI Goggles RE?
О: Улучшения Goggles RE:
- Помимо диапазона цифровой передачи 2.4 ГГц, новые очки DJI Goggles RE также поддерживают диапазон 5.8 ГГц, что позволяет избежать обычных помех в более загруженном диапазоне 2.4 ГГц.
- Переработаны внутренние всенаправленные антенны с линейной поляризацией и добавлена новая внешняя антенна Pagoda, одночастотная всенаправленная антенна с левой круговой поляризацией (LHCP) на частоте 5.8 ГГц.
- Реструктурирована стратегия радиосвязи и алгоритм декодирования видео, чтобы снизить задержку передачи до 50 мс (с задержкой беспроводной передачи менее 10 мс; результат был достигнут при тестировании с видеопотоком 480p), обеспечивая плавную и надёжную передачу видео и избегая задержки видео и отключения от цифровой системы видеопередачи при работе в нормальных условиях.
- DJI Goggles RE поддерживают аналоговую передачу на любой целочисленной частоте от 5.650 до 5.925 ГГц и хранение аналогового видео на Micro SD карте.
- DJI Goggles RE могут хранить цифровое видео на карте Micro SD.
- DJI Goggles RE поддерживают локальное воспроизведение видео и просмотр панорамы Sphere, позволяя пользователям поворачивать голову, чтобы получить обзор панорамы Sphere на 360°.
- Лицевая накладка была переработана, а в оголовье использовались новые сменные кожаные материалы, чтобы сделать его ещё более комфортным.
В: С какими дронами DJI совместимы очки?
О: Spark, Mavic серия, Phantom 4 серия и Inspire 2.
В: От чего питаются Goggles RE?
О: Встроенная литий-полимерная батарея емкостью 9440мАч.
В: Возможна ли видеозапись?
О: Да, все полученные маской изображения и видео будут сохраняться на microSD карте предварительно установленной в microSD порт очков. Запись будет осуществляться как цифровых сигналов, так и аналоговых.
В: Совместим ли видеопередатчик OcuSync Air Unit с другими FPV камерами?
О: Нет, только с камерой DJI OcuSync.
В: Можно ли камеру DJI OcuSync подключить к другим системам передачи Air Unit?
В: Можно ли получать изображения на аналоговой частоте 5.8ГГц?
В: Поддерживают ли очки режим Headtracking?
О: Да, для управления ориентацией.
В: Поддерживают ли очки случайную перестройку рабочей частоты (FHSS) при передаче сигнала?
О: Да, технология FHSS работает, она позволяет автоматически менять несущую частоту, в случае если канал шумный. Работает только совместно с OcuSync.
В: Каковы особенности камеры DJI OcuSync?
О: Построена на 1/3″ CMOS сенсоре с моментальной фиксацией изображения Global shutter (уменьшает нежелательные эффекты Роллинг-шаттер). FOV камеры составляет 148°. Может снимать в 1280 × 960 со скоростью 50 кадров в секунду, 1280 × 720 при 60 кадрах в секунду и 640 × 480 со скоростью 100 кадров в секунду. Работает только с видеопередатчиком Ocusync Air Unit. Подробная спецификация здесь.
В: Какие полетные контроллеры поддерживает камера DJI OcuSync?
О: F3, F4, KISS, NAZE.
В: Какие аппаратуры управления поддерживает камера DJI OcuSync?
О: X9D (Frsky), DEVO 10 (Walkera), T8FG (Futaba), T14SG (Futaba), WTF09sll (WFLY), AT9S (RadioLink) .
В: Каковы особенности видеопередатчика Ocusync Air Unit?
О: Предназначен для передачи видеосигнала получаемого с камеры DJI OcuSync. Работает в двух диапазонах радиочастот 2.4ГГц и 5.8ГГц с поддержкой технологии FHSS. Имеет в распоряжении 19 каналов (12 в 5.8 ГГц и 7 в 2.4 ГГц). Способен передавать картинку в разрешении 1280 × 960 пикселей с задержкой 70м/с при 50 кадрах в секунду. Для обеспечения видеопередачи с минимальной задержкой 50м/с, переходит на разрешение 480p при 50 кадрах в секунду.
В: Размеры/вес камеры и видеопередатчика?
О: Размеры камеры OcuSync: 2.94 × 2.82 × 2.26 см. Вес: 18.2 гр. Размеры модуля Ocusync Air Unit: 7.2 × 3.3 × 1.4 см. Вес: 43.7 гр.
В: Мощность передаваемого сигнала?
О: В 2.4 ГГц составляет 178 мВт для США (FCC) и 70 мВт для Европы (ЕС). На частоте 5.8 ГГц составляет 350 мВт для США (FCC) и 18 мВт для Европы (ЕС).
В: Допустимое расстояние удаления?
О: В диапазоне 2.4ГГц — 4 км для Европы (7км для США). В диапазоне 5.8ГГц — 700 метров для Европы (4 км для США).
В: Какова задержка в цифровом режиме с помощью Ocusync Air Unit?
О: Согласно спецификации: 70 миллисекунд в 1280 × 960 при 50 кадрах в секунду, 60 миллисекунд в 1280 × 720 при 60 кадрах в секунду и 50 миллисекунд в 640 × 480 при 50 кадрах в секунду.
В: Цена?
О: Комплект с DJI Goggles Racing Edition предлагается за — 549$. Комплект DJI Goggles Racing Edition & Carry More Backpack – 609$. Комбинированная комплектация DJI Goggles Racing Combo (куда входит FPV камера Ocusync + передатчик Ocusync Air Unit) предлагается за — 739$ (ознакомиться с содержимым комплектов кликнув по закладке «In the box» можно в онлайн магазине разработчика).
Источник
Dji goggles racing edition инструкция
Дельта принтеры крайне требовательны к точности изготовления комплектующих (геометрия рамы, длины диагоналей, люфтам соединения диагоналей, эффектора и кареток) и всей геометрии принтера. Так же, если концевые выключатели (EndStop) расположены на разной высоте (или разный момент срабатывания в случае контактных концевиков), то высота по каждой из осей оказывается разная и мы получаем наклонную плоскость не совпадающая с плоскостью рабочего столика(стекла). Данные неточности могут быть исправлены либо механически (путем регулировки концевых выключателей по высоте), либо программно. Мы используем программный способ калибровки.
Далее будут рассмотрены основные настройки дельта принтера.
Для управления и настройки принтера мы используем программу Pronterface.
Калибровка принтера делится на три этапа:
1 Этап. Корректируем плоскость по трем точкам
Выставление в одну плоскость трех точек — A, B, C (расположенных рядом с тремя направляющими). По сути необходимо уточнить высоту от плоскости до концевых выключателей для каждой из осей.
Большинство (если не все) платы для управления трехмерным принтером (В нашем случае RAMPS 1.4) работают в декартовой системе координат, другими словами есть привод на оси: X, Y, Z.
В дельта принтере необходимо перейти от декартовых координат к полярным. Поэтому условимся, что подключенные к двигателям X, Y, Z соответствует осям A, B, C.(Против часовой стрелки начиная с любого двигателя, в нашем случае смотря на логотип слева — X-A, справа Y-B, дальний Z-C) Далее при слайсинге, печати и управлении принтером в ручном режиме, мы будем оперировать классической декартовой системой координат, электроника принтера сама будет пересчитывать данные в нужную ей систему. Это условность нам необходима для понятия принципа работы и непосредственной калибровки принтера.
Точки, по которым мы будем производить калибровку назовем аналогично (A, B, C) и позиция этих точек равна A= X-52 Y-30; B= X+52 Y-30; C= X0 Y60.
Алгоритм настройки:
- Подключаемся к принтеру. (В случае “крагозяб” в командной строке, необходимо сменить скорость COM порта. В нашем случае с 115200 на 250000 и переподключится)
После чего мы увидим все настройки принтера.
- Обнуляем высоты осей X, Y, Z командой M666 x0 y0 z0.
И сохраняем изменения командой M500. После каждого изменения настроек необходимо нажать home (или команда g28), для того что бы принтер знал откуда брать отсчет. - Калибровка принтера производится “на горячую”, то есть должен быть включен подогрев стола (если имеется) и нагрев печатающей головки (HotEnd’а) (Стол 60град., сопло 185 град.) Так же нам понадобится щуп, желательно металлический, известных размеров. Для этих задач вполне подойдет шестигранный ключ (самый большой, в нашем случае 8мм, он предоставляется в комплекте с принтерами Prizm Pro и Prizm Mini)
- Опускаем печатающую головку на высоту (условно) 9мм (от стола, так, что бы сопло еле касалось нашего щупа, т.к. высота пока что не точно выставлена.) Команда: G1 Z9.
- Теперь приступаем непосредственно к настройке наших трех точек.
Для удобства можно вместо g- команд создать в Pronterface четыре кнопки, для перемещения печатающей головки в точки A, B, C, 0-ноль.
Далее командой меняем параметры высоты оси Y: M666 Y <посчитанная величина>
M666 Y0.75
M500
G28
2 Этап. Исправляем линзу
После того как мы выставили три точки в одну плоскость необходимо произвести коррекцию высоты центральной точки. Из за особенности механики дельты при перемещении печатающей головки между крайними точками в центре она может пройти либо ниже либо выше нашей плоскости, тем самым мы получаем не плоскость а линзу, либо вогнутую либо выпуклую.
Корректируется этот параметр т.н. дельта радиусом, который подбирается экспериментально.
Калибровка:
- Отправляем головку на высоту щупа в любую из трех точек стола. Например G1 Z9 X-52 Y-30
- Сравниваем высоту центральной точки и высоту точек A,B,C. (Если высота точек A, B, C разная, необходимо вернутся к предыдущей калибровки.)
- Если высота центральной точки больше остальных, то линза выпуклая и необходимо увеличить значение дельта радиуса. Увеличивать или уменьшать желательно с шагом +-0,2мм, при необходимости уменьшить или увеличить шаг в зависимости от характера и величины искривления (подбирается экспериментально)
- Команды:
G666 R67,7
M500
G28 - Подгоняем дельта радиус пока наша плоскость не выровняется
3 Этап. Находим истинную высоту от сопла до столика
Третьим этапом мы подгоняем высоту печати (от сопла до нижней плоскости — столика) Так как мы считали, что общая высота заведомо не правильная, необходимо ее откорректировать, после всех настроек высот осей. Можно пойти двумя путями решения данной проблемы:
1 Способ:
Подогнав вручную наше сопло под щуп, так что бы оно свободно под ним проходило, но при этом не было ощутимого люфта,
- Командой M114 выводим на экран значение фактической высоты нашего HotEnd’а
- Командой M666 L получаем полное значение высоты (Параметр H)
- После чего вычитаем из полной высоты фактическую высоту.
- Получившееся значение вычитаем из высоты щупа.
Таким образом мы получаем величину недохода сопла до нижней плоскости, которое необходимо прибавить к полному значению высоты и и записать в память принтера командами:
G666 H 235.2
M500
G28
2 Способ:
Второй способ прост как валенок. С “потолка”, “на глаз” прибавляем значение высоты (после каждого изменение не забываем “уходить” в home), добиваясь необходимого значения высоты, но есть шанс переборщить со значениями и ваше сопло с хрустом шмякнется об стекло.
Как сделать авто калибровку для вашего принтера и что при этом авто калибрует принтер вы узнаете из следующих статей.
Источник
DJI Goggles обзор
Пару часов назад курьер привез домой заказанные очки DJI Goggles.
Поскольку вещь эта ещё мало распространенная в Москве (пока DJI Goggles предлагают лишь барыги, которые получили единичные экземпляры с экипажами воздушных судов, летающих в Штаты и Китай) — с ходу пишу обзор этого дивайса от DJI, потом дополню отзывом.
- Зачем мне нужны очки DJI Goggles
- Первое впечатление от DJI Goggles
- Включение очков и сопряжение их с Mavic Pro
- Активация DJI Goggle
- Ощущение от DJI Goggles
- Органы управления очков
- Продолжение: испытание на природе
- Дальность видео-линка HD Mode
- Поворот камеры поворотом головы
- 4К
Зачем мне нужны очки DJI Goggles
Думаю, что те кто снимал дроном пляжи или вообще что-то в солнечных странах (не России конечно) — меня поддержат.
Я не сторонник разных шторок на монитор чтобы убрать на нём блики — это какое-то кустарничество.
Покупал пару раз на предыдущие дроны — Фантом 2 и 3, а после забил.
Не помогают.
Для DJI Mavic нашелся простой дивайс, спасающий от бликов на смартфоне — полотенце.
Я накрывался им с головой и таким образом обеспечивал хоть какую-то тень, в которой можно было смотреть — что собственно снимаешь.
Вот например снятое на Филиппинах видео (с полотенцем).
Очки DJI Goggles призваны спасти от полотенца.
Только и всего.
Я предложил жене — давай возьму двое очков — будешь тоже смотреть что я снимаю.
Но она отказалась, мотивируя тем, что лучше посмотрит готовый видеоклип или фото позже.
Первое впечатление от DJI Goggles
Первое впечатление: они очень большие!
Просто огромные…
Я с тоской посмотрел на свой рюкзак, в котором уже зарезервировано место под Macbook Pro, Sony A7RM2 c FE 2.8/24-70, DJI Osmo, DJI Mavic Pro с батарейками пультом и зарядками, GoPro c куполом Dome и еще барсетка с различными зарядками.
Вес рюкзака уже более 10 кг и еще прибавляется пусть не сильно тяжелая, но очень объемная вещь.
Ощущение от DJI Goggles
Да какое ощущение может быть в квартире?
Подключилось на этот раз все: пульт и очки.
Стартанул (take off) — по холлу разлетелись клочки коробки и какие-то инструкции DJI Goggles.