

DIGITAL VOICE
RECORDER
Getting started
Recording
1
2
DM-770
Other information
USER MANUAL
Thank you for purchasing an Olympus digital voice recorder.
Please read these instructions for information about using the product
correctly and safely.
Keep the instructions handy for future reference.
To ensure successful recording, we recommend that you test the record
function and volume before use.
Playback
Menu
Use with a PC
EN
3
4
5
6

Table of contents
Names of parts ……………………………………………….. 4
Recorder……………………………………………………………………4
Display ……………………………………………………………………..5
1 Getting started
Setup ……………………………………………………………. 7
Inserting the battery …………………………………………………..8
Turning the power ON …………………………………………………9
Selecting the battery setting ……………………………………….9
Setting the time/date ……………………………………………….10
Setting the voice guidance …………………………………………10
Charging the battery ……………………………………….11
Charging the battery by connecting to
a PC’s USB connector ……………………………………………..11
Charging the battery by connecting to an AC adapter
with a USB connection (model A514; optional) …………12
Batteries ……………………………………………………….14
Inserting/removing a microSD card ……………………..16
Inserting a microSD card ……………………………………………16
Removing a microSD card ………………………………………….17
Preventing accidental operation …………………………18
Setting HOLD mode ………………………………………………….18
Releasing HOLD mode ……………………………………………….18
Turning the power OFF ……………………………………..19
Selecting folders and files …………………………………20
Using the calendar search function to search for a file ……21
2 Recording
Recording………………………………………………………22
Basic recording procedure ………………………………………….22
Pausing/resuming recording ………………………………………24
Quickly checking a recording ………………………………………24
Monitoring while recording ……………………………………….25
Selecting the automatic recording setting
[Rec Scene] ………………………………………………..26
Recording with an external microphone ……………….28
Recording from another connected device …………….29
Recording audio from another device with this recorder …29
Recording audio from this recorder with another device …29
3 Playback
Playback ……………………………………………………….30
Basic playback procedure …………………………………………..30
Fast-forwarding ……………………………………………………….31
Rewinding ………………………………………………………………31
Skipping to the beginning of a file ……………………………..32
Playback through the earphones ………………………………..33
Index marks/temp marks ………………………………….35
Writing an index mark/temp mark ……………………………..35
Erasing an index mark/temp mark ………………………………35
Erasing files……………………………………………………36
4 Menu
Setting menu items …………………………………………38
Basic operation ………………………………………………………..38
Recording menu [Rec Menu] ………………………………40
Selecting the recording level [Rec Level] ………………………40
Setting the recording mode [Rec Mode] ………………………40
Selecting microphone directivity [Zoom Mic]………………..41
Reducing noise during recording [Low Cut Filter] …………..42
Selecting the three microphones system [Mic Select] …….42
Setting timer recording [Timer Rec] …………………………….43
Playback menu [Play Menu] ……………………………….45
Skipping non-voice portions during playback
[Voice Playback] …………………………………………………..45
Reducing noise during playback [Noise Cancel] …………….45
Adjusting low volume portions during playback
[Voice Balancer] …………………………………………………..46
Selecting playback modes [Play Mode] ………………………..46
EN
2

Table of contents
Changing the playback speed [Play Speed] …………………..47
Setting a skip space [Skip Space] ………………………………..48
File menu [File Menu] ………………………………………49
Extracting the speaking portions of files of spoken-word
content [Voice Detect] …………………………………………..49
Preventing accidental file erasure [File Lock] ……………….. 50
Dividing files [File Divide] ………………………………………….51
LCD/Sound menu [LCD/Sound Menu] ……………………52
Setting the voice guidance [Voice Guide] ……………………..52
Turning beeping sound on/off [Beep] ………………………….53
Inverting the colors of the display [Invert colors] …………..53
Setting the backlight [Backlight] ……………………………….53
Setting the LED indicator light [LED] ……………………………53
Adjusting the contrast [Contrast] ………………………………..54
Changing the display language [Language] …………………54
Device menu [Device Menu] ………………………………55
Setting the battery in use [Battery] …………………………….55
Setting the time/date [Time & Date] …………………………..55
Setting the USB connection [USB Settings] ………………….56
Restoring the default settings [Reset Settings] ……………..57
Formatting a recording media [Format] ……………………….58
Checking voice recorder information [System Info.] ………59
5 Use with a PC
PC operating environment ………………………………..60
PC connection/disconnection ……………………………..62
Connecting the voice recorder to a PC ………………………….62
Disconnecting the voice recorder from a PC ………………….64
Functions available in Olympus Sonority ………………65
Installing software ………………………………………….67
Uninstalling software ………………………………………69
Using online help …………………………………………….70
Transferring files to a PC……………………………………71
6 Other information
Alarm message list …………………………………………..73
Troubleshooting …………………………………………….75
Recorder care …………………………………………………78
Accessories (optional) ………………………………………79
Copyright and trademark information …………………80
Safety precautions …………………………………………..81
Specifications …………………………………………………86
Indications used in this manual
NOTE
Describes precautions and operations that
should be absolutely avoided in using the
voice recorder.
TIP
Describes useful information and hints that
will help you getting the most out of your
voice recorder.
☞
Indicates reference pages describing details
or related information.
EN
3
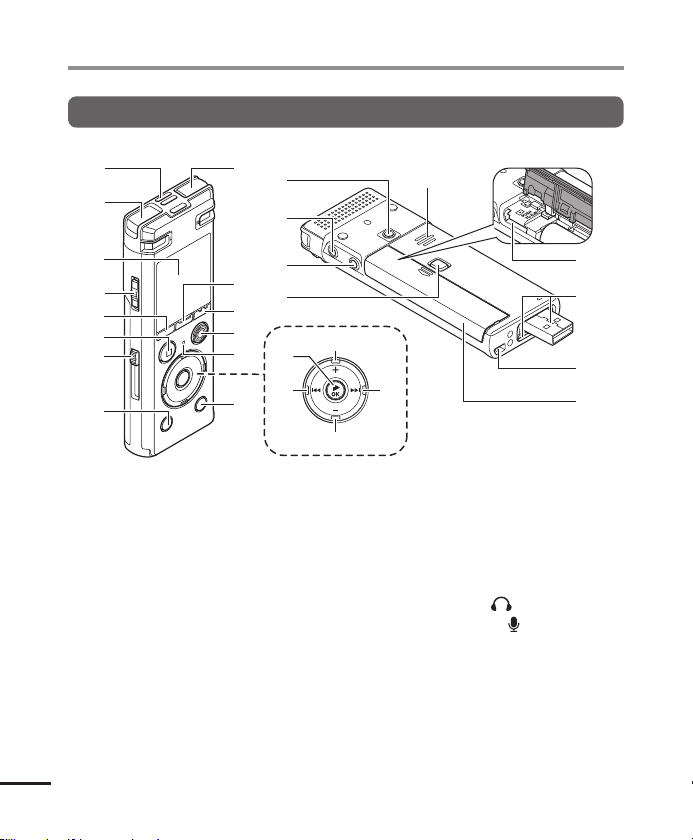
Names of parts
Recorder
Names of parts
9
)
—
w
1 Built-in center microphone
2 Built-in stereo microphone (L)
3 Display
4
POWER/HOLD
5
F1
button
6
STOP
7 USB connector slide lever
8
ERASE
9 Built-in stereo microphone (R)
0
MENU/SCENE
!
F2
button
@
REC
(record)( s) button
# LED indicator light (LED)
EN
$
LIST
button
% `
OK
4
button
switch
( 4) button
button
button
0
!
@
#
$
=
q
%
^
&
*
(
^ 0 button
+
button
&
* 9 button
(
–
button
) Attachment mounting hole
— Earphone jack (
= Microphone jack (
q Battery/card cover lock button
w Built-in speaker
e microSD card slot
r USB connector/USB connector
cover (retractable)
t Strap hole
y Battery/card cover
)
e
r
t
y
)
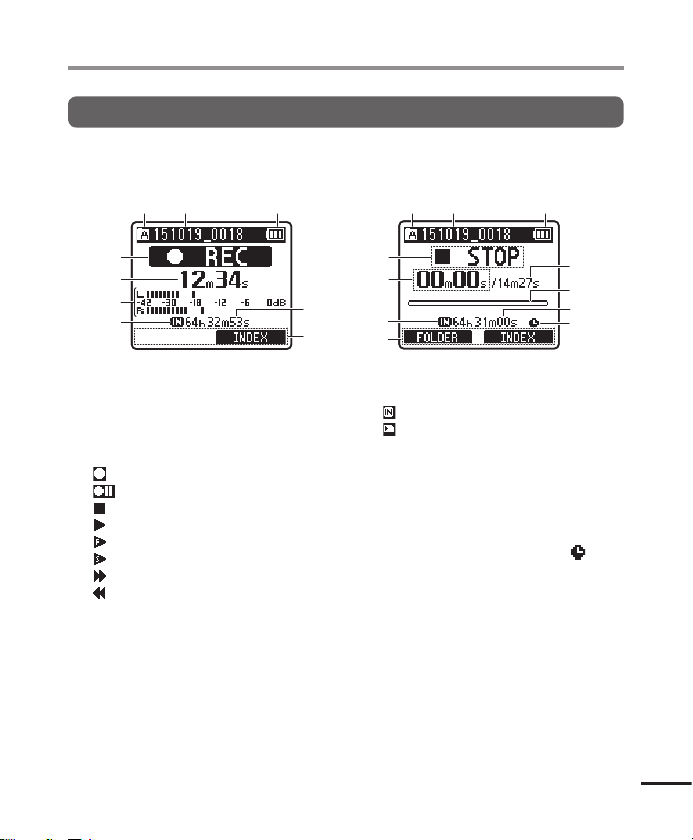
Names of parts
Display
During recording mode During stop mode
or playback mode
Names of parts
1 Folder indicator
2 File name
3 Battery indicator
4 Voice recorder status indicator
[ ]: Recording indicator
[
[
[
[
[
[
[
5 Elapsed recording time
6 Level meter
]: Recording pause indicator
]: Stop indicator
]: Playback indicator
]: Fast playback indicator
]: Slow playback indicator
]: Fast-forward indicator
]: Fast-rewind indicator
7 Recording media indicator
[ ]: Internal memory
[
]: microSD card
8 Possible recording time remaining
9 Function button guide display
0 Elapsed playback time
! File length
@ Playback position bar indicator
# Timer recording indicator (
)
EN
5
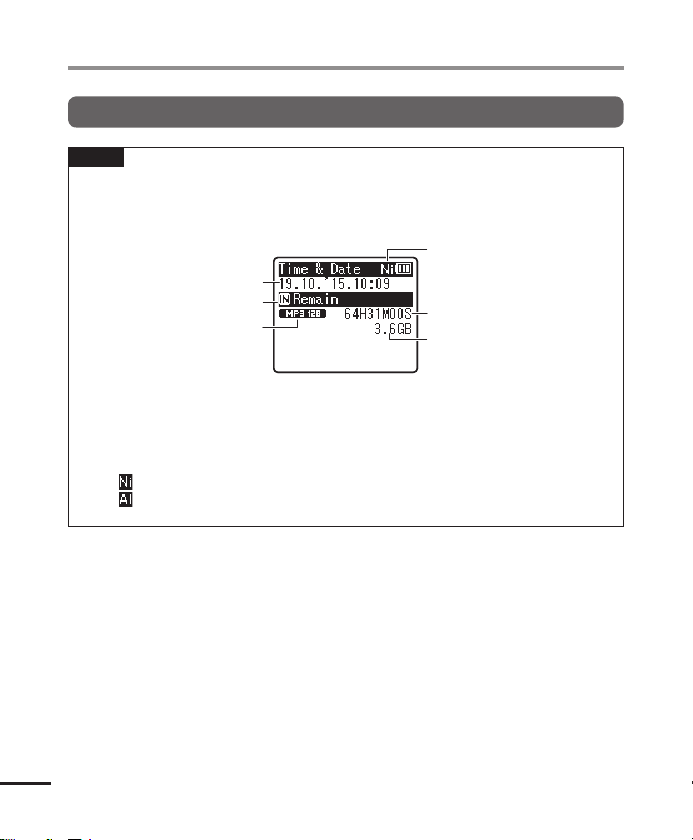
Names of parts
Display
TIP
• Pressing and holding the STOP ( 4) button while the voice recorder is in stop mode
Names of parts
displays the settings [Time & Date] and [Remain] (amount of possible recording time
remaining). If the current time/date is set incorrectly, see “Setting the time/date [Time &
Date]” (☞ P.55).
EN
1 Current time & date
2 Recording media indicator
3 Recording format indicator
4 Battery indicator
[ ]: Ni-MH
[
]: Alkaline
5 Possible recording time
6 Available free space
6
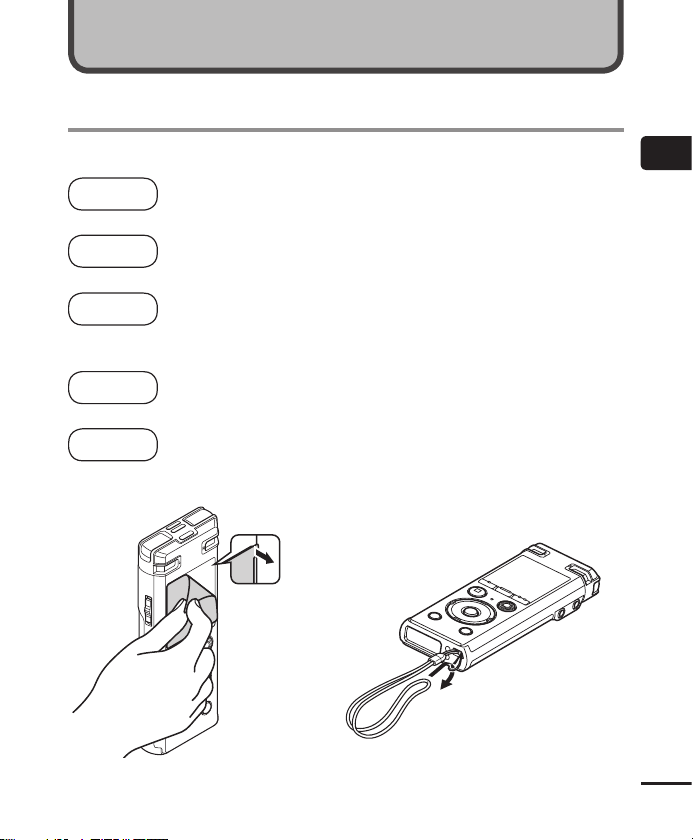
Setup
Getting started
After unpacking the voice recorder, follow the steps below to have it ready for use.
Getting
started
Inserting the battery
1
3
Getting
started
Turning the power ON
2
3
Getting
started
3
Getting
started
3
Getting
started
Selecting the battery setting
3
Select the battery setting to match the inserted battery. Select the setting
for a nickel-metal hydride rechargeable battery or the setting for an alkaline
battery.
Setting the time/date
4
Set the voice recorder’s clock for use with file management.
Setting the voice guidance
5
Attaching the strap:
Remove the screen
protector on the
display.
1
Setup
EN
7
Setup
Inserting the battery
Before using the voice recorder, insert the battery in the battery compartment of the voice
1
recorder.
Setup
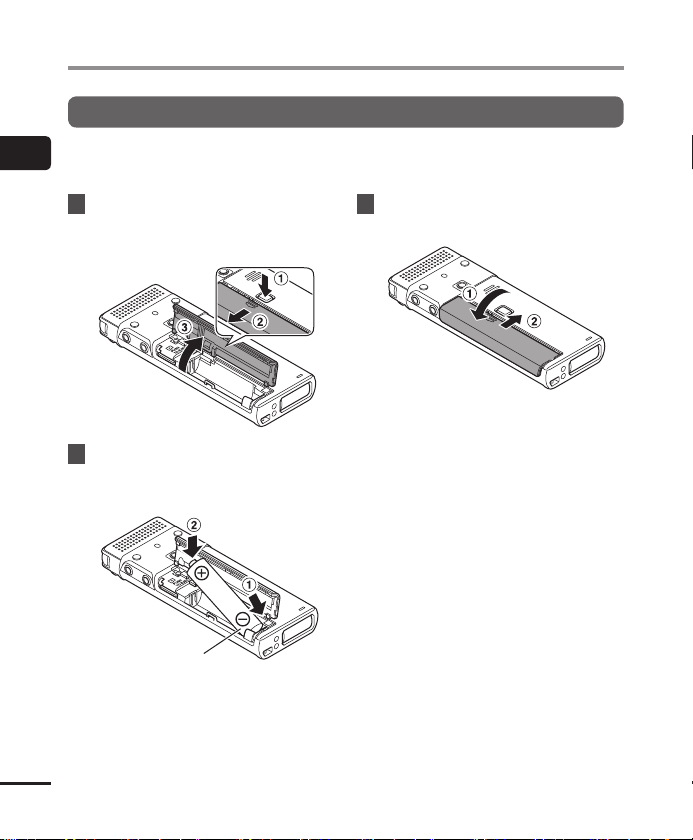
1 Press and hold the battery/card
cover lock button, and then slide
the battery/card cover to open.
2 Insert a AAA battery, making
sure its positive and negative
terminals are placed correctly.
3 Slide the battery/card cover
completely closed.
EN
Insert the battery’s
negative terminal first
8
Setup
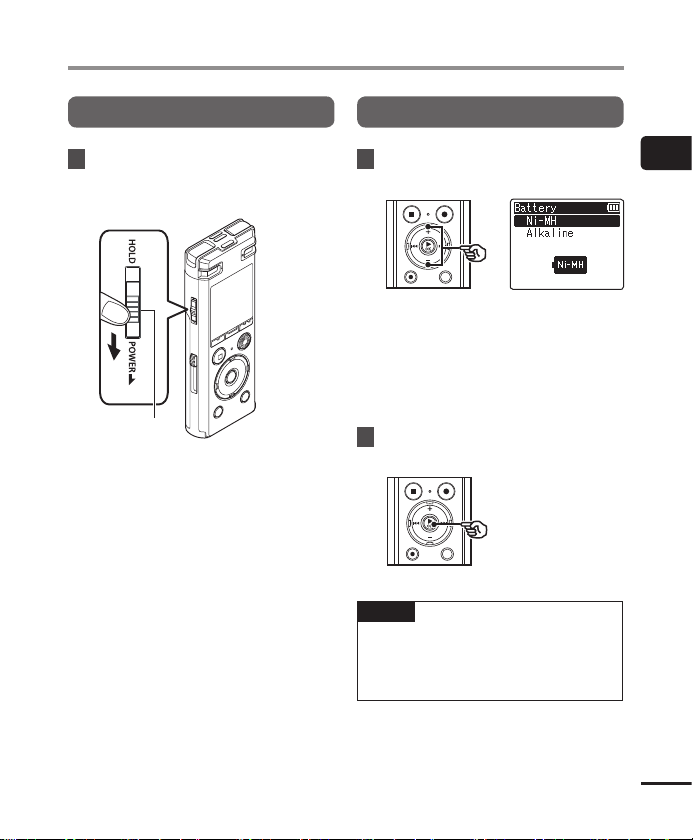
Turning the power ON
1 While the voice recorder is turned
off, slide the
in the direction of the arrow.
POWER/HOLD
switch
POWER/HOLD
switch
Selecting the battery setting
1 Press the + or – button to select
the type of battery you inserted.
[Ni-MH]
Select if you inserted an Olympus
nickel-metal hydride rechargeable
battery (model BR404).
[Alkaline]
Select if you inserted an alkaline
battery.
2 Press the `OK button to finalize
the setting.
NOTE
• See “Setting the time/date” if a time
display with a blinking cursor on the
hour appears in the display after setting
the battery (☞ P. 10).
1
Setup
EN
9
Setup
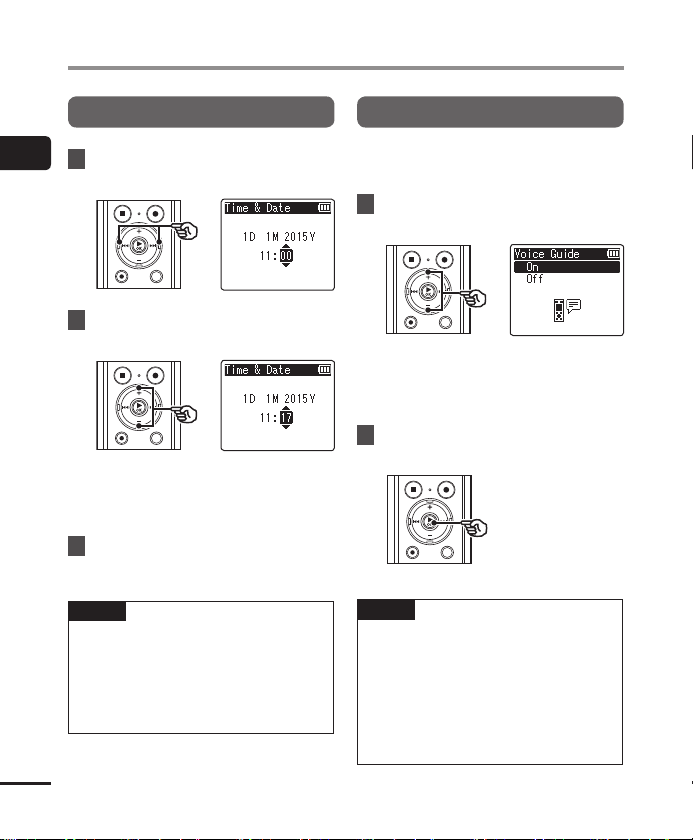
Setting the time/date
1
1 Press the 9 or 0 button to
Setup
EN
10
select the item to set.
2 Press the + or – button to change
the number.
• To change the setting of another item,
press the 9 or 0 button to move
the blinking cursor, then press the + or
– button to change the number.
3 Press the `OK button to finalize
the setting.
TIP
• You can press the `OK button during
the setting procedure to set the items
entered so far and start the clock.
• You can change the clock display format.
See “Setting the time/date [Time &
Date]” (☞ P. 55) for the procedure.
Setting the voice guidance
Using this feature, a voice announces the
operating conditions of the recorder.
1 Press the + or – button to select
[On] or [
Off
].
[On]
Voice guidance will be enabled.
[Off]
Voice guidance will be canceled.
2 Press the `OK button to finalize
the setting.
TIP
• [On/Off], [Speed], and [Volume] can
be set for the voice guidance. See
“Setting the voice guidance [Voice
Guide]” (☞ P. 52) for the procedure.
• If you press and hold the F2 button
during other than recording and
playback, you can listen to the voice
guidance again.
Charging the battery
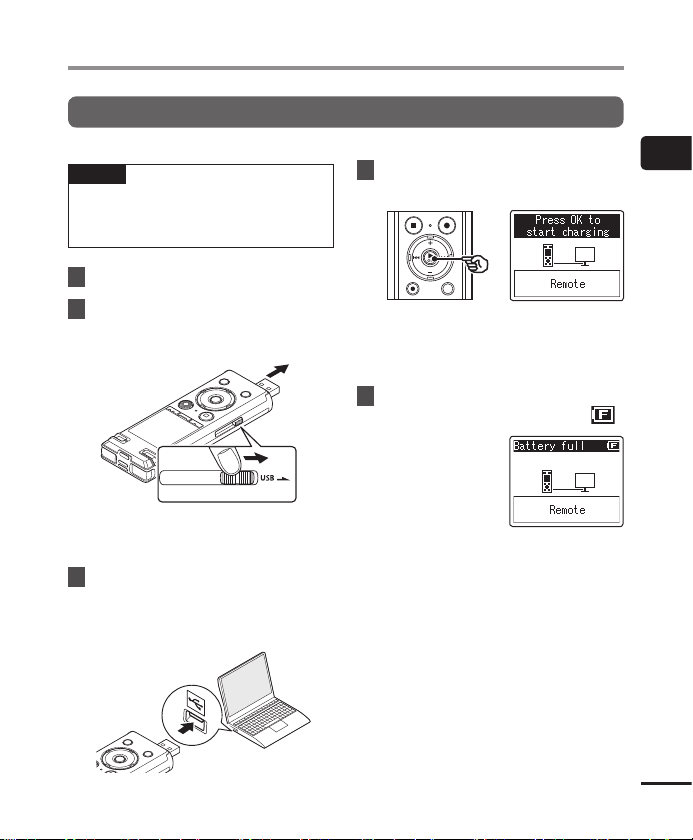
Charging the battery by connecting to a PC’s USB connector
NOTE
• Before charging the battery, insert the
rechargeable battery provided and set
[Battery] to [Ni-MH] (☞ P.8, P. 9).
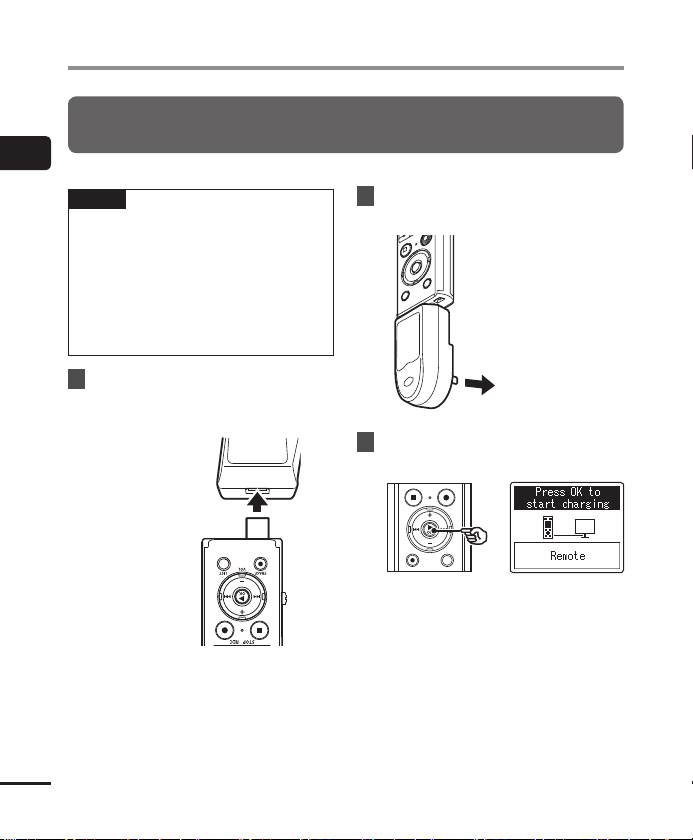
1 Start the PC.
2 Slide the USB connector slide
lever in the direction of the
arrow.
• The USB connector extends out. The
USB connector cover is stored inside
the voice recorder.
3 After making sure the voice
recorder is stopped, connect the
USB connector to a USB port on a
PC.
4 Press the `OK button to start
charging the battery.
• When [Battery] (☞ P. 55) is set to
[Ni-MH], [Press OK to start charging]
appears on the display. Press the `OK
button while this message is blinking.
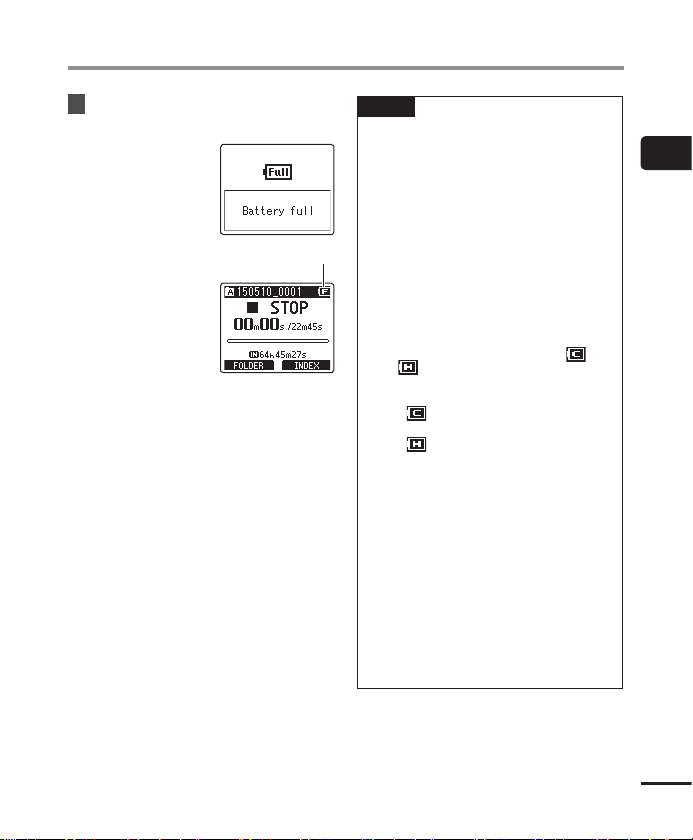
5 Charging has finished when the
battery indicator changes to [ ].
Chargingtime: About 3 hours*
* Approximate time needed to fully
charge a completely flat battery at
room temperature.
Battery charging time will depend on
the amount of remaining power and
the state of the battery.
1
Charging the battery
EN
11
Charging the battery
Charging the battery by connecting to an AC adapter with a USB connection
(model A514; optional)
1
Charging the battery
NOTE
• Before connecting the AC adapter,
select [AC Adapter] for the USB
connection setting (☞ P. 56).
• Before charging the battery, insert the
rechargeable battery provided and set
[Battery] to [Ni-MH] (☞ P.8, P. 9).
• Use only the Olympus USB connecting
AC adapter model provided (A514).
2 Connect the AC adapter to an AC
power outlet.
1 Connect the voice recorder to
the USB connector on the AC
adapter.
To USB connector
of AC adapter
(model A514)
EN
12
To an AC power
outlet
3 Press the `OK button to start
charging.
• When [Battery] (☞ P. 55) is set to
[Ni-MH], [Press OK to start charging]
appears on the display. Press the `OK
button while this message is blinking.
Charging the battery
4 Charging is finished when
[
Battery full
When charged with
the power turned off
When charged with
the power turned on
] appears.
Displayed when the battery
is fully charged
NOTE
• Never attempt to charge an alkaline
battery, lithium battery or other
primary cell battery. Fluid leakage or
overheating may cause the recorder to
malfunction.
• The power of the PC must be ON to
charge the battery using the USB
connector.
You cannot charge the battery when
the power of the PC is OFF, or the PC
is in standby, sleep or auto power OFF
mode.
• Do not use a USB hub when charging
the battery by connecting to the PC.
• You cannot charge the battery if [
or [
]*2 is blinking. Charge the battery
in an ambient temperature of between 5
and 35°C (41 and 95°F).
*1 [
] Ambient temperature is too
low.
*2 [
] Ambient temperature is too
high
• If battery life has become noticeably
short on a full charge, replace the
battery with a new one.
• Insert the USB connector securely all
the way. Operation will not be normal if
the connection is not made properly.
• Use only a compatible Olympus USB
extension cable (KP-19). Operation
is not guaranteed if another
manufacturer’s cable is used. Only
use the Olympus USB extension cable
(KP-19) with the voice recorder and
never use if a product from another
manufacturer is used.
1
Charging the battery
]*1
EN
13
Batteries
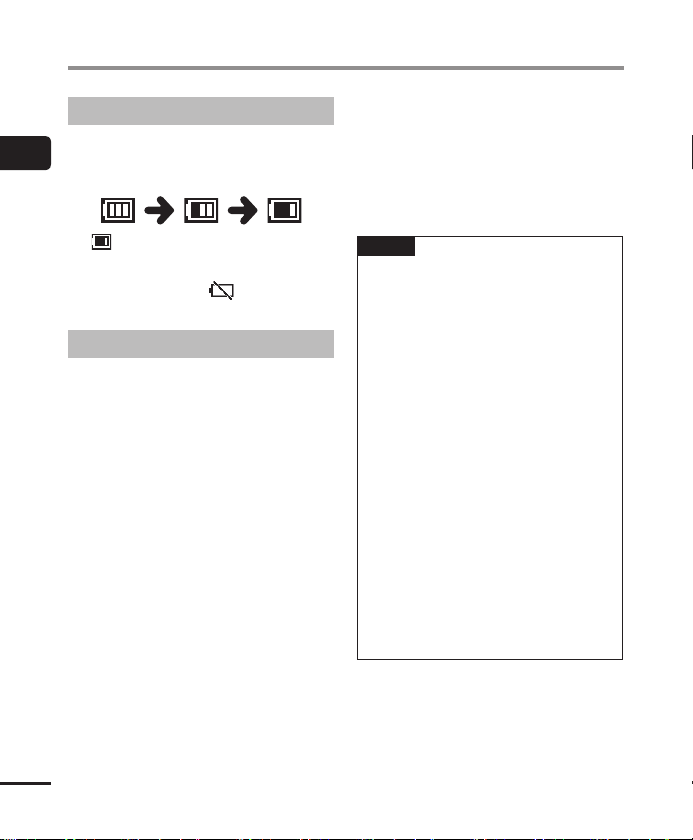
Battery indicator
As the battery loses its remaining charge, the
1
battery indicator on the display changes as
follows:
Batteries
• [ ] indicates there is little remaining
battery charge. Charge the battery or
replace it with a fresh one. When the
battery has run out, [
low] appear, and operation stops.
Rechargeable batteries
Read the information below carefully when
using a nickel-metal hydride rechargeable
battery (model BR404).
4 Discharging
Rechargeable batteries discharge naturally
when not in use. Be sure to charge the
battery before use.
4 Operating temperature
Rechargeable batteries are chemical-based
products. Their performance can vary
even when used within the recommended
operating temperature range. This variation
is normal.
4 Recommended temperature
ranges
When powering voice recorder: 0 to 42°C
(32 to 107.6°F)
When being charged: 5 to 35°C (41 to 95°F)
During long-term storage: -20 to 30°C (-4
to 86°F)
EN
14
] and [Battery
Use of a rechargeable battery outside the
temperature ranges above may result in
drops in battery performance or life. When
not using the voice recorder for an extended
period, remove the rechargeable battery
before storage to prevent fluid leakage or
rust.
NOTE
• Due to the nature of nickel-metal
hydride rechargeable batteries, new
batteries and batteries not used for an
extended period (one month or more)
may not charge completely. The battery
should become fully charged after
charging and discharging the battery
up to three times.
• Always dispose rechargeable batteries
in the legally prescribed manner. Before
disposing rechargeable batteries that
are not fully discharged, take steps to
prevent shorting such as insulating
their terminals with tape.
• When buying rechargeable batteries,
always select model BR404 nickelmetal hydride rechargeable batteries.
Operation is not guaranteed if a battery
from another manufacturer is used.
• The continuous battery usage time of
a nickel-metal hydride rechargeable
battery that has been used repeatedly
will be reduced due to battery
degradation (☞P. 88).

Batteries
Battery precautions
• The voice recorder does not support
manganese batteries.
• Always turn power OFF before replacing
the battery. Files may be damaged if the
battery is removed while the voice recorder
is recording or performing an operation
such as erasing a file.
• If the batteries are removed from the
voice recorder, the [Time & Date] screen is
displayed automatically when the power
is turned on. See “Setting the time/date
[Time & Date]” (☞P.55) for the procedure.
• When not using the voice recorder for
an extended period, always remove the
battery before storage.
• When replacing the battery, use an AAA
alkaline dry cell battery or an Olympus
nickel-metal hydride rechargeable battery
(model BR404).
• Even if the battery indicator is [
playback with the built-in speaker at some
volumes may result in a drop in battery
output voltage, causing the voice recorder
to reset. Lower the volume in this case.
• The battery indicator may differ between
when the internal memory is used and
when a microSD card is used.
• The continuous battery usage time is
reduced when using a microSD card
(☞P. 88).
• The continuous battery usage time will
vary depending on the performance of the
battery in use (☞P. 88).
• The [Battery] screen appears automatically
after you have replaced the battery. You can
also use a menu operation to display this
screen and set the battery (☞P. 55).
],
For users in Germany
Olympus has an agreement with the GRS
(Joint Battery Disposal Association) in
Germany to ensure environmentally-friendly
battery disposal.
1
Batteries
EN
15
Inserting/removing a microSD card
The voice recorder has its own internal memory, and also supports standard microSD cards
(microSD, microSDHC) sold separately. If you insert a microSD card, the recording media
is switched automatically from the internal memory and recorded files are all saved to the
microSD card.
1
Inserting/removing a microSD card
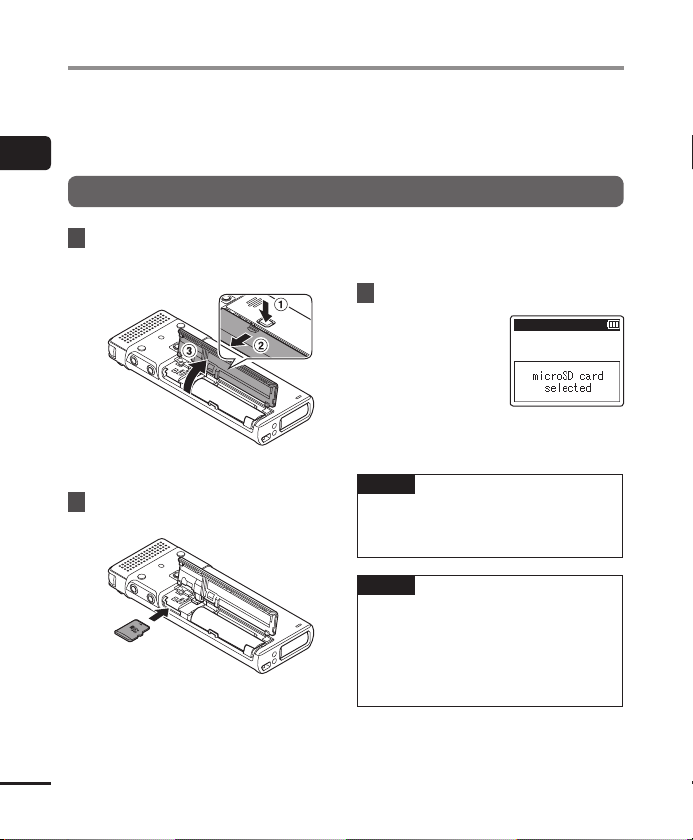
Inserting a microSD card
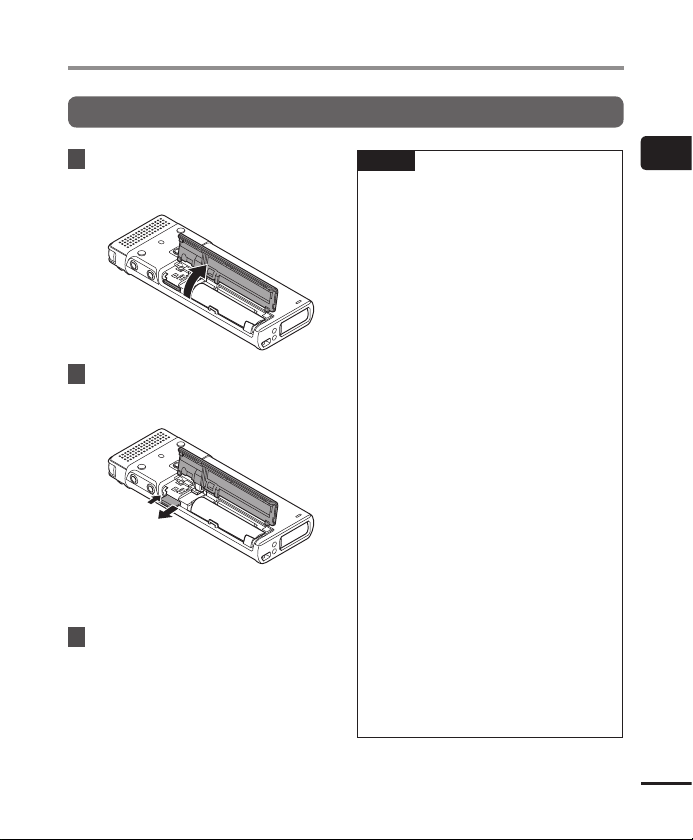
1 While the voice recorder is in
stop mode, open the battery/
card cover.
• The microSD card slot is inside the
battery/card cover.
2
Insert a microSD card, making sure
it is placed correctly as shown.
• Insert the microSD card straight,
avoiding crooked insertion.
• Inserting a microSD card the wrong
way or crookedly could damage its
EN
contact surface or cause it to jam in
the slot.
16
• A microSD card not inserted fully (until
it clicks into place) might not record
data.
3 Close the battery/card cover.
• The recording media is switched
automatically to the microSD card.
TIP
• If you wish to record to the internal
memory, remove the microSD card
from the voice recorder (☞P.17).
NOTE
• The voice recorder may not be able to
recognize a microSD card formatted
(initialized) for a PC or other device.
Before using a microSD card, always
initialize it on the voice recorder
(☞P. 58).
Inserting/removing a microSD card
Removing a microSD card
1 While the voice recorder is in
stop mode, open the battery/
card cover.
2 Release the microSD card by
pressing it inward, then letting it
slowly return.
• The microSD card moves outward and
stops. Pull the microSD card out with
your fingertips.
3 Close the battery/card cover.
• The recording media is switched
automatically to the internal memory.
NOTE
• MicroSD cards may pop out forcefully
on removal if you flick or release your
finger too quickly after pressing the
card in.
• Depending on the card’s manufacturer
and type, some microSD cards and
microSDHC cards may not be fully
compatible with the voice recorder and
not be recognized properly.
• For microSD card compatibility under
Olympus verification, please contact
our customer support at:
http://www.olympus-europa.com
Note that our customer support will
provide information on microSD card
manufacturers and card types for which
Olympus has verified operation, but
will not guarantee it’s performance.
Also note that some cards may
no longer be recognized correctly
by the voice recorder in case
card manufacturer changes card
specifications.
• Read the operating instructions
provided with the card when using a
microSD card.
• If a microSD card is not recognized by
the voice recorder, try removing and
reinserting the card to have the voice
recorder attempt recognition again.
• Processing speed may be low for
some microSD card types. Processing
performance may also be reduced by
writing or deleting data repeatedly
from a microSD card. In this case,
reinitialize the card (☞ P.58).
1
Inserting/removing a microSD card
EN
17
Preventing accidental operation
Setting the voice recorder to HOLD mode maintains the current operation and disables button
operations. HOLD mode is a handy feature for preventing unintentional operation from
accidental button presses when the voice recorder is carried in a bag or pocket. It is also useful
for preventing the voice recorder being accidentally stopped during recording.
1
Preventing accidental operation
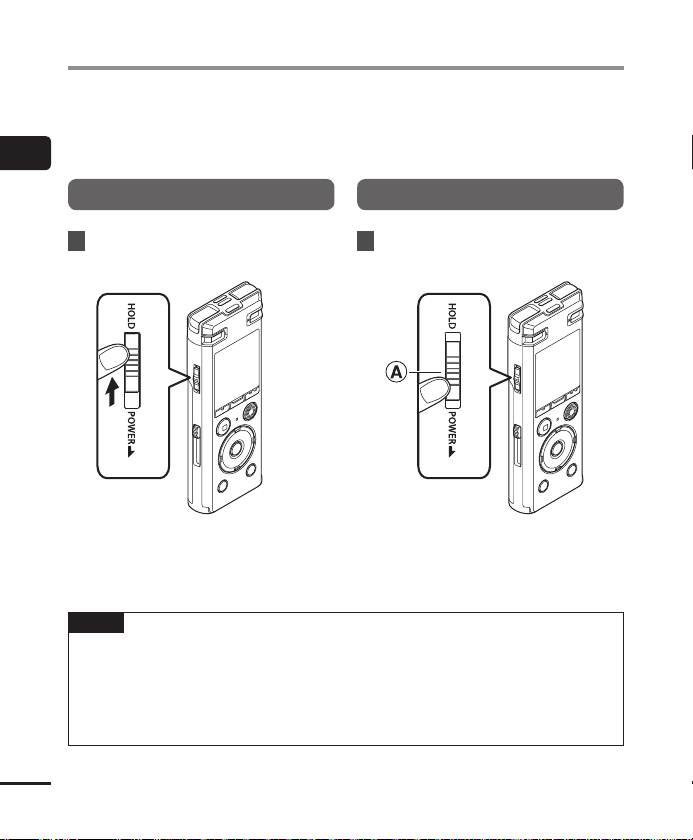
Setting HOLD mode
Releasing HOLD mode
1 Slide the
the [
• [Hold] appears in the display, and the
recorder enters HOLD mode.
NOTE
• When any button is pressed during HOLD mode, [Hold] appears in the display for 2 seconds.
No other operation is performed.
• Setting HOLD mode during voice recorder playback (or recording) continues the playback
(or recording) operation and prevents any other operation from being performed. (The
voice recorder stops when playback ends or when recording ends because, for example,
there is no remaining memory space.)
EN
18
POWER/HOLD
HOLD
] position.
switch to
1 Slide the
position A shown below.
POWER/HOLD
switch to
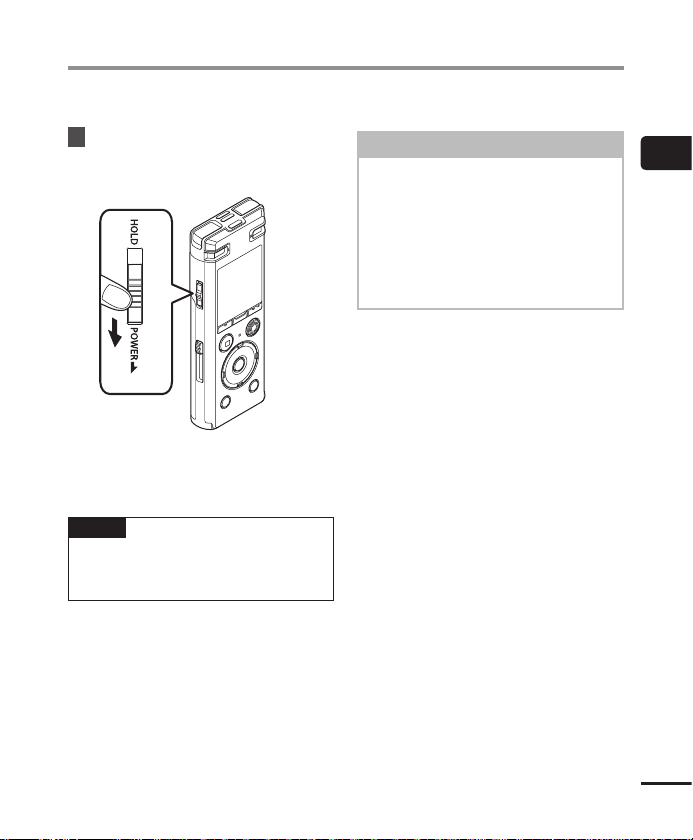
Turning the power OFF
Existing data, mode settings and the clock setting are saved when the power is turned off.
1 Slide the
POWER/HOLD
switch in
the direction of the arrow for at
least half a second.
• The playback stop position at power
OFF is stored in memory.
TIP
• Turning the power OFF whenever the
voice recorder is not in use minimizes
battery consumption.
Power Save mode
When the voice recorder has been
stopped for at least 10 minutes (default
setting) after power ON, the display
disappears and the voice recorder
automatically enters the Power Save
mode.
• Pressing any button releases the
Power Save mode.
1
Turning the power OFF
EN
19

Selecting folders and files
The recorder provides five folders, [&], [‘], [(], [)] and [*]. Each folder can store up to 200
files.
1 While the voice recorder is in
1
Selecting folders and files
stop mode, press the F1 (
button.
• The folder changes each time you
press the F1 (FOLDER) button.
a Folder indicator
b File name
FOLDER
2 Press the 9 or 0 button to
)
select the desired file.
• The following information is displayed
for just 2 seconds immediately after a
file is selected.
c Current file number/Total number of
recorded files in folder
d State of the voice detection
e State of the file lock
f Recorded end time and date
EN
20
Selecting folders and files
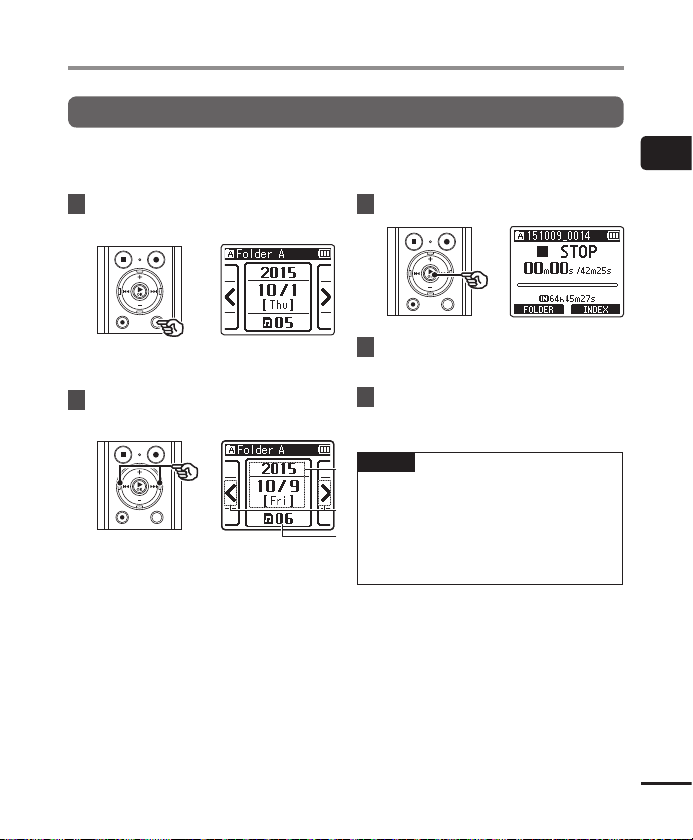
Using the calendar search function to search for a file
Recorded audio files are automatically marked with the date and displayed in calendar format,
making it quick and easy to search for files.
1 While the voice recorder is in stop
mode, press the
• The display changes to the calendar
screen.
LIST
button.
2 Press the 9 or 0 button to
to select the desired date.
a Date file was recorded
b Displayed when dates with files exist
before and after
c Number of files saved (recorded) on
selected date
3 Press the `OK button.
4 Press the 9 or 0 button to
select the desired file.
OK
5 Press the `
button to start
playback.
TIP
• The search is performed within the
current folder. If the saved file is in
another folder, press the F1 (FOLDER)
button to select a folder again.
• Only the dates on which files exist are
displayed.
1
Selecting folders and files
EN
21
Recording
Recording
The voice recorder has five folders ([&] to [*]) in which recorded files can be saved. These
folders provide a handy way to sort recordings into separate categories (such as business and
leisure).
2
Recording
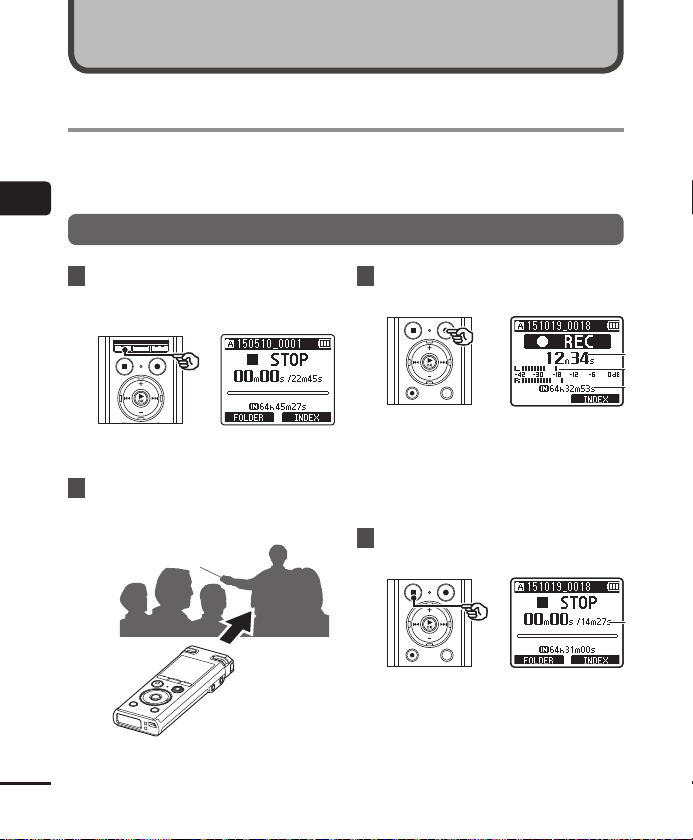
Basic recording procedure
1 Press the F1 (
to select the folder to save the
recording in.
• Each new voice recording file is saved
in the selected folder.
2 Point the built-in microphone
in the direction of the sound to
record.
EN
22
FOLDER
) button
3 Press the
recording.
a Elapsed recording time
b Level meter (changes according to
c Remaining possible recording time
• The LED indicator light lights.
4 Press the
you want to stop recording.
d File length
REC
( s) button to start
recording volume and recording
function setting)
STOP
( 4) button when

Recording
Sound files recorded with the voice
recorder are automatically given a file
name in the format below.
150510_0001.MP3
1 Date recorded
Indicates the year, month and day the
recording was made.
2 File number
Appended file numbers are
consecutive regardless of whether the
recording media has been switched.
3 Extension
A file extension indicating the
recording format the file was recorded
in by the voice recorder.
• Linear PCM format: “. WAV”
• MP3 format: “.MP3”
TIP
• [Rec Mode] must be set with the voice
recorder stopped (☞P.40).
NOTE
• To prevent the beginning of the
recording being cut off, start recording
after the LED indicator light has lit or
mode indicator has appeared in the
display.
• When the remaining possible recording
time is 60 seconds, the LED indicator
light starts flashing. It flashes more
rapidly as the remaining time decreases
(at the 30- and 10-second points).
• When [Folder full] appears, no more
recording can be done. To record more,
you will need to select a different folder
or delete unneeded files (☞P.36).
• If [Memory full] appears, the voice
recorder has no more available
memory space. You will need to
delete unneeded files to record more
(☞P.36).
• Processing performance may
be reduced when data has been
repeatedly written to or deleted from
the recording media. Please initialize
the recording media in this case
(☞P. 58).
2
Recording
EN
23
Recording
Recording linear PCM format files of over
2 GB
When recording a linear PCM format file,
recording will continue even after the file size
exceeds 2 GB.
2
• The data is divided and saved in separate
Recording
files of up to 2 GB. The files are processed
as multiple files during playback.
• After recording 200 files which exceed 2GB
recording stops.
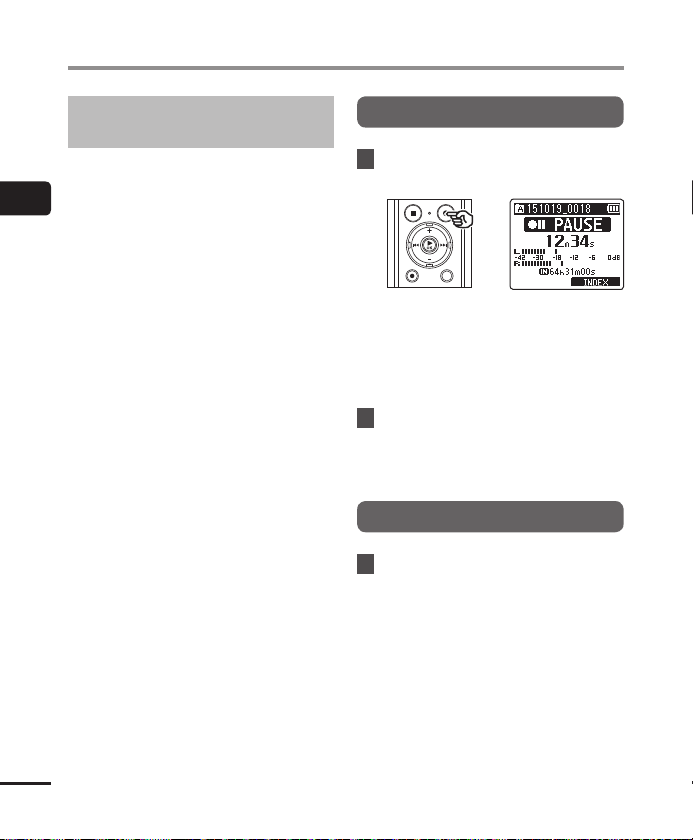
Pausing/resuming recording
1 Press the
recording.
• Recording pauses, and the blinking
• Recording is stopped automatically
2 Press the
while recording is paused.
• Recording resumes from the position it
REC
( s) button during
message [75 PAUSE] appears in the
display.
after being paused for at least 60
minutes.
REC
( s) button again
was paused at.
Quickly checking a recording
1 Press the `OK button during
recording.
• Recording ends, and the file just
recorded is played.
EN
24
Recording
Recording settings
Various recording settings are available,
letting you tailor recording to different
recording conditions.
Used to select one of multiple
preregistered templates of
[
Rec Scene
(☞ P. 26)
Rec Level
[
(☞P. 40)
Rec Mode
[
(☞ P. 40)
Zoom Mic
[
(☞ P. 41)
Low Cut Filter
[
(☞ P. 42)
Mic Select
[
(☞ P. 42)
Timer Rec
[
(☞ P. 43)
recording settings. When
]
selected, each template enters
several settings tailored to a
particular recording location
or condition all in a single
operation.
]
Sets the recording level.
]
Sets the recording sound quality.
]
Sets the built-in stereo
microphone’s directivity.
Reduces humming sounds
]
from equipment such as
air-conditioners or projectors.
Selects whether or not the built-
]
in center microphone is to be
turned on or off.
]
Sets the content such as date and
time to schedule a recording.
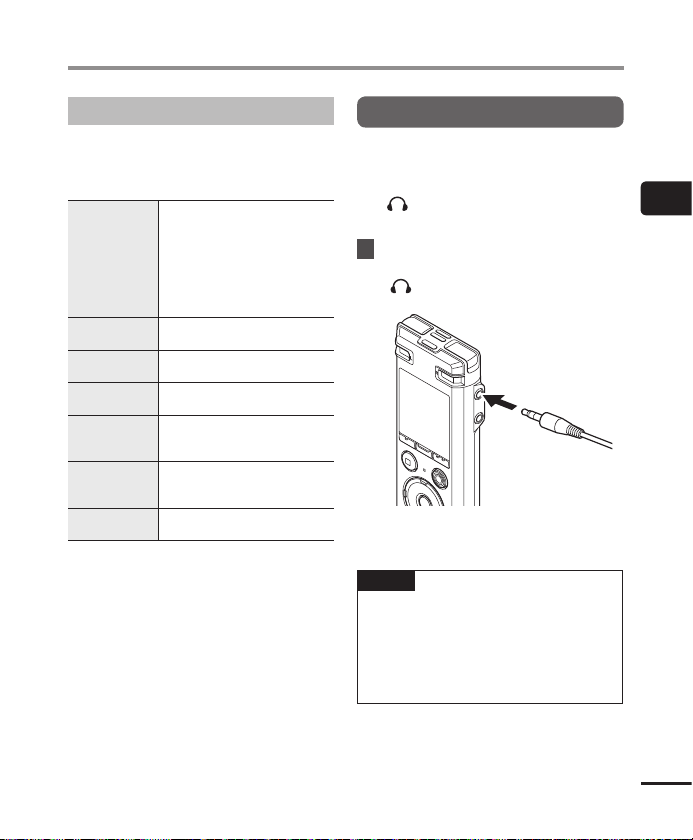
Monitoring while recording
You can monitor the recording as you are
making it by listening on the earphones
plugged into the voice recorder’s earphone
jack (
). Use the + or – button to adjust the
recording monitor volume.
1 Connect the earphones to the
voice recorder’s earphone jack
( ).
To earphone jack
• Changing the volume will not affect
the recording level.
NOTE
• To avoid unpleasantly loud sound, set
the volume to [00] before plugging in
the earphone.
• To prevent feedback, do not place the
earphone near the microphone while
recording.
2
Recording
EN
25
Selecting the automatic recording setting [Rec Scene]
The voice recorder has preregistered templates of optimum settings tailored to various recording
applications such as lectures and dictation. When selecting one of these templates you can enter
several settings recommended for your recording application all in a single operation.
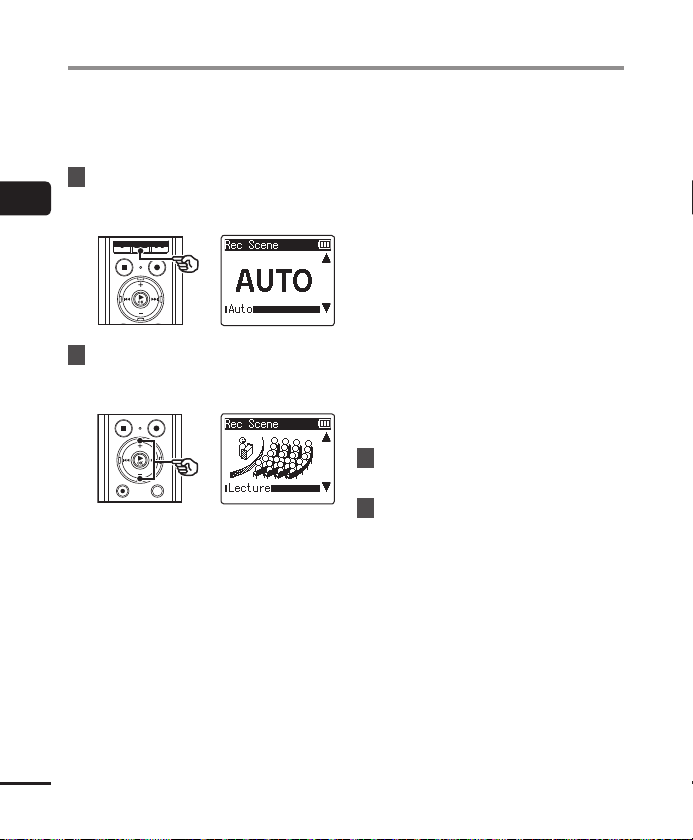
1 While the voice recorder is in stop
2
Selecting the automatic recording setting [Rec Scene]
mode, press and hold the
SCENE
button.
2 Press the + or – button to
select the desired recording
application.
[Auto]:
The recording level always
automatically changes according to
the volume of the input sound. Suited
to recording all sounds.
[Lecture]:
This is suitable for recording with
the microphone pointed in a specific
direction such as at a large venue
where the speaker is far away.
MENU
[Conference]:
/
Suitable for recording conferences in
a large space and other sounds over a
wide area.
[Meeting]:
Suitable for recording meetings held
in a small space and other sounds that
are fairly close.
[Dictation]:
Suitable for recording your own voice
and other sounds that are extremely
close.
[Manual]:
You can press the 9 button to
change five settings related to
recording, such as [Rec Level] and
[Rec Mod e] (☞ P. 40 to P.42).
3 Press the `OK button to finalize
the setting.
STOP
4 Press the
( 4) button to exit
the selection screen.
EN
26
Selecting the automatic recording setting [Rec Scene]
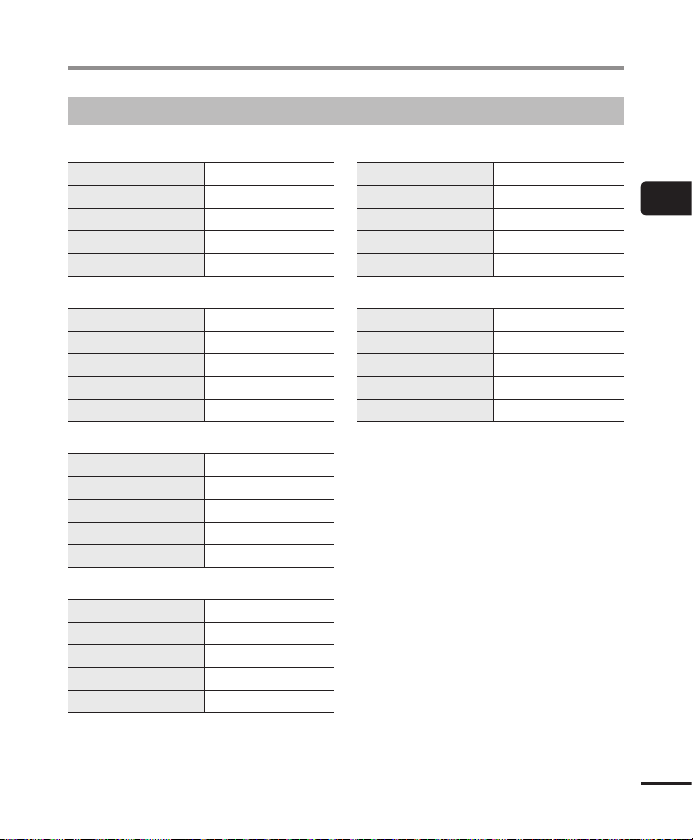
Preregistered [Rec Scene] settings
[
Auto
]
[
Rec Level
Rec Mode
[
Zoom Mic
[
Low Cut Filter
[
Mic Select
[
[
Lecture
[
Rec Level
Rec Mode
[
Zoom Mic
[
Low Cut Filter
[
Mic Select
[
[
Conference
[
Rec Level
Rec Mode
[
Zoom Mic
[
Low Cut Filter
[
Mic Select
[
[
Meeting
[
Rec Level
Rec Mode
[
Zoom Mic
[
Low Cut Filter
[
Mic Select
[
] [
] [
] [
] [
] [
]
] [
] [
] [+6]
] [On]
] [
]
] [
] [
] [
] [On]
] [
]
] [
] [
] [
] [
] [
Auto
]
MP3 128 kbps
Off
]
Off
]
Central Mic On
High
]
MP3 128 kbps
Central Mic On
High
]
MP3 128 kbps
Off
]
Central Mic On
Middle
]
MP3 128 kbps
Off
]
Off
]
Central Mic On
]
]
]
]
]
]
]
]
[
Dictation
]
[
Rec Level
Rec Mode
[
Zoom Mic
[
Low Cut Filter
[
Mic Select
[
[
Manual
[
Rec Level
Rec Mode
[
Zoom Mic
[
Low Cut Filter
[
Mic Select
[
] [
] [
] [
] [On]
] [
]*
] [
] [
] [
] [
] [
Low
]
MP3 128 kbps
Off
]
Central Mic On
Auto
]
MP3 128 kbps
Off
]
Off
]
Central Mic On
]
]
* The default is shown for each item of
[Manual]. The setting of each of item can
be changed from the recording menu
(☞ P.40 to P.42).
]
]
2
Selecting the automatic recording setting [Rec Scene]
EN
27
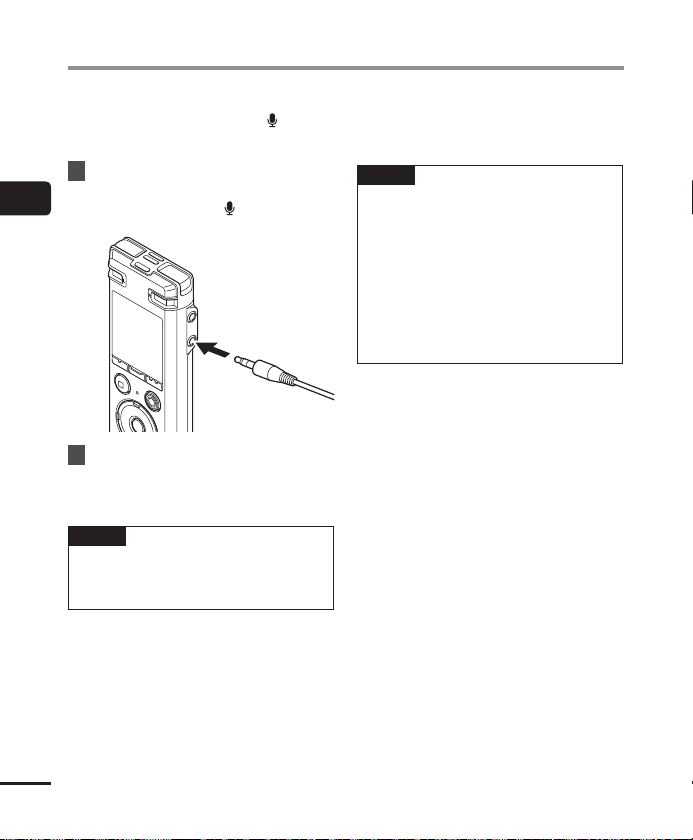
Recording with an external microphone
You can record audio input using an external microphone or other device connected to the
voice recorder’s microphone jack (
while recording.
). Do not plug or unplug devices into voice recorder jacks
1 Connect an external microphone
2
to the voice recorder’s
microphone jack ( ).
Recording with an external microphone
To microphone jack
2 Start recording.
• See “Recording” (☞P. 22) for
descriptions of recording operations.
TIP
• See “Accessories (optional)”
(☞P. 79) for the compatible external
microphones.
NOTE
• Microphones with plug-in power
supplies can be used.
• When [Rec Mode] is set to stereo,
recording with an external mono
microphone records on the left channel
only (☞P. 40).
• When [Rec Mode] is set to mono,
only the input from the left channel
microphone is recorded when using an
external stereo microphone (☞P. 40).
EN
28
Loading…
Перейти к контенту
Диктофоны Olympus
- Размер инструкции: 2.79 Мб
- Формат файла: pdf
Если вы потеряли инструкцию от диктофона Olympus DM-770, можете скачать файл для просмотра на компьютере или печати.
Инструкция для диктофона Olympus DM-770 на русском языке. В руководстве описаны возможности и полезные функции, а также правила эксплуатации. Перед использованием внимательно ознакомьтесь с инструкцией.
Чтобы не читать всю инструкцию вы можете выполнить поиск по содержимому внутри инструкции и быстро найти необходимую информацию. Рекомендации по использованию помогут увеличить срок службы диктофона Olympus DM-770. Если у вас появилась проблема, то найдите раздел с описанием неисправностей и способами их решения. В нем указаны типичные поломки и способы их решения.
Olympus dm-770 Voice Recorder PDF User Guides and Manuals for Free Download: Found (3) Manuals for Olympus dm-770 Device Model (Basic Manual, Operation & User’s Manual, Training Manual)
The Olympus DM-770 is a digital voice recorder that stands out for its blend of advanced features and user-friendly design. Aimed at professionals, students, and anyone needing an efficient recording device, the DM-770 captivates users with its impressive audio quality and functionality. With a sleek design and a host of features, it strives to meet the demands of modern recording needs.
One of the standout features of the Olympus DM-770 is its audio recording quality. Equipped with high-quality microphones, it captures audio in remarkable detail across various recording environments. Whether you are capturing classroom lectures or boardroom meetings, this device ensures clarity without distortion. Additionally, the built-in noise-cancellation technology significantly enhances voice clarity, even in noisy environments, which is a definite plus for users who find themselves in such situations.
Portability is another significant advantage of the Olympus DM-770. It is lightweight and compact, making it easy to carry in a pocket or a small bag. This design is particularly beneficial for journalists or students who need to take notes on the go. The device also supports various file formats, including MP3 and WAV, allowing for compatibility with different applications and devices. Users can effortlessly transfer files to their computers or share them via cloud services for convenient access.
In terms of user interface, the Olympus DM-770 shines with an intuitive menu system. A bright LCD display provides clear navigation, and the ergonomic buttons allow for swift adjustments even while recording. Users can quickly access settings such as microphone sensitivity, recording quality, and playback speed without hassle. This intuitive design helps enhance productivity, ensuring that users spend less time fumbling with controls and more time focused on recording.
For those who require longer recording times, the Olympus DM-770 operates with substantial internal memory and supports microSD cards for expanded storage. This flexibility is particularly beneficial for users who undertake lengthy interviews or seminars. The battery life is also commendable, with a long-lasting rechargeable battery that minimizes downtime.
One of the integrated features that many users will appreciate is the voice activation mode. This function allows the DM-770 to start recording automatically when sound is detected, significantly saving storage space and making post-recording editing much easier. Additionally, users can easily label and categorize their recordings, which simplifies the retrieval process later on.
However, while the Olympus DM-770 offers many benefits, it may have a learning curve for those not familiar with digital recorders. Some users might also find the variety of settings a bit overwhelming initially. Yet, with a little time invested in learning the features, the device becomes a powerful tool in a user’s arsenal.
In conclusion, the Olympus DM-770 is an excellent choice for anyone in search of a reliable and efficient digital voice recorder. Its combination of superior audio quality, portability, user-friendly interface, and versatile recording options makes it suitable for a wide range of applications. While there may be a slight learning curve, the benefits offered by this device far outweigh any initial challenges. For users poised to enhance their recording experience, the Olympus DM-770 is well worth considering.
FAQ: Types of Manuals and Their Contents
Olympus dm-770 Manuals come in various types, each serving a specific purpose to help users effectively operate and maintain their devices. Here are the common types of Olympus dm-770 User Guides and the information they typically include:
- User Manuals: Provide comprehensive instructions on how to use the device, including setup, features, and operation. They often include troubleshooting tips, safety information, and maintenance guidelines.
- Service Instructions: Designed for technicians and repair professionals, these manuals offer detailed information on diagnosing and repairing issues with the device. They include schematics, parts lists, and step-by-step repair procedures.
- Installation Guides: Focus on the installation process of the device, providing detailed instructions and diagrams for proper setup. They are essential for ensuring the device is installed correctly and safely.
- Maintenance Manuals: Provide guidance on routine maintenance tasks to keep the device in optimal condition. They cover cleaning procedures, part replacements, and regular servicing tips.
- Quick Start Guides: Offer a concise overview of the essential steps needed to get the device up and running quickly. They are ideal for users who need immediate assistance with basic setup and operation.
Each type of Olympus dm-770 instruction is designed to address specific needs, ensuring users have the necessary information to use, maintain, and repair their devices effectively.
Related Instructions for Olympus dm-770:
1
WS 331M — 2 GB Digital Voice Recorder
Instrucciones #3K72RY: WS 331M — 2 GB Digital Voice Recorder Voice Recorder Instrucciones
104
481
121
2
CAMEDIA C-5060 Wide Zoom
Basic manual CAMEDIA C-5060 Wide Zoom (Digital Camera ePDF Manual, #4462S3)
204
975
166
3
BH2 Series
Manual Olympus BH2 Series Guide (Manual ), @8129YB
6
803
169
4
E-M5 Mark III
257
322
81
8
StLtlU5 850 SW
Instruction manual Olympus Digital Camera Instruction manual (File: olympus-stltlu5-850-sw-instruction-manual-92, 29th Mar 2025)
92
909
200
9
SP-565 UZ
Specifications Manual: Olympus SP-565 UZ (U5ATR3, Upd.27/01/2025)
4
371
60
Voice Recorder Devices by Other Brands:
|
Olympus VN-541PC Basic Manual PDF User Guide (@88D8YJ), Olympus VN-541PC Voice Recorder (Friday 17-01-2025) DIGITAL VOICE RECORDER 17 Jan 2025 | 136 |
|
|
ABB Commander C1900 Commissioning Instruction ABB Commander C1900 User Manual (Commissioning instruction), @OF7FHV — 15 Oct 2024 | 20 |
|
|
Tascam DA-6400 Manual Guide: Tascam DA-6400 (X85X99, Upd.14/05/2025) TASCAM DA-6400/DA-6400dp 1 14 May 2025 | 36 |
|
|
Olympus DP-10 Instructions Manual Voice Recorder #EZ4JM7 VOICE RECORDER 05 Mar 2025 | 6 |
Categories:
Water Pump
Cables and connectors
Outdoor Light
Heater
Wire Feeders
Controller
Инструкция
Посмотреть инструкция для Olympus DM-770 бесплатно. Руководство относится к категории диктофоны, 1 человек(а) дали ему среднюю оценку 7.7. Руководство доступно на следующих языках: английский. У вас есть вопрос о Olympus DM-770 или вам нужна помощь?
Задайте свой вопрос здесь
Часто задаваемые вопросы
Не можете найти ответ на свой вопрос в руководстве? Вы можете найти ответ на свой вопрос ниже, в разделе часто задаваемых вопросов о Olympus DM-770.
Какой вес Olympus DM-770?
Olympus DM-770 имеет вес 72 g.
Какая высота Olympus DM-770?
Olympus DM-770 имеет высоту 105.9 mm.
Какая ширина Olympus DM-770?
Olympus DM-770 имеет ширину 39.6 mm.
Какая толщина Olympus DM-770?
Olympus DM-770 имеет толщину 14.4 mm.
Какой размер экрана Olympus DM-770?
Размер экрана Olympus DM-770 составляет 1.36 «.
Какой тип USB-подключения Olympus DM-770 имеет?
Olympus DM-770 имеет USB тип-A подключение.
Инструкция Olympus DM-770 доступно в русский?
К сожалению, у нас нет руководства для Olympus DM-770, доступного в русский. Это руководство доступно в английский.
Не нашли свой вопрос? Задайте свой вопрос здесь