
Описание
Сетевой дисковый массив ShareCenter с 2 отсеками для жестких дисков и поддержкой сервиса mydlink DNS-320L является удобным решением для организации совместного доступа и осуществления резервного копирования важных данных путем создания персонального “облака”.
Удаленный совместный доступ
Сетевой дисковый массив ShareCenter с 2 отсеками для жестких дисков и поддержкой сервиса mydlink DNS-320L оснащен файловым Web-сервером, позволяющим загружать документы, фотографии и другие мультимедийные файлы вне зависимости от вашего местонахождения. После настройки ShareCenter воспользуйтесь удобным пользовательским Web-интерфейсом для просмотра списка доступных файлов. Также можно использовать мобильное приложение mydlink для подключения и воспроизведения музыки, просмотра видео и фотографий непосредственно на мобильном устройстве.
Потоковый цифровой медиа-контент со встроенным медиа-сервером
Создавайте резервные копии цифровых медиа-файлов для надежного хранения на ShareCenter и воспользуйтесь преимуществами встроенного медиа-сервера UPnP AV, получившего сертификат DLNA®. Выполните передачу потокового цифрового медиа-контента на совместимые медиа-плейеры, такие как PlayStation® 3, Microsoft Xbox 360™, или непосредственно на Smart TV. Также передачу потокового видео, фотографий, музыки можно выполнить удаленно через мобильные устройства.
Простая установка и настройка
Установка дисков в DNS-320L не представляет сложности – просто снимите крышку и вставьте 3.5″ жесткие диски SATA. Нажмите на кнопку с защелкой, чтобы получить доступ к отсекам для дисков, а затем установите их. Удобный USB-порт на задней панели ShareCenter можно использовать либо для совместного доступа целого дома или офиса к USB-принтеру, либо для подключения внешнего USB-накопителя с целью выполнения резервного копирования одним нажатием кнопки. Также можно подключить источник бесперебойного питания (ИБП) для отслеживания уровня заряда и обеспечения сохранности данных в случае отключения питания.
Высокая производительность и гибкость
ShareCenter поддерживает работу жестких дисков в четырех различных конфигурациях (Standard, JBOD, RAID 0, RAID 1), позволяющих выбрать наиболее подходящую из них в зависимости от требований пользователя. В режиме Standard создаются два доступных отдельных жестких диска. JBOD объединяет оба диска в один том. RAID 0 объединяет оба диска в массив с чередованием данных для обеспечения максимальной производительности с использованием соединения Gigabit Ethernet. В RAID 1 содержимое одного жесткого диска дублируется на другой, что обеспечивает максимальную надежность. Если один диск выйдет из строя, другой продолжит функционировать отдельно до тех пор, пока не будет произведена замена вышедшего из строя диска. После этого данные будут автоматически скопированы на новый диск, позволяя массиву ShareCenter вернуться к полноценному уровню защиты, сохранив файлы в целостности.
Технология D-Link Green
Для пользователей, заинтересованных в сокращении платы за электроэнергию и в сохранении окружающей среды, продукты D-Link Green™ обеспечивают экологически безопасные альтернативные варианты без ущерба для производительности. Данное устройство использует функции управления питанием жесткого диска и управления скоростью вентилятора для снижения затрат энергии, минимизируют шум и продлевают срок службы жестких дисков.
Характеристики
Стандарты
• IEEE 802.3
• IEEE 802.3ab
• IEEE 802.3u
• TCP/IP
• CIFS/SMB
• NFS
• AFP
• DHCP-клиент
• DDNS
• NTP
• FTP over SSL/TLS/FXP
• HTTP/HTTPS
• LLTD
• PnP-X
• UPnP AV
• USB 2.0
• Bonjour
• WebDAV
Поддерживаемые типы жестких дисков*
• Внутренний 3.5″ SATA I/II
• Емкость жесткого диска: до 6 ТБ1
Порты
• Порт 10/100/1000 Gigabit Ethernet
• Порт USB 2.0
• Питание
Индикаторы
• Power
• USB
• LAN (на порту LAN)
• HDD 1
• HDD 2
Функциональные возможности
Управление диском
• Несколько конфигураций жестких дисков
+ RAID 0
+ RAID 1
+ JBOD
+ Standard
• Миграция RAID: из Standard в RAID 1
• Формат файловой системы: EXT4
• Сканирование диска
• S.M.A.R.T.
• Поддержка расширенного формата HDD (Advanced Format)
Управление учетными записями
• Управление учетными записями пользователей
• Управление учетными записями групп
• Управление квотами пользователей/групп
• Управление сетевым доступом
• Управление монтированием образов дисков
Управление загрузками
• Расписание загрузок по HTTP/FTP
• Загрузка Peer to peer (P2P)
Мультимедиа
• DLNA-сервер
• iTunes-сервер
• Приложение My Surveillance (видеонаблюдение)
• Пакеты приложений Addons
Управление резервным копированием
• Расписание резервного копирования с ПК на NAS (D-Link ShareCenter Sync)
• Расписание локального резервного копирования
• Расписание удаленного резервного копирования
• Поддержка функции Apple Time Machine
• Резервное копирование USB-устройств
• Резервное копирование хранилища Cloud (Amazon S3)
Управление устройством
• Поддержка браузера:
+ Internet Explorer 7 или выше
+ Mozilla Firefox 3 или выше
+ Apple Safari 4 или выше
• Мастер установки системы (Win / Mac)
• Утилита D-Link Storage (Win / Mac)
• Уведомления по e-mail
• Уведомления по SMS
• Журнал системный/FTP
• Функциональные возможности принт-сервера
Управление питанием
• Режим сохранения энергии
• Автоматическое восстановление питания
• Выключение питания по расписанию
• Управление скоростью вентилятора
• D-Link Green Ethernet
• Поддержка подключения к ИБП (через USB)
Удаленный совместный доступ к файлам
• Файловый Web-сервер
• FTP-сервер
• WebDAV
• Доступ с мобильного устройства
• Доступ с портала mydlink
Совместный доступ к файлам
• Макс. количество учетных записей пользователей: 256 пользователей
• Макс. количество учетных записей групп: 32 группы
• Макс. количество общих папок: 128 папок
• Макс. количество одновременных Samba-соединений: 64 соединения
• Макс. количество одновременных FTP-соединений: 10 соединений
Сертификаты
Заказ
DNS-320L Облачный сетевой накопитель с 2 отсеками для жестких дисков, 1 портом 10/100/1000Base-T и 1 USB-портом (добавлены отверстия в нижней части корпуса для лучшей вентиляции и теплоотвода)
Изображения
DNS-320L/Ax
Вид спереди
Вид сзади
Вид справа
Загрузки
Смотрите также
Version 1.30 | 09/17/2014
User Manual
ShareCenter™ 2-Bay Cloud Network Storage Enclosure
DNS-320L
Preface
D-Link reserves the right to revise this publication and to make changes in the content hereof without obligation to notify
any person or organization of such revisions or changes.
Manual Revisions
Revision Date Description
1.0 March 28, 2013 • Initial release for Revision A1
1.01 November 07, 2013 • Content revision and correction
1.20 November 13, 2013 • add “My Surveillance “ Section
1.30 September 17, 2014 • mydlink updates, multimedia, Google Drive
Trademarks
D-Link and the D-Link logo are trademarks or registered trademarks of D-Link Corporation or its subsidiaries in the United
States or other countries. All other company or product names mentioned herein are trademarks or registered trademarks
of their respective companies.
Copyright © 2014 by D-Link Corporation.
All rights reserved. This publication may not be reproduced, in whole or in part, without prior expressed written permission
from D-Link Corporation.
Power Usage
This device is an Energy Related Product (ErP) designed to be always on. It can be turned o through a power switch to save
energy when it is not needed.
Switched O: 0.37 watts
iD-Link ShareCenter DNS-320L User Manual

Table of Contents
Table of Contents
Preface ……………………………………………………………………… i
Manual Revisions ………………………………………………………………… i
Trademarks ………………………………………………………………………….. i
Power Usage ………………………………………………………………………… i
Product Overview …………………………………………………….. 1
Before you Begin …………………………………………………………………2
System Requirements ……………………………………………………….. 2
Package Contents ……………………………………………………………….2
Features ………………………………………………………………………………..3
Checking the Hardware Requirements …………………………..6
Hardware Overview …………………………………………………………… 7
Front Panel …………………………………………………………………… 7
LED Description ………………………………………………………. 8
Rear Panel …………………………………………………………………….. 9
Bottom Panel ………………………………………………………………10
Getting Started ………………………………………………………. 11
RAID 0 ………………………………………………………………………36
RAID 1 ………………………………………………………………………39
Mapping a Drive ……………………………………………………………….48
Alternative Methods for Mapping a Drive ……………..51
Mac — Setup Wizard Installation ……………………………….. 52
Conguration …………………………………………………………. 53
Managing your DNS-320L ……………………………………………….53
D-Link Storage Utility ……………………………………………………….54
D-Link Storage Utility — For Mac ……………………………………..56
Web UI Login ……………………………………………………………………..59
Web UI General Layout ……………………………………………..60
Home ……………………………………………………………………….60
Applications ……………………………………………………………61
Management ………………………………………………………….62
Management ………………………………………………………………63
Setup Wizard (Web UI) ………………………………………….63
Hardware Setup ………………………………………………………………..11
Zero Conguration Setup ………………………………………………..14
mydlink on the DNS-320L …………………………………………19
Windows Installation ……………………………………………….20
Setup Wizard ……………………………………………………………………..20
Hard Drive Conguration ………………………………………….29
Standard RAID ………………………………………………………..30
JBOD ………………………………………………………………………..33
Disk Management …………………………………………………68
Hard Drive Conguration ………………………………..68
Hard Drive Conguration Wizard ……………..69
Upgrading from Standard Mode to RAID 1 75
SMART Test ………………………………………………………..81
Creating a Schedule ……………………………………82
Scan Disk ……………………………………………………………83
Volume Encryption …………………………………………..85
iiD-Link ShareCenter DNS-320L User Manual

Table of Contents
Account Management ………………………………………….88
Users / Groups …………………………………………………..88
Creating a Single User ………………………………..88
Creating Multiple Users ……………………………..93
Modify Users ………………………………………………..97
Delete Users ……………………………………………… 101
Import Users …………………………………………….. 102
Creating a Group ……………………………………… 105
Modifying a Group …………………………………… 110
Deleting a Group ……………………………………… 115
Quotas …………………………………………………………….. 116
Network Shares ……………………………………………… 120
Add/Modify Network Shares Wizard …….. 121
Deleting a Network Share ………………………. 127
Resetting the Network Shares ……………….. 128
ISO Shares Setup Wizard …………………………. 129
Creating an ISO Image ……………………………. 133
Application Management …………………………………. 157
FTP server ………………………………………………………. 157
Block IP List …………………………………………………….. 159
Add-ons ………………………………………………………….. 162
Installing Add-ons from the Web UI …………… 164
AFP Service …………………………………………………….. 166
NFS Service …………………………………………………….. 166
Multimedia Services ……………………………………… 167
UPnP AV Server ……………………………………………… 174
iTunes Server ………………………………………………….175
System Management …………………………………………177
Language ……………………………………………………….. 177
Time and Date ……………………………………………….. 178
Device …………………………………………………………….. 179
System Settings …………………………………………….. 180
Power Management ……………………………………..181
Notications …………………………………………………… 182
ISO Name and File Path Settings …………… 134
ISO Tree Editing ………………………………………… 136
Verifying the ISO image ………………………….. 137
Admin Password ……………………………………………. 138
mydlink Account …………………………………………… 139
mydlink Account online ………………………………. 145
Network Management ………………………………………. 148
LAN Setup ………………………………………………………. 148
IPv6 Settings …………………………………………….. 150
Link Speed and LLTD Settings ……………….. 152
DDNS ………………………………………………………………. 153
Port Forwarding……………………………………………..154
Email Settings …………………………………………… 182
SMS Settings …………………………………………….. 184
Adding an SMS Service Provider …………… 185
Event Settings …………………………………………..186
Logs ………………………………………………………………….187
Firmware Upgrade ………………………………………… 188
USB Devices …………………………………………………… 189
UPS Settings ……………………………………………… 189
USB Storage Information …………………………190
Printer Information ………………………………….. 191
System Status ……………………………………………………… 192
System Info ……………………………………………………..192
iiiD-Link ShareCenter DNS-320L User Manual

Table of Contents
Home ………………………………………………………………………… 195
My Photos ……………………………………………………………. 196
Creating an Album ………………………………………..197
Editing Photos in an Album …………………………201
Select a Photo as a Cover image………………….202
Select a Photo to Move ………………………………… 203
Delete a Photo ……………………………………………….204
Share a Photo to Picasa …………………………………205
Share a Photo to Facebook …………………………..207
Share a Photo to Flickr ………………………………….210
Deleting an Album ……………………………………….. 212
Refreshing the Album Database …………………213
Managing Photos ………………………………………….214
Slideshow Toolbar …………………………………….215
Viewing images using Cooliris ……………….217
Stream a Slideshow to your Airplay
Device ………………………………………………………… 220
Unzipping a Zipped File ……………………………….238
Unzipping a Tar File ………………………………………. 239
Opening a File ……………………………………………….. 240
Previewing a File …………………………………………… 241
Share to Facebook ………………………………………… 242
My Music ……………………………………………………………… 243
My Music — The Interface …………………………………… 245
My Music — Categories ……………………………………….. 246
My Music — Music on your DNS-320L ………………. 247
My Music — Playback Music on an Apple Device 249
My Music — The Player ………………………………………… 250
My Music — Create a Playlist ………………………………. 251
My Surveillance ………………………………………………….. 253
My Surveillance ………………………………………………….. 261
My Surveillance — Live View ………………………………. 262
My Surveillance — Live View ………………………………. 263
My Surveillance — Single Camera Live Video
Photo Gallery …………………………………………………. 221
My Files ………………………………………………………………… 223
My Files — Icons ……………………………………………………. 224
Upload ……………………………………………………………. 225
Download ………………………………………………………. 226
Copy ………………………………………………………………… 227
Move ……………………………………………………………….. 229
Delete ……………………………………………………………… 231
Rename …………………………………………………………… 232
Properties……………………………………………………….. 234
Create a Zip le from the Selected Folder …. 235
Add to Zip ………………………………………………………. 236
Mode ……………………………………………………………………. 264
My Surveillance — Full Screen Live Video Mode 265
My Surveillance — Digital Zoom Video Mode….. 266
My Surveillance — E-Map View …………………………..267
My Surveillance — Snapshot View ……………………..268
My Surveillance — Motion Detection Camera
Mode ……………………………………………………………………. 269
My Surveillance — Conguring Patrol Settings ..270
My Surveillance — Conguring Patrol Preset
Points …………………………………………………………………….271
My Surveillance — Viewing Preset Points …………. 272
My Surveillance — Live Video/Playback Settings 273
ivD-Link ShareCenter DNS-320L User Manual

Table of Contents
My Surveillance — OSD Settings ……………………….. 274
My Surveillance — Playback ……………………………….. 275
My Surveillance — Playback ……………………………….. 276
My Surveillance — Recording Information ………. 277
My Surveillance — Setup …………………………………….. 279
My Surveillance — Setup — Camera Setup ………… 280
My Surveillance -Search and Add Camera ………287
My Surveillance -Setup — Audio and Video ……..290
My Surveillance — Setup — Recording Setup ……. 292
My Surveillance -Setup — Event Setup …………….. 300
My Surveillance — Setup — E-map Upload ………… 303
My Surveillance — Setup — Backup …………………….. 306
My Surveillance — Setup — Server Port ……………… 311
My Surveillance — Status ……………………………………. 312
My Surveillance — Status ……………………………………. 313
My Favorite Applications……………………………………316
Adding Applications …………………………………….. 317
MTP Backup Process…………………………………340
P2P Downloads ……………………………………………… 342
Settings …………………………………………………………… 347
Amazon S3 ………………………………………………………348
Creating an AWS Account ………………………. 349
Google Drive ………………………………………………….. 354
mydlink …………………………………………………………… 364
mydlink Verication ……………………………………… 365
mydlink Java Runtime Environment ………….. 367
Creating a New Folder ………………………………….. 372
mydlink Settings Details ……………………………….373
ShareCenter NAS Status ……………………………….374
Deleting a mydlink device …………………………… 375
Deleting a mydlink account ………………………… 376
The mydlink Access NAS App ……………………… 378
The mydlink Access NAS App — Features ……379
The mydlink Access NAS App — Compatibility 381
Applications …………………………………………………………….. 318
FTP/HTTP Downloads ……………………………………….. 318
Remote Backups …………………………………………………. 320
Create Wizard ………………………………………………… 321
Local Backups …………………………………………………325
Time Machine ………………………………………………… 327
Time Machine Setup Wizard ……………………….. 328
Time Machine Setup — Mac OS ……………………. 331
Time Machine — Delete a Volume ……………….. 335
USB Backups ………………………………………………….. 337
MTP Backups …………………………………………….. 338
USB Backups …………………………………………….. 339
Knowledge Base ……………………………………………………382
What is RAID? …………………………………………………………………. 382
RAID Options …………………………………………………………… 384
UPS Connectivity …………………………………………………………… 386
Deleting a UPS Slave ……………………………………………….390
USB Print Server …………………………………………………………….. 391
Setting up a Printer Using Mac OS 10.8 ………………. 394
Technical Specications ………………………………………… 399
vD-Link ShareCenter DNS-320L User Manual

Section 1 — Product Overview
Product Overview
The D-Link ShareCenter® DNS-320L is a 2-Bay Cloud Network Storage device. This cloud-centric network storage device
oers all the features a regular NAS oers but brings advanced data backup and storage to the Cloud. This is provided
through the “mydlink Account Management” console. The mydlink Cloud service oers complete data management of
les, music, photos, and video in the Cloud. So not only can you use the DNS-320L via the Cloud but you can also continue
accessing les through the Internet using the built-in FTP server, web le server and the WebDAV protocol. Whether you are
allowing access locally or over the Internet, you can keep data safe by only giving rights to specic users or groups. Users
can also access their DNS-320L remotely using the mydlink™ portal, or by using the mydlink Access NAS app on a mobile
phone or tablet. When conguring the DNS-320L, you can create and assign users and groups to folders with either read or
read/write permissions. This is ideal for an oce environment with employee-specic sensitive data, or for the home where
you can limit children’s access to certain material. The DNS-320L will be available to any computer (PC, Mac, or Linux) on
your network, without the need to install any software.
You may back up your music, photo, and video collections to the DNS-320L for safekeeping, as well as enjoy the benets
1
of the built-in UPnP AV media server as you stream digital content to compatible media players
D-Link’s MediaLounge product line). This feature is highly convenient as it allows you to turn o a computer that would
normally be needed for the same function.
(such as those found in
The availability of four dierent hard drive modes (Standard, JBOD, RAID 0, RAID 1) allows you to choose the conguration
best suited to your needs. Standard mode creates two separately accessible hard drives. JBOD combines both drives in
linear fashion for maximum space eciency. RAID 0 combines both drives in a ‘striped’ conguration, which provides the
highest performance when accessing data across disks. RAID 1 causes the drives to mirror each other, providing maximum
protection. If one drive fails while congured as RAID 1, the unaected drive continues to function as a single drive until the
failed drive is replaced. The new drive will then be re-mirrored, allowing the DNS-320L to return to its full protective state.
The DNS-320L also has several add-on features to enhance your experience, including PhotoCenter, Blogging, Transmission
and Audio Streamer. The DNS-320L Cloud network storage also provides access to Google Drive. This allows you to access,
save, and manage Google apps like Google Docs, Google Spreadsheets, and Google Presentations to your NAS.
1
D-Link cannot guarantee full compatibility or proper playback with all codecs. Playback capability depends on the codec support of the UPnP AV media player.
1D-Link ShareCenter DNS-320L User Manual

Section 1 — Product Overview
Before you Begin
• Check package contents
• Check system requirements
• Ensure that you have the hardware you need for your ShareCenter device
System Requirements
For best results, the following minimum requirements are recommended on any system used to congure and use the
ShareCenter:
• Computer with: 1 GHz processor / 512 MB RAM / 200 MB available space / CD-ROM drive
• Internet Explorer® version 9, Mozilla® Firefox® 26.0, Google® Chrome 33.0, or Apple® Safari® 5 and above
• Windows® XP (with Service Pack 2), Windows Vista®, Windows® 7, Windows® 8, or Mac OS® X 10.5.6 or higher
• Up to two 3.5” SATA Hard Drive(s)
• D-Link ShareCenter DNS-320L
• CD-ROM with Manual and Software
• Quick Installation Guide
• 12 V DC 3A Output Power Adapter
• CAT5e Ethernet Cable
Package Contents
2D-Link ShareCenter DNS-320L User Manual

Section 1 — Product Overview
Features
The ShareCenter DNS-320L is an easy to install data storage platform used for remote access through a local network or over the
Internet. This ShareCenter supports up to 2 SATA hard drives and includes the product features listed below:
• Equipped with one 10/100/1000 Mbps auto-MDIX Gigabit
Ethernet LAN port, 1000BASE-T supports half-duplex and fullduplex mode
• Two embedded SATA II 3.5” HDD interfaces support drives up
to 4 TB
• 2-bay SATA with RAID 0/1 and JBOD support
• Equipped with Ultra Cooler (Plastic housing + FAN speed
control)
• Included hard drive trays
• Supports Real-Time Clock (RTC)
• Networking Support
• DHCP Client or Static IP
• NTP Client
• Windows 7/Vista x32/64 PnP-X/LLTD
• Dynamic DNS
• Bonjour
• UPnP port forwarding
• HTTP and HTTPS for web browsers
• WebDAV
• File System
• EXT4 for internal HDD
• FAT32, NTFS for USB external storage
• File System Management
• Unicode support for both Samba and FTP server
• File sharing: Windows/Mac/Linux
• File searching
• FTP server
• FTP over explicit SSL/ TLS mode (FTPES)
• FTP bandwidth and connection control
• FTP support FXP
• IP blocking
• Disk Management
• Hot-swappable
• RAID: Standard, JBOD, 0, 1
• IPv6
• Network File Services
• Supports Windows XP/Vista/7/8, Mac OSX 10.5+, Linux
clients
• CIFS/SMB for Windows and Mac OS X and Linux
• NFSv3 Server for Linux and UNIX
• AFP 3.3 for Mac OS X
• RAID 1 Auto/Manual rebuild
• RAID migration: Standard to RAID 1
• SMART Disk Status Monitoring
• HDD SMART test
• Scandisk
• Supports advanced format HDD
• AES-based volume encryption
3D-Link ShareCenter DNS-320L User Manual

Section 1 — Product Overview
• Disk roaming
• RAID roaming
• Folder Management
• Share folder level permission
• Supports ISO mount
• ISO creator
• Remote File Sharing
• My les (Web File Server)
• WebDAV
• FTP server
• Mobile device access (mydlink Access NAS)
• User/Group Management
• User/Group assignment for network sharing and FTP server
• Quota for user and group
• Assign users to multiple groups
• Create user/Import user(s) batch les
• Backup Management
• Peer-to-peer (P2P) downloads, aMule and Transmission
support
• System Management
• Supports mydlink portal
• Supports D-Link storage utility/setup wizard
• OS Support: Windows XP/Vista/7/8 and Mac OS X
• Two access modes supported: Open (Share) mode and
Account (User) mode, no setup account and password
necessary in Open mode
• Supports conguration le save/load
• System Service Management
• mydlink Account Management
• System Status
• Email / SMS notications
• Network recycle bin
• System /FTP Log (Syslog Client)
• Rescue F/W image
• Scheduled backup from PC to NAS (ShareCenter Sync)
• Remote network backup (Rsync, Remote Snapshot)
• Apple Time Machine® support
• Local backup
• USB backup
• USB copy button
• Cloud storage backup (Amazon S3, Google Drive, D-Link
Vault)
• Download Management
• HTTP/FTP schedule download
• Resource monitor
• Multi-lingual GUI support
• Power Management
• Power saving (disk idle spin-down)
• Automatic power recovery (with UPS)
• Schedule power on/o
• Auto-shutdown on UPS low battery
• Smart Fan control
• Network UPS
• USB Port Support
• Print server
4D-Link ShareCenter DNS-320L User Manual

Section 1 — Product Overview
• UPS monitoring
• External storage device
• MTP/PTP
• Media Streaming
• UPnP AV Server
• Supports PS3 / XBOX 360
• Supports UPnP AV > 4 GB
• Complies with DLNA HNv1.5
• Supports Logitech® Media Server
• Support Sonos digital music system via Samba
• iTunes server
• Audio streamer (IceStation)
• My Music (Music Center)
• My Photos (Photo Center)
• Enhance Contents Aggregation
• Cloud Service — mydlink Portal Web Access
• Remote les access through web browser
• Content classication: Classify contents according to media
type (photo, video, music)
• iPhone®, iPad®, and Android® app support
• My Surveillance
• Camera auto installation
• 4-Channel Motion JPEG, MPEG4 or H.264 recording
• Audio & video recording in synchronization
• Auto recycling recording
• 4-channel live video
• 4-channel synchronous playback
• Recording type : Record by schedule, manual record
• E-map support
• Backup recorded video
• Add-on Applications
• Multilingual language package
• Photo center (Gallery2)
• Blog (WordPress)
• Browse, upload/download, and manage le/folders
• Redirect to NAS device UI for the access of NAS applications
• Email notication to registered mydlink account
• Supports zero conguration
• Supports surveillance redirect
• Cloud Service – mobile apps (the “mydlink Access-NAS” app)
• Ability to access content from mobile devices
• Browse, upload/download, open, and manage les/folders
• Auto-upload photos stored on mobile devices to NAS
• View photos and play back multimedia les
• Access to media: Streaming for music, photo galleries
• Audio streamer
• Logitech Media Center
• AjaXplorer
• aMule
• phpMyAdmin
• phpBB
• Joomla
• Transmission
5D-Link ShareCenter DNS-320L User Manual

Section 1 — Product Overview
Checking the Hardware Requirements
To use your DNS-320L, you will need at least one hard drive installed. If you plan to use RAID 1, which protects your data
against failure of one hard drive, you will need to install two hard drives.
This section will help you:
• Select the appropriate hard drives
• Determine how much hard disk space you will need
• Ensure your data is protected
• Understand the basic requirements for a router or switch
Selecting hard drives:
You can use hard drives from any manufacturer and with any capacity with your DNS-320L. The D-Link ShareCenter supports
standard 3.5” internal SATA drives. If you are unsure, check with your administrator or hard drive retailer/manufacturer to
verify that your hard drives meet this standard
*Warning — Any pre-existing data on the drives will be erased during installation.
Determining how much hard drive space you need:
In order to protect your data from hard drive failure, your DNS-320L requires more space than what you will use for your data,
sometimes more than double the amount of space required. You should select hard drives that are larger in capacity than
your maximum storage requirements.
Using a Router or Switch:
If you are connecting your ShareCenter to a router or switch, your router or switch should support Gigabit Ethernet
(1000 Mbit/s) for maximum performance. The ShareCenter will auto-negotiate the highest connection speed available to your
router or switch. If you are using port bonding, use a managed switch.
Using an Uninterrupted Power Supply (UPS):
We highly recommend that you use your ShareCenter in conjunction with an Uninterrupted Power Supply (UPS), which will
protect against sudden data loss in power outages surges.
6D-Link ShareCenter DNS-320L User Manual
Section 1 — Product Overview
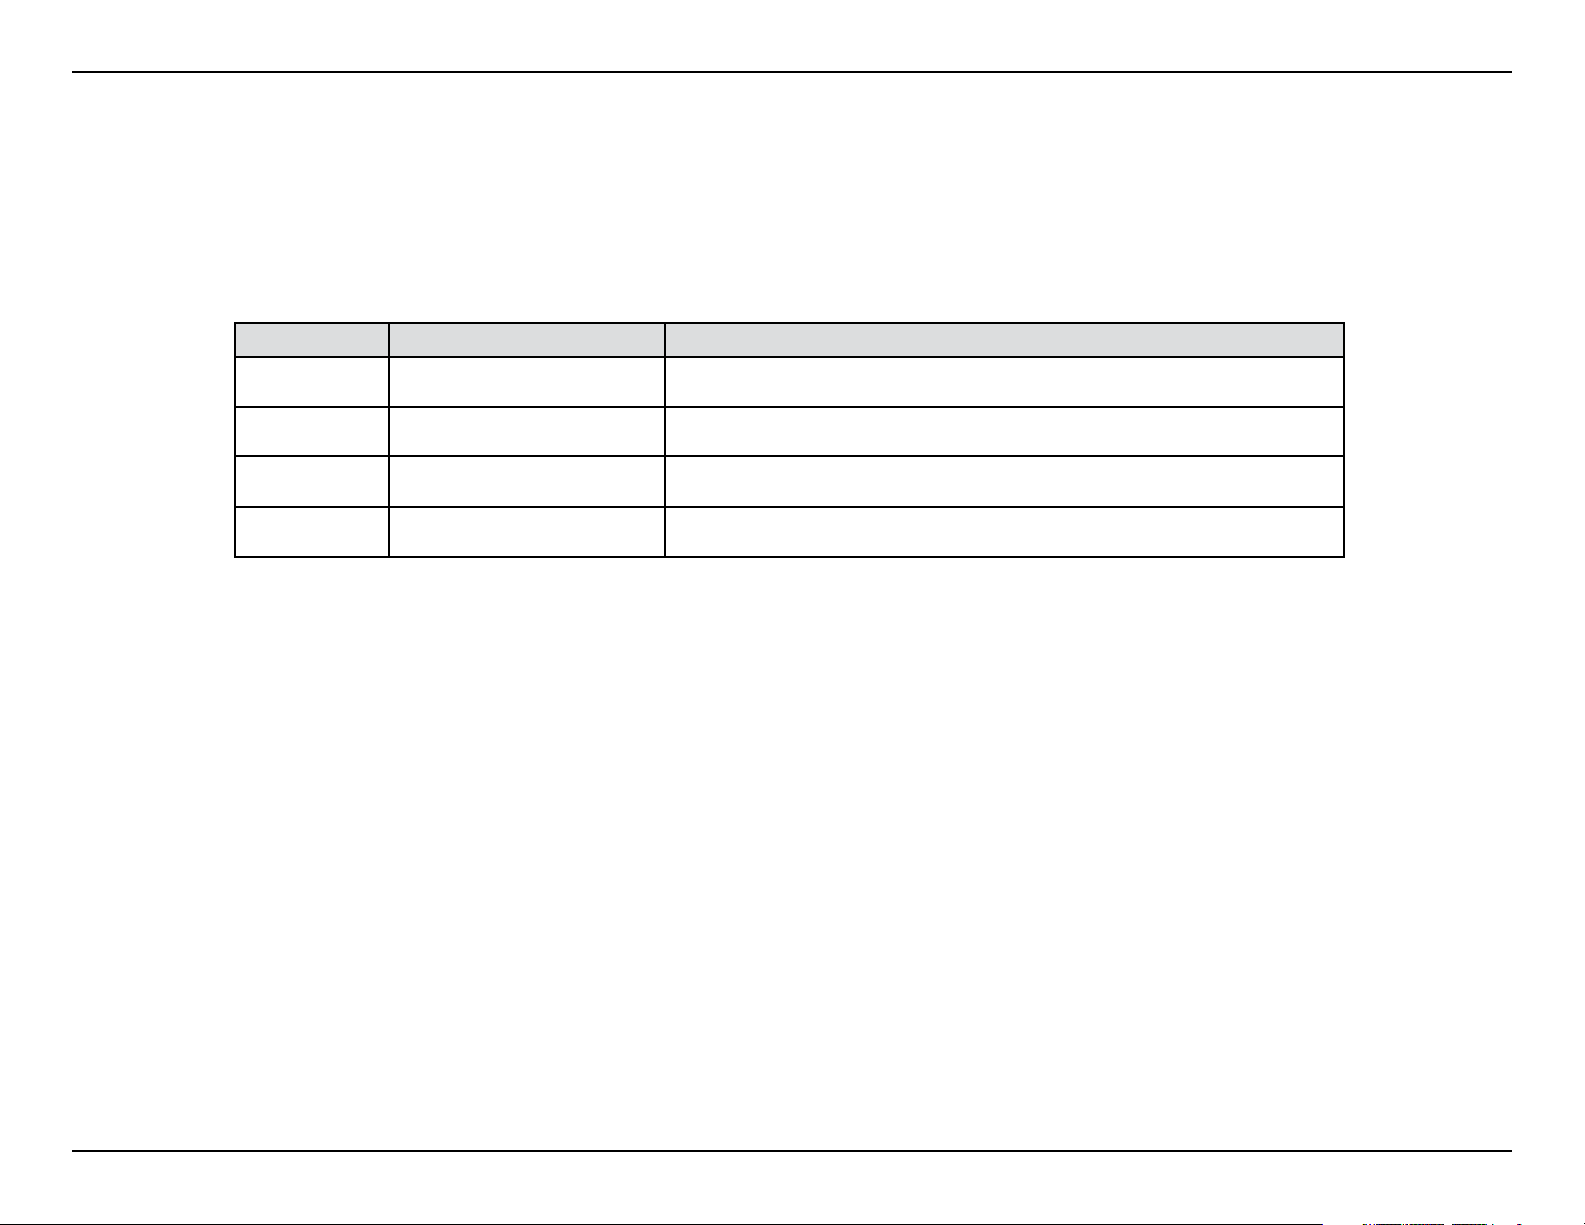
Hardware Overview
Front Panel
Top Panel
USB Button
Power Button
COMPONENT DESCRIPTION
Top Panel This panel unlatches simply by pressing the lever at the back. Unhook and lift up to insert or remove your hard drive(s).
Power Button Press once to power on the ShareCenter. Press and hold the button for more than 5 seconds to power it down.
USB Button Press once to activate the USB port, or press and hold the button for more than 5 seconds to unmount the USB device.
Left HDD/Right
HDD
LED Indicators Illuminate depending on activity (see next page for details).
Identies the left and right hard drives.
Left HDD/ Right HDD
LED Indicators
7D-Link ShareCenter DNS-320L User Manual
Section 1 — Product Overview
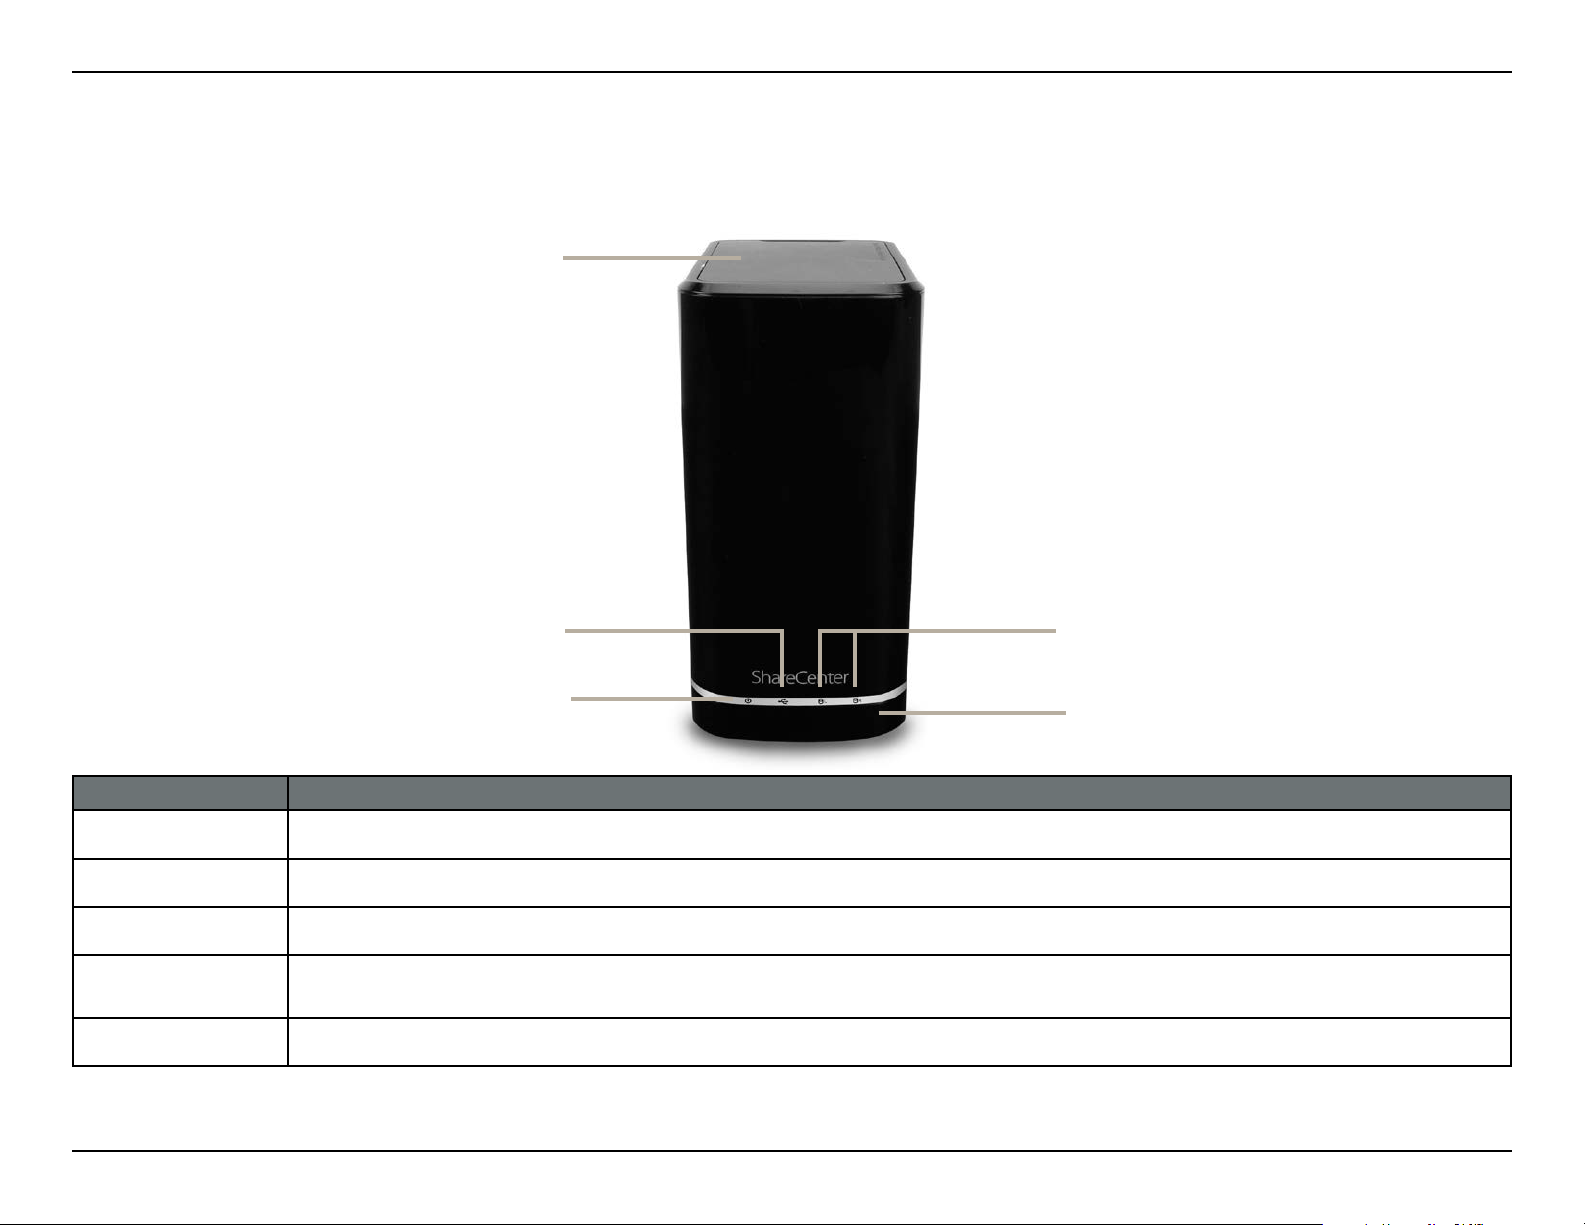
LED Description
Power:
Solid Blue — the device is on
Blinking Blue — the device is booting or restarting
No Light — the device is o or in power saving mode
USB:
Solid Blue — USB Storage is connected
Blinking Blue — transferring data, or a USB device is being
installed or unmounted
Solid Orange — USB storage failed to mount
No Light — No USB storage or the device is o
HDD (Left/Right):
Solid Orange — the specied hard drive has a problem
No Light — the specied hard drive is inactive
Solid Blue — the specied hard drive is functioning correctly
Blinking Blue — there is reading / writing / hot-swapping
activity on the specied hard drive
8D-Link ShareCenter DNS-320L User Manual
Section 1 — Product Overview
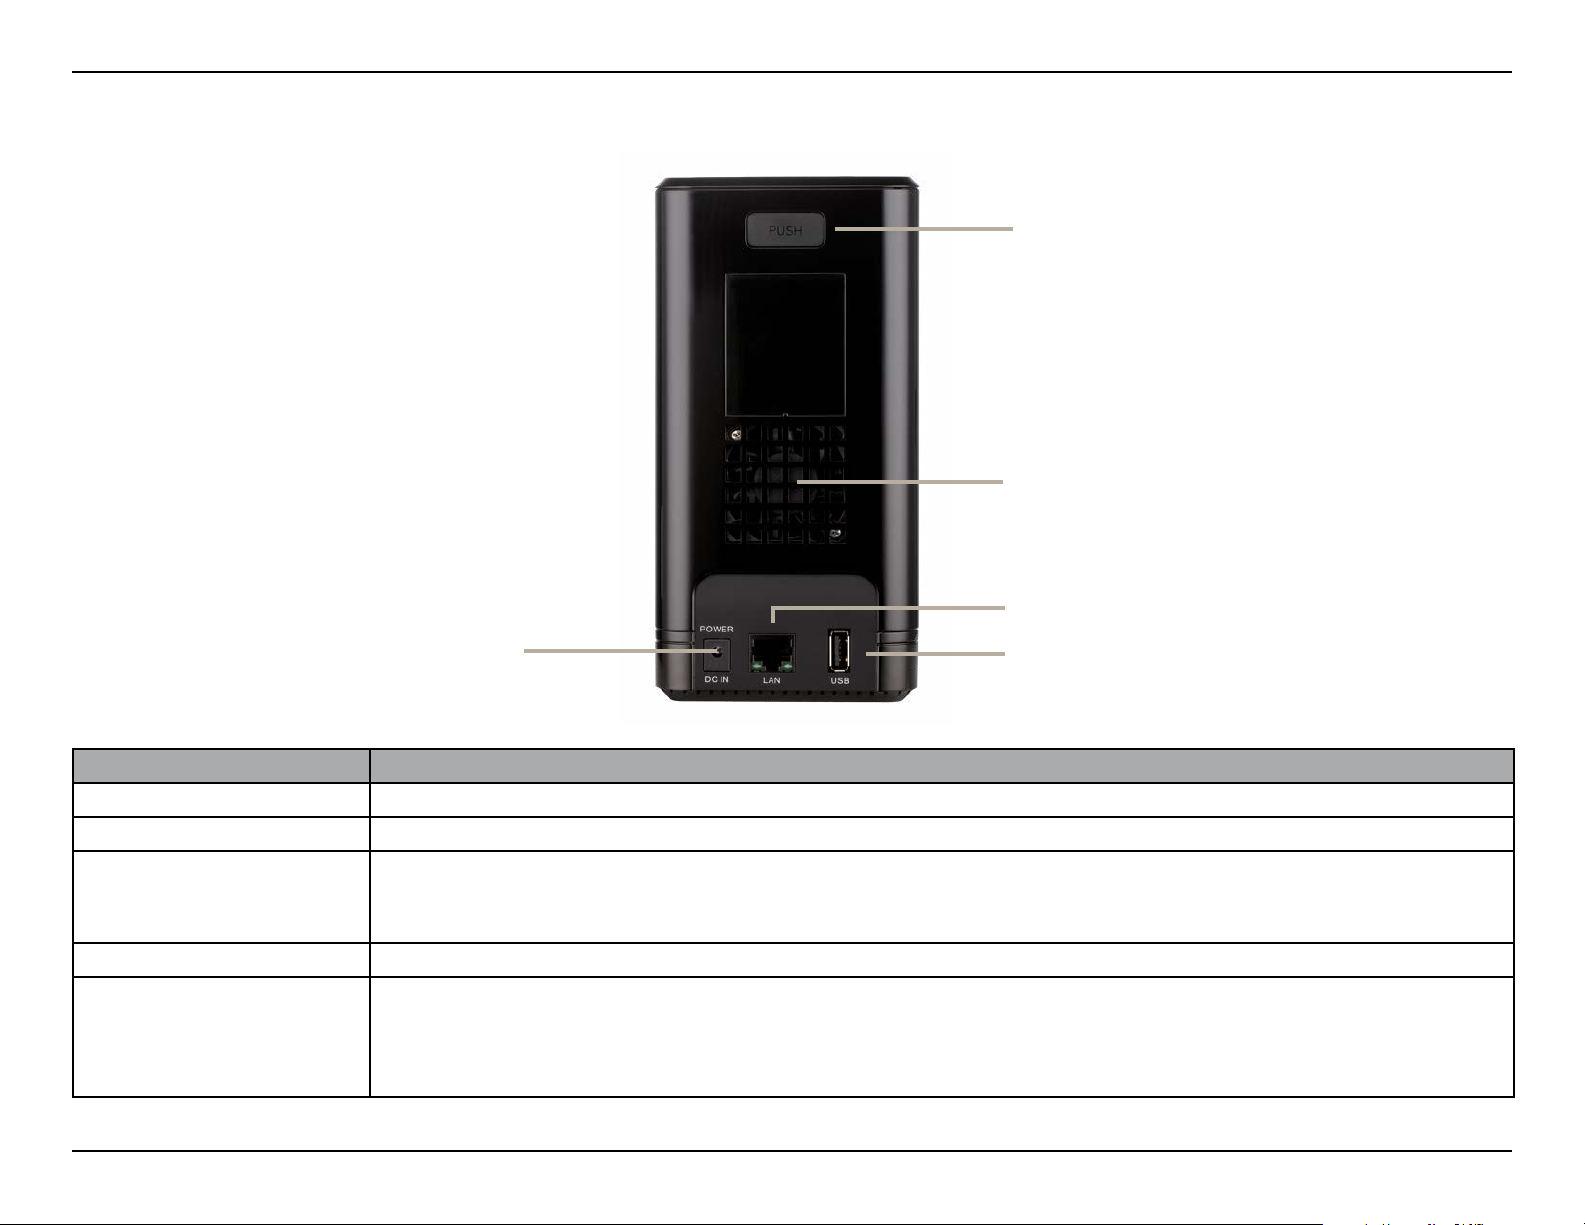
Rear Panel
Latch for Top Panel
Cooling Fan/Outlet
Gigabit Ethernet Port
Power Receptor
COMPONENT DESCRIPTION
Power Receptor Connect the supplied power cord to the receptor.
Latch Press the latch to release the top panel for inserting or removing the hard drives.
The cooling fan cools the hard drives and features speed control. When the unit is rst powered on, the fans
Cooling Fan/Outlet
USB Port A single USB 3.0 (type A) connector. The USB Host port is for Printers, USB storage, or UPS monitoring.
Gigabit Ethernet Port
rotate at a low speed and later rotate at a high speed when the temperature inside the unit rises above 49 °C. Do
not cover or obstruct this outlet.
Use the Gigabit Ethernet port to connect the ShareCenter to your local network. The port is equipped with 2 LEDs.
The LED on the left will illuminate solid green for a good connection and will blink during data transmission. If this
LED is o, check the connection/cable to the device you are connecting to. The LED on the right will light solid for a
Gigabit connection and will remain o when connected to a 10/100 Mbps device.
USB Port
9D-Link ShareCenter DNS-320L User Manual
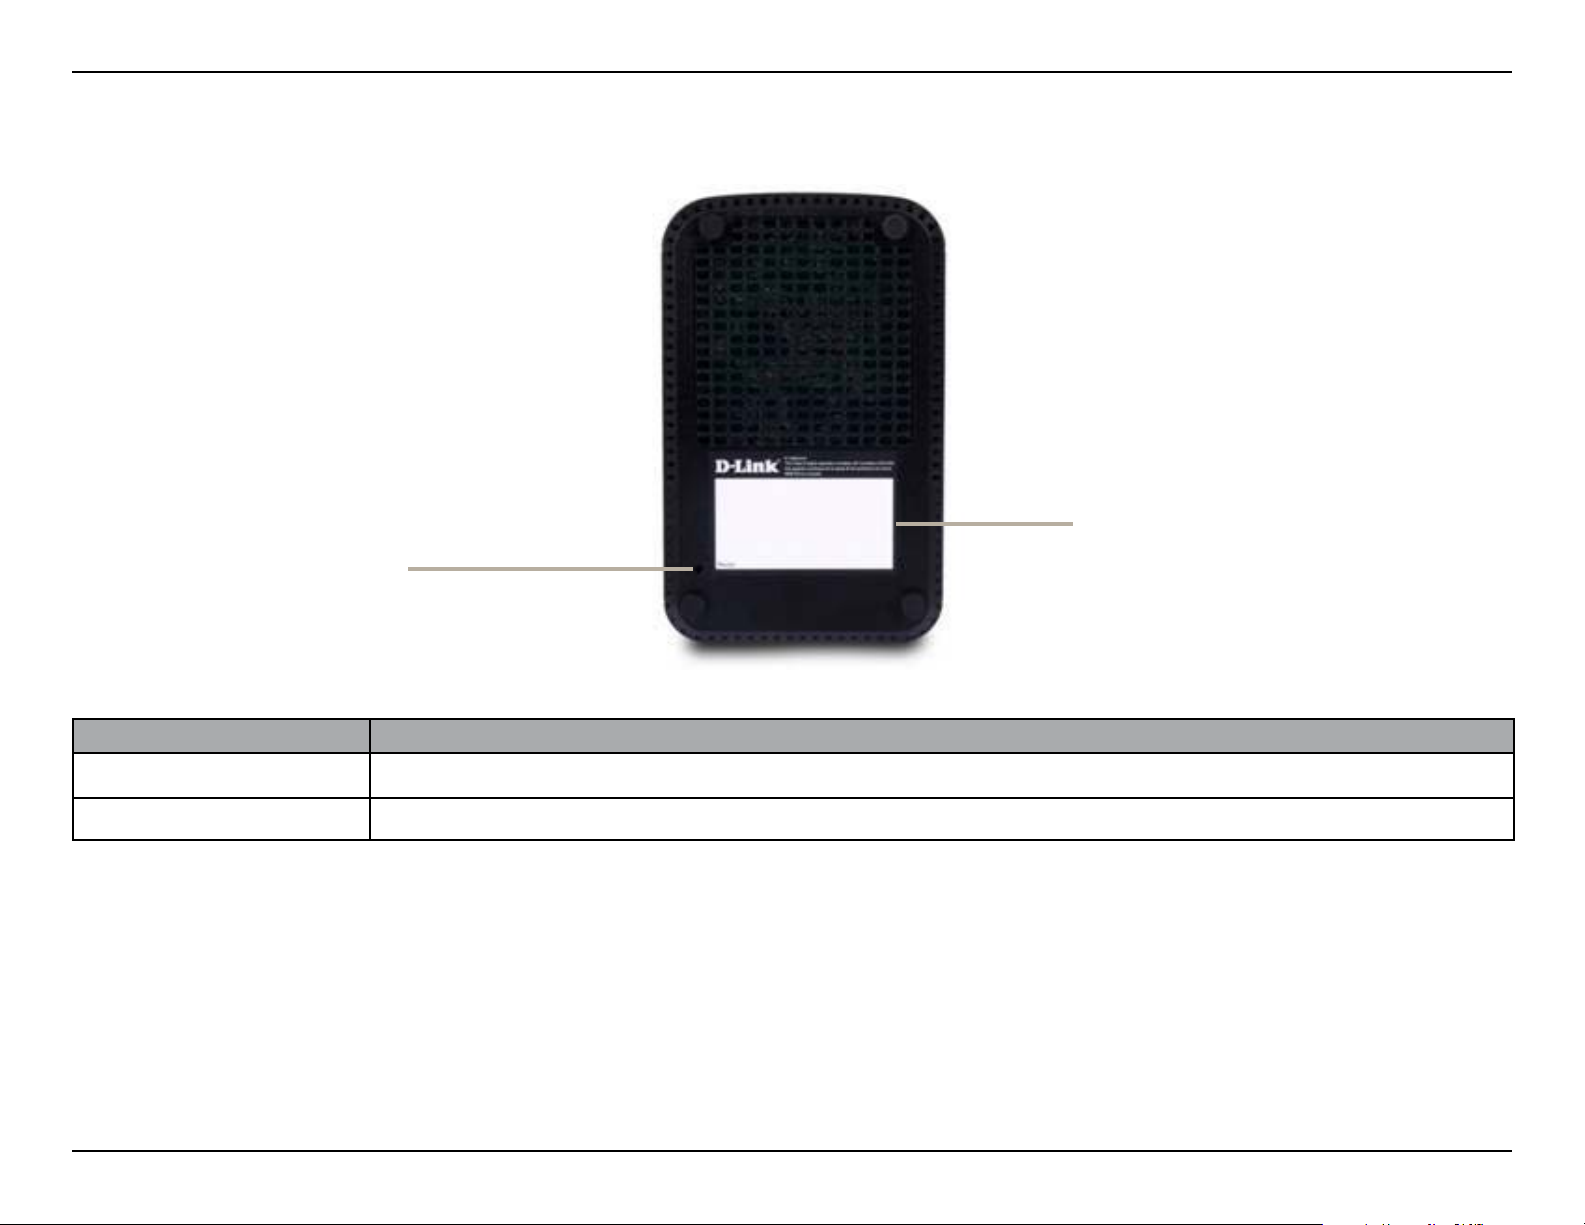
Section 1 — Product Overview
Reset Button
Bottom Panel
Product Details
COMPONENT DESCRIPTION
Product Details Information about the product — DNS-320L including serial number, part number, manufacturer number etc.
Reset Button Press and hold this button for more than 5 seconds to reset the unit to its factory defaults.
10D-Link ShareCenter DNS-320L User Manual
Section 2 — Getting Started
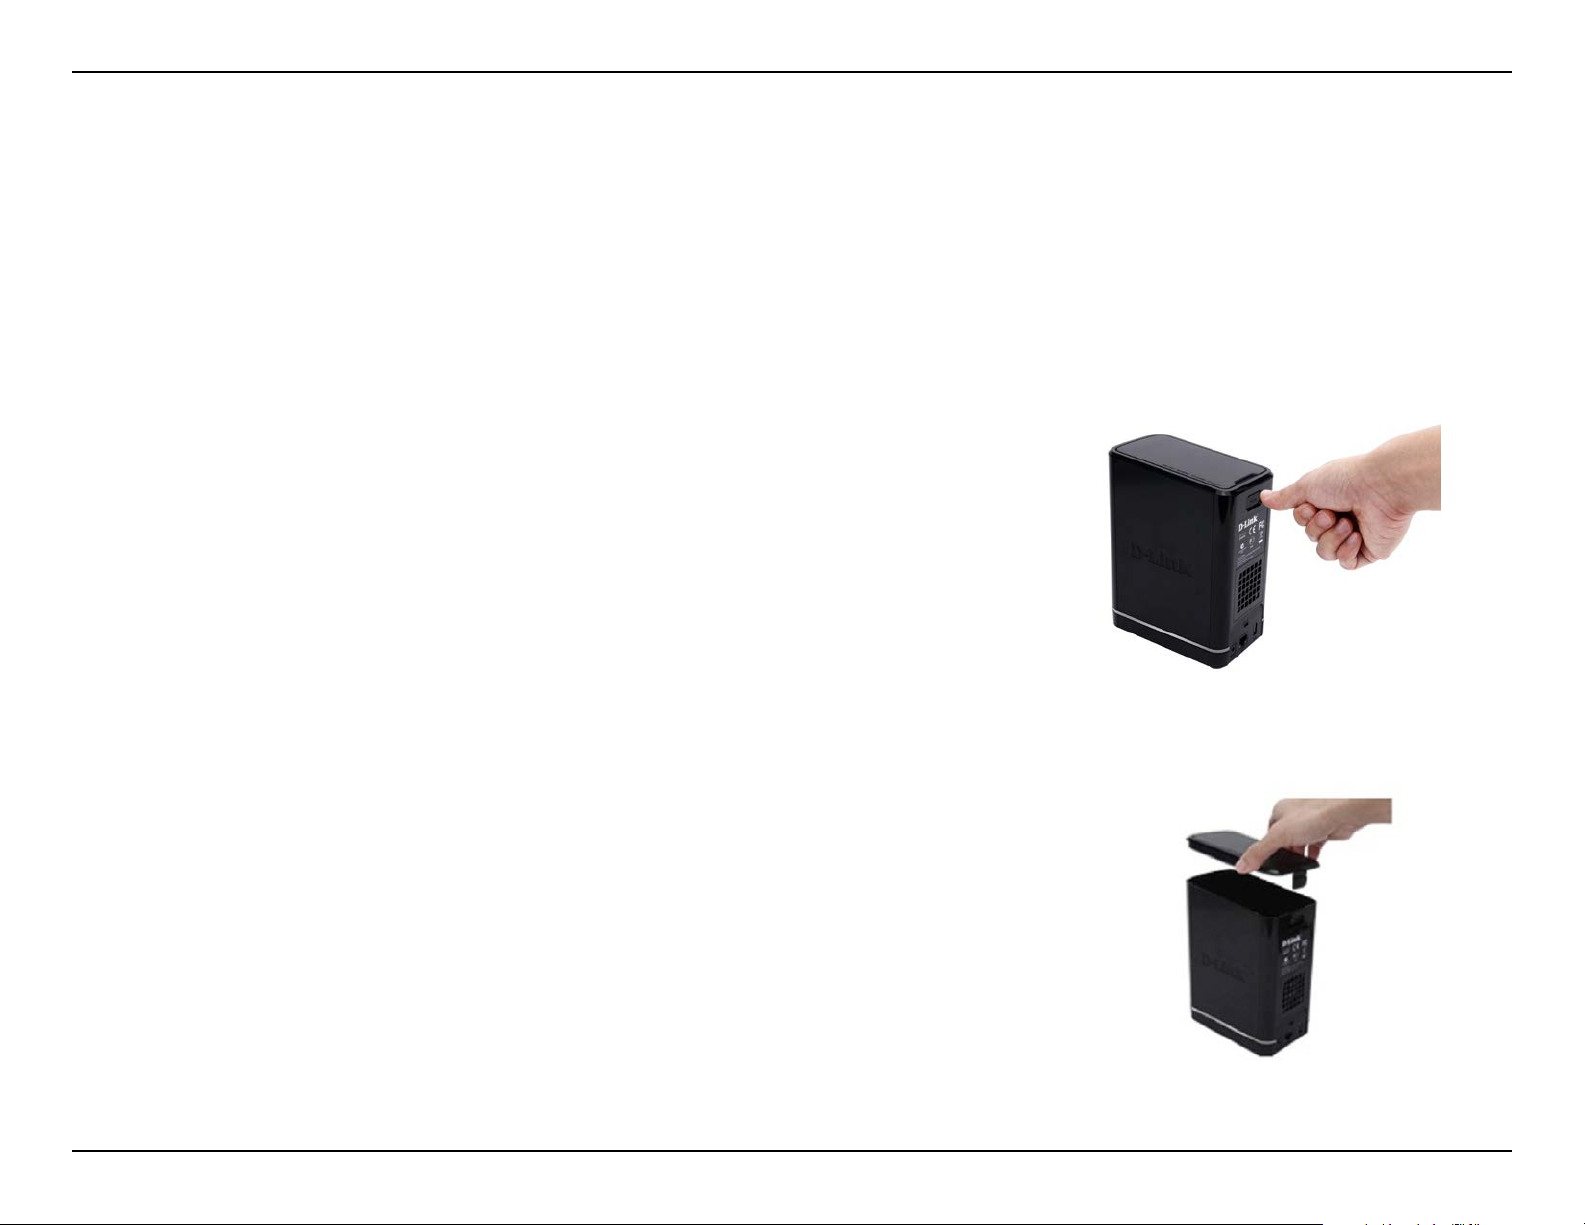
Getting Started
Hardware Setup
This user guide will help you get your ShareCenter set up in just a few steps. To install the ShareCenter on your local network, refer to the steps below, or skip to Zero Conguration Setup on page 14 to run the setup wizard which will show you
how to install and congure your DNS-320L.
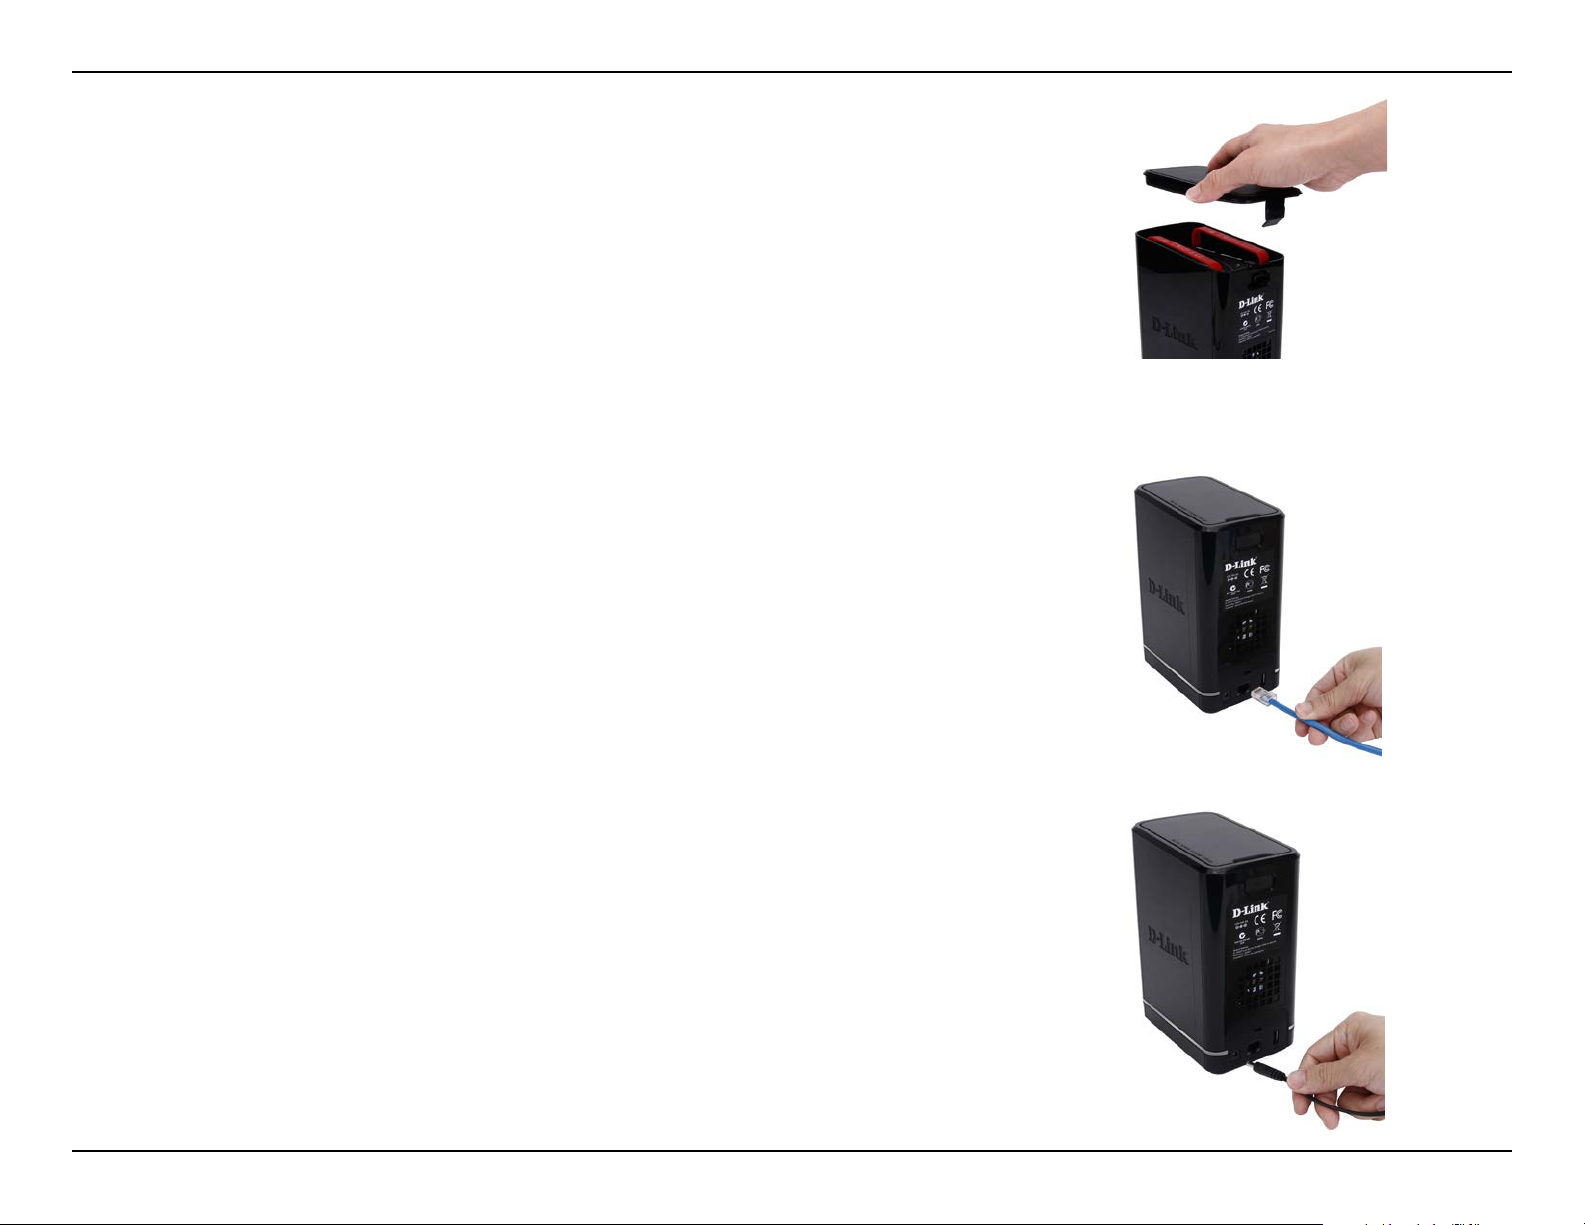
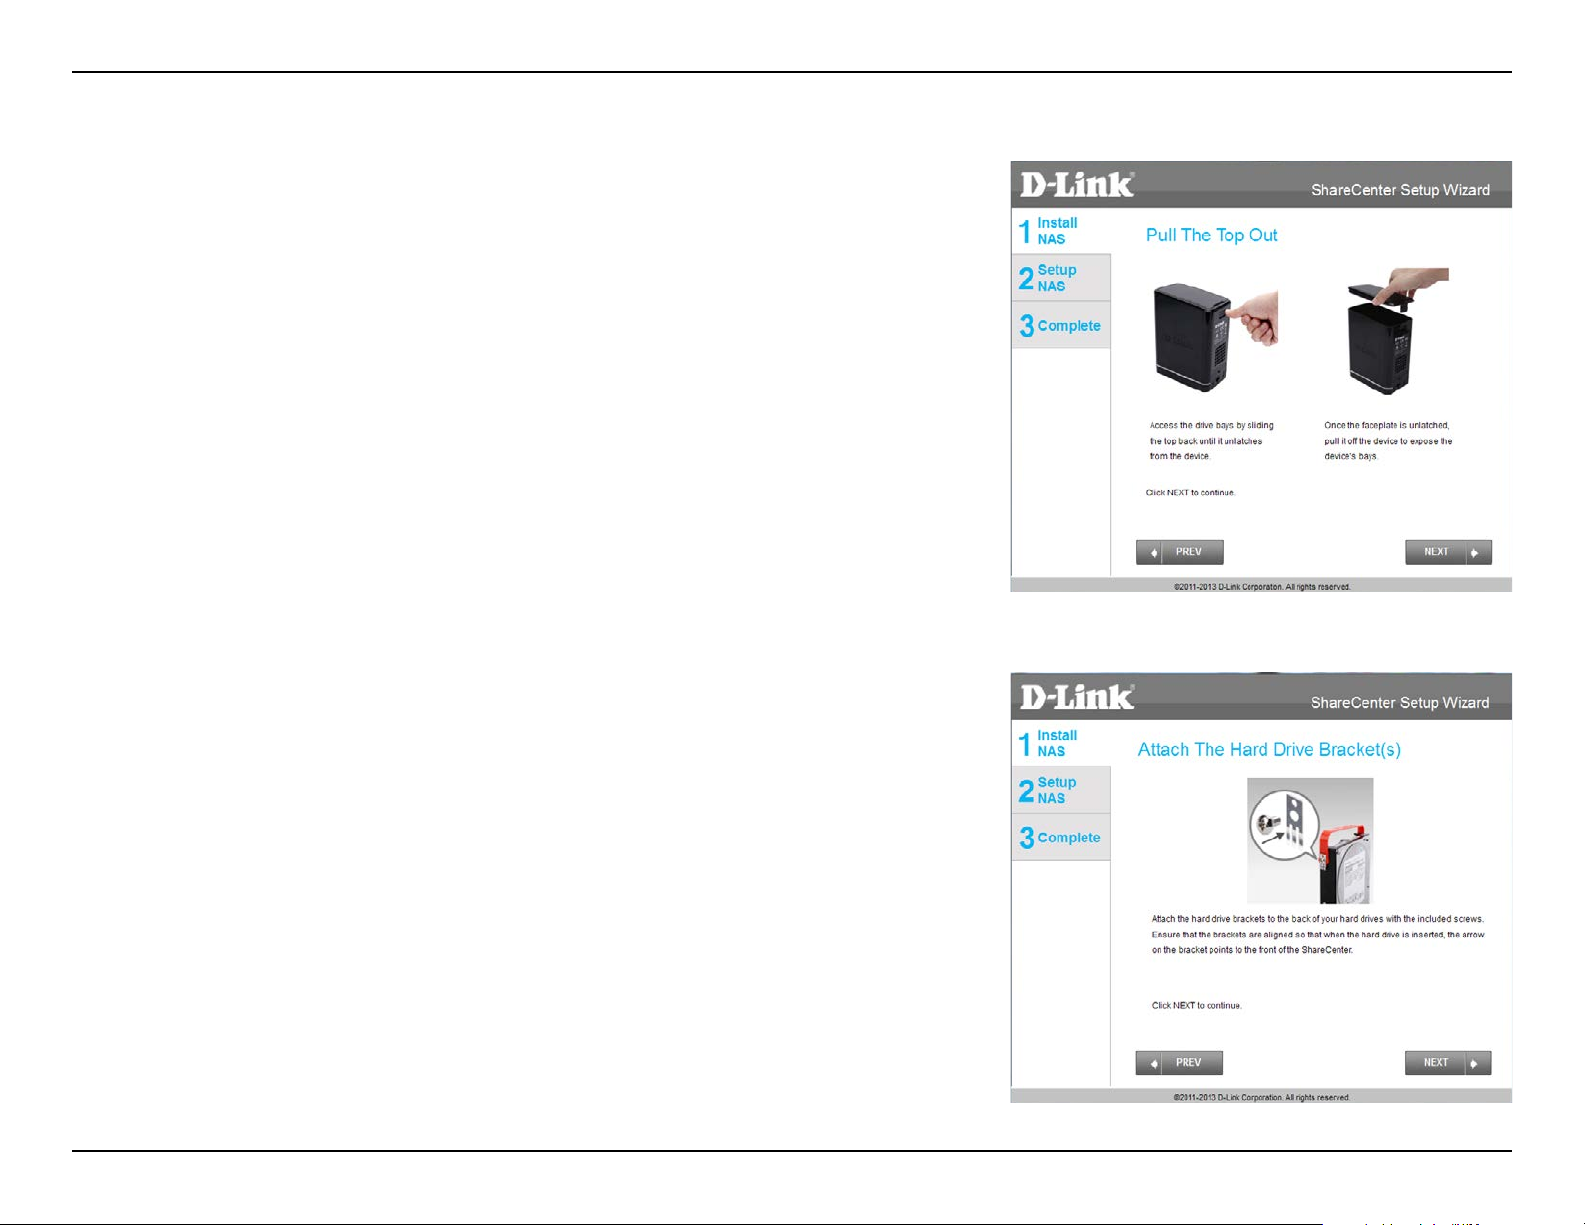
Release the top panel by rmly pressing the latch at the back.
Once the faceplate is unlatched, remove it to expose the hard drive bays.
11D-Link ShareCenter DNS-320L User Manual
Section 2 — Getting Started
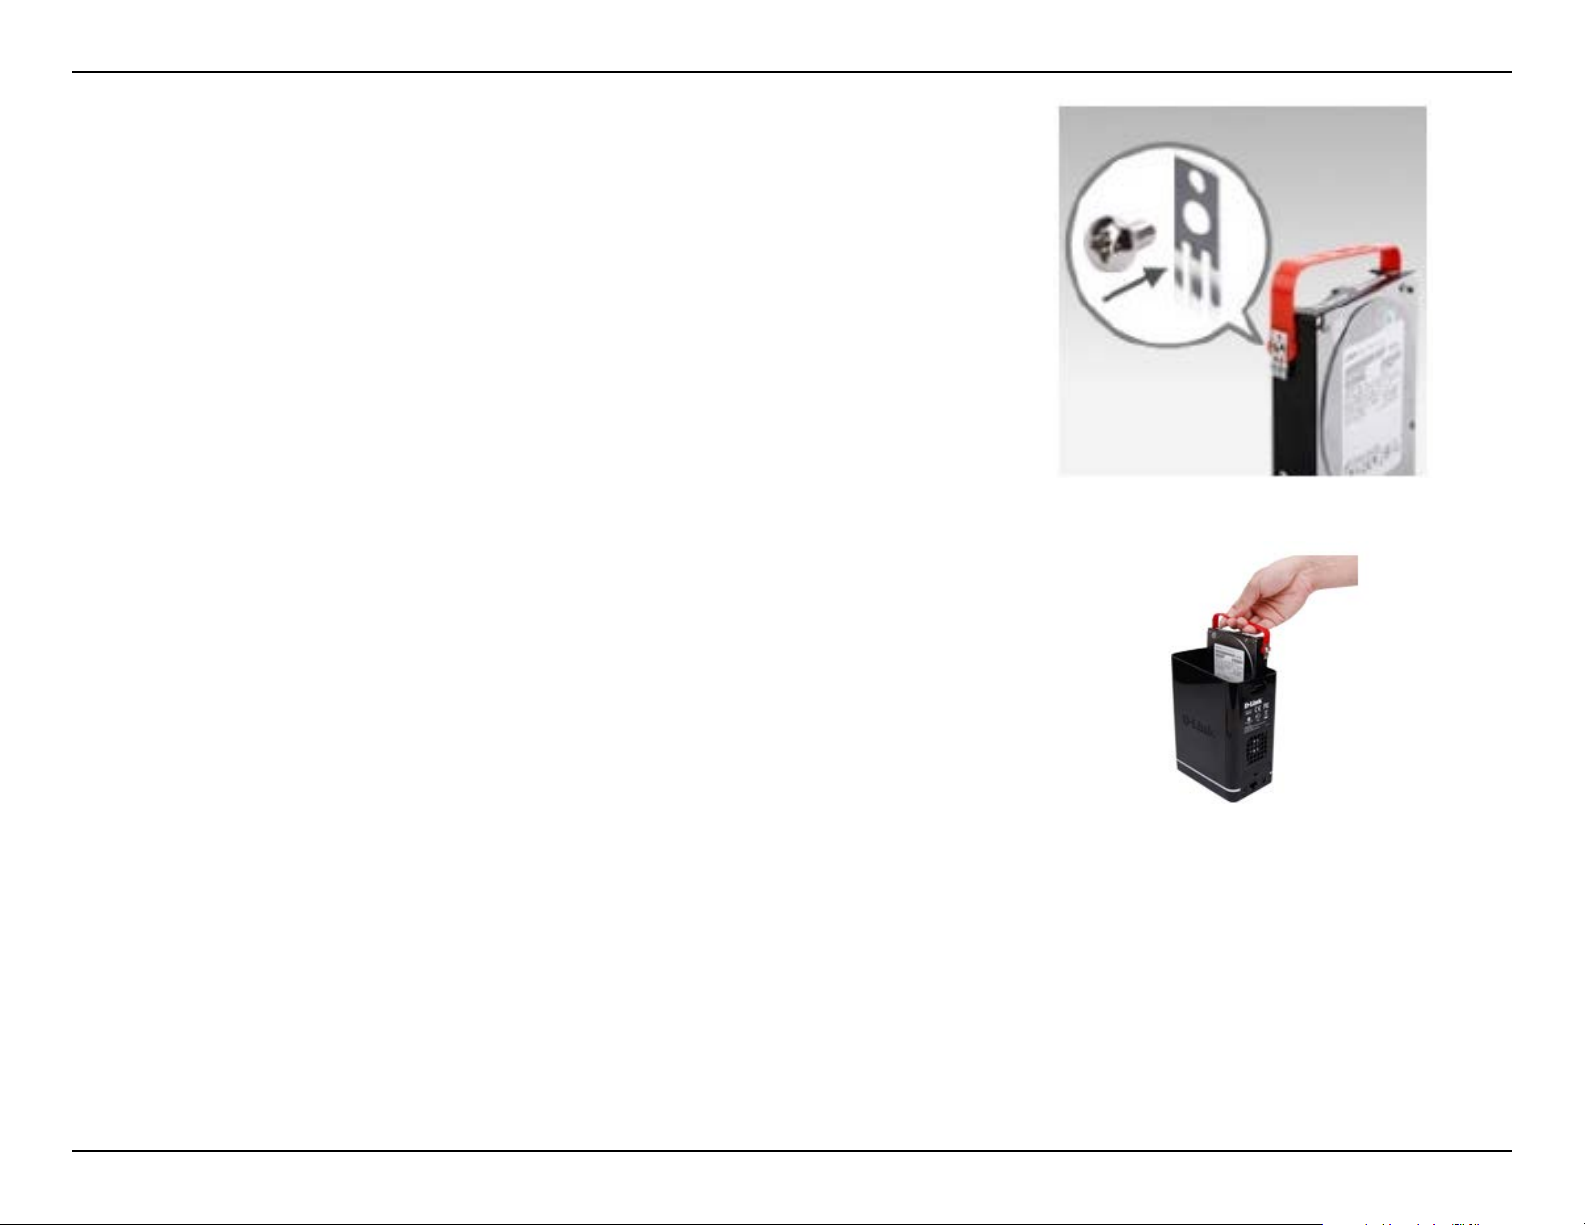
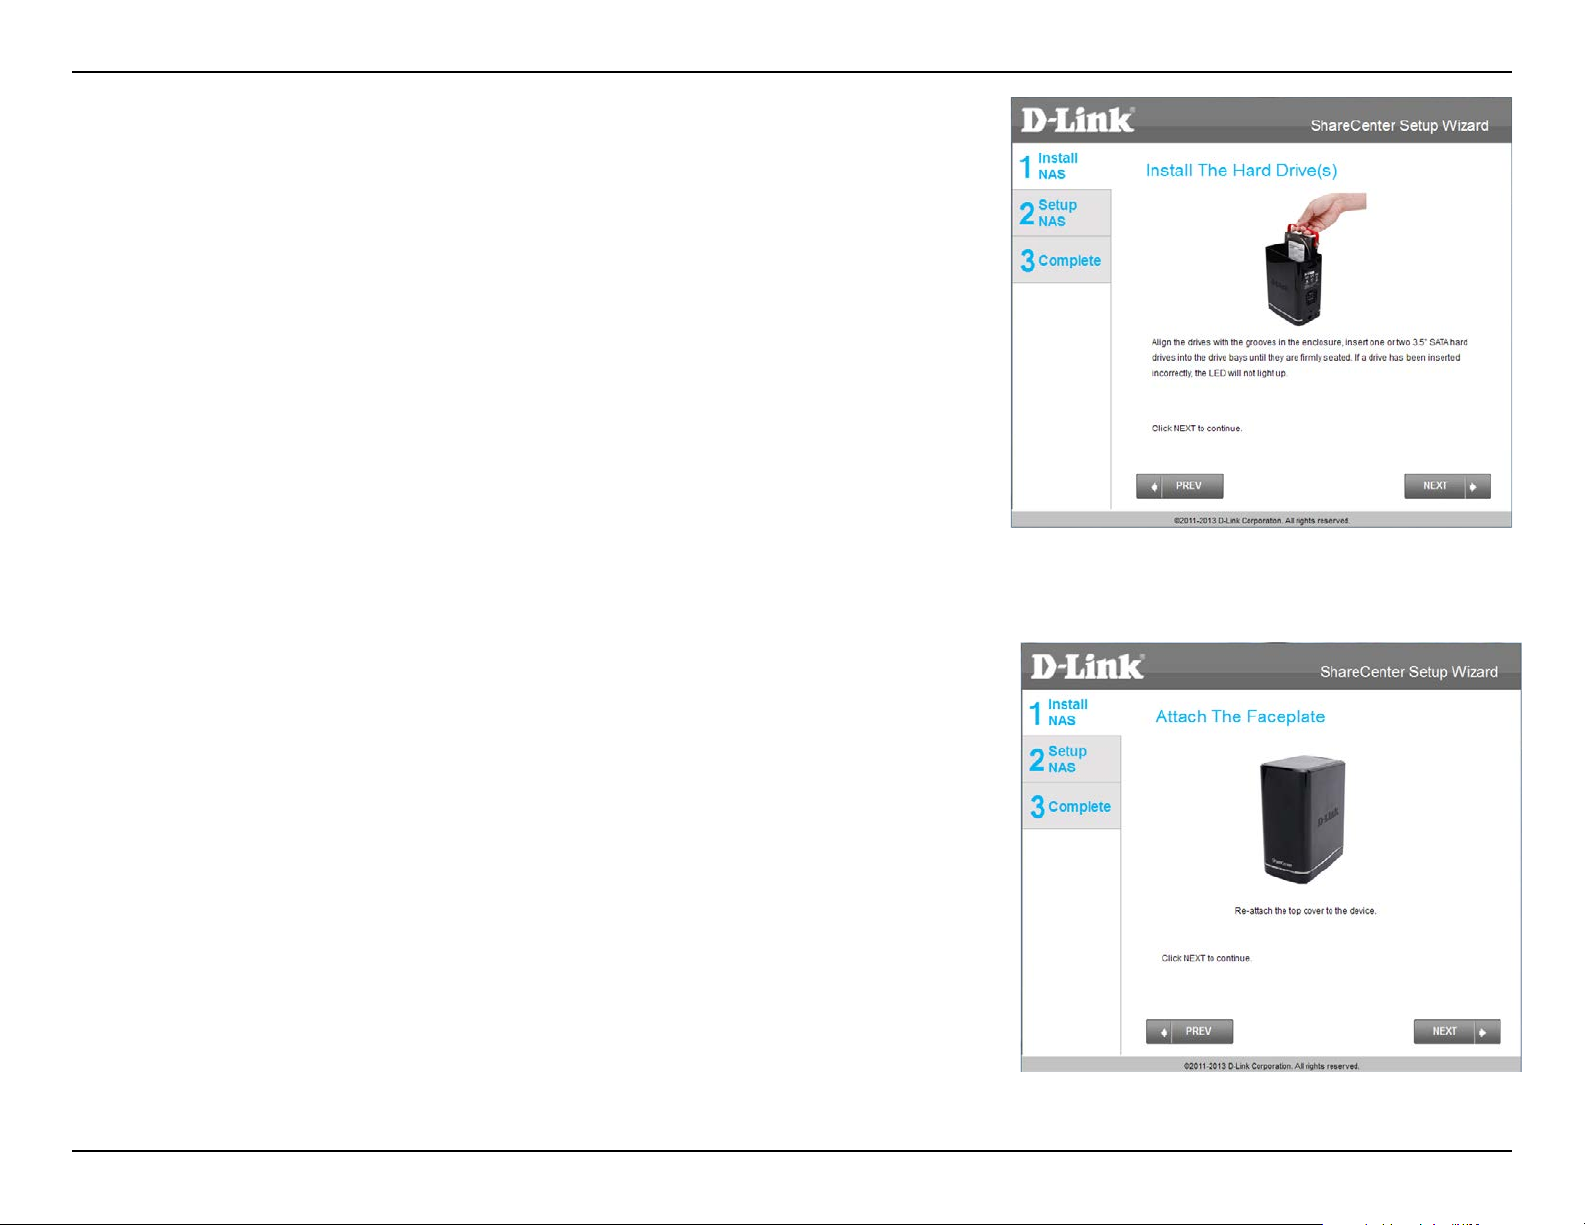
Attach the hard drive brackets to the sides of your hard drives with the included screws. Ensure the brackets are aligned so that when the hard drive is
inserted, the arrow on the bracket points to the front of the ShareCenter .
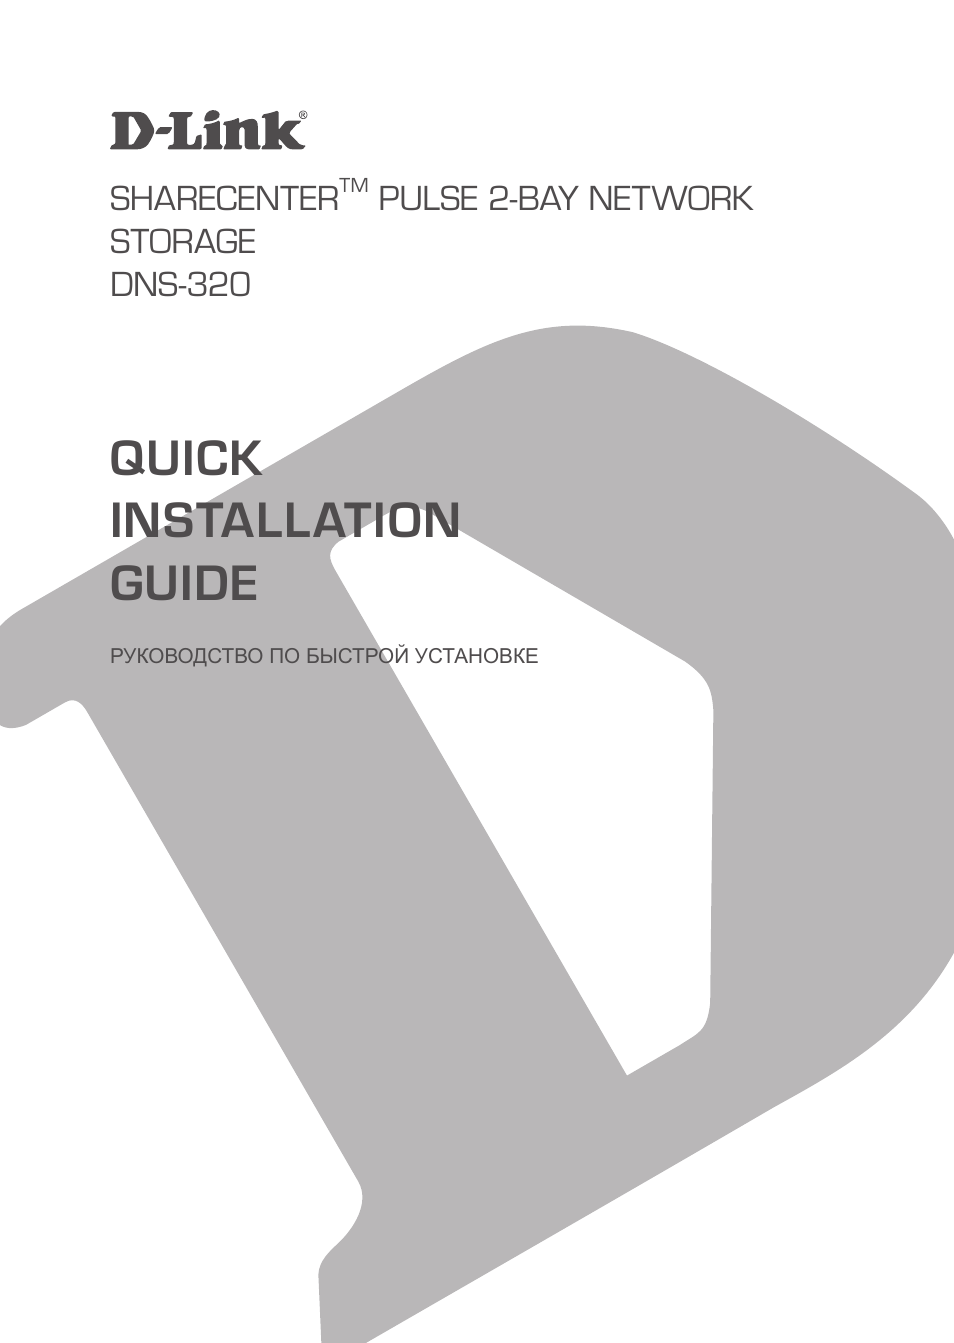
Insert up to two 3.5” SATA hard drives into the drive bays.
Note: Make sure to align the drive connector to the SATA connector at the
back edge inside the drive bay of the ShareCenter. Gently push the drive in
until it connects. When a drive is inserted properly, you will feel it “set” into
the connector. Some hard drives that are thin or oddly shaped may need to
be inserted carefully into position. If a drive is not properly set in place, the
hard drive LED will not illuminate after powering on the device.
12D-Link ShareCenter DNS-320L User Manual
Section 2 — Getting Started
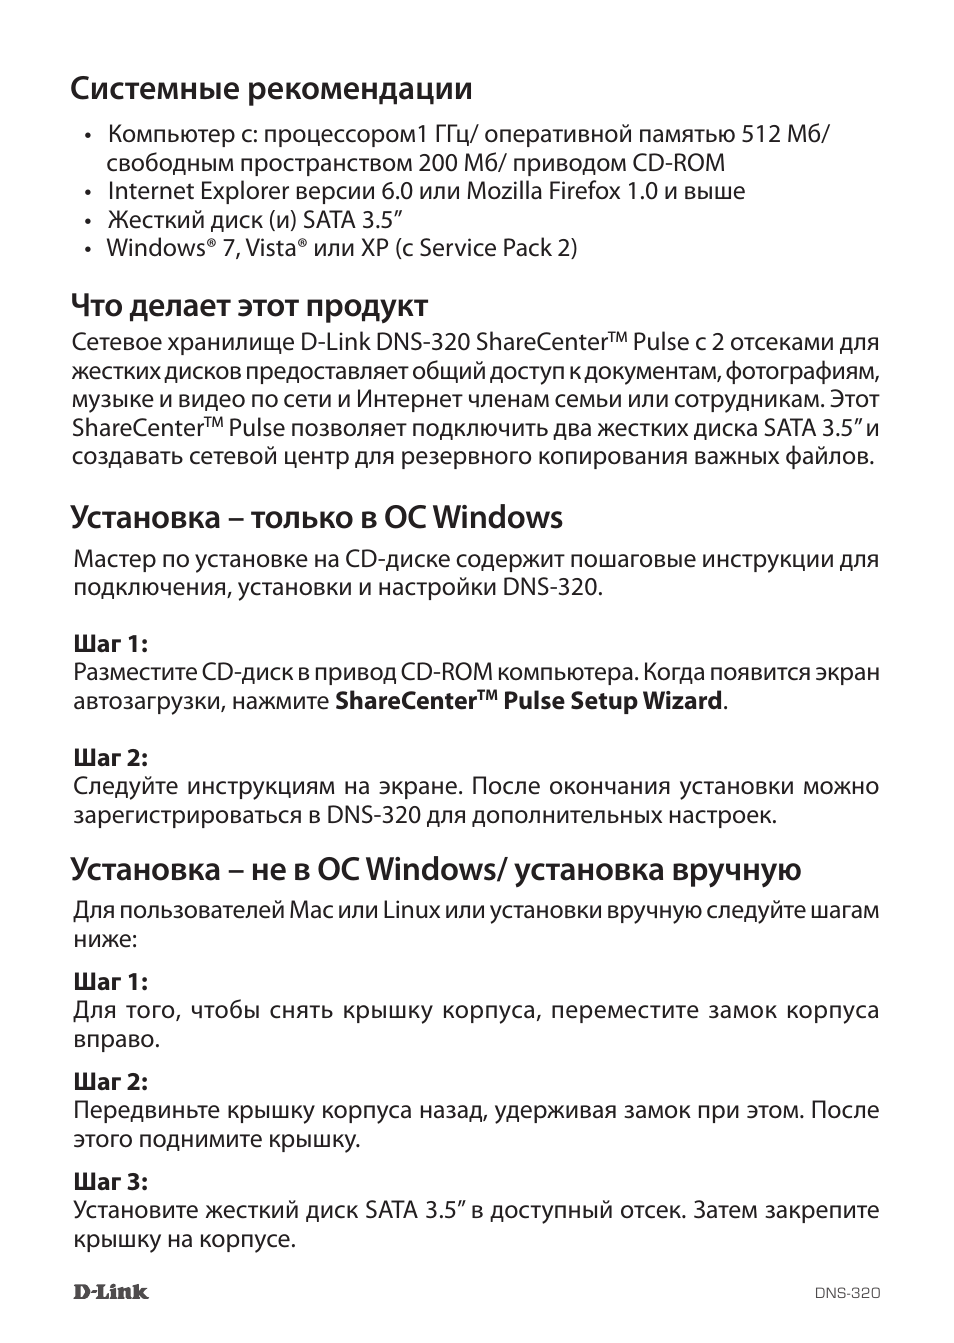
Re-attach the top panel. Ensure the latch is inserted inside the panel.
Connect an Ethernet cable to the Ethernet port. This cable should connect
the ShareCenter to your local network via a router, switch, or directly to a
computer for conguration (cross-over cable required).
Connect the power adapter to the power receptor.
13D-Link ShareCenter DNS-320L User Manual
Section 2 — Getting Started
Zero Conguration Setup
If you have a mydlink-enabled cloud router (DIR-808L, DIR-810L, DIR-820L
DIR-850L, DIR-860L, DIR-868L, DIR-865L, DIR-855L, DIR-836L), you can take
advantage of Zero Conguration setup. Zero Conguration automatically
congures your NAS’s settings for you, and adds it to your mydlink account.
This type of setup allows you to set up your DNS-320L by simply plugging it
in and connecting it to your mydlink-enabled router.
Connect your NAS to your mydlink-enabled cloud router and Zero Conguration will automatically congure your DNS-320L and automatically add
it to your mydlink account. After the short time it takes to do this you can
remotely access your NAS from the www.mydlink.com website to manage
and monitor your DNS-320L.
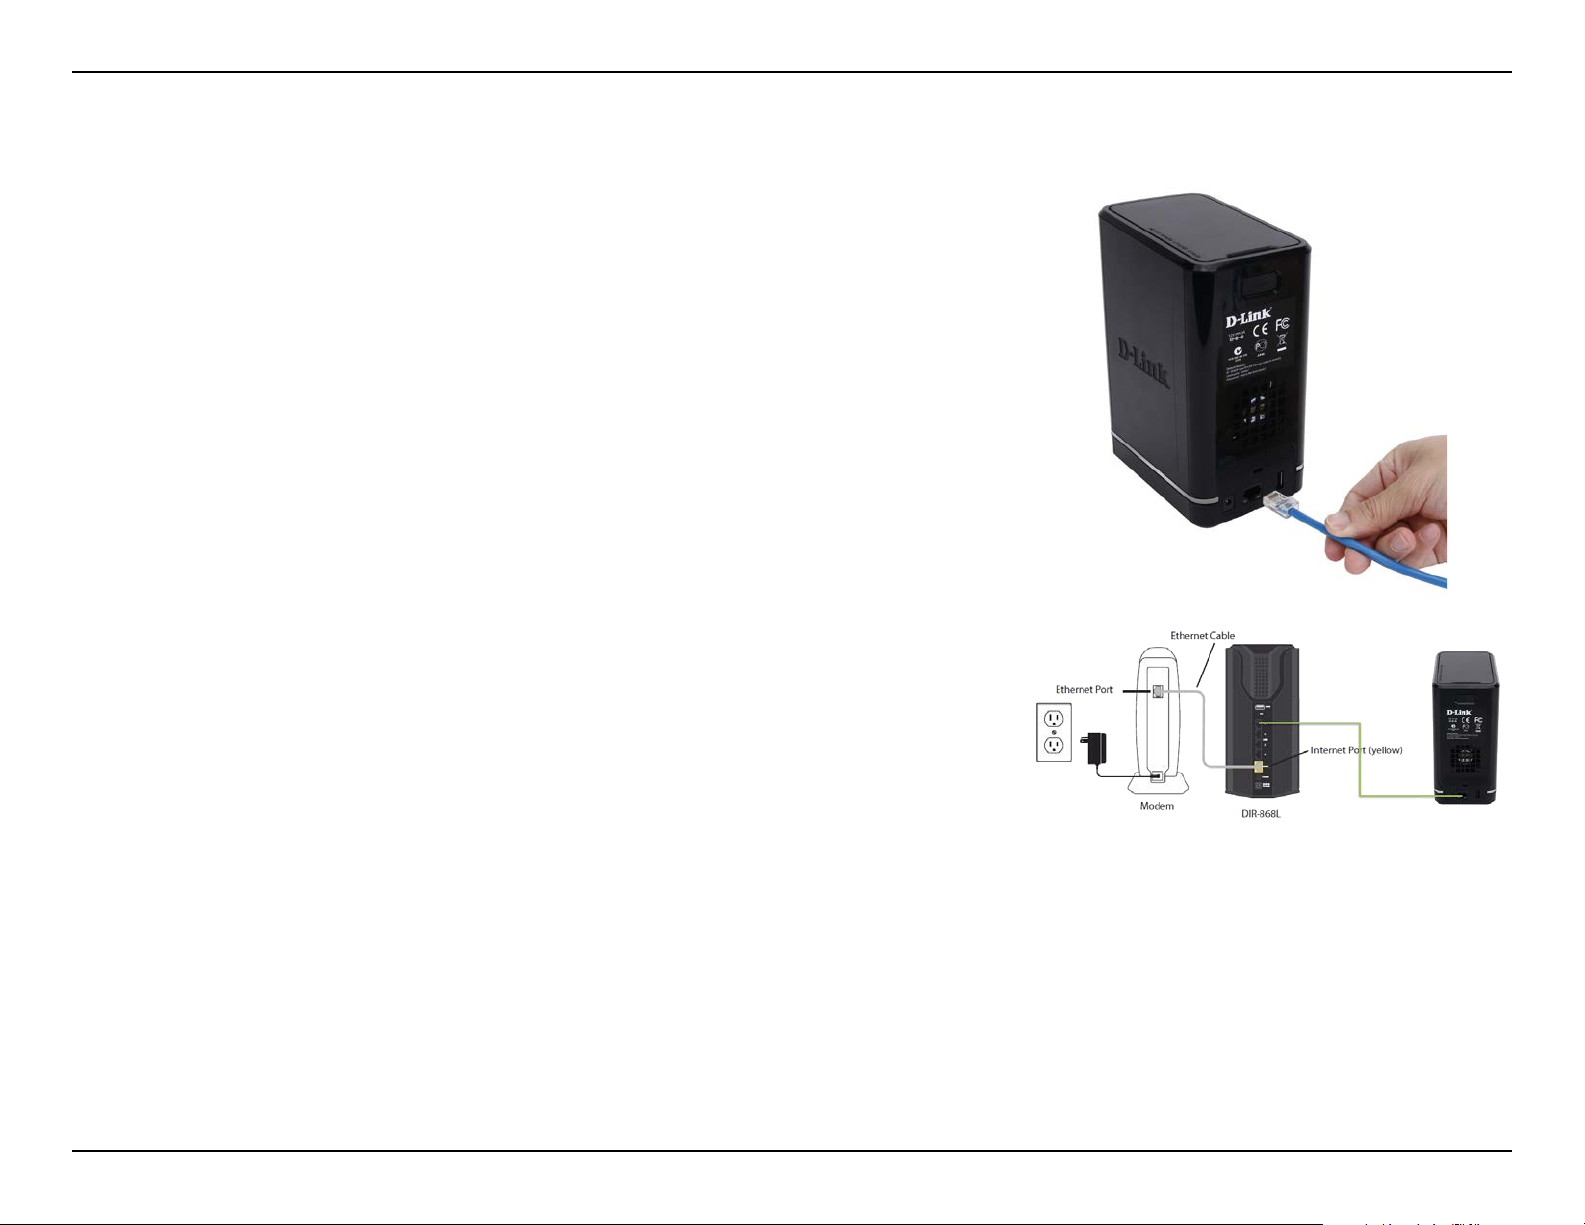
Connect the Ethernet Cable
Use the included Ethernet cable and plug it into the DNS-320L. Plug the
other end into an available port on your router. If you wish to use your NAS
wirelessly, you will be able to remove the cable from the router after Zero
Conguration Setup is complete.
14D-Link ShareCenter DNS-320L User Manual
Section 2 — Getting Started
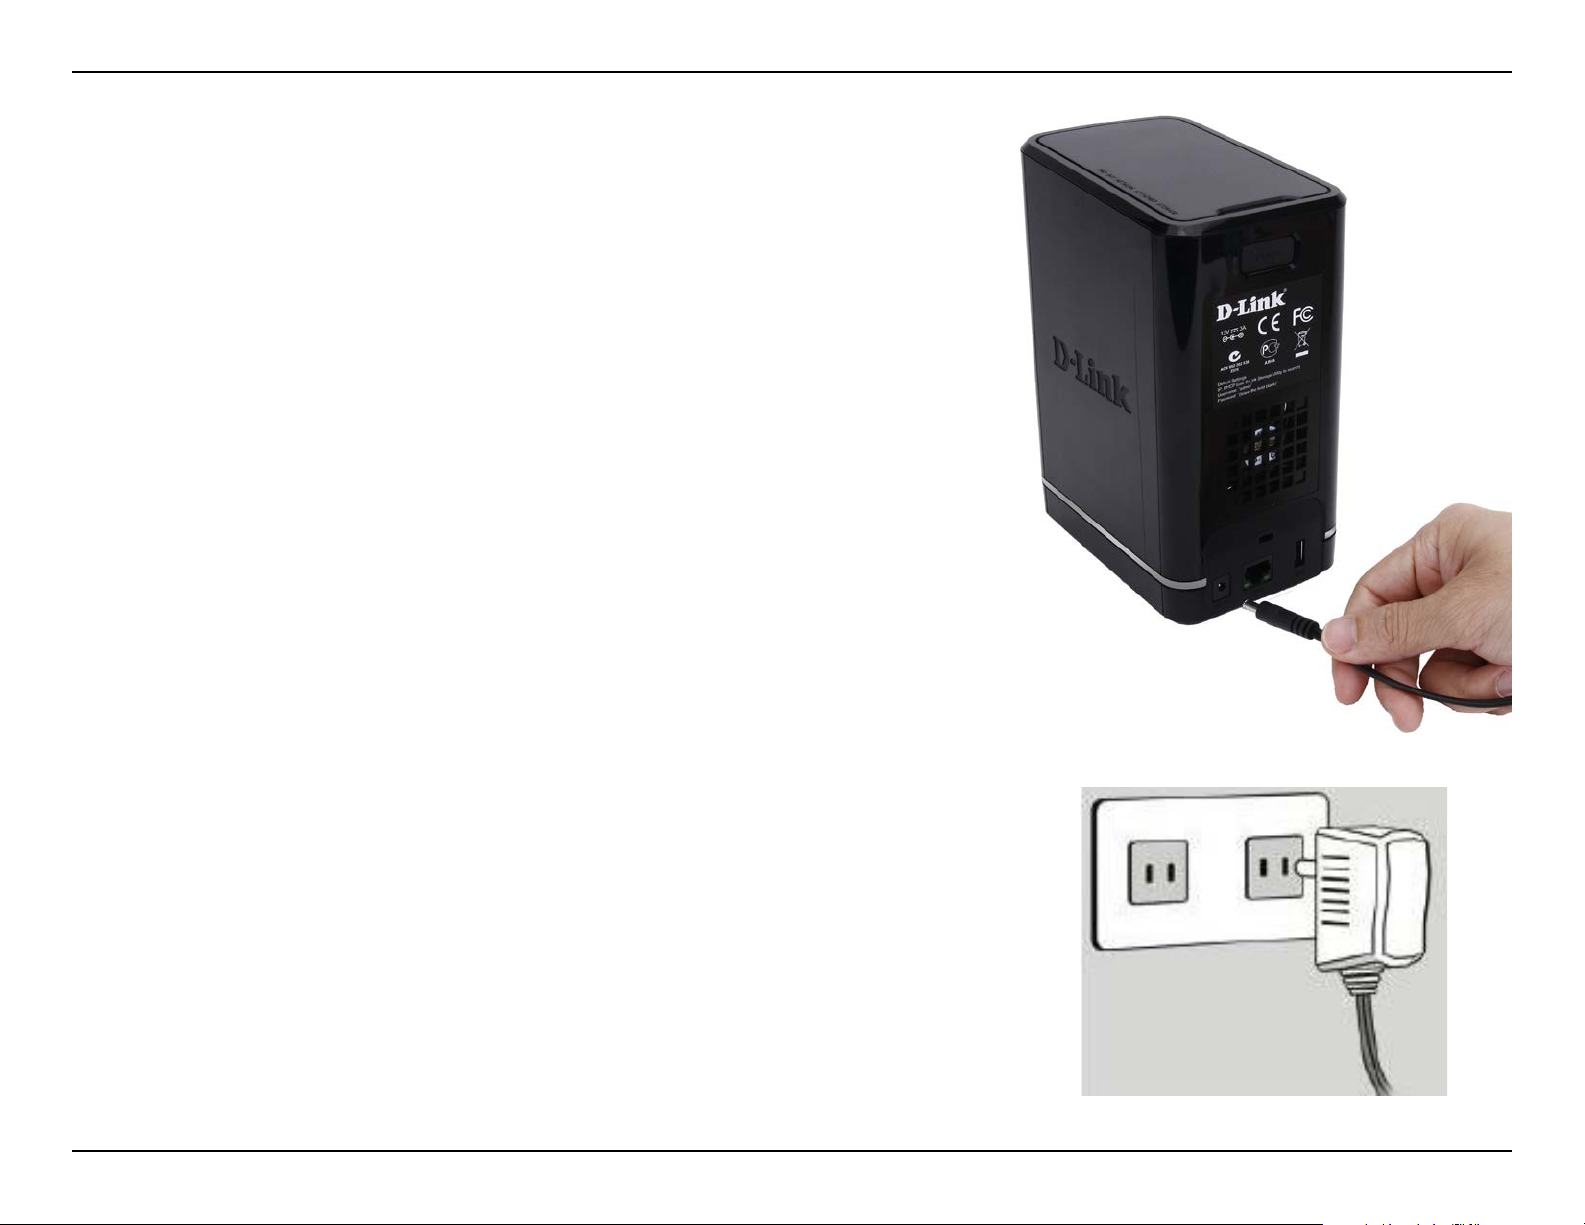
Attach the External Power Adapter
Connect the power adapter to the power connector on your NAS, then plug
the power adapter into a wall outlet.
15D-Link ShareCenter DNS-320L User Manual
Section 2 — Getting Started
Check Your mydlink Account
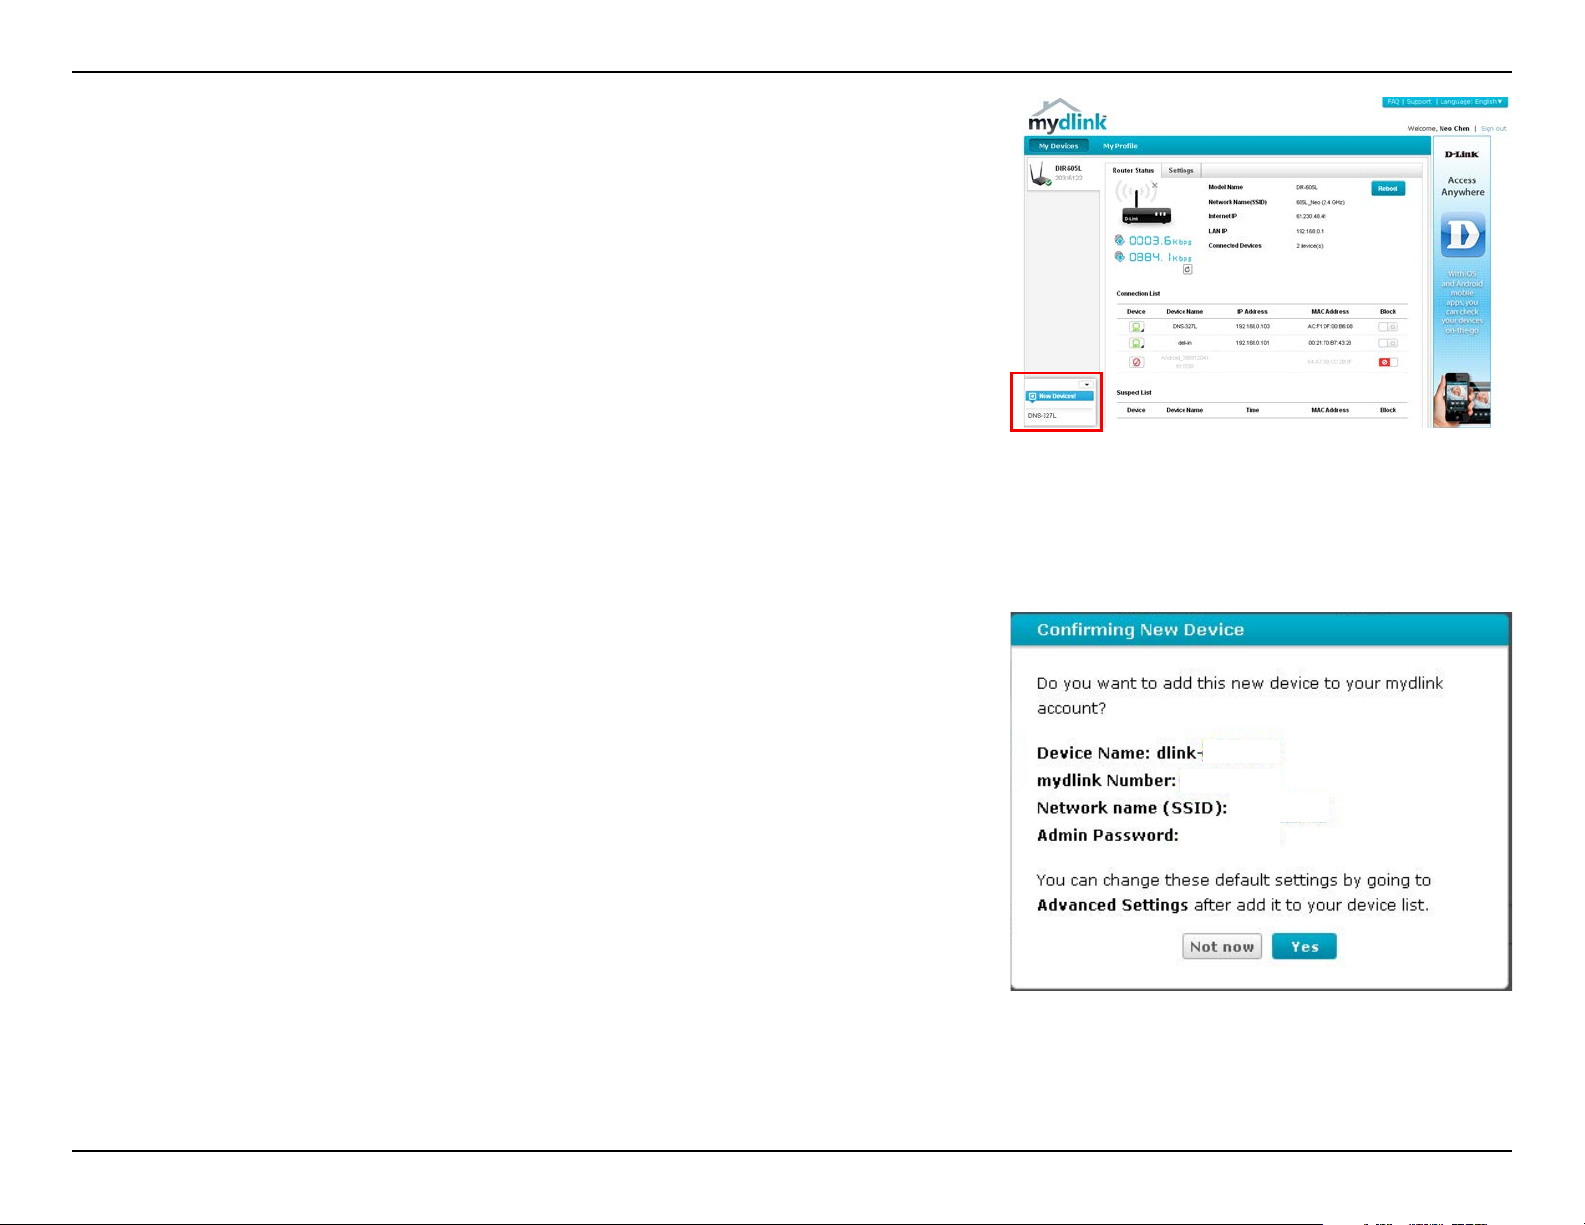
Open a web browser and login to your mydlink account. The mydlink page
will check for new devices and display a New Device Found! pop-up notica-
tion in the bottom-left corner. Click the notication to continue.
Double-click the device to add it to your mydlink devices. If you wish to add it
immediately, click Yes , but if you are unsure of what to do click No. The popup screen displays the Device Name, mydlink number, Network Name, and
Admin Password. If you are unsure of what to do, you can always go back to
Advanced Settings.
16D-Link ShareCenter DNS-320L User Manual
Section 2 — Getting Started
After your DNS-320L is registered, you will be able to access all information
about the NAS from the cloud service. This information is already available
locally, but the mydlink service provides a way for you to view these details
from any location. From this location, you can view all physical disk information,
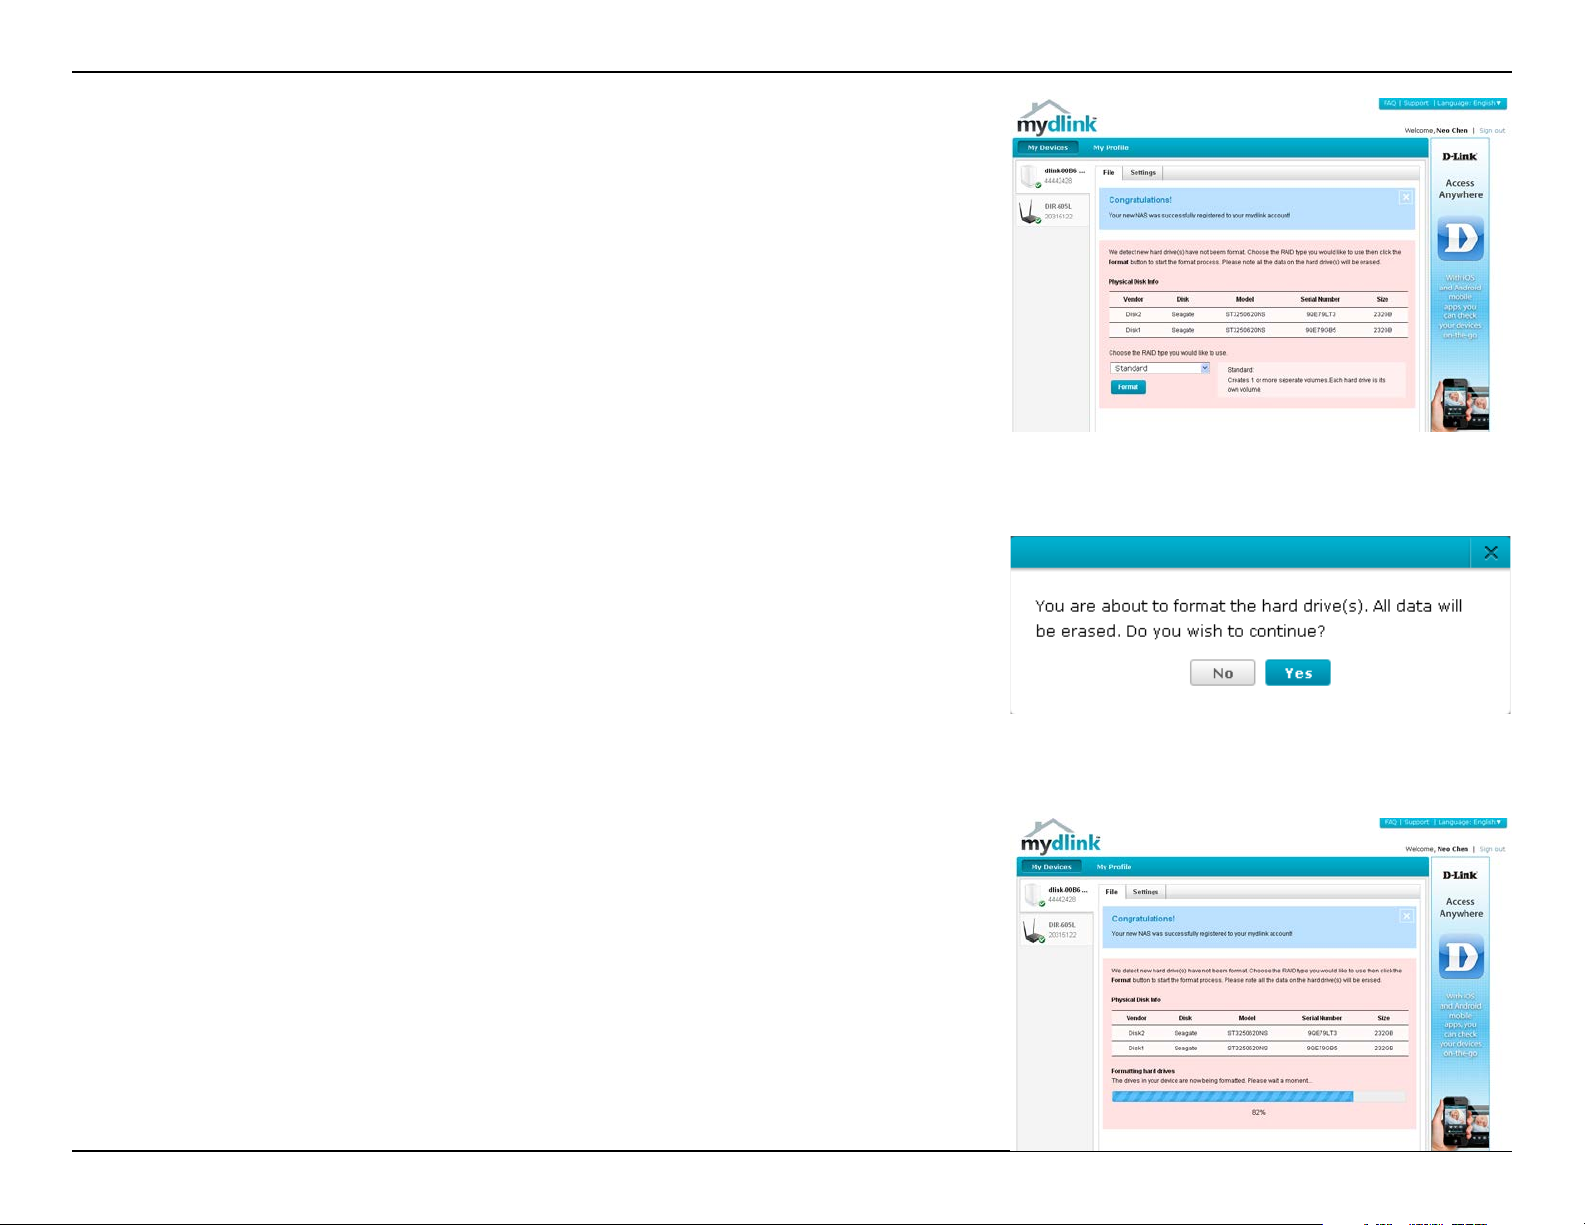
and congure RAID. Please be advised that conguring RAID over the mydlink
service will slow your system down and the speed of this service will depend
on your ISP and the speeds you are using to connect to mydlink.
If you have decided to format your NAS using mydlink, select the RAID method
from the drop-down list and then click the Format button. A pop-up message
appears asking you to conrm your choice to format the volume using mydlink.
Click Yes to format, or No to return to the menu.
The format process may take some time to complete. The format process
depends on the speed of your network connection and client CPU.
17D-Link ShareCenter DNS-320L User Manual
Section 2 — Getting Started
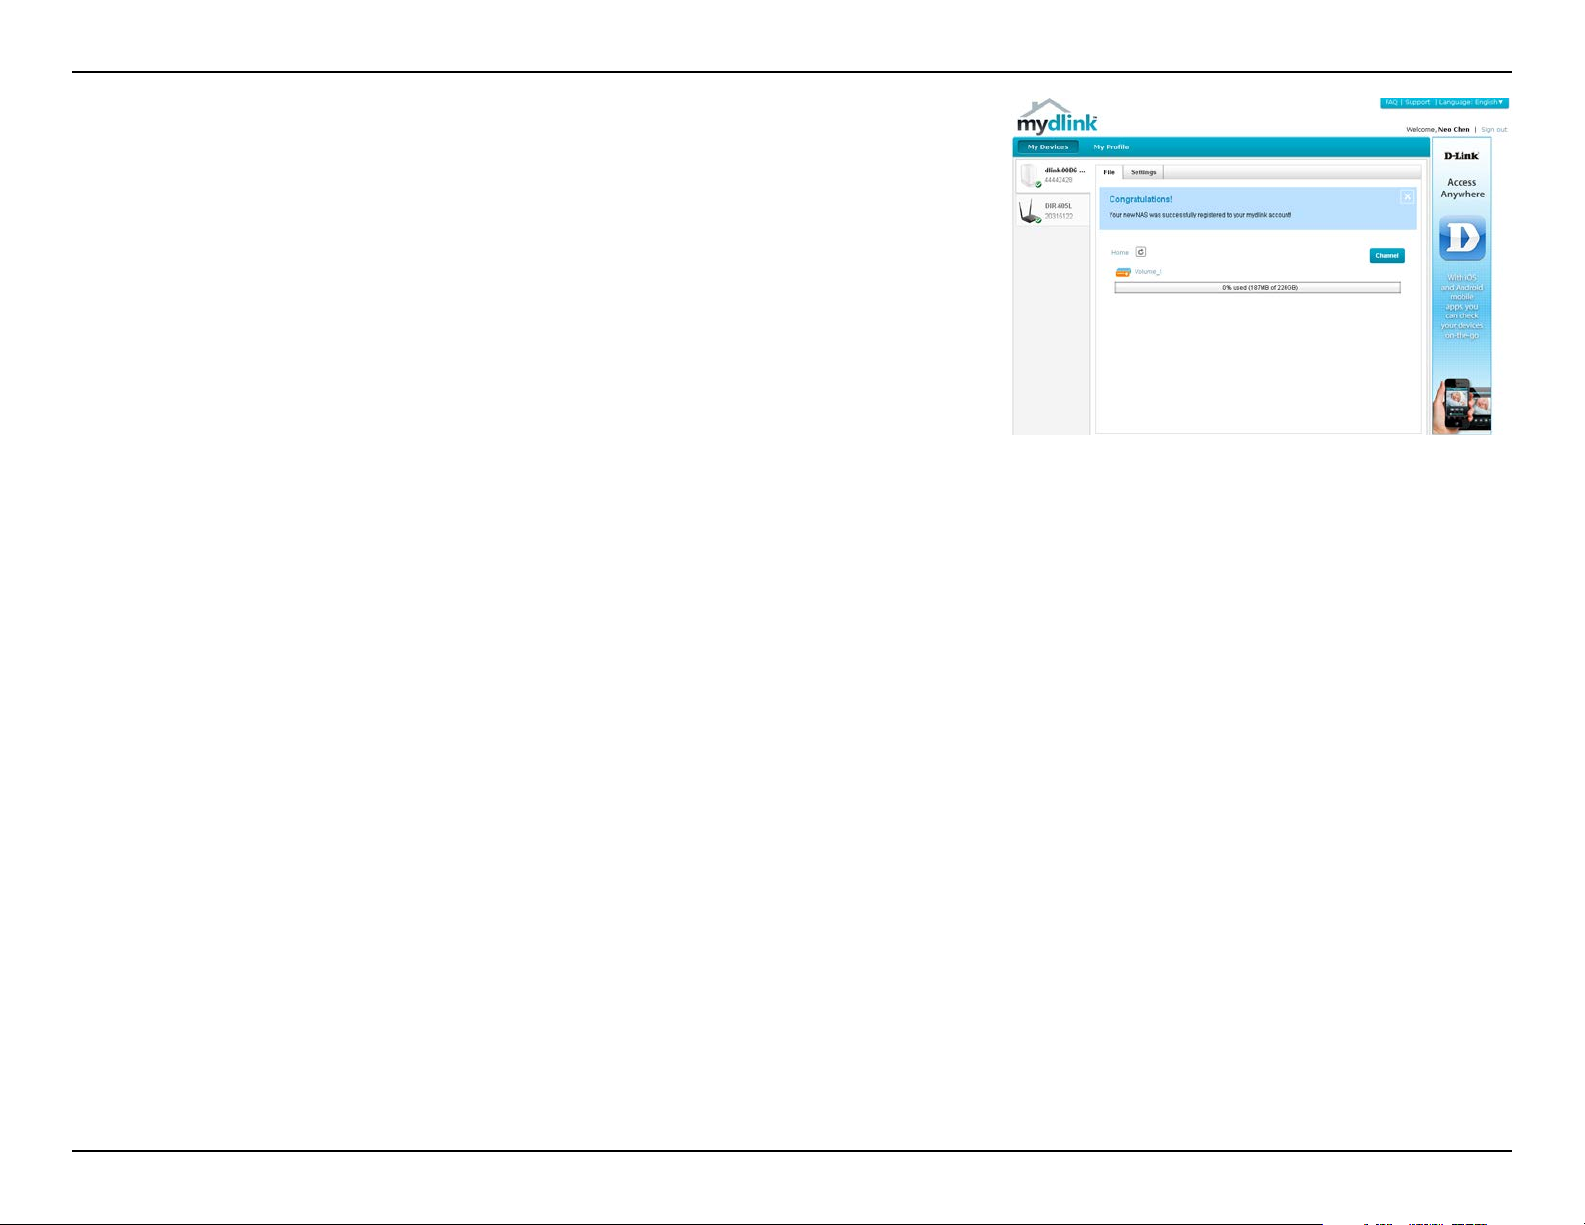
Once the format process is complete, your mydlink cloud service will show
you the RAID status and the Volume Status. It also displays the size of the drive,
and available and used space.
18D-Link ShareCenter DNS-320L User Manual
Section 2 — Getting Started
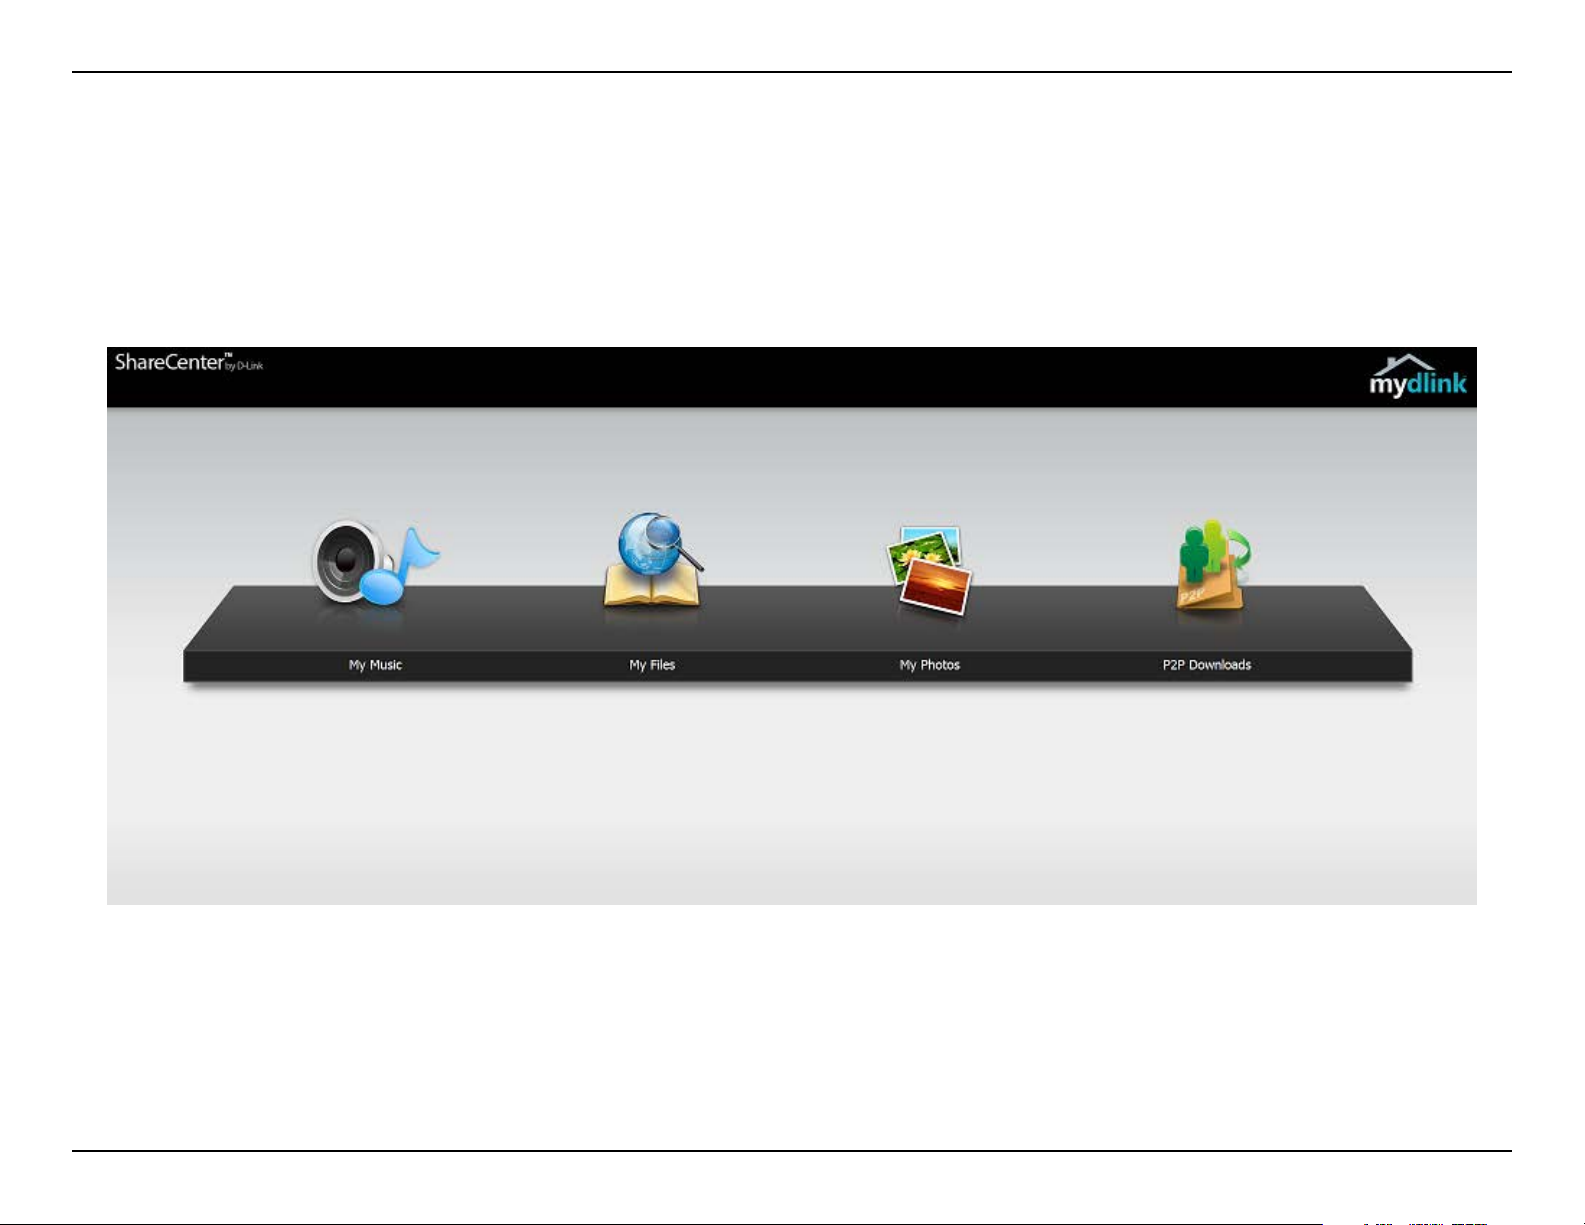
mydlink on the DNS-320L
Accessing the DNS-320L using mydlink provides a dierent user interface experience than the usual NAS interface. Once connected to the mydlink
service, click the Application button to access My Music, My Files, My Photos, and P2P Downloads from the main panel.
19D-Link ShareCenter DNS-320L User Manual
Section 3 — Installation
Windows Installation
Setup Wizard
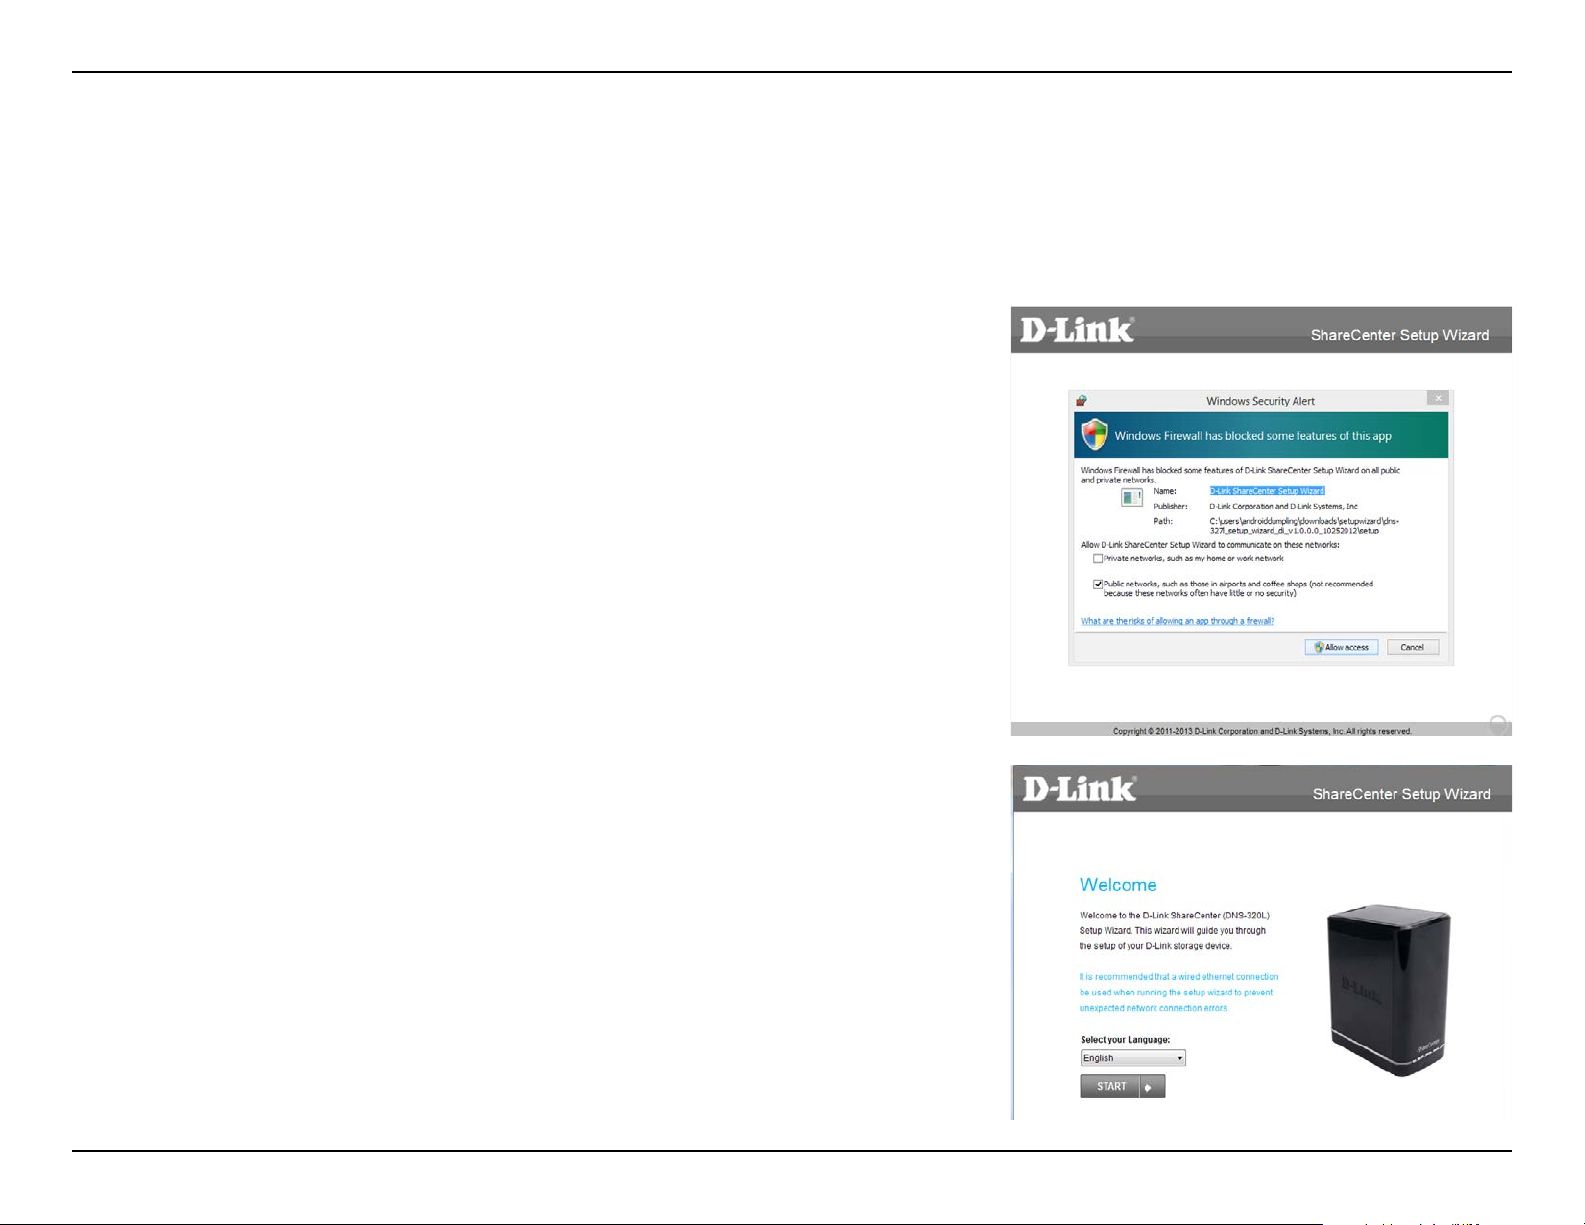
To run the setup wizard, insert the ShareCenter CD into your CD-ROM drive.
When the autorun screen appears, click Install
Note: Windows Firewall may present you with a warning message to unblock
the device. Click Allow Access to allow your computer access to the NAS.
Select the language of your choice and then click the Start button.
20D-Link ShareCenter DNS-320L User Manual
Section 3 — Installation
Installing the Hard Drives
Follow the instructions to remove the top cover of your ShareCenter.
Click Next to continue.
Attach the hard drive bracket(s) to the side of the hard drives as indicated.
Click Next to continue.
21D-Link ShareCenter DNS-320L User Manual
Section 3 — Installation
Slide one or two hard drives into an available hard drive bay of your ShareCenter.
Click Next to continue.
With the hard drives installed properly into each bay, close the chassis by reattaching the top panel into place.
Click Next to continue.
22D-Link ShareCenter DNS-320L User Manual

Section 3 — Installation
Connect a CAT5 Ethernet cable to your ShareCenter and connect the other
end to a switch or router (Local LAN).
Click Next to continue.
Connect the power adapter connector to the power receptor on the back of
the ShareCenter. Then, power on the ShareCenter by pressing the power button located on the front panel.
Click Next to continue.
23D-Link ShareCenter DNS-320L User Manual

Section 3 — Installation
Setting up the NAS
With the power on, press the Next button on the device and check and make
sure the IP address of your ShareCenter matches what you see on the screen.
Note: Allow 1-2 minutes for the DNS-320L to be recognized.
Click Next to continue.
Note: To double-check the NAS’s IP address, go to settings of your local router
and check the IP address table.
A warning message will appear prompting you to conrm that the LED on
the front of your device is blinking. If so, click Yes to proceed.
Click Next to continue.
24D-Link ShareCenter DNS-320L User Manual
Loading…
SHARECENTER
TM
PULSE 2-BAY NETWORK
STORAGE
DNS-320
QUICK
INSTALLATION
GUIDE
Руководство по быстРой установке
Руководство по быстрой установке, Комплект поставки, Сетевое хранилище sharecenter
Pulse с 2 отсеками для жестких дисков Чат поддержки
- Изображение
- Текст
DNS-320
Руководство по быстрой установке
Сетевое хранилище ShareCenter
TM
Pulse с 2 отсеками для
жестких дисков
Спасибо за приобретение сетевого хранилища ShareCenter
TM
Pulse с 2
отсеками для жестких дисков. Следуйте простым шагам этого руководства для
корректной установки сетевого хранилища. Пожалуйста, проверьте комплект
поставки.
Если что-либо из перечисленного отсутствует, пожалуйста, обратитесь к продавцу.
Комплект поставки
D-Link DNS-320 — сетевое хранилище ShareCenter
TM
с 2 отсеками
для жестких дисков
Кабель Ethernet 5 категории
Шнур питания
Адаптер питания (12В/4A)
CD-диск с руководством пользователя и программным
обеспечением

DNS-320
Что делает этот продукт
Системные рекомендации
• Компьютер с: процессором1 ГГц/ оперативной памятью 512 Мб/
свободным пространством 200 Мб/ приводом CD-ROM
• Internet Explorer версии 6.0 или Mozilla Firefox 1.0 и выше
• Жесткий диск (и) SATA 3.5”
• Windows® 7, Vista® или XP (с Service Pack 2)
Мастер по установке на CD-диске содержит пошаговые инструкции для
подключения, установки и настройки DNS-320.
Шаг 1:
Разместите CD-диск в привод CD-ROM компьютера. Когда появится экран
автозагрузки, нажмите ShareCenter
TM
Pulse Setup Wizard.
Шаг 2:
Следуйте инструкциям на экране. После окончания установки можно
зарегистрироваться в DNS-320 для дополнительных настроек.
Для пользователей Mac или Linux или установки вручную следуйте шагам
ниже:
Шаг 1:
Для того, чтобы снять крышку корпуса, переместите замок корпуса
вправо.
Шаг 2:
Передвиньте крышку корпуса назад, удерживая замок при этом. После
этого поднимите крышку.
Шаг 3:
Установите жесткий диск SATA 3.5” в доступный отсек. Затем закрепите
крышку на корпусе.
Установка – только в ОС Windows
Установка – не в ОС Windows/ установка вручную
Сетевое хранилище D-Link DNS-320 ShareCenter
TM
Pulse с 2 отсеками для
жестких дисков предоставляет общий доступ к документам, фотографиям,
музыке и видео по сети и Интернет членам семьи или сотрудникам. Этот
ShareCenter
TM
Pulse позволяет подключить два жестких диска SATA 3.5” и
создавать сетевой центр для резервного копирования важных файлов.
DNS-320
Примечание: За инструкциями по установке программного обеспечения,
пожалуйста, обратитесь к руководству пользователя.
RESET
LAN
10/100/1000
DC IN
Model: DNS-320
INTERNET
5V — — — 3A
1
2 LAN
3
4
INTERNET
USB
RESET
Router
Modem
DNS-320
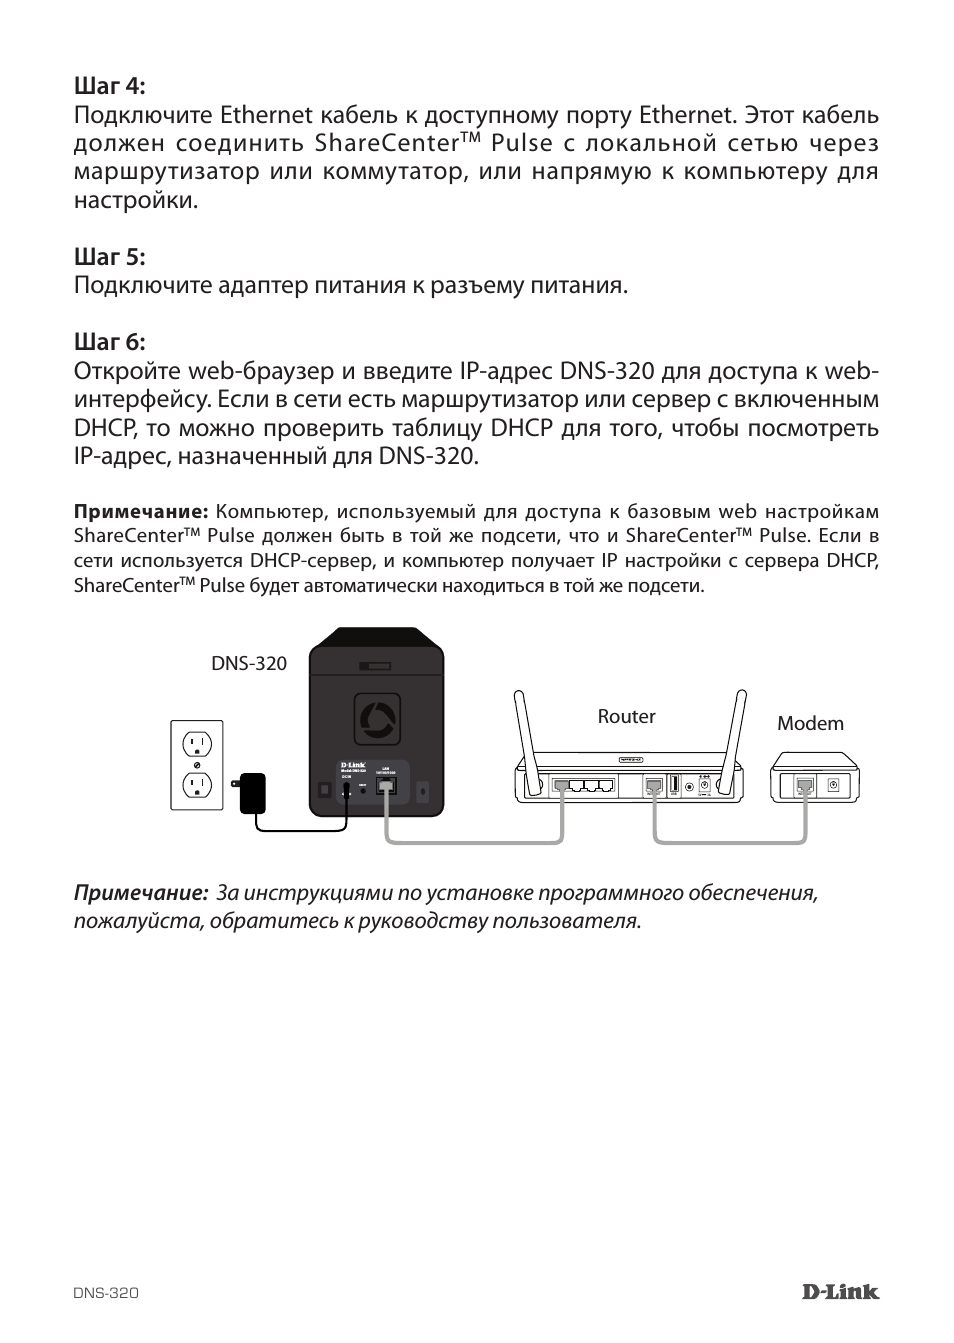
Шаг 4:
Подключите Ethernet кабель к доступному порту Ethernet. Этот кабель
должен соединить ShareCenter
TM
Pulse с локальной сетью через
маршрутизатор или коммутатор, или напрямую к компьютеру для
настройки.
Шаг 5:
Подключите адаптер питания к разъему питания.
Шаг 6:
Откройте web-браузер и введите IP-адрес DNS-320 для доступа к web-
интерфейсу. Если в сети есть маршрутизатор или сервер с включенным
DHCP, то можно проверить таблицу DHCP для того, чтобы посмотреть
IP-адрес, назначенный для DNS-320.
Примечание: Компьютер, используемый для доступа к базовым web настройкам
ShareCenter
TM
Pulse должен быть в той же подсети, что и ShareCenter
TM
Pulse. Если в
сети используется DHCP-сервер, и компьютер получает IP настройки с сервера DHCP,
ShareCenter
TM
Pulse будет автоматически находиться в той же подсети.
Техническая поддержка офисы, Техническая поддержка d-link, Техническая поддержка через интернет
Украина, Беларусь, Казахстан, Узбекистан, Армения, Грузия, Lietuva Чат поддержки
- Изображение
- Текст
DNS-320
техническая поддеРжка
офисы
обновления программного обеспечения и документация доступны на интернет-сайте d-link.
d-link предоставляет бесплатную поддержку для клиентов
в течение гарантийного срока.
клиенты могут обратиться в группу технической поддержки d-link по телефону или через
интернет.
Техническая поддержка D-Link:
+7(495) 744-00-99
Техническая поддержка через Интернет
http://www.dlink.ru
e-mail: support@dlink.ru
Украина,
04080 г. киев , ул. Межигорская, 87-а, офис 18
тел.: +38 (044) 545-64-40
e-mail: kiev@dlink.ru
Беларусь
220114, г. Минск, проспект независимости,
169 , бЦ «XXI век»
тел.: +375(17) 218-13-65
e-mail: minsk@dlink.ru
Казахстан,
050008, г. алматы, ул. курмангазы, дом 143
(уг. Муканова)
тел./факс: +7 727 378-55-90
e-mail: almaty@dlink.ru
Узбекистан
100015, г.ташкент, ул. нукусская, 89
тел./факс: +998 (71) 120-3770, 150-2646
e-mail: tashkent@dlink.ru
Армения
0038, г. ереван, ул. абеляна, 6/1, 4 этаж
тел./факс: + 374 (10) 398-667
e-mail: erevan@dlink.ru
Грузия
0162, г. тбилиси,
проспект чавчавадзе 74, 10 этаж
тел./факс: + 995 (32) 244-563
Lietuva
09120, Vilnius, Žirmūnų 139-303
tel./faks. +370 (5) 236-3629
e-mail: info@dlink.lt
Eesti
peterburi tee 46-205
11415, tallinn, eesti , susi Bürookeskus
tel +372 613 9771
e-mail: info@dlink.ee
Latvija
mazā nometņu 45/53 (ieeja no nāras ielas)
lV-1002, Rīga
tel.: +371 6 7618703 +371 6 7618703
e-pasts: info@dlink.lv
06:12
ShareCenter D-Link DNS-320L network file server — The correct configuration on Windows 10
24:14
Чтобы не потерять самое ценное в компе! Как уберечь важные файлы?
04:40
Обзор сетевого файлохранилища D-Link 320L
04:38
D-Link DNS-320 ShareCenter NAS Introduction
10:01
How To: Set Up A NAS (D-LINK 320L)
07:25
Мой NAS D-Link DNS-343
02:55
DLink DNS-320 Dynamic DNS Setup
02:41
Замена кулера на DNS-320L
Нажмите на кнопку для помощи
-
Страница 1
[…]
-
Страница 2
i D-Link ShareCent er DNS-320 User Manual T able of Con tents T able of C onten ts Product Overview …………………………………………………….. 1 Introduction ……………………………………………………………………….. 1 P ackage Contents …………………………………………………………..[…]
-
Страница 3
ii D-Link ShareCent er DNS-320 User Manual T able of Con tents iT unes Ser ver ……………………………………………………………… 64 AFP Ser vice ………………………………………………………………… 65 NFS Ser vice …………………………………………………………………66 Syst em Mana[…]
-
Страница 4
1 D-Link ShareCent er DNS-320 User Manual Sec tion 1 — P roduct O v er view The D-Link ShareC enter® DNS-320 2-Ba y Network Storage , when used with internal SA T A drives, enables you to share documents, les , and digital media such as music, photos , and video with ev er yone on the home or oce network. Remotely accessing les thr ough t[…]
-
Страница 5
2 D-Link ShareCent er DNS-320 User Manual Sec tion 1 — P roduct O v er view • D -Link ShareC enter® DNS-320 • CD -ROM with Manual and Sof tware • Quick I nstallation Guide • Po wer A dapter • Po wer C ord • CA T5 Ethernet Cable P ack age C ont ents Note: Using a po wer supply with a di erent v oltage than the one included with the S[…]
-
Страница 6
3 D-Link ShareCent er DNS-320 User Manual Sec tion 1 — P roduct O v er view F eatur es • T wo Hard Drive Bay s for 3.5” SA T A Hard Drives • Gigabit Ethernet Connectivity • Simplied Hard Drive Installation P roc ess • USB port suppor t External Storage Device , P rinter Ser ver , UPS Monitoring • F our Hard Drive Congurations: Sta[…]
-
Страница 7
4 D-Link ShareCent er DNS-320 User Manual Sec tion 1 — P roduct O v er view Har dwar e O v er view F r ont P anel C OMPONENT DESCRIPTION HDD1/HDD2 LED These lights will be solid BL UE when drives are connected but inactive The lights will blink when the drives are being accessed , formatted or synchr onized. They will illuminate AMBER if a drive ha[…]
-
Страница 8
5 D-Link ShareCent er DNS-320 User Manual Sec tion 1 — P roduct O v er view Rear P anel ( C onnections) C OMPONENT DESCRIPTION Cov er Lock This lock is used to r emove the co ver when unlocked . Locking it will restrict the removal of the top co ver . Cooling F an The cooling fan is used to cool the har d drives and f eatures speed contr ol. When t[…]
-
Страница 9
6 D-Link ShareCent er DNS-320 User Manual Sec tion 2 — Getting Started T o get star ted with the ShareCen ter® Setup W izard , inser t the supplied CD into y our CD-ROM drive: Getting Star ted Shar eC en ter Sof tware CD Cl ick the Ins ta ll but t on to st art the Sh ar e C en te r® Setup W izard .[…]
-
Страница 10
7 D-Link ShareCent er DNS-320 User Manual Sec tion 3 — Installation The Setup wizard will walk y ou through the c onguration of your Shar eCen ter® device . Installation Setup W izard Note: T he comput er used to ac cess the ShareCenter® web-based c onguration manager must be on the same subnet as the ShareC enter . If your network is using[…]
-
Страница 11
8 D-Link ShareCent er DNS-320 User Manual Sec tion 3 — Installation Install the Hard Driv es This step shows you how to open your ShareCen ter so that you can install one or two hard drives . Click Next to continue . Slide either one or t wo hard drives into the open hard drive bays of your device. Click Next to continue .[…]
-
Страница 12
9 D-Link ShareCent er DNS-320 User Manual Sec tion 3 — Installation Once the hard driv es are installed , you can attach the top cover . Click Ne xt to continue. A s tandard CA T5E Et hernet cable with a RJ-45 connec tor i s need ed to connec t your ShareC enter® to y our network . Click Ne xt to continue.[…]
-
Страница 13
10 D-Link ShareCent er DNS-320 User Manual Sec tion 3 — Installation P o w er and Device Selection Connect the pow er adapter to the power receptor on the back of the device . Pr ess the power button located un der the faceplate L EDs to turn on the device. Cli ck Next to continue . With the power on check that the P ow er LED is solid. I f it is s[…]
-
Страница 14
11 D-Link ShareCent er DNS-320 User Manual Sec tion 3 — Installation A dmin passwor d This window r equests the Admin (administrat or) password . If this is the rst installation of this device then the passwor d will be blank. Click Next to continue. In this step you can cr eate a new passwor d f or the A dmin username . It is rec ommended you s[…]
-
Страница 15
12 D-Link ShareCent er DNS-320 User Manual Sec tion 3 — Installation Network Setup Y o u ma y u se e it he r St at i c I P or D HC P to co n fi gu re t he I P n et wo r k se t ti ng s o f t h e ShareC enter®. If you selec t Static IP then input the IP net work settings. Click Next to continue . If you want your ShareCenter® to be par t of a Windo[…]
-
Страница 16
13 D-Link ShareCent er DNS-320 User Manual Sec tion 3 — Installation Dynamic DNS C li ck o n t he Y e s ra d io b ut t on i f yo u a lr ea d y h a ve a D DN S ac co u nt to u s e fo r t he ShareC enter® DDNS settings. If you do not have a DDNS account or do not want to use one, click on the No Radio button. Click Ne xt to continue. If you clicked […]
-
Страница 17
14 D-Link ShareCent er DNS-320 User Manual Sec tion 3 — Installation DDNS A cc ount and S y stem T ime If y ou want a DDNS ac count to use with your ShareCenter®, D -Link provides a free DDNS account b y clicking on the web link shown. Y ou will need to do the follo wing: • Create an ac count with a username and passwor d. • Cr eat e a hostn a[…]
-
Страница 18
15 D-Link ShareCent er DNS-320 User Manual Sec tion 3 — Installation E-mail Settings and V olume I nf ormation Y ou can congure messages to be sent aler ting you to c er tain operational conditions and drive status conditions to your e -mail account. These aler ts can prove helpful with the management and safeguar ding of impor tant data. Enter […]
-
Страница 19
16 D-Link ShareCent er DNS-320 User Manual Sec tion 3 — Installation RAID Congur ation and Driv e Mapping Select one of the Vo lume F ile Syst ems type. Clicking on each le sy stem type ra dio butt on will give a description below . F or more information concerning the dierent RAID Disk Formats please ref er to “ What is RAID?” on page[…]
-
Страница 20
17 D-Link ShareCent er DNS-320 User Manual Sec tion 3 — Installation C ongura tion Summar y and Drive F ormatting Revi ew y our volum e co ngu ra tion summ ary detai ls her e be fo re clic king next and startin g the drive f ormat. If nec essar y use the PREV button to go back and rec ongure the RAID conguration of the v olume(s). When […]
-
Страница 21
18 D-Link ShareCent er DNS-320 User Manual Sec tion 3 — Installation F ormat Complet e The wizard will show this window if the hard drive format(s) are successful. Click Next to continue .[…]
-
Страница 22
19 D-Link ShareCent er DNS-320 User Manual Sec tion 3 — Installation The nal window of the installation wizard shows succ essful completion. Y our de vice is now i nstal led an d re ady for us e. Y our dr ives are ne twor k mapped fr om using the wizard so you will be able to acc ess them under you My Computer icon.[…]
-
Страница 23
20 D-Link ShareCent er DNS-320 User Manual Sec tion 2 — Getting Started When rst pow ered on, during the initial boot sequence , the device will wait to be assig ned an IP address via DHCP . If it does not receive a DHCP assigned IP address the A uto-IP process will assig n a 169.254.xxx.xxx address to the device I f you want to change the IP ad[…]
-
Страница 24
21 D-Link ShareCent er DNS-320 User Manual Sec tion 2 — Getting Started Selec t the device from the list and click the Congur ation button. This will launch the computer ’ s default web browser and direct it to the IP address listed for the device. Make sure the browser is not congured to use a proxy ser ver . Note: The comput er used to ac[…]
-
Страница 25
22 D-Link ShareCent er DNS-320 User Manual Sec tion 4 — C onguration The L ogin screen will appear: Sel ect Sy st em A dmi nis tr a to r an d ent er the pas sword yo u crea ted d uri ng th e Setup Wizar d. Click Login Note: The computer , used to acc ess the web-based c ongur ation, manager must be on the same subnet as the ShareC enter . If […]
-
Страница 26
23 D-Link ShareCent er DNS-320 User Manual Sec tion 4 — C onguration If a hard disk volume has not been created , then the ShareCenter W eb UI defaults to the Management tab. Once a volume is created , then the web UI defaults to the My F avorites tab . The conguration icons are located in the tabs at the top of the page . The icons av ailabl[…]
-
Страница 27
24 D-Link ShareCent er DNS-320 User Manual Sec tion 4 — C onguration Management Th is tab co nt ain s the Setup W iza rd , Di sk Manag em ent , Ac c oun t Manag eme nt , Netw ork Man ag eme nt , Appl ica ti on Man age men t, Syst em Management and Status Icons . Click each of the icons to see the submenus .[…]
-
Страница 28
25 D-Link ShareCent er DNS-320 User Manual Sec tion 4 — C onguration Setup W izard ( W eb UI) Click the Run W izard button to star t the setup wizar d. Click Next to con tinue. The ShareCent er® has a System Wizar d that allow s you to quickly congure some of the basic device settings. Click the Sy stem W izard ic on to star t the Setup W iz[…]
-
Страница 29
26 D-Link ShareCent er DNS-320 User Manual Sec tion 4 — C onguration It is recommended you set an admin password here . Enter the ne w passw o rd an d re- en te r it f or co nr ma tio n. Clic k N ext to continue . Set the appropriate Time Zone for your location. Click Ne xt to continue .[…]
-
Страница 30
27 D-Link ShareCent er DNS-320 User Manual Sec tion 4 — C onguration Enter your workgr oup , name and descr iption, or leave the default values and click Ne xt to continue. Edit or change the LAN settings. Selecting DHCP Client will cause the device to obtain an IP addr ess fro m the local DHCP ser ver such as a router . Selec ting Static IP req[…]
-
Страница 31
28 D-Link ShareCent er DNS-320 User Manual Sec tion 4 — C onguration Se le c t Acco unt a nd e nte r yo ur e -m ail p ara me ter s i n th e box es to send event aler ts from the device. Click Next to continue . Click Finish to sav e y our settings and complete the wizard . Y ou ma y click the P revious button to go back and edit your settings or[…]
-
Страница 32
29 D-Link ShareCent er DNS-320 User Manual Sec tion 4 — C onguration Disk Management Hard Driv e C ongur ation T o setup the Har d Driv e RAID con gura tion of you r Shar eC ent er®, click on the Managem ent tab and then the Disk Manag ement icon. S elect the Hard Drive Conguration menu item on the lef t of the window . This menu will […]
-
Страница 33
30 D-Link ShareCent er DNS-320 User Manual Sec tion 4 — C onguration Hard Driv e C ongur ation W izar d When you click the Set RAID type and Re -F ormat button in the Disk Management-Har d Driv e C onguration menu, a wizard will launch allowing you to f ormat your drives and cr eate the RAID f ormat. The f ollowing is an example of a RAID1[…]
-
Страница 34
31 D-Link ShareCent er DNS-320 User Manual Sec tion 4 — C onguration Select the forma t desired by click ing on the RAID type bo x to highlight it in blue. In this example the maxi mum data prot ection option of RAID 1 is selected. Click Next to con tinue. If you have selec ted R AID 1 then the wizard will display this step to ena ble or di sab […]
-
Страница 35
32 D-Link ShareCent er DNS-320 User Manual Sec tion 4 — C onguration If you sel ect a RAID 0 or 1 optio n then yo u need to determ ine the siz e of the RAID v olume. An y extra spac e will be f ormatted as a JBOD volume . Click Next to continue . Note: I f you select Lea ving the remaining disk spac e f or future , you can format the JBOD partit[…]
-
Страница 36
33 D-Link ShareCent er DNS-320 User Manual Sec tion 4 — C onguration During the formatting proc ess a progr ess bar is displayed . When the formatting is completed the wizard displays the nished V olume Congur ation table. Click F inish to end the wizar d.[…]
-
Страница 37
34 D-Link ShareCent er DNS-320 User Manual Sec tion 4 — C onguration S.M.A.R.T T est S.M.A.R.T stands for “Self-Monitoring, A nalysis, and Reporting T echnology” . This is a system on a hard driv e used to monitor and repor t on the health of the drive. If the HD is gra yed out, then it does not support S.M.A.R.T . S.M.A.R.T T est: T o run t[…]
-
Страница 38
35 D-Link ShareCent er DNS-320 User Manual Sec tion 4 — C onguration Schedule: By click ing the Crea te Schedule button the user can create a S.M.A.R.T . test schedule where this test will run automatically at the congur ed time. S ele c t t he fre qu en c y ( Da il y , Week l y , M on th ly ) a nd the Time here. Click on the Create button to[…]
-
Страница 39
36 D-Link ShareCent er DNS-320 User Manual Sec tion 4 — C onguration Scan Disk Scan disk provides a method to t est the disk ’ s le syst em in your ShareC enter . Scan Disk: Scan Disk will scan your disks le system for errors and /or c orru ptio n. Aft er c ompl eti on, th e tes t re sul ts will show Success or F ailure . Click on the Sc[…]
-
Страница 40
37 D-Link ShareCent er DNS-320 User Manual Sec tion 4 — C onguration A c coun t Management Users / Gr oups The Users / Groups menu is used to crea te and manage user and group acc ounts. Up to 256 users and 32 groups can be created . By default, all users have r ead and write access t o all folders but acc ess rules can be created in the Network[…]
-
Страница 41
38 D-Link ShareCent er DNS-320 User Manual Sec tion 4 — C onguration A dding New Users Wizar d Here you can enter the User Name and P asswor d f or the new user account. The passwor d needs to be c onrmed by r e -entering the password in the C onrm P asswor d eld. Click on the Pre vious button to return t o the previous window . Click o[…]
-
Страница 42
39 D-Link ShareCent er DNS-320 User Manual Sec tion 4 — C onguration Here the user can congure the appropriate Network Acc ess settings for the user by simply selec ting one of the follo wing options: Read Only , Read/W rite or Den y Acc ess . Cli ck on the Pr ev ious butt on to ret urn to the previ ous wind ow . Click on the Next button to a[…]
-
Страница 43
40 D-Link ShareCent er DNS-320 User Manual Sec tion 4 — C onguration Here the user can congur e the application privileges assigned to this user . Selec t FTP . CIFs and AFP is set as default. • CIFS is short for Common Internet F ile S ystem. • AFP is short for Apple F iling P rotoc ol. • FTP is short for F ile T ransfer P rot ocol. Cl[…]
-
Страница 44
41 D-Link ShareCent er DNS-320 User Manual Sec tion 4 — C onguration Here you can congur e the Quotas settings for the user accoun t. Enter the quota amount in the block(s) indicated in M egabytes . By entering 0Mb the quota will be set to unlimited . Click on the Pre vious button to return t o the previous window . Click on the Next butt on […]
-
Страница 45
42 D-Link ShareCent er DNS-320 User Manual Sec tion 4 — C onguration A dding New Groups W izar d The follo wing section will describe how to add a new group on this device . T o add a group click on the New button. A wizar d will be launched: Th i s w i n do w w el c o m es t h e u s e r t o t h e s e tu p w i z a rd f or a d di n g o r modifyin[…]
-
Страница 46
43 D-Link ShareCent er DNS-320 User Manual Sec tion 4 — C onguration Select the users you would like to add to your new group by checking the box. Cli ck on the Pre vi ou s bu tt on to r et urn to the pr ev iou s w ind ow . Click on the Next button to accept the change and c ontinue to the next window . Click o n the Exit button to discard the c[…]
-
Страница 47
44 D-Link ShareCent er DNS-320 User Manual Sec tion 4 — C onguration S e le c t t h e a pp l i ca t i on p r i v il e g es a s s ig n e d t o t hi s g ro u p. Options to select are FTP . CIFS and AFP is set as default. • CIFS is short for Common Internet F ile S ystem. • AFP is short for Apple F iling P rotoc ol. • FTP is short for F ile T[…]
-
Страница 48
45 D-Link ShareCent er DNS-320 User Manual Sec tion 4 — C onguration A nal messag e app ears indicati ng th e group was created successfully and added to the Shar eCent er® conguration. Success: V erify the settings and click F inish . Cli ck on the Pre vi ou s bu tt on to r et urn to the pr ev iou s w ind ow . Cl ic k on the F i ni sh bu[…]
-
Страница 49
46 D-Link ShareCent er DNS-320 User Manual Sec tion 4 — C onguration Click the Enabled button to enfor ce the quotas that are se t in the Users / G roups mana gement o r the tables below . Quotas The Shar eCe nter® suppo r ts stor age quotas fo r both groups and individual users . Assig ning a quota to a group or user will limit the amou nt of […]
-
Страница 50
47 D-Link ShareCent er DNS-320 User Manual Sec tion 4 — C onguration The Net work Shares page allows the user to congure shared folders and rights to specic users and groups. T o be able to create new network access rules, the default rule must rst be remo ved by simply selecting it and clicking on the Delet e butt on. Y ou can also mou[…]
-
Страница 51
48 D-Link ShareCent er DNS-320 User Manual Sec tion 4 — C onguration A dding New Network Shar es W izar d The f ollowing section will describe how to add a new Network Share on the ShareCen ter . T o add a Network Share click on the A dd button. A easy to congur e wizard will be launched and look like the follo wing: This window w elcomes the[…]
-
Страница 52
49 D-Link ShareCent er DNS-320 User Manual Sec tion 4 — C onguration Se lec t wh ich u ser a ccount s or gro up are a llowed t o acces s thi s folder (s). Sel ect All Account to al low all account s a ccess to this folder . Selec t Specic User/Group to only allow certain users or groups ac cess to this f older . Click on the Pre vious button […]
-
Страница 53
50 D-Link ShareCent er DNS-320 User Manual Sec tion 4 — C onguration If you select Specic U ser/Group in Step 2, then this step allows yo u to set the ac ce ss rig ht s fo r ea ch U ser con gu re d on the dev ic e. Click on the Pre vious button to return t o the previous window . Click on the Next button to accept the change and continue t[…]
-
Страница 54
51 D-Link ShareCent er DNS-320 User Manual Sec tion 4 — C onguration This step allow s you to assig n privileges to this share. Op p or t u ni st ic l oc ks ( op lo ck s ) a re a c ha ra c te r is ti c of t he LA N Mana ger ne twor king pr oto col imple men ted in the 32bit Win dow s fa mil y . Op lo ck s a re gu ar an t ee s m ade b y a se rver[…]
-
Страница 55
52 D-Link ShareCent er DNS-320 User Manual Sec tion 4 — C onguration Select the FTP settings for this share. FTP ac cess can be: 1) FTP Anonymous None (No A ccess). 2) FTP Anonymous Read Only (Limited A ccess). 3) FTP Anonymous Read/W rite (F ull A ccess). Click on the Pre vious button to return t o the previous window . Click on the Next button[…]
-
Страница 56
53 D-Link ShareCent er DNS-320 User Manual Sec tion 4 — C onguration Click Finish t o save y our settings. Click on the Pre vious button to return t o the previous window . Click on the Finish button to accept the change and complete the wizard. Click on the Exit button t o discard the changes made and return to the Network Shares P age . Step 4[…]
-
Страница 57
54 D-Link ShareCent er DNS-320 User Manual Sec tion 4 — C onguration Setup: A dding New ISO Mount Shares Wizar d The following section will descr ibe how to add a new ISO mount on the ShareC enter . T o add an ISO M ount click on the New button. A wizard will launch as shown below: This wizard will guide the user thr ough the steps of setup . Th[…]
-
Страница 58
55 D-Link ShareCent er DNS-320 User Manual Sec tion 4 — C onguration Assign acc ess privileges to this ISO Mount share. • Select All Acc ount s to ass ign the ISO Mount share read /den y privi leges to all use rs. • Selec t Specic User/Group in order to assign read/den y privileges to individual users and groups . Click on the Pre vious b[…]
-
Страница 59
56 D-Link ShareCent er DNS-320 User Manual Sec tion 4 — C onguration Y ou may add a c omment that describes the ISO Mount Share . Click on the Pre vious button to return t o the previous window . Click on the Next button to accept the change and continue to the next window . Click on the Exit button t o discard the changes made and return to the[…]
-
Страница 60
57 D-Link ShareCent er DNS-320 User Manual Sec tion 4 — C onguration Click Finish t o save y our settings. Click on the Pre vious button to return t o the previous window . Click on the Finish button to accept the change and complete the wizard. Click on the Exit button t o discard the changes made and return to the Network Shares P age . Step 4[…]
-
Страница 61
58 D-Link ShareCent er DNS-320 User Manual Sec tion 4 — C onguration A dmin P assw ord Username: T he administrator user name is admin , and this cannot be changed. P assword: Ent er the cu rre nt pa ssw or d. (L ea ve this blank if y ou have not set a passw ord y et.) New P assword: Enter a new passw ord. Conrm P assw ord: Enter the new pass[…]
-
Страница 62
59 D-Link ShareCent er DNS-320 User Manual Sec tion 4 — C onguration Network Management LAN Setup The LAN Settings allows y ou to enable LL TD and to congure the Link Speed and the IP addr ess as a DHCP client or Static IP . DHCP Client: Selec ting DHCP Client will cause the DNS-320 to obtain an IP addr ess from the local DHCP server . Static[…]
-
Страница 63
60 D-Link ShareCent er DNS-320 User Manual Sec tion 4 — C onguration Link Speed and LL TD Settings Speed: Displays the current Ethernet bit r ate in Megabits per second. Link Speed: S e le c t e i th er Au to (Au to — Ne g ot ia te ), 10 0 M b ps, o r 1000 Mbps by clicking the appropriate radio button. Then click the S av e Settings button to sa[…]
-
Страница 64
61 D-Link ShareCent er DNS-320 User Manual Sec tion 4 — C onguration Dynamic DNS T h e D D N S fe a t u r e a l l o w s t h e u s e r t o h o s t a s e r v e r ( We b , F T P , G a m e S e r ve r, e t c … ) u s i n g a d o m a i n n a m e t h a t yo u h a v e p u r c h a s e d (www .whate veryournameis .com) with your dynamically assigned IP a[…]
-
Страница 65
62 D-Link ShareCent er DNS-320 User Manual Sec tion 4 — C onguration FTP Ser ver The device is equipped with a built in FTP Server . The server is easy t o c ongure and allows users acc ess t o impor tant data whether they are on the local network or at a r emote location. The FTP server can be congured t o allow user ac cess to specic […]
-
Страница 66
63 D-Link ShareCent er DNS-320 User Manual Sec tion 4 — C onguration UPnP A V Ser ver The device features a UP nP A V Ser ver . T his ser ver provides the ability to stream photos, music and videos to UPnP A V compatible network media players . If the ser ver is enabled, the devic e will be automatically detected by UP nP A V compatible media pl[…]
-
Страница 67
64 D-Link ShareCent er DNS-320 User Manual Sec tion 4 — C onguration iT unes S er v er The DNS-320 f eatures an iT unes S erver . This ser ver provides the abilit y to shar e music and videos t o computers on the local network running iT unes. If the ser ver is enabled, the device will be automa tically detected by the iT unes program and the mu[…]
-
Страница 68
65 D-Link ShareCent er DNS-320 User Manual Sec tion 4 — C onguration AFP Ser vice The Shar eC ent er sup ports Appl e F ilin g Service f or co nnectiv ity with MA C OS bas ed co mput ers . If you need t o use AFP service ena ble it here otherwise leave it disabled t o reduce CPU r esource o verhead. AFP Ser vice: S e l e c t e n a b l e t o a l […]
-
Страница 69
66 D-Link ShareCent er DNS-320 User Manual Sec tion 4 — C onguration NFS Ser vice The device suppor ts Network File System (NFS) ser vice . T o enable this multi-platform le system on your device enable it here. Other wise disable the option to prev ent unnecessary CPU overhead. NFS Ser vice: Selec t Enable to allow systems that suppor t NFS […]
-
Страница 70
67 D-Link ShareCent er DNS-320 User Manual Sec tion 4 — C onguration Language This menu item allows you to install language pack ages onto your system. I n addition, you can also install language pack ages to suit your local language needs. S y stem Management Languages: Click on Brow se to search for the specic language pack y ou want to ins[…]
-
Страница 71
68 D-Link ShareCent er DNS-320 User Manual Sec tion 4 — C onguration T ime and Dat e The Time and Dat e page con tains several dierent options f or setting the device’ s internal clock. I t is impor tant to set an accur ate time so that backups and downloads can be accurat ely scheduled. Sy stem T ime Settings: Di spl a ys the curr en t dat[…]
-
Страница 72
69 D-Link ShareCent er DNS-320 User Manual Sec tion 4 — C onguration W orkg roup: Ente r your Workgroup nam e he re. The workgrou p name should be the same as the computers on the ne two rk. Devi ce s us in g th e s ame w ork gr o up will ha v e additional le sharing methods available. Name: Enter your device name here. T his name is what the[…]
-
Страница 73
70 D-Link ShareCent er DNS-320 User Manual Sec tion 4 — C onguration Sy st em Settings Restar t: Click ing to reboot the devic e. Default: C l i c k t o r e s t o r e t h e d e v i c e b a c k t o t h e f a c t o r y default settings. All previous settings that hav e been congured will be er ased. Shutdown: Click to turn o the device.[…]
-
Страница 74
71 D-Link ShareCent er DNS-320 User Manual Sec tion 4 — C onguration Congur ation Settings: Click on the S a ve button to sav e the current c o n f i g u r a t i o n s e t t i n g s t o a f i l e o n y o u r comp uter . If at a later tim e you need to reloa d thi s c on gu ra ti on after a sy st em re se t, bro w se to the le and click […]
-
Страница 75
72 D-Link ShareCent er DNS-320 User Manual Sec tion 4 — C onguration P o w er Management The device P ower M anagement f eature allows you to congure the drives to shut down while power remains constant to the device. The dr ives will power up again when da ta is accessed. HDD Hibernation: Click Enable or D isable . T urn O Hard Driv e: S[…]
-
Страница 76
73 D-Link ShareCent er DNS-320 User Manual Sec tion 4 — C onguration Y ou can also cont rol the speed of the fan us ing three dier ent settings and you can pow er o the device at scheduled times for each day of the week. F an C ontrol: The s pee d of t he f an c an b e con trol led f rom t his section. If you selec t Auto mode , the speed […]
-
Страница 77
74 D-Link ShareCent er DNS-320 User Manual Sec tion 4 — C onguration Notications Email Settings With E-Mail Alerts, you can congur e e -mails to be sent to you that alert you to certain operational conditions and drive status conditions. These aler ts can pro ve helpful with the management and saf eguarding of important data. Login Method:[…]
-
Страница 78
75 D-Link ShareCent er DNS-320 User Manual Sec tion 4 — C onguration SMS Settings The same aler ts of syst em conditions that can be sent to an email box can also be sent to a mobile phone or by SMS text messages. Y ou need to have an agreement with a SMS ser vice gateway that the device can then be congured to send the aler ts to . The ser v[…]
-
Страница 79
76 D-Link ShareCent er DNS-320 User Manual Sec tion 4 — C onguration Adding an SMS Ser vic e Pr ovider Once you hav e a SMS Ser vice provide y ou with a HT TP API URL, enter it int o the Add SMS Ser vice P rovider wizar d. Enter the URL in the rst window with an appropriate Pro vider Name. In the next window select the appropriate HT TP API U[…]
-
Страница 80
77 D-Link ShareCent er DNS-320 User Manual Sec tion 4 — C onguration Ev ent Settings Y ou can limit which ev ents are sent as alerts to the Email or SMS settings by checking the events here . Ev ent Settings: Se le c t t he i nfo r mat io n yo u w an t e — ma il ed to t he above a ddre ss or s ent ove r SMS m essa ges to t he above mo bile n umb[…]
-
Страница 81
78 D-Link ShareCent er DNS-320 User Manual Sec tion 4 — C onguration Logs Within the L ogs menu item you can setup your devic e t o r eceive Log Events from other ShareC enters or send the log events to another ShareCent er or SysL og ser ver . Y ou can also view the NAS system logs and the FTP logs here . Enable Sy slog: Click to activate the S[…]
-
Страница 82
79 D-Link ShareCent er DNS-320 User Manual Sec tion 4 — C onguration F irm w are Upgr ade The Firm ware Upgrade Page makes it simple to check for new rm ware releases and upload them t o the device. This section provides a link to check for new rm ware on the D-Link suppor t website . If a new rmware is a vailable, do wnload the le t[…]
-
Страница 83
80 D-Link ShareCent er DNS-320 User Manual Sec tion 4 — C onguration Sy st em Info Here you can view v arious system information some of which is sta tic and others dynamic. Sta tus LAN Information: Displays the local network settings of y our device. Device Information: Displays the workgroup , name, description, current temperatur e, packet co[…]
-
Страница 84
81 D-Link ShareCent er DNS-320 User Manual Sec tion 4 — C onguration Hard Driv e Info This section will disp lay a summ ar y of the har d driv e(s) curr ent ly instal led. The summ ary wi ll includ e info rmatio n such as the har d driv e manufactur er , model, serial number , tempera ture, total capacity siz e, and status. The “Status” of t[…]
-
Страница 85
82 D-Link ShareCent er DNS-320 User Manual Sec tion 4 — C onguration FTP/HT TP Downloads Schedule le and f older backups from an FTP ser ver , w eb server , or local network shar e. Always test the URL bef ore applying changes . This will help to ensure a suc cessful download. Applica tions Cat egor y: Use the radio butt ons to select the typ[…]
-
Страница 86
83 D-Link ShareCent er DNS-320 User Manual Sec tion 4 — C onguration Save T o: Enter the specic destination on the internal dr ives for the downloaded les or folders to be saved to . Click Brow se to brow se the internal drives. Rename: If you would like to rename a le after it has been downloaded from the specied HT TP/FTP ser ver ,[…]
-
Страница 87
84 D-Link ShareCent er DNS-320 User Manual Sec tion 4 — C onguration Remote Backups Remote Backups allow s you to back up y our device t o another ShareC enter or Linux S erver or vice versa from a remote ShareC enter or Linux S erver to your devic e. Click the Crea te button in the r emote backups list to start a wizard where you can congur […]
-
Страница 88
85 D-Link ShareCent er DNS-320 User Manual Sec tion 4 — C onguration Remote Backups — Crea te wizar d When you click the Cr eate Button abo ve the Remote Backup list this wizard will launch allo wing you to c ongure a new Remote Backup job . W ec ome: Displays the st eps of the wizard. Ser vice T ype: NAS to NAS : Backup fr om the local NAS t[…]
-
Страница 89
86 D-Link ShareCent er DNS-320 User Manual Sec tion 4 — C onguration Local Settings: T ask (Name): The name used to refer to the backup jo b wh ic h will be li st ed la te r in th e Remot e Bac ku p l ist . F old er P ath: Select a loc al netw ork sha re f old er or le as the target or sourc e for the backup job . Remote Settings: Remote IP :[…]
-
Страница 90
87 D-Link ShareCent er DNS-320 User Manual Sec tion 4 — C onguration Remote Settings: Remote P ath : Using the dr op- down menu, selec t the le sy stem (fol der) pat h to the r emot e targ et or sour ce system f or backup. Schedule Settings: Manual : Check either Y es or No selection below to star t the backup (yes) immediately on completion […]
-
Страница 91
88 D-Link ShareCent er DNS-320 User Manual Sec tion 4 — C onguration F inished: Click on F inish if you are satised with all the settings of the Back up job created . Other wise click on the Previous button to go back and make changes. Alternatively click on Exit to end the congura tion without adding a Remote Backup job . Remote Backups l[…]
-
Страница 92
89 D-Link ShareCent er DNS-320 User Manual Sec tion 4 — C onguration Local Backups Schedule local le and folder backups fr om the local network share of the device or from the local computer . Alway s test the URL bef ore applying changes. This will help to ensure a succ essful download. Cat egor y: Use the radio buttons to select the backup […]
-
Страница 93
90 D-Link ShareCent er DNS-320 User Manual Sec tion 4 — C onguration Local Backups — Time Machine This section allows the user to congure the device so that it becomes a backup destination in the Mac OS X Time Machine. I n order to use this function, the AFP ser vice is required . The AFP ser vice will star t automatically as soon as this fun[…]
-
Страница 94
91 D-Link ShareCent er DNS-320 User Manual Sec tion 4 — C onguration P2P Downloads — Settings Within this menu y ou can congure the P2P do wnload management settings. P2P: Selec t Enable or Disable . Disable: I n the block provided the user can congure the runni ng sched ule f or P2P do wnload s. Sim ply sele ct the Star t and Stop block f[…]
-
Страница 95
92 D-Link ShareCent er DNS-320 User Manual Sec tion 4 — C onguration P2P Downloads — Do wnloads Congur e the Peer -to-Peer do wnload manager settings. Add T orrent fr om URL: I n the eld provided you can copy and paste a link to a torrent le hosted on the I nternet. The P2P download manager will add the torrent le to the download man[…]
-
Страница 96
93 D-Link ShareCent er DNS-320 User Manual Sec tion 4 — C onguration W eb F ile Ser ver Whenever you cannot mount the network shares of your NAS, use the W eb File Ser ver to access the les using a bro wser over the Internet. If the network that your device is c onnected to is using NA T , you will need to f orward HT TP por t 80 across your […]
-
Страница 97
94 D-Link ShareCent er DNS-320 User Manual Sec tion 5 — Knowledge Base AjaXplor er This section allow s y ou to congure the AjaXplorer function. AjaXplorer is a le explor er that allows you to remot ely manage the les stor ed under the AjaXplorer f older by using a web br owser . Launch Inter face: This launches your browser with the Ajaxp[…]
-
Страница 98
95 D-Link ShareCent er DNS-320 User Manual Sec tion 4 — C onguration My F av orites The M y F a vorites tab allows you to add any icon you routinely access from the Applications or Management T ab in one con venient location f or easy and quick access . Y ou can add icons to the My F avorites tab using two dier ent methods: Re -arrang ing the[…]
-
Страница 99
96 D-Link ShareCent er DNS-320 User Manual Sec tion 4 — C onguration A dd an Icon to My F av orites There are two methods t o add an icon alias to My F avorites . Y ou can either right-click the icon and select A dd to My F a vorites or use the Drag and Drop method as per item 2 belo w . 1. Right-click on an icon in the applications or manag eme[…]
-
Страница 100
97 D-Link ShareCent er DNS-320 User Manual Sec tion 4 — C onguration Remov e an Icon fr om My F a vorit es T o remove an icon alias from the My F avorites tab simply right-click on it and selec t Remo ve From My F a vorite in the context selection that appears. Right-click an Icon alias in the My F avorit es tab and selec t Remov e F rom My F av[…]
-
Страница 101
98 D-Link ShareCent er DNS-320 User Manual Sec tion 5 — Knowledge Base Knowledge Base Wha t is RAID? RAID , short for Redundant Arra y of I ndepende nt Disks, is a com bination of two or more disks with the aim of provid ing fault toleranc e and improv ing per formanc e. There are several di erent levels of RAID , with each one pr oviding a di?[…]
-
Страница 102
99 D-Link ShareCent er DNS-320 User Manual Sec tion 5 — Knowledge Base Mapping a Drive Y ou can use the D-Link Storage Utility to map drives to y our computer . Inser t the ShareCen ter® CD into y our CD-ROM dr ive . The Stor age Utility will load and detec t any Shar eCent er® devices that are on the local network. Click D-Link Storage Utility[…]
-
Страница 103
100 D-Link ShareCent er DNS-320 User Manual Sec tion 5 — Knowledge Base Once connected, y our mapped drive(s) will appear in My Computer . Highlight an available device . Av a i l a b l e v o l u m e s w i l l b e d i s p l a y e d u n d e r D r i v e M a p p i n g . H i g h l i g h t t h e volume you w ant to map . Select an available drive letter[…]
-
Страница 104
101 D-Link ShareCent er DNS-320 User Manual Sec tion 5 — Knowledge Base Dou ble — cl ick t he My Compu ter icon on your deskt op. Doubl e -cl ick t he ma pped drive to access the les and f olders.[…]
-
Страница 105
102 D-Link ShareCent er DNS-320 User Manual Sec tion 5 — Knowledge Base Mapping the Rec ycle Bin If you ha ve turned on the Recycle Bin option with any of your Net work Shares created , then y ou can map the r ecycle bin as a Net work Driv e to ha ve access to it . Th e R ec y cl e Bi n wi l l a p pe ar i n th e d r ive ma pp in g a rea of t he Sto[…]
-
Страница 106
103 D-Link ShareCent er DNS-320 User Manual Sec tion 5 — Knowledge Base USB P rint Ser ver The device featur es a built-in USB print server , giving users the ability to share a printer on their local network. Connect a USB pr inter to the USB por t on the back of the devic e. I t is important to ensure that an y of the printer manufacturer’ s dr[…]
-
Страница 107
104 D-Link ShareCent er DNS-320 User Manual Sec tion 5 — Knowledge Base S e l e c t t h e p r i n t e r d r i v e r f r o m t h e i n s t a l l e d Manufacturer list or use the Ha ve Disk button to brow se for the printer driv er le. The Windows ® Add P rinter Wizar d will launch: Click OK to continue . Conn ec t to yo ur de vice wit h Sa mba a[…]
-
Страница 108
105 D-Link ShareCent er DNS-320 User Manual Sec tion 5 — Knowledge Base On ce you h ave se lec te d the prop er d rive r as shown in the brow se list then click OK t o install the printer . The pr inter is n ow i nstal led an d the printer queue will appear .[…]
-
Страница 109
106 D-Link ShareCent er DNS-320 User Manual Sec tion 5 — Knowledge Base Y ahoo! W idget I nstallation D-Link provides an added featur e called a Y ahoo! Widget. What is a Y ahoo Widget? Y ahoo! W idg ets are fr ee appli ca tio n pla tf or ms th at can be use d in Micr oso ft Win do ws and Mac OS X. Th e en gi ne us es a Jav aSc rip t run tim e en v[…]
-
Страница 110
107 D-Link ShareCent er DNS-320 User Manual Sec tion 5 — Knowledge Base Y ahoo! W idget D ispla y The D-Link Widget is mainly used f or monitoring the activities tak ing place . Sy stem: Hard Drive: Ser ver: Download: In the System window inf ormation about your Comp uter , D N S — 3 2 0 , I P A d d r es s , F i r mw a r e Ve r s i on a n d Cu r r […]
-
Страница 111
108 D-Link ShareCent er DNS-320 User Manual Sec tion 5 — Knowledge Base USB C op y F unc tion The DNS-320 suppor ts on option where the user can enter a USB st orage medium in to the USB por t and with a click of a button automatically copy the contents of the USB st orage medium into a f older on the device Step 1: Step 2: Step 3: Inser t a USB st[…]
-
Страница 112
109 D-Link ShareCent er DNS-320 User Manual Appendix A — C ontacting T echnical Support C ontac ting T echnical Suppor t U .S. and Canadian customers can c ontact D -Link technical support through our web site or b y phone. Befor e you contact technical support, please have the f ollowing ready: • Model number of the produc t (e .g. DNS-320) • […]
-
Страница 113
110 D-Link ShareCent er DNS-320 User Manual Appendix B — W arranty W arran t y Subject to the terms and conditions set forth herein, D-Link Systems, Inc. (“D-Link ”) pr ovides this Limited Warranty: • Only to the person or entity that originally purchased the pr oduct from D-Link or its author ized r eseller or distributor . • Only for prod[…]
-
Страница 114
111 D-Link ShareCent er DNS-320 User Manual Appendix B — W arranty Limited Soft war e W arranty: D-Link warrants that the soft ware portion of the product (“Soft war e ”) will substantially conf orm to D-Link ’ s then current func tional specications for the Sof tware , as set forth in the applicable documentation, from the date of origina[…]
-
Страница 115
112 D-Link ShareCent er DNS-320 User Manual Appendix B — W arranty • After an RMA numb er is issued, the def ective product must be packaged securel y in the original or other suitab le shipping package to ensur e that it will not be damaged in transit, and the RMA number must be prominently marked on the outside of the package. Do not include an[…]
-
Страница 116
113 D-Link ShareCent er DNS-320 User Manual Appendix B — W arranty IF ANY IMPLIED W ARRANT Y C ANNO T BE DISCLAIMED IN ANY TERRITOR Y WHERE A PRODUC T IS SOLD , THE DURA TION OF SUCH IMPLIED W ARRANT Y SHALL BE LIMITED T O THE DURA TION OF THE APPLICABLE W ARRANT Y PERIOD SE T FORTH ABOVE. EXCEPT AS EXPRESSL Y COVERED UNDER THE LIMITED W ARRANT Y P[…]
-
Страница 117
114 D-Link ShareCent er DNS-320 User Manual Appendix B — W arranty CE Mark W arning: This is a Class A produc t. In a domestic environment , this product may cause radio inter fer ence, in which case the user may be required to take adequate measures . FC C Sta tement: This equipment has been tested and found to comply with the limits for a Class A[…]
-
Страница 118
115 D-Link ShareCent er DNS-320 User Manual Appendix C — Registra tion V ersion 1.0 Januar y 14, 2011 Pr oduct registration is en tirely volun tar y and failure to c omplete or return this f orm will not diminish your warran ty rights. Registr ation Register y our product at http://registr ation.dlink.com[…]