
Сообщения без ответов | Активные темы
Текущее время: 30 май 2025, 07:46
Список форумов » Информация для пользователей » Help » Exact Audio Copy (EAC)
Часовой пояс: UTC [ Летнее время ]
ЕАС 1.5: Правильная настройка и создание рипа
| Страница 1 из 1 | [ Сообщений: 3 ] |
| Версия для печати | Пред. тема | След. тема |
ЕАС 1.5: Правильная настройка и создание рипа
| Автор | Сообщение | |||||||||||||||||||||||||||||||||||||||||||||||||||||||||||||||||||||||||||||||||||||||||||||||||||||||||||||||||||||||||||||||||||||||||||||||||||||||||||||||||||||||||||||||||||||||||||||||||||||||||||||||||||||||||||||||||||||||||||||||||||||||||||||||||||||||||||||||||||||||
|---|---|---|---|---|---|---|---|---|---|---|---|---|---|---|---|---|---|---|---|---|---|---|---|---|---|---|---|---|---|---|---|---|---|---|---|---|---|---|---|---|---|---|---|---|---|---|---|---|---|---|---|---|---|---|---|---|---|---|---|---|---|---|---|---|---|---|---|---|---|---|---|---|---|---|---|---|---|---|---|---|---|---|---|---|---|---|---|---|---|---|---|---|---|---|---|---|---|---|---|---|---|---|---|---|---|---|---|---|---|---|---|---|---|---|---|---|---|---|---|---|---|---|---|---|---|---|---|---|---|---|---|---|---|---|---|---|---|---|---|---|---|---|---|---|---|---|---|---|---|---|---|---|---|---|---|---|---|---|---|---|---|---|---|---|---|---|---|---|---|---|---|---|---|---|---|---|---|---|---|---|---|---|---|---|---|---|---|---|---|---|---|---|---|---|---|---|---|---|---|---|---|---|---|---|---|---|---|---|---|---|---|---|---|---|---|---|---|---|---|---|---|---|---|---|---|---|---|---|---|---|---|---|---|---|---|---|---|---|---|---|---|---|---|---|---|---|---|---|---|---|---|---|---|---|---|---|---|---|---|---|---|---|---|---|---|---|---|---|---|---|---|---|---|---|---|---|---|---|---|---|
|
Активный участник Зарегистрирован: 06 ноя 2011, 19:23 |
ЕАС 1.5: Правильная настройка и создание рипа в разработке …
В этой теме мы рассмотрим пошаговую установку и правильную настройку Exact Audio Copy V1.5 (EAC) — самого лучшего аудиоэкстрактор-а для Windows. 1. Скачайте последнюю версию EAC V1.5 со страницы загрузки программы. Для установки программы требуется проинсталлированная платформа Microsoft .NET Frameworks 2.0 (и выше). Если у Вас она в Вашей системе не инсталлирована, скачайте и установите её до установки ЕАС. Установщик, с учётом разрядности Вашей системы, можно взять отсюда. Запускаете инсталятор и следуете этапам в соответствии с представленными скриншотами. Установка Exact Audio Copy V1.5
Во время установки ЕАС Вы увидите окно выбора компонентов программы в котором Вы можете отключить ненужные Вам элементы и/или включить необходимые:
Для заполнения тегов Вам будет необходим, как минимум, один поставщик метаданных. В поставке ЕАС их предлагается три:
Кроме поставщиков метаданных предлагаются еще следующие дополнительные компоненты:
Вот и все: часть установки программы завершена. Если в Вашей системе программа ЕАС по какой-то причине не установилась или не открылась, то рекомендуется скачать и установить какую-либо из предыдущих версий. 2. При первом запуске программа предложит выполнить макрос настройки — вам следует отказаться и самому настроить программу. После запуска программы откроется главное окно, в соответствии с представленным скриншотом. Внимание! Особое внимание следует обратить на опции обведенные прямоугольником:
Выберите пункт меню Параметры ЕАС или нажмите F9 и выставьте в указанных вкладках все «галочки» и переключатели в полное соответствие с представленными скриншотами:
Параметры ЕАС/Извлечение — подробное описание опций
Примечание! На нашем трекере (впрочем как и на всех знаменитых и респектабельных музыкальных трекерах) присутствует парсер лога, который распознает только англоязычные логи; настоятельно рекомендую включить опцию, обведенную на скриншоте красным прямоугольником. Параметры ЕАС/Общие — подробное описание опций
Параметры ЕАС/Разное — подробное описание опций
Внимание! Если Вас интересуют только полные и точные лосслесс рипы или Вы планируете размещать свои рипы в сети, то НИКОГДА ничего не включайте на вкладке «Нормализация» и вообще забудьте о её существовании! Рипы, сделанные с включенной нормализацией считаются нелегитимными и запрещены к размещению на аудиофильских сайтах и большинстве трекеров.
Если Вы собираетесь снимать рипы образом (image+.cue), то во вкладку «Имена» можно не заглядывать, если же Вы планируете снимать потрековые рипы (tracks+.cue), то настройте имена сохраняемых файлов по предлагаемым шаблонам. Внимание! Имена файлов должны обязательно начинаться с номера трека и содержать название композиции. Для сборников разных исполнителей в названии файла рекомендуется указывать и имя артиста. Дополнительные данные в имена файлов можно добавлять по желанию. Рекомендуемые шаблоны:
Здесь можно указать, использовать ли для сохранения треков папку по умолчанию или последнюю использованную. Параметры ЕАС/Папка — подробное описание опций
3. В ниспадающем списке приводов, расположенном под главным меню программы, должен появиться Ваш CD привод (все приводы, если у Вас их несколько). Если привод определился, можно переходить к его настройке — пункту 4.. Если этого по какой-то причине не произошло, что бывает в крайне редких случаях, следует установить внешний интерфейс ASPI. Скачайте интерфейсную библиотеку по адресу ftp://ftp6.ahead.de/wnaspi32.dll и поместите её в папку с установленной ЕАС.
Это окно не будет пустым только в том случае, если во время установки Вы выбрали компонент CTDB Plugin или компонент AcoustID Plugin. Внимание! Если Вы планируете использовать данный плагин только в качестве дополнительного поставщика метаданных, включать его на этой вкладке не нужно. Предупреждение пользователям CTDB Plugin: Если у Вашего рипа, в результате проверки, будут найдены расхождения с данными из базы CUETools DB, в логе извлечения Вы увидите приглашение откорректировать рип в программе CUETools. Ни в коем случае не проводите эту операцию! Рипы изменённые в сторонних программах считаются нелегитимными и запрещены к размещению на аудиофильских сайтах и большинстве трекеров. Щелкните на кнопке ‘OK‘ и сохраните установки. EAC теперь настроен для обычной работы. Содержимое остальных вкладок, не представленных на скриншотах, на порядок и качество извлечения аудиоданных не влияет. Неплохо в этом месте закрыть Exact Audio Copy. Программа при выходе сохраняет свои установки в реестре, поэтому при сбое или зависании во время дальнейшей конфигурации вы не потеряете всех настроек. Следующий шаг — конфигурация привода(ов) CD-ROM, используемых для извлечения треков. Это один из самых важных этапов, потому что, если вы не сделаете это должным образом, результат извлечения будет неточным. 4. Выберите пункт меню Параметры дисковода или нажмите F10 и выполните настройки текущего привода. Если у Вас несколько приводов, настройки нужно будет произвести для каждого из них.
Параметры дисковода/Метод извлечения — подробное описание опций
В поле обозначенное красным прямоугольником нужно вписать правильное значение коррекции смещения для выбранного привода. Внимание! Настоятельно рекомендую не вписать значение коррекции смещения вручную, а автоматически определить смещение привода по «ключевому диску», при автоматической настройке ЕАС для работы с базой AccurateRip. Активировать функцию AccurateRip в EAC достаточно просто, когда вы вставите компакт диск, который по мнению EAC может являться ключевым (Key Disk), автоматически появится окно приглашения к конфигурированию. Окно выглядит так:
Далее жмете на кнопку «Configure«, ждете какое-то время и если увидите следующее окно:
Значит вам не повезло, и диск не является ключевым, меняете диск до тех пор, пока после нажатия «Configure» вы не увидите такое окно:
Возможно понадобится перебрать некоторое количество дисков из своей коллекции. Поздравляем, вы успешно активировали функцию AccurateRip. Оффсет чтения для вашего привода на соотвествующей вкладке является «серым» неактивным, так и должно быть. Теперь вам доступна база AccurateRip сверка с которой будет происходит в автоматическом режиме после снятия рипа. Результаты сверки (сводка accuraterip) автоматически будут добавлены в лог вашего рипа. О том, что AccurateRip сконфигурирован, сигнализирует значок в правом нижнем углу главного окна ЕАС, справа от ползунка текущей позиции (правда, он появляется только если вставленный диск есть в базе AccurateRip).
Примечание. Используйте опцию выделенную синим прямоугольником только если Вы на 100% уверены, что Ваш привод поддерживает чтение обоих экстраобластей — Lead-In и Lead-Out. Неправильное использование опции может привести к ошибкам извлечения. В закладке Поиск зазоров установите значения как показано на скриншоте.
5. Поскольку раздача несжатых образов на трекере запрещена, можно настроить параметры сжатия Вашего рипа. Для настройки параметров сжатия во время снятия рипа выберите закладку Параметры сжатия или нажмите F11.
Рекомендуемые параметры командной строки:
На следующем скриншоте указаны все доступные параметры:
6. Для того, чтобы использовать функцию автозаполнения тегов и закачки мультимедия, выберите закладку Параметры метаданных или нажмите F12 и настройте взаимодействие ЕАС с интернет-базами:
В поле ‘Ваш адрес e-mail’ следует внести свой e-mail. Если это поле останется незаполненным, Вы не сможете пользоваться функцией поиска информации о диске для авто заполнения тегов. Выбирая в раскрывающемся списке поставщика метаданных, Вы можете настроить дополнительные параметры для каждого из них, если таковые имеются. Да установки дополнительных параметров нажмите кнопку «Параметры выбранного поставщика метаданных».
Здесь Вы можете настроить или отключить функции поиска картинок и текстов песен.
Здесь настраивается глубина поиска информации.
Здесь настраивается доступ к службе (имя пользователя и пароль). Вот и все : Настройка ЕАС завершена. © Выражаем благодарность авторам оригинальной инструкции. |
|||||||||||||||||||||||||||||||||||||||||||||||||||||||||||||||||||||||||||||||||||||||||||||||||||||||||||||||||||||||||||||||||||||||||||||||||||||||||||||||||||||||||||||||||||||||||||||||||||||||||||||||||||||||||||||||||||||||||||||||||||||||||||||||||||||||||||||||||||||||
| 08 мар 2014, 15:43 | ||||||||||||||||||||||||||||||||||||||||||||||||||||||||||||||||||||||||||||||||||||||||||||||||||||||||||||||||||||||||||||||||||||||||||||||||||||||||||||||||||||||||||||||||||||||||||||||||||||||||||||||||||||||||||||||||||||||||||||||||||||||||||||||||||||||||||||||||||||||||
|
MisterEco Активный участник Зарегистрирован: 06 ноя 2011, 19:23 |
ЕАС 1.1: Снятие точного потрекового рипа (tracks + .cue) в разработке … |
|||||||||||||||||||||||||||||||||||||||||||||||||||||||||||||||||||||||||||||||||||||||||||||||||||||||||||||||||||||||||||||||||||||||||||||||||||||||||||||||||||||||||||||||||||||||||||||||||||||||||||||||||||||||||||||||||||||||||||||||||||||||||||||||||||||||||||||||||||||||
| 09 мар 2014, 14:18 | ||||||||||||||||||||||||||||||||||||||||||||||||||||||||||||||||||||||||||||||||||||||||||||||||||||||||||||||||||||||||||||||||||||||||||||||||||||||||||||||||||||||||||||||||||||||||||||||||||||||||||||||||||||||||||||||||||||||||||||||||||||||||||||||||||||||||||||||||||||||||
|
MisterEco Активный участник Зарегистрирован: 06 ноя 2011, 19:23 |
ЕАС 1.5: Снятие точного рипа в формате (image + .cue) Цель данной инструкции — помочь начинающим, неподготовленным пользователям научиться снимать правильные рипы с аудио CD. Методика снятия рипов образом (image + .cue), описанная в данной инструкции, универсальна и применима в подавляющем большинстве случаев. Перед тем как начинать снять рип, убедитесь что программа Exact Audio Copy (в дальнейшем ЕАС) настроена правильно. От правильности настроек зависит будет ли ваш рип иметь право на жизнь на нашем трекере, и не только на нашем. Как правильно настроить ЕАС можно ознакомится здесь. После того как программа настроена правильно, можно приступить к снятию имиджевого рипа (image + .cue).
Примеры листингов правильно снятого рипа Лог создания рипа Exact Audio Copy V1.5 from 20. February 2020 Содержание индексной карты (.CUE) REM DATE 1996 Примечание! Рипы образом (image +. cue) по приведенной в данной инструкции методике можно снимать со всех дисков, отвечающих стандарту Audio CD (диски без защиты и со стандартной немодифицированной ТОС), а также со всех типов экстра-CD (ECD, дисков, содержащих медийные данные в качестве бонуса), кроме тех дисков, у которых медийные данные размещены в предзазоре первого трека. Снятие образов с подобных дисков производится по специальной методике, описание которой выходит за рамки настоящей инструкции. © Выражаем благодарность авторам оригинальной инструкции. |
|||||||||||||||||||||||||||||||||||||||||||||||||||||||||||||||||||||||||||||||||||||||||||||||||||||||||||||||||||||||||||||||||||||||||||||||||||||||||||||||||||||||||||||||||||||||||||||||||||||||||||||||||||||||||||||||||||||||||||||||||||||||||||||||||||||||||||||||||||||||
| 09 мар 2014, 14:23 | ||||||||||||||||||||||||||||||||||||||||||||||||||||||||||||||||||||||||||||||||||||||||||||||||||||||||||||||||||||||||||||||||||||||||||||||||||||||||||||||||||||||||||||||||||||||||||||||||||||||||||||||||||||||||||||||||||||||||||||||||||||||||||||||||||||||||||||||||||||||||
| Показать сообщения за: Поле сортировки |
| Страница 1 из 1 | [ Сообщений: 3 ] |
Список форумов » Информация для пользователей » Help » Exact Audio Copy (EAC)
Часовой пояс: UTC [ Летнее время ]
Кто сейчас на конференции |
|
Сейчас этот форум просматривают: нет зарегистрированных пользователей и гости: 1 |
| Вы не можете начинать темы Вы не можете отвечать на сообщения Вы не можете редактировать свои сообщения Вы не можете удалять свои сообщения Вы не можете добавлять вложения |
| Найти: |
Перейти: |
Создано на основе phpBB® Forum Software © phpBB Group
Designed by ST Software.
Русская поддержка phpBB
[ Time : 0.081s | 15 Queries | GZIP : Off ]
Снятие точного рипа в формате image+.cue
1. Вставьте диск в CD-привод.
2. Выполните (проверьте) заполнение тэгов для индексной карты CUE
Заполнение тэгов
Если на диске присутствует информация в виде CD-текста, тэги Название CD, Артист и Названия треков заполнятся автоматически. Тэги Год издания и Жанр в этом случае нужно будет заполнить вручную. Если на диске нет CD-текста, будет выполнена попытка автоматической загрузки тэгов от интернет-поставщика метаданных.
Если Вас по какой либо причине не устраивает информация из CD-текста диска, или Вы хотите загрузить дополнительные данные, процедуру автозаполнения тэгов по информации от интернет-поставщиков метаданных можно вызвать вручную, нажав кнопку
находящуюся на панели управления под списком выбора дисковода.
При этом на самой кнопке будет присутствовать логотип текущего поставщика метаданных (выбранного последний раз).
Если Вас этот поставщик не устраивает или не может предоставить данные, вы можете сменить его нажав на чёрный треугольник справа от кнопки:
Для вызова процедуры автозаполнения тэгов от текущего поставщика метаданных, можно также воспользоваться меню База данных->получить информацию о CD из->сетевой базы поставщика метаданных, или комбинацией клавиш Alt+G.
Если так случилось, что информации о Вашем диске и в интернет-базах ещё нет — такое бывает со «свежими» дисками — информацию для тэгов нужно заполнить вручную. Поля обязательные для заполнения выделены красными прямоугольниками:
Если это альбом одного исполнителя и он указан в поле Артист для всего альбома, то поля Исполнитель для каждого трека заполнять не надо — они заполнятся автоматически.
Заполняйте поля Исполнитель для каждого трека, только если на диске сборник разных исполнителей. При этом в поле Артист альбома желательно указать «Сборник» («Компиляция») или «Трибьют-альбом» для русскоязычных альбомов, в зависимости от типа конкретного сборника, или «Various Artist» («Compilation») или «Tribute», для англоязычных альбомов соответственно.
Будьте внимательны! Не все поставщики метаданных заполняют автоматически все необходимые поля тэгов. В этом случае, Вам также необходимо заполнить недостающие поля вручную.
Остальные информационные поля (не выделенные красным) при создании рипа образом не используются, но сохраняются в базе данных ЕАС.
3. Выполните команду меню Действия->Протестировать и скопировать образ, создав индексную карту (Cue Sheet)->в сжатом виде…, как показано на рисунке
Команда снятия сжатого рипа
В открывшемся окне проводника выберите папку для сохранения рипа и нажмите OK.
Внимание! Для снятия рипа настоятельно рекомендуется использовать команду Протестировать и скопировать.
4. В процессе снятия рипа Вы будете наблюдать окно извлечения аудиоданных. По завершению процедуры снятия окно примет такой вид
Окно извлечения аудиоданных
Нажмите кнопку ОК.
Снятие рипа завершено.
Примеры листингов правильно снятого рипа
Лог создания рипа
Exact Audio Copy V1.0 beta 3 from 29. August 2011
EAC extraction logfile from 15. October 2011, 13:03
Manhattan Jazz Quintet / My Funny Valentine
Used drive : TEAC CD-W524E Adapter: 0 ID: 3
Read mode : Secure
Utilize accurate stream : Yes
Defeat audio cache : Yes
Make use of C2 pointers : No
Read offset correction : 686
Overread into Lead-In and Lead-Out : No
Fill up missing offset samples with silence : Yes
Delete leading and trailing silent blocks : No
Null samples used in CRC calculations : Yes
Used interface : Native Win32 interface for Win NT & 2000
Used output format : User Defined Encoder
Selected bitrate : 128 kBit/s
Quality : High
Add ID3 tag : No
Command line compressor : G:\Program Files\Exact Audio Copy\Encoder\wavpack.exe
Additional command line options : -hm -w «Year=%year%» -w «Genre=%genre%» %source% %dest%
TOC of the extracted CD
Track | Start | Length | Start sector | End sector
———————————————————
1 | 0:00.00 | 6:58.50 | 0 | 31399
2 | 6:58.50 | 9:09.05 | 31400 | 72579
3 | 16:07.55 | 7:59.05 | 72580 | 108509
4 | 24:06.60 | 7:26.20 | 108510 | 141979
5 | 31:33.05 | 7:53.25 | 141980 | 177479
6 | 39:26.30 | 8:56.67 | 177480 | 217746
Range status and errors
Selected range
Filename F:\WAV\Manhattan Jazz Quintet — My Funny Valentine.wav
Peak level 100.0 %
Extraction speed 5.0 X
Range quality 100.0 %
Test CRC 04135E17
Copy CRC 04135E17
Copy OK
No errors occurred
AccurateRip summary
Track 1 accurately ripped (confidence 3) [AC866C70] (AR v1)
Track 2 accurately ripped (confidence 3) [CCADD110] (AR v1)
Track 3 accurately ripped (confidence 3) [D6752C49] (AR v1)
Track 4 accurately ripped (confidence 3) [05B09156] (AR v1)
Track 5 accurately ripped (confidence 3) [0CF8667C] (AR v1)
Track 6 accurately ripped (confidence 3) [8D0C1823] (AR v1)
All tracks accurately ripped
End of status report
==== Log checksum 19538941844B6C46BA6FBEB00B0DCF00F565A7812BFA6755C75429062F41ABD1 ====
Содержание индексной карты (.CUE)
REM GENRE Jazz
REM DATE 1986
REM DISCID 5B0B5706
REM COMMENT «ExactAudioCopy v1.0b3»
PERFORMER «Manhattan Jazz Quintet»
TITLE «My Funny Valentine»
FILE «Manhattan Jazz Quintet — My Funny Valentine.wv» WAVE
TRACK 01 AUDIO
TITLE «Mr. P.C.»
PERFORMER «Manhattan Jazz Quintet»
INDEX 01 00:00:00
TRACK 02 AUDIO
TITLE «‘Round Midnight»
PERFORMER «Manhattan Jazz Quintet»
INDEX 00 06:57:00
INDEX 01 06:58:50
TRACK 03 AUDIO
TITLE «On A Clear Day (You Can See For Ever)»
PERFORMER «Manhattan Jazz Quintet»
INDEX 00 16:06:07
INDEX 01 16:07:55
TRACK 04 AUDIO
TITLE «My Funny Valentine»
PERFORMER «Manhattan Jazz Quintet»
INDEX 00 24:04:72
INDEX 01 24:06:60
TRACK 05 AUDIO
TITLE «New York State Of Mind»
PERFORMER «Manhattan Jazz Quintet»
INDEX 00 31:30:27
INDEX 01 31:33:05
TRACK 06 AUDIO
TITLE «S.U. Blues»
PERFORMER «Manhattan Jazz Quintet»
INDEX 01 39:26:30
[свернуть]
Примечание. Рипы образом (image+.cue) по приведенной в данной инструкции методике можно снимать со всех дисков, отвечающих стандарту Audio CD (диски без защиты и со стандартной немодифицированной ТОС), а также со всех типов экстра-CD (ECD, дисков, содержащих медийные данные в качестве бонуса), кроме тех дисков, у которых медийные данные размещены в предзазоре первого трека. Снятие образов с подобных дисков производится по специальной методике, описание которой выходит за рамки настоящей инструкции.
Изменено пользователем Grand
Installation and Configuration
Anything with a green outline around it is a required setting. Anything orange is required but depends on your drive.
Download and Install EAC
This guide was made for EAC version 1.8, and here is the official download link.
You can see this window before installing, Make sure you install MusicBrainz Metadata Plugin, CDRDAO, FLAC, AccurateRip, CTDB Plugin and AcoustID Plugin as a bare minimum.
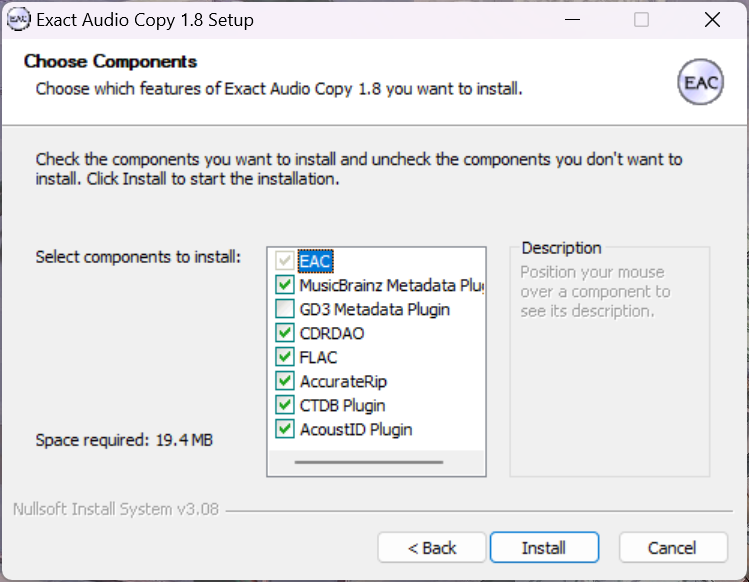
FLAC will be useful as well if you don’t have it separately installed. GD3 is only useful if you want to pay for metadata results. I assume you don’t.
ATTENTION: This version of EAC doesn’t combine with the latest FLAC. You may download the latest version of FLAC on GitHub, then copy and paste it to the Exact Audio Copy\Flac path. As of Feb. 2025, the latest version is 1.5.0.
Set Offset
The “read sample offset correction value” will be simply called “offset” in this article.
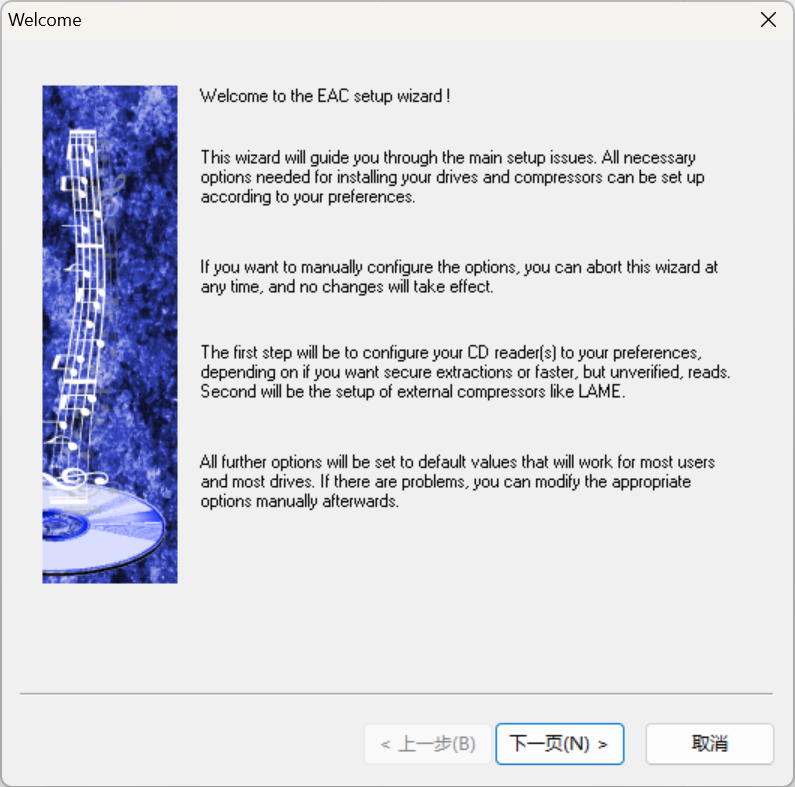
When you first start EAC, you’ll see a screen like this one. Hit “Cancel”.
Next, put a popular retail CD into your drive, there will be two situations.
Your Drive Has Been Recorded at AccurateRip
You’ll see this window.

Hit “Configure”. It may take about one minute. Then you will see this:

Hit “OK”. If you have an older version of EAC or dBpoweramp installed, it’s likely AccurateRip was already configured, and this may not appear. You may need to try multiple CDs to get this to show up.
Your Drive Has Not Been Recorded at AccurateRip Yet
(The CDs mentioned below should all be popular retail ones, they are called “Key Discs” by EAC.) After putting a CD, EAC will show you a window (if not, change another CD, until the window popped up), which reads:

Hit “Configure”.
OK, change another CD (still, change CDs if nothing happened), now it shows like this:
Hit “Configure” again, and you’ll see:
EAC needs 3 Key Discs to confirm the offset in all. We’ve put two, and got the same result. If the third one gives the same offset, we will finish this step.
Hit “Configure”.
This means you are done. Good job!


Download and Load the Profile
Download the Profile file.
Then “Load Profile…”:
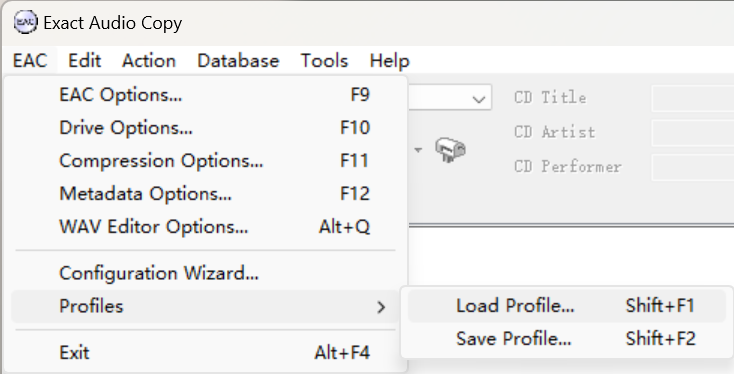
Find the EACProfile.cfg file you just downloaded and open it. Most settings will be configured correctly.
External Compression
Set “Program, including path, used for compression” to the flac.exe file in the Flac folder of EAC directory.
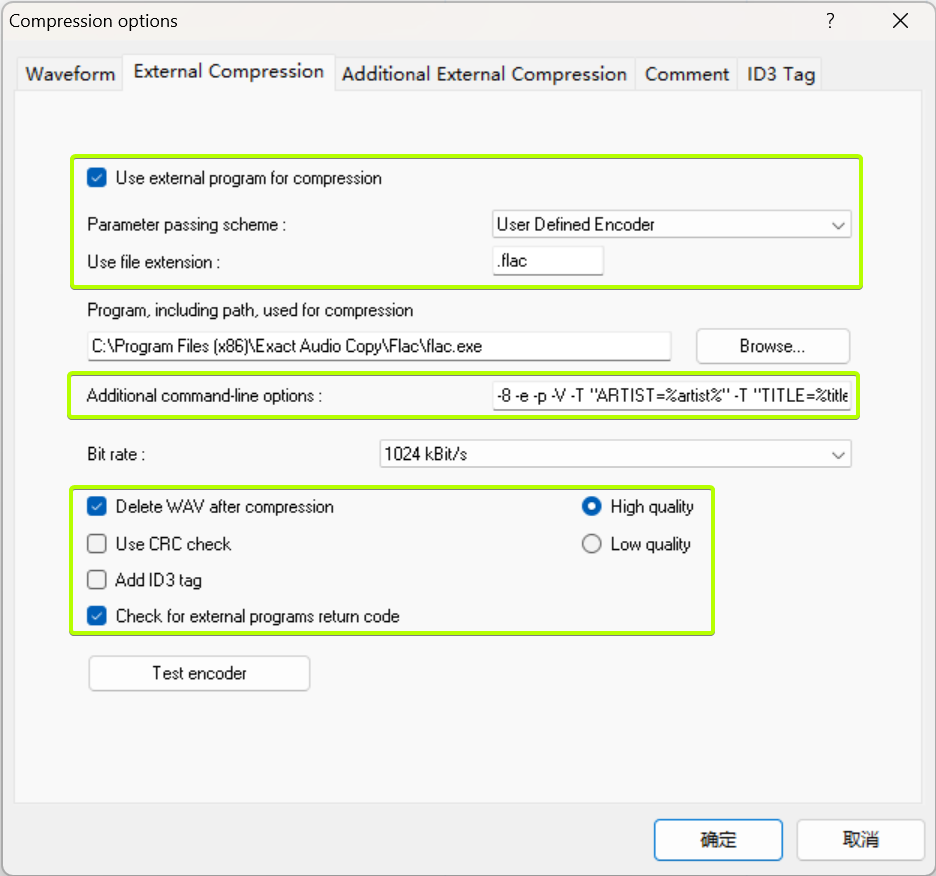
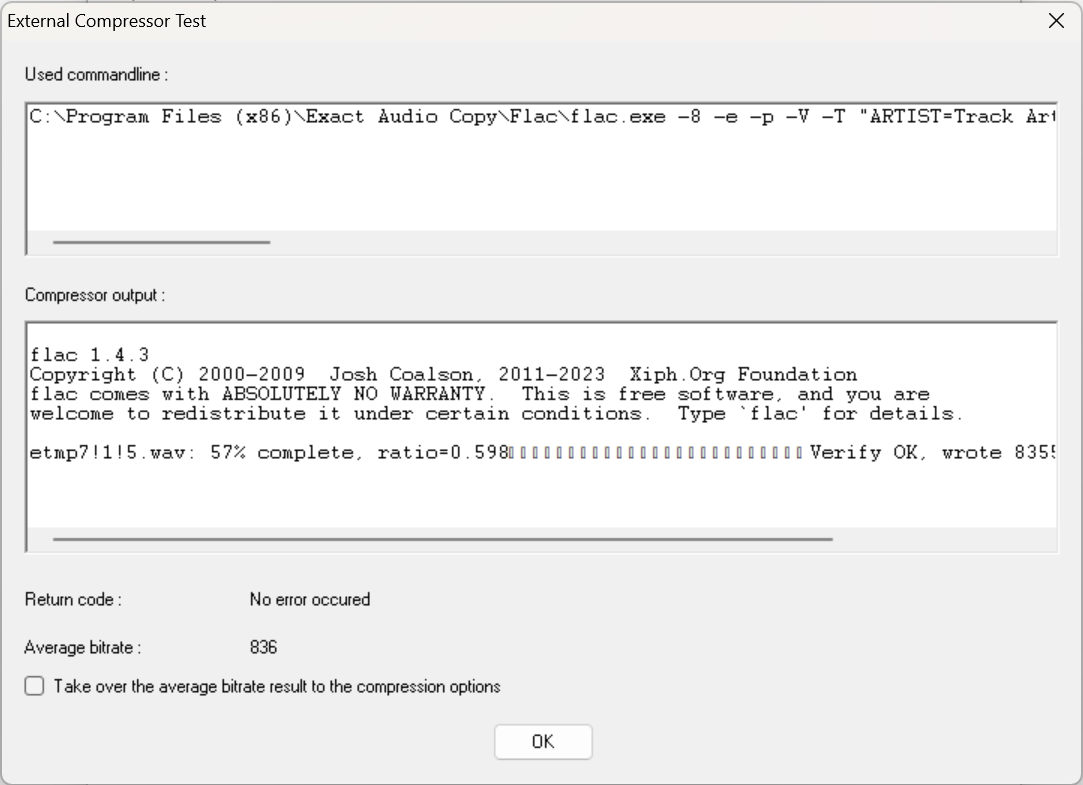
Please notice that FLAC 1.5.0 supports multi-thread compression. You may edit “Additional command-line options” to speed up.
You just easily use -8 -j 8 to replace -8 in the command-line, then you can use 8 thread compression. The number behind -j is the thread number you use. After my test, 16 threads can provide 10× compression speed. There is no benefit to using more than 16 threads.
After editing, tap “Test encoder”, and make sure “No error occurred”:
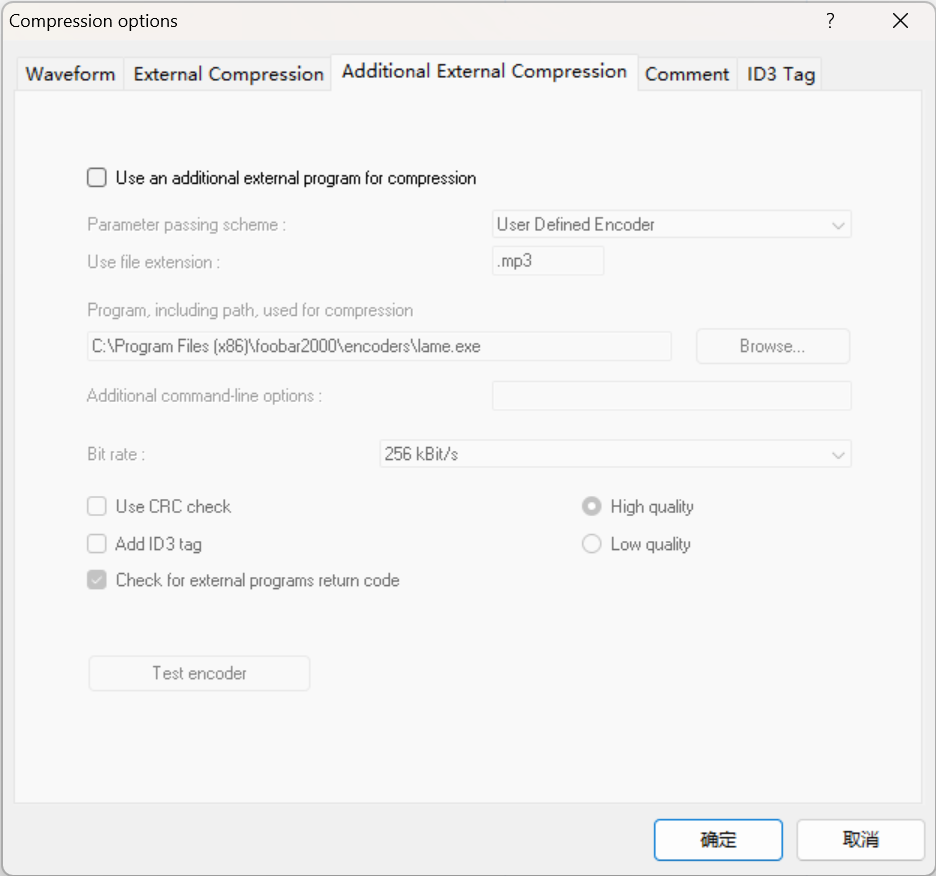
Additional External Compression (optional)
If you want to rip another format at the same time, you may check “Use an additional external program for compression”, and configure and test it like the “External Compression”:
EAC Options
Directories
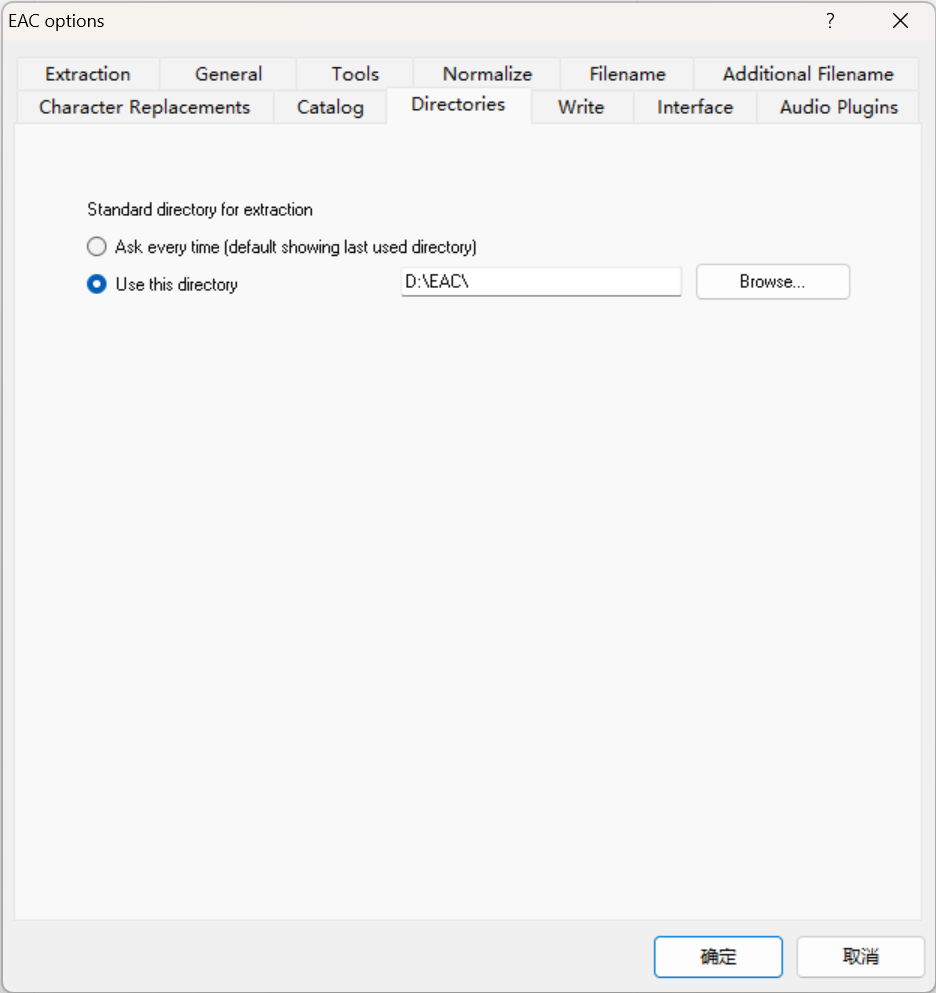
“Use this directory” is a good choice, which can put all rips in the same main folder. Of course, you may have another design, just edit it here.
Drive Options
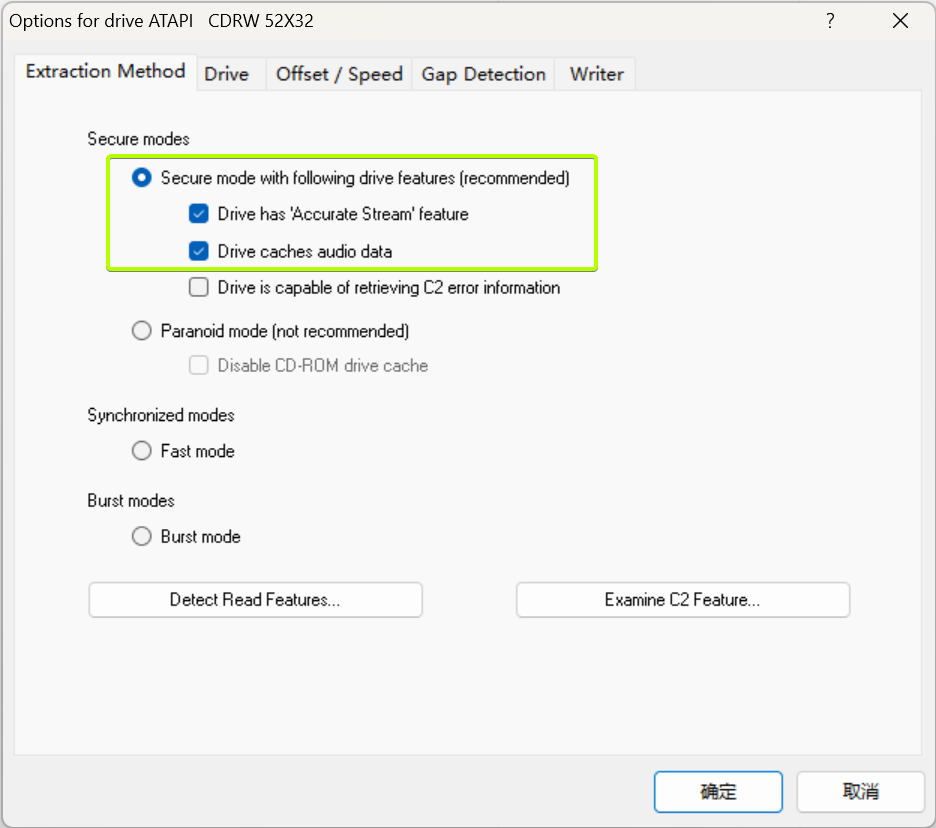
Check like the screenshot.
Drive
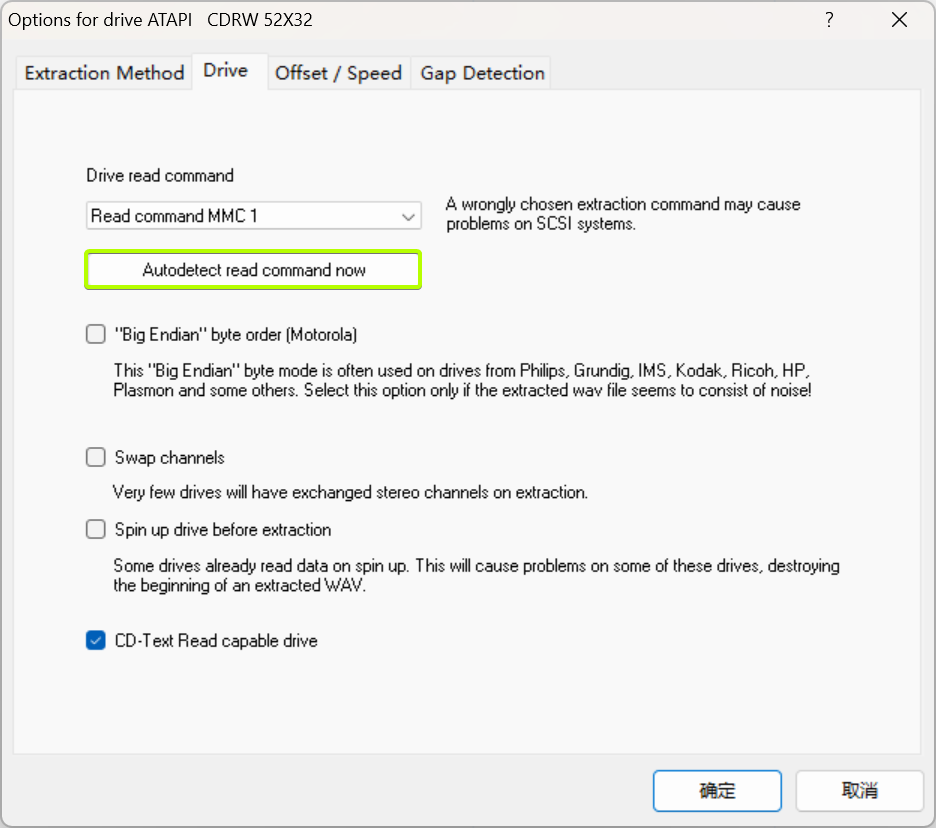
Hit “Auto detect read command now”.
Check “CD-Text Read capable drive” if your drive supports this function. Which can bring you some extra information in your cue file:

If your drive is slow, you may try to check “Spin up drive before extraction”, that MAY make the ripping process faster. If your drive is purchased recently, you may not need to check this option.
Offset / Speed
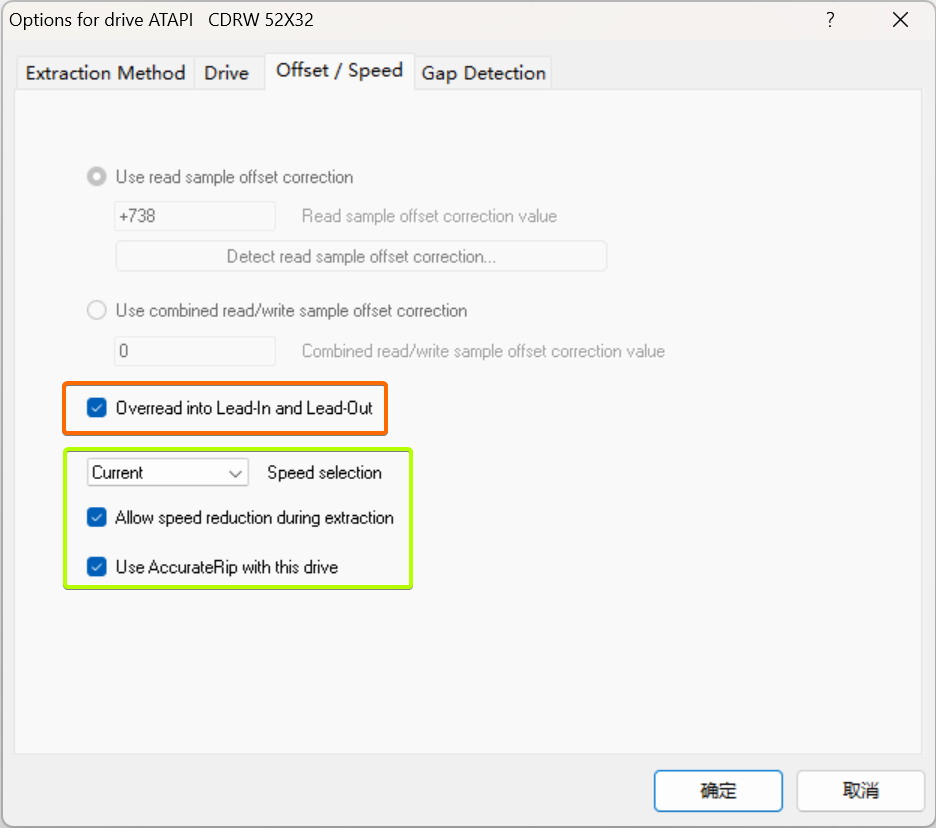
If you did the AccurateRip configuration at the start of this guide, the top half here will be greyed out. AccurateRip is a very useful function for checking that your rips are OK, so you will need to go back and get it configured if this option isn’t greyed out.
Gap Detection
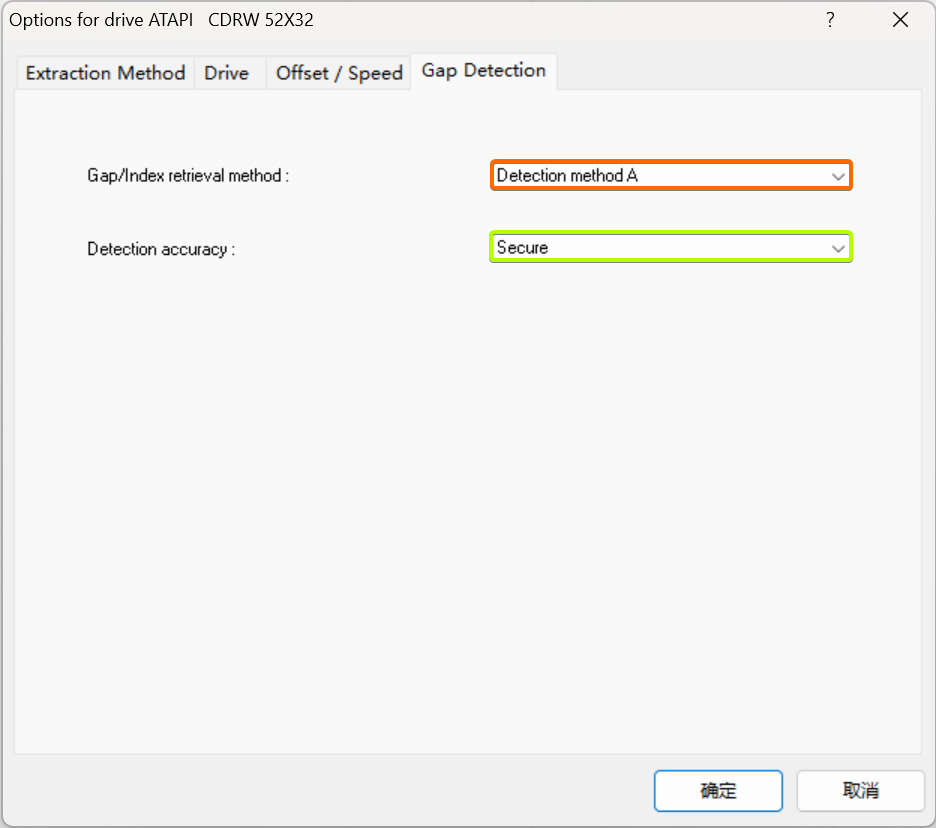
Pretty much every drive should work with the settings shown. If yours stalls on detecting gaps or detects gaps that are obviously wrong (like 30-second gaps on a non-live album), try Detection method B or C. If A, B, and C all fail, you can switch “Secure” to “Accurate” and try again.
Ripping
EAC is now properly set up! You may start from here next time.
Tagging
EAC has several metadata providers:
MusicBrainz and CTDB are both useful. Besides, Gracenote is also a good choice. You may want to try it if MusicBrainz and CTDB don’t work.
How to Configure Gracenote and Import Its Data
Firstly, go to the official site to download and install the software called “Player”.
After installation, run it as an Administrator.
Register Gracenote.
Just hit “Next” and “Agree”.
Then you may use “Retrieve Disc Info” to fetch CD info.
Then export CD info.
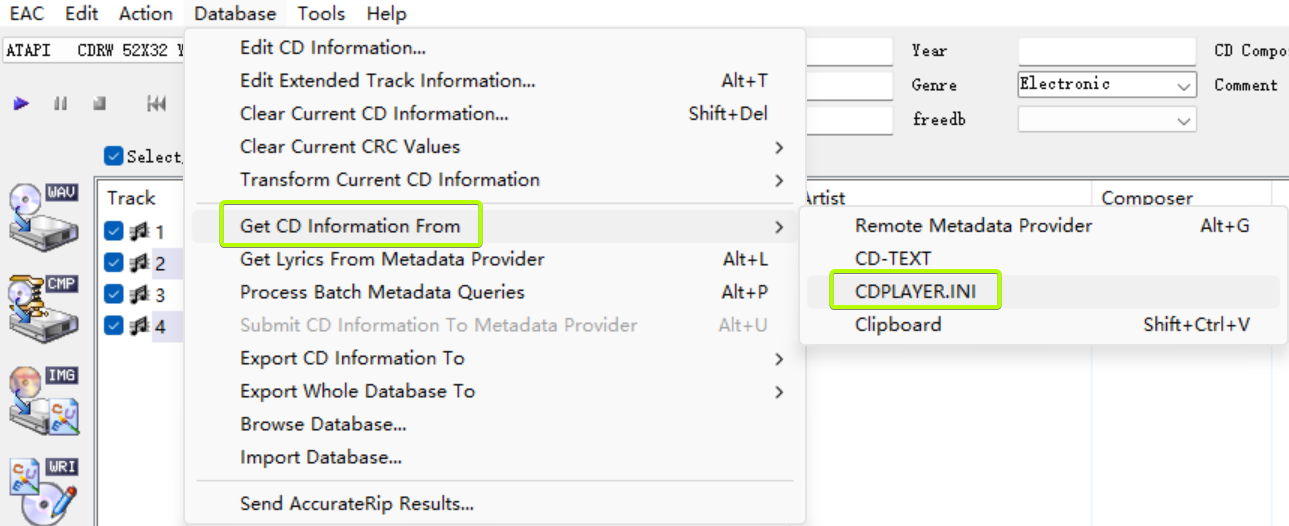
It seems nothing happened after exporting, but the information has been exported successfully. Then open EAC, “Get CD Information From”
CDPLAYER.INIto import the info:
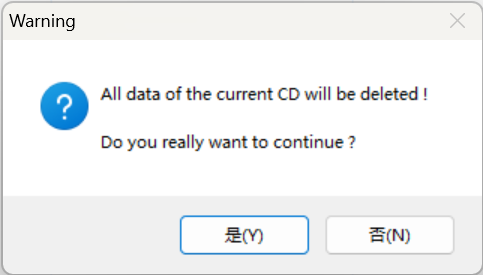
There will be a warning:

Only metadata will be wiped. The data on the CD will be safe, don’t worry. Just “Yes”.
Gracenote doesn’t provide the release year, you need to search and fill in. Some characters are not supported by Gracenote, they would be replaced by
?, take care of this please.If the import fails (sometimes because the CD has data tracks), you may copy and paste manually. You can find a
cdplayer.inifile in theC:\Windowsdirectory. Open it with Notepad. The info stored incdplayer.iniwill be like:
 1
 2
 3
 4
 5
 6
 7
 8
 9
10
11
12
13
[43CCB1] EntryType=1 artist=欅坂46 title=世界には愛しかない numtracks=6 0=世界には愛しかない 1=ボブディランは返さない 2=ひらがなけやき 3=世界には愛しかない -off vocal ver.- 4=ボブディランは返さない -off vocal ver.- 5=ひらがなけやき -off vocal ver.- order=0 1 2 3 4 5 numplay=6
0=follows the track title of the first track and so on.


Sometimes, Gracenote will put artist names in the “Track Title” field, which typically happens on multi-artist albums. I suggest you split artist names into the “Artist” field.
The Situation Where Artist Names and Track Titles Are Stacked Together
If you meet this:
Hit “Database” → “Transform Current CD Information” → “Split Track Information To Artist/Title”, then check if the info was splitted correctly. If EAC put artists and track titles in the opposite position:
You need to hit “Database” → “Transform Current CD Information” → “Exchange Artist <-> Title”:
This is the easy way to split artists and track titles.


It’s very necessary to fill the “CD Performer” for the multi-artist album. If not, music players may recognize the tracks belong to different albums (same title but different artists). You may fill in Various Artists or other suitable content, to make the whole album unique.
Correctly Set the Folder Name for Your Rip
Please read this section carefully and follow the instructions to avoid mistakes!
Please read this section carefully and follow the instructions to avoid mistakes!
Please read this section carefully and follow the instructions to avoid mistakes!
Open “EAC” → “EAC Options…” → “Filename”, and you should see this window:
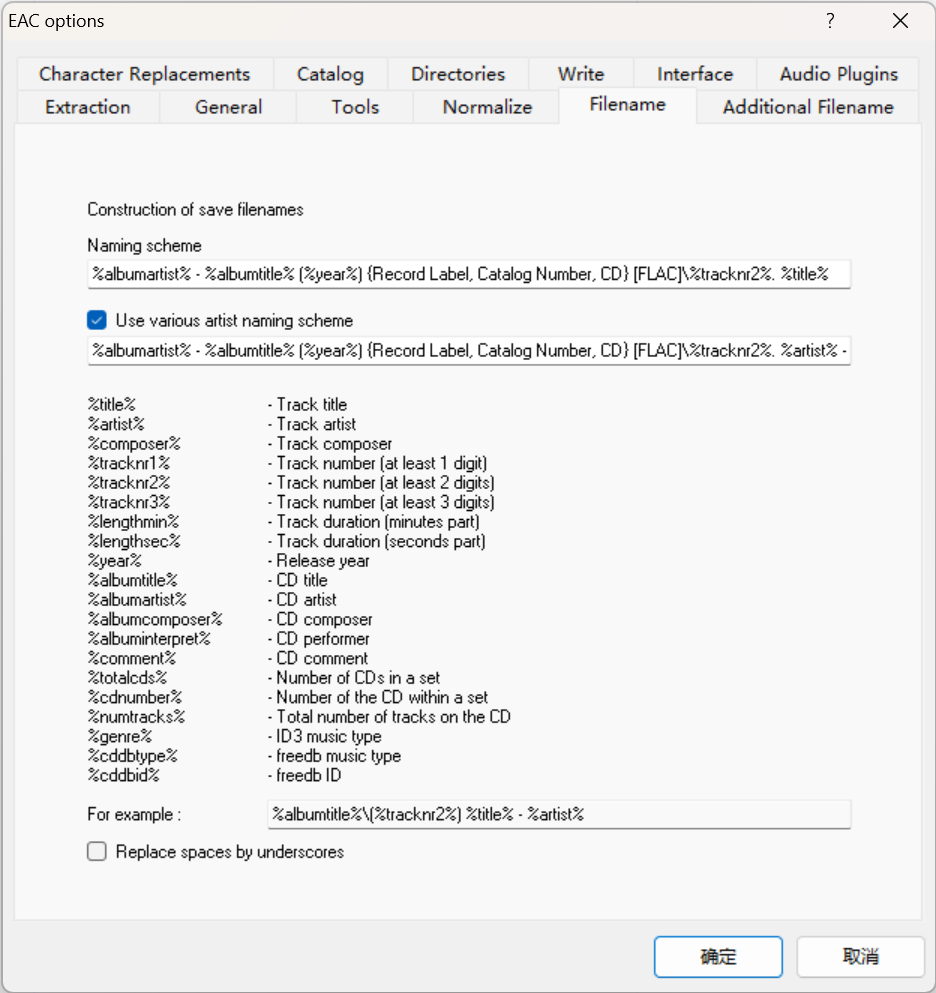
The “Naming scheme” is already filled by:
|
|
It provides a very detailed naming format.
If you know nothing about Record Label and Catalog Number, or your album doesn’t have this information, you may delete the whole part in the {}, like:
|
|
But, if you collect different media, versions, or formats of a specific album, the detailed naming format can help you find the folder you want easily. If you keep “Record Lable” and “Catalog Number”, you have to fill them every time manually according to the physical media. They are not variable. For example:
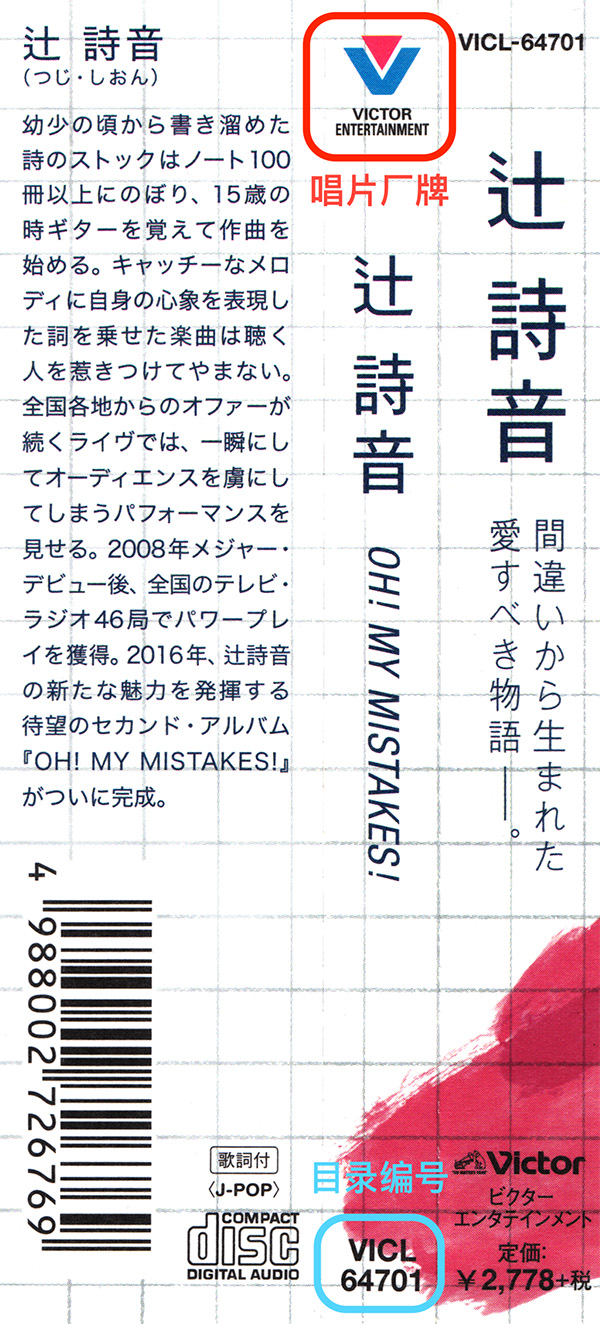
You need to edit it like this according to its obi:
|
|
Correctly filling this part can help people recognize different releases and make you look professional. This info would be written in the log file, even if the folder name was edited. The LOG file keeps the original data.
Of course, some albums don’t provide this info, it’s OK to ignore if the album doesn’t have.
After checking “Use various artist naming scheme”, the naming format setting here will be activated if trackers have different artists. Whether check this option or not is totally up to you.
Additional Filename
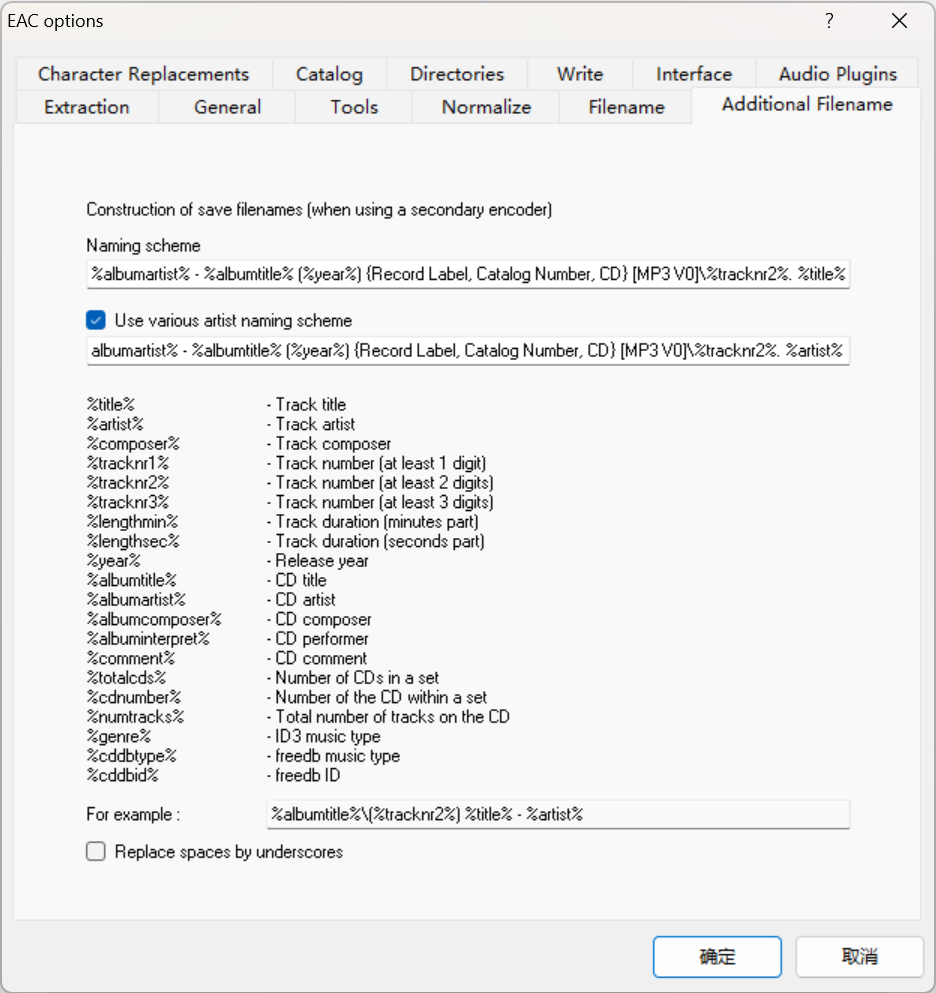
Briefly speaking, by setting an additional compression program and filename, EAC can output two formats of rips at the same time.
Gap Detection and Cuesheets
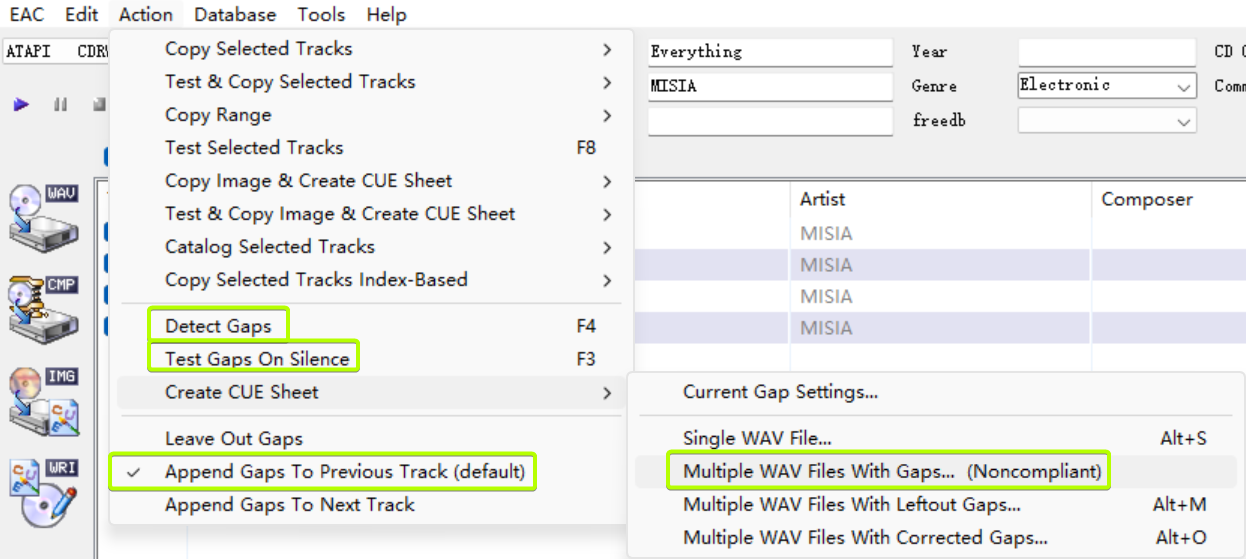
Check like the screenshot.
“Detect Gaps” first, and then “Test Gaps On Silence” (which is related to the ripping quality), and “Create CUE Sheet” → “Multiple WAV Files With Gaps… (Noncompliant)”. Put the CUE file in the rip folder.
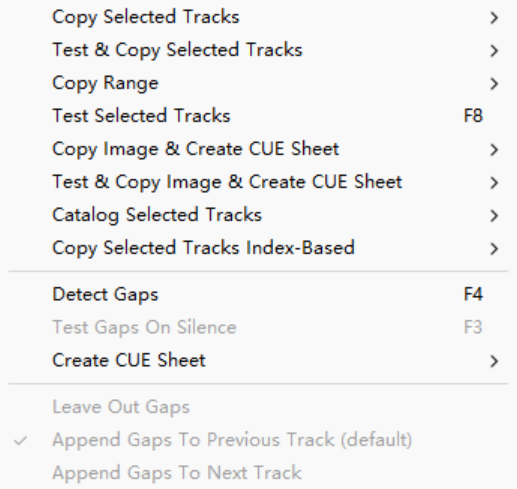
The last three options would be gray if you didn’t detect gaps:
Ripping
Finally, the rip itself!
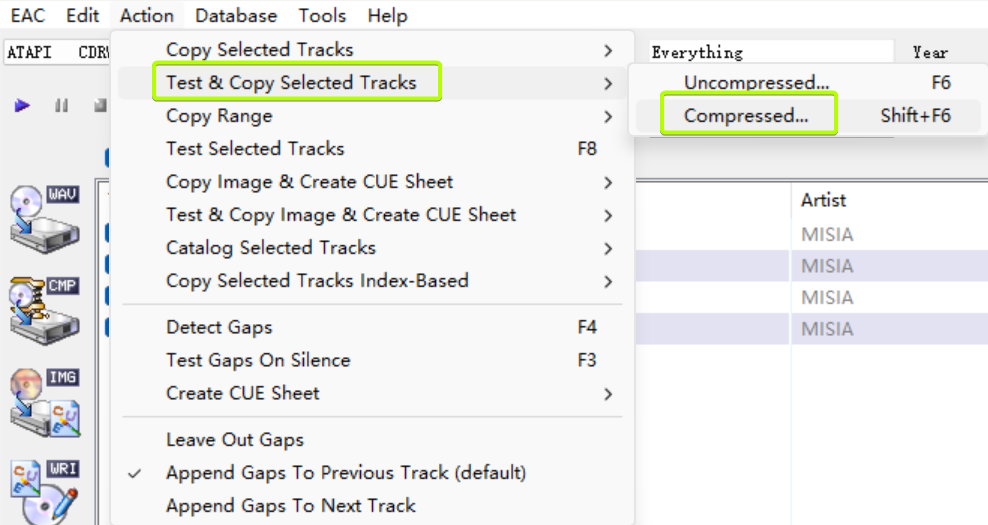
Make sure all the tracks are checked in the main window unless there are some you don’t want to rip. Check “Append Gaps To Previous Track (default)” and hit “Test & Copy Selected Tracks” → “Compressed…”.
Please avoid putting your rip in the path that contains your personal information. Because this path will be recorded in the LOG file which is EDITING FORBIDDEN.
Depending on your drive and whether or not the CD is scratched, this could take anywhere from ten minutes to hours. Be patient.
Now, you’ve finished your first configuration and ripping with EAC.
Sometimes, after ripping, AccurateRip would ask you to upload some information:

Hit “Submit Now” to help more rippers.
Post-Rip
Files
The CUE file you made is for burning, rather than a playlist (the M3U8 file is the playlist). Please notice the filename of CUE files. You may use the Artist - Album Title.cue format, like GARNiDELiA - Violet Cry.cue, which is identical to LOG and M3U8 files. You can also use the Noncompliant.cue as the filename.
Album Artwork (Cover)
The cover gives people an intuitive impression of the album and also reflects the core information, sometimes affecting the audience’s experience. So, finding a high-definition cover now is a wise choice, and the recommended ways to obtain it are:
- Amazon: Mostly are HD covers;
- Google: Search pictures by pictures;
- iTunes: The definition is very high, you even need to zoom it smaller. You may search and download easily from iTunes Artwork Finder or CoverBox;
- Netease Music;
- Album Art Downloader: A software with many cover sources.
After getting the cover file, you may cut it to a square, and name it “Cover” or “Folder”. If you want to embed the cover into an audio file (the advantage of doing so is that the mobile player can display the cover), its size should be less than 1024 KB.
If the above methods cannot obtain satisfactory cover (such as finding blurry or redundant labels), it is also a good practice to scan and process them yourself. Please refer to the Scanning Guide.
Self-Checking
The entire tutorial is so cumbersome that you may make some small mistakes on your first attempt. How do you know if you have any missing steps?
Your LOG file will look just like the example if you set all options correctly.
An online tool called cambia LogTools can also help you, which is good-looking and powerful. What you should do is just drag and drop your LOG file to the browser, then see the score in “EVALUATIONS” is 100, which means your rip is great.
Maybe sometimes you can see the score is only 95, the reason why is “Incorrect read offset for drive”. It’s not your fault if you have configured the offset correctly by this tutorial. Unless there is a very rare problem happened.
FAQ
You may read the official FAQ.
Knotty Problems
Got Nothing After Ripping Start
This may be caused by the presence of tab characters in the information-filling column used to generate file names. Please double-check whether the contents of columns such as “Artist”, “Album Title”, and “Track Title” contain redundant tab characters.
All Characters Looks Huge in EAC Configuration
This is because the font is missing, please install related font files.
The LOG File Shows That the Gap Length of the First Track Is not Identical to ToC
Please check if any video disc-ripping software such as AnyDVD is also running.
EAC Crashed
This may be caused by the activation of an additional external compression program. Please check whether “Compression Options…” → “Additional External Compression” is enabled. If enabled, please disable or specify the correct compression program path.
References
- caaok@What.CD — Installing, configuring, and ripping with Exact Audio Copy (EAC);
- Exact Audio Copy FAQ.
| Configuration |
|---|
|
| Compression |
|
| Other |
|
The configuration of Exact Audio Copy is the next step after installing Exact Audio Copy (EAC). Especially when you prefer high quality rips, a correct configuration is essential. But for the first-time user of EAC this might be a little difficult, because there are many options available with only few or no information about how to configure these. Bear in mind that there is not always the correct configuration which fits for all systems/purposes. An example would be the drive configuration, where the correct settings depend on the drive used.
So all these guides were created with the following in mind:
- Configure EAC so that high quality and accurate rips are possible.
- Provide the user also with background information about the technologies/functions behind the options so that he can decide on his own how to correctly set up EAC, rather than only running through these guides setting all the options as indicated.
Configuration wizard
- EAC Configuration Wizard — The first time you run a new installation of EAC, you’re presented with a configuration wizard, which sets up some crucial options. This guide walks you through the wizard. After you run the wizard, you should continue with the following guides to configure additional options.
Option guides
The following guides are aligned with the EAC option menus which can be accessed through the EAC menu item:
- Drive Options — This reference contains info and recommended settings for each option available in the Drive Options (F10) dialog.
- EAC Options — This reference contains info and recommended settings for each option available in the EAC Options (F9) dialog.
- Compression Options — This reference contains info and recommended settings for each option available in the Compression Options (F11) dialog. For help in choosing the right options here, you may want to read the compression guide for your favorite encoder.
- Metadata Options — This reference contains info concerning the Metadata Options (F12) dialog.
- WAV Editor Options
- EAC Gap Settings — This reference contains info and recommended settings for the gap handling options at the bottom of the Action menu.
This tutorial was prepared by a nice gentleman named ZTX
Thanks ZTX!
Outline
This is a basic guide to configure Exact Audio Copy (EAC) with preset profiles that will allow the choice of ripping Cd’s and compressing the output to MP3 (190 VBR (APS), 245 VBR (APX) 256 CBR & 320 CBR (API)) and FLAC.
What You Need
1: Download and install Exact Audio Copy, the version used here is eac-0.95b4. Do not start EAC just yet.
2: Download and install FLAC, version used FLAC 1.1.2.
3: Download Lame Encoder, unpack to a folder and move the folder to your Program Files folder, version used LAME MP3 Encoder 3.97 beta 2 do not use the alpha versions these are for test purposes only.
4: Download winaspi32.dll Link= ftp://ftp6.nero.com/wnaspi32.dll and place it in the EAC directory. Note: If you are using an application like PeerGuardian you may need to temporarily allow Insoft in order to download the file.
5: A clean unscratched audio CD, do not insert just yet.
I would recommend using EAC in conjunction with Accurate Rip but for the sake of convenience I will go into this in a little more detail when the initial setup is completed.
Initial Setup
This should take no more than a few minutes and only needs to be done once.
Configuration Wizard
A: When you open EAC for the first time the Configuration Wizard window should pop up if not click EAC (Next to Edit) and select the Configuration Wizard.
Click Next, you can pretty much click next for each step with the exception of the steps below where some input may be required.
B: Extraction Preferences window.
1: Your drive model should be indicated here.
2: Make sure that I prefer to have accurate results is checked.
3: Click next.
C: Encoder Configuration window.
1: Make sure this is checked.
2: Click next.
Note: The Configuration Wizard will now search for Lame.exe
D: LAME Configuration window.
1: If the Configuration Wizard failed to find Lame.exe you can browse for the location.
2: If all settings are as shown here click next.
E: freedb Configuration window. freedb is a free database service to look up CD information which will allow EAC to automatically label your rips, EAC will need access to the internet to use this so you may need to set permissions with firewall etc..
1: You will need to enter an email address here for access to the freedb database, the address does not have to be genuine but should have the format of a real email address.
2:Click Next.
F: Configuration Wizard Done window.
1: Check the expert option as this will give you access to additional settings.
2: Click Finish.
EAC Options
Press F9 to bring up EAC Options. Note: No modification is required for the Catalog, Write and Interface so the are skipped.
A: Extraction Tab
Only two options need to be checked here.
1: Check Fill Up Missing Offset Samples With Silence.
2: Check Synchronize Between Tracks.
3: Change Error Recovery Quality to High.
B: General Tab
For the most part these settings have no part in accurate ripping and are more for personal preference, there are a couple that should be checked for automatic CD information.
1: Check On Unknown CD’s.
2: Check Automatically Access On line freedb Database.
C: Tools Tab
Just check that your settings match this image.
D: Normalize Tab
The Normalize function should be unchecked. Note: Lossless ripping is not possible with this enabled.
E: Filename Tab
This is where you set up your chosen file naming convention.
%D%C%N – %T
This will extract tracks to folder ArtistCdTitle 01 – TrackTitle.Format
%D – %C%N – %T
This will extract tracks to folder Artist – CdTitle 01 – TrackTitle.Format
If a .torrent file were created from this folder the name would include Artist and CD titles.
F: Directories Tab
Use this option only if you want to extract files to a default directory, most people prefer to choose the extraction location and leave this option set to Ask Every Time.
Note: C:Music is just an example and does not normally exist unless created by the user.
1: Select for default directory.
2: Browse for chosen directory.
Click OK
Drive Options
Press F10 to bring up the Drive Options you will see an information window uncheck the Show this information next time box an click OK. This stage is just a tab at a time.
A: Extraction Method Tab
1: Detect Read Features, you can manually configure your chosen drive if it is not listed in the EAC internal database or you think that the settings are incorrect. Insert a clean unscratched CD into the drive a click Detect Read Features, how long this will take depends on the drive, during the analysis you will see a window similar to the one below when finished click Apply.
2: It is very important that Secure Mode is enabled.
3: Quite alot of drives support C2 error retrieval however the vast majority are not truly accurate, if you are unsure about the accuracy of your drive with respect to C2 error retrieval make sure it is unchecked.
B: Drive Tab
Still with the disc in the drive click Autodetect Read Command Now, the read command that it finds is the one we are going to use. Move on to the next tab.
C: Offset / Speed Tab
The Read Offset Correction Value (+48) shown in point 2 is for an NEC – DVD_RW ND-2500A this is not the same value for all makes and model of drive find the value for your drive offset in the Accurate Rip Database. If your drive is not listed in the Accuraterip Database skip this part for the time being and install Accuraterip as detailed at the bottom of this post.
1: Check Use Read Sample Offset Correction.
2: Type offset value.
3: Check Allow Speed Reduction During Extraction.
Move to next Tab
E: Gap Detection Tab
1: Detection Method A should be fine but if you drive cannot detect gaps then try B or C.
2: Set Detection Accuracy to Secure.
Click OK.
Profiles, (Encoder Configurations)
By configuring a few profiles and saving them it is quite simple to load the desired profile prior to ripping.
MP3, Lame
These steps are repeated for each mp3 profile created.
Press F11 to bring up Compression Options.
A: External Compression Tab
1: Check Use External Program for Compression.
2: Change Use file extension to .mp3 (including the dot).
3: Browse to find Lame.exe.
4: Additional command line options is where the the quality of the out put is set here are some suggested settings…
Equivalent to Alt Preset Standard (APS), variable bitrate (VBR) with a target of 190kbps, reasonable size for quality trade off.
-V 2 –vbr-new –add-id3v2 –pad-id3v2 –ta “%a” –tt “%t” –tl “%g” –ty “%y” –tn “%n” %s %d
Equivalent to Alt Preset Extreme (APX), variable bitrate (VBR) with a target of 245kbps, greater quality than above, slightly larger size and gaining popularity.
-V 0 –vbr-new –add-id3v2 –pad-id3v2 –ta “%a” –tt “%t” –tl “%g” –ty “%y” –tn “%n” %s %d
Constant bitrate (CBR) at 256kbps.
-b 256 –add-id3v2 –pad-id3v2 –ta “%a” –tt “%t” –tl “%g” –ty “%y” –tn “%n” %s %d
Equivalent to Alt Preset Insane (API), constant bitrate (CBR) at 320kbps, the best quality with a larger filesize.
-b 320 –add-id3v2 –pad-id3v2 –ta “%a” –tt “%t” –tl “%g” –ty “%y” –tn “%n” %s %d
5: Bit Rate can be ignored, the command line makes it redundant.
6: High Quality.
You can find more information about the Additional command line options at the Hydrogen Audio Forums
B: ID3 Tag Tab
Check that the options are the same as this screen shot, click OK and save the profile as shown below.
Saving Current Profile
Note: Some of the highlighted elements in this picture are off to the right, you can click This Link to view it separately.
1: Click New.
2: Choose a name for the profile, a descriptive name will be useful when you have multiple profiles.
3: Make sure All EAC Options is checked and click OK.
4: Click Save
Flac Profile
Press F11 again
1: Change the used file extension to .flac
2: Browse for flac.exe which is the external compression program being used.
3: Change the Additional command line options to read..
-8 -V -T “artist=%a” -T “title=%t” -T “album=%g” -T “date=%y” -T “tracknumber=%n” -T “genre=%m” %s
4: Selected bitrate has no impact here.
5: Click OK and save the profile as shown above.
AccurateRip
The philosophy behind AccurateRip is quite simple – each time an audio track is ripped (recorded by computer) it is compared with rips from other people, this allows a confidence report to be generated. The report might say that 4 other people had exactly the same results, this would guarantee your rip was without error, or the report could say that 3 other people disagree with your rip, the likely hood is that your CD has a scratch and should be cleaned.
AccurateRip will also set the CD drive offset value, for more info Accuraterip.com
Setup
A: Download dMC-AccurateRip.exe from This Link by clicking on the AccurateRip Function link.
B: Install
C: Copy the AccurateRip.dll from C:Program FilesIllustratedBpowerAMP To your Exact Audio Copy installation folder.
Configuration
After initial installation AccurateRip is in an unconfigured state it will offer to configure itself when what is know as a Key Disc is inserted, there are over 100000 different Key Discs at present and you can find a list of some of them HERE
To configure AccurateRip have 2 or 3 Cd’s to hand, open EAC, insert a disc and follow any on screen prompts, it’s pretty much automatic.
To generate a confidence report when ripping is complete make sure that you check Show Status Dialog After Extraction in EAC under the General Tab in EAC Options (F9) prior to starting the rip.
Note: Once configured AccurateRip will remove the ability to change the drive offset and due the the way the database is structured will only work if a CD is being extracted as individual tracks as oppsed to an entire disc image.
Ripping
1: Open EAC, insert CD and load your preferred ripping profile.
Note: a FLAC profile is being used in this example however if you just want the output as WAV files any of the preconfigured profiles can be used.
2: Click Action and Detect Gaps (or F4).
3: Click Action, Create Cue Sheet and Multiple WAV Files With Gaps (Noncompliant).
Note: This is a good point to check that Append Gaps To Previous Track is checked, it should be set as default.
4: Click CTRL + A to select all tracks, Action, Test And Copy Selected Tracks and Compressed (Shift + F6).
Note: For WAV files select Uncompressed (F6).
5: During the extraction process you will see this window, when you see the Audio Extraction Complete message click OK and you are done.
Note: Remember to check the .log file for any errors.
FLAC To MP3 Via WAV
Sometimes I just need to covert my FLAC backups to MP3, this is how I do it.
What You Need
EAC configured as detailed above.
A: Decoding FLAC to WAV
Open FLAC frontend.exe.
1: Click Add and browse for the files.
2: Select the output directory.
3: Click Decode.
B: WAV to MP3.
1: Open EAC and Load the prefered MP3 profile.
2: As shown above click Tools, Compress WAVs and select the WAV files.
3: As shown below select the destination folder and click Save.
Audio Ripping, EAC, FLAC, MP3, VBR