
EWC 1150
………………………………………… ………………………………………
RU СТИРАЛЬНАЯ МАШИНА
ИНСТРУКЦИЯ ПО
ЭКСПЛУАТАЦИИ

Electrolux. Thinking of you.
Обменяйтесь с нами своими мыслями на
www.electrolux.com
СОДЕРЖАНИЕ
Сведения по технике безопасности
2
Указания по безопасности
3
Описание изделия
5
Панель управления
6
Перед первым использованием
8
Ежедневное использование
8
Полезные советы
11
Программы мойки
13
Уход и очистка
16
Что делать, если …
17
Технические данные
20
Показатели потребления
20
Установка
21
Охрана окружающей среды
25
Право на изменения сохраняется.
СВЕДЕНИЯ ПО ТЕХНИКЕ БЕЗОПАСНОСТИ
Перед установкой и эксплуатацией прибора внимательно
ознакомьтесь с приложенным руководством. Производи-
тель не несет ответственность за травмы и поврежде-
ния, полученные/вызванные неправильной установкой и
эксплуатацией. Позаботьтесь о том, чтобы данное руко-
водство было у Вас под рукой на протяжении всего срока
службы прибора.
БЕЗОПАСНОСТЬ ДЕТЕЙ И ЛИЦ С
ОГРАНИЧЕННЫМИ ВОЗМОЖНОСТЯМИ
ВНИМАНИЕ! Существует риск удушья, получения
травм или стойких нарушений нетрудоспособности.
• Не допускайте лиц, включая детей, с ограниченной
чувствительностью, умственными способностями или
не обладающих необходимыми знаниями, к
эксплуатации прибора. Они должны находиться под
присмотром или получить инструкции от лица, ответ-
ственного за их безопасность.
• Не позволяйте детям играть с прибором.
• Храните все упаковочные материалы вне досягаемо-
сти детей.
• Храните все средства для стирки вне досягаемости де-
тей.
2 electrolux
• Не подпускайте детей и домашних животных к прибо-
ру, когда его дверца открыта.
• Если прибор оснащен устройством защиты от детей,
рекомендуем Вам включить это устройство.
ОБЩИЕ ПРАВИЛА ТЕХНИКИ БЕЗОПАСНОСТИ
• Перед выполнением операций по чистке и уходу вы-
ключите прибор и извлеките вилку сетевого шнура из
розетки.
• Не изменяйте параметры данного прибора.
• Соблюдайте максимально допустимую загрузку в 3 кг
(см. Главу «Таблица программ»).
• В случае повреждения шнура питания во избежание
несчастного случая он должен быть заменен изготови-
телем, специалистом авторизованного сервисного
центра или специалистом с аналогичной квалифика-
цией.
• Рабочее давление воды (минимальное и максималь-
ное) должно находиться в пределах 0,5 бар (0,05 МПа)
и 8 бар (0,8 МПа)
• Вентиляционные отверстия в днище (если они предус-
мотрены конструкцией) не должны перекрываться ко-
вровым покрытием.
• При подключении прибора к водопроводу должны ис-
пользоваться новые поставляемые с ним комплекты
шлангов. Использовать старые комплекты шлангов не-
льзя.
УКАЗАНИЯ ПО БЕЗОПАСНОСТИ
УСТАНОВКА
• Удалите всю упаковку и вывинтите
транспортировочные болты.
• Сохраните транспортировочные бол-
ты. Перед следующим перемеще-
нием прибора Вам будет необходимо
заблокировать барабан.
• Не устанавливайте и не подключайте
прибор, если он имеет повреждения.
• Не устанавливайте и не эксплуати-
руйте прибор в помещениях с темпе-
ратурой ниже 0°C или в местах, где
он может оказаться под действием
атмосферных условий.
• Следуйте приложенным к прибору ин-
струкциям по его установке.
• Убедитесь, что пол на месте установ-
ки прибора ровный, прочный, чистый
и не боится нагрева.
electrolux 3
• Не устанавливайте прибор там, где
его дверцу будет невозможно полно-
стью открыть.
• Прибор имеет большой вес: не забы-
вайте о мерах предосторожности при
его перемещении. Обязательно ис-
пользуйте защитные перчатки.
• Убедитесь, что между днищем прибо-
ра и полом имеется достаточная вен-
тиляция.
• Для обеспечения необходимого про-
странства между прибором и ковро-
вым покрытием отрегулируйте высоту
ножек прибора.
Подключение к электросети
ВНИМАНИЕ! Существует риск
пожара и поражения электрическим
током.
• Прибор должен быть заземлен.
• Убедитесь, что параметры электропи-
тания, указанные на табличке с тех-
ническими данными, соответствуют
параметрам электросети. В против-
ном случае вызовите электрика.
• Включайте прибор только в устано-
вленную надлежащим образом элек-
тророзетку с защитным контактом.
• Не пользуйтесь тройниками и удлини-
телями.
• Следите за тем, чтобы не повредить
вилку и сетевой кабель. Для замены
сетевого кабеля обратитесь в сервис-
ный центр или к электрику.
• Вставляйте вилку сетевого кабеля в
розетку только во конце установки
прибора. Убедитесь, что после уста-
новки имеется доступ к вилке.
• Для отключения прибора от электро-
сети не тяните за кабель электропи-
тания. Всегда беритесь за саму вил-
ку.
• Не беритесь за кабель электропита-
ния или за его вилку мокрыми рука-
ми.
• Данный прибор соответствует евро-
директивам E.E.C.
Подключение к водопроводу
• Следите за тем, чтобы не повредить
шланги для воды.
• При подключении прибора к водопро-
воду должны использоваться новые
поставляемые с ним комплекты
шлангов. Использовать старые ком-
плекты шлангов нельзя.
• Перед подключением прибора к но-
вым или давно не использовавшимся
трубам дайте воде стечь, пока она не
станет чистой.
• Перед первым использованием при-
бора убедитесь в отсутствии проте-
чек.
ЭКСПЛУАТАЦИЯ
ВНИМАНИЕ! Существует риск
травмы, поражения электрическим
током, пожара, получения ожогов
или повреждения прибора.
• Используйте прибор в жилых поме-
щениях.
• Следуйте правилам по безопасному
обращению, приведенным на упаков-
ке средства для стирки.
• Не кладите на прибор, рядом с ним
или внутрь него легковоспламеняю-
щиеся материалы или изделия, про-
питанные легковоспламеняющимися
веществами.
• Не прикасайтесь к стеклянной части
дверцы во время работы программы.
Дверца может быть горячей.
• Удостоверьтесь, что из белья извле-
чены все металлические предметы.
• Не помещайте под прибор контейнер
для сбора воды на случай возможной
ее протечки. Чтобы узнать, какие до-
полнительные принадлежности могут
использоваться с Вашим прибором,
обратитесь в сервисный центр.
УХОД И ОЧИСТКА
ВНИМАНИЕ! Существует риск
повреждения прибора или травм.
• Не используйте для очистки прибора
подаваемую под давлением воду или
пар.
• Протирайте прибор мягкой влажной
тряпкой. Используйте только не-
йтральные моющие средства. Не ис-
пользуйте абразивные средства, ца-
рапающие губки, растворители или
металлические предметы.
4 electrolux
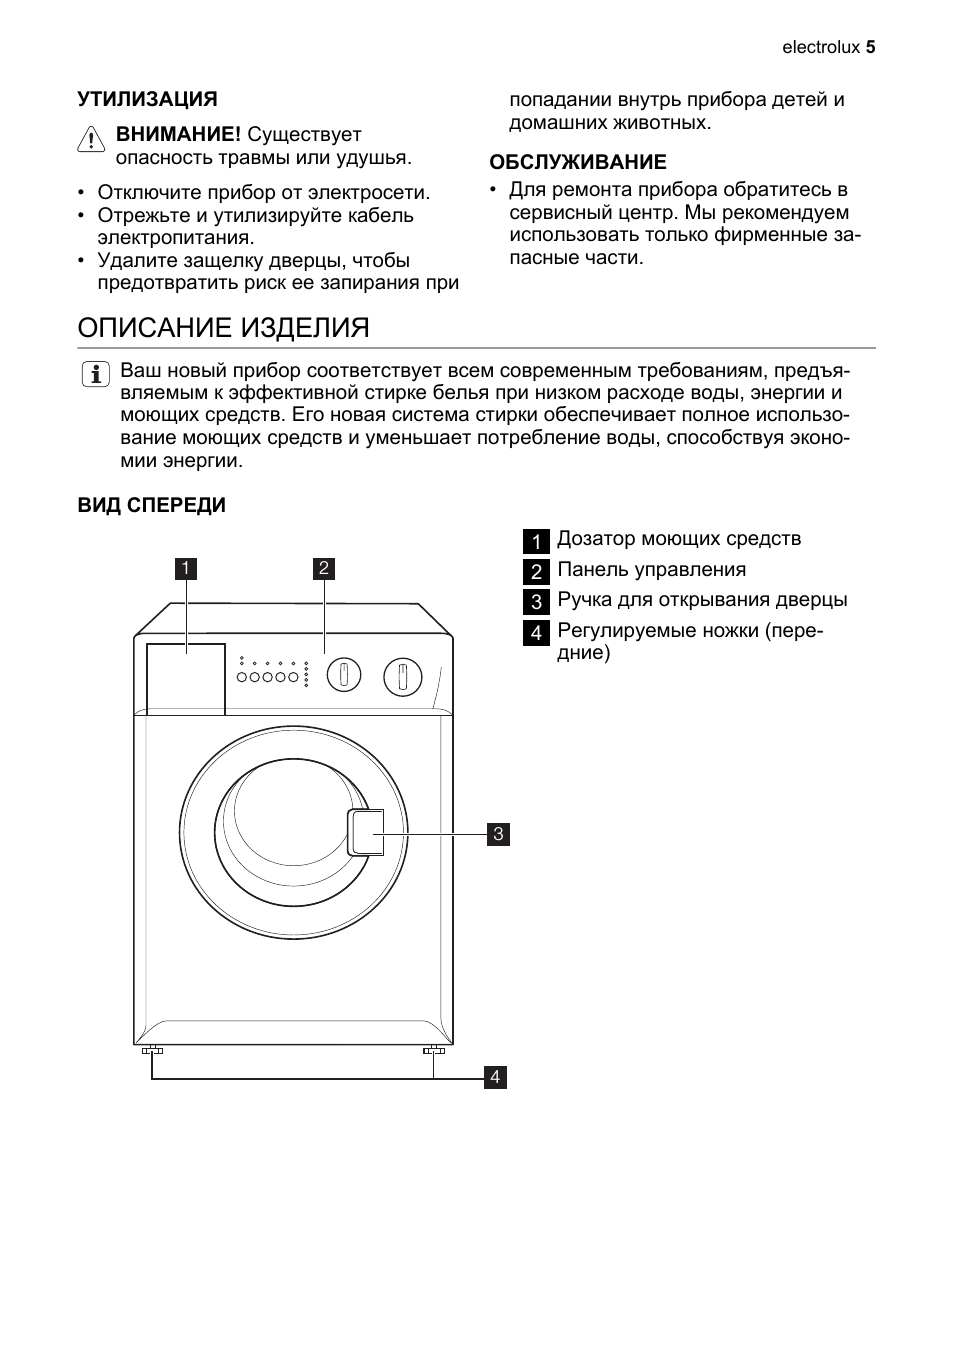
УТИЛИЗАЦИЯ
ВНИМАНИЕ! Существует
опасность травмы или удушья.
• Отключите прибор от электросети.
• Отрежьте и утилизируйте кабель
электропитания.
• Удалите защелку дверцы, чтобы
предотвратить риск ее запирания при
попадании внутрь прибора детей и
домашних животных.
ОБСЛУЖИВАНИЕ
• Для ремонта прибора обратитесь в
сервисный центр. Мы рекомендуем
использовать только фирменные за-
пасные части.
ОПИСАНИЕ ИЗДЕЛИЯ
Ваш новый прибор соответствует всем современным требованиям, предъя-
вляемым к эффективной стирке белья при низком расходе воды, энергии и
моющих средств. Его новая система стирки обеспечивает полное использо-
вание моющих средств и уменьшает потребление воды, способствуя эконо-
мии энергии.
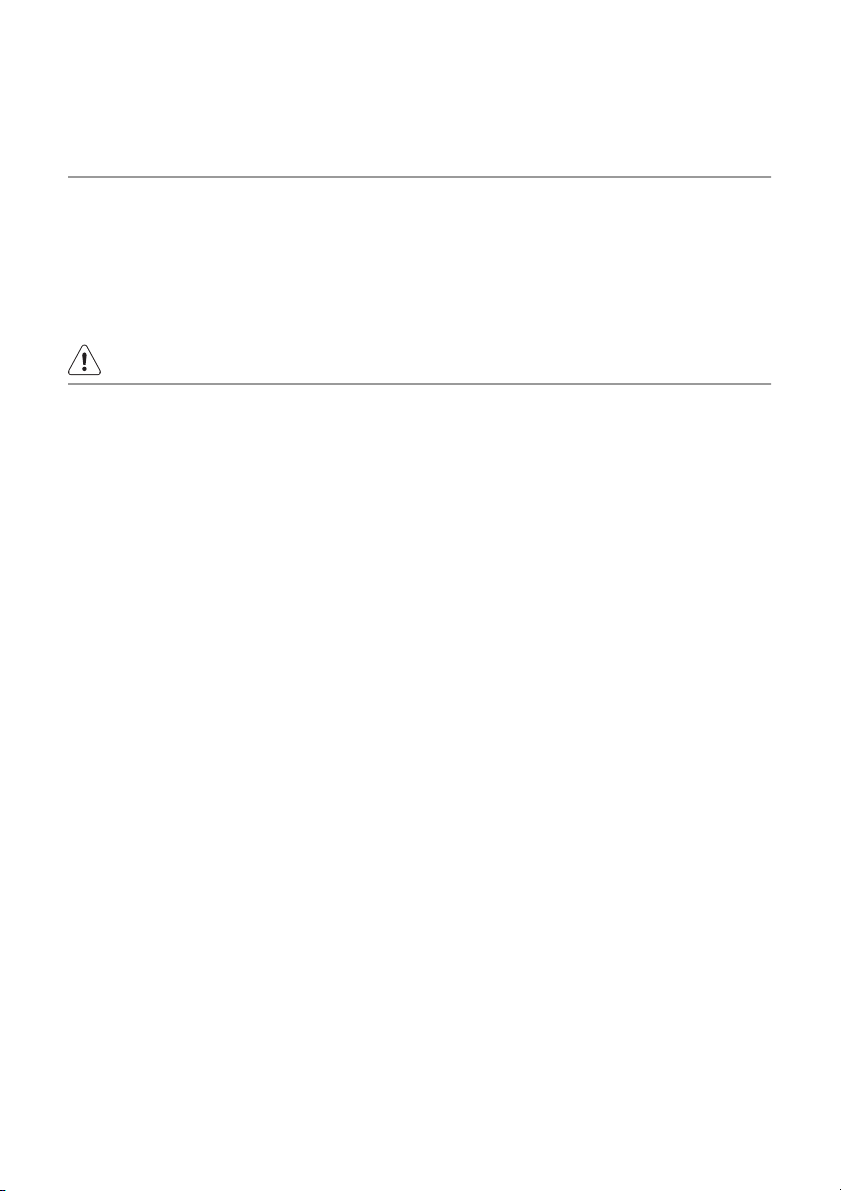
ВИД СПЕРЕДИ
1
2
3
4
1
Дозатор моющих средств
2
Панель управления
3
Ручка для открывания дверцы
4
Регулируемые ножки (пере-
дние)
electrolux 5
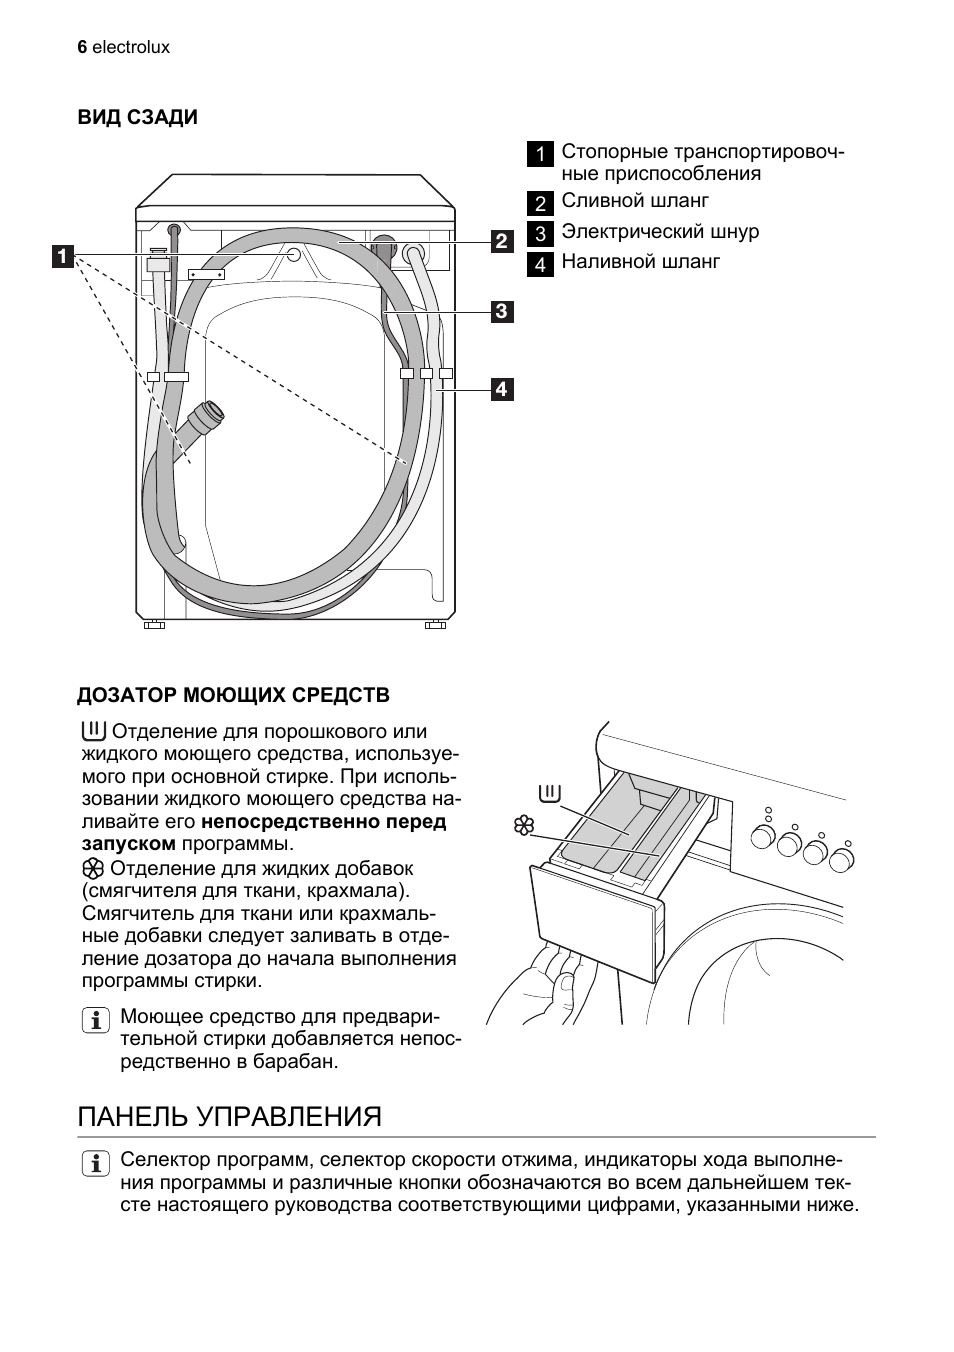
ВИД СЗАДИ
1
3
2
4
1
Стопорные транспортировоч-
ные приспособления
2
Сливной шланг
3
Электрический шнур
4
Наливной шланг
ДОЗАТОР МОЮЩИХ СРЕДСТВ
Отделение для порошкового или
жидкого моющего средства, используе-
мого при основной стирке. При исполь-
зовании жидкого моющего средства на-
ливайте его непосредственно перед
запуском программы.
Отделение для жидких добавок
(смягчителя для ткани, крахмала).
Смягчитель для ткани или крахмаль-
ные добавки следует заливать в отде-
ление дозатора до начала выполнения
программы стирки.
Моющее средство для предвари-
тельной стирки добавляется непос-
редственно в барабан.
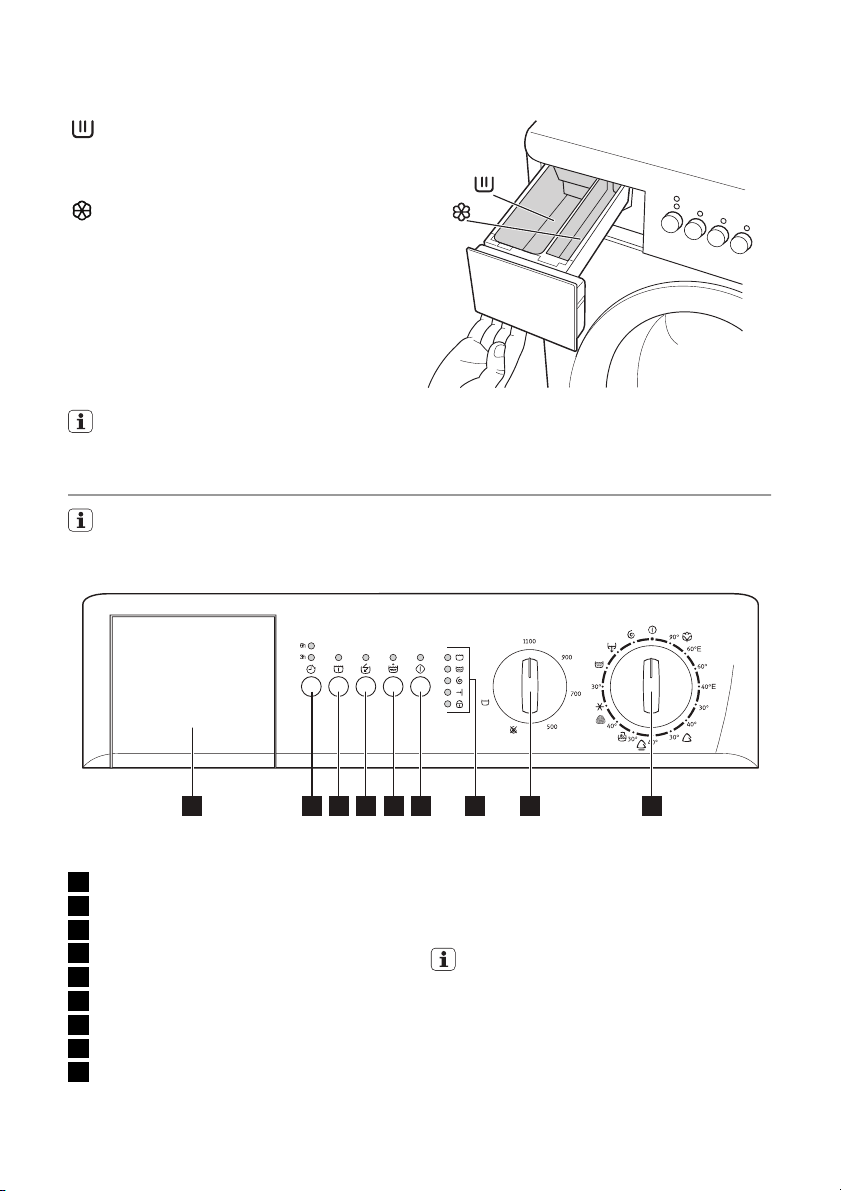
ПАНЕЛЬ УПРАВЛЕНИЯ
Селектор программ, селектор скорости отжима, индикаторы хода выполне-
ния программы и различные кнопки обозначаются во всем дальнейшем тек-
сте настоящего руководства соответствующими цифрами, указанными ниже.
6 electrolux
1
2 3 4 5 6
8
9
7
1
Дозатор моющих средств
2
Кнопка «ОТСРОЧКА ПУСКА»
3
Кнопка «ПРЕДВАРИТЕЛЬНАЯ
СТИРКА»
4
Кнопка «БЫСТРАЯ СТИРКА»
5
Кнопка «ДОПОЛНИТЕЛЬНОЕ ПО-
ЛОСКАНИЕ»
6
Кнопка «ПУСК/ПАУЗА»
7
Дисплей хода выполнения про-
граммы
8
Регулятор снижения скорости от-
жима
9
Селектор программ
ДОЗАТОР МОЮЩИХ СРЕДСТВ
Дозатор моющих средств имеет два от-
дельных отсека: для моющего средства
и кондиционера для ткани.
Моющее средство для предвари-
тельной стирки добавляется непос-
редственно в барабан.
ОТСРОЧКА СТАРТА
С помощью этой кнопки можно отло-
жить запуск программы на 6 часов или
3 часа.
ПРЕДВАРИТЕЛЬНАЯ СТИРКА
При выборе этой функции машина вы-
полняет предварительную стирку перед
тем, как приступать к основной стирке.
Время стирки будет увеличено. Эта
функция рекомендуется для стирки
сильно загрязненного белья.
БЫСТРАЯ СТИРКА
При выборе этой функции время стирки
будет уменьшено приблизительно на
10 минут. Эта функция рекомендуется
для стирки слабозагрязненного белого/
цветного хлопка и синтетики.
ДОПОЛНИТЕЛЬНОЕ ПОЛОСКАНИЕ
Данный прибор разработан для обеспе-
чения экономии электроэнергии. Если
необходимо прополоскать белье допол-
нительным количеством воды (допол-
нительное полоскание), выберите эту
функцию. Будет выполнено несколько
дополнительных полосканий. Эта функ-
ция рекомендуется для людей, стра-
дающих аллергией на моющие сред-
ства, а также в местностях с очень мяг-
кой водой.
СТАРТ/ПАУЗА
С помощью этой кнопки можно запу-
стить или прервать выполнение вы-
бранной программы.
ДИСПЛЕЙ
(A)
(B)
(C)
(D)
(E)
Индикатор A загорается, когда машина
выполняет фазу стирки.
electrolux 7
Индикатор B загорается, когда машина
выполняет полоскание.
Индикатор C загорается, когда машина
выполняет отжим.
Индикатор D загорается по окончании
цикла стирки.
Индикатор E указывает, можно ли от-
крыть дверцу
• Индикатор включен: дверцу откры-
вать нельзя.
• Индикатор выключен: дверцу можно
открывать.
• Индикатор мигает: дверцу скоро мож-
но будет открыть.
РЕГУЛЯТОР СНИЖЕНИЯ СКОРОСТИ
ОТЖИМА
Поворачивая селектор скорости отжи-
ма, можно изменить скорость отжима в
выбранной программе, либо выбрать
функцию «Остановка с водой в баке»
или «Без отжима».
СЕЛЕКТОР ПРОГРАММ
Селектор программ позволяет выби-
рать нужную программу, а также вклю-
чать и выключать машину.
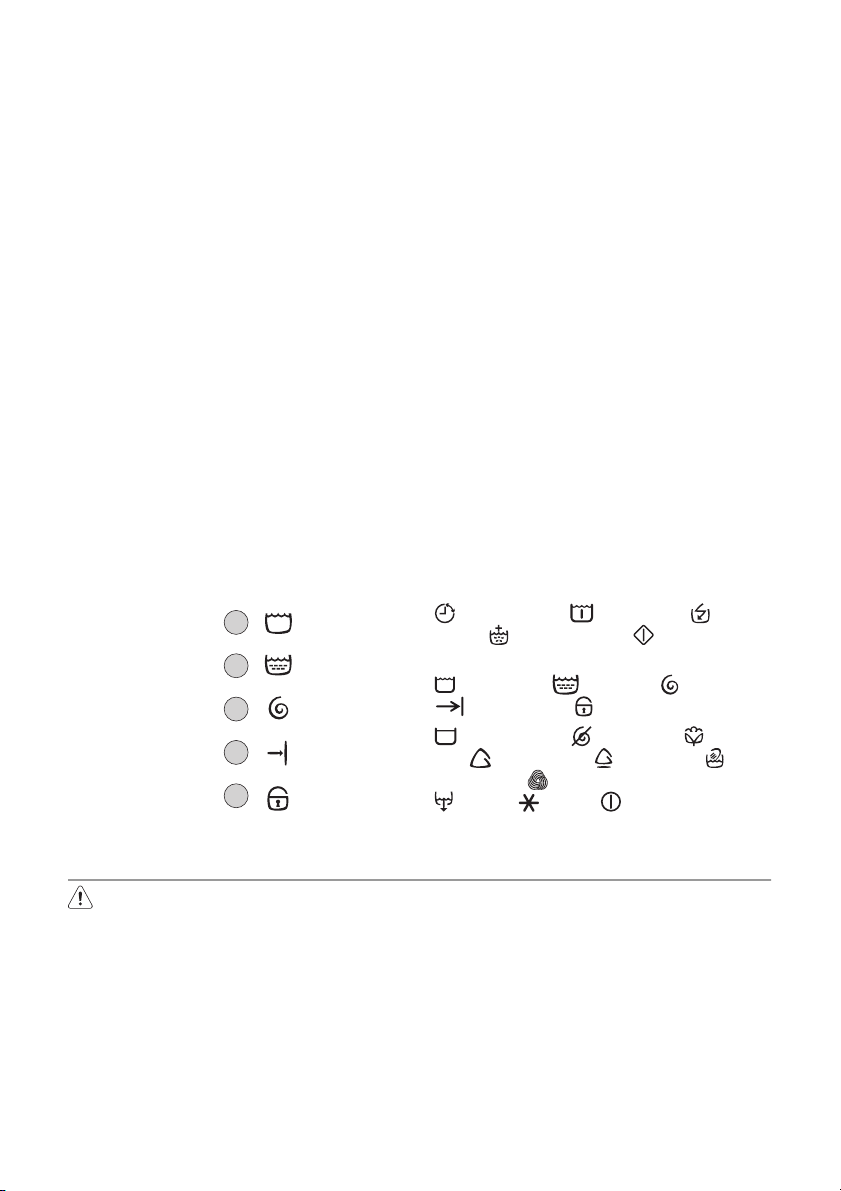
УСЛОВНЫЕ ОБОЗНАЧЕНИЯ
= отсрочка пуска,
= предвари-
тельная стирка, = быстрая стирка,
= дополнительное полоскание, =
Пуск/Пауза
= стирка,
= полоскания, = от-
жим,
= конец цикла, = дверца
заблокирована
= остановка с водой в баке, =
без отжима, = хлопок,
= синтети-
ка, = деликатные ткани,
= Микс
20°С, = шерсть, 30 ° = быстрая
стирка 30°С , = слив, = холодная
стирка, = ВКЛ/ВЫКЛ
ПЕРЕД ПЕРВЫМ ИСПОЛЬЗОВАНИЕМ
ВНИМАНИЕ!
Убедитесь, что подключение прибора к
электросети, водопроводу и канализа-
ции выполнено в соответствии с ин-
струкциями по установке.
ВАЖНО! Выньте из барабана все
материалы.
ВАЖНО! Рекомендуется выполнить
программу стирки без белья для
удаления любых загрязнений, которые
могли остаться после процесса
изготовления прибора. Залейте
приблизительно 100 мл моющего
средства непосредственно в барабан и
запустите программу стирки хлопка при
60°C. После завершения программы
стирки машина будет готова к
эксплуатации.
ЕЖЕДНЕВНОЕ ИСПОЛЬЗОВАНИЕ
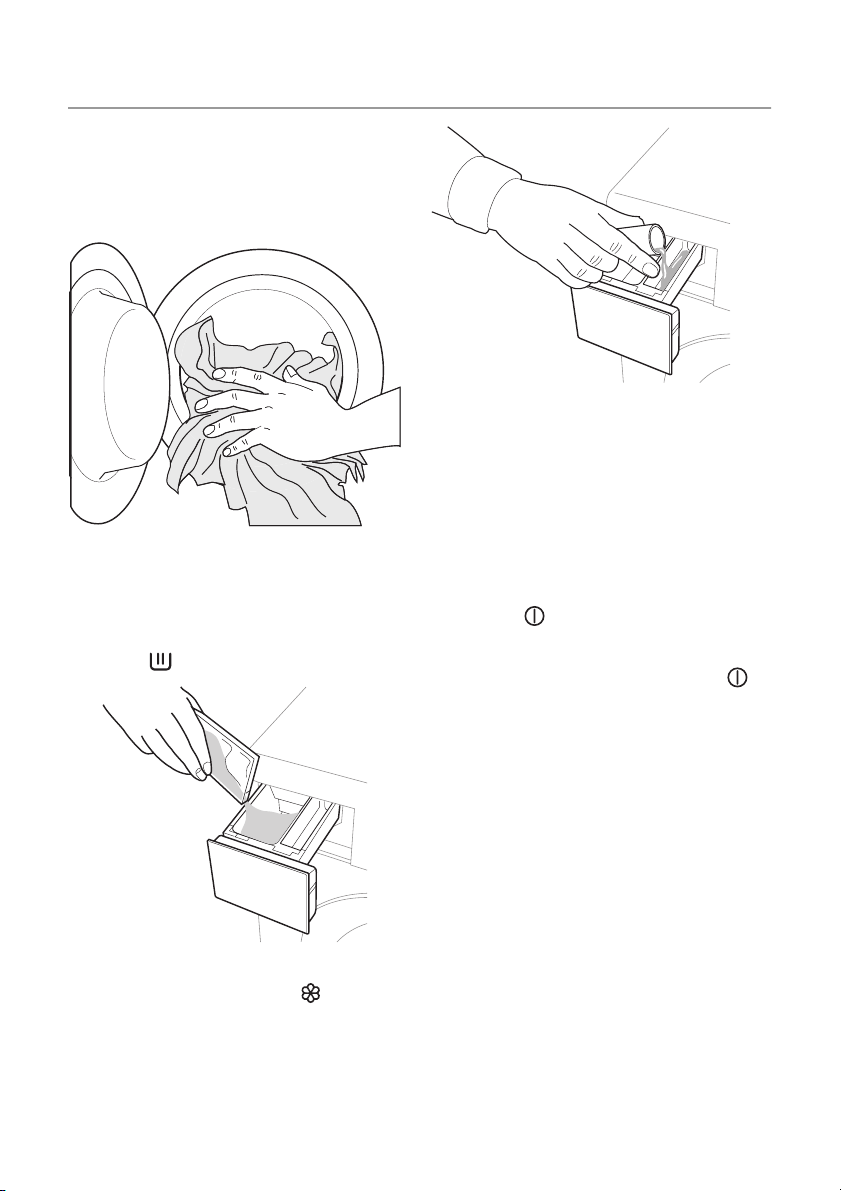
Загрузка белья
Откройте дверцу, осторожно потянув ее
за ручку. Кладите белье в барабан по
одной вещи, стараясь максимально
развернуть каждую. Закройте дверцу.
Убедитесь, что белье не зажато между
уплотнением и дверцей. Это может при-
вести к протечке или повреждению бе-
лья.
8 electrolux
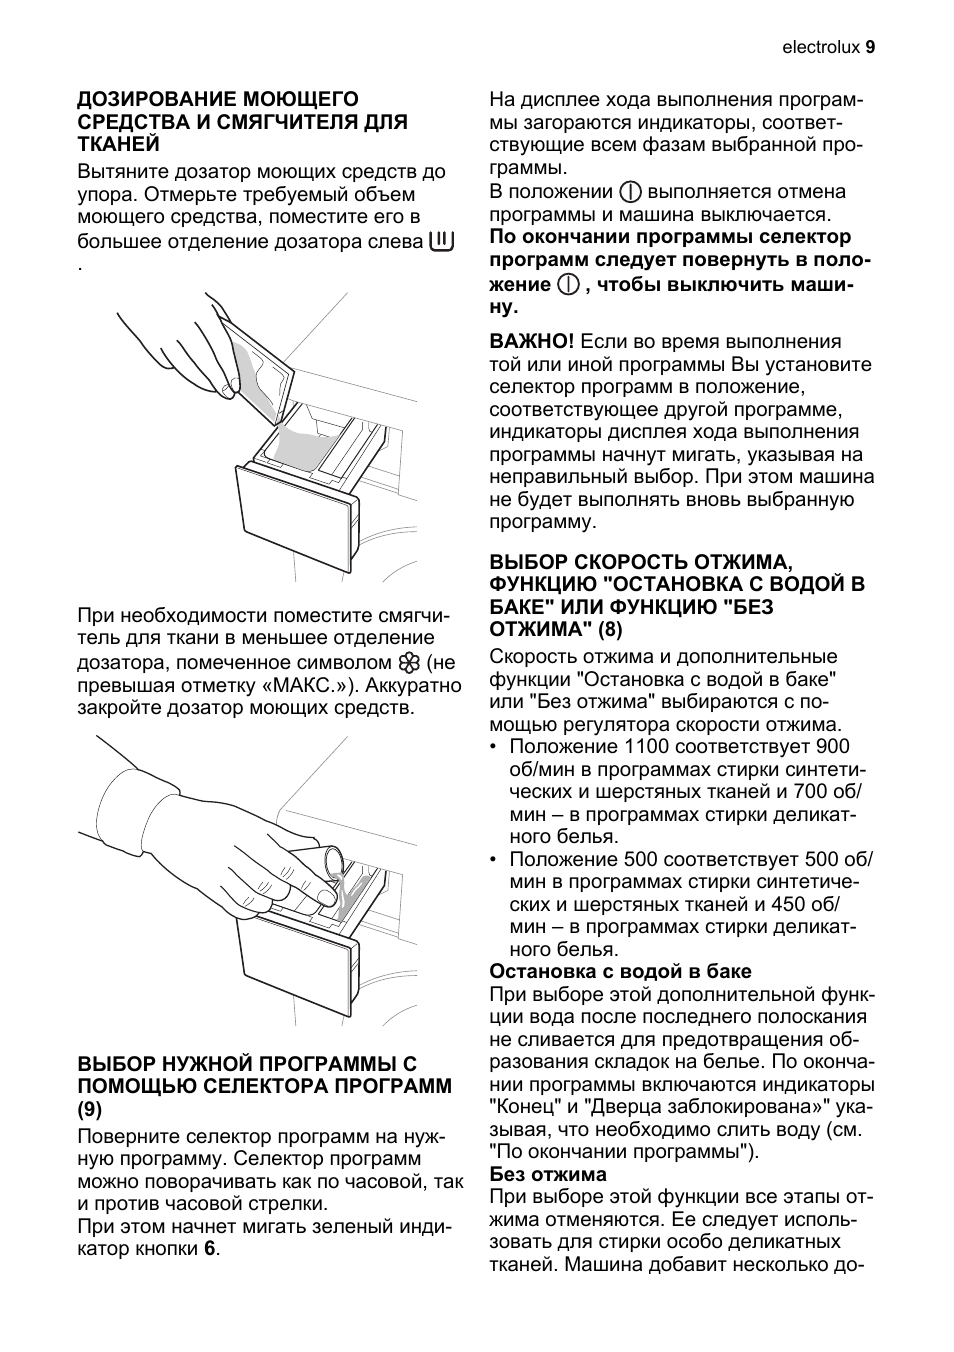
ДОЗИРОВАНИЕ МОЮЩЕГО
СРЕДСТВА И СМЯГЧИТЕЛЯ ДЛЯ
ТКАНЕЙ
Вытяните дозатор моющих средств до
упора. Отмерьте требуемый объем
моющего средства, поместите его в
большее отделение дозатора слева
.
При необходимости поместите смягчи-
тель для ткани в меньшее отделение
дозатора, помеченное символом (не
превышая отметку «МАКС.»). Аккуратно
закройте дозатор моющих средств.
ВЫБОР НУЖНОЙ ПРОГРАММЫ С
ПОМОЩЬЮ СЕЛЕКТОРА ПРОГРАММ
(9)
Поверните селектор программ на нуж-
ную программу. Селектор программ
можно поворачивать как по часовой, так
и против часовой стрелки.
При этом начнет мигать зеленый инди-
катор кнопки 6.
На дисплее хода выполнения програм-
мы загораются индикаторы, соответ-
ствующие всем фазам выбранной про-
граммы.
В положении выполняется отмена
программы и машина выключается.
По окончании программы селектор
программ следует повернуть в поло-
жение , чтобы выключить маши-
ну.
ВАЖНО! Если во время выполнения
той или иной программы Вы установите
селектор программ в положение,
соответствующее другой программе,
индикаторы дисплея хода выполнения
программы начнут мигать, указывая на
неправильный выбор. При этом машина
не будет выполнять вновь выбранную
программу.
ВЫБОР СКОРОСТЬ ОТЖИМА,
ФУНКЦИЮ «ОСТАНОВКА С ВОДОЙ В
БАКЕ» ИЛИ ФУНКЦИЮ «БЕЗ
ОТЖИМА» (8)
Скорость отжима и дополнительные
функции «Остановка с водой в баке»
или «Без отжима» выбираются с по-
мощью регулятора скорости отжима.
• Положение 1100 соответствует 900
об/мин в программах стирки синтети-
ческих и шерстяных тканей и 700 об/
мин – в программах стирки деликат-
ного белья.
• Положение 500 соответствует 500 об/
мин в программах стирки синтетиче-
ских и шерстяных тканей и 450 об/
мин – в программах стирки деликат-
ного белья.
Остановка с водой в баке
При выборе этой дополнительной функ-
ции вода после последнего полоскания
не сливается для предотвращения об-
разования складок на белье. По оконча-
нии программы включаются индикаторы
«Конец» и «Дверца заблокирована»» ука-
зывая, что необходимо слить воду (см.
«По окончании программы»).
Без отжима
При выборе этой функции все этапы от-
жима отменяются. Ее следует исполь-
зовать для стирки особо деликатных
тканей. Машина добавит несколько до-
electrolux 9
полнительных полосканий в програм-
мах для стирки тканей из хлопка и син-
тетики.
Максимальная скорость отжима, допу-
стимая для каждой программы, указана
в разделе Программы стирки.
ВЫБЕРИТЕ ФУНКЦИЮ «ОТСРОЧКА
ПУСКА» С ПОМОЩЬЮ КНОПКИ 2
Перед тем, как запустить программу,
если вы хотите задать отсрочку пуска,
нажимайте на кнопку 2 до тех пор, пока
на дисплее не высветится нужное вре-
мя задержки. При этом загорится инди-
катор, соответствующий выбранной от-
срочке.
Данную функцию следует задавать по-
сле установки программы, но до нажа-
тия на кнопку Пуск.
Время отсрочки пуска можно изменить,
а саму отсрочку – отменить в любой мо-
мент до нажатия на кнопку Пуск.
Отмена отсрочки пуска после нажатия
на кнопку Пуск:
1. Установите машину в режим паузы,
нажав на кнопку Пуск.
2. Нажмите один раз на кнопку 2; при
этом индикатор, соответствующий
выбранной отсрочке, погаснет.
3. Снова нажмите на кнопку Пуск для
начала выполнения программы.
ВАЖНО! Заданное значение отсрочки
пуска можно изменить только после
повторного выбора программы стирки.
На протяжении времени отсрочки пуска
дверца остается заблокированной (го-
рит индикатор блокировки дверцы).
Выбрать функцию «Отсрочка пуска» не-
льзя, если выбрана программа СЛИВ
или ОТЖИМ.
ВЫБЕРИТЕ НУЖНУЮ ФУНКЦИЮ С
ПОМОЩЬЮ КНОПОК 3, 4 И 5
В зависимости от программы возможно
сочетание различных функций. Их сле-
дует выбирать после выбора нужной
программы и до нажатия кнопки 6. При
этом загорится соответствующий инди-
катор.
При выборе ошибочной функции соот-
ветствующий индикатор мигает в тече-
ние примерно 2 секунд. О совместимо-
сти различных дополнительных функ-
ций с теми или иными программами
стирки см. Главу «Программы стир-
ки».
ЗАПУСК ПРОГРАММЫ С ПОМОЩЬЮ
КНОПКИ 6
Чтобы начать выполнение выбранной
программы, нажмите на данную кнопку;
соответствующий зеленый индикатор
перестанет мигать и станет гореть по-
стоянным светом.
На дисплее хода выполнения програм-
мы загорятся индикаторы A и E, указы-
вая, что прибор начал работу и его
дверца заблокирована.
ИЗМЕНЕНИЕ ДОПОЛНИТЕЛЬНОЙ
ФУНКЦИИ ИЛИ ВЫПОЛНЯЕМОЙ
ПРОГРАММЫ
Любые функции можно изменить до то-
го, как программа приступит к их выпол-
нению
Перед внесением в программу любых
изменений необходимо перевести сти-
ральную машину в режим паузы, нажав
на кнопку 6.
Пока не была нажата кнопка 6, в про-
грамму можно вносить изменения. Из-
менить текущую программу можно
только путем ее отмены. Для этого по-
верните селектор программ на , а за-
тем — на новую программу. Запустите
10 electrolux
46:16
Ремонт стиральной машинки электролюкс Electrolux в домашних условиях
00:59
Electrolux EWC 1350 остановился с водой, не сливает воду.
06:34
Ремонт стиральной машины Electrolux EWS 1050. Проверка прессостата.
02:24
Обзор Распаковка ELECTROLUX EWC 1150 из Rozetka
01:22
Стиральная машина компактная Electrolux EWC1150 обзор
00:47
Обзор Стиральная машина компактная ELECTROLUX EWC 1150 из Rozetka
01:50
Стиральная машина Electrolux EWW 1697 MDW
Нажмите на кнопку для помощи

user manual
Инструкция по
эксплуатации
Washing Machine
Стиральная машина
EWC 1150
2 electrolux
Electrolux. Thinking of you.
Share more of our thinking at www.electrolux.com
CONTENTS
Safety information 2
Product description 3
Control panel 5
Before first use 6
Daily use 7
Helpful hints and tips 9
SAFETY INFORMATION
Important! Read carefully & keep for future
reference.
• The safety of Your appliance complies
with the industry standards and with legal
requirements on the safety of appliances.
However, as manufacturers, we feel it is
our duty to provide the following safety
notes.
• It is most important that this instruction
book should be retained with the appliance for future reference. Should the appliance be sold or transferred to another
owner, or should you move house and
leave the appliance, always ensure that
the book is supplied with the appliance in
order that the new owner can get to
know the functioning of the appliance
and the relevant warnings.
• You MUST read them carefully before installing or using the appliance.
• Before first starting up, check the appliance for any damage incurred during
transport. Never connect up a damaged
appliance . If parts are damaged, contact
your supplier.
• If the appliance is delivered in the winter
months when there are minus temperatures. Store it at room temperature for 24
hours before using for the first time.
General safety
• It is dangerous to alter the specifications
or attempt to modify this product in any
way.
• During high temperature wash programmes the door glass may get hot. Do
not touch it!
Care and cleaning 12
What to do if… 14
Technical data 16
Consumption values 16
Installation 17
Environment concerns 21
Subject to change without notice
• Make sure that small pets and children
do not climb into the drum. To avoid this,
please check into the drum before using.
• Any objects such as coins, safety pins,
nails, screws, stones or any other hard,
sharp material can cause extensive damage and must not be placed into the machine.
• Only use the advised quantities of fabric
softener and detergent. Damage to the
fabric can ensue if you over-fill. Refer to
the manufacturer’s recommendations of
quantities.
• Wash small items such as socks, laces,
washable belts etc in a washing bag or
pillow case as it is possible for such
items to slip down between the tub and
the inner drum.
• Do not use your washing machine to
wash articles with whalebones, material
without hems or torn material.
• Always unplug the appliance and turn off
the water supply after use, cleaning and
maintenance.
• Under no circumstances should you attempt to repair the machine yourself. Repairs carried out by inexperienced people
may cause injury or serious malfunctioning. Contact your local Service Centre.
Always insist on genuine spare parts.
Installation
• This appliance is heavy. Care should be
taken when moving it.
• When unpacking the appliance, check
that it is not damaged. If in doubt, do not
use it and contact the Service Centre.
• All packing and transit bolts must be removed before use. Serious damage can

electrolux 3
occur to the product and to property if
this is not adhered to. See relevant section in the user manual.
• After having installed the appliance,
check that it is not standing on the inlet
and drain hose and the worktop is not
pressing the electrical supply cable
against the wall.
• If the machine is situated on a carpeted
floor, please adjust the feet in order to allow air to circulate freely under the appliance.
• Always be sure, that there is no water
leakage from hoses and their connections after the installation.
• If the appliance is installed in a location
subject to frost, please read the “dangers
of freezing” chapter.
• Any plumbing work required to install this
appliance should be carried out by a
qualified plumber or competent person.
• Any electrical work required to install this
appliance should be carried out by a
qualified electrician or competent person.
Use
• This appliance is designed for domestic
use. It must not be used for purposes
other than those for which it was designed.
• Only wash fabrics which are designed to
be machine washed. Follow the instructions on each garment label.
• Do not overload the appliance. See the
Washing Programme Table.
• Before washing, ensure that all pockets
are empty and buttons and zips are fastened. Avoid washing frayed or torn articles and treat stains such as paint, ink,
rust, and grass before washing. Underwired bras must NOT be machine washed.
• Garments which have been in contact
with volatile petroleum products should
not be machine washed. If volatile cleaning fluids are used, care should be taken
to ensure that the fluid is removed from
the garment before placing in the machine.
• Never pull the power supply cable to remove the plug from the socket; always
take hold of the plug itself.
• Never use the appliance if the power
supply cable, the control panel, the working surface or the base are damaged so
that the inside of the washing machine is
accessible.
Child safety
• This appliance is not intended for use by
person (including children) with reduced
physical sensory or mental capabilities or
lack of experience and knowledge unless
they have been given supervision or instruction concerning use of the appliance
by a person responsible for their safety.
• Young children should be supervised to
ensure that they do not play with the appliance
• The packaging components (e.g. plastic
film, polystyrene) can be dangerous to
children — danger of suffocation! Keep
them out of children’s reach.
• Keep all detergents in a safe place out of
children’s reach.
• Make sure that children or pets do not
climb into the drum.
PRODUCT DESCRIPTION
Your new appliance meets all modern requirements for effective treatment of laundry
with low water, energy and detergent consumption. Its new washing system allows total use of detergent and reduces water consumption so saving energy.
4 electrolux
Machine front
1 2
1 Detergent dispenser drawer
2 Control panel
3 Door opening handle
4 Adjustable feet (front)
3
4
Machine rear
1
1 Transit locking devices
2 Drain hose
3 Electrical lead
4 Inlet hose
2
3
4
Detergent dispenser drawer
Compartment for powder or liquid de-
tergent used for main wash. If using liquid
detergent pour it just before starting the
programme.
Compartment for liquid additives (fabric
softener, starch).
Any fabric softener or starching additives
must be poured into the compartment before starting the wash programme.
Prewash detergent is to be added straight into the drum.
CONTROL PANEL
Henceforth, the programme selector dial, the spin selector dial, programme progress
lights and different buttons will be indicated in all the book with the relevant numbers
given below.
electrolux 5
1 2 3 4 5 6 8 97
1 Detergent drawer
DELAY START button
2
PREWASH button
3
QUICK button
4
5 SUPER RINSE button
START/PAUSE button
6
Programme progress display
7
SPIN reduction selector
8
Programme selector dial
9
Detergent drawer
Detergent drawer has 2 separate compartments for detergent and fabric conditioner.
Prewash detergent is to be added
straight into the drum.
Delay Start
The start of the programme can be delayed
by 6 or 3 hours by means of this button.
6 electrolux
Prewash
By selecting this option the machine performs a prewash cycle before the main
wash phase. The washing time will be prolonged. This option is recommended for
heavily soiled laundry.
Quick
By selecting this option the washing time
will be reduced approx. 10 minutes. This
option is recommended for lightly soiled
white-/coloured and synthetic laundry.
Super Rinse
This appliance is designed for saving energy. If it necessary to rinse the laundry using
an extra quantity of water (super rinse), select this option. Some additional rinses will
be performed. This option is recommended
for people who are allergic to detergents,
and in areas where the water is very soft.
Start Pause
This button allows you to start or to interrupt the selected programme.
Display
(A)
(B)
(C)
(D)
(E)
The light A illuminates when the machine is
performing the washing phase.
The light B illuminates when the machine is
rinsing.
The light C illuminates when the machine is
spinning.
The light D illuminates at the end of the
washing cycle.
The light E indicates if the door can be
opened:
• The light is lit: the door cannot be
opened.
• The light is out: the door can be opened.
• The light is flashing: the door can soon
be opened.
Spin Reduction Dial
By turning the spin speed selector you can
change the spin speed of the selected programme or to select «Rinse hold» or «No
spin»option.
Programme Selector Dial
It allows you to switch the appliance on/off
and/or to select a programme.
Table of Symbols
= Delay Start, = Prewash, =
Quick,
Pause
ton,
Handwash,
= Super Rinse, = Start/
= Washing, = Rinses, = Spin,
= Cycle End, = Door Locked
= Rinse Hold, = No Spin, = Cot-
= Synthetic, = Delicate, =
= Wool, 30 ° = Mini 30 ° ,
=Drain, =Cold, = ON/OFF
BEFORE FIRST USE
Warning!
Ensure that the electrical and water connections comply with the installation instructions.
Important! Remove any material from the
drum.
Important! We recommend you to run a
wash programme without any load, to clear
any residues which may have been left by
the manufacturing process. Pour approx.
100 ml of detergent straight into the drum
and run a cotton cycle at 60°C. When the
programme is finished the machine will be
ready to use.
DAILY USE
Load the laundry
Open the door by carefully pulling the door
handle outwards. Place the laundry in the
drum, one item at a time, shaking them out
as much as possible. Close the door.
Measure out the detergent and the
fabric softener
Pull out the dispenser drawer until it stops.
Measure out the amount of detergent required, pour it into the larger compartment
on the left
If required, pour fabric softener into the
smaller compartment marked
amount used must not exceed the «MAX»
mark in the drawer). Close the drawer gently.
.
(the
electrolux 7
Select the required programme by
means of the programme selector dial
(9)
Turn the programme selector dial to the required programme. The selector can be
turned either clockwise or anticlockwise.
The green light of button 6 starts to flash
On programme progress display the pilot
lights corresponding to all phases composing the selected programme are lit.
On position
the machine is switched OFF.
At the end of the programme the selector dial must be turned to position
switch the machine off.
Important! If you turn the programme
selector dial to another programme when
the machine is working, the lights in the
programme progress display will start to
flash to indicate a wrong selection. The
machine will not perform the new selected
programme.
Select the spin speed, Rinse Hold or No
spin option (8)
Select the spin speed, Rinse Hold option or
No Spin option by turning the spin speed
selector.
• The position 1100 is equivalent to 900
rpm for the synthetic and wool programmes and 700 rpm for the delicate
wash programme.
• The position 500 is equivalent to 500 rpm
for the synthetic and wool programmes
and 450 rpm for the delicate wash programme.
the programme is reset and
to
8 electrolux
Rinse hold
By selecting this option the water of the last
rinse is not emptied out to prevent the fabrics from creasing. When the programme
has finished, the lights «End» and «Door
locked» are lit to indicate that the water
must be emptied out (See: » At the end of
the programme»).
No spin
By selecting this option all the spinning
phases are excluded. To be used for extremely delicate material. The machine will
add some additional rinses to the cotton
and synthetic programmes.
For the maximum spin speed allowed by
each programme, refer to the chapter
Washing programmes.
Select the Delay Start by pressing
button 2
Before you start the programme, if you wish
to delay the start, press the button 2 repeatedly, to select the desired delay. The
corresponding pilot light will light up.
You must select this option after you have
set the programme and before you press
button 6.
You can cancel or modify the delay time at
any moment, before you press button 6.
Cancelling the delayed start after having
pressed button 6:
1. Set the washing machine to PAUSE by
pressing button 6.
2. Press the button 2 once, the light rele-
vant to the selected delay goes off.
3. Press button 6 again to start the pro-
gramme.
Important! The selected delay can be
changed only after selecting the washing
programme again.
The door will be locked throughout the delay time (door locked light lit).
The Delay Start can not be selected with
DRAIN or SPIN programme.
Select the desired option by means of
buttons 3, 4 and 5
Depending on the programme, different
functions can be combined. These must be
selected after choosing the desired programme and before pressing the button
6.The relevant light will illuminate.
If an incorrect option is selected, the corresponding indicator lamp flashes for about 2
seconds. For the compatibility of the options with the washing programmes, refer
to the chapter «Washing programmes».
Start the programme by pressing
button 6
To start the selected programme, press this
button; the corresponding pilot light stops
flashing and remains lit.
On programme progress display the pilot
lights A and E illuminate to indicate that the
appliance starts operating and the door is
locked.
Altering an option or a running
programme
It is possible to change any option before
the programme carries it out.
Before you make any change, you must
pause the washing machine by pressing the
button 6.
The programme can be changed as long as
the button 6 has not been pressed. Changing a running programme is possible only
by resetting it. Turn the programme selector
dial to
and then to the new programme
position. Start the new programme by
pressing the button 6 again.
Interrupting a programme
Press the button 6 to interrupt a pro-
gramme which is running, the corresponding light starts to flash. Press the button
again to restart the programme.
electrolux 9
Cancelling a programme
Turn the selector dial to
position to cancel a programme which is running. Now
you can select a new programme.
Opening the door after the programme
has started
First set the machine to pause by pressing
the button 6.
After some minutes, the door can be
opened, when the following conditions are
observed:
• The water temperature is below 55°C.
• The water level is below the bottom edge
of the door.
• The machine doesn’t spin.
If you cannot open the door but it is absolutely necessary to open it you have to
switch the machine off by turning the selec-
tor dial to
. After few minutes the door
can be opened
(Pay attention to the water level and
temperature!).
After this procedure, it will be necessary to
set the programme and the options again
and then press the button 6.
HELPFUL HINTS AND TIPS
Sorting out the laundry
Follow the wash code symbols on each
garment label and the manufacturer’s
washing instructions. Sort the laundry as
follows: whites, coloureds, synthetics, delicates, woollens.
Temperatures
95° or 90°
60°/50°
40°-30°Cold
for normally soiled white cottons and linen (e.g. tea cloths,
towels, tablecloths, sheets…)
for normally soiled, colour fast
garments (e.g. shirts, night
dresses, pyjamas….) in linen,
cotton or synthetic fibres and
for lightly soiled white cotton
(e.g. underwear)
for delicate items (e.g. net curtains), mixed laundry including
synthetic fibres and woollens
bearing the label «pure new
wool, machine washable, nonshrink»
At the end of the programme
The machine stops automatically.
The pilot light D illuminates to indicate that
the programme has finished. The pilot light
E goes out, the door can be opened and
the laundry can be removed.
If at the end of a programme there is water
in the tub (when «Rinse hold» option has
been selected), to empty out the water
follow the following instructions:
•
turn the programme selector dial to
• select the «Drain» or «Spin» programme
•press button 6
When the pilot light E goes out, the door
can be opened and the laundry can be removed.
At the end of the cycle, turn the programme
selector dial to
to switch the machine
off.
Remove the laundry from the drum and
carefully check that the drum is empty. If
you do not intend to carry out another
wash, close the water tap.
Leave the door open to prevent the formation of mildew and unpleasant smells.
Before loading the laundry
Never wash whites and coloureds together.
Whites may lose their «whiteness» in the
wash.
New coloured items may run in the first
wash; they should therefore be washed
separately the first time.
Make sure that no metal objects are
left in the laundry (e.g. hair clips, safety
pins, pins).
Button up pillowcases, close zip fasteners,
hooks and poppers. Tie any belts or long
tapes.
Remove persistent stains before washing.
Rub particularly soiled areas with a special
detergent or detergent paste.
Treat curtains with special care. Remove
hooks or tie them up in a bag or net.
Maximum loads
Recommended loads are indicated in the
washing programme charts.
General rules:

10 electrolux
• Cotton, linen: drum full but not too
tightly packed;
• Synthetics: drum no more than half full;
• Delicate fabrics and woollens: drum
no more than one third full.
Washing a maximum load makes the most
efficient use of water and energy.
For heavily soiled laundry, reduce the load
size.
Laundry weights
The following weights are indicative:
The following weights are indicative:
bathrobe 1200 g
quilt cover 700 g
man’s work shirt 600 g
sheet, man’s pyjamas 500 g
tablecloth 250 g
pillow case, towelling towel,
night dress, man’s shirt
tea cloth, ladies’ briefs, napkin, blouse, men’s underpants
200 g
100 g
Removing stains
Stubborn stains may not be removed by
just water and detergent. It is therefore advisable to treat them prior to washing.
Blood: treat fresh stains with cold water.
For dried stains, soak overnight in water
with a special detergent then rub in the
soap and water.
Oil based paint: moisten with benzine
stain remover, lay the garment on a soft
cloth and dab the stain; treat several times.
Dried grease stains: moisten with turpentine, lay the garment on a soft surface and
dab the stain with the fingertips and a cotton cloth.
Rust: oxalic acid dissolved in hot water or a
rust removing product used cold. Be careful
with rust stains which are not recent since
the cellulose structure will already have
been damaged and the fabric tends to hole.
Mould stains: treat with bleach, rinse well
(whites and fast coloureds only).
Grass: soap lightly and treat with bleach
(whites and fast coloureds only).
Ball point pen and glue: moisten with
1)
acetone
, lay the garment on a soft cloth
and dab the stain.
1) do not use acetone on artificial silk
Lipstick: moisten with acetone as above,
then treat stains with methylated spirits.
Treat any residual marks with bleach.
Red wine: soak in water and detergent,
rinse and treat with acetic or citric acid,
then rinse. Treat any residual marks with
bleach.
Ink: depending on the type of ink, moisten
1)
the fabric first with acetone
, then with
acetic acid; treat any residual marks on
white fabrics with bleach and then rinse
thoroughly.
Tar stains: first treat with stain remover,
methylated spirits or benzine, then rub with
detergent paste.
Detergents and additives
Good washing results also depend on the
choice of detergent and use of the correct
quantities to avoid waste and protect the
environment.
Although biodegradable, detergents contain
substances which, in large quantities, can
upset the delicate balance of nature.
The choice of detergent will depend on the
type of fabric (delicates, woollens, cottons,
etc.), the colour, washing temperature and
degree of soiling.
All commonly available washing machine
detergents may be used in this appliance:
• powder detergents for all types of fabric
• powder detergents for delicate fabrics
(60°C max) and woollens
• liquid detergents, preferably for low tem-
perature wash programmes (60°C max)
for all types of fabric, or special for wool-
lens only.
The detergent and any additives must be
placed in the appropriate compartments of
the dispenser drawer before starting the
wash programme.
Prewash detergent is to be added
straight into the drum
If using liquid detergents, a programme
without prewash must be selected. Pour
the liquid detergent into the detergent compartment immediately before you start the
programme.
Your appliance incorporates a recirculation
system which allows an optimal use of the
concentrated detergent.
electrolux 11
Follow the product manufacturer’s recommendations on quantities to use and do
not exceed the «MAX» mark in the detergent dispenser drawer.
Degrees of water hardness
Water hardness is classified in so-called
“degrees” of hardness. Information on hardness of the water in your area can be ob-
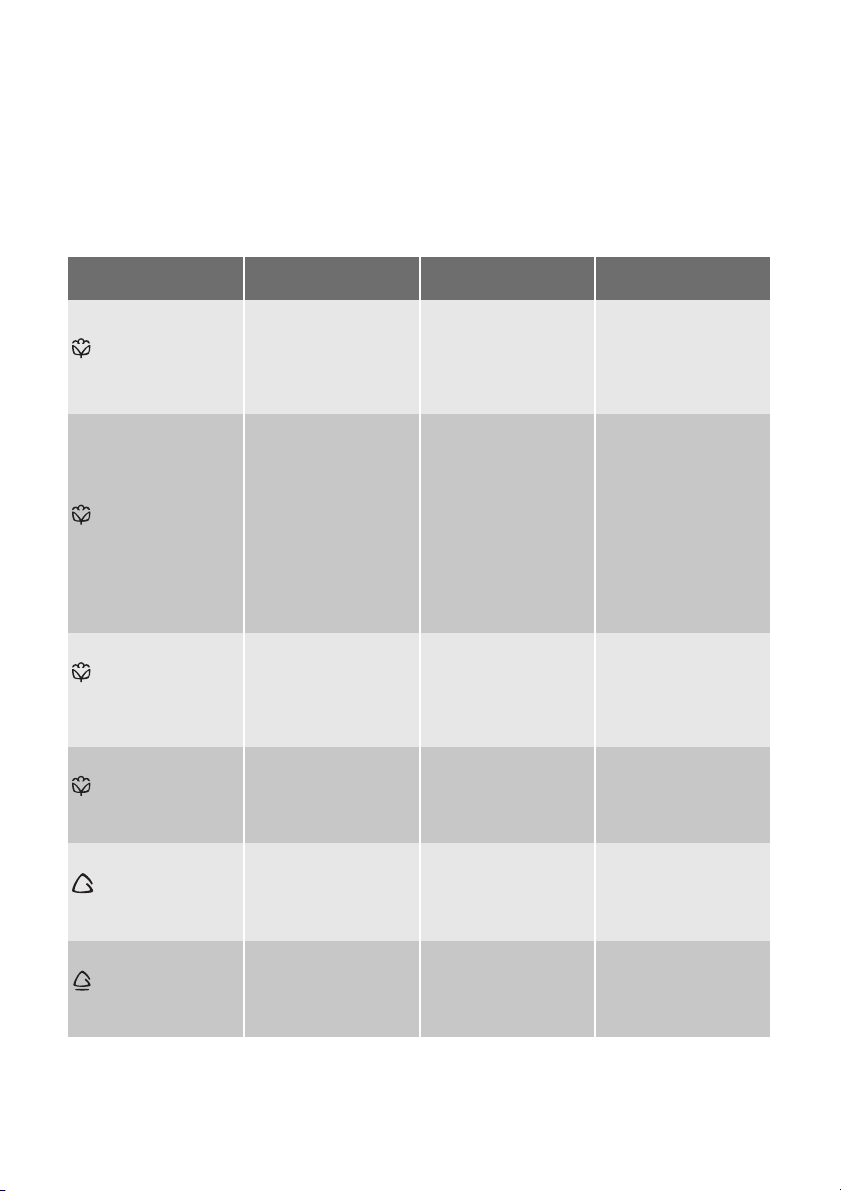
Programme/ Tem-
perature
WHITE COTTON
90°
COTTON E
60°
COLOURED COT-
TON
60° — 30°
COTTON E
40°
SYNTHETIC
40°-30°
DELICATE
40°
Type of laundry Options
White cotton (heavily
and normally soiled
cotton items)
White cotton economy
(This programme can
be selected for slightly
or normally soiled cotton items. The temperature will decrease and
the washing time will
be extended. This allows to obtain a good
washing efficiency so
saving energy.)
Coloured cotton
(heavily and normally
soiled cotton items)
Coloured cotton
economy
(Cotton economy program. See: Cotton 60°
E)
Synthetic or mixed
fabrics: underwear,
coloured garments,
non-shrink shirts, blouses.
Delicate fabrics:
acrylics, viscose, polyester.
tained from the relevant water supply company, or from your local authority. If the water hardness degree is medium or high we
suggest you to add a water softener following always the manufacturer’s instructions.
When the degree of hardness is soft, readjust the quantity of the detergent.
Description of the
programme
SPIN REDUCTION/
RINSE HOLD — DELAY
START- PREWASH —
1)
— SUPER
QUICK
RINSE
SPIN REDUCTION/
RINSE HOLD — DELAY
START- PREWASH SUPER RINSE
SPIN REDUCTION/
RINSE HOLD — DELAY
START- PREWASH —
1)
QUICK
RINSE
SPIN REDUCTION/
RINSE HOLD — DELAY
START- PREWASH SUPER RINSE
SPIN REDUCTION/
RINSE HOLD — DELAY
START- PREWASH —
QUICK
RINSE
SPIN REDUCTION/
RINSE HOLD — DELAY
START — PREWASH SUPER RINSE
— SUPER
1)
— SUPER
Main wash
Rinses
Long spin max. 1100
rpm
Max load 3 kg
Red. load 2 kg
Main wash
Rinses
Long spin max. 1100
rpm
Max load 3 kg
Main wash
Rinses
Long spin max. 1100
rpm
Max load 3 kg
Red. load 2 kg
Main wash
Rinses
Long spin max. 1100
rpm
Max load 3 kg
Main wash
Rinses
Short spin max. 900
rpm
Max Load 1,5 kg
Main wash
Rinses
Short spin max. 700
rpm
Max Load 1,5 kg
12 electrolux
Programme/ Tem-
perature
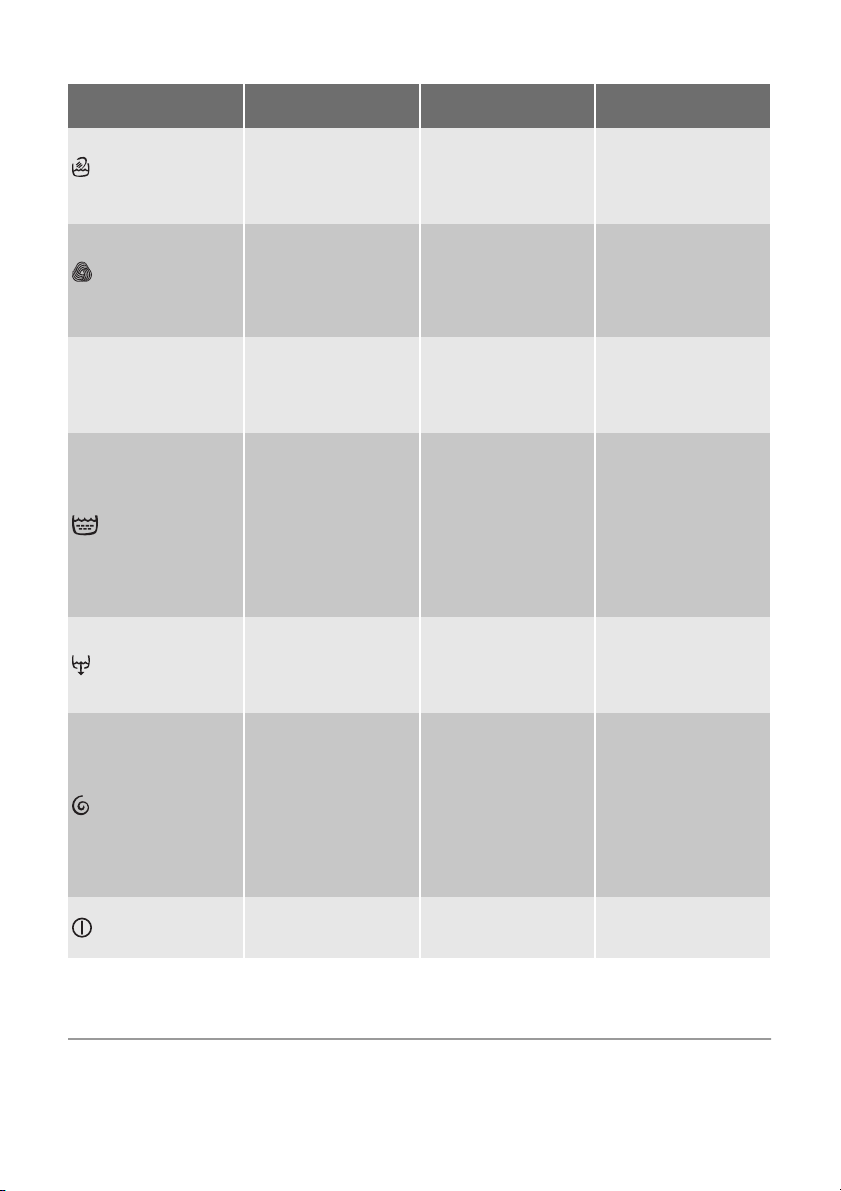
HANDWASH
30°
WOOL
40°-COLD
MINI
30°
RINSES
DRAIN
SPIN
/OFF
1) If you select this option, we recommend that you reduce the maximum load as indicated. (Red. load= reduced
load). Full loading is possible however with somewhat reduced cleaning results.
Type of laundry Options
Special programme for
delicate fabrics with
«hand washing» care
symbol.
Washing programme
for machine washable
wool as well as for
hand washable woollens and delicate fabrics.
For lightly soiled laundry or for laundry
which needs freshening up.
With this programme it
is possible to rinse and
spin cotton garments
which have been
washed by hand. The
machine performs 3
rinses, followed by a final long spin. The spin
speed can be reduced.
For emptying out the
water of the last rinse
in programmes with
the Rinse Hold or No
Spin option selected.
Separate spin for hand
washed garments and
after programmes with
the Rinse Hold option
selected. You can
choose the spin speed
by turning the spin
speed selector to
adapt it to the fabrics
to be spun.
For resetting the programme or switching
the machine off
SPIN REDUCTION/
RINSE HOLD — DELAY
START
SPIN REDUCTION/
RINSE HOLD — DELAY
START
SPIN REDUCTION/
RINSE HOLD — DELAY
START
SPIN REDUCTION/
RINSE HOLD — SUPER
RINSE
SPIN REDUCTION
Description of the
programme
Main wash
Rinses
Short spin max. 900
rpm
Max Load 1 kg
Main wash
Rinses
Short spin max. 900
rpm
Max Load 1 kg
Main wash
Rinses
Short spin max. 700
rpm
Max Load 1,5 kg
Rinses
Spin max. 1100 rpm
Max Load 3 kg
Draining of water
Max Load 3 kg
Drain and long spin
Max. spin speed 1100
rpm
Max Load 3 kg
CARE AND CLEANING
Important! You must DISCONNECT the
appliance from the electricity supply, before
you can carry out any cleaning or
maintenance work.
Descaling
The water we use normally contains lime. It
is a good idea to periodically use a water
softening powder in the machine. Do this
separately from any laundry washing, and
electrolux 13
according to the softening powder manufacturer’s instructions. This will help to prevent the formation of lime deposits.
Maintenance Wash
With the use of low temperature washes it
is possible to get a build up of residues inside the drum.
We recommend that a maintenance wash
be performed on a regular basis.
To run a maintenance wash:
• The drum should be empty of laundry.
• Select the hottest cotton wash pro-
gramme.
• Use a normal measure of detergent,
must be a powder with biological properties.
External cleaning
Clean the exterior cabinet of the appliance
with soap and water only, and then dry
thoroughly.
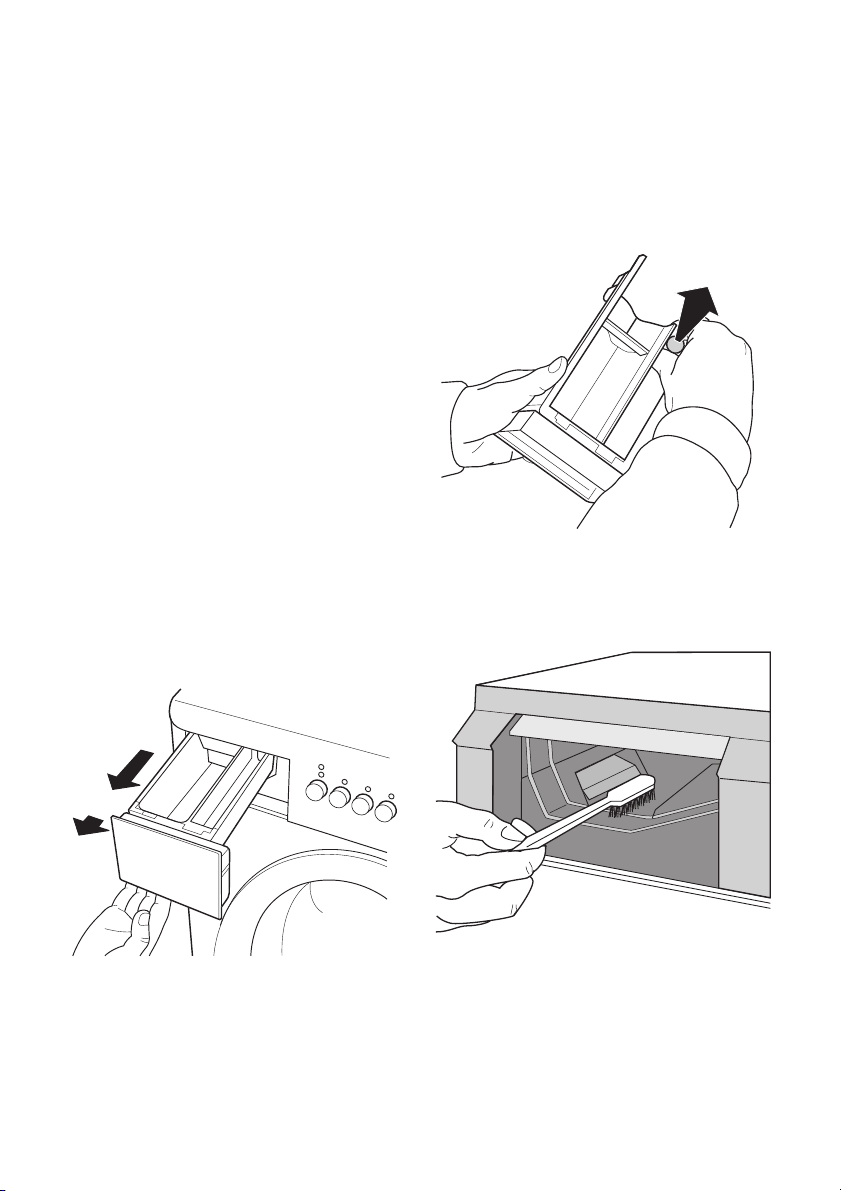
Cleaning the dispenser drawer
The washing powder and additive dispenser drawer should be cleaned regularly.
1. If necessary, the whole detergent draw-
er can be taken out of the machine for
cleaning. You need to pull it firmly outwards, so that it comes free of retaining
stop.
2. To remove the siphon at the inside edge
of the drawer for cleaning, you need to
press it inwards and pull it upwards at
the same time. Flush it out under a tap,
to remove any traces of accumulated
powder. When you put it back, press it
downwards until you hear a distinct
click.
Cleaning the drawer recess
Having removed the drawer, use a small
brush to clean the recess, ensuring that all
washing powder residue is removed from
the upper and lower part of the recess.
Replace the drawer and run the rinse programme without any clothes in the drum.
Cleaning the water inlet filter
If your water is very hard or contains traces
of lime deposit, the water inlet filter may become clogged. It is therefore a good idea to
clean it from time to time.
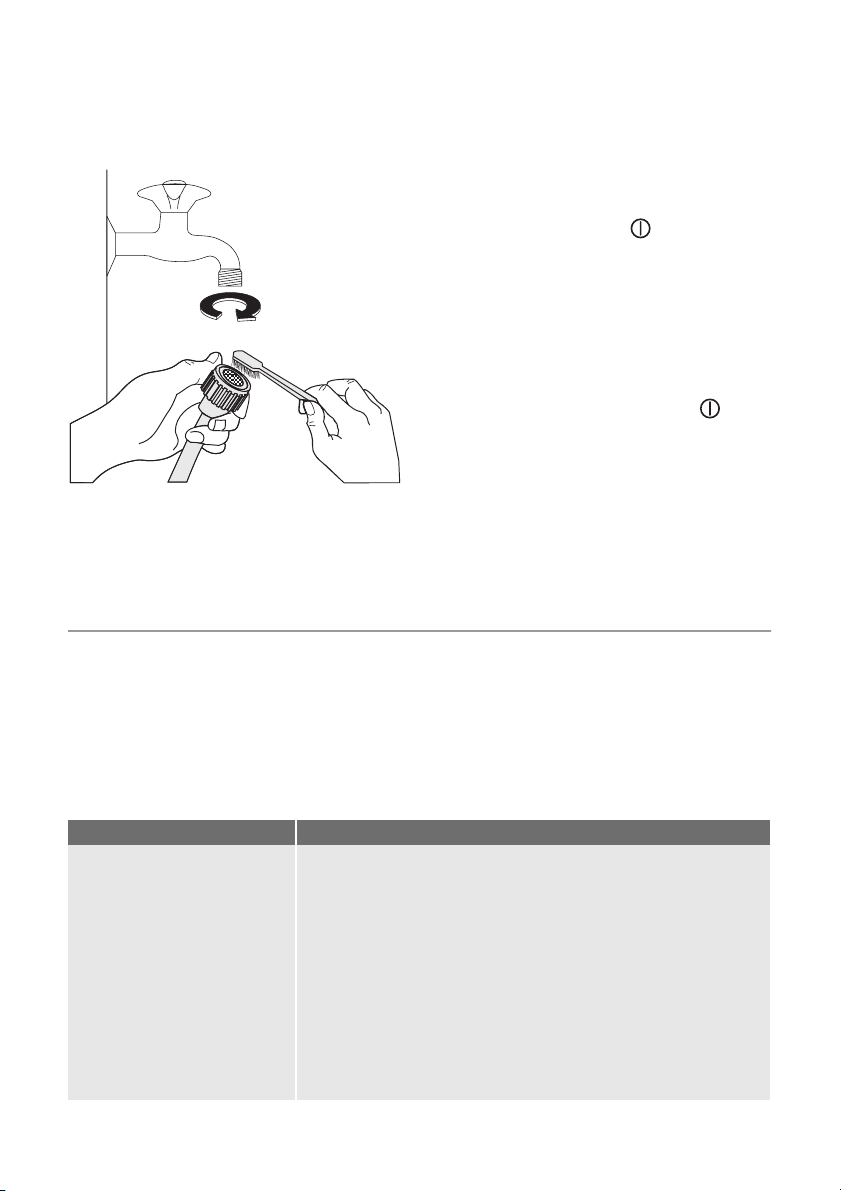
14 electrolux
Turn off the water tap. Unscrew the water
inlet hose. Clean the filter using a hard bristle brush. Tighten up the inlet hose.
The dangers of freezing
If the machine is exposed to temperatures
below 0°C, certain precautions should be
taken.
WHAT TO DO IF…
Certain problems are due to lack of simple
maintenance or oversights, which can be
solved easily without calling out an engineer. Before contacting your local Service
Centre, please carry out the checks listed
below.
During machine operation it is possible that
the End pilot light blinks to indicate that the
machine is not working:
Problem Possible cause/Solution
The door has not been closed.
• Close the door firmly.
The plug is not properly inserted in the power socket.
• Insert the plug into the power socket.
There is no power at the socket.
• Please check your domestic electrical installation.
The machine does not start:
The main fuse has blown.
• Replace the fuse.
The selector dial is not correctly positioned and the button Start
has not been pressed.
• Please turn the selector dial and press the button Start again.
The delay start has been selected.
• If the laundry are to be washed immediately, cancel the delay
start.
• Turn off the water supply.
• Unscrew the inlet hose from the supply
tap.
• Select a wash programme, start the machine and let the programme run for a
short time.
• Interrupt the programme by turning the
programme selector to
position.
• Place the end of inlet and drain hoses
down low, into the waste gully (floor
drain) set into the floor. Make sure that
the end of the hose does not go below
the water level in the gully’s (drain’s) water tap.
• Select the programme «Drain» and let it
run until it is finished.
•
Turn the programme selector to
position. When you intend to start the machine up again, make sure that the room
temperature is above 0 °C.
The appliance is only to be used and stored
indoors at normal room temperature. The
manufacturer is not responsible for any
frost damage.
• 1 flash: problem with the water supply.
• 2 flashes: problem with the water drain-
ing.
• 4 flashes: door open.
Once the problem has been eliminated,
press the button START to restart the programme. If after all checks, the problem
persists, contact your local Service Centre.

Problem Possible cause/Solution
The machine does not fill:
The machine fills then empties immediately:
The machine does not
empty and/or does not
spin:
There is water on the floor:
Unsatisfactory washing results:
The door will not open:
The machine vibrates is
noisy:
electrolux 15
The water tap is closed.
• Open the water tap.
The inlet hose is squashed or kinked.
• Check the inlet hose connection.
The filter in the inlet hose is blocked.
• Clean the water inlet hose filter.
The door is not properly closed.
• Close the door firmly.
The end of the drain hose is too low.
• Refer to relevant paragraph in «Installation» chapter.
The drain hose is squashed or kinked.
• Check the drain hose connection.
An option or a programme that ends with the water still in the tub
or that eliminates all the spinning phases has been selected.
• Select the draining or spinning programme.
The laundry is not evenly distributed in the drum.
• Redistribute the laundry.
Too much detergent or unsuitable detergent (creates too much
foam) has been used.
• Reduce the detergent quantity or use another one.
Check whether there are any leaks from one of the inlet hose fittings. It is not always easy to see this as the water runs down the
hose; check to see if it is damp.
• Check the water inlet hose connection.
The drain or inlet hose is damaged.
• Change it with a new one.
Too little detergent or unsuitable detergent has been used.
• Increase the detergent quantity or use another one.
Stubborn stains have not been treated prior to washing.
• Use commercial products to treat the stubborn stains.
The correct temperature was not selected.
• Check if you have selected the correct temperature.
Excessive laundry load.
• Reduce the laundry load.
The programme is still running.
• Wait the end of washing cycle.
The door lock has not been released.
• Wait until the indicator light for door locked has gone out.
There is water in the drum.
• Select drain or spin programme to empty out the water.
The transit bolts and packing have not been removed.
• Check the correct installation of the appliance.
The support feet have not been adjusted
• Check the correct levelling of the appliance.
The laundry is not evenly distributed in the drum.
• Redistribute the laundry.
Maybe there is very little laundry in the drum.
• Load more laundry.
Loading…
Перейти к контенту
Русские электронные инструкции по эксплуатации
Постоянно обновляемый большой каталог документации по эксплуатации и использованию современных устройств и оборудования на русском языке. Бесплатное скачивание файлов.
Поиск:
Главная
♥ В закладки
Просмотр инструкции в pdf
Инструкция по эксплуатации стиральной машины Electrolux EWC1150.
Скачать инструкцию к стиральной машине Electrolux EWC1150 (957,84 КБ)
Инструкции по эксплуатации стиральных машин Electrolux
« Инструкция к стиральной машине Electrolux EWS1064EDW
» Инструкция к стиральной машине Electrolux EWT0862IFW
Вам также может быть интересно

Инструкция к водонагревателю Electrolux EWH 80 Centurio Digital 2

Инструкция к электрокамину Electrolux EFP-W-1200URLS

Инструкция к кухонной машине Electrolux Assistent EKM4200

Инструкция к электрической плите Electrolux SteamBake RKR660101W

Инструкция к водонагревателю Electrolux SP Multytronic S

Инструкция к пылесосу Electrolux ZSPC2010

Инструкция к обогревателю Electrolux EFH-S-115

Инструкция к газовой варочной панели Electrolux GEE26MB
Добавить комментарий
Имя *
Email *
Сайт
Комментарий
Сохранить моё имя, email и адрес сайта в этом браузере для последующих моих комментариев.
- Добавить инструкцию
- Заказать инструкцию
- Политика конфиденциальности
Страницы и текст этой инструкции
Инструкция стиральной машины Electrolux EWC 1150
Информация отображена на картинке
Информация отображена на картинке
Информация отображена на картинке
Информация отображена на картинке
Как использовать наш сайт инструкций OnlineManuals.ru
Наша цель состоит в том, чтобы предоставить вам быстрый доступ к содержанию инструкции для стиральной машины Electrolux EWC 1150.
С помощью онлайн просмотра, Вы можете быстро просмотреть содержимое инструкции и найти решение проблемы с стиральной машины Electrolux EWC 1150.
Для Вашего удобства
Если листать руководство пользователя стиральной машины Electrolux EWC 1150 прямо на сайте, не очень удобно для Вас, есть два возможных решения:
• Просмотр в полноэкранном режиме — легко просмотреть руководство пользователя (без загрузки его на свой компьютер), Вы можете использовать режим полноэкранного просмотра.
Для просмотра инструкции пользователя стиральной машины Electrolux EWC 1150 на полном экране, используйте кнопку «Открыть в Pdf-viewer».
• Загрузка на компьютер — Вы можете также скачать Инструкция стиральной машины Electrolux EWC 1150 на свой компьютер и сохранить его в файлах.
Многие люди предпочитают читать документы не на экране, а в печатной версии.
Возможность печати руководства пользователя также была предусмотрена на нашем сайте,
и вы можете использовать ее, нажав на иконку «печать» в Pdf-viewer.
Нет необходимости печатать все руководство стиральной машины Electrolux EWC 1150, можно выбрать только нужные страницы инструкции.