
1/4
Instruction Manual for
Programmable Digital Timer
Item No.: EMT757
A. Functions
1. The Programmable Digital Timer (hereinafter refer as “Timer”) can preset specific on/off
time of your home electrical appliances, e.g. using in coffee machine, lamps. It is ideal for
energy saving and home security.
2. The countdown function can switch on/off your appliance on your pre-set time and
random functions allows you to switch on and off the appliance in irregular time, it is not
only ideal for home automation, also prevent burglary during your absence.
3. The LCD displays program setting status and real time.
4. With maximum 140 on/off programs per week .
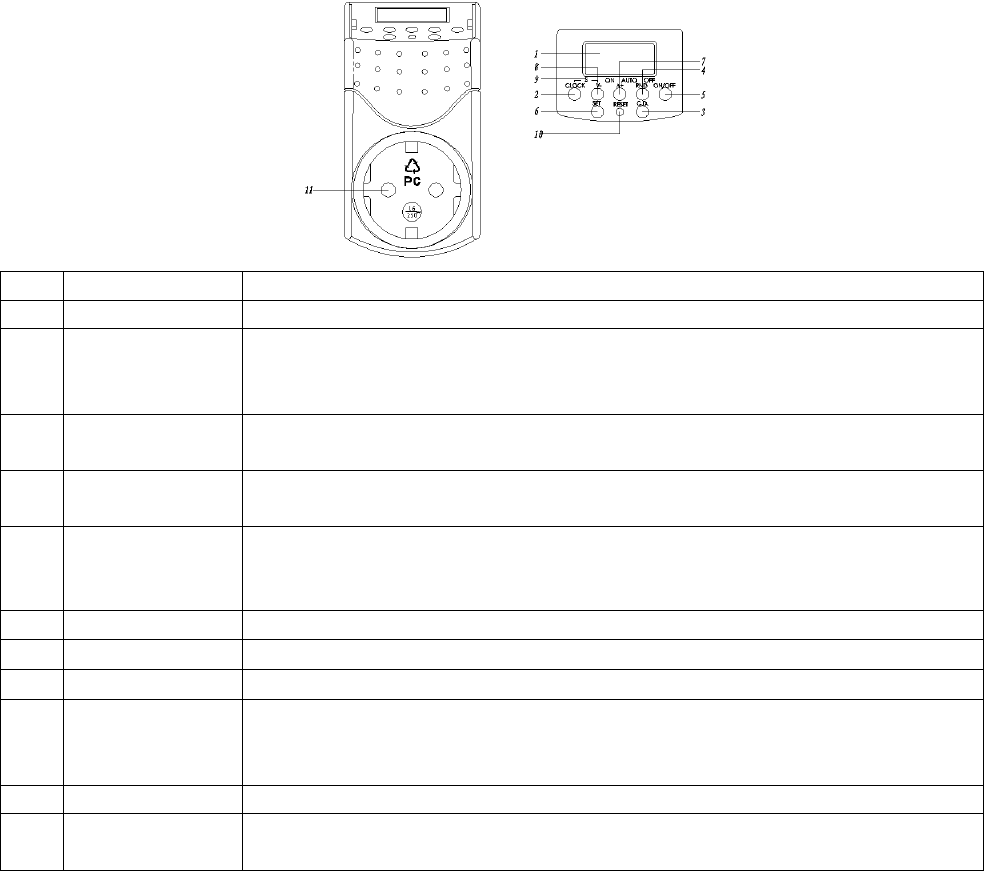
B. Diagram & Descriptions
No. Description Functions
1 LCD Display Shows time and program setting.
2 CLOCK button Return to real time display when in program setting
press together with SET Button to set real time and week
press together with -Button to change to Summer Time
3 CD button Press the button to start/stop countdown program when it is in
AUTO status
4 RND button Press the button to start/stop random program when it is in AUTO
status
5 On/Off button Change the setting mode to ON, ATUO or OFF. When press the
button each time, the horizontal line in the LCD moves to
ONÅÆAUTOÅÆOFF which were silk printed on the Timer
6 SET button To set time and week and to confirm setting
7
∧+ button
Press the button to increase the time, week or program group
8
∨ — button
Press the button to reduce the time, week or program group
9 S — silk screen
printing
Press CLOCK Button and - Button at the same time to change to
Summer Time. Time display adds one hour automatically and “S”
are shown on the LCD.
10 Reset button Press once to reset all your preset programs
11 Socket & Plug Connect your appliance to the socket and plug the timer to the wall
AC socket to get power
C. Time Display
There are two different kinds of time displays:
1. 12-hour display: the digital number is from 11:59 to 12:00 with AM or PM shown on the
LCD
2. 24-hour display: the digital number is from 00:00 to 23:59, no AM or PM is shown on the
LCD
GREAT BRITAIN • CUSTOMER SERVICE tel. 020 8247 9300 e-mail customerservice@clasohlson.co.uk internet www.clasohlson.co.uk
Ver. 20141216
Use
Time display
The clock is showing 12 or 24 hour display. To change between 12 and 24 hour display, press and hold CLOCK until the display changes the time format. • At 12 hour display AM or PM is shown on the display.• At 24 hour display neither AM nor PM is shown on the display.Set timeNote: The time switch must be in normal mode (time) before setting of time and week day. Push CLOCK to return to normal mode.1. Push and hold SET until the week indicator blinks.
2. Push ▲+ to change week day forward, or ▼— to change week day
backwards. The selected week day is shown in the display.3. Push SET to confirm. The hour setting blinks in the display.
4. Use ▲+ and ▼— to set hours.
5. Push SET to confirm. The minute setting blinks in the display.
6. Use ▲+ and ▼— to set minutes.
7. Push CLOCK to return to normal mode.Summer/Winter time
Press CLOCK and ▼— at the same time to switch between summer and
winter time. S is shown on the display to indicate summer time.
Installation of programme
1. Push ON/OFF to set the time switch in AUTO mode.
2. When the display is in normal mode, press ▲+ to return to settings mode.
1ON is shown on the display’s bottom left corner. “1” indicates program number 1 (of 20). “ON” indicates the time for activation. “OFF” indicates the time for off activation.
3. Use ▲+ and ▼— to change the program number according to
the following sequence:
1ON → 1OFF → …… 20ON → 20OFF → d ON/OFF (countdown)
4. After selected program, push SET to set week day for on and off activation.
5. Use ▲+ to change week days. The days will be changed in the following
combinations:
MO TU WE TH FR SA SU; MO → TU → WE → TH → FR → SA → SU:
MO WE FR; TU TH SA; SA SU; MO TU WE; TH FR SA; MO TU WE TH FR; MO TU WE TH FR SA6. Push SET to confirm. The hour setting blinks in the display.
7. Use ▲+ and ▼— to set hours.
8. Push SET to confirm. The minute setting blinks in the display.
9. Use ▲+ and ▼— to set minutes.
10. Press CLOCK to return to normal mode.
Countdown function
Set the countdown timeThe countdown interval is from 1 second to 99 hours, 59 minutes and 59 seconds.
1. When the display is in normal mode, press ▼— to return to the countdown
function. The display shows d ON or d OFF. d indicates that the countdown function is activated.
2. Push SET until ON or OFF blinks on the display.
3. Use ▲+ and ▼— to switch between ON or OFF.
ON Set the duration for how long the device/output will be ON (the device/output will be turned off after the countdown). OFF set the duration for how long the device/output will be OFF (the device/output will be turned on after the countdown). 4. Push SET to confirm. The timer display blinks.
5. Use ▲+ and ▼— to set hours.
6. Push SET to confirm. The minutes display blinks.
7. Use ▲+ and ▼— to set minutes.
8. Push SET to confirm. The seconds blink.
9. Use ▲+ and ▼— to set seconds.
10. Push SET to confirm and then push CLOCK to return to normal mode.
Start the countdown1. Set the countdown time according to the instructions above. 2. Connect the device to the time switch and connect the time switch to a wall socket.
3. Push ON/OFF to set the time switch in AUTO mode.
4. Push CD to start the countdown function. CD will blink to confirm that CD-
mode is activated.5. When the countdown has come to 00:00:00, the e.g. lamp turns on or off depending on what has been programmed.
Random on and off activation
1. Connect the device to the time switch and connect the time switch to a wall socket. 2. Push ON/OFF to set the time switch in AUTO mode.
3. Push RND. An icon with the letter R will appear to confirm that the RND-
mode is activated. The output is now off for 26 to 42 minutes before it randomly turns on. The output then stays on for 10 to 26 minutes before it turns off again.
Turning the lamp on and off manually
Push ON/OFF to manually activate or deactivate the time switch. ON The voltage turns on regardless of the setting and the connected device can be used. AUTO The time switch operates according to pre-set program. OFF The voltage turns off and the connected device cannot be used.
Safety
• The time switch is intended for use indoors and may not be used outdoors!
• Devices connected to the time switch must be constructed for the same voltage according to the specifications below. • The built-in batteries are fully charged after approx. 2 hours use.
Disposal
Follow local ordinances when disposing this product. If you are unsure about the disposal of this product contact your municipality.
Specifications
Mains Supply 230 V AC, 50 HzMax load 1800 WOperating Temperature 0–55 °CClass IP20Minimum time interval 1 minute1. LCD-display2. S – Indication on the display for summer time.3. CLOCK – Press to return to normal mode (time).4. SET – Sets time and week day and also confirms settings. 5. ▼— – Adjusts time, week, and program group.6. ▲+ – Adjusts time, week, and program group. 7. ON/OFF – Changes function on the time switch. ON, AUTO or OFF.8. RND – Randomly activates on and off when the time switch is in AUTO mode. 9. CD – Starts or stops the countdown function when the time switch is in AUTO mode.
10. RESET – Press one time to reset the time switch to factory settings.
11. Plug socket
Digital time switch
Art.no 18-2029 Modell EMT757-UK 18-2175 EMT757-UK 36-2901 EMT757 36-4600 EMT757 36-5035 EMT757x2Please read the entire instruction manual before using the product and save it for future reference. We apologise for any text or photographic errors and any changes in technical data. If you have any questions concerning technical problems please contact our Customer Service Department.
Product Description
Digital time switch with 20 on/off activations per day. • CD • Random function (random on and off activation) • LCD-display• Safety shuttered socket
Buttons and Functions
5
6
7
8
9
10
1
2
3
4
11
tel 020 8247 9300 e-mail customerservice@clasohlson.co.uk internet www.clasohlson.co.uk postal 10 – 13 Market Place, Kingston upon Thames, Surrey, KT1 1JZ
Ver. 20181212
Digital time switch
Art.no 18-2029 Modell EMT757-UK
18-2175 EMT757-UK
36-2901 EMT757
36-4600 EMT757
36-5035 EMT757x2
Please read theentire instruction manual before using theproduct and save it for future reference. We apologise for any text or photographic errors and any changes in technical data. If you have any questions concerning technical problems please contact our Customer Service Department.
Product Description
Digital time switch with 20 on/off activations per day.• CD• Random function (random on and off activation)• LCD-display• Safety shuttered socket
Buttons and Functions
Set time
Note: Thetime switch must be in normal mode (time) before setting of time and week day. Push CLOCK to return to normal mode.1. Push and hold SET until theweek indicator blinks.2. Push
▲+ to change week day forward, or ▼− to change week day backwards.
Theselected week day is shown in thedisplay.3. Push SET to confirm. Thehour setting blinks in thedisplay.4. Use
▲+ and ▼− to set hours.
5. Push SET to confirm. Theminute setting blinks in thedisplay.6. Use
▲+ and ▼− to set minutes.
7. Push CLOCK to return to normal mode.
Summer/Winter time
Press CLOCK and ▼− at thesame time to switch between summer and winter time.
“S” is shown on thedisplay to indicate summer time.
Installation of programme
1. Push ON/OFF to set thetime switch in AUTO mode.2. When thedisplay is in normal mode, press ▲+ to return to settings mode. “1ON”
is shown on thedisplay’s bottom left corner. “1” indicates program number 1 (of 20).
“ON” indicates thetime for activation. “OFF” indicates thetime for off activation.
3. Use
▲+ and ▼− to change theprogram number according to thefollowing sequence:
1ON
→ 1OFF → …… 20ON → 20OFF → d ON/OFF (countdown)
4. After selected program, push SET to set week day for on and off activation.5. Use ▲+ to change week days. Thedays will be changed in thefollowing combinations: MO TU WE TH FR SA SU; MO
→ TU → WE → TH → FR → SA → SU:
MO WE FR; TU TH SA; SA SU; MO TU WE; TH FR SA; MO TU WE TH FR; MO TU WE TH FR SA6. Push SET to confirm. Thehour setting blinks in thedisplay.7. Use
▲+ and ▼− to set hours.
8. Push SET to confirm. Theminute setting blinks in thedisplay.9. Use
▲+ and ▼− to set minutes.
10. Press CLOCK to return to normal mode.
Countdown function
Set thecountdown time
Thecountdown interval is from 1 second to 99 hours, 59 minutes and 59 seconds.1. When thedisplay is in normal mode, press ▼− to return to thecountdown function. Thedisplay shows “d ON” or “d OFF”. d indicates that thecountdown function is activated.2. Push SET until “ON” or “OFF” blinks on thedisplay.3. Use
▲+ and ▼− to switch between ON or OFF. ON set theduration for how
long thedevice/output will be ON (thedevice/output will be turned off after thecountdown). OFF set theduration for how long thedevice/output will be OFF (thedevice/output will be turned on after thecountdown).4. Push SET to confirm. Thetimer display blinks.5. Use
▲+ and ▼− to set hours.
6. Push SET to confirm. Theminutes display blinks.7. Use
▲+ and ▼− to set minutes.
8. Push SET to confirm. Theseconds blink.9. Use
▲+ and ▼− to set seconds.
10. Push SET to confirm and then push CLOCK to return to normal mode.
Start thecountdown
1. Set thecountdown time according to theinstructions above.2. Connect thedevice to thetime switch and connect thetime switch to awall socket.3. Push ON/OFF to set thetime switch in AUTO mode.4. Push CD to start thecountdown function. “CD” will blink to confirm that CD-mode is activated.5. When thecountdown has come to 00:00:00, thee.g. lamp turns on or off depending on what has been programmed.
Random on and off activation
1. Connect thedevice to thetime switch and connect thetime switch to awall socket.2. Push ON/OFF to set thetime switch in AUTO mode.
3. Push RND. Anicon with theletter “R” will appear to confirm that theRND-mode is
activated. Theoutput is now off for 26 to 42 minutes before it randomly turns on. Theoutput then stays on for 10 to 26 minutes before it turns off again.
Turning thelamp on and off manually
Push ON/OFF to manually activate or deactivate thetime switch.ON Thevoltage turns on regardless of thesetting and theconnected device can be used.AUTO Thetime switch operates according to pre-set program.OFF Thevoltage turns off and theconnected device cannot be used.
Safety
• Thetime switch is intended for use indoors and may not be used outdoors!• Devices connected to thetime switch must be constructed for thesame voltage according to thespecifications below.• Thebuilt-in batteries are fully charged after approx. 2 hours use.• Make sure that theelectrical socket that theproduct is plugged into is easily accessible in case it and theconnected product need to be quickly disconnected from themains electricity.• Do not connect products of this type to each other.• Do not cover theproduct.
Troubleshooting
Display is blank: Plug thetimer switch into awall socket and press [ RESET ] to reset it.
Responsible disposal
This symbol indicates that this product should not be disposed of with general householdwaste. Thisapplies throughout theentire EU. Inorder to prevent any harm to theenvironment or health hazards caused by incorrect waste disposal, theproduct must be handed in for recycling so that thematerial can be disposed of in aresponsible manner. Whenrecycling your product, take it to your local collection facility or contact theplace of purchase. Theywill ensure that theproduct is disposed of in anenvironmentally sound manner.
Specifications
Mains Supply 230 V AC, 50 HzMax load 1800 WOperating Temperature 0–55 °CClass IP20Minimum time interval 1 minute
5
6
7
8
9
10
1
2
3
4
11
1. LCD-display2. S – Indication on thedisplay for summer time.3. CLOCK – Press to return to normal mode (time).4. SET – Sets time and week day and also confirms settings.
5.
▼− – Adjusts time, week, and program group.
6.
▲+ – Adjusts time, week, and program group.7. ON/OFF – Changes function on thetime switch. ON, AUTO or OFF.
8. RND – Randomly activates on and off when thetime switch is in AUTO mode.
9. CD – Starts or stops thecountdown function when thetime switch is in AUTO mode.
10. RESET – Press one time to reset thetime switch to factory settings.11. Plug socket
Use
Time display
Theclock is showing 12 or 24 hour display. To change between 12 and 24 hour display, press and hold CLOCK until thedisplay changes thetime format.• At 12 hour display “AM” or “PM” is shown on thedisplay.• At 24 hour display neither AM nor PM is shown on thedisplay.
FAQ: Types of Manuals and Their Contents
Everflourish EMT757 Manuals come in various types, each serving a specific purpose to help users effectively operate and maintain their devices. Here are the common types of Everflourish EMT757 User Guides and the information they typically include:
- User Manuals: Provide comprehensive instructions on how to use the device, including setup, features, and operation. They often include troubleshooting tips, safety information, and maintenance guidelines.
- Service Instructions: Designed for technicians and repair professionals, these manuals offer detailed information on diagnosing and repairing issues with the device. They include schematics, parts lists, and step-by-step repair procedures.
- Installation Guides: Focus on the installation process of the device, providing detailed instructions and diagrams for proper setup. They are essential for ensuring the device is installed correctly and safely.
- Maintenance Manuals: Provide guidance on routine maintenance tasks to keep the device in optimal condition. They cover cleaning procedures, part replacements, and regular servicing tips.
- Quick Start Guides: Offer a concise overview of the essential steps needed to get the device up and running quickly. They are ideal for users who need immediate assistance with basic setup and operation.
Each type of Everflourish EMT757 instruction is designed to address specific needs, ensuring users have the necessary information to use, maintain, and repair their devices effectively.
Related Instructions for Everflourish EMT757:
2
G-Homa RF302PIR
2
1053
253
7
RF302DA
Instruction manual Everflourish Kitchen Appliances Instruction manual (File: everflourish-rf302da-instruction-manual-2, 11/02/2025)
2
1040
229
8
376 768
Product information PDF User Manual (@1ZNXNW), Everflourish 376 768 Receiver (Sat 12.2024)
6
831
167
10
G-homa EMW302WF-UL
3
1104
199
Timer Devices by Other Brands:
|
Taylor 5806 Specification 5806 (Timer ePDF User Guide, #LTW441) Timers 10 Nov 2024 | 2 |
|
|
hager EH712 User Instructions hager EH712 Guide (User instructions), @PX78Y7 6LE002822B 11 May 2025 | 2 |
|
|
Intermatic EI215 Supplementary Manual EI215 Supplementary manual — H62Q5I INTERMATIC EI215 ELECTRONIC 15 Feb 2025 | 1 |
|
|
scigiene TM-619 Operation & User’s Manual TM-619 Operation & user’s manual — 7QVY31 1/2 27 Dec 2024 | 2 |
Categories:
Timer
Kitchen Appliances
Security Sensors
Receiver
Transmitter
Home Automation

Digital time switch
Art.no 18-2029 Modell EMT757-UK
18-2175 EMT757-UK
36-2901 EMT757
36-4600 EMT757
36-5035 EMT757x2
Please read the entire instruction manual before using the product and save
it for future reference. We apologise for any text or photographic errors and
any changes in technical data. If you have any questions concerning technical
problems please contact our Customer Service Department.
Product Description
Digital time switch with 20 on/off activations per day.
• CD
• Random function (random on and off activation)
• LCD-display
• Safety shuttered socket
Buttons and Functions
1
2
3
4
1. LCD-display
2. S – Indication on the display for summer time.
3. CLOCK – Press to return to normal mode (time).
4. SET – Sets time and week day and also confirms settings.
5. ▼- – Adjusts time, week, and program group.
6. ▲+ – Adjusts time, week, and program group.
7. ON/OFF – Changes function on the time switch. ON, AUTO or OFF.
8. RND – Randomly activates on and off when the time switch
is in AUTO mode.
9. CD – Starts or stops the countdown function when the time switch
is in AUTO mode.
10. RESET – Press one time to reset the time switch to factory settings.
11. Plug socket
5
6
7
8
9
10
11
Use
Time display
The clock is showing 12 or 24 hour display. To change between 12 and 24 hour
display, press and hold CLOCK until the display changes the time format.
• At 12 hour display AM or PM is shown on the display.
• At 24 hour display neither AM nor PM is shown on the display.
Set time
Note: The time switch must be in normal mode (time) before setting
of time and week day. Push CLOCK to return to normal mode.
1. Push and hold SET until the week indicator blinks.
2. Push ▲+ to change week day forward, or ▼— to change week day
backwards. The selected week day is shown in the display.
3. Push SET to confirm. The hour setting blinks in the display.
4. Use ▲+ and ▼— to set hours.
5. Push SET to confirm. The minute setting blinks in the display.
6. Use ▲+ and ▼— to set minutes.
7. Push CLOCK to return to normal mode.
Summer/Winter time
Press CLOCK and ▼- at the same time to switch between summer and
winter time. S is shown on the display to indicate summer time.
Installation of programme
1. Push ON/OFF to set the time switch in AUTO mode.
2. When the display is in normal mode, press ▲+ to return to settings mode.
1ON is shown on the display’s bottom left corner.
“1” indicates program number 1 (of 20).
“ON” indicates the time for activation.
“OFF” indicates the time for off activation.
3. Use ▲+ and ▼- to change the program number according to
the following sequence:
1ON → 1OFF → …… 20ON → 20OFF → d ON/OFF (countdown)
4. After selected program, push SET to set week day for on and off activation.
5. Use ▲+ to change week days. The days will be changed in the following
combinations:
MO TU WE TH FR SA SU; MO → TU → WE → TH → FR → SA → SU:
MO WE FR; TU TH SA; SA SU; MO TU WE; TH FR SA;
MO TU WE TH FR; MO TU WE TH FR SA
6. Push SET to confirm. The hour setting blinks in the display.
7. Use ▲+ and ▼— to set hours.
8. Push SET to confirm. The minute setting blinks in the display.
9. Use ▲+ and ▼— to set minutes.
10. Press CLOCK to return to normal mode.
Countdown function
Set the countdown time
The countdown interval is from 1 second to 99 hours, 59 minutes and 59 seconds.
1. When the display is in normal mode, press ▼- to return to the countdown
function. The display shows d ON or d OFF.
d indicates that the countdown function is activated.
2. Push SET until ON or OFF blinks on the display.
3. Use ▲+ and ▼— to switch between ON or OFF.
ON Set the duration for how long the device/output will be ON (the device/
output will be turned off after the countdown). OFF set the duration for how
long the device/output will be OFF (the device/output will be turned on after
the countdown).
4. Push SET to confirm. The timer display blinks.
5. Use ▲+ and ▼— to set hours.
6. Push SET to confirm. The minutes display blinks.
7. Use ▲+ and ▼— to set minutes.
8. Push SET to confirm. The seconds blink.
9. Use ▲+ and ▼— to set seconds.
10. Push SET to confirm and then push CLOCK to return to normal mode.
Start the countdown
1. Set the countdown time according to the instructions above.
2. Connect the device to the time switch and connect the time switch
to a wall socket.
3. Push ON/OFF to set the time switch in AUTO mode.
4. Push CD to start the countdown function. CD will blink to confirm that CD-
mode is activated.
5. When the countdown has come to 00:00:00, the e.g. lamp turns on
or off depending on what has been programmed.
Random on and off activation
1. Connect the device to the time switch and connect the time switch
to a wall socket.
2. Push ON/OFF to set the time switch in AUTO mode.
3. Push RND. An icon with the letter R will appear to confirm that the RND-
mode is activated. The output is now off for 26 to 42 minutes before it
randomly turns on. The output then stays on for 10 to 26 minutes before it
turns off again.
Turning the lamp on and off manually
Push ON/OFF to manually activate or deactivate the time switch.
ON The voltage turns on regardless of the setting and the connected
device can be used.
AUTO The time switch operates according to pre-set program.
OFF The voltage turns off and the connected device cannot be used.
Safety
• The time switch is intended for use indoors and may not be used outdoors!
• Devices connected to the time switch must be constructed for the same
voltage according to the specifications below.
• The built-in batteries are fully charged after approx. 2 hours use.
Disposal
Follow local ordinances when disposing this product. If you are unsure about
the disposal of this product contact your municipality.
Specifications
Mains Supply 230 V AC, 50 Hz
Max load 1800 W
Operating Temperature 0–55 °C
Class IP20
Minimum time interval 1 minute
Ver. 20141216
GREAT BRITAIN • CUSTOMER SERVICE tel. 020 8247 9300 e-mail customerservice@clasohlson.co.uk internet www.clasohlson.co.uk

Kopplingsur
Art.nr 18-2029 Modell EMT757-UK
18-2175 EMT757-UK
36-2901 EMT757
36-4600 EMT757
36-5035 EMT757x2
Läs igenom hela bruksanvisningen före användning och spara den sedan för
framtida bruk. Vi reserverar oss för ev. text- och bildfel samt ändringar av tekniska
data. Vid tekniska problem eller andra frågor, kontakta vår kundtjänst.
Produktbeskrivning
Digitalt kopplingsur med upp till 20 från- och tillslag per vecka.
• Nedräkningsfunktion
• Randomfunktion (slumpmässigt från- och tillslag)
• LCD-display
• Petskydd
Knappar och funktioner
1
2
3
4
1. LCD-display
2. S – Markering i displayen för sommartid.
3. CLOCK – Tryck för att återgå till normalläget (tidvisning).
4. SET – Ställer in tid och veckodag samt bekräftar inställningar.
5. ▼- – Justerar tid, vecka och programgrupp.
6. ▲+ – Justerar tid, vecka och programgrupp.
7. ON/OFF – Ändrar funktion på kopplingsuret. ON, AUTO eller OFF.
8. RND – Aktiverar slumpmässigt från och tillslag när kopplingsuret är i AUTO-läge.
9. CD – Startar eller stoppar nedräkningsfunktionen när kopplingsuret
är i AUTO-läge.
10. RESET – Tryck en gång för att återställa kopplingsuret till fabriksinställning.
11. Anslutning för stickpropp
5
6
7
8
9
10
11
Användning
Tidvisning
Tiden kan visas i 12- eller 24-timmarsformat. För att ändra mellan 12- och
24-timmarsvisning, tryck och håll in CLOCK tills displayen ändrar tidsformatet.
• Vid 12-timmarsvisning visas AM eller PM i displayen.
• Vid 24-timmarsvisning visas varken AM eller PM i displayen.
Ställa in tiden
Obs! Kopplingsuret måste vara i normalläget (tidvisning) före inställning
av tid och veckodag. Tryck en gång på CLOCK för att återgå till normalläget.
1. Tryck och håll in SET tills veckoangivelsen blinkar.
2. Tryck på ▲+ för att ändra veckodag framåt, eller ▼- för
att ändra veckodag bakåt. Vald veckodag visas i displayen.
3. Tryck på SET för att bekräfta. Timangivelsen blinkar i displayen.
4. Använd ▲+ och ▼— för att ställa timmar.
5. Tryck på SET för att bekräfta. Minutangivelsen blinkar i displayen.
6. Använd ▲+ och ▼— för att ställa minuter.
7. Tryck på CLOCK för att återgå till normalläget.
Sommartidsinställning
Tryck på CLOCK och ▼- samtidigt för att växla mellan sommar- och vintertid.
S visas i displayen för att indikera sommartid.
Inställning av program
1. Tryck på ON/OFF för att sätta kopplingsuret i läge AUTO.
2. När displayen är i normalläget, tryck på ▲+ för att gå till programmeringsläget.
1ON visas i displayens nedre vänstra hörn.
”1” indikerar program nummer 1 (av 20).
”ON” indikerar tiden för tillslag.
”OFF” indikerar tiden för frånslag.
3. Använd ▲+ och ▼- för att ändra programnummer enligt följande sekvens:
1ON → 1OFF → …… 20ON → 20OFF → d ON/OFF (nedräkning)
4. Efter valt program, tryck på SET för att ställa veckodag för från och tillslag.
5. Använd ▲+ för att ändra veckodagar. Dagarna ändras i följande
kombinationer:
MO TU WE TH FR SA SU; MO → TU → WE → TH → FR → SA → SU;
MO WE FR; TU TH SA; SA SU; MO TU WE; TH FR SA;
MO TU WE TH FR; MO TU WE TH FR SA
6. Tryck på SET för att bekräfta. Timangivelsen blinkar i displayen.
7. Använd ▲+ och ▼— för att ställa timmar.
8. Tryck på SET för att bekräfta. Minutangivelsen blinkar i displayen.
9. Använd ▲+ och ▼— för att ställa minuter.
10. Tryck på CLOCK för att återgå till normalläget.
Nedräkningsfunktion
Ställa in nedräkningstiden
Nedräkningsintervallet är från 1 sekund till 99 timmar, 59 minuter och 59 sekunder.
1. När displayen är i normalläget, tryck på ▼- för att gå till programmeringsläget
för nedräkningsfunktionen. Displayen visar d ON eller d OFF. d indikerar att
nedräkningsfunktionen är aktiverad.
2. Tryck på SET tills ON eller OFF blinkar i displayen.
3. Använd ▲+ och ▼— för att välja mellan ON eller OFF.
ON Ställ in tiden för hur länge enheten/utgången är PÅ (enheten/utgången
kommer att stängas av efter nedräkning). OFF Ställ in tiden för hur länge
enheten/utgången är AV (enheten/utgången kommer att aktiveras efter
nedräkning).
4. Tryck på SET för att bekräfta. Timangivelsen blinkar.
5. Använd ▲+ och ▼— för att ställa timmar.
6. Tryck på SET för att bekräfta. Minutangivelsen blinkar.
7. Använd ▲+ och ▼— för att ställa minuter.
8. Tryck på SET för att bekräfta. Sekunderna blinkar.
9. Använd ▲+ och ▼— för att ställa sekunder.
10. Tryck på SET för att bekräfta och tryck sedan på CLOCK
för att gå tillbaka till normalläget.
Starta nedräkningen
1. Ställ in nedräkningstiden enligt ovan.
2. Anslut apparaten till kopplingsuret och sätt kopplingsuret i ett vägguttag.
3. Tryck på ON/OFF för att sätta kopplingsuret i läge AUTO.
4. Tryck på CD för att starta nedräkningsfunktionen. CD blinkar för att bekräfta att
CD-läge är aktiverat.
5. När nedräkningen kommit till 00:00:00 tänds eller släcks ex. lampan
beroende på vad som programmerats in.
Slumpmässigt från och tillslag
1. Anslut apparaten till kopplingsuret och sätt kopplingsuret i ett vägguttag.
2. Tryck på ON/OFF för att sätta kopplingsuret i läge AUTO.
3. Tryck på RND. En ikon med bokstaven R kommer att visas för att bekräfta att
RDN-läge är aktiverat. Utgången är nu avstängd i 26 till 42 minuter innan det
slumpvis slås på. Utgången är sedan tillslagen i 10 till 26 minuter innan den
stängs av igen.
Tända och släcka manuellt
Tryck på ON/OFF för att manuellt aktivera eller avaktivera kopplingsuret.
ON Spänningen slås till oavsett inställning och ansluten apparat går
att använda.
AUTO Kopplingsuret fungerar enligt inställda program.
OFF Spänningen slås ifrån och ansluten apparat går ej att använda.
Säkerhet
• Kopplingsuret är endast avsett för inomhusbruk och får inte användas utomhus!
• Apparater anslutna till kopplingsuret måste vara konstruerade för samma
spänning enligt specifikationen nedan.
• De inbyggda batterierna laddas upp fullt efter ca 2 timmars användning.
Avfallshantering
När du ska göra dig av med produkten ska detta ske enligt lokala föreskrifter.
Är du osäker på hur du ska gå tillväga, kontakta din kommun.
Specifikationer
Nätspänning 230 V AC, 50 Hz
Max belastning 1800 W
Arbetstemperatur 0 – 55 °C
Skyddsklass IP20
Minsta tidsintervall 1 minut
Ver. 20141216
SVERIGE • KUNDTJÄNST tel: 0247/445 00 fax: 0247/445 09 e-post: kundservice@clasohlson.se internet: www.clasohlson.se