

Setup Sheet
Provides you with information on assembling the printer and
installing the printer software.
Reference Guide (this manual)
Provides you with detailed information on the printer’s functions,
optional products, maintenance, troubleshooting, and technical
specifications.
1

2

Color Laser Printer
All rights reserved. No part of this publication may be reproduced, stored in a retrieval
system, or transmitted in any form or by any means, mechanical, photocopying, recording,
or otherwise, without the prior written permission of SEI KO EPSON CORPORATION. No
patent liability is assumed with respect to the use of the information contained herein. Neither
is any liability assumed for damages resulting from the use of the information contained
herein.
Neither SEIKO EPSON CORPORATION nor its affiliates shall be liable to the purchaser of
this product or third parties for damages, losses, costs, or expenses incu rred by purchaser or
third parties as a result of: accident , misuse, or abuse of this product or unauthorized
modifications, repairs, or alterations to this product, or (excluding the U.S.) failure to strictly
comply with SEIKO EPSON CORPORATION’s operating and maintenance instructions.
SEIKO EPSON CORPORATION shall not be liable against any damages or problems arising
from the use of any options or any consumable products other than those designated as
Original EPSON Products or EPSON Approved Products by SEIKO EPSON
CORPORATION.
EPSON and EPSON ESC/P are registered trademarks and EPSON ESC/P 2 is a trademark
of SEIKO EPSON CORPORATION.
General Notice: Other product names used herein are for identification purposes only and
may be trademarks of their respective owners. EPSON disclaims any and all righ ts i n thos e
marks.
Copyright © 2002 by SEIKO EPSON CORPORATION, Nagano, Japan
Reference Guide

4

Contents
Safety Information
Warnings, Cautions, and Notes . . . . . . . . . . . . . . . . . . . . . . . . . . . . . 11
Safety Precautions . . . . . . . . . . . . . . . . . . . . . . . . . . . . . . . . . . . . . . . . 11
Important Safety Instructions. . . . . . . . . . . . . . . . . . . . . . . . . . . . . . . 14
Power On/Off Cautions . . . . . . . . . . . . . . . . . . . . . . . . . . . . . . . . . . . 14
Chapter 1 Product Information
Printer Parts . . . . . . . . . . . . . . . . . . . . . . . . . . . . . . . . . . . . . . . . . . . . . 17
Indicator lights. . . . . . . . . . . . . . . . . . . . . . . . . . . . . . . . . . . . . . . 19
Options and Consumable Products. . . . . . . . . . . . . . . . . . . . . . . . . . 19
Options . . . . . . . . . . . . . . . . . . . . . . . . . . . . . . . . . . . . . . . . . . . . . 19
Consumable products. . . . . . . . . . . . . . . . . . . . . . . . . . . . . . . . . 20
About Your Printer . . . . . . . . . . . . . . . . . . . . . . . . . . . . . . . . . . . . . . . 21
Pre-defined color settings in printer driver. . . . . . . . . . . . . . . 21
Duplex printing. . . . . . . . . . . . . . . . . . . . . . . . . . . . . . . . . . . . . . 21
Resolution Improvement Technology (RITech) . . . . . . . . . . . 22
Chapter 2 Paper Handling
Available Paper . . . . . . . . . . . . . . . . . . . . . . . . . . . . . . . . . . . . . . . . . . 23
EPSON special media. . . . . . . . . . . . . . . . . . . . . . . . . . . . . . . . . 23
General paper . . . . . . . . . . . . . . . . . . . . . . . . . . . . . . . . . . . . . . . 25
Paper that should not be used. . . . . . . . . . . . . . . . . . . . . . . . . . 25
Paper Sources . . . . . . . . . . . . . . . . . . . . . . . . . . . . . . . . . . . . . . . . . . . . 27
MP tray. . . . . . . . . . . . . . . . . . . . . . . . . . . . . . . . . . . . . . . . . . . . . 27
500-Sheet Paper Cassette Unit. . . . . . . . . . . . . . . . . . . . . . . . . . 28
Selecting a paper source. . . . . . . . . . . . . . . . . . . . . . . . . . . . . . . 28
Output Tray . . . . . . . . . . . . . . . . . . . . . . . . . . . . . . . . . . . . . . . . . . . . . 29
Loading Paper. . . . . . . . . . . . . . . . . . . . . . . . . . . . . . . . . . . . . . . . . . . . 30
MP tray. . . . . . . . . . . . . . . . . . . . . . . . . . . . . . . . . . . . . . . . . . . . . 30
5

Optional Lower Cassette. . . . . . . . . . . . . . . . . . . . . . . . . . . . . . .32
Printing on Special Media . . . . . . . . . . . . . . . . . . . . . . . . . . . . . . . . . .34
EPSON Color Laser Paper . . . . . . . . . . . . . . . . . . . . . . . . . . . . .35
EPSON Color Laser Coated Paper. . . . . . . . . . . . . . . . . . . . . . .35
EPSON Color Laser Transparencies . . . . . . . . . . . . . . . . . . . . .35
Envelopes . . . . . . . . . . . . . . . . . . . . . . . . . . . . . . . . . . . . . . . . . . .36
Labels. . . . . . . . . . . . . . . . . . . . . . . . . . . . . . . . . . . . . . . . . . . . . . .38
Thick paper. . . . . . . . . . . . . . . . . . . . . . . . . . . . . . . . . . . . . . . . . .39
Loading a custom paper size . . . . . . . . . . . . . . . . . . . . . . . . . . .39
Chapter 3 Using the Printer Software with Windows
About the Printer Software . . . . . . . . . . . . . . . . . . . . . . . . . . . . . . . . .41
Accessing the Printer Driver . . . . . . . . . . . . . . . . . . . . . . . . . . . . . . . .41
Making Changes to Printer Settings. . . . . . . . . . . . . . . . . . . . . . . . . .42
Making the print quality setting . . . . . . . . . . . . . . . . . . . . . . . .42
Resizing printouts . . . . . . . . . . . . . . . . . . . . . . . . . . . . . . . . . . . .49
Modifying the print layout. . . . . . . . . . . . . . . . . . . . . . . . . . . . .51
Using a watermark. . . . . . . . . . . . . . . . . . . . . . . . . . . . . . . . . . . .53
Printing with the Duplex Unit . . . . . . . . . . . . . . . . . . . . . . . . . .56
Making Extended Settings . . . . . . . . . . . . . . . . . . . . . . . . . . . . .58
Monitoring Your Printer by Using EPSON Status Monitor 3. . . . .60
Accessing EPSON Status Monitor 3 . . . . . . . . . . . . . . . . . . . . .61
Getting printer status details . . . . . . . . . . . . . . . . . . . . . . . . . . .62
Setting Monitoring Preferences . . . . . . . . . . . . . . . . . . . . . . . . .64
Status Alert window . . . . . . . . . . . . . . . . . . . . . . . . . . . . . . . . . .66
Setting Monitored Printers . . . . . . . . . . . . . . . . . . . . . . . . . . . . .66
Setting for the USB Connection. . . . . . . . . . . . . . . . . . . . . . . . . . . . . .67
Canceling Printing . . . . . . . . . . . . . . . . . . . . . . . . . . . . . . . . . . . . . . . .69
Uninstalling the Printer Software. . . . . . . . . . . . . . . . . . . . . . . . . . . .69
Chapter 4 Using the Printer Software with Macintosh
About the Printer Software . . . . . . . . . . . . . . . . . . . . . . . . . . . . . . . . .75
Accessing the Printer Driver . . . . . . . . . . . . . . . . . . . . . . . . . . . . . . . .75
Making Changes to Printer Settings. . . . . . . . . . . . . . . . . . . . . . . . . .76
Making the print quality setting . . . . . . . . . . . . . . . . . . . . . . . .76
6

Resizing printouts. . . . . . . . . . . . . . . . . . . . . . . . . . . . . . . . . . . . 81
Modifying the print layout . . . . . . . . . . . . . . . . . . . . . . . . . . . . 82
Using a watermark . . . . . . . . . . . . . . . . . . . . . . . . . . . . . . . . . . . 85
Printing with the Duplex Unit. . . . . . . . . . . . . . . . . . . . . . . . . . 91
Making Extended Settings. . . . . . . . . . . . . . . . . . . . . . . . . . . . . 92
Monitoring Your Printer by using EPSON Status Monitor 3. . . . . 94
Accessing the EPSON Status Monitor 3. . . . . . . . . . . . . . . . . . 95
Getting printer status details. . . . . . . . . . . . . . . . . . . . . . . . . . . 96
Setting Monitoring Preferences. . . . . . . . . . . . . . . . . . . . . . . . . 98
Status Alert window. . . . . . . . . . . . . . . . . . . . . . . . . . . . . . . . . . 99
Setting for the USB connection. . . . . . . . . . . . . . . . . . . . . . . . . . . . . . 99
Canceling Printing . . . . . . . . . . . . . . . . . . . . . . . . . . . . . . . . . . . . . . . 101
Uninstalling the Printer Software . . . . . . . . . . . . . . . . . . . . . . . . . .101
Chapter 5 Setting Up Your Printer on a Network
For Windows. . . . . . . . . . . . . . . . . . . . . . . . . . . . . . . . . . . . . . . . . . . . 103
Sharing the printer . . . . . . . . . . . . . . . . . . . . . . . . . . . . . . . . . . 103
Setting up your printer as a shared printer. . . . . . . . . . . . . . 104
Using an additional driver. . . . . . . . . . . . . . . . . . . . . . . . . . . . 106
Note for Windows XP Users . . . . . . . . . . . . . . . . . . . . . . . . . . 114
Setting for the clients . . . . . . . . . . . . . . . . . . . . . . . . . . . . . . . . 117
Installing the printer driver from the CD-ROM . . . . . . . . . . 125
For Macintosh. . . . . . . . . . . . . . . . . . . . . . . . . . . . . . . . . . . . . . . . . . . 126
About the shared printer . . . . . . . . . . . . . . . . . . . . . . . . . . . . . 126
Setting up your printer as a shared printer. . . . . . . . . . . . . . 127
Accessing the shared printer . . . . . . . . . . . . . . . . . . . . . . . . . . 128
Chapter 6 Installing Options
500-Sheet Paper Cassette Unit . . . . . . . . . . . . . . . . . . . . . . . . . . . . . 131
Duplex Unit. . . . . . . . . . . . . . . . . . . . . . . . . . . . . . . . . . . . . . . . . . . . . 137
Memory Module. . . . . . . . . . . . . . . . . . . . . . . . . . . . . . . . . . . . . . . . . 144
Interface Cards . . . . . . . . . . . . . . . . . . . . . . . . . . . . . . . . . . . . . . . . . . 147
7

Chapter 7 Replacing Consumable Products
Precautions During Replacement. . . . . . . . . . . . . . . . . . . . . . . . . . .151
Replacement Messages. . . . . . . . . . . . . . . . . . . . . . . . . . . . . . . . . . . .152
Developer Cartridge. . . . . . . . . . . . . . . . . . . . . . . . . . . . . . . . . . . . . .152
When the toner is low . . . . . . . . . . . . . . . . . . . . . . . . . . . . . . . .153
When the toner is end . . . . . . . . . . . . . . . . . . . . . . . . . . . . . . . .154
Photoconductor Unit . . . . . . . . . . . . . . . . . . . . . . . . . . . . . . . . . . . . .158
Waste Toner Collector . . . . . . . . . . . . . . . . . . . . . . . . . . . . . . . . . . . .161
Transfer Unit . . . . . . . . . . . . . . . . . . . . . . . . . . . . . . . . . . . . . . . . . . . .164
Chapter 8 Cleaning and Transporting the Printer
Cleaning the Printer . . . . . . . . . . . . . . . . . . . . . . . . . . . . . . . . . . . . . .171
Cleaning the pickup roller . . . . . . . . . . . . . . . . . . . . . . . . . . . .171
Cleaning the print head filter. . . . . . . . . . . . . . . . . . . . . . . . . .172
Transporting the Printer. . . . . . . . . . . . . . . . . . . . . . . . . . . . . . . . . . .174
Chapter 9 Troubleshooting
Ready and Error Lights . . . . . . . . . . . . . . . . . . . . . . . . . . . . . . . . . . .179
Printing a Status Sheet . . . . . . . . . . . . . . . . . . . . . . . . . . . . . . . . . . . .181
Clearing Jammed Paper. . . . . . . . . . . . . . . . . . . . . . . . . . . . . . . . . . .182
Precautions for clearing jammed paper . . . . . . . . . . . . . . . . .182
Jam Cover AB. . . . . . . . . . . . . . . . . . . . . . . . . . . . . . . . . . . . . . .183
Jam MP tray or cassette. . . . . . . . . . . . . . . . . . . . . . . . . . . . . . .191
Jam Cover DM . . . . . . . . . . . . . . . . . . . . . . . . . . . . . . . . . . . . . .197
Operational Problems. . . . . . . . . . . . . . . . . . . . . . . . . . . . . . . . . . . . .199
The Ready light does not turn on . . . . . . . . . . . . . . . . . . . . . .199
The Ready light is on but nothing prints . . . . . . . . . . . . . . . .199
Printout Problems. . . . . . . . . . . . . . . . . . . . . . . . . . . . . . . . . . . . . . . .201
Printout is garbled . . . . . . . . . . . . . . . . . . . . . . . . . . . . . . . . . . .201
The printout position is not correct. . . . . . . . . . . . . . . . . . . . .201
Graphics do not print correctly . . . . . . . . . . . . . . . . . . . . . . . .201
The surface is rough (duplex printing, coated paper) . . . . .203
Color Printing Problems. . . . . . . . . . . . . . . . . . . . . . . . . . . . . . . . . . .203
Cannot print in color . . . . . . . . . . . . . . . . . . . . . . . . . . . . . . . . .203
8

The color differs when printed from different printers. . . . 203
The color looks different from the computer screen . . . . . . 205
Print Quality Problems . . . . . . . . . . . . . . . . . . . . . . . . . . . . . . . . . . . 205
The background is dark or dirty. . . . . . . . . . . . . . . . . . . . . . . 205
Black or white bands appear in the printout. . . . . . . . . . . . . 207
White dots appear in the printout. . . . . . . . . . . . . . . . . . . . . . 207
Print quality is uneven on the page . . . . . . . . . . . . . . . . . . . . 207
Print quality is uneven (thick or coated paper). . . . . . . . . . . 208
Half-tone images print unevenly . . . . . . . . . . . . . . . . . . . . . . 208
Toner smudges . . . . . . . . . . . . . . . . . . . . . . . . . . . . . . . . . . . . . 208
Areas are missing in the printed image . . . . . . . . . . . . . . . . . 210
Completely blank pages are output . . . . . . . . . . . . . . . . . . . . 210
The printed image is light or faint . . . . . . . . . . . . . . . . . . . . . 212
The non-printed side of the page is dirty. . . . . . . . . . . . . . . . 212
Paper Handling Problems. . . . . . . . . . . . . . . . . . . . . . . . . . . . . . . . . 212
Paper does not feed properly . . . . . . . . . . . . . . . . . . . . . . . . . 212
Appendix A Technical Specifications
Available Paper . . . . . . . . . . . . . . . . . . . . . . . . . . . . . . . . . . . . . . . . . 215
Available paper types. . . . . . . . . . . . . . . . . . . . . . . . . . . . . . . . 216
Specifications . . . . . . . . . . . . . . . . . . . . . . . . . . . . . . . . . . . . . . . 217
Printable area. . . . . . . . . . . . . . . . . . . . . . . . . . . . . . . . . . . . . . . 220
Printer . . . . . . . . . . . . . . . . . . . . . . . . . . . . . . . . . . . . . . . . . . . . . . . . . 221
General . . . . . . . . . . . . . . . . . . . . . . . . . . . . . . . . . . . . . . . . . . . . 221
Environmental. . . . . . . . . . . . . . . . . . . . . . . . . . . . . . . . . . . . . . 223
Mechanical . . . . . . . . . . . . . . . . . . . . . . . . . . . . . . . . . . . . . . . . . 223
Electrical . . . . . . . . . . . . . . . . . . . . . . . . . . . . . . . . . . . . . . . . . . . 223
Standards and approvals . . . . . . . . . . . . . . . . . . . . . . . . . . . . . 224
Interfaces . . . . . . . . . . . . . . . . . . . . . . . . . . . . . . . . . . . . . . . . . . . . . . . 226
Parallel interface . . . . . . . . . . . . . . . . . . . . . . . . . . . . . . . . . . . . 226
USB interface . . . . . . . . . . . . . . . . . . . . . . . . . . . . . . . . . . . . . . . 226
Options and Consumables . . . . . . . . . . . . . . . . . . . . . . . . . . . . . . . . 227
500-Sheet Paper Cassette Unit. . . . . . . . . . . . . . . . . . . . . . . . . 227
Duplex Unit . . . . . . . . . . . . . . . . . . . . . . . . . . . . . . . . . . . . . . . . 227
Memory Module . . . . . . . . . . . . . . . . . . . . . . . . . . . . . . . . . . . . 228
Developer cartridges. . . . . . . . . . . . . . . . . . . . . . . . . . . . . . . . . 228
Photoconductor unit. . . . . . . . . . . . . . . . . . . . . . . . . . . . . . . . . 229
9

Transfer unit . . . . . . . . . . . . . . . . . . . . . . . . . . . . . . . . . . . . . . . .229
Waste toner collector . . . . . . . . . . . . . . . . . . . . . . . . . . . . . . . . .230
Appendix B Working with Fonts
EPSON BarCode Fonts (Windows Only). . . . . . . . . . . . . . . . . . . . .231
System requirements. . . . . . . . . . . . . . . . . . . . . . . . . . . . . . . . .233
Installing EPSON BarCode Font . . . . . . . . . . . . . . . . . . . . . . .233
Printing with EPSON BarCode Fonts . . . . . . . . . . . . . . . . . . .234
BarCode Font specifications . . . . . . . . . . . . . . . . . . . . . . . . . . .239
Available Fonts . . . . . . . . . . . . . . . . . . . . . . . . . . . . . . . . . . . . . . . . . .251
LJ4/GL2 mode . . . . . . . . . . . . . . . . . . . . . . . . . . . . . . . . . . . . . .251
ESC/P 2 and FX modes. . . . . . . . . . . . . . . . . . . . . . . . . . . . . . .253
I239X mode . . . . . . . . . . . . . . . . . . . . . . . . . . . . . . . . . . . . . . . . .254
Printing font samples. . . . . . . . . . . . . . . . . . . . . . . . . . . . . . . . .254
Adding More Fonts. . . . . . . . . . . . . . . . . . . . . . . . . . . . . . . . . . . . . . .255
Selecting Fonts. . . . . . . . . . . . . . . . . . . . . . . . . . . . . . . . . . . . . . . . . . .255
Downloading Fonts . . . . . . . . . . . . . . . . . . . . . . . . . . . . . . . . . . . . . .255
EPSON Font Manager (Windows Only) . . . . . . . . . . . . . . . . . . . . .256
Installing EPSON Font Manager . . . . . . . . . . . . . . . . . . . . . . .256
Contacting Customer Support . . . . . . . . . . . . . . . . . . . . . . . . . . . . .259
For users in Latin America . . . . . . . . . . . . . . . . . . . . . . . . . . . .260
For users in Australia . . . . . . . . . . . . . . . . . . . . . . . . . . . . . . . .260
For users in Singapore. . . . . . . . . . . . . . . . . . . . . . . . . . . . . . . .262
For users in Thailand. . . . . . . . . . . . . . . . . . . . . . . . . . . . . . . . .262
For users in Indonesia . . . . . . . . . . . . . . . . . . . . . . . . . . . . . . . .263
For users in Hong Kong . . . . . . . . . . . . . . . . . . . . . . . . . . . . . .264
For users in Malaysia. . . . . . . . . . . . . . . . . . . . . . . . . . . . . . . . .265
For users in India . . . . . . . . . . . . . . . . . . . . . . . . . . . . . . . . . . . .266
For users in the Philippines . . . . . . . . . . . . . . . . . . . . . . . . . . .268
Glossary
Index
10
Safety Information
Warnings, Cautions, and Notes
Warnings must be followed carefully to avoid bodily injury.
w
Cautions must be observed to avoid damage to your equipment.
c
Notes contain important information and useful tips on the operation
of your printer.
Safety Precautions
Be sure to follow these precautions carefully to ensure safe,
efficient operation:
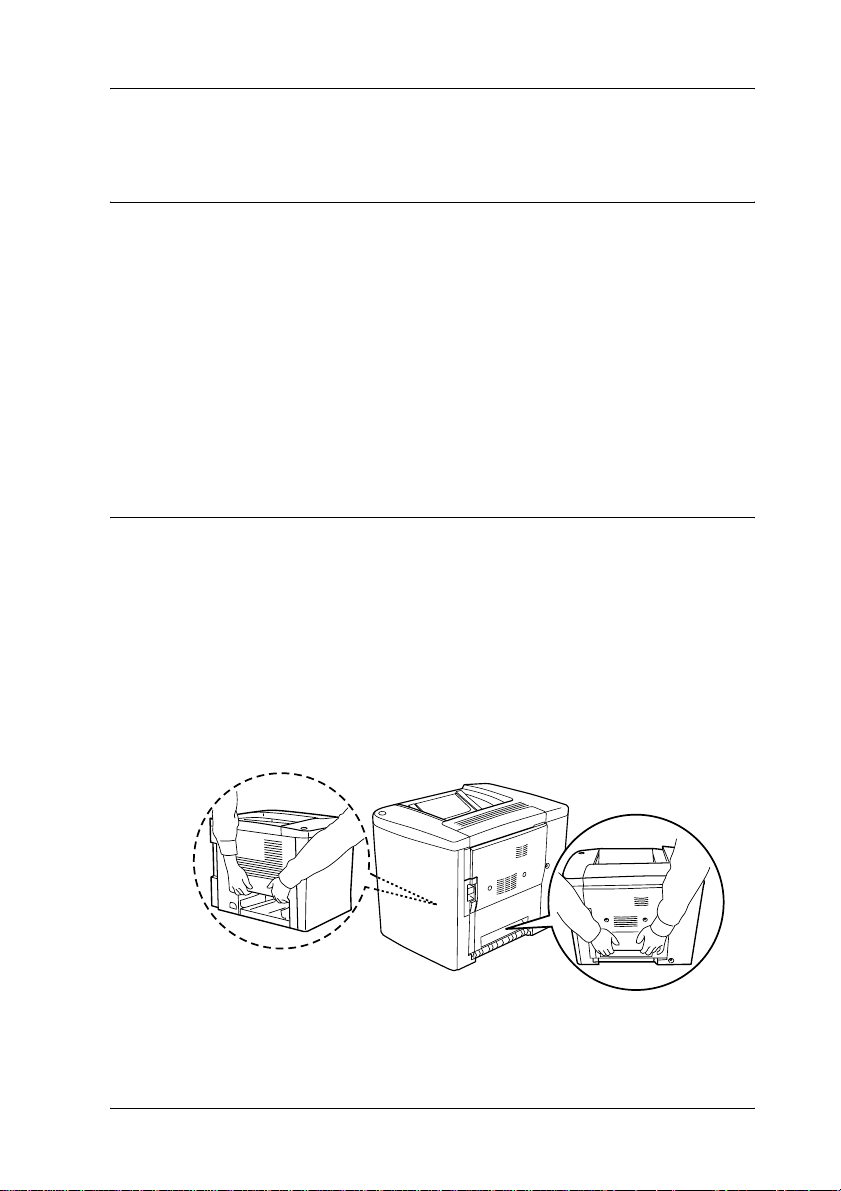
❏ Because the printer weighs approximately 30 kg (66.1 lb), one
person should not lift or carry it. Two people should carry the
printer, lifting it by the correct positions as shown below.
Safety Information 11

❏ Unless specifically instructed in this guide, be careful not to
touch the fuser, which is marked CAUTION Hot Surface Avoid
Contact, or the surrounding areas. If the printer has been in
use, the fuser and the surrounding areas may be very hot.
Unless specifically instructed in
this guide, do not insert your
hand into the fuser unit, as it may
be very hot.
❏ Do not insert your hand into the fuser unit as some
components are sharp and may cause injury.
❏ Avoid touching the components inside the printer unless
instructed to do so in this guide.
❏ Never force the printer’s components into place. Although the
printer is designed to be sturdy, rough handling can damage
it.
❏ When handling developer cartridges or photoconductor
units, always place them on a clean, smooth surface.
❏ Do not attempt to modify developer cartridges or take them
apart. They cannot be refilled.
❏ Do not touch the toner. Keep the toner away from your eyes.
12 Safety Information

❏ Do not dispose of used developer cartridges, waste toner
collectors or photoconductor units in fire, as they can explode
and cause injury. Dispose of them according to local
regulations.
❏ Wait at least one hour before using a developer cartridge or
a photoconductor unit after moving it from a cool to a warm
environment to prevent damage from condensation.
❏ When removing the photoconductor unit, avoid exposing it
to light for more than 5 minutes. The unit contains a
green-colored light-sensitive drum. Exposure to light can
damage the drum, causing dark or light areas to appear on
the printed page and reducing the service life of the drum. If
you need to keep the unit out of the printer for long periods,
cover it with an opaque cloth.
❏ Be sure not to scratch the surface of the photoconductor unit’s
drum. When you remove the photoconductor unit from the
printer, always place the unit on a clean, smooth surface.
Avoid touching the drum, since oil from your skin can
permanently damage its surface and affect print quality.
❏ To get the best print quality, do not store the photoconductor
unit in an area subject to direct sunlight, dust, salty air, or
corrosive gases (such as ammonia). Avoid locations subject to
extreme or rapid changes in temperature or humidity.
❏ Be sure to keep all consumable components out of the reach
of children.
❏ Do not leave jammed paper inside the printer. This can cause
the printer to overheat.
❏ Avoid sharing outlets with other appliances.
❏ Use only an outlet that meets the power requirements of this
printer.
Safety Information 13

Important Safety Instructions
❏ Connect your printer to an electrical outlet that meets the
power requirements of this printer. Your printer’s power
requirements are indicated on a label attached to the printer.
If you are not sure of the power supply specifications in your
area, contact your local power company or consult your
dealer.
❏ If you are unable to insert the AC plug into the electrical
outlet, contact an electrician.
❏ Adjust only those controls that are covered by the operating
instructions. Improper adjustment of other controls may
result in damage that requires repair by a qualified service
representative.
ENERGY STAR
The International
is a voluntary partnership with the computer and office
equipment industry to promote the introduction of
energy-efficient personal computers, monitors, printers, fax
machines, copiers, and scanners, in an effort to reduce air
pollution caused by power generation.
®
Compliance
As an International ENERGY STAR® Partner,
EPSON has determined that this product meets the
International
for energy efficiency.
ENERGY STAR
ENERGY STAR
®
Office Equipment Program
®
Program guidelines
Power On/Off Cautions
Do not turn off the printer:
14 Safety Information

❏ For at least 180 seconds after turning on the printer. Wait
until the Ready (green) light comes on and is not flashing.
❏ While the Ready light is flashing
❏ While printing
Safety Information 15

16 Safety Information
Chapter 1
Product Information
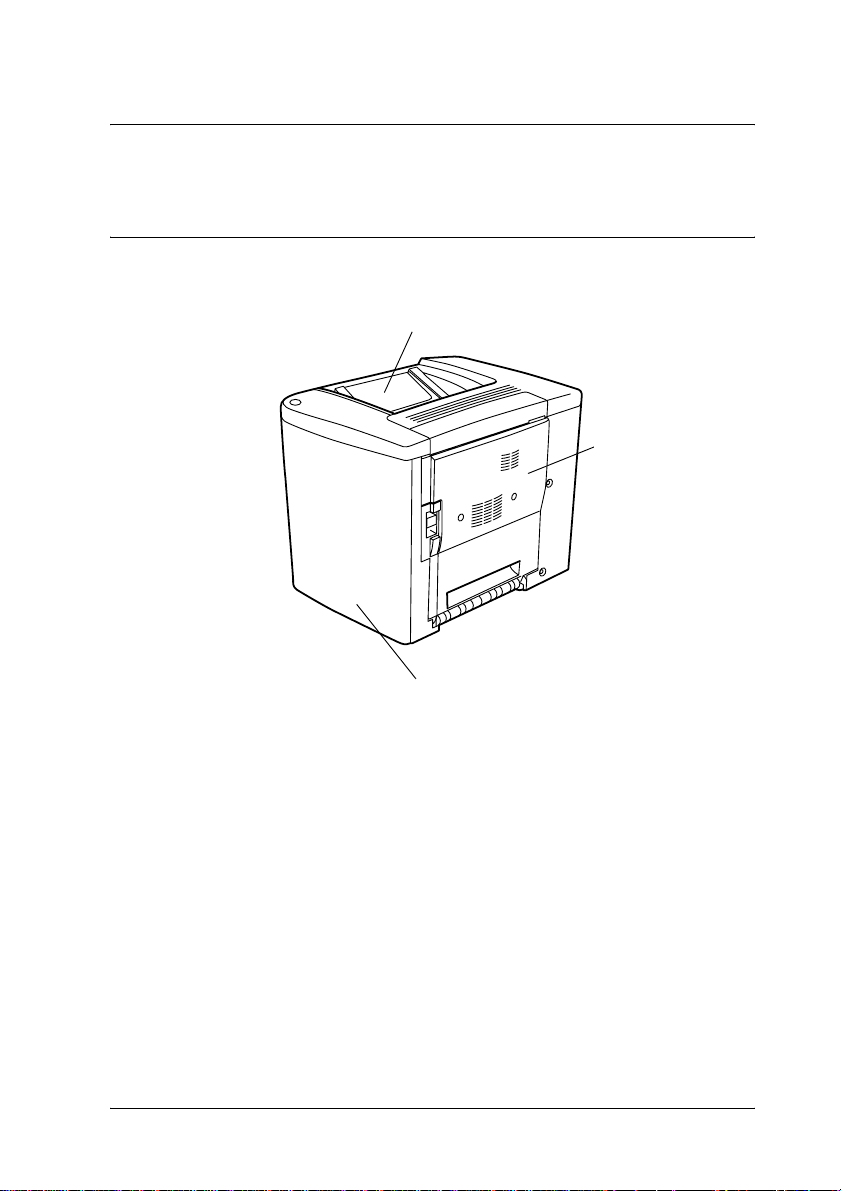
Printer Parts
face-down tray
front cover
Cover AB
1
1
1
1
1
1
1
1
Product Information 17
1
1
1
1
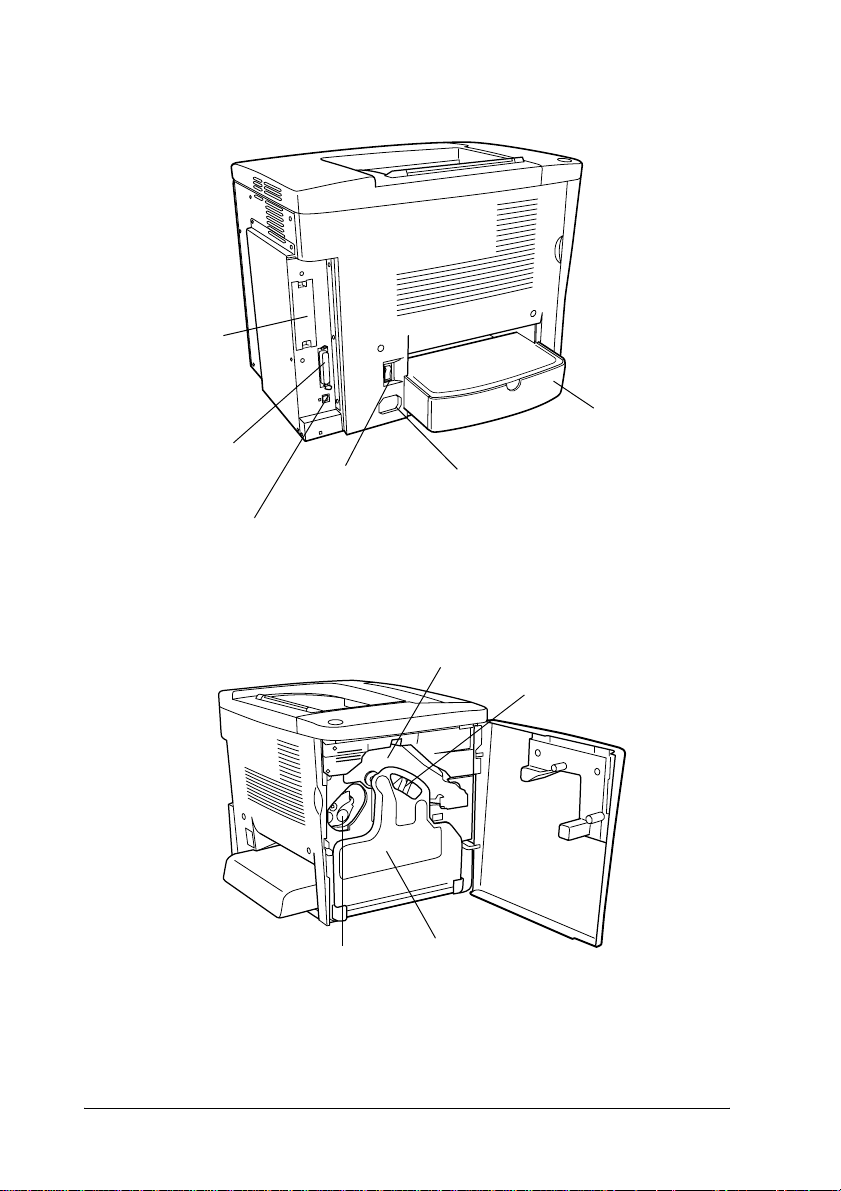
ype B Interface
ard slot cover
parallel interface
connector
power switch
USB interface
connector
developer
cartridge
AC inlet
transfer unit
waste toner
collector
MP tray (Multi-Purpos
tray)
photoconductor unit
18 Product Information

Indicator lights
1
1
Error light
For information about the flashing, on, and off conditions for
indicator lights, see “Ready and Error Lights” on page 179.
Options and Consumable Products
Options
You can add to your printer’s capabilities by installing any of the
following options.
❏ The 500-Sheet Paper Cassette Unit (C12C813911) holds one
paper cassette. It increases paper-feeding capacity up to 500
sheets of paper.
Ready light
1
1
1
1
1
1
1
1
❏ The Duplex Unit (C12C813921) provides for automatic
printing on both sides of the paper.
❏ An optional memory module expands your printer’s
memory, allowing you to print complex and
graphics-intensive documents.
Product Information 19
1
1

❏ The interface card (C12C82391✽) provides your printer with
Ethernet connections.
Note:
❏ The asterisk (✽) is a substitute for the last digit of the product
number, which varies by country.
❏ Firmware versions of the interface card (C12C82391✽) before 2.1
are not supported. Update the firmware version to 2.1 or later.
Consumable products
The life of the following consumable products is monitored by the
printer. The printer lets you know when replacements are needed.
Developer Cartridge (Black)
Developer Cartridge (Yellow)
Developer Cartridge (Magenta)
Developer Cartridge (Cyan)
Photoconductor Unit
Waste Toner Collector
Transfer Unit
The EPSON special media listed below provide you with
best-quality printouts.
EPSON Color Laser Paper (A4)
EPSON Color Laser Paper (Letter)
EPSON Color Laser Transparencies (A4)
EPSON Color Laser Transparencies (Letter)
EPSON Color Laser Coated Paper (A4)
S050100
S050097
S050098
S050099
S051083
S050101
S053009
S041215
S041218
S041175
S041174
S041383
20 Product Information

Caution:
❏ Do not use other EPSON media such as EPSON special
c
media for ink jet printers, as they can cause paper jams and
damage the printer.
1
❏ Do not use the media listed above in any other printers, except
when specified in the documentation.
About Your Printer
The printer comes with a full set of features that contributes to
ease of use and consistent, high-quality output. The main features
are described below.
Pre-defined color settings in printer driver
The printer driver offers many pre-defined settings for color
printing, allowing you to optimize print quality for various types
of color documents.
For Windows, see “Using the predefined settings” on page 44. For
Macintosh, see “Using the predefined settings” on page 77.
Duplex printing
1
1
1
1
1
1
1
1
EPSON provides optional Duplex Unit, allowing you to easily
print on both sides of the page. You can produce professional
quality double-sided documents. Use this feature with any print
job to cut costs and save resources.
Product Information 21
1
1
1

Resolution Improvement Technology (RITech)
Resolution Improvement Technology (RITech) is an original
EPSON printer technology that improves the appearance of
printed lines, text, and graphics. RITech is also applied to color
printing.
22 Product Information

Chapter 2
Paper Handling
Available Paper
This section explains what kind of paper you can use with your
printer. Avoid using paper not mentioned in this section.
Note:
The printer is extremely sensitive to moisture. Be sure to store your paper
in a dry environment.
EPSON special media
EPSON provides special media that are created especially for this
printer.
EPSON Color Laser Paper
This media is designed specifically for this printer. You can load
this media from the MP tray and the optional 500-Sheet Paper
Cassette Unit.
2
2
2
2
2
2
2
2
2
S041215 (A4)
S041218 (Letter)
EPSON Color Laser Transparencies
This media is designed specifically for this printer. You can load
this media only from the MP tray.
S041175 (A4)
S041174 (Letter)
Paper Handling 23
2
2
2

Caution:
❏ Do not use other EPSON media such as EPSON special
c
media for ink jet printers, as they can cause paper jams and
damage the printer.
❏ Do not use the media listed above in any other printers, except
when specified in the documentation.
EPSON Color Laser Coated Paper
EPSON Color Laser Coated Paper is designed specifically for this
printer. This media is thicker than EPSON Color Laser Paper and
produces glossier and higher quality printing. To print on EPSON
Color Laser Coated Paper, choose Coated or Coated (Back) as the
Paper Type setting. This setting is optimized for printing on
coated paper, but paper can only be fed from the MP tray.
S041383 (A4)
Note:
Duplex printing using the optional Duplex Unit is not possible. To print
on both sides, load the paper manually from the MP tray.
24 Paper Handling

General paper
You can use the following paper in addition to the EPSON special
media introduced in the previous section.
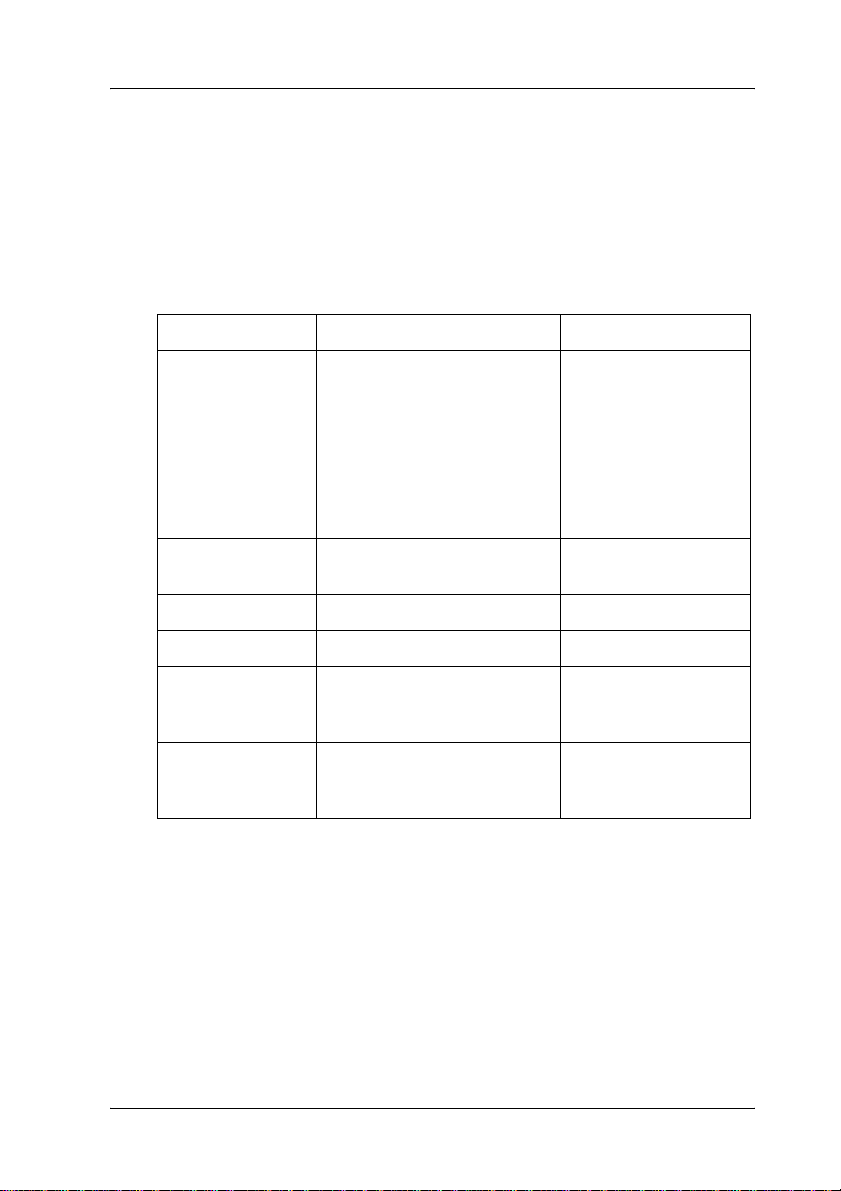
Paper Type Description
Plain paper Recycled paper is acceptable.*
Weight: 60 to 90 g/m² (16 to 24 lb)
Envelopes No paste and no tape
No plastic window (unless specifically designed for
laser printers)
Labels The backing sheet should be covered completely,
with no gaps between labels.**
Thick paper Weight: 91 to 163 g/m² (24 to 43 lb)
Colored paper Non-coated
* Use recycled paper only under normal temperature and humidity conditions. Poor
quality paper may reduce print quality, or cause paper jams and other problems.
** Gaps between labels may cause the labels to p eel off inside the printer an d damage
the printer.
Note:
❏ Since the quality of any particular brand or type of media may be
changed by the manufacturer at any time, EPSON cannot
guarantee the quality of any type of media. Always test samples of
media stock before purchasing large quantities or printing large jobs.
2
2
2
2
2
2
2
2
2
❏ You may use paper with preprinted letterheads, provided that the
paper and ink are both compatible with laser printers.
Paper that should not be used
You cannot use the following paper in this printer. It may cause
printer damage, paper jams, and poor print quality.
Paper Handling 25
2
2
2

❏ Media meant for other color laser printers, black-and-white
laser printers, color copiers, black-and-white copiers, or ink
jet printers
❏ Previously printed paper by any other color laser printers,
black-and-white laser printers, color copiers, black-and-white
copiers, ink jet printers, or thermal transfer printers
❏ Carbon paper, carbonless paper, thermal-sensitive paper,
pressure-sensitive paper, acid paper, or paper that uses
high-temperature-sensitive ink (around 180°C)
❏ Labels that peel easily or labels that do not cover the backing
sheet completely
❏ Coated paper or special surface-colored paper other than
EPSON Color Laser Coated Paper
❏ Paper that has binder holes or is perforated
❏ Paper that has glue, staples, paper clips, or tape on it
❏ Paper that attracts static electricity
❏ Moist or damp paper
❏ Paper of uneven thickness
❏ Overly thick or thin paper
❏ Paper that is too smooth or too rough
❏ Paper that is different on the front and back
❏ Paper that is folded, curled, wavy, or torn
❏ Paper of irregular shape, or paper that does not have right
angle corners
26 Paper Handling
Paper Sources
This section describes the combinations of paper sources and
paper types that you can use.
MP tray
Paper Type Paper Size Capacity
2
2
2
Plain paper,
EPSON Color
Laser Paper
Envelopes Monarch (MON), C10, DL, C6,
Labels A4, Letter(LT) Up to 50 sheets
Thick paper A4, A5, B5, LT, GLT, HLT, EXE Up to 50 sheets
EPSON Color
Laser
Transparencies
EPSON Color
Laser Coated
Paper
* All sizes should be loaded short edge first.
A4, A5, B5,
Letter (LT),
Half-Letter (HLT),
Executive (EXE),
Government Letter (GLT)
Custom-size paper:
92 × 210 mm minimum
216 × 297 mm maximum
C5, IB5
A4, Letter (LT) Up to 50 sheets
A4, Letter (LT) Up to 50 sheets
Up to 200 sheets
(Total thickness:
23 mm maximum)
Up to 10 envelopes
2
2
2
2
2
2
2
2
Paper Handling 27
2

500-Sheet Paper Cassette Unit
Paper Type Paper Size Capacity
Plain paper A4 Up to 500 sheets
(Total thickness:
less than 57 mm
maximum)
Selecting a paper source
You can specify a paper source manually, or set the printer to
select the paper source automatically.
Manual selection
You can use the printer driver to select a paper source manually.
For Windows, access the printer driver, click the Basic
Settings tab, and select the paper source that you want to use
from the Paper Source list. Then click OK.
For Macintosh, access the printer driver, open the Basic
Settings dialog box, and select the paper source that you want
to use from the Paper Source list. Then click OK.
Auto selection
If you want the printer to select the paper source containing the
appropriate size of paper automatically, select Auto Selection in
the printer driver.
The printer will search for a paper source containing the specified
paper size in the following order.
Standard configuration:
MP tray
28 Paper Handling
Note:
If you make paper size settings or paper source settings in your
application, these settings may override the printer driver settings.
2
With optional 500-Sheet Paper Cassette Unit installed:
MP tray
Lower cassette
Note:
❏ If you make paper size settings or paper source settings in your
application, these settings may override the printer driver settings.
❏ If you select an envelope for the Paper Size setting, it can be fed only
from the MP tray regardless of the Paper Source setting.
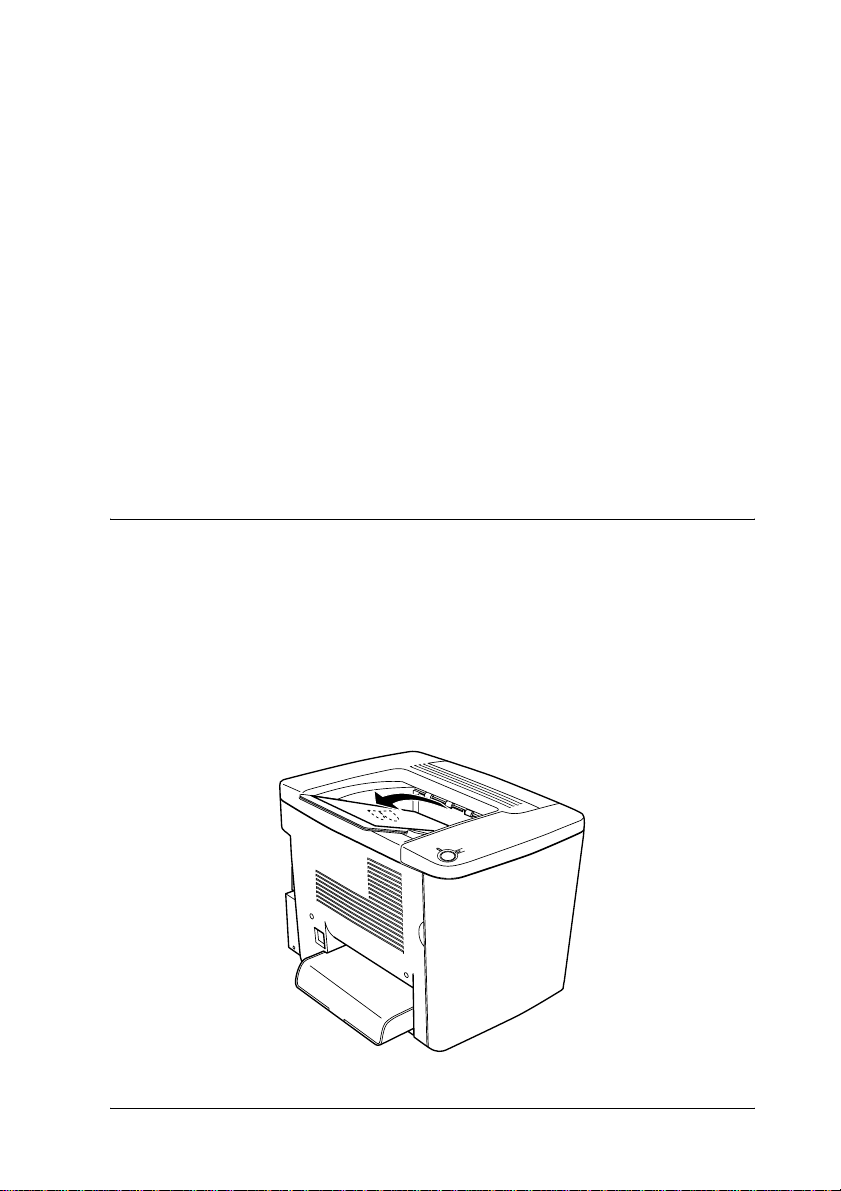
Output Tray
The face-down tray is located on the top of the printer. Your
printouts will be stacked facing down.
Raise the paper support to prevent your printouts from slipping
off the printer.
2
2
2
2
2
2
2
2
Paper Handling 29
2
2
2

You can use the face-down tray with the following types of paper.
Paper type: All types of paper that are supported can be used.
Capacity: Up to 200 sheets of plain paper
Loading Paper
This section describes how to load paper into the MP tray, and
the optional lower cassette. If you use special media such as
EPSON Color Laser Transparencies or envelopes, see also
“Printing on Special Media” on page 34.
MP tray
The MP tray is the most flexible paper source, accommodating
various paper sizes and media types. It is also the paper source
for feeding paper manually. See “MP tray” on page 27 for details.
Follow these steps to load paper into the MP tray.
1. Remove the MP tray cover and open the MP tray flap.
30 Paper Handling
Loading…
Manual Configuration:
This manual consists ofsix chapters and Appendix.
1.Product Descriptions.
Provides a general overview and specifications of the Epson AcuLaser C1900 / C900.
2.Operating Principles.
Describes the theory of electrical and mechanical operations of the product.
3.Troubleshooting.
Describes the step-by-step procedures for the troubleshooting.
4.Disassembly / Assembly.
Describes the step-by-step procedures for disassembling and assembling the Epson AcuLaser C1900 / C900.
5.Adjustment.
Provides Epson-approved methods for adjustment.
6.Maintenance.
Provides preventive maintenance procedures and the lists of Epson-approved lubricants and adhesives required for servicing the product.
Appendix Provides the following additional information for reference:
• Connector pin assignments;
• Electric circuit boards components layout;
• Electrical circuit boards schematics;
• Exploded diagram & Parts List.
Download Epson AcuLaser C1900 / C900. Service Manual
Все материалы на сайте представлены исключительно для ознакомления. Все торговые марки и права на публикуемые материалы принадлежат их владельцам.
All materials on the site are presented solely for information. All trademarks and copyrights in the published materials belong to their respective owners.
Downloads
Downloads
Product Setup
Epson Software updater (v4.6.9.0)
v.4.6.9.0
06-May-2025
5.76 MB
.exe
Additional Information:
Epson Software Updater allows you to update Epson software as well as download 3rd party applications. Please Note: To use this updater, your Epson product must be turned on and connected to a computer with Internet access.
This latest version includes
— Feature improvements
Download
Drivers
Epson Printer Driver Security Support Tool (v1.0)
v.1.0
18-Apr-2025
1.04 MB
.zip
Additional Information:
Security countermeasure
— Security countermeasures for printer driver vulnerability on Windows OS.
Download
Epson Universal Common Driver (v2.0e)
v.2.0e
19-Aug-2008
2.74 MB
.zip
Universal Windows Multilangual driver to print on Epson mono and color laser priner.
Download
Network Utilities
EpsonNet Config Portable (v4.9.11.21)
v.4.9.11.21
23-Jun-2023
14.17 MB
.zip
Additional Information:
EpsonNet Config is configuration software for administrators to configure the network interface of EPSON printers. Windows users can configure the network interface for TCP/IP, NetWare, MS Network, AppleTalk, IPP, and SNMP. Macintosh users can configure the network interface for TCP/IP, AppleTalk, and IPP.
This latest version includes
— Security update
— Compatibility with new models
Download
EpsonNet Config (v4.9.11.21)
v.4.9.11.21
23-Jun-2023
18.78 MB
.exe
EpsonNet Config is configuration software for administrators to configure the network interface of EPSON printers. Windows users can configure the network interface for TCP/IP, NetWare, MS Network, AppleTalk, IPP, and SNMP. Macintosh users can configure the network interface for TCP/IP, AppleTalk, and IPP.
Additional Information:
This latest version includes
— Security update
— Compatibility with new models
Download
Epson AcuLaser C900 Printer PDF User Guides and Manuals for Free Download: Found (4) Manuals for Epson AcuLaser C900 Device Model (Setup Sheet, Service Manual, Quick Reference Manual)
The Epson AcuLaser C900 is a color laser printer designed for small to medium-sized businesses that require high-quality printing with good speed and efficiency. Known for its compact design and impressive features, this printer stands out in the competitive market of laser printers. Upon initial examination, it’s clear that the AcuLaser C900 has been crafted to deliver both performance and usability.
One of the noteworthy aspects of the AcuLaser C900 is its print quality. It utilizes Epson’s unique AcuLaser technology, which ensures sharp, vibrant colors and well-defined text. Whether you’re printing marketing materials, presentations, or important documents, the output remains consistently impressive. The printer boasts a maximum print resolution of 600 x 600 dpi, which is more than adequate for most office environments.
In terms of performance, the Epson AcuLaser C900 does not disappoint. It offers a print speed of up to 30 pages per minute for black and white documents and around 27 pages per minute for color prints. This level of efficiency makes it a suitable choice for busy work environments where time is of the essence. Moreover, the printer’s first page out time is quick, ensuring that you spend less time waiting and more time on productive tasks.
The design of the AcuLaser C900 is another highlight. Its compact footprint allows it to fit comfortably in smaller office spaces, while the user-friendly control panel simplifies operation. The printer features a 250-sheet paper tray, which can be expanded with additional trays if higher capacity is needed. This flexibility makes the AcuLaser C900 an excellent choice for growing businesses.
Connectivity options on the Epson AcuLaser C900 are also commendable. It comes with USB and Ethernet ports, allowing you to connect it to a single workstation or a network, respectively. The capability for networking means that multiple users can easily share the printer, enhancing productivity across teams.
When it comes to cost-efficiency, the AcuLaser C900 excels with its economical printing approach. It uses high-yield toner cartridges, which minimize the frequency of replacements and reduce overall printing costs. Additionally, the printer supports automatic duplex printing, further saving on paper consumption and expenses.
However, like any product, the Epson AcuLaser C900 is not without its limitations. Some users may find that the initial setup requires a bit of patience, especially in network configurations. Additionally, while the printer performs well in most scenarios, heavy graphics or complex designs may lead to extended processing times. It’s essential for potential buyers to consider their specific printing needs.
In summary, the Epson AcuLaser C900 is a robust and efficient color laser printer that fulfills the demands of various office environments. Its key features include:
- High-quality color and black-and-white printing
- Impressive print speeds
- Compact and user-friendly design
- Networking capabilities and multiple connectivity options
- Cost-effective with high-yield toner cartridges
Overall, the AcuLaser C900 emerges as a reliable choice for businesses seeking quality, speed, and efficiency in a single package. With its combination of stellar performance and standout features, this printer is designed to meet the needs of today’s fast-paced working environments.
About Epson Aculaser C1900-C900 Service Manual
Epson Aculaser C1900-C900 Service Manual describes basic functions, theory of electrical and mechanical operations, maintenance and repair procedures of the printer. The instructions and procedures included herein are intended for the experienced repair technicians, and attention should be given to the precautions on the preceding page.
Aculaser C1900-C900 Manual Configuration
This manual consists of six chapters and Appendix.
CHAPTER 1.PRODUCT DESCRIPTIONS
Provides a general overview and specifications of the product.
CHAPTER 2.OPERATING PRINCIPLES
Describes the theory of electrical and mechanical operations of the product.
CHAPTER 3.TROUBLESHOOTING
Describes the step-by-step procedures for the troubleshooting.
CHAPTER 4.DISASSEMBLY / ASSEMBLY
Describes the step-by-step procedures for disassembling and assembling the product.
CHAPTER 5.ADJUSTMENT
Provides Epson-approved methods for adjustment.
CHAPTER 6.MAINTENANCE
Provides preventive maintenance procedures and the lists of Epson-approved lubricants and adhesives required for servicing the product.
APPENDIX Provides the following additional information for reference:
- Connector pin assignments
- Electric circuit boards components layout
- Electrical circuit boards schematics
- Exploded diagram & Parts List
Precautions for Service
When performing inspection and service procedures, observe the following precautions to prevent mishandling of the machine and its parts.
* Depending on the model, some of the precautions given in the following do not apply.
PRECAUTIONS BEFORE SERVICE
- When the user is using a word processor or personal computer from a wall outlet of the same line, take necessary steps to prevent the circuit breaker from opening due to overloads.
- Never disturb the LAN by breaking or making a network connection, altering termination, installing or removing networking hardware or software, or shutting down networked devices without the knowledge and express permission of the network administrator or the shop supervisor.
HOW TO USE THIS BOOK
- DIS/REASSEMBLY, ADJUSTMENT
- To reassemble the product, reverse the order of disassembly unless otherwise specified.
- TROUBLESHOOTING
- If a component on a PWB or any other functional unit including a motor is defective, the text only instructs you to replace the whole PWB or functional unit and does not give troubleshooting procedures applicable within the defective unit.
- All troubleshooting procedures contained herein assume that there are no breaks in the harnesses and cords and all connectors are plugged into the right positions.
- The procedures preclude possible malfunctions due to noise and other external causes.
PRECAUTIONS FOR SERVICE
- Check the area surrounding the service site for any signs of damage, wear or need of repair.
- Keep all disassembled parts in good order and keep tools under control so that none will be lost or damaged.
- After completing a service job, perform a safety check. Make sure that all parts, wiring and screws are returned to their original positions.
- Do not pull out the toner hopper while the toner bottle is turning. This could result in a damaged motor or locking mechanism.
- If the product is to be run with the front door open, make sure that the toner hopper is in the locked position.
- Do not use an air gun or vacuum cleaner for cleaning the ATDC Sensor and other sensors, as they can cause electrostatic destruction. Use a blower brush and cloth. If a unit containing these sensors is to be cleaned, first remove the sensors from the unit.
Read More Epson Aculaser C1900-C900 Service Manual On PDF Below
