

Руководство по эксплуатации

Содержание
2
Условные Oбозначения, Используемые в
Данном Pуководстве 7
Поиск информации с помощью Руководства ……………………….. 9
Поиск по ключевым словам………………………………………………………………………………………… 9
Прямой переход с помощью закладок…………………………………………………………………….. 9
Печать только необходимых страниц………………………………………………………………………. 9
Получение последней версии документов …………………………. 10
Первое знакомство с проектором 11
Функции проектора …………………………………………………………….. 12
Быстрая и простая настройка ………………………………………………………………………………….. 12
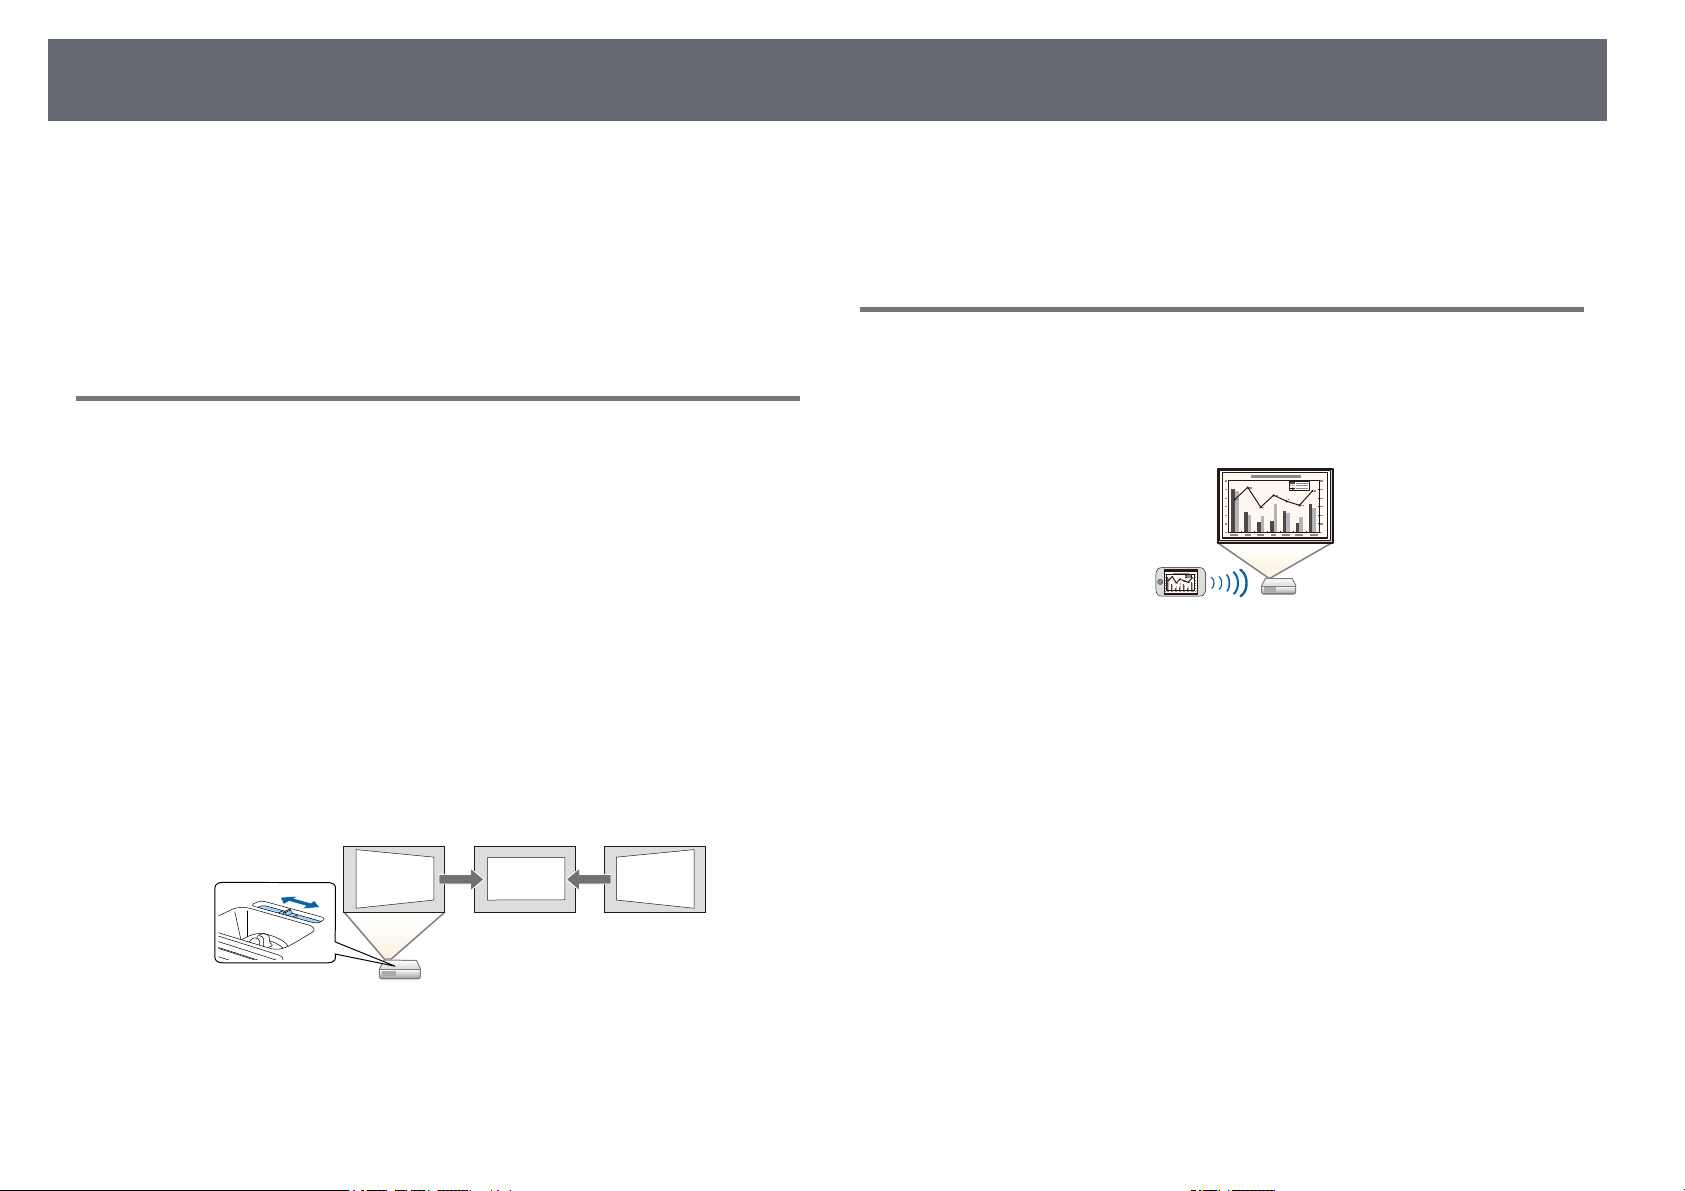
Удобное беспроводное проецирование ………………………………………………………………. 12
Список функций …………………………………………………………………………………………………………… 13
Детали и функции проектора ……………………………………………… 15
Детали проектора — спереди…………………………………………………………………………………….. 15
Детали проектора – сзади…………………………………………………………………………………………. 16
Детали проектора – на основании………………………………………………………………………….. 17
Детали проектора – панель управления……………………………………………………………….. 18
Детали проектора – пульт дистанционного управления………………………………….. 19
Подключение к компьютеру для передачи видео- и аудиосигнала
через HDMI ………………………………………………………………………………………………………………. 28
Соединение с источниками видеосигнала …………………………………………………………… 28
Соединение с источником видеосигнала через порт HDMI……………………….. 29
Соединение с источником композитного видеосигнала…………………………….. 29
Соединение с внешними устройствами USB………………………………………………………… 30
Проецирование с устройства USB……………………………………………………………………… 30
Подключение к устройству USB………………………………………………………………………….. 31
Отсоединение устройства USB……………………………………………………………………………. 31
Соединение с камерой для документов ……………………………………………………………….. 31
Подключение к внешним устройствам ………………………………………………………………….. 31
Подключение к внешним динамикам ……………………………………………………………….. 32
Установка батареек в пульт дистанционного управления …. 33
Работа с пультом дистанционного управления ………………….. 34
Открывание крышки линзы………………………………………………… 35
Использование основных функций проектора 36
Включение проектора …………………………………………………………. 37
Главный экран………………………………………………………………………………………………………………. 38
Выключение проектора ………………………………………………………. 40
Настройка проектора 22
Размещение проектора……………………………………………………….. 23
Настройка проектора и варианты установки………………………………………………………. 24
Расстояние проецирования ……………………………………………………………………………………… 24
Соединения проектора ……………………………………………………….. 26
Подключение к компьютеру …………………………………………………………………………………….. 26
Присоединение к компьютеру для передачи видео- и аудиосигнала
через VGA …………………………………………………………………………………………………………………. 26
Присоединение к компьютеру для передачи видео- и аудиосигнала
через USB………………………………………………………………………………………………………………….. 27
Настройка даты и времени …………………………………………………. 41
Выбор языка для меню проектора……………………………………… 43
Режимы проецирования……………………………………………………… 44
Изменение режима проецирования с помощью пульта дистанционного
управления……………………………………………………………………………………………………………………. 44
Изменение режима проецирования с помощью меню …………………………………….. 44
Отображение тестового шаблона ……………………………………….. 46
Настройка высоты изображения ………………………………………… 47
Форма изображения……………………………………………………………. 48
Верт. автокоррекция…………………………………………………………………………………………………… 48

Содержание
3
Корректировка формы изображения с помощью ползунка регулировки
горизонтальных трапецеидальных искажений …………………………………………………… 48
Корректировка формы изображения с помощью кнопок корректировки
трапецеидального искажения………………………………………………………………………………….. 49
Корректировка формы изображения с помощью функции Quick Corner…….. 50
Изменение размера изображения с помощью кольца
масштабирования ……………………………………………………………….. 53
Фокусировка изображения с помощью кольца
фокусировки ……………………………………………………………………….. 54
Выбор источника изображения ………………………………………….. 55
Формат изображения………………………………………………………….. 57
Изменение формата изображения …………………………………………………………………………. 57
Доступные форматы изображения…………………………………………………………………………. 57
Вид проецируемого изображения в каждом формате изображения……………. 58
Наст. производит. (Цветовой режим)………………………………….. 59
Изменение цветового режима…………………………………………………………………………………. 59
Доступные цветовые режимы………………………………………………………………………………….. 59
Настройка автоматической диафрагмы ………………………………………………………………… 59
Управление громкостью с помощью кнопок громкости …….. 61
Регулировка функций проектора 62
Временное отключение изображения и звука……………………. 71
Временное прекращение подачи видеосигнала…………………. 72
Увеличение/ Уменьшение изображений (E-Zoom) ……………… 73
Масштабирование изображений…………………………………………………………………………….. 73
Уменьшение масштаба изображений…………………………………………………………………….. 73
Сохранение изображения логотипа пользователя …………….. 75
Сохранение пользовательского шаблона …………………………… 77
Корректировка разницы цветов при проецировании с
нескольких проекторов ………………………………………………………. 78
Настройка ID проектора ……………………………………………………………………………………………. 78
Выбор проектора, с которым нужно работать ……………………………………………………. 78
Приведение в соответствие качества отображения с нескольких
проекторов……………………………………………………………………………………………………………………. 79
Функции защиты проектора ……………………………………………….. 81
Типы защиты паролем ……………………………………………………………………………………………….. 81
Настройка пароля ………………………………………………………………………………………………….. 81
Выбор типов защиты паролем ……………………………………………………………………………. 82
Ввод пароля для пользования проектором ……………………………………………………. 83
Блокировка кнопок проектора………………………………………………………………………………… 84
Разблокировка кнопок проектора…………………………………………………………………….. 84
Установка защитного тросика………………………………………………………………………………….. 84
Одновременное проецирование двух изображений …………. 63
Неподдерживаемые сочетания источников входного сигнала для
проецирования на полиэкран …………………………………………………………………………………. 65
Ограничения проецирования на полиэкран……………………………………………………….. 65
Проецирование презентации PC Free …………………………………. 66
Поддерживаемые типы файлов PC Free………………………………………………………………… 66
Меры предосторожности при проецировании с функцией PC Free……………… 66
Запуск показа слайдов PC Free ………………………………………………………………………………… 67
Запуск презентации фильмов PC Free……………………………………………………………………. 69
Параметры отображения в функции PC Free……………………………………………………….. 69
Использование проектора в сети 86
Проецирование по беспроводной сети ………………………………. 87
Установка модуля беспроводной ЛВС……………………………………………………………………. 87
Выбор настроек беспроводной сети вручную…………………………………………………….. 88
Выбор настроек беспроводной сети в Windows…………………………………………………. 90
Выбор настроек беспроводной сети в Mac ………………………………………………………….. 91
Настройка безопасности беспроводной сети ……………………………………………………… 91
Поддерживаемые сертификаты: клиента и ЦС ………………………………………………. 93
Использование QR-кода для подключения мобильного устройства …………….. 93

Содержание
4
Подключение к компьютеру на базе ОС Windows с помощью USB-ключа ….. 94
Проецирование по беспроводной сети с мобильного
устройства (функция Screen Mirroring) ……………………………….. 96
Выбор настроек функции Screen Mirroring …………………………………………………………… 96
Подключение с использованием функции Screen Mirroring для
программного обеспечения Miracast …………………………………………………………………….. 98
Подключение с использованием функции Screen Mirroring в Windows
10 ………………………………………………………………………………………………………………………………… 98
Подключение с использованием функции Screen Mirroring в Windows
8.1 ……………………………………………………………………………………………………………………………….. 99
Безопасное HTTP-соединение……………………………………………. 101
Импортирование сертификата веб-сервера с помощью меню…………………….. 101
Поддерживаемые сертификаты веб-сервера……………………………………………….. 102
Контролирование проектора и управление
им 103
Epson Projector Management ……………………………………………… 104
Контролирование сетевого проектора с помощью веб-
браузера ……………………………………………………………………………. 105
Параметры функции «Контроль Web» …………………………………………………………………. 106
Регистрация цифрового сертификата из веб-браузера ……. 109
Настройка отправки предупреждений о состоянии
проектора по эл. почте ……………………………………………………… 110
Предупреждающие сообщения по эл. почте о состоянии проектора………… 111
Доступный текст для ввода с помощью экранной клавиатуры…………………….. 118
Настройки качества изображения — Меню Изображен……… 119
Настройки входного сигнала — Меню Сигнал …………………….. 121
Настройки функций проектора — Меню Настройки …………… 123
Настройка проектора – Меню Расширен…………………………… 125
Сетевые настройки проектора – Меню Сеть …………………….. 128
Меню Сеть – Наст. Screen Mirroring………………………………………………………………………. 129
Меню Сеть – Меню Основные ……………………………………………………………………………….. 130
Меню Сеть – Меню беспроводная ЛВС ……………………………………………………………….. 131
Меню Сеть – Меню Уведомл…………………………………………………………………………………… 134
Меню Сеть – Меню Другое……………………………………………………………………………………… 135
Меню Сеть – Меню Сброс……………………………………………………………………………………….. 136
Настройка проектора — Меню ECO……………………………………… 137
Отображение информации о проекторе — Меню
Информация………………………………………………………………………. 139
Меню Информация – Меню Инф. о проекторе………………………………………………….. 139
Список кодов идентификации действий ……………………………………………………….. 140
Сброс настроек проектора – Меню Сброс …………………………. 142
Копирование меню Настройки на все проекторы (пакетная
настройка) …………………………………………………………………………. 143
Настройки передачи с флеш-накопителя USB…………………………………………………… 143
Настройки передачи от компьютера …………………………………………………………………… 144
Уведомление об ошибке пакетной настройки …………………………………………….. 145
Настройка контролирования с помощью SNMP ……………….. 112
Настройка графиков действий проектора ………………………… 113
Регулировка параметров меню 116
Использование меню проектора ………………………………………. 117
Использование экранной клавиатуры………………………………. 118
Техническое обслуживание проектора 146
Техническое обслуживание проектора …………………………….. 147
Очистка объектива ……………………………………………………………. 148
Очистка корпуса проектора ………………………………………………. 149

Содержание
5
Техническое обслуживание воздушного фильтра и
вентиляционных отверстий………………………………………………. 150
Очистка воздушного фильтра и вентиляционных отверстий ……………………….. 150
Замена воздушного фильтра………………………………………………………………………………….. 150
Техническое обслуживание лампы проектора …………………. 153
Замена лампы …………………………………………………………………………………………………………….. 153
Сброс таймера лампы………………………………………………………………………………………………. 156
Решение проблем 157
Проблемы с проектором …………………………………………………… 158
Состояние индикаторов проектора…………………………………… 159
Использование экрана справки по проектору………………….. 162
Решение проблем с изображением или звуком ……………….. 163
Решения, если изображение не появляется………………………………………………………. 163
Решения, если изображения, проецируемые с помощью функции USB
Display, неправильные……………………………………………………………………………………………… 163
Решения, когда появляется сообщение «Нет сигнала» ……………………………………. 164
Отображение с ноутбука ……………………………………………………………………………………. 164
Отображение с ноутбука Mac……………………………………………………………………………. 165
Решения, когда появляется сообщение «Не поддерживается» …………………….. 165
Решения, когда появляется только часть изображения …………………………………. 165
Решения, когда изображение не прямоугольное…………………………………………….. 165
Решения, когда изображение имеет шум или помехи ……………………………………. 166
Решения, когда изображение расплывчатое или смазанное………………………… 167
Решения, когда яркость или цвета изображения неправильные ………………… 167
Решения проблем со звуком ………………………………………………………………………………….. 168
Решения, когда имена файлов изображений в функции PC Free
отображаются неправильно…………………………………………………………………………………… 168
Решение проблем при работе проектора и пульта
дистанционного управления …………………………………………….. 169
Решения проблем с питанием проектора или его отключением…………………. 169
Решения проблем с пультом дистанционного управления…………………………… 169
Решения проблем с паролем …………………………………………………………………………………. 170
Решение, когда появляется сообщение «Зарядка батареи,
обеспечивающей индикацию времени, заканчивается.» ……………………………….. 170
Решение проблем с сетью …………………………………………………. 171
Решения в случае ошибки беспроводной аутентификации ………………………….. 171
Решения, когда невозможно получить доступ к проектору через сеть …….. 171
Решения, когда по эл. почте не приходят предупреждения …………………………. 171
Решения, когда изображение во время проецирования по сети имеет
помехи………………………………………………………………………………………………………………………….. 172
Решения, когда невозможно соединиться с помощью функции Screen
Mirroring……………………………………………………………………………………………………………………….. 172
Решения, когда изображение или звук во время подключения с помощью
функции Screen Mirroring содержит помехи………………………………………………………. 173
Приложение 174
Дополнительные принадлежности и запасные части ………. 175
Экраны………………………………………………………………………………………………………………………….. 175
Кабели ………………………………………………………………………………………………………………………….. 175
Кронштейны ……………………………………………………………………………………………………………….. 175
Подключение по беспроводной сети…………………………………………………………………… 175
Внешние устройства …………………………………………………………………………………………………. 176
Запасные части…………………………………………………………………………………………………………… 176
Размер экрана и расстояние проецирования …………………… 177
Разрешение отображения, поддерживаемое монитором… 180
Технические характеристики проектора ………………………….. 181
Спецификации соединителя…………………………………………………………………………………… 181
Внешние размеры ……………………………………………………………… 183
Системные требования для функции USB Display …………….. 184
Перечень символов и правил техники безопасности……….. 185
Глоссарий…………………………………………………………………………… 188
Примечания ………………………………………………………………………. 190

Содержание
Indication of the manufacturer and the importer in accordance with
requirements of EU directive…………………………………………………………………………………….. 190
Ограниченное применение ……………………………………………………………………………………. 190
Рекомендации по операционной системе …………………………………………………………. 190
Торговые марки…………………………………………………………………………………………………………. 191
Уведомление об авторских правах ………………………………………………………………………. 191
Определение авторского права ……………………………………………………………………………. 191
6
Условные Oбозначения, Используемые в Данном Pуководстве
Символы техники безопасности
Для проектора и в его руководстве пользователя используются графические символы и метки для указания на информацию, указывающую на то, как
безопасно пользоваться проектором.
Прочитайте инструкции (и неукоснительно следуйте им), которые помечены этими символами и метками во избежание травм персонала или порчи
имущества.
Данный символ указывает на информацию, игнорирование которой может привести к травме или даже смерти людей.
Предупреждени
е
Данный символ сообщает информацию, игнорирование которой может причинить вред или физические повреждения людям из-за
неправильного обращения.
Предостережен
ие
Общая информация по условным обозначениям
Эта метка указывает на процедуры, которые при недостаточной осторожности могут привести к повреждению оборудования или травме
персонала.
Внимание
Эта метка указывает на дополнительную информацию, которая может быть полезна.
[Название кнопки] Указывает наименования кнопок на пульте ДУ или на проекторе.
Пример: кнопка [Esc]
Название меню / настройки Указывает названия пунктов меню и настроек проектора.
Пример:
Выберите пункт меню Изображен.
s Изображен. > Дополнительно
Эта метка указывает на соответствующие страницы.

s
Эта метка указывает на уровень текущего меню проектора.
gg Дополнительная информация
• «Поиск информации с помощью Руководства» стр.9
• «Получение последней версии документов» стр.10

Поиск информации с помощью Руководства
9
Руководство PDF позволяет выполнять поиск нужной информации по
ключевым словам или прямо переходить к определенным разделам,
используя закладки. Можно распечатать только необходимые вам
страницы. В данном разделе представлены инструкции по
использованию руководства PDF, открытого на компьютере в программе
Adobe Reader X.
gg Дополнительная информация
• «Поиск по ключевым словам» стр.9
• «Прямой переход с помощью закладок» стр.9
• «Печать только необходимых страниц» стр.9
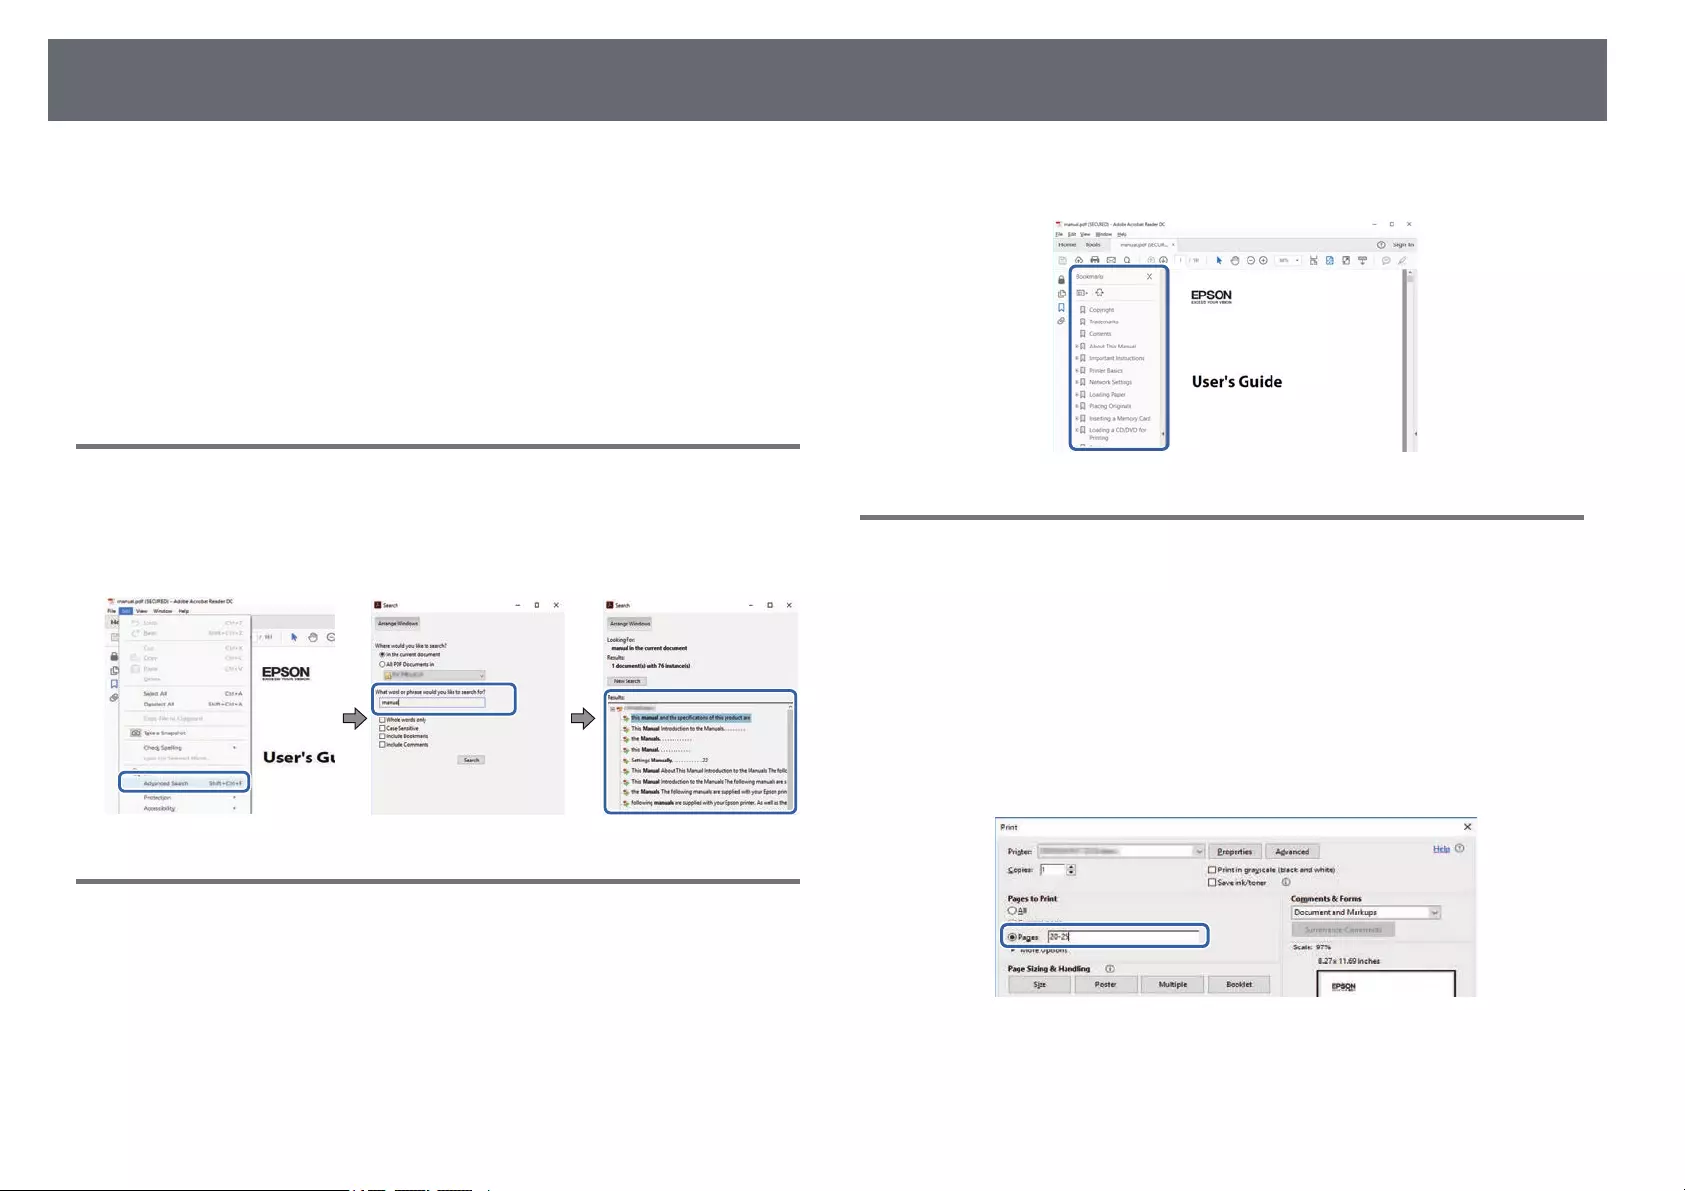
Поиск по ключевым словам
Нажмите кнопку Редактировать > Расширенный поиск. Введите в окне
поиска ключевое слово (текст) для поиска нужной информации и
нажмите кнопку Поиск. Результаты выводятся на экран в виде списка.
Для перехода на конкретную страницу щелкните один из
отобразившихся результатов.
• Windows: удерживая нажатой кнопку Alt, нажмите кнопку ←.
• Mac OS: удерживая нажатой командную кнопку, нажмите кнопку ←.
Печать только необходимых страниц
Можно извлечь и напечатать только необходимые вам страницы.
Нажмите кнопку Печать в меню Файл и укажите страницы, которые
необходимо напечатать, в пункте Страницы меню Страницы для
печати.
• Чтобы указать диапазон страниц, укажите начальную и конечную
страницу, поставив между ними дефис.
Пример: 20–25
• Чтобы указать страницы, не составляющие диапазон, разделяйте их
запятыми.
Пример: 5, 10, 15
Прямой переход с помощью закладок
Щелкните заголовок для перехода к этой странице. Нажмите кнопку +
или > для просмотра заголовков нижнего уровня в данном разделе.
Чтобы вернуться на предыдущую страницу, выполните следующие
действия на клавиатуре.

Получение последней версии документов
Последние версии руководств и технических характеристик доступны на
веб-сайте Epson.
Зайдите на epson.sn и введите название проектора.
10

Первое знакомство с проектором
Обратитесь к этим разделам, чтобы узнать больше о функциях и названиях деталей проектора.
gg Дополнительная информация
• «Функции проектора» стр.12
• «Детали и функции проектора» стр.15
Функции проектора
12
Проектор оснащен следующими специальными функциями. Подробные
сведения см. в этих разделах.
gg Дополнительная информация
• «Быстрая и простая настройка» стр.12
• «Удобное беспроводное проецирование» стр.12
• «Список функций» стр.13
Быстрая и простая настройка
• Функция Direct Power On для включения проектора непосредственно
после присоединения вилки к розетке.
• Функция Автовкл. питания предназначена для включения проектора
после того, как он распознает сигнал изображения с порта, указанного
в качестве источника Автовкл. питания.
• На Главном экране можно легко выбрать источник сигнала
изображения и воспользоваться полезными функциями.
• Автоматическая коррекция трапецеидальных искажений по вертикали
в реальном времени всегда обеспечивает отображение прямоугольного
экрана (Верт. автокоррекция).
• Регулировка трапецеидальных искажений по горизонтали позволяет
быстро откорректировать горизонтальное искажение проецируемого
изображения.
• «Включение проектора» стр.37
• «Корректировка формы изображения с помощью ползунка
регулировки горизонтальных трапецеидальных искажений» стр.48
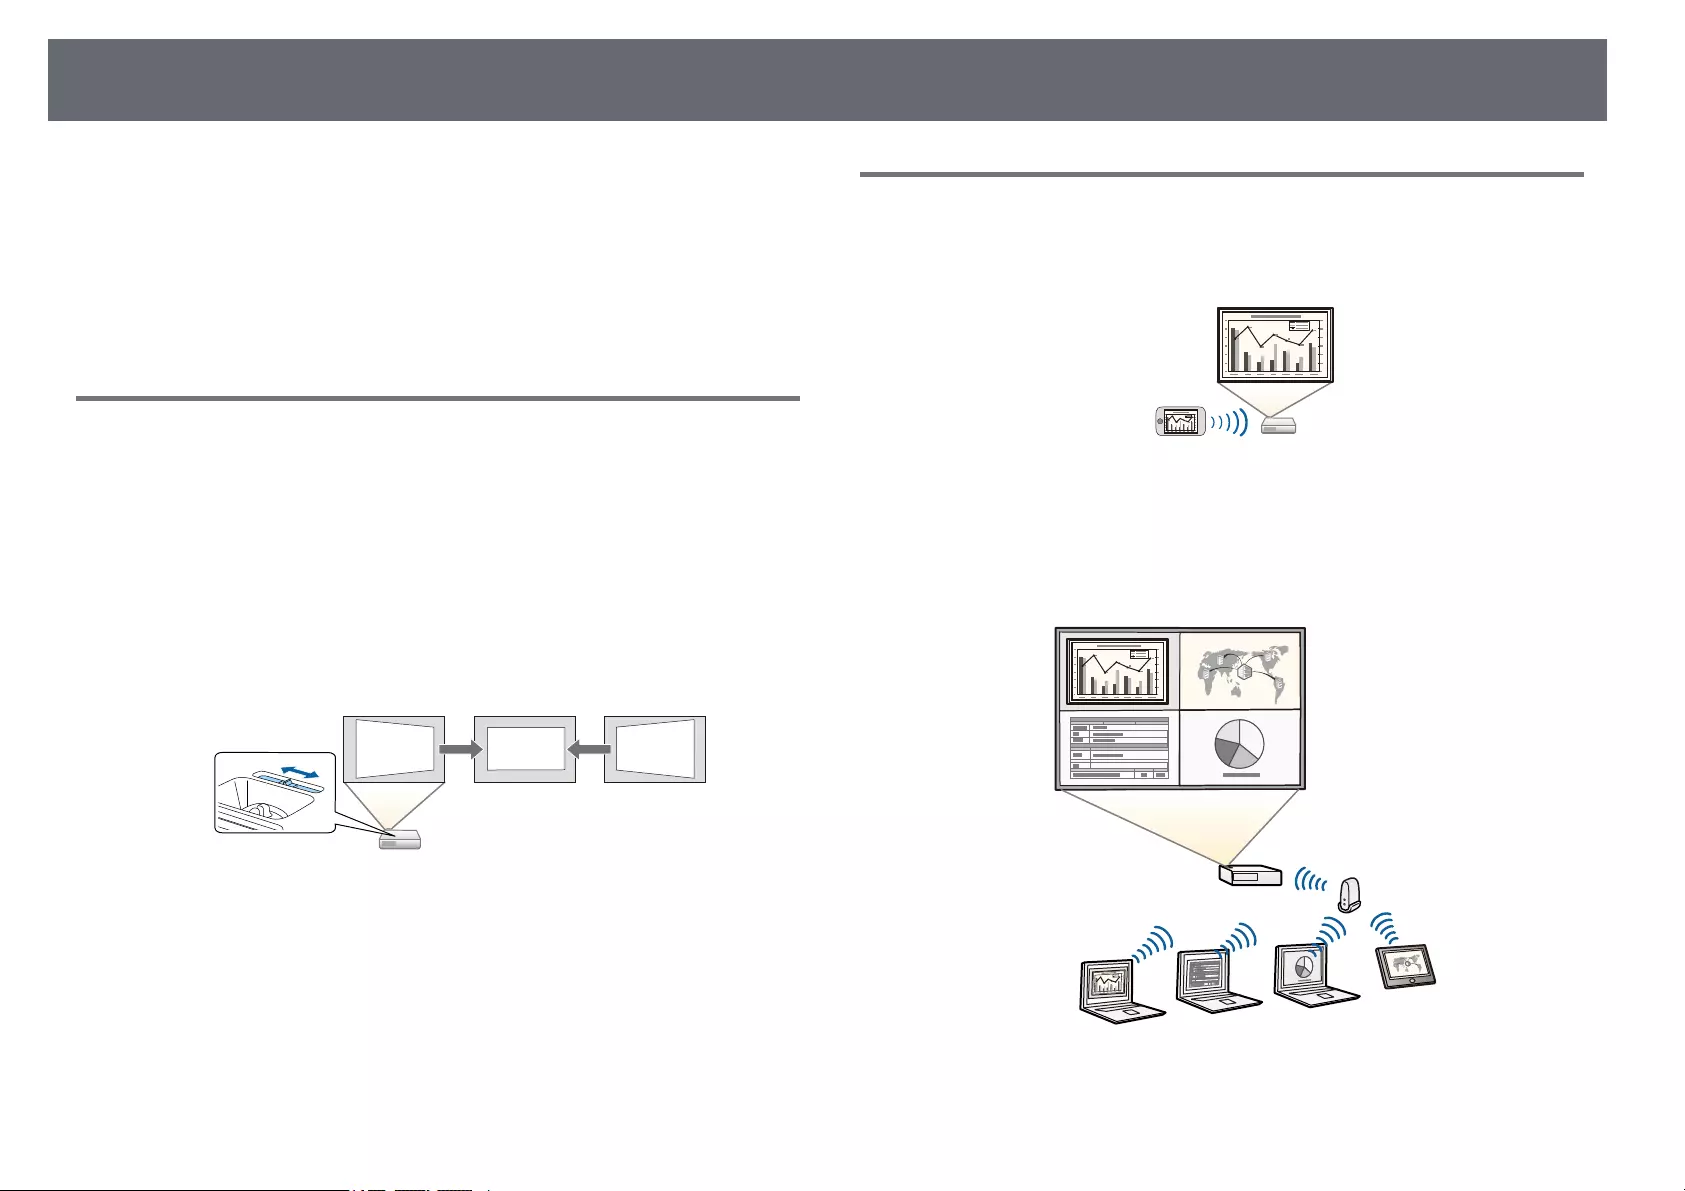
Удобное беспроводное проецирование
• Функция Screen Mirroring (Зеркальное отображение экрана)
применяется для работы проектора с мобильным устройством
посредством беспроводной технологии Miracast.
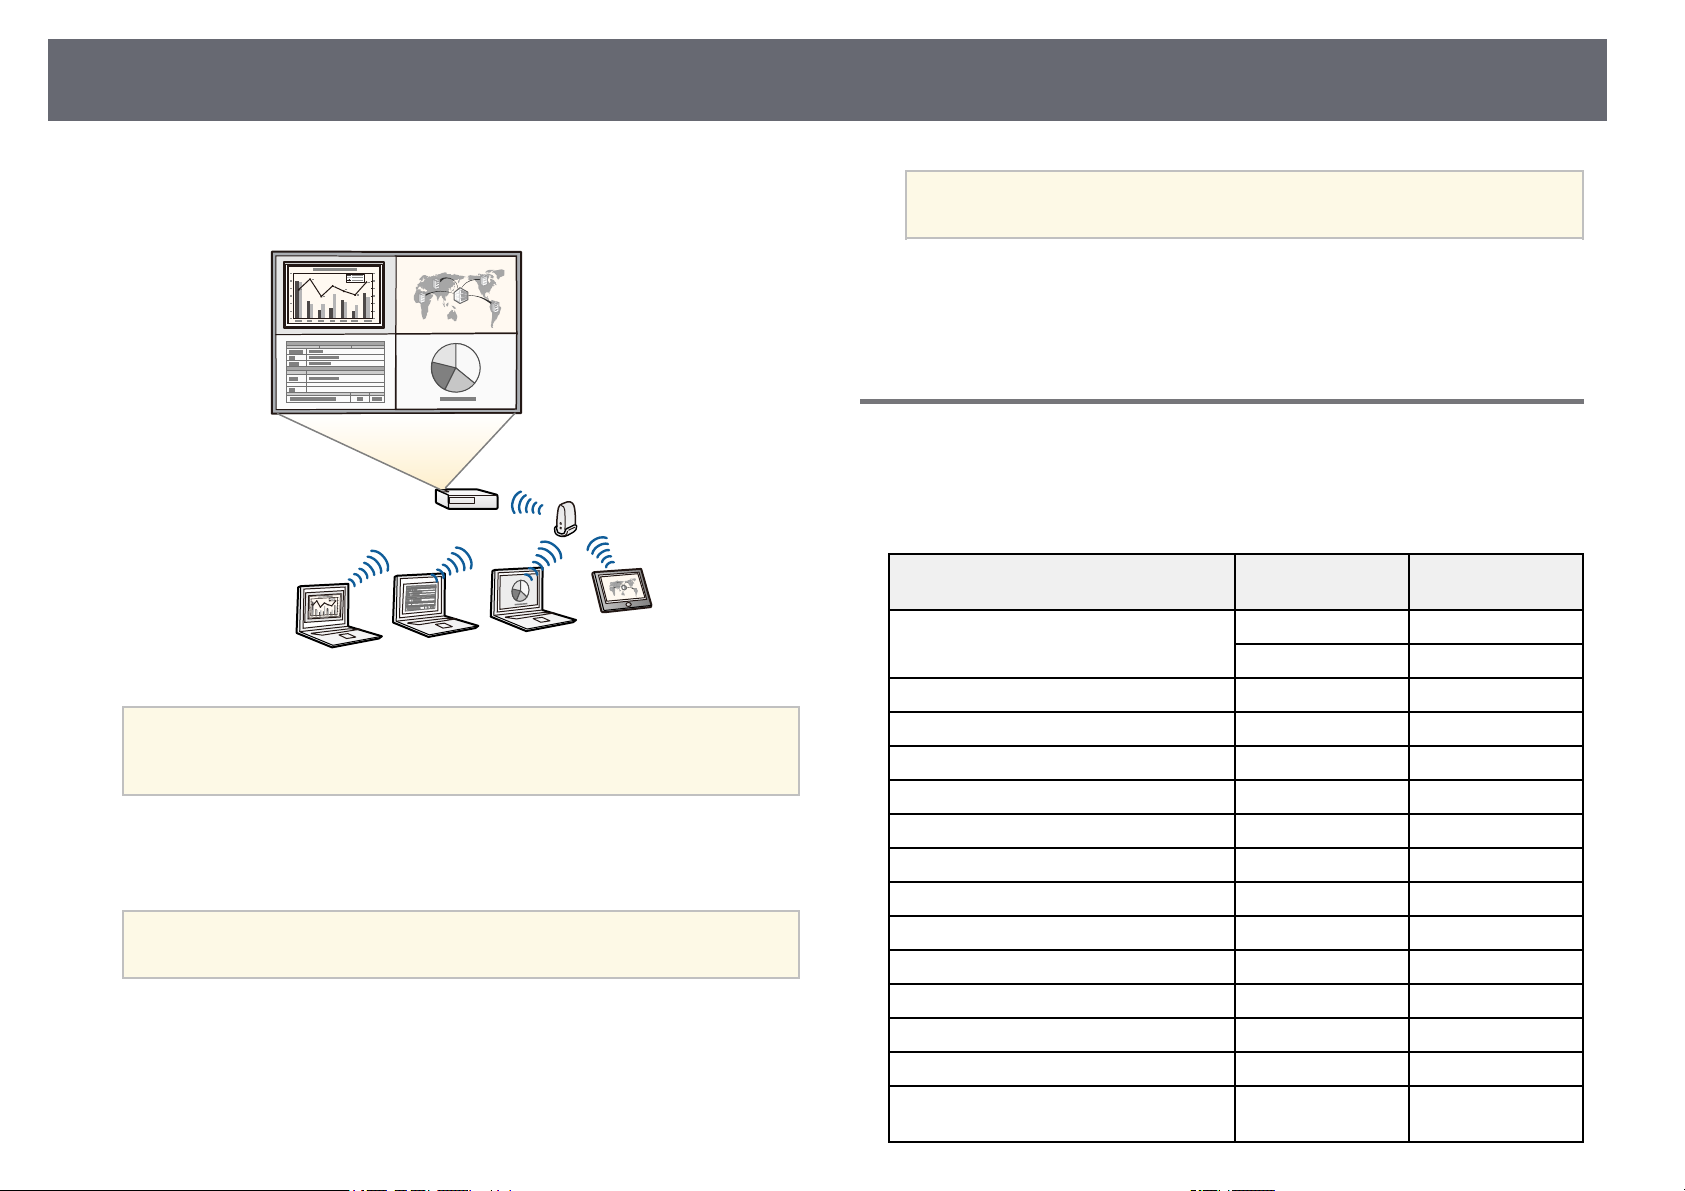
• Функция Epson iProjection (Windows/Mac) предназначена для
проецирования одновременно до четырех изображений посредством
разделения проецируемого экрана. Можно проецировать изображения
с компьютеров по сети, либо на смартфонах или планшетах.
gg Дополнительная информация
• «Верт. автокоррекция» стр.48
• «Настройка проектора – Меню Расширен.» стр.125
• «Список функций» стр.13
Функции проектора
13
Подробные сведения см. в Руководство по эксплуатации Epson
iProjection (Windows/Mac).
• Программу и руководство можно загрузить со следующего
a
• Приложение Epson iProjection (iOS/Android) предназначено для
беспроводного подключения проектора к мобильному устройству
посредством приложения, имеющегося в App Store или Google Play.
a
• Приложение Epson iProjection (Chromebook) предназначено для
беспроводного подключения проектора к устройству (Chromebook)
посредством приложения, имеющегося в Chrome Web Store.
веб-сайта:
http://www.epson.com/
Все расходы, связанные с использованием App Store или Google
Play, несет пользователь.
Все расходы, связанные с получением данных из Chrome Web
a
gg Дополнительная информация
• «Список функций» стр.13
• «Использование проектора в сети» стр.86
Store, несет пользователь.
Список функций
В нижеследующей таблице приводится список функций,
поддерживаемых различными моделями проектора. Поддерживаемые
функции отмечены значком «✓».
EH‑TW740 EH‑TW750/EH‑T
W710
Разрешение Full HD Full HD
1920×1080 1920×1080
Беспроводная ЛВС (встроено) — ✓
Беспроводная ЛВС (дополнительно) ✓ —
Screen Mirroring — ✓
Порты HDMI1/HDMI2 — ✓
Порт HDMI ✓ —
Порт Computer — ✓
Порт Video — ✓
Порт USB-A ✓ ✓
Порт USB-B ✓ ✓
Порты L-Audio-R — ✓
Порт Audio Out ✓ ✓
Крышка объектива ✓ ✓
Ползунок коррекции горизонтальных
трапецеидальных искажений
✓ ✓
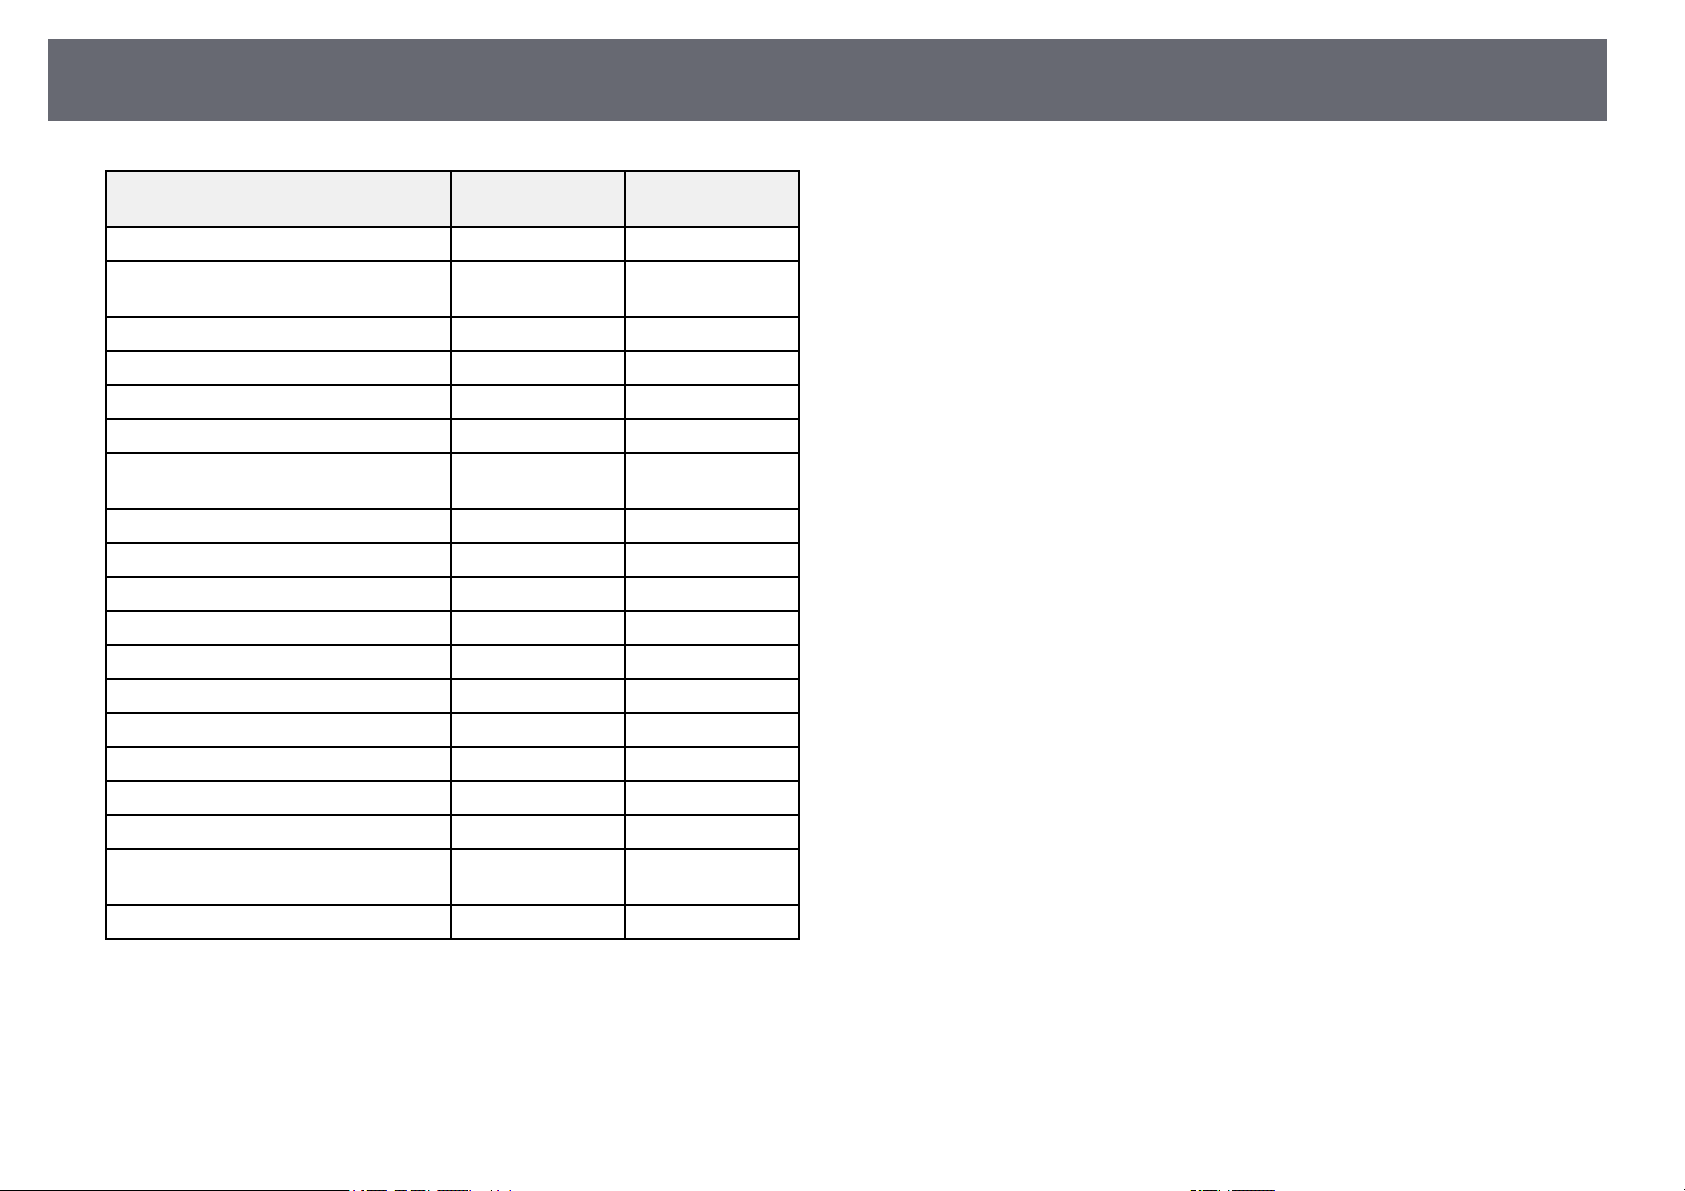
Функции проектора
EH‑TW740 EH‑TW750/EH‑T
Кольцо масштабирования — ✓
Камера для документов
(дополнительно)
Настройка Дата и время — ✓
Настройки графика — ✓
Верт. автокоррекция ✓ ✓
PC Free ✓ ✓
Пакетная настройка (флешнакопитель USB)
Пакетная настройка (кабель USB) ✓ ✓
Защита логотипа ✓ ✓
Защита сети ✓ ✓
Защита графика — ✓
Защита Screen Mirroring — ✓
Epson iProjection ✓ ✓
Epson Projector Management ✓ ✓
Epson Web Control ✓ ✓
Уведом. по почте ✓ ✓
SNMP ✓ ✓
Безопасное HTTP-соединение
(HTTPS)
Безопасность WPA Enterprise — ✓
✓ ✓
✓ ✓
— ✓
14
W710
Детали и функции проектора
15
В следующих разделах описываются детали проектора и их функции.
Если не указано иное, все функции, описанные в настоящем
руководстве, поясняются на изображениях модели EH‑TW750.
gg Дополнительная информация
• «Детали проектора — спереди» стр.15
• «Детали проектора – сзади» стр.16
• «Детали проектора – на основании» стр.17
• «Детали проектора – панель управления» стр.18
• «Детали проектора – пульт дистанционного управления» стр.19
• «Список функций» стр.13
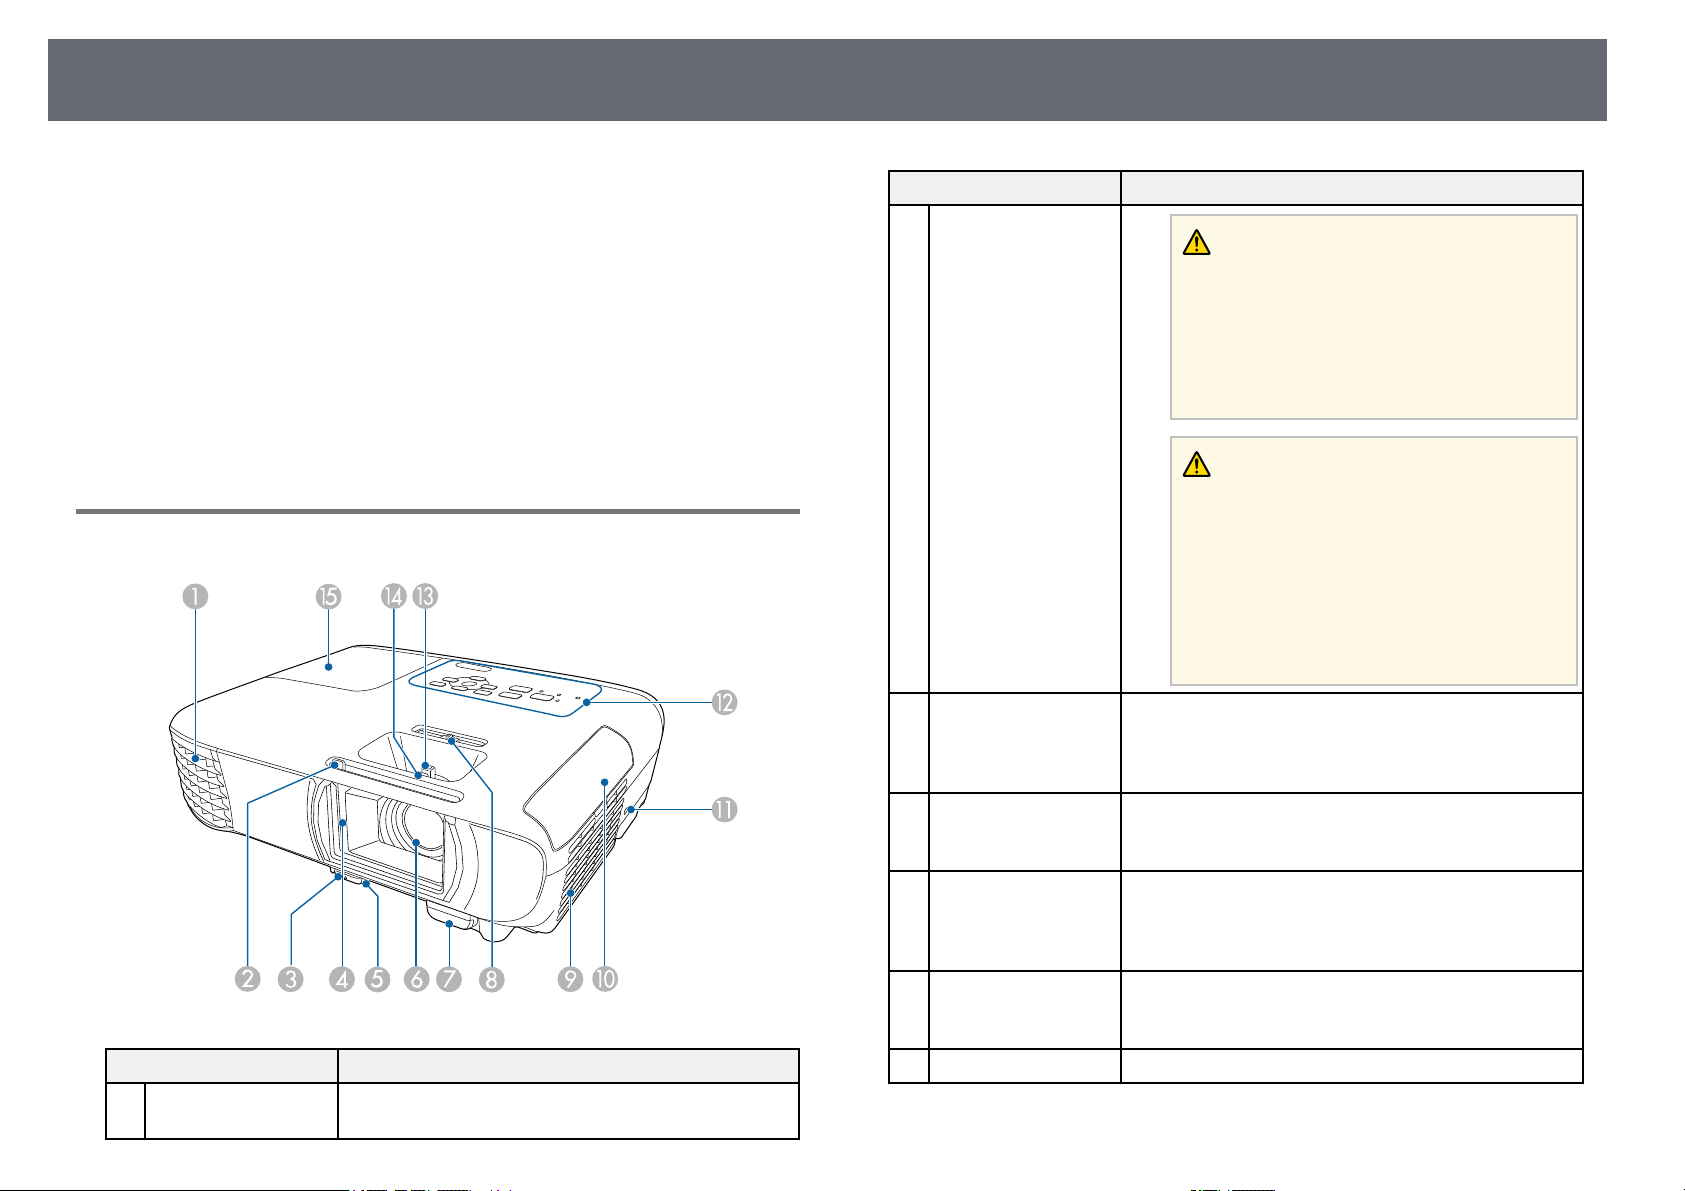
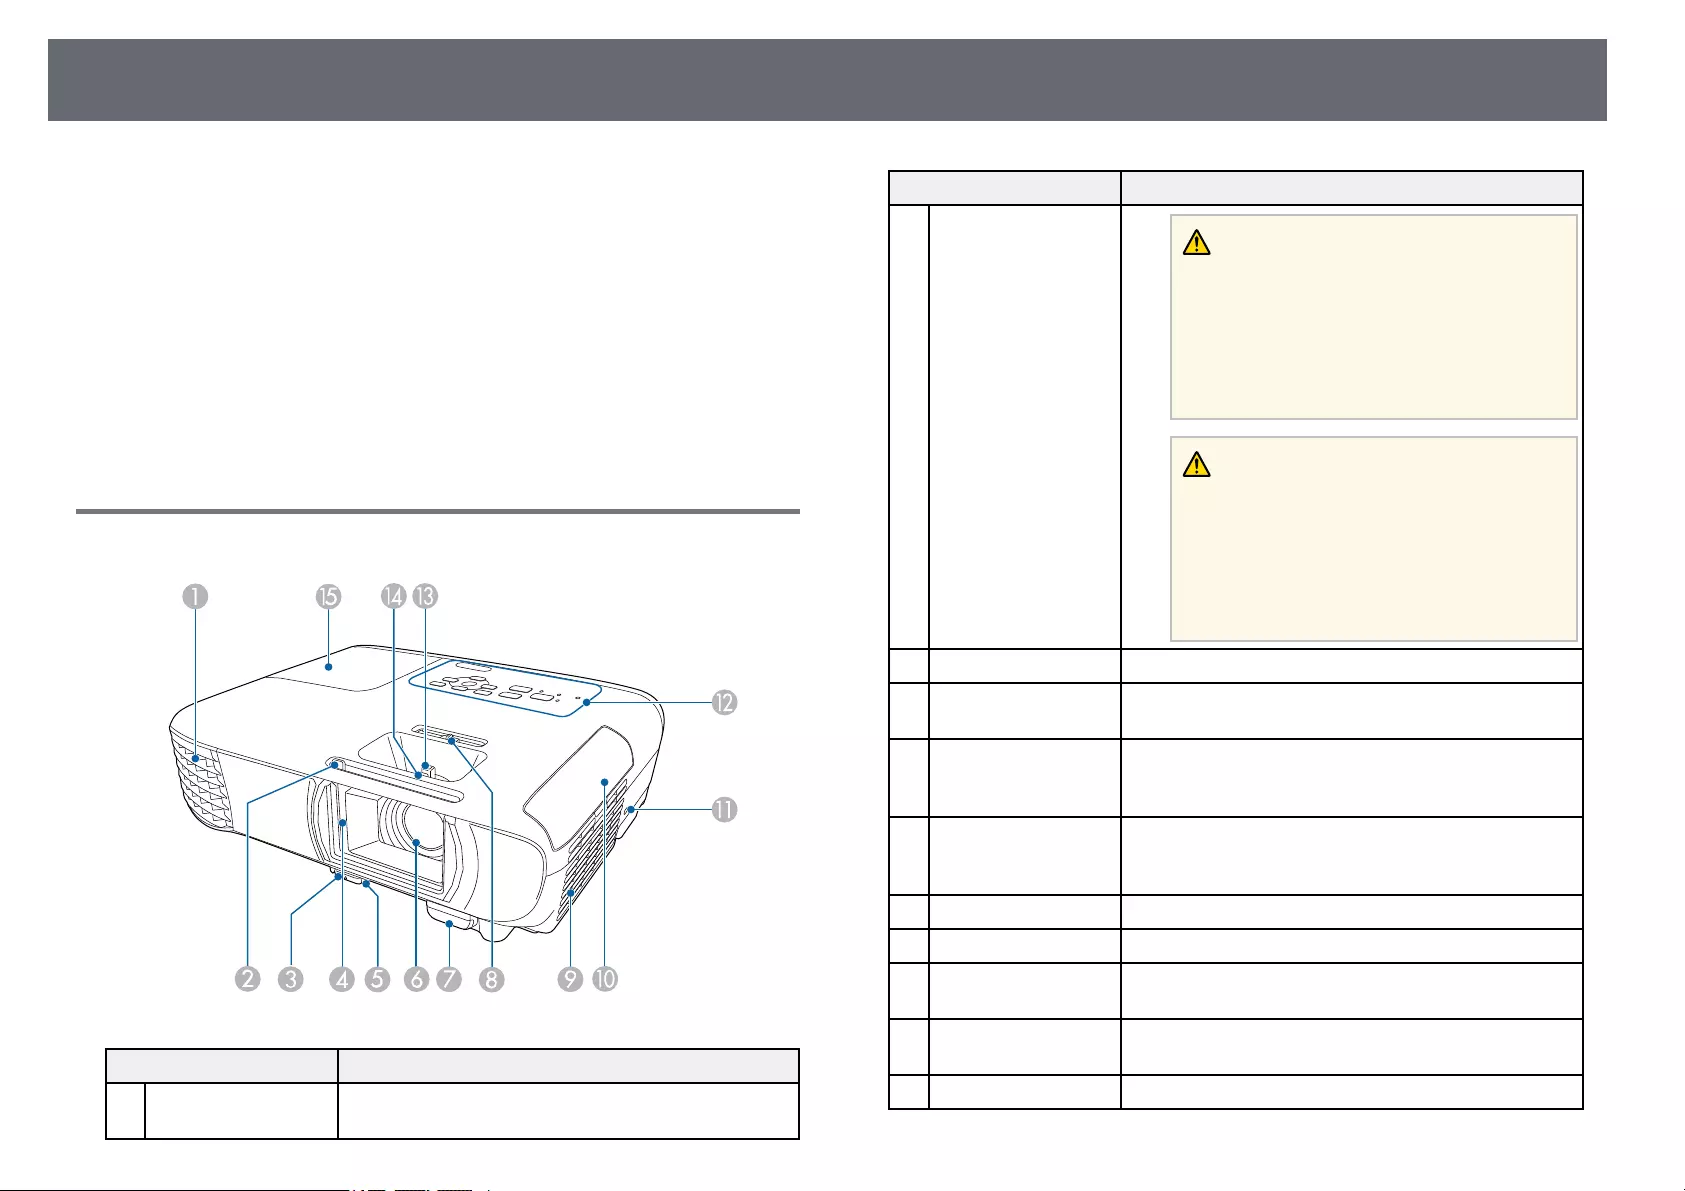
Детали проектора — спереди
Название Функция
Выходное отверстие
A
для воздуха
Выходное вентиляционное отверстие служит для
внутреннего охлаждения проектора.
Название Функция
Предупреждение
Не смотрите в вентиляционное отверстие.
При взрыве лампы выбрасываемый газ, а
также мелкие осколки стекла могут стать
причиной травмы. При попадании стекла в
дыхательные пути, в глаза или рот
обратитесь к врачу.
Предостережение
Не приближайте к этому отверстию лицо и
руки и не ставьте перед ним предметы,
которые могут испортиться от нагрева
выходящим из отверстия воздухом.
Горячий воздух из выходного
вентиляционного отверстия может стать
причиной ожогов, деформации или
несчастных случаев.
Рычаг ползунка
B
переключателя
подавления сигнала
аудио/видео
Рычаг
C
разблокировки
опоры
Крышка объектива С целью защиты объектива закройте шторку, если
D
Передняя
E
регулируемая опора
Объектив Обеспечивает проецирование изображение.
F
Чтобы открыть или закрыть крышку отсека лампы,
сдвиньте ручку.
Нажмите на рычаг разблокировки опоры, чтобы
отрегулировать высоту передней опоры.
проектор не используется. Закрывая его во время
проецирования, можно скрыть изображение и
отключить звук.
Если проектор устанавливается на поверхности
(например, на столе), отрегулируйте ножку, чтобы
правильно расположить изображение.
Детали и функции проектора
16
Название Функция
Приемник сигнала
G
от пульта
дистанционного
управления
Ползунок
H
коррекции
горизонтальных
трапецеидальных
искажений
Отверстие
I
воздухозаборника
(воздушный фильтр)
Крышка воздушного
J
фильтра
Гнездо защиты Гнездо защиты поддерживается системой
K
Панель управления Используется для управления проектором.
L
Кольцо
M
масштабирования
Фокальное кольцо Служит для фокусировки изображения.
N
Крышка отсека
O
лампы
Принимает сигналы от пульта дистанционного
управления.
Корректировка горизонтального искажения
проецируемого изображения.
Служит для забора воздуха для внутреннего
охлаждения проектора.
Откройте, чтобы получить доступ к воздушному
фильтру.
Microsaver Security System производства компании
Kensington.
Служит для регулировки размера изображения.
Откройте, чтобы получить доступ к лампе
проектора.
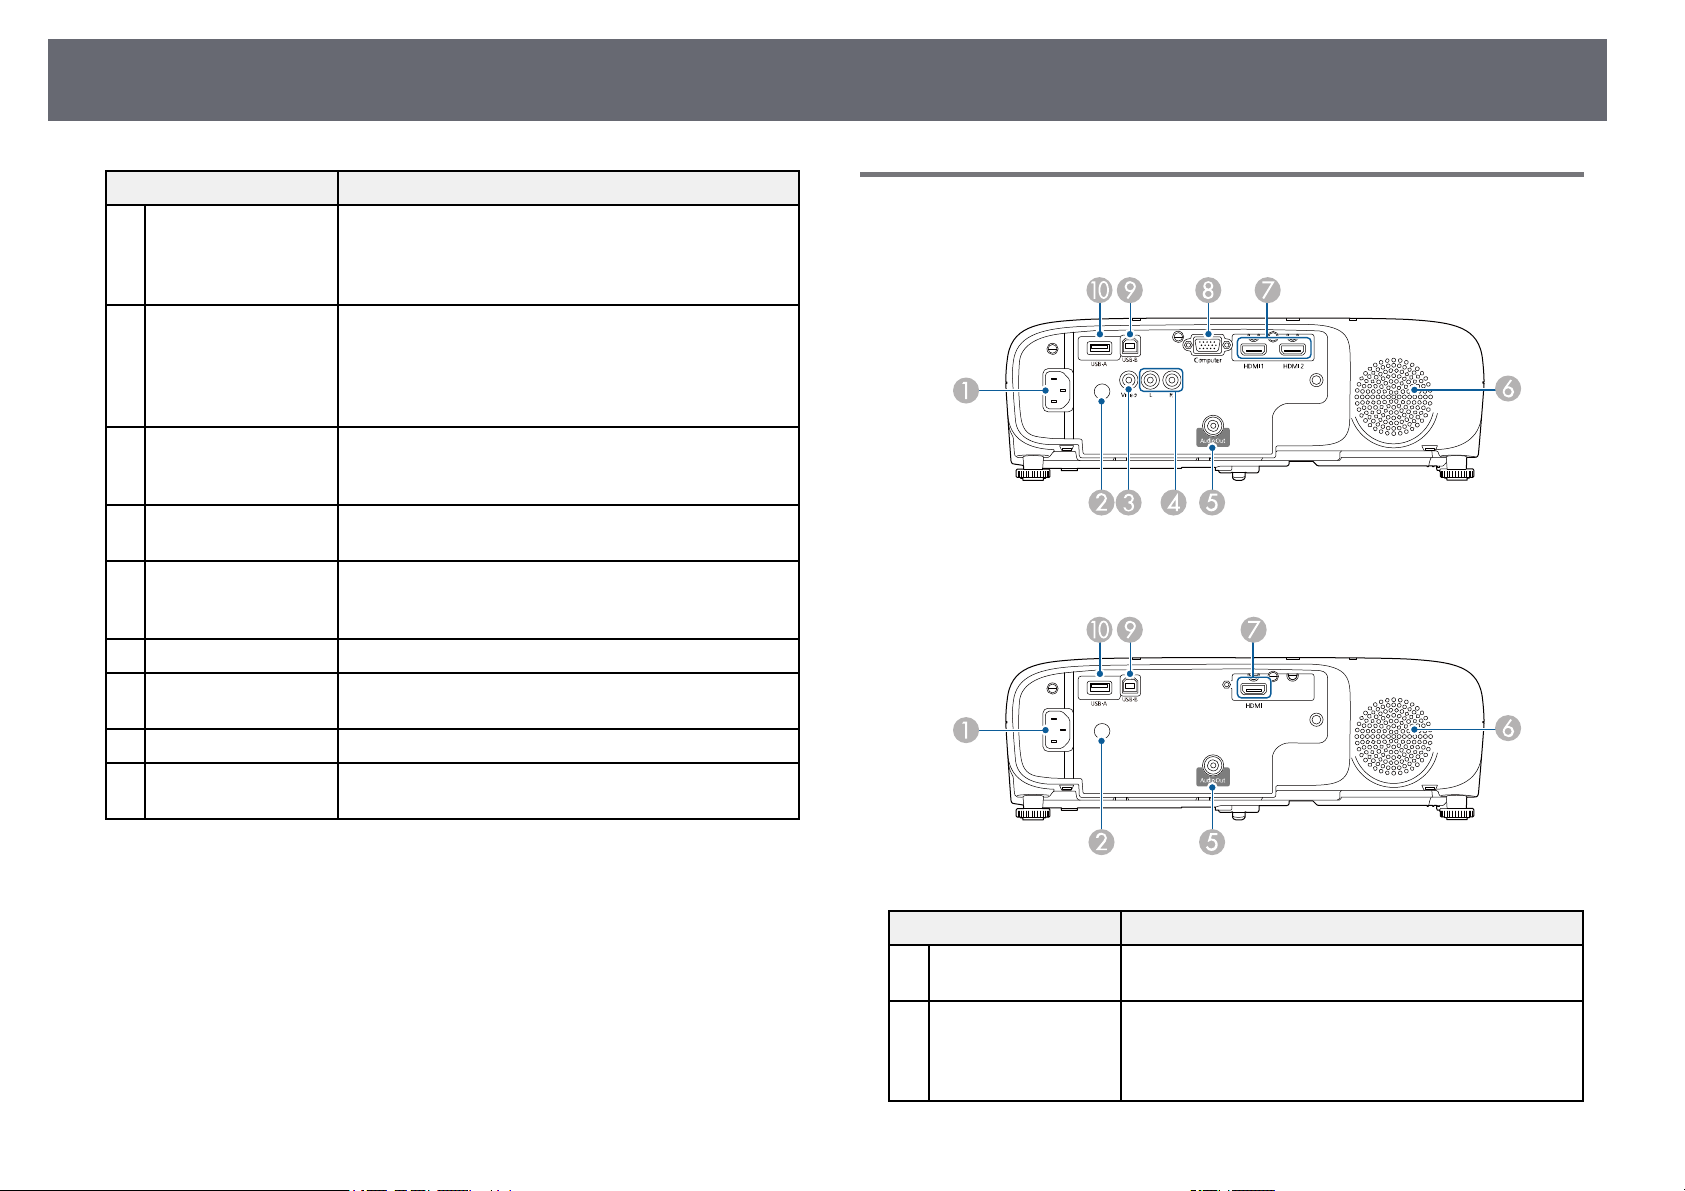
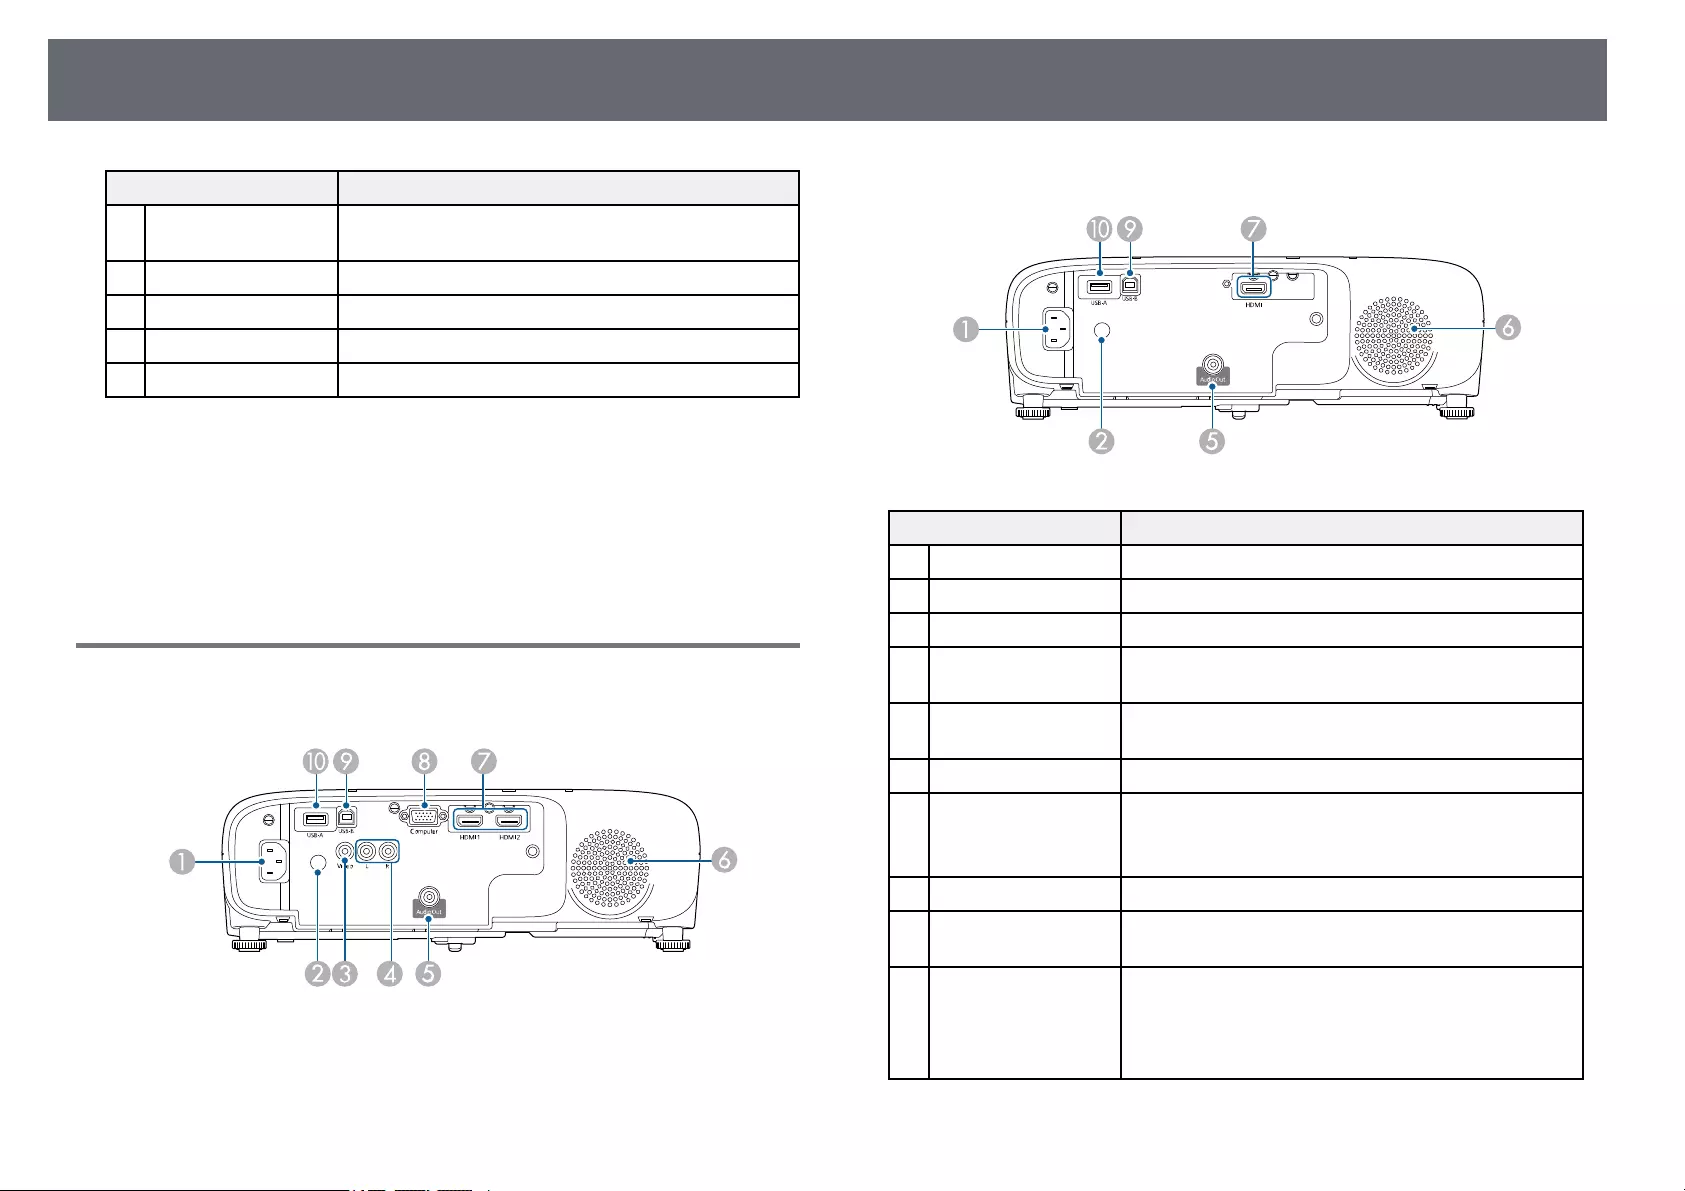
Детали проектора – сзади
EH‑‑TW750/EH‑‑TW710
EH‑‑TW740
gg Дополнительная информация
• «Состояние индикаторов проектора» стр.159
• «Список функций» стр.13
• «Изменение размера изображения с помощью кольца
масштабирования» стр.53
• «Фокусировка изображения с помощью кольца фокусировки» стр.54
• «Корректировка формы изображения с помощью ползунка
регулировки горизонтальных трапецеидальных искажений» стр.48
Название Функция
Вход для подачи
A
питания
Приемник сигнала
B
от пульта
дистанционного
управления
Служит для подключения кабеля питания к
проектору.
Принимает сигналы от пульта дистанционного
управления.
Детали и функции проектора
17
Название Функция
Порт Video Для компонентных видеосигналов от источников
C
Порты L-Audio-R Входы звукового сигнала от оборудование,
D
Порт Audio Out Вывод звука проецируемого изображения на
E
Динамик Вывод звука.
F
Порты HDMI1,
G
HDMI2
Порт HDMI
Порт Computer Передача входных сигналов изображения от
H
Порт USB-B Предназначен для подключения кабеля USB к
I
Порт USB-A Подключите запоминающее устройство USB или
J
видеосигнала.
подключенного к порту Computer или Video.
внешний динамик.
Предназначен для подачи видеосигналов от HDMIсовместимой видеоаппаратуры и компьютеров.
Этот проектор поддерживает стандарт HDCP.
компьютера.
компьютеру для проецирования изображений с
компьютера.
цифровую камеру и проецируйте фильмы или
изображения с помощью PC Free.
Подключение к дополнительной камере для
документов.
Подключение модуля беспроводной ЛВС.
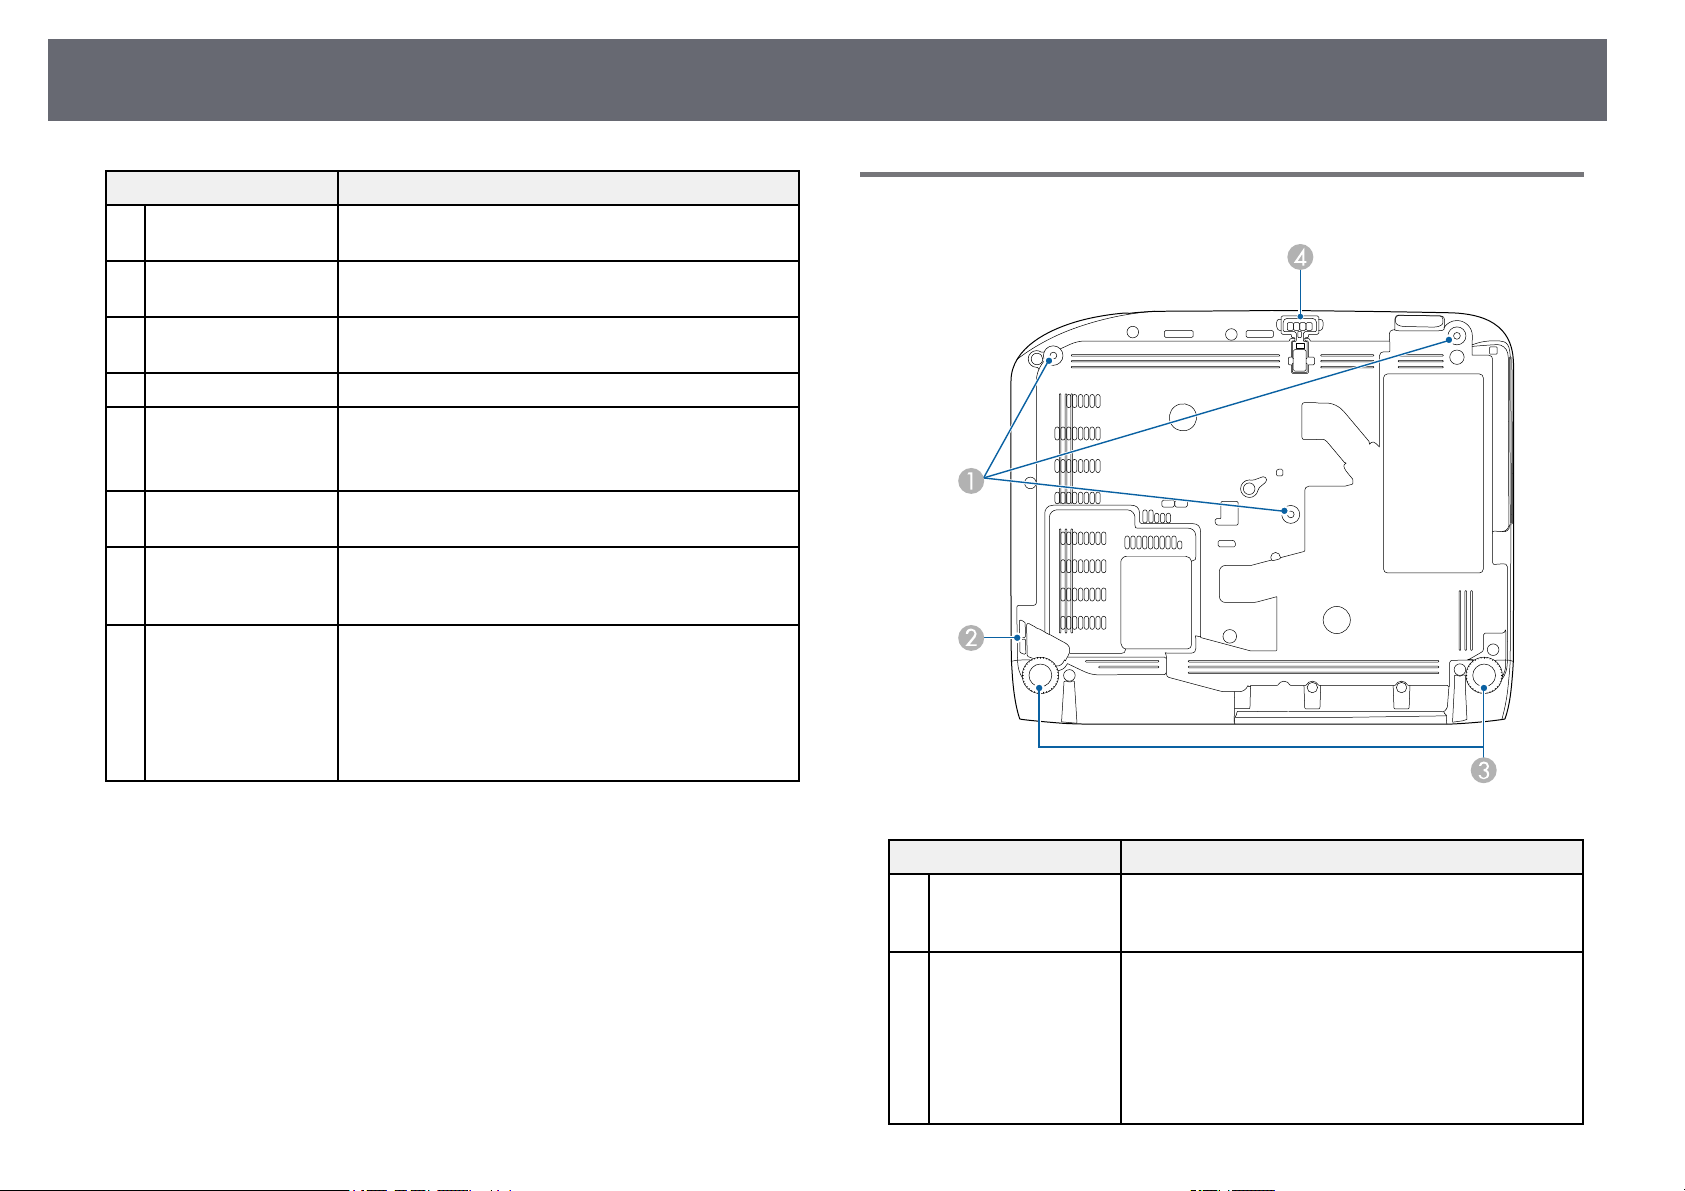
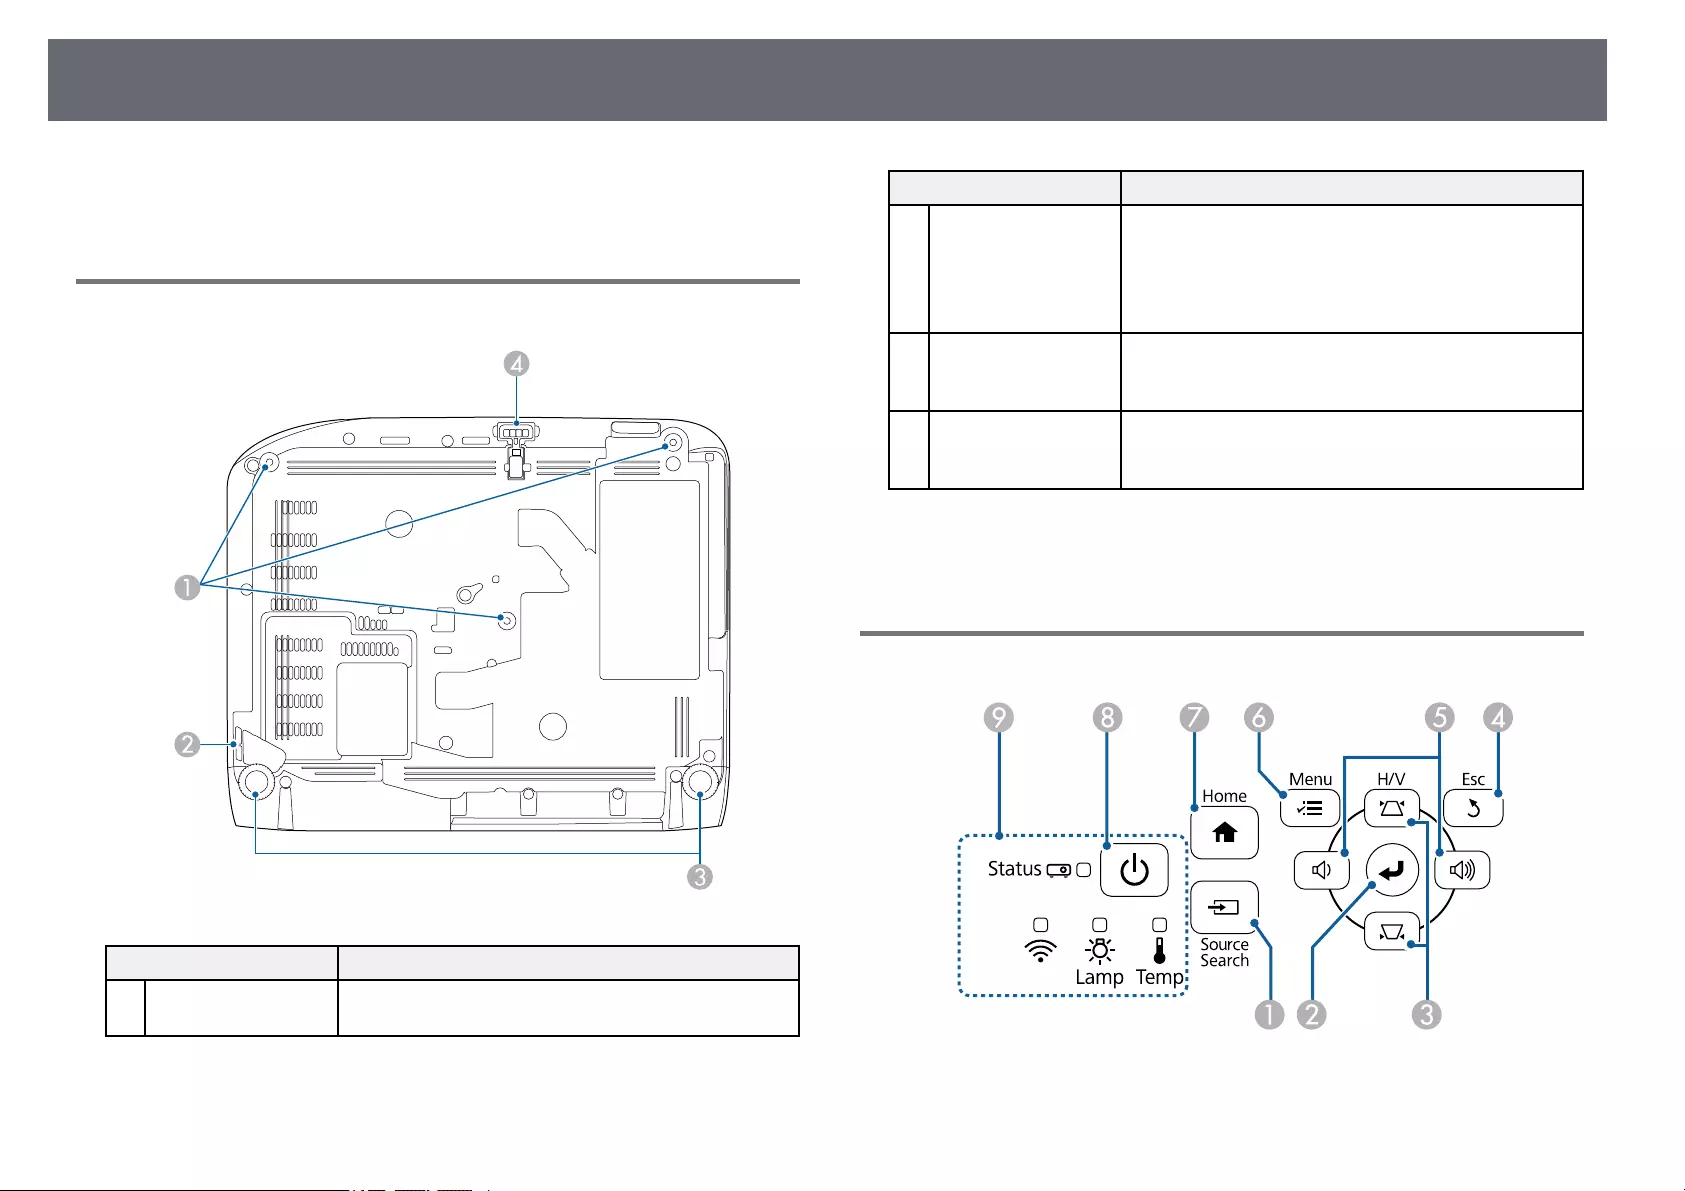
Детали проектора – на основании
gg Дополнительная информация
• «Список функций» стр.13
Название Функция
Места для
A
крепления к потолку
(три точки)
Точка крепления
B
защитного тросика
При подвешивании проектора к потолку в этих
точках следует закрепить дополнительный
потолочный крепеж.
Пропустите через проем тросик с замком
(приобретается отдельно), прикрепите к месту
установки и закройте замок.
Кроме того, эту точку можно использовать для
крепления дополнительного защитного провода
для защиты проектора от падения с потолка или
стены.
Детали и функции проектора
18
Название Функция
Задняя опора При настольной установке проектора поверните
C
Передняя
D
регулируемая опора
ножки, чтобы отрегулировать наклон по
горизонтали за счет их выдвижения или
втягивания.
Если проектор устанавливается на поверхности
(например, на столе), отрегулируйте ножку, чтобы
правильно расположить изображение.
gg Дополнительная информация
• «Установка защитного тросика» стр.84
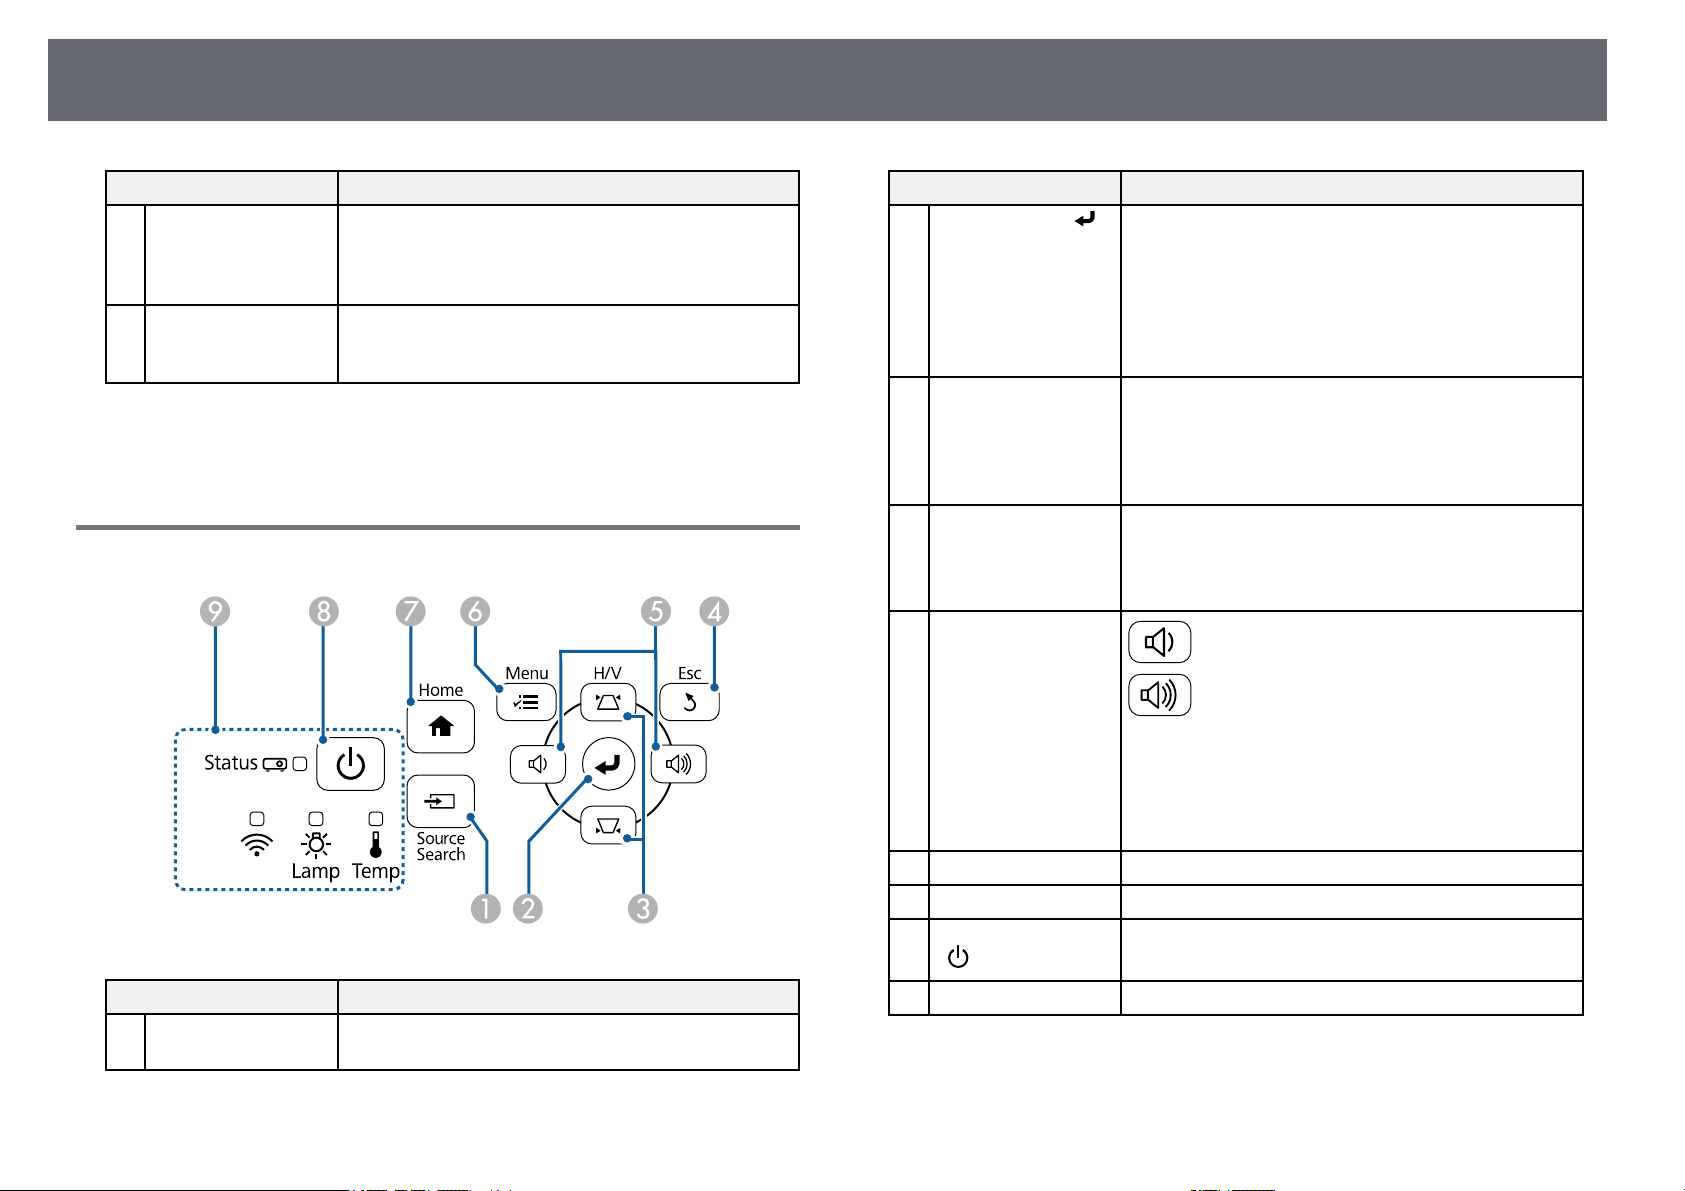
Детали проектора – панель управления
Название Функция
Кнопка [Source
A
Search]
Переход к следующему источнику входного
сигнала.
Название Функция
Кнопка [Enter] [ ] Ввод текущего варианта выбора и переход на
B
Кнопки регулировки
C
трапецеидальных
искажений и кнопки
со стрелками
Кнопка [Esc] Служит для прекращения выполнения текущей
D
Кнопки громкости и
E
кнопки со
стрелками
Кнопка [Menu] Открытие и закрытие меню проектора.
F
Кнопка [Home] Открытие и закрытие Главного экрана.
G
Кнопка питания
H
[ ]
Индикаторы Показывает состояние проекционной лампы.
I
следующий уровень при отображении меню и
справочной информации проектора.
Оптимизирует параметры Трекинг,
Синхронизация и Позиция в меню проектора
Сигнал во время проецирования аналогового RGB-
сигнала с порта Computer.
Отображает экран Корр-ия трапеции, на котором
можно откорректировать трапецеидальный
искажения.
Выбор пунктов при отображении меню или
справочной информации.
функции.
Возврат к предыдущему уровню меню при его
отображении меню проектора.
: Уменьшение громкости звука.
: Увеличение громкости звука.
Служит для коррекции трапецеидальных
искажений по горизонтали при отображении
экрана Корр-ия трапеции.
Выбор пунктов при отображении меню или
справочной информации.
Включение и выключение питания проектора.
gg Дополнительная информация
• «Настройки входного сигнала — Меню Сигнал» стр.121
• «Главный экран» стр.38
Детали и функции проектора
19
• «Состояние индикаторов проектора» стр.159
• «Корректировка формы изображения с помощью кнопок
корректировки трапецеидального искажения» стр.49
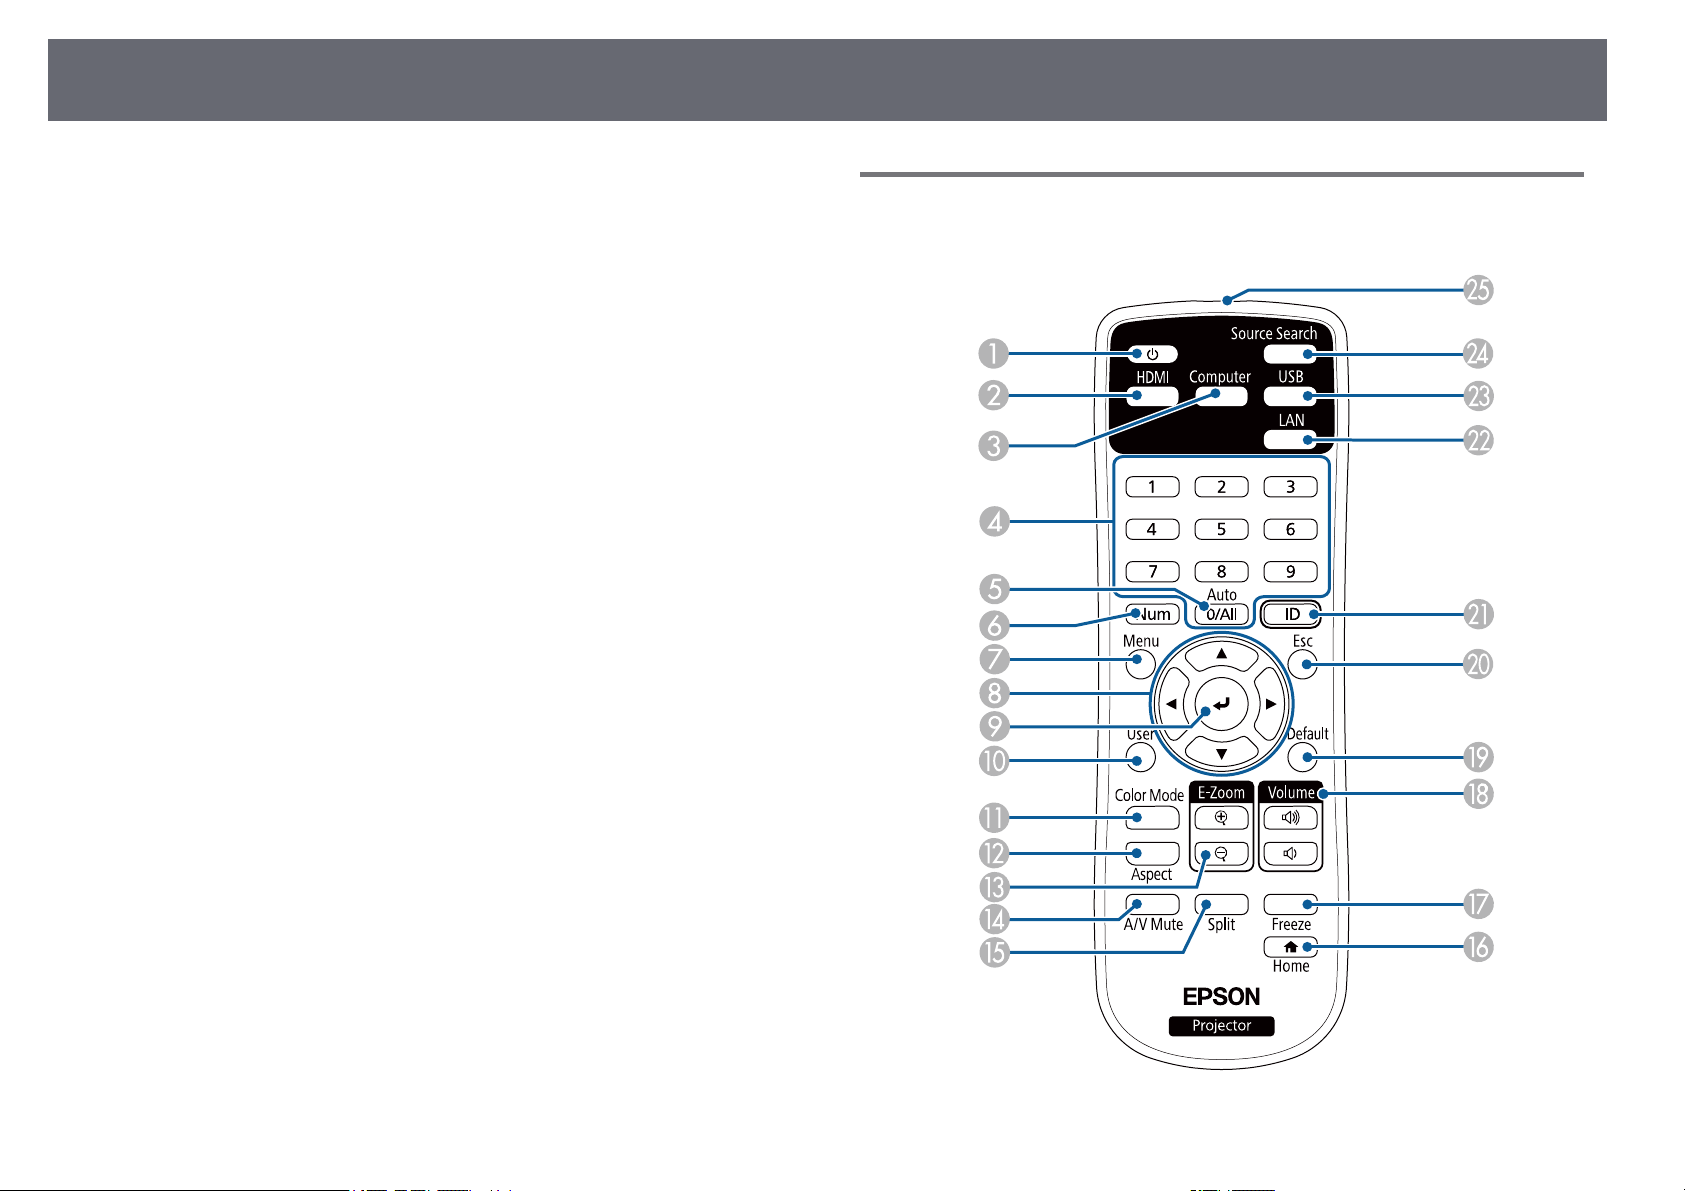
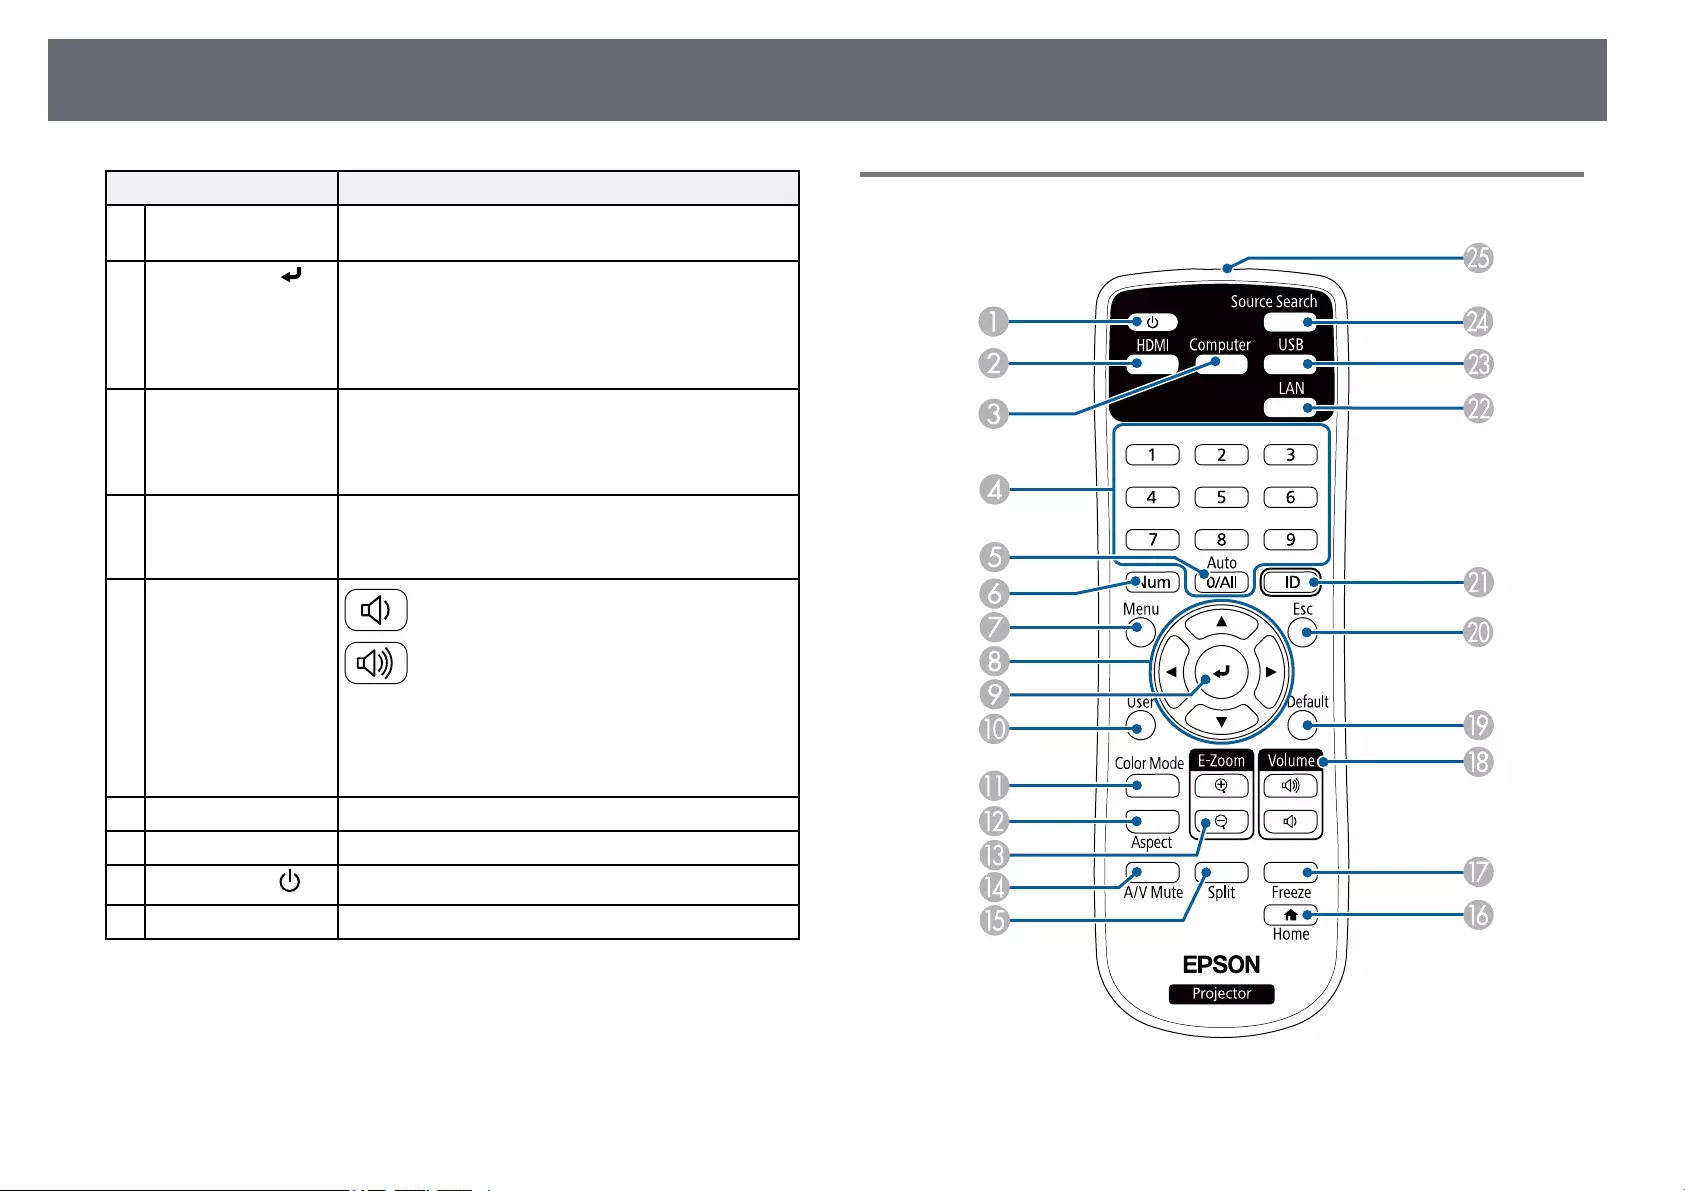
Детали проектора – пульт дистанционного
управления
Детали и функции проектора
20
Название Функция
Кнопка питания
A
[ ]
Кнопка [HDMI] Переключение источника изображения между
B
Кнопка [Computer] Переключает источник изображения на порты
C
Цифровые кнопки При удержании кнопки [Num] позволяют ввести
D
Кнопка [Auto] Оптимизирует параметры Трекинг,
E
Кнопка [Num] Удержите эту кнопку нажатой, чтобы ввести числа
F
Кнопка [Menu] Открытие и закрытие меню проектора.
G
Кнопки со
H
стрелками
Кнопка [Enter] [ ] Ввод текущего варианта выбора и переход на
I
Кнопка [User] Выполнение настройки с помощью параметра
J
Кнопка [Color
K
Mode]
Кнопка [Aspect] Изменение режима формата.
L
Кнопки [E-
M
Zoom]+/–
Кнопка [A/V Mute] Временное включение или выключение видео- или
N
Кнопка [Split] Одновременное проецирование двух изображений
O
Кнопка [Home] Открытие и закрытие Главного экрана.
P
Включение и выключение питания проектора.
портами HDMI.
Computer.
цифры в меню проектора.
Синхронизация и Позиция в меню проектора
Сигнал во время проецирования аналогового RGB-
сигнала с портов Computer.
с помощью цифровых кнопок.
Выбор пунктов при отображении меню проектора.
следующий уровень при отображении меню
проектора.
Польз. кнопка в меню проектора Настройки.
Изменение режима цветности.
Изменение размера проецируемого изображения.
аудиосигнала.
из различных источников путем разделения
проецируемого экрана.
Название Функция
Кнопка [Freeze] Приостановка и возобновление воспроизведения
Q
Кнопки [Volume]
R
для
увеличения/уменьше
ния громкости
Кнопка [Default] Возврат выбранной настройки к ее значению по
S
Кнопка [Esc] Служит для прекращения выполнения текущей
T
Кнопка [ID] Удерживая эту кнопку, нажимайте на цифровые
U
Кнопка [LAN] Изменяет источник изображения между
V
Кнопка [USB] Переключение источника изображения между
W
Кнопка [Source
X
Search]
Зона излучения
Y
света на пульте
дистанционного
управления
изображений.
Корректировка уровня звука динамика.
умолчанию.
функции.
Возврат к предыдущему уровню меню при его
отображении меню проектора.
кнопки, чтобы выбрать ID проектора, которым вы
хотите управлять с помощью пульта.
устройствами, подключенными в сеть.
портами USB Display и USB-A.
Переход к следующему источнику входного
сигнала.
Служит для подачи сигналов пульта
дистанционного управления.
gg Дополнительная информация
• «Формат изображения» стр.57
• «Наст. производит. (Цветовой режим)» стр.59
• «Настройки входного сигнала — Меню Сигнал» стр.121
• «Настройка проектора – Меню Расширен.» стр.125
• «Главный экран» стр.38
• «Одновременное проецирование двух изображений» стр.63
• «Присоединение к компьютеру для передачи видео- и аудиосигнала
через USB» стр.27

Детали и функции проектора
• «Проецирование презентации PC Free» стр.66
• «Использование проектора в сети» стр.86
21

Настройка проектора
Ниже приводятся инструкции по настройке проектора.
gg Дополнительная информация
• «Размещение проектора» стр.23
• «Соединения проектора» стр.26
• «Установка батареек в пульт дистанционного управления» стр.33
• «Работа с пультом дистанционного управления» стр.34
• «Открывание крышки линзы» стр.35
Размещение проектора
23
Проектор можно расположить почти на любой плоской поверхности.
Если необходимо использовать проектор в зафиксированном
положении, можно также прикрепить его к потолку с помощью
потолочного кронштейна. При подвешивании проектора к потолку
требуется дополнительный потолочный кронштейн.
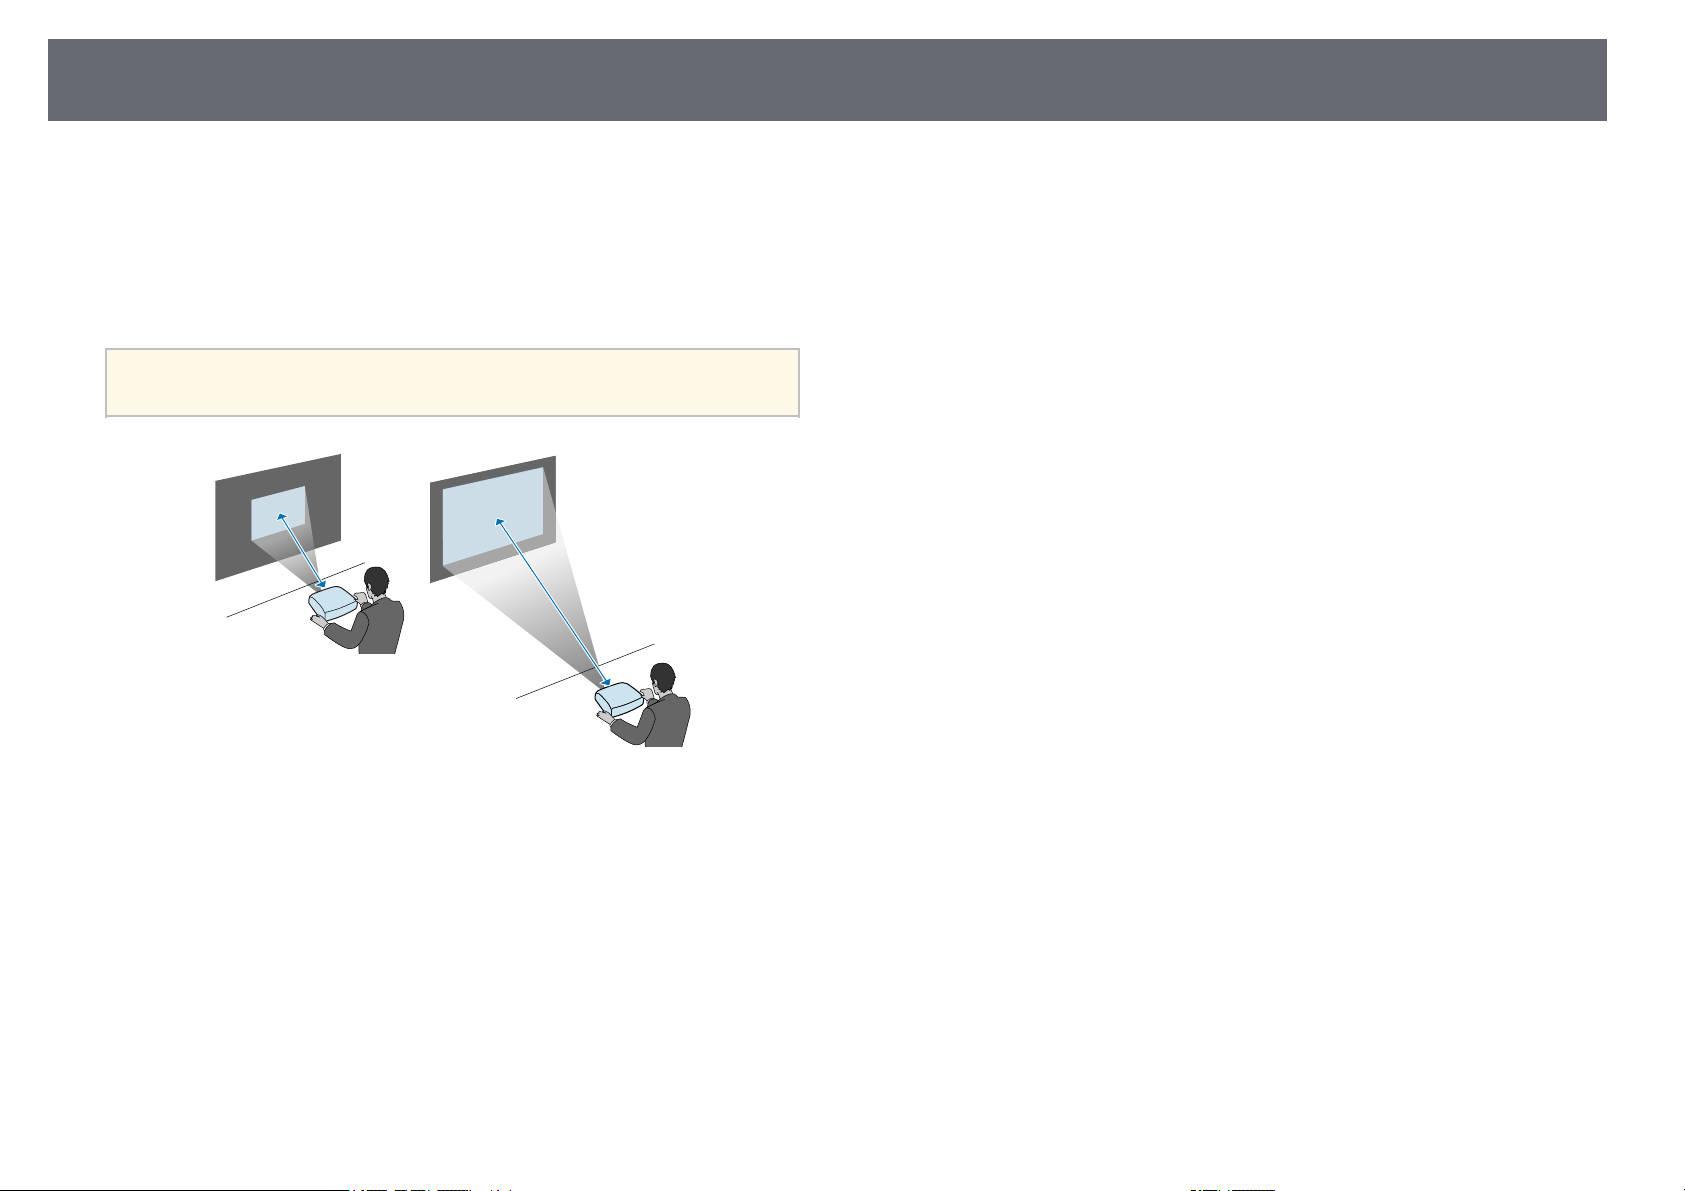
При выборе местоположения проектора обратите внимание на
следующие моменты:
• Проектор должен устанавливаться на прочной и ровной поверхности
или крепиться с помощью подходящего кронштейна.
• Оставьте вокруг проектора и под ним достаточно места для
вентиляции и не располагайте его на чем-либо или рядом с чем-либо,
что может закрыть вентиляционные отверстия.
• Расположите проектор так, чтобы он был направлен прямо на экран,
не под углом.
Если невозможно установить проектор так, чтобы он был
a
направлен прямо на экран, устраните возникшее
трапецеидальное искажение с помощью элементов управления
проектора. Для достижения наилучшего качества изображения
рекомендуем отрегулировать положение установки проектора
так, чтобы получить правильные размер и форму изображения.
Предупреждение
• При подвешивании проектора к потолку необходимо установить
потолочный монтаж. Если установить проектор неправильно, он может
упасть, что может привести к его повреждению или травмам людей.
• Не используйте клей в точках крепления потолочного кронштейна, чтобы
избежать ослабевания затяжки винтов, а также смазочные материалы,
масла или похожие вещества на проекторе; корпус проектора может
треснуть, что приведет к его падению. Это может привести к серьезной
травме человека, находящегося под потолочным креплением, а также к
повреждению проектора.
• Неправильная установка проектора на потолочный кронштейн может
привести к падению монитора. Установив определенное крепление Epson,
подходящее для вашего проектора, зафиксируйте крепление во всех точках
крепления кронштейнов подвески. А также закрепите проектор и
кронштейн проводом, достаточно прочным, чтобы выдержать их вес.
• Не устанавливайте проектор в месте с высоким уровнем запыленности или
влажности, а также с содержанием дыма или пара. В противном случае
возможен пожар или поражение электрическим током. Кроме того,
разрушается корпус проектора. В результате таких повреждений он может
упасть с крепления.
Примеры условий, которые могут стать причиной падения проектора
из-за разрушения корпуса
• Места, подверженные воздействию сильного дыма и взвешенных в
воздухе частиц масла, такие как фабрики или кухни.
• Места, в которых присутствуют летучие растворители или химикаты,
такие как фабрики или лаборатории
• Места, в которых проектор мог бы подвергнуться воздействию моющих
средств или химикатов, такие как фабрики или кухни
• Места, в которых часто используются ароматические масла, такие как
комнаты отдыха
• Вблизи устройств, образующих сильный дым, взвешенные в воздухе
частицы масла или пену на мероприятиях
Размещение проектора
24
Предупреждение
• Не закрывайте входные и выходные вентиляционные отверстия проектора.
В противном случае повысится температура внутри устройства и может
произойти возгорание.
• Запрещается эксплуатировать и хранить проектор в местах с высоким
содержанием пыли и грязи. Иначе может ухудшиться качество
проецируемого изображения либо может засориться воздушный фильтр,
что приведет к неисправности или возгоранию.
• Не устанавливайте проектор на неустойчивую поверхность или на место,
которое не выдержит вес проектора. Иначе он может упасть или
опрокинуться, что может привести к несчастному случаю или травме.
• При его установке на высоте, примите меры против падения путем
применения проводов для обеспечения безопасности в чрезвычайных
ситуациях, например при землетрясении, и предотвращения несчастных
случаев. При неправильной установке возможно падение проектора,
приводящее к несчастным случаям и травмам.
• Запрещается выполнять установку в местах, подверженных воздействию
соли или агрессивных газов, например сернистого газа от горячих
источников. Иначе коррозия может привести к падению проектора. А
также это может вызвать нарушения в работе проектора.
Внимание
• Запрещается пользоваться проектором в положении на боку. Это приведет
к неправильной работе проектора.
• Если проектор используется на высоте более 1500 м над уровнем моря,
установите для параметра Высотный режим значение Вкл. в меню
проектора, чтобы обеспечить правильный температурный режим внутри
проектора.
s Расширен. > Oперация > Высотный режим
• Не рекомендуется устанавливать проектор в местах, подверженных
воздействию высокой влажности и запыленности, а также дыма от
источников огня или сигаретного дыма.
Настройка проектора и варианты установки
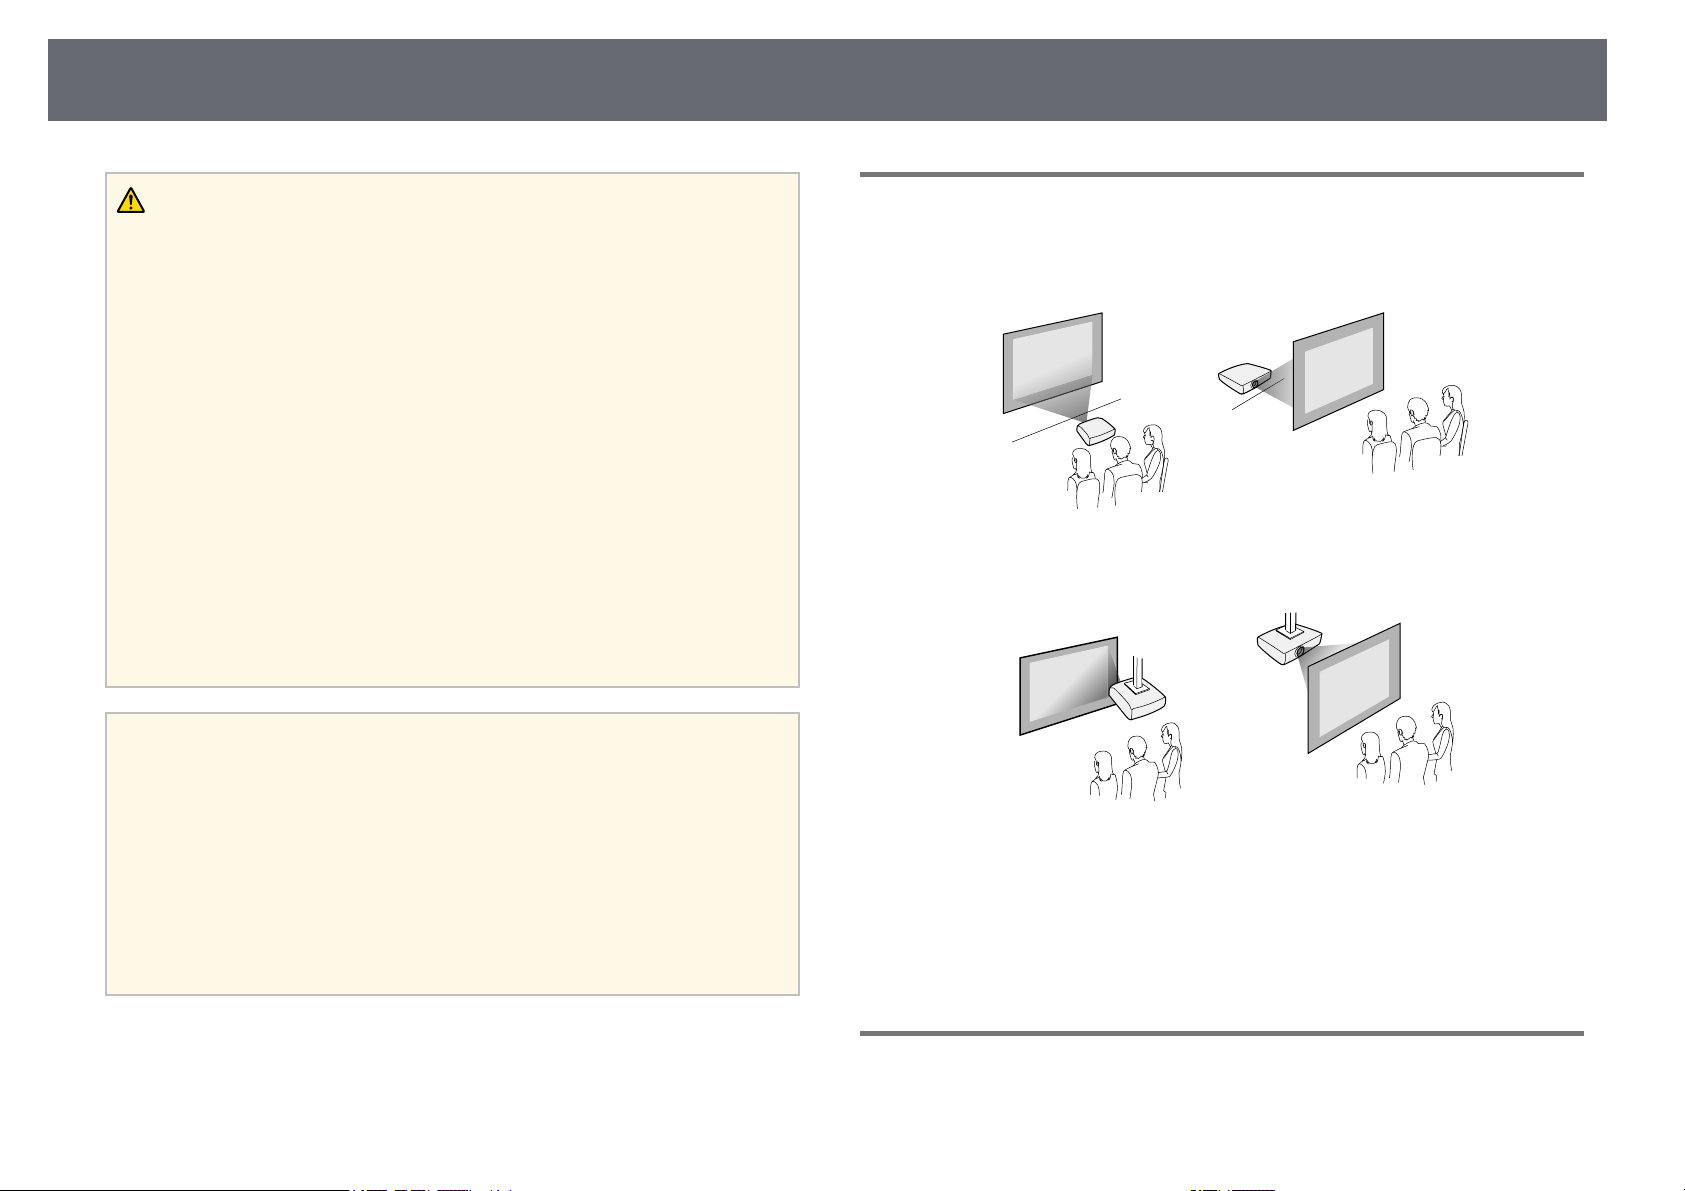
Настроить и установить проектор можно следующим образом:
Спереди / Сзади
Спереди на потолке / Сзади на потолке
Проверьте, что выбран параметр Проецирование в меню Расширен.
проектора в зависимости от используемого способа установки.
gg Дополнительная информация
• «Режимы проецирования» стр.44
gg Дополнительная информация
• «Настройка проектора и варианты установки» стр.24
• «Расстояние проецирования» стр.24
• «Форма изображения» стр.48
• «Настройка проектора – Меню Расширен.» стр.125
Расстояние проецирования
Примерный размер изображения определяется расстоянием, на котором
располагается проектор от экрана. Размер изображения увеличивается
Размещение проектора
при отдалении проектора от экрана, но может сильно зависеть от
коэффициента масштабирования, формата изображения и других
параметров.
Подробные сведения о расстоянии, на котором необходимо
расположить проектор от экрана в зависимости от проецируемого
изображения.
При корректировке трапецеидального искажения изображение
a
становится немного меньше.
25
gg Дополнительная информация
• «Размер экрана и расстояние проецирования» стр.177
Соединения проектора
26
Информация о подключении проектора к различным источникам
изображения содержится в этих разделах.
Внимание
Проверьте форму и ориентацию разъемов на всех кабелях, которые
необходимо присоединить. Если разъем не соответствует порту, не
вставляйте его с силой. Устройство или проектор могут быть повреждены
или работать неправильно.
Перечень кабелей, поставляемых с проектором, см. Руководство
a
gg Дополнительная информация
• «Подключение к компьютеру» стр.26
• «Соединение с источниками видеосигнала» стр.28
• «Соединение с внешними устройствами USB» стр.30
• «Соединение с камерой для документов» стр.31
• «Подключение к внешним устройствам» стр.31
по быстрой установке. Приобретите дополнительные кабели, если
необходимо.
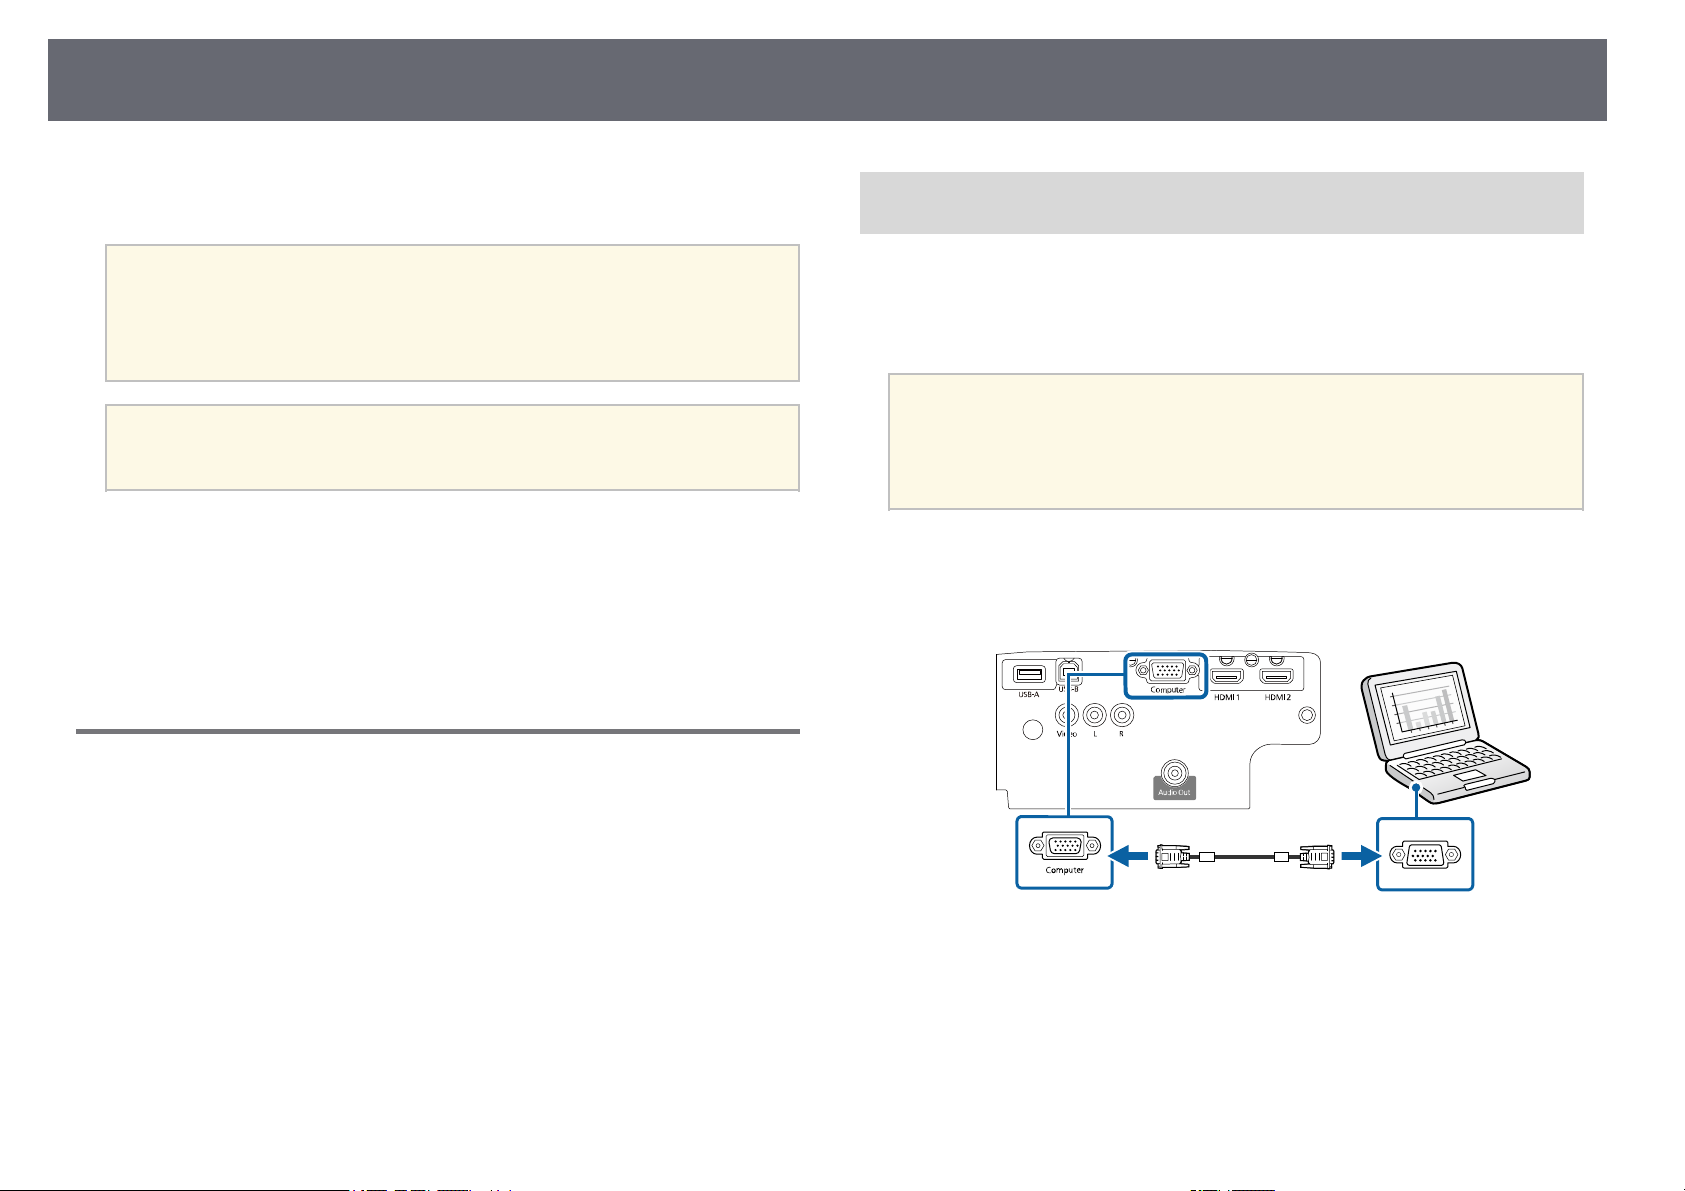
Подключение к компьютеру
Присоединение к компьютеру для передачи видео- и
аудиосигнала через VGA
Подключить проектор к компьютеру можно с помощью компьютерного
кабеля VGA.
Можно воспроизвести звук через акустическую систему проектора,
присоединив приобретаемый отдельно аудиокабель RCA.
• Для подключения компьютера, не имеющего видео порта VGA,
a
Подключите кабель VGA к порту монитора компьютера.
a
Другой конец подключите к порту проектора Computer.
b
необходимо использовать адаптер, позволяющий подключаться
к видео порту VGA проектора.
• Убедитесь, что аудиокабель имеет маркировку «No resistance»
(Нет сопротивления).
Ниже приводятся инструкции для подключения компьютера к
проектору.
gg Дополнительная информация
• «Присоединение к компьютеру для передачи видео- и аудиосигнала
через VGA» стр.26
• «Присоединение к компьютеру для передачи видео- и аудиосигнала
через USB» стр.27
• «Подключение к компьютеру для передачи видео- и аудиосигнала через
HDMI» стр.28
Затяните винты на разъеме VGA.
c
Подключите аудиокабель к гнезду наушников или аудиовыходу
d
ноутбука или к порту динамиков или порту аудиовыхода
настольного компьютера.
Соединения проектора
27
Присоедините другой конец кабеля к порту проектора L-Audio-R.
e
gg Дополнительная информация
• «Настройка проектора – Меню Расширен.» стр.125
• «Список функций» стр.13
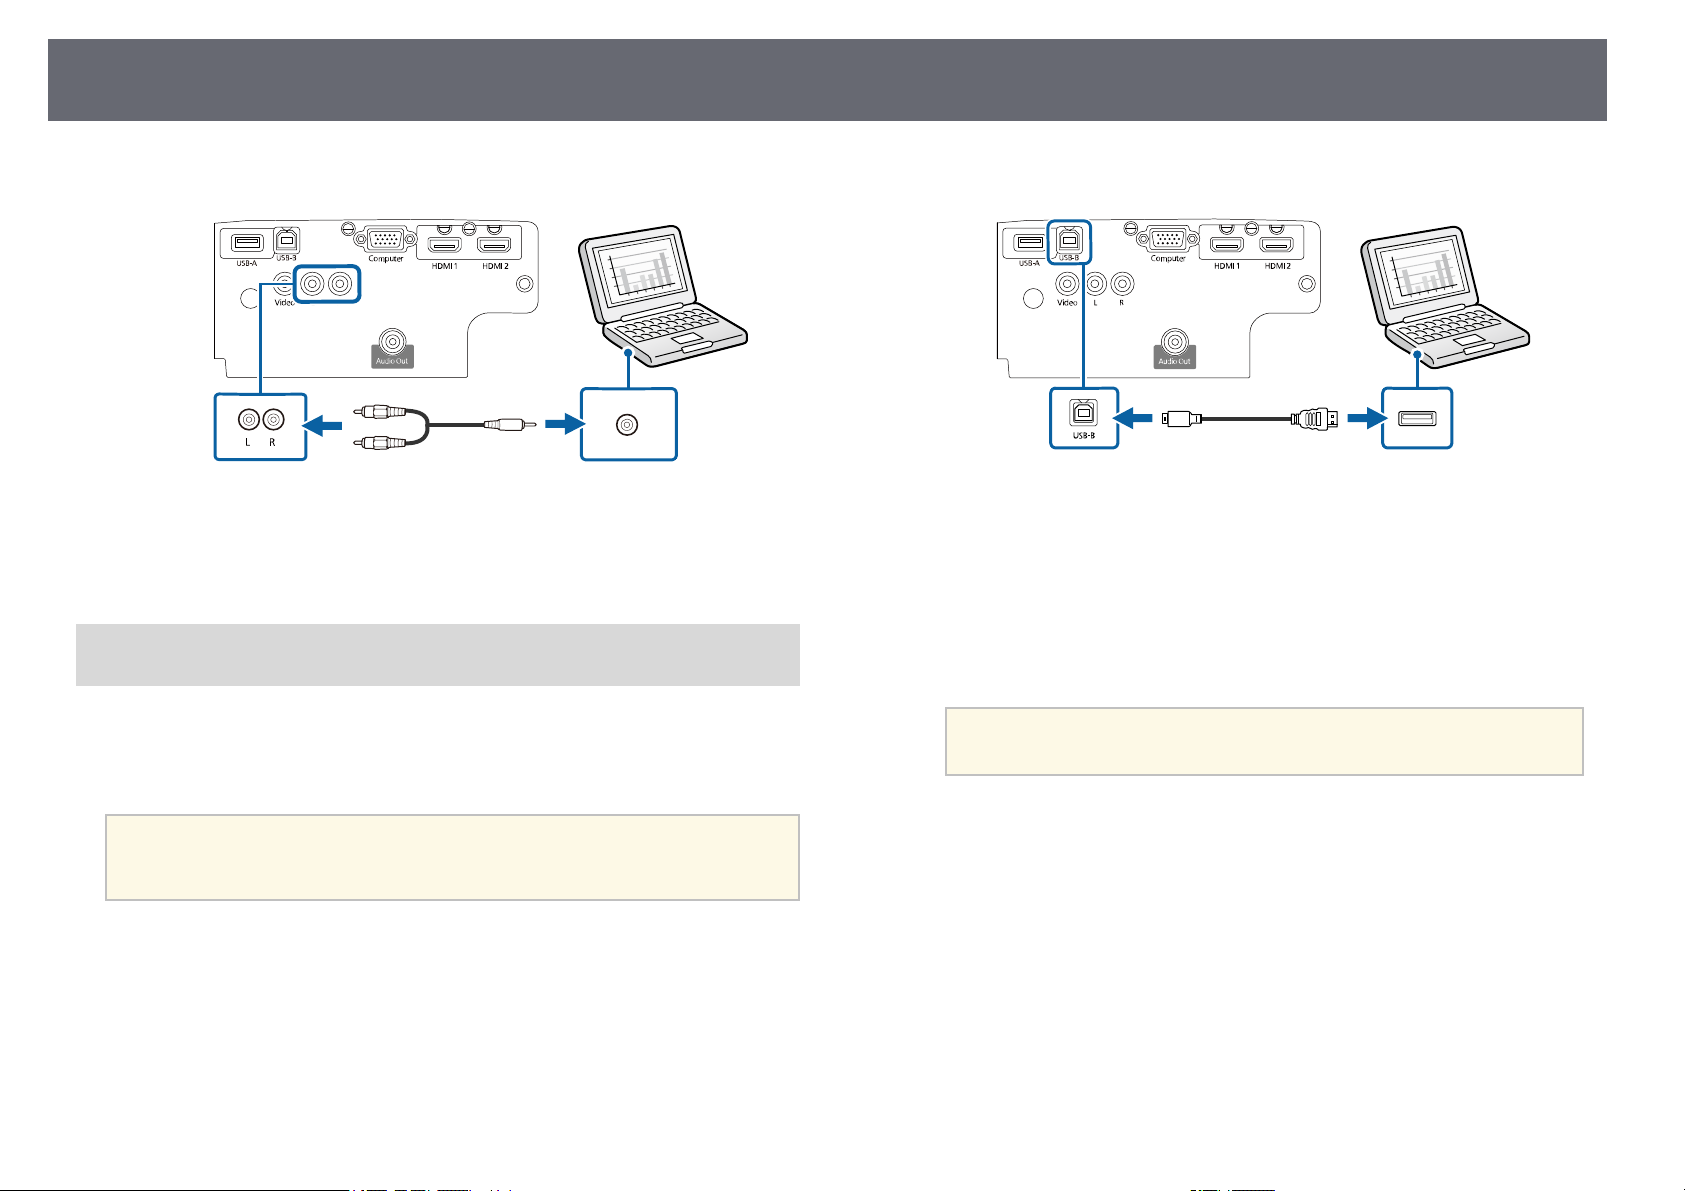
Присоединение к компьютеру для передачи видео- и
аудиосигнала через USB
Если компьютер отвечает системным требованиям, можно передать на
проектор видео- и аудиосигнал через порт USB компьютера. Эта
функция называется USB Display. Подключите проектор к компьютеру
кабелем USB.
• Соединение может работать неправильно при использовании
a
концентратора USB. Подключайте кабель USB непосредственно
к проектору.
Подключите кабель к порту USB-B проектора.
a
Другой конец соедините с любым свободным портом USB
b
компьютера.
Включите проектор и компьютер.
c
Чтобы установить программное обеспечение Epson USB Display,
d
выполните одно из следующих действий:
Прежде чем подключить проектор к компьютеру,
a
• Windows: выберите Выполнить EMP_UDSE.EXE в диалоговом
окне установки программного обеспечения Epson USB Display.
• Mac: папка настройки Epson USB Display отображается на
экране. Выберите USB Display Installer и следуйте
инструкциями на экране по установке программы Epson USB
Display. Если папка USB Display Setup автоматически не
появляется, дважды нажмите EPSON_PJ_UD > USB Display
Installer.
необходимо установить это программное обеспечение (ПО).
Следуйте инструкциям на экране.
e
Пока проецируются изображения, не отсоединяйте кабель USB и
не выключайте питание проектора.
Соединения проектора
28
Проектор проецирует изображение с вашего рабочего стола и
воспроизводит звук, если в презентации он есть.
• Если проектор не показывает изображение, выполните одно из
a
gg Дополнительная информация
• «Системные требования для функции USB Display» стр.184
• «Список функций» стр.13
Подключение к компьютеру для передачи видео- и
аудиосигнала через HDMI
следующих действий:
• Windows: нажмите Все программы > EPSON Projector >
Epson USB Display > Epson USB Display Ver.x.xx.
• Mac: дважды щелкните значок USB Display в папке
Application.
• После завершения проецирования выполните одно из
следующих действий:
• Windows: Отсоедините кабель USB. Не требуется использовать
функцию Безопасное удаление устройства.
• Mac: выберите Отключить в меню пиктограммы USB Display
на панели меню или Dock и отсоедините кабель USB.
Присоедините другой конец кабеля к порту проектора HDMI.
b
Если при прослушивании звука через HDMI-соединение имеются
a
проблемы, подключите один конец приобретаемого отдельно
аудиокабеля RCA к порту L-Audio-R проектора, а другой конец к
выходному аудиопорту компьютера. Выберите аудио вход,
подключенный в меню Расширен. проектора.
s Расширен. > Настройки A/V > Настройки аудио > Выход
аудио HDMI1
s Расширен. > Настройки A/V > Настройки аудио > Выход
аудио HDMI2
Если в компьютере имеется порт HDMI, можно подключить его к
проектору с помощью приобретаемого отдельно кабеля HDMI и
передавать изображение со звуком с компьютера.
Для подключения компьютера Mac, не имеющего порта HDMI,
a
a
необходимо использовать адаптер, позволяющий подключаться к
порту HDMI проектора. Обратитесь в компанию Apple за
информацией о совместимых адаптерах. Более старые
компьютеры Mac (до 2009 года) могут не поддерживать передачу
аудиосигнала через порт HDMI.
Подключите кабель HDMI к выходному порту HDMI компьютера.
gg Дополнительная информация
• «Настройка проектора – Меню Расширен.» стр.125
• «Список функций» стр.13
Соединение с источниками видеосигнала
Ниже приводятся инструкции для подключения к проектору
видеоустройств.
Соединения проектора
29
• Если порт на присоединяемом устройстве имеет нестандартную
a
gg Дополнительная информация
• «Соединение с источником видеосигнала через порт HDMI» стр.29
• «Соединение с источником композитного видеосигнала» стр.29
Соединение с источником видеосигнала через порт HDMI
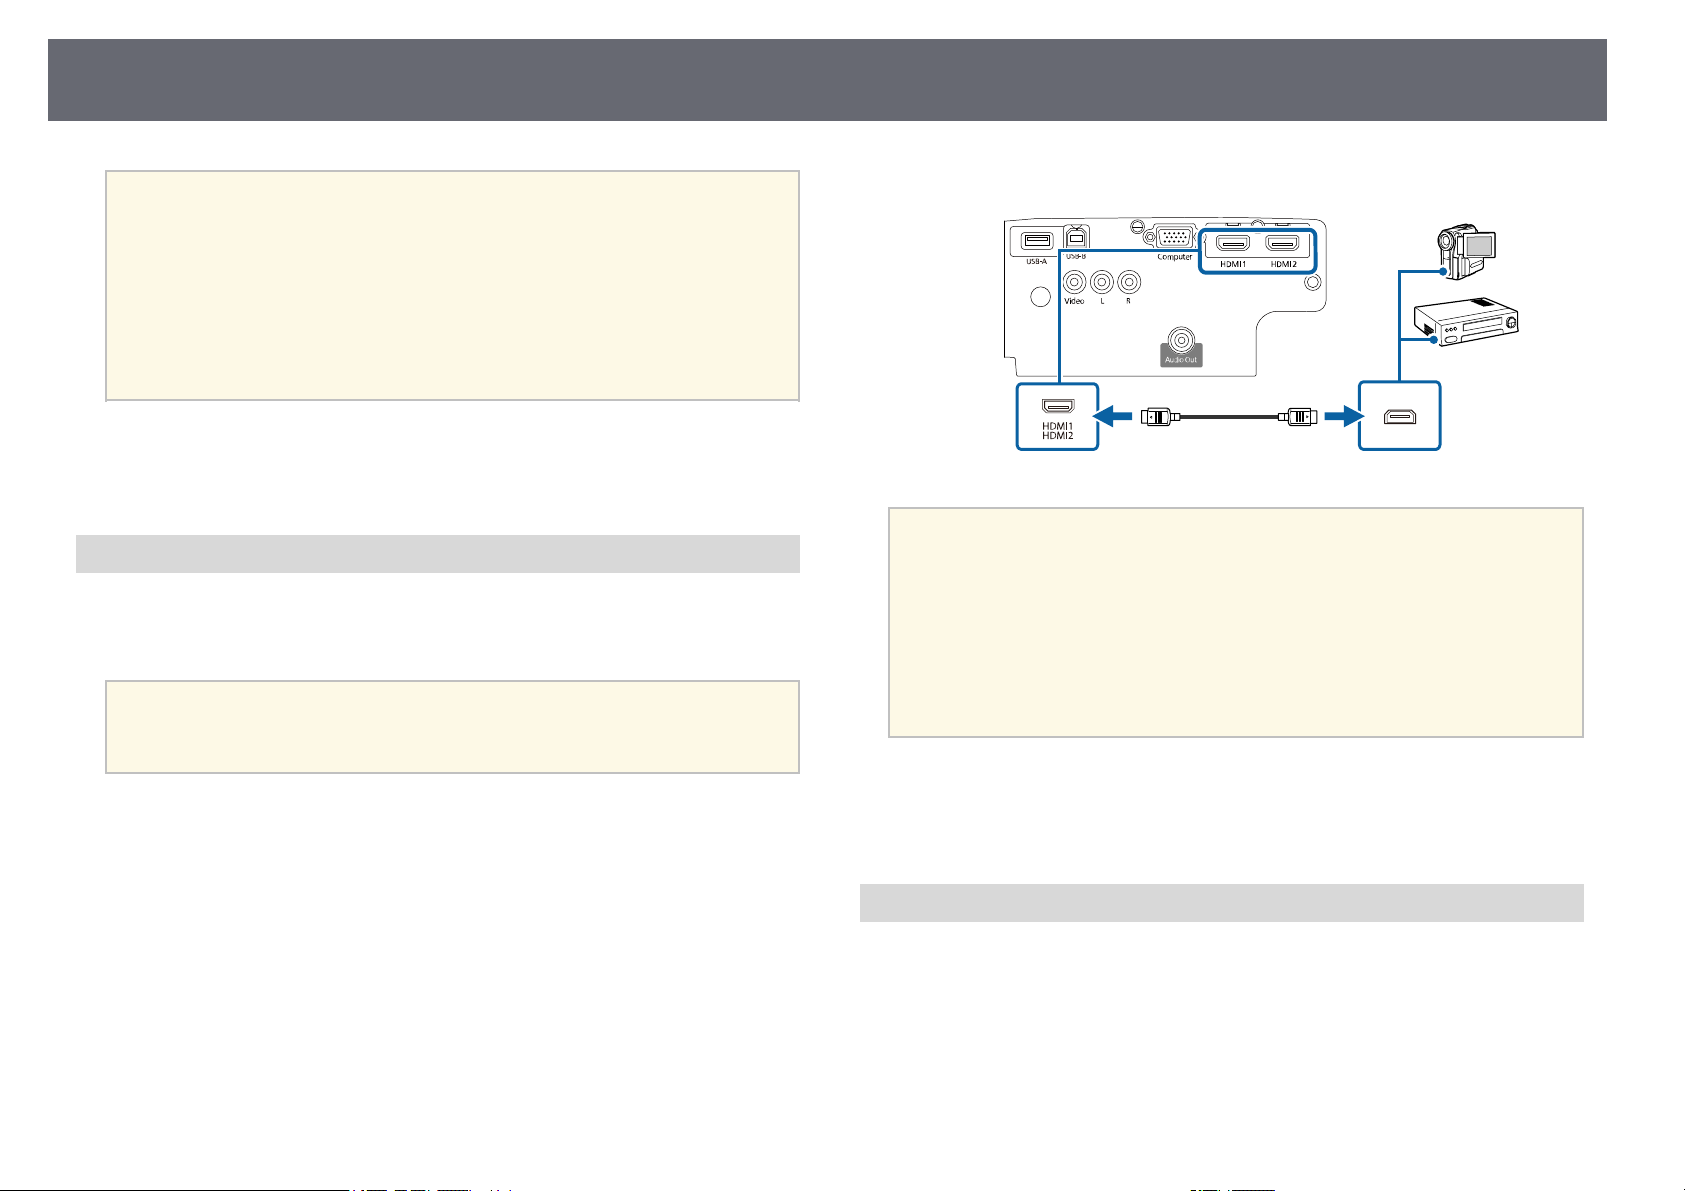
Если в источнике видеосигнала имеется порт HDMI, чтобы передать
проецируемое изображение со звуком, сигнал на проектор подается с
помощью кабеля HDMI.
Внимание
Не включайте источник видеосигнала до подключения его к проектору. В
противном случае проектор может быть поврежден.
форму, для подключения к проектору воспользуйтесь кабелем из
комплекта поставки устройства или дополнительным кабелем.
• Кабели отличаются в зависимости от выходного сигнала
подключенного видеооборудования.
• Некоторые типы видеооборудования могут выводить разные
типы сигналов. Ознакомьтесь с руководством пользователя,
поставляемым в комплекте с видеооборудованием, чтобы узнать
тип сигналов на выходе.
Присоедините другой конец кабеля к порту проектора HDMI.
b
Если при прослушивании звука через HDMI-соединение имеются
a
проблемы, подключите один конец приобретаемого отдельно
аудиокабеля RCA к порту L-Audio-R проектора, а другой конец к
выходному аудиопорту источника видеосигнала. Выберите аудио
вход, подключенный в меню Расширен. проектора.
s Расширен. > Настройки A/V > Настройки аудио > Выход
аудио HDMI1
s Расширен. > Настройки A/V > Настройки аудио > Выход
аудио HDMI2
Подключите кабель HDMI к выходному порту HDMI источника
a
видеосигнала.
gg Дополнительная информация
• «Настройка проектора – Меню Расширен.» стр.125
• «Список функций» стр.13
Соединение с источником композитного видеосигнала
Если источник видеосигнала имеет порт композитного видеосигнала,
можно присоединить его к проектору с помощью видеокабеля RCA или
кабеля A/V.
Можно воспроизвести звук через акустическую систему проектора,
присоединив приобретаемый отдельно аудиокабель RCA.
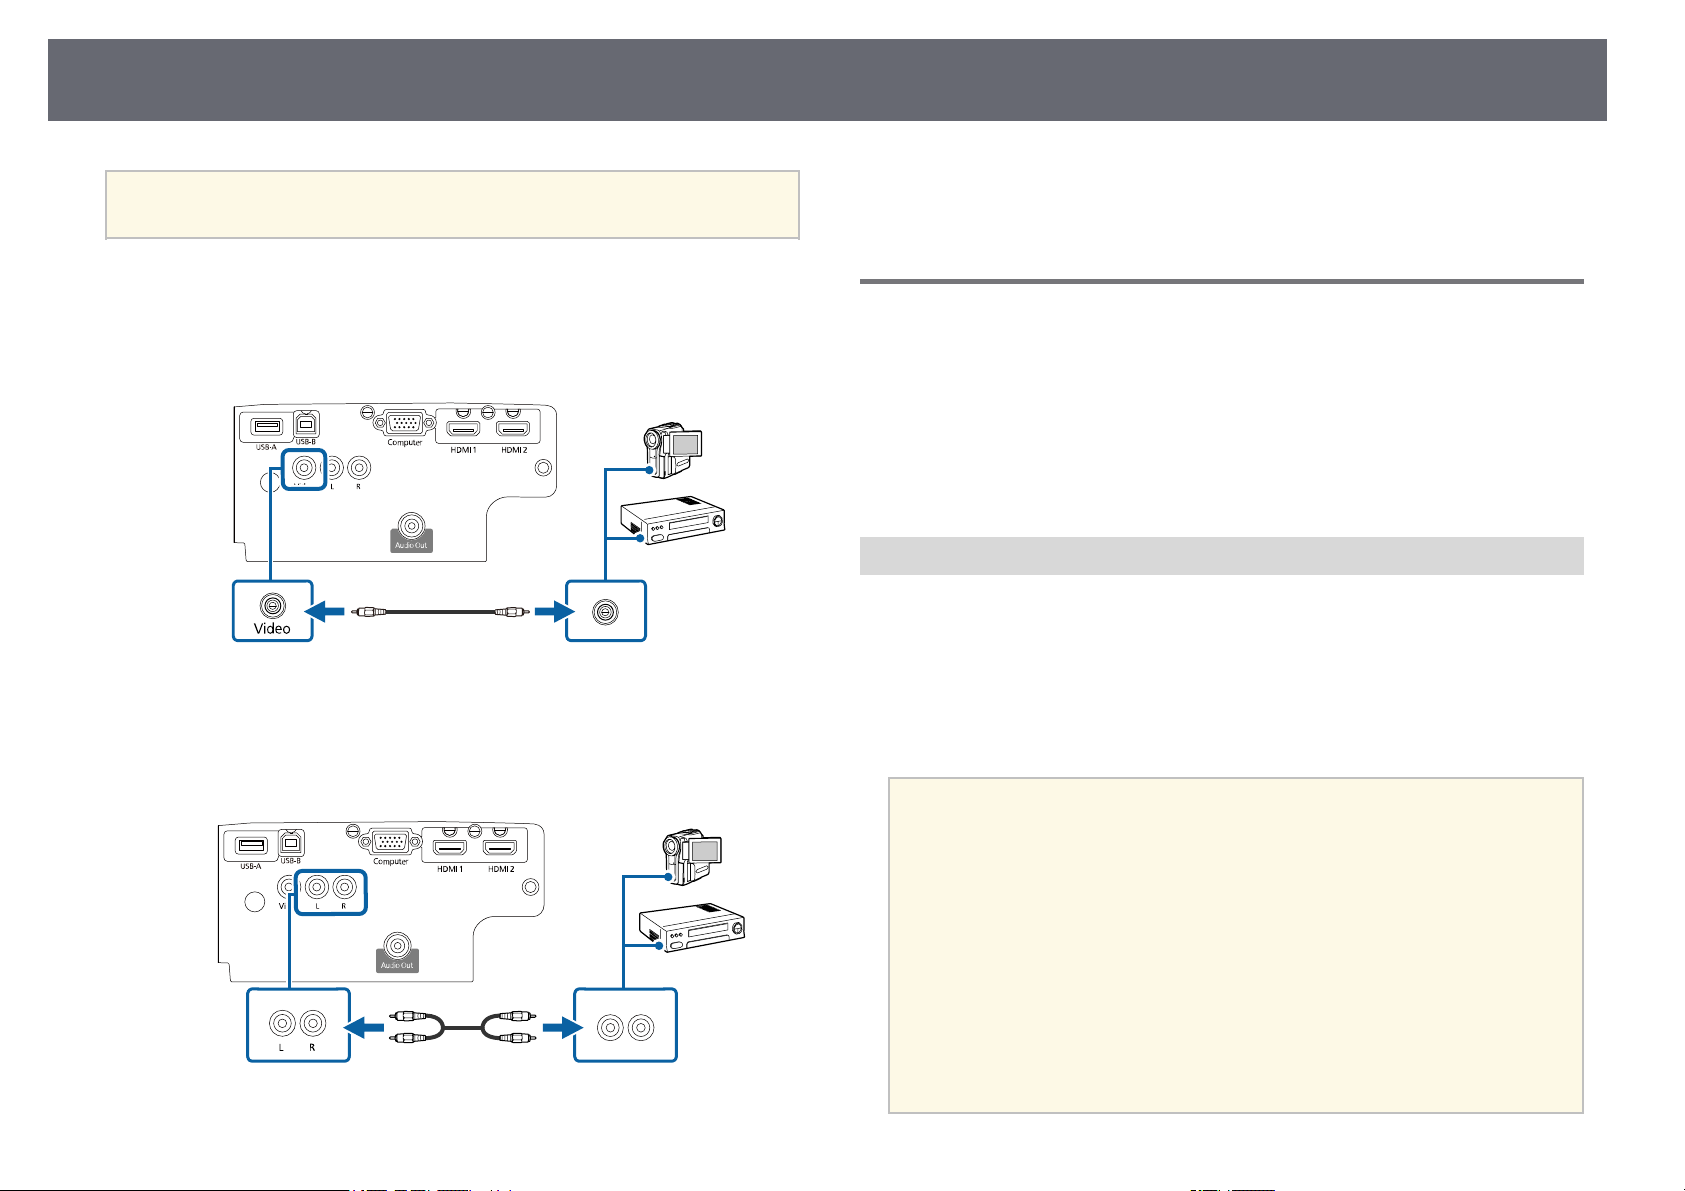
Соединения проектора
30
Убедитесь, что аудиокабель имеет маркировку «No resistance» (Нет
a
a
b
c
сопротивления).
Подключите кабель с желтым разъемом к желтому выходному
видеопорту источника видеосигнала.
Присоедините другой конец кабеля к порту проектора Video.
Подключите аудиокабель к портам аудиовыхода источника
видеосигнала.
gg Дополнительная информация
• «Список функций» стр.13
Соединение с внешними устройствами USB
Ниже приводятся инструкции для подключения к проектору устройств
USB.
gg Дополнительная информация
• «Проецирование с устройства USB» стр.30
• «Подключение к устройству USB» стр.31
• «Отсоединение устройства USB» стр.31
Проецирование с устройства USB
Можно проецировать изображения и другое содержимое без
использования компьютера или устройства видеосигнала, присоединив к
проектору следующие устройства:
• Флеш-накопитель USB
• Цифровая камера или смартфон
• Жесткий диск USB
Присоедините другой конец кабеля к порту проектора L-Audio-R.
d
a
• Цифровые камеры или смартфоны должны быть устройствами с
подключением по USB, а не TWAIN-совместимыми
устройствами, и должны соответствовать классу массовой
памяти USB.
• Жесткие диски USB должны соответствовать следующим
требованиям:
• Соответствие классу массовой памяти USB (поддерживаются
не все устройства с любым классом массовой памяти USB)
• Отформатировано в FAT16/32
• Питание от собственного источника питания перем. тока
(жесткие диски с питанием от шины не рекомендуются)
• Нежелательно использовать жесткие диски с несколькими
разделами
Loading…
User’s Guide

Contents 2
Notations Used in This Guide 6
Using the Manual to Search for Information ……………………………. 7
Searching by Keyword……………………………………………………………………………………………………. 7
Jumping Directly from Bookmarks……………………………………………………………………………….. 7
Printing Only the Pages You Need……………………………………………………………………………….. 7
Getting the Latest Version of the Documents…………………………… 8
Introduction to Your Projector 9
Projector Features…………………………………………………………………. 10
Quick and Easy Setup …………………………………………………………………………………………………… 10
Easy Wireless Projection ………………………………………………………………………………………………. 10
List of Functions…………………………………………………………………………………………………………….. 11
Projector Parts and Functions ……………………………………………….. 13
Projector Parts — Front…………………………………………………………………………………………………… 13
Projector Parts — Rear…………………………………………………………………………………………………….. 14
Projector Parts — Base ……………………………………………………………………………………………………. 15
Projector Parts — Control Panel……………………………………………………………………………………. 15
Projector Parts — Remote Control ……………………………………………………………………………….. 16
Setting Up the Projector 18
Projector Placement ……………………………………………………………… 19
Projector Setup and Installation Options………………………………………………………………….. 20
Projection Distance……………………………………………………………………………………………………….. 20
Projector Connections …………………………………………………………… 22
Connecting to a Computer………………………………………………………………………………………….. 22
Connecting to a Computer for VGA Video and Audio………………………………………. 22
Connecting to a Computer for USB Video and Audio……………………………………….. 23
Connecting to a Computer for HDMI Video and Audio ……………………………………. 24
Connecting to Video Sources ……………………………………………………………………………………… 24
Connecting to an HDMI Video Source …………………………………………………………………. 25
Connecting to a Composite Video Source…………………………………………………………… 25
Connecting to External USB Devices …………………………………………………………………………. 26
USB Device Projection …………………………………………………………………………………………….. 26
Connecting to a USB Device ………………………………………………………………………………….. 26
Disconnecting a USB Device ………………………………………………………………………………….. 27
Connecting to a Document Camera ………………………………………………………………………….. 27
Connecting to External Devices………………………………………………………………………………….. 27
Connecting to External Speakers ………………………………………………………………………….. 27
Installing Batteries in the Remote Control……………………………… 29
Remote Control Operation…………………………………………………….. 30
Opening the Lens Cover ………………………………………………………… 31
Using Basic Projector Features 32
Turning On the Projector ………………………………………………………. 33
Home Screen………………………………………………………………………………………………………………….. 34
Turning Off the Projector ………………………………………………………. 36
Setting the Date and Time …………………………………………………….. 37
Selecting the Language for the Projector Menus ……………………. 39
Projection Modes ………………………………………………………………….. 40
Changing the Projection Mode Using the Remote Control…………………………………… 40
Changing the Projection Mode Using the Menus …………………………………………………… 40
Displaying a Test Pattern ………………………………………………………. 42
Adjusting the Image Height…………………………………………………… 43
Image Shape…………………………………………………………………………. 44
Auto V-Keystone ……………………………………………………………………………………………………………. 44
Correcting the Image Shape with the Horizontal Keystone Slider……………………….. 44
Correcting the Image Shape with the Keystone Buttons ………………………………………. 45
Correcting the Image Shape with Quick Corner ……………………………………………………… 46

Contents 3
Resizing the Image with the Zoom Ring…………………………………. 48
Focusing the Image Using the Focus Ring………………………………. 49
Selecting an Image Source…………………………………………………….. 50
Image Aspect Ratio ……………………………………………………………….. 52
Changing the Image Aspect Ratio……………………………………………………………………………… 52
Available Image Aspect Ratios ……………………………………………………………………………………. 52
Projected Image Appearance with Each Aspect Mode ………………………………………….. 53
Adjusting Image Quality (Color Mode)…………………………………… 54
Changing the Color Mode …………………………………………………………………………………………… 54
Available Color Modes………………………………………………………………………………………………….. 54
Setting Auto Iris …………………………………………………………………………………………………………….. 54
Controlling the Volume with the Volume Buttons ………………….. 56
Adjusting Projector Features 57
Projecting Two Images Simultaneously …………………………………. 58
Unsupported Input Source Combinations for Split Screen Projection………………… 60
Split Screen Projection Restrictions……………………………………………………………………………. 60
Projecting a PC Free Presentation………………………………………….. 61
Supported PC Free File Types……………………………………………………………………………………… 61
Precautions on PC Free Projection …………………………………………………………………………….. 61
Starting a PC Free Slide Show …………………………………………………………………………………….. 62
Starting a PC Free Movie Presentation ……………………………………………………………………… 63
PC Free Display Options ………………………………………………………………………………………………. 64
Shutting Off the Image and Sound Temporarily …………………….. 66
Stopping Video Action Temporarily ………………………………………. 67
Zooming In/Zooming Out of Images (E-Zoom)……………………….. 68
Zooming Into Images …………………………………………………………………………………………………… 68
Zooming Out of Images……………………………………………………………………………………………….. 68
Saving a User’s Logo Image …………………………………………………… 70
Saving a User Pattern ……………………………………………………………. 71
Color Difference Correction when Projecting from Multiple
Projectors……………………………………………………………………………… 72
Setting the Projector ID ……………………………………………………………………………………………….. 72
Selecting the Projector You want to Operate ………………………………………………………….. 72
Matching Multiple-Projector Display Quality …………………………………………………………… 73
Projector Security Features……………………………………………………. 75
Password Security Types ……………………………………………………………………………………………… 75
Setting a Password…………………………………………………………………………………………………… 75
Selecting Password Security Types……………………………………………………………………….. 76
Entering a Password to Use the Projector …………………………………………………………… 77
Locking the Projector’s Buttons………………………………………………………………………………….. 77
Unlocking the Projector’s Buttons ………………………………………………………………………… 78
Installing a Security Cable……………………………………………………………………………………………. 78
Using the Projector on a Network 80
Wireless Network Projection………………………………………………….. 81
Installing the Wireless LAN Module …………………………………………………………………………… 81
Selecting Wireless Network Settings Manually………………………………………………………… 82
Selecting Wireless Network Settings in Windows …………………………………………………… 84
Selecting Wireless Network Settings in Mac…………………………………………………………….. 85
Setting Up Wireless Network Security……………………………………………………………………….. 85
Supported Client and CA Certificates…………………………………………………………………… 87
Using a QR Code to Connect a Mobile Device…………………………………………………………. 87
Using a USB Key to Connect a Windows Computer ……………………………………………….. 88
Wireless Network Projection from a Mobile Device (Screen
Mirroring)……………………………………………………………………………… 90
Selecting Screen Mirroring Settings…………………………………………………………………………… 90
Connecting Using Screen Mirroring with the Miracast Function …………………………. 92
Connecting Using Screen Mirroring in Windows 10………………………………………….. 92
Connecting Using Screen Mirroring in Windows 8.1…………………………………………. 93
Secure HTTP………………………………………………………………………….. 95

Contents 4
Importing a Web Server Certificate Using the Menus…………………………………………….. 95
Supported Web Server Certificates……………………………………………………………………….. 96
Monitoring and Controlling the Projector 97
Epson Projector Management ……………………………………………….. 98
Controlling a Networked Projector Using a Web Browser ………. 99
Web Control Options………………………………………………………………………………………………….. 100
Registering Digital Certificates from a Web Browser…………….. 103
Setting Up Projector Network E-Mail Alerts …………………………. 104
Network Projector E-mail Alert Messages ………………………………………………………………. 104
Setting Up Monitoring Using SNMP……………………………………… 106
Setting Projector Event Schedules……………………………………….. 107
Adjusting the Menu Settings 110
Using the Projector’s Menus ………………………………………………… 111
Using the Displayed Keyboard…………………………………………….. 112
Available Text Using the Displayed Keyboard……………………………………………………….. 112
Image Quality Settings — Image Menu ………………………………….. 113
Input Signal Settings — Signal Menu……………………………………… 114
Projector Feature Settings — Settings Menu ………………………….. 115
Projector Setup Settings — Extended Menu …………………………… 117
Projector Network Settings — Network Menu………………………… 120
Network Menu — Screen Mirroring Settings ……………………………………………………………. 121
Network Menu — Basic Menu …………………………………………………………………………………….. 122
Network Menu — Wireless LAN Menu ………………………………………………………………………. 123
Network Menu — Notifications Menu……………………………………………………………………….. 125
Network Menu — Others Menu………………………………………………………………………………….. 126
Network Menu — Reset Menu…………………………………………………………………………………….. 127
Projector Setup Settings — ECO Menu …………………………………… 128
Projector Information Display — Info Menu …………………………… 130
Info Menu — Projector Info Menu ……………………………………………………………………………… 130
Event ID Code List………………………………………………………………………………………………….. 131
Projector Reset Options — Reset Menu ………………………………….. 133
Copying Menu Settings Between Projectors (Batch Setup) …… 134
Transferring Settings From a USB Flash Drive ……………………………………………………….. 134
Transferring Settings From a Computer …………………………………………………………………. 135
Batch Setup Error Notification …………………………………………………………………………….. 136
Maintaining the Projector 137
Projector Maintenance ………………………………………………………… 138
Cleaning the Lens………………………………………………………………… 139
Cleaning the Projector Case…………………………………………………. 140
Air Filter and Vent Maintenance ………………………………………….. 141
Cleaning the Air Filter and Vents……………………………………………………………………………… 141
Replacing the Air Filter ………………………………………………………………………………………………. 141
Projector Lamp Maintenance ………………………………………………. 144
Replacing the Lamp……………………………………………………………………………………………………. 144
Resetting the Lamp Timer …………………………………………………………………………………………. 147
Solving Problems 148
Projection Problems ……………………………………………………………. 149
Projector Indicator Status ……………………………………………………. 150
Using the Projector Help Displays………………………………………… 152
Solving Image or Sound Problems……………………………………….. 153
Solutions When No Image Appears…………………………………………………………………………. 153
Solutions When Image is Incorrect Using the USB Display Function ………………… 153

Contents 5
Solutions When «No Signal» Message Appears……………………………………………………… 154
Displaying From a Laptop…………………………………………………………………………………….. 154
Displaying From a Mac Laptop……………………………………………………………………………. 154
Solutions When «Not Supported» Message Appears ……………………………………………. 154
Solutions When Only a Partial Image Appears………………………………………………………. 155
Solutions When the Image is not Rectangular………………………………………………………. 155
Solutions When the Image Contains Noise or Static…………………………………………….. 155
Solutions When the Image is Fuzzy or Blurry ………………………………………………………… 156
Solutions When the Image Brightness or Colors are Incorrect …………………………… 156
Solutions to Sound Problems……………………………………………………………………………………. 157
Solutions When Image File Names are not Displayed Correctly in PC Free……… 157
Solving Projector or Remote Control Operation Problems……. 158
Solutions to Projector Power or Shut-Off Problems……………………………………………… 158
Solutions to Problems with the Remote Control…………………………………………………… 158
Solutions to Password Problems………………………………………………………………………………. 159
Solution When «The Battery that Saves Your Clock Settings is Running Low»
Message Appears………………………………………………………………………………………………………… 159
Solving Network Problems ………………………………………………….. 160
Solutions When Wireless Authentication Fails ………………………………………………………. 160
Solutions When You Cannot Access the Projector Through the Web ………………. 160
Solutions When Network Alert E-Mails are not Received…………………………………….. 160
Solutions When the Image Contains Static During Network Projection…………… 161
Solutions When You Cannot Connect Using Screen Mirroring…………………………… 161
Solutions When the Image or Sound Contains Static During Screen Mirroring
Connection…………………………………………………………………………………………………………………… 161
Appendix 163
Optional Accessories and Replacement Parts……………………….. 164
Screens………………………………………………………………………………………………………………………….. 164
Cables ……………………………………………………………………………………………………………………………. 164
Mounts………………………………………………………………………………………………………………………….. 164
For Wireless Connection ……………………………………………………………………………………………. 164
External Devices ………………………………………………………………………………………………………….. 165
Replacement Parts………………………………………………………………………………………………………. 165
Screen Size and Projection Distance…………………………………….. 166
Supported Monitor Display Resolutions ………………………………. 168
Projector Specifications ………………………………………………………. 169
Connector Specifications …………………………………………………………………………………………… 169
External Dimensions……………………………………………………………. 171
USB Display System Requirements ………………………………………. 172
List of Safety Symbols and Instructions ……………………………….. 173
Glossary ……………………………………………………………………………… 175
Notices ……………………………………………………………………………….. 177
FCC Compliance Statement………………………………………………………………………………………. 177
Indication of the manufacturer and the importer in accordance with
requirements of EU directive…………………………………………………………………………………….. 178
Restriction of Use………………………………………………………………………………………………………… 178
Operating System References…………………………………………………………………………………… 178
Trademarks…………………………………………………………………………………………………………………… 178
Copyright Notice…………………………………………………………………………………………………………. 179
Copyright Attribution…………………………………………………………………………………………………. 179
Notations Used in This Guide
Safety Symbols
The projector and its manuals use graphical symbols and labels to indicate content that tells you how to use the projector safely.
Read and carefully follow the instructions that are marked with these symbols and labels to avoid injury to persons or damage to property.
Warning
This symbol indicates information that, if ignored, could possibly result in personal injury or even death.
Caution
This symbol indicates information that, if ignored, could possibly result in personal injury or physical damage due to incorrect handling.
General Information Notations
Attention
This label indicates procedures that may result in damage or injury if sufficient care is not taken.
This label indicates additional information that may be useful to know.
[Button name] Indicates the name of the buttons on the remote control or the projector.
Example: [Esc] button
Menu/Setting name Indicates projector menu and setting names.
Example:
Select the Image menu
sImage >Advanced
This label indicates links to the related pages.
sThis label indicates the projector’s current menu level.
gg Related Links
• «Using the Manual to Search for Information» p.7
• «Getting the Latest Version of the Documents» p.8
Using the Manual to Search for Information 7
The PDF manual allows you to search for information you are looking for by
keyword, or jump directly to specific sections using the bookmarks. You can
also print only the pages you need. This section explains how to use a PDF
manual that has been opened in Adobe Reader X on your computer.
gg Related Links
• «Searching by Keyword» p.7
• «Jumping Directly from Bookmarks» p.7
• «Printing Only the Pages You Need» p.7
Searching by Keyword
Click Edit >Advanced Search. Enter the keyword (text) for information you
want to find in the search window, and then click Search. Hits are displayed
as a list. Click one of the displayed hits to jump to that page.
Jumping Directly from Bookmarks
Click a title to jump to that page. Click +or >to view the lower level titles in
that section. To return to the previous page, perform the following operation
on your keyboard.
• Windows: Hold down Alt, and then press ←.
• Mac OS: Hold down the command key, and then press ←.
Printing Only the Pages You Need
You can extract and print only the pages you need. Click Print in the File
menu, and then specify the pages you want to print in Pages in Pages to
Print.
• To specify a series of pages, enter a hyphen between the start page and the
end page.
Example: 20-25
• To specify pages that are not in series, divide the pages with commas.
Example: 5, 10, 15

Getting the Latest Version of the Documents 8
You can get the latest version of the manuals and specifications on the Epson
Web site.
Visit epson.sn, and enter your projector’s name.

Introduction to Your Projector
Refer to these sections to learn more about your projector’s features and part names.
gg Related Links
• «Projector Features» p.10
• «Projector Parts and Functions» p.13
Projector Features 10
This projector comes with these special features. Refer to these sections for
more details.
gg Related Links
• «Quick and Easy Setup» p.10
• «Easy Wireless Projection» p.10
• «List of Functions» p.11
Quick and Easy Setup
• Direct Power On feature to turn on the projector as soon as you plug it in.
• Auto Power On feature to turn on the projector when the projector detects
an image signal from the port you specified as the Auto Power On source.
• Home screen feature to easily select an input source and useful functions.
• Automatic vertical keystone correction always displays a rectangular screen
(Auto V-Keystone).
• Horizontal keystone slider allows you to quickly correct horizontal
distortion in the projected image.
gg Related Links
• «Auto V-Keystone» p.44
• «Projector Setup Settings — Extended Menu» p.117
• «List of Functions» p.11
• «Turning On the Projector» p.33
• «Correcting the Image Shape with the Horizontal Keystone Slider» p.44
Easy Wireless Projection
• Screen Mirroring to connect your projector and mobile device wirelessly
using Miracast technology.
• Epson iProjection (Windows/Mac) to project up to four images at the same
time by splitting the projected screen. You can project images from
computers on the network, or from smartphones or tablet devices.
See the Epson iProjection Operation Guide (Windows/Mac) for details.
Projector Features 11
a• You can download the necessary software and manuals from the
following Web site:
http://www.epson.com/
• Epson iProjection (iOS/Android) to connect your projector and mobile
device wirelessly using the app available on the App Store or Google Play.
aAny fees incurred when communicating with the App Store or
Google Play are the responsibility of the customer.
• Epson iProjection (Chromebook) to connect your projector and
Chromebook device wirelessly using the app available on the Chrome Web
Store.
aAny fees incurred when communicating with the Chrome Web Store
are the responsibility of the customer.
gg Related Links
• «List of Functions» p.11
• «Using the Projector on a Network» p.80
List of Functions
The following table lists the functions supported by each projector model.
Supported functions are indicated by a «✓» mark.
EH‑TW740 EH‑TW750/EH‑T
W710
Resolution Full HD Full HD
1920×1080 1920×1080
Wireless LAN (built-in) — ✓
Wireless LAN (optional) ✓ —
Screen Mirroring — ✓
EH‑TW740 EH‑TW750/EH‑T
W710
HDMI1/HDMI2 ports — ✓
HDMI port ✓ —
Computer port — ✓
Video port — ✓
USB-A port ✓ ✓
USB-B port ✓ ✓
L-Audio-R ports — ✓
Audio Out port ✓ ✓
Lens cover ✓ ✓
Horizontal keystone slider ✓ ✓
Zoom ring — ✓
Document camera (optional) ✓ ✓
Date & Time setting — ✓
Schedule Settings — ✓
Auto V-Keystone ✓ ✓
PC Free ✓ ✓
Batch Setup (USB flash drive)✓ ✓
Batch Setup (USB cable)✓ ✓
User’s Logo Protection ✓ ✓
Network Protection ✓ ✓
Schedule Protection — ✓
Screen Mirroring Protection — ✓
Epson iProjection ✓ ✓
Epson Projector Management ✓ ✓
Epson Web Control ✓ ✓
Mail Notification ✓ ✓
SNMP ✓ ✓
Projector Features 12
EH‑TW740 EH‑TW750/EH‑T
W710
Secure HTTP (HTTPS) — ✓
WPA Enterprise security — ✓
Projector Parts and Functions 13
The following sections explain the projector parts and their functions.
All of the features in this guide are explained using illustrations of EH‑TW750
unless otherwise mentioned.
gg Related Links
• «Projector Parts — Front» p.13
• «Projector Parts — Rear» p.14
• «Projector Parts — Base» p.15
• «Projector Parts — Control Panel» p.15
• «Projector Parts — Remote Control» p.16
• «List of Functions» p.11
Projector Parts — Front
Name Function
AAir exhaust vent Exhaust vent for air used to cool the projector
internally.
Name Function
Warning
Do not look into the vents. If the lamp
explodes, gases may escape and small
fragments of glass may be scattered which
could cause an injury. Contact a doctor if any
fragments of broken glass are inhaled or get
into the eyes or mouth.
Caution
While projecting, do not put your face or
hands near the air exhaust vent, and do not
place objects that may become warped or
damaged by heat near the vent. Hot air from
the air exhaust vent could cause burns,
warping, or accidents to occur.
BA/V Mute slide lever Slide the knob to open and close the lens cover.
CFoot release lever Press the foot release lever to extend and retract the
front adjustable foot.
DLens cover Close when not using the projector to protect the lens.
By closing it during projection you can hide the image
and the sound.
EFront adjustable foot When the projector is set up on a surface such as a
desk, extend the foot to adjust the position of the
image.
FLens Images are projected from here.
GRemote receiver Receives signals from the remote control.
HHorizontal keystone
slider
Corrects horizontal distortion in the projected image.
IAir intake vent (air
filter)
Takes in air to cool the projector internally.
JAir filter cover Open to access the air filter.
Projector Parts and Functions 14
Name Function
KSecurity slot The security slot is compatible with the Microsaver
Security System manufactured by Kensington.
LControl panel Operates the projector.
MZoom ring Adjusts the image size.
NFocus ring Adjusts the image focus.
OLamp cover Open to access the projector’s lamp.
gg Related Links
• «Projector Indicator Status» p.150
• «List of Functions» p.11
• «Resizing the Image with the Zoom Ring» p.48
• «Focusing the Image Using the Focus Ring» p.49
• «Correcting the Image Shape with the Horizontal Keystone Slider» p.44
Projector Parts — Rear
EH‑‑TW750/EH‑‑TW710
EH‑‑TW740
Name Function
APower inlet Connects the power cord to the projector.
BRemote receiver Receives signals from the remote control.
CVideo port Inputs composite video signals from video sources.
DL-Audio-R ports Inputs audio from equipment connected to the
Computer or Video port.
EAudio Out port Outputs audio from the current input source to an
external speaker.
FSpeaker Outputs audio.
GHDMI1, HDMI2
ports
HDMI port
Inputs video signals from HDMI compatible video
equipment and computers.
This projector is compatible with HDCP.
HComputer port Inputs image signals from a computer.
IUSB-B port Connects a USB cable to the computer to project
computer images.
JUSB-A port Connects a USB memory device or a digital camera
and projects movies or images using PC Free.
Connects the optional document camera.
Connects the wireless LAN module.
Projector Parts and Functions 15
gg Related Links
• «List of Functions» p.11
Projector Parts — Base
Name Function
ACeiling mount fixing
points (three points)
Attach the optional ceiling mount here when
suspending the projector from a ceiling.
Name Function
BSecurity cable
attachment point
Pass a commercially available wire lock through here
and lock it in place.
You can also attach the optional safety wire here to
prevent the projector from falling from the ceiling or
wall.
CRear feet When the projector is set up on a surface such as a
desk, turn to extend and retract the feet to adjust the
horizontal tilt.
DFront adjustable foot When the projector is set up on a surface such as a
desk, extend the foot to adjust the position of the
image.
gg Related Links
• «Installing a Security Cable» p.78
Projector Parts — Control Panel
Projector Parts and Functions 16
Name Function
A[Source Search]
button
Switches to the next input source.
B[Enter] button [ ] Enters the current selection and moves to the next level
while displaying the projector’s menu or help.
Optimizes Tracking,Sync., and Position in the
projector’s Signal menu while projecting an analog
RGB signal from the Computer port.
CKeystone adjustment
buttons and arrow
buttons
Displays the Keystone screen allowing you to correct
keystone distortion.
Selects menu items while displaying the projector’s
menu or help.
D[Esc] button Stops the current function.
Moves back to the previous menu level while
displaying the projector’s menu.
EVolume buttons and
arrow buttons : Decreases the volume.
: Increases the volume.
Corrects keystone distortion in the horizontal direction
when the Keystone screen is displayed.
Selects menu items while displaying the projector’s
menu or help.
F[Menu] button Displays and closes the projector’s menu.
G[Home] button Displays and closes the Home screen.
HPower button [ ] Turns the projector on or off.
IIndicators Indicates the projector’s status.
gg Related Links
• «Input Signal Settings — Signal Menu» p.114
• «Home Screen» p.34
• «Projector Indicator Status» p.150
• «Correcting the Image Shape with the Keystone Buttons» p.45
Projector Parts — Remote Control
Projector Parts and Functions 17
Name Function
APower button [ ] Turns the projector on or off.
B[HDMI] button Switches the image source between the HDMI ports.
C[Computer] button Switches the image source to the Computer ports.
DNumeric buttons Enters numbers in the projector’s menu while holding
down the [Num] button.
E[Auto] button Optimizes Tracking,Sync., and Position in the
projector’s Signal menu while projecting an analog
RGB signal from the Computer ports.
F[Num] button Hold down this button to enter numbers using the
numeric buttons.
G[Menu] button Displays and closes the projector’s menu.
HArrow buttons Selects menu items while displaying the projector’s
menu.
I[Enter] button [ ] Enters the current selection and moves to the next level
while displaying the projector’s menu.
J[User] button Performs settings assigned in the User Button setting
in the projector’s Settings menu.
K[Color Mode] button Changes the color mode.
L[Aspect] button Changes the aspect mode.
M[E-Zoom] +/–
buttons
Resizes the projected image.
N[A/V Mute] button Turns the video and audio on or off temporarily.
O[Split] button Projects two images from different image sources
simultaneously by splitting the projected screen.
P[Home] button Displays and closes the Home screen.
Q[Freeze] button Pauses or resumes images.
R[Volume] up/down
buttons
Adjusts the speaker volume.
S[Default] button Returns the selected setting to its default value.
Name Function
T[Esc] button Stops the current function.
Moves back to the previous menu level while
displaying the projector’s menu.
U[ID] button Hold down this button and press the numeric buttons
to select the ID for the projector you want to operate
using the remote control.
V[LAN] button Switches the image source between the network
connected devices.
W[USB] button Switches the image source between the USB Display
and USB-A port.
X[Source Search]
button
Switches to the next input source.
YRemote control light
emitting area
Outputs remote control signals.
gg Related Links
• «Image Aspect Ratio» p.52
• «Adjusting Image Quality (Color Mode)» p.54
• «Input Signal Settings — Signal Menu» p.114
• «Projector Setup Settings — Extended Menu» p.117
• «Home Screen» p.34
• «Projecting Two Images Simultaneously» p.58
• «Connecting to a Computer for USB Video and Audio» p.23
• «Projecting a PC Free Presentation» p.61
• «Using the Projector on a Network» p.80

Setting Up the Projector
Follow the instructions in these sections to set up your projector.
gg Related Links
• «Projector Placement» p.19
• «Projector Connections» p.22
• «Installing Batteries in the Remote Control» p.29
• «Remote Control Operation» p.30
• «Opening the Lens Cover» p.31
Projector Placement 19
You can place the projector on almost any flat surface to project an image.
You can also install the projector in a ceiling mount if you want to use it in a
fixed location. An optional ceiling mount is required when suspending the
projector from a ceiling.
Note the following points when selecting a projector location:
• Place the projector on a sturdy, level surface or install it using a compatible
mount.
• Leave plenty of space around and under the projector for ventilation, and
do not place it on top of or next to anything that could block the vents.
• Place the projector so it squarely faces the screen, not at an angle.
aIf you cannot install the projector squarely facing the screen, correct
any resulting keystone distortion using the projector controls. For the
best quality images, we recommend adjusting the installation position
of the projector to achieve the correct image size and shape.
Warning
• You must install a ceiling mount when suspending the projector from a ceiling.
If you do not install the projector correctly, it could fall and cause damage or
injury.
• Do not use adhesives on the ceiling mount fixing points to prevent the screws
from loosening, or use lubricants, oils, or similar substances on the projector; the
projector case may crack causing it to fall from its ceiling mount. This could
cause serious injury to anyone under the ceiling mount and could damage the
projector.
• Failure to install the ceiling mount and projector may cause the projector to fall.
After installing the specific Epson mount that supports your projector, make
sure you secure the mount to all of the projector’s ceiling mount fixing points.
Also, secure the projector and the mounts using wire that is strong enough to
hold their weight.
• Do not install the projector in a location subject to high levels of dust or
humidity, or in a location subject to smoke or steam. Otherwise, it could cause a
fire or electric shock to occur. The projector’s case could also deteriorate and be
damaged causing the projector to fall from the mount.
Examples of environments that could cause the projector to fall due to case
deterioration
• Locations subject to excessive smoke or airborne oil particles, such as factories
or kitchens
• Locations containing volatile solvents or chemicals, such as factories or
laboratories
• Locations where the projector could be subjected to detergents or chemicals,
such as factories or kitchens
• Locations in which aroma oils are often used, such as relaxation rooms
• Near devices that produce excessive smoke, airborne oil particles, or foam at
events
Projector Placement 20
Warning
• Do not cover the projector’s air intake or air exhaust vents. If the vents are
covered, the internal temperature could rise and cause a fire.
• Do not use or store the projector in locations where it will be subject to dust or
dirt. Otherwise, the quality of the projected image may decline, or the air filter
may become clogged, resulting in a malfunction or fire.
• Do not install the projector on an unstable surface or in a location beyond the
weight specifications of the projector. Otherwise, it could fall or topple causing
an accident and injury.
• When installing the projector in a high position, take measures to prevent falling
by using wires to ensure safety in an emergency, such as an earthquake, and to
prevent accidents. If it is not installed correctly, it could fall causing an accident
and injury.
• Do not install in locations where salt damage could occur, or in locations subject
to corrosive gas such as sulphuric gas from hot springs. Otherwise, corrosion
could cause the projector to fall. It could also cause the projector to malfunction.
Attention
• Do not operate the projector on its side. This may cause the projector to
malfunction.
• If you are using the projector at altitudes above 1,500 m, set the High Altitude
Mode setting to On in the projector’s menu to ensure the projector’s internal
temperature is regulated properly.
sExtended >Operation >High Altitude Mode
• Try not to setup the projector in locations subject to high humidity and dust, or
in locations subject to smoke from fires or tobacco smoke.
gg Related Links
• «Projector Setup and Installation Options» p.20
• «Projection Distance» p.20
• «Image Shape» p.44
• «Projector Setup Settings — Extended Menu» p.117
Projector Setup and Installation Options
You can set up or install your projector in the following ways:
Front/Rear
Front Ceiling/Rear Ceiling
Make sure you select the correct Projection option in the projector’s
Extended menu according to the installation method being used.
gg Related Links
• «Projection Modes» p.40
Projection Distance
The distance at which you place the projector from the screen determines the
approximate size of the image. The image size increases the farther the
Projector Placement 21
projector is from the screen, but can vary depending on the zoom factor,
aspect ratio, and other settings.
See the Appendix for details about how far to place the projector from the
screen based on the size of the projected image.
aWhen correcting keystone distortion, your image is slightly smaller.
gg Related Links
• «Screen Size and Projection Distance» p.166
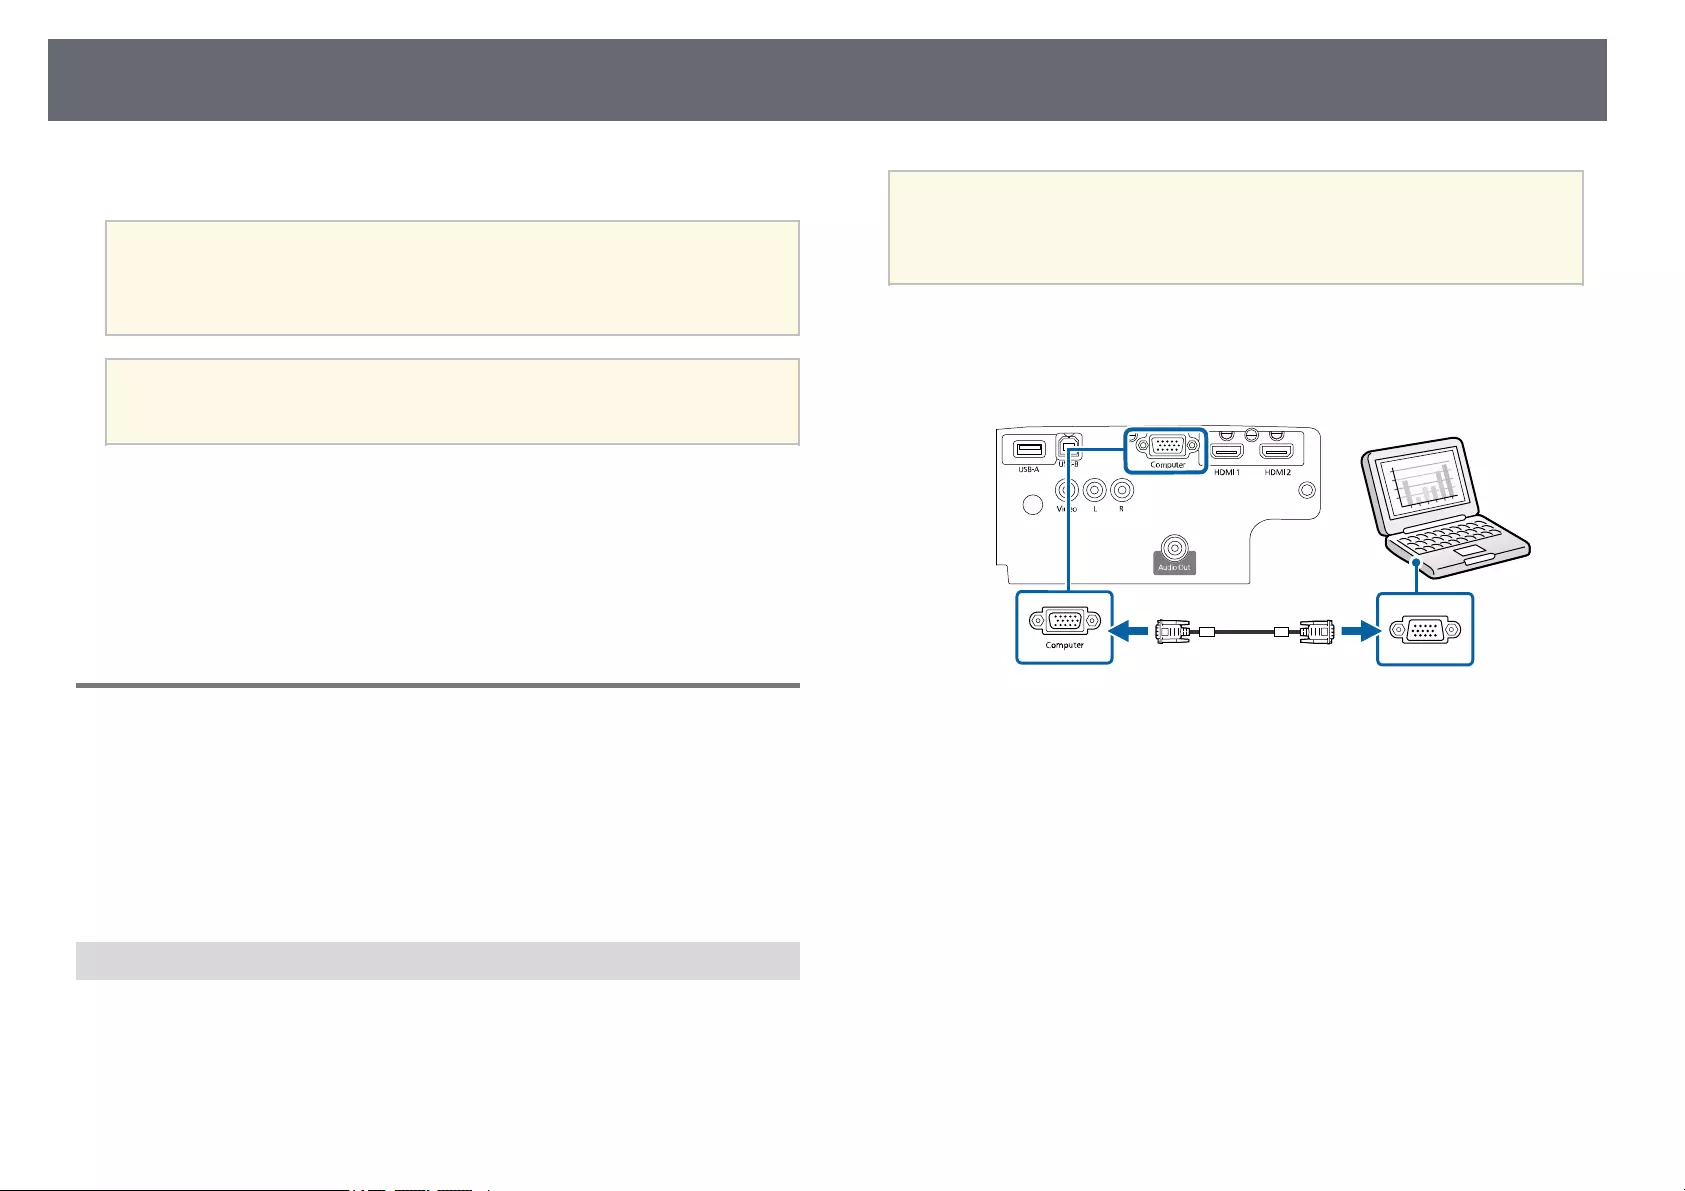
Projector Connections 22
See these sections to connect the projector to a variety of projection sources.
Attention
Check the shape and orientation of the connectors on any cable you plan to
connect. Do not force a connector into a port if it does not fit. The device or your
projector could be damaged or could malfunction.
aSee the Quick Start Guide for a list of cables supplied with your
projector. Purchase optional or commercially available cables when
necessary.
gg Related Links
• «Connecting to a Computer» p.22
• «Connecting to Video Sources» p.24
• «Connecting to External USB Devices» p.26
• «Connecting to a Document Camera» p.27
• «Connecting to External Devices» p.27
Connecting to a Computer
Follow the instructions in these sections to connect a computer to the
projector.
gg Related Links
• «Connecting to a Computer for VGA Video and Audio» p.22
• «Connecting to a Computer for USB Video and Audio» p.23
• «Connecting to a Computer for HDMI Video and Audio» p.24
Connecting to a Computer for VGA Video and Audio
You can connect the projector to your computer using a VGA computer
cable.
You can play sound through the projector’s speaker system by connecting a
commercially available RCA audio cable.
a• To connect a computer that does not have a VGA video port, you
need an adapter that allows you to connect to the projector’s VGA
video port.
• Make sure the audio cable is labeled «No resistance».
aConnect the VGA computer cable to your computer’s monitor port.
bConnect the other end to a Computer port on the projector.
cTighten the screws on the VGA connector.
dConnect the audio cable to your laptop’s headphone or audio-out jack,
or your desktop’s speaker or audio-out port.
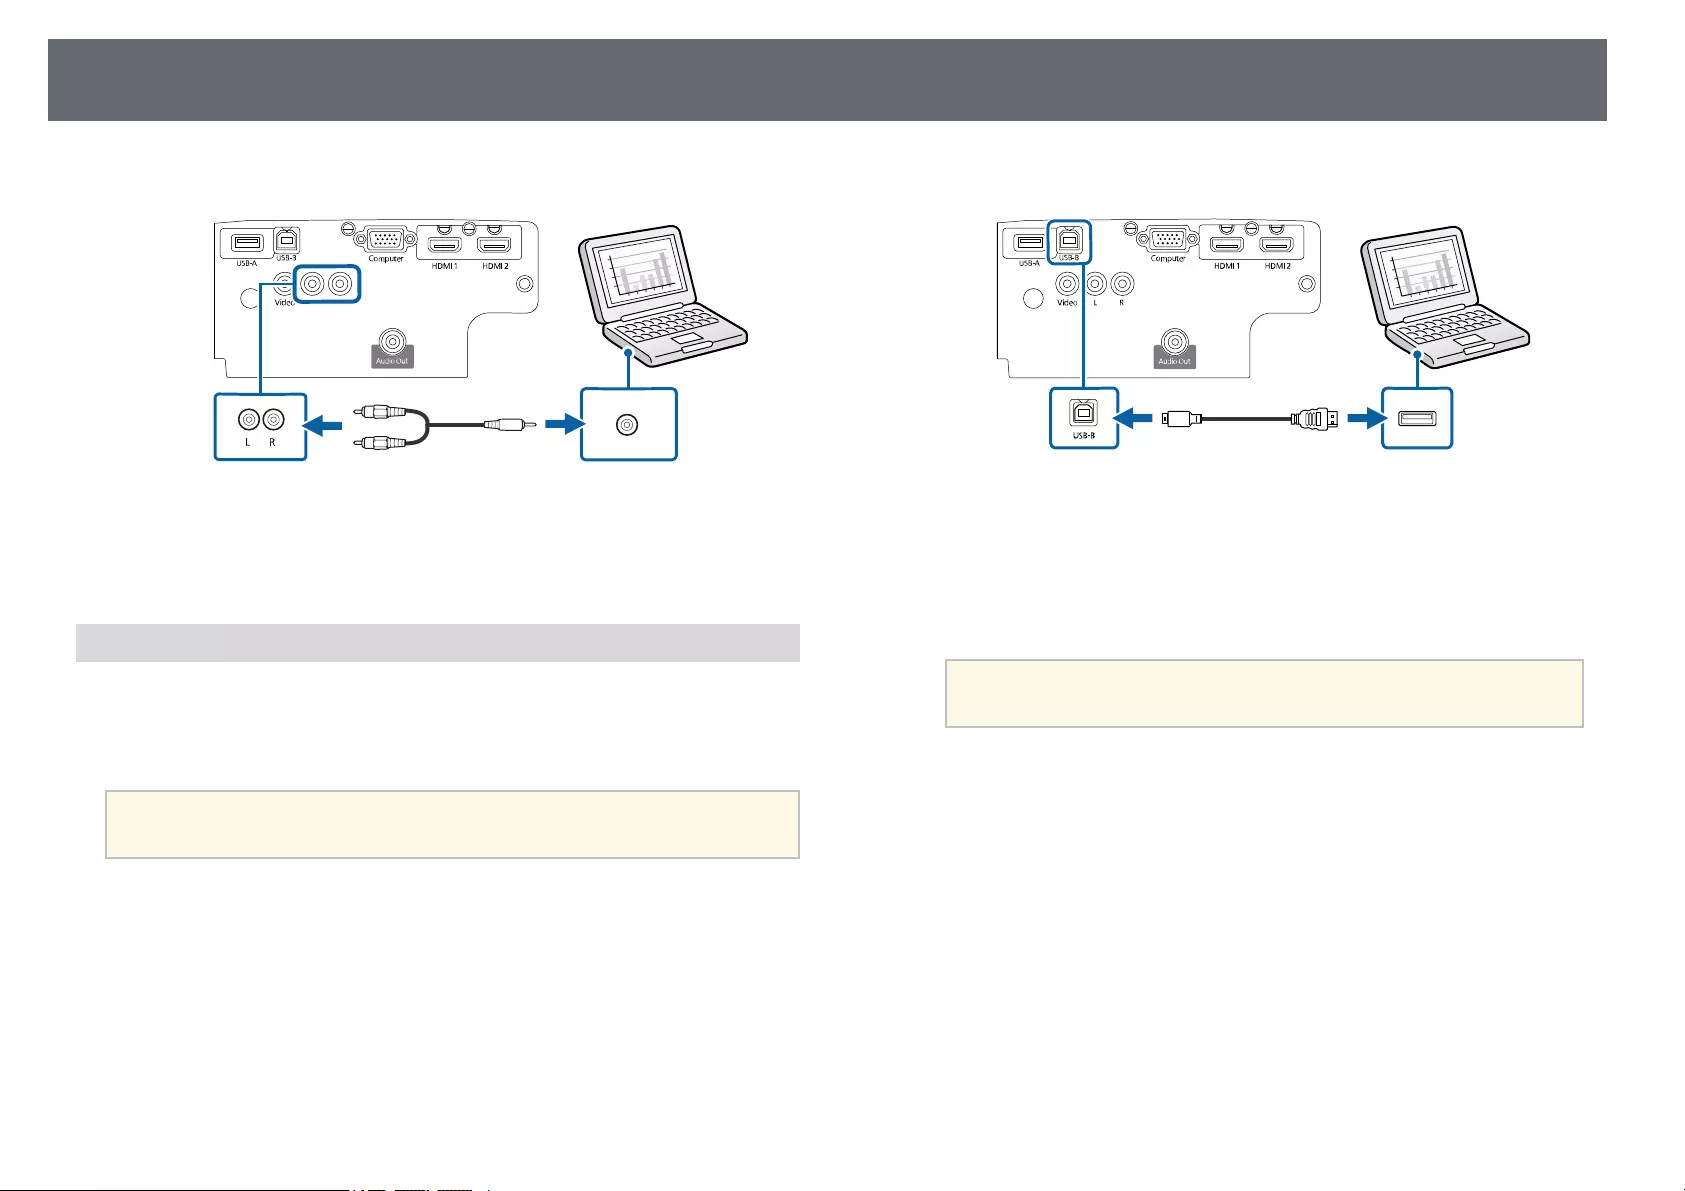
Projector Connections 23
eConnect the other end to the projector’s L-Audio-R ports.
gg Related Links
• «Projector Setup Settings — Extended Menu» p.117
• «List of Functions» p.11
Connecting to a Computer for USB Video and Audio
If your computer meets the system requirements, you can send video and
audio output to the projector through the computer’s USB port. This function
is called USB Display. Connect the projector to your computer using a USB
cable.
a• If you use a USB hub, the connection may not operate correctly.
Connect the USB cable directly to the projector.
aConnect the cable to your projector’s USB-B port.
bConnect the other end to any available USB port on your computer.
cTurn on the projector and your computer.
dDo one of the following to install the Epson USB Display software:
aYou only need to install this software the first time you connect
the projector to the computer.
• Windows: Select Run EMP_UDSE.EXE in the dialog box that is
displayed to install the Epson USB Display software.
• Mac: The Epson USB Display setup folder is displayed on your
screen. Select USB Display Installer and follow the on-screen
instructions to install the Epson USB Display software. If the USB
Display Setup folder is not displayed automatically, double-click
EPSON_PJ_UD >USB Display Installer.
eFollow any on-screen instructions.
Do not disconnect the USB cable or turn off the projector until the
projector displays an image.
The projector displays the image from your computer’s desktop and outputs
sound if your presentation contains audio.
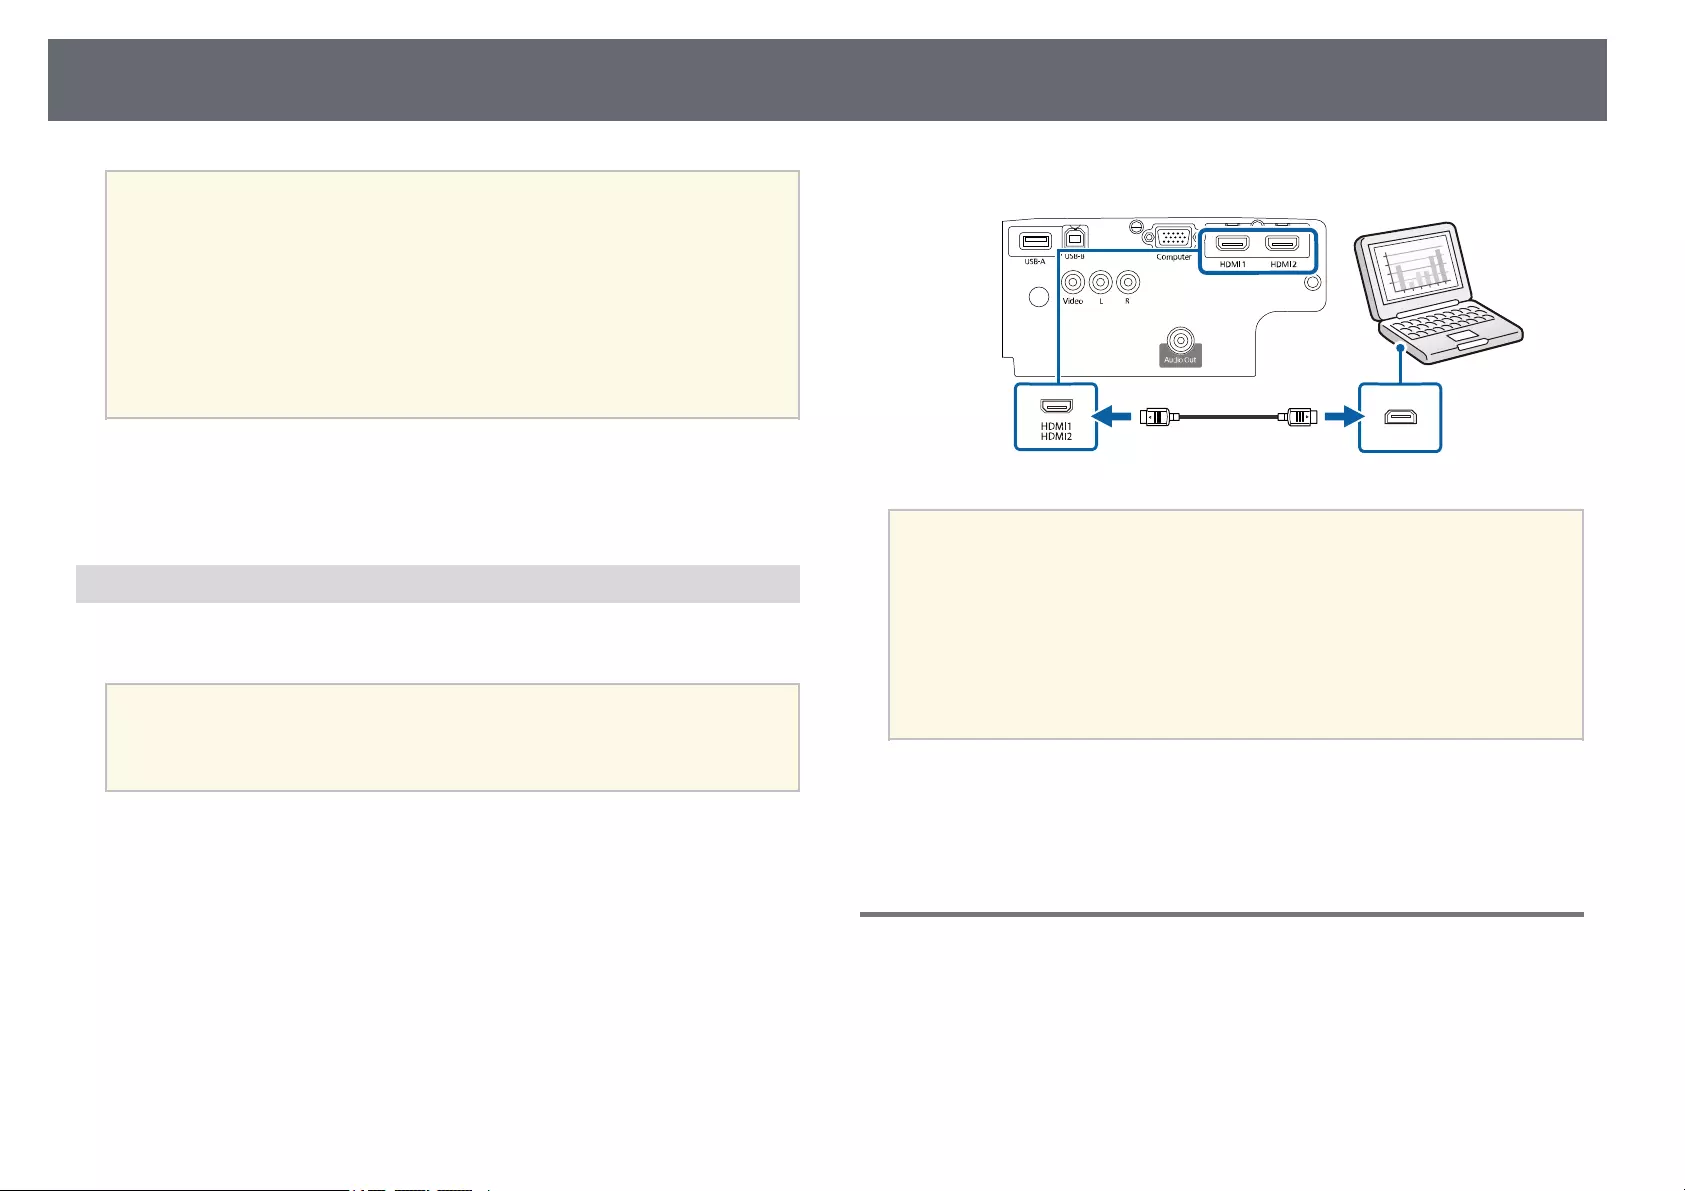
Projector Connections 24
a• If the projector does not project any images, do one of the following:
• Windows: Click All Programs >EPSON Projector >Epson USB
Display >Epson USB Display Ver.x.xx.
• Mac: Double-click the USB Display icon in the Application folder.
• When you finish projection, do one of the following:
• Windows: Disconnect the USB cable. You do not need to operate
Safely Remove Hardware.
• Mac: Select Disconnect from the USB Display icon menu on the
menu bar or Dock, and then disconnect the USB cable.
gg Related Links
• «USB Display System Requirements» p.172
• «List of Functions» p.11
Connecting to a Computer for HDMI Video and Audio
If your computer has an HDMI port, you can connect it to the projector using
an HDMI cable and send the computer’s audio with the projected image.
aTo connect a Mac that does not have an HDMI port, you need an
adapter that allows you to connect to the projector’s HDMI port.
Contact Apple for compatible adapter options. Older Mac computers
(2009 and earlier) may not support audio through the HDMI port.
aConnect the HDMI cable to your computer’s HDMI output port.
bConnect the other end to the projector’s HDMI port.
aIf you have problems hearing audio through the HDMI connection,
connect one end of a commercially available RCA audio cable to the
projector’s L-Audio-R port and the other end to your computer’s audio
out port. Select the audio input port you connected to in the projector’s
Extended menu.
sExtended >A/V Settings >Audio Settings >HDMI1 Audio
Output
sExtended >A/V Settings >Audio Settings >HDMI2 Audio
Output
gg Related Links
• «Projector Setup Settings — Extended Menu» p.117
• «List of Functions» p.11
Connecting to Video Sources
Follow the instructions in these sections to connect video devices to the
projector.
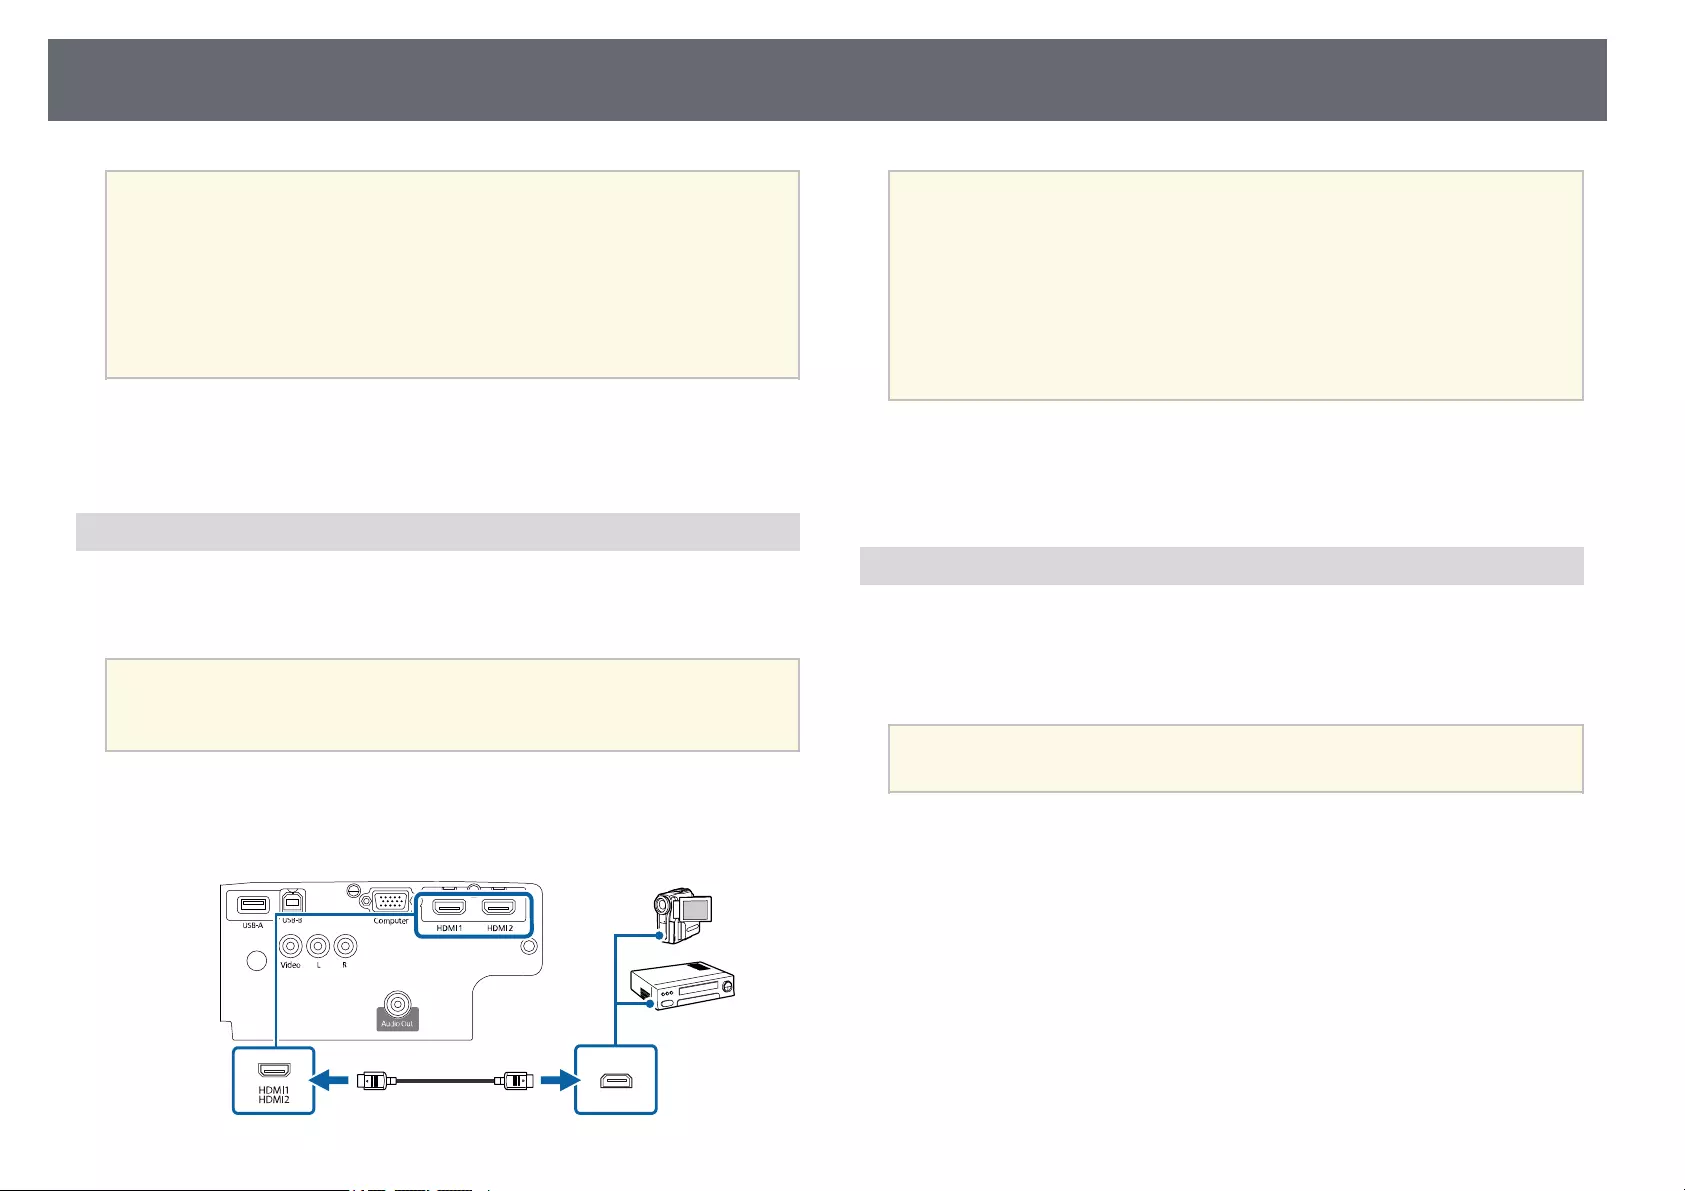
Projector Connections 25
a• If the port on the device you connect has an unusual shape, use the
cable supplied with the device or an optional cable to connect to the
projector.
• The cable differs depending on the output signal from the connected
video devices.
• Some video devices are capable of outputting different types of
signals. See your video device manual to confirm what type of signals
can be output.
gg Related Links
• «Connecting to an HDMI Video Source» p.25
• «Connecting to a Composite Video Source» p.25
Connecting to an HDMI Video Source
If your video source has an HDMI port, you can connect it to the projector
using an HDMI cable and send the image source’s audio with the projected
image.
Attention
Do not turn on the video source before connecting it to the projector. Doing so
could damage the projector.
aConnect the HDMI cable to your video source’s HDMI output port.
bConnect the other end to the projector’s HDMI port.
aIf you have problems hearing audio through the HDMI connection,
connect one end of a commercially available RCA audio cable to the
projector’s L-Audio-R port and the other end to your video source’s
audio out port. Select the audio input port you connected to in the
projector’s Extended menu.
sExtended >A/V Settings >Audio Settings >HDMI1 Audio
Output
sExtended >A/V Settings >Audio Settings >HDMI2 Audio
Output
gg Related Links
• «Projector Setup Settings — Extended Menu» p.117
• «List of Functions» p.11
Connecting to a Composite Video Source
If your video source has a composite video port, you can connect it to the
projector using a RCA-style video or A/V cable.
You can play sound through the projector’s speaker system by connecting a
commercially available RCA audio cable.
aMake sure the audio cable is labeled «No resistance».
aConnect the cable with the yellow connector to your video source’s
yellow video output port.
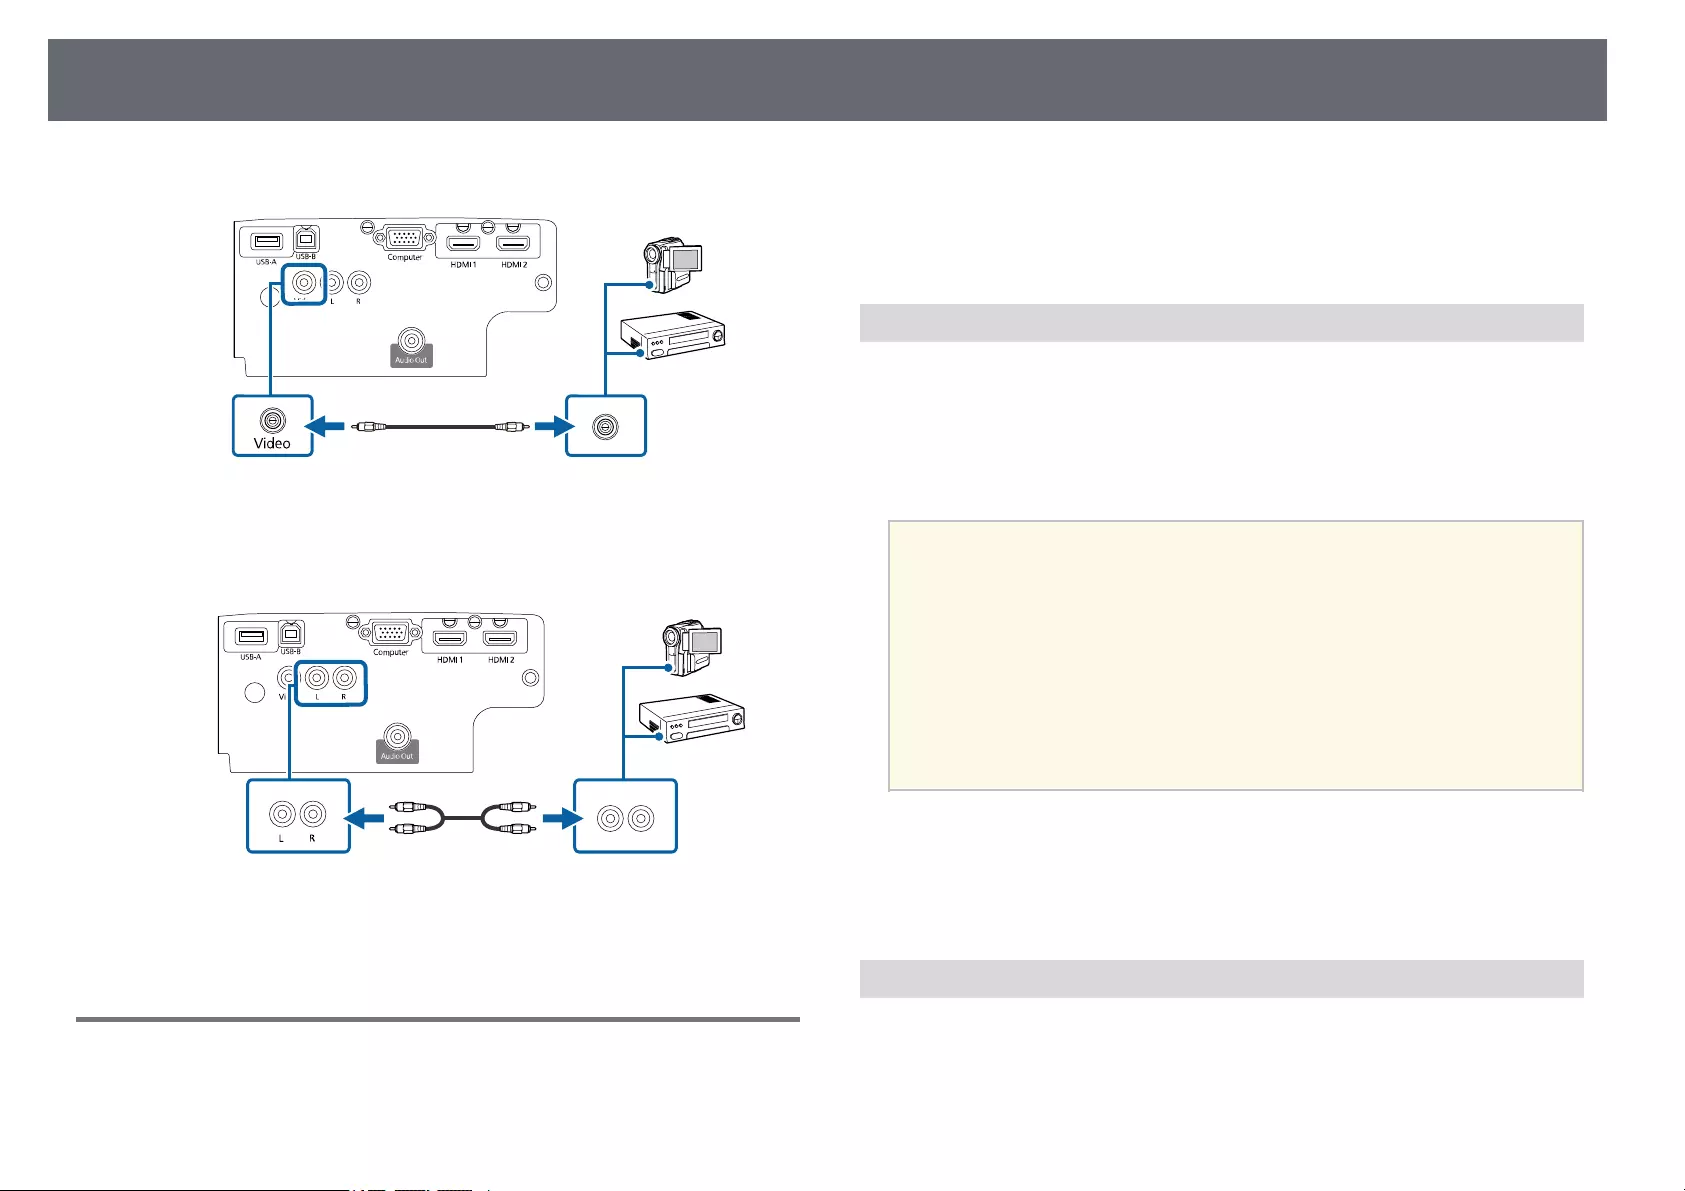
Projector Connections 26
bConnect the other end to the projector’s Video port.
cConnect the audio cable to your video source’s audio-out ports.
dConnect the other end to the projector’s L-Audio-R ports.
gg Related Links
• «List of Functions» p.11
Connecting to External USB Devices
Follow the instructions in these sections to connect external USB devices to
the projector.
gg Related Links
• «USB Device Projection» p.26
• «Connecting to a USB Device» p.26
• «Disconnecting a USB Device» p.27
USB Device Projection
You can project images and other content without using a computer or video
device by connecting any of these devices to your projector:
• USB flash drive
• Digital camera or smartphone
• USB hard drive
a• Digital cameras or smartphones must be USB-mounted devices, not
TWAIN-compliant devices, and must be USB Mass Storage Class-
compliant.
• USB hard drives must meet these requirements:
• USB Mass Storage Class-compliant (not all USB Mass Storage
Class devices are supported)
• Formatted in FAT16/32
• Self-powered by their own AC power supplies (bus-powered hard
drives are not recommended)
• Avoid using hard drives with multiple partitions
You can project slide shows from image files on a connected USB device.
gg Related Links
• «List of Functions» p.11
• «Projecting a PC Free Presentation» p.61
Connecting to a USB Device
You can connect your USB device to the projector’s USB-A port and use it to
project images and other content.
aIf your USB device came with a power adapter, plug the device into an
electrical outlet.

Projector Connections 27
bConnect the USB cable or USB flash drive to the projector’s USB-A port
as shown.
Attention
• Use the USB cable supplied with or specified for use with the device.
• Do not connect a USB hub or a USB cable longer than 3 meters, or the
device may not operate correctly.
cConnect the other end to your device, if necessary.
gg Related Links
• «List of Functions» p.11
Disconnecting a USB Device
When you have finished presenting with a connected USB device, disconnect
the device from the projector.
aTurn off and unplug the device, if necessary.
bDisconnect the USB device from the projector.
Connecting to a Document Camera
You can connect a document camera to your projector to project images
viewed by the camera.
The connection method varies depending on your Epson document camera
model. See the document camera manual for details.
gg Related Links
• «List of Functions» p.11
Connecting to External Devices
Follow the instructions in these sections to connect external devices to the
projector.
gg Related Links
• «Connecting to External Speakers» p.27
Connecting to External Speakers
To enhance the sound from your presentation, you can connect the projector
to external self-powered speakers. You can control the volume using the
projector’s remote control.
a• If you want to output audio from the external speakers when the
projector is turned off, select Always On as the A/V Output setting
in the projector’s Extended menu.
sExtended >A/V Settings >A/V Output
• You can also connect the projector to an amplifier with speakers.
• The projector’s built-in speaker system is disabled when you connect
external speakers.
aMake sure your computer or video source is connected to the projector
with both audio and video cables as necessary.
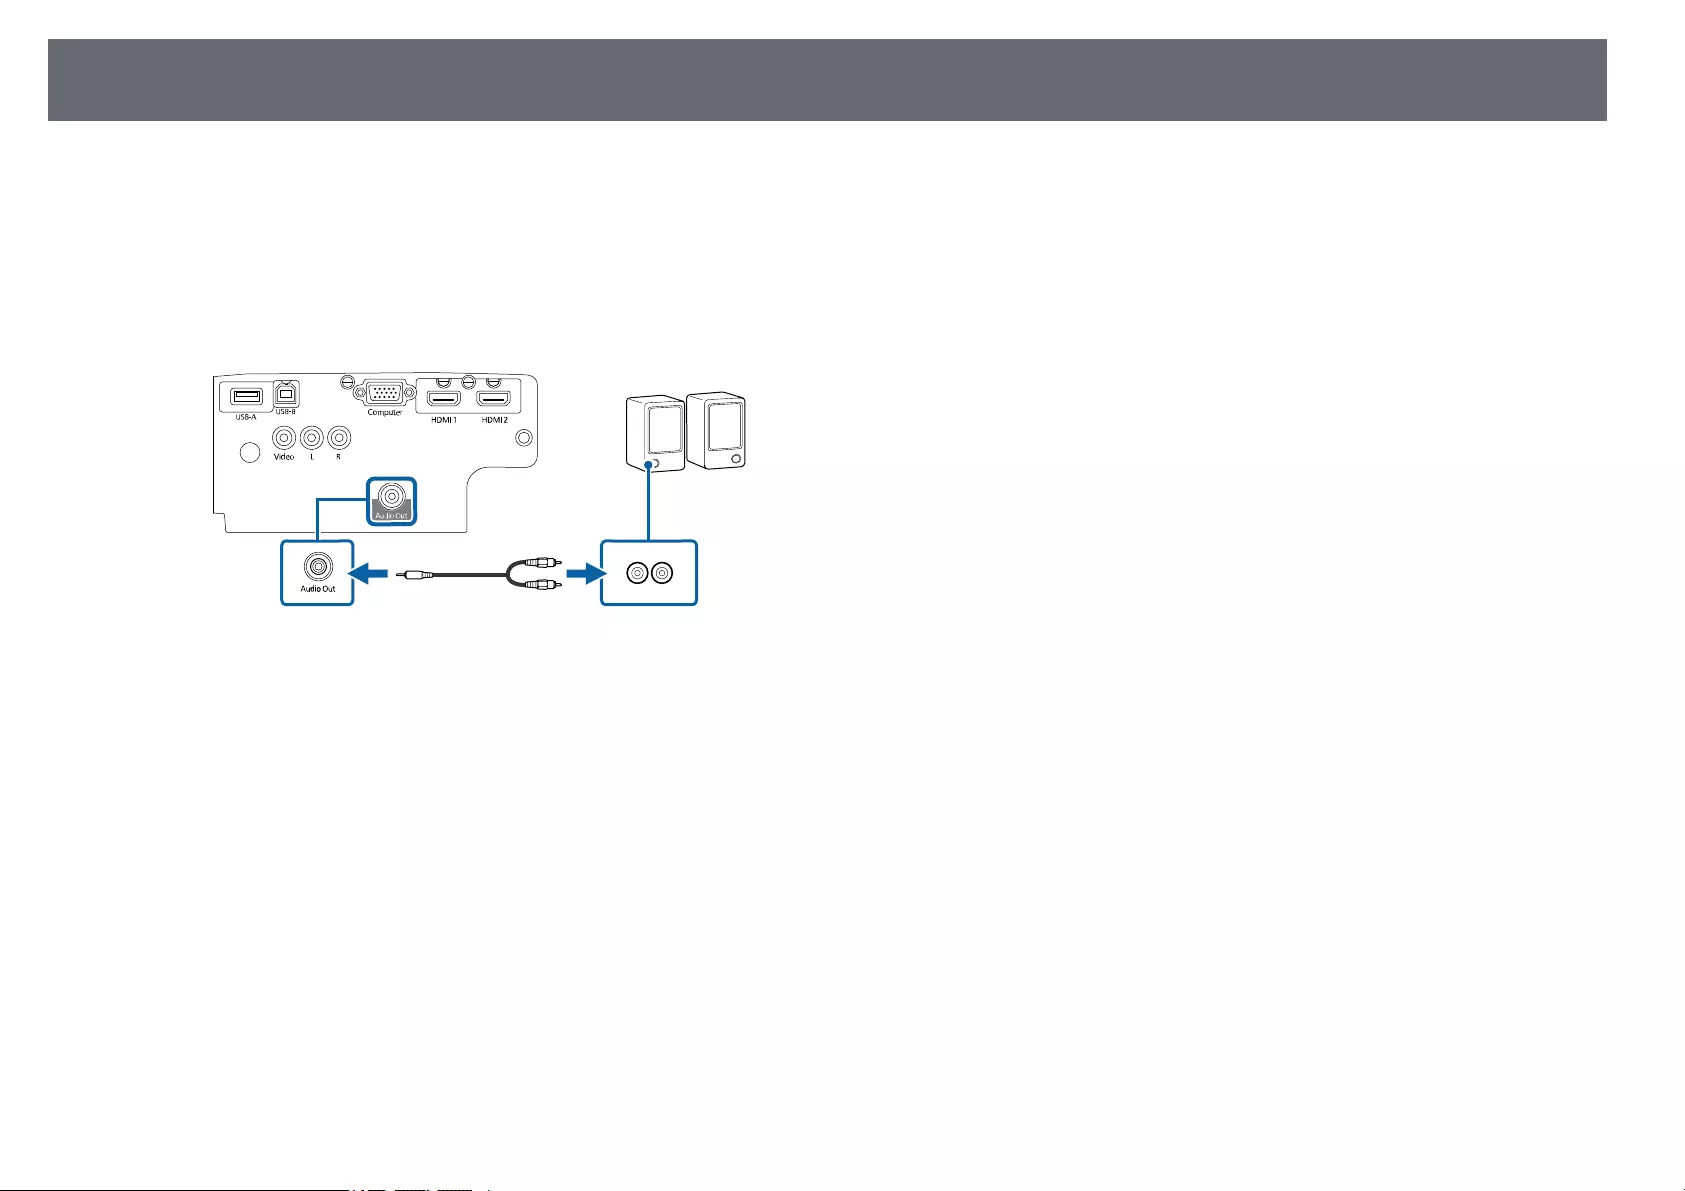
Projector Connections 28
bLocate the appropriate cable to connect your external speakers, such as
a stereo mini-jack-to-pin-jack cable, or another type of cable or adapter.
cConnect one end of the cable to your external speakers as necessary.
dConnect the stereo mini-jack end of the cable to your projector’s Audio
Out port.
gg Related Links
• «Projector Setup Settings — Extended Menu» p.117
• «List of Functions» p.11
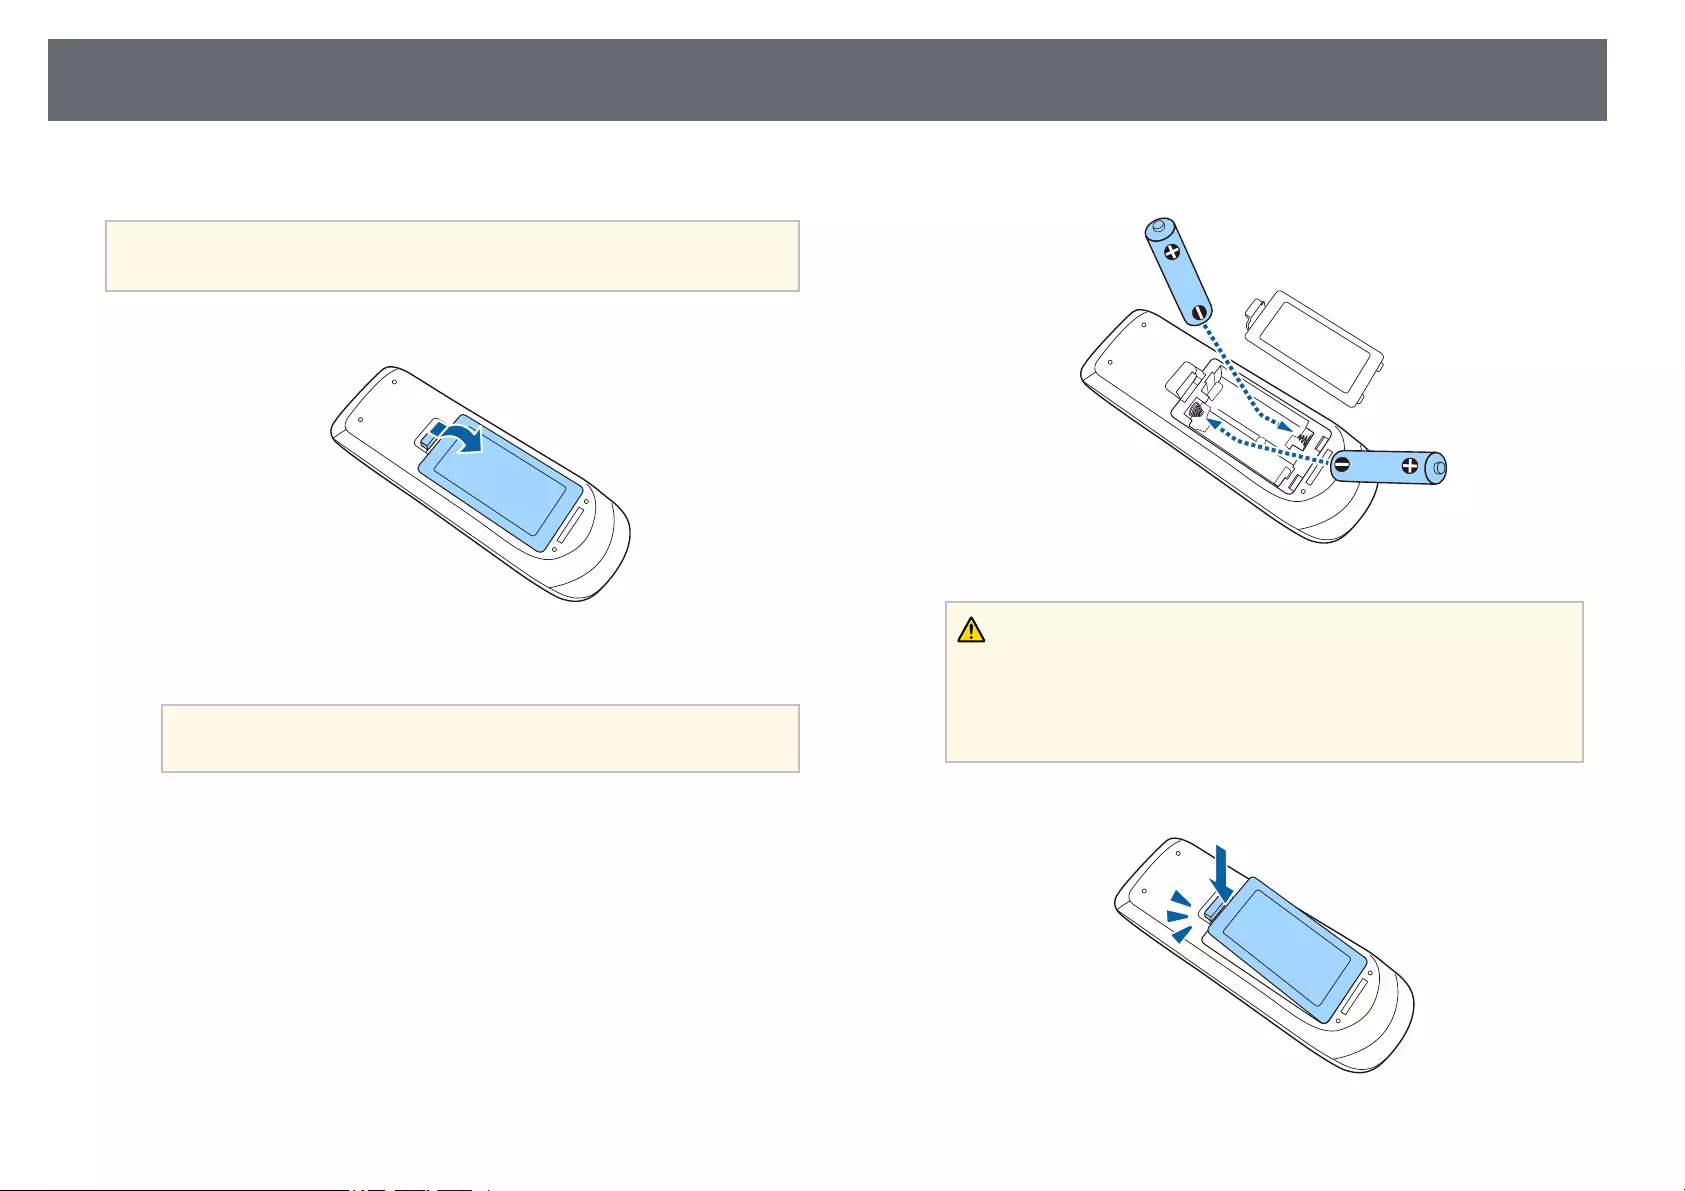
Installing Batteries in the Remote Control 29
The remote control uses the two AA batteries that came with the projector.
Attention
Make sure you read the Safety Instructions before handling the batteries.
aRemove the battery cover as shown.
bRemove the old batteries, if necessary.
aDispose of used batteries according to local regulations.
cInsert the batteries with the +and –ends facing as shown.
Warning
Check the positions of the (+) and (–) marks inside the battery holder to
ensure the batteries are inserted the correct way. If the batteries are not used
correctly, they could explode or leak causing a fire, injury, or damage to the
product.
dReplace the battery cover and press it down until it clicks into place.

Remote Control Operation 30
The remote control lets you control the projector from almost anywhere in
the room.
Make sure that you aim the remote control at the projector’s receivers within
the distance and angles listed here.
aAvoid using the remote control in conditions with bright fluorescent
lights or in direct sunlight, or the projector may not respond to
commands. If you are not going to use the remote control for a long
time, remove the batteries.
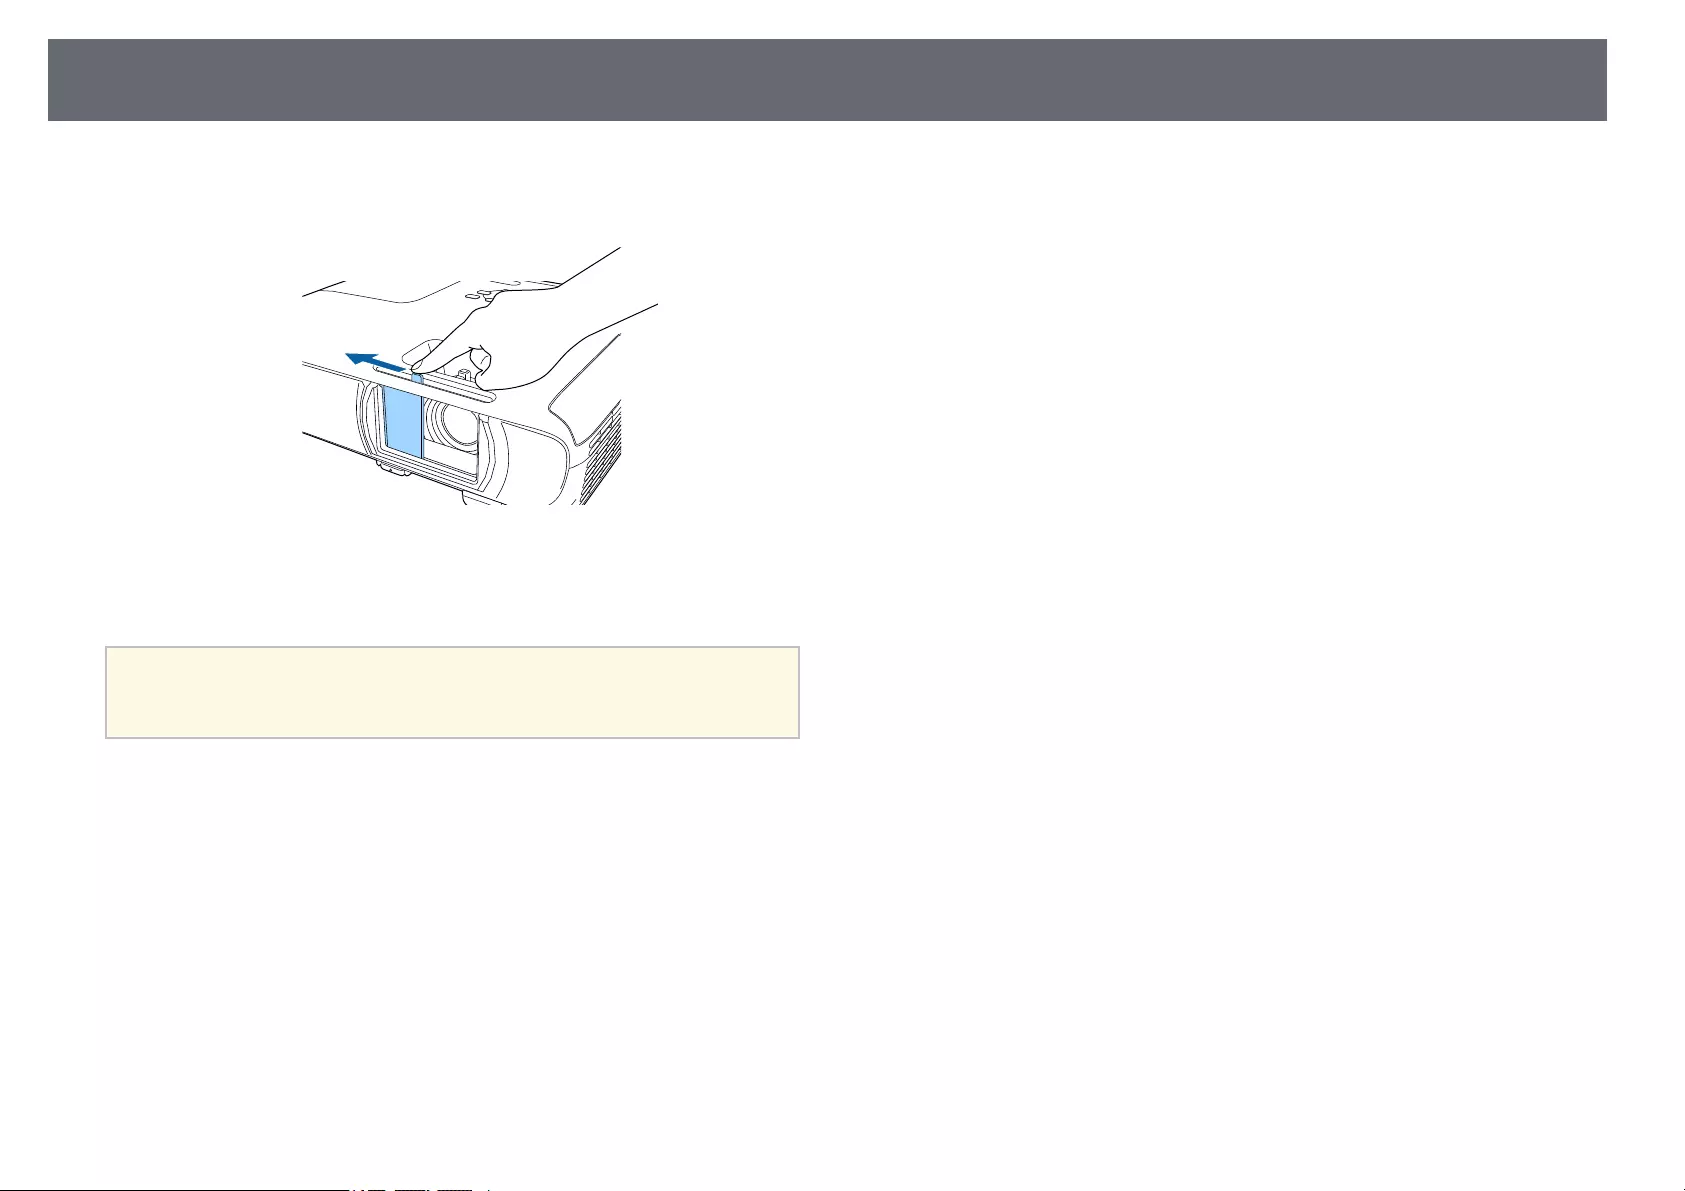
Opening the Lens Cover 31
aTo open the projector’s lens cover, slide the A/V Mute slide lever until
it clicks.
bTo cover the lens or temporarily turn off the projected image and
sound, close the lens cover.
aThe projector’s power automatically turns off 30 minutes after A/V
Mute is enabled. You can disable this feature.
sECO >Lens Cover Timer
gg Related Links
• «List of Functions» p.11

Using Basic Projector Features
Follow the instructions in these sections to use your projector’s basic features.
gg Related Links
• «Turning On the Projector» p.33
• «Turning Off the Projector» p.36
• «Setting the Date and Time» p.37
• «Selecting the Language for the Projector Menus» p.39
• «Projection Modes» p.40
• «Displaying a Test Pattern» p.42
• «Adjusting the Image Height» p.43
• «Image Shape» p.44
• «Resizing the Image with the Zoom Ring» p.48
• «Focusing the Image Using the Focus Ring» p.49
• «Selecting an Image Source» p.50
• «Image Aspect Ratio» p.52
• «Adjusting Image Quality (Color Mode)» p.54
• «Controlling the Volume with the Volume Buttons» p.56
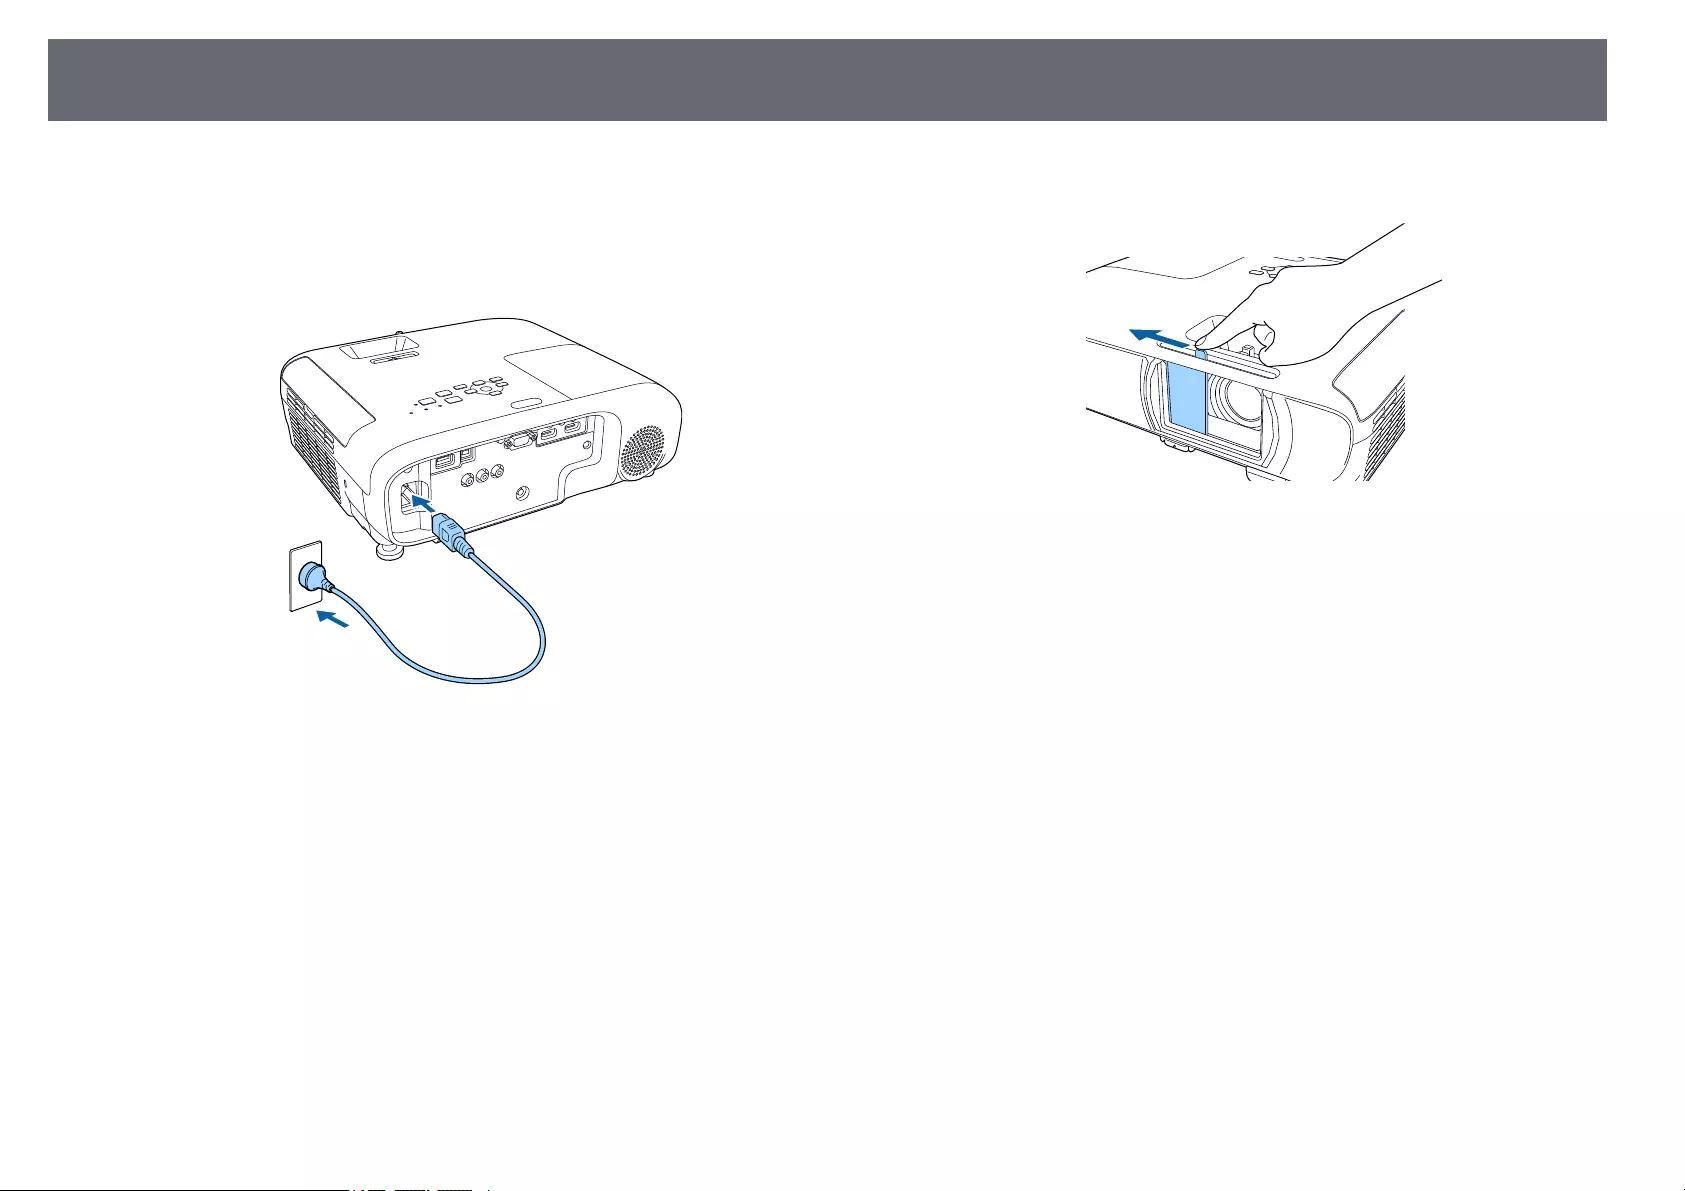
Turning On the Projector 33
Turn on the computer or video equipment you want to use after you turn on
the projector.
aConnect the power cord to the projector’s power inlet and plug it into
an electrical outlet.
The projector’s power indicator turns blue. This indicates that the
projector is receiving power, but is not yet turned on (it is in standby
mode).
bPress the power button on the control panel or remote control to turn
on the projector.
The projector beeps and the status indicator flashes blue as the
projector warms up. Once the projector is warmed up, the status
indicator stops flashing and turns blue.
cOpen the projector’s lens cover.
Try the following if you do not see a projected image.
• Verify the lens cover is open all the way.
• Turn on the connected computer or video device.
• Change the screen output from the computer when using a laptop
computer.
• Insert a DVD or other video media, and press play (if necessary).
• Press the [Source Search] button on the control panel or remote control to
detect the source.
• Press the button for the desired video source on the remote control.
• If the Home screen is displayed, select the source you want to project.

Turning On the Projector 34
Warning
• Never look into the projector lens when the lamp is on. This can damage your
eyes and is especially dangerous for children.
• When turning on the projector at a distance using the remote control, make sure
there is no one looking into the lens.
• During projection, do not block the light from the projector with a book or other
objects. If the light from the projector is blocked, the area on which the light
shines becomes hot which could cause it to melt, burn, or start a fire. Also, the
lens may get hot due to the reflected light which could cause the projector to
malfunction. To stop projection, use the A/V Mute function, or turn off the
projector.
• A mercury lamp with high internal pressure is used as the projector’s light
source. If the lamp is subjected to vibrations or shocks, or if it is used for an
overly extended length of time, the lamp may break or it may not turn on. If the
lamp explodes, gases may escape and small fragments of glass may be scattered
which could cause an injury. Be sure to observe the instructions below.
• Do not disassemble or damage the lamp or subject it to any impacts.
• Do not bring your face close to the projector while it is in use.
• Particular care should be taken when the projector is installed to a ceiling, as
small pieces of glass may fall down when the lamp cover is removed. When
cleaning the projector or replacing the lamp yourself, be very careful not to
allow such pieces of glass to get into the eyes or mouth.
If the lamp breaks, ventilate the area immediately, and contact a doctor if any
fragments of broken glass are inhaled or get into the eyes or mouth.
a• When the Direct Power On setting is set to On in the projector’s
Extended menu, the projector turns on as soon as you plug it in.
Note that the projector also turns on automatically in cases such as
recovery from a power outage.
sExtended >Operation >Direct Power On
• If you select a specific port as the Auto Power On setting in the
projector’s Extended menu, the projector turns on as soon as it
detects a signal or cable connection from that port.
sExtended >Operation >Auto Power On
gg Related Links
• «Home Screen» p.34
• «Projector Setup Settings — Extended Menu» p.117
• «List of Functions» p.11
Home Screen
The Home screen feature allows you to easily select an image source and
access useful functions. You can display the Home screen by pressing the
[Home] button on the control panel or remote control. The Home screen is
also displayed when you turn on the projector and no signal is being input.
Press the arrow buttons on the control panel or remote control to select a
menu item, and then press [Enter].
ASelects the source you want to project.
BDisplays the Connection Guide. You can select the wireless connection methods
according to the devices you are using, such as smartphones or computers.
CDisplays the Help screen.
DDisplays the projector’s menu.

Turning On the Projector 35
EPerforms menu options assigned to Home Screen in the projector’s Extended
menu.
FProjects two images from different image sources simultaneously by splitting
the projected screen.
GCorrects the shape of an image that is an uneven rectangle.
aThe Home screen disappears after 10 minutes of inactivity.
gg Related Links
• «Image Shape» p.44
• «Projector Setup Settings — Extended Menu» p.117
• «List of Functions» p.11
• «Using the Projector’s Menus» p.111
• «Using the Projector Help Displays» p.152
• «Projecting Two Images Simultaneously» p.58
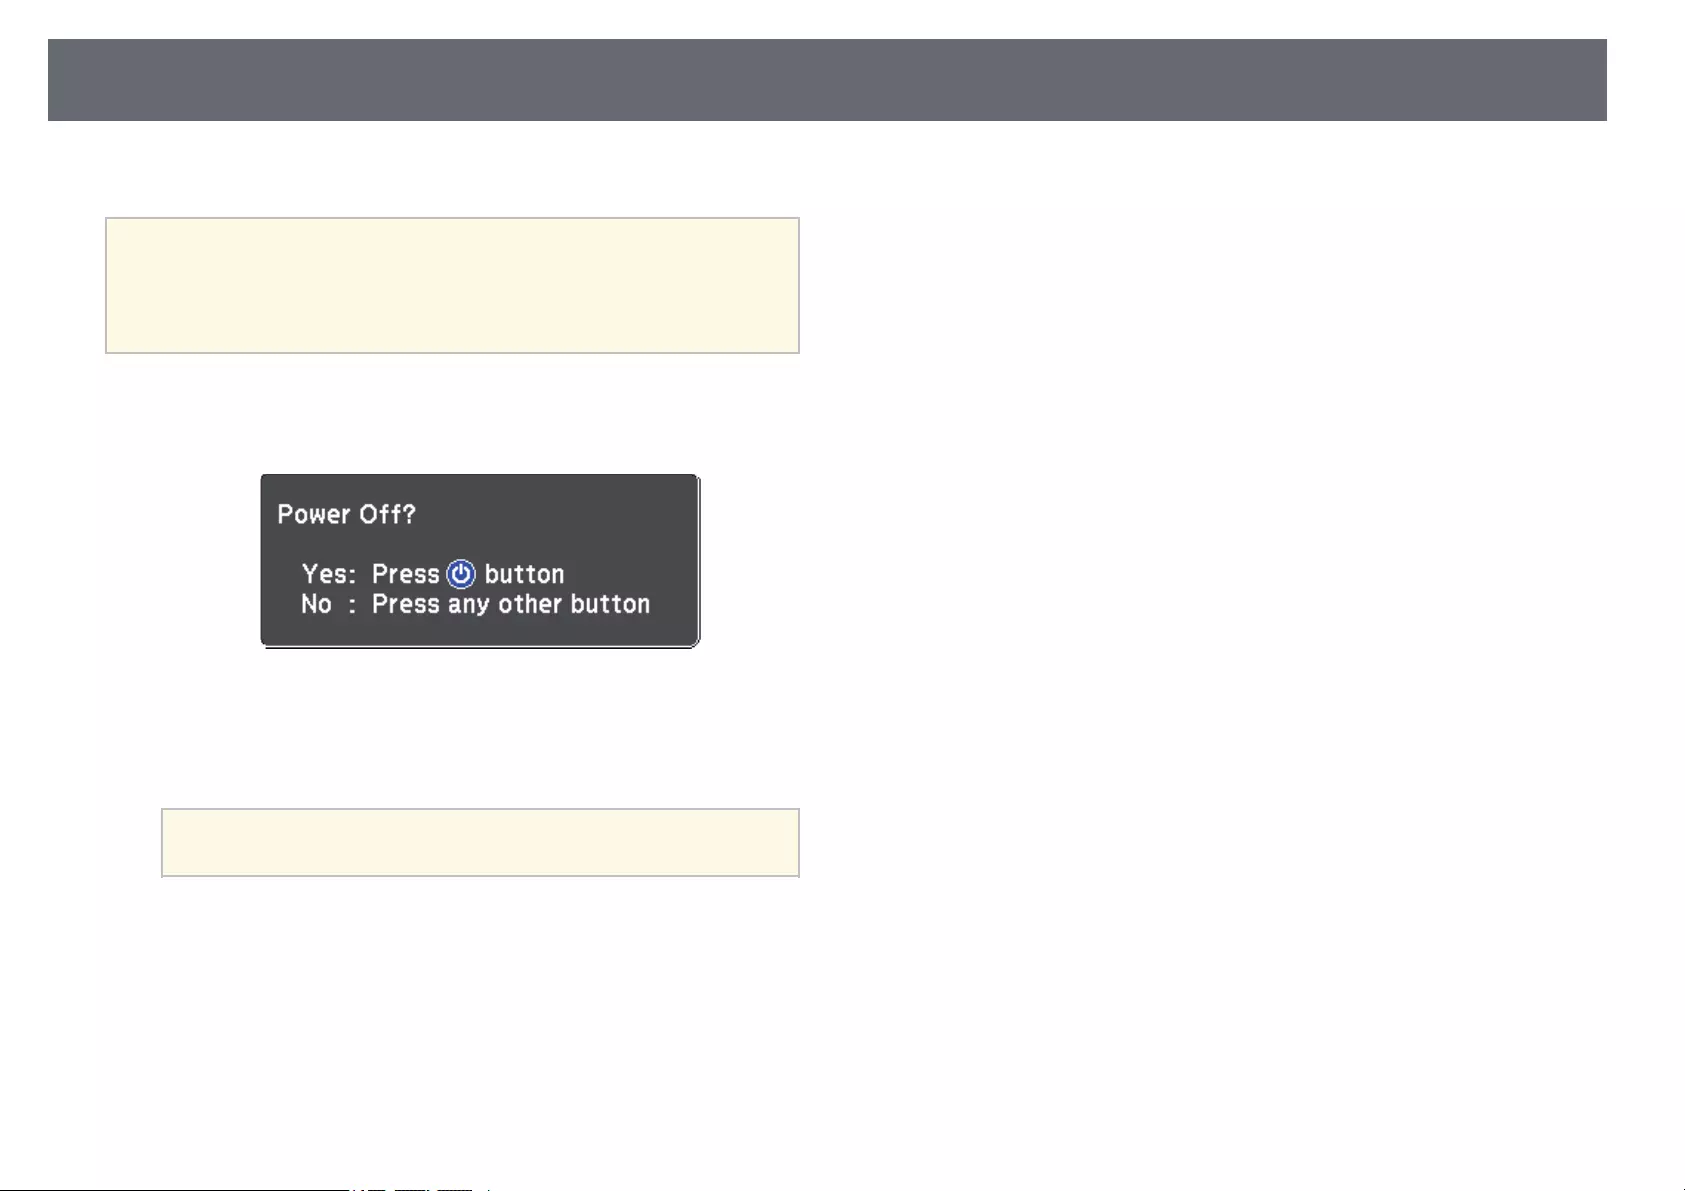
Turning Off the Projector 36
Turn off the projector after use.
a• Turn off this product when it is not in use to prolong the life of the
projector. Lamp life varies depending on the mode selected,
environmental conditions, and usage. Brightness decreases over time.
• Since the projector supports the direct shutdown feature, it can be
turned off directly using the breaker.
aPress the power button on the control panel or remote control.
The projector displays a shutdown confirmation screen.
bPress the power button again. (To leave it on, press any other button.)
The projected image disappears, the projector beeps twice, and the
status indicator turns off.
aWith Epson’s Instant Off technology, there is no cool-down
period so you can pack up the projector for transport right away.
cTo transport or store the projector, make sure the power indicator is
blue (but not flashing) and the status indicator is off, then unplug the
power cord.
dClose the projector’s lens cover.
gg Related Links
• «List of Functions» p.11

Setting the Date and Time 37
You can set the date and time for the projector.
aTurn on the projector.
bPress the [Menu] button on the control panel or remote control.
cSelect the Extended menu and press [Enter].
dSelect the Operation setting and press [Enter].
eSelect the Date & Time setting and press [Enter].
You see this screen:
fSelect the Date & Time setting and press [Enter].
You see this screen:
gSelect Date, press [Enter], and use the displayed keyboard to enter
today’s date.
hSelect Time, press [Enter], and use the displayed keyboard to enter the
current time.
iSelect Time Difference (UTC), press [Enter], and set the time
difference from Coordinated Universal Time.
jWhen you are finished, select Set and press [Enter].
kTo activate daylight saving time, select the Daylight Saving Time
setting and press [Enter]. Then select settings.
lWhen you are finished, select Set and press [Enter].
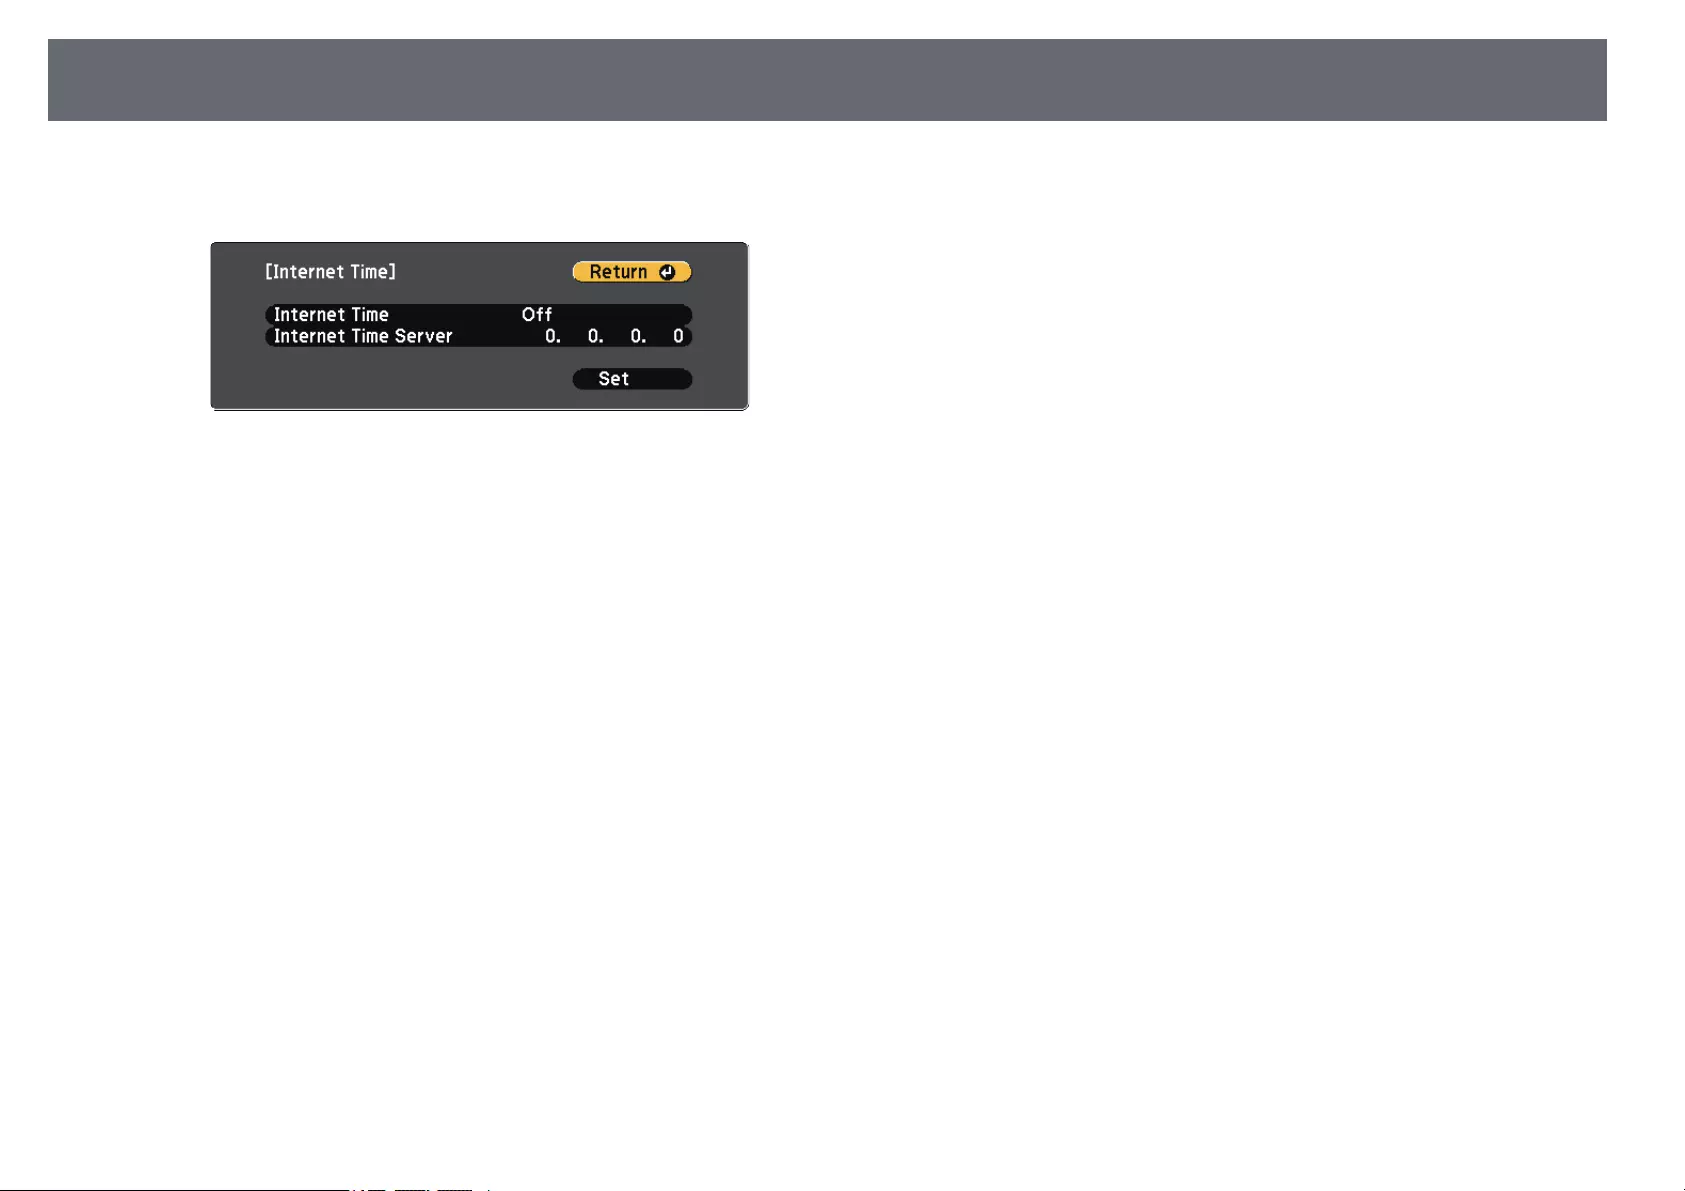
Setting the Date and Time 38
mTo update the time automatically through an Internet time server,
select the Internet Time setting and press [Enter]. Then select settings.
nWhen you are finished, select Set and press [Enter].
oPress [Menu] or [Esc] to exit the menus.
gg Related Links
• «List of Functions» p.11
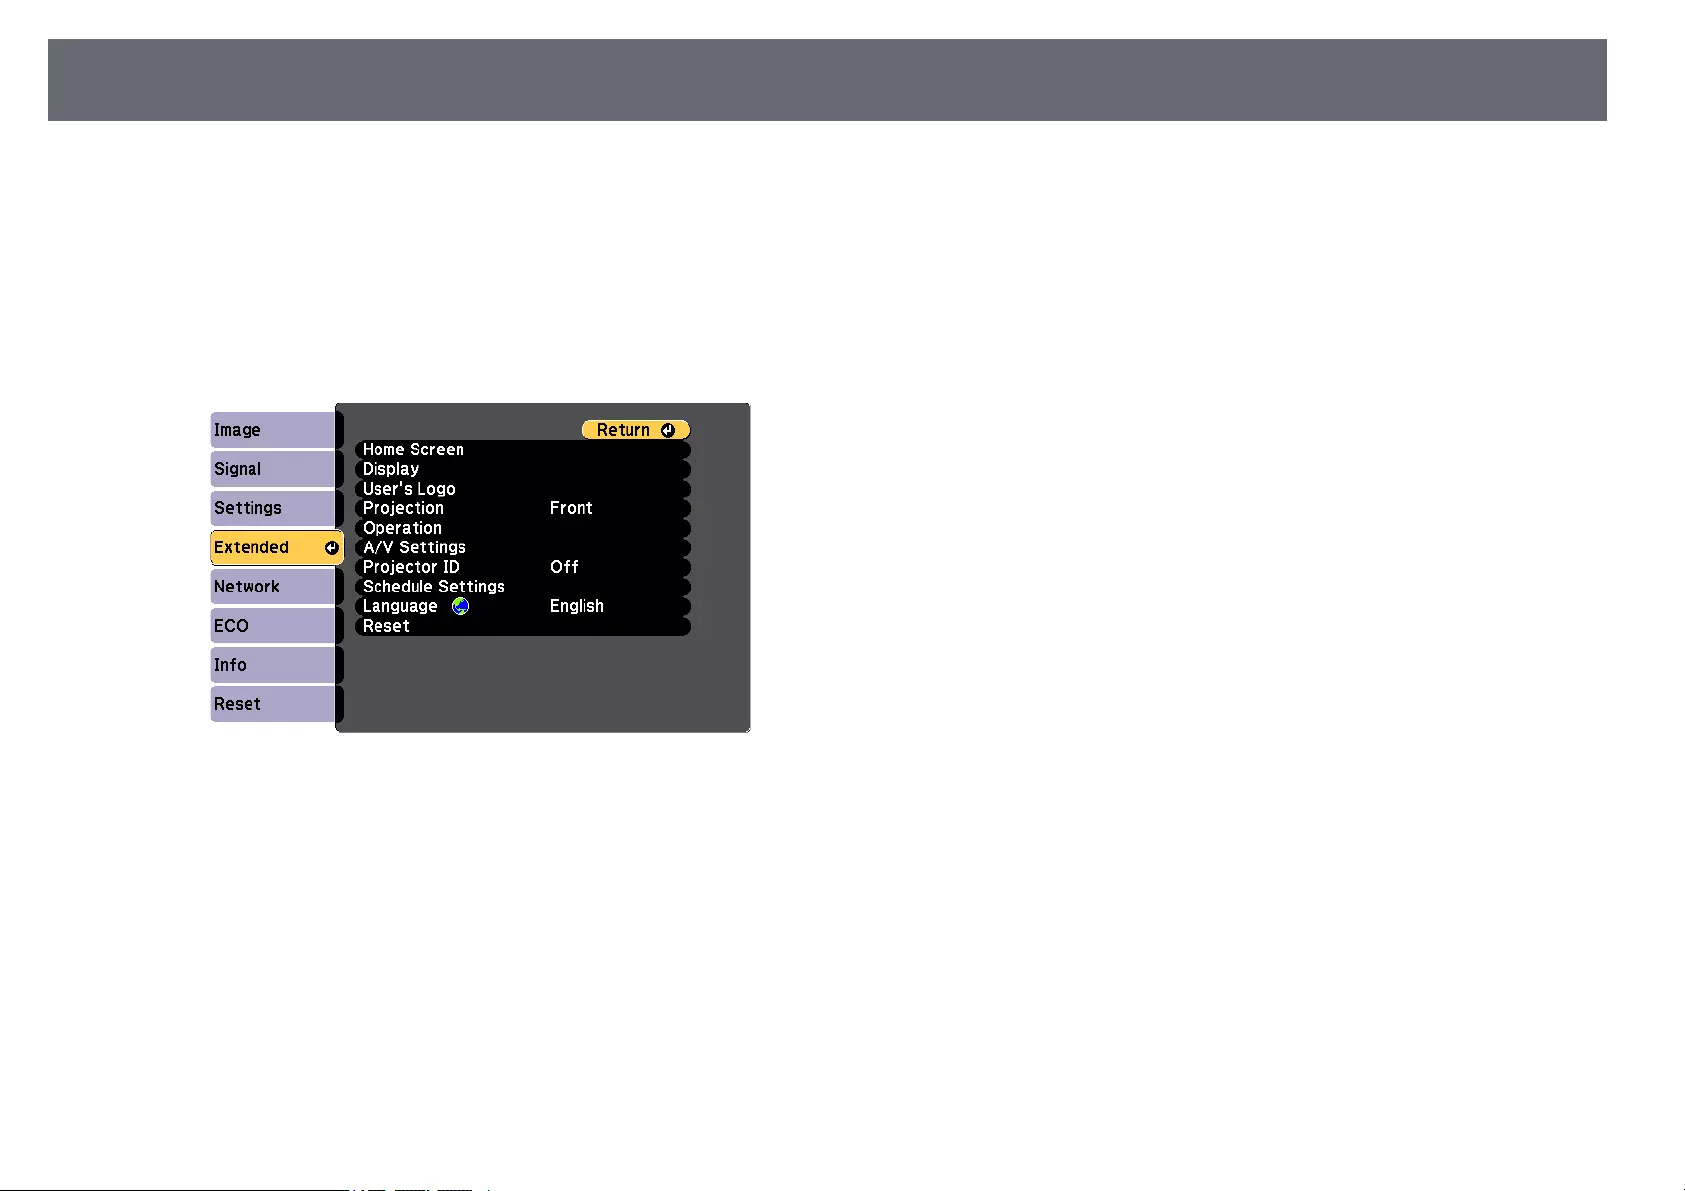
Selecting the Language for the Projector Menus 39
If you want to view the projector’s menus and messages in another language,
you can change the Language setting.
aTurn on the projector.
bPress the [Menu] button on the control panel or remote control.
cSelect the Extended menu and press [Enter].
dSelect the Language setting and press [Enter].
eSelect the language you want to use and press [Enter].
fPress [Menu] or [Esc] to exit the menus.
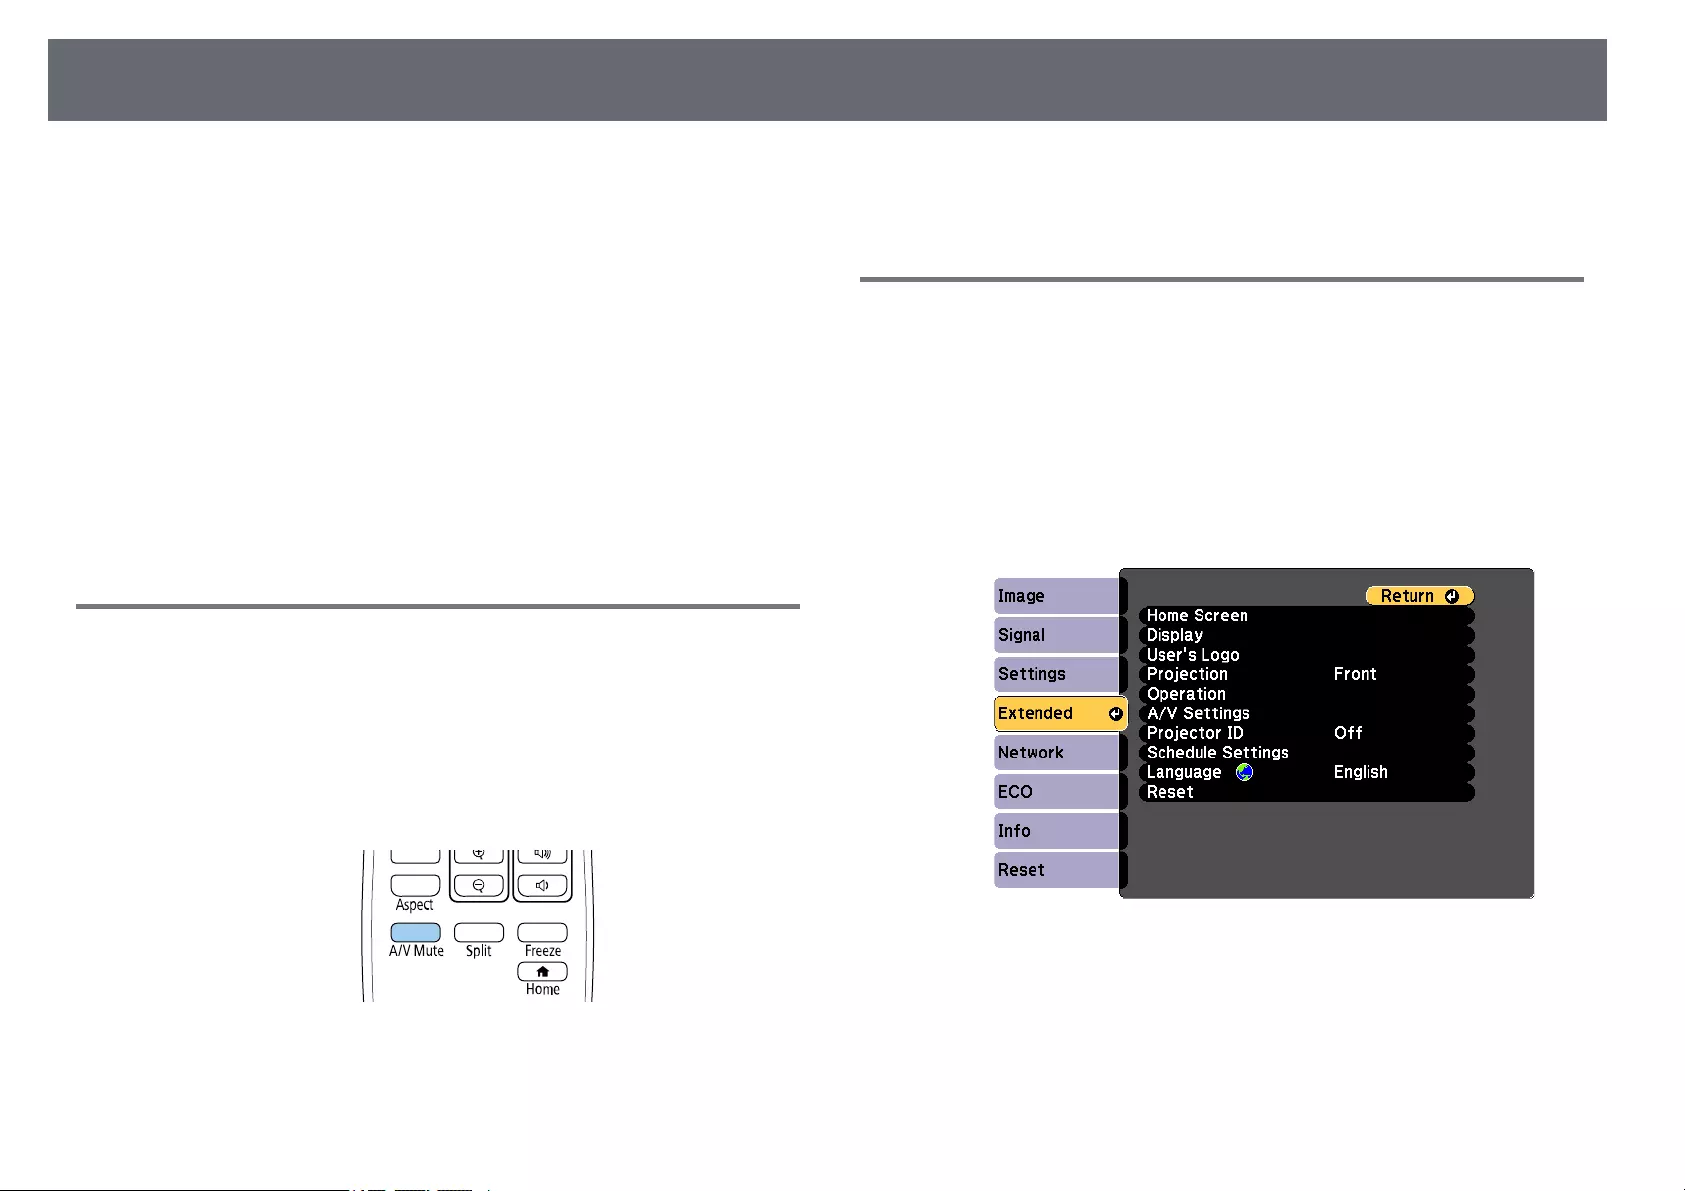
Projection Modes 40
Depending on how you positioned the projector, you may need to change the
projection mode so your images project correctly.
•Front lets you project from a table in front of the screen.
•Front/Ceiling flips the image over top-to-bottom to project upside-down
from a ceiling or wall mount.
•Rear flips the image horizontally to project from behind a translucent
screen.
•Rear/Ceiling flips the image over top-to-bottom and horizontally to project
from a ceiling or wall mount and behind a translucent screen.
gg Related Links
• «Changing the Projection Mode Using the Remote Control» p.40
• «Changing the Projection Mode Using the Menus» p.40
• «Projector Setup and Installation Options» p.20
Changing the Projection Mode Using the Remote
Control
You can change the projection mode to flip the image over top-to-bottom.
aTurn on the projector and display an image.
bHold down the [A/V Mute] button on the remote control for 5 seconds.
The image disappears briefly and reappears flipped top-to-bottom.
cTo change projection back to the original mode, hold down the [A/V
Mute] button for 5 seconds again.
Changing the Projection Mode Using the Menus
You can change the projection mode to flip the image over top-to-bottom
and/or left-to-right using the projector menus.
aTurn on the projector and display an image.
bPress the [Menu] button on the control panel or remote control.
cSelect the Extended menu and press [Enter].
dSelect Projection and press [Enter].

Projection Modes 41
eSelect a projection mode and press [Enter].
fPress [Menu] or [Esc] to exit the menus.
Displaying a Test Pattern 42
You can display a test pattern to adjust the projected image without
connecting a computer or video device.
aTo set menu items that cannot be set while the test pattern is being
displayed or to fine-tune the projected image, project an image from
the connected device.
aTurn on the projector.
bPress the [Menu] button on the control panel or remote control.
cSelect the Settings menu and press [Enter].
dSelect Pattern >Test Pattern, and press [Enter].
The test pattern is displayed.
eAdjust the image as necessary.
fPress [Esc] to clear the test pattern.
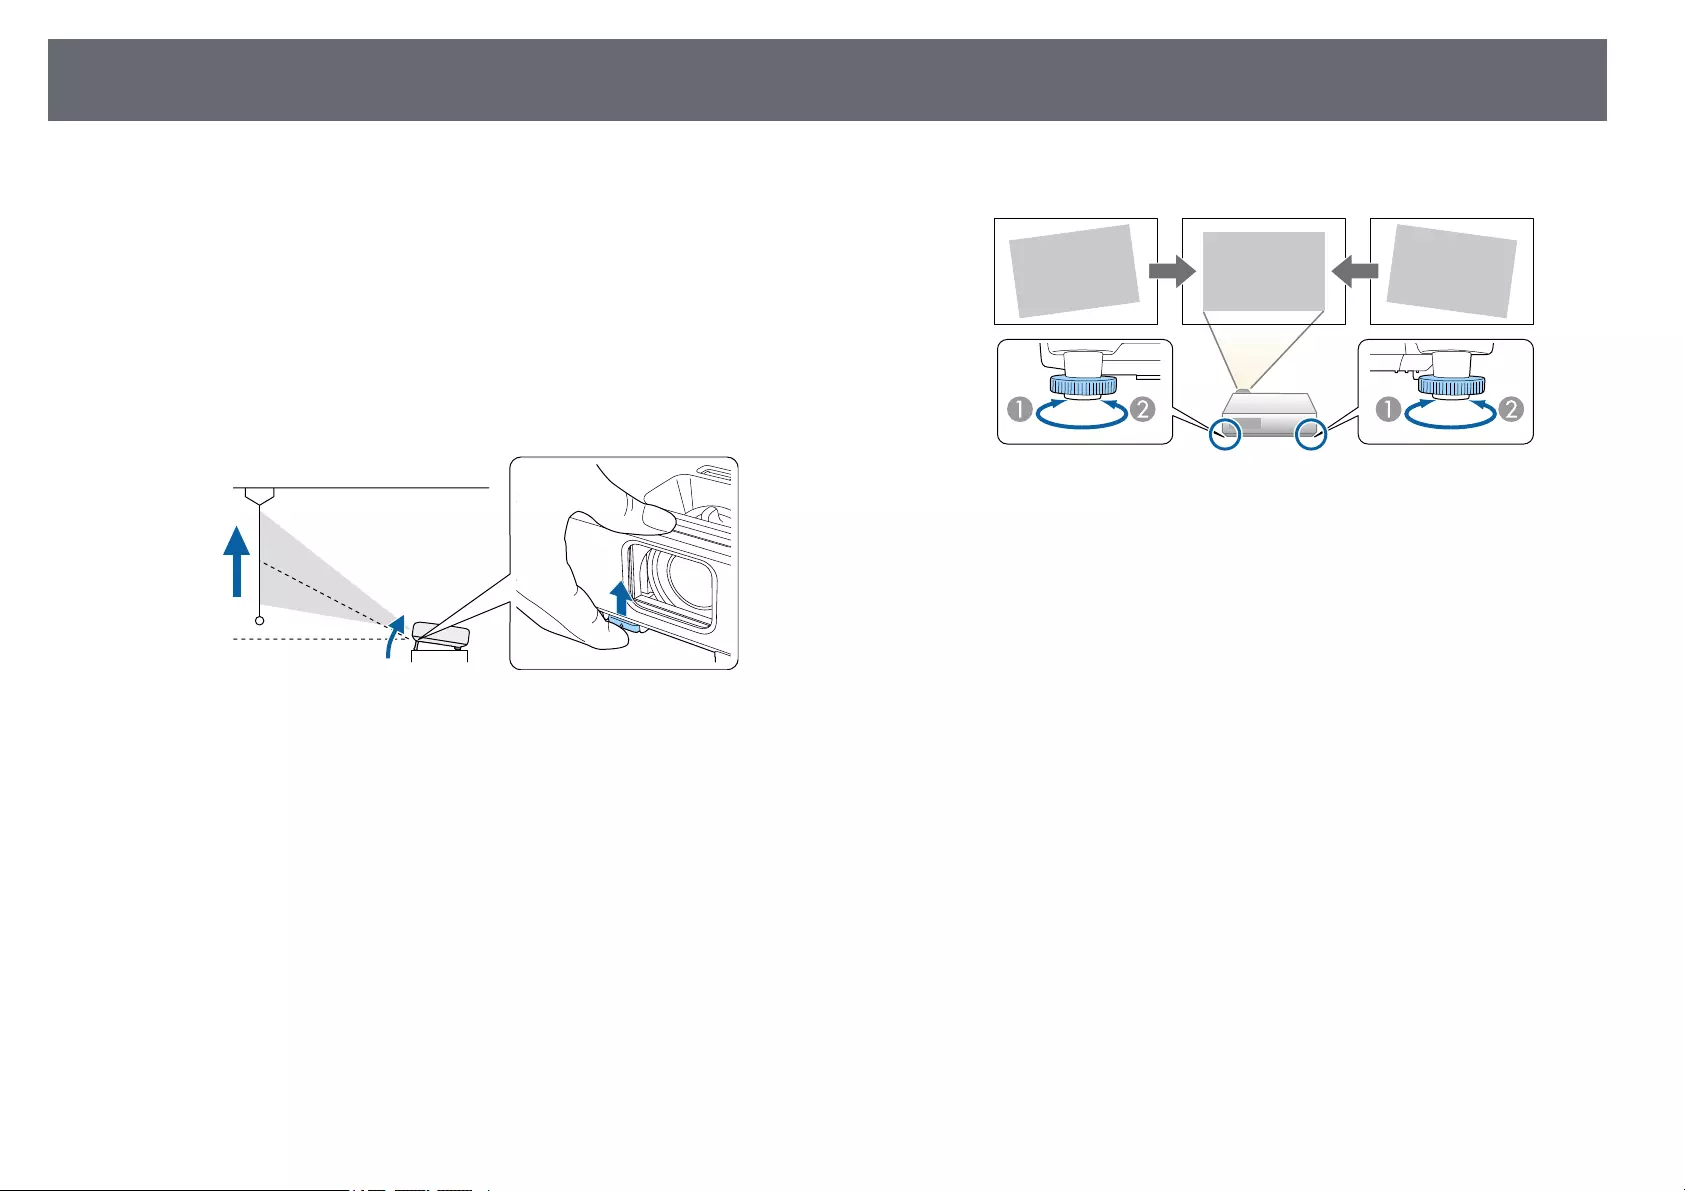
Adjusting the Image Height 43
If you are projecting from a table or other flat surface and the image is too
high or low, you can adjust the image height using the projector’s adjustable
feet.
The larger the angle of tilt, the harder it becomes to focus. Locate the
projector so that it only needs to be tilted at a small angle.
aTurn on the projector and display an image.
bTo adjust the front foot, pull up on the foot release lever and lift the
front of the projector.
The foot extends from the projector.
You can adjust the position up to approximately 12 degrees.
cRelease the lever to lock the foot.
dIf the image is tilted, rotate the rear feet to adjust their height.
AExtend the rear foot
BRetract the rear foot
If the projected image is unevenly rectangular, you need to adjust the image
shape.
gg Related Links
• «Image Shape» p.44
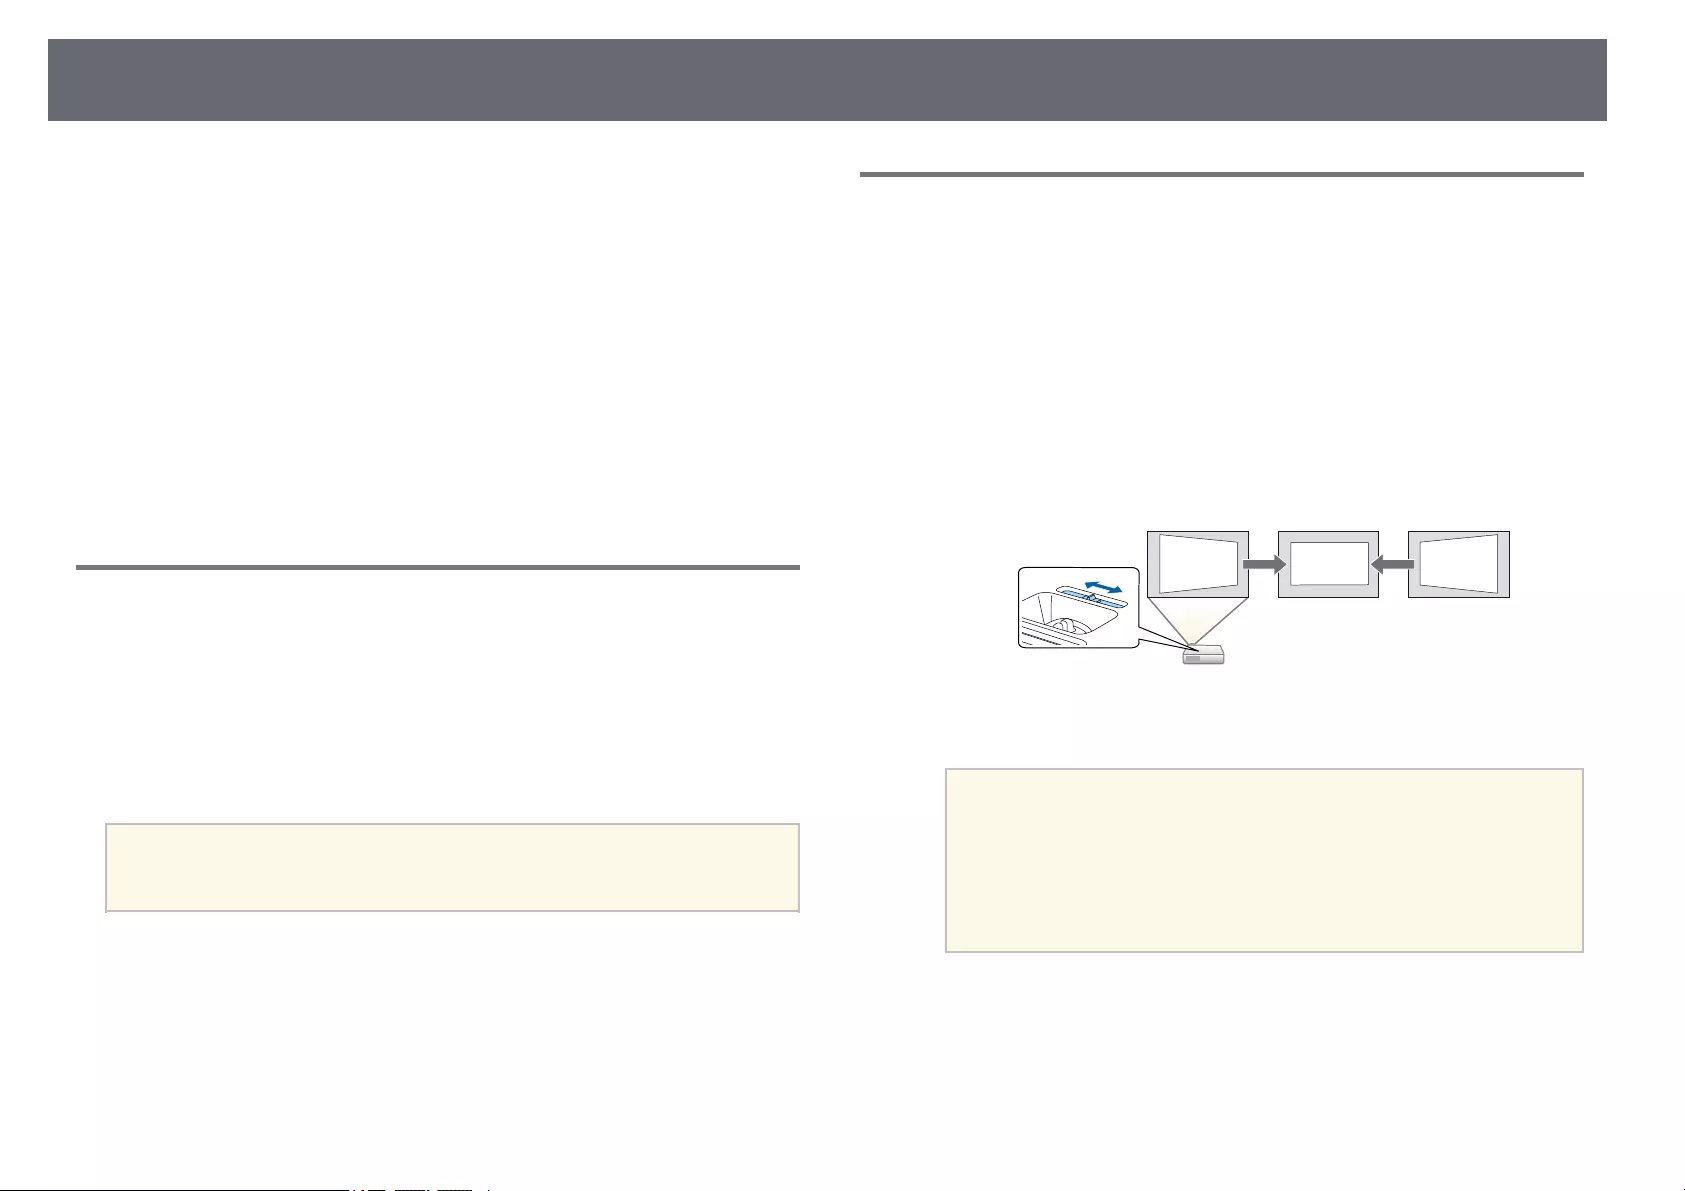
Image Shape 44
You can project an even, rectangular image by placing the projector directly
in front of the center of the screen and keeping it level. If you place the
projector at an angle to the screen, or tilt it up or down, or off to the side, you
may need to correct the image shape.
After correction, your image is slightly smaller.
For the best quality images, we recommend adjusting the installation position
of the projector to achieve the correct image size and shape.
gg Related Links
• «Auto V-Keystone» p.44
• «Correcting the Image Shape with the Horizontal Keystone Slider» p.44
• «Correcting the Image Shape with the Keystone Buttons» p.45
• «Correcting the Image Shape with Quick Corner» p.46
Auto V-Keystone
When the projector is moved or tilted, Auto V-Keystone automatically
corrects any vertical keystone distortion.
Auto V-Keystone can correct the projected image distortion in these
conditions:
• Projection angle is about 30º up or down
• The Projection setting is set to Front in the projector’s Extended menu
a• If you do not want to use the Auto V-Keystone function, set Auto
V-Keystone to Off in the projector’s menu.
sSettings >Keystone >H/V-Keystone >Auto V-Keystone
gg Related Links
• «Projection Modes» p.40
• «Projector Setup Settings — Extended Menu» p.117
• «Projector Feature Settings — Settings Menu» p.115
• «List of Functions» p.11
Correcting the Image Shape with the Horizontal
Keystone Slider
You can use the projector’s horizontal keystone slider to correct the shape of
an image that is an uneven horizontal rectangle, such as when the projector is
placed to the side of the projection area.
You can make effective corrections when the projection angle is about 30º
right or left.
aTurn on the projector and display an image.
bAdjust the slider until the image is an even rectangle.
After correction, your image is slightly smaller.
a• When you use the horizontal keystone slider, set H-Keystone
Adjuster to On in the projector’s Settings menu.
sSettings >Keystone >H/V-Keystone >H-Keystone
Adjuster
• You can also correct the shape of the image in the horizontal
direction in the projector’s Settings menu.
sSettings >Keystone >H/V-Keystone
gg Related Links
• «Projector Feature Settings — Settings Menu» p.115
• «List of Functions» p.11
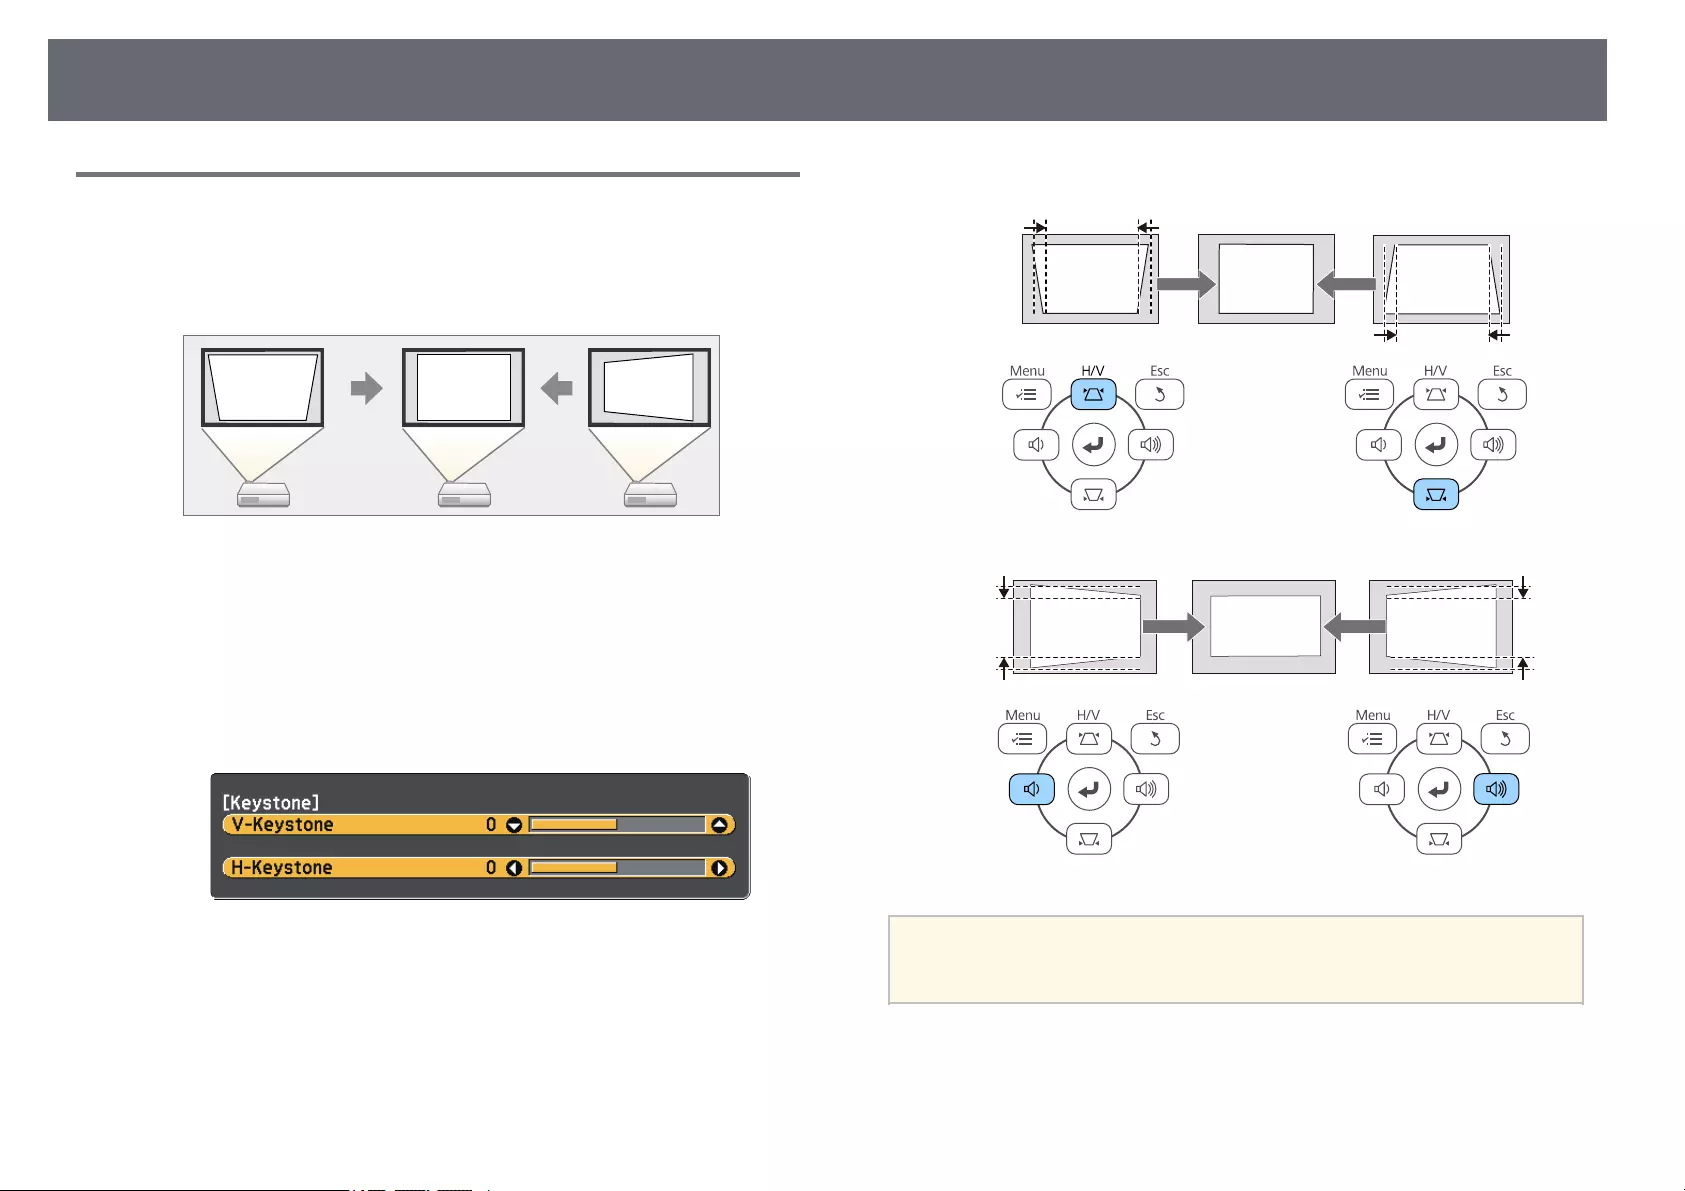
Image Shape 45
Correcting the Image Shape with the Keystone
Buttons
You can use the projector’s keystone correction buttons to correct the shape
of an image that is unevenly rectangular.
You can use keystone buttons to correct images up to 30º right, left, up, or
down.
aTurn on the projector and display an image.
bPress one of the keystone adjustment buttons on the control panel to
display the Keystone adjustment screen.
cPress a keystone button to adjust the image shape.
a• If the projector is installed out of your reach, you can also correct the
shape of the image using the remote control.
sSettings >Keystone >H/V-Keystone
gg Related Links
• «Projector Feature Settings — Settings Menu» p.115
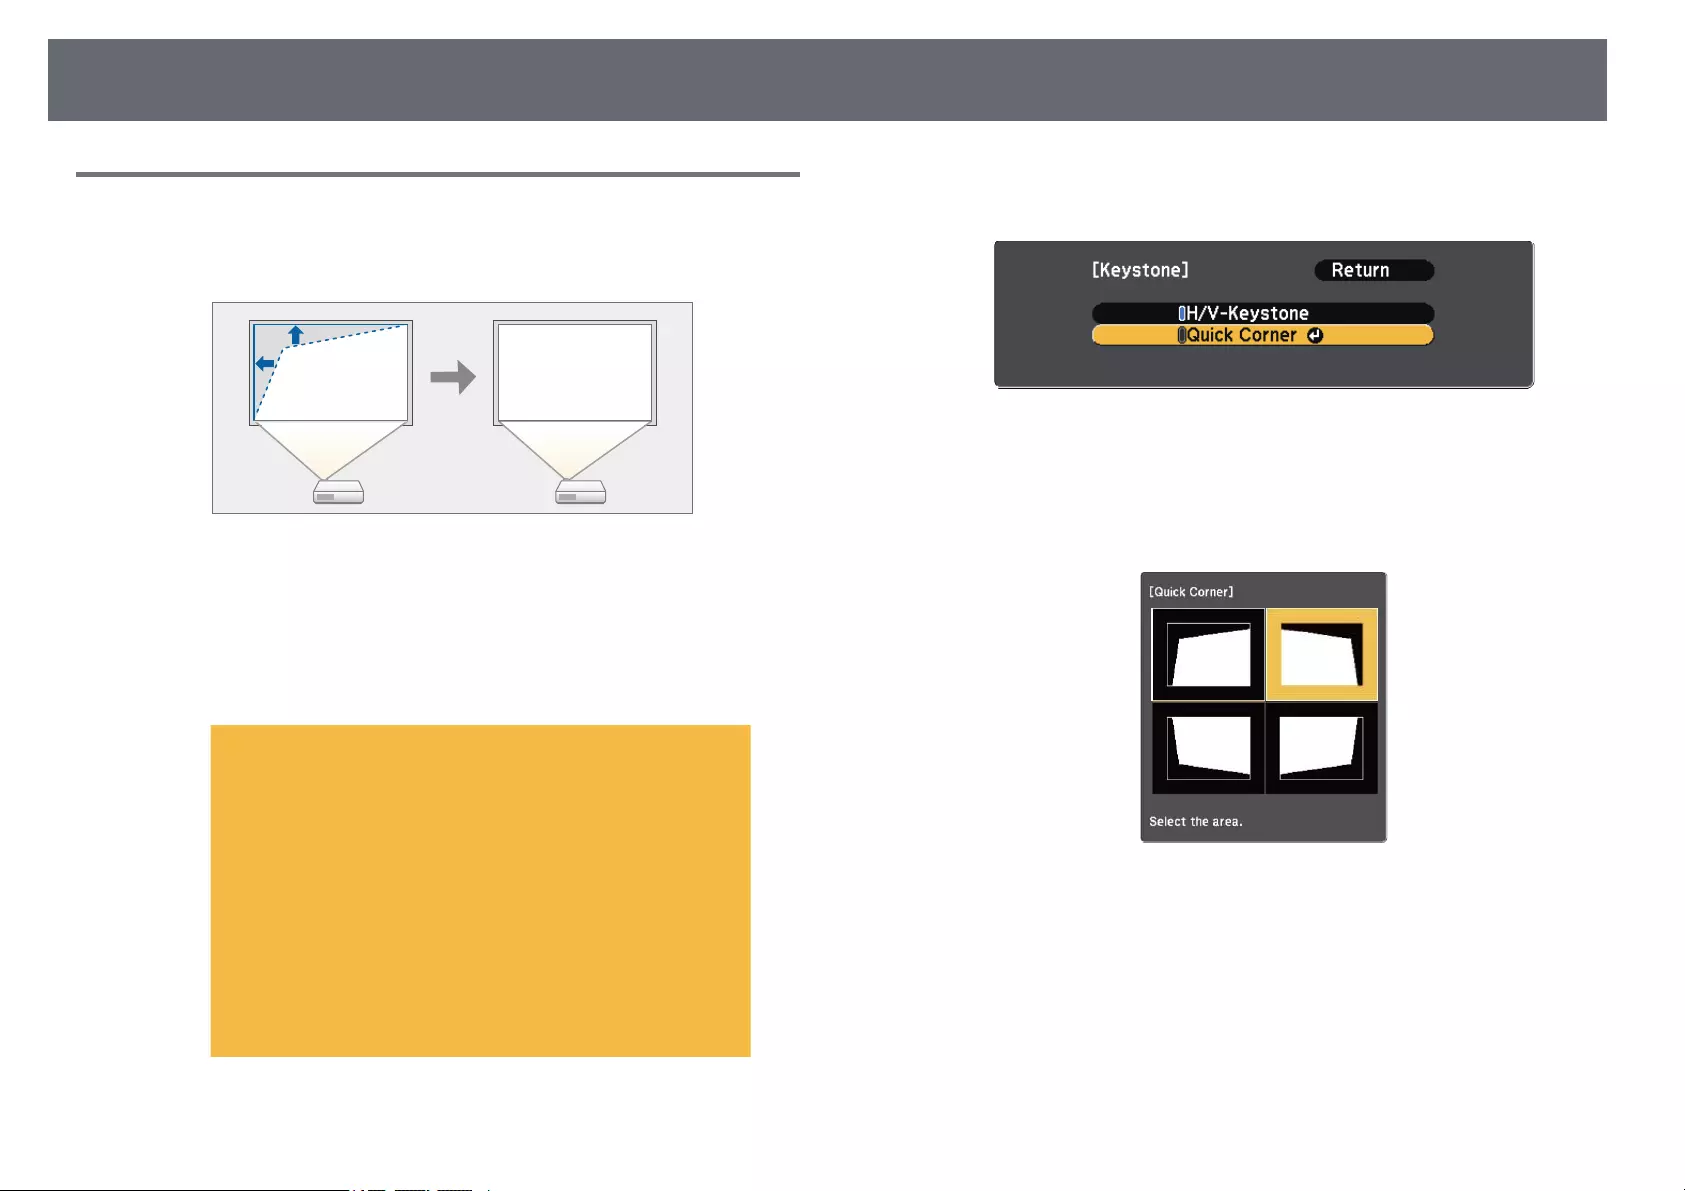
Image Shape 46
Correcting the Image Shape with Quick Corner
You can use the projector’s Quick Corner setting to correct the shape and size
of an image that is unevenly rectangular.
aTurn on the projector and display an image.
bPress the [Menu] button on the control panel or remote control.
cSelect the Settings menu and press [Enter].
dSelect Keystone and press [Enter].
eSelect Quick Corner and press [Enter]. Then press [Enter] again if
necessary.
You see the area selection screen.
fUse the arrow buttons to select the corner of the image you want to
adjust. Then press [Enter].
gPress the arrow buttons to adjust the image shape as necessary.
To return to the area selection screen, press [Enter].
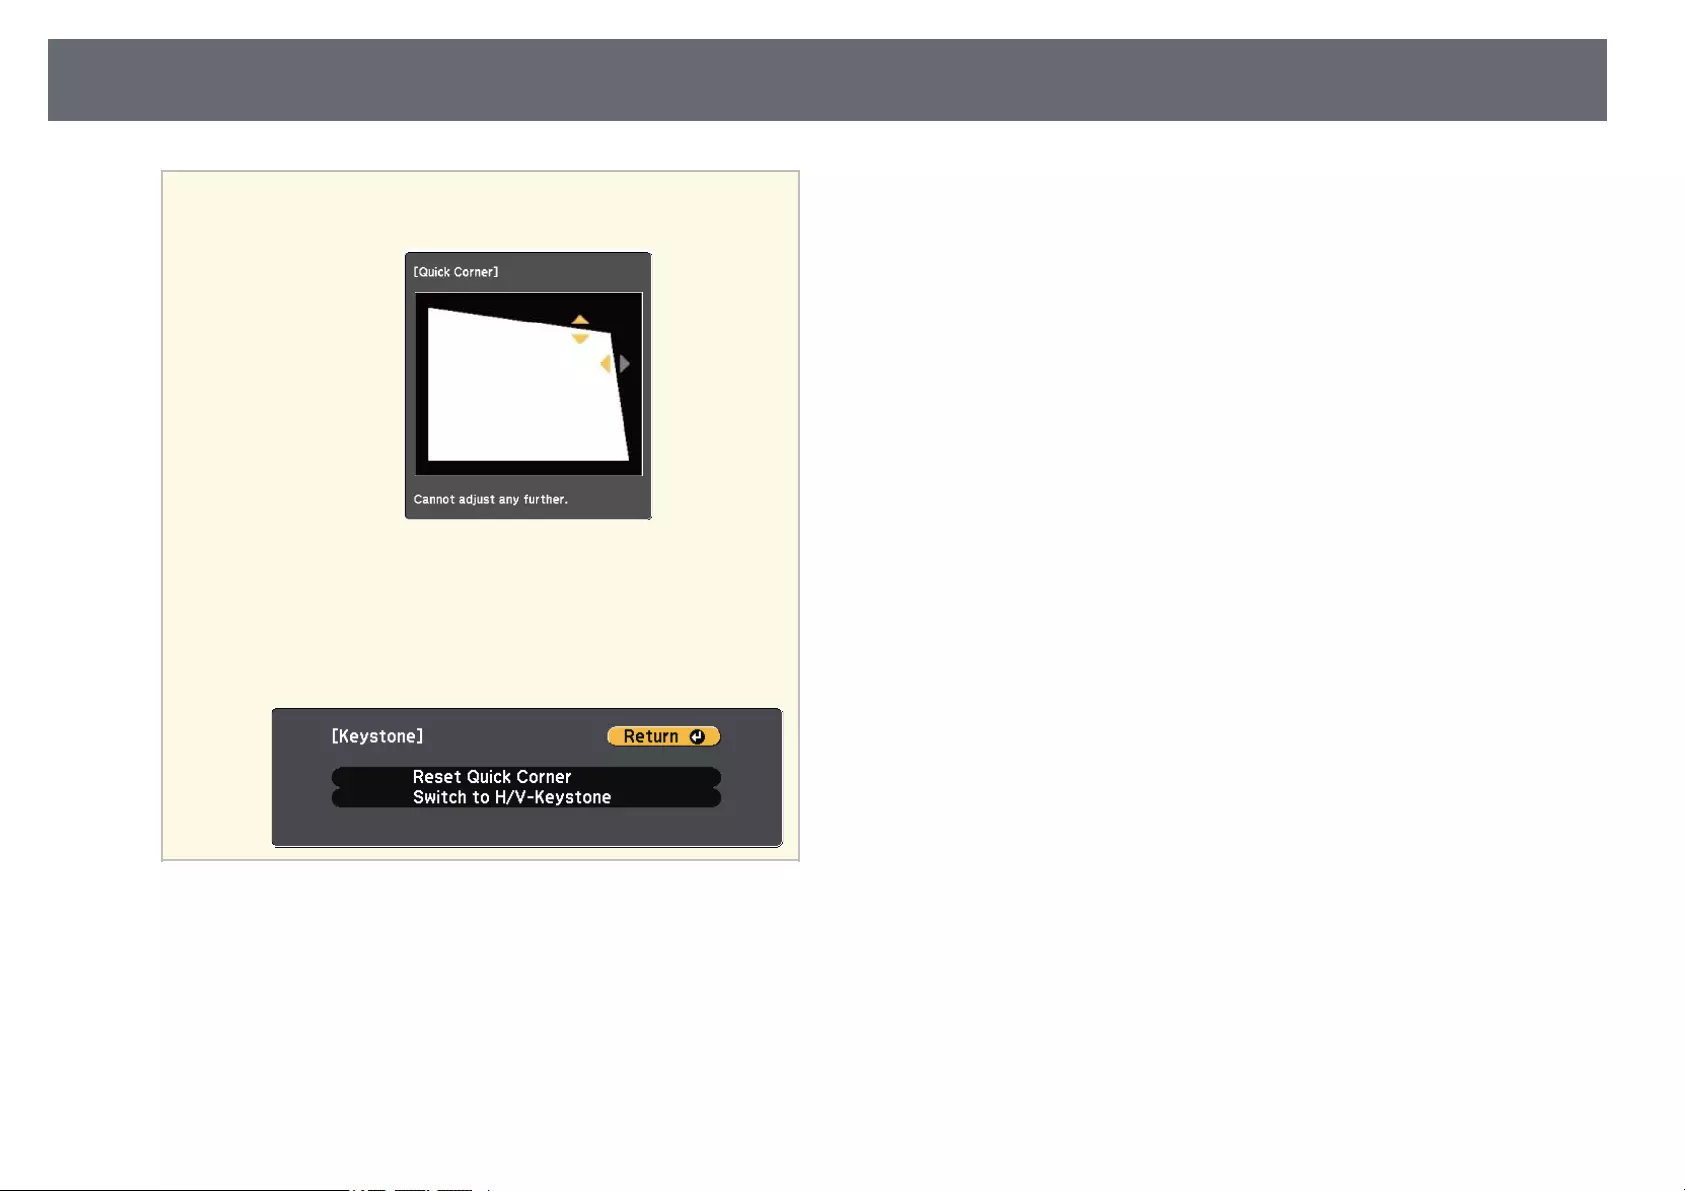
Image Shape 47
a• If you see this screen, you cannot adjust the shape any further
in the direction indicated by the gray triangle.
• To reset the Quick Corner corrections, hold down [Esc] for
about 2 seconds while the Quick Corner adjustment screen is
displayed, and select Reset Quick Corner. Select Switch to
H/V-Keystone to switch the image shape correction method to
H/V-Keystone.
hRepeat steps 6 and 7 as needed to adjust any remaining corners.
iWhen you are finished, press [Esc].
The Keystone setting is now set to Quick Corner in the projector’s Settings
menu. The next time you press the keystone adjustment buttons on the
control panel, the area selection screen is displayed.
gg Related Links
• «Projector Feature Settings — Settings Menu» p.115
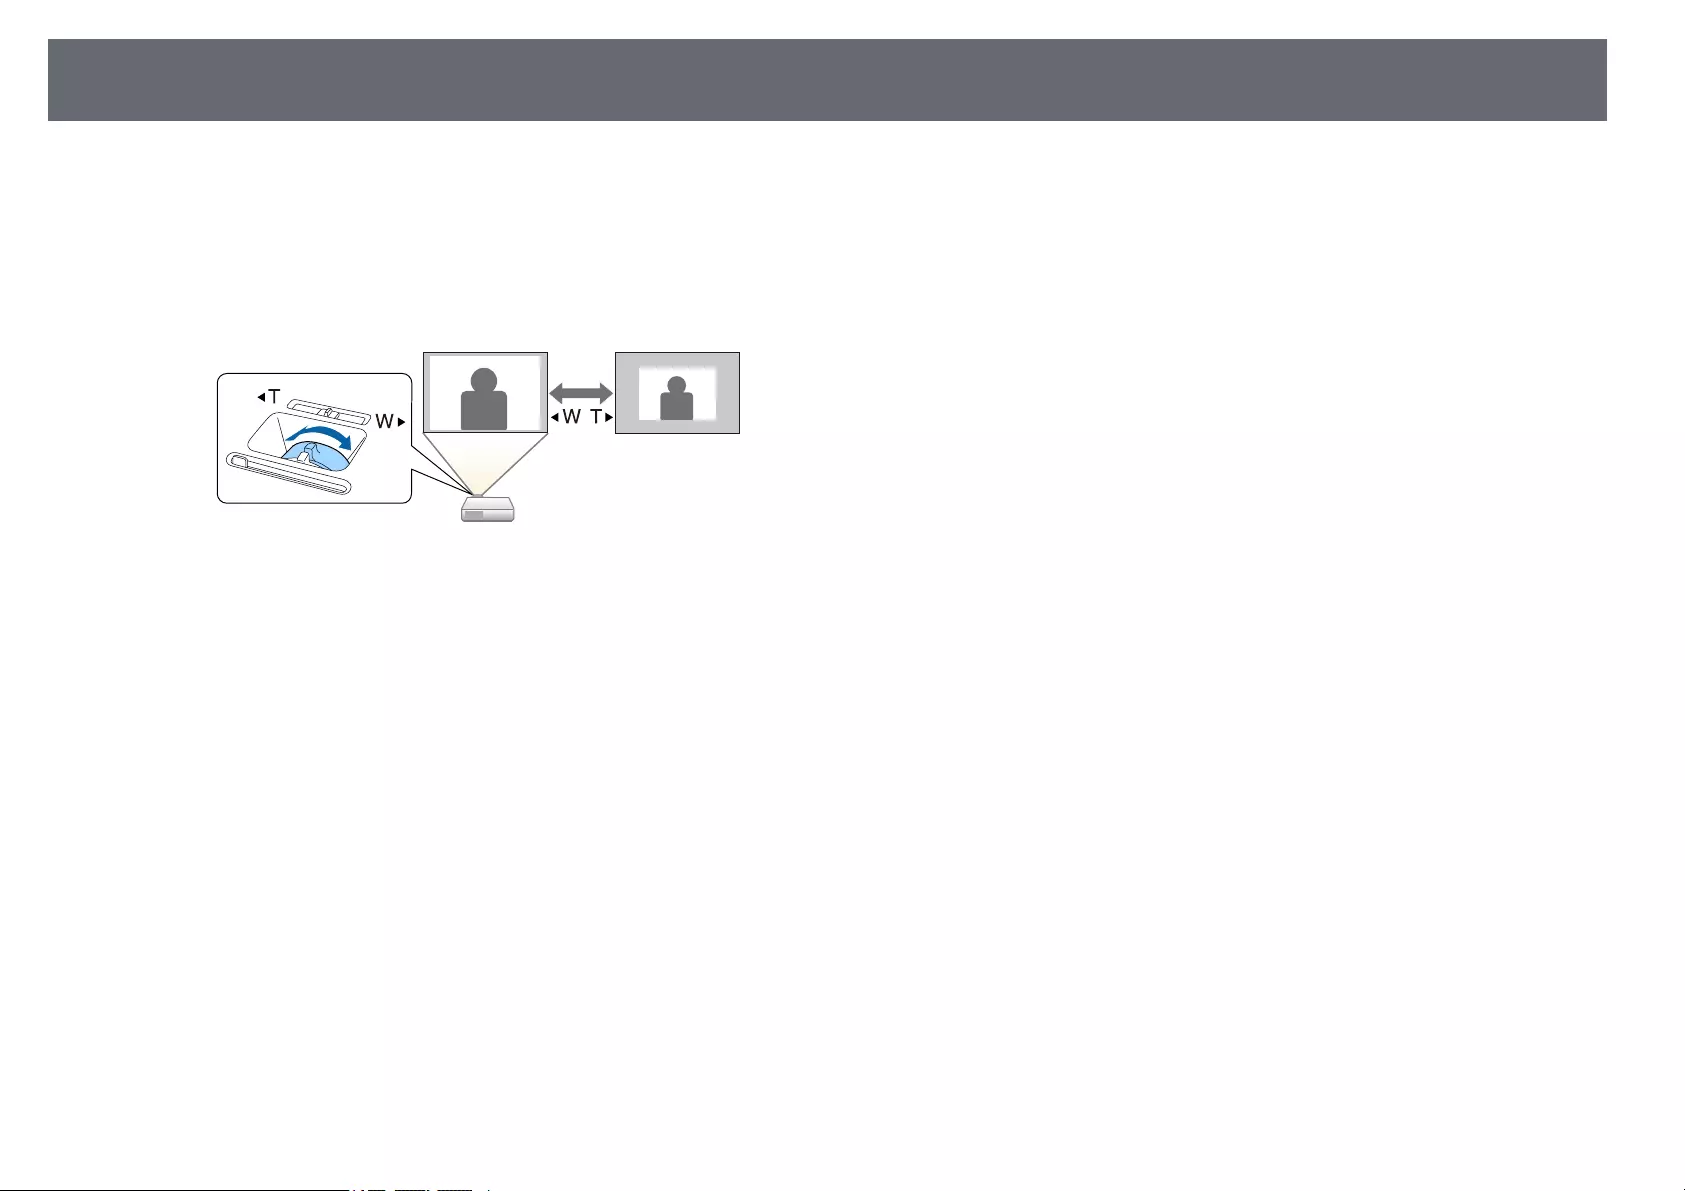
Resizing the Image with the Zoom Ring 48
You can resize the image using the projector’s zoom ring. (Available only for
models that have the zoom ring.)
aTurn on the projector and display an image.
bRotate the zoom ring to enlarge or reduce the image.
gg Related Links
• «List of Functions» p.11
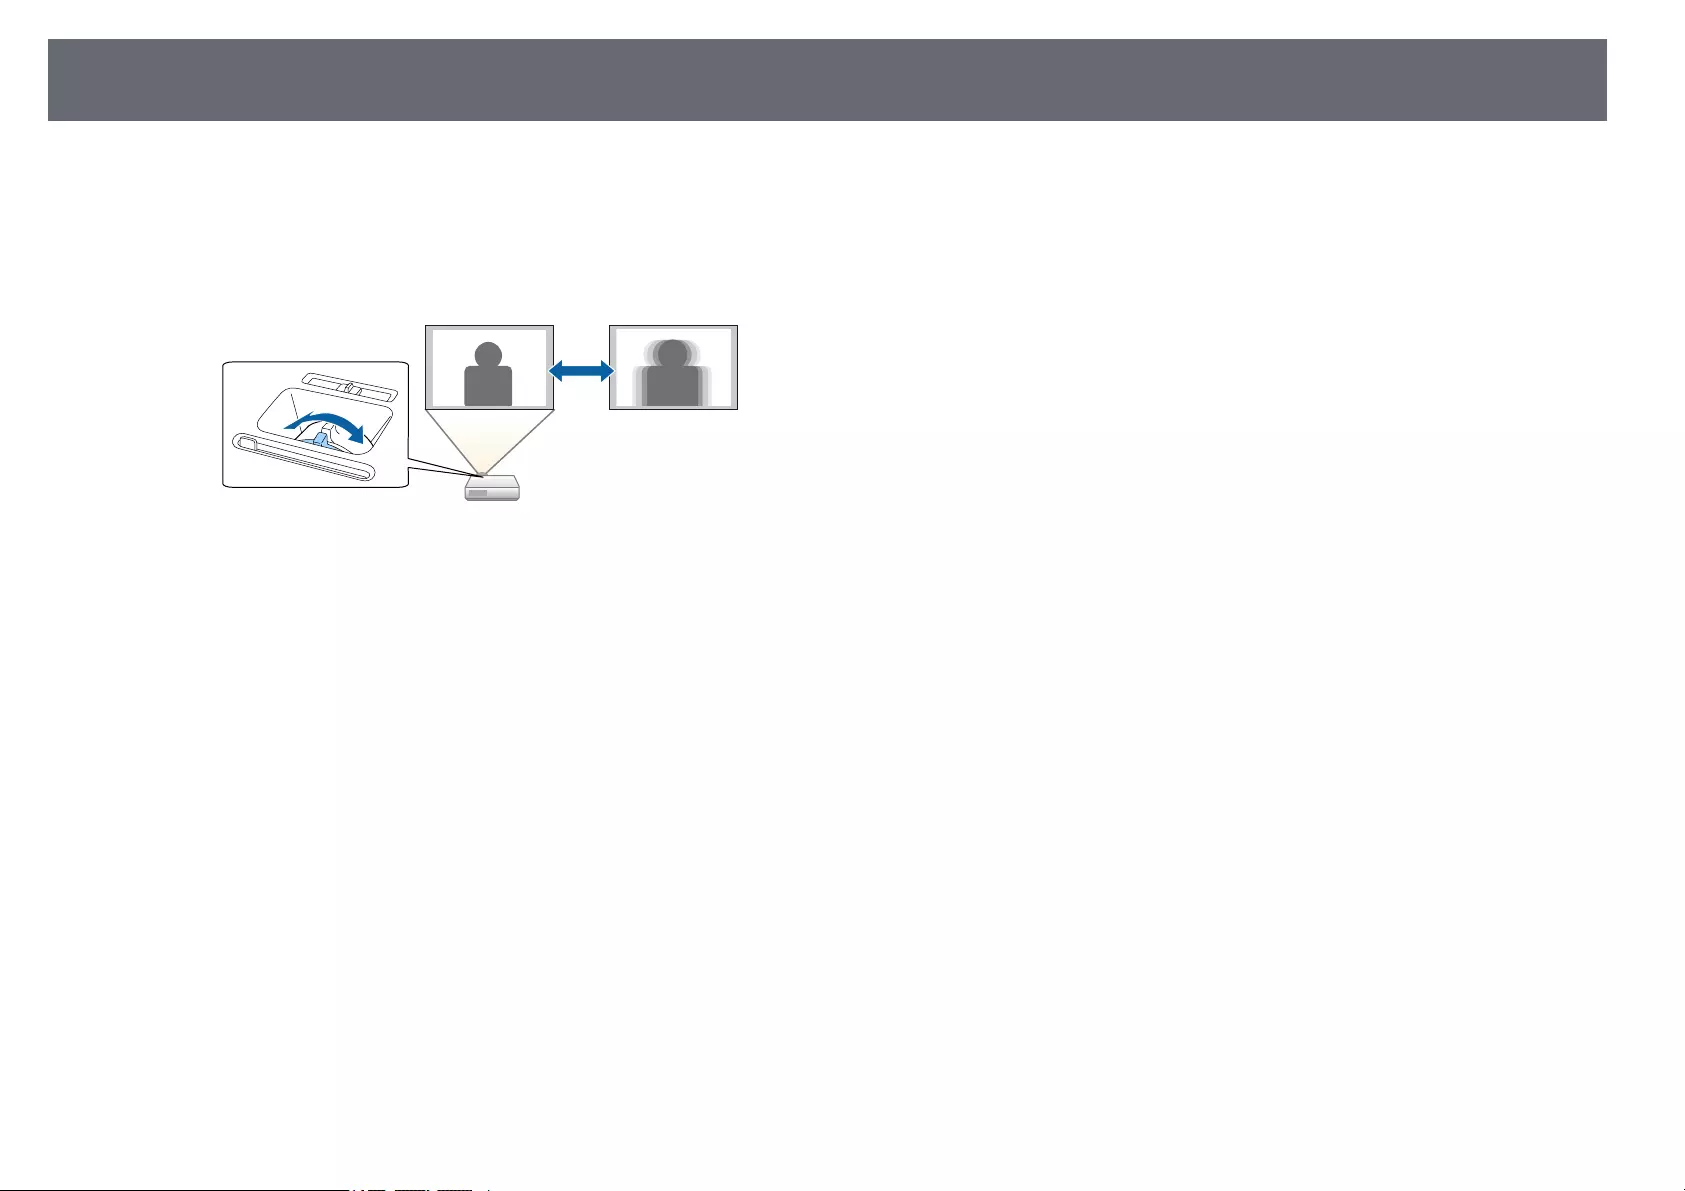
Focusing the Image Using the Focus Ring 49
You can correct the focus using the focus ring.
aTurn on the projector and display an image.
bRotate the focus ring to adjust the focus.

Selecting an Image Source 50
When multiple image sources are connected to the projector, such as a
computer and DVD player, you can switch from one image source to the
other.
Available sources vary depending on the projector model.
aMake sure the connected image source you want to use is turned on.
bFor video image sources, insert a DVD or other video media and press
play.
cDo one of the following:
• Press the [Source Search] button on the control panel or remote
control until you see the image from the source you want.
aThis screen is displayed when no image signal is detected.
Check the cable connections between the projector and image
source.
• Press the button for the source you want on the remote control. If
there is more than one port for that source, press the button again to
cycle through the sources.
• Press the [Home] button on the control panel or remote control.
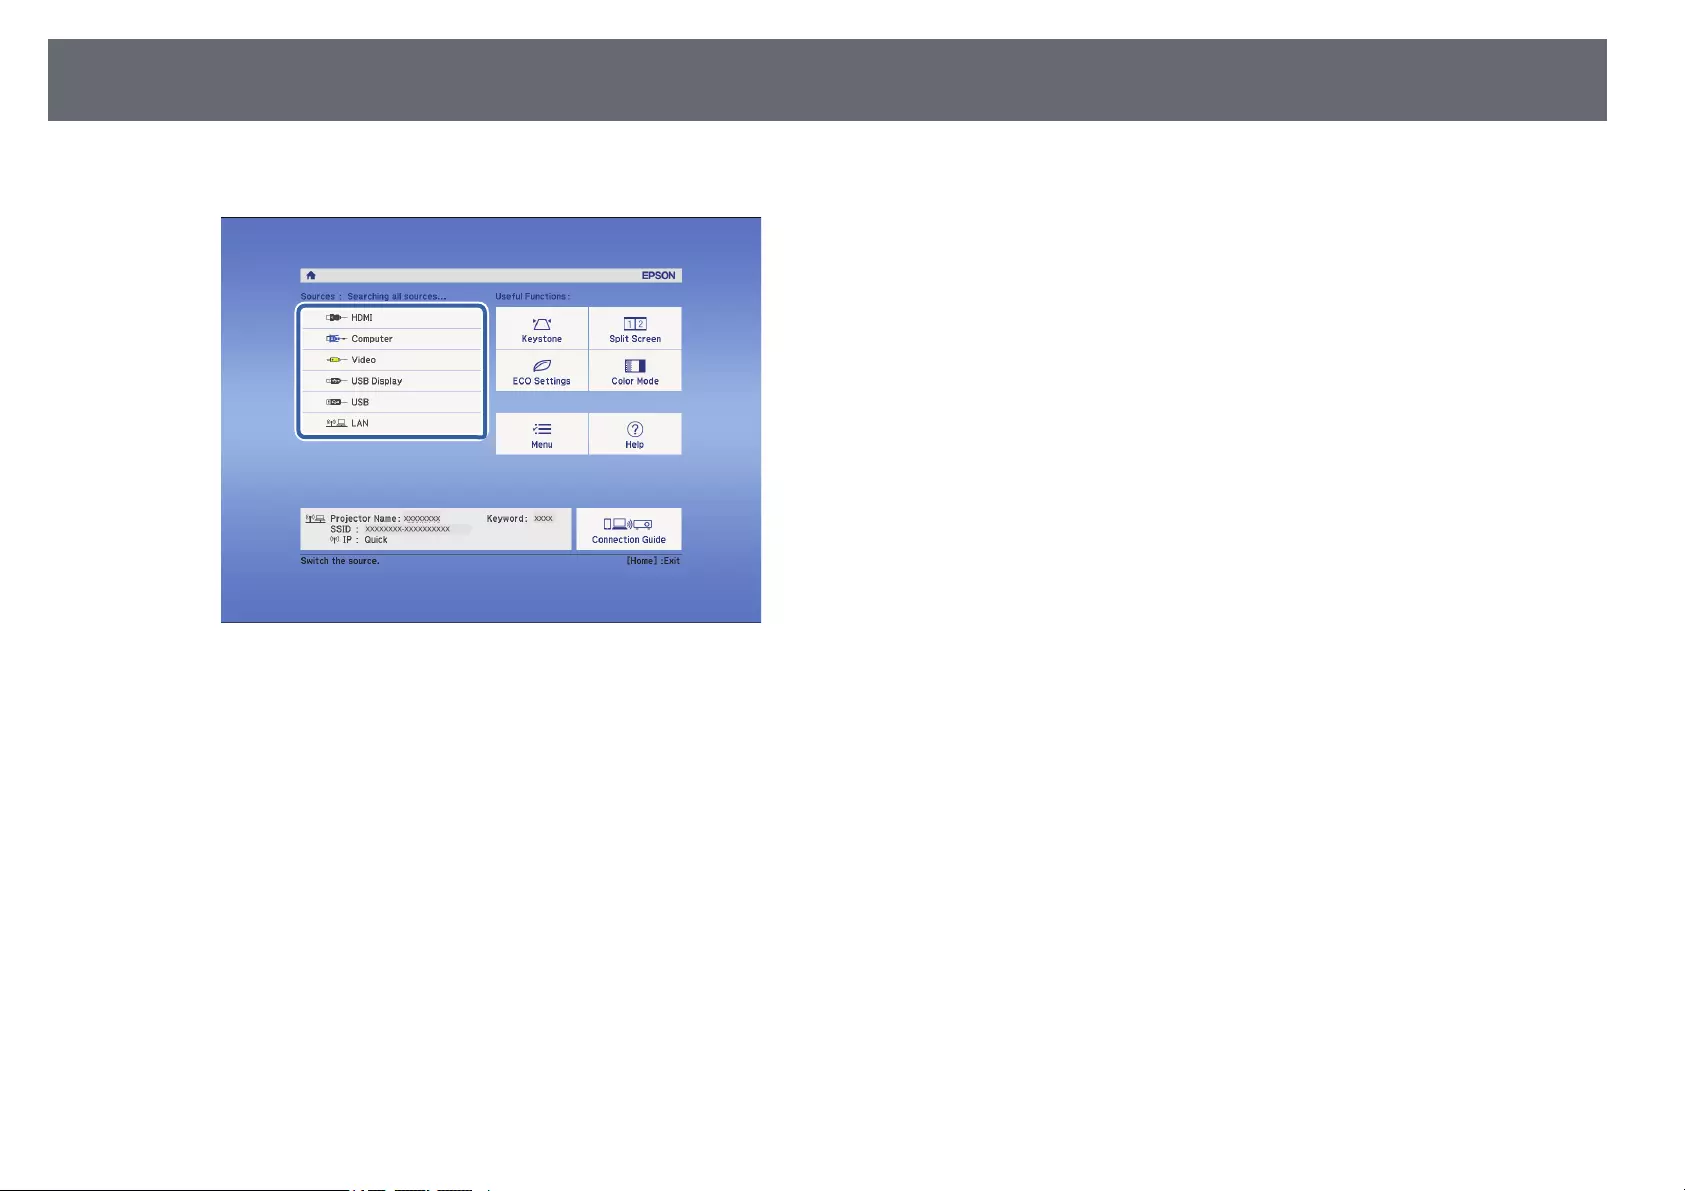
Selecting an Image Source 51
Then select the source you want to use from the screen displayed.
gg Related Links
• «List of Functions» p.11

Image Aspect Ratio 52
The projector can display images in different width-to-height ratios called
aspect ratios. Normally, the input signal from your video source determines
the image’s aspect ratio. However, for certain images you can change the
aspect ratio to fit your screen.
If you always want to use a particular aspect ratio for a certain video input
source, you can select it using the projector’s Signal menu.
gg Related Links
• «Changing the Image Aspect Ratio» p.52
• «Available Image Aspect Ratios» p.52
• «Projected Image Appearance with Each Aspect Mode» p.53
• «Input Signal Settings — Signal Menu» p.114
Changing the Image Aspect Ratio
You can change the aspect ratio of the displayed image.
aTurn on the projector and switch to the image source you want to use.
bPress the [Aspect] button on the remote control.
The shape and size of the displayed image changes, and the name of the
aspect ratio appears briefly on the screen.
cTo cycle through the available aspect ratios for your input signal, press
the [Aspect] button repeatedly.
aTo display images without black bars, set Resolution to Wide or
Normal in the projector’s Signal menu according to the computer’s
resolution.
gg Related Links
• «Input Signal Settings — Signal Menu» p.114
Available Image Aspect Ratios
You can select the following image aspect ratios, depending on the input
signal from your image source.
a• The available aspect ratio setting varies depending on the input
signal.
• Note that using the aspect ratio function of the projector to reduce,
enlarge, or split the projected image for commercial purposes or for
public viewing may infringe upon the rights of the copyright holder
of that image based on copyright law.
Aspect mode Description
Auto Automatically sets the aspect ratio according to the
input signal and the Resolution setting.
Normal Displays images using the full projection area and
maintains the aspect ratio of the image.
Full Displays images using the full size of the projection
area, but does not maintain the aspect ratio.
Zoom Displays images using the full width of the projection
area and maintains the aspect ratio of the image.
Native Displays images as is (aspect ratio and resolution are
maintained).
gg Related Links
• «List of Functions» p.11
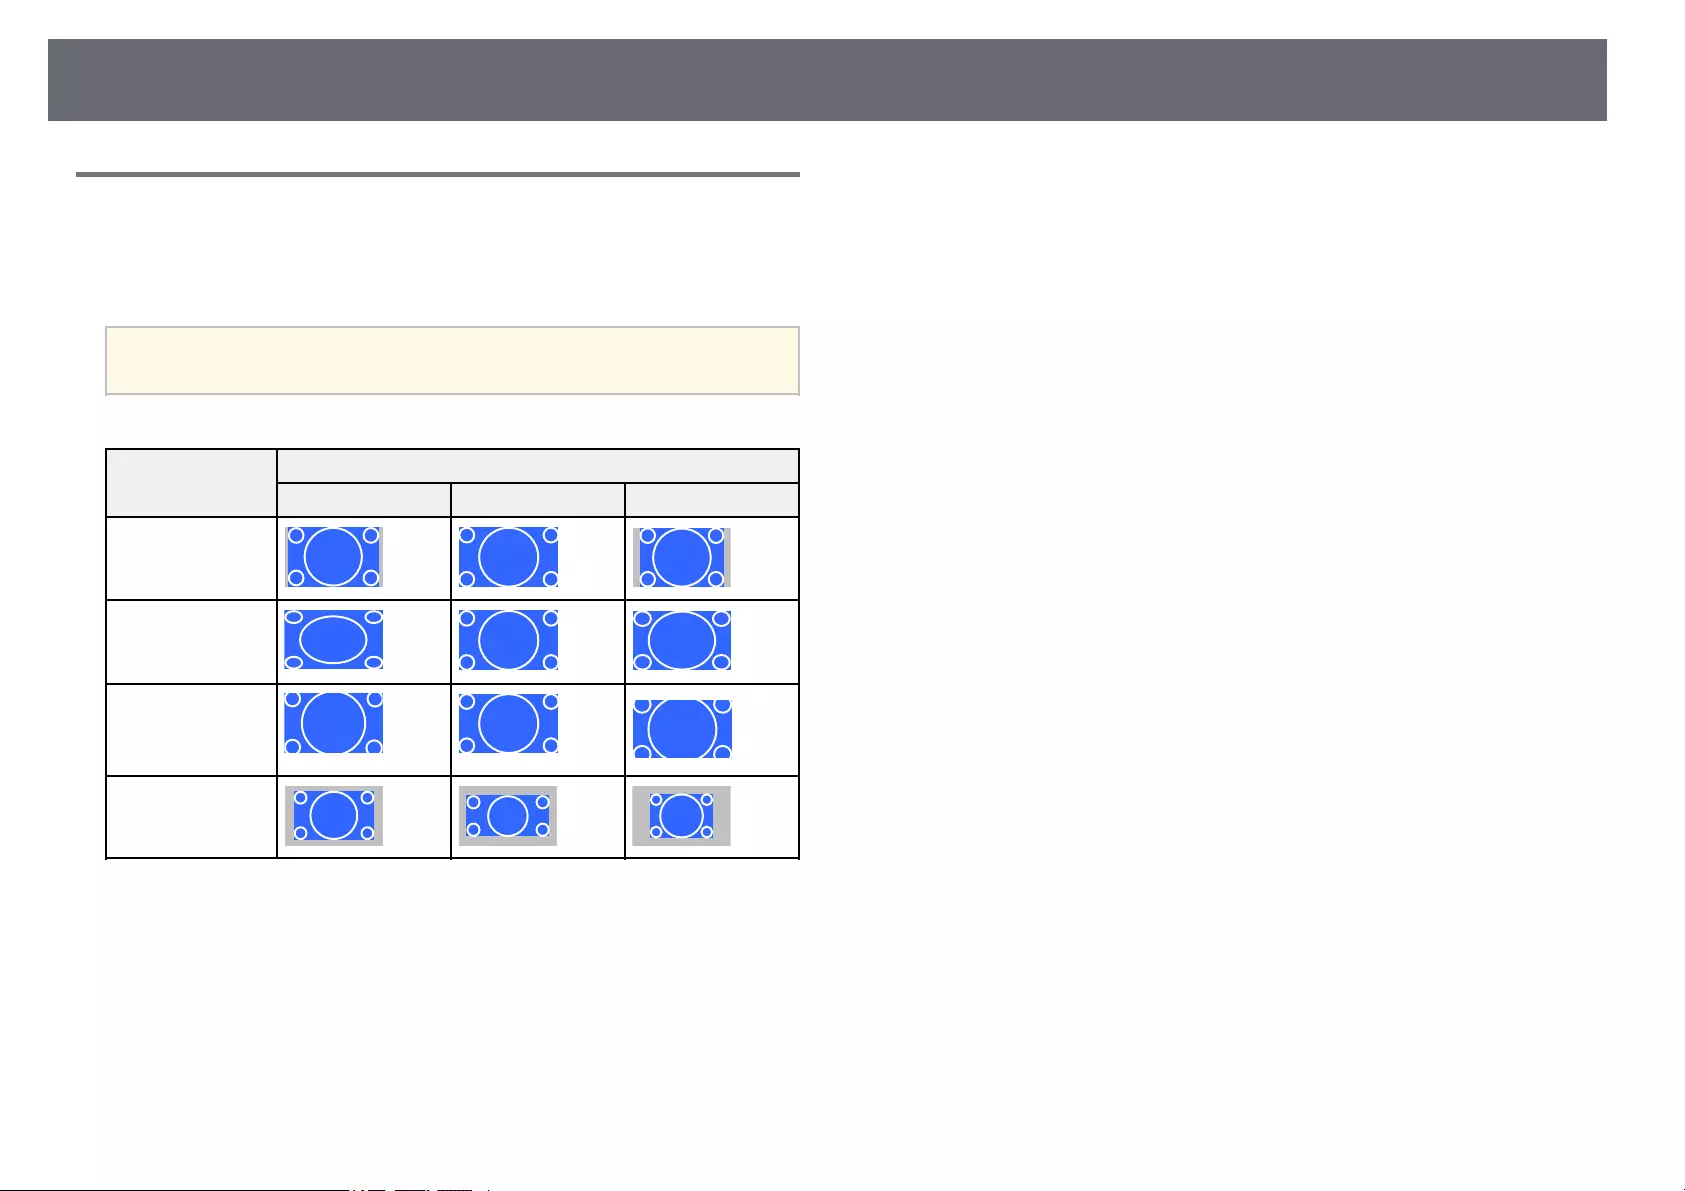
Image Aspect Ratio 53
Projected Image Appearance with Each Aspect Mode
Black bands and cropped images may project in certain aspect ratios,
depending on the aspect ratio and resolution of your input signal. See the
following table to confirm the position of black bands and cropped images.
aThe image for Native varies depending on the input signal.
Aspect mode Aspect ratio for input signals
16:10 16:9 4:3
Normal
Auto
Full
Zoom
Native
gg Related Links
• «List of Functions» p.11
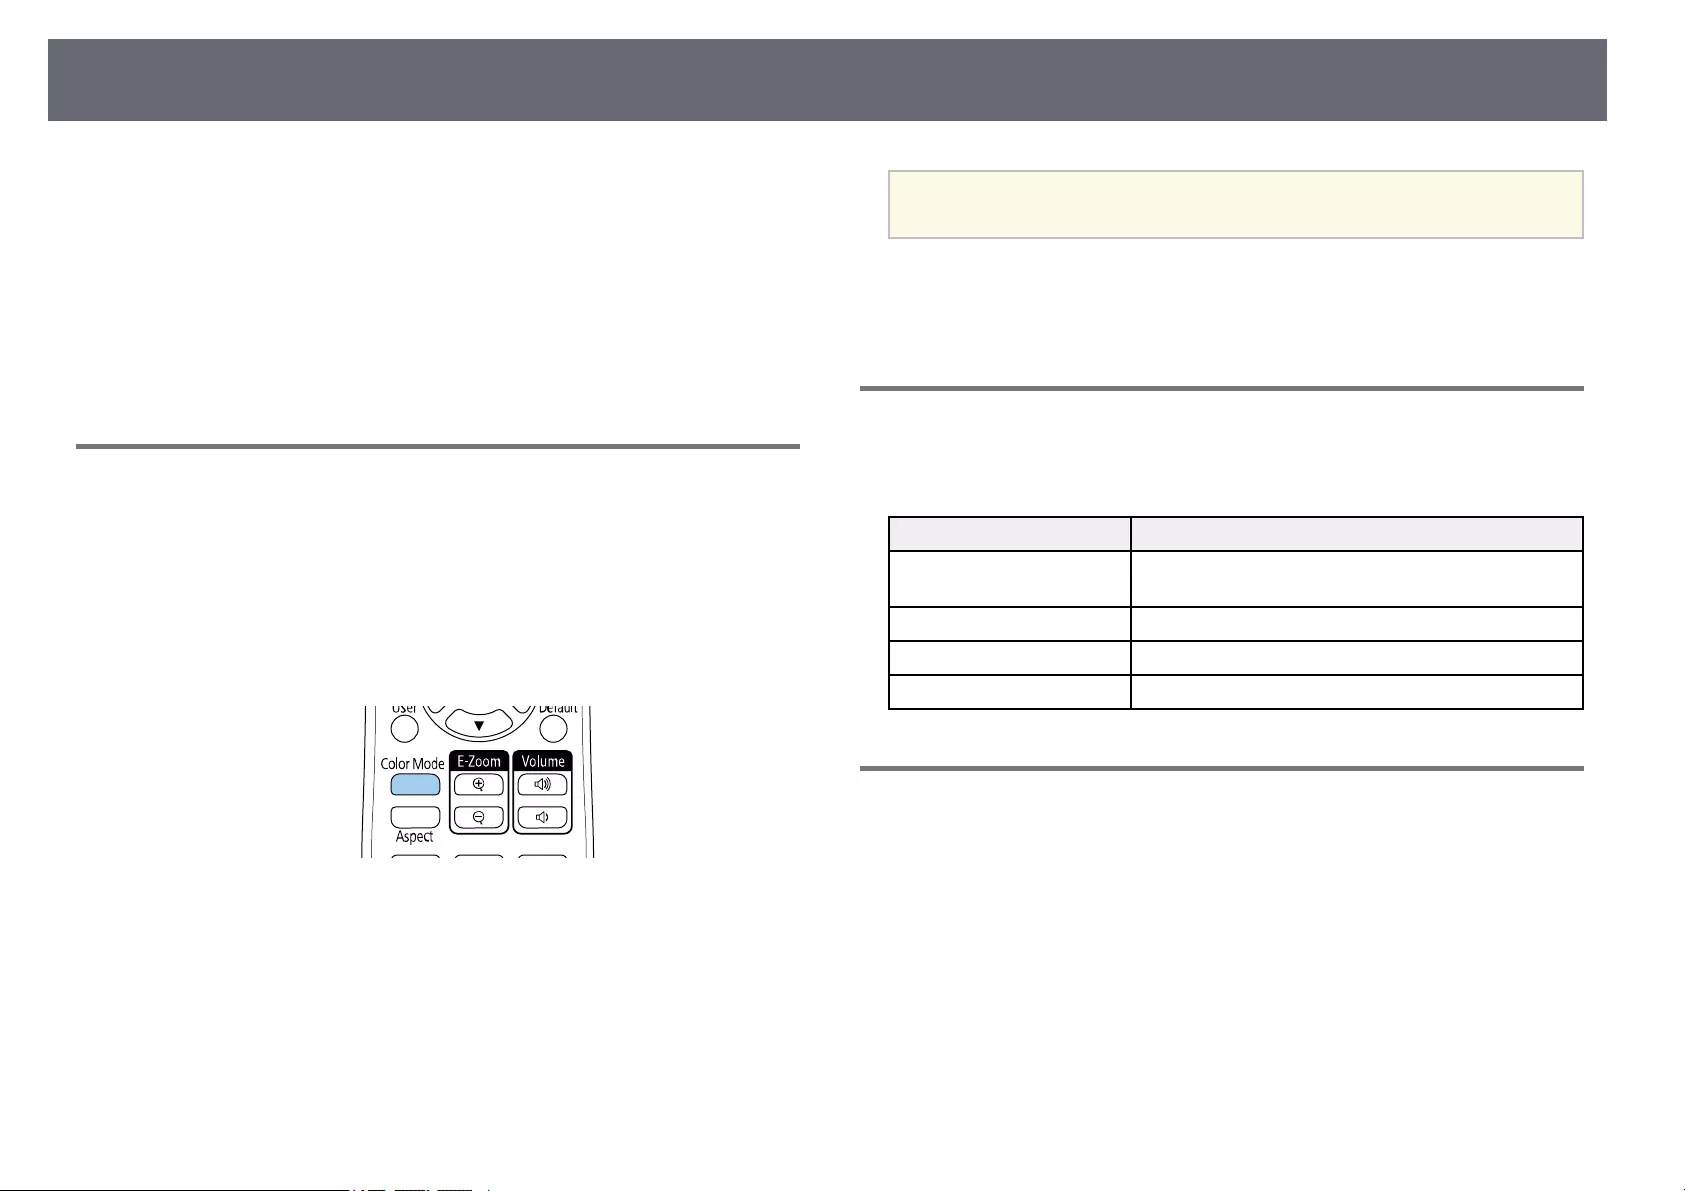
Adjusting Image Quality (Color Mode) 54
The projector offers different color modes to provide optimum brightness,
contrast, and color for a variety of viewing environments and image types.
You can select the mode designed to match your image and environment, or
experiment with the available modes.
gg Related Links
• «Changing the Color Mode» p.54
• «Available Color Modes» p.54
• «Setting Auto Iris» p.54
Changing the Color Mode
You can change the projector’s Color Mode using the remote control to
optimize the image for your viewing environment.
aTurn on the projector and switch to the image source you want to use.
bPress the [Color Mode] button on the remote control to change the
Color Mode.
The name of the Color Mode appears briefly on the screen and then
image appearance changes.
cTo cycle through all of the available color modes for your input signal,
press the [Color Mode] button repeatedly.
aYou can also set the Color Mode setting in the projector’s Image
menu.
gg Related Links
• «Image Quality Settings — Image Menu» p.113
Available Color Modes
You can set the projector to use these color modes, depending on the input
source you are using:
Color mode Description
Dynamic This is the brightest mode. Best for prioritizing
brightness.
Bright Cinema Best for projecting vivid images.
Cinema Best for enjoying content such as movies.
Game Best for gaming.
Setting Auto Iris
You can turn on Auto Iris to automatically optimize the image based on the
brightness of the content.
This setting is available for Dynamic or Cinema color modes.
aTurn on the projector and switch to the image source you want to use.
bPress the [Menu] button on the control panel or remote control.
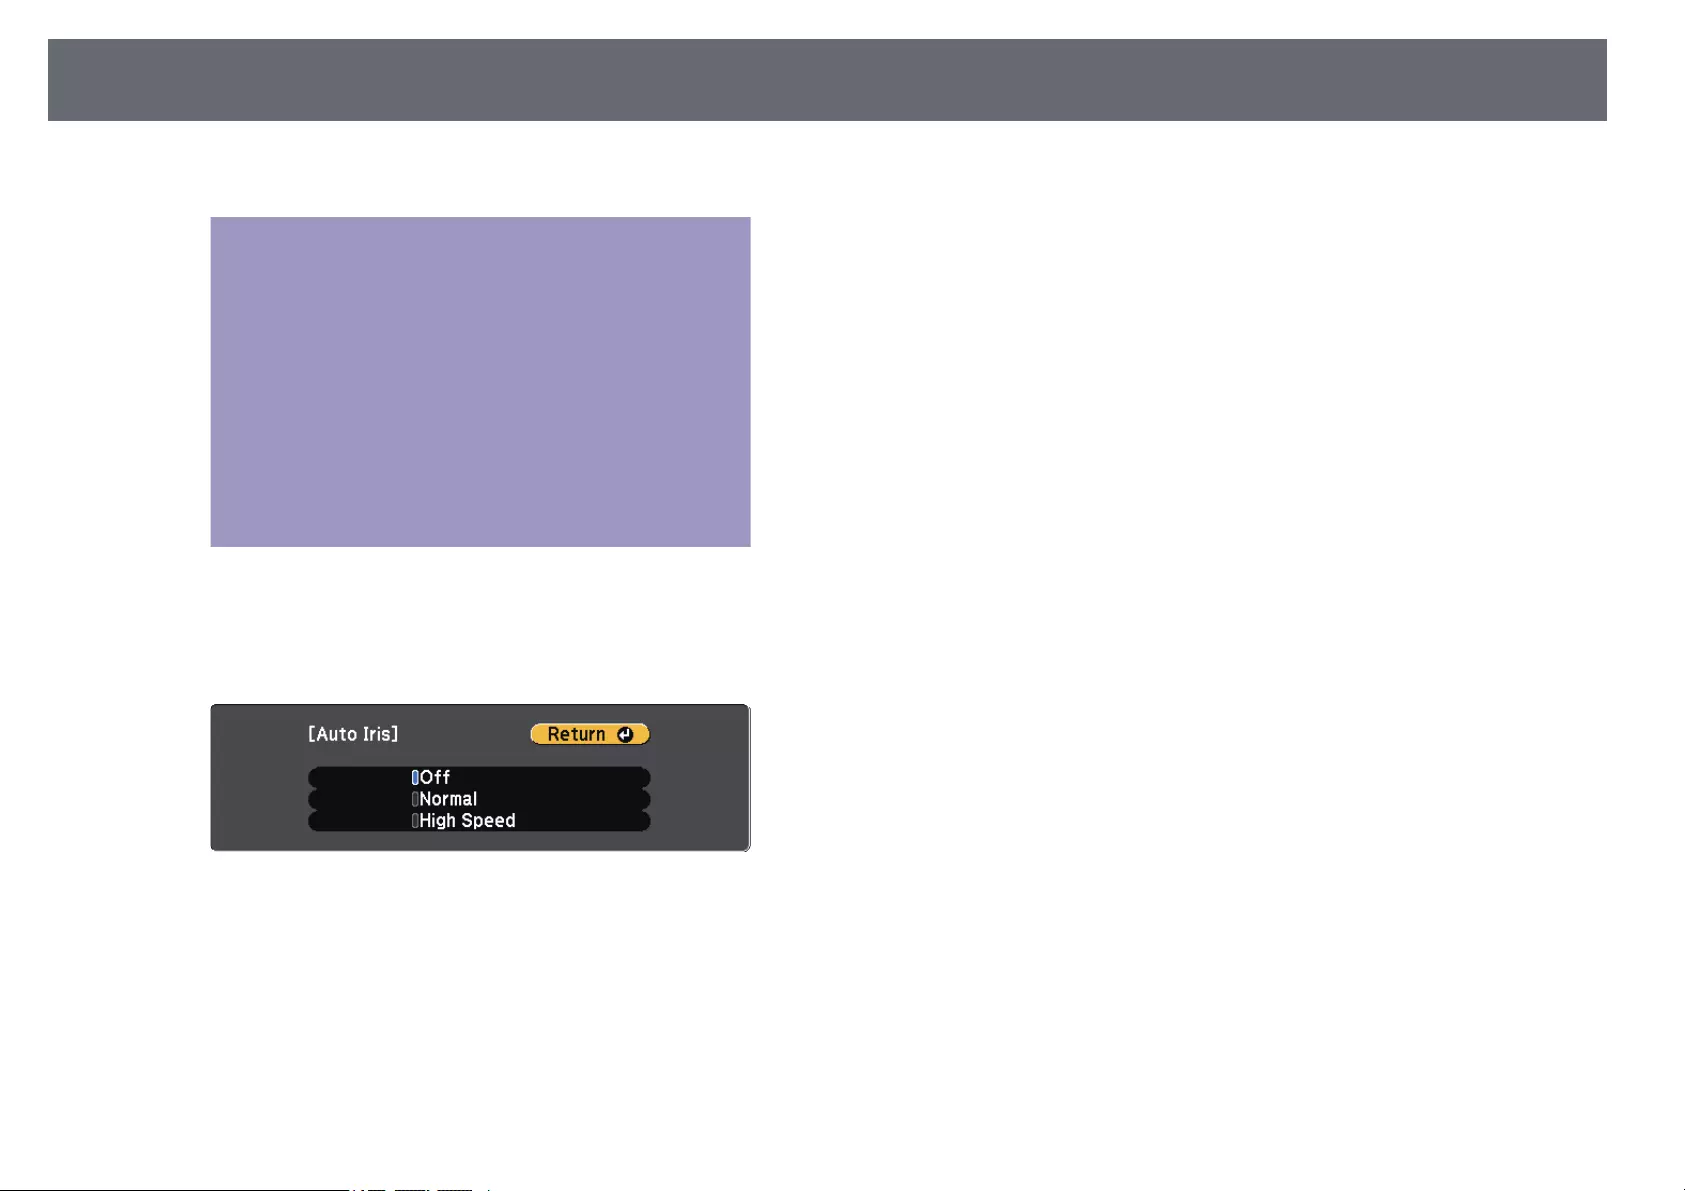
Adjusting Image Quality (Color Mode) 55
cSelect the Image menu and press [Enter].
dSelect Auto Iris and press [Enter].
eChoose one of the following options and press [Enter]:
•Normal for standard brightness adjustment.
•High Speed to adjust brightness as soon as the scene changes.
fPress [Menu] or [Esc] to exit the menus.
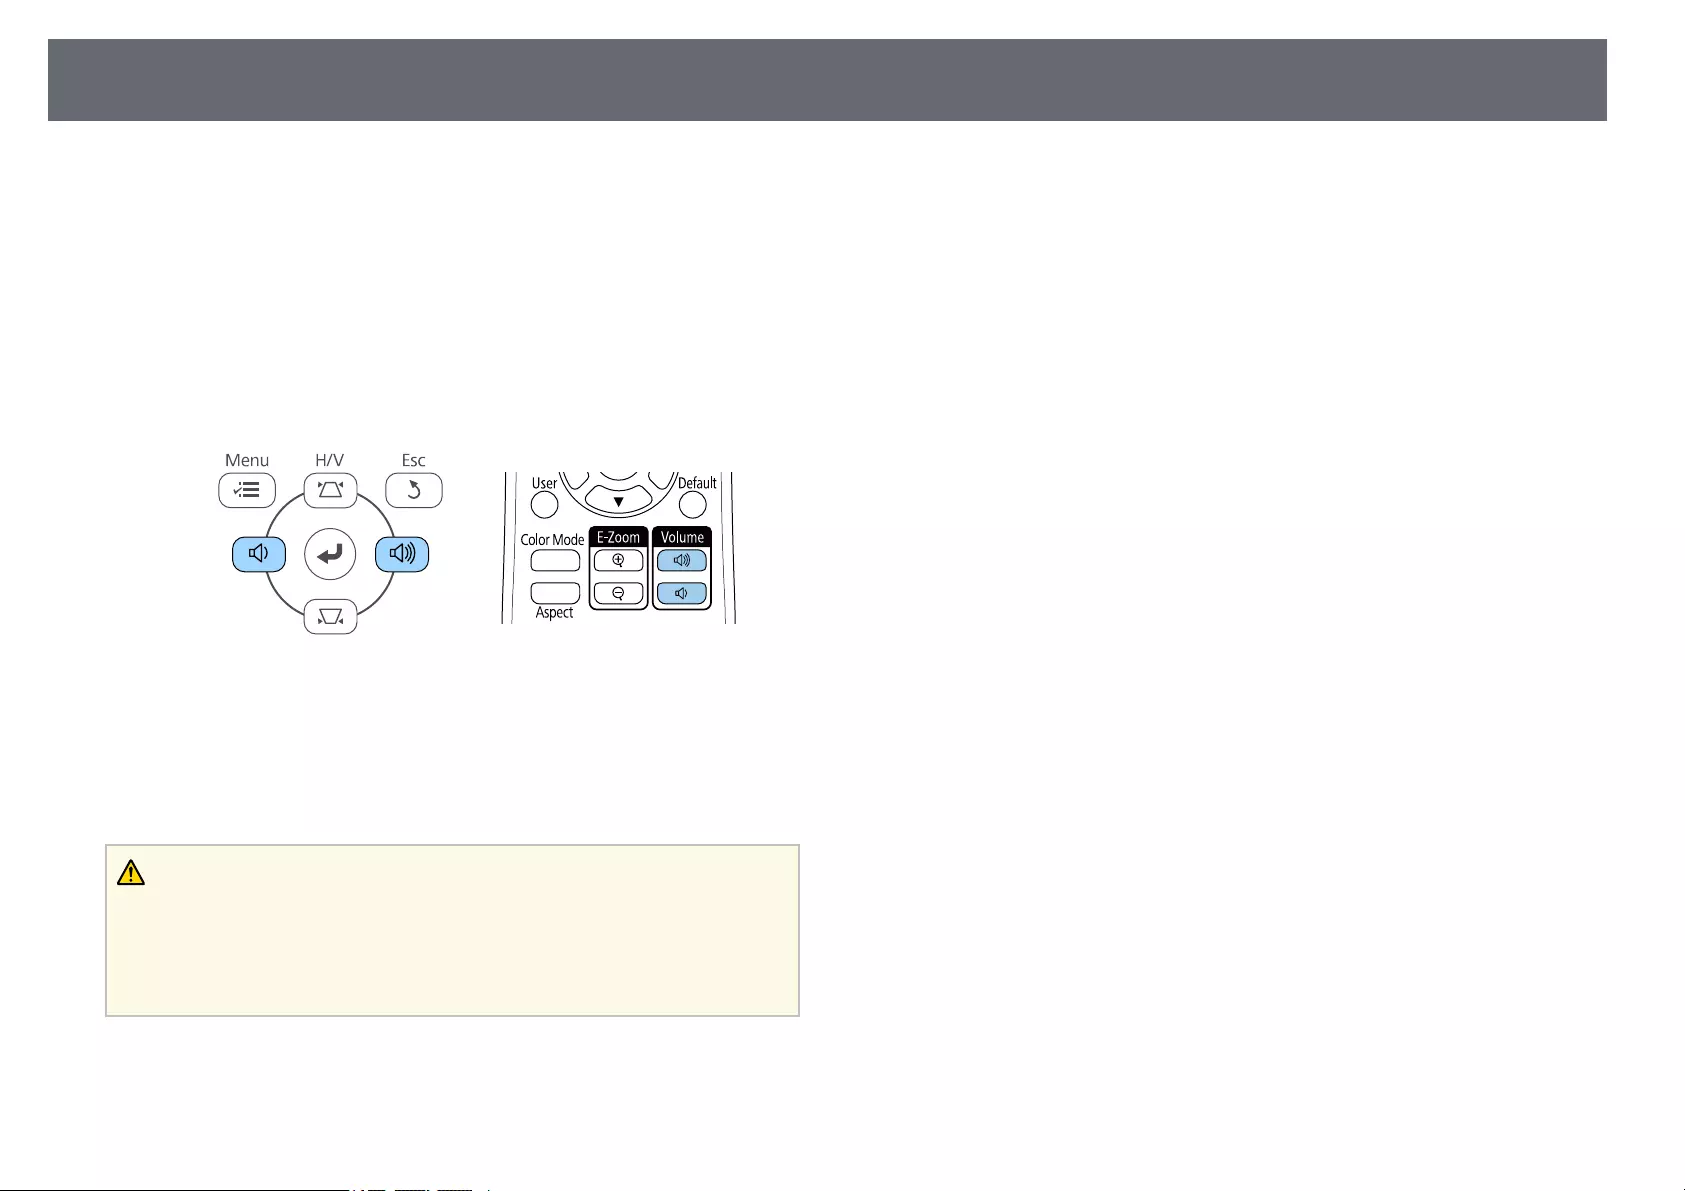
Controlling the Volume with the Volume Buttons 56
The volume buttons control the projector’s internal speaker system.
You can also control the volume of any external speakers you connected to
the projector.
You must adjust the volume separately for each connected input source.
aTurn on the projector and start a presentation.
bTo lower or raise the volume, press the [Volume] buttons on the
control panel or remote control as shown.
A volume gauge appears on the screen.
cTo set the volume to a specific level for an input source, select Volume
in the projector’s Settings menu.
Caution
Do not start a presentation at a high volume setting. Sudden loud noises may cause
hearing loss.
Always lower the volume before powering off, so that you can power on and then
gradually increase the volume.
gg Related Links
• «Projector Feature Settings — Settings Menu» p.115

Adjusting Projector Features
Follow the instructions in these sections to use your projector’s adjustment features.
gg Related Links
• «Projecting Two Images Simultaneously» p.58
• «Projecting a PC Free Presentation» p.61
• «Shutting Off the Image and Sound Temporarily» p.66
• «Stopping Video Action Temporarily» p.67
• «Zooming In/Zooming Out of Images (E-Zoom)» p.68
• «Saving a User’s Logo Image» p.70
• «Saving a User Pattern» p.71
• «Color Difference Correction when Projecting from Multiple Projectors» p.72
• «Projector Security Features» p.75
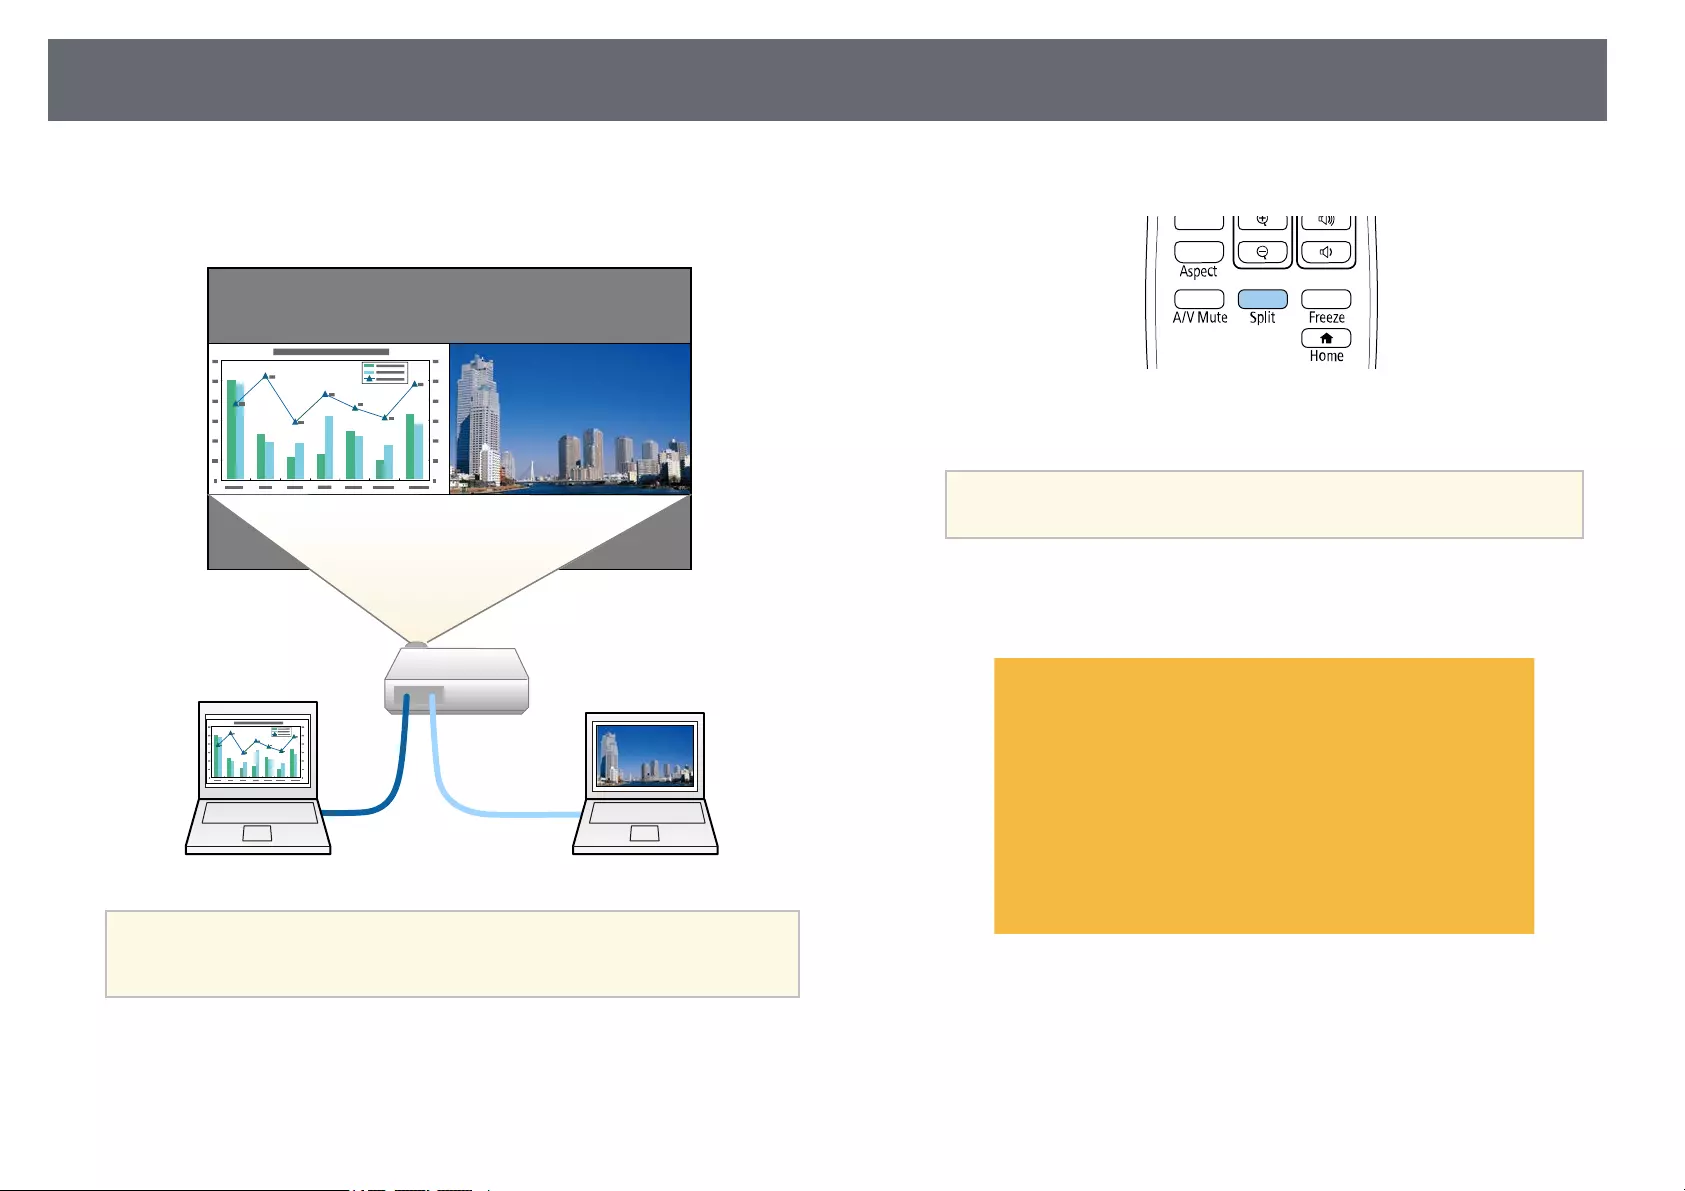
Projecting Two Images Simultaneously 58
You can use the split screen feature to simultaneously project two images
from different image sources. You can control the split screen feature using
the remote control or the projector menus.
a• While using the split screen feature, other projector features may not
be available and some settings may be automatically applied to both
images.
aPress the [Split] button on the remote control.
The currently selected input source moves to the left of the screen.
aYou can perform the same operations from Split Screen in the
projector’s Settings menu.
bPress the [Menu] button.
You see this screen:
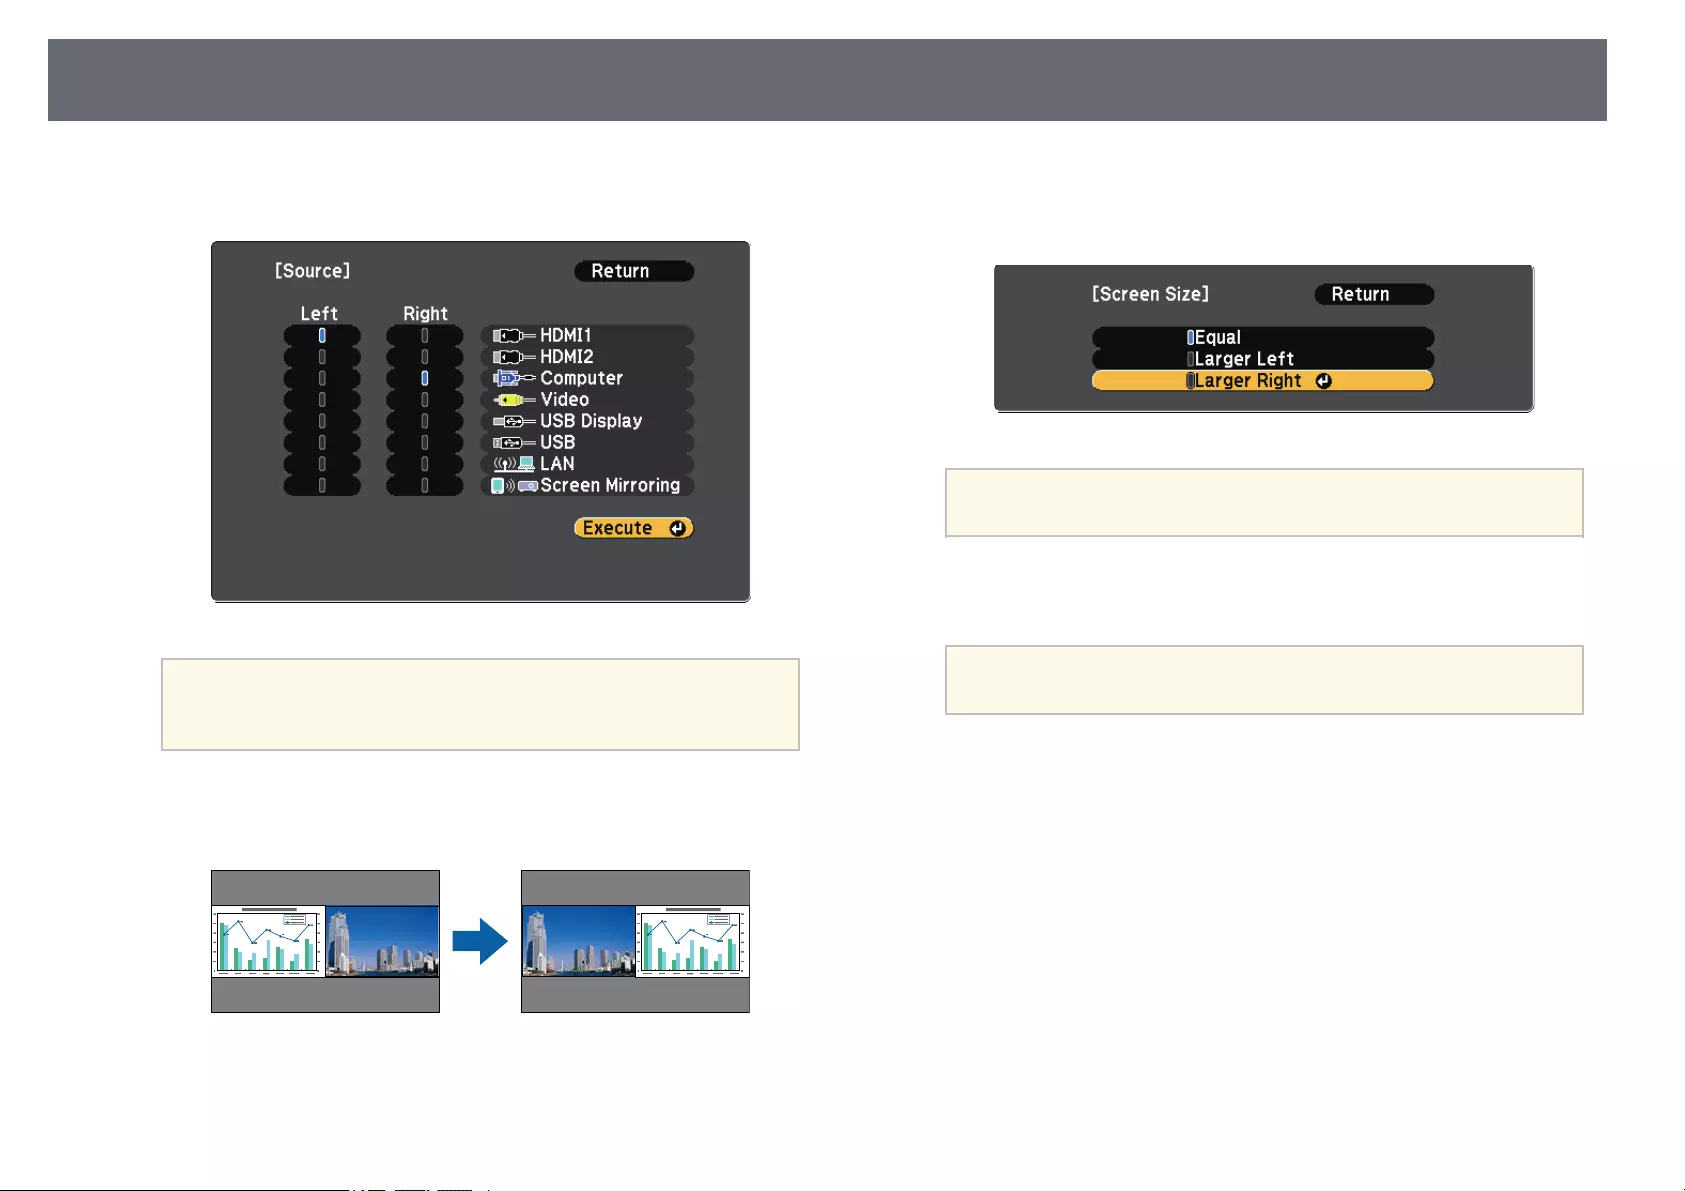
Projecting Two Images Simultaneously 59
cTo select an input source for the other image, select the Source setting,
press [Enter], select the input source, select Execute, and press [Enter].
a• You can only select input sources that can be combined.
• While using the split screen feature, the Source screen appears
when you change the input source from the remote control.
dTo switch images, select Swap Screens and press [Enter].
The projected images on the left and right are swapped.
eTo enlarge one image while reducing the other image, select Screen
Size, press [Enter], select a size, and press [Enter]. To exit the menu,
press [Menu].
aDepending on the video input signals, the images may not
appear at the same size even if you select Equal.
fTo select the audio, select Audio Source, press [Enter], select an audio
option, and press [Enter]. To exit the menu, press [Menu].
aSelect Auto to hear audio from the largest screen or the left
screen.
gTo align the projected images, select Align, press [Enter], select the
setting, and press [Enter] again. To exit the menu, press [Menu].
hTo exit the split screen feature, press [Split] or [Esc].
gg Related Links
• «Unsupported Input Source Combinations for Split Screen Projection» p.60
• «Split Screen Projection Restrictions» p.60
• «List of Functions» p.11

Projecting Two Images Simultaneously 60
Unsupported Input Source Combinations for Split
Screen Projection
These input source combinations cannot be projected on a split screen.
• Computer and Video
• HDMI1/HDMI2 and Screen Mirroring
• HDMI1 and HDMI2
• USB Display and USB/LAN
• USB and LAN
gg Related Links
• «List of Functions» p.11
Split Screen Projection Restrictions
Operating restrictions
The following operations cannot be performed during split screen projection.
• Setting the projector’s menu
• E-Zoom
• Switching the aspect mode (the aspect mode is set to Normal)
• Operations using the [User] button on the remote control
• Auto Iris
Image restrictions
• If you make adjustments such as Brightness,Contrast,Color Saturation,
Tint, and Sharpness in the projector’s Image menu, you can apply them
only to the image on the left. Default adjustments are applied to the image
on the right. Adjustments that affect the entire projected image such as
Color Mode and Color Temp. are applied for both left and right images.
• Even if you make adjustments for Noise Reduction and Deinterlacing in
the projector’s Image menu, Noise Reduction is set to 0 and Deinterlacing
is set to Off for the image on the right.
sImage >Image Enhancement >Noise Reduction
sImage >Image Enhancement >Deinterlacing
• Even if you set Display Background to Logo in the projector’s Extended
menu, the blue screen appears when no image signal is being input.
gg Related Links
• «Image Aspect Ratio» p.52
• «Adjusting Image Quality (Color Mode)» p.54
• «Projector Feature Settings — Settings Menu» p.115
• «Projector Setup Settings — Extended Menu» p.117
• «Image Quality Settings — Image Menu» p.113
• «Zooming In/Zooming Out of Images (E-Zoom)» p.68
• «Setting Auto Iris» p.54
Projecting a PC Free Presentation 61
You can use your projector’s PC Free feature whenever you connect a USB
device that contains compatible presentation files. This lets you quickly and
easily display a presentation and control it using the projector’s remote
control.
gg Related Links
• «Supported PC Free File Types» p.61
• «Precautions on PC Free Projection» p.61
• «Starting a PC Free Slide Show» p.62
• «Starting a PC Free Movie Presentation» p.63
• «PC Free Display Options» p.64
• «List of Functions» p.11
Supported PC Free File Types
You can project these types of files using the projector’s PC Free feature.
a• For best results, place your files on media that is formatted in
FAT16/32.
• If you have trouble projecting from media formatted for non-
Windows file systems, try formatting the media for Windows
instead.
File contents File type
(extension)
Details
Image .jpg Make sure the file is not:
• CMYK format
• Progressive format
• Highly compressed
• Above 8192 × 8192 resolution
.bmp Make sure the file is not:
• Above 1280 × 800 resolution
.gif Make sure the file is not:
• Above 1280 × 800 resolution
• Animated
• Interlaced
.webp Make sure the file is not:
• Above 1920 × 1080 resolution
• Interlaced
Movie .avi
(Motion
JPEG)
Supports only AVI 1.0.
Make sure the file is not:
• Saved with an audio codec other than PCM or
ADPCM
• Above 1280 × 720 resolution
• Larger than 2 GB
Precautions on PC Free Projection
Note the following precautions when using PC Free features.
• You cannot use a USB key for PC Free features.
• Do not disconnect the USB storage device while it is being accessed;
otherwise, PC Free may not operate correctly.
• You may not be able to use the security features on certain USB storage
devices with PC Free features.
Projecting a PC Free Presentation 62
• When connecting a USB device that includes an AC adapter, connect the
AC adapter to an electrical outlet when you use the device with your
projector.
• Some commercially available USB card readers may not be compatible with
the projector.
• The projector can recognize up to 5 cards inserted into the connected card
reader at one time.
• You cannot correct keystone distortion while projecting in PC Free, so
correct the image shape before you begin your presentation.
• You can use the following functions while projecting in PC Free.
• Freeze
• A/V Mute
• E-Zoom
gg Related Links
• «Stopping Video Action Temporarily» p.67
• «Shutting Off the Image and Sound Temporarily» p.66
• «Zooming In/Zooming Out of Images (E-Zoom)» p.68
Starting a PC Free Slide Show
After connecting a USB device to the projector, you can switch to the USB
input source and start your slide show.
a• You can change the PC Free operation options or add special effects
by highlighting Option at the bottom of the screen and pressing
[Enter].
aPress the [USB] button on the remote control.
The PC Free file list screen is displayed.
a• If the Select Drive screen is displayed, press the arrow buttons
to select the drive and press [Enter].
• To display images on the other USB drive, highlight Select
Drive at the top of the file list screen and press [Enter].
bDo one of the following to locate your files:
• If you need to display files inside a subfolder on your device, press
the arrow buttons to highlight the folder and press [Enter].
• To move back up a folder level on your device, highlight Back to
Top and press [Enter].
cDo one of the following:
• To display an individual image, press the arrow buttons to highlight
the image and press [Enter]. (Press the [Esc] button to return to the
file list screen.)
• To display a slide show of all the images in a folder, press the arrow
buttons to highlight the Slideshow option at the bottom of the screen
and press [Enter].
Projecting a PC Free Presentation 63
a• You can change the image switching time by highlighting
Option at the bottom of the screen and pressing [Enter].
• If any file names are longer than the display area or include
unsupported symbols, the file names may be shortened or
changed only on the screen display.
dWhile projecting, use the following commands to control the display:
• To rotate a displayed image, press the up or down arrow button.
• To move to the next or previous image, press the left or right arrow
button.
eTo stop the display, follow the on-screen instructions or press the [Esc]
button.
You return to the file list screen.
fTurn off the USB device, if necessary, and then disconnect the device
from the projector.
gg Related Links
• «PC Free Display Options» p.64
• «Connecting to a USB Device» p.26
Starting a PC Free Movie Presentation
After connecting a USB device to the projector, you can switch to the USB
input source and start your movie.
a• You can change the PC Free operation options by highlighting
Option at the bottom of the screen and pressing [Enter].
aPress the [USB] button on the remote control.
The PC Free file list screen is displayed.
a• If the Select Drive screen is displayed, press the arrow buttons
to select the drive and press [Enter].
• To display movie files on the other USB drive, highlight Select
Drive at the top of the file list screen and press [Enter].
Projecting a PC Free Presentation 64
bDo one of the following to locate your files:
• If you need to display files inside a subfolder on your device, press
the arrow buttons to highlight the folder and press [Enter].
• To move back up a folder level on your device, highlight Back to
Top and press [Enter].
cTo play back a movie, press the arrow buttons to highlight the file and
press [Enter].
a• If any file names are longer than the display area or include
unsupported symbols, the file names may be shortened or
changed only on the screen display.
• If you want to play back all the movies in a folder in sequence,
select the Slideshow option at the bottom of the screen.
dTo stop movie playback, press the [Esc] button, highlight Exit, and
press [Enter].
You return to the file list screen.
eTurn off the USB device, if necessary, and then disconnect the device
from the projector.
gg Related Links
• «PC Free Display Options» p.64
• «Connecting to a USB Device» p.26
PC Free Display Options
You can select these display options when using PC Free. To access this
screen, highlight Option at the bottom of the PC Free file list screen and press
[Enter].
Setting Options Description
Display Order Name Order Displays files in name order
Date Order Displays files in date order
Sort Order In Ascending Sorts files in first-to-last order
In Descending Sorts files in last-to-first order
Continuous Play On Displays a slide show continuously
Off Displays a slide show once
Screen Switching
Time
No Does not display the next file
automatically
1 Second to 60 Seconds Displays files for the selected time
and switches to the next file
automatically; high resolution images
may switch at a slightly slower rate
Projecting a PC Free Presentation 65
Setting Options Description
Effect No No effect
Wipe Transitions between images using a
wipe effect
Dissolve Transitions between images using a
dissolve effect
Random Transitions between images using a
random variety of effects

Shutting Off the Image and Sound Temporarily 66
You can temporarily turn off the projected image and sound if you want to
redirect your audience’s attention during a presentation. Any sound or video
action continues to run, however, so you cannot resume projection at the
point that you stopped it.
aIf you want to display an image such as a company logo or picture
when the [A/V Mute] button is pressed, you can select the screen
displayed in the A/V Mute setting in the projector’s Extended menu.
sExtended >Display >A/V Mute
aPress the [A/V Mute] button on the remote control to temporarily stop
projection and mute any sound.
bTo turn the image and sound back on, press [A/V Mute] again.
a• You can also stop projection using the A/V Mute slide lever on the
projector.
• The projector’s power automatically turns off 30 minutes after A/V
Mute is enabled. You can disable this feature.
sECO >A/V Mute Timer
• The lamp is still operating during A/V Mute, so the lamp hours
continue to accumulate.
gg Related Links
• «Projector Setup Settings — Extended Menu» p.117
• «Projector Setup Settings — ECO Menu» p.128
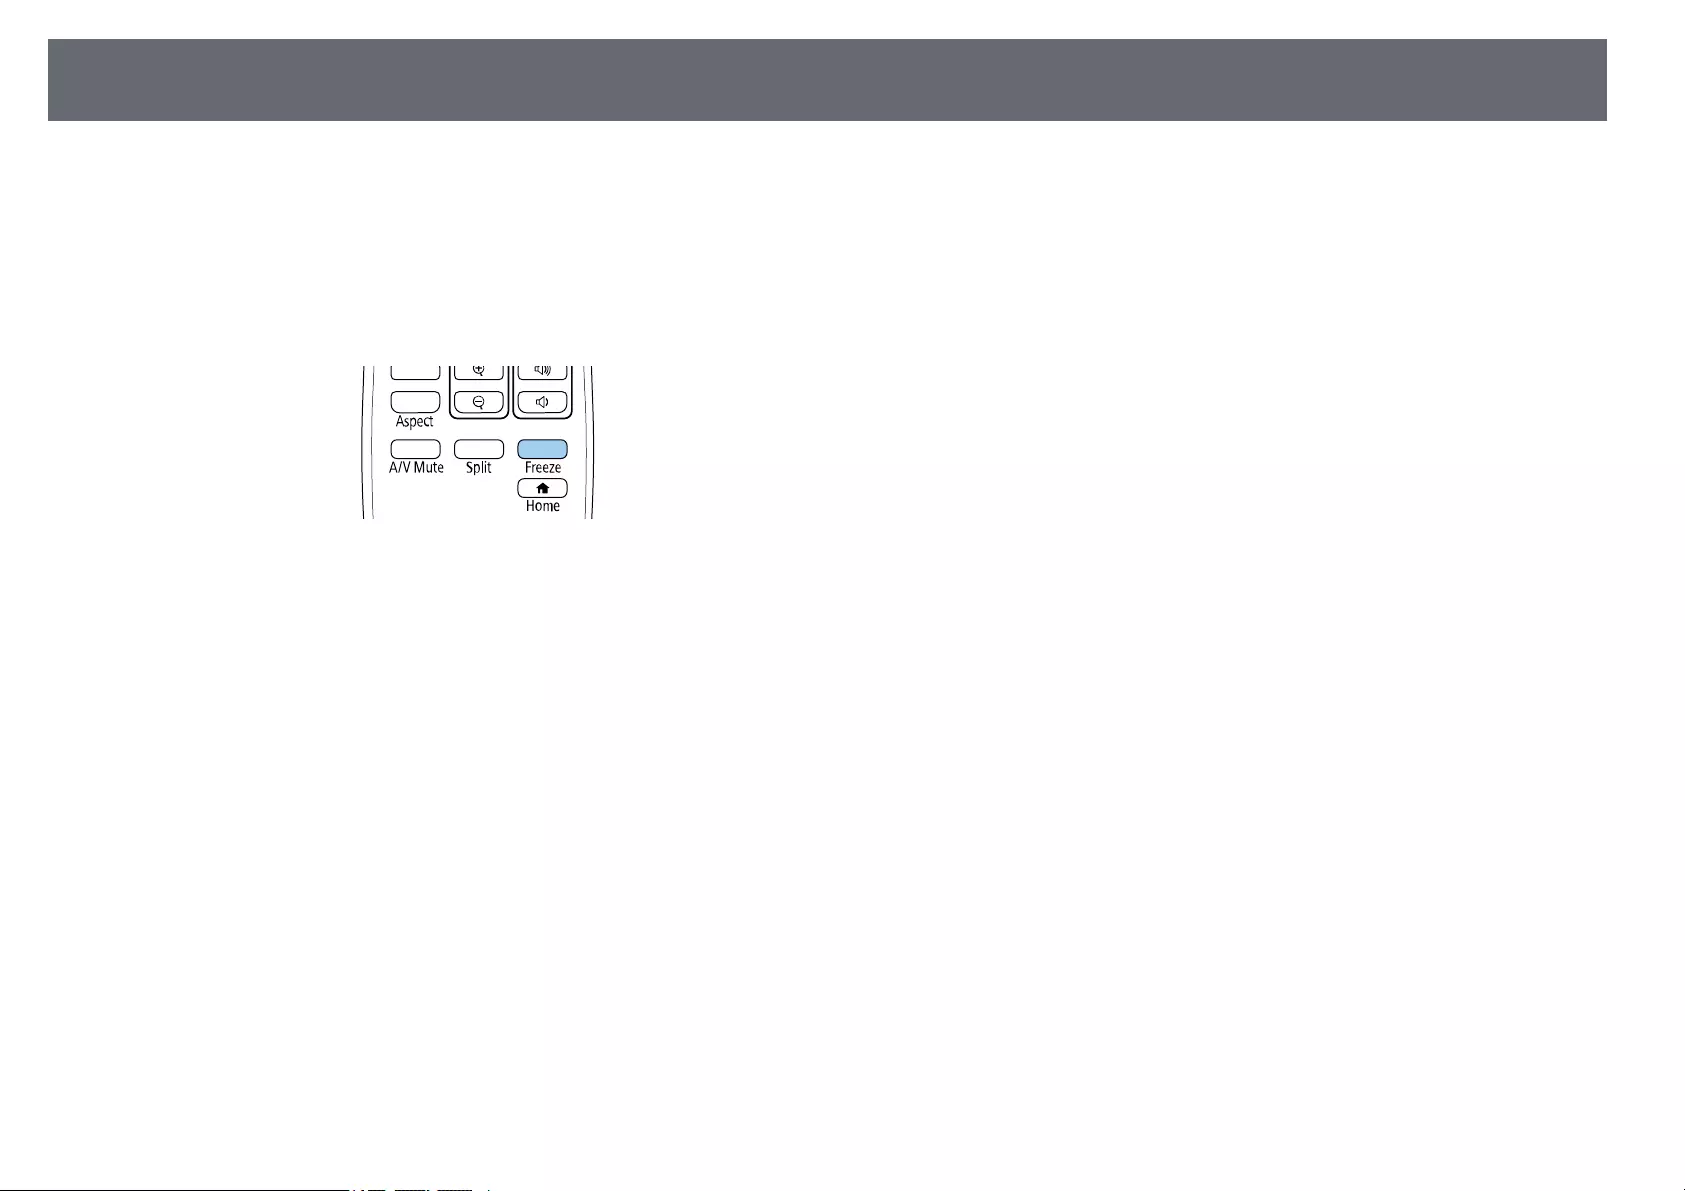
Stopping Video Action Temporarily 67
You can temporarily stop the action in a video or computer presentation and
keep the current image on the screen. Any sound or video action continues to
run, however, so you cannot resume projection at the point that you stopped
it.
aPress the [Freeze] button on the remote control to stop the video
action.
bTo restart the video action in progress, press [Freeze] again.
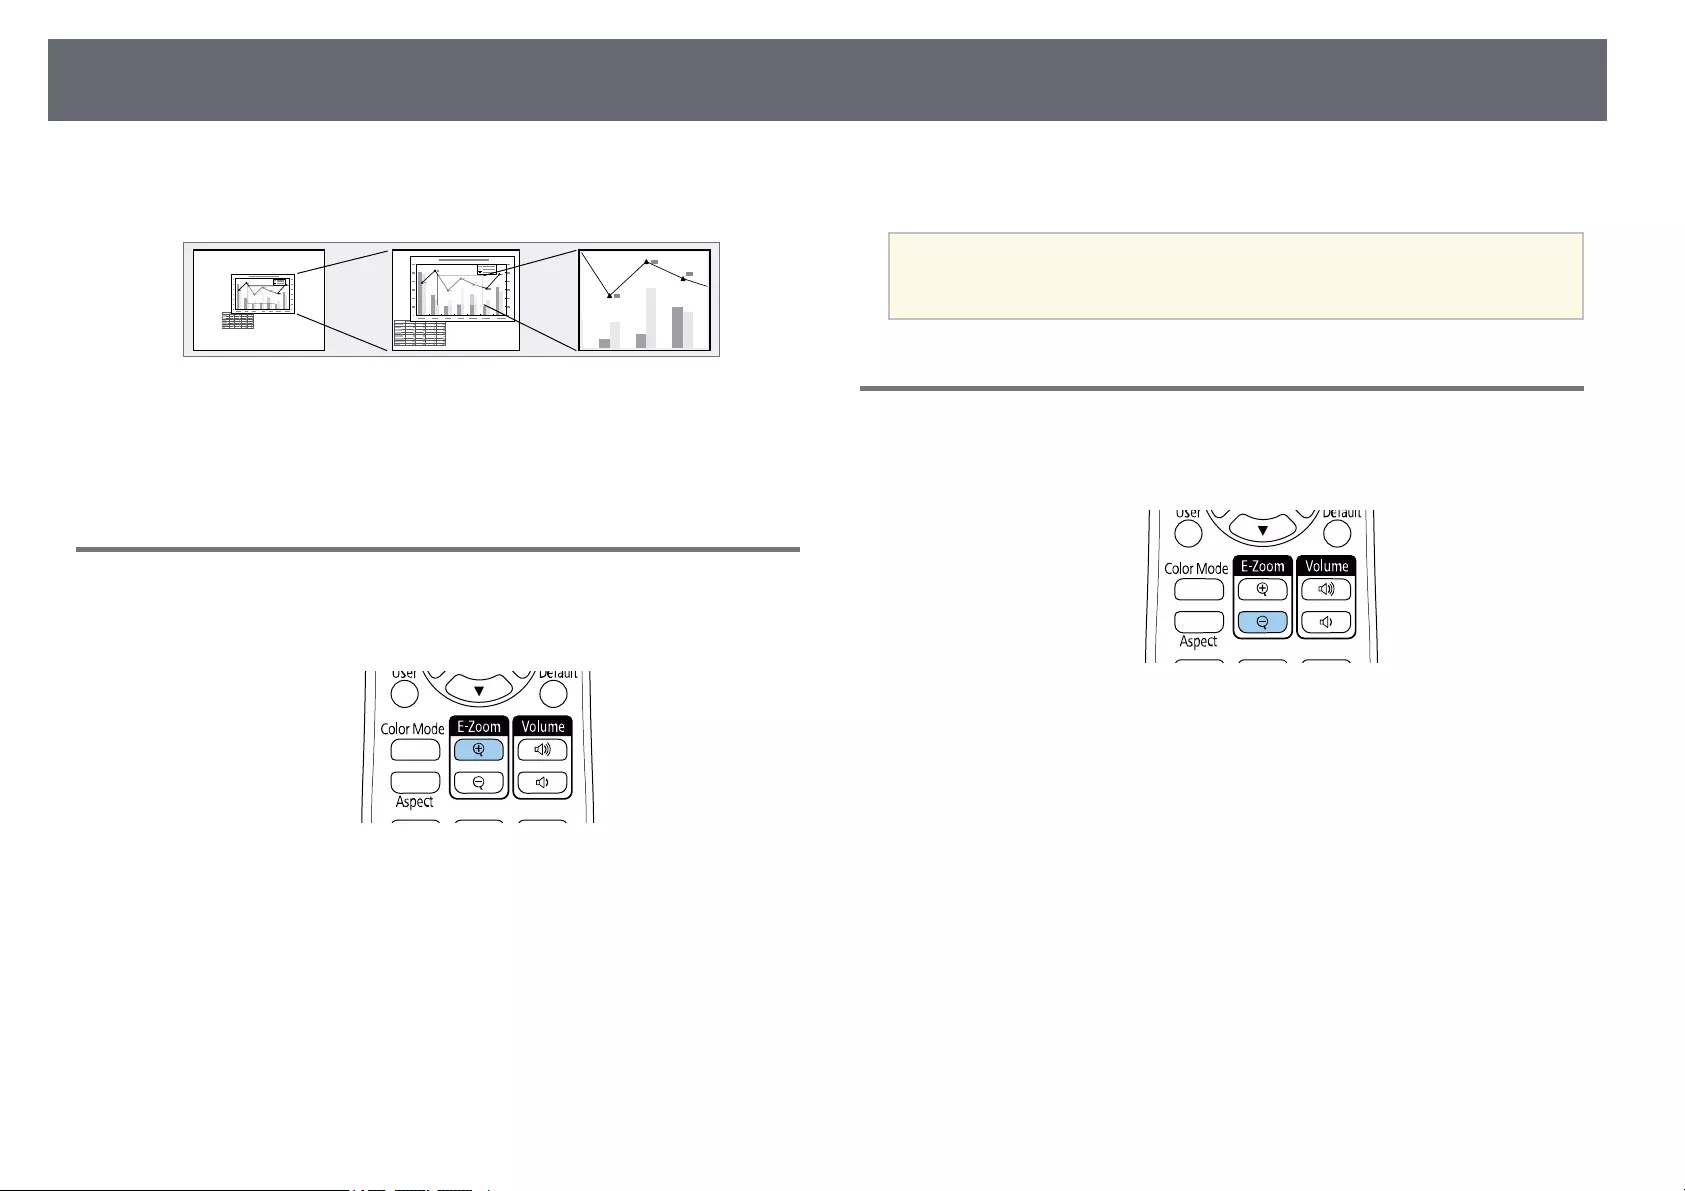
Zooming In/Zooming Out of Images (E-Zoom) 68
You can zoom in or zoom out of the projected image using the [E-Zoom]
button on the remote control.
gg Related Links
• «Zooming Into Images» p.68
• «Zooming Out of Images» p.68
Zooming Into Images
aPress the [E-Zoom] + button on the remote control.
The projected image is enlarged focusing around the center of the
image. You can enlarge the image between one to four times in 25
incremental steps.
bUse the following buttons on the remote control to adjust the zoomed
image:
• Press the [E-Zoom] + button repeatedly to zoom into the image.
• To pan around the zoomed image, use the arrow buttons.
• To zoom out of the image, press the [E-Zoom] – button.
• To return to the original image size, press the [Default] button.
aWhen projecting images from an Epson document camera, you can
enlarge the image from one to eight times its size in 57 incremental
steps using the [E-Zoom] + button on the document camera.
Zooming Out of Images
aPress the [E-Zoom] — button on the remote control.
The projected image is reduced. You can reduce the image between
100% to 50% in incremental steps.
bUse the following buttons on the remote control to adjust the zoomed-
out image:
• Press the [E-Zoom] — button repeatedly to zoom out of the projected
image.
• To move the zoomed-out image in the projection area, use the arrow
buttons.
• To zoom into the image, press the [E-Zoom] + button.
• To return to the original image size, press the [Default] button.

Zooming In/Zooming Out of Images (E-Zoom) 69
aWhen projecting image from an Epson document camera, you can also
reduce the image using the [E-Zoom] — button on the document
camera.
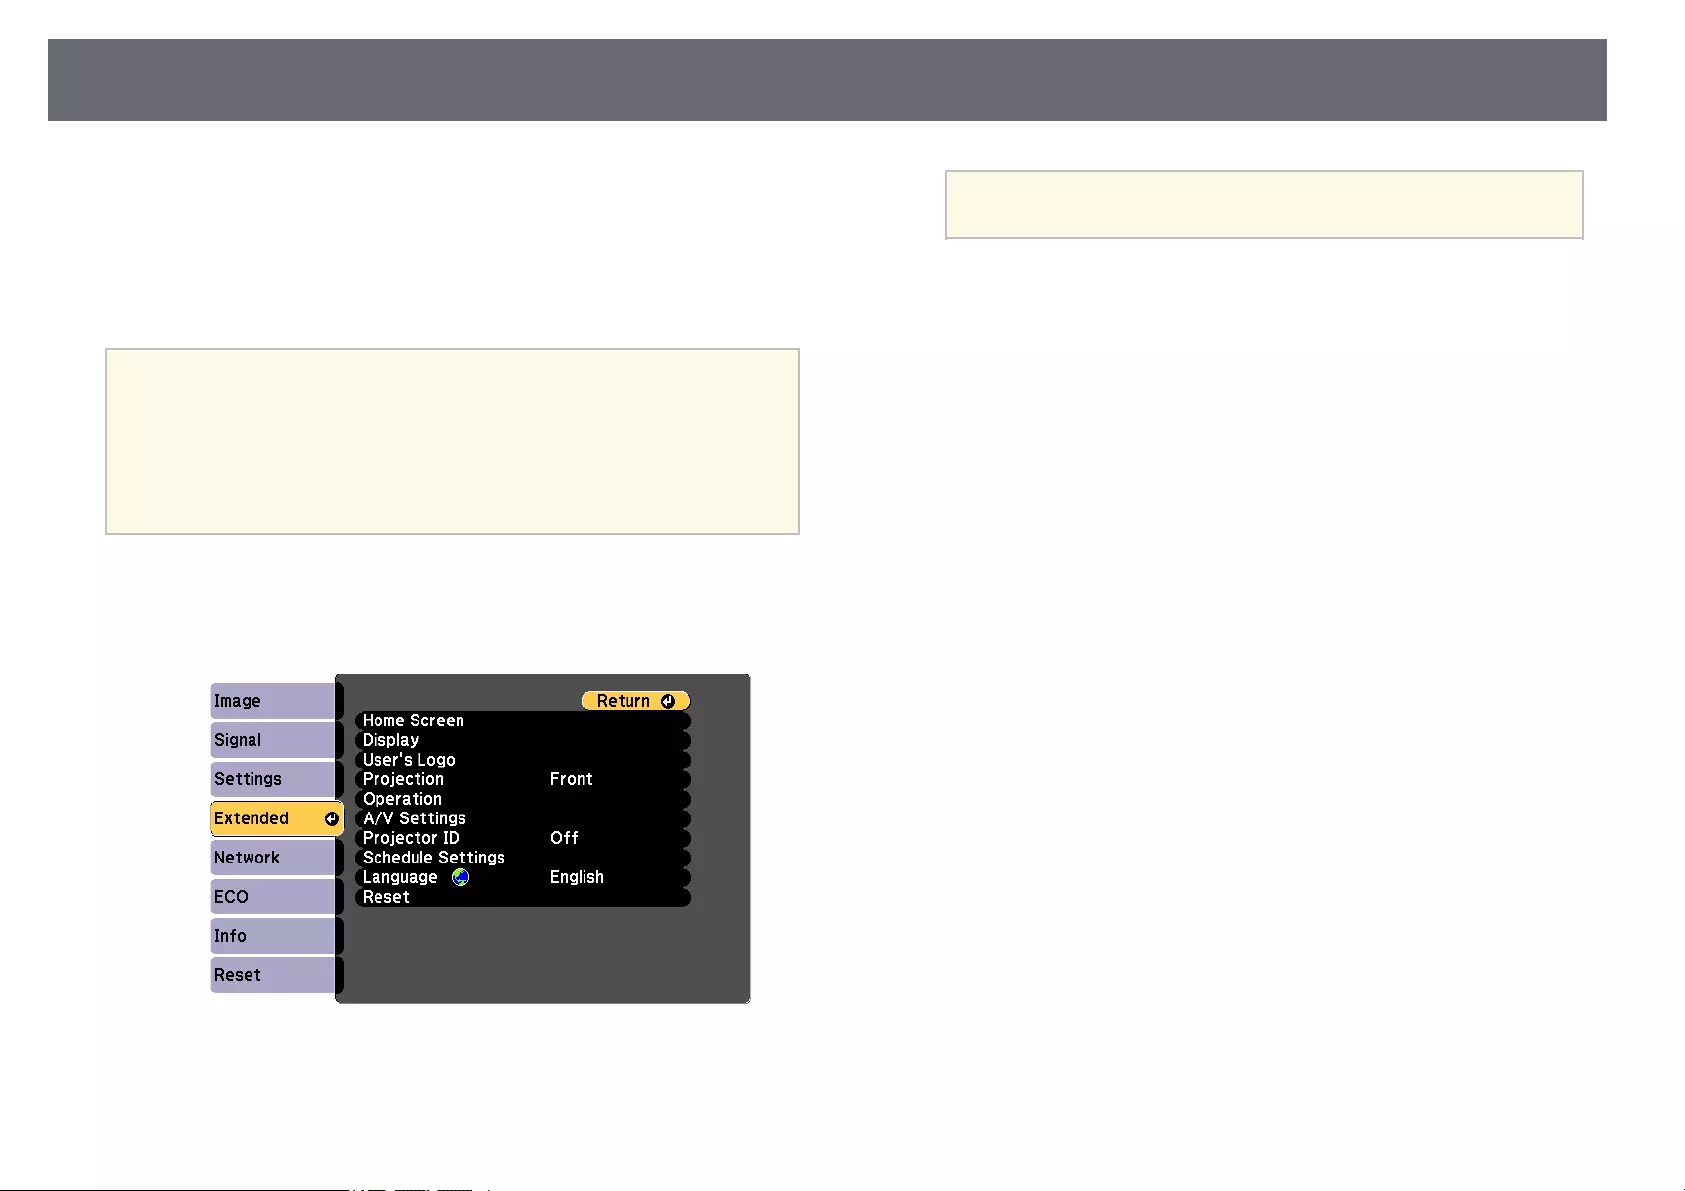
Saving a User’s Logo Image 70
You can save an image on the projector and display it whenever the projector
turns on. You can also display the image when the projector is not receiving
an input signal. This image is called the user’s logo screen.
You can select a photo, graphic, or company logo as the user’s logo, which is
useful in identifying the projector’s owner to help deter theft. You can prevent
changes to the user’s logo by setting up password protection.
a• If the User’s Logo Protection setting in the Password Protection
setting menu is set to On, set to Off before saving the user’s logo.
• When you copy the menu settings from one projector to another
using the batch setup feature, user’s logo is also copied. Do not
register the information that you do not want to share between
multiple projectors as a user’s logo.
• You cannot save content that is protected by HDCP.
aDisplay the image you want to project as the user’s logo.
bPress the [Menu] button, select the Extended menu, and press [Enter].
cSelect User’s Logo >Start Setting and press [Enter].
You see a prompt asking if you want to use the displayed image as a
user’s logo.
aAdjustments such as Keystone, E-Zoom, or Aspect are
temporarily canceled when you select User’s Logo.
dSelect Yes and press [Enter].
eCheck the displayed image, and then select Yes to save it as the user’s
logo.
The user’s logo is overwritten and a completion message is displayed.
fPress [Esc] to exit the message screen.
gSelect the Extended menu and press [Enter].
hSelect Display and press [Enter].
iSelect when you want to display the User’s Logo screen:
• To display it whenever there is no input signal, select Display
Background and set it to Logo.
sExtended >Display >Display Background
• To display it whenever you turn the projector on, select Startup
Screen and set it to On.
sExtended >Display >Startup Screen
• To display it whenever you press the [A/V Mute] button, select A/V
Mute and set it to Logo.
sExtended >Display >A/V Mute
To prevent anyone from changing the User’s Logo settings without first
entering a password, set the User’s Logo Protection setting to On in the
Password Protection setting menu and set the password.
gg Related Links
• «Shutting Off the Image and Sound Temporarily» p.66
• «Selecting Password Security Types» p.76
Saving a User Pattern 71
There are four types of patterns pre-registered in the projector, such as ruled
lines and grid patterns. You can project these patterns to aid in presentations
using the Pattern Display settings.
You can also save the image that is currently being projected as a User
Pattern.
aOnce you save a User Pattern, the pattern cannot be returned to the
factory default.
aProject the image you want to save as the User Pattern, and then press
the [Menu] button on the control panel or remote control.
bSelect the Settings menu and press [Enter].
cSelect Pattern >User Pattern and press [Enter].
You see a prompt asking if you want to use the displayed image as a
User Pattern.
a• Adjustments such as Keystone, E-Zoom, or Aspect are
temporarily cancelled when you select User Pattern.
• You cannot save digital images protected by HDCP technology
as a User Pattern.
dSelect Yes and press [Enter].
You see a prompt asking if you want to save the image as the User
Pattern.
eSelect Yes and press [Enter].
You see a completion message.
Color Difference Correction when Projecting from Multiple Projectors 72
When lining up multiple projectors to project images, you can correct the
brightness and color tone of each projector’s image so that the images match
closely.
You can set a unique projector ID for each projector to operate them
individually using a remote control, and then correct the brightness and color
for each projector.
a• In some cases the brightness and color tone may not match
completely even after correction.
• If brightness and color tone differences become more noticeable over
time, repeat the adjustments.
gg Related Links
• «Setting the Projector ID» p.72
• «Selecting the Projector You want to Operate» p.72
• «Matching Multiple-Projector Display Quality» p.73
Setting the Projector ID
To control multiple projectors from a remote control, give each projector a
unique ID.
aPress the [Menu] button, select the Extended menu, and press [Enter].
bSelect Projector ID and press [Enter].
cUse the arrow buttons to select the identification number you want to
use for the projector. Then press [Enter].
dPress [Menu] or [Esc] to exit the menus.
eRepeat these steps for all the other projectors you want to operate from
one remote control.
Selecting the Projector You want to Operate
After setting the projector’s ID, select the ID for the projector you want to
operate using the remote control.
aAim the remote control at the target projector and press the [ID]
button.
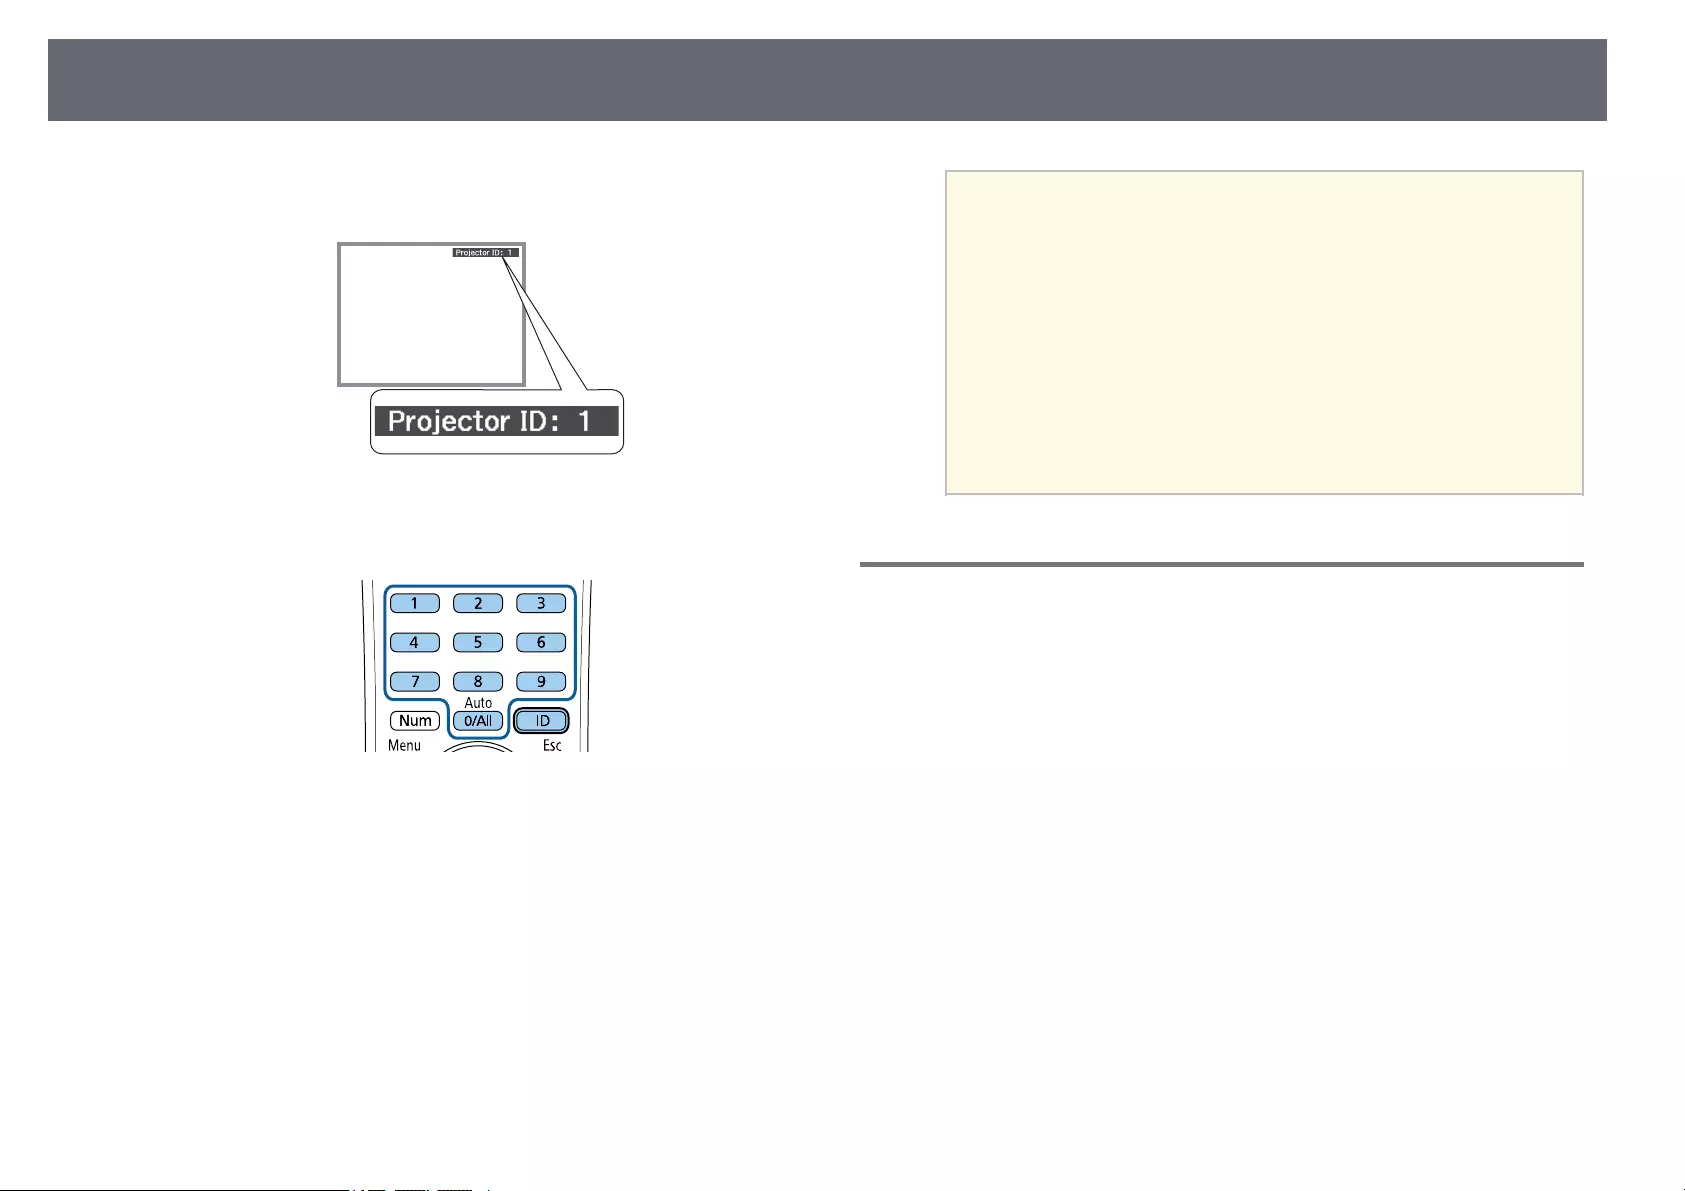
Color Difference Correction when Projecting from Multiple Projectors 73
The current Projector ID is displayed on the projected screen. It
disappears after about 3 seconds.
bWhile holding the [ID] button, press the number button that matches
the ID of the projector you want to operate.
The projector you want to operate is selected.
a• When you select [0/All] on the remote control, you can
operate all projectors regardless the Projector ID setting.
• When you set the Projector ID setting to Off, you can operate
the projector using the remote control whichever ID you select
on the remote control.
• The projector ID setting is saved in the remote control. Even if
the remote control batteries are removed to replace them and
so on, the saved ID setting is retained. However, if the batteries
are left out of the remote control for an extended period, the
ID returns to its default setting (0/All).
• When you use multiple remote controls at the same time, you
may not be able to operate projectors as intended due to
infrared interference.
Matching Multiple-Projector Display Quality
You can match the display quality of multiple projectors that will project next
to each other.
aTurn on all the projectors on which you want to match the display
quality.
bSet ID numbers on each projector.
cMake sure all the projectors are using the same Color Mode setting.
dSelect the remote control ID to match the first projector.

Color Difference Correction when Projecting from Multiple Projectors 74
ePress the [Menu] button, select the Image menu, and press [Enter].
fSelect settings as necessary.
gSelect the remote control ID to match the next projector, then repeat
Image menu adjustments as necessary to match the projectors’ displays.
Projector Security Features 75
You can secure your projector to deter theft or prevent unintended use by
setting up the following security features:
• Password security to prevent people who do not know the password from
using the projector, and prevent changes to the startup screen and other
settings.
This acts as an anti-theft function as the projector cannot be used even if it
is stolen, and you can limit who can use the projector.
• Button lock security to block operation of the projector using the buttons
on the control panel.
This is useful at events or shows when you want to deactivate all buttons
during projection or at schools when you want to limit button operation.
• Security cabling to physically secure the projector in place.
gg Related Links
• «Password Security Types» p.75
• «Locking the Projector’s Buttons» p.77
• «Installing a Security Cable» p.78
Password Security Types
You can set up the following types of password security using one shared
password:
•Power On Protection password prevents anyone from using the projector
without first entering a password. When plugging the power cord and
turning on the projector at first time, you must enter the correct password.
This also applies to Direct Power On and Auto Power On.
•User’s Logo Protection password prevents anyone from changing the
custom screen displayed when the projector turns on, when no signal is
being input, or when you use the A/V Mute feature. The custom screen
discourages theft by identifying the projector’s owner.
•Network Protection password prevents anyone from changing the
projector’s Network settings.
•Schedule Protection password prevents anyone from changing the
projector’s schedule settings.
•Screen Mirroring Protec. password prevents anyone from changing the
projector’s Screen Mirroring settings.
gg Related Links
• «Setting a Password» p.75
• «Selecting Password Security Types» p.76
• «Entering a Password to Use the Projector» p.77
• «List of Functions» p.11
Setting a Password
To use password security, you must set a password.
aThe default password is set to «0000». Change this to your own
password.
aHold down the [Freeze] button on the remote control for about 5
seconds.
You see the Password Protection setting menu.
aIf Password Protection is already activated, you must enter the
correct password to display the Password Protection setting
menu.
Projector Security Features 76
bSelect Password and press [Enter].
You see the prompt «Change the password?».
cSelect Yes and press [Enter].
aIf you select No, the Password Protection setting menu is
displayed again.
dHold down the [Num] button on the remote control and use the
numeric buttons to set a four-digit password.
The password displays as **** as it is entered. A confirmation prompt is
displayed when you enter the fourth digit.
eEnter the password again.
You see the message «Password accepted». If you enter the password
incorrectly, a message is displayed prompting you to re-enter the
password.
fPress [Esc] to return to the menu.
gMake a note of the password and keep it in a safe place.
Selecting Password Security Types
After setting a password, you see this menu, allowing you to select the
password security types you want to use.
If you do not see this menu, hold down the [Freeze] button on the remote
control for 5 seconds until the menu appears.
• To prevent unauthorized use of the projector, select On as the Power On
Protection setting.
• To prevent changes to the User’s Logo screen or related display settings,
select On as the User’s Logo Protection setting.
• To prevent changes to network settings, select On as the Network
Protection setting.
• To prevent changes to the projector’s schedule settings, select On as the
Schedule Protection setting.
• To prevent changes to the projector’s Screen Mirroring settings, select On as
the Screen Mirroring Protec. setting.

Projector Security Features 77
You can attach the password protect sticker to the projector as an additional
theft deterrent.
aBe sure to keep the remote control in a safe place; if you lose it, you will
not be able to enter the password.
Entering a Password to Use the Projector
When the password screen is displayed, enter the correct password.
aHold down the [Num] button on the remote control while you enter
the password using the numeric buttons.
The password screen closes.
bIf the password is incorrect, you see a message and a prompt to try
again. Enter the correct password to proceed.
Attention
• If an incorrect password is entered three times in succession, the message
«The projector’s operation will be locked.» is displayed for approximately
5 minutes, and the projector switches to standby mode. If this happens,
disconnect the power plug from the electrical outlet, reinsert it, and turn
the projector back on. The projector displays the password entry screen
again so that you can enter the correct password.
• If you have forgotten the password, make a note of the «Request Code:
xxxxx» number that appears on the screen and contact Epson for help.
• If you continue to repeat the above operation and input the wrong
password 30 times in succession, the message «The projector’s operation
will be locked. Contact Epson as described in your documentation.» is
displayed and the projector does not accept any more password entries.
Contact Epson for help.
Locking the Projector’s Buttons
You can lock the buttons on the control panel to prevent anyone from using
the projector. The projector can still be operated using the remote control.
aPress the [Menu] button on the control panel or remote control.
Projector Security Features 78
bSelect the Settings menu and press [Enter].
cSelect Lock Setting >Control Panel Lock, and press [Enter].
dSelect one of these lock types and press [Enter]:
• To lock all of the projector’s buttons, select Full Lock.
• To lock all buttons except the power button, select Partial Lock.
You see a confirmation prompt.
eSelect Yes and press [Enter].
The Control Panel Lock setting takes effect.
gg Related Links
• «Unlocking the Projector’s Buttons» p.78
Unlocking the Projector’s Buttons
If the projector’s buttons have been locked, do one of the following to unlock
them.
• Hold down the [Enter] button on the control panel for 7 seconds. A
message is displayed and the lock is released.
• Select Off as the Control Panel Lock setting in the projector’s Settings
menu.
sSettings >Lock Setting >Control Panel Lock
gg Related Links
• «Projector Feature Settings — Settings Menu» p.115
Installing a Security Cable
You can install the security cable on the projector to deter theft.
• Use the security slot on the projector to attach a Kensington Microsaver
Security system.
aFor more details on the Microsaver Security System, visit the
Kensington Web site.
https://www.kensington.com/
• Use the security cable attachment point on the projector to attach a wire
cable and secure it to a room fixture or heavy furniture.

Projector Security Features 79
aYou can use a commercially available theft-prevention wire lock. See
the documentation supplied with the wire lock for locking
instructions.

Using the Projector on a Network
Follow the instructions in these sections to set up your projector for use on a network.
gg Related Links
• «Wireless Network Projection» p.81
• «Wireless Network Projection from a Mobile Device (Screen Mirroring)» p.90
• «Secure HTTP» p.95
Wireless Network Projection 81
You can send images to your projector through a wireless network.
• To do this, you must install the Epson 802.11b/g/n wireless LAN module,
and then set up your projector and computer for wireless projection.
• Some models have built-in wireless LAN modules
(EH‑TW750/EH‑TW710). You don’t need to install the Epson 802.11b/g/n
wireless LAN module.
You can connect the projector to your wireless network by configuring the
connection manually using the projector’s Network menus.
After installing the wireless LAN module and setting up the projector,
download and install the necessary network software. Use the following
software and documentation to set up and control wireless projection.
• Epson iProjection (Windows/Mac) software allows you to hold interactive
meetings by projecting the computer screens of users over a network. See
the Epson iProjection Operation Guide (Windows/Mac) for instructions.
• Epson iProjection (iOS/Android) app allows you to project from iOS or
Android devices.
You can download Epson iProjection from the App Store or Google Play.
Any fees incurred when communicating with the App Store or Google Play
are the responsibility of the customer.
• Epson iProjection (Chromebook) app allows you to project from
Chromebook devices.
You can download Epson iProjection from the Chrome Web Store. Any fees
incurred when communicating with the Chrome Web Store are the
responsibility of the customer.
gg Related Links
• «Installing the Wireless LAN Module» p.81
• «Selecting Wireless Network Settings Manually» p.82
• «Selecting Wireless Network Settings in Windows» p.84
• «Selecting Wireless Network Settings in Mac» p.85
• «Setting Up Wireless Network Security» p.85
• «Using a QR Code to Connect a Mobile Device» p.87
• «Using a USB Key to Connect a Windows Computer» p.88
• «List of Functions» p.11
Installing the Wireless LAN Module
To use the projector over a wireless network, install the Epson 802.11b/g/n
wireless LAN module. Do not install any other type of wireless LAN module.
Attention
Never remove the module while its indicator is blue or flashing, or while you are
projecting wirelessly. This could damage the module or lose data.
aUse a cross-head screwdriver to remove the screw that secures the
wireless LAN module cover.
Wireless Network Projection 82
bConnect the wireless LAN module to the USB-A port.
cAttach the wireless LAN module cover, and secure it in place with the
screw.
gg Related Links
• «List of Functions» p.11
Selecting Wireless Network Settings Manually
Before you can project from your wireless network, you need to select
network settings for the projector.
aPress the [Menu] button, select the Network menu, and press [Enter].
bSelect On as the Wireless LAN Power setting.
cSelect Network Configuration and press [Enter].
Wireless Network Projection 83
dSelect the Basic menu and press [Enter].
eSelect the basic options as necessary.
•Projector Name lets you enter a name up to 16 alphanumeric
characters long to identify the projector over the network.
•Remote Password lets you enter a password up to 8 alphanumeric
characters long for accessing the projector using the Basic Control.
(User name is EPSONREMOTE; default password is guest.)
•Web Control Password lets you enter a password up to 8
alphanumeric characters long for accessing the projector over the
Web. (User name is EPSONWEB; default password is admin.)
•Moderator Password lets you enter a four-digit number password
for accessing the projector as a moderator using Epson iProjection.
(No password is set by default.)
•Projector Keyword lets you turn on a security password to prevent
access to the projector by anyone not in the room with it. You must
enter a displayed, randomized keyword from a computer using
Epson iProjection to access the projector and share the current
screen.
•Display Keyword lets you select whether to display a projector
keyword on the projected image when accessing the projector using
Epson iProjection.
•Display LAN Info. lets you set the display format for the projector’s
network information.
aUse the displayed keyboard to enter numbers and characters.
Press the arrow buttons on the remote control to highlight
characters and press [Enter] to select them.
fSelect the Wireless LAN menu and press [Enter].
gSelect the Connection Mode setting.
•Quick lets you connect to multiple smartphones, tablets, or
computers directly using wireless communication.
•Advanced lets you connect to smartphones, tablets, or computers
over a wireless network access point.
hIf you selected the Advanced connection mode, select Search Access
Point to select the access point you want to connect to.

Wireless Network Projection 84
aIf you need to assign the SSID manually, select SSID to enter the
SSID.
iFor the Advanced connection mode, assign the IP settings for your
network as necessary.
• If your network assigns addresses automatically, select IP Settings to
set the DHCP setting to On.
• If you must set addresses manually, select IP Settings to set the
DHCP setting to Off, and then enter the projector’s IP Address,
Subnet Mask, and Gateway Address as necessary.
• If you want to connect the projector to the network using IPv6, select
IPv6 Settings to set the IPv6 setting to On, and then set the Auto
Configuration and Use Temporary Address settings as necessary.
jTo prevent the SSID or IP address from being displayed on the LAN
standby screen and Home screen, set the SSID Display setting or the IP
Address Display setting to Off.
kWhen you finish selecting settings, select Complete and follow the on-
screen instructions to save your settings and exit the menus.
lPress the [LAN] button on the remote control.
The wireless network settings are complete when you see the correct IP
address on the LAN standby screen.
When you have finished making wireless settings for your projector, you need
to select the wireless network on your computer. Then start the network
software to send images to your projector through a wireless network.
Selecting Wireless Network Settings in Windows
Before connecting to the projector, select the correct wireless network on your
computer.
aTo access your wireless utility software, click the network icon on the
Windows taskbar.
bWhen connecting in Advanced connection mode, select the network
name (SSID) of the network the projector is connecting to.
cClick Connect.

Wireless Network Projection 85
Selecting Wireless Network Settings in Mac
Before connecting to the projector, select the correct wireless network in Mac.
aClick the Wi-Fi icon on the menu bar at the top of the screen.
bWhen connecting in Advanced connection mode, make sure Wi-Fi is
turned on and select the network name (SSID) of the network the
projector is connecting to.
Setting Up Wireless Network Security
You can set up security for your projector to use on a wireless network. Set up
one of the following security options to match the settings used on your
network:
• WPA2-PSK security
• WPA3-PSK security *
• WPA2/WPA3-PSK security *
• WPA3-EAP security * **
• WPA2/WPA3-EAP security * **
* Available only for the Advanced connection mode.
** Available only for models that support WPA Enterprise security.
aContact your network administrator for guidance on entering the
correct information.
aIf you want to set up the WPA3-EAP or WPA2/WPA3-EAP security,
make sure your digital certificate file is compatible with projector
registration and placed directly on the USB storage device.
bPress the [Menu] button, select the Network menu, and press [Enter].
cSelect Network Configuration and press [Enter].
dSelect the Wireless LAN menu and press [Enter].
eSelect the Security setting and press [Enter].
fSelect the security settings to match your network settings.

Wireless Network Projection 86
gDo one of the following according to the security you selected.
•WPA2-PSK,WPA3-PSK or WPA2/WPA3-PSK: Select Passphrase,
press [Enter], and enter a passphrase from 8 to 63 characters long.
To enter more than 32 characters, use your Web browser. Then go to
step 16.
•WPA3-EAP or WPA2/WPA3-EAP: Select EAP Method and press
[Enter].
hSelect the protocol for authentication as the EAP Type setting.
iTo import your certificate, select the certificate type and press [Enter].
•Client Certificate for the PEAP-TLS or EAP-TLS type
•CA certificate for all EAP types
aYou can also register the digital certificates from your Web
browser. However, be sure to register just once or the certificate
may not install correctly.
jSelect Register and press [Enter].
kFollow the on-screen instructions to connect a USB storage device to
the projector’s USB-A port.
lPress [Enter] to display the certificate list.
mSelect the certificate to import using the displayed list.
A message is displayed prompting you to enter the password for the
certificate.
nEnter a password and press [Enter].
The certificate is imported and a completion message appears.
oSelect your EAP settings as necessary.
•User name lets you enter a user name using up to 64 alphanumeric
characters. To enter more than 32 characters, use your Web browser.
When importing a client certificate, the name the certificate was
issued to is automatically set.
•Password lets you enter a password using up to 64 alphanumeric
characters for authentication when using the PEAP or EAP-FAST
type. To enter more than 32 characters, use your Web browser.
•Verify Server Cert. lets you select whether or not to verify the server
certificate when a CA certificate has been set.
Wireless Network Projection 87
•RADIUS Serv.Name lets you enter the server name to be verified.
pWhen you have finished selecting settings, select Complete and follow
the on-screen instructions to save your settings and exit the menus.
gg Related Links
• «Supported Client and CA Certificates» p.87
• «Network Menu — Wireless LAN Menu» p.123
Supported Client and CA Certificates
You can register these types of digital certificates.
Client Certificate (PEAP-TLS/EAP-TLS)
Specification Description
Format PKCS#12
Extension PFX, P12
Encryption RSA
Hashes MD5/SHA-1/SHA-256/SHA-384/SHA-512
Key length 512/1024/2048/4096 bit
Specification Description
Password * Up to 64 alphanumeric characters; required
CA Certificate (PEAP/PEAP-TLS/EAP-TLS/EAP-FAST)
Specification Description
Format X509v3
Extension DER/CER/PEM
Encryption RSA
Hashes MD5/SHA-1/SHA-256/SHA-384/SHA-512
Key length 512/1024/2048/4096 bit
Encoding BASE64/Binary
* You can set a password using up to 64 alphanumeric characters. However,
you need to use your Web browser to enter more than 32 characters.
Using a QR Code to Connect a Mobile Device
After selecting the wireless network settings for your projector, you can
display a QR code on the screen and use it to connect a mobile device using
the Epson iProjection (iOS/Android) app.
a• Make sure you have installed the latest version of Epson iProjection
on your device.
• You can download Epson iProjection for free from the App Store or
Google Play. Any fees incurred when communicating with the App
Store or Google Play are the responsibility of the customer.
• When using Epson iProjection in Quick connection mode, we
recommend making security settings.
aPress the [LAN] button on the remote control.
The QR code is displayed on the projected surface.
Wireless Network Projection 88
a• If you do not see the QR code, set the Display LAN Info.
setting to Text & QR Code in the projector’s Network menu.
sNetwork >Network Configuration >Basic >Display
LAN Info.
• To hide the QR code, press [Esc].
• When the QR code is hidden, press [Enter] to display the code.
bStart Epson iProjection on your mobile device.
cRead the projected QR code using Epson iProjection to connect it to
the projector.
aTo correctly read the QR code, make sure you face the screen
squarely and closely enough so that the projected code fits into
the guide of the mobile device’s QR code reader. If you are too
far from the screen, the code may not be read.
When a connection is established, select Contents menu from , and
then select the file you want to project.
Using a USB Key to Connect a Windows Computer
You can set up your USB flash drive as a USB key to quickly connect the
projector to a wireless LAN supported Windows computer. After creating the
USB key, you can quickly project images from the network projector.
aSet up the USB key using Epson iProjection (Windows/Mac) software.
aSee the Epson iProjection Operation Guide (Windows/Mac) for
instructions.
bMake sure the wireless LAN module is installed or built into your
projector.
cTurn on the projector.
dPress the [LAN] button on the remote control.
The LAN standby screen is displayed. Verify that an SSID and IP
address are displayed.
eDo one of the following to connect the USB key.
• Connect the USB key to the projector’s USB-A port. (Models with a
built-in wireless LAN module.)
• Remove the wireless LAN module from the projector and insert the
USB key into the same port used for the wireless LAN module.
(Models with the optional wireless LAN module installed.)
You see a projected message that the network information update is
complete.
fRemove the USB key.
If your projector needs the wireless LAN module, reinsert the wireless
LAN module into the projector. (Models with the optional wireless
LAN module installed.)
gConnect the USB key to a USB port on your computer.
hFollow the on-screen instructions to install the necessary application.
a• If the Windows Firewall message is displayed, click Yes to
disable the firewall.
• You need administrator authority to install the software.
• If it is not installed automatically, double-click
MPPLaunch.exe in the USB key.
After a few minutes, your computer image is displayed by the projector.
iWhen you have finished projecting wirelessly, select the Safely Remove
Hardware option in the Windows taskbar, and then remove the USB
key from your computer.

Wireless Network Projection 89
aYou may need to restart your computer to reactivate your
wireless LAN connection.
Wireless Network Projection from a Mobile Device (Screen Mirroring) 90
You can send image to your projector from mobile devices such as laptops,
smartphones, and tablets using Miracast technology.
If your device supports Miracast, you do not need to install any additional
software. When using a Windows computer, make sure the necessary adapter
for the Miracast connection is available.
Note the following limitations when using Screen Mirroring features.
• You cannot play an interlaced image.
• You cannot play multi-channel audio over 3ch (channel 3).
• You cannot project images with a resolution above 1920 × 1080 and a frame
rate above 30 fps.
• You cannot play 3D video.
• You may not be able to view contents with copyright protection with a
Miracast connection depending on your device.
• Do not change the projector’s Screen Mirroring Settings during Screen
Mirroring projection. Doing so may cause the projector to disconnect and it
may take a while to re-connect.
sNetwork >Screen Mirroring Settings
• Do not turn off the projector directly by the breaker during Screen
Mirroring projection.
aMobile devices with Android installed or Windows 8.1 or later installed
mainly support Miracast.
Support for Miracast varies depending on the mobile device. See your
mobile device manual for details.
gg Related Links
• «Selecting Screen Mirroring Settings» p.90
• «Connecting Using Screen Mirroring with the Miracast Function» p.92
• «List of Functions» p.11
Selecting Screen Mirroring Settings
You must select Screen Mirroring settings for your projector to project images
from your mobile device.
aIf you set a Screen Mirroring Protec. password, turn off your Screen
Mirroring Protec. password first.
aPress the [Menu] button, select the Network menu, and press [Enter].

Wireless Network Projection from a Mobile Device (Screen Mirroring) 91
bSelect On as the Screen Mirroring setting.
cSelect Screen Mirroring Settings and press [Enter].
dSet the Display Name setting as necessary.
eSelect the Operation Mode setting.
•Basic lets you connect with basic options.
•Extended lets you connect with advanced options.
fSelect the Basic setting as necessary.
•Wireless LAN Sys. lets you select the type of wireless LAN system
the projector is connecting to.
•Adjust Image Quality lets you adjust the screen mirroring
speed/quality. Select a small number to improve the quality and
select large number to increase the speed.
•Connection Mode lets you select the security type. Available only for
the Basic operation mode.
gFor the Extended operation mode, select the Extended setting.
•Meeting Mode lets you select the type of meeting. Select
Interruptions OK to connect to another mobile device during
Screen Mirroring projection or No Interruptions to exclusively
connect to one device.
•Channel lets you select the wireless channel used by Screen
Mirroring.

Wireless Network Projection from a Mobile Device (Screen Mirroring) 92
hSelect the Display setting as necessary.
•Display PIN Code lets you display the PIN code on the projected
image while projecting input sources other than Screen Mirroring.
•Display Device Name lets you display the newly connected device
name on the projected image while projecting input sources other
than Screen Mirroring.
iWhen you finish selecting settings, select Set and follow the on-screen
instructions to save your settings and exit the menus.
jPress the [Home] button on the remote control. The settings are
complete when you see the Display Name on the Home screen.
Connecting Using Screen Mirroring with the Miracast
Function
If your mobile device such as a smartphone supports Miracast, you can
connect it to the projector wirelessly and project images. You can play audio
through the projector’s speaker system by connecting using Screen Mirroring.
aSelect Screen Mirroring Settings on your projector as necessary.
bPress the [LAN] button on the remote control to switch to the Screen
Mirroring source.
You see the Screen Mirroring standby screen.
cOn your mobile device, use your Miracast function to search for the
projector.
You see a list of available devices.
dSelect the projector’s Display Name from the list.
eIf you see the PIN entry screen on your mobile device, enter the PIN
code displayed on the Screen Mirroring standby screen or at the bottom
right of the projected image.
The projector displays the image from your mobile device.
aIt may take some time until the connection is established. While
connecting, do not disconnect the projector’s power cord. Doing
so may cause your device to freeze or malfunction.
Depending on the mobile device, you may need to delete a device
when connecting. Follow the on-screen instructions on your
device.
gg Related Links
• «Connecting Using Screen Mirroring in Windows 10″ p.92
• «Connecting Using Screen Mirroring in Windows 8.1″ p.93
Connecting Using Screen Mirroring in Windows 10
You can set up your computer for wireless projection and play audio through
the projector’s speaker system by connecting using Screen Mirroring.
aSelect Screen Mirroring Settings on your projector as necessary.
bPress the [LAN] button on the remote control to switch to the Screen
Mirroring source.
You see the Screen Mirroring standby screen.
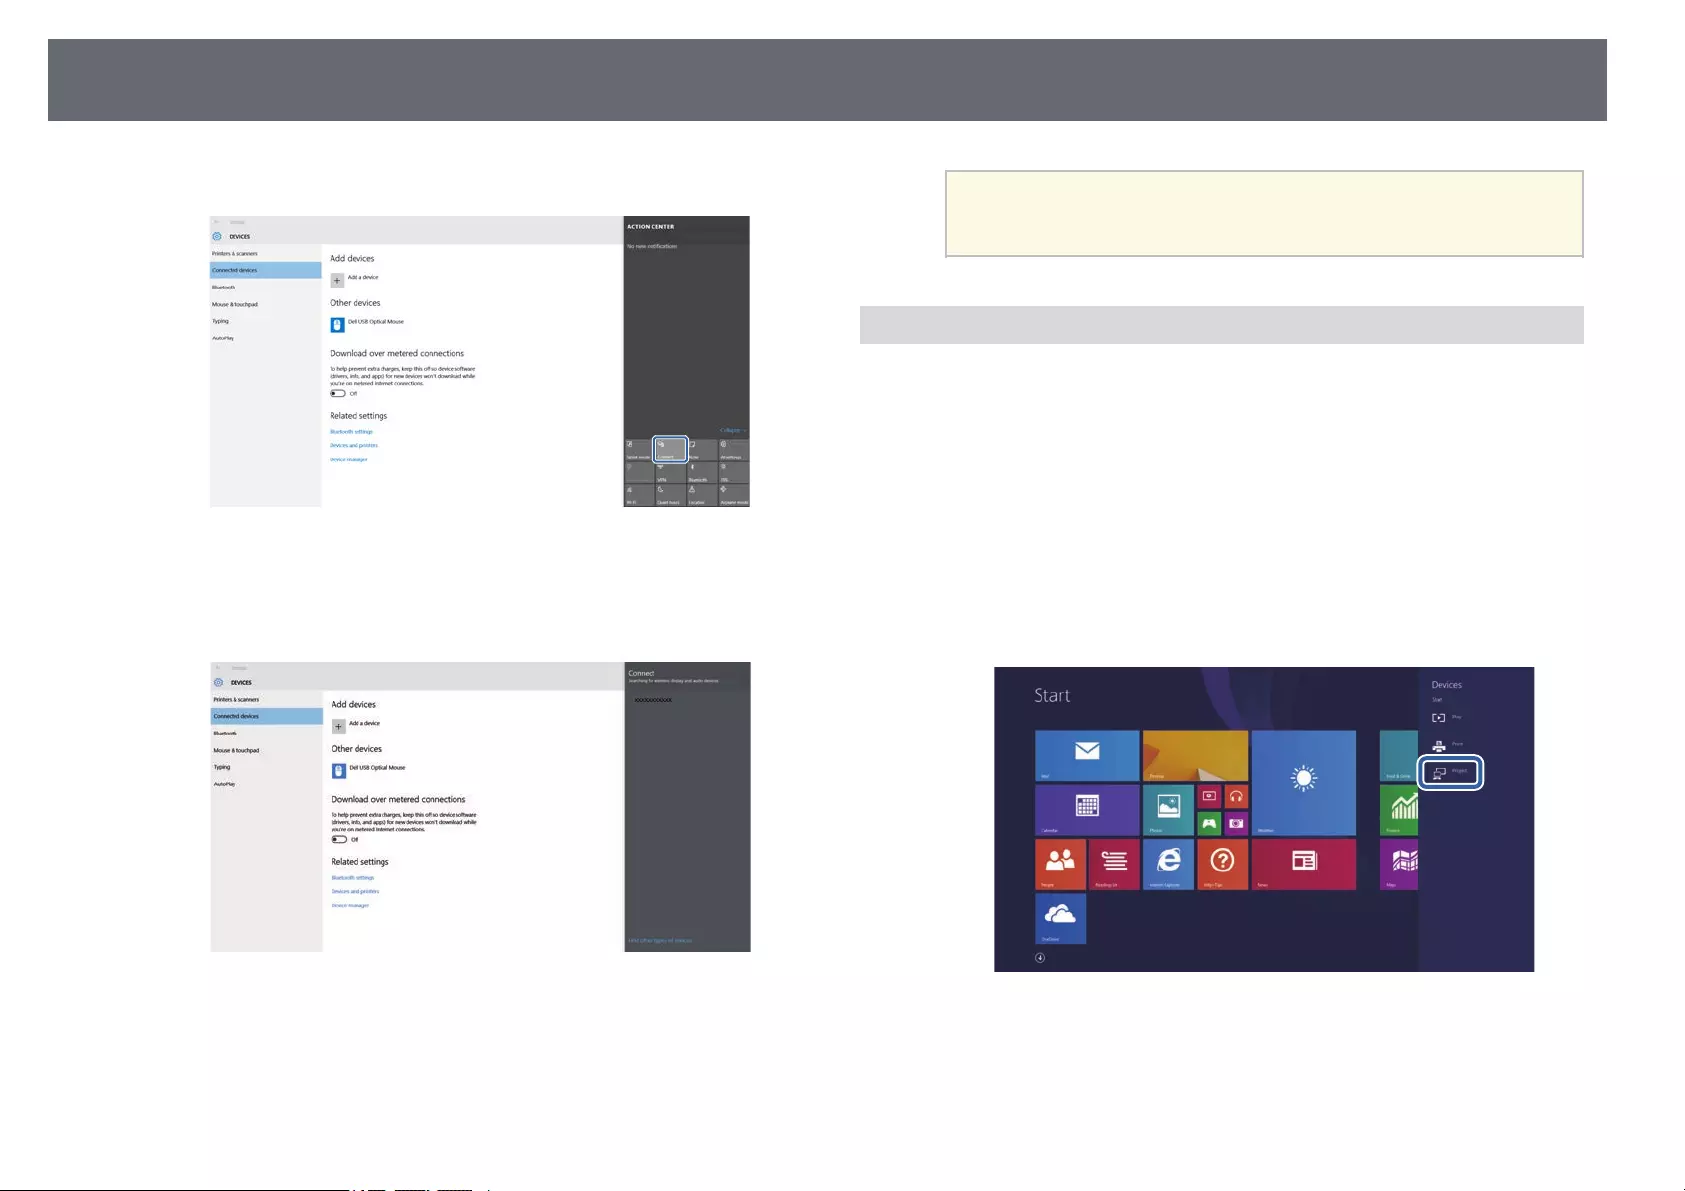
Wireless Network Projection from a Mobile Device (Screen Mirroring) 93
cDisplay Action Center, and then select Connect.
You see a list of available devices.
dSelect the projector’s Display Name from the list.
eIf you see the PIN entry screen on your computer, enter the PIN code
displayed on the Screen Mirroring standby screen or at the bottom
right of the projected image.
The projector displays the image from your computer.
aIt may take some time until the connection is established. While
connecting, do not disconnect the projector’s power cord. Doing
so may cause your device to freeze or malfunction.
Connecting Using Screen Mirroring in Windows 8.1
You can set up your computer for wireless projection from Charms in
Windows 8.1. You can play audio through the projector’s speaker system by
connecting using Screen Mirroring.
aSelect Screen Mirroring Settings on your projector as necessary.
bPress the [LAN] button on the remote control to switch to the Screen
Mirroring source.
You see the Screen Mirroring standby screen.
cOn your computer, select Devices from Charms and select Project.
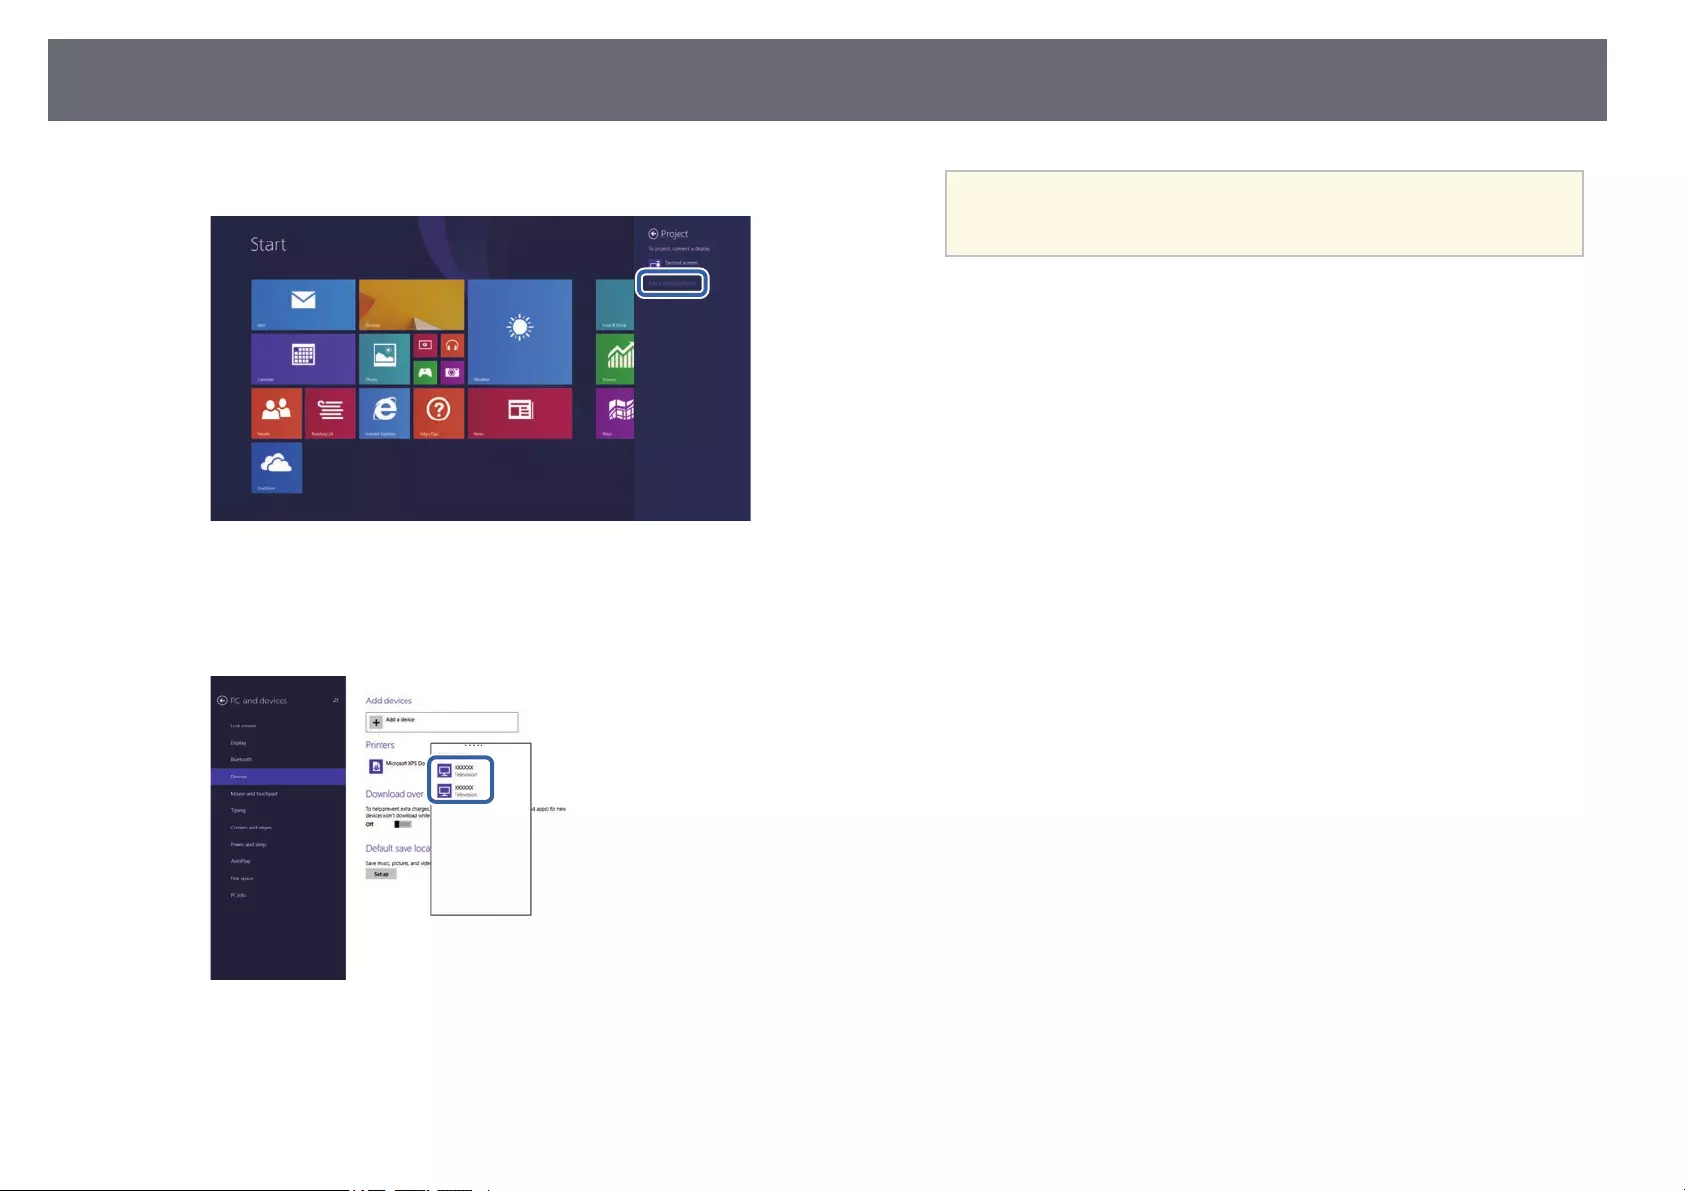
Wireless Network Projection from a Mobile Device (Screen Mirroring) 94
dSelect Add a wireless display.
You see a list of available devices.
eSelect the projector’s Display Name from the list.
fIf you see the PIN entry screen on your computer, enter the PIN code
displayed on the Screen Mirroring standby screen or at the bottom
right of the projected image.
The projector displays the image from your computer.
aIt may take some time until the connection is established. While
connecting, do not disconnect the projector’s power cord. Doing
so may cause your device to freeze or malfunction.
Secure HTTP 95
You can use the HTTPS protocol to increase security between the projector
and a Web browser communicating with it. To do this, you create a server
certificate, install it on the projector, and turn on the Secure HTTP setting in
the projector menus to verify the reliability of the Web browser.
sNetwork >Network Configuration >Others >Secure HTTP
Even if you do not install a server certificate, the projector automatically
creates a self-signed certificate and allows communication. However, because
the self-signed certificate cannot verify reliability from a Web browser, you
see a warning about the server’s reliability when you access the projector from
a Web browser. This warning does not prevent communication.
gg Related Links
• «Importing a Web Server Certificate Using the Menus» p.95
• «List of Functions» p.11
Importing a Web Server Certificate Using the Menus
You can create your Web server certificate, and import it using the projector
menus and a USB flash drive.
aYou can also register the digital certificates from your Web browser.
However, be sure to register just once or the certificate may not install
correctly.
aMake sure your digital certificate file is compatible with projector
registration and directly placed on the USB storage device.
bPress the [Menu] button, select the Network menu, and press [Enter].
cSelect Network Configuration and press [Enter].
dSelect the Others menu and press [Enter].
eSet the Secure HTTP setting to On.
fSelect Web Server Cert. and press [Enter].
gSelect Register and press [Enter].
hFollow the on-screen instructions to connect a USB storage device to
the projector’s USB-A port.
iPress [Enter] to display the certificate list.
jSelect the certificate to import using the displayed list.
A message is displayed prompting you to enter the password for the
certificate.
kEnter a password and press [Enter].
The certificate is imported and a completion message appears.

Secure HTTP 96
gg Related Links
• «Supported Web Server Certificates» p.96
Supported Web Server Certificates
You can register these types of digital certificates.
Web Server Certificate (Secure HTTP)
Specification Description
Format PKCS#12
Extension PFX, P12
Encryption RSA
Hashes MD5/SHA-1/SHA-256/SHA-384/SHA-512
Key length 512/1024/2048/4096 bit
Common name Network host name
Organization Optional
Password * Up to 64 alphanumeric characters; required
* You can set a password using up to 64 alphanumeric characters. However,
you need to use your Web browser to enter more than 32 characters.

Monitoring and Controlling the Projector
Follow the instructions in these sections to monitor and control the projector over a network.
gg Related Links
• «Epson Projector Management» p.98
• «Controlling a Networked Projector Using a Web Browser» p.99
• «Registering Digital Certificates from a Web Browser» p.103
• «Setting Up Projector Network E-Mail Alerts» p.104
• «Setting Up Monitoring Using SNMP» p.106
• «Setting Projector Event Schedules» p.107

Epson Projector Management 98
Epson Projector Management software (Windows only) lets you monitor and
control your projector through the network. See the Epson Projector
Management Operation Guide for instructions.
You can download Epson Projector Management from the following Web
site.
epson.sn/
gg Related Links
• «List of Functions» p.11
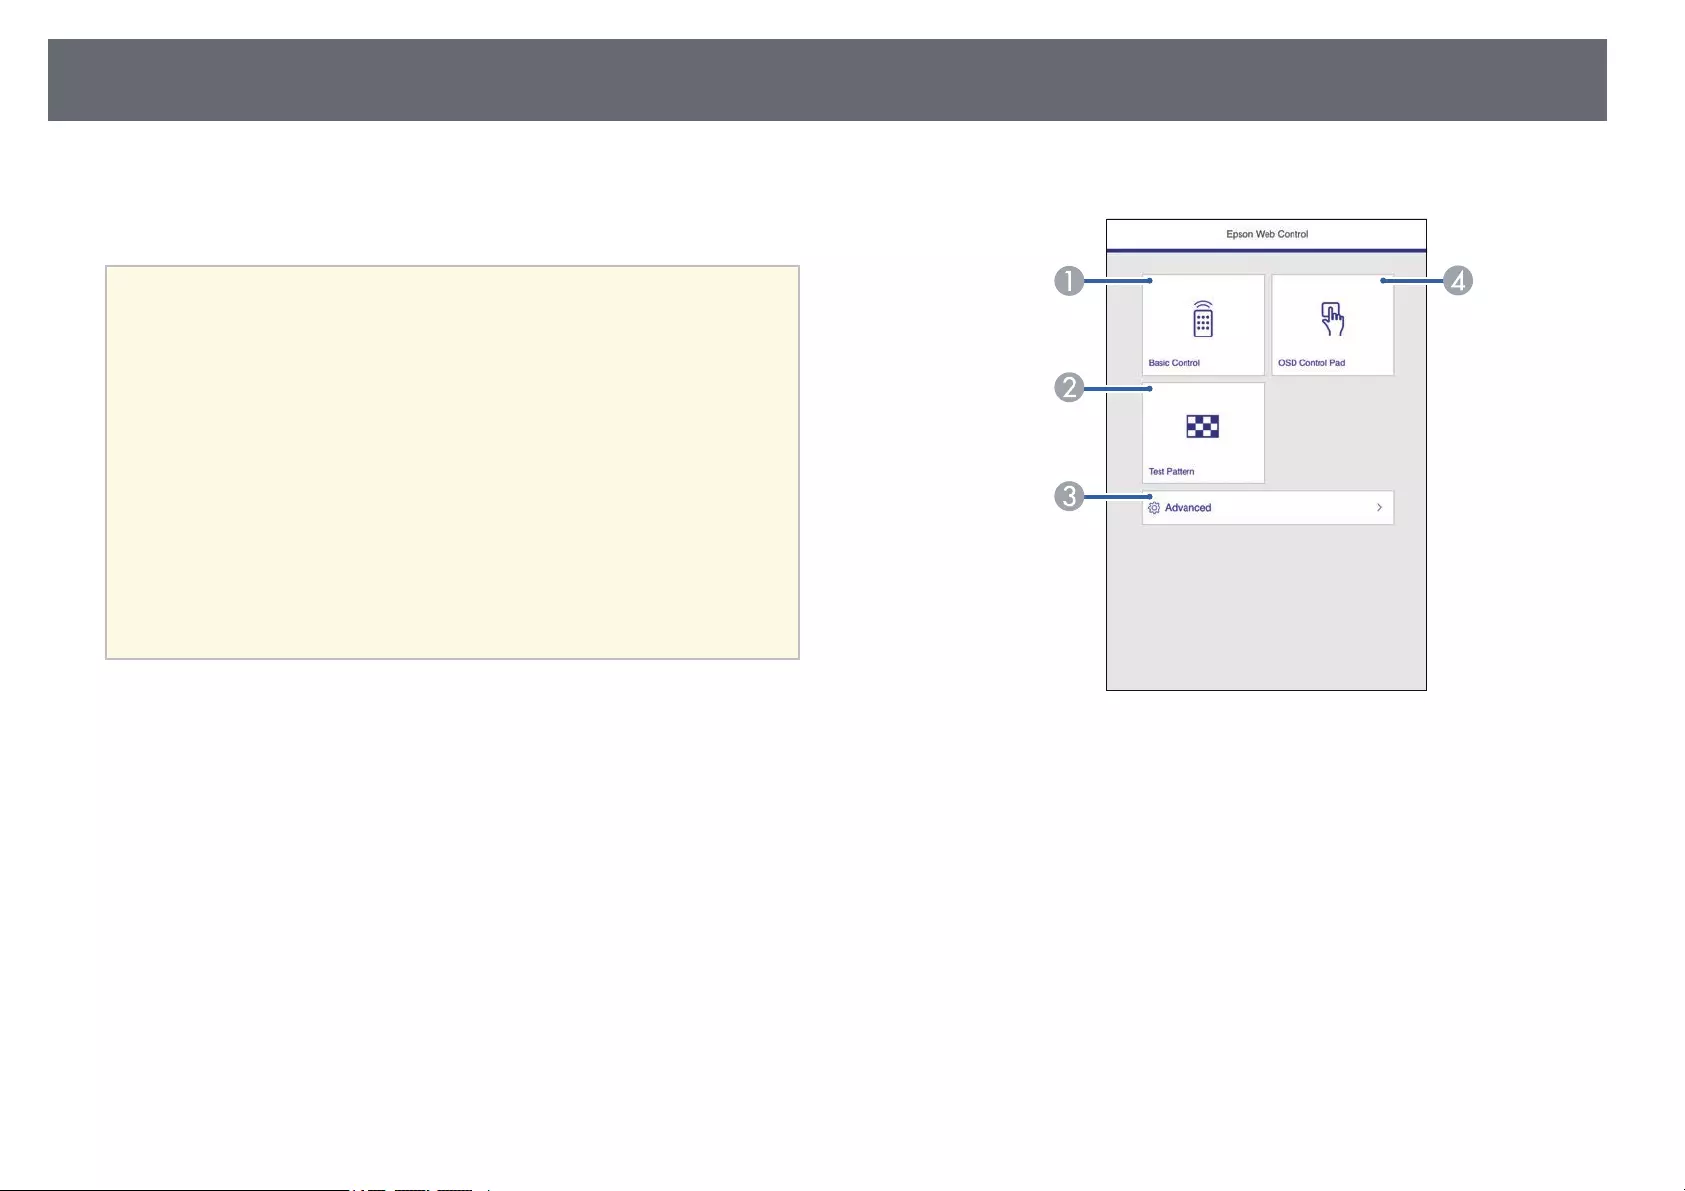
Controlling a Networked Projector Using a Web Browser 99
Once you have connected your projector to your network, you can select
projector settings and control projection using a compatible Web browser.
This lets you access the projector remotely.
a• Make sure the computer and projector are connected to the network.
When projecting images using a wireless LAN, connect in Advanced
connection mode.
• You can use the following Web browsers.
• Internet Explorer 11 or later (Windows)
• Microsoft Edge (Windows)
• Safari (Mac, iOS)
• Chrome (Android)
• While using the Web browser, do not connect using a proxy server.
You cannot select all of the projector menu settings or control all
projector functions using a Web browser.
• If you set Standby Mode to Communication On, you can use a Web
browser to select settings and control projection even if the projector
is in standby mode (when the power is off).
sECO >Standby Mode
aMake sure the projector is turned on.
bMake sure your computer or device is connected to the same network
as the projector.
cStart your Web browser on the computer or device.
dGo to the Epson Web Control screen by entering the projector’s IP
address into the browser’s address box. When entering an IPv6 address,
wrap the address with [ and ].
You see the Epson Web Control screen.
AControls the projector remotely.
BDisplays a test pattern.
CSets detailed projector settings.
DOperates the projector’s menu settings with your finger or mouse.
eSelect the option corresponding to the projector function you want to
control.

Controlling a Networked Projector Using a Web Browser 100
a• You may need to log in to access some of the options on the
Epson Web Control screen. If you see a log in window, enter
your user name and password.
• When accessing the Basic Control option, the user name is
EPSONREMOTE and the default password is guest.
• When accessing other options, the user name is
EPSONWEB and the default password is admin.
• You can change the password in the projector’s Network
menu.
sNetwork >Network Configuration >Basic >Web
Control Password
• You can only select the following settings from Advanced.
• Monitor Password (up to 16 alphanumeric characters)
• IPv6 Settings (manual)
• HTTP port (port number used for Web Control except for
80 [default], 843, 3620, 3621, 3625, 3629, 4352, 4649, 5357,
10000, 10001, 41794)
gg Related Links
• «Web Control Options» p.100
• «Projector Setup Settings — ECO Menu» p.128
• «Network Menu — Basic Menu» p.122
• «List of Functions» p.11
Web Control Options
Basic Control
a• If you see a log in window, enter your user name and password. (The
user name is EPSONREMOTE and the default password is guest.)
• You can change the password in the projector’s Network menu.
sNetwork >Network Configuration >Basic >Remote Password
AReturns to the Epson Web Control screen.
BTurns the projector on or off.
CSelects the input source.
DTurns the video and audio on or off temporarily.
EPauses or resumes images.
FDisplays the QR code.
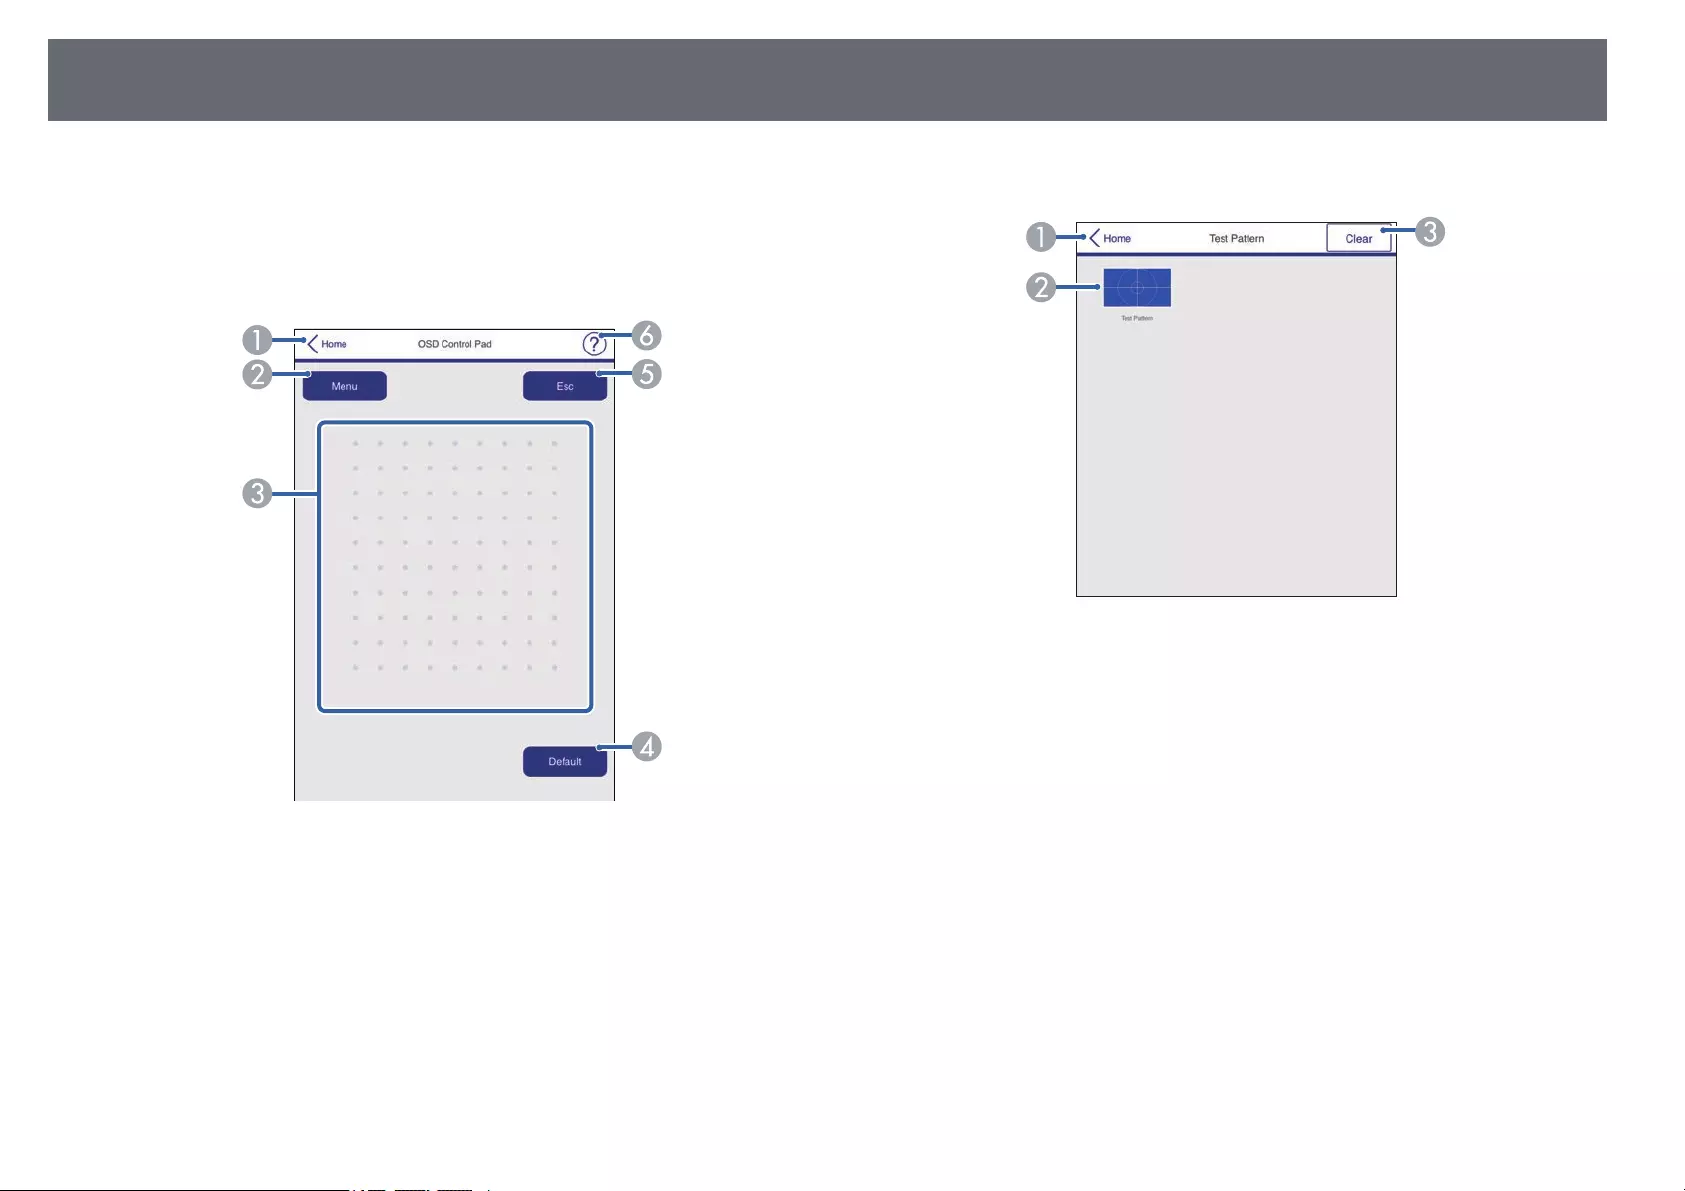
Controlling a Networked Projector Using a Web Browser 101
GAdjusts the speaker volume.
HSearches for sources.
OSD Control Pad
AReturns to the Epson Web Control screen.
BDisplays the projector’s setting menus.
CUse your finger or mouse to navigate the menus.
DResets the selected setting to its default value.
EReturns to the previous menu.
FDisplays help topics.
Test Pattern
AReturns to the Epson Web Control screen.
BDisplays available test patterns; select to project a test pattern.
CTurns off test pattern display.
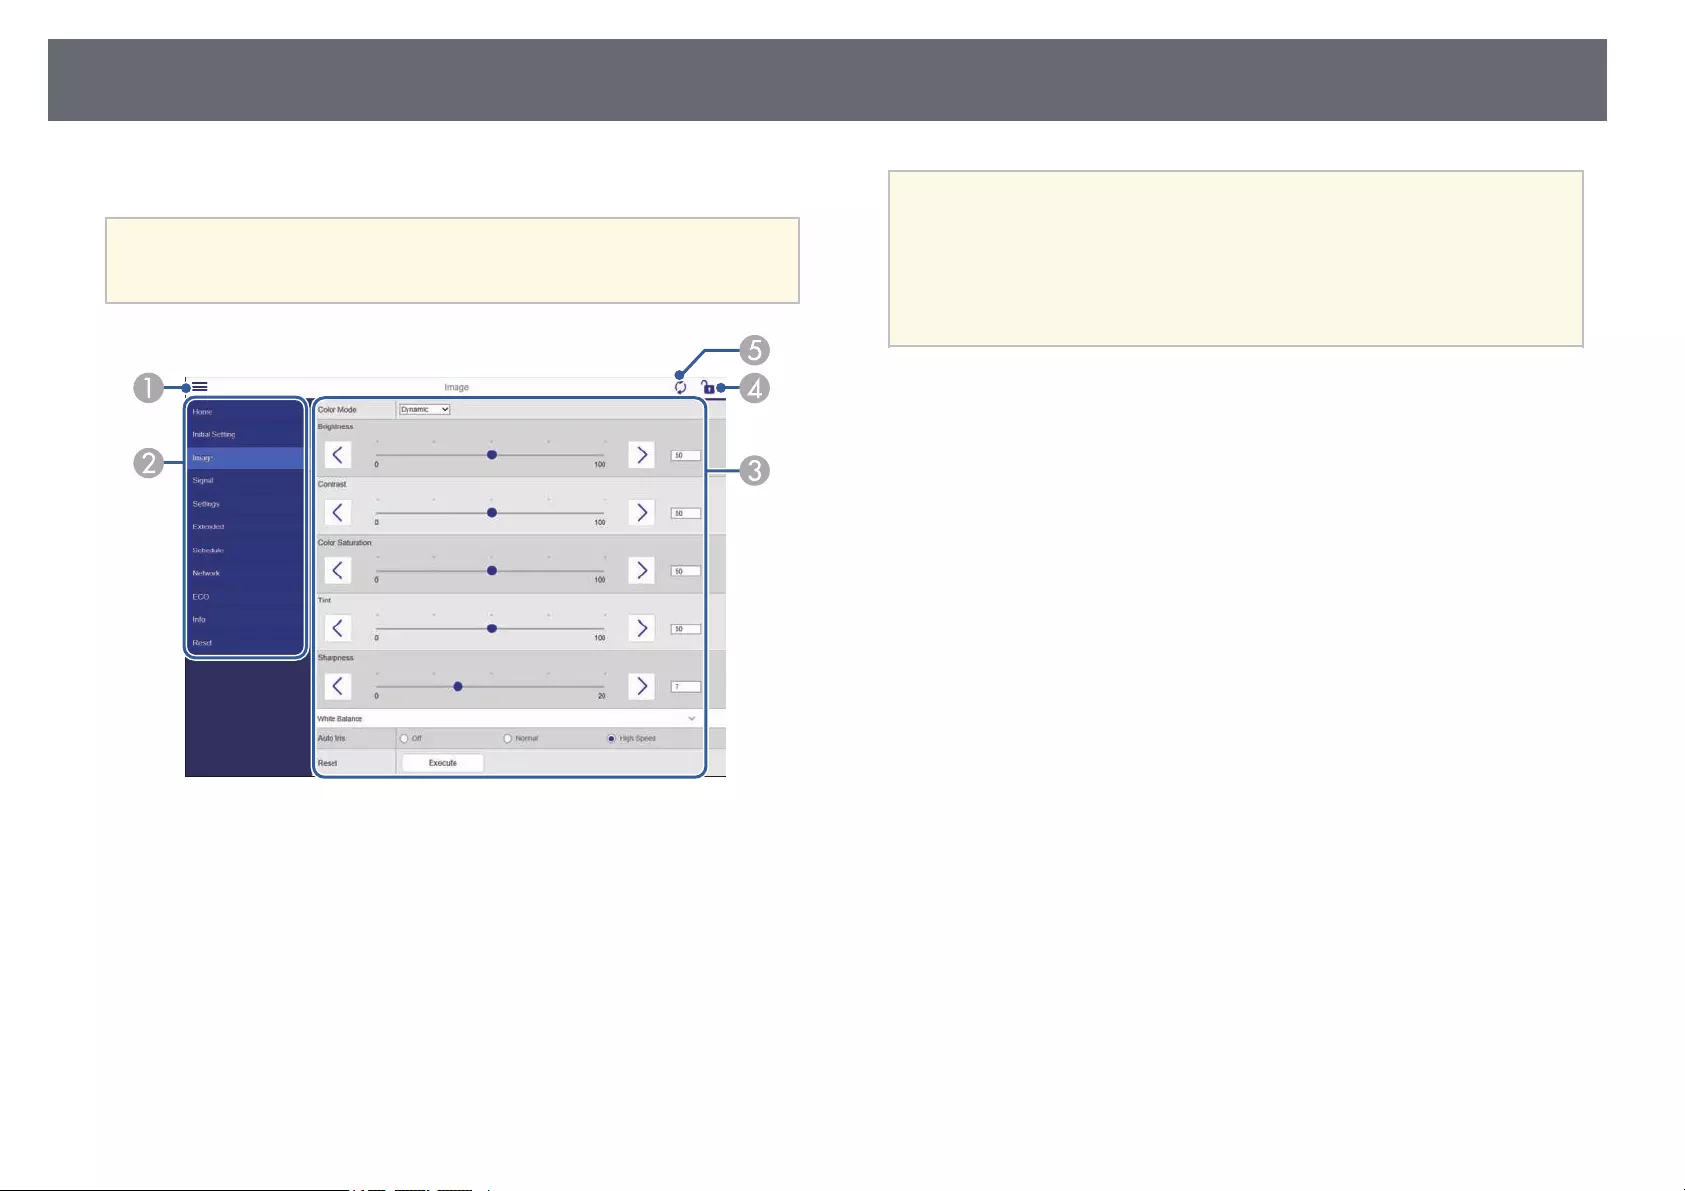
Controlling a Networked Projector Using a Web Browser 102
Advanced
aIf the default Web Control Password is set, a screen prompting to
change the password appears before you can view the Advanced screen.
Follow the on-screen instructions to change the password.
AOpens the menus.
BDisplays the menu name you selected.
CSpecifies the projector settings.
DLock/unlock the projector settings.
EUpdates the projector settings.
aYou cannot change the following settings using Epson Web Control.
• User Button
• User’s Logo
• HDMI EQ Setting
• Language
• Reset Lamp Hours
gg Related Links
• «List of Functions» p.11

Registering Digital Certificates from a Web Browser 103
You can register the digital certificates on the projector to provide security for
your presentation files.
aYou can also register the digital certificates in the projector’s Network
menu. However, be sure to register just once or the certificate may not
install correctly.
sNetwork >Network Configuration >Wireless LAN >EAP
Method >Client Certificate
sNetwork >Network Configuration >Wireless LAN >EAP
Method >CA certificate
sNetwork >Network Configuration >Others >Web Server
Certificate
aMake sure your digital certificate file is compatible with projector
registration.
bMake sure the projector is turned on.
cStart your Web browser on a computer or device connected to the
network.
dGo to the Epson Web Control screen by entering the projector’s IP
address into the browser’s address box.
You see the Epson Web Control screen.
eSelect Advanced.
a• You may need to log in before you see the Advanced screen. If
a login screen is displayed, enter your user name and
password. (The user name is EPSONWEB and the default
password is admin.)
• You can change the password in the projector’s Network
menu.
sNetwork >Network Configuration >Basic >Web
Control Password
fUnder Network, select Certificate.
gSelect the certificate file you want to register.
hEnter the password in the Password box, and then click Set.
iWhen you finish registering the certificate, click Apply to finalize your
changes and complete the registration.
gg Related Links
• «List of Functions» p.11
Setting Up Projector Network E-Mail Alerts 104
You can set up the projector to send you an e-mail alert over the network if
there is a problem with the projector.
If you set the Standby Mode setting to Communication On, you can receive
the e-mail alerts even if the projector is in standby mode (when the power is
off).
sECO >Standby Mode
aPress the [Menu] button, select the Network menu, and press [Enter].
bSelect Network Configuration and press [Enter].
cSelect the Notifications menu and press [Enter].
dSet the Mail Notification setting to On.
eEnter the IP address for the SMTP Server option.
aDo not use «127.x.x.x» (where x is a number from 0 to 255) for
the SMTP Server.
fSelect a number for the SMTP server Port Number, from 0 to 65535
(default is 25).
gSelect a type of Authentication of SMTP server.
hEnter a User Name for the SMTP server.
iEnter a Password for the SMTP server authentication.
jEnter the e-mail address to be indicated as the sender in From.
kChoose an address field, enter the e-mail address, and select the alerts
you want to receive. Repeat for up to three addresses.
aYour e-mail address can be up to 64 alphanumeric characters
long. To enter more than 32 characters, use your Web browser.
lWhen you finish selecting settings, select Complete and follow the on-
screen instructions to save your settings and exit the menus.
aIf a critical problem causes a projector to shut down, you may not
receive an e-mail alert.
gg Related Links
• «Network Projector E-mail Alert Messages» p.104
• «Projector Setup Settings — ECO Menu» p.128
• «List of Functions» p.11
Network Projector E-mail Alert Messages
When a problem occurs with a projector on the network, and you selected to
receive e-mail alerts, you receive an e-mail containing the following
information:

Setting Up Projector Network E-Mail Alerts 105
• The email address set in From as the mail sender
•Epson Projector in the subject line
• The name of the projector experiencing a problem
• The IP address of the affected projector
• Detailed information about the problem

Setting Up Monitoring Using SNMP 106
Network administrators can install SNMP (Simple Network Management
Protocol) software on network computers so they can monitor projectors. If
your network uses this software, you can set up the projector for SNMP
monitoring.
aPress the [Menu] button, select the Network menu, and press [Enter].
bSelect Network Configuration and press [Enter].
cSelect the Notifications menu and press [Enter].
dSet the SNMP setting to On.
eEnter up to two IP addresses to receive SNMP notifications, using 0 to
255 for each address field.
aDo not use these addresses: 224.0.0.0 through 255.255.255.255
(where x is a number from 0 to 255). This projector supports
SNMP agent version 1 (SNMPv1).
fEnter the SNMP Community Name up to 32 alphanumeric characters
long.
gWhen you finish selecting settings, select Complete and follow the on-
screen instructions to save your settings and exit the menus.
gg Related Links
• «List of Functions» p.11
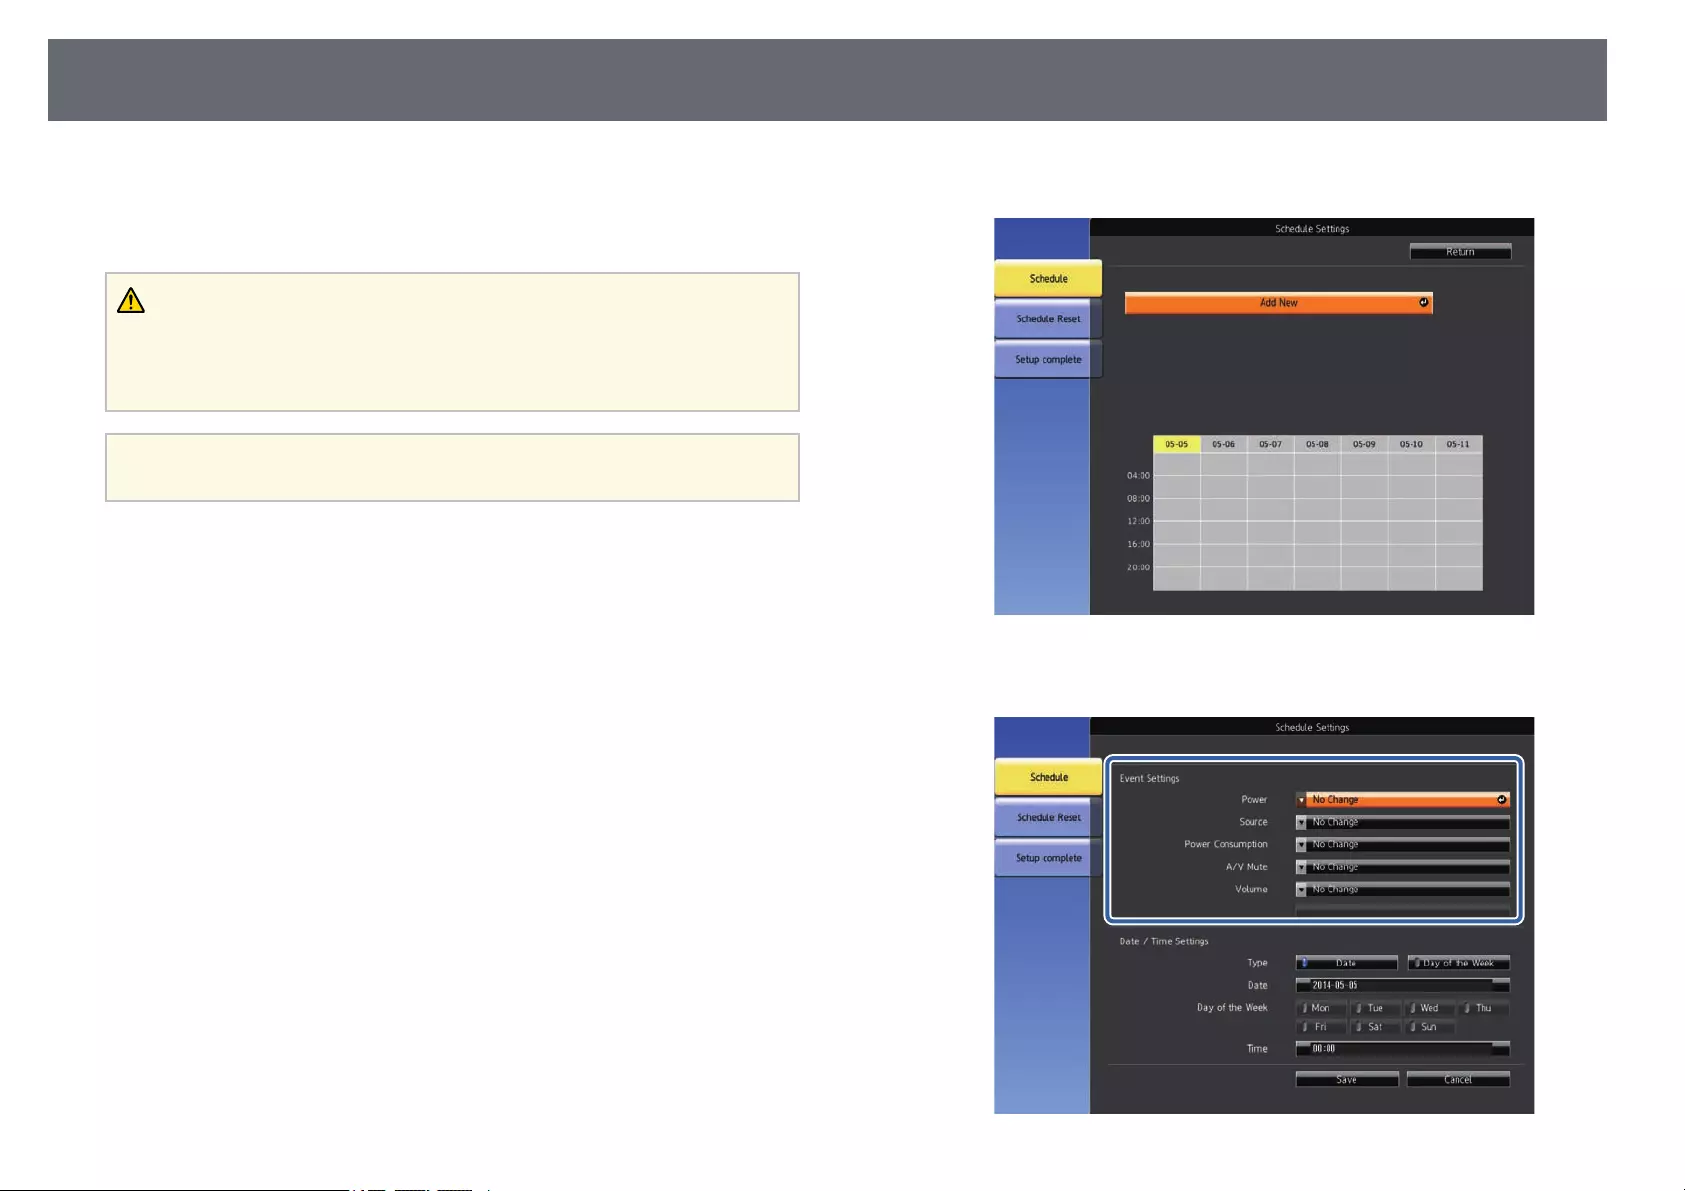
Setting Projector Event Schedules 107
You can schedule up to 30 events to occur automatically on your projector,
such as turning the projector on or off or switching the input source. The
projector performs the selected events on the specified date and time in the
schedule you set up.
Warning
Do not place flammable objects in front of the lens. If you schedule the projector
to turn on automatically, flammable objects in front of the lens could catch on a
fire.
a• If you set a Schedule Protection password, turn off your Schedule
Protection password first.
aSet the date and time in the Date & Time menu.
sExtended >Operation >Date & Time
bPress the [Menu] button, select the Extended menu, and press [Enter].
cSelect Schedule Settings and press [Enter].
dSelect Schedule and press [Enter].
eSelect Add New and press [Enter].
fSelect the event details you want to perform.
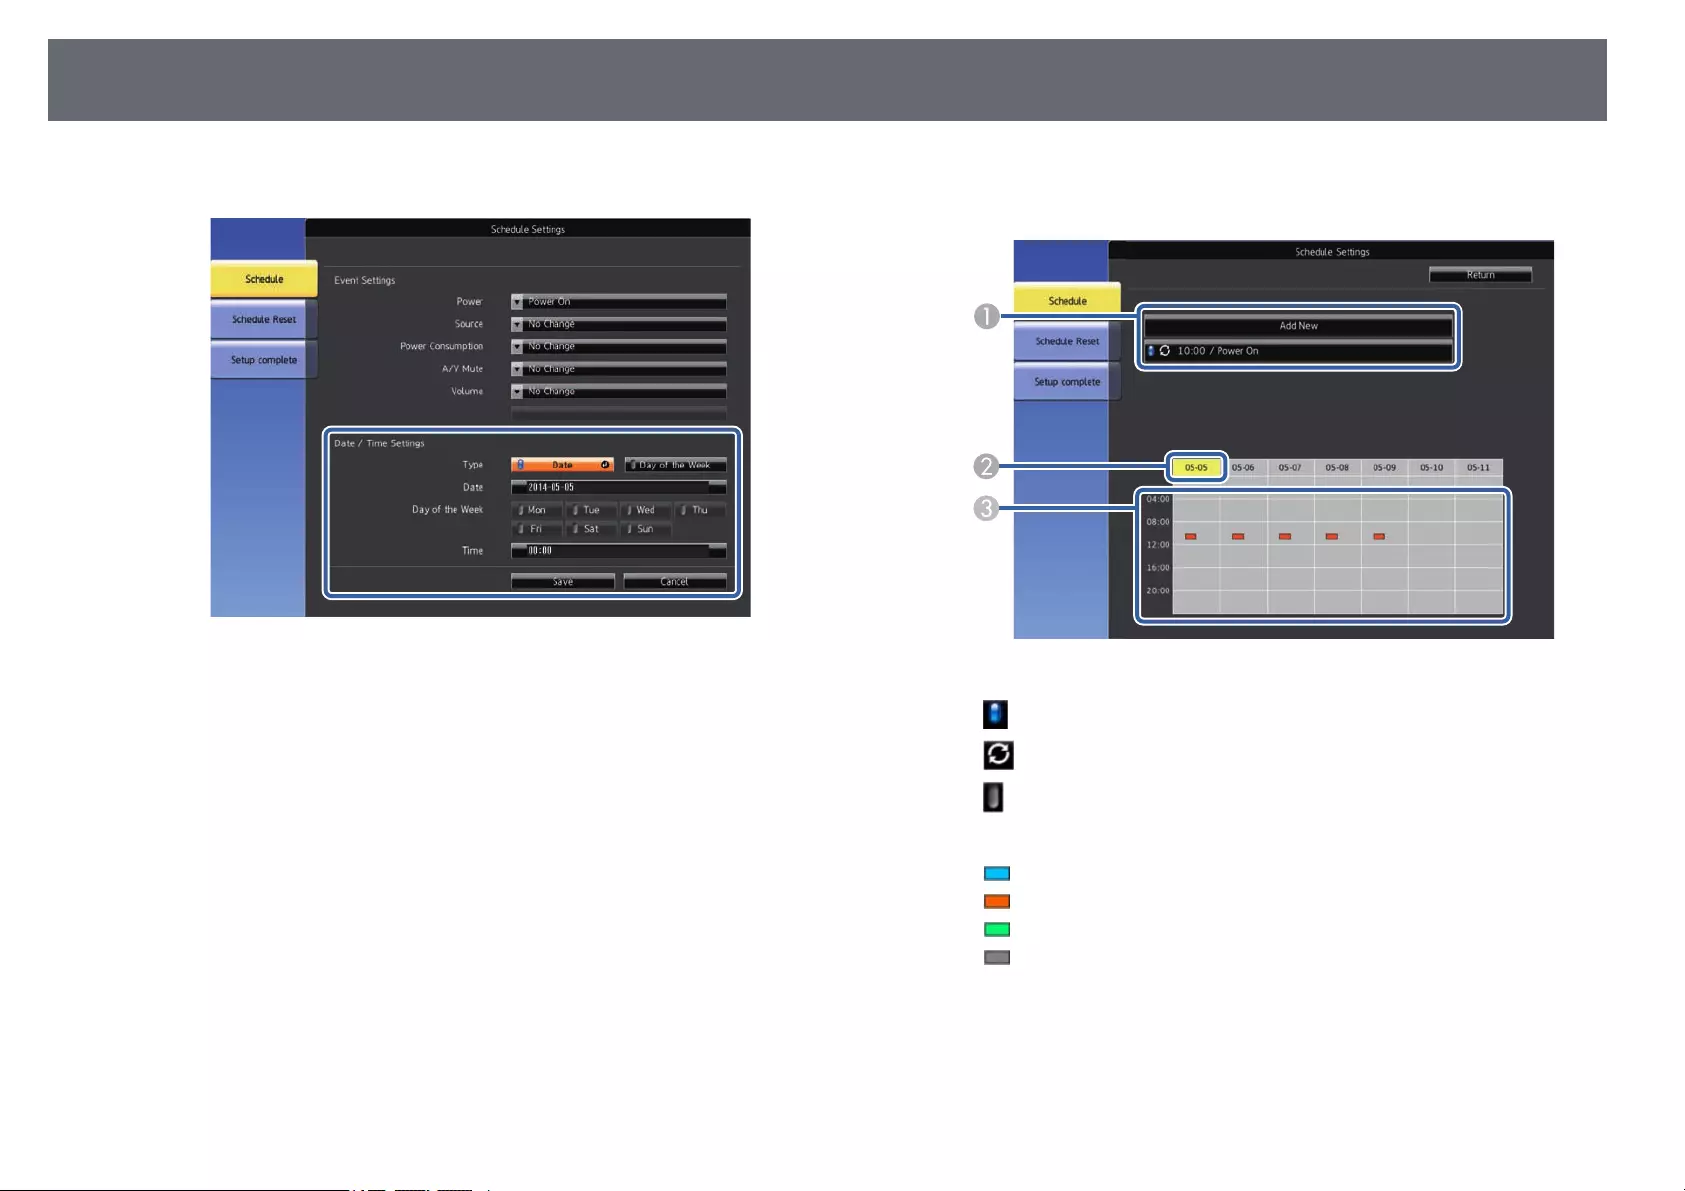
Setting Projector Event Schedules 108
gSelect the date and time at which you want the event to occur.
hSelect Save and press [Enter].
The scheduled events are displayed on the screen with icons indicating
the event status.
A: valid schedule
: regular schedule
: invalid schedule
BThe date currently selected (highlighted in yellow)
C: one time schedule
: regular schedule
: standby schedule (turns communication on or off during standby)
: invalid schedule
iTo edit a scheduled event, select the schedule and press [Esc].
jSelect an option from the menu displayed.
•On or Off lets you enable or disable the selected event.

Setting Projector Event Schedules 109
•Edit lets you change the event details or date and time.
•Clear lets you remove the scheduled event from a list.
kSelect Complete, then select Yes.
To delete all scheduled events, select Schedule Reset.
gg Related Links
• «List of Functions» p.11
• «Setting the Date and Time» p.37
• «Setting a Password» p.75

Adjusting the Menu Settings
Follow the instructions in these sections to access the projector menu system and change projector settings.
gg Related Links
• «Using the Projector’s Menus» p.111
• «Using the Displayed Keyboard» p.112
• «Image Quality Settings — Image Menu» p.113
• «Input Signal Settings — Signal Menu» p.114
• «Projector Feature Settings — Settings Menu» p.115
• «Projector Setup Settings — Extended Menu» p.117
• «Projector Network Settings — Network Menu» p.120
• «Projector Setup Settings — ECO Menu» p.128
• «Projector Information Display — Info Menu» p.130
• «Projector Reset Options — Reset Menu» p.133
• «Copying Menu Settings Between Projectors (Batch Setup)» p.134

Using the Projector’s Menus 111
You can use the projector’s menus to adjust the settings that control how your
projector works. The projector displays the menus on the screen.
aPress the [Menu] button on the control panel or remote control.
You see the menu screen displaying the Image menu settings.
bPress the up or down arrow buttons to move through the menus listed
on the left. The settings for each menu are displayed on the right.
aThe available settings depend on the current input source.
cTo change settings in the displayed menu, press [Enter].
dPress the up or down arrow button to move through the settings.
eChange the settings using the buttons listed on the bottom of the menu
screens.
fTo return all the menu settings to their default values, select Reset.
gWhen you finish changing settings on a menu, press [Esc].
hPress [Menu] or [Esc] to exit the menus.

Using the Displayed Keyboard 112
You can use the displayed keyboard to enter numbers and characters.
aUse the arrow buttons on the control panel or remote control to
highlight the number or character you want to enter and press the
[Enter] button.
aEach time you select the CAPS key, the characters change
between upper case and lower case. Each time you select the
SYM1/2 key, the symbols enclosed by the frame change.
bAfter entering the text, select Finish on the keyboard to confirm your
entries. Select Cancel to cancel entering text.
aYou can select projector settings and control projection over a network
using a Web browser from your computer.
Some symbols cannot be entered using the displayed keyboard. Use
your Web browser to enter the text.
gg Related Links
• «Available Text Using the Displayed Keyboard» p.112
• «Controlling a Networked Projector Using a Web Browser» p.99
Available Text Using the Displayed Keyboard
You can enter the following text when using the displayed keyboard.
Text type Details
Numbers 0123456789
Alphabet ABCDEFGHIJKLMNOPQRSTUVWXY
Z
abcdefghijklmnopqrstuvwxyz
Symbols ! « # $ % & ‘ ( ) * + , — . / : ; < = > ? @ [ \ ]
^_`{|}~
Image Quality Settings — Image Menu 113
Settings on the Image menu let you adjust the quality of your image for the
input source you are currently using. The available settings depend on the
currently selected input source.
To change settings for an input source, make sure the source is connected and
select that source.
Setting Options Description
Color Mode See the list of
available color
modes
Adjusts the vividness of image colors for
various image types and environments.
Brightness Varying levels
available
Lightens or darkens the overall image.
Contrast Varying levels
available
Adjusts the difference between light and
dark areas of the image.
Color Saturation Varying levels
available
Adjusts the intensity of the image colors.
Tint Varying levels
available
Adjusts the balance of green to magenta
tones in the image.
Sharpness Varying levels
available
Adjusts the sharpness or softness of
image details.
White Balance Adjusts the overall tint of the image.
Setting Options Description
Color Temp. Color Temp.: sets the color temperature
according to the color mode you selected.
Higher values tint the image blue and
lower values tint the image red.
Custom Custom: adjusts the individual R (red), G
(green), and B (blue) components of the
offset and gain.
Image
Enhancement
Adjusts the perceived resolution of the
image:
Noise Reduction Noise Reduction: reduces flickering in
analog images.
Detail
Enhancement
Detail Enhancement: creates a more
emphatic texture and material feel of the
image.
Deinterlacing
(For interlaced
signal
[480i/576i/1080i]
input)
Deinterlacing: sets whether or not to
convert interlaced-to-progressive signals
for certain video image types.
•Off: for fast-moving video images.
•Video: for most video images.
•Film/Auto: for movies, computer
graphics, and animation.
Auto Iris Off
Normal
High Speed
Adjusts the projected luminance based
on the image brightness.
Available when the Color Mode is set to
Dynamic or Cinema.
Reset — Resets all adjustment values on the
Image menu for the selected color mode
to their default settings.
a• The Brightness setting does not affect lamp brightness. To change
the lamp brightness mode, use the Power Consumption setting in
the projector’s ECO menu.
gg Related Links
• «Available Color Modes» p.54

Input Signal Settings — Signal Menu 114
Normally the projector automatically detects and optimizes the input signal
settings. If you need to customize the settings, you can use the Signal menu.
The available settings depend on the currently selected input source.
aYou can restore the default settings of the Tracking,Sync., and
Position settings by pressing the [Auto] button on the remote control.
To change settings for an input source, make sure the source is connected and
select that source.
Setting Options Description
Resolution Auto
Wide
Normal
Sets the input signal resolution if not
detected automatically using the Auto
option. (Available only for models that
have a Computer port.)
Aspect See the list of
available aspect
ratios.
Sets the aspect ratio (width-to-height
ratio) for the selected input source.
Tracking Varying levels
available
Adjusts the signal to eliminate vertical
stripes in computer images.
Sync. Varying levels
available
Adjusts the signal to eliminate fuzziness
or flickering in computer images.
Setting Options Description
Position — Adjusts the image location on the screen.
(Available only for models that have a
Computer port.)
Auto Setup On
Off
Automatically optimizes computer image
quality (when On).
Overscan Auto
Off
4%
8%
Changes the projected image ratio to
make the edges visible by a selectable
percentage or automatically.
Advanced Video Range Video Range: sets the video range to
match the setting of the device connected
to the HDMI port.
Video Signal Video Signal: specifies the signal type
from the input sources connected to the
Video ports. If interference appears or no
image appears when set to Auto, select
the appropriate signal according to the
connected equipment. (Available only for
models that have a Video port.)
Reset — Resets all adjustment values on the
Signal menu to their default settings.
gg Related Links
• «Available Image Aspect Ratios» p.52
• «List of Functions» p.11
Projector Feature Settings — Settings Menu 115
Options on the Settings menu let you customize various projector features.
Setting Options Description
E-Zoom Varying levels
available
Adjusts the size of the projected image.
Keystone Adjusts image shape to rectangular
(horizontally and vertically).
H/V-Keystone H/V-Keystone: Select to manually
correct horizontal and vertical sides.
Auto V-Keystone: Turns automatic
correction on or off.
H-Keystone Adjuster: Turns H-
Keystone Adjuster on or off.
Quick Corner Quick Corner: Select to correct image
shape and alignment using an on-screen
display.
Setting Options Description
Split Screen Screen Size
Source
Swap Screens
Audio Source
Align
Display the QR
Code
Exit Split Screen
Divides the viewing area horizontally and
displays two images side-by-side (press
[Esc] to cancel split screen display).
Volume Varying levels
available
Adjusts the volume of projector’s speaker
system.
You can also adjust the volume of
external speakers.
Setting values are saved for each source.
Lock Setting Control Panel Lock Controls projector button locking to
secure the projector:
Full Lock: locks all buttons.
Partial Lock: locks all buttons except the
power button.
Off: no buttons locked.
Remote Receiver Front/Rear
Front
Rear
Off
Limits reception of remote control
signals by the selected receiver; Off turns
off all receivers.
User Button Power
Consumption
Info
Deinterlacing
Test Pattern
Resolution
Pattern Display
Display the QR
Code
Assigns a menu option to the [User]
button on the remote control for one-
touch access.
Projector Feature Settings — Settings Menu 116
Setting Options Description
Pattern Selects various pattern display options.
Attention
If a pattern is displayed for a
long time, a residual image may
be visible in projected images.
Pattern Display Pattern Display: lets you display the
selected pattern type on the screen to aid
in presentation.
Pattern Type Pattern Type: select from Patterns 1 to 4
or User Pattern. Patterns 1 to 4 display
patterns pre-registered in the projector,
such as ruled lines or grid patterns.
User Pattern User Pattern: captures a projected screen
and saves it as a pattern for display.
Test Pattern Test Pattern: displays a test pattern to
assist in focusing and zooming the image
and correcting image shape (press the
[Esc] button to cancel pattern display).
Reset — Resets all adjustment values on the
Settings menu to their default settings,
except for the following:
•E-Zoom
•User Button
gg Related Links
• «List of Functions» p.11
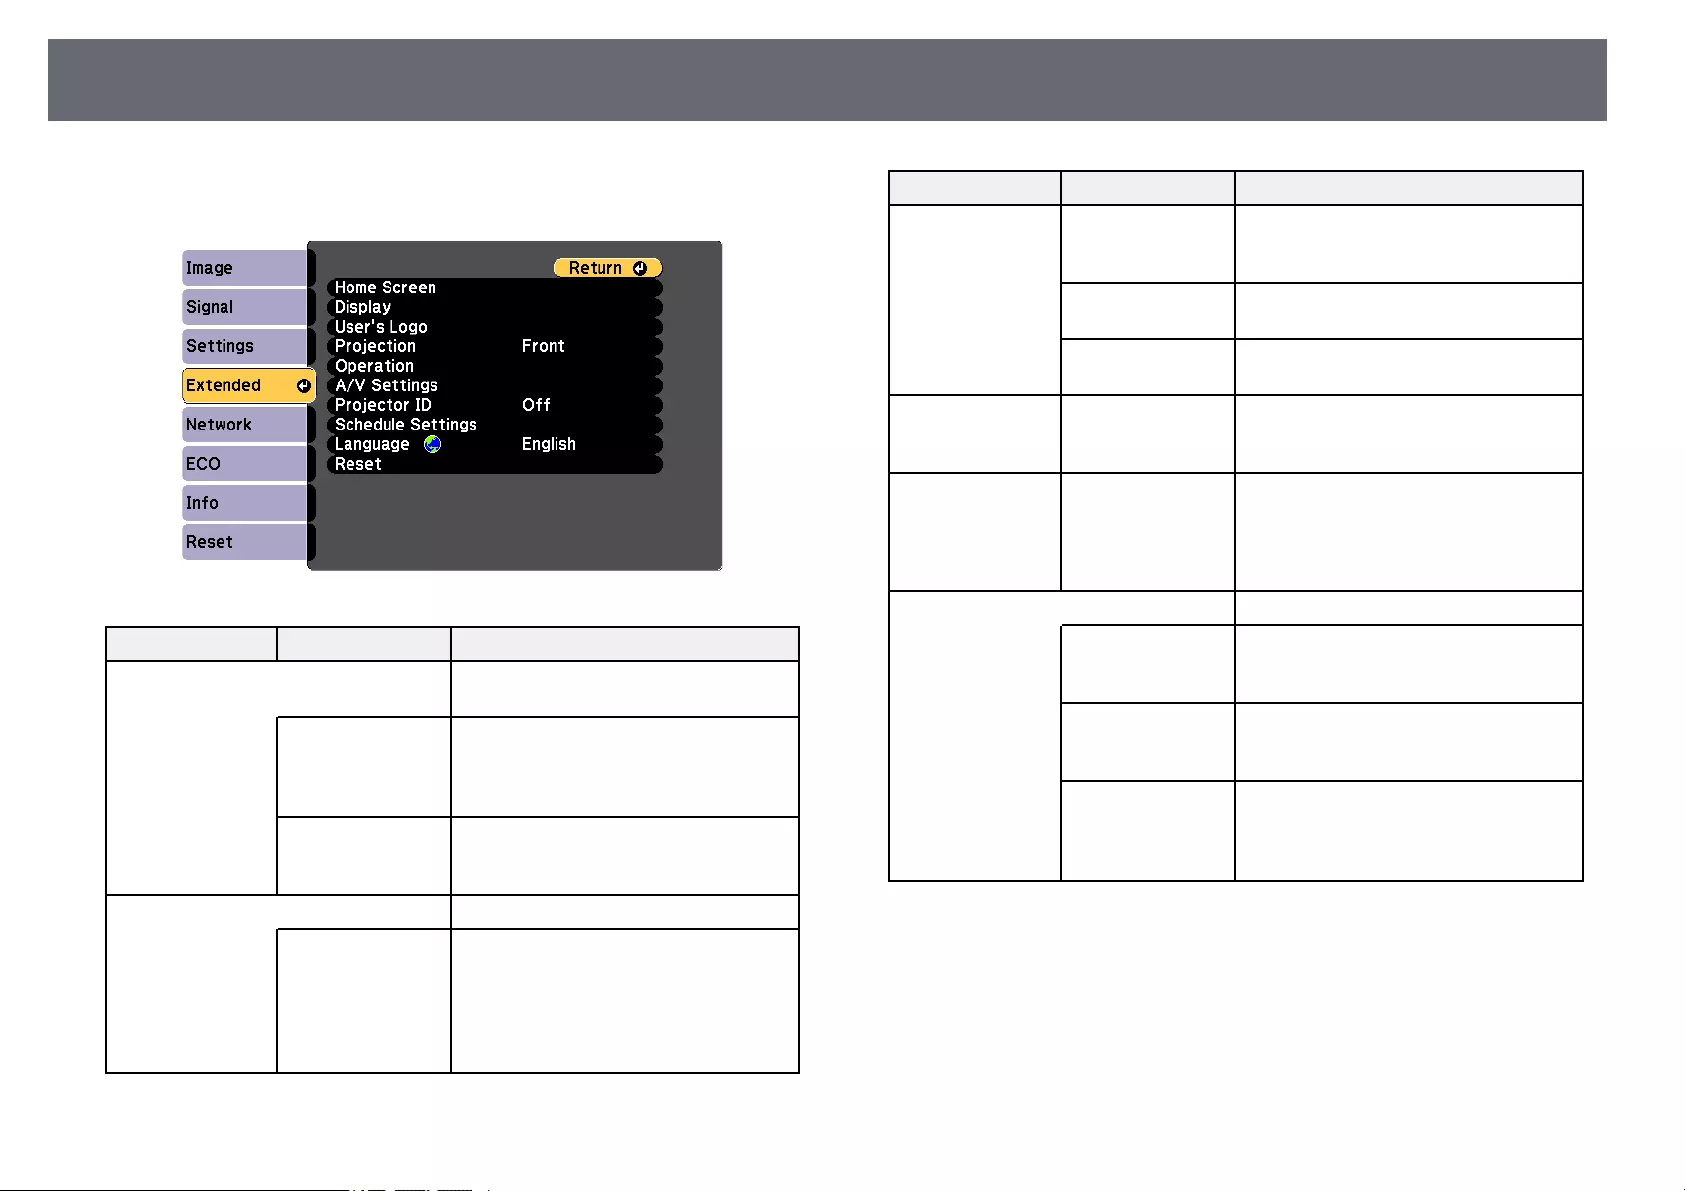
Projector Setup Settings — Extended Menu 117
Settings on the Extended menu let you customize various projector setup
features.
Setting Options Description
Home Screen Selects the projector’s Home screen
display options:
Home Screen Auto
Disp.
Home Screen Auto Disp.: select whether
or not to display the Home screen
automatically when there is no input
signal when turning on the projector.
Custom Function 1
Custom Function 2
Custom Function 1/Custom Function
2: select to set functions and the display
as the customized Home screen.
Display Selects various display options:
Messages Messages: set to On to display messages
such as input source name, color mode
name, aspect ratio, no signal message, or
high temperature warning on your
projected image. Set to Off if you do not
want to display messages.
Setting Options Description
Display
Background
Display Background: sets the screen
color or logo to display when no signal is
received.
Startup Screen Startup Screen: set to On to display a
logo when the projector starts up.
A/V Mute A/V Mute: sets the screen color or logo
to display when A/V Mute is turned on.
User’s Logo — Creates a screen that the projector
displays to identify itself and enhance
security.
Projection Front
Front/Ceiling
Rear
Rear/Ceiling
Selects the way the projector faces the
screen so the image is oriented correctly.
Operation Selects various operation options:
Direct Power On Direct Power On: lets you turn on the
projector by plugging it in without
pressing the power button.
High Altitude
Mode
High Altitude Mode: regulates the
projector’s operating temperature at
altitudes above 1500 m.
Auto Source Search Auto Source Search: set to On to detect
the input signal automatically and
project images when there is no input
signal.

Projector Setup Settings — Extended Menu 118
Setting Options Description
Auto Power On Auto Power On: select the image source
from which you want to automatically
start projection. When the projector
detects the input signal from the selected
image source, it projects automatically in
standby mode.
The following image sources are available
for this feature:
• HDMI1
• HDMI
• Computer
• USB Display
HDMI EQ Setting HDMI EQ Setting: Adjust the HDMI
input signal level depending on the
devices connected to the HDMI port. If
there is a lot of interference in the image,
or if a problem such as no image being
projected occurs, change the setting.
If no images are displayed using a
thumb-sized media streaming device,
select 1.
Advanced Log Save Destination: sets the location
in which to save error and operation log
files.
Batch Setup Range: select All to copy all
of the projector menu settings using the
batch setup feature. Select Limited, if you
do not want to copy the following
settings:
•Password Protection settings
•Network menu settings
Setting Options Description
Date & Time Date & Time: adjusts the projector’s
system time and date settings.
(Available only for models that support
the Schedule function.)
•Daylight Saving Time: set to On to
activate daylight saving time.
•Internet Time: set to On to update the
time automatically through an Internet
time server.
A/V Settings Selects various audio and video output
settings:
A/V Output A/V Output: set to Always On to output
audio and images to external devices
when the projector is in standby mode.
Audio Settings HDMI1 Audio Output/HDMI2 Audio
Output: selects the audio input port
when projecting images from HDMI
ports. (Available only for models that
have multiple HDMI ports.)
Projector ID Off
1 through 9
Assigns an ID for the projector when you
use multiple projectors.
Schedule Settings To Schedule
Settings menu
Schedules projector events to occur
automatically at selected dates and times.
(Available only for models that support
the Schedule function.)
Language Various languages
available
Select the language for projector menu
and message displays.

Projector Setup Settings — Extended Menu 119
Setting Options Description
Reset — Resets all adjustment values on the
Extended menu to their default settings,
except for the following:
•User’s Logo
•Projection
•High Altitude Mode
•Auto Source Search
•HDMI EQ Setting
•Date & Time
•A/V Output
•Projector ID
•Schedule Settings
•Language
aWhen you set User’s Logo Protection to On in the Password
Protection screen, you cannot change settings related to user’s logo
display (Display Background,Startup Screen,A/V Mute in the
Display setting). Set User’s Logo Protection to Off first.
gg Related Links
• «List of Functions» p.11
• «Selecting Password Security Types» p.76

Projector Network Settings — Network Menu 120
Settings on the Network menu let you view network information and set up
the projector for controlling over a network.
When you set Network Protection to On in the Password Protection screen,
you cannot change the network settings. Set Network Protection to Off first.
Setting Options Description
Screen Mirroring * On
Off
Configures your Screen Mirroring
settings.
Select On to project with the Screen
Mirroring features.
Screen Mirroring
Info *
Display Name
MAC Address
Region Code
Channel
Connected Device
Displays Screen Mirroring status and
details.
Available when you have set Screen
Mirroring to On.
Screen Mirroring
Settings *
To Screen
Mirroring Settings
menu
Configures your Screen Mirroring
settings.
Setting Options Description
Wireless LAN
Power
On
Off
Configures your wireless LAN settings.
Select On to project images via a wireless
LAN. If you do not want to connect via
wireless LAN, turn it off to prevent
unauthorized access by others.
Net. Info. —
Wireless LAN
Connection Mode
Wireless LAN Sys.
Antenna Level
Projector Name
SSID
DHCP
IP Address
Subnet Mask
Gateway Address
MAC Address
Region Code
IPv6
Displays wireless network status and
details.
Available when you have set Wireless
LAN Power to On.
The following settings are displayed
when you select the IPv6 option.
• IPv6 Address (Manual)
• IPv6 Address
• Prefix Length
• Gateway Address
• IPv6 Address (Auto)
• Temporary Address
• Link-local Address
• Stateless Address
• Stateful Address
Display the QR
Code
— Displays a QR code for connecting with
iOS or Android devices using the Epson
iProjection app.
Network
Configuration
To additional
network menus
Configures your network settings.
* Available only for models that support Screen Mirroring.
aOnce you have connected your projector to your network, you can
select projector settings and control projection using a compatible Web
browser. This allows you to access the projector remotely.
gg Related Links
• «Network Menu — Screen Mirroring Settings» p.121
• «Network Menu — Basic Menu» p.122
Projector Network Settings — Network Menu 121
• «Network Menu — Wireless LAN Menu» p.123
• «Network Menu — Notifications Menu» p.125
• «Network Menu — Others Menu» p.126
• «Network Menu — Reset Menu» p.127
• «List of Functions» p.11
• «Selecting Password Security Types» p.76
Network Menu — Screen Mirroring Settings
Settings on the Screen Mirroring Settings menu let you select the Screen
Mirroring settings.
sNetwork >Screen Mirroring Settings
This menu is available only for models that support Screen Mirroring.
Setting Options Description
Display Name Up to 32
alphanumeric
characters
Enter a name to identify the projector
when searching for the projector using
the screen mirroring feature.
Operation Mode Basic
Extended
Select Extended to connect with
advanced options.
Setting Options Description
Basic Wireless LAN Sys. Sets the communication method between
the projector and the mobile device.
You can select the following methods:
• 802.11a/g/n/ac (Wi-Fi 5)
• 802.11a/g/n (Wi-Fi 4)
• 802.11g/n (Wi-Fi 4)
The available methods vary depending
on countries and regions.
Adjust Image
Quality
Adjusts the screen mirroring
speed/quality.
When you want to increase image
quality, select a small number. When you
want to increase processing speed, select
a large number.
Connection Mode Selects the security type when you
connect to the network wirelessly. Select
PIN to improve the connection security.
If your mobile device supports only the
PBC connection, select PIN/PBC.
Available when you have set Operation
Mode to Basic.
Extended Available when you have set Operation
Mode to Extended.
Meeting Mode Selects the type of meeting.
•Interruptions OK: lets you connect to
another mobile device during Screen
Mirroring projection.
•No Interruptions: lets you exclusively
connect to one device.
Channel Selects the wireless channel used by
Screen Mirroring.
Display Display PIN Code Set to On to display the eight-digit PIN
code on the projected image when
projecting input sources other than
Screen Mirroring.
Projector Network Settings — Network Menu 122
Setting Options Description
Display Device
Name
Set to On to display the newly connected
device name on the projected image
when projecting input sources other than
Screen Mirroring.
Reset — Resets all adjustment values on the
Screen Mirroring Settings menu to their
default settings.
gg Related Links
• «List of Functions» p.11
Network Menu — Basic Menu
Settings on the Basic menu let you select the basic network settings.
sNetwork >Network Configuration >Basic
Setting Options Description
Projector Name Up to 16
alphanumeric
characters
(do not use « * + ,
/:;<=>?[\]`|
spaces)
Enter a name to identify the projector
over the network.
Remote Password Up to 8
alphanumeric
characters
(do not use * :
spaces)
Enter a password for accessing the
projector using the Basic Control. (User
name is EPSONREMOTE; default
password is guest.)
Web Control
Password
Up to 8
alphanumeric
characters
(do not use * :
spaces)
Enter a password for accessing the
projector over the Web. (User name is
EPSONWEB; default password is
admin.)
Moderator
Password
Four-digit number Enter a password for accessing the
projector as a moderator using Epson
iProjection. (No password is set by
default.)
Projector Keyword On
Off
Set to On to enable a security password
to prevent access to the projector by
anyone not in the same room as the
projector. You must enter a displayed,
randomized keyword from a computer
using Epson iProjection to access the
projector and share the current screen.
Display Keyword On
Off
Set to On to display a projector keyword
on the projected image when accessing
the projector using Epson iProjection.
Available when Projector Keyword is set
to On.
Projector Network Settings — Network Menu 123
Setting Options Description
Display LAN Info. Text & QR Code
Text
Set the display format for the projector’s
network information.
By simply reading the QR code with
Epson iProjection, you can connect the
mobile device to the projector through a
network. The default value is Text & QR
Code.
gg Related Links
• «List of Functions» p.11
Network Menu — Wireless LAN Menu
Settings on the Wireless LAN menu let you select the wireless LAN settings.
sNetwork >Network Configuration >Wireless LAN
Setting Options Description
Connection Mode Select the type of wireless connection:
Setting Options Description
Quick Quick: lets you connect to multiple
smartphones, tablets, or computers
directly using wireless communication.
When you select Quick connection
mode, the projector acts as an easy access
point. (We recommend limiting the
number of devices to six or less to
maintain the projection performance.)
Advanced Advanced: lets you connect to multiple
smartphones, tablets, or computers over
a wireless network access point.
Search Access Point To Search View Search for available wireless network
access points in Advanced connection
mode. Depending on the access point
settings, they may not be displayed in the
list.
SSID Up to 32
alphanumeric
characters
Sets the SSID (network name) of the
wireless LAN system the projector is
connecting to.
Security Selects the type of security used on the
wireless network.
When setting security, follow the
instructions from the administrator of
the network system you want to connect
to.
Open Security is not set.
WPA2-PSK Communication is performed using
WPA2 security. Uses AES method for
encryption. When establishing a
connection from a computer to the
projector, enter the value set in the
passphrase.
WPA3-PSK Communication is performed using
WPA3 security. Uses AES method for
encryption. When establishing a
connection from a computer to the
projector, enter the value set in the
passphrase.
Projector Network Settings — Network Menu 124
Setting Options Description
WPA2/WPA3-PSK Connects in WPA2/WPA3 personal
mode. Encryption method is selected
automatically according to the access
point settings. Set a passphrase which is
the same for the access point.
WPA3-EAP Connects in WPA3 enterprise mode.
Encryption method is selected
automatically according to the access
point settings. (Available only for models
that support WPA Enterprise security.)
WPA2/WPA3-EAP Connects in WPA2/WPA3 enterprise
mode. Encryption method is selected
automatically according to the access
point settings. (Available only for models
that support WPA Enterprise security.)
Passphrase Various
passphrases from 8
to 32 characters
(when entering
from a Web
browser: various
passphrases from 8
to 63 characters)
For WPA2-PSK,WPA3-PSK and
WPA2/WPA3-PSK security, selects the
pre-shared passphrase used on the
network.
When the passphrase is entered and the
[Enter] button is pressed, the value is set
and displayed as an asterisk (*).
We recommend changing the passphrase
periodically for security. If the network
settings are initialized, it returns to the
initial passphrase.
EAP Method Set the EAP settings for WPA3-EAP and
WPA2/WPA3-EAP security. (Available
only for models that support WPA
Enterprise security.)
Setting Options Description
EAP Type EAP Type: selects the protocol for
authentication.
•PEAP: authentication protocol widely
used in Windows Server.
•PEAP-TLS: authentication protocol
used in Windows Server. Select this
when using a client certificate.
•EAP-TLS: authentication protocol
widely used to use a client certificate.
•EAP-FAST: select this when these
authentication protocols are used.
User name User name: Enter up to 64 alphanumeric
characters. You can enter up to 32
alphanumeric characters in the projector
menu. To enter more than 32 characters,
use your Web browser. You can enter a
domain name by adding it before the
user name and separating them with a
backslash (domain\username).
When importing a client certificate, the
name the certificate was issued to is
automatically set.
Password Password: Enter a password up to 64
alphanumeric characters for
authentication when EAP Type is set to
PEAP or EAP-FAST. You can enter up
to 32 alphanumeric characters in the
projector menu. To enter more than 32
characters, use your Web browser. After
you enter the password and select Set,
the password is displayed as an asterisk
(*).
Client Certificate Client Certificate: imports the client
certificate when EAP Type is set to
PEAP-TLS or EAP-TLS.
Verify Server Cert. Verify Server Cert.: Set to On to verify
the server certificate when a CA
certificate has been set.

Projector Network Settings — Network Menu 125
Setting Options Description
CA certificate CA certificate: imports the CA
certificate.
RADIUS
Serv.Name
RADIUS Serv.Name: Enter the server
name you want to verify. You can enter
up to 64 alphanumeric characters. To
enter more than 32 characters, use your
Web browser.
Channel Various channels
available
In Quick connection mode, selects the
frequency band (channel) used by the
wireless LAN.
IP Settings DHCP
IP Address
Subnet Mask
Gateway Address
DHCP: set to On if your network assigns
addresses automatically; set to Off to
manually enter the network’s IP
Address,Subnet Mask, and Gateway
Address using 0 to 255 for each address
field.
Do not use these addresses: 0.0.0.0,
127.x.x.x, 192.0.2.x or 224.0.0.0 through
255.255.255.255 (where x is a number
from 0 to 255) for IP Address,
255.255.255.255 or 0.0.0.0 through
254.255.255.255 for Subnet Mask, and
0.0.0.0, 127.x.x.x or 224.0.0.0 through
255.255.255.255 for Gateway Address.
SSID Display On
Off
Select whether to display the SSID on the
network standby screen and Home
screen.
IP Address Display On
Off
Select whether to display the IP address
on the network standby screen and
Home screen.
IPv6 Settings Select the IPv6 settings if you want to
connect the projector to the network
using IPv6:
IPv6 IPv6: set to On if you want to connect
the projector to the network using IPv6.
IPv6 is supported to monitor and control
the projector over a network using Epson
Web Control.
Setting Options Description
Auto Configuration Auto Configuration: set to On to assign
addresses automatically according to the
Router Advertisement.
Use Temporary
Address
Use Temporary Address: set to On if
you want to use a temporary IPv6
address.
gg Related Links
• «List of Functions» p.11
Network Menu — Notifications Menu
Settings on the Notifications menu let you receive an email notification if a
problem or warning occurs in the projector.
sNetwork >Network Configuration >Notifications
Projector Network Settings — Network Menu 126
Setting Options Description
Mail Notification On
Off
Set to On to send an email to the preset
addresses when a problem or warning
occurs with a projector.
SMTP Server IP address Enter the IP address for the projector’s
SMTP server using 0 to 255 for each
address field.
Do not use these addresses: 127.x.x.x,
192.0.2.x or 224.0.0.0 through
255.255.255.255 (where x is a number
from 0 to 255).
Port Number 0 to 65535 (default
is 25)
Select a number for the SMTP server
Port Number.
From Up to 32
alphanumeric
characters
Up to 64
alphanumeric
characters from the
Web browser
(do not use « ( ) , : ;
< > [ \ ] spaces)
Enter the email address of the sender.
Address 1 Setting
Address 2 Setting
Address 3 Setting
Enter the e-mail address, and select the
alerts you want to receive. Repeat for up
to three addresses.
SNMP On
Off
Set to On to monitor the projector using
SNMP. To monitor the projector, you
need to install the SNMP manager
program on your computer. SNMP
should be managed by a network
administrator.
Trap IP Address 1
Trap IP Address 2
IP address Enter up to two IP addresses to receive
SNMP notifications, using 0 to 255 for
each address field.
Do not use these addresses: 127.x.x.x or
224.0.0.0 through 255.255.255.255
(where x is a number from 0 to 255).
Setting Options Description
Community Name Up to 32
alphanumeric
characters
(do not use spaces
and any symbols
other than @)
Set the SNMP community name.
gg Related Links
• «List of Functions» p.11
Network Menu — Others Menu
Settings on the Others menu let you select other network settings.
sNetwork >Network Configuration >Others
Projector Network Settings — Network Menu 127
Setting Options Description
Secure HTTP On
Off
To strengthen security, communication
between the projector and computer in
Web control is encrypted. When setting
security with Web control, it is
recommended to set this to On.
(Available only for models that support
WPA Enterprise security.)
Web Server Cert. — Imports the Web server certificate for
secure HTTP. (Available only for models
that support WPA Enterprise security.)
Message
Broadcasting
On
Off
Set to On to receive the message
delivered by Epson Projector
Management. See the Epson Projector
Management Operation Guide for details.
gg Related Links
• «List of Functions» p.11
Network Menu — Reset Menu
Settings on the Reset menu let you reset all of the network settings.
sNetwork >Network Configuration >Reset
Setting Options Description
Reset network
settings.
Yes
No
Select Yes to reset all network settings.
Projector Setup Settings — ECO Menu 128
Settings on the ECO menu let you customize projector functions to save
power.
When you select a power-saving setting, a leaf icon appears next to the menu
item.
Setting Options Description
Power
Consumption
High
ECO
Selects the brightness mode of the
projector lamp. You cannot select
settings when you use your projector at
high altitude or in locations subject to
high temperatures.
Select ECO to reduce lamp brightness
and fan noise, and to save power and
lamp life.
Setting Options Description
Light Optimizer On
Off
When set to On, the lamp brightness is
adjusted according to the projected
image. This helps to reduce the power
consumption by lowering the lamp
brightness according to the scene being
projected.
The setting is stored for each Color
Mode.
This item is enabled when:
•Power Consumption is set to High.
•Auto Iris is set to Off.
sImage >Auto Iris
Sleep Mode On
Off
Automatically turns off the projector
after an interval of inactivity (when On).
Sleep Mode Timer 1 to 30 minutes Sets the interval for Sleep Mode.
Lens Cover Timer On
Off
Automatically turns off the projector
after 30 minutes if the lens cover is
closed (when On).
A/V Mute Timer On
Off
Automatically turns off the projector
after 30 minutes if A/V Mute is enabled
(when On).
Standby Mode Communication
On
Communication
Off
Communication On indicates that the
projector can be monitored over a
network when the projector is in standby
mode. Enable this setting to allow the
following operations to occur when the
projector is in standby mode:
• Monitor and control the projector over
a network
Communication On is automatically
selected when A/V Output is set to
Always On.
sExtended >A/V Settings >A/V
Output
Projector Setup Settings — ECO Menu 129
Setting Options Description
ECO Display On
Off
Displays a leaf icon in the bottom left
corner of the projected screen to indicate
the power-saving status when the lamp
brightness changes (when On).
Reset — Resets all adjustment values on the ECO
menu to their default settings, except for
Standby Mode.
a• When the Sleep Mode Timer setting is enabled, the lamp dims for a
short time before the timer limit is reached and the projector turns
off.
• When the Lens Cover Timer or A/V Mute Timer settings are
enabled, the lamp uses less power when the lens cover is closed or
A/V Mute is activated.
gg Related Links
• «Projector Setup Settings — Extended Menu» p.117
• «List of Functions» p.11
Projector Information Display — Info Menu 130
You can display information about the projector and version by viewing the
Info menu. However, you cannot change any settings in the menu.
Information item Description
Projector Info Displays the projector information.
Version Displays the projector’s firmware version.
Temp Warning Info Displays various high temperature warnings.
(Available only for models that support the Schedule
function.)
Power On/Off History Displays the projector’s power on and power off
history. (Available only for models that support the
Schedule function.)
gg Related Links
• «Info Menu — Projector Info Menu» p.130
• «List of Functions» p.11
Info Menu — Projector Info Menu
You can display information about the projector and input sources by viewing
the Projector Info menu in the projector’s Info menu.
aThe available settings depend on the current input source.
The lamp usage timer does not register any hours until you have used
the lamp for at least 10 hours.
Information item Description
Lamp Hours Displays the number of hours (H) the lamp has been
used in each Power Consumption mode; if the
information is displayed in yellow, obtain a genuine
Epson replacement lamp soon.
sECO >Power Consumption
Source Displays the name of the port to which the current
input source is connected.
Input Signal Displays the input signal setting of the current input
source.
Resolution Displays the resolution of the current input source.
Projector Information Display — Info Menu 131
Information item Description
Refresh Rate Displays the refresh rate of the current input source.
Sync Info Displays information that may be needed by a service
technician.
Status Displays information about projector problems that
may be needed by a service technician.
Serial Number Displays the projector’s serial number.
Event ID Displays the Event ID number corresponding to a
network problem; see the list of Event ID codes.
gg Related Links
• «Event ID Code List» p.131
• «List of Functions» p.11
Event ID Code List
If the Event ID option on the Projector Info menu displays a code number,
check this list of Event ID codes for the solution to the projector problem
associated with the code.
If you cannot resolve the problem, contact your network administrator or
Epson for technical support.
Event ID
code
Cause and solution
0432
0435
The network software did not start. Turn the projector off and then
on again.
0433 Cannot display the transferred images. Restart the network software.
0434
0481
0482
0485
Unstable network communication. Check the network
communication status, wait a few moments, and try connecting to
the network again.
0483
04FE
The network software quit unexpectedly. Check the network
communication status, then turn the projector off and then on again.
Event ID
code
Cause and solution
0484 Communication with computer was disconnected. Restart the
network software.
0479
04FF
A projector system error has occurred. Turn the projector off and
then on again.
0891 Cannot find an access point with the same SSID. Set your computer,
access point, and projector to the same SSID.
0892 The WPA/WPA2/WPA3 authentication type does not match. Make
sure the wireless network security settings are correct.
0893 The TKIP/AES encryption type does not match. Make sure the
wireless network security settings are correct.
0894 Communication with an unauthorized access point was
disconnected. Contact your network administrator.
0895 Communication with a connected device was disconnected. Check
your device connection status.
0898 Failed to acquire DHCP. Make sure the DHCP server is operating
correctly. If you are not using DHCP, set the DHCP setting to Off in
the projector’s Network menu.
sNetwork >Network Configuration >Wireless LAN >IP
Settings >DHCP
0899 Other communication errors.
089A The EAP authentication type does not match the network. Check the
wireless LAN security settings and make sure that the security
certificate is installed correctly.
089B EAP server authentication failed. Check the wireless LAN security
settings and make sure that the security certificate is installed
correctly.
089C EAP client authentication failed. Check the wireless LAN security
settings and make sure that the security certificate is installed
correctly.
089D Key exchange failed. Check the wireless LAN security settings and
make sure that the security certificate is installed correctly.

Projector Information Display — Info Menu 132
gg Related Links
• «List of Functions» p.11

Projector Reset Options — Reset Menu 133
You can reset most of the projector settings to their default values using the
Reset menu.
Setting Options Description
Reset Lamp Hours — Reset the projector’s lamp usage timer to
zero when you replace the lamp.
Reset All Config — Resets most of the projector settings to
their default values.
You cannot reset the following settings using the Reset All Config option:
• E-Zoom
• User’s Logo
• Display Background *
• Startup Screen *
• A/V Mute *
• Schedule Settings
• Language
• Date & Time
• Network menu items
• Lamp Hours
• Password
* Only when you set the User’s Logo Protection setting to On in the
Password Protection setting menu.
Copying Menu Settings Between Projectors (Batch Setup) 134
After selecting the projector’s menu settings for one projector, you can use the
following methods to copy the settings to other projectors, as long as they are
the same model.
• by using a USB flash drive
• by connecting a computer and projector using a USB cable
Menu settings such as the following are not copied to the other projector.
•Network menu settings (except for the Notifications menu and the Others
menu)
•Lamp Hours and Status from the Projector Info menu
a• Perform batch setup before adjusting the image settings such as
keystone distortion correction. Since image adjustment values are
also copied to another projector, the adjustments you made before
performing the batch setup are overwritten and the projected screen
you adjusted may change.
• When copying the menu settings from one projector to another,
user’s logo is also copied. Do not register the information that you do
not want to share between multiple projectors as a user’s logo.
• Make sure Batch Setup Range is set to Limited if you do not want to
copy the following settings:
•Password Protection settings
•Network menu settings (except for the Notifications menu and
the Others menu)
sExtended >Operation >Advanced >Batch Setup Range
Caution
Epson takes no responsibility for batch setup failures and associated repair costs
due to power outages, communication errors, or other problems that may cause
such failures.
gg Related Links
• «Transferring Settings From a USB Flash Drive» p.134
• «Transferring Settings From a Computer» p.135
• «List of Functions» p.11
Transferring Settings From a USB Flash Drive
You can copy menu settings from one projector to another of the same model
using a USB flash drive.
a• The USB flash drive must use a FAT format and not incorporate any
security function. Delete any files on the drive before using it for
batch setup or the settings may not be saved correctly.
aDisconnect the power cord from the projector, and check that all of the
projector’s indicators have turned off.
bConnect an empty USB flash drive directly to the projector’s USB-A
port.
cHold down the [Esc] button on the remote control or the control panel
and connect the power cord to the projector.
dWhen all of the projector’s indicators turn on, release the [Esc] button.
The indicators start flashing and the batch setup file is written to the
USB flash drive. When writing is finished, the projector turns off.
Caution
Do not disconnect the power cord or the USB flash drive from the projector
while the file is being written. If the power cord or USB flash drive is
disconnected, the projector may not start correctly.
eRemove the USB flash drive.
aThe file name for the batch setup file is PJCONFDATA.bin. If
you need to change the file name, add text after PJCONFDATA
using only alphanumeric characters. If you change the
PJCONFDATA section of the file name, the projector may not be
able to recognize the file correctly.
Copying Menu Settings Between Projectors (Batch Setup) 135
fDisconnect the power cord from the projector to which you want to
copy settings, and check that all of the projector’s indicators have
turned off.
gConnect the USB flash drive containing the saved batch setup file to the
projector’s USB-A port.
hHold down the [Menu] button on the remote control or the control
panel and connect the power cord to the projector.
iWhen all of the projector’s indicators turn on, release the [Menu]
button.
When all of the indicators start flashing, the settings are being written.
When writing is finished, the projector turns off.
Caution
Do not disconnect the power cord or the USB flash drive from the projector
while the file is being written. If the power cord or USB flash drive is
disconnected, the projector may not start correctly.
jRemove the USB flash drive.
Transferring Settings From a Computer
You can copy menu settings from one projector to another of the same model
by connecting the computer and projector with a USB cable.
aYou can use this batch setup method with the following operating
system versions:
• Windows 7 and later
• OS X 10.11.x and later
aDisconnect the power cord from the projector, and check that all of the
projector’s indicators have turned off.
bConnect a USB cable to the computer’s USB port and to the projector’s
USB-B port.
cHold down the [Esc] button on the remote control or the control panel
and connect the power cord to the projector.
dWhen all of the projector’s indicators turn on, release the [Esc] button.
The computer recognizes the projector as a removable disk.
eOpen the removable disk icon or folder, and save the batch setup file to
the computer.
aThe file name for the batch setup file is PJCONFDATA.bin. If
you need to change the file name, add text after PJCONFDATA
using only alphanumeric characters. If you change the
PJCONFDATA section of the file name, the projector may not be
able to recognize the file correctly.
fEject the USB device (Windows) or drag the removable disk icon to the
Trash (Mac).
gDisconnect the USB cable.
The projector turns off.
hDisconnect the power cord from the projector to which you want to
copy settings, and check that all of the projector’s indicators have
turned off.
iConnect the USB cable to the computer’s USB port and to the
projector’s USB-B port.
jHold down the [Menu] button on the remote control or the control
panel and connect the power cord to the projector.
kWhen all of the projector’s indicators turn on, release the [Menu]
button.
Copying Menu Settings Between Projectors (Batch Setup) 136
The computer recognizes the projector as a removable disk.
lCopy the batch setup file (PJCONFDATA.bin) that you saved to your
computer to the top level folder of the removable disk.
aDo not copy any files or folders other than the batch setup file to
the removable disk.
mEject the USB device (Windows) or drag the removable disk icon to the
Trash (Mac).
nDisconnect the USB cable.
When all of the indicators start flashing, the settings are being written.
When writing is finished, the projector turns off.
Caution
Do not disconnect the power cord from the projector while the file is being
written. If the power cord is disconnected, the projector may not start
correctly.
gg Related Links
• «Batch Setup Error Notification» p.136
Batch Setup Error Notification
The projector’s indicators notify you if an error occurs during a batch setup
operation. Check the status of the projector’s indicators and follow the
instructions described in the table here.
Indicator status Problem and solutions
• Lamp: Orange — flashing
fast
• Temp: Orange — flashing
fast
The batch setup file may be corrupt, or the USB flash
drive or USB cable may not be connected correctly.
Disconnect the USB flash drive or the USB cable,
unplug and then plug in the projector’s power cord, and
then try again.
Indicator status Problem and solutions
• Power: Blue — flashing
fast
• Status: Blue — flashing
fast
• Lamp: Orange — flashing
fast
• Temp: Orange — flashing
fast
Writing the settings may have failed and an error may
have occurred in the projector’s firmware.
Stop using the projector, remove the power plug from
the electrical outlet. Contact Epson for help.
gg Related Links
• «Projector Indicator Status» p.150

Maintaining the Projector
Follow the instructions in these sections to maintain your projector.
gg Related Links
• «Projector Maintenance» p.138
• «Cleaning the Lens» p.139
• «Cleaning the Projector Case» p.140
• «Air Filter and Vent Maintenance» p.141
• «Projector Lamp Maintenance» p.144
Projector Maintenance 138
You may need to clean the projector’s lens periodically, and clean the air filter
and air vents to prevent the projector from overheating due to blocked
ventilation.
The only parts you should replace are the lamp, air filter, and remote control
batteries. If any other part needs replacing, contact Epson or an authorized
Epson servicer.
Warning
Before cleaning any part of the projector, turn it off and unplug the power cord.
Never open any cover on the projector, except as specifically explained in this
manual. Dangerous electrical voltages in the projector can injure you severely.
Cleaning the Lens 139
Clean the projector’s lens periodically, or whenever you notice dust or
smudges on the surface.
• To remove dust or smudges, gently wipe the lens with lens-cleaning paper.
• To remove stubborn smudges, moisten a soft, lint-free cloth with lens
cleaner and gently wipe the lens. Do not spray any liquid directly on the
lens.
Warning
Do not use a lens cleaner that contains flammable gas. The high heat generated
by the projector lamp may cause a fire.
Attention
Do not use glass cleaner or any harsh materials to clean the lens and do not
subject the lens to any impacts; otherwise, it could be damaged. Do not use
canned air, or the gases may leave a flammable residue.

Cleaning the Projector Case 140
Before cleaning the projector case, turn off the projector and unplug the
power cord.
• To remove dust or dirt, use a soft, dry, lint-free cloth.
• To remove stubborn dirt, use a soft cloth moistened with water and mild
soap. Do not spray liquid directly on the projector.
Attention
Do not use wax, alcohol, benzene, paint thinner, or other chemicals to clean the
projector case. These can damage the case. Do not use canned air, or the gases
may leave a flammable residue.
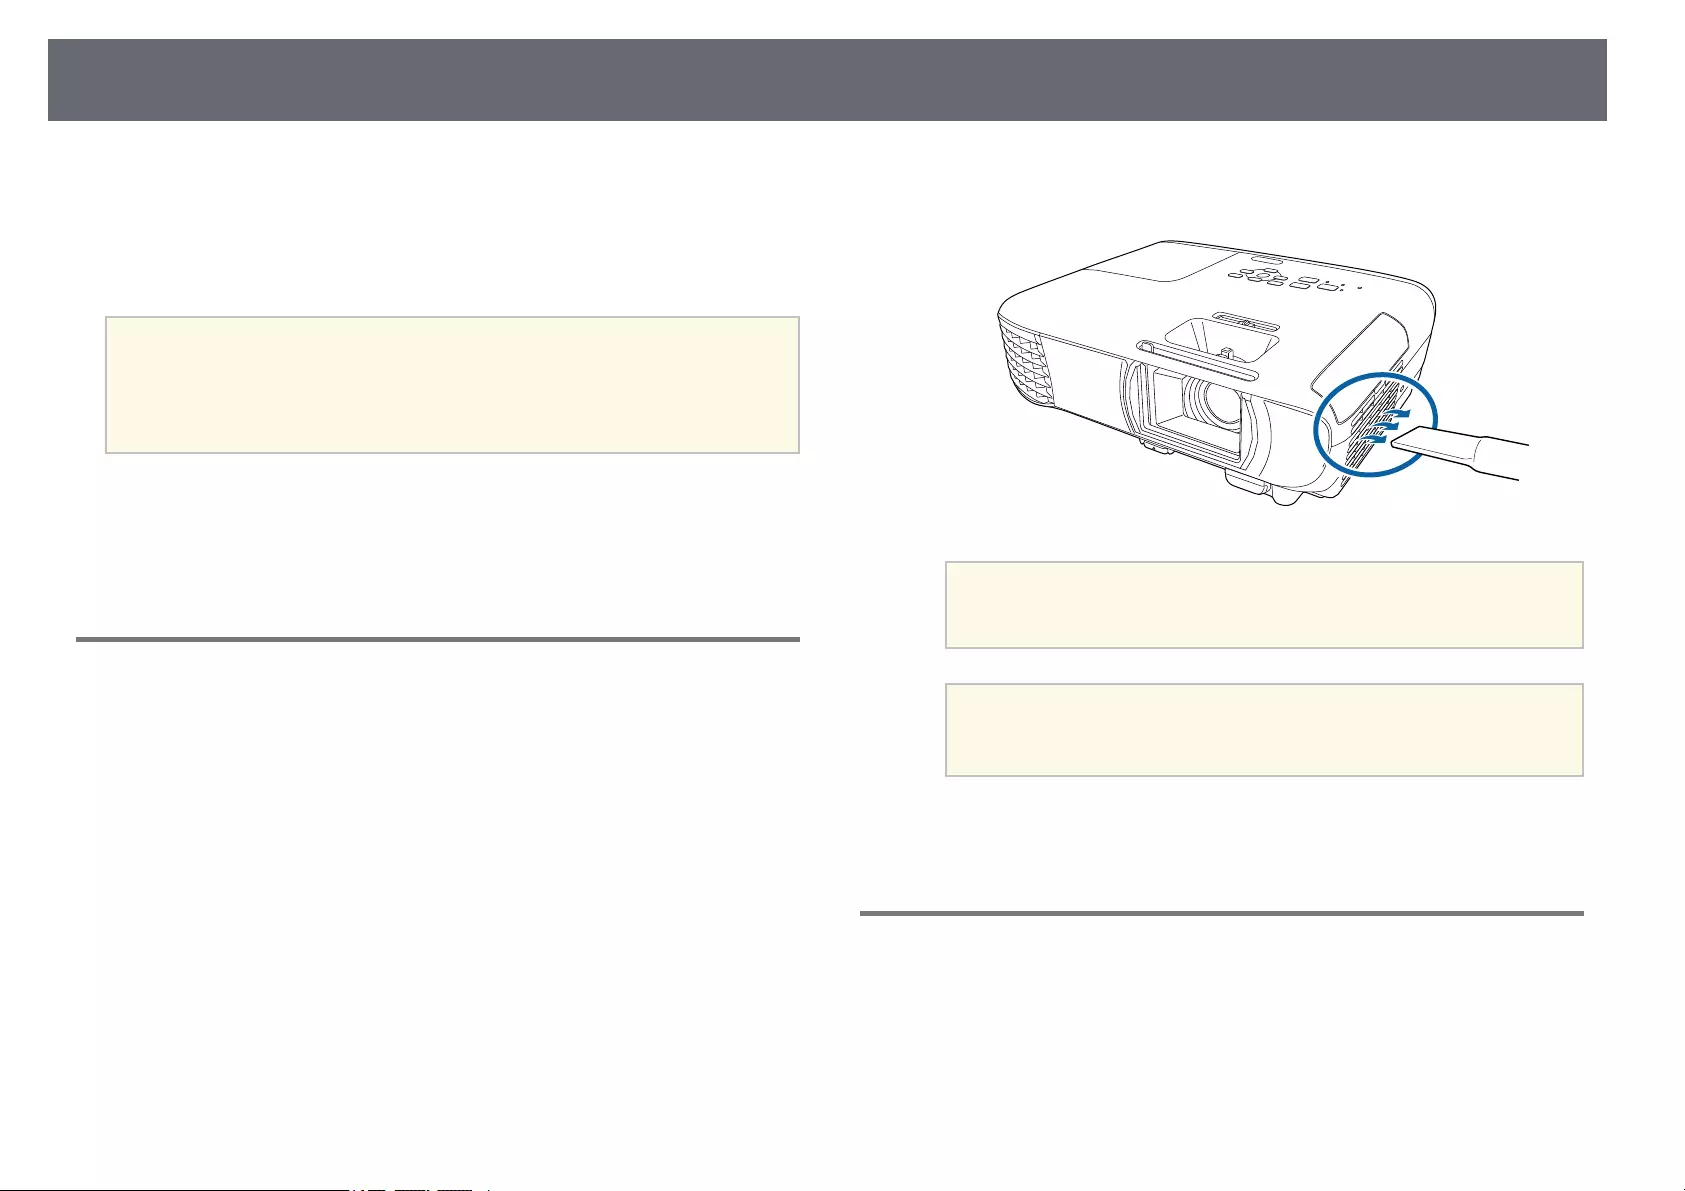
Air Filter and Vent Maintenance 141
Regular filter maintenance is important to maintaining your projector. Clean
the air filter when a message appears telling you the temperature inside the
projector has reached a high level. It is recommended that you clean these
parts over a 6,000‑hour period. Clean them more often than this if you use the
projector in a particularly dusty environment.
Attention
If regular maintenance is not performed, your Epson projector will notify you
when the temperature inside the projector has reached a high level. Do not wait
until this warning appears to maintain your projector filter as prolonged exposure
to high temperatures may reduce the life of your projector or lamp.
gg Related Links
• «Cleaning the Air Filter and Vents» p.141
• «Replacing the Air Filter» p.141
• «List of Functions» p.11
Cleaning the Air Filter and Vents
Clean the projector’s air filter or vents if they get dusty, or if you see a
message telling you to clean them.
aTurn off the projector and unplug the power cord.
bGently remove the dust using a small vacuum designed for computers
or a very soft brush (such as a paintbrush).
aYou can remove the air filter so that you can clean both sides. Do
not rinse the air filter in water, or use any detergent or solvent to
clean it.
Attention
Do not use canned air. The gases may leave a flammable residue or push
dust and debris into the projector’s optics or other sensitive areas.
cIf dust is difficult to remove or the air filter is damaged, replace the air
filter.
Replacing the Air Filter
You need to replace the air filter in the following situations:
• After cleaning the air filter, you see a message telling you to clean or replace
it.
• The air filter is torn or damaged.
You can replace the air filter while the projector is mounted to the ceiling or
placed on a table.
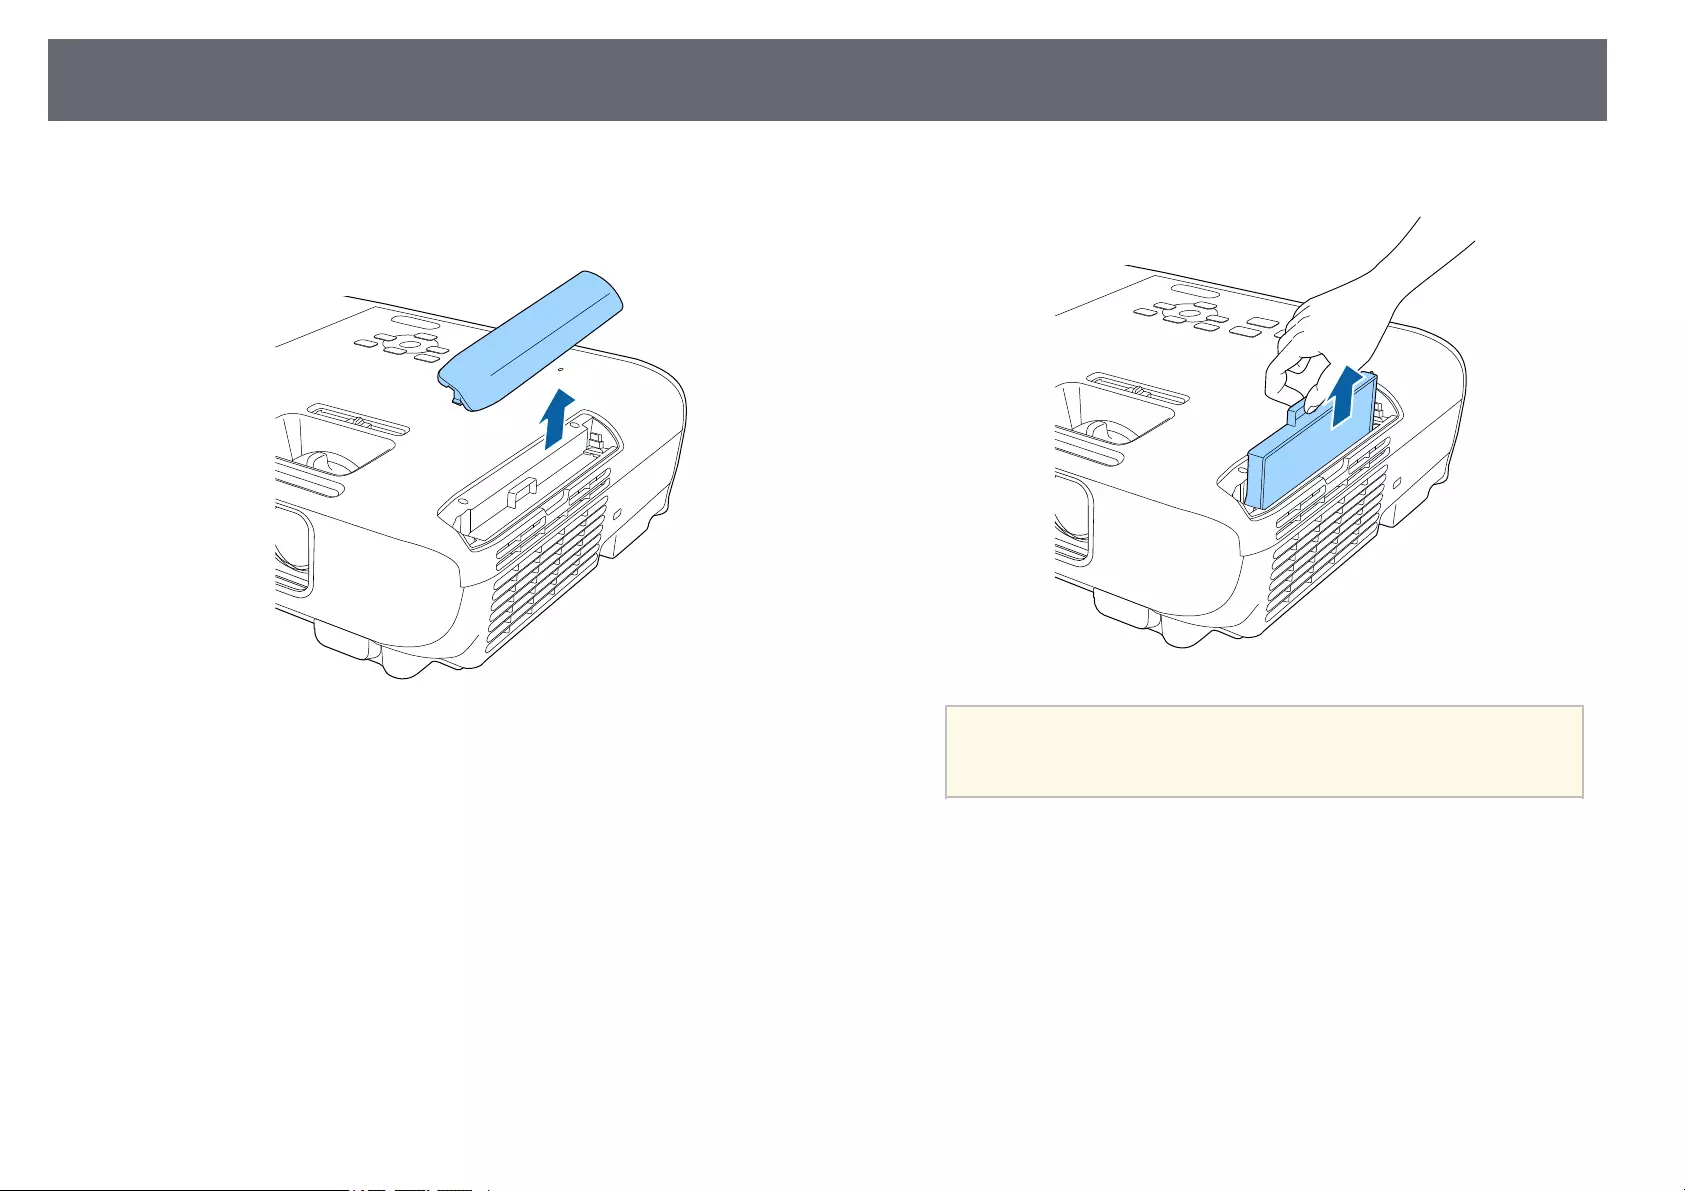
Air Filter and Vent Maintenance 142
aTurn off the projector and unplug the power cord.
bOpen the air filter cover.
cPull the air filter out of the projector.
aDispose of used air filters according to local regulations.
• Filter frame: ABS
• Filter: Polyurethane foam
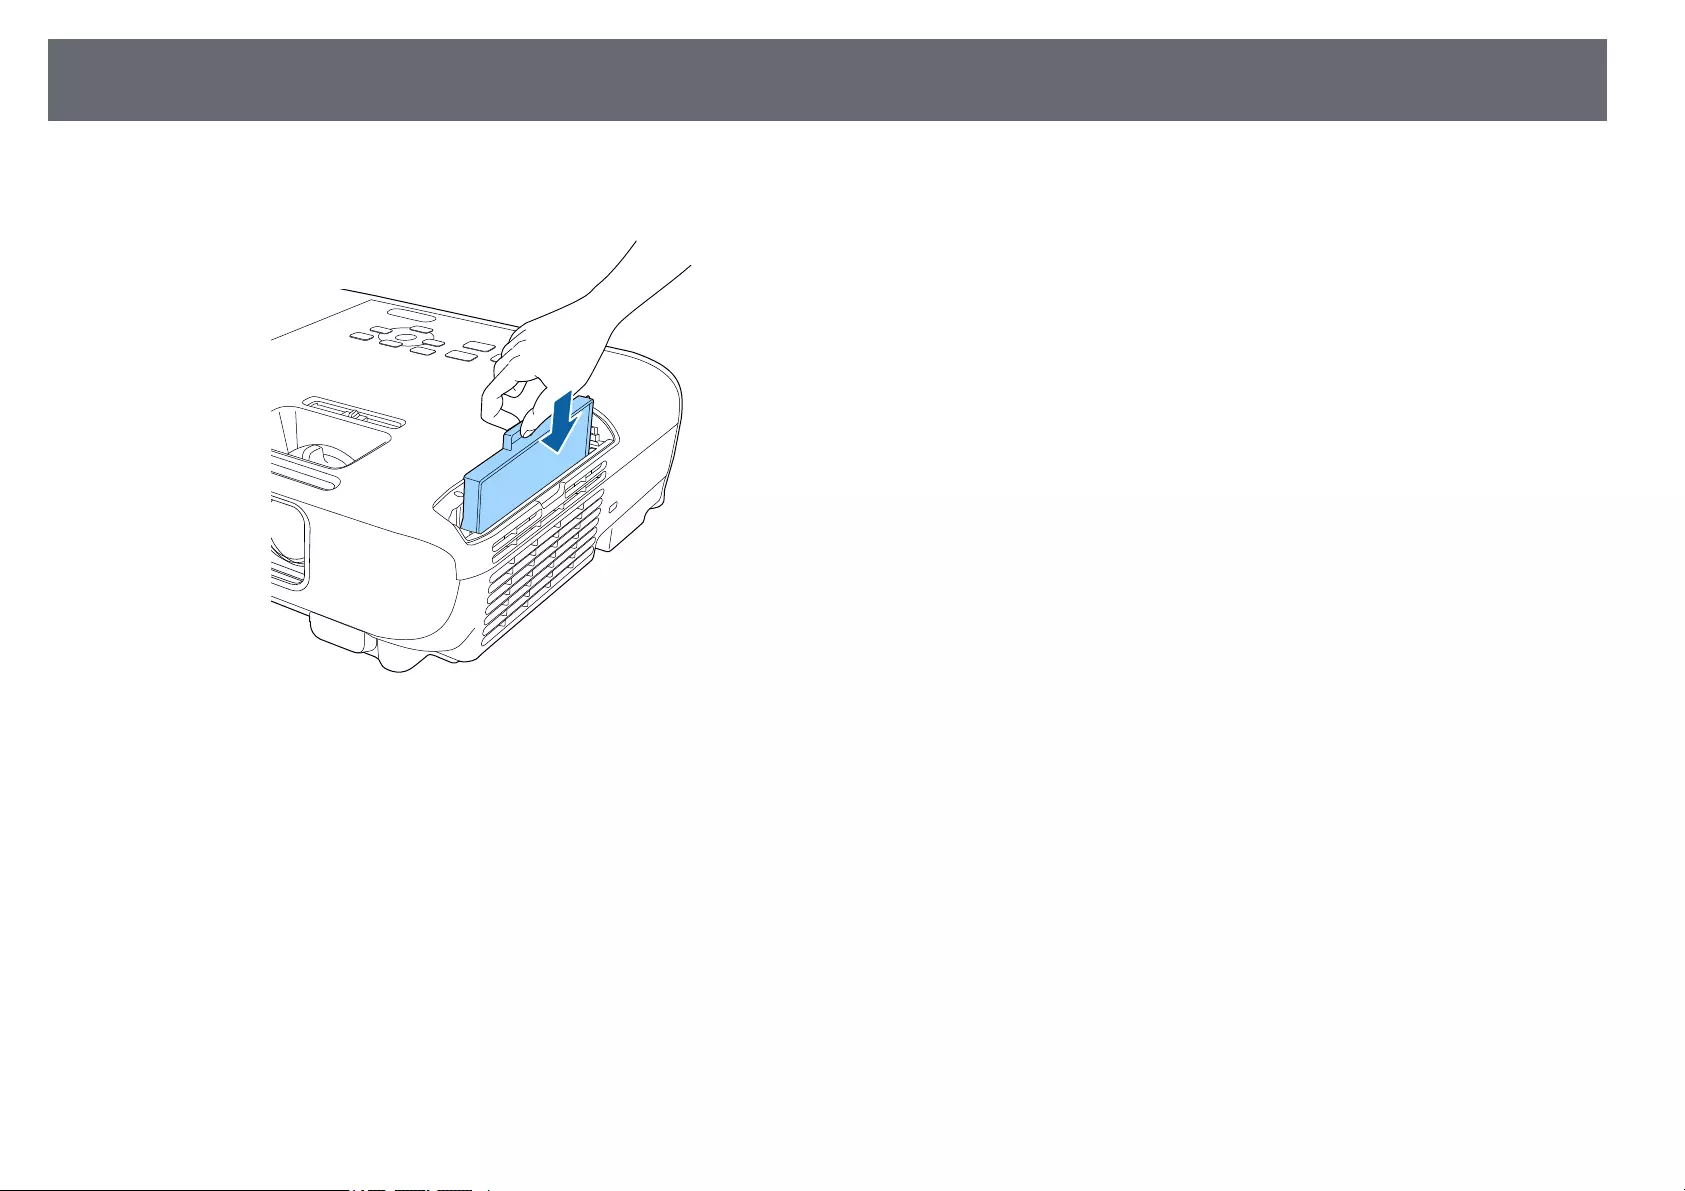
Air Filter and Vent Maintenance 143
dPlace the new air filter in the projector as shown and push gently until
it clicks into place.
eClose the air filter cover.
gg Related Links
• «Replacement Parts» p.165
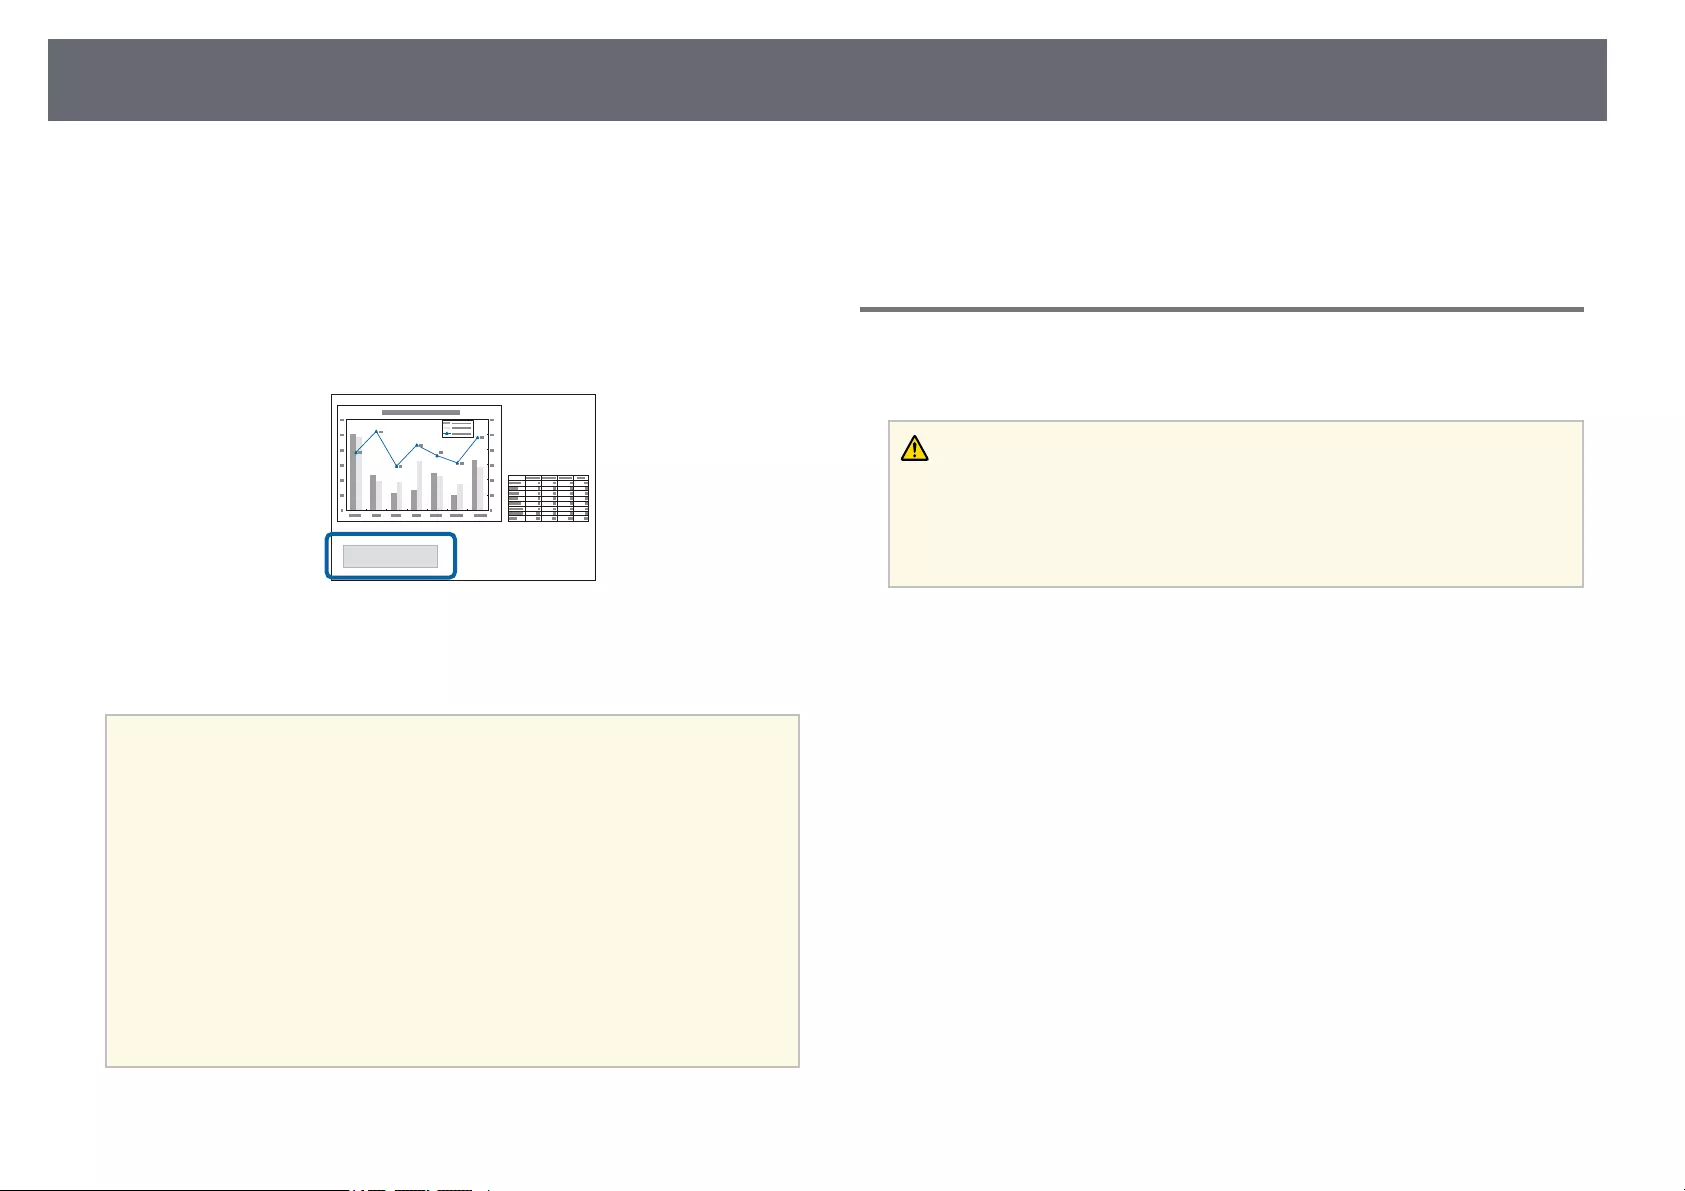
Projector Lamp Maintenance 144
The projector monitors the number of hours the lamp is used and displays
this information in the projector’s menu system.
Replace the lamp as soon as possible when the following occurs:
• The projected image gets darker or quality declines
• A message is displayed when you turn on the projector telling you to replace
the lamp (the message is displayed 100 hours before the expected end of the
lamp life and appears for 30 seconds)
• The projector’s power indicator is flashing blue and its lamp indicator is
flashing orange.
Attention
• If you continue to use the lamp after the replacement period has passed, the
possibility that the lamp may explode increases. When the lamp replacement
message appears, replace the lamp with a new one as soon as possible, even if it
is still working.
• Do not repeatedly turn off the power and then immediately turn it back on.
Turning the power on and off frequently may shorten the lamp’s operating life.
• Depending on the characteristics of the lamp and the way it has been used, the
lamp may become darker or stop working before the lamp warning message
appears. You should always have a spare lamp unit ready in case it is needed.
• We recommend the use of genuine Epson replacement lamps. The use of non-
genuine lamps may affect projection quality and safety. Any damage or
malfunction caused by the use of non-genuine lamps may not be covered by
Epson’s warranty.
gg Related Links
• «Replacing the Lamp» p.144
• «Resetting the Lamp Timer» p.147
• «Projector Specifications» p.169
• «Projector Indicator Status» p.150
Replacing the Lamp
You can replace the lamp while the projector is placed on a table or mounted
to the ceiling.
Warning
• Let the lamp fully cool before replacing it to avoid injury.
• Never disassemble or modify the lamp. If a modified or disassembled lamp is
installed in the projector, it could cause a fire, electric shock, or other damage or
injury.
aTurn off the projector and unplug the power cord.
bAllow the projector lamp to cool down for at least one hour.
cUse the screwdriver included with the replacement lamp to loosen the
screw securing the lamp cover.
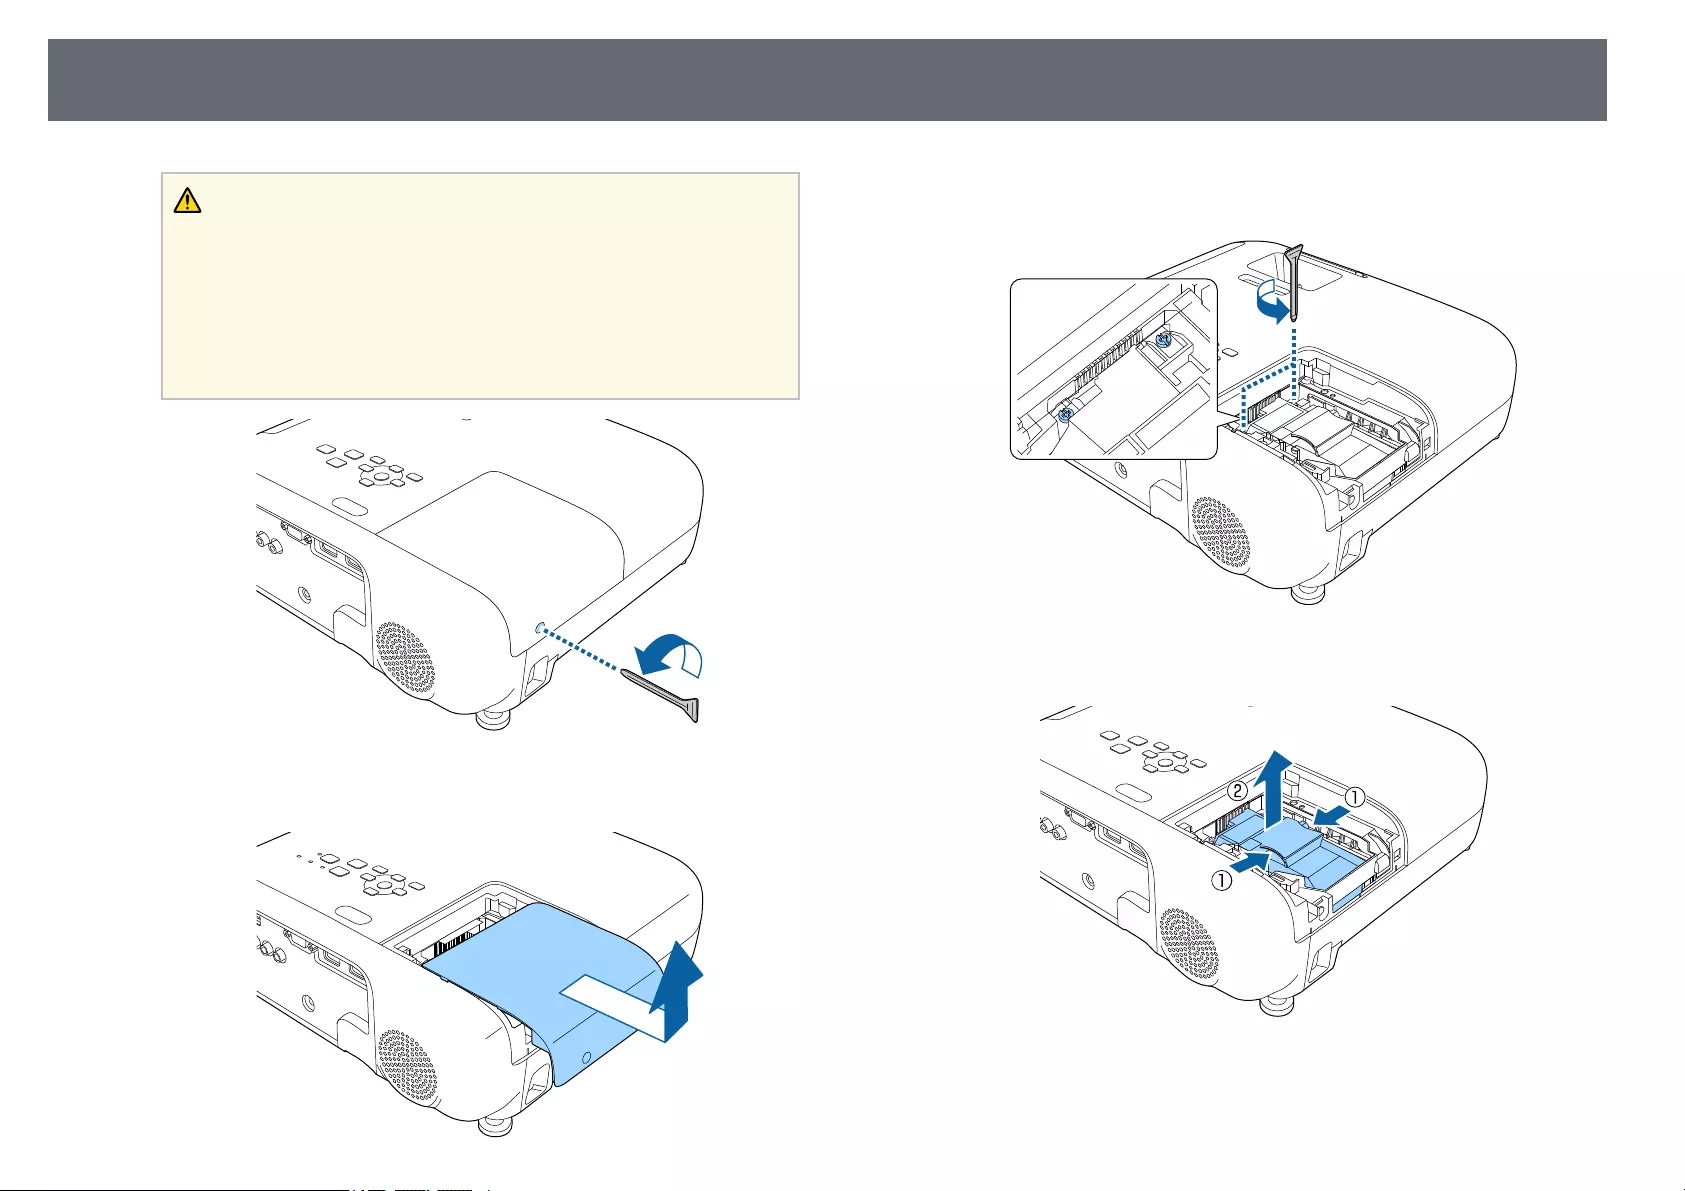
Projector Lamp Maintenance 145
Warning
When replacing the lamp, there is a possibility that the lamp may be
broken. If replacing the lamp of a projector which has been installed on the
ceiling, you should always assume that the lamp is cracked, and you should
stand to the side of the lamp cover, not underneath it. Remove the lamp
cover gently. Be careful when removing the lamp cover as shards of glass
may fall out and could cause an injury. If any shards of glass get into your
eyes or mouth, contact a doctor immediately.
dSlide the lamp cover out and lift it off.
eLoosen the screws securing the lamp to the projector. The screws do
not come all the way out.
fGrip the raised section of the lamp and remove it.

Projector Lamp Maintenance 146
a• If you notice the lamp is cracked when removing the lamp,
contact Epson for help.
• The lamp(s) in this product contain mercury (Hg). Check your
local laws and regulations regarding disposal or recycling. Do
not put in the trash.
gGently insert the new lamp into the projector. If it does not fit easily,
make sure it is facing the right way.
Attention
Do not touch any glass on the lamp assembly to avoid premature lamp
failure.
hPush in the lamp firmly and tighten the screws to secure it.
iReplace the lamp cover and tighten the screw to secure it.
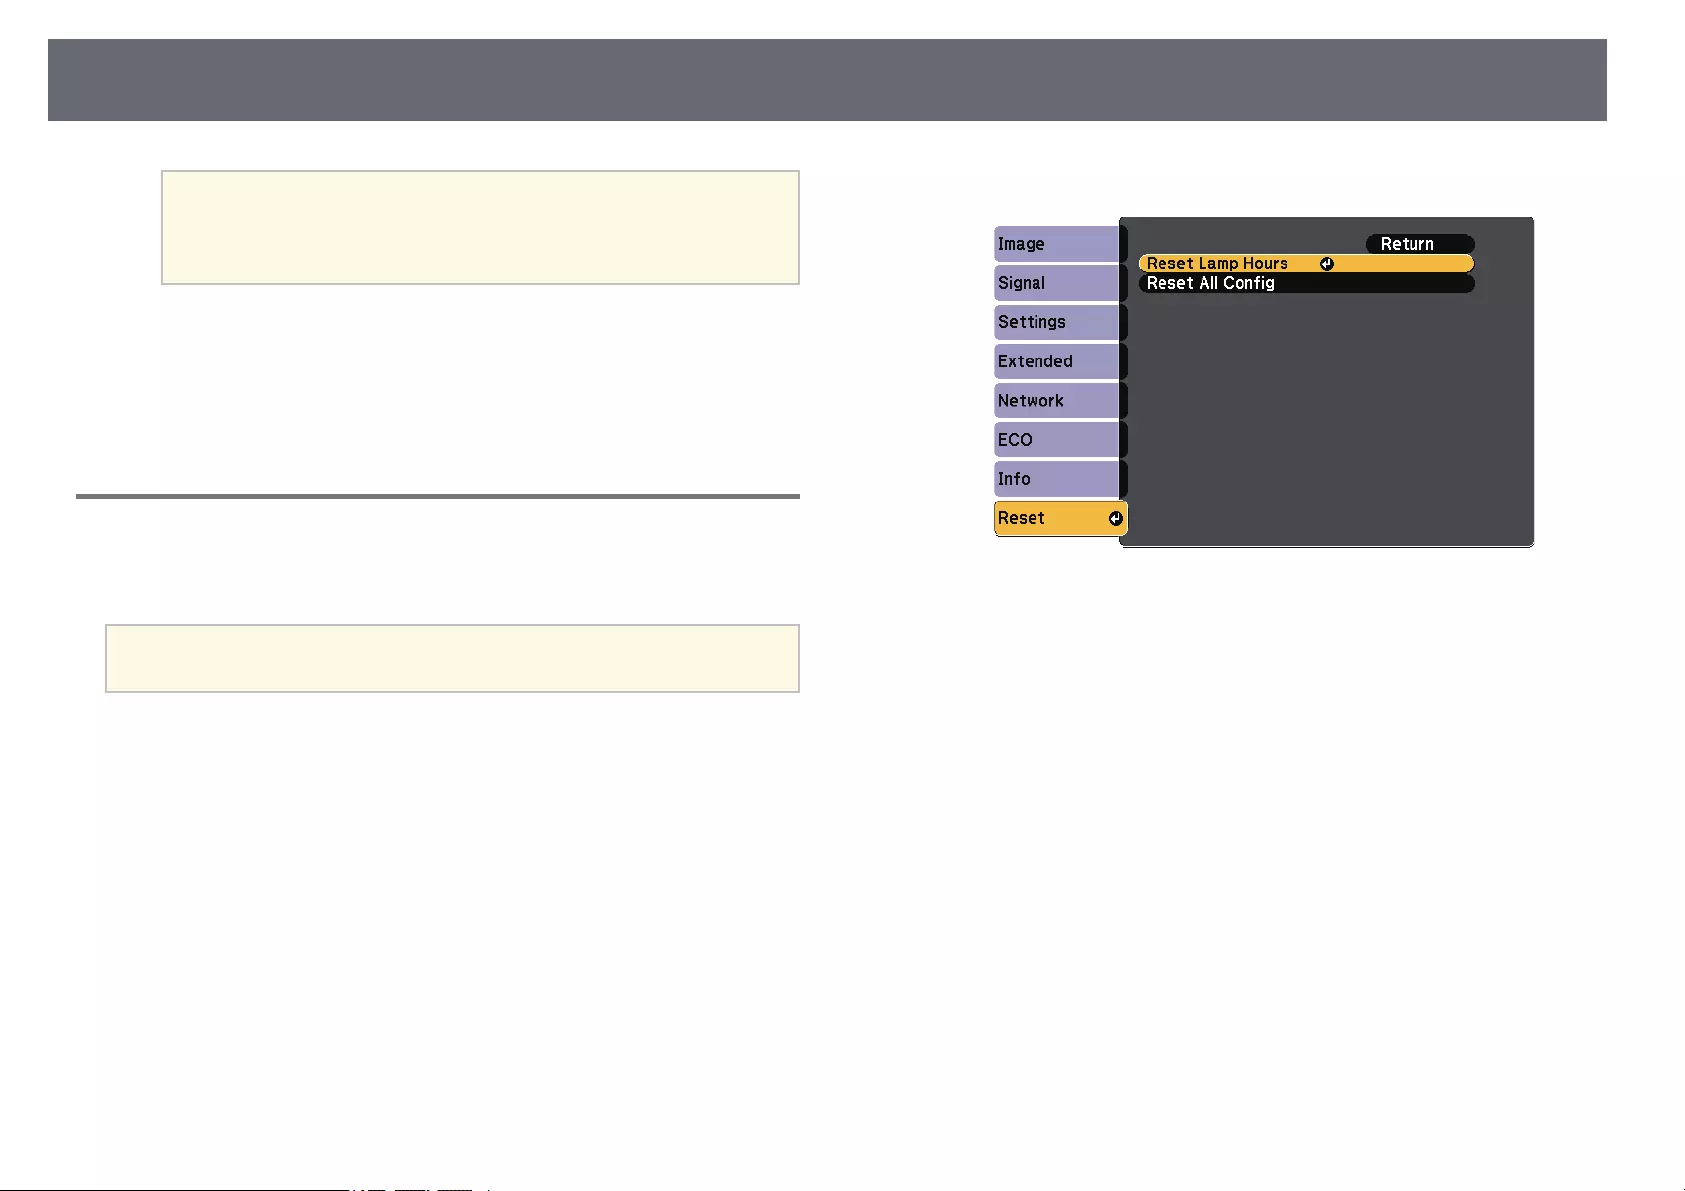
Projector Lamp Maintenance 147
a• Make sure the lamp cover is securely installed or the lamp will
not turn on.
• Do not replace the lamp cover with too much force and make
sure the lamp cover is not deformed.
Reset the lamp timer to zero to monitor the new lamp’s usage.
gg Related Links
• «Replacement Parts» p.165
Resetting the Lamp Timer
You must reset the lamp timer after replacing the projector’s lamp to clear the
lamp replacement message and to monitor lamp usage correctly.
aDo not reset the lamp timer if you have not replaced the lamp to avoid
inaccurate lamp usage information.
aTurn on the projector.
bPress the [Menu] button, select the Reset menu, and press [Enter].
cSelect Reset Lamp Hours and press [Enter].
You see a prompt asking if you want to reset the lamp hours.
dSelect Yes and press [Enter].
ePress [Menu] or [Esc] to exit the menus.

Solving Problems
Check the solutions in these sections if you have any problems using the projector.
gg Related Links
• «Projection Problems» p.149
• «Projector Indicator Status» p.150
• «Using the Projector Help Displays» p.152
• «Solving Image or Sound Problems» p.153
• «Solving Projector or Remote Control Operation Problems» p.158
• «Solving Network Problems» p.160

Projection Problems 149
If the projector is not working properly, turn it off, unplug it, and then plug it
back in and turn it on.
If this does not solve the problem, check the following:
• The indicators on the projector may indicate the problem.
• The projector’s Help system can display information about common
problems.
• The solutions in this manual can help you solve many problems.
If none of these solutions help, contact Epson for technical support.
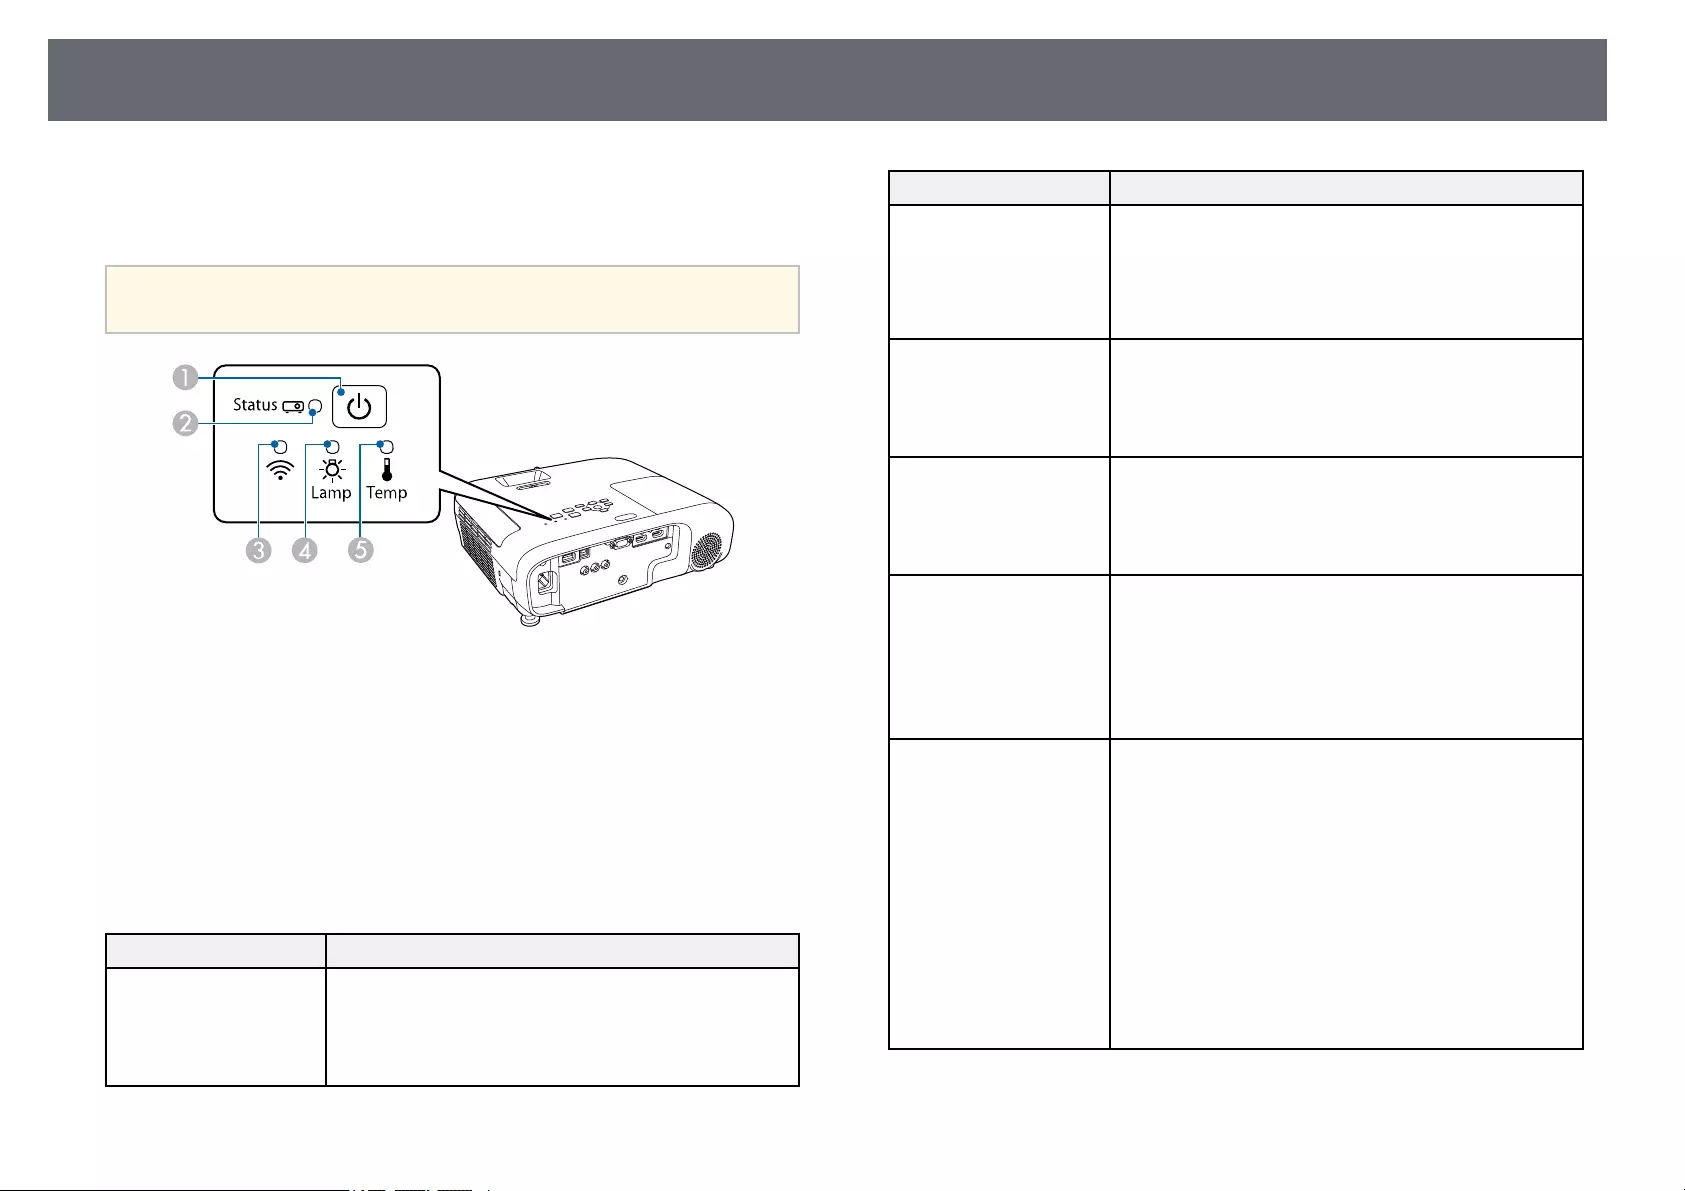
Projector Indicator Status 150
The indicators on the projector indicate the projector status and let you know
when a problem occurs. Check the status and color of the indicators and then
refer to this table for a solution.
a• If the indicators display a pattern not listed in the table below, turn
the projector off, unplug it, and contact Epson for help.
APower indicator
BStatus indicator
CWireless LAN indicator
DLamp indicator
ETemp (temperature) indicator
Projector status
Indicator and status Problem and solutions
Power: Lit blue
Status: Lit blue
Lamp: Off
Temp: Off
Normal operation.
Indicator and status Problem and solutions
Power: Lit blue
Status: Flashing blue
Lamp: Off
Temp: Off
Warming up, shutting down, or cooling down.
When warming up, wait about 30 seconds for an image
to appear.
All buttons are disabled during warm-up, shutting
down, and cooling down.
Power: Lit blue
Status: Off
Lamp: Off
Temp: Off
Standby, sleep mode, or monitoring.
When you press the power button, projection starts.
Power: Flashing blue
Status: Off
Lamp: Off
Temp: Off
Preparing for monitoring and all features are disabled.
Power: Flashing blue
Status: Indicator status
varies
Lamp: Indicator status
varies
Temp: Flashing orange
Projector is too hot.
• Make sure that the vents and air filter are not clogged
with dust or obstructed by nearby objects.
• Clean or replace the air filter.
• Make sure the environmental temperature is not too
hot.
Power: Off
Status: Flashing blue
Lamp: Off
Temp: Lit orange
Projector has overheated and turned off. Leave it turned
off to cool down for 5 minutes.
• Make sure that the vents and air filter are not clogged
with dust or obstructed by nearby objects.
• Make sure the environmental temperature is not too
hot.
• Clean or replace the air filter.
• If operating the projector at high altitude, set the High
Altitude Mode setting to On in the projector’s menu.
sExtended >Operation >High Altitude Mode
• If the problem persists, unplug the projector and
contact Epson for help.
Projector Indicator Status 151
Indicator and status Problem and solutions
Power: Off
Status: Flashing blue
Lamp: Lit orange
Temp: Off
Lamp has a problem.
• Check to see if the lamp is burned out, broken, or
installed incorrectly. Reseat or replace the lamp as
necessary.
• Clean the air filter.
• If operating the projector at high altitude, set the High
Altitude Mode setting to On in the projector’s menu.
sExtended >Operation >High Altitude Mode
• If the problem persists, unplug the projector and
contact Epson for help.
Lamp cover has a problem.
• Check that the lamp and the lamp cover are securely
installed. The lamp does not turn on if the lamp and
the lamp cover are not installed correctly.
Power: Flashing blue
Status: Indicator status
varies
Lamp: Flashing orange
Temp: Indicator status
varies
Replace the lamp soon to avoid damage. Do not
continue using the projector.
Power: Off
Status: Flashing blue
Lamp: Off
Temp: Flashing orange
A fan or sensor has a problem.
Turn the projector off, unplug it, and contact Epson for
help.
Power: Off
Status: Flashing blue
Lamp: Flashing orange
Temp: Off
Internal projector error.
Turn the projector off, unplug it, and contact Epson for
help.
Power: Off
Status: Flashing blue
Lamp: Flashing orange
Temp: Flashing orange
Auto iris error. Turn the projector off, unplug it, and
contact Epson for help.
Indicator and status Problem and solutions
Power: Off
Status: Flashing blue
Lamp: Lit orange
Temp: Lit orange
Power error (Ballast). Turn the projector off, unplug it,
and contact Epson for help.
Wireless LAN status
Wireless LAN indicator
status
Problem and solutions
Lit blue Wireless LAN is available.
Flashing blue (quickly) Connecting to a device.
Flashing blue (slowly) An error has occurred. Turn off the projector and then
on again.
Off Wireless LAN is not available. Make sure the wireless
LAN settings are correct.
gg Related Links
• «List of Functions» p.11
• «Cleaning the Air Filter and Vents» p.141
• «Replacing the Air Filter» p.141
• «Replacing the Lamp» p.144
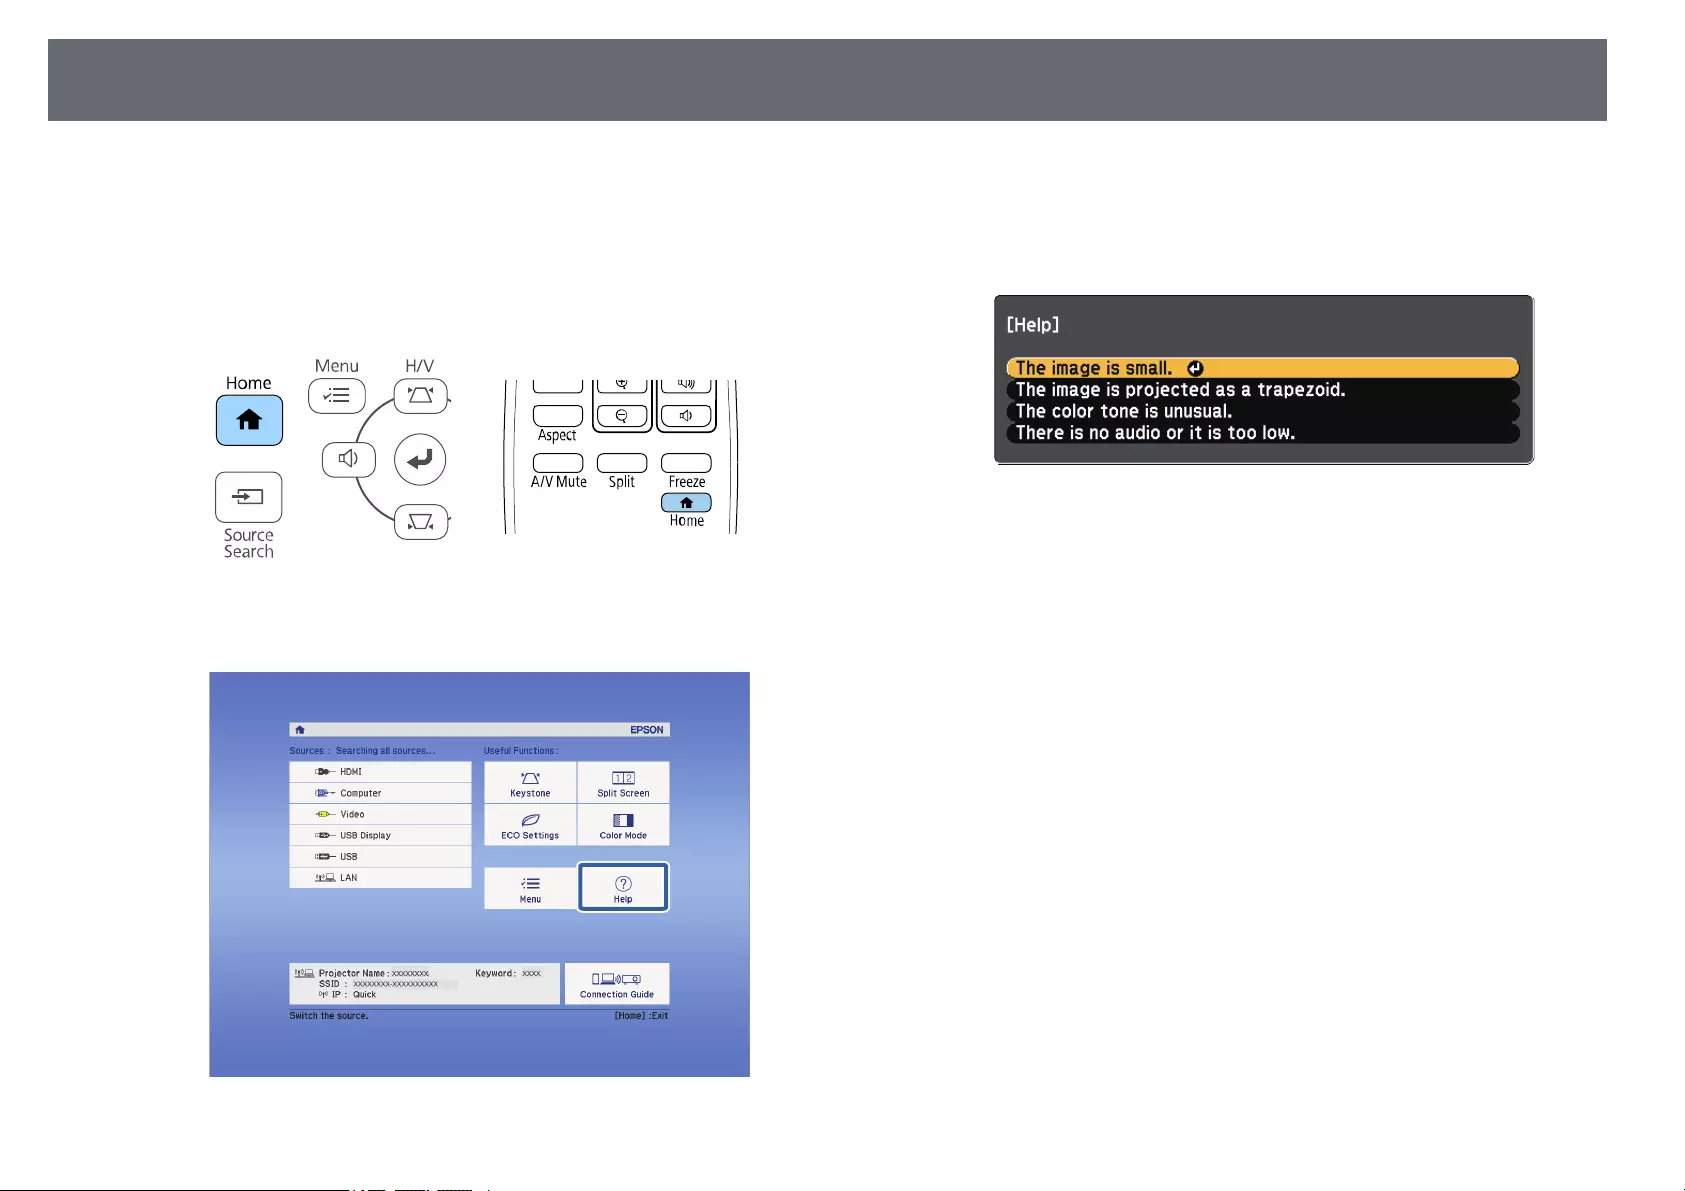
Using the Projector Help Displays 152
You can display information to help you solve common problems using the
projector’s Help system.
aTurn on the projector.
bPress the [Home] button on the control panel or remote control.
cSelect Help on the Home screen.
The Help menu is displayed.
dUse the up and down arrow buttons to highlight the problem you want
to solve.
ePress [Enter] to view the solutions.
fPerform one of the following actions when you are finished.
• To select another problem to solve, press [Esc].
• To exit the help system, press [Menu].

Solving Image or Sound Problems 153
Check the solutions in these sections if you have any problems with projected
images or sound.
gg Related Links
• «Solutions When No Image Appears» p.153
• «Solutions When Image is Incorrect Using the USB Display Function» p.153
• «Solutions When «No Signal» Message Appears» p.154
• «Solutions When «Not Supported« Message Appears» p.154
• «Solutions When Only a Partial Image Appears» p.155
• «Solutions When the Image is not Rectangular» p.155
• «Solutions When the Image Contains Noise or Static» p.155
• «Solutions When the Image is Fuzzy or Blurry» p.156
• «Solutions When the Image Brightness or Colors are Incorrect» p.156
• «Solutions to Sound Problems» p.157
• «Solutions When Image File Names are not Displayed Correctly in PC Free»
p.157
Solutions When No Image Appears
If no image appears, try the following solutions:
• Make sure the lens cover is open all the way.
• Press the [A/V Mute] button on the remote control to see if the image was
temporarily turned off.
• Make sure all necessary cables are securely connected and the power is on
for the projector and connected video sources.
• Press the projector’s power button to wake it from standby or sleep mode.
Also, check if the connected computer is in sleep mode or displaying a
blank screen saver.
• If the projector does not respond when you press the control panel buttons,
the buttons may be locked for security. Unlock the buttons in the Control
Panel Lock setting or use the remote control to turn on the projector.
sSettings >Lock Setting >Control Panel Lock
• Adjust the Brightness setting in the projector’s Image menu.
• Select High as the Power Consumption setting.
sECO >Power Consumption
• Check the Display setting in the projector’s Extended menu to make sure
Messages is set to On.
• The projector may not be able to project copyrighted videos that you play
back on a computer. For more details, see the manual supplied with the
computer.
• For images projected with Windows Media Center, reduce the screen size
from full screen mode.
• For images projected from applications using Windows DirectX, turn off
DirectX functions.
gg Related Links
• «Input Signal Settings — Signal Menu» p.114
• «Image Quality Settings — Image Menu» p.113
• «Projector Setup Settings — ECO Menu» p.128
• «Projector Setup Settings — Extended Menu» p.117
• «Unlocking the Projector’s Buttons» p.78
Solutions When Image is Incorrect Using the USB
Display Function
If no image appears or if the image appears incorrectly using the USB Display
function, try the following solutions:
• Press the [USB] button on the remote control.
• Disconnect the USB cable, and reconnect it.
• Make sure the Epson USB Display software has been installed correctly.
Depending on your OS or computer settings, the software may not have
been installed automatically. Download the latest software from the
following Web site and install it.
epson.sn/
• For Mac, select the USB Display icon in the Dock folder. If the icon does
not appear on the Dock, double-click USB Display in the Applications
folder.

Solving Image or Sound Problems 154
If you select Exit from the USB Display icon menu on the Dock, USB
Display does not start automatically when you connect the USB cable.
• If the mouse cursor flickers, select Make the movement of the mouse
pointer smooth in the Epson USB Display Settings program on your
computer.
• Turn off the Transfer layered window setting in the Epson USB Display
Settings program on your computer.
• For images projected with Windows Media Center, reduce the screen size
from full screen mode.
• For images projected from applications using Windows DirectX, turn off
DirectX functions.
gg Related Links
• «Connecting to a Computer for USB Video and Audio» p.23
Solutions When «No Signal» Message Appears
If the «No Signal» message appears, try the following solutions:
• Press the [Source Search] button and wait a few seconds for an image to
appear.
• Turn on the connected computer or video source, and press play to begin
your presentation, if necessary.
• Check that all cables required for projection are securely connected.
• If you are projecting from a laptop computer, make sure it is set up to
display on an external monitor.
• If necessary, turn off the projector and the connected computer or video
source, and then turn them back on.
• If you are projecting from an HDMI source, replace the HDMI cable with
the shorter one.
gg Related Links
• «Displaying From a Laptop» p.154
• «Displaying From a Mac Laptop» p.154
Displaying From a Laptop
If the message «No Signal» is displayed when projecting from a laptop, you
need to set up the laptop to display on an external monitor.
aHold down the laptop’s Fn key and press the key labeled with a monitor
icon or CRT/LCD. Wait a few seconds for an image to appear.
bTo display on the laptop’s monitor and the projector, try pressing the
same keys again.
cIf the same image is not displayed by the laptop and projector, check
the Windows Display utility to make sure the external monitor port is
enabled and extended desktop mode is disabled.
dIf necessary, check your video card settings and set the multiple display
option to Clone or Mirror.
Displaying From a Mac Laptop
If the message «No Signal» is displayed when projecting from a Mac laptop,
you need to set up the laptop for mirrored display. (See your laptop manual
for details.)
aOpen the System Preferences utility and select Displays.
bSelect the Display or Color LCD option, if necessary.
cClick the Arrange or Arrangement tab.
dSelect Mirror Displays.
Solutions When «Not Supported» Message Appears
If the message «Not supported» is displayed, try the following solutions:

Solving Image or Sound Problems 155
• Make sure the correct input signal is selected in the projector’s Signal menu.
• Make sure the computer’s display resolution does not exceed the projector’s
resolution and frequency limits. If necessary, select a different display
resolution for your computer.
gg Related Links
• «Input Signal Settings — Signal Menu» p.114
• «Supported Monitor Display Resolutions» p.168
Solutions When Only a Partial Image Appears
If only a partial computer image appears, try the following solutions:
• If you are projecting from a computer using a VGA computer cable, press
the [Auto] button on the remote control to optimize the image signal.
• Try adjusting the image position using the Position setting in the
projector’s Signal menu.
• Press the [Aspect] button on the remote control to select a different image
aspect ratio.
• Change the Resolution setting in the projector’s Signal menu according to
the signal for the connected equipment.
• If you zoomed into or out of the image using the [E-Zoom] buttons, press
the [Default] button to return to the original image size.
• Check your computer display settings to disable dual display and set the
resolution within the projector’s limits.
• Check the resolution assigned to your presentation files to see if they are
created for a different resolution.
• Make sure you selected the correct projection mode. You can select this
using the Projection setting in the projector’s Extended menu.
gg Related Links
• «Input Signal Settings — Signal Menu» p.114
• «Projector Setup Settings — Extended Menu» p.117
• «Supported Monitor Display Resolutions» p.168
Solutions When the Image is not Rectangular
If the projected image is not evenly rectangular, try the following solutions:
• Place the projector directly in front of the center of the screen, facing it
squarely, if possible.
• Set Auto V-Keystone to On in the projector’s Settings menu. The projector
automatically corrects the image every time you move the projector.
sSettings >Keystone >H/V-Keystone >Auto V-Keystone
• Set H-Keystone Adjuster to On in the projector’s Settings menu. Then
adjust the horizontal keystone slider until the image is evenly rectangular.
sSettings >Keystone >H/V-Keystone >H-Keystone Adjuster
• Press the keystone buttons on the projector to adjust the image shape.
• Adjust the Quick Corner setting to correct the image shape.
sSettings >Keystone >Quick Corner
gg Related Links
• «Auto V-Keystone» p.44
• «Correcting the Image Shape with the Keystone Buttons» p.45
• «Correcting the Image Shape with Quick Corner» p.46
• «Correcting the Image Shape with the Horizontal Keystone Slider» p.44
Solutions When the Image Contains Noise or Static
If the projected image contains electronic interference (noise) or static, try the
following solutions:
• Check the cables connecting your computer or video source to the
projector. They should be:
• Separated from the power cord to prevent interference
• Securely connected at both ends
• Not connected to an extension cable
• Check the settings in the projector’s Signal menu to make sure they match
the video source.

Solving Image or Sound Problems 156
• If available for your video source, adjust the Deinterlacing and Noise
Reduction settings in the projector’s Image menu.
sImage >Image Enhancement >Noise Reduction
sImage >Image Enhancement >Deinterlacing
• Select Auto as the Resolution setting in the projector’s Signal menu.
• Select a computer video resolution and refresh rate that are compatible with
the projector.
• If you are projecting from a computer using a VGA computer cable, press
the [Auto] button on the remote control to automatically adjust the
Tracking and Sync. settings. If the images are not adjusted correctly,
manually adjust the Tracking and Sync. settings in the projector’s Signal
menu.
• If you adjusted the image shape using the projector controls, try decreasing
the Sharpness setting in the projector’s Image menu to improve image
quality.
• If you connected an extension power cable, try projecting without it to see if
it caused interference in the signal.
• If you are using the USB Display function, turn off the Transfer layered
window setting in the Epson USB Display Settings program on your
computer.
gg Related Links
• «Input Signal Settings — Signal Menu» p.114
• «Image Quality Settings — Image Menu» p.113
• «Supported Monitor Display Resolutions» p.168
Solutions When the Image is Fuzzy or Blurry
If the projected image is fuzzy or blurry, try the following solutions:
• Adjust the image focus.
• Position the projector close enough to the screen.
• Position the projector so the keystone adjustment angle is not so wide that it
distorts the image.
• Clean the projector lens.
aTo avoid condensation on the lens after bringing the projector in
from a cold environment, let the projector warm up to room
temperature before using it.
• Adjust the Sharpness setting in the projector’s Image menu to improve
image quality.
• If you are projecting from a computer using a VGA computer cable, press
the [Auto] button on the remote control to automatically adjust the
Tracking and Sync. settings. If any bands or overall blurriness remain,
display a uniformly patterned image on the screen and manually adjust the
Tracking and Sync. settings in the projector’s Signal menu.
• If you are projecting from a computer, use a lower resolution or select a
resolution that matches the projector’s native resolution.
gg Related Links
• «Auto V-Keystone» p.44
• «Input Signal Settings — Signal Menu» p.114
• «Image Quality Settings — Image Menu» p.113
• «Supported Monitor Display Resolutions» p.168
• «Focusing the Image Using the Focus Ring» p.49
• «Cleaning the Lens» p.139
Solutions When the Image Brightness or Colors are
Incorrect
If the projected image is too dark or light, or the colors are incorrect, try the
following solutions:
• Press the [Color Mode] button on the remote control to try different color
modes for the image and environment.
• Check your video source settings.
• Adjust the available settings in the projector’s Image menu for the current
input source, such as Brightness,Contrast,Tint, and Color Saturation.
• Make sure you selected the correct Video Signal or Video Range setting in
the projector’s Signal menu, if available for your image source.

Solving Image or Sound Problems 157
sSignal >Advanced >Video Signal
sSignal >Advanced >Video Range
• Make sure all the cables are securely connected to the projector and your
video device. If you connected long cables, try connecting shorter cables.
• If you are using ECO as Power Consumption, try selecting High.
sECO >Power Consumption
aAt high altitudes or locations subject to high temperatures, the image
may become darker and you may not be able to adjust the Power
Consumption setting.
• Position the projector close enough to the screen.
• If the image has been progressively darkening, you may need to replace the
projector lamp soon.
gg Related Links
• «Adjusting Image Quality (Color Mode)» p.54
• «Input Signal Settings — Signal Menu» p.114
• «Image Quality Settings — Image Menu» p.113
• «Projector Setup Settings — ECO Menu» p.128
Solutions to Sound Problems
If there is no sound or the volume is too low or high, try the following
solutions:
• Adjust the projector’s volume settings.
• Press the [A/V Mute] button on the remote control to resume video and
audio if they were temporarily stopped.
• Check your computer or video source to make sure the volume is turned up
and the audio output is set for the correct source.
• Check the audio cable connections between the projector and your video
source.
• Make sure any connected audio cables are labeled «No Resistance».
• If you are using the USB Display function, turn on the Output audio from
the projector setting in the Epson USB Display Settings program on your
computer.
• Select the correct audio input in the A/V Settings setting in the projector’s
Extended menu.
• If you want to use a connected audio source when the projector is off, set
the Standby Mode option to Communication On and make sure the A/V
Settings options are set correctly in the projector’s Extended menu.
sECO >Standby Mode
• If you do not hear sound from an HDMI source, set the connected device to
PCM output.
• When you are connecting the projector to a Mac using an HDMI cable,
make sure your Mac supports audio through the HDMI port. If not, you
need to connect an audio cable.
• If the volume for the computer is set to the minimum while the projector is
set to the maximum, the noise may be mixed. Turn up the computer’s
volume and turn down the projector’s volume. (When you use Epson
iProjection (Windows/Mac) or USB Display.)
gg Related Links
• «Projector Connections» p.22
• «Projector Feature Settings — Settings Menu» p.115
• «Projector Setup Settings — Extended Menu» p.117
• «Projector Setup Settings — ECO Menu» p.128
• «Controlling the Volume with the Volume Buttons» p.56
Solutions When Image File Names are not Displayed
Correctly in PC Free
If any file names are longer than the display area or include unsupported
symbols, the file names are shortened or changed in PC Free. Shorten or
change the file name.

Solving Projector or Remote Control Operation Problems 158
Check the solutions in these sections if you have problems operating the
projector or remote control.
gg Related Links
• «Solutions to Projector Power or Shut-Off Problems» p.158
• «Solutions to Problems with the Remote Control» p.158
• «Solutions to Password Problems» p.159
• «Solution When «The Battery that Saves Your Clock Settings is Running
Low» Message Appears» p.159
Solutions to Projector Power or Shut-Off Problems
If the projector does not turn on when you press the power button or it turns
off unexpectedly, try the following solutions:
• Make sure the power cord is securely connected to the projector and to a
working electrical outlet.
• If the power button on the remote control does not turn on the projector,
check its batteries and make sure at least one of the remote receivers are
available in the Remote Receiver setting in the projector’s Settings menu.
• The projector’s buttons may be locked for security. Unlock the buttons in
the Control Panel Lock setting or use the remote control to turn on the
projector.
sSettings >Lock Setting >Control Panel Lock
• If the projector’s lamp turns off unexpectedly, it may have entered sleep
mode after a period of inactivity. Perform any operation to wake the
projector. To turn off sleep mode, select Off as the Sleep Mode setting in
the projector’s ECO menu.
• If the projector’s lamp turns off unexpectedly, the A/V mute timer may be
enabled. To turn off the A/V mute timer, select Off as the A/V Mute Timer
setting in the projector’s ECO menu.
• If the projector’s lamp turns off unexpectedly, the lens cover timer may be
enabled. To turn off the lens cover timer, select Off as the Lens Cover
Timer setting in the projector’s ECO menu.
• If the projector’s lamp turns off, the status indicator is flashing, and the
temp (temperature) indicator is lit, the projector has overheated and turned
off.
• The cooling fans may run in standby status depending on the projector
settings. Also, when the projector wakes from standby status, the fans may
cause an unexpected noise. This is not a malfunction.
• The power cord may be defective. Disconnect the cord and contact Epson
for help.
gg Related Links
• «Projector Setup Settings — ECO Menu» p.128
• «Projector Indicator Status» p.150
• «Projector Feature Settings — Settings Menu» p.115
• «Unlocking the Projector’s Buttons» p.78
Solutions to Problems with the Remote Control
If the projector does not respond to remote control commands, try the
following solutions:
• Check that the remote control batteries are installed correctly and have
power. If necessary, replace the batteries.
• Make sure you are operating the remote control within the reception angle
and range of the projector.
• Make sure the projector is not warming up or shutting down.
• Check to see if a button on the remote control is stuck down, causing it to
enter sleep mode. Release the button to wake the remote control up.
• Strong fluorescent lighting, direct sunlight, or infrared device signals may be
interfering with the projector’s remote receivers. Dim the lights or move the
projector away from the sun or interfering equipment.
• Make sure at least one of the remote receivers are available in the Remote
Receiver setting in the projector’s Settings menu.
• If the Remote Receiver setting is disabled, hold down the [Menu] button on
the remote control for at least 15 seconds to reset the setting to its default.

Solving Projector or Remote Control Operation Problems 159
• If you assigned an ID number to the projector to operate multiple projectors
from the remote control, you may need to check or change the ID setting.
• Press the 0 (zero) button on the remote control while holding down the
[ID] button. By selecting 0 on the remote control, you can operate all of the
projectors regardless of the projector ID settings.
• If you lose the remote control, you can order another one from Epson.
gg Related Links
• «Remote Control Operation» p.30
• «Projector Feature Settings — Settings Menu» p.115
• «Selecting the Projector You want to Operate» p.72
• «Installing Batteries in the Remote Control» p.29
Solutions to Password Problems
If you cannot enter or remember a password, try the following solutions:
• You may have turned on password protection without first setting a
password. Try entering 0000 using the remote control.
• If you have entered an incorrect password too many times and see a
message displaying a request code, write down the code and contact Epson
for help. Provide the request code and proof of ownership for assistance in
unlocking the projector.
• If you set a Epson Web Control password and forgot the user ID or
password, try entering the following:
• User ID: EPSONWEB
• Default password: admin
• If you set a Remote password (in Epson Web Control) and forgot the user
ID or password, try entering the following:
• User ID: EPSONREMOTE
• Default password: guest
• If you lose the remote control you cannot enter a password. Order a new
one from Epson.
Solution When «The Battery that Saves Your Clock
Settings is Running Low» Message Appears
If the message «The battery that saves your clock settings is running low.» is
displayed, contact Epson for help.

Solving Network Problems 160
Check the solutions in these sections if you have problems using the projector
on a network.
gg Related Links
• «Solutions When Wireless Authentication Fails» p.160
• «Solutions When You Cannot Access the Projector Through the Web» p.160
• «Solutions When Network Alert E-Mails are not Received» p.160
• «Solutions When the Image Contains Static During Network Projection»
p.161
• «Solutions When You Cannot Connect Using Screen Mirroring» p.161
• «Solutions When the Image or Sound Contains Static During Screen
Mirroring Connection» p.161
Solutions When Wireless Authentication Fails
If you are having trouble with the authentication, try the following solutions:
• If the wireless settings are correct, but authentication fails, you may need to
update the Date & Time settings.
sExtended >Operation >Date & Time
• Check the Security settings in the projector’s Network menu.
sNetwork >Network Configuration >Wireless LAN
• If the access point security is WPA3-EAP, change the access point setting to
WPA2/WPA3-EAP.
gg Related Links
• «Projector Setup Settings — Extended Menu» p.117
• «Network Menu — Wireless LAN Menu» p.123
Solutions When You Cannot Access the Projector
Through the Web
If you are unable to access the projector through a Web browser, make sure
you are using the correct ID and password.
• For the user ID, enter EPSONWEB. (You cannot change the user ID.)
• For the password, enter the password set in the projector’s Network menu.
The default password is admin.
• Make sure you have access to the network the projector is on.
• If your Web browser is set up to connect via a proxy server, the Epson Web
Control screen cannot be displayed. Make settings for a connection without
using a proxy server.
• If you set Standby Mode to Communication On in the projector’s menu in
standby mode, make sure the network device is turned on. After turning on
the network device, turn on the projector.
sECO >Standby Mode
aThe user ID and password are case sensitive.
gg Related Links
• «Network Menu — Basic Menu» p.122
Solutions When Network Alert E-Mails are not
Received
If you do not receive an e-mail alerting you to problems with a projector over
the network, try the following solutions:
• Make sure the projector is turned on and connected to the network
correctly. (If an error shuts down the projector, the email may not be
delivered.)
• Make sure you set up the projector e-mail alert settings correctly in the
projector’s network Notifications menu or in the network software.
• Set the Standby Mode setting to Communication On so that the network
software can monitor the projector in standby mode.
sECO >Standby Mode
gg Related Links
• «Network Menu — Notifications Menu» p.125
• «Projector Setup Settings — ECO Menu» p.128

Solving Network Problems 161
Solutions When the Image Contains Static During
Network Projection
If the projected image contains static during network projection, try the
following solutions:
• Check for any obstacles between the access point, the computer, the mobile
device, and the projector, and change their positions to improve
communication.
• Make sure that the access point, the computer, the mobile device and the
projector are not too far apart. Move them closer together and try to
connect again.
• Check for interference from other equipment, such as a Bluetooth device or
microwave. Move the interfering device farther away or expand your
wireless bandwidth.
• Reduce the number of connected devices if the connection speed declines.
Solutions When You Cannot Connect Using Screen
Mirroring
If you are unable to connect to the projector using Screen Mirroring, try the
following solutions:
• Check the projector’s settings.
• Select On as the Screen Mirroring setting in the projector’s Network
menu.
• Change the Display Name so that it does not include «-« in the projector’s
Screen Mirroring Settings setting menu or it may not be displayed
correctly on your mobile device.
sNetwork >Screen Mirroring Settings >Display Name
• Select Off as the Screen Mirroring setting in the projector’s Network
menu, and select On again.
• Change the Operation Mode setting and connect again.
sNetwork >Screen Mirroring Settings >Operation Mode
• Make sure that the no other devices are connected to the projector with
No Interruptions settings.
sNetwork >Screen Mirroring Settings >Extended >Meeting Mode
• Change the Channel setting according to the wireless LAN environment.
sNetwork >Screen Mirroring Settings >Extended >Channel
• Check the mobile device’s settings.
• Make sure the settings on the mobile device are correct.
• When connecting again immediately after disconnecting, it may take
some time until the connection is established. Reconnect after waiting for
a while.
• Restart the mobile device.
• Once you have connected using Screen Mirroring, the projector
connection information may be recorded on the mobile device. However,
you may not be able to reconnect to the projector from the recorded
information. Select the projector from the list of available devices.
gg Related Links
• «Projector Network Settings — Network Menu» p.120
• «Network Menu — Screen Mirroring Settings» p.121
Solutions When the Image or Sound Contains Static
During Screen Mirroring Connection
If the projected image or sound contains static when connecting using Screen
Mirroring, try the following solutions:
• Avoid covering the Wi-Fi antenna of the mobile device.
• If you use a Screen Mirroring connection and an internet connection at the
same time, the image may stop or contain noise. Disconnect the internet
connection to expand your wireless bandwidth and improve the connection
speed of the mobile device.
• Make sure the projection contents meet the Screen Mirroring requirements.
• Depending on the settings of the mobile device, the connection may be lost
when the device enters power saving mode. Check the electrical power
saving settings on the mobile device.

Solving Network Problems 162
• Update to the latest version of the wireless driver or firmware on the mobile
device.
gg Related Links
• «Wireless Network Projection from a Mobile Device (Screen Mirroring)»
p.90

Appendix
Check these sections for the technical specifications and important notices about your projector.
gg Related Links
• «Optional Accessories and Replacement Parts» p.164
• «Screen Size and Projection Distance» p.166
• «Supported Monitor Display Resolutions» p.168
• «Projector Specifications» p.169
• «External Dimensions» p.171
• «USB Display System Requirements» p.172
• «List of Safety Symbols and Instructions» p.173
• «Glossary» p.175
• «Notices» p.177

Optional Accessories and Replacement Parts 164
The following optional accessories and replacement parts are available. Please
purchase these products as and when needed.
The following list of optional accessories and replacement parts is current as
of: March 2020.
Details of accessories are subject to change without notice and availability
may vary depending on the country of purchase.
gg Related Links
• «Screens» p.164
• «Cables» p.164
• «Mounts» p.164
• «For Wireless Connection» p.164
• «External Devices» p.165
• «Replacement Parts» p.165
Screens
80″ portable screen ELPSC24
Portable roll-type screens. (aspect ratio 16:10)
50″ portable screen ELPSC32
A compact screen that can be carried easily. (aspect ratio 4:3)
80″ Mobile X-Type Screen ELPSC21
Portable X-type screens. (aspect ratio 16:9)
Multi Aspect Screen ELPSC26
Portable multi-aspect screen.
Cables
Computer cable ELPKC02 (1.8 m — for mini D-sub 15-pin/mini D-Sub
15pin)
Computer cable ELPKC09 (3 m — for mini D-sub 15-pin/mini D-Sub
15pin)
Computer cable ELPKC10 (20 m — for mini D-sub 15-pin/mini D-Sub
15pin)
Use when connecting to the Computer port.
Mounts
Ceiling mount ELPMB23
Use when installing the projector on a ceiling.
Safety Wire Set ELPWR01
Use when connecting the projector to the installation mount to prevent the
projector from falling down.
Ceiling pipe (450 mm) ELPFP13
Ceiling pipe (700 mm) ELPFP14
Use when installing the projector on a high ceiling.
aSpecial expertise is required to suspend the projector from a ceiling.
Contact Epson for help.
For Wireless Connection
Wireless LAN module ELPAP11 (EH‑‑TW740)
Use this to project images from a computer via a wireless communication.

Optional Accessories and Replacement Parts 165
External Devices
Document Camera ELPDC21/ELPDC13/ELPDC07
Use when projecting image such as books, OHP documents, or slides.
Soft carrying case ELPKS69
Use this to carry the projector by hand.
Replacement Parts
Lamp unit ELPLP97
Use as a replacement for used lamps.
Air filter ELPAF32
Use as a replacement for used air filters.
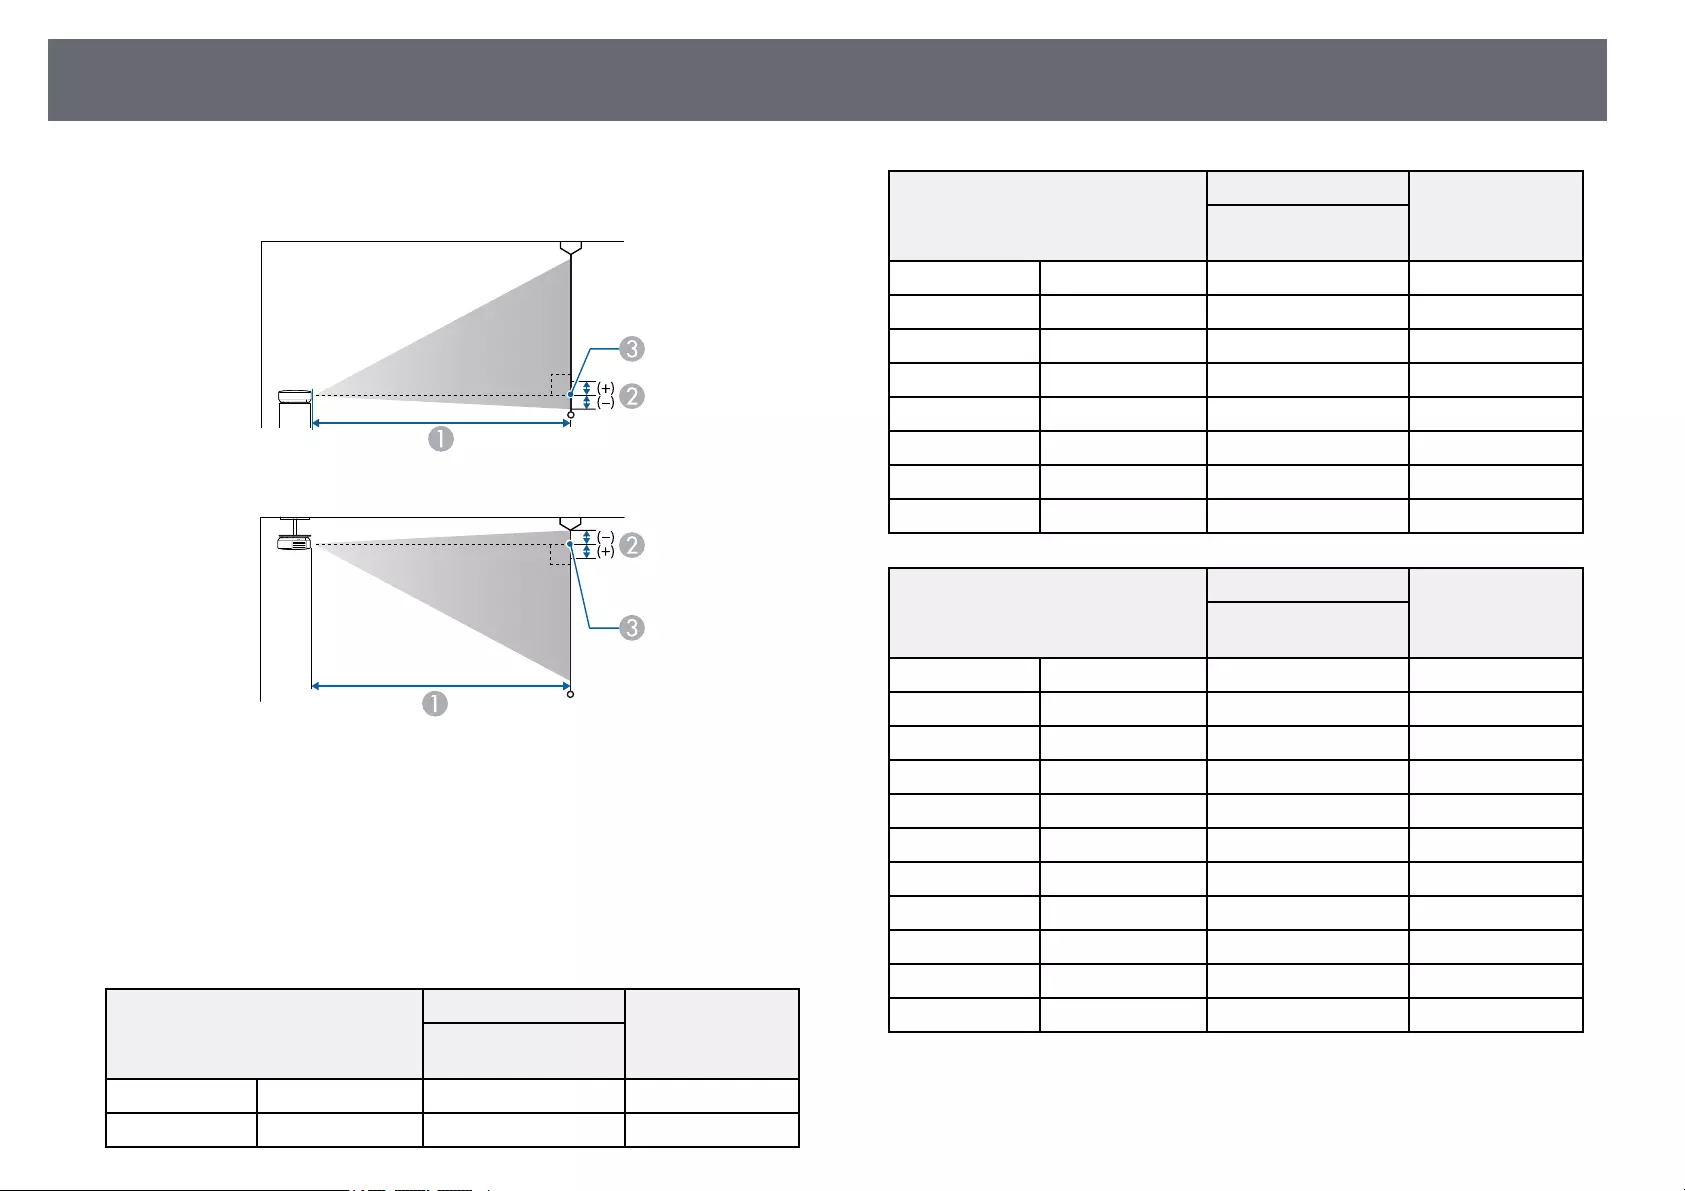
Screen Size and Projection Distance 166
Check the table here to determine how far to place the projector from the
screen based on the size of the projected image.
AProjection distance (cm)
BDistance from the center of the lens to the base of the screen (or to the top of
the screen, if suspended from a ceiling) (cm)
CCenter of lens
EH‑‑TW740
16:9 screen size A B
Minimum (Wide) to
Maximum (Tele)
34″ 75 × 42 90 — 122 -5
50″ 111 × 62 133 — 180 -8
16:9 screen size A B
Minimum (Wide) to
Maximum (Tele)
60″ 133 × 75 160 — 217 -9
70″ 155 × 87 187 — 253 -11
80″ 177 × 100 214 — 290 -12
100″ 221 × 125 268 — 363 -16
150″ 332 × 187 403 — 545 -23
200″ 443 × 249 539 — 728 -31
300″ 664 × 374 809 -47
386″ 855 × 481 1041 -60
4:3 screen size A B
Minimum (Wide) to
Maximum (Tele)
27″ 55 × 41 87 — 119 -5
30″ 61 × 46 97 — 132 -6
50″ 102 × 76 163 — 221 -10
60″ 122 × 91 196 — 266 -11
70″ 142 × 107 230 — 311 -13
80″ 163 × 122 263 — 355 -15
100″ 203 × 152 329 — 445 -19
150″ 305 × 229 494 — 668 -29
200″ 406 × 305 660 — 891 -38
300″ 610 × 457 990 -57
315″ 640 × 480 1040 -60

Screen Size and Projection Distance 167
16:10 screen size A B
Minimum (Wide) to
Maximum (Tele)
31″ 67 × 42 89 — 120 -5
40″ 86 × 54 115 — 156 -7
50″ 108 × 67 144 — 195 -8
60″ 129 × 81 173 — 235 -10
70″ 151 × 94 203 — 274 -12
80″ 172 × 108 232 — 314 -13
100″ 215 × 135 290 — 392 -17
150″ 323 × 202 436 — 590 -25
200″ 431 × 269 582 — 787 -34
300″ 646 × 404 875 -50
357″ 769 × 481 1041 -60
EH‑‑TW750/EH‑‑TW710
16:9 screen size A B
Minimum (Wide) to
Maximum (Tele)
30″ 66 × 37 67 — 81 -3
40″ 89 × 50 90 — 109 -3
50″ 111 × 62 113 — 136 -4
60″ 133 × 75 135 — 164 -5
80″ 177 × 100 181 — 219 -7
100″ 221 × 125 227 — 275 -8
150″ 332 × 187 342 — 413 -13
200″ 443 × 249 457 — 551 -17
250″ 553 × 311 571 — 690 -21
300″ 664 × 374 686 — 828 -25
4:3 screen size A B
Minimum (Wide) to
Maximum (Tele)
25″ 51 × 38 68 — 83 -3
30″ 61 × 46 82 — 100 -3
40″ 81 × 61 110 — 133 -4
50″ 102 × 76 138 — 167 -5
60″ 122 × 91 166 — 201 -6
80″ 163 × 122 222 — 269 -8
100″ 203 × 152 279 — 337 -10
150″ 305 × 229 419 — 506 -15
200″ 406 × 305 559 — 675 -20
245″ 498 × 373 686 — 828 -25
16:10 screen size A B
Minimum (Wide) to
Maximum (Tele)
30″ 65 × 40 72 — 88 -3
40″ 86 × 54 97 — 118 -4
50″ 108 × 67 122 — 148 -5
60″ 129 × 81 147 — 177 -5
70″ 151 × 94 171 — 207 -6
80″ 172 × 108 196 — 237 -7
100″ 215 × 135 246 — 297 -9
150″ 323 × 202 370 — 447 -14
200″ 431 × 269 494 — 596 -18
250″ 538 × 337 618 — 746 -23
275″ 592 × 370 680 — 821 -25

Supported Monitor Display Resolutions 168
The tables here list the compatible refresh rate and resolution for each
compatible video display format.
Computer Signals (Analog RGB)
Signal Refresh rate (Hz) Resolution (dots)
VGA 60/72/75/85 640 × 480
SVGA 60/72/75/85 800 × 600
XGA 60/70/75/85 1024 × 768
WXGA 60 1280 × 768
60 1366 × 768
60/75/85 1280 × 800
WXGA+ 60/75/85 1440 × 900
WXGA++ 60 1600 × 900
SXGA 70/75/85 1152 × 864
60/75/85 1280 × 960
60/75/85 1280 × 1024
SXGA+ 60/75 1400 × 1050
WSXGA+ * 60 1680 × 1050
UXGA 60 1600 × 1200
1920 × 1080 50/60 1920 × 1080
* Compatible only when Wide is selected as the Resolution setting in the
projector’s Signal menu.
Even when signals other than those mentioned above are input, it is likely that
the image can be projected. However, not all functions may be supported.
Composite Video
Signal Refresh rate (Hz) Resolution (dots)
TV (NTSC) 60 720 × 480
TV (SECAM) 50 720 × 576
Signal Refresh rate (Hz) Resolution (dots)
TV (PAL) 50/60 720 × 576
HDMI Port Input Signals
Signal Refresh rate (Hz) Resolution (dots)
VGA 60 640 × 480
SVGA 60 800 × 600
XGA 60 1024 × 768
WXGA 60 1280 × 800
60 1366 × 768
WXGA+ 60 1440 × 900
WXGA++ 60 1600 × 900
SXGA 60 1280 × 960
60 1280 × 1024
SXGA+ 60 1400 × 1050
WSXGA+ 60 1680 × 1050
UXGA 60 1600 × 1200
1920 × 1080 50/60 1920 × 1080
WUXGA (Reduced
Blanking)
60 1920 × 1200
SDTV (480i/480p) 59.94 720 × 480
SDTV (576i/576p) 50 720 × 576
HDTV (720p) 50/59.94/60 1280 × 720
HDTV (1080i) 50/59.94/60 1920 × 1080
HDTV (1080p) 23.98/24/29.97/30/50/59.94/60 1920 × 1080

Projector Specifications 169
Product name EH‑TW750/EH‑TW740/EH‑TW710
Dimensions 302 (W) × 87 (H) × 249 (D) mm (not including raised
section)
LCD panel size 0.61″
Display method Poly-silicon TFT active matrix
Resolution 2,073,600 pixels
Full HD (1,920 (W) × 1,080 (H) dots) × 3
Focus adjustment Manual
Zoom adjustment EH‑‑TW750/EH‑‑TW710
1 to 1.2 (Optical Zoom)
EH‑‑TW740
1 to 1.35 (Digital Zoom)
Lamp UHE lamp, 210 W Model No.: ELPLP97
Lamp life High Power Consumption mode: Up to 6,000 hours
ECO Power Consumption mode: Up to 12,000 hours
Air filter maintenance
cycle
6,000 hours
Max. audio output 2 W
Speaker 1
Power supply 100-240V AC±10% 50/60Hz 3.5 — 1.6 A
Power consumption
(100 to 120 V area)
Operating: 345 W
Power consumption
(220 to 240 V area)
Operating: 327 W
Standby power
consumption
Communication On: 2.0 W
Communication Off: 0.3 W
Operating altitude Altitude 0 to 3,048 m
Operating
temperature *
Altitude of 0 to 2,286 m: +5 to +40°C (No condensation)
Altitude of 2,287 to 3,048 m: +5 to +35°C (Humidity of 20
to 80%, No condensation)
Storage temperature -10 to +60°C (Humidity of 10 to 90%, No condensation)
Mass EH‑‑TW750/EH‑‑TW710
Approx. 2.8 kg
EH‑‑TW740
Approx. 2.7 kg
* Lamp brightness automatically dims if the surrounding temperature gets too
high. (Approximately 35°C at an altitude of 0 to 2,286 m, and approximately
30°C at an altitude of 2,287 to 3,048 m; however, this may vary depending on
the surrounding environment.)
This product is also designed for IT power distribution system with phase-to-
phase voltage 230V.
Angle of tilt
If you use the projector tilted at an angle of more than 30˚ it could be
damaged and cause an accident.
gg Related Links
• «Connector Specifications» p.169
Connector Specifications
See the List of Functions for details on the ports on your projector.
Computer port Mini D-Sub15-pin (female)
Projector Specifications 170
Video port RCA pin jack
L-Audio-R ports RCA pin jack × 2 (L-R)
Audio Out port Stereo mini pin jack
HDMI port HDMI (Audio is only supported by
PCM)
HDMI1 port HDMI (Audio is only supported by
PCM)
HDMI2 port HDMI (Audio is only supported by
PCM)
USB-A port USB connector (Type A)
USB-B port USB connector (Type B)
a• USB-A and USB-B port supports USB 2.0. However, USB ports are
not guaranteed to operate all devices that support USB.
• USB-B port does not support USB 1.1.
gg Related Links
• «List of Functions» p.11
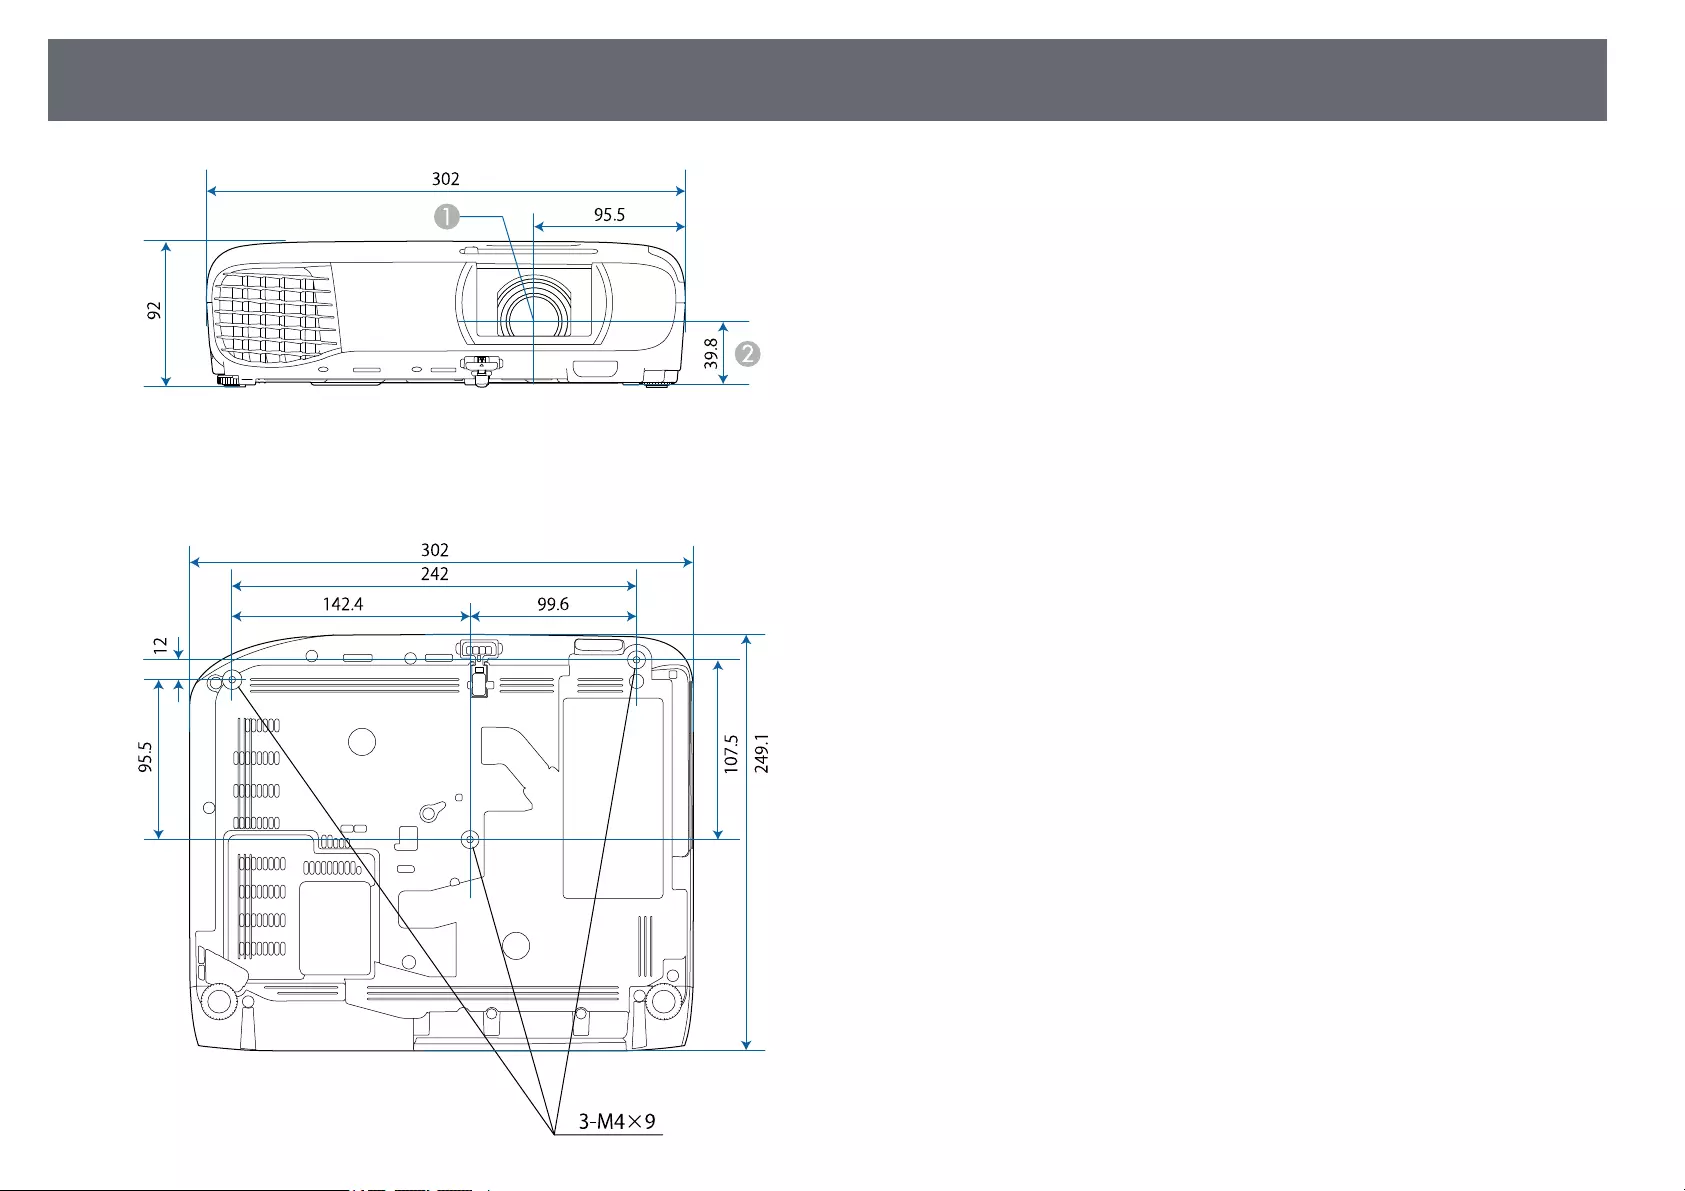
External Dimensions 171
ACenter of lens
BDistance from center of lens to suspension bracket fixing point
The unit in these illustrations is mm.
USB Display System Requirements 172
To use the projector’s Epson USB Display software, your computer must meet
the following system requirements.
Requirement Windows Mac
Operating system Windows 7
• Ultimate (32- and 64-bit)
• Enterprise (32- and 64-bit)
• Professional (32- and 64-bit)
• Home Premium (32- and 64-
bit)
• Home Basic (32-bit)
• Starter (32-bit)
OS X
• 10.11.x (64-bit)
Windows 8.1
• Windows 8.1 (32- and 64-bit)
• Windows 8.1 Pro (32- and 64-
bit)
• Windows 8.1 Enterprise (32-
and 64-bit)
macOS
• 10.12.x (64-bit)
• 10.13.x (64-bit)
• 10.14.x (64-bit)
• 10.15.x (64-bit)
Windows 10
• Windows 10 Home (32- and
64-bit)
• Windows 10 Pro (32- and 64-
bit)
• Windows 10 Enterprise (32-
and 64-bit)
CPU Intel Core2Duo or faster
(Intel Core i3 or faster
recommended)
Intel Core2Duo or faster
(Intel Core i5 or faster
recommended)
Memory 2 GB or more
(4 GB or more recommended)
Hard disk space 20 MB or more
Display Resolution between 640 × 480 and 1920 × 1200
16-bit color or greater
List of Safety Symbols and Instructions 173
The following table lists the meaning of the safety symbols labeled on the
equipment.
No. Symbol mark Approved
standards
Description
AIEC60417
No. 5007
«ON» (power)
To indicate connection to the mains.
BIEC60417
No. 5008
«OFF» (power)
To indicate disconnection from the
mains.
CIEC60417
No. 5009
Stand-by
To identify the switch or switch
position by means of which part of the
equipment is switched on in order to
bring it into the stand-by condition.
DISO7000
No. 0434B,
IEC3864-B3.1
Caution
To identify general caution when
using the product.
EIEC60417
No. 5041
Caution, hot surface
To indicate that the marked item can
be hot and should not be touched
without taking care.
FIEC60417
No. 6042
ISO3864-B3.6
Caution, risk of electric shock
To identify equipment that has risk of
electric shock.
GIEC60417
No. 5957
For indoor use only
To identify electrical equipment
designed primarily for indoor use.
HIEC60417
No. 5926
Polarity of d.c. power connector
To identify the positive and negative
connections (the polarity) on a piece
of equipment to which a d.c. power
supply may be connected.
No. Symbol mark Approved
standards
Description
I— The same as No. 8.
JIEC60417
No. 5001B
Battery, general
On battery powered equipment. To
identify a device for instance a cover
for the battery compartment, or the
connector terminals.
KIEC60417
No. 5002
Positioning of cell
To identify the battery holder itself
and to identify the positioning of the
cell(s) inside the battery holder.
L— The same as No. 11.
MIEC60417
No. 5019
Protective earth
To identify any terminal which is
intended for connection to an external
conductor for protection against
electric shock in case of a fault, or the
terminal of a protective earth
electrode.
NIEC60417
No. 5017
Earth
To identify an earth (ground) terminal
in cases where neither the symbol No.
13 is explicitly required.
OIEC60417
No. 5032
Alternating current
To indicate on the rating plate that the
equipment is suitable for alternating
current only; to identify relevant
terminals.
PIEC60417
No. 5031
Direct current
To indicate on the rating plate that the
equipment is suitable for direct
current only; to identify relevant
terminals.
List of Safety Symbols and Instructions 174
No. Symbol mark Approved
standards
Description
QIEC60417
No. 5172
Class II equipment
To identify equipment meeting the
safety requirements specified for Class
II equipment according to IEC 61140.
RISO 3864 General prohibition
To identify actions or operations that
are prohibited.
SISO 3864 Contact prohibition
To indicate injury that could occur
due to touching a specific part of the
equipment.
T— Never look into the optical lens while
the projector is on.
U— To indicate that the marked item don’t
place anything on projector.
VISO3864
IEC60825-1
Caution, laser radiation
To indicate the equipment has a laser
radiation part.
WISO 3864 Disassembly prohibition
To indicate a risk of injury, such as
electric shock, if the equipment is
disassembled.
XIEC60417
No. 5266
Standby, partial standby
To indicate that part of the equipment
is in the ready status.
YISO3864
IEC60417
No. 5057
Caution, movable parts
To indicate that you must keep away
from movable parts according to
protection standards.
ZIEC60417
No. 6056
Caution (Moving Fan Blades)
As a safety precaution, stay away from
the moving fan blades.
No. Symbol mark Approved
standards
Description
aIEC60417
No. 6043
Caution (Sharp Corners)
To indicate sharp corners that should
not be touched.
b— To indicate that looking into the lens
while projecting is prohibited.
cISO7010
No. W027
ISO 3864
Warning, Optical radiation (such as
UV, visible radiation, IR)
Taking care to avoid injury to eyes and
skin when in the vicinity of optical
radiation.
dIEC60417
No. 5109
Not to be used in residential areas.
To identify electrical equipment which
is not suitable for a residential area.
Glossary 175
This section briefly explains the difficult terms that are not explained in the
text of this guide. For details, refer to other commercially available
publications.
Aspect Ratio The ratio between an image’s length and its height.
Screens with a horizontal:vertical ratio of 16:9, such as HDTV
screens, are known as wide screens.
SDTV and general computer displays have an aspect ratio of
4:3.
Composite Video A method that combines the video signal into a luminance
component and a color component for transmission down a
single cable.
Contrast The relative brightness of the light and dark areas of an image
can be increased or decreased to make text and graphics stand
out more clearly, or to make them appear softer. Adjusting this
particular property of an image is called contrast adjustment.
DHCP An abbreviation of Dynamic Host Configuration Protocol, this
protocol automatically assigns an IP address to equipment
connected to a network.
Full HD A screen size standard with a resolution of 1,920 (horizontal) ×
1,080 (vertical) dots.
Gateway Address This is a server (router) for communicating across a network
(subnet) divided according to subnet mask.
HDCP HDCP is an abbreviation for High-bandwidth Digital Content
Protection.
It is used to prevent illegal copying and protect copyrights by
encrypting digital signals sent over DVI and HDMI ports.
Because the HDMI port on this projector supports HDCP, it
can project digital images protected by HDCP technology.
However, the projector may not be able to project images
protected with updated or revised versions of HDCP
encryption.
HDMI™An abbreviation for High Definition Multimedia Interface.
HDMI™is a standard aimed at digital consumer electronics and
computers. This is the standard by which HD images and
multichannel audio signals are digitally transmitted.
By not compressing the digital signal, the image can be
transferred at the highest quality possible. It also provides an
encryption function for the digital signal.
HDTV An abbreviation for High-Definition Television that refers to
high-definition systems which satisfy the following conditions:
• Vertical resolution of 720p or 1080i or greater (p =
Progressive, i = Interlace)
• Screen aspect ratio of 16:9
Interlace Transmits information needed to create one screen by sending
every other line, starting from the top of the image and working
down to the bottom.
Images are more likely to flicker because one frame is displayed
every other line.
IP Address A number to identify a computer connected to a network.
Progressive Projects information to create one screen at a time, displaying
the image for one frame.
Even though the number of scan lines is the same, the amount
of flicker in images decreases because the volume of
information has doubled compared with an interlace system.
Refresh Rate The light-emitting element of a display maintains the same
luminosity and color for an extremely short time.
Because of this, the image must be scanned many times per
second to refresh the light-emitting element.
The number of refresh operations per second is called the
Refresh rate and is expressed in hertz (Hz).
SDTV An abbreviation for Standard Definition Television that refers
to standard television systems which do not satisfy the
conditions for HDTV High-Definition Television.
SNMP An abbreviation for Simple Network Management Protocol,
which is the protocol for monitoring and controlling devices
such as routers and computers connected to a TCP/IP network.
Glossary 176
sRGB An international standard for color intervals that was
formulated so that colors that are reproduced by video
equipment can be handled easily by computer operating
systems (OS) and the Internet. If the connected source has an
sRGB mode, set both the projector and the connected signal
source to sRGB.
SSID SSID is identification data for connecting to another device on
a wireless LAN. Wireless communication is possible between
devices with the same SSID.
Subnet Mask This is a numerical value that defines the number of bits used
for the network address on a divided network (subnet) from the
IP address.
SVGA A screen size standard with a resolution of 800 (horizontal) ×
600 (vertical) dots.
SXGA A screen size standard with a resolution of 1,280 (horizontal) ×
1,024 (vertical) dots.
Sync. The signals output from computers have a specific frequency.
If the projector frequency does not match this frequency, the
resulting images are not of a good quality.
The process of matching the phases of these signals (the relative
position of the crests and the troughs in the signal) is called
Synchronization.
If the signals are not synchronized, flickering, blurriness, and
horizontal interference occur.
Tracking The signals output from computers have a specific frequency.
If the projector frequency does not match this frequency, the
resulting images are not of a good quality.
The process of matching the frequency of these signals (the
number of crests in the signal) is called Tracking.
If Tracking is not carried out correctly, wide vertical stripes
appear in the signal.
Trap IP Address This is the IP address for the destination computer used for
error notification in SNMP.
VGA A screen size standard with a resolution of 640 (horizontal) ×
480 (vertical) dots.
XGA A screen size standard with a resolution of 1,024 (horizontal) ×
768 (vertical) dots.
WXGA A screen size standard with a resolution of 1,280 (horizontal) ×
800 (vertical) dots.
WUXGA A screen size standard with a resolution of 1,920 (horizontal) ×
1,200 (vertical) dots.

Notices 177
Check these sections for important notices about your projector.
gg Related Links
• «FCC Compliance Statement» p.177
• «Indication of the manufacturer and the importer in accordance with
requirements of EU directive» p.178
• «Restriction of Use» p.178
• «Operating System References» p.178
• «Trademarks» p.178
• «Copyright Notice» p.179
• «Copyright Attribution» p.179
FCC Compliance Statement
Supplier’s DECLARATION of CONFORMITY
According to 47CFR, Part 2 and 15
Class B Personal Computers and Peripherals; and/or
CPU Boards and Power Supplies used with Class B Personal Computers
We: Epson America, Inc.
Located at: 3840 Kilroy Airport Way Long Beach, CA 90806
Tel: 562-981-3840
Declare under sole responsibility that the product identified herein, complies
with 47CFR Part 2 and 15 of the FCC rules as a Class B digital device. Each
product marketed, is identical to the representative unit tested and found to
be compliant with the standards. Records maintained continue to reflect the
equipment being produced can be expected to be within the variation
accepted, due to quantity production and testing on a statistical basis as
required by 47CFR 2.906. Operation is subject to the following two
conditions: (1) this device may not cause harmful interference, and (2) this
device must accept any interface received, including interference that may
cause undesired operation.
Trade Name: EPSON
Type of Product: LCD Projector
Model:
H971C/H972C/H973C/H974C/H975C/H976C/H977C/HA02C/H978C/H979
C/H980C/H981C/H982C/H983C/HA03C/H985C/H986C/H987C/H988C
Options:
Product name Model
Remote controller 2198635 xx (x=0-9)
FCC Compliance Statement For United States Users
This device complies with part 15 of the FCC Rules. Operation is subject to
the following two conditions: (1) This device may not cause harmful
interference, and (2) this device must accept any interference received,
including interference that may cause undesired operation.
This equipment has been tested and found to comply with the limits for a
Class B digital device, pursuant to Part 15 of the FCC Rules. These limits are
designed to provide reasonable protection against harmful interference in a
residential installation. This equipment generates, uses, and can radiate radio
frequency energy and, if not installed and used in accordance with the
instructions, may cause harmful interference to radio communications.
However, there is no guarantee that interference will not occur in a particular
installation. If this equipment does cause interference to radio and television
reception, which can be determined by turning the equipment off and on, the
user is encouraged to try to correct the interference by one or more of the
following measures.
• Reorient or relocate the receiving antenna.
• Increase the separation between the equipment and receiver.
• Connect the equipment into an outlet on a circuit different from that to
which the receiver is connected.
• Consult the dealer or an experienced radio/TV technician for help.
WARNING
The connection of a non-shielded equipment interface cable to this
equipment will invalidate the FCC Certification or Declaration of this device
and may cause interference levels which exceed the limits established by the
FCC for this equipment. It is the responsibility of the user to obtain and use a
shielded equipment interface cable with this device. If this equipment has
Notices 178
more than one interface connector, do not leave cables connected to unused
interfaces. Changes or modifications not expressly approved by the
manufacturer could void the user’s authority to operate the equipment.
Statement for Canadian EMC Rules
Indication of the manufacturer and the importer in
accordance with requirements of EU directive
Manufacturer: SEIKO EPSON CORPORATION
Address: 3-5, Owa 3-chome, Suwa-shi, Nagano-ken 392-8502 Japan
Telephone: 81-266-52-3131
http://www.epson.com/
Importer: EPSON EUROPE B.V.
Address: Atlas Arena, Asia Building, Hoogoorddreef 5,1101 BA Amsterdam
Zuidoost
The Netherlands
Telephone: 31-20-314-5000
http://www.epson.eu/
Restriction of Use
When this product is used for applications requiring high reliability/safety
such as transportation devices related to aviation, rail, marine, automotive
etc.; disaster prevention devices; various safety devices etc; or
functional/precision devices etc, you should use this product only after giving
consideration to including fail-safes and redundancies into your design to
maintain safety and total system reliability. Because this product was not
intended for use in applications requiring extremely high reliability/safety
such as aerospace equipment, main communication equipment, nuclear
power control equipment, or medical equipment related to direct medical care
etc, please make your own judgment on this product’s suitability after a full
evaluation.
Operating System References
• Microsoft®Windows®7 operating system
• Microsoft®Windows®8.1 operating system
• Microsoft®Windows®10 operating system
In this guide, the operating systems above are referred to as «Windows 7″,
«Windows 8.1″, and «Windows 10″. Furthermore, the collective term
«Windows» is used to refer to them all.
• OS X 10.11.x
• macOS 10.12.x
• macOS 10.13.x
• macOS 10.14.x
• macOS 10.15.x
In this guide, the operating systems above are referred to as «OS X 10.11.x»,
«macOS 10.12.x», «macOS 10.13.x», «macOS 10.14.x», and «macOS 10.15.x».
Furthermore, the collective term «Mac» is used to refer to them all.
Trademarks
EPSON is a registered trademark, EXCEED YOUR VISION, ELPLP and their
logos are registered trademarks or trademarks of Seiko Epson Corporation.
Mac, OS X, and macOS are trademarks of Apple Inc.
Microsoft, Windows, and the Windows logo are trademarks or registered
trademarks of Microsoft Corporation in the United States and/or other
countries.
Wi-Fi™, WPA2™, WPA3™, and Miracast™are trademarks of Wi-Fi Alliance®.
App Store is a service mark of Apple Inc.

Notices 179
Chrome, Chromebook, and Google Play are trademarks of Google LLC.
HDMI, the HDMI Logo and High-Definition Multimedia Interface are
trademarks or registered trademarks of HDMI Licensing Administrator, Inc.
«QR Code» is a registered trademark of DENSO WAVE INCORPORATED.
Intel®is a registered trademark of Intel Corporation in the U.S. and/or other
countries.
Other product names used herein are also for identification purposes only
and may be trademarks of their respective owners. Epson disclaims any and
all rights in those marks.
Copyright Notice
All rights reserved. No part of this publication may be reproduced, stored in a
retrieval system, or transmitted in any form or by any means, electronic,
mechanical, photocopying, recording, or otherwise, without the prior written
permission of Seiko Epson Corporation. No patent liability is assumed with
respect to the use of the information contained herein. Neither is any liability
assumed for damages resulting from the use of the information contained
herein.
Neither Seiko Epson Corporation nor its affiliates shall be liable to the
purchaser of this product or third parties for damages, losses, costs, or
expenses incurred by the purchaser or third parties as a result of: accident,
misuse, or abuse of this product or unauthorized modifications, repairs, or
alterations to this product, or (excluding the U.S.) failure to strictly comply
with Seiko Epson Corporation’s operating and maintenance instructions.
Seiko Epson Corporation shall not be liable against any damages or problems
arising from the use of any options or any consumable products other than
those designated as Original Epson Products or Epson Approved Products by
Seiko Epson Corporation.
The contents of this guide may be changed or updated without further notice.
Illustrations in this guide and the actual projector may differ.
Copyright Attribution
This information is subject to change without notice.
© 2020 Seiko Epson Corporation
2020.3 413901400EN
Downloads
Downloads
Firmware
Firmware Updater Link
By following this updater link, you will be directed on a page where you will have access to the latest firmware file and a list of the changes. Please update the Firmware using one of the following method: — USB-A port Firmware update (Manual available in the manual section) — USB-B port Firmware update (Manual available in the manual section)
View
Other Software
Throw Distance Simulator — Offline (v2.4.1)
v.2.4.1
04-Mar-2025
78.59 MB
.zip
Additional Information:
Throw Distance Simulator is an application for calculating the throw distance between screen and the EPSON projector.
Download
Throw Distance Simulator
Additional Information:
Throw Distance Simulator is a web application for calculating the throw distance between screen and the EPSON projector. Supported browsers: Google Chrome, Firefox, Safari
View
Mobile Apps
Epson iProjection for Android and Chrome OS
Additional Information:
By using Epson iProjection, you can use the projectors to hold interactive meetings. You can connect up to 16 computers to one projector via a network. You can then select up to four of these connected computers and project their screens.
View
Epson iProjection for iOS
Additional Information:
By using Epson iProjection, you can use the projectors to hold interactive meetings. You can connect up to 16 computers to one projector via a network. You can then select up to four of these connected computers and project their screens.
View
View the manual for the Epson EH-TW740 here, for free. This manual comes under the category video projectors and has been rated by 5 people with an average of a 8.8. This manual is available in the following languages: English. Do you have a question about the Epson EH-TW740 or do you need help?
Ask your question here
Questions & answers
Can’t find the answer to your question in the manual? You may find the answer to your question in the FAQs about the Epson EH-TW740 below.
What is the weight of the Epson EH-TW740?
The Epson EH-TW740 has a weight of 2800 g.
What is the height of the Epson EH-TW740?
The Epson EH-TW740 has a height of 92 mm.
What is the width of the Epson EH-TW740?
The Epson EH-TW740 has a width of 302 mm.
What is the depth of the Epson EH-TW740?
The Epson EH-TW740 has a depth of 252 mm.
Is the manual of the Epson EH-TW740 available in English?
Yes, the manual of the Epson EH-TW740 is available in English .
Is your question not listed? Ask your question here