
Start Here
Epson® Perfection® 3490 Photo
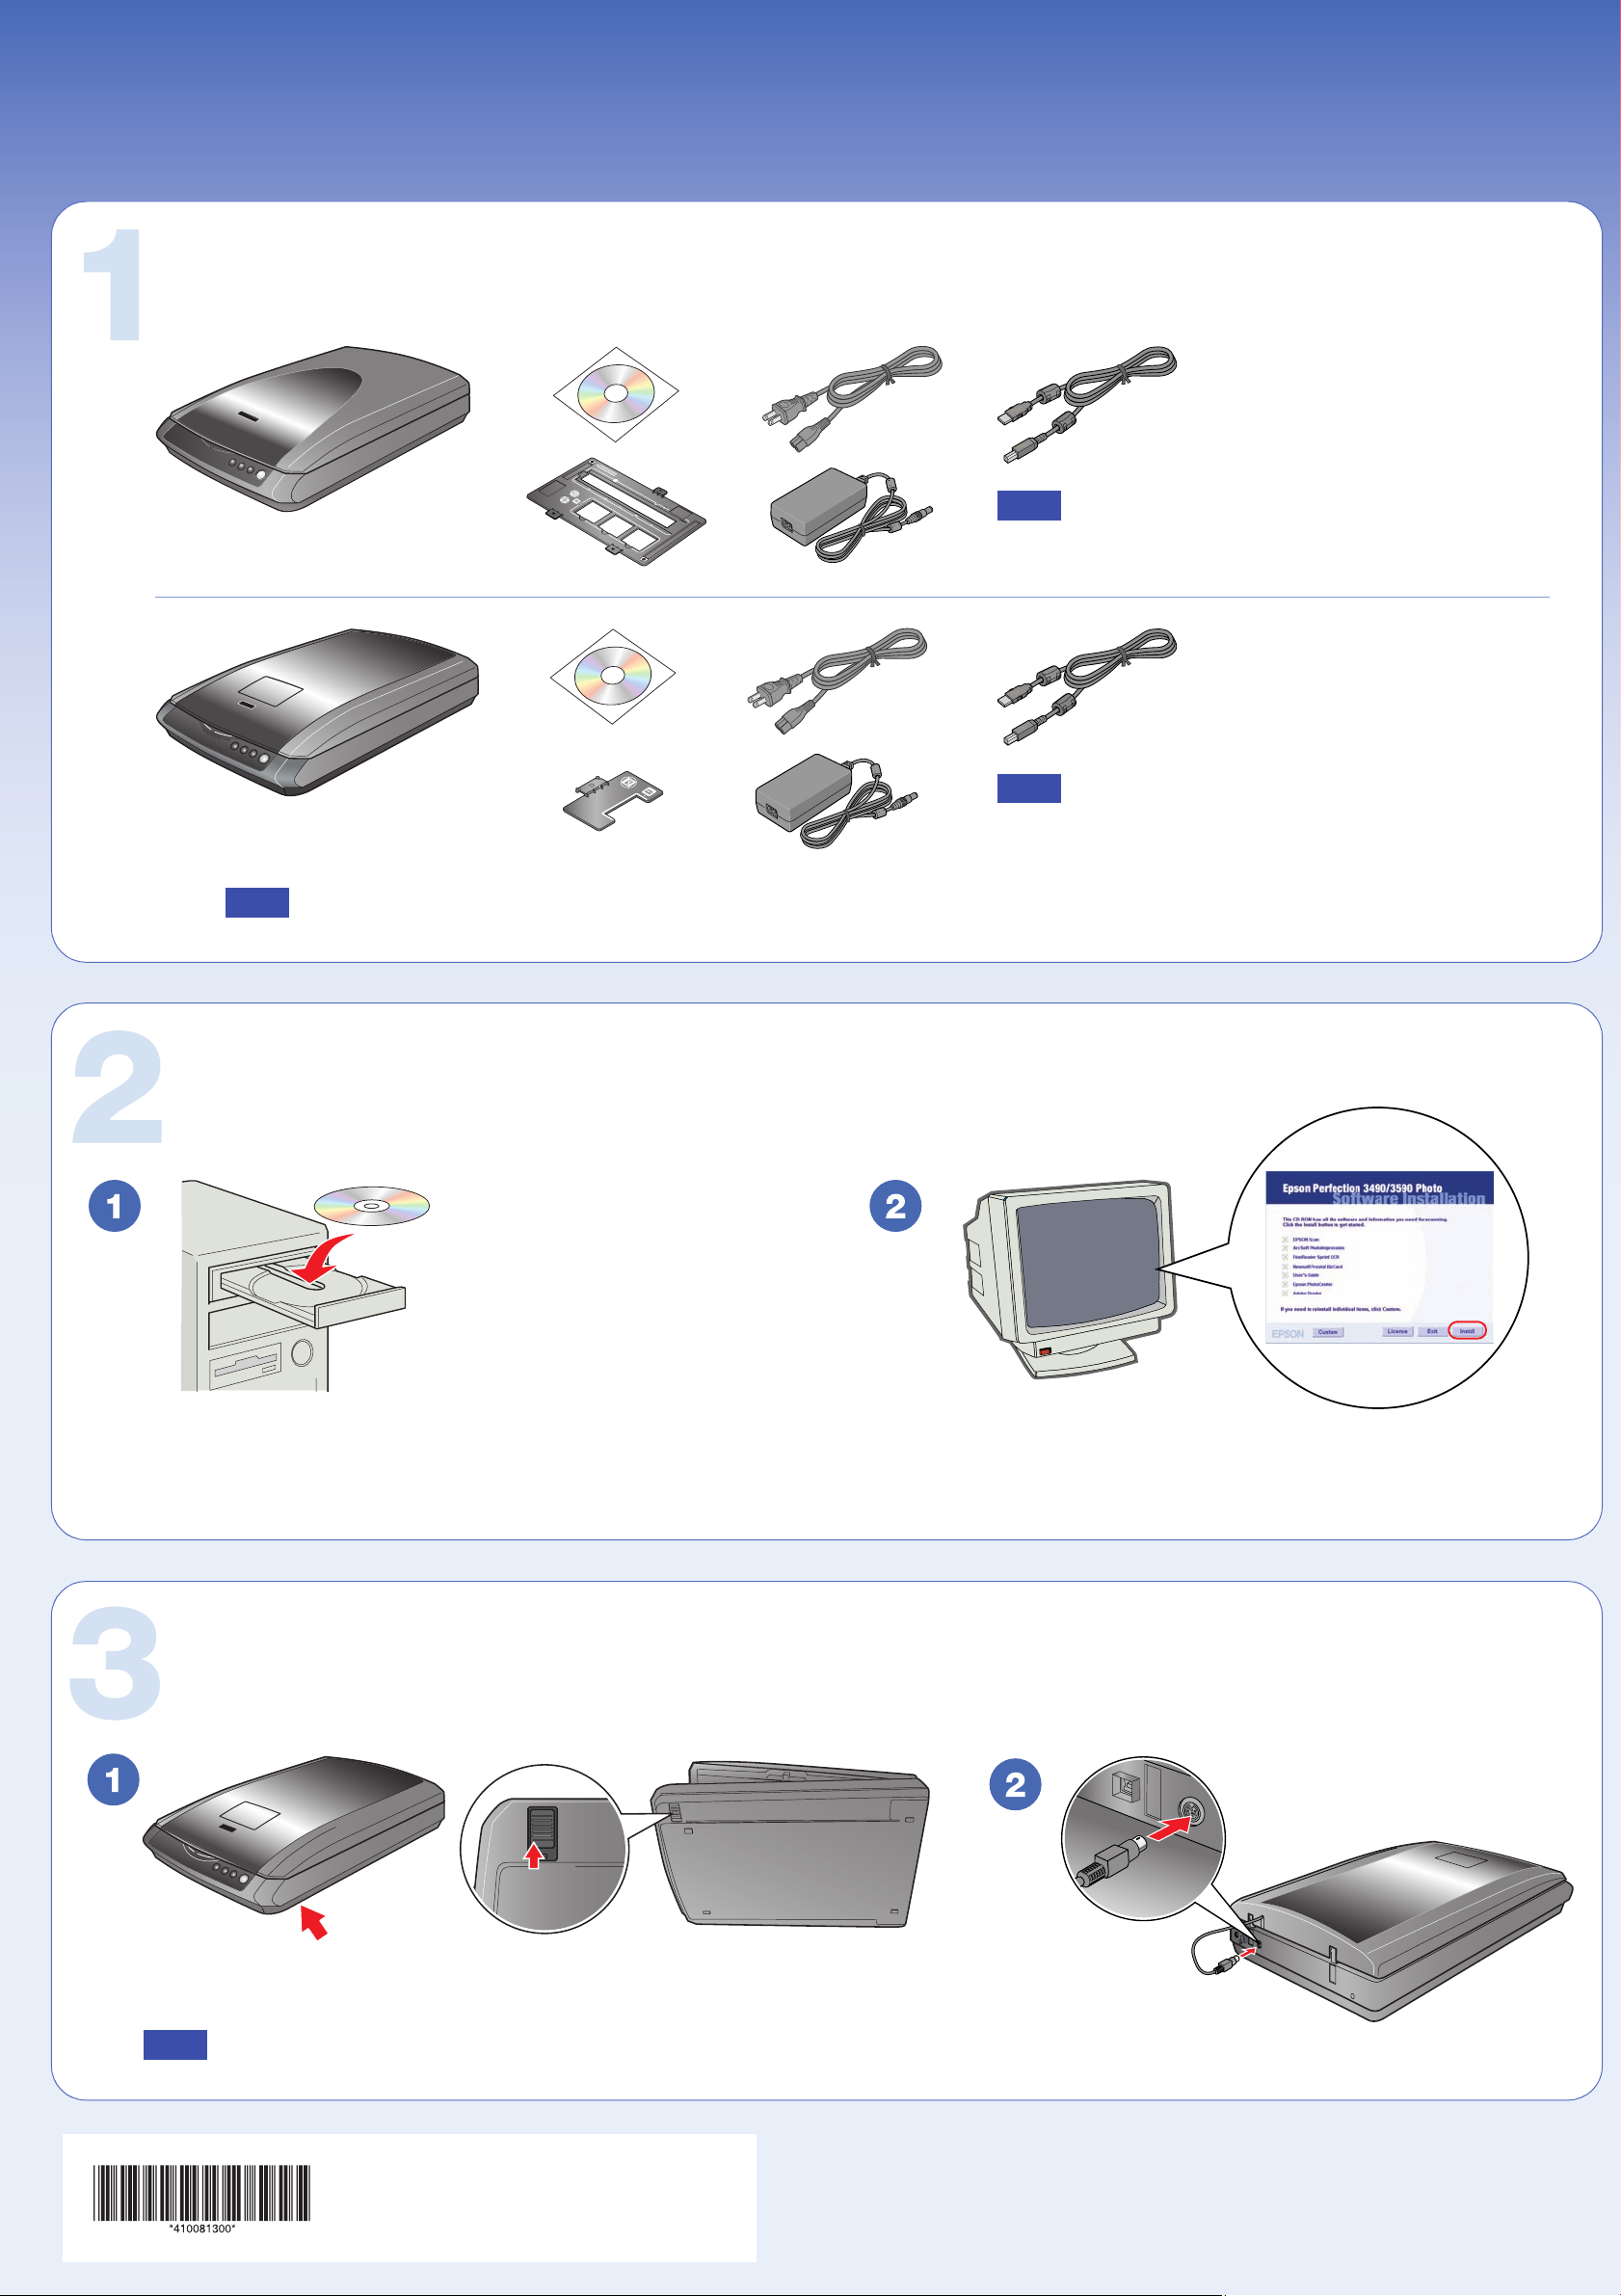
Unpack
Perfection 3490 Photo
●
Epson® Perfection® 3590 Photo
Note: Do not connect the USB cable yet.
Perfection 3590 Photo
Note: The setup illustrations show the Perfection 3590 Photo scanner, but the instructions are the same for the Perfection 3490 Photo.
Install software
Note: Do not connect the USB cable yet.
Insert the Scanner Software CD.
Windows:
Macintosh
®
The installer starts automatically.
®
OS X: Double-click the CD-ROM icon on the desktop.
Unlock and assemble
Unlock the transportation lock.
Click Install and follow the on-screen instructions.
Note: Do not connect the USB cable yet.
Printed in XXXXXX XX.XX-XX XXX
Connect the cover cable.
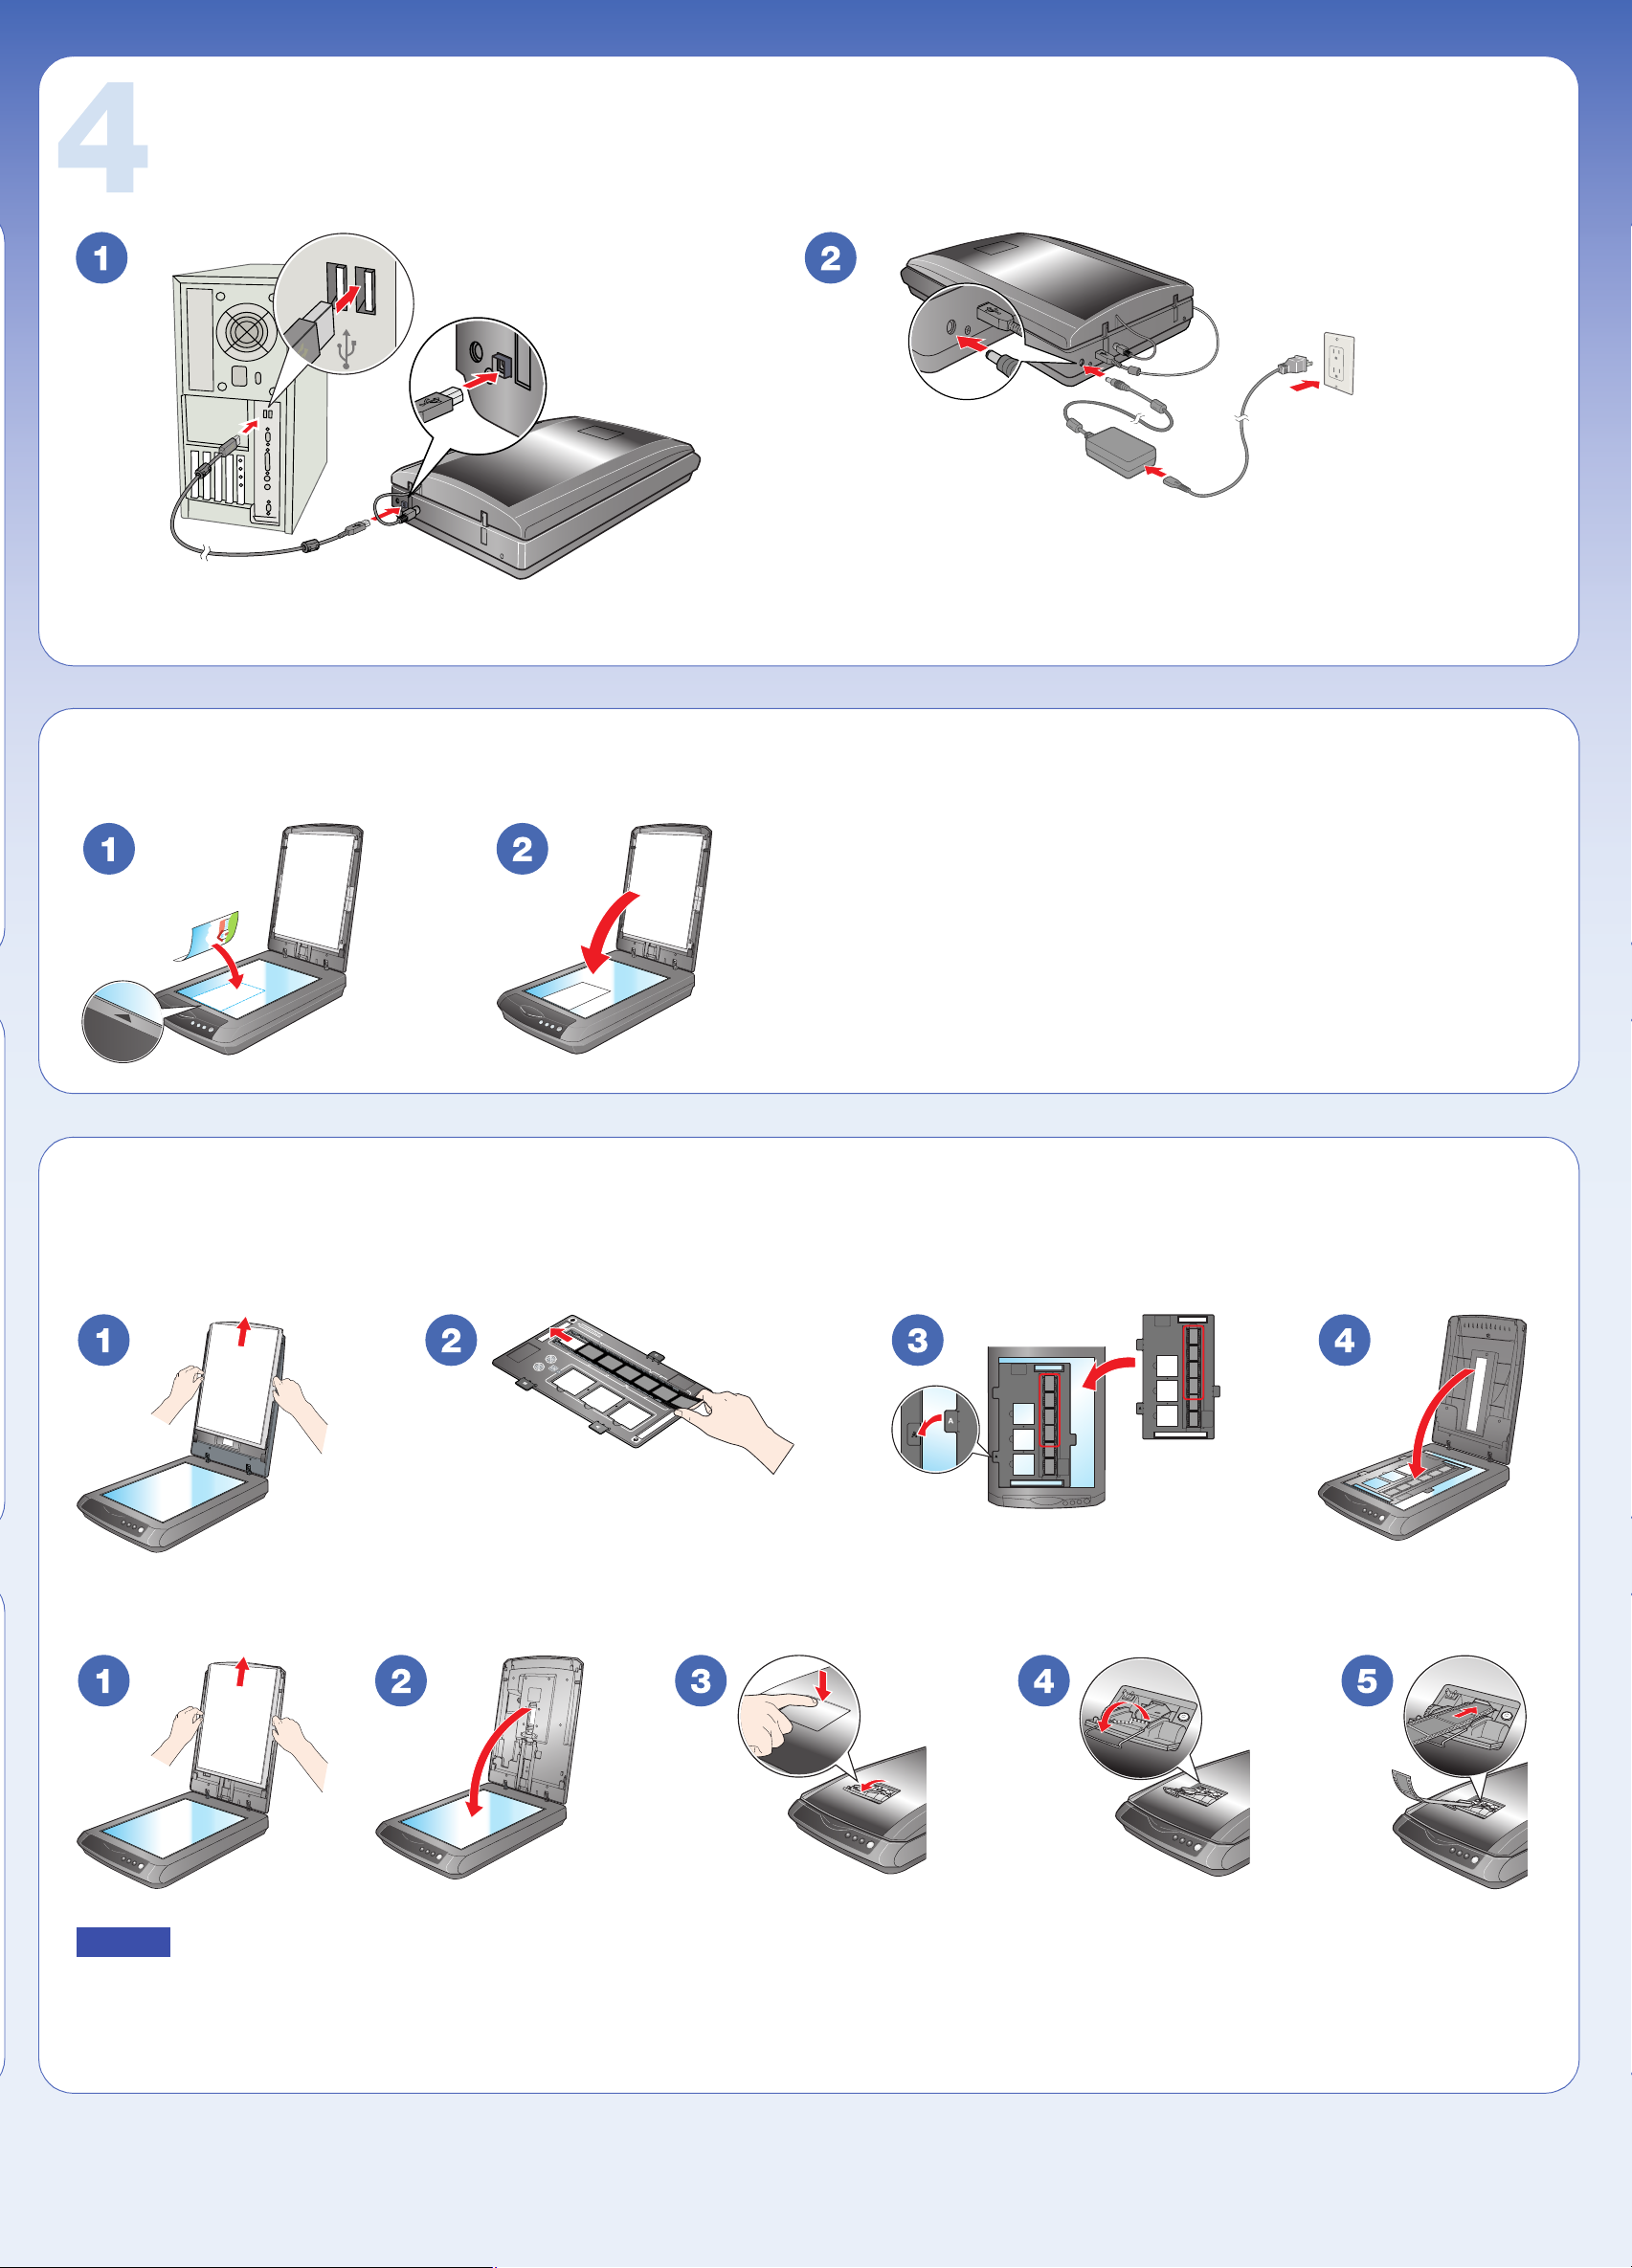
Connect and turn on
Connect the USB cable.
Connect the power adapter and cable to turn on the scanner.
Place a document or photo
Place film
Perfection 3490
Perfection 3590
Caution: Make sure the film strip contains between 2 and 6 photos.
Don’t load folded or creased film
Slide in the film with the shiny base side facing down.
The scanner automatically feeds the film into position.
Loading…
Epson Perfection 3490 Photo
6/05
Epson Perfection 3490 Photo — 1
Scanner Parts
Option
The Multi Photo Feeder (part number B813372) lets you load
up to 24 photos or business cards and scan them automatically.
See the on-screen User’s Guide for instructions.
Scanner Specifications
Basic Specifications
Scanner type
Flatbed, color
Photoelectric
Color CCD line sensor
device
Effective pixels
27,200 × 37,400 pixels at 3200 dpi
Document size
8.5 × 11.7 inches (216 × 297 mm)
Letter size or A4 (reading area can
be specified from software)
Scanning
3200 dpi (main scan)
resolution
6400 dpi with Micro Step (sub scan)
Output
50 dpi to 12800 dpi
resolution
(50 to 6400 dpi in 1 dpi increments.
9600 dpi and 12800 dpi performed with
zoom function.)
Color separation
RGB color filters on CCD
Image data
16 bits per pixel per color internal
16 bits per pixel per color external
(maximum)
Interface
USB 2.0 Hi-Speed (Type B connector)
Light source
White cold cathode fluorescent lamp
Dimensions
Width: 10.8 inches (275 mm)
Depth: 16.5 inches (419 mm)
Height: 3.4 inches (86 mm)
Weight
Approx. 6.6 lb (3.0 kg)
Document
table
Carriage and
lamp (in the
home position)
USB port
DC
inlet
Option
port
]
Start button
Scanner cover with built in
transparency unit (TPU)
Transportation lock
(beneath scanner; see page 6)
{
Copy button
|
Scan to
E-mail button
a
Scan to
PDF button
Reflective
document mat
Cover
cable
Output tray
Edge guides
Cable
Downloads
Downloads
Product Setup
Epson Software updater (v4.6.9.0)
v.4.6.9.0
06-May-2025
5.76 MB
.exe
Additional Information:
Epson Software Updater allows you to update Epson software as well as download 3rd party applications. Please Note: To use this updater, your Epson product must be turned on and connected to a computer with Internet access.
This latest version includes
— Feature improvements
Download
Other Software
Event Manager (v3.11.74)
v.3.11.74
16-Mar-2023
21.85 MB
.exe
Additional Information:
Event Manager launches File Manager or PageManager for EPSON automatically when you press the B&W Start or Color Start button on the control panel in Scan mode. You can select an application to be launched when pressing the B&W Start or Color Start button.
This latest version includes
— Bug Fix
Download
EPSON Copy Utility (v3.1f)
v.3.1f
10-Aug-2005
5.52 MB
.exe
EPSON Copy Utility is an application that enables you to use your scanner and printer together to function like a copy machine. It can print a scanned image in just a single step, so you do not need to use additional applications for your scanner or printer. Like a copy machine, this utility provides both color and monochrome copying, enlarged and reduced copying, and image adjustment functions.
Additional Information:
EPSON Copy Utility is an application that enables you to use your scanner and printer together to function like a copy machine. It can print a scanned image in just a single step, so you do not need to use additional applications for your scanner or printer. Like a copy machine, this utility provides both color and monochrome copying, enlarged and reduced copying, and image adjustment functions.
Download
Notices
Important Safety Instructions
Read all these instructions and save them for later reference. Follow all warnings and instructions
marked on the scanner.
Caution: Be sure the AC power cord meets the relevant local safety standards.
■ Place the scanner close enough to the computer for the interface cable to reach it easily. Do not
place or store the scanner or the AC adapter outdoors, near excessive dirt or dust, water, or heat
sources, or in locations subject to shocks, vibrations, high temperature or humidity, direct
sunlight, strong light sources, or rapid changes in temperature or humidity. Do not use with
wet hands.
■ When connecting the scanner to a computer or other device with a cable, ensure the correct
orientation of the connectors. Each connector has only one correct orientation. Inserting a
connector in the wrong orientation may damage both devices connected by the cable.
■ Place the scanner and the AC adapter near an electrical outlet where the power cord can be
easily unplugged.
■ Power cords should be placed to avoid abrasions, cuts, fraying, crimping, and kinking. Do not
place objects on top of power cords and do not allow the AC adapter or power cords to be
stepped on or run over. Be particularly careful to keep all power cords straight at the ends and
at the points where they enter and leave the AC adapter.
■ Use only the AC adapter model A291B/E that comes with your scanner. Using any other
adapter could cause fire, electrical shock, or injury.
■ The AC adapter is designed for use with the scanner with which it was included. Do not
attempt to use it with other electronic devices unless specified.
■ Use only the type of power source indicated on the AC adapter’s label, and always supply
power directly from a standard domestic electrical outlet with the AC power cord that meets
the relevant local safety standards.
■ Avoid using outlets on the same circuit as photocopiers or air control systems that regularly
switch on and off.
■ If you use an extension cord with the scanner, make sure the total ampere rating of the devices
plugged into the extension cord does not exceed the cord’s ampere rating. Also, make sure the
total ampere rating of all devices plugged into the electrical outlet does not exceed the electrical
outlet’s ampere rating. Do not place multiple loads on the electrical outlet.
■ Never disassemble, modify, or attempt to repair the AC adapter, power cord, scanner, or
scanner option by yourself.
■ Do not insert objects into any opening, as they may touch dangerous voltage points or short
out parts. Beware of electrical shock hazards.
■ Unplug the scanner and the AC adapter before cleaning. Clean with a damp cloth only. Do not
use liquid or aerosol cleaners. Do not apply any liquid directly on the scanner glass.