
Скачать
Epson Stylus Photo R220
Printer Basics
®
R220.book Page 1 Sunday, August 7, 2005 3:41 PM
На этой странице вы можете совершенно бесплатно скачать Руководство по эксплуатации Epson Stylus Photo R220.
У документа PDF Руководство по эксплуатации 70 страниц, а его размер составляет 1.74 Mb.
Читать онлайн Принтеры Epson Stylus Photo R220 Руководство по эксплуатации
Скачать файл PDF «Epson Stylus Photo R220 Руководство по эксплуатации» (1.74 Mb)
Популярность:
2190 просмотры
Подсчет страниц:
70 страницы
Тип файла:
Размер файла:
1.74 Mb
Прочие инструкции Epson Stylus Photo R220
Прочие инструкции Epson Принтеры
Прочие инструкции Epson
Русский
- Bedienungsanleitung Epson Stylus Photo R220
- Epson Stylus Photo R220 User Manual
- Manual Usuario Epson Stylus Photo R220
- Mode d’emploi Epson Stylus Photo R220
- Istruzioni Epson Stylus Photo R220
- инструкция Epson Stylus Photo R220
- Epson Stylus Photo R220の取扱説明書
- Handleiding Epson Stylus Photo R220
- Manual de uso Epson Stylus Photo R220
Вам нужна инструкция? Мы поможем Вам ее найти и сэкономить Ваше время.
- 2 stron
- 0.19 mb
Изделие Epson Stylus Photo R220, а также другие, которыми Вы пользуетесь ежедневно, наверняка вы получили в комплекте с инструкцией обслуживания. Из опыта наших пользователей мы знаем, что большинство из Вас не уделили этому особого внимания. Большая часть инструкций, сразу же после покупки попадает в корзину для мусора вместе с коробкой — это ошибка. Ознакомьтесь с информацией, касающейся инструкции Epson Stylus Photo R220, которая поможет Вам в будущем сэкономить нервы и избежать головной боли.
Важная подсказка — не забывайте хотя бы раз прочитать инструкцию Epson Stylus Photo R220
Если вы не хотите каждый раз читать информационные брошюры, касающиеся, тех или Epson Stylus Photo R220 иных изделий, достаточно, прочитать их раз — сразу же после покупки устройства. Вы получите основное знания, касающиеся поддержания изделия Epson Stylus Photo R220 в хорошем эксплуатационном состоянии, так, чтобы без проблем достигнуть его планируемого цикла работы. Затем инструкцию можно отложить на полку и вернуться к ней только в случае, если вы не уверены, правильно ли проводится техобслуживание изделия. Правильный уход является необходимым элементом Вашего удовольствия Epson Stylus Photo R220.
Раз в году пересмотрите шкафчик, в котором держите инструкции для всех устройств, — выбросите те, которыми вы уже не пользуетесься. Это поможет Вам сохранять порядок в своей домашней базе инструкций обслуживания.
Summary of Contents for Epson Stylus Photo R220
Что находится в инструкции Epson Stylus Photo R220? Почему стоит ее прочитать?
- Гарантия и подробности, касающиеся техобслуживания изделия
Хорошей идеей будет прикрепить чек к странице инструкции. Если что-то плохое случится во время использования Epson Stylus Photo R220, у вас будет комплект документов, необходимый для гарантийного ремонта. В этой части инструкции вы найдете информацию об авторизованных сервисных центрахEpson Stylus Photo R220 а также, как самостоятельно правильно ухаживать за оборудованием — так, чтобы не потерять гарантийных прав. - Указания по монтажу и Setup
Не терять нервов и времени на самостоятельную попытку установки и первого запуска изделия. Воспользуйтесь рекомендациями производителя Epson Stylus Photo R220 чтобы правильно запустить изделие, без лишнего риска повреждения оборудования. - Информация, касающаяся дополнительных запчастей (входящих в комплект а также являющихся опцией)
Пересматривая эту часть документа вы сможете проверить, доставлен ли ваш Epson Stylus Photo R220 с полним комплектом аксессуаров. Вы также сможете узнать, какие дополнительные запчасти или аксессуары для Epson Stylus Photo R220 Вы сможете найти и докупить к своему устройству. - Troubleshooting
Самые частые проблемы, касающиеся Epson Stylus Photo R220 и методы их решения. Это очень полезная часть руководства по обслуживанию — она позволит Вам сэкономить много времени на поиск решений. 90% проблем с Epson Stylus Photo R220 повторяется у многих пользователей. - Требования, касающиеся питания и энергетический класс
Информация, касающаяся количества потребляемой энергии, а также рекомендации, касающиеся установки и питания Epson Stylus Photo R220. Прочитайте, чтобы оптимально пользоваться Epson Stylus Photo R220 и не использовать большего количества ресурсов, нежели это необходимо для правильной работы изделия. - Специальные функции Epson Stylus Photo R220
Здесь вы можешь узнать, как персонализировать изделие Epson Stylus Photo R220. Вы узнаете, какие дополнительные функции могут помочь Вам удобно использовать продукт Epson Stylus Photo R220 а также, какие функции Вашего устройства оптимальны для выполнения конкретной деятельности.
Как видите в инструкции вы найдете информацию, которая реально поможет Вам в использовании Вашего изделия. Стоит с ней ознакомиться, чтобы избежать разочарований, возникающих из более короткого, нежели предусматривалось, периода исправности изделия Epson Stylus Photo R220. Если все же вы не хотите копить инструкции в своем доме, наш сайт поможет Вам в этом — вы должны найти у нас руководство по обслуживанию большинства из своих устройств, а также Epson Stylus Photo R220.
Комментарии (0)
Найди любой мануал:
Например: Sony VGN-FW460J/T
Вы можете бесплатно скачать Руководство по эксплуатации для Epson Stylus Photo R220.
Также вы сможете прочесть онлайн этот документ без скачивания.
Скачать Руководство по эксплуатации для Epson Stylus Photo R220
Тип файла
PDF
Размер
1.74 Mb
Кол-во страниц
70
Просмотров
2191
Читать онлайн Руководство по эксплуатации для Epson Stylus Photo R220 (Страница 1)

Другие Принтеры Epson Stylus Photo R220
Топ Epson Принтеры
Ранее вы смотрели
Эта страница полезна для вас? Поделитесь ссылкой:

®
Epson Stylus Photo R220
Printer Basics

Copyright Notice
All rights reserved. No part of this publication may be reproduced, stored in a retrieval system, or
transmitted in any form or by any means, electronic, mechanical, photocopying, recording, or
otherwise, without the prior written permission of Seiko Epson Corporation. The information
contained herein is designed only for use with this Epson product. Epson is not responsible for any
use of this information as applied to other equipment.
Neither Seiko Epson Corporation nor its affiliates shall be liable to the purchaser of this product or
third parties for damages, losses, costs, or expenses incurred by purchaser or third parties as a result
of: accident, misuse, or abuse of this product or unauthorized modifications, repairs, or alterations to
this product, or (excluding the U.S.) failure to strictly comply with Seiko Epson Corporation’s
operating and maintenance instructions.
Seiko Epson Corporation shall not be liable for any damages or problems arising from the use of any
options or any consumable products other than those designated as Original Epson Products or
Epson Approved Products by Seiko Epson Corporation.
Responsible Use of Copyrighted Materials
Digital cameras, scanners, and ink jet printers, like conventional photocopiers and cameras, can be
misused by improper copying or printing of copyrighted material. While some countries’ laws
permit limited copying of copyrighted material in certain circumstances, those circumstances may
not be as broad as some people assume. Epson encourages each user to be responsible and respectful
of the copyright laws when using digital cameras, scanners, and ink jet printers.
Trademarks
Epson, Epson Stylus, MicroWeave, and Epson Photo Stickers are registered trademarks of Seiko
Epson Corporation.
BorderFree, RPM, and ColorLife are registered trademarks, PhotoEnhance and Print Lab are
trademarks, and Epson Connection, Epson Store, and SoundAdvice are service marks of Epson
America, Inc.
General Notice: Other product names used herein are for identification purposes only and may be
trademarks of their respective owners. Epson disclaims any and all rights in those marks.
© 2005 Epson America, Inc. CPD-19889
5/05
2

Contents
Welcome . . . . . . . . . . . . . . . . . . . . . . . . . . . . . . . . . . . . . . . . . . . . . . 5
Exif Print . . . . . . . . . . . . . . . . . . . . . . . . . . . . . . . . . . . . . . . . . . . . . . . . 5
About Your Documentation . . . . . . . . . . . . . . . . . . . . . . . . . . . . . . . . . . . 6
Printing From Start to Finish . . . . . . . . . . . . . . . . . . . . . . . . . . . . 7
Loading Paper. . . . . . . . . . . . . . . . . . . . . . . . . . . . . . . . . . . . . . . . . . . . . 7
Printing in Windows . . . . . . . . . . . . . . . . . . . . . . . . . . . . . . . . . . . . . . . . 9
Selecting Default Settings . . . . . . . . . . . . . . . . . . . . . . . . . . . . . . . . . 12
Printing With a Macintosh. . . . . . . . . . . . . . . . . . . . . . . . . . . . . . . . . . . 13
Selecting the Correct Paper Type. . . . . . . . . . . . . . . . . . . . . . . . . . . . . . . 17
Printing Borderless Photos . . . . . . . . . . . . . . . . . . . . . . . . . . . . . . . . . . . 18
Windows . . . . . . . . . . . . . . . . . . . . . . . . . . . . . . . . . . . . . . . . . . . . 19
Macintosh . . . . . . . . . . . . . . . . . . . . . . . . . . . . . . . . . . . . . . . . . . . 20
Printing on CDs and DVDs . . . . . . . . . . . . . . . . . . . . . . . . . . . . . . . . . . 22
Cleaning the Rollers . . . . . . . . . . . . . . . . . . . . . . . . . . . . . . . . . . . . 22
Inserting a CD or DVD . . . . . . . . . . . . . . . . . . . . . . . . . . . . . . . . . . 23
Designing CDs and DVDs . . . . . . . . . . . . . . . . . . . . . . . . . . . . . . . . 25
Printing Your Design. . . . . . . . . . . . . . . . . . . . . . . . . . . . . . . . . . . . 27
Adjusting the Print Position . . . . . . . . . . . . . . . . . . . . . . . . . . . . . . . 28
Adjusting the Print Density . . . . . . . . . . . . . . . . . . . . . . . . . . . . . . . 29
Maintaining Your Printer . . . . . . . . . . . . . . . . . . . . . . . . . . . . . . 31
Cleaning the Print Head . . . . . . . . . . . . . . . . . . . . . . . . . . . . . . . . . . . . 31
Running the Head Cleaning Utility . . . . . . . . . . . . . . . . . . . . . . . . . . 31
Replacing an Ink Cartridge. . . . . . . . . . . . . . . . . . . . . . . . . . . . . . . . . . . 33
Checking the Ink Supply . . . . . . . . . . . . . . . . . . . . . . . . . . . . . . . . . 33
Purchasing Ink Cartridges . . . . . . . . . . . . . . . . . . . . . . . . . . . . . . . . 35
Ink Cartridge Precautions. . . . . . . . . . . . . . . . . . . . . . . . . . . . . . . . . 35
Removing and Installing Ink Cartridges . . . . . . . . . . . . . . . . . . . . . . . 36

Aligning the Print Head. . . . . . . . . . . . . . . . . . . . . . . . . . . . . . . . . . . . . 39
Cleaning the Printer . . . . . . . . . . . . . . . . . . . . . . . . . . . . . . . . . . . . . . . 41
Transporting the Printer . . . . . . . . . . . . . . . . . . . . . . . . . . . . . . . . . . . . 42
Solving Problems . . . . . . . . . . . . . . . . . . . . . . . . . . . . . . . . . . . . . 43
Printer Parts . . . . . . . . . . . . . . . . . . . . . . . . . . . . . . . . . . . . . . . . . . . . . 43
Diagnosing Printer Problems . . . . . . . . . . . . . . . . . . . . . . . . . . . . . . . . . 44
Running a Printer Check . . . . . . . . . . . . . . . . . . . . . . . . . . . . . . . . . 45
Problems and Solutions . . . . . . . . . . . . . . . . . . . . . . . . . . . . . . . . . . . . . 46
Setup and Software Installation Problems . . . . . . . . . . . . . . . . . . . . . . 46
Printer Problems . . . . . . . . . . . . . . . . . . . . . . . . . . . . . . . . . . . . . . . 47
Print Quality Problems . . . . . . . . . . . . . . . . . . . . . . . . . . . . . . . . . . 48
Problems With Paper Feeding. . . . . . . . . . . . . . . . . . . . . . . . . . . . . . 50
CD/DVD Printing Problems . . . . . . . . . . . . . . . . . . . . . . . . . . . . . . 51
Miscellaneous Printout Problems. . . . . . . . . . . . . . . . . . . . . . . . . . . . 52
Uninstalling Printer Software . . . . . . . . . . . . . . . . . . . . . . . . . . . . . . . . . 53
Windows . . . . . . . . . . . . . . . . . . . . . . . . . . . . . . . . . . . . . . . . . . . . 53
Macintosh . . . . . . . . . . . . . . . . . . . . . . . . . . . . . . . . . . . . . . . . . . . 54
Where To Get Help . . . . . . . . . . . . . . . . . . . . . . . . . . . . . . . . . . . . . . . 54
Requirements and Notices . . . . . . . . . . . . . . . . . . . . . . . . . . . . . 57
Windows System Requirements . . . . . . . . . . . . . . . . . . . . . . . . . . . . . . . 57
Macintosh System Requirements. . . . . . . . . . . . . . . . . . . . . . . . . . . . . . . 57
Important Safety Instructions . . . . . . . . . . . . . . . . . . . . . . . . . . . . . . . . . 58
Ink Cartridge Safety Instructions . . . . . . . . . . . . . . . . . . . . . . . . . . . . 59
FCC Compliance Statement . . . . . . . . . . . . . . . . . . . . . . . . . . . . . . . . . . 60
Declaration of Conformity . . . . . . . . . . . . . . . . . . . . . . . . . . . . . . . . . . . 61
ENERGY STAR Compliance . . . . . . . . . . . . . . . . . . . . . . . . . . . . . . . . . . . 61
Epson America, Inc. Limited Warranty . . . . . . . . . . . . . . . . . . . . . . . . . . 62
Index . . . . . . . . . . . . . . . . . . . . . . . . . . . . . . . . . . . . . . . . . . . . . . . . 65
4 Contents

Welcome
Your Ep son Sty lu s® Photo R220 is a full-featured photo and CD/DVD printer.
You get outstanding prints from these advanced features:
■ Epson’s exclusive 6-color ink technology lets you achieve fine shadow detail,
dazzling highlights, and excellent fill across a wide range of colors. Genuine
®
Epson
■ CD and DVD printing on ink jet-printable CDs and DVDs.
■ Tr u e B or d e r F re e
size papers.
■ A standard rear USB port plus a front USB port for quick connection to
your laptop.
Note:
The front USB port does not support digital cameras or other USB devices.
Exif Print
ink and papers create long-lasting and water-resistant prints.
®
frame-ready prints on select 4 × 6, 5 × 7, 8 × 10, and letter-
The Exif (Exchangeable Image File) Print format includes information about your
digital camera settings in JPEG/TIFF files so your printer and application can use
them to create accurate print settings. Most digital cameras store Exif Print
information such as shutter speed, metering, flash, exposure settings, resolution,
and lens use in the JPEG/TIFF image file. Your printer uses the information to
ensure the most accurate image reproduction.

About Your Documentation
To set up your printer and install its software, see the Start Here sheet.
This book contains instructions on loading paper, printing with Windows
Macintosh,
your printer, and solving basic problems.
®
printing borderless photos, printing on CDs and DVDs, maintaining
®
and
For more information about your printer, double-click the
Guide
icon on your desktop.
Please follow these guidelines throughout:
Warning:
Warnings must be followed carefully to avoid bodily injury.
Caution:
Cautions must be observed to avoid damage to your equipment.
Note:
Notes contain important information about your printer.
Tip:
Tips contain hints for better printing.
SPR220 Reference
6 Welcome
Printing From Start to Finish
Loading Paper
The type of paper you choose affects the way your printout looks, so be sure to
select the correct paper for your job. If you are just printing a rough draft, plain
paper is fine. For the best results, you’ll want to use one of Epson’s special ink jet
papers designed for your printer. For example, your photos will look great printed
on Epson Ultra Premium Glossy Photo Paper. See “Selecting the Correct Paper
Type” on page 17 for more information.
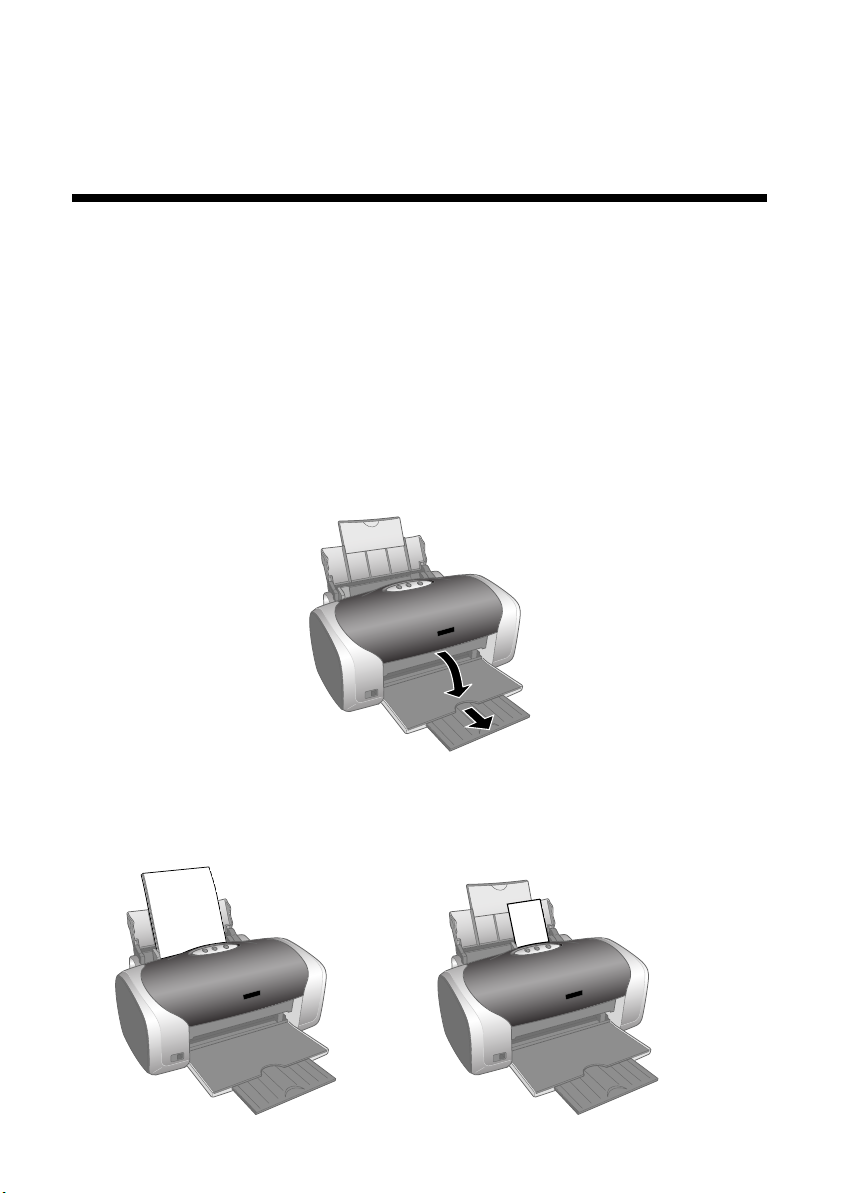
Follow these steps to load paper in your printer.
1. Open the output tray and its extension.
2. Insert paper, printable side up, against the right edge guide behind the tab.
3. Slide the left edge guide against the paper (but not too tightly).
8 × 10-inch or
Letter-size paper
4 × 6-inch or
5 × 7-inch paper
Follow these guidelines when loading paper:
■ Load the printable side face-up. It’s often brighter or whiter than the
other side.
■ Load letterhead or preprinted paper into the printer top edge first.
■ Always load the short edge first, even when printing in landscape mode.
■ Don’t load paper above the arrow on the left edge guide.
■ If you’re using special paper, follow the instructions that came with it.
■ If the paper has a cut corner, position it in the upper right corner as you load
it in the sheet feeder.
■ To load Epson ink jet papers, follow these guidelines:
Paper Type Loading Capacity
Premium Bright White Paper
Photo Quality Ink Jet Paper
Photo Quality Ink Jet Cards 30 cards
Matte Paper Heavyweight
Glossy Photo Paper
ColorLife® Photo Paper
Ultra Premium Glossy Photo Paper
Premium Glossy Photo Paper
Premium Semigloss Photo Paper
Premium Luster Photo Paper
Semigloss Scrapbook Photo Paper
PremierArt
Double-Sided Matte Paper
Iron-On Transfer Paper
Glossy Photo Greeting Cards
Photo Stickers
Photo Quality Self Adhesive Sheets
Ink Jet Transparencies
TM
Matte Scrapbook Photo Paper
100 sheets
20 sheets
1 sheet
8 Printing From Start to Finish
Printing in Windows
Follow the instructions in this section to print a document or photo using basic
print settings. For instructions on printing borderless photos, see page 18. For
instructions on printing with Advanced print settings, see your on-screen
Reference Guide.
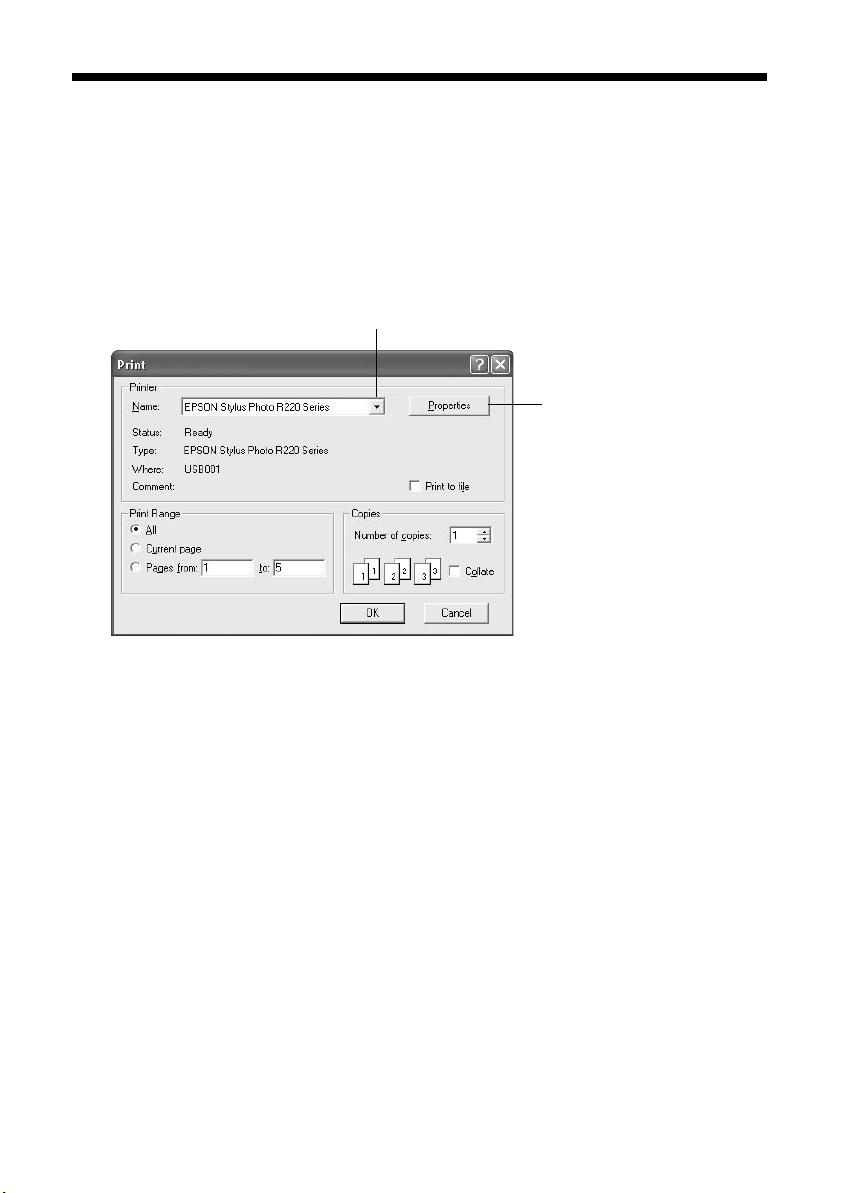
1. From the File menu, click
2. Make sure
3. Click the
Options button, click it. Then click Properties or Preferences on the
EPSON Stylus Photo R220 Series is selected.
Properties or Preferences button. (If you see a Setup, Printer, or
Print.
Select your printer here
Click here to open
your printer software
next screen.)
Printing in Windows 9
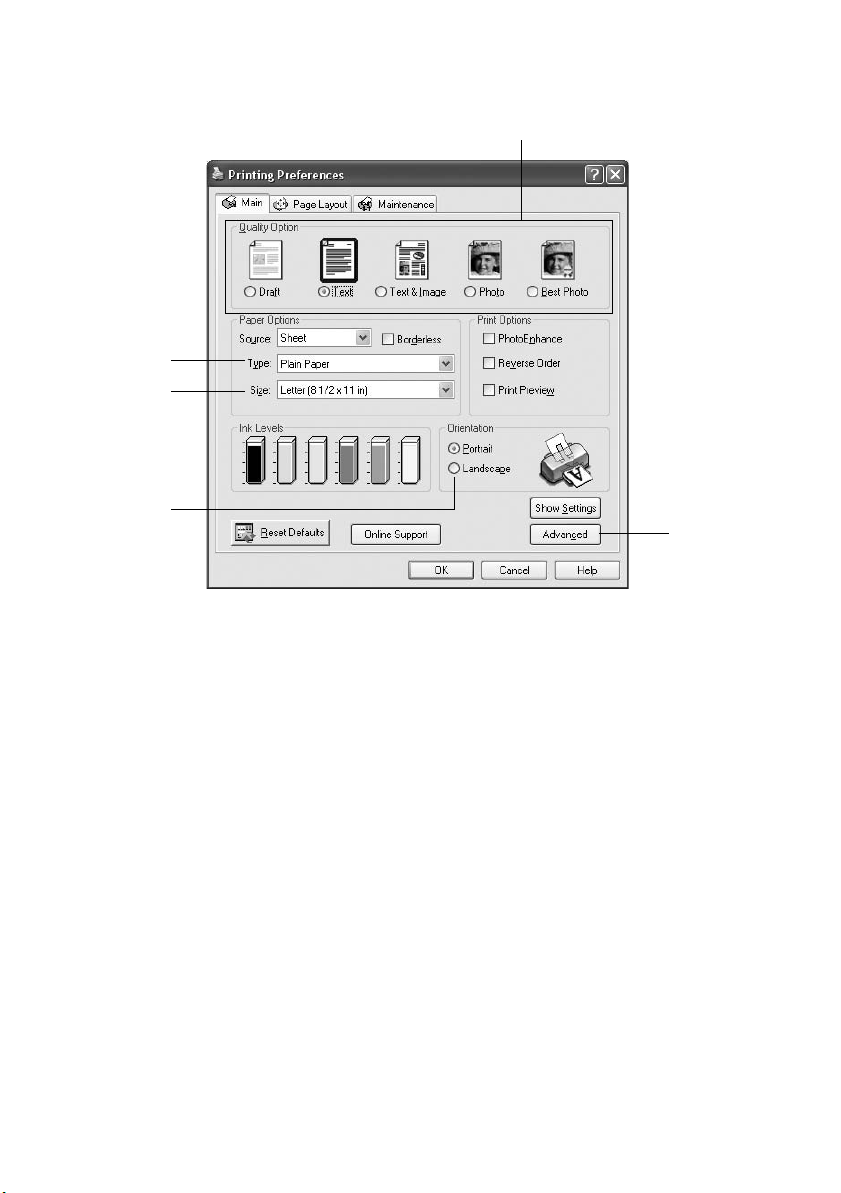
You see the basic print settings window:
Select the type of document you’re printing
Select your
paper Type
Select your
paper Size
Select your
document
or image
orientation
Click here
for more
options
4. Select from these
Quality Option settings:
Draft: For rough drafts with reduced print quality
Text: For text-only documents with higher text quality
Text & Image: For documents with text and images with higher quality
Photo: For photos and graphics with good quality and speed
Best Photo: For photos or graphics with high print quality
5. Make sure the paper
Type and Size settings match the paper you’ve loaded in
the printer. See “Selecting the Correct Paper Type” on page 17.
6. Select
Portrait or Landscape for the Orientation setting.
10 Printing From Start to Finish
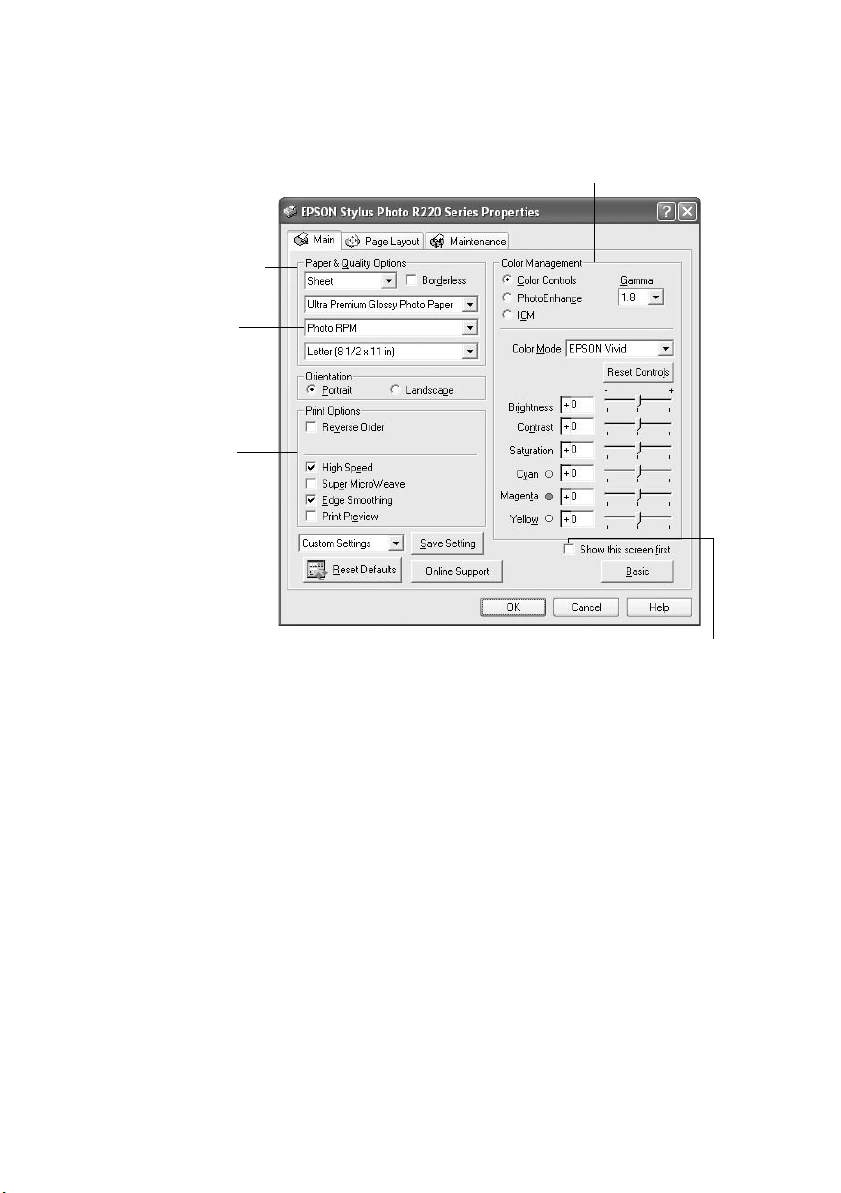
7. For more printing options, click the
following settings as necessary.
Select a color management method
(To choose No Color Adjustment, click ICM first)
Select Paper & Quality
Options as necessary
Advanced button. Then select the
Click here to select
Photo RPM
best print quality on
certain paper types
Select Print Options
as necessary
®
for the
Click here if you want to see this Advanced
screen each time you access your print settings
Note:
For more information about advanced settings, or instructions on saving them as a
group so you can reuse them later, click ? or Help.
8. If you want to change the layout settings, click the Page Layout tab and
select settings as necessary.
9. Click
OK to save your settings, then click OK or Print to start printing.
Printing in Windows 11
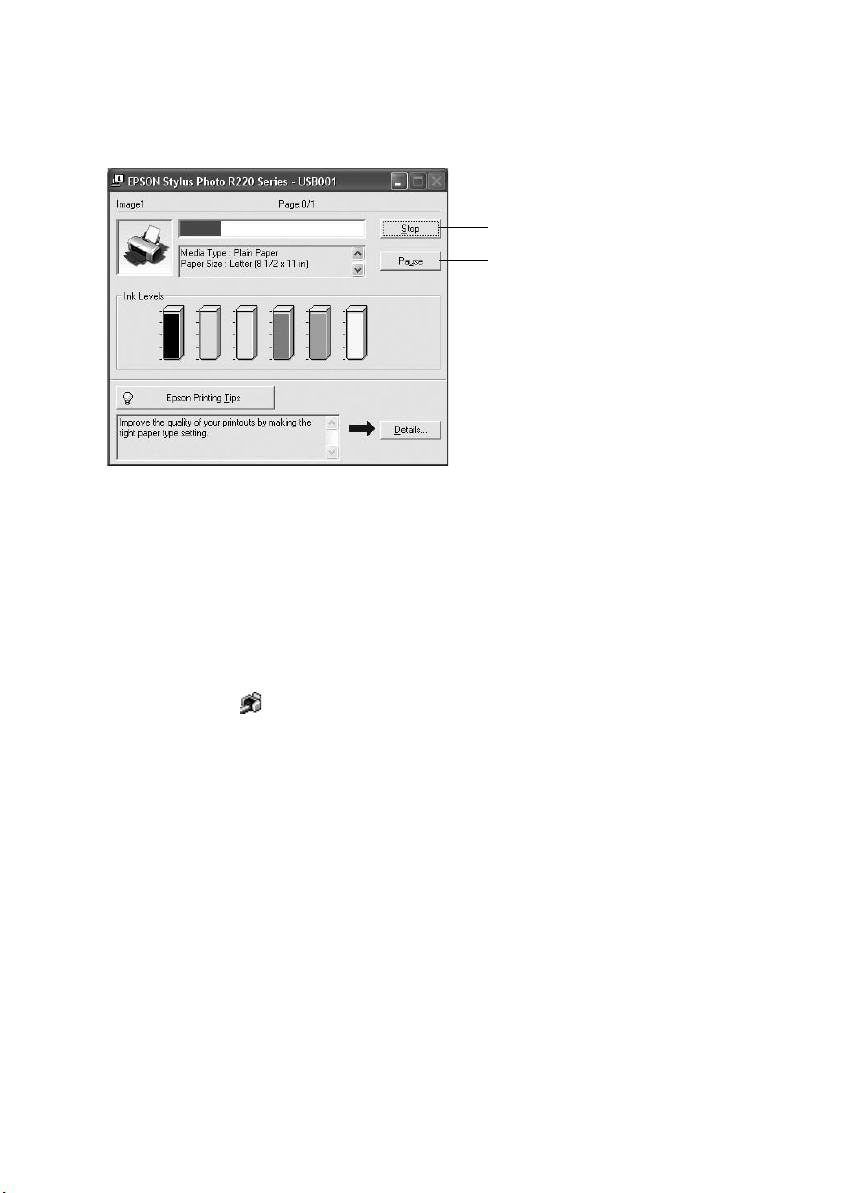
During printing, this window appears and shows the progress of your print job.
You can use these buttons to cancel, pause, or resume printing. You can also see
how much ink you have left.
Click to cancel printing
Click to pause or resume printing
Tip:
You can also cancel printing by pressing the ) paper button on your printer.
Selecting Default Settings
Your printer settings only apply to the program that you’re currently using. If you
want, you can change the Windows default printer settings for all your programs.
1. Right-click the icon in the lower right corner of your screen (taskbar).
2. Select
Printer Settings. You see the window shown on page 10.
3. Select the default settings you want for all your applications, then click
You can still change the printer settings in your program, if necessary.
12 Printing From Start to Finish
OK.
Printing With a Macintosh
Follow the instructions in this section to print a document or photo using basic
print settings. For instructions on printing borderless photos, see page 18. For
instructions on printing with Advanced print settings, see your on-screen
Reference Guide.
Before you begin, make sure you added your printer to the Printer Setup Utility or
Print Center as described on the Start Here sheet.
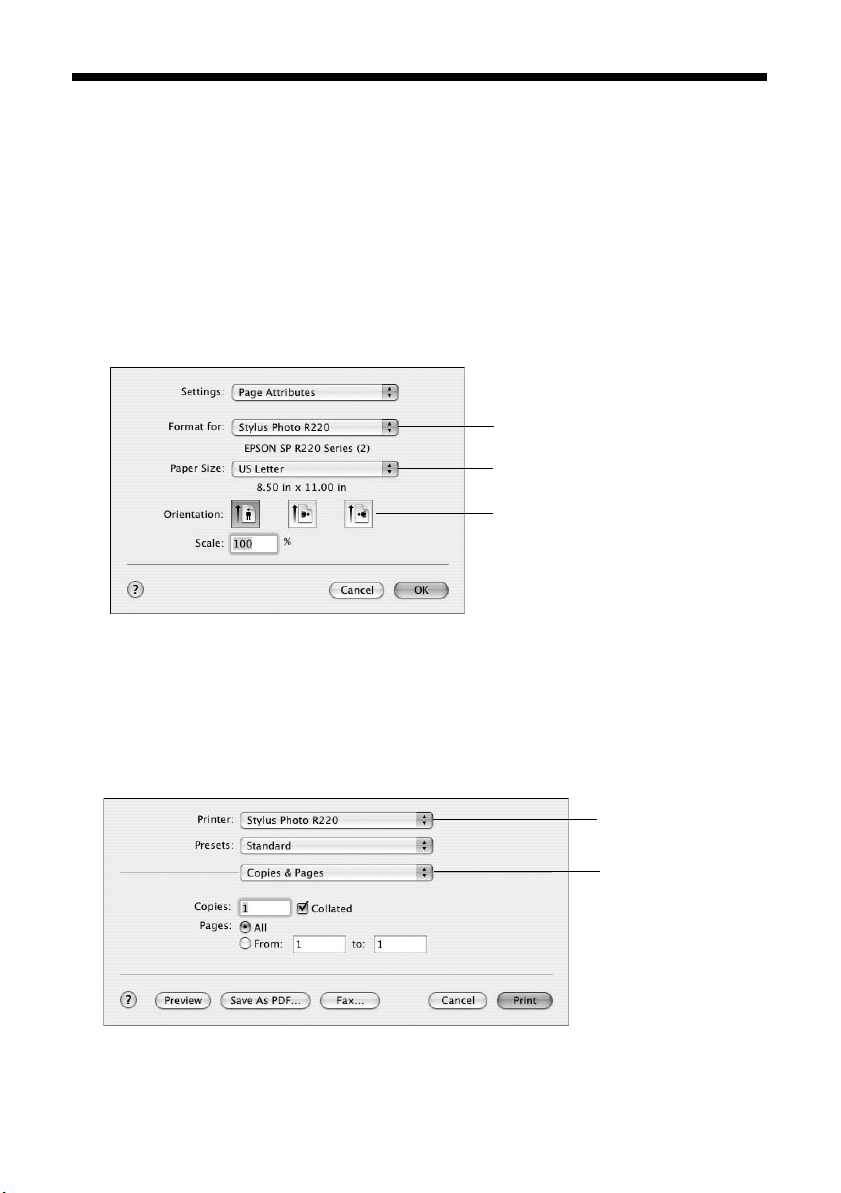
1. From the File menu, select
2. Select
Stylus Photo R220 from the Format for pop-up menu.
Page Setup. You see the Page Setup window:
3. Select your Paper Size and Orientation.
4. Click
5. From the File menu, select
OK to close the Page Setup window.
Print. You see a window like this one:
Select Stylus
Photo R220
Select your Paper Size
Select your document
or image orientation
Select Stylus
Photo R220
Select Print Settings
6. Select
7. Select
Stylus Photo R220 from the Printer pop-up menu.
Print Settings from the pop-up menu.
Printing With a Macintosh 13
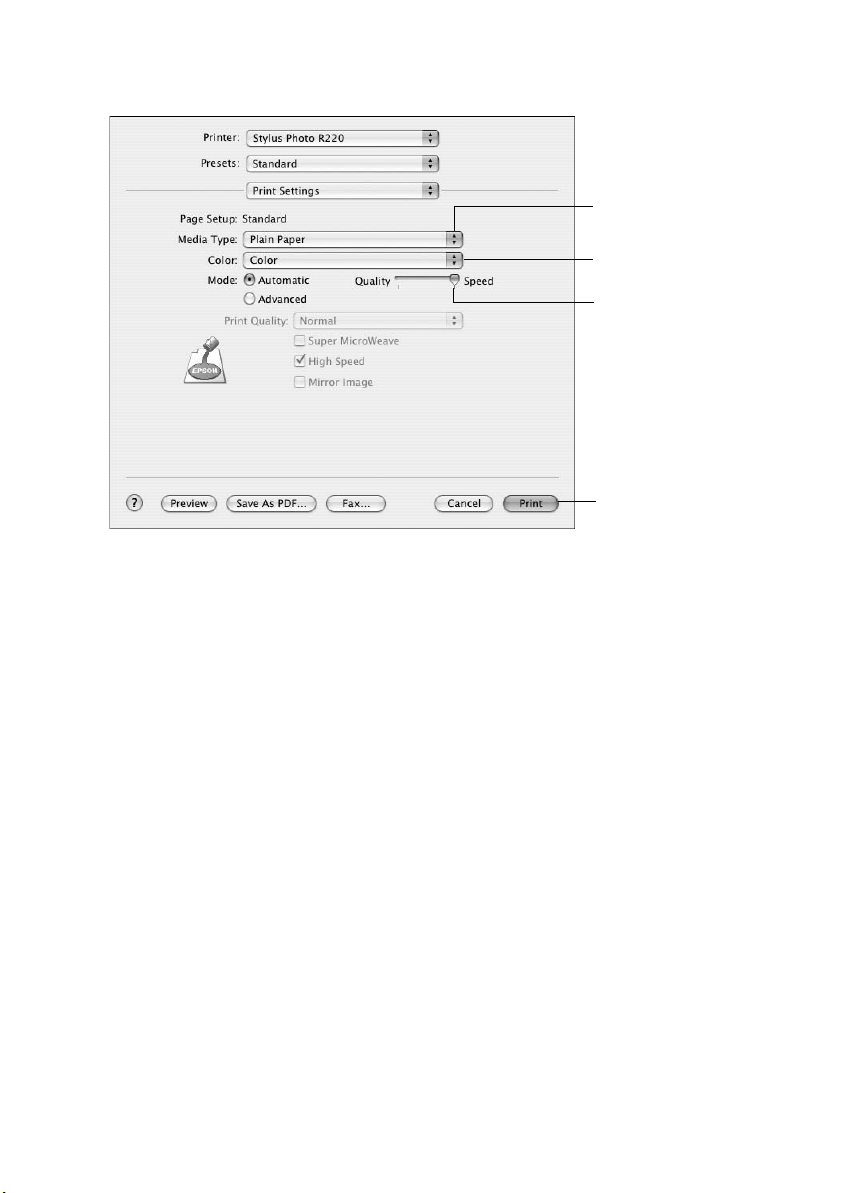
8. Select the following Print Settings as necessary:
Select the type of
paper you’re using
Select Color or
Black ink
Select higher
quality or faster
printing (if available)
Click Print
9. You can also choose other print settings by selecting these options in the
pop-up menu:
■ Copies & Pages: To select the number of copies or a page range.
■ Layout: To select page layout options.
■ Output Options: To save your print job as a PDF file.
■ Scheduler: To schedule your print job to print at a later time.
■ Paper Handling: To select page printing options, such as Reverse
print order
■ Cover Page: To print a cover page before your document or photo.
■ ColorSync or Color Management: To select ColorSync
.
color controls or gamma setting, or turn off color adjustments made by
the printer driver.
■ Expansion: To adjust the borderless image size; see page 20 for details.
■ Summary: To view a list of all your selections.
14 Printing From Start to Finish
®
or adjust the
■ Extension Setting: To select a wider platen gap if ink smears on sheets
or envelopes.
■ Save Custom Settings: To save your selections for future use. (In OS X
10.2.4, select
Note:
For more information about printer settings, click the ? button.
Save As from the Presets pop-up menu.)
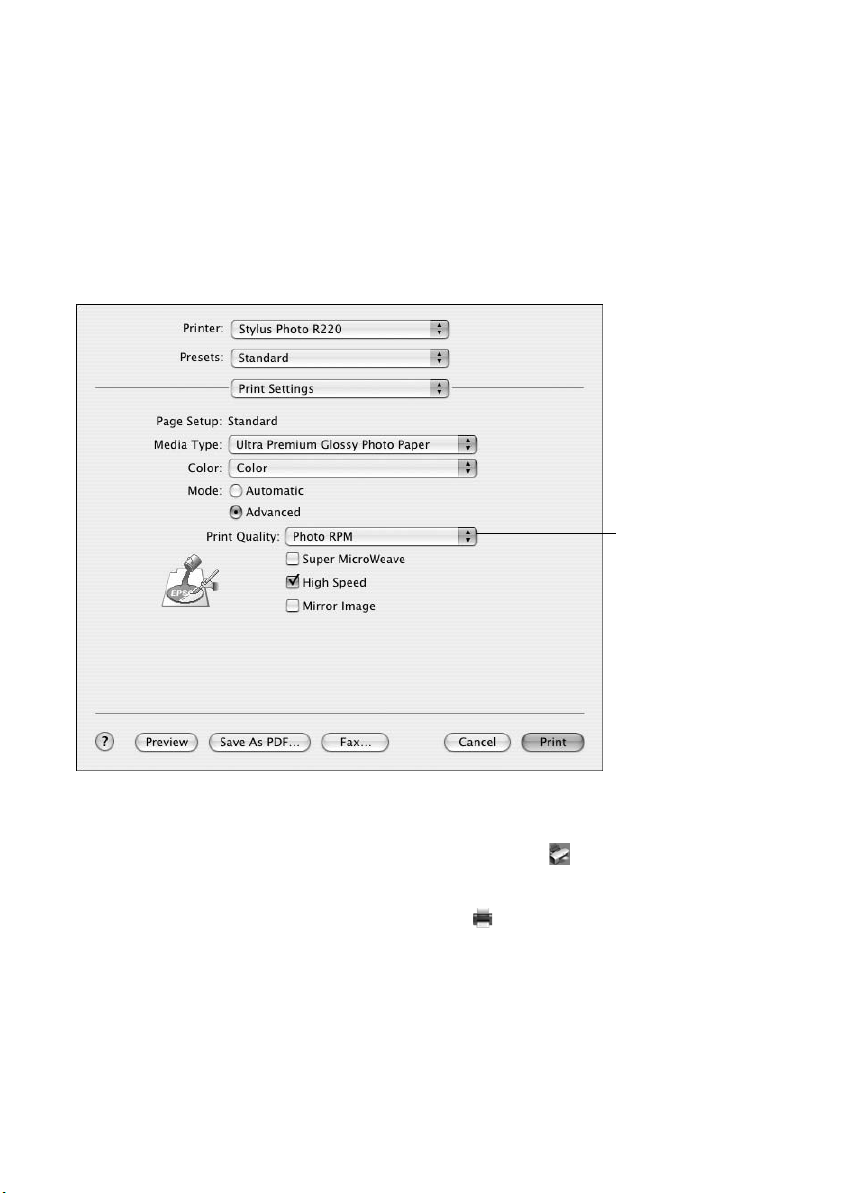
10. Click the Advanced button to change these settings:
Select Photo RPM
for the best print
quality on certain
paper types
11. Click
Print to start printing.
12. To monitor the progress of your print job, click the printer icon when it
appears in the dock on the bottom of your desktop.
If you’re using Mac OS X 10.2.4, click the Print Center icon instead, then
double-click
Stylus Photo R220 in the Printer List window.
Printing With a Macintosh 15
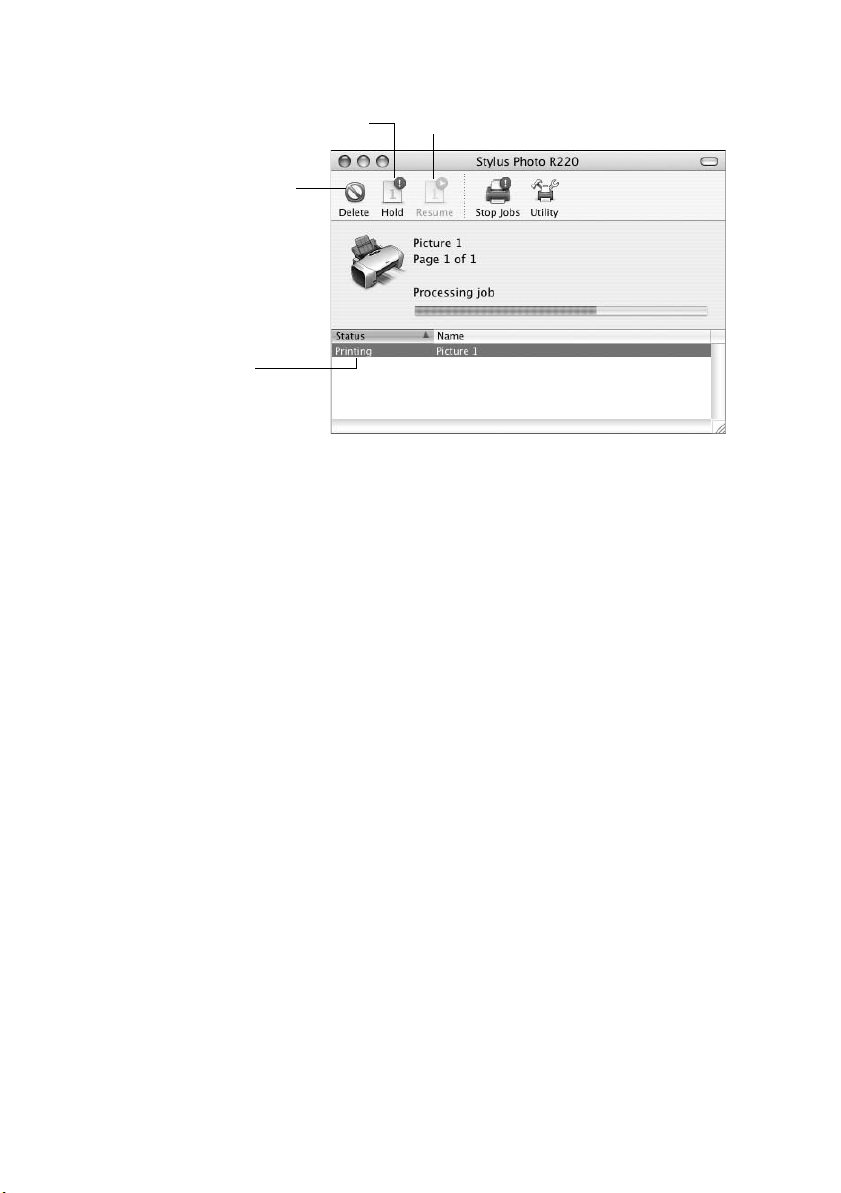
You see a screen like this:
Pause printing Resume printing
Cancel printing
Select the
print job
Tip:
You can also cancel printing by pressing the ) paper button on your printer.
13. When you’re finished, close the printer window or Print Center.
16 Printing From Start to Finish
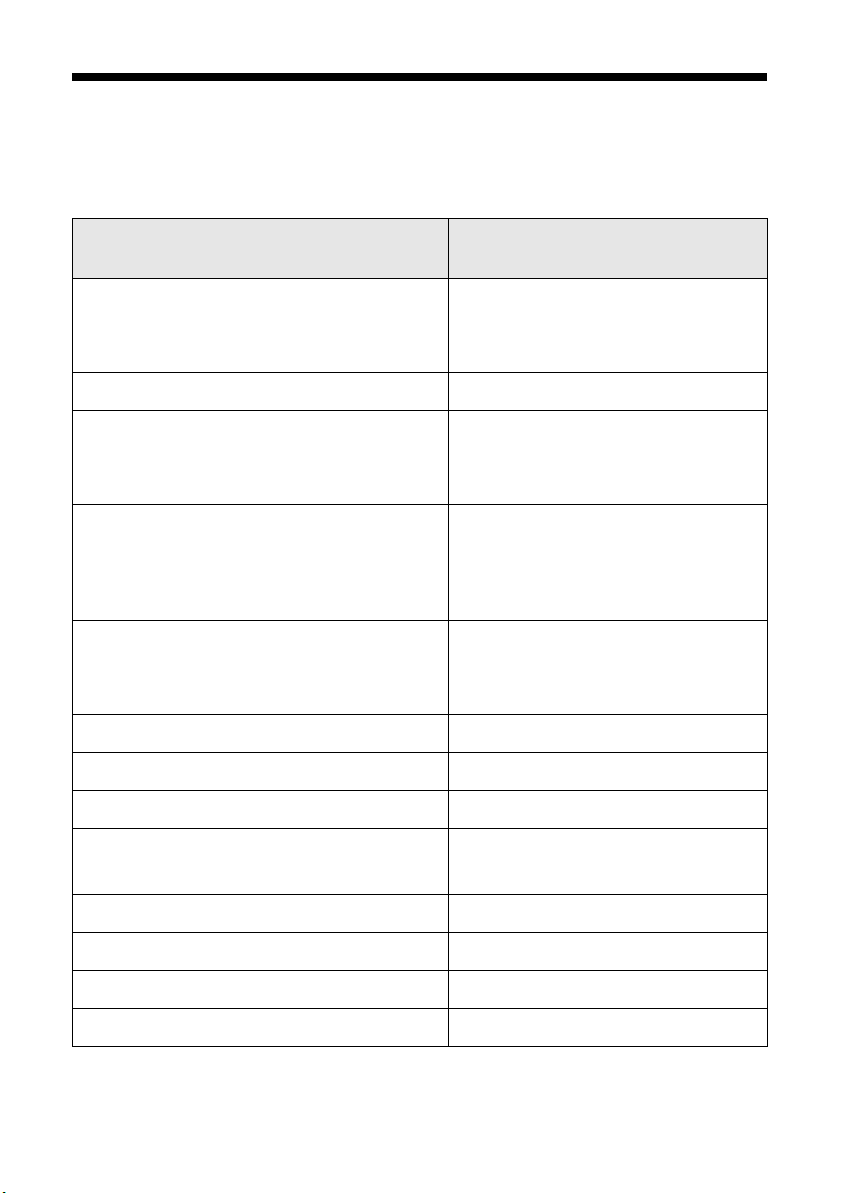
Selecting the Correct Paper Type
Select the correct paper Type or Media Type setting so your printer knows what
kind of paper you’re using and adjusts the ink coverage accordingly.
Select this paper Type or Media
For this paper
Type setting
Plain paper
Epson Iron-On Transfer Paper
Epson Ink Jet Transparencies
Epson Premium Bright White Paper Bright White Paper
Epson Photo Quality Ink Jet Paper
Epson Photo Quality Ink Jet Cards
Epson Photo Quality Self Adhesive Sheets
Epson Matte Paper Heavyweight
Epson Double-Sided Matte Paper
PremierArt Matte Scrapbook Photo Paper
for Epson
Epson Glossy Photo Paper
Epson ColorLife Photo Paper
Epson Glossy Photo Greeting Cards
Epson Ultra Premium Glossy Photo Paper Ultra Premium Glossy Photo Paper
Epson Premium Glossy Photo Paper Premium Glossy Photo Paper
Epson Premium Luster Photo Paper Premium Luster Photo Paper
Epson Premium Semigloss Photo Paper
Epson Semigloss Scrapbook Photo Paper
Epson Photo Stickers
®
Plain Paper
Photo Quality Ink Jet Paper
Matte Paper — Heavyweight
Glossy Photo Paper
Premium Semigloss Photo Paper
Photo Stickers
CDs or DVDs CD/DVD
Premium Surface CDs or DVDs CD/DVD Premium Surface
Envelopes Envelope
Selecting the Correct Paper Type 17
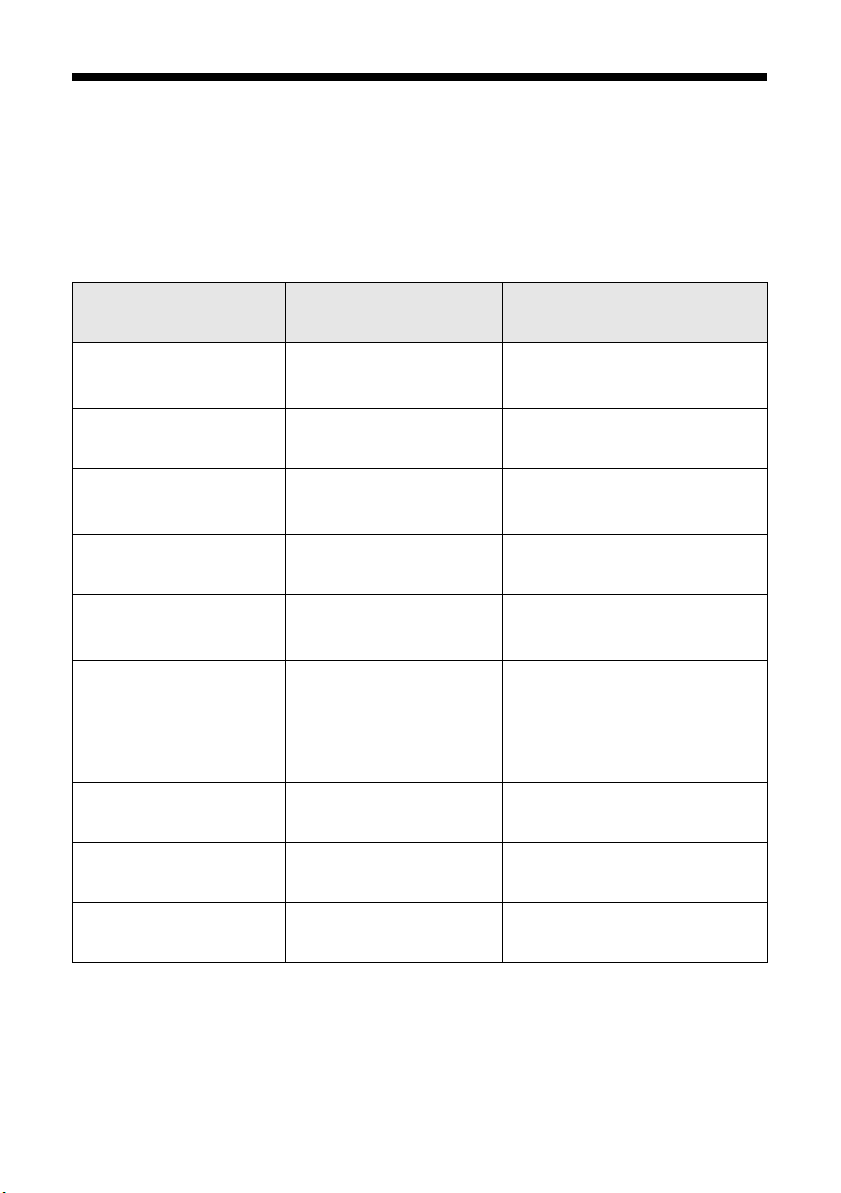
Printing Borderless Photos
You can print your photos with no margins, extending the image all the way to the
edges of the page.
Although borderless printing is a bit slower, you get beautiful snapshots and
enlargements, without trimming, on these papers and sizes:
Paper Type or Media Type
Paper name Sizes
setting
Epson Matte Paper
Heavyweight
PremierArt Matte
Scrapbook Photo Paper
Epson Glossy Photo
Paper
Epson ColorLife Photo
Paper
Epson Ultra Premium
Glossy Photo Paper
Epson Premium Glossy
Photo Paper
Epson Premium Luster
Photo Paper
Epson Premium
Semigloss Photo Paper
Epson Semigloss
Scrapbook Photo Paper
8 × 10 inches
Letter (8.5 × 11 inches)
Letter (8.5 × 11 inches) Matte Paper — Heavyweight
4 × 6 inches
Letter (8.5 × 11 inches)
Letter (8.5 × 11 inches) Glossy Photo Paper
4 × 6 inches
Letter (8.5 × 11 inches)
4 × 6 inches
5 × 7 inches
8 × 10 inches
Letter (8.5 × 11 inches)
Letter (8.5 × 11 inches) Premium Luster Photo Paper
Letter (8.5 × 11 inches) Premium Semigloss Photo
Letter (8.5 × 11 inches) Premium Semigloss Photo
Matte Paper — Heavyweight
Glossy Photo Paper
Ultra Premium Glossy Photo
Paper
Premium Glossy Photo Paper
Paper
Paper
Return any unused paper to its original package. Store your printouts in resealable
plastic bags, photo albums, or glass-covered picture frames. Keep both printed and
unused paper away from high temperatures, humidity, and sunlight.
18 Printing From Start to Finish
See these sections for instructions on selecting printer settings:
■ “Windows” below
■ “Macintosh” on page 20
Windows
1. Start your photo program and open your photo.
2. From the File menu, select
3. Make sure
Properties or Preferences.
EPSON Stylus Photo R220 Series is selected, then click
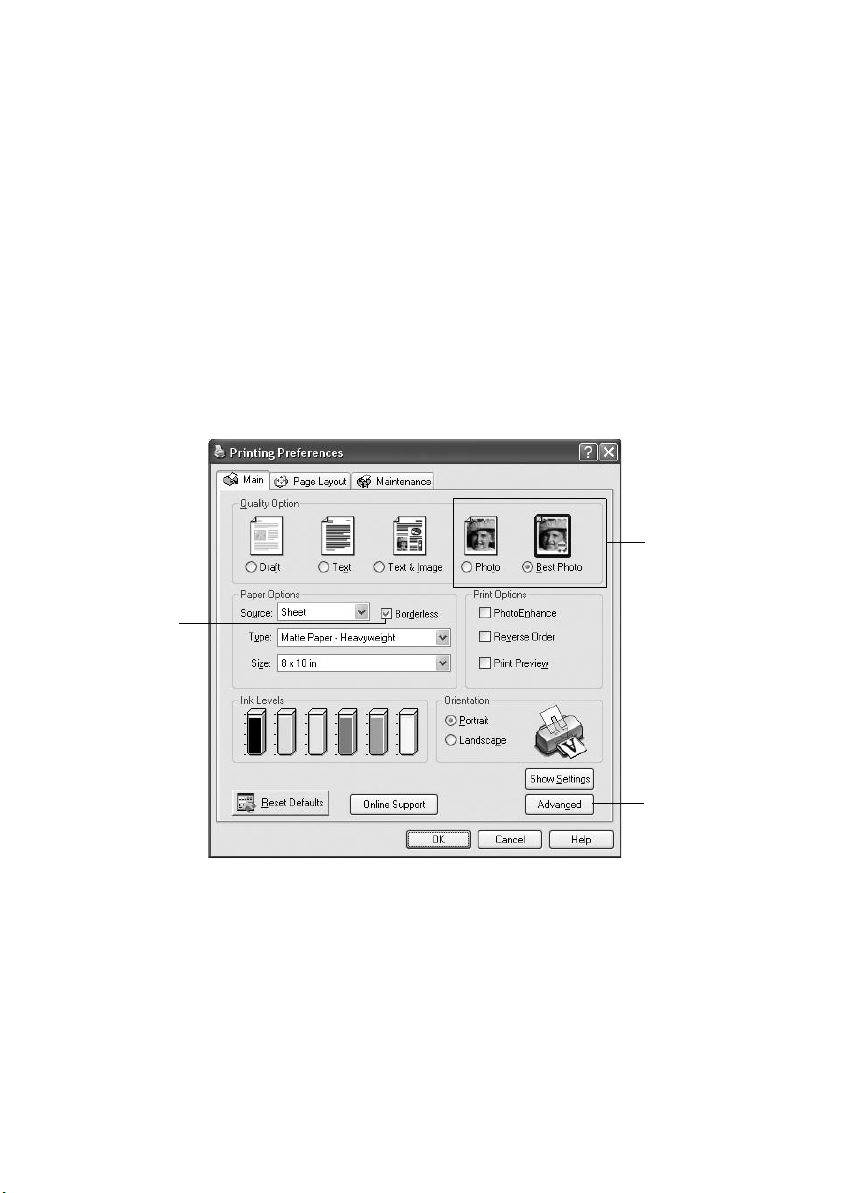
You see the following window:
Click here for
photos without
white borders
Print.
Select Photo
or Best Photo
Click here for
more settings
4. Select
Photo or Best Photo as the Quality Option setting.
5. Select one of the following as the paper Type setting:
■ Matte Paper — Heavyweight
■ Photo Paper
■ Glossy Photo Paper
■ Ultra Premium Glossy Photo Paper
■ Premium Glossy Photo Paper
Printing Borderless Photos 19
■ Premium Luster Photo Paper
■ Premium Semigloss Photo Paper
6. Click the Borderless checkbox. Read the message and click OK.
Note:
If you need to adjust the amount of image expansion necessary for borderless
printing, click the Page Layout tab and move the Expansion slider.
7. Select your paper Size setting.
8. Select your photo orientation.
9. Click
OK to save your settings, then click OK or Print to start printing.
Macintosh
1. Start your photo program and open your photo.
2. From the File menu, select
3. Select
Stylus Photo R220 from the Format for pop-up menu.
4. Select a borderless Paper Size.
5. Select your photo orientation.
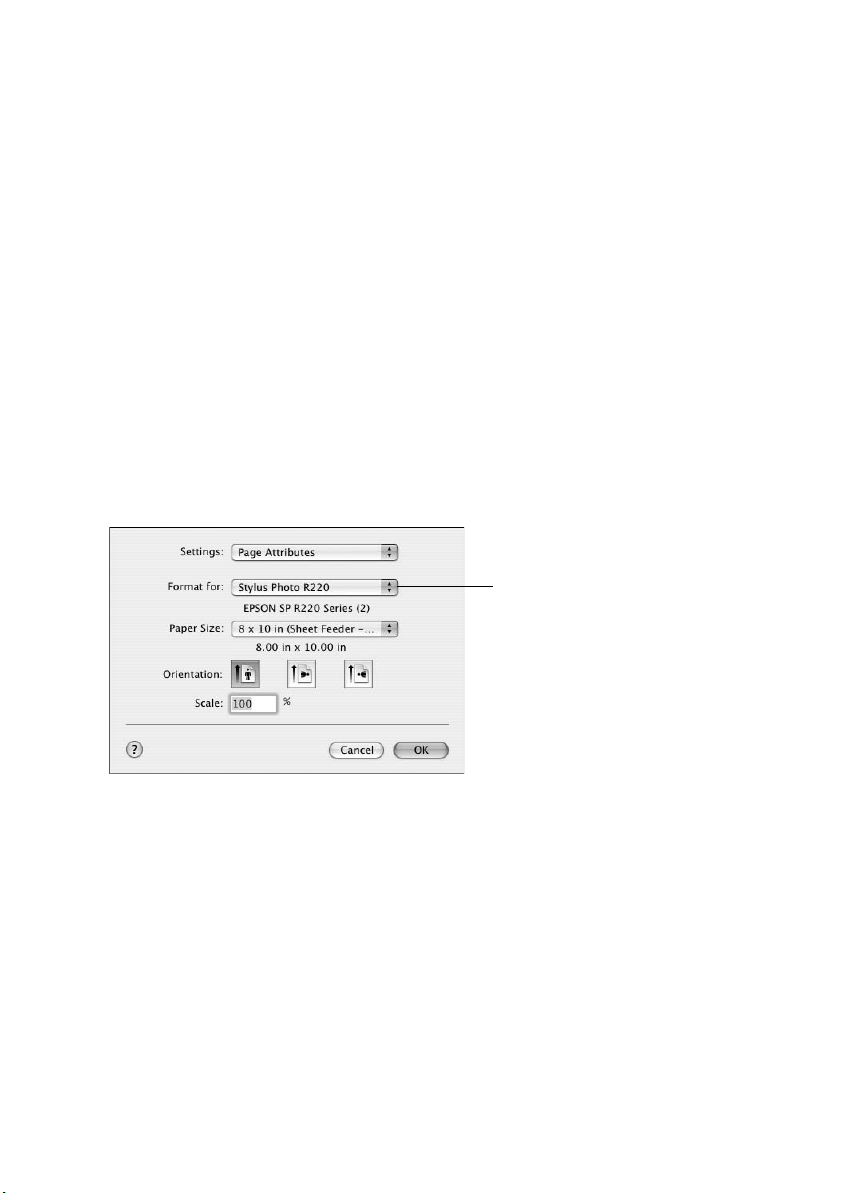
Page Setup. You see the Page Setup window:
Select Stylus Photo R220
6. Click
OK to close the Page Setup window.
20 Printing From Start to Finish
7. From the File menu, select
Print.
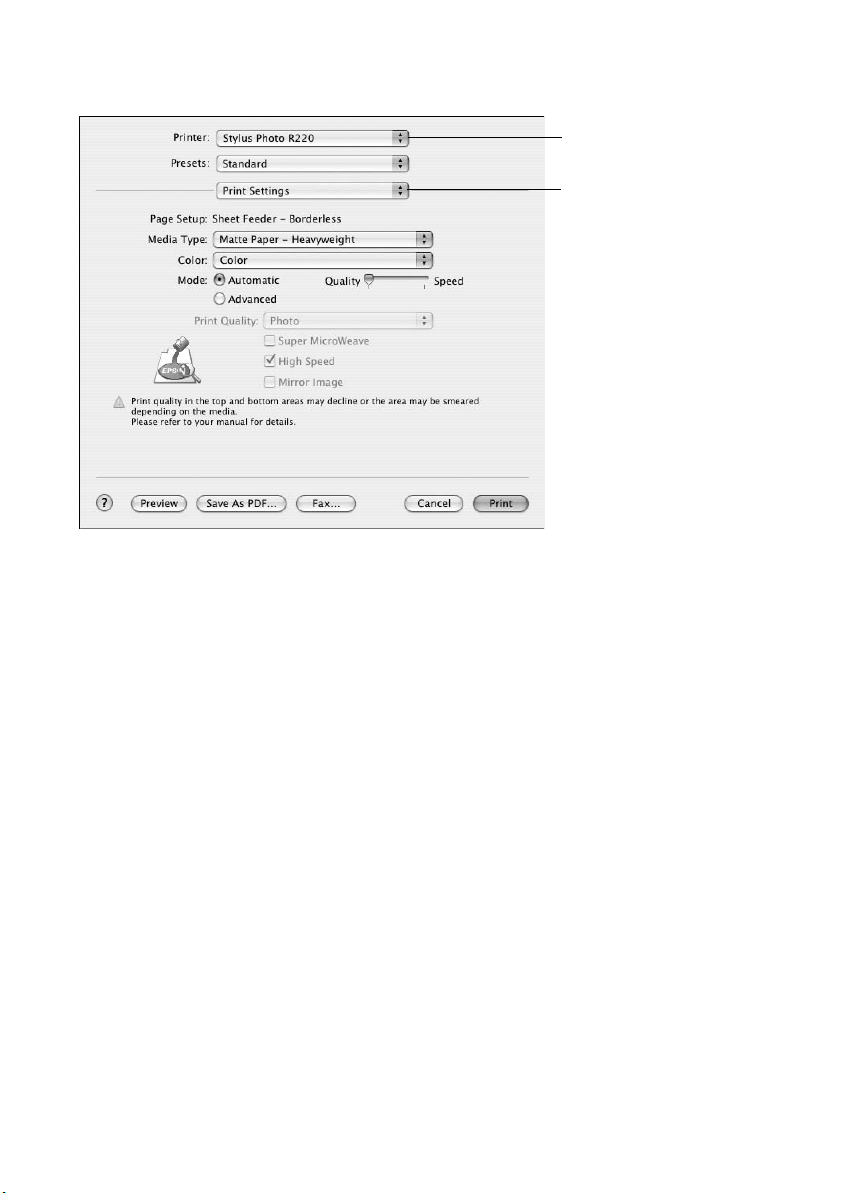
Select Stylus Photo R220
Select Print Settings
8. Select
9. Select
Stylus Photo R220 in the Printer pop-up menu.
Print Settings from the pop-up menu.
10. Select one of the following as the Media Type setting:
■ Matte Paper — Heavyweight
■ Photo Paper
■ Glossy Photo Paper
■ Ultra Premium Glossy Photo Paper
■ Premium Glossy Photo Paper
■ Premium Luster Photo Paper
■ Premium Semigloss Photo Paper
11. Select Quality using the slider.
Note:
If you need to adjust the amount of image expansion necessary for borderless
printing, select Expansion from the pop-up menu and move the Expansion slider.
12. Click Print to start printing.
Printing Borderless Photos 21
Loading…