

CD RDS RECEIVER
AUTORADIO CD RDS
SINTOLETTORE CD RDS
REPRODUCTOR DE CD CON RECEPTOR RDS
CD RDS-EMPFÄNGER
CD RDS-ONTVANGER
CD RDS ПРИЕМНИК
Owner’s Manual
DEH-1320MP
DEH-1300MP
Mode d’emploi
Manuale d’istruzioni
Manual de instrucciones
Bedienungsanleitung
Handleiding
Руководство пользователя
NederlandsDeutschEspañolItalianoFrançaisEnglish
Русский
Thank you for purchasing this PIONEER
product.
To ensure proper use, please read through this
manual before using this product. It is especially important that you read and observe
WARNINGs and CAUTIONs in this manual.
Please keep the manual in a safe and accessible
place for future reference.
If you want to dispose this product, do not mix
it with general household waste. There is a separate collection system for used electronic
products in accordance with legislation that requires proper treatment, recovery and recycling.
Private households in the member states of
the EU, in Switzerland and Norway may return
their used electronic products free of charge
to designated collection facilities or to a retailer (if you purchase a similar new one).
For countries not mentioned above, please
contact your local authorities for the correct
method of disposal.
By doing so you will ensure that your disposed
product undergoes the necessary treatment,
recovery and recycling and thus prevent potential negative effects on the environment
and human health.
In case of trouble
Should this product fail to operate properly,
please contact your dealer or nearest authorized Pioneer Service Station.
About this unit
The tuner frequencies on this unit are allocated for use in Western Europe, Asia, the
Middle East, Africa and Oceania. Use in other
areas may result in poor reception. The RDS
(radio data system) function only operates in
areas with broadcasting RDS signals for FM
stations.
CAUTION
This product is a class 1 laser product classified under the Safety of laser products, IEC
60825-1:2007, and contains a class 1M laser
module. To ensure continued safety, do not remove any covers or attempt to gain access to
the inside of the product. Refer all servicing to
qualified personnel.
CAUTION—CLASS 1M INVISIBLE LASER
RADIATION WHEN OPEN, DO NOT VIEW
DIRECTLY WITH OPTICAL INSTRUMENTS.
CAUTION
! Do not allow this unit to come into contact
with liquids. Electrical shock could result.
Also, damage to this unit, smoke, and overheating could result from contact with liquids.
! The Pioneer CarStereo-Pass is for use only in
Germany.
! Always keep the volume low enough to hear
outside sounds.
! Avoid exposure to moisture.
! If the battery is disconnected or discharged,
any preset memory will be erased.
En
2
Section
01
Before You Start
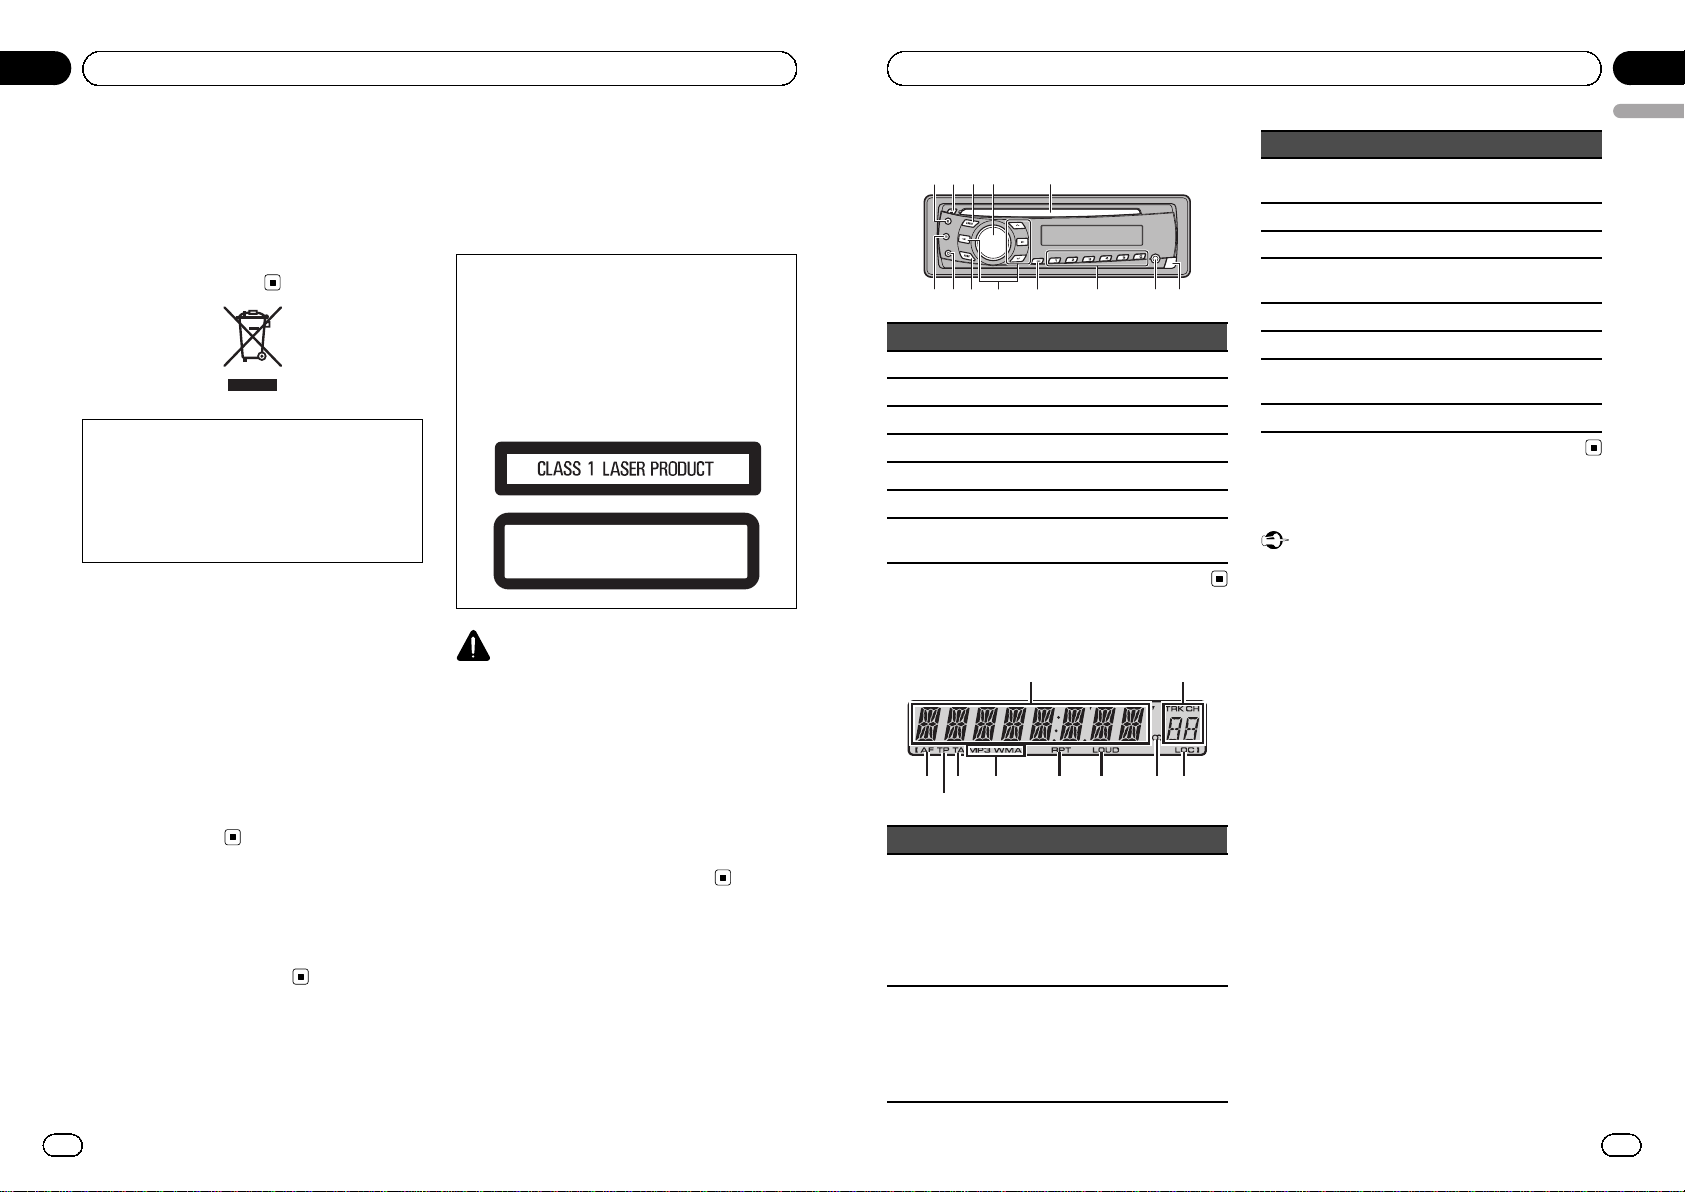
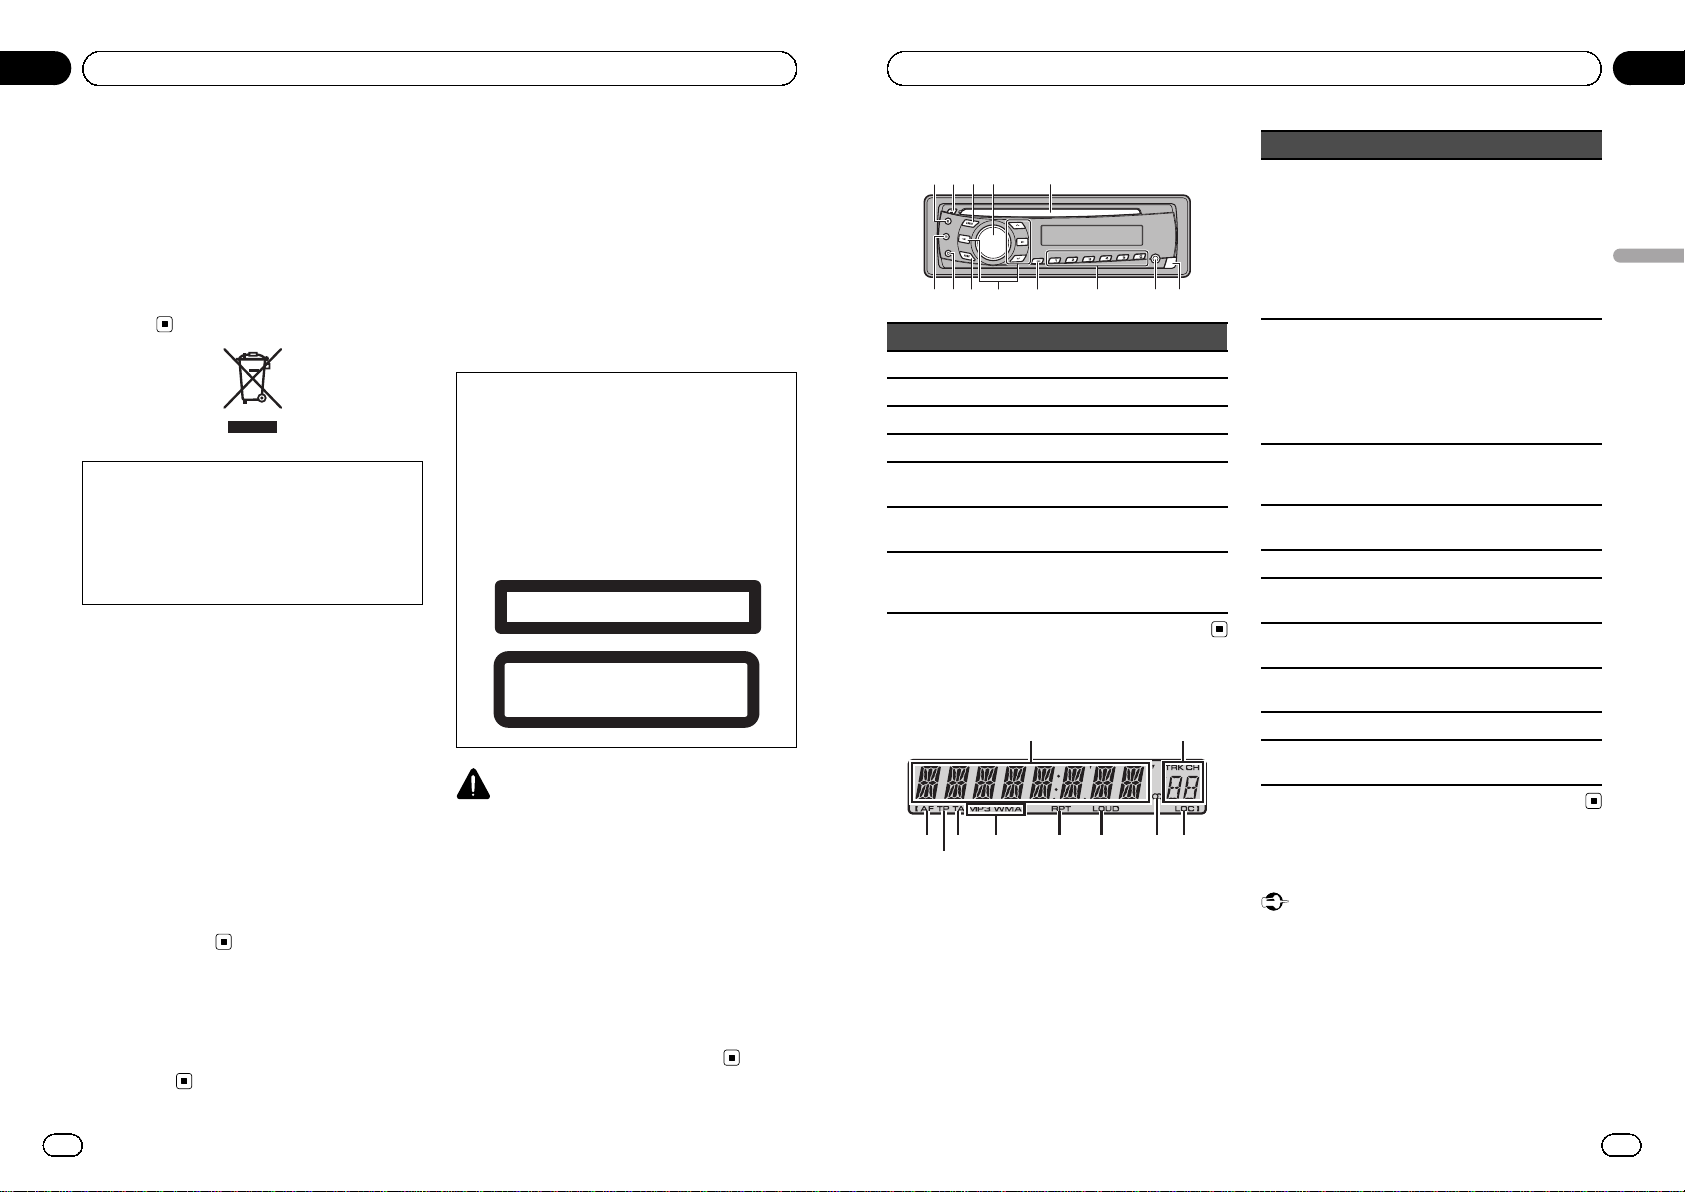
123 4 5
Button Button
1 E (EQ/LOUD) 8 1 to 6
2 h (eject) 9 TA/AF
3 AUDIO a a/b/c/d
4 SRC/OFF b FUNC
5 Disc loading slot c D (DISP/SCRL)
6 Detach button d B (BAND/ESC)
7
AUX input jack (3.5
mm stereo jack)
Display indication
6
3
2
1
5
7 8 9 a
Indicator State
1
Main display section
! Tuner: band and frequency
! RDS: program service name,
PTY information and other literal information
! Built-in CD player: elapsed
playback time and text information
2
Preset
number/
track number
! The track number or preset
number.
! If a track number 100 or more
is selected, d on the left of
the track number indicator
will light.
Indicator State
3 AF
AF (alternative frequencies
search) function is on.
4 TP A TP station is tuned in.
5 TA TA function is on.
6
MP3/
WMA
The type of the currently playing
file.
7 RPT Repeat play is turned on.
8 LOUD Loudness is on.
9 5 (stereo)
Receiving the stereo broadcasting.
a LOC Local seek tuning is on.
Basic Operations
Important
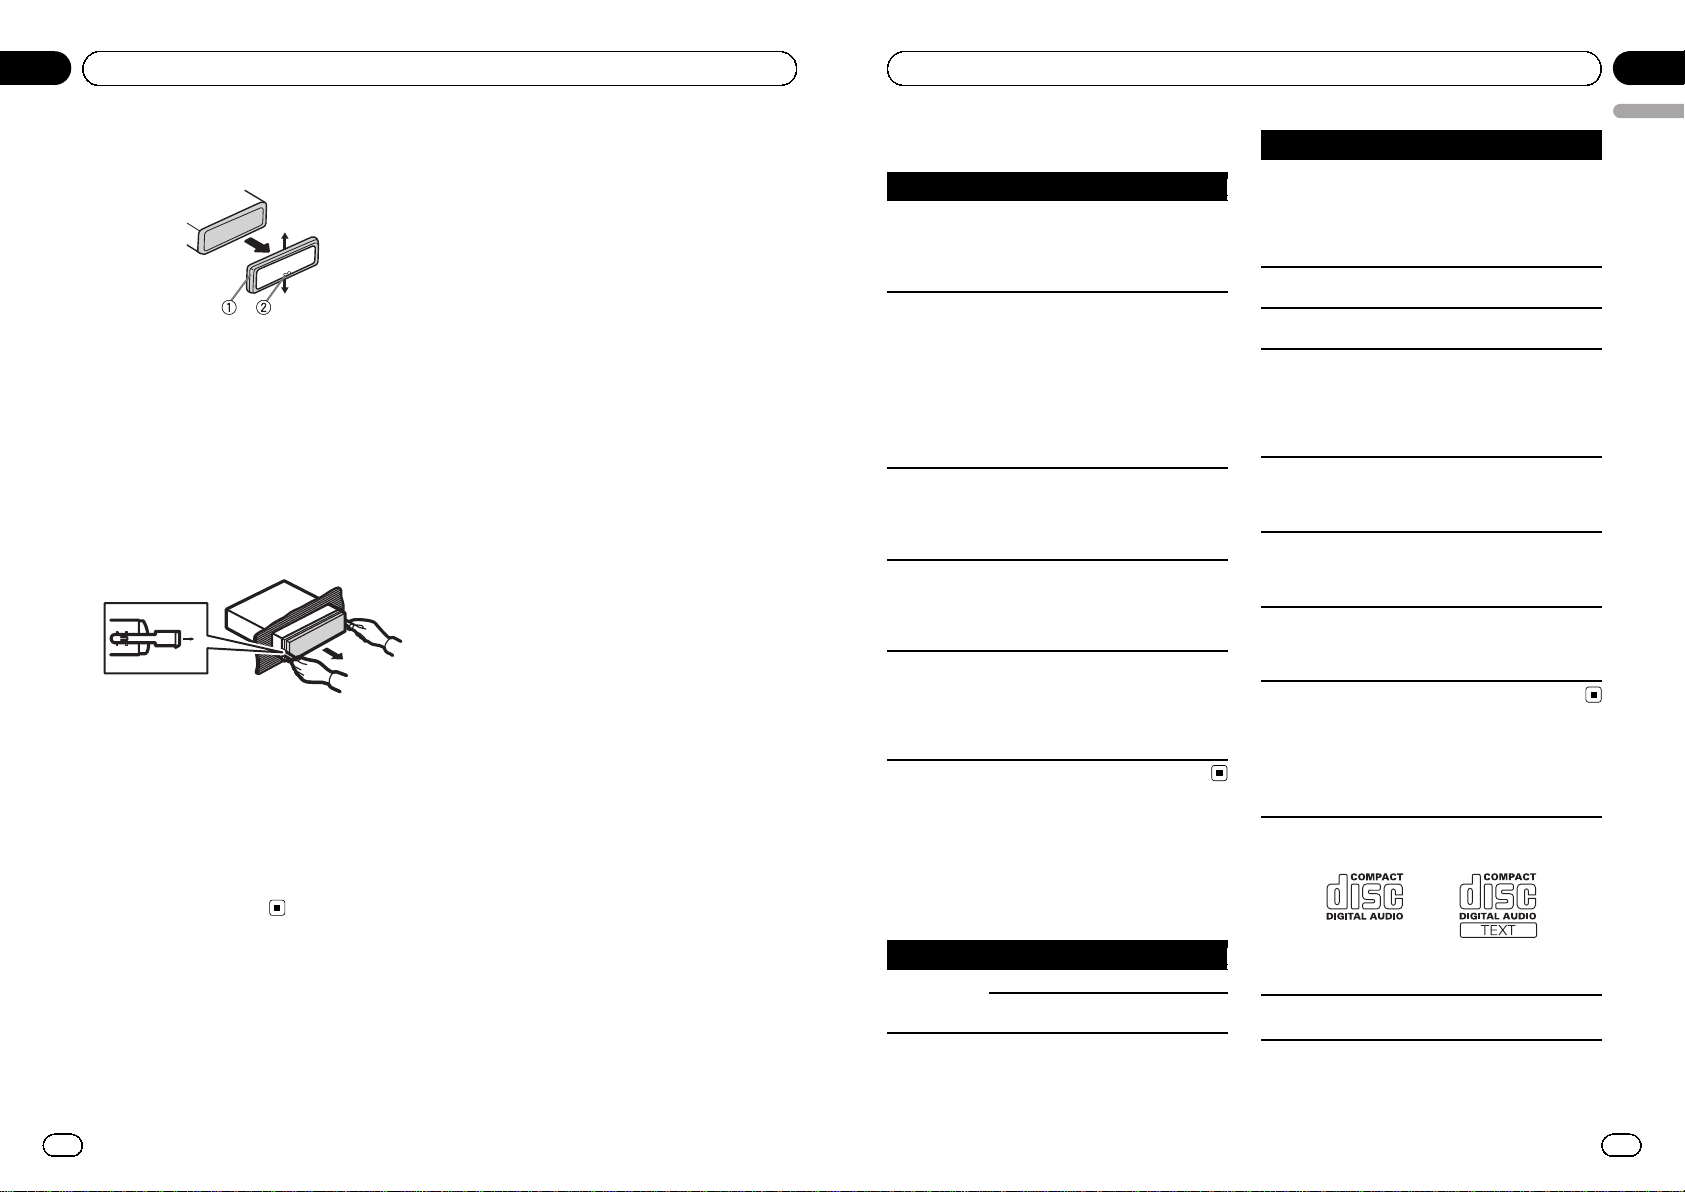
! Handle gently when removing or attaching
the front panel.
! Avoid subjecting the front panel to excessive
shock.
! Keep the front panel out of direct sunlight and
high temperatures.
! To avoid damage to the device or vehicle inter-
ior, remove any cables and devices attached
to the front panel before detaching it.
En
3
English
Section
02
Operating this unit
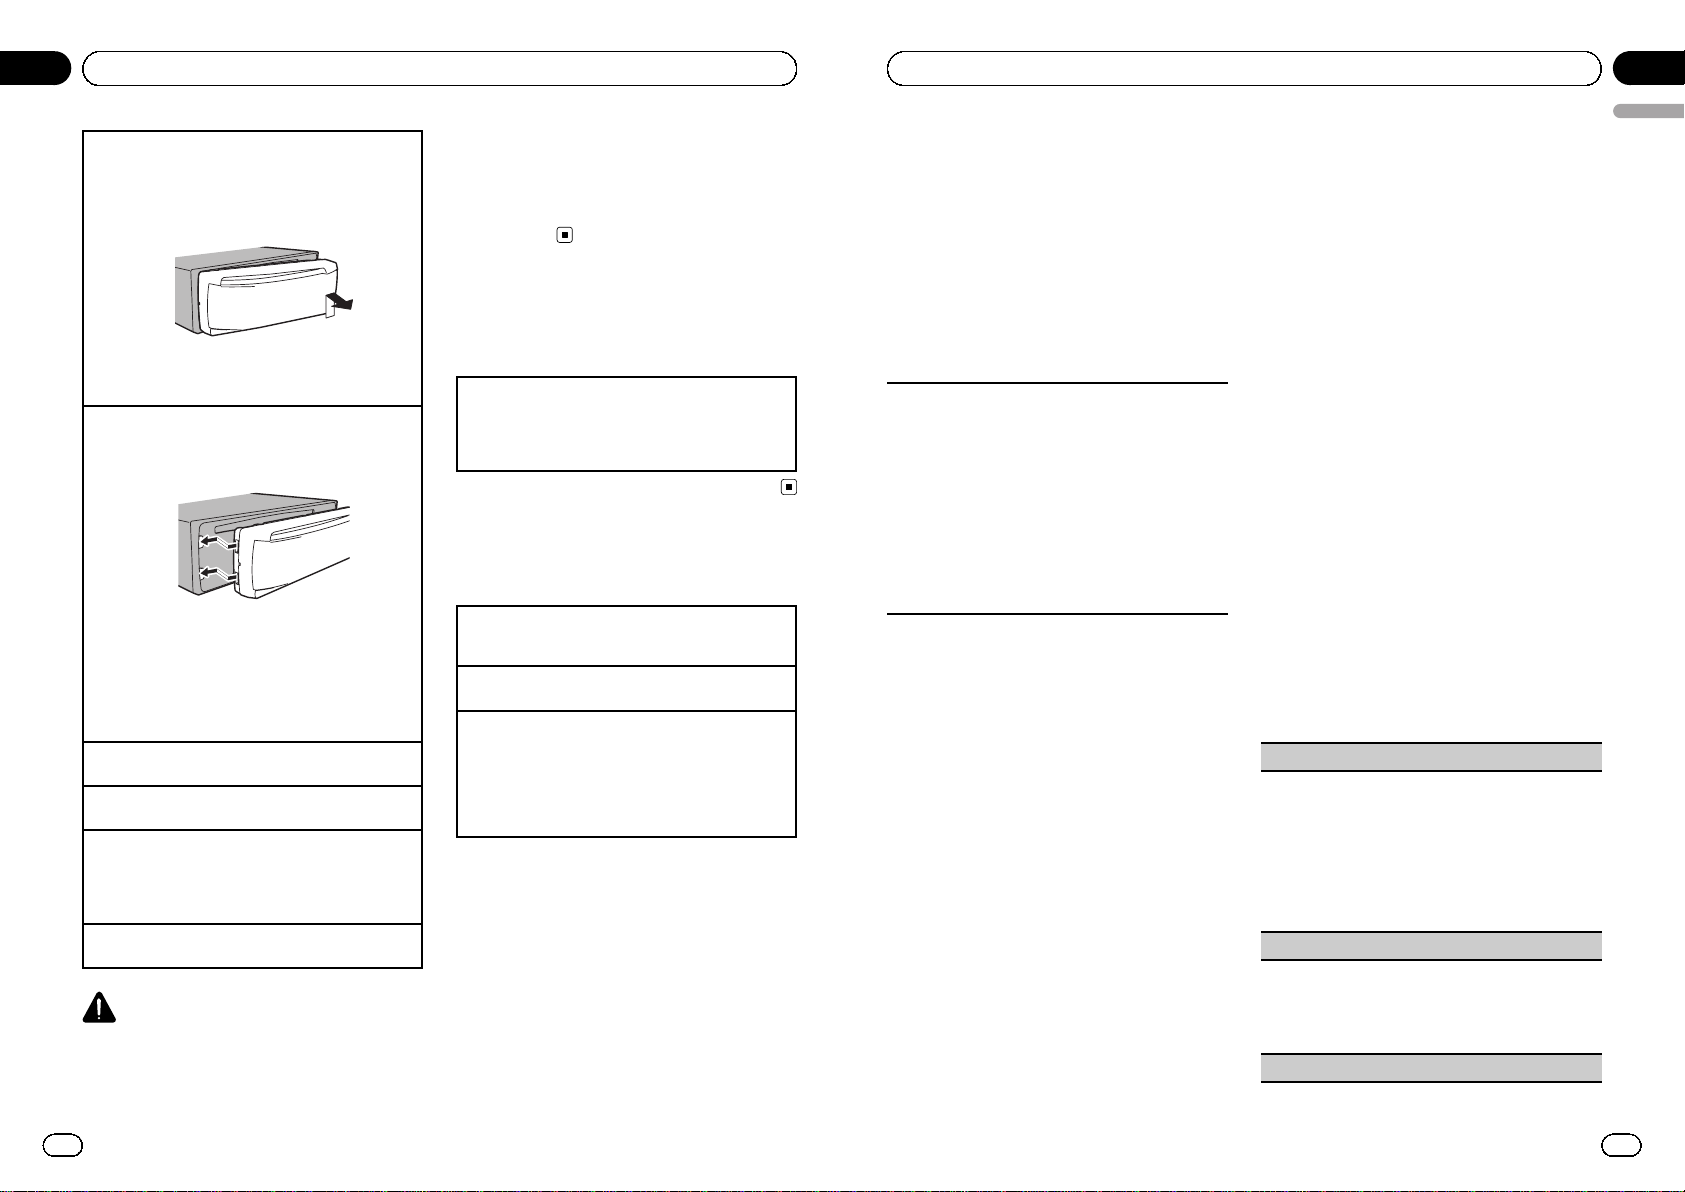
Removing the front panel to protect your unit from
theft
1 Press the detach button to release the front
panel.
2 Push the front panel upward and pull it toward
you.
3 Always keep the detached front panel in a protec-
tion device such as a protection case.
Re-attaching the front panel
1 Slide the front panel to the left.
Make sure to insert the tabs on the left side of the
head unit into the slots on the front panel.
2 Press the right side of the front panel until it is
firmly seated.
If you cannot attach the front panel to the head
unit successfully, make sure that you are placing
the front panel onto the head unit correctly. Forcing the front panel into place may result in damage to the front panel or head unit.
Turning the unit on
1 Press SRC/OFF to turn the unit on.
Turning the unit off
1 Press SRC/OFF and hold until the unit turns off.
Selecting a source
1 Press SRC/OFF to cycle through the sources
listed below:
TUNER (tuner)—CD (built-in CD player)—AUX
(AUX)
Adjusting the volume
1 Turn SRC/OFF to adjust volume.
CAUTION
For safety reasons, park your vehicle when removing the front panel.
Note
When this unit’s blue/white lead is connected to
the vehicle’s auto-antenna relay control terminal,
the vehicle’s antenna extends when this unit’s
source is turned on. To retract the antenna, turn
the source off.
Menu operations identical
for function settings/audio
adjustments/initial settings
Returning to the ordinary display
Canceling the initial setting menu
1 Press B (BAND/ESC) .
You can also cancel initial settings by holding
down SRC/OFF until the unit turns off.
Tuner
Basic Operations
Selecting a band
1 Press B (BAND/ESC) until the desired band (F1,
F2 for FM or MW/LW) is displayed.
Manual tuning (step by step)
1 Press c or d.
Seeking
1 Press and hold c or d, and then release.
You can cancel seek tuning by briefly pressing c
or d.
While pressing and holding c or d, you can skip
stations. Seek tuning starts as soon as you release c or d.
Storing and recalling stations
for each band
% When you find a station that you want
to store in memory, press one of the preset
tuning buttons (1 to 6) and hold until the
preset number stops flashing.
Stored radio station frequency can be recalled
by pressing the preset tuning button.
# Press a or b to recall radio station frequen-
cies.
En
4
Section
02
Operating this unit
Switching the RDS display
RDS (radio data system) contains digital information that helps search for the radio stations.
% Press D (DISP/SCRL).
Program service name—PTY information—
Frequency
# PTY information and the frequency appear on
the display for eight seconds.
PTY list
NEWS (News), AFFAIRS (Current affairs), INFO (Information), SPORT (Sports), WEATHER (Weather), FI-
NANCE (Finance), POP MUS (Popular music), ROCK
MUS (Rock music), EASY MUS (Easy listening), OTH
MUS (Other music), JAZZ (Jazz), COUNTRY (Country
music), NAT MUS (National music), OLDIES (Oldies
music), FOLK MUS (Folk music), L.CLASS (Light classical), CLASSIC (Classical), EDUCATE (Education),
DRAMA (Drama), CULTURE (Culture), SCIENCE
(Science), VARIED (Varied), CHILDREN (Children’s),
SOCIAL (Social affairs), RELIGION (Religion), PHONE
IN (Phone in), TOURING (Travel), LEISURE (Leisure),
DOCUMENT (Documentaries)
Selecting alternative frequencies
When the tuner cannot get a good reception,
the unit automatically searches for a different
station in the same network.
% Press and hold TA/AF to turn AF on or
off.
Using PI Seek
If the tuner cannot find a suitable station, or
the reception status deteriorates, the unit
automatically searches for a different station
with the same programming. During the
search, PI SEEK is displayed and sound is
muted.
Using Auto PI Seek for preset stations
When preset stations cannot be recalled, as
when travelling long distances, the unit can
be set to perform PI Seek during preset recall.
! The default setting for Auto PI Seek is off.
Refer to A-PI (auto PI seek) on page 8.
Receiving traffic announcements
Regardless of the source you are listening to,
you can receive traffic announcements automatically with TA (traffic announcement
standby).
1 Tune in to a TP or enhanced other network’s TP station.
2 Press TA/AF to turn traffic announcement standby on or off.
3 Turn SRC/OFF to adjust the TA volume
when a traffic announcement begins.
The newly set volume is stored in the memory
and will be recalled for subsequent traffic announcements.
4 Press TA/AF while a traffic announcement is being received to cancel the announcement.
The tuner returns to the original source but remains in the standby mode until TA/AF is
pressed again.
Function settings
% Press FUNC to select the function.
After selecting, perform the following procedures to set the function.
! If MW/LW band is selected, only BSM or
LOCAL is available.
BSM (best stations memory)
BSM (best stations memory) automatically stores the
six strongest stations in the order of their signal
strength.
Storing broadcast frequencies with BSM may replace
broadcast frequencies you have saved using 1 to 6.
1 Press a to turn BSM on.
The six strongest broadcast frequencies are
stored in the order of their signal strength.
To cancel the storage process, press b.
REG (regional)
When AF is used, the regional function limits the selection of stations to those broadcasting regional programs.
1 Press a or b to turn the regional function on or
off.
LOCAL (local seek tuning)
En
5
English
Section
02
Operating this unit
Local seek tuning lets you tune in to only those radio
stations with sufficiently strong signals for good reception.
1 Press a or b to turn local seek tuning on or off.
2 Press c or d to set the sensitivity.
FM: LOCAL 1 —LOCAL 2—LOCAL 3—LOCAL 4
MW/LW: LOCAL 1—LOCAL 2
The highest level setting allows reception of only
the strongest stations, while lower levels allow the
reception of weaker stations.
TA (traffic announcement standby)
1 Press a or b to turn traffic announcement stand-
by on or off.
AF (alternative frequencies search)
1 Press a or b to turn AF on or off.
CD
Basic Operations
Playing a CD/CD-R/CD-RW
1 Insert the disc into the disc loading slot with the
label side up.
Ejecting a CD/CD-R/CD-RW
1 Press h.
Selecting a folder
1 Press a or b.
Selecting a track
1 Press c or d.
Fast forwarding or reversing
1 Press and hold c or d.
When playing compressed audio, there is no
sound during fast forward or reverse.
Switching between compressed audio and CD-DA
1 Press B (BAND/ESC) .
Displaying text information
Selecting the desired text information
1 Press D (DISP/SCRL) .
Scrolling the text information to the left
1 Press and hold D (DISP/SCRL).
Notes
! Depending on the version of iTunes used to
write MP3 files to a disc or media file types, incompatible text stored within an audio file
may be displayed incorrectly.
! Text information items that can be changed
depend on the media.
Function settings
% Press FUNC to select the function.
After selecting, perform the following procedures to set the function.
RPT (repeat play)
1 Press c or d to select the repeat range.
DSC – Repeat all tracks
TRK – Repeat the current track
FLD – Repeat the current folder
RDM (random play)
1 Press a or b to turn random play on or off.
When random play is on, RDM appears in the display.
If you turn random play on during folder repeat,
FRDM appears in the display.
SCAN (scan play)
Scan play searches for a song within the selected repeat range.
1 Press a to turn scan play on.
If you turn scan play on during FLD, FSCN appears in the display.
2 When you find the desired track press b to turn
scan play off.
If the display has automatically returned to the
playback display, select SCAN again by pressing
FUNC.
After scanning of a disc (folder) is finished, normal playback of the tracks begins.
PAUSE (pause)
1 Press a or b to pause or resume.
SRTRV (sound retriever)
Automatically enhances compressed audio and restores rich sound.
1 Press a or b to select your favorite setting.
OFF (off)—1—2
1 is effect ive for low compression rates, and 2 is
effective for high compression rates.
En
6
Section
02
Operating this unit
FF/REV (fast forward/reverse)
You can switch the search method between fast forward/reverse and searching every 10 tracks. Selecting
ROUGH enables you to search every 10 tracks.
1 Press d to select ROUGH.
FF/REV – Fast forward and reverse
ROUGH – Searching every 10 tracks
To select FF/REV, press c.
2 Press B (BAND/ESC) to return to the playback dis-
play.
3 Press and hold c or d to search every 10 tracks
on a disc (folder).
If the rest of track number is less than 10, press
and hold c or d recalls the first (last) one.
Audio Adjustments
Audio Adjustments
% Press AUDIO to select the audio function.
After selecting, perform the following procedures to set the audio function.
FAD (fader/balance adjustment)
1 Press a or b to adjust fader (front/rear speaker
balance).
2 Press c or d to adjust the balance (left/right
speaker balance).
BASS/MID/TREBLE (equalizer adjustment)
! Adjusted equalizer curve settings are stored in
CUSTOM.
1 Press a or b to adjust the level.
Adjustment range: +6 to -6
LOUD (loudness)
Loudness compensates for deficiencies in the lowand high-frequency ranges at low volume.
1 Press a or b to turn loudness on or off.
2 Press c or d to select the desired setting.
LOW (low)—HI (high)
! You can also turn loudness on or off by pressing
and holding E (EQ/LOUD).
SLA (source level adjustment)
SLA (Source Level Adjustment) lets you adjust the vo-
lume level of each source to prevent radical changes
in volume when switching between sources.
! When selecting FM as the source, you cannot
switch to SLA.
! Settings are based on the FM volume level, which
remains unchanged.
! The MW/LW volume level can also be adjusted
with this function.
1 Press a or b to adjust the source volume.
Adjustment range: SLA +4 to SLA –4
Using the equalizer
% Press E (EQ/LOUD) to select the equalizer.
DYNAMIC—VOCAL—NATURAL—CUSTOM
—FLAT—POWERFUL
! CUSTOM allows you to create a customized
setting.
En
7
English
Section
02
Operating this unit

Other Functions
Important
SAVE (power saving) is cancelled if the vehicle
battery is disconnected and will need to be
turned back on once the battery is reconnected.
When SAVE (power saving) is off, depending on
connection methods, the unit may continue to
draw power from the battery if your vehicle’s ignition switch doesn’t have an ACC (accessory position).
Adjusting initial settings
1 Press SRC/OFF and hold until the unit
turns off.
2 Press SRC/OFF and hold until function
name appears in the display.
3 Press FUNC to select the initial setting.
After selecting, perform the following procedures to set the initial setting.
FM (FM tuning step)
Normally, the FM tuning step employed by seek tuning is 50 kHz. When AF or TA is on, the tuning step
automatically changes to 100 kHz. It may be preferable to set the tuning step to 50 kHz when AF is on.
! The tuning step remains at 50 kHz during manual
tuning.
1 Press c or d to select the FM tuning step.
50 (50 kHz)—100 (100 kHz)
A-PI (auto PI seek)
The unit can automatically search for a different station with the same programming, even during preset
recall.
1 Press a or b to turn Auto PI seek on or off.
AUX (auxiliary input)
Activate this setting when using an auxiliary device
connected to this unit.
1 Press a or b to turn auxiliary setting on or off.
SAVE (power saving)
Switching this function on enables you to reduce the
consumption of battery power.
! Turning on the source is the only operation al-
lowed when this function is on.
1 Press a or b to turn the power save on or off.
TITLE (multi language)
This unit can display the text information of a compressed audio file even if they are embedded in a
Western European or Russian language.
! If the embedded language and the selected lan-
guage setting are not the same, text information
may not be displayed properly.
! Some characters may not be displayed properly.
1 Press c or d to select the language.
EUR (European)—RUS (Russian)
Using an AUX source
1 Insert the stereo mini plug into the
AUX input jack.
2 Press SRC/OFF to select AUX as the
source.
# AUX cannot be selected unless the auxiliary
setting is turned on. For more details, refer to
AUX (auxiliary input) on this page.
Sound muting
Sound is muted automatically when:
! A call is made or received using a cell
phone connected to this unit.
! Voice guidance is output from a connected
Pioneer navigation unit.
The sound is turned off, MUTE is displayed
and no audio adjustments, except volume control, are possible. Operation returns to normal
when the phone connection or the voice guidance is ended.
En
8
Section
02
Operating this unit
Connections
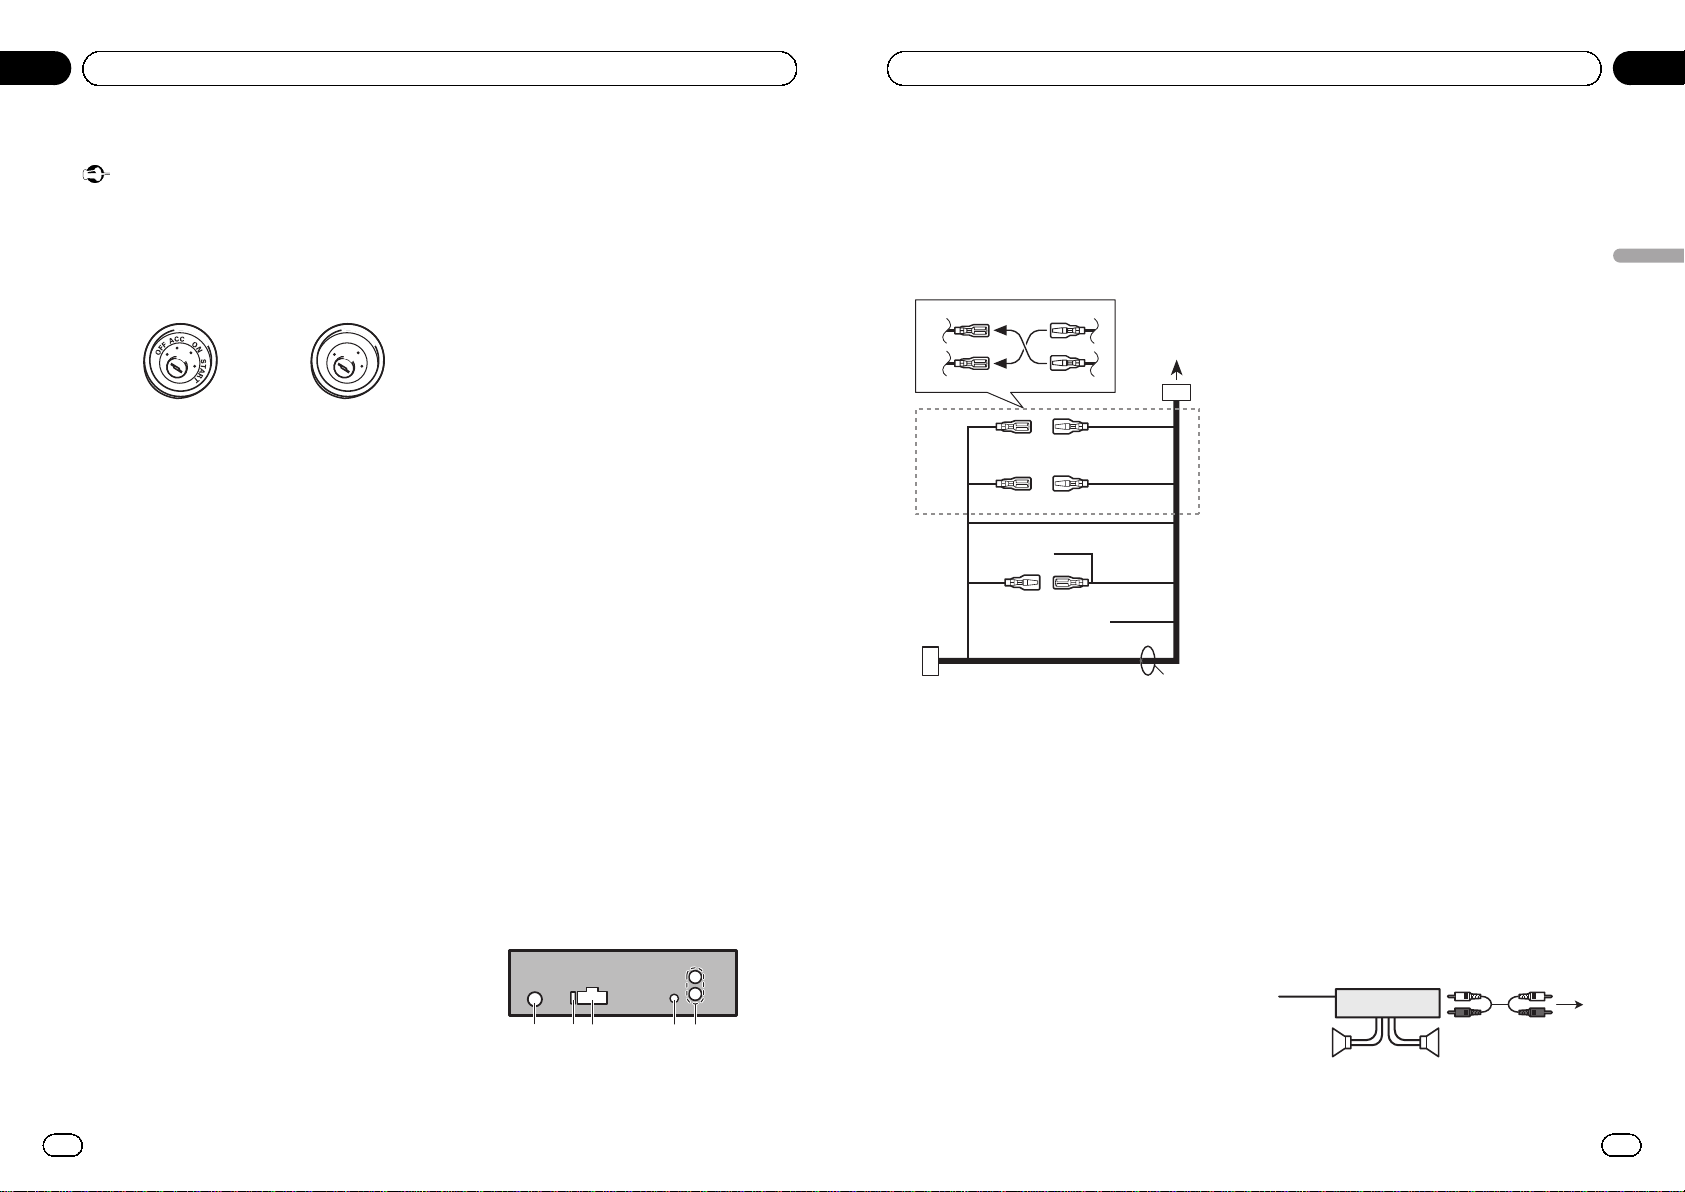
Important
! When installing this unit in a vehicle without
an ACC (accessory) position on the ignition
switch, failure to connect the red cable to the
terminal that detects operation of the ignition
key may result in battery drain.
O
N
S
T
A
R
T
O
F
F
ACC position No ACC pos ition
! Use of this unit in conditions other than the
following could result in fire or malfunction.
— Vehicles with a 12-volt battery and negative
grounding.
— Speakers with 50 W (output value) and 4
ohm to 8 ohm (impedance value).
! To prevent a short-circuit, overheating or mal-
function, be sure to follow the directions
below.
— Disconnect the negative terminal of the
battery before installation.
— Secure the wiring with cable clamps or ad-
hesive tape. Wrap adhesive tape around
wiring that comes into contact with metal
parts to protect the wiring.
— Place all cables away from moving parts,
such as the gear shift and seat rails.
— Place all cables away from hot places,
such as near the heater outlet.
— Do not connect the yellow cable to the bat-
tery by passing it through the hole to the
engine compartment.
— Cover any disconnected cable connectors
with insulating tape.
— Do not shorten any cables.
— Never cut the insulation of the power cable
of this unit in order to share the power
with other devices. The current capacity of
the cable is limited.
— Use a fuse of the rating prescribed.
— Never wire the negative speaker cable di-
rectly to ground.
— Never band together negative cables of
multiple speakers.
! When this unit is on, control signals are sent
through the blue/white cable. Connect this
cable to the system remote control of an external power amp or the vehicle’s auto-antenna
relay control terminal (max. 300 mA 12 V DC).
If the vehicle is equipped with a glass antenna, connect it to the antenna booster power
supply terminal.
! Never connect the blue/white cable to the
power terminal of an external power amp.
Also, never connect it to the power terminal of
the auto antenna. Doing so may result in battery drain or a malfunction.
! The black cable is ground. Ground cables for
this unit and other equipment (especially,
high-current products such as power amps)
must be wired separately. If they are not, an
accidental detachment may result in a fire or
malfunction.
This unit
123 4 5
1 Antenna input
2 Fuse (10 A)
3 Power cord input
4 Wired remote input
Hard-wired remote control adaptor can be
connected (sold separately).
5 Rear output
En
9
English
Section
03
Installation
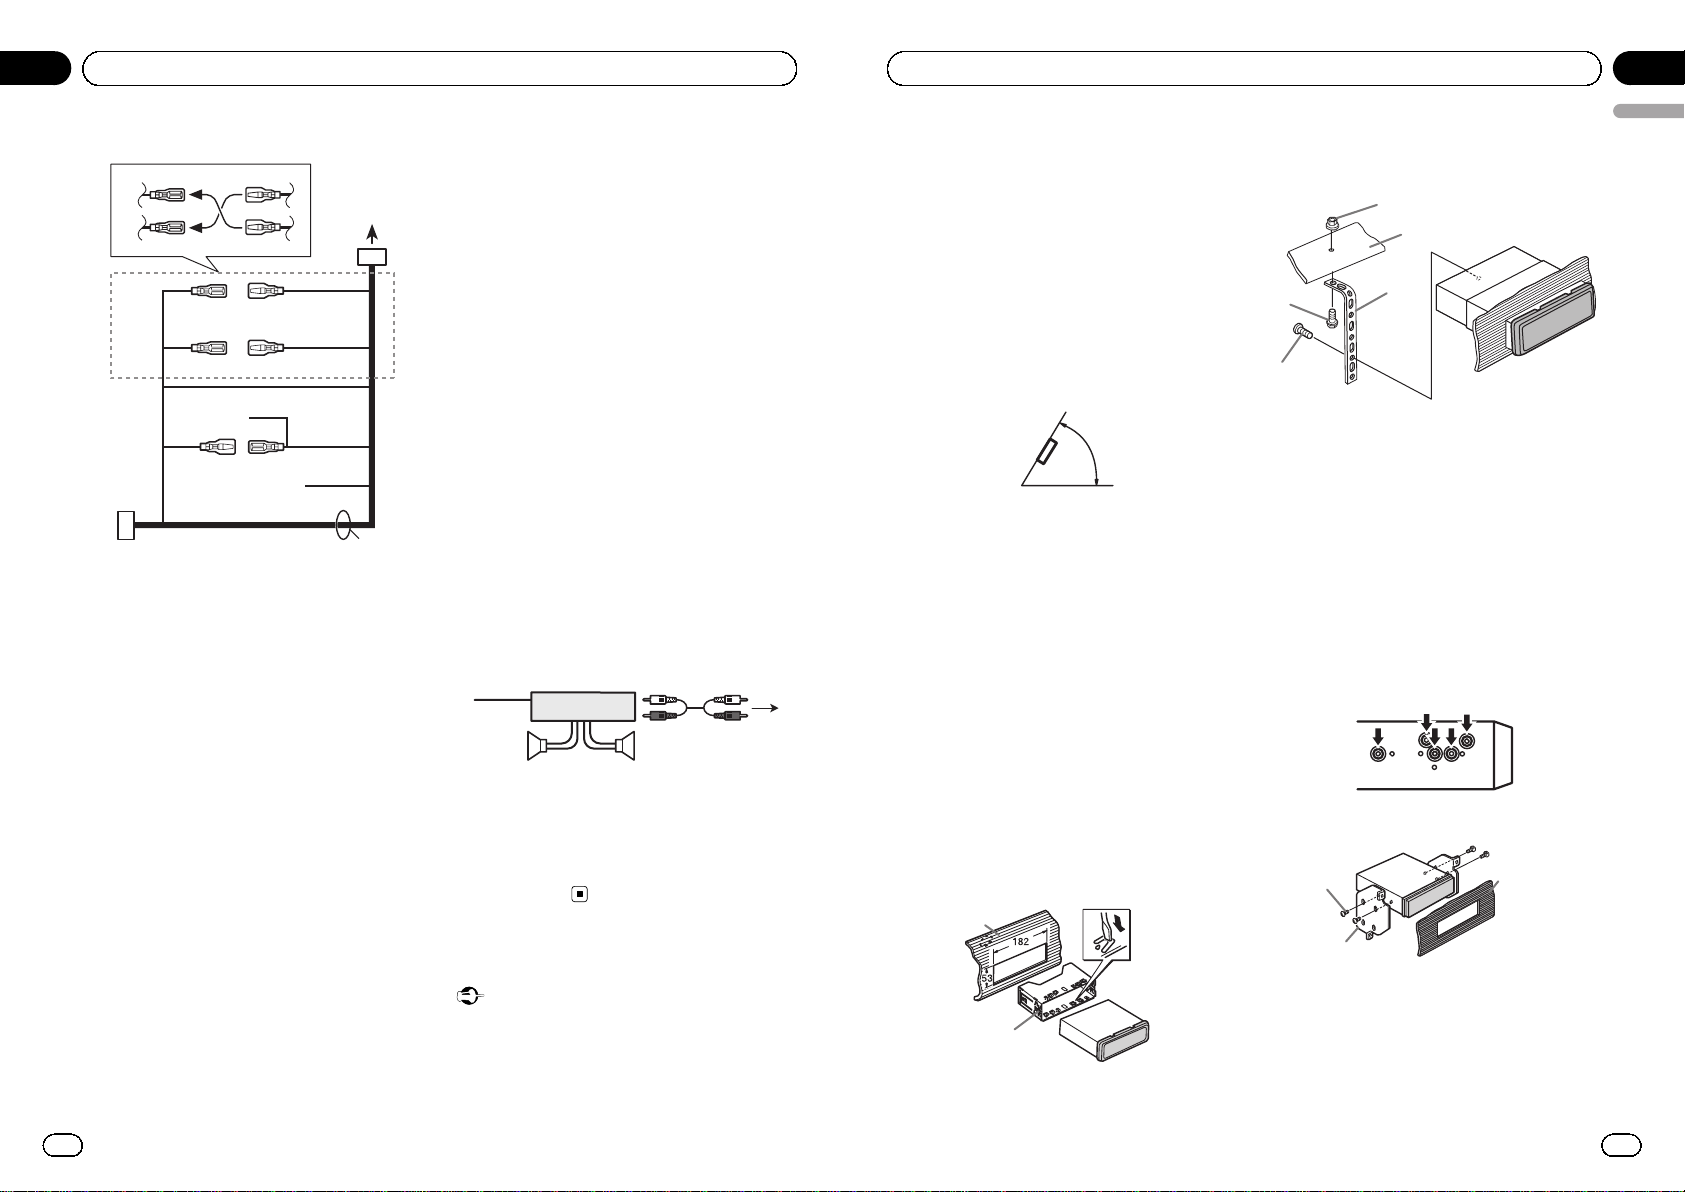
Power cord
1
324
56
34
56
b
8
9
7
a
e
c
1 To power cord input
2 Depending on the kind of vehicle, the function
of 3 and 5 may be different. In this case, be
sure to connect 4 to 5 and 6 to 3.
3 Yellow
Back-up (or accessory)
4 Yellow
Connect to the constant 12 V supply terminal.
5 Red
Accessory (or back-up)
6 Red
Connect to terminal controlled by ignition
switch (12 V DC).
7 Connect leads of the same color to each
other.
8 Black (chassis ground)
Connect to a clean, paint-free metal location.
9 Blue/white
The pin position of the ISO connector will differ depending on the type of vehicle. Connect
9 and b when Pin 5 is an antenna control
type. In another type of vehicle, never connect
9 and b.
a Blue/white
Connect to system control terminal of the
power amp (max. 300 mA 12 V DC).
b Blue/white
Connect to auto-antenna relay control term-
inal (max. 300 mA 12 V DC).
c Yellow/black
If you use an equipment with Mute function,
wire this lead to the Audio Mute lead on that
equipment. If not, keep the Audio Mute lead
free of any connections.
d Speaker leads
White: Front left +
White/black: Front left *
Gray: Front right +
Gray/black: Front right *
Green: Rear left +
Green/black: Rear left *
Violet: Rear right +
Violet/black: Rear right *
e ISO connector
In some vehicles, the ISO connector may be
divided into two. In this case, be sure to con-
nect to both connectors.
Power amp (sold separately)
Perform these connections when using the
optional amplifier.
1
4
2
55
3
1 System remote control
Connect to Blue/white cable.
2 Power amp (sold separately)
3 Connect with RCA cables (sold separately)
4 To Rear output
5 Rear speaker
Installation
Important
! Check all connections and systems before
final installation.
! Do not use unauthorized parts as this may
cause malfunctions.
En
10
Section
03
Installation
! Consult your dealer if installation requires dril-
ling of holes or other modifications to the vehicle.
! Do not install this unit where:
— it may interfere with operation of the vehi-
cle.
— it may cause injury to a passenger as a re-
sult of a sudden stop.
! The semiconductor laser will be damaged if it
overheats. Install this unit away from hot
places such as near the heater outlet.
! Optimum performance is obtained when the
unit is installed at an angle of less than 60°.
60°
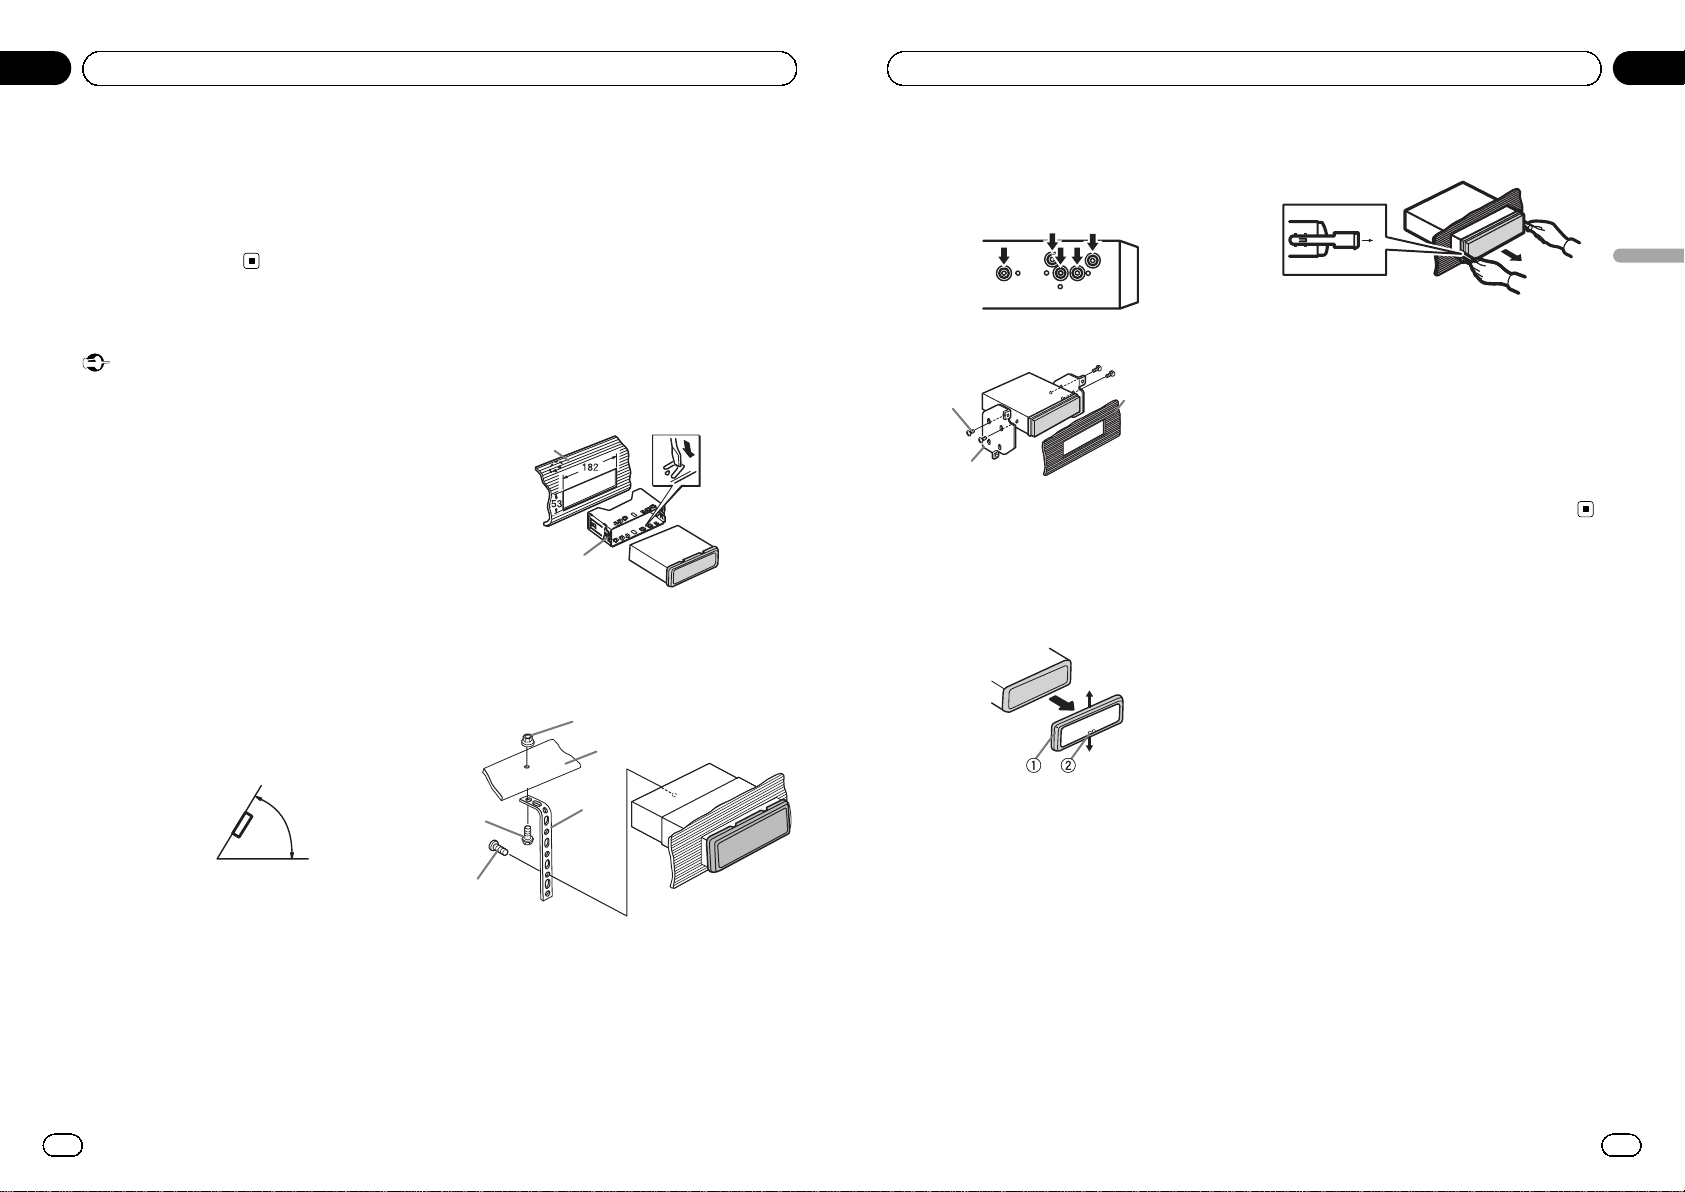
DIN front/rear mount
This unit can be properly installed using either
front-mount or rear-mount installation.
DIN Front-mount
1 Insert the mounting sleeve into the
dashboard.
For installation in shallow spaces, use the supplied mounting sleeve. If there is enough
space, use the mounting sleeve that came
with the vehicle.
! Use commercially available parts when in-
stalling.
2 Secure the mounting sleeve by using a
screwdriver to bend the metal tabs (90°)
into place.
1
2
1 Dashboard
2 Mounting sleeve
3 Install the unit as illustrated.
1
2
3
4
5
1 Nut
2 Firewall or metal support
3 Metal strap
4 Screw
5 Screw (M4 × 
# Make sure that the unit is installed securely in
place. An unstable installation may cause skipping or other malfunctions.
DIN Rear-mount
1 Determine the appropriate position
where the holes on the bracket and the
side of the unit match.
2 Tighten two screws on each side.
1
2
3
1 Tapping screw (5 mm × 8 mm)
2 Mounting bracket
3 Dashboard or console
En
11
English
Section
03
Installation
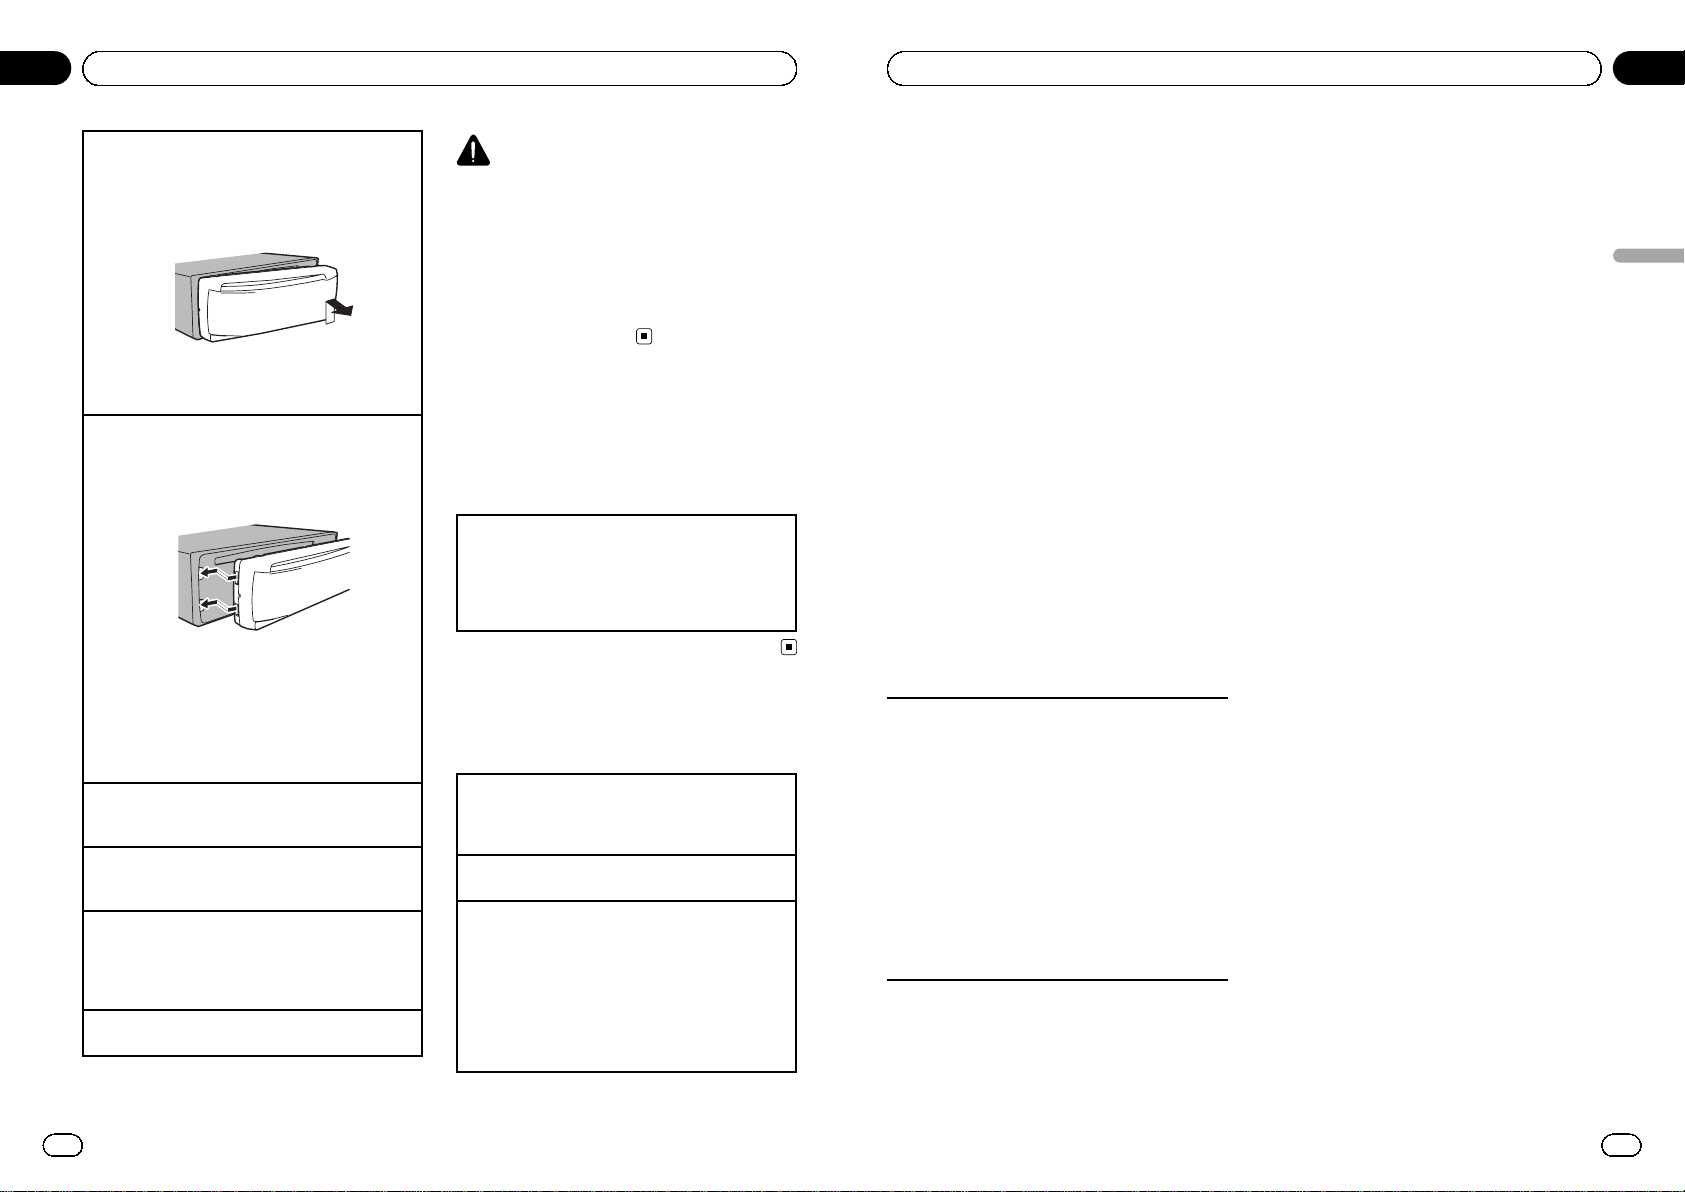
Removing the unit
1 Remove the trim ring.
1 Trim ring
2 Notched tab
! Releasing the front panel allows easier ac-
cess to the trim ring.
! When reattaching the trim ring, point the
side with the notched tab down.
2 Insert the supplied extraction keys into
both sides of the unit until they click into
place.
3 Pull the unit out of the dashboard.
Removing and re-attaching the front
panel
You can remove the front panel to protect your
unit from theft.
Press the detach button and push the front
panel upward and pull it toward you.
For details, refer to Removing the front panel to
protect your unit from theft and Re-attaching
the front panel on page 4.
En
12
Section
03
Installation
Troubleshooting
Symptom Cause Action
The display
automatically
returns to the
ordinary display.
You did not perform any operation within about
30 seconds.
Perform operation
again.
The repeat play
range changes
unexpectedly.
Depending on
the repeat play
range, the selected range may
change when selecting another
folder or track, or
when fast forwarding/reversing.
Select the repeat
play range again.
A subfolder is
not played
back.
Subfolders cannot be played
when FLD (folder
repeat) is selected.
Select another repeat play range.
NO XXXX appears when a
display is changed (NO T-TTL,
for example).
There is no text
information embedded.
Switch the display
or play another
track/file.
The unit is malfunctioning.
There is interference.
You are using a
device, such as a
cellular phone,
that transmits
electric waves
near the unit.
Move electrical devices that may be
causing the interference away from
the unit.
Error messages
When you contact your dealer or your nearest
Pioneer Service Center, be sure to note the
error message.
Message Cause Action
ERROR-11, 12,
17, 30
The disc is dirty. Clean the disc.
The disc is
scratched.
Replace the disc.
Message Cause Action
ERROR-10, 11,
12, 15, 17, 30,
A0
There is an electrical or mechanical error.
Turn the ignition
switch OFF and
back ON, or switch
to a different
source, then back
to the CD player.
ERROR-15 The inserted disc
is blank
Replace the disc.
ERROR-23 Unsupported CD
format
Replace the disc.
FRMTREAD Sometimes there
is a delay between the start of
playback and
when you start to
hear any sound.
Wait until the message disappears
and you hear
sound.
NO AUDIO The inserted disc
does not contain
any playable
files.
Replace the disc.
PROTECT All the files on
the inserted disc
are embedded
with DRM.
Replace the disc.
SKIPPED The inserted disc
contains DRM
protected WMA
files.
Replace the disc.
Handling guideline
Discs and player
Use only discs featuring either of following two logos.
Use 12-cm disc. Do not use 8-cm disc or an adapter
for 8-cm disc.
En
13
English
Appendix
Additional Information
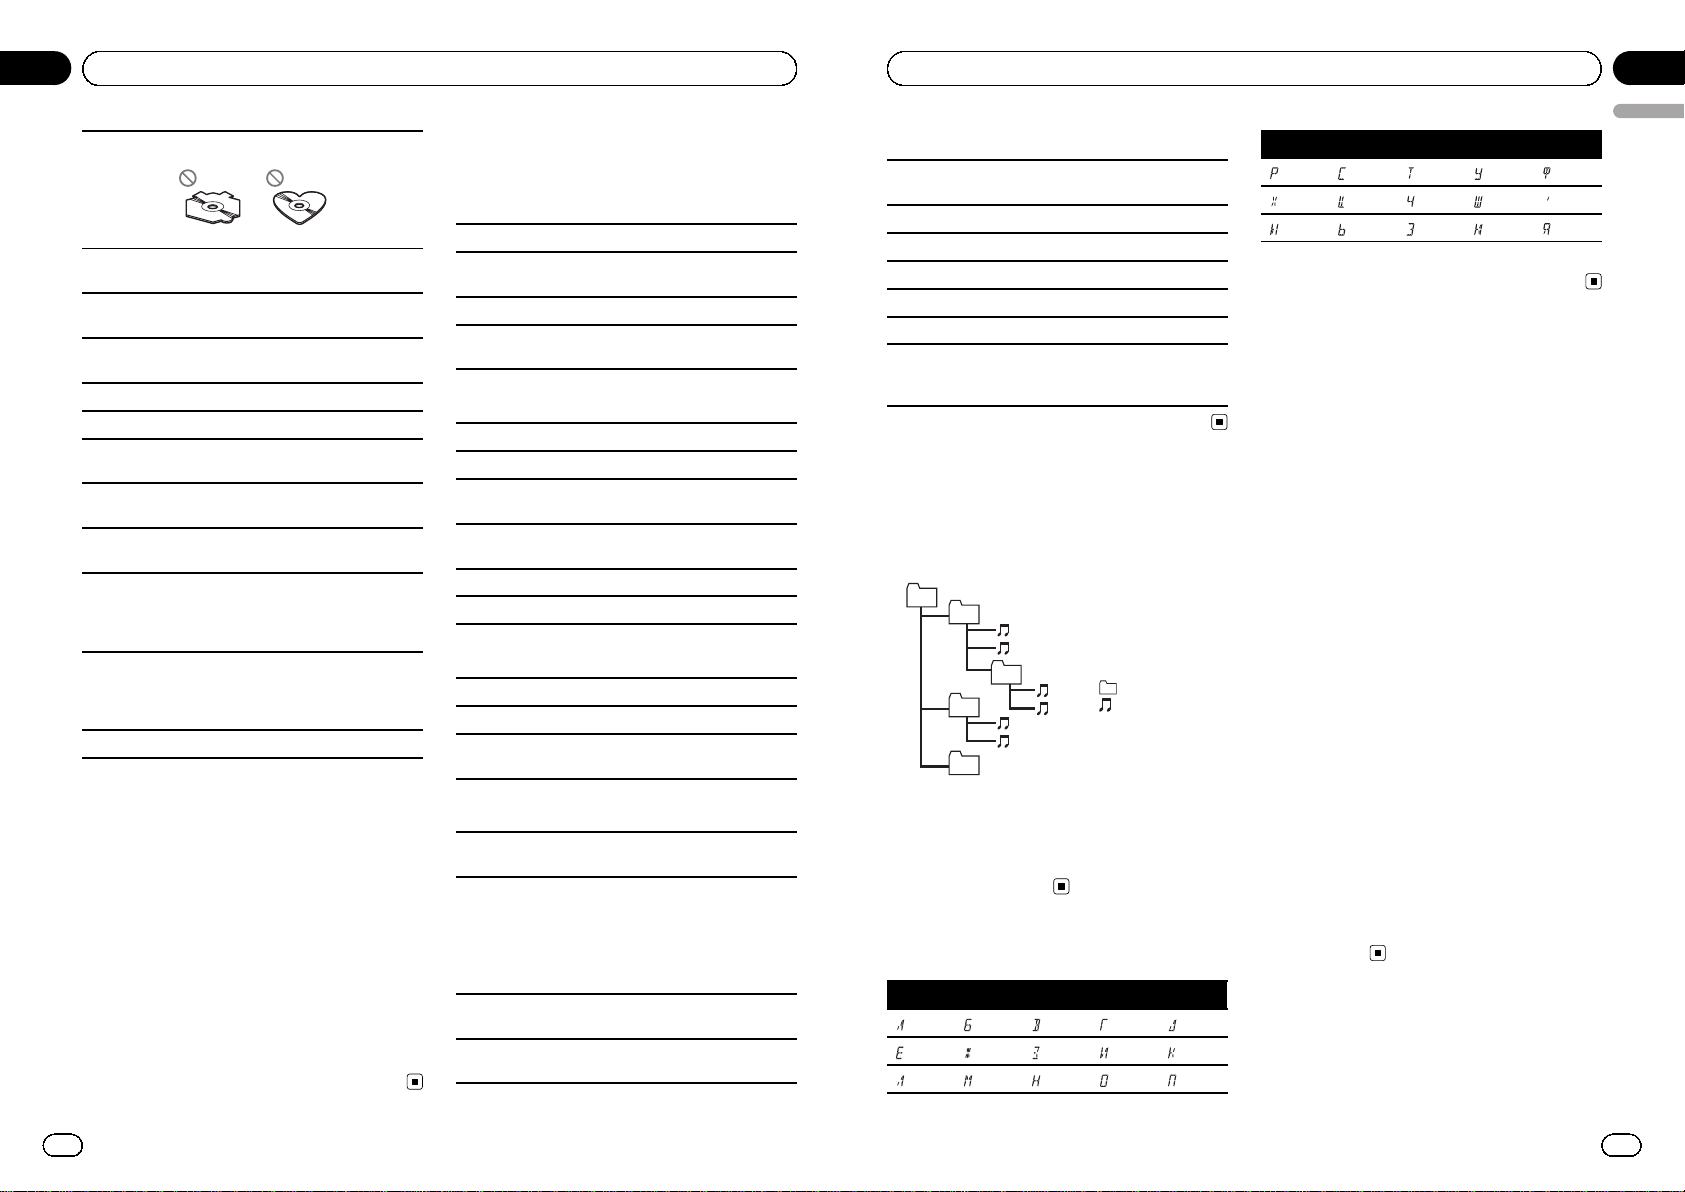
Use only conventional, fully circular discs. Do not use
shaped discs.
Do not insert anything other than a CD into the CD
loading slot.
Do not use cracked, chipped, warped, or otherwise
damaged discs as they may damage the player.
Unfinalized CD-R/CD-RW disc playback is not possible.
Do not touch the recorded surface of the discs.
Store discs in their cases when not in use.
Avoid leaving discs in excessively hot environments
including under direct sunlight.
Do not attach labels, write on or apply chemicals to
the surface of the discs.
To clean a CD, wipe the disc with a soft cloth outward
from the center.
Condensation may temporarily impair the player’s
performance. Leave it to adjust to the warmer temperature for about one hour. Also, wipe any damp
discs with a soft cloth.
Playback of discs may not be possible because of
disc characteristics, disc format, recorded application, playback environment, storage conditions, and
so on.
Road shocks may interrupt disc playback.
DualDiscs
DualDiscs are two-sided discs that have a recordable
CD for audio on one side and a recordable DVD for
video on the other.
Since the CD side of DualDiscs is not physically compatible with the general CD standard, it may not be
possible to play the CD side with this unit.
Frequent loading and ejecting of a DualDisc may result in scratches on the disc. Serious scratches can
lead to playback problems on this unit. In some
cases, a DualDisc may become stuck in the disc loading slot and will not eject. To prevent this, we recommend you refrain from using DualDisc with this unit.
Please refer to the information from the disc manufacturer for more detailed information about DualDiscs.
Compressed audio
compatibility
WMA
File extension: .wma
Bit rate: 48 kbps to 320 kbps (CBR), 48 kbps to 384
kbps (VBR)
Sampling frequency: 32 kHz to 48 kHz
Windows Media Audi o Professional, Lossless, Voice/
DRM Stream/Stream with video: No
MP3
File extension: .mp3
Bit rate: 8 kbps to 320 kbps (CBR), VBR
Sampling frequency: 8 kHz to 48 kHz (32, 44.1, 48 kHz
for emphasis)
Compatible ID3 tag version: 1.0, 1.1, 2.2, 2.3, 2.4 (ID3
tag Version 2.x is given priority over Version 1.x.)
M3u playlist: No
MP3i (MP3 interactive), mp3 PRO: No
WAV
File extension: .wav
Quantization bits: 8 and 16 (LPCM), 4 (MS ADPCM)
Sampling frequency: 16 kHz to 48 kHz (LPCM), 22.05
kHz and 44.1 kHz (MS ADPCM)
Supplemental information
Only the first 32 characters can be displayed as a file
name (including the file extension) or a folder name.
Russian text to be displayed on this unit should be encoded with the following character sets:
! Unicode (UTF-8, UTF-16)
! Character sets other than Unicode that are used
in a Windows environment and are set to Russian
in the multi-language setting
This unit may not operate correctly depending on the
application used to encode WMA files.
There may be a slight delay when starting playback of
audio files embedded with image data.
En
14
Appendix
Additional Information
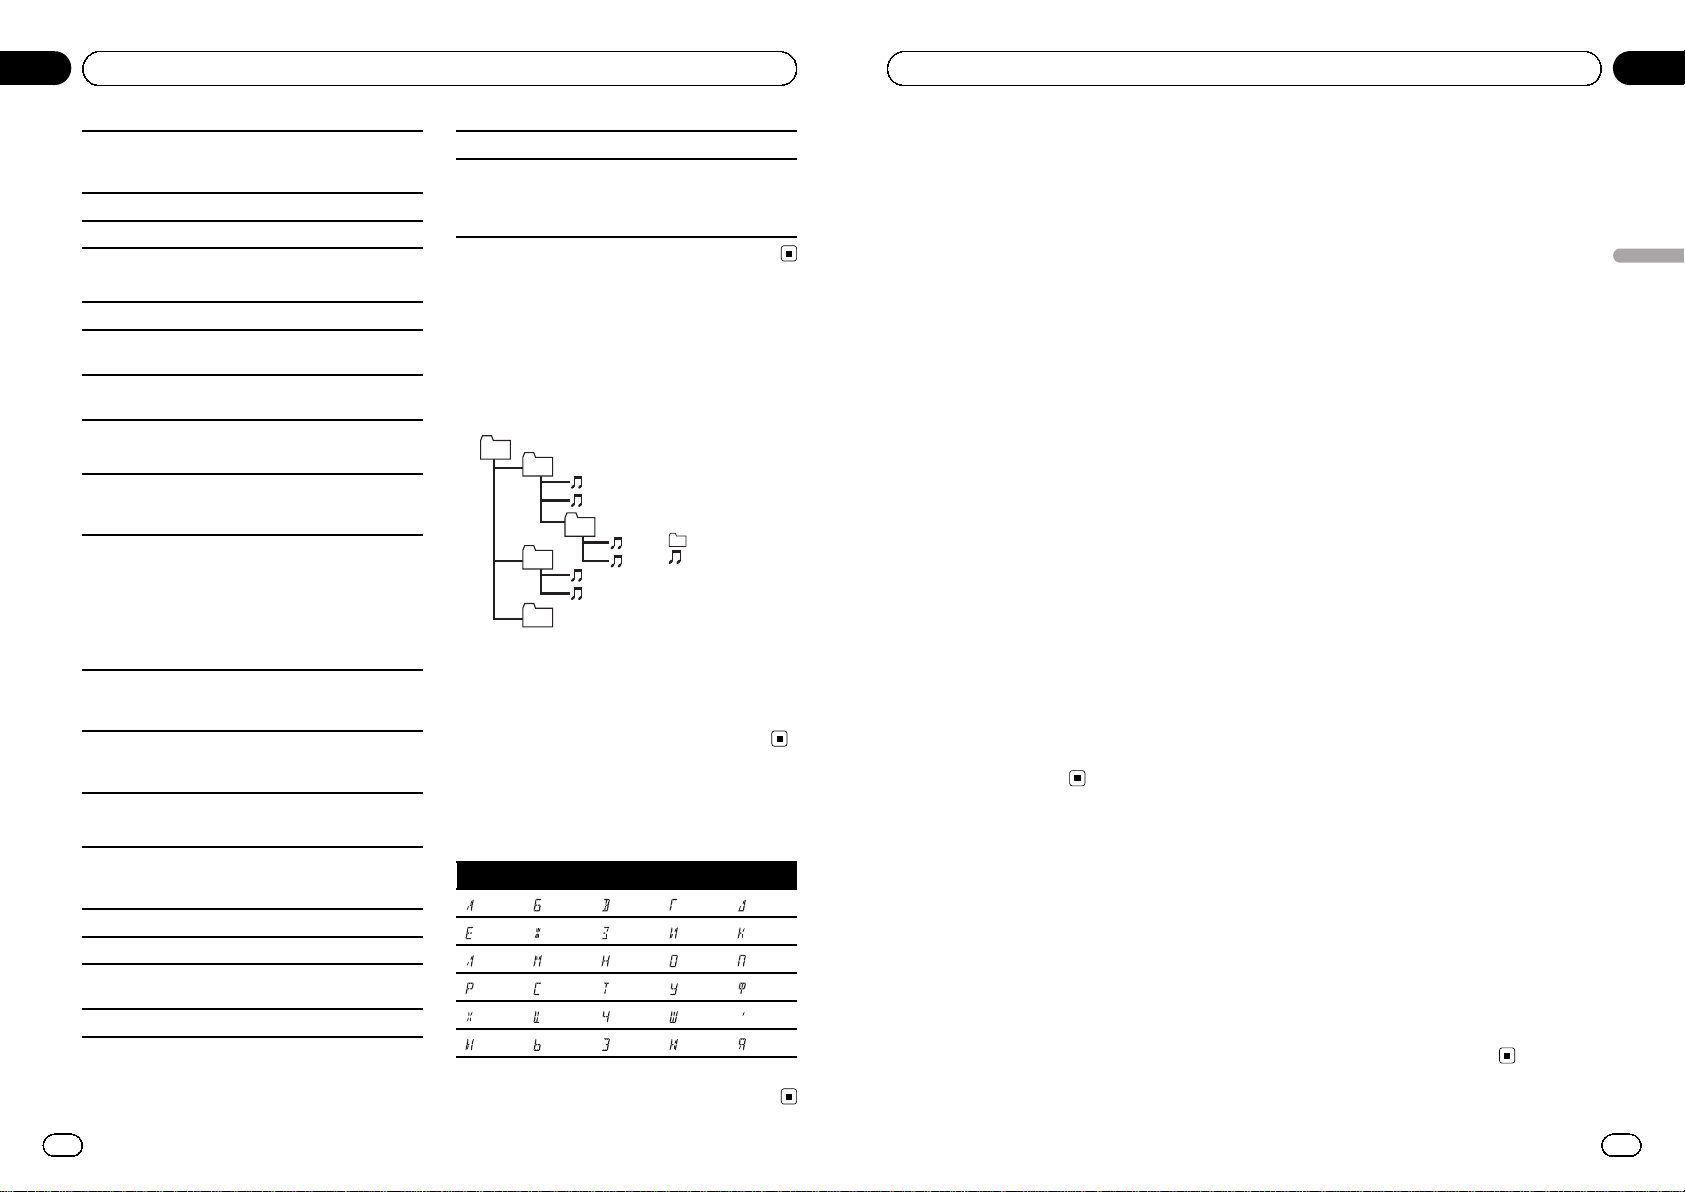
Disc
Playable folder hierarchy: up to eight tiers (A practical
hierarchy is less than two tiers.)
Playable folders: up to 99
Playable files: up to 999
File system: ISO 9660 Level 1 and 2, Romeo, Joliet
Multi-session playback: Yes
Packet write data transfer: No
Regardless of the length of blank section between the
songs of the original recording, compressed audio
discs play with a short pause between songs.
Sequence of audio files
The user cannot assign folder numbers and
specify playback sequences with this unit.
Example of a hierarchy
Level 1 Level 2 Level 3 Level 4
01
02
03
04
05
: Folder
: Compressed
audio file
01 to 05: Folder
number
1 to 6: Playback
sequence
Disc
! Folder selection sequence or other opera-
tion may differ depending on the encoding
or writing software.
Russian character chart
D: C D: C D: C D: C D: C
: А : Б : В : Г : Д
: Е, Ё : Ж : З : И, Й : К
: Л : М : Н : О : П
D: C D: C D: C D: C D: C
: Р : С : Т : У : Ф
: Х : Ц : Ч : Ш, Щ : Ъ
: Ы : Ь : Э : Ю : Я
D: Display C: Character
Copyright and trademark
iTunes
Apple and iTunes are trademarks of Apple
Inc., registered in the U.S. and other countries.
MP3
Supply of this product only conveys a license
for private, non-commercial use and does not
convey a license nor imply any right to use
this product in any commercial (i.e. revenuegenerating) real time broadcasting (terrestrial,
satellite, cable and/or any other media), broadcasting/streaming via internet, intranets and/
or other networks or in other electronic content distribution systems, such as pay-audio or
audio-on-demand applications. An independent license for such use is required. For details, please visit
http://www.mp3licensing.com.
WMA
Windows Media and the Windows logo are trademarks or registered trademarks of Microsoft
Corporation in the United States and/or other
countries.
This product includes technology owned by
Microsoft Corporation and cannot be used or
distributed without a license from Microsoft
Licensing, Inc.
Specifications
General
Power source ……………………….. 14.4 V DC (10.8 V to 15.1 V
allowable)
En
15
English
Appendix
Additional Information

Grounding system ………………. Negative type
Maximum current consumption
…………………………………………….. 10.0 A
Dimensions (W × H × D):
DIN
Chassis ………………… 178 mm × 50 mm × 165
mm
Nose ……………………… 188 mm × 58 mm × 17 mm
D
Chassis ………………… 178 mm × 50 mm × 165
mm
Nose ……………………… 170 mm × 46 mm × 17 mm
Weight …………………………………… 1.3 kg
Audio
Maximum power output ……. 50 W × 4
Continuous power output … 22 W × 4 (50 Hz to 15 000
Hz, 5 % THD, 4 W load, both
channels driven)
Load impedance …………………. 4 W (4 W to 8 W allowable)
Preout maximum output level
…………………………………………….. 2.0 V
Tone controls:
Bass
Frequency ……………. 100 Hz
Gain ………………………. ±12 dB
Mid
Frequency ……………. 1 kHz
Gain ………………………. ±12 dB
Treble
Frequency ……………. 10 kHz
Gain ………………………. ±12 dB
CD player
System …………………………………… Compact disc audio system
Usable discs ………………………… Compact disc
Signal-to-noise ratio …………… 94 dB (1 kHz) (IEC-A net-
work)
Number of channels ………….. 2 (stereo)
WMA decoding format ……… Ver. 7, 7.1, 8, 9, 10, 11, 12
(2ch audio)
(Windows Media Player)
MP3 decoding format ……….. MPEG-1 & 2 Audio Layer 3
WAV signal format ……………… Linear PCM & MS ADPCM
FM tuner
Frequency range …………………. 87.5 MHz to 108.0 MHz
Usable sensitivity ………………… 11 dBf (0.7 µV/75 W, mono,
S/N: 30 dB)
Signal-to-noise ratio …………… 72 dB (IEC-A network)
MW tuner
Frequency range …………………. 531 kHz to 1 602 kHz
Usable sensitivity ………………… 25 µV (S/N: 20 dB)
Signal-to-noise ratio …………… 62 dB (IEC-A network)
LW tuner
Frequency range …………………. 153 kHz to 281 kHz
Usable sensitivity ………………… 28 µV (S/N: 20 dB)
Signal-to-noise ratio …………… 62 dB (IEC-A network)
Note
Specifications and the design are subject to modifications without notice.
En
16
Appendix
Additional Information
Nous vous remercions d’avoir acheté cet
appareil PIONEER.
Pour garantir une utilisation correcte, lisez
bien ce mode d’emploi avant d’utiliser cet appareil. Il est particulièrement important que
vous lisiez et respectiez les indications AT-
TENTION et PRÉCAUTION de ce mode
d’emploi. Conservez-le dans un endroit sûr et
facilement accessible pour toute consultation
ultérieure.
Si vous souhaitez vous débarrasser de cet appareil, ne le mettez pas à la poubelle avec vos
ordures ménagères. Il existe un système de
collecte séparé pour les appareils électroniques usagés, qui doivent être récupérés, traités
et recyclés conformément à la législation.
Dans les états membres de l’UE, en Suisse et
en Norvège, les foyers domestiques peuvent
rapporter leurs produits électroniques usagés
gratuitement à des points de collecte spécifiés
ou à un revendeur (sous réserve d’achat d’un
produit similaire).
Dans les pays qui ne sont pas mentionnés cidessus, veuillez contacter les autorités locales
pour vous informer de la méthode correcte de
mise au rebut.
En agissant ainsi vous assurerez que le produit que vous mettez au rebut est soumis au
processus de traitement, de récupération et
de recyclage nécessaire et éviterez ainsi les effets négatifs potentiels sur l’environnement et
la santé publique.
En cas d’anomalie
En cas d’anomalie, consultez le distributeur
ou le service d’entretien agréé par Pioneer le
plus proche.
Quelques mots sur cet appareil
Les fréquences du syntoniseur de cet appareil
sont attribuées pour une utilisation en Europe
de l’Ouest, Asie, Moyen Orient, Afrique et Océanie. Son utilisation dans d’autres régions
peut se traduire par une réception de mauvaise qualité. La fonction RDS (radio data system) n’est opérationnelle que dans les régions
où des signaux RDS sont diffusés pour les stations FM.
PRÉCAUTION
Ce produit est classifié comme produit laser
de classe 1 selon la norme IEC 60825-1:2007
“Sécurité des appareils à laser” et contient un
module laser de classe 1M. Pour assurer une
sécurité permanente, n’enlevez aucun couvercle et n’essayez pas d’accéder à l’intérieur du
produit. Faites effectuer l’entretien par du personnel qualifié.
APPAREIL À LASER DE CLASSE 1
ATTENTION—ÉMISSIONS DE RADIATIONS LASER
INVISIBLES DE CLASSE 1M SI OUVERT. NE PAS OBSERVER
DIRECTEMENT AVEC DES INSTRUMENTS OPTIQUES.
PRÉCAUTION
! Ne laissez pas cet appareil entrer en contact
avec des liquides. Cela pourrait provoquer une
électrocution. Tout contact avec des liquides
pourrait aussi provoquer des dommages, de
la fumée et une surchauffe de l’appareil.
! Le Pioneer CarStereo-Pass est utilisable seule-
ment en Allemagne.
! Maintenez le niveau d’écoute à une valeur
telle que vous puissiez entendre les sons provenant de l’extérieur.
! Évitez tout contact avec l’humidité.
! Si la batterie est débranchée ou déchargée, le
contenu de la mémoire sera effacé.
Fr
18
Section
01
Avant de commencer
123 4 5
Touche Touche
1 E (EQ/LOUD) 8 1 à 6
2 h (éjection) 9 TA/AF
3 AUDIO a a/b/c/d
4 SRC/OFF b FUNC
5
Fente de chargement des disques
c D (DISP/SCRL)
6
Touche de retrait de
la face avant
d B (BAND/ESC)
7
Jack d’entrée AUX
(jack stéréo 3,5
mm)
Indications affichées
6
3
2
1
5
7 8 9 a
Indicateur État
1
Section
d’affichage
principal
! Syntoni seur : gamme et fré-
quence
! RDS : nom du service de pro-
gramme, informations PTY et
autres informations textuelles
! Lecteur de CD intégré : temps
de lecture écoulé et informations textuelles
2
Numéro de
présélection/numéro de plage
! Le numéro de plage ou le nu-
méro de présélection.
! Si un numéro de plage de 100
ou plus est sélectionné, d à
gauche de l’ indicateur de numéro de plage s’allume.
3 AF
La fonction AF (recherche des autres fréquences possibles) est en
service.
4 TP
L’appareil est accordé sur une sta-
tion TP.
5 TA La fonction TA est en service.
6
MP3/
WMA
Le type du fichier en cours de lecture.
7 RPT
La répétition de la lecture est en
service.
8 LOUD
La correction physiologique est
en service.
9 5 (stéréo) Réception d’émission stéréo.
a LOC
L’accord automatique sur une sta-
tion locale est en service.
Opérations de base
Important
! Lorsque vous enlevez ou remontez la face
avant, manipulez-la doucement.
! Évitez de heurter la face avant.
! Conservez la face avant à l’abri des tempéra-
tures élevées et de la lumière directe du soleil.
! Pour éviter d’endommager le périphérique ou
l’intérieur du véhicule, retirez tous les câbles
et périphériques connectés à la face avant
avant d’enlever cette dernière.
Fr
19
Section
Français
02
Utilisation de l’appareil
Retrait de la face avant pour protéger l’ appareil
contre le vol
1 Appuyez sur la touche de retrait pour libérer la
face avant.
2 Poussez la face avant vers le haut, puis tirez-la
vers vous.
3 Conservez toujours la face avant dans un boîtier
de protection lorsqu’elle est détachée.
Remontage de la face avant
1 Faites glisser la face avant vers la gauche.
Assurez-vous d’insérer les encoches sur le côté
gauche de l’ appareil central dans les fentes du
panneau de commande.
2 Appuyez sur le côté droit de la face avant jusqu’à
ce qu’elle soit bien en place.
Si vous ne pouvez pas monter la face avant sur
l’appareil central, vérifiez que la face avant est
correctement placée sur l’appareil central. Forcer
la face avant en position risque de l’endommager
ou d’endommager l’appareil central.
Mise en service de l’appareil
1 Appuyez sur SRC/OFF pour mettre en service l’ap-
pareil.
Mise hors service de l’appareil
1 Maintenez la pression sur SRC/OFF jusqu’àce
que l’appareil soit mis hors tension.
Choix d’une source
1 Appuyez sur SRC/OFF pour parcourir les sources
listées ci-dessous :
TUNER (syntoniseur)—CD (lecteur de CD intégré)
—AUX (AUX)
Réglage du volume
1 Tournez SRC/OFF pour régler le volume.
PRÉCAUTION
Pour des raisons de sécurité, garez votre véhicule
pour retirer la face avant.
Remarque
Si le fil bleu/blanc de l’appareil est relié à la prise
de commande du relais de l’antenne motorisée
du véhicule, celle-ci se déploie lorsque la source
est mise en service. Pour rétracter l’antenne, mettez la source hors service.
Opérations communes des
menus pour les réglages
des fonctions/réglages
audio/réglages initiaux
Retour à l’affichage ordinaire
Annulation du menu des réglages initiaux
1 Appuyez sur B (BAND/ESC).
Vous pouvez également abandonner les réglages
initiaux en maintenant la pression sur SRC/OFF
jusqu’à ce que l’appareil se mette hors service.
Syntoniseur
Opérations de base
Sélection d’une gamme
1 Appuyez sur B (BAND/ESC) jusqu’à ce que la
gamme désirée (F1, F2 en FM ou MW/LW (PO/
GO)) soit affichée.
Accord manuel (pas à pas)
1 Appuyez sur c ou d.
Recherche
1 Appuyez de façon continue sur c ou d, puis relâ-
chez.
Vous pouvez annuler l’accord automatique en appuyant brièvement sur c ou d.
Lorsque vous appuyez sur c ou d de façon prolongée, vous pouvez sauter des stations. L’accord
automatique démarre dès que vous relâchez c
ou d.
Fr
20
Section
02
Utilisation de l’appareil
Enregistrement et rappel des
stations pour chaque gamme
% Lorsque se présente une station que
vous désirez mettre en mémoire, maintenez la pression sur une des touches de présélection (1 à 6) jusqu’à ce que le numéro
de la présélection cesse de clignoter.
La fréquence d’une station radio mémorisée
peut être rappelée en appuyant sur le bouton
de présélection.
# Appuyez sur a ou b pour rappeler les fré-
quences des stations de radio.
Changement de l’affichage RDS
RDS (radio data system) contient des informations numériques qui facilitent la recherche
des stations de radio.
% Appuyez sur D (DISP/SCRL).
Nom du service de programme—Informations
PTY—Fréquence
# Les informations PTY et la fréquence s’affi-
chent pendant huit secondes.
Liste des codes PTY
NEWS (Bulletin d’informations), AFFAIRS (Actualités), INFO (Information), SPORT (Sports), WEATHER
(Météo), FINANCE (Finance), POP MUS (Musique populaire), ROCK MUS (Rock), EASY MUS (Musique légère), OTH MUS (Autre musique), JAZZ (Jazz),
COUNTRY (Country), NAT MUS (Musique nationale),
OLDIES (Musique du bon vieux temps), FOLK MUS
(Musique folklorique), L.CLASS (Musique classique
d’abord aisé), CLASSIC (Musique classique), EDU-
CATE (Éducation), DRAMA (Drame), CULTURE
(Culture), SCIENCE (Science), VARIED (Programmes
variés), CHILDREN (Émissions destinées aux enfants),
SOCIAL (Sujets de société), RELIGION (Religion),
PHONE IN (Programmes à ligne ouverte), TOURING
(Voyages), LEISURE (Loisirs), DOCUMENT (Documentaires)
Choix d’une autre fréquence
possible
Quand le syntoniseur n’obtient pas une bonne
réception, l’appareil recherche automatiquement une autre station sur le même réseau.
% Appuyez sur la touche TA/AF et maintenez-la enfoncée pour mettre la fonction AF
en service ou hors service.
Utilisation de la recherche PI
Si le syntoniseur ne parvient pas à trouver une
station adéquate, ou si l’état de la réception se
détériore, l’appareil recherche automatiquement une autre station avec le même programme. Pendant la recherche, PI SEEK
s’affiche et le son est coupé.
Recherche automatique PI d’une station
dont la fréquence est en mémoire
Si les fréquences mises en mémoire ne sont
pas utilisables, par exemple parce que vous
êtes très éloigné des émetteurs, vous pouvez
décider que le syntoniseur procède à une recherche PI pendant le rappel d’une station
dont la fréquence est en mémoire.
! Par défaut, la recherche automatique PI
n’est pas en service. Reportez-vous à la
page 25, A-PI (recherche automatique PI).
Réception des bulletins
d’informations routières
Quelle que soit la source que vous écoutez,
vous pouvez recevoir des bulletins d’informations routières automatiquement avec la fonction TA (mise en attente de bulletins
d’informations routières).
1 Accordez le syntoniseur sur une station
TP ou une station TP de réseau étendu.
2 Appuyez sur TA/AF pour mettre en service ou hors service l’attente d’un bulletin
d’informations routières.
Fr
21
Section
Français
02
Utilisation de l’appareil
3 Tournez SRC/OFF pour régler le niveau
sonore de la fonction TA au moment où débute un bulletin d’informations routières.
Le réglage du niveau sonore est mis en mémoire et sera utilisé lors de nouvelles réceptions d’un bulletin d’informations routières.
4 Appuyez sur TA/AF pendant la réception d’un bulletin d’informations routières
pour abandonner cette réception.
La source d’origine est rétablie mais le syntoniseur demeure en attente d’un bulletin d’informations routières aussi longtemps que
vous n’appuyez pas sur TA/AF de nouveau.
Réglages des fonctions
% Appuyez sur FUNC pour sélectionner la
fonction.
Après avoir sélectionné la fonction, effectuez
les procédures de paramétrage suivantes.
! Si la gamme MW/LW (PO/GO) est sélection-
née, seul BSM ou LOCAL est disponible.
BSM (mémoire des meilleures stations)
La fonction BSM (mémoire des meilleures stations)
mémorise automatiquement les six stations les plus
fortes dans l’ordre de la force du signal.
La mise en mémoire de fréquences à l’aide de la fonction BSM peut provoquer le remplacement d’autres
fréquences déjà conservées grâce aux touches 1 à 6.
1 Appuyez sur a pour mettre la fonction BSM en
service.
Les six fréquences d’émission les plus puissantes
sont mémorisées dans l’ordre de la force du signal.
Pour annuler la mise en mémoire, appuyez sur b.
REG (stations régionales)
Quand la fonction AF est utilisée, la fonction de recherche des stations régionales limite la sélection
aux stations qui diffusent des programmes régionaux.
1 Appuyez sur a ou b pour mettre la fonction re-
cherche des stations régionales en service ou
hors service.
LOCAL (accord automatique sur un e station locale)
L’accord automatique sur une station locale ne s’inté-
resse qu’aux stations de radio dont le signal reçu est
suffisamment puissant pour garantir une réception
de bonne qualité.
1 Appuyez sur a ou b pour mettre l’accord automa-
tique sur une station locale en service ou hors service.
2 Appuyez sur c ou d pour régler la sensibilité.
FM : LOCAL 1—LOCAL 2 —LOCAL 3—LOCAL 4
MW/LW (PO/GO) : LOCAL 1—LOCAL 2
La valeur la plus élevée permet la réception des
seules stations très puissantes ; les autres valeurs
autorisent la réception de stations moins puissantes.
TA (attente de bulletins d’informations routières)
1 Appuyez sur a ou b pour mettre en service ou
hors service l’attente d’un bulletin d’informations
routières.
AF (recherche des autres fréquences possibles)
1 Appuyez sur a ou b pour mettre la fonction AF
en service ou hors service.
CD
Opérations de base
Lecture d’un CD/CD-R/CD-RW
1 Introduisez un disque, l’étiquette vers le haut,
dans le logem ent de chargement des disques.
Éjection d’un CD/CD-R/CD-RW
1 Appuyez sur h.
Sélection d’un dossier
1 Appuyez sur a ou b.
Sélection d’une plage
1 Appuyez sur c ou d.
Avance ou retour rapide
1 Appuyez de façon continue sur c ou d.
Lors de la lecture d’un disque d’audio compressé,
aucun son n’est émis pendant l’avance ou le retour rapide.
Commutation entre les modes audio compressé et
CD-DA
1 Appuyez sur B (BAND/ESC).
Fr
22
Section
02
Utilisation de l’appareil
Affichage des informations
textuelles
Sélection des informations textuelles désirées
1 Appuyez sur D (DISP/SCRL).
Défilement des informations textuelles sur la gauche
1 Appuyez sur D (DISP/SCRL) de façon prolongée.
Remarques
! Selon la version de iTunes utilisée pour enre-
gistrer les fichiers MP3 sur un disque ou les
types de fichiers média, des informations textuelles incompatibles enregistrées dans le fichier audio peuvent ne pas s’afficher
correctement.
! Les informations textuelles pouvant être modi-
fiées dépendent du média.
Réglages des fonctions
% Appuyez sur FUNC pour sélectionner la
fonction.
Après avoir sélectionné la fonction, effectuez
les procédures de paramétrage suivantes.
RPT (répétition de la lecture)
1 Appuyez sur c ou d pour choisir l’étendue de ré-
pétition.
DSC – Répét ition de toutes les plages
TRK – Répétition de la plage en cours de lecture
FLD – Répétition du dossier en cours de lecture
RDM (lecture aléatoire)
1 Appuyez sur a ou b pour mettre la lecture aléa-
toire en service ou hors service.
Quand la fonction lecture aléatoire est en service,
RDM est affiché sur l’écran.
Si vous activez la lecture aléatoire pendant la répétition de dossier, FRDM s’affiche sur l’écran.
SCAN (examen du disque)
L’examen du disque recherche une plage à l’intérieur
de l’étendue de répétition sélectionnée.
1 Appuyez sur a pour activer la lecture du contenu
du disque.
Si vous activez la lecture du disque pendant FLD,
FSCN s’affiche sur l’écran.
2 Quand vous trouvez la plage désirée, appuyez sur
b pour arrêter la lecture du contenu du disque.
Si les conditions de lecture se sont à nouveau affichées d’elles-mêmes, choisissez SCAN une fois
encore en appuyant sur FUNC.
Lorsque l’examen du disque (dossier) est terminé,
la lecture normale reprend.
PAUSE (pause)
1 Appuyez sur a ou b pour mettre en pause ou re-
prendre la lecture.
SRTRV (sound retriever)
Améliore automatiquement l’audio compressé et restaure un son riche.
1 Appuyez sur a ou b pour choisir la correction dé-
sirée.
OFF (hors service)—1—2
1 est efficace pour les faibles taux de compres-
sion et 2 est efficace pour les taux de compression élevés.
FF/REV (avance/retour rapide)
Vous pouvez choisir entre les méthodes recherche rapide avant, recherche rapide arrière et recherche toutes les 10 plages. Sélectionner ROUGH vous permet
d’effectuer une recherche toutes les 10 plages.
1 Appuyez sur d pour choisir ROUGH.
FF/REV – Recherche rapide avant et arrière
ROUGH – Recherche toutes les 10 plages
Pour sélectionner FF/REV, appuyez sur c.
2 Appuyez sur B (BAND/ESC) pour revenir à l’affi-
chage des conditions de lecture.
3 Appuyez de façon prolongée sur c ou d pour ef-
fectuer une recherche toutes les 10 plages sur un
disque (dossier).
Si le nombre de plages restantes est inférieur à
10, l’appui de façon prolongée sur c ou d rappelle la première (la dernière) plage.
Fr
23
Section
Français
02
Utilisation de l’appareil
Réglages sonores
Réglages sonores
% Appuyez sur AUDIO pour sélectionner
la fonction audio.
Après avoir sélectionné la fonction audio, effectuez les procédures de paramétrage suivantes.
FAD (réglage de l’équilibre avant-arrière/droite-gau-
che)
1 Appuyez sur a ou b pour régler l’équilibre des
haut-parleurs avant-arrière.
2 Appuyez sur c ou d pour régler l’équilibre des
haut-parleurs gauche-droite.
BASS/MID/TREBLE (réglage de l’égaliseur)
! Les réglages de la courbe d’égalisation ajustée
sont mémorisés dans CUSTOM.
1 Appuyez sur a ou b pour régler le niveau.
Plage de réglage : +6 à -6
LOUD (correction physiologique)
La correction physiologique a pour objet d’accentuer
les hautes et les basses fréquences à bas niveaux d’écoute.
1 Appuyez sur a ou b pour mettre la correction
physiologique en service ou hors service.
2 Appuyez sur c ou d pour sélectionner le réglage
désiré.
LOW (faible)—HI (élevé)
! Vous pouvez également mettre en ser vice ou hors
service la correction physiologique en appuyant
de façon prolongée sur E (EQ/LOUD).
SLA (réglage du niveau de la source)
La fonction SLA (réglage du niveau de la source) permet d’ajuster les niveaux sonores de chaque source
afin d’éviter que ne se produisent de fortes variations
d’amplitude sonore lorsque vous passez d’une source
àl’autre.
! Si FM a été choisie comme source, vous ne pou-
vez pas afficher la fonction SLA.
! Les réglages sont basés sur le niveau du volume
FM qui lui, demeure inchangé.
! Le niveau du volume MW/LW (PO/GO) peut égale-
ment être réglé avec cette fonction.
1 Appuyez sur a ou b pour régler le volume de la
source.
Plage de réglage : SLA +4 à SLA –4
Utilisation de l’égaliseur
% Appuyez sur E (EQ/LOUD) pour sélectionner l’égaliseur.
DYNAMIC—VOCAL—NATURAL—CUSTOM
—FLAT—POWERFUL
! CUSTOM vous permet de créer un réglage
personnalisé.
Autres fonctions
Important
La fonction SAVE (économie d’énergie) est annulée si la batterie du véhicule est déconnectée et
devra être réactivée une fois la batterie reconnectée. Quand SAVE est hors service, il est possible
que selon la méthode de connexion utilisée l’appareil continue à consommer du courant de la
batterie si le commutateur de contact de votre véhicule ne possède pas de position ACC (accessoire).
Ajustement des réglages initiaux
1 Maintenez la pression sur SRC/OFF jusqu’à ce que l’appareil soit mis hors tension.
2 Appuyez sur SRC/OFF et maintenez la
touche enfoncée jusqu’à ce que le nom de
la fonction apparaisse sur l’affichage.
3 Appuyez sur FUNC pour sélectionner le
réglage initial.
Après avoir sélectionné le réglage initial, effectuez les procédures de paramétrage suivantes.
FM (incrément d’accord FM)
Normalement, l’incrément d’accord FM employé par
l’accord automatique est 50 kHz. Quand la fonction
AF ou TA est en service, l’incrément d’accord passe
automatiquement à 100 kHz. Il peut être préférable de
régler l’incrément d’accord à 50 kHz quand la fonction AF est en service.
! Pendant l’accord manuel, l’ incrément d’accord
est maintenu à 50 kHz.
1 Appuyez sur c ou d pour choisir l’incrément
d’accord FM.
50 (50 kHz)—100 (100 kHz)
Fr
24
Section
02
Utilisation de l’appareil
A-PI (recherche automatique PI)
L’appareil peut rechercher automatiquement une
autre station avec le même type de programme, y
compris si l ’accord a été obtenu par le rappel d’une
fréquence en mémoire.
1 Appuyez sur a ou b pour mettre en service ou
hors service la recherche automatique PI.
AUX (entrée auxiliaire)
Activez ce réglage lorsque vous utilisez un appareil
auxiliaire connecté à cet appareil.
1 Appuyez sur a ou b pour mettre le réglage auxi-
liaire en service ou hors service.
SAVE (économie d’énergie)
Activer cette fonction vous permet de réduire la
consommation de la batterie.
! La mise en service de la source est la seule opéra-
tion permise quand cette fonction est en service.
1 Appuyez sur a ou b pour mettre l’économie d’é-
nergie en service ou hors service.
TITLE (multilingue)
Cet appareil peut afficher les informations textuelles
d’un fichier audio compressé même si elles sont incorporées dans une langue d’Europe de l’Ouest ou
Russe.
! Si la langue incorporée et la langue sélectionnée
sont différentes, les informations textuelles peuvent ne pas s’afficher correctement.
! Certains caractères peuvent ne pas s’afficher cor-
rectement.
1 Appuyez sur c ou d pour sélectionner la langue.
EUR (Langue européenne)—RUS (Russe)
Utilisation d’une source AUX
1 Insérez la mini prise stéréo dans le jack
d’entrée AUX.
2 Appuyez sur SRC/OFF pour choisir AUX
comme source.
# Vous ne pouvez pas sélectionner AUX à moins
que le réglage auxiliaire soit activé. Pour plus de
détails, reportez-vous à cette page, AUX (entrée
auxiliaire).
Coupure du son
Le son est coupé automatiquement quand :
! Un appel est effectué ou reçu sur un télé-
phone cellulaire connecté à cet appareil.
! Un guidage vocal est émis par un appareil
de navigation Pioneer connecté.
Le son est coupé, MUTE est affiché et aucun
réglage audio n’est possible sauf le contrôle
du volume. Le fonctionnement retourne à la
normale quand la connexion téléphonique ou
le guidage vocal est terminé.
Fr
25
Section
Français
02
Utilisation de l’appareil
Connexions
Important
! Lors de l’installation de cet appareil dans un
véhicule sans position ACC (accessoire) sur le
contacteur d’allumage, ne pas connecter le
câble rouge à la borne qui détecte l’utilisation
de la clé de contact peut entraîner le déchargement de la batterie.
O
N
S
T
A
R
T
O
F
F
Avec position ACC Sans position ACC
! L’utilisation de cet appareil dans des condi-
tions autres que les conditions suivantes
pourrait provoquer un incendie ou un mauvais
fonctionnement.
— Véhicules avec une batterie 12 volts et
mise à la masse du négatif.
— Haut-parleurs avec une puissance de sor-
tie de 50 W et une impédance de 4 ohms à
8 ohms.
! Pour éviter un court-circuit, une surchauffe ou
un dysfonctionnement, assurez-vous de respecter les instructions suivantes.
— Déconnectez la borne négative de la batte-
rie avant l’installation.
— Fixez le câblage avec des serre-fils ou de la
bande adhésive. Pour protéger le câblage,
enroulez dans du ruban adhésif les parties
du câblage en contact avec des pièces en
métal.
— Placez les câbles à l’écart de toutes les
parties mobiles, telles que le levier de vitesse et les rails des sièges.
— Placez les câbles à l’écart de tous les en-
droits chauds, par exemple les sorties de
chauffage.
— Ne reliez pas le câble jaune à la batterie à
travers le trou dans le compartiment moteur.
— Recouvrez tous les connecteurs de câbles
qui ne sont pas connectés avec du ruban
adhésif isolant.
— Ne raccourcissez pas les câbles.
— Ne coupez jamais l’isolation du câble d’ali-
mentation de cet appareil pour partager
l’alimentation avec d’autres appareils. La
capacité en courant du câble est limitée.
— Utilisez un fusible correspondant aux ca-
ractéristiques spécifiées.
— Ne câblez jamais le câble négatif du haut-
parleur directement à la masse.
— Ne réunissez jamais ensemble les câbles
négatifs de plusieurs haut-parleurs.
! Lorsque cet appareil est sous tension, les si-
gnaux de commande sont transmis via le
câble bleu/blanc. Connectez ce câble à la télécommande du système d’un amplificateur de
puissance externe ou à la borne de
commande du relais de l’antenne motorisée
du véhicule (max. 300 mA 12 V CC). Si le véhicule est équipé d’une antenne intégrée à la lunette arrière, connectez-le à la borne
d’alimentation de l’amplificateur d’antenne.
! Ne reliez jamais le câble bleu/blanc à la borne
d’alimentation d’un amplificateur de puissance externe. De même, ne le reliez pas à la
borne d’alimentation de l’antenne motorisée.
Dans le cas contraire, il peut en résulter un
déchargement de la batterie ou un dysfonctionnement.
! Le câble noir est la masse. Les câbles de terre
de cet appareil et d’autres produits (particulièrement les produits avec des courants élevés
tels que l’amplificateur de puissance) doivent
être câblés séparément. Dans le cas contraire,
ils peuvent se détacher accidentellement et
provoquer un incendie ou un dysfonctionnement.
Cet appareil
123 4 5
1 Entrée antenne
2 Fusible (10 A)
Fr
26
Section
03
Installation
3 Entrée cordon d’alimentation
4 Entrée télécommande câblée
Un adaptateur de télécommande câblée
(vendu séparément) peut être connecté.
5 Sortie arrière
Cordon d’alimentation
1
324
56
34
56
b
8
9
7
a
e
c
1 Vers l’entrée cordon d’alimentation
2 Selon le type de véhicule, 3 et 5 peuvent
avoir une fonction différente. Dans ce cas, assurez-vous de connecter 4 à 5 et 6 à 3.
3 Jaune
Alimentation de secours (ou accessoire)
4 Jaune
Connectez à la borne d’alimentation 12 V permanente.
5 Rouge
Accessoire (ou alimentation de secours)
6 Rouge
Connectez à la borne contrôlée par le contact
d’allumage (12 V CC).
7 Connectez les fils de même couleur en-
semble.
8 Noir (masse du châssis)
Connectez sur un endroit métallique propre,
non recouvert de peinture.
9 Bleu/blanc
La position des broches du connecteur ISO
est différente selon le type de véhicule.
Connectez 9 et b lorsque la broche 5 est de
type commande de l’antenne. Dans un type
différent de véhicule, ne connectez jamais 9
et b.
a Bleu/blanc
Connectez à la prise de commande du sys-
tème de l’amplificateur de puissance (max.
300 mA 12 V CC).
b Bleu/blanc
Connectez à la borne de commande du relais
de l’antenne motorisée (max. 300 mA 12 V
CC).
c Jaune/noir
Si vous utilisez un équipement avec la fonc-
tion Coupure du son, câblez ce fil au fil Cou-
pure Audio de cet équipement. Sinon, ne
connectez rien au fil Coupure Audio.
d Fils du haut-parleur
Blanc : Avant gauche +
Blanc/noir: Avant gauche *
Gris : Avant droite +
Gris/noir: Avant droite *
Vert: Arrière gauche +
Vert/noir: Arrière gauche *
Violet : Arrière droite +
Violet/noir: Arrière droite *
e Connecteur ISO
Dans certains véhicules, il est possible que le
connecteur ISO soit divisé en deux. Dans ce
cas, assurez-vous de connecter les deux
connecteurs.
Amplificateur de puissance
(vendu séparément)
Réalisez ces connexions lors de l’utilisation
d’un amplificateur optionnel.
1
4
2
55
3
1 Télécommande du système
Fr
27
Section
Français
03
Installation
Connectez au câble bleu/blanc.
2 Amplificateur de puissance (vendu séparé-
ment)
3 Connectez avec des câbles RCA (vendus sépa-
rément)
4 Vers la sortie arrière
5 Haut-parleur arrière
Installation
Important
! Vérifiez toutes les connexions et tous les systè-
mes avant l’installation finale.
! N’utilisez pas de pièces non autorisées car il
peut en résulter des dysfonctionnements.
! Consultez votre revendeur si l’installation né-
cessite le perçage de trous ou d’autres modifications du véhicule.
! N’installez pas cet appareil là où :
— il peut interférer avec l’utilisation du véhi-
cule.
— il peut blesser un passager en cas d’arrêt
soudain du véhicule.
! Le laser à semi-conducteur sera endommagé
s’il devient trop chaud. Installez cet appareil à
l’écart de tous les endroits chauds, par exemple les sorties de chauffage.
! Des performances optimales sont obtenues
quand l’appareil est installé à un angle inférieur à 60°.
60°
Montage avant/arrière DIN
Cet appareil peut être installé correctement
soit en montage frontal ou en montage arrière.
Montage frontal DIN
1 Insérez le manchon de montage dans le
tableau de bord.
Lors de l’installation de cet appareil dans un
espace peu profond, utilisez le manchon de
montage fourni. Si l’espace est insuffisant, utilisez le manchon de montage fourni avec le véhicule.
! Utilisez des pièces disponibles dans le
commerce lors de l’installation.
2 Fixez le manchon de montage en utilisant un tournevis pour courber les pattes
métalliques (90°) en place.
1
2
1 Tableau de bord
2 Manchon de montage
3 Installez l’appareil comme indiqué sur
la figure.
1
2
3
4
5
1 Écrou
2 Pare-feu ou support métallique
3 Attache en métal
4 Vis
5 Vis (M4 ×
# Assurez-vous que l’appareil est correctement
mis en place. Toute installation instable peut entraîner des sauts ou autres dysfonctionnements.
Fr
28
Section
03
Installation
Montage arrière DIN
1 Déterminez la position appropriée où
les trous sur le support et sur le côté de
l’appareil se correspondent.
2 Serrez deux vis de chaque côté.
1
2
3
1 Vis taraudeuse (5 mm × 8 mm)
2 Support de montage
3 Tableau de bord ou console
Retrait de l’appareil
1 Retirez l’anneau de garniture.
1 Anneau de garniture
2 Encoche
! Relâcher la face avant permet d’accéder
plus facilement à l’anneau de garniture.
! Quand vous remontez l’anneau de garni-
ture, pointez le côté avec l’encoche vers le
bas.
2 Insérez les clés d’extraction fournies
dans les deux côtés de l’appareil jusqu’àce
qu’elles s’enclenchent en place.
3 Tirez l’appareil hors du tableau de
bord.
Retrait et remontage de la face
avant
Vous pouvez retirer la face avant pour protéger
l’appareil contre le vol.
Appuyez sur la touche de retrait, puis poussez
la face avant vers le haut et tirez-la vers vous.
Pour les détails, reportez-vous à Retrait de la
face avant pour protéger l’appareil contre le vol
et à la page 20, Remontage de la face avant.
Fr
29
Section
Français
03
Installation

Dépannage
Symptôme Causes possi-
bles
Action corrective
L’écran revient
automatiquement à l’affichage ordinaire.
Vous n’avez exécuté aucune opération pendant
30 secondes.
Réexécutez l’opération.
L’étendue de ré-
pétition de lecture change de
manière inattendue.
En fonction de
l’étendue de répétition de lecture, l’étendue
sélectionnée
peut changer
lors de la sélection d’un autre
dossier ou d’une
autre plage ou en
cas d’avance/retour rapide.
Resélectionnez l’étendue de répétition de lecture.
Un sous-dossier n’est pas
lu.
Il est impossible
de lire les sousdossiers lorsque
FLD (répétition
du dossier) est
sélectionné.
Sélectionnez une
autre étendue de
répétition de lecture.
NO XXXX apparaît lors de la
modification de
l’affichage (par
exemple NO T-
TTL).
Aucune information textuelle
n’est intégrée.
Basculez l’affichage ou la lecture
sur une autre
plage/un autre fichier.
L’appareil ne
fonctionne pas
correctement.
Il y a des interférences.
Vous utilisez un
autre appareil, tel
qu’un téléphone
cellulaire, qui
transmet des
ondes électromagnétiques à
proximité de l ’appareil.
Éloignez tous les
appareils électriques qui pourrait
provoquer des interférences.
Messages d’erreur
Quand vous contactez votre distributeur ou le
Service d’entretien agréé par Pioneer le plus
proche, n’oubliez pas de noter le message
d’erreur.
Message Causes possi-
bles
Action corrective
ERROR-11, 12,
17, 30
Le disque est
sale.
Nettoyez le disque.
Le disque est
rayé.
Utilisez un autre
disque.
ERROR-10, 11,
12, 15, 17, 30,
A0
Une erreur mécanique ou électrique est
survenue.
Coupez et remettez
le contact d’allumage ou choisissez une autre
source, puis revenez au lecteur de
CD.
ERROR-15 Le disque inséré
est vierge.
Utilisez un autre
disque.
ERROR-23 Format CD non
pris en charge
Utilisez un autre
disque.
FRMTREAD Le début de la
lecture et le
début de l’émission des sons
sont parfois décalés.
Attendez que le
message disparaisse pour entendre les sons.
NO AUDIO Le disque inséré
ne contient pas
de fichiers pouvant être lus.
Utilisez un autre
disque.
PROTECT Tous les fichiers
sur le disque inséré intègrent la
protection par
DRM.
Utilisez un autre
disque.
SKIPPED Le disque inséré
contient des fichiers WMA protégés par DRM.
Utilisez un autre
disque.
Fr
30
Annexe
Informations complémentaires
Conseils sur la manipulation
Disques et lecteur
Utilisez uniquement des disques affichant l’un ou
l’autre des logos suivants.
Utilisez des disques 12 cm. N’utilisez pas de disques
8 cm ni un adaptateur pour disques 8 cm.
Utilisez seulement des disques conventionnels de
forme circulaire. N’utilisez pas de disques ayant une
forme particulière.
N’introduisez aucun objet dans le logement pour CD
autre qu’un CD.
N’utilisez pas de disques fendillés, ébréchés, voilés
ou présentant d’autres défauts, car ils peuvent endommager le lecteur.
La lecture de disques CD-R/CD-RW non finalisés
n’est pas possible.
Ne touchez pas la surface enregistrée des disques.
Rangez les disques dans leur coffret dès que vous ne
les écoutez plus.
Évitez de laisser les disques dans des environnements
trop chauds, en particulier à la lumière directe du soleil.
Ne posez aucune étiquette sur la surface des disques,
n’écrivez pas sur un disque, n’appliquez aucun agent
chimique sur un disque.
Pour nettoyer un CD, essuyez le disque avec un chiffon doux en partant du centre vers l’extérieur.
La condensation peut perturber temporairement le
fonctionnement du lecteur. Laissez celui-ci s’adapter
à la température plus élevée pendant une heure environ. Essuyez également les disques humides avec un
chiffon doux.
La lecture de certains disques peut être impossible en
raison des caractéristiques du disque, de son format,
de l’application qui l’a enregistré, de l’environnement
de lecture, des conditions de stockage ou d’autres
conditions.
Les cahots de la route peuvent interrompre la lecture
d’un disque.
DualDiscs
Les DualDiscs sont des disques à deux faces avec un
CD enregistrable pour l’audio sur une face et un DVD
enregistrable pour la vidéo sur l’autre.
Comme la face CD des DualDiscs n’est pas physiquement compatible avec le standard CD général, la lecture de la face CD sur cet appareil peut ne pas être
possible.
Charger et éjecter fréquemment un DualDisc peut
provoquer des rayures sur le disque. Des rayures importantes peuvent entraîner des problè mes de lecture
sur cet appareil. Dans certains cas, un DualDisc peut
se retrouver bloqué dans le logement pour CD et ne
sera pas éjecté. Pour éviter cela, nous vous recommandons de vous abstenir d’utiliser des DualDiscs
avec cet appareil.
Pour des informations plus détaillées sur les DualDiscs, veuillez vous reporter aux informations fournies par le fabricant des disques.
Compatibilité des formats
audio compressés
WMA
Extension de fichier : .wma
Débit binaire : 48 kbit/s à 320 kbit/s (CBR), 48 kbit/s à
384 kbit/s (VBR)
Fréquence d’échantillonnage : 32 kHz à 48 kHz
Windows Media Audi o Professional, Lossless, Voice/
DRM Stream/Stream avec vidéo : Non
MP3
Extension de fichier : .mp3
Débit binaire : 8 kbit/s à 320 kbit/s (CBR), VBR
Fréquence d’échantillonnage : 8 kHz à 48 kHz (32,
44,1, 48 kHz pour accentuation)
Fr
31
Annexe
Français
Informations complémentaires
Version étiquette ID3 compatible : 1.0, 1.1, 2.2, 2.3, 2.4
(la Version 2.x de l’étiquette ID3 a priorité sur la Version 1.x.)
Liste de lecture m3u : Non
MP3i (MP3 interactif), mp3 PRO : Non
WAV
Extension de fichier : .wav
Bits de quantification : 8 et 16 (LPCM), 4 (MS
ADPCM)
Fréquence d’échantillonnage : 16 kHz à 48 kHz
(LPCM), 22,05 kHz et 44,1 kHz (MS ADPCM)
Informations supplémentaires
Seuls les 32 premiers caractères d’un nom de fichier
(incluant l’extension de fichier) ou d’un nom de dossier peuvent être affichés.
Les textes russes à afficher sur cet appareil doivent
être codés avec les jeux de caractères suivants :
! Unicode (UTF-8, UTF-16)
! Jeux de caractères autres que Unicode qui sont
utilisés dans un environnement Windows et sont
paramétrés sur Russe dans le paramétrage multilingue
Cet appareil peut ne pas fonctionner correctement
selon l’application utilisée pour encoder les fichiers
WMA.
Il peut se produire un léger retard lors du démarrage
de la lectur e de fichiers audio intégrés avec des données image.
Disque
Hiérarchie des dossiers pouvant être lus : jusqu’à 8 niveaux (dans la pratique, la hiérarchie compte moins
de 2 niveaux).
Dossiers pouvant être lus : jusqu’à99
Fichiers pouvant être lus : jusqu’à 999
Système de fichiers : ISO 9660 Niveau 1 et 2, Romeo,
Joliet
Lecture multi-session : Oui
Transfert des données en écriture par paquet : Non
Quelle que soit la durée du silence entre les plages
musicales de l’enregistrement original, la lecture des
disques d’audio compressé s’effectue avec une
courte pause entre les plages musicales.
Séquence des fichiers audio
Sur cet appareil, l’utilisateur ne peut pas affecter de numéros de dossier ni spécifier les séquences de lecture.
Exemple de hiérarchie
1
2
3
4
5
6
01
02
03
04
05
Niveau 1 Niveau 2 Niveau 3 Niveau 4
: Dossier
: Fichier audio
compressé
01 à 05 : Numéro de
dossier
1 à 6 : Séquence
de lecture
Disque
! La séquence de sélection des dossiers ou
d’autres opérations peut différer en fonction du logiciel de codage ou d’écriture.
Tableau des caractères
cyrilliques
D:C D:C D:C D:C D:C
: А : Б : В : Г : Д
: Е, Ё : Ж : З : И, Й : К
: Л : М : Н : О : П
: Р : С : Т : У : Ф
: Х : Ц : Ч : Ш, Щ : Ъ
: Ы : Ь : Э : Ю : Я
D : Affichage C : Caractère
Fr
32
Annexe
Informations complémentaires
Droits d’auteur et marques
commerciales
iTunes
Apple et iTunes sont des marques commerciales de Apple Inc. déposées aux États-Unis et
dans d’autres pays.
MP3
La vente de ce produit comporte seulement
une licence d’utilisation privée, non commerciale, et ne comporte pas de licence ni n’implique aucun droit d’utilisation de ce produit
pour une diffusion commerciale (c’est-à-dire
générant des revenus) en temps réel (terrestre,
par satellite, câble et/ou tout autre média), diffusion/streaming via internet, des intranets et/
ou d’autres systèmes électroniques de distribution de contenu, telles que les applications
audio payante ou audio sur demande. Une licence indépendante est requise pour de telles
utilisations. Pour les détails, veuillez visiter le
site
http://www.mp3licensing.com.
WMA
Windows Media et le logo Windows sont des
marques commerciales ou des marques déposées de Microsoft Corporation aux États-Unis
et/ou dans d’autres pays.
Ce produit intègre une technologie détenue
par Microsoft Corporation, qui ne peut être utilisée et distribuée que sous licence de
Microsoft Licensing, Inc.
Caractéristiques techniques
Généralités
Tension d’alimentation ……… 14,4 V CC (10,8 V à 15,1 V
acceptable)
Mise à la masse ………………….. Pôle négatif
Consommation maximale … 10,0 A
Dimensions (L × H × P) :
DIN
Châssis ………………… 178 mm × 50 mm × 165
mm
Panneau avant …… 188 mm × 58 mm × 17 mm
D
Châssis ………………… 178 mm × 50 mm × 165
mm
Panneau avant …… 170 mm × 46 mm × 17 mm
Poids ………………………………………. 1,3 kg
Audio
Puissance de sortie maximale
…………………………………………….. 50 W × 4
Puissance de sortie continue
…………………………………………….. 22 W × 4 (50 Hz à 15 000
Hz, DHT 5 %, impédance de
charge 4 W, avec les deux
canaux entraînés)
Impédance de charge ……….. 4 W (4 W à8W acceptable)
Niveau de sortie maximum de la sortie préamp
…………………………………………….. 2,0 V
Contrôles de tonalité :
Grave
Fréquence …………… 100 Hz
Gain ………………………. ±12 dB
Moyen
Fréquence …………… 1 kHz
Gain ………………………. ±12 dB
Aigus
Fréquence …………… 10 kHz
Gain ………………………. ±12 dB
Lecteur de CD
Système ………………………………… Compact Disc Digital Audio
Disques utilisables …………….. Disques compacts
Rapport signal/bruit …………… 94 dB (1 kHz) (réseau IEC-A)
Nombre de canaux …………….. 2 (stéréo)
Format de décodage WMA
…………………………………………….. Ver. 7, 7.1, 8, 9, 10, 11, 12 (2
canaux audio)
(Windows Media Player)
Format de décodage MP3 … MPEG-1 & 2 Couche Audio
3
Format du signal WAV ………. PCM Linéaire & MS ADPCM
Syntoniseur FM
Gamme de fréquence ………… 87,5 MHz à 108,0 MHz
Sensibilité utile ……………………. 11 dBf (0,7 µV/75 W, mono,
S/B : 30 dB)
Rapport signal/bruit …………… 72 dB (réseau IEC-A)
Syntoniseur MW (PO)
Gamme de fréquence ………… 531 kHz à 1 602 kHz
Sensibilité utile ……………………. 25 µV (S/B : 20 dB)
Rapport signal/bruit …………… 62 dB (réseau IEC-A)
Syntoniseur LW (GO)
Gamme de fréquence ………… 153 kHz à 281 kHz
Sensibilité utile ……………………. 28 µV (S/B : 20 dB)
Rapport signal/bruit …………… 62 dB (réseau IEC-A)
Remarque
Les caractéristiques et la présentation peuvent
être modifiées sans avis préalable.
Fr
33
Annexe
Français
Informations complémentaires
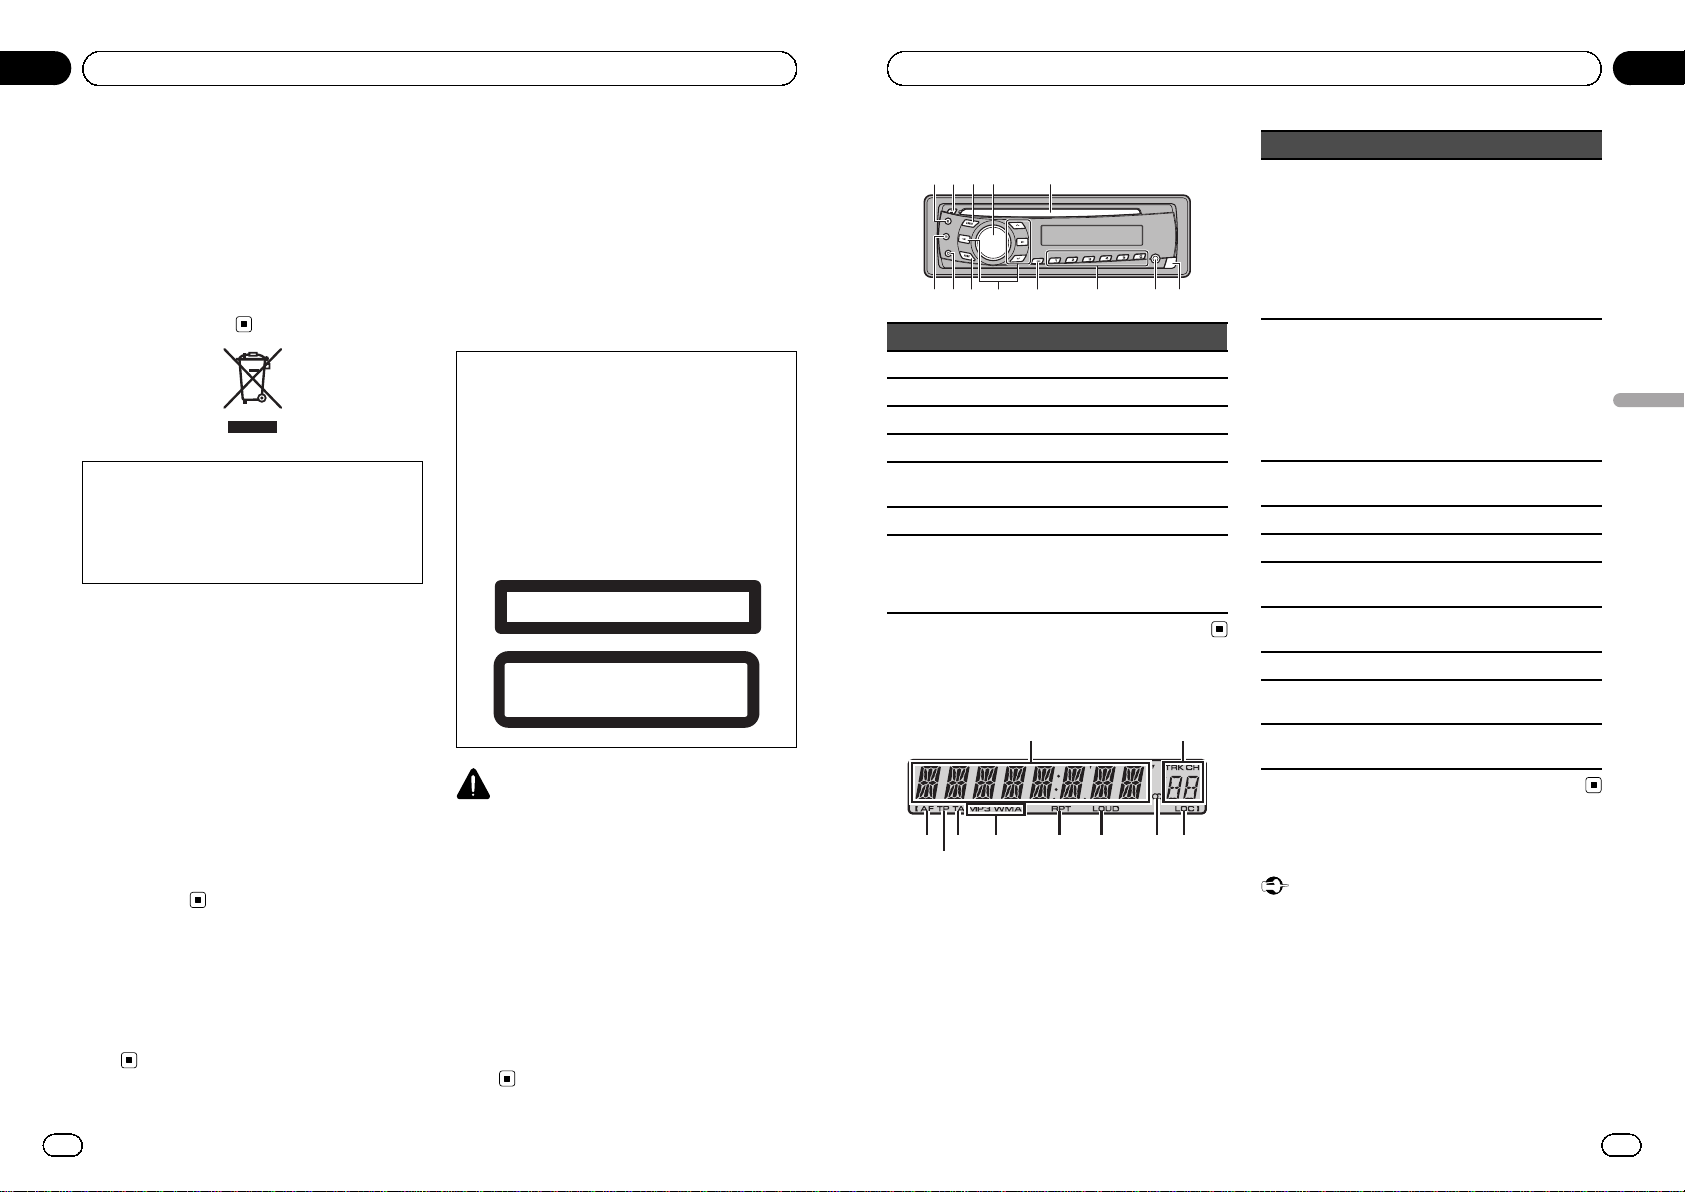
Grazie per aver acquistato questo prodotto
PIONEER.
Leggere attentamente questo manuale prima
di utilizzare il prodotto, per assicurarne il corretto utilizzo. È particolarmente importante
leggere e osservare le precauzioni contrassegnate da AVVERTENZA e ATTENZIONE
contenute in questo manuale. Conservare il
manuale in un luogo sicuro e accessibile, per
consultazione futura.
Se si vuole eliminare questo prodotto, non gettarlo insieme ai rifiuti domestici. Esiste un sistema di raccolta differenziata in conformità
alle leggi che richiedono appositi trattamenti,
recupero e riciclo.
Gli utenti privati dei Paesi membri dell’Unione
Europea, della Svizzera e della Norvegia possono portare i propri prodotti elettronici gratuitamente presso i centri di raccolta specificati
o presso il rivenditore al dettaglio (se l’acquisto è stato eseguito presso un rivenditore di
questo tipo).
Per i Paesi non specificati in precedenza, contattare le autorità locali per informazioni sul
corretto metodo di smaltimento.
In questo modo si garantirà che il prodotto
smaltito subisca i processi di trattamento, recupero e riciclaggio necessari per prevenire i
potenziali effetti negativi per l’ambiente e la
salute umana.
In caso di problemi
Nel caso che questo prodotto non funzioni
correttamente, contattare il rivenditore o il
Centro di assistenza autorizzato Pioneer più vicino.
Informazioni sull’unità
Le frequenze del sintonizzatore di questa unità
sono destinate all’uso in Europa occidentale,
in Asia, nel Medio Oriente, in Africa e in Oceania. L’uso in altre aree può dare come risultato
una ricezione non adeguata. La funzione RDS
(Radio Data System) è operativa solo nelle
aree in cui vengono trasmessi segnali RDS
per stazioni FM.
ATTENZIONE
Questo prodotto è classificato come prodotto
laser di classe 1 in conformità con gli standard
di sicurezza dei prodotti laser (IEC 608251:2007) e contiene un modulo laser di classe
1M. Per garantire continuativamente la sicurezza, non rimuovere nessuna copertura o cercare di accedere ai componenti interni del
prodotto. Rivolgersi a personale qualificato per
qualsiasi intervento di manutenzione.
PRODOTTO LASER DI CLASSE 1
ATTENZIONE—RADIAZIONI LASER INVISIBILI
CLASSE 1M QUANDO APERTO. NON OSSERVARE
IN MODO DIRETTO CON STRUMENTI OTTICI.
ATTENZIONE
! Non lasciare che questa unità entri in contatto
con liquidi, in caso contrario possono verificarsi scosse elettriche. Inoltre, se questa unità
entra in contatto con liquidi, può subire danni
oppure emettere fumo o surriscaldarsi.
! Il CarStereo-Pass Pioneer può essere usato
solo in Germania.
! Mantenere sempre il volume basso abbastan-
za da poter udire i suoni provenienti dall’esterno.
! Evitare l’esposizione all’umidità.
! Se la batteria viene scollegata o si scarica, la
memoria delle preselezioni viene cancellata.
It
34
Sezione
01
Prima di iniziare
123 4 5
Tasto Tasto
1 E (EQ/LOUD) 8 1 — 6
2 h (espulsione) 9 TA/AF
3 AUDIO a a/b/c/d
4 SRC/OFF b FUNC
5
Vano d’inserimento
dei dischi
c D (DISP/SCRL)
6 Tasto Rimozione d B (BAND/ESC)
7
Connettore di ingresso ausiliario
(AUX) (connettore
stereo da 3,5 mm)
Indicazioni sui display
6
3
2
1
5
7 8 9 a
Indicatore Stato
1
Sezione del
display
principale
! Sintonizzatore: banda e fre-
quenza
! RDS: nome di servizio del pro-
gramma, informazioni PTY e
altre informazioni letterali
! Lettore CD incorporato: tempo
di riproduzione trascorso e informazioni di testo
2
Numero di
preselezione/numero
del brano
! Il numero del brano o il nume-
ro di prese lezione.
! Se viene selezionato un nume-
ro di brano pari o superiore a
100, si accende d a sinistra
dell’indicatore del numero di
brano.
3 AF
È attivata la funzione AF (ricerca
delle frequenze alternative).
4 TP È sintonizzata una stazione TP.
5 TA La funzione TA è attivata.
6
MP3/
WMA
Il tipo di file correntemente in riproduzione.
7 RPT
Attivazione della riproduzione ripetuta.
8 LOUD La sonorità è attiva.
9 5 (stereo)
Ricezione della trasmissione stereo.
a LOC
La ricerca di sintonia in modo locale è attiva.
Funzionamento di base
Importante
! Rimuovere o montare il frontalino delicata-
mente.
! Evitare di sottoporre il frontalino a urti eccessi-
vi.
! Mantenere il frontalino lontano dalla luce so-
lare diretta e dalle alte temperature.
! Per evitare danni ai dispositivi o agli interni
del veicolo, accertarsi di scollegare gli eventuali cavi e i dispositivi collegati al frontalino,
prima di rimuoverlo.
It
35
Sezione
Italiano
02
Funzionamento dell’unità
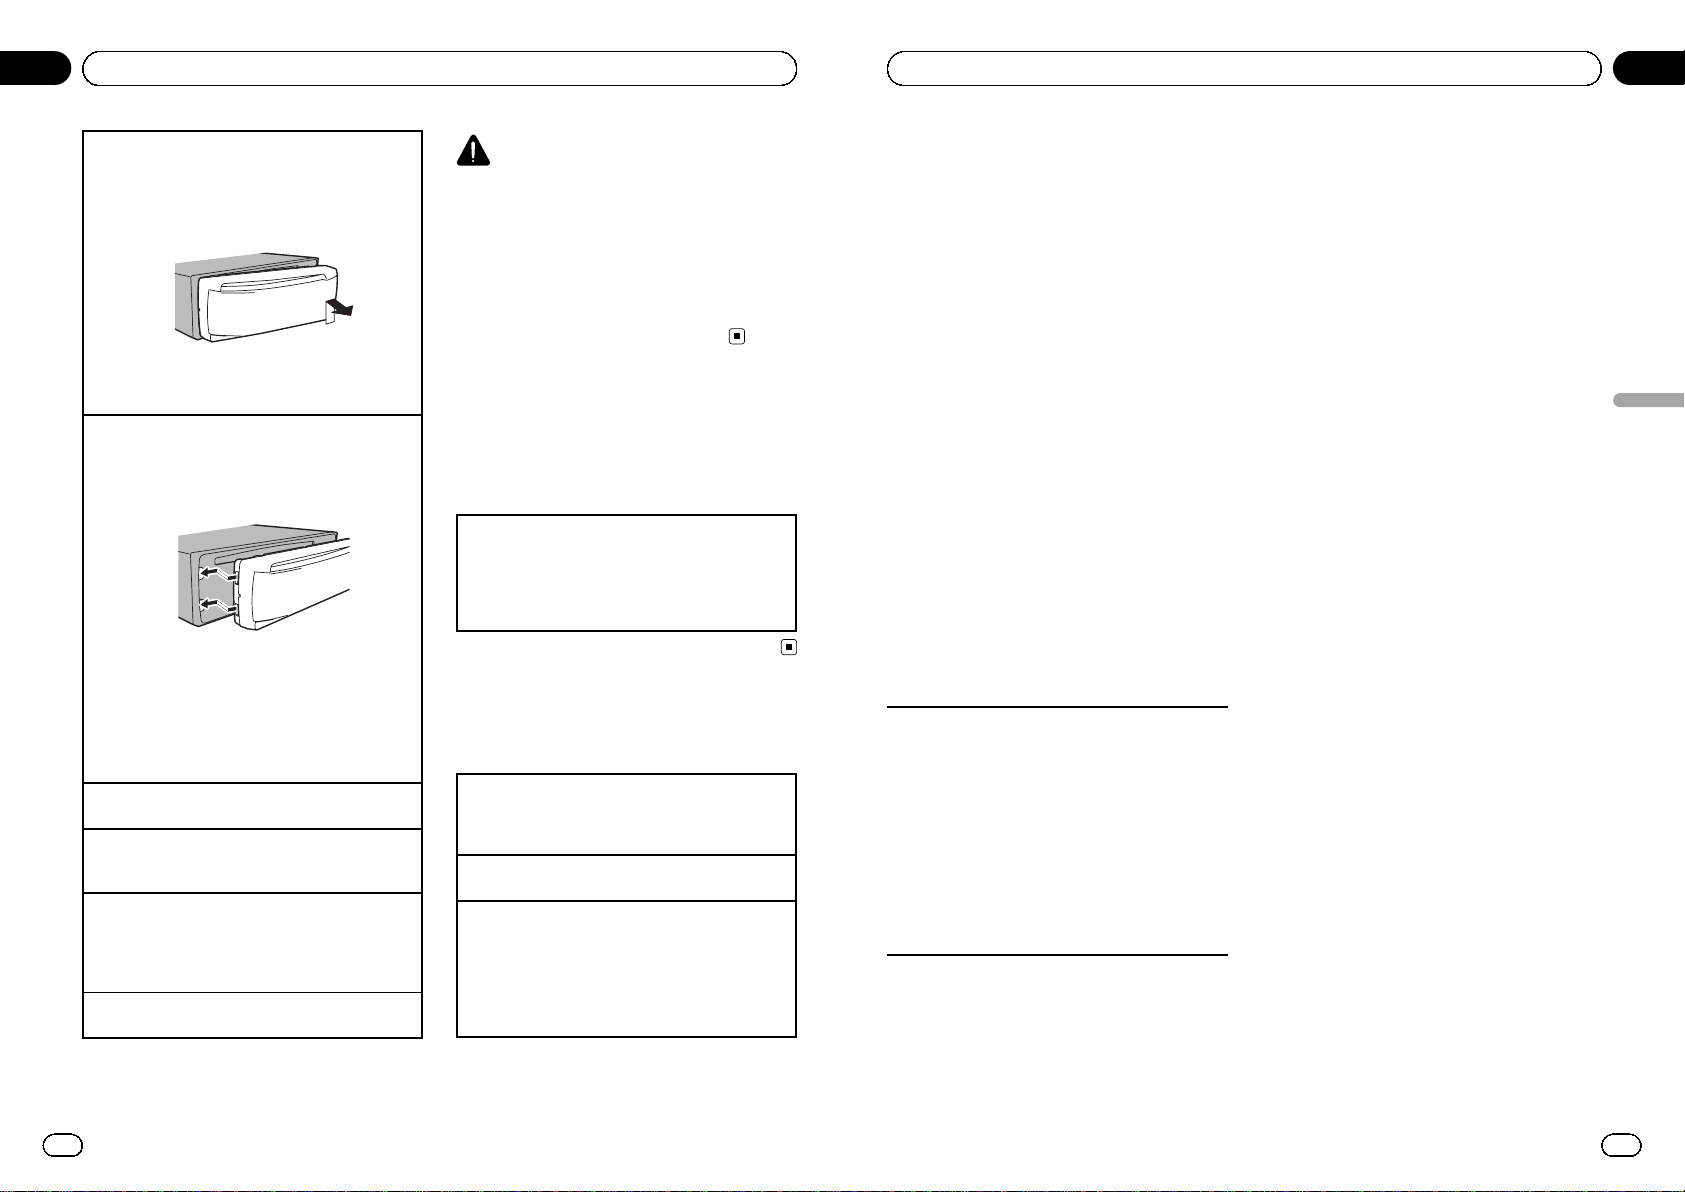
Rimozione del frontalino per proteggere l’unità dai
furti
1 Premere il tasto di rimozione per sganciare il fron-
talino.
2 Spingere il frontalino verso l’alto e tirarlo verso l’e-
sterno.
3 Tenere sempre il frontalino in una custodia di pro-
tezione quando non è collegato all’unità.
Reinserimento del frontalino
1 Fare scorrere il frontalino verso sinistra.
Inserire le linguette sul lato sinistro dell’unità
principale nei corrispondenti alloggiamenti sul
frontalino.
2 Premere il lato destro del frontalino fino a quando
è saldamente installato.
Se non è possibile collegare il frontalino all’unità
principale, accertarsi di aver posizionato il frontalino sull’unità principale in modo corretto. Inserendo il frontalino con forza eccessiva, l ’unità o il
frontalino potrebbero subire danni.
Accensione dell’unità
1 Premere SRC/OFF per accendere l’unità.
Spegnimento dell’unità
1 Premere SRC/OFF e tenerlo premuto fino a quan-
do l’unità non si spegne.
Selezione di una sorgente
1 Premere SRC/OFF per passare in rassegna le sor-
genti elencate in basso.
TUNER (Sintonizzatore)—CD (Lettore CD incorporato)—AUX (AUX)
Regolazione del volume
1 Ruotare SRC/OFF per regolare il volume.
ATTENZIONE
Per motivi di sicurezza, parcheggiare il veicolo
quando si rimuove il frontalino.
Nota
Quando il conduttore isolato blu/bianco di questa
unità viene collegato al terminale di controllo del
relè dell’antenna automatica, l’antenna dell’automobile si estende quando si accende l’unità. Per
ritirare l’antenna, spegnere la sorgente.
Operazioni dei menu
identiche per impostazioni
funzioni/regolazioni audio/
impostazioni iniziali
Ritorno al display normale
Annullamento del menu delle impostazioni iniziali
1 Premere B (BAND/ESC).
È anche possibile annullare le impostazioni iniziali tenendo premuto SRC/OFF fino a quando l’unità non si spegne.
Sintonizzatore
Funzionamento di base
Selezione di una banda
1 Premere B (BAND/ESC) fino a quando viene vi-
sualizzata la banda desiderata (F1, F2 per FM o
MW/LW).
Sintonizzazione manuale (passo per passo)
1 Premere c o d.
Ricerca
1 Premere e tenere premuto c o d e poi rilasciare.
È possibile annullare la ricerca di sintonia premendo brevemente c o d.
Se si spinge e si tiene premuto c o d, è possibile
saltare le stazioni. La ricerca di sintonia viene avviata non appena si rilascia c o d.
It
36
Sezione
02
Funzionamento dell’unità
Memorizzazione e richiamo delle
stazioni per ciascuna banda
% Quando viene individuata una stazione
che si desidera memorizzare, premere uno
dei tasti di preselezione sintonia (da 1 a 6),
mantenendolo premuto fino a quando il
numero di preselezione non cessa di lampeggiare.
È possibile richiamare la stazione radio memorizzata premendo il tasto di preselezione sintonia.
# Premere a o b per richiamare dalla memoria
le stazioni radio.
Scorrimento del display RDS
Il sistema RDS (radio data system) contiene informazioni digitali che facilitano la ricerca
delle stazioni radio.
% Premere D (DISP/SCRL).
Nome di servizio del programma—Informazioni PTY—Frequenza
# Le informazioni PTY e la frequenza vengono visualizzate sul display per otto secondi.
Elenco PTY
NEWS (Notizie), AFFAIRS (Problemi attuali), INFO (Informazione), SPORT (Sport), WEATHER (Informazioni
meteorologiche), FINANCE (Economia), POP MUS
(Musica popolare), ROCK MUS (Musica Rock), EASY
MUS (Musica rilassante), OTH MUS (Altra musica),
JAZZ (Jazz), COUNTRY (Musica Country), NAT MUS
(Musica nazionale), OLDIES (Vecchi successi), FOLK
MUS (Musica Folk), L.CLASS (Musica classica legge-
ra), CLASSIC (Musica classica), EDUCATE (Educazione), DRAMA (Teatro), CULTURE (Cultura), SCIEN CE
(Scienza), VARIED (Varietà), CHILDREN (Bambini),
SOCIAL (Questioni sociali), RELIGION (Religione),
PHONE IN (Chiamate in diretta), TOURING (Viaggi),
LEISURE (Tempo libero), DOCUMENT (Documentari)
Selezione di frequenze alternative
Se il sintonizzatore riceve un segnale debole,
l’unità ricerca automaticamente una stazione
diversa della stessa rete.
% Premere e tenere premuto TA/AF per
attivare o disattivare la funzione AF.
Uso della ricerca PI
Se il sintonizzatore non riesce a trovare una
stazione adatta o se la ricezione si indebolisce,
l’unità ricerca automaticamente una stazione
diversa con la stessa programmazione. Durante la ricerca, viene visualizzata l’indicazione
PI SEEK el’audio viene silenziato.
Uso della funzione di ricerca automatica
PI per le stazioni preselezionate
Quando non risulta possibile richiamare le
stazioni preselezionate, come ad esempio nel
corso di lunghi viaggi, è possibile impostare
l’unità in modo che esegua la ricerca PI durante il richiamo delle stazioni preselezionate
stesse.
! L’impostazione predefinita della ricerca
automatica PI è disattivata. Vedere A-PI (ri-
cerca automatica PI) a pagina 40.
Ricezione dei notiziari sul traffico
Indipendentemente dalla sorgente che si sta
ascoltando, è possibile ricevere automaticamente i notiziari sul traffico con la funzione TA
(attesa di notiziari sul traffico).
1 Sintonizzarsi su una stazione TP o su
una stazione TP con estensione alle altre
stazioni del network.
2 Premere TA/AF per attivare o disattivare l’attesa di notiziari sul traffico.
3 Ruotare SRC/OFF per regolare il volume
TA quando inizia un notiziario sul traffico.
Il volume appena impostato viene memorizzato e richiamato per i notiziari sul traffico successivi.
It
37
Sezione
Italiano
02
Funzionamento dell’unità

4 Per annullare il notiziario sul traffico,
premere TA/AF mentre è in corso la ricezione del notiziario sul traffico.
Il sintonizzatore torna alla sorgente originale
ma resta in modalità di attesa fino a quando si
preme di nuovo TA/AF.
Impostazioni delle funzioni
% Premere FUNC per selezionare la funzione.
Dopo averla selezionata, eseguire la procedura
descritta di seguito per impostare la funzione.
! Se è selezionata la banda MW/LW, è possi-
bile selezionare solo BSM o LOCAL.
BSM (memorizzazione delle stazioni migliori)
La funzione BSM (memorizzazione delle stazioni migliori) memorizza automaticamente le sei stazioni più
forti in ordine di forza del segnale.
La memorizzazione delle frequenze di trasmissione
tramite la funzione BSM può determinare la sostituzione delle frequenze di trasmissione memorizzate
usando i tasti da 1 a 6.
1 Premere a per attivare la funzione BSM.
Le sei frequenze di trasmissione più potenti vengono memorizzate in ordine decresce nte di forza
del segnale.
Per annullare il processo di memorizzazione, premere b.
REG (regionale)
Quando si utilizza la funzione AF, la funzione regionale limita la selezione alle stazioni che trasmettono
programmi regionali.
1 Premere a o b per attivare o disattivare la funzio-
ne regionale.
LOCAL (ricerca di sintonia in modo locale)
La ricerca di sintonia in modo locale consente di sintonizzare solo le stazioni radio con segnali radio sufficientemente potenti per una buona ricezione.
1 Premere a o b per attivare e disattivare la ricerca
di sintonia in modo locale.
2 Premere c o d per impostare la sensibilità.
FM: LOCAL 1 —LOCAL 2—LOCAL 3—LOCAL 4
MW/LW: LOCAL 1—LOCAL 2
L’impostazione di livello massimo consente la ri-
cezione solo delle stazioni più forti, mentre i livelli
più bassi consentono di ricevere stazioni più deboli.
TA (attesa di notiziari sul traffico)
1 Premere a o b per attivare o disattivare l’attesa di
notiziari sul traffico.
AF (ricerca delle frequenze alternative)
1 Premere a o b per attivare o disattivare la funzio-
ne AF.
CD
Funzionamento di base
Riproduzione di CD/CD-R/CD-RW
1 Inserire un disco nel vano d’inserimento dei di-
schi, con il lato dell’etichetta rivolto verso l’alto.
Espulsione dei CD/CD-R/CD-RW
1 Premere h.
Selezione di una cartella
1 Premere a o b.
Selezione di una traccia
1 Premere c o d.
Avanzamento rapido/modalità inversa rapida
1 Premere e tenere premuto c o d.
Quando si riproducono file audio compressi, durante l’avanzamento rapido e la modalità inversa
non viene emesso audio.
Passaggio da audio compresso a CD-DA
1 Premere B (BAND/ESC).
Visualizzazione delle
informazioni di testo
Selezione delle informazioni di testo desiderate
1 Premere D (DISP/SC RL).
Scorrimento delle informazioni di testo a sinistra
1 Premere e tenere premuto D (DISP/SCRL).
Note
! A seconda della versione di iTunes utilizzata
per scrivere i file MP3 o del tipo di file multimediali, il testo memorizzato su un file audio
potrebbe essere incompatibile e non essere visualizzato correttamente.
! Le informazioni di testo che possono essere
cambiate dipendono dal tipo di supporto.
It
38
Sezione
02
Funzionamento dell’unità
Impostazioni delle funzioni
% Premere FUNC per selezionare la funzione.
Dopo averla selezionata, eseguire la procedura
descritta di seguito per impostare la funzione.
RPT (riproduzione ripetuta)
1 Premere c o d per selezionare l’intervallo di ripe-
tizione.
DSC – Ripete tutti i brani
TRK – Ripete il brano corrente
FLD – Ripete la cartella corrente
RDM (riproduzione casuale)
1 Premere a o b per attivare o disattivare la ripro-
duzione casuale.
Quando è attivata la riproduzione casuale, sul display viene visualizzata l’indicazione RDM.
Se si attiva la riproduzione casuale durante la ripetizione della cartella, sul display viene visualizzata l’indicazione FRDM.
SCAN (lettura a scansione)
La lettura a scansione consente di eseguire la ricerca
di un brano nell’intervallo di ripetizione selezionato.
1 Premere a per attivare la lettura a scansione.
Se si attiva la lettura a scansione durante FLD, sul
display viene visualizzata l’indicazione FSCN.
2 Quando si trova il brano desiderato, premere b
per disattivare la lettura a scansione.
Se il display è tornato automaticament e alla visualizzazione della riproduzione, selezionare di nuovo
SCAN premendo FUNC.
Dopo che la scansione del disco (o della cartella)
è terminata, la riproduzione normale dei brani riprende.
PAUSE (pausa)
1 Premere a o b per attivare o disattivare la pausa.
SRTRV (Sound Retriever)
Questa funzione migliora automaticamente l’audio
compresso e ripristina il suono completo.
1 Premere a o b per selezionare l’impostazione
preferita.
OFF (disattivata)—1—2
1 è efficace per le velocità di compressione basse,
mentre 2 è efficace per le velocità di compressione alte.
FF/REV (avanzamento rapido/modalità inversa rapida)
È possibile alternare il metodo di ricerca tra avanzamento rapido/modalità inversa e la ricerca ogni 10
brani. Selezionando ROUGH, è possibile cercare ogni
10 brani.
1 Premere d per selezionare ROUGH.
FF/REV – Avanzamento rapido e modalità inversa
ROUGH – Ricerca ogni 10 brani
Per selezionare FF/REV, premere c.
2 Premere B (BAND/ESC) per tornare al display
della riproduzione.
3 Premere e tenere premuto c o d per cercare ogni
10 brani del disco (o della cartella).
Se il numero dei brani restanti è inferiore a 10,
premendo e tenendo premuto c o d viene richiamato il primo (o l’ultimo) brano.
Regolazione dell’audio
Regolazione dell’audio
% Premere AUDIO per selezionare la funzione audio.
Dopo averla selezionata, eseguire la procedura
descritta di seguito per impostare la funzione
audio.
FAD (dissolvenza/regolazione del bilanciamento)
1 Premere a o b per regolare la dissolvenza (bilan-
ciamento degli altoparlanti anteriori/posteriori).
2 Premere c o d per regolare il bilanciamento (bi-
lanciamento degli altoparlanti lato sinistro/destro).
BASS/MID/TREBLE (regolazione dell’equalizzatore)
! Le impostazioni della curva d’equalizzazione rego-
lata vengono memorizzate in CUSTOM.
1 Premere a o b per regolare il livello.
Intervallo di regolazione: da +6 a -6
LOUD (sonorità)
It
39
Sezione
Italiano
02
Funzionamento dell’unità
Loading…
- Состав
- Описание
- Фармакологическое действие
- Фармакокинетика
- Показания к применению
- Противопоказания
- Беременность и период лактации
- Способ применения и дозы
- Побочное действие
- Передозировка
- Взаимодействие с другими лекарственными средствами
- Особенности применения
- Форма выпуска
- Условия хранения
- Срок годности
- Условия отпуска из аптек
Состав
Действующее вещество:
Бензалкония хлорида 50 % водный раствор………….37,8 мг
что соответствует бензалконию хлориду………….18,9 мг
Вспомогательные вещества:
гипролоза…………………………..9,1 мг
жир твердый Witepsol S 51………… 1553,1 мг
Описание
Суппозитории белого цвета, цилиндрической формы с конусообразным концом, с характерным запахом.
Фармакологическое действие
Спермицидное действие обусловлено способностью действующего вещества разрушать мембраны сперматозоидов (сначала жгутиков, затем головок), что приводит к невозможности оплодотворения яйцеклетки поврежденным сперматозоидом.
Эффект развивается сразу после введения во влагалище.
In vitro активен в отношении Neisseria gonorrhoeae., Chlamydia spp., Trichomonas vaginalis., Herpes simplex тип 2, Staphylococcus aureus. Не оказывает действия на Mycoplasma spp. и слабо действует на Gardnerella vaginalis, Candida albicans, Haemophilus ducreyi и Treponema pallidum.
Не влияет на нормальную микрофлору влагалища (в т.ч. на палочку Додерляйна) и гормональный цикл..
Фармакокинетика
Бензалкония хлорид не всасывается слизистой оболочкой влагалища, удаляется простым промыванием водой и с нормальными физиологическими выделениями.
Показания к применению
Местная контрацепция для женщин репродуктивного возраста (в том числе при наличии противопоказаний к применению пероральных контрацептивов или внутриматочной контрацепции; в послеродовом периоде, лактации; после прерывания беременности; при менопаузе; нерегулярных половых контактах; пропуске или опоздании в приеме постоянно используемых пероральных контрацептивов). В качестве дополнительной местной контрацепции при использовании вагинальной диафрагмы или внутриматочной спирали.
Противопоказания
Повышенная чувствительность к компонентам препарата, вагинит, изъязвление и раздражение слизистой оболочки влагалища и шейки матки.
Беременность и период лактации
Препарат является контрацептивом, во время беременности не используется. При наступлении беременности на фоне контрацепции бензалкония хлоридом, воздействия на течение беременности не обнаружено. Не выделяется с грудным молоком, может применяться в период лактации.
Способ применения и дозы
Для вагинального применения. Лежа на спине, суппозиторий вводят глубоко во влагалище за 5 минут до полового акта. Длительность действия – 4 часа. Обязательно вводить новый суппозиторий перед каждым повторным половым актом.
Побочное действие
Аллергические реакции, контактный дерматит, зуд и жжение во влагалище и/или половом члене партнера, болезненное мочеиспускание. В случае их возникновения прекратить использование Фарматекса. Если любые из указанных в инструкции побочных эффектов усугубляются, или Вы заметили любые другие побочные эффекты не указанные в инструкции, сообщите об этом врачу.
Передозировка
Случаи передозировки не отмечены.
Взаимодействие с другими лекарственными средствами
Любое лекарственное средство, а также мыло и растворы, его содержащие, могут снижать спермицидное действие препарата. Растворы йода (в том числе 0,1 % раствор йодоната) инактивируют препарат.
Особенности применения
Эффективность контрацепции зависит от правильного использования препарата.
Запрещается использование мыла для туалета половых органов за 2 часа до и после полового акта, т.к. мыло разрушает действующее вещество Фарматекса.
После полового акта возможен туалет наружных половых органов только чистой водой. Влагалищное орошение применяют через 2 часа после полового акта.
С Фарматексом, введенным во влагалище, из-за опасности снижения последующего контрацептивного действия нельзя принимать ванны и купаться в море, бассейне и водоемах.
Следует временно прекратить применение Фарматекса при заболеваниях влагалища до окончания лечения вагинальными лекарственными средствами.
Форма выпуска
Суппозитории вагинальные.
По 5 суппозиториев в стрип из ПВХ пленки, покрытой полиэтиленом низкой плотности.
1 или 2 стрипа с инструкцией по применению в картонной пачке.
Условия хранения
Хранить при температуре не выше 25 °С. Хранить в недоступном для детей месте. Если от тепла суппозитории расплавятся, необходимо положить их в холодильник или поместить под струю холодной воды заостренным концом вниз – суппозитории примут первоначальную форму; состав препарата при этом не изменится.
Срок годности
3 года. Не использовать по истечении срока годности.
Условия отпуска из аптек
Без рецепта.
Фарматекс таблетки вагинальные — инструкция по применению
Синонимы, аналоги
Статьи
Регистрационный номер:
П N011489/03
Торговое название:
ФАРМАТЕКС
МНН:
Миристалкония хлорид
Лекарственная форма:
таблетки вагинальные
Состав на 1 таблетку:
| Действующее вещество: | |
| Миристалкония хлорид | 20,0 мг |
| Вспомогательные вещества: | |
| натрия гидрокарбонат | 111,0 мг |
| лимонная кислота | 96,0 мг |
| кремния диоксид коллоидный | 12,0 мг |
| целлюлоза микрокристаллическая | 172,0 мг |
| магния стеарат | 5,3 мг |
| лактозы моногидрат | 363,0 мг |
| макрогол 6000 | 20,7 мг |
Описание
Белые круглые таблетки с отверстием в центре.
Фармакотерапевтическая группа
Контрацептивное средство для местного применения.
Код АТХ:
G02BB
Фармакологические свойства
Фармакодинамика
Миристалкония хлорид является одновременно спермицидом и антисептиком. Спермицидное действие обусловлено способностью действующего вещества разрушать мембраны сперматозоидов (сначала жгутиков, затем головок), что приводит к невозможности оплодотворения яйцеклетки поврежденным сперматозоидом.
Эффект развивается через 10 мин после введения таблетки во влагалище.
Применение препарата Фарматекс значительно снижает риск возникновения беременности, однако не устраняет его полностью.
Не влияет на нормальную микрофлору влагалища (в т.ч. на палочку Додерляйна).
Фарматекс не влияет на менструальный цикл, либидо и фертильность.
In vitro миристалкония хлорид активен в отношении Neisseria gonorrhoeae, Chlamydia spp., Trichomonas vaginalis, Herpes simplex тип 2, Staphylococcus aureus. Не оказывает действия на Mycoplasma spp. и слабо действует на Gardnerella vaginalis, Candida albicans, Haemophilus ducreyi и Treponema pallidum.
Фармакокинетика
Aбсорбция миристалкония хлорида слизистой оболочкой влагалища очень низка. С поверхности слизистой оболочки препарат удаляется простым промыванием водой и с нормальными физиологическими выделениями.
Показания к применению
Местная контрацепция для женщин репродуктивного возраста, и особенно:
- при наличии противопоказаний к применению гормональных контрацептивов или внутриматочной контрацепции;
- в послеродовом периоде, в период грудного вскармливания; после прерывания беременности;
- при пременопаузе;
- при нерегулярных половых контактах;
- в качестве дополнительной местной контрацепции при использовании вагинальной диафрагмы, цервикального колпачка или других внутриматочных контрацептивов, особенно при длительном применении лекарственных препаратов, таких как НПВС (нестероидные противовоспалительные средства).
- в качестве дополнительного метода контрацепции при пропуске или опоздании в приеме пероральных гормональных контрацептивов. В этом случае рекомендуется сочетать оба метода контрацепции на протяжении оставшихся дней менструального цикла.
Противопоказания
Повышенная чувствительность к компонентам препарата, вагинит, изъязвление и раздражение слизистой оболочки влагалища и шейки матки.
Беременность и период грудного вскармливания
Беременность
Препарат является контрацептивом, во время беременности не применяется.
При случайном применении этого спермицида на ранних сроках беременности не было выявлено какого-либо отрицательного воздействия на плод.
Грудное вскармливание
Проникновение в материнское молоко возможно в крайне незначительном количестве без каких-либо известных негативных последствий. Препарат может применяться в период грудного вскармливания.
Способ применения и дозы
Для вагинального применения.
Лежа на спине, смоченную водой таблетку вводят глубоко во влагалище для полного растворения за 10 минут до полового акта. Длительность действия – 3 часа. Обязательно вводить новую таблетку перед каждым повторным половым актом.
Побочное действие
Аллергические реакции, контактный дерматит, зуд и жжение во влагалище и/или половом члене партнера, болезненное мочеиспускание.
В случае их возникновения прекратить применение препарата Фарматекс.
Если любые из указанных в инструкции побочных эффектов усугубляются, или Вы заметили любые другие побочные эффекты, не указанные в инструкции, сообщите об этом врачу.
Передозировка
Случаи передозировки не отмечены.
Взаимодействие с другими лекарственными средствами
Любое средство, применяемое интравагинально, может снижать спермицидное действие препарата. Действующее вещество – миристалкония хлорид, разрушается мылом, поэтому запрещается использование мыла для туалета половых органов, даже в минимальных количествах.
Особые указания
Фарматекс является эффективным препаратом для предохранения от беременности при условии его правильного применения. Однако, метод спермицидной местной контрацепции всегда менее эффективен, по сравнению с гормональной контрацепцией, внутриматочными контрацептивами, диафрагмой, цервикальным колпачком или презервативом.
Запрещается использование мыла для туалета половых органов за 2 часа до и 2 часа после полового акта, т.к. мыло разрушает действующее вещество препарата Фарматекс.
Туалет наружных половых органов возможен только простой водой для обоих партнёров. Влагалищное орошение (спринцевание) может применяться не раньше, чем через 2 часа после полового акта.
С препаратом Фарматекс, введенным во влагалище, нельзя принимать ванны и купаться в море, бассейне и водоемах во избежание снижения его контрацептивного действия.
При необходимости лечения препаратами для вагинального применения следует временно прекратить использование препарата Фарматекс до окончания курса лечения.
Данный метод контрацепции не защищает от инфекций, передающихся половым путем или вызванных вирусом иммунодефицита человека. От этих заболеваний есть только один метод барьерной контрацепции – презерватив.
Влияние на способность управлять транспортными средствами
Нет данных об отрицательном влиянии препарата на способность к управлению транспортными средствами и механизмами.
Форма выпуска
Таблетки вагинальные 20,0 мг
По 12 таблеток в полипропиленовую тубу, закрытую пробкой из полиэтилена с силикагелем. 1 туба с инструкцией по применению в картонной пачке.
Условия хранения
Хранить при температуре не выше 25 °С.
Хранить в недоступном для детей месте.
Срок годности
3 года. Не использовать по истечении срока годности.
Условия отпуска из аптек
Без рецепта.
Наименование держателя (владельца) РУ:
Лаборатория Иннотек Интернасиональ
22, авеню Аристид Бриан, 94110 Аркей, Франция
Производственные площадки
Производство готовой лекарственной формы и выпускающий контроль качества:
Иннотера Шузи
Рю Рене Шантеро, Шузи-сюр-Сис, Валуар-сюр-Сис, 41150, Франция
Фасовка, упаковка:
Страдис
Рю Леон Фоше, 51100 Реймс, Франция
Претензии потребителей направлять по адресу:
ООО «ИННОТЕК»
115035, г. Москва, Садовническая набережная, д. 71
Купить Фарматекс таблетки вагинальные в apteka.ru
Купить Фарматекс таблетки вагинальные в ГорЗдрав
Купить Фарматекс таблетки вагинальные в megapteka.ru
Купить Фарматекс таблетки вагинальные в Планета Здоровья
*Цены в Москве. Точная цена в Вашем городе будет указана на сайте аптеки.
Комментарии
(видны только специалистам, верифицированным редакцией МЕДИ РУ)
Фармакодинамика
Миристалкония хлорид является одновременно спермицидом и антисептиком. Активное вещество разрушает мембраны сперматозоидов. На физиологическом уровне разрушение сперматозоидов происходит в два этапа: сначала разрушение жгутиков, затем расщепление головок. Это приводит к невозможности оплодотворения яйцеклетки поврежденным сперматозоидом.
Клиническая эффективность определяется корректированным индексом Перля значением менее 1 в том случае, если препарат правильно использован. Как правило, отсутствие эффекта обусловлено неправильным применением препарата.
Теоретическая эффективность, измеренная в лаборатории, равна 100 процентам, так как жизнь сперматозоидов невозможна в присутствии активного вещества, даже в остаточном виде.
Эффективность препарата изменяется в зависимости от строгости соблюдения показаний и точности информации, предоставленной пациентом врачу до назначения препарата. Эффект развивается через 10 мин после введения во влагалище.
Применение препарата Фарматекс значительно снижает риск возникновения беременности, однако не устраняет его полностью.
In vitro активен в отношении Neisseria gonorrhoeae., Chlamydia spp., Trichomonas vaginalis., Herpes simplex тип 2, Staphylococcus aureus. He оказывает действия на Mycoplasma spp. и слабо действует на Gardnerella vaginalis, Candida albicans, Haemophilus ducreyi и Treponema pallidum.
He влияет на нормальную микрофлору влагалища (в т.ч. на палочку Додерляйна) и менструальный цикл.
In vivo препарат воздействует на предупреждение болезней, передающихся половым путем (отсутствуют данные по применению).
Фармакокинетика
Миристалкония хлорид не всасывается слизистой оболочкой влагалища, удаляется простым промыванием водой и с нормальными физиологическими выделениями.

ИМЕЮТСЯ ПРОТИВОПОКАЗАНИЯ. ВОЗМОЖНЫ ПОБОЧНЫЕ ЭФФЕКТЫ. НЕОБХОДИМА КОНСУЛЬТАЦИЯ СПЕЦИАЛИСТА.
Автор статьи
Асанова Наталья Геннадьевна
,
Профессия: провизор
Название вуза: Иркутский государственный медицинский университет
Специальность: фармация
Стаж работы: 30 лет
Диплом о фармацевтическом образовании: 587802
Места работы: контрольно-аналитическая лаборатория, фарминспектор аптек и ЛПУ, компания «ПРОТЕК», провизор сервиса Мегаптека
Все авторы
Содержание
- Состав
- Сколько действует препарат?
- Что лучше свечи или крем?
- Капсулы или свечи что лучше?
- Побочные действия
- Фарматекс или Ноноксинол: что лучше?
- Бенатекс или Фарматекс: что лучше?
- Краткое содержание
Для оценки эффективности противозачаточных средств используется индекс Перля, названный так по имени ученого-биолога, разработавшего показатель в 1933 году. Этот индекс рассчитывается, как число наступивших беременностей у 100 женщин, использовавших определенный вид контрацепции в течение года.
На сегодня высокой степенью надежности обладают КОК (комбинированные оральные контрацептивы) и гормоносодержащие ВМС (внутриматочные спирали): индекс Перля у них равен 0,05-0,5. Но что делать женщинам, имеющим противопоказания к применению гормональной контрацепции? Есть ли другие средства, сопоставимые по надежности с таблетками и спиралями?
Рассказываем в статье о препарате Фарматекс, индекс Перля которого при правильном использовании меньше 1. Узнаем его состав, принцип действия, лекарственные формы, побочные эффекты. Сравним с препаратами Бенатекс и Ноноксинол.
Состав
Противозачаточные средства Фарматекс предназначены для местного применения. Препараты производятся во Франции компанией Лаборатория Иннотек Интернасиональ и представлены следующими лекарственными формами:
- Фарматекс таблетки вагинальные — содержат антисептик и спермицид миристалкония хлорид, который разрушает оболочку сперматозоидов и не влияет на микрофлору, менструальный цикл и половое влечение;
- Фарматекс капсулы вагинальные — в состав входит действующее вещество бензалкония хлорид с антисептическим действием, которое разрушает мембраны хвостика и головки сперматоизоида;
- Фарматекс суппозитории вагинальные — содержит также бензалкония хлорид;
- Фарматекс крем вагинальный — в состав входит бензалкония хлорид.
Бензалкония хлорид отличается от миристалкония хлорида длиной углеродной цепочки. Всемирная организация здравоохранения (ВОЗ) применяет название «бензалкония хлорид» для смеси молекул с разной длиной (C12, C14, C16), а «миристалкония хлорид» — для молекулы с содержанием только С14.
Фарматекс не выпускается ни в каких других формах, например, таких как гель, мазь, губка или тампоны.
От чего защищает Фарматекс? Прежде всего, это спермицидное средство, которое повреждает структуру сперматозоидов и делает невозможным процесс оплодотворения яйцеклетки. Еще действующие вещества-антисептики Фарматекса снижают риск заражения инфекциями, передающиеся половым путем. Но всегда следует помнить, что эффективность препарата зависит от соблюдения правил его применения, указанных в инструкции, и не устраняет на 100% риск возникновения беременности.
Сколько действует препарат?
Отвечая на популярный вопрос: «Сколько действует Фарматекс после введения?», обращаем внимание, что время начало действия препаратов и длительность эффекта зависит от формы выпуска. И что всегда необходимо вводить новую дозу любого средства перед следующим половым актом.
- Фарматекс таблетки вагинальные начинают действовать через 10 минут после введения, продолжительность контрацептивного эффекта — 3 часа;
- Фарматекс капсулы вагинальные — начало действия через 10 минут, продолжительность 4 часа;
- Фарматекс суппозитории вагинальные — начинают «работать» через 5 минут, длительность действия 4 часа;
- Фарматекс крем вагинальный — действует сразу непосредственно после введения, длительность контрацептивного эффекта 10 часов.
Что лучше свечи или крем?
Специалисты компании Лаборатория Иннотек специально разработали четыре формы препарата, которые подходят при различной влагалищной секреции. Контрацептивная эффективность у всех видов Фарматекса одинаковая.
Крем больше подходит женщинам, испытывающим сухость влагалища, а также парам, кому нужна срочная защита, так как он действует сразу же после введения. Дополнительный плюс крема состоит в том, что он еще выполняет функцию лубриканта.
Фарматекс свечи имеют свои плюсы и минусы. Они предназначены для использования при умеренном секрете влагалища. Их вводят не позднее, чем за 5 минут до полового акта и действуют они всего 4 часа, в отличие от десятичасового периода крема. Свечи удобнее вводить, чем крем, для которого требуется специальное устройство-дозатор (входит в комплект).
Капсулы или свечи что лучше?
Свечи и капсулы противозачаточные Фарматекс применяются при умеренной влагалищной секреции. Количество действующего вещества (бензалкония хлорида) в одной капсуле соответствует содержанию в одном суппозитории. Разница между ними состоит в том, что для растворения оболочки капсулы требуется на 5 минут больше времени. Время действия у них одинаковое — 4 часа. При этом обязательно вводить новую капсулу или свечу перед каждым повторным половым актом.
Что выбрать — капсулы или свечи — вопрос личных предпочтений партнеров.
Побочные действия
Пациентки часто спрашивают: «Фарматекс свечи (таблетки, капсулы) гормональные или нет?», так как существует достаточно много противопоказаний к применению гормональных контрацептивов. Средства Фарматекс не содержат гормонов, поэтому подходят как нельзя лучше в послеродовом периоде, при грудном вскармливании, после аборта, в период менопаузы или нерегулярных половых контактах, а также при пропуске или опоздании приема КОК.
Препараты Фарматекс действует местно и не всасывается в кровоток. Их применение может вызывать такие побочные действия у женщин, как дерматит, зуд, жжение во влагалище, аллергические реакции и болезненное мочеиспускание.
Как Фарматекс хранить? Все лекарственные формы не требуют особых условий, их хранят при температуре не выше 25 градусов.

Фарматекс или Ноноксинол: что лучше?
Ноноксинол тоже является местным контрацептивным средством. Он выпускается только в виде вагинальных суппозиториев и содержит другое действующее вещество — ноноксинол-9 (моноэфир полиэтиленгликоля). Препарат был выведен на рынок в 1967 году и в настоящее время широко применяется как негормональное контрацептивное средство.
Ноноксинол представляет собой поверхностно-активное вещество, которое снижает подвижность сперматозоидов, разрушает их структуру и вызывает гибель. А также обладает бактерицидным действием в отношении хламидий и гонококков. По сравнению со свечами Фарматекс, суппозитории Ноноксинол растворяются медленнее (10 минут) и действуют с меньшей продолжительностью (2 часа).
Показания для применения, побочные эффекты и противопоказания у препаратов схожи. Фарматекс или Ноноксинол — выбор за покупателем, препараты отпускаются без рецепта врача. Фарматекс имеет преимущества в разнообразии лекарственных форм и длительности контрацептивного эффекта.
Бенатекс или Фарматекс: что лучше?
Бенатекс является интравагинальным контрацептивом в виде суппозиториев с действующим веществом миристалкония хлорид. Свечи выпускала отечественная компания Нижфарм, но на сегодняшний день государственная регистрация данного препарата отменена.
Краткое содержание
- Противозачаточные средства Фарматекс предназначены для местного применения. В состав вагинальных таблеток входит действующее вещество миристалкония хлорид, а в состав капсул, свечей и крема — бензалкония хлорид.
- Время начала действия препаратов и длительность эффекта зависит от формы выпуска Фарматекса. Необходимо всегда вводить новую дозу любого средства перед следующим половым актом.
- Крем больше подходит женщинам, испытывающим сухость влагалища, а также парам, кому нужна срочная защита, так как он действует сразу же после введения. Дополнительный плюс крема состоит в том, что он выполняет еще функцию лубриканта.
- Свечи и капсулы противозачаточные Фарматекс применяются при умеренной влагалищной секреции. Количество действующего вещества — бензалкония хлорида — в одной капсуле соответствует содержанию в одном суппозитории. Разница между ними состоит в том, что для растворения оболочки капсулы требуется на 5 минут больше времени.
- Препараты Фарматекс действует местно и не всасывается в кровоток. Их применение может вызывать такие побочные действия у женщин, как дерматит, зуд, жжение во влагалище, аллергические реакции и болезненное мочеиспускание.
- Показания для применения, побочные эффекты и противопоказания у препаратов схожи. Фарматекс или Ноноксинол — выбор за покупателем, препараты отпускаются без рецепта врача. Фарматекс имеет преимущества в разнообразии лекарственных форм и длительности контрацептивного эффекта.
- Бенатекс — противозачаточные суппозитории с действующим веществом миристалкония хлорид. Свечи выпускала отечественная компания Нижфарм, но на сегодняшний день государственная регистрация данного препарата отменена.
Задайте вопрос эксперту по теме статьи
Остались вопросы? Задайте их в комментариях ниже – наши эксперты ответят вам. Там же вы можете поделиться своим опытом с другими читателями Мегасоветов.
от 522,60 ₽