
Простое устройство позволяющее в домашних условиях перевести свои фотопленки в цифровой формат и сохранить на компьютере в виде файлов.
Работает автономно. Подключать к компьютеру не нужно.
Работает с черно-белыми и цветными пленками (негативы и позитивы)
На экране видно изображение со вставленной пленки причем негатив видно сразу в правильном виде.
Можно при помощи кнопок повернуть изображение или изменить экспозицию. И сохранить на карту памяти. Процесс сканирования кадра занимает около 1 секунды.
Экранное меню на английском языке но в нем только 5 слов все остальное символами. Подробная инструкция на русском языке в комплекте.
Так же сканер можно подключить к ТВ по композитному выходу и смотреть снимки не на маленьком экране а на большом. (кабель для подключения к ТВ в комплекте)
Характеристики
Рамки для нарезанной пленки для слайдов.в рамках и для протяжки пленки в рулоне.
Материал корпуса: пластмасса.
Сканирующее устройство: CMOS Sensor
Размер файла: 5 Megapixels (2592pixels x 1944pixels)
Разрешение: 3600dpi (программное) 1800 dpi (оптическое)
F/6.1 f=10.13 Focus Range:51.5mm(Macro)
Автоматический баланс цвета
Автоматическая и ручная настройка экспозиции
Сохранение файлов происходит на карту памяти SD (покупает отдельно) максимальный объем поддерживаемых карт памяти 32Gb
Питание от USB порта или от сети 220В (адаптер питания и кабель в комплекте)
При подключении к ПК сканер становиться карт-ридером. То есть можно работать с файлами на SD карте.
Обратите внимание что экран сканера при продаже защищен специальной пленкой. Некоторые не замечают ее и думают что экран дефектный. Пленку нужно удалить в начале работы под ней глянцевый и яркий экран.
| Наименование | Cлайд — сканер Espada FilmScanner EC718 для слайдов и фотопленок 35мм 5МП с цветным LCD экраном 2,4″ |
| Назначение |
Простое устройство, позволяющее в домашних условиях перевести свои фотопленки в цифровой формат и сохранить на компьютере в виде файлов. |
| Датчик изображения | 5.0 мега пикселей (2592*1944) |
| Качество сканирования | 1800 точек/дюйм & 3600 точек/дюйм (интерполяция) |
| Дисплей | Цветной 2.4 » TFT LCD (480×234) |
| Диапазон фокусировки | фиксированный фокус |
| Тип сканирующего элемента | CMOS |
| Источник света | СВЕТОДИОДНАЯ Подсветка |
| Баланс белого | Автоматический |
| Тип пленки | 35 мм пленки, черно-белые и цветные (негативы и позитивы) |
| Формат изображения | JPEG |
| ТВ-ВЫХОД | NTSC/PAL |
| Внешние карты памяти | Поддержка SD карт до 32 ГБ |
| Питание | DC 5В (Адаптер USB Порт) |
| Тип интерфейса | USB |
| Подключение к компьютеру |
При подключении к ПК сканер становиться карт-ридером |
| Мульти-языки поддержки | Английский, французский, немецкий, итальянский, испанский, китайский, японский |
| Поддержка системы | Windows XP/Vista/7 |
| Размеры | 86*86.2*102.4 мм |
| Размеры в упаковке | 270*110*180 мм |
| Вес | 300 гр |
| Вес в упаковке | 700гр |
| Комплектация | Cканер для плёнки, слайдов или негативов USB-кабель AV-кабель Адаптер питания Держатель для негативов Слайд держатель Держатель кассетный |
Оценок — 3
, средний балл: 2.7
()
Фрагмент инструкции
Step 2. Place original on the holder Place the film in the film holder. Two types of film holders are supplied with your film scanner. You can select the appropriate film holder that fits the type of your film: Note: When you place the film/slide in the filmstrip/slide holder, make sure that the film/slide is free from dust. You may also want to check that the film/slide is cleaned properly. If you want to scan a filmstrip: You can use the filmstrip holder (the holder with 6 rectangular lattices and a FILM mark) to place your filmstrip. F I L M P U S H C L O S E Filmstrip holder Pull the handle on the cover to open the cover. 9 English Place the filmstrip on the filmstrip holder with the emulsion side facing up. Close the cover and push the “PUSH CLOSE” mark at the middle of the cover. You will hear a click when the cover is secured. PUSH PUSHPUSH Insert the filmstrip holder into the holder insertion slot. 10 English If you want to scan slides: You can use the slide holder (the holder with 4 rectangular lattices and a SLIDE mark) to place your slide. Slide holder Pull the handle on the cover to open the cover. Then place the slide on the slide holder with the emulsion side face up. When you place the slide in the lattice, insert the lower left corner of the slide into the plastic stopper, then push the slide into the lattice until it is firmly fixed. You can place up to 4 slides in the slide holder. 11 English Close the cover and push the “PUSH CLOSE” mark and the middle of the cover. You will hear a click when the cover is secured. P U S H P U SH Insert the slide holder into the holder insertion slot. Step 3. Scan Now you can either push the SCAN button to activate automatic preview, or manually open an image editing software to activate MiraPhoto and do the preview: 12 English To use SCAN button: Push the SCAN button on the film scanner front panel. A dialogue box will pop up on the screen asking you to choose an image editing software to use. Choose the application you want to use and then click OK. Note: if you have only one image editing software installed in your computer, this dialogue box will be skipped. The application you choose will be activated. Meanwhile, MiraPhoto will start to preview the original. To preview manually: (1) Open your image editing application software. (2) From “File” menu, choose “Scanner”, “Select source” or “Select TWAIN_32 source” to select MiraPhoto as the TWAIN image source. (This differs according to the application you use) (3) Choose “Scan”, “Acquire” or “TWAIN_32 source” (this also differs according to the application you use), MiraPhoto will pop up on the screen. Click “Preview” to preview the original. According to the original you scan, choose an appropriate image type from the “Image Type” drop-down listbox in MiraPhoto. Specify a scanning resolution in the “Resolution” drop-down listbox and adjust the size and position of the dotted rectangle in the Preview Area to specify a scan area. Click «Scan» to start scanning the original. Step 4. Edit When scanning has completed, MiraPhoto will import the images into your image editing software. You can now close MiraPhoto and begin editing or saving the image. 13 English 14 English Chapter 4. Using MiraPhoto You can access MiraPhoto through your image editing applications. When you click “Acquire” or “Scan” in your application, the MiraPhoto main screen will appear: Menu Bar Image Thumbnail Area Tool Buttons Combo Boxes Film Selection Area Control Buttons Job Info ButtonPreview Area The following sections in this chapter will describe MiraPhoto in more detail. 15 English Menu Bar There are three selectable menu items in the Menu Bar. Each menu item contains several options in its submenu: File submenu MiraPhoto can record the settings you make for each scan session in a configuration file. With this feature, you can specify different settings for each individual scan job in a configuration file. You can then load the configuration file when you want to apply the settings. For example, you can save the settings you make for scanning artwork films in a configuration file called “Artwork”. The next time you want to scan artwork films, you can load the “Artwork” configuration file, and MiraPhoto will apply the settings recorded in it. Load Config… Load the configuration file you created. When the configuration file is loaded successfully, MiraPhoto will apply the settings recorded in the configuration file automatically. Save Config… Save current MiraPhoto settings to the configuration file Save Config As… Save current MiraPhoto Settings as another new configuration file. Usually you can create a new configuration file in this way. You can designate different file names for each configuration file. Reset Config When you select this item, the settings you make in MiraPhoto will reset to their default value. Auto Save Config When you select this item, your settings will be saved automatically in a configuration file a…
Ручной сканер Iscan S001 LCD является идеальным помощником для человека, работающего с документами, оригиналами текстов, фотографиями, которые нельзя выносить за пределы библиотеки. Сканер позволяет быстро и эффективно сканировать даже цветные материалы без помощи громоздких устройств. Гаджет легко помещается в рюкзак или женскую сумочку.
Слот памяти позволяет без лишних проблем расширить память устройства, чтобы непосредственно на нем хранить последние отсканированные фотографии или тексты.
Характеристики:
- Цвет корпуса: черный;
- Материал: пластмасса;
- Подключение: USB 2.0;
- Ширина поля сканирования: 30 см;
- Угол сканирования: 90 градусов;
- Расстояние считывания: 0 — 10 мм;
- Дополнительное расширение памяти за счет Micro SD карт: до 32 GB (в комплект не входит);
- Формат сканирования: JPEG/PDF;
- Размеры: 25,7 см 3 см 2,45 см;
- Вес: 190 г;
- Скорость сканирования: 900DPI, цветное — 12 сек; 600DPI, цветное — 8 сек; 300DPI, цветное — 3 сек;
- Длина сканирования: 900DPI — 89 см; 600DPI — 114 см; 300DPI — 248 см;
- Размер файла: High: 900х900DPI; Mi: 600х600DPI; Low: 300х300 DPI;
- Устройство автоматически выключается через 180 секунд бездействия;
- Совместимость: Windows XP/Vista,7 или выше;
- Питание: Две АА батарейки (в комплект не входят);
- Время работы: до 200 листов в низком разрешении и в цвете (в зависимости от емкости батареек).
Начало работы:
Для начала необходимо установить батарейки. Для этого откройте соответствующий отсек и вставьте в него соблюдая полярность две батарейки типа АА (в комплект не входят). Удерживайте кнопку SCAN (она же вклвыкл) в течение 2 секунд, чтобы включить сканер. Далее необходимо вставить карту памяти (в комплект не входит). Установите в соответствующий слот карту памяти microSD card для последующей записи и хранения сканируемых материалов.
Установка времени:
Нажмите кнопку TIME SET. Так вы войдете в режим установки времени. Нажимайте кнопки JPG/PDF и DPI для установки времени. Нажмите кнопку SCAN, чтобы подтвердить установки.
Форматирование карты памяти:
После установки карты памяти в соответствующий слот, необходимо провести ее форматирование. Нажмите кнопку Format, на дисплее отобразится символ «F». Нажмите кнопку SCAN для начала форматирования карты памяти. Индикатор SD на дисплее будет мигать вплоть до окончания форматирования карты памяти MicroSD.
Установка разрешения сканирования:
Нажимайте клавишу DPI для выбора нужного разрешения: High: 900DPI; Mi:600DPI; Low:300DPI. На дисплее будут отображаться значки: Hi, Mi, Lo.
Установка режима цветности сканирования:
Нажимайте кнопку JPG/PDF для выбора формата. На дисплее отобразится значок JPG/PDF, C/BW, (Color/Black & White).
Сканирование:
Чтобы начать сканировать, возьмите сканер в руку и ровно расположите его над сканируемым объектом. В идеале прижать сканер к объекту по всей поверхности. Для начала процесса сканирования нажмите кнопку SCAN. Чтобы изображение получилось качественным, ведите сканер медленно, а сканируемое изображение не двигайте. Для окончания сканирования нажмите кнопку SCAN.
- Page 1
English Français Deutsch Italiano Español Film Scanner User’s Manual… -
Page 4: Important Safety Instructions
Copyright Copyright © 1999 by this company. All rights reserved. No part of this publication may be reproduced, transmitted, transcribed, stored in a retrieval system or translated into any language or computer language, in any form or by any means, electronic, mechanical, magnetic, optical, chemical, manual or otherwise, without the prior written permission of this company.
- Page 6
FCC Information The Federal Communication Commission Radio Frequency Interference Statement includes the following paragraph: This equipment has been tested and found to comply with the limits for a Class B Digital Device, pursuant to Part 15 of the FCC Rules. These limits are designed to provide reasonable protection against harmful interference in a residential installation. - Page 8
Eject button… 23 Zoom button… 23 Preview button… 23 Scan button… 23 Exit button … 23 … 24 UTTONS Film Type button … 24 Flip button… 24 Rotate button … 25 Mirror button … 25 Crop button … 25 Color Enhancement Tools button … 26 Invert button… - Page 10
English … -
Page 12: 1.2 Hardware Introduction
Friendly and Smart Driver MiraPhoto is the driver for your ScanWit film scanner. Its easy and instinctive interface design allows you to proceed with your scanning job quickly. You can also use it to adjust the scanning parameters efficiently. Its powerful functions can help you to optimize the scanned image for your specific purpose.
-
Page 14: Rear Panel
Ventilation holes These holes are used to ventilate the heat from inside of the film scanner. Do not block these holes when the film scanner is in use. SCSI ID selector You can use the SCSI ID selector to select the SCSI ID of your film scanner.
-
Page 16: 1.3 Software Introduction
English 1.3 Software Introduction MiraPhoto is the driver program for your scanner. It is TWAIN compliant and designed to be user-friendly. With its iconlized user- interface and fully logical task-flow design, you can complete a satisfactory scanning job with only a few mouse clicks. With MiraPhoto, you can: Preview, scan and import the scanned image into your image editing software.
-
Page 18: Step 3 Test The Scanner
Step 3 Test the scanner Turn the scanner power on by depressing the power button on the front panel of the scanner. You may notice that the scanner will start to perform a self-test, and the LED indicators will blink for a few seconds.
- Page 20
English Place the filmstrip on the filmstrip holder with the emulsion side facing Close the cover and push the “PUSH CLOSE” mark at the middle of the cover. You will hear a click when the cover is secured. Insert the filmstrip holder into the holder insertion slot. -
Page 22: Step 3. Scan
Close the cover and push the “PUSH CLOSE” mark and the middle of the cover. You will hear a click when the cover is secured. Insert the slide holder into the holder insertion slot. Step 3. Scan Now you can either push the SCAN button to activate automatic preview, or manually open an image editing software to activate MiraPhoto and do the preview:…
- Page 24
English … -
Page 26: Menu Bar
Menu Bar File submenu Load Config… Load the configuration file you created. When the configuration file is loaded successfully, MiraPhoto will apply the settings recorded in the configuration file automatically. Save Config… Save current MiraPhoto settings to the configuration file Save Config As……
-
Page 28: Monitor Gamma
English Monitor Gamma Generally, a monitor cannot display the real colors of an image in the real world. In order to have the monitor approximate the colors as close as possible, you may need to adjust the monitor gamma. Adjustment of the monitor gamma can make the monitor approximate the colors of the original image more closely.
-
Page 30: Image Thumbnail Area
Image Thumbnail Area The Image Thumbnail Area displays thumbnail images of each previewed scan. Click on the thumbnail image and the image will be displayed in the Preview Area. You can select the image you want to scan by clicking the red dot at the upper right corner of the thumbnail.
-
Page 32: Scan Mode Box
Frame You can click the number of the frame you want to scan. You can select multiple frames and the film scanner will scan all the images you selected. MiraPhoto will display the frame(s) selected in green. Click to select all the images in the Image Thumbnail Area for scanning.
-
Page 34: Tool Buttons
Tool Buttons Tool Buttons provide a full range of tools and image effect options to optimize the scan quality. Film Type button When this button is clicked, the Film Type dialog box will appear: If you do not know the type of your film or if your film type is not listed, select Generic from the drop-down list.
-
Page 36: Color Enhancement Tools Button
English Color Enhancement Tools button Click this button to activate the Tool Bar which contains the buttons for the following tools: Invert button Click this button to get an inverted image: Original image Image after Invert is applied…
-
Page 38: Color Balance Button
Color Balance button Click this button to evoke the Color Balance dialog box: To adjust the color balance, you will want to first select the channel you want to adjust, then drag the triangles under the three color bars. In addition, you can also enter the desired values directly into the three entry boxes to the right of the color bars to adjust the color balance.
- Page 40
Entry Box While you drag within the Color Wheel to choose the hue and saturation of color or drag the triangle below the Lightness Bar to specify the lightness of color, the related information will also be shown in the Entry Boxes. - Page 42
The original image and its Tonal Map. The curve is straight and diagnal. You can also click the curve to add new points and further change the shape of the curve: Click to add a new point. Input/Output Status Area You can read the precise input/output value here. - Page 44
Brighter images have brighter pixels, therefore the bars in the right are higher than that in the left. In addition, if we take a look at the two images below: Image 1 We notice that in Image 1, there is higher contrast between the brighter and darker part of the image;… - Page 46
If the Input Level is set as 20 to 230, then you may represent a total of 210 (230 minus 20) color levels in the image. If you set the Output Level as 10 to 250, you can “expand” the original 210 levels of color to 240 levels (250 minus 10). -
Page 48: Color Wizard Button
Color Wizard button The Color Wizard button offers two quick and convenient tools for you to adjust the overall quality of the scanned image: Auto Density: if you choose this item, MiraPhoto will optimize the density of the image automatically. Apply all button Click on the Apply All button to apply the setting changes you make in the Tool Bar to all images.
- Page 50
English … -
Page 52: Getting Started
English Getting Started To run Photo Express, double click the Photo Express icon on your Windows desktop or open from Windows Start Menu. When you run Photo Express, make sure that the monitor display is at a resolution of 800×600 or 1024×768 and Hi Color (15/16 bit) or True Color (24 bit) mode.
-
Page 54: Getting Images
Getting Images The first thing you want to do when you start Photo Express is to get the photos you want to work with into the actual program. The place you start is with Album. From here, you can do almost anything in Photo Express. All other ways of getting photos can work independently of Album, but they are also set up to let you capture or open images directly to it.
-
Page 56: Working On Images
Working on Images Adjusting Images After you have acquired an image from a scanner or digital camera, it may need some adjustments. Photo Express provides you with the perfect tool for adjusting your photos: the Transform tool. To re-align a photo: .To freely rotate a photo, select the spin wheel in the upper right or lower left corner of the photo and rotate into position.
-
Page 58: Sharing Images
Sharing Images Printing Images Once you have put the finishing touches onto your photos, it is time to print them out. Photo Express contains numerous printing options, letting you output posters and name cards in addition to its regular printing duties. To print an image: You can also print album thumbnails.
-
Page 60: Express Your Images
Express Your Images Create Calendars One of the easiest tasks to accomplish in Photo Express is making calendars, either for your Windows desktop or for your real desktop. They are great for keeping your loved ones close, in addition to being a convenient way to keep track of important dates in style.
-
Page 62: Working In Project Mode
Working in Project Mode The Project mode gives you a focused environment in which to create custom greeting cards, calendars, invitations, birthday and anniversary cards, name cards, and planners. The Project mode is useful for getting through a “project” as quickly and efficiently as possible. It is where Photo Express lives up to its name, speeding you through all the necessary tasks while keeping all the unnecessary or extraneous components secure in the background.
-
Page 64: Adding Decoration
Adding Decoration One category of tools on the Edit menu in Project mode is unique to that tab: Decoration. These are special, object-based effects such as Frames, Edges and Props you can use to enhance photo objects in a project. To add special edge effects to a photo object: To add frame to a photo object: Select a photo object.
-
Page 66: Sharing Templates
Sharing Templates Sharing templates works exactly the same way as sharing photos in Photo mode. You can print, e-mail, fax, or output them to web pages. For more on these tools, see the online help and related documents. To e-mail a template: To fax a template: To output a template as a Web page: Click the Share: E-mail button on the…
-
Page 68: 6.2 Faq
If you find that your ScanWit film scanner uses the same SCSI ID number with another SCSI device, you must either change the SCSI ID number of your scanner or that of the other SCSI device. To change the SCSI ID number of your ScanWit film scanner: 1.
-
Page 70: Appendix
Interface Platform Power Consumption Net Weight Dimension Film scanner with color-CCD optical module Color — 3 s Color — less than 10 ms / line — less than 38 s/ 35mm film, 2700 dpi Color — 3s for 35mm film…
Page 3
English Film Scanner User’s Manual…
Page 5
This product should be operated from the type of power indicated on the marking label. If you are not sure of the type of power available, consult your dealer or local power company. Do not allow anything to rest on the power cord. Do not locate this product where persons will walk on the cord.
Page 7: Table Of Contents
CHAPTER 1. INTRODUCTION… 1 1.1 F … 1 EATURES 1.2 H ARDWARE NTRODUCTION Front Panel … 2 Rear Panel … 4 1.3 S OFTWARE NTRODUCTION CHAPTER 2. INSTALLATION … 7 1. I SCSI NSTALL THE 2. C ONNECT THE SCANNER TO YOUR COMPUTER EST THE SCANNER 4.
Page 9
English … 60 RODUCT PECIFICATION MiraPhoto Quick Reference Map Menu Bar Image Thumbnail Area Tool Buttons page 16 page 20 page 23 Combo Boxes page 20 Film Selection Area page 22 Control Buttons Preview Area page 23 page 39…
Page 11: Chapter 1. Introduction
1.1 Features Congratulations on your purchase of the ScanWit film scanner! The ScanWit film scanner is the utmost cost-effective solution for film scanning. Its high capability is bound to boost your scan job efficiency significantly. It is equipped with the following unique features:…
Page 13: Led Indicators
READY: When the film scanner is powered on and ready to scan, this LED indicator will remain on, indicating that you can start to scan. Holder insertion slot You can insert the filmstrip/slide holder through this slot for scanning.
Page 15
This is a 25-pin SCSI connector. Use this connector to connect other SCSI devices from the film scanner. Note: when you position the ScanWit film scanner, be sure to leave the space illustrated below to ensure that the film/slide holder moves into/out of the film scanner without being blocked by any object.
Page 17: Chapter 2. Installation
Chapter 2. Installation Please follow the steps below to set up your ScanWit film scanner: Step 1. Install the SCSI interface card Power off your computer and disconnect the computer power from the power outlet. Open the computer cover and locate the PCI slot of your computer.
Page 19: Chapter 3. Making Your First Scan
Step 1. Test the scanner Turn on the power of your film scanner, then your computer. Wait until the scanner completes its self-test. You can judge the status of the film scanner from the LED indicators. Once the READY LED indicator stops flashing, the film scanner is ready to scan.
Page 21
English If you want to scan slides: You can use the slide holder (the holder with 4 rectangular lattices and a SLIDE mark) to place your slide. Slide holder Pull the handle on the cover to open the cover. Then place the slide on the slide holder with the emulsion side face up.
Page 23: Step 4. Edit
To use SCAN button: Push the SCAN button on the film scanner front panel. A dialogue box will pop up on the screen asking you to choose an image editing software to use. Choose the application you want to use and then click Note: if you have only one image editing software installed in your computer, this dialogue box will be skipped.
Page 25: Chapter 4. Using Miraphoto
Chapter 4. Using MiraPhoto You can access MiraPhoto through your image editing applications. When you click “Acquire” or “Scan” in your application, the MiraPhoto main screen will appear: Menu Bar Combo Boxes Film Selection Area Control Buttons The following sections in this chapter will describe MiraPhoto in more detail.
Page 27: Settings Submenu
Settings submenu Scan Size… When you choose this item, the following dialog box will appear: There are two selectable items: Max. Area and Custom. Choosing Max. Area, MiraPhoto will scan the full range of the image. If you choose Custom, you can enter the size you want into the Width (max.: 0.94 inches) and Height (max.: 1.38 inches) text boxes.
Page 29: Film Type
Film Type Choosing this item, the following dialog box will appear: If you do not know the type of your film or if your film type is not listed, select Generic from the drop-down list. When the selection is done, click OK to confirm or Cancel to abort. Auto Preview If this item is checked, MiraPhoto will perform the preview operation automatically each time it is invoked.
Page 31: Resolution Box
Resolution box Resolution is used to decide how delicate the scanner captures the original image. When the original is scanned and turned into a digital image, the scanner captures and records the image in terms of pixels. As more pixels are used to record an image, more details in the image can be represented.
Page 33: Control Buttons
Control Buttons Eject button Click this button to eject the filmstrip/slide holder from the film scanner. Zoom button Click this button to zoom in on the image. Preview button Click this button to begin previewing the image. Preview proceeds in color or in monochrome depending on the setting in the Image Type combo box.
Page 35: Rotate Button
English Rotate button Click this button to rotate the image 90 degrees clockwise. You can click this button several times to get the image orientation you want. Mirror button Click this button to get a mirror reflection effect on the original as if you were viewing the image in a mirror: Original image Image after Mirror is applied…
Page 37: Brightness/contrast Button
Brightness/Contrast button Click this button to bring up the Brightness/Contrast Dialog box: Brightness control You can drag the triangle below the bar to increase/decrease the overall brightness of the image, or click on the Auto button to let MiraPhoto adjust the brightness automatically. Contrast control You can drag the triangle below the bar to increase/decrease the overall contrast of the…
Page 39: Color Adjustment Button
Color Adjustment button Click this button, and the Color Adjustment dialog box will appear: The Color Adjustment tool uses three control items: Hue, Saturation and Lightness. Hue is a characteristic that distinguishes one color from another, while Saturation decides the intensity of a color.
Page 41: Curve Button
Curve button The Curve tool is used to adjust the brightness properties of midtone pixels in an image. The following dialogue box will appear after you click this button: Below component in the dialog box and how to use the Curve tool to adjust an image: Color Channel box Use this box to select the color channel to be adjusted.
Page 43: Level Button
Level button Clicking on the Level button, and the Level dialog box will appear: Color Channel box Use this box to select the color channel to be adjusted. This allows you to adjust the histogram property of each color channel respectively. Histogram The Histogram displays the distributing status of dark and bright pixels in an image.
Page 45
With the information from the histogram, we will be better able to adjust an image with the histogram tools. Below the Histogram, there are three tiny triangles: Shadow Threshold By dragging these triangles, you can adjust the brightness and contrast of an image precisely. For example, if you drag the Shadow Threshold triangle to the right, the pixels with lower brightness level than the Shadow Threshold will be cut into black, which makes the image look darker.
Page 47: Filter Button
Filter button This function allows you to sharpen or blur the image. You can choose from the list: No filter, Sharpen, Sharpen more, Blur, Blur more and Unsharp Mask. If you want the edge of the image to be sharper, i.e., in a higher contrast against the background, select sharpen or sharpen more.
Page 49: Preview Area
Preview Area Info button The Info button is located at the lower right corner of the MiraPhoto main window. You can click this button to read the detailed information of the image you are currently working on in the JobInfo dialog box, or click on the Save as… button in the dialog box to save the information as a .txt file for future reference.
Page 51: Chapter 5. Photo Express
Chapter 5. Photo Express In this chapter you will be introduced to the fantastic world of Photo Express. Learn more about this bundled software and make your everyday life more interesting and colorful! Refer to Photo Express electronic User’s Manual in the software disc for more details on how to use its different features and functions.
Page 53
Express between Photo mode and Project mode. Photo mode is where the majority of your work is done, while the Project mode lets you make greeting cards, name cards, and other fun things based on templates. Command Panel: The Command panel lists all of the available categories in Photo Express necessary for getting the most out of your creativity when working on photos.
Page 55
To add new images to an album: Select an album. Click the File icon and browse for the folder where the images are stored. 3. When they appear in the Options panel, click the Select All button (or select images individually by holding down the Ctrl key as you click them).
Page 57
To trim your photo: To re-size your photo: Click the Trim button in the Edit: Adjust category. The Trim options will open in the Options panel. Select a Trim shape and then set the amount of Soft edge you want to soften the edges of the trimmed photo with.
Page 59: Saving Images
Saving Images After work on your photo is complete, you may want to save it. In Photo Express, you can save a photo in a variety of different image file formats. Each file format has its own unique properties and characteristics. Some formats, however, are better than others for specific situations, such as saving for the Web are.
Page 61: Morphing Photos
Morphing Photos One of Photo Express’ more novel effects extras is that of image morphing. Morphing transforms an image over time to create interesting and unique “warps” of the original photo. Image morphs are output as either image sequences or animated GIF files. To morph an image: Note: you can output image morphs as either an image sequence or GIF animations.
Page 63: Working With Templates
Working with Templates Photo Express’ unique templates can be edited and customized to suit your own needs. Templates consist of multiple components, usually a combination of text and photos with a decoration or two perhaps thrown in. To change any one of these components, simply select it and choose the appropriate tools from the Toolbar.
Page 65: Printing Templates
Printing Templates As with Photo mode, Project mode lets you print your work when you’re finished with it. The same options available in Photo mode apply in Project mode as well. For more on printing, see Printing Images and the online help.
Page 67: Chapter 6. Troubleshooting And Faq
6.1.3 SCSI Connection Guideline ScanWit film scanner uses a SCSI interface to connect to your computer and other SCSI devices. Depending upon the configuration you use, there will be certain guidelines to follow in order to ensure the proper function of…
Page 69: Chapter 7. Service Information
Taiwan: [email protected] USA: [email protected] Europe: [email protected] For free driver updates, product information and news release, please visit the following web addresses: http://www.acerperipherals.com.tw (Taiwan)
У многих из нас, особенно рождённых в СССР, хранится дома солидный архив фотоплёнок. Вот и у моего тестя, который в молодости, занимался в фотокружке этих негативов видимо-невидимо. И как-то он мне и говорит: «Вот в Китае, на том сайте, где вы обычно заказываете всякое разное есть такая штука с помощью которой можно негативы перевести в компьютер! Вот бы мне такую.» Ну и конечно зять (то есть я) начал искать и конечно же нашёл (в Китае есть даже то что о чём ты и не догадываешься). Заказали, обошёлся данный сканер нам в 2 817,51 руб. Пришла посылочка за 8 (восемь!!!) дней.
Сам сканер
— две рамки для слайдов
— одна рамка для пленок, она же универсальная для слайдов и катушечных пленок
— щёточка для чистки пленок
— кабель для подключения к телевизору
— USB кабель
— электрическая вилка.
Должна быть ещё инструкция, но положить видимо забыли… Да и ещё: электрическая вилка сгорела через полминуты… Хорошо сам сканер не пострадал. Так что запитывался я от ноутбука, с которого пишу данный обзор, по кабелю usb. Само собой открою диспут, долларов 10 с китайцев, думаю стрясу.
Собственно сканер.
Внизу слева кнопка включения, она же меню и справа кнопка сканирования. По бокам следующие кнопки: Слева – кнопка разворота (снизу) и просмотра (повыше), справа кнопки перемещения по меню.
Меню сканера выглядит так:
— выбор типа съемки (ч/б негатив, позитив и цветной негатив)
— экспозиция или яркость
— разрешение 5 или 10 мегапикселей (второе интерполяция).
— выбор языка – русского нет
— подключение по USB к компьютеру.
Меню сканера
Отсканированный кадр можно менять на ходу кнопками вверх, вниз. Кнопка поворот кадра при съемке разворачивает кадр влево, вправо и зеркально.
Негатив в катушке удобнее сканировать в универсальной рамке, нарезанный – в рамке для слайдов, хотя и то и то можно сканировать и с помощью рамки для слайдов – в ней есть держатели для предотвращения смещения.
Разрезанный негатив в рамке
Ну и для тех кому интересно как сканер выглядит в разобранном состоянии.
Простое устройство позволяющее в домашних условиях перевести свои фотопленки в цифровой формат и сохранить на компьютере в виде файлов.
Работает автономно. Подключать к компьютеру не нужно.
Работает с черно-белыми и цветными пленками (негативы и позитивы)
На экране видно изображение со вставленной пленки причем негатив видно сразу в правильном виде.
Можно при помощи кнопок повернуть изображение или изменить экспозицию. И сохранить на карту памяти. Процесс сканирования кадра занимает около 1 секунды.
Экранное меню на английском языке но в нем только 5 слов все остальное символами. Подробная инструкция на русском языке в комплекте.
Так же сканер можно подключить к ТВ по композитному выходу и смотреть снимки не на маленьком экране а на большом. (кабель для подключения к ТВ в комплекте)
Характеристики
Рамки для нарезанной пленки для слайдов.в рамках и для протяжки пленки в рулоне.
Материал корпуса: пластмасса.
Сканирующее устройство: CMOS Sensor
Размер файла: 5 Megapixels (2592pixels x 1944pixels)
Разрешение: 3600dpi (программное) 1800 dpi (оптическое)
F/6.1 f=10.13 Focus Range:51.5mm(Macro)
Автоматический баланс цвета
Автоматическая и ручная настройка экспозиции
Сохранение файлов происходит на карту памяти SD (покупает отдельно) максимальный объем поддерживаемых карт памяти 32Gb
Питание от USB порта или от сети 220В (адаптер питания и кабель в комплекте)
При подключении к ПК сканер становиться карт-ридером. То есть можно работать с файлами на SD карте.
Обратите внимание что экран сканера при продаже защищен специальной пленкой. Некоторые не замечают ее и думают что экран дефектный. Пленку нужно удалить в начале работы под ней глянцевый и яркий экран.
| Наименование | Cлайд — сканер Espada FilmScanner EC718 для слайдов и фотопленок 35мм 5МП с цветным LCD экраном 2,4″ |
| Назначение |
Простое устройство, позволяющее в домашних условиях перевести свои фотопленки в цифровой формат и сохранить на компьютере в виде файлов. |
| Датчик изображения | 5.0 мега пикселей (2592*1944) |
| Качество сканирования | 1800 точек/дюйм & 3600 точек/дюйм (интерполяция) |
| Дисплей | Цветной 2.4 » TFT LCD (480×234) |
| Диапазон фокусировки | фиксированный фокус |
| Тип сканирующего элемента | CMOS |
| Источник света | СВЕТОДИОДНАЯ Подсветка |
| Баланс белого | Автоматический |
| Тип пленки | 35 мм пленки, черно-белые и цветные (негативы и позитивы) |
| Формат изображения | JPEG |
| ТВ-ВЫХОД | NTSC/PAL |
| Внешние карты памяти | Поддержка SD карт до 32 ГБ |
| Питание | DC 5В (Адаптер USB Порт) |
| Тип интерфейса | USB |
| Подключение к компьютеру |
При подключении к ПК сканер становиться карт-ридером |
| Мульти-языки поддержки | Английский, французский, немецкий, итальянский, испанский, китайский, японский |
| Поддержка системы | Windows XP/Vista/7 |
| Размеры | 86*86.2*102.4 мм |
| Размеры в упаковке | 270*110*180 мм |
| Вес | 300 гр |
| Вес в упаковке | 700гр |
| Комплектация | Cканер для плёнки, слайдов или негативов USB-кабель AV-кабель Адаптер питания Держатель для негативов Слайд держатель Держатель кассетный |
Ручной сканер Iscan S001 LCD является идеальным помощником для человека, работающего с документами, оригиналами текстов, фотографиями, которые нельзя выносить за пределы библиотеки. Сканер позволяет быстро и эффективно сканировать даже цветные материалы без помощи громоздких устройств. Гаджет легко помещается в рюкзак или женскую сумочку.
Слот памяти позволяет без лишних проблем расширить память устройства, чтобы непосредственно на нем хранить последние отсканированные фотографии или тексты.
Характеристики:
- Цвет корпуса: черный;
- Материал: пластмасса;
- Подключение: USB 2.0;
- Ширина поля сканирования: 30 см;
- Угол сканирования: 90 градусов;
- Расстояние считывания: 0 — 10 мм;
- Дополнительное расширение памяти за счет Micro SD карт: до 32 GB (в комплект не входит);
- Формат сканирования: JPEG/PDF;
- Размеры: 25,7 см 3 см 2,45 см;
- Вес: 190 г;
- Скорость сканирования: 900DPI, цветное — 12 сек; 600DPI, цветное — 8 сек; 300DPI, цветное — 3 сек;
- Длина сканирования: 900DPI — 89 см; 600DPI — 114 см; 300DPI — 248 см;
- Размер файла: High: 900х900DPI; Mi: 600х600DPI; Low: 300х300 DPI;
- Устройство автоматически выключается через 180 секунд бездействия;
- Совместимость: Windows XP/Vista,7 или выше;
- Питание: Две АА батарейки (в комплект не входят);
- Время работы: до 200 листов в низком разрешении и в цвете (в зависимости от емкости батареек).
Начало работы:
Для начала необходимо установить батарейки. Для этого откройте соответствующий отсек и вставьте в него соблюдая полярность две батарейки типа АА (в комплект не входят). Удерживайте кнопку SCAN (она же вклвыкл) в течение 2 секунд, чтобы включить сканер. Далее необходимо вставить карту памяти (в комплект не входит). Установите в соответствующий слот карту памяти microSD card для последующей записи и хранения сканируемых материалов.
Установка времени:
Нажмите кнопку TIME SET. Так вы войдете в режим установки времени. Нажимайте кнопки JPG/PDF и DPI для установки времени. Нажмите кнопку SCAN, чтобы подтвердить установки.
Форматирование карты памяти:
После установки карты памяти в соответствующий слот, необходимо провести ее форматирование. Нажмите кнопку Format, на дисплее отобразится символ «F». Нажмите кнопку SCAN для начала форматирования карты памяти. Индикатор SD на дисплее будет мигать вплоть до окончания форматирования карты памяти MicroSD.
Установка разрешения сканирования:
Нажимайте клавишу DPI для выбора нужного разрешения: High: 900DPI; Mi:600DPI; Low:300DPI. На дисплее будут отображаться значки: Hi, Mi, Lo.
Установка режима цветности сканирования:
Нажимайте кнопку JPG/PDF для выбора формата. На дисплее отобразится значок JPG/PDF, C/BW, (Color/Black & White).
Сканирование:
Чтобы начать сканировать, возьмите сканер в руку и ровно расположите его над сканируемым объектом. В идеале прижать сканер к объекту по всей поверхности. Для начала процесса сканирования нажмите кнопку SCAN. Чтобы изображение получилось качественным, ведите сканер медленно, а сканируемое изображение не двигайте. Для окончания сканирования нажмите кнопку SCAN.
У многих из нас, особенно рождённых в СССР, хранится дома солидный архив фотоплёнок. Вот и у моего тестя, который в молодости, занимался в фотокружке этих негативов видимо-невидимо. И как-то он мне и говорит: «Вот в Китае, на том сайте, где вы обычно заказываете всякое разное есть такая штука с помощью которой можно негативы перевести в компьютер! Вот бы мне такую.» Ну и конечно зять (то есть я) начал искать и конечно же нашёл (в Китае есть даже то что о чём ты и не догадываешься). Заказали, обошёлся данный сканер нам в 2 817,51 руб. Пришла посылочка за 8 (восемь!!!) дней.
Сам сканер
— две рамки для слайдов
— одна рамка для пленок, она же универсальная для слайдов и катушечных пленок
— щёточка для чистки пленок
— кабель для подключения к телевизору
— USB кабель
— электрическая вилка.
Должна быть ещё инструкция, но положить видимо забыли… Да и ещё: электрическая вилка сгорела через полминуты… Хорошо сам сканер не пострадал. Так что запитывался я от ноутбука, с которого пишу данный обзор, по кабелю usb. Само собой открою диспут, долларов 10 с китайцев, думаю стрясу.
Собственно сканер.
Внизу слева кнопка включения, она же меню и справа кнопка сканирования. По бокам следующие кнопки: Слева – кнопка разворота (снизу) и просмотра (повыше), справа кнопки перемещения по меню.
Меню сканера выглядит так:
— выбор типа съемки (ч/б негатив, позитив и цветной негатив)
— экспозиция или яркость
— разрешение 5 или 10 мегапикселей (второе интерполяция).
— выбор языка – русского нет
— подключение по USB к компьютеру.
Меню сканера
Отсканированный кадр можно менять на ходу кнопками вверх, вниз. Кнопка поворот кадра при съемке разворачивает кадр влево, вправо и зеркально.
Негатив в катушке удобнее сканировать в универсальной рамке, нарезанный – в рамке для слайдов, хотя и то и то можно сканировать и с помощью рамки для слайдов – в ней есть держатели для предотвращения смещения.
Меню сканера
Отсканированный кадр можно менять на ходу кнопками вверх, вниз. Кнопка поворот кадра при съемке разворачивает кадр влево, вправо и зеркально.
Негатив в катушке удобнее сканировать в универсальной рамке, нарезанный – в рамке для слайдов, хотя и то и то можно сканировать и с помощью рамки для слайдов – в ней есть держатели для предотвращения смещения.
Разрезанный негатив в рамке
Ну и для тех кому интересно как сканер выглядит в разобранном состоянии.
- Page 1
English Français Deutsch Italiano Español Film Scanner User’s Manual… -
Page 4: Important Safety Instructions
Copyright Copyright © 1999 by this company. All rights reserved. No part of this publication may be reproduced, transmitted, transcribed, stored in a retrieval system or translated into any language or computer language, in any form or by any means, electronic, mechanical, magnetic, optical, chemical, manual or otherwise, without the prior written permission of this company.
- Page 6
FCC Information The Federal Communication Commission Radio Frequency Interference Statement includes the following paragraph: This equipment has been tested and found to comply with the limits for a Class B Digital Device, pursuant to Part 15 of the FCC Rules. These limits are designed to provide reasonable protection against harmful interference in a residential installation. - Page 8
Eject button… 23 Zoom button… 23 Preview button… 23 Scan button… 23 Exit button … 23 … 24 UTTONS Film Type button … 24 Flip button… 24 Rotate button … 25 Mirror button … 25 Crop button … 25 Color Enhancement Tools button … 26 Invert button… - Page 10
English … -
Page 12: 1.2 Hardware Introduction
Friendly and Smart Driver MiraPhoto is the driver for your ScanWit film scanner. Its easy and instinctive interface design allows you to proceed with your scanning job quickly. You can also use it to adjust the scanning parameters efficiently. Its powerful functions can help you to optimize the scanned image for your specific purpose.
-
Page 14: Rear Panel
Ventilation holes These holes are used to ventilate the heat from inside of the film scanner. Do not block these holes when the film scanner is in use. SCSI ID selector You can use the SCSI ID selector to select the SCSI ID of your film scanner.
-
Page 16: 1.3 Software Introduction
English 1.3 Software Introduction MiraPhoto is the driver program for your scanner. It is TWAIN compliant and designed to be user-friendly. With its iconlized user- interface and fully logical task-flow design, you can complete a satisfactory scanning job with only a few mouse clicks. With MiraPhoto, you can: Preview, scan and import the scanned image into your image editing software.
-
Page 18: Step 3 Test The Scanner
Step 3 Test the scanner Turn the scanner power on by depressing the power button on the front panel of the scanner. You may notice that the scanner will start to perform a self-test, and the LED indicators will blink for a few seconds.
- Page 20
English Place the filmstrip on the filmstrip holder with the emulsion side facing Close the cover and push the “PUSH CLOSE” mark at the middle of the cover. You will hear a click when the cover is secured. Insert the filmstrip holder into the holder insertion slot. -
Page 22: Step 3. Scan
Close the cover and push the “PUSH CLOSE” mark and the middle of the cover. You will hear a click when the cover is secured. Insert the slide holder into the holder insertion slot. Step 3. Scan Now you can either push the SCAN button to activate automatic preview, or manually open an image editing software to activate MiraPhoto and do the preview:…
- Page 24
English … -
Page 26: Menu Bar
Menu Bar File submenu Load Config… Load the configuration file you created. When the configuration file is loaded successfully, MiraPhoto will apply the settings recorded in the configuration file automatically. Save Config… Save current MiraPhoto settings to the configuration file Save Config As……
-
Page 28: Monitor Gamma
English Monitor Gamma Generally, a monitor cannot display the real colors of an image in the real world. In order to have the monitor approximate the colors as close as possible, you may need to adjust the monitor gamma. Adjustment of the monitor gamma can make the monitor approximate the colors of the original image more closely.
-
Page 30: Image Thumbnail Area
Image Thumbnail Area The Image Thumbnail Area displays thumbnail images of each previewed scan. Click on the thumbnail image and the image will be displayed in the Preview Area. You can select the image you want to scan by clicking the red dot at the upper right corner of the thumbnail.
-
Page 32: Scan Mode Box
Frame You can click the number of the frame you want to scan. You can select multiple frames and the film scanner will scan all the images you selected. MiraPhoto will display the frame(s) selected in green. Click to select all the images in the Image Thumbnail Area for scanning.
-
Page 34: Tool Buttons
Tool Buttons Tool Buttons provide a full range of tools and image effect options to optimize the scan quality. Film Type button When this button is clicked, the Film Type dialog box will appear: If you do not know the type of your film or if your film type is not listed, select Generic from the drop-down list.
-
Page 36: Color Enhancement Tools Button
English Color Enhancement Tools button Click this button to activate the Tool Bar which contains the buttons for the following tools: Invert button Click this button to get an inverted image: Original image Image after Invert is applied…
-
Page 38: Color Balance Button
Color Balance button Click this button to evoke the Color Balance dialog box: To adjust the color balance, you will want to first select the channel you want to adjust, then drag the triangles under the three color bars. In addition, you can also enter the desired values directly into the three entry boxes to the right of the color bars to adjust the color balance.
- Page 40
Entry Box While you drag within the Color Wheel to choose the hue and saturation of color or drag the triangle below the Lightness Bar to specify the lightness of color, the related information will also be shown in the Entry Boxes. - Page 42
The original image and its Tonal Map. The curve is straight and diagnal. You can also click the curve to add new points and further change the shape of the curve: Click to add a new point. Input/Output Status Area You can read the precise input/output value here. - Page 44
Brighter images have brighter pixels, therefore the bars in the right are higher than that in the left. In addition, if we take a look at the two images below: Image 1 We notice that in Image 1, there is higher contrast between the brighter and darker part of the image;… - Page 46
If the Input Level is set as 20 to 230, then you may represent a total of 210 (230 minus 20) color levels in the image. If you set the Output Level as 10 to 250, you can “expand” the original 210 levels of color to 240 levels (250 minus 10). -
Page 48: Color Wizard Button
Color Wizard button The Color Wizard button offers two quick and convenient tools for you to adjust the overall quality of the scanned image: Auto Density: if you choose this item, MiraPhoto will optimize the density of the image automatically. Apply all button Click on the Apply All button to apply the setting changes you make in the Tool Bar to all images.
- Page 50
English … -
Page 52: Getting Started
English Getting Started To run Photo Express, double click the Photo Express icon on your Windows desktop or open from Windows Start Menu. When you run Photo Express, make sure that the monitor display is at a resolution of 800×600 or 1024×768 and Hi Color (15/16 bit) or True Color (24 bit) mode.
-
Page 54: Getting Images
Getting Images The first thing you want to do when you start Photo Express is to get the photos you want to work with into the actual program. The place you start is with Album. From here, you can do almost anything in Photo Express. All other ways of getting photos can work independently of Album, but they are also set up to let you capture or open images directly to it.
-
Page 56: Working On Images
Working on Images Adjusting Images After you have acquired an image from a scanner or digital camera, it may need some adjustments. Photo Express provides you with the perfect tool for adjusting your photos: the Transform tool. To re-align a photo: .To freely rotate a photo, select the spin wheel in the upper right or lower left corner of the photo and rotate into position.
-
Page 58: Sharing Images
Sharing Images Printing Images Once you have put the finishing touches onto your photos, it is time to print them out. Photo Express contains numerous printing options, letting you output posters and name cards in addition to its regular printing duties. To print an image: You can also print album thumbnails.
-
Page 60: Express Your Images
Express Your Images Create Calendars One of the easiest tasks to accomplish in Photo Express is making calendars, either for your Windows desktop or for your real desktop. They are great for keeping your loved ones close, in addition to being a convenient way to keep track of important dates in style.
-
Page 62: Working In Project Mode
Working in Project Mode The Project mode gives you a focused environment in which to create custom greeting cards, calendars, invitations, birthday and anniversary cards, name cards, and planners. The Project mode is useful for getting through a “project” as quickly and efficiently as possible. It is where Photo Express lives up to its name, speeding you through all the necessary tasks while keeping all the unnecessary or extraneous components secure in the background.
-
Page 64: Adding Decoration
Adding Decoration One category of tools on the Edit menu in Project mode is unique to that tab: Decoration. These are special, object-based effects such as Frames, Edges and Props you can use to enhance photo objects in a project. To add special edge effects to a photo object: To add frame to a photo object: Select a photo object.
-
Page 66: Sharing Templates
Sharing Templates Sharing templates works exactly the same way as sharing photos in Photo mode. You can print, e-mail, fax, or output them to web pages. For more on these tools, see the online help and related documents. To e-mail a template: To fax a template: To output a template as a Web page: Click the Share: E-mail button on the…
-
Page 68: 6.2 Faq
If you find that your ScanWit film scanner uses the same SCSI ID number with another SCSI device, you must either change the SCSI ID number of your scanner or that of the other SCSI device. To change the SCSI ID number of your ScanWit film scanner: 1.
-
Page 70: Appendix
Interface Platform Power Consumption Net Weight Dimension Film scanner with color-CCD optical module Color — 3 s Color — less than 10 ms / line — less than 38 s/ 35mm film, 2700 dpi Color — 3s for 35mm film…
Page 3
English Film Scanner User’s Manual…
Page 5
This product should be operated from the type of power indicated on the marking label. If you are not sure of the type of power available, consult your dealer or local power company. Do not allow anything to rest on the power cord. Do not locate this product where persons will walk on the cord.
Page 7: Table Of Contents
CHAPTER 1. INTRODUCTION… 1 1.1 F … 1 EATURES 1.2 H ARDWARE NTRODUCTION Front Panel … 2 Rear Panel … 4 1.3 S OFTWARE NTRODUCTION CHAPTER 2. INSTALLATION … 7 1. I SCSI NSTALL THE 2. C ONNECT THE SCANNER TO YOUR COMPUTER EST THE SCANNER 4.
Page 9
English … 60 RODUCT PECIFICATION MiraPhoto Quick Reference Map Menu Bar Image Thumbnail Area Tool Buttons page 16 page 20 page 23 Combo Boxes page 20 Film Selection Area page 22 Control Buttons Preview Area page 23 page 39…
Page 11: Chapter 1. Introduction
1.1 Features Congratulations on your purchase of the ScanWit film scanner! The ScanWit film scanner is the utmost cost-effective solution for film scanning. Its high capability is bound to boost your scan job efficiency significantly. It is equipped with the following unique features:…
Page 13: Led Indicators
READY: When the film scanner is powered on and ready to scan, this LED indicator will remain on, indicating that you can start to scan. Holder insertion slot You can insert the filmstrip/slide holder through this slot for scanning.
Page 15
This is a 25-pin SCSI connector. Use this connector to connect other SCSI devices from the film scanner. Note: when you position the ScanWit film scanner, be sure to leave the space illustrated below to ensure that the film/slide holder moves into/out of the film scanner without being blocked by any object.
Page 17: Chapter 2. Installation
Chapter 2. Installation Please follow the steps below to set up your ScanWit film scanner: Step 1. Install the SCSI interface card Power off your computer and disconnect the computer power from the power outlet. Open the computer cover and locate the PCI slot of your computer.
Page 19: Chapter 3. Making Your First Scan
Step 1. Test the scanner Turn on the power of your film scanner, then your computer. Wait until the scanner completes its self-test. You can judge the status of the film scanner from the LED indicators. Once the READY LED indicator stops flashing, the film scanner is ready to scan.
Page 21
English If you want to scan slides: You can use the slide holder (the holder with 4 rectangular lattices and a SLIDE mark) to place your slide. Slide holder Pull the handle on the cover to open the cover. Then place the slide on the slide holder with the emulsion side face up.
Page 23: Step 4. Edit
To use SCAN button: Push the SCAN button on the film scanner front panel. A dialogue box will pop up on the screen asking you to choose an image editing software to use. Choose the application you want to use and then click Note: if you have only one image editing software installed in your computer, this dialogue box will be skipped.
Page 25: Chapter 4. Using Miraphoto
Chapter 4. Using MiraPhoto You can access MiraPhoto through your image editing applications. When you click “Acquire” or “Scan” in your application, the MiraPhoto main screen will appear: Menu Bar Combo Boxes Film Selection Area Control Buttons The following sections in this chapter will describe MiraPhoto in more detail.
Page 27: Settings Submenu
Settings submenu Scan Size… When you choose this item, the following dialog box will appear: There are two selectable items: Max. Area and Custom. Choosing Max. Area, MiraPhoto will scan the full range of the image. If you choose Custom, you can enter the size you want into the Width (max.: 0.94 inches) and Height (max.: 1.38 inches) text boxes.
Page 29: Film Type
Film Type Choosing this item, the following dialog box will appear: If you do not know the type of your film or if your film type is not listed, select Generic from the drop-down list. When the selection is done, click OK to confirm or Cancel to abort. Auto Preview If this item is checked, MiraPhoto will perform the preview operation automatically each time it is invoked.
Page 31: Resolution Box
Resolution box Resolution is used to decide how delicate the scanner captures the original image. When the original is scanned and turned into a digital image, the scanner captures and records the image in terms of pixels. As more pixels are used to record an image, more details in the image can be represented.
Page 33: Control Buttons
Control Buttons Eject button Click this button to eject the filmstrip/slide holder from the film scanner. Zoom button Click this button to zoom in on the image. Preview button Click this button to begin previewing the image. Preview proceeds in color or in monochrome depending on the setting in the Image Type combo box.
Page 35: Rotate Button
English Rotate button Click this button to rotate the image 90 degrees clockwise. You can click this button several times to get the image orientation you want. Mirror button Click this button to get a mirror reflection effect on the original as if you were viewing the image in a mirror: Original image Image after Mirror is applied…
Page 37: Brightness/contrast Button
Brightness/Contrast button Click this button to bring up the Brightness/Contrast Dialog box: Brightness control You can drag the triangle below the bar to increase/decrease the overall brightness of the image, or click on the Auto button to let MiraPhoto adjust the brightness automatically. Contrast control You can drag the triangle below the bar to increase/decrease the overall contrast of the…
Page 39: Color Adjustment Button
Color Adjustment button Click this button, and the Color Adjustment dialog box will appear: The Color Adjustment tool uses three control items: Hue, Saturation and Lightness. Hue is a characteristic that distinguishes one color from another, while Saturation decides the intensity of a color.
Page 41: Curve Button
Curve button The Curve tool is used to adjust the brightness properties of midtone pixels in an image. The following dialogue box will appear after you click this button: Below component in the dialog box and how to use the Curve tool to adjust an image: Color Channel box Use this box to select the color channel to be adjusted.
Page 43: Level Button
Level button Clicking on the Level button, and the Level dialog box will appear: Color Channel box Use this box to select the color channel to be adjusted. This allows you to adjust the histogram property of each color channel respectively. Histogram The Histogram displays the distributing status of dark and bright pixels in an image.
Page 45
With the information from the histogram, we will be better able to adjust an image with the histogram tools. Below the Histogram, there are three tiny triangles: Shadow Threshold By dragging these triangles, you can adjust the brightness and contrast of an image precisely. For example, if you drag the Shadow Threshold triangle to the right, the pixels with lower brightness level than the Shadow Threshold will be cut into black, which makes the image look darker.
Page 47: Filter Button
Filter button This function allows you to sharpen or blur the image. You can choose from the list: No filter, Sharpen, Sharpen more, Blur, Blur more and Unsharp Mask. If you want the edge of the image to be sharper, i.e., in a higher contrast against the background, select sharpen or sharpen more.
Page 49: Preview Area
Preview Area Info button The Info button is located at the lower right corner of the MiraPhoto main window. You can click this button to read the detailed information of the image you are currently working on in the JobInfo dialog box, or click on the Save as… button in the dialog box to save the information as a .txt file for future reference.
Page 51: Chapter 5. Photo Express
Chapter 5. Photo Express In this chapter you will be introduced to the fantastic world of Photo Express. Learn more about this bundled software and make your everyday life more interesting and colorful! Refer to Photo Express electronic User’s Manual in the software disc for more details on how to use its different features and functions.
Page 53
Express between Photo mode and Project mode. Photo mode is where the majority of your work is done, while the Project mode lets you make greeting cards, name cards, and other fun things based on templates. Command Panel: The Command panel lists all of the available categories in Photo Express necessary for getting the most out of your creativity when working on photos.
Page 55
To add new images to an album: Select an album. Click the File icon and browse for the folder where the images are stored. 3. When they appear in the Options panel, click the Select All button (or select images individually by holding down the Ctrl key as you click them).
Page 57
To trim your photo: To re-size your photo: Click the Trim button in the Edit: Adjust category. The Trim options will open in the Options panel. Select a Trim shape and then set the amount of Soft edge you want to soften the edges of the trimmed photo with.
Page 59: Saving Images
Saving Images After work on your photo is complete, you may want to save it. In Photo Express, you can save a photo in a variety of different image file formats. Each file format has its own unique properties and characteristics. Some formats, however, are better than others for specific situations, such as saving for the Web are.
Page 61: Morphing Photos
Morphing Photos One of Photo Express’ more novel effects extras is that of image morphing. Morphing transforms an image over time to create interesting and unique “warps” of the original photo. Image morphs are output as either image sequences or animated GIF files. To morph an image: Note: you can output image morphs as either an image sequence or GIF animations.
Page 63: Working With Templates
Working with Templates Photo Express’ unique templates can be edited and customized to suit your own needs. Templates consist of multiple components, usually a combination of text and photos with a decoration or two perhaps thrown in. To change any one of these components, simply select it and choose the appropriate tools from the Toolbar.
Page 65: Printing Templates
Printing Templates As with Photo mode, Project mode lets you print your work when you’re finished with it. The same options available in Photo mode apply in Project mode as well. For more on printing, see Printing Images and the online help.
Page 67: Chapter 6. Troubleshooting And Faq
6.1.3 SCSI Connection Guideline ScanWit film scanner uses a SCSI interface to connect to your computer and other SCSI devices. Depending upon the configuration you use, there will be certain guidelines to follow in order to ensure the proper function of…
Page 69: Chapter 7. Service Information
Taiwan: [email protected] USA: [email protected] Europe: [email protected] For free driver updates, product information and news release, please visit the following web addresses: http://www.acerperipherals.com.tw (Taiwan)
Перейти на страницу of 23
Summary
-
Reflecta Film Scanner — page 1
Us er m anual …
-
Reflecta Film Scanner — page 2
1- For c ustomers in North and So u th America For custo mers in USA This device complie s w ith Part 15 of the FCC rules . Opera tion is subjec t to t he follow ing t w o condition s: (1) Thi s devi c e may not cause ha rmful interfer ence. (2) This devi c e must accept any in terf eren ce rece ived, including i nt erfere nce that may cause unde …
-
Reflecta Film Scanner — page 3
2 — 1. Name of p art s Note: Thi s film scanner supports Windows XP and Vista (32-bits) via USB 2.0 only. W e strongly sug ges t using a clean, dry, non-alcohol cotton swab to insert into the film scanner slot and clean th e glas s surface periodically to prod uce a clear imag e. Please make sure your film negativ es/mounted slides and cover tra …
-
Reflecta Film Scanner — page 4
3- 2. How to i n st all a film into the fil m holde r a. Open the film holde r as illustra ted b. Put a film in the fil m slot as show n c. Close the film holder …
-
Reflecta Film Scanner — page 5
4- 3. Inst all th e sof twa re and d river T o use the fil m scanner y ou need to i nstall t he s o ftw are d ri v er and ArcSof t PhotoImp ression 6 in ad vance. Inst alling Driver 1.T u rn on the comp ut e r . 2.Insert i nstallatio n CD in to t he CD- RO M drive and t he in stallati on CD m enu w ill appear . 3. W hen you se e the follow in …
-
Reflecta Film Scanner — page 6
5- Recommend ed to selec t “Install the so ftw are automatically . …
-
Reflecta Film Scanner — page 7
6- Choose “con t inue anyw a y” button. 3.Sele ct “Finish” but ton to comp lete the inst allatio n. …
-
Reflecta Film Scanner — page 8
7 — New Hardw are Wizard (Vist a) 1. Af ter connecting the fil m scanner to the computer wit h USB cable, the new hardware wizard will d etect the new device. 2. Follow the in s tructions on screen. Reco mm ended to select “I ns t all the sof tware auto ma tically . Choos e “Don’ t show this mes sage again for th is device” button. …
-
Reflecta Film Scanner — page 9
8- Choose “Ins tall this driver sof tw are anyw ay” button. 3.Sele ct “Finish” but ton to comp lete the inst allatio n. …
-
Reflecta Film Scanner — page 10
9- 4. Con nect film scanne r and y our compu ter with t he USB cable Note: For first time u ser , p lease do not plug the film holder include d with film sl ot i nto the f i lm scann er whi le connect the scanner with the co mpute r . Y ou w ill s ee t he P W R LED is re d 5. Using the film sc anner 1. Click “ Photo Impress ion 6” i co n o n …
-
Reflecta Film Scanner — page 11
10 — In select t he device option make sure OVT scanner is displ ayed. When u s ers st art the ope ration, the picture will show on “N ormal qualit y”. Then it is user ’s choice t o selec t “TIF” or “JPG”. I t is recom mended to select “JPG” format. Pic2 Select t he loca tion t o save the pic tures 1 Select the type of film …
-
Reflecta Film Scanner — page 12
1 1- Pic4 Y ou can adjust the locatio n of the film by moving t he film holde r , th e f ilm holder c an b e moved forw ard only one w ay . Pic5 Click “Sn ap Shot” or p res s the “Copy” button and th e “Snap Shot” w ill appear i n the smaller w indo w t o the right . On the film strip a gr een frame indi cates the cu rren t picture se …
-
Reflecta Film Scanner — page 13
12- Click exi t and you w ill see the pictur e in t he ma in Arcsof t w indow a s below . T o ensure t he best image quality , t he sc anner balances the sensor fo r each pi cture this m ay ta ke 3 or 5 se c. dep ending on the im age complexity and your compu ter hardw are. …
-
Reflecta Film Scanner — page 14
13- PIC 6 Click the “ format” to f ind out the re solution o f t he pi cture. 6. Now y ou can s t art to ed it the pictu re as yo u like: First you are suppo sed to select t he picture by clic k ing a t the picture . And then u se the Arc s o ft tools to edit the pictures. — Ma in Menu The M ain Men u appears in the uppe r left corner of the …
-
Reflecta Film Scanner — page 15
14- Select th e folde rs you want to scan -L e t» s you choose the folders f or scanning . * View Full Sc ree n /Play (F4) Play s or display s t he first selec te d file in full screen view . — Ma in Button s * Get Photos Acquire f rom Scanne r …
-
Reflecta Film Scanner — page 16
15- Here you can: Acquire image s from conne c ted T WAIN complian t devices s uch as scanners and some digi tal cameras. Assign na mes t o image file s as they are acquired (using today» s date or a descripti ve w ord). How to acqu ire images from a T W AIN c omplian t device: 1. Sele c t a scanner or othe r T WAIN de vice from the …
-
Reflecta Film Scanner — page 17
16- In additio n to the large photo w o rkspace, the Photo Editing T ools module includes five distinct sets of c ont rols: Enh ance The Enhan ce fun c tion i n c ludes tw o types o f contro ls: Auto E nhance Click «A ut o Enhan ce» button to impr ove the overall quality of your picture s with a single cli ck. Manua l F i x For prec …
-
Reflecta Film Scanner — page 18
17- How to fix the color o f a photo: 1. Drag t he c olor balanc e s lider s to make the photo c olor appear m or e natural. Add red or yellow to make the photo warmer . Add blue or gr een t o make the photo cooler . 2. Drag the Lighter/Dar ker slider t o the l eft to reveal detail s hidden in a dark photo o r to the righ t to make a faded pho t …
-
Reflecta Film Scanner — page 19
18- 5. Click «U ndo» if you make a m ista ke or don» t like the resul t. Crop This f eature enables you to trim p hoto s fo r d ra m ati c eff ect or c ut off the u gly/di st ractin g p arts of a pic t ure. How to use crop: 1. Choose the crop ori entation (portrait or landscape) . 2. Sele c t a f ixed proportion fo r t he crop rect …
-
Reflecta Film Scanner — page 20
19- 2. Drag the fi rst sli der to m ake the transition betw e en the b lurred and n on-blurred are a sharp o r smooth. 3. Drag the second s lider to increase o r decrea se the amou nt of blur . 4. Click «A pply» if you lik e the result . Cli c k «Can cel» if you d o not. Saving You r Results W he n you» re done edi tin g …
-
Reflecta Film Scanner — page 21
20- Clone The Clon e tool is g ood for removing un w anted element s from a p hoto. It c an also be used for fun effe ct, l i ke moving a nose from one person t o an other. How to use the Clone t ool to remove a t elepho ne pole from the ba ckground of a photo: 1. Esta blish a source point for th e Clone tool by holding t he Shif t key and clicki …
-
Reflecta Film Scanner — page 22
21- Paint Brush Let you «paint» on yo ur image w he n you click and drag the mouse. Plea se click and drag the sliders be low to change the brush si ze and transpar ency. Line Draw a straight line i n the photo. Ple ase click an d drag the s lider s below to change th e line w idth and tran sparency. Eraser Simula te an eraser, removing …
-
Reflecta Film Scanner — page 23
22 — 6. S p ecification Inte rface: USB 2.0 only Image Sensor: 1/1. 8” inch 5 mega CMOS sensor (5,174,400 pixels) Lens: F no.= 2.0, 4 Glass eleme nt s, Half-field A ngle=15 Frame Rate (M ax.): 5M(2592×1944) 2 f ps, SXGA (1280X960) 15 fp s Focus Range: Fixed focus Exposure Control: Automatic Color Balance: Automatic Scan high resolution 5MP …
Производитель Reflecta
Категория Photo Scanner
Документы, которые мы получаем от производителя устройства Reflecta Film Scanner мы можем разделить на несколько групп. Это в частности:
— технические чертежи Reflecta
— инструкции обслуживания Film Scanner
— паспорта изделия Reflecta
— информационные брошюры
— энергетические этикетки Reflecta Film Scanner
Все из них важны, однако самую важную информацию с точки зрения пользователя мы найдем в инструкции обслуживания Reflecta Film Scanner.
Группа документов, определяемая как инструкции обслуживания, делится также на более подробные типы, такие как: Инструкции монтажа Reflecta Film Scanner, инструкции обслуживания, короткие инструкции или инструкции пользователя Reflecta Film Scanner. В зависимости от потребностей, Вам необходимо поискать требуемый документ. На нашем сайте Вы можете просмотреть самую популярную инструкцию использования изделия Reflecta Film Scanner.
Полная инструкция обслуживания устройства Reflecta Film Scanner, как должна выглядеть?
Инструкция обслуживания, определяемая также как пособие пользователя, или просто «руководство» — это технический документ, цель которого заключается в использовании Reflecta Film Scanner пользователями. Инструкции пишет, как правило технический писатель, языком, доступным для всех пользователей Reflecta Film Scanner.
Полная инструкция обслуживания Reflecta, должна заключать несколько основных элементов. Часть из них менее важная, как например: обложка / титульный лист или авторские страницы. Однако остальная часть, должна дать нам важную с точки зрения пользователя информацию.
1. Вступление и рекомендации, как пользоваться инструкцией Reflecta Film Scanner
— В начале каждой инструкции, необходимо найти указания, как пользоваться данным пособием. Здесь должна находится информация, касающаяся местонахождения содержания Reflecta Film Scanner, FAQ и самых распространенных проблем — то есть мест, которые чаще всего ищут пользователи в каждой инструкции обслуживания
2. Содержание
— индекс всех советов, касающихся Reflecta Film Scanner, которое найдем в данном документе
3. Советы по использованию основных функций устройства Reflecta Film Scanner
— которые должны облегчить нам первые шаги во время использования Reflecta Film Scanner
4. Troubleshooting
— систематизированный ряд действия, который поможет нам диагностировать а в дальнейшем очередность решения важнейших проблем Reflecta Film Scanner
5. FAQ
— чаще всего задаваемые вопросы
6. Контактные данные
Информация о том, где искать контактные данные производителя / сервисного центра Reflecta Film Scanner в данной стране, если самостоятельно не получится решить проблему.
У вас вопрос, касающийся Reflecta Film Scanner?
Воспользуйтесь формуляром, находящимся ниже
Нужно оцифровать фотопленку?
Просто скачайте программу ФотоВИНТАЖ и следуйте инструкции:
Поддерживает все версии Windows
Оцифровка фотопленки: простые способы для переноса снимков на компьютер
У многих в семейных архивах сохранились старые негативы, которые были проявлены, но снимки с пленки не были распечатаны. Вы можете перенести кадры на компьютер: это позволит обработать фото и сохранить изображения на долгую память. В этой статье мы расскажем, как оцифровать фотопленку в домашних условиях самостоятельно.
Чтобы оцифровать фотопленку своими руками, вы можете использовать два способа. Для первого потребуется купить сканер, для второго использовать фотоаппарат с макрорежимом или объективом, а также осветительный прибор.
Способ 1. Сканирование фото
Самый быстрый и удобный вариант — отсканировать фотопленку 35мм с помощью профессионального устройства: слайд-сканера или планшетного. Сканирование негативов может быть утомительным и трудоемким делом, но это дает полный контроль над процессом и позволяет получить качественный результат. При оцифровке дома вы сможете отбросить пропуски, ненужные и плохие фотографии. Компании предлагают различные модели, цены которых отличаются по качеству итогового материала, цветопередачи, удобству и скорости.
Слайд-сканер дает лучшее разрешение, но стоит дороже планшетного. Средняя стоимость такого аппарата 10 тысяч рублей. Существуют особенности, которые следует учитывать:
- Качество. В результате важно разрешение. Проверьте количество мегапикселей интересующего вас устройства. Они могут варьироваться от 5 до 9 мегапикселей. Чем больше пикселей, тем крупнее будет отпечаток.
- Скорость. Недорогие слайд-сканеры требуют, чтобы вы работали с одним кадром. Если сканирование каждого слайда и его сохранение на ПК продолжается 30-60 секунд, обработка блока может занять значительное время. Дорогие 35-миллиметровые сканеры имеют высокоскоростной режим даже при самом высоком разрешении 7200 точек на дюйм. При сканировании с высоким разрешением получаются файлы большего размера, поэтому нужна высокая скорость передачи во внутреннюю память или на карту SD/SDHC.
- Совместимость. Большинство аппаратов будут работать с новыми компьютерами Mac или Windows. Для некоторых моделей даже не требуется компьютер. Если же у вас старый ПК, проверьте характеристики и совместимость при выборе устройства.

Нет возможности приобрести сканер? Воспользуйтесь услугами компании по аренде фотографической техники. Часто у них есть сканеры проф.уровня, доступные в аренду.
Более дешевая альтернатива — использовать планшетный сканер. Поскольку слайды должны освещаться сзади, планшетные аппараты улавливают отраженный свет от документа. Так возникнут ограничения по качеству, освещению и разрешению, а также потребуется программное обеспечение для обработки фотографий. После сканирования таким способом вам потребуется кадрировать изображение, настроить яркость и контраст. Чтобы улучшить качество, вы можете создать картонный адаптер, отражающий свет от сканера.
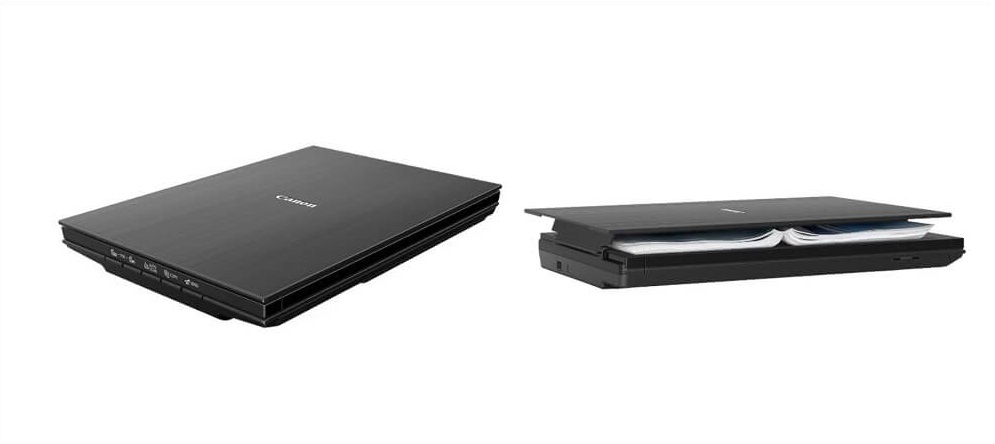
Способ 2. Пересъемка негативов
Оцифровка фотопленки в домашних условиях возможна не только с помощью специального оборудования, но и при использовании фотоаппарата, подсветки или самодельного прибора. Последний вариант сложен в реализации и требует определенных навыков, но нет необходимости совершать дополнительные траты на технику.
Одна из вещей, которая отличает «сканирование» с помощью камеры от обычного, — это время для захвата изображения. С фотоаппаратом захват изображения происходит мгновенно, и вы можете относительно быстро перейти к следующему кадру. Но при пересъемке вам потребуется время на подготовку, а качество материала может быть ниже, чем при сканировании.
Для пересъемки с помощью подсветки вам потребуется:
- DSLR, беззеркальная или цифровая камера среднего формата;
- макрообъектив или удлинительные трубки для макросъемки;
- прочный штатив с головкой, позволяющий опустить объектив вниз;
- световой короб с точной цветопередачей.
Если вы боитесь ошибиться с выбором оборудования, у некоторых компаний существуют готовые наборы, например, комплект Kaiser 2458 FilmCopy Vario.
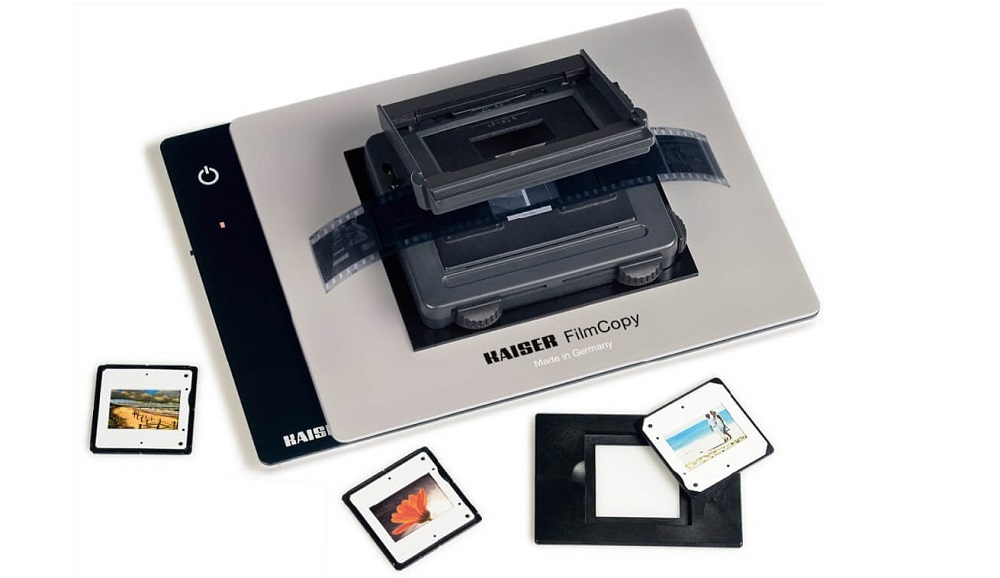
Чтобы перенести снимки на компьютер, расположите пленку на световой короб. Если вы не можете приобрести оборудование для подсветки, используйте подручные материалы: например, лампу или фонарик. Камеру лучше установить на штатив и поместить ее над негативом. Для съемки больше всего подходит макрообъектив и удлинительные трубы. Или перейдите в соответствующий режим на фотоаппарате, но будут сложности при фокусировке.
Также важно снимать в формате RAW и ручном режиме: вы сможете контролировать весь процесс, изменять выдержку и диафрагму, четко фокусироваться на слайде. Световой короб сбалансирован для дневного света, поэтому установите для камеры соответствующий баланс белого. Хорошая диафрагма для большинства макрообъективов — f/8-f/11, так что начните с нее. Установите максимально низкое значение ISO, чтобы уменьшить шум.
Если у вас есть провод для подключения камеры к компьютеру, это позволит получить наилучший результат. Так вы сможете сразу проверять экспозицию и фокус.
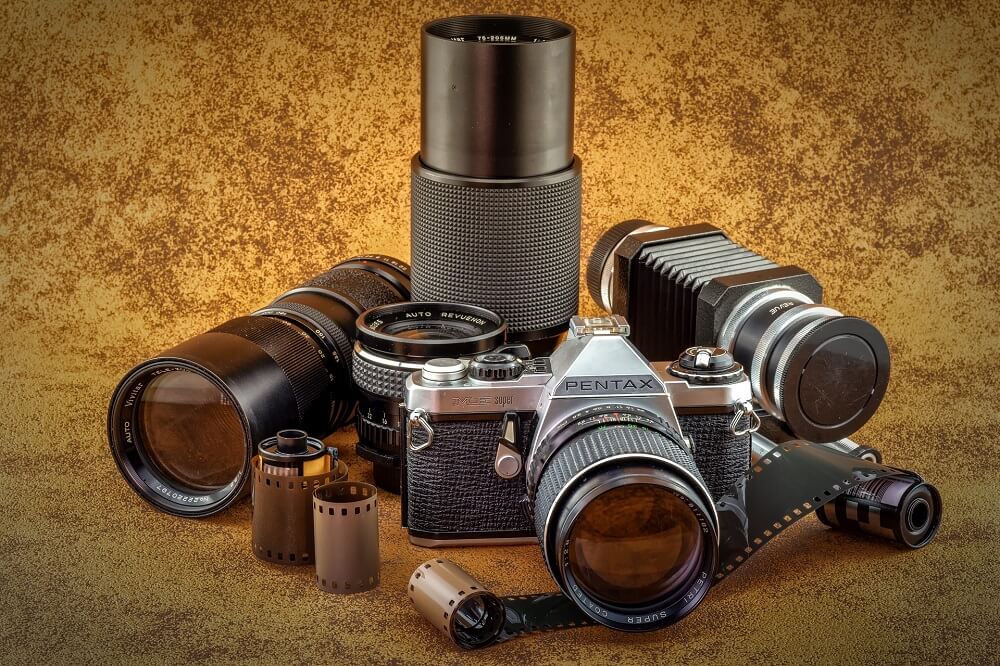
Постобработка
Вне зависимости от того, какой способ вы выберете, фотографию необходимо обработать в программном обеспечении для редактирования снимков. Скачайте редактор ФотоВИНТАЖ! Он позволит инвертировать негатив, улучшить качество кадров и скрыть любые недостатки.
Установите приложение на компьютер. Далее пройдите стандартные этапы инсталляции: ознакомьтесь с пользовательским соглашением, выберите тип установки, укажите папку и создайте ярлык на рабочий стол. Готово!
Запустите редактор и откройте фотографию. В разделе «Улучшения» кликните на «Негатив». Изображение автоматически изменится на ваших глазах.
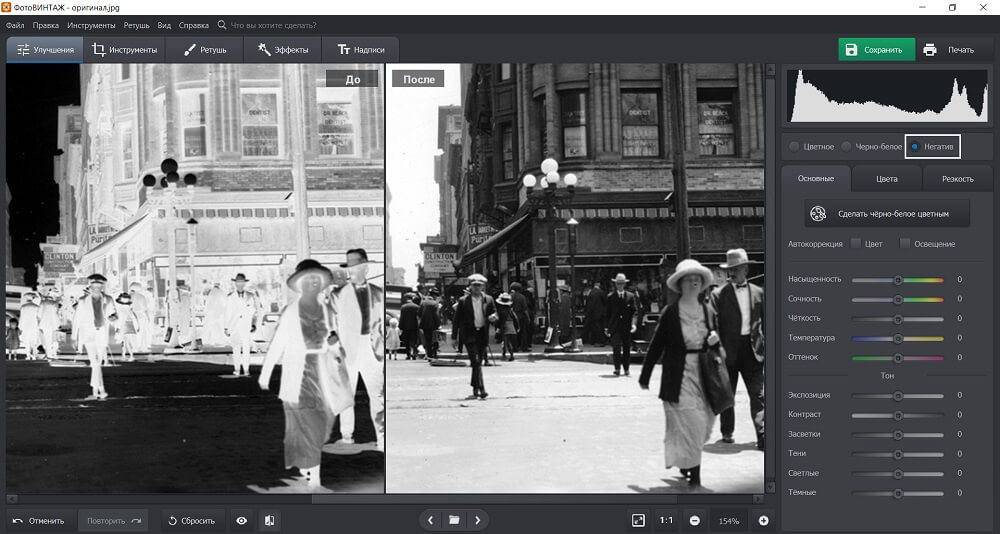
Также вы можете нажать на меню «Инструменты» в верхней части интерфейса и выбрать инструмент «Кривые». Измените положение RGB прямой: нижняя точка должна быть вверху, а верхняя — внизу. Так вы сделаете все темные оттенки светлыми и наоборот.
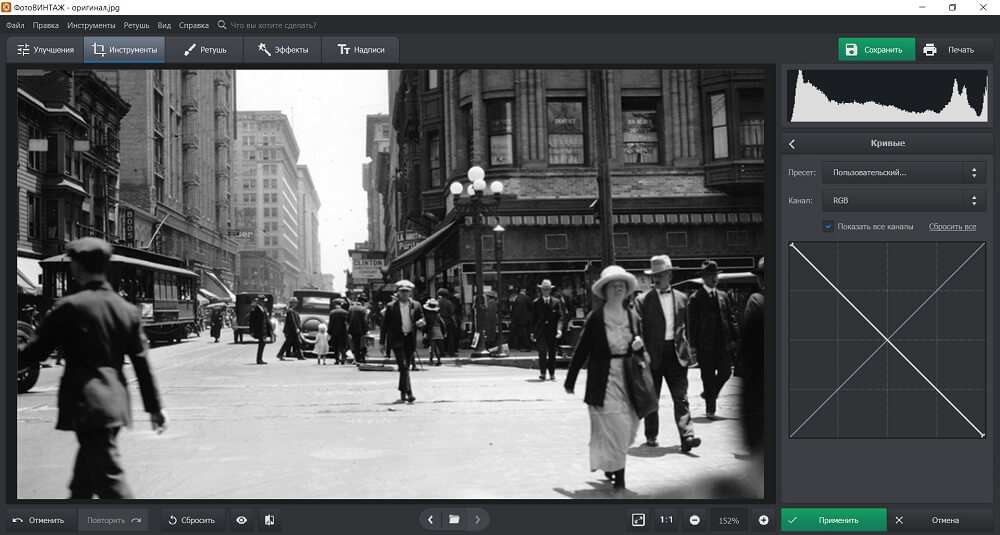
Инструмент «Кадрирования» позволит удалить лишнее пространство на фото. Вы можете установить пропорции самостоятельно или выбрать предложенные настройки. Это особенно пригодится, если в полученный кадр влезли края пленки.
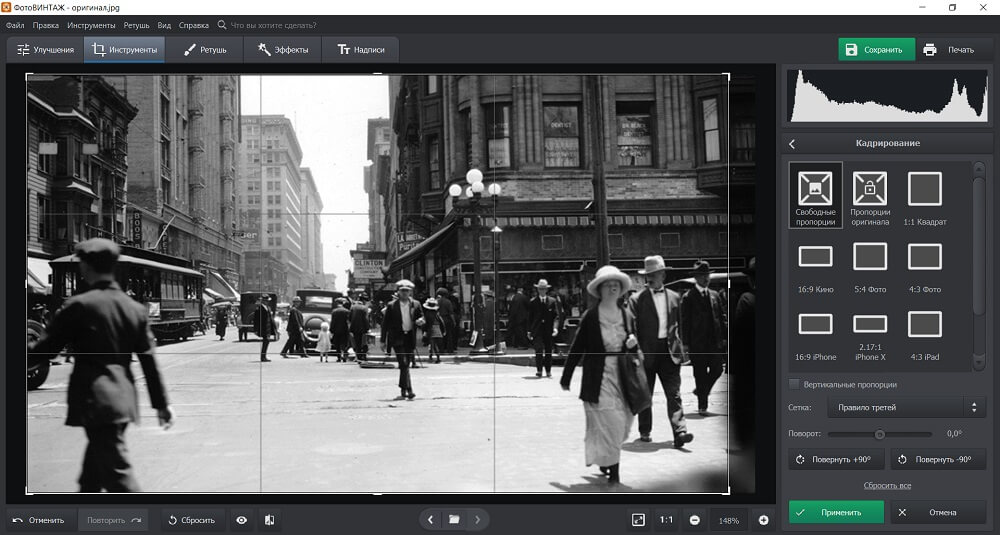
Опция «Геометрия» даст возможность исправить любые искажения. Это может пригодиться при обработке негатива, снятого с помощью фотокамеры.
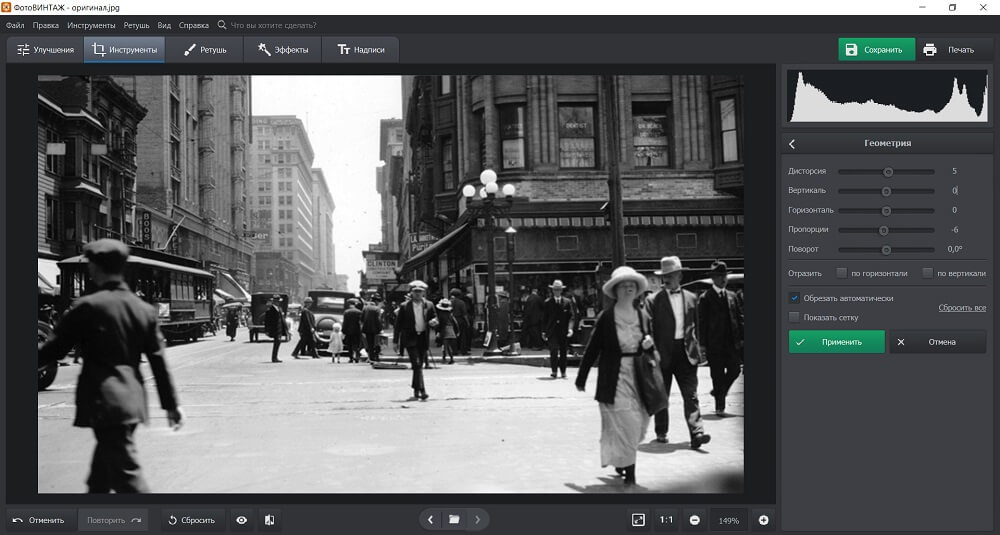
В разделе «Улучшения» вы можете исправить экспозицию, контраст, светлые и темные участки, добавить резкости изображению. Также можно автоматически сделать черно-белое фото цветным с помощью нейросети и настроить результат раскрашивания. Помимо этого в софте есть готовые эффекты, инструменты для создания надписей и ретуши.
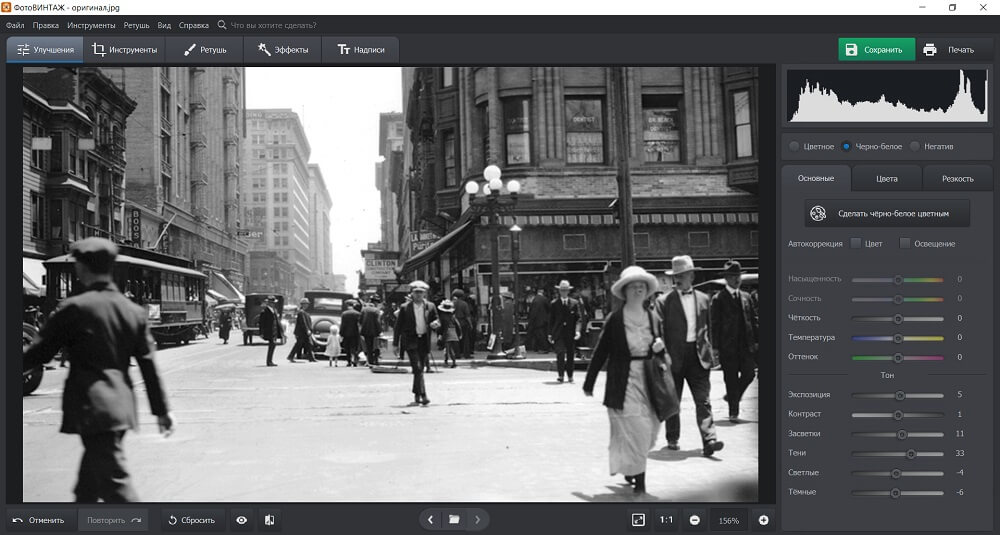
Оцифровка пленки в домашних условиях — несложная задача. К ней нужно подойти ответственно: выбрать и подготовить оборудование, провести сканирование, а затем обработать фото на компьютере. Лучше всего скорректировать результат в программе, предназначенной для редактирования старых снимков. ФотоВИНТАЖ позволит обработать негатив, скрыть любые недостатки, сделать черно-белый кадр цветным, а также применить готовые фильтры. Скачайте редактор прямо сейчас!
Содержание
- 2.36″ TFT LCD 5MP CMOS 35mm Film Scanner with SD/MMC + Mini USB
- Сканер Espada EC717 / Описание
- Смотрите также
- Похожие на этот сканер товары
- Рейтинг сканеров для фото
- На что обратить внимание при выборе
- 8 место — Epson Perfection V850 Pro
- Wimi EC717 5MP Отрицательный 2,4-дюймовый цифровой LCD слайд-фильм сканер поддерживает 35-мм фильм
2.36″ TFT LCD 5MP CMOS 35mm Film Scanner with SD/MMC + Mini USB
Давно мечтал оцифровать свои старые негативы. Увидел на DX этот сканер, долго боролся с жабой и вот, наконец, купил. (Это произошло больше года назад).
После распаковки оказалось, что комплектация не нарушена, все на месте, как и на сайте DX.

Две рамки под разные пленки, щеточка для чистки…
Но вот usb шнур оказался намертво вживленным в устройство, что огорчило.
Сканер питается от usb.
Но лучше его не подключать к компу, а работать автономно, записывая фотки на карту памяти.
Включается устройство каким-то непонятным образом. Надо нажать кнопки в какой-то последовательности и на определенное время. Последовательность и продолжительность каждый раз меняются. 🙂
В комплекте нет пленкопротяжного механизма, поэтому приходится нарезать негативы на полоски и закреплять в рамках. По 4-ре кадра.
Процесс сканирования прост — смотрим на экран, перемещаем кадр, выбираем режим — негатив или позитив, нажимаем кнопку. Готово.
Вынимаем карту памяти, вставляем в компьютер и…
Лучше этого не видеть.
Полный отстой.
Изображения получаются примерно 2400х1800 пикселей. Разрешение 180 dpi.
Вот пример отсканированного негатива.

А вот 100% фрагмент — выделен на картинке выше желтым квадратиком:
Если перемножить стороны, то пяти мегапикселей не выйдет — 4,3 только.
Качество картинки говорит о том, что оно было снято и растянуто. При этом возникло множество жутких артефактов.
В общем полное разочарование. Посканировал несколько пленок, да так и забросил это кетайское чудо в шкаф. Валяется уже больше года.
Резюме:
Не рекомендую. Лучше отнести пленки в фотосалон или найти более качественный сканер.
Хотя для размещения фоток в «Одноклассниках» или фконтакте пойдет.
Источник
Сканер Espada EC717 / Описание
- Вес: 700 г
- Тип: Сканер
- Марка: Espada
- Нет в наличии
- Отложить
- Оставить отзыв о товаре
- Вес 700 г
- Ширина упаковки 180 мм
- Высота упаковки 110 мм
- Глубина упаковки 270 мм
- Тип Сканер
Наименование Автономный компактный слайд-сканер Espada FilmScanner EC717 с цветным LCD экраном — для пленок 35 мм и слайдовНазначение Простое устройство, позволяющее в домашних условиях перевести свои фотопленки в цифровой формат и сохранить на компьютере в виде файлов. Для сканирования не требуется подключение к компьютеру . Для переноса снимков на компьютер, необходимо снимки сохранить на SD карту и далее скопировать на компьютерДатчик изображения 5.0 мега пикселей (2592*1944)Качество сканирования 1800 точек/дюйм & 3600 точек/дюйм (интерполяция)Дисплей Цветной 2.4 » TFT LCD (480×234)Диапазон фокусировки фиксированный фокусТип сканирующего элемента CMOSИсточник света СВЕТОДИОДНАЯ ПодсветкаБаланс белого АвтоматическийТип пленки 35 мм пленки, черно-белые и цветные (негативы и позитивы)Формат изображения JPEGТВ-ВЫХОД NTSC/PALВнешние карты памяти Поддержка SD карт до 32 ГБПитание DC 5В (Адаптер USB Порт)Тип интерфейса USBПодключение к компьютеру При подключении к ПК сканер становиться карт-ридеромМульти-языки поддержки Английский, французский, немецкий, итальянский, испанский, китайский, японскийПоддержка системы Windows XP/Vista/7Размеры 88*86*102 ммРазмеры в упаковке 270*110*180 ммВес 300 грВес в упаковке 700грКомплектация Cканер для плёнки, слайдов или негативов, USB-кабель, AV-кабель, Адаптер питания, Держатель для негативов, Слайд держатель, Держатель кассетный, Руководство пользователя на русском языке
Смотрите также
Похожие на этот сканер товары
Экран — Цветной; Диагональ — 2.4 ″ Материал — Пластик;
Сканер ESPADA FilmScanner EC717 черный
Экран — Цветной; Материал — Пластик; Габариты — 86 × 102 × 88 мм;
Экран — Цветной; Материал — Пластик; Габариты — 910 × 105 × 104 мм;
Максимальный формат бумаги — A4; Тип датчика сканера — Cmos; Встроенный аккумулятор — +;
Сканер ESPADA iScan A4 черный
Экран — Цветной; Материал — Пластик; Электропитание — От USB;
© mobisfera.ru 2007-2021 Сравниваем цены на электронику и гаджеты
Проект «Мобисфера» объединил в себе наиболее популярные интернет-магазины, торгующие электроникой и аксессуарами с доставкой по России. На сайте указаны цены, предоставленные магазинами в рамках партнерских отношений. Сроки и условия доставки следует уточнять на сайте продавца. Как правило, срок не превышает 30 дней. Минимальный срок доставки — 1 день. На все товары действует официальная гарантия. Все права на тексты и изображения принадлежат их авторам.
Источник
Рейтинг сканеров для фото

Электроника
Напечатанные фото хранятся в альбомах или рамках ограниченное время. Воздействие света и температуры портит снимок . Преимущества электронного формата: экономия места, долгое хранение.
Отсканированное изображение можно детально рассмотреть на компьютере, обработать в программе. Четкость результата зависит от разрешения сканера. Электронный вариант снимков и документов – это надежный способ хранения, удобное использование и простой вариант отправки.
Изучив рейтинг сканеров для фотографий , можно выбрать хороший вариант.
- На что обратить внимание при выборе
- 8 место — Epson Perfection V850 Pro
- 7 место — Plustek OpticFilm 8100
- 6 место — Epson Perfection V550 Photo
- 5 место – Plustek OpticFilm 8200i SE
- 4 место – Epson Perfection V33
- 3 место – Fujitsu fi-7160
- 2 место – Reflecta CrystalScan 7200
- 1 место – Epson Perfection V370 Photo
- Как ухаживать за сканером
На что обратить внимание при выборе
Сканер для фотографий технологически похож на фото- и видеоаппаратуру. Выбор качественной техники зависит от производителя, типа сканирования, интерфейса, разрешения, датчика, формата. Операционная система, указанная в паспорте сканера (Windows, Linux или MacOS), должна поддерживаться на компьютере.
Оптимальный формат сканирования – А4, варианты крупнее актуальны для промышленных масштабов. Лучший сканер для фотографий имеет датчик CCD или CIS.
Качество сканирования зависит от оптического разрешения или светочувствительности строки ПЗС-матрицы. Чем выше этот показатель, тем больше точек на исходном изображении различит сканер и тем четче получится результат. Глубина цвета влияет на градации серого и палитру оттенков. Лучший сканер для фотопленки – с 48-битным показателем.
На оптическое разрешение влияет качество настройки и возможности сканера, а на интерполяционное – установленный на аппарате драйвер. Для обработки фотографий важна цветопередача. Чем больше глубина цвета, тем выше точность полученного изображения.
Динамический диапазон устройства влияет на насыщенность тона, различимость и детальность. От оптической плотности зависит точность света и тени в деталях. Сканирование при высоком диапазоне обеспечивает получение ярких и объемных снимков.
Сканер для старых фотографий позволяет отредактировать снимок: изменить свет и цвет, отрисовать элементы фото. Для качественной оцифровки старых кадров нужно высокое разрешение и максимальная глубина цвета.
По отзывам владельцев, лучший сканер для фотографий 2020 года для использования дома – планшетный .
8 место — Epson Perfection V850 Pro
Сканер фирмы Epson относится к High-End уровню. Главная особенность – оцифровка слайдов и пленки среднего размера и 5*4 дюйма. Аппарат превосходит предшественников быстротой загрузки и малым потреблением энергии.
Источник
Wimi EC717 5MP Отрицательный 2,4-дюймовый цифровой LCD слайд-фильм сканер поддерживает 35-мм фильм
Показать оптовые цены
- В наличии
- Оптом и в розницу
- Код: 1334291
Особенности:
Характеристики:
| Размер | 88,15 (L) x 86,25 (W) × 111,20 (H) мм |
| вес | Около 296 г |
| Датчик | 1 / 3,2-дюймовый 5-мегагерцовый CMOS |
| Эффективное разрешение | 5mega |
| Медиа хранилище | Внутренний: build-in32MBflash card |
| Внешний: SD-карта, совместимая карта SDHC | |
| чувствительность | авто |
| Объектив | Фиксированный фокус F / 6.0, F = 6.34 мм |
| Диапазон фокусировки | 5.6cm |
| Неподвижное изображение | Формат: JPEG, разрешение: 5M, 10M (интерполяция) |
| Увеличить | нет |
| Дисплей | 2,36 дюйма TFT |
| Формат ТВ-выхода | NTSC / PAL |
| Источники света | Компенсация задней подсветки |
| баланс белого | авто |
| Компенсация экспозиции | авто |
| Интерфейс | MSDC: USB2.0 |
| Автоматическое включение | нет |
| Мощность | DC 5V |
| Операционная система | Windows XP, Vista, 7 |
| ЦПУ | Intel Pentium 42,8 ГГц выше |
| Память | 512 МБ выше |
| Видеокарта | 64-мегабайтная или верхняя видеокарта |
| Передающее соединение | Стандартный USB 2.0 или выше |
| Емкость жесткого диска | Не менее 200 МБ |
В пакет включено:
1 x Wimi EC717 Film Scanner
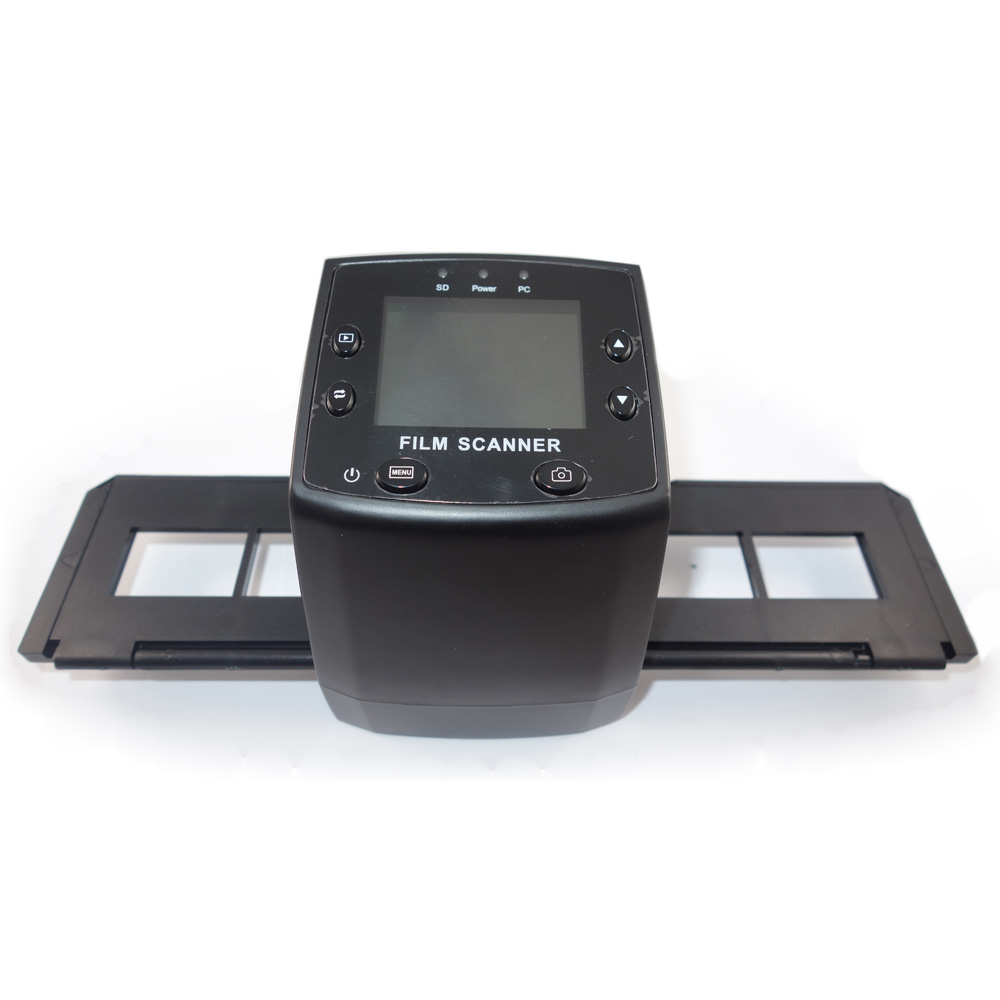
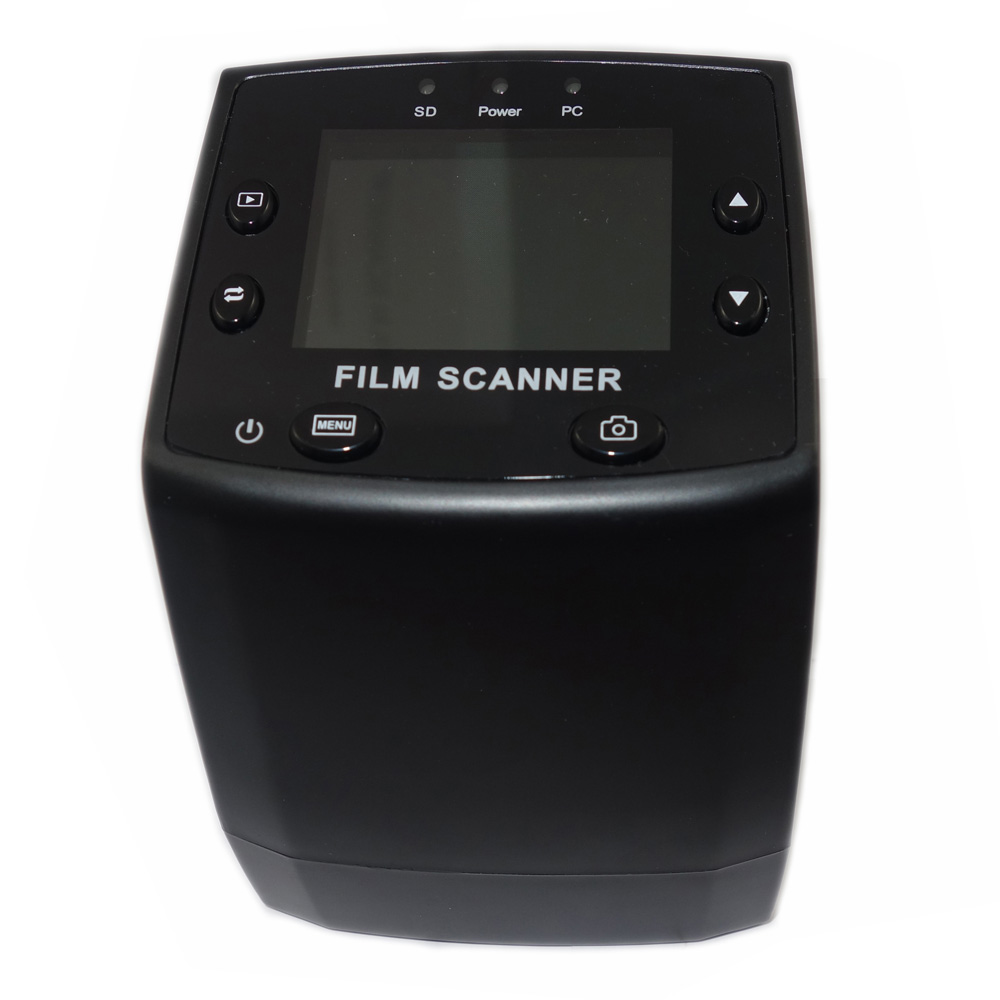
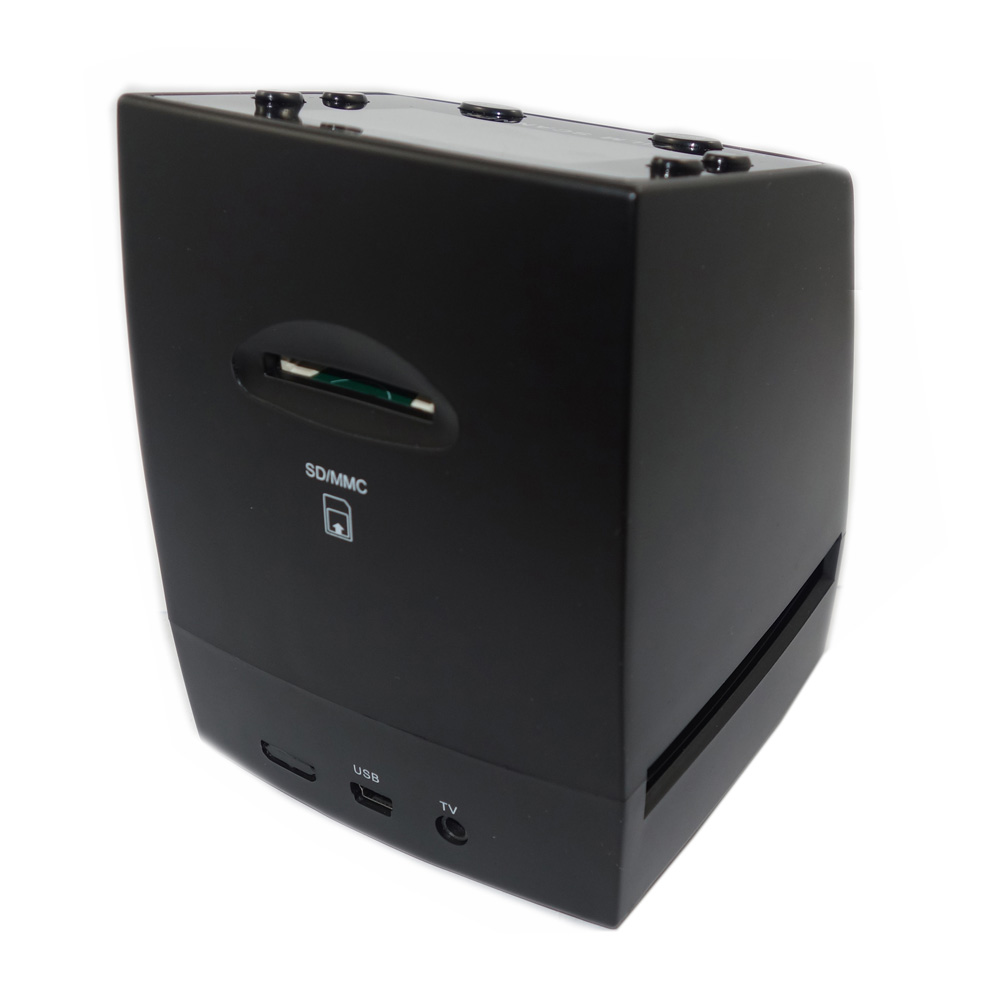
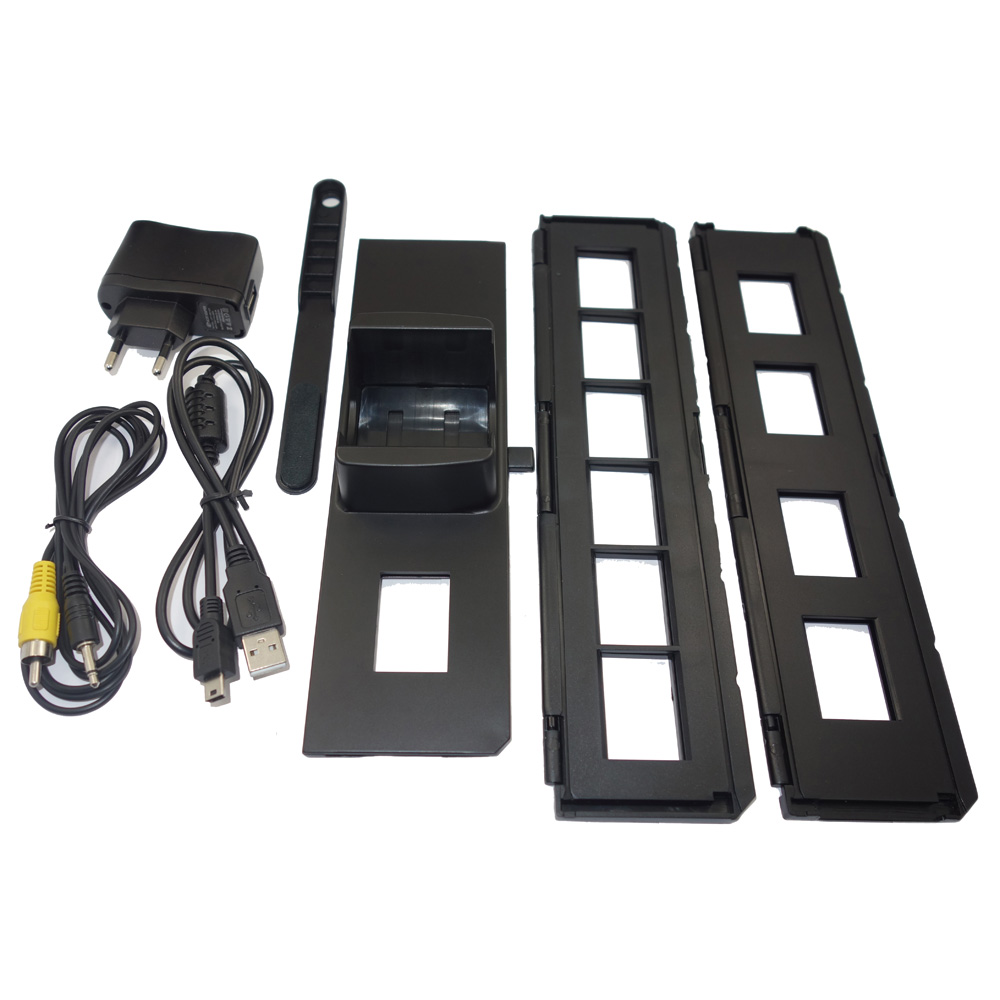
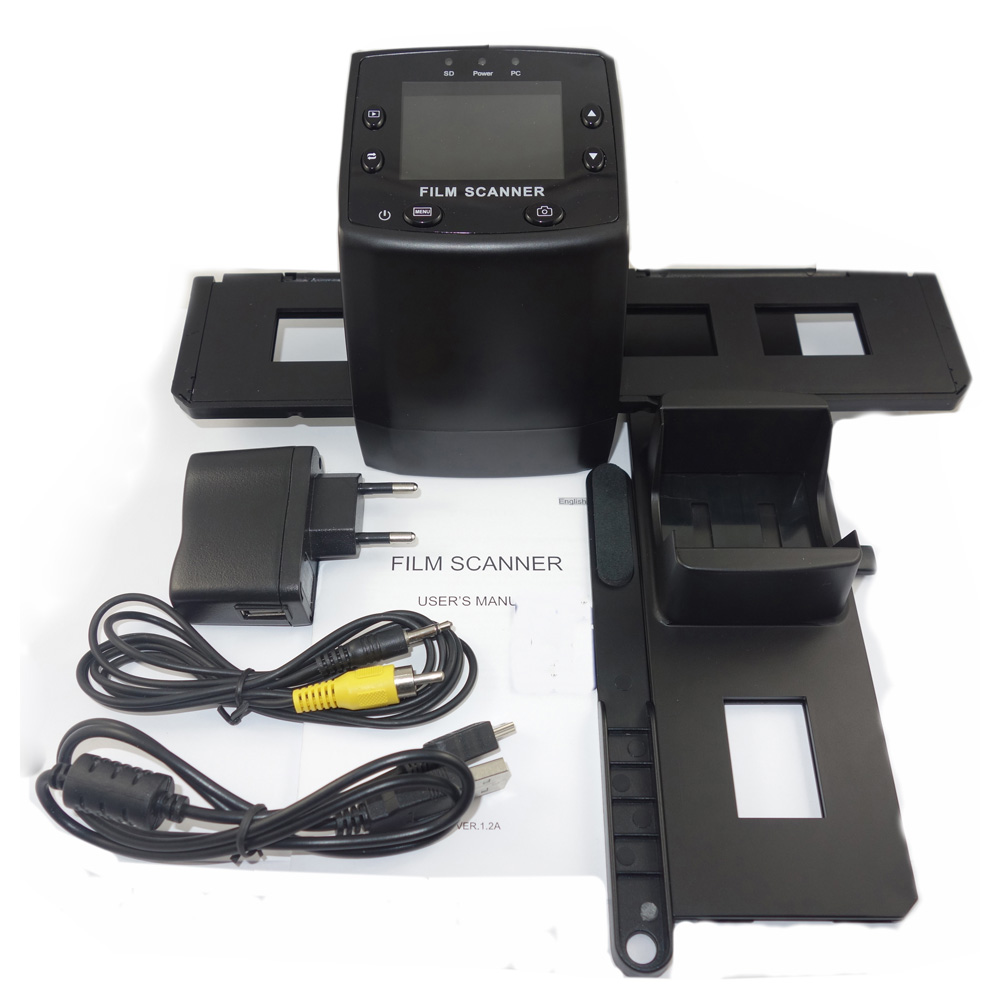
Доступные разновидности товара:
адаптер НАС /адаптер EU /
Источник
Здесь можно выбрать и купить сканер Espada FilmScanner EC717 по низкой, лучшей цене, Тип слайд-сканер, макс. разрешение 1800×3600 dpi, оптический элемент CMOS (5 мегапикселей), глубина цвета (внутр.) 36 бит, ч/б сканирование 20 стр/мин, цветное сканирование 20 стр/мин, слайд-модуль встроенный, передача данных USB, жк дисплей + (2.4), картридер +, источник питания от сети, габариты 88x86x102 мм, вес 0.27 кг, выполнен в современном дизайне. Доставка и самовывоз возможны.
Для того чтобы сравнить несколько моделей сканеров укажите их названия в форме ниже
или посмотрите популярные сравнения в списке.
Реальные отзывы о Espada FilmScanner EC717 от пользователей и покупателей. Только честные отзывы владельцев. ✔
Добавить свой отзыв
Добавить свой отзыв
Интересные отзывы
Устройство служило верой и правдой целых 7 лет!!! Очень прост в использовании и невероятно живуч! Вырубалось посреди использования, сильно примялась щетина, после того как крякнул датчик от перегревания начал дымиться и шпарить как сумасшедший Данный фен мне подарили, когда он только вышел в… >>>>>
5 дюймовый сенсорный дисплей, поддержка 3G Нет Автонавигатор Лександ SA5 hd удобен в использовании тем, что имеет пятидюймовый сенсорный экран, умеет прокладывать маршрут с учетом пробок c выходом в интернет через 3G модем. В комплекте имеется зарядка в прикуриватель, держатель на стекло, кабель… >>>>>
Великолепное звучание, эквалайзер с усилением частот на 24 Дб, большой запас мощности для наушников При перезагрузках Windows 8 устройство «вылетает» — не определяется системой автоматически, приходится выбирать вручную 10 лет использовал Audigy и не мог подобрать новую карту, устраивающую меня…. >>>>>
— Собран он просто великолепно, на уровне Apple. — В руке лежит хорошо, большой и удобный, но большой в меру. — Яркость — не запредельная, но на солнце я оставил 80% яркости и мне хватило. Так что зачот. — Цвета отменные. ОЧЕНЬ хорошая цветопередача, как и следовало ожидать от современного IPS… >>>>>
Хорошая батарея, нормальный экран, очень тонкий и красивый в черном цвете. старый андроид, камеры так себе. телефон по сути копия сяоми но чуть дешевле. за свою цену железо огонь, сканер отпечатков, металлическая крышка. за 5,5к был просто бомба. >>>>>
Стильный дизайн, для бюджетного смартфона вполне хорошее быстродействие, Android 6, наличие 4G, тонкий, хороший экран, нормальный функционал. Камера, при заявленных 13 Мп, снимки получаются среднего качества, особенно при малейших недостатках освещения. Не снимается задняя крышка. Аккумулятор… >>>>>
Все отлично Пока полет прекрасный Не плохой планшет. Смотреть на нем фильмы и лазать в нэте одно удовольствие. Камера хорошая как и фронтальная так и основная. В автономном режиме может работать около 8 часов при средней нагрузке. Музыку слушать комфортно. Производительность на высоте, все-таки 4… >>>>>
Основные: детальность воспроизведения композиций, для аудиофилов, внешний вид и качество исполнения, комплектация. не выявлено Не подойдут молодёжи которые любят побольше баса, дабы они воспроизводят ровно столько баса- сколько было задумано звукорежиссером. Не смотря что они не являются… >>>>>
По управлению-настоящий фотоаппарат: зумирование ручное, можно навернуть фильтр, бленда есть, диафрагма настоящая, а не набор дисков с дырками или набор же серых светофильтров. Переучиваться с зеркалки почти не пришлось. Хорошая сборка и приличный вид. Удобно располагается в руках. Большое, но не… >>>>>
недорогой быстро греет воду защита всегда срабатывала маленькая струйка воды большой расход энергии 3 года эксплуатации на даче,ни разу не подвел. >>>>>
Низы и верха в этих динамиках отыгрываются на 5+, Если прибавить низы в эквалайзере да еще bassboost какой-нибудь включить, полное ощущение что в машине стоит неплохой сабвуфер. Верх середины слабоват, лечится эквалайзером. Ну и конечно размер, 20см не в каждую дверь влезут, правда глубина… >>>>>
Быстро освоил мастерство изготовления блинов Регулятор температуры хлипкий/ на новый год 2014 в белокурихе опять качегарил блины, когда остывает после использования, то изредка что-то внутри громко трескается это мне очень не понравилось Покупал блинницу для выезда на Горный Алтай, чтобы кормить… >>>>>
Вместительная, бесшумная, удобная в эксплуатации. Нет луча в пол. Пользуемся 1 месяц. Это первая посудомойка и я думаю, что мы с моделью угадали. В семье 4 человека. На неделе моем через день, благо посуды достаточно. Перепробовала все программы и всеми осталась довольна. Главное… >>>>>
Две «мешалки»; Дизигн; Путанная инструкция. Печёт! В связи с постом опробовали только рецепт «Французский хлеб» на второй программе. Но уже с импровизацией, — добавляли семечки а так же обжаренный лук. >>>>>
Короткую щетину бреет чисто, широкой стороной триммера удобно сбривать заросшую щетину, симпатичный дизайн, удобно лежит в руке. Заросшую щетину можно сбрить только триммером, сама бритва её практически не бреет, только дёргает волосы. Во время бритья часть срезанных волос вываливается наружу,… >>>>>
не успел увидеть не видит мою симку, не стабильно пишет на флэшку, для такого большого экрана слишком слабый видеоадаптер… сломался через час после покупки с этим устройством связаны плохие воспоминания, мне его чинили полтора месяца, хотя говорили что это экспертиза, долго не хотели возвращать… >>>>>
Покупался из-за «компактности». Внешне он вроде небольшой. НО — к заявленной толщине прибавьте 1,5 мм из-за ребер спайки корпуса по бортам. В результате никакой компактности нет. Этот камешек весьма ощутимо торчит из кармана рубашки, др. мест и конечно имеет железный корпус для облегчения работы… >>>>>
1) Очень качественное исполнение корпуса; 2) поворотный дисплей, кто пишет, что это недостаток, сильно ошибаются, т.к. его можно оставить в развернутом виде и не трогать, при этом он станет обычным экраном. 3) множество режимов, которые позволяют фотографировать либо совсем положившись на… >>>>>
— компактность — внешний вид — относительно тихие и плавные нажатия — очень удобное расположение клавиш для этого форм фактора(левый ctrl на свем месте, для игр важно), нормальные стрелки(на маленьких клавах часто встречаются мелкие). — цена (брал за 393 руб.) — глянец (это имхо) Купил неделю… >>>>>
В целом быстро ловит спутники. Нормальный корпус. Без использования GPRS вполне нормальный навигатор. Подразумевает доустановку дополнительного ПО и запуск её из стандартной оболочки, весьма удобно можно яндекс карты поставить и айгоу. Узнали про веселую программу навител =Р. Зарядка умерла… >>>>>
Достоинства книги оценить пока не сумел, жаль только, что не читает зип-файлы. Но вот организация покупки, оформление,информация — все было на высоком уровне. Отлично! Не читает зип-файлы. Иногда немного «тупит» — медленно соображает. Или сообразит, но не в том направлении. Но за такие деньги это… >>>>>
-быстро пере прокладывает маршрут (идеально для города) -бесплатные пробки (хотя я ни разу не видел чтоб они работали за границей) -простое обновление и обслуживаение -дома спокойно заряжается от любой современной телефонной зарядки -отвратительно работает на трассах (трассы не всегда прямо идут… >>>>>
Очень компактный, полный автомат, хороший угол обзора и удобный для размещения аппарат (посадил его за зеркало заднего вида и в самой верхней точке лобовухи, лишнего, а в частности салона авто, не захватывает). Очень чувствительный G-сенсор, не нужно чувствительный, особенно для машины со… >>>>>
— комбайн — шустрый навигитор — индикация включенного регистратора и отдельная кнопка его вызова — комбайн — маловат угол обзора регистратора (следует из предыдущего пункта) — неудобный пользовательский интерфейс регистратора — перегрев К навигатору претензий нет, но регистратор, чувствуется, был… >>>>>
Присоска, аккумулятор держит 1,5 часа. Кртинка ночью с максимальным разрешением не автобалансируется. Ночной режим не работает. Юзаю данный девайс более месяца. Чтобы видео записывалось со звуком, необходимо после включения (как загорится экран) еще раз нажать кнопку включения и удерживать 2 сек… >>>>>
вернули деньги за ЭТО НИКЧЕМНОЕ ТВОРЕНИЕ без особых разговоров звук как от пластиковых ПК колонок которые были популярны в 2000х ,саб то густо то пусто.Корпус маркий, USB вход на лицевой стороне….кто до этого додумался вообще. Реальная цена сего товара 2000-3000т.р. нет слов одни эмоции. не… >>>>>
Может быть дизайн и кнопка включения сверху? Самое плохое, что через 7 месяцев вздулся аккумулятор, мне удалось купить новый, но он тоже вздулся и не держит заряд совсем , как только кончился гарантийный срок. Больше аккумуляторов нигде нет. >>>>>
Качество картинки Дизайн Сложности в навигации при покупке телевизора ориетировались на следующие тезисы: 1. нам не нужно 3D. 2. телевизор должен быть 48-50″ 3. Full HD достаточно (о резком наплыве 4К контента мы не мечтаем). Брался он в основном как большой экран, чтобы смотреть скаченные… >>>>>
в описании существенная неточность)))) на этом ноутбуке не просто линукс, а дистрибутив SUSE — вполне себе понятливая операционка, уверенных пользователей виндоус сильно не озадачит))) смотрите-ка: купила, включила, сунула двд — посмотрела мультик, сунула сд — посмотрела фотки в формате nef… и… >>>>>
Не успел выявить 1) при установке винды с флешки не обнаружил SSD (куда винду ставить), будто бы его, нет, а в биосе она есть. Ноут не трогал, если асер не ответят мне в течении 4-х часов — пойду сдавать назад. Сырой продукт. 2) тачпад из коробки не работает при установке винды!!! мышку подрубать… >>>>>
| Производитель | Espada |
| Наименование | Автономный компактный слайд-сканер Espada FilmScanner EC717 с цветным LCD экраном 2.4” для пленок 35 мм и слайдов |
| Назначение |
Простое устройство, позволяющее в домашних условиях перевести свои фотопленки в цифровой формат и сохранить на компьютере в виде файлов. |
| Модель |
EC717 |
| Интерфейс |
USB 2.0 |
| Оптическое разрешение |
1800 dpi (2592*1944) |
| Максимальное разрешение (интерполяция) |
3600 dpi |
| Качество сканирования | 5 мегапикселей / 10 мегапикселей |
| Дисплей | Цветной 2.4 » TFT LCD (480×234) |
| Тип сканирующего элемента | CMOS |
| Диапазон фокусировки | фиксированный фокус |
| Баланс белого | Автоматический |
| Тип пленки | 35 мм пленки, черно-белые и цветные (негативы и позитивы), слайды |
| Формат изображения | JPEG |
| Метод сканирования | Один проход |
| Воспроизведение | Одно изображение |
| Подключение к компьютеру | При подключении к ПК сканер становиться карт-ридером |
| ТВ-выход | NTSC/PAL для вывода изображения на ТВ |
| Встроенная память | Нет |
| Поддержка карт памяти | SD карт до 32 Гб |
| Поддержка языка |
Английский, французский, немецкий, итальянский, испанский, китайский, японский |
| Поддержка ОС | Windows XP Vista Windows7, Windows 8, Windows 10 |
| Источник света | Светодиодная подсветка |
| Питание | DC 5В (Адаптер USB Порт) |
| Размеры устройства |
88х86х102 мм |
| Размеры в упаковке | 270х170х105 мм |
| Вес нетто |
300 г |
| Вес брутто | 700 г |
| Комплектация | Cканер для плёнки, слайдов или негативов USB-кабель AV-кабель Адаптер питания Держатель для негативов Слайд держатель Держатель кассетный Руководство пользователя на русском языке |