
160 страниц подробных инструкций и пользовательских руководств по эксплуатации на русском
71
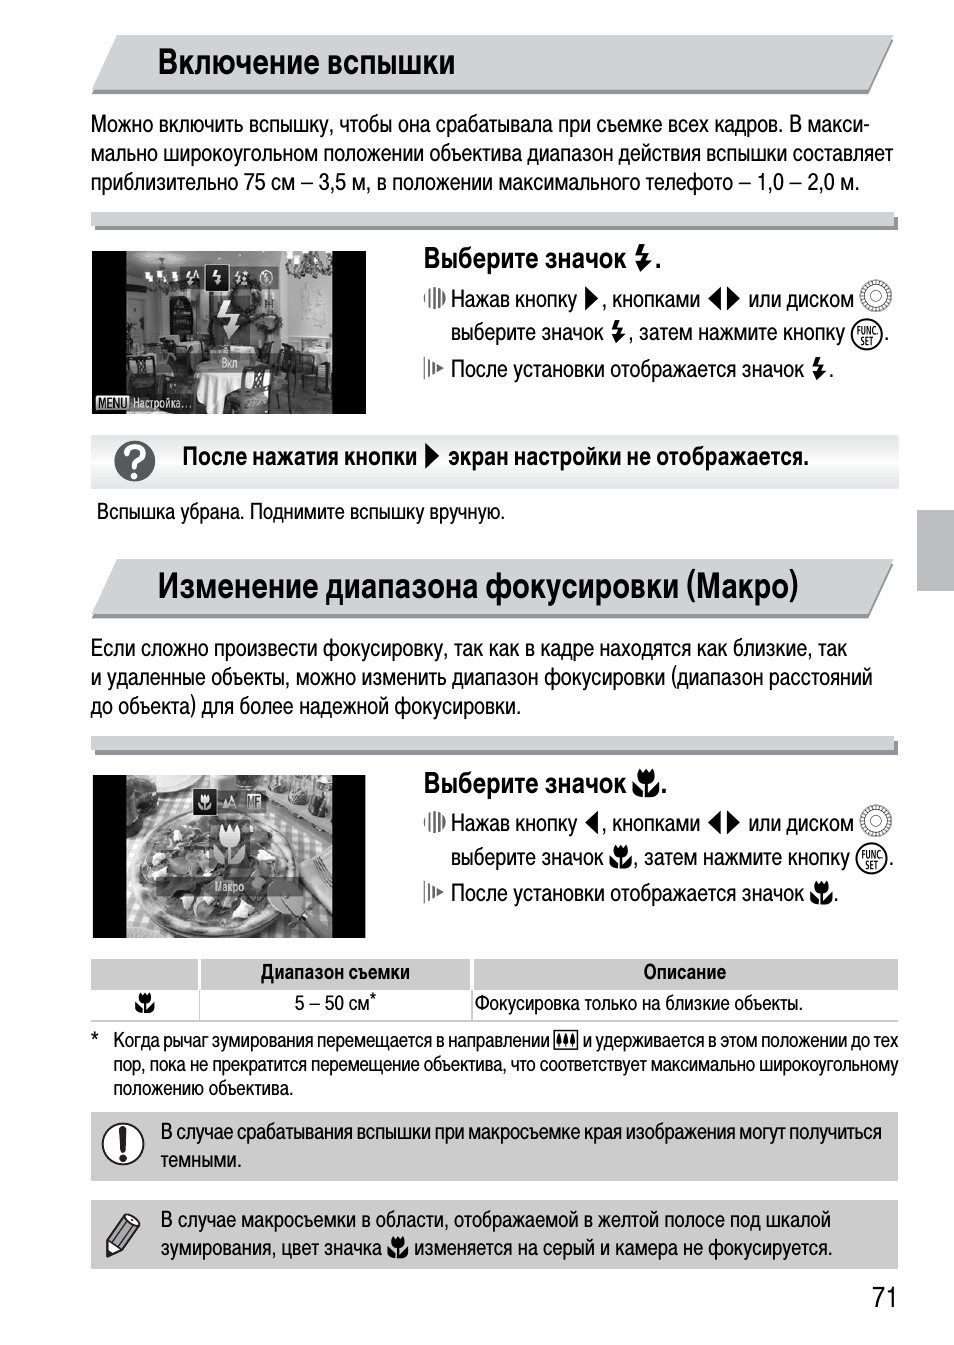
Можно включить вспышку, чтобы она срабатывала при съемке всех кадров. В макси-
мально широкоугольном положении объектива диапазон действия вспышки составляет
приблизительно 75 см – 3,5 м, в положении максимального телефото – 1,0 – 2,0 м.
Выберите значок
h.
∆
Нажав кнопку
r, кнопками qr или диском Â
выберите значок
h, затем нажмите кнопку m.
После установки отображается значок
h.
Если сложно произвести фокусировку, так как в кадре находятся как близкие, так
и удаленные объекты, можно изменить диапазон фокусировки (диапазон расстояний
до объекта) для более надежной фокусировки.
Выберите значок
e.
∆
Нажав кнопку
q, кнопками qr или диском Â
выберите значок
e, затем нажмите кнопку m.
После установки отображается значок
e.
* Когда рычаг зумирования перемещается в направлении
j и удерживается в этом положении до тех
пор, пока не прекратится перемещение объектива, что соответствует максимально широкоугольному
положению объектива.
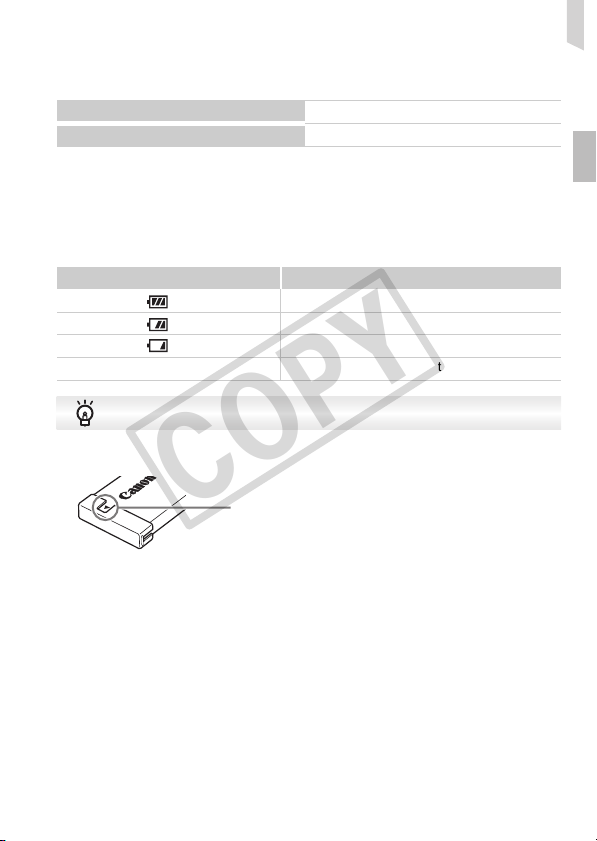
Включение вспышки
Вспышка убрана. Поднимите вспышку вручную.
После нажатия кнопки
r экран настройки не отображается.
Изменение диапазона фокусировки (Макро)
Диапазон съемки
Описание
e
5 – 50 см
*
Фокусировка только на близкие объекты.
В случае срабатывания вспышки при макросъемке края изображения могут получиться
темными.
В случае макросъемки в области, отображаемой в желтой полосе под шкалой
зумирования, цвет значка
e изменяется на серый и камера не фокусируется.
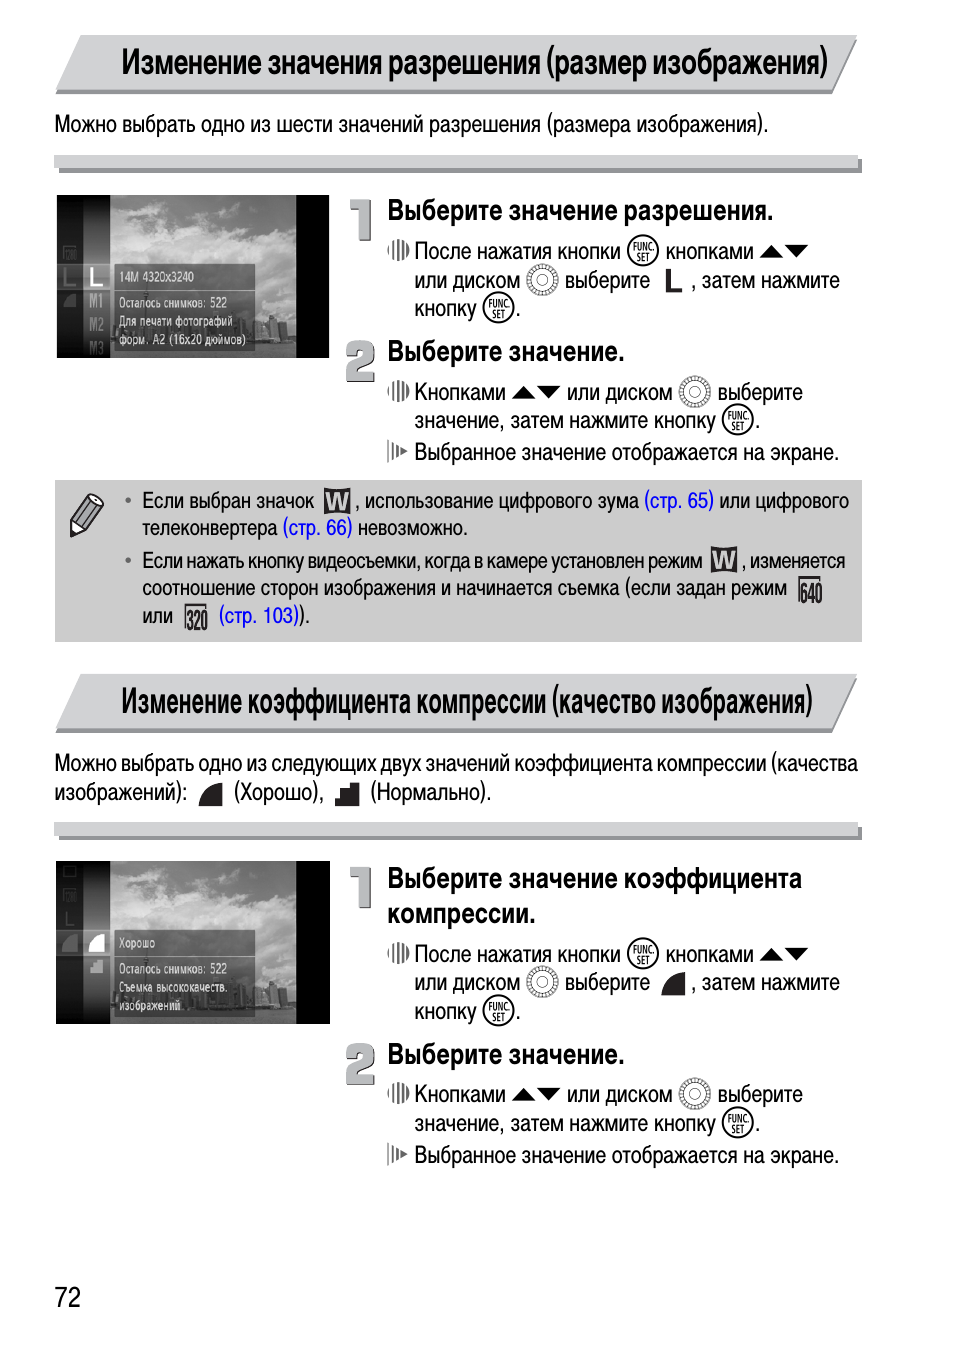
Изменение значения разрешения (размер изображения), Выберите значение разрешения, Выберите значение
Выберите значение коэффициента компрессии Чат поддержки
- Изображение
- Текст
72
Можно выбрать одно из шести значений разрешения (размера изображения).
Выберите значение разрешения.
∆
После нажатия кнопки
m кнопками op
или диском
 выберите
, затем нажмите
кнопку
m.
Выберите значение.
∆
Кнопками
op или диском Â выберите
значение, затем нажмите кнопку
m.
Выбранное значение отображается на экране.
Можно выбрать одно из следующих двух значений коэффициента компрессии (качества
изображений):
(Хорошо),
(Нормально).
Выберите значение коэффициента
компрессии.
∆
После нажатия кнопки
m кнопками op
или диском
 выберите
, затем нажмите
кнопку
m.
Выберите значение.
∆
Кнопками
op или диском Â выберите
значение, затем нажмите кнопку
m.
Выбранное значение отображается на экране.
Изменение значения разрешения (размер изображения)
•
Если выбран значок
, использование цифрового зума
(стр. 65)
или цифрового
телеконвертера
(стр. 66)
невозможно.
•
Если нажать кнопку видеосъемки, когда в камере установлен режим
, изменяется
соотношение сторон изображения и начинается съемка (если задан режим
или
(стр. 103)
).
Изменение коэффициента компрессии (качество изображения)
Изменение коэффициента компрессии (качество изображения)
73
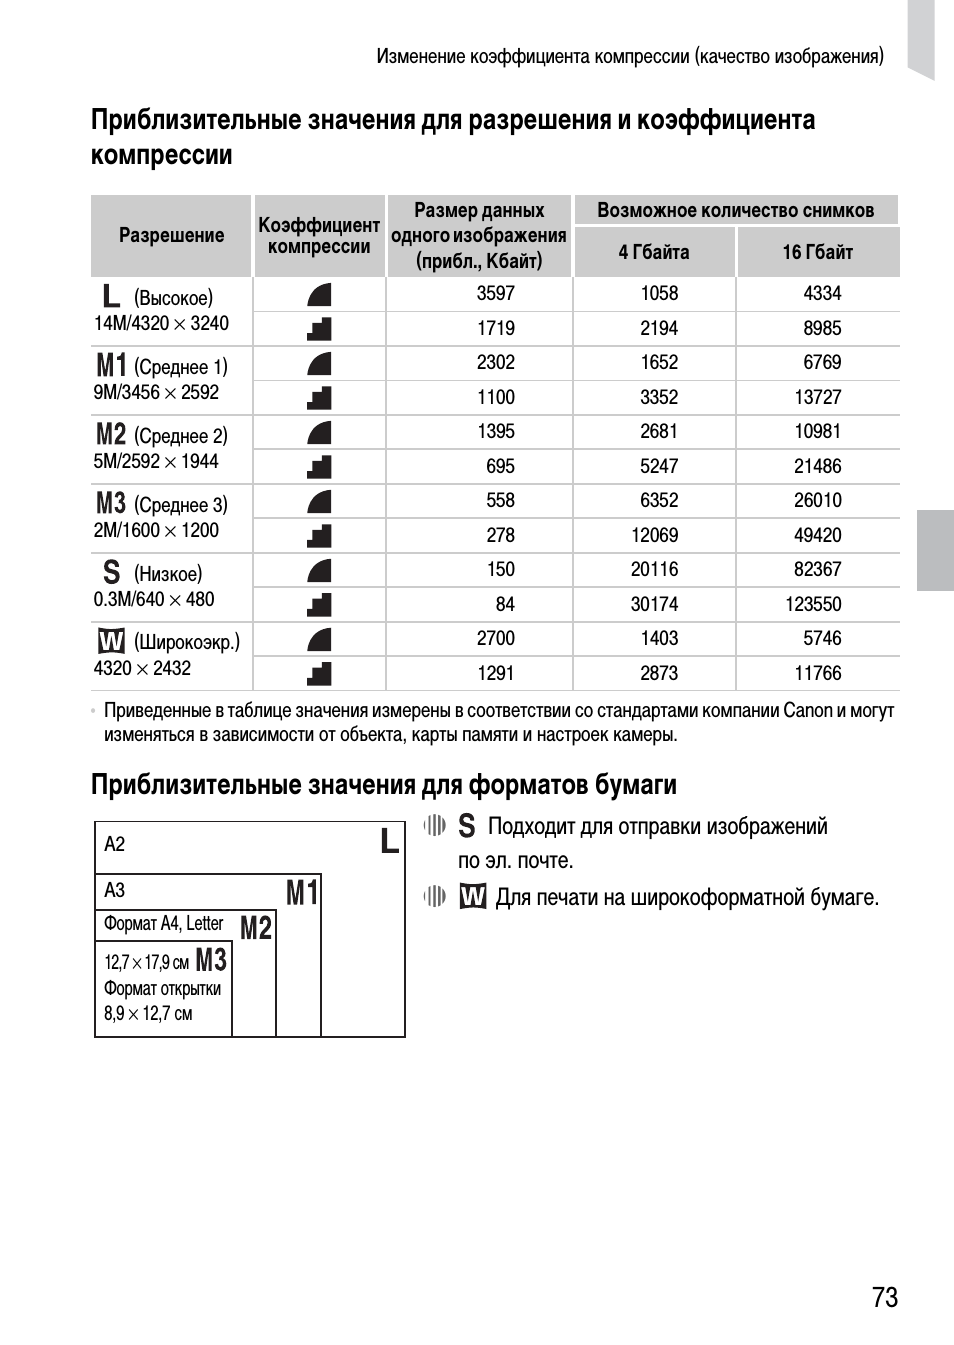
Приблизительные значения для разрешения и коэффициента
компрессии
•
Приведенные в таблице значения измерены в соответствии со стандартами компании Canon и могут
изменяться в зависимости от объекта, карты памяти и настроек камеры.
Приблизительные значения для форматов бумаги
∆
Подходит для отправки изображений
по эл. почте.
∆
Для печати на широкоформатной бумаге.
Разрешение
Коэффициент
компрессии
Размер данных
одного изображения
(прибл., Кбайт)
Возможное количество снимков
4 Гбайта
16 Гбайт
(Высокое)
14M/4320
× 3240
3597
1058
4334
1719
2194
8985
(Среднее 1)
9M/3456
× 2592
2302
1652
6769
1100
3352
13727
(Среднее 2)
5M/2592
× 1944
1395
2681
10981
695
5247
21486
(Среднее 3)
2M/1600
× 1200
558
6352
26010
278
12069
49420
(Низкое)
0.3M/640
× 480
150
20116
82367
84
30174
123550
(Широкоэкр.)
4320
× 2432
2700
1403
5746
1291
2873
11766
A2
A3
12,7
× 17,9 см
Формат открытки
8,9
× 12,7 см
Формат A4, Letter
74
Выберите число ISO.
∆
После нажатия кнопки
m кнопками op
или диском
 выберите
, затем нажмите
кнопку
m.
Выберите значение.
∆
Кнопками
op или диском Â выберите
значение, затем нажмите кнопку
m.
Выбранное значение отображается на экране.
Изменение числа ISO
Автоматическая настройка оптимального числа ISO в соответствии с режимом
и условиями съемки.
Меньше
Больше
Хорошая погода, съемка вне помещений.
Облачно, сумерки.
Ночные пейзажи, темные помещения.
•
Понижение числа ISO дает более четкие изображения, однако в определенных условиях
съемки повышается вероятность смазывания изображения.
•
Увеличение числа ISO приводит к уменьшению выдержки затвора, сокращая сотрясение
камеры и увеличивая радиус действия вспышки. Изображения, однако, будут выглядеть
грубыми.
•
Если в камере установлено значение
, можно наполовину нажать кнопку спуска
затвора для отображения автоматически установленного значения числа ISO.
•
В режиме
(стр. 56)
в зависимости от сюжета автоматически устанавливается
более высокое значение числа ISO, чем в режиме
A.
Изменение числа ISO
75
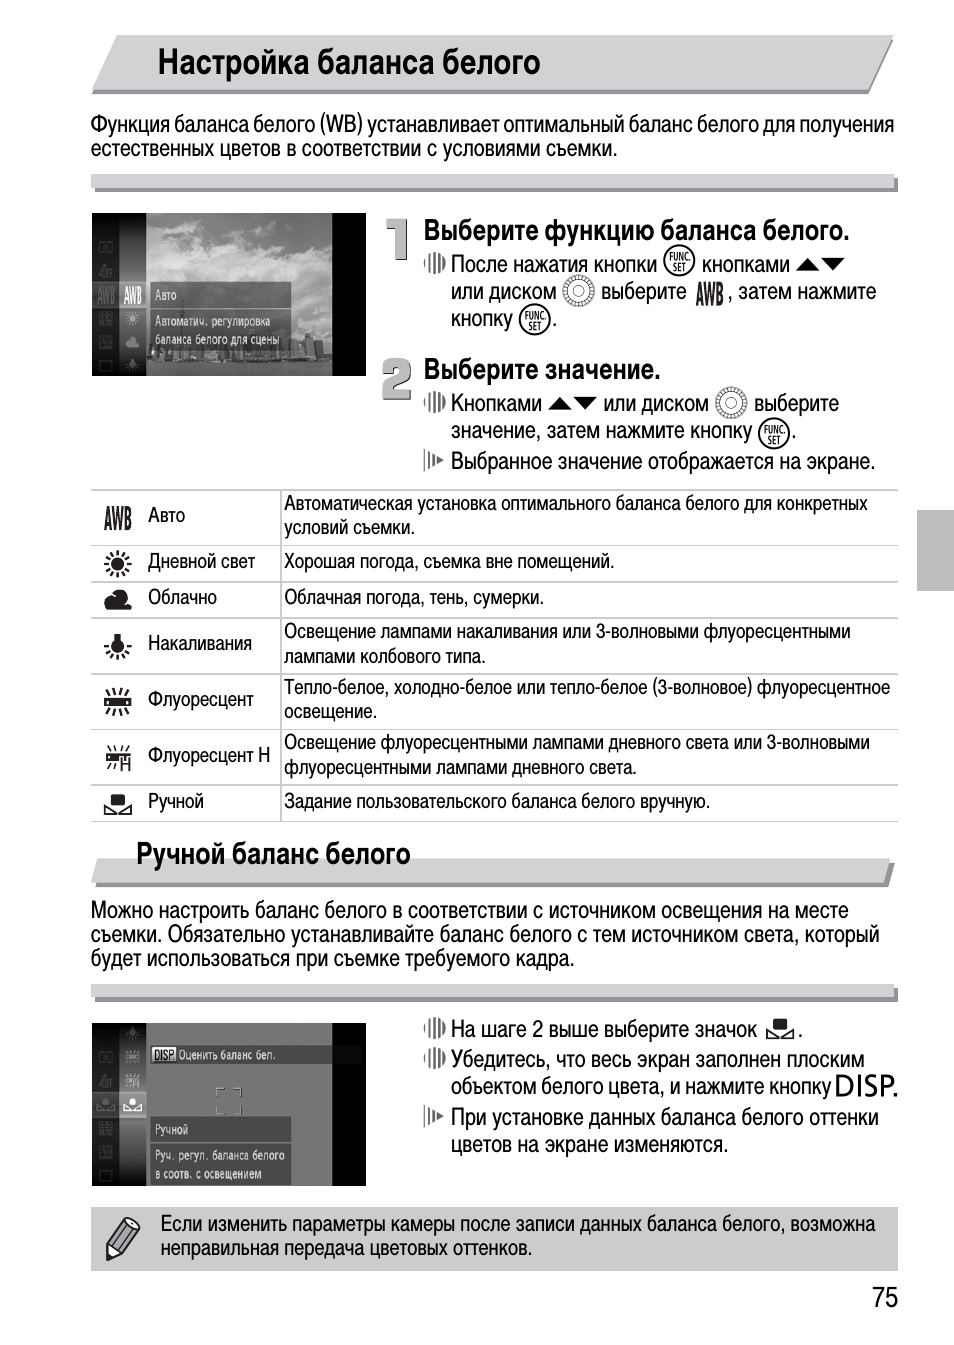
Функция баланса белого (WB) устанавливает оптимальный баланс белого для получения
естественных цветов в соответствии с условиями съемки.
Выберите функцию баланса белого.
∆
После нажатия кнопки
m кнопками op
или диском
 выберите
, затем нажмите
кнопку
m.
Выберите значение.
∆
Кнопками
op или диском Â выберите
значение, затем нажмите кнопку
m.
Выбранное значение отображается на экране.
Ручной баланс белого
Можно настроить баланс белого в соответствии с источником освещения на месте
съемки. Обязательно устанавливайте баланс белого с тем источником света, который
будет использоваться при съемке требуемого кадра.
∆
На шаге 2 выше выберите значок
.
∆
Убедитесь, что весь экран заполнен плоским
объектом белого цвета, и нажмите кнопку
l
При установке данных баланса белого оттенки
цветов на экране изменяются.
Настройка баланса белого
Авто
Автоматическая установка оптимального баланса белого для конкретных
условий съемки.
Дневной свет
Хорошая погода, съемка вне помещений.
Облачно
Облачная погода, тень, сумерки.
Накаливания
Освещение лампами накаливания или 3-волновыми флуоресцентными
лампами колбового типа.
Флуоресцент
Тепло-белое, холодно-белое или тепло-белое (3-волновое) флуоресцентное
освещение.
Флуоресцент H
Освещение флуоресцентными лампами дневного света или 3-волновыми
флуоресцентными лампами дневного света.
Ручной
Задание пользовательского баланса белого вручную.
Если изменить параметры камеры после записи данных баланса белого, возможна
неправильная передача цветовых оттенков.
76
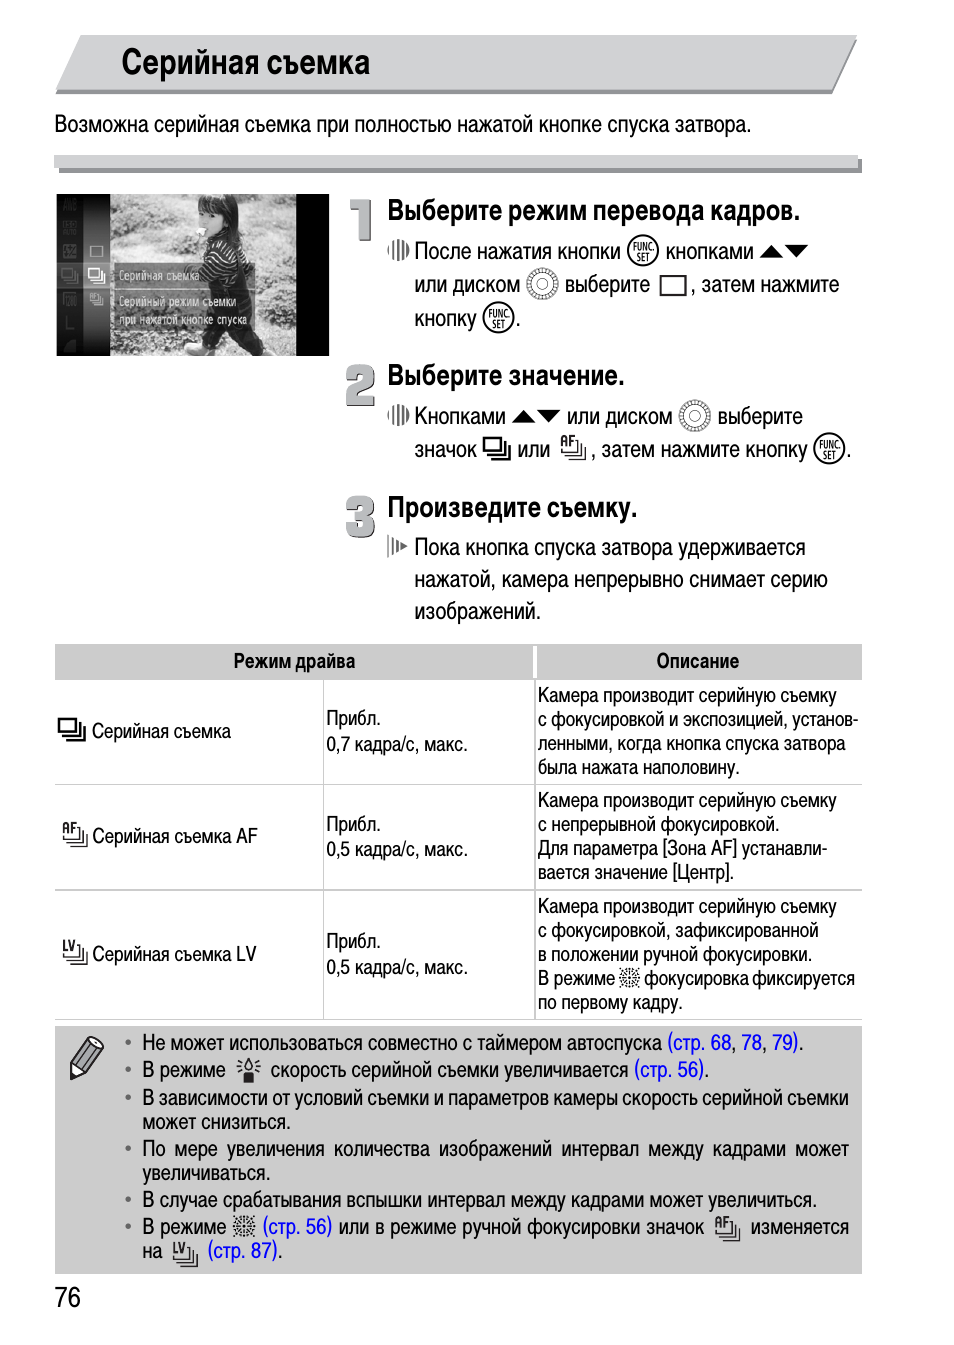
Возможна серийная съемка при полностью нажатой кнопке спуска затвора.
Выберите режим перевода кадров.
∆
После нажатия кнопки
m кнопками op
или диском
 выберите
, затем нажмите
кнопку
m.
Выберите значение.
∆
Кнопками
op или диском Â выберите
значок
W или
, затем нажмите кнопку
m.
Произведите съемку.
Пока кнопка спуска затвора удерживается
нажатой, камера непрерывно снимает серию
изображений.
Серийная съемка
Режим драйва
Описание
W
Серийная съемка
Прибл.
0,7 кадра/с, макс.
Камера производит серийную съемку
с фокусировкой и экспозицией, установ-
ленными, когда кнопка спуска затвора
была нажата наполовину.
Серийная съемка AF
Прибл.
0,5 кадра/с, макс.
Камера производит серийную съемку
с непрерывной фокусировкой.
Для параметра [Зона AF] устанавли-
вается значение [Центр].
Серийная съемка LV
Прибл.
0,5 кадра/с, макс.
Камера производит серийную съемку
с фокусировкой, зафиксированной
в положении ручной фокусировки.
В режиме
t фокусировка фиксируется
по первому кадру.
•
Не может использоваться совместно с таймером автоспуска
(стр. 68
,
78
,
79)
.
•
В режиме
скорость серийной съемки увеличивается
(стр. 56)
.
•
В зависимости от условий съемки и параметров камеры скорость серийной съемки
может снизиться.
•
По мере увеличения количества изображений интервал между кадрами может
увеличиваться.
•
В случае срабатывания вспышки интервал между кадрами может увеличиться.
•
В режиме
t
(стр. 56)
или в режиме ручной фокусировки значок
изменяется
на
(стр. 87)
.
77
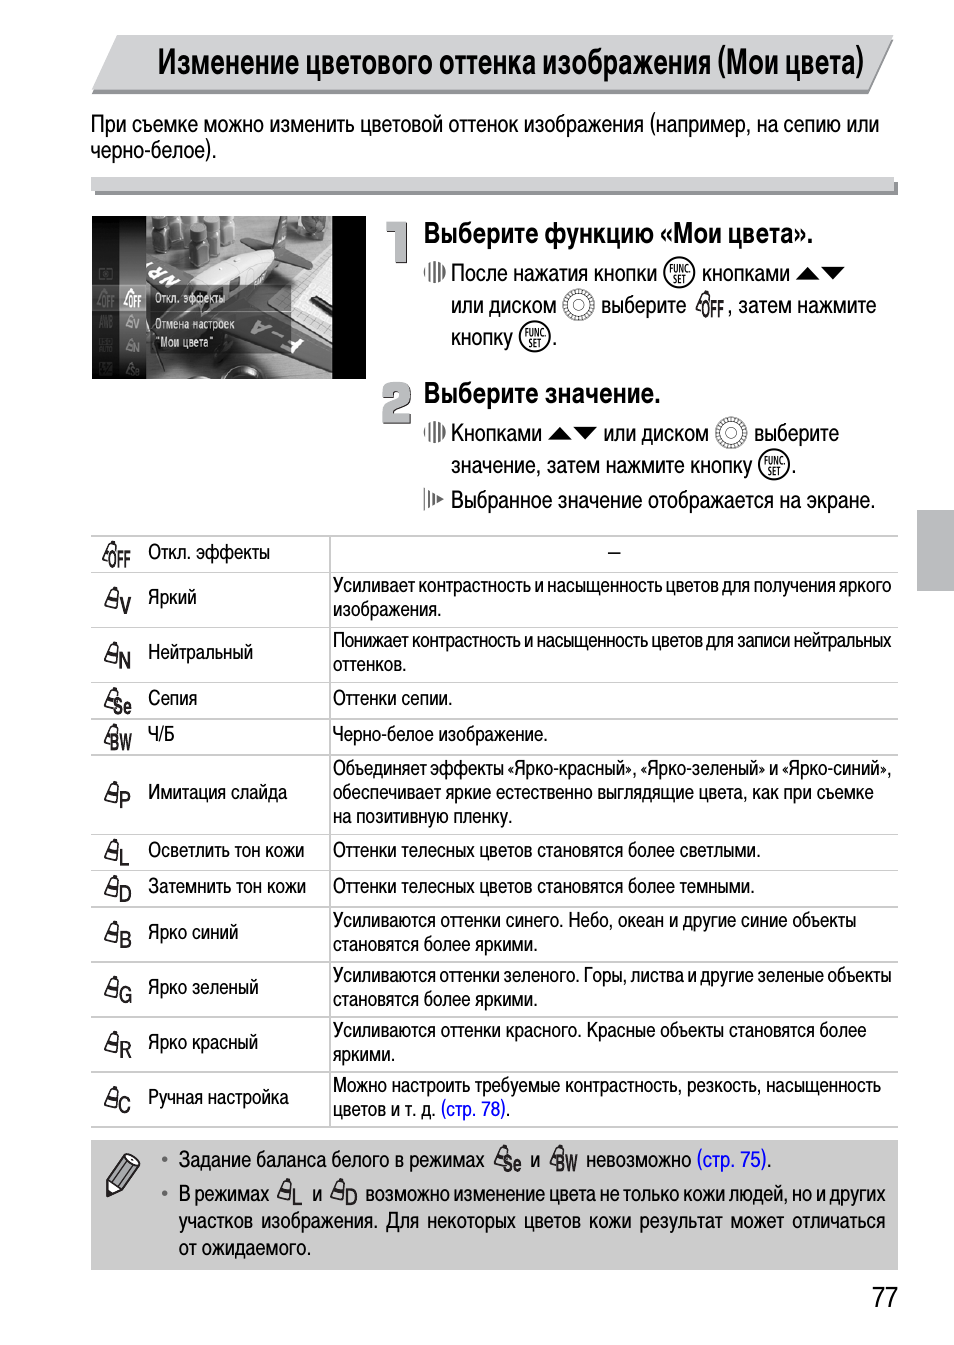
При съемке можно изменить цветовой оттенок изображения (например, на сепию или
черно-белое).
Выберите функцию «Мои цвета».
∆
После нажатия кнопки
m кнопками op
или диском
 выберите
, затем нажмите
кнопку
m.
Выберите значение.
∆
Кнопками
op или диском Â выберите
значение, затем нажмите кнопку
m.
Выбранное значение отображается на экране.
Изменение цветового оттенка изображения (Мои цвета)
Откл. эффекты
—
Яркий
Усиливает контрастность и насыщенность цветов для получения яркого
изображения.
Нейтральный
Понижает контрастность и насыщенность цветов для записи нейтральных
оттенков.
Сепия Оттенки
сепии.
Ч/Б
Черно-белое изображение.
Имитация слайда
Объединяет эффекты «Ярко-красный», «Ярко-зеленый» и «Ярко-синий»,
обеспечивает яркие естественно выглядящие цвета, как при съемке
на позитивную пленку.
Осветлить тон кожи
Оттенки телесных цветов становятся более светлыми.
Затемнить тон кожи
Оттенки телесных цветов становятся более темными.
Ярко синий
Усиливаются оттенки синего. Небо, океан и другие синие объекты
становятся более яркими.
Ярко зеленый
Усиливаются оттенки зеленого. Горы, листва и другие зеленые объекты
становятся более яркими.
Ярко красный
Усиливаются оттенки красного. Красные объекты становятся более
яркими.
Ручная настройка
Можно настроить требуемые контрастность, резкость, насыщенность
цветов и т. д.
(стр. 78)
.
•
Задание баланса белого в режимах
и
невозможно
(стр. 75)
.
•
В режимах
и
возможно изменение цвета не только кожи людей, но и других
участков изображения. Для некоторых цветов кожи результат может отличаться
от ожидаемого.
Съемка с использованием 2-секундного таймера
78
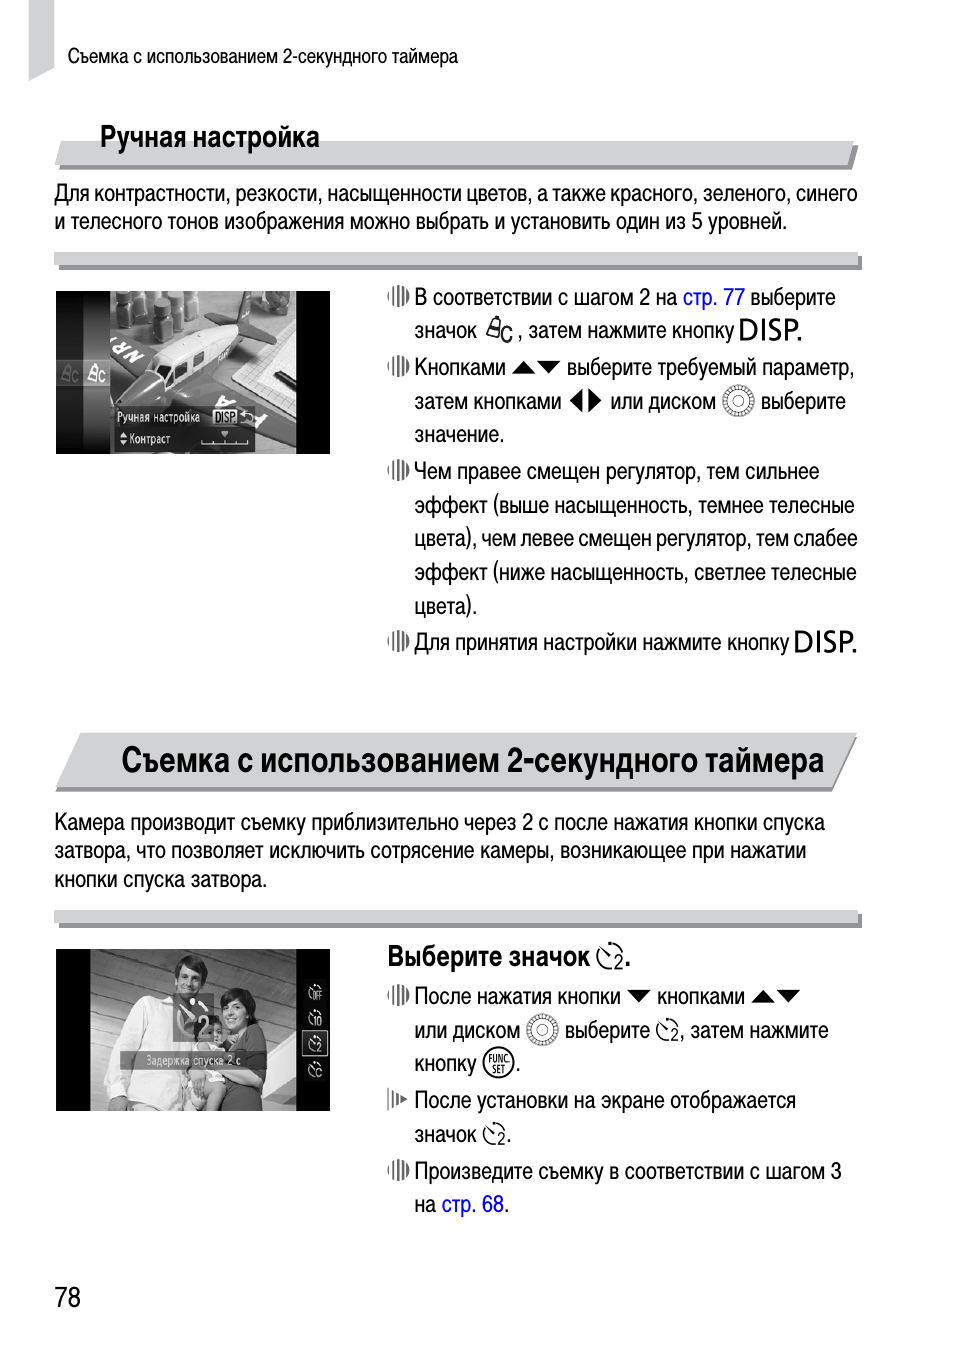
Ручная настройка
Для контрастности, резкости, насыщенности цветов, а также красного, зеленого, синего
и телесного тонов изображения можно выбрать и установить один из 5 уровней.
∆
В соответствии с шагом 2 на
стр. 77
выберите
значок
, затем нажмите кнопку
l
∆
Кнопками
op выберите требуемый параметр,
затем кнопками
qr или диском Â выберите
значение.
∆
Чем правее смещен регулятор, тем сильнее
эффект (выше насыщенность, темнее телесные
цвета), чем левее смещен регулятор, тем слабее
эффект (ниже насыщенность, светлее телесные
цвета).
∆
Для принятия настройки нажмите кнопку
l
Камера производит съемку приблизительно через 2 с после нажатия кнопки спуска
затвора, что позволяет исключить сотрясение камеры, возникающее при нажатии
кнопки спуска затвора.
Выберите значок
Î.
∆
После нажатия кнопки
p кнопками op
или диском
 выберите Î, затем нажмите
кнопку
m.
После установки на экране отображается
значок
Î.
∆
Произведите съемку в соответствии с шагом 3
на
стр. 68
.
Съемка с использованием 2-секундного таймера
79
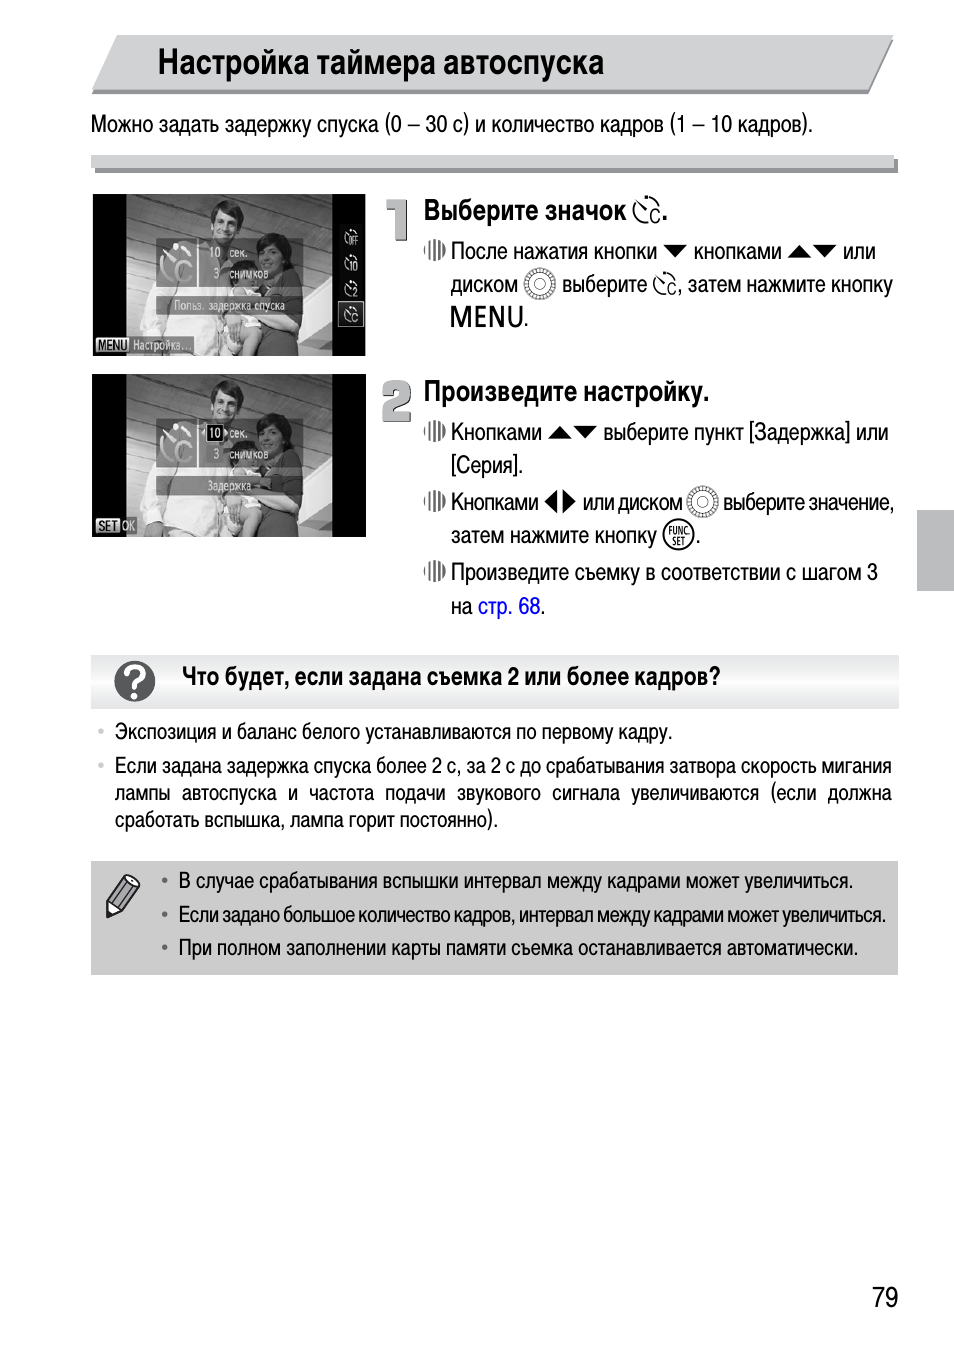
Можно задать задержку спуска (0 – 30 с) и количество кадров (1 – 10 кадров).
Выберите значок
$.
∆
После нажатия кнопки
p кнопками op или
диском
 выберите $, затем нажмите кнопку
n.
Произведите настройку.
∆
Кнопками
op выберите пункт [Задержка] или
[Серия].
∆
Кнопками
qr или диском Â выберите значение,
затем нажмите кнопку
m.
∆
Произведите съемку в соответствии с шагом 3
на
стр. 68
.
Настройка таймера автоспуска
•
Экспозиция и баланс белого устанавливаются по первому кадру.
•
Если задана задержка спуска более 2 с, за 2 с до срабатывания затвора скорость мигания
лампы автоспуска и частота подачи звукового сигнала увеличиваются (если должна
сработать вспышка, лампа горит постоянно).
•
В случае срабатывания вспышки интервал между кадрами может увеличиться.
•
Если задано большое количество кадров, интервал между кадрами может увеличиться.
•
При полном заполнении карты памяти съемка останавливается автоматически.
Что будет, если задана съемка 2 или более кадров?
80
Во время съемки изображение с экрана камеры можно вывести на телевизор.
•
Подключите камеру к телевизору в соответствии с инструкциями раздела
«Просмотр
изображений на экране телевизора»
(стр. 117)
.
•
Порядок съемки не отличается от порядка съемки с помощью экрана камеры.
Пока кнопка спуска затвора удерживается наполовину нажатой, фокусировка и экспозиция
фиксированы. При этом можно изменить композицию кадра и произвести съемку. Такой
прием называется «фиксация фокусировки».
Сфокусируйтесь.
∆
Наведите камеру так, чтобы объект, на который
требуется сфокусироваться, находился в центре
экрана, и наполовину нажмите кнопку спуска
затвора.
∆
Убедитесь, что рамка автофокусировки зеленого
цвета.
Измените композицию кадра.
∆
Удерживая кнопку спуска затвора наполовину
нажатой, измените композицию сюжета.
Произведите съемку.
∆
Полностью нажмите кнопку спуска затвора.
При подключении к телевизору высокой четкости с помощью HDMI-кабеля HTC-100
(продается отдельно) съемка с контролем изображения на экране телевизора
невозможна.
Съемка с помощью телевизора
Изменение композиции кадра с помощью фиксации фокусировки

09:13
Видеообзор Canon PowerShot SX210 IS
02:29
Обзор Canon PowerShot SX210 IS
07:23
Обзор фотоаппарата Canon PowerShot SX210 IS
03:43
Canon PowerShot SX210 IS Review
04:33
СРАВНЕНИЕ NIKON B500 И CANON SX210 IS/ мой новый фотоаппарат
02:15
Canon PowerShot SX210 IS
04:01
Unboxing the Canon PowerShot SX210
Нажмите на кнопку для помощи

Camera User Guide
ENGLISH
• Make sure you read this guide before using the camera.
• Store this guide safely so that you can use it in the future.
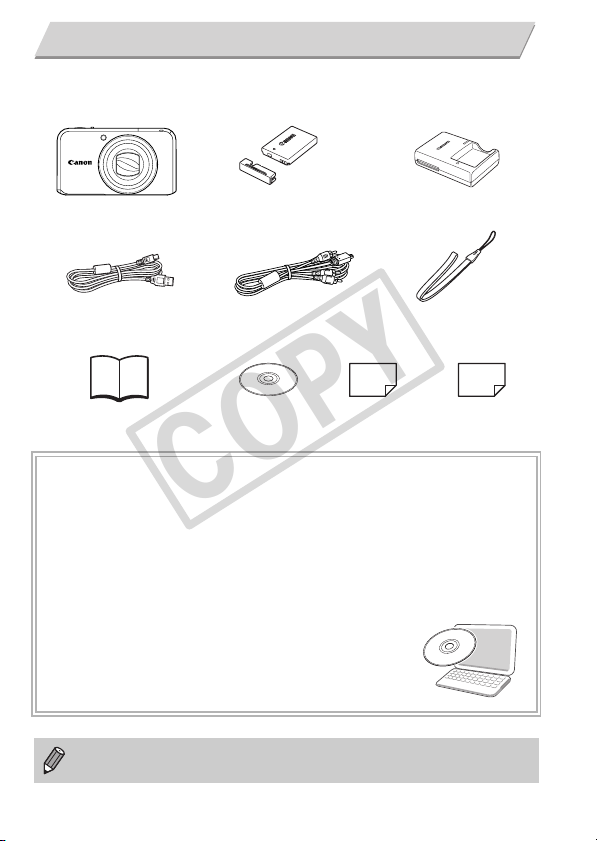
Checking the Package Contents
Check if the following items are included in your camera package. If anything
is missing, contact the retailer from which you purchased the camera.
Camera
Interface Cable
IFC-400PCU
Getting Started
Battery Pack NB-5L
(with Terminal Cover)
STEREO AV CABLE
AVC-DC400ST
DIGITAL CAMERA
Solution Disk
Warranty
CB-2LX/CB-2LXE
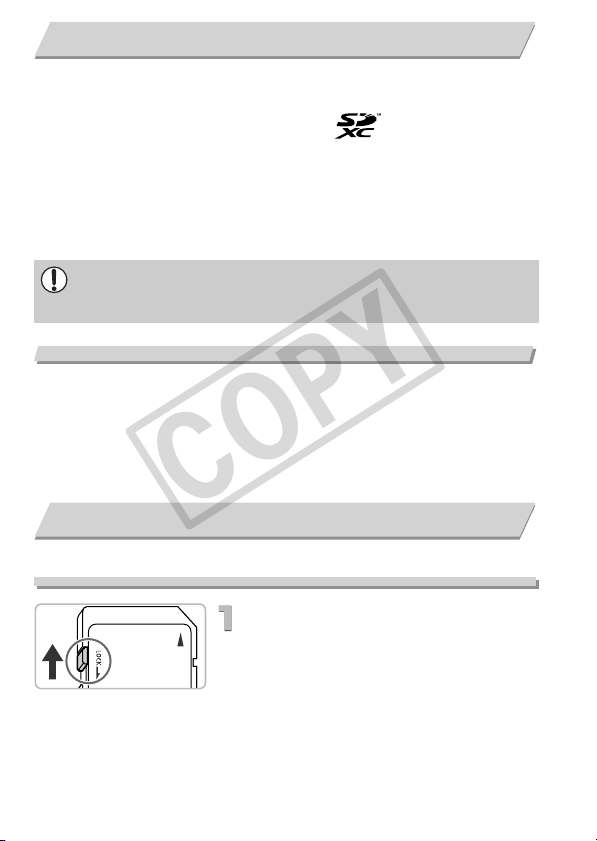
Card
Battery Charger
Wrist Strap
WS-DC9
“Canon Customer
Support” Leaflet
Using the PDF Manuals
Also refer to the PDF manuals on the CD-ROM. After installation, shortcut icons
appear on the desktop. If the software installation fails, you can find the manuals in
the Readme folder on the CD-ROM.
• Camera User Guide (This Guide)
Once you have mastered the basics, use the camera’s many features to shoot
more challenging photos.
• Personal Printing Guide
Read when you want to connect the camera to a printer (sold
separately) and print.
• Software Guide
Read when you want to use the included software.
• A memory card is not included.
• Adobe Reader is required to view the PDF manuals.
2

Read This First
Test Shots
Take some initial test shots and play them back to make sure the images
were recorded correctly. Please note that Canon Inc., its subsidiaries and
affiliates, and its distributors are not liable for any consequential damages
arising from any malfunction of a camera or accessory, including memory
cards, that results in the failure of an image to be recorded or to be recorded
in a way that is machine readable.
Warning Against Copyright Infringement
The images recorded with this camera are intended for personal use. Do not
record images that infringe upon copyright laws without the prior permission
of the copyright holder. Please be advised that in certain cases the copying
of images from performances, exhibitions, or commercial properties by
means of a camera or other device may contravene copyright or other legal
rights even if the image was shot for personal use.
Warranty Limitations
This camera’s warranty is only effective in the country of sale. If there is a
problem with the camera while abroad, please return it to the country of sale
before proceeding with a warranty claim to a Canon Customer Support Help
Desk. For Canon Customer Support contacts, please see the customer
support list supplied with your camera.
LCD Monitor
• The LCD monitor is made from reinforced glass, but it may break if
subjected to severe impacts. Please read the Safety Precautions (p. 9)
carefully. In case the glass breaks, exercise adequate caution so as not to
injure yourself on any broken fragments.
• The LCD monitor is produced with extremely high-precision manufacturing
techniques. More than 99.99% of the pixels operate to specification, but
occasionally non-performing pixels may appear as bright or dark dots. This
is not a malfunction. and has no effect on the recorded image.
•
The LCD monitor may be covered with a thin plastic film for protection against
scratches during shipment. If so, remove the film before using the camera.
Camera Body Temperature
Please take care when operating the camera for an extended period as the
camera body may become warm. This is not a malfunction.
3

What Do You Want to Do?
Shoot
● Shoot, leaving it to the camera to make settings …………………….24
● Just take pictures (Easy mode)…………………………………………….29
● Shoot to match special conditions…………………………………….54-55
Take good people shots
4
IF wPC
Portraits
(p. 54)
Shoot various other scenes
J
Landscape
(p. 54)
● Focus on faces………………………………………..24, 60, 61, 62, 82, 85
● Shoot in places where I cannot use the flash
(turn off the flash)………………………………………………………….29, 64
● Take pictures with me in them too (self-timer)…….61, 62, 68, 78, 79
● Insert the date and time into my shots …………………………………..67
● Take sepia toned or black and white pictures …………………………77
● Add effects and shoot (Fish-eye Effect, Miniature Effect) ……58, 59
● Change the size of picture I want to take (recording pixels) ……..72
● Take pictures continuously…………………………………………………..76
● Change the ISO speed………………………………………………………..74
● Maintain the focus on moving subjects (Servo AF)………………….84
● Make dark subjects appear brighter (i-Contrast)……………………..93
At night
(p. 54)
Ht
Indoors
(p. 55)
Kids and pets
(p. 54)
O
Foliage
(p. 56)
At the beach
(p. 56)
Fireworks
(p. 56)
Against snow
(p. 56)
Low light
(p. 56)
4

View
What Do You Want to Do?
● Look at my pictures …………………………………………………………….27
● Easy Playback (Easy Mode) ………………………………………………..30
● Automatically play back pictures (slideshow) …………………..30, 113
● Look at my pictures on a TV ……………………………………….117, 118
● Look at my pictures on a computer ………………………………..34 – 37
● Quickly search pictures ………………………………………………110, 111
● Erase pictures ………………………………………………..28, 30, 123, 124
● Protect pictures from accidental erasure……………………….120, 122
Shoot/View Movies
● Shoot movies ……………………………………………………………..31, 102
● View movies……………………………………………………………….33, 106
Print images
● Easily print pictures…………………………………………………………..136
1
2
Save
● Save images to a computer ……………………………………………34, 37
Other
● Turn off sounds ………………………………………………………………….48
● Use the camera abroad………………………………………………..15, 148
● Understand what is displayed on the screen. ………………..164, 165
5

Table of Contents
Chapters 1 – 3 explain the basic operations and frequently used functions of
this camera. Chapters 4 onward explain the advanced functions, letting you
learn more as you read each chapter.
Checking the Package Contents …….2
Read This First …………………………….3
What Do You Want to Do? …………….4
Conventions Used in This Guide …….8
Safety Precautions………………………..9
1. Getting Started
……………………………………. 13
Charging the Battery ……………………14
Compatible Memory Cards
(Sold Separately) ………………………..16
Inserting the Battery and
Memory Card ……………………………..16
Setting the Date and Time ……………19
Setting the Display Language……….21
Formatting Memory Cards ……………22
Pressing the Shutter Button………….23
Taking Pictures (Smart Auto)………..24
Viewing Images ………………………….27
Erasing Images …………………………..28
Shooting in Easy mode………………..29
Viewing or Erasing in Easy mode ….30
Shooting Movies …………………………31
Viewing Movies…………………………..33
Transferring Images to a Computer for
Viewing ……………………………………..34
Accessories ……………………………….38
Separately Sold Accessories………..39
2. Learning More
……………………………………. 41
Components Guide ……………………..42
Screen Display……………………………44
Indicator …………………………………….45
FUNC. Menu – Basic Operations ….46
MENU – Basic Operations ……………47
Changing the Sound Settings ……….48
6
Changing the Screen Brightness …. 49
Returning the Camera to Default
Settings ……………………………………. 50
Low Level Memory Card
Formatting ………………………………… 51
Power Saving Function (Auto Power
Down)………………………………………. 52
Clock Functions…………………………. 52
3.
Shooting in Special Conditions and
Commonly Used Functions……..
Shooting in Various Conditions ……. 54
Shooting in Special Scenes ………… 55
Adding Effects and Shooting ……….. 58
Detecting a Smile and Shooting…… 60
Using the Wink Self-Timer ………….. 61
Using the Face Self-Timer ………….. 62
Turning the Flash Off …………………. 64
Zooming in More Closely on
Subjects (Digital Zoom) ………………. 65
Inserting the Date and Time………… 67
Using the Self-Timer ………………….. 68
4. Choosing Settings
Yourself ……………………….. 69
Shooting in Program AE……………… 70
Adjusting the Brightness (Exposure
Compensation) ………………………….. 70
Turning the Flash On …………………. 71
Changing the Focus Range
(Macro)…………………………………….. 71
Changing the Recording Pixel
Setting (Image Size)…………………… 72
Changing the Compression Ratio
(Image Quality)………………………….. 72
Changing the ISO Speed ……………. 74
Adjusting the White
Balance ……………………………………. 75
53

Table of Contents
Continuous Shooting………………….. 76
Changing the Tone of
an Image (My Colors) ………………… 77
Shooting Using the Two
Second Self-Timer …………………….. 78
Customizing the Self-
Timer……………………………………….. 79
Shooting Using a TV Monitor ………. 80
Changing the
Composition with the Focus Lock… 80
5. Getting More Out of
Your Camera………………….81
Changing the AF Frame Mode…….. 82
Magnifying the Focal Point………….. 83
Shooting with the AF Lock ………….. 84
Shooting with Servo AF ……………… 84
Choosing the Person to Focus On
(Face Select)…………………………….. 85
Changing the Metering Method……. 86
Shooting in Manual Focus Mode …. 87
Shooting with the AE Lock ………….. 88
Shooting with the FE Lock ………….. 88
Shooting with Slow Synchro ……….. 89
Setting the Shutter Speed …………… 90
Setting the Aperture Value………….. 91
Setting the Shutter
Speed and Aperture Value………….. 92
Correcting the
Brightness and Shooting
(i-Contrast) ……………………………….. 93
Red-Eye Correction …………………… 94
Adjusting the Flash Exposure
Compensation…………………………… 95
Adjusting the Flash Output………….. 96
Checking for Shut Eyes ……………… 96
Changing the Color and Shooting… 97
Shooting Stitch Assist Images …… 100
6. Using Various Functions for
Shooting Movies ………….101
Shooting Movies ……………………… 102
Changing the Movie Mode ………… 102
Changing the Image Quality……….103
AE Lock/Exposure Shift…………….. 104
Other Shooting Functions………….. 105
Playback Functions ………………….. 106
Editing ……………………………………. 107
7.
Using Various Playback and
Editing Functions ………….
Quickly Searching Images…………. 110
Viewing Images in Filtered
Playback…………………………………. 111
Viewing Slideshows………………….. 113
Checking the Focus………………….. 115
Magnifying Images …………………… 116
Changing Image
Transitions………………………………. 116
Viewing Images on a TV …………… 117
Viewing Images on a High-Definition
TV………………………………………….. 118
Displaying Various Images
(Smart Shuffle) ………………………… 119
Protecting Images ……………………. 120
Erasing All Images ……………………123
Organizing Images
by Category (My Category) ………..125
Tagging Images as Favorites …….. 127
Rotating Images ………………………. 129
Resizing Images ……………………….130
Trimming ………………………………… 131
Adding Effects with
the My Colors Function ……………..132
Correcting the
Brightness (i-Contrast) ……………… 133
Correcting the Red-Eye Effect……. 134
8. Printing
……………………………………135
Printing Images ……………………….. 136
Printing from the Print List
(DPOF) …………………………………… 138
Choosing Images for Printing
(DPOF) …………………………………… 140
109
7
Conventions Used in This Guide
9. Customizing
Camera Settings…………. 143
Changing Camera Settings…………144
Changing Shooting Function
Settings……………………………………149
Changing Playback Function
Settings……………………………………154
10.Useful Information
………………………………….. 155
Using Household Power …………….156
Using the Eye-Fi Card ………………. 157
Troubleshooting ………………………. 159
List of Messages That Appear
on the Screen ………………………….. 162
Information Displayed on the
Screen……………………………………. 164
Functions Available in Each
Shooting Mode ………………………… 166
Menus ……………………………………. 168
Handling Precautions ……………….. 172
Specifications ………………………….. 173
Index ……………………………………… 176
Conventions Used in This Guide
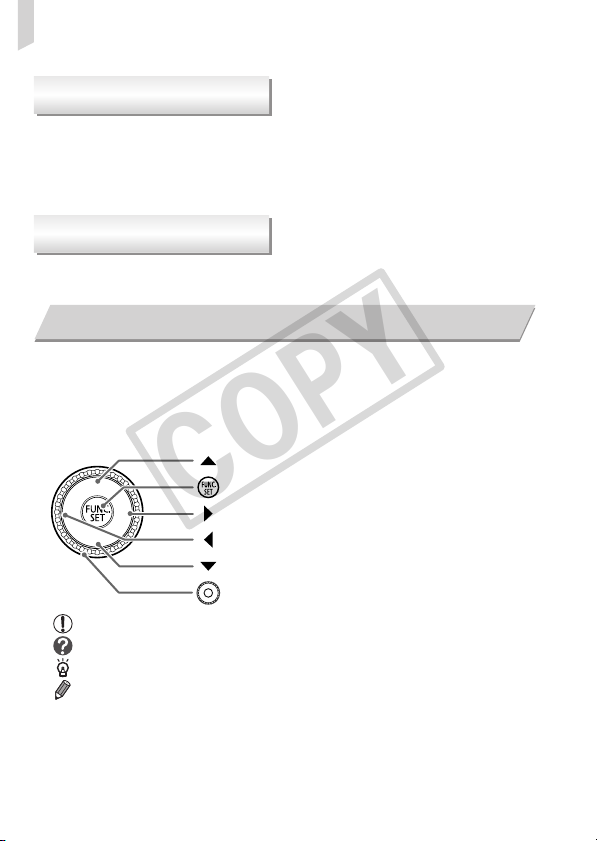
• Icons are used in the text to represent the camera buttons and control dial.
• Language that displays on the screen appears inside [ ] (square brackets).
• The directional buttons, control dial, and FUNC./SET button are
represented by the following icons.
(Up button)
(FUNC./SET button)
(Right button)
(Left button)
(Down button)
(Control dial)
• : Things you should be careful about.
• : Troubleshooting tips.
• : Hints for getting more out of your camera.
• : Supplemental information.
• (p. xx): Reference pages. “xx” stands for a page number.
• This guide assumes all functions are at their default settings.
• The various types of memory cards that can be used in this camera are
collectively referred to as memory cards in this guide.
8
Safety Precautions
• Before using the camera, please ensure that you read the safety precautions
described below. Always ensure that the camera is operated correctly.
• The safety precautions noted on the following pages are intended to prevent injuries
to yourself and other persons, or damage to the equipment.
Be sure to also check the guides included with any separately sold accessories you use.
•
Warning
Caution
Caution
Camera
• Do not trigger the flash in close proximity to people’s eyes.
The above could damage your eyesight. In particular, remain at least one meter (39
inches) away from infants when using the flash.
• Store this equipment out of the reach of children and infants.
Strap: Putting the strap around a child’s neck could result in asphyxiation.
Memory card: Dangerous if swallowed. If this occurs, contact a doctor immediately.
• Do not attempt to disassemble or alter any part of the equipment unless
expressly indicated to do so in this guide.
• To avoid the risk of injury, do not touch the interior of the camera if it has been
dropped or otherwise damaged.
• Stop operating the camera immediately if it emits smoke, a strange smell, or
otherwise behaves abnormally.
Do not use organic solvents such as alcohol, benzine, or thinner to clean the equipment.
•
• Do not allow liquids or foreign objects to enter the camera.
The above could result in fire or electrical shock.
If liquid or foreign objects come into contact with the camera interior, immediately turn the
camera power off and remove the battery.
• Use only recommended power sources.
Using other power sources could result in fire or electrical shock.
Denotes the possibility of serious injury or death.
Denotes the possibility of injury.
Denotes the possibility of damage to the equipment.
Warning
Battery and Battery Charger
• Use only recommended batteries.
• Do not place the battery near or in direct flame.
Do not let the battery come into contact with water (e.g. sea water) or other liquids.
•
• Do not attempt to disassemble, alter or apply heat to the battery.
9

Safety Precautions
• Avoid dropping or subjecting the batteries to severe impacts.
The above may cause explosions or leaks, resulting in fire, injury and damage to the
surroundings. In the event that a battery leaks and the eyes, mouth, skin or clothing
contacts these substances, immediately flush with water and seek medical assistance.
If the battery charger becomes wet, unplug it from the outlet and consult your camera
distributor or the closest Canon Customer Support Help Desk.
Use only the specified battery charger to charge the battery.
•
•
Unplug the power cord periodically and wipe away any dust and dirt that has
collected on the plug, the exterior of the power outlet, and the surrounding area.
• Do not handle the power cord with wet hands.
• Do not use the equipment in a manner that exceeds the rated capacity of the
electrical outlet or wiring accessories. Do not use if the power cord or plug are
damaged, or not fully plugged into the outlet.
• Do not allow dirt or metal objects (such as pins or keys) to contact the charger
terminals or plug.
The above could result in fire or electrical shock.
Other Warnings
Do not play the supplied CD-ROM(s) in any CD player that does not support data CD-ROMs.
•
It is possible to suffer hearing loss from listening with headphones to the loud sounds of
a CD-ROM played on a music CD player. Additionally, playing the CD-ROM(s) in an audio
CD player (music player) could damage the speakers.
•
Be careful not to bang the camera or subject it to strong impacts or shocks when
hanging it by the strap.
• Be careful not to bump or push strongly on the lens.
This could damage the camera or lead to injury.
• Avoid using, placing or storing the camera in the following places.
— Places subject to strong sunlight.
— Places subject to temperatures above 40 °C (104 °F).
— Humid or dusty areas.
These could cause leakage, overheating or an explosion of the battery, resulting in electrical
shock, fire, burns or other injuries. High temperatures may also cause deformation of the casing.
• The slideshow transition effects may cause discomfort when viewed for
prolonged periods.
• When using the flash, be careful not to cover it with your fingers or clothing.
This could result in burns or damage to the flash.
Caution
10
Safety Precautions
Caution
• Do not aim the camera at bright light sources (the sun, etc.).
Doing so may cause malfunctions or damage the image sensor.
• When using the camera on a beach or at a windy location, be careful not to allow
dust or sand to enter the camera.
This may cause the camera to malfunction.
• In regular use, small amounts of smoke may be emitted from the flash.
This is due to the high intensity of the flash burning dust and foreign materials stuck to the
front of the unit. Please use a cotton swab to remove dirt, dust or other foreign matter from
the flash to prevent heat build-up and damage to the unit.
• Unplug the battery charger from the power outlet after recharging is complete,
or when you are not using it.
• Do not place anything, such as cloth on top of the battery charger while it is
charging.
Leaving the unit plugged in for a long period of time may cause it to overheat and distort,
resulting in fire.
• Remove and store the battery when you are not using the camera.
If the battery is left inside the camera, damage caused by leakage may occur.
• Before you discard batteries, cover the terminals with tape or other insulators.
Contacting other metal materials in waste containers may lead to fire or explosions.
• Do not place the battery near pets.
Pets biting the battery could cause leakage, overheating or explosion, resulting in fire or
injuries.
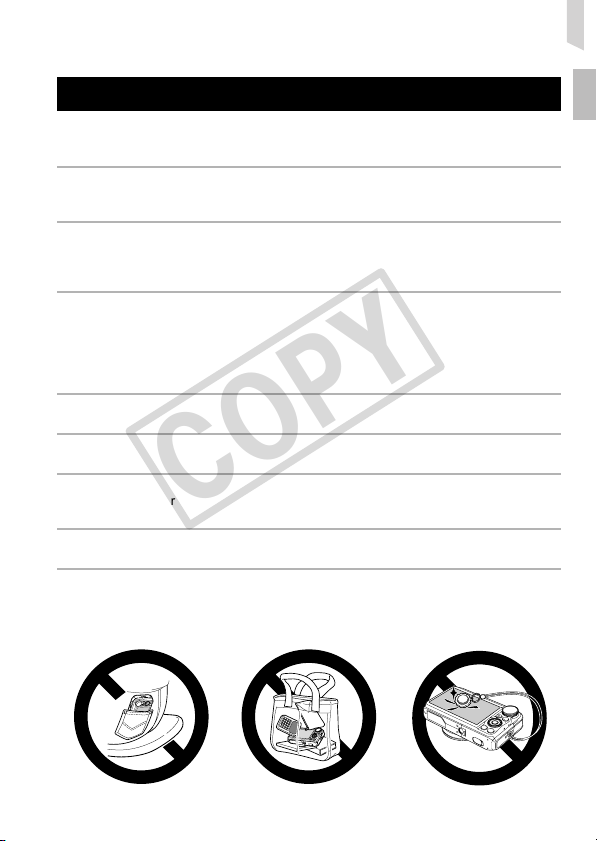
• Do not sit down with the camera in your pocket.
Doing so may cause malfunctions or damage the screen.
• When putting the camera in your bag, ensure that hard objects do not come into
contact with the screen.
• Do not attach accessories to the strap.
Doing so may cause malfunctions or damage the screen.
11

12
4

1
Getting Started
This chapter explains preparations before shooting, how to shoot in
A mode, and then how to view and erase the images you take. The
latter part of this chapter explains how to shoot and view images in
Easy Mode, how to shoot and view movies and how to transfer images
to a computer.
Attaching the Strap/Holding the Camera
• Be sure to attach the supplied strap to the camera and wrap it around your
wrist when shooting to avoid dropping the camera.
• Keep your arms tight against your body while holding the camera firmly by
the sides. Be sure that your fingers do not block the flash.
Strap
13

Charging the Battery
Use the included charger to charge the battery. Be sure to charge the battery
as it is not charged at the time of purchase.
Remove the cover.
Insert the battery.
∆ Align the o marks on the battery and
charger, then insert the battery by sliding it
in and down .
Charge the battery.
∆ For CB-2LX: Flip out the plug and plug
the charger into a power outlet .
CB-2LX
CB-2LXE
∆ For CB-2LXE: Plug the power cord into
the charger, then plug the other end into a
power outlet.
The charge lamp lights red and charging
starts.
The charge lamp will light green when
charging has finished. Charging takes
approx. 2 hours and 5 minutes.
Remove the battery.
∆Unplug the battery charger from the power
outlet, then remove the battery by sliding it
in and up .
To protect the battery and prolong its life, do not charge it for longer than
24 hours continuously.
14
Charging the Battery
Approximate Number of Shots That Can Be Taken
Number of Shots
Playback Time (Hours)
• The number of shots that can be taken is based on the Camera & Imaging Products
Association (CIPA) measurement standard.
• Under some shooting conditions, the number of shots that can be taken may be less
than mentioned above.
260
6
Battery Charge Indicator
An icon or message will appear on the screen indicating the battery’s charge state.
Display Summary
Sufficient charge.
Slightly depleted, but sufficient.
(Blinking red) Nearly depleted. Charge the battery.
“Change the battery pack.” Depleted. Recharge the battery.
Using the battery and charger effectively
• Charge the battery on the day, or the day before, it will be used.
Charged batteries continue to discharge naturally even if they are not used.
Attach the cover to a charged battery
so that the o mark is visible.
• How to store the battery for long periods:
Deplete and remove the battery from the camera. Attach the terminal cover and
store the battery. Storing a battery for long periods of time (about a year) without
depleting it may shorten its life span or affect its performance.
• The battery charger can also be used when abroad.
The charger can be used in regions that have 100 – 240 V (50/60 Hz) AC power.
If the plug does not fit the outlet, use a commercially available plug adapter. Do
not use electrical transformers for foreign travel as they will cause damage.
• The battery may develop a bulge.
This is a normal characteristic of the battery and does not indicate a problem.
However, if the battery bulges to the point where it will no longer fit into the
camera, please contact a Canon Customer Support Help Desk.
• If the battery is quickly depleted even after charging,
it has reached the end of its life span. Purchase a new battery.
15
Compatible Memory Cards (Sold Separately)
• SD memory cards (2 GB and less)
• SDHC memory cards (more than 2 GB, up to and including 32 GB)*
• SDXC memory cards (more than 32 GB)
• MultiMediaCards
• MMCplus memory cards
• HC MMCplus memory cards
• Eye-Fi Cards
*
This memory card complies with the SD standards. Some cards may not operate
properly depending on the brand of card used.
Depending on your computer’s OS version, SDXC memory cards may not
be recognized when using a commercially available card reader. Check to
make sure that your OS supports this function beforehand.
About Eye-Fi Cards
This product is not guaranteed to support Eye-Fi card functions (including
wireless transfer). In case of an issue with an Eye-Fi card, please check with
the card manufacturer.
Also note that an approval is required to use Eye-Fi cards in many countries
or regions. Without approval, use of the card is not permitted. If it is unclear
whether the card has been approved for use in the area, please check with
the card manufacturer.
*
*
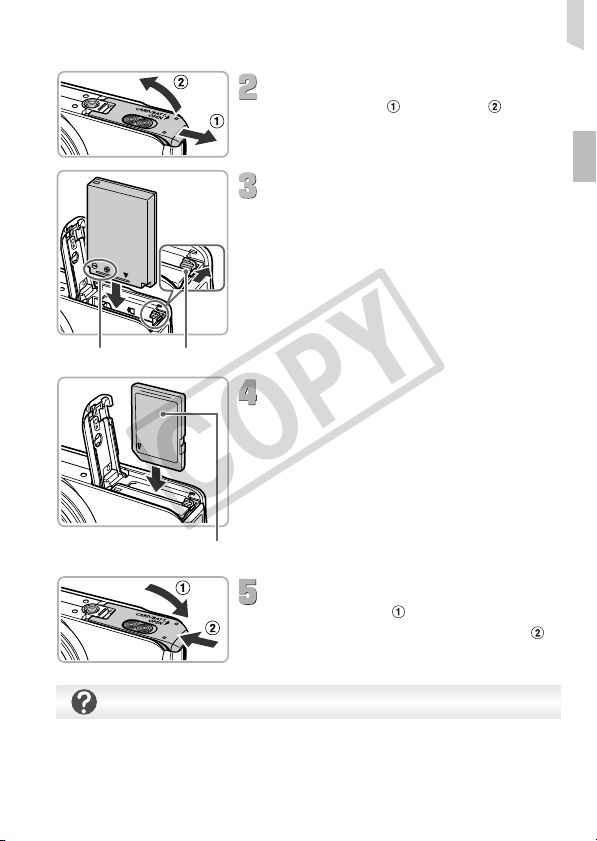
Inserting the Battery and Memory Card
Insert the included battery and a memory card (sold separately).
Check the card’s write-protect tab.
∆ If the memory card has a write-protect tab,
you will not be able to record images if the
tab is in the locked position. Slide the tab
up until you hear a click.
16
Terminals Battery Lock
Label
Inserting the Battery and Memory Card
Open the cover.
∆ Slide the cover and open it .
Insert the battery.
∆ Press the battery lock in the direction of the
arrow, then insert the battery as shown until
it locks into place with a click.
∆ Be sure to insert the battery in the correct
direction or it will not properly lock into
place.
Insert the memory card.
∆ Insert the memory card as shown until it
locks into place with a click.
∆ Be sure the memory card is oriented
correctly. Inserting the memory card in the
wrong direction could damage the camera.
Close the cover.
∆ Close the cover , and press downward
as you slide it until it clicks into place .
What if [Memory card locked] appears on the screen?
SD, SDHC and SDXC memory cards have a write-protect tab. If this tab is in the
locked position, [Memory card locked] will appear on the screen and you will not
be able to take or erase images.
17
Inserting the Battery and Memory Card
Removing the Battery and Memory Card
Remove the battery.
∆ Open the cover and press the battery lock
in the direction of the arrow.
The battery will pop up.
Remove the memory card.
∆ Push the memory card in until you hear a
click, then slowly release it.
The memory card will pop up.
Approximate Number of Shots per Memory Card
Memory Card
Number of Shots
• Values are based on the default settings.
• The number of shots that can be taken will vary depending on camera settings, the
subject and the memory card used.
Can you check the number of shots that can be taken?
You can check the number of shots that can be taken when the camera is in a
Shooting mode (p. 24).
4GB 16GB
1058 4334
Number of shots that can be taken
18

Setting the Date and Time
The Date/Time settings screen will appear the first time the camera is turned
on. Since the dates and times recorded into your images are based on these
settings, be sure to set them.
Turn on the camera.
∆ Press the power button.
The Date/Time screen will appear.
Set the date and time.
∆ Press the qr buttons to choose an option.
∆ Press the op buttons or turn the  dial
to set a value.
Complete the setting.
∆ Press the m button.
Once the date and time have been set, the
Date/Time screen will close.
∆ Pressing the power button will turn off the
camera.
Reappearing Date/Time screen
Set the correct date and time. If you have not set the date and time, the Date/Time
screen will appear each time you turn on the camera.
Daylight saving time settings
If you choose in Step 2 and press the op buttons or turn the  dial to
choose , you will set the time to daylight saving (1 hour ahead).
19
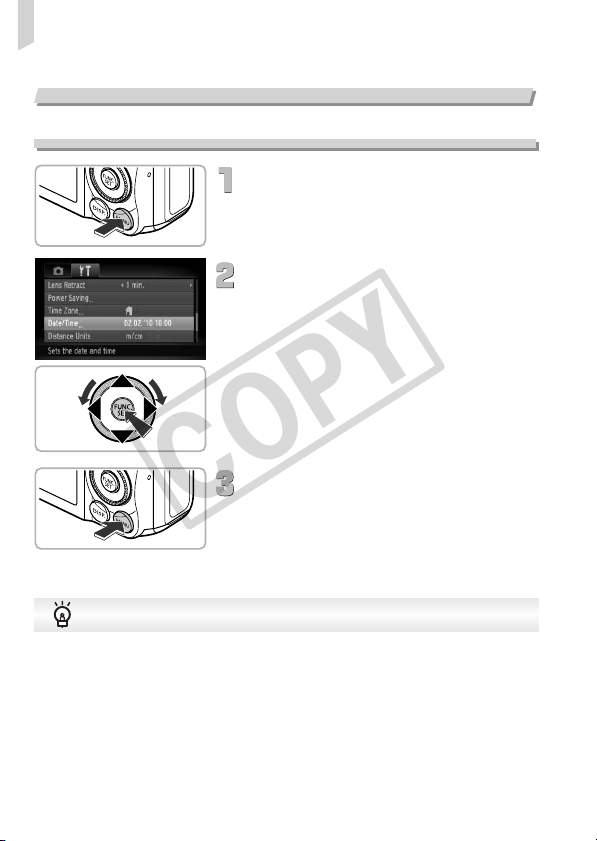
Setting the Date and Time
Changing the Date and Time
You can change the current date and time settings.
Display the menu.
∆ Press the n button.
Choose [Date/Time] in the 3 tab.
∆ Press the qr buttons to choose the 3
tab.
∆ Press the op buttons or turn the  dial
to choose [Date/Time], then press the m
button.
Change the date and time.
∆ Follow Steps 2 and 3 on p. 19 to adjust the
Date/Time battery
• The camera has a built-in date/time battery (backup battery) that allows the
date/time settings to be retained for about three weeks after the battery pack
has been removed.
• By inserting a charged battery or connecting an AC adapter kit (sold separately,
p. 39) the date/time battery can be charged in about 4 hours even if the camera
is not turned on.
• If the date/time battery is depleted, the Date/Time menu will appear when you turn
the camera on. Follow the steps on p. 19 to set the date and time.
setting.
∆ Pressing the n button will close the
menu.
20

Setting the Display Language
You can change the language that displays on the screen.
Enter Playback mode.
∆ Press the 1 button.
Display the settings screen.
∆ Press and hold the m button, then
immediately press the n button.
Set the display language.
∆ Press the opqr buttons or turn the Â
dial to choose a language, then press the
m button.
Once the display language has been set,
the settings screen will close.
What if the clock appears when the m button is pressed?
The clock will appear if too much time passes between pressing the m button
and the n button in Step 2. If the clock appears, press the m button to
remove the clock and repeat Step 2.
You can also change the display language by pressing the n button,
choosing the 3 tab, and choosing the [Language] menu item.
21

Formatting Memory Cards
Before you use a new memory card or one that has been formatted in other
devices, you should format the card with this camera.
Formatting (initializing) a memory card erases all data on the memory card.
As you cannot retrieve the erased data, exercise adequate caution before
formatting the memory card.
Before formatting an Eye-Fi card, be sure to install the software contained on
the card to a computer.
Display the menu.
∆ Press the n button.
Choose [Format].
∆ Press the qr buttons to choose the 3
tab.
∆ Press the op buttons or turn the  dial
to choose [Format], then press the m
button.
Format the memory card.
∆ Press the qr buttons or turn the  dial to
choose [OK] and press the m button.
A confirmation screen will appear.
∆ Press the op buttons or turn the  dial
to choose [OK], then press the m button.
The memory card will be formatted.
When formatting ends, [Memory card
formatting complete] will appear on the screen.
∆ Press the m button.
Formatting or erasing data on a memory card merely changes the file
management information on the card and does not ensure its contents are
completely erased. Be careful when transferring or disposing of a memory
card. When disposing of a memory card, take precautions such as
physically destroying the card to prevent personal information leaks.
The total capacity of the memory card displayed in the formatting screen
may be less than indicated on the memory card.
22
Pressing the Shutter Button
To take images that are in focus, be sure to first press the shutter button
lightly (halfway) to focus, then press fully to shoot.
Press halfway (lightly to focus).
∆ Press lightly until the camera beeps twice
and AF frames appear where the camera
focused.
Press fully (all the way to shoot).
The camera plays the shutter sound and
takes the shot.
∆ Since the shot is being taken while the
shutter sound plays, be careful not to move
the camera.
Does the length of the shutter sound change?
• Since the time required to shoot differs according to the scene you want to take,
the length of the shutter sound may change.
• If the camera or subject moves while the shutter sound is playing, the recorded
image may be blurry.
If you shoot without pressing the shutter button halfway, the image may not
be in focus.
23
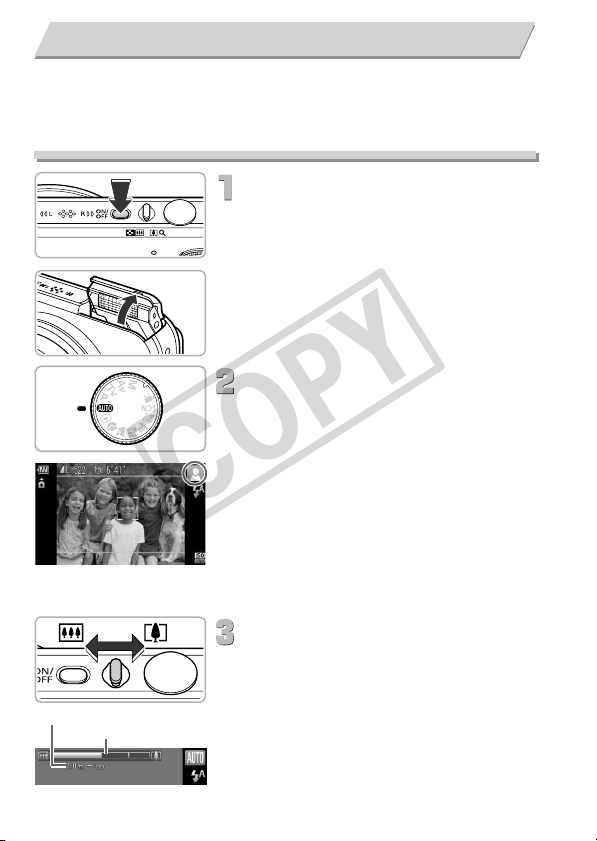
Taking Pictures (Smart Auto)
Since the camera can determine the subject and shooting conditions, you can
let it automatically select the best settings for the scene and just shoot. The
camera can also detect and focus on faces, setting the color and brightness
to optimal levels.
Turn on the camera.
∆ Press the power button.
The start-up screen will appear.
The flash will automatically rise.
∆ You can also raise or lower the flash
manually (the flash turns off when
lowered).
Choose A mode.
∆ Set the mode dial to A.
∆ When you point the camera toward the
subject, the camera will make a slight
noise as it determines the scene.
The icon for the determined scene will
appear in the upper right of the screen.
The camera will focus on detected faces
and display frames on them.
∆ Black bars will appear on the left and right
sides of the screen. There areas cannot be
recorded when shooting.
Compose the shot.
∆ Moving the zoom lever toward i will
zoom in on your subject, making it appear
larger. Moving the lever toward j will
zoom out from your subject, making it
appear smaller. The zoom bar appears.
∆
If you move the zoom lever all the way to the left
or right the size will change quickly, and if you
move it slightly, the size will change slowly (except
for movies).
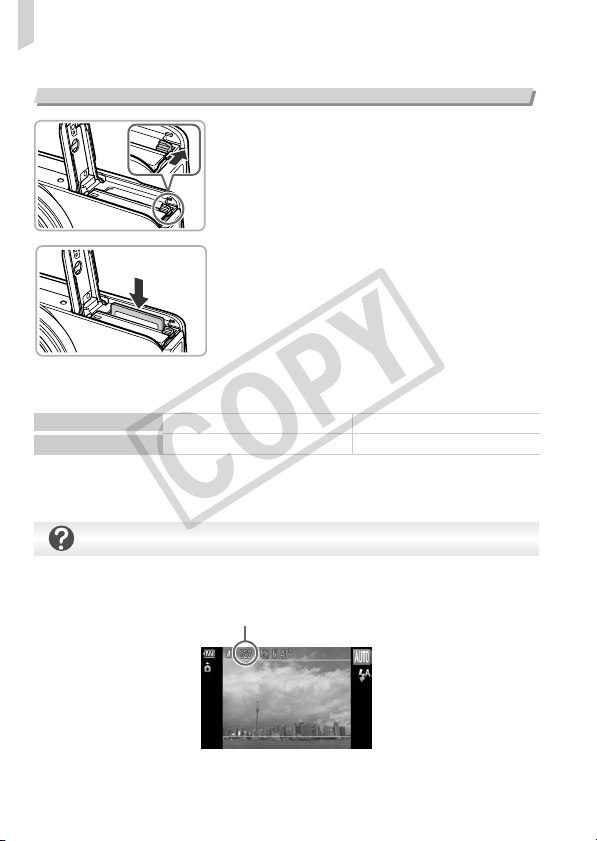
Focus Range (Approx.)
Zoom Bar
24

Taking Pictures (Smart Auto)
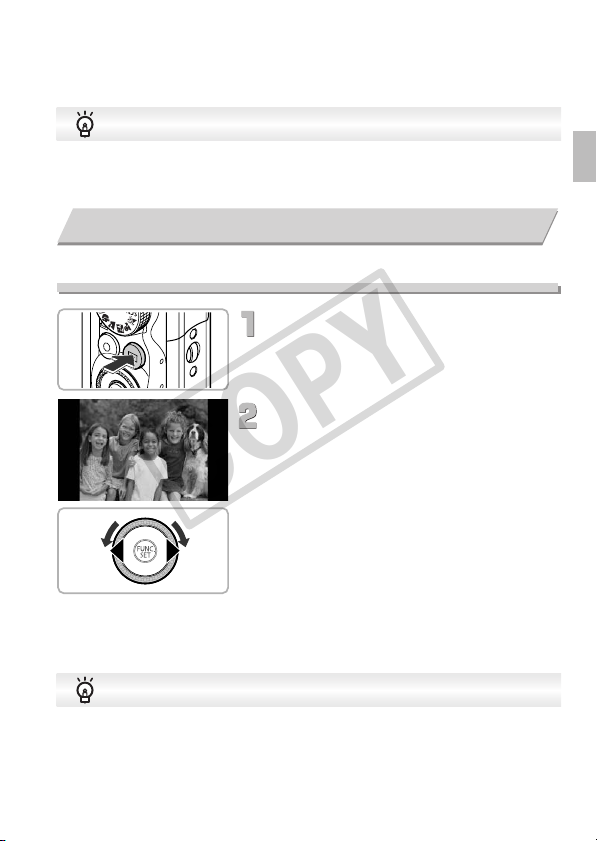
Focus.
∆ Press the shutter button halfway to focus.
When the camera focuses, it will beep
twice and AF frames will appear where the
camera focused.
Several AF frames will appear when the
camera focuses on more than one point.
AF Frames
Shoot.
∆
Press the shutter button fully.
The camera will play the shutter sound and
shoot. The flash will automatically fire in
low light conditions if it is raised.
The image will appear on the screen for
about two seconds.
∆
You can take a second picture even while
an image is displayed by pressing the
shutter button again.
Scene Icons
The camera displays an icon for the scene it has determined and then automatically
focuses and selects the optimum settings for subject brightness and color.
Background
Subject
People
When
Moving
Non-Human Subject s/
Landscapes
Close Subjects
Icon Background
Color
* Appears when the camera is attached to a tripod.
Bright
Gray Light Blue
Including Blue Skies
Backlit Backlit When Using Tripod
Sunsets
—
——
—
Orange
Dark Blue
Dark
*
—
*
—
25

Taking Pictures (Smart Auto)
Under certain conditions, the icon that appears may not match the actual
scene. Especial ly when there is an orange or blue colored background (a
wall for example), [ ] or the “Incl uding Blue Skies” icons may appear and
it may not be possible to shoot with the appropriate color. If thi s happens, try
shooting in
• What if white and gray frames appear when you point the camera toward
a subject?
When faces are detected, a white frame appears on the face of the main
subject, while gray frames appear on other detected faces. The frames will
follow the subjects within a certain range. If the main subject moves, however,
the gray frames will disappear.
• What if a blue frame appears when you press the shutter button halfway?
A blue frame appears when a moving subject is detected; the focus and
exposure will continuously adjust (Servo AF).
• What if the indicator blinks orange and blinks on the screen?
Attach the camera to a tripod so that the camera does not move and blur the image.
• What if the camera does not play any sounds?
Pressing the l button while turning on the camera power will turn off all
sounds except for warning sounds. To turn the sounds on, press the n
button, choose the 3 tab, and then choose [Mute]. Press the qr buttons to
choose [Off].
•
What if the indicator blinks orange, and [Raise the flash] appears on the screen?
Try raising the flash manually to shoot. The flash will automatically fire when
shooting.
• What if the image comes out dark even if the flash fired when shooting?
The subject is too far away for the flash to reach. Move the zoom lever toward j
and hold it until the lens stops moving. The camera will be at its maximum wide
angle setting and you can shoot within th e effective flash range of approximately 75
cm – 3.5 m (2.5 – 11.5 ft.). Move the zoom lever toward
stops moving. The camera will be at its maximum telephoto setting and you can
shoot within the effective flash range of approximately 1.0 – 2.0 m (3.3 – 6.6 ft.).
•
What if the camera beeps once when the shutter button is pressed halfway?
Your subject may be too close. Move the zoom lever toward j and hold it until
the lens stops moving. The camera will be at its maximum wide angle setting
and you will be able to focus on subjects that are about 5 cm (2.0 in.) or more
away from the end of the lens. Move the zoom lever toward i and hold it until
the lens stops moving. The camera will be at its maximum telephoto setting and
you will be able to focus on subjects that are about 1 m (3.3 ft.) or more away
from the end of the lens.
What if…
G
mode (p. 70).
i
and hold it until the lens
26
• What if the lamp lights when the shutter button is pressed halfway?
To reduce red-eye and to assist in focusing, the lamp may light when shooting
in dark areas.
• What if the h icon blinks when you try to shoot?
The flash is charging. You can shoot when recharging ends.
What if two gray lines appear on the screen?
The area between the two gray lines will be recorded in a movie. Movies can be shot simply
by pressing the movie button, no matter what position the mode dial is in (p. 31).
Viewing Images
You can view the images you have taken on the screen.
Enter Playback mode.
∆ Press the 1 button.
The last image you took will appear.
Choose an image.
∆ Pressing q or turning the  dial
counterclockwise will cycle through the
images in the reverse order they were
taken, from the newest image to the oldest.
∆ Pressing r or turning the  dial clockwise
will cycle through images in the order they
were taken, from oldest to newest.
∆ The images change more quickly if you
keep the qr buttons pressed.
∆ The lens will retract after approximately 1
minute elapses.
∆ When the lens is retracted, pressing the 1
button once more will turn off the power.
Switching to Shooting mode
Pressing the shutter button halfway, or turning the mode dial in Playback mode
switches the camera to Shooting mode.
27
Erasing Images
You can choose and erase images one at a time. Please note that erased
images cannot be recovered. Exercise adequate caution before erasing an
image.
Enter Playback mode.
∆ Press the 1 button.
The last image you took will appear.
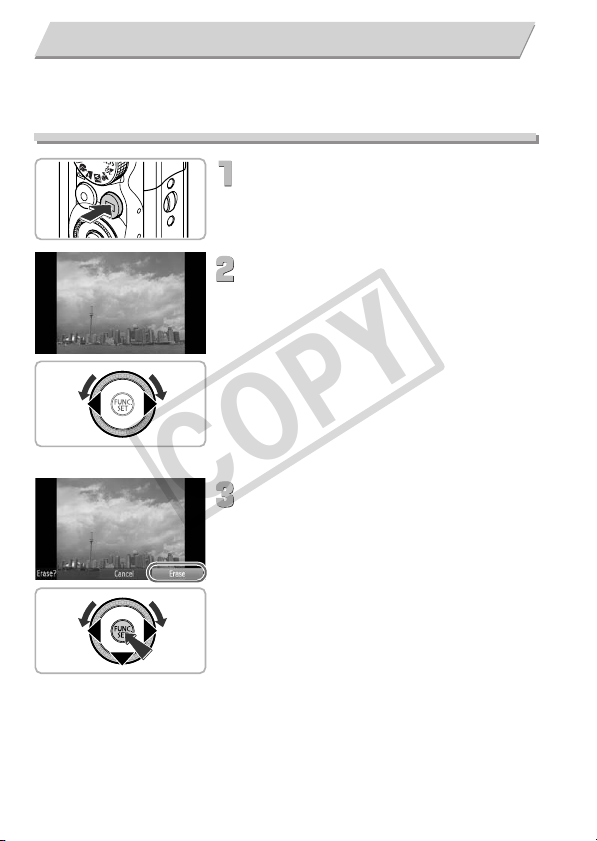
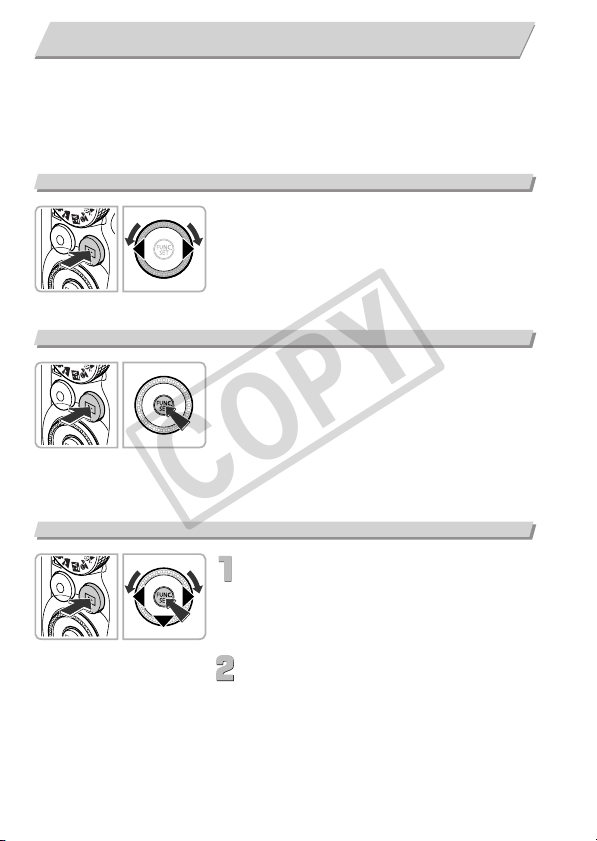
Choose an image to erase.
∆ Press the qr buttons or turn the  dial to
choose an image.
Erasing Images
∆ Press the p button.
[Erase?] appears.
∆ Press the qr buttons or turn the  dial to
choose [Erase], then press the m button.
The displayed image will be erased.
∆ To exit instead of erasing, press the qr
buttons or turn the  dial to choose
[Cancel], then press the m button.
28

Shooting in Easy mode
In Easy mode, operational instructions are displayed on the screen, and the
camera is set so that only the buttons, the zoom lever and the movie button
(p. 31) explained on this page are functional. This prevents incorrect
operation of the camera, allowing even beginners to take worry-free pictures.
Enter 9 mode.
∆ Set the mode dial to 9.
Shoot.
∆ Follow Steps 3 – 5 on pages 24 – 25 to
shoot (no sound will play).
∆ If the indicator blinks orange and “Raise
the flash” appears on the screen, try
shooting with the flash. Try raising the
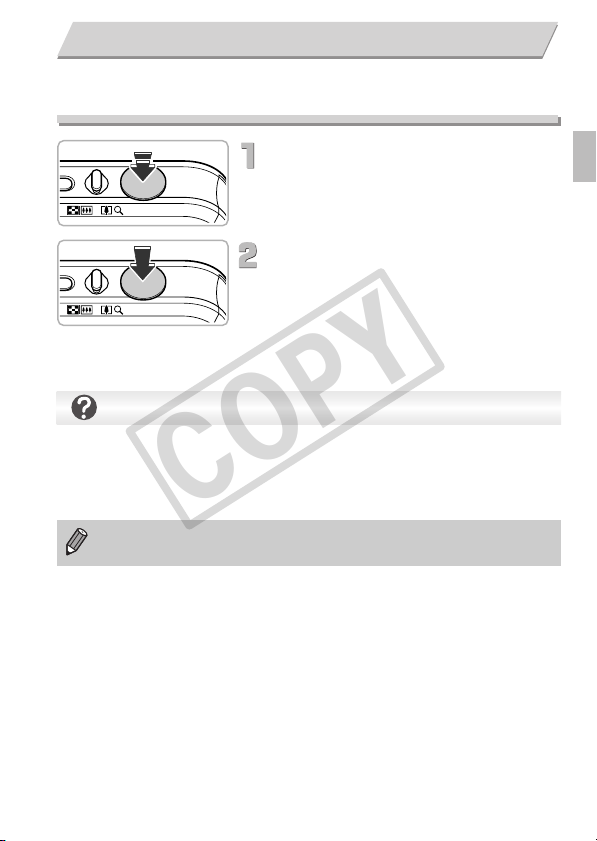
Turning Off the Flash
flash manually to shoot. The flash will
automatically fire when shooting.
Press the r button.
∆ The flash turns off and ! appears.
∆ Pressing r again displays on the
screen, and the flash will automatically fire
in low light conditions.
29
Viewing or Erasing in Easy mode
In Easy mode, operational instructions are displayed on the screen, and the
camera is set so that only the buttons explained on this page are functional.
This prevents incorrect operation of the camera, allowing even beginners to
view and erase images without worry.
Viewing Single Images
Choose an image.
∆ Press the 1 button, then press the qr
buttons or turn the  dial to switch
images.
Viewing Slideshows
Start the slideshow.
Press the 1 button, then press the m
button, and all the shots you have taken
will display for about 3 seconds each.
∆ Press the m button again to stop the
slideshow.
Erase the image.
Choose an image to erase.
∆ Press the 1 button, then press the qr
buttons or turn the  dial to display the
image you want to erase.
Erase the image.
∆ Press the p button, then press the qr
buttons or turn the  dial to choose
[Erase] and press the m button.
The chosen image will be erased.
30

Shooting Movies
The camera can automatically select all settings so that you can shoot movies
just by pressing the movie button. The audio will record in stereo.
If you continue shooting for a long time, the camera may become warm. This
is not a malfunction.
Choose A mode.
∆ Set the mode dial to A.
Shooting Time
Compose the shot.
∆ Moving the zoom lever toward i will
zoom in on your subject, making it appear
Elapsed Time
larger. Moving the lever toward j will
zoom out from your subject, making it
appear smaller.
Shoot.
∆ Press the movie button.
The camera will beep once, recording will
start, and [ Rec] and the elapsed time will
appear on the screen.
∆ Once shooting begins, take your finger off
the movie button.
∆ If you change the composition of your shot
during shooting, the focus, brightness and
tone will automatically adjust.
31

Shooting Movies
∆ You can also zoom in and out with the
zoom lever during shooting.
∆ Do not touch the microphone while
shooting.
Microphone
∆ Do not press any buttons other than the
movie button while shooting. The sound
the buttons make will be recorded in the
movie.
Finish shooting.
∆ Press the movie button again.
The camera will beep twice and stop
shooting the movie.
The movie will record to the memory card.
Shooting will automatically stop when the
memory card fills.
• When the mode dial is set to A, the icon for the determined scene will
appear (p. 25). However, “When Moving” icons will not appear even if
people move. Different scene icons will appear. Under certain
conditions, the icon that appears may not match the actual scene.
• If you change the composition while shooting so the optimum white
balance is not possible, press the movie button, to stop recording, then
start recording again.
• Movies can be shot by pressing the movie button even when the mode
dial is in positions other than A (p. 101).
• When the mode dial is set to E, you can set each setting for shooting
movies (p. 101).
Estimated Shooting Times
Memory Card
Shooting Time
• Shooting times are based on default settings.
• Maximum clip length is approx. 29 min. 59 sec..
• Recording may stop even if the maximum clip length has not been reached on some
memory cards. SD Speed Class 4 or higher memory cards are recommended.
4GB
20 min. 43 sec. 1 hr. 24 min. 54 sec.
16GB
32

Viewing Movies
You can view the movies you have shot on the screen.
Enter Playback mode.
∆ Press the 1 button.
The last image you took will appear.
appears on movies.
Choose a movie.
∆ Press the qr buttons or turn the  dial to
choose a movie, then press the m button.
Play the movie.
∆ Press the op buttons or turn the  dial
to choose , then press the m button
again.
The movie will play.
∆ If you press the m button again the movie
will pause, and the movie control panel will
appear. Press the qr buttons or turn the
 dial to choose (Play), then press
the m button to resume playback.
∆ Press the op buttons to adjust the
volume.
After the movie finishes, appears.
Movie Control Panel
What if you can’t play back movies on a computer?
• Install the included software (p. 35).
• When watching a movie on a computer, frames may drop, it may not play
smoothly, and the audio may stop suddenly depending on the computer’s
capabilities.
• If you use the supplied software to copy the movie back onto the memory card,
you can play back the movie smoothly with the camera. For enhanced playback
you can also connect the camera to a TV.
33

Transferring Images to a Computer for Viewing
You can use the included software to transfer images you have shot with the
camera to a computer for viewing.
If you are already using ZoomBrowser EX/ImageBrowser, install the software
from the included CD-ROM, overwriting your current installation.
System Requirements
Windows
OS
Computer model The above OS should be pre-installed on computers with built-in
CPU
RAM
Interface
Free Hard Disk
Space
Display
* For Windows XP, Microsoft .NET Framework 3.0 or later (max. 500MB) must be
installed. Installation may take some time depending on your computer’s capabilities.
Macintosh
OS
Computer model The above OS should be pre-installed on computers with built-in
CPU
RAM
Interface
Free Hard Disk
Space
Display 1,024 x 768 pixels or higher
Windows 7
Windows Vista (including Service Pack 1 and 2)
Windows XP Service Pack 2, Service Pack 3
USB ports.
Viewing images Pentium 1.3GHz or higher
Viewing movies Core2 Duo 1.66GHz or higher
Windows 7 (64bit): 2GB or more
Windows 7 (32bit),
Windows XP: 512 MB or more (still images), 1 GB or more
(movies)
USB
ZoomBrowser EX: 200MB or more*
PhotoStitch: 40MB or more
1,024 x 768 pixels or higher
Windows Vista: 1GB or more
Mac OS X (v10.4 – v10.6)
USB ports.
Viewing images PowerPC G4/G5 or Intel Processor
Viewing movies Core Duo 1.66GHz or higher
Mac OS X v10.4 – v10.5: 512 MB or more (still images), 1 GB or
more (movies)
Mac OS X v10.6: 1 GB or more
USB
ImageBrowser: 300 MB or more
PhotoStitch: 50 MB or more
34

Transferring Images to a Computer for Viewing
Preparations
Windows Vista and Mac OS X (v10.5) are used for these explanations.
Install the Software.
Windows
Place the CD in the computer’s CD-ROM
drive.
∆ Place the supplied CD-ROM (DIGITAL
CAMERA Solution Disk) (p. 2) into the
computer’s CD-ROM drive.
Begin installation.
∆ Click [Easy Installation] and follow the
on-screen instructions to proceed with the
installation.
If the [User Account Control] window appears,
∆
follow the on-screen instructions to proceed.
When the install finishes, click
[Restart] or [Finish].
Remove the CD-ROM.
∆
Remove the CD-ROM when your desktop
screen appears.
Macintosh
Place the CD in the computer’s
CD-ROM drive.
∆ Place the supplied CD-ROM (DIGITAL
CAMERA Solution Disk) (p. 2) into the
computer’s CD-ROM drive.
Begin installation.
∆ Double-click the on the CD.
Click [Install], and follow the on-screen
∆
instructions to proceed with the installation.
35

Transferring Images to a Computer for Viewing
Connect the camera to the
computer.
∆ Turn off the camera.
∆ Open the cover, and insert the cable’s
smaller plug firmly into the camera terminal
in the direction shown.
∆ Insert the cable’s larger plug into the
computer. For connection details, refer to
the user guide provided with the computer.
Turn on the camera.
∆ Press the 1 button to turn on the camera.
Open CameraWindow.
Windows
∆ Click [Downloads Images From Canon
Camera using Canon CameraWindow].
CameraWindow will appear.
∆
If CameraWindow does not appear, click the
[Start] menu and choose [AllPrograms],
followed by [Canon Utilities],
[CameraWindow], [CameraWindow] and
[CameraWindow].
Macintosh
CameraWindow will appear when you
establish a connection between the
camera and computer.
∆ If CameraWindow does not appear, click
the CameraWindow icon on the Dock (the
bar which appears at the bottom of the
desktop).
36

Transferring Images to a Computer for Viewing
For Windows 7, use the following steps to display CameraWindow.
• Click on the task bar.
• In the screen that appears, click the link to modify the program.
• Click [Downloads Images From Canon Camera using Canon
CameraWindow], then click [OK].
• Double click .
Transfer and View Images
∆ Click [Import Images from Camera], and
then click [Import Untransferred Images].
All images not previously transferred will
transfer to the computer. Transferred
images will be sorted by date and saved in
separate folders in the Pictures folder.
∆ When [Image import complete.] appears,
click [OK]. Click [X] to close
CameraWindow.
Turn off the camera and unplug the cable.
∆
∆ For details on how to view images using a
You can transfer images without installing the included software by simply
connecting your camera to a computer. There are, however, the following
limitations.
• It may take a few minutes from when you connect the camera to the
computer until you can transfer images.
• Movies will not transfer correctly.
• Images shot in the vertical position may be transferred in the horizontal
position.
• Protection settings for images may be lost when transferred to a
computer.
• There may be problems transferring images or image information
correctly depending on the version of the operating system in use, the
file size, or the software in use.
computer, refer to the Software Guide.
37

Accessories
Supplied with Camera
Wrist Strap
WS-DC9
DIGITAL CAMERA
Solution Disk
STEREO AV CABLE
AVC-DC400ST
See the user guide supplied with the printer for more information on the
printer and interface cables.
*
Interface Cable
IFC-400PCU
*
Canon-Brand PictBridge Compliant Printers
TV/Video
Battery Pack NB-5L
(with Terminal Cover)
Memory Card
SELPHY series
*Also available for purchase separately.
Card Reader
Battery Charger
*
CB-2LX/CB-2LXE
Windows/Macintosh
PIXMA series
*
38
High-Definition TVHDMI Cable HTC-100

Separately Sold Accessories
The following camera accessories are sold separately. Some accessories are
not sold in some regions,or may no longer be available.
Power Supplies
AC Adapter Kit ACK-DC30
This kit lets you power the camera using
household power. Recommended for powering
the camera for an extended period of time or
when connecting to a computer or printer.
Cannot be used to charge the battery inside the
camera.
Battery Charger CB-2LX/CB-2LXE
An adapter for charging Battery Pack NB-5L.
Battery Pack NB-5L
Rechargeable lithium-ion battery.
CAUTION
RISK OF EXPLOSION IF BATTERY IS REPLACED BY AN INCORRECT TYPE.
DISPOSE OF USED BATTERIES ACCORDING TO LOCAL REGULATION.
Using Accessories Abroad
The battery charger and the AC adapter kit can be used in regions that have 100 240 V (50/60 Hz) AC power. If the plug does not fit the outlet, use a commercially
available plug adapter. Do not use electrical transformers for foreign travel as they
will cause damage.
Flash
High-Power Flash HF-DC1
This attachable supplementary flash can be
used to capture photographic subjects that are
too distant for the built-in flash to illuminate.
39

Separately Sold Accessories
Other Accessories
HDMI Cable HTC-100
Use this cable to connect the camera to the
HDMI™ terminal on a high-definition TV set.
Printers
Canon-Brand PictBridge Compliant
Printers
By connecting your camera to one of the
SELPHY series
PIXMA series
Use of genuine Canon accessories is recommended.
This product is designed to achieve excellent performance when used with genuine
Canon accessories. Canon shall not be liable for any damage to this product and/or
accidents such as fire, etc., caused by the malfunction of non-genuine Canon
accessories (e.g., a leakage and/or explosion of a battery pack). Please note that this
warranty does not apply to repairs arising out of the malfunction of non-genuine Canon
accessories, although you may request such repairs on a chargeable basis.
Canon-brand PictBridge compliant printers
below, you can print your images without having
to use a computer.
For more information, visit your nearest Canon
retailer.
40

2
Learning More
This chapter explains the parts of the camera and what appears on the
screen, as well as the basic operating instructions.
41

Components Guide
Indicator (pp. 62, 68, 150)
Lens
Speaker
Shutter Button (p. 23)
Zoom Lever
Shooting: i (Telephoto) / j (Wide
Angle) (pp. 24, 31, 65)
Playback: k (Magnify) / g (Index)
(pp. 110, 116)
Power Button (p. 19)
Microphone (p. 32)
Flash (pp. 24, 29, 64, 71)
Tripod Socket
DC Coupler Terminal Cover (p. 156)
Memory Card / Battery Cover (p. 17)
Strap Mount (p. 13)
Mode Dial
Use the mode dial to change the Shooting mode.
P, Tv, Av, M Mode
You can make settings such as the
shutter speed and aperture value in order
to take the kind of picture you want
(pp. 70, 90, 91, 92).
Auto Mode
You can leave it to the camera
to select settings (p. 24).
Easy Mode
You can shoot just by pressing
the shutter button (p. 29).
If you turn the mode dial while in Playback mode, the camera will switch to
Shooting mode.
Movie Mode
For shooting movies (p. 102).
You can use the largest possible
portion of the screen to shoot movies
(p. 103). Even if the mode dial is set
to a position other than Movie mode,
movies can be shot by pressing the
movie button (pp. 31, 101).
Scene Mode
You can shoot with the best settings
for the scene (p. 54) or choose
settings yourself to take various
types of pictures (p. 55).
42

Components Guide
Screen (LCD Monitor) (pp. 44, 164, 165)
Indicator (p. 45)
Mode Dial (p.31)
HDMI Terminal (p.118)
A/V OUT (Audio/Video Output) / DIGITAL
Terminal (pp. 36, 117, 136)
Movie Button (pp. 31, 153) / c
Print) (pp. 13 7, 138)
1 (Playback) Button ( pp. 27, 30, 33, 109)
n Button (p. 47)
(Direct
Control Dial
(Display) Button (p. 44)
l
b
Exposure Compensation (p. 70) /
o
Button
e
(Macro) (p. 71) / f (Manual Focus)
q
Button
(p. 87) /
Control Dial
m
FUNC./SET (Function/Set) button
(p. 46)
h
(Flash) (pp. 64, 71, 89) / r Button
Q
(Self-Timer) (pp.68, 78, 79) /
a
(Single Image Erase) (pp.28 ,30) /
Button
p
Turning the control dial allows you to
perform operations such as choosing
items or switching images. Except for a
few operations, the same operations are
possible with the opqrbuttons.
If you touch the control dial in shooting
mode, a button description displays on the
screen. When you switch to playback
mode, hints and tips will display for a few
seconds.
43

Screen Display
Switching the Display
You can change the screen display using the l button. Refer to pp. 164,
165 for details on information that appears on the screen.
Shooting
Playback
No Information
Display
Information Display No Information
Simple Information
Display
Detailed Information
Display
Display
You can also switch the display by pressing the l button while the
image displays shortly after shooting. However, Simple Information
Display is not available. You can change the display that appears first by
pressing the n button to choose the 4 tab, then setting [Review Info]
(p. 151).
44
Focus Check
Display (p. 115)

Indicator
Screen Display in Dark Shooting Conditions
The display automatically brightens when shooting in dark conditions, allowing
you to check the composition (Night Display function). However, the brightness of
the image on the screen, and the brightness of the actual image recorded may be
different. Screen noise may appear and the movement of the subject may appear
somewhat jagged on the screen. This has no effect on the recorded image.
Overexposure Warning during Playback
In “Detailed Information Display” (pp. 44, 165), overexposed areas of the
image flash on the screen.
Histogram during Playback
∆
The graph that appears in “Detailed
Information Display”
the histogram. The histogram shows the
distribution of brightness in an image
horizontally, and the amount of brightness
vertically. When the graph approaches the
right side, the image is bright, but when it
approaches the left side, the image is dark,
and in this way you can judge the exposure.
(pp.
44, 165) is called
Dark
High
Low
Bright
Indicator
The indicator on the back of the camera (p. 43) will light or blink depending
on the camera’s status.
Colors Status Operation Status
Green
Orange
When the indicator blinks green, data is being recorded to/read from the memory
card or various information is being transmitt ed. Do not turn off the power, open the
memory card slot/battery cover, shake or jolt the camera. These actions may
corrupt the image data or cause the camera or memory card to malfunction.
Lights Shooting preparation complete/Display off
Blinks Recording/reading/transmitting image data
Lights Shooting preparation complete (flash on)
Blinks Camera shake warning (pp. 26, 64)
(pp. 147, 153)
45

FUNC. Menu – Basic Operations
Commonly used shooting functions can be set with the ø menu. The
menu items and options differ depending on the mode (p. 166). You can also
use the ø menu in Playback mode.
Choose a shooting mode.
∆ Set the mode dial to the desired shooting
mode.
Display the ø menu.
∆ Press the m button.
Choose a menu item.
∆ Press the op buttons or turn the  dial
to choose a menu item, then press the m
or r buttons.
Available Options
Menu Items
∆ Depending on the menu, the screen and
menu items may switch.
Choose an option.
∆ Press the op buttons or turn the  dial
to choose an option.
∆ You can also choose settings by pressing
the l button on options that display
.
∆ To return to the menu, press the q button.
46
Complete the setting.
∆ Press the m button.
The shooting screen will reappear and the
setting you chose will display on the screen.

MENU – Basic Operations
Various functions can be set from the menus. The menu items are organized
under tabs, such as for shooting (4) and playback (1). The available menu
items differ depending on the mode (p. 168).
Display the menu.
∆ Press the n button.
Choose a tab.
∆ Press the qr buttons, or move the zoom
lever (p. 42) left or right to choose a tab.
Choose a menu item.
∆ Press the op buttons or turn the  dial
to choose a menu item.
∆ Some items require you to press the m
button or r button to display a submenu in
which you change the setting.
Choose an option.
∆ Press the qr buttons to choose an option.
Complete the setting.
∆ Press the n button.
The normal screen will reappear.
47

Changing the Sound Settings
You can silence or adjust the volume of camera sounds.
Muting Sounds
Display the menu.
∆ Press the n button.
Choose [Mute].
∆
Press the qr buttons to choose the 3 tab.
∆ Press the op buttons or turn the  dial
to choose [Mute], then press the qr
buttons to choose [On].
∆ Press the n button again to accept
the setting.
Adjusting the Volume
Display the menu.
∆ Press the n button.
Choose [Volume].
∆
Press the qr buttons to choose the 3 tab.
∆
Press the op buttons or turn the  dial to
choose [Volume], then press the
m
button.
48
Change the volume.
∆Press the op buttons or turn the  dial
to choose an item, then press the qr
buttons to adjust the volume.
∆ Pressing the n button twice will
restore the normal screen.

Changing the Screen Brightness
The screen brightness can be changed in two ways.
Using the Menu
Display the menu.
∆ Press the n button.
Choose [LCD Brightness].
∆
Press the qr buttons to choose the 3 tab.
∆ Press the op buttons or turn the  dial
to choose [LCD Brightness].
Change the brightness.
∆ Press the qr buttons to change the
brightness.
∆ Pressing the n button twice will
restore the normal screen.
Using the l Button
∆ Press the l button for more than one
second.
The screen increases to maximum
brightness regardless of the setting in the
3 tab.
∆ Pressing the l button again for more
than one second will return the screen to
the original brightness.
• The next time you turn on the camera, the screen will be at the
brightness setting chosen in the 3 tab.
• When you have set the brightness to its highest setting in the 3 tab, you
cannot change the brightness with the l button.
49

Returning the Camera to Default Settings
When you have mistakenly changed a setting, you can reset the camera to the
default settings.
Display the menu.
∆ Press the n button.
Choose [Reset All].
∆ Press the qr buttons to choose the 3
tab.
∆ Press the op buttons or turn the  dial
to choose [Reset All], then press the m
button.
Reset the settings.
∆ Press the qr buttons or turn the  dial to
choose [OK] and press the m button.
The camera will reset to the default
settings.
Are there functions that cannot be reset?
• The [Date/Time] (p. 20) in the 3 tab, [Language] (p. 21), [Video System]
(p. 117), [Time Zone] (p. 148), and the image registered in [Start-up Image]
(p. 145).
• The saved data for custom white balance (p. 75).
• Colors that were chosen in Color Accent (p. 97) or Color Swap (p. 98).
• Scene modes set with K. (p. 55)
50

Low Level Memory Card Formatting
Perform low level formatting when you think that the recording/reading speed
of a memory card has dropped. Performing a low-level format on (initializing)
a memory card erases all data on the memory card. As you cannot retrieve
the erased data, exercise adequate caution before performing a low-level
format on the memory card.
Display the menu.
∆ Press the n button.
Choose [Format].
∆
Press the qr buttons to choose the 3 tab.
∆ Press the op buttons or turn the Â
dial to choose [Format], then press the m
button.
Perform the low level format.
∆ Press the op buttons or turn the  dial
to choose [Low Level Format], then press
the qr buttons to display .
∆ Press the opqr buttons or turn the Â
dial to choose [OK], then press the m
button.
A confirmation screen will appear.
∆ Press the op buttons or turn the  dial
to choose [OK], then press the m button.
When low level formatting ends, [Memory
card formatting complete] will appear.
∆ Press the m button.
About low level formatting
When the [Memory card error] message appears, or when the camera does not
work correctly, low level formatting the memory card may solve the problem. Copy
the images from the memory card to a computer or other device before low level
formatting.
51

Power Saving Function (Auto Power Down)
• Low level formatting may take longer than standard formatting, since all
recorded data are erased.
• You can stop a low level format of a memory card by choosing [Stop].
When stopping low level formatting, the data will be erased but the
memory card can be used without problem.
Power Saving Function (Auto Power Down)
To save battery power, the camera shuts down automatically when it is not
operated for a certain time.
Power Saving during Shooting
The screen will turn off approximately 1 minute after the camera is last operated.
After about 2 more minutes, the lens will retract and the power will turn off. When
the screen has turned off but the lens has not yet retracted, pressing the shutter
button halfway (p. 23) turns on the screen and shooting can continue.
Power Saving during Playback
The power will turn off approximately 5 minutes after the camera is last
operated.
• You can turn off the Power Saving Function (p. 147).
• You can adjust the time before the screen turns off (p. 147).
Clock Functions
You can check the current time.
∆ Press and hold the m button.
The current time appears.
If you hold the camera vertically while using
∆
the clock function, it will switch to vertical
display. Press the
Â
dial to change the display color.
∆ Press the m button to cancel the clock
display.
When the camera power is off, press and hold the m button, then press
the power button to display the clock.
52
qr
buttons or turn the

3
Shooting in Special
Conditions and Commonly Used
Functions
This chapter explains how to shoot in different conditions, as well as
how to use common functions, such as the self-timer.
• When you choose a Shooting mode that matches a particular set of
conditions, the camera will automatically select any necessary settings. All
you need do is press the shutter button to take an optimized picture.
• This chapter assumes the mode dial is set to A for the sections “Turning
the Flash Off” (p. 64) to “Using the Self-Timer” (p. 68). When shooting in a
mode other than A, check which functions are available in that mode
(pp. 166 – 168).
53

Shooting in Various Conditions
The camera will select the necessary settings for the conditions in which you
wish to shoot when you choose the matching mode.
Choose a shooting mode.
∆ Set the mode dial to the desired Shooting
mode.
Shoot.
I Take portraits (Portrait)
∆ Produces a soft effect when
photographing people.
JTake landscapes (Landscape)
∆ Lets you shoot majestic landscapes with a
real sense of depth.
F Take snapshots at night
(Night Snapshot)
∆ Lets you take beautiful snapshots of city
nightscapes or people against night
backgrounds.
∆ If you hold the camera firmly, you can take
pictures with reduced camera shake, even
without a tripod.
CTake shots of kids and pets
(Kids&Pets)
∆ Lets you capture subjects that move
around, such as children and pets, without
missing photo opportunities.
54

Shooting in Special Scenes
H Take indoor shots (Indoor)
∆ Lets you shoot indoors with natural colors.
In F, C or H mode, images may appear coarse because the ISO speed
(p. 74) is increased to match the shooting conditions.
Shooting in Special Scenes
The camera will select the necessary settings for the conditions in which you
wish to shoot when you choose the matching mode.
Enter SCN mode.
∆ Set the mode dial to K.
Choose a shooting mode.
∆ After pressing the m button, press the
op buttons or turn the  dial to choose
, then press the m button again.
∆ Press the op or turn the  dial to
choose the desired mode, then press the
m button.
Shoot.
55

Shooting in Special Scenes
Take shots in low light conditions
(Low Light)
∆ Depending on the scene, the ISO speed
will be set higher and the shutter speed
faster than in A mode so that you can
shoot in dark places with reduced camera
shake and subject blur.
A recording pixel setting of D will display, and
∆
the image will be fixed at 2144 x 1608 pixels.
w Take shots of people at the beach
(Beach)
∆ Lets you take shots of brightly lit people on
sandy beaches where the reflected
sunlight is strong.
Take shots of foliage (Foliage)
O
∆ Lets you shoot trees and leaves, such as
new growth, autumn leaves or blossoms,
in vivid colors.
Take shots of people in snow (Snow)
P
∆ Lets you take bright, natural-colored shots
of people against snowy backgrounds.
Take shots of fireworks (Fireworks)
t
∆ Lets you take shots of fireworks in vivid
colors.
In t mode, attach the camera to a tripod to prevent the camera from
moving and blurring the image. Additionally, you should set [IS Mode] to
[Off] (p. 152).
56

Shooting in Special Scenes
Modes for other scenes
In addition to the modes explained here, the following scene modes are also
available.
•
Smart Shutter
— Smile (p. 60)
— Wink Self-Timer (p. 61)
— Face Self-Timer (p. 62)
T
• Color Accent (p. 97)
Y
• Color Swap (p. 98)
• Fish-eye Effect (p. 58)
• Miniature Effect (p. 59)
• x v Stitch Assist (p. 100)
57

Adding Effects and Shooting
You can add various effects to images when shooting.
Shoot with the Effects of a Fish-Eye Lens
(Fish-eye Effect)
Lets you shoot with the distorting effect of a fish-eye lens.
Choose .
∆ Follow Steps 1 – 2 on p. 55 to choose .
Choose an effect level.
∆ Press the l button.
[Effect Level] will appear on the screen.
∆ Press the qr buttons or turn the  dial to
choose an effect level, then press the
l button.
You can check the effect on the screen.
Shoot.
Since you may not achieve the expected results depending on the
shooting conditions, try taking some test shots first.
58

Adding Effects and Shooting
Take Shots That Look Like a Miniature Model (Miniature Effect)
Blurs chosen portions in the top and bottom of an image to produce the effect
of a miniature model.
Choose .
∆ Follow Steps 1 – 2 on p. 55 to choose .
Choose the area to keep in focus.
∆ Press the l button.
A white frame (the area that will not be
blurred) appears on the screen.
∆ Move the zoom lever to change the frame
size, and press the op buttons to change
the frame position.
∆ Pressing the l button restores the
settings screen.
Shoot.
• Holding the camera vertically will change the orientation of the frame.
• Since you may not achieve the expected results depending on the
shooting conditions, try taking some test shots first.
59

Detecting a Smile and Shooting
The camera will shoot, even without pressing the shutter button, when it
detects a smile.
Choose .
∆ Follow Steps 1 – 2 on p. 55 to choose ,
then press the l button.
∆ Press the qr buttons or turn the  dial to
choose and press the l button.
The camera will enter shooting stand-by,
and [Smile Detection on] will appear on the
screen.
∆ Each time the camera detects a smile it will
shoot after the lamp lights.
∆ Pressing the p button will pause smile
detection. Press the p button again to
resume smile detection.
What if a smile is not detected?
Smiles are easier to detect if the subject faces the camera, and opens their mouth
enough to show some teeth when smiling.
Changing the number of shots
Press the l button, then press the op buttons to choose the number of
shots. Press the l button to change the setting.
• You should switch to another mode when you finish shooting, or the
camera will continue taking shots each time the camera detects a smile.
• You can also shoot by pressing the shutter button.
60

Using the Wink Self-Timer
Point the camera at the subject and press the shutter button fully. The camera
will shoot approximately two seconds after it detects a wink.
Choose .
∆ Follow Steps 1 – 2 on p. 55 to choose ,
then press the l button.
∆ Press the qr buttons or turn the  dial to
choose , then press the m button.
Compose the shot and press the
shutter button halfway.
∆
Confirm that a green frame appears around
the face of the person who will wink.
Press the shutter button fully.
The camera will enter shooting stand-by,
and [Wink to take picture] will appear on
the screen.
Face the camera and wink.
What if a wink is not detected?
• Wink a bit slowly.
• A wink may not be detected if eyes are covered by hair or a hat, or when wearing
glasses.
The shutter will release approximately 2
seconds after a wink is detected from the
person with a frame around the person’s face.
∆
To cancel the countdown, press the p button.
Changing the number of shots
For the screen in Step 1, press the l button, then press the op buttons to
change the number of shots. Press the l button to accept the setting.
61

Using the Face Self-Timer
• Shutting both eyes will also be detected as a wink.
• If a wink is not detected, the shutter will release approximately 15
seconds later.
• If there are no people in the shot when the shutter button is pressed fully,
the camera will shoot after a person enters the shot and winks.
Using the Face Self-Timer
To take a photo that includes the photographer, such a group photo, compose
the shot, and press the shutter button. The camera will shoot two seconds
after you enter the shot and it detects your face (p. 82).
Choose .
∆ Follow Steps 1 – 2 on p. 55 to choose ,
then press the l button.
∆ Press the qr buttons or turn the  dial to
choose , then press the l button.
Compose the shot and press the
shutter button halfway.
∆ Make sure a green frame appears on the
face focused on and white frames appear
on other faces.
Press the shutter button fully.
The camera will enter shooting stand-by,
and [Look straight at camera to start count
down] will appear on the screen.
The lamp will blink and the self-timer sound
will play.
62

Using the Face Self-Timer
Join the subjects and look at the
camera.
When the camera detects a new face, the
lamp and sound will speed up (the lamp
remains lit when the flash will fire), and two
seconds later the shutter will release.
∆ To cancel shooting with the timer after
countdown has started, press the p
button.
Changing the number of shots
For the screen in Step 1, press the l button, then press the op buttons to
change the number of shots. Press the l button to accept the setting.
Even if your face is not detected after joining the subjects, the shutter will
release approximately 15 seconds later.
63

Turning the Flash Off
You can shoot with the flash turned off.
Press the r button.
Choose !.
∆ Press the qr buttons or turn the  dial to
choose !, then press the m button.
Once set, ! will appear on the screen.
∆ Follow the steps above to return the setting
to .
What if the indicator blinks orange and a flashing appears?
When you press the shutter button halfway in low light conditions where camera
shake is likely, the indicator will blink orange and a flashing will appear on the
screen. Attach the camera to a tripod to prevent it from moving.
! will also appear if you manually lower the flash.
64

Zooming in More Closely on Subjects (Digital Zoom)
You can use the digital zoom to zoom up to a maximum of 56x and capture
subjects that are too far away for the optical zoom to enlarge. The images
may appear coarse, however, depending on the recording pixel setting (p. 72)
and the zoom factor used.
Move the zoom lever toward i.
∆ Hold the lever until zooming stops.
The zoom will stop when the largest
possible zoom factor without image
deterioration has been reached, and the
zoom factor will appear.
Zoom Factor
What if the zoom factor appears in blue?
Images shot at zoom factors that appear in blue will be coarse.
Turning off the digital zoom
To turn off the digital zoom, press the n button, choose the 4 tab, and
choose [Digital Zoom] and the [Off] option.
Move it toward i again.
The digital zoom will zoom in even further
on the subject.
The equivalent focal length when using the optical zoom is 28 — 392 mm,
and the equivalent focal length when using the digital zoom is 392 1568 mm (35mm film equivalent).
65

Zooming in More Closely on Subjects (Digital Zoom)
Digital Tele-Converter
The focal length of the lens can be increased by an equivalent of 1.7x or 2.1x.
This enables a faster shutter speed and less chance of camera shake than
the zoom (including digital zoom) used by itself at the same zoom factor.
The images may appear coarse, however, depending on the combination of
recording pixel (p. 72) and digital tele-converter settings used.
Choose [Digital Zoom].
∆ Press the n button.
∆ Press the qr buttons to choose the 4
tab.
∆ Press the op buttons or turn the  dial
to choose [Digital Zoom].
Make the setting.
∆ Press the qr buttons to choose a
magnification.
∆ Pressing the n button will restore the
What if the zoom factor appears in blue?
• Using [1.7x] at a recording pixel setting of or will cause image
deterioration (the zoom factor will appear in blue).
• Using [2.1x] at a recording pixel setting of , or will cause image
deterioration (the zoom factor will appear in blue).
shooting screen.
The view will be enlarged and the zoom
factor will appear on the screen.
∆ To return to standard digital zoom, choose
[Digital Zoom] and the [Standard] option.
• The respective focal lengths when using [1.7x] and [2.1x] are 47.6 –
666.4 mm and 58.8 – 823.2 mm (35mm film equivalent).
• The digital tele-converter cannot be used together with the digital zoom.
66

Inserting the Date and Time
You can insert the shooting date and time in the lower right corner of an
image. Once inserted, however, they cannot be deleted. Be sure to check
beforehand that the date and time are correctly set (p. 19).
Choose [Date Stamp].
∆ Press the n button.
∆ Press the qr buttons to choose the 4
tab.
∆ Press the op buttons or turn the  dial
to choose [Date Stamp].
Make the setting.
∆ Press the qr buttons to choose [Date] or
[Date & Time].
∆ Pressing the n button will restore the
shooting screen.
Once set, [DATE] will appear on the screen.
Shoot.
The shooting date or time will be recorded
in the image’s lower right corner.
∆ To restore to the original setting, choose
[Off] in Step 2.
You can insert and print the shooting date in images which do not have an
embedded date and time as follows. However if you do this for images with
an embedded date and time, the date and time will be printed twice.
• Use the DPOF print settings (p. 140) to print.
• Use the included software to print.
Refer to the Software Guide for details.
• Print using printer functions.
Refer to the Personal Printing Guide for details.
67

Using the Self-Timer
The self-timer can be used to shoot a group photo that includes the
photographer. The camera will activate approximately 10 seconds after the
shutter button is pressed.
Press the p button.
Choose Ò.
∆ Press the op buttons or turn the  dial
to choose Ò, then press the m button.
Once set, Ò will appear.
Shoot.
∆ Press the shutter button halfway to focus
You can change the delay time and number of shots (p. 79).
on the subject, then press it fully.
When the self-timer starts, the lamp blinks
and the self-timer sound plays.
Two seconds before the shutter releases,
the lamp and sound speed up (the lamp
remains lit when the flash will fire).
∆ To cancel shooting with the timer after
countdown has started, press the p
button.
∆ To restore to the original setting, choose
in Step 2.
68

4
Choosing Settings Yourself
In this chapter you will learn how to use the various functions in G
mode to progressively advance your shooting skills.
• This chapter assumes that the mode dial is set to G.
• G stands for Program AE.
• Before attempting to shoot using a function explained in this chapter in
modes other than G mode, check if the function is available in those modes
(pp. 166 – 169).
69

Shooting in Program AE
You can choose the settings for various functions to suit your preferences.
AE stands for Auto Exposure.
Set the mode dial to G.
Adjust the settings according to
your purposes (pp. 70 – 80).
Shoot.
What if the shutter speed and aperture value appear in orange?
If a correct exposure cannot be obtained when pressing the shutter button
halfway, the shutter speed and aperture value are shown in orange. Try the
following settings to obtain the correct exposure.
• Turn on the flash (p. 71)
• Choose a higher ISO speed (p. 74)
Adjusting the Brightness (Exposure Compensation)
You can adjust the standard exposure set by the camera in 1/3-stop
increments in the range of –2 to +2.
70
Enter Exposure Compensation
mode.
∆ Press the o button.
Adjust the brightness.
∆ While watching the screen, turn the  dial
to adjust the brightness and press the o
button.
The exposure compensation amount will
appear on the screen.

Turning the Flash On
You can make the flash fire every time you shoot. At maximum wide angle,
the flash range is approximately 75 cm – 3.5 m (2.5 – 11.5 ft.), and at
maximum telephoto, it is 1.0 – 2.0 m (3.3 – 6.6 ft.)
Choose h.
∆ After pressing the r button, press the qr
buttons or turn the  dial to choose h,
then press the m button.
Once set, h will appear.
The setting screen does not appear even when you press r.
The flash is lowered. Raise the flash manually.
Changing the Focus Range (Macro)
When it is difficult to focus because your shot contains subjects that are both
near and far, you can change the focus range (the distance range from your
subject) to focus more reliably.
e 5 – 50 cm (2.0 in. – 1.6 ft.)*Only focuses on close subjects.
* When the zoom lever is moved toward j and held until the lens stops moving, which
is the maximum wide angle setting of the lens.
Shooting Range Description
The edges of the image may darken if the flash fires in macro shooting.
For macro shooting, e will turn gray in the area that displays in the yellow
bar underneath the zoom bar, and the camera will not focus.
Choose e.
∆ After pressing the q button, press the qr
buttons or turn the  dial to choose e,
then press the m button.
Once set, e will appear.
71

Changing the Recording Pixel Setting (Image Size)
You can choose from six recording pixels (image size) settings.
Choose the recording pixel setting.
∆ After pressing the m button, press the
op buttons or turn the  dial to choose
, then press the m button.
Choose an option.
∆
Press the op buttons or turn the  dial to
choose an option, then press the
The setting you chose will display on the
screen.
• If you choose you cannot use Digital Zoom (p. 65) or Digital Tele-
Converter (p. 66).
• If you press the movie button, when the camera is set to , the aspect
ratio of the display will change and recording will begin (when set to
or (p. 103)).
Changing the Compression Ratio (Image Quality)
m
button.
You can choose from the following two levels of compression ratio (image
quality): (Fine), (Normal).
72
Choose the compression ratio
setting.
∆ After pressing the m button, press the
op buttons or turn the  dial to choose
, then press the m button.
Choose an option.
∆
Press the op buttons or turn the  dial to
choose an option, then press the
The setting you chose will display on the
screen.
m
button.

Changing the Compression Ratio (Image Quality)
Approximate Values for Recording Pixels and Compression
Ratio
sion
Ratio
Single Image
Data Size
(Approx. KB)
3597 1058 4334
1719 2194 8985
2302 1652 6769
1100 3352 13727
1395 2681 10981
695 5247 21486
558 6352 26010
278 12069 49420
150 20116 82367
84 30174 123550
2700 1403 5746
1291 2873 11766
∆ Suitable for sending images as e-mail
attachments.
∆ For printing on wide size paper.
Recording Pixels
(Large)
14M/4320×3240
(Medium 1)
9M/3456×2592
(Medium 2)
5M/2592×1944
(Medium 3)
2M/1600×1200
(Small)
0.3M/640×480
(Widescreen)
4320×2432
• The values in the table are measured according to Canon standards and may change
depending on the subject, memory card and camera settings.
Approximate Values for Paper Size
A2
A3
A4, Letter size
5″ x 7″
Postcard size
3.5″ x 5″
Compres-
Number of Recordable Images
4GB 16GB
73

Changing the ISO Speed
Choose the ISO speed.
∆ After pressing the m button, press the
op buttons or turn the  dial to choose
, then press the m button.
Choose an option.
∆ Press the op buttons or turn the  dial
to choose an option, then press the m
button.
The setting you chose will display on the
screen.
Automatically adjusts the ISO speed to the Shooting mode and shooting
conditions.
Fine weather conditions, outdoor shooting
Low
Cloudy, Twilight
High
Nightscapes, Dark interiors
Changing the ISO speed
• Lowering the ISO speed results in sharper images, but there may be an
increased chance of image blurring in certain shooting conditions.
• Raising the ISO speed results in a faster shutter speed, reducing camera shake
and letting the flash reach greater distances to the subject. The images,
however, will appear coarse.
• When the camera is set to , you can press the shutter button halfway
to display the automatically set ISO speed.
• In (p. 56), ISO speeds will automatically be set higher than in A
mode, depending on the scene.
74

Adjusting the White Balance
The white balance (WB) function sets the optimal white balance for natural
looking colors to match the shooting conditions.
Choose the white balance function.
∆ After pressing the m button, press the
op buttons or turn the  dial to choose
, then press the m button.
Choose an option.
∆
Press the op buttons or turn the  dial to
choose an option, then press the
The setting you chose will display on the
screen.
Auto
Day Light Fine weather conditions, outdoor shooting
Cloudy Cloudy, shady, twilight conditions
Tungsten Tungsten, bulb-type (3-wavelength) fluorescent lighting
Fluorescent
Fluorescent H
Manual Manually sets a custom white balance.
Automatically sets the optimal white balance for the shooting conditions.
Warm-white fluorescent, cool-white fluorescent, warm-white-type
(3-wavelength) fluorescent lighting
Daylight f luorescent, daylight-type (3-wav elength) f luorescent lighting
m
button.
Custom White Balance
You can adjust the white balance to the light source at the shooting location.
Make sure that you set the white balance under the light source of the actual
scene you will shoot.
∆ In Step 2 above, choose .
∆ Make sure the entire screen is filled with a
plain, white colored subject, then press the
l button.
The tint on the screen will change when a
white balance data is set.
If you change camera settings after recording white balance data, the tone
may not turn out properly.
75

Continuous Shooting
You can shoot continuously while the shutter button is pressed fully and held.
Choose a Drive mode.
∆ After pressing the m button, press the
op buttons or turn the  dial to choose
, then press the m button.
Choose an option.
∆ Press the op buttons or turn the  dial
to choose W or , then press the m
button.
Shoot.
As long as you hold the shutter button
down, the camera will shoot successive
images.
Drive Mode Description
W Continuous Shooting
Continuous Shooting AF
Continuous Shooting LV
• Cannot be used together with the self-timer (pp. 68, 78, 79).
• Continuous shooting speed increases in mode (p. 56).
• Depending on the shooting conditions and the camera settings, the
shooting speed may slow down.
• As the number of images increases, the shooting interval may take
longer.
• If the flash fires, the shooting interval may take longer.
• When in t (p. 56) or manual focus modes, will change to
(p. 87).
Approx.
0.7 images/sec., max.
Approx.
0.5 images/sec., max.
Approx.
0.5 images/sec., max.
The camera shoots continuously with
the focus and exposure set when the
shutter button is pressed halfway.
The camera shoots continuously
and focuses.
The [AF Frame] is set to [Center].
The camera shoots continuously
with the focus fixed to the position
set in manual focus.In t, the focus
is locked on the first shot.
76

Changing the Tone of an Image (My Colors)
You can change the tone of an image to sepia or black and white when
shooting.
Choose My Colors.
∆ After pressing the m button, press the
op buttons or turn the  dial to choose
, then press the m button.
Choose an option.
∆
Press the op buttons or turn the  dial to
choose an option, then press the
The setting you chose will display on the
screen.
My Colors Off —
Vivid
Neutral Tones down the contrast and color saturation for neutral hues.
Sepia Sepia tones.
B/W Black and white.
Positive Film
Lighter Skin Tone Makes skin tones lighter.
Darker Skin Tone Makes skin tones darker.
Vivid Blue
Vivid Green
Vivid Red Emphasizes red tints. Makes red subjects more vivid.
Custom Color
• The white balance cannot be set in the and modes (p. 75).
• In and modes, colors other than people’s skin color may change.
You may not obtain the expected results with some skin colors.
Emphasizes the contrast and color saturation for a vivid
impression.
Combines the effects of Vivid Red, Vivid Green and Vivid Blue
to produce intense natural appearing colors like those
obtained with positive film.
Emphasizes blue tints. Makes the sky, ocean and other blue
subjects more vivid.
Emphasizes green tints. Makes mountains, foliage and other
green subjects more vivid.
You can adjust contrast, sharpness, and color saturation etc.
to your preference (p. 78).
m
button.
77

Shooting Using the Two Second Self-Timer
Custom Color
The contrast, sharpness, color saturation, red, green, blue, and skin tones in
an image can be chosen and set at 5 different levels.
∆ Follow Step 2 on p. 77 to choose , then
press the l button.
∆ Press the op buttons to choose an option,
then press the qr buttons or turn the Â
dial to choose a value.
∆ The more to the right, the stronger/deeper/
darker (skin tone) the effect gets, the more
to the left, the weaker/lighter/fairer (skin
tone) the effect gets.
∆ Press the l button to accept the
setting.
Shooting Using the Two Second Self-Timer
The camera will shoot approximately two seconds after the shutter button is
pressed, avoiding any camera shake that occurs when pressing the shutter
button.
Choose Î.
∆ After pressing the p button, press the
op buttons or turn the  dial to choose
Î, then press the m button.
Once set, Î will appear on the screen.
∆ Follow Step 3 on p. 68 to shoot.
78

Customizing the Self-Timer
You can set the time delay (0 – 30 seconds) and the number of shots (1 – 10
shots).
Choose $.
∆ After pressing the p button, press the
op buttons or turn the  dial to choose
$, then press the n button.
Make the setting.
∆ Press the op buttons to choose [Delay]
or [Shots].
∆ Press the qr buttons or turn the  dial to
choose a value, then press the m button.
∆ Follow Step 3 on p. 68 to shoot.
What if the number of shots is set to two or more shots?
• Exposure and white balance settings are set with the first shot.
• When you set the time delay for more than 2 seconds, the self-timer lamp and
sound speed up 2 seconds before the shutter releases (when the flash will fire,
the lamp lights).
• If the flash fires, the shooting interval may be longer.
• If you set a high number of shots, the shooting interval may be longer.
• If the memory card becomes full, shooting stops automatically.
79

Shooting Using a TV Monitor
You can use a TV to display the camera screen content while shooting.
• Connect the camera to a TV as described in “Viewing Images on a TV”
(p. 117).
• Shooting procedures are the same as when using the camera screen.
TV display is not available when using HDMI Cable HTC-100 (sold
separately) to connect the camera to a high-definition TV.
Changing the Composition with the Focus Lock
While you keep the shutter button pressed halfway, the focus and exposure
are locked. You can now recompose and shoot. This is called Focus Lock.
Focus.
∆ Center the subject you want in focus, and
press the shutter button halfway.
∆ Confirm that the AF Frame is green.
Recompose.
∆ Keep the shutter button pressed halfway
and recompose the scene.
Shoot.
∆ Press the shutter button fully.
80

5
Getting More Out of Your
Camera
This chapter serves as the advanced version of Chapter 4 and explains
how to take pictures using various functions.
• This chapter assumes that the mode dial is set to G.
• The sections “Setting the Shutter Speed” (p. 90), “Setting the Aperture
Value” (p. 91), “Setting the Shutter Speed and Aperture Value” (p. 92),
assume that the mode dial is set to these modes.
• The section “Adjusting the Flash Output” (p. 96) assumes that the mode
dial is set to D.
• The sections “Changing the Color and Shooting” (p. 97) and “Shooting
Stitch Assist Images” (p. 100) assume that the mode dial is set to K and
chosen the corresponding mode.
• Before attempting to shoot using a function explained in this chapter in
modes other than G mode, check if the function is available in those modes
(pp. 166 – 169).
81

Changing the AF Frame Mode
You can change the AF (Auto Focus) frame mode to match the conditions you
want to shoot.
Choose [AF Frame].
∆ Press the n button to choose the 4
tab. Choose [AF Frame], then press the
qr buttons to choose an option.
Face Detect
• Detects people’s faces and sets the focus, exposure (evaluative metering
only) and white balance ( only).
• When the camera is pointed at subjects, a white frame appears on the face
the camera judges to be the main subject, and gray frames (max. 2) will
appear on other faces.
• A frame will follow a detected face that is moving within a certain range.
• When the shutter button is pressed halfway, up to 9 green frames will
appear on faces on which the camera focuses. If a face is not detected, the
AF frame will appear in the center of the screen.
• If a face is not detected and only gray frames (no white frame) appear,
AF Frame will be set to [Center].
• Examples of faces that cannot be detected:
• Subjects that are far away or extremely close.
• Subjects that are dark or light.
• Faces turned to the side or at a diagonal, or faces with a portion hidden.
• The camera may mistakenly identify non-human subjects as a face.
• If the camera cannot focus when you press the shutter button halfway,
the AF frame will not appear.
Center
The AF frame is locked to the center. This is effective for focusing on a specific
point.
82

Magnifying the Focal Point
You can reduce the AF frame size
• Press the n button, choose the 4 tab, then choose the [AF Frame Size]
menu item and [Small] option.
• The setting is configured to [Normal] when the Digital Zoom (p. 65), Digital Tele-
converter (p. 66) or Manual Focus (p. 87) is used.
If the camera cannot focus when you press the shutter button halfway, the
AF frame will turn yellow and will appear.
Magnifying the Focal Point
If you press the shutter button halfway, the AF frame will magnify and you can
check the focus.
Choose [AF-Point Zoom].
∆
Press the
and then choose the [AF-Point Zoom] menu
item. Press the
n
button, choose the 4 tab,
qr
buttons to choose [On].
What if the display does not magnify?
The display will not appear magnified in [Face Detect] if a face cannot be detected
or is too big in relation to the screen. In [Center], it will not appear magnified if the
camera cannot focus.
The magnified display will not appear when using Digital Zoom (p. 65),
Digital Tele-converter (p. 66), Servo AF (p. 84) or when connected to a TV
(p. 80).
Check the focus.
∆ Press the shutter button halfway.
In [Face Detect] (p. 82), the face detected
as the main subject will appear magnified.
In [Center] (p. 82), the contents of the
center AF frame will appear magnified.
83

Shooting with the AF Lock
The focus can be locked. After locking the focus, the focal distance will not
change even when you release your finger from the shutter button.
Lock the focus.
∆ Keep the shutter button pressed halfway
and press the q button.
and the MF indicator appear. You can
check the distance to the subject.
∆ After you release your finger from the
shutter button, press the q button again,
then press the qr buttons or turn the Â
dial and choose , the focus will unlock.
Compose the scene and shoot.
Shooting with Servo AF
While the shutter button is pressed halfway, the focus and exposure will
continue to adjust, allowing you to take pictures of moving subjects without
missing a shot.
Choose [Servo AF].
∆ Press the n button and choose
[Servo AF] from the 4 tab, and press the
qr buttons to choose [On].
84
Focus.
∆ The focus and exposure will be maintained
where the blue AF frame appears while
you press the shutter button halfway.

Choosing the Person to Focus On (Face Select)
• The camera may not be able to focus in some conditions.
• If a correct exposure cannot be obtained, the shutter speed and aperture
value appear in orange. Release your finger from the shutter button, then
press it again halfway.
• In low light conditions, AF frames may not turn blue even after pressing
the shutter button halfway. In this case, focus and exposure are locked.
•
The [AF-Point Zoom] option in the 4 tab is not available in Servo AF mode.
• Not available when using Self-Timer (pp. 68, 78, 79).
Choosing the Person to Focus On (Face Select)
You can choose a specific person’s face to focus on and then shoot.
Register 0 to the movie button
(p. 153)
Enter Face Select mode.
∆ Point the camera toward the face of the
subject and press the movie button.
After [Face Select : On] appears, a face
frame will appear around the face
detected as the main subject.
∆ Even if the subject moves, the face frame
will follow the subject within a certain
range.
If a face is not detected, will not appear.
∆
Choose the face on which to focus.
∆ If you press the movie button, the face
frame will move to another face
detected by the camera.
∆ When the frame has made a full circuit of
all detected faces, [Face Select: Off] will
appear, and the AF frame mode screen will
reappear.
85

Changing the Metering Method
Shoot.
∆ Press the shutter button halfway. The face
frame of the chosen face will change into a
green .
∆ Press the shutter button fully to shoot.
Changing the Metering Method
You can change the metering method (brightness measuring function) to
match the shooting conditions.
Choose the metering method.
∆ After pressing the m button, press the
op buttons or turn the  dial to choose
, then press the m button.
Choose an option.
∆ Press the op buttons or turn the  dial
to choose an option, then press the m
button.
The setting will appear on the screen.
Evaluative
Center
Weighted Avg.
Spot
Suitable for standard shooting conditions, including back lit shots.
Automatically adjusts the exposure to match the shooting
conditions.
Averages the light metered from the entire frame, but gives greater
weight to the center.
Only meters within the (Spot AE Point frame) that appears at
the center of the screen.
86

Shooting in Manual Focus Mode
You can use manual focus when auto focus is not possible. If you press the
shutter button halfway after roughly focusing manually, you can fine tune the
focus.
Choose f.
∆ Press the q button, then press the qr
buttons or turn the  dial to choose f,
then press the m button.
and the MF indicator appear.
Focus roughly.
∆ The side bar shows your focal point and a
distance display. While looking at the
magnified area, turn the  dial to find an
approximate focus.
Fine tuning the focus.
∆ If you press the shutter button halfway, you
can fine tune the focus (Safety MF).
• You cannot change the AF frame setting or size while focusing manually
(pp. 82, 83). If you want to change the AF frame mode or size, cancel
Manual focus mode first.
• In order to focus accurately, try attaching the camera to a tripod.
• When using the Digital Zoom (p. 65), Digital Tele-converter (p. 66), or
when using a television as a display (p. 80), you will be able to focus but
the magnified area will not display.
• If [MF-Point Zoom] is set to [Off] in the 4 tab, the magnified display will
not be available.
• If [Safety MF] is set to [Off] in the 4 tab, you will not be able to fine tune
the focus even if you press the shutter button.
87

Shooting with the AE Lock
You can lock the exposure and shoot, or set the focus and exposure
separately to shoot.
AE stands for “Auto Exposure”
Lock the exposure.
∆ Point the camera toward the subject and
press the o button while pressing the
shutter button halfway.
When appears, the exposure will be set.
∆ If you release your finger from the shutter
button and press the o button, will
disappear and the AE will unlock.
Compose the scene and shoot.
Program Shift
If you lock the exposure and turn the  dial, you can change the shutter speed
and aperture value combination.
Shooting with the FE Lock
Just as with the AE lock, you can lock the exposure for shooting with the flash.
FE stands for “Flash Exposure”.
Make sure the flash is raised and
choose h (p. 71).
Lock the exposure.
∆ Point the camera toward the subject and
press the o button while pressing the
shutter button halfway.
88

Shooting with Slow Synchro
The flash will fire and when appears,
the flash output will be retained.
∆ If you release your finger from the shutter
button and press the o button, will
disappear and the FE will unlock.
Compose the scene and shoot.
Shooting with Slow Synchro
You can make the main subject, such as people, appear bright by having the
camera provide the appropriate illumination with the flash. At the same time,
you can use a slow shutter speed to brighten the background that the light
from the flash cannot reach.
Choose ….
∆ After checking if the flash is raised (p. 71)
and pressing the r button, press the qr
buttons or turn the  dial to choose …,
then press the m button.
Once set, … will appear on the screen.
Shoot.
∆ Even if the flash fires, ensure that the
subject does not move until the shutter
sound ends.
Attach the camera to a tripod to prevent the camera from moving and
blurring the image. Additionally, you should set [IS Mode] to [Off] (p. 152).
89

Setting the Shutter Speed
You can set the shutter to the speed at which you want to shoot. The camera
will set the appropriate aperture value for the shutter speed you set.
M stands for “Time value”.
Set the mode dial to M.
Make the setting.
∆ Turn the  dial to set the shutter speed.
Shoot.
Available Shutter Speeds
15″, 13″, 10″, 8″, 6″, 5″, 4″, 3″2, 2″5 , 2″, 1″6, 1″3, 1″, 0″8, 0″6, 0″5, 0″4 , 0″3, 1/4, 1/5, 1/6, 1/8 ,
1/10, 1/13, 1/15, 1/20, 1/25, 1/30, 1/40, 1/50, 1/60, 1/ 80, 1/100, 1/125, 1/160, 1/200, 1/250,
1/320, 1/400, 1/500, 1/ 640, 1/800, 1/1000, 1/1250, 1/1600, 1/2000, 1 /2500, 1/3200
•
2″ indicates 2 seconds, 0″3 indicates 0.3 second and 1/160 indicates 1/160 second.
• The fastest shutter speed when using the flash is 1/2000 second. The camera
automatically resets the shutter speed to less than 1/2000 second if a faster
shutter speed is chosen. However, if [Safety FE] is set to [Off] (p. 95), the fastest
shutter speed is 1/500 second.
• In addition, when the flash fires, the camera may automatically adjust the current
shutter speed to the optimum speed for the shooting conditions.
• Depending on the zoom position, some shutter speeds may not be available.
• When shutter speeds of 1.3 seconds or slower are used, images are
processed to eliminate noise after being taken. A certain amount of
processing time may be needed before you can take the next shot.
• You should set the [IS Mode] to [Off] when lowering the shutter speed
and shoot with a tripod (p. 152).
What if the aperture value appears in orange?
If the aperture value appears in orange when the shutter button is pressed
halfway, the scene has exceeded the correct exposure limits. Adjust the shutter
speed until the aperture value appears in white. Safety Shift can also be used
(p. 91).
90

Setting the Aperture Value
You can set the aperture to a value at which you want to shoot. The camera
will set the appropriate shutter speed for the aperture value you set.
B stands for “Aperture value”, which refers to the size of the aperture
opening inside the lens.
Set the mode dial to B.
Make the setting.
∆ Turn the  dial to set the aperture value.
Shoot.
Available Aperture Values
F3.1, F3.5, F4.0, F4.5, F5.0, F5.6, F5.9, F6.3, F7.1, F8.0
• Regardless of the aperture value you set, the camera will set a shutter speed of
1/2000 second or less when the flash fires. However, if [Safety FE] is set to [Off]
(p. 95), the fastest shutter speed is 1/500 second.
• Depending on the zoom position, some aperture values may not be available.
What if the shutter speed appears in orange?
If the shutter speed appears in orange when the shutter button is pressed halfway,
the scene has exceeded the correct exposure limits. Adjust the aperture value
until the shutter speed appears in white. Safety shift can also be used.
Safety Shift
With M and B modes, if [Safety Shift] is set to [On] in the 4 tab, the shutter
speed or aperture value is automatically adjusted for the correct exposure when
it cannot otherwise be obtained.
Safety Shift is disabled when the flash is enabled.
91

Setting the Shutter Speed and Aperture Value
You can manually set the shutter speed and aperture to shoot images.
D stands for “Manual”.
Set the mode dial to D.
Make the setting.
∆ Press the o button to choose the shutter
speed or aperture value.
∆ Turn the  dial to set a value.
Aperture
Value
Shutter
Speed
Standard
Exposure Level
Exposure Level
Exposure Level Indicator
The set exposure level appears on the
indicator. You can check the difference
against the standard exposure level.
When the difference is more than ±2 stops,
the set exposure level appears in orange.
When you press the shutter button
halfway, “–2”or “+2” appears in orange.
• The standard exposure is calculated according to the metering method
chosen (p. 86).
• If you use the zoom after making settings or change the composition, the
exposure level may change.
• Depending on the shutter speed or aperture value set, the screen
brightness may change. If the flash is raised and set to h, the screen
brightness will not change.
• If you press the o button while holding down the shutter button halfway,
the shutter speed or aperture value (whichever is not set in Step 2), will
automatically adjust to obtain the correct exposure (the correct exposure
may not be obtained depending on the settings).
92

Correcting the Brightness and Shooting (i-Contrast)
The camera can detect areas in the scene, such as faces or backgrounds,
that are too bright or dark and automatically adjust them to the optimum
brightness when shooting. Also, when the overall image is lacking in contrast,
the camera will automatically correct the image for a sharper impression
when shooting.
Choose [i-Contrast].
∆ Press the n button, choose the 4
tab, and then choose the [i-Contrast] menu
item. Press the qr buttons to choose
[Auto].
Once set, @ will appear on the screen.
Under some conditions, the image may appear coarse or may not be
corrected properly.
You can correct recorded images (p. 133).
93

Red-Eye Correction
You can automatically correct red-eye that occurs in images taken with the
flash.
Choose [Flash Settings].
∆ Press the n button, choose [Flash
Settings] from the 4 tab and press the m
button.
Make the setting.
∆ Press the op buttons or turn the  dial
to choose [Red-Eye Corr.] and press the
qr buttons to choose [On].
Once set, Πwill appear on the screen.
Red-eye correction may be applied to areas other than red eyes. For
example, when red make-up has been used around eyes.
• You can correct recorded images (p. 134).
• With the flash raised, if you press the r button and immediately press
the n button, the screen in Step 2 will appear.
94

Adjusting the Flash Exposure Compensation
Just like with exposure compensation (p. 70), you can adjust the exposure ±2
stops in 1/3-stop increments when using the flash.
Choose ~.
∆ After pressing the m button, press the
op buttons or turn the  dial to choose
~, then press the m button.
Make the setting.
∆ Press the op buttons or turn the  dial
to choose the amount of flash exposure
compensation, then press the m button.
~ will appear on the screen.
Safety FE
The camera automatically changes the shutter speed or aperture value when the
flash fires to avoid overexposing and blowing out the highlights in the scene. In
the 4 tab, if [Safety FE] in [Flash Settings] is set to [Off], the shutter speed and
aperture value will not automatically adjust.
You can also set the flash exposure compensation from the 4 tab.
Choose [Flash Settings], then choose [Flash Exp. Comp] and press the
qr buttons to choose a setting (p. 47).
95

Adjusting the Flash Output
In D mode, you can choose 3 levels of flash output.
Set the camera to D mode.
Choose the flash output.
∆
After pressing the m button, press the op
buttons or turn the
press the
m
Â
dial to choose ~, then
button.
Make the setting.
∆ Press the op buttons or turn the  dial
to choose the flash output, then press the
m button.
•
You can also set the flash output from the 4 tab. Choose [Flash Settings], then
choose [Flash Output] and press the
• In M and B modes, you can set the flash output if you choose the 4
tab, then [Flash Settings] and set the [Flash Mode] option to [Manual].
qr
buttons to choose a setting (p. 47).
Checking for Shut Eyes
When the camera detects the possibility that people have their eyes shut,
appears.
Choose [Blink Detection].
∆
Press the
and then choose the [Blink Detection] menu
item. Press the
n
button, choose the 4 tab,
qr
buttons to choose [On].
Shoot.
When a person with shut eyes is detected,
a frame and appear.
• In or $ mode, when the number of shots is set to two or more shots,
this function is only available for the last image shot.
• Not available in W, , or modes.
96

Changing the Color and Shooting
You can change the look of an image when shooting. However, depending on
shooting conditions the image may become coarse, or the colors may not
come out as expected.
Color Accent
You can choose to retain a single color and change the rest to black and white
in a composition.
Choose T.
∆ Follow Steps 1 – 2 on p. 55 to choose T.
Press the l button.
The unchanged image and the Color
Accent image will both display.
∆ The color for default settings is green.
Specify the color.
∆ Position the center frame so it is filled with
the color you want and press the q button.
Recorded color
The specified color will be recorded.
Specify the range of colors.
∆ Press the op buttons or turn the  dial
to change the range of colors to be
retained.
∆ Choose a negative value to limit the range
of colors. Choose a positive value to
extend the range of colors to similar colors.
∆ Pressing the l button accepts the
setting and restores the shooting screen.
Using the flash may cause unexpected results in this mode.
97

Changing the Color and Shooting
Color Swap
You can swap one color in an image for another when recording it. You can
only swap one color.
Choose Y.
∆ Follow Steps 1 – 2 on p. 55 to choose Y.
Press the l button.
The unchanged image and the Color Swap
image will both display.
∆ The default setting is to change green to
gray.
Specify the color to be swapped.
∆ Position the center frame so it is filled with
the color you want and press the q button.
The specified color will be recorded.
Specify the target color.
∆ Position the center frame so it is filled with
the color you want and press the r button.
The specified color will be recorded.
98

Changing the Color and Shooting
Specify the range of colors to be
swapped.
∆ Press the op buttons or turn the  dial
to adjust the range of colors affected.
∆ Choose a negative value to limit the range
of colors. Choose a positive value to
extend the range of colors to similar colors.
∆ Pressing the l button accepts the
setting and restores the shooting screen.
• Using the flash may cause unexpected results in this mode.
• Under some conditions, the image may appear coarse.
99

Shooting Stitch Assist Images
Large subjects can be split into several shots that can later be merged
together using the included software on a computer to create a panoramic
image.
Choose x or v.
∆ Follow Steps 1 – 2 on p. 55 to choose x
or v.
Take the first shot.
The exposure and white balance will be set
with the first shot.
Take subsequent shots.
∆ Overlap part of the first shot when taking
the second shot.
∆ Minor discrepancies in the overlapping
portions will be corrected when the images
are merged.
∆ Up to 26 shots can be recorded with the
same procedures.
Finish shooting.
∆ Press the m button
Merge the images on a computer.
∆ For details on how to merge the images,
refer to the Software Guide.
This function is not available when a TV is used as the monitor (p. 80).
100
Loading…
Раздел: Бытовая, кухонная техника, электроника и оборудование
Тип: Цифровая Фотокамера
Характеристики, спецификации
Общее число пикселов:
14.1 млн
Число эффективных пикселов:
14.1 млн
Максимальное разрешение:
4320 x 3240
Чувствительность:
80 — 1600 ISO, Auto ISO
Баланс белого:
автоматический, ручная установка, из списка
Вспышка:
встроенная, до 3.50 м, подавление эффекта красных глаз
Стабилизатор изображения (фотосъемка):
оптический, подвижный элемент в объективе
Скорость съемки:
0.7 кадр./сек
Время работы таймера:
2, 10, пользовательский c
Формат кадра (фотосъемка):
4:3, 16:9
Фокусное расстояние:
28 — 392 мм
Функция «Оптический Zoom»:
14x
Название объектива:
Canon Zoom Lens
Число оптических элементов:
12
Число групп оптических элементов:
10
Особенности устройства:
асферические линзы, низкодисперсные линзы
Использование экрана в качестве видоискателя:
есть
Жидко кристалический экран:
230000 точек, 3 дюйма
Ручная настройка выдержки и диафрагмы:
есть
Автоматическая обработка экспозиции:
с приоритетом затвора, с приоритетом диафрагмы
Экспо коррекция:
+/- 2 EV с шагом 1/3 ступени
Замер экспозиции:
центровзвешенный, точечный
Подсветка автофокуса:
есть
Корректировка автофокуса:
есть
Минимальное расстояние съемки:
0.05 м
Тип карт памяти:
SD, SDHC, SDXC, MMCPlus, HC MMCPlus
Форматы изображения:
2 JPEG
Интерфейсы:
USB 2.0, видео, HDMI, аудио
Формат аккумуляторов:
свой собственный
Количество аккумуляторов:
1
Емкость аккумулятора:
260 фотографий
Запись видео роликов:
есть
Максимальное разрешение видеороликов:
1280×720
Максимальная частота кадров видеоролика:
30 кадров/с
Максимальная частота кадров при съемке HD видео:
25/30 кадров/с при разрешении 1280×720
Время записи видео:
30 минут
Электронная стабилизация при видеосъемке:
есть
Оптический Zoom при записи видео:
есть
Функция «Цифровой Zoom»:
4x
Вес устройства:
215 г, с элементами питания
Инструкция к Цифровой Фотокамере Canon POWERSHOT SX210 IS
Руководство пользователя камеры
РУССКИЙ
• Перед началом работы с камерой обязательно ознакомьтесь с данным
Руководством.
• Храните это Руководство в надежном месте, чтобы его можно было использовать
в будущем.
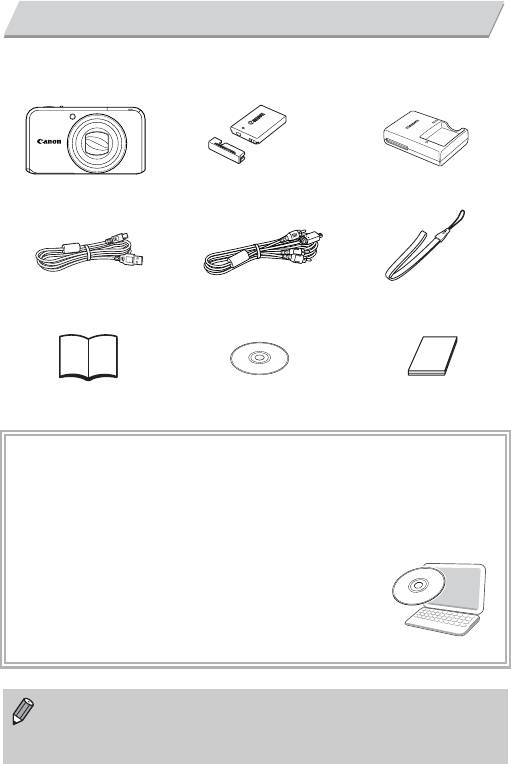
Проверка комплектности
Проверьте наличие в комплекте поставки камеры перечисленных ниже комплектующих.
При отсутствии какой-либо принадлежности обращайтесь по месту приобретения камеры.
Аккумулятор NB-5L
Зарядное устройство
Камера
(с крышкой клемм)
CB-2LX/CB-2LXE
Интерфейсный кабель
Стереофонический
Наручный ремень
IFC-400PCU
аудио/видеокабель
WS-DC9
AVC-DC400ST
Начало работы
Компакт-диск DIGITAL
Гарантийный талон Canon
CAMERA Solution Disk
на русском языке
Использование Руководств
Также см. руководства на компакт-диске «DIGITAL CAMERA Manuals Disk».
• Руководство пользователя камеры (настоящее Руководство)
Освоив основные операции, переходите к освоению многочисленных функций камеры для
съемки более сложных фотографий.
• Руководство по персональной печати
Ознакомьтесь с ним, если требуется подключить камеру к принтеру
(продается отдельно) и произвести печать.
• Руководство по программному обеспечению
Ознакомьтесь с ним перед использованием прилагаемого програм-
много обеспечения.
• Карта памяти не входит в комплект поставки.
• Для просмотра руководств в формате PDF требуется программа Adobe Reader. Для
просмотра руководств в формате Word (требуется только для стран Среднего Востока)
можно установить программу Microsoft Word/Word Viewer.
2

Прочитайте это в первую очередь
Тестовые снимки
Для проверки правильности записи изображений сделайте несколько начальных
тестовых снимков и просмотрите их. Обратите внимание на то, что компания Canon Inc.,
ее филиалы и дочерние компании, а также дистрибьюторы не несут никакой ответствен-
ности за любой ущерб, обусловленный какой-либо неисправностью камеры и ее принад-
лежностей (включая карты памяти), приводящей к сбою в записи изображения или
к записи изображения не тем способом, на который рассчитан аппарат.
Предостережение в отношении нарушения авторских прав
Изображения, снятые данной камерой, предназначены для личного использования.
Не записывайте изображения, защищенные авторскими правами, без предварительного
разрешения владельца авторских прав. В некоторых случаях копирование с помощью
камеры или иного устройства изображений, снятых во время спектаклей или выставок,
а также снимков объектов коммерческого назначения может являться нарушением
авторских прав или других установленных законодательством прав даже в том случае,
если съемка изображения была произведена в целях личного использования.
Ограничения действия гарантии
Условия гарантии на камеру см. в гарантийном талоне Canon на русском языке,
входящем в комплект поставки камеры. Адреса службы поддержки клиентов Canon
см. в гарантийном талоне Canon на русском языке.
ЖК-монитор
• ЖК-монитор изготовлен из армированного стекла, но при очень сильных ударах оно
все равно может треснуть. Внимательно ознакомьтесь с разделом «Меры предосто-
рожности» (стр. 9). Если стекло разобьется, соблюдайте необходимую осторожность,
чтобы не порезаться об осколки.
• Жидкокристаллический монитор изготавливается с использованием высокопреци-
зионных технологий. Более 99,99% пикселов работают в соответствии с техническими
требованиями, но иногда неработающие пикселы могут отображаться в виде ярких
или темных точек. Это не является неисправностью и не влияет на записываемое
изображение.
• Для защиты от царапин во время транспортировки ЖК-монитор может быть закрыт
тонкой пластиковой пленкой. В таком случае перед началом использования камеры
удалите пленку.
Температура корпуса камеры
Будьте осторожны при длительной работе с камерой – ее корпус может нагреться. Это
не является неисправностью.
3

Что требуется сделать
Съемка
● Съемка, все параметры настраиваются автоматически …………………….……. 24
4
● Просто съемка (Простой режим) ……………………….………….………….…………... 29
● Съемка в соответствии с определенными условиями……..………….……. 54 – 55
Качественная портретная съемка
IF wPC
На снежном
Портреты
Ночью
Дети и животные
На пляже
фоне
(стр. 54)
(стр. 54)
(стр. 54)
(стр. 56)
(стр. 56)
Съемка различных других сюжетов
J
Ht
O
Недостаточная
Пейзаж
Вечеринка
Листва
Фейерверк
освещенность
(стр. 54)
(стр. 55)
(стр. 56)
(стр. 56)
(стр. 56)
● Фокусировка на лица……..……….………….………….………….. 24, 60, 61, 62, 82, 85
● Съемка там, где вспышка запрещена (отключение вспышки)……………. 29, 64
● Съемка фотографий с самим собой (таймер автоспуска)……. 61, 62, 68, 78, 79
● Вставка в снимки даты и времени ………………………….………….……….…………. 67
● Съемка тонированных сепией или черно-белых фотографий………….………. 77
● Съемка после добавления эффектов (эффект «Рыбий глаз»,
эффект миниатюры) ….………….……….………….………….……….………….……. 58, 59
● Изменение размера снимаемых фотографий (разрешение)…………………... 72
● Серийная съемка фотографий ……………………….………….………….………..……. 76
● Изменение числа ISO ………………….………….………..………….………….……….….. 74
● Сохранение фокусировки на движущиеся объекты (Servo AF)……..…………. 84
● Повышение яркости темных объектов (i-Contrast).………….………….…………... 93
4

Что требуется сделать
Просмотр
● Просмотр фотографий ……….………….………….……….………….………..…………... 27
1
● Простое воспроизведение (Простой режим) ………………….………….…………... 30
● Автоматическое воспроизведение фотографий (слайд-шоу)……….….. 30, 113
● Просмотр фотографий на экране телевизора..……………………….…….. 117, 118
● Просмотр фотографий на экране компьютера ……………………….………. 34 – 37
● Быстрый поиск фотографий…..………….……….………….………….…………. 110, 111
● Стирание фотографий…………….………….………..………….……….. 28, 30, 123, 124
● Защита изображений от случайного стирания …………..………….………. 120, 122
Съемка/просмотр видеозаписей
5
E
● Съемка видеофильмов..………….………….………..………….………….………... 31, 102
● Просмотр видеофильмов …………..……….………….………….………..………… 33, 106
Печать изображений
● Простая печать фотографий….……….………….………….………….……….……….. 136
2
Сохранение
● Сохранение изображений в компьютере ……………………….………….……… 34, 37
Прочее
3
● Отключение звуковых сигналов.………….………..………….………….……….………. 48
● Использование камеры за рубежом………………………….………….………... 15, 148
● Что отображается на экране ……………….………….………….………….…….. 164, 165

Содержание
В главах 1 – 3 рассматриваются основные операции с данной камерой и ее часто исполь-
зуемые функции. В главе 4 и в последующих главах рассматриваются дополнительные
функции, расширяющие Ваши возможности по мере их изучения.
Проверка комплектности…………………………2
Изменение яркости экрана…………………… 49
Прочитайте это в первую очередь …..……….3
Восстановление в камере настроек
Что требуется сделать…….…………………..…..4
по умолчанию ………..………………..………….. 50
Условные обозначения …………………..……….8
Низкоуровневое форматирование
карты памяти………….………..………………….. 51
Меры предосторожности ………………………...9
Функция экономии энергии
1. Начало работы
(Автовыключение)…………….………………….. 52
…………….…………..…………..…………13
Функции часов…………..………………………… 52
Зарядка аккумулятора…………………………..14
3. Съемка в особых условиях и широко
Поддерживаемые карты памяти
используемые функции……..………..53
(продаются отдельно) …………….……………..16
Съемка в различных условиях………………. 54
Установка аккумулятора
и карты памяти …………………………………..…16
Съемка в режиме специальных сюжетов ……55
Установка даты и времени……………………..19
Съемка с добавлением эффектов………… 58
Установка языка…………………..……………….21
Съемка при обнаружении улыбки .………… 60
Форматирование карт памяти………………..22
Использование таймера при моргании……. 61
Нажатие кнопки спуска затвора …………….23
Использование таймера при
определении лица ……………………..………... 62
Съемка фотографий (интеллектуальный
автоматический режим)…………….………..…24
Выключение вспышки …….………..………….. 64
Просмотр изображений ….……………………..27
Дополнительное увеличение
объектов (Цифровой зум)…………..………… 65
Стирание изображений…………..……………..28
Вставка даты и времени……………………….. 67
Съемка в Простом режиме………….………...29
Использование таймера автоспуска……… 68
Просмотр или стирание
в Простом режиме………….……………………..30
4. Выбираем настройки
Съемка видеофильмов……………..…………..31
самостоятельно……….…………….69
Просмотр видеофильмов ……………..……….33
Передача изображений
Съемка в режиме программной AE ………. 70
в компьютер для просмотра………………..…34
Настройка яркости (компенсация
Дополнительные принадлежности………….38
экспозиции)………….………………..……………. 70
Отдельно продаваемые аксессуары……….39
Включение вспышки……………..………..……. 71
Изменение диапазона фокусировки
2. Дополнительные сведения
(Макро)………..………………..……………………. 71
…………….…………..…………..…………41
Изменение значения разрешения
(размер изображения)………………..………... 72
Элементы камеры и их назначение………..42
Изменение коэффициента компрессии
Индикация на экране………………..………..…44
(качество изображения)……………………….. 72
Индикатор………….………………………..……….45
Изменение числа ISO……….………..………... 74
Меню FUNC. – Основные операции………..46
Настройка баланса белого …………………… 75
MENU – Основные операции…………..……..47
Серийная съемка………….……………………… 76
Изменение режима звуковых сигналов………48
6

Содержание
Изменение цветового оттенка
Изменение качества изображения………..103
изображения (Мои цвета)……………..……….77
Фиксация AE/Сдвиг экспозиции …………..104
Съемка с использованием
Прочие функции съемки…………..………....105
2-секундного таймера…………….……………..78
Функции воспроизведения …………………..106
Настройка таймера автоспуска …..………...79
Редактирование…………..………………………107
Съемка с помощью телевизора……………..80
Изменение композиции кадра
7. Использование различных функций
с помощью фиксации фокусировки.………80
воспроизведения и редактирования……. 109
5. Полное использование
Быстрый поиск изображений…………….….110
возможностей камеры…………..81
Просмотр изображений при
воспроизведении с фильтром……………...111
Изменение режима рамки
Просмотр слайд-шоу……………………………113
автофокусировки …………..……………………..82
Проверка фокусировки………………………..115
Увеличение точки фокусировки………..……83
Увеличение изображений …………..………..116
Съемка с фиксацией автофокусировки……..84
Изменение эффекта перехода
Съемка в режиме Servo AF ……………………84
между изображениями……..………………….116
Выбор человека для фокусировки
Просмотр изображений на экране
(Выбор лица)………..………………………..……..85
телевизора………………………..………………..117
Изменение способа экспозамера ……….…86
Просмотр изображений на телевизоре
Съемка в режиме ручной фокусировки………87
высокой четкости……………….………………..118
Съемка с фиксацией автоэкспозиции…….88
Отображение различных изображений
Фиксация экспозиции при съемке
(Умное отображение) ……………..………..….119
со вспышкой………..………..……………………..88
Защита изображений……....………………....120
Съемка с синхронизацией
Стирание всех изображений …..………..….123
при длительной выдержке…………..…………89
Систематизация изображений
Установка выдержки затвора………..……….90
по категориям (Моя категория) ……..……..125
Установка величины диафрагмы ……………91
Пометка изображений как избранных…….127
Установка выдержки затвора
Поворот изображений…….……………………129
и величины диафрагмы …………………………92
Изменение размера изображений………..130
Коррекция яркости и съемка
Кадрировка……………………..………………….131
(i-Contrast)……………..……………………………..93
Добавление эффектов с помощью
Коррекция красных глаз………………………..94
функции «Мои цвета»…………………………..132
Настройка компенсации экспозиции
Коррекция яркости (i-Contrast)………..……133
при съемке со вспышкой………….……………95
Коррекция эффекта «красных глаз».…….134
Настройка мощности вспышки………………96
Проверка наличия закрытых глаз…………..96
8. Печать
Съемка с изменением цветов……………..…97
………………………..…………………….135
Съемка панорам ….………..……………………100
Печать изображений …………………….……..136
6. Использование различных функций
Печать из списка печати (DPOF)…………..138
для съемки видеофильмов………..101
Выбор изображений для печати
(DPOF)………………..……………………….……..140
Съемка видеофильмов………………………..102
Изменение режима видеосъемки………… 102
7
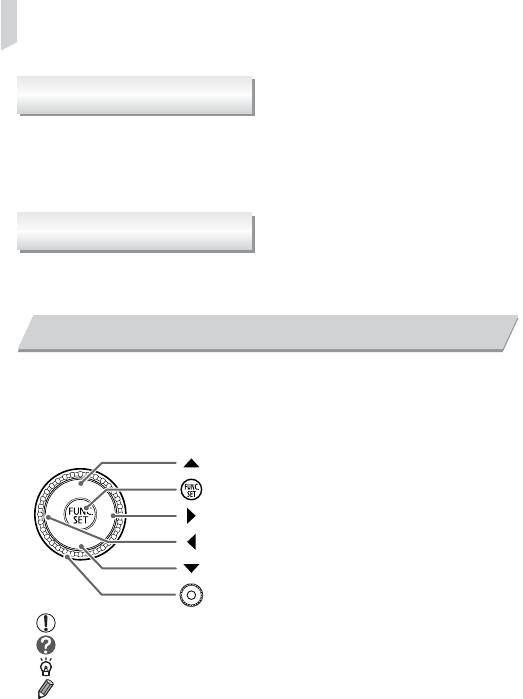
Условные обозначения
Устранение неполадок……………..………… 159
9. Настройка параметров
Список сообщений, отображаемых
камеры………….……………..……….143
на экране…………………………………………… 162
Информация, отображаемая
Изменение параметров камеры…………...144
на экране…………………………………………… 164
Изменение параметров функций
Функции, доступные в различных
съемки……………….………..………………..……149
режимах съемки …..………..………..………… 166
Изменение параметров функций
Меню…………………………………………………. 168
воспроизведения………………..………..……..154
Правила обращения…..………………………. 172
10. Полезная информация
Технические характеристики………………. 173
……………..………………………..……155
Алфавитный указатель……..………..………. 176
Питание от бытовой электросети…..……..156
Использование карты Eye-Fi …..……………157
Условные обозначения
• Кнопки и диск управления камеры обозначаются в тексте значками.
• Текст, отображаемый на экране, заключается в скобки [ ] (квадратные скобки).
• Кнопки направления, диск управления и кнопка FUNC./SET обозначаются следующими
значками.
(Кнопка «Вверх»)
(Кнопка FUNC./SET)
(Кнопка «Вправо»)
(Кнопка «Влево»)
(Кнопка «Вниз»)
(Диск управления)
• : Предостережения.
• : Рекомендации по устранению неполадок.
• : Советы по наиболее полному использованию возможностей камеры.
• : Дополнительная информация.
• (стр. xx): Ссылка на страницу. «xx» обозначает номер страницы.
• В этом Руководстве предполагается, что для всех функций установлены значения
по умолчанию.
• В настоящем Руководстве для карт памяти различных типов, которые могут исполь-
зоваться в данной камере, используется общий термин «карта памяти».
8
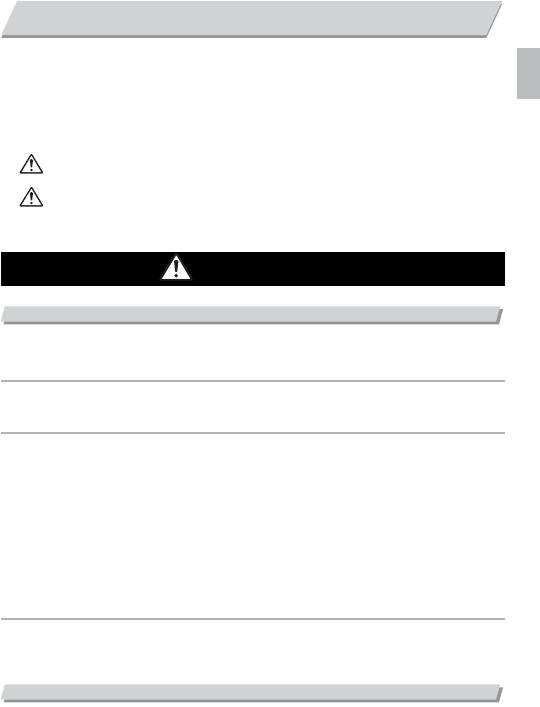
Меры предосторожности
• Перед использованием камеры обязательно прочтите приведенные ниже правила техники
безопасности. Строго следите за соблюдением правил надлежащего обращения с камерой.
• Рассматриваемые на последующих страницах меры предосторожности позволят исключить
нанесение травм Вам и другим людям, а также повреждение оборудования.
• Также обязательно изучите руководства, входящие в комплект поставки всех используемых
Вами дополнительных принадлежностей.
Указывает на возможность серьезной травмы, вплоть
Предостережение
до смертельного исхода.
Указывает на возможность травмы.
Предупреждение
Указывает на возможность повреждения оборудования.
Предупреждение
Предостережение
Камера
• Запрещается применять вспышку в непосредственной близости от глаз людей.
Это может привести к повреждению глаз. В частности, при съемке детей минимально допустимое
расстояние до ребенка составляет 1 м.
• Оборудование следует хранить в местах, недоступных для детей и подростков.
Ремень: попадание наручного ремня на шею ребенка может привести к удушению.
Карта памяти: представляет опасность при проглатывании. В этом случае немедленно обратитесь к врачу.
• Не пытайтесь разобрать или изменить какую-либо часть оборудования, если это не предпи-
сывается настоящим Руководством.
• Если камера упала или каким-либо другим образом повреждена, во избежание опасности
получения травмы не дотрагивайтесь до внутренних деталей камеры.
• Если из камеры идет дым, ощущается посторонний запах или камера работает неправильно,
немедленно прекратите использование камеры.
• Запрещается чистить оборудование органическими растворителями, такими как спирт, бензин
или растворитель для краски.
• Не допускайте попадания в камеру жидкостей или посторонних предметов.
Возможно возгорание или поражение электрическим током.
В случае попадания внутрь камеры жидкости или посторонних предметов немедленно выключите
питание камеры и извлеките из нее аккумулятор.
• Используйте только рекомендованные источники питания.
Использование других источников питания может привести к пожару или поражению электрическим током.
Аккумулятор и зарядное устройство
• Пользуйтесь только рекомендованными аккумуляторами.
• Не оставляйте аккумулятор рядом с открытым огнем и не бросайте аккумулятор в огонь.
•
Не допускайте контакта аккумулятора с водой (например, морской) или другими жидкостями.
• Запрещается разбирать, модифицировать или нагревать аккумулятор.
9

Меры предосторожности
• Не допускайте падения аккумуляторов или сильных ударов по ним.
Это может вызвать взрывы или протечки, ведущие к пожару, травмам и повреждению окружающей
обстановки. При попадании в глаза, рот, на кожу или одежду веществ, вытекших в случае протекания
аккумулятора, немедленно смойте их водой и обратитесь к врачу.
В случае намокания зарядного устройства отсоедините его от электрической розетки и обратитесь
к дистрибьютору камеры или в ближайшее отделение службы поддержки клиентов компании Canon.
• Для зарядки аккумулятора используйте только указанное зарядное устройство.
• Регулярно отсоединяйте кабель питания и удаляйте пыль и загрязнения, скапливающиеся
на вилке, внутренних поверхностях электрической розетки и на окружающих областях.
• Не беритесь за кабель питания влажными руками.
• При использовании оборудования следите, чтобы его мощность не превышала номиналь-
ной нагрузочной способности электрической розетки или соединительных проводов.
Не используйте оборудование с поврежденным кабелем или вилкой питания, а также
следите, чтобы вилка была полностью вставлена в розетку.
• Не допускайте контакта металлических предметов (например, булавок или ключей)
с контактами или вилкой зарядного устройства, а также загрязнения контактов или вилки.
Возможно возгорание или поражение электрическим током.
Прочие предостережения
• Не пытайтесь проигрывать прилагаемый компакт-диск(и) в проигрывателе, не поддержи-
вающем воспроизведение компакт-дисков с записанными данными.
При прослушивании через наушники громких звуков, возникающих при проигрывании этих компакт-
дисков в музыкальных проигрывателях, возможно повреждение слуха. Кроме того, воспроизведение
таких компакт-дисков в проигрывателях музыкальных компакт-дисков может привести к повреждению
громкоговорителей.
Предупреждение
•
Держа камеру за ремень, соблюдайте осторожность, чтобы не ударять камеру и не подвергать
ее чрезмерным механическим нагрузкам и тряске.
• Будьте осторожны, чтобы не допускать ударов или сильного нажатия на объектив.
Это может привести к поломке камеры или к травме.
• Не используйте, не оставляйте и не храните камеру в следующих местах:
— под яркими солнечными лучами;
— в местах, в которых температура превышает 40 °C;
— во влажных и пыльных местах.
В противном случае возможна протечка, перегрев или взрыв аккумулятора, и, в результате, поражение
электрическим током, возникновение пожара или причинение ожогов и других травм. Высокая темпе-
ратура может также вызвать деформацию корпуса.
• При длительном просмотре эффекты перехода между кадрами слайд-шоу могут вызывать
дискомфорт.
• Следите, чтобы в процессе съемки не закрывать вспышку пальцами или одеждой.
Это может привести к ожогам или повреждению вспышки.
10
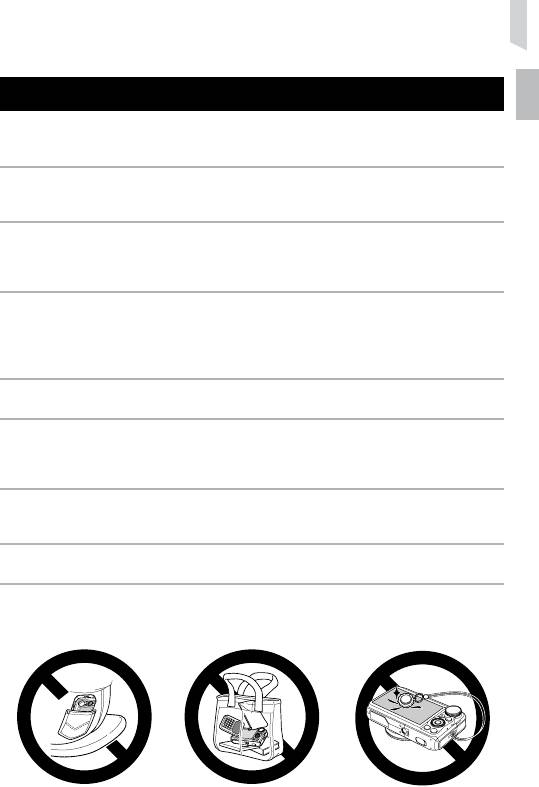
Меры предосторожности
Предупреждение
• Не направляйте камеру на яркие источники света (солнце и т. п.).
В противном случае возможно возникновение неполадок или повреждение датчика изображения.
• При использовании камеры на пляже или в ветряных местах не допускайте попадания внутрь
камеры пыли или песка.
Это может привести к неполадкам в работе камеры.
• При обычном использовании от вспышки может идти небольшой дымок.
Это вызвано тем, что из-за высокой интенсивности вспышки сгорают пыль и другие посторонние
материалы, попавшие на линзу вспышки. Во избежание перегрева и повреждения вспышки удаляйте
с нее грязь, пыль и другие посторонние материалы с помощью ватной палочки.
• Отключайте зарядное устройство от электрической розетки после завершения зарядки или
когда Вы не пользуетесь зарядным устройством.
• Во время зарядки не кладите на зарядное устройство никакие предметы, например одежду.
Если устройство длительное время остается подключенным к электрической розетке, оно может
перегреться и деформироваться, что, в свою очередь, может привести к возгоранию.
• Если камера не используется, извлеките из нее аккумулятор и уберите его на хранение.
Если оставить аккумулятор в камере, он может протечь и повредить камеру.
• Перед тем как выбросить аккумуляторы, закройте их клеммы лентой или другим изоляционным
материалом.
Контакт с другими металлическими предметами в контейнере для мусора может привести к возгоранию
или взрыву.
• Не оставляйте аккумулятор в местах, доступных домашним животным.
Если животное укусит аккумулятор, возможна протечка, перегрев или взрыв аккумулятора, и, в результате,
возникновение пожара или причинение травм.
• Не садитесь, если в кармане лежит камера.
В противном случае возможно возникновение неполадок или повреждение экрана.
• Убирая камеру в сумку, следите, чтобы твердые предметы не касались экрана камеры.
• Не закрепляйте аксессуары на ремне.
В противном случае возможно возникновение неполадок или повреждение экрана.
11
12
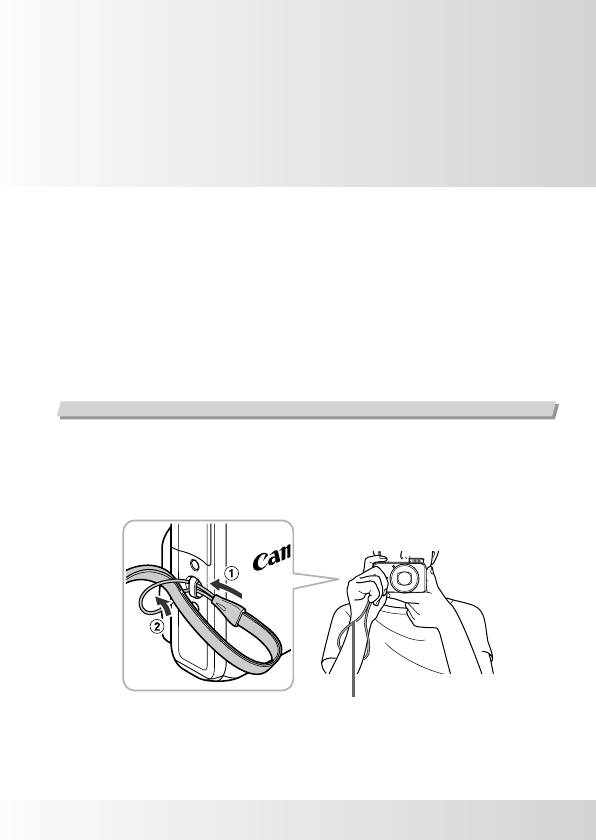
1
Начало работы
В этой главе рассматриваются подготовка к съемке, порядок съемки в режиме
A и порядок просмотра и стирания снятых изображений. В последней части
этой главы рассматриваются съемка и просмотр изображений в Простом режиме,
съемка и просмотр видеофильмов, а также передача изображений в компьютер.
Закрепление ремня/как правильно держать камеру
• Обязательно закрепите на камере прилагаемый ремень и при съемке надевайте его
на кисть, чтобы исключить возможность падения камеры.
• Надежно удерживая камеру по краям, прижмите руки к телу. Следите, чтобы пальцы
не закрывали вспышку.
Ремень
13
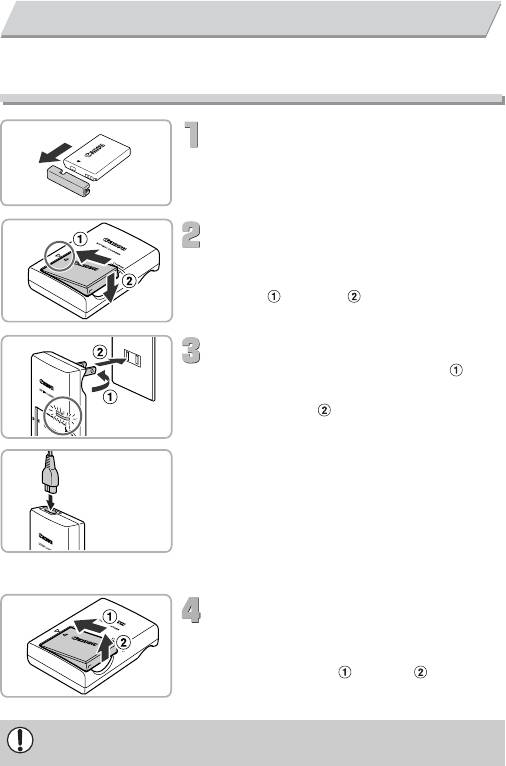
Зарядка аккумулятора
Для зарядки аккумулятора пользуйтесь зарядным устройством из комплекта поставки.
Обязательно зарядите аккумулятор, так как он продается незаряженным.
Снимите крышку.
Установите аккумулятор.
∆ Совместив метки o на аккумуляторе и зарядном
устройстве, установите аккумулятор, сдвинув его
внутрь и опустив .
Зарядите аккумулятор.
∆ Для CB-2LX: откройте контакты вилки
и подключите зарядное устройство к электри-
ческой розетке .
CB-2LX
∆ Для CB-2LXE: подключите кабель питания
к зарядному устройству, затем подключите
другой конец кабеля к электрической розетке.
Индикатор зарядки загорается красным цветом,
и начинается зарядка.
CB-2LXE
После завершения зарядки цвет индикатора
зарядки меняется на зеленый. Зарядка занимает
приблизительно 2 ч 5 мин.
Извлеките аккумулятор.
∆Отсоедините зарядное устройство от электри-
ческой розетки, затем извлеките аккумулятор,
сдвинув его внутрь и подняв .
Для защиты аккумулятора и продления срока его службы длительность непрерывной
зарядки не должна превышать 24 ч.
14
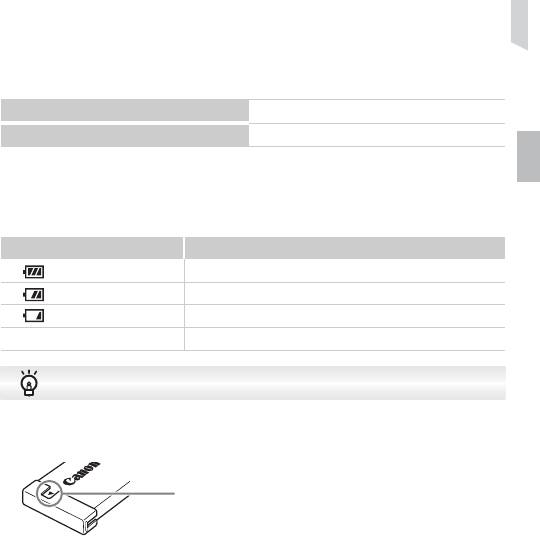
Зарядка аккумулятора
Приблизительное возможное количество снимков
Количество снимков
260
Время воспроизведения (ч)
6
• Указанное возможное количество снимков получено на основе стандарта измерения ассоциации CIPA.
• В некоторых условиях съемки доступное количество кадров может быть меньше указанного выше.
Индикатор заряда аккумулятора
Для индикации заряда аккумулятора на экране отображается значок или сообщение.
Дисплей Описание
Достаточный заряд.
Аккумулятор несколько разряжен, но имеет достаточный заряд.
(мигает красным цветом) Аккумулятор почти полностью разряжен. Зарядите аккумулятор.
«Поменяйте батарею» Аккумулятор разряжен. Зарядите аккумулятор.
Эффективное использование аккумулятора и зарядного устройства
• Заряжайте аккумулятор в день его предполагаемого использования или накануне.
Заряженные аккумуляторы разряжаются за счет естественного саморазряда, даже если
они не используются.
Установите крышку на заряженный аккумулятор
таким образом, чтобы была видна метка o.
• Порядок длительного хранения аккумулятора.
Разрядите аккумулятор и извлеките его из камеры. Установите крышку клемм и уберите акку-
мулятор на хранение. При хранении неразряженного аккумулятора в течение длительного вре—
мени (около 1 года) возможно сокращение срока его службы или ухудшение характеристик.
• Зарядным устройством можно пользоваться также и в других странах.
Зарядным устройством можно пользоваться в регионах с напряжением сети переменного
тока 100 – 240 В (50/60 Гц). Если вилка не подходит к розетке, приобретите специальный
переходник. Не используйте при заграничных поездках электрические трансформаторы,
так как они приведут к повреждениям.
• Аккумулятор может вздуться.
Это обычное состояние аккумулятора, которое не является признаком неисправности. Однако
если аккумулятор вздуется настолько, что перестанет помещаться в камеру, обратитесь
в службу поддержки клиентов компании Canon.
• Если аккумулятор быстро разряжается даже после зарядки, это означает, что закончился
срок его службы. Приобретите новый аккумулятор.
15
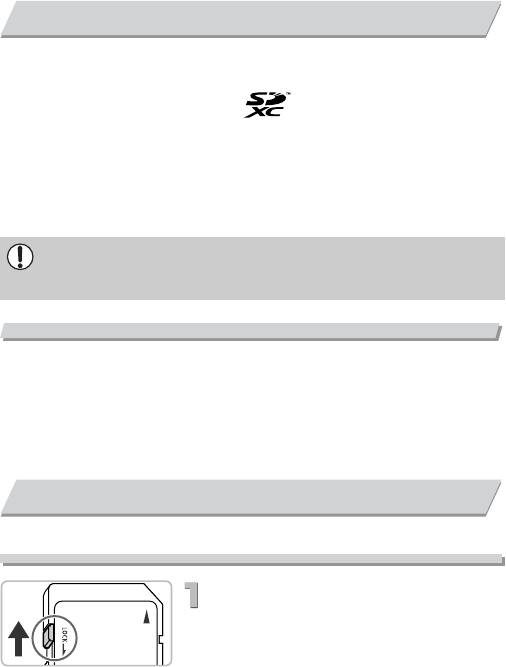
Поддерживаемые карты памяти (продаются отдельно)
*
• Карты памяти SD (2 Гбайта и менее)
*
• Карты памяти SDHC (более 2 Гбайт, вплоть до 32 Гбайт включительно)
*
• Карты памяти SDXC (более 32 Гбайт)
• Карты памяти MultiMediaCard
• Карты памяти MMCplus
• Карты памяти HC MMCplus
• Карты Eye-Fi
*
Эта карта памяти соответствует стандартам SD. В зависимости от марки используемой карты,
некоторые карты памяти могут работать неправильно.
В зависимости от версии ОС компьютера, карты памяти SDXC могут не распознаваться
при использовании имеющихся в продаже устройств чтения карт памяти. Заранее
убедитесь, что ОС поддерживает эту функцию.
О картах Eye-Fi
Это изделие может не поддерживать все функции карты Eye-Fi (в том числе беспроводную
передачу). При возникновении проблем при работе с картой Eye-Fi, пожалуйста, прокон-
сультируйтесь с производителем карты.
Также имейте в виду, что во многих странах и регионах для пользования картой Eye-Fi
требуется специальное разрешение, без которого ее применение запрещено. Для выяс-
нения того, разрешено ли применение данной карты в данном регионе, пожалуйста,
проконсультируйтесь с производителем карты.
Установка аккумулятора и карты памяти
Установите прилагаемый аккумулятор и карту памяти (продается отдельно).
Проверьте положение язычка защиты
от записи на карте памяти.
∆ Если на карте памяти есть язычок защиты от
записи и он установлен в положение блокировки,
запись изображений невозможна. Сдвиньте
язычок до щелчка в фиксаторе.
16
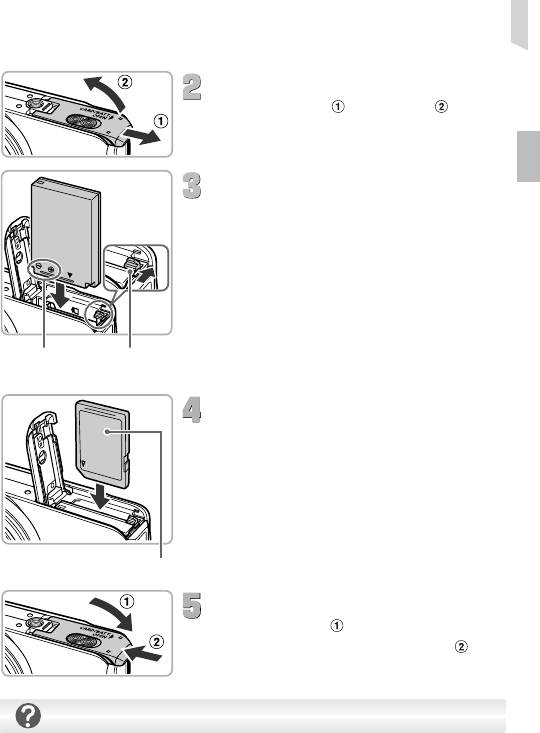
Установка аккумулятора и карты памяти
Откройте крышку.
∆ Сдвиньте крышку и откройте ее .
Установите аккумулятор.
∆ Нажмите фиксатор аккумулятора в направлении
стрелки, затем установите аккумулятор, как пока-
зано на рисунке, до фиксации со щелчком.
∆ Обязательно устанавливайте аккумулятор в пра-
вильной ориентации – в противном случае он не
зафиксируется.
Контакты Фиксатор
аккумулятора
Установите карту памяти.
∆ Установите карту памяти, как показано на рисунке,
до фиксации со щелчком.
∆ Убедитесь в правильной ориентации карты памяти.
При установке карты памяти в неправильном
положении можно повредить камеру.
Этикетка
Закройте крышку.
∆ Закройте крышку , затем нажмите на крышку
и сдвиньте ее до щелчка в фиксаторах .
Что означает сообщение на экране [Карта памяти блокирована]?
На картах памяти SD, SDHC и SDXC предусмотрен язычок защиты от записи. Если этот
язычок находится в положении блокировки, на экране отображается сообщение [Карта
памяти блокирована] и невозможна запись или стирание изображений.
17
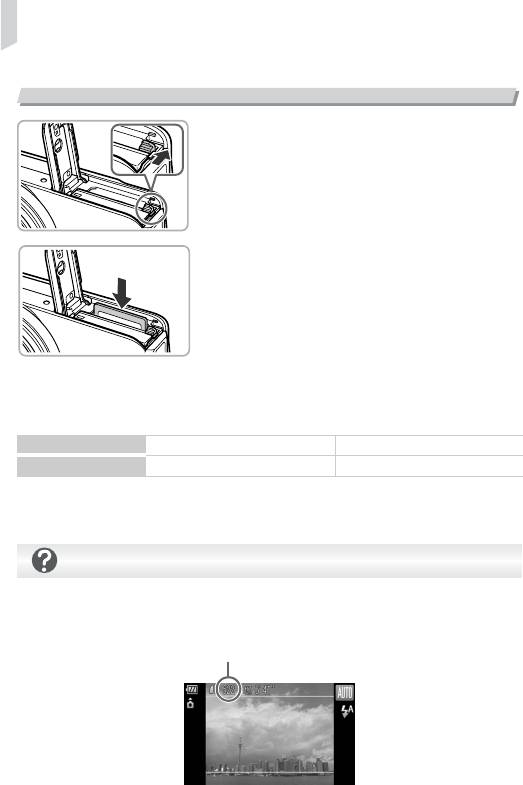
Установка аккумулятора и карты памяти
Извлечение аккумулятора и карты памяти
Извлеките аккумулятор.
∆ Откройте крышку и нажмите фиксатор
аккумулятора в направлении стрелки.
Аккумулятор выдвинется вверх.
Извлеките карту памяти.
∆ Нажмите на карту памяти до щелчка, затем
медленно отпустите ее.
Карта памяти выдвинется вверх.
Приблизительное количество снимков, которые можно записать
на карту памяти
Карта памяти
4 Гбайта 16 Гбайт
Количество снимков
1058 4334
• Значения для настроек по умолчанию.
• Возможное количество записанных снимков зависит от настроек камеры, объекта съемки
и используемой карты памяти.
Можно ли проверить оставшееся количество снимков?
Оставшееся количество снимков можно проверить, когда камера находится в режиме съемки
(стр. 24).
Приблизительное количество снимков,
которые можно записать на карту памяти
18
Установка даты и времени
При первом включении камеры отображается экран установки даты/времени. Так как
дата и время, записываемые вместе с изображениями, основаны на этих параметрах,
обязательно установите их.
Включите камеру.
∆ Нажмите кнопку ON/OFF.
Отображается экран «Дата/Время».
Установите дату и время.
∆ Кнопками qr выберите позицию.
∆ Нажимая кнопки op или поворачивая диск Â,
установите значение.
Завершите установку.
∆ Нажмите кнопку m.
После установки даты и времени экран «Дата/
Время» закрывается.
∆ При нажатии кнопки ON/OFF камера выключается.
Снова отображается экран «Дата/Время»
Установите правильную дату и время. Если дата и время не установлены, экран «Дата/Время»
отображается при каждом включении камеры.
Установка летнего времени
Если на шаге 2 был выбран значок и кнопками op или диском Â был выбран значок ,
устанавливается летнее время (часы переводятся на 1 ч вперед).
19
Установка даты и времени
Изменение даты и времени
Текущие дату и время можно изменить.
Откройте меню.
∆ Нажмите кнопку n.
Выберите пункт [Дата/Время] на
вкладке 3.
∆ Кнопками qr выберите вкладку 3.
∆ Кнопками op или диском Â выберите
пункт [Дата/Время], затем нажмите кнопку m.
Измените дату и время.
∆ Для изменения настройки выполните шаги 2 и 3
на стр. 19.
∆ При нажатии кнопки n меню закрывается.
Аккумулятор календаря
• В камере предусмотрен встроенный аккумулятор календаря (аккумулятор резервного питания),
обеспечивающий сохранение установленных даты и времени в течение приблизительно трех
недель после снятия основного аккумулятора.
• При установке заряженного аккумулятора или подключении комплекта сетевого питания
(продается отдельно, стр. 39) аккумулятор календаря заряжается приблизительно за 4 ч,
даже если камера выключена.
• Если аккумулятор календаря разряжен, при включении камеры отображается меню «Дата/
Время». Для установки даты и времени выполните операции, приведенные на стр. 19.
20
Установка языка
Можно изменить язык текста, отображаемого на экране.
Перейдите в режим воспроизведения.
∆ Нажмите кнопку 1.
Откройте экран настройки.
∆ Нажмите кнопку m и, не отпуская ее, сразу
же нажмите кнопку n.
Установите язык.
∆ Кнопками opqr или диском Â выберите
язык, затем нажмите кнопку m.
После установки языка экран настройки
закрывается.
Что делать, если при нажатии кнопки m отображаются часы?
Если на шаге 2 между нажатием кнопок m и n прошло слишком много времени,
отображаются часы. Если появились часы, нажмите кнопку m, чтобы убрать их с экрана,
и снова выполните шаг 2.
Язык экранных сообщений и меню можно также изменить, нажав кнопку n,
выбрав вкладку 3 и выбрав пункт меню [Язык].
21
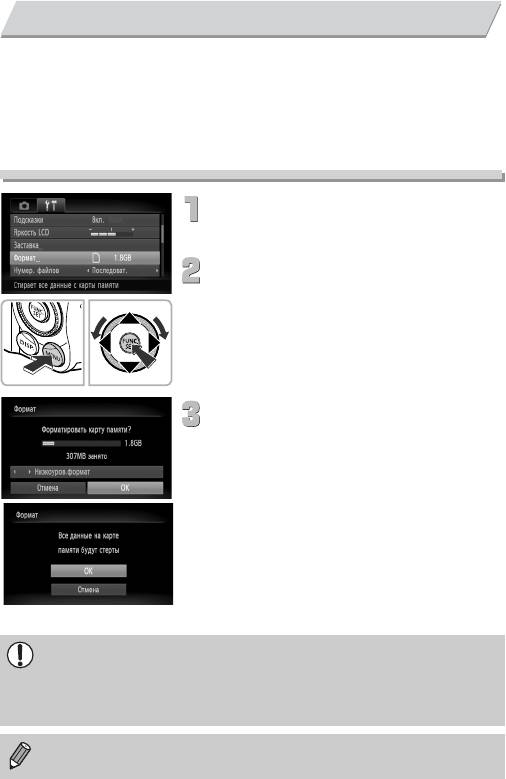
Форматирование карт памяти
Перед использованием новой карты памяти или карты памяти, ранее отформатированной
в другом устройстве, необходимо отформатировать эту карту в камере.
При форматировании (инициализации) карты памяти с нее стираются все данные. Так
как восстановление стертых данных невозможно, перед форматированием карты памяти
обязательно проверьте ее содержимое.
Перед форматированием карты Eye-Fi обязательно установите на компьютер программное
обеспечение, содержащееся на карте.
Откройте меню.
∆ Нажмите кнопку n.
Выберите пункт [Формат].
∆ Кнопками qr выберите вкладку 3.
∆ Кнопками op или диском Â выберите пункт
[Формат], затем нажмите кнопку m.
Отформатируйте карту памяти.
∆ Кнопками qr или диском Â выберите [OK]
и нажмите кнопку m.
Отображается экран запроса подтверждения.
∆ Кнопками op или диском
Â
выберите пункт
[OK], затем нажмите кнопку
m
.
Карта памяти будет отформатирована.
После завершения форматирования на экране
отображается сообщение [Форматирование
карты памяти завершено].
∆ Нажмите кнопку
m
.
При форматировании карты памяти или при стирании с нее данных производится
изменение только данных управления файлами – это не гарантирует полного
удаления содержимого карты памяти. Будьте осторожны при передаче или утили-
зации карты памяти. Во избежание утечки личной информации при утилизации карты
памяти примите меры предосторожности, например физически уничтожьте карту.
Общий объем карты памяти, отображаемый на экране форматирования, может быть
меньше указанного на карте памяти.
22
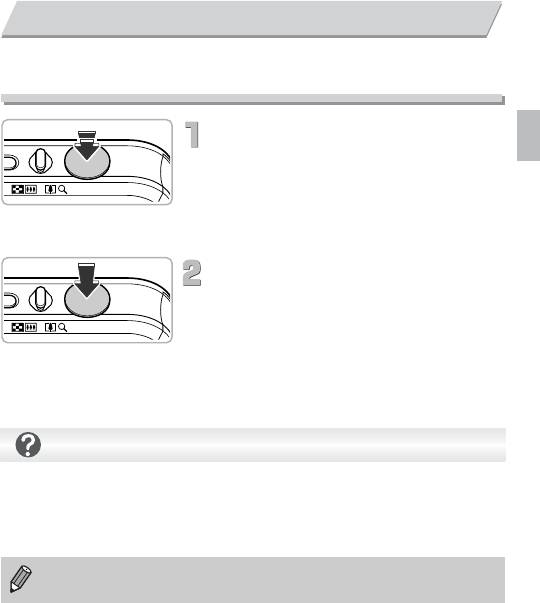
Нажатие кнопки спуска затвора
Для съемки резких изображений обязательно сначала нажимайте кнопку спуска затвора
слегка (наполовину), чтобы сфокусироваться, затем нажимайте ее полностью для съемки.
Нажмите наполовину (несильно, чтобы
сфокусироваться).
∆ Слегка нажимайте до тех пор, пока камера
не подаст два звуковых сигнала и в точках,
на которые сфокусировалась камера,
не появятся рамки автофокусировки.
Нажмите полностью (до упора, чтобы
произвести съемку).
Камера воспроизводит звук срабатывания
затвора и снимает кадр.
∆ Так как во время воспроизведения звука
срабатывания затвора производится съемка,
не допускайте смещения камеры.
Изменяется ли длительность звукового сигнала срабатывания затвора?
• Так как время, необходимое для съемки, зависит от снимаемого сюжета, длительность
звукового сигнала срабатывания затвора может изменяться.
• Записанное изображение может быть смазано в случае перемещения камеры или объекта
во время воспроизведения звукового сигнала срабатывания затвора.
Если сразу полностью нажать кнопку спуска затвора, не нажимая ее предварительно
наполовину, изображение может оказаться нерезким.
23
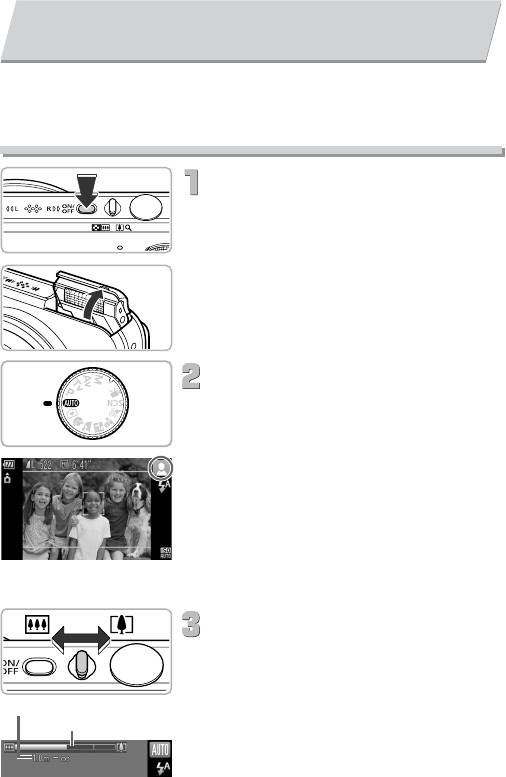
Съемка фотографий (интеллектуальный
автоматический режим)
Так как камера способна определить объект и условия съемки, она может автомати-
чески выбрать оптимальные настройки для сюжета – Вам остается просто произвести
съемку. Кроме того, камера может определять лица и фокусироваться на них, устанав-
ливая оптимальные значения цветов и яркости.
Включите камеру.
∆ Нажмите кнопку ON/OFF.
Открывается начальный экран.
Автоматически поднимается вспышка.
∆ Вспышку можно также поднимать и убирать
вручную (когда вспышка убрана, она выключается).
Выберите режим A.
∆ Поверните диск установки режима в положение
A.
∆ Когда камера направляется на объект, из нее
слышен слабый шум, издаваемый при опреде-
лении сюжета.
В правом верхнем углу экрана отображается
значок определенного сюжета.
Камера фокусируется на обнаруженных лицах,
на которых отображаются рамки.
∆ С левой и правой сторон экрана отображаются
черные полосы. Во время съемки эти области
не записываются.
Выберите композицию кадра.
∆ При перемещении рычага зумирования в направле-
нии i объект приближается и выглядит крупнее.
При перемещении рычага зумирования в направ-
лении j объект удаляется и выглядит меньше.
Диапазон фокусировки (прибл.)
Отображается шкала зумирования.
Шкала зумирования
∆ Если переместить рычаг зумирования влево или
вправо до упора, размер изменяется быстро, если
немного переместить рычаг, размер изменятся
медленно (кроме съемки видеофильмов).
24
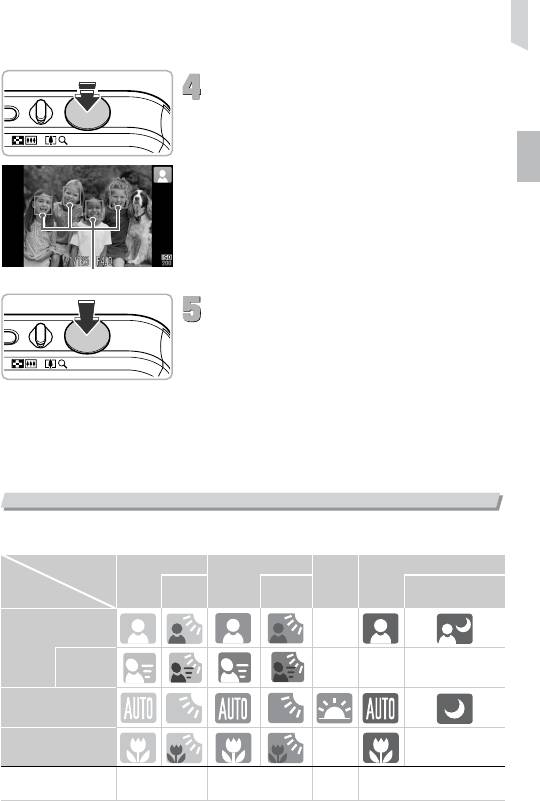
Съемка фотографий (интеллектуальный автоматический режим)
Сфокусируйтесь.
∆ Нажмите наполовину кнопку спуска затвора для
осуществления фокусировки.
После завершения фокусировки камера подает
два звуковых сигнала, и в точках фокусировки
отображаются рамки автофокусировки.
Если камера сфокусировалась на несколько
точек, отображаются несколько рамок авто—
фокусировки.
Рамки автофокусировки
Произведите съемку.
∆
Полностью нажмите кнопку спуска затвора.
Камера воспроизводит звук срабатывания затвора
и производит съемку. При недостаточной осве-
щенности автоматически срабатывает вспышка,
если она поднята.
Изображение выводится на экран прибл. на 2 с.
∆
Снова нажав кнопку спуска затвора, можно снять
следующий кадр, даже если на экране отобража-
ется изображение.
Значки сюжетов
Камера отображает значок определенного ею сюжета, затем автоматически фокуси-
руется и выбирает оптимальные настройки для яркости и цвета объекта.
Фон Яркий
Содержит синее небо
Темный
Контро-
Контро-
Закаты
Объект
Со штативом
вой свет
вой свет
*
—
Люди
Если
——
—
двигается
*
Прочие объекты/
пейзажи
Близкие объекты
—
—
Оран-
Цвет фона значка Серый Светло-голубой
Темно-синий
жевый
* Отображается, когда камера установлена на штатив.
25

Съемка фотографий (интеллектуальный автоматический режим)
В некоторых условиях отображаемый значок может не соответствовать фактическому
сюжету. В частности, при наличии оранжевого или синего заднего плана (например,
стена) может отображаться значок [ ] или значки «Содержит синее небо», при этом
съемка с правильной цветопередачей может оказаться невозможной. В таких случаях
попробуйте произвести съемку в режиме
G
(стр. 70).
Что если…
• Что означают белые и серые рамки, появляющиеся, когда камера направлена на объект?
Если обнаружены лица, то вокруг лица главного объекта появляется белая рамка; вокруг
остальных обнаруженных лиц появляются серые рамки. Рамки в определенных пределах
следуют за объектами. Однако при перемещении главного объекта серые рамки пропадают.
•
Что означает синяя рамка, появляющаяся при наполовину нажатой кнопке спуска затвора?
Синяя рамка появляется при обнаружении движущегося объекта; фокусировка и экспозиция
будут постоянно подстраиваться (Servo AF).
• Что если индикатор мигает оранжевым цветом и на экране мигает значок ?
Установите камеру на штатив, чтобы избежать смазывания изображения из-за движения камеры.
• Что если камера не воспроизводит никаких звуковых сигналов?
Если при включении камеры удерживать нажатой кнопку l, будут отключены все
звуковые сигналы, кроме предупредительных. Для включения звуковых сигналов нажмите
кнопку n, выберите вкладку 3, затем выберите пункт [Тихо]. Кнопками qr выбе-
рите значение [Выкл.].
• Что если индикатор мигает оранжевым цветом, и на экране отображается сообщение
[Поднимите вспышку]?
Попробуйте для съемки поднять вспышку вручную. При съемке вспышка срабатывает
автоматически.
• Что если изображение получается темным даже при срабатывании вспышки?
Объект расположен слишком далеко и не освещается вспышкой. Нажмите рычаг зумиро-
вания в направлении j и удерживайте его до тех пор, пока объектив не остановится.
Объектив будет установлен в максимально широкоугольное положение, и можно будет
снимать в пределах эффективного радиуса действия вспышки прибл. 75 см – 3,5 м. Нажмите
рычаг зумирования в направлении i и удерживайте его до тех пор, пока объектив не оста-
новится. Объектив будет установлен в положение максимального телефото, и можно будет
снимать в пределах эффективного радиуса действия вспышки прибл. 1,0 – 2,0 м.
•
Что если при наполовину нажатой кнопке спуска затвора подается один звуковой сигнал?
Возможно, расстояние до объекта слишком мало. Нажмите рычаг зумирования в направ-
лении j и удерживайте его до тех пор, пока объектив не остановится. Объектив будет
установлен в максимально широкоугольное положение, и Вы сможете сфокусироваться
на объекты, находящие на расстоянии не менее 5 см от торца объектива. Нажмите рычаг
зумирования в направлении i и удерживайте его до тех пор, пока объектив не остановится.
Объектив будет установлен в положение максимального телефото, и Вы сможете сфокуси-
роваться на объекты, находящие на расстоянии не менее 1 м от торца объектива.
26
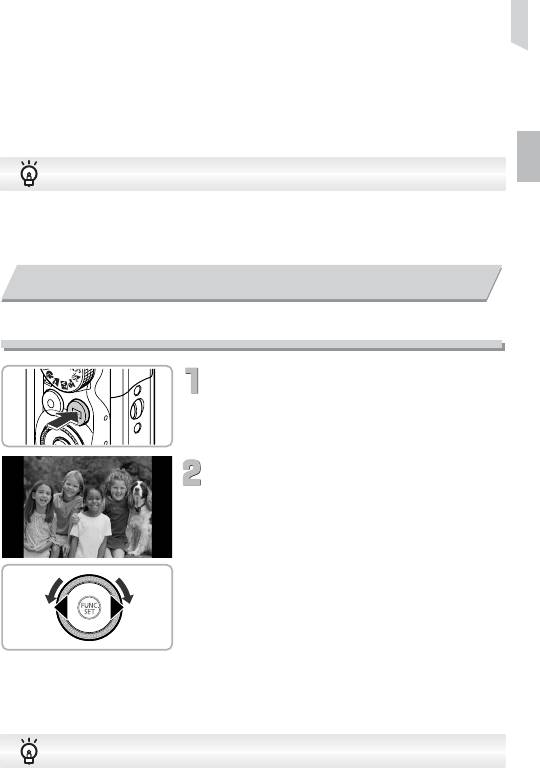
Просмотр изображений
• Что если при наполовину нажатой кнопке спуска затвора загорается лампа?
Для уменьшения эффекта «красных глаз» и для помощи в фокусировке при съемке в местах
с недостаточной освещенностью может загораться лампа.
• Что если при попытке съемки мигает значок h?
Заряжается вспышка. Съемку можно будет произвести после завершения зарядки.
Что означает две серые линии, появившиеся на экране?
В видеофильме записывается область между двумя серыми линиями. Видеофильмы можно
снимать, просто нажимая кнопку видеосъемки, независимо от положения диска установки
режима (стр. 31).
Просмотр изображений
Снятые изображения можно просматривать на экране.
Перейдите в режим воспроизведения.
∆ Нажмите кнопку 1.
Отображается последнее снятое изображение.
Выберите изображение.
∆ При нажатии кнопки q или повороте диска
Â
против часовой стрелки производится цикличес-
кий переход между изображениями в порядке,
обратном порядку съемки, от самого нового до
самого старого.
∆ При нажатии кнопки r или повороте диска
Â
по часовой стрелке производится циклический
переход между изображениями в порядке их
съемки, от самого старого до самого нового.
∆ Если удерживать одну из кнопок qr нажатой,
изображения сменяются быстрее.
∆ Объектив убирается приблизительно через 1 мин.
∆ Если объектив убран, при последующем нажатии
кнопки 1 выключается питание.
Переключение в режим съемки
Если в режиме воспроизведения наполовину нажать кнопку спуска затвора или повернуть
диск установки режима, камера переключается в режим съемки.
27
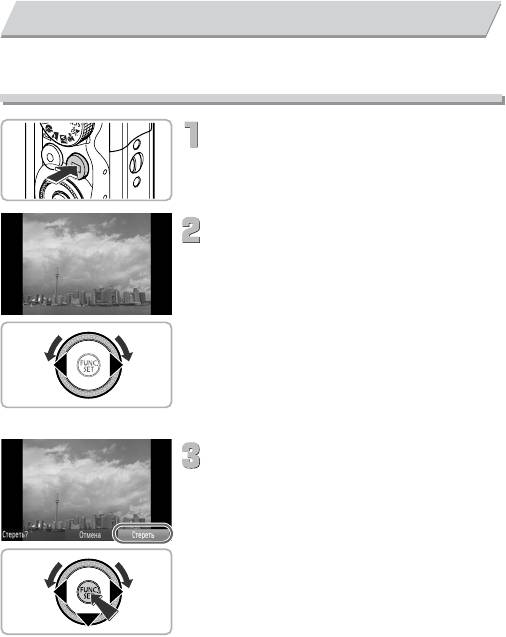
Стирание изображений
Изображения можно выбирать и удалять по одному. Помните, что стертые изображения
невозможно восстановить. Будьте внимательны при стирании изображений.
Перейдите в режим воспроизведения.
∆ Нажмите кнопку 1.
Отображается последнее снятое изображение.
Выберите изображение для стирания.
∆ Кнопками qr или диском Â выберите
изображение.
Стирание изображений
∆ Нажмите кнопку p.
Отображается экран [Стереть?].
∆ Кнопками qr или диском Â выберите
[Стереть], затем нажмите кнопку m.
Отображаемое изображение будет стерто.
∆ Чтобы выйти из операции без выполнения
стирания, кнопками qr или диском Â
выберите пункт [Отмена], затем нажмите
кнопку m.
28
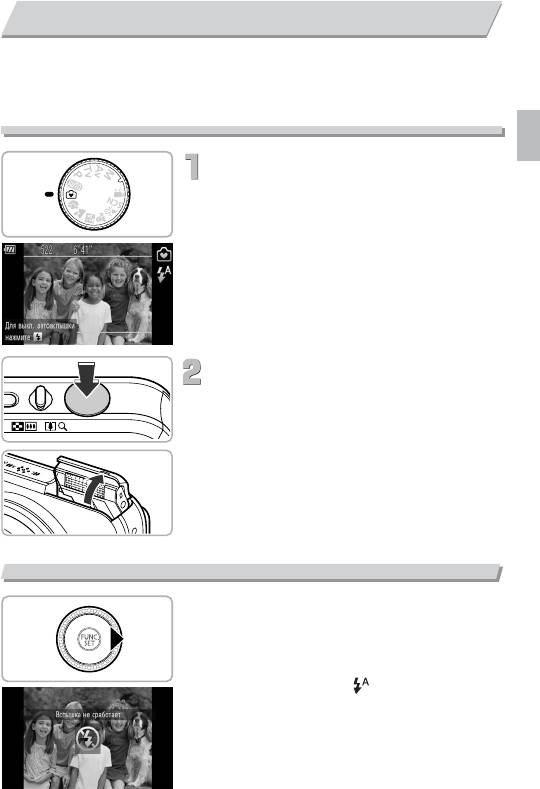
Съемка в Простом режиме
В Простом режиме на экране отображаются инструкции по выполняемым операциям,
а в камере работают только кнопки, описываемые на этой странице, рычаг зумирования
и кнопка видеосъемки (стр. 31). Это исключает неправильную работу с камерой, позволяя
даже начинающим легко производить съемку.
Перейдите в режим 9.
∆ Поверните диск установки режима
в положение 9.
Произведите съемку.
∆ Для съемки выполните шаги 3 – 5 на стр. 24 – 25
(звуковые сигналы не воспроизводятся).
∆ В случае, если мигает оранжевый индикатор
и появилось сообщение «Поднимите вспышку»,
попробуйте произвести съемку со вспышкой.
Попробуйте для съемки поднять вспышку
вручную. При съемке вспышка срабатывает
автоматически.
Выключение вспышки
Нажмите кнопку r.
∆ Вспышка выключается, и на экране отображается
значок !.
∆ При повторном нажатии кнопки r на экране
отображается значок , и вспышка будет
автоматически срабатывать при недостаточной
освещенности.
29
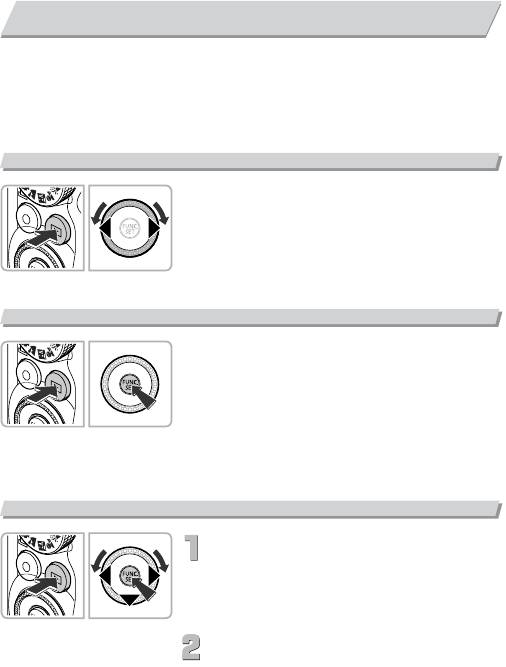
Просмотр или стирание в Простом режиме
В Простом режиме на экране отображаются инструкции по выполняемым операциям,
а в камере работают только кнопки, описываемые на этой странице. Это исключает
неправильную работу с камерой, позволяя даже начинающим легко просматривать
или стирать изображения.
Просмотр одиночных изображений
Выберите изображение.
∆ Нажмите кнопку 1, затем нажимайте кнопки qr
или поворачивайте диск Â для перехода между
изображениями.
Просмотр слайд-шоу
Запустите слайд-шоу.
Нажмите кнопку 1, затем нажмите кнопку m –
все снятые изображения будут отображаться
в течение 3 с каждое.
∆ Для прекращения слайд-шоу нажмите кнопку m
еще раз.
Стирание изображений
Выберите изображение для стирания.
∆ Нажмите кнопку 1, затем кнопками qr или
диском Â выведите на экран изображения,
которые требуется удалить.
Сотрите изображение.
∆ Нажмите кнопку p, затем кнопками qr или
диском
Â
выберите пункт [Стереть] и нажмите
кнопку
m
.
Выбранное изображение будет стерто.
30
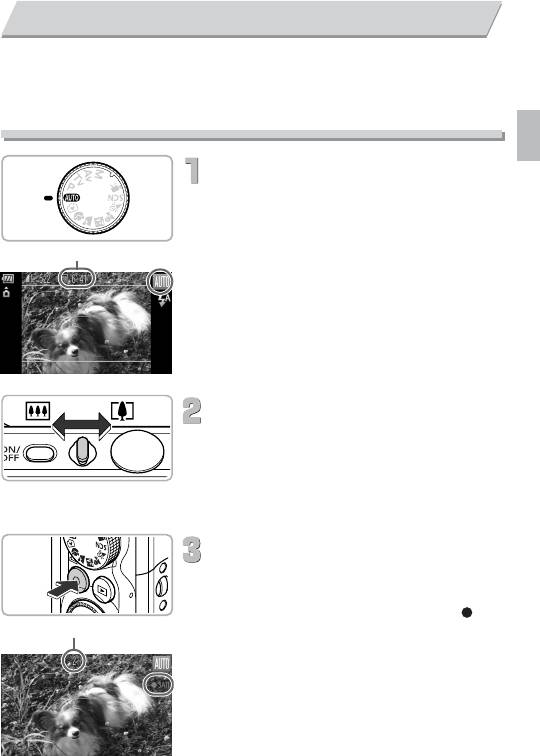
Съемка видеофильмов
Камера может автоматически выбирать все параметры, чтобы можно было снимать
видеофильмы, просто нажав кнопку видеосъемки. Звук записывается в стереофони-
ческом режиме.
При длительной съемке камера может нагреться. Это не является неисправностью.
Выберите режим A.
∆ Поверните диск установки режима
в положение A.
Время съемки
Выберите композицию кадра.
∆ При перемещении рычага зумирования
в направлении i объект приближается
и выглядит крупнее. При перемещении
рычага зумирования в направлении j
объект удаляется и выглядит меньше.
Произведите съемку.
∆ Нажмите кнопку видеосъемки.
Камера подает один звуковой сигнал, начинается
съемка, и на экране отображаются значок [ ЗАП]
Прошедшее время
и прошедшее время съемки.
∆ После начала съемки отпустите кнопку видео-
съемки.
∆ Если во время съемки изменяется композиция
кадра, производится автоматическая настройка
фокусировки, яркости и цветового тона.
31
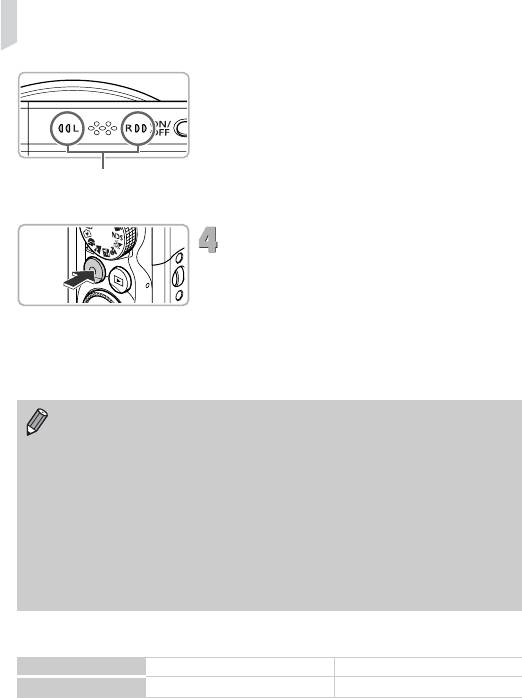
Съемка видеофильмов
∆ Во время съемки можно также выполнять
зумирование с помощью рычага зумирования.
∆ Не дотрагивайтесь до микрофона во время
съемки.
∆ Во время съемки не нажимайте никакие кнопки,
Микрофон
кроме кнопки видеосъемки. Звуки нажатия
кнопок записываются в видеофильме.
Завершите съемку.
∆ Снова нажмите кнопку видеосъемки.
Камера подает два звуковых сигнала, и съемка
видеофильма останавливается.
Видеофильм записывается на карту памяти.
При полном заполнении карты памяти запись
автоматически останавливается.
• Когда диск установки режима находится в положении A, отображается значок
определенного сюжета (стр. 25). Однако значки «Если двигается» не отображаются,
даже если люди двигаются. Отображаются другие значки сюжетов. В некоторых
условиях отображаемый значок может не соответствовать фактическому сюжету.
• Если во время съемки была изменена композиция кадра и баланс белого стал
неоптимальным, нажмите кнопку видеосъемки, чтобы остановить съемку, затем
снова начните съемку.
• Видеофильмы можно снимать, нажимая кнопку съемки видеофильмов, даже если
диск установки режима не находится в положении A (стр. 101).
• Когда диск установки режима находится в положении E, можно задавать все
параметры для съемки видеофильмов (стр. 101).
Приблизительное время съемки
Карта памяти
4 Гбайта
16 Гбайт
Время съемки
20 мин 43 с 1 ч 24 мин 54 с
• Значения времени съемки указаны для настроек по умолчанию.
• Максимальная длительность клипа составляет прибл. 29 мин 59 с.
• С некоторыми картами памяти запись может остановиться до достижения максимальной длительности
видеоклипа. Рекомендуется использовать карты памяти SD с классом скорости Speed Class 4 или выше.
32
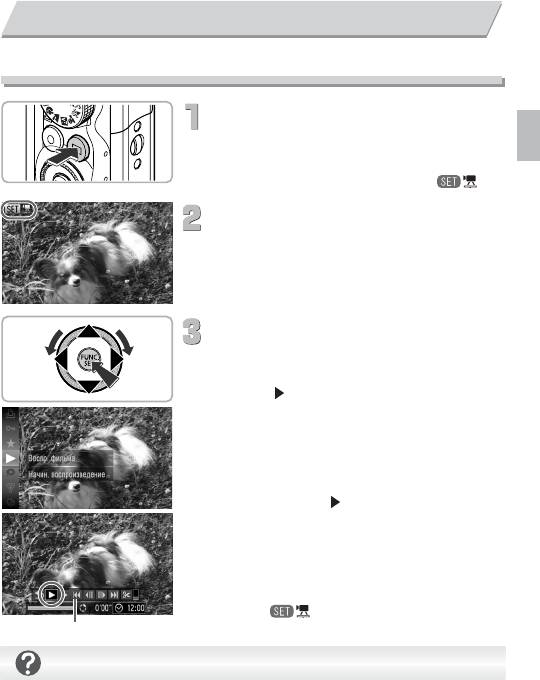
Просмотр видеофильмов
Снятые видеофильмы можно просматривать на экране.
Перейдите в режим воспроизведения.
∆ Нажмите кнопку 1.
Отображается последнее снятое изображение.
Видеофильмы помечаются значком .
Выберите видеофильм.
∆ Кнопками qr или диском Â выберите
видеофильм, затем нажмите кнопку m.
Запустите воспроизведение
видеофильма.
∆ Кнопками op или диском Â выберите
значок , затем нажмите кнопку m.
Начинается воспроизведение видеофильма.
∆ Если снова нажать кнопку m, воспроизведение
видеофильма приостанавливается и появляется
панель управления. Кнопками qr или диском Â
выберите значок (Показать), затем нажмите
кнопку m.
∆ Для регулировки громкости используйте
кнопки op.
После завершения видеофильма отображается
значок .
Панель управления видеофильмом
Что делать, если видеофильмы не воспроизводятся на компьютере?
• Установите программное обеспечение (стр. 35).
• При просмотре видеофильма на экране компьютера возможны пропуск кадров, неравно-
мерное воспроизведение и внезапное пропадание звука – это зависит от характеристик
компьютера.
• Если с помощью прилагаемого программного обеспечения скопировать видеофильм
обратно на карту памяти, видеофильм в камере будет воспроизводиться без помех.
Для удобства просмотра можно подключить камеру к телевизору.
33

Передача изображений в компьютер для просмотра
Для передачи в компьютер снятых камерой изображений для просмотра можно исполь-
зовать прилагаемое программное обеспечение.
Если программа ZoomBrowser EX/ImageBrowser уже используется, установите программное
обеспечение с прилагаемого компакт-диска, переписав текущую установленную версию.
Требования к системе
Windows
ОС
Windows 7
Windows Vista (включая Service Pack 1 и 2)
Windows XP Service Pack 2, Service Pack 3
Модель компьютера Перечисленные выше операционные системы (ОС) должны быть установлены
на заводе-изготовителе на компьютеры со встроенными USB-портами.
Процессор
Просмотр изображений: Pentium 1,3 ГГц или более мощный
Просмотр видеофильмов: Core2 Duo 1,66 ГГц или более мощный
ОЗУ
Windows 7 (64-разрядная): не менее 2 Гбайт
Windows 7 (32-разрядная),
Windows Vista: не менее 1 Гбайта
Windows XP: не менее 512 Мбайт (фотографии), не менее 1 Гбайта
(видеофильмы)
Интерфейс
USB
Свободное пространство
ZoomBrowser EX: не менее 200 Мбайт*
на жестком диске
PhotoStitch: не менее 40 Мбайт
Дисплей
1024 × 768 пикселов или выше
* Для ОС Windows XP необходимо установить платформу Microsoft .NET Framework версии 3.0 или
старше (макс. 500 Мбайт). Установка может занимать некоторое время, в зависимости от харак-
теристик компьютера.
Macintosh
ОС
Mac OS X (v10.4 – v10.6)
Модель компьютера Перечисленные выше операционные системы (ОС) должны быть установлены
на заводе-изготовителе на компьютеры со встроенными USB-портами.
Процессор
Просмотр изображений: PowerPC G4/G5 или процессор Intel
Просмотр видеофильмов: Core Duo 1,66 ГГц или более мощный
ОЗУ
Mac OS X v10.4 – v10.5: не менее 512 Мбайт (фотографии),
не менее 1 Гбайта (видеофильмы)
Mac OS X v10.6: не менее 1 Гбайта
Интерфейс
USB
Свободное пространство
ImageBrowser: не менее 300 Мбайт
на жестком диске
PhotoStitch: не менее 50 Мбайт
Дисплей 1024 × 768 пикселов или выше
34
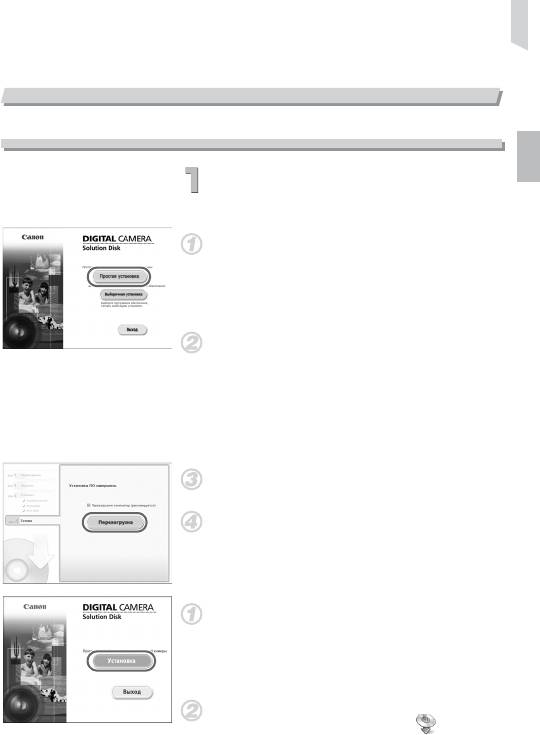
Передача изображений в компьютер для просмотра
Подготовка
В данных пояснениях используются примеры для ОС Windows Vista и Mac OS X (v10.5).
Установите программное обеспечение.
Windows
Установите компакт-диск в дисковод компакт-
дисков компьютера.
∆ Установите прилагаемый компакт-диск (DIGITAL
CAMERA Solution Disk) (стр. 2) в дисковод
компакт-дисков компьютера.
Запустите установку.
∆ Щелкните мышью на кнопке [Простая установка]
и продолжайте установку в соответствии с инст-
рукциями, выводимыми на экран.
∆ Если открылось окно [Контроль учетных записей],
для продолжения следуйте выводимым на экран
инструкциям.
После завершения установки щелкните мышью
на кнопке [Перезагрузка] или [Готово].
Извлеките компакт-диск.
∆ Извлеките компакт-диск после появления экрана
рабочего стола.
Macintosh
Установите компакт-диск в дисковод компакт-
дисков компьютера.
∆ Установите прилагаемый компакт-диск (DIGITAL
CAMERA Solution Disk) (стр. 2) в дисковод
компакт-дисков компьютера.
Запустите установку.
∆ Дважды щелкните мышью значок на компакт-
диске.
∆ Щелкните мышью на кнопке [Установка] и продол-
жайте установку в соответствии с инструкциями,
выводимыми на экран.
35
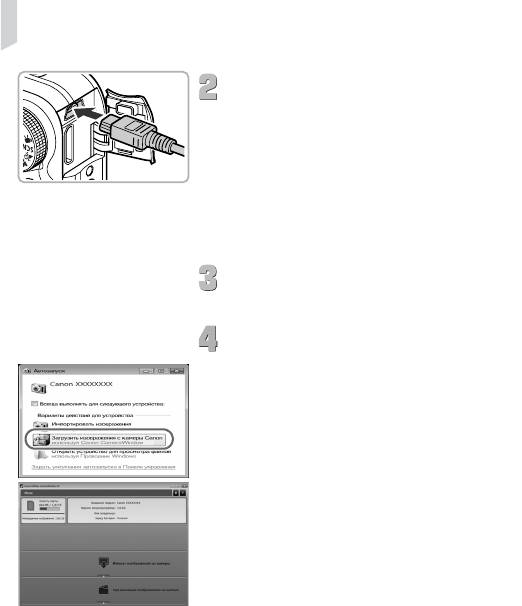
Передача изображений в компьютер для просмотра
Подключите камеру к компьютеру.
∆ Выключите камеру.
∆ Откройте крышку и вставьте меньший разъем
кабеля в разъем на камере в показанной на
рисунке ориентации.
∆ Вставьте больший разъем кабеля в компьютер.
Подробнее о подключении см. в руководстве
пользователя компьютера.
Включите камеру.
∆ Для включения камеры нажмите кнопку 1.
Откройте программу CameraWindow.
Windows
∆ Нажмите кнопку [Загрузить изображения с камеры
Canon, используя Canon CameraWindow].
Открывается окно CameraWindow.
∆ Если окно CameraWindow не открывается,
щелкните мышью на меню [Пуск], выберите
[Все программы], затем выберите [Canon
Utilities], [CameraWindow], [CameraWindow]
и [CameraWindow].
Macintosh
После установления соединения между камерой
и компьютером открывается окно CameraWindow.
∆ Если окно CameraWindow не открылось, щелк-
ните мышью на значке CameraWindow на панели
Dock (панель, появляющаяся в нижней части
рабочего стола).
36
Передача изображений в компьютер для просмотра
В случае Windows 7 для открытия программы CameraWindow выполните
следующие шаги.
• Щелкните значок на панели задач.
• В открывшемся окне щелкните ссылку для изменения программы.
• Нажмите кнопку [Загрузить изображения с камеры Canon, используя Canon
CameraWindow], затем нажмите кнопку [OK].
• Дважды щелкните значок .
Передача и просмотр изображений
∆ Нажмите кнопку [Импорт изображений из камеры],
затем [Импорт непереданных изображений].
В компьютер будут переданы все ранее не пере-
данные изображения. Переданные изображения
сортируются по дате и записываются в отдельные
папки, вложенные в папку «Изображения».
∆ При появлении сообщения [Импорт изображений
завершен.] щелкните мышью на кнопке [OK].
Щелкните кнопку [X], чтобы закрыть программу
CameraWindow.
∆
Выключите камеру и отсоедините кабель.
∆ Подробные сведения о просмотре изображений
с помощью компьютера см. в Руководстве по
программному обеспечению.
Изображения можно передавать, не устанавливая прилагаемое программное
обеспечение, а просто подключив камеру к компьютеру. Однако при этом действуют
следующие ограничения.
• При подключении камеры к компьютеру передача изображений может стать
возможна только через несколько минут.
• Видеофильмы будут передаваться неправильно.
• Изображения, снятые в вертикальной ориентации, могут быть переданы в гори-
зонтальной ориентации.
• При передаче в компьютер могут быть утрачены параметры защиты изображений.
• В зависимости от используемой операционной системы, размера файла или исполь-
зуемого программного обеспечения возможны неполадки при передаче изображения
или информации об изображении.
37
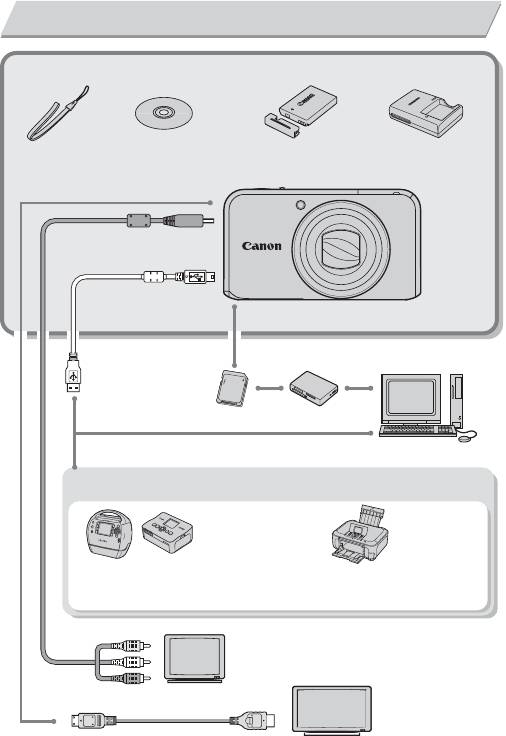
Дополнительные принадлежности
Комплект поставки камеры
Наручный ремень
Компакт-диск DIGITAL
Аккумулятор NB-5L
Зарядное устройство
*
*
WS-DC9
CAMERA Solution Disk
(с крышкой клемм)
CB-2LX/CB-2LXE
Стереофонический аудио/
*
видеокабель AVC-DC400ST
Интерфейсный кабель
*
IFC-400PCU
* Также продается отдельно.
Карта памяти
Устройство чтения карт
Windows/Macintosh
PictBridge-совместимые принтеры Canon
Серия SELPHY
Струйные
принтеры
Дополнительную информацию о принтере и кабеле интерфейса см. в руководстве
пользователя принтера.
Телевизор/видеомагнитофон
Телевизор высокой четкостиHDMI-кабель HTC-100
38
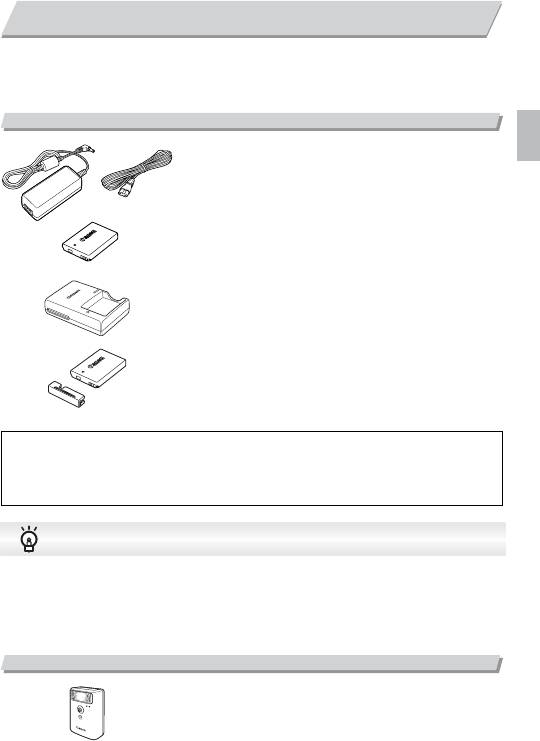
Отдельно продаваемые аксессуары
Следующие принадлежности камеры продаются отдельно. Некоторые принадлежности
могут не продаваться в ряде регионов или могут быть уже сняты с продажи.
Источники питания
Адаптер переменного тока ACK-DC30
Этот комплект обеспечивает питание от бытовой
электросети. Рекомендуется для питания камеры
во время длительных сеансов работы или при под-
ключении к компьютеру или принтеру. Не может
использоваться для зарядки аккумулятора,
установленного в камеру.
Зарядное устройство CB-2LX/CB-2LXE
Адаптер для зарядки аккумулятора NB-5L.
Аккумулятор NB-5L
Перезаряжаемый литиево-ионный аккумулятор.
ОСТОРОЖНО
ОПАСНОСТЬ ВЗРЫВА ПРИ ЗАМЕНЕ ЭЛЕМЕНТАМИ ПИТАНИЯ НЕПРАВИЛЬНОГО ТИПА.
УТИЛИЗИРУЙТЕ ИСПОЛЬЗОВАННЫЕ ЭЛЕМЕНТЫ ПИТАНИЯ В СООТВЕТСТВИИ С МЕСТНЫМИ
ПРАВИЛАМИ.
Использование дополнительных принадлежностей за рубежом
Комплект батарей и зарядное устройство, а также адаптер переменного тока можно использо-
вать в регионах с питанием напряжением 100 – 240 В переменного тока (50/60 Гц). Если вилка
не подходит к розетке, приобретите специальный переходник. Не используйте при заграничных
поездках электрические трансформаторы, так как они приведут к повреждениям.
Вспышка
Вспышка повышенной мощности HF-DC1
Эта устанавливаемая на камеру дополнительная
вспышка может использоваться для съемки объектов,
расположенных дальше зоны действия встроенной
вспышки.
39
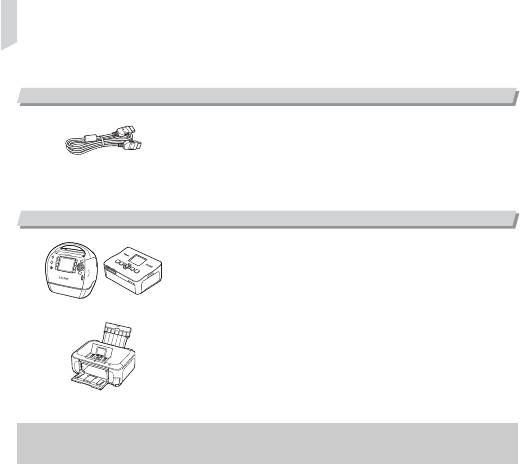
Отдельно продаваемые аксессуары
Прочие принадлежности
HDMI-кабель HTC-100
Этот кабель служит для подключения камеры
к разъему HDMI™ телевизора высокой четкости.
Принтеры
PictBridge-совместимые принтеры Canon
Подключив камеру к одному из показанных ниже
PictBridge-совместимых принтеров Canon, можно
печатать изображения без использования
Серия SELPHY
компьютера.
За дополнительной информацией обращайтесь
к ближайшему дилеру Canon.
Струйные принтеры
Рекомендуется использовать оригинальные дополнительные принадлежности компании
Canon.
Данное изделие оптимизировано для работы с оригинальными дополнительными принадлежностями
компании Canon. Компания Canon не несет ответственности за любые повреждения данного изделия
и/или несчастные случаи, такие, как возгорание и т. п., вызванные неполадками в работе дополни-
тельных принадлежностей сторонних производителей (например, протечка и/или взрыв аккумуля-
тора). Обратите внимание, что гарантия не распространяется на ремонт, связанный с неправильной
работой дополнительных принадлежностей сторонних производителей, хотя такой ремонт возможен
на платной основе.
40
Оглавление
Аннотация для Цифровой Фотокамеры Canon POWERSHOT SX210 IS в формате PDF
Топ 10 инструкций
Другие инструкции
View the manual for the Canon PowerShot SX210 IS here, for free. This user manual comes under the category camcorders and has been rated by 1 people with an average of a 7.5. This manual is available in the following languages: English. Do you have a question about the Canon PowerShot SX210 IS?
Ask your question here
Frequently asked questions
Can’t find the answer to your question in the manual? You may find the answer to your question in the FAQs about the Canon PowerShot SX210 IS below.
What is the weight of the Canon PowerShot SX210 IS?
The Canon PowerShot SX210 IS has a weight of 215 g.
What is the height of the Canon PowerShot SX210 IS?
The Canon PowerShot SX210 IS has a height of 59.3 mm.
What is the width of the Canon PowerShot SX210 IS?
The Canon PowerShot SX210 IS has a width of 105.8 mm.
What is the depth of the Canon PowerShot SX210 IS?
The Canon PowerShot SX210 IS has a depth of 31.9 mm.
What is the screen size of the Canon PowerShot SX210 IS?
The screen size of the Canon PowerShot SX210 IS is 3 «.
What does the abbreviation ‘MP’ stand for?
MP stands for MegaPixels.
What is a megapixel?
The number of megapixels denotes how many pixels there are in the sensor. 1 megapixel equals 1 million pixels. The more pixels, the higher the potential image quality.
Is the manual of the Canon PowerShot SX210 IS available in English?
Yes, the manual of the Canon PowerShot SX210 IS is available in English .
Is your question not listed? Ask your question here
Manufacturer:Canon
Category:Computers & Peripherals
Device:Canon PowerShot SX210 IS
Name:ImageBrowser EX / CameraWindow — Instruction Manual
Language:Latviešu
Version:2.00
Pages:89
Size:5.45 MB
Manufacturer:Canon
Category:Computers & Peripherals
Device:Canon PowerShot SX210 IS
Name:ImageBrowser EX / CameraWindow — Instruction Manual
Language:Português
Version:2.00
Pages:92
Size:6.99 MB
Manufacturer:Canon
Category:Computers & Peripherals
Device:Canon PowerShot SX210 IS
Name:ImageBrowser EX / CameraWindow — Instruction Manual
Version:2.00
Pages:89
Size:6.56 MB
Manufacturer:Canon
Category:Computers & Peripherals
Device:Canon PowerShot SX210 IS
Name:ImageBrowser EX / CameraWindow — Instruction Manual
Language:Eesti
Version:2.00
Pages:89
Size:5.00 MB
Manufacturer:Canon
Category:Computers & Peripherals
Device:Canon PowerShot SX210 IS
Name:ImageBrowser EX / CameraWindow — Instruction Manual
Language:Русский
Version:2.00
Pages:89
Size:5.61 MB
Manufacturer:Canon
Category:Computers & Peripherals
Device:Canon PowerShot SX210 IS
Name:ImageBrowser EX / CameraWindow — Instruction Manual
Language:Україньска
Version:2.00
Pages:89
Size:5.53 MB
Manufacturer:Canon
Category:Computers & Peripherals
Device:Canon PowerShot SX210 IS
Name:ImageBrowser EX / CameraWindow — Instruction Manual
Language:Čeština
Version:2.00
Pages:89
Size:6.58 MB
Manufacturer:Canon
Category:Computers & Peripherals
Device:Canon PowerShot SX210 IS
Name:ImageBrowser EX / CameraWindow — Instruction Manual
Language:Lietuvių
Version:2.00
Pages:89
Size:5.55 MB
Manufacturer:Canon
Category:Computers & Peripherals
Device:Canon PowerShot SX210 IS
Name:ImageBrowser EX / CameraWindow — Instruction Manual
Language:Ελληνικά
Version:2.00
Pages:89
Size:6.78 MB
Manufacturer:Canon
Category:Computers & Peripherals
Device:Canon PowerShot SX210 IS
Name:ImageBrowser EX / CameraWindow — Instruction Manual
Language:Deutsch
Version:CA.2.00
Pages:89
Size:6.33 MB
Manufacturer:Canon
Category:Computers & Peripherals
Device:Canon PowerShot SX210 IS
Name:ImageBrowser EX / CameraWindow — Instruction Manual
Language:Svenska
Version:CA.2.00
Pages:89
Size:6.61 MB
Manufacturer:Canon
Category:Computers & Peripherals
Device:Canon PowerShot SX210 IS
Name:ImageBrowser EX / CameraWindow — Instruction Manual
Language:Italiano
Version:CA.2.00
Pages:89
Size:6.48 MB
Manufacturer:Canon
Category:Computers & Peripherals
Device:Canon PowerShot SX210 IS
Name:ImageBrowser EX / CameraWindow — Instruction Manual
Language:Dansk
Version:CA.2.00
Pages:89
Size:6.80 MB
Manufacturer:Canon
Category:Computers & Peripherals
Device:Canon PowerShot SX210 IS
Name:ImageBrowser EX / CameraWindow — Instruction Manual
Language:English
Version:CA.2.00
Pages:89
Size:6.91 MB
Manufacturer:Canon
Category:Computers & Peripherals
Device:Canon PowerShot SX210 IS
Name:ImageBrowser EX / CameraWindow — Instruction Manual
Language:Español
Version:CA.2.00
Pages:91
Size:6.20 MB
Manufacturer:Canon
Category:Computers & Peripherals
Device:Canon PowerShot SX210 IS
Name:ImageBrowser EX / CameraWindow — Instruction Manual
Language:Suomi
Version:CA.2.00
Pages:89
Size:6.62 MB
Manufacturer:Canon
Category:Computers & Peripherals
Device:Canon PowerShot SX210 IS
Name:ImageBrowser EX / CameraWindow — Instruction Manual
Language:Nederlands
Version:CA.2.00
Pages:89
Size:6.64 MB
Manufacturer:Canon
Category:Computers & Peripherals
Device:Canon PowerShot SX210 IS
Name:ImageBrowser EX / CameraWindow — Instruction Manual
Language:Français
Version:CA.2.00
Pages:91
Size:6.97 MB
Manufacturer:Canon
Category:Computers & Peripherals
Device:Canon PowerShot SX210 IS
Name:ImageBrowser EX / CameraWindow — Instruction Manual
Language:Polski
Version:2.00
Pages:89
Size:6.80 MB
Manufacturer:Canon
Category:Computers & Peripherals
Device:Canon PowerShot SX210 IS
Name:ImageBrowser EX / CameraWindow — Instruction Manual
Version:2.00
Pages:89
Size:5.09 MB
Manufacturer:Canon
Category:Computers & Peripherals
Device:Canon PowerShot SX210 IS
Name:ImageBrowser EX / CameraWindow — Instruction Manual
Language:Magyar
Version:2.00
Pages:89
Size:6.76 MB
Manufacturer:Canon
Category:Computers & Peripherals
Device:Canon PowerShot SX210 IS
Name:— Camera User Guide
Language:Română
Version:1.00
Pages:36
Size:959.33 KB
Manufacturer:Canon
Category:Computers & Peripherals
Device:Canon PowerShot SX210 IS
Name:Software Starter Guide
Language:Eesti
Version:55-66
Size:3.91 MB
DescriptionCanon PowerShot SX210 IS Software Starter Guide
Please use Acrobat Reader v5.0 or less to view these files
Manufacturer:Canon
Category:Computers & Peripherals
Device:Canon PowerShot SX210 IS
Name:Software Starter Guide
Language:Latviešu
Version:55-66
Size:3.91 MB
DescriptionCanon PowerShot SX210 IS Software Starter Guide
Please use Acrobat Reader v5.0 or less to view these files
Manufacturer:Canon
Category:Computers & Peripherals
Device:Canon PowerShot SX210 IS
Name:Software Starter Guide
Language:Lietuvių
Version:55-66
Size:3.91 MB
DescriptionCanon PowerShot SX210 IS Software Starter Guide
Please use Acrobat Reader v5.0 or less to view these files
Manufacturer:Canon
Category:Computers & Peripherals
Device:Canon PowerShot SX210 IS
Name:Camera User Guide
Language:Eesti
Version:1.0
Pages:107
Size:3.91 MB
Manufacturer:Canon
Category:Computers & Peripherals
Device:Canon PowerShot SX210 IS
Name:Camera User Guide
Language:Latviešu
Version:1.0
Pages:107
Size:3.91 MB
Manufacturer:Canon
Category:Computers & Peripherals
Device:Canon PowerShot SX210 IS
Name:Camera User Guide
Language:Lietuvių
Version:1.0
Pages:107
Size:3.91 MB
Manufacturer:Canon
Category:Computers & Peripherals
Device:Canon PowerShot SX210 IS
Name:Software Starter Guide
Language:Русский
Version:55-66
Size:9.99 MB
DescriptionCanon PowerShot SX210 IS Software Starter Guide
Please use Acrobat Reader v5.0 or less to view these files
Manufacturer:Canon
Category:Computers & Peripherals
Device:Canon PowerShot SX210 IS
Name:Software Starter Guide
Version:55-66
Size:13.87 MB
DescriptionCanon PowerShot SX210 IS Software Starter Guide
Please use Acrobat Reader v5.0 or less to view these files
Manufacturer:Canon
Category:Computers & Peripherals
Device:Canon PowerShot SX210 IS
Name:Software Starter Guide
Language:Svenska
Version:55-66
Size:14.82 MB
DescriptionCanon PowerShot SX210 IS Software Starter Guide
Please use Acrobat Reader v5.0 or less to view these files
Manufacturer:Canon
Category:Computers & Peripherals
Device:Canon PowerShot SX210 IS
Name:Software Starter Guide
Language:Deutsch
Version:55-66
Size:15.07 MB
DescriptionCanon PowerShot SX210 IS Software Starter Guide
Please use Acrobat Reader v5.0 or less to view these files
Manufacturer:Canon
Category:Computers & Peripherals
Device:Canon PowerShot SX210 IS
Name:Software Starter Guide
Language:Español
Version:55-66
Size:15.14 MB
DescriptionCanon PowerShot SX210 IS Software Starter Guide
Please use Acrobat Reader v5.0 or less to view these files
Manufacturer:Canon
Category:Computers & Peripherals
Device:Canon PowerShot SX210 IS
Name:Software Starter Guide
Version:55-66
Size:15.19 MB
DescriptionCanon PowerShot SX210 IS Software Starter Guide
Please use Acrobat Reader v5.0 or less to view these files
Manufacturer:Canon
Category:Computers & Peripherals
Device:Canon PowerShot SX210 IS
Name:Software Starter Guide
Language:Suomi
Version:55-66
Size:14.81 MB
DescriptionCanon PowerShot SX210 IS Software Starter Guide
Please use Acrobat Reader v5.0 or less to view these files
Manufacturer:Canon
Category:Computers & Peripherals
Device:Canon PowerShot SX210 IS
Name:Software Starter Guide
Language:Français
Version:55-66
Size:15.20 MB
DescriptionCanon PowerShot SX210 IS Software Starter Guide
Please use Acrobat Reader v5.0 or less to view these files
Manufacturer:Canon
Category:Computers & Peripherals
Device:Canon PowerShot SX210 IS
Name:Software Starter Guide
Language:Magyar
Version:55-66
Size:13.95 MB
DescriptionCanon PowerShot SX210 IS Software Starter Guide
Please use Acrobat Reader v5.0 or less to view these files
Manufacturer:Canon
Category:Computers & Peripherals
Device:Canon PowerShot SX210 IS
Name:Software Starter Guide
Language:Italiano
Version:55-66
Size:15.09 MB
DescriptionCanon PowerShot SX210 IS Software Starter Guide
Please use Acrobat Reader v5.0 or less to view these files
Manufacturer:Canon
Category:Computers & Peripherals
Device:Canon PowerShot SX210 IS
Name:Software Starter Guide
Language:Nederlands
Version:55-66
Size:14.88 MB
DescriptionCanon PowerShot SX210 IS Software Starter Guide
Please use Acrobat Reader v5.0 or less to view these files
Manufacturer:Canon
Category:Computers & Peripherals
Device:Canon PowerShot SX210 IS
Name:Software Starter Guide
Language:Polski
Version:55-66
Size:13.94 MB
DescriptionCanon PowerShot SX210 IS Software Starter Guide
Please use Acrobat Reader v5.0 or less to view these files
Manufacturer:Canon
Category:Computers & Peripherals
Device:Canon PowerShot SX210 IS
Name:Software Starter Guide
Language:Português
Version:55-66
Size:14.88 MB
DescriptionCanon PowerShot SX210 IS Software Starter Guide
Please use Acrobat Reader v5.0 or less to view these files
Manufacturer:Canon
Category:Computers & Peripherals
Device:Canon PowerShot SX210 IS
Name:Software Starter Guide
Language:English
Version:55-66
Size:14.79 MB
DescriptionCanon PowerShot SX210 IS Software Starter Guide
Please use Acrobat Reader v5.0 or less to view these files
Manufacturer:Canon
Category:Computers & Peripherals
Device:Canon PowerShot SX210 IS
Name:Software Starter Guide
Version:55-66
Size:15.23 MB
DescriptionCanon PowerShot SX210 IS Software Starter Guide
Please use Acrobat Reader v5.0 or less to view these files
Manufacturer:Canon
Category:Computers & Peripherals
Device:Canon PowerShot SX210 IS
Name:Software Starter Guide
Language:Čeština
Version:55-66
Size:13.87 MB
DescriptionCanon PowerShot SX210 IS Software Starter Guide
Please use Acrobat Reader v5.0 or less to view these files
Manufacturer:Canon
Category:Computers & Peripherals
Device:Canon PowerShot SX210 IS
Name:Software Starter Guide
Language:Dansk
Version:55-66
Size:14.84 MB
DescriptionCanon PowerShot SX210 IS Software Starter Guide
Please use Acrobat Reader v5.0 or less to view these files
Manufacturer:Canon
Category:Computers & Peripherals
Device:Canon PowerShot SX210 IS
Name:Camera User Guide
Language:Svenska
Version:1.0
Pages:180
Size:12.93 MB
Manufacturer:Canon
Category:Computers & Peripherals
Device:Canon PowerShot SX210 IS
Name:Camera User Guide
Version:1.0
Pages:180
Size:14.40 MB
Manufacturer:Canon
Category:Computers & Peripherals
Device:Canon PowerShot SX210 IS
Name:Camera User Guide
Language:Suomi
Version:1.0
Pages:180
Size:13.02 MB
Manufacturer:Canon
Category:Computers & Peripherals
Device:Canon PowerShot SX210 IS
Name:Camera User Guide
Language:Français
Version:1.0
Pages:180
Size:11.99 MB
Manufacturer:Canon
Category:Computers & Peripherals
Device:Canon PowerShot SX210 IS
Name:Camera User Guide
Language:Magyar
Version:1.0
Size:13.09 MB
DescriptionCanon PowerShot SX210 IS Camera User Guide
Please use Acrobat Reader v5.0 or later to view these files.
Manufacturer:Canon
Category:Computers & Peripherals
Device:Canon PowerShot SX210 IS
Name:Camera User Guide
Language:Italiano
Version:1.0
Pages:180
Size:13.06 MB
Manufacturer:Canon
Category:Computers & Peripherals
Device:Canon PowerShot SX210 IS
Name:Camera User Guide
Language:Nederlands
Version:1.0
Pages:182
Size:13.12 MB
Manufacturer:Canon
Category:Computers & Peripherals
Device:Canon PowerShot SX210 IS
Name:Camera User Guide
Language:Polski
Version:1.0
Pages:180
Size:13.30 MB
Manufacturer:Canon
Category:Computers & Peripherals
Device:Canon PowerShot SX210 IS
Name:Camera User Guide
Language:Português
Version:1.0
Pages:180
Size:12.98 MB
Manufacturer:Canon
Category:Computers & Peripherals
Device:Canon PowerShot SX210 IS
Name:Camera User Guide
Language:Русский
Version:1.0
Pages:180
Size:12.99 MB
Manufacturer:Canon
Category:Computers & Peripherals
Device:Canon PowerShot SX210 IS
Name:Camera User Guide
Version:1.0
Pages:180
Size:13.13 MB
Manufacturer:Canon
Category:Computers & Peripherals
Device:Canon PowerShot SX210 IS
Name:Camera User Guide
Language:English
Version:1.0
Pages:180
Size:12.89 MB
Manufacturer:Canon
Category:Computers & Peripherals
Device:Canon PowerShot SX210 IS
Name:Camera User Guide
Version:1.0
Pages:180
Size:14.93 MB
Manufacturer:Canon
Category:Computers & Peripherals
Device:Canon PowerShot SX210 IS
Name:Camera User Guide
Language:Čeština
Version:1.0
Pages:180
Size:13.14 MB
Manufacturer:Canon
Category:Computers & Peripherals
Device:Canon PowerShot SX210 IS
Name:Camera User Guide
Language:Dansk
Version:1.0
Pages:180
Size:13.02 MB
Manufacturer:Canon
Category:Computers & Peripherals
Device:Canon PowerShot SX210 IS
Name:Camera User Guide
Language:Deutsch
Version:1.0
Size:13.26 MB
DescriptionCanon PowerShot SX210 IS Camera User Guide
Please use Acrobat Reader v5.0 or later to view these files.
Manufacturer:Canon
Category:Computers & Peripherals
Device:Canon PowerShot SX210 IS
Name:Camera User Guide
Language:Español
Version:1.0
Pages:180
Size:12.04 MB