
View the manual for the FrSky Taranis X9D Plus here, for free. This user manual comes under the category radio controlled toys and has been rated by 3 people with an average of a 8.1. This manual is available in the following languages: -. Do you have a question about the FrSky Taranis X9D Plus?
Ask your question here
FrSky Taranis X9D Plus specifications
Below you will find the product specifications and the manual specifications of the FrSky Taranis X9D Plus.
Display resolution
212 x 64 pixels
Operating temperature (T-T)
-10 — 60 °C
Not for children 0-3 years
Yes
General
Features
| Product colour | Silver |
| Compatible memory cards | MicroSD (TransFlash) |
| Channels quantity | 32 channels |
| Frequency band | 2.4 GHz |
| Telemetry receiver | Yes |
| Product type | Remote control |
| Brand compatibility | FrSky |
| Proper use | Multirotor, Quadcopter |
| Product colour | Silver |
| Compatible memory cards | MicroSD (TransFlash) |
| Channels quantity | 32 channels |
| Display resolution | 212 x 64 pixels |
| Display type | LCD |
| Frequency band | 2.4 GHz |
| Operating temperature (T-T) | -10 — 60 °C |
| Telemetry receiver | Yes |
| Product type | Control unit |
| Brand compatibility | FrSky |
| Built-in display | Yes |
Display
| Display resolution | 212 x 64 pixels |
| Display type | LCD |
| Built-in display | Yes |
Packaging data
| Manual | Yes |
| Batteries included | Yes |
Battery
| Battery capacity | 270 mAh |
| Battery voltage | 1.5 V |
| Battery technology | Lithium Polymer (LiPo) |
| Battery capacity | 270 mAh |
| Battery voltage | 1.5 V |
| Battery technology | Lithium Polymer (LiPo) |
Operational conditions
| Operating temperature (T-T) | -10 — 60 °C |
Safety warning
| Not for children 0-3 years | Yes |
| Not for children 0-3 years | Yes |
Packaging content
| Manual | Yes |
| Batteries included | Yes |
show more
Frequently asked questions
Can’t find the answer to your question in the manual? You may find the answer to your question in the FAQs about the FrSky Taranis X9D Plus below.
What is the screen resolution of the display of the FrSky Taranis X9D Plus?
The screen resolution of the FrSky Taranis X9D Plus is 212 x 64 pixels.
A battery in my radio controlled toy has started to corrode. Is the device still safe to use?
The product can still be used safely after proper cleaning. Remove the battery with gloves and clean the battery compartment with a toothbrush and vinegar. After drying, new batteries can be inserted into the device.
Is the manual of the FrSky Taranis X9D Plus available in English?
Unfortunately, we do not have the manual for the FrSky Taranis X9D Plus available in English. This manual is available in -.
Is your question not listed? Ask your question here
FrSky 2.4GHz ACCESS Taranis X9D Plus 2019/Taranis X9D Plus SE 2019 Manual
Introduction
The FrSky Taranis X9D Plus 2019 is a re-designed version with additions like an additional momentary button placed on the top left shoulder making it ergonomically friendly for DLG pilots to activate launch mode and features a program scroll wheel making it even easier to navigate the menus. The upgraded MCU is used in conjunction with a re-designed mainboard that further increases the computing capability and increases data storage. The upgrades not only improve the running of LUA scripts, it also optimizes overall performance like voice speech outputs.
The 2019 version uses the latest ACCESS communication protocol, it boasts 24 channels with a faster baud rate and lower latency with a high-speed module digital interface. Along with the new spectrum analysis function added to the OpenTX firmware, it is now possible to check the airwaves for RF noise with an accurate SWR indicator. This version will give you a further improved experience based on the classic Taranis remote control. Additionally, tons of extra upcoming features that ACCESS brings will make this an ideal transmitter for any skill level.
The SE 2019 version is installed with the upgraded switches and M9 hall sensor gimbals and features the addition of a PARA wireless trainer function which makes them compatible with the FrSky Free Link App and AirLink S.
Due to unforeseen changes in production, the information contained in this manual is subject to change without notice. Pay special attention to safety were indicated by the following marks:
Meanings of Special Markings

DANGER – procedures that may lead to dangerous conditions and cause death/serious injury if not carried out properly.
WARNING – Procedures which may lead to a dangerous condition or cause serious injury and even death to the user if not carried out properly or procedures where the probability of superficial injury or physical damage is high.
CAUTION – Procedures where the possibility of serious injury to the user is small, but there is a danger of injury or physical damage, if not carried out properly.
NOTE Steps, Tips or information
WARNING – Always keep electrical components away from children.
Layout
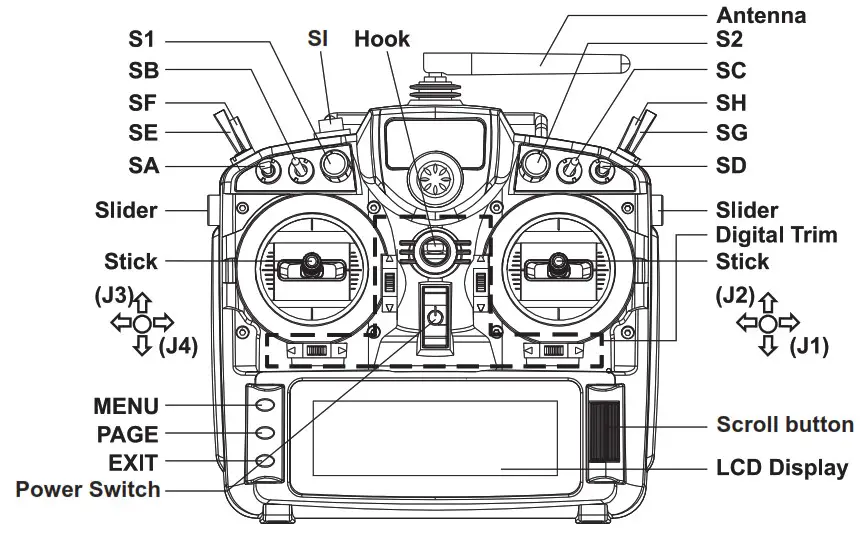
Switch
SA: 3 positions; Short lever
SB: 3 positions; Long lever
SC: 3 positions; Long lever
SD: 3 positions; Short lever
SE: 3 positions; Short lever
SF: 2 positions; Long lever
SG: 3 positions; Short lever
SH: 2 positions; Momentary, Long lever
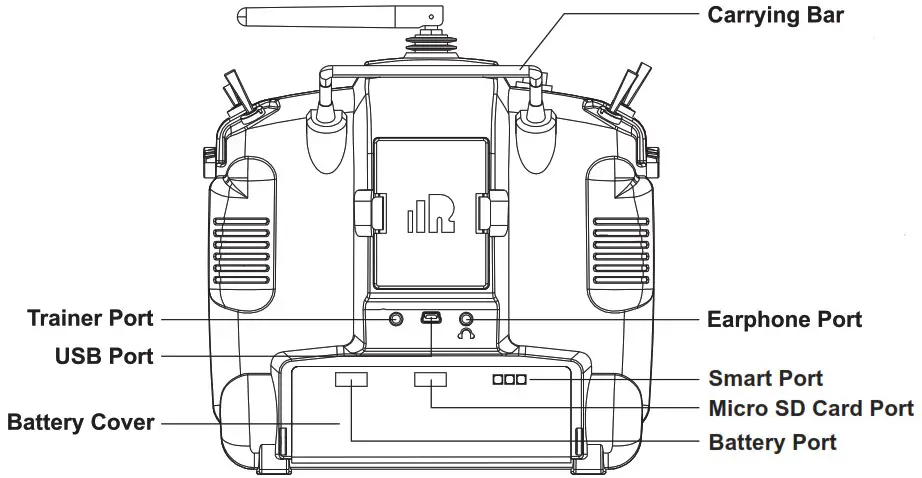
- Micro SD card is not provided with the shipment.
- USB port is for upgrading, reading/writing Micro SD cards, and internal memory of radio contents and charing (Includes USB cable in the package but without the adapter).
- Smart Port is for a firmware upgrade for all FrSky S.Port devices.
Specifications
- Model Name: Taranis X9D Plus 2019/Taranis X9D Plus SE 2019
- Dimension: 200*194*110 (L*W*H)
- Weight: Taranis X9D Plus 2019: 670g (without battery)
- Taranis X9D Plus SE 2019: 700g (without battery)
- Operating Current: [email protected] (Typ)
- Backlight LCD resolution: 212*64
- Model Memories: 60 models (Extendable by Micro SD card)
- Number of channels: 24 channels
- Operating Voltage Range: DC 6.5~8.4V
- Operating Temperature: -10~60 (14~140)
- Smart Port, Micro SD card slot, and USB Port OpenTX system
Features
- Classic Taranis form factor design
- High-speed module digital interface
- Easy launch momentary button
- Installed with ACCESS protocol
- Supports spectrum analyzer function
- Accurate SWR indicator
- Haptic vibration alerts and voice speech outputs
Comparison List
| Taranis X9D Plus 2019 | Taranis X9D Plus SE 2019 | |
| Operating System | OpenTX | OpenTX |
| Communication Protocol | ACCST D16 /ACCESS | ACCST D16 /ACCESS |
| Program Navigation Button | √ | √ |
| Easily Launch Momentary Button | √ | √ |
| 2S Li-Battery Charging System* | √ | √ |
| G9D Potentiometer Gimbal | √ | |
| M9 Hall Sensor Gimbal | √ | |
| Upgraded Switches | √ | |
| Wired Training System | √ | √ |
| PARA wireless training function ● PAPA High-speed training system with a lower latency ● Compatible with FrSky Free Link App and AirLink S via mobile devices |
√ |
About USB 2S Li-battery balance charing:
The Green Power indicator LED states:
Led on: charging
Led off: charge end
Led flash: charge fault
Note:
- Charge the battery with the adapter (power [email protected]) when you use the USB charging function.
- The lower the initial charging voltage, the better the charging effect is when the voltage difference between the two cells exceeds 50 mV.
Caution: Only 2S Li battery without a protective circuit can be applied to the balance charging system, and please do not charge any other types of battery.
Warnings for Battery
Do not remove the battery from the X9D Plus 2019/X9D Plus SE 2019 transmitter while the voltage warning is blinking as this could cause internal settings and memories to be destroyed. Do not use the transmitter if a “Backup Error” warning occurs.
To navigate the menus, Taranis X9D Plus 2019/Taranis X9D Plus SE 2019 has the following elements:
- Scroll Button
- MENU Button
- PAGE Button
- EXIT Button
Taranis X9D Plus 2019/Taranis X9D Plus SE 2019 supports OpenTX system
Scroll Button
To navigate menus or widgets, roll the button to the left or right as navigation.
MENU Button
To go to the [Model] menu, press the button. To go to the [RADIO SETUP] menu, press the button, and hold for one second.
PAGE Button
To go to switch the page, press the button. To go to the [Telemetry] menu, press the button, and hold for one second.
EXIT Button
To exit current page or operation widgets.
Where am I in the menu tree
System item Currently selected page

Overview of the menu tree
Quick select options

FrSky 2.4GHz ACCESS Taranis X9D Plus 2019/Taranis X9D Plus SE 2019 Manual
Long press the Scroll Button there will generate a pop-up where the user can reset the timer, reset telemetry values, reset all above, jump to the tele setup page.
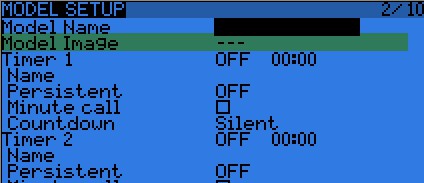
Model Setup for Taranis X9D Plus 2019/Taranis X9D Plus SE 2019 Internal RF Module
Step 1: Set the Mode for Taranis X9D Plus 2019/Taranis X9D Plus SE 2019 Internal RF.
Go to the MODEL SETUP menu, and select the Internal RF, select [Mode] [ACCESS].
Step 2: Set the Channel Range
The Internal RF module of Taranis X9D Plus 2019/Taranis X9D Plus SE 2019 supports up to 24 channels. The channel range is configurable and needs to be confirmed before use.
Step 3: Set the Receiver Number
When you create a new model, the system will assign you a receiver number automatically, but this can be easily changed. The range of the receiver number is 00-63, with the default number being 01 (use 00 is not recommended). Once the receiver is set to the desired number and is bound to the Taranis X9D Plus 2019/Taranis X9D Plus SE 2019, the bind procedure will not need to be repeated unless the receiver number is changed. In this case, either set the receiver number to the previous one or repeat the bind procedure.
Step 4: Registration
In ACCESS, select the Module [Register] into Registration status. Then Press the F/S button and power on your receiver, and select the “RX Name XX” and [ENTER] to complete the Registration process then power down the receiver.

Note: If two or three receivers are used at the same time, the UID should be set to different values.
Step 5: Automatic binding (Smart MatchTM )
Move the cursor to Receiver1[Bind], and select it, power your receiver, select the RX and complete the process, the system will confirm “Bind successful”. (You do not need to press the “F/S” button in ACCESS to Bind. Refer to the receiver’s manual for details)
Step 6: Set Failsafe mode
There are 4 failsafe modes: No pulse, Hold, Custom, and receiver. No Pulse: on the loss of signal the receiver produces no pulses on any channel. To use this type, select it in the menu and wait 9 seconds for the failsafe to take effect.
Hold: the receiver continues to output the last positions before the signal was lost. To use this type, select it in the menu and wait 9 seconds for the failsafe to take effect.
Custom: pre-set to required positions on lost signal. Move the cursor to “Set” and press the Scroll Button, and you can see the FAILSAFE SETTING screen below. Move the cursor to the channel you want to set failsafe on, and press the Scroll Button. When moving the corresponding sticks or switches, you will see the channel bar moving. Move the channel bar to the place you want for failsafe and long-press the Scroll Button to finish the setting. Wait 9 seconds before the failsafe takes effect.
Receiver: set the failsafe on the receiver (see receiver instructions) in ACCESS, select it in the menu, and wait 9 seconds for the failsafe to take effect.
Step 7: Range
Range refers to Taranis X9D Plus 2019/Taranis X9D Plus SE 2019 range check mode. A pre-flight range check should be done before each flying session. Move the cursor to [Range] and press the Scroll Button. In range check mode, the effective distance will be decreased to 1/30. Press the Scroll Button or EXIT to exit.
FCC
This equipment has been tested and found to comply with the limits for a Class B digital device, pursuant to part 15 of the FCC Rules
CE
The product may be used freely in these countries: Germany, UK, Italy, Spain, Belgium, Netherlands, Portugal, Greece, Ireland, Denmark, Luxembourg, Austria, Finland, Sweden, Norway, France and Iceland.
FLYING SAFETY
Warning:
To ensure the safety of yourself and others, please observe the following precautions.
Have regular maintenance been performed? Although your Taranis X9D Plus 2019/Taranis X9D Plus SE 2019 protects the model memories with non-volatile EEPROM memory (which does not require periodic replacement) and of a battery, it still should have regular check-ups for wear and tear. We recommend sending your system to your FrSky Service Center annually during your non-flying-season for a complete check-up and service.
Battery
Using a fully charged battery (DC 6.5~8.4V). A low battery will soon die, causing loss of control and a crash. When you begin your flying session, reset your transmitter’s built-in timer, and during the session pay attention to the duration of usage. Also, if your model using a separate receiver battery, make sure it is fully charged before each flying session.
Stop flying long before your batteries become over-discharged. Do not rely on your radio’s low battery warning systems, intended only as a precaution, to tell you when to recharge. Always check your transmitter and receiver batteries prior to each flight.
Where to Fly
We recommend that you fly at a recognized model airplane flying field. You can find model clubs and fields by asking your nearest hobby dealer.
Always pay particular attention to the flying field’s rules, as well as the presence and location of spectators, the wind direction, and any obstacles on the field. Be very careful flying in areas near power lines, tall buildings, or communication facilities as there may be radio interference in their vicinity.
At the flying field
To prevent possible damage to your radio gear, turn the power switches on and off in the proper sequence:
- Pull throttle stick to idle position, or otherwise disarm your motor/engine.
- Turn on the transmitter power and allow your transmitter to reach its home screen.
- Confirm the proper model memory has been selected.
- Turn on your receiver power.
- Test all controls. If a servo operates abnormally, don’t attempt to fly until you determine the cause of the problem.
- Start your engine.
- Complete a full range check.
- After flying, bring the throttle stick to idle position, engage any kill switches or otherwise disarm your motor/ engine.
If you do not turn on your system on and off in this order, you may damage your servos or control surfaces, flood your engine, or in the case of electric-powered or gasoline-powered models, the engine may unexpectedly turn on and cause a severe injury.
Make sure your transmitter can’t tip it over. If it is knocked over, the throttle stick may be accidentally moved, causing the engine to speed up. Also, damage to your transmitter may occur.
In order to maintain complete control of your aircraft, it is important that it remains visible at all times. Flying behind large objects such as buildings, grain bins, etc. must be avoided. Doing so may interrupt the radio frequency link to the model, resulting in loss of control.
Do not grasp the transmitter’s antenna during flight. Doing so may degrade the quality of the radio frequency transmission and could result in loss of control.
As with all radio frequency transmissions, the strongest area of signal transmission is from the sides of the transmitter’s antenna. As such, the antenna should not be pointed directly at the model. If your flying style creates this situation, easily move the antenna to correct this situation.
Before taxiing, be sure to extend the transmitter antenna to its full length. A collapsed antenna will reduce your flying range and cause a loss of control. It is a good idea to avoid pointing the transmitter antenna directly at the model since the signal is weakest in that direction.
Don’t fly in the rain! Water or moisture may enter the transmitter through the antenna or stick openings and cause erratic operation or loss of control. If you must fly in wet weather during a contest, be sure to cover your transmitter with a plastic bag or waterproof barrier. Never fly if lightning is expected.
Updates
FrSky is continuously adding features and improvements to our radio systems. Updating (via USB Port or the Micro SD card) is easy and free. To get the most from your new transmitter, please check the download section of the FrSky website for the latest update firmware and guide for adjusting your sticks. (www.frsky-rc.com)
FrSky is continuously adding features and improvements to our products. To get the most from your product, please check the download section of the FrSky website www.frsky-rc.com for the latest update firmware and manuals
FrSky Electronic Co., Ltd.
www.frsky-rc.com
Contact us: [email protected]
Add: F-4, Building C, Zhongxiu Technology Park, No.3 Yuanxi Road, Wuxi, 214125, Jiangsu, China
Technical Support: [email protected]
Table of Contents
- Taranis X9D Plus 2019 ACCESS Transmitters
- Specifications:
- Product Usage Instructions:
- Overview of Controls:
- Using the Menu:
- Warnings for Battery:
- FAQ:
- Q: What is the purpose of the PARA wireless trainer
- Q: Can I upgrade firmware using the Smart Port?
- References
- Read User Manual Online (PDF format)
- Download This Manual (PDF format)
Taranis X9D Plus 2019 ACCESS Transmitters
“`html
Specifications:
-
Upgraded switches and M9 hall sensor gimbals
-
Features PARA wireless trainer function
-
Compatible with FrSky Free Link App and AirLink S
-
Smart Port for firmware upgrade for all FrSky S.Port
devices -
Battery compartment size: 1003026.5mm (LWH)
Product Usage Instructions:
Overview of Controls:
The Taranis X9D Plus/SE 2019 features various controls including
sliders, sticks, switches, knobs, and buttons. The controls include
SA, SB, SC, SD, SE, SF, SG switches, S1 & S2 knobs, SI tact
switch, and more.
To navigate the menus on the Taranis X9D Plus/SE 2019, use the
following elements: Scroll Button for left or right navigation,
MENU Button for accessing the Model menu, PAGE Button for accessing
the RADIO SETUP menu, and EXIT Button for exiting menus.
Warnings for Battery:
Do not remove the battery while the voltage warning is blinking
to avoid internal settings and memories damage. Avoid using the
transmitter if a Backup Error warning occurs.
FAQ:
Q: What is the purpose of the PARA wireless trainer
function?
A: The PARA wireless trainer function enables compatibility with
the FrSky Free Link App and AirLink S for enhanced training
capabilities.
Q: Can I upgrade firmware using the Smart Port?
A: Yes, the Smart Port allows firmware upgrades for all FrSky
S.Port devices.
“`
Instruction Manual for FrSky Taranis X9D Plus/SE 2019
Introduction
The FrSky Taranis X9D Plus 2019 is a re-designed version with additions like
an additional momentary button placed on the top left shoulder making it
ergonomically friendly for DLG pilots to activate launch mode, and features a
program scroll wheel making it even easier to navigate the menus. The upgraded
MCU is used in conjunction with a re-designed mainboard that further increases
the computing capability and increases the data storage. The upgrades not only
improve the running of LUA scripts, it also optimizes overall performance like
voice speech outputs.
The 2019 version uses the latest ACCESS communication protocol, it boasts 24
channels with a faster baud rate and lower latency with a high-speed module
digital interface. Along with the new spectrum analysis function added to the
OpenTX firmware, it is now possible to check the airwaves for RF noise. This
version will give you a further improved experience based on the classic
Taranis remote control. Additionally, tons of extra upcoming features that
ACCESS brings will make this an ideal transmitter for any skill level.
The SE 2019 version is installed with the upgraded switches and M9 hall sensor
gimbals and features the addition of a PARA wireless trainer function which
makes them compatible with the FrSky Free Link App and AirLink S.
Due to unforeseen changes in production, the information contained in this
manual is subject to change without notice. Pay special attention to safety
where indicated by the following marks:
Meanings of Special Markings
DANGER – procedures which may lead to dangerous conditions and cause
death/serious injury if not carried out properly.
WARNING – Procedures which may lead to a dangerous condition or cause serious
injury and even death to the user if not carried out properly or procedures
where the probability of superficial injury or physical damage is high.
CAUTION – Procedures where the possibility of serious injury to the user is
small, but there is a danger of injury or physical damage, if not carried out
properly.
NOTE Steps, Tips or information
WARNING – Always keep electrical components away from children.
Overview
S1 SB SF SE SA
Slider
Stick (J3)
(J4)
MENU PAGE
EXIT Power Switch
SI Hook
Antenna S2 SC SH SG SD
Slider Digital Trim Stick (J2)
(J1)
Scroll button
LCD Diaplay
Switch SA: 3 positions; Short Lever SB: 3 positions; Long Lever SC: 3
positions; Long Lever SD: 3 positions; Short Lever SE: 3 positions; Short
Lever SF: 2 positions; Long Lever
SG: 3 positions; Short Lever SH: 2 positions; Momentary,
Long lever S1&S2: Knob, Switch SI: Tact switch, Momentary
1. Micro SD card is not provided with shipment. 2. USB port is for upgrading,
reading/writing Micro SD cards and internal memory of radio contents and
charging (Includes USB cable in packge but without the adapter). 3. Smart Port
is for firmware upgrade for all FrSky S.Port devices. 4. Battery compartment
size: 1003026.5mm (LWH
Carrying Bar Infinity 24 Antenna
Recommended 2.4GHz optional high-gain antenna for achieving higher performance
and further range.
+X
+Z
Trainer port Mini USB Port
Battery Port Battery Cover
Earphone Port
Smart Port Micro SD Card Port
+Y SMA Connector
FrSky Electronic Co., Ltd.
www.frsky-rc.com
Contact us: frsky@frsky-rc.com
Add: F-4,Building C, Zhongxiu Technology Park, No.3 Yuanxi Road, Wuxi, 214125,
Jiangsu, China Technical Support: sales4tech@gmail.com
Instruction Manual for FrSky Taranis X9D Plus/SE 2019
Warnings for Battery
Do not remove the battery from the X9D Plus 2019/X9D Plus SE 2019 transmitter
while the voltage warning is blinking as this could cause internal settings
and memories to be destroyed. Do not use the transmitter if a “Backup Error”
warning occurs.
Navigate the Menu
To navigate the menus, Taranis X9D Plus 2019/Taranis X9D Plus SE 2019 has the
following elements: Scroll Button MENU Button PAGE Button EXIT Button
Taranis X9D Plus 2019/Taranis X9D Plus SE 2019 supports OpenTX system
Scroll Button
To navigate menus or widgets, roll the button to left or right as navigation.
MENU Button
To go to the [Model] menu, press the button. To go to the [RADIO SETUP] menu,
press the button, and hold for one second.
PAGE Button
To go to switch the page, press the button. To go to the [Telemetry] menu,
press the button, and hold for one second.
EXIT Button
To exit current page or operation widgets.
Where am I in the menu tree
System item Currently selected page
To go to the next page, move the cursor to the item, then Scroll Button roll
to the left or right.
The cursor will firstly stay at the item which indicates the current page.
To change the data in other items, firstly roll Scroll Button to the left or
right until the cursor stays at the needed item.
Secondly, press Scroll Button and roll the button to the left or right.
Overview of the menu tree
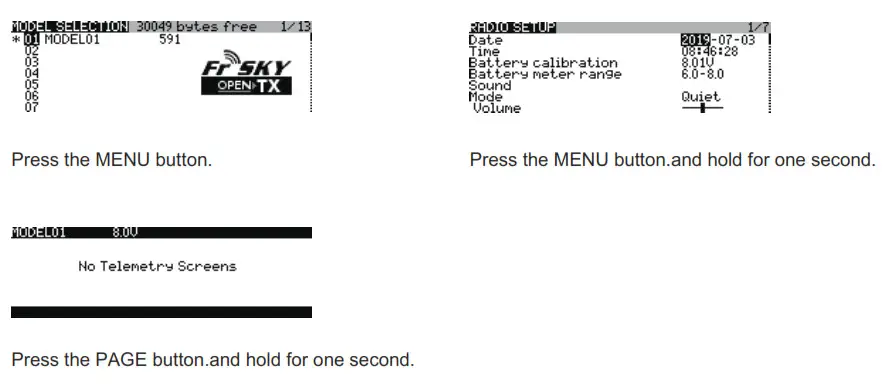
Press the MENU button.
Press the MENU button.and hold for one second.
Press the PAGE button.and hold for one second.
FrSky Electronic Co., Ltd.
www.frsky-rc.com
Contact us: frsky@frsky-rc.com
Add: F-4,Building C, Zhongxiu Technology Park, No.3 Yuanxi Road, Wuxi, 214125,
Jiangsu, China Technical Support: sales4tech@gmail.com
Instruction Manual for FrSky Taranis X9D Plus/SE 2019
Specifications
Model name: Taranis X9D Plus 2019/Taranis X9D Plus SE 2019 Dimension:
200194110 (LWH) Weight: Taranis X9D Plus 2019: 670g (without battery)
Taranis X9D Plus SE 2019: 700g (without battery) Operating Current: 130mA@8.2V
(Typ) Backlight LCD resolution: 212*64 Model Memories: 60 models (Extenable by
Micro SD card) Number of channels: 24 channels Operating Voltage Range: DC
6.5~8.4V Opertaing Temperature: -10~60 (14~140) Smart Port, Micro SD card slot
and USB Port OpenTX system
Features
Classic Taranis form factor design High-speed module digital interface Easy
Launch Momentary Button Installed with ACCESS protocol Supports spectrum
analyzer function SWR indicator Haptic vibration alerts and voice speech
outputs
Comparison List
Operating System
Communication Protocol
Program Navigation Button Easy Launch Momentary Button 2S Li-Battery Charging
System* G9D Potentiometer Gimbal M9 Hall Sensor Gimbal
Upgraded Switches
Wired Training System
PARA wireless training function PARA High-speed training system with a lower
latency Compatible with FrSky Free Link App and AirLink S
via mobile devices
Taranis X9D Plus 2019 OpenTX
ACCST D16 /ACCESS
About USB 2S Li-battery balance charging :
The Green Power indicator LED state:
Led on: charging
Led off: charge end
Using the following type of battery:
Led flash: charge fault
Taranis X9D Plus SE 2019 OpenTX
ACCST D16 /ACCESS
Olny 2S Li-Ion/Li-Po battery
Battery + Battery Balance Battery –
PH2.54-XH-3Y
LiFePO4 battery is not supported. Battery compartment size:
1003026.5mmcLWH) Recommended battery pack size: 803024mm(LWH) *USB
adapter Voltage: 5V+0.2V Current:2.0A
Note: 1. Charge the battery with the USB adapter (Voltage:5V+0.2V
Current:2.0A) when you use the USB
charging function.
2. The lower the initial charging voltage, the better the charging effect is
when the voltage difference
between the two cells exceed 50 mV.
FrSky Electronic Co., Ltd.
www.frsky-rc.com
Contact us: frsky@frsky-rc.com
Add: F-4,Building C, Zhongxiu Technology Park, No.3 Yuanxi Road, Wuxi, 214125,
Jiangsu, China Technical Support: sales4tech@gmail.com
Quick select options
Instruction Manual for FrSky Taranis X9D Plus/SE 2019
Long press the Scroll Button there will generate a pop-up where the user can
reset timer, reset telemetry values, reset all above, jump to the tele setup
page.
Model Setup for Taranis X9D Plus 2019/Taranis X9D Plus SE 2019 Internal RF
Module
Enter the MODEL SETUP menu. Step 1: Set the Mode for Taranis X9D Plus
2019/Taranis X9D Plus SE 2019 Internal RF. Go to the MODEL SETUP menu, and
select the Internal RF, select [Mode] [ACCESS]. Step 2: Set the Channel Range
The Internal RF module of Taranis X9D Plus 2019/Taranis X9D Plus SE 2019
supports up to 24 channels. The channel range is configurable,and needs to be
confirmed before use. Step 3: Set the Receiver Number When you create a new
model, the system will assign you a receiver number automatically, but this
can be easily changed. The range of the receiver number is 00-63, with the
default number being 01 (use 00 is not recommended). Once the receiver is set
to desired number and is bound to the Taranis X9D Plus 2019/Taranis X9D Plus
SE 2019, the bind procedure will not need to be repeated unless the receiver
number is changed. In this case, either set the receiver number to the
previous one or repeat the bind procedure. Step 4: Registration In ACCESS,
select the Module [Register] into Registration status. Then Press the F/S
button and power on your receiver, and select the “RX Name XX” and [ENTER] to
complete the Registration process then power down the receiver.
Note: If two or three receivers are used at the same time, the UID should be
set to different values.
Step 5: Automatic binding (Smart MatchTM ) Move the cursor to
Receiver1[Bind],and select it , power your receiver, select the RX
and complete the process, the system will confirm “Bind successful”. (You do
not need to press the “F/S” button in ACCESS to Bind. Refer to the receivers
manual for details)
FrSky Electronic Co., Ltd.
www.frsky-rc.com
Contact us: frsky@frsky-rc.com
Add: F-4,Building C, Zhongxiu Technology Park, No.3 Yuanxi Road, Wuxi, 214125,
Jiangsu, China Technical Support: sales4tech@gmail.com
Instruction Manual for FrSky Taranis X9D Plus/SE 2019
Step 6: Set Failsafe mode There are 4 failsafe modes: No pulse, Hold, Custom
and receiver. No Pulse: on loss of signal the receiver produces no pulses on
any channel. To use this type, select it in the menu and wait 9 seconds for
the failsafe to take effect.
Hold: the receiver continues to output the last positions before signal was
lost. To use this type, select it in the menu and wait 9 seconds for the
failsafe to take effect.
Custom: pre-set to required positions on lost signal. Move the cursor to “Set”
and press the Scroll Button, and you can see FAILSAFE SETTING screen below.
Move the cursor to the channel you want to set failsafe on, and press the
Scroll Button. When moving the corresponding sticks or switches, you will see
the channel bar moving. Move the channel bar to the place you want for
failsafe and long press the Scroll Button to finish the setting. Wait 9
seconds before failsafe takes effect.
Receiver: set the failsafe on the receiver (see receiver instructions) in
ACCESS, select it in the menu and wait 9 seconds for the failsafe to take
effect.
Step 7: Range Range refers to Taranis X9D Plus 2019/Taranis X9D Plus SE 2019
range check mode. A pre-flight range check should be done before each flying
session. Move the cursor to [Range] and press the Scroll Button. In range
check mode, the effective distance will be decreased to 1/30. Press the Scroll
Button or EXIT to exit.
FCC
This equipment has been tested and found to comply with the limits for a Class
B digital device, pursuant to part 15 of the FCC Rules
CE
The product may be used freely in these countries: Germany, Italy, Spain,
Belgium, Netherlands, Portugal, Greece, Ireland, Denmark, Luxembourg, Austria,
Finland, Sweden, Norway, Switzerland, France and Iceland.
FLYING SAFETY Warning:
To ensure the safety of yourself and others, please observe the following
precautions. Have regular maintenance performed. Although your Taranis X9D
Plus 2019/Taranis X9D Plus SE 2019
protects the model memories with non-volatile EEPROM memory (which does not
require periodic replacement) and of a battery, it still should have regular
check-ups for wear and tear. We recommend sending your system to your FrSky
Service Center annually during your non-flying-season for a complete check-up
and service.
Battery
Using a fully charged battery (DC 6.5~8.4V). A low battery will soon die,
causing loss of control and a crash. When you begin your flying session, reset
your transmitter’s built-in timer, and during the session pay attention to the
duration of usage. Also, if your model used a separate receiver battery, make
sure it is fully charged before each flying session.
Stop flying long before your batteries become over discharged. Do not rely on
your radio’s low battery warning systems, intended only as a precaution, to
tell you when to recharge. Always check your transmitter and receiver
batteries prior to each flight.
FrSky Electronic Co., Ltd.
www.frsky-rc.com
Contact us: frsky@frsky-rc.com
Add: F-4,Building C, Zhongxiu Technology Park, No.3 Yuanxi Road, Wuxi, 214125,
Jiangsu, China Technical Support: sales4tech@gmail.com
Instruction Manual for FrSky Taranis X9D Plus/SE 2019
Updates
FrSky is continuously adding features and improvements to our radio systems.
Updating (via USB Port or the Micro SD card) is easy and free. To get the most
from your new transmitter, please check the download section of the FrSky
website for the latest update firmware and guide for adjusting your sticks.
(www.frsky-rc.com)
Instruction Manual for FrSky Taranis X9D Plus/SE 2019
Where to Fly
We recommend that you fly at a recognized model airplane flying field. You can
find model clubs and fields by asking your nearest hobby dealer.
Always pay particular attention to the flying field’s rules, as well as the
presence and location of spectators, the wind direction, and any obstacles on
the field. Be very careful flying in areas near power lines, tall buildings,
or communication facilities as there may be radio interference in their
vicinity.
At the flying field
To prevent possible damage to your radio gear, turn the power switches on and
off in the proper sequence:
1. Pull throttle stick to idle position, or otherwise disarm your
motor/engine. 2. Turn on the transmitter power and allow your transmitter to
reach its home screen. 3. Confirm the proper model memory has been selected.
4. Turn on your receiver power. 5. Test all controls. If a servo operates
abnormally, don’t attempt to fly until you determine the cause of the problem.
6. Start your engine. 7. Complete a full range check. 8. After flying, bring
the throttle stick to idle position, engage any kill switches or otherwise
disarm your motor/ engine.
If you do not turn on your system on and off in this order, you may damage
your servos or control surfaces, flood your engine, or in the case of
electric-powered or gasoline-powered models, the engine may unexpectedly turn
on and cause a severe injury.
Make sure your transmitter can’t tip it over. If it is knocked over, the
throttle stick may be accidentally moved, causing the engine to speed up.
Also, damage to your transmitter may occur.
In order to maintain complete control of your aircraft it is important that it
remains visible at all times. Flying behind large objects such as buildings,
grain bins, etc. must be avoided. Doing so may interrupt the radio frequency
link to the model, resulting in loss of control.
Do not grasp the transmitter’s antenna during flight. Doing so may degrade the
quality of the radio frequency transmission and could result in loss of
control.
As with all radio frequency transmissions, the strongest area of signal
transmission is from the sides of the transmitter’s antenna. As such, the
antenna should not be pointed directly at the model. If your flying style
creates this situation, easily move the antenna to correct this situation.
Before taxiing, be sure to extend the transmitter antenna to its full length.
A collapsed antenna will reduce your flying range and cause a loss of control.
It is a good idea to avoid pointing the transmitter antenna directly at the
model, since the signal is weakest in that direction.
Don’t fly in the rain! Water or moisture may enter the transmitter through the
antenna or stick openings and cause erratic operation or loss of control. If
you must fly in wet weather during a contest, be sure to cover your
transmitter with a plastic bag or waterproof barrier. Never fly if lightning
is expected.
FrSky Electronic Co., Ltd.
www.frsky-rc.com
Contact us: frsky@frsky-rc.com
Add: F-4,Building C, Zhongxiu Technology Park, No.3 Yuanxi Road, Wuxi, 214125,
Jiangsu, China Technical Support: sales4tech@gmail.com
FrSky Electronic Co., Ltd.
www.frsky-rc.com
Contact us: frsky@frsky-rc.com
Add: F-4,Building C, Zhongxiu Technology Park, No.3 Yuanxi Road, Wuxi, 214125,
Jiangsu, China Technical Support: sales4tech@gmail.com
References
- Robinson+Cole
- FrSky Top Rated RC Hobby Radio, Receiver and RC Model — Lets you set the limits
Read User Manual Online (PDF format)
Read User Manual Online (PDF format) >>
Download This Manual (PDF format)
Download this manual >>
FrSky Taranis X9D Plus Transmitter PDF User Guides and Manuals for Free Download: Found (3) Manuals for FrSky Taranis X9D Plus Device Model (Operation & User’s Manual, Manual )
The FrSky Taranis X9D Plus is undoubtedly one of the most popular choices among hobbyists and professional pilots in the realm of remote-controlled aircraft. With its advanced features, robust build quality, and an affordability that is hard to beat, the Taranis X9D Plus has carved out a significant niche in the market. In this review, we will explore its features, performance, and overall value to help you determine if it’s the right transmitter for your needs.
First and foremost, the design of the Taranis X9D Plus is ergonomic and user-friendly, making it suitable for extended use during flight sessions. The controller comes with a comfortable grip that allows for precise thumb control. The well-placed buttons and dials contribute to an intuitive experience, enabling users to navigate through menus with ease. The inclusion of a large OLED screen provides excellent visibility, allowing pilots to monitor their information quickly, even in bright daylight.
One of the standout features of the FrSky Taranis X9D Plus is its versatility. It supports a variety of protocols, making it compatible with a wide range of receivers and models. This versatility is further enhanced by the ability to customize your model settings through its sophisticated OpenTX firmware. Users can configure channels, mix controls, and set up telemetry data to ensure optimal performance tailored to specific flying styles.
Another impressive aspect of the Taranis X9D Plus is its long range and robust signal. Utilizing FrSky’s unique ACCST (Advanced Continuous Channel Shifting Technology), the transmitter provides a reliable connection even at substantial distances. This is crucial for serious FPV (First Person View) and long-range pilots. With a maximum range of up to 2 kilometers, you can expect seamless communication between the transmitter and your model, giving you the confidence to fly without barriers.
As for battery life, the Taranis X9D Plus excels with its built-in 2000mAh Lithium-polymer battery. This substantial power capacity ensures that you can spend long hours flying without the constant worry of recharging. The battery indicator on the screen provides real-time updates on power levels, and it’s easy to replace with a compatible one if needed. Users can also opt for an external battery if they wish to extend the usage times further.
However, while the Taranis X9D Plus is widely praised, it is not without its drawbacks. The initial learning curve associated with OpenTX can be steep for newcomers unfamiliar with programmable transmitters. Users may face challenges in understanding the system’s capabilities entirely. Additionally, the default settings might not be suitable for every model, necessitating customization that can be time-consuming.
In conclusion, the FrSky Taranis X9D Plus is a powerful and versatile transmitter suitable for pilots of all levels, particularly those who seek an inexpensive yet feature-rich option for their flying needs. Its solid construction, advanced functionalities, and long range make it a reliable choice. However, new users should be prepared to spend some time learning the system and configuring their settings appropriately.
For anyone serious about their hobby, investing in the Taranis X9D Plus is certainly worthwhile. Here’s a quick summary of its pros and cons:
- Pros:
- Ergonomic design and user-friendly interface
- Extensive compatibility with various protocols
- Long range with reliable signal quality
- Customizable settings with OpenTX firmware
- Good battery life
- Cons:
- Steep learning curve for OpenTX
- Initial setup may be complicated for beginners
Overall, the FrSky Taranis X9D Plus remains a cornerstone in the world of RC transmitters, balancing functionality with affordability. Whether you’re a beginner or an experienced pilot, it’s worth considering as your next flight controller.
Эта статья содержит огромное количество разнообразных апгрейдов, модификаций, улучшений, хаков и руководств для Taranis X9D! По сути это компиляция из разных источников. Некоторые из приведенных советов и модификаций подойдут и для другой модели -Taranis Q X7.
Оригинал: Frsky Taranis X9D Tutorials, Mods, Tips & Tricks
Бесспорно, Taranis X9D — один из наиболее функциональных радио передатчиков. Прошивка имеет очень гибкие настройки и большое сообщество пользователей, каждый день появляются новые хаки и идеи. Я буду периодически обновлять этот пост, надеюсь он будет вам полезен.
Содержание
- Руководства — пошаговые инструкции, позволяющие улучшить аппаратуру и получить дополнительный функционал
- Моды и апгрейды — модификации типа «сделай сам», обновление железа
- Советы и хаки — простые и полезные советы по использованию аппаратуры
- Меняем цвет подсветки экрана
- Меняем экран загрузки аппаратуры
- Меняем звук при включении
- Ставим свою картинку модели
- Меняем набор звуков
Руководства
- Настраиваем жесткость стиков (англ.) — может помочь улучшить плавность полетов
- Устанавливаем прошивку OpenTX — пошаговое руководство по установке OpenTX
- Воспроизводим любые звуки — показано как создать звуковые файлы для проигрывания их на Таранисе
- Воспроизводим музыку и настраиваем громкость (англ.) — превращаем Таранис в аудио плеер
- Используем Taranis для обновления прошивки приемников D4R-II и X4R-SB (англ.) — да, аппаратуру можно использовать как инструмент для обновления прошивки приемников
- Получаем сигнал RSSI в канале PPM/SBUS — можно настроить Таранис, получать RSSI из одного PPM или SBUS канала
- Настраиваем предупреждение о низком напряжении при помощи виртуальных тумблеров (англ.)
- Превращаем Таранис в музыкальный автомат — скоро
Моды и апгрейды
- «M9» — стики на датчиках Холла — устанавливаем новые стики на датчиках Холла в Таранис
- Модуль передатчика для коллекторных нанокоптеров (англ.) — с этим радио модулем вы сможете управлять разными микро и нано коптерами с вашего Тараниса
- Корпус под «карбон», стики, колпачки и гайки на тумблеры — главный апгрейд внешнего вида моего Тараниса
- Меняем динамик — замена динамика для получения более чистого и громкого звука
- Шести-позиционный переключатель полетных режимов — скоро
- Разноцветные гайки тумблеров — скоро
- Апгрейд аккумулятора — скоро
- Обновление антенны — установка 5dB антенны, очень многие уже сделали и доказали, что это не очень хорошая идея. Радиус уверенного приема уменьшается — так что не спешите менять антенну
Советы и хаки
Все нижеследующие советы работают в OpenTX 2.2 и более новых версиях.
Меняем цвет подсветки экрана
Taranis X9D Plus позволяет менять цвет подсветки. Некоторых передатчики имеют белую/янтарную подсветку, другие — бело-голубую. Если вы не выбирали цвет, то он будет случайным. Если хотите поменять цвет, то можете сделать это самостоятельно.
Для этого:
- Перейдите в «Radio Setup», для этого нужно долгое нажатие на кнопку «Menu»
- Пролистайте вниз до «Backlight > Color»
- Выберите нужный цвет
Меняем экран загрузки аппаратуры
Вы можете заменить логотип OpenTX на свой собственный, он появляется при включении аппаратуры. Замена картинки происходит при перепрошивке OpenTX.
Для QX7 — требуется монохромная картинка в формате BMP и с разрешением 128х64. Для X9D разрешение должно быть 212х64.
Подробнее читайте в инструкции по установке OpenTX на Taranis.
Ставим свою картинку модели
По центру домашнего экрана модели вы можете разместить свою картинку.
Требования к картинке: монохромная BMP, разрешение 64×32 пиксела.
Имя файла может быть любым (лучше короткое и нужно избегать всяких разных спец символов), файл поместите в папку «/IMAGES/«.
Теперь можно выбрать картинку модели, второй пункт меню.
Меняем звук при включении
Открываем папку «\SOUNDS\en\SYSTEM» на SD карте Тараниса и заменяем файл «hello.wav» на свой любимый трек. Подробнее про требования к файлу читайте в этом руководстве.
Заметка: раньше файл назывался «tada.wav«, но начиная с версии OpenTX 2.2 структура файлов и папок изменилась.
Меняем набор звуков
Стоковый женский голос, довольно грубоват, а качество звука не очень. Гораздо более сексуальный голос можно выкачать с сайта OpenTX:
http://open-txu.org/v2-2-resources-2/
Скачайте «Amber Sound pack», распакуйте его и замените файлы в папке «\SOUNDS\en». На мой взгляд новые файлы гораздо лучше, их определенно стоит заценить.
Другие, более старые наборы звуков не работают с новой версией OpenTX, потому что используют старые имена файлов. Так что не забывайте качать наиболее свежие ресурсы.