
Перейти к контенту
Метеостанции Hama
- Размер инструкции: 3.21 Мб
- Формат файла: pdf
Если вы потеряли инструкцию от метеостанции Hama EWS-800, можете скачать файл для просмотра на компьютере или печати.
Инструкция для метеостанции Hama EWS-800 на русском языке. В руководстве описаны возможности и полезные функции, а также правила эксплуатации. Перед использованием внимательно ознакомьтесь с инструкцией.
Чтобы не читать всю инструкцию вы можете выполнить поиск по содержимому внутри инструкции и быстро найти необходимую информацию. Рекомендации по использованию помогут увеличить срок службы метеостанции Hama EWS-800. Если у вас появилась проблема, то найдите раздел с описанием неисправностей и способами их решения. В нем указаны типичные поломки и способы их решения.
Wetterstation
00
076045
„EWS-800“Weather Station
PRESSURE
96
IN
TEMP
25.
HUMIDITY
%%
41
RH
DATE
9.
11.
TIME
DCF
:
9
53
SET
SNOOZE
ALM
LIGHT
1.4
2
abs
°C
MIN/MAX
hpa
-24h-21h-18h -15h-12h-9h -6h-3h0h
OUT
25.
HUMIDITY
43
15
HISTORY
TEMP
MON
56
Operating Instructions
Bedienungsanleitung
Mode d‘emploi
Instrucciones de uso
Руководство по эксплуатации
Istruzioni per l‘uso
Gebruiksaanwijzing
Οδηγίες χρήσης
°C
.5
%
Instrukcja obsługi
°C
5
RH
RFWIRELESS
Ch
SEC
+
1
25
43
REMOTESENSOR
GB
D
F
E
RUS
I
NL
GR
PL
A
96
2
25.
5
9.
11.
15
56
25.
41
9
:
53
43
1.4
TIME
DATE
IN
OUT
DCF
HUMIDITY
TEMP
PRESSURE
HISTORY
TEMP
HUMIDITY
SEC
MON
SET
ALM
SNOOZE
LIGHT
+
MIN/MAX
RH
°C
abs
hpa
-24h-21h-18h-15h-12h -9h-6h-3h 0h
°C
%%
RH
B
1
2
4
5
9
10
12
11
13
14
21
22
23
24
28
36
37
MAX
MIN
HIAL
HIAL HIAL
LOAL
FF
DSTOFF
SNOOZE
ALM +
SET
29 30 31
LOAL
rel
LIGHT
32
inhg
ALARMON
MIN/MAX
7
LOAL
DEWPOINT
40
41
3
6
8
15
16
17
18
19
20
25
26
27
33
34
35
39
38

G Operating instruction
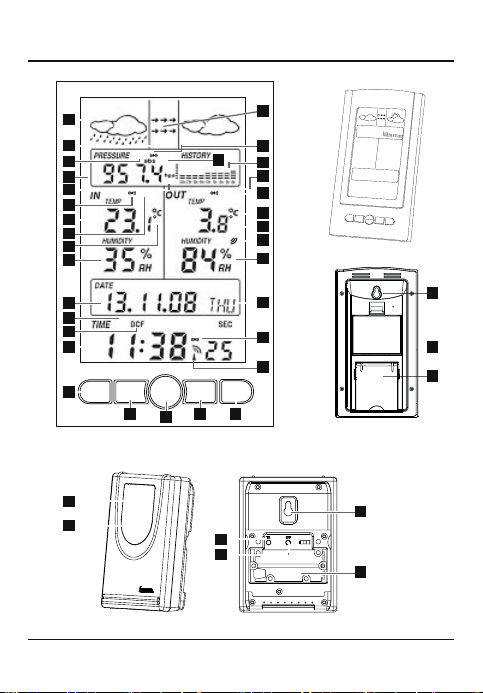
Controls and Displays
A Base station
1. Weather forecast symbol
2. Minimum/maximum data
3. Atmospheric pressure trend
4. Low (LO)/ high (HI) atmosphericpressure alarm
5. Atmospheric pressure value
6. Low (LO)/ high (HI) atmosphericpressure alarm, active
7. Relative/absolute atmospheric pressure
8. 24 hour (atmospheric pressurehistory)
9. Atmospheric pressure unit
10. Low (LO)/ high (HI) room temperature/room humidity alarm, active
11. Low (LO)/ high (HI) room temperature/room humidity alarm
12. Room temperature
13. Room temperature unit
14. Relative room humidity
15. Low (LO)/ high (HI) outdoor temperature/outdoor humidity alarm, active
16. Outdoor temperature/outdoor humidity lower (LO)/ higher (HI) alarm
17. Outdoor temperature unit
18. Outdoor temperature/dew point temperature
19. Outdoor transmitter signal
20. Relative outdoor humidity
21. Date
22. Summer time
23. DCF-controlled time
24. Time
25. Weekday
26. Alarm time, active
27. Wireless symbol
28. SET button = switching display mode/conrmation of set value
29. ALM button = displaying/setting/deactivating/activating the alarm functions
30. MIN/MAX button = accessing the saved maximum/minimum values/reduction of the current set value
31. + button = increasing the current set value
32. SNOOZE / LIGHT button = stopping the alarm/activating the backlight (approx. 10 seconds)/stopping
Settings
33. Opening for wall mounting
34. Battery compartment
35. Base
2
B Measuring station
36. Outdoor temperature
37. Outdoor humidity
38. Battery compartment
39. Opening for wall mounting
40. TX button = not used
41. C/F button = switching between°C and°F
Thank you for choosing a Hama product.
Take your time and read the following instructions and information completely. Please keep these instructions
in a safe place for future reference. If you sell the device, please pass these operating instructions on to the
new owner.
1. Explanation of Warning Symbols and Notes
Warning
This symbolis used to indicate safety instructions or todr aw your attention to specichazards
and risks.
Note
This symbolis used to indicate additional information orimportant notes.
2. Package Contents
• Weather station EWS-800 (base station for indoors / outdoor measuring station)
• These operating instructions
3. Safety Notes
• The product is intended for private, non-commercial use only.
• Do not operate the product outside the power limits given in the specications.
• Do not use the product in moist environments and avoid splashes.
• Do not use the product in the immediate vicinity of heaters or other heat sources or in direct sunlight.
• Do not use the product in areas where the use of electronic devices is not permitted.
• Only connect the product to a socket that has been approved for the device. The socket must be installed
close to the product and easily accessible.
• Do not drop the product and do not expose it to any major shocks.
• Do not open the device or continue to operate it if it becomes damaged.
3
• Do not attempt to service or repair the product yourself. Leave any and all service work to qualied experts.
• Keep the packaging material out of the reach of children due to the risk of suffocation.
• Dispose of packaging material immediately according to locally applicable regulations.
• Do not modify the product in any way. Doing so voids the warranty.
Warning – Batteries
• Immediately remove and dispose of dead batteries from the product.
• Only use batteries (or rechargeable batteries) that match the specied type.
• Do not mix old and new batteries or batteries of a different type or make.
• When inserting batteries, note the correct polarity (+ and — markings) and insert the batteries
accordingly. Failure to do so could result in the batteries leaking or exploding.
4. Getting Started
4.1 Measuring station
• Unscrewthe screw on the battery compartment (38) on the back of the measuring station and open it.
• Insert two AAA batteries and close the battery compartment (38) and then secure the screw again.
Note
• Before use, ensure you insert the batteries in the measuring station rst and then in the base station.
4.2 Base station
• Open the battery compartment (34) and insert three AA batteries with the correct polarity into the battery
compartment. Close the battery compartment.
5. Installation
Note – Installation
• We recommend initially placing the base and measuring stations in the intended locations without
installing them and making all the settings described in 6. Operating the Base Station
• Only install the stations once the appropriate settings have been made and a stable wireless
connection is established.
4
Note
• The wireless transmission range between the measuring and base stations is up to 30 m in open
spaces. Before installation, ensure that wireless transmission will not be disrupted by interference or
obstacles like buildings, trees, vehicles, high-voltage lines, etc.
• Before the nal installation, ensure that there is sucient reception between the intended installation
locations.
• When installing the measuring station, ensure that it is protected from direct sunlight and rain.
• The international standard height for measuring air temperature is 1.25 m (4 ft) above ground.
Warning
• Buy special or suitable installation material from a specialised dealer for wall-mounting.
• Ensure that no faulty or damaged parts are installed.
• Never apply force during mounting. This could damage the product.
• Before mounting, ensure that the chosen wall is suitable for the weight to be mounted, and make sure
that there are no electrical wires, water, gas or other lines at the installation site on the wall.
5.1 Base station
• Use the base (35) to position the base station on a level surface.
• Alternatively, you can install the basestation on a wall using the opening (33) on the back.
5.2 Measuring station
• You can also position the measuring station on a level outdoor surface using the base.
• We recommend installing the measuring station securely on an outdoor wall.
• Install an anchor, screw, nail, etc. in the wall of your choice.
• Hang up the base/measuring station using the opening (33/39) intended for this purpose.
6. Operating the Base Station
Note – Input
• Hold down the MIN/MAX button (30) or the + button (31) to select the values faster.
If you press the SNOOZE / LIGHT button (32), the display will light up for approx. 10 seconds.
5
6.1. Automatic initial setup
• All available LC D segments on the display are displayed briey after turning the measuring station on for
the rst time.
• The base station then performs automatic initial setup. During setup, the base station performs measuring
station synchronisation, the pressure measurement values are stabilised and factory settings are set.
Note – Initial setup
• Initial setup takes approx. 3 minutes.
• Do not press any buttons during setup. Otherwise, values may not be transmitted correctly and there is
a risk of value errors and inaccuracies.
• The setup process is completed when the indoor (12, 14) and outdoor (18, 20) measurement data is
displayed
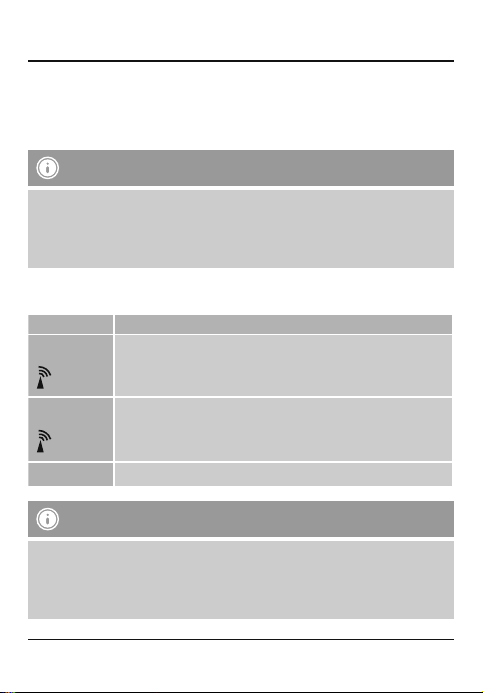
• After the rst time the base station is switched on and successful transmission is established between the
base station and the measuring station, the clock will automatically search for a DCF signal. During the
search, the wireless symbol (27) will ash.
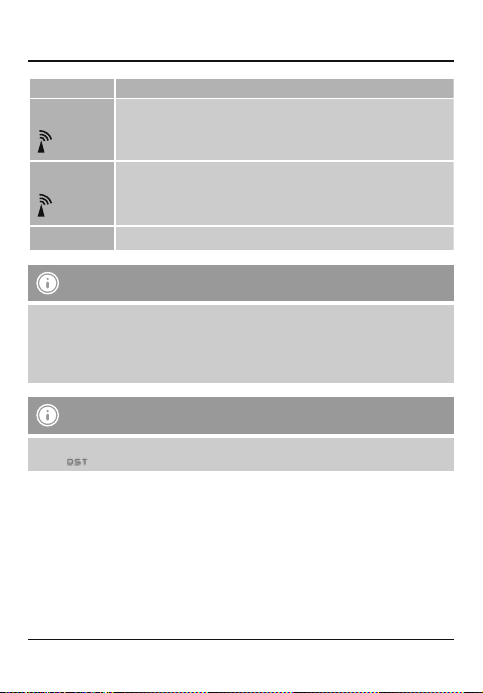
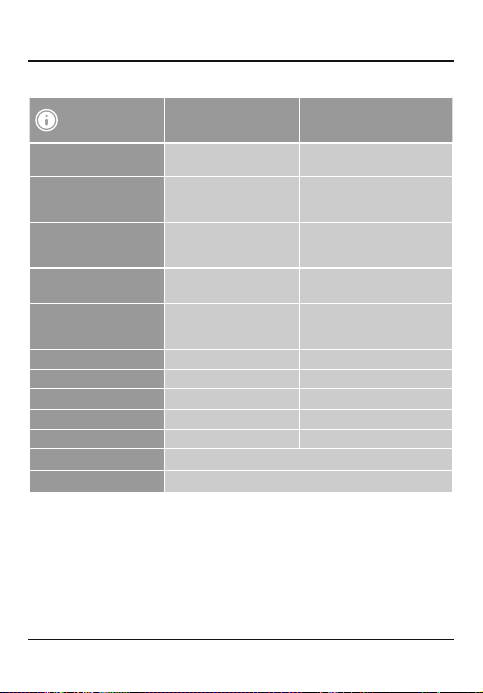
Display Searching for the DCF signal
Flashing display
Active
Constant display
No display Error – signal search ended
• If, during the rst minute of the initial setup, no DCF signal can be found, the search is stopped and
repeated every two hours. The wireless symbol will go out.
• You can, however, set the time and the date manually.
• The clock automatically continues to search for the DCF signal on a daily basis. If the signal is received
successfully, the manually-set time and date are overwritten.
Successful – signal is being received
Note – Time settings
6

Note – Summer time
The clock automatically switches to summer time. appears on the display as long as summer time
is activated.
6.2. Basic and manual settings
• Pressand hold the SET button (28) for approx. 3 seconds to make the following settings one after the other:
• Time zone (24)
• 12/24 hour format (24)
• Hours (24)
• Minutes (24)
• Year (21)
• Month (21)
• Day (21)
• Temperature unit (°C / °F) (13+17)
• Room temperature value (12)
• Room humidity value (14)
• Outdoor temperature value (18)
• Outdoor humidity value (20)
• Atmospheric pressure unit (hPa / inHg) (5+9)
• Relative atmospheric pressure reference value (5)
• Atmospheric pressure threshold value (5)
• Storm threshold value (5)
• To select the individual values, press the MIN/MAX button (30) or the + button (31) and conrm each
selection by pressing the SET button (28).
• Press the SET button (28) to adopt the set value displayed and to skip.
• If you do not make an entry for 20 seconds, you automatically exit setup mode. Alternatively, press the
SNOOZE / LIGHT button (32) to exit setup mode before selecting all the values.
Note – Time zone
• The DCF signal can be received over a wide range, but always corresponds to the applicable Central
European Time in Germany. Make sure you account for the time difference in countries with another
time zone.
• If you are in Moscow, the time is 3 hours later than in Germany. This means that you should set +3 for
the time zone. The clock then automatically sets itself 3 hours ahead after receiving the DCF signal or
according to the manually set time.
7
Note – Te mperature and humidity
• In terms of accuracy, the temperature and air humidity measurement is intended for private, noncommercial use.
• In individual cases, the measured values displayed may differ slightly from comparison values, e.g.
values from a calibrated measuring device. Using the Basic and manual settings, you can adjust and
recalibrate the values for the room/outdoor temperature and/or the humidity.
• We recommend that you do not manually calibrate the measured values, press the SET button (28)
during manual setup to skip this step.
Note – Atmospheric pressure
• The absolute atmospheric pressure (abs) is a value measured at the installation location that cannot
be changed.
• The relative atmospheric pressure (rel) is the absolute atmospheric pressure at the installation location
corrected to the atmospheric pressure at sea level (msl).
• The reference value for relative atmospheric pressure is set to 1013.2 hPa as standard. For an exact
measurement, adapt the reference value to your location. You can manually set the reference value to
within a range of 919.0 hPa and 1080.0 hPa.
• Information on the current relative atmospheric pressure for you location is available on the Internet,
from your local meteorological oce, on the radio, etc.
Note – Atmospheric pressure threshold value
• The weather forecast is based on atmospheric pressure changes, and you individually set their
threshold values between 2 hPa and 4 hPa. The threshold value is set to 3 hPA as standard.
• A decrease or increase in the atmospheric pressure by at least the set threshold value is registered as
a change in the weather.
• For locations with frequent changes in atmospheric pressure, we recommend you set a higher
atmospheric threshold value than for locations with a relatively constant atmospheric pressure.
8
Note – Storm threshold value
• The storm forecast is also based on atmospheric pressure changes, and you individually set their
threshold values between 3 hPa and 9 hPa. The threshold value is set to 6 hPA as standard.
• The storm warning display is activated if, over a period of three hours, there is a decrease or increase in
the atmospheric pressure by at least the set threshold value.
• When the storm warning display is activated, the rain symbol and the trend arrow ash for three hours.
6.3. Weather forecast
• Based on changes in the atmospheric pressure and the data saved, the base station is able to make
weather forecasts for the next 12 to 24 hours.
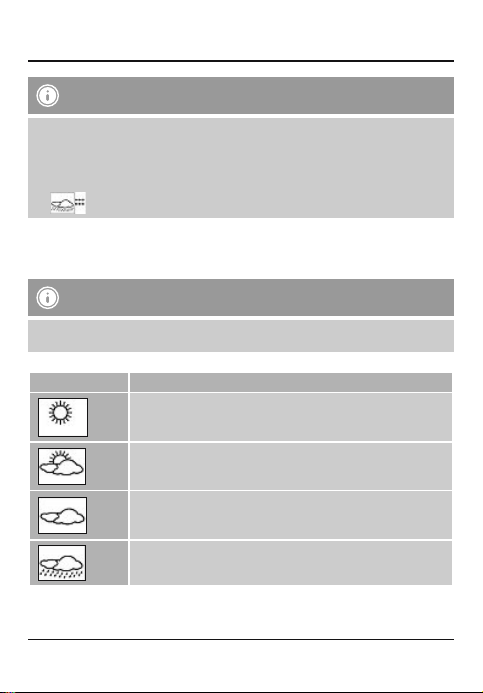
Note – Weather forecast
• The weather forecast function is not available during the rst few hours of operation because it
requires data that is collected during operation.
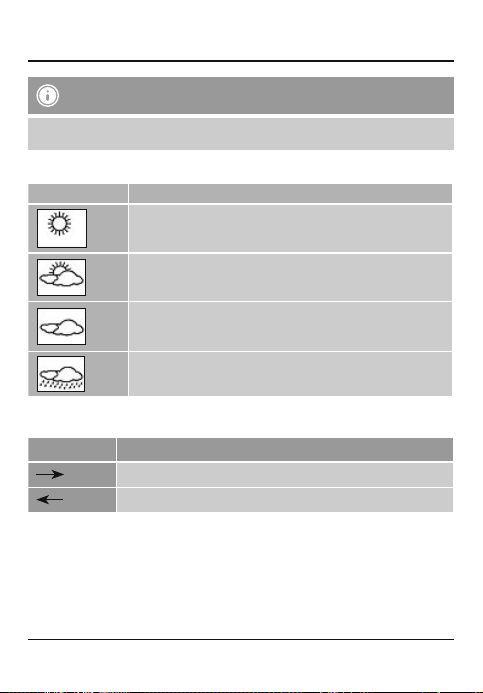
• The weather forecast and the current weather are indicated by four different symbols (1):
Symbol (1) Weather
Sun
Slightly cloudy
Cloudy
Rain
• Based on the measured barometer values, the atmospheric pressure trend for the next few hours is
displayed between the weather forecast symbols.
9
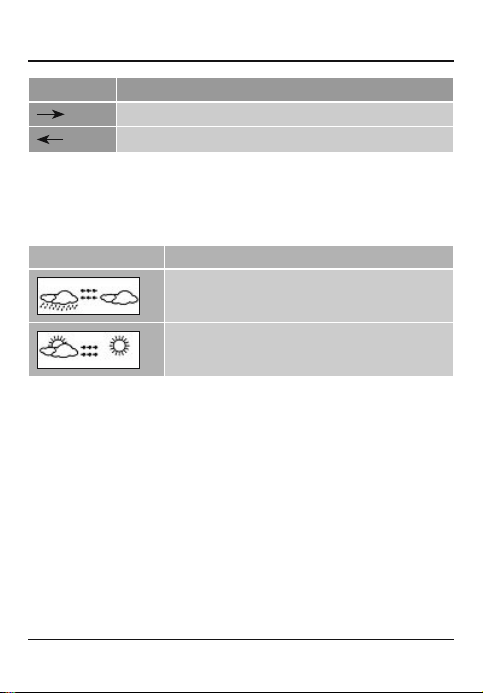
Display (3) Atmospheric pressure trend / weather forecast
Increasing / Weather is improving
Decreasing / Weather is getting worse
• The weather symbols change depending on the current relative atmospheric pressure and atmospheric
pressure changes within the past six hours. If the weather is changing, the atmospheric pressure trend
arrows (3) ash for three hours to indicate the change in weather. The arrows (3) stop ashing when the
weather conditions have subsequently stabilised and the station has not detected any further changes in
weather.
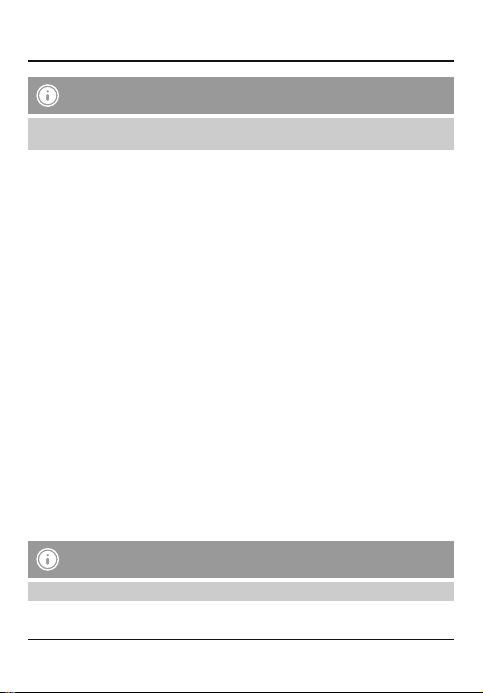
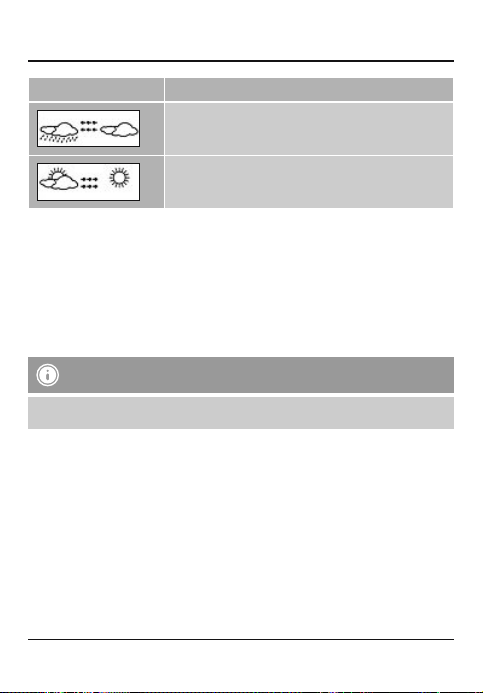
Examples:
Display Meaning
ather forecast: Rain
We
Atmospheric pressure trend: Decreasing / Weather is getting worse
Current weather: Cloudy
Current weather: Slightly cloudy
Atmospheric pressure trend: Increasing / Weather is improving
Weather forecast: Sun
• The bar graph (8) shows the history of the relative atmospheric pressure within the last 24 hours.
6.4. Temperature / atmospheric pressure display mode
• Pressthe SET button (28) repeatedly to change between the following displays:
• Outdoor temperature (18: TEMP)/ Dew point temperature (18: DEWPOINT)
• Absolute atmospheric pressure (7: abs)/Relative atmospheric pressure (7: rel)
The applicable display begins to ash.
• While the display is ashing, press the MIN/MAX button (30) or the + button (31) to switch between the
outdoor temperature and the dew point or between the absolute and relative atmospheric pressure.
• Conrm your display selection by pressing the SET button (28).
10
Note – Dew point
• The dew point temperature indicates a value to which, with the current humidity level, the outside
temperature would have to increase/decrease in order to reach 100% relative humidity.
6.5 Alarm mode
• Repeatedly press the ALM button (29) to access HI AL (4/11/16/21) or LO AL (4/11/16/21) alarm mode.
• In alarm mode HI AL (4/11/16/21), repeatedly press the SET button (28) to switch between the following
alarm functions:
• Alarm (hour/minute) (24)
• High room humidity alarm (14)
• High room temperature alarm (12)
• High outside humidity alarm (20)
• High outdoor temperature alarm (18)
• High absolute atmospheric pressure alarm (5)
The applicable display begins to ash.
• In alarm mode LO AL (4/11/16/21), repeatedly press the SET button (28) to switch between the following
alarm functions:
• Alarm (hour/minute) (24)
• Low room humidity alarm (14)
• Low room temperature alarm (12)
• Low outside humidity alarm (20)
• Low outdoor temperature alarm (18)
• Low absolute atmospheric pressure alarm (5)
The applicable display begins to ash.
• In the corresponding display, press the MIN/MAX button (30) or the + button (31) to change the alarm
value, and conrm your selection by pressing the SET button (28).
• In the corresponding display, press the ALM button (29) to activate/deactivate the corresponding alarm
function.
• If the alarm is activated, the corresponding symbol (6/10/15/26), HI AL (4/11/16) and/or LO AL (4/11/16)
is displayed.
• If you do not make an entry for 20 seconds, you automatically exit setup mode. Alternatively, press the
SNOOZE / LIGHT button (32) to exit setup mode before selecting all the values.
Note
• The set value is displayed for alarms that are already set, deactivated alarms are indicated by — or —.
11
• The corresponding alarm triggers when the weather conditions or the time reaches the set values for an
active alarm. An alarm will sound and the corresponding symbols (6/10/15/26), HI AL (4/11/16)
and/or LO AL (4/11/16) and the alarm value will ash for 2 minutes.
• Pressany button to stop the alarm.
Note – Alarm due to weather conditions
• The alarm signal does not sound again if the same alarm function is triggered again within 10
minutes. The symbol and the alarm value ash so long until the weather conditions have stabilised.
• The alarm is automatically triggered again if the weather conditions exceed or fall below the set alarm
value.
• If the dew point temperature triggers the low/high outdoor temperature alarm, the DEW POINT
symbol also begins to ash.
Note – Snooze function
While the alarm signal is sounding, press the SNOOZE / LIGHT button (32) to activate the snooze
function. The alarm signal will be stopped for 5 minutes, after which it will sound again. The
corresponding alarm symbol will start to ash.
6.6. Maximum and minimum temperature and humidity values
• The base station automatically stores the maximum and minimum temperature and humidity values.
• Repeatedly press the MIN/MAX button (30) to switch between the current temperature and humidity,
minimum temperature and humidity (2: MIN) and the maximum temperature and humidity (2: MAX).
• In the maximum value display (2: MAX), repeatedly press the + button (31) to display the following values
with the date (21) and time (24) they were recorded.
• Maximum room humidity (14)
• Maximum room temperature (12)
• Maximum outdoor humidity (20)
• Maximum outdoor temperature (18)
• Maximum absolute/ relative atmospheric pressure (5)
• In the minimum value display (2: MIN), repeatedly press the + button (31) to display the following values
with the date (21) and time (24) they were recorded.
• Minimum room humidity (14)
• Minimum room temperature (12)
• Minimum outdoor humidity (20)
• Minimum outdoor temperature (18)
• Minimum absolute/ relative atmospheric pressure (5)
12
• In the individual maximum and minimum value display, press the SET button (28) for approx. 3 seconds to
delete the corresponding values with the date (21) and time (24) they were recorded.
• Pressthe SNOOZE / LIGHT button (32), or wait for approx. 20 seconds to return to the display of the
current measurement values.
Note – Replacing the batteries
Note, the stations have to be resynchronised each time after you change the batteries in the measuring
or base station. To do this, remove the batteries from the other station and then reinsert them, or change
them as required.
Note – Faulty transfer of measured values
In isolated cases, interference—e.g. from a WLAN network, a computer or a television set—can cause the
transfer of measured values between the measuring station and the base station to fail.
In this case, you must resynchronise the stations by briey removing the batteries from both stations and
reinserting them.
If the measured values are not transferred again once the batteries are inserted, replace the batteries with
new ones.
If necessary, select a new location for the base station in order to avoid possible interference in the future.
7. Care and Maintenance
Only clean this product with a slightly damp, lint-free cloth and do not use aggressive cleaning agents. Make
sure that water does not get into the product.
8. Warranty Disclaimer
Hama GmbH & Co. KG assumes no liability and provides no warranty for damage resulting from improper
installation/mounting, improper use of the product or from failure to observe the operating instructions and/
or safety notes.
9. Service and Support
Please contact Hama Product Consulting if you have any questions about this product.
Hotline: +49 9091 502-115 (German/English)
Further support information can be found here:
www.hama.com
13
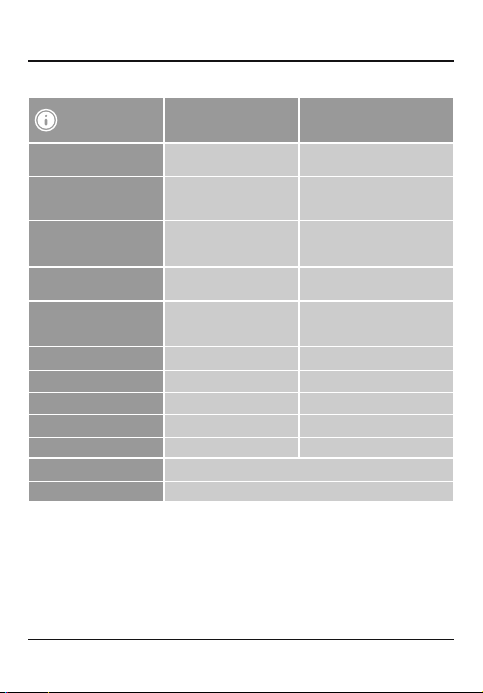
10. Technical Data
Base station
Power supply
Measuring range
Temperature
Humidity
Measuring increments
Temperature
Humidity
Temperature and humidity
measuring cycle
Barometer measurement range
Measuring increments
Radio-controlled DCF clock
Hygrometer YesYes
Thermometer YesYes
Barometer YesNo
Alarm function YesNo
Frequency 433 MHz
Range ≤ 100 m
4.5 V
3 x AA batteries
0°C – +50°C/ 32°F – 122°F
20% – 95%
0.1°C / 0.2°F
1 %
30 s57 s
919 – 1080 mbar/hPa
(27.14 – 31.89 inHg)
0.1 hPa
Yes
Measuring station
3.0 V
2 x AAA batteries
-20°C – +60°C/ -4°F – 140°F
20% – 95%
0.1°C / 0.2°F
1 %
—
No
14
11. Recycling Information
Note on environmental protection:
After the implementation of the European Directive 2012/19/EU and 2006/66/EU in the national
legal system, the following applies: Electric and electronic devices as well as batteries must not be
disposed of with household waste. Consumers are obliged by law to return electrical and
electronic devices as well as batteries at the end of their service lives to the public collecting
points set up for this purpose or point of sale. Details to this are dened by the national law of the
respective country. This symbol on the product, the instruction manual or the package indicates that a product
is subject to these regulations. By recycling, reusing the materials or other forms of utilising old devices/
Batteries, you are making an important contribution to protecting our environment.
12. Declaration of Conformity
Hama GmbH & Co. KG hereby declares that the device complies with the essential requirements
and other relevant provisions of Directive 2014/53/EU. See www.hama.com for the declaration of
conformity with the relevant directive.
15

D Bedienungsanleitung
Bedienungselemente und Anzeigen
A Basisstation
1. Wettervorhersagesymbol
2. Minimal-/ Maximaldaten
3. Luftdrucktendenz
4. Alarm geringer (LO)/ hoher (HI) Luftdruck
5. Luftdruckwert
6. Aktiver Alarm geringer (LO)/ hoher (HI) Luftdruck
7. Absoluter/ relativer Luftdruck
8. Luftdruckverlauf 24 Stunden
9. Luftdruckeinheit
10. Aktiver Alarm geringe (LO)/ hohe (HI) Raumtemperatur/ Raumluftfeuchtigkeit
11. Alarm geringe (LO)/ hohe (HI) Raumtemperatur/ Raumluftfeuchtigkeit
12. Raumtemperatur
13. Raumtemperatureinheit
14. Relative Raumluftfeuchtigkeit
15. Aktiver Alarm geringe (LO)/ hohe (HI) Außentemperatur/ Außenluftfeuchtigkeit
16. Alarm geringe (LO)/ hohe (HI) Außentemperatur/ Außenluftfeuchtigkeit
17. Außentemperatureinheit
18. Außentemperatur/ Taupunkttemperatur
19. Außensendersignal
20. Relative Außenluftfeuchtigkeit
21. Datum
22. Sommerzeit
23. DCF-gesteuerte Uhrzeit
24. Uhrzeit
25. Wochentag
26. Aktiver Alarm Weckzeit
27. Funksymbol
28. SET-Taste = Wechsel Anzeigemodus/ Bestätigung des Einstellungswerts
29. ALM-Taste = Anzeige/ Einstellung/ Deaktivierung/ Aktivierung Alarmfunktionen
30. MIN/MAX-Taste = Abruf der gespeicherten Höchst-/ Tiefwerte / Verringerung des aktuellen
Einstellungswertes
31. + -Taste = Erhöhung des aktuellen Einstellungswertes
32. SNOOZE / LIGHT-Taste = Unterbrechung des Wecksignals / Aktivierung Hintergrundbeleuchtung
(ca. 10 Sekunden)/ Abbruch Einstellungen
33. Aussparung für Wandmontage
34. Batteriefach
35. Standfuß
16
B Messstation
36. Außentemperatur
37. Außenluftfeuchtigkeit
38. Batteriefach
39. Aussparung für Wandmontage
40. TX-Taste = bietet keine vom Anwender nutzbare Funktion
41. C/F-Taste
= Wechsel zwischen °C und °F
Vielen Dank, dass Sie sich für ein Hama Produkt entschieden haben!
Nehmen Sie sich Zeit und lesen Sie die folgenden Anweisungen und Hinweise zunächst ganz durch. Bewahren
Sie diese Bedienungsanleitung anschließend an einem sicheren Ort auf, um bei Bedarf darin nachschlagen
zu können. Sollten Sie das Gerät veräußern, geben Sie diese Bedienungsanleitung an den neuen Eigentümer
weiter.
1. Erklärung von Warnsymbolen und Hinweisen
Warnung
Wird verwendet,um Sicherheitshinweise zu kennzeichnen oderum Aufmerksamkeit auf besondere
Gefahren und Risikenzu lenken.
Hinweis
Wird verwendet, um zusätzlich Informationen oder wichtige Hinweise zu kennzeichnen.
2. Packungsinhalt
• Wetterstation EWS-800 (Basisstation für den Innenbereich / Messstation für den Außenbereich)
• Diese Bedienungsanleitung
3. Sicherheitshinweise
• Das Produkt ist für den privaten, nicht-gewerblichen Haushaltsgebrauch vorgesehen.
• BetreibenSie das Produkt nicht außerhalb seiner in den technischen Daten angegebenen Leistungsgrenzen.
• Verwenden Sie das Produkt nicht in einer feuchten Umgebung und vermeiden Sie Spritzwasser.
• BetreibenSie das Produkt nicht in unmittelbarer Nähe der Heizung, anderer Hitzequellen oder in direkter
Sonneneinstrahlung.
• Benutzen Sie das Produkt nicht in Bereichen, in denen elektronische Produkte nicht erlaubt sind.
• Positionieren Sie das Produkt nicht in der Nähe von Störfeldern, Metallrahmen, Computern und Fernsehern
etc. Elektronische Geräte sowie Fensterrahmen beeinträchtigen die Funktion des Produktes negativ.
17
• Lassen Sie das Produkt nicht fallen und setzen Sie es keinen heftigen Erschütterungen aus.
• Öffnen Sie das Produkt nicht und betreiben Sie es bei Beschädigungen nicht weiter.
• Versuchen Sie nicht, das Produkt selbst zu warten oder zu reparieren. Überlassen Sie jegliche
Wartungsarbeit dem zuständigen Fachpersonal.
• Halten Sie Kinder unbedingt von dem Verpackungsmaterial fern, es besteht Erstickungsgefahr.
• EntsorgenSie das Verpackungsmaterial sofort gemäß den örtlich gültigen Entsorgungsvorschriften.
• Nehmen Sie keine Veränderungen am Produkt vor. Dadurch verlieren sie jegliche
Gewährleistungsansprüche.
Warnung — Batterien
• Entfernen und entsorgen Sie verbrauchte Batterien unverzüglich aus dem Produkt.
• Verwenden Sie ausschließlich Akkus (oder Batterien), die dem angegebenen Typ entsprechen.
• Mischen Sie alte und neue Batterien nicht, sowie Batterien unterschiedlichen Ty ps oder Herstellers.
• Beachten Sie unbedingt die korrekte Po larität (Beschriftung + und -) der Batterien und legen Sie diese
entsprechend ein. Bei Nichtbeachtung besteht die Gefahr des Auslaufens oder einer Explosion der
Batterien.
4. Inbetriebnahme
4.1 Messstation
• Lösen Sie die Schraube des Batteriefachs (38) auf der Rückseite der Messstation und öffnen es.
• Legen Sie zwei AAA Batterien polrichtig ein und verschließen Sie das Batteriefach (38) anschließend mit
der Schraube.
Hinweis
Beachten Sie, dass Sie bei der Inbetriebnahme immer zuerst die Batterien in die Messstation, und dann in
die Basisstation einlegen.
4.2 Basisstation
• Öffnen Sie das Batteriefach (34) und legen Sie drei AA Batterien polrichtig ein. Schließen Sie die
Batteriefachabdeckung anschließend.
18
5. Montage
Hinweis – Montage
• Es wird empfohlen, die Basis- und Messstation zunächst an den gewünschten Aufstellorten ohne
Montage zu platzieren und alle Einstellungen — wie in 6. Betrieb Basisstation beschrieben –
vorzunehmen.
• Montieren Sie erst nach korrekter Einstellung und stabiler Funkverbindung die Station/en.
Hinweis
• Die Reichweite der Funkübertragung zwischen der Mess- und Basisstation beträgt im freien Gelände
bis zu 30m.
• Achten Sie vor der Montage darauf, dass die Funkübertragung nicht durch Störsignale oder Hindernisse
wie Gebäude, Bäume, Fahrzeuge, Hochspannungsleitungen, u.a. beeinusst wird.
• Stellen Sie vor der endgültigen Montage sicher, dass zwischen den gewünschten Aufstellorten
ausreichender Empfang besteht.
• Achten Sie bei der Montage der Messstation darauf, dass diese vor direkter Sonne und Regen
geschützt positioniert ist.
• Die internationale Standardhöhe für die Messung der Lufttemperatur beträgt 1,25 m (4 ft) über Grund.
Warnung
• Besorgen Sie sich spezielles bzw. geeignetes Montagematerial im Fachhandel für die Montage an der
vorgesehenen Wand.
• Stellen Sie sicher, dass keine fehlerhaften oder beschädigten Teile montiert werden.
• Wenden Sie bei der Montage niemals Gewalt oder hohe Kräfte an. Diese können das Produkt
beschädigen.
• Prüfen Sie vor Montage die Eignung der vorgesehenen Wand für das anzubringende Gewicht und
vergewissern Sie sich, dass sich an der Montagestelle in der Wand keine elektrischen Leitungen,
Wasser-, Gas- oder sonstige Leitungen benden.
5.1 Basisstation
• Stellen Sie die Basisstation mithilfe des Standfußes (35) auf einer ebenen Fläche auf.
• Alternativ können Sie die Basisstation mithilfe der Aussparung (33) auf der Rückseite an einer Wand montieren.
19
5.2 Messstation
• Die Messstation können Sie ebenfalls mithilfe des Standfußes auf einer ebenen Fläche im Außenbereich
aufstellen.
• Es wird empfohlen, die Messstation sicher und fest an einer Außenwand zu montieren.
• Befestigen Sie Dübel, Schraube, Nagel, etc. in der dafür vorgesehenen Wand.
• Hängen Sie die Basis-/ Messstation mit der dafür vorgesehenen Aussparung (33/39) daran ein.
6. Betrieb Basisstation
Hinweis – Eingabe
Halten Sie die MIN/MAX-Taste (30) oder die +-Taste (31) gedrückt, um die Werte schneller auswählen
zu können.
Drücken Sie die SNOOZE / LIGHT-Taste (32), wird das Display für ca. 10 Sekunden beleuchtet.
6.1. Automatische Ersteinrichtung
• Nach dem ersten Einschalten werden kurzzeitig alle verfügbaren LCD-Segmente auf dem Display angezeigt.
• Anschließend führt die Basisstation eine automatische Ersteinrichtung durch. Dabei erfolgen die
Synchronisierung mit der Messstation, die Stabilisierung der Druckmesswerte sowie die Einrichtung mit
Werkseinstellungen.
Hinweis – Ersteinrichtung
• Die Ersteinrichtung dauert ca. 3 Minuten.
• Vermeiden Sie in dieser Zeit jegliche Betätigung der Tasten! Andernfalls können Fehler und
Ungenauigkeiten bei den Werten und deren Übertragung entstehen.
• Der Vorgang ist beendet, sobald die Messdaten für den Innen- (12, 14) und Außenbereich (18, 20)
angezeigt werden.
• Nach dem ersten Einschalten der Basisstation und erfolgreicher Übertragung zwischen Basis- und
Messstation, beginnt die Uhr automatisch die Suche nach einem DCF-Signal. Während des Suchvorgangs
blinkt das Funksymbol (27) auf.
20
Anzeige Suche nach DCF-Signal
Blinkende Anzeige
Aktiv
Dauerhafte Anzeige
Keine Anzeige Fehlgeschlagen – Signal wird nicht empfangen
• Wird innerhalb einer Minute während der Ersteinrichtung kein DCF-Signal empfangen, wird die Suche
beendet und automatisch alle zwei Stunden wiederholt. Das Funksymbol erlischt.
• Sie können währenddessen eine manuelle Einstellung von Uhrzeit und Datum vornehmen.
• Die Uhr sucht automatisch weiterhin täglich nach dem DCF-Signal. Bei erfolgreichem Signalempfang
werden die manuell eingestellte Uhrzeit und das Datum überschrieben.
Die Uhrzeit stellt sich automatisch auf die Sommerzeit um. Solange die Sommerzeit aktiv ist, wird auf dem
Display angezeigt.
Erfolgreich – Signal wird empfangen
Hinweis – Uhrzeiteinstellung
Hinweis – Sommerzeit
6.2. Grundeinstellungen und manuelle Einstellungen
• Drücken und halten Sie die SET-Taste (28) für ca. 3 Sekunden, um folgende Einstellungen nacheinander
vorzunehmen:
• Zeitzone (24)
• 12/24-Stunden-Format (24)
• Stunden (24)
• Minuten (24)
• Jahr (21)
• Monat (21)
• Tag (21)
21
• Temperatureinheit (°C / °F) (13+17)
• Raumtemperaturwert(12)
• Raumluftfeuchtigkeitswert (14)
• Außentemperaturwert(18)
• Außenluftfeuchtigkeitswert (20)
• Luftdruckeinheit (hPa / inHg) (5+9)
• Relativer Luftdruck-Referenzwert (5)
• Luftdruckschwellenwert (5)
• Sturmschwellenwert (5)
• Drücken Sie zum Auswählen der einzelnen Werte die MIN/MAX-Taste (30) oder die +-Taste (31) und
bestätigen Sie die jeweilige Auswahl durch Drücken der SET-Taste (28).
• Drücken Sie direkt die SET-Taste (28), um den angezeigten Einstellungswert zu übernehmen und zu
überspringen.
• Erfolgt 20 Sekunden keine Eingabe, wird der Einstellungsmodus automatisch verlassen. Alternativ drücken Sie
die SNOOZE / LIGHT-Taste (32), um den Einstellungsmodus vor Auswahl aller Werte zu verlassen.
Hinweis – Zeitzone
• Das DCF-Signal kann weitläug empfangen werden, entspricht jedoch immer der MEZ, die in
Deutschland gilt. Beachten Sie daher, dass Sie in Ländern mit anderer Zeitzone die Zeitverschiebung
beachten.
• Benden Sie sich in Moskau, ist es dort bereits 3 Stunden später als in Deutschland. Stellen Sie daher
bei der Zeitzone +3 ein. Die Uhr stellt sich dann immer nach Empfang des DCF-Signals bzw. in Bezug
auf die manuell eingestellte Uhrzeit automatisch 3 Stunden weiter.
Hinweis – Te mperatur- und Luftfeuchtigkeit
• Die Genauigkeit der Temperatur- und Luftfeuchtigkeitsmessung ist für den privaten, nicht-gewerblichen
Haushaltsgebrauch angemessen.
• In Einzelfällen kann es bei den angezeigten Messwerten zu geringen Abweichungen zu
Vergleichswerten – z.B. von einem kalibrierten Messgerät – kommen. Sie haben dann die Möglichkeit,
die Werte für Raum-/ Außentemperatur und/oder –Luftfeuchtigkeit über die Grundeinstellungen
und manuelle Einstellungen anzupassen und neu zu kalibrieren.
• Es wird empfohlen, die Messwerte nicht manuell zu kalibrieren und während den manuellen
Einstellungen durch Drücken der SET-Taste (28) zu überspringen.
22
Hinweis – Luftdruck
• Der absolute Luftdruck (abs) ist ein am Aufstellungsort gemessener Wert, der nicht verändert werden
kann.
• Der relative Luftdruck (rel) ist der absolute Luftdruck am Aufstellungsort, umgerechnet auf Meereshöhe
(Normalnull).
• Standardmäßig ist der relative Luftdruck-Referenzwert auf 1013,2 hPa eingestellt. Für eine exakte
Messung passen Sie den Referenzwert an Ihren Standort an. Sie können den Referenzwert manuell
in einem Bereich zwischen 919,0 hPa und 1080,0 hPa einstellen. Informationen über den aktuellen
relativen Luftdruck an Ihrem Standort erhalten Sie im Internet, lokalem Wetteramt, Radio, etc.
Hinweis – Luftdruckschwellenwert
• Die Wettervorhersage basiert auf atmosphärischen Luftdruckveränderungen, deren Schwellenwerte Sie
individuell zwischen 2 hPa und 4 hPa einstellen können. Standardmäßig ist ein Schwellenwert von 3
hPA eingestellt.
• Erfolgt ein Luftdruckabfall oder –anstieg von mindestens dem eingestellten Schwellenwert, wird dieser
als Wetteränderung registriert.
• Es empehlt sich für Standorte mit häugen Luftdruckänderungen eine höhere Einstellung des
Luftdruckschwellenwertes als für Standorte mit relativ konstantem Luftdruck.
Hinweis – Sturmschwellenwert
• Die Sturmvorhersage basiert ebenfalls auf atmosphärischen Luftdruckveränderungen, deren
Schwellenwerte Sie individuell zwischen 3 hPa und 9 hPa einstellen können. Standardmäßig ist ein
Schwellenwert von 6 hPa eingestellt.
• Erfolgt über einen Zeitraum von drei Stunden ein Luftdruckabfall von mindestens dem eingestellten
Schwellenwert, wird die Sturmwarnungsanzeige aktiviert.
• Bei aktivierter Sturmwarnungsanzeige blinken das Regensymbol und die Tendenzpfeile drei Stunden
lang.
6.3. Wettervorhersage
• Anhand von atmosphärischen Luftdruckveränderungen und der gespeicherten Daten kann die Basisstation
Angaben zu der Wetteraussicht für die kommenden 12 bis 24 Stunden machen.
23
Hinweis – Wettervorhersage
In den ersten Stunden des Betriebs ist die Wettervorhersage aufgrund von fehlenden Daten, die erst im
Laufe des Betriebs abgespeichert werden, nicht möglich.
Die Wettervorhersage und das aktuelle Wetter werden durch vier verschiedene Sy mbole (1) dargestellt:
Symbol (1) Wetter
Sonne
Leichte Bewölkung
Bewölkung
Regen
• EineTendenz über den Luftdruck für die nächsten Stunden anhand der gemessenen Barometerwerte wird
zwischen den Symbolen der Wettervorhersage angegeben.
Anzeige (3) Luftdrucktendenz / Wetteraussicht
Steigend / Wetterverbesserung
Fallend / Wetterverschlechterung
• Die Wettersymbole wechseln in Abhängigkeit von dem derzeitigen relativen Luftdruck und den
Luftdruckveränderungen innerhalb der vergangenen sechs Stunden.
Wenn sich das Wetter ändert, blinken die Pfeile der Luftdrucktendenz (3) drei Stunden lang auf, um die
Wetterveränderung anzuzeigen. Wenn sich die Wetterbedingungen im Anschluss daran stabilisiert haben
und keine Wetteränderung mehr registriert wird, hören die Pfeile (3) auf zu blinken.
Beispiele:
24
Anzeige Bedeutung
Wettervorhersage: Regen
Luftdrucktendenz: Fallend / Wetterverschlechterung
Aktuelles Wetter: Bewölkung
Aktuelles Wetter: Leichte Bewölkung
Luftdrucktendenz: Steigend / Wetterverbesserung
Wettervorhersage: Sonne
• Das Balkendiagramm (8) gibt den Verlauf des relativen Luftdrucks der letzten 24 Stunden wieder.
6.4. Anzeigemodus Temperatur / Luftdruck
• Drücken Sie wiederholt die SET-Taste (28), um zwischen folgenden Anzeigen zu wechseln:
• Außentemperatur(18: TEMP)/ Ta upunkttemperatur (18: DEWPOINT)
• Absoluter Luftdruck (7: abs)/ relativer Luftdruck (7: rel)
Die jeweilige Anzeige beginnt zu blinken.
• Drücken Sie während der Anzeige die MIN/MAX-Taste (30) oder die +-Taste (31), um zwischen den
Anzeigen Außentemperatur und Taupunkt bzw. absoluter und relativer Luftdruck zu wechseln.
• Bestätigen Sie die Anzeigeauswahl durch Drücken der SET-Taste (28).
Hinweis – Ta upunkt
Die Ta upunkttemperatur gibt den Wert an, auf den die Außentemperatur bei aktueller Luftfeuchtigkeit
ansteigen/ abkühlen müsste, um 100% relative Luftfeuchtigkeit zu erreichen.
6.5 Alarmmodus
• Drücken Sie wiederholt die ALM-Taste (29), um in den Alarmmodus HI AL (4/11/16/21) oder LO AL
(4/11/16/21) zu gelangen.
• Drücken Sie im Alarmmodus HI AL (4/11/16/21) wiederholt die SET-Taste (28), um zwischen folgenden
Alarmfunktionen zu wechseln:
• Weckalarm (Stunde/ Minute) (24)
• Alarm hohe Raumluftfeuchtigkeit (14)
• Alarm hohe Raumtemperatur (12)
• Alarm hohe Außenluftfeuchtigkeit (20)
• Alarm hohe Außentemperatur (18)
• Alarm hoher absoluter Luftdruck (5)
Die jeweilige Anzeige beginnt zu blinken.
25
• Drücken Sie im Alarmmodus LO AL (4/11/16/21) wiederholt die SET-Taste (28), um zwischen folgenden
Alarmfunktionen zu wechseln:
• Weckalarm (Stunde/ Minute) (24)
• Alarm niedrige Raumluftfeuchtigkeit (14)
• Alarm niedrige Raumtemperatur (12)
• Alarm niedrige Außenluftfeuchtigkeit (20)
• Alarm niedrige Außentemperatur (18)
• Alarm niedriger absoluter Luftdruck (5)
Die jeweilige Anzeige beginnt zu blinken.
• Drücken Sie während der jeweiligen Anzeige die MIN/MAX-Taste (30) oder die +-Taste (31), um den
Alarmwert zuändern und bestätigen Sie Ihre Auswahl durch Drücken der SET-Taste (28).
• Drücken Sie während der jeweiligen Anzeige die ALM-Taste (29), um die jeweilige Alarmfunktion zu
aktivieren bzw. zu deaktivieren.
• Bei aktivierter Alarmfunktion wird das entsprechende Sy mbol (6/10/15/26), HI AL (4/11/16) und/oder
LO AL (4/11/16) angezeigt.
• Erfolgt 20 Sekunden keine Eingabe, wird der Einstellungsmodus automatisch verlassen. Alternativ drücken
Sie die SNOOZE / LIGHT-Taste (32), um den Einstellungsmodus vor Auswahl aller Werte zu verlassen.
Hinweis
Bei bereits aktivierten Alarmen werden die jeweils eingestellten Werte angezeigt, bei deaktivierten
Alarmen wird — bzw. — angezeigt.
• Erreichendie Wetterbedingungen oder die Uhrzeit die eingestellten Werte einer aktivierten Alarmfunktion,
wird der jeweilige Alarm entsprechend ausgelöst.
Es ertönt ein Alarmsignal und die entsprechende Symbole (6/10/15/26), HI AL (4/11/16) und/oder LO AL
(4/11/16) sowie der Alarmwert blinken für 2 Minuten.
• Drücken Sie eine beliebige Taste, um den Alarm zu beenden.
Hinweis – Wetterbedingter Alarm
• Wird dieselbe Alarmfunktion innerhalb 10 Minuten erneut ausgelöst, ertönt kein Alarmsignal mehr.
Das Symbol und der Alarmwert blinken so lange, bis sich die Wetterbedingungen stabilisiert haben.
• Fallen bzw. steigen die Wetterbedingungen unter bzw. über den eingestellten Wert der Alarmfunktion,
wird die Alarmfunktion automatisch erneut aktiviert.
• Wird der Alarm für hohe/ niedrige Außentemperatur durch die Ta upunkttemperatur ausgelöst, beginnt
zusätzlich DEW POINT zu blinken.
26
Hinweis – Schlummerfunktion
Drücken Sie während des Alarmsignals die SNOOZE / LIGHT-Taste (32), um die Schlummerfunktion zu
aktivieren. Das Wecksignal wird für 5 Minuten unterbrochen und dann erneut ausgelöst. Das jeweilige
Alarmsymbol beginnt zu blinken.
6.6. Höchst- und Tiefstwerte der Temperatur und Luftfeuchtigkeit
• Die Basisstation speichert die Höchst- und Tiefstwerte der Te mperatur sowie der Luftfeuchtigkeit im Außenund Raumbereich automatisch ab.
• Drücken Sie wiederholt die MIN/MAX-Taste (30), um zwischen der Anzeige von aktueller Te mperatur
und Luftfeuchtigkeit, niedrigster Temperatur und Luftfeuchtigkeit (2: MIN) und höchster Temperatur und
Luftfeuchtigkeit (2: MAX) zu wechseln.
• Drücken Sie während der Anzeige der Maximalwerte (2: MAX) wiederholt die +-Taste (31), um folgende
Werte mit Datum (21) und Uhrzeit (24) ihrer Erfassung anzuzeigen:
• Maximale Raumluftfeuchtigkeit (14)
• Maximale Raumtemperatur (12)
• Maximale Außenluftfeuchtigkeit (20)
• Maximale Außentemperatur (18)
• Maximaler absoluter/ relativer Luftdruck (5)
• Drücken Sie während der Anzeige der Minimalwerte (2: MIN) wiederholt die +-Taste (31), um folgende
Werte mit Datum (21) und Uhrzeit (24) ihrer Erfassung anzuzeigen:
• Minimale Raumluftfeuchtigkeit (14)
• Minimale Raumtemperatur (12)
• Minimale Außenluftfeuchtigkeit (20)
• Minimale Außentemperatur (18)
• Minimaler absoluter/ relativer Luftdruck (5)
• Halten Sie während der Anzeige der einzelnen Maximal- und Minimalwerte die SET-Taste (28) für ca. 3
Sekunden gedrückt, um die jeweiligen Werte mit Datum (21) und Uhrzeit (24) ihrer Erfassung zu löschen.
• Drücken Sie die SNOOZE / LIGHT-Taste (32) oder warten Sie ca. 20 Sekunden, um zur Anzeige der
aktuellen Messwerte zurückzukehren.
Hinweis – Batteriewechsel
Beachten Sie, dass Sie nach jedem Batteriewechsel an Mess- oder Basisstation eine neue Synchronisation
der Stationen erfolgen muss.
Nehmen Sie dazu die Batterien der anderen Station heraus und setzen sie erneut ein oder wechseln diese
bei Bedarf ebenfalls aus.
27

Hinweis – fehlerhafte Übertragung der Messwerte
In einzelnen Fällen kann es aufgrund von Störsignalen – z.B. durch ein WLAN-Netzwerk, Computer,
Fernseher, etc. – vorkommen, dass die Übertragung der Messwerte zwischen Basis- und Messstation
fehlschlägt.
Synchronisieren Sie dann die Stationen neu, indem Sie die Batterien beider Stationen kurz herausnehmen
und erneut einsetzen.
Sollten die Messwerte anschließend erneut nicht übertragen werden, wechseln Sie die Batterien durch
neue aus.
Wählen Sie ggfs. einen neuen Aufstellort für die Basisstation, um die möglichen Störsignale zukünftig zu
umgehen.
7. Wartung und Pflege
Reinigen Sie dieses Produkt nur mit einem fusselfreien, leicht feuchten Tu ch und verwenden Sie keine
aggressiven Reiniger.
8. Haftungsausschluss
Die Hama GmbH & Co. KG übernimmt keinerlei Haftung oder Gewährleistung für Schäden, die aus
unsachgemäßer Installation, Montage und unsachgemäßem Gebrauch des Produktes oder einer
Nichtbeachtung der Bedienungsanleitung und/oder der Sicherheitshinweise resultieren.
9. Service und Support
Bitte wenden Sie sich bei Fragen zum Produkt gerne an die Hama-Produktberatung.
Hotline: +49 9091 502-115 (Deu/Eng)
Weitere Supportinformationen nden sie hier:
www.hama.com
28
10. Technische Daten
Basisstation
Stromversorgung
Messbereich
Temperatur
Luftfeuchtigkeit
Messschritte
Temperatur
Luftfeuchtigkeit
Messzyklus Te mperatur/
Luftfeuchtigkeit
Messbereich Barometer
Messschritte
DCF-Funkuhr
Hygrometer Ja Ja
Thermometer Ja Ja
Barometer Ja Nein
Weckfunktion Ja Nein
Frequenz 433 MHz
Reichweite ≤ 100 m
4,5 V
3 x AA Batterie
0°C – +50°C/ 32°F – 122°F
20% – 95%
0,1°C / 0,2°F
1 %
30 s57 s
919 – 1080 mbar/hPa
(27,14 – 31,89 inHg)
0,1 hPa
Ja
Messstation
3,0 V
2 x AAA Batterie
-20°C – +60°C/ -4°F – 140°F
20% – 95%
0,1°C / 0,2°F
1 %
—
Nein
29

11. Entsorgungshinweise
Hinweis zum Umweltschutz:
Ab dem Zeitpunkt der Umsetzung der europäischen Richtlinien 2012/19/EU und 2006/66/EG in
nationales Recht gilt folgendes: Elektrische und elektronische Geräte sowie Batterien dürfen nicht
mit dem Hausmüll entsorgt werden. Der Verbraucher ist gesetzlich verpichtet, elektrische und
elektronische Geräte sowie Batterien am Ende ihrer Lebensdauer an den dafür eingerichteten,
öffentlichen Sammelstellen oder an die Verkaufsstelle zurückzugeben. Einzelheiten dazu regelt das
jeweilige Landesrecht. Das Symbol auf dem Produkt, der Gebrauchsanleitung oder der Verpackung weist auf
diese Bestimmungen hin. Mit der Wiederverwertung, der stoichen Verwertung oder anderen Formen der
Verwertung von Altgeräten/Batterien leisten Sie einen wichtigen Beitrag zum Schutz unserer Umwelt.
12. Konformitätserklärung
Hiermit erklärt Hama GmbH & Co. KG, dass sich dieses Gerät in Übereinstimmung mit den
grundlegenden Anforderungen und den anderen relevanten Vorschriften der Richtlinie 2014/53/
EU bendet. Die Konformitätserklärung gemäß der entsprechenden Richtlinie nden Sie unter
www.hama.com.
30

F Mode d‘emploi
Éléments de commande et d‘affichage
A Station de base
1. Icônes de prévision météorologiques
2. Valeurs minimales / maximales
3. Tendance de la pression atmosphérique
4. Alarme de pression faible (LO) / pression forte (HI)
5. Valeur de la pression atmosphérique
6. Alarme de pression faible (LO) / pression forte (HI) activée
7. Pression atmosphérique absolue/relative
8. Historique de la pression atmosphérique sur 24 heures
9. Unité de pression atmosphérique
10. Alarme de température ambiante / humidité de l‘air ambiant faible (LO) / forte (HI) activée
11. Alarme de température ambiante / humidité de l‘air ambiant faible (LO) / forte (HI)
12. Te mpérature ambiante
13. Unité de température ambiante
14. Humidité relative de l’air ambiant
15. Alarme de température extérieure / humidité de l‘air extérieur faible (LO) / forte (HI)
activée
16. Alarme de température extérieure / humidité de l‘air extérieur faible (LO) / forte (HI)
17. Unité de température extérieure
18. Te mpérature extérieure / température du point de rosée
19. Signal de l‘émetteur extérieur
20. Humidité relative de l’air extérieur
21. Date
22. Heure d‘été
23. Heure radio-pilotée DCF
24. Heure
25. Jour de la semaine
26. Heure d‘alarme activée
27. Icône radio
28. To uche SET = commutation mode d‘achage / conrmation de la valeur sélectionnée
29. To uche ALM = achage / réglage / désactivation / activation des alarmes
30. To uche MAX/MIN = consultation des valeurs maximales / minimales / diminution de la valeur en cours
de réglage
31. To uche + = augmentation de la valeur en cours de réglage
32. To uche SNOOZE / LIGHT = interruption de la sonnerie de réveil / allumage du rétro-éclairage
(env. 10 secondes) / interruption du paramétrage
33. Fente pour l‘installation murale
34. Compartiment à piles
35. Pied
31

B Station de mesure
36. Te mpérature extérieure
37. Humidité de l‘air extérieur
38. Compartiment à piles
39. Fente pour l‘installation murale
40. To uche TX = ne fournit aucune fonction utilisable par l’utilisateur
41. To uche C/F
= commutation entre achage °C et °F
Nous vous remercions d’avoir choisi un produit Hama.
Veuillez prendre le temps de lire l‘ensemble des remarques et consignes suivantes. Veuillez conserver ce
mode d‘emploi à portée de main an de pouvoir le consulter en cas de besoin. Tr ansmettez-le au nouveau
propriétaire avec l’appareil le cas échéant.
1. Explication des symboles d‘avertissement et des remarques
Avertissement
Ce symbole est utilisé pour indiquer des consignes de sécuritéou pour attirer votre attention sur
des dangers et risques particuliers.
Remarque
Ce symbole est utilisé pour indiquer des informations supplémentaires ou des remarques
importantes.
2. Contenu de l‘emballage
• Station météo EWS-800 (station de base pour l‘intérieur / station de mesure pour l‘extérieur)
• Mode d‘emploi
3. Consignes de sécurité
• Ce produit est destiné à une installation domestique non commerciale.
• N‘utilisez pas le produit en dehors des limites de puissance indiquées dans les caractéristiques techniques.
• N‘utilisez pas le produit dans un environnement humide et évitez toute projection d‘eau.
• Évitez d’utiliser le produit à proximité immédiate d‘un chauffage, d’autres sources de chaleur ou exposé aux
rayons directs du soleil.
• N‘utilisez pas le produit dans les zones dans lesquelles l‘utilisation d‘appareils électroniques est interdite.
32

• Utilisez l‘appareil exclusivement branché à une prise de courant appropriée. La prise de courant doit être
située à proximité du produit et doit être facilement accessible.
• Protégezle produit des secousses violentes et évitez tout choc ou toute chute.
• Ne tentez pas d‘ouvrir le produit en cas de détérioration et cessez de l’utiliser.
• Ne tentez pas de réparer l’appareil vous-même ni d’effectuer des travaux d’entretien. Déléguez tous travaux
d‘entretien à des techniciens qualiés.
• Tenez les emballages d‘appareils hors de portée des enfants, risque d‘étouffement.
• Recyclez les matériaux d’emballage conformément aux prescriptions locales en vigueur.
• N’apportez aucune modication à l’appareil. Des modications vous feraient perdre vos droits de garantie.
Avertissement concernant les piles
• Retirez les piles usagées immédiatement du produit pour les recycler.
• Utilisez exclusivement des batteries (ou des piles) du type indiqué.
• N’utilisez pas simultanément des piles usagées et des piles neuves ou des piles de différents types.
• Respectez impérativement la polarité de la pile (marquage + et -) lors de l‘insertion dans le boîtier ;
risques d‘écoulement et d‘explosion des piles si tel n‘est pas le cas.
4. Mise en service
4.1 Station de mesure
• Desserrezla vis du compartiment à piles (38) situé au dos de la station de mesure et ouvrez le
compartiment.
• Insérezdeux piles LR03/AAA conformément aux indications de polarité, puis refermez le compartiment (38)
en resserrant la vis.
Remarque
Lors de la première mise en service, veuillez premièrement insérer les piles dans la station de mesure, puis
dans la station de base.
4.2 Station de base
• Ouvrezle compartiment à piles (34) et insérez trois piles R6/AA conformément aux indications de polarité.
Refermez le couvercle du compartiment.
33

5. Installation
Remarque concernant l‘installation
• Nous vous recommandons de positionner la station de base et la station de mesure dans les endroits
envisagés sans effectuer le montage, puis d‘effectuer les réglages tels que décrits au chapitre
6. Fonctionnement de la station de base.
• Procédez ensuite à l‘installation des stations après avoir effectué le réglage et reçu une connexion
radio stable.
Remarque
• La portée de la transmission radio entre la station de base et la station de mesure est de 30 m dans
un espace dégagé.
• Veuillez contrôler, avant l‘installation, que la portée radio ne soit pas altérée par des interférences ou
des obstacles tels que bâtiments, arbres, véhicules, lignes haute tension, etc.
• Veuillez contrôler, avant l‘installation dénitive, la bonne qualité de la transmission entre les deux
stations.
• Veuillez également protéger les stations de l‘ensoleillement direct et de la pluie lors de l‘installation.
• La hauteur standard internationale de mesure de la température de l‘air est de 1,25 m (4 ft) au-dessus
du sol.
Avertissement
• En vue de l‘installation, procurez-vous le matériel d‘installation adéquat pour le mur concerné dans un
commerce spécialisé.
• Veuillez contrôler que l‘emballage ne contienne aucune pièce erronée ni endommagée.
• N‘appliquez en aucun cas une force excessive lors de l‘installation. Une force excessive est susceptible
d‘endommager le produit.
• Avant l‘installation, vériez que le mur prévu pour recevoir le produit dispose d‘une force portante
susante et qu‘aucune conduite d‘électricité, d‘eau, de gaz ni aucune autre conduite ne passe dans
cette partie de la cloison.
34

5.1 Station de base
• Placez la station de base sur une surface plane à l‘aide de son pied (35).
• Vous pouvez également installer la station de base à une paroi à l‘aide de la fente(33) située sur la face
arrière de la station.
5.2 Station de mesure
• Vous pouvez également placer la station de mesure à l‘extérieur, sur une surfaceplane, à l‘aide de son pied.
• Nous vous recommandons d‘installer solidement la station de mesure à une paroi extérieure.
• Fixez cheville, vis, clou, etc. dans la paroi prévue pour recevoir l‘installation.
• Suspendez la station de base/ de mesure à l‘aide de la fente (33/39) prévue à cet effet.
6. Fonctionnement de la station de base
Remarque concernant la saisie
Maintenez la touche MIN/MAX (30) ou la touche + (31) enfoncée an de faire déler rapidement les
chiffres.
Appuyez sur la touche SNOOZE / LIGHT (32) an d‘allumer l‘écran pendant environ 10 secondes.
6.1. Première configuration automatique
• Lors de la première mise en service, tous les segments LCD disponibles apparaissent brièvement à l‘écran.
• La station de base effectue ensuite une première conguration automatique. Sont effectués pendant cette
première phase : la synchronisation avec la station de mesure, la stabilisation des valeurs de pression
mesurées, ainsi que la conguration sur la base des réglages d‘usine.
Remarque concernant la première conguration
• La conguration dure environ 3 minutes.
• N‘appuyez sur aucune touche pendant cette phase ; des erreurs ou des inexactitudes de mesure ou de
transmission pourraient en résulter.
• La conguration est terminée dès que les valeurs mesurées pour la zone intérieure (12, 14) et pour la
zone extérieure (18, 20) apparaissent à l‘écran.
• Après avoir mis la station de base sous tension et en cas de transmission correcte entre la station de base et
la station de mesure, l‘horloge recherche automatiquement le signal horaire DCF. L‘ cône radio (27) clignote
pendant la recherche du signal horaire.
35

Achage Recherche du signal horaire DCF
Achage clignotant
Recherche active
Achage permanent
Aucun achage Échec de réception — aucune réception du signal
Remarque concernant le réglage de l‘heure
• En cas d‘échec de réception du signal horaire DCF pendant la minute suivant la première
conguration, la station termine la recherche et la relance automatiquement toutes les deux heures
suivantes. L‘ icône radio s‘éteint.
• Vous pouvez également régler l‘heure et la date manuellement.
• L‘horloge continue à rechercher quotidiennement le signal horaire DCF. Les réglages manuels de
l‘heure et de la date seront corrigés dès que la station reçoit correctement le signal horaire DCF.
Remarque concernant l‘heure d‘été
Le réveil s‘adapte automatiquement à l‘heure d‘été. apparaît à l‘écran pendant la durée de l‘heure
d‘été.
Recherche aboutie — signal en cours de réception
6.2. Réglages de base et paramétrage manuel
• Appuyez sur la touche SET (28) pendant environ 3 secondes an d‘effectuer successivement els réglages
suivants :
• fuseau horaire (24)
• format horaire 12/24 heures (24)
• heures(24)
• minutes (24)
• année (21)
• mois (21)
36

• jour (21)
• unité de température (°C / °F) (13+17)
• températureambiante (12)
• humidité de l‘air ambiant (14)
• températureextérieure (18)
• humidité de l‘air extérieur (20)
• unité de la pression atmosphérique (hPa / inHg) (5+9)
• valeur de référence de la pression atmosphérique relative (5)
• seuil de sensibilité de la pression atmosphérique (5)
• seuil de tempête (5)
• Appuyez sur la touche MIN/MAX (30) ou sur la touche + (31) an de sélectionner les différentes valeurs,
puis conrmez votre sélection en appuyant sur la touche SET (28).
• Appuyez directement sur la touche SET (28) an d‘adopter la valeur achée et passer au réglage suivant.
• Le mode de paramétrage s‘interrompt automatiquement lorsque vous n‘appuyez sur aucune touche
pendant plus de 20 secondes. vous pouvez également appuyer sur la touche SNOOZE / LIGHT (32) an
quitter le mode de paramétrage avant d‘avoir effectué tous els réglages.
Remarque concernant les fuseaux horaires
• Il est possible de recevoir le signal horaire à grande distance ; ce signal ne correspond toutefois pas
toujours à GMT + 1, l‘heure en vigueur en Allemagne. Veuillez donc noter qu‘un décalage horaire doit
être adopté dans les pays situés dans un autre fuseau horaire.
• Si vous vous trouvez, par exemple, à Moscou, le décalage horaire entre Moscou et l‘Allemagne est de
3 heures (l‘heure de Moscou est en avance). Réglez donc le fuseau horaire sur +3. L‘ horloge s‘adaptera
alors automatiquement à l‘heure captée par le signal horaire DCF (ou à l‘heure réglée manuellement)
et lui ajoutera 3 heures.
Remarque concernant la température et l‘humidité de l‘air
• Cette station météo ainsi que les valeurs de température et d‘humidité mesurées sont destinées à une
installation domestique non commerciale.
• Dans certains cas, de légères variations sont susceptibles d‘apparaître entre les valeurs mesurées
et les valeurs de référence – provenant, par exemple, d‘un appareil de mesure étalonné. Vous
pouvez adapter et réétalonner les valeurs de température ambiante, de température extérieure et/ou
d‘humidité de l0‘air à l‘aide des Réglages de base et paramétrage manuel.
• Nous vous recommandons d‘éviter l‘étalonnage manuel des valeurs et de sauter ce point lors du
paramétrage en appuyant sur la touche SET (28).
37

Remarque concernant la pression atmosphérique
• La pression atmosphérique absolue (abs) est une valeur mesurée sur le lieu d‘installation ; elle ne peut
pas être modiée.
• La pression atmosphérique relative (rel) est la pression atmosphérique mesurée sur le lieu d‘installation
et convertie par rapport à la pression au niveau de la mer (altitude 0).
• La valeur de référence de la pression atmosphérique relative est dénie par défaut à 1013,2 hPa. Pour
obtenir une mesure exacte, adaptez la valeur de référence par rapport à votre domicile. Vous pouvez
régler manuellement la valeur de référence dans une plage située entre 919,0 hPa et 1080,0 hPa.
Vous obtiendrez des informations concernant la pression atmosphérique relative de votre domicile sur
internet, auprès de votre oce météo local, à la radio, etc.
Remarque concernant le seuil de sensibilité de la pression atmosphérique
• Les prévisions météorologiques sont basées sur les variations de la pression atmosphérique relative
dont vous pouvez régler individuellement les valeurs seuils entre 2 hPa et 4 hPa. La valeur seuil est
réglée par défaut sur 3 hPA.
• Une chute ou une augmentation de la pression atmosphérique égale (au minimum) à la valeur seuil
paramétrée est indiquée comme variation météorologique.
• Dans un endroit sujet aux variations de la pression atmosphérique, nous vous recommandons
d‘adopter une valeur seuil de pression atmosphérique plus importante que dans un endroit jouissant
d‘une pression atmosphérique relativement stable.
Remarque concernant le seuil de tempête
• Les prévisions de tempête sont basées sur les variations de la pression atmosphérique relative dont les
vous pouvez régler individuellement les valeurs seuils entre 3 hPa et 9 hPa. La valeur seuil est réglée
par défaut sur 6 hPA.
• L‘achage d‘avertissement de tempête est activé en cas d‘une chute de la pression atmosphérique,
pendant trois heures, correspondant au minimum à la valeur seuil paramétrée.
• L‘icône de pluie et les èches de tendance clignotent pendant trois heures lorsque l‘achage
d‘avertissement de tempête est activé.
38

6.3. Prévisions météorologiques
• La station de base peut acher des prévisions météo pour les prochaines 12 à 24 heures sur la base des
variations de la pression atmosphérique et des données en mémoire.
Remarque concernant les prévisions météorologiques
Dans les premières heures suivant la mise en service, la station n‘est pas capable d‘acher de prévisions
météo en raison du manque de données qui seront enregistrées pendant le fonctionnement ultérieur de
la station.
Les prévisions météo ainsi que les conditions météo actuelles sont achées à l‘aide de quatre icônes différents (1).
Icône (1) Météo
Ensoleillé
Légèrement nuageux
Nuageux
Pluie
• La tendance météo pour les prochaines heures, établie sur la base des valeurs barométriques mesurées, est
indiquée entre les icônes des prévisions météo.
Achage (3) Tendance de la pression atmosphérique / prévisions
Hausse / amélioration des conditions météo
Baisse / dégradation des conditions météo
39

• Les icônes météo varient en fonction de la pression atmosphérique relative et des variations de la pression
atmosphérique relevées au cours des dernières six heures.
Les èches de la tendance de la pression atmosphérique (3) clignotent pendant trois heures en cas de
changement de temps. Les èches (3) cessent de clignoter lorsque les conditions se sont stabilisées et plus
aucun changement de temps n‘est détecté.
Exemples :
Achage Signication
Prévisions météo : pluie
Tendance de la pression atmosphérique : baisse / dégradation des
conditions météo
Temps actuel : nuageux
Temps actuel : légèrement nuageux
Tendance de la pression atmosphérique : hausse / amélioration des
conditions météo
Prévisions météo : ensoleillé
• Le diagramme à barres (8) indique l‘évolution de la pression atmosphérique relative des dernières 24
heures.
6.4. Mode d’affichage de la température / la pression atmosphérique
• Appuyez sur la touche SET (28) an de sélectionner un des modes d0achage suivants :
• Température extérieure (18 : TEMP) / température du point de rosée (18: DEWPOINT)
• Pressionatmosphérique absolue (7 : abs) / pression atmosphérique relative (7 : rel)
L‘achage correspondant se met à clignoter.
• En mode d‘achage, appuyez sur la touche MIN/MAX (30) ou sur la touche + (31) an de passer de
l‘achage de la température extérieure et du point de rosée à l‘achage de la pression atmosphérique
absolue et relative.
• Conrmez votre sélection d‘achage en appuyant sur la touche SET (28).
Remarque concernant le point de rosée
La température du point de rosée indique la valeur que la tempréature extérieure devrait atteindre, dans
les conditions d‘humidité actuelles, pour être égale à une humidité relative de l‘air de 100 %.
6.5 Mode alarme
• Appuyez plusieurs fois sur la touche ALM (29) an de sélectionner le mode alarme HI AL (4/11/16/21) ou
LO AL (4/11/16/21).
40

• Dans le mode alarme HI AL (4/11/16/21), appuyez plusieurs fois sur la touche SET (28) an de sélectionner
une des fonctions d‘alarme suivantes :
• alarme de réveil (heure / minutes) (24)
• alarme d‘humidité ambiante importante (14)
• alarme de température ambiante importante (12)
• alarme d‘humidité extérieure importante (20)
• alarme de température extérieure importante (18)
• alarme de pression atmosphérique absolue importante (5)
L‘achage correspondant se met à clignoter.
• Dans le mode alarme LO AL (4/11/16/21), appuyez plusieurs fois sur la touche SET (28) an de sélectionner
une des fonctions d‘aleme suivantes :
• alarme de réveil (heure / minutes) (24)
• alarme d‘humidité ambiante basse (14)
• alarme de température ambiante basse (12)
• alarme d‘humidité extérieure basse (20)
• alarme de température extérieure basse (18)
• alarme de pression atmosphérique absolue basse (5)
L‘achage correspondant se met à clignoter.
• Dans le mode alarme sélectionné, appuyez sur la touche MIN/MAX (30) ou sur la touche + (31) an de
modier la valeur, puis conrmez votre sélection en appuyant sur la touche SET (28).
• Dans le mode alarme sélectionné, appuyez sur la touche ALM (29) an d‘activer / désactiver la fonction
d‘alarme sélectionnée. ++
L‘icône (6/10/15/26), HI AL (4/11/16) et/ou LO AL (4/11/16) apparaît à l‘écran dès que la fonction d‘alarme
concernée est activée.
• Le mode de paramétrage s‘interrompt automatiquement lorsque vous n‘appuyez sur aucune touche
pendant plus de 20 secondes. vous pouvez également appuyer sur la touche SNOOZE / LIGHT (32) an
quitter le mode de paramétrage avant d‘avoir effectué tous els réglages.
Remarque
Les valeurs paramétrées apparaissent pour les alarmes activées, — ou — apparaît en cas d‘alarme
désactivée.
• La fonction d‘alarme se déclenche dès que les conditions météo ou l‘heure atteignent la valeur paramétrée
pour l‘alarme.
Une sonnerie retentit et l‘icône concerné (6/10/15/26), HI AL (4/11/16) et/our LO AL (4/11/16) ainsi que la
valeur de l‘alarme clignotent à l‘écran pendant 2 minutes.
• Appuyez sur n‘importe quelle touche an d‘arrêter l‘alarme.
41

Remarque concernant les alarmes météo
• Aucune sonnerie ne retentit lorsque la même fonction d‘alarme est déclenchée dans les 10 minutes.
L‘icône et la valeur de l‘alarme clignotent jusqu‘à la stabilisation des conditions météo.
• La fonction d‘alarme est automatiquement réactivée en cas de nouvelle chute ou hausse des
conditions météo au-dessous ou au-dessus de la valeur paramétrée pour la fonction d‘alarme.
• DEW POINT clignote également à l‘écran dans le cas où le déclenchement de l‘alarme de température
extérieure importante / basse est provoqué par la température du point de rosée.
Remarque concernant la fonction de répétition de l‘alarme
Appuyez sur la touche SNOOZE / LIGHT (32) pendant la sonnerie an d‘activer la fonction de répétition
de la sonnerie. La sonnerie s‘interrompt pendant 5 minutes, puis retentit à nouveau. L‘ icône d‘alarme
concerné se met à clignoter.
6.6. Valeurs maximales et minimales de température et d’humidité de l’air
• La station de base garde automatiquement en mémoire les valeurs minimales et maximales de la
température et de l‘humidité de l‘air à l‘extérieur et à l‘intérieur.
• Appuyez plusieurs fois sur la touche MIN/MAX (30), an de passer de l‘achage de la température et de
l‘humidité de l‘air actuelles à l‘achage de la température et de l‘humidité de l‘air minimales (2 : MIN) et à
l‘achage de la température et de l‘humidité de l‘air à l‘extérieur maximales (2 : MAX).
• En mode d‘achage des valeurs maximales (2 : MAX), appuyez plusieurs fois sur la touche + (31) an
d‘acher les valeurs suivantes avec leur date (21) et leur heure (24) de détection :
• humidité ambiante maximale (14)
• températureambiante maximale (12)
• humidité de l‘air extérieur maximale (20)
• températureextérieure maximale (18)
• pressionatmosphérique absolue / relative maximale (5)
• En mode d‘achage des valeurs minimales (2 : MAX), appuyez plusieurs fois sur la touche + (31) an
d‘acher les valeurs suivantes avec leurs date (21) et heure (24) de détection :
• humidité ambiante minimale (14)
• températureambiante minimale (12)
• humidité de l‘air extérieur minimale (20)
• températureextérieure minimale (18)
• pressionatmosphérique absolue/relative minimale (5)
42
• Appuyez sur la touche SET (28) pendant env. 3 secondes, pendant l‘achage d‘une valeur minimale ou
maximale, an d‘effacer cette valeur et de ses mentions de date (21) et d‘heure (24).
• Appuyez sur la touche SNOOZE / LIGHT-Taste (32) ou patientez pendant environ 20 secondes an de
revenir à l‘achage des valeurs actuellement mesurées.
Remarque concernant le remplacement des piles
Veuillez noter qu‘après chaque remplacement de piles de la station de base ou de la station de mesure,
vous devrez effectuer une nouvelle synchronisation der stations.
Lors de cette synchronisation, extrayez également les piles de la station qui continuait à fonctionner, puis
réinsérez-les ou remplacez ces dernières.
Remarque – transmission défectueuse des valeurs mesurées
Dans certains cas, des interférences provoquées, par exemple, par un réseau WiFi, un ordinateur, un
téléviseur, etc. sont susceptibles d’empêcher la transmission des données mesurées entre la station de
base et la station de mesure.
Effectuez une nouvelle synchronisation des stations en extrayant brièvement les piles des deux stations
avant de les réinsérer.
Remplacez les piles par des piles neuves dans le cas où les valeurs mesurées ne sont toujours pas
transmises correctement.
Le cas échéant choisissez une autre emplacement pour la station de base an d’éviter toute interférence
éventuelle.
7. Nettoyage et entretien
Nettoyez ce produit uniquement à l’aide d’un chiffon non pelucheux légèrement humide ; évitez tout détergent
agressif. Veillez à ce qu’aucun liquide ne pénètre dans le produit.
8. Exclusión de responsabilidad
Hama GmbH & Co KG no se responsabiliza ni concede garantía por los daños que surjan por una instalación,
montaje o manejo incorrectos del producto o por la no observación de las instrucciones de manejo y/o de las
instrucciones de seguridad.
9. Servicio y soporte
Si tiene que hacer alguna consulta sobre el producto, diríjase al asesoramiento de productos Hama.
Línea directa: +49 9091 502-115 (Alemán/Inglés)
Encontrar más información de soporte aquí:
www.hama.com
43

10. Datos técnicos
Station de base
Alimentation électrique
Plage de mesure de l‘humidité
de l‘air
Incrément de mesure de
température
humidité de l‘air
Cycle de mesure température /
humidité de l‘air
Plage de mesure du baromètre
incrément de mesure
Horloge radio-pilotée DCF
Hygromètre
Thermomètre
Baromètre
Fonction de réveil
Fréquence 433 MHz
Portée ≤ 100 m
4,5 V
3 piles LR6/AA
0 °C – +50 °C/ 32 °F – 122 °F
20 % – 95 %
0,1 °C / 0,2 °F
1 %
30 s57 s
919 – 1080 mbar/hPa (27,14 –
31,89 inHg)
0,1 hPa
oui
oui oui
oui oui
oui
oui
44
Station de mesure
3,0 V
2 piles LR03/AAA
-20 °C – +60 °C/ -4 °F – 140 °F
20 % – 95 %
0,1 °C / 0,2 °F
1 %
—
non
non
non

11. Instrucciones para desecho y reciclaje
Nota sobre la protección medioambiental:
Conformément à la directive européenne 2012/19/EU et 2006/66/CE, et an d‘atteindre un certain
nombre d‘objectifs en matière de protection de l‘environnement, les règles suivantes doivent être
appliquées: Les appareils électriques et électroniques ainsi que les batteries ne doivent pas être
éliminés avec les déchets ménagers. Le pictogramme “picto” présent sur le produit, son manuel
d‘utilisation ou son emballage indique que le produit est soumis à cette réglementation. Le
consommateur doit retourner le produit/la batterie usager aux points de collecte prévus à cet effet. Il peut
aussi le remettre à un revendeur. En permettant enn le recyclage des produits ainsi que les batteries, le
consommateur contribuera à la protection de notre environnement. C‘est un acte écologique.
12. Declaración de conformidad
La société Hama GmbH & Co. KG déclare par la présente que cet appareil est conforme aux
exigences essentielles et aux autres dispositions de la directive 2014/53/UE. Voss trouverez la
déclaration de conformité selon la directive correspondante sur notre site: www.hama.com.
45

E Instrucciones de uso
Elementos de manejo e indicadores
A Estación base
1. Símbolo de pronóstico del tiempo
2. Datos máximos/ mínimos
3. Tendencia de presión atmosférica
4. Alarma por baja (LO)/ alta (HI) presión atmosférica
5. Valor de presión atmosférica
6. Alarma activa por baja (LO)/ alta (HI) presión atmosférica
7. Presión atmosférica absoluta/ relativa
8. Historial de presión atmosférica 24 horas
9. Unidad para la presión atmosférica
10. Alarma activa por baja (LO)/ alta (HI) temperatura ambiente/ humedad ambiente
11. Alarma por baja (LO)/ alta (HI) temperatura ambiente/ humedad ambiente
12. Te mperatura ambiente
13. Unidad para la temperatura ambiente
14. Humedad relativa ambiente
15. Alarma activa por baja (LO)/ alta (HI) temperatura exterior/ humedad exterior
16. Alarma por baja (LO)/ alta (HI) temperatura exterior/ humedad exterior
17. Unidad para la temperatura exterior
18. Te mperatura exterior/ punto de rocío
19. Señal del emisor exterior
20. Humedad relativa exterior
21. Fecha
22. Horario de verano
23. Hora de ajuste por DCF
24. Hora
25. Día de la semana
26. Hora de alarma del despertador activa
27. Símbolo de radiofrecuencia
28. Te cla SET = Conmutación al modo de visualización/ conrmación del valor de ajuste
29. Te cla ALM = Visualización/ ajuste/ desactivación/ activación de las funciones de alarma
30. Te cla MIN/MAX = Consulta de los valores máximos/ mínimos almacenados/ disminución del valor de
ajuste actual
31. Te cla + = Aumento del valor de ajuste actual
32. Te cla y = Interrupción de la señal del despertador/ activación de la retroiluminación
(aprox. 10 segundos)/ cancelación Ajustes
33. Abertura para el montaje en pared
34. Compartimento de pilas
35. Pie
46

B Estación de medición
36. Te mperatura exterior
37. Humedad exterior
38. Compartimento de pilas
39. Abertura para el montaje en pared
40. Te cla TX = no ofrece ninguna función utilizable por el usuario
41. Te cla C/F
= Conmutación entre °C y °F
Le agradecemos que se haya decidido por un producto de Hama.
Tómese tiempo y léase primero las siguientes instrucciones e indicaciones. Después, guarde estas instrucciones
de manejo en un lugar seguro para poder consultarlas cuando sea necesario. Si vende el aparato, entregue
estas instrucciones de manejo al nuevo propietario.
1. Explicación de los símbolos de aviso y de las indicaciones
Aviso
Se utiliza para caracterizar las indicaciones de seguridad o para llamar la atención sobre peligros y riesgos
especiales.
Nota
Se utiliza para caracterizar informaciones adicionales o indicaciones importantes.
2. Contenido del paquete
• Estación meteorológica EWS-800 (Estación base para interior / estación de medición para el exterior)
• Estas instrucciones de manejo
3. Instrucciones de seguridad
• El producto es para el uso doméstico privado, no comercial.
• No opere el producto fuera de los límites de potencia indicados en los datos técnicos.
• No utilice el producto en entornos húmedos y evite el contacto con las salpicaduras de agua.
• No opere el producto en las inmediaciones de la calefacción, de otras fuentes de calor o bajo la radiación
directa del sol.
• No utilice el producto en áreas donde no se permitan aparatos electrónicos.
• Utilice el producto sólo conectado a una toma de corriente autorizada. La toma de corriente debe estar
colocada cerca del producto y de forma accesible.
• No deje caer el producto ni lo someta a sacudidas fuertes.
47

• No abra el producto y no lo siga operando de presentar deterioros.
• No intente mantener o reparar el aparato por cuenta propia. Encomiende cualquier trabajo de
mantenimiento al personal especializado competente.
• Mantenga el material de embalaje fuera del alcance de los niños, existe peligro de asxia.
• Deseche el material de embalaje en conformidad con las disposiciones locales sobre el desecho vigentes.
• No realice cambios en el aparato. Esto conllevaría la pérdida de todos los derechos de la garantía.
Aviso — Pilas
• Retire y deseche de inmediato las pilas gastadas del producto.
• Utilice exclusivamente pilas recargables (o pilas) que sean del mismo tipo.
• No mezcle pilas viejas y nuevas, ni tampoco pilas de tipos o fabricantes diferentes.
• Observe siempre la correcta polaridad (inscripciones + y -) de las pilas y coloque éstas de forma
correspondiente. La no observación de lo anterior conlleva el riesgo de derrame o explosión de las
pilas.
4. Puesta en funcionamiento
4.1 Estación de medición
• Suelte el tornillo del compartimento de pilas (38) situado en la parte posterior de la estación de medición
y ábralo.
• Coloque dos pilas AAA prestando atención a que la polaridad sea correcta y, a continuación, cierre el
compartimento de pilas (38) utilizando el tornillo.
Nota
En la puesta en funcionamiento, es importante que coloque las pilas en la estación de medición, en primer
lugar, y, seguidamente, en la estación base.
4.2 Estación base
• Abrael compartimento para pilas (34) y coloque tres pilas AA atendiendo a la polaridad correcta. A
continuación, cierre la cubierta del compartimento para pilas.
48

5. Montaje
Nota – Montaje
• Se recomienda colocar primero, sin montar, la estación de base y la estación de medición, en los
lugares de instalación deseados y llevar a cabo todos los ajustes tal y como se describe en
6. Funcionamiento de la estación base.
• Proceda a montar la(s) estación(es) únicamente cuando haya podido realizar correctamente los ajustes
y cuente con una conexión inalámbrica estable.
Nota
• El alcance de la transmisión por radio entre la estación base y la estación de medición al aire libre es
de hasta 30 m. Antes de proceder al montaje, preste atención a que la transmisión por radio no se vea
inuida, entre otros, por interferencias u obstáculos tales como edicios, árboles, vehículos o líneas
de alta tensión.
• Antes de proceder al montaje denitivo, asegúrese de que cuenta con recepción suciente entre los
lugares de instalación deseados.
• Al montar la estación de medición, procure situarla de manera que quede protegida de la radiación
directa del sol y de la lluvia.
• La altura estándar internacional para la medición de la temperatura del aire es de 1,25 m (4 pies)
sobre el suelo.
Aviso
• Adquiera material de montaje especial o adecuado en un comercio especializado para el montaje en
la pared prevista.
• Compruebe que no haya piezas deterioradas o defectuosas.
• No ejerza nunca fuerza durante el montaje. El producto podría verse dañado.
• Antes de empezar con el montaje, compruebe que la pared puede soportar el peso que se va a montar
y asegúrese de que por el punto de montaje de la pared no pasan cables eléctricos ni tuberías de
agua, gas o de otro tipo.
49

5.1 Estación base
• Coloque la estación base sobre una supercie plana utilizando el pie (35).
• O bien fíjela a una pared utilizando la abertura (33) situada en la parte posterior.
5.2 Estación de medición
• Igualmente, puede colocar la estación de medición sobre una supercie plana en el exterior utilizando el pie.
• Se recomienda jar la estación de medición de forma segura y able a una pared exterior.
• Fije el taco, el tornillo, el clavo, etc., en la pared prevista.
• Cuelgue la estación base/de medición utilizando la abertura prevista para ello (33/39).
6. Funcionamiento de la estación base
Nota – Entrada
Mantenga pulsada las teclas MIN/MAX (30) o + (31) para seleccionar los valores más rápidamente.
Si pulsa la tecla SNOOZE / LIGHT (32), la pantalla se ilumina durante aprox. 10 segundos.
6.1. Ajuste inicial automático
• Una vez encendida por primera vez la unidad base, se visualizan brevemente todos los segmentos LCD
disponibles en la pantalla.
• A continuación, la estación base procede a realizar un ajuste inicial automático. Durante el ajuste se
produce la sincronización con la estación de medición, la estabilización de los valores de medición de la
presión y el ajuste conforme a los valores de fábrica.
Nota – Ajuste inicial automático
• El ajuste inicial dura aprox. 3 minutos.
• No pulse ninguna tecla mientras dure el ajuste. De lo contrario, pueden producirse fallos o
imprecisiones en los valores y su transmisión.
• El proceso naliza en cuanto se visualizan los valores de medición registrados para interior (12, 14) y
exterior (18, 20).
• Encendida la estación base por primera vez y tras una transmisión correcta entre la estación base y la
estación de medición, el reloj inicia automáticamente la búsqueda de una señal DCF. El símbolo de
radiofrecuencia (27) parpadea durante el proceso de búsqueda.
50

Visualización Búsqueda de señal DCF
parpadea
Activa
permanente
Ninguna visualización Fallo en la búsqueda, no se recibe señal
Nota – Ajuste de hora
• Si durante el ajuste inicial no se recibe señal DCF durante un minuto, la búsqueda naliza, repitiéndose
automáticamente cada dos horas. El símbolo de radiofrecuencia se apaga.
• Mientras tanto, puede realizar un ajuste manual de la hora y la fecha.
• En cualquier caso, el reloj sigue buscando la señal DCF diariamente. En caso de recibirse la señal
correctamente, la hora y la fecha ajustadas se sobrescriben.
Nota – Horario de verano
La hora se ajusta automáticamente al horario de verano. Durante el horario de verano, en la pantalla se
visualiza .
La búsqueda ha nalizado con éxito, se recibe la señal
6.2. Ajustes básicos y ajustes manuales
• Pulse y mantenga pulsada la tecla SET (28) durante aprox. 3 segundos para realizar los siguientes ajustes,
consecutivamente:
• Zona horaria (24)
• Formato de 12/24 horas (24)
• Horas(24)
• Minutos (24)
• Año (21)
• Mes (21)
• Día (21)
51

• Unidad para la temperatura (°C / °F) (13+17)
• Valor de la temperatura ambiente (12)
• Valor de la humedad ambiente (14)
• Valor de la temperatura exterior (18)
• Valor de la humedad exterior (20)
• Unidad para la presión atmosférica (hPa / inHg) (5+9)
• Valor de referencia para la presión atmosférica relativa (5)
• Valor umbral para la presión atmosférica (5)
• Valor umbral para tormenta (5)
• Para seleccionar cada valor, pulse las teclas MIN/MAX (30) o + (31) y conrme la selección
correspondiente pulsando la tecla SET (28).
• Pulse directamente la tecla SET (28) para aceptar y saltar el valor de ajuste visualizado.
• Si no se introduce ningún dato en 20 segundos, se sale automáticamente del modo de ajuste.
Alternativamente, pulse la tecla SNOOZE / LIGHT (32) para salir del modo de ajuste antes de seleccionar
los valores.
Nota – Zona horaria
• La señal DCF puede recibirse a gran distancia, correspondiéndose siempre con la HCE vigente en
Alemania. Por ello, tenga en cuenta la posible diferencia horaria en países situados en otra zona
horaria.
• Si se encuentra en Moscú, la diferencia es de 3 horas de adelanto con respecto a Alemania. Así, ajuste
la zona horaria +3. Se sumarán automáticamente 3 horas a la hora recibida o ajustada manualmente
tras la recepción de la señal DCF.
Nota – Te mperatura y humedad del aire óptimas
• La precisión de la medición de la temperatura y la humedad del aire ha sido adecuada para un uso
doméstico privado, no comercial.
• En algunos casos concretos pueden producirse pequeñas variaciones en los valores de medición
visualizados con respecto a valores comparados, p. ej. los mostrados por un medidor calibrado. En tal
caso, puede ajustar y recalibrar los valores de temperatura y/o humedad ambiente/exterior mediante
los ajustes básicos y ajustes manuales.
• Se recomienda no calibrar los valores de medición manualmente y saltarlos en los ajustes manuales
pulsando la tecla SET (28).
52

Nota – Presión atmosférica
• La presión atmosférica absoluta (abs) es un valor medido en el lugar de colocación que no se puede
modicar.
• La presión atmosférica relativa (rel) es la presión atmosférica absoluta medida en el lugar de
colocación calculada sobre el nivel del mar (cota cero).
• Por defecto, el valor de referencia de la presión atmosférica relativa ajustado es de 1013,2 hPa. Para
una medición exacta, adapte el valor de referencia a su ubicación concreta. Puede ajustar el valor de
referencia manualmente, debiendo encontrarse dentro del rango de 919,0 hPa y 1080,0 hPa.
• Puede consultar información relativa a la presión atmosférica relativa actual en su ubicación en
Internet, su instituto de meteorología local, en la radio, etc.
Nota – Valor umbral para la presión atmosférica
• El pronóstico del tiempo se basa en variaciones de la presión atmosférica con un valor umbral
ajustable individualmente entre 2 hPa y 4 hPa. El valor umbral por defecto es de 3 hPA.
• Si se produce una caída o un ascenso de la presión atmosférica que alcanza como mínimo el valor
umbral ajustado, la variación se registra como cambio meteorológico.
• Para ubicaciones con variaciones frecuentes de la presión atmosférica, en contraposición a otras
ubicaciones con presión atmosférica relativamente constante, se recomienda seleccionar un valor
mayor para el valor umbral para la presión atmosférica.
Nota – Valor umbral para tormenta
• Igualmente, la predicción de tormentas se basa en variaciones de la presión atmosférica con un valor
umbral ajustable individualmente entre 3 hPa y 9 hPa. El valor umbral por defecto es de 6 hPA.
• Si se produce una caída de la presión atmosférica dentro de un período de tres horas que alcanza
como mínimo el valor umbral ajustado, se activa el aviso por tormenta.
• La visualización del aviso por tormenta supone el parpadeo del símbolo de lluvia y las echas de
tendencia durante tres horas.
6.3. Pronóstico del tiempo
• La estación base da información sobre el pronóstico del tiempo para las siguientes 12 a 24 horas
basándose en las variaciones registradas en la presión atmosférica y los datos almacenados
53
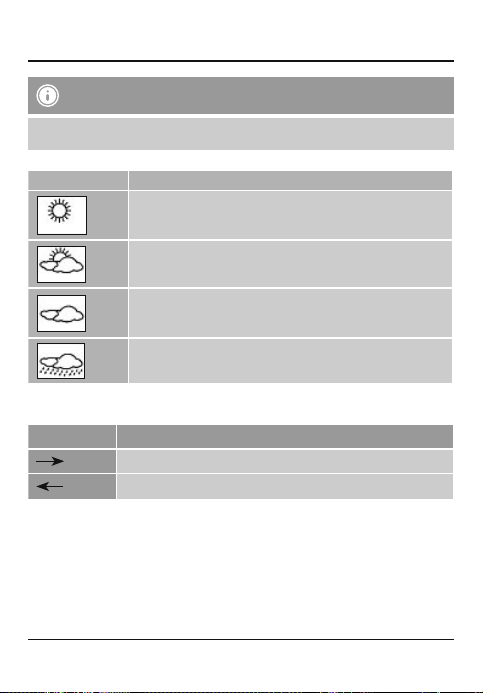
Nota – Símbolos para el pronóstico del tiempo
El pronóstico del tiempo no es posible en las primeras horas de funcionamiento al no contar la estación
con los datos necesarios, que se registran a lo largo del funcionamiento.
El pronóstico del tiempo y el tiempo actual se indican mediante cuatro símbolos diferentes (1):
Símbolo (1) Tiempo
Sol
Nubosidad ligera
Nubosidad
Lluvia
• A partir de los datos barométricos medidos se calcula la tendencia de la presión atmosférica para las
siguientes horas, indicándose entre los símbolos para el pronóstico del tiempo.
Visualización (3) Tendencia de la presión atmosférica / previsión del tiempo
Ascendente / mejoría
Descendente / empeoramiento
• Los símbolos del tiempo varían en función de la presión atmosférica relativa medida a cada momento y de
las variaciones de la presión atmosférica registradas en las últimas seis horas.
Cuando cambia el tiempo, las echas de la tendencia de la presión atmosférica (3) parpadean durante tres
horas para visualizarlo. Si, nalmente, se estabilizan las condiciones meteorológicas y no se registra ningún
otro cambio meteorológico, las echas (3) dejan de parpadear.
Ejemplos:
54

Visualización Signicado
Pronóstico del tiempo: Lluvia
Tendencia de presión atmosférica: Descendente / empeoramiento
Tiempo actual: Nubosidad
Tiempo actual: Nubosidad ligera
Tendencia de presión atmosférica: Ascendente / mejoría
Pronóstico del tiempo: Sol
• El diagrama de barras (8) muestra la evolución de la presión atmosférica relativa a lo largo de las últimas
24 horas.
6.4. Modo de visualización de la temperatura / presión atmosférica
• Pulse repetidamente la tecla SET (28) para alternar entre las siguientes visualizaciones:
• Temperatura exterior (18: TEMP)/ Punto de rocío (18: DEWPOINT)
• Presiónatmosférica absoluta (7: abs)/ Presión atmosférica relativa (7: rel)
• La visualización correspondiente comienza a parpadear.
• Durantela visualización, pulse las teclas MIN/MAX (30) o + (31) para alternar entre la visualización de la
temperatura exterior y el punto de rocío o la presión atmosférica absoluta y relativa.
• Conrme la visualización seleccionada pulsando la tecla SET (28).
Nota – Punto de rocío
El punto de rocío indica el valor que debería alcanzar la temperatura exterior con la humedad actual para
alcanzarse una humedad relativa del 100 %.
6.5 Modo de alarma
• Pulse repetidamente la tecla ALM (29) para acceder al modo de alarma HI AL (4/11/16/21) o LO AL
(4/11/16/21).
• En el modo de alarma HI AL (4/11/16/21), pulse repetidamente la tecla SET (28) para alternar entre las
siguientes funciones de alarma:
• Alarma de despertador (hora/ minuto) (24)
• Alarma por humedad ambiente elevada (14)
• Alarma por temperatura ambiente elevada (12)
• Alarma por humedad exterior elevada (20)
• Alarma por temperatura exterior elevada (18)
• Alarma por humedad absoluta elevada (5)
La visualización correspondiente comienza a parpadear.
55

• En el modo de alarma LO AL (4/11/16/21), pulse repetidamente la tecla SET (28) para alternar entre las
siguientes funciones de alarma:
• Alarma de despertador (hora/ minuto) (24)
• Alarma por humedad ambiente baja (14)
• Alarma por temperatura ambiente baja (12)
• Alarma por humedad exterior baja (20)
• Alarma por temperatura exterior baja (18)
• Alarma por humedad absoluta baja (5)
La visualización correspondiente comienza a parpadear.
• Desde la visualización correspondiente, pulse las teclas MIN/MAX (30) o + (31) para modicar el valor de
alarma y conrme la selección pulsando la tecla SET (28).
• Desde la visualización correspondiente, pulse la tecla ALM (29) para activar o desactivar la función de
alarma correspondiente. Cuando la función de alarma está activada se visualiza el símbolo correspondiente
(6/10/15/26), HI AL (4/11/16) y/o LO AL (4/11/16).
• Si no se introduce ningún dato en 20 segundos, se sale automáticamente del modo de ajuste.
Alternativamente, pulse la tecla SNOOZE / LIGHT (32) para salir del modo de ajuste antes de seleccionar
los valores.
Nota
Si las alarmas ya están activadas se muestran los valores ajustados en cada caso, de lo contrario se
visualiza — o —.
• Si las condiciones meteorológicas o la hora alcanzan los valores ajustados para una función de alarma
activada, se dispara la alarma correspondiente. Suena una señal de alarma y los símbolos correspondientes
(6/10/15/26), HI AL (4/11/16) y/o LO AL (4/11/16) y el valor de la alarma parpadean durante 2 minutos.
• Pulse cualquier tecla para cancelar la alarma.
Nota – Alarma vinculada al tiempo meteorológico
• Si una misma función de alarma se dispara repetidamente en un plazo de 10 minutos, no vuelve a
sonar la señal de alarma. El símbolo y el valor de la alarma parpadean hasta que las condiciones
meteorológicas se estabilicen.
• Si las condiciones meteorológicas sobrepasan o dejan de alcanzar el valor ajustado para la función de
alarma, la función de alarma se reactiva automáticamente.
• Si se dispara la alarma por temperatura exterior alta/baja por el punto de rocío, adicionalmente
comienza a parpadear DEW POINT.
56

Nota – Función de repetición de alarma
Pulse la tecla SNOOZE/LIGHT (32) mientras suena la señal de alarma para activar la función de repetición
de alarma. La señal de alarma se interrumpe durante 5 minutos, disparándose a continuación de forma
automática. El símbolo de la alarma correspondiente comienza a parpadear.
6.6. Valores máximos y mínimos de la temperatura y la humedad
• La estación base almacena automáticamente los valores máximos y mínimos de la temperatura y la
humedad, tanto interiores como exteriores.
• Pulse repetidamente la tecla MIN/MAX (30) para alternar entre la visualización de la temperatura y la
humedad actuales, la temperatura y la humedad mínimas (2: MIN) y la temperatura y la humedad máximas
(2: MAX).
• Durantela visualización de los valores máximos (2: MAX), pulse repetidamente la tecla + (31) para mostrar
los siguientes valores con fecha (21) y hora (24):
• Humedad ambiente máxima (14)
• Temperatura ambiente máxima (12)
• Humedad exterior máxima (20)
• Temperatura exterior máxima (18)
• Presiónabsoluta/relativa máxima (5)
• Durantela visualización de los valores mínimos (2: MIN), pulse repetidamente la tecla + (31) para mostrar
los siguientes valores con fecha (21) y hora (24):
• Humedad ambiente mínima (14)
• Temperatura ambiente mínima (12)
• Humedad exterior mínima (20)
• Temperatura exterior mínima (18)
• Presiónabsoluta/relativa mínima (5)
• Durantela visualización de cada valor máximo y mínimo, mantenga pulsada la tecla SET (28) durante
aprox. 3 segundos para borrar de su registro los valores correspondientes con fecha (21) y hora (24).
• Pulse la tecla SNOOZE / LIGHT (32) o espere aprox. 20 segundos para volver a la visualización de los
valores de medición actuales.
Nota – Cambio de pilas
Tenga en cuenta que es necesario resincronizar las estaciones tras realizar un cambio de pilas en la
estación de medición o base.
Para ello, retire las pilas de la otra estación y vuelva a colocarlas o, de ser necesario, proceda a sustituirlas.
57

Nota – transmisión incorrecta de los valores de medición
• En algunos casos concretos, puede ocurrir que la transmisión de los valores de medición entre la
estación base y la estación de medición falle debido a interferencias, p. ej. las de una red WLAN, un
ordenador, un televisor, etc.,
• En tales casos, resincronice las estaciones retirando brevemente las pilas de ambas estaciones y
volviendo a colocarlas.
• Si a continuación todavía no se transmitieran los valores de medición, reemplace las pilas por unas
pilas nuevas.
• Puede ser necesario escoger un lugar de colocación nuevo para la estación base, evitando posibles
interferencias.
7. Mantenimiento y cuidado
Limpie este producto sólo con un paño ligeramente humedecido que no deje pelusas y no utilice detergentes
agresivos. Asegúrese de que no entre agua en el producto.
8. Exclusión de responsabilidad
Hama GmbH & Co KG no se responsabiliza ni concede garantía por los daños que surjan por una instalación,
montaje o manejo incorrectos del producto o por la no observación de las instrucciones de manejo y/o de las
instrucciones de seguridad.
9. Servicio y soporte
Si tiene que hacer alguna consulta sobre el producto, diríjase al asesoramiento de productos Hama.
Línea directa: +49 9091 502-115 (Alemán/Inglés)
Encontrar más información de soporte aquí:
www.hama.com
58

10. Datos técnicos
Estación base
Alimentación de corriente
Rango de medición
de la temperatura
y la humedad
Intervalos de medición
de la temperatura
y la humedad
Ciclo de medición de la
temperatura/humedad del aire
Rango de medición del
barómetro
Intervalos de medición
Reloj de radiofrecuencia DCF
Higrómetro
Termómetro
Barómetro
Función de despertador
Frecuencia 433 MHz
Alcance ≤ 100 m
4,5 V
3 pilas AA
0°C – +50°C/ 32°F – 122°F
20% – 95%
0,1°C / 0,2°F
1 %
30 s57 s
919 – 1080 mbar/hPa
(27,14 – 31,89 inHg)
0,1 hPa
Si
Si Si
Si Si
Si
Si
Estación de medición
3,0 V
2 pilas AAA
-20°C – +60°C/ -4°F – 140°F
20% – 95%
0,1°C / 0,2°F
1 %
—
No
No
No
59

11. Instrucciones para desecho y reciclaje
Nota sobre la protección medioambiental:
Después de la puesta en marcha de la directiva Europea 2012/19/EU y 2006/66/EU en el sistema
legislativo nacional, se aplicara lo siguiente: Los aparatos eléctricos y electrónicos, así como las
baterías, no se deben evacuar en la basura doméstica. El usuario está legalmente obligado a
llevar los aparatos eléctricos y electrónicos, así como pilas y pilas recargables, al nal de su vida
útil a los puntos de recogida comunales o a devolverlos al lugar donde los adquirió. Los detalles
quedaran denidos por la ley de cada país. El símbolo en el producto, en las instrucciones de uso o en el
embalaje hace referencia a ello. Gracias al reciclaje, al reciclaje del material o a otras formas de reciclaje de
aparatos/pilas usados, contribuye Usted de forma importante a la protección de nuestro medio ambiente.
12. Declaración de conformidad
Madiante la presente, Hama GmbH & Co. KG delcara que este aparato cumple con los requisitos
esenciales y cualesquiera otras disposiciones aplicables o exigibles de la directiva 2014/53/UE. La
declaración de conformidad conforme a la directiva correspondiente la encontrará en www.hama.com.
60

R Руководство по эксплуатации
Органы управления и индикации
A Основной блок
1. Значок прогноза погоды
2. Минимальные и максимальные значения
3. Динамика изменения давления
4. Сигнализация пониженного (LO) и повышенного (HI) давления воздуха
5. Значение давления воздуха
6. Значок включения сигнализации пониженного (LO) и повышенного (HI) давления воздуха
7. Абсолютное/относительное давление воздуха
8. Динамика изменения давления воздуха за последние 24 часа
9. Единица измерения давления воздуха
10. Значок включения сигнализация низких (LO) и высоких (HI) значений температуры и влажности
воздуха в помещении
11. Сигнализация низких (LO) и высоких (HI) значений температуры и влажности воздуха помещения
12. температура в помещении
13. Единица измерения температуры в помещении
14. Относительная влажность воздуха помещения
15. Значок включения сигнализация низких (LO) и высоких (HI) значений температуры и влажности
воздуха вне помещения.
16. Сигнализация низких (LO) и высоких (HI) значений температуры и влажности воздуха вне
помещения.
17. Единица измерения температуры вне помещения.
18. Те мпература вне помещения/точка росы
19. Сигнал внешнего датчика
20. Относительная влажность воздуха вне помещения
21. Дата
22. Индикация летнего времени
23. Часы с коррекцией по радиосигналу точного времени
24. Те кущее время
25. День недели
26. Значок включения будильника
27. Значок коррекции по радиосигналу точного времени
28. Кнопка SET = выбор режима индикации, подтверждение ввода значения параметра
29. Кнопка ALM = индикация, настройка, включение и выключение функций будильника
30. Кнопка MIN/MAX = просмотр сохраненных макс. и миним. значений; уменьшение текущего
значения во время настройки
31. Кнопка + = увеличение значения текущего значения во время настройки
32. Кнопка SNOOZE / LIGHT = функция автоповтора сигнала будильника; включение подсветки
(ок. 10 секунд; отмена нестроек
33. Отверстие для настенного монтажа
61

34. Отсек батарей
35. Подставка
В Блок внешнего датчика
36. Наружная температура
37. Влажность воздуха вне помещения
38. Отсек батарей
39. Отверстие для настенного монтажа
40. Кнопка ТХ = не применяется
41. Кнопка C/F
= выбор единицы измерения температуры (°C, °F)
Благодарим за покупку изделия фирмы Hama.
внимательно ознакомьтесь с настоящей инструкцией. Храните инструкцию в надежном месте для
справок в будущем. В случае передачи изделия другому лицу приложите и эту инструкцию.
1. Предупредительные пиктограммы и инструкции
Внимание
Данным значком отмечены инструкции, несоблюдение которых может привести к опасной
ситуации.
Примечание
Дополнительная или важная информация.
2. Комплект поставки
• Метеорологическийприбор EWS-800 (основной блок для контроля воздуха внутри помещения, блок
датчика внешних атмосферных условий)
• Настоящаяинструкция
3. Техника безопасности
• Изделие предназначено только для домашнего применения.
• Соблюдать технические характеристики.
• Беречь от влаги и брызг.
• Не эксплуатировать в непосредственной близости с нагревательными приборами и беречь от
прямых солнечных лучей
62

• Не применять в запретных зонах.
• Прибор разрешается подключать только к соответствующей розетке электросети. Розетка электросети
должна находиться рядом с устройством в легко доступном месте.
• Не ронять. Беречь от сильных ударов.
• Изделие не открывать. Запрещается эксплуатировать неисправное изделие.
• Запрещаетсясамостоятельно ремонтировать устройство. Ремонт разрешается производить только
квалифицированному персоналу.
• Упаковку не давать детям: опасность асфиксии.
• Утилизировать упаковку в соответствии с местными нормами.
• Запрещаетсявносить изменения в конструкцию. В противном случае гарантийные обязательства
аннулируются.
Батареи. Те хника безопасности
• Израсходованные батареи немедленно удалять из прибора и утилизировать.
• Разрешается применять аккумуляторы только указанного типа.
• Не применять различные типы или новые и старые батареи вместе.
• Соблюдать полярность батарей (+ и -). Несоблюдение полярности может стать причиной взрыва
батарей.
4. Ввод в эксплуатацию
4.1 Блок внешнего датчика
• На задней панели блока внешнего датчика открутите винты и откройте крышку отсека батарей (38).
• Вставьтедве батареи ААА, соблюдая полярность, и закройте крышку отсека батарей (38).
Инструкция
При вводе в эксплуатацию всегда сначала вставляйте батареи в блок наружного датчика, а затем
в основной блок.
4.2 Основной блок
• Откройте крышку отсека батарей (34) и вставьте три батареи АА, соблюдая полярность. Закройте
крышку отсека батарей.
63

5. Монтаж
Инструкция по монтажу
• Перед тем как монтировать блоки, рекомендуется сначала завершить настройки в местах
будущей установки (см. 6. Работа основного блока).
• Монтаж следует производить после того, как правильные настройки обеспечат надежную
радиосвязь между блоками.
Инструкция
• Максимально допустимое расстояние между блоками составляет 30 метров.
• Монтируя блоки, следует учесть, что различные препятствия (стены, деревья, автомобили,
высоковольтные линии и др.) создают помехи радиосвязи между блоками.
• Перед монтажом убедитесь, что в местах расположения блоков обеспечивается устойчивая
радиосвязь.
• Блок внешнего датчика должен размещаться в месте, защищенном от воздействия прямых
солнечных лучей и осадков.
• Международный стандарт высоты для измерения влажности воздуха составляет 1,25 метра (4
фута) над землей.
Внимание
• Αγορά ειδικών ή κατάλληλο υλικό εγκατάστασης από εξειδικευμένο αντιπρόσωπο για τοποθέτηση σε
τοίχο.
• Перед началом эксплуатации убедитесь в отсутствии дефектных или поврежденных деталей.
• При монтаже не применять чрезмерных усилий. В противном случае можно повредить
устройство.
• Убедитесь, что стена подходит для монтажа. В стене на месте монтажа не должно быть
электрической проводки, газопровода, водопровода и других трубопроводов.
64

5.1 Основной блок
• С помощью подставки (35) установите основной блок на ровную поверхность.
• Основной блок также можно повесить на стену за отверстие (33).
5.2 Блок внешнего датчика
• Блок внешнего датчика можно разместить на улице с помощью подставки.
• Однако рекомендуется монтировать внешний блок на стене.
• С помощью дюбеля закрепите шуруп на стене.
• Подвесьтеблок за соответствующее отверстие (33/39).
6. Работа основного блока
Ввод данных
Удерживая кнопку MIN/MAX (30) и кнопку + (31), можно увеличить скорость изменения значения
параметра.
Нажмите кнопку SNOOZE / LIGHT (32), чтобы включить подсветку дисплея прибл. на 10 секунд.
6.1. Автоматическая настройка при вводе в эксплуатацию
• Сразу после включения на короткое время загораются все ЖК-сегменты дисплея.
• После этого основной блок выполняет автоматическую настройку. В процессе настройки
осуществляется синхронизация с внешним блоком, стабилизация значения атмосферного давления,
а также синхронизация с заводскими параметрами.
Примечание к автоматической настройке при вводе в эксплуатацию
• Автоматическая настройка при вводе в эксплуатацию длится ок. 3 минут.
• В течение этого времени не нажимайте кнопки устройства! В противном случае может
возникнуть сбой точной настройки значений и передачи сигнала.
• Автоматическая настройка завершена, когда на дисплее начнут отображаться данные
измерения внутри помещения (12, 14) и вне помещения (18, 20).
• После первого включения основного блока и установки радиосвязи с блоком внешнего датчика
часы прибора автоматически начинают поиск радиосигнала точного времени (DCF). Во время этого
процесса на дисплее мигает значок радиосигнала точного времени (27).
65

Индикация Поиск сигнала DCF
Мигает значок
Активный
Горит непрерывно
Не горит Сигнал не принят
• Если в течение одной минуты радиосигнал точного времени обнаружить не удалось, поиск
сигнала прекращается. В этом случае режим коррекции часов будет повторятся каждые 2 часа.
Значок радиосигнала точного времени гаснет.
• При необходимости часы и календарь можно настроить вручную.
• Режим поиска радиосигнала DCF включается ежедневно автоматически. При успешном приеме
радиосигнала введенные вручную значения времени и календаря заменяются.
Переключение на летнее время происходит автоматически. Во время индикации летнего времени
на дисплее отображается .
Сигнал принят успешно
Примечание к настройке часов
Индикация летнего времени
6.2. Основные параметры и ручные настройки
• Нажмите и ок. 3 секунд удерживайте кнопку SET (28), чтобы настроить параметры в следующем
порядке:
• Часовой пояс (24)
• Форматиндикации времени (24)
• Час (24)
• Минуты (24)
• Год (21)
• Месяц (21)
66

• Число месяца (21)
• Единица измерения температуры (°C/°F) (13+17)
• Значение температуры в помещении (12)
• Значение влажности воздуха в помещении (14)
• Значение температуры вне помещения (18)
• Значение влажности воздуха вне помещения (20)
• Единица измерения давления воздуха (гПа / дюймов рт.ст) (5+9)
• Опорное значение относительного давления воздуха (5)
• Пороговоезначение давления воздуха (5)
• Пороговоезначение для определения шторма (5)
• Установите значение кнопкой MIN/MAX (30) или кнопкой + (31), затем подтвердите выбор кнопкой
SET (28).
• Чтобыприменить значение и перейти к следующему параметру, нажмите кнопку SET (28).
• Режим настройки выключается автоматически, если нажатий на кнопки не производилось в течение
20 секунд. Чтобы принудительно выйти из режима настройки, нажмите кнопку SNOOZE/LIGHT (32).
Часовые пояса
• Радиосигнал точного времени DCF соответствует среднеевропейскому времени. Если часы
эксплуатируются в другом часовом поясе, то их необходимо настроить соответствующим
образом.
• Например, разница во времени между Москвой и Берлином составляет 3 часа. В Москве,
таким образом, необходимо сделать поправку на +3 часа. В этом случае к показателю времени
(установленному автоматически по радиосигналу DCF или вручную) часы автоматически будут
прибавлять 3 часа.
Температура и влажность воздуха
• Точность измерений температуры и влажности воздуха соответствует только для домашнего
непрофессионального использования.
• В некоторых случаях прибор отображает значения, которые несколько отличаются от опорных
значений (на калиброванном измерительном устройстве и т.п.). В этом случае значения
температуры и влажности воздуха можно отрегулировать/калибровать в основных параметрах
и ручных настройках.
• Значения измерения не рекомендуется калибровать вручную. Во время настройки данный пункт
следует пропустить, нажав кнопку SET (28).
67

Давление воздуха
• Абсолютное давление воздуха (abs), измеренное в месте эксплуатации прибора, отрегулировать
нельзя.
• Относительное давление воздуха (rel) представляет собой абсолютное давление, приведенное к
высоте над уровнем моря (нормальному нулю).
• По умолчанию опорное значение относительного давления установлено на 1013,2 гПа. Для
наиболее точного значения необходимо применить опорное значение на месте эксплуатации
прибора. Опорное значение регулируется вручную в диапазоне от 919 до 1080 гПа.
• Информацию о текущем относительном давлении в месте эксплуатации можно получить через
интернет, местную метеослужбу, радиостанцию и т.п.
Пороговое значение давления воздуха
• Прогноз погоды основывается на динамике изменений атмосферного давления, пороговое
значения которого регулируется вручную в диапазоне от 2 до 4 гПа. Заводская настройка: 3 гПа.
• Если падение или повышение атмосферного давления превысит установленное пороговое
значение, прибор регистрирует изменение погодных условий.
• Для местоположений с частными изменениями давления рекомендуется устанавливать более
высокие пороговые значения, по сравнению с местоположениями, в которых атмосферное
давление относительно стабильное.
Пороговое значение для определения шторма
• Прогноз шторма также основывается на динамике изменений атмосферного давления,
пороговое значения которого регулируется вручную в диапазоне от 3 до 9 гПа. По умолчанию
установлено 6 гПа.
• Если в период трех часов регистрируется падение давления ниже порогового значения, на
дисплее появится значок штормового предупреждения.
• В этом случае значок дождя и стрелка динамики изменения мигает в течение трех часов.
68

6.3. прогноз погоды
• На основе изменений атмосферного давления и сохраненных данных прибор прогнозирует погоду
на период от 12 до 24 часов.
Прогноз погоды
В первые часы после ввода в эксплуатацию из-за отсутствия необходимых данных функция
прогноза погоды не работает.
Прогноз погоды отображается с помощью четырех значков (1):
Значок (1) Погода
ясно
переменная облачность
облачность
дождь
• Направленность изменения давления для ближайших часов отображается между значками прогноза
погоды.
Индикация (3) Динамика изменения давления/прогноз
Давление повышается/погода улучшается
Давление понижается/погода ухудшается
• Прибор отображает значок прогноза погоды в зависимости от текущего относительного давления
воздуха и показателей изменения давления за последние 6 часов. Если ожидается изменение
погоды, стрелка динамики изменения давления (3) мигает в течение трех часов. При стабилизации
условий погоды мигание стрелки (3) прекращается.
69

Примеры:
Индикация Описание
Прогноз погоды: дождь
Направление изменения давления: давление понижается/погода
ухудшается
Текущая погода: облачность
Текущая погода: переменная облачность
Направление изменения давления: давление повышается/погода
улучшается
На диаграмме (8) отображается динамика измерения относительного давления за последние 24 часа.
Прогноз погоды: ясно
6.4. Режим индикации температуры / давления
• КнопкойSET (28) переключается следующая индикация:
• Наружная температура (18: TEMP)/ точка росы (18: DEWPOINT)
• Абсолютноедавление (7: abs)/ относительное давление (7: rel)
Соответствующая индикация начинает мигать.
• Чтобыпереключить индикацию температуры вне помещения и точки росы или абсолютного
давления и относительного давления, нажмите кнопку MIN/MAX (30) или +-Taste (31).
• Подтвердитевыбор режима индикации кнопкой SET (28).
Точка росы
Температура точки росы показывает значение наружной температуры, когда при текущем давлении
относительная влажность достигнет 100%.
6.5 Сигнализация
• Несколько раз нажмите кнопку ALM (29), чтобы включить режим сигнализации HI AL (4/11/16/21)
или LO AL (4/11/16/21).
• В режиме сигнализации HI AL (4/11/16/21) несколько раз нажмите кнопку SET (28), чтобы
переключить функции режима:
• Будильник (час/минуты) (24)
• Сигнализация повышенной влажности воздуха в помещении (14)
• Сигнализация повышенной температуры воздуха в помещении (12)
• Сигнализация повышенной влажности воздуха вне помещения (20)
• Сигнализация повышенной температуры вне помещения (18)
• Сигнализация повышенного абсолютного давления (5)
Соответствующая индикация начинает мигать.
70

• В режиме сигнализации LO AL (4/11/16/21) несколько раз нажмите кнопку SET (28), чтобы
переключить функции режима:
• Будильник (час/минуты) (24)
• Сигнализация пониженной влажности воздуха в помещения (14)
• Сигнализация пониженной температуры в помещении (12)
• Сигнализация пониженной влажности воздуха вне помещения (20)
• Сигнализация пониженной температуры воздуха вне помещения (18)
• Сигнализация пониженного абсолютного давления (5)
Соответствующая индикация начинает мигать.
• С помощью кнопок MIN/MAX (30) и + (31) осуществляется настройка значений режима
сигнализации. Чтобы подтвердить настройку, нажмите кнопку SET (28).
• Чтобывключить/выключить соответствующую функцию режима сигнализации, нажмите кнопку
ALM (15). Если режим сигнализации включен, на дисплее отображается соответствующий значок
(6/10/15/26), HI AL (4/11/16) и/или LO AL (4/11/16).
• Режим настройки выключается автоматически, если нажатий на кнопки не производилось в течение
20 секунд. Чтобы принудительно выйти из режима настройки, нажмите кнопку SNOOZE/LIGHT (32).
Примечание
Если сигнализация включена, то на дисплее отображаются соответствующие значения. При
выключенной сигнализации на дисплее отображается — и —.
• Прибор подает звуковой сигнал при достижении соответствующего порогового значения
атмосферных условий или при наступлении времени срабатывания будильника.
• Кроме звукового сигнала в течение 2 минут мигают соответствующие значки (6/10/15/26), HI AL
(4/11/16) и/или LO AL (4/11/16), а также значения атмосферных условий.
• Чтобыотключить подачу сигнала предупреждения, нажмите любую кнопку.
Работа сигнализации пороговых состояний атмосферы
• Если в течение 10 минут срабатывает одна и та же функция режима сигнализации, звуковой
сигнал не подается. Соответствующий значок и пороговое значение мигает до тех пор, пока
атмосферные условия не стабилизируются.
• Если значение атмосферного параметра превысит пороговое, функция режима сигнализации
автоматически срабатывает снова.
• Если сигнализация срабатывает вследствие достижения температуры значения точки росы, на
дисплее дополнительно мигает значок DEW POINT.
71

Автоповтор сигнала
Во время подачи сигнала нажмите SNOOZE / LIGHT (32), чтобы включить автоповтор сигнала.
Подача сигнала прерывается на 5 минут, после чего сигнал подается снова. Если работает функция
автоповтора сигнала, на дисплее мигает соответствующий значок.
6.6. Максимальные и минимальные значения температуры и влажности воздуха
• Зафиксированныемаксимальные и минимальные значения наружной и комнатной температуры, а
также влажности воздуха автоматически сохраняются в памяти прибора.
• Нажимайте кнопку MIN/MAX (30), чтобы переключить индикацию текущей температуры и
влажности, минимальной температуры и влажности (2: MIN), а также максимальной температуры
и влажности (2: MAX).
• В режиме индикации максимальных значений (2: MAX) нажатие кнопок + (31) открывает
следующие значения (по датам (21) и времени (24) их регистрации):
• Максимальнаявлажность воздуха в помещении (14)
• Максимальнаятемпература в помещении (12)
• Максимальнаявлажность наружного воздуха (20)
• Максимальнаятемпература наружного воздуха (18)
• Максимальноеабсолютное/относительное атмосферное давление (5)
• В режиме индикации минимальных значений (2: MIN) нажатие кнопок + (31) открывает следующие
значения (по датам (21) и времени (24) их регистрации):
• Минимальная влажность воздуха в помещении (14)
• Минимальная температура в помещении (12)
• Минимальная влажность наружного воздуха (20)
• Минимальная температура наружного воздуха (18)
• Минимальное абсолютное/относительное атмосферное давление (5)
• Чтобыудалить максимальное/минимальное значение с его временной меткой, нажмите и ок. 3
секунд удерживайте кнопку SET (28).
• Нажмите кнопку SNOOZE / LIGHT (32) или подождите ок. 20 секунд, чтобы сбросить индикацию
текущих значений.
Замена батареи
После замены батарей основного блока и блока внешнего датчика необходимо заново выполнить
синхронизацию блоков.
Для этого необходимо удалить батареи в том числе из другого блока (даже если они не были
разряжены), а затем снова загрузить их в отсек батарей. При необходимости замените батареи.
72

Неправильная передача измеренных значений. Примечание
Иногда в случае помех (сеть WLAN, компьютеры, телевизоры и др.) обмен данными между
блоками может нарушаться.
Синхронизируйте блоки заново, выгрузив и снова загрузив батареи.
Если обмен данными не возобновиться, замените батареи новыми.
При необходимости установите основной блок в другое место, чтобы предотвратить сбои в
будущем.
7. Уход и техническое обслуживание
Чистку изделия производить только безворсовой слегка влажной салфеткой. Запрещается применять
агрессивные чистящие средства. Следите за тем, чтобы в устройство не попала вода.
8. Отказ от гарантийных обязательств
Компания Hama GmbH & Co. KG не несет ответственность за ущерб, возникший вследствие
неправильного монтажа, подключения и использования изделия не по назначению, а также вследствие
несоблюдения инструкции по эксплуатации и техники безопасности.
9. Отдел техобслуживания
По вопросам ремонта или замены неисправных изделий обращайтесь к продавцу или в сервисную
службу компании Hama.
Горячая линия отдела техобслуживания:
+49 9091 502-115 (немецкий, английский)
Подробнее смотрите здесь: www.hama.com
73

10. Технические характеристики
Основной блок
Питание
Диапазон измерения
Температура
Влажность воздуха
Шаг шкалы
Температура
Влажность воздуха
Цикл измерения температуры /
влажности
Диапазон измерения
барометра
Шаг шкалы
Часы с коррекцией по
радиосигналу точного времени
Гигрометр Да Да
Термометр Да Да
Барометр Да Нет
Функция будильника Да Нет
Частота 433 МГц
Дальность действия ≤ 100 м
4,5 В
3 батареи АА
0°C – +50°C/ 32°F – 122°F
20% – 95%
0,1°C / 0,2°F
1 %
30 сек. 57 сек.
919 – 1080 мбар/гПа (27,14 –
31,89 дюймов рт.ст.)
0,1 гПа
Да
74
Блок внешнего датчика
3,0 В
2 батареи ААА
-20°C – +60°C/ -4°F – 140°F
20% – 95%
0,1°C / 0,2°F
1 %
—
Нет

11. Инструкции по утилизации
Охрана окружающей среды:
С момента перехода национального законодательства на европейские нормативы 2012/19/
EU и 2006/66/EU действительно следующее: Электрические и электронные приборы, а
также батареи запрещается утилизировать с обычным мусором. Потребитель, согласно
закону, обязан утилизировать электрические и электронные приборы, а также батареи и
аккумуляторы после их использования в специально предназначенных для этого пунктах
сбора, либо в пунктах продажи. Детальнаярегламентация этих требований осуществляется
соответствующим местным законодательством. Необходимость соблюдения данных предписаний
обозначается особым значком на изделии, инструкции по эксплуатации или упаковке. При переработке,
повторном использовании материалов или при другой форме утилизации бывших в употреблении
приборов Вы помогаете охране окружающей среды. В соответствии с предписаниями по обращению с
батареями, в Ге рмании вышеназванные нормативы действуют для утилизации батарей и
аккумуляторов.
12. Декларация производителя
Компания Hama GmbH & Co. KG настоящим подтверждает, что данное изделие полностью
соответствует основным и другим соответствующим нормативам Директивы 2014/53/ЕС.
Декларация о соответствии товара нормативам смотрите на вебсайте www.hama.com.
75

I Istruzioni per l‘uso
Elementi di comando e indicazioni
Stazione base A
1. Simbolo delle previsioni del tempo
2. Dati minimi/massimi
3. Tendenza pressione atmosferica
4. Allarme pressione atmosferica più bassa (LO ) / più alta (HI)
5. Valore pressione atmosferica
6. Allarme attivo pressione atmosferica più bassa (LO) / più alta (HI)
7. Pressione atmosferica assoluta / relativa
8. Andamento della pressione atmosferica 24 ore
9. Unità pressione atmosferica
10. Allarme attivo temperatura ambiente / umidità ambiente bassa (LO )/ alta (HI)
11. Allarme temperatura ambiente / umidità ambiente bassa (LO)/ alta (HI)
12. Te mperatura ambiente
13. Unità temperatura ambiente
14. Umidità aria ambiente relativa
15. Allarme attivo temperatura esterna / umidità aria esterna bassa (LO) / alta (HI)
16. Allarme temperatura esterna e umidità aria esterna bassa (LO ) / alta (HI)
17. Unità temperatura esterna
18. Te mperatura esterna / temperatura punto di rugiada
19. Segnale trasmettitore esterno
20. Umidità aria esterna relativa
21. Data
22. Ora legale
23. Segnale orario via DCF
24. Ora
25. Giorno della settimana
26. Allarme attivo ora sveglia
27. Simbolo radio
28. Ta sto SET = cambio modalità di visualizzazione / conferma del valore d‘impostazione
29. Ta sto ALM = visualizzazione / impostazione / disattivazione / attivazione funzioni di allarme
30. Ta sto MIN/MAX = richiesta dei valori massimi e minimi memorizzati / riduzione del valore impostato
attuale
31. Ta sto + = aumento dell‘attuale valore d‘impostazione
32. Ta sto SNOOZE / LIGHT = interruzione del segnale di sveglia / attivazione della retroilluminazione
(ca. 10 secondi) / interruzione impostazioni
33. Foro per montaggio a parete
34. Vano batterie
35. Piedino di sostegno
76

B Stazione di misura
36. Te mperatura esterna
37. Umidità aria esterna
38. Vano batterie
39. Foro per montaggio a parete
40. Ta sto TX = non ha funzioni utilizzabili dall’utente
41. Ta sto C/F
= commutazione tra gradi °C e °F
Grazie per avere acquistato un prodotto Hama!
Prima della messa in esercizio, leggete attentamente le seguenti istruzioni e avvertenze, quindi conservatele
in un luogo sicuro per una eventuale consultazione. In caso di cessione dell‘apparecchio, consegnate anche le
presenti istruzioni al nuovo proprietario.
1. Spiegazioni di simboli di attenzione e avvertenze
Attenzione
Viene utilizzato per contrassegnare le indicazioni di sicurezza oppure per rivolgere l‘attenzione verso
particolari rischi e pericoli.
Avvertenza
Viene utilizzato per contrassegnare informazioni supplementari o indicazioni importanti.
2. Contenuto della confezione
• stazione meteo EWS-800 (stazione base per interni / stazione di misurazione per esterni)
• queste istruzioni per l’uso
3. Avvertenze di sicurezza
• Il prodotto è concepito per l’uso domestico privato, non commerciale.
• Non mettere in esercizio il prodotto al di fuori dei suoi limiti di rendimento indicati nei dati tecnici.
• Non usare il prodotto in ambienti umidi ed evitare il contatto con gli spruzzi.
• Evitaredi mettere in esercizio il prodotto in prossimità di riscaldamento, altre fonti di calore o la luce diretta
del sole.
• Non utilizzare il prodotto in zone in cui non sono ammesse le apparecchiature elettroniche.
• Collegareil prodotto solo a una presa appositamente omologata. La presa deve trovarsi nei pressi del
prodotto ed essere facilmente accessibile.
• Non fare cadere il prodotto e non sottoporlo a forti scossoni!
77

• Non aprire il prodotto e non utilizzarlo più se danneggiato
• Non tentare di aggiustare o riparare l’apparecchio da soli. Fare eseguire qualsiasi lavoro di riparazione al
personale specializzato competente.
• Tenere l’imballo fuori dalla portata dei bambini, pericolo di soffocamento!
• Smaltireimmediatamente il materiale d‘imballaggio attenendosi alle prescrizioni locali vigenti.
• Non apportare modiche all’apparecchio per evitare di perdere i diritti di garanzia.
Attenzione – Batterie
• Rimuovere e smaltire immediatamente le batterie scariche.
• Utilizzare unicamente accumulatori (o batterie) conformi al tipo indicato.
• Non utilizzare batterie di tipi o costruttori diversi, né mischiare batterie vecchie e nuove.
• Attenersi sempre alla corretta polarità (scritte + e -) delle batterie e inserirle
• di conseguenza. La mancata osservanza comporta la perdita di potenza o il rischio di esplosione delle
batterie.
4. Messa in esercizio
4.1 Stazione di misurazione
• Svitare la vite del vano batterie (38) sul retro della stazione di misura e aprirlo.
• Inseriredue batterie AAA con la polarità corretta, quindi chiudere il vano batterie (38) con la vite.
Nota
Per mettere in servizio l‘apparecchio, inserire sempre prima le batterie nella stazione di misura, quindi
nella stazione base.
4.2 Stazione base
• Aprireil vano batterie (34) e inserire tre batterie AA con la polarità corretta. Quindi chiudere il coperchio
del vano batterie.
78

5. Montaggio
Avvertenza – montaggio
• Si consiglia di collocare la stazione base e di misura nel luogo di montaggio desiderato senza montarla
e di effettuare tutte le impostazioni come descritto al capitolo 6. Messa in esercizio della stazione base.
• Montare la/le stazioni solo dopo avere effettuato l‘impostazione corretta e un collegamento radio
stabile.
Nota
• La portata della trasmissione radio tra la stazione base e di misurazione all‘aperto è di max. 30m.
• Prima del montaggio prestare attenzione che la trasmissione radio non venga impedita da segnali di
disturbo o ostacoli come edici, alberi, veicoli, linee di alta tensione ecc.
• Prima del montaggio denitivo, accertarsi che tra i luoghi di montaggio desiderati vi sia una ricezione
suciente.
• Durante il montaggio della stazione di misurazione, accertarsi che il luogo d‘installazione sia protetto
dalla luce diretta del sole e dalla pioggia.
• L‘altezza standard internazionale per la misurazione della temperatura dell‘aria è pari a 1,25 m (4 ft)
dal suolo.
Avvertenza
• Procurarsi il materiale di installazione idoneo per il montaggio alla parete prevista presso i rivenditori
specializzati.
• Vericare che non vengano montati pezzi difettosi o danneggiati.
• Non usare troppa forza, né violenza durante il montaggio per evitare di danneggiare il prodotto.
• Prima di procedere al montaggio, vericare che la parete sia idonea per il peso da montare e accertarsi
che nel punto della parete dove si desidera montare il supporto non vi siano cavi elettrici, né tubazioni
di acqua, gas o altro.
5.1 Stazione base
• Posizionare la stazione base con il piedino di sostegno (35) su una supercie piana.
• In alternativa la stazione base si può ssare alla parete mediante il foro (33) presente sul retro.
79

5.2 Stazione di misurazione
• Anche la stazione di misurazione si può posizionare con il piedino di sostegno su una supercie piana
all’esterno.
• Si consiglia di montare la stazione di misurazione in modo sicuro e stabile su una parete esterna.
• Fissaretasselli, viti, chiodi ecc. alla parete prevista.
• Agganciarela stazione base/di misurazione con il foro previsto (33/39).
6. Funzionamento stazione base
Avvertenza – immissione
Tenere premuto il tasto MIN/MAX (30) o il tasto — (31), per selezionare i valori più velocemente.
Se si preme il tasto SNOOZE / LIGHT (32), il display viene illuminato per ca. 10 secondi.
6.1. Prima configurazione automatica
• Dopo la prima accensione, tutti i segmenti LC D disponibili vengono visualizzati sul display.
• La stazione base effettua quindi una congurazione automatica durante la quale avvengono la
sincronizzazione con la stazione di misurazione, la stabilizzazione dei valori di misurazione della pressione e
la congurazione delle impostazioni di fabbrica.
Avvertenza – prima congurazione
• La prima congurazione dura ca. 3 minuti.
• Non premere alcun tasto in questo lasso di tempo per evitare errori e imprecisioni dei valori e della
loro trasmissione.
• La procedura è conclusa non appena vengono visualizzati i dati di misurazione per l‘interno (12, 14)
e l‘esterno (18, 20).
Dopo la prima accensione della stazione base e la trasmissione tra stazione base e di misurazione, l‘orologio
inizia automaticamente a cercare un segnale DCF. Durante il processo di ricerca, il simbolo della radio (27)
lampeggia.
80

Indicazione Ricercadel segnale DCF
Indicazione lampeggiante
Attiva
Indicazione ssa
Nessuna indicazione Ricerca non riuscita — il segnale non viene ricevuto
Avvertenza – impostazione dell‘ora
• Se entro un minuto durante la prima congurazione non viene ricevuto alcun segnale DCF, la ricerca
viene conclusa e viene ripetuta automaticamente ogni due ore. Il simbolo della radio si spegne.
• In questo lasso di tempo si può effettuare un‘impostazione manuale di ora e data.
• L‘orologio continua a ricercare automaticamente ogni giorno il segnale DCF. Se il tentativo di ricezione
ha successo, l‘ora e la data impostate manualmente vengono sovrascritte.
Avvertenza – ora legale
L‘ora si aggiorna automaticamente all‘ora legale. Se è attiva l‘ora legale, sul display viene visualizzato
Ricerca riuscita — il segnale viene ricevuto
6.2. Impostazioni di base e manuali
• Tenere premuto il tasto SET (28) per ca. 3 secondi per effettuare in sequenza le seguenti impostazioni.
• Fuso orario (24)
• Formato 12/24 ore(24)
• Ore(24)
• Minuti (24)
• Anno (21)
• Mese (21)
• Giorno (21)
• Unità di temperatura (°C / °F) (13+17)
81

• Valore temperatura ambiente (12)
• Valore umidità aria ambiente (14)
• Valore temperatura esterna (18)
• Valore umidità aria esterna (20)
• Unità pressione aria (hPa / inHg) (5+9)
• Valore riferimento pressione aria relativa(5)
• Valore soglia pressione aria (5)
• Valore soglia temporale (5)
• Per selezionare i singoli valori, premere il tasto MIN/MAX (30) o il tasto + (31) e confermare la selezione
con il tasto SET (28).
• Premeredirettamente il tasto SET (28) per salvare il valore visualizzato e procedere oltre.
• Se per 20 secondi non si effettua alcuna immissione, si esce automaticamente dalla modalità
d‘installazione. In alternativa premere il tasto SNOOZE / LIGHT (32) per uscire dalla modalità
d‘installazione prima di aver selezionato tutti i valori.
Avvertenza – fuso orario
• Il segnale DCF può essere ricevuto in tutto il mondo ma corrisponde sempre al CET vigente in
Germania. Nei paesi con altri fusi orari deve essere considerata la variazione dell‘ora.
• Se ci si trova a Mosca, dove l‘ora è spostata in avanti di 3 ore rispetto alla Germania, occorre
impostare per il fuso orario +3. Dopo la ricezione del segnale DCF o dell‘impostazione manuale,
l‘orologio si porta quindi sempre automaticamente 3 ore avanti.
Avvertenza — temperatura e umidità dell’aria
• La precisione di misurazione di temperatura e umidità dell‘aria sono adeguate a un uso domestico
privato, non commerciale.
• In singoli casi, i valori di misurazione visualizzati possono differire minimamente dai valori misurati ad
es. con uno strumento calibrato. È quindi possibile adeguare e ricalibrare i valori della temperatura
ambiente/esterna e/o dell‘umidità dell‘aria mediante la funzione Impostazioni di base e manuali.
• Si consiglia di non calibrare manualmente i valori di misurazione e di saltare questa operazione
premendo il tasto SET (28) durante le impostazioni manuali.
82

Avvertenza – pressione atmosferica
• La pressione atmosferica assoluta (abs) è un valore misurato sul luogo d‘installazione che non può
essere modicato.
• La pressione atmosferica relativa (rel) è la pressione atmosferica assoluta sul luogo d‘installazione,
convertita sul livello del mare (quota zero).
• Come standard, il valore di riferimento della pressione atmosferica relativa è impostato su 1013,2
hPa. Per una misurazione precisa, adeguare il valore di riferimento alla propria località. È possibile
impostare manualmente il valore di riferimento in un campo compreso tra 919,0 hPa e 1080,0 hPa.
Informazioni sull‘attuale pressione atmosferica relativa nella vostra località, possono essere reperite in
Internet, presso la stazione meteorologica locale, alla radio ecc.
Avvertenza – valore soglia pressione atmosferica
• La previsione meteorologica avviene sulla base dei cambiamenti della pressione atmosferica, i cui
valori soglia possono essere impostati individualmente tra 2 hPa e 4 hPa. Il valore soglia standard
impostato è di 3hPA.
• In caso di diminuzione o aumento della pressione almeno del valore soglia impostato, viene registrata
una variazione climatica.
• Per le località con frequenti variazioni della pressione atmosferica, si consiglia di impostare un valore
soglia più alto rispetto alle località con pressione dell‘aria sostanzialmente costante.
Avvertenza – valore soglia temporale
• Anche la previsione di temporale si basa sulle variazioni della pressione atmosferica i cui valori soglia
possono essere impostati individualmente tra 3 hPa e 9 hPa. Il valore soglia standard impostato è
pari a 6 hPa.
• Se per un periodo di tre ore si registra una caduta della pressione atmosferica di almeno il valore soglia
impostato, viene attivata l‘indicazione di avvertimento temporale.
• In questo caso il simbolo della pioggia e la freccia della tendenza lampeggiano per tre ore.
6.3. Previsioni del tempo
• Sulla base delle variazioni della pressione atmosferica e dei dati raccolti, la stazione base può effettuare le
previsioni del tempo per le 12-24 ore successive.
83

Avvertenza – previsioni del tempo
Nelle prime ore di esercizio non è possibile effettuare previsioni del tempo, a causa della mancanza di dati
che vengono memorizzati solo durante il funzionamento.
• Le previsioni del tempo e il tempo attuale vengono rappresentate mediante quattro simboli diversi (1):
Simbolo (1) Meteo
Sole
Poco nuvoloso
Nuvoloso
Pioggia
• Una tendenza della pressione atmosferica per le prossime ore sulla base dei valori barometrici misurati,
viene indicata tra i simboli delle previsioni del tempo.
Indicazione (3) Tendenza pressione atmosferica / previsioni meteo
In aumento / miglioramento del tempo
In diminuzione / peggioramento del tempo
• I simboli della previsione del tempo cambiano in funzione della pressione atmosferica relativa e della
modica della pressione atmosferica nell‘arco delle ultime sei ore. Quando il tempo cambia, le frecce della
tendenza della pressione atmosferica (3) lampeggiano tre ore per visualizzare la variazione del tempo. Alla
ne, quando le condizioni del tempo si sono stabilizzate e non si è registrata più nessuna variazione del
tempo, le frecce (3) smettono di lampeggiare.
Esempi:
84

Indicazione Signicato
Previsioni del tempo: pioggia
Tendenza pressione dell‘aria: in diminuzione / peggioramento del
tempo
Tempo attuale: nuvoloso
Tempo attuale: poco nuvoloso
Tendenza pressione atmosferica: in aumento / miglioramento del
tempo
Previsioni del tempo: sole
• Il diagramma a barre (8) indica l‘andamento della pressione atmosferica relativa delle ultime 24 ore.
6.4. Modalità d’indicazione temperatura / pressione atmosferica
• Premereripetutamente il tasto SET (28) per passare tra le seguenti indicazioni:
• temperaturaesterna (18: TEMP) / temperatura punto di rugiada (18: DEWPOINT)
• pressioneatmosferica assoluta (7: abs) / pressione atmosferica relativa (7: rel).
L‘indicazione corrispondente inizia a lampeggiare.
• Durantel‘indicazione premere il tasto MIN/MAX (30) oppure il tasto + (31) per passare tra l‘indicazione
della temperatura esterna e del punto di rugiada ovvero tra la pressione atmosferica assoluta e relativa.
• Confermarela selezione dell‘indicazione premendo il tasto SET (28).
Avvertenza – punto di rugiada
La temperatura del punto di rugiada indica il valore a cui la temperatura esterna con l‘attuale umidità
dell‘aria deve aumentare/diminuire per raggiungere l‘umidità dell’aria del 100%.
6.5 Modalità allarme
• Premereripetutamente il tasto ALM(29) per passare alla modalità allarme HI AL (4/11/16/21) oppure
LO AL (4/11/16/21).
• Nella modalità allarme HI AL (4/11/16/21) premere ripetutamente il tasto SET-(28) per passare tra le
seguenti funzioni di allarme:
• Sveglia (ora/minuti) (24)
• Allarme umidità aria elevata (14)
• Allarme temperatura ambiente elevata (12)
• Allarme umidità aria esterna elevata (20)
• Allarme temperatura esterna elevata (18)
• Allarme pressione atmosferica assoluta elevata (5)
L‘indicazione corrispondente inizia a lampeggiare.
85

• Nella modalità allarme LO AL (4/11/16/21) premere ripetutamente il tasto SET (28) per passare tra le
seguenti funzioni di allarme:
• Sveglia (ora/minuti) (24)
• Allarme umidità aria bassa (14)
• Allarme temperatura ambiente bassa (12)
• Allarme umidità aria esterna bassa (20)
• Allarme temperatura esterna bassa (18)
• Allarme pressione atmosferica assoluta bassa (5)
L‘indicazione corrispondente inizia a lampeggiare.
• Durantel‘indicazione corrispondente, premere il tasto MIN/MAX (30) oppure il tasto + (31) per modicare
il valore di allarme e confermare la selezione corrispondente premendo il tasto SET (28).
• Durantel‘indicazione corrispondente, premere il tasto ALM (29) per attivare o disattivare la funzione di
allarme corrispondente.
• Se la funzione di allarme è attiva, viene visualizzato il simbolo corrispondente (6/10/15/26), HI AL (4/11/16)
e/o LO AL (4/11/16). Se per 20 secondi non si effettua alcuna immissione, si esce automaticamente dalla
modalità d‘installazione. In alternativa premere il tasto SNOOZE / LIGHT (32) per uscire dalla modalità
d‘installazione prima di aver selezionato tutti i valori.
Nota
Se gli allarmi sono attivati, vengono visualizzati i valori impostati, se sono disattivati, viene visualizzato
— oppure — .
• Se le condizioni meteo o l‘ora raggiungono i valori impostati in una funzione di allarme, l‘allarme
corrispondente si attiva. Viene emesso un segnale di allarme e i simboli corrispondenti (6/10/15/26), HI AL
(4/11/16) e/o LO AL (4/11/16) nonché il valore allarme lampeggiano per 2 minuti.
• Premereun tasto qualsiasi per interrompere l‘allarme.
Avvertenza — allarme dovuto al tempo
• Se la stessa funzione di allarme viene nuovamente attivata entro 10 minuti, non viene più emesso
alcun segnale. Il simbolo e il valore allarme lampeggiano nché le condizioni del tempo non si sono
stabilizzate.
• Se le condizioni del tempo salgono o scendono al di sopra o al di sotto del valore impostato della
funzione di allarme, l‘allarme viene di nuovo attivato automaticamente.
• Se scatta l‘allarme per temperatura esterna alta / bassa attraverso la temperatura del punto di rugiada,
anche DEW POINT inizia a lampeggiare.
86

Avvertenza – funzione snooze
• Quando la sveglia suona, premere il tasto SNOOZE / LIGHT (32) per attivare la funzione snooze. La
sveglia viene disattivata per 5 minuti, quindi suona nuovamente. Il simbolo di allarme corrispondente
inizia a lampeggiare.
6.6. Valori massimi e minimi di temperatura e umidità dell’aria
• La stazione base memorizza automaticamente i valori massimi e minimi della temperatura e dell‘umidità
dell‘aria esterna.
• Premereripetutamente il tasto MIN/MAX (30), per passare tra l‘indicazione della temperatura e
dell‘umidità dell’aria attuali, minime (2: MIN) e massime (2: MAX).
• Durantel‘indicazione dei valori massimi (2: MAX) premere ripetutamente il tasto + (31) per visualizzare i
seguenti valori con data (21) e ora (24) di rilevamento:
• Umidità aria ambiente massima (14)
• Temperatura ambiente massima (12)
• Umidità aria esterna massima (20)
• Temperatura esterna massima (18)
• Pressioneatmosferica assoluta / relativa massima (5)
• Durantel‘indicazione dei valori minimi (2: MIN) premere ripetutamente il tasto + (31) per visualizzare i
valori seguenti con data (21) e ora (24) del loro rilevamento:
• Umidità aria ambiente minima (14)
• Temperatura ambiente minima (12)
• Umidità aria esterna minima (20)
• Temperatura esterna minima (18)
• Pressioneatmosferica assoluta / relativa minima (5)
• Durantela visualizzazione dei singoli valori minimi e massimi, tenere premuto il tasto SET (28) per ca. 3
secondi per cancellare i valori corrispondenti con data (21) e ora (24) di rilevamento.
• Premereil tasto SNOOZE / LIGHT (32) o attendere ca. 20 secondi per tornare alla visualizzazione dei valori
di misurazione attuali.
87

Avvertenza – sostituzione delle batterie
Accertarsi che dopo ogni sostituzione delle batterie sulla stazione di misurazione o sulla stazione base
avvenga una nuova sincronizzazione delle stazioni.
Estrarre anche le batterie dall‘altra stazione e inserirle nuovamente o, se necessario, sostituirle.
Nota — trasmissione errata dei valori di misurazione
In singoli casi non si esclude che per via di segnali di disturbo – riconducibili ad es. a una rete WLAN,
computer, televisione, ecc. – non abbia luogo la trasmissione dei valori di misurazione tra la stazione base
e quella di misurazione.
Procedere quindi a una nuova sincronizzazione delle stazioni, estraendo brevemente le batterie di
entrambe le stazioni e inserendole nuovamente. Se anche questa volta non vengono trasmessi di valori
di misurazione, sostituire le batterie con batterie nuove. Optare eventualmente per un nuovo luogo di
installazione della stazione di base per evitare in futuro possibili segnali di disturbo.
7. Manutenzione e cura
Pulire il prodotto unicamente con un panno che non lascia pelucchi e appena inumidito e non ricorrere a
detergenti aggressivi. Fare attenzione a non fare penetrare acqua nel prodotto.
8. Esclusione di garanzia
Hama GmbH & Co.KG non si assume alcuna responsabilità per i danni derivati dal montaggio o l‘utilizzo
scorretto del prodotto, nonché dalla mancata osservanza delle istruzioni per l‘uso e/o delle indicazioni di
sicurezza.
9. Assistenza e supporto
In caso di domande sul prodotto, rivolgersi alla Consulenza prodotto Hama.
Hotline: +49 9091 502-115 (ted./ing.)
Ulteriori informazioni sul supporto sono disponibili qui: www.hama.com
88

10. Dati tecnici
Stazione base
Alimentazione elettrica
Campo di misurazione
temperatura
umidità dell’aria
Passi di misura
temperatura
umidità dell’aria
Ciclo di misurazione temperatura
/ umidità dell‘aria
Campo di misurazione barometro
Passi di misura
Segnale orario via radio DCF
IgrometroSiSi
TermometroSiSi
BarometroSiNo
Funzione sveglia Si No
Frequenza 433 MHz
Portata ≤ 100 m
4,5 V
3 batterie AA
0°C – +50°C/ 32°F – 122°F
20% – 95%
0,1°C / 0,2°F
1 %
30 s57 s
919 – 1080 mbar/hPa
(27,14 – 31,89 inHg)
0,1 hPa
Si
Stazione di misurazione
3,0 V
2 batterie AAA
-20°C – +60°C/ -4°F – 140°F
20% – 95%
0,1°C / 0,2°F
1 %
—
No
89

11. Indicazioni di smaltimento
Informazioni per protezione ambientale:
Dopo l’implementazione della Direttiva Europea 2012/19/EU e 2006/66/EU nel sistema legale
nazionale, ci sono le seguenti applicazioni: Le apparecchiature elettriche ed elettroniche e le
batterie non devono essere smaltite con i riuti domestici. I consumatori sono obbligati dalla
legge a restituire I dispositivi elettrici ed elettronici e le batterie alla ne della loro vita utile ai
punti di raccolta pubblici preposti per questo scopo o nei punti vendita. Dettagli di quanto
riportato sono deniti dalle leggi nazionali di ogni stato. Questo simbolo sul prodotto, sul manuale d’istruzioni
o sull’imballo indicano che questo prodotto è soggetto a queste regole. Riciclando, ri-utilizzando i materiali o
utilizzando sotto altra forma i vecchi prodotti/le batterie, darete un importante contributo alla protezione
dell’ambiente.
12. Dichiarazione di conformità
Hama GmbH & Co. KG dichiara che questo apparecchio soddisfa i requisiti essenziali ed alle altre
disposizioni pertinenti stabilite della direttiva 2014/53/UE. La dichiarazione di conformità secondo
la direttiva corrispondente è riportata all´indirizzo www.hama.com.
90

N Gebruiksaanwijzing
Bedieningselementen en weergaven/indicaties
A Basisstation
1. Symbool voor weersvoorspelling
2. Minimaal-/maximaal gegevens
3. Luchtdruktrend
4. Alarm voor lage (LO)/ hoge (HI) luchtdruk
5. Luchtdrukwaarde
6. Actief alarm voor lage (LO)/ hoge (HI) luchtdruk
7. Absolute/ relatieve luchtdruk
8. Luchtdrukverloop van de laatste 24 uur
9. Luchtdrukeenheid
10. Actief alarm voor lage (LO)/hoge (HI) ruimtetemperatuur/ -luchtvochtigheid
11. Alarm voor lage (LO)/hoge (HI) ruimtetemperatuur/ -luchtvochtigheid
12. Ruimtetemperatuur
13. Ruimtetemperatuureenheid
14. Relatieve luchtvochtigheid van de ruimte
15. Actief alarm voor lage (LO)/hoge (HI) buitentemperatuur/ -luchtvochtigheid
16. Alarm voor lage (LO)/hoge (HI) buitentemperatuur/ -luchtvochtigheid
17. Buitentemperatuureenheid
18. Buitentemperatuur/ dauwpunttemperatuur
19. Signaal buitenzender
20. Relatieve luchtvochtigheid buiten
21. Datum
22. Zomertijd
23. DCF-gestuurde tijd
24. Tijd
25. Dag van de week
26. Actief alarm wektijd
27. Zendsymbool (DCF)
28. SET-toets = omschakelen weergavemodus/ bevestigen van de ingestelde waarde
29. ALM-toets = weergeven/ instellen/ deactiveren/ activeren van de alarmfuncties
30. MIN/MAX-toets = opvragen van de opgeslagen hoogste- / laagste waarden / verlagen van de huidige
ingestelde waarde
31. + -toets = verhogen van de huidige ingestelde waarde
32. SNOOZE / LIGHT-toets = onderbreken van het weksignaal / activeren achtergrondverlichting
(ca. 10 seconden)/ annuleren Instellingen
33. Uitsparing voor wandmontage
34. Batterijvak
35. Voet
91

B Meetstation
36. Buitentemperatuur
37. Luchtvochtigheid buiten
38. Batterijvak
39. Uitsparing voor wandmontage
40. TX toets = toets biedt geen door de gebruiker te gebruiken functie
41. C/F toets
= omschakelen tussen °C en °F
Hartelijk dank dat u voor een product van Hama heeft gekozen.
Neem de tijd om de volgende aanwijzingen en instructies volledig door te lezen. Berg deze gebruiksaanwijzing
vervolgens op een goede plek op zodat u hem als naslagwerk kunt gebruiken. Op zodat u hem als naslagwerk
kunt gebruiken. Mocht u het toestel verkopen, geeft u dan ook deze gebruiksaanwijzing aan de nieuwe
eigenaar.
1. Verklaring van waarschuwingssymbolen en instructies
Waarschuwing
Wordt gebruikt voor veiligheidsinstructies of om de aandacht te trekken op bijzondere gevaren en risico‘s.
Aanwijzing
Wordt gebruikt voor extra informatie of belangrijke informatie.
2. Inhoud van de verpakking
• weerstation EWS-800 (basisstation voor opstelling binnen / meetstation voor opstelling buiten)
• deze bedieningsinstructies
3. Veiligheidsinstructies
• Het product is bedoeld voor niet-commercieel privegebruik in huiselijke kring.
• Gebruik het product niet buiten de in de technische gegevens vermelde vermogensgrenzen.
• Gebruik het product niet in een vochtige omgeving en voorkom spat- en spuitwater.
• Gebruik het product niet in de onmiddellijke nabijheid van een verwarming of andere warmtebronnen en
stel het niet bloot aan directe zonnestralen.
• Gebruik het product niet binnen omgevingen, waarin elektronische apparatuur niet is toegestaan.
• Sluit het product alleen aan op een daarvoor geschikt en intact stopcontact. Het stopcontact moet in de
buurt van het product zijn aangebracht en goed bereikbaar zijn.
• Laat het product niet vallen en stel het niet bloot aan zware schokken of stoten.
92

• Open het product niet en gebruik het niet meer als het beschadigd is.
• Probeerniet het product zelf te onderhouden of te repareren. Laat onderhouds- en
reparatiewerkzaamheden door vakpersoneel uitvoeren.
• Het verpakkingsmateriaal mag absoluut niet in handen van kinderen komen; verstikkingsgevaar.
• Het verpakkingsmateriaal direct en overeenkomstig de lokaal geldende afvoervoorschriften afvoeren.
• Verander niets aan het toestel. Daardoor vervalt elke aanspraak op garantie.
Waarschuwing – batterijen
• Lege batterijen direct uit het product verwijderen en afvoeren.
• Gebruik uitsluitend accu’s (of batterijen), welke met het vermelde type overeenstemmen.
• Gebruik geen oude en nieuwe batterijen tegelijkertijd alsmede geen batterijen van een verschillende
soort of fabrikaat.
• Let absoluut op de correcte polariteit (opschrift + en -) van de batterijen en plaats deze
dienovereenkomstig in het batterijvakje. Indien de batterijen verkeerd worden geplaatst kunnen deze
gaan lekken of zelfs exploderen.
4. Inbedrijfstelling
4.1 Meetstation
• Draaide schroef van het batterijvak (38) op de achterzijde van het meetstation los en open het vak.
• Plaats twee AAA batterijen met de polen (+) en (-) in de juiste richting en sluit het batterijvak (38)
aansluitend weer met de schroef.
Aanwijzing
Let erop dat bij de inbedrijfstelling te allen tijde als eerste de batterijen in het meetstation en dan in het
basisstation worden geplaatst.
4.2 Basisstation
• Open het batterijvak (34) en plaats drie AA batterijen met de polen (+) en (-) in de juiste richting. Sluit
vervolgens weer het deksel van het batterijvak.
93

5. Montage
Aanwijzing – montage
• Het is aanbevelenswaardig het basis- en meetstation allereerst op de gewenste plaatsen van opstelling
zonder montage neer te zetten en alle instellingen — zoals in 6. Gebruik en werking basisstation is
beschreven — uit te voeren.
• Monteer pas na een correcte instelling en stabiele draadloze verbinding het/de station/s.
Aanwijzing
• Het bereik van de draadloze verbinding tussen het meet- en basisstation bedraagt in open veld max.
30 m. Let vóór de montage erop dat de draadloze verbinding niet door storende signalen of obstakels
zoals gebouwen, bomen, voertuigen, hoogspanningskabels o.a. negatief wordt beïnvloed.
• Vergewis u vóór de denitieve montage ervan dat er tussen de gewenste plaatsen van opstelling een
voldoende ontvangst c.q. stabiele draadloze verbinding bestaat.
• Let bij de montage van het meetstation erop dat dit tegen direct zonlicht en regen beschermd is
gepositioneerd.
• De internationale standaardhoogte voor het meten van de luchttemperatuur bedraagt 1,25 m (4 ft)
boven maaiveld.
Waarschuwing
• Schaf speciaal resp. geschikt montagemateriaal bij de vakspecialist aan voor de montage aan de
daartoe bestemde wand.
• Vergewis u ervan dat er geen defecte of beschadigde onderdelen worden gemonteerd.
• Tijdens de montage nimmer geweld of grote krachten aanwenden. Dit kan het product beschadigen.
• Controleer vóór de montage of de wand, waaraan het product wordt bevestigd, het aan te brengen
gewicht kan dragen en vergewis u ervan dat er zich bij de montageplaats in de wand geen elektrische
bedrading, water-, gas- of andere leidingen bevinden.
5.1 Basisstation
• Zet het basisstation met behulp van de voet (35) op een vlakke ondergrond neer.
• Alternatief kunt u het basisstation met behulp van de uitsparing (33) op de achterzijde aan een wand
monteren.
94

5.2 Meetstation
• Het meetstation kunt u tevens met behulp van de voet op een vlak oppervlak buiten opstellen.
• Het is aanbevelenswaardig het meetstation veilig en stevig aan een buitenwand te monteren.
• Bevestig plug, schroef, spijker, enz. in de daarvoor beoogde wand.
• Haak het basis-/ meetstation met de daarvoor bedoelde uitsparing (33/39) daaraan in.
6. Gebruik en werking basisstation
Aanwijzing – invoeren
Houd MIN/MAX-toets (30) of de +-toets (31) ingedrukt teneinde de waarden sneller te kunnen selecteren.
Indien u op de SNOOZE / LIGHT-toets (32) drukt, dan wordt de display gedurende ca. 10 seconden verlicht.
6.1. Automatische eerste configuratie
• Na de eerste maal inschakelen worden voor een moment alle beschikbare LC D-segmenten op de display
weergegeven.
• Aansluitend wordt door het basisstation een automatische eerste conguratie uitgevoerd. Daarbij vindt het
synchroniseren met het meetstation, het stabiliseren van de drukmeetwaarden benevens de conguratie
met fabrieksinstellingen plaats.
Aanwijzing – eerste conguratie
• De eerste conguratie duurt ca. 3 minuten.
• Gedurende deze tijd het bedienen van toetsen voorkomen! Anders kunnen fouten en
onnauwkeurigheden bij de waarden en de overdracht daarvan onstaan.
• Deze procedure is voltooid zodra de meetwaarden voor binnen (12, 14) en buiten (18, 20) worden
weergegeven.
• Na het eerste maal inschakelen van het basisstation en een succesvol tot stand gekomen verbinding tussen
basis- en meetstation begint de klok automatisch met het zoeken naar een DCF-signaal. Tijdens het zoeken
knippert het zendsymbool (27) voor de draadloze verbinding.
95

Indicatie Zoeken naar DCF-signaal
Knipperende indicatie
Actief
Continue indicatie
Geen indicatie Mislukt – signaal wordt niet ontvangen
Aanwijzing – instellen van de tijd
• Indien er binnen een minuut tijdens de eerste conguratie geen DCF-tijdsignaal wordt ontvangen,
dan wordt het zoeken naar een signaal afgebroken en automatisch elke twee uur herhaald. Het
zendsymbool voor de draadloze verbinding (DCF-signaal) gaat uit.
• U kunt ondertussen de tijd en datum handmatig instellen.
• De klok zoekt dagelijks automatisch verder naar het DCF-signaal. Bij een succesvolle signaalontvangst
worden de handmatig ingestelde tijd en datum overschreven.
Aanwijzing – zomertijd
Aanwijzing – zomertijd
De tijd wordt automatisch aangepast op de zomertijd. Zolang de zomertijd actief is, wordt op de display
weergegeven .
Succesvol – signaal wordt ontvangen
6.2. Basisinstellingen en handmatige instellingen
• Houd de SET— toets (28) gedurende ca. 3 seconden ingedrukt teneinde de volgende instellingen na elkaar
uit te voeren:
• Tijdzone (24)
• 12h-/24h-formaat (24)
• Uren(24)
• Minuten (24)
• Jaar (21)
96

• Maand (21)
• Dag (21)
• Temperatuureenheid (°C / °F) (13+17)
• Ruimtetemperatuurwaarde(12)
• Luchtvochtigheidswaarde binnen (14)
• Buitentemperatuurwaarde(18)
• Luchtvochtigheidswaarde buiten (20)
• Luchtdrukeenheid (hPa / inHg) (5+9)
• Relatieve luchtdruk-referentiewaarde (5)
• Grenswaardeluchtdruk (5)
• Grenswaardestorm (5)
• Druk voor het selecteren van de afzonderlijke waarden op de MIN/MAX-toets (30) of de +-toets (31) en
bevestig de desbetreffende selectie door op de SET-toets (28) te drukken.
• Druk direct op de SET-toets (28) teneinde de weergegeven ingestelde waarde over te nemen en verder te
gaan.
• Indien er gedurende 20 seconden niets wordt ingevoerd, dan wordt de modus voor de instellingen
automatisch verlaten. Alternatief drukt u op de SNOOZE / LIGHT-toets (32) teneinde de modus voor de
instellingen vóór de selectie van alle waarden te verlaten.
Aanwijzing – tijdzone
• Het DCF-signaal kan over een enorme oppervlakte worden ontvangen, komt echter te allen tijde
overeen met de MEZ welke in Duitsland geldt. Let er om die reden op dat u, in landen met een andere
tijdzone, met de tijdverschuiving rekening dient te houden.
• Bevindt u zich bijv. in Moskou, dan is het daar reeds 3 uur later dan in Duitsland. Dan dient u dus
in dit geval bij de tijdzone +3 in te stellen. De klok zal zich dan altijd, na de ontvangst van het DCFsignaal resp. in relatie tot de handmatig ingestelde tijd, automatisch 3 uur verder instellen.
Aanwijzing – temperatuur en luchtvochtigheid
• De nauwkeurigheid van het meten van de temperatuur en luchtvochtigheid is prima voor nietcommercieel privégebruik in huiselijke kring.
• In enkele gevallen kan het bij de weergegeven meetwaarden tot geringe afwijkingen met
vergelijkingswaarden – bijv. van een gekalibreerd meettoestel – komen. U heeft dan de mogelijkheid
de waarden voor ruimte-/ buitentemperatuur en/of -luchtvochtigheid via de basisinstellingen en
handmatige instellingen aan te passen en nieuw te kalibreren.
• Het is aanbevelenswaardig de meetwaarden niet handmatig te kalibreren en tijdens de handmatige
instellingen, door op de SET-toets (28) te drukken, over te slaan.
97

Aanwijzing – luchtdruk
• De absolute luchtdruk (abs) is een op de plaats van opstelling gemeten waarde welke niet kan worden
gewijzigd.
• De relatieve luchtdruk (rel) is de absolute luchtdruk op de plaats van opstelling maar dan omgerekend
op zeeniveau (nulniveau).
• De relatieve luchtdruk-referentiewaarde is standaard op 1013,2 hPa ingesteld. Voor een exacte meting
past u de referentiewaarde op uw verblijfplaats aan. U kunt de referentiewaarde handmatig in een
bereik tussen 919,0 hPa en 1080,0 hPa instellen.
• Informatie over de actuele relatieve luchtdruk op uw verblijfplaats is te vinden op het internet, bij de
lokale weerdienst, te horen via de radio, enz.
Aanwijzing – grenswaarde luchtdruk
• De weersvoorspelling is gebaseerd op atmosferische luchtdrukveranderingen waarvan u de
grenswaarden individueel tussen 2 hPa en 4 hPa kunt instellen. De grenswaarde is standaard op 3
hPa ingesteld.
• Indien de luchtdruk met minimaal de ingestelde grenswaarde daalt of stijgt, dan wordt dit als een
weersverandering geregistreerd.
• Voor omgevingen met frequente luchtdrukveranderingen is het aanbevelenswaardig een hogere
instelling van de luchtdrukgrenswaarde te kiezen dan voor omgevingen met een relatief constante
luchtdruk.
Aanwijzing – grenswaarde storm
• De stormvoorspelling is tevens gebaseerd op atmosferische luchtdrukveranderingen waarvan u de
grenswaarden individueel tussen 3 hPa en 9 hPa kunt instellen. De grenswaarde is standaard op 6
hPa ingesteld.
• Indien de luchtdruk over een periode van drie uur met minimaal de ingestelde grenswaarde daalt, dan
wordt de weergave voor de stormwaarschuwing geactiveerd.
• Bij een geactiveerde weergave voor de stormwaarschuwing knipperen het regensymbool en de
trendpijlen gedurende drie uur.
98
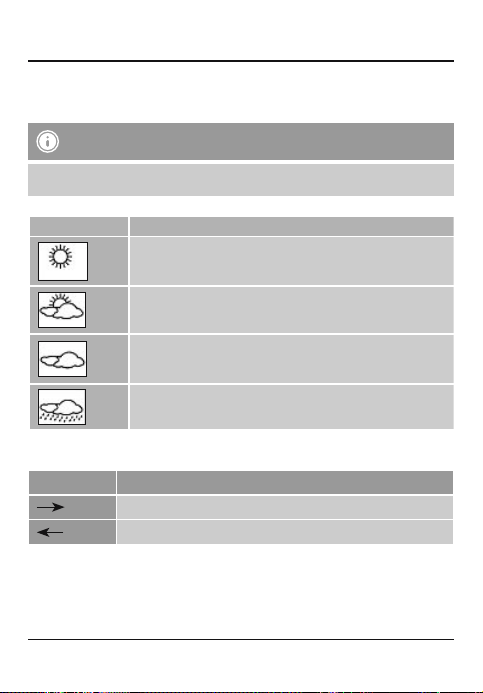
6.3. Weersvoorspelling
• Aan de hand van atmosferische luchtdrukveranderingen en de opgeslagen gegevens kan het basisstation
informatie over de weersverwachting voor de komende 12 tot 24 uur tonen.
Aanwijzing – weersvoorspelling
Tijdens de eerste uren dat het station in werking is, is een weersvoorspelling wegens ontbrekende
gegevens, welke pas na verloop van tijd worden opgeslagen, niet mogelijk.
De weersvoorspelling en het actuele weer worden door vier verschillende symbolen (1) afgebeeld:
Symbool (1) Weer
Zonnig
Licht bewolkt
Bewolkt
Regen
• Een trend over de luchtdruk voor de komende uren aan de hand van de gemeten barometerwaarden wordt
tussen de symbolen van de weersvoorspelling afgebeeld.
Weergave (3) Luchtdruktrend / Weersverwachting
Stijgend / Weersverbetering
Dalend / Weersverslechtering
• De weersymbolen veranderen aan de hand van de actuele relatieve luchtdruk en de luchtdrukveranderingen
gedurende de laatste zes uur. Indien het weer verandert, dan knipperen de pijlen van de luchtdruktrend
(3) drie uur lang en geven daarmee een weersverandering aan. Indien de weersomstandigheden daarna
zijn gestabiliseerd en er geen weersverandering meer wordt geregistreerd, dan stoppen de pijlen (3) met
knipperen.
99
Loading…
- June 6, 2024
- Hama
Table of Contents
- Explanation of Warning Symbols and Notes
- Package Contents
- Safety Notes
- Getting Started
- Measuring station
- Base station
- Installation
- Base station
- Measuring station
- Operating the Base Station
- Automatic initial setup
- Basic and manual settings
- Weather forecast
- Temperature /atmospheric pressure display mode
- Alarm mode
- Maximum and minimum temperature and humidity values
- Care and Maintenance
- Warranty Disclaimer
- Technical Data
- Declaration of Conformity
- Read User Manual Online (PDF format)
- Download This Manual (PDF format)
00186355
00076045
Weather Station EWS-800
Operating Instructions
Controls and Displays
1. Weather forecast symbol
2. Minimum/maximum data
3. Atmospheric pressure trend
4. Low (LO)/high (HI) atmospheric pressure alarm
5. Atmospheric pressurevalue
6. Low (LO)/high (HI) atmospheric pressure alarm, active
7. Relative/absolute atmospheric pressure
8. 24 hour (atmospheric pressure history)
9. Atmospheric pressure unit
10. Low (LO)/high (HI) room temperature/room humidity alarm, active
11. Low (LO)/high (HI) room temperature/room humidity alarm
12. Room temperature
13. Room temperature unit
14. Relative room humidity
15. Low (LO)/high (HI) outdoor temperature/outdoor humidity alarm, active
16. Outdoor temperature/outdoor humidity lower (LO)/higher (HI) alarm
17. Outdoor temperature unit
18. Outdoor temperature/dew point temperature
19. Outdoor transmitter signal
20. Relative outdoor humidity
21. Date
22. Summertime| 23. DCF-controlled time
24. Time
25. Weekday
26. Alarm time, active
27. Wireless symbol
28. SET button =switching display mode/confirmation of set value
29. ALM button =displaying/setting/deactivating/activating the alarm
functions
30. MIN/MAX button =accessing the saved maximum/minimum
values/reduction of the current set value
31. + button =increasing the current set value
32. SNOOZE /LIGHT button =stopping the alarm/activating the backlight
(approx. 10 seconds)/stopping Settings
33. Opening for wall mounting
34. Battery compartment
35. Base
B Measuring station
36. Outdoor temperature
37. Outdoor humidity
38. Battery compartment
39. Opening for wall mounting
40. TX button =not used
41. C/F button =switching between°C and°F
—|—
Thank you for choosing a Hama product.
Take your time and read the following instructions and information completely.
Please keep these instructions in a safe place for
futurereference. If you sell the device, please pass these operating
instructions on to the new owner.
Explanation of Warning Symbols and Notes
Warning
This symbol is used to indicate safety instructions or to draw your attention
to specifichazards and risks.
Note
This symbol is used to indicate additional information or important notes.
Package Contents
- Weather station EWS-800 (base station for indoors /outdoor measuring station)
- These operating instructions
Safety Notes
- The product is intended for private, non-commercial use only.
- Do not operate the product outside the power limits given in the specifications.
- Do not use the product in moist environments and avoid splashes.
- Do not use the product in the immediate vicinity of heaters or other heat sources or in direct sunlight.
- Do not use the product in areas where the use of electronic devices is not permitted.
- Only connect the product to a socket that has been approved for the device. The socket must be installed close to the product and easily accessible.
- Do not drop the product and do not expose it to any major shocks.
- Do not open the device or continue to operate it if it becomes damaged.
- Do not attempt to service or repair the product yourself.Leave any and all service work to qualified experts.
- Keep the packaging material out of the reach of children due to the risk of suffocation.
- Dispose of packaging material immediately according to locally applicable regulations.
- Do not modify the product in any way. Doing so voids the warranty.
- Use the product for its intended purpose only.
Warning –Batteries
- When inserting batteries, note the correct polarity (+ and markings) and insert the batteries accordingly. Failure to do so could result in the batteries leaking or exploding.
- Only use batteries (or rechargeable batteries) that match the specified type.
- Before you insert the batteries, clean the battery contacts and the polar contacts.
- Do not allow children to change batteries without supervision.
- Do not mix old and new batteries or batteries of different types or make.
- Remove the batteries from products that are not being used for an extended period (unless these are being kept ready for an emergency).
- Do not short-circuit batteries.
- Do not charge batteries.
- Do not throw batteries in a fire.
- Keep batteries out of the reach of children.
- Never open, damage or swallow batteries or allow them to enter the environment. They can contain toxic, environmentally harmful heavy metals.
- Immediately remove and dispose of dead batteries from the product.
- Avoid storing, charging or using the device in extreme temperatures and extremely low atmospheric pressure(for example, at high altitudes).
Getting Started
Measuring station
- Unscrew the screw on the battery compartment (38) on the back of the measuring station and open it.
- Insert two AAA batteries and close the battery compartment (38) and then secure the screw again.
Note
Before use, ensure you insert the batteries in the measuring station first and
then in the base station.
Base station
- Open the battery compartment (34) and insert three AA batteries with the correct polarity into the battery compartment. Close the battery compartment.
Installation
Note –Installation
- We recommend initially placing the base and measuring stations in the intended locations without installing them and making all the settings described in Operating the Base Station
- Only install the stations once the appropriate settings have been made and an astable wireless connection is established.
Note
- The wireless transmission range between the measuring and base stations is up to 100 min open spaces. Before installation, ensure that wireless transmission will not be disrupted by interference or obstacles like buildings, trees, vehicles, high-voltage lines, etc.
- Before the final installation, ensure that there is sufficient reception between the intended installation locations.
- When installing the measuring station, ensure that it is protected from direct sunlight and rain.
- The international standard height for measuring air temperatureis1.25 m(4ft) above ground.
Warning
- Buy special or suitable installation material from a specialized dealer for wall-mounting.
- Ensure that no faulty or damaged parts are installed.
- Never apply force during mounting. This could damage the product.
- Before mounting, ensure that the chosen wall is suitable for the weight to be mounted, and make sure that there are no electrical wires, water, gas or other lines at the installation site on the wall.
- Do not mount the product above locations where persons might linger.
Base station
- Use the base (35) to position the base station on a level surface.
- Alternatively, you can install the base station on a wall using the opening (33) on the back.
Measuring station
- You can also position the measuring station on a level outdoor surface using the base.
- We recommend installing the measuring station securely on an outdoor wall.
- Install an anchor, screw, nail, etc. in the wall of your choice.
- Hang up the base/measuring station using the opening (33/39) intended for this purpose.
Operating the Base Station
Note –Input
Hold down the MIN/MAX button (30) or the + button (31) to select the values
faster.
If you press the SNOOZE /LIGHT button (32), the display will light up for
approx. 10 seconds.
Automatic initial setup
All available LCDsegments on the display are displayed briefly after turning
the measuring station on for the first time.
- The base station then performs an automatic initial setup. During setup, the base station performs measuring station synchronization, the pressure measurement values are stabilized and factory settings are set.
Note –Initial setup
- Initial setup takes approx. 3minutes.
- Do not press any buttons during setup. Otherwise, values may not be transmitted correctly and there is a risk of value errors and inaccuracies.
- The setup process is completed when the indoor (12, 14) and outdoor (18, 20) measurement data is displayed
- After the first time, the base station is switched on and successful transmission is established between the base station and the measuring station, the clock will automatically search for the PCF signal. During the search, the wireless symbol (27) will flash.
| Display | Searching for the DCF signal |
|---|---|
| Flashing display | Active |
| Constant display | Successful –signal is being received |
| No display | Error –signal search ended |
Note –Time settings
- If during the first minute of the initial setup, no DCF signal can be found, the search is stopped and repeated every two hours. The wireless symbol will go out.
- You can, however,set the time and the date manually.
- The clock automatically continues to search for the DCF signal on a daily basis. If the signal is received successfully, the manually-set time and date are overwritten.
Note –Summertime
The clock automatically switches to summertime. DST appears on the display as
long as summertime is activated.
Basic and manual settings
- Press and hold the SET button (28) for approx. 3seconds to make the following settings one after the other:
- Time zone (24)
- 12/24 hour format (24)
- Hours (24)
- Minutes (24)
- Year (21)
- Month (21)
- Day (21)
- Temperature unit (°C /°F) (13+17)
- Room temperature value (12)
- Room humidity value (14)
- Outdoor temperature value (18)
- Outdoor humidity value (20)
- Atmospheric pressure unit (hPa/inHg) (5+9)
- Relative atmospheric pressure reference value (5)
- Atmospheric pressure threshold value (5)
- Storm threshold value (5)
- To select the individual values press the MIN/MAX button (30) or the + button (31) and confirm each selection by pressing the SET button (28).
- Press the SET button (28) to adopt the set value displayed and to skip.
- If you do not make an entry for 20 seconds, you automatically exit setup mode. Alternatively, press the SNOOZE /LIGHT
button (32) to exit setup mode before selecting all the values.
Note –Time zone
- The DCF signal can be received over a wide range, but always corresponds to the applicable Central European Time in Germany. Make sure you account for the time difference in countries with another time zone.
- If you are in Moscow, the time is 3hours later than in Germany. This means that you should set +3 for the time zone. The clock then automatically sets itself 3hours ahead after receiving the DCF signal or according to the manually set time.
Note –Temperature and humidity
- In terms of accuracy, the temperature and air humidity measurement is intended for private, non-commercial use.
- In individual cases, the measured values displayed may differ slightly from comparison values, e.g. values from the calibrated measuring device. Using the Basic and manual settings, you can adjust and recalibrate the values for the room/outdoor temperature and/or the humidity.
- We recommend that you do not manually calibrate the measured values, press the SET button (28) during manual setup to skip this step.
Note –Atmospheric pressure
- The absolute atmospheric pressure(abs)is a value measured at the installation location that cannot be changed.
- The relative atmospheric pressure(rel)is the absolute atmospheric pressure at the installation location corrected to the atmospheric pressure at sea level (msl).
- The reference value for relative atmospheric pressure is set to 1013.2 HIPAA standard. For an exact measurement, adapt the reference value to your location. You can manually set the reference value to within arangeof919.0 hPa and 1080.0 hPa.
- Information on the current relative atmospheric pressure for you location is available on the Internet, from your local meteorological office, on the radio, etc.
Note –Atmospheric pressure threshold value
- The weather forecast is based on atmospheric pressure changes, and you individually set their threshold values between 2hPa and 4hPa.The threshold value is set to 3hPA as standard.
- A decrease or increase in the atmospheric pressure at least the set threshold value is registered as a change in the weather.
- For locations with frequent changes in atmospheric pressure, we recommend you set a higher atmospheric threshold value than for locations with a relatively constant atmospheric pressure.
Note –Storm threshold value
- The storm forecast is also based on atmospheric pressure changes, and you individually set their threshold values between 3hPa and 9hPa.The threshold value is set to 6hPA as standard.
- The storm warning display is activated if, over a period of three hours, there is a decrease or increase in the atmospheric pressure by at least the set threshold value.
- When the storm warning display is activated, the rain symbol and the trend arrow flash for three hours.
Weather forecast
- Based on changes in the atmospheric pressure and the data saved, the base station is able to make weather forecasts for the next 12 to 24 hours.
Note –Weather forecast
- The weather forecast function is not available during the first few hours of operation because it requires data that is collected during operation.
The weather forecast and the current weather are indicated by four different
symbols (1):
| Symbol (1) | Weather |
|---|---|
| Sun | |
| Slightly cloudy | |
| Cloudy | |
| Rain |
- Based on the measured barometer values, the atmospheric pressure trend for the next few hours is displayed between the weather forecast symbols.
| Display (3) | Atmospheric pressure trend /weather forecast |
|---|---|
| → | Increasing /Weather is improving |
| ← | Decreasing /Weather is getting worse |
- The weather symbols change depending on the current relative atmospheric pressure and atmospheric pressure changes within the past six hours. If the weather is changing, the atmospheric pressure trend arrows (3) flash for three hours to indicate the change in weather. The arrows (3) stop flashing when the weather conditions have subsequently stabilized and the station has not detected any further changes in weather.
Examples:
| Display | Meaning |
|---|---|
| Weather forecast: Rain |
Atmospheric pressure trend: Decreasing /Weather is getting worse
Current weather: Cloudy
| Current weather: Slightly cloudy
Atmospheric pressure trend: Increasing /Weather is improving
Weather forecast: Sun
- The bar graph (8) shows the history of the relative atmospheric pressure within the last 24 hours.
Temperature /atmospheric pressure display mode
-
Press the SET button (28) repeatedly to change between the following displays:
-
Outdoor temperature(18: TEMP)/ Dew point temperature (18: DEWPOINT)
-
Absolute atmospheric pressure(7: abs)/Relative atmospheric pressure(7: rel)
The applicable display begins to flash. -
While the display is flashing, press the MIN/MAX button (30) or the + button (31) to switch between the outdoor temperature and the dew point or between the absolute and relative atmospheric pressure.
-
Confirm your display selection by pressing the SET button (28).
The weather station offers you the option to adjust the relative air pressure
display according to the height of the location above sea level.
To set /calibrate the relative air pressure, proceed as follows:
- Press and hold the SET button (28) until the time at the bottom edge of the display disappears.
- Now press the SET button (28) several times until “rel”appears next to air pressure and the numeric value for the air pressure flashes.
- Now use MIN/MAX (30) or + (31) to adjust the (current) relative value in 0.1 increments. Use the value from calibrated weather station nearby or the value from a weather service to set the value for the relative air pressure.
Note –Dew point
- The dew point temperature indicates the value to which, with the current humidity level, the outside temperature would have to increase/decrease in order to reach 100% relative humidity.
Alarm mode
- Repeatedly press the ALM button (29) to access HI AL (4/11/16/21) or LO AL (4/11/16/21) alarm mode.
- In alarm mode HI AL (4/11/16/21), repeatedly press the SET button (28) to switch between the following alarm functions:
- Alarm (hour/minute) (24)
- High room humidity alarm (14)
- High room temperature alarm (12)
- High outside humidity alarm (20)
- High outdoor temperature alarm (18)
- High absolute atmospheric pressure alarm (5)
The applicable display begins to flash.
- In alarm mode LO AL (4/11/16/21), repeatedly press the SET button (28) to switch between the following alarm functions:
- Alarm (hour/minute) (24)
- Lowroomhumidity alarm (14)
- Lowroomtemperaturealarm (12)
- Low outside humidity alarm (20)
- Low outdoor temperature alarm (18)
- Low absolute atmospheric pressure alarm (5)
The applicable display begins to flash.
- In the corresponding display, press the MIN/MAX button (30) or the + button (31) to change the alarm value, and confirm your selection by pressing the SET button (28).
- In the corresponding display, press the ALM button (29) to activate/deactivate the corresponding alarm function.
- If the alarm is activated, the corresponding symbol (6/10/15/26), HI AL (4/11/16), and/or LO AL (4/11/16) is displayed.
- If you do not make an entry for 20 seconds, you automatically exit setup mode. Alternatively, press the SNOOZE /LIGHT
button (32) to exit setup mode before selecting all the values.
Note
- The set value is displayed for alarms that are already set, deactivated alarms are indicated by — or –.
- The corresponding alarm triggers when the weather conditions or the time reaches the set values for an active alarm. An alarm will sound and the corresponding symbols (6/10/15/26), HI AL (4/11/16), and/or LO AL (4/11/16), and the alarm alue will flash for 2 minutes.
- Press any button to stop the alarm.
Note –Alarm due to weather conditions
- The alarm signal does not sound again if the same alarm function is triggered again within 10 minutes. The symbol and the alarm value flash so long until the weather conditions have stabilized.
- The alarm is automatically triggered again if the weather conditions exceed or fall below the set alarm value.
- If the dew point temperature triggers the low/high outdoor temperature alarm, the DEW POINT symbol also begins to flash.
Note –Snooze function
While the alarm signal is sounding, press the SNOOZE /LIGHT button (32) to
activate the snooze function. The alarm signal will be stopped for 5minutes,
after which it will sound again. The corresponding alarm symbol will start to
flash.
Maximum and minimum temperature and humidity values
-
The base station automatically stores the maximum and minimum temperature and humidity values.
-
Repeatedly press the MIN/MAX button (30) to switch between the current temperature and humidity, minimum temperature and humidity (2: MIN)and the maximum temperature and humidity (2: MAX).
-
In the maximum value display (2: MAX), repeatedly press the + button (31) to display the following values with the date (21) and time (24) they were recorded.
-
Maximum room humidity (14)
-
Maximum room temperature(12)
-
Maximum outdoor humidity (20)
-
Maximum outdoor temperature(18)
-
Maximum absolute/ relative atmospheric pressure(5)
-
Inthe minimum value display (2: MIN), repeatedly press the + button (31) to display the following values with the date (21)
and time (24) they were recorded. -
Minimum room humidity (14)
-
Minimum room temperature(12)
-
Minimum outdoor humidity (20)
-
Minimum outdoor temperature(18)
-
Minimum absolute/ relative atmospheric pressure(5)
-
In the individual maximum and minimum value display, press the SET button (28) for approx. 3seconds to delete the corresponding values with the date (21) and time (24) they were recorded.
-
Press the SNOOZE /LIGHT button (32), or wait for approx. 20 seconds to return to the display of the current measurement values.
Note –Replacing the batteries
Note, the stations have to be resynchronized each time after you change the
batteries in the measuring or base station. To do this, remove the batteries
from the other station and then reinsert them, or change them as required.
Note –Faulty transfer of measured values
In isolated cases, interference—e.g. from a WLAN network, computer or
television set—can cause the transfer of measured values between the measuring
station and the base station to fail.
In this case, you must resynchronize the stations by briefly removing the
batteries from both stations and reinserting them.
If the measured values are not transferred again once the batteries are
inserted, replace the batteries with new ones. If necessary, select a new
location for the base station in order to avoid possible interference in the
future.
Care and Maintenance
Only clean this product with a slightly damp, lint-free cloth and do not use
aggressive cleaning agents. Make sure that water does not get into the
product.
Warranty Disclaimer
Hama GmbH &CoKG assumes no liability and provides no warranty for damage
resulting from improper installation/mounting, improper use of the product or
from failuretoobserve the operating instructions and/or safety notes.
Technical Data
| **** | Base station | Measuring station |
|---|---|---|
| Power supply | 4.5 V | |
| 3xAAbatteries | 3.0 V |
2xAAA batteries
Measuring range
Temperature
Humidity| 0°C –+50°C/32°F–122°F
20%–95%| -20°C –+60°C/-4°F –140°F
20% –95%
Measuring increments
Temperature
Humidity| 0,1°C /0,2°F
1%
| 0,1°C /0,2°F
1%
Temperature and humidity measuring cycle| 30 s| 57 s
Barometer measurement range Measuring increments| 919 –1080mbar/hPa
(27.14 –31.89 inHg)
0.1hPa| –
Radio-controlled DCF clock| Yes| No
Hygrometer| Yes| Yes
Thermometer| Yes| Yes
Barometer| Yes| No
Alarm function| Yes| No
Frequency| 433 MHz
Range| ≤ 100 m
Declaration of Conformity
Hereby, Hama GmbH &CoKG declares that the radio equipment type [00076045,
00186355] is in compliance with Directive 2014/53/EU.The full text of the EU
declaration of conformity is available at the following internet address:
www.hama.com -> 00076045, 00186355 -> Downloads.
| Frequency band(s) | 433 MHz |
|---|---|
| Maximum radio-frequency power transmitted | 0,107mW |
Hama GmbH &CoKG
86652 Monheim /Germany
Service &Support
www.hama.com
+49 9091 502-0
All listed brands are trademarks of the corresponding companies. Errors and
omissions excepted, and subject to technical changes. Our general terms of
delivery and payment are applied.
Read User Manual Online (PDF format)
Read User Manual Online (PDF format) >>
Download This Manual (PDF format)
Download this manual >>
Хорошее руководство по эксплуатации
Законодательство обязывает продавца передать покупателю, вместе с товаром, руководство по эксплуатации Hama EWS-800. Отсутствие инструкции либо неправильная информация, переданная потребителю, составляют основание для рекламации в связи с несоответствием устройства с договором. В законодательстве допускается предоставлении руководства в другой, чем бумажная форме, что, в последнее время, часто используется, предоставляя графическую или электронную форму инструкции Hama EWS-800 или обучающее видео для пользователей. Условием остается четкая и понятная форма.
Что такое руководство?
Слово происходит от латинского «instructio», тоесть привести в порядок. Следовательно в инструкции Hama EWS-800 можно найти описание этапов поведения. Цель инструкции заключается в облегчении запуска, использования оборудования либо выполнения определенной деятельности. Инструкция является набором информации о предмете/услуге, подсказкой.
К сожалению немного пользователей находит время для чтения инструкций Hama EWS-800, и хорошая инструкция позволяет не только узнать ряд дополнительных функций приобретенного устройства, но и позволяет избежать возникновения большинства поломок.
Из чего должно состоять идеальное руководство по эксплуатации?
Прежде всего в инструкции Hama EWS-800 должна находится:
— информация относительно технических данных устройства Hama EWS-800
— название производителя и год производства оборудования Hama EWS-800
— правила обслуживания, настройки и ухода за оборудованием Hama EWS-800
— знаки безопасности и сертификаты, подтверждающие соответствие стандартам
Почему мы не читаем инструкций?
Как правило из-за нехватки времени и уверенности в отдельных функциональностях приобретенных устройств. К сожалению само подсоединение и запуск Hama EWS-800 это слишком мало. Инструкция заключает ряд отдельных указаний, касающихся функциональности, принципов безопасности, способов ухода (даже то, какие средства стоит использовать), возможных поломок Hama EWS-800 и способов решения проблем, возникающих во время использования. И наконец то, в инструкции можно найти адресные данные сайта Hama, в случае отсутствия эффективности предлагаемых решений. Сейчас очень большой популярностью пользуются инструкции в форме интересных анимаций или видео материалов, которое лучше, чем брошюра воспринимаются пользователем. Такой вид инструкции позволяет пользователю просмотреть весь фильм, не пропуская спецификацию и сложные технические описания Hama EWS-800, как это часто бывает в случае бумажной версии.
Почему стоит читать инструкции?
Прежде всего здесь мы найдем ответы касательно конструкции, возможностей устройства Hama EWS-800, использования отдельных аксессуаров и ряд информации, позволяющей вполне использовать все функции и упрощения.
После удачной покупки оборудования/устройства стоит посвятить несколько минут для ознакомления с каждой частью инструкции Hama EWS-800. Сейчас их старательно готовят или переводят, чтобы они были не только понятными для пользователя, но и чтобы выполняли свою основную информационно-поддерживающую функцию.
Метеостанция Hama EWS 800 — это современное устройство, которое позволяет измерять различные показатели погоды, такие как температура, влажность, давление, направление и скорость ветра. Эта метеостанция обладает удобным дизайном и широким функционалом, что делает ее отличным выбором для домашнего использования.
Однако для того чтобы метеостанция Hama EWS 800 работала корректно и давала точные результаты, необходимо правильно ее настроить. В этой статье мы рассмотрим подробную инструкцию по настройке метеостанции Hama EWS 800 и поделимся полезными советами, которые помогут вам использовать ее максимально эффективно.
Первый шаг в настройке метеостанции Hama EWS 800 — это выбор правильного места для установки. Метеостанцию следует устанавливать на открытой и стабильной поверхности, подальше от деревьев, зданий и других преград, чтобы измерения не были искажены. Также стоит учесть, что метеостанция не должна быть подвержена прямому воздействию солнечных лучей или дождю, поэтому лучше установить ее под навесом или использовать специальную защитную крышку.
Второй важный шаг — это правильная установка и настройка датчиков. Метеостанция Hama EWS 800 поставляется с датчиками температуры, влажности, давления и ветра, которые должны быть правильно расположены для получения точных данных. Датчик температуры и влажности следует установить на северной стороне дома, чтобы избежать прямого солнечного воздействия. Датчик давления рекомендуется установить на нижнем этаже дома, а датчик ветра — на высоте не менее 10 метров, чтобы исключить возможные помехи. Важно также правильно настроить направление ветра на метеостанции, ориентируясь на компас.
Содержание
- Настройка метеостанции Hama EWS 800
- Инструкция по распаковке и сборке
- Подключение к электропитанию
- Установка наружного датчика
- Калибровка датчика температуры
- Настройка радиосвязи между базовой станцией и датчиками
- Установка и настройка даты и времени
- Определение и отображение погодных показателей
- Советы по уходу и эксплуатации
Настройка метеостанции Hama EWS 800
Метеостанция Hama EWS 800 предоставляет возможность отслеживать погодные условия и получать актуальную информацию о температуре, влажности, атмосферном давлении и прочих метеорологических параметрах в реальном времени. Чтобы настроить метеостанцию Hama EWS 800, выполните следующие шаги:
- Распакуйте метеостанцию и убедитесь, что в комплекте есть все необходимые компоненты: датчик, основная станция, инструкция по эксплуатации и другие аксессуары.
- Установите батарейки в датчик и основную станцию, следуя инструкции.
- Разместите датчик на открытом месте, вдали от препятствий, чтобы обеспечить точные показания.
- Включите основную станцию. Вы должны увидеть различные параметры на дисплее, такие как температура и время.
- Настройте часы и дату на основной станции, используя соответствующие кнопки и настройки.
- Сопряжение основной станции и датчика произойдет автоматически через несколько минут. Основная станция будет отображать данные от датчика.
- Если нужно, вы можете провести дополнительные настройки, такие как единицы измерения температуры и времени.
После завершения всех настроек метеостанция Hama EWS 800 будет готова к использованию. Вы сможете отслеживать текущие погодные условия и получать актуальную информацию, которая поможет вам принимать различные решения на основе метеорологических данных.
| Компоненты метеостанции Hama EWS 800: |
|---|
| Датчик |
| Основная станция |
| Инструкция по эксплуатации |
| Батарейки |
| Другие аксессуары |
Инструкция по распаковке и сборке
Перед началом работы с метеостанцией Hama EWS 800 необходимо правильно распаковать и собрать все компоненты. Следуйте инструкции ниже:
1. Внимательно откройте упаковку метеостанции, аккуратно извлекая все компоненты из коробки.
2. Распакуйте основной блок метеостанции и положите его на стабильную поверхность, чтобы работать с ним удобно.
3. Разместите батарейные блоки, предоставленные в комплекте, в соответствующие отделения основного блока. Убедитесь, что полярность соответствует указаниям на блоках и в метеостанции.
4. Подключите сенсорную панель к основному блоку с помощью предоставленного кабеля. Внимательно вставьте каждый конец кабеля в соответствующие разъемы на обоих блоках.
5. Данный шаг может быть необязательным в зависимости от модели метеостанции. Если в комплекте предоставлена ветродатчик и датчик дождя, следуйте инструкции по их сборке и подключению, указанной в руководстве пользователя.
6. Проверьте установку всех компонентов и убедитесь, что они надежно закреплены и находятся в нужном положении.
Поздравляем! Распаковка и сборка вашей метеостанции Hama EWS 800 завершены. Теперь вы готовы к следующему этапу — настройке и пользованию метеостанцией.
Подключение к электропитанию
Для правильной работы метеостанции Hama EWS 800 необходимо подключить ее к электропитанию. Для этого выполните следующие действия:
- Включите электропитание в помещении, где будет размещена метеостанция.
- Подключите адаптер питания к розетке и кабель адаптера к разъему на задней панели метеостанции.
- Убедитесь, что кабель адаптера подключен к метеостанции надежно и плотно.
Теперь метеостанция Hama EWS 800 готова к работе. Убедитесь, что индикатор питания на передней панели светится, что указывает на успешное подключение к электропитанию.
Установка наружного датчика
Для правильной работы метеостанции Hama EWS 800 необходимо правильно установить наружный датчик. Следуйте следующим инструкциям для корректной установки:
- Выберите место установки наружного датчика. Оно должно быть открытым и без препятствий для получения точных данных о погоде. Идеальное место — это тенистое место на высоте около 1,5 метра.
- Прикрепите наружный датчик к выбранному месту, используя крепежные элементы, входящие в комплект метеостанции.
- Убедитесь, что наружный датчик находится на достаточном расстоянии от любых источников тепла, таких как кондиционеры или нагревательные устройства. Это поможет избежать искажения данных.
- Установите батареи в наружный датчик, следуя инструкциям в руководстве пользователя.
- Установите наружный датчик в метеостанции, следуя инструкциям в руководстве пользователя. Убедитесь, что наружный датчик правильно подключен и активирован.
- Проверьте, отображаются ли данные с наружного датчика на экране метеостанции. Если данные не отображаются, перепроверьте подключения и активацию наружного датчика.
После правильной установки наружного датчика ваша метеостанция Hama EWS 800 будет готова к получению и отображению точных данных о погоде.
Калибровка датчика температуры
Для начала процедуры калибровки вам понадобятся термометр с известной точностью измерения и доступ к настройкам метеостанции. Важно, чтобы термометр был калиброванным и использовался в соответствии с производителем.
Шаги для калибровки датчика температуры на метеостанции Hama EWS 800:
- Убедитесь, что метеостанция находится в нормальных условиях эксплуатации, исключая прямое воздействие солнечных лучей и воздействие других источников тепла.
- Сравните показания температуры на метеостанции с измеренными значениями термометра.
- Запомните разницу между отображаемыми значениями на метеостанции и реальной температурой, измеренной термометром.
- Войдите в меню настроек метеостанции Hama EWS 800, используя соответствующие кнопки или сенсорные панели.
- Найдите настройку «Калибровка температуры» или аналогичную и активируйте ее.
- Используя клавиши управления, настройте значение калибровки так, чтобы разница между отображаемыми значениями и реальной температурой устранялась.
- Сохраните настройки и проверьте показания метеостанции после калибровки.
Важно: Помните, что процедура калибровки может потребовать нескольких итераций для достижения точного соответствия. Будьте внимательны и тщательно контролируйте показания температуры на метеостанции и термометре во время всего процесса.
Этот раздел поможет вам настроить датчик температуры метеостанции Hama EWS 800 для более точных и надежных результатов измерений.
Настройка радиосвязи между базовой станцией и датчиками
Для правильной работы метеостанции Hama EWS 800 необходимо настроить радиосвязь между базовой станцией и датчиками. Это позволит передавать данные о температуре, влажности и других показателях с датчиков на базовую станцию.
Вот пошаговая инструкция по настройке радиосвязи:
- Установите батарейки в базовую станцию и датчики. Убедитесь, что батарейки установлены правильно, соблюдая полярность.
- Переведите базовую станцию в режим настройки путем удерживания кнопки «SET» на ней в течение нескольких секунд. На дисплее появится иконка настройки.
- Выберите канал связи, нажимая кнопку «CHANNEL» на базовой станции до тех пор, пока не будет выбран нужный канал. Таким же образом выберите канал на датчике.
- Установите код связи, нажимая кнопку «CODE» на базовой станции. Затем выберите соответствующий код на датчике. Коды должны совпадать, чтобы связь функционировала корректно.
- Установите время на базовой станции, нажимая кнопку «TIME» и используя кнопки «UP» и «DOWN» для настройки. Затем установите время на датчике аналогичным образом.
- После завершения настройки, нажмите кнопку «SET» на базовой станции для сохранения настроек. Она перейдет в режим работы и начнет получать данные с датчиков.
Убедитесь, что базовая станция и датчики находятся на достаточном расстоянии друг от друга для надежной связи. Избегайте помех от других электронных устройств и металлических предметов, таких как микроволновые печи или металлические столы, которые могут ослабить сигнал.
Следуйте этим простым инструкциям, и вы сможете настроить радиосвязь между базовой станцией и датчиками метеостанции Hama EWS 800 без проблем.
Установка и настройка даты и времени
Для правильной работы метеостанции Hama EWS 800 необходимо установить и настроить правильную дату и время. Для этого выполните следующие шаги:
- Включите метеостанцию, нажав кнопку питания на ее передней панели.
- На дисплее метеостанции отобразится текущая дата и время в формате «День, Месяц, Год Часы:Минуты».
- Для изменения даты и времени нажмите и удерживайте кнопку «Mode» на задней панели метеостанции. Дисплей перейдет в режим настройки.
- Используйте кнопки «Up» и «Down» для выбора нужной даты и времени. Переключайтесь между разделами даты и времени, нажимая кнопку «Mode».
- После установки правильной даты и времени нажмите кнопку «OK» для сохранения настроек.
- Настройка даты и времени завершена. Метеостанция будет использовать новые настройки для отображения актуальных данных.
Важно: При необходимости поменять дату и время в последующем, повторите описанные выше шаги.
Определение и отображение погодных показателей
Метеостанция Hama EWS 800 предоставляет возможность определения и отображения ряда погодных показателей. Эти показатели включают в себя температуру, влажность, давление, скорость и направление ветра, а также осадки.
Температура измеряется с помощью встроенного термометра, который можно разместить на открытом воздухе для получения более точных данных. Измеренная температура отображается как текущее значение, а также как минимальное и максимальное значения за определенный период.
Влажность — это процентное отношение содержания влаги в воздухе к максимально возможному его содержанию при той же температуре и давлении. Метеостанция Hama EWS 800 оснащена гигрометром, который измеряет влажность и отображает ее значение на экране.
Давление — это сила, с которой атмосфера давит на землю и все находящиеся на ней предметы. Метеостанция оборудована барометром, который измеряет атмосферное давление и отображает его значение в гектопаскалях или миллибарах.
Скорость ветра измеряется с помощью анемометра, который устанавливается на открытой площадке. Измеренное значение отображается на экране, а также может быть представлено в виде графика, отображающего изменение скорости ветра в течение определенного периода времени.
Направление ветра также измеряется анемометром. Это значение представлено в виде градусов относительно севера и может быть представлено как числовое значение или на графике.
Метеостанция Hama EWS 800 также может отслеживать количество осадков, но для этого требуется дополнительное оборудование — дождемер. Информация об осадках может быть отображена как общая сумма осадков за определенный период, а также в виде графика, показывающего изменение количества осадков с течением времени.
Отслеживание и отображение погодных показателей является важной функцией метеостанции Hama EWS 800, которая позволяет вам быть в курсе текущей погодной ситуации и делать прогнозы на будущее.
Советы по уходу и эксплуатации
Для правильной работы и долговечности метеостанции Hama EWS 800 рекомендуется следовать нескольким простым советам:
1. Установка и расположение
Перед установкой метеостанции необходимо выбрать оптимальное место, чтобы исключить возможность возникновения помех и получить максимально точные измерения:
- Установите метеостанцию на открытом пространстве, подальше от деревьев, зданий и других объектов, которые могут повлиять на измерения.
- Убедитесь, что датчик находится на достаточной высоте от земли и не закрыт ничем. Идеальный вариант — установка на высоте около 2 метров.
- Между метеостанцией и датчиком не должно быть препятствий, которые могут мешать передаче сигнала.
2. Уход за метеостанцией
Для сохранения эффективной работы метеостанции необходимо соблюдать следующие рекомендации:
- Регулярно очищайте метеостанцию и датчик от пыли и грязи с помощью мягкой щетки или сухой тряпки.
- Не используйте агрессивные средства для очистки, чтобы избежать повреждения корпуса и поверхности прибора.
- Если метеостанция не используется долгое время, выньте батареи из прибора, чтобы избежать утечки электролита и возможного повреждения.
3. Обслуживание и калибровка
Метеостанция Hama EWS 800 не требует специального обслуживания, но для достижения наивысшей точности измерения рекомендуется периодически проводить калибровку:
- Сравнивайте показания метеостанции с другими надежными и проверенными метеорологическими источниками. В случае расхождений, произведите калибровку в соответствии с инструкцией производителя.
- При калибровке учитывайте факторы, которые могут влиять на точность измерений: высоту над уровнем моря, рельеф местности, близость водных объектов и другие.
- Следите за состоянием батарей в метеостанции и в датчике. При снижении заряда, замените батареи свежими экземплярами.
Следуя этим рекомендациям, вы сможете наслаждаться точностью и надежностью работы метеостанции Hama EWS 800 в течение длительного времени.