
Гоночный руль HORI APEX для PlayStation®4 /
PlayStation®3. Инструкция на русском языке
Платформа: PlayStation®4 / PlayStation®3
*Совместимость с ПК не протестирована и не заявлена.
Обратите внимание, что данная информация относится к PlayStation®4 и
PlayStation®3. Для большей информации обратитесь к инструкциям для
PlayStation®4 и PlayStation®3
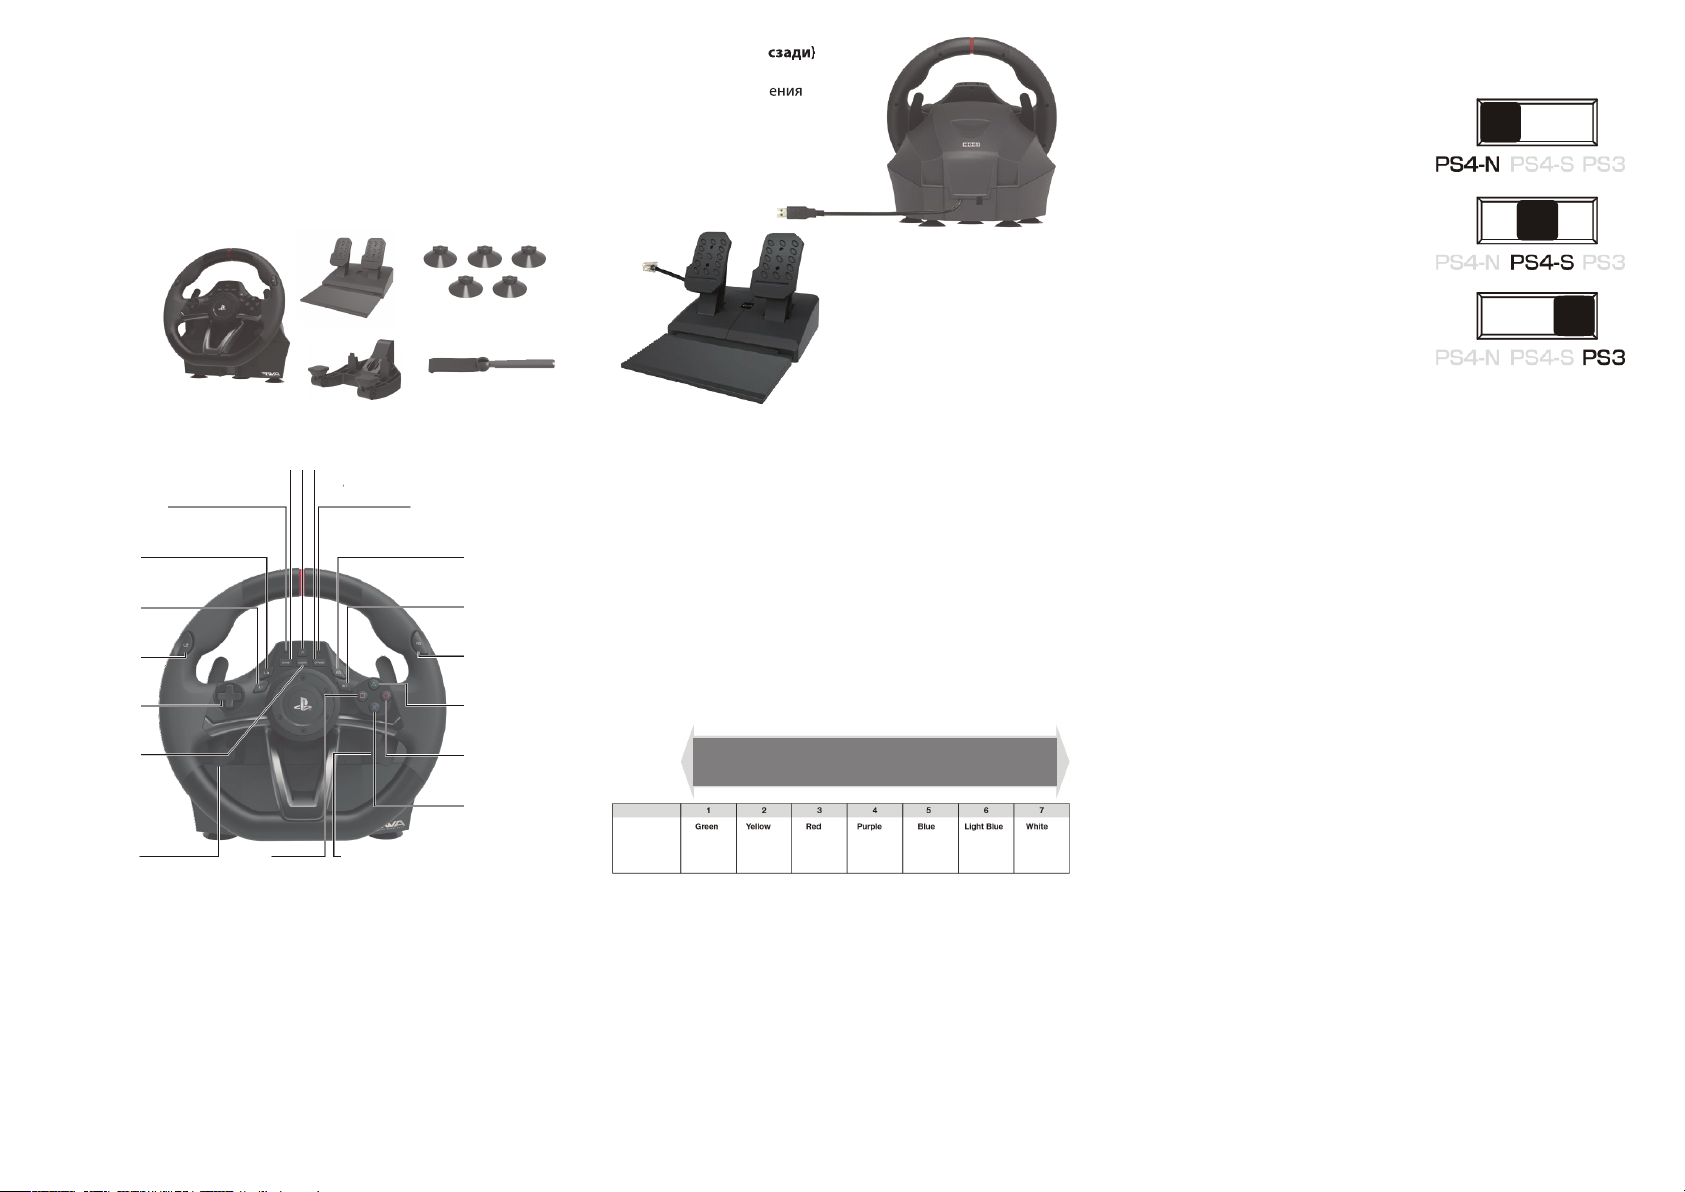
Комплектация
Руль,
Педали
Присоски
Держатель
Отвертка
Инструция
Схема
1
19
2
18
17
16
15
14
13
12
Рулевое колесо (вид спереди)
1. Кнопка PS. Те же функции, что и у кнопки PS (Не включает устройство
PlayStation®4 / PlayStation®3). Невозможно выйти из ждущего режима
используя кнопку ПК во время использования PlayStation®4
Пожалуйста, не нажимайте кнопку PS для перехода из ждущего режима на
PlayStation®4. 2. Кнопка OPTIONS (Кнопка START для PlayStation®3)
3. Правый световой индикатор программирования. 4. R3
5. R1. 6. R2. 7. Треугольник. 8. Круг. 9. Х. 10. Левый подрульный лепесток
(L1) (кнопка L2 для PlayStation®3). 11. Квадрат. 12. Правый подрульный
лепесток (R1)(кнопка R2 для PlayStation®3). 13. Кнопка ASSIGN.
14.Крестовина. 15. L2.16. L1.17. L3.18. Левый световой индикатор
программирования. 19.Кнопка SHARE. (Кнопка SELECT (для PS3)
11
10
3
4
5
6
7
8
9
Рулевое колесо (вид сзади)
1. Разъем для подключения
модульного штекера
2. Кабель контроллера
3. Разъем
3
2
1
3
1
2
Педали
1. Левая педаль
2. Правая педаль
3. Модульный штекер
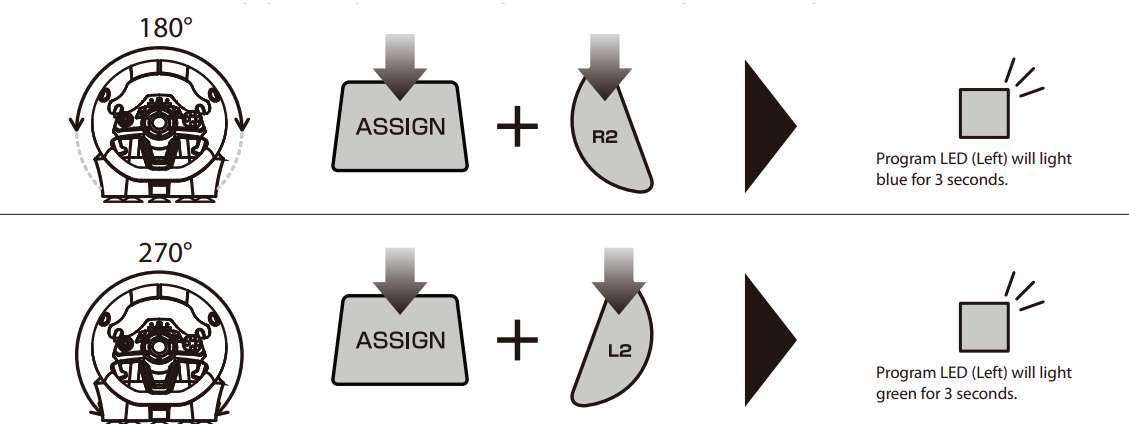
Режим быстрого переключения 270-180°
Теперь вы можете быстро переключить режим рулевого колеса с
270° на 180°.
Нажмите кнопку R2 во время удерживания кнопки Assign , чтобы
включить режим (270°/180°)
* Левый световой индикатор загорится синим на 3 секунды.
Нажмите кнопку L2 во время удерживания кнопки Assign чтобы
выключить режим.
* Левый световой индикатор загорится зеленым на 3 секунды.
Настраиваемая чувствительность
Настройка чувствительности рулевого колеса имеет семь уровней.
Индикатор программирования будет менять свет отображая
уровень чувствительности.
Цветовая
схема 1.
Цвет
Рулевое колесо. Как настроить.
1. Нажмите и удерживайте кнопку ASSIGN в течение 3 секунд.
Индикатор программирования загорится.
Нажмите кнопку OPTIONS. Индикатор программирования (справа)
начнет мигать.
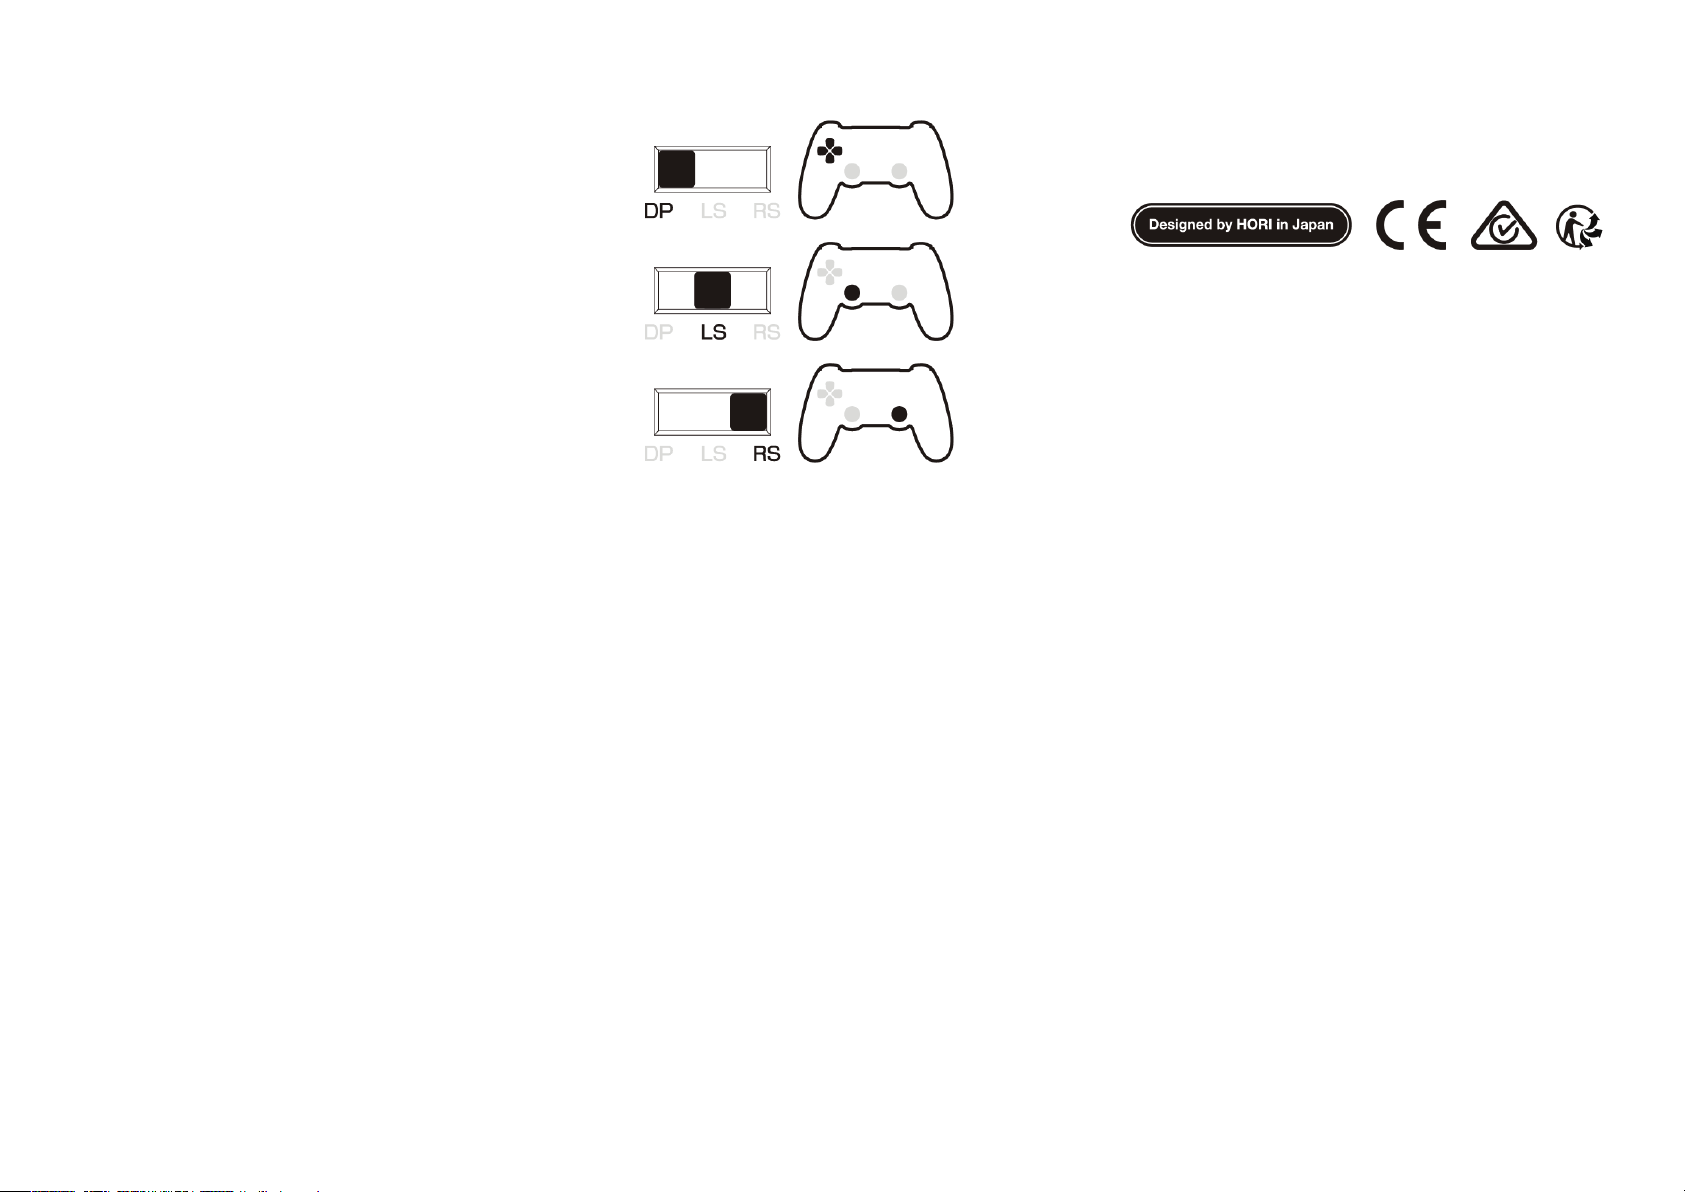
3. Переставьте переключатель на крестовине в положение «RS»
Индикатор программирования (слева) будет менять цвет в
соответствии с углом поворота.
4. Уровень чувствительности увеличивается/уменьшается при
нажимании кнопок вверх/вниз на крестовине.
Нажмите кнопку ASSIGN. Индикатор программирования (слева)
погаснет. Индикатор программирования (справа) погаснет.
* Во время выполнения шагов 2-4 включенными должны быть
только рулевое колесо и педали. Вход для кнопок контроллера в
систему работать не будет.
Сложный По умолчанию Легкий
Зелен. Желтый Красн. Фиолет. Синий Голубой Белый
Функция Тумблера
Тумблера данной платформы переключает
устройство между режимами совместимости
с PlayStation®4 и PlayStation®3.
Передвиньте тумблер на нужную платформу
перед подключением.
Для подключения к PlayStation®4 в
Нормальном режиме (Normal)
Для подключения к PlayStation®4 в Р
ежиме руля (Steering Mode Function).
Для подключения к PlayStation®3.
Режим руля
Работает только при подключении к PlayStation®4.
Функционирует только в «режиме руля».
Вы можете ощутить повышенную реалистичность используя режим руля.
1. Убедитесь, что тумблер переключения платформ стоит в позиции ON.
2. Подключите USB кабель к PlayStation®4.
(В режиме по умолчанию, левая педаль – кнопка L2, правая педаль – кнопка
R2 ) Левая педаль – кнопка КВАДРАТ, правая педаль –кнопка X)
Педали. Как настроить
1. Нажмите и удерживайте кнопку ASSIGN в течение 3 секунд.
Индикатор программирования (справа) загорится.
2. Нажмите и удерживайте педаль, которую хотите настроить в течение трех
секунд. Индикатор программирования (справа) начнет мигать.
3. Настройка увеличения/уменьшения чувствительности происходит путем
нажатия кнопок вверх/вниз на крестовине.
4. Нажмите кнопку ASSIGN. Индикатор программирования (слева)
выключится. Индикатор программирования (справа) выключится.
* Во время шагов 2-3 будут функционаровать только педали и руль.
Настройка мертвых зон
Настройка мертвых зон оцентрованного руля имеет семь уровней.
Цвет индикатора программирования (слева) изменится в соответствии с
уровнем мертвой зоны так же как указано в цветовой схеме 1.
Как настроить
1. Нажмите и удерживайте кнопку ASSIGN в течение 3 секунд. Индикатор
программирования (Справа) загорится.
2. Нажмите кнопку OPTIONS. Индикатор программирования (срава) начнет
мигать.
3. Перевести тумблер крестовины в положение “LS”. Цветовой индикатор
программирования (слева) изменится в соответствии с выбранным углом
поворота.
4. Уровень мертвых зон увеличивается/уменьшается нажатием кнопок
ввер/вниз на крестовине.
5. Нажмите кнопку ASSIGN. Индикатор программирования (слева)погаснет.
Индикатор программирования (справа) погаснет.
* Во время п. 2- 4,используются только входы для рулевого колеса и
педалей. Вход от контроллера к PlayStation®4 использоваться не будет.
* Настройки контроллера сохраняются даже в случае отключения USB.
Режим назначения
L2, R2, левая педаль, правая педаль, кнопки левой и правой педали
можно переназначить, используя программирование кнопок.
Как настроить.
1. Нажмите и удерживайте кнопку ASSIGN в течение 3 секунд. Индикатор
программирования (справа) загорится.
2. Нажмите ту кнопку, из программируемых, которую хотите изменить.
Индикатор программирования (справа)начнет мигать.
3. Нажмите кнопку, на которую вы хотите ее переназначить. Индикатор
программирования (справа)погаснет. Индикатор программирования
(слева) загорится.
* После 4 секунд отсутствия активности между действиями, индикатор
программирования(зеленый) погаснет и режим программирования
прекратится.
* Во время п. 2, кнопки контроллера на PlayStation®4 не будут работать.
* Когда индикатор программирования (красный) загорается, это
означает, что кнопка переназначена и не выключится пока кнопка не
вернется к настройкам по умолчанию.
* Следующие кнопки можно переназначить: КРУГ, ×, ТРЕУГОЛЬНИК,
КВАДРАТ,L1, L2, L3, R1, R2 иR3.
Если вы хотите отключить кнопку, нажмите и удерживайте в течение 3
секунд кнопку, которую вы нажали во время действия 2 и во время
действия 3.
* Если вы нажали несколько кнопок во время п. 3, назначенной будет
последняя нажатая кнопка.
* Настройки контроллера сохраняются даже в случае отключения от USB
Тумблер управления кнопками направления.
Кнопки направления можно переключить на левый рычаг, правый
рычаг или оставить на самих кнопках.
Совместимость функции переключения кнопок направления
данного продукта со всеми ПО не гарантировано.
HORI и логотип HORI являются зарегистрированными торговыми марками
HORI.
“PlayStation”, “DUALSHOCK” и другие являются зарегистрированным
торговыми марками Sony Computer Entertainment Inc. Все права защищены.
Лицензия на продажу: Европа, Африка, Ближний Восток, Россия, Индия и
Океания.
Исключительно для использования с PlayStation®3 и PlayStation®4.
Как перезагрузить-1
Чтобы перезагрузить назначенные кнопки самостоятельно, нажмите и
удерживайте программируемую кнопку в течение 3 секунд и затем
дважды нажмите ту кнопку, которую хотите перезагрузить.
Как перезагрузить -2
1. Нажмите и удерживайте кнопку ASSIGN в течение 3 секунд. Индикатор
программирования (справа)загорится.
2. Нажмите кнопку PS. Индикатор программирования (зеленый) погаснет
и все назначения кнопки вернутся к настройкам по умолчанию.
Режим быстрого вождения
Перезагрузите одновременно: режим быстрого вождения, настройки
мертвых зон, настройки линейности.
Как перезагрузить
1. Нажмите и удерживайте кнопку ASSIGN в течение 3 секунд. Индикатор
программирования (справа)загорится. Нажмите кнопку SHARE.
Индикатор программирования(Слева / Справа) погаснет.
(Индикатор кнопки ASSIGN LED загорится красным во время назначения
кнопок)
Когда режим быстрой настройки отменен, угол рулевого колеса вернется
по умолчанию к 270°.
Уровень мертвых зон и линейности вернется к “4”.
* При невыполнении действия 2 после 1, индикатор кнопки ASSIGN
погаснет после четырех секунд и режим назначения кнопок
автоматически прекратится.
Пожалуйста, внимательно ознакомьтесь с инструкцией к ПО.
Данное устройство не работает с устройствами в аналоговом
режиме.
Провода не вставляются в розетки.
Сохраняйте упаковку, она содержит важную информацию.
ИНФОРМАЦИЯ ПО УТИЛИЗАЦИИ ПРОДУКТА
[Перечеркнутое ведро] Символ с изображением перечеркнутого
мусорного контейнера на продукте означает, что электрическое и
электронное оборудование, а также батареи, зарядные батарей и
устройства не должны выбрасываться вместе с домашними
отходами.
Выбрасывайте их в специально отведенные места. Таким образом,
вы поможете сохранить природные ресурсы и окружающую
среду.
Гарантия
По вопросам гарантии, возникшим в течение 30 дней после
покупки, для получения большей информации по товару,
уточняйте в магазине место изначальной закупки.
Если претензии по гарантии не могут быть удовлетворены
изначальным поставщиком, а также по другим вопросам,
касающимся нашей продукции, обращайтесь в HORI.
Изображение на упаковке может отличаться от реального вида
устройства.
/Per favore, rimuovere polvere e sporco prima di utilizzare le 5 ventose per fissare
il controller alla superficie di un tavolo.
/Por favor quitar mugre y polvo antes de usar 5 succión taza para seguro el
controlador encima de surface plano.②Attach suction cups to steering unit when setting up. / Ajusta las ventosas correctamente a la base del volante para fijarlo. / Mettere le ventose correttamente alla base del volante.Steering unit / Base du volant / Unità di sterzo
① ②
Option 2:
① ②
Option 1:* Do not combine both securing methods as it may damage the suction cups./ * Veuillez ne pas combiner les deux méthodes de mise en place car cela peut endommager les ventouses./ * Non combinare entrambi i metodi di fissaggio in quanto potrebbe danneggiare le ventose .* Do not affix to furniture made from glass or other fragile materials./ * Ne pas fixer sur une surface en verre ou faite de matériaux fragiles./ * No utilices la abrazadera con superficies de cristal u otros materiales frágiles.* Detach from furniture carefully to prevent damage to furniture or product./ * Retira siempre el volante con cuidado para no dañar ni el mueble ni el producto.
/ * Quando viene rimosso dai mobili che fissano il prodotto , staccare con attenzione per evitare danni ai mobili o prodotto.
Place Foot Pedals onto a flat surface./ Utilisez les pédales en les plaçant sur une surface plane sur le sol./ Por favor, utilice los pedales colocándolos sobre una superficie plana en el suelo.Foot pedals / Pédales / Fußpedal / Pedale / Pie pedalfor PlayStation®4 / PlayStation®3 / PC
MANUAL
■ Layout / Connectique / DiseñoSteering unit
(
Front View
)
/ Base du volant
(
Vue de face
)
/ Unità di sterzo
(
Visión Frontal
)
R paddle (R1 button)(R2 button for the PlayStation®3 system)/ Vitesse R(Touche R1) (Bouton R2 pour la PlayStation®3 système)/ R pala (Botón R1) (Botón de R2 para PlayStation®3 sistema)L paddle (L1 button)(L2 button for the PlayStation®3 system)/ Vitesse L (Touche L1) (Bouton L2 pour la PlayStation®3 système)/ Lpala (Botón L1) (Botón de L2 para PlayStation®3 sistema)SHARE button(SELECT button for the PlayStation®3 system)/ Touche SHARE (SELECT button for the PlayStation®3 system)/ Botón de SHARE (Botón de SELECT para PlayStation®3 sistema)L2 button/ Touche L2/ Botón L2L3 button/ Touche L3/ Botón L3L1 button/ Touche L1/ Botón L1R2 button/ Touche R2/ Botón R2ASSIGN button/ Touche Assignement/ Botón AsignarR3 button/ Touche R3/ Botón R3Directional pad/ Croix directionnelle/ Dirección D-PadPS button * Same functionality as the PS button. (Will not turn the PlayStation®4 / PlayStation®3 system’s power on.)* It is not possible to return from standby mode by using the PS button when using the PlayStation®4 system.* Please do not press the PS button when returning from stand-by mode on the PlayStation®4 system./ Touche PS * Même fonction que le Touche PS. (Ne permet pas de mettre en marche la PlayStation®4 / PlayStation®3 système.)
* Il n’est pas possible de revenir de mode stand-by à l’aide de la touche PS lorsque vous utilisez le PlayStation
®4 système. * Ne pas appuyer sur le bouton PS lors du retour de mode stand-by sur la PlayStation®4 système./ Botón de PS * Misma funcionalidad que el botón PS. (No se encenderá la PlayStation®4 / PlayStation®3 sistema.) * No es posible volver desde el modo “Stand By” con el botón PS cuando se utiliza la consola PlayStation®4 sistema. * Por favor, no pulse el botón PS, al regresar de «stand by» en la PlayStation®4 sistema.OPTIONS Button(START button for the PlayStation®3 system)/ Bouton Option (Bouton Start pour la PlayStation®3 système)/ Botón de opción (Botón de start para PlayStation®3 sistema)△ button/ Touche △/ Botón △□ button/ Touche □/ Botón □○ button/ Touche ○/ Botón ○× button/ Touche ×/ Botón ×Programming LED [ R ]/ LED paramétrable [ R ]/ LED Programación [ R ]Programming LED [ L ]/ LED paramétrable [ L ]/ LED Programación [ L ]■ Platform / Plateform / Plataforma
PlayStation®4/PlayStation®3/PC
Please note that the information provided is for the PlayStation®4 and PlayStation®3 systems.
Please refer to PlayStation
®4 and PlayStation®3 systems manuals for more information.
This product does not feature stereo headset / mic input, light bar / touch pad, motion sensors, or force feedback.This product will not work with PlayStation
®2, PlayStation®, or PS one®.
EN
Notez bien que les renseignements fournis sont pour la PlayStation®4 et PlayStation®3 systèmes.
Merci de vous référer au manuel de la système PlayStation®3 pour plus d’information.Ce produit ne dispose pas de fonction pour casque stéréo / entrée micro, barre lumineuse / touchpad, détecteurs de mouvement, ou retour de force.Ce produit n’est pas compatible avec la PlayStation
®2, PlayStation®, ou PS one®.
FR
Tenga en cuenta que la información proporcionada es para la consola PlayStation®3 y PlayStation®4 sistemas.
Consulte el manual de la sistema PlayStation®3 si desea más información.
Este producto no dispone de auriculares / entrada de micrófono, light bar / táctil, sensores de movimiento, o Force Feedback.
Este producto no funciona con PlayStation
®2, PlayStation® o PS one®.
ES
1903-41EU
■ Included / Inclus / ContenidoFoot pedals/ Pédales/ Pie pedalSteering unit/ Base du volant/ Unità di sterzoSuction cup/ Ventouse/ VentosaClamp/ Attache/ MorsettoInstruction Manual/ Mode d’emploi/ Manual de InstruccionesScrew/ Vis/ TornilloSteering unit
(
Back View
)
/ Base du volant
(
Vue arrière
)
/ Unità di sterzo
(
Vista trasera
)
Controller cable/ Câble du contrôleur/ Cable del controlador Modular plug connection port/ Port de connexion de la prise modulaire/ Puerto de conexión para modular enchufe.Connector / Connecteur/ ConectorR1 button/ Touche R1/ Botón R1
Functions as PC controller through XInput.
/ Fonctionne comme contrôleur de PC à travers XInput.
/ Funciona como controlador de PC a través de XInput.
This product does not support DirectInput.
/ Ce produit ne fonctionne pas avec DirectInput.
/ Este producto no es compatible con DirectInput.
Windows 8.1 / 8 / 7 / Vista
USB port / Port USB / Puerto USB
System requirements / Configuration requise / Requisitos del sistema
May not function as desired with all PlayStation®4 games.
/ Peut ne pas fonctionner comme souhaité avec tous les jeux PlayStation®4.
/ No se garantiza el mismo funcionamiento con todos los juegos para PlayStation®4.
Foot pedals / Pédales / Pie pedalModular plug/ Prise modulaire/ Modular enchufeL pedal/ Pédale L/ L pedalR pedal/ Pédale R/ R pedal■ Toggle Function / Fonction Plate-form / Función de palanca plataformaSteering Mode FunctionThe Platform Toggle Switch toggles between PlayStation®4 and PlayStation®3 compatibility.Switch the toggle switch to the desired platform before connecting.Connecting to the PlayStation®4 systemNormal.Connecting to the PlayStation®4 system_Steering Mode Function.Connecting to the PlayStation®3 system.Works only when connected to a PlayStation®4 system.Functions only for “Steering Mode” compatible titles.Experience heightened realism by using the Steering Mode.1. Make sure that the Platform Toggle Switch is set to “4” and turn the Mode Toggle Switch ON.2. Connect the USB cable to the PlayStation®4 system. (In default settings, the L paddle is the L2 button, R paddle is the R2 button, L pedal is the □ button and R pedal is the X button.)
EN
Mode fonction volantLe commutateur plate-forme permet de basculerde compatibilité entre 4 et PlayStation®4 et PlayStation®3.Assurez-vous que le commutateur plate-forme est bien placé avec de conencter votre console.Connection à la PlayStation®4 système_Normal.Connection à la PlayStation®4 système_Mode fonction volant.Connection à la PlayStation®3 système.Seulement quand connecté à la PlayStation®4 système.Optimisé pour Jeux de course.Expérience accrue en réalisme en utilisant le mode volant.1. Assurez-vous que l’interrupteur plate-forme «4» est activé et que l’interrupteur à switch est ON.2. Branchez le câble USB à la console PlayStation®4 système. (Dans les paramètres par défaut, le pad L est le bouton L2, le pad R est la touche R2, la pédale Lest le bouton □ et la pédale R est le bouton X.)
FR
Funcíon de modo de conducirEl interruptor de palanca plataforma alterna entre PlayStation®4 y PlayStation®3 compatibilidad.Por favor, asegúrese de apagar el interruptor de palanca a la plataforma deseada antes de conectar.Conexión al PlayStation®4 sistema_Normal.Conexión al PlayStation®4 sistema_Funcíon de modo de conducir.Conexión al PlayStation®3 sistema.Sólo cuando se conecta a la PlayStation®4 sistema.Optimizado para los juegos de carreras.Experiencia acentúa el realismo utilizando el modo de conducir.1. Asegúrese de que la Plataforma Toggle Switch en «4» y gire el modo Toggle Switch ON.2. Conecte el cable USB a la consola PlayStation®4 sistema. (En la configuración predeterminada, la paleta L es el botón L2, R pádel es el botón R2, L pedal es el botón □ y el pedal de R es el botón X.)
ES
■ Adjustable dead zone / Réglage de la zone morte / Zona morta regolabile
EN
The dead zone play of centered wheel is adjustable to seven levels.Program LED (Left) color will change to indicate the dead zone value.How to adjust1. Press and hold the ASSIGN button for 3 seconds. →Program LED (Right) will turn on.2.Press the OPTIONS button. →Program LED (Right) will flash.
3. Toggle the D-Pad function switch to the “LS” position. →Program LED (Left) color will change to indicate
the selected rotation angle.4. Dead zone value increases / decreases by pressing up / down on the Directional Pad.5.Press the ASSIGN button. →Program LED (Left) will turn off. Program LED (Right) will turn off.* During steps 2〜4, only the steering unit and foot pedal input are enabled. Button input from the controller to the PlayStation®4 will be disabled.* Controller settings are stored even if the USB is disconnected.■ How to connect / Comment se connecter / Come connettersi■ Quick Handling Mode / Mode Conduite Rapide / Modo Conducción rápida
EN
Experience quicker handling by switching the max steering output from 270 degrees to 180 degrees.Press R2 while holding the Assign Button to turn ON. (270°→ 180°)* The Assign LED (Left) will light blue for 3 seconds.Press L2 while holding the Assign Button to turn OFF. (180°→ 270°)* The Assign LED (Left) will light green for 3 seconds.
FR
Profitez d’une expérience de conduite plus rapide en ajustant l’angle de rotation de 270°à 180°.
Veuillez presser la gâchette R2 tout en maintenant le bouton ASSIGN appuyé pour activer le mode (270°→ 180°)
* La LED du bouton ASSIGN (gauche) va s’allumer de couleur bleu durant 3 secondes.
Veuillez presser la gâchette L2 tout en maintenant le bouton ASSIGN appuyé pour desactiver le mode (270°→ 180°)
* La LED du bouton ASSIGN (gauche) va s’allumer de couleur vert durant 3 secondes.
ES
Disfruta de una experiencia de conducción más rápida ajustando el ángulo de giro máximo de 270º a 180º.Para activarlo, pulsa R2 al tiempo que mantienes pulsado el botón ASSIGN. El ángulo disminuirá de 270º a 180º.* El LED de ASSIGN (a la izquierda) se pondrá azul durante 3 segundos.Para desactivarlo, pulsa L2 al tiempo que mantienes pulsado el botón ASSIGN. El ángulo aumentará de 180º a 270º.* El LED de ASSIGN (a la izquierda) se pondrá verde durante 3 segundos.■ Adjustable sensitivity / Sensibilité réglable / Sensibilidad regulable
EN
1. Connect the Foot Pedals modular plug to the Steering Wheel modular connection port. * This product can be used without the Foot Pedals.
2. Connect the Steering Wheel USB to the PlayStation®4 or PlayStation®3 system’s USB port.
* Please make sure that the Platform Toggle Switch is set to “4” when connecting to the PlayStation®4 system,
and set the toggle switch to “3” when connecting to the PlayStation®3 system.
3. Turn the steering wheel to its maximum rotation position once in both directions.
* Please repeat the process when you re-connect the controller or restart the PlayStation®4 or PlayStation®3 system.
4. Press down fully into each of the L pedal and R pedal once.(*) You are now ready to play!
* Please repeat the process when you re-connect the controller or restart the PlayStation®4 or PlayStation®3 system.
FR
1. Connectez la prise modulaire des Pédales au port de connexion modulaire du Volant. * Ce produit peut être utilisé sans les Pédales.2. Connectez le Volant USB au port USB de la PlayStation®4 ou PlayStation®3 système. * Assurez-vous que l’interrupteur plate-forme est réglé sur «4» lors de la connexion au PlayStation®4 système, puis réglez le commutateur à «3» lors de la connexion à la console pour PlayStation®3 système.3.Veuillez tourner une fois le volant à sa rotation maximum dans les deux directions. * Répétez le processus lorsque vous rebranchez le contrôleur ou redémarrez la PlayStation®4 ou PlayStation®3 système.
4.Appuyez fermement une fois sur les deux pédales L et R.(*) Vous êtes maintenant prêt à jouer !
* Répétez le processus lorsque vous rebranchez le contrôleur ou redémarrez la PlayStation®4 ou PlayStation®3 système.
ES
1. Conecta el pie pedal modular enchufe al puerto de enchufe del volante. * Se puede usar este producto sin pie pedal.2. Conecta el USB cable del volante al puerto de PlayStation®4 o PlayStation®3 sistema. * Por favor, asegúrese de que el interruptor de palanca Plataforma se ajusta en «4» cuando se conecta a la PlayStation
®4 sistema, y ajuste el interruptor en «3» cuando se conecta a la PlayStation®3 sistema.
3. Gira el volante una vez al máximo en ambos sentidos. * Por favor repitar la proceso cuando se re-enchufa el conectador o re-arranca la PlayStation®4 o PlayStation®3 sistema.4. Pisa completo de ambos pies pedales una vez.(*) Esta listo de jugar ahora! * Por favor repitar la proceso cuando se re-enchufa el conectador o re-arranca la PlayStation®4 o PlayStation®3 sistema.Modular plug connection port./ Port de connexion de la prise modulaire./ Puerto de conexión para modular enchufe.
EN
Steering wheel sensitivity is adjustable to seven levels.The Program LED (Left) color will change to indicate the sensitivity value.Steering unitHow to adjust1. Press and hold the ASSIGN button for 3 seconds. →Program LED (Right) will turn on.2.Press the OPTIONS button. →Program LED (Right) will flash.
3. Toggle the D-Pad function switch to the “RS” position. →Program LED (Left) color will change to indicate
the selected rotation angle.4. Sensitivity value increases / decreases by pressing up / down on the Directional Pad.5.Press the ASSIGN button. →Program LED (Left) will turn off. Program LED (Right) will turn off.* During steps 2〜4, only the steering unit and foot pedal input are enabled. Button input from the controller to the PlayStation®4 will be disabled.* Controller settings are stored even if the USB is disconnected.
FR
La sensibilité du volant peut être réglée sur 7 niveaux.La LED (Gauche) de programmation va changer de couleur pour indiquer le niveau de sensibilité.Base du volantComment ajuster
1.
Appuyez et maintenez la Touche Assignement pendant 3 secondes. →La LED (Droit) de programmation va s’allumer.
2.Appuyez sur la bouton Option. → La LED (Droit) de programmation va clignoter.
3. Placez le bouton de fonction D-Pad sur la position “RS”. →La couleur de la LED (Gauche) va changer pour
indiquer quel angle de rotation est sélectionné.4. La sensibilité peut être augmentée / réduite à l’aide des touches haut / bas du pavé directionnel.
5.Appuyez sur la Bouton ASSIGN. →La LED (Gauche) de programmation va s’éteindre.
La LED (Droit) de programmation va s’éteindre. * Entre les étapes 2〜4, seuls la base du volant et les pédales peuvent être utilisés. Les autres boutons du volant vers la PlayStation®4 seront désactivés.* Controller settings are stored even if the USB is disconnected.PédalesComment ajuster
1.
Appuyez et maintenez la Touche Assignement pendant 3 secondes. →La LED (Droit) de programmation va s’allumer.
2.Appuyez et maintenez la pédale que vous souhaitez régler →La LED (Droit) de programmation va clignoter.
durant 3 secondes.3. La sensibilité peut être augmentée / réduite à l’aide des touches haut / bas du pavé directionnel.
4.Appuyez sur la Bouton ASSIGN. →La LED (Gauche) de programmation va s’éteindre.
La LED (Droit) de programmation va s’éteindre.* Entre les étapes 2〜4, seuls la base du volant et les pédales peuvent être utilisés. Les autres boutons du volant vers la PlayStation®4 seront désactivés.* Controller settings are stored even if the USB is disconnected.Foot pedalsHow to adjust1. Press and hold the ASSIGN button for 3 seconds. →Program LED (Right) will turn on.
2.Press and hold the foot pedal you want to adjust for 3 seconds. →Program LED (Right) will flash.
3. Sensitivity value increases / decreases by pressing up / down on the Directional Pad.4.Press the ASSIGN button. →Program LED (Left) will turn off. Program LED (Right) will turn off.* During steps 2〜3, only the steering unit and foot pedal input are enabled. Button input from the controller to the PlayStation®4 will be disabled.* Controller settings are stored even if the USB is disconnected.
ES
Se puede regular la sensibilidad del volante a siete niveles distintos.El LED de programación (Izquierda) cambiará de color para indicar el valor seleccionado.Unità di sterzoModo de ajuste
1. Mantenga el botón Asignar pulsado durante 3 segundos. →El LED de programación (Derecho) se encenderá.
2.Presione el Botón de opción. →El LED de programación (Derecho) parpadeará.
3. Mueve el interruptor de activación de la función cruceta →El LED de programación (Izquierda) cambiará de color
a la posición “RS”. para indicar el ángulo de giro seleccionado.
4. La sensibilidad aumenta / disminuye al pulsar la flecha superior / inferior de la cruceta.
5.Presione el Botón Asignar. →El LED de programación (Izquierda) se apagará.
El LED de programación (Derecho) se apagará.* Durante los pasos 2-4, la PlayStation®4 solo se podrá controlar con el volante y los pedales. El mando de la consola quedará desactivado.* Los ajustes se guardarán aunque el cable USB no esté conectado.Pie pedalModo de ajuste
1. Mantenga el botón Asignar pulsado durante 3 segundos. →El LED de programación (Derecho) se encenderá.
2.Mantén pisado durante 3 segundos el pedal que desees configurar. →El LED de programación (Derecho) parpadeará.
3. La sensibilidad aumenta / disminuye al pulsar la flecha superior / inferior de la cruceta.
5.Presione el Botón Asignar. →El LED de programación (Izquierda) se apagará.
El LED de programación (Derecho) se apagará.* Durante los pasos 2-4, la PlayStation®4 solo se podrá controlar con el volante y los pedales. El mando de la consola quedará desactivado.* Los ajustes se guardarán aunque el cable USB no esté conectado.Gradual (Steady steering)/ Résistant (Direction stable)/ Baja (Dirección estable)Responsive (Easy to turn)/ Sensible (Manipulation rapide)/ Alta (Maniobra rápida)Default/ Par défaut/ Normal1 2 3 5 6LED colorCouleur LED Colore del LED4 7Green/ vert/ verdeYellow/ jaune/ amarillo
Red
/ rouge/ rojoPurple/ pourpre/ Morado
Blue
/ bleu/ azulLight Blue/ Bleu clair/ Azul claroWhite/ blanc/ blanco
FR
La jeu de la zone morte est ajustable sur 7 niveaux de réglage.La LED de programmation (Gauche) va changer de couleur pour indiquer quelle est la valeur attribuée à la dead zone.Comment ajuster
1.
Appuyez et maintenez la Touche Assignement pendant 3 secondes. →La LED (Droit) de programmation va s’allumer.
2.Appuyez sur la bouton Option. → La LED (Droit) de programmation va clignoter.
3. Placez le bouton de fonction D-Pad sur la position “LS”. →La couleur de la LED (Gauche) va changer pour
indiquer quel angle de rotation est sélectionné.4. La valeur de la zone morte peut être augmentée / réduite en utilisant les boutons haut / bas du pavé directionnel.
5.Appuyez sur la Bouton ASSIGN. →La LED (Gauche) de programmation va s’éteindre.
La LED (Droit) de programmation va s’éteindre. * Entre les étapes 2〜4, seuls la base du volant et les pédales peuvent être utilisés. Les autres boutons du volant vers la PlayStation®4 seront désactivés.* Controller settings are stored even if the USB is disconnected.
ES
La zona muerta en torno a la posición central del volante (la amplitud del movimiento que no provoca una respuesta) admite siete ajustes distintos.El LED de programación (Izquierda) cambiará de color para indicar la amplitud de la zona muerta.Modo de ajuste
1. Mantenga el botón Asignar pulsado durante 3 segundos. →El LED de programación (Derecho) se encenderá.
2.Presione el Botón de opción. →El LED de programación (Derecho) parpadeará.
3. Mueve el interruptor de activación de la función cruceta →El LED de programación (Izquierda) cambiará de color
a la posición “LS”. para indicar el ángulo de giro seleccionado.
4. La magnitud de la zona muerta se amplía / acorta pulsando la flecha superior / inferior de la cruceta.
5.Presione el Botón Asignar. →El LED de programación (Izquierda) se apagará.
El LED de programación (Derecho) se apagará.* Durante los pasos 2-4, la PlayStation®4 solo se podrá controlar con el volante y los pedales. El mando de la consola quedará desactivado.* Los ajustes se guardarán aunque el cable USB no esté conectado.
■ Quick Handling Mode ・ Dead Zone Adjustment ・ Linearity Adjustment Reset All
/Mode Conduite Rapide ・ Ajustement de la zone morte ・ Ajustement de la linéarité
Tout restaurer par défaut
/Modo de conducción rápida ・ Ajuste de la zona muerta ・ Ajuste de la linealidad Reajustar todo
EN
To simultaneously reset all of the following : Quick Handling Mode ・ Dead Zone Adjustment ・ Linearity Adjustment.
How to reset
1. Press and hold the ASSIGN button for 3 seconds. →Program LED (Right) will turn on.
2.Press the SHARE button. →Program LED (Left / Right) will turn off.
(The ASSIGN LED will light red when assigning buttons.) When Quick Handling Mode is canceled, steering wheel input value will default to 270°. Dead zone and linearity default values are set to “4”.
* If you do not perform step ② after ①, the ASSIGN LED will turn off after four seconds and
button assignment mode will automatically end.
FR
Afin de restaurant par défaut les fonctions suivantes : Mode Conduite Rapide ・ Ajustement de la zone morte ・ Ajustement
de la linéarité.Comment rétablir par défaut
1.
Appuyez et maintenez la Touche Assignement pendant 3 secondes. →La LED (Droit) de programmation va s’allumer.
2.Appuyez sur la bouton SHARE. →La LED (Gauche / Droit) de programmation va s’éteindre.
(La LED ASSIGN va s’allumer en rouge lors de la configuration des boutons.) Lorsque le mode Conduite Rapide est désactivé, la valeur du volant sera rétablie par défaut à 270°. Les valeurs par défaut de la zone morte et de la linéarité sont de“4”.
* Si l’étape ② n’est pas initiée après l’étape ①, la LED « ASSIGN » va s’éteindre après 4 secondes et le mode de configuration
sera automatiquement arrêté.
ES
Para reajustar a la vez : Modo de conducción rápida ・ Ajuste de la zona muerta ・ Ajuste de la linealidad.
Reajuste
1. Mantenga el botón Asignar pulsado durante 3 segundos. →El LED de programación (Derecho) se encenderá.
2.Presione el Botón de SHARE. →El LED de programación (Izquierda / Derecho) se apagará.
(El LED de ASSIGN se pondrá en rojo al configurar botones.) Al salir del Modo de conducción rápida, el volante recuperará su ángulo de giro de fábrica (270º). El valor predeterminado de la zona muerta y la linealidad es “4”.
* Si no inicias el paso ② una vez ejecutado el ①, el LED de ASSIGN se apagará al cabo de cuatro segundos y el modo de
configuración de botones se cancelará automáticamente.
Wide
/ Ample / AmpliaNarrow/ Réduit/ EstrechaDefault/ Par défaut/ Normal1 2 3 5 6LED colorCouleur LED Colore del LED4 7Green/ vert/ verdeYellow/ jaune/ amarillo
Red
/ rouge/ rojoPurple/ pourpre/ Morado
Blue
/ bleu/ azulLight Blue/ Bleu clair/ Azul claroWhite/ blanc/ blanco
Table of Contents
- Instruction Manual
- Caution
- Included
- Platform
- PlayStation®5 console / PlayStation®4 console / PC
- Layout
- Steering unit
- Foot pedals
- Product Setup
- How to Connect
- Download App
- 『HORI Device Manager』
- Quick Handling Mode
- Directional Pad Control Toggle Switch
- Adjustable Dead Zone
- Adjustable Sensitivity
- Steering unit
- Foot pedals
- Quick Handling Mode • Dead Zone Adjustment • Linearity Adjustment Reset
- Assign Mode
- How to adjust
- How to Reset Buttons Individually
- How to Reset All Buttons
- Main Features
- Documents / Resources
- References
- Read User Manual Online (PDF format)
- Download This Manual (PDF format)
Official Licensed Product
Instruction Manual
Thank you for purchasing this product.
Before using this product, please read the instructions carefully.
After reading the instruction manual, please keep it for reference.
Caution
Caution
Parents/Guardians:
Please read the following information carefully.
- This product contains small parts. Keep away from children under 3 years old.
- Keep this product away from small children or infants. Seek medical attention immediately if any small parts are swallowed.
- Long cord. Strangulation hazard.
- Keep the product away from dusty or humid areas.
- Do not use this product if it has been damaged or modified.
- Do not get this product wet. This may cause an electric shock or malfunction.
- Do not place this product near heat sources or leave under direct sunlight for an extended period. Overheating may cause malfunction.
- Do not touch the metal parts of the USB plug.
- Do not apply strong impact or weight on the product.
- Do not pull roughly or bend the cable of the product.
- Do not disassemble, modify or attempt to repair this product.
- If product needs cleaning, use only a soft dry cloth. Do not use any chemical agents like benzene or thinner.
- Do not use this product for anything other than its intended purpose. We are not responsible for any accidents or damages in the event of use other than the intended purpose.
Included
Steering unit ×1 Foot pedals ×1
Clamp ×1 Screw ×1
Platform
PlayStation®5 console / PlayStation®4 console / PC
System requirements
|
USB Port, Internet Connection
—|—
- Functions as PC controller through XInput.
This product does not support DirectInput.
Important
Before using this product with your PlayStation®5 console or PlayStation®4
console, please read the included instructions carefully.
Please check that your PlayStation®5 console or PlayStation®4 console is
updated to the latest system software.
Layout
Steering unit
[Front View]
-
R1 Button
“PC Mode” : RB Button -
R2 Button
“Normal Mode” : R2 Button
“PC Mode” : RT Button -
Δ Button
“PC Mode” : Y Button -
Ο Button
“PC Mode” : B Button -
X Button
“PC Mode” : A Button -
Button
“PC Mode” : X Button -
R3 Button
“PC Mode” : R Stick Button -
≡ Button
“PS4 Mode” : OPTIONS Button
“PC Mode” : START Button -
Program LED(Right)
-
ASSIGN Button
-
Program LED(Left)
-
Button
“PS4 Mode” : SHARE Button
“PC Mode” : BACK Button -
L3 Button
“PC Mode” : L Stick Button -
Directional Pad
-
PS Button
“PC Mode” : LT Button -
L2 Button
“PC Mode” : HOME Button -
L1 Button
“PC Mode” : LB Button
[Back View]

-
Mode Toggle Switch
-
Hardware Toggle Switch
-
L Paddle
“Normal Mode” : L1 Button
“Steering Mode” : L1 Paddle
“PC Mode” : A Button -
Modular plug connection port
-
Controller cable
-
USB connector
-
R Paddle
“Normal Mode” : R1 Button
“Steering Mode” : R1 Paddle
“PC Mode” : X Button -
Directional Pad Control Toggle Switch
Foot pedals
-
R Pedal
“Normal Mode” : R2 Button
“Steering Mode” : Accelerator
“PC Mode” : RT Button -
Foot pedals cable
-
Modular plug
-
L Pedal
“Normal Mode” : L2 Button
“Steering Mode” : Brake
“PC Mode” : LT Button
Product Setup
(1) Tighten the clamp into the steering unit base with the screw.
(2) Use the clamp to secure the steering unit to a flat, hard surface
(i.e. table).
- Do not attach to furniture made from glass or other fragile materials.
- Carefully detach from furniture to prevent damage to furniture or product.
(3) Assemble the foot pedal as shown in the image below.
How to Connect
(1) Connect the foot pedal’s modular plug to the steering unit’s modular
plug connection port.
-
This product can be used without the foot pedals.
- Modular plug connection port
- Modular plug
(2) Set the Mode Toggle Switch to the appropriate setting, and then
connect the USB cable.
- Do not press on any buttons when connecting the USB cable.
- Check the connector direction before inserting.
[PS5™ Steering Mode]
PS5 PS4 PC
Hardware Toggle Switch
(For PlayStation®5 consoles)
NORMAL STEERING
Mode Toggle Switch
- Functions only for “Steering Mode” compatible titles.
Please visit website for more information. (URL)
Connect to the USB port of the PlayStation®5 console.
[PS5 Normal Mode]
PS5 PS4 PC
Hardware Toggle Switch
NORMAL STEERING
Mode Toggle Switch
Connect to the USB port of the PlayStation®5 console.
[PS4™ Steering Mode]
PS5 PS4 PC
Hardware Toggle Switch
(For PlayStation®4 consoles)
NORMAL STEERING
Mode Toggle Switch
- Functions only for “Steering Mode” compatible titles.
Please visit website for more information. (URL)
Connect to the USB port of the PlayStation®5 console.
[PS4 Normal Mode]
PS5 PS4 PC
Hardware Toggle Switch
NORMAL STEERING
Mode Toggle Switch
Connect to the USB port of the PlayStation®5 console.
[PC Mode]
PS5 PS4 PC
Hardware Toggle Switch
Connect to the USB port of the PC.
Download App
『HORI Device Manager』
Please download and install the “HORI Device Manager” from this product’s
website using your PC.
URL : https://hori.jp/manual/p5/spf-004/
The following features can be adjusted in the app:
- Quick Handling Mode
- Dead Zone Adjustment
- Sensitivity Adjustment
- Assign Mode
- Profile
- D-Pad/Analog Stick
Toggle Switch
Quick Handling Mode
Experience quicker handling by switching the max steering output from 270
degrees to 180 degrees.
Program LED (Left) will light up blue for 3 seconds.
Program LED (Left) will light up green for 3 seconds.
Directional Pad Control Toggle Switch
Directional pad controls can be toggled to directional pad, left stick or
right stick controls.
This product’s directional pad toggle function is not guaranteed to work with
all software.
- Please refer to the software’s instruction manual. This product does not work with Analog mode.
Directional pad
Left stick
Right stick
Adjustable Dead Zone
The dead zone play of centered wheel is adjustable to seven levels.
Program LED (Left) color will change to indicate the dead zone value.
(1)| | |
Program LED (Right) will turn on.
—|—|—|—
(2)| | |
Program LED (Right) will flash.
(3)| | |
Program LED (Left) color will change to indicate the selected rotation
angle.
(4)| | ****| Dead zone value increases by pressing up on the Directional
Pad.
⇒
Narrow
(5)| | ****| Dead zone value decreases by pressing down on the
Directional Pad.
⇐
Wide
(6)| | ****| Program LED (Left) will turn off.| Program LED (Right)
will turn off.
(The Program LED will light up red when assigning buttons.)
- If you do not perform step (2) after (1), the Program LED will turn off after four seconds and Dead Zone Adjustment mode will automatically end.
- During steps (2)~(3), only the steering unit and foot pedal input are enabled.
Button input from the controller to the PlayStation®5 console or PlayStation®4
console will be disabled. - Controller settings are saved even if the USB is disconnected.
| ⇐ Wide| Default|
Narrow ⇒
—|—|—|—
|
1
| 2| 3| 4| 5| 6|
7
LED color| Green| Yellow| Red| Purple| Blue|
Light Blue|
White
Adjustable Sensitivity
Steering wheel sensitivity is adjustable to seven levels.
The Program LED (Left) color will change to indicate the sensitivity value.
Steering unit
(1)| | **|
Program LED (Right) will turn on.
—|—|—|—
(2)| | **|
Program LED (Right) will flash.
(3)| | | Program LED (Left) color will change to indicate the
selected rotation angle.
(4)| | ****|
Sensitivity value increases by pressing up on the Directional Pad.
⇒
Responsive
(5)| | ****|
Sensitivity value decreases by pressing down on the Directional Pad.
⇐
Gradual
(6)| | ****| Program LED (Left) will turn off.| Program LED (Right)
will turn off.
(The ASSIGN LED will light up red when assigning buttons.)
- If you do not perform step (2) after (1), the Program LED will turn off after four seconds and Sensitivity Adjustment mode will automatically end.
- During steps (2)~(4), only the steering unit and foot pedal input are enabled. Button input from the controller to the PlayStation®5 console or PlayStation®4 console will be disabled.
- Controller settings are saved even if the USB is disconnected.
|
⇐Gradual (Steady steering)
| Default|
Responsive (Easy to turn)⇒
—|—|—|—
| 1| 2| 3| 4| 5| 6|
7
LED color
| Green| Yellow| Red| Purple| Blue| Light Blue|
White
Foot pedals
(1)| | ****|
****Program LED (Right) will turn on.
—|—|—|—
(2)| | | Program LED (Left) color will change to indicate the
selected rotation angle.| **Program LED (Right) will flash.
(3)| | **| Sensitivity value increases by pressing up on the
Directional Pad.
⇒
Responsive
(4)| | **| Sensitivity value decreases by pressing down on the
Directional Pad.
⇐
Gradual
(5)| | **| Program LED (Left) will turn off.| Program LED (Left) will
turn off.
(The Program LED will light up red when assigning buttons.)
- If you do not perform step (2) after (1), the Program LED will turn off after four seconds and Sensitivity Adjustment mode will automatically end.
- During steps (2)~(3), only the steering unit and foot pedal input are enabled.
Button input from the controller to the PlayStation®5 console or PlayStation®4
console will be disabled. - Controller settings are saved even if the USB is disconnected.
| ⇐Gradual|
Default
|
Responsive⇒
—|—|—|—
|
1
| 2| 3| 4| 5| 6| 7
LED color | Green| Yellow| Red| Purple| Blue| Light Blue|
White
Quick Handling Mode • Dead Zone Adjustment • Linearity Adjustment Reset
All
To simultaneously reset all of the following : Quick Handling Mode • Dead Zone
Adjustment • Linearity Adjustment.
| (1) | **** | ****Program LED (Right) will turn on. | |
|---|---|---|---|
| (2) | **** | Program LED (Left) will turn off. |
turn off.
(The ASSIGN LED will light up red when assigning buttons.)
(3)| When Quick Handling Mode is canceled, steering wheel input value
will default to 270°. Dead zone and linearity default values are set to “4”.
- If you do not perform step (2) after (1), the Program LED will turn o after four seconds and
assignment mode will automatically end.
Assign Mode
You can remap the function of buttons using this feature.
Programmable Buttons
L1 Button / R1 Button / L2 Button / R2 Button / L3 Button / R3 Button / L
paddle / R paddle L pedal / R pedal
Assignable Functions
Ο Button / X Button / Δ Button / Button / L1 Button / L2 Button / L3 Button /
R1 Button / R2 Button / R3 Button / L paddle / R paddle / L pedal / R pedal
Left stick (Right / Down / Left / Up) / Right stick (Right / Down / Left / Up)
/ Directional Pad
How to adjust
(1)| | ****|
****Program LED (Right) will turn on.
—|—|—|—
(2)|
Programmable Buttons| | Program LED (Right) will flash.
(3)|
Assignable Functions
- Press the direction (Right, Down, Left or Up) to
assign the desired function.
| | Program LED (Left)
will turn on.| Program LED (Right)
will turn off.
- For step 3, to assign a specific direction input of the Left Analog Stick to a button, set the Directional Pad toggle switch (DP/LS/RS) to [LS] and press the D-Pad in the direction you want to assign. For Right Analog Stick, set to [RS].
or
“LS” for Left stick “RS” for Right stick
- After 4 seconds of inactivity between steps, Program LED (Right) will turn off and program mode will stop.
- During steps 2, button input from the controller to the PlayStation®4 console will be disabled.
- When the Program LED (Left) turns on, it indicates that a button is remapped and will not turn off until button function is reset to default.
- If you want to disable button function, press and hold for 3 seconds the same button you pressed in step 2 at the time of step 3.
- If you pressed multiple buttons during step 3, the last button you pressed will be assigned.
- Controller settings are stored even if the USB is disconnected.
How to Reset Buttons Individually
For step 3, press the same button from step 2 to individually reset buttons to
default.
How to Reset All Buttons
(1)| | ****|
****Program LED (Right) will turn on.
—|—|—|—
(2)| | ****|
Program LED (Left / Right) will turn off and all button assignments will reset
to its default settings.
Main Features
Steering unit
External Dimensions  280×243×268mm
Steering Diameter 280mm
Angle of Rotation 270°
Weight : | 1.4kg
Cable Length 3.0m
Foot pedals
External Dimensions 225×300×148mm
Weight 0.9kg
Cable Length 1.5m
Simplified Declaration of Conformity
Hereby, HORI declares that this product is in compliance with Directive
2014/53/EU.
The full text of the EU declaration of conformity is available at the
following internet address: https://hori.co.uk/consumer-information/
For UK: Hereby, HORI declares that this product is in compliance with the
relevant statutory requirements.
The full text of the declaration of conformity is available at the following
internet address: https://hori.co.uk/consumer-information/
THE FCC WANTS YOU TO KNOW
This device complies with part 15 of the FCC Rules. Operation is subject to
the following two conditions: (1) This device may not cause harmful
interference, and (2) this device must accept any interference received,
including interference that may cause undesired operation.
NOTE: This equipment has been tested and found to comply with the limits for a
Class B digital device, pursuant to part 15 of the FCC Rules. These limits are
designed to provide reasonable protection against harmful interference in a
residential installation. This equipment generates, uses and can radiate radio
frequency energy and, if not installed and used in accordance with the
instructions, may cause harmful interference to radio communications. However,
there is no guarantee that interference will not occur in a particular
installation. If this equipment does cause harmful interference to radio or
television reception, which can be determined by turning the equipment off and
on, the user is encouraged to try to correct the interference by one or more
of the following measures:
– Reorient or relocate the receiving antenna.
– Increase the separation between the equipment and receiver.
– Connect the equipment into an outlet on a circuit different from that to
which the receiver is connected.
– Consult the dealer or an experienced radio/TV technician for help.
The normal function of the product may be disturbed by strong electro-magnetic
interference. If so, simply reset the product to resume normal operation by
following the instruction manual (How to connect). In case the function does
not resume, please relocate to an area which does not have electro-magnetic
interference to use the product.
The wires are not to be inserted into socket-outlets.
The packaging must be retained since it contains important information.
PRODUCT DISPOSAL INFORMATION
Where you see this symbol on any of our electrical products or packaging, it
indicates that the relevant electrical product or battery should not be
disposed of as general household waste in Europe. To ensure the correct waste
treatment of the product and battery, please dispose of them in accordance
with any applicable local laws or requirements for disposal of electrical
equipment or batteries. In so doing, you will help to conserve natural
resources and improve standards of environmental protection in treatment and
disposal of electrical waste. Applicable to EU countries and Turkey only.
EU and Turkey only
US
Warranty HORI warrants to the original purchaser that the product purchased
new in its original packaging shall be free of any defects in material and
workmanship for a period of 1 year from the original date of purchase. If the
warranty claim cannot be processed through the original retailer please
contact HORI customer support directly at
info@horiusa.com. Please visit
http://stores.horiusa.com/policies/ for warranty details.
EU
Warranty For all warranty claims made within the first 30 days after purchase,
please check with the retailer where the original purchase was made for
details. If the warranty claim cannot be processed through the original
retailer or for any other inquiries pertaining to our products, please contact
HORI customer support directly at info@horiuk.com.
“ “, “PlayStation”, “PS5”, “PS4” and “DualSense” are registered trademarks or
trademarks of Sony Interactive Entertainment Inc. All rights reserved.
All other trademarks are the property of their respective owners.
Manufactured and distributed under license from Sony Interactive
Entertainment.
Ages 6+
Documents / Resources
| HORI
43 Racing Wheel
Apex
[pdf] Instruction Manual
43 Racing Wheel Apex, 43, Racing Wheel Apex, Wheel Apex, Apex
—|—
References
- Consumer Information
- 株式会社 HORI |
Read User Manual Online (PDF format)
Read User Manual Online (PDF format) >>
Download This Manual (PDF format)
Download this manual >>
Японская компания HORI присутствует на рынке игровой периферии с 1967 года. Почти столько же времени, сколько существует Sony. Компания производит игровые аксессуары и разнотипные контроллеры для современных серий консолей: PlayStation и Xbox. На сайте HORI можно найти разные игровые манипуляторы, некоторые по стилистике похожи на первые геймпады для приставки Nintendo. К нам на тесты попал беспроводной руль с поддержкой управления сразу для трех платформ: ПК, PS4 и PS5.
Характеристики руля
- Габаритные размеры (ШхВхГ), мм: 241 х 162 х 168
- Способы крепления: на пять съемных присосок; на струбцину;
- Допустимая толщина стола для крепления на струбцину: от 6 мм до 45 мм
- Максимальный угол поворота: 135° в каждую из сторон (270° суммарно)
- Масса: 700 г
- Длина интерфейсного кабеля: 1,5 м
- Емкость аккумулятора: Li-ion 850 мА*ч
- Официальный сайт
- Инструкция пользователя
- Купить руль
Характеристики педального блока
- Габаритные размеры (ШхВхГ): 230 х 305 (в разложенном виде) х 180
- Количество педалей: 2
- Методы крепления: естественный (сила трения);
Комплектация

- Беспроводной руль
- Блок педалей
- Провод для соединения педалей с рулем
- Провод USB – USB micro-B для зарядки руля
- Инструкция пользователя
- Струбцина
- Крепящее устройство
- Пять съемных присосок
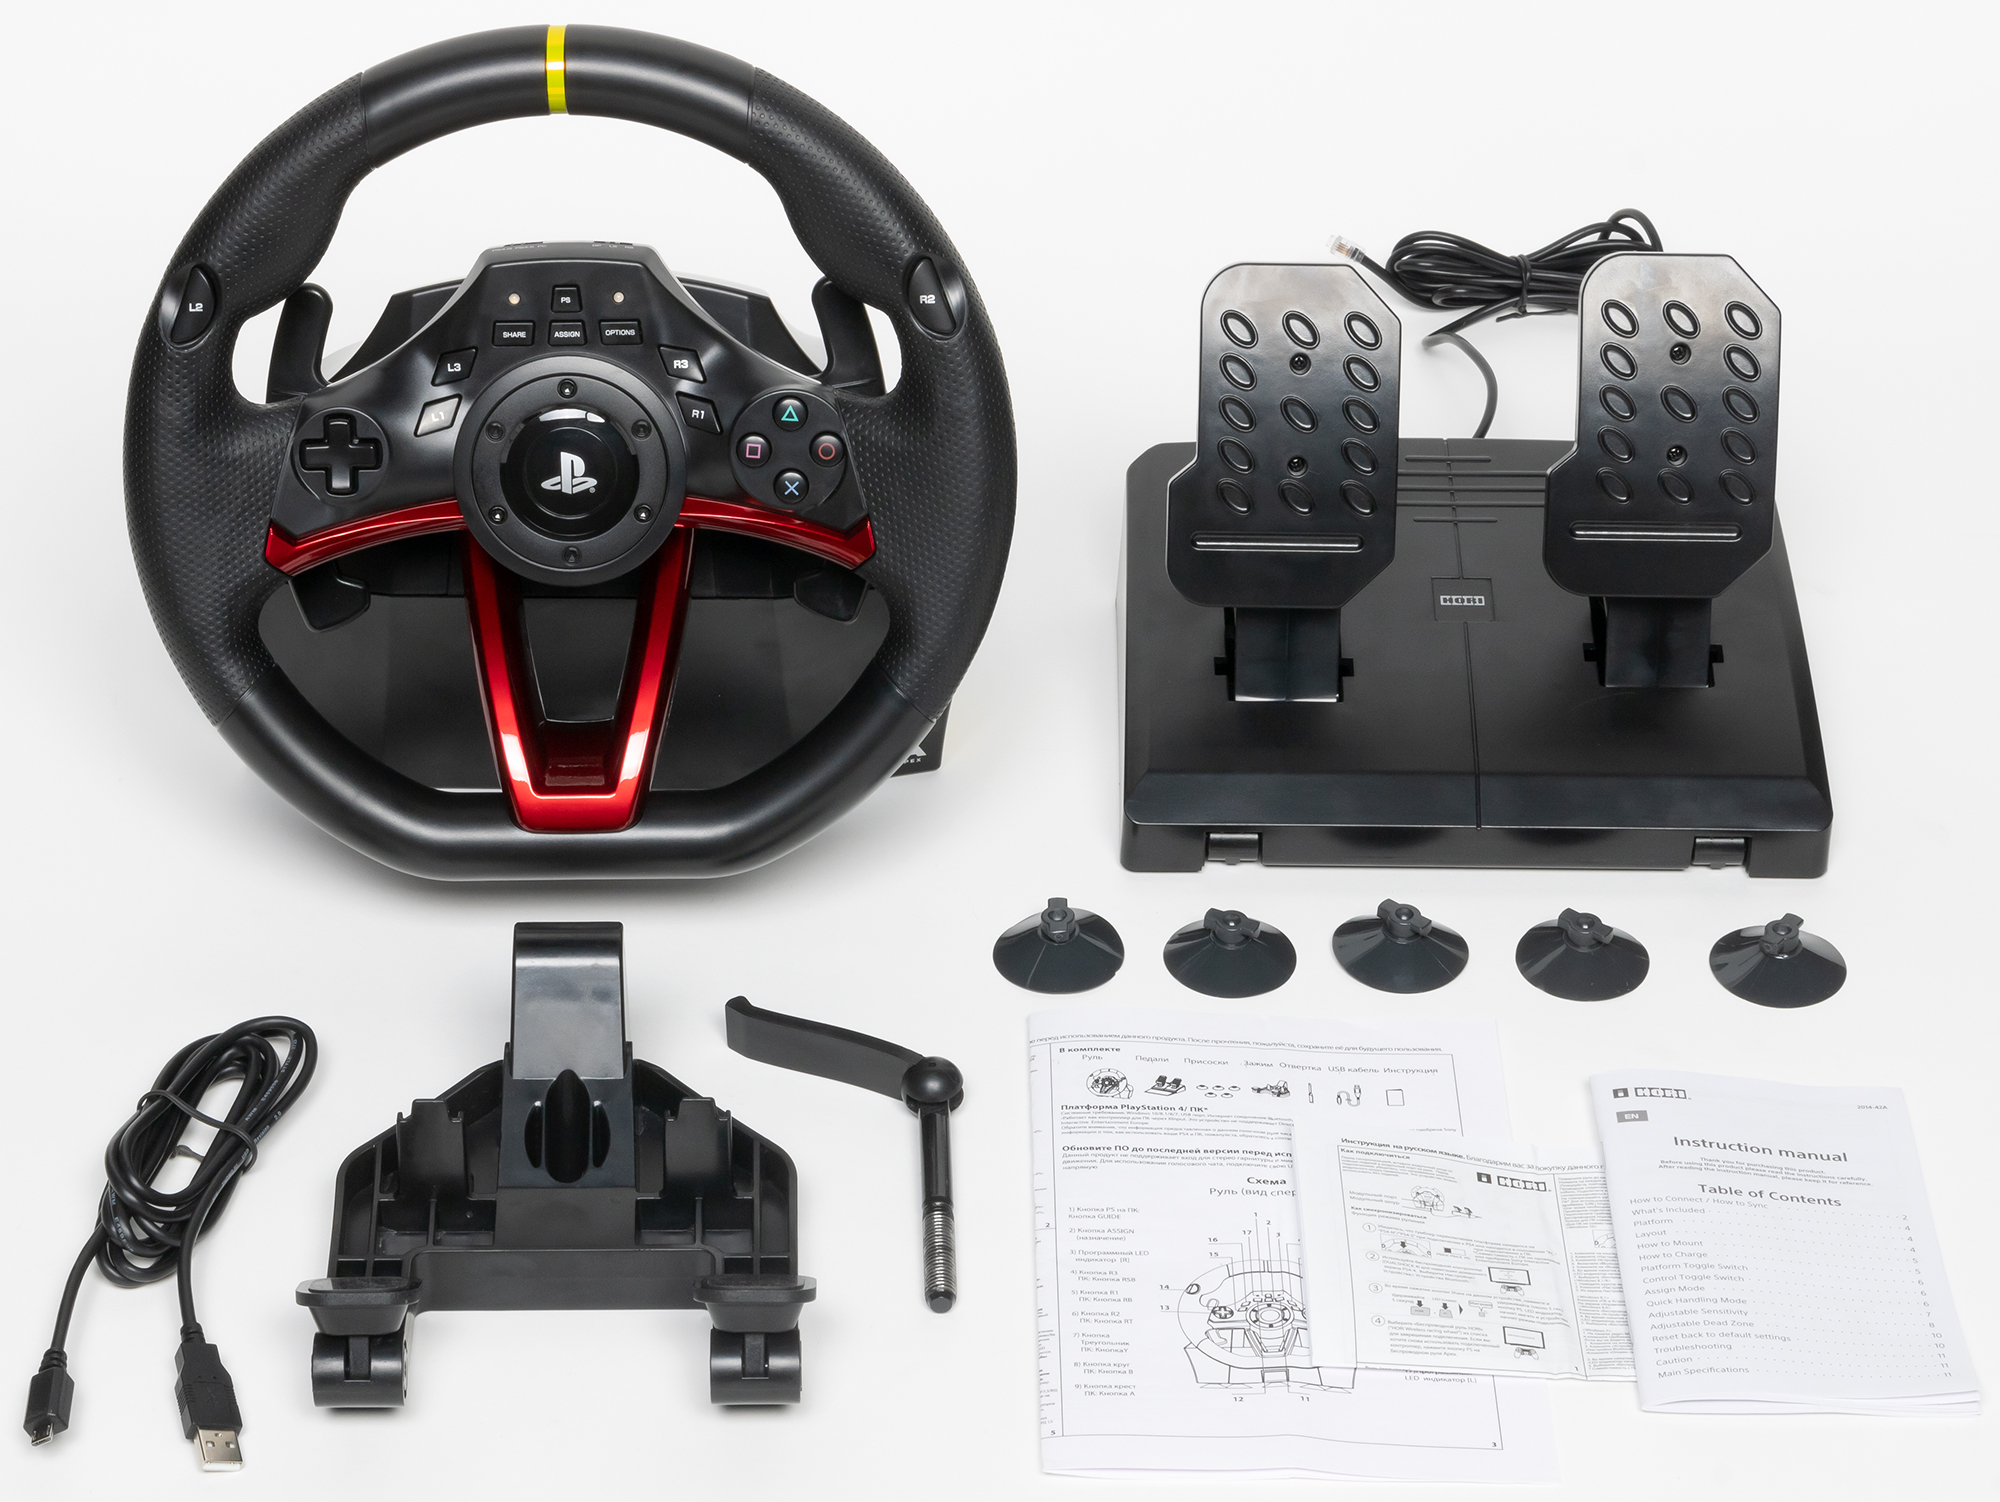
Дизайн
Игровой манипулятор на первый взгляд выглядит как стильный спортивный руль гоночного болида, по центру красуется логотип Sony PlayStation. Он тут неспроста. Hori владеет лицензией от Sony на использование фирменных программ и компонентов, что позволяет рулю иметь вибро-отклик как у контроллеров DualShock и быть совместимым с большим списком игр и работать в них как руль, а не эмулятор геймпада.

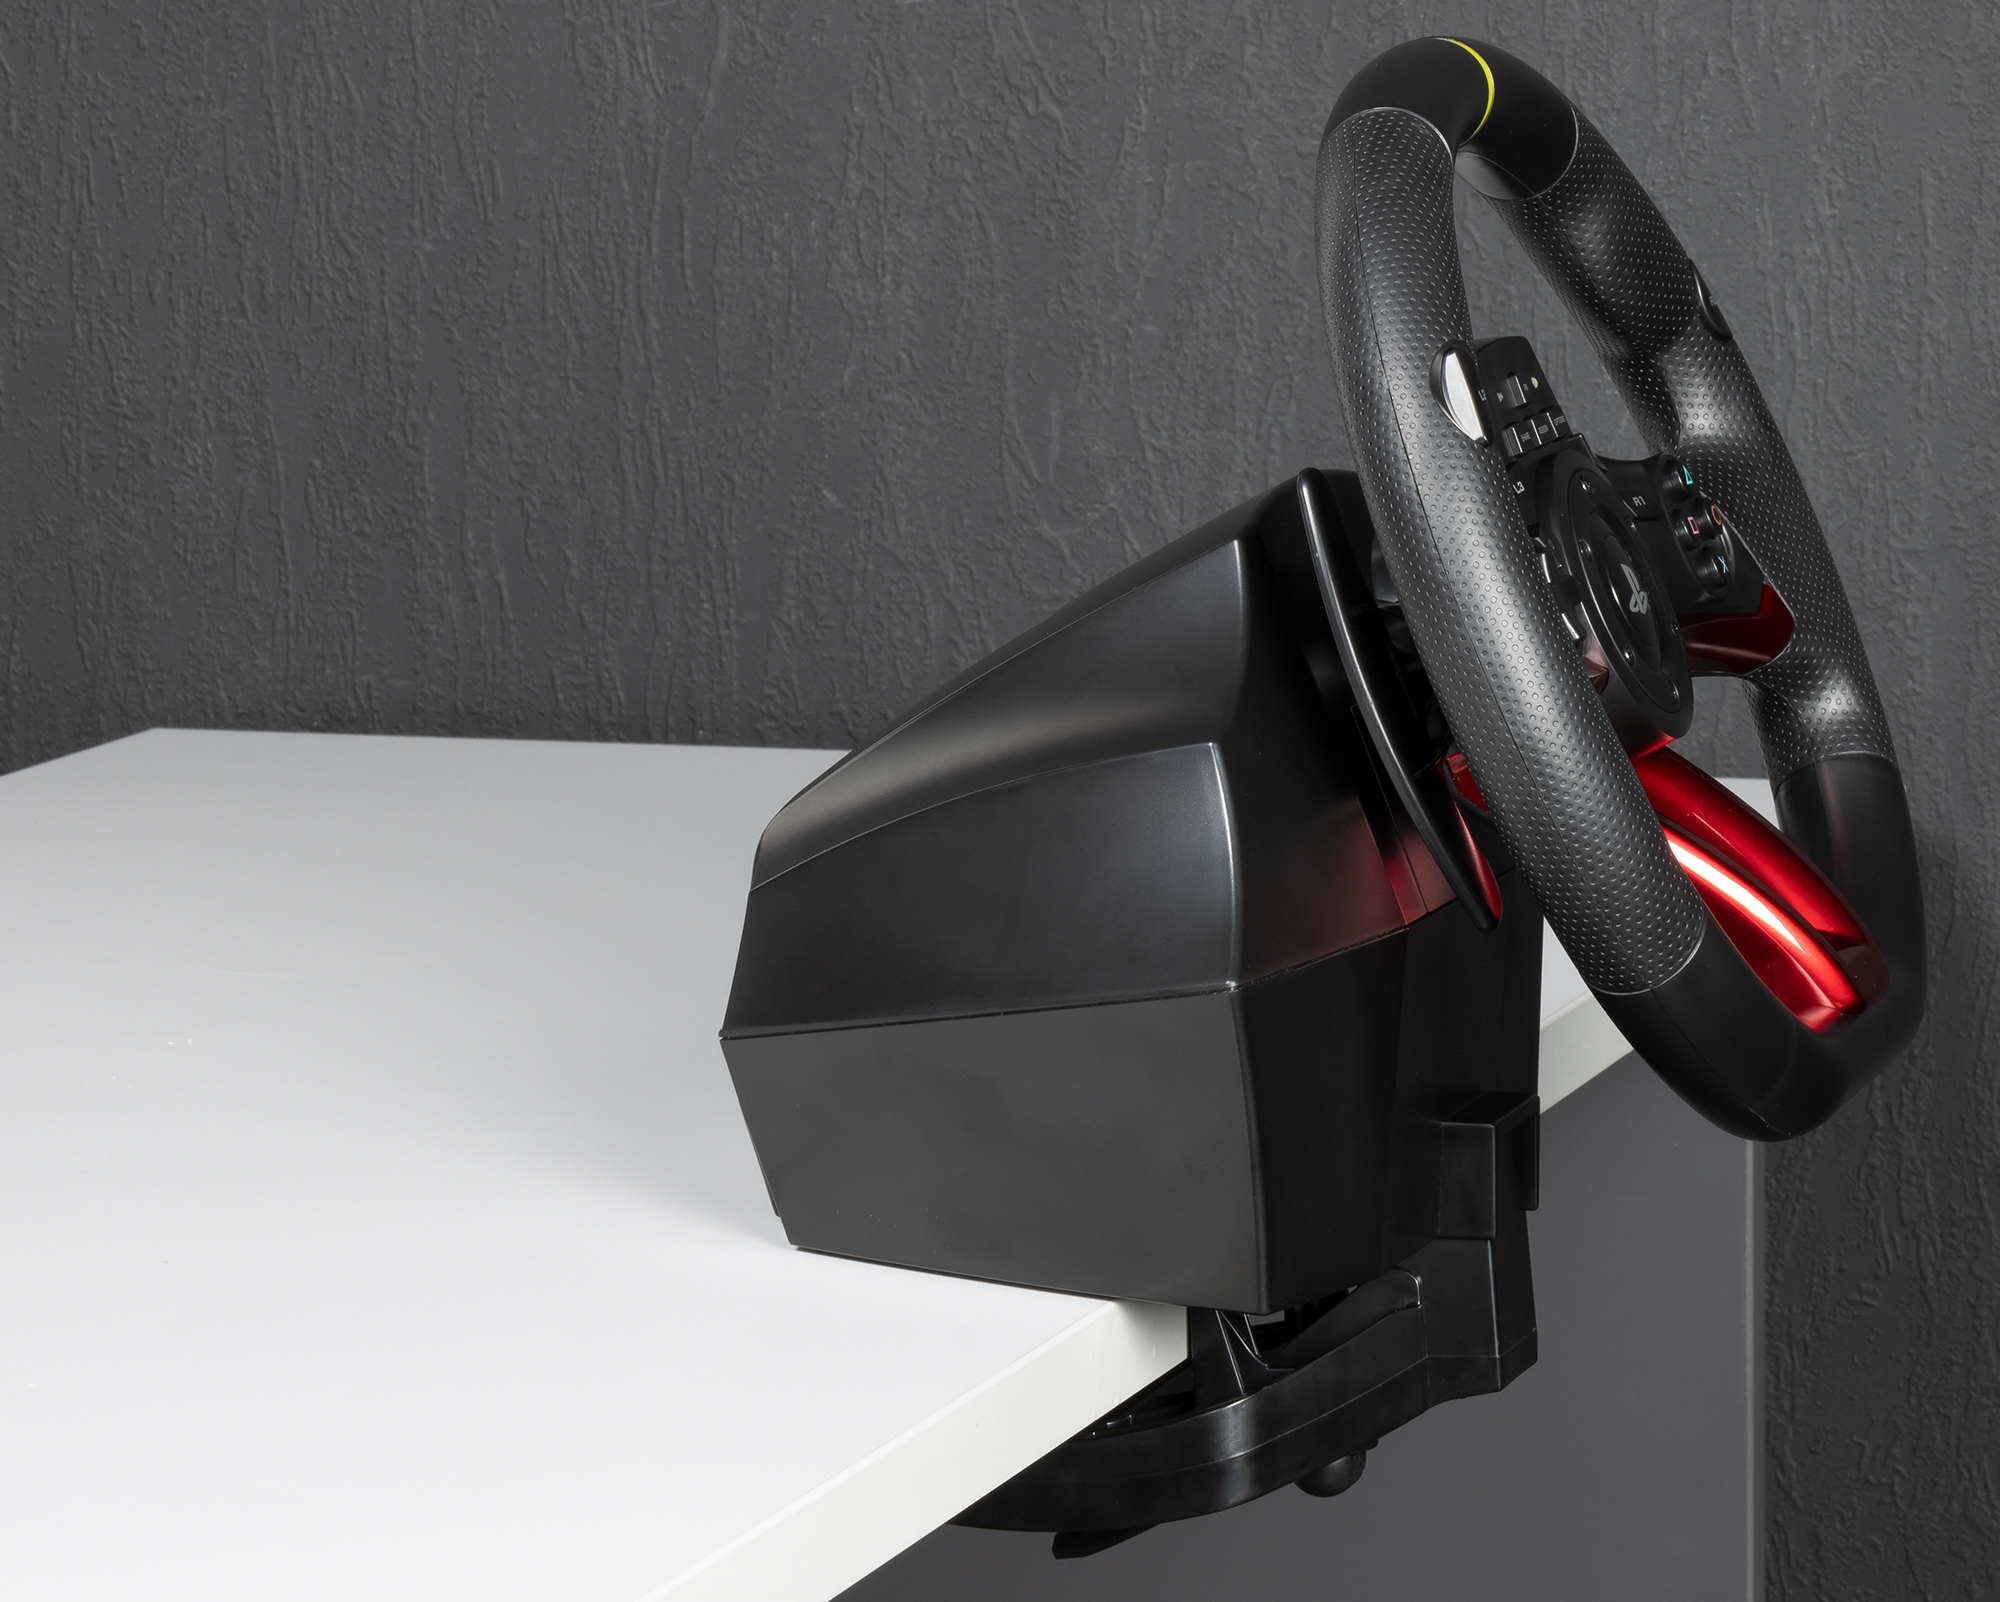
Руль состоит из двух частей: вращающаяся часть (рулевое колесо) и неподвижный блок управления, который отвечает за крепление устройства к поверхности и передачу сигнала на консоль или ПК. Связь осуществляется только посредством Bluetooth.
Перед сопряжением с устройством, следует перевести тумблер на верхней стороне руля в нужное положение, в соответствии с подключаемой платформой. Каждой из трех платформ соответствует свое положение. Там же есть тумблер отвечающий за смену типа управлением курсором в игре: DP – directional pad (крестовина), LS – left stick (левый стик), RS – right stick (правый стик).

Также там есть небольшая утопленная кнопка, которая при помощи скрепки позволит сбросить руль до заводских настроек.
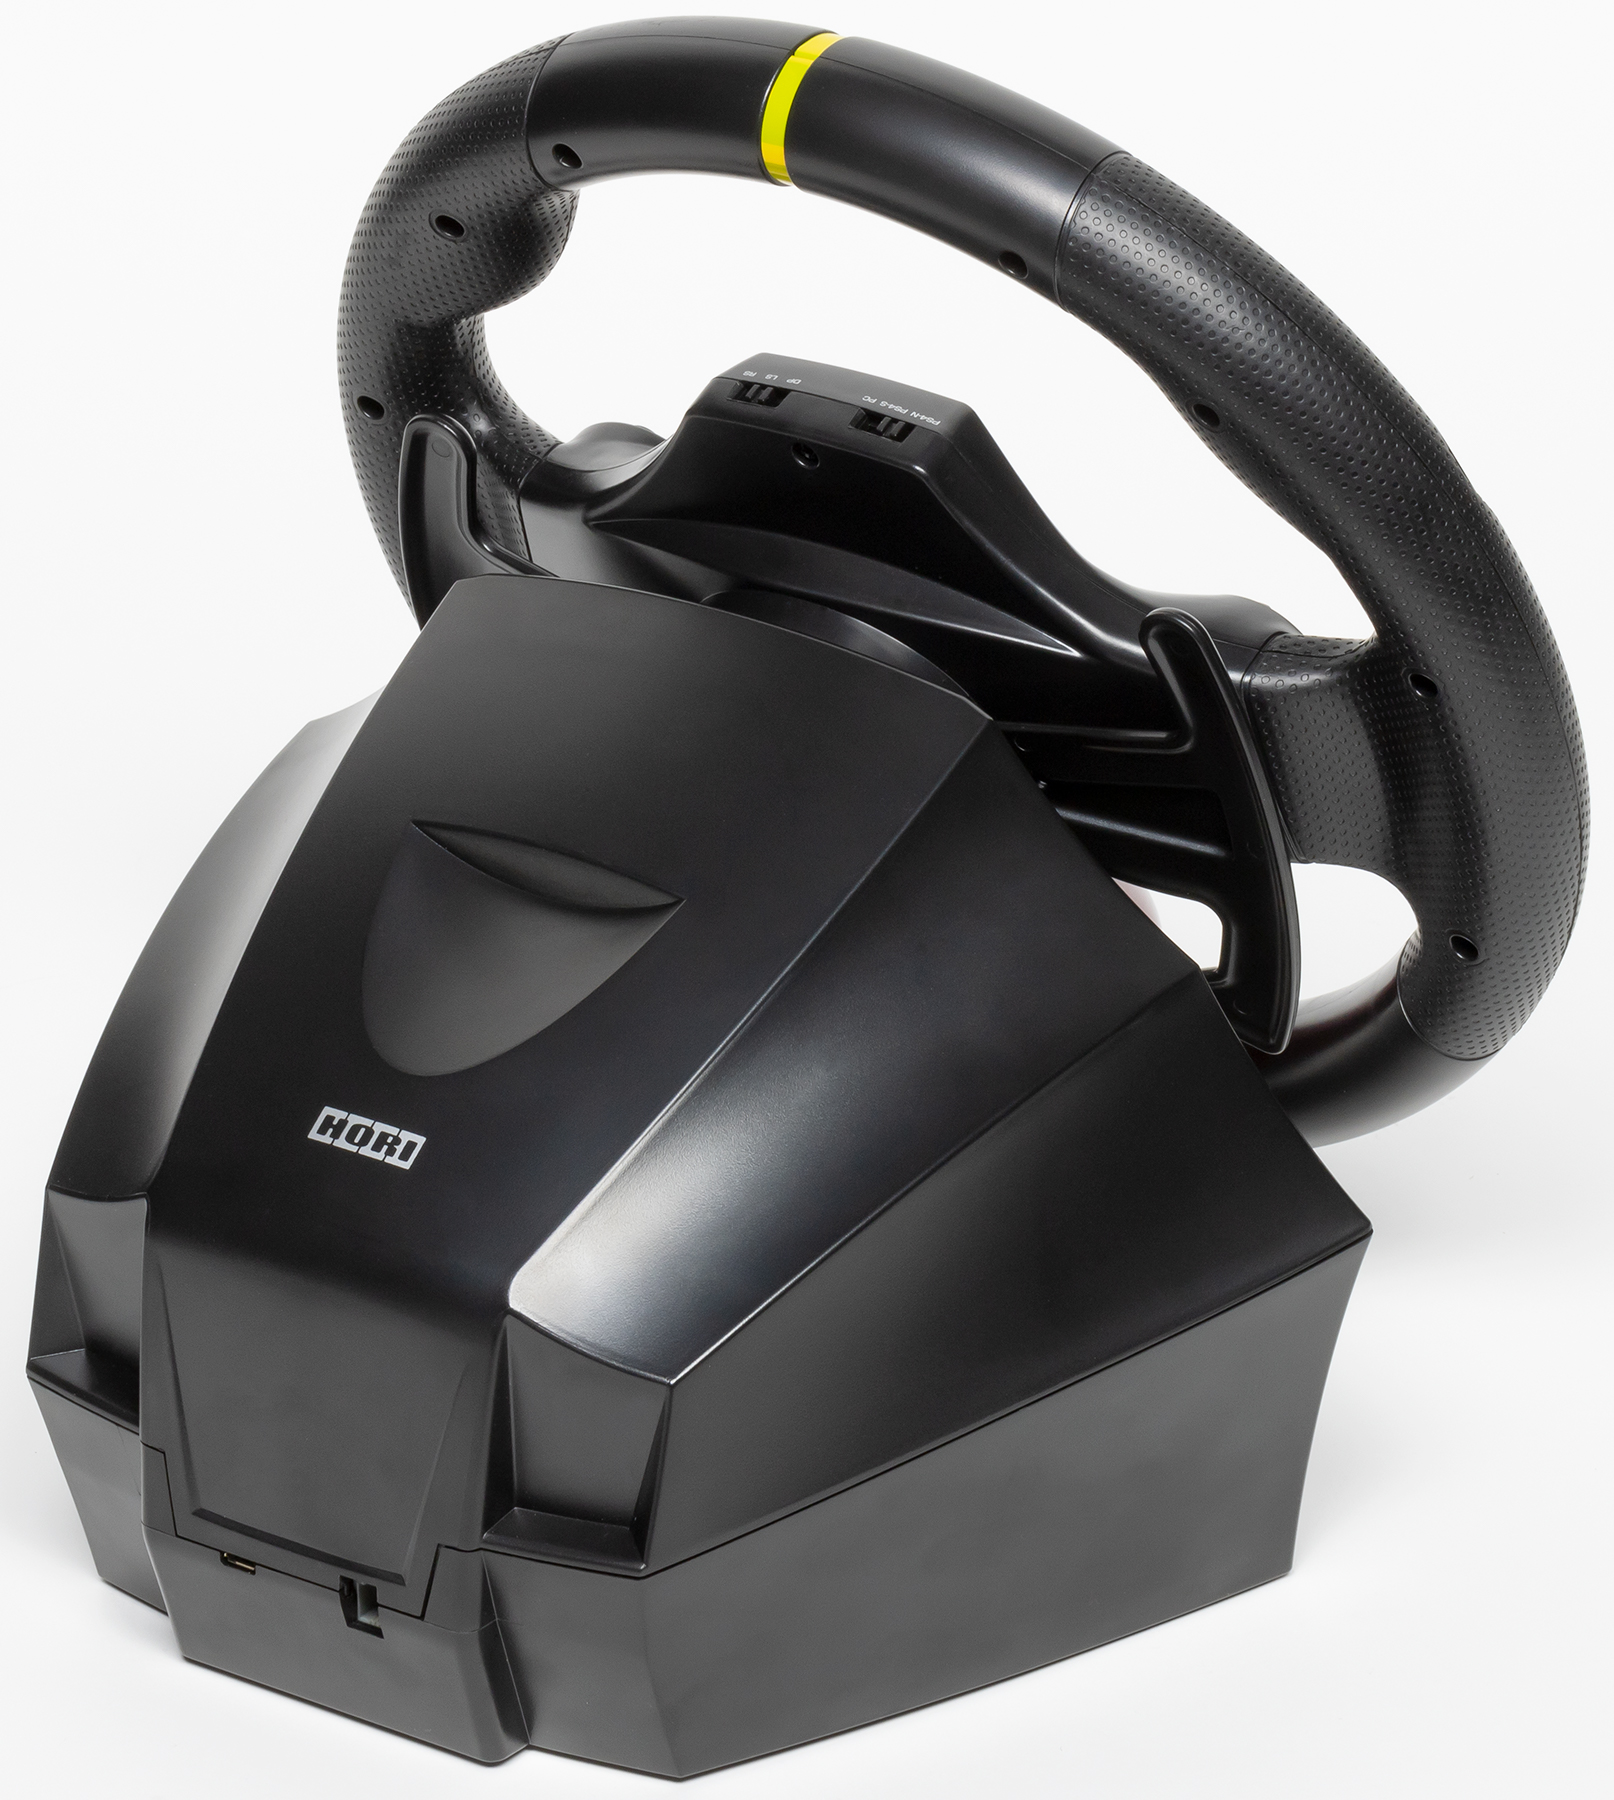
Руль обладает встроенным аккумулятором, что позволяет без дополнительной зарядки играть в течении целого дня.
Индикатором центрального положения рулевого колеса служит желтая полоска. Если при движении прямо это метка смещена в сторону, значит пора калибровать.
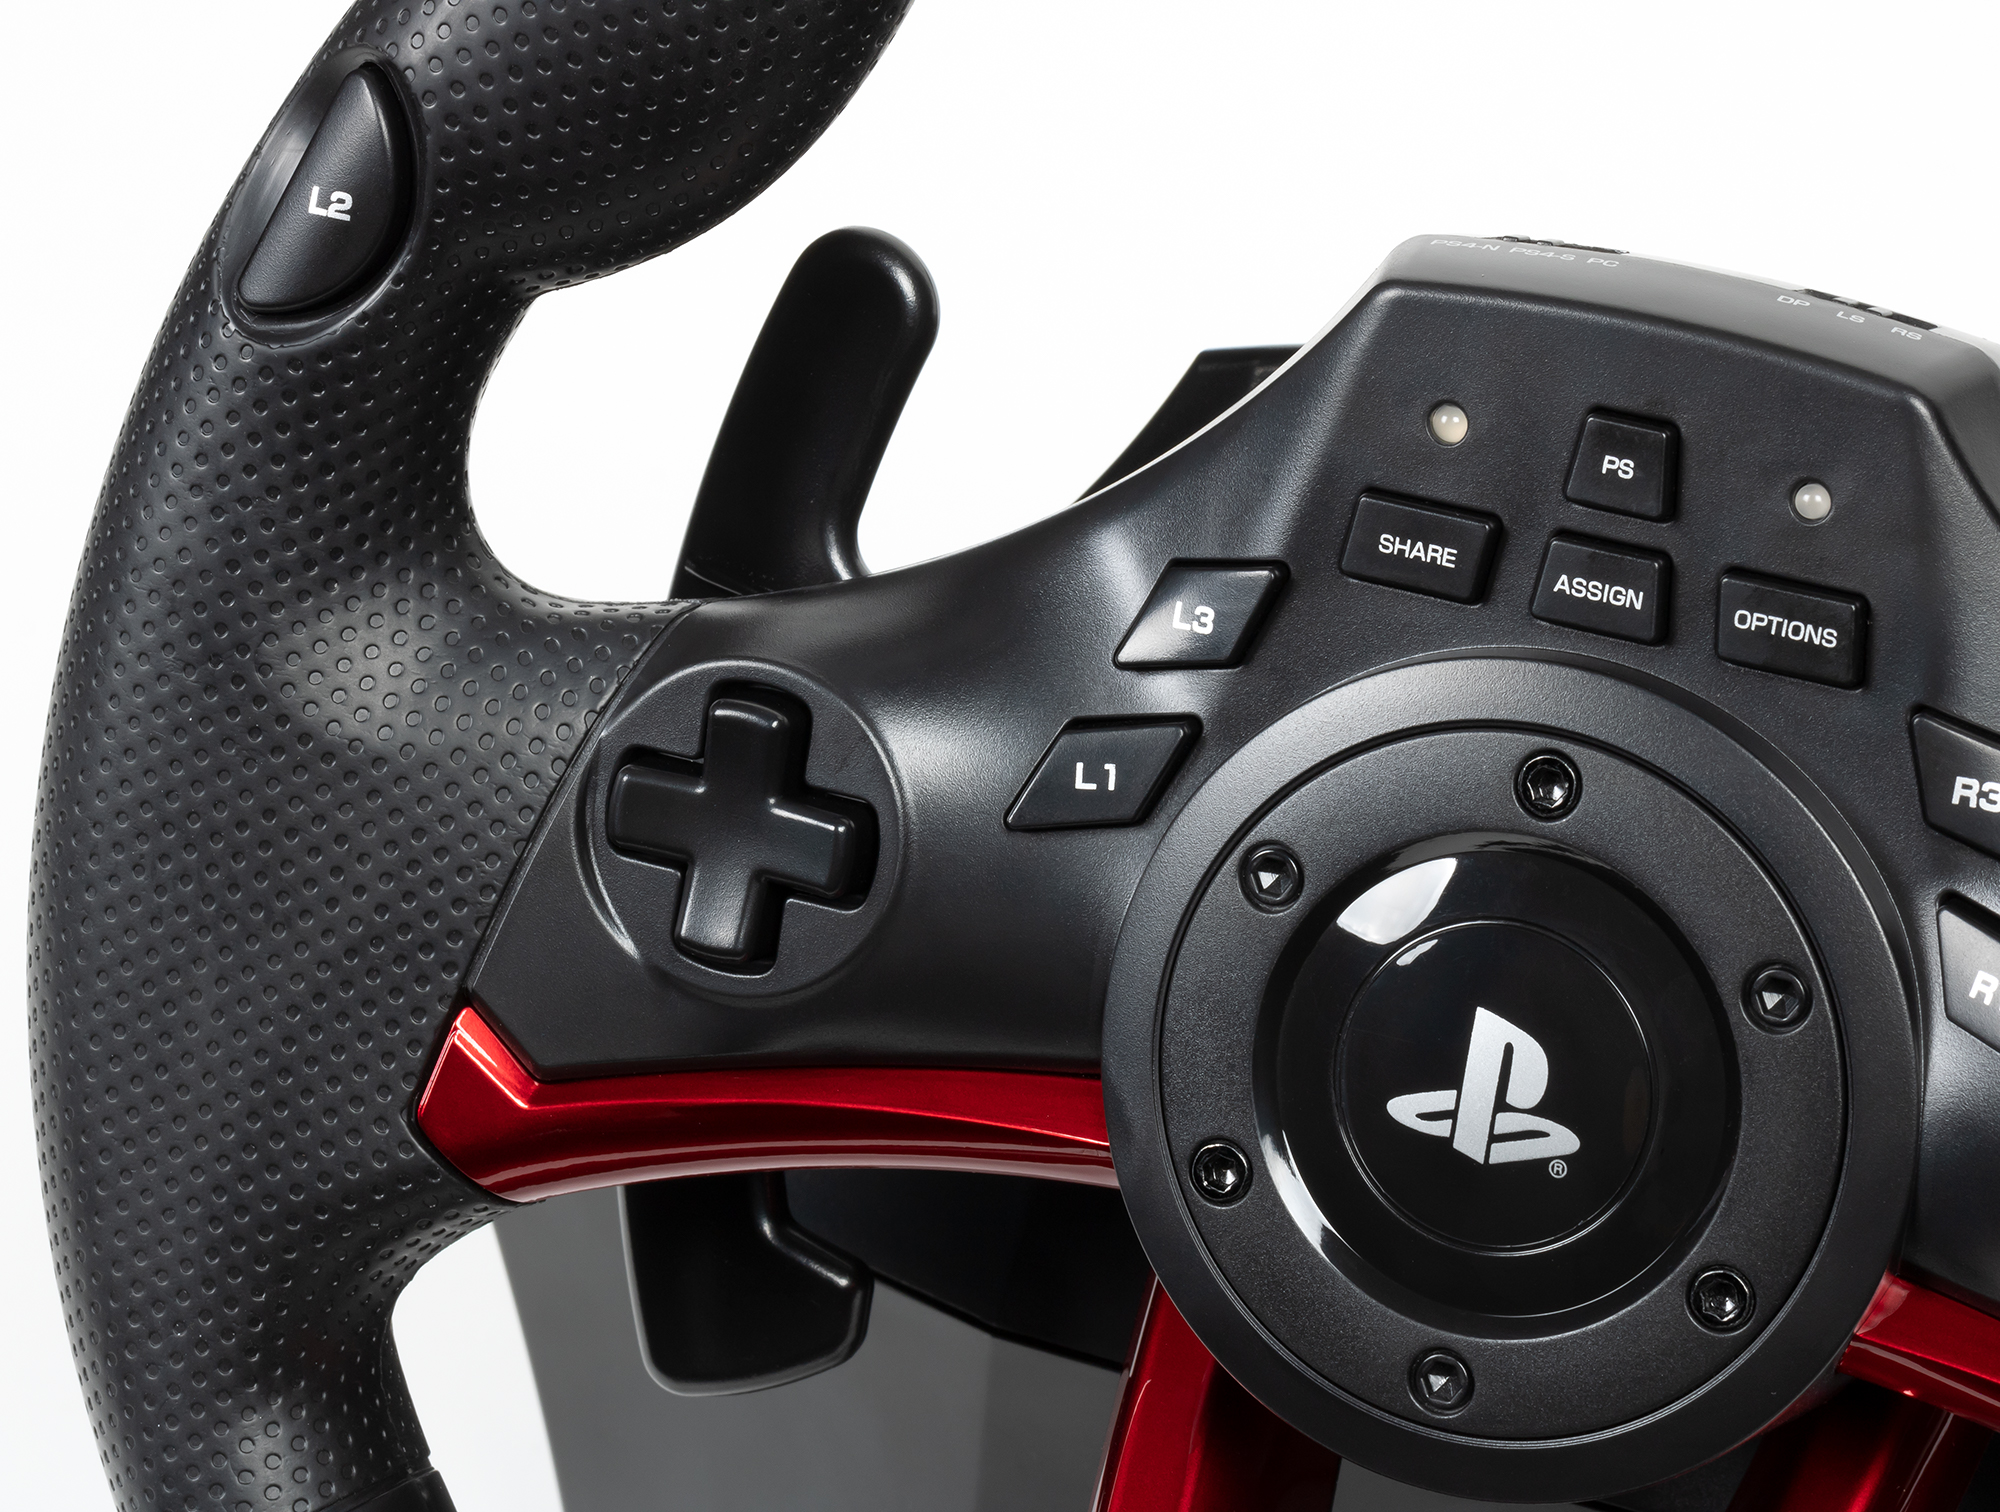
Чуть ниже, находятся первые кнопки: L2 и R2, которые соответствуют лепесткам геймпада второй нижний слева и справа.
Часть рулевого колеса прорезинена и приятна на ощупь. Основные кнопки расположены на центральной части руля. В верхней части основного блока расположена кнопка PS, которая по умолчанию вызывает меню системы. Слева и справа от нее расположены два индикаторных светодиода, которые позволят определить: заряд аккумулятора руля, соединено ли устройство с консолью, режим работы и т.д.
Ниже кнопки PS расположена вторая строчка кнопок: Share, Assign и Options, которые соответствуют кнопкам на геймпаде DualShock. Еще ниже, расположены кнопки L3 и R3, которые соответствуют нажатию на стики геймпада.
На левой стороне вынесена крестовина для удобной навигации по меню игры или системы консоли.
На правой стороне рулевого колеса расположены основные кнопки управления системой: квадрат, треугольник, круг и крестик.
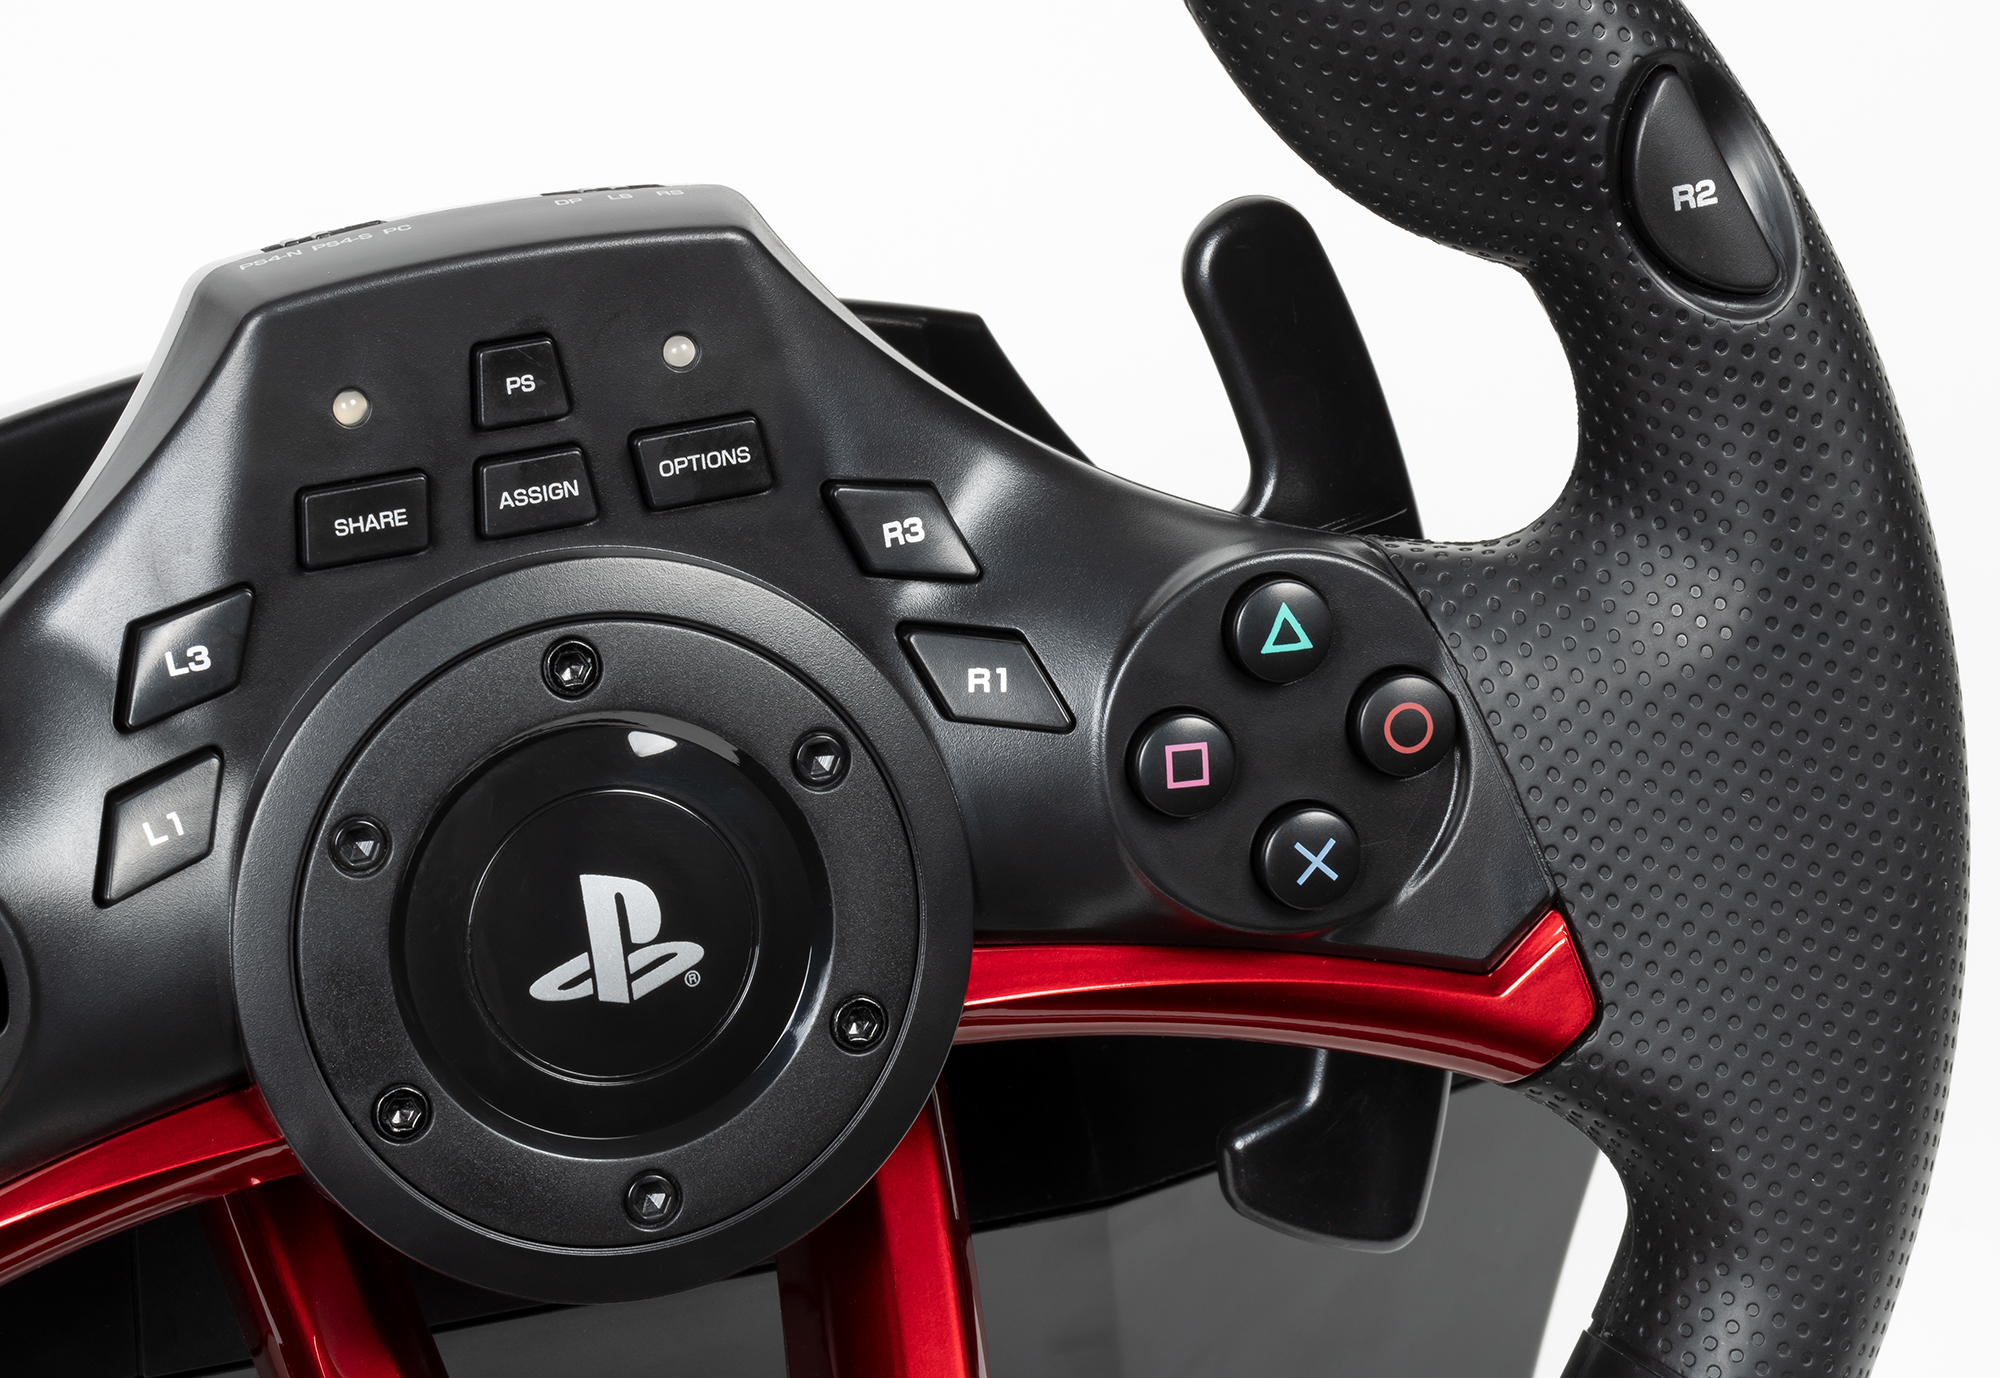
Особенно отметим, что за рулевым колесом находятся два секвентальных подрулевых лепестка. Управление напоминает смену передач на некоторых машинах с АКПП. По умолчанию эти рычажки дублируют L1 и R1 геймпада.
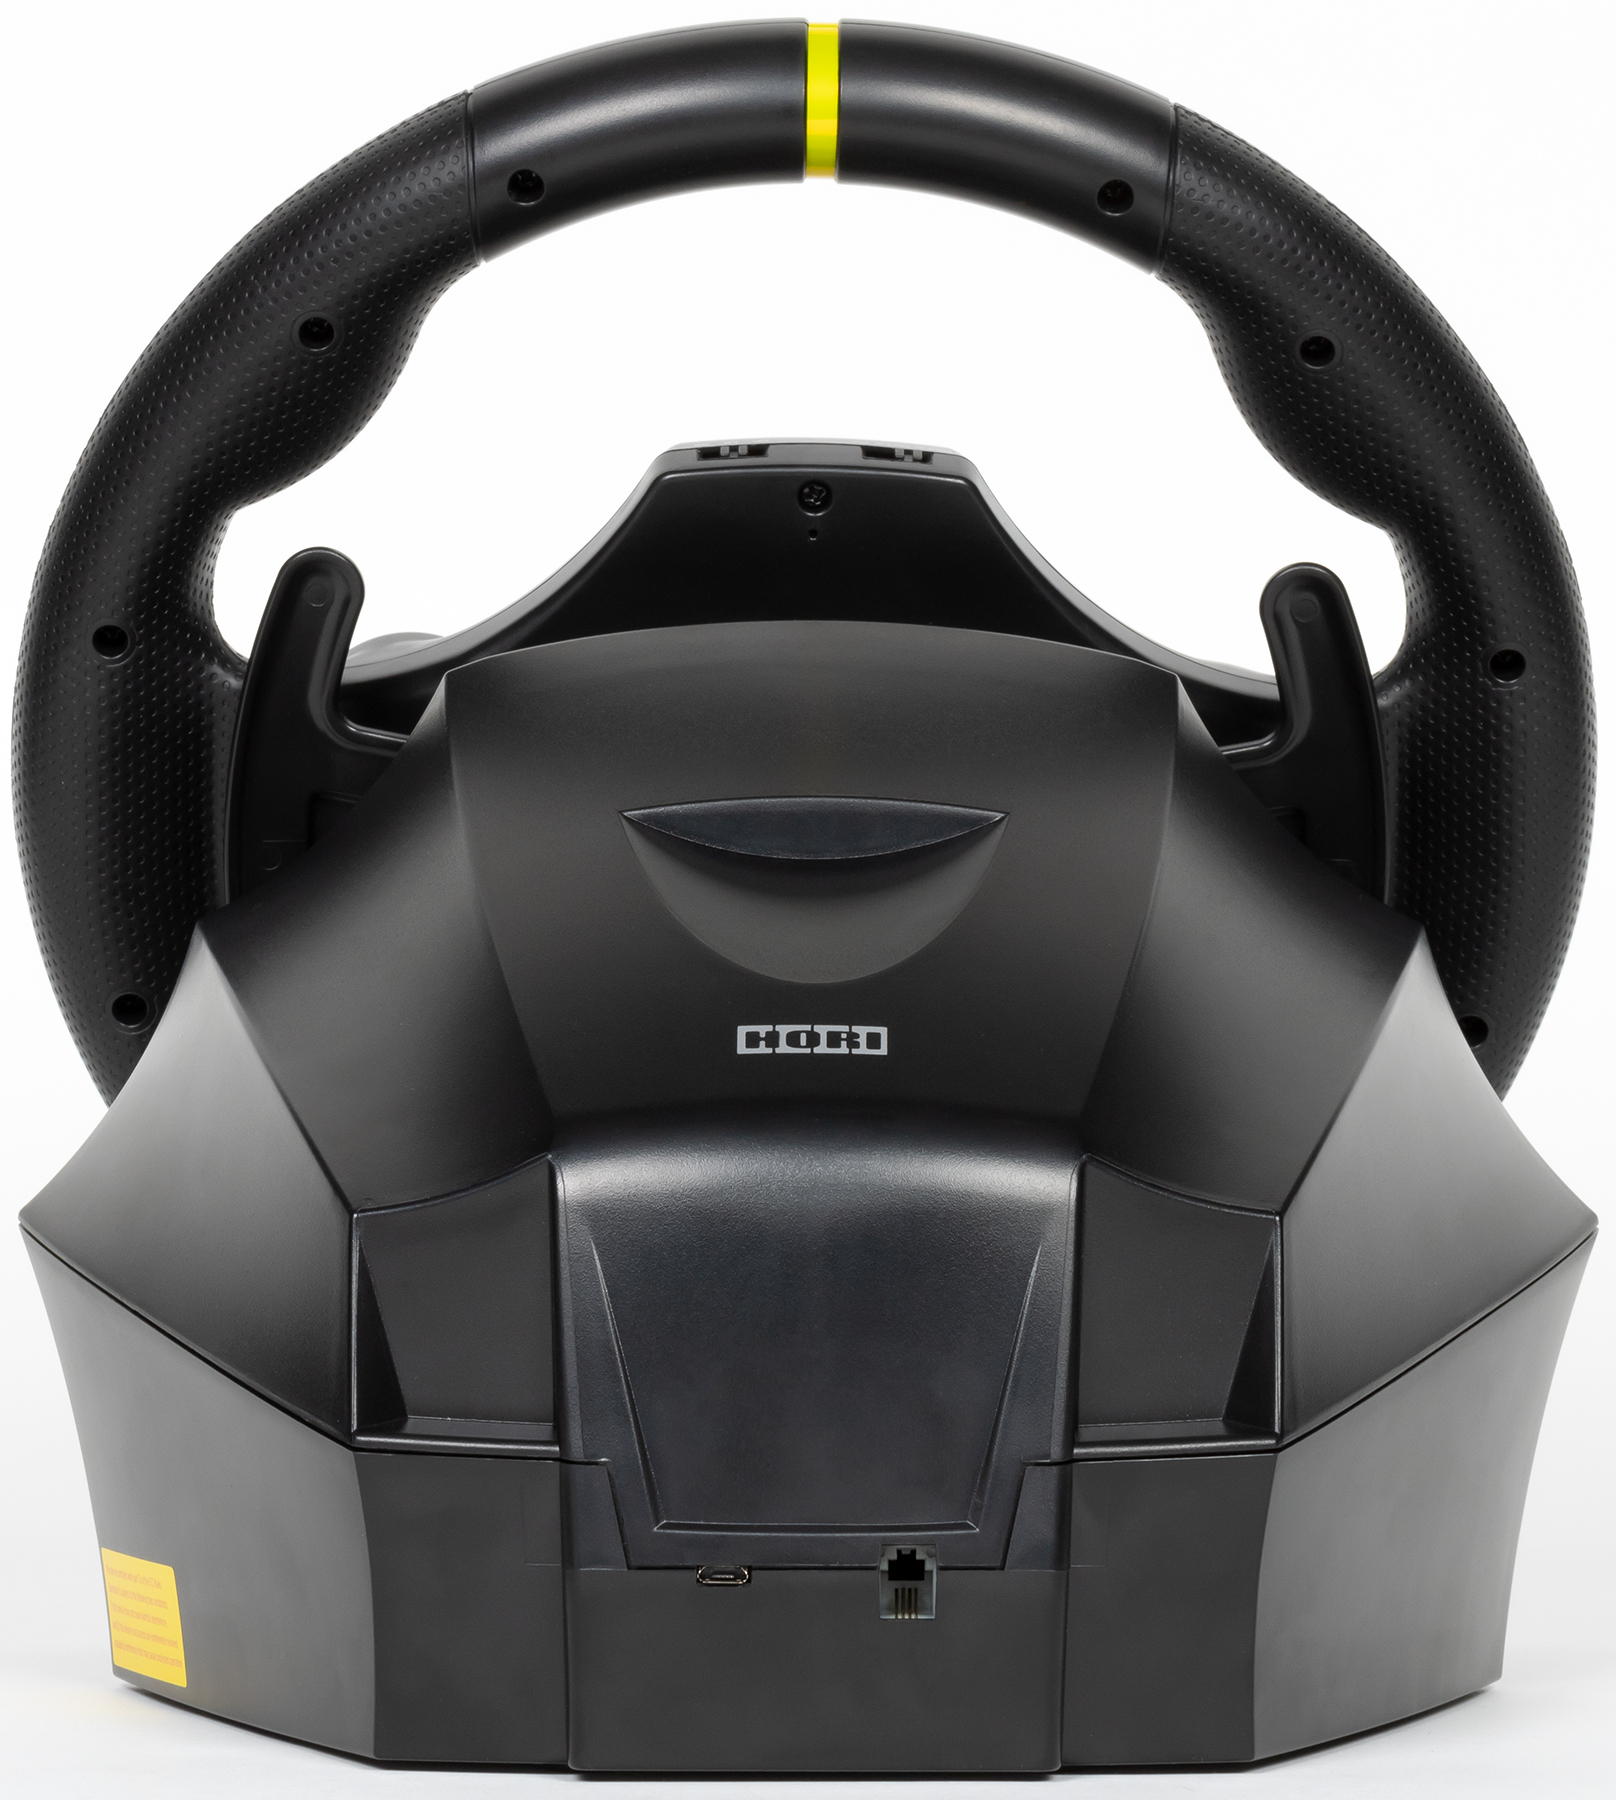
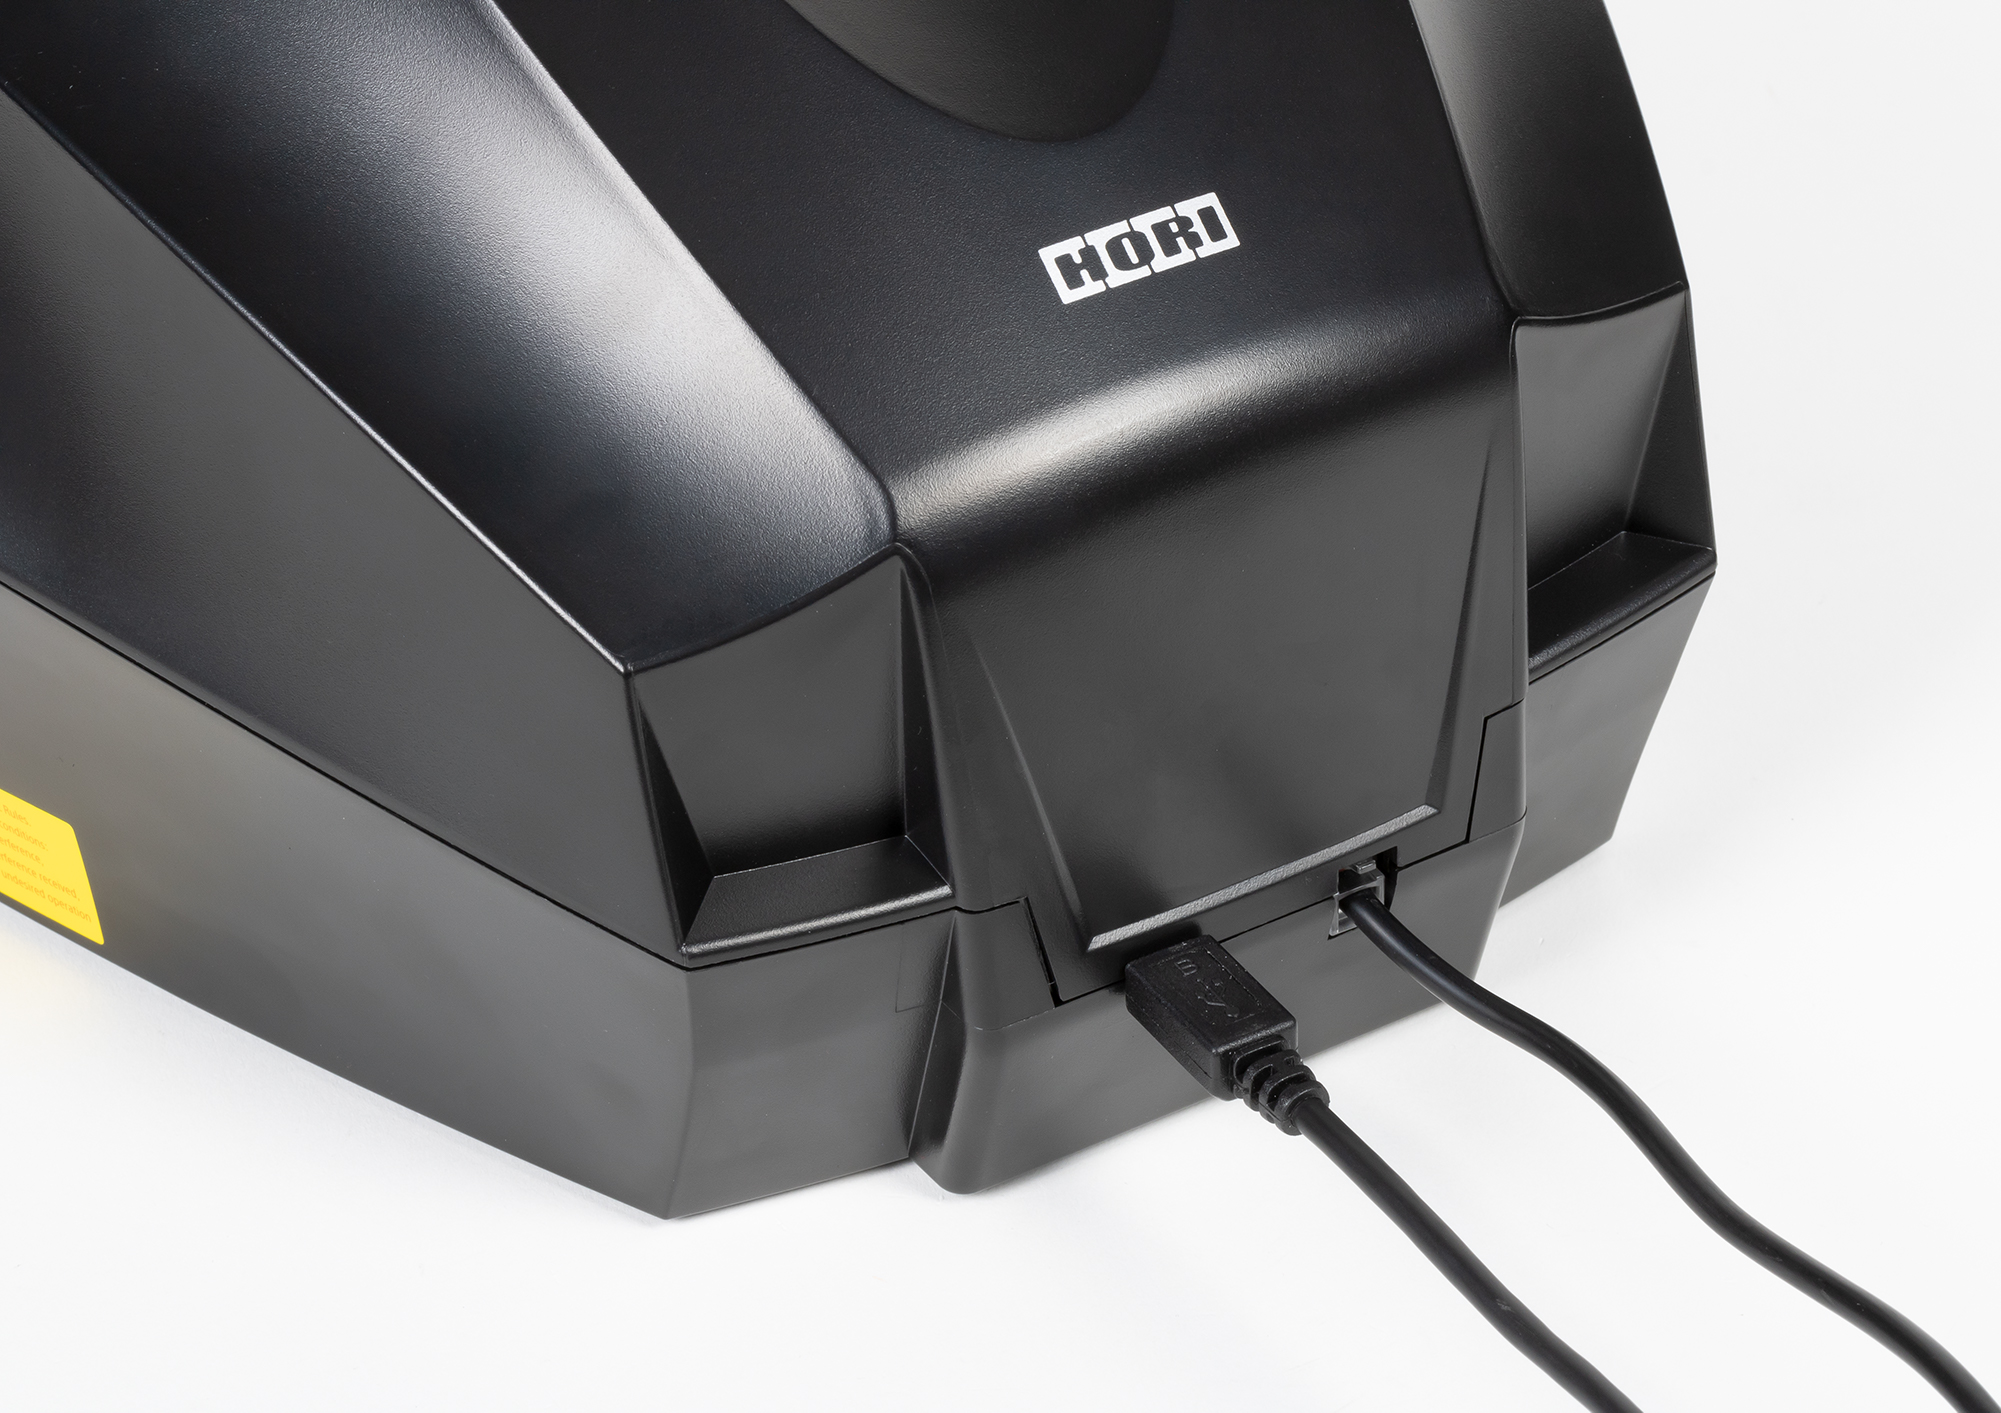
На тыльной стороне расположены два порта: USB micro-B для зарядки устройства удобным способом и и разъем для подключения педального блока по кабелю.
В правом углу лицевой стороны красуется шильдик, на котором написано серебристой краской название устройства “Wireless Racing Wheel Apex”.

На днище расположено большое множество мест для крепления. Начнем с пяти прямоугольных отверстий предназначеныx для съемных присосок, которые фиксируются в корпусе путем проталкивания и прокручивания вокруг своей оси каждой из присосок.

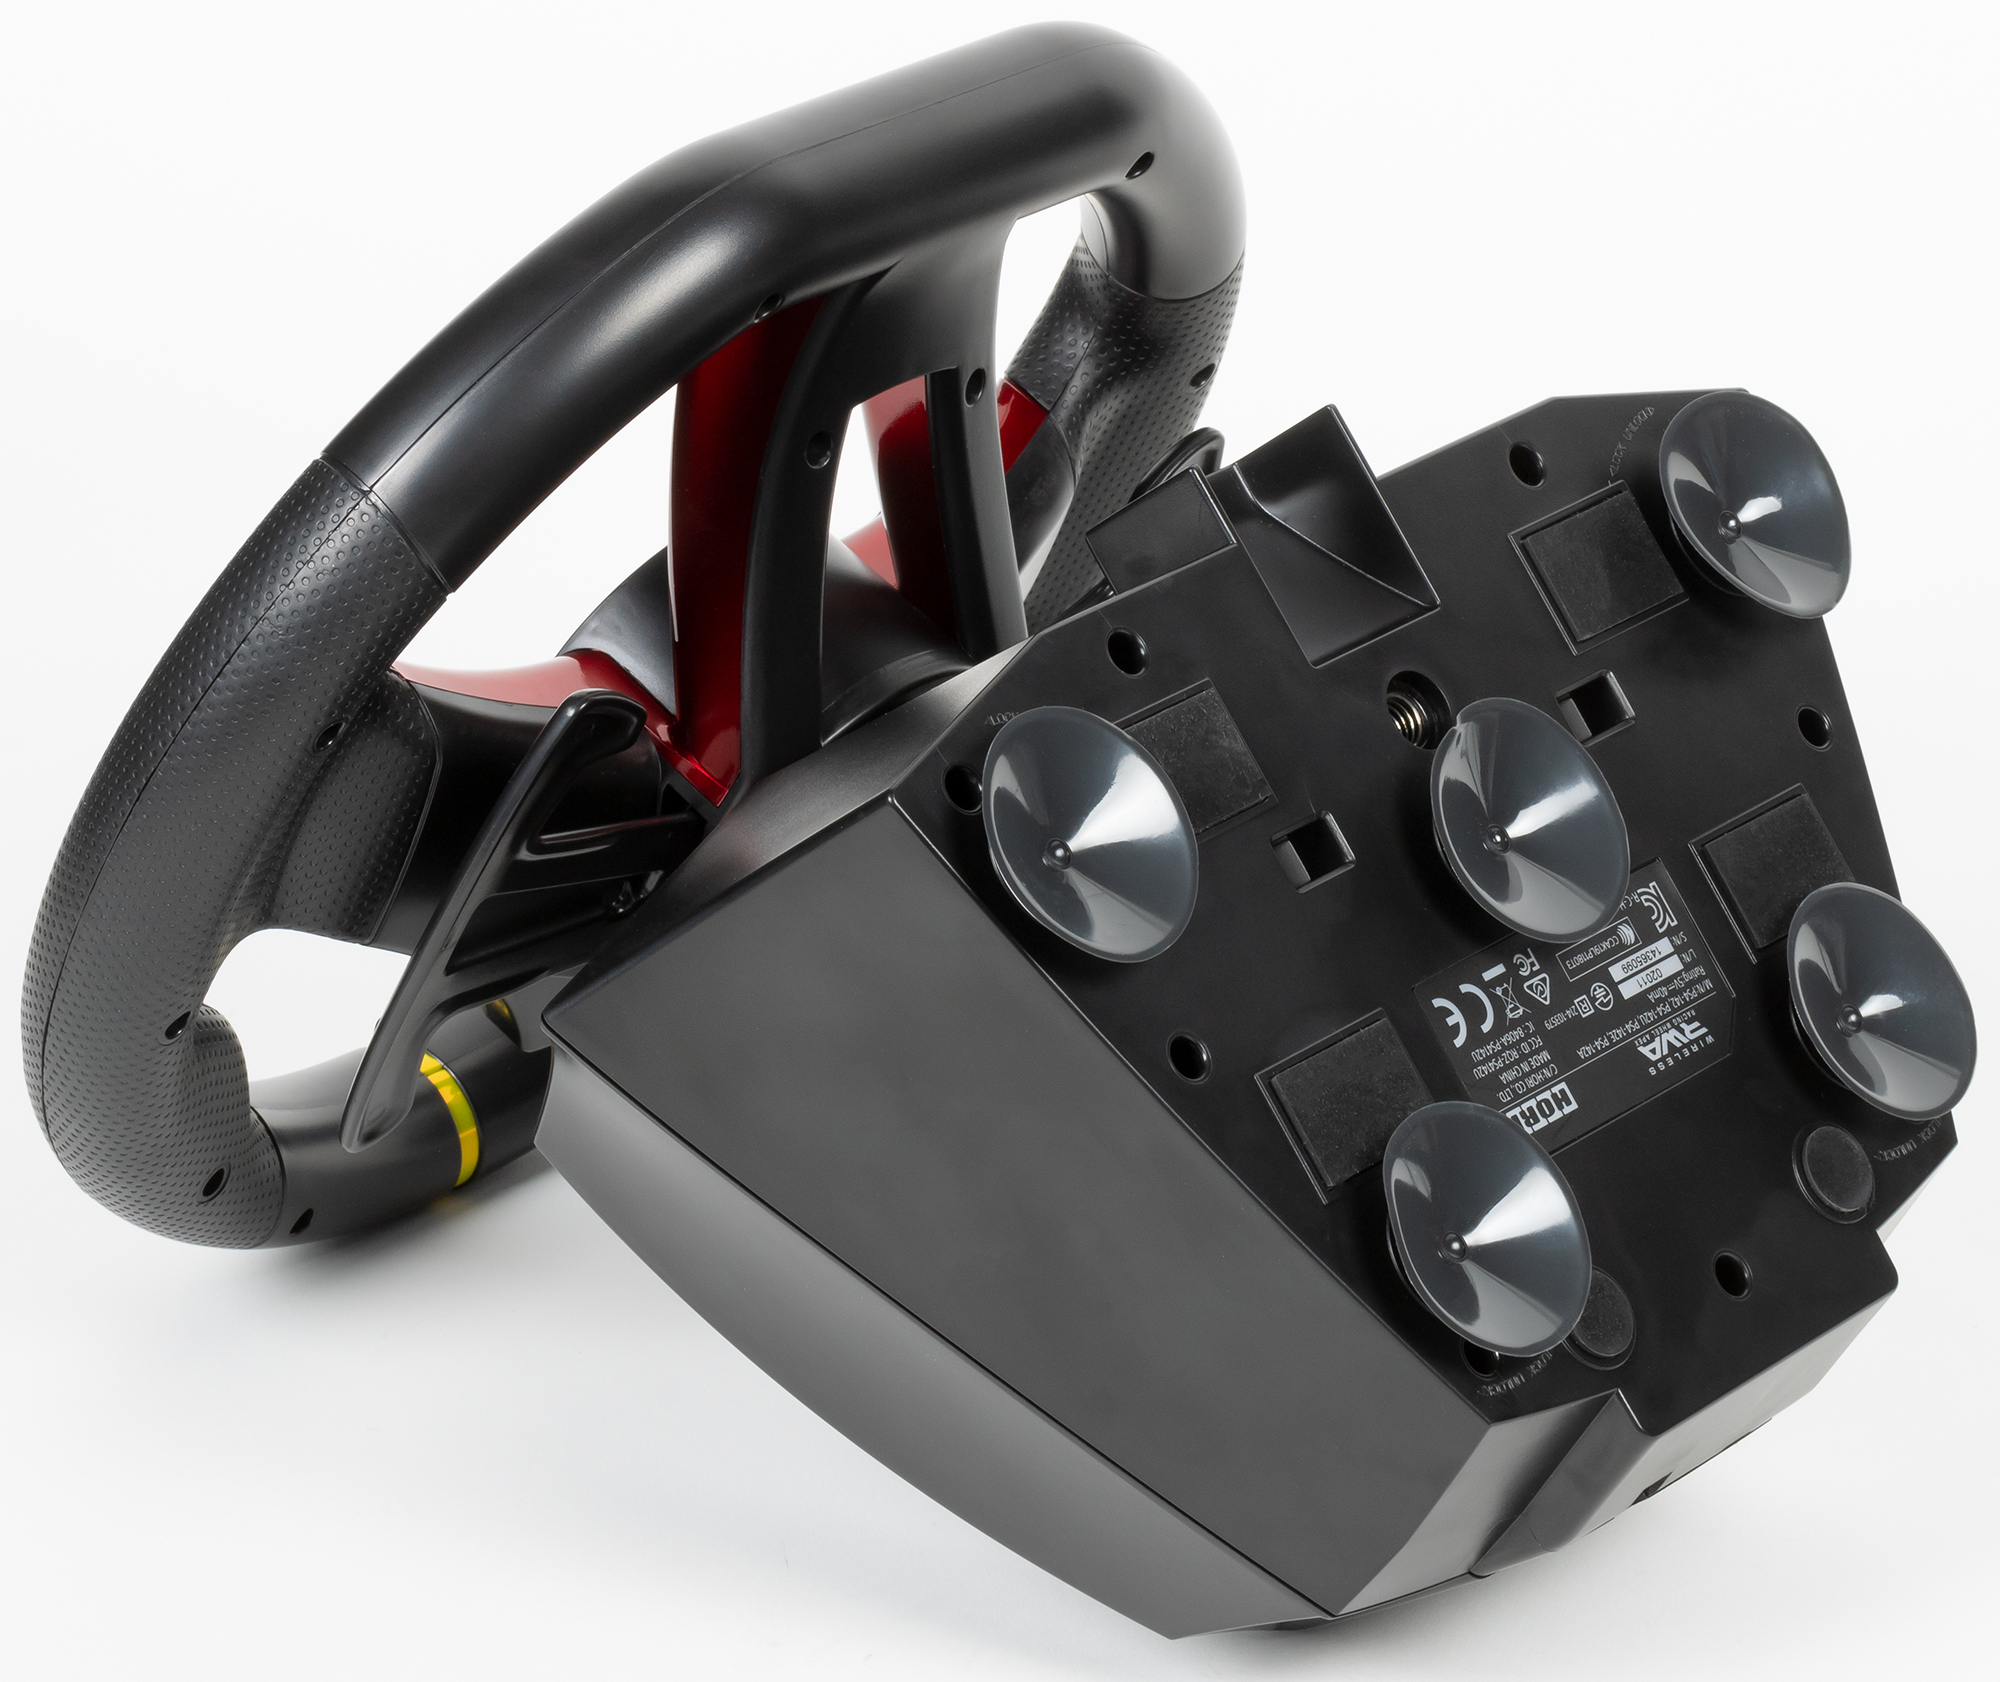
Большое 10 миллиметровое отверстие предназначено для струбцины, которая работает в паре с пластиковым крепежом. Струбцина проходит через соответствующее отверстие в крепеже и закручивается на пару витков в корпус руля, таким образом, чтобы крепящая конструкция могла встать на специальную направляющую выемку в корпусе. После чего, руль пристыковывают к краю стола, а струбцину закручивают. Важно убедиться, что подвижная часть крепящего устройства была строго параллельно столу, и не препятствовала плотному прилеганию манипулятора к поверхности.
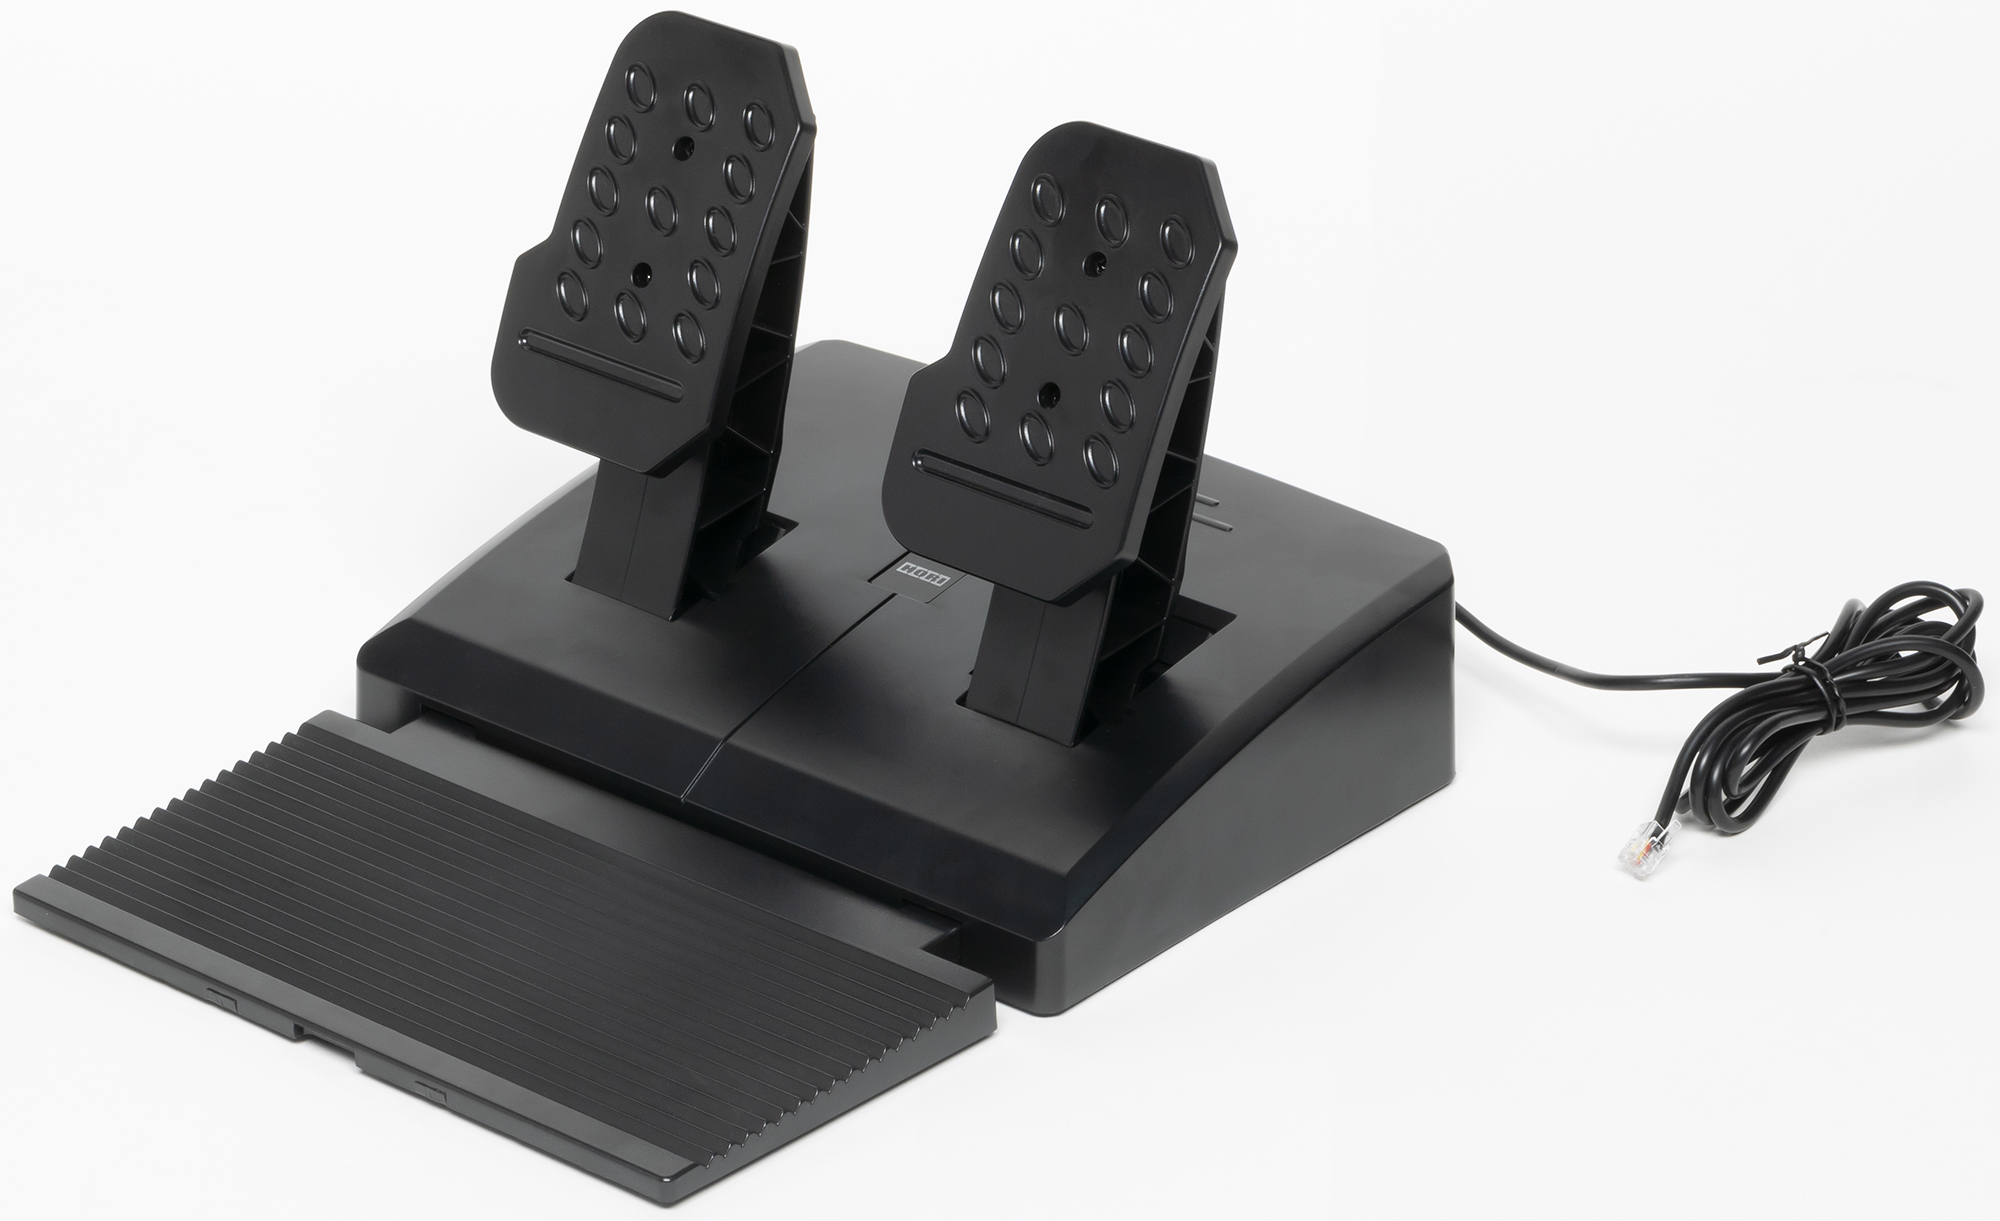
Перейдем к блоку педалей. Корпус как и педали сделан из пластика, что делает всю конструкции достаточно легкой и неустойчивой, но производитель учел это и сделал раскладывающуюся ребристую платформу, с дополнительными противоскользящими пластинами на днище.
Педали расположены достаточно близко друг к другу, но вот создаваемый угол между опорной и нажимной поверхностью, таков, что стопа находится в положении «низкого старта». Лучшая игровая схема это левая нога стоит на выставной платформе и поддерживает весь педальный блок, а вторая управляет педалями.
В руле реализована быстрая настройка клавиш. При нажатии и удержании кнопоки Assign, вы можете назначить другое действие на клавиши: L2, R2, левый и правый рычажок, левую и правую педали. Список назначемых действий выглядит так: круг, крестик, треугольник, квадрат, L1, R1, L2, R2, L3, R3, движение левыми или правым стиком, движение крестовины.
Процесс использования горячих клавиш для разных функций очень схож. Но обычно начинается с удержания клавиш PS + Assign в течении 5 секунд, после чего светодиод начнет мигать. Таким образом можно настроить чувствительность скорости поворота руля. Логика работы такая: чем больше чувствительность тем более резко вы сможете крутить руль на крутых поворотах. Настраивая мертвую зону, можно увеличивать ее если нужно избавиться от рысканья в управлении в аркадных гонках, управление в которых «заточено» под геймпад или наоборот уменьшить ее для более резкого реагирования автомобиля на мельчайшие движения руля в играх категории ралли и полноценных автосимуляторах.
Есть два заготовленных профиля: 180° и 270° поворота руля.
Практика
В качестве теста мы выбрали одну гоночную игру для всех трех платформ – Gran Turismo Sports. Многие игроки когда-то играли или играют в гоночные игры, но у нас опыт был давний и только с мышью и клавиатурой. Удовольствия от такого процесса мало, но, получив в руки для тестирования игровой руль, мы испытали совсем иные чувства от игры.
За последние 10 лет гоночные игры сильно развились, как в плане графики, так и в плане симуляции физических процессов, по типу заноса, разгона, тряски, торможения. Особенно удивила опция с настройкой коробки передачи между автоматической и механической. Единственное, чего не хватает, так это отдельной педали, которая была бы аналогична педали сцепления.
Было очень интересно приобрести опыт езды в видеоигре на коробке автомат или на механике. Да, тут есть выбор почти всего, начиная с самой машины, заканчивая выбором для нее резины под данный гоночный маршрут. Но мы не будем вдаваться в детали настройки машины, все-таки обзор руля, а не игры. Нас больше интересуют возможности настройки управления руля.
Осуществляется настройка двумя способами: при помощи встроенных горячих клавиш, или используя внутриигровые настройки управления. Все это делается очень быстро, и вы сможете буквально за 10 минут сделать управление под ваши предпочтения. Каких то своих глобальных профилей тут нет.
Что первое стоит отметить, так это особую важность стола, кресла и экрана, а именно их взаиморасположение. В идеале стоит воспроизвести салон машины, но без ограниченного обзора, чтобы ваши ноги хорошо ложились на блок управления педалями. При хвате руля, вообще есть стандартное правило, расстояние до руля должно быть таким, чтобы согнутое запястье накрывало обод колес сверху. В качестве экрана мы взяли проектор.
Ранее мы вскользь упомянули, что угол между поверхностью нажатия педали и пола достаточно крутой, и что это неудобно с непривычки. Удобное расположение ног выглядит так: одна нога должна удерживать выставную панель, чтобы весь блок педалей не укатился от вас, а вторая почти всегда должна быть на весу, чтобы оставалась возможность для быстрого маневрирования. От этого процесса нога быстро устает, но можно просто всегда выжимать полный газ, и ногу не придется держать на весу, но в таком случае вы лишаетесь возможности быстрого перекладывания ноги с одной педали на другую. Проблема со скольжением лечится более шершавой поверхностью или установкой дополнительного импровизированного упора. По ощущениям педали хорошо нажимаются, но для владельцев реальных машин первое время ощущения будут странными, как будто полный ход коротковат.
Однозначно стоит отметить, что руль позволяет быстро адаптировать устройство к определенной игре и хорошо передает чувство, что вы едете в гоночной машине, не хватает только селектора для смены передач, сцепления и 4-D кресла, которое бы симулировала езду по дороге. Сравнивая с настоящей машиной, хоть и не гоночной, ощущения конечно совсем не те. Никакой игровой руль полностью не заменит ощущения от управления настоящей машиной. Такой подарок понравится любителям водить транспорт, тем кто собирается водить или только начинает осваивать данный навык.
Отдельным плюсом стоит выделить, что руль поддерживается целым рядом игр на PS4, в которых он подключается сразу как игровой руль Apex, что позволяет сходу приступить к игре. Таким может похвастаться далеко не каждый игровой руль. Вот список поддерживаемых игр:
- F1 2021 – F1 2015
- GRAN TURISMO SPORT
- ASSETTO CORSA
- ASSETTO CORSA COMPETIZIONE
- Baja : Edge of Control
- CarX Drift Racing Online
- Crash Team Racing
- Dangerous Driving
- Dirt 5
- Dirt 4
- Dirt Rally 2.0
- Dirt Rally
- Driveclub
- FAST & FURIOUS CROSSROAD
- HOT WHEELS UNLEASHED™
- Monster Jam Steel Titans 2
- Motorcycle Club
- Nascar Heat 2
- Nascar Heat Evolution
- Need for Speed™:Hot Pursuit Remastered
- Need for Speed: Heat
- Need for Speed
- Need for Speed payback
- Need for Speed: Rivals
- Nickelodeon Kart Racers 2: Grand Prix
- OFFROAD RACING
- OVERPASS
- PROJECT CARS 3
- PROJECT CARS 2
- Project CARS
- Sebastian Loeb Rally Evo
- SnowRunner
- Street Outlaws 2: Winner Takes All
- Super Toy Cars 2
- The Crew™
- The Crew™ 2
- Trackmania Turbo
- VRally 4
- WRC 10 – WRC 5 и т.д.
Во время езды, как в жизни так и в игре, есть два основных типа дороги, прямые, где вы набираете максимальную допустимую скорость, и дороги со стисненным движением, где нужно маневрировать и выполнять приемы. Игровой руль HORI позволяет отработать такие движение путем частичного симулирования поведения настоящего руля.
При крутом повороте вы поворачиваете и руль, который после отпускания достаточно быстро возвращается в естественное положение. В настраиваемом режиме вы можете выбрать подходящую мертвую зону на руле. Это позволит при малых отклонениях руля в сторону выполнять более резкие повороты. Это может пригодиться для трасс или игр, где есть много узких улиц и много резких поворотов. При столкновении или при езде по грунтовой дороге не чувствовалась какая либо вибрация от руля.
Настоящую беспроводность смогут оценить обладатели широкоформатных экранов. Вы можете усесться на диван или кресло, закрепить руль на присоске к столику и погонять на гоночных трассах, а для пользователей поскромнее это позволит сократить количество проводов на игровом месте. Но стоит отметить, что при использовании блока педалей его нужно обязательно соединить коротким проводом 1,5 м с рулем.
Руль обладает встроенным аккумулятором на 850 мА*ч, что позволяет спокойно целый день играть в гоночные симуляторы и не беспокоиться о заряде. Индикатор низкого заряда в случае чего будет мигать на игровом экране, как если бы у вас в руках был бы контроллер DUALSHOCK.
Diagnosis
Игровой руль HORI Wireless racing wheel Apex является одним из лидеров в сфере контроллеров для гоночных игр. Данное устройство предлагает за сравнительно скромные деньги (12 500 руб.) ощутить себя гонщиком Formula 1, с возможностью беспроводной связи, быстрой настройки клавиш без рысканья по настройкам игры, совместимости с PS4, PS5 и ПК и богатым списком совместимых игр на PS4, которым не каждый другой руль может похвастаться. Отдельно отметим, что поставляемый в комплекте провод для соединения педалей и руля коротковат и совсем не подойдет для больших столов.

Покупая данный продукт себе или в подарок, вы открываете целый жанр игр заново. После хотя бы одной игры с таким рулем, вы уже не захотите играть в гоночные игры без руля. Впечатления совсем не те, что были при использовании руля. За сравнительно небольшую цену в 12 500 рублей, HORI Wireless racing wheel Apex будет одним из лучших и универсальных выборов покупки для любителей гоночного жанра.
Инструкция по эксплуатации HORI Wireless Racing Wheel Apex на русском языке доступна здесь.
Pro:
- Беспроводная связь
- Совместимость с тремя платформами
- Быстрая настройка кнопок
- Настраиваемая мертвая зона поворота
Contra:
- Короткий провод для подсоединения педалей к рулю
Видеообзор: