
Сколько усилителей и педалей вам необходимо для наилучшего звучания?
Возможно, вам нужен лишь HOTONE AMPERO ONE, гитарный процессор эффектов с великолепными ламповыми усилителями, созданными по новой технологии, которые моделируют все: от чрезвычайно мощных драйвовых звуков до невероятно чистых. Вы можете играть от тяжелого гранжа до джазовых клинов … да, это возможно, благодаря новой технологии моделирования Hotone: CDCM HD + F.I.R.E.
Динамическое моделирование под названием «CDCM HD» достаточно хорошо реагирует на динамику вашего игрового стиля. Звук совершенно не плоский. Также предусмотрены системы импульсного отклика (IR). Простыми словами «они эмулируют звук с предустановленным сэмплом».
CDCM HD + F.I.R.E

Чтобы сделать ваше звучание невероятным, AMPERO ONE нужна огромная мощность обработки, она должна быть МОЛНИЕНОСНОЙ. Чтобы ваше оборудование звучало так, как вы хотите, необходимо использовать чип SHARC DSP. AMPERO ONE оснащен мощным DSP-процессором серии Analog Devices SHARC. По сравнению с HOTONE XTOMP, он обладает увеличенной производительностью и аппаратными модулями ускорителя обработки звука, что позволяет легко обрабатывать несколько алгоритмов высококачественных эффектов класса XTOMP.
AMPERO ONE невероятно прост в использовании: один переключатель изменяет все пресеты. И эти переключатели можно адаптировать под ваши потребности.
Многие мульти-эффекты имеют фиксированную цепочку сигналов (некоторые из них могут иметь несколько гибких модулей эффектов), но AMPERO ONE другой. Вы можете легко модифицировать цепочку эффектов с помощью слайдов и простых прикосновений на экране — это гораздо удобнее, чем использование мульти-эффектов с «фиксированной цепочкой» или изменение порядка педалей в массивном педалборде!
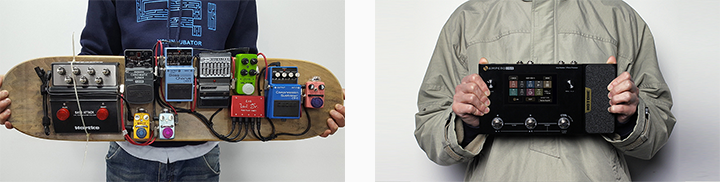
Вам больше не нужно носить усилитель на свои выступления. Может, только одну или две любимые педали вместе с AMPERO ONE. Это будет вашим полноценным ригом для лайвов.

Кроме того, AMPERO ONE работает от блока питания 9 В, как и другие цифровые педали в вашем педалборде. Это обеспечивает улучшенный комфорт, но внутренне AMPERO ONE работает от 18 В в аналоговой секции для максимально возможного воспроизведения. Этот дизайн выдает значительно более высокую динамику, чем другие педали. Электрические и акустические гитары могут звучать глубже. Вы можете играть со своими гуд-чопами.

AMPERO ONE не имеет переключателя входного режима, но обладает специальным входным джеком с высоким входным сопротивлением (до 4,7 мОм) для наилучшей совместимости инструментов. Это делает AMPERO ONE готовым к использованию с электро-, бас-гитарами и акустическими инструментами без переключателя входного режима.

Как только вы запрограммируете любимые саунды в качестве «патча» на AMPERO ONE, вы сможете напрямую записывать через USB или подключаться к аудиоинтерфейсу с аналоговых выходов. Таким образом, на концертах вы можете вызвать любой «патч», чтобы сыграть его и на лайве.
AMPERO ONE предоставляет бескомпромиссный, широко известный звук Ampero в уменьшенном корпусе. Он предлагает все реальные звуки рока прошлого и настоящего. 4-дюймовый цветной сенсорный экран высокой четкости и оптимизированный пользовательский интерфейс обеспечивают более плавную и умную работу.
Продвинутая система моделирования CDCM HD и F.I.R.E.
Driving Ampero — это инновационная система CDCM HD (Comprehensive Dynamic Circuit Modeling High Definition) и F.I.R.E. (Field Impulse Response Enhancement) от Hotone. Созданная на основе мощной платформы XTOMP от Hotone, известной серии Binary и революционного виртуального плагина VStomp Amp, система CDCM HD & F.I.R.E нового поколения демонстрирует новые методы для моделирования схем. Основные методы моделирования, как правило, основаны на моделировании схем статического состояния или теории «black box», которые просто «приближаются» к моделируемому звуку. CDCM HD & F.I.R.E. использует сложную систему, основанную на динамическом моделировании. В этой матрице технология «перестраивает» всю схему, используя смоделированные электронные компоненты, в результате чего получается яркий, точный и выразительный тон. Более того, новая система улучшает взаимодействие между усилителями и акустическими системами, обеспечивая реалистичное ощущение и отклик, которого вы никогда не испытывали на цифровом оборудовании.
Два основных DSP-процессора
AMPERO ONE оснащен двумя DSP-процессорами с бескомпромиссной высокой производительностью и работает на фирменной системе моделирования CDCM HD & F.I.R.E от Hotone.
• Основной процессор — серия Analog Devices® SHARC® 4-го поколения
По сравнению с XTOMP, этот процессор обладает повышенной производительностью и аппаратными модулями ускорителя обработки звука, что позволяет легко обрабатывать несколько алгоритмов высококачественных эффектов класса XTOMP.
• Со-процессор- серия NXP® RT
Кроссоверный со-процессор серии NXP® RT работает на ядре ARM® Cortex®-M7. Он не только помогает обрабатывать аудио стримы, но также питает тач скрин дисплей, USB I/O и другие функции.

AMPERO ONE может обрабатывать до 9 модулей эффектов одновременно с помощью гибких модулей эффектов FX1, FX2, FX3 и редактируемой цепочки эффектов для наилучших возможностей комбинации эффектов. Ampero One использует ту же библиотеку эффектов с аутентичной обработкой стереосигнала:
• 242 эффекта
• CDCM HD & F.I.R.E. моделирующие эффекты включают: 64 модели усилителей / 60 моделей кабинетов / 100 + легендарных моделей педалей / следующего поколения симуляторы положения и типа микрофона
• Поддержка пользовательских и сторонних импульсных откликов (IR)
• 50+ оригинальных эффектов Hotone (включая высококачественные эффекты драйв / динамик / фильтр / модуляция / дилей / реверберация и т.д.)
Аутентичное акустическое звучание
Больше не нужно носить с собой дополнительные акустические инструменты! AMPERO ONE обладает продвинутыми алгоритмами акустического моделирования. Используя встроенные акустические импульсные отклики (IR) и пресеты акустического моделирования, вы можете легко трансформировать электрические инструменты в микшированные акустические шедевры со стальными/нейлоновыми струнами и даже дабл басами!

Сенсорный интерфейс
AMPERO ONE использует простой пользовательский интерфейс. Благодаря 4-дюймовому тач скрину с разрешением 800 x 480 с динамичным цветным дисплеем и оптимизированным пользовательским интерфейсом, Ampero One невероятно прост в сетапе и программировании, путем несколько нажатий и слайдинга.
Особенности
• Популярный моделирующий усилитель и процессор эффектов в небольшом корпусе
• CDCM & F.I.R.E. система моделирования нового поколения, обеспечивающая высокую тональную экспрессивность и реалистичный игровой опыт
• Мощная платформа с двумя DSP обеспечивает великолепное качество звука
• 24-битная обработка сигнала с отношением сигнал / шум до 120 дБ
• 4-дюймовый цветной сенсорный экран с разрешением 800 x 480 с мгновенным управлением
• Внутренняя схема Voltage Boost для превосходного динамического диапазона
• USB порт для обновления прошивки, загрузки / редактирования / управления эффектами / импульсными откликами (IR) через бесплатный софт для Mac / ПК или для использования в качестве USB аудиоинтерфейса
• Продвинутые эффекты акустического моделирования
• Выделенные акустические эффекты и пресеты — универсальное решение для музыкантов, играющих на акустических инструментах
• 242 эффекта на основе потрясающей библиотеки эффектов XTOMP
• CDCM HD & F.I.R.E. моделирующие эффекты включают: 64 модели усилителей / 60 моделей кабинетов / 100 + легендарных моделей педалей / следующего поколения симуляторы положения и типа микрофона
• 50+ оригинальных эффектов Hotone (включая высококачественные эффекты драйв / динамик / фильтр / модуляция / дилей / реверберация и т.д.)
• Поддержка пользовательских и сторонних импульсных откликов (IR)
• 198 пресетов
• Встроенная драм-машина с сотней паттернов
• Встроенный лупер, обладающий возможностью 100 секундной записи
• 3 назначаемых футсвитча со светодиодами
• Встроенная педаль экспрессии
• Аутентичная обработка стерео выхода
• Необходимые для подключения входы / выходы
• Разъем для подключения внешних футсвитчей / педалей
• Настраиваемые основные режимы дисплея: изменение подсветки / язык пользовательского интерфейса (английский / упрощенный китайский)
• Дорожно-готовый, легкий алюминиевый корпус
• Источник питания: 9 В DC
Спецификация
Цифровая обработка аудио сигнала: 24-бит глубина, частота дискретизации 44,1 кГц
SNR: 120 дБ
Эффекты: 242
Модули эффектов: Всего 9 одновременных
Патчи: 198 (99 пользовательских патчей, 99 заводских патчей)
Лупер: запись в режиме моно 100 секунд / стерео 50 секунд
Встроенная драм-машина: 100 ритмических паттернов
Входы: 1 х 1/4″ Tip Sleeve (TS) инструментальный джек / 1 х 1/8″ стерео Aux вход / 1 х 1/4″ Tip Ring Sleeve (TRS) входной разъем для педали экспрессии
Выходы: 2 х 1/4″ Tip Sleeve (TS) небалансных стерео выходных джека / 1 х 1/8″ стерео выход для наушников
Входное сопротивление: Input: 4,7 МОм / Aux In: 10 кОм
Выходное сопротивление: Output: 3,2 кОм / Phones: 66 Ом
Экран: 4-дюймовый динамичный цветной сенсорный экран с разрешением 800 x 480
Порт USB: типа B с поддержкой USB Audio
Импульсный отклик / IR обработка: Поддержка 24-бит / 44,1 кГц моно WAV-файлов, 1024 точек
Требования к питанию: 9 В DC центр отрицательный
Потребление тока: 500 мА (максимум)
Размеры: 273 мм (Ш) х 143 мм (Д) х 51 мм (В)
Вес: 1202 г
Сетап
С использованием инструмента и усилителя
Подключение к петле эффектов (RETURN) усилителя

Подключение ко входу усилителя мощности (Loudster)

Подключение к микшеру, аудиоинтерфейсу, наушникам и прочему оборудованию

Подключение к компьютеру в качестве аудиоинтерфейса

Используя линейный вход AUX

Сегодня гитарный процессор – это одна из самых востребованных вещей для любого гитариста. И это не удивительно! Процессор компактнее, практичнее и куда универсальнее любого педалборда и, тем более, усилителя или комбика. Такие производители, как Line 6, Fractal Audio, Kemper, Boss, Headrush предлагают десятки разновидностей гитарных процессоров под любой комплекс задач – от игры дома до профессиональной студийной и концертной работы. Чем дороже процессор, тем более высокопроизводительное “железо” в нем стоит, тем больше возможностей менеджмента сигнала, а функционал и звучание расширяются и улучшаются.
Но кто сказал, что получить максимально естественное звучание можно только в дорогих процессорах?
Hotone Ampero – это абсолютно новое слово в мире бюджетных гитарных процессоров. Вместо того, чтобы создать серию аппаратов, инженеры Hotone приняли решение сконструировать один универсальный, максимально оптимизированный процессор, отвечающий требованиям как новичков и любителей, так и профи. В Hotone Ampero вы найдете и продвинутый звуковой движок с аудиоинтерфейсом, и удобное управление с сенсорным экраном, и специальную программу-эдитор для ПК.
Продвинутые технологии моделирования CDCM HD и F.I.R.E
Абсолютное большинство бюджетных гитарных процессоров эмулирует звук усилителей, кабинетов и педалей одинаково – через моделирование по статическому состоянию «живого» исходника. Проще говоря, в таких процессорах, модель живого усилителя – это всего-навсего один вариант его звучания, на который можно наложить эквалайзер. Отсюда вся «замыленность» и излишне «цифровой» звук. Делается это по очевидной причине — такой вариант не требует высокой вычислительной мощности, а сам программный код максимально прост, стабилен и не занимает много места.
Конечно же, в реальности дела обстоят совсем по-другому: каждый усилитель, педаль и кабинет содержат сотни вариантов звучания, которые зависят от выбранных настроек, а также от множества других факторов — особенностей гитары, техники игры, манеры звукоизвлечения и т.д. Чтобы воссоздать все это «в цифре», понадобится мощное вычислительное ядро, а также сложное программное обеспечение, которое переносит в код буквально каждый транзистор и конденсатор «живого» аппарата. По такому принципу работают профессиональные гитарные процессоры, например Line 6 HELIX и Fractal Audio AXE-FX.
Понимая все это, инженеры Hotone решили не экономить на качестве моделирования. В процессоре Hotone Ampero стоят мощные спаренные DSP-процессоры SHARC® и NXP® RT. Они дают достаточно ресурсов для обслуживания специальных программных комплексов CDCM HD и F.I.R.E, которые динамично и с высокой точностью моделируют звучание усилителей, педалей и кабинетов именно так, как это делается в дорогих процессорах.
Подойдет для любого инструмента!
Кто сказал, что гитарный процессор должен работать только с электрогитарами? Hotone Ampero оптимизирован для работы с электрогитарой, бас-гитарой, электроакустической гитарой и любыми цифровыми инструментами с линейным выходом: например, с синтезаторами и микрофонами. Все, что нужно сделать – это поставить переключатель рядом с входом процессора в правильное положение:
- E.GT – электрогитары, бас-гитары;
- A.GT – электроакустические гитары;
- Line – синтезаторы, микрофоны, а также любой инструмент с линейным выходом сигнала.

Максимальный арсенал усилителей и эффектов
Hotone Ampero позволяет задействовать до 9 блоков модуляции одновременно в режиме стерео.
В процессоре предустановлены:
- 64 модели усилителей
- 60 моделей кабинетов с возможностью выбора микрофона и его положения
- 100+ цифровых версий реальных педалей
- 50 дополнительных эффектов и инструментов пространственной/динамической обработки
Варианты подключения
1. Перед усилителем или в петле эффектов усилителя
Чтобы использовать Hotone Ampero перед усилителем, нужно подключить гитару в разъем INPUT процессора, а затем соединить выход L/MONO (UNBALANCED OUTPUT) со входом усилителя. Также, можно послать сигнал одновременно на два разных усилителя, используя выходы L/MONO и R группы UNBALACED OUTPUT.
Если вы хотите использовать процессор в петле эффектов вашего усилителя, то соедините выход усилителя SEND со входом процессора INPUT, а выход процессора L/MONO (UNBALANCED OUTPUT) соедините со входом RETURN усилителя.
Для обоих вариантов следует использовать обычные гитарные кабели, а в самом Hotone Ampero отключить секции AMP и CAB, так как и усилитель и кабинет в данном случае – “живые”.
2. Подключение напрямую в оконечный усилитель
Такой вариант подойдет, если ваше звучание уже настроено в Hotone Ampero, а усилитель вы хотите использовать только для того, чтобы послать сигнал в кабинет. Для этого потребуется подключить гитару в разъем INPUT процессора, после чего соединить выход L/MONO (UNBALANCED OUTPUT) с входом RETURN петли эффектов усилителя.
Как и в первом варианте, есть возможность использовать одновременно два усилителя с кабинетами. Подключение также производится гитарными кабелями, а в самом Hotone Ampero отключить секции CAB.
3. Подключение напрямую в микшерный пульт
В случае, если вы играете концерт и не хотите возиться с усилителями и кабинетами, можно просто подключить Hotone Ampero напрямую в микшерный пульт звукорежиссера. Этот путь – самый простой и, при этом, самый надежный.
Все, что нужно, это соединить XLR-выходы R и L (MONO) группы BALANCED OUTPUT c входами каналов микшерного пульта. Если стерео-подключение необязательно, можно ограничиться подключением только XLR-выхода L (MONO).
В данном случае, для подключения следует использовать балансные XLR-кабели.
4. Подключение в аудиоинтерфейс
То же самое, что и при подключении в усилитель — соединить выход L/MONO (UNBALANCED OUTPUT) со входом аудиокарты. Также, можно послать на аудиоинтефейс стерео-сигнал, используя выходы L/MONO и R группы UNBALACED OUTPUT.
5. Подключение напрямую в ПК
Если у вас нет отдельного аудиоинтерфейса – не беда! В Hotone Ampero есть встроенный аудионтерфейс с АЦП-преобразователем, который превращает звук в код и отправляет в компьютер по USB-каналу. Все, что требуется – настроить USB-вход компьютера на получение аудио-сигнала.

Специальная программа-контроллер для ПК
В Hotone Ampero работает простая и интуитивно понятная система управления звуковым трактом. Несколько крутилок-энкодеров и сенсорный дисплей 800×480 позволяют в считанные секунды найти нужный пресет или создать отличный звук с нуля.
Еще легче это сделать с помощью бесплатной программы-эдитора для ПК – AMPERO. Для этого нужно лишь подключить Hotone Ampero к компьютеру по USB и запустить программу. Программа позволяет в реальном времени управлять всеми функциями процессора. Кроме того, в этом режиме вы можете загрузить в Hotone Ampero ваши любимые IR-импульсы гитарных кабинетов или другого оборудования и использовать в вашем звуковом тракте.

Основные особенности:
- Супер-компактный, полноценный процессор с поддержкой IR-импульсов
- 4” яркий сенсорный дисплей для управления всеми функциями
- Продвинутые технологии моделирования CDCM & F.I.R.E. – как в процессорах премиум-класса
- Мощное вычислительное ядро из двух DSP-процессоров для лучшего качества звука
- Встроенный аудиоинтерфейс – 24 бит, соотношение сигнал/шум – 120 дБ
- USB-порт для прямого подключения к ПК в качестве накопителя или аудиоинтерфейса
- 64 модели усилителей
- 60 моделей кабинетов с возможностью выбора микрофона и его положения
- 100+ цифровых версий реальных педалей
- 50 дополнительных эффектов и инструментов пространственной/динамической обработки
- 198 пресетов
- Встроенная драм-машина с 100 типовых барабанных рисунков
- Встроенный лупер с временем записи – 120 сек
- 4 назначаемых футсвича с LED-подсветкой
- Встроенная педаль экспрессии
- Балансные и небалансные выходы Jack и XLR для универсальной маршрутизации сигнала
- Возможность подключения дополнительной педали экспрессии
- Прочный алюминиевый корпус
Купить Hotone Ampero можно прямо сейчас в Музторге!
Предыдущая
Следующая

Для гитариста и клавишника очень важно удобно и быстро настроить качественный звук на концерте и вовремя включать нужные эффекты. И сделать это можно с помощью процессоров эффекта Ampero One и Ampero II Stomp от Hotone! В этом обзоре мы рассмотрим их основные возможности.
Гитарный процессор Hotone Ampero II Stomp

Внешний вид процессора Hotone 2 Stomp
Hotone Ampero II Stomp представляет собой гитарный процессор эффектов с возможностью моделирования различных усилителей. Модель получила обновленный трехъядерный процессор, цифроаналоговый преобразователь ESS Sabre, технологии CDCM HD (комплексного динамического моделирования цепей высокой четкости) и F.I.R.E. (улучшения импульсного отклика поля), что обеспечивает высочайшую тональную выразительность и реалистичность игры. Благодаря 24-битной обработке сигнала процессор Хотон Амперо 2 способен обеспечить динамический диапазон до 127 дБ.
3 назначаемых ножных переключателя с светодиодами позволяют переключаться между банками эффектов, включать/выключать эффекты, управлять лупером и многое другое.

Интуитивно понятный чувствительный к нажатию экран Hotone Ampero II
На лицевой панели Амперо 2 Стомп расположен яркий 4-дюймовый сенсорный дисплей c с разрешением экрана 800 x 480 px. С его помощью можно считывать информацию и быстро вносить изменения настройках с помощью ручек или касания к дисплею.

Коммутационная панель Амперо 2 Стомп
На задней панели Ampero 2 Stomp расположены 2 входных и выходных разъема 6,3 мм для моно и стерео подключения гитары или синтезатора, разъем для подключения внешней педали экспрессии и футсвича, а также кнопка питания и разъем для 9-18-вольтового блока питания постоянного тока.

Дополнительные возможности коммутации Ampero II Stomp с помощью FX Loop
На левой стороне Hotone Ampero 2 находится панель со стерео разъёмами для подключения петли эффектов, 3,5 мм AUX-вход для запуска звука от внешних источников и выход для наушников.

Управление процессором Ampero II Stomp через MIDI порты
На правой стороне Hotone II Stomp расположены 5-пиновые DIN разъёмы MIDI In/Out/Thru, а также порт USB тип C для подключения процессора эффектов к ПК на Windows и MacOS и использования его в качестве аудиоинтерфейса.
Процессор Hoton Ampero II предлагает 300 патчей, обновляемую библиотеку с более 400 эффектами (100+ легендарных педалей), встроенный 60-секундный лупер, моделирование 87 усилителей, 68 кабинетов, возможностью загрузки собственных импульсов (IR). Кроме этого, вас ждёт настраиваемая двойная цепочка эффектов с поддержкой множественной последовательной/параллельной маршрутизации сигналов.

Удобное создание и редактирование пресетов на ПК в приложении для Ampero II Stomp
Настроить свой звук можно на самом устройстве Амперо 2 Стомп, а также подключившись процессор к вашему персональному компьютеру или ноутбуку. Фирменный редактор Ampero II Stomp Editor совместим с Win/Mac. С его помощью вы сможете удобно просматривать и редактировать патчи. В приложении есть подробное описание всех эффектов. Hotone предусмотрели всё, чтобы вы могли качественно и удобно творить хиты вместе с крутым звуком вашей гитары или синтезатора!
Купить Hotone Ampero II Stomp – это значит получить максимально эффективное устройство с компактным размером и с огромным разнообразием звуков, реалистичным моделированием усилителей и кабинетов, с удобным управлением и возможностью записи. Идеальное решение для концертной, студийной работы и домашнего музицирования!
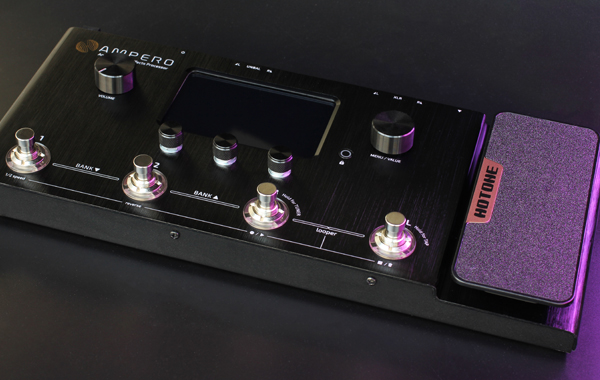
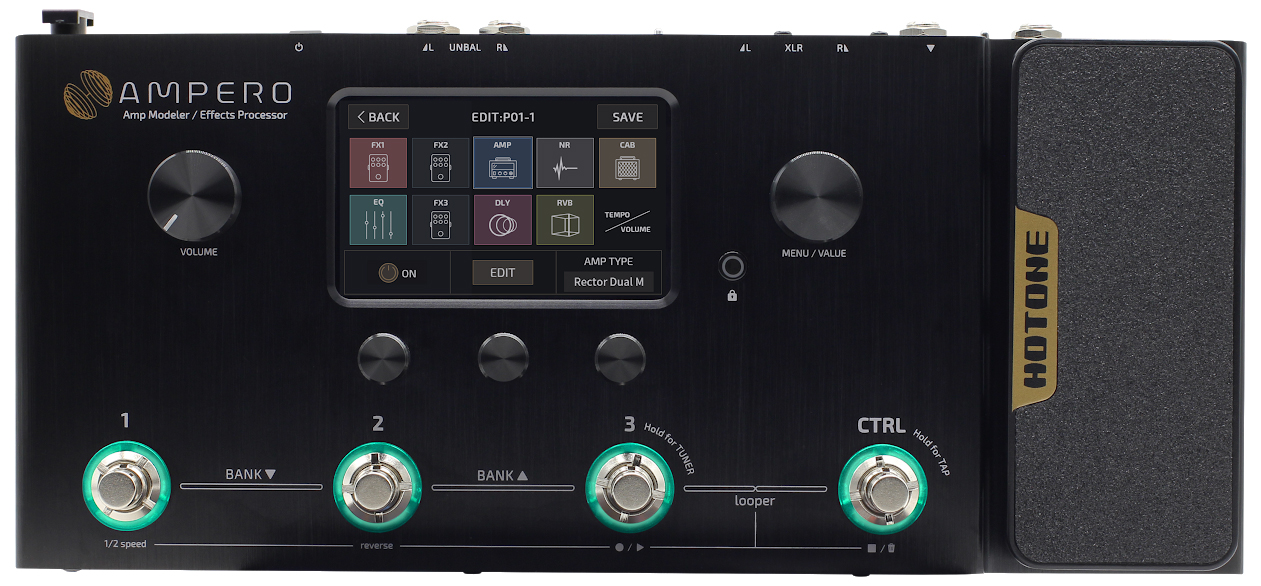
Гитарный процессор Hotone Ampero One

Фронтальная панель управления Ampero One
Hotone Ampero One представляет собой компактный гитарный процессор эффектов с 3 ножными переключателями со светодиодной подсветкой, с встроенной педалью экспрессии, с встроенной драм машиной и лупером.
Для создания крутого тона Ampero One оснащен двойным DSP с 24-битной обработкой сигнала, технологиями CDCM HD и F.I.R.E., которые обеспечат необходимую динамику и реалистичность игры.

Большой арсенал оборудования в компактном корпусе Ampero One
С процессором Hotone Ampero One вы легко замените любой педалборд! Прямо из коробки вы получаете 198 пресетов, 242 эффекта, 64 моделей усилителя, 60 моделей кабинетов, более 100 знаменитых педалей, функцию эмуляции снятия звука микрофонами с выбором их типа и позиции. Вы также можете загружать свои любимые импульсы в Hotone Ampero!
Для любителей акустической гитары в процессоре реализована её мощная имитация с отдельными специальными эффектами и пресетами.

Сенсорный экран процессора Hotone Ampero 1 облегчает навигацию в меню
С 4-дюймовым сенсорным дисплеем на лицевой панели Хотон Амперо Ван вы получите быстрый доступ ко всем настройкам устройства. Просто прикоснитесь к дисплею, поменяйте эффекты или измените их порядок в цепи – настройка звука за считанные секунды!

Панель коммутации гитарного процессора Hotone One
Вся коммутация осуществляется на задней панели Ampero One. Производитель разработал специальное входное 6,3 мм TRS моно гнездо, которое автоматически определяет какой инструмент подключен к процессору эффектов: электрогитара, бас гитара, акустическая гитара, синтезатор или клавишные. Наличие AUX In разъема позволяет подключать мобильные телефоны или плееры для игры под минусовку, а выход на наушники поможет мониторить звук. Расширить возможности процессора можно благодаря наличию входа для дополнительной внешней педали экспрессии или футсвича.

Быстрое редактирование параметров в фирменном приложении Ampero One
Вы можете подключить процессор к компьютеру и через приложение Ampero Editor быстро и удобно создавать и настраивать патчи и управлять импульсами. Текстовое описание эффектов облегают работу.
Купить Ampero One – это не только получить крутой звук. Благодаря USB порту вы сможете использовать процессор эффектов как аудиоинтерфейс для звукозаписи своих гитар и синтезаторов.
О производителе Hotone Audio
Вам не нужно настраивать подключать и настраивать множество отдельных педалей эффектов, когда есть гитарные процессоры эффектов Hotone! Китайская компания Hotone
Audio основа в 2012 году в Хуане. За последние несколько лет производитель уверенно потеснил знаменитые бренды, благодаря своим компактным, недорогим, но очень качественным процессорам и педалями эффектов для гитаристов, басистов и клавишников.
Создание доступных для всех музыкантов высокоуровневых устройств с DSP – это одна из самых главных задач производителя Хотон Амперо. Модельных ряд продукции Хотон состоит из процессоров эффектов, педалей эффектов, MIDI-контроллеров, аудиоинтерфейса и дополнительных аксессуаров. Самые популярные процессоры эффектов сегодня – Hotone Ampero 1 и Hotone Ampero 2 Stomp.
Подведем итог
Hotone Ampero One и Hotone Ampero 2 Stomp — это очень функциональные процессоры эффектов для гитар и синтезаторов по доступной цене. Огромное количество смоделированных эффектов, усилителей и кабинетов, интуитивно понятный интерфейс и проста в управлении – весомая причина, чтобы купить Хотон Амперо. Они подойдут для любого музыканта, которому нужен серьезный звук в компактном корпусе!
Читайте также:
- Как выбрать гитарный комбик?
USER’S MANUAL
For Firmware V1.0
DE SI GN I NS PI RAT IO N
The contents of this manual are subject to change without notice.

Contents
Welcome
Notice
Definitions
Panel
Getting Started
Main Display Screen and Device Lock Screen
Using the Screen
Touch Operation
Main Knob
Ampero One Tools
Tuner
Drum
Looper
EXP Pedal
Customizing your Ampero One
Edit
Patch Edit Menu
Module Edit Menu
Control Settings
Current Settings
Quick Access Paras
CTRL Settings
Tap Tempo and Tap Divide
EXP Settings
SAVE
GLOBAL
I/O
USB Audio
Footswitch
EXP 2/FS
Display
About
Factory Reset
Suggested Setups
Using with your instrument and amp
Connecting to your amp’s RETURN or Power Amp (Loudster)
INPUT
Connecting your mixer, interface, headphones, and other
equipment
Connecting to your computer as an audio interface
Using the AUX IN line
Included Software
DES IGN INS PIRATI ON
· · · · · · · · · · · · · · · · · · · · · · · · · · · · · · · · · · · 1
· · · · · · · · · · · · · · · · · · · · · · · · · · · · · · · · · · · · · 1
· · · · · · · · · · · · · · · · · · · · · · · · · · · · · · · · · · 2
· · · · · · · · · · · · · · · · · · · · · · · · · · · · · · · · · · · · · · 2
· · · · · · · · · · · · · · · · · · · · · · · · · · · · · · · · · 3
· · · · · · · · · · · · · · · · · · · · · · · · · · · · · · 4
· · · · · · · · · · · · · · · · · · · · · · · · · · · · 4
· · · · · · · · · · · · · · · · · · · · · · · · · · · · · · · · · · 4
· · · · · · · · · · · · · · · · · · · · · · · · · · · · · · 5
· · · · · · · · · · · · · · · · · · · · · · · · · · · · · · · · · · · · · 5
· · · · · · · · · · · · · · · · · · · · · · · · · · · · · · · · · · · · · 5
· · · · · · · · · · · · · · · · · · · · · · · · · · · · · · · · · · · · 6
· · · · · · · · · · · · · · · · · · · · · · · · · · · · · · · · · · 7
· · · · · · · · · · · · · · · · · · · · · · 7
· · · · · · · · · · · · · · · · · · · · · · · · · · · · · · · · · · · · · · 7
· · · · · · · · · · · · · · · · · · · · · · · · · · · · · 7
· · · · · · · · · · · · · · · · · · · · · · · · · · · · 8
· · · · · · · · · · · · · · · · · · · · · · · · · · · · · · · 9
· · · · · · · · · · · · · · · · · · · · · · · · · · · · · 9
· · · · · · · · · · · · · · · · · · · · · · · · · · 1 0
· · · · · · · · · · · · · · · · · · · · · · · · · · · · · 1 0
· · · · · · · · · · · · · · · · · · · · · · 1 1
· · · · · · · · · · · · · · · · · · · · · · · · · · · · · · 1 1
· · · · · · · · · · · · · · · · · · · · · · · · · · · · · · · · · · · · 1 4
· · · · · · · · · · · · · · · · · · · · · · · · · · · · · · · · · · · 1 4
· · · · · · · · · · · · · · · · · · · · · · · · · · · · · · · · · · · · 1 5
· · · · · · · · · · · · · · · · · · · · · · · · · · · · · · · 1 5
· · · · · · · · · · · · · · · · · · · · · · · · · · · · · · · 1 5
· · · · · · · · · · · · · · · · · · · · · · · · · · · · · · · · 1 6
· · · · · · · · · · · · · · · · · · · · · · · · · · · · · · · · · 1 6
· · · · · · · · · · · · · · · · · · · · · · · · · · · · · · · · · · 1 6
· · · · · · · · · · · · · · · · · · · · · · · · · · · · · · 1 6
· · · · · · · · · · · · · · · · · · · · · · · · · · · · · 1 7
· · · · · · · · · · · · · · · · · · 1 7
· · · · · · · · · · · · · · · · · · · · · · · · · · · · · · · · · · · · · 1 7
· · · · · · · · · · · · · · · · · · · · · · · · · · · · · · · · · · 1 8
· · · · · · · · · · · · · · · · · · · · · · · · · · 1 9
· · · · · · · · · · · · · · · · · · · · · · · · · · · · 2
· · · · · · · · · · · 4
· · · · · · · · · 1 9
Effects List
Effect Models List
FX 1, FX 2, FX 3
AMP
NR
CAB/IR
EQ
DLY
RVB
Drum Machine Rhythms
Troubleshooting
Technical Specifications
0
· · · · · · · · · · · · · · · · · · · · · · · · · · · · · · · · · · 2 7
· · · · · · · · · · · · · · · · · · · · · · · · · · · · · · · · · · · 3 2
· · · · · · · · · · · · · · · · · · · · · · · · · · · · · · · · · · · 3 5
· · · · · · · · · · · · · · · · · · · · · · · · · · · · · · · · · · 3 6
· · · · · · · · · · · · · · · · · · · · · · · · · · · · · · · · · · 3 8
· · · · · · · · · · · · · · · · · · · · · · · · · · · · · · · · 2 1
· · · · · · · · · · · · · · · · · · · · · · · · · · · 2 1
· · · · · · · · · · · · · · · · · · · · · · · · · · · · 2 1
· · · · · · · · · · · · · · · · · · · · · · · · · · · · · · · · 3 2
· · · · · · · · · · · · · · · · · · · · · · · · 3 9
· · · · · · · · · · · · · · · · · · · · · · · · · · · · · 4 2
· · · · · · · · · · · · · · · · · · · · · · · 4 2

Welcome
Thank you for purchasing a Hotone product.
Please read this manual carefully to get the most out of your Ampero One.
Please keep this manual to use for further reference.
Notice
Please read this manual carefully. It contains information regarding the
proper use of this product and other important information.
1
Warning
• Do not open the casing or attempt to modify the product or power
supply. Hotone will not be responsible for product damage or bodily
harm should the product be tampered with.
• To reduce the risk of hearing damage, do not use headphones at
high volume for an extended period of time. Should you notice
discomfort, discontinue use and see a medical professional
immediately.
• Children using this product should be accompanied by an adult.
Environment
Avoid using the unit in any of the following conditions that could
cause malfunction:
• Extreme environment (extremely hot or cold places, near heaters
and other heat sources, under strong sunlight, etc.)
• Sandy or dusty places
• Places that are extremely humid or exposed to splashing water
• Places with lots of vibrations
Power Supply Safety
• Always use a DC 9V center negative adapter. Use of an adapter
other than that specified could damage the unit or cause malfunction
and pose a safety hazard.
• Always connect the adapter to an outlet that supplies the rated
voltage required by the adapter.
• When disconnecting the adapter from an outlet, always pull the
adapter itself. Pulling the cable will cause damage to the unit. Make
sure to separate the power adapter and store in a safe place.
• During lightning storms or when not using the unit for an extended
period, disconnect the adapter from the outlet.
• Make sure your hands are dry when plugging in the adapter.
Operation Safety
•Never put objects filled with liquids on the unit as this could cause
electric shock.
• Never place candles and other burning objects on top of the
Ampero One. Doing so could cause a fire.
• Ampero One is a precision device. Do not apply excessive force to
the switches and other controls. Do not expose the unit to strong
impact or drop it.
• Do not apply excessive force to the touchscreen or casing, which
may cause malfunction.
• Do not place foreign objects (liquid or solid) into the product.
• The unit and power supply will become warm with extended use;
this is normal.
Connections and Interference
•Turn off Ampero One and all other connected devices before
connecting any cables to it.
• Disconnect the power supply and other line connections before
moving Ampero One to another location.
• Ampero One is designed to resist external electromagnetic
interference, but may produce static in some cases of strong
electromagnetic interfere (e.g. high power transformers or wireless
TV/phone equipment). Turn off any nearby electromagnetic equipment
when using, if possible.
• Like all digital devices, Ampero One may experience malfunction
and/or loss of data if exposed to strong electromagnetic interference.
Please use caution.
Cleaning
Use a soft cloth to clean the panels if they become dirty. If necessary,
slightly moisten the cloth. Never use cleansers, wax, or solvents such
as paint thinner, benzene or alcohol.
Malfunction
•If the unit should malfunction, disconnect the power adapter and
turn the power OFF immediately. Then, disconnect all other connected
cables. For:
-Power adapter malfunction
-The unit or power supply emits an odor
-Liquids or foreign objects entered the unit
-The unit has other obvious signs of malfunction (e.g. won’t turn on,
knobs won’t work, won’t produce sound, etc.)
Prepare information including the model name, serial number, specific
symptoms related to the malfunction, your name, address and
telephone number and contact the store where you bought the unit.
DES IGN INS PIRATI ON
Definitions
Module
Ampero One supports the simultaneous use of up to 9 effects. Each is called an “effects module”, or simply “module”. There are several effects
available in each module.
Parameter
Variables that determine the application of an effect are called “parameters”. If we imagine each module as a separate effect pedal, then each
parameter would be a knob on that pedal.
Patch
The ON/OFF status of each module and the parameter settings are stored in units called “patches”. These are your “tones”. Use patches to recall,
edit, and save your favorite tones.
Bank
A set of 3 patches is called a “bank”. Ampero One has a total of 66 banks, including 33 editable player (user) banks and 33 factory banks (F01-F33),
which can be adjusted by not saved.
Panel
2
2
VOLUME
1
44
/
●●●
/
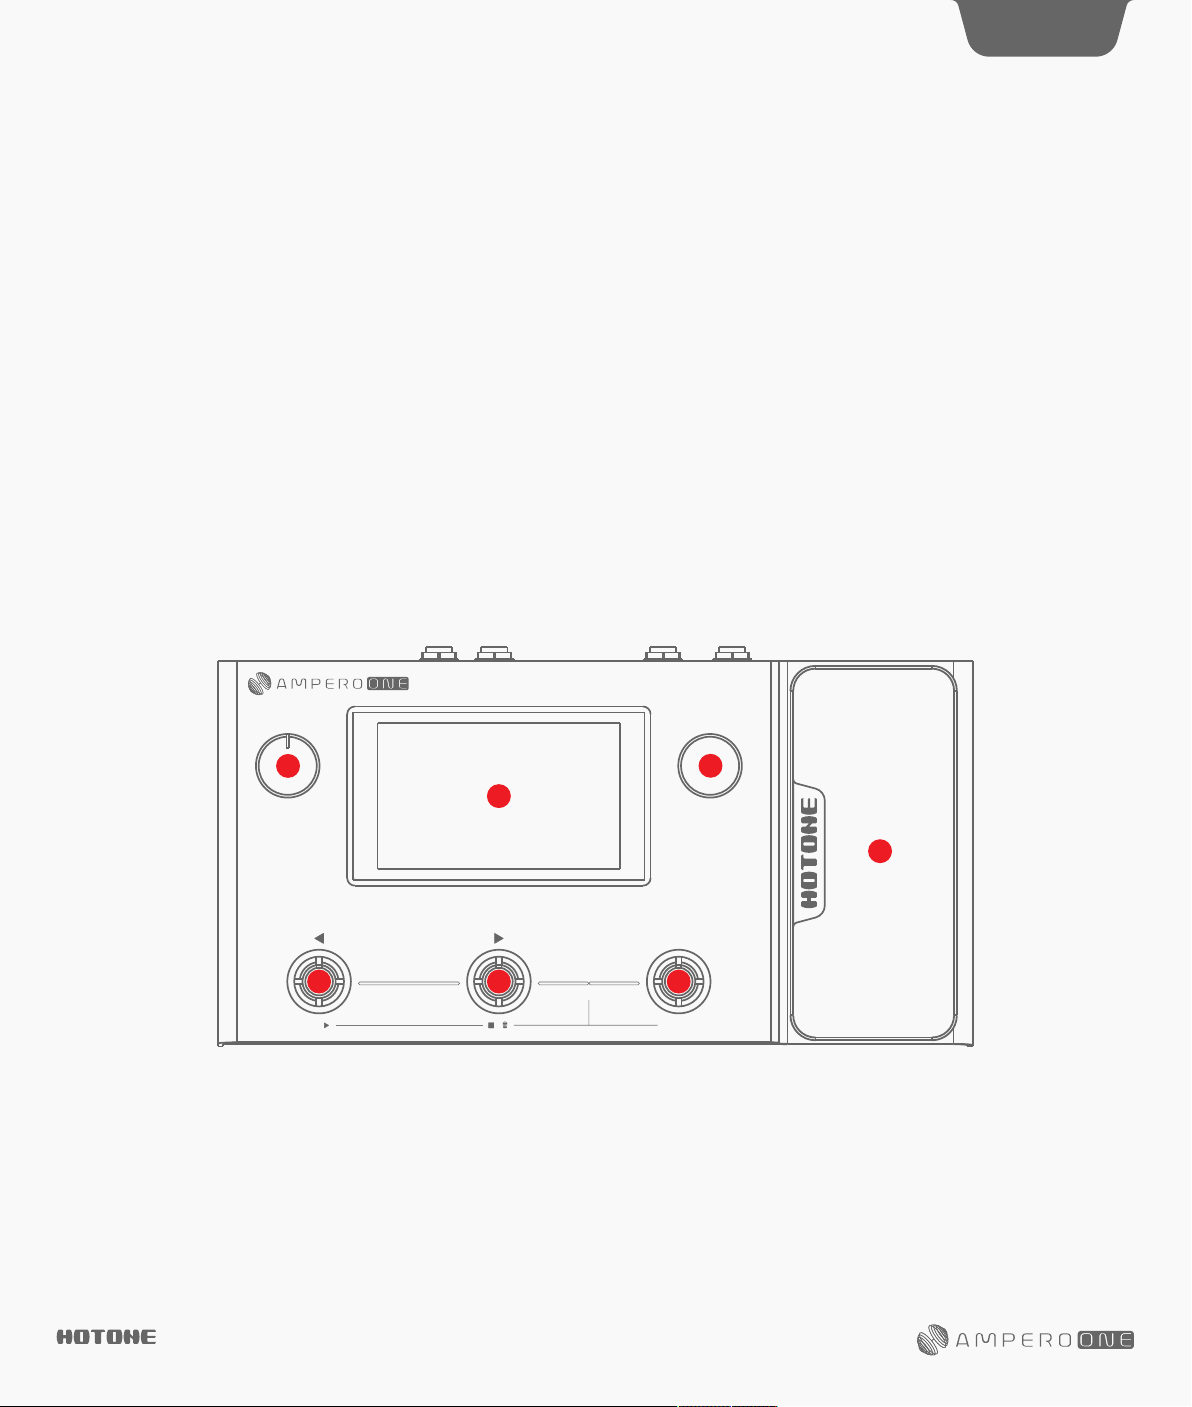
1. Display Screen: Displays Ampero One’s current status. Use the
touchscreen to select effects, edit patches, and make tone
adjustments.
2. Volume Knob: Adjusts the overall volume of all output connections.
3. MENU/VALUE Knob (Main Knob): Turning or pressing this knob
Amp Modeler / Effects Processor
3
MENU / VALUE
5
CTRL
H
o
l
d
f
o
r
T
A
P
loopertuner
4
1/2 speed
reverse
allows you to change menus and adjust parameters.
4. Footswitch: Use to change patches, turn on/off effects, set tap
tempo, etc.
5. Expression Pedal: Use to control the parameter of one or several
effects, including output volume.
DES IGN INS PIRATI ON
Panel
3
11
USB
6 7
EXP 2/CTRL
(FS 4/5)
INPUT
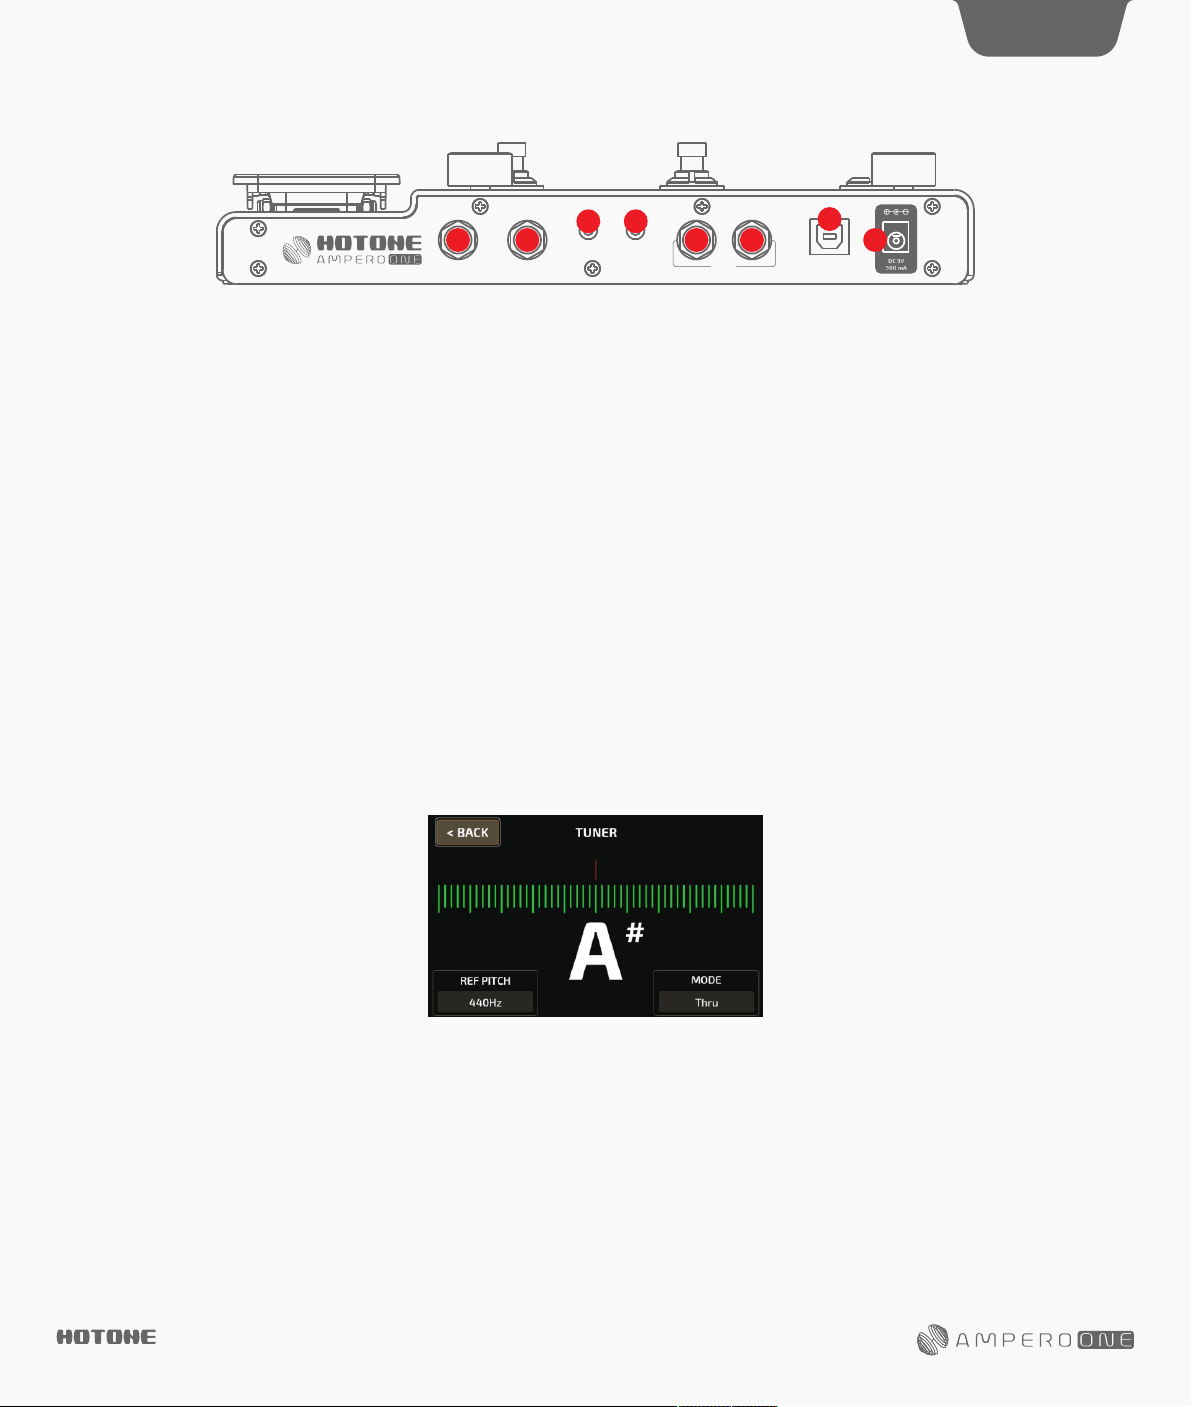
6. EXP2/CTRL : 1/4” TRS input, for connecting an external expression
pedal. Perfect for Hotone Soul Press or Bass Press.
7. INPUT: 1/4” mono input connection for guitar or other instrument.
8. AUX IN: 1/8” stereo input for connecting external devices (phone,
MP3 player) for practice and jamming.
9. PHONES: 1/8” stereo output for connecting headphones.
8 9
AUX IN
PHONES
10 10
OUTPUT
R
L(MONO)
10. OUTPUT: Unbalanced 1/4” TS stereo output connections to
amplifiers or other equipment. For mono output, use only the left
unbalanced output.
11. USB: USB Type-B connects to your computer for use with Ampero
One software.
12. Power Supply Connection: Power supply input (9V DC center
negative).
Getting Started
1. Connecting your Device
Plug your guitar in to the Ampero One input jack and run a cable from OUTPUT L to your amp. Please remember:
(1) Keep your amp volume down.
(2) Connect your cable to the amp’s FX Loop Return if it has one. .See page 17
2. Turn the Ampero One volume knob all the way down, then connect the power supply to turn Ampero One ON.
3. Calibrate the strings. Press left and middle footswitches together until the TUNER comes on the display screen. .See page 5
Pluck each string and tune until the pitch reaches the middle of the screen and turns green, as below:
12
When finished, tap any footswitch again to exit the tuner.
4. Select a patch:
Tap left footswitch to move back through the patches, tap middle footswitch to move forward through the patches. Hold either footswitch for fast
switching.
DES IGN INS PIRATI ON
Main Display Screen and Device Lock Screen
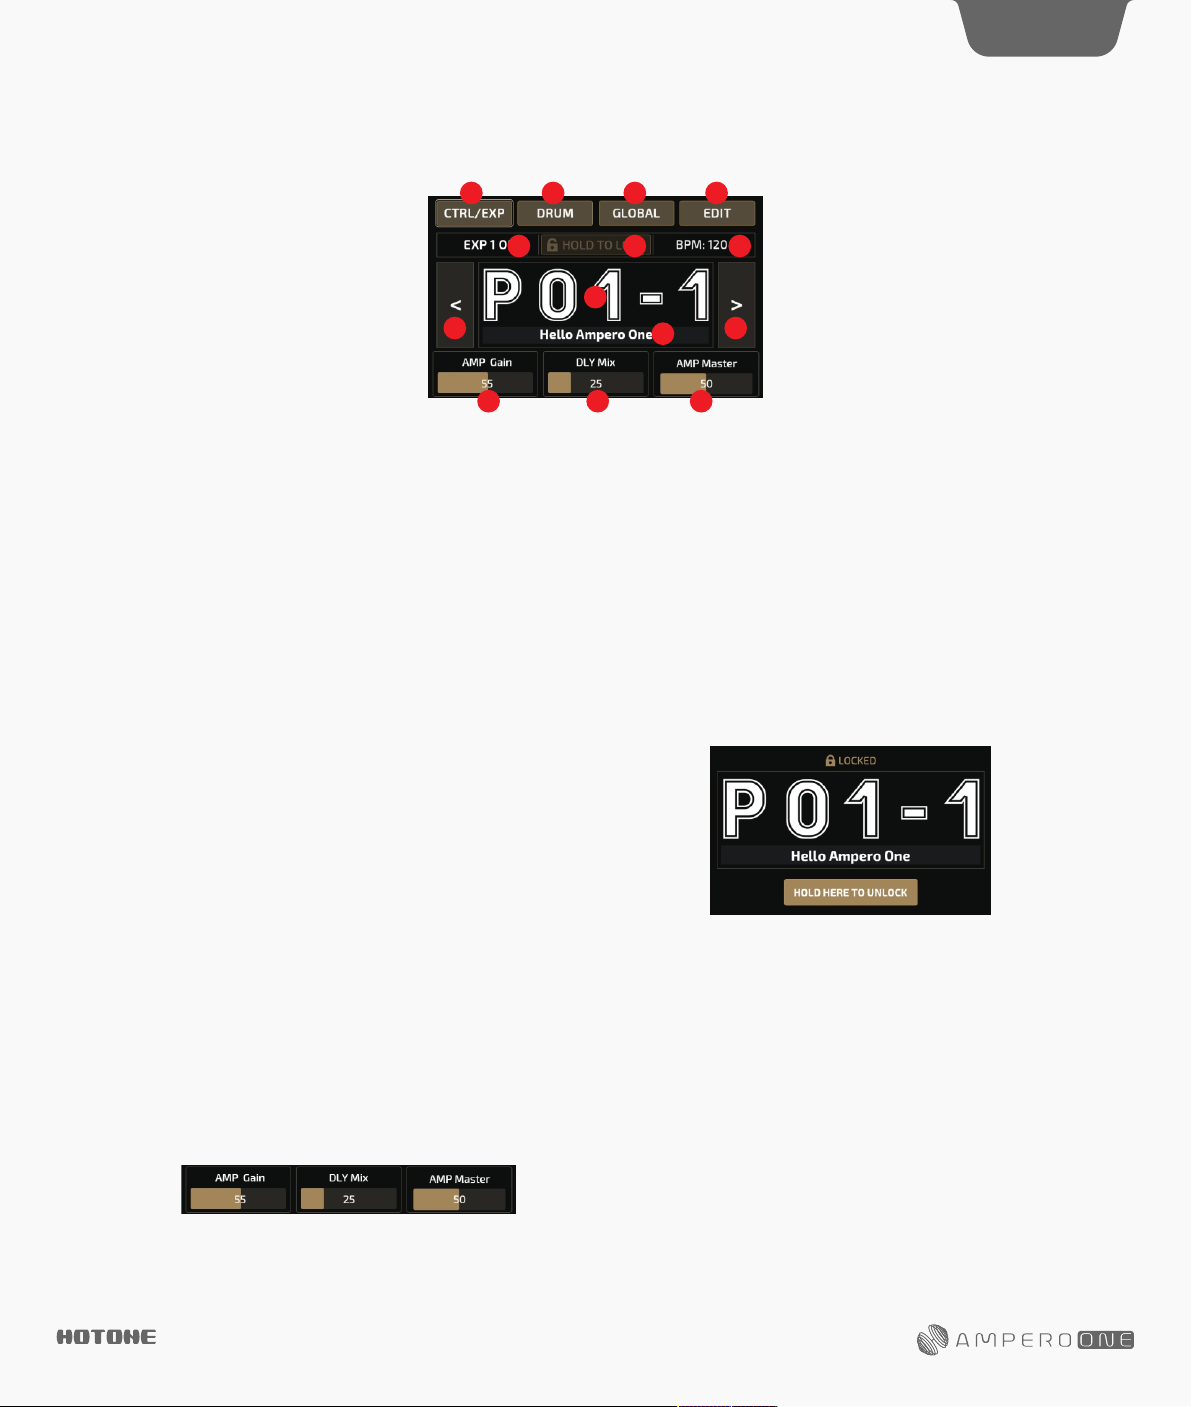
When Ampero One is turned on it will display the main screen, as shown below:
6 7 8 9
4
10 11
1
3 4
5 5 5
1. Current patch number
2. Current patch name
3. Patch selection back button
4. Patch selection forward button
5. Quick Access parameters (Quick Access Para) controlled by touch screen (or main knob). Press and hold the parameter name to change the
parameter you’re controlling. See page 10.
6. CTRL/EXP gives you access to control settings. See page 9.
7. DRUM opens the drum machine settings. See page 5.
8. GLOBAL opens the global settings page. See page 14.
9. EDIT allows you to edit the current patch. See page 7.
10. Indicates the status of the built-in expression pedal (lit up when on, gray when off)
11. Hold to lock the device; touch screen and Main Knob won’t work when locked
12. Indicates the current patch tempo
When Ampero One is locked, it will display the device lock screen, as shown
below:
Hold the unlock button to unlock the device. You can also unlock the device by
entering other menus by footswitch (Tuner, Looper, etc.).
2
12
Using the Screen
Touch operation
Changing patches and editing settings can all be done with the
touchscreen.
DES IGN INS PIRATI ON
Main Knob
Turning the main knob lets you select the object you want to control.
That object will light up when selected, then press the knob to
confirm the selection.
• If the object selected is a button, it will respond as if you’d touched
the button on the touchscreen.
• If the object selected is a parameter, you can use the main knob to
adjust the parameter value. Pressing the main knob again will take
you back to selection mode.
Reminder: The details of Ampero One’s use and programming may
slightly vary under certain operational circumstances. Please read
this manual carefully to get all the necessary information.
Ampero One Tools
Ampero One is equipped with some great tools to expand your playing experience: a tuner, drum machine, looper, and expression pedal.
TUNER
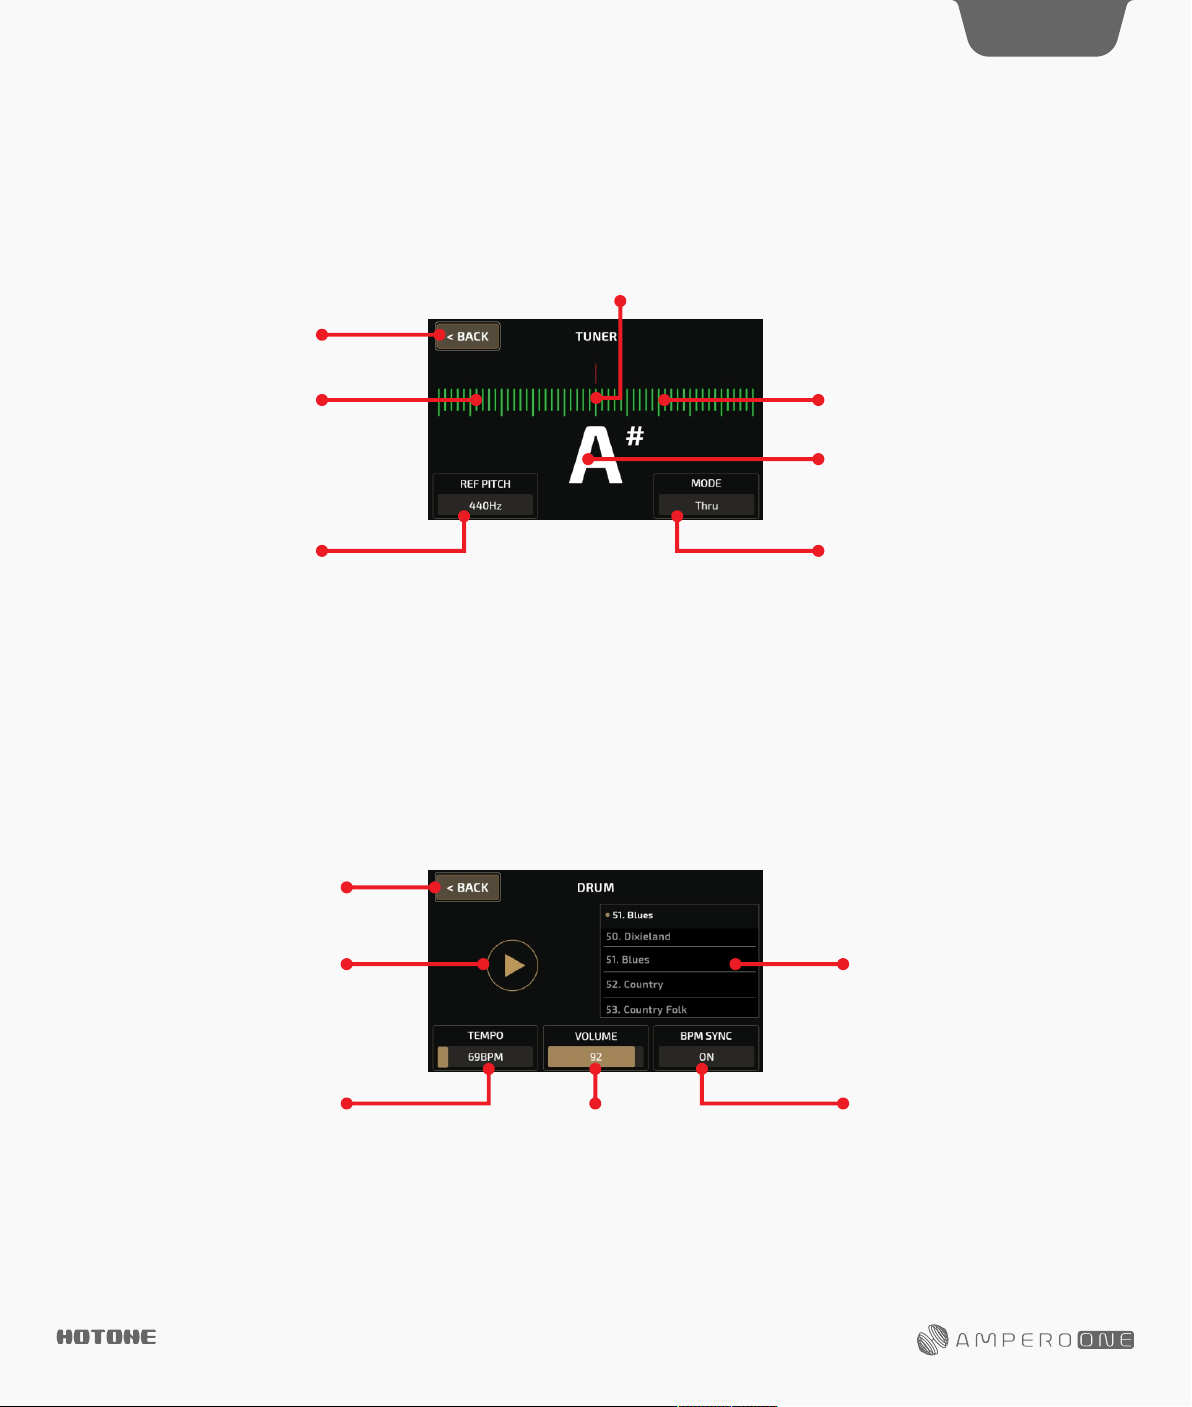
In default mode, pressing left and middle footswitches together will open the tuner.
Intune
Exit tuner
5
Pitchflat
On the upper part is a scale that indicates your pitch. Left of center is
flat, and right of center is sharp. As you tune your instrument towards
the middle, the color of the scale will change from red (out of tune) to
yellow (near pitch) to green (in tune).
Use REF PITCH to adjusts the pitch calibration ranging from 432Hz to
DRUM
Select DRUM on the main screen to access the drum machine.
Exit the menu
Play/stopbutton
Pitchsharp
Indicatesthecurrentnotename
SelectstunermodeAdjuststhepitchcalibration
447Hz. Standard pitch is set at 440Hz.
MODE lets you select the tuner mode from Thru (for signal through),
Bypass (bypass tuning) or Mute (for silent tuning).
You can exit the tuner either by pressing any footswitch or by
pressing the Back button on the touchscreen.
Drum style list
Use the style list to scroll between genre styles. Ampero One has 100
drum styles. See page 39.
Use TEMPO to adjust the drum tempo, ranging from 40BPM-250BPM.
Use VOLUME to adjusts the drum volume from 0-100.
Turn on BPM SYNC switch if you need to set drum tempo by Tap
Tempo function. In this case, the drum tempo will be the same as
DES IGN INS PIRATI ON
Controlsdrummachineoutput
BPM sync on/off switchControlsdrumspeed
patch tempo.
Exit the drum machine menu by pressing BACK at the top left. Exiting
the menu will not stop the drums from playing.
Reminder: Setting the drum tempo will affect patch tempo if you turn
BPM SYNC ON.
Ampero One Tools
LOOPER
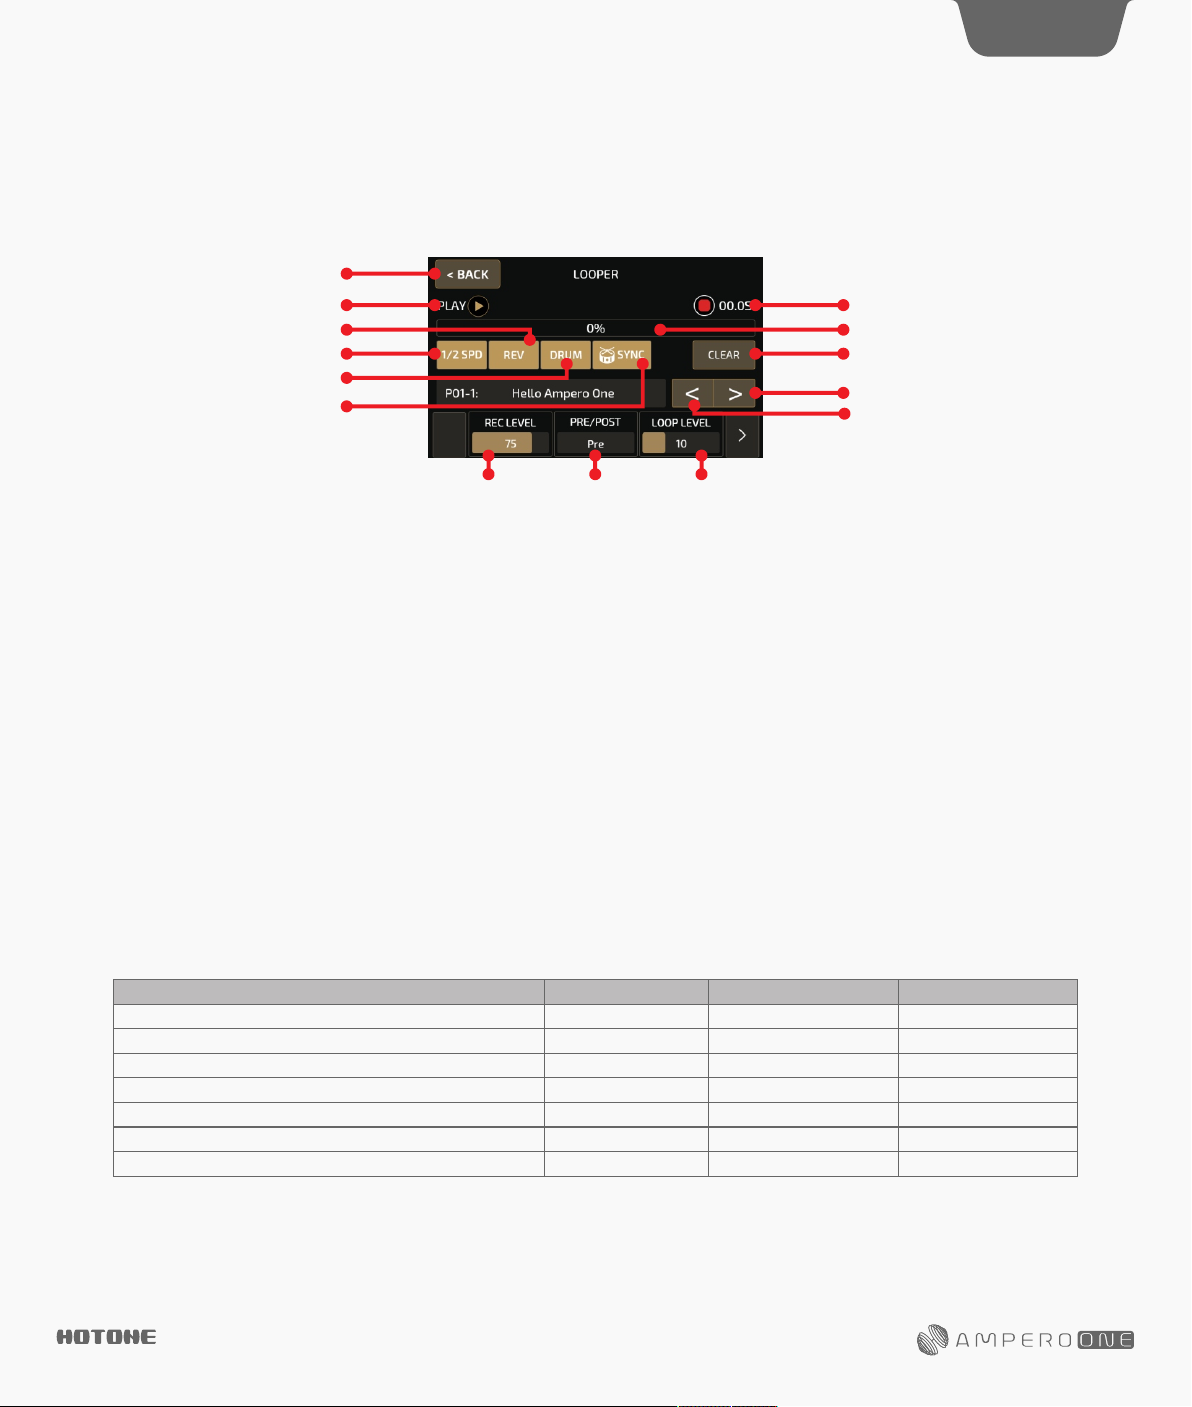
In default mode, pressing footswitch 2 and the CTRL footswitch together will open the looper menu.
Exit looper
Currentlooperstatus
Reverseon/offswitch
1/2speed on/off switch
Drum machine on/off switch
Drum sync on/off switch
6
Record/playtime
Record/playprogressbar
Clearallrecordeddata
Nextpatch
Previouspatch
Switcheslooperposition
(pre/posteffects)
The progress bar at the top will be shown in red during recording and
overdubbing. It will be shown in green in play mode.
Tap CTRL footswitch to turn on/off half speed playback (1/2 SPD),
hold CTRL footswitch to turn on/off reverse playback (REV). The
footswitch controls correspond with the 1/2 SPD and REV buttons on
the touchscreen.
When you record phrases with drum rhythms, you can sync drum
rhythms to your loop phrase by turning on drum sync switch. Please
note that some unusual operations (e.g. randomly play/stop
looping/drum machine or change drum style/tempo) may break the
sync status. Switching 1/2 SPD and REV on/off won’t affect this.
Use REC LEVEL to adjust the loop recording level from 0-100.
Use PRE/POST switch to select the looper position: before (Pre) or
after (Post) your effects chain.
• In Pre mode, the looper will record mono audio without any effects,
up to 100 seconds.
• In Post mode, the looper will record stereo audio with effects, up
Default Looper operation and status modes:
Operation
On with no data
Stop
Tap footswitch 1 when there’s no data
Tap footswitch 1 while recording, overdubbing, or paused
Tap footswitch 1 while loop is playing
Tap and hold footswitch 2
Each time a recorded loop plays from the beginning
Reminder:
1. When the loop recording reaches it’s time limit, the looper will automatically stop the recording and begin playback.
2. When the looper is in Post mode, changing patches will not change already recorded loop phrases.
3. Half-speed and Reverse functions will affect all recorded loop phrases.
4. If you switch looper position while it’s running, the loop will automatically stop and be erased.
to 50 seconds.
Use LOOP LEVEL to adjust the loop playback volume from 0-100.
Exit the looper by pressing BACK on the upper left of the screen.
You can use «Footswitch X» (X=1-3, corresponding to FS 1,2 and CTRL)
to assign function of footswitch in looper page. The function includes
the following:
Rec/Play: Tap to recording, then tap again to start playback
Drum Rec/Play: Start drum when starting to record
Stop/Clear: Tap to stop recording and hold to clear
Drum Stop/Clear: Stop drum when stop recording
FX: Tap to toggle 1/2 speed function. Hold to toggle reverse function.
(Violet LED on)
1/2 SPD: On (Yellow LED on)/Off (Yellow LED off)
REV: On (White LED on)/Off (White LED off)
Drum: On (Green LED on)/Off (Green LED off)
Looper Exit: Exit looper page
Function/Status
Stop
Stop
Record
Play
Stop
Clear
Play
ControlslooperplaybacklevelControlslooperrecording level
LED Color (FS 1)
None
Flashing green
Steady red
Steady green
Flashing green
Quickly flashing green
Single flash
LED Color (FS 2)
None
Flashing green
None
Steady Green
Flashing green
Quickly flashing green
Single flash
DES IGN INS PIRATI ON
Ampero One Tools
EXP Pedal
7
You can either use the built in expression pedal (EXP 1) or connect
your own (EXP 2) to control various Ampero One paramaters.
Some of Ampero One’s preset patches have been set up to use the
built in expression pedal. These can be used without any further
setup. For more on expression pedal settings. See page 11.
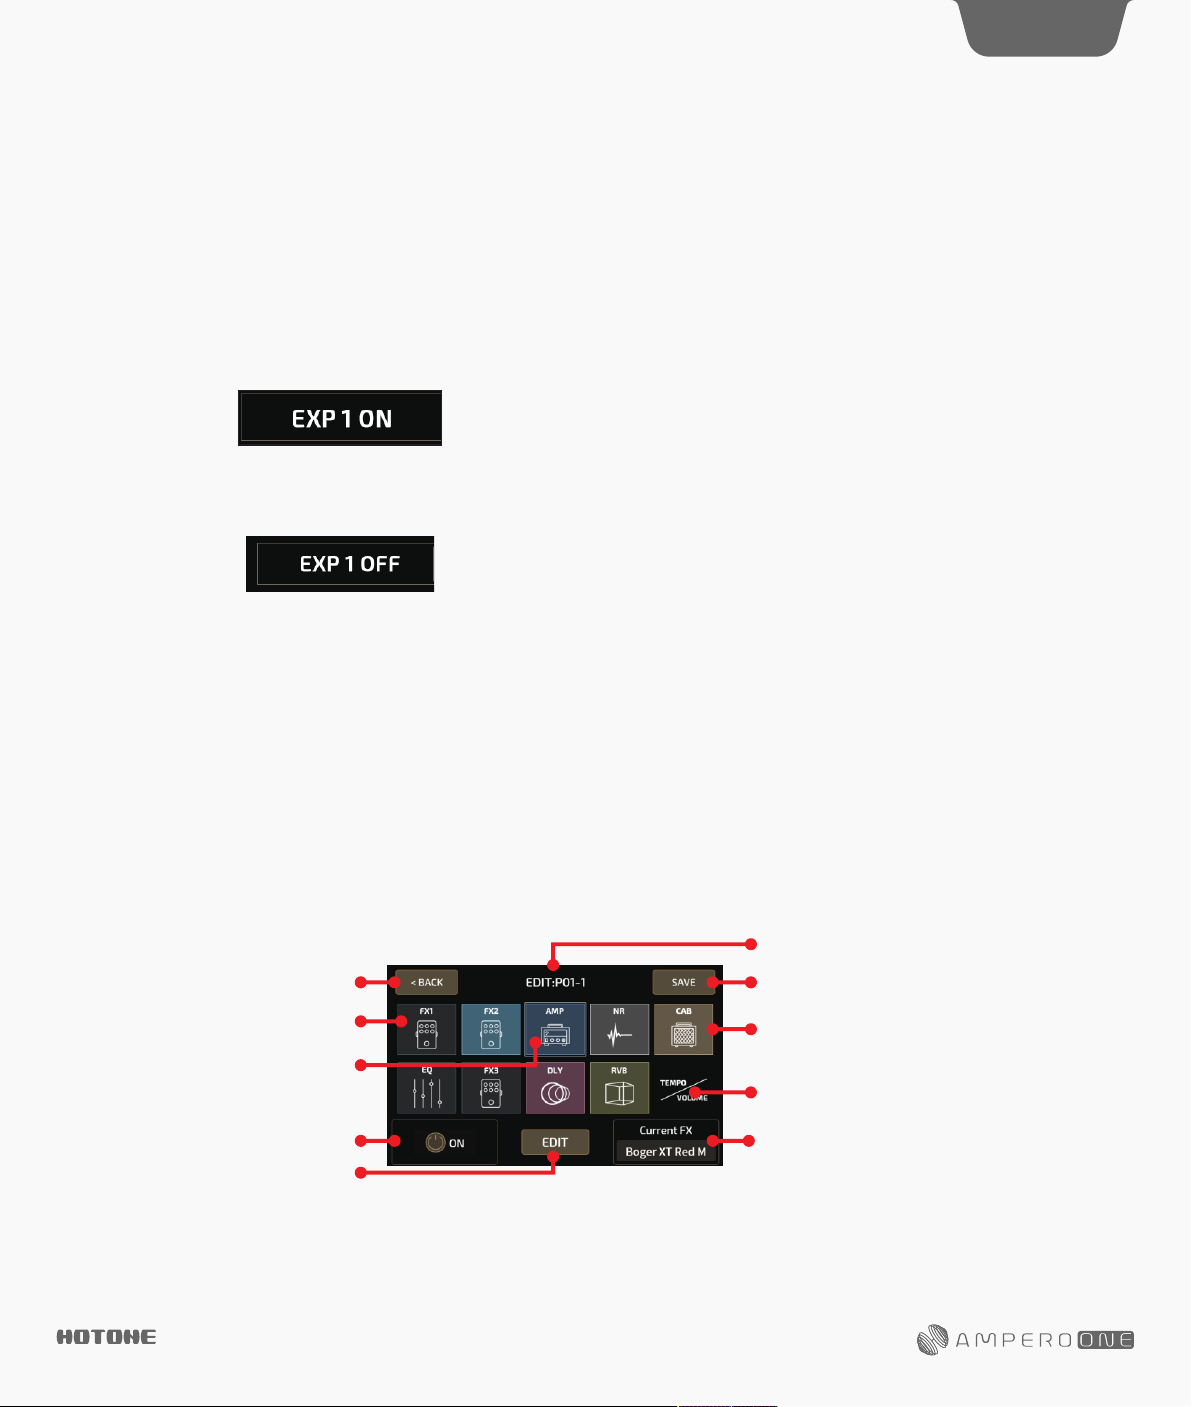
To turn the built in expression pedal on, press the pedal all the way
forward so it clicks. The EXP 1 icon in Main Display Screen will come
on to indicate the pedal is on:
To turn the pedal off, press the pedal all the way forward again so it
clicks. The EXP 1 icon in Main Display Screen will come on to
indicate the pedal is off:
Reminder:
1. When the built in expression pedal is off, it continues to work as a
volume pedal for Ampero One. For more on volume pedal settings,
see page 12.
2. You can use CTRL footswitch to switch built in expression pedal
on/off. See page 10.
3. If your external expression pedal has an off switch and is turned
off, it will not function.
4. If you use an external expression pedal, the display won’t show
any message when it is connected. As soon as you connect and turn
on an external expression pedal, it will function to control the effects
parameter determined by the current patch. If the current patch does
not have any effects controllable by expression pedal, the pedal will
not function. See page 11.
Customizing Your Ampero One
This section will show you how to customize your Ampero One’s settings, edit patches, setup the expression pedal, and change other features to
your taste.
EDIT
Edit your patches to get the tone you want.
Remember that turning the modules on/off and adjusting parameters will change the current patch. If you switch patches or turn Ampero One off
before saving your changes, the changes will be lost.
Make sure to press SAVE on the upper right of the display screen to save your settings.
Patch Edit Menu
Select a patch from the main menu by using the forward/backward arrows on the screen. Tap left footswitch to move back through the patches, tap
middle footswitch to move forward through the patches. Hold either footswitch for fast switching.
Currentpatchnumber
Exitediting Entersavemenu
Indicates a module that is turned off
The highlighted frame indicates that
the AMP module is selected
Turntheselectedmoduleon/off
Edittheselected module
The menu is made of ten icon squares representing Ampero One’s nine effects modules and a volume/tempo module.
The default signal chain is ordered like this:
FX1 (select one)-FX2 (select one)-AMP (amp simulator)-NR (noise reducer)-CAB (cabinet simulator)-EQ (equalization)-FX3 (select
one)-DLY (delay)-RVB (reverb)
FX1, FX2, and FX3 will hold effects of your choosing.
DES IGN INS PIRATI ON
Indicatedsamodulethatisturnedon
Presstoeditpatchtempoandpatchvolume
Indicatestheeffectusedintheselectedmodule
Customizing Your Ampero One
8
Press a square to select that module, then use the on/off button to
turn that module on or off. Press EDIT to enter the module edit menu.
You can also use the main knob: turn it to select a module, then press
and click it to turn the module on or off. Press and hold the knob to
enter the module edit menu.
Current FX shows the effect on the current module.
When you select TEMPO/VOLUME square,you can adjust the patch
tempo (40-250BPM) and the patch volume (0-99) with the touch
screen
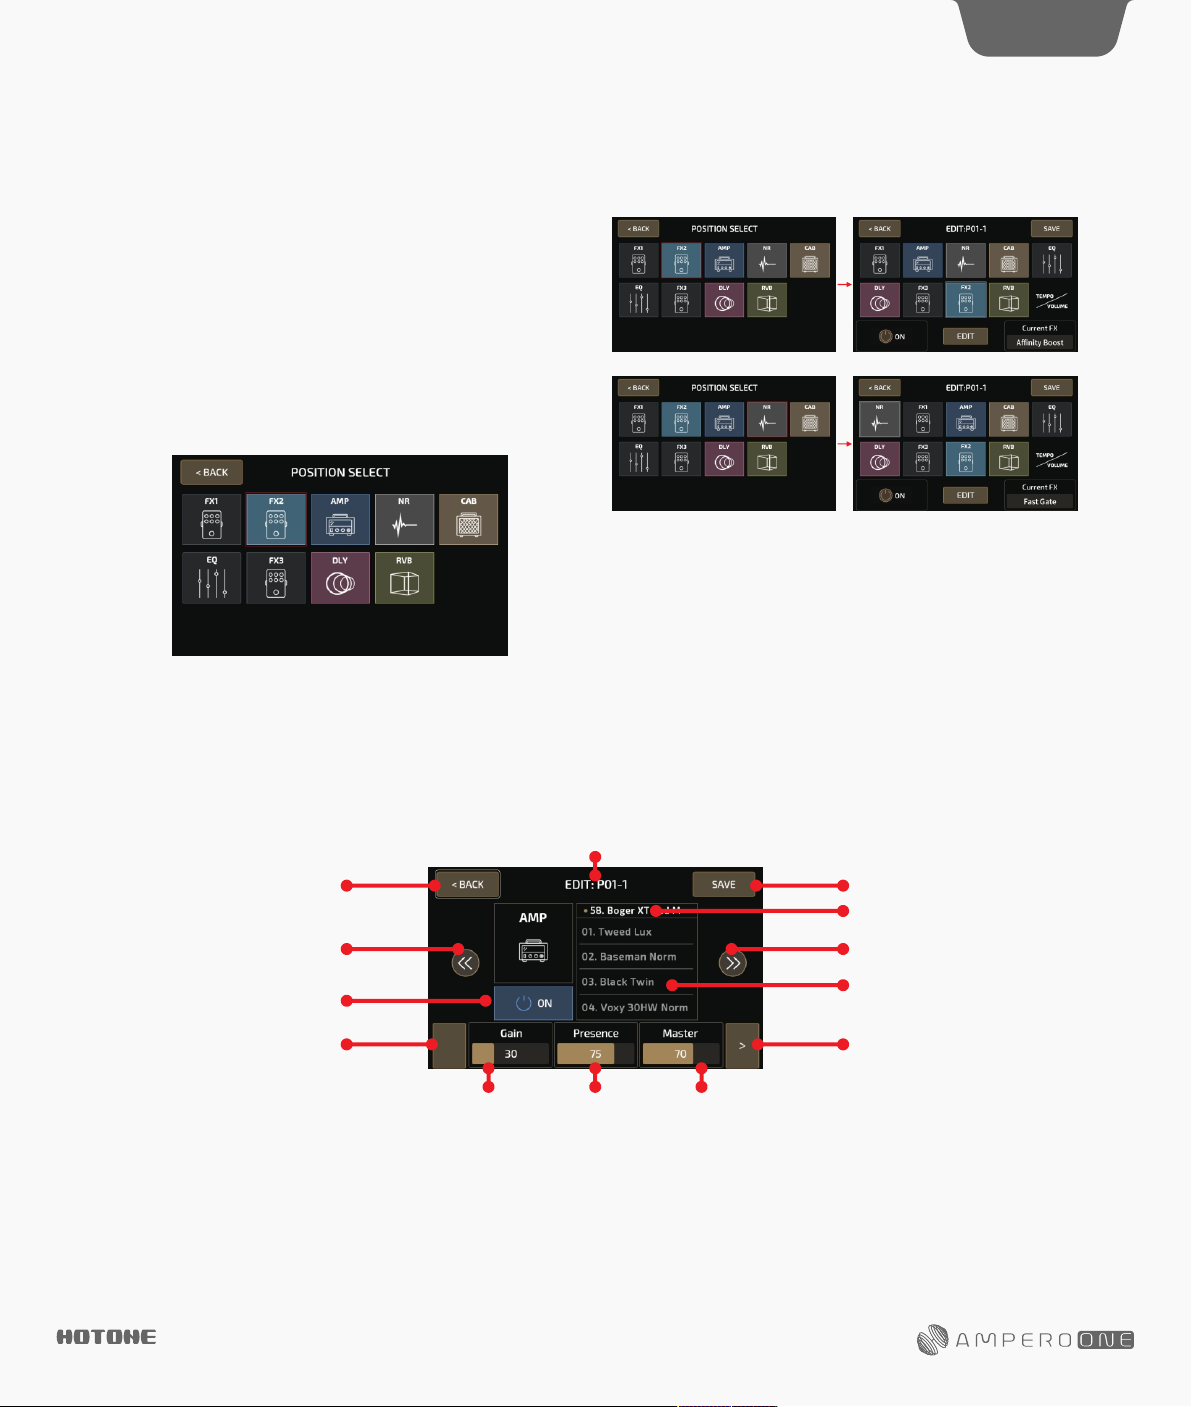
To move a square to a different position, press a square twice (or turn
main knob to select a square and press it twice) to pick it up:
Press another square (or turn main knob to select a square and press)
to insert into the selected position:
Reminder: The VOLUME/TEMPO square is fixed at the end.
Module Edit Menu
Go back to patch edit menu
Previousmodule
Taptoturnthemoduleon/off
Taptoseeotherparameters
(appearsonlywhenmorethan
3parametersareavailable)
Use the module control panel to edit or turn the current module
on/off.
Select an effect from the effects list.
The parameter panel shows the adjustable parameters of the effect
selected.
If the selected effect has more than three adjustable parameters,
DES IGN INS PIRATI ON
Current patch number
Parameter2 Parameter3Parameter1
there will be an arrow at the right of the parameter panel. Press the
arrow to see the other parameters.
For more information on modules, effects, and parameters. See page 21.
Reminder: In some extreme cases the signal processor may become
overloaded and display a “System Overload” caution.
Entersavescreen
Effectslist
Nextmodule
Slidetocheckavailableeffects
Taptoselect
Taptoseeotherparameters
(appearsonlywhenmorethan
3parametersareavailable)
Customizing Your Ampero One
CTRL
Use the control settings to determine the CTRL footswitch and Quick Access Para targets, setup the expression pedal parameters, and calibrate the
expression pedal.
Remember that all the control settings will change as you change patches. If you switch patches or turn Ampero One off before saving your
changes, the changes will be lost. Make sure to press SAVE on the upper right of the display screen to save your settings.
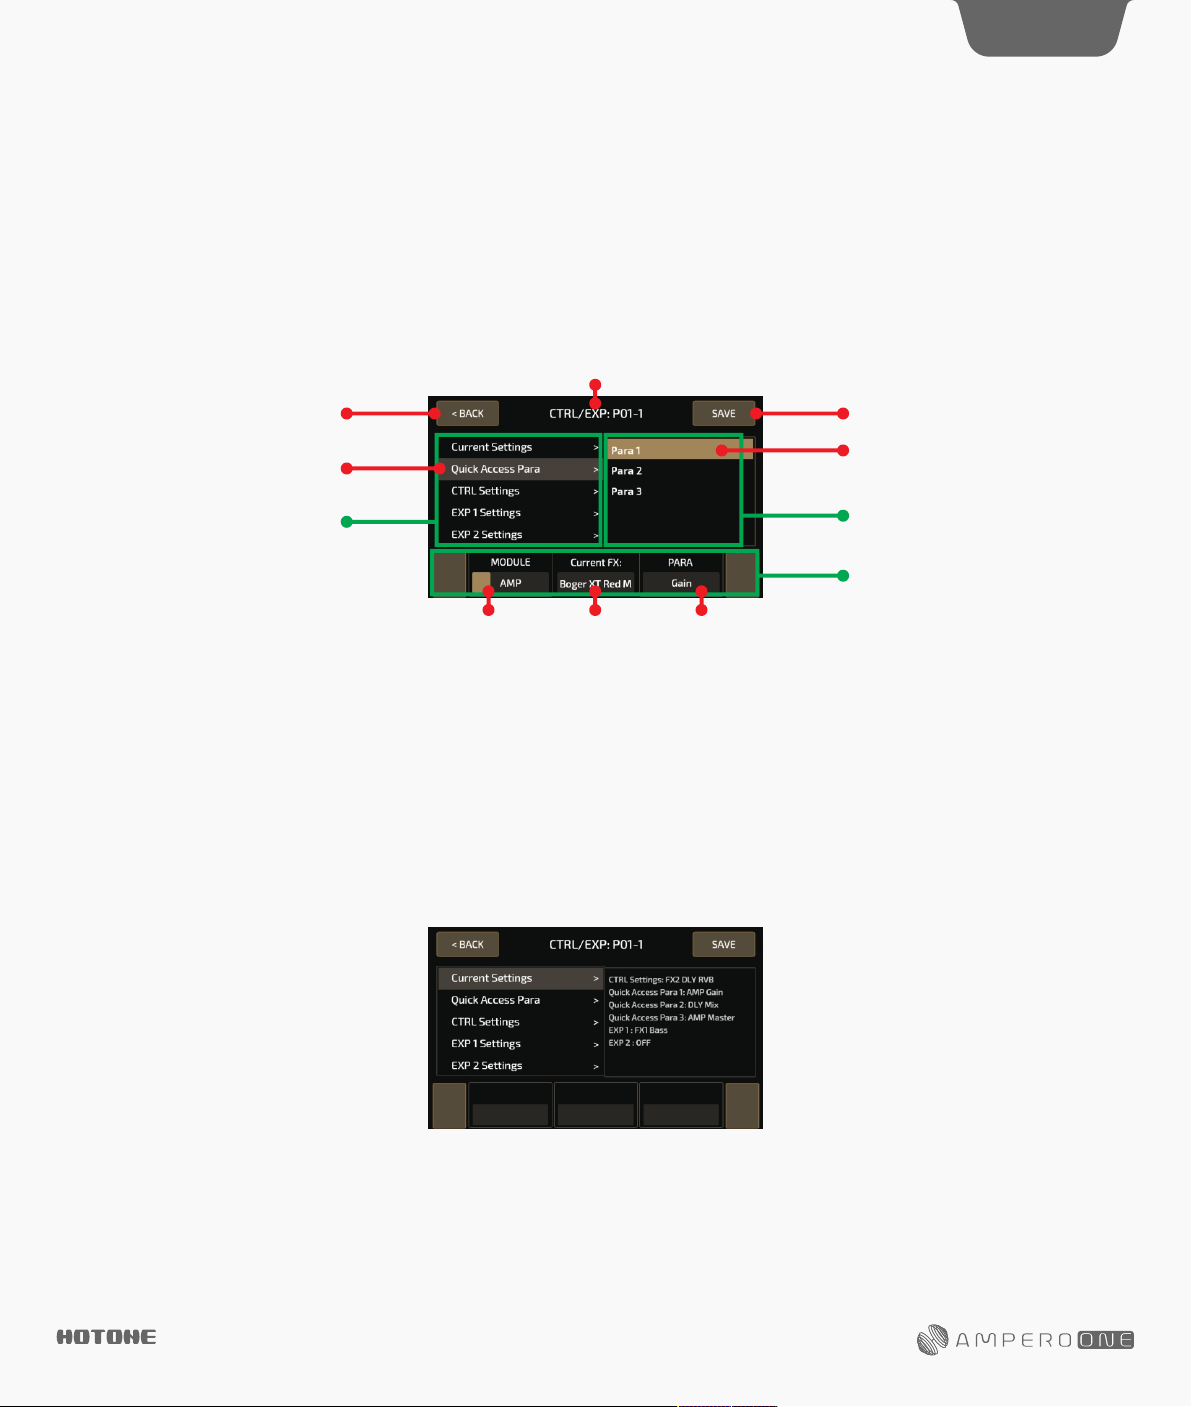
Press CTRL on the main menu to enter the control menu.
Current patch number
9
Exitthemenu
Tap to select
Mainmenu
Option2
Make selections from the right and left panels.
Like the effects module parameter menu, the selection panel features
three adjustable options. These options will change according to the
current menu option.
Current Settings
Pressing Current Settings allows you to see the CTRL footswitch function for the current patch, the quick access knobs targets,
and the expression pedal target.
Option3Option1
If the selected menu has more than three adjustable options, there
will be an arrow at the right of the selection panel. Press the arrow
to see the other options.
Entersave screen
Taptoselect
Sub menu
Optionspanel
DES IGN INS PIRATI ON
Customizing Your Ampero One
10
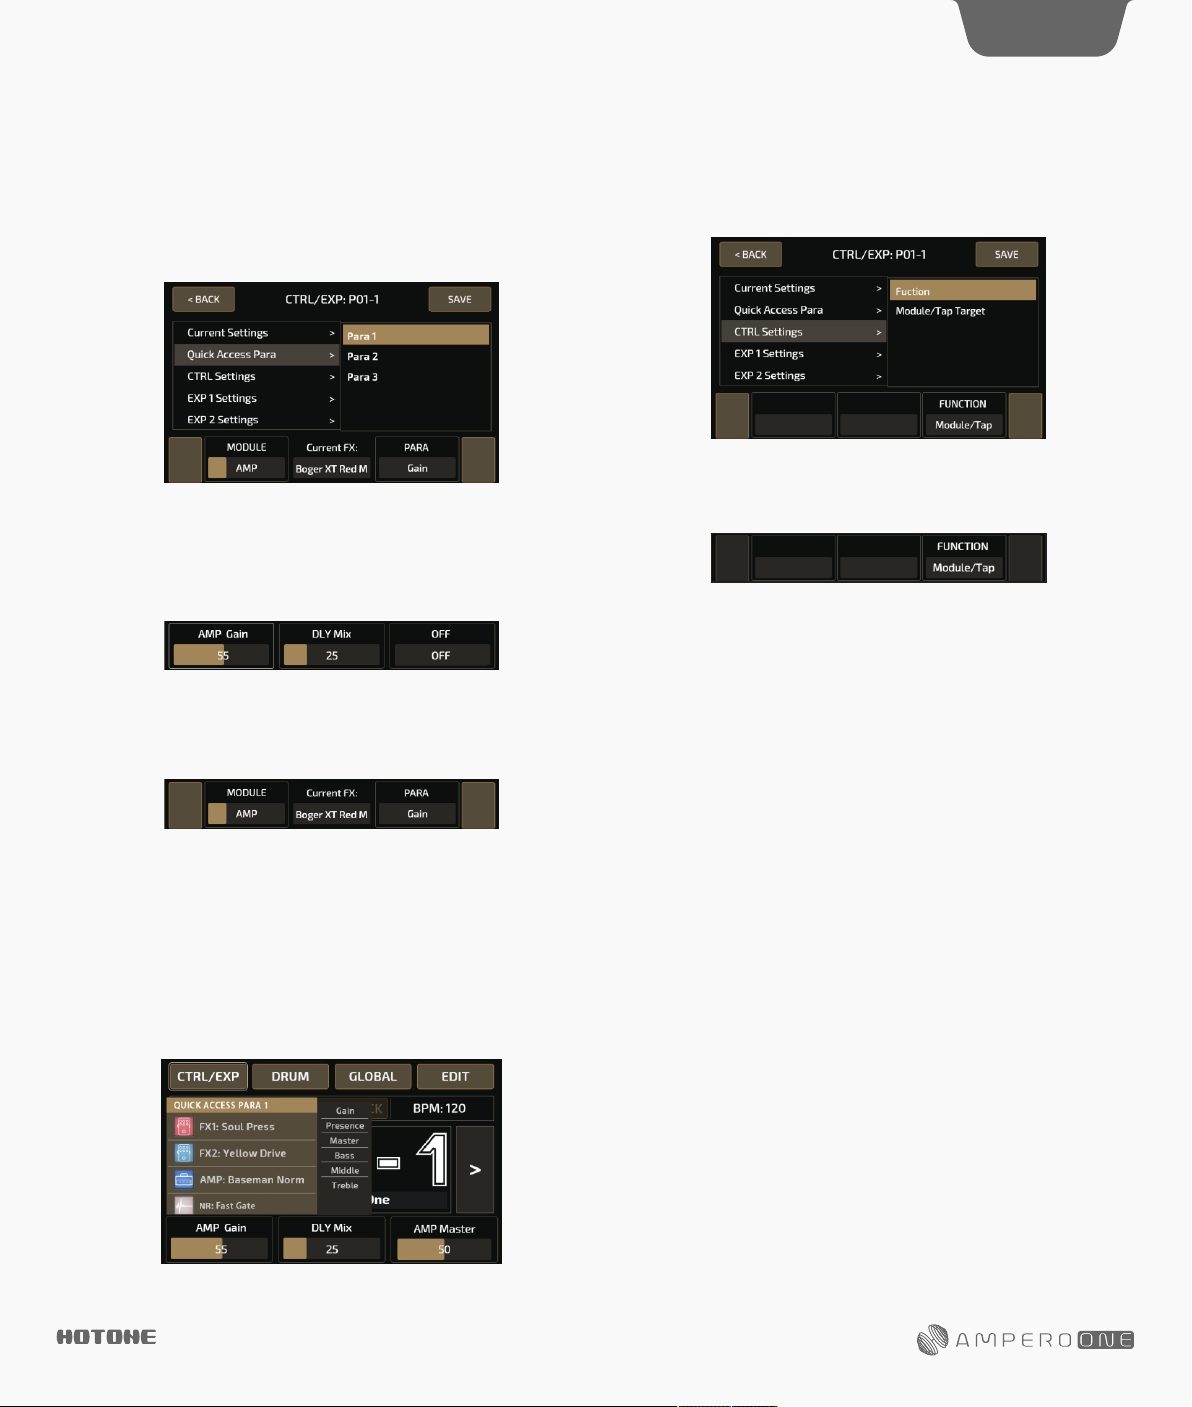
Quick Access Para
This menu allows you to set the parameter targets for the three Quick
Access Paras under the current patch. The parameter targets can also
be the effects parameters of the current effects module, patch
volume and patch tempo.
Use MODULE to select the target module. If you don’t want the quick
access para on, select OFF to turn its function off. When a quick
access para is off, the parameter panel will display the status as
shown:
The effect the current module is using will show up in the center of
the selection panel.
Use PARA to select the parameter you want to control. The
controllable parameters will vary with the different modules and
effects. Refer to Effects List for more on the controllable parameters
of different modules and effects.
Refer to Effects List for more on the controllable parameters of
different modules and effects. See page 21.
You can press any parameter on the selection panel of the main
menu as a quick access control target. This must be done on the
touch screen, as shown below:
CTRL Settings
Use the CTRL Settings menu to assign a function to CTRL footswitch
or select which modules of the current patch will be controlled by the
CTRL footswitch.
•Function
Under the Function option you can assign a function to CTRL
footswitch. There are three FUNCTION selections:
Module/Tap: For controlling module on/off or tap tempo
Tap Tempo: For tap tempo only
EXP 1 On/Off: For switching built in expression pedal on/off or tap
tempo
When Module/Tap or EXP 1 On/Off is assigned to CTRL footswitch,
you can use CTRL footswitch to switch module/built-in expression
pedal on/off or tap tempo. You can press and hold CTRL footswitch to
switch between the two functions:
— Module on/off switch
Repeatedly pressing the CTRL footswitch will turn it on or off, with
green and red LED lights to show the on/off status respectively. The
modules it controls will be affected when switching CTRL switch
on/off. The CTRL footswitch is set on (green) by default. To set
target modules, see Module/Tap Target section below for detailed
info.
— EXP 1 on/off switch
Repeatedly pressing the CTRL footswitch will turn the built-in
expression pedal on or off, with green and red LED lights to show
the on/off status respectively.
— Tap Tempo
When Tap Tempo engaged, the footswitch LED will turn blue and
will flash with the tempo set. Set the tempo by repeatedly tapping
the footswitch. This tempo will apply to the delay time and other
effects with adjustable speed parameters.
DES IGN INS PIRATI ON
Customizing Your Ampero One
11
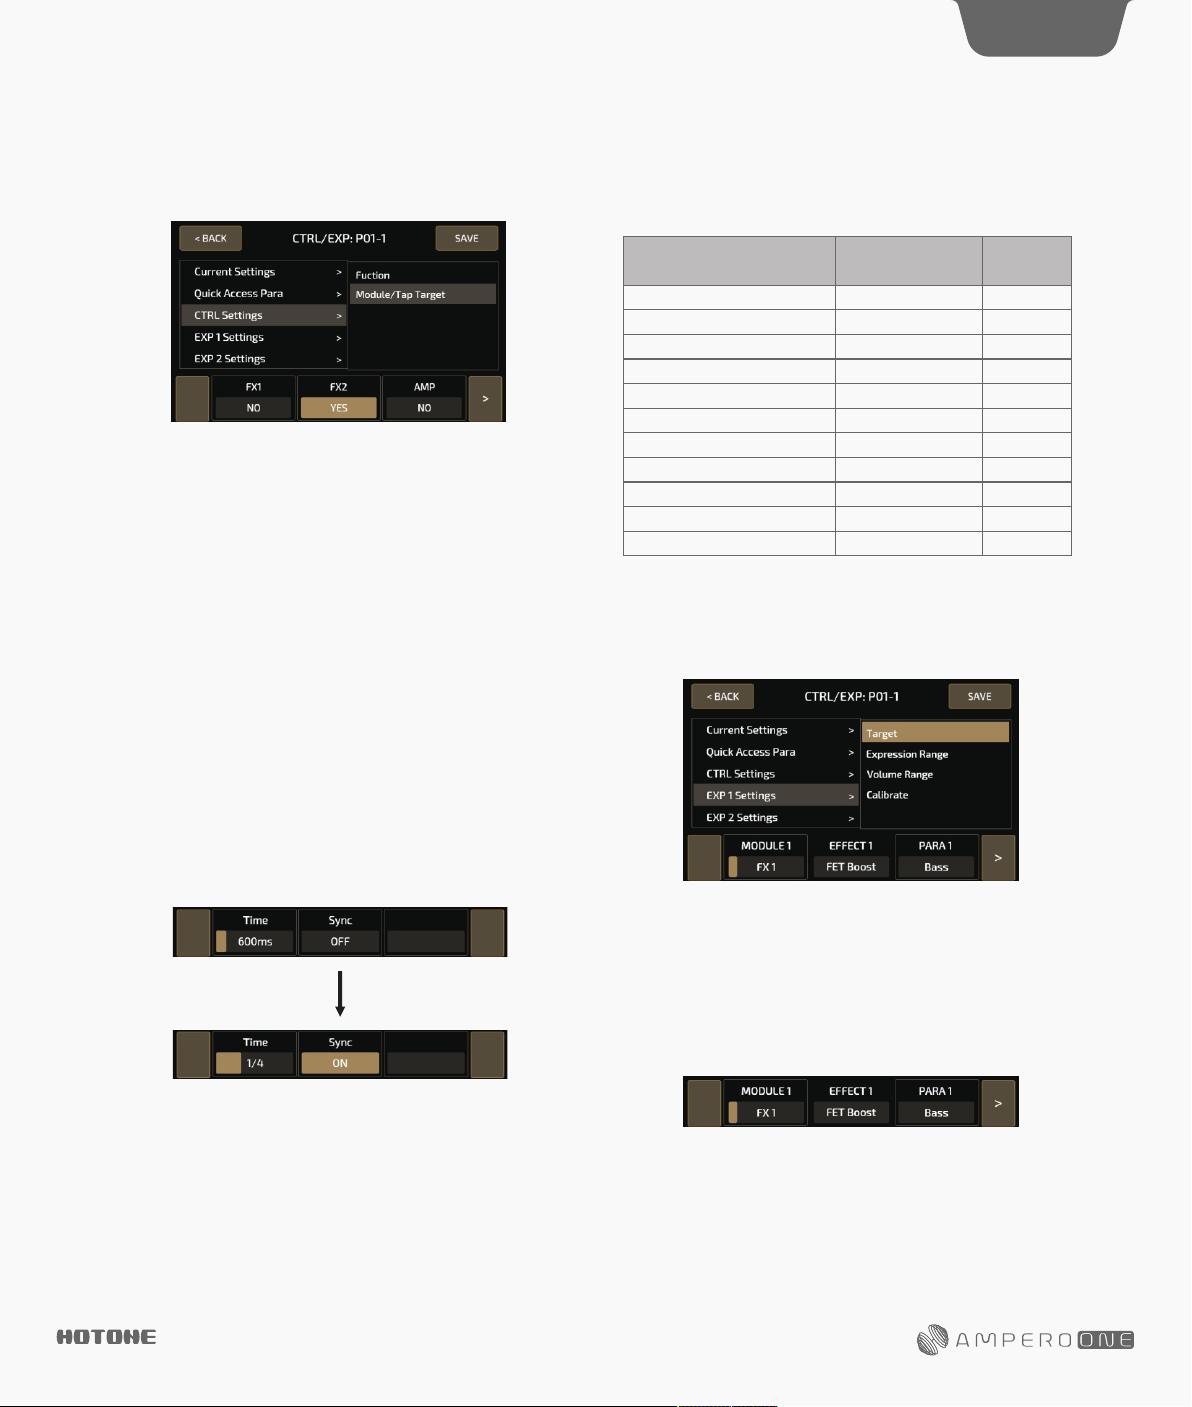
• Module/Tap Target
Use the Module/Tap Target menu to select which modules of the
current patch will be controlled by the CTRL footswitch:
The 9 Ampero One effects modules are listed in the panel, with yes
and no below each module to show if the CTRL footswitch is
activated or not. In the example image above, FX1 and FX2 are
controlled by the CTRL footswitch, whereas the AMP module is not.
Slide (or use Main Knob) to change between yes/no, and press the
arrows on the right/left to scroll through the modules.
Tap Tempo and Tap Divide
To use tap tempo function you can:
(1) Hold the footswitch when Module/Tap or EXP 1 On/Off function
is assigned to CTRL footswitch
(2) Assign Tap Tempo function to CTRL footswitch
You can also opt to use tap divide rather than time-based tempo. The
default tap divide is set to quarter notes (1/4).
Tap divide values in relation to their musical beats are shown below:
Beats
Time Value
Whole note
Half note
Dotted half note
Half note triplet
Quarter note (no divide)
Dotted quarter note
Quarter note triplet
Eighth note
Dotted eighth note
Eighth note triplet
Sixteenth note
EXP Settings
From this menu, you can control the settings of or calibrate your
built-in or external expression pedal. Here, EXP 1 refers to the built-in
pedal, and EXP 2 refers to your external expression pedal.
(Quarter note as 1)
4
2
3
4/3
1/1
3/2
2/3
1/2
3/4
1/3
1/4
Display
1/1
1/2
1/2D
1/2T
1/4
1/4D
1/4T
1/8
1/8D
1/8T
1/16
When in Tap Tempo, the footswitch LED will turn blue and will flash
with the tempo set. Set the tempo by repeatedly tapping the
footswitch. This tempo will apply to the delay time and other effects
with adjustable speed parameters.
If you want a certain effect to be controlled by tap tempo, go into the
patch settings, select an effect, then select SYNC. When you do this,
the time will sync to the tap tempo value.
•EXP 1 Settings
There are four options within this menu: Target, Expression Range,
Volume Range, and Calibrate.
— Target
Under the Target option, you can set the pedal’s control target. You
can set up a maximum of four effects parameters for the built-in
expression pedal to control.
In the selection panel, MODULE X (X standing for 1-4 controllable
targets) represents the effects module in play. EFFECT X displays the
actual effect name, and PARA X shows the effect’s controllable
parameter.
You can also turn the expression pedal off by turning selecting OFF in
the settings panel.
DES IGN INS PIRATI ON
12
Customizing Your Ampero
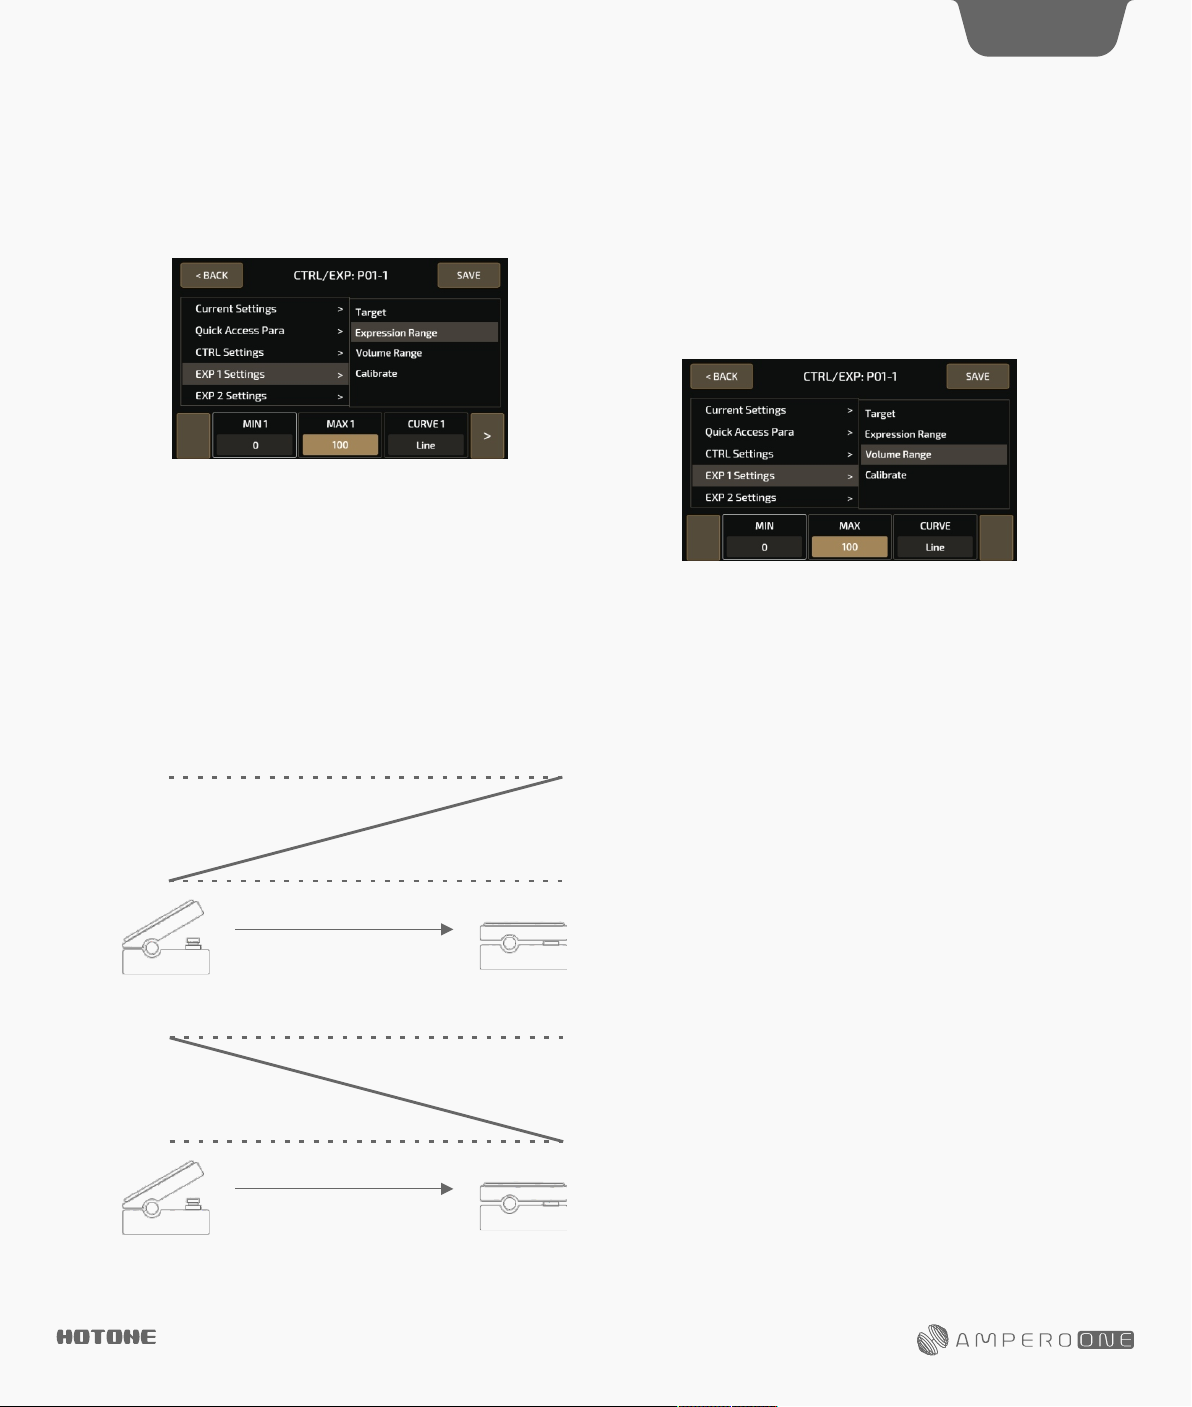
-Expression Range
Under the Expression Range option, you can set the expression
pedal expression range and sweep curve. There are four adjustable
targets to change these settings.
In the selection panel, MIN X (X standing for 1-4 controllable targets)
represents the lowest range value. This is the value the pedal will
have when pushed all the wayup. MAX X represents the highest
range value, when the pedal is pushed all the way down. CURVE X
represents the curve line the pedal will follow when pushed fromall
the way up to all the way down.
The MIN and MAX range is 0-100, and the MIN value can be greater
than the MAX value.
There are three CURVE types:
Line follows a straight line
Exp follows an exponential line from slow to fast
Log follows a logarithmic line that changes as the pedal moves
One
— Volume Range
When the built in expression pedal is off, it continues to work as a
volume pedal for Ampero One. Under the Volume Range option, you
can set the volume pedal range and sweep curve.
Same as Expression Range section, MIN and MAX represent the
lowest/highest volume range value. The MIN and MAX range is 0100, and the MIN value can be greater than the MAX value.
There are also three CURVE types like expression settings: Line,
Exp and Log.
MAX
MIN
MAX
MIN
DES IGN INS PIRATI ON
When MIN < MAX
When MIN > MAX
Loading…