
Использование функций сканера
Методы сканирования
Сканировать документ можно следующими способами.
●
Сканирование с компьютера через программное обеспечение HP Scan
●
Сканирование с помощью программного обеспечения, совместимого с TWAIN или WIA.
ПРИМЕЧАНИЕ.
Для ознакомления с программой распознавания текста и ее использования
установите программу Readiris с компакт-диска программного обеспечения. Программа
распознавания текста также называется программой оптического распознавания символов
(OCR).
Сканирование при помощи ПО HP Scan (Windows)
1.
Дважды щелкните на значке HP Scan на рабочем столе компьютера.
2.
Выберите ярлык сканирования и при необходимости измените настройки.
3.
Щелкните на кнопке Сканировать.
ПРИМЕЧАНИЕ.
Выберите пункт Advanced Settings (Расширенные настройки), чтобы
увидеть дополнительные параметры.
Нажмите Create New Shortcut (Создать новый ярлык), чтобы создать пользовательский
набор настроек и сохранить его в списке ярлыков.
Сканирование с использованием другого программного обеспечения
Устройство является TWAIN- и WIA-совместимым (WIA — Windows Imaging Application).
Устройство работает с программами Windows, которые поддерживают TWAIN- или WIA-
совместимые сканирующие устройства, и с программами Macintosh, которые поддерживают
TWAIN-совместимые сканирующие устройства.
В TWAIN- или WIA-совместимой программе Вы можете получить доступ к функции
сканирования и сканировать изображение прямо в открытую программу. За дополнительной
информацией обратитесь к файлу справки или документации, поставляемой с TWAIN- или
WIA-совместимой программой.
Сканирование с помощью программы, совместимой с TWAIN
Обычно совместимая с TWAIN программа содержит такие команды, как Acquire (Получить),
File Acquire (Получить файл), Scan (Сканировать), Import New Object (Импорт нового
объекта), Insert from (Вставить из) и Scanner (Сканер). Если Вы не уверены в совместимости
программы или не знаете, какую команду вызывать, обратитесь к справке или документации по
программе.
При сканировании из программы, совместимой с TWAIN, ПО HP Scan может запуститься
автоматически. Если ПО HP Scan запустится, можно вносить необходимые изменения во
время предварительного просмотра изображения. Если программа не запустится
автоматически, изображение будет передано в TWAIN-совместимое приложение немедленно.
Запуск сканирования из совместимого с TWAIN приложения. Информацию об используемых
действиях и командах см. в справке или документации по приложению.
108 Глава 9 Сканирование
RUWW
Сканирование из WIA-совместимой программы
WIA представляет собой другой способ сканирования, при котором изображение сканируется
прямо в приложении. Для сканирования WIA использует программное обеспечение Microsoft
вместо HP Scan.
Обычно совместимая с WIA программа содержит такие команды, как Рисунок/Со сканера или
камеры в меню «Вставка» или «Файл». Информацию о совместимости программы с WIA см. в
справке или документации по программе.
Запуск сканирования из совместимого с WIA приложения. Информацию об используемых
действиях и командах см. в справке или документации по приложению.
или
В панели управления Windows в папке Сканеры и камеры (находится в папке Оборудование
и звук для Windows Vista и Windows 7) дважды щелкните значок устройства. При этом
откроется стандартный мастер Microsoft WIA, который позволит выполнить сканирование в
файл.
Сканирование с помощью программы оптического распознавания символов
(OCR)
Чтобы импортировать отсканированный текст в нужный текстовый редактор, откройте
программное обеспечение HP Scan и выберите ярлык Сохранить как редактируемый текст
(OCR).
Также возможно использование программного обеспечения OCR стороннего поставщика.
Программа Readiris OCR поставляется на отдельном компакт-диске, который входит в
комплект поставки устройства. Чтобы использовать ПО Readiris, установите его с
соответствующего компакт-диска, а затем следуйте инструкциям из интерактивной справки.
Отмена сканирования
Для отмены задания сканирования используйте одну из указанных ниже инструкций.
●
На панели управления нажмите кнопку Отмена .
●
В диалоговом окне на экране нажмите кнопку Отмена.
RUWW
Использование функций сканера 109
Параметры сканирования
Разрешение и цветопередача сканера
Неудовлетворительное качество при печати отсканированных изображений во многих случаях
вызвано неправильной настройкой разрешения и цветопередачи в программном обеспечении
сканера. Разрешение и цветопередача влияют на следующие параметры отсканированных
изображений.
●
Четкость изображения
●
Текстура градаций цвета (плавная или грубая)
●
Время сканирования
●
Размер файла
Разрешение сканирования измеряется в пикселях на дюйм (п/д).
ПРИМЕЧАНИЕ.
Разрешение сканирования (п/д) и разрешение печати (измеряется в точках
на дюйм) не являются взаимозаменяемыми.
На количество возможных цветов влияют параметры сканируемого изображения: цветное, в
градациях серого или черно-белое. Аппаратное разрешение сканера можно установить до
1200 ppi.
В таблице параметров разрешения и цветопередачи приведены основные указания по выбору
параметров сканирования.
ПРИМЕЧАНИЕ.
Выбор больших значений параметров разрешения и цветопередачи может
привести к увеличению размера файлов и снижению скорости сканирования. Перед установкой
параметров разрешения и цветопередачи определите цель использования отсканированного
изображения.
110 Глава 9 Сканирование
RUWW
Указания по выбору параметров разрешения и цветопередачи
В следующей таблице даны рекомендуемые значения для параметров разрешения и
цветопередачи при выполнении различных типов заданий сканирования.
Назначение
использования
Рекомендуемое разрешение
Рекомендуемые параметры цветопередачи
Факс
150 п/д
●
Черно-белое
Электронная почта
150 п/д
●
Черно-белое, если плавная градация оттенков
не требуется.
●
Оттенки серого, если требуется плавная
градация оттенков изображения.
●
Цвет, если изображение является цветным.
Редактирование текста
300 п/д
●
Черно-белое
Печать (графика или
текст)
600 п/д для сложных графических
изображений или если требуется
значительно увеличить документ
300 п/д для обычных графических
изображений и текста
150 п/д для фотографий
●
Черно-белое, если печатается текст и
штриховой рисунок.
●
Оттенки серого, если печатаются цветные
графические изображение или изображения с
оттенками серого и фотографии.
●
Цвет, если изображение является цветным.
Отображение на экране
75 п/д
●
Черно-белое, если отображается текст.
●
Оттенки серого, если отображаются
графические изображения и фотографии.
●
Цвет, если изображение является цветным.
Цветная печать
При сканировании можно установить указанные ниже значения параметров цветопередачи.
Значение
Рекомендуемое использование
Цветное
Это значение используется для высококачественных цветных фотографий и
документов, в которых цветопередача играет важную роль.
Черно-белое
Это значение используется для текстовых документов.
Оттенки серого
Это значение используется в том случае, когда необходимо ограничить размер
файла или быстро отсканировать документ или фотографию.
Качество сканирования
Со временем грязь, скапливающаяся на стекле сканера и белой пластиковой подкладке, может
сказаться на работе устройства. Чтобы очистить стекло сканера и белую пластиковую
подкладку, следуйте приведенным ниже инструкциям.
RUWW
Параметры сканирования 111
1.
Выключите устройство с помощью
выключателя питания и отключите кабель
питания от электросети.
2.
Откройте крышку сканера.
3.
Протрите стекло сканера и белую
пластиковую подкладку мягкой тряпкой или
губкой, смоченной в неабразивном
стеклоочистителе.
ПРЕДУПРЕЖДЕНИЕ.
Не используйте
для очистки каких либо деталей
устройства абразивные материалы,
ацетон, бензол, аммиак, этиловый спирт
или четыреххлористый углерод, так как это
может привести к повреждению
устройства. Не лейте жидкость прямо на
крышку стекла. Жидкость может
просочиться и повредить устройство.
4.
Чтобы предотвратить появление пятен,
насухо протрите стекло и подкладку
замшевой тряпкой или целлюлозной
губкой.
5.
Подключите устройство и включите его с
помощью выключателя питания.
112 Глава 9 Сканирование
RUWW
Сканирование фотографии
1.
Поместите фотографию лицевой стороной вниз на планшетный сканер таким образом,
чтобы верхний левый угол фотографии находился в углу, обозначенном значком на
сканере.
2.
Аккуратно закройте крышку.
3.
Отсканируйте фотографию с использованием одного из методов сканирования.
RUWW
Сканирование фотографии 113
Настройка факса
Установите и подключите оборудование
Подключите факс к телефонной линии
Данное устройство является аналоговым. HP рекомендует использовать это устройство на
выделенной аналоговой телефонной линии.
ПРИМЕЧАНИЕ.
В некоторых странах/регионах может потребоваться адаптер к телефонному
кабелю, который поставляется в комплекте с телефоном.
Подключите дополнительные устройства
Аппарат оснащен двумя факсимильными портами:
●
Линейный разъем (
) для подключения аппарата к телефонной розетке.
●
Телефонный разъем (
) для подключения дополнительных устройств к аппарату.
С этим аппаратом можно использовать телефоны двумя способами:
●
Добавочный телефон — это телефонный аппарат, подключаемый к той же телефонной
линии в другом месте.
●
Параллельный телефон — это телефонный аппарат или другое устройство, подключаемые
непосредственно к данному аппарату.
Подключите дополнительные устройства в описанном ниже порядке. Выходной порт каждого
устройства подключен к входному порту следующего, образуя «цепь». Если не требуется
подключать какое-нибудь устройство, пропустите его и перейдите к следующему.
ПРИМЕЧАНИЕ.
Не подключайте более трех устройств к одной телефонной линии.
ПРИМЕЧАНИЕ.
Данный аппарат не поддерживает голосовую почту.
1.
Отключите шнур питания от всех устройств, которые требуется подключить.
2.
Если аппарат еще не подключен к телефонной линии, то предварительно ознакомьтесь с
руководством по установке устройства. Аппарат уже должен быть подключен к
телефонной розетке.
116 Глава 10 Работа с факсом
RUWW
Нажмите на кнопку для помощи
LASERJET PRO M1530
MFP SERIES
User Guide


HP LaserJet Pro M1530 MFP Series
User Guide

Copyright and License
© 2010 Copyright Hewlett-Packard
Development Company, L.P.
Trademark Credits
®
, Acrobat®, and PostScript® are
Adobe
trademarks of Adobe Systems Incorporated.
Reproduction, adaptation, or translation
without prior written permission is prohibited,
except as allowed under the copyright laws.
The information contained herein is subject
to change without notice.
The only warranties for HP products and
services are set forth in the express warranty
statements accompanying such products
and services. Nothing herein should be
construed as constituting an additional
warranty. HP shall not be liable for technical
or editorial errors or omissions contained
herein.
Part number: CE538-90909
Edition 1, 9/2010
Intel® Core™ is a trademark of Intel
Corporation in the U.S. and other countries.
Java™ is a US trademark of Sun
Microsystems, Inc.
Microsoft®, Windows®, Windows® XP, and
Windows Vista® are U.S. registered
trademarks of Microsoft Corporation.
®
is a registered trademark of The Open
UNIX
Group.
ENERGY STAR and the ENERGY STAR
mark are registered U.S. marks.

Conventions used in this guide
TIP: Tips provide helpful hints or shortcuts.
NOTE: Notes provide important information to explain a concept or to complete a task.
CAUTION: Cautions indicate procedures that you should follow to avoid losing data or damaging the
product.
WARNING! Warnings alert you to specific procedures that you should follow to avoid personal injury,
catastrophic loss of data, or extensive damage to the product.
ENWW iii

iv Conventions used in this guide ENWW

Table of contents
1 Product basics ……………………………………………………………………………………………………………………………… 1
Product features ………………………………………………………………………………………………………………….. 2
Environmental features ………………………………………………………………………………………………………… 3
Accessibility features ……………………………………………………………………………………………………………. 3
Product views ……………………………………………………………………………………………………………………… 4
Front view ……………………………………………………………………………………………………………. 4
Back view …………………………………………………………………………………………………………….. 5
Interface ports ………………………………………………………………………………………………………. 5
Serial number and model number location ……………………………………………………………….. 6
Control panel layout ………………………………………………………………………………………………. 7
2 Control panel menus …………………………………………………………………………………………………………………….. 9
Setup menu ………………………………………………………………………………………………………………………. 10
Quick Forms menu ……………………………………………………………………………………………… 11
Reports menu …………………………………………………………………………………………………….. 11
Fax Setup ………………………………………………………………………………………………………….. 12
System Setup menu ……………………………………………………………………………………………. 14
Service menu ……………………………………………………………………………………………………… 16
Network Setup menu …………………………………………………………………………………………… 17
Function specific menus ……………………………………………………………………………………………………… 18
Copy …………………………………………………………………………………………………………………. 18
Fax ……………………………………………………………………………………………………………………. 19
3 Software for Windows …………………………………………………………………………………………………………………. 21
Supported operating systems for Windows ……………………………………………………………………………. 22
Supported printer drivers for Windows ………………………………………………………………………………….. 22
Select the correct printer driver for Windows …………………………………………………………………………. 22
Change print job settings …………………………………………………………………………………………………….. 24
Change printer-driver settings for Windows …………………………………………………………………………… 24
Change the settings for all print jobs until the software program is closed …………………… 24
Change the default settings for all print jobs ……………………………………………………………. 25
Change the product configuration settings ……………………………………………………………… 25
Remove software for Windows …………………………………………………………………………………………….. 26
Supported utilities for Windows ……………………………………………………………………………………………. 27
ENWW v

Other Windows components and utilities ………………………………………………………………… 27
Software for other operating systems ……………………………………………………………………………………. 27
4 Use the product with Mac ……………………………………………………………………………………………………………. 29
Software for Mac ……………………………………………………………………………………………………………….. 30
Supported operating systems for Mac ……………………………………………………………………. 30
Supported printer drivers for Mac ………………………………………………………………………….. 30
Install software for Mac operating systems ……………………………………………………………… 30
Remove software from Mac operating systems ……………………………………………………….. 31
Change printer-driver settings for Mac …………………………………………………………………… 32
Software for Mac computers …………………………………………………………………………………. 33
Print with Mac ……………………………………………………………………………………………………………………. 34
Cancel a print job with a Mac ………………………………………………………………………………… 34
Change the paper size and type with Mac ………………………………………………………………. 34
Create and use printing presets with Mac ………………………………………………………………. 34
Resize documents or print on a custom paper size with Mac …………………………………….. 35
Print a cover page with Mac …………………………………………………………………………………. 35
Use watermarks with Mac …………………………………………………………………………………….. 35
Print multiple pages on one sheet of paper with Mac ……………………………………………….. 36
Print on both sides of the page (duplex printing) with Mac ………………………………………… 36
Use the Services menu with Mac ………………………………………………………………………….. 37
Fax with Mac …………………………………………………………………………………………………………………….. 38
Scan with Mac …………………………………………………………………………………………………………………… 39
5 Connect the product ……………………………………………………………………………………………………………………. 41
Supported network operating systems ………………………………………………………………………………….. 42
Printer sharing disclaimer ……………………………………………………………………………………………………. 42
Connect with USB ……………………………………………………………………………………………………………… 42
Connect to a network …………………………………………………………………………………………………………. 42
Supported network protocols ………………………………………………………………………………… 42
Install the product on a wired network ……………………………………………………………………. 43
Configure network settings …………………………………………………………………………………… 44
6 Paper and print media …………………………………………………………………………………………………………………. 47
Understand paper use ………………………………………………………………………………………………………… 48
Special paper guidelines ………………………………………………………………………………………. 48
Change the printer driver to match the paper type and size …………………………………………………….. 50
Supported paper sizes ……………………………………………………………………………………………………….. 50
Supported paper types and tray capacity ………………………………………………………………………………. 51
Paper orientation for loading trays …………………………………………………………………………. 52
Load paper trays ……………………………………………………………………………………………………………….. 54
Load the priority input slot …………………………………………………………………………………….. 54
Load Tray 1 ………………………………………………………………………………………………………… 54
vi ENWW

Load the document feeder ………………………………………………………………………………………………….. 55
Configure trays ………………………………………………………………………………………………………………….. 57
7 Print tasks …………………………………………………………………………………………………………………………………… 59
Cancel a print job ………………………………………………………………………………………………………………. 60
Basic print tasks with Windows ……………………………………………………………………………………………. 61
Open the printer driver with Windows …………………………………………………………………….. 61
Get help for any printing option with Windows …………………………………………………………. 62
Change the number of print copies with Windows ……………………………………………………. 62
Save custom print settings for reuse with Windows …………………………………………………. 62
Improve print quality with Windows ……………………………………………………………………….. 66
Print on both sides (duplex) with Windows ……………………………………………………………… 67
Print multiple pages per sheet with Windows ………………………………………………………….. 71
Select page orientation with Windows ……………………………………………………………………. 73
Additional print tasks with Windows ……………………………………………………………………………………… 75
Print on preprinted letterhead or forms with Windows ………………………………………………. 75
Print on special paper, labels, or transparencies ……………………………………………………… 77
Print the first or last page on different paper with Windows ……………………………………….. 80
Scale a document to fit page size ………………………………………………………………………….. 83
Add a watermark to a document with Windows ……………………………………………………….. 85
Create a booklet with Windows …………………………………………………………………………….. 85
8 Copy …………………………………………………………………………………………………………………………………………… 87
Use copy functions …………………………………………………………………………………………………………….. 88
One-touch copy ………………………………………………………………………………………………….. 88
Multiple copies ……………………………………………………………………………………………………. 88
Copy a multiple-page original ……………………………………………………………………………….. 89
Copy identification cards ………………………………………………………………………………………. 89
Cancel a copy job ……………………………………………………………………………………………….. 90
Reduce or enlarge a copy image …………………………………………………………………………… 90
Collate a copy job ……………………………………………………………………………………………….. 91
Copy settings …………………………………………………………………………………………………………………….. 91
Change copy quality ……………………………………………………………………………………………. 91
Set the paper size and type for copying on special paper …………………………………………. 93
Save copy setting changes as default settings ………………………………………………………… 94
Restore copy default settings ……………………………………………………………………………….. 94
Copy photos ……………………………………………………………………………………………………………………… 96
Copy mixed-size originals …………………………………………………………………………………………………… 97
Copy on both sides (duplex) ………………………………………………………………………………………………… 98
Copy documents automatically ……………………………………………………………………………… 98
Copy two-sided documents manually …………………………………………………………………….. 98
ENWW vii

9 Scan …………………………………………………………………………………………………………………………………………. 101
Use the scan functions ……………………………………………………………………………………………………… 102
Scan methods …………………………………………………………………………………………………… 102
Cancel a scan …………………………………………………………………………………………………… 103
Scan settings …………………………………………………………………………………………………………………… 104
Scanner resolution and color ………………………………………………………………………………. 104
Scan quality ……………………………………………………………………………………………………… 106
Scan a photo …………………………………………………………………………………………………………………… 107
10 Fax ………………………………………………………………………………………………………………………………………….. 109
Set up fax ……………………………………………………………………………………………………………………….. 110
Install and connect the hardware …………………………………………………………………………. 110
Configure fax settings ………………………………………………………………………………………… 113
Use the phone book …………………………………………………………………………………………………………. 115
Use the control panel to create and edit the fax phone book …………………………………… 115
Import or export Microsoft Outlook contacts into the fax phone book ………………………… 115
Use phone-book data from other programs …………………………………………………………… 115
Delete the phone book ……………………………………………………………………………………….. 115
Use speed dials ………………………………………………………………………………………………… 116
Manage group-dial entries ………………………………………………………………………………….. 118
Set fax settings ………………………………………………………………………………………………………………… 120
Send fax settings ………………………………………………………………………………………………. 120
Receive fax settings …………………………………………………………………………………………… 124
Set fax polling …………………………………………………………………………………………………… 130
Disable the product fax ………………………………………………………………………………………. 130
Use fax …………………………………………………………………………………………………………………………… 131
Fax software …………………………………………………………………………………………………….. 131
Cancel a fax ……………………………………………………………………………………………………… 131
Delete faxes from memory ………………………………………………………………………………….. 131
Use fax on a DSL, PBX, or ISDN system ……………………………………………………………… 132
Use fax on a VoIP service ………………………………………………………………………………….. 133
Fax memory ……………………………………………………………………………………………………… 133
Send a fax ………………………………………………………………………………………………………… 133
Receive a fax ……………………………………………………………………………………………………. 141
Solve fax problems …………………………………………………………………………………………………………… 143
Fax troubleshooting checklist ……………………………………………………………………………… 143
Fax error messages ………………………………………………………………………………………….. 144
Troubleshoot fax codes and trace reports …………………………………………………………….. 150
Fax logs and reports ………………………………………………………………………………………….. 152
Change error correction and fax speed ………………………………………………………………… 155
Solve problems sending faxes …………………………………………………………………………….. 156
Solve problems receiving faxes …………………………………………………………………………… 162
Solve general fax problems ……………………………………………………………………………….. 168
viii ENWW

Regulatory information and warranties ………………………………………………………………………………… 170
11 Manage and maintain the product …………………………………………………………………………………………….. 171
Information pages …………………………………………………………………………………………………………….. 172
HP ToolboxFX …………………………………………………………………………………………………………………. 174
View HP ToolboxFX …………………………………………………………………………………………… 174
Status ………………………………………………………………………………………………………………. 174
Fax ………………………………………………………………………………………………………………….. 175
Help ………………………………………………………………………………………………………………… 177
System Settings ………………………………………………………………………………………………… 178
Print Settings ……………………………………………………………………………………………………. 180
Network Settings ……………………………………………………………………………………………….. 181
Embedded Web server ……………………………………………………………………………………………………… 182
Features …………………………………………………………………………………………………………… 182
Use HP Web Jetadmin software ………………………………………………………………………………………… 183
Product security features …………………………………………………………………………………………………… 183
Assign a system password through the product control panel …………………………………. 183
Assign a system password through the EWS ………………………………………………………… 183
Lock the product ……………………………………………………………………………………………….. 184
Economy settings …………………………………………………………………………………………………………….. 185
Print with EconoMode ………………………………………………………………………………………… 185
Archive print ……………………………………………………………………………………………………… 185
Quiet mode settings …………………………………………………………………………………………………………. 186
Manage supplies and accessories ……………………………………………………………………………………… 187
Print when a cartridge is at estimated end of life ……………………………………………………. 187
Manage print cartridges ……………………………………………………………………………………… 188
Replacement instructions …………………………………………………………………………………… 189
Clean the product …………………………………………………………………………………………………………….. 198
Clean the pickup roller ……………………………………………………………………………………….. 198
Clean the document feeder pickup rollers and separation pad ………………………………… 199
Clean the paper path …………………………………………………………………………………………. 199
Clean the scanner glass strip and platen ………………………………………………………………. 200
Product updates ………………………………………………………………………………………………………………. 201
12 Solve problems ……………………………………………………………………………………………………………………….. 203
Self help …………………………………………………………………………………………………………………………. 204
Problem-solving checklist ………………………………………………………………………………………………….. 205
Step 1: Check that the product power is on …………………………………………………………… 205
Step 2: Check the control panel for error messages ………………………………………………. 205
Step 3: Test print functionality …………………………………………………………………………….. 205
Step 4: Test copy functionality …………………………………………………………………………….. 205
Step 5: Test the fax sending functionality ……………………………………………………………… 206
Step 6: Test the fax receiving functionality ……………………………………………………………. 206
ENWW ix

Step 7: Try sending a print job from a computer …………………………………………………….. 206
Factors that affect product performance ……………………………………………………………………………… 207
Restore the factory-set defaults …………………………………………………………………………………………. 207
Interpret control panel messages ……………………………………………………………………………………….. 208
Control panel message types ……………………………………………………………………………… 208
Control panel messages …………………………………………………………………………………….. 208
Paper feeds incorrectly or becomes jammed ……………………………………………………………………….. 214
The product does not pick up paper …………………………………………………………………….. 214
The product picks up multiple sheets of paper ………………………………………………………. 214
Prevent paper jams ……………………………………………………………………………………………. 214
Clear jams ………………………………………………………………………………………………………… 215
Improve print quality …………………………………………………………………………………………………………. 224
Select a paper type ……………………………………………………………………………………………. 225
Use paper that meets HP specifications ……………………………………………………………….. 225
Print a cleaning page …………………………………………………………………………………………. 225
Check the print cartridge …………………………………………………………………………………….. 226
Use the printer driver that best meets your printing needs ………………………………………. 229
Improve print quality for copies ……………………………………………………………………………. 229
The product does not print or it prints slowly ………………………………………………………………………… 230
The product does not print ………………………………………………………………………………….. 230
The product prints slowly ……………………………………………………………………………………. 231
Solve connectivity problems ……………………………………………………………………………………………… 231
Solve direct-connect problems ……………………………………………………………………………. 231
Solve network problems …………………………………………………………………………………….. 231
Product software problems ………………………………………………………………………………………………… 234
Solve common Mac problems ……………………………………………………………………………………………. 234
The printer driver is not listed in the Print & Fax list ……………………………………………….. 234
The product name does not appear in the product list in the Print & Fax list ……………… 235
The printer driver does not automatically set up the selected product in the Print & Fax
list …………………………………………………………………………………………………………………… 235
A print job was not sent to the product that you wanted ………………………………………….. 235
When connected with a USB cable, the product does not appear in the Print & Fax list
after the driver is selected. ………………………………………………………………………………….. 235
You are using a generic printer driver when using a USB connection ……………………….. 236
Appendix A Supplies and accessories ………………………………………………………………………………………….. 237
Order parts, accessories, and supplies ……………………………………………………………………………….. 238
Part numbers …………………………………………………………………………………………………………………… 238
Print cartridge …………………………………………………………………………………………………… 238
Cables and interfaces ………………………………………………………………………………………… 238
Maintenance kits ……………………………………………………………………………………………….. 238
x ENWW

Appendix B Service and support ………………………………………………………………………………………………….. 239
Hewlett-Packard limited warranty statement ………………………………………………………………………… 240
HP’s Premium Protection Warranty: LaserJet print cartridge limited warranty statement ……………. 241
Data stored on the print cartridge ……………………………………………………………………………………….. 242
End User License Agreement ……………………………………………………………………………………………. 243
Customer support …………………………………………………………………………………………………………….. 245
Repack the product ………………………………………………………………………………………………………….. 246
Appendix C Product specifications ………………………………………………………………………………………………. 247
Physical specifications ……………………………………………………………………………………………………… 248
Power consumption, electrical specifications, and acoustic emissions …………………………………….. 248
Environmental specifications ……………………………………………………………………………………………… 248
Appendix D Regulatory information ……………………………………………………………………………………………… 249
FCC regulations ………………………………………………………………………………………………………………. 250
Environmental product stewardship program ……………………………………………………………………….. 250
Protecting the environment …………………………………………………………………………………. 250
Ozone production ……………………………………………………………………………………………… 250
Power consumption …………………………………………………………………………………………… 250
Toner consumption ……………………………………………………………………………………………. 251
Paper use ………………………………………………………………………………………………………… 251
Plastics ……………………………………………………………………………………………………………. 251
HP LaserJet print supplies ………………………………………………………………………………….. 251
Return and recycling instructions …………………………………………………………………………. 251
Paper ………………………………………………………………………………………………………………. 252
Material restrictions ……………………………………………………………………………………………. 25 2
Disposal of waste equipment by users in private households in the European Union … . 253
Chemical substances …………………………………………………………………………………………. 253
Material Safety Data Sheet (MSDS) …………………………………………………………………….. 253
For more information …………………………………………………………………………………………. 253
Declaration of conformity …………………………………………………………………………………………………… 254
Safety statements …………………………………………………………………………………………………………….. 256
Laser safety ……………………………………………………………………………………………………… 256
Canadian DOC regulations …………………………………………………………………………………. 256
VCCI statement (Japan) …………………………………………………………………………………….. 256
Power cord instructions ……………………………………………………………………………………… 256
Power cord statement (Japan) …………………………………………………………………………….. 256
EMC statement (Korea) ……………………………………………………………………………………… 256
Laser statement for Finland ………………………………………………………………………………… 257
GS statement (Germany) ……………………………………………………………………………………. 257
Substances Table (China) ………………………………………………………………………………….. 258
Restriction on Hazardous Substances statement (Turkey) ……………………………………… 258
Additional statements for telecom (fax) products ………………………………………………………………….. 259
ENWW xi

EU Statement for Telecom Operation …………………………………………………………………… 259
New Zealand Telecom Statements ………………………………………………………………………. 259
Additional FCC statement for telecom products (US) ……………………………………………… 259
Telephone Consumer Protection Act (US) ……………………………………………………………. 260
Industry Canada CS-03 requirements ………………………………………………………………….. 260
Index …………………………………………………………………………………………………………………………………………….. 263
xii ENWW

1 Product basics
Product features
●
Environmental features
●
Accessibility features
●
Product views
●
ENWW 1
Product features
The product has the following features.
HP LaserJet M1536dnf MFP
Prints letter-size pages at speeds up to 26 pages per minute (ppm) and A4-size pages at speeds up to 25 ppm.
●
PCL 5 and PCL 6 printer drivers and HP postscript level 3 emulation.
●
Priority input tray holds up to 10 sheets of print media.
●
Tray 1 holds up to 250 sheets of print media or 10 envelopes.
●
Hi-Speed USB 2.0 port and 10/100 Base-T network port.
●
64-MB random-access memory (RAM).
●
Flatbed scanner and 35-page document feeder.
●
V.34 fax
●
Two RJ-11 fax phone line ports.
●
Automatic two-sided printing
●
2 Chapter 1 Product basics ENWW

Environmental features
Duplex Save paper by using duplex printing as your default print setting.
Print multiple pages per sheet Save paper by printing two or more pages of a document side-by-side on one sheet of paper.
Recycling Reduce waste by using recycled paper.
Access this feature through the printer driver.
Recycle print cartridges by using the HP return process.
Accessibility features
The product includes several features that aid users with accessibility issues.
Online user guide that is compatible with text screen-readers.
●
Print cartridges can be installed and removed by using one hand.
●
All doors and covers can be opened by using one hand.
●
ENWW Environmental features 3
Product views
Front view
1
8
1 Control panel
2 Document feeder input tray
3 Document feeder output bin
4 Scanner lid
2
3
4
5
6
7
5 Output bin
6 Priority input tray
7 Tray 1
8 Power button
4 Chapter 1 Product basics ENWW
Back view
1
1 Kensington lock
2 Rear jam access door
3 Interface ports
4 Power connector
2
3
4
Interface ports
The product has a 10/100 Base-T (RJ-45) network port, a Hi-Speed USB 2.0 port, and fax ports.
1 Hi-Speed USB 2.0 port
2 Network port
3
“Line” fax port
1
2
3
4
4
“Telephone” fax port
ENWW Product views 5
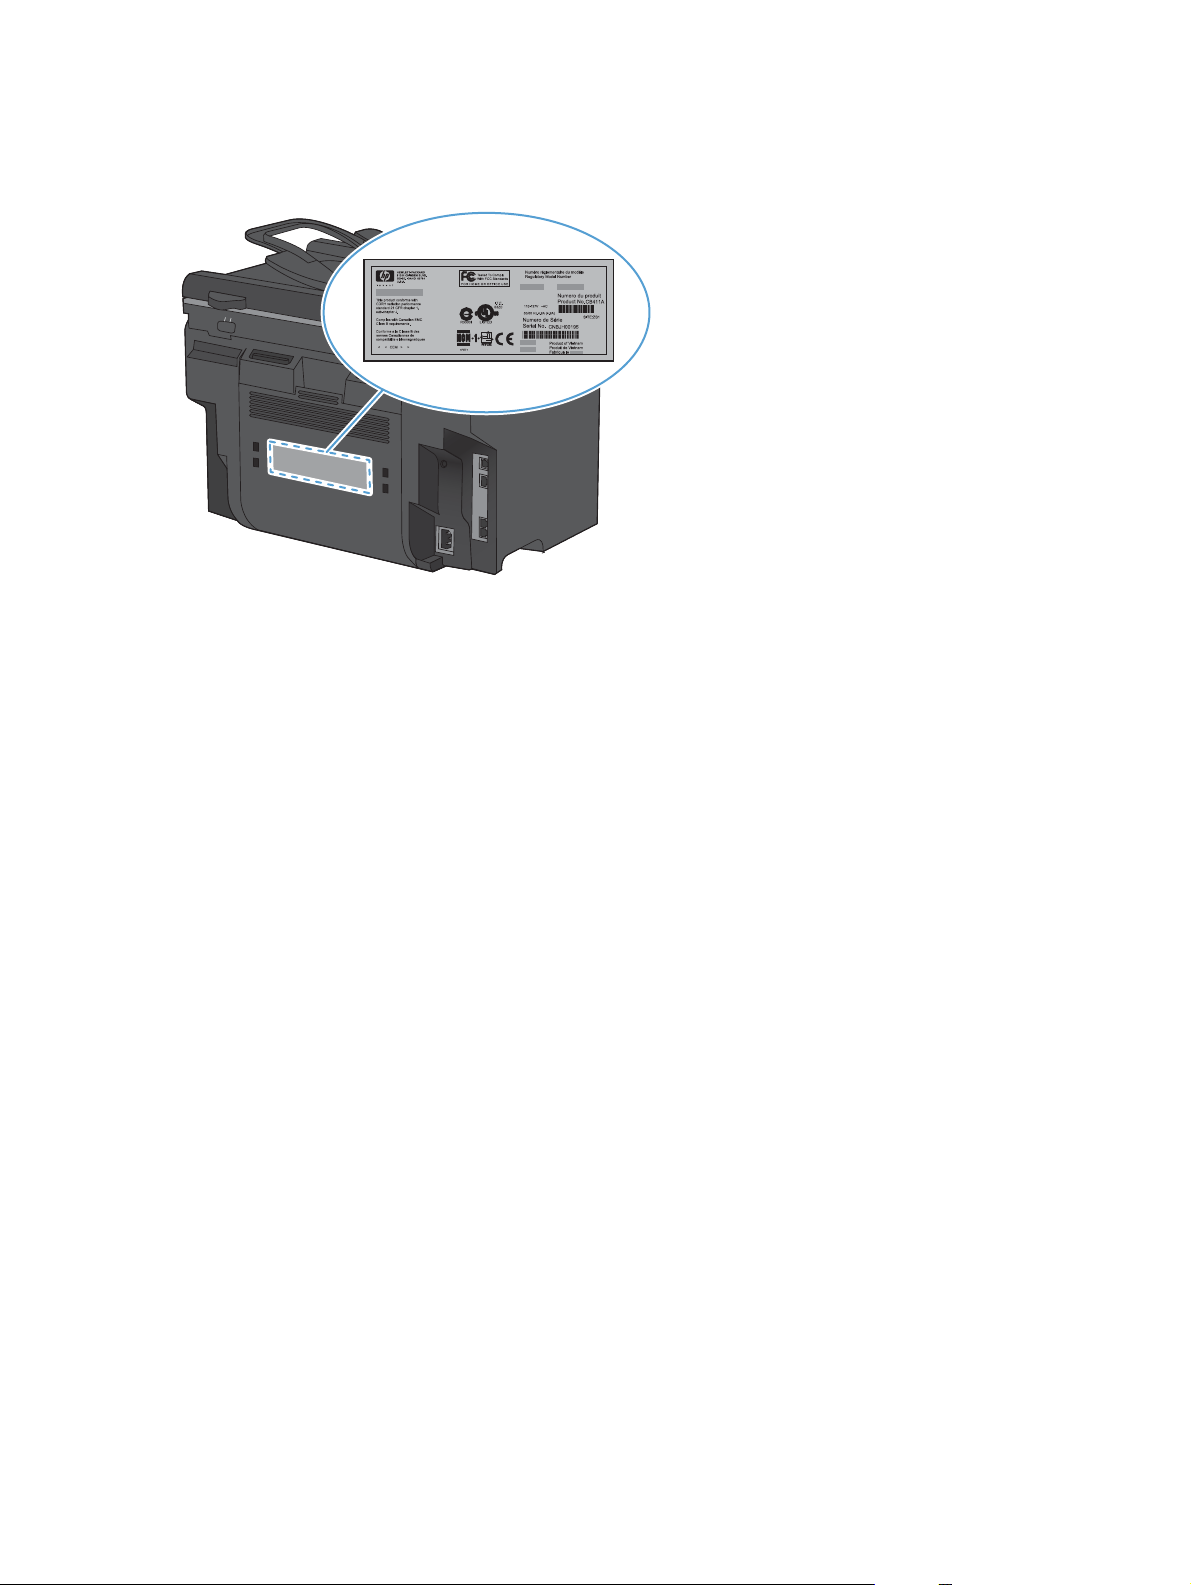
Serial number and model number location
The serial number and product model number label is on the back of the product.
6 Chapter 1 Product basics ENWW
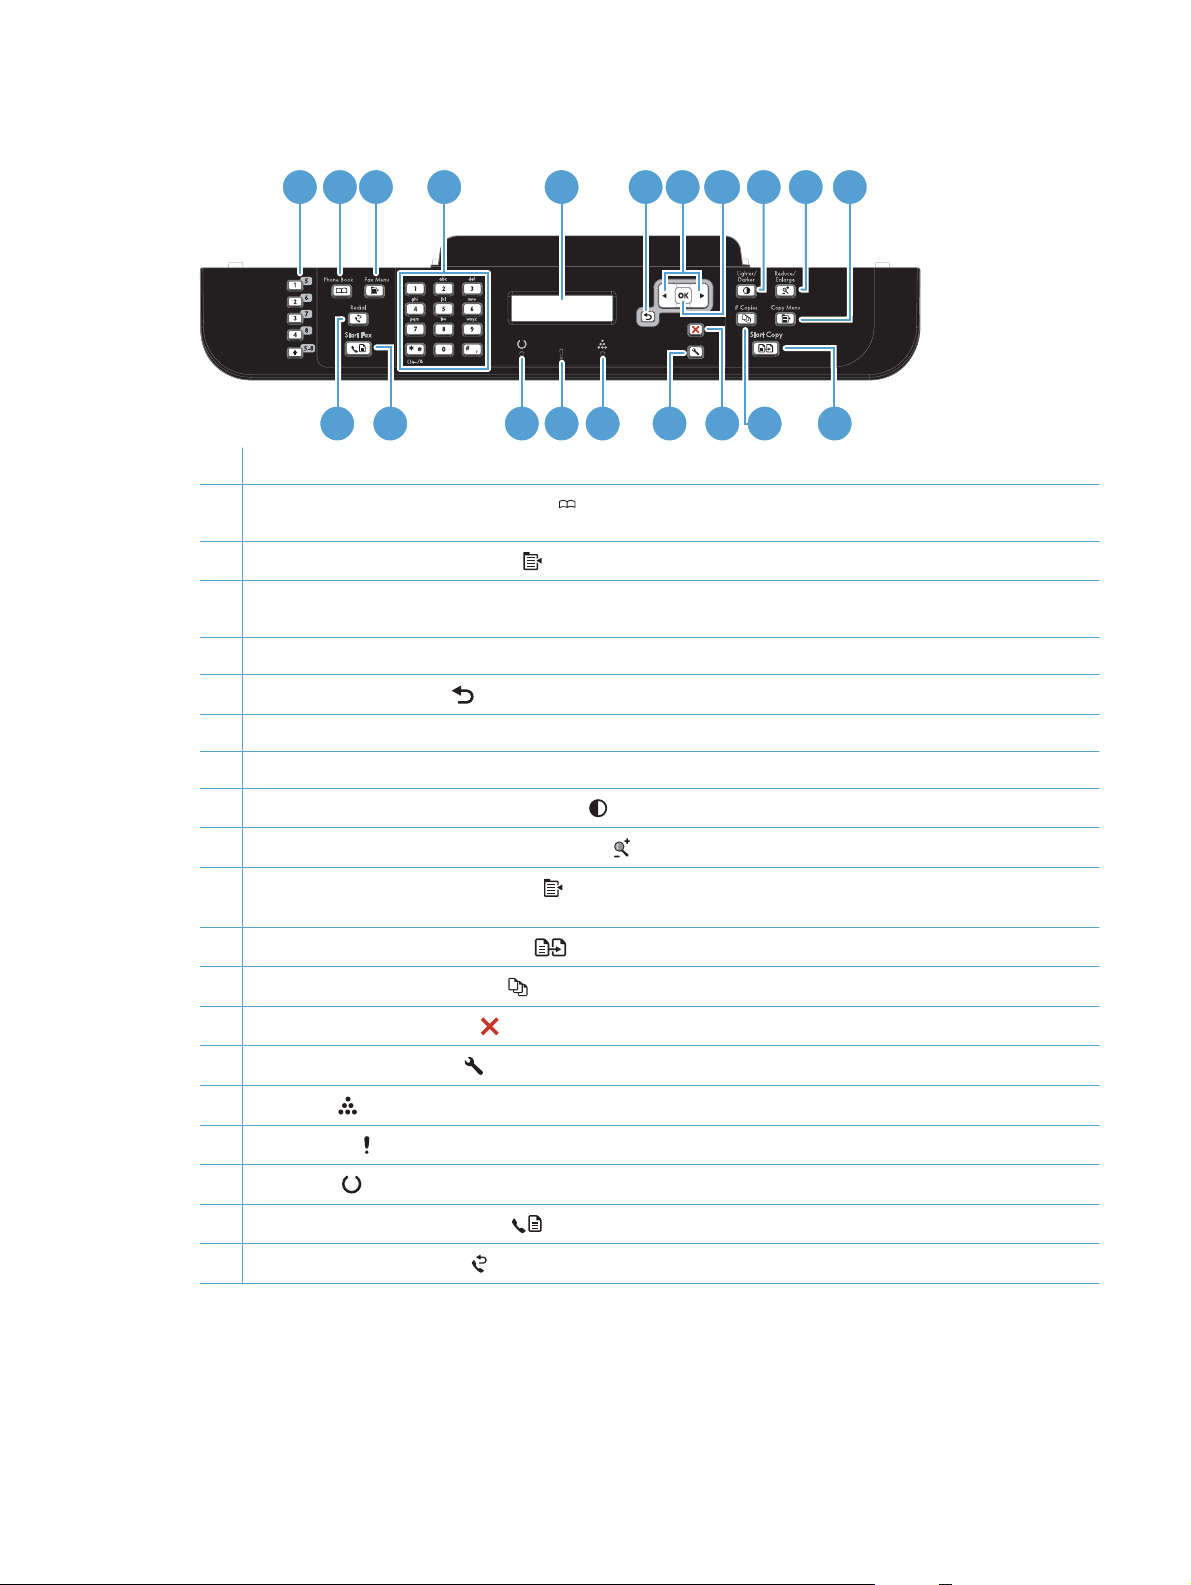
Control panel layout
21 3
54 6 9 10 11
18 16 15 1417
1 Speed dial buttons. Use the speed dial buttons to quickly fax documents to commonly used destinations.
2 Phone Book button. Use the Phone Book button to access the phone book entries that have been set up for the
product.
3 Fax Menu button. Use the Fax Menu button to open a fax settings menu.
4 Alphanumeric keypad. Use the alphanumeric buttons to type data into the product control-panel display and dial
telephone numbers for faxing.
5 LCD display. Use the LCD display to navigate the menu structure and monitor product status.
6 Back button. Use the Back button to return to a previous menu, or to exit the menus and return to the Ready state.
7 Arrow buttons. Use the arrow buttons to navigate the menus and adjust certain settings.
8 OK button. Use the OK button to acknowledge a setting or to confirm an action to proceed.
7
8
1220 19 13
9 Lighter/Darker button. Use the Lighter/Darker button to control the brightness or darkness of a copy.
10 Reduce/Enlarge button. Use the Reduce/Enlarge button to reduce or enlarge the size of a copy.
11 Copy Menu button. Use the Copy Menu button to open a copy settings menu. To use the ID copy feature, press the
button until the ID Copy item displays.
12 Start Copy button. Use the Start Copy button to start a copy job.
13 # Copies button. Use the # Copies button to set the number of copies that you want for the current copy job.
14 Cancel button. Use the Cancel button to cancel the current job.
15 Setup button. Use the Setup button to open the main menu options.
16 Toner light . This light indicates that the print cartridge toner level is low.
17 Attention light . This light indicates a problem with the product. View the LCD display for a message.
18 Ready light . This light indicates that the product is ready or is processing a job.
19 Start Fax button. Use the Start Fax button to start a fax job.
20 Redial button. Use the Redial button to recall the last digits used for the previous fax job.
ENWW Product views 7

8 Chapter 1 Product basics ENWW

2 Control panel menus
Setup menu
●
Function specific menus
●
ENWW 9

Setup menu
To open this menu, press the Setup button. The following sub menus are available:
Quick Forms
●
Reports
●
Fax Setup
●
System Setup
●
Service
●
Network Setup
●
10 Chapter 2 Control panel menus ENWW

Quick Forms menu
Menu item Sub-menu item Description
Notebook Paper Narrow Rule
Graph Paper 1/8 inch
Checklist 1-Column
Music Paper Portrait
Reports menu
Menu Item Description
Demo Page Prints a page that demonstrates print quality.
Menu Structure Prints a control-panel menu layout map. The active settings for each menu are listed. It also
Config Report Prints a list of all the product settings. Includes network information when the product is
Prints pages that have preprinted lines
Wide Rule
Child Rule
Prints pages that have preprinted graph lines
5 mm
Prints pages that have preprinted lines with check boxes
2-Column
Prints pages that have preprinted lines for writing music
Landscape
prints a Fax Menu map.
connected to the network.
Supplies Status Prints the print-cartridge status. Includes the following information:
Estimated pages remaining
●
Serial number
●
Number of pages printed
●
Network Summary Displays status for:
Network hardware configuration
●
Enabled features
●
TCP/IP and SNMP information
●
Network statistics
●
Usage Page Displays the number of pages printed, faxed, copied, and scanned by the product.
PCL Font List Prints a list of all installed PCL 5 fonts.
PS Font List Prints a list of all installed PS fonts.
PCL6 Font List Prints a list of all installed PCL 6 fonts.
Service Page Displays supported paper types, copy settings, and miscellaneous product settings.
ENWW Setup menu 11

Fax Setup
Menu Item Sub-menu item Sub-menu item Description
Basic Setup Time/Date (Settings for time
format, current
time, date format,
and current date.)
Fax Header Your Fax Number
Company Name
Answer Mode Automatic
Manual
TAM
Fax/Tel
Sets the time and date setting for the product.
Sets the identifying information that is sent to the receiving
product.
Sets the type of answer mode. The following options are
available:
Automatic: The product automatically answers an
●
incoming call on the configured number of rings.
TAM: A telephone answering machine (TAM) is
●
attached to the Aux phone port of the product. The
product will not pick up any incoming call, but only listen
for fax tones after the answering machine has picked
up the call.
Fax/Tel: The product must automatically pick up the
●
call and determine if the call is a voice or fax call. If the
call is a fax call, the product handles the call as usual.
If the call is a voice call, an audible synthesized ring is
generated to alert the user of an incoming voice call.
Manual : The user must press the Start Fax
●
or use an extension phone to make the product answer
the incoming call.
button
Rings to Answer (Range of 1-9) Sets the number of rings that must occur before the fax
Basic Setup Distinctive Ring All Rings
Single
Double
Triple
Double&Triple
Dial Prefix On
Off
modem answers.
Allows a user with distinctive-ring phone service to set which
rings are answered by the fax device.
All Rings: The product answers any calls that come
●
through the telephone line.
Single: The product answers any calls that produce a
●
single-ring pattern.
Double: The product answers any calls that produce a
●
double-ring pattern.
Triple: The product answers any calls that produce a
●
triple-ring pattern.
Double&Triple: The product answers any calls that
●
produce a double-ring or triple-ring pattern.
The On setting specifies that a prefix number will be dialed
automatically when sending faxes from the product.
12 Chapter 2 Control panel menus ENWW

Menu Item Sub-menu item Sub-menu item Description
Advanced Setup Fax Resolution Standard
Fine
Superfine
Photo
Light/Dark Sets the darkness of outgoing faxes. The setting is a range
Fit to Page On
Off
Glass Size Letter
A4
Dialing Mode Tone
Pulse
Redial if Busy On
Off
Redial-No Answer On
Off
Sets the resolution for sent documents. Higher resolution
images have more dots per inch (dpi), so they show more
detail. Lower resolution images have fewer dots per inch and
show less detail, but the file size is smaller.
from 1 to 11. Setting the slider to 6 (the default setting) will
result in no change to the faxed copy.
Shrinks faxes that are larger than Letter-size or A4-size so
that they can fit onto a Letter-size or A4-size page. If this
feature is set to Off, faxes larger than Letter or A4 will print
on multiple pages.
Sets the default paper size for documents being scanned
from the flatbed scanner.
Sets whether the product should use tone or pulse dialing.
Sets whether or not the product should attempt to redial if
the recipient fax number is busy.
Sets whether the product should attempt to dial if the
recipient fax number does not answer.
Redial Comm.
Error
Detect Dial Tone On
Advanced Setup
(continued)
Extension Phone On
Stamp Faxes Off
Billing Codes Off
On
Off
Off
On
Off
On
Sets whether the product should attempt to redial the
recipient fax number if a communication error occurs.
Sets whether the product should check for a dial tone before
sending a fax.
Enables the use of billing codes when set to On. A prompt
will appear that asks you to enter the billing code for an
outgoing fax.
When this feature is enabled, the user can press the 1-2-3
buttons on the extension phone to cause the product to
answer an incoming fax call.
Sets product to add the date, time, sender’s phone number,
and page number to each page of the faxes that this product
receives.
ENWW Setup menu 13

Menu Item Sub-menu item Sub-menu item Description
Private Receive On
Off
Print Faxes Prints stored faxes when the private-receive feature is on.
Confirm Fax # On
Off
Allow Reprint On
Off
F/T Ring Time (A range that
depends on the
country/region in
which the product
operates)
Setting Private Receive to On requires you to have set a
password in product security. After the password is set, the
following options are set:
Private Receive is turned on.
●
All old faxes are deleted from memory.
●
Forward Fax or Receive to PC are set to On and are
●
not allowed to be set.
All incoming faxes are stored in memory.
●
This menu item appears only when the private-receive
feature is turned on.
Sets whether an outgoing fax requires you to confirm the
number to which you are sending the fax. This feature is
useful in ensuring that faxes that contain sensitive
information go to the correct destination.
Sets whether all received faxes stored in available memory
can be reprinted.
Sets when the product should stop sounding the Fax/Tel
audible ring to notify the user of an incoming voice call.
Print Duplex Off
Fax Speed Fast(V.34)
System Setup menu
Menu Item Sub-menu item Sub-menu item Description
Language (List of available
control-panel
display languages.)
Sets whether incoming faxes are printed on both sides of the
paper.
On
Increases or decreases the allowed fax communication
speed.
Medium(V.17)
Slow(V.29)
Sets the language in which the control panel displays
messages and product reports.
14 Chapter 2 Control panel menus ENWW

Menu Item Sub-menu item Sub-menu item Description
Paper Setup Def. Paper Size Letter
A4
Legal
Def. Paper Type Lists available
media types.
Tray 1 Paper Type
Paper Size
Paper Out Action Wait Forever
Cancel
Override
Sets the size for printing internal reports or any print job that
does not specify a size.
Sets the type for printing internal reports or any print job that
does not specify a type.
Sets the default size and type for tray 1.
Determines how the product reacts when a print job requires
a media size or type that is unavailable or when a specified
tray is empty.
Select Wait Forever to make the product wait until the
●
correct media is loaded.
Select Override to print on a different size paper after
●
a specified delay.
Select Cancel to automatically cancel the print job after
●
a specified delay.
If either Override or Cancel is chosen, the control
●
panel prompts for the number of seconds to delay. Use
the arrow keys to either decrease the time or increase
the time up to 3600 seconds.
Print Density (Range of 1-5) Sets how much toner the product should apply to thicken
lines and edges.
Volume Settings Alarm Volume
Ring Volume
Key-Press Volume
Phoneline Volume
Time/Date (Settings for time
format, current time,
date format, and
current date.)
Product Security On
Off
Disable Fax On
Off
At Very Low Black Cartridge Stop
Soft
Medium
Loud
Off
Sets the time and date setting for the product.
Sets the product-security feature. When the setting is set to
Disables the product fax features. If a password has been
Prompt
Continue
Sets the volume levels for the product. Each volume-type
has the same four volume settings.
On, you must set a personal identification number (PIN).
set under the Product Security setting, you must enter the
password to disable the fax features. If a password has not
been set, you will be prompted to create one.
Sets how the product reacts when it detects that the print
cartridge is out.
User-Defined Low Black (Range of 1-20) Sets the percentage at which the control panel generates a
low-toner message.
ENWW Setup menu 15

Menu Item Sub-menu item Sub-menu item Description
Courier Font Regular
Quiet Mode On
Service menu
Menu item Sub-menu item Description
Fax Service Clear Saved Faxs Clears all faxes in memory. These include any
Sets Courier font values.
Dark
Sets the Quiet Mode setting for the product.
Off
received faxes (including non-printed, non-sent PC
upload, and non-forwarded faxes), unsent faxes
(including delayed faxes), and any printed faxes that
are still in memory. Deleted faxes cannot be
recovered. For each deleted item, the fax activity log
is updated.
Run Fax Test Performs a fax test to verify that the phone cord is
Print T.30 Trace Never
If error
plugged in the correct outlet and that there is a signal
on the phone line. A fax test report is printed indicating
the results.
Prints or schedules a report that is used to
troubleshoot fax transmission issues.
At End of Call
Now
Error Correction The error correction mode allows the sending device
Fax Service Log The fax service log prints out the last 40 entries in the
Cleaning Page Cleans the product when specks or other marks
USB Speed High
Full
Less Paper Curl On
Off
to re-transmit data if it detects an error signal. The
default setting is on.
fax log.
appear on printed output. The cleaning process
removes dust and excess toner from the paper path.
When selected, the product prompts you to load plain
Letter or A4 paper in Tray 1. Press the OK button to
begin the cleaning process. Wait until the process
completes. Discard the page that prints.
Sets the USB speed. The High setting is the default
setting.
When printed pages are consistently curled, this
option sets the product to a mode that reduces curl.
The default setting is Off.
16 Chapter 2 Control panel menus ENWW
Loading…
LASERJET PRO M1530 MFP SERIES
User Guide
HP LaserJet Pro M1530 MFP Series
User Guide
Copyright and License
2010 Copyright Hewlett-Packard Development Company, L.P.
Reproduction, adaptation, or translation without prior written permission is prohibited, except as allowed under the copyright laws.
The information contained herein is subject to change without notice.
The only warranties for HP products and services are set forth in the express warranty statements accompanying such products and services. Nothing herein should be construed as constituting an additional warranty. HP shall not be liable for technical or editorial errors or omissions contained herein.
Part number: CE538-90909
Edition 1, 9/2010
Trademark Credits
Adobe, Acrobat, and PostScript are trademarks of Adobe Systems Incorporated.
Intel Core is a trademark of Intel Corporation in the U.S. and other countries.
Java is a US trademark of Sun Microsystems, Inc.
Microsoft, Windows, Windows XP, and Windows Vista are U.S. registered trademarks of Microsoft Corporation.
UNIX is a registered trademark of The Open Group.
ENERGY STAR and the ENERGY STAR mark are registered U.S. marks.
Conventions used in this guide TIP: Tips provide helpful hints or shortcuts.
NOTE: Notes provide important information to explain a concept or to complete a task.
CAUTION: Cautions indicate procedures that you should follow to avoid losing data or damaging the product.
WARNING! Warnings alert you to specific procedures that you should follow to avoid personal injury, catastrophic loss of data, or extensive damage to the product.
ENWW iii
iv Conventions used in this guide ENWW
Table of contents
1 Product basics ……………………………………………………………………………………………………………………………… 1 Product features ………………………………………………………………………………………………………………….. 2 Environmental features ………………………………………………………………………………………………………… 3 Accessibility features ……………………………………………………………………………………………………………. 3 Product views ……………………………………………………………………………………………………………………… 4
Front view ……………………………………………………………………………………………………………. 4 Back view …………………………………………………………………………………………………………….. 5 Interface ports ………………………………………………………………………………………………………. 5 Serial number and model number location ……………………………………………………………….. 6 Control panel layout ………………………………………………………………………………………………. 7
2 Control panel menus …………………………………………………………………………………………………………………….. 9 Setup menu ………………………………………………………………………………………………………………………. 10
Quick Forms menu ……………………………………………………………………………………………… 11 Reports menu …………………………………………………………………………………………………….. 11 Fax Setup ………………………………………………………………………………………………………….. 12 System Setup menu ……………………………………………………………………………………………. 14 Service menu ……………………………………………………………………………………………………… 16 Network Setup menu …………………………………………………………………………………………… 17
Function specific menus ……………………………………………………………………………………………………… 18 Copy …………………………………………………………………………………………………………………. 18 Fax ……………………………………………………………………………………………………………………. 19
3 Software for Windows …………………………………………………………………………………………………………………. 21 Supported operating systems for Windows ……………………………………………………………………………. 22 Supported printer drivers for Windows ………………………………………………………………………………….. 22 Select the correct printer driver for Windows …………………………………………………………………………. 22 Change print job settings …………………………………………………………………………………………………….. 24 Change printer-driver settings for Windows …………………………………………………………………………… 24
Change the settings for all print jobs until the software program is closed …………………… 24 Change the default settings for all print jobs ……………………………………………………………. 25 Change the product configuration settings ……………………………………………………………… 25
Remove software for Windows …………………………………………………………………………………………….. 26 Supported utilities for Windows ……………………………………………………………………………………………. 27
ENWW v
Other Windows components and utilities ………………………………………………………………… 27 Software for other operating systems ……………………………………………………………………………………. 27
4 Use the product with Mac ……………………………………………………………………………………………………………. 29 Software for Mac ……………………………………………………………………………………………………………….. 30
Supported operating systems for Mac ……………………………………………………………………. 30 Supported printer drivers for Mac ………………………………………………………………………….. 30 Install software for Mac operating systems ……………………………………………………………… 30 Remove software from Mac operating systems ……………………………………………………….. 31 Change printer-driver settings for Mac …………………………………………………………………… 32 Software for Mac computers …………………………………………………………………………………. 33
Print with Mac ……………………………………………………………………………………………………………………. 34 Cancel a print job with a Mac ………………………………………………………………………………… 34 Change the paper size and type with Mac ………………………………………………………………. 34 Create and use printing presets with Mac ………………………………………………………………. 34 Resize documents or print on a custom paper size with Mac …………………………………….. 35 Print a cover page with Mac …………………………………………………………………………………. 35 Use watermarks with Mac …………………………………………………………………………………….. 35 Print multiple pages on one sheet of paper with Mac ……………………………………………….. 36 Print on both sides of the page (duplex printing) with Mac ………………………………………… 36 Use the Services menu with Mac ………………………………………………………………………….. 37
Fax with Mac …………………………………………………………………………………………………………………….. 38 Scan with Mac …………………………………………………………………………………………………………………… 39
5 Connect the product ……………………………………………………………………………………………………………………. 41 Supported network operating systems ………………………………………………………………………………….. 42 Printer sharing disclaimer ……………………………………………………………………………………………………. 42 Connect with USB ……………………………………………………………………………………………………………… 42 Connect to a network …………………………………………………………………………………………………………. 42
Supported network protocols ………………………………………………………………………………… 42 Install the product on a wired network ……………………………………………………………………. 43 Configure network settings …………………………………………………………………………………… 44
6 Paper and print media …………………………………………………………………………………………………………………. 47 Understand paper use ………………………………………………………………………………………………………… 48
Special paper guidelines ………………………………………………………………………………………. 48 Change the printer driver to match the paper type and size …………………………………………………….. 50 Supported paper sizes ……………………………………………………………………………………………………….. 50 Supported paper types and tray capacity ………………………………………………………………………………. 51
Paper orientation for loading trays …………………………………………………………………………. 52 Load paper trays ……………………………………………………………………………………………………………….. 54
Load the priority input slot …………………………………………………………………………………….. 54 Load Tray 1 ………………………………………………………………………………………………………… 54
vi ENWW
Load the document feeder ………………………………………………………………………………………………….. 55 Configure trays ………………………………………………………………………………………………………………….. 57
7 Print tasks …………………………………………………………………………………………………………………………………… 59 Cancel a print job ………………………………………………………………………………………………………………. 60 Basic print tasks with Windows ……………………………………………………………………………………………. 61
Open the printer driver with Windows …………………………………………………………………….. 61 Get help for any printing option with Windows …………………………………………………………. 62 Change the number of print copies with Windows ……………………………………………………. 62 Save custom print settings for reuse with Windows …………………………………………………. 62 Improve print quality with Windows ……………………………………………………………………….. 66 Print on both sides (duplex) with Windows ……………………………………………………………… 67 Print multiple pages per sheet with Windows ………………………………………………………….. 71 Select page orientation with Windows ……………………………………………………………………. 73
Additional print tasks with Windows ……………………………………………………………………………………… 75 Print on preprinted letterhead or forms with Windows ………………………………………………. 75 Print on special paper, labels, or transparencies ……………………………………………………… 77 Print the first or last page on different paper with Windows ……………………………………….. 80 Scale a document to fit page size ………………………………………………………………………….. 83 Add a watermark to a document with Windows ……………………………………………………….. 85 Create a booklet with Windows …………………………………………………………………………….. 85
8 Copy …………………………………………………………………………………………………………………………………………… 87 Use copy functions …………………………………………………………………………………………………………….. 88
One-touch copy ………………………………………………………………………………………………….. 88 Multiple copies ……………………………………………………………………………………………………. 88 Copy a multiple-page original ……………………………………………………………………………….. 89 Copy identification cards ………………………………………………………………………………………. 89 Cancel a copy job ……………………………………………………………………………………………….. 90 Reduce or enlarge a copy image …………………………………………………………………………… 90 Collate a copy job ……………………………………………………………………………………………….. 91
Copy settings …………………………………………………………………………………………………………………….. 91 Change copy quality ……………………………………………………………………………………………. 91 Set the paper size and type for copying on special paper …………………………………………. 93 Save copy setting changes as default settings ………………………………………………………… 94 Restore copy default settings ……………………………………………………………………………….. 94
Copy photos ……………………………………………………………………………………………………………………… 96 Copy mixed-size originals …………………………………………………………………………………………………… 97 Copy on both sides (duplex) ………………………………………………………………………………………………… 98
Copy documents automatically ……………………………………………………………………………… 98 Copy two-sided documents manually …………………………………………………………………….. 98
ENWW vii
9 Scan …………………………………………………………………………………………………………………………………………. 101 Use the scan functions ……………………………………………………………………………………………………… 102
Scan methods …………………………………………………………………………………………………… 102 Cancel a scan …………………………………………………………………………………………………… 103
Scan settings …………………………………………………………………………………………………………………… 104 Scanner resolution and color ………………………………………………………………………………. 104 Scan quality ……………………………………………………………………………………………………… 106
Scan a photo …………………………………………………………………………………………………………………… 107
10 Fax ………………………………………………………………………………………………………………………………………….. 109 Set up fax ……………………………………………………………………………………………………………………….. 110
Install and connect the hardware …………………………………………………………………………. 110 Configure fax settings ………………………………………………………………………………………… 113
Use the phone book …………………………………………………………………………………………………………. 115 Use the control panel to create and edit the fax phone book …………………………………… 115 Import or export Microsoft Outlook contacts into the fax phone book ………………………… 115 Use phone-book data from other programs …………………………………………………………… 115 Delete the phone book ……………………………………………………………………………………….. 115 Use speed dials ………………………………………………………………………………………………… 116 Manage group-dial entries ………………………………………………………………………………….. 118
Set fax settings ………………………………………………………………………………………………………………… 120 Send fax settings ………………………………………………………………………………………………. 120 Receive fax settings …………………………………………………………………………………………… 124 Set fax polling …………………………………………………………………………………………………… 130 Disable the product fax ………………………………………………………………………………………. 130
Use fax …………………………………………………………………………………………………………………………… 131 Fax software …………………………………………………………………………………………………….. 131 Cancel a fax ……………………………………………………………………………………………………… 131 Delete faxes from memory ………………………………………………………………………………….. 131 Use fax on a DSL, PBX, or ISDN system ……………………………………………………………… 132 Use fax on a VoIP service ………………………………………………………………………………….. 133 Fax memory ……………………………………………………………………………………………………… 133 Send a fax ………………………………………………………………………………………………………… 133 Receive a fax ……………………………………………………………………………………………………. 141
Solve fax problems …………………………………………………………………………………………………………… 143 Fax troubleshooting checklist ……………………………………………………………………………… 143 Fax error messages ………………………………………………………………………………………….. 144 Troubleshoot fax codes and trace reports …………………………………………………………….. 150 Fax logs and reports ………………………………………………………………………………………….. 152 Change error correction and fax speed ………………………………………………………………… 155 Solve problems sending faxes …………………………………………………………………………….. 156 Solve problems receiving faxes …………………………………………………………………………… 162 Solve general fax problems ……………………………………………………………………………….. 168
viii ENWW
Regulatory information and warranties ………………………………………………………………………………… 170
11 Manage and maintain the product …………………………………………………………………………………………….. 171 Information pages …………………………………………………………………………………………………………….. 172 HP ToolboxFX …………………………………………………………………………………………………………………. 174
View HP ToolboxFX …………………………………………………………………………………………… 174 Status ………………………………………………………………………………………………………………. 174 Fax ………………………………………………………………………………………………………………….. 175 Help ………………………………………………………………………………………………………………… 177 System Settings ………………………………………………………………………………………………… 178 Print Settings ……………………………………………………………………………………………………. 180 Network Settings ……………………………………………………………………………………………….. 181
Embedded Web server ……………………………………………………………………………………………………… 182 Features …………………………………………………………………………………………………………… 182
Use HP Web Jetadmin software ………………………………………………………………………………………… 183 Product security features …………………………………………………………………………………………………… 183
Assign a system password through the product control panel …………………………………. 183 Assign a system password through the EWS ………………………………………………………… 183 Lock the product ……………………………………………………………………………………………….. 184
Economy settings …………………………………………………………………………………………………………….. 185 Print with EconoMode ………………………………………………………………………………………… 185 Archive print ……………………………………………………………………………………………………… 185
Quiet mode settings …………………………………………………………………………………………………………. 186 Manage supplies and accessories ……………………………………………………………………………………… 187
Print when a cartridge is at estimated end of life ……………………………………………………. 187 Manage print cartridges ……………………………………………………………………………………… 188 Replacement instructions …………………………………………………………………………………… 189
Clean the product …………………………………………………………………………………………………………….. 198 Clean the pickup roller ……………………………………………………………………………………….. 198 Clean the document feeder pickup rollers and separation pad ………………………………… 199 Clean the paper path …………………………………………………………………………………………. 199 Clean the scanner glass strip and platen ………………………………………………………………. 200
Product updates ………………………………………………………………………………………………………………. 201
12 Solve problems ……………………………………………………………………………………………………………………….. 203 Self help …………………………………………………………………………………………………………………………. 204 Problem-solving checklist ………………………………………………………………………………………………….. 205
Step 1: Check that the product power is on …………………………………………………………… 205 Step 2: Check the control panel for error messages ………………………………………………. 205 Step 3: Test print functionality …………………………………………………………………………….. 205 Step 4: Test copy functionality …………………………………………………………………………….. 205 Step 5: Test the fax sending functionality ……………………………………………………………… 206 Step 6: Test the fax receiving functionality ……………………………………………………………. 206
ENWW ix
Step 7: Try sending a print job from a computer …………………………………………………….. 206 Factors that affect product performance ……………………………………………………………………………… 207 Restore the factory-set defaults …………………………………………………………………………………………. 207 Interpret control panel messages ……………………………………………………………………………………….. 208
Control panel message types ……………………………………………………………………………… 208 Control panel messages …………………………………………………………………………………….. 208
Paper feeds incorrectly or becomes jammed ……………………………………………………………………….. 214 The product does not pick up paper …………………………………………………………………….. 214 The product picks up multiple sheets of paper ………………………………………………………. 214 Prevent paper jams ……………………………………………………………………………………………. 214 Clear jams ………………………………………………………………………………………………………… 215
Improve print quality …………………………………………………………………………………………………………. 224 Select a paper type ……………………………………………………………………………………………. 225 Use paper that meets HP specifications ……………………………………………………………….. 225 Print a cleaning page …………………………………………………………………………………………. 225 Check the print cartridge …………………………………………………………………………………….. 226 Use the printer driver that best meets your printing needs ………………………………………. 229 Improve print quality for copies ……………………………………………………………………………. 229
The product does not print or it prints slowly ………………………………………………………………………… 230 The product does not print ………………………………………………………………………………….. 230 The product prints slowly ……………………………………………………………………………………. 231
Solve connectivity problems ……………………………………………………………………………………………… 231 Solve direct-connect problems ……………………………………………………………………………. 231 Solve network problems …………………………………………………………………………………….. 231
Product software problems ………………………………………………………………………………………………… 234 Solve common Mac problems ……………………………………………………………………………………………. 234
The printer driver is not listed in the Print & Fax list ……………………………………………….. 234 The product name does not appear in the product list in the Print & Fax list ……………… 235 The printer driver does not automatically set up the selected product in the Print & Fax list …………………………………………………………………………………………………………………… 235 A print job was not sent to the product that you wanted ………………………………………….. 235 When connected with a USB cable, the product does not appear in the Print & Fax list after the driver is selected. ………………………………………………………………………………….. 235 You are using a generic printer driver when using a USB connection ……………………….. 236
Appendix A Supplies and accessories ………………………………………………………………………………………….. 237 Order parts, accessories, and supplies ……………………………………………………………………………….. 238 Part numbers …………………………………………………………………………………………………………………… 238
Print cartridge …………………………………………………………………………………………………… 238 Cables and interfaces ………………………………………………………………………………………… 238 Maintenance kits ……………………………………………………………………………………………….. 238
x ENWW
Appendix B Service and support ………………………………………………………………………………………………….. 239 Hewlett-Packard limited warranty statement ………………………………………………………………………… 240 HP’s Premium Protection Warranty: LaserJet print cartridge limited warranty statement ……………. 241 Data stored on the print cartridge ……………………………………………………………………………………….. 242 End User License Agreement ……………………………………………………………………………………………. 243 Customer support …………………………………………………………………………………………………………….. 245 Repack the product ………………………………………………………………………………………………………….. 246
Appendix C Product specifications ………………………………………………………………………………………………. 247 Physical specifications ……………………………………………………………………………………………………… 248 Power consumption, electrical specifications, and acoustic emissions …………………………………….. 248 Environmental specifications ……………………………………………………………………………………………… 248
Appendix D Regulatory information ……………………………………………………………………………………………… 249 FCC regulations ………………………………………………………………………………………………………………. 250 Environmental product stewardship program ……………………………………………………………………….. 250
Protecting the environment …………………………………………………………………………………. 250 Ozone production ……………………………………………………………………………………………… 250 Power consumption …………………………………………………………………………………………… 250 Toner consumption ……………………………………………………………………………………………. 251 Paper use ………………………………………………………………………………………………………… 251 Plastics ……………………………………………………………………………………………………………. 251 HP LaserJet print supplies ………………………………………………………………………………….. 251 Return and recycling instructions …………………………………………………………………………. 251 Paper ………………………………………………………………………………………………………………. 252 Material restrictions ……………………………………………………………………………………………. 252 Disposal of waste equipment by users in private households in the European Union …. 253 Chemical substances …………………………………………………………………………………………. 253 Material Safety Data Sheet (MSDS) …………………………………………………………………….. 253 For more information …………………………………………………………………………………………. 253
Declaration of conformity …………………………………………………………………………………………………… 254 Safety statements …………………………………………………………………………………………………………….. 256
Laser safety ……………………………………………………………………………………………………… 256 Canadian DOC regulations …………………………………………………………………………………. 256 VCCI statement (Japan) …………………………………………………………………………………….. 256 Power cord instructions ……………………………………………………………………………………… 256 Power cord statement (Japan) …………………………………………………………………………….. 256 EMC statement (Korea) ……………………………………………………………………………………… 256 Laser statement for Finland ………………………………………………………………………………… 257 GS statement (Germany) ……………………………………………………………………………………. 257 Substances Table (China) ………………………………………………………………………………….. 258 Restriction on Hazardous Substances statement (Turkey) ……………………………………… 258
Additional statements for telecom (fax) products ………………………………………………………………….. 259
ENWW xi
EU Statement for Telecom Operation …………………………………………………………………… 259 New Zealand Telecom Statements ………………………………………………………………………. 259 Additional FCC statement for telecom products (US) ……………………………………………… 259 Telephone Consumer Protection Act (US) ……………………………………………………………. 260 Industry Canada CS-03 requirements ………………………………………………………………….. 260
Index …………………………………………………………………………………………………………………………………………….. 263
xii ENWW
1 Product basics
Product features
Environmental features
Accessibility features
Product views
ENWW 1
Product features The product has the following features.
HP LaserJet M1536dnf MFP
Prints letter-size pages at speeds up to 26 pages per minute (ppm) and A4-size pages at speeds up to 25 ppm.
PCL 5 and PCL 6 printer drivers and HP postscript level 3 emulation.
Priority input tray holds up to 10 sheets of print media.
Tray 1 holds up to 250 sheets of print media or 10 envelopes.
Hi-Speed USB 2.0 port and 10/100 Base-T network port.
64-MB random-access memory (RAM).
Flatbed scanner and 35-page document feeder.
V.34 fax
Two RJ-11 fax phone line ports.
Automatic two-sided printing
2 Chapter 1 Product basics ENWW
Environmental features Duplex Save paper by using duplex printing as your default print setting.
Print multiple pages per sheet Save paper by printing two or more pages of a document side-by-side on one sheet of paper. Access this feature through the printer driver.
Recycling Reduce waste by using recycled paper.
Recycle print cartridges by using the HP return process.
Accessibility features The product includes several features that aid users with accessibility issues.
Online user guide that is compatible with text screen-readers.
Print cartridges can be installed and removed by using one hand.
All doors and covers can be opened by using one hand.
ENWW Environmental features 3
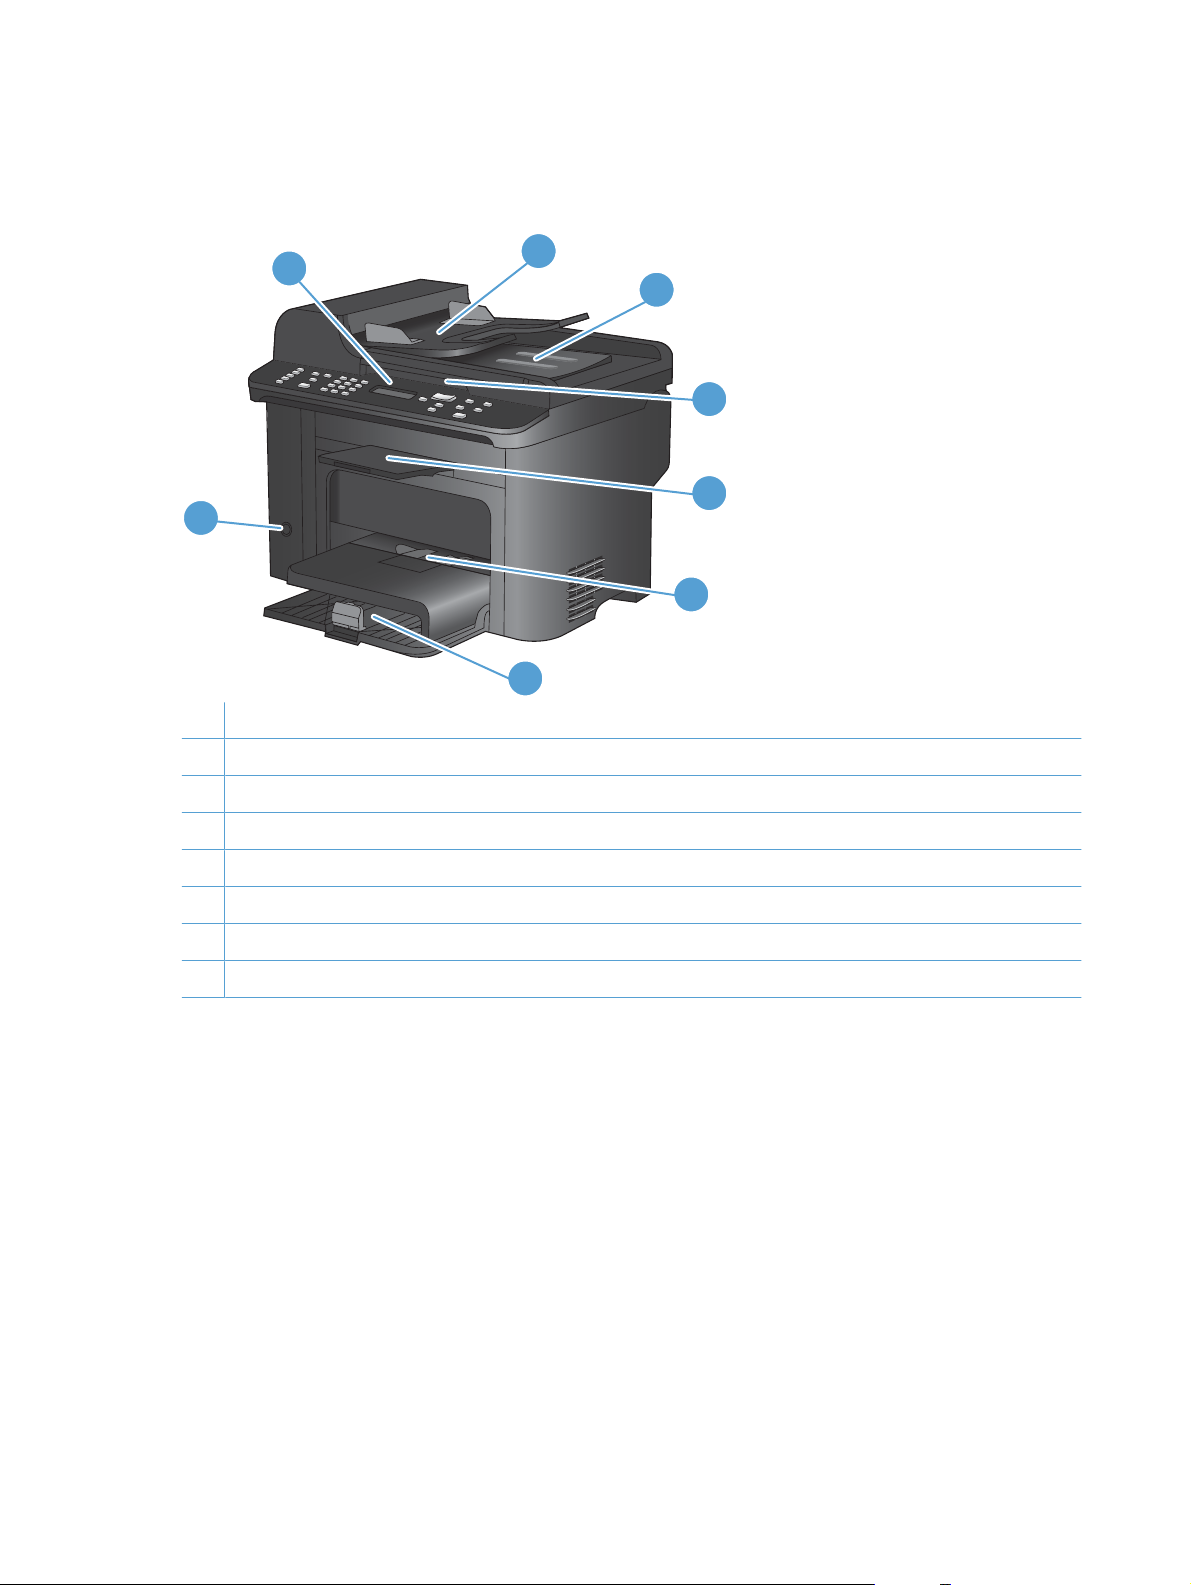
Product views Front view
1 2 3
5
6
7
8
4
1 Control panel
2 Document feeder input tray
3 Document feeder output bin
4 Scanner lid
5 Output bin
6 Priority input tray
7 Tray 1
8 Power button
4 Chapter 1 Product basics ENWW
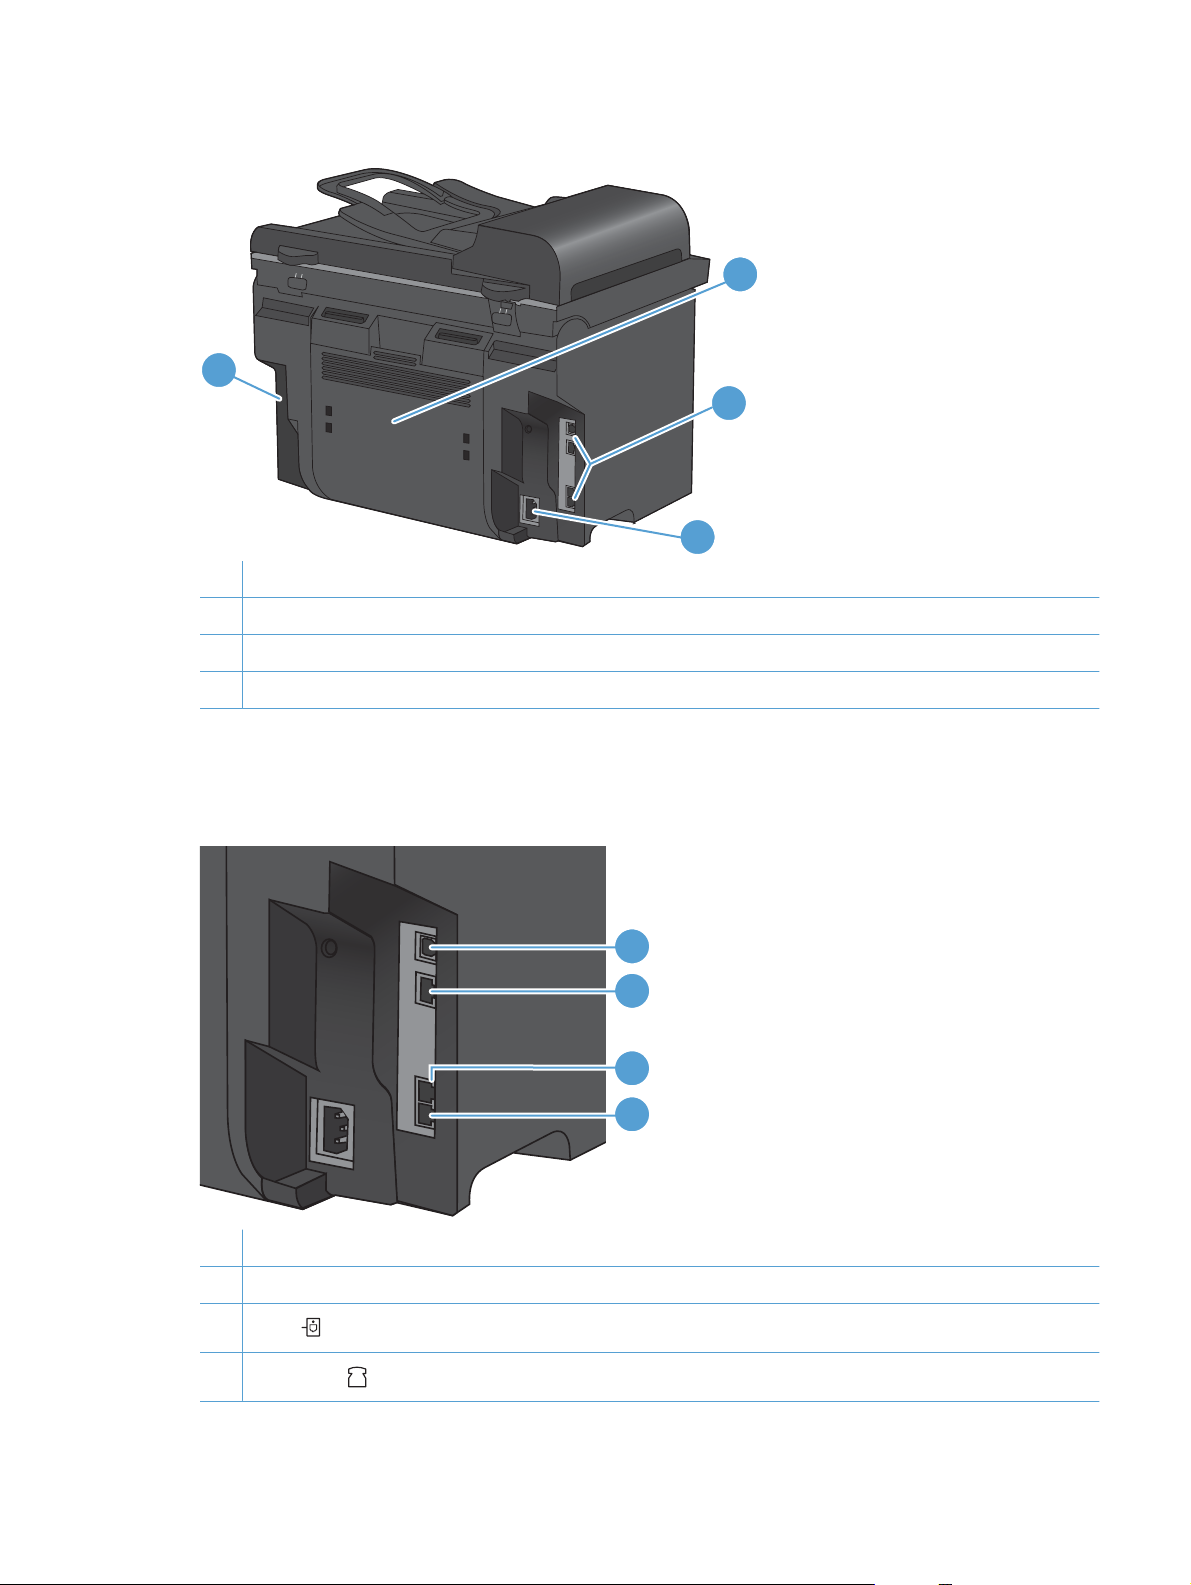
Back view
2
1 3
4 1 Kensington lock
2 Rear jam access door
3 Interface ports
4 Power connector
Interface ports The product has a 10/100 Base-T (RJ-45) network port, a Hi-Speed USB 2.0 port, and fax ports.
3
1 2
4
1 Hi-Speed USB 2.0 port
2 Network port
3 Line fax port
4 Telephone fax port
ENWW Product views 5
Serial number and model number location The serial number and product model number label is on the back of the product.
6 Chapter 1 Product basics ENWW
Control panel layout
18 16 15 1417
54 6 9 10 118721 3
1220 19 13 1 Speed dial buttons. Use the speed dial buttons to quickly fax documents to commonly used destinations.
2 Phone Book button. Use the Phone Book button to access the phone book entries that have been set up for the product.
3 Fax Menu button. Use the Fax Menu button to open a fax settings menu.
4 Alphanumeric keypad. Use the alphanumeric buttons to type data into the product control-panel display and dial telephone numbers for faxing.
5 LCD display. Use the LCD display to navigate the menu structure and monitor product status.
6 Back button. Use the Back button to return to a previous menu, or to exit the menus and return to the Ready state.
7 Arrow buttons. Use the arrow buttons to navigate the menus and adjust certain settings.
8 OK button. Use the OK button to acknowledge a setting or to confirm an action to proceed.
9 Lighter/Darker button. Use the Lighter/Darker button to control the brightness or darkness of a copy.
10 Reduce/Enlarge button. Use the Reduce/Enlarge button to reduce or enlarge the size of a copy.
11 Copy Menu button. Use the Copy Menu button to open a copy settings menu. To use the ID copy feature, press the button until the ID Copy item displays.
12 Start Copy button. Use the Start Copy button to start a copy job.
13 # Copies button. Use the # Copies button to set the number of copies that you want for the current copy job.
14 Cancel button. Use the Cancel button to cancel the current job.
15 Setup button. Use the Setup button to open the main menu options.
16 Toner light . This light indicates that the print cartridge toner level is low.
17 Attention light . This light indicates a problem with the product. View the LCD display for a message.
18 Ready light . This light indicates that the product is ready or is processing a job.
19 Start Fax button. Use the Start Fax button to start a fax job.
20 Redial button. Use the Redial button to recall the last digits used for the previous fax job.
ENWW Product views 7
8 Chapter 1 Product basics ENWW
2 Control panel menus
Setup menu
Function specific menus
ENWW 9
Setup menu To open this menu, press the Setup button. The following sub menus are available:
Quick Forms
Reports
Fax Setup
System Setup
Service
Network Setup
10 Chapter 2 Control panel menus ENWW
Quick Forms menu
Menu item Sub-menu item Description
Notebook Paper Narrow Rule
Wide Rule
Child Rule
Prints pages that have preprinted lines
Graph Paper 1/8 inch
5 mm
Prints pages that have preprinted graph lines
Checklist 1-Column
2-Column
Prints pages that have preprinted lines with check boxes
Music Paper Portrait
Landscape
Prints pages that have preprinted lines for writing music
Reports menu
Menu Item Description
Demo Page Prints a page that demonstrates print quality.
Menu Structure Prints a control-panel menu layout map. The active settings for each menu are listed. It also prints a Fax Menu map.
Config Report Prints a list of all the product settings. Includes network information when the product is connected to the network.
Supplies Status Prints the print-cartridge status. Includes the following information:
Estimated pages remaining
Serial number
Number of pages printed
Network Summary Displays
-
Инструкции по эксплуатации
1
HP LaserJet Pro M1530 MFP инструкция по эксплуатации
(322 страницы)
- Языки:Русский
-
Тип:
PDF -
Размер:
6.05 MB -
Описание:
Многофункциональное устройство (МФУ)
Просмотр
На NoDevice можно скачать инструкцию по эксплуатации для HP LaserJet Pro M1530 MFP. Руководство пользователя необходимо для ознакомления с правилами установки и эксплуатации HP LaserJet Pro M1530 MFP. Инструкции по использованию помогут правильно настроить HP LaserJet Pro M1530 MFP, исправить ошибки и выявить неполадки.