

HP Photosmart 5510 series


Содержание
1 Справка HP Photosmart 5510 series……………………………………………………………………………………………………………….3
2 Краткий обзор устройства HP Photosmart
Компоненты принтера……………………………………………………………………………………………………………………………………..5
Функции панели управления…………………………………………………………………………………………………………………………….6
3 Приемы работы…………………………………………………………………………………………………………………………………………….7
4 Печать
Печать фотографий с карты памяти…………………………………………………………………………………………………………………9
Печать отовсюду……………………………………………………………………………………………………………………………………………11
Управление приложениями……………………………………………………………………………………………………………………………13
Советы по успешной печати…………………………………………………………………………………………………………………………..13
5 Копирование и сканирование
Копирование текстовых или смешанных документов………………………………………………………………………………………15
Сканирование на компьютер или на карту памяти…………………………………………………………………………………………..17
Советы по успешному копированию и
6 Работа с картриджами
Проверка приблизительного уровня чернил……………………………………………………………………………………………………19
Автоматическая очистка печатающей головки………………………………………………………………………………………………..19
Очистка потеков…………………………………………………………………………………………………………………………………………….19
Замена картриджей……………………………………………………………………………………………………………………………………….20
Выравнивание принтера………………………………………………………………………………………………………………………………..22
Заказ расходных материалов…………………………………………………………………………………………………………………………22
Информация о гарантии на картридж……………………………………………………………………………………………………………..22
Советы по работе с картриджами…………………………………………………………………………………………………………………..23
сканированию………………………………………………………………………………………18
Содержание
7 Подключение
Добавление устройства HP Photosmart в сеть…………………………………………………………………………………………………25
Переход с USB-соединения на подключение по беспроводной сети………………………………………………………………..27
Подключение нового принтера……………………………………………………………………………………………………………………….27
Изменение параметров сети………………………………………………………………………………………………………………………….27
Советы по настройке и использованию сетевого принтера……………………………………………………………………………..28
Дополнительные средства управления принтером (для сетевых принтеров)……………………………………………………28
8 Решение проблемы
Дополнительная справка……………………………………………………………………………………………………………………………….31
Регистрация принтера……………………………………………………………………………………………………………………………………31
Устранение замятия бумаги…………………………………………………………………………………………………………………………..31
Решение проблемы печати…………………………………………………………………………………………………………………………….33
Решение проблем копирования и сканирования……………………………………………………………………………………………..33
Устранение неполадок в сети…………………………………………………………………………………………………………………………33
Поддержка HP по телефону…………………………………………………………………………………………………………………………..34
9 Техническая информация
Уведомление…………………………………………………………………………………………………………………………………………………39
Информация о микросхеме
Технические характеристики………………………………………………………………………………………………………………………….40
Программа охраны окружающей среды………………………………………………………………………………………………………….41
Заявления о соответствии стандартам…………………………………………………………………………………………………………..46
Соответствие нормам беспроводной связи…………………………………………………………………………………………………….49
Указатель………………………………………………………………………………………………………………………………………………………….51
картриджа……………………………………………………………………………………………………………39
1

Содержание
2

1 Справка HP Photosmart 5510 series
Сведения об устройстве HP Photosmart см. в следующих разделах.
• Краткий обзор устройства HP Photosmart на стр. 5
• Приемы работы на стр. 7
• Печать на стр. 9
• Копирование и сканирование на стр. 15
• Работа с картриджами на стр. 19
• Подключение на стр. 25
• Техническая информация на стр. 39
• Решение проблемы на стр. 31
Справка HP Photosmart 5510
series
Справка HP Photosmart 5510 series 3

Справка HP Photosmart 5510
series
Глава 1
4 Справка HP Photosmart 5510 series
2 Краткий обзор устройства
HP Photosmart
• Компоненты принтера
Функции панели управления
•
Компоненты принтера
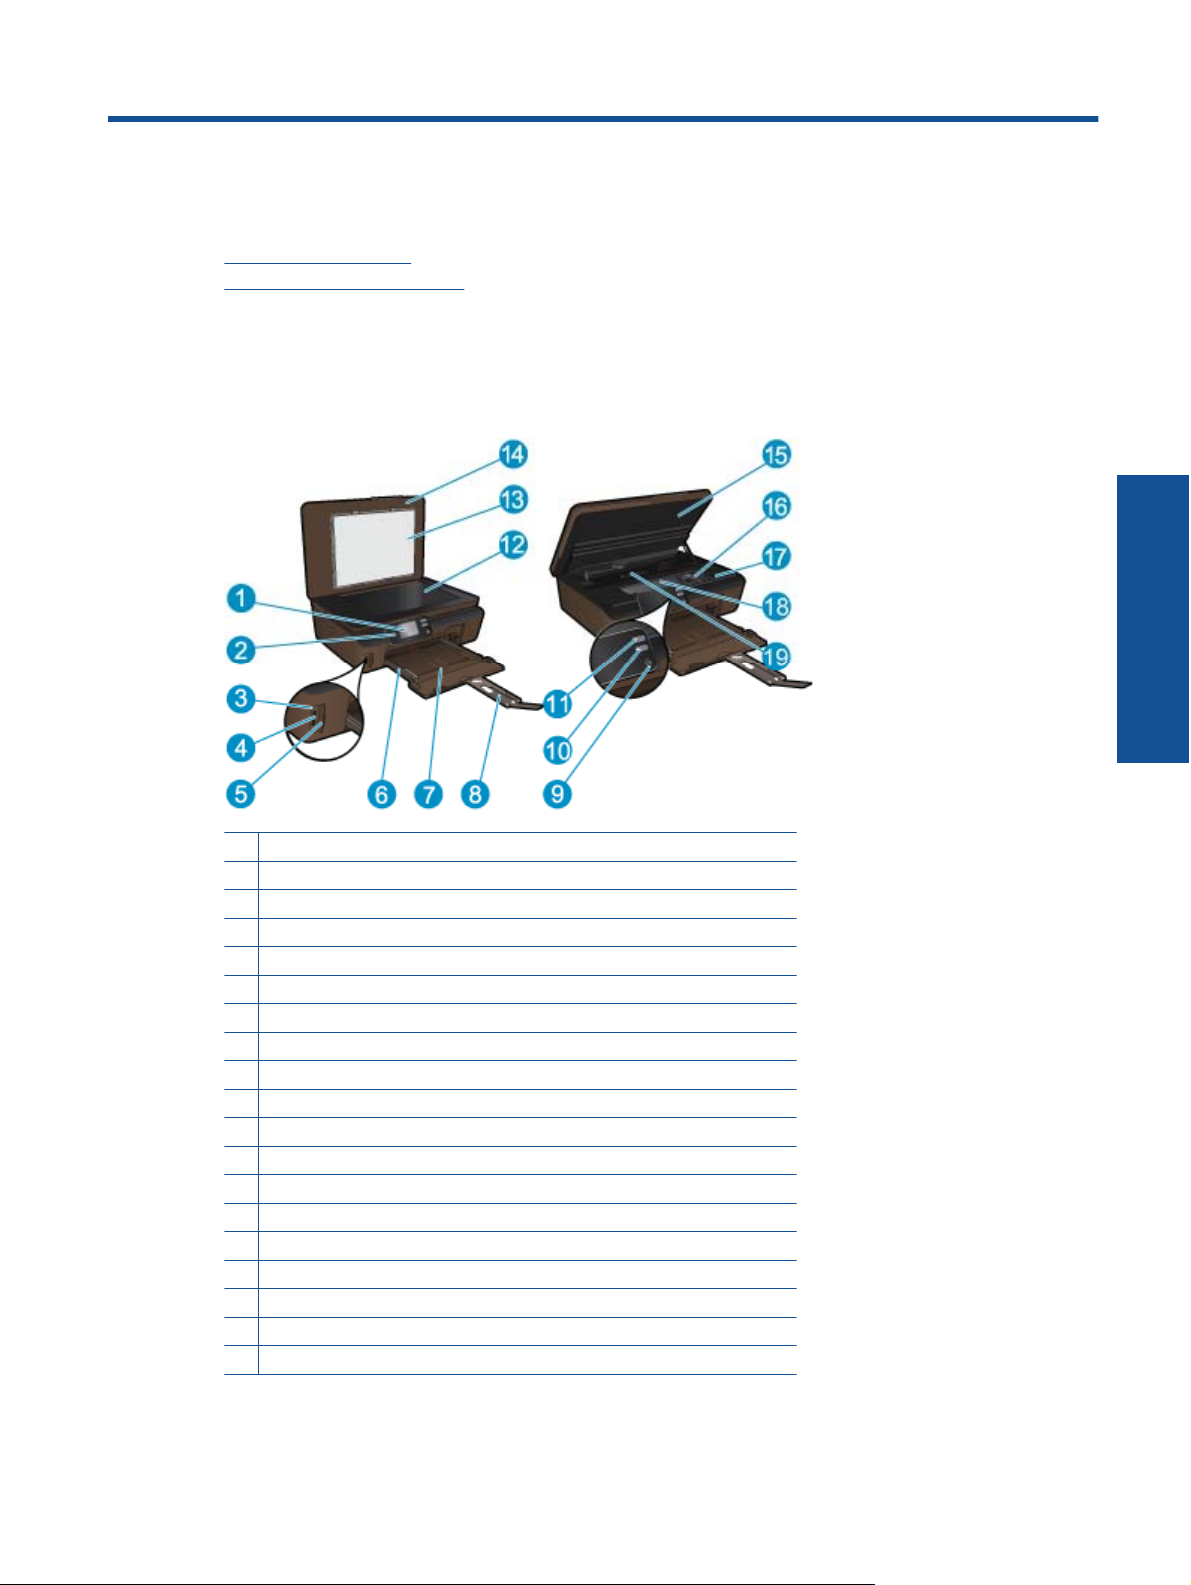
• Вид HP Photosmart спереди и сверху
1 Цветной графический дисплей (также называется дисплеем)
2 Панель управления
3 Индикатор фото
4 Гнездо для карт памяти
5 Дверца отсека для карт памяти
6 Направляющая ширины бумаги
7 Лоток для бумаги
8 Удлинитель лотка для бумаги (также называется удлинителем лотка)
9 Кнопка Вкл
10 Кнопка ePrint
11 Кнопка беспроводной связи
12 Стекло
13 Подложка крышки
14 Крышка
15 Крышка доступа к картриджам
16 Блок печатающих
17 Расположение номера модели
18 Область доступа к картриджам
19 Крышка тракта подачи бумаги
головок
Краткий обзор устройства
HP Photosmart
• Вид HP Photosmart сзади
Краткий обзор устройства HP Photosmart 5
Глава 2
20 Задний порт USB
21 Разъем питания. Используйте только кабель питания HP.
Функции панели управления
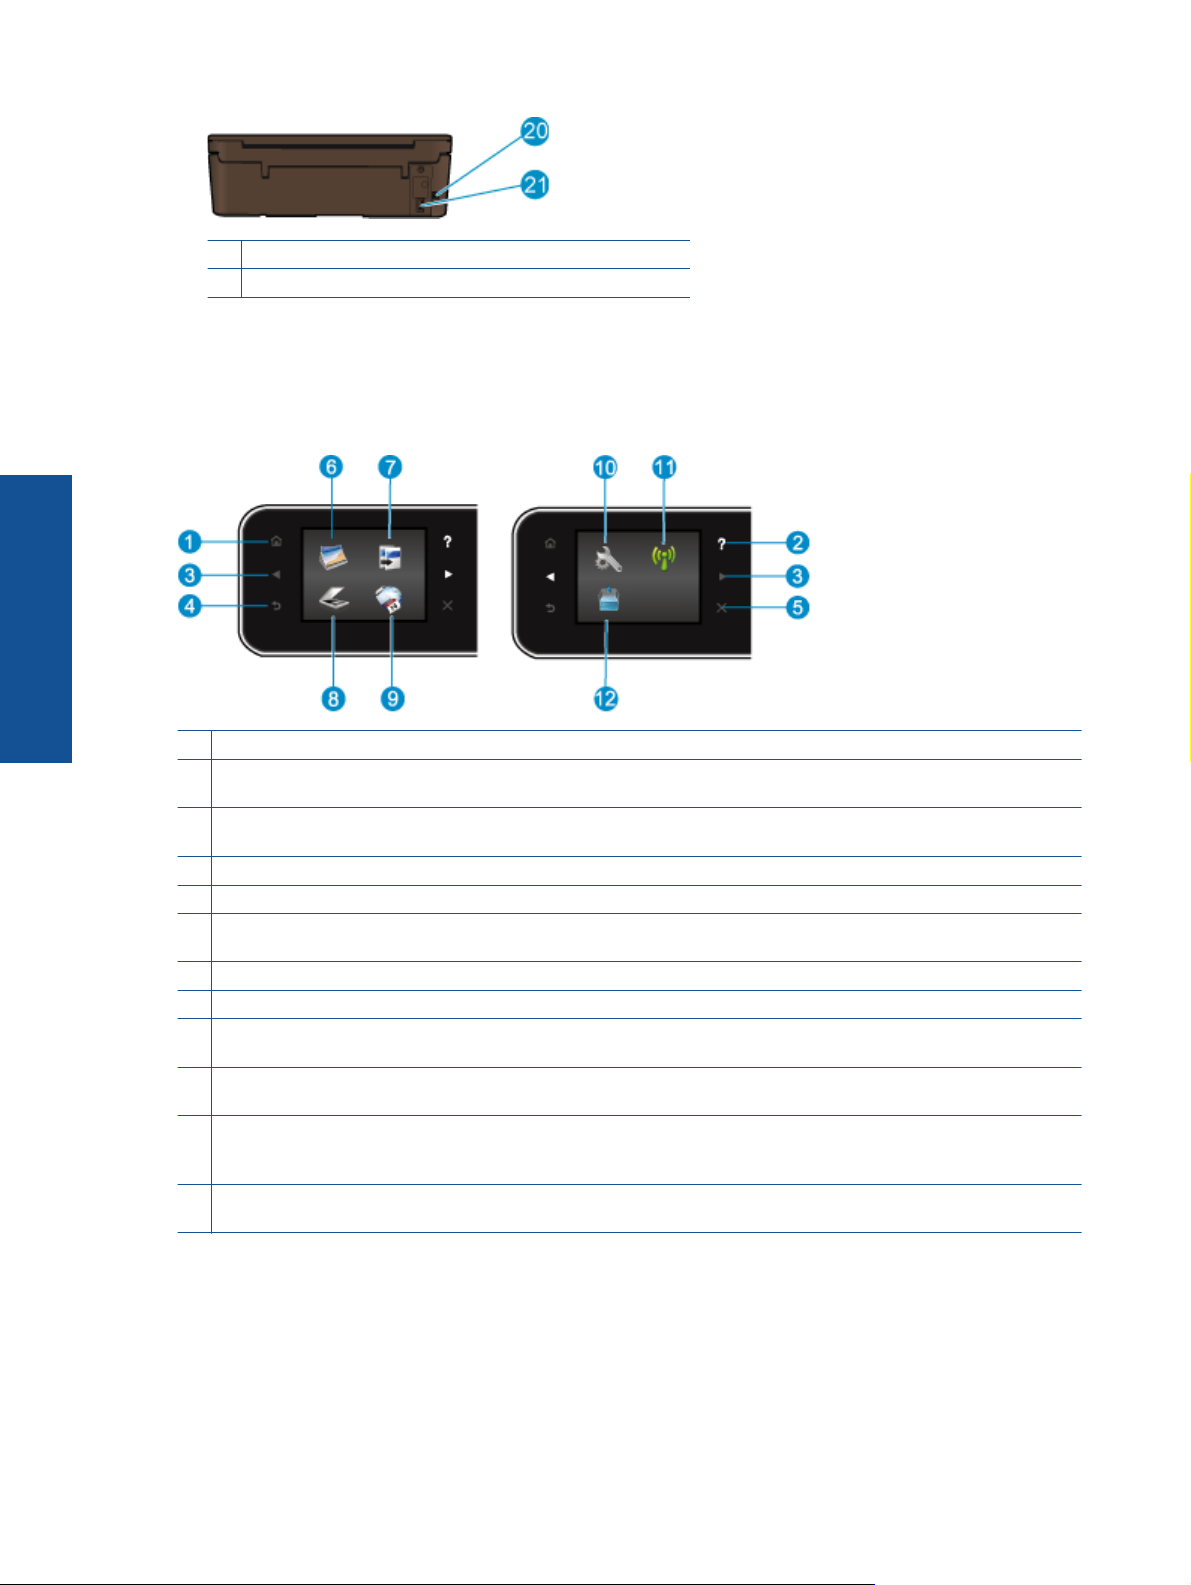
Для перемещения между двумя начальными экранами используйте кнопки со стрелками.
Функции панели управления
Краткий обзор устройства
HP Photosmart
1 Начало. Позволяет вернуться на начальный экран (экран, который отображается при включении принтера).
2 Справка. На начальном экране показывает все разделы справки. На другом экране отображает дополнительную
информацию или анимацию о текущем действии.
3 Кнопки со стрелками. Позволяет перемещаться между двумя начальными экранами, фотографиями и
приложениями.
4 Назад. Позволяет вернуться на предыдущий экран.
5
Отмена. Останавливает текущую операцию.
6 Фото. Открывает меню Фото, которое позволяет просматривать и печатать фотографии, а также
перепечатывать уже напечатанные фотографии.
7 Копия. Открывает меню Копия, в котором можно выбрать тип копии и изменить параметры копирования.
8 Сканер. Открывает меню Сканер, в котором можно выбрать место назначения для сканирования.
9 Apps. Позволяет быстро
для раскрашивания, головоломки и многое другое.
10 Настройка. Открывает меню Настройка, в котором можно изменить параметры устройства и воспользоваться
различными инструментами для выполнения функций обслуживания.
11 Беспроводное. Открывает меню Параметры беспр., в котором можно просмотреть свойства беспроводного
подключения и изменить соответствующие
связи для диагностики проблем сетевого подключения.
12 Чернила. Показывает приблизительный уровень чернил в картридже. Если уровень чернил ниже минимального,
отображается символ предупреждения.
и легко получать доступ и печатать данные из Интернета, например купоны, страницы
параметры. Можно также напечатать отчет о проверке беспроводной
6 Краткий обзор устройства HP Photosmart

3 Приемы работы
В этом разделе приведены ссылки на информацию о выполнении типичных задач, таких как управление
приложениями, сканирование и создание копий.
Загрузка бумаги на стр. 10
•
Замена картриджей на стр. 20
•
Управление приложениями на стр. 13
•
Знакомство с функцией ePrint на стр. 12
•
Устранение замятия бумаги на стр. 31
•
Копирование текстовых или смешанных документов
•
на стр. 15
Сканирование на компьютер или на карту памяти
•
на стр. 17
Решение проблемы на стр. 31
•
Приемы работы 7
Приемы работы

Глава 3
Приемы работы
8 Приемы работы
4 Печать
Печать фотографий с карты памяти на стр. 9
Печать отовсюду на стр. 11
Управление приложениями на стр. 13
См. также:
• Загрузка бумаги на стр. 10
Советы по успешной печати на стр. 13
Печать фотографий с карты памяти
Как печатать фотографии с карты памяти
1. Загрузите фотобумагу в лоток для бумаги.
2. Убедитесь, что удлинитель лотка для бумаги открыт.
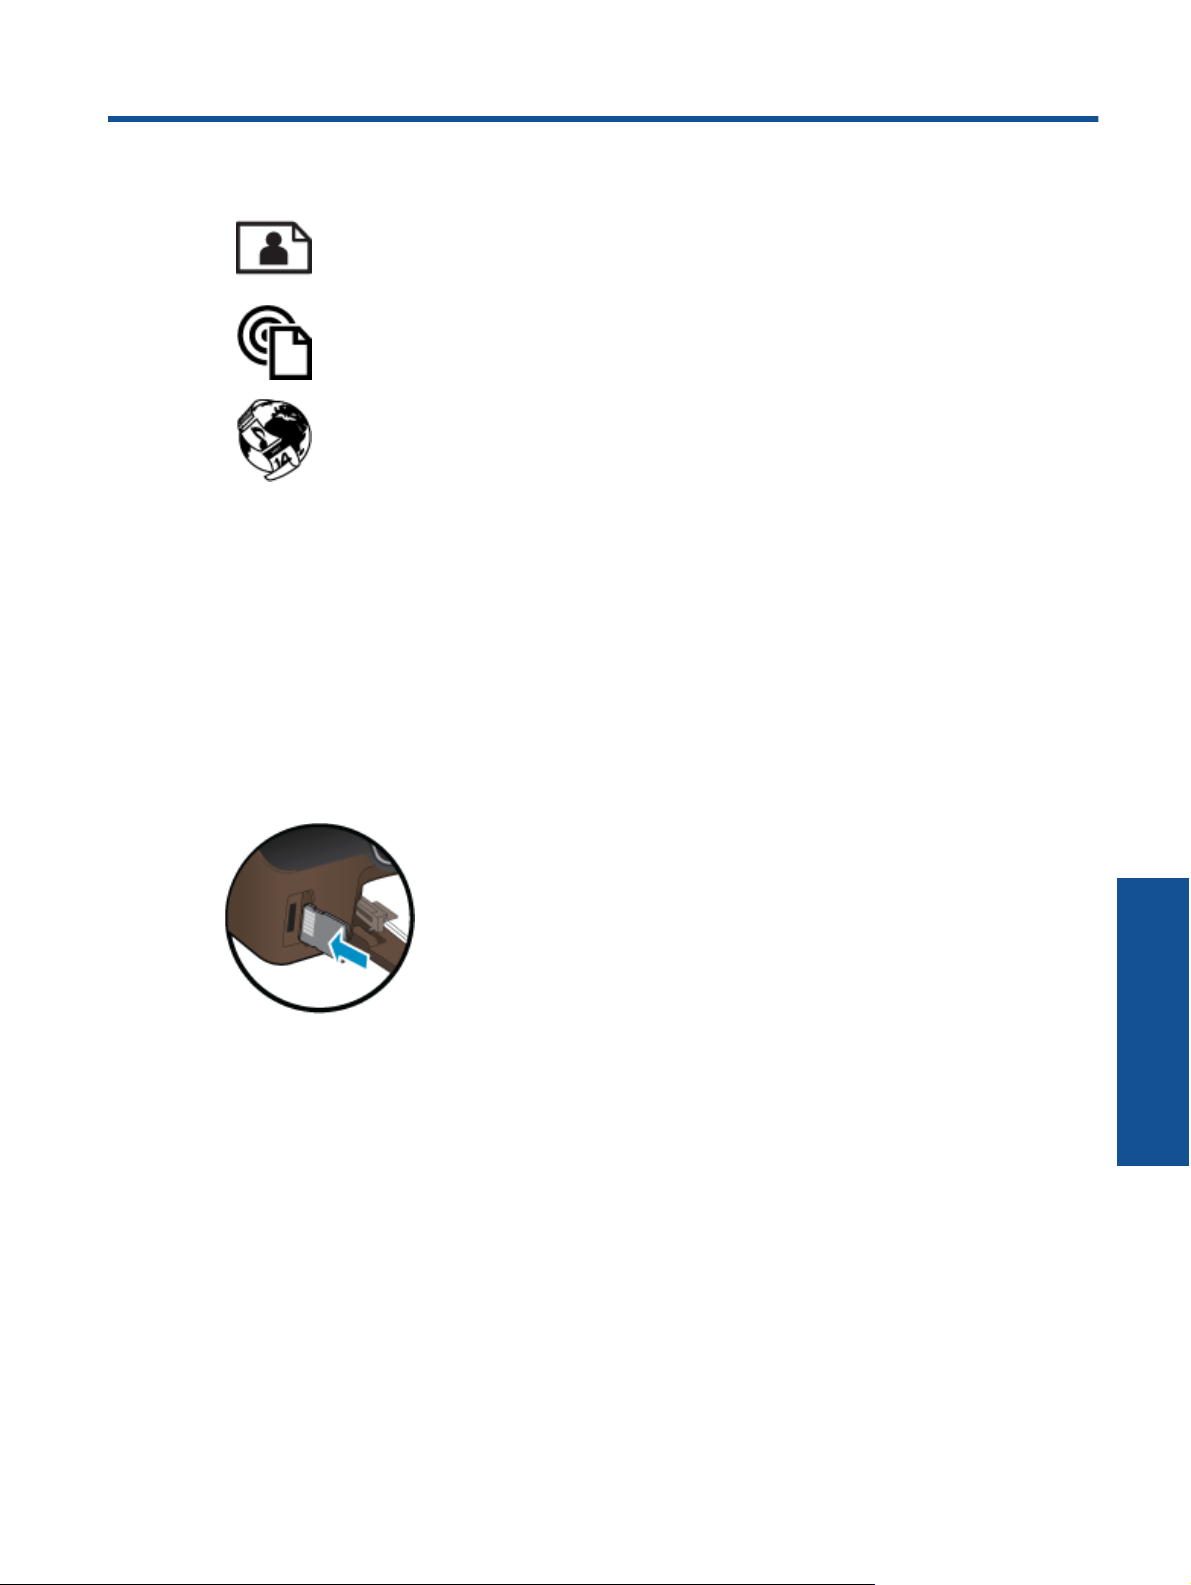
3. Вставьте карту памяти в гнездо.
4. На начальном экране коснитесь Фото для отображения меню Фото.
5. В меню Фото коснитесь Просмотр и печать для отображения фотографий.
6. Коснитесь фотографии, которую требуется напечатать.
7. Коснитесь стрелки вверх/вниз, чтобы выбрать количество фотографий для печати.
8. Коснитесь Правка для выбора параметров редактирования выбранных фотографий. Можно повернуть
или обрезать фотографию, включить или
9. Коснитесь Предв. просмотр, чтобы просмотреть выбранную фотографию. Для настройки макета,
типа бумаги, устранения эффекта красных глаз, автовыравнивания или отметки даты коснитесь
Параметры, затем коснитесь выбранной фотографии. Также можно сохранить любые новые
параметры в качестве параметров по умолчанию.
10. Для запуска печати коснитесь Печать.
См. также:
• Загрузка бумаги
Советы по успешной печати на стр. 13
на стр. 10
отключить функцию Исправить фото.
Печать 9
Печать
Глава 4
Загрузка бумаги
▲ Выполните одно из указанных ниже действий.
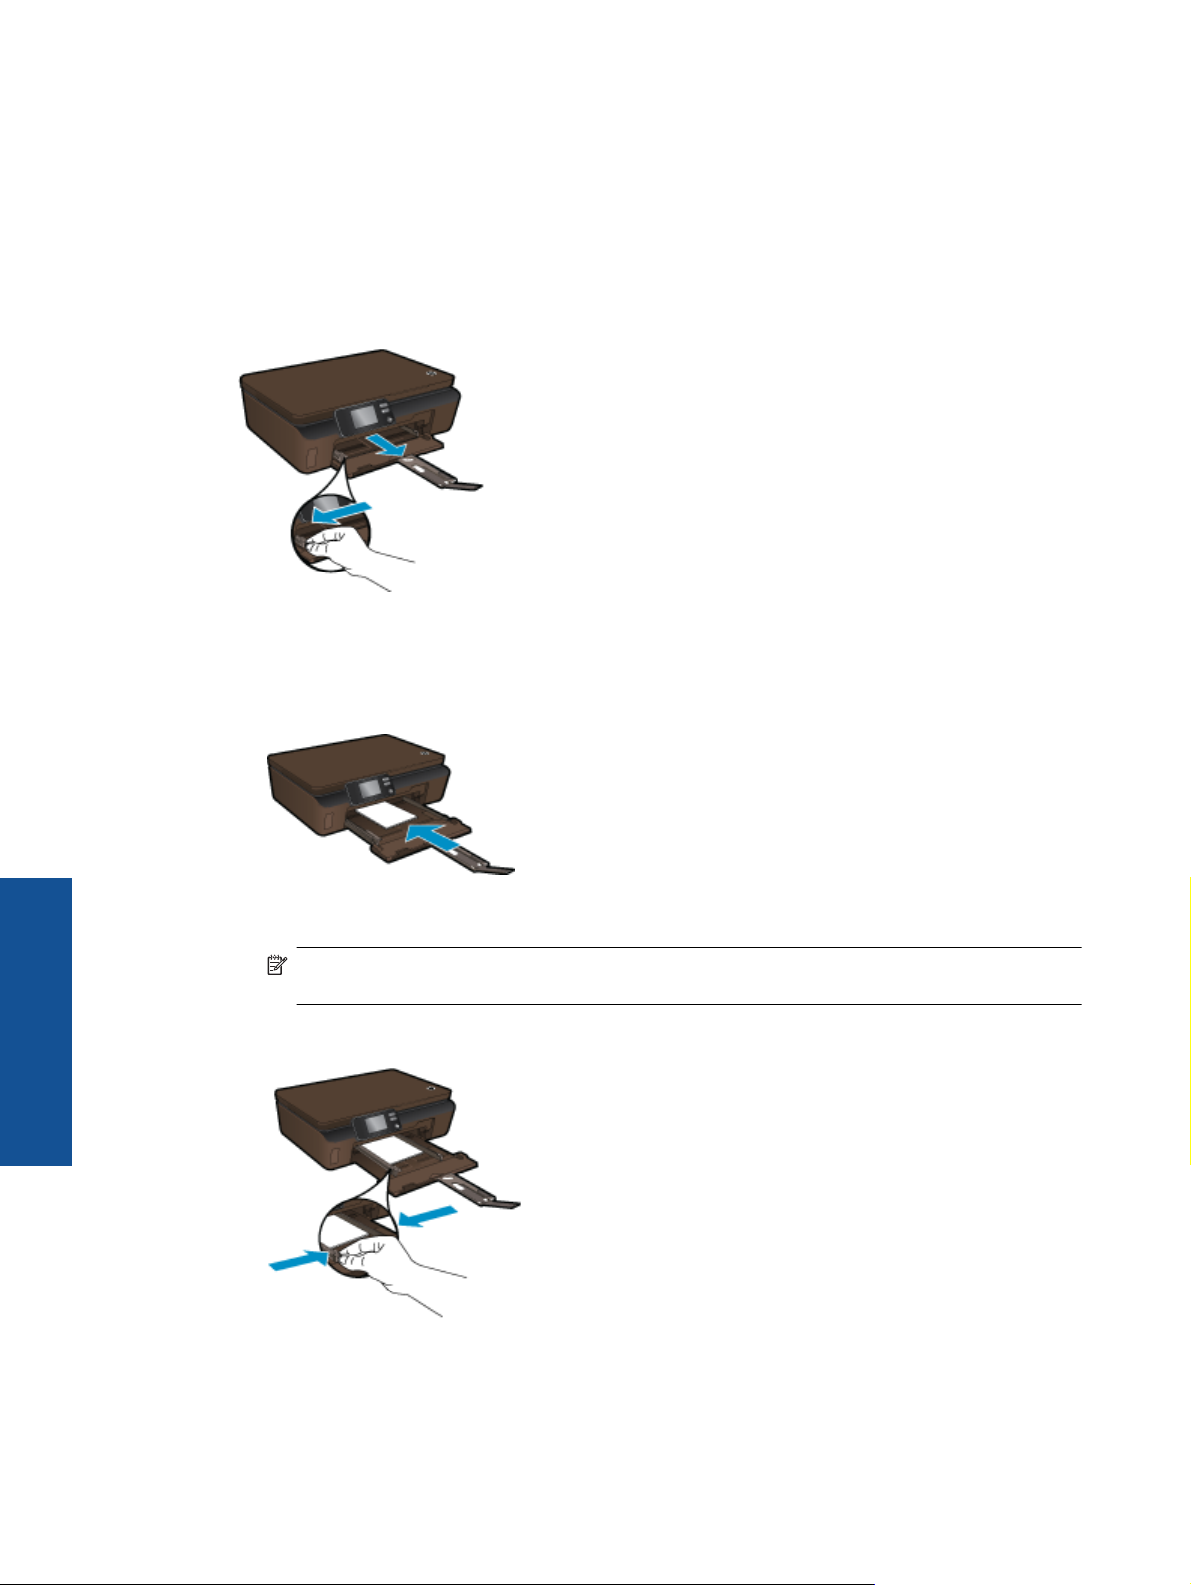
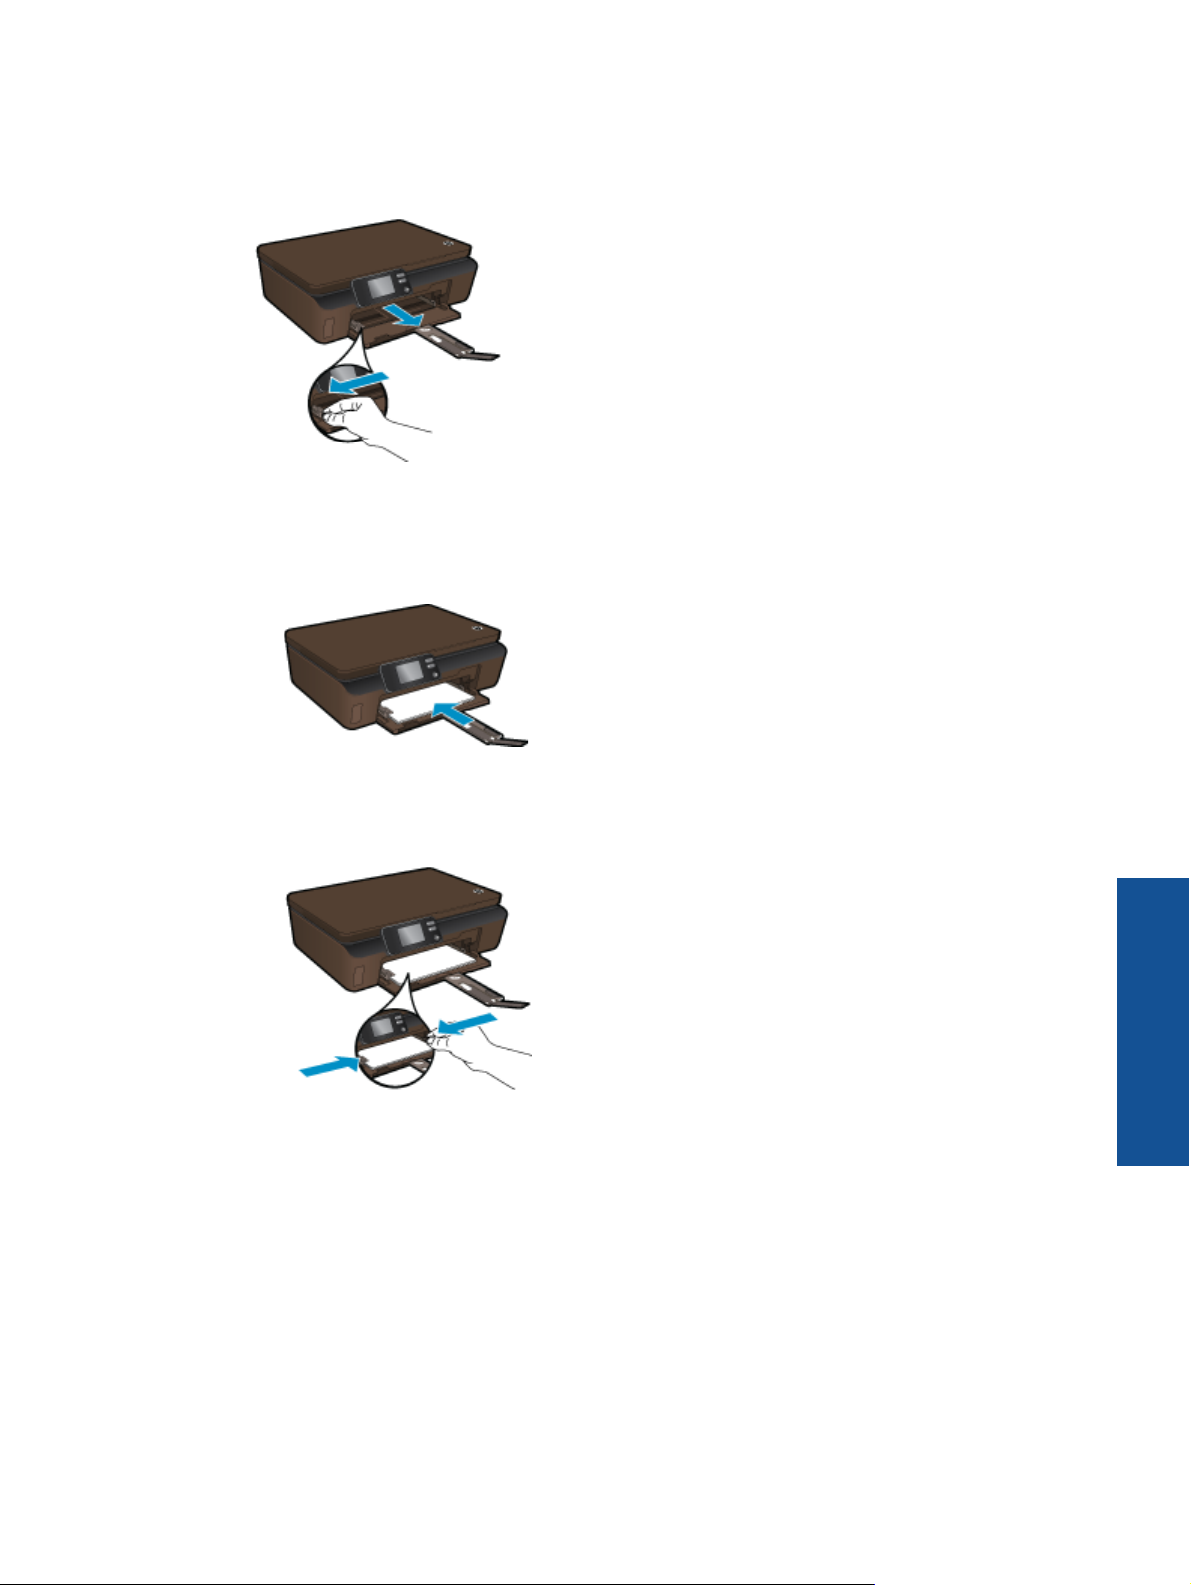
Загрузка бумаги малого размера
а. Вытащите лоток для бумаги, раздвиньте наружу направляющие ширины бумаги, затем извлеките
любые другие ранее загруженные носители.
б. Загрузите бумагу.
❑
Загрузите стопку фотобумаги в лоток для бумаги коротким краем вперед и стороной для печати
вниз.
Печать
10 Печать
❑ Продвиньте фотобумагу вперед до упора.
Примечание. Если на используемой фотобумаге имеются перфорированные полоски,
загружайте фотобумагу полосками к себе.
❑ Сдвиньте направляющие ширины бумаги вплотную к краю бумаги.
❑
Закройте лоток для бумаги и выдвиньте удлинитель лотка для бумаги.
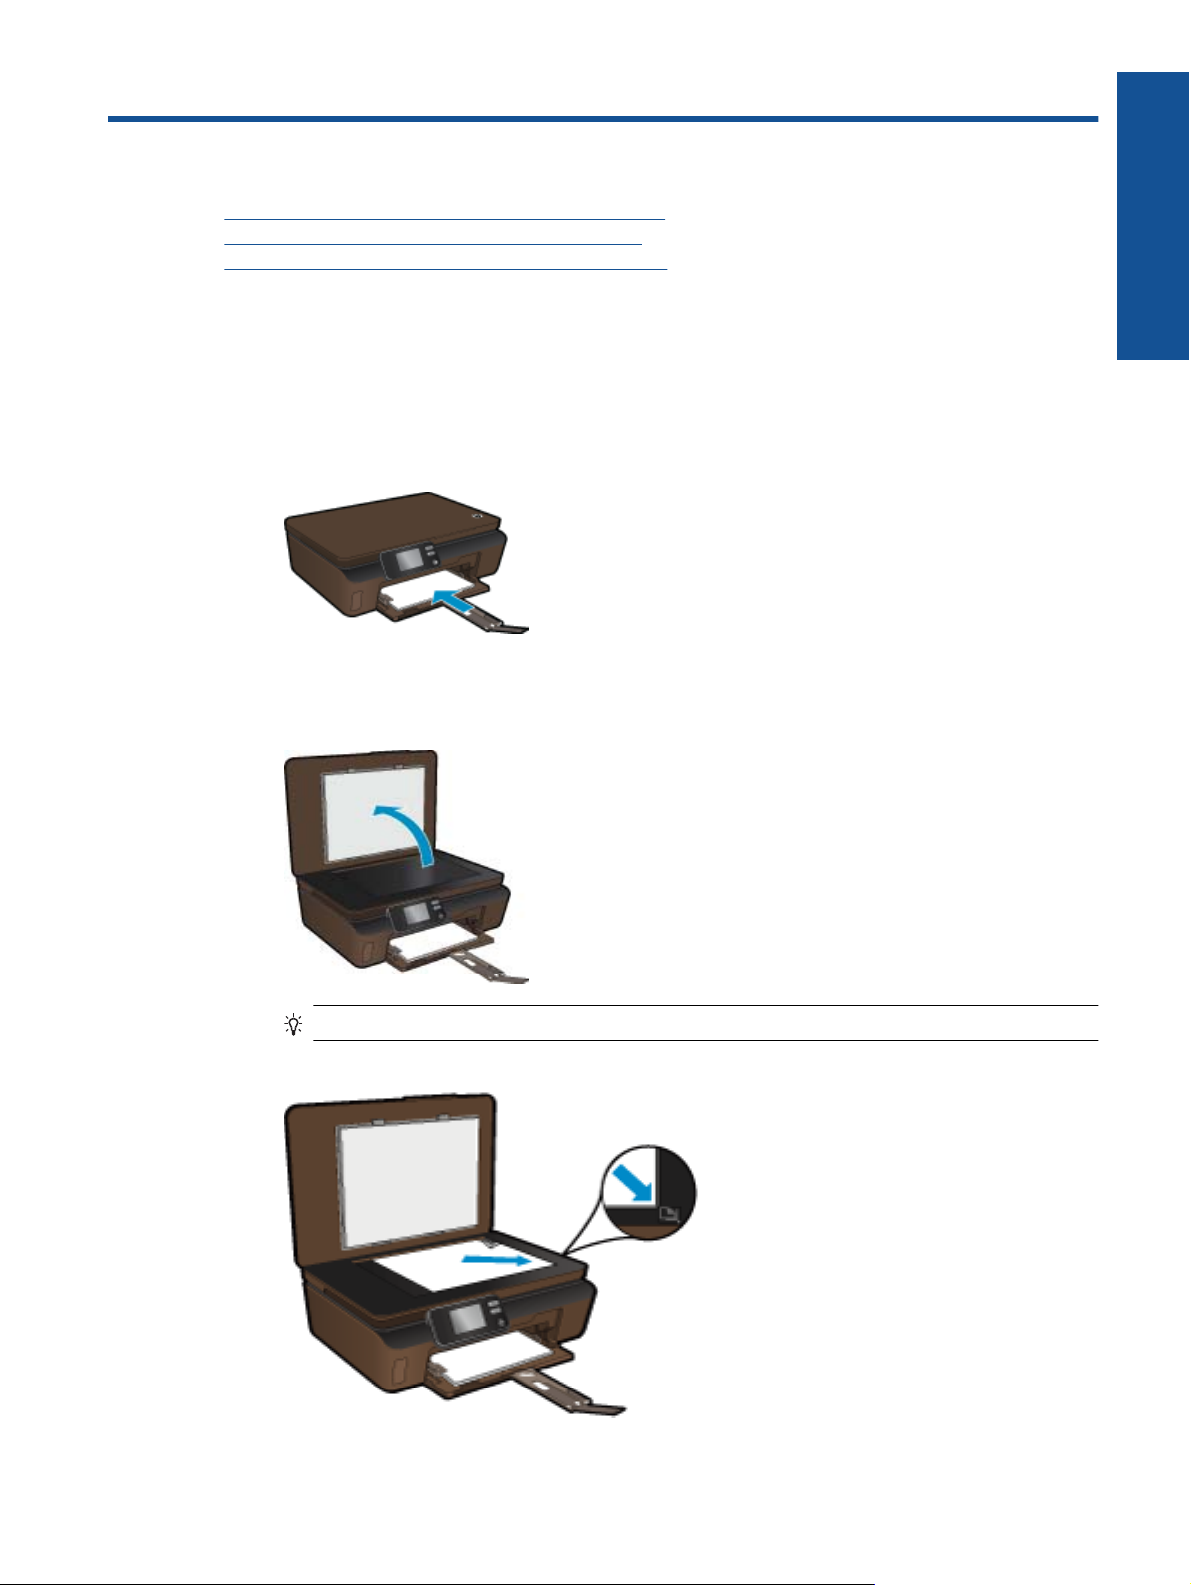
Загрузка полноразмерной бумаги
а. Раздвиньте направляющие ширины бумаги, затем извлеките любые другие ранее загруженные
носители.
б. Загрузите бумагу.
❑
Загрузите стопку бумаги в лоток для бумаги коротким краем вперед и стороной для печати
вниз.
❑
Продвиньте бумагу вперед до упора.
❑ Сдвиньте направляющие ширины бумаги вплотную к краям стопки бумаги.
❑
Выдвиньте удлинитель лотка для бумаги.
Печать отовсюду
Бесплатная служба HP ePrint предоставляет простой способ печати с помощью электронной почты в
любом месте и в любое время. Просто перешлите электронное сообщение на адрес электронной почты
Печать
Печать отовсюду 11

Глава 4
принтера с компьютера или мобильного устройства, и сообщение и распознанные вложения будут
напечатаны.
• Принтер должен быть подключен к Интернету через беспроводную сеть. Функцию ePrint невозможно
использовать при подключении к компьютеру с помощью USB.
• В зависимости от исходных шрифтов и используемых параметров компоновки вид распечатанных
вложений может отличаться от того, как они выглядели
• Служба ePrint предоставляет бесплатные обновления для устройства. Для использования некоторых
функциональных возможностей могут потребоваться определенные обновления.
См. также:
• Защита принтера на стр. 12
Знакомство с функцией ePrint на стр. 12
Использование веб-сайта HP ePrintCenter
на стр. 13
Защита принтера
Чтобы предотвратить получение несанкционированных электронных писем, HP назначает принтеру
случайный адрес электронной почты. Этот адрес никогда не разглашается. Кроме того, функция ePrint
поддерживает стандартную фильтрацию нежелательной почты и преобразовывает электронные
сообщения и вложения в формат только для печати, чтобы снизить угрозу вредоносного воздействия
вирусов или другого опасного содержимого. Однако служба ePrint не выполняет фильтрацию
электронной почты на основе содержимого и поэтому не позволяет предотвратить печать нежелательных
материалов или содержимого, защищенного авторским правом.
Дополнительную информацию и условия см. на веб-сайте HP ePrintCenter по адресу:
ePrintCenter.
при создании.
сообщений
www.hp.com/go/
Знакомство с функцией ePrint
Для использования ePrint необходимо подключить принтер к беспроводной сети с доступом в Интернет и
включить веб-службы.
Как начать работу с функцией ePrint
1. Для подключения к беспроводной сети включите беспроводную связь.
а. Коснитесь кнопки Беспроводное на панели управления принтера для просмотра свойств
беспроводной связи. Если отображается состояние Подключено и показываются подробные
сведения, например IP-адрес
б. Если отображается Беспровод. связь выкл., коснитесь Включить, принтер повторит попытку
подключения к беспроводной сети.
Если подключение к беспроводной сети не было настроено до этого, следуйте инструкциям на
экране для его настройки.
Печать
2. Включите веб-службы.
а. Коснитесь ePrint на панели управления для
электронный адрес ePrint, в поле состояния ePrint будет установлено значение Подключено, а в
поле Функция ePrint будет установлено значение Вкл., веб-службы включены и готовы к
использованию.
б. Если на экране Веб-службы появилось соответствующее приглашение, коснитесь Да, чтобы
включить веб-службы.
Если на экране Сервер: сбой подключения
Повторить или Ввод прокси, чтобы настроить параметры веб—прокси.
3. Коснитесь ePrint на панели управления. На экране Сводка веб—служб получите адрес электронной
почты принтера.
4. Составьте и отправьте сообщение на адрес электронной почты принтера с помощью компьютера или
мобильного устройства в любом месте и в любое время.
Сообщение
и распознанные вложения будут напечатаны.
и сетевое имя, принтер подключен к беспроводной сети.
просмотра состояния веб-служб. Если отображается
появилось соответствующее приглашение, коснитесь
12 Печать

Использование веб-сайта HP ePrintCenter
С помощью бесплатного веб-сайта HP ePrintCenter можно настроить повышенную безопасность ePrint и
указать адреса электронной почты, с которых можно отправлять электронные сообщения на принтер.
Кроме того, можно получать обновления для устройства и дополнительные приложения печати, а также
доступ к другим бесплатным услугам.
Дополнительную информацию и условия см. на веб-сайте HP ePrintCenter по адресу
ePrintCenter.
Управление приложениями
Печатайте страницы из Интернета без использования компьютера с помощью настройки бесплатных
приложения HP. Печатайте страницы для раскрашивания, календари, головоломки, рецепты, карты и
многое другое (доступность приложений зависит от страны/региона).
На экране Apps коснитесь значка Дополнительно для подключения к Интернету и добавления
дополнительных приложений. Для использования приложений необходимо включить веб-службы.
: www.hp.com/go/
Как управлять
1. Добавление приложений
а. На начальном экране коснитесь Apps, а затем коснитесь значка Дополнительно.
б. Коснитесь значка приложения, которое необходимо добавить.
в. Коснитесь Добавить для подтверждения.
2. Удаление приложений
а. На начальном экране коснитесь Apps, а затем коснитесь значка Дополнительно.
б. Коснитесь значка одного или нескольких приложений для выбора приложений, которые
необходимо удалить
в. Коснитесь Да для подтверждения.
Дополнительную информацию и условия см. на веб-сайте HP ePrintCenter по адресу:
ePrintCenter.
приложениями
.
Советы по успешной печати
Для успешной печати используйте следующие советы.
Советы для печати с компьютера
Для печати документов и фотографий, а также для печати на конвертах с компьютера используйте
следующие ссылки. С их помощью можно получить доступ к интерактивным инструкциям для
используемой операционной системы.
• Узнайте, как печатать документы с компьютера.
сведений в Интернете.
• Узнайте как, печатать фотографии, сохраненные на компьютере. Узнайте о разрешении печати и об
использовании максимального разрешения.
в Интернете.
• Узнайте, как печатать на конвертах с компьютера.
сведений в Интернете.
Щелкните здесь для получения дополнительных сведений
www.hp.com/go/
Щелкните здесь для получения дополнительных
Печать
Щелкните здесь для получения дополнительных
Советы по картриджам и бумаге
• Используйте подлинные картриджи HP. Подлинные картриджи HP предназначены для принтеров HP и
протестированы с ними для обеспечения неизменно высокого качества печати.
• Убедитесь, что в картриджах достаточно чернил. Для просмотра уровня чернил на начальном экране
коснитесь значка Чернила.
• Дополнительную информацию по работе с картриджами см. в разделе
картриджами на стр. 23.
Советы по работе с
Советы по успешной печати 13

Глава 4
• Загружайте листы не по отдельности, а сразу стопку листов. Используйте чистую ровную бумагу
одного размера. Загружайте одновременно только бумагу одного типа.
• Отрегулируйте направляющие ширины бумаги в лотке, чтобы они вплотную прилегали к бумаге.
Убедитесь, что направляющие ширины бумаги не сгибают бумагу в лотке.
• Установите качество печати и размер бумаги в
соответствии с типом и размером бумаги, загруженной
в лоток для бумаги.
• Дополнительную информацию об устранении замятия бумаги см. в разделе Устранение замятия
бумаги на стр. 31.
Советы по приложениям печати и использованию ePrint
• Узнайте, как обмениваться фотографиями в Интернете и заказать распечатку.
Щелкните здесь для
получения дополнительных сведений в Интернете.
• Узнайте о функциях приложений печати для быстрой и простой печати рецептов, купонов и другого
веб-содержимого.
Щелкните здесь для получения дополнительных сведений в Интернете.
• Узнайте, как выполнять печать отовсюду путем отправки на принтер сообщений электронной почты с
вложениями.
Щелкните здесь для получения дополнительных сведений в Интернете.
• Если функция Автоотключение включена, ее необходимо отключить перед использованием ePrint.
Дополнительную информацию см. в разделе Автоотключение на стр. 46.
Печать
14 Печать
5 Копирование и сканирование
• Копирование текстовых или смешанных документов
•
Сканирование на компьютер или на карту памяти
Советы по успешному копированию и сканированию
•
Копирование текстовых или смешанных документов
▲ Выполните одно из указанных ниже действий.
Создание черно-белой копии
а. Загрузите бумагу.
❑
Загрузите полноразмерную бумагу в лоток для бумаги.
❑
Убедитесь, что удлинитель лотка для бумаги открыт.
б. Загрузите оригинал.
❑
Поднимите крышку устройства.
Копирование и сканирование
Совет Для копирования толстых оригиналов (например, книг) можно снять крышку.
❑
Поместите оригинал на стекло в правый передний угол отпечатанной стороной вниз.
Копирование и сканирование 15
Loading…
Manuals.eu
- Manuals.eu
- HP
- Computers & Peripherals
- Printers
- Photosmart Printers
- Photosmart 5510 B111b
- Руководство пользователя
×
1
2
3
4
5
6
7
8
9
10
11
12
13
14
15
16
17
18
19
20
21
22
23
24
25
26
27
28
29
30
31
32
33
34
35
36
37
38
39
40
41
42
43
44
45
46
47
48
49
50
51
52
53
54
⟨
⟩
Copyright © Manuals.eu
Agreement
Privacy Policy
Contact us
HP Photosmart 5510 series

Содержание
1 Справка HP Photosmart 5510 series……………..……………………………………….……………………………………………………….3
2 Краткий обзор устройства HP Photosmart
Компоненты принтера…………………………………………………….……………………………..………………………….……………….……5
Функции панели управления………………………..…………….……………..…………….…………….……………..…………….……….…..6
Содержание
3 Приемы работы………………………………………………….……………………………………………………………..………………………….7
4 Печать
Печать фотографий с карты памяти………………..……………………………………………………………………………………………....9
Печать отовсюду……………….…………….……………….…………….…………….……………..…………….……..…………..………………11
Управление приложениями………………………..……………………………………………………………………………………....…………13
Советы по успешной печати……………………………………………………………………………………………………………….………….13
5 Копирование и сканирование
Копирование текстовых или смешанных документов………………………………………………………………………………………15
Сканирование на компьютер или на карту памяти………………………………….……………………………………………………….17
Советы по успешному копированию и
сканированию………………………………..…………………………………………………….18
6 Работа с картриджами
Проверка приблизительного уровня чернил……………………………………………………………………………………………………19
Автоматическая очистка печатающей головки………………………………………………………………………………………………..19
Очистка потеков………………………………………..……………….……………………………….…………………….………………..…………19
Замена картриджей……………………..…………………………..………………………..……………………………………………..…………..20
Выравнивание принтера………………………..…………………………..……………………………………………………………………..…..22
Заказ расходных материалов……….…………………..……………………………………………..…………………………………..………..22
Информация о гарантии на картридж……….………………..…………………….………………….…………………………………….…..22
Советы по работе с картриджами……………………………………………………..…………………………….………………………….….23
7 Подключение
Добавление устройства HP Photosmart в сеть……………………………………………………………..………………………………….25
Переход с USB-соединения на подключение по беспроводной сети………………………………………………………………..27
Подключение нового принтера……………………..………………………………….………………..……………….………………………....27
Изменение параметров сети………………………………………………………………………………………………………………….………27
Советы по настройке и использованию сетевого принтера………………………………….………………………………………….28
Дополнительные средства управления принтером (для сетевых принтеров).…………………………………………………..28
8 Решение проблемы
Дополнительная справка…………………………………..…………………………………….…………………………………….……………...31
Регистрация принтера……………….……………………………….………………………………..………………….………..…………………..31
Устранение замятия бумаги…………….…………………………………………………………………………………………………………….31
Решение проблемы печати………..………………..…………….……………..…………….…………….…………….…………………………33
Решение проблем копирования и сканирования…………………………………………………………………………..…………………33
Устранение неполадок в сети…….……………………………….…………………..……………………………….……………………..……..33
Поддержка HP по телефону………………………………..……………………………………………………………………………..………….34
9 Техническая информация
Уведомление..……………………………..…………….………………………………..……………………………..…….…………….…………….39
Информация о микросхеме
картриджа………..……………………………….……………………………..…………….……………………39
Технические характеристики…………………………………………..…………………………………………………………………..…………40
Программа охраны окружающей среды.…………………………………………………………………………………………………………41
Заявления о соответствии стандартам…………………………………….…………………………………………………………………….46
Соответствие нормам беспроводной связи…………………………………………………………………………………………………….49
Указатель………………………….……………………………………….…………………………………………..……………………..………………….51
1
X 4
*CQ176-90022* *CQ176-90022*
sdsffdfsssddgrsdhasdfdf
sdsffdfs sdsffdfsssddgrsdhasdfhyhdf
sdsffdfsssddgrsdhasdhjfdf
sdsffdfsssddfhgghghgf
sdsffdfsssddgrsdhasdfhhdf
sdfdf
sdsffdfsssddgrsdhasdfdfffff
sdsffdfsssddgrsdhasdfdf
sdsffdfsssddgrsdhasdfddggjhjjhjf
sdfdf
sdfdf sdsdddfdf sdfdfsdfdf
sdfsssdf
sdsffdaaafs
sdsffdaaafs
sdsffdaaafs
USB
<3 M
1
2
CQ176-90022
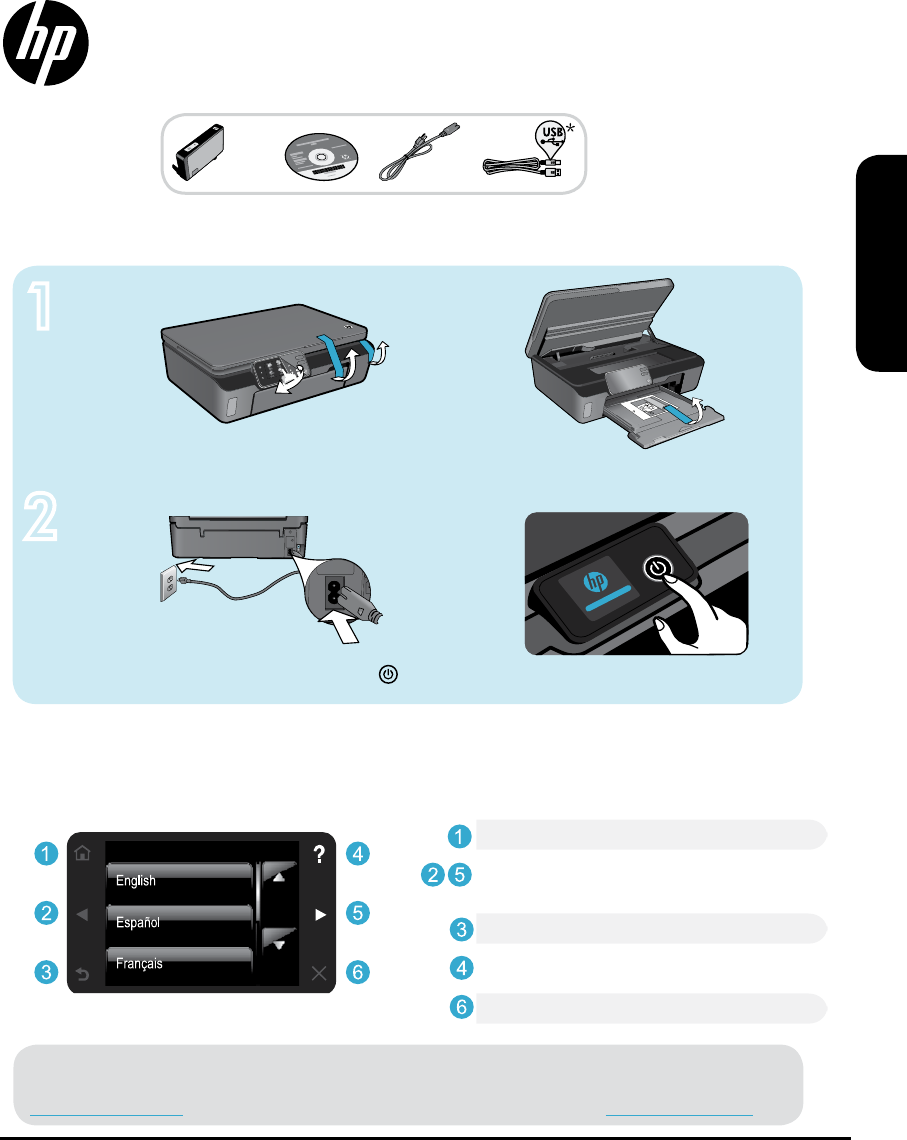
PHOTOSMART 5510 e-ALL-IN-ONE SERIES
Remove protective film, all tape, and packing material.
* Not included with all models.
Register your printer Get quicker service and support alerts by registering at www.register.hp.com.
Verify box content.
Connect power cord. Touch to turn on the printer.
Continue setup and activate ePrint on the printer display.
No CD/DVD drive? For computers without a CD/DVD drive, please go to www.hp.com/support to download and install the software.
Start setup…
Unpack printer
Power on
2011 Hewlett-Packard Development Company, L.P.
Animations and instructions on the printer display will guide you through all the steps you need to finish setting up your printer.
Home: Touch to display the Home screen.
Back: Touch to return to the previous screen.
Help: Touch to run animations and get more help.
Cancel: Touch to stop the current job in progress.
Directional buttons: Touch to navigate through photos, apps, and menu options.
Control panel buttons are lit only when available.
Printed in [Spanish] Printed in [French] Printed in [English]
En gl
is h
2
Wireless
ePrint
Wireless
ePrint
Get to know your HP Photosmart
Copy: Displays the Copy menu where you can select a copy type or change the copy settings.
Photo: Displays the Photo menu where you can view, print and reprint photos.
Scan: Displays the Scan menu where you can scan your photos or documents to a connected computer or a memory card.
Wireless: Displays the Wireless menu where you can check wireless status and change wireless settings.
Setup: Displays the Setup menu where you can change preferences and use tools to perform maintenance functions.
Apps: Provides a quick and easy way to access and print information from the web, such as maps, coloring pages, puzzles, and more.
Ink: Shows estimated ink levels by cartridge.
Power specifications Note: Only use this printer with the power cord supplied by HP.
CQ191-60018 Input voltage: 200-240 Vac (+/- 10%) Input frequency: 50/60 Hz (+/- 3 Hz)
CQ191-60017 Input voltage: 100-240 Vac (+/- 10%) Input frequency: 50/60 Hz (+/- 3 Hz)
Cartridge access door
Printhead assembly
Paper tray (open)
Paper-width guide
Memory card slot
Scanning glass
Removable scan lid
Paper path cover
Paper tray extender
Wireless status light and button: Solid blue light indicates wireless connection. Slow blinking light indicates that wireless is on, but the printer is not connected to a network. Fast blinking light indicates wireless error. Press the button to display wireless status, IP address, network name, hardware
ePrint light and button: White light indicates ePrint is connected. Press the button to display the printers email address, ePrint status, and ePrint feature.
Power button
English
address (MAC). and
3
Features and tips
Copy text or mixed documents Make color, black and white, or economy copies. Use the Settings menu on the printer display to set paper size, paper
type, resize, change quality, lighten/darken images, margin and enhancement of copies. Load your original, print side down, on the right front corner of the glass. For thick originals, like a page in a book, remove the lid. Place the original, print side down, into the right front corner
of the glass. If possible, lay the lid on top of the original to provide a white background.
Economical and energy saving Individual ink tanks allow you to replace each cartridge separately. The Energy Save mode and Auto Power-off feature are turned on by default, reducing energy use. You can change
these settings from the Setup > Preferences menu on the printer display.
Print photos and documents Print photos directly from a memory card in various sizes and papers. Just insert your memory
card into the memory card slot. Touch View & Print to browse and print photos from the printer display. Use the Edit menu to rotate a photo, crop a photo, or turn Photo Fix on and off.
Print documents and photos from software on a connected computer. When receiving a low ink alert message, consider getting replacement cartridges to avoid
possible printing delays. You do not have to replace ink cartridges until the print quality is unacceptable.
Ink from the cartridges is used in the printing process in several ways, including in the initialization process, which prepares the printer and cartridges for printing, and in the printhead servicing process, which keeps print nozzles clear and ink flowing smoothly. In addition, some residual ink is left in the cartridge after it is used. For more information, go to: www.hp.com/go/inkusage.
When installing new cartridges, make sure to remove the orange plastic pull tab first, and then twist off the orange plastic cap.
Scan to a computer or memory card To scan photographs or documents, touch Scan from the Home screen to start a scan:
1. Load the original, print side down, on the right front corner of the glass. 2. Select the destination by touching either Memory Card or Computer. 3. To scan to a computer, select the computer, and then select a scan type to start the
scan. If your computer is not listed, make sure the printer is connected to your computer
either on a wireless network or through a USB cable. If the printer is connected to your computer through a USB cable, you can start your scan immediately from the printer display. If the printer is connected to a Windows computer on a wireless network, you need to enable wireless scan in the software first. To do this:
1. From your computer, click Start > All Programs > HP > HP Photosmart 5510 series > HP Photosmart 5510 series. 2. Under Scanner Actions, click Manage Scan to Computer.
For best scanning results, keep the glass and the back of the lid clean. The scanner interprets any spot or mark detected as part of the scan image.
If you want to adjust scan size, output type, scan resolution, file type, and other settings, start your scan from the printer software.
En gl
is h
Windows Mac
4
Auto Wireless Connect (for computers connected wirelessly to a network) Auto Wireless Connect will automatically configure the printer with your wireless network settings. Follow the instructions on the printer display to set up the printer hardware, and then insert the printer software CD. The software will guide you through the software installation. If the Auto Wireless Connect method does not apply for your configuration or operating system, the software will guide you through another wireless installation method. For more wireless installation information, go to the HP Wireless Printing Center website (www.hp.com/go/wirelessprinting).
If you are unable to print… Check for error messages and resolve them. If you are still unable to print, try the following in order:
Setup and troubleshooting
Make sure that your HP Photosmart is set as the default printer and is not offline. To do this: 1. On the Windows taskbar, click Start. 2. Then click:
Devices and Printers (Windows 7) Printers (Windows Vista) Control Panel,and then click Printers and Faxes
(Windows XP) Look for your printer to see if it has a check mark in a circle next to it. If not, right-click the printer icon and select Set as default printer from the menu. To check that your printer is not offline, right-click the printer icon and ensure that Use Printer Offline and Pause Printing are not selected.
If you still cant print, or if the HP printer software installation failed: 1. Remove the CD from your computers CD drive, and
then disconnect the printer from the computer. 2. Restart the computer. 3. Temporarily disable any software firewall and close
any anti-virus software. 4. Insert the printer software CD into your computers
CD drive, then follow the onscreen instructions to install the printer software. Do not connect the USB cable until you are told to do so.
5. After the installation finishes, restart the computer and any security software you disabled or closed.
If you are still unable to print, uninstall and reinstall the HP printer software. To uninstall the software: 1. Disconnect the printer from your computer. 2. Open the Applications: Hewlett-Packard folder. 3. Double-click HP Uninstaller. Follow the onscreen
instructions.
Restart and reset: 1. Restart the computer. 2. Reset the printer:
a. Turn off the printer and unplug the power cord. b. Wait a minute, then plug the power cord back in
and turn on the printer.
Check your print queue: 1. In System Preferences, click Print & Fax. 2. Click the Open Print Queue button. 3. Click a print job to select it. 4. Use the following buttons to manage the print job:
Delete: Cancel the selected print job. Resume: Continue a paused print job. If you made any changes, try to print again.
To install the software: 1. Insert the CD into your computers CD drive. 2. On the desktop, open the CD, then double-click
HP Installer. 3. Follow the onscreen instructions.
English
5
Windows Mac
Networked printer use and troubleshooting
Change from USB to wireless network connection If you initially set up your printer using a USB connection to your computer, you can switch the connection to a wireless network connection by following these steps.
To change from USB to wireless connection: 1. From your computer, click Start > All Programs >
HP > HP Photosmart 5510 series > Printer Setup & Software.
2. Click Convert a USB connected printer to wireless. Keep your USB cable connected until prompted to disconnect it.
3. Follow the instructions on the screen.
To change from USB to wireless connection: 1. On the HP Photosmart control panel, from the Home
screen, touch the right directional button, and then touch the Wireless icon.
2. Touch Wireless Setup Wizard. 3. Follow the steps in the Wireless Setup Wizard to
connect the printer. 4. Use HP Setup Assistant in Applications/Hewlett-
Packard/Device Utilities to change the software connection to this printer to wireless.
If you cannot connect the printer to the network The wireless radio of your printer might be off. From the printer display, press the Wireless button, if it shows Not
Connected, touch Turn On. Print a wireless test report to check that your printer is on the network. To do this:
1. From the Home screen on your printer display, touch the right directional button, and then touch the Wireless icon. 2. On the Wireless menu, use the down arrow to scroll through options, and then touch Print Wireless Test Report. 3. The Wireless Test Report is automatically printed.
— Check the top of the report to see if something failed during the test. — See the DIAGNOSTICS RESULTS section for all tests that were performed, and whether or not your printer passed. — Find out the Network Name (SSID) to which your printer is currently configured for connection from the CURRENT CONFIGURATION section.
Network Diagnostic Utility (Windows only) can help solve many common network printing issues. Go to: www.hp.com/go/wirelessprinting to download the Network Diagnostic Utility, then run it.
Share your printer with multiple computers If you already have your printer connected to your wireless network and want to share it with the other computers connected to the same network, you need to install the printer software on other computers. During the software installation, select the Network (Ethernet/Wireless) connection when prompted, and then follow the instructions on the screen to finish installing the printer software.
Get help from Wireless Printing Center The HP Wireless Printing Center website (www.hp.com/go/wirelessprinting) is an online reference guide to setting up your home network and HP printer for wireless printing. On this website, you will find information that can help you do the following: Prepare your wireless network. Set up your printer. Reconfigure your system. Troubleshoot your setup, including using the Windows Network Diagnostic Utility. Understand firewalls and security information and settings. En
gl is
h
6
Networked printing troubleshooting Connection and security tips Check for and resolve the following possible conditions: Your computer might not be connected to your network. Make sure that the computer is connected to the same network
to which the HP Photosmart is connected. If you are connected wirelessly, for example, it is possible that your computer is connected to a neighbors network by mistake.
Your computer might be connected to a Virtual Private Network (VPN). Temporarily disable the VPN before proceeding with the installation. Being connected to a VPN is like being on a different network; you will need to disconnect the VPN to access the product over the home network.
Security software might be causing problems. Security software installed on your computer is designed to protect your computer against threats that can come from outside your home network. A security software suite can contain different types of software such as an anti-virus, anti-spyware, firewall and child protection applications. Firewalls can block communication between devices connected on the home network and can cause problems when using devices like network printers and scanners.
Find more information Additional product information can be found in the electronic Help and Readme file. Note: If you did not install the electronic Help with the HP Photosmart software, you can install the electronic Help from the software CD or the support website. To install from the HP Photosmart software CD, insert the CD, and then begin installing the software. To install from the support website, go to the HP support website www.hp.com/support, and then download the Full Feature Software and Drivers software. When you see the screen listing recommended software, make sure the HP Photosmart 5510 series Help option is selected. Learn about printer use, features, troubleshooting, notices, environmental, regulatory, and support information from the electronic Help. The Readme file contains HP support contact information, operating system requirements, and the most recent updates to your product information.
The electronic Help must be installed to view the European Union Regulatory Notice statement and compliance information. From the electronic Help, click Technical information > Regulatory notices > European Union Regulatory Notice. The Declaration of Conformity for this product is available at the following web address: www.hp.eu/certificates.
Windows Mac To locate the electronic Help after it has been installed: Click Start > All Programs > HP > HP Photosmart 5510 series > Help.
To locate the electronic Help after it has been installed: Mac OS X v10.5 and v10.6: Click Help > Mac Help. In the Help Viewer. Choose HP Photosmart 5510 series from the Mac Help pop-up menu.
Find the Readme file Insert the software CD, open it on your desktop, double- click the ReadMe.chm located at the top-level of the software CD, and then select ReadMe in your language.
Find the Readme file Insert the software CD, open it on your desktop, and then open the Readme folder to find the file.
Problemsthatyoumightseeinclude: — Theprintercannotbefoundoverthenetworkwheninstallingtheprintersoftware. — Yousuddenlycannotprinttotheprintereventhoughyoucouldthedaybefore. — TheprintershowsthatitisOFFLINEinthePrinter and Faxesfolder. — Thesoftwareshowstheprinterstatusisdisconnectedeventhoughtheprinterisconnectedtothenetwork. — IfyouhaveanAll-in-One,somefunctionswork,likeprint,andothersdont,likescan.
Aquicktroubleshootingtechniqueistodisableyourfirewallandcheckiftheproblemgoesaway. Here are some basic guidelines for using security software:
— If your firewall has a setting called trusted zone, use it when your computer is connected to your home network. — Keep your firewall up to date. Many security software vendors provide updates which correct known issues. — If your firewall has a setting to not show alert messages, you should disable it. When installing the HP software and using the HP printer, you may see alert messages from your firewall software. You should allow any HP software which causes an alert. The alert message may provide options to allow, permit, or unblock. Also, if the alert has a remember this action or create a rule for this selection, make sure to select it. This is how the firewall learns what can be trusted on your home network.
English
7
A. Extent of limited warranty 1. Hewlett-Packard (HP) warrants to the end-user customer that the HP products specified above will be free from defects
in materials and workmanship for the duration specified above, which duration begins on the date of purchase by the customer.
2. For software products, HPs limited warranty applies only to a failure to execute programming instructions. HP does not warrant that the operation of any product will be interrupted or error free.
3. HP’s limited warranty covers only those defects that arise as a result of normal use of the product, and does not cover any other problems, including those that arise as a result of:
a. Improper maintenance or modification; b. Software, media, parts, or supplies not provided or supported by HP; c. Operation outside the product’s specifications; d. Unauthorized modification or misuse. 4. For HP printer products, the use of a non-HP cartridge or a refilled cartridge does not affect either the warranty to the
customer or any HP support contract with the customer. However, if printer failure or damage is attributable to the use of a non-HP or refilled cartridge or an expired ink cartridge, HP will charge its standard time and materials charges to service the printer for the particular failure or damage.
5. If HP receives, during the applicable warranty period, notice of a defect in any product which is covered by HP’s warranty, HP shall either repair or replace the product, at HP’s option.
6. If HP is unable to repair or replace, as applicable, a defective product which is covered by HP’s warranty, HP shall, within a reasonable time after being notified of the defect, refund the purchase price for the product.
7. HP shall have no obligation to repair, replace, or refund until the customer returns the defective product to HP. 8. Any replacement product may be either new or like-new, provided that it has functionality at least equal to that of the
product being replaced. 9. HP products may contain remanufactured parts, components, or materials equivalent to new in performance. 10. HP’s Limited Warranty Statement is valid in any country where the covered HP product is distributed by HP. Contracts
for additional warranty services, such as on-site service, may be available from any authorized HP service facility in countries where the product is distributed by HP or by an authorized importer.
B. Limitations of warranty TO THE EXTENT ALLOWED BY LOCAL LAW, NEITHER HP NOR ITS THIRD PARTY SUPPLIERS MAKES ANY OTHER WARRANTY OR CONDITION OF ANY KIND, WHETHER EXPRESS OR IMPLIED WARRANTIES OR CONDITIONS OF MERCHANTABILITY, SATISFACTORY QUALITY, AND FITNESS FOR A PARTICULAR PURPOSE.
C. Limitations of liability 1. To the extent allowed by local law, the remedies provided in this Warranty Statement are the customer’s sole and
exclusive remedies. 2. TO THE EXTENT ALLOWED BY LOCAL LAW, EXCEPT FOR THE OBLIGATIONS SPECIFICALLY SET FORTH IN
THIS WARRANTY STATEMENT, IN NO EVENT SHALL HP OR ITS THIRD PARTY SUPPLIERS BE LIABLE FOR DIRECT, INDIRECT, SPECIAL, INCIDENTAL, OR CONSEQUENTIAL DAMAGES, WHETHER BASED ON CONTRACT, TORT, OR ANY OTHER LEGAL THEORY AND WHETHER ADVISED OF THE POSSIBILITY OF SUCH DAMAGES.
D. Local law 1. This Warranty Statement gives the customer specific legal rights. The customer may also have other rights which vary
from state to state in the United States, from province to province in Canada, and from country to country elsewhere in the world.
2. To the extent that this Warranty Statement is inconsistent with local law, this Warranty Statement shall be deemed modified to be consistent with such local law. Under such local law, certain disclaimers and limitations of this Warranty Statement may not apply to the customer. For example, some states in the United States, as well as some governments outside the United States (including provinces in Canada), may:
a. Preclude the disclaimers and limitations in this Warranty Statement from limiting the statutory rights of a consumer (e.g., the United Kingdom);
b. Otherwise restrict the ability of a manufacturer to enforce such disclaimers or limitations; or c. Grant the customer additional warranty rights, specify the duration of implied warranties which the manufacturer
cannot disclaim, or allow limitations on the duration of implied warranties. 3. THE TERMS IN THIS WARRANTY STATEMENT, EXCEPT TO THE EXTENT LAWFULLY PERMITTED, DO NOT
EXCLUDE, RESTRICT, OR MODIFY, AND ARE IN ADDITION TO, THE MANDATORY STATUTORY RIGHTS APPLICABLE TO THE SALE OF THE HP PRODUCTS TO SUCH CUSTOMERS.
HP Limited Warranty Dear Customer, You will find below the name and address of the HP entity responsible for the performance of the HP Limited Warranty in your country. You may have additional statutory rights against the seller based on your purchase agreement. Those rights are not in any way affected by this HP Limited Warranty. Ireland: Hewlett-Packard Ireland Limited, 63-74 Sir John Rogerson’s Quay, Dublin 2 United Kingdom: Hewlett-Packard Ltd, Cain Road, Bracknell, GB-Berks RG12 1HN Malta: Hewlett-Packard International Trade B.V., Malta Branch, 48, Amery Street, Sliema SLM 1701, MALTA South Africa: Hewlett-Packard South Africa Ltd, 12 Autumn Street, Rivonia, Sandton, 2128, Republic of South Africa
HP product Duration of limited warranty Software Media 90 days Printer 1 year Print or Ink cartridges Until the HP ink is depleted or the end of warranty date printed
on the cartridge has been reached, whichever occurs first. This warranty does not cover HP ink products that have been refilled, remanufactured, refurbished, misused, or tampered with.
Printheads (only applies to products with customer 1 year replaceable printheads) Accessories 1 year unless otherwise stated
HP printer limited warranty statement
En gl
is h
8
Wireless
ePrint
@
Web Services
What is ePrint? HPs ePrint service provides a safe and easy way to print by sending email to your printers email address. Send email and attachments from any email-capable device to the printers email address assigned during the initial product setup when you enable Web Services, and both the email message and recognized attachments will print.
Use the HP ePrintCenter website Use HPs ePrintCenter website to expand and enrich your printing experience and manage your ePrint account and apps.
Manage your ePrint settings. Increase security for ePrint. Manage your ePrint queue and monitor the status of print jobs. Add more apps from the web. Get support for your printer. www.hpeprintcenter.com
Print the web, without a computer On your web-connected printer, touch the Apps icon on the control panel to print pages for the whole family. Print calendars, notebook and graph paper, puzzles, cards, crafts, and more! From the Apps menu, touch Get More to add more apps from the web. Free product updates are provided with this service. Some updates may be required to
enable certain functionality.
Get started with ePrint To use ePrint, your printer must be connected to an active network with Internet access. During the initial setup, enable Web Services when prompted: 1. Touch Yes to accept terms of use. 2. Touch Yes to enable automatic update. 3. Touch OK to enable Web Services. The ePrint information page that is printed contains your
printers Claim Code. 4. Go to ePrintCenter at www.hpeprintcenter.com and enter this Claim Code to create an account
with HP ePrintCenter. Once you create the ePrint account, your printer is assigned an email address to use for printing with ePrint.
To enable ePrint later: 1. Press the ePrint button on the printer display of your web-connected printer. 2. Enable Web Services when prompted. 3. On the HP ePrintCenter website that opens on your computer, create an account and get an email address assigned to
your printer.
HP ePrint provides industry-standard spam filtering and transforms email and attachments to a print-only format to reduce the threat of a virus or other harmful content.
Print results may appear slightly different from the initial look, depending on the original fonts and layout options used.
The ePrint service cannot prevent printing of objectionable or copyrighted material, but it allows you to secure your printer by specifying who can send print jobs to your printers email address.
English
X 4
sdsffdfsssddgrsdhasdfdf
sdsffdfs sdsffdfsssddgrsdhasdfhyhdf
sdsffdfsssddgrsdhasdhjfdf
sdsffdfsssddfhgghghgf
sdsffdfsssddgrsdhasdfhhdf
sdfdf
sdsffdfsssddgrsdhasdfdfffff
sdsffdfsssddgrsdhasdfdf
sdsffdfsssddgrsdhasdfddggjhjjhjf
sdfdf
sdfdf sdsdddfdf sdfdfsdfdf
sdfsssdf
sdsffdaaafs
sdsffdaaafs
sdsffdaaafs
USB
<3 M
1
2
PHOTOSMART 5510 e-ALL-IN-ONE SERIES
Retire la lmina protectora, la cinta y el material de embalaje.
* No incluido en todos los modelos.
Registre la impresora Obtenga un servicio ms rpido y alertas de asistencia registrndose en www.register.hp.com.
Verifique el contenido de la caja.
Conecte el cable de alimentacin. Toque una vez para encender la impresora.
Contine con la instalacin y active ePrint en la pantalla de la impresora.
No dispone de unidad de CD/DVD? Si no dispone de una unidad de CD/DVD, visite www.hp.com/support para descargar e instalar el software.
Iniciar configuracin…
Desembale la impresora
Encender
Las animaciones e instrucciones que aparecen en la pantalla de la impresora le guiarn a travs de todos los pasos que necesita realizar para configurar la impresora.
Inicio: Toque una vez para mostrar la pantalla Inicio.
Atrs: Toque una vez para volver a la pantalla anterior.
Ayuda: Toque una vez para ejecutar las animaciones y obtener ms ayuda.
Cancelar: Toque una vez para detener el trabajo actual en curso.
Botones direccionales: Toque una vez para desplazarse por las fotos, aplicaciones y opciones del men.
Los botones del panel de control se iluminan solo cuando estn disponibles.
Es pa
o l
10
Wireless
ePrint
Wireless
ePrint
Conozca HP Photosmart
Copiar: Muestra el men Copiar donde puede seleccionar un tipo de copia o cambiar los ajustes de copia.
Foto: Muestra el men Foto donde podr ver, imprimir y volver a imprimir fotografas.
Explorar: Muestra el men Escanear donde podr escanear sus fotos o documentos a un ordenador conectado o tarjeta de memoria.
Conexin inalmbrica: Muestra el men Inalmbrico donde puede comprobar el estado inalmbrico o cambiar los ajustes.
Configurar: Muestra el men Configurar donde podr cambiar las preferencias y usar las herramientas para realizar funciones de mantenimiento.
Apps: Proporciona una forma rpida y fcil para acceder e imprimir informacin desde Internet, como mapas, pginas de colorear, puzles y mucho ms.
Tinta: Muestra el nivel de tinta estimado de un cartucho de impresin.
Especificaciones de energa Nota: Utilice esta impresora solo con el cable de alimentacin suministrado por HP.
CQ191-60018 Tensin de entrada: 200-240 VCA (+/- 10%) Frecuencia de entrada: 50/60 Hz (+/- 3 Hz)
CQ191-60017 Tensin de entrada: 100-240 VCA (+/- 10%) Frecuencia de entrada: 50/60 Hz (+/- 3 Hz)
Puerta de acceso al cartucho
Cabezales de impresin
Bandeja de papel (abierta)
Gua de anchura del papel
Ranura para tarjetas de memoria
Cristal de originales
Tapa extrable del escner
Cubierta de la ruta del papel
Extensor de la bandeja de papel
Luz de estado inalmbrico y botn: Una luz azul encendida indica conexin inalmbrica. Una luz con parpadeo lento indica que la funcin inalmbrica est encendida, pero que la impresora no est conectada a una red. Una luz con parpadeo rpido indica error en la conexin inalmbrica. Pulse este botn para visualizar el estado inalmbrico, la direccin IP, el nombre de red, la direccin de hardware (MAC)
Luz y botn ePrint: Una luz blanca indica que ePrint est conectado. Pulse este botn para mostrar la direccin de correo electrnico de la impresora, el estado de ePrint y la funcin ePrint.
Botn de encendido
Espaol
y .
11
Funciones y sugerencias
Copiar documentos de texto y de otro tipo Haga copias en color, en blanco y negro, o econmicas. Utilice el men Configuracin de la pantalla de la impresora
para configurar el tamao de papel, el tipo de papel, ajustar el tamao, cambiar la calidad, aclarar/ oscurecer imgenes, mrgenes y mejorar las copias.
Cargue el original con la cara de impresin hacia abajo en la esquina frontal derecha del cristal. Para originales gruesos, como la pgina de un libro, retire la tapa. Coloque el original con la cara de impresin hacia
abajo en la esquina frontal derecha del cristal. Si es posible, ponga la tapa sobre el original, para tener un fondo blanco.
Econmico y con ahorro energtico Los depsitos de tinta le permiten sustituir cada cartucho de forma separada. El modo de Ahorro energtico y Autoapagado se encienden por defecto, para reducir el consumo energtico. Puede
cambiar esta configuracin en el men Configuracin > Preferencias de la pantalla de la impresora.
Imprimir fotos y documentos Imprima fotos directamente desde una tarjeta de memoria en diversos tamaos y papeles.
Inserte la tarjeta de memoria en la ranura. Toque una vez Ver e Imprimir para visualizar e imprimir fotos desde la pantalla de la impresora. Use el men Editar para rotar o recortar una foto, o bien encienda o apague Photo Fix.
Imprima documentos y fotos desde aplicaciones de software en un equipo conectado. Cuando reciba un mensaje de alerta de tinta, piense en tener cartuchos de tinta de recambio
a mano para evitar demoras en la impresin. No tiene que sustituir los cartuchos hasta que la calidad de impresin sea inaceptable.
Se utiliza tinta de los cartuchos en el proceso de impresin de varias maneras, entre las que estn el proceso de inicio, que prepara la impresora y los cartuchos para la impresin, y el proceso de mantenimiento de cabeceras, para mantener los inyectores de impresin limpios y el flujo de tinta correcto. Asimismo, parte de la tinta residual se queda en el cartucho despus de utilizarlo. Para obtener ms informacin, visite: www.hp.com/go/inkusage.
Al instalar un cartucho nuevo, asegrese de retirar antes la lmina naranja y, a continuacin, desenrosque la tapa naranja de plstico.
Escanear a ordenador o tarjeta de memoria Para escanear fotografas o documentos, toque una vez Escanear desde la pantalla
Inicio para iniciar un escaneado: 1. Cargue el original con la cara de impresin hacia abajo en la esquina frontal
derecha del cristal. 2. Seleccione el destino tocando Tarjeta de memoria u Ordenador. 3. Para escanear a un ordenador seleccione el ordenador y, a continuacin,
seleccione el tipo de escaneado para iniciar la tarea. Si su ordenador no aparece en la lista, asegrese de que la impresora se encuentra
conectada al ordenador a travs de una red inalmbrica o mediante cable USB. Si la impresora est conectada al ordenador mediante un cable USB, puede iniciar el escaneado de manera inmediata desde la pantalla de la impresora. Si la impresora est conectada a un ordenador con Windows en una red inalmbrica, necesitar activar primero el escaneado inalmbrico en el software. Para hacer esto:
1. Desde su ordenador, pulse Inicio > Todos los programas > HP > HP Photosmart 5510 series > HP Photosmart 5510 series.
2. En Acciones del escner, pulse Administrar escaneado a ordenador. Para escanear mejor, limpie el cristal y la parte posterior de la tapa. El escner considera parte de la imagen
escaneada cualquier mancha o marca detectada. Si desea ajustar el tamao del escaneado, el tipo de resultado, la resolucin de escaneado y otras configuraciones,
inicie el escaneado desde el software de la impresora.
Es pa
o l
Windows Mac
12
Conexin inalmbrica automtica (para ordenadores conectados inalmbricamente a una red) Conexin inalmbrica automtica configurar automticamente la impresora con la configuracin de su red inalmbrica. Siga las instrucciones de la pantalla de la impresora para configurar el hardware de la impresora e inserte el CD que contiene el software de impresin. El software le guiar a travs del proceso de instalacin. Si el mtodo Conexin inalmbrica automtica no es aplicable a su configuracin o sistema operativo, el software le guiar a travs de otro mtodo de instalacin inalmbrica. Si desea ampliar la informacin sobre instalacin inalmbrica, visite el sitio web Centro de impresin inalmbrica HP (www.hp.com/go/wirelessprinting).
Si no puede imprimir… Compruebe si hay mensajes de error y solucione los errores. Si an no puede imprimir, siga este procedimiento, por orden:
Configuracin y solucin de problemas
Asegrese de que la HP Photosmart se haya definido como la impresora predeterminada y no est sin conexin. Para hacer esto: 1. En la barra de tareas de Windows, haga clic en Inicio. 2. A continuacin, haga clic en:
Dispositivos e impresoras (Windows 7) Impresoras (Windows Vista) Panel de control, y a continuacin en Impresoras
y faxes (Windows XP) Mire la impresora para ver si tiene al lado una marca de seleccin dentro de un crculo. Si no la tiene, haga clic con el botn secundario en el icono de la impresora y elija Definir como impresora predeterminada en el men. Para comprobar que la impresora no est sin conexin haga clic con el botn secundario en el icono de la impresora y asegrese de que Usar impresora sin conexin y Pausar impresin no estn seleccionadas.
Si sigue sin poder imprimir o falla la instalacin del software de la impresora HP: 1. Extraiga el CD de la unidad de CD del equipo y, a
continuacin, desconecte la impresora del ordenador. 2. Reinicie el equipo. 3. Desactive temporalmente los servidores de seguridad
y cierre el software antivirus. 4. Inserte el CD del software de la impresora en la
unidad de CD del equipo y siga las instrucciones en pantalla para instalar el software de la impresora. No conecte el cable USB hasta que se le indique.
5. Una vez que finalice la instalacin, reinicie el ordenador y cualquier software de seguridad desactivado o cerrado.
Si sigue sin poder imprimir, desinstale y vuelva a instalar el software de impresin HP. Para desinstalar el software: 1. Desconecte la impresora del equipo. 2. Abra la carpeta Aplicaciones: Carpeta Hewlett-Packard. 3. Haga doble clic en Programa de desinstalacin de HP.
Siga las instrucciones que aparecen en la pantalla.
Reinicio: 1. Reinicie el equipo. 2. Reinicie la impresora:
a. Apague la impresora y desconecte el cable de alimentacin. b. Espere un minuto, vuelva a enchufar el cable y
encienda la impresora.
Compruebe la cola de impresin: 1. En Preferencias del sistema, haga clic en Impresoras y faxes. 2. Haga clic en el botn Abrir la cola de impresin. 3. Haga clic sobre un trabajo de impresin para seleccionarlo. 4. Utilice los botones siguientes para administrar el
trabajo de impresin: Eliminar: cancela el trabajo de impresin seleccionado. Reanudar: contina un trabajo de impresin que se ha detenido. Si ha hecho algn cambio, intente volver a imprimir.
Para instalar el software: 1. Inserte el CD en la unidad de CD del equipo. 2. En el escritorio, abra el CD y haga doble clic en
HP Installer. 3. Siga las instrucciones que aparecen en la pantalla.
Espaol
13
Windows Mac
Uso de impresora en red y resolucin de problemas
Para cambiar de USB a una conexin de red inalmbrica Si ha configurado inicialmente su impresora utilizando una conexin USB en su equipo, puede cambiar la conexin a una conexin de red inalmbrica realizando los siguientes pasos.
Para cambiar de USB a una conexin inalmbrica: 1. Desde su ordenador, pulse Inicio > Todos los
programas > HP > HP Photosmart 5510 series > Configuracin y software de impresin.
2. Pulse Convertir una impresora conectada con USB a inalmbrica. Mantenga el cable USB conectado hasta que se le pida que lo desconecte.
3. Siga las instrucciones que aparecen en la pantalla.
Para cambiar de USB a una conexin inalmbrica: 1. En el panel de control de HP Photosmart, desde la
pantalla Inicio, toque el botn direccional derecho y, seguidamente, toque el icono Inalmbrico.
2. Toque el Asistente de instalacin inalmbrica. 3. Siga los pasos del Asistente de configuracin
inalmbrica para conectar la impresora. 4. Use Asistente de configuracin HP en Aplicaciones/
Hewlett-Packard/Device Utilities para modificar la conexin de software de la impresora a conexin inalmbrica.
Si no puede conectar la impresora a la red… La conexin inalmbrica de su impresora puede estar apagada. Desde la pantalla de la impresora, pulse el botn
Inalmbrico, y si muestra No conectado, toque una vez Encender. Imprima un informe de comprobacin de la red inalmbrica para comprobar que la impresora est en la red. Para hacer esto:
1. Desde la pantalla Inicio de la pantalla de su impresora, toque el botn direccional derecho y, a continuacin, el icono Inalmbrico. 2. En el men Inalmbrico, use la flecha abajo para desplazarse por las opciones, y, seguidamente toque una vez
Imprimir informe de comprobacin de la red inalmbrica. 3. El informe de Comprobacin de la red inalmbrica se imprime automticamente.
— Compruebe la parte superior del informe para ver si algo ha fallado durante la comprobacin. — Consulte el RESULTADO DEL DIAGNSTICO de todas las comprobaciones realizadas, y si la impresora lo ha pasado o no. — Averige el Nombre de red (SSID) con el que la impresora est actualmente configurada para la conexin desde la seccin CONFIGURACIN ACTUAL.
La Utilidad de diagnstico de red (solo Windows) puede ayudar a resolver muchos de los problemas ms habituales de impresin en red. Vaya a: www.hp.com/go/wirelessprinting para descargar la Utilidad de diagnstico de red y ejectela.
Comparta la impresora con otros equipos Si ya ha conectado su impresora a la red inalmbrica y desea compartirla con los dems ordenadores conectados a la misma red, necesitar instalar el software de impresin en otros ordenadores. Durante la instalacin del software, seleccione la conexin de Red (Ethernet/Inalmbrica) cuando le sea solicitado, y, seguidamente, siga las instrucciones que aparezcan en pantalla para finalizar la instalacin del software de impresin.
Obtenga ayuda del Centro de impresin inalmbrica El sitio web Centro de impresin inalmbrica HP (www.hp.com/go/wirelessprinting) contiene una gua de referencia en lnea para configurar una red domstica e impresoras HP inalmbricas. En esta pgina web, encontrar informacin que le podr ser de ayuda para lo siguiente: Preparar su red inalmbrica. Instalar la impresora. Reconfigurar su sistema. Solucionar problemas de instalacin, incluido el uso de la utilidad Diagnstico de red de Windows. Entender los cortafuegos y la informacin y configuracin de seguridad.
Es pa
o l
14
Solucin de problemas de redes de impresin Consejos para la conexin y la seguridad Compruebe y solucione las siguientes condiciones posibles: Es posible que el ordenador no est conectado a la red. Asegrese de que el equipo que utiliza est conectado a la misma red
que HP Photosmart. Si la red es inalmbrica, por ejemplo, es posible que el ordenador est conectado a una red vecina por error. El ordenador puede estar conectado a una red privada virtual (VPN). Desactive temporalmente la VPN antes de
continuar con la instalacin. La conexin a una VPN es una conexin a una red distinta; debe desconectar la VPN para acceder al producto a travs de la red domstica.
El software de seguridad puede estar provocando problemas. El software de seguridad instalado en su ordenador est diseado para proteger su ordenador de amenazas procedentes de fuera de su red domstica. Un paquete de programas de seguridad puede contener varios tipos de programas, como antivirus, anti software espa, servidor de seguridad, y aplicaciones de proteccin infantil. Los servidores de seguridad pueden bloquear la comunicacin entre los aparatos conectados a la red domstica y provocar problemas al usar dispositivos como impresoras de red y escneres.
Cmo buscar ms informacin Ms informacin sobre el producto, en la ayuda electrnica y en el archivo lame. Nota: si usted no instala la ayuda electrnica con el software HP Photosmart, puede instalarla desde el CD de software o la pgina web de soporte. Para instalar desde el software HP Photosmart, inserte el CD y luego proceda con la instalacin del software. Para instalar desde la pgina web de soporte, vaya a la pgina web www.hp.com/support, y descargue el software software y controladores con todas las funciones. Cuando vea en la pantalla una lista que recomienda software, asegrese de que la opcin de ayuda HP Photosmart 5510 series est seleccionada. Infrmese sobre el uso de la impresora, las funciones, la solucin de problemas, los avisos, el entorno, la normativa y la informacin de soporte desde la ayuda electrnica. El archivo lame contiene informacin de contacto del soporte de HP, los requisitos del sistema operativo, y las ltimas actualizaciones de la informacin sobre su producto.
La ayuda electrnica debe estar instalada para ver el marco regulador de la Unin Europea y la informacin de cumplimiento. Desde la ayuda electrnica, haga clic en Informacin tcnica > Avisos reglamentarios > Aviso reglamentario de la Unin Europea. La Declaracin de conformidad para este producto est disponible en la siguiente direccin Web: www.hp.eu/certificates.
Windows Mac Para localizar la Ayuda electrnica, despus de que haya sido instalada: Haga clic en Inicio > Todos los programas > HP > HP Photosmart 5510 series > Ayuda.
Para localizar la Ayuda electrnica, despus de que haya sido instalada: Mac OS X v10.5 y v10.6: Haga clic en Ayuda > Ayuda de Mac. En eI Visor de ayuda. Elija HP Photosmart 5510 series en el men emergente Ayuda de Mac.
Consulta del archivo Lame Inserte el CD del software, bralo en su escritorio, haga doble clic en el archivo ReadMe.chm ubicado en el nivel superior del CD de software y seguidamente seleccione ReadMe en su idioma.
Consulta del archivo Lame Inserte el CD de software, bralo en su escritorio, y a continuacin abra la carpeta Readme para ubicar el archivo.
Losproblemaspuedenser: — Noseencuentralaimpresoraenlaredalinstalarelsoftwaredelaimpresora. — Derepente,nopuedeimprimirenlaimpresora,aunquespudohacerloeldaanterior. — LaimpresoramuestraqueestFUERADELNEAenlacarpetaimpresora y faxes. — Elsoftwaremuestraelestadodelaimpresoracomodesconectadoaunquelaimpresoraestconectadaalared. — Sitieneundispositivotodo-en-uno,algunascaractersticasfuncionanbienyotrasno,comoelescner.
Unasolucinrpidapuedeserdesactivarsuservidordeseguridadyversielproblemadesaparece. stas son algunas pautas bsicas sobre el software de seguridad:
— Si su servidor de seguridad tiene un ajuste llamado zona de confianza, defnalo cuando el ordenador est conectado a su red domstica. — Actualice el servidor de seguridad. Muchos proveedores de software de seguridad lo actualizan con soluciones a los problemas conocidos. — Si su servidor de seguridad tiene un ajuste que se denomina no mostrar avisos de alerta, deber desactivarlo. Al instalar el software HP y usar la impresora HP, es posible que vea mensajes de alerta de su software de servidor de seguridad. Debe autorizar el uso de cualquier software de HP que provoque una alerta. El mensaje de alerta puede dar opciones para autorizar, permitir o desbloquear. Asimismo, si la alerta tiene una opcin recordar esta accin o crear una regla para esto, confirme y seleccinela. Esta es la forma en que el servidor de seguridad puede saber en qu puede confiar.
Espaol
15
A. Alcance de la garanta limitada 1. Hewlett-Packard (HP) garantiza al usuario final que el producto de HP especificado no tendr defectos de materiales ni mano de obra por
el periodo anteriormente indicado, cuya duracin empieza el da de la compra por parte del cliente. 2. Para los productos de software, la garanta limitada de HP se aplica nicamente a la incapacidad del programa para ejecutar las
instrucciones. HP no garantiza que el funcionamiento de los productos se interrumpa o no contenga errores. 3. La garanta limitada de HP abarca slo los defectos que se originen como consecuencia del uso normal del producto, y no cubre otros
problemas, incluyendo los originados como consecuencia de: a. Mantenimiento o modificacin indebidos; b. Software, soportes de impresin, piezas o consumibles que HP no proporcione o no admita; c. Uso que no se ajuste a las especificaciones del producto; d. Modificacin o uso incorrecto no autorizados. 4. Para los productos de impresoras de HP, el uso de un cartucho que no sea de HP o d
X 4
*CQ183-90001*
*CQ183-90001*
sdsffdfsssddgrsdhasdfdf
sdsffdfs
sdsffdfsssddgrsdhasdfhyhdf
sdsffdfsssddgrsdhasdhjfdf
sdsffdfsssddfhgghghgf
sdsffdfsssddgrsdhasdfhhdf
sdfdf
sdsffdfsssddgrsdhasdfdfffff
sdsffdfsssddgrsdhasdfdf
sdsffdfsssddgrsdhasdfddggjhjjhjf
sdfdf
sdfdf
sdsdddfdf
sdfdf
sdfdf
sdfsssdf
sdsffdaaafs
sdsffdaaafs
sdsffdaaafs
USB
<3 M
1
2
CQ183-90001
PHOTOSMART 5510 e-ALL-IN-ONE SERIES
Remove protective film, all tape, and packing material.
* Not included with all models.
Register your printer
Get quicker service and support alerts by
registering at www.register.hp.com.
Verify box content.
Connect power cord. Touch
to turn on the printer.
Continue setup and activate ePrint on the printer display.
No CD/DVD drive?
For computers without a CD/DVD drive, please go to
www.hp.com/support to download and install the software.
Start setup…
Unpack printer
Power on
© 2011 Hewlett-Packard Development Company, L.P.
Animations and instructions on the printer display will guide you through all the steps you need to finish
setting up your printer.
Home:
Touch to display the Home screen.
Back: Touch to return to the previous screen.
Help: Touch to run animations and get more help.
Cancel: Touch to stop the current job in progress.
Directional buttons: Touch to navigate
through photos, apps, and menu options.
Control panel buttons are lit only when available.
Printed in [Spanish]
Printed in [French]
Printed in [English]
English