
Инструкция и руководство для
HP ProBook 6560b
26 страниц подробных инструкций и пользовательских руководств по эксплуатации на русском
10:38
Мини-обзор подержанного ноутбука (HP Probook 6360b) за 100 евро
13:16
Чистка ноутбука HP 6550b и замена процессора.
05:18
Обзор ноутбука HP ProBook 6565b из США — Ebay за 95$. Какой бу ноутбук купить?
17:21
HP PROBOOK 6560B take apart video, disassemble, how to open disassembly
05:16
HP ProBook 6560b Review — Business Class Notebook
07:15
The HP Workhorse — HP ProBook 6560B
06:08
Ноутбук HP ProBook 6360b
09:57
How to disassemble and clean laptop HP ProBook 6560b, 6565b
Нажмите на кнопку для помощи
— У вас стиральная машина Indesit?
— Нет не индезит, раньше индезела, а сейчас — нет.
— А стиральный порошок Persil?
— А он должен был персить?

HP EliteBook 8560p Notebook PC
HP ProBook 6560b Notebook PC
Maintenance and Service Guide

© Copyright 2011 Hewlett-Packard
Development Company, L.P.
Bluetooth is a trademark owned by its
proprietor and used by Hewlett-Packard
Company under license. Intel and Core are
trademarks or registered trademarks of Intel
Corporation in the United States and other
countries. Microsoft, Windows, and
Windows Vista are either trademarks or
registered trademarks of Microsoft
Corporation in the United States and/or
other countries. SD Logo is a trademark of
its proprietor.
The information contained herein is subject
to change without notice. The only
warranties for HP products and services are
set forth in the express warranty statements
accompanying such products and services.
Nothing herein should be construed as
constituting an additional warranty. HP shall
not be liable for technical or editorial errors
or omissions contained herein.
Fifth Edition: October 2011
First Edition: March 2011
Document Part Number: 644148-005

Safety warning notice
WARNING! To reduce the possibility of heat-related injuries or of overheating the computer, do not
place the computer directly on your lap or obstruct the computer air vents. Use the computer only on
a hard, flat surface. Do not allow another hard surface, such as an adjoining optional printer, or a soft
surface, such as pillows or rugs or clothing, to block airflow. Also, do not allow the AC adapter to
contact the skin or a soft surface, such as pillows or rugs or clothing, during operation. The computer
and the AC adapter comply with the user-accessible surface temperature limits defined by the
International Standard for Safety of Information Technology Equipment (IEC 60950).
iii

iv Safety warning notice

Table of contents
1 Product description ………………………………………………………………………………………………………………………. 1
2 External component identification …………………………………………………………………………………………………. 9
Display ……………………………………………………………………………………………………………………………….. 9
Top ………………………………………………………………………………………………………………………………….. 11
TouchPad ………………………………………………………………………………………………………….. 11
Lights ………………………………………………………………………………………………………………… 12
Buttons and fingerprint reader ………………………………………………………………………………. 14
Keys ………………………………………………………………………………………………………………….. 16
Front ………………………………………………………………………………………………………………………………… 18
Left ………………………………………………………………………………………………………………………………….. 19
Rear …………………………………………………………………………………………………………………………………. 21
Right ………………………………………………………………………………………………………………………………… 22
Bottom ……………………………………………………………………………………………………………………………… 23
3 Illustrated parts catalog ………………………………………………………………………………………………………………. 25
Service tag ……………………………………………………………………………………………………………………….. 25
Computer major components ………………………………………………………………………………………………. 26
Display components …………………………………………………………………………………………………………… 34
Plastics Kit ………………………………………………………………………………………………………………………… 36
Cable Kit …………………………………………………………………………………………………………………………… 37
Mass storage devices …………………………………………………………………………………………………………. 38
Miscellaneous parts ……………………………………………………………………………………………………………. 39
Sequential part number listing ……………………………………………………………………………………………… 40
4 Removal and replacement procedures …………………………………………………………………………………………. 51
Preliminary replacement requirements ………………………………………………………………………………….. 51
Tools required …………………………………………………………………………………………………….. 51
Service considerations …………………………………………………………………………………………. 51
Plastic parts …………………………………………………………………………………………. 51
Cables and connectors …………………………………………………………………………. 52
v

Drive handling ……………………………………………………………………………………… 52
Grounding guidelines …………………………………………………………………………………………… 53
Electrostatic discharge damage ……………………………………………………………… 53
Packaging and transporting guidelines ……………………………………… 54
Workstation guidelines …………………………………………………………… 54
Equipment guidelines …………………………………………………………….. 55
Component replacement procedures ……………………………………………………………………………………. 56
Service tag …………………………………………………………………………………………………………. 56
Computer feet …………………………………………………………………………………………………….. 57
Battery ………………………………………………………………………………………………………………. 58
Display assembly (panel, bezel, webcam, microphone) ……………………………………………. 59
SIM …………………………………………………………………………………………………………………… 63
Bottom door ……………………………………………………………………………………………………….. 64
Optical drive ……………………………………………………………………………………………………….. 65
Upgrade bay ………………………………………………………………………………………………………. 67
Hard drive ………………………………………………………………………………………………………….. 69
RTC battery ……………………………………………………………………………………………………….. 71
Memory modules ………………………………………………………………………………………………… 72
WWAN module …………………………………………………………………………………………………… 74
WLAN module …………………………………………………………………………………………………….. 76
Bluetooth module ………………………………………………………………………………………………… 81
Modem module …………………………………………………………………………………………………… 83
Fan ……………………………………………………………………………………………………………………. 85
Heat sink ……………………………………………………………………………………………………………. 86
Processor …………………………………………………………………………………………………………… 90
Keyboard …………………………………………………………………………………………………………… 92
Bottom cover ………………………………………………………………………………………………………. 94
Speaker assembly ………………………………………………………………………………………………. 99
RJ-11 jack cable ……………………………………………………………………………………………….. 101
Function board ………………………………………………………………………………………………….. 103
USB board ……………………………………………………………………………………………………….. 105
System board ……………………………………………………………………………………………………. 106
Display assembly and components (whole hinge-up, cable, antennas, hinges,
enclosure) ………………………………………………………………………………………………………… 111
5 Computer Setup (BIOS) and System Diagnostics ……………………………………………………………………….. 120
Using Computer Setup ……………………………………………………………………………………………………… 120
Starting Computer Setup ……………………………………………………………………………………. 120
Navigating and selecting in Computer Setup …………………………………………………………. 120
Restoring factory settings in Computer Setup ……………………………………………………….. 121
Updating the BIOS …………………………………………………………………………………………….. 122
vi

Determining the BIOS version ………………………………………………………………. 122
Downloading a BIOS update ………………………………………………………………… 122
Using System Diagnostics …………………………………………………………………………………………………. 123
6 Specifications ……………………………………………………………………………………………………………………………. 124
Computer specifications ……………………………………………………………………………………………………. 124
39.6-cm (15.6-in), HD display specifications ………………………………………………………………………… 125
39.6-cm (15.6-in), HD+ display specifications ………………………………………………………………………. 126
Hard drive specifications …………………………………………………………………………………………………… 127
Blu-ray BD-R/RE + DVDSM DL Drive …………………………………………………………………………………. 128
DVD±RW and CD-RW SuperMulti DL Combo Drive specifications …………………………………………. 129
Blu-ray Disc ROM with SuperMulti DVD±R/RW DL Drive ………………………………………………………. 130
DVD-ROM Drive specifications ………………………………………………………………………………………….. 131
Specification information in Device Manager ……………………………………………………………………….. 132
7 Backup and recovery …………………………………………………………………………………………………………………. 133
Windows 7 ………………………………………………………………………………………………………………………. 133
Backing up your information ……………………………………………………………………………….. 133
Performing a system recovery …………………………………………………………………………….. 134
Using the Windows recovery tools ………………………………………………………… 135
Using f11 recovery tools ………………………………………………………………………. 135
Using a Windows 7 operating system DVD (purchased separately) …………… 136
Windows Vista …………………………………………………………………………………………………………………. 137
Backing up your information ……………………………………………………………………………….. 137
Performing a recovery ……………………………………………………………………………………….. 138
Using the Windows recovery tools ………………………………………………………… 138
Using f11 recovery tools ………………………………………………………………………. 139
Using a Windows Vista operating system DVD (purchased separately) ……… 139
8 Power cord set requirements …………………………………………………………………………………………………….. 141
Requirements for all countries and regions ………………………………………………………………………….. 141
Requirements for specific countries and regions ………………………………………………………………….. 142
9 Recycling ………………………………………………………………………………………………………………………………….. 143
Battery ……………………………………………………………………………………………………………………………. 143
Display ……………………………………………………………………………………………………………………………. 143
Index …………………………………………………………………………………………………………………………………………….. 149
vii

viii

1 Product description
Category Description HP ProBook 6560b
Notebook PC
Product Name HP ProBook 6560p Notebook PC √
HP EliteBook 8560p Notebook PC √
Processors Intel® Core™ i7 processor, Dual Core
2620M, 2.70-GHz (Turbo up to 3.40) processor 4-MB L3
cache, 4 threads
Intel® Core i5 processors, Dual Core
(not available with iAMT, Intel QM67 chipset)
2540M, 2.60-GHz (Turbo up to 3.30) processor 3-MB L3
cache, 4 threads
2520M, 2.50-GHz (Turbo up to 3.20) processor 3-MB L3
cache, 4 threads
2410M, 2.30-GHz (Turbo up to 2.90) processor 3-MB L3
cache, 4 threads
Intel Core i3 processors, Dual Core
(not available with iAMT, Intel QM67 chipset)
2310M, 2.10-GHz processor 3-MB L3 cache √√
√
√
√√
√√
HP EliteBook
8560p
Notebook PC
Intel Celeron processor, Dual Core
B810, 1.60-GHz processor 2-MB L3 cache, 2 threads √
Chipset Mobile Intel HM65 chipset
(Non-vPro configurations)
Mobile Intel QM67 chipset
(vPro configurations)
Graphics Intel HD Graphics 3000 (UMA) √√
AMD Radeon™ HD 6470M (discrete) √√
Supports dual-display ports through the dock √√
Panel All display assemblies include 2 wireless local area
network (WLAN) antennas
√
√
√√
1

Category Description HP ProBook 6560b
Notebook PC
39.6-cm (15.6-in) HD, anti-glare, LED SVA (1366×768) √√
39.6-cm (15.6-in) HD+, anti-glare, LED SVA (1600×900) √√
HP EliteBook
8560p
Notebook PC
39.6-cm (15.6-in) HD, anti-glare, LED SVA (1366×768)
with WWAN
39.6-cm (15.6-in) HD+, anti-glare, LED SVA (1600×900)
with WWAN
39.6-cm (15.6-in) HD, anti-glare, LED SVA (1366×768)
with camera
39.6-cm (15.6-in) HD+, anti-glare, LED SVA (1600×900)
with camera
39.6-cm (15.6-in) HD, anti-glare, LED SVA (1366×768)
with camera and WWAN
39.6-cm (15.6-in) HD+, anti-glare, LED WVA (1600×900)
with camera and WWAN
Support privacy filter √
Memory Two customer-accessible/upgradeable memory module
slots supporting up to 16 GB of RAM
Supports dual-channel memory √√
PC3-10600, 1333-MHz, DDR3 √√
Supports the following configurations:
● 16384 (8192 × 2)
√
√
√√
√√
√
√
√√
√√
8192 (8192 × 1)
●
8192 (4096 × 2)
●
● 6144 (4096 + 2048)
4096 (2048 × 2)
●
4096 (4096 × 1)
●
● 3072 (2048 + 1024)
2048 (2048 × 1)
●
Hard drives Supports 9.5-mm or 7-mm, 6.35-cm (2.50-in) SATA hard
Customer-accessible √√
Supports the following drives:
drives
● 750-GB, 7200-rpm
500-GB, 7200-rpm
●
320-GB, 7200-rpm
●
● 250-GB, 7200-rpm
√√
√√
2 Chapter 1 Product description

Category Description HP ProBook 6560b
Notebook PC
HP EliteBook
8560p
Notebook PC
Supports the following solid-state drives:
● 160-GB
● 128-GB
Upgrade bay Fixed √√
Customer-accessible √√
Serial ATA √√
12.7-mm tray load √√
Supports “No Drive” option √√
Supports the following 12.7-mm SATA optical drives:
DVD-ROM
●
DVD+/-RW SuperMulti DL
●
● Blu-ray ROM DVD+/-RW SuperMulti DL
Supports the following 9.5-mm SATA hard drive:
500-GB, 7200-rpm
●
Supports the following 12.7-mm SATA optical drive:
● Blu-ray R/RE DVD +/-RW SuperMulti DL Drive
√√
√√
√
Microphone Integrated dual-array microphone (webcam models only) √√
Integrated mono (non-webcam models) √
Audio HP SRS Premium Sound √√
HP Premier Sound √
Stereo speakers (2) √√
Webcam Integrated webcam (720p HD) √√
Modem 56K V.92 MDC data/fax modem √√
Modem cable not included √√
Supports “No Modem” option √√
Ethernet Intel 82579LM GbE LAN 10/100/1000 network interface
card (NIC) with iAMT (vPro models)
Intel 82579V GbE LAN 10/100/1000 network interface
card (non-vPro models)
S3/S4/S5 wake on LAN √√
NIC power down technology √√
Ethernet cable not included √√
Wireless Integrated WLAN options by way of wireless module:
√√
√
Two WLAN antennas built into display assembly √
3

Category Description HP ProBook 6560b
Notebook PC
Three WLAN antennas built into display assembly √
Supports “no WLAN” option √√
HP EliteBook
8560p
Notebook PC
Supports the following WLAN formats:
● Broadcom 802.11 b/g/n, 1×1
Broadcom 802.11 a/b/g/n, 2×2
●
Intel Centrino Advanced N 6205, 2×2 a/b/g/n
●
● Atheros 802.11 a/b/g/n 3×3 √
Integrated WWAN options by way of wireless module:
Two WWAN antennas built into display assembly (world-
Subscriber identity module (SIM) security (customer-
Supports “no WWAN” option √√
Supports the following WWAN modules:
Integrated personal area network (PAN) options by way of Bluetooth® module:
Intel Centrino Wireless-N 1000, 1×2 b/g/n √
●
Intel Centrino Ultimate-N 6300, 3×3 a/b/g/n √
●
wide 5 band, in WWAN panels only)
accessible in battery bay)
● Qualcomm Gobi 3000 HSPA/CDMA with GPS
Ericsson 5521 HSPA+
●
√√
√√
√√
√√
Supports “no PAN” option √√
Integrated Bluetooth 2.1 √√
External media card One ExpressCard/54 slot √√
Integrated Media Card Reader with SD, MMC support √√
Ports Audio-in (stereo microphone) √√
Audio-out (stereo headphone) √√
DisplayPort 1.1a √√
DisplayPort 1.2 √√
RJ-11 (modem) √√
RJ-45 (Ethernet, includes link and activity lights) √√
USB 3.0 √
USB 2.0 (3) √
USB 2.0 charging port √
eSATA/USB 2.0 combo port √√
4 Chapter 1 Product description

Category Description HP ProBook 6560b
Notebook PC
HP EliteBook
8560p
Notebook PC
VGA (Dsub 15-pin) supporting 1920 × 1200 external
resolution at 75-GHz (hot plug with auto-detect)
1394a √√
Serial port √√
3-pin AC power √√
Secondary battery connector √√
Docking connector √√
Docking HP Docking Station √√
HP Advanced Docking Station √√
Keyboard/pointing
devices
Dual point √√
Spill-resistant design √√
Full chiclet keyboard √√
Touchpad includes: on/off button, supports 2-way scroll
Power requirements Smart AC adapter with localized cable plug support (3-
Keyboard with numeric keypad √√
with legend, taps enabled by default, 2-finger scrolling
and zoom enabled by default
wire plug with ground pin, supports 3-pin DC connector):
√√
√√
√√
● 90-W
65-W
●
9-cell, 3.0-Ah (100-Wh) Li-ion battery √√
6-cell, 2.8-Ah (62-Wh) Li-ion battery √√
6-cell, 2.55-Ah (55-Wh) Li-ion battery √
3-cell, 2.8-Ah (31-Wh) Li-ion battery √√
Supports 9-cell, 73-Wh HP Ultra-Capacity Extended Life
Battery
Supports 9-cell, 100-Wh HP Extended Life Battery √√
Supports 6-cell, 51-Wh HP Long Life Li-ion battery √√
HP Fast Charge Technology √√
Security Integrated fingerprint reader √√
Integrated smart card reader √√
Security cable slot √√
Trusted platform module (TPM) V.1.2 √√
Full volume encryption √√
Preboot authentication (password, smart card) √√
√√
5

Category Description HP ProBook 6560b
Notebook PC
Operating system Preinstalled:
Windows 7 Professional 32 with Microsoft® Basics √√
Windows 7 Professional 64 with Microsoft Basics √√
Windows 7 Home Premium 64 with Microsoft Basics √√
Windows 7 Home Premium 32 with Microsoft Basics √√
Windows Vista Home Basic 32 with Microsoft Basics √√
Novell™: SuSE Linux™ – SLED 11 √
FreeDOS √√
Preinstalled with Microsoft Office:
HP EliteBook
8560p
Notebook PC
Windows 7 Professional 32 with Microsoft Office 2010
Starter
Windows 7 Professional 32 with Microsoft Office 2010
Personal
Windows 7 Professional 32 with Microsoft Office 2010
Home & Business
Windows 7 Professional 32 with Microsoft Office 2010
Professional
Windows 7 Professional 64 with Microsoft Office 2010
Starter
Windows 7 Professional 64 with Microsoft Office 2010
Personal
Windows 7 Professional 64 with Microsoft Office 2010
Home & Business
Windows 7 Professional 64 with Microsoft Office 2010
Professional
Windows 7 Home Premium 32 with Microsoft Office
2010 Starter
Windows 7 Home Premium 32 with Microsoft Office
2010 Personal
Windows 7 Home Premium 32 with Microsoft Office
2010 Home & Business
√√
√√
√√
√√
√√
√√
√√
√√
√√
√√
√√
Windows 7 Home Premium 32 with Microsoft Office
2010 Professional
Windows 7 Home Premium 64 with Microsoft Office
2010 Starter
Windows 7 Premium 64 with Microsoft Office 2010
Professional
Windows 7 Starter with Microsoft Office 2010 Starter √√
Windows 7 Home Basic 32 with Microsoft Office 2010
Starter
6 Chapter 1 Product description
√√
√√
√√
√√

Category Description HP ProBook 6560b
Notebook PC
HP EliteBook
8560p
Notebook PC
Windows Vista Basic 32 with Microsoft Office 2010
Starter
Windows Vista Basic 32 with Microsoft Office 2010
Personal
Windows Vista Basic 32 with Microsoft Office 2010
Home & Business
Windows Vista Basic 32 with Microsoft Office 2010
Professional
Restore Media:
Windows 7 Professional 64 √√
Windows 7 Professional 32 √√
Windows 7 Home Basic 32 √√
Windows 7 Home Premium 64 √√
Windows 7 Home Premium 32 √√
Windows 7 Starter 32 √
DRDVD Windows 7 √√
DRDVD Windows 7 with WinDVD √√
Web-only support:
√√
√√
√√
√√
Windows XP Professional 64 √
Windows XP Professional 32 √
Windows Vista Enterprise 32/64 √√
Windows Vista Business 32/64 √√
Windows 7 Enterprise 32/64 √√
Windows 7 Ultimate 32/64 √√
Certified:
Microsoft WHQL √√
Novell: SuSE Linux √√
Serviceability End-user replaceable parts:
AC adapter √√
Battery (system) √√
Hard drive √√
Memory module √√
Optical drive √√
Mini-PCI components (WLAN, WWAN, SIM) √√
Modem √√
7

Category Description HP ProBook 6560b
Notebook PC
Keyboard √√
Bluetooth module √√
HP EliteBook
8560p
Notebook PC
8 Chapter 1 Product description
2 External component identification
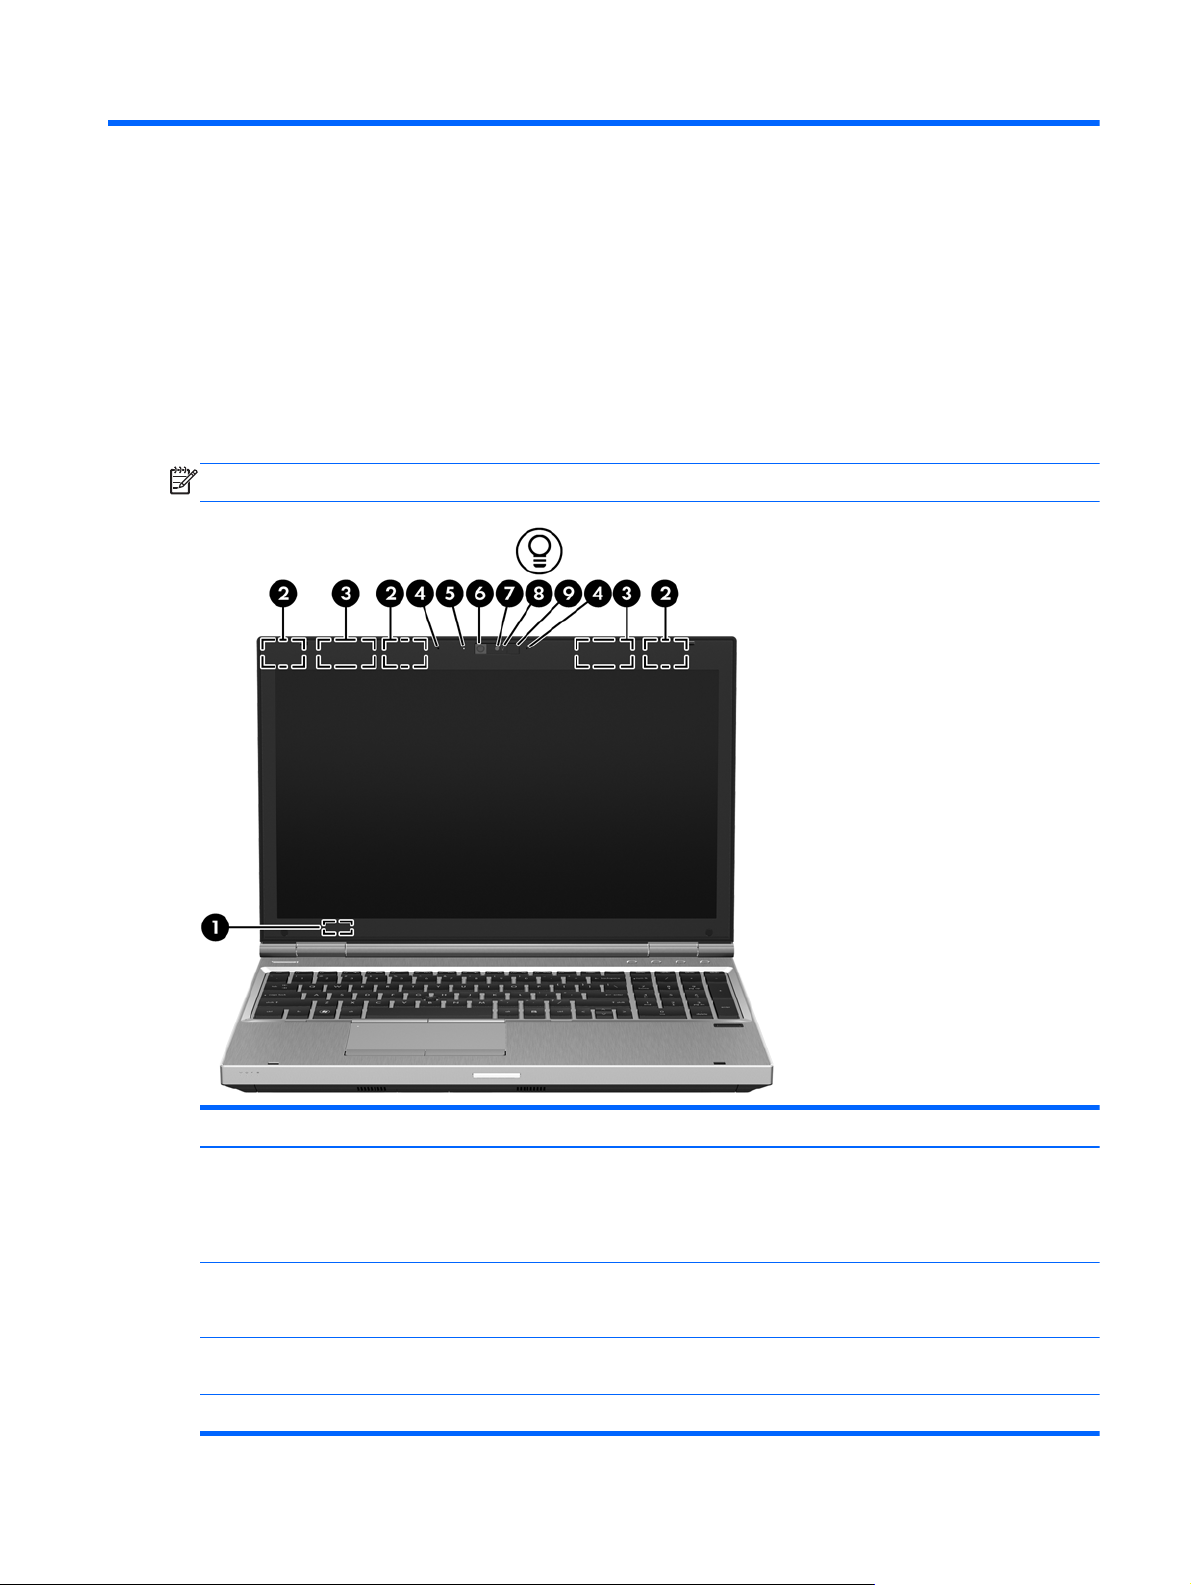
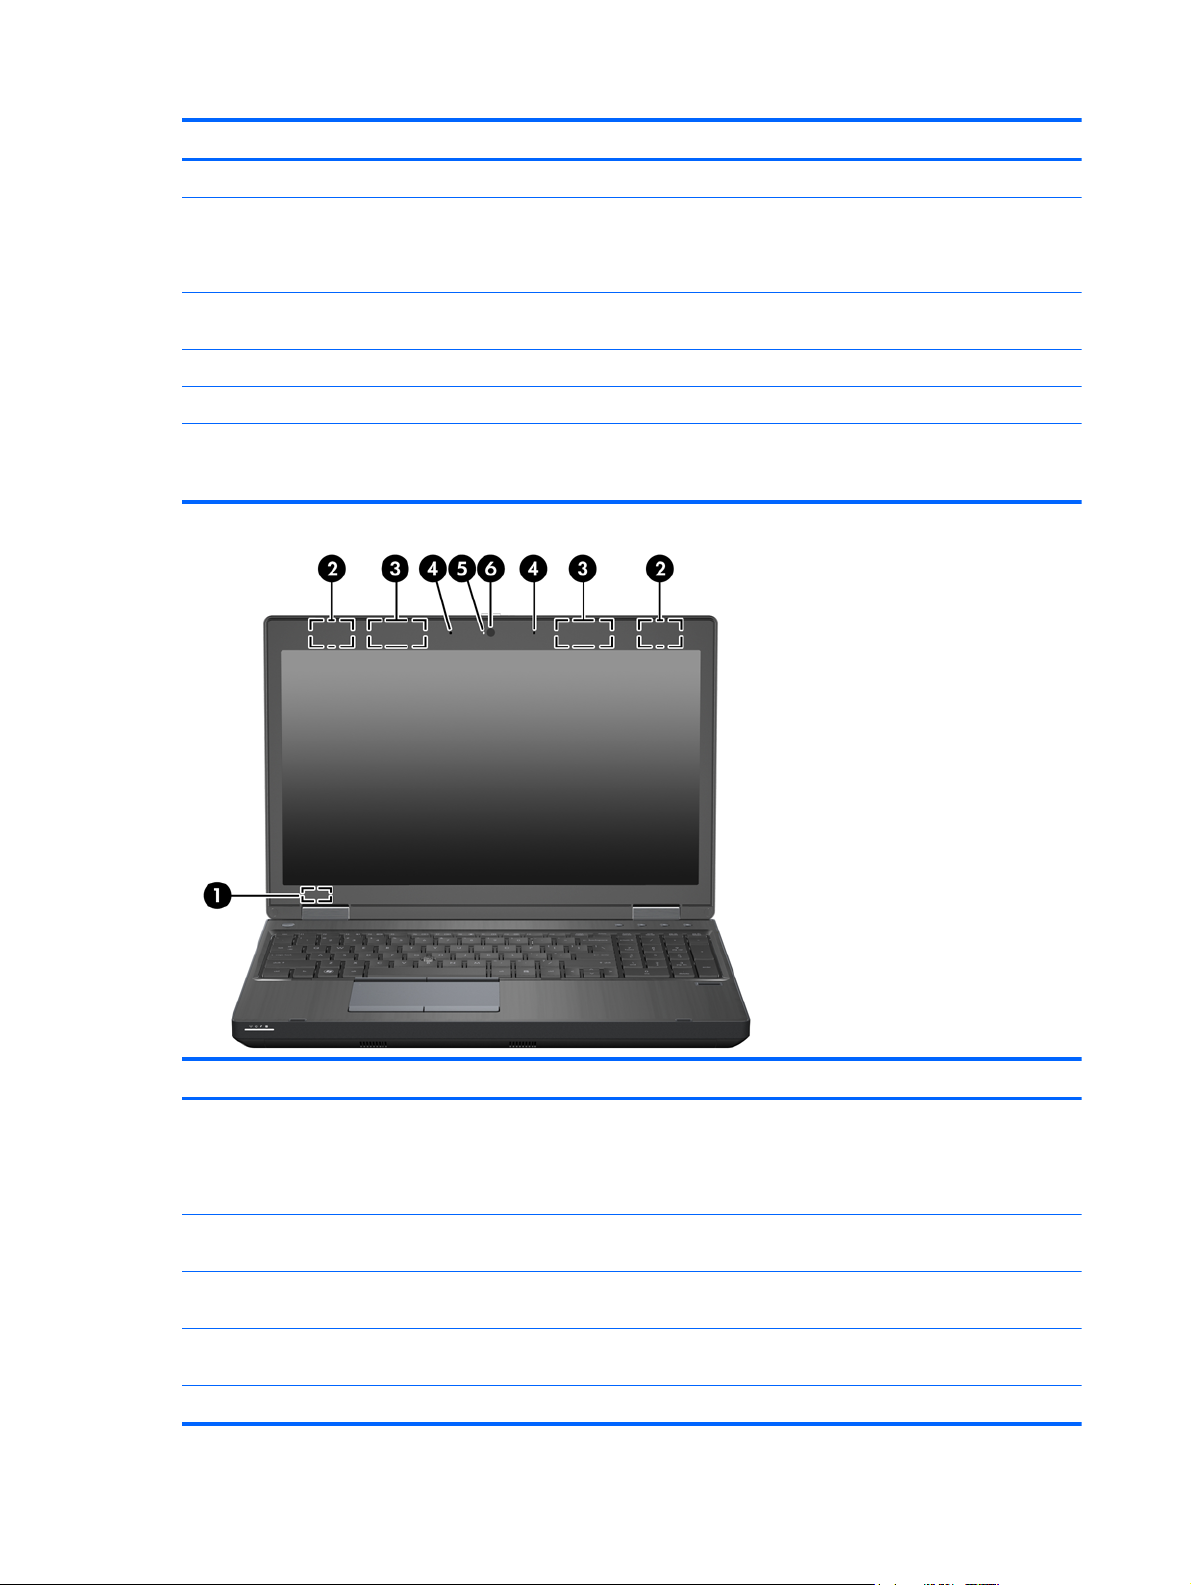
Display
NOTE: Refer to the illustration that most closely matches your computer.
Component Description
(1) Internal display switch Turns off the display or initiates Sleep if the display is closed
(2) WLAN antennas (3)* — 8560p models
WLAN antennas (2)* — 6560b models
(3) WWAN antennas (2)* (select models only) Send and receive wireless signals to communicate with wireless
(4) Internal microphones (2) (select models only) Record sound.
while the power is on.
NOTE: The display switch is not visible from the outside of the
computer.
Send and receive wireless signals to communicate with wireless
local area networks (WLAN).
wide-area networks (WWAN).
Display 9
Component Description
(5) Webcam light (select models only) On: The webcam is in use.
(6) Webcam (select models only) Records video and captures still photographs.
To use the webcam, select Start > All Programs > HP >
HP Webcam.
(7) Ambient light sensor When activated, the sensor automatically adjusts the display
(8) Keyboard light On: When the keyboard light is activated.
(9) Keyboard light button Used to activate the keyboard light.
*The antennas are not visible from the outside of the computer. For optimal transmission, keep the areas immediately
around the antennas free from obstructions. To see wireless regulatory notices, refer to the section of the Regulatory, Safety
and Environmental Notices that applies to your country or region. These notices are located in Help and Support.
brightness based on the lighting conditions in your environment.
Component Description
(1) Internal display switch Turns off the display or initiates Sleep if the display is closed
(2) WLAN antennas (2)* Send and receive wireless signals to communicate with wireless
(3) WWAN antennas (2)* (select models only) Send and receive wireless signals to communicate with wireless
(4) Internal microphone(s) (1 or 2 depending on
model)
(5) Webcam light (select models only) On: The webcam is in use.
10 Chapter 2 External component identification
while the power is on.
NOTE: The display switch is not visible from the outside of the
computer.
local area networks (WLAN).
wide-area networks (WWAN).
Record sound.
Component Description
(6) Webcam (select models only) Records video and captures still photographs.
*The antennas are not visible from the outside of the computer. For optimal transmission, keep the areas immediately
around the antennas free from obstructions. To see wireless regulatory notices, refer to the section of the Regulatory, Safety
and Environmental Notices that applies to your country or region. These notices are located in Help and Support.
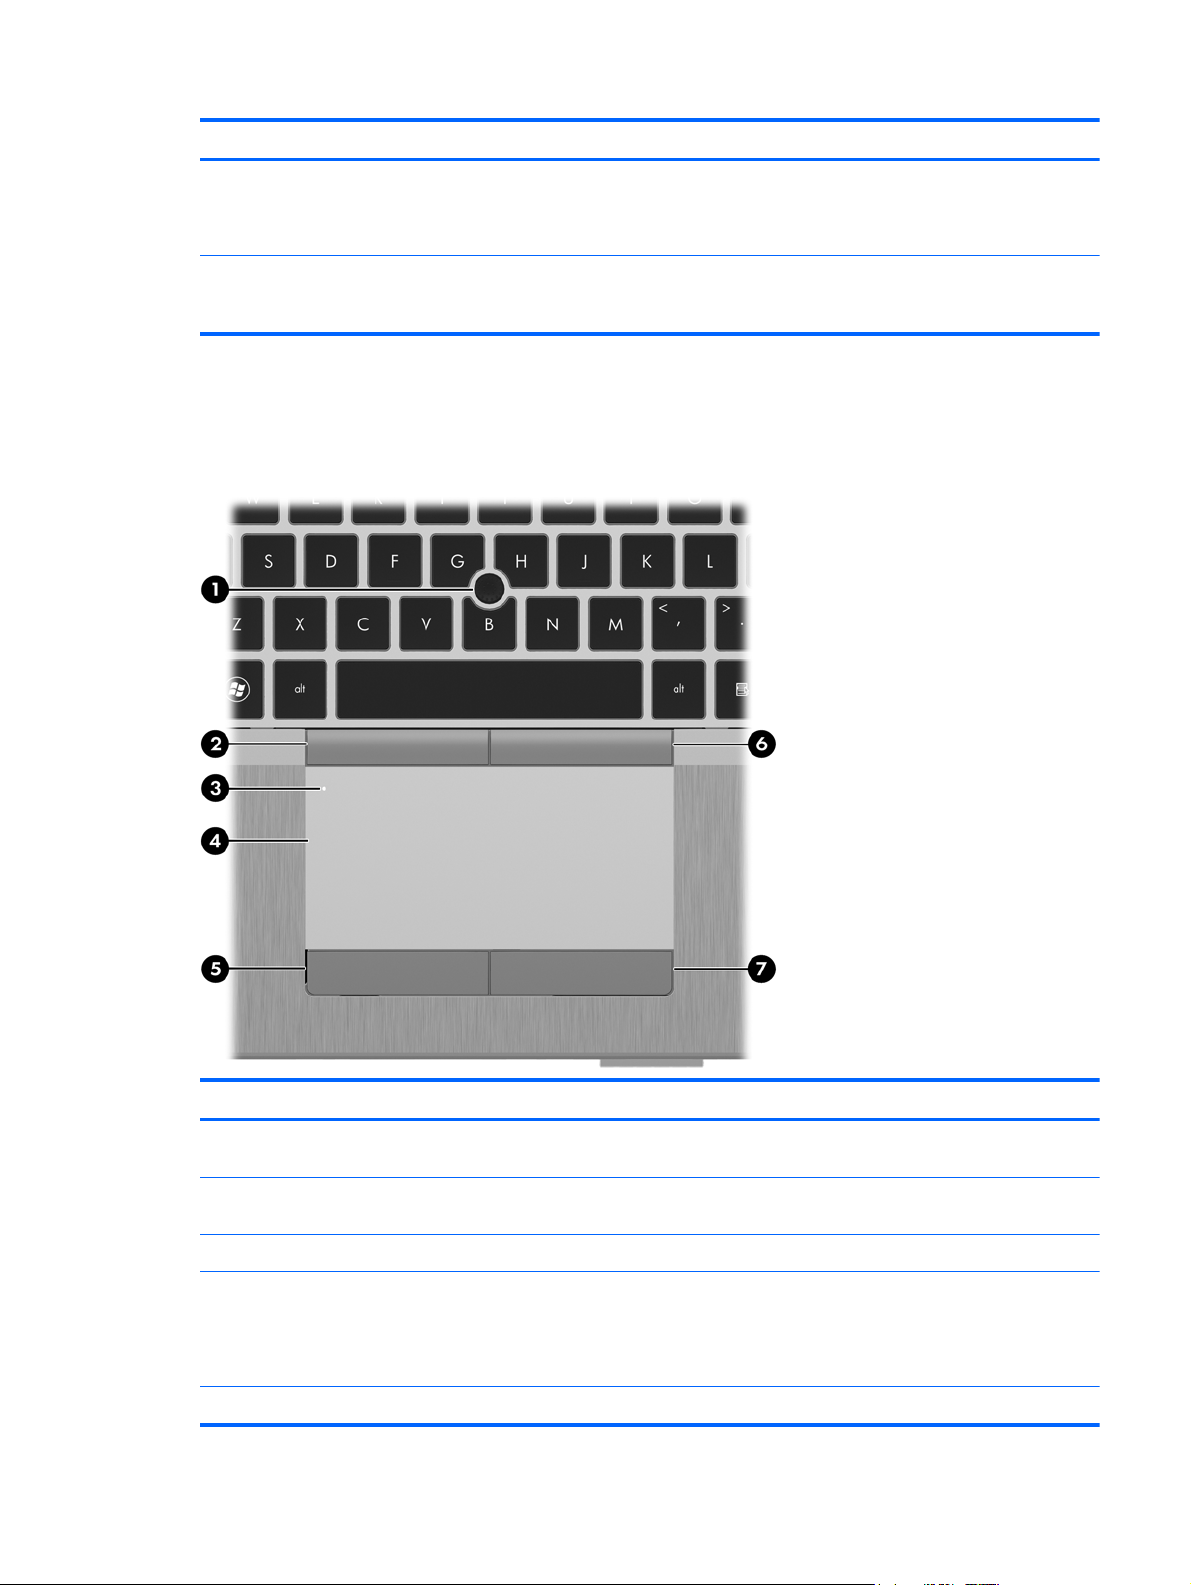
Top
TouchPad
To use the webcam, select Start > All Programs > HP >
HP Webcam.
Component Description
(1) Pointing stick (select models only) Moves the pointer and selects or activates items on the
(2) Left pointing stick button (select models
only)
(3) TouchPad on/off button Turns the TouchPad on and off.
(4) TouchPad Moves the pointer and selects or activates items on the
(5) Left TouchPad button Functions like the left button on an external mouse.
screen.
Can be used with the pointing stick and functions like the
left button on an external mouse.
screen.
NOTE: Vertical scrolling is supported on the right edge of
the TouchPad.
Top 11
Component Description
Lights
(6) Right pointing stick button (select models
only)
(7) Right TouchPad button Functions like the right button on an external mouse.
Can be used with the pointing stick and functions like the
right button on an external mouse.
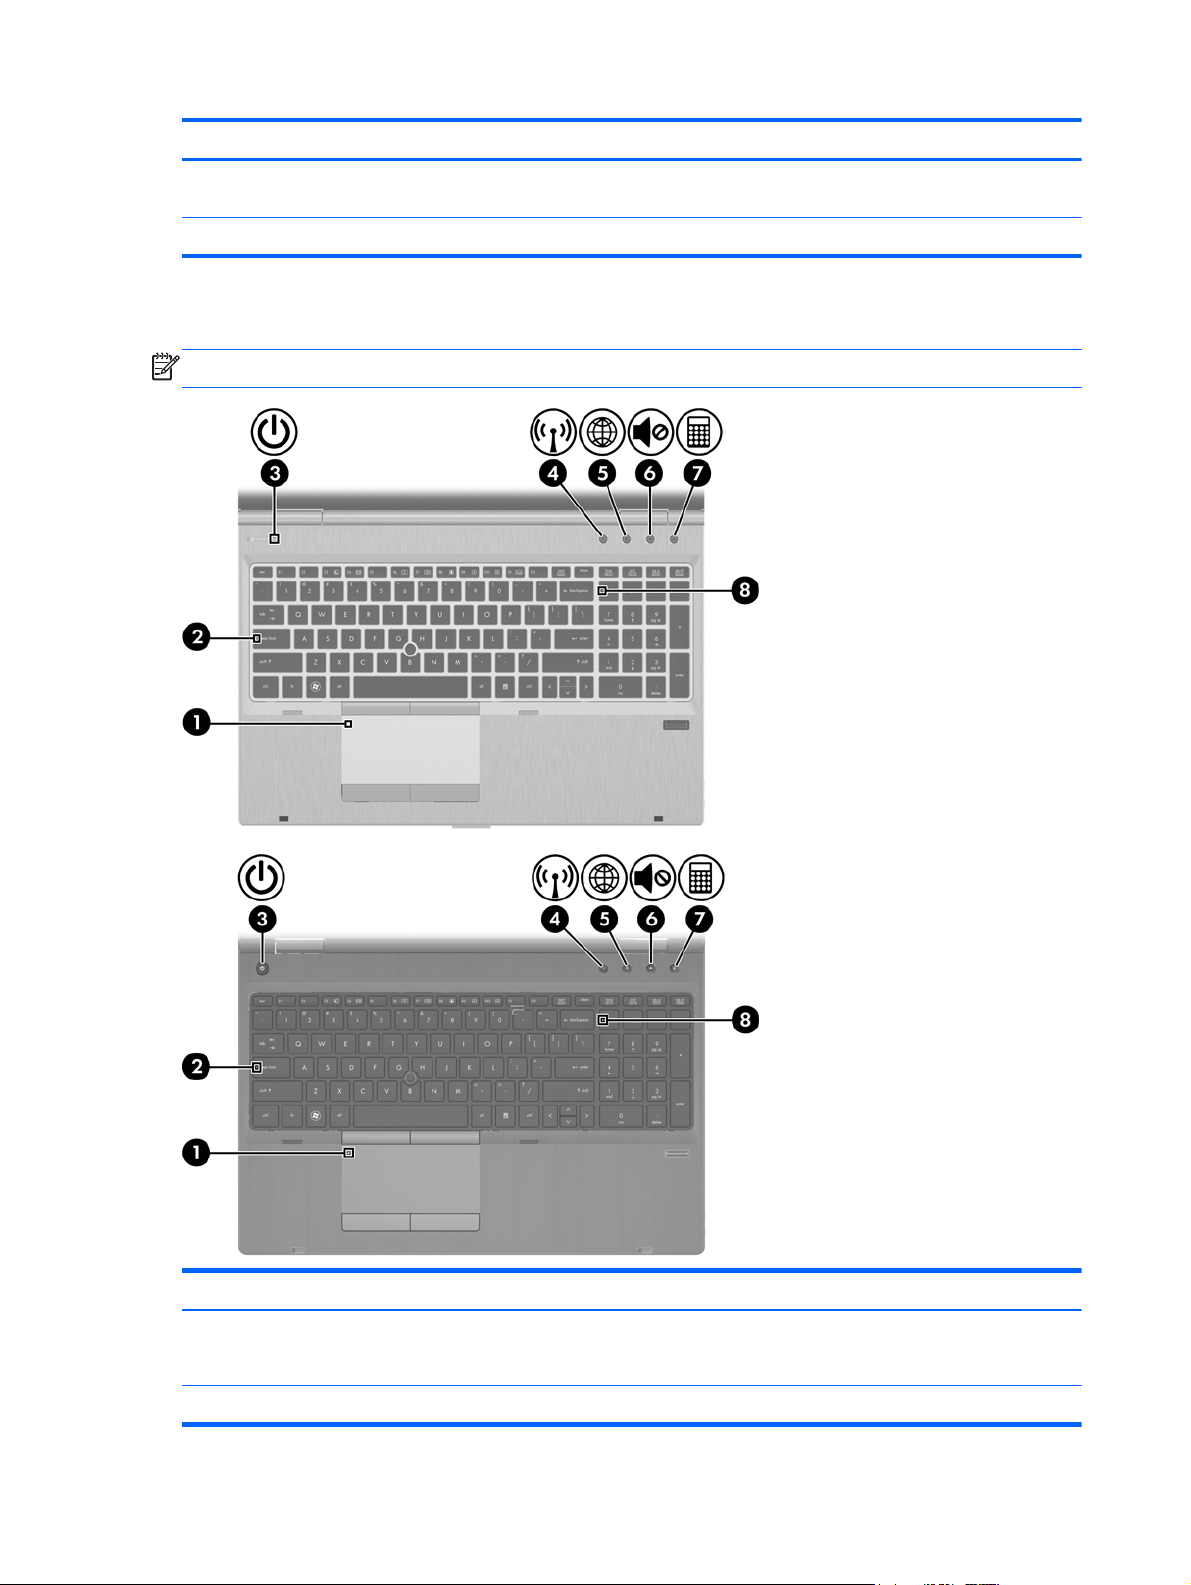
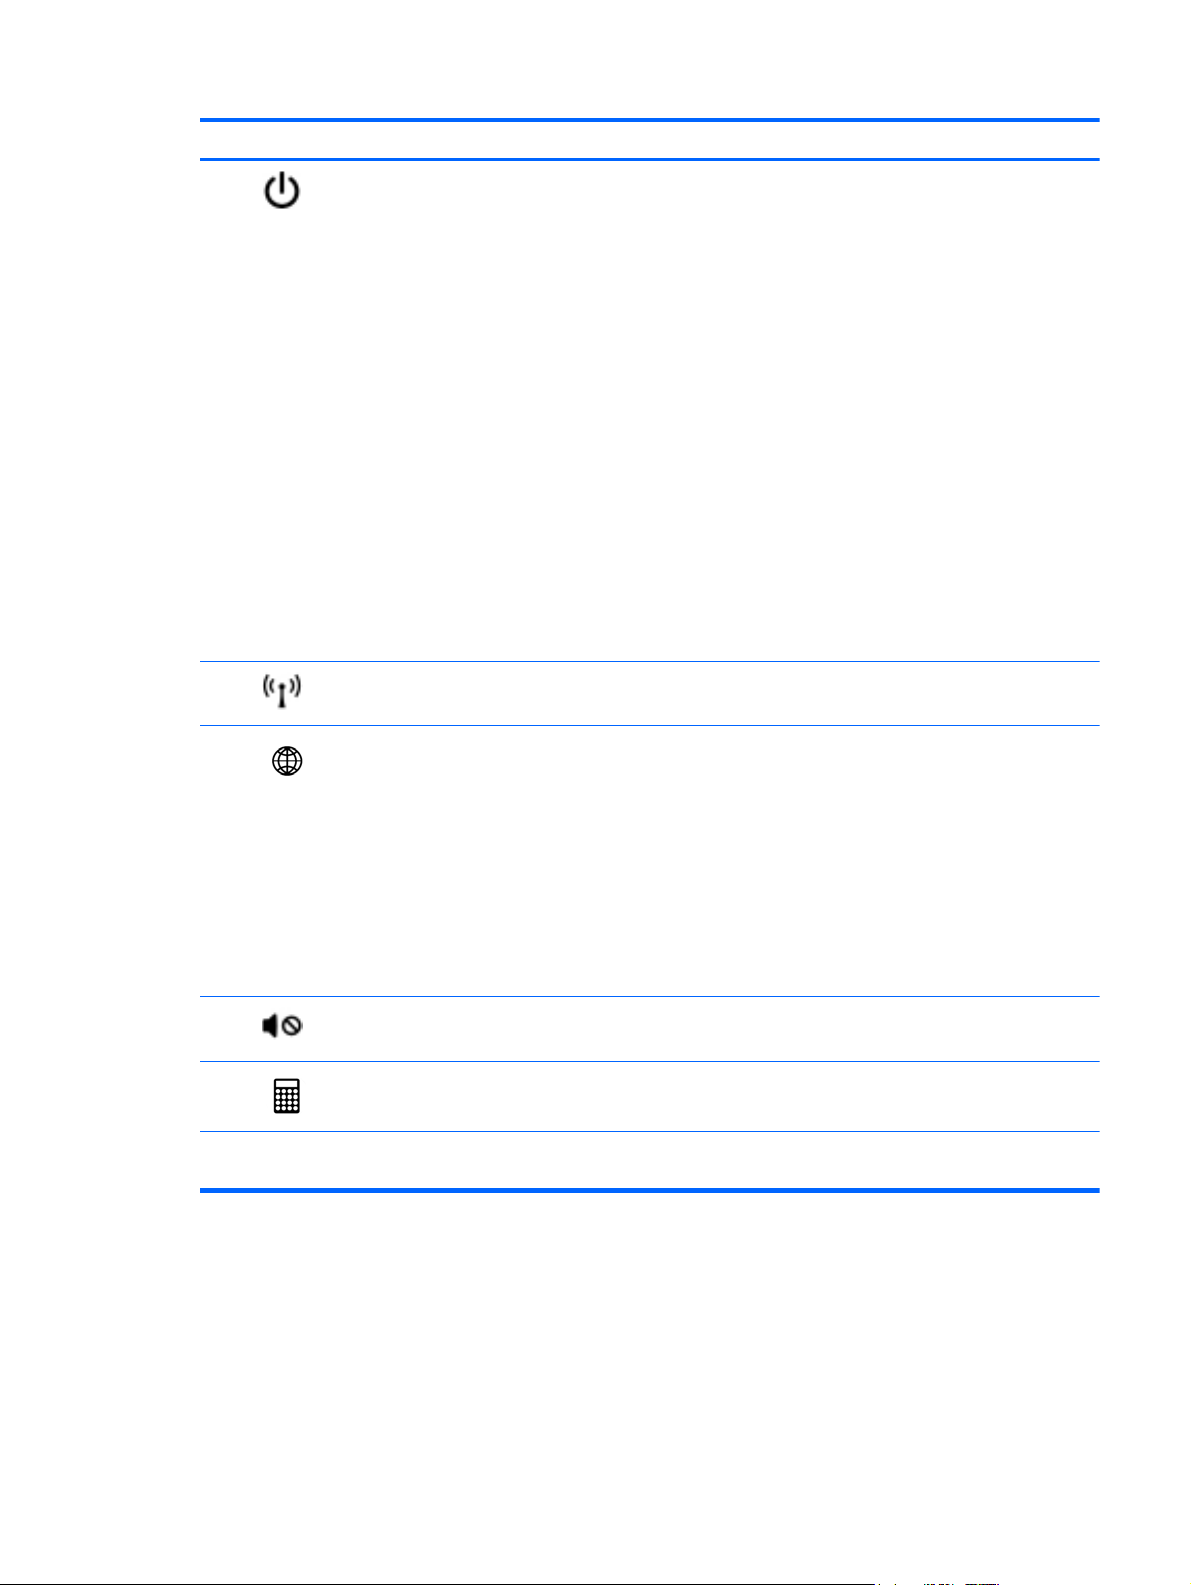
NOTE: Refer to the illustration that most closely matches your computer.
Component Description
(1) TouchPad on/off light ● Amber: The TouchPad is off.
(2) Caps lock light On: Caps lock is on.
12 Chapter 2 External component identification
Off: The TouchPad is on.
●
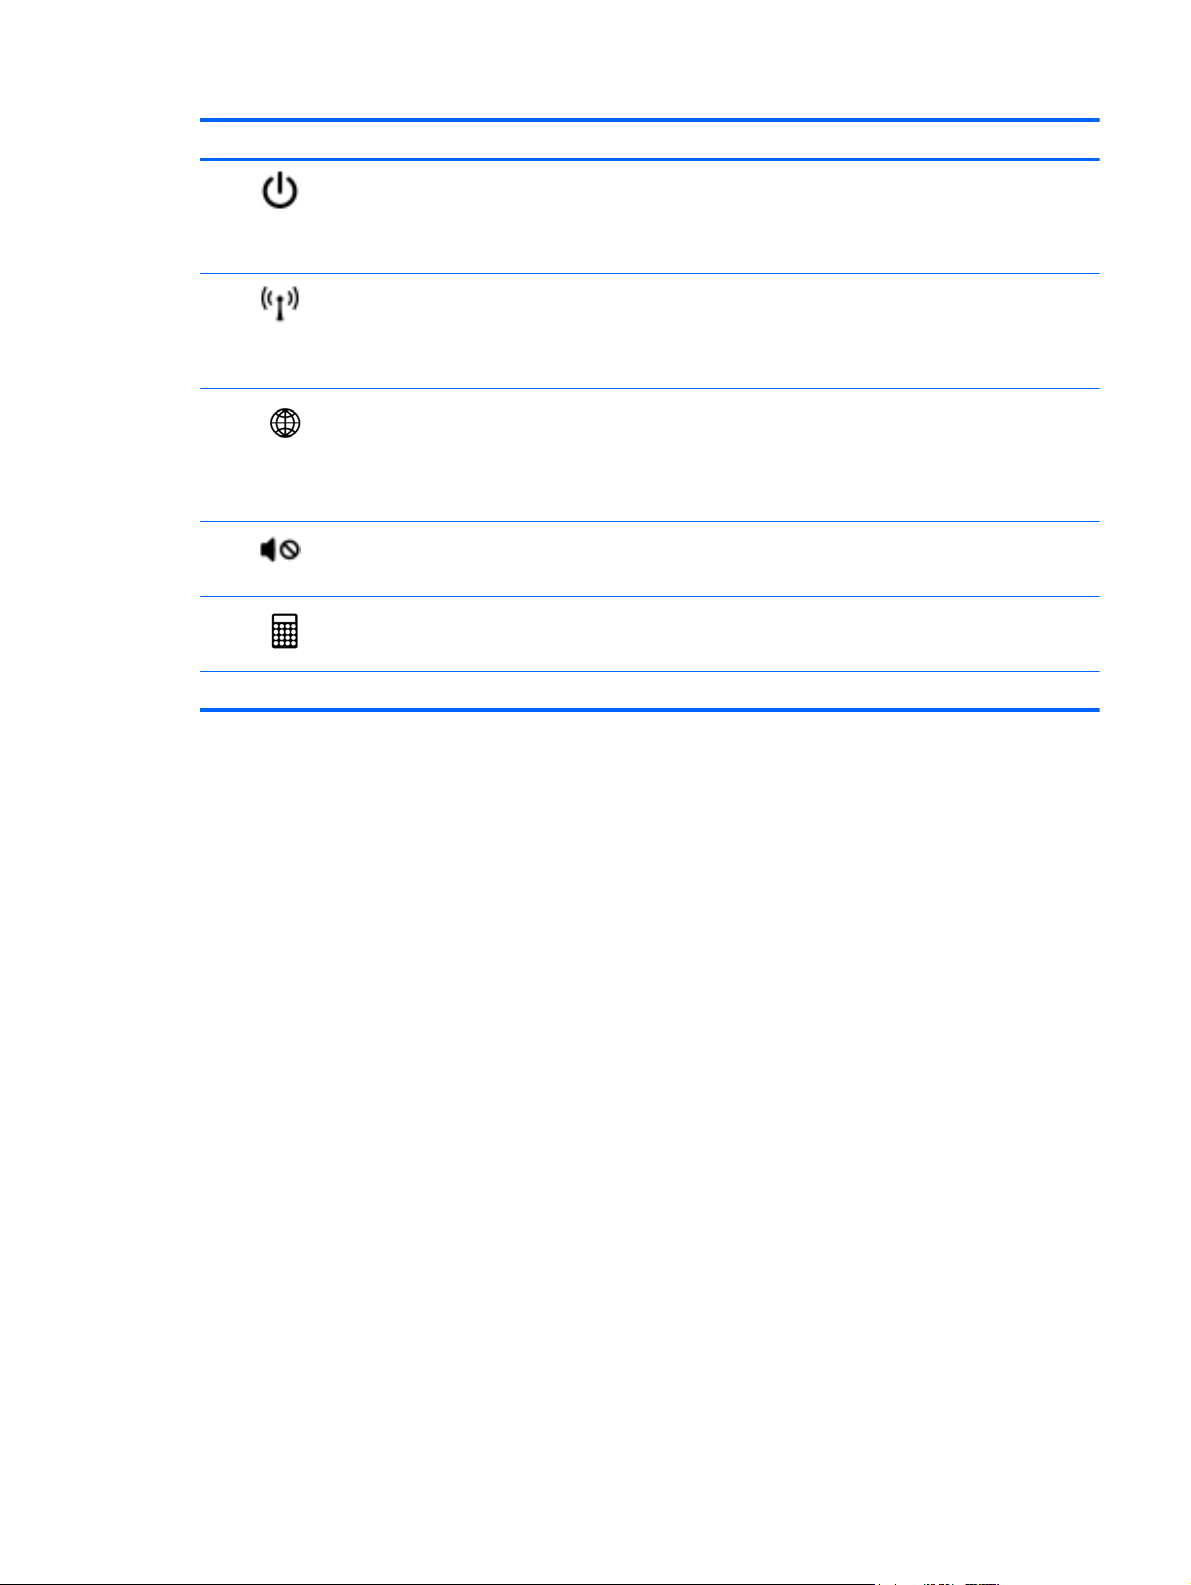
Component Description
(3)
(4)
(5)
(6)
(7)
(8) Num lock light On: Num lock is on.
Power light
Wireless light ● White: An integrated wireless device, such as a
QuickWeb light
Mute light
Calculator light
On: The computer is on.
●
● Blinking: The computer is in the Sleep state.
Off: The computer is off or in Hibernation.
●
wireless local area network (WLAN) device and/or a
Bluetooth® device, is on.
● Amber: All wireless devices are off.
On: The computer is on.
●
● Off: The computer is off or in Hibernation.
NOTE: For more information, refer to “HP QuickWeb” in
this guide and to the HP Quickweb software Help
Amber: Computer sound is off.
●
● Off: Computer sound is on.
On: The Windows® calculator function is on.
●
● Blinking: The Windows calculator has been activated.
Top 13
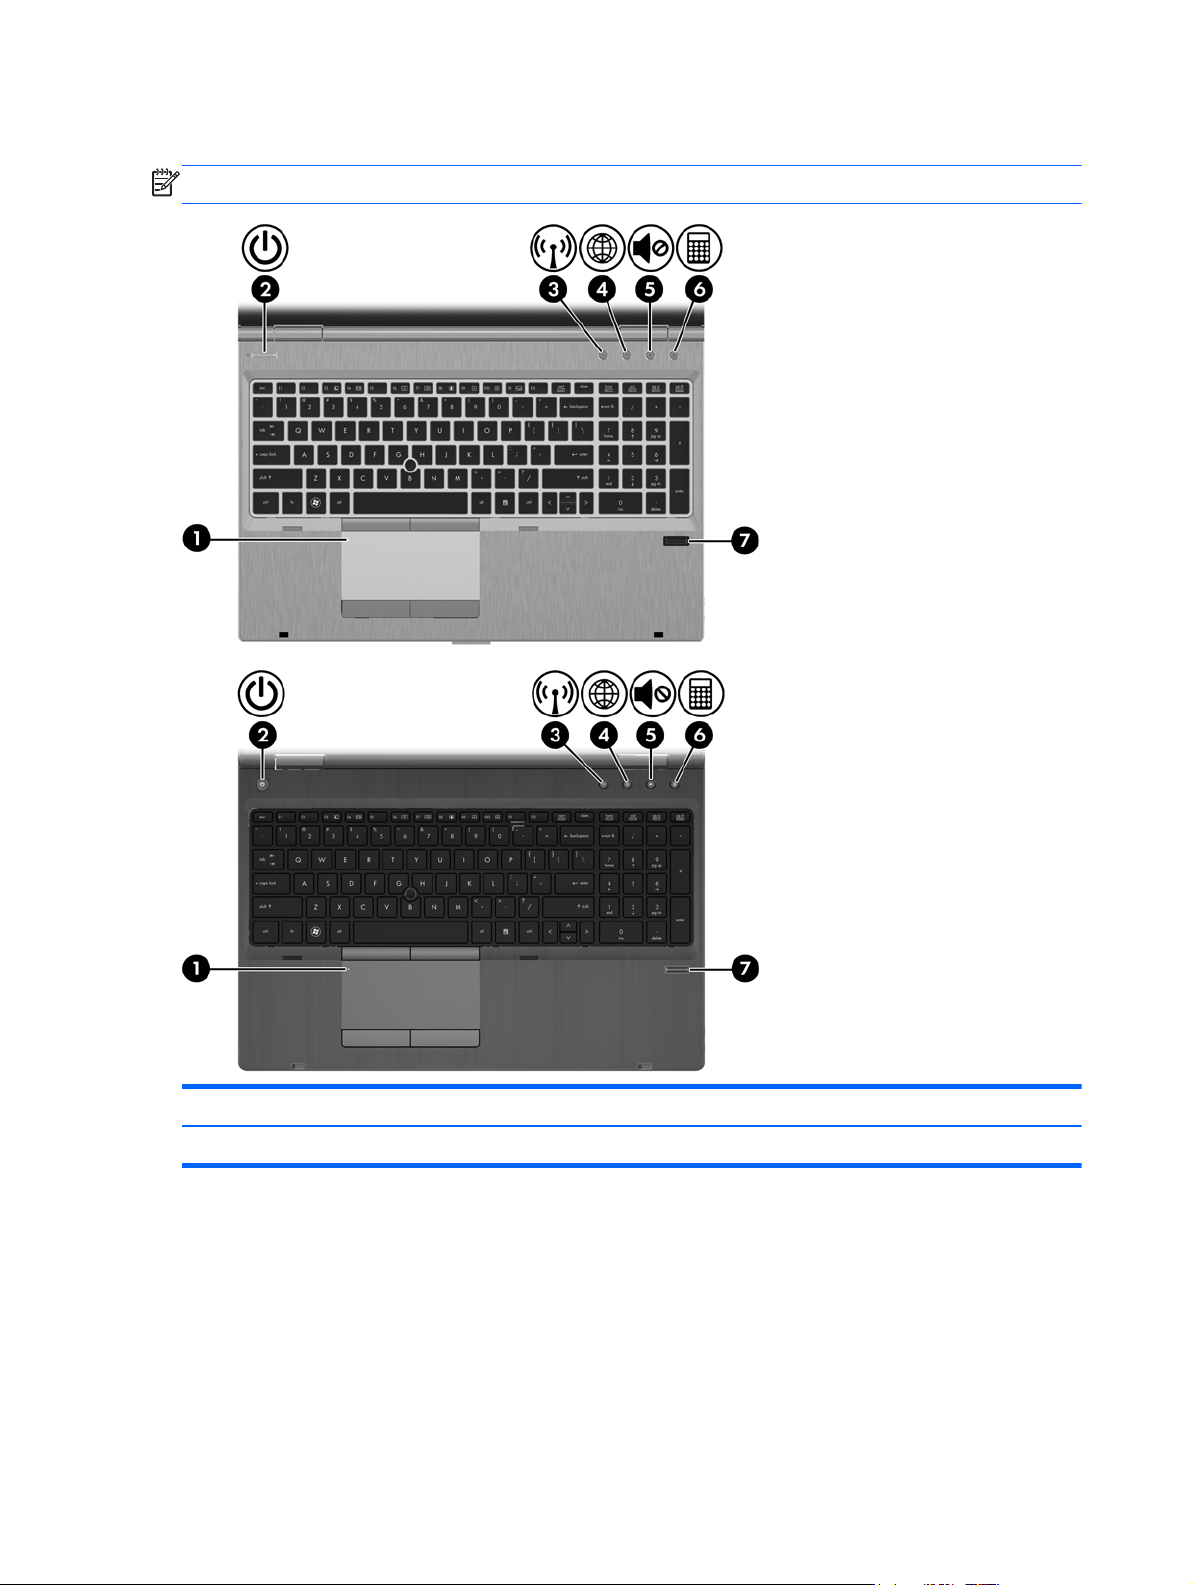
Buttons and fingerprint reader
NOTE: Refer to the illustration that most closely matches your computer.
Component Description
(1) TouchPad on/off button Turns the TouchPad on and off.
14 Chapter 2 External component identification
Component Description
(2)
(3)
(4)
Power button
Wireless button Turns the wireless feature on or off but does not establish a
QuickWeb button ● When the computer is off or in Hibernation, press the
When the computer is off, press the button to turn on
●
the computer.
When the computer is on, press the button briefly to
●
initiate Sleep.
● When the computer is in the Sleep state, press the
button briefly to exit Sleep.
When the computer is in Hibernation, press the button
●
briefly to exit Hibernation.
If the computer has stopped responding and Windows®
shutdown procedures are ineffective, press and hold the
power button for at least 5 seconds to turn off the computer.
To learn more about your power settings:
Windows 7—Select Start > Control Panel > System
●
and Security > Power Options.
Windows Vista—Select Start > Control Panel >
●
System and Maintenance > Power Options
Or refer to the HP Notebook Reference Guide.
●
wireless connection.
button to open HP QuickWeb.
When the computer is in Microsoft Windows, press the
●
button to open the default Web browser.
When the computer is in HP QuickWeb, press the
●
button to open the default Web browser.
NOTE: For more information, refer to “HP QuickWeb” in
this guide and to the HP QuickWeb software Help. If your
computer does not have HP QuickWeb software, the button
does not perform any action or function.
(5)
(6)
(7) Fingerprint reader (select models only) Allows a fingerprint logon to Windows, instead of a
Volume mute button Mutes and restores speaker sound.
Calculator button (select models only) Opens the Windows calculator function.
password logon.
Top 15
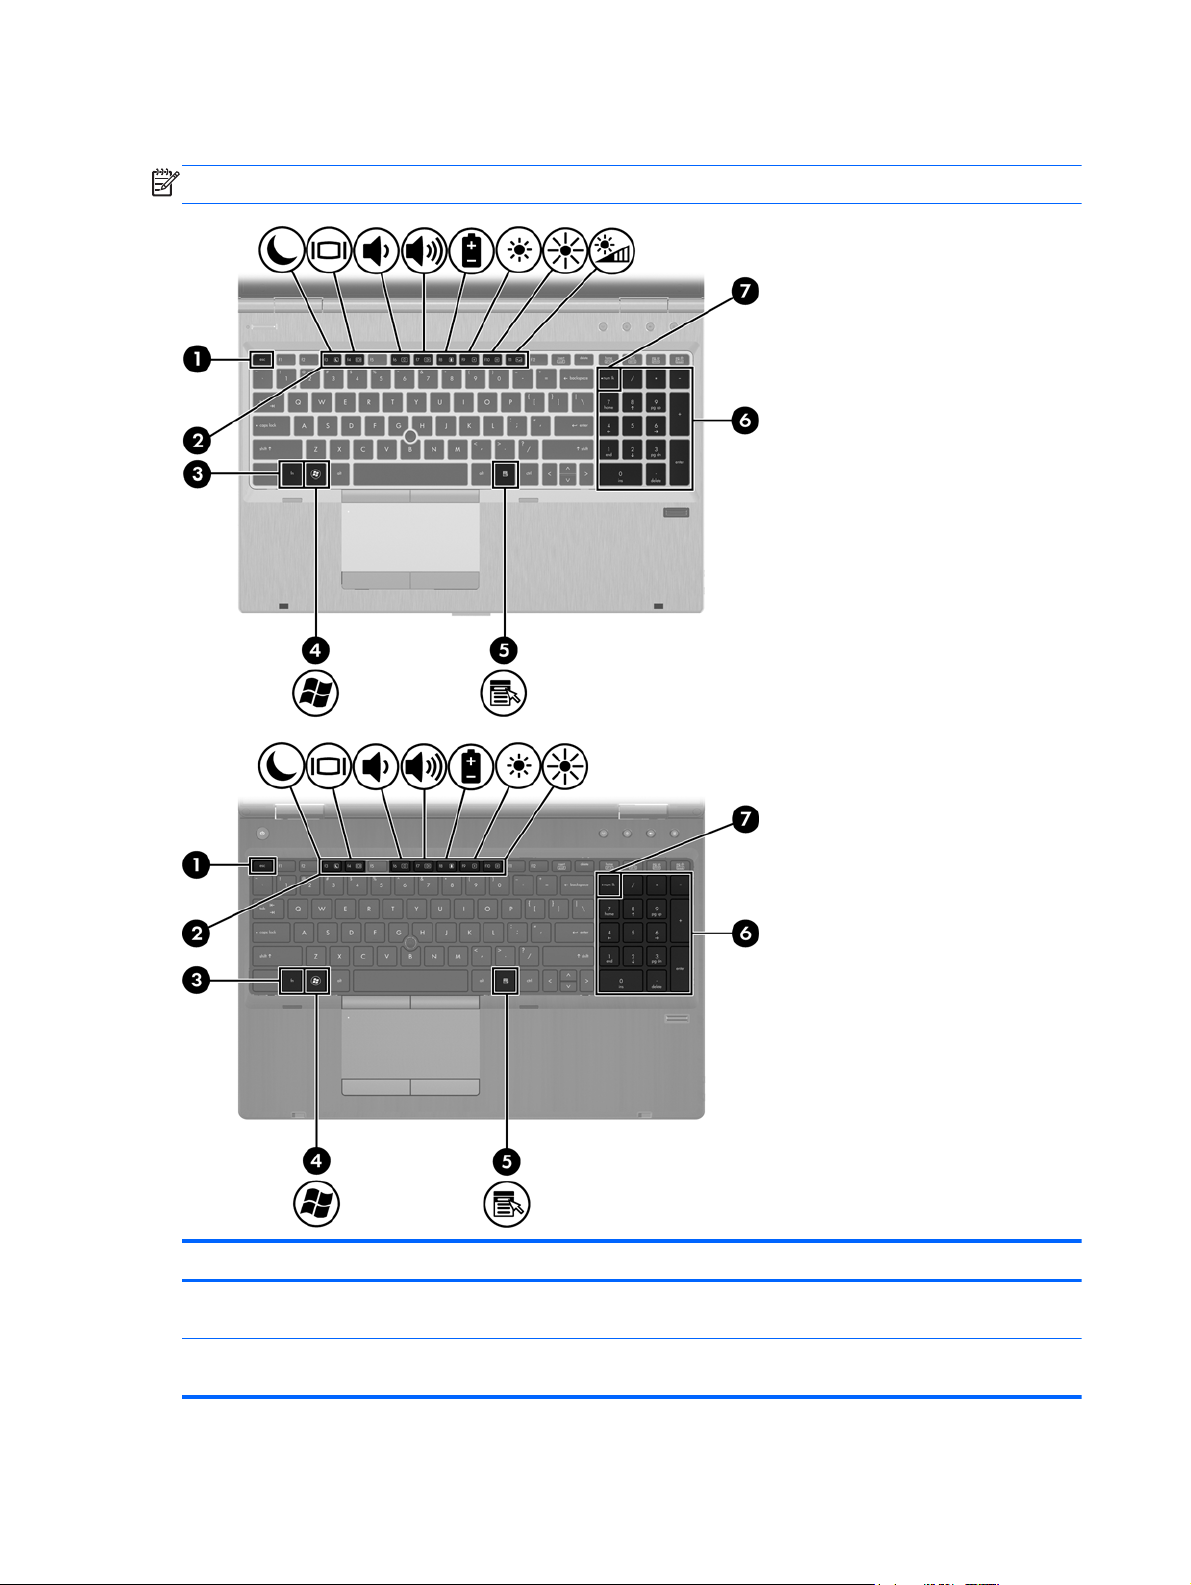
Keys
NOTE: Refer to the illustration that most closely matches your computer.
Component Description
(1) esc key Displays system information when pressed in combination
(2) Function keys Execute frequently used system functions when pressed in
16 Chapter 2 External component identification
with the fn key.
combination with the fn key.

Component Description
(3) fn key Executes frequently used system functions when pressed
(4)
(5)
(6) Integrated numeric keypad When the keypad has been enabled, the keys can be used
(7) num lk key Enables/disables the embedded numeric keypad when
Start key Displays the Start menu.
Menu key Displays the active program’s shortcut menu (same as
in combination with a function key, the num lk key, or the
esc key.
right-click menu).
like an external numeric keypad.
pressed in combination with the fn key.
Top 17
Front
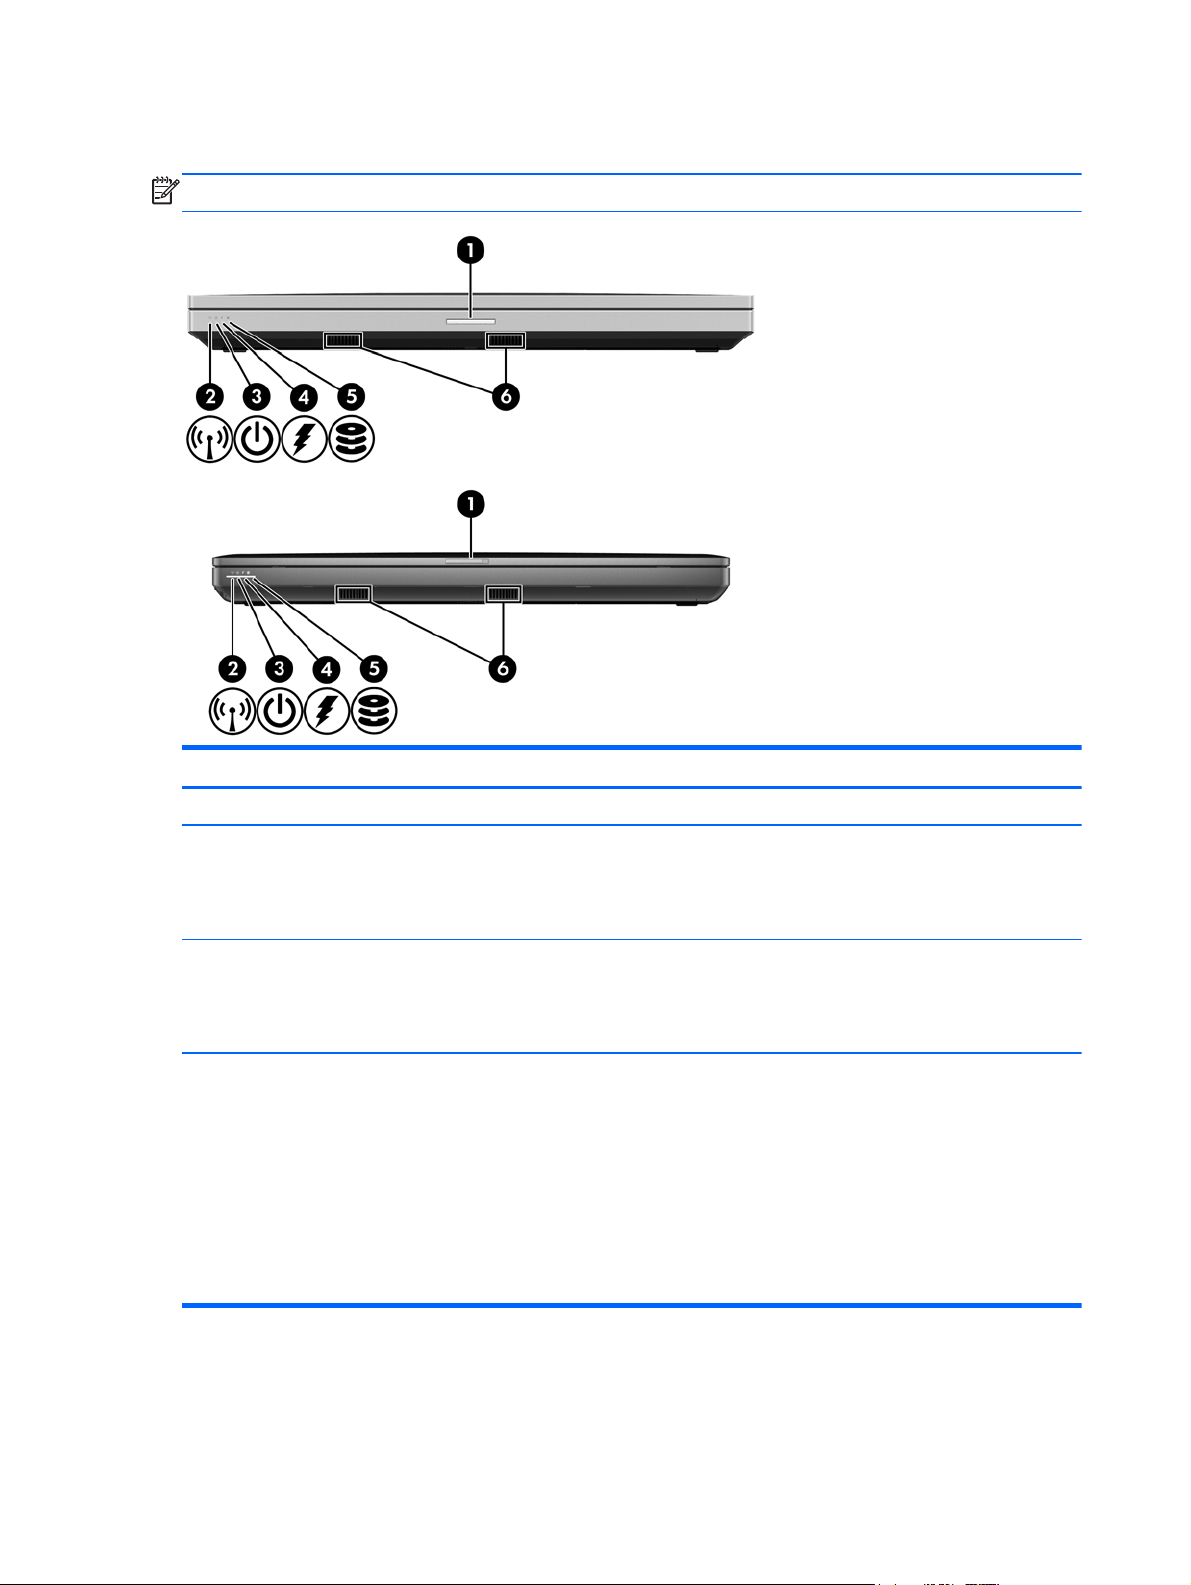
NOTE: Refer to the illustration that most closely matches your computer.
Component Description
(1) Display release latch Opens the computer.
(2) Wireless light
(3) Power light ● On: The computer is on.
(4) Battery light
White: An integrated wireless device, such as a wireless
●
local area network (WLAN) device and/or a Bluetooth®
device, is on.
Amber: All wireless devices are off.
●
Blinking: The computer is in the Sleep state.
●
Off: The computer is off or in Hibernation.
●
Amber: The computer is connected to external power and
●
the battery is charged from 0 – 90%.
● White: The computer is connected to external power and
the battery is charged from 90 – 99%.
● Blinking amber: A battery that is the only available power
source has reached a low battery level. When the battery
reaches a critical battery level, the battery light begins
blinking rapidly.
Off: The battery is fully charged.
●
18 Chapter 2 External component identification
Component Description
Left
(5) Hard drive light
(6) Speakers (2) Produce SRS Premium sound (select models only).
Blinking turquoise: The hard drive or optical drive is being
●
accessed.
Amber: HP 3D DriveGuard has temporarily parked the hard
●
drive.
NOTE: To use the SRS Premium sound software, select Start
> All Programs > SRS Premium Sound.
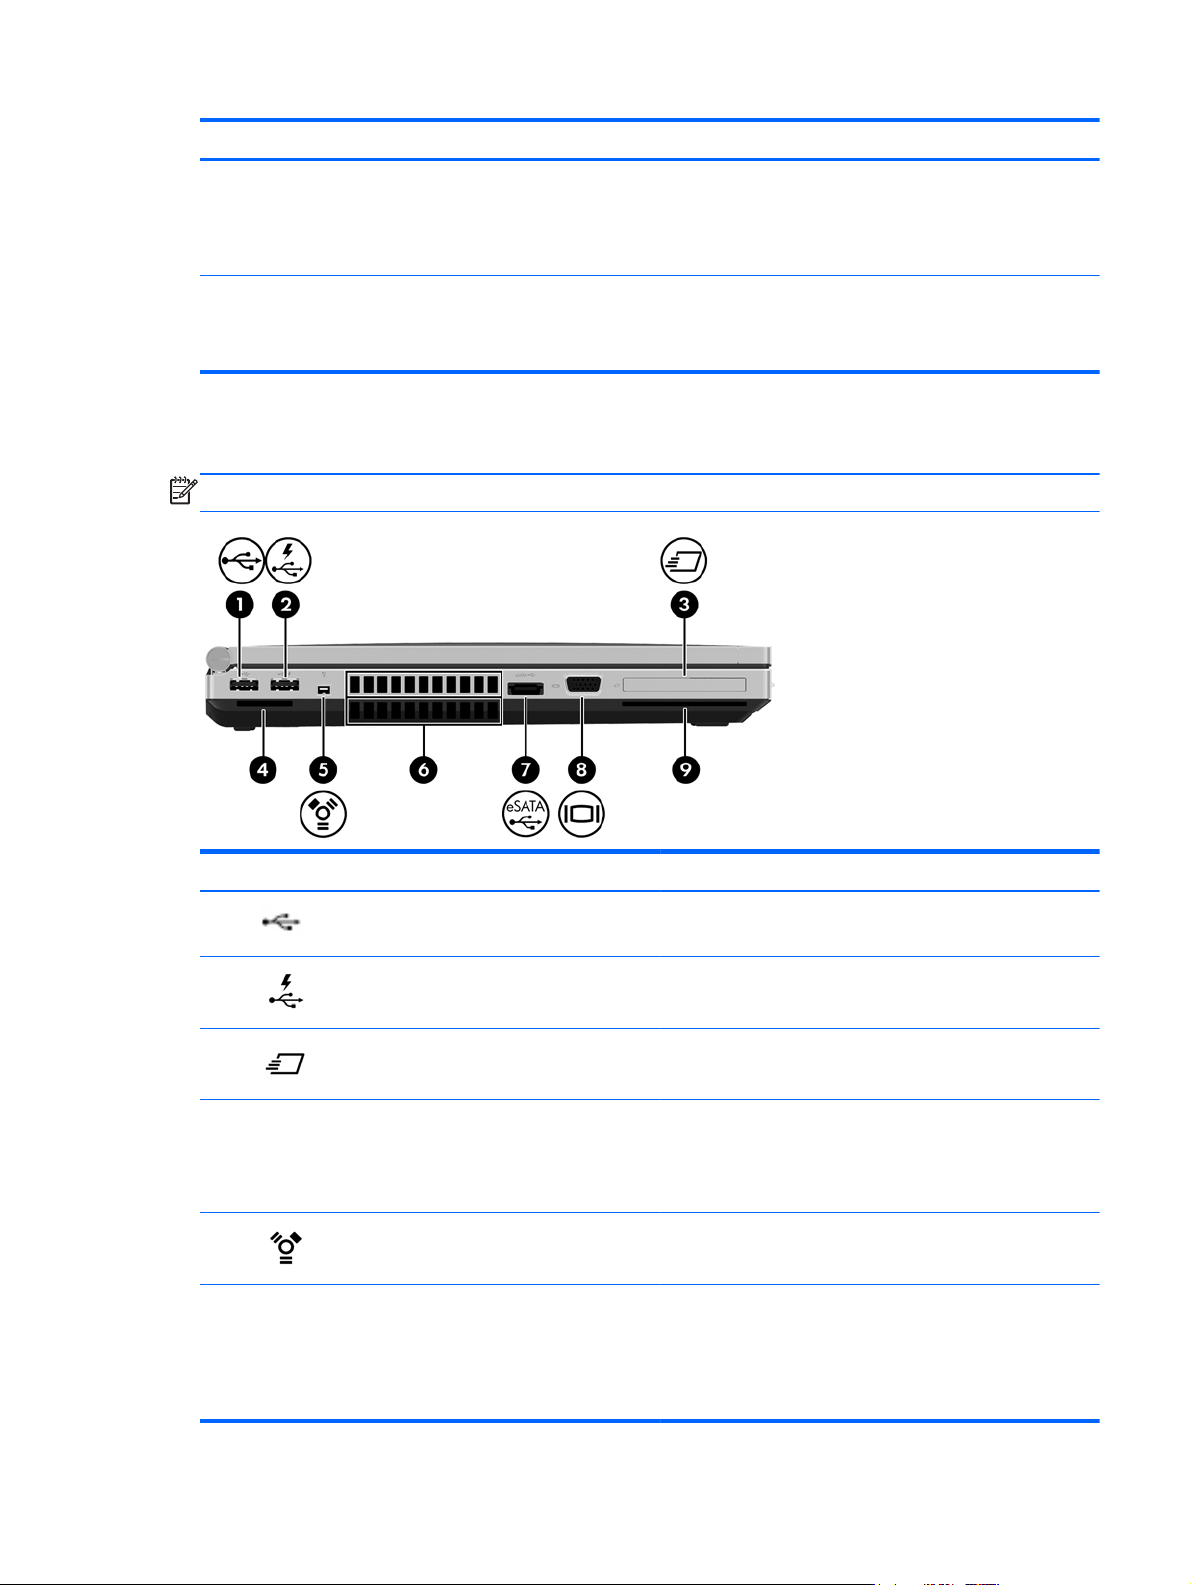
NOTE: Refer to the illustration that most closely matches your computer.
Component Description
(1)
(2)
(3)
(4) Media Card Reader Supports the following digital card formats:
(5)
(6) Vents (2) Enable airflow to cool internal components.
USB port Connects an optional USB device.
USB powered/charging port Connects an optional USB device.
ExpressCard slot (select models only) Supports optional ExpressCards.
● Secure Digital (SD) Card
MultiMediaCard (MMC)
●
1394 port Connects an optional IEEE 1394 or 1394a device, such as
a camcorder.
NOTE: The computer fan starts up automatically to cool
internal components and prevent overheating. It is normal
for the internal fan to cycle on and off during routine
operation.
Left 19
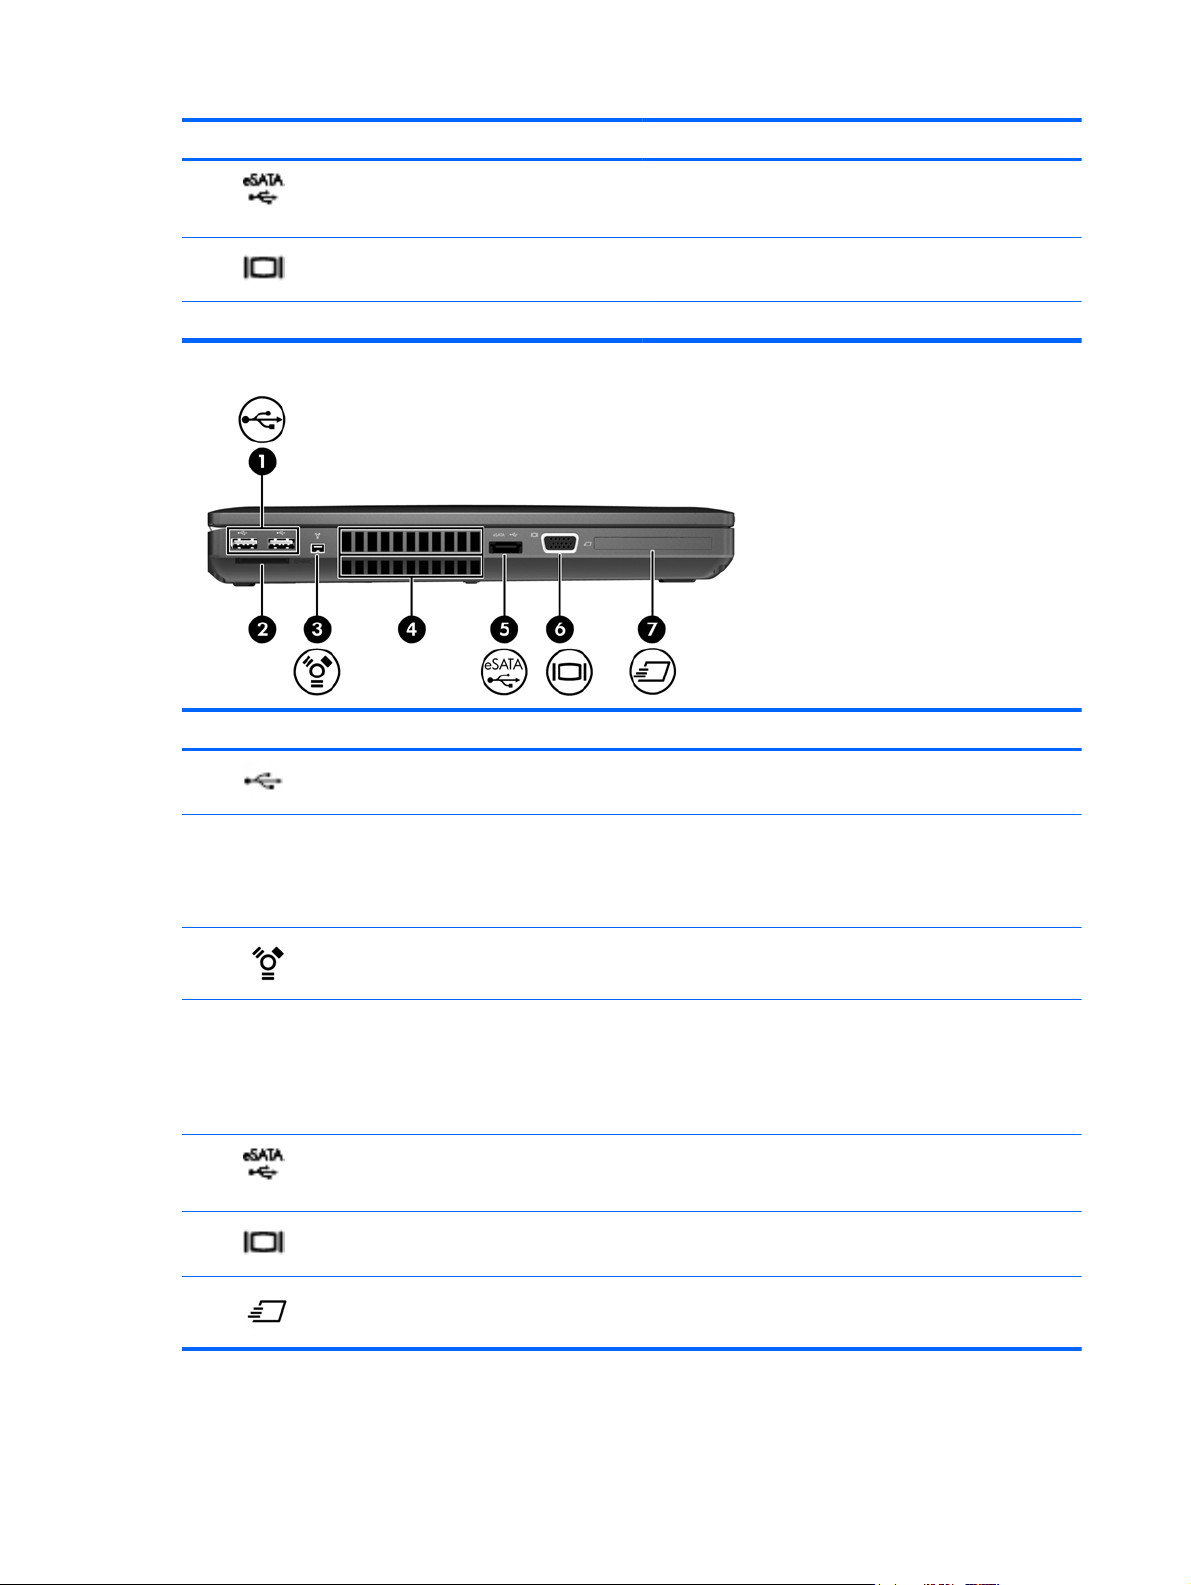
Component Description
(7)
(8)
(9) Smart Card reader slot (select models only) Supports optional Smart Cards.
Component Description
eSATA/USB port Connects a high-performance eSATA component, such as
an eSATA external hard drive, or connects an optional USB
device.
External monitor port Connects an external VGA monitor or projector.
(1)
(2) Media Card Reader Supports the following digital card formats:
(3)
(4) Vents (2) Enable airflow to cool internal components.
(5)
(6)
(7)
USB ports (2) Connects an optional USB device.
● Secure Digital (SD) Card
MultiMediaCard (MMC)
●
1394 port Connects an optional IEEE 1394 or 1394a device, such as
eSATA/USB port Connects a high-performance eSATA component, such as
External monitor port Connects an external VGA monitor or projector.
ExpressCard slot or Smart Card reader slot
(depending on configuration)
a camcorder.
NOTE: The computer fan starts up automatically to cool
internal components and prevent overheating. It is normal
for the internal fan to cycle on and off during routine
operation.
an eSATA external hard drive, or connects an optional USB
device.
Supports optional ExpressCards or Smart Cards.
20 Chapter 2 External component identification
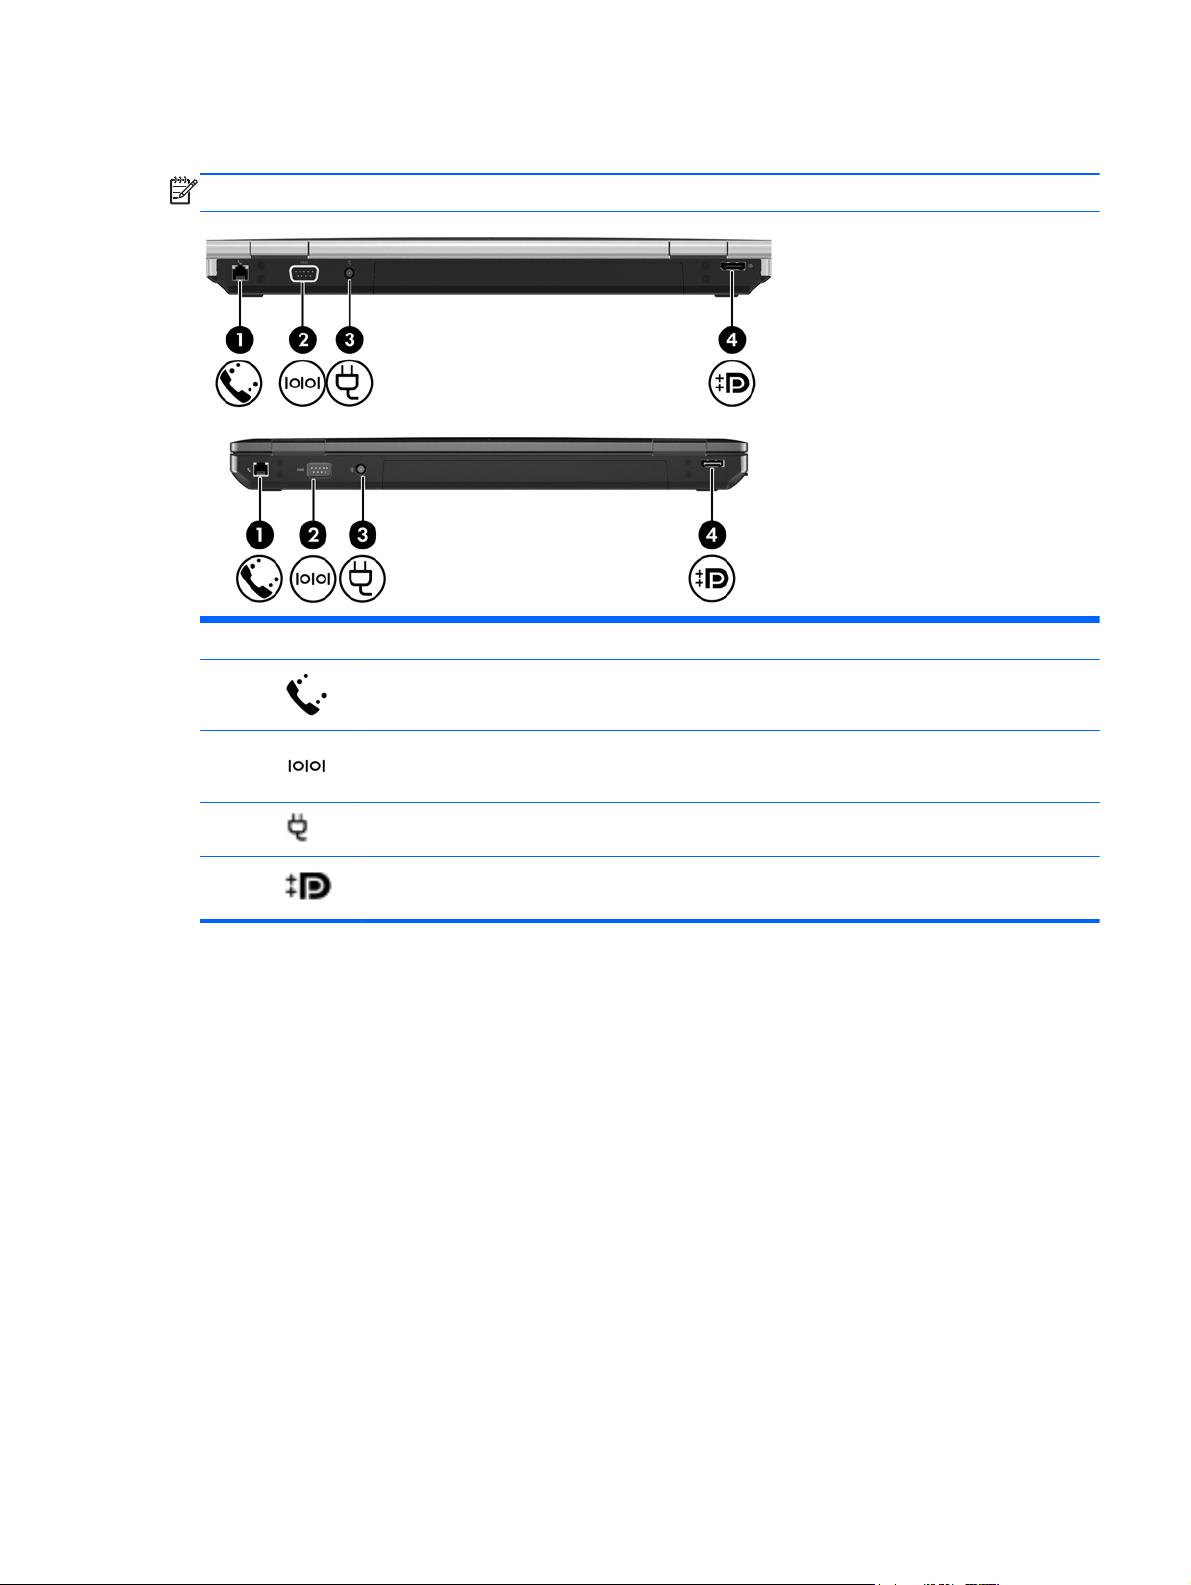
Rear
NOTE: Refer to the illustration that most closely matches your computer.
Component Description
(1)
(2)
(3)
(4)
RJ-11 (modem) jack Connects a modem cable.
Serial port Connects an optional device such as a serial
modem, mouse, or printer.
Power connector Connects an AC adapter.
DisplayPort Connects an optional digital display device, such
as a high-performance monitor or projector.
Rear 21
Right
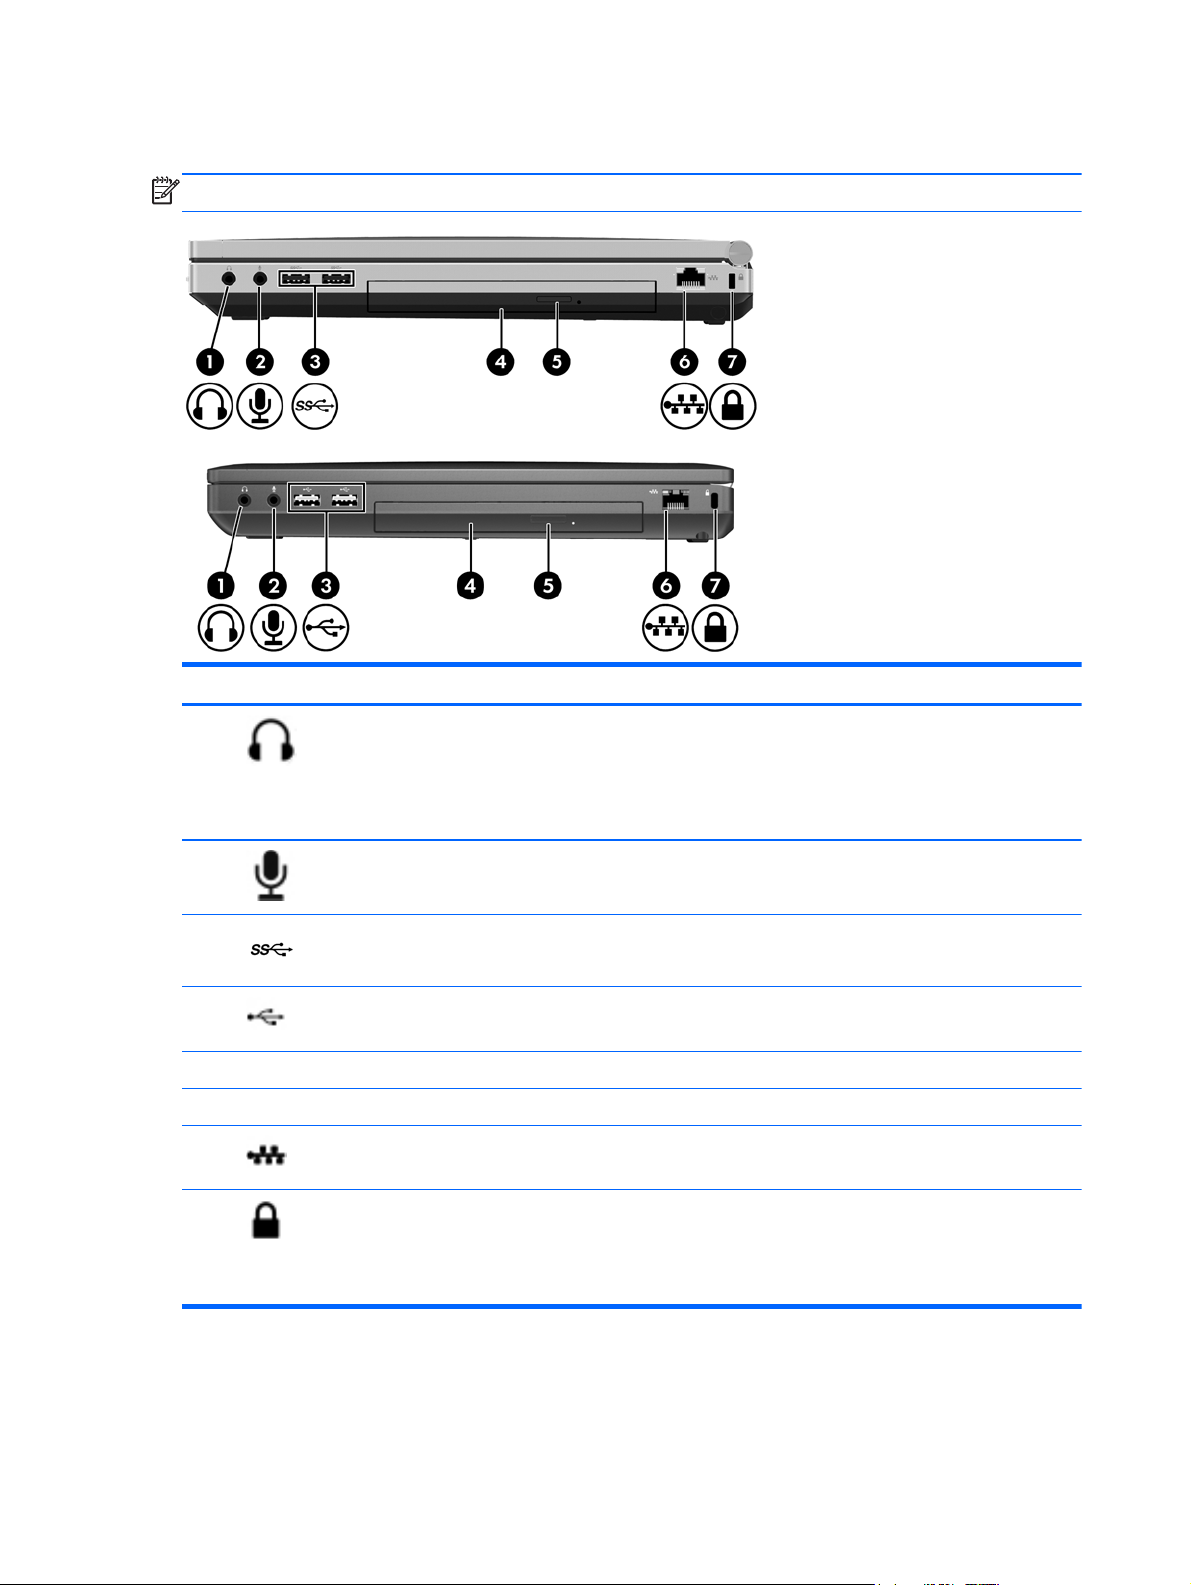
NOTE: Refer to the illustration that most closely matches your computer.
Component Description
(1)
(2)
(3)
(4) Optical drive Reads and writes (select models only) to an optical disc.
(5) Optical drive eject button Ejects the optical drive.
(6)
(7)
Audio-out (headphone) jack Produces sound when connected to optional powered
stereo speakers, headphones, ear buds, a headset, or
television audio.
NOTE: When a device is connected to the headphone
jack, the computer speakers are disabled.
Audio-in (microphone) jack Connects an optional computer headset microphone,
stereo array microphone, or monaural microphone.
SuperSpeed USB ports (2) Connect optional USB devices.
USB ports (2) Connect optional USB devices.
RJ-45 (network) jack Connects a network cable.
Security cable slot Attaches an optional security cable to the computer.
NOTE: The security cable is designed to act as a
deterrent, but it may not prevent the computer from being
mishandled or stolen.
22 Chapter 2 External component identification
Loading…
All-new professional design
Boasting an elevated level of design in a tungsten color, the
HP ProBook 6560b sports a bead-blasted aluminum display
enclosure, a magnesium-reinforced ABS chassis, and a bottom
case with drain that helps protect against accidental minor
spills. The full-sized keyboard allows you to type quickly, and
the generous touchpad is conducive to using gestures.
Enhanced performance and graphics
Create documents, presentations, and spreadsheets, and
quickly share them with coworkers. The new Intel architecture
features 2nd generation Intel
®
Core™ i7,
2
, i5,
2
and i3
2
dual-
core processors, offering incredible performance,
responsiveness, and enhanced graphics.
Choose Intel
®
HD Graphics 3000 for responsive performance
and rich media capabilities. Or, choose the AMD Radeon™
HD 6470M discrete graphics processor for an amazing visual
experience with powerful performance.
Legibility and portability
Enjoy the easy-to-view 15.6-inch diagonal HD
3
display on the
HP ProBook 6560b.
Extensive battery solutions
Multiple battery options allow you to configure your laptop
with the mobility and battery run time that works for you.
4
Built to protect
HP ProtectTools is a portfolio of security technologies designed
to give users three-dimensional protection through Strong
Authentication, Data at Rest, and Data in Motion.
5
Built to conserve
HP Power Assistant
6
extends battery run time while reducing
energy consumption. It is an integrated solution that measures
and logs reported system energy usage through a simple
interface.
Built to simplify
Tap into fast, convenient, and more secure access to the
internet, email, contacts, and calendar at the touch of a button
without long boot-up times with HP QuickWeb.
7
It delivers
improved security via enhanced user authentication with
support for passwords and biometrics.
Common docking options
1
allow professionals to share
docking solutions for the HP ProBook 6560b in various
locations.
ProBook 6560b
Tailored for Business
Equip your team with HP’s 15.6-inch
diagonal business notebook with a
new design, the latest Intel technology,
common docking,
1
and choice of
graphics.
Windows
®
. Life without Walls
TM
. HP recommends Windows 7.
Are you looking for the manual for HP ProBook 6560b? You are in the right place. Below the document viewer for HP ProBook 6560b manual in PDF format. To save your time, we say that the most common problems with HP ProBook 6560b can be found in the manual in the «Troubleshooting» section. Check the appropriate page number in the table of contents, and then enter it in the page number box on the right side of the document viewer for HP ProBook 6560b.
If you have questions about the HP ProBook 6560b device, use the form at the bottom of the page and ask our community a question.
Remember! Reading the HP ProBook 6560b user manual and adhering to the rules of using the device provided there, greatly help in its effective use. It is important to correctly configure HP ProBook 6560b, it will save resources needed to use it. In case of problems, you will also find recommended companies that can properly fix HP ProBook 6560b. One of the most important reasons why you should read the HP ProBook 6560b user manual is that to take advantage of the warranty provided on HP ProBook 6560b — the device must be used in accordance with the manufacturer’s recommendations presented in user manual.
If you want to download HP ProBook 6560b manual, use the «Download» button below. You can easily view the downloaded version and print selected manual pages HP ProBook 6560b. All manuals on our website are available in PDF format, which is the most universal format that is as easy to use as possible on all operating systems.
-
Драйверы
61
-
Руководства по ремонту
1
-
Инструкции по эксплуатации
14
Языки:
HP Probook 6560b инструкция по эксплуатации
(105 страниц)
- Языки:Английский
-
Тип:
PDF -
Размер:
974.53 KB
Просмотр
HP Probook 6560b инструкция по эксплуатации
(106 страниц)
- Языки:Эстонский
-
Тип:
PDF -
Размер:
3.76 MB
Просмотр
HP Probook 6560b инструкция по эксплуатации
(42 страницы)
- Языки:Турецкий
-
Тип:
PDF -
Размер:
2.05 MB
Просмотр
HP Probook 6560b инструкция по эксплуатации
(40 страниц)
- Языки:Китайский
-
Тип:
PDF -
Размер:
2.06 MB
Просмотр
HP Probook 6560b инструкция по эксплуатации
(42 страницы)
- Языки:Испанский
-
Тип:
PDF -
Размер:
2 MB
Просмотр
HP Probook 6560b инструкция по эксплуатации
(42 страницы)
- Языки:Тайский
-
Тип:
PDF -
Размер:
2.08 MB
Просмотр
HP Probook 6560b инструкция по эксплуатации
(45 страниц)
- Языки:Немецкий
-
Тип:
PDF -
Размер:
2.01 MB
Просмотр
HP Probook 6560b инструкция по эксплуатации
(41 страница)
- Языки:Шведский
-
Тип:
PDF -
Размер:
1.99 MB
Просмотр
HP Probook 6560b инструкция по эксплуатации
(42 страницы)
- Языки:Португальский
-
Тип:
PDF -
Размер:
2 MB
Просмотр
HP Probook 6560b инструкция по эксплуатации
(41 страница)
- Языки:Иврит
-
Тип:
PDF -
Размер:
2.05 MB
Просмотр
HP Probook 6560b инструкция по эксплуатации
(43 страницы)
- Языки:Нидерландский
-
Тип:
PDF -
Размер:
2 MB
Просмотр
HP Probook 6560b инструкция по эксплуатации
(41 страница)
- Языки:Датский
-
Тип:
PDF -
Размер:
2 MB
Просмотр
HP Probook 6560b инструкция по эксплуатации
(41 страница)
- Языки:Финский
-
Тип:
PDF -
Размер:
1.99 MB
Просмотр
HP Probook 6560b инструкция по эксплуатации
(41 страница)
- Языки:Корейский
-
Тип:
PDF -
Размер:
2.08 MB
Просмотр
На NoDevice можно скачать инструкцию по эксплуатации для HP Probook 6560b. Руководство пользователя необходимо для ознакомления с правилами установки и эксплуатации HP Probook 6560b. Инструкции по использованию помогут правильно настроить HP Probook 6560b, исправить ошибки и выявить неполадки.