
-
Инструкции по эксплуатации
1
HYUNDAI H-1625 инструкция по эксплуатации
(13 страниц)
- Языки:Русский
-
Тип:
PDF -
Размер:
159.18 KB -
Описание:
Портативный радиоприемник
Просмотр
На NoDevice можно скачать инструкцию по эксплуатации для HYUNDAI H-1625. Руководство пользователя необходимо для ознакомления с правилами установки и эксплуатации HYUNDAI H-1625. Инструкции по использованию помогут правильно настроить HYUNDAI H-1625, исправить ошибки и выявить неполадки.
H-1625
PORTABLE RADIO RECEIVER
ПОРТАТИВНЫЙ
РАДИОПРИЕМНИК
Руководство по эксплуатации Instruction manual
Instruction manual Instruction manual
Dear customer!
Thank you for purchasing our product. For safety, it is strongly recommended to read
this manual carefully before connecting, operating and/or adjusting the product and keep
the manual for reference in future.
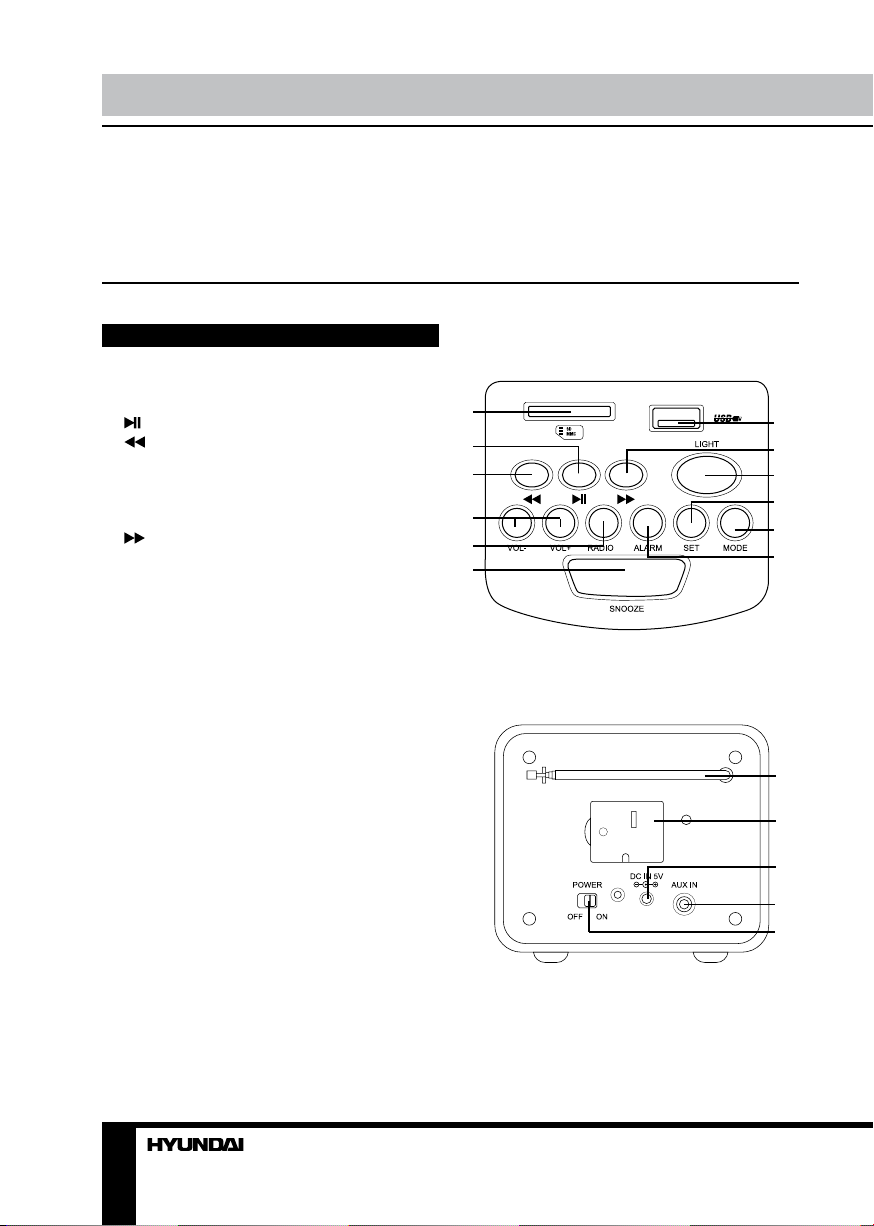
Description
Top panel
1. SD/MMC memory card slot
2. button
3. button
4. VOL-/VOL+ buttons
5. RADIO button
6. SNOOZE button
7. USB port
8. button
9. LIGHT button
10. SET button
11. MODE button
12. ALARM button
1
2
3
4
5
6
7
8
9
10
11
12
Back panel
1. Telescopic FM-antenna
2. Battery compartment
3. Power (DC5V) input
4. AUX input
5. POWER ON/OFF switch
Not indicated: display (front panel), speaker
(left and right panels)
2 3
1
2
3
4
5
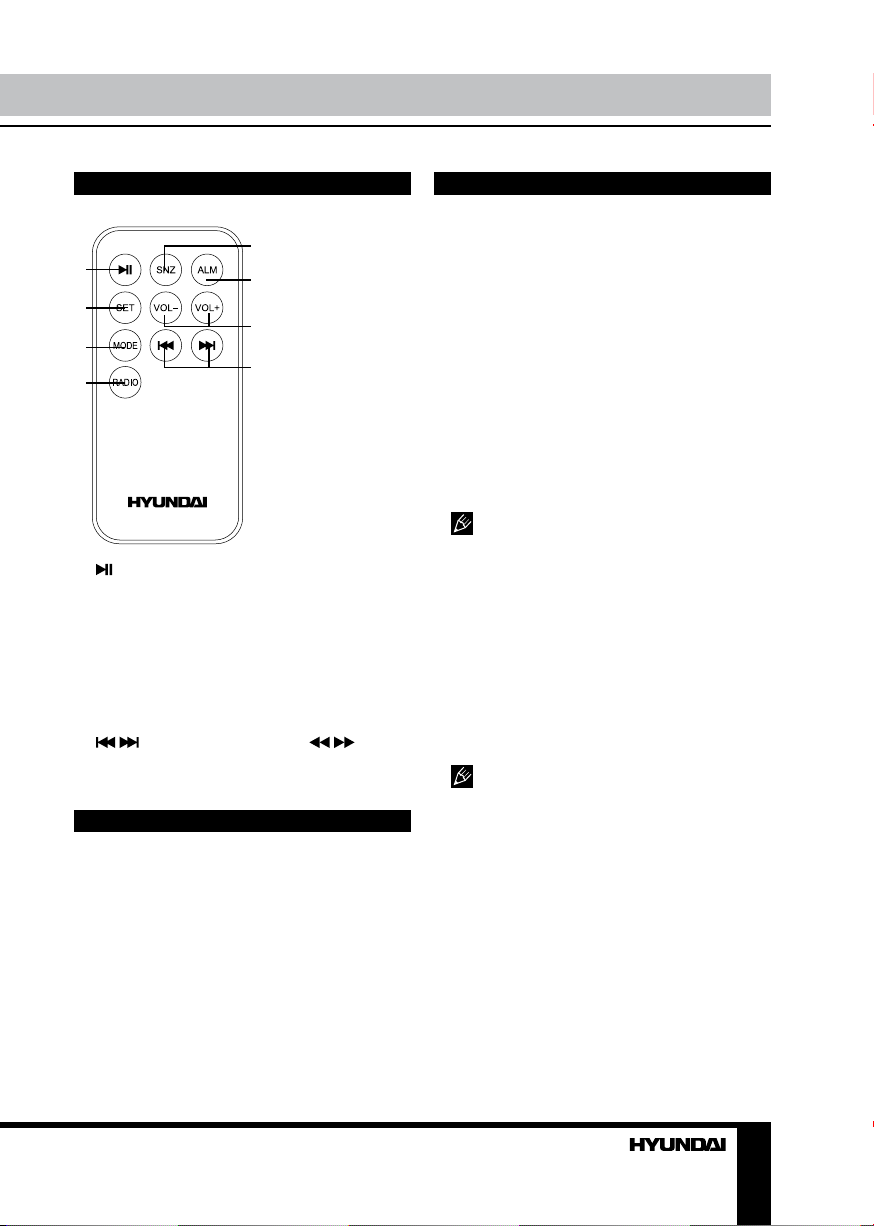
Remote controller
5
1
2
3
4
1.
button
2. SET button
3. MODE button
4. RADIO button
5. SNZ button (corresponds to SNOOZE
button on the unit)
6. ALM button (corresponds to ALARM button
on the unit)
7. VOL+/VOL- buttons
8. / buttons (correspond to /
buttons on the unit)
6
7
8
Important safeguards
• The instruction manual contains important
operating and maintenance instructions. For
your safety, it is necessary to refer the manual.
Keep the manual for use in future.
• Do not hit or drop the unit.
• Do not expose the unit to vibration, direct
sunlight, too high or low temperature or humidity.
• Do not disassemble the unit yourself.
Refer servicing to qualified service personnel.
• When the battery is exhausted, it should
be removed from the set to prevent leakage.
Power supply
Battery power
• The built-in battery used for the unit power
supply is rechargeable. The battery must be
fully charged before the first use. The first
charging time should be about 14…16 hours.
It will reach its optimal performance after fully
charged and discharged for a few times.
• To ensure the battery in optimal state,
it is recommended to discharge the battery
fully once each month at least by using up the
power so as to switch off the unit.
• In course of charging, it is normal to find
the battery and the unit warm up slightly. The
unit can automatically self-protect so as to suit
for the temperature.
Actual time of usage for the battery
varies according to operation mode.
Procedure for battery charging
• Connect the adapter to a power supply
socket, and insert the charging plug into the
Power input of the unit.
• The unit will start charging after well
connected. The power indicator will light up in
red.
• When fully charged, the course of charging
stops automatically. Now the adaptor can be
unplugged from the unit.
To ensure safety, neither change the
parts and fitments of the battery by yourself nor
unwrap the battery. We suggest you use only
the battery and the adapter supplied with the
unit, so as not to do the damage to the unit.
Additional power
There are 2 batteries AG13 (1.5 V) in the
terminal inside the battery compartment. This
is additional power intended for operation
of clock, alarm, calendar, termometer and
countdown timer. Without the additional power
the time and alarm settings will not be stored if
the unit is switched off.
Instruction manual
General operations
Power on/off
When the unit is connected to the current
supply mains, slide POWER switch to ON
position to switch the power on. To switch the
power off, slide POWER switch to OFF position.
Clock and calendar
• In clock mode (no ALARM indication)
press and hold SET button to enable time
setting mode. Press repeatedly SET button
to go to setting of parameters in following
sequence: minute => hour => 12/24-hour
=> year => month => date. The selected
parameter will blink meaning readiness for
adjustment. The default time setting is 01-01,
2009, THU, 12-hour, AM12:00.
• Press VOL+ button to adjust the parameter
up. Press VOL- to adjust the parameter down.
• Day of week will be set automatically.
• In time setting mode, if no button is pressed
within 30 seconds after a parameter is selected,
the unit will automatically go to clock mode.
• In time setting mode, press MODE button
to return to clock mode.
Termometer
The unit is equipped with a built-in
termometer. The current temperature is
updated every 30 seconds and is shown on the
display. In clock mode press VOL- button to
select Celsius or Fahrenheit termometer mode.
AUX input
To connect an external audio device (eg.
MP3-player), please use a standard stereo
cable with 3.5 mm to 3.5 mm plugs to connect
the audio line-out of the external device to the
AUX input socket of this unit.
Backlight
Press LIGHT button on the unit to switch on/
off the display backlight. When the backlight
is off, pressing any button will enable the
backlight for 10 seconds.
Radio operation
• Radio reception is only available when the
unit is powered by the rechargeable battery.
• In clock mode press RADIO button to
switch the FM radio on.
• For FM reception extend the telescopic
antenna.
• To adjust the frequency step by step
press repeatedly
search of a station, press and hold
button; the unit will look for the next available
station and start its broadcast. Repeat the
operation to search more stations.
• To save a station, press and hold SET
button. The memory position will blink. Press
VOL+/VOL- buttons to select a memory
position. Press SET button to save the current
station under the selected number. You can
maximum 20 stations in the memory.
During program saving, if no button is
pressed within several seconds, the unit will
return to normal radio mode.
• To call a saved station, press SET button,
then press VOL+/VOL- buttons.
• To adjust volume, in radio mode press
repeatedly VOL+/VOL- buttons.
• To switch off the radio, press MODE button.
/ buttons. For automatic
or
USB/SD/MMC operation
Connecting USB/SD/MMC
• Insert a USB device into the USB port or
insert a memory card into the memory card
slot. Press button to enable USB/SD/MMC
mode. The unit will start reading the device,
LOAD will be displayed. Press and hold
button to select between USB or SD/MMC
mode, if both devices are inserted (USB is
played by default). If no device is detected, NO
CARD will be dislpayed.
• When the device and tracks on it are
detected, the display shows the total number of
tracks, currently playing track number, playback
time, equalizer mode and other playback
4
Просмотр
Доступно к просмотру 12 страниц. Рекомендуем вам скачать файл инструкции, поскольку онлайн просмотр документа может сильно отличаться от оригинала.
-
H-1625
ПОРТАТИВНЫЙ
PORTABLE RADIO RECEIVER                          РАДИОПРИЕМНИК
Instruction manual          Руководство по эксплуатации
-
Instruction manual                                                                                                        Instruction manual
Dear customer!
Thank you for purchasing our product. For safety, it is strongly recommended to read
this manual carefully before connecting, operating and/or adjusting the product and keep
the manual for reference in future.
Description
Top panel
1.  SD/MMC memory card slot         1
2.    button                                                        7
3.     button                       2                               8
4.  VOL-/VOL+ buttons
5.  RADIO button                    3                               9
6.  SNOOZE button                                                   10
7.  USB port                        4
8.     button                       5                               11
9.  LIGHT button                                                    12
10. SET button                      6
11. MODE button
12. ALARM button
Back panel
1.  Telescopic FM-antenna
2.  Battery compartment
3.  Power (DC5V) input                                              1
4.  AUX input
5.  POWER ON/OFF switch
2
Not indicated: display (front panel), speaker
(left and right panels)                                             3
4
5
2                                                                                                                                                  3
-
Instruction manual                                Instruction manual
Remote controller                   Power supply
Battery power
5                   •  The built-in battery used for the unit power
1                 6                 supply is rechargeable. The battery must be
fully charged before the first use. The first
2                                   charging time should be about 14…16 hours.
7                 It will reach its optimal performance after fully
3                                   charged and discharged for a few times.
8                   •  To ensure the battery in optimal state,
4                                   it is recommended to discharge the battery
fully once each month at least by using up the
power so as to switch off the unit.
•  In course of charging, it is normal to find
the battery and the unit warm up slightly. The
unit can automatically self-protect so as to suit
for the temperature.
Actual time of usage for the battery
varies according to operation mode.
1.    button
2.  SET button                        Procedure for battery charging
3.  MODE button                       •  Connect the adapter to a power supply
4.  RADIO button                    socket, and insert the charging plug into the
5.  SNZ button (corresponds to SNOOZE   Power input of the unit.
button on the unit)                   •  The unit will start charging after well
6.  ALM button (corresponds to ALARM button   connected. The power indicator will light up in
on the unit)                        red.
7.  VOL+/VOL- buttons                 •  When fully charged, the course of charging
8.    /   buttons (correspond to   /     stops automatically. Now the adaptor can be
buttons on the unit)                unplugged from the unit.
To ensure safety, neither change the
parts and fitments of the battery by yourself nor
Important safeguards              unwrap the battery. We suggest you use only
the battery and the adapter supplied with the
unit, so as not to do the damage to the unit.
•  The instruction manual contains important
operating and maintenance instructions. For   Additional power
your safety, it is necessary to refer the manual.   There are 2 batteries AG13 (1.5 V) in the
Keep the manual for use in future.  terminal inside the battery compartment. This
•  Do not hit or drop the unit.   is additional power intended for operation
•  Do not expose the unit to vibration, direct   of clock, alarm, calendar, termometer and
sunlight, too high or low temperature or humidity.  countdown timer. Without the additional power
•  Do not disassemble the unit yourself.   the time and alarm settings will not be stored if
Refer servicing to qualified service personnel.  the unit is switched off.
•  When the battery is exhausted, it should
be removed from the set to prevent leakage.
2                                                                          3
- 1
- 2
- 3
- 4
- 12
H-1625 PORTABLE RADIO RECEIVER ПОРТАТИВНЫЙ РАДИОПРИЕМНИК Instruction manual Руководство по эксплуатации
Instruction manual Dear customer! Thank you for purchasing our product. For safety, it is strongly recommended to read this manual carefully before connecting, operating and/or adjusting the product and keep the manual for reference in future. Description Top panel 1. SD/MMC memory card slot 2.
Instruction manual Remote controller Power supply 5 1 2 6 7 3 4 8 1. button 2. SET button 3. MODE button 4. RADIO button 5. SNZ button (corresponds to SNOOZE button on the unit) 6. ALM button (corresponds to ALARM button on the unit) 7. VOL+/VOL- buttons 8. / buttons (correspond to / buttons on the
Instruction manual General operations Power on/off When the unit is connected to the current supply mains, slide POWER switch to ON position to switch the power on. To switch the power off, slide POWER switch to OFF position. Clock and calendar • In clock mode (no ALARM indication) press and hold
Instruction manual information. If no tracks are found in the storage device, NO SONG will be displayed. Playback operations • During playback press button to pause playback. Press this button again to resume playback. • During playback press / buttons to go to previous or next track. • To adjust
Instruction manual for 3 minutes. After 3 minutes the alarm sound will go on again. • When the alarm signal is on, press any button (except SNOOZE) to switch off the alarm sound completely. Snooze function is only available if Bibi sound is selected for alarm signal. Sleep timer • In USB/SD/MMC
Руководство по эксплуатации Уважаемый покупатель! Благодарим Вас за покупку нашего изделия. Чтобы понять, как правильно и безопасно пользоваться Вашей моделью изделия, рекомендуется тщательно изучить настоящее руководство перед включением, регулировкой и эксплуатацией изделия. Сохраняйте
Руководство по эксплуатации Пульт дистанционного управления 5 1 6 2 7 3 8 4 комнатах, около кухонных плит, отопительного оборудования. • Не разбирайте корпус устройства самостоятельно. Доверяйте ремонт устройства только квалифицированным специалистам. В приборе находятся оголенные провода высокого
Руководство по эксплуатации ряда автоматически прекращается. После этого разъем адаптера нужно извлечь из входа для адаптера. В целях безопасности не заменяйте отдельные части аккумулятора и его компоненты, а также не разбирайте его. Рекомендуется пользоваться только той батареей и адаптером,
Руководство по эксплуатации ты нажимайте кнопки / . Для автоматического поиска радиостанции нажмите и удерживайте кнопку или ; устройство выполнит поиск ближайшей станции с сильным сигналом и после ее нахождения начнет ее вещание. Повторите эту операцию для поиска других доступных станций. • Чтобы
Руководство по эксплуатации накопителя объемом до 32 Гб и воспроизведения с него MP3-файлов (совместим с версией USB 2.0). • Устройство также оснащено разъемом для карт памяти SD/MMC объемом до 16 Гб, с которых возможно воспроизведение MP3-файлов. Внимание: Всегда выключайте устройство или
Руководство по эксплуатации задать время, по истечении которого устройство автоматически отключится. При каждом нажатии время будет изменяться на 10 минут. Вы можете установить интервал автоотключения от 10 минут до 3 часов. После того, как время таймера будет установлено, нажмите кнопку ALARM для