

Congratulations
By purchasing a Gigaset, you have chosen a brand that is fully committed
to sustainability. This product’s packaging is eco-friendly!
To learn more, visit www.gigaset.com.


The handset at a glance
i
à V
07:15
INT 1 14 Oct
Calls SMS
2
3
5
4
6
7
15
13
11
8
1
14
16
9
10
12
The handset at a glance
1 Display in idle status
2 Battery charge status
¢page 18)
(
3 Display keys (
¢page 21)
4 Message key (
Access to calls and message lists;
Flashes: new message or new call
5 End call key, On/Off key
End call, cancel function, go back one menu
level (press briefly), back to idle status (press
and hold), activate/deactivate handset (press
and hold in idle status)
6 Hash key
Keypad lock on/off (press and hold in
idle status);
toggles between upper/lower case and digits
7 Mute key (
Mute the microphone
8 Microphone
9 Recall key
— Consultation call (flash)
— Insert a dialling pause (press and hold)
10 Star key
Ringtone on/off (press and hold);
with an open connection: switch between dial
pulsing/tone dialling (press briefly);
Text input: Open table of special characters
11 Connection socket for headset (
12 Key 1
Dial answering machine (C610A only)/network
mailbox (press and hold)
13 Talk k ey
Flashes: incoming call;
Accept a call; open redial list (press briefly);
start dialling (press and hold);
When writing an SMS: send SMS
14 Handfree key
Switch between earpiece and handfree mode
15 Control key (
16 Signal strength (
Green: Eco Mode activated (¢page 57)
17 Answering machine icon (C610A only)
Answering machine switched on;
Flashes: Answering machine is recording a
message or is being operated by another inter-
nal party
¢page 38)
¢page 31)
¢page 18)
¢page 20)
¢page 18)
Gigaset service contact numbers:
For personal advice on our range of products and for repairs or guarantee/warranty claims call:
Service Centre UK: 08453 6708 12
(local call cost charge)
1

Display symbols
Ø
«
Ú
Signalling
External call (¢ page 29)
ØåÚ Ø
þ
Ú
Internal call (¢page 59)
Answering machine is
recording (
¢ page 50)
i à ó V
Û 08:00
07:15
INT 1 14 Oct
Ã
™
¾
02 10 09 08
Calls SMS
ØðÚ
Anniversary (¢ page 37)
ØìÚ
Alarm clock (¢ page 58)
Signal strength i(¢ page 57)
or Eco Mode+ ¼
icon (¢ page 57)
Answering machine activated (C610A only)
Ringtone switched off (
¢ page 66)
Battery charging (
¢ page 18)
Battery charge status (
¢ page 18)
Alarm switched on and wake-up time (
¢ page 58)
Current time (
¢ page 18)
Current day and month (¢page 18)
Name of the handset (
¢ page 61)
Number of new messages:
u à on the answering machine (Gigaset C610A only)/
network mailbox (
¢ page 38)
u ™ in the list of missed calls (¢ page 38)
u ¾ in the SMS list (¢ page 43)
u in the list of missed appointments (¢page 40)
Display symbols
The following symbols are displayed dependent on the settings and the operating status of
your telephone:
2

The base at a glance
The base at a glance
You can use the keys on the base to register
handsets to the base, search for handsets
(paging)
grated answering machine (Gigaset C610A
only).
Gigaset C610A base
¢ page 59 and operate the inte-
During message playback:
4 Play/stop key
Play back new messages from answering
machine or cancel playback (press briefly).
Play back new and old messages (press and
hold).
5 Sk ip to next mess age ( press once ) or next me s-
sage but one (press twice).
6 Skip back five seconds (press briefly once), to
skip back to the beginning of the message
(press and hold) or skip back to the previous
message (press twice).
7 Delete current message.
8 Adjust volume during message playback:
= quieter;
While an external call is being signalled: adjust
ringtone volume.
ø = louder.
÷
Please note:
If the answering machine is being operated
from a handset or if it is recording a message
(00 flashes), it cannot be operated from the
base.
Gigaset C610 base
1 Registration/paging key
Press briefly: Search for handsets (paging)
¢page 59.
Press and hold: Register handsets and
DECT devices
2 On/Off key
Activating/deactivating the answering machine.
3 Display icon
Lights up: answering machine is activated.
The number of saved messages is displayed.
00 flashes: The answering machine is recording a new message.
Flashes slowly: There are new messages. The
number of new messages is displayed.
99 flashes quickly: The answering machine is
full.
¢page 58.
Registration/paging key
– Press briefly: Search for handsets (paging)
¢page 59.
– Press and hold: Register handsets and
DECT devices
¢page 58.
3

Contents
Contents
The handset at a glance . . . . . . . . . . . . . . . . . . . . . . . . . . . . . . . . . . . . . . . . . . . . 1
Display symbols . . . . . . . . . . . . . . . . . . . . . . . . . . . . . . . . . . . . . . . . . . . . . . . . . . . 2
The base at a glance . . . . . . . . . . . . . . . . . . . . . . . . . . . . . . . . . . . . . . . . . . . . . . . 3
Safety precautions . . . . . . . . . . . . . . . . . . . . . . . . . . . . . . . . . . . . . . . . . . . . . . . . . 7
Gigaset C610/C610A – more than just a telephone . . . . . . . . . . . . . . . . . . 8
First steps . . . . . . . . . . . . . . . . . . . . . . . . . . . . . . . . . . . . . . . . . . . . . . . . . . . . . . . . . 9
Checking the pack contents . . . . . . . . . . . . . . . . . . . . . . . . . . . . . . . . . . . . . . . . . . . . . . . . . . . 9
Setting up the base and charging cradle (if included) . . . . . . . . . . . . . . . . . . . . . . . . . 10
Connecting the base . . . . . . . . . . . . . . . . . . . . . . . . . . . . . . . . . . . . . . . . . . . . . . . . . . . . . . . . . 10
Connecting the charging cradle (if included) . . . . . . . . . . . . . . . . . . . . . . . . . . . . . . . . . . 11
Setting up the handset for use . . . . . . . . . . . . . . . . . . . . . . . . . . . . . . . . . . . . . . . . . . . . . . . 12
Changing the display language . . . . . . . . . . . . . . . . . . . . . . . . . . . . . . . . . . . . . . . . . . . . . . 15
Setting the date and time . . . . . . . . . . . . . . . . . . . . . . . . . . . . . . . . . . . . . . . . . . . . . . . . . . . . 16
Connecting the headset . . . . . . . . . . . . . . . . . . . . . . . . . . . . . . . . . . . . . . . . . . . . . . . . . . . . . 18
What would you like to do next? . . . . . . . . . . . . . . . . . . . . . . . . . . . . . . . . . . . . . . . . . . . . . . 19
Using the phone . . . . . . . . . . . . . . . . . . . . . . . . . . . . . . . . . . . . . . . . . . . . . . . . . . 20
Control key . . . . . . . . . . . . . . . . . . . . . . . . . . . . . . . . . . . . . . . . . . . . . . . . . . . . . . . . . . . . . . . . . . 20
Display keys . . . . . . . . . . . . . . . . . . . . . . . . . . . . . . . . . . . . . . . . . . . . . . . . . . . . . . . . . . . . . . . . . 21
Keys on the keypad . . . . . . . . . . . . . . . . . . . . . . . . . . . . . . . . . . . . . . . . . . . . . . . . . . . . . . . . . . 21
Correcting incorrect entries . . . . . . . . . . . . . . . . . . . . . . . . . . . . . . . . . . . . . . . . . . . . . . . . . . 21
Menu guidance . . . . . . . . . . . . . . . . . . . . . . . . . . . . . . . . . . . . . . . . . . . . . . . . . . . . . . . . . . . . . . 22
Activating/deactivating the handset . . . . . . . . . . . . . . . . . . . . . . . . . . . . . . . . . . . . . . . . . . 23
Activating/deactivating the keypad lock . . . . . . . . . . . . . . . . . . . . . . . . . . . . . . . . . . . . . . 23
Illustration of operating steps in the user guide . . . . . . . . . . . . . . . . . . . . . . . . . . . . . . . 24
Menu overview . . . . . . . . . . . . . . . . . . . . . . . . . . . . . . . . . . . . . . . . . . . . . . . . . . . 26
Making calls . . . . . . . . . . . . . . . . . . . . . . . . . . . . . . . . . . . . . . . . . . . . . . . . . . . . . . 29
Making an external call . . . . . . . . . . . . . . . . . . . . . . . . . . . . . . . . . . . . . . . . . . . . . . . . . . . . . . 29
One Touch Call . . . . . . . . . . . . . . . . . . . . . . . . . . . . . . . . . . . . . . . . . . . . . . . . . . . . . . . . . . . . . . . 29
Ending a call . . . . . . . . . . . . . . . . . . . . . . . . . . . . . . . . . . . . . . . . . . . . . . . . . . . . . . . . . . . . . . . . . 29
Accepting a call . . . . . . . . . . . . . . . . . . . . . . . . . . . . . . . . . . . . . . . . . . . . . . . . . . . . . . . . . . . . . . 29
Calling Line Identification . . . . . . . . . . . . . . . . . . . . . . . . . . . . . . . . . . . . . . . . . . . . . . . . . . . . 30
Notes on calling line display (CLIP) . . . . . . . . . . . . . . . . . . . . . . . . . . . . . . . . . . . . . . . . . . . . 30
Handfree mode . . . . . . . . . . . . . . . . . . . . . . . . . . . . . . . . . . . . . . . . . . . . . . . . . . . . . . . . . . . . . . 31
Switching to mute . . . . . . . . . . . . . . . . . . . . . . . . . . . . . . . . . . . . . . . . . . . . . . . . . . . . . . . . . . . 31
Making calls using network services . . . . . . . . . . . . . . . . . . . . . . . . . . . . . . . 32
Calling Line Identification . . . . . . . . . . . . . . . . . . . . . . . . . . . . . . . . . . . . . . . . . . . . . . . . . . . . 32
Ringback . . . . . . . . . . . . . . . . . . . . . . . . . . . . . . . . . . . . . . . . . . . . . . . . . . . . . . . . . . . . . . . . . . . . 32
Call waiting during an external call . . . . . . . . . . . . . . . . . . . . . . . . . . . . . . . . . . . . . . . . . . . 32
Call divert (CD) . . . . . . . . . . . . . . . . . . . . . . . . . . . . . . . . . . . . . . . . . . . . . . . . . . . . . . . . . . . . . . . 33
Consultation call, call swap . . . . . . . . . . . . . . . . . . . . . . . . . . . . . . . . . . . . . . . . . . . . . . . . . . . 33
4

Contents
Using the directory and lists . . . . . . . . . . . . . . . . . . . . . . . . . . . . . . . . . . . . . . . 34
Directory . . . . . . . . . . . . . . . . . . . . . . . . . . . . . . . . . . . . . . . . . . . . . . . . . . . . . . . . . . . . . . . . . . . . 34
Redial list . . . . . . . . . . . . . . . . . . . . . . . . . . . . . . . . . . . . . . . . . . . . . . . . . . . . . . . . . . . . . . . . . . . . 37
Incoming SMS message list . . . . . . . . . . . . . . . . . . . . . . . . . . . . . . . . . . . . . . . . . . . . . . . . . . 37
Answering machine list (Gigaset C610A only) . . . . . . . . . . . . . . . . . . . . . . . . . . . . . . . . . 38
Call lists . . . . . . . . . . . . . . . . . . . . . . . . . . . . . . . . . . . . . . . . . . . . . . . . . . . . . . . . . . . . . . . . . . . . . 38
Message key function . . . . . . . . . . . . . . . . . . . . . . . . . . . . . . . . . . . . . . . . . . . . . . . . . . . . . . . . 38
List of missed appointments . . . . . . . . . . . . . . . . . . . . . . . . . . . . . . . . . . . . . . . . . . . . . . . . . 40
Making cost-effective calls . . . . . . . . . . . . . . . . . . . . . . . . . . . . . . . . . . . . . . . . 40
Automatic network provider code (preselection) . . . . . . . . . . . . . . . . . . . . . . . . . . . . . . 40
SMS (text messages) . . . . . . . . . . . . . . . . . . . . . . . . . . . . . . . . . . . . . . . . . . . . . . 42
Writing/sending an SMS . . . . . . . . . . . . . . . . . . . . . . . . . . . . . . . . . . . . . . . . . . . . . . . . . . . . . 42
Receiving an SMS . . . . . . . . . . . . . . . . . . . . . . . . . . . . . . . . . . . . . . . . . . . . . . . . . . . . . . . . . . . . 43
SMS with vCard . . . . . . . . . . . . . . . . . . . . . . . . . . . . . . . . . . . . . . . . . . . . . . . . . . . . . . . . . . . . . . 45
Notification by SMS . . . . . . . . . . . . . . . . . . . . . . . . . . . . . . . . . . . . . . . . . . . . . . . . . . . . . . . . . . 46
SMS mailboxes . . . . . . . . . . . . . . . . . . . . . . . . . . . . . . . . . . . . . . . . . . . . . . . . . . . . . . . . . . . . . . . 46
Setting SMS centres . . . . . . . . . . . . . . . . . . . . . . . . . . . . . . . . . . . . . . . . . . . . . . . . . . . . . . . . . . 47
SMS on a PABX . . . . . . . . . . . . . . . . . . . . . . . . . . . . . . . . . . . . . . . . . . . . . . . . . . . . . . . . . . . . . . . 48
Activating/deactivating first ringtone muting . . . . . . . . . . . . . . . . . . . . . . . . . . . . . . . . . 48
Activating/deactivating SMS function . . . . . . . . . . . . . . . . . . . . . . . . . . . . . . . . . . . . . . . . 48
SMS troubleshooting . . . . . . . . . . . . . . . . . . . . . . . . . . . . . . . . . . . . . . . . . . . . . . . . . . . . . . . . 49
Operating the answering machine of the Gigaset C610A base . . . . . . . 50
Operation via the handset . . . . . . . . . . . . . . . . . . . . . . . . . . . . . . . . . . . . . . . . . . . . . . . . . . . . 50
Activating/deactivating call screening . . . . . . . . . . . . . . . . . . . . . . . . . . . . . . . . . . . . . . . . 53
Setting the recording parameters . . . . . . . . . . . . . . . . . . . . . . . . . . . . . . . . . . . . . . . . . . . . 54
Resetting fast access for the answering machine using key 1 . . . . . . . . . . . . . . . . . . 54
Operating when on the move (remote operation) . . . . . . . . . . . . . . . . . . . . . . . . . . . . . 54
Using the network mailbox . . . . . . . . . . . . . . . . . . . . . . . . . . . . . . . . . . . . . . . 56
Configuring fast access for the network mailbox . . . . . . . . . . . . . . . . . . . . . . . . . . . . . . 56
Viewing the network mailbox message . . . . . . . . . . . . . . . . . . . . . . . . . . . . . . . . . . . . . . . 56
ECO DECT . . . . . . . . . . . . . . . . . . . . . . . . . . . . . . . . . . . . . . . . . . . . . . . . . . . . . . . . 57
Setting the alarm clock . . . . . . . . . . . . . . . . . . . . . . . . . . . . . . . . . . . . . . . . . . . 58
Using several handsets . . . . . . . . . . . . . . . . . . . . . . . . . . . . . . . . . . . . . . . . . . . 58
Registering handsets . . . . . . . . . . . . . . . . . . . . . . . . . . . . . . . . . . . . . . . . . . . . . . . . . . . . . . . . . 58
De-registering handsets . . . . . . . . . . . . . . . . . . . . . . . . . . . . . . . . . . . . . . . . . . . . . . . . . . . . . . 59
Locating a handset («Paging») . . . . . . . . . . . . . . . . . . . . . . . . . . . . . . . . . . . . . . . . . . . . . . . . 59
Changing the base . . . . . . . . . . . . . . . . . . . . . . . . . . . . . . . . . . . . . . . . . . . . . . . . . . . . . . . . . . . 59
Making internal calls . . . . . . . . . . . . . . . . . . . . . . . . . . . . . . . . . . . . . . . . . . . . . . . . . . . . . . . . . 59
Listening in to an external call . . . . . . . . . . . . . . . . . . . . . . . . . . . . . . . . . . . . . . . . . . . . . . . . 61
Changing the name of a handset . . . . . . . . . . . . . . . . . . . . . . . . . . . . . . . . . . . . . . . . . . . . . 61
Changing a handset’s internal number . . . . . . . . . . . . . . . . . . . . . . . . . . . . . . . . . . . . . . . 61
Using a handset as a room monitor (Babyphone) . . . . . . . . . . . . . . . . . . . 62
5

Contents
Handset settings . . . . . . . . . . . . . . . . . . . . . . . . . . . . . . . . . . . . . . . . . . . . . . . . . 63
Quick access to numbers and functions . . . . . . . . . . . . . . . . . . . . . . . . . . . . . . . . . . . . . . . 63
Changing the display language . . . . . . . . . . . . . . . . . . . . . . . . . . . . . . . . . . . . . . . . . . . . . . 64
Setting the display . . . . . . . . . . . . . . . . . . . . . . . . . . . . . . . . . . . . . . . . . . . . . . . . . . . . . . . . . . . 64
Activating/deactivating auto answer . . . . . . . . . . . . . . . . . . . . . . . . . . . . . . . . . . . . . . . . . 65
Changing the speaker/earpiece volume . . . . . . . . . . . . . . . . . . . . . . . . . . . . . . . . . . . . . . 65
Changing ringtones . . . . . . . . . . . . . . . . . . . . . . . . . . . . . . . . . . . . . . . . . . . . . . . . . . . . . . . . . . 66
Activating/deactivating advisory tones . . . . . . . . . . . . . . . . . . . . . . . . . . . . . . . . . . . . . . . 67
Setting your own area code . . . . . . . . . . . . . . . . . . . . . . . . . . . . . . . . . . . . . . . . . . . . . . . . . . 67
Restoring the handset default settings . . . . . . . . . . . . . . . . . . . . . . . . . . . . . . . . . . . . . . . . 68
Base settings . . . . . . . . . . . . . . . . . . . . . . . . . . . . . . . . . . . . . . . . . . . . . . . . . . . . . 68
Changing the base ringtones (Gigaset C610A only) . . . . . . . . . . . . . . . . . . . . . . . . . . . 68
Activating/deactivating music on hold . . . . . . . . . . . . . . . . . . . . . . . . . . . . . . . . . . . . . . . 68
Repeater support . . . . . . . . . . . . . . . . . . . . . . . . . . . . . . . . . . . . . . . . . . . . . . . . . . . . . . . . . . . . 68
Protecting against unauthorised access . . . . . . . . . . . . . . . . . . . . . . . . . . . . . . . . . . . . . . . 69
Restoring the base to the factory settings . . . . . . . . . . . . . . . . . . . . . . . . . . . . . . . . . . . . . 69
Connecting the base to the PABX . . . . . . . . . . . . . . . . . . . . . . . . . . . . . . . . . . 70
Dialling modes and recall . . . . . . . . . . . . . . . . . . . . . . . . . . . . . . . . . . . . . . . . . . . . . . . . . . . . 70
Saving an access code (outside line code) . . . . . . . . . . . . . . . . . . . . . . . . . . . . . . . . . . . . . 70
Setting pauses . . . . . . . . . . . . . . . . . . . . . . . . . . . . . . . . . . . . . . . . . . . . . . . . . . . . . . . . . . . . . . . 71
Temporarily switching to tone dialling (DTMF) . . . . . . . . . . . . . . . . . . . . . . . . . . . . . . . . 71
Customer Service & Assistance . . . . . . . . . . . . . . . . . . . . . . . . . . . . . . . . . . . . 72
Questions and answers . . . . . . . . . . . . . . . . . . . . . . . . . . . . . . . . . . . . . . . . . . . . . . . . . . . . . . 73
Authorisation . . . . . . . . . . . . . . . . . . . . . . . . . . . . . . . . . . . . . . . . . . . . . . . . . . . . . . . . . . . . . . . . 74
Guarantee Certificate
United Kingdom . . . . . . . . . . . . . . . . . . . . . . . . . . . . . . . . . . . . . . . . . . . . . . . . . . . . . . . . . . . . . 74
Environment . . . . . . . . . . . . . . . . . . . . . . . . . . . . . . . . . . . . . . . . . . . . . . . . . . . . . 75
Appendix . . . . . . . . . . . . . . . . . . . . . . . . . . . . . . . . . . . . . . . . . . . . . . . . . . . . . . . . 76
Care . . . . . . . . . . . . . . . . . . . . . . . . . . . . . . . . . . . . . . . . . . . . . . . . . . . . . . . . . . . . . . . . . . . . . . . . . 76
Contact with liquid . . . . . . . . . . . . . . . . . . . . . . . . . . . . . . . . . . . . . . . . . . . . . . . . . . . . . . . . . . 76
Specifications . . . . . . . . . . . . . . . . . . . . . . . . . . . . . . . . . . . . . . . . . . . . . . . . . . . . . . . . . . . . . . . . 76
Writing and editing text . . . . . . . . . . . . . . . . . . . . . . . . . . . . . . . . . . . . . . . . . . . . . . . . . . . . . . 77
Accessories . . . . . . . . . . . . . . . . . . . . . . . . . . . . . . . . . . . . . . . . . . . . . . . . . . . . . . . 79
Mounting the base on the wall . . . . . . . . . . . . . . . . . . . . . . . . . . . . . . . . . . . . 82
Mounting the charging cradle on the wall . . . . . . . . . . . . . . . . . . . . . . . . . . 82
Index . . . . . . . . . . . . . . . . . . . . . . . . . . . . . . . . . . . . . . . . . . . . . . . . . . . . . . . . . . . . 83
6

Safety precautions
Safety precautions
Warning
Read the safety precautions and the user guide before use.
Explain their content and the potential hazards associated with using the telephone to your
children.
Only use the mains adapter supplied, as indicated on the underside of the base.
$
ƒ
Only use the recommended, rechargeable batteries (
erwise result in significant health risks and personal injury.
Using your telephone may affect nearby medical equipment. Be aware of the technical conditions in your particular environment e.g., doctor’s surgery.
If you use a medical device (e.g. a pacemaker), please contact the device manufacturer. They will be able to advise you regarding the susceptibility of the device to
external sources of high-frequency energy. Please refer to the “Appendix” chapter
for the specifications of this Gigaset product.
Do not hold the rear of the handset to your ear when it is ringing or when handfree
mode is activated. Otherwise you risk serious and permanent damage to your hearing.
Your Gigaset is compatible with the majority of digital hearing aids on the market.
However, perfect function with all hearing aids cannot be guaranteed.
The handset may cause an unpleasant humming or whistling noise in hearing aids
or cause them to overload. If you require assistance, please contact the hearing aid
supplier.
Do not install the base or charging cradle in bathrooms or shower rooms. The base
and charging cradle are not splashproof (
Do not use your phone in environments with a potential explosion hazard (e.g. paint
shops).
If you give your Gigaset to someone else, make sure you also give them the
user guide.
¢ page 76).
¢ page 76) as this could oth-
Please remove faulty bases from use or have them repaired by our Service department, as they could interfere with other wireless services.
Please note
u Not all of the functions described in this user guide are available in all countries.
u The device cannot be used in the event of a power failure. It is also not possible to trans-
mit emergency calls.
7

Gigaset C610/C610A – more than just a telephone
Gigaset C610/C610A – more than just a telephone
Your telephone sets new standards for the way you communicate at home.
The large TFT display, user-friendly keypad and clearly laid out menu are very sim-
ple to use.
It can do a whole lot more:
u Store anniversaries such as birthdays in your phone and it will remind you
of them in advance.
u Allocate important people to one of six VIP groups so you can identify important
calls from the ringtone and the colour of the allocated VIP group.
u If you only want to accept calls when you can see the number, you can set your
phone to only ring when the phone number is transferred.
u You can assign important numbers to the number keys on your handset.
The number is then dialled by simply pressing the key.
u Set the display to show in large print to increase readability during certain
important situations (e.g. in the directory and in lists).
u Set the menu display to suit your individual requirements so that only the most
important functions (standard mode) or all functions are displayed
(expert mode
marked with the
u Gigaset Green Home – be environmentally aware when using your phone.
For more information, see www.gigaset.com/service
). Menu options that are only available in expert mode are
•
icon.
•
.
You can find additional information about your telephone at
www.gigaset.com/gigasetc610
.
Have fun using your new phone!
8

First steps
Checking the pack contents
First steps
1 one Gigaset C610/C610A base
2 one mains adapter
3 one Gigaset C610H handset
4 one phone cord
5 two batteries
6 one battery cover
7 one belt clip
8 one user guide
If you have purchased a
model with multiple handsets the package should
contain two batteries, a battery cover, a belt clip and a
charging cradle
mains adapter
additional handset.
9 with
J for each
9

First steps
Setting up the base and charging cradle (if included)
The base and charging cradle are designed for use in enclosed dry rooms with a
temperature range of +5°C to +45°C.
¤ Install the base on a level, non-slip surface in a central location in your house or
flat or mount the base or charging cradle on the wall
Please note
Pay attention to the range of the base.
This is up to 300 m in unobstructed outdoor areas and up to 50 m inside buildings. The range is reduced when Eco Mode (
The phone’s feet do not usually leave any marks on surfaces. However, due to the
multitude of different varnishes and polishes used on today’s furnishings, the
occurrence of marks on the surfaces cannot be completely ruled out.
Please note:
u Never expose the telephone to the influence of heat sources, direct sunlight or
other electrical devices.
u Protect your Gigaset from moisture, dust, corrosive liquids and vapours.
Connecting the base
¢ page 57) is activated.
¢ page 82.
¤ First connect the
telephone jack 2
and insert the cables
into the cable ducts.
¤ Then connect the
mains adapter 1.
Please note:
u The mains adapter must always be connected, as the phone will not operate
without a mains connection.
u Only use the mains adapter and phone cord supplied. Pin connections on
telephone cables can vary (pin connections
10
¢ page 77).

Connecting the charging cradle (if included)
¤ Plug the mains adapter into the plug
socket 2.
¤ Connect the flat plug from the mains
adapter 1.
If you need to disconnect the plug from the charging cradle,
press the release button 3 and disconnect the plug 4.
1
2
3
4
First steps
11

First steps
¤ Insert the batteries the
right way round.
The polarity is indicated
in/on the battery compartment.
¤ First insert the battery
cover at the top a.
¤ Then press the cover b
until it clicks into place.
If you need to open the battery
cover, for instance to replace the
batteries, place your fingertip in
the cavity on the casing and pull
the battery cover upwards.
a
b
Setting up the handset for use
The display is protected by a plastic film.
Please remove the protective film!
Inserting the batteries and closing the battery cover
Only use the rechargeable batteries (¢page 76) recommended by Gigaset
Communications GmbH, i.e. never use conventional (non-rechargeable) batteries, as this could result in significant health risks and personal injury. For example, the outer casing of the batteries could be damaged or the batteries could
explode. The phone could also malfunction or be damaged as a result of using
batteries that are not of the recommended type.
Warning
12

Attaching the belt clip
The handset has notches on each side to attach the belt clip.
¤ To attach – press the belt clip
onto the back of the handset so
that the protrusions on the belt
clip engage with the notches.
¤ To remove – using your right
thumb apply pressure to the centre of the belt clip, push the fingernail of your left index finger
between the clip and the casing
and lift the clip upwards.
First steps
13

First steps
Initial charging and discharging of the batteries
The correct charge status can only be displayed if the batteries are first fully
charged and discharged.
¤ Charge the handset in the base for 10 hours.
Please note
The handset must only be placed in the designated Gigaset C610/C610A base
or charging cradle.
¤ After charging, remove the handset from the base and only replace it when the
batteries are fully discharged.
14
Please note
u Each handset is registered with the base at the factory. You do not need to
register the handset again. If you wish to use your handset with a different
base or use further handsets with your base, you have to register the handset
manually
u After the first battery charge and discharge, you may place your handset in
the base after every call.
u Always repeat the charging and discharging procedure if you remove the
batteries from the handset and reinsert them.
u The batteries may warm up during charging. This is not dangerous.
u After a while, the charge capacity of the batteries will decrease for technical
reasons.
¢ page 58.

Changing the display language
L5
¤ Press right on the control key.
¤ Press the keys L and 5 slowly
one after the other.
The display for setting languages appears.
The current language (e.g. English) is
selected.
¤ Press down on the control key
s
…
… until the language you wish to use
is marked, e.g. French.
¤ Press the right key directly below the
display to select this language.
The selection is marked with Ø.
Deutsch
±
English
Ø
Fran cais
±
Deutsch
±
English
Ø
Fran cais
±
Italiano
±
Espanol
±
x
Back Select
Deutsch
±
English
±
Fran cais
Ø
Change the display language, if you do not understand the language currently set.
First steps
¤ Press and hold the end call key a to return to idle status.
15

First steps
Date/Time
Date:
14.10.2011
Time:
00:00
Back Save
¤ Press the key below §Time§ on the screen
display to open the input field.
(If you have already set the time and
date, open the input field via the menu
¢ page 28.)
The Date/Time submenu is shown on
the display.
¤ The active input position flashes.
Enter day, month and year as an
8-digit number via the keypad,
e.g. 4Q
2Q for 14/10/2011.
Date/Time
Date:
31.01.2011
Time:
00:00
Back Save
Press the right or left control key
to change the input position and
correct an entry.
¤ Enter the hours and minutes as
four digit numbers via the keypad,
e.g. QM5 for 07:15 am.
Change the input position with
the control key if necessary.
¤ Press down on the control key to switch
to the time input field.
Setting the date and time
Set the date and time so that the correct date and time can be assigned to incoming
calls, and so that the alarm can be used.
16

First steps
¤ Press the key below §Save§ on the dis-
play screen to confirm your entry.
The display shows Saved. You will hear a
confirmation tone and the handset will
automatically return to idle status.
17

First steps
i à V
07:15
INT 1 14 Oct
Calls SMS
Display in idle status
Once the phone is registered and the time set, the idle display is shown as in this
example. If the answering machine is activated, the answering machine icon
will be displayed in the header.
Displays
u Reception signal between the base and handset:
– good to poor: ÐiÑÒ
– no reception: |
Green: Eco Mode activated (
u Battery charge status:
– { white: charged over 66%
– { white: charged between 34% and 66 %
– y white: charged between 11% and 33 %
– y red: charged below 11%
– y flashes red: battery almost empty (less
than 10-minutes talktime)
– xyxyx{x{ white: battery charging
¢ page 57)
Please note
Have you chosen a color scheme with white background, the white symbols are
displayed in black.
Ã
u INT 1
Internal name of the handset (
If Eco Mode+ (¢ page 57) is activated, the ¼ icon is displayed in the top left.
Your answering machine is set with a pre-recorded announcement.
Your phone is now ready for use!
Connecting the headset
18
¢ page 61)
You can connect a headset with a 2.5 mm jack connector.
See the relevant product page at at www.gigaset.com
information on recommended headsets.
for

What would you like to do next?
Now you have successfully started your Gigaset, you will probably want to adapt it
to your personal requirements. Use the following guide to quickly locate the most
important subjects.
If you are unfamiliar with menu-driven devices such as other Gigaset telephones
you should first read the section entitled «Using the phone»
Information on … … is located here.
Setting the ringtone and volume page 66
Setting the earpiece volume page 65
First steps
¢ page 20.
Recording a personal announcement for the
answering machine
Setting Eco Mode / Eco Mode+ page 57
Preparing the telephone for SMS reception page 42
Operating the telephone on a PABX page 70
Registering existing Gigaset handsets to a base page 58
Transferring directory entries from existing Gigaset
handsets to new handset(s)
If you have any questions about using your phone, please read the tips
on troubleshooting (
(
¢ page 72).
¢ page 73) or contact our Customer Care team
page 51
page 36
19

Using the phone
Using the phone
Control key
Below, the side of the control key that you must press in
the respective operating situation is marked in black
(top, bottom, right, left, centre), e.g. v for «press right on the
control key» or w for «press the centre of the control key».
The control key has a number of different functions:
When the handset is in idle status
s Open the directory.
v Open the main menu.
u Open the list of handsets.
t Call up the menu to set the call volume (¢page 65) of the handset.
In the main menu
t, s, v or u
Navigate to the required function.
In submenus and lists
t / s Scroll up/down line by line.
In input fields
Use the control key to move the cursor up t, down s, right v or left u.
Press and hold v or u to move the cursor word by word.
20
During an external call
s Open the directory.
u Initiate an internal consultation call.
t Adjust the loudspeaker volume for earpiece and handfree mode.
Functions when pressing the middle of the control key
Depending on the operating situation, the key has different functions.
u In idle status the key opens the main menu.
u In submenus, selection and input fields the key takes on the function of the dis-
play keys
§OK§, §Yes§, §Save§, §Select§ or §Change§.
Please note
In these instructions, opening the main menu is represented by pressing right
on the control key and functions are confirmed by pressing the corresponding
display key. However, if you prefer, you can use the control key as described
above.

Display keys
Current display key functions.
Display keys
The functions of the display keys change depending on the particular operating situation. Example:
Some important display keys:
Open a context-dependent menu.
Confirm selection.
Delete key: delete one character/word at a time from right to left.
Go back one menu level or cancel operation.
Store entry.
Open the redial list.
Forward a call to the answering machine.
Keys on the keypad
c/ Q / * etc.
Press the matching key on the handset.
~ Enter digits or letters.
Using the phone
Correcting incorrect entries
You can correct incorrect characters in the input fields by navigating to the incorrect entry using the control key. You can then:
u Delete the character by briefly pressing Ñ or press and hold to delete the
word to the left of the cursor.
u Insert characters next to the cursor.
u Overwrite the highlighted (flashing) character, e.g. when entering time and
date.
21

Using the phone
Settings
Ë
Ê
Ì
Ç
É Ï
Back OK
Settings
Date/Time
Audio Settings
Display
Language
Registration
Back OK
Menu guidance
Your telephone’s functions are accessed using a menu that has a number of levels.
The menu display can be extended (Expert mode •) or reduced
(Standard mode). Expert mode is activated by default.
Settings or functions that are only available in expert mode are marked in these
instructions with the
Switching between standard/expert mode and the menu overview ¢ page 26.
Main menu (first menu level)
¤ When the handset is in idle status press the right v control key to open the
main menu.
The main menu functions are shown in the display with
icons. The icon for the selected function is marked in
orange and the name of the associated function
appears in the display’s header.
To access a function, i.e. to open the corresponding submenu (next menu level):
¤ Use the control key p to select the required func-
tion and press the display key
Briefly press the display key §Back§ or the end call key
a to revert back to idle status.
Submenus
The functions in the submenus are displayed as lists
(example on the right).
To access a function:
¤ Scroll to the function with the control key q and
§OK§.
press
Briefly press the display key §Back§ or the end call key
a to return to the previous menu level/cancel the
operation.
•
icon.
§OK§.
Reverting to idle status
You c an re vert to i dle stat us fr om an ywhere in t he menu
as follows:
¤ Press and hold the end call key a.
22
Or:
¤ Do not press any key: after 2 minutes the display will automatically re ver t to idl e
Settings that have not been saved by selecting the display key
§Change§ will be lost
An example of the display in idle status is shown on page 18.
status.
§OK§, §Yes§, §Save§ or

Activating/deactivating the handset
a With the phone in idle status, press and hold the end call key
(confirmation tone) to switch off the handset.
Press and hold the end call key again to switch the handset on.
Please note
When the handset is switched on, an animation of the Gigaset logo will be
displayed for several seconds.
Activating/deactivating the keypad lock
The keypad lock prevents any inadvertent use of the phone.
# Press and hold the hash key in idle status to activate or deactivate the
keypad lock. You will hear the confirmation tone.
If the keypad lock is activated a warning will be shown when you press a key.
The keypad lock deactivates automatically when you receive a call. It is reactivated
when the call is ended.
Please note
When the keypad lock is active, you cannot call emergency numbers.
Using the phone
23

Using the phone
¤ Press right on the control key v to
open the main menu.
¤ Use the right, left, down and up
control key p to navigate to the
Settings submenu.
¤ Press the display key §OK§ to confirm
your selection.
¤ Press down on the control key
s
until the Eco Mode menu appears on
the display.
¤ Press the display key §OK§ to confirm
your selection.
Settings
Display
Language
Registration
Menu View
Eco Mode
Back OK
Settings
Ë
Ê
Ì
Ç
É Ï
Back OK
Illustration of operating steps in the user guide
The operating steps are shown in abbreviated form.
Example:
The illustration:
v ¢Ï ¢ Eco Mode ¢ Eco Mode+ (³ =on)
means:
24

Using the phone
Changes are effective immediately
and do not have to be confirmed.
¤ Press down on the control key
s
until the Eco Mode+ menu appears
on the display.
¤ Press the display key §Change§ to
activate/deactivate the function.
Eco Mode
Eco Mode
³
Eco Mode+
³
Back Change
Eco Mode
Eco Mode
³
Eco Mode+
´
Back Change
¤ Press the key below §Back§ on the
display to jump back to the previous
menu level.
or
Press and hold the end call key a
to return to idle status.
25

Menu overview
Menu overview
Setting standard or expert mode
The menu display can be extended (Expert mode •) or reduced (Standard mode). Menu
options that are only available in expert mode are marked with the
The settings are carried out as follows:
Select v ¢Ï ¢Menu View ¢Simplified (standard mode) or Complete (expert mode)
¢ §Select§ (the active mode is marked with Ø).
Open the main menu: When the telephone is in idle status pressv.
SMS
Ë
You have activated an SMS mailbox (general or private) without a PIN
New SMS
Incoming
Draft
You have activated an SMS mailbox with a PIN or 2-3 mailboxes
Mailbox New SMS
¢page 42
¢page 44
¢page 43
Incoming
Draft
•
icon.
¢page 42
¢page 44
¢page 43
Mailbox 1
Mailbox 2
Mailbox 3
Settings Service Centres ¢page 47
•
Call Lists
Ê
All Calls ¢page 38
Outgoing Calls
Accepted Calls
Missed Calls
26
New SMS
Incoming
Draft
SMS Mailboxes
Notification
¢page 38
¢page 38
¢page 38
¢page 42
¢page 44
¢page 43
¢page 46
¢page 46

Voice Mail
Ì
Play Messages Network Mailbox ¢page 56
Answ. Machine *
Activation *
Announcements * Rec. Announcement *
Recordings * ¢page 54
•
Call Screening * ¢ page 53
•
Network Mailbox ¢page 56
•
Set Key 1 * Network Mailbox ¢ page 56
•
* Only base with answering machine
Select Services
Ç
Withhold Number ¢page 32
All Calls Call Divert
Ringback Off
¢page 50
Play Announcement *
Del. Announcement *
Rec. Advisory Msg. * ¢page 51
•
Play Advisory Msg. * ¢page 51
•
Del. Advisory Msg. * ¢ page 51
•
Answ. Machine
Call Waiting
¢page 32
Menu overview
¢page 50
¢page 51
¢page 51
¢page 51
¢page 56
¢page 33
¢page 32
Additional Features
É
Alarm Clock ¢page 58
Room Monitor
One Touch Call
¢page 62
¢page 29
27
Loading…
Gigaset C610/C610A / RU / A31008-M2305-S301-1-5619 / Cover_front.fm / 10.05.2011
Поздравляем!
Купив продукцию Gigaset, вы выбрали марку, которая заботится об
окружающей среде. Эта продукция упакована в экологически чистую
упаковку!
Подробнее на сайте www.gigaset.com.
Gigaset C610/C610A / RU / A31008-M2305-S301-1-5619 / Cover_front.fm / 10.05.2011

1
Как выглядит ваш телефон
Gigaset C610/C610A / RU / A31008-M2305-S301-1-5619 / overview.fm / 10.05.2011
Версия 4,
16.09.20
05
Как выглядит ваш
телефон
1 Дисплей в состоянии готовности
2 Состояние зарядки аккумуляторов
(
¢
стр. 19)
3 Кнопки управления меню, отображаемого
на дисплее (
¢
стр. 22)
4 Кнопка сообщений (
¢
стр. 41)
Доступ к спискам сообщений и вызовов;
Мигает: новое сообщение или новый вызов
5 Кнопка отбоя, кнопка включения/
выключения
Отбой, функция отмены, возврат на
предыдущий уровень меню (нажать и сразу
отпустить), возврат в режим готовности
(нажать и держать), включить/выключить
телефон (в режиме готовности нажать и
держать)
6 Кнопка «#»
Включение/выключение блокировки
клавиатуры (в состоянии готовности нажать
и держать);
Переключение между прописными/
строчными буквами и цифрами
7 Кнопка выключения звука (
¢
стр. 34)
Выключить микрофон
8 Микрофон
9 Кнопка R («флэш»)
— Консультационный вызов («флэш»)
— Вставка паузы при наборе (нажать
и держать)
10 Кнопка «звездочка»
Включение/выключение сигнала вызова
(нажать и держать);
при установленном соединении:
переключение между импульсным и
тональным набором (нажать и сразу
отпустить);
Ввод текста: открыть таблицу специальных
символов
11 Разъем для 2,5-мм гарнитуры (
¢
стр. 19)
12 Кнопка 1
Набрать автоответчик (только C610A)/сетевой
почтовый ящик (нажать и держать)
13 Кнопка соединения
Мигает: входящий вызов;
Принять вызов; открыть список повторного
набора (кратко нажать); начать набор с
гудка в линии (нажать и держать);
Если пишется SMS: отправить SMS
14 Кнопка громкоговорителя
Переключение между громкой связью и
разговором через трубку
15 Управляющая кнопка (
¢
стр. 21)
16 Интенсивность сигнала (
¢
стр. 19)
Зеленый: Режим Eco Mode активирован
(
¢
стр. 63)
17 Значок автоответчика (только C610A)
Автоответчик включен;
Мигает: Автоответчик записывает
сообщение или используется другим
внутренним абонентом
i
Ã
V
07:15
INT 1
14 Окт
Вызовы
SMS
2
3
5
4
6
7
15
13
11
8
1
14
16
9
10
12
17
РОСС DE.MО04.
Д
00313 (с 27.04.2011 до 26.04.2014)
2
Дисплейные символы
Gigaset C610/C610A / RU / A31008-M2305-S301-1-5619 / overview.fm / 10.05.2011
Версия 4,
16.09.20
05
Дисплейные символы
В зависимости от настройки и рабочего состояния вашего телефона на дисплей выводятся
следующие символы:
Ш«Ъ
Сигнализация
Внешний вызов (
¢
стр. 31)
Ш
е
Ъ
Ш
ю
Ъ
Внутренний вызов
(
¢
стр. 66)
Автоответчик
записывает (
¢
стр. 55)
i Г у
V
Û
08:00
07:15
INT 1
14 Окт
Ã
™
¾
02
10
09
08
Вызовы
SMS
ØðÚ
Годовщина (
¢
стр. 39)
ØìÚ
Будильник (
¢
стр. 64)
Интенсивность сигнала
i (
¢
стр. 63)
или значок режима Эко+
¼ (
¢
стр. 63)
Автоответчик активирован (только C610A)
Сигнал вызова отключен (
¢
стр. 74)
Аккумулятор заряжается (
¢
стр. 19)
Состояние зарядки аккумуляторов (
¢
стр. 19)
Будильник включен; время подачи сигнала (
¢
стр. 64)
Текущее время (
¢
стр. 19)
Текущая дата и месяц (
¢
стр. 19)
Название трубки (
¢
стр. 68)
Количество новых сообщений:
u
Ã
в сетевом почтовом ящике (
¢
стр. 40)
u
™ в списке пропущенных вызовов (
¢
стр. 41)
u
¾ в списке SMS (
¢
стр. 47)
u
в списке пропущенных напоминаний о
встречах(
¢
стр. 43)
3
Как выглядит база
Gigaset C610/C610A / RU / A31008-M2305-S301-1-5619 / overview.fm / 10.05.2011
Версия 4,
16.09.20
05
Как выглядит база
Вы можете использовать кнопки базы для
регистрации трубок в базе, поиска трубок
(пейджинг)
¢
стр. 66 и управления
встроенным автоответчиком (только
Gigaset C610A).
База Gigaset C610A
1 Кнопка регистрации/пейджинга
Нажать кратко: Поиск трубок (пейджинг)
¢
стр. 66.
Нажать и держать: Регистрация трубок и
устройств DECT
¢
стр. 65.
2 Кнопка включения/выключения
Включение/выключение автоответчика
3 Значок на дисплее
Светится: автоответчик включен.
Выводится число записанных сообщений.
Мигает 00: Автоответчик записывает новое
сообщение.
Медленно мигает: Есть новые сообщения.
Выводится число новых сообщений.
Быстро мигает 99: Автоответчик полон.
При воспроизведении сообщения:
4 Кнопка воспроизведения/отмены
Воспроизвести с автоответчика новые
сообщения или отменить воспроизведение
(нажать кратко).
Воспроизвести новые и старые сообщения
(нажать и держать).
5 Перейти к следующему сообщению (нажать
один раз) через одно сообщение (нажать
дважды).
6 Вернуться назад на пять секунд (нажать
кратко один раз), вернуться к началу
сообщения (нажать и держать) или
вернуться к предыдущему сообщению
(нажать дважды).
7 Удалить текущее сообщение.
8 Отрегулировать громкость
воспроизведения:
÷
– тише;
ø
– громче.
При сигнализации о внешнем вызове:
отрегулировать громкость сигнала вызова.
Обратите внимание:
Если вы управляете автоответчиком с
трубки или если он записывает
сообщение (мигает 00), то им нельзя
управлять с базы.
База Gigaset C610
Кнопка регистрации/пейджинга
– Нажать кратко: Поиск трубок (пейджинг)
¢
стр. 66.
– Нажать и держать: Регистрация трубок и
устройств DECT
¢
стр. 65.
7
8
2
4
6
1
5
3
4
Содержание
Gigaset C610/C610A / RU / A31008-M2305-S301-1-5619 / C610AIVZ.fm / 10.05.2011
Версия 4,
16.09.20
05
Содержание
Как выглядит ваш телефон . . . . . . . . . . . . . . . . . . . . . . . . . . . . . . . . . . . . . . . 1
Дисплейные символы . . . . . . . . . . . . . . . . . . . . . . . . . . . . . . . . . . . . . . . . . . . . 2
Как выглядит база . . . . . . . . . . . . . . . . . . . . . . . . . . . . . . . . . . . . . . . . . . . . . . . . 3
Правила техники безопасности . . . . . . . . . . . . . . . . . . . . . . . . . . . . . . . . . . . 7
Gigaset C610/C610A – это больше, чем просто телефон . . . . . . . . . . . 9
Первые шаги . . . . . . . . . . . . . . . . . . . . . . . . . . . . . . . . . . . . . . . . . . . . . . . . . . . . 10
Проверка содержимого упаковки . . . . . . . . . . . . . . . . . . . . . . . . . . . . . . . . . . . . . . . . . . 10
Установка базы и зарядной стойки (если она входит в комплект) . . . . . . . . . . . 11
Подключение базы . . . . . . . . . . . . . . . . . . . . . . . . . . . . . . . . . . . . . . . . . . . . . . . . . . . . . . . . . 11
Подключение зарядной стойки (если она входит в комплект) . . . . . . . . . . . . . . 12
Подготовка трубки к работе . . . . . . . . . . . . . . . . . . . . . . . . . . . . . . . . . . . . . . . . . . . . . . . . 13
Изменение языка дисплея . . . . . . . . . . . . . . . . . . . . . . . . . . . . . . . . . . . . . . . . . . . . . . . . . . 16
Установка даты и времени . . . . . . . . . . . . . . . . . . . . . . . . . . . . . . . . . . . . . . . . . . . . . . . . . . 17
Подключение гарнитуры . . . . . . . . . . . . . . . . . . . . . . . . . . . . . . . . . . . . . . . . . . . . . . . . . . . 19
Что вы хотели бы сделать теперь? . . . . . . . . . . . . . . . . . . . . . . . . . . . . . . . . . . . . . . . . . . 20
Как пользоваться телефоном . . . . . . . . . . . . . . . . . . . . . . . . . . . . . . . . . . . . 21
Управляющая кнопка . . . . . . . . . . . . . . . . . . . . . . . . . . . . . . . . . . . . . . . . . . . . . . . . . . . . . . . 21
Кнопки управления меню, отображаемого на дисплее . . . . . . . . . . . . . . . . . . . . . 22
Кнопки кнопочной панели . . . . . . . . . . . . . . . . . . . . . . . . . . . . . . . . . . . . . . . . . . . . . . . . . . 22
Исправление неправильного ввода . . . . . . . . . . . . . . . . . . . . . . . . . . . . . . . . . . . . . . . . 22
Работа под управлением меню . . . . . . . . . . . . . . . . . . . . . . . . . . . . . . . . . . . . . . . . . . . . . 23
Включение и выключение трубки . . . . . . . . . . . . . . . . . . . . . . . . . . . . . . . . . . . . . . . . . . . 24
Включение и выключение блокировки кнопочной панели . . . . . . . . . . . . . . . . . 24
Показ рабочих шагов в инструкции по эксплуатации . . . . . . . . . . . . . . . . . . . . . . . 25
Обзор меню . . . . . . . . . . . . . . . . . . . . . . . . . . . . . . . . . . . . . . . . . . . . . . . . . . . . . 27
Телефонные вызовы . . . . . . . . . . . . . . . . . . . . . . . . . . . . . . . . . . . . . . . . . . . . 30
Внешний вызов . . . . . . . . . . . . . . . . . . . . . . . . . . . . . . . . . . . . . . . . . . . . . . . . . . . . . . . . . . . . . 30
Переключение между импульсным и тональным (DTMF) набором номера . 30
Быстрый набор . . . . . . . . . . . . . . . . . . . . . . . . . . . . . . . . . . . . . . . . . . . . . . . . . . . . . . . . . . . . . 30
Окончание вызова . . . . . . . . . . . . . . . . . . . . . . . . . . . . . . . . . . . . . . . . . . . . . . . . . . . . . . . . . . 31
Прием вызова и определение номера звонящего (АОН или CallerID) . . . . . . . 31
Замечания по определению номера вызывающего абонента (CLIP) . . . . . . . . 33
Режим громкоговорителя . . . . . . . . . . . . . . . . . . . . . . . . . . . . . . . . . . . . . . . . . . . . . . . . . . 34
Отключение микрофона . . . . . . . . . . . . . . . . . . . . . . . . . . . . . . . . . . . . . . . . . . . . . . . . . . . . 34
Телефонные вызовы с использованием сетевых услуг . . . . . . . . . . . 35
Использование телефонной книги и списков . . . . . . . . . . . . . . . . . . . . 36
Телефонная книга . . . . . . . . . . . . . . . . . . . . . . . . . . . . . . . . . . . . . . . . . . . . . . . . . . . . . . . . . . 36
Список повторного набора . . . . . . . . . . . . . . . . . . . . . . . . . . . . . . . . . . . . . . . . . . . . . . . . . 40
Список входящих SMS . . . . . . . . . . . . . . . . . . . . . . . . . . . . . . . . . . . . . . . . . . . . . . . . . . . . . . 40
5
Содержание
Gigaset C610/C610A / RU / A31008-M2305-S301-1-5619 / C610AIVZ.fm / 10.05.2011
Версия 4,
16.09.20
05
Список автоответчика (только Gigaset C610A) . . . . . . . . . . . . . . . . . . . . . . . . . . . . . . 40
Списки вызовов . . . . . . . . . . . . . . . . . . . . . . . . . . . . . . . . . . . . . . . . . . . . . . . . . . . . . . . . . . . . . 40
Кнопка сообщений . . . . . . . . . . . . . . . . . . . . . . . . . . . . . . . . . . . . . . . . . . . . . . . . . . . . . . . . . . 41
Список пропущенных напоминаний . . . . . . . . . . . . . . . . . . . . . . . . . . . . . . . . . . . . . . . . 43
Экономные звонки . . . . . . . . . . . . . . . . . . . . . . . . . . . . . . . . . . . . . . . . . . . . . . 43
Код телефонного оператора (предварительный выбор) . . . . . . . . . . . . . . . . . . . . 43
SMS (текстовые сообщения) . . . . . . . . . . . . . . . . . . . . . . . . . . . . . . . . . . . . . 45
Ввод и отправка SMS . . . . . . . . . . . . . . . . . . . . . . . . . . . . . . . . . . . . . . . . . . . . . . . . . . . . . . . . 45
Прием SMS . . . . . . . . . . . . . . . . . . . . . . . . . . . . . . . . . . . . . . . . . . . . . . . . . . . . . . . . . . . . . . . . . . 47
SMS с vCard . . . . . . . . . . . . . . . . . . . . . . . . . . . . . . . . . . . . . . . . . . . . . . . . . . . . . . . . . . . . . . . . . 49
Уведомления посредством SMS . . . . . . . . . . . . . . . . . . . . . . . . . . . . . . . . . . . . . . . . . . . . . 50
Почтовые ящики SMS . . . . . . . . . . . . . . . . . . . . . . . . . . . . . . . . . . . . . . . . . . . . . . . . . . . . . . . 50
Настройка SMS-центров . . . . . . . . . . . . . . . . . . . . . . . . . . . . . . . . . . . . . . . . . . . . . . . . . . . . 52
SMS на офисной АТС . . . . . . . . . . . . . . . . . . . . . . . . . . . . . . . . . . . . . . . . . . . . . . . . . . . . . . . . 53
Включение/отключение глушения первого звонка . . . . . . . . . . . . . . . . . . . . . . . . . 53
Включение/отключение функции SMS . . . . . . . . . . . . . . . . . . . . . . . . . . . . . . . . . . . . . . 53
SMS: поиск и устранение неисправностей . . . . . . . . . . . . . . . . . . . . . . . . . . . . . . . . . . 54
Управление автоответчиком базы Gigaset C610A . . . . . . . . . . . . . . . 55
Управление автоответчиком с трубки . . . . . . . . . . . . . . . . . . . . . . . . . . . . . . . . . . . . . . 55
Включение/выключение прослушивания . . . . . . . . . . . . . . . . . . . . . . . . . . . . . . . . . . . 59
Настройка параметров записи . . . . . . . . . . . . . . . . . . . . . . . . . . . . . . . . . . . . . . . . . . . . . . 59
Отмена использования кнопки 1 для быстрого вызова автоответчика . . . . . 60
Управление в движении (дистанционное управление) . . . . . . . . . . . . . . . . . . . . . 60
Использование сетевого почтового ящика . . . . . . . . . . . . . . . . . . . . . . 62
Настройка быстрого доступа к сетевому почтовому ящику . . . . . . . . . . . . . . . . . 62
Просмотр сообщения сетевого почтового ящика . . . . . . . . . . . . . . . . . . . . . . . . . . . 62
Стандарт связи ECO DECT . . . . . . . . . . . . . . . . . . . . . . . . . . . . . . . . . . . . . . . . 63
Настройка будильника . . . . . . . . . . . . . . . . . . . . . . . . . . . . . . . . . . . . . . . . . . 64
Использование нескольких трубок . . . . . . . . . . . . . . . . . . . . . . . . . . . . . . 65
Регистрация трубок . . . . . . . . . . . . . . . . . . . . . . . . . . . . . . . . . . . . . . . . . . . . . . . . . . . . . . . . . 65
Отмена регистрации трубок . . . . . . . . . . . . . . . . . . . . . . . . . . . . . . . . . . . . . . . . . . . . . . . . 65
Поиск трубки («пейджинг») . . . . . . . . . . . . . . . . . . . . . . . . . . . . . . . . . . . . . . . . . . . . . . . . . 66
Переключение на другую базу . . . . . . . . . . . . . . . . . . . . . . . . . . . . . . . . . . . . . . . . . . . . . . 66
Внутренние вызовы . . . . . . . . . . . . . . . . . . . . . . . . . . . . . . . . . . . . . . . . . . . . . . . . . . . . . . . . . 66
Подключение к текущему разговору . . . . . . . . . . . . . . . . . . . . . . . . . . . . . . . . . . . . . . . . 67
Изменение имени трубки . . . . . . . . . . . . . . . . . . . . . . . . . . . . . . . . . . . . . . . . . . . . . . . . . . . 68
Изменение внутреннего номера трубки . . . . . . . . . . . . . . . . . . . . . . . . . . . . . . . . . . . . 68
Использование трубки в качестве акустического контроля
(«радионяни») . . . . . . . . . . . . . . . . . . . . . . . . . . . . . . . . . . . . . . . . . . . . . . . . . . . 68
Настройка трубки . . . . . . . . . . . . . . . . . . . . . . . . . . . . . . . . . . . . . . . . . . . . . . . 70
Быстрый вызов номеров и функций . . . . . . . . . . . . . . . . . . . . . . . . . . . . . . . . . . . . . . . . 70
Изменение языка дисплея . . . . . . . . . . . . . . . . . . . . . . . . . . . . . . . . . . . . . . . . . . . . . . . . . . 71
Настройка дисплея . . . . . . . . . . . . . . . . . . . . . . . . . . . . . . . . . . . . . . . . . . . . . . . . . . . . . . . . . 71
6
Содержание
Gigaset C610/C610A / RU / A31008-M2305-S301-1-5619 / C610AIVZ.fm / 10.05.2011
Версия 4,
16.09.20
05
Включение/выключение автоматического приема вызовов . . . . . . . . . . . . . . . . 72
Изменение громкости громкоговорителя трубки . . . . . . . . . . . . . . . . . . . . . . . . . . . 73
Изменение сигналов вызова . . . . . . . . . . . . . . . . . . . . . . . . . . . . . . . . . . . . . . . . . . . . . . . . 73
Включение/выключение предупредительных сигналов . . . . . . . . . . . . . . . . . . . . 75
Установка кода своей зоны . . . . . . . . . . . . . . . . . . . . . . . . . . . . . . . . . . . . . . . . . . . . . . . . . 75
Возврат стандартных настроек трубки . . . . . . . . . . . . . . . . . . . . . . . . . . . . . . . . . . . . . . 76
Настройка базы . . . . . . . . . . . . . . . . . . . . . . . . . . . . . . . . . . . . . . . . . . . . . . . . . 76
Изменение мелодии звонка базового блока (только для Gigaset C610A) . . . . 76
Включение/отключение музыки при ожидании соединения . . . . . . . . . . . . . . . . 76
Поддержка ретранслятора . . . . . . . . . . . . . . . . . . . . . . . . . . . . . . . . . . . . . . . . . . . . . . . . . 76
Защита телефона от несанкционированного доступа . . . . . . . . . . . . . . . . . . . . . . . 77
Восстановление стандартных настроек базы . . . . . . . . . . . . . . . . . . . . . . . . . . . . . . . 77
Подключение базы к офисной АТС . . . . . . . . . . . . . . . . . . . . . . . . . . . . . . . 78
Виды набора и recall («флэш») . . . . . . . . . . . . . . . . . . . . . . . . . . . . . . . . . . . . . . . . . . . . . . 78
Сохранение кода доступа (кода внешней линии) . . . . . . . . . . . . . . . . . . . . . . . . . . . 78
Настройка пауз . . . . . . . . . . . . . . . . . . . . . . . . . . . . . . . . . . . . . . . . . . . . . . . . . . . . . . . . . . . . . 79
Служба сервиса и поддержи . . . . . . . . . . . . . . . . . . . . . . . . . . . . . . . . . . . . . 80
Вопросы и ответы . . . . . . . . . . . . . . . . . . . . . . . . . . . . . . . . . . . . . . . . . . . . . . . . . . . . . . . . . . . 81
Допуск к эксплуатации . . . . . . . . . . . . . . . . . . . . . . . . . . . . . . . . . . . . . . . . . . . . . . . . . . . . . . 82
Гарантия . . . . . . . . . . . . . . . . . . . . . . . . . . . . . . . . . . . . . . . . . . . . . . . . . . . . . . . . . . . . . . . . . . . . 83
Меры экологической безопасности . . . . . . . . . . . . . . . . . . . . . . . . . . . . . 85
Приложение . . . . . . . . . . . . . . . . . . . . . . . . . . . . . . . . . . . . . . . . . . . . . . . . . . . . . 86
Уход . . . . . . . . . . . . . . . . . . . . . . . . . . . . . . . . . . . . . . . . . . . . . . . . . . . . . . . . . . . . . . . . . . . . . . . . 86
Контакт с жидкостью . . . . . . . . . . . . . . . . . . . . . . . . . . . . . . . . . . . . . . . . . . . . . . . . . . . . . . . 86
Технические характеристики . . . . . . . . . . . . . . . . . . . . . . . . . . . . . . . . . . . . . . . . . . . . . . . 86
Ввод и редактирование текста . . . . . . . . . . . . . . . . . . . . . . . . . . . . . . . . . . . . . . . . . . . . . . 87
Принадлежности . . . . . . . . . . . . . . . . . . . . . . . . . . . . . . . . . . . . . . . . . . . . . . . . 89
Установка базы на стене . . . . . . . . . . . . . . . . . . . . . . . . . . . . . . . . . . . . . . . . . 94
Установка зарядной стойки на стене . . . . . . . . . . . . . . . . . . . . . . . . . . . . . 94
Индекс . . . . . . . . . . . . . . . . . . . . . . . . . . . . . . . . . . . . . . . . . . . . . . . . . . . . . . . . . . 95
7
Правила техники безопасности
Gigaset C610/C610A / RU / A31008-M2305-S301-1-5619 / security.fm / 10.05.2011
Версия
4, 16.09.20
05
Правила техники безопасности
Внимание
Перед использованием телефона внимательно прочитайте инструкции по технике
безопасности в руководстве по эксплуатации.
Объясните детям возможные опасности, связанные с использованием телефона.
Используйте только прилагаемое зарядное устройство, как это указано на
нижней стороне базы.
Используйте только рекомендуемые перезаряжаемые аккумуляторы
(
¢
стр. 86), так как в противном случае возникает серьезная угроза здоровью
и опасность травмы.
Работающий телефон может воздействовать на находящееся поблизости
медицинское оборудование. Следите за соблюдением технических
требований в конкретных условиях (например, в кабинете врача).
Если вы используете медицинское устройство (например, кардиостимулятор),
обратитесь к его изготовителю. Он сможет сообщить вам данные о
восприимчивости устройства к воздействию внешних высокочастотных
источников энергии. Технические характеристики этого изделия Gigaset см. в
разделе «Приложение».
Не подносите трубку к уху обратной стороной, если он звонит или если
включен режим громкоговорителя. В противном случае возможно
хроническое повреждение слуха.
Ваш Gigaset совместим с большинством коммерческих цифровых слуховых
аппаратов. Однако мы не можем гарантировать идеальную работу со всеми
слуховыми аппаратами.
Телефонная трубка может вызвать в слуховом аппарате помехи (неприятный
шум или свист) или привести к его перезагрузке. Если вам потребуется помощь,
обратитесь к продавцу слухового аппарата.
Не устанавливайте базу или зарядную стойку в ванной или в душе. База и
зарядная стойка не относятся к брызгозащищенным устройствам (
¢
стр. 86).
$
8
Правила техники безопасности
Gigaset C610/C610A / RU / A31008-M2305-S301-1-5619 / security.fm / 10.05.2011
Версия 4,
16.09.20
05
Не пользуйтесь телефоном в помещениях с повышенной взрывоопасностью
(например, в окрасочных цехах).
Если вы передаете Gigaset кому-либо другому, обязательно передайте
и инструкцию по эксплуатации.
Не используйте неисправную базу или отремонтируйте ее в нашем отделе
обслуживания, так как она может создавать помехи работе других
беспроводных устройств.
Обратите внимание
u
Не все функции, описанные в настоящей инструкции по эксплуатации, доступны во
всех странах.
u
Это устройство не будет работать при нарушении электропитания. Оно не сможет
также передавать экстренные вызовы.
ƒ
13:24
Gigaset C530 A IP — обзор рассуждение или МГТС vs VoIP
02:22
Handset Gigaset C580 Disasembly Instruction
13:53
Обзор Gigaset C610A IP
02:30
Gigaset C610 review en unboxing (NL/BE)
01:36
Gigaset C610 DECT Phone Introduction
03:23
Siemens Gigaset C610A
02:55
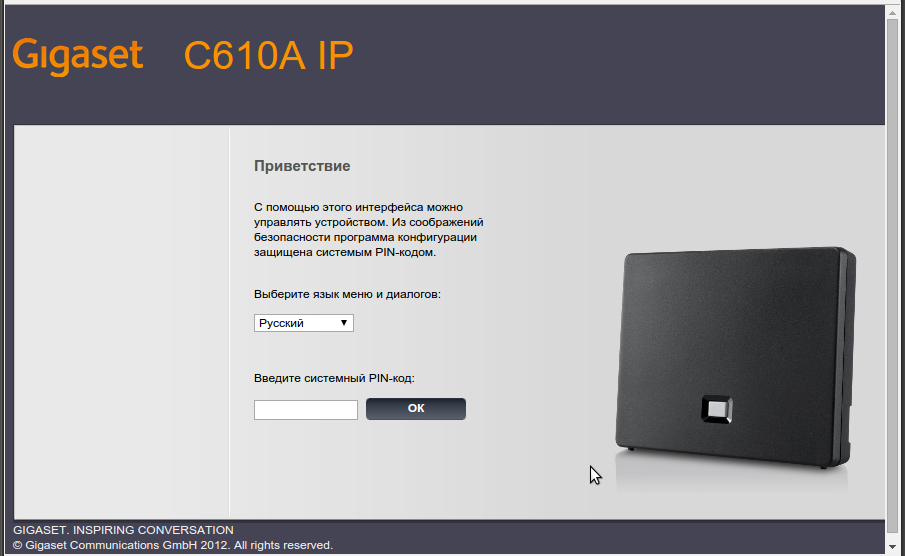
Как просто подключить Gigaset C610A IP к SIPNET
Нажмите на кнопку для помощи
Для настройки телефона в первую очередь вам необходимо подсоединить кабель LAN к аппарату, и узнать его IP адрес.
Вбиваем этот адрес в браузер компьютера, чтобы открыть панель управления.
Пароль по умолчанию 0000, обычно указан в инструкции к аппарату. После аутентификации вы попадаете в панель управления.
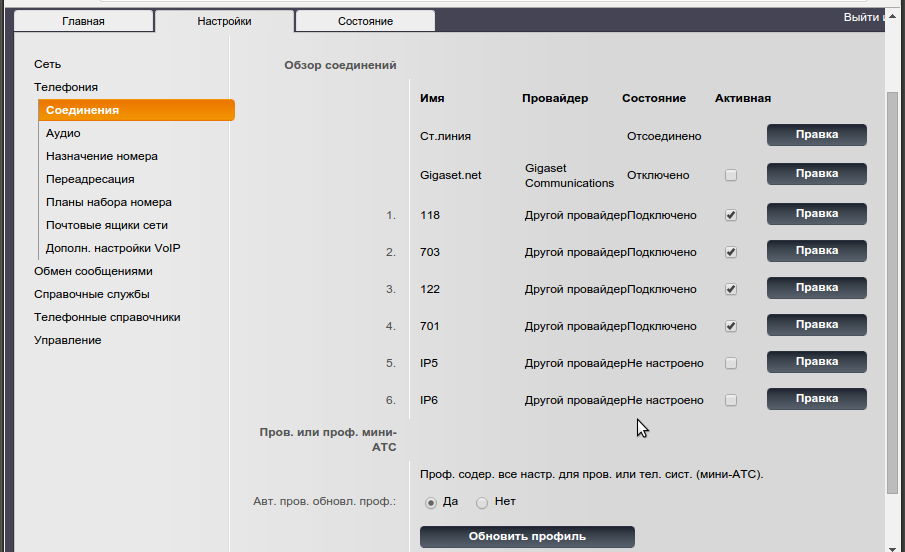
Теперь нам необходимо зарегистрировать телефон в системе. Для этого переходим во вкладку Настройки,
и далее в подменю Телефония. В данном примере мы настроили четыре учетные записи – номера 118,703,122,701.
Детально разберем настройку одного из них, а именно 701. Для этого нажмите на кнопку Правка напротив 701.
У вас откроется форма для редактирования только основных параметров аккаунта. Заполните поля по примеру как в
изображении, заменив 701 на желаемый номер. Далее, нажмите на «Показать доп. настройки».
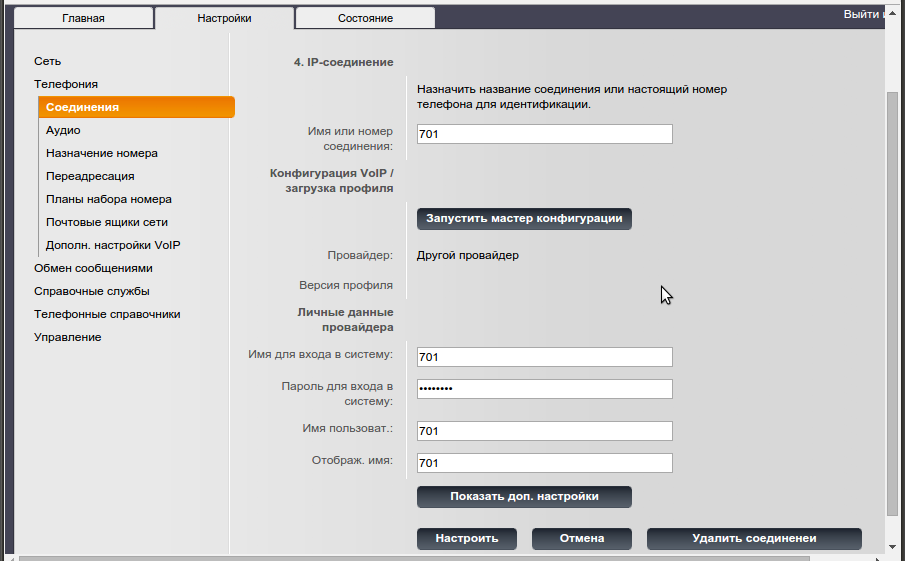
Посмотрите пример, как заполнять поля в расширенных настройках. В нашем примере —
- Домен: mydomain.com
- Адрес прокси-сервера: sip.digitoffice.ru
- Порт прокси-сервера: 5060
- Сервер регистрации: sip.digitoffice.ru
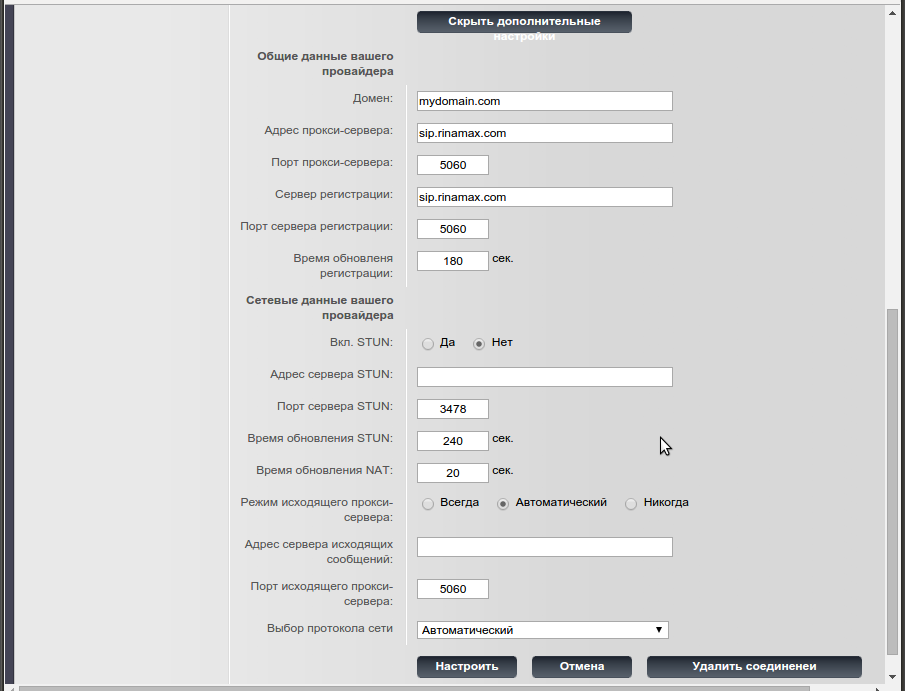
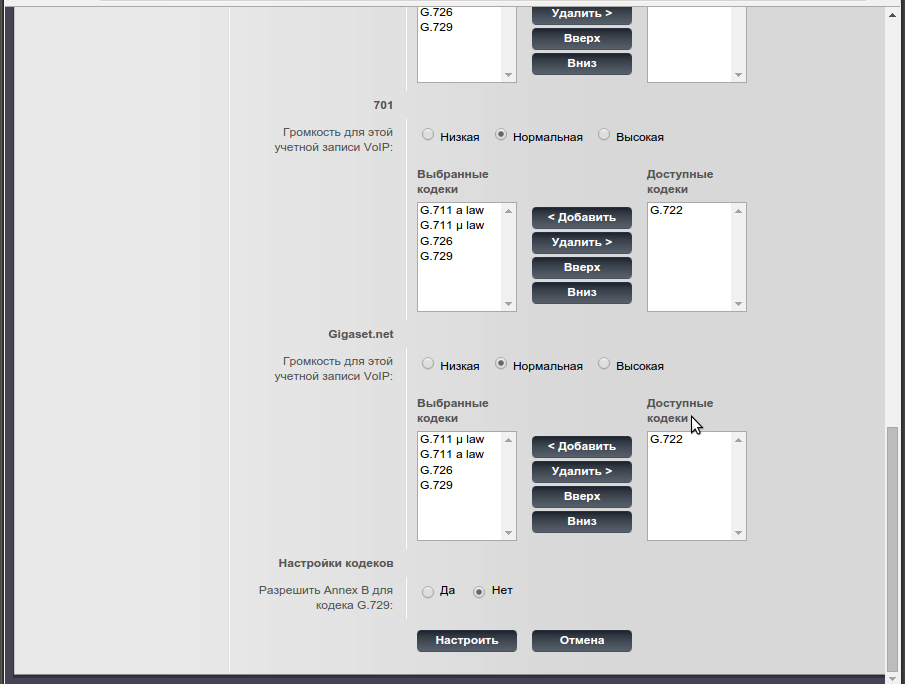
После этих настроек перейдите в раздел Аудио, так как вам необходимо настроить аудио кодеки для аккаунта.
Вам необходимо первые два кодека выбрать G.711 alaw и G.711 ulaw.
После этих настроек необходимо сделать тестовые звонки. Если у вас не удается сделать тестовый звонок,
еще раз пересмотрите настройки. Если и после этого не удается позвонить, сделайте скриншоты ваших настроек,
и пришлите их нам в службу поддержки.
Страницы и текст этой инструкции
Инструкция dect Gigaset C610(A)
Информация отображена на картинке
Информация отображена на картинке
Информация отображена на картинке
Информация отображена на картинке
Как использовать наш сайт инструкций OnlineManuals.ru
Наша цель состоит в том, чтобы предоставить вам быстрый доступ к содержанию инструкции для dect Gigaset C610(A).
С помощью онлайн просмотра, Вы можете быстро просмотреть содержимое инструкции и найти решение проблемы с dect Gigaset C610(A).
Для Вашего удобства
Если листать руководство пользователя dect Gigaset C610(A) прямо на сайте, не очень удобно для Вас, есть два возможных решения:
• Просмотр в полноэкранном режиме — легко просмотреть руководство пользователя (без загрузки его на свой компьютер), Вы можете использовать режим полноэкранного просмотра.
Для просмотра инструкции пользователя dect Gigaset C610(A) на полном экране, используйте кнопку «Открыть в Pdf-viewer».
• Загрузка на компьютер — Вы можете также скачать Инструкция dect Gigaset C610(A) на свой компьютер и сохранить его в файлах.
Многие люди предпочитают читать документы не на экране, а в печатной версии.
Возможность печати руководства пользователя также была предусмотрена на нашем сайте,
и вы можете использовать ее, нажав на иконку «печать» в Pdf-viewer.
Нет необходимости печатать все руководство dect Gigaset C610(A), можно выбрать только нужные страницы инструкции.